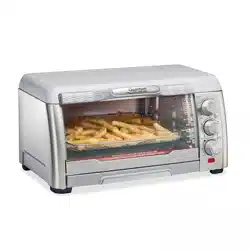
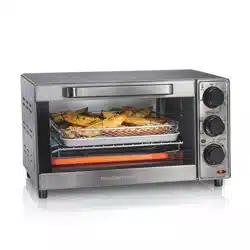
User manual 6-Slice Toaster Oven
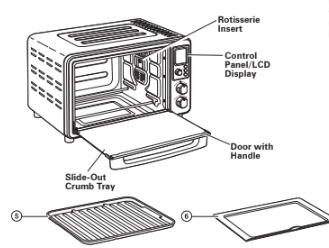
Parts and Features
Before first use: Most heating appliances produce an odor and/or smoke when used for the first time. Plug into outlet. Turn FUNCTION Dial to Bake  . Turn Temperature Dial
  to 450°F (232°C). Then, turn the Time Dial
  to 5 minutes. The odor should not be present after this initial preheating. Wash Baking Pan, Rotisserie Skewer, and Oven Rack in hot, soapy water before using.
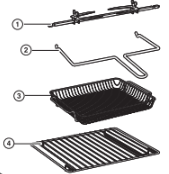
- Rotisserie Forks on Rotisserie Rod (Rotisserie Skewer)
- Rotisserie Lift
- Air Fry Basket – Mesh basket used for air fry cooking in the top rack position. Always slide Baking Pan under Oven Rack in middle rack position to use as a drip tray.
- Oven Rack – Three positions: Bottom for baking large chicken or roasts; middle for toasting and baking 12" pizzas, casseroles, and baked items; and top for air frying and broiling.
- Baking Pan – Use for baking, or slide under Oven Rack to use as a drip tray when air frying, broiling, or using the rotisserie.
- Slide-Out Crumb Tray – Slides out easily to clean.
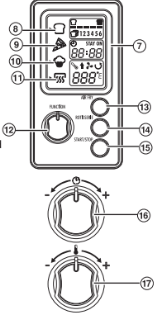
- LCD Display – Illuminates after any control is used. It will enter standby mode after 30 seconds if START/STOP button is not pressed.
- Toast
 Mode – Turn Time Dial
  to select shade and turn Temperature Dial
  to select 1-6 slices.
- Pizza
 Mode – Default temperature is 400°F (204°C).
- Bake
 Mode – Default temperature is 350°F (177°C).
- Broil
 Mode – Set timer to desired time; oven also has auto-shutoff at 30 minutes.
- FUNCTION Dial – Turn dial to select a cooking mode. The icon for the selected mode will illuminate on the Display.
- AIR FRY Button with red power indicator light – Used during Pizza mode. Press and hold for 3 seconds to change from Fahrenheit to Celsius.
- ROTISSERIE Button with red power indicator light – Press button, then press START/STOP button to start cooking.
- START/STOP Button – Can be pressed at any time to turn oven function on or off.
- Time Dial with Auto Shutoff
 – Turn to adjust cook time from 1 minute to 4 hours, except in Broil mode. Timer has a stay on feature to use during Pizza and Bake
  modes, AIR FRY and ROTISSERIE. STAY ON will be on the display. Can be adjusted at any time. NOTE: When timer is set, it starts to count down before preheat is complete. Adjust time when adding food.
- Temperature Dial
 – Turn to adjust temperature from 170°F (77°C) to 450°F (232°C). Can be adjusted at any time.
How to Use
Place Oven Rack in desired position with Slide-Out Crumb Tray in place. Plug into outlet. If Display is blank, press any button to illuminate Display. Rack can be in middle or bottom position for Bake mode, depending on size of food. Oven will beep 3 times when Toast , Pizza , Bake or Broil mode is complete.
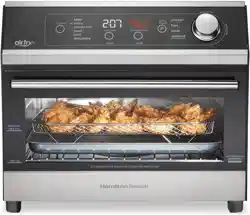
AIR FRY Mode
Can be used with Pizza or Bake mode. Cooks and browns evenly by circulating forced hot air which crisps food with little to no added oil. Check foods for doneness before recommended packaging cook time.
- Place food in a single layer in Air Fry Basket.
- Slide Basket into top rack position, then slide Baking Pan under Oven Rack into middle rack position to use as a drip tray.
- Turn FUNCTION Dial to Pizza or Bake .
- Set time by turning Time Dial to desired time. Press AIR FRY Button, then press START/STOP Button to start baking.
- Most foods cooked in Air Fry Mode will cook between 400o–450oF (204°–232°C). Adjust Temperature and Time Dials for the food being cooked.
- Check temperature of food for doneness before recommended package cook time. TIP: Lightly misting fresh foods with oil will produce crispier results. Visit foodsafety.gov for recommended internal food temperatures.
Air Fry Cooking Guide
NOTE: Foods may need to be flipped, stirred, or rotated halfway during cooking. Foods that can’t be flipped might need to be lightly covered with foil, if getting too brown.
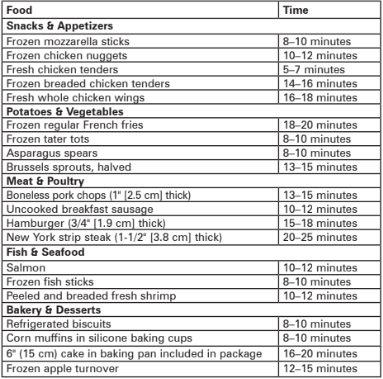
*Times are a guide for different types of foods which vary in cook time. Cook food until desired crispness.
NOTE: Cooking times are based on a preheated oven.
STAY ON Function
The Oven can be set to stay on by turning the Time Dial to STAY ON. “STAY ON” will show in the display.
Broil Mode
Use to brown foods such as beef, chicken, fish, pork, and casseroles. Broil food on Oven Rack in top or middle rack position. Slide Baking Pan under Oven Rack to catch drippings. Food must be a minimum of 1 inch (2.5 cm) from the heating elements.
- Turn FUNCTION Dial to Broil . The Broil icon will show in the display; the time default is 20 minutes. Oven broils on high temperature and may not be adjusted.
- Press START/STOP Button to begin broiling.
Toast Mode
Use for browning and toasting breads, bagels, and English muffins. Rack should be in top or middle position.
- Turn FUNCTION Dial to Toast .
- Select one of 5 shades of browning by turning Time Dial to increase or decrease shade, then turn Temperature Dial to select 1 to 6 slices. Then press START/STOP Button to begin toasting. Oven will beep 3 times when cycle is complete and will automatically shut off.
How to Use the Rotisserie
WARNING Fire Hazard.
- If contents ignite, do not open oven door. Unplug oven and allow contents to stop burning and cool before opening door.
- Do not use oven cooking bags.
- Always allow at least 1 inch (2.5 cm) between food and heating element.
- Always unplug oven when not in use.
- Slide Baking Pan under Oven Rack into bottom rack position to use as a drip tray.
- Tie chicken and large pieces of meat tightly with cotton string to prevent meat from hitting drip pan. For instructions on how to truss a chicken, visit our blog at everydaygoodthinking.com and search for “The Ultimate Guide to Trussing a Chicken.”
- Insert Rotisserie Rod into center of meat. Place Rotisserie Forks on rod with forks inserted into bottom side of chicken. Center meat lengthwise on rod. Tighten screws on Rotisserie Forks.
- Manually insert pointed end of Rotisserie Rod into Rotisserie Insert on right side of oven, rotating rod if necessary to fit. Place square end of rod into slot in bracket on left side.
- Press ROTISSERIE Button, then turn the Time Dial to select the desired cook time.
- Turn the Temperature Dial to the desired cooking temperature and press the START/STOP Button to begin baking.
- NOTE: Only the upper heating elements are on in Rotisserie mode. To remove cooked meat from oven, place Rotisserie Lift with the hooks under the Rotisserie Rod. Lift and slide the Rotisserie Rod to the left and remove from the oven. Place meat on a clean surface to cool slightly. Using oven mitts, unscrew Rotisserie Forks from Rotisserie Rod.
- Slide meat onto a serving tray or cutting surface. Remove Rotisserie Rod and ties before carving.
Care and Cleaning
Your Toaster Oven should be cleaned regularly for best performance and long life. Regular cleaning will also reduce the risk of fire hazard.
- Unplug Oven and cool completely.
- Wash Basket, Slide-Out Crumb Tray, Baking Pan and Oven Rack in hot, soapy water. Rinse and dry.
- Wipe base, LCD display, buttons, and dials with a damp sponge and dry.
- Use a damp, soapy sponge to clean inside of Oven. Repeat with a damp sponge and dry.
- Use a razor blade to gently lift baked-on foods. Spray glass cleaner on cloth to clean and wipe with a damp sponge to rinse. Dry with a clean cloth.
- The Rotisserie Forks on the Rotisserie Rod can be washed in hot, soapy water.
Troubleshooting
What size chicken will the Oven handle?
- The Oven will hold a 5-pound (2.3-kg) chicken.
When should I choose BAKE, BROIL, or AIR FRY?
- Choose Bake for foods such as roasts, potatoes, or cakes.
- Choose Broil to brown foods such as beef, chicken, fish, pork, and casseroles.
- Choose Pizza for pizza, frozen foods and snacks.
- Choose AIR FRY Button for fresh or frozen foods to crisp and evenly brown.
If I want to toast bread, what setting is best?
- The Toast mode is best for toasting both sides of sliced breads. You can also use the Broil mode for open- faced sandwiches, baguettes, and crostini. The Broil mode activates the top heating element and is great when toasting is required on one side only. You can also flip the bread when the desired level of browning is reached.