Loading ...
Loading ...
Loading ...
21
Remote Control Unit/Télécommande/Control Remoto
ENGLISH
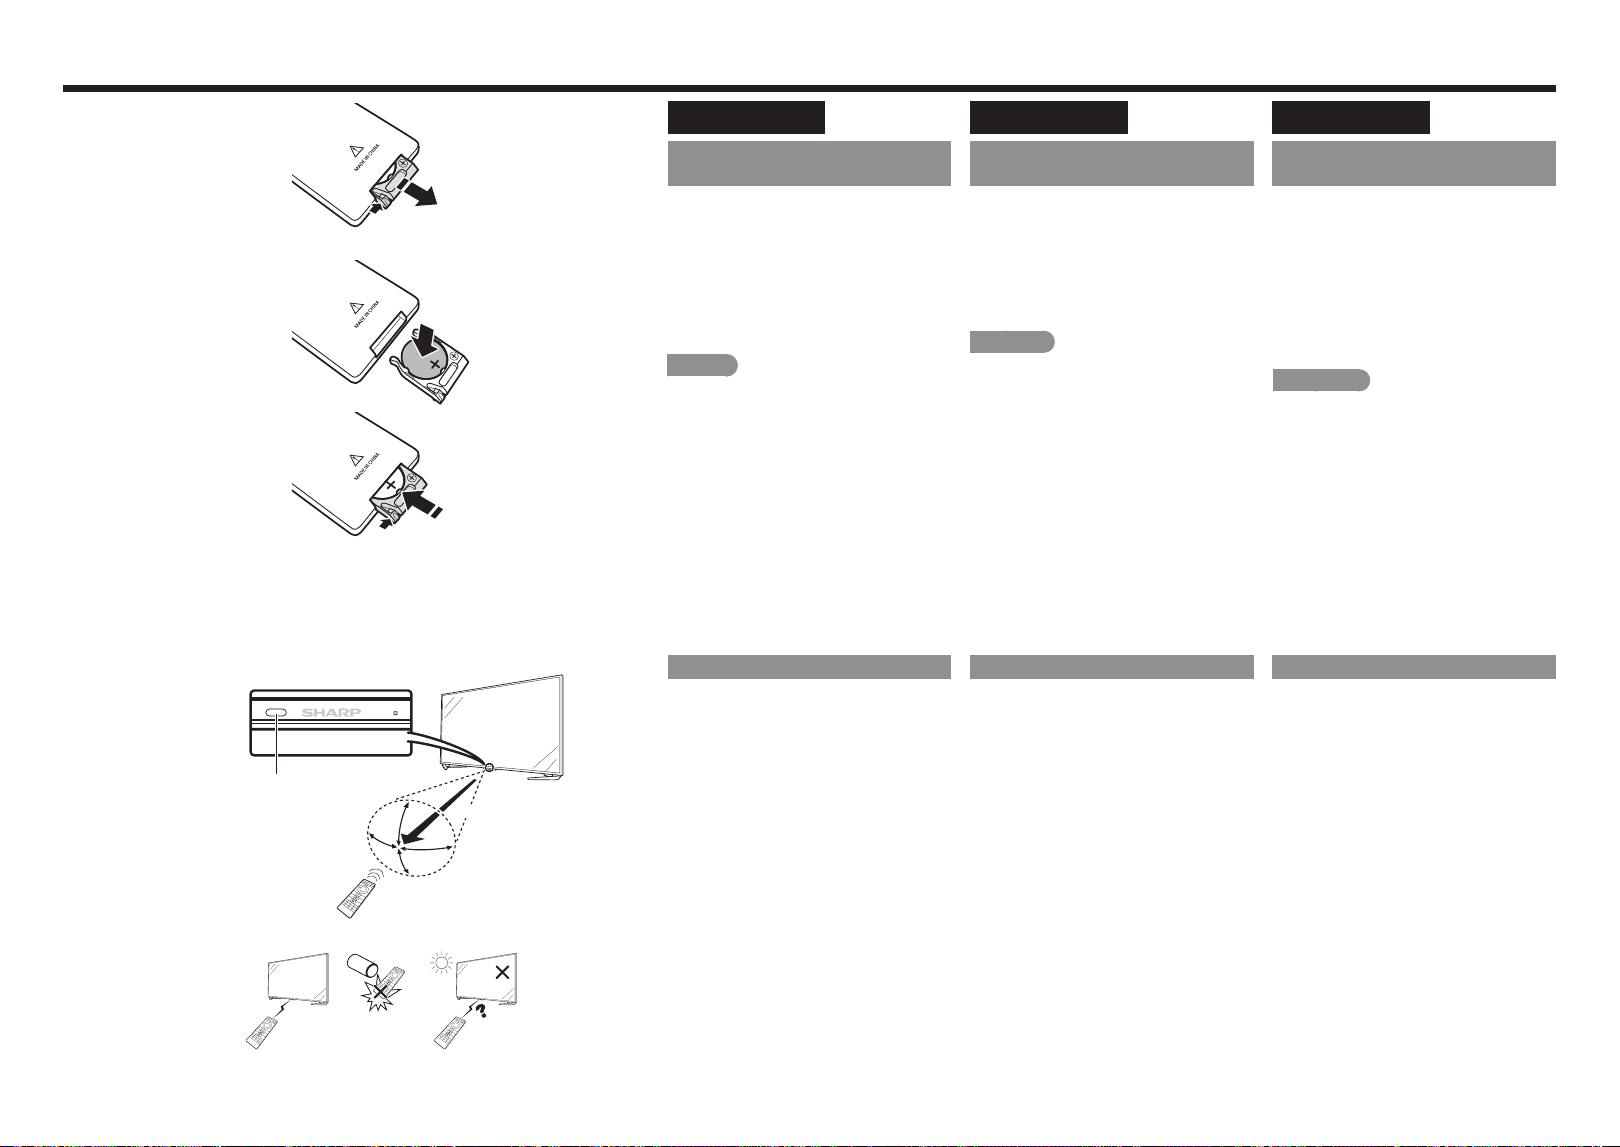
Installing Battery in the Remote
Control Unit
If the remote control fails to operate TV functions,
replace the battery in the remote control unit.
1
Open the battery cover.
2
Install a new CR2032 battery into the
battery compartment, with the positive
(+) pole facing up.
3
Close the battery cover.
CAUTION
Improper use of battery can result in chemical leakage
or explosion. Be sure to follow the instructions below.
• Remove battery as soon as they are worn out.
Chemicals that leak from battery that come in
contact with skin can cause a rash. If you find any
chemical leakage, wipe thoroughly with a cloth.
• The battery supplied with this product may have a
shorter life expectancy due to storage conditions.
• If you will not be using the remote control unit for
an extended period of time, remove battery from it.
Using the Remote Control Unit
Use the remote control unit by pointing it towards
the remote control sensor on the TV. Objects
between the remote control unit and the remote
control sensor may prevent proper operation.
Q
Cautions regarding the remote
control unit
• Do not expose the remote control unit to shock.
In addition, do not expose the remote control unit
to liquids, and do not place it in an area with high
humidity.
• Do not install or place the remote control unit under
direct sunlight. The heat may cause deformation of
the remote control unit.
• The remote control unit may not work properly if
the remote control sensor on the TV is under direct
sunlight or strong lighting. In such cases, change
the angle of the lighting or the TV, or operate the
remote control unit closer to the remote control
sensor.
IMPORTANT:
IF THE UNIT DOES NOT POWER ON - UNPLUG
THE TELEVISION FROM THE OUTLET AND
REPEAT THE INSTALLATION STEPS.
IF YOU STILL ENCOUNTER NO POWER,
PLEASE CONTACT US AT 1-800-BE-SHARP.
FRANÇAIS
Installation de la pile dans la
télécommande
Si la télécommande ne fonctionne pas pour les
fonctions TV, remplacez sa pile.
1
Ouvrez le couvercle des piles.
2
Installez une nouvelle pile CR2032
dans le compartiment des piles, pôle
positif (+) orienté vers le haut.
3
Refermez le couvercle.
ATTENTION
Une utilisation incorrecte des piles peut provoquer
des fuites ou une explosion. Veillez à suivre les
instructions ci-dessous.
• Retirez les piles dès qu'elles sont épuisées. Les
produits chimiques des piles peuvent entrer en
contact avec la peau et causer des rougeurs. Si
vous remarquez une fuite de produit chimique,
essuyez soigneusement avec un chiffon.
• La pile fournie avec ce produit peut avoir une durée
de vie plus courte en fonction des conditions de
stockage.
• Si vous ne prévoyez pas d'utiliser la télécommande
pendant une période prolongée, retirez la pile.
Utilisation de la télécommande
Utilisez la télécommande en la dirigeant vers
le capteur de télécommande du téléviseur.
Les objets placés entre la télécommande et le
capteur de télécommande risquent d'empêcher
le bon fonctionnement des appareils.
Q
Précautions relatives à la
télécommande
• N'exposez pas la télécommande à des chocs. Ne
l'exposez pas non plus à des liquides et ne la placez
pas dans des endroits très humides.
• N'installez pas et n'exposez pas la télécommande
directement au soleil. La chaleur peut provoquer la
déformation de la télécommande.
• La télécommande risque de ne pas fonctionner
normalement si le capteur de télécommande du
téléviseur est directement exposé au soleil ou
sous un éclairage violent. Dans ce cas, changez
l'angle de l'éclairage ou du téléviseur, ou utilisez la
télécommande en vous rapprochant du capteur de
télécommande.
IMPORTANT:
SI L'UNITÉ NE SE MET PAS SOUS TENSION -
DÉBRANCHEZ LE TÉLÉVISEUR DE LA PRISE
SECTEUR ET RÉPÉTEZ LES ÉTAPES DE
L'INSTALLATION.
SI LE TÉLÉVISEUR NE SE MET TOUJOURS
PAS SOUS TENSION, CONTACTEZ-NOUS AU
1-800-BE-SHARP.
ESPAÑOL
Instalar la pila en el mando a
distancia
Si el mando a distancia no hace funcionar las
funciones de la TV, sustituya la pila del mando a
distancia.
1
Abra la cubierta de las pilas.
2
Introduzca una pila CR2032 nueva
en el compartimento de la pila, con
el polo positivo (+) orientado hacia
arriba.
3
Cierre la cubierta de las pilas.
PRECAUCIÓN
La utilización incorrecta de las pilas puede causar
escapes de sustancias químicas o explosiones.
Asegúrese de seguir las instrucciones dadas a
continuación.
• Extraiga la pila en cuanto esté gastada. Pueden
producirse fugas de las sustancias químicas
de la pila que, al entrar en contacto con la piel,
podrían provocar erupciones cutáneas. Si observa
alguna fuga de sustancias químicas, límpielas
minuciosamente con un paño.
• La vida útil de la pila suministrada con este producto
podría ser más corta de la esperada debido a las
condiciones de almacenamiento.
• Si no va a utilizar el mando a distancia durante un
periodo prolongado de tiempo, extraiga la pila.
Utilización del control remoto
Utilice el control remoto apuntándolo hacia el
sensor de control remoto en el televisor. Los
objetos ubicados entre el control remoto y el
sensor de control remoto pueden impedir el
funcionamiento apropiado.
Q
Precauciones relacionadas con el
control remoto
• No exponga a golpes el control remoto. Además, no
exponga tampoco el control remoto a los líquidos, y
no lo coloque en un área con alta humedad.
• No instale ni coloque el control remoto bajo la luz
directa del sol. El calor puede causar deformaciones
en el mismo.
• El control remoto puede que no funcione
correctamente si el sensor de control remoto del
televisor está bajo la luz solar directa o una fuente
de iluminación intensa. En tales casos, cambie el
ángulo de la iluminación o del televisor, o utilice el
control remoto más cerca del sensor de control
remoto.
IMPORTANTE:
SI LA UNIDAD NO SE ENCIENDE, DESENCHUFE
EL TELEVISOR DE LA TOMA DE CORRIENTE Y
REPITA LOS PASOS DE INSTALACIÓN.
SI SIGUE SIN PODER ENCENDERLO, PÓNGASE
EN CONTACTO CON NOSOTROS LLAMANDO
AL 1-800-BE-SHARP.
1
CR2032
2
CR2032
3
CR2032
30°
30°
30°
30°
30´ (9.1 m)
•
Remote control sensor
•
Capteur de télécommande
•
Sensor de control remoto
Loading ...
Loading ...
Loading ...