Loading ...
Loading ...
Loading ...
OPERATION
WARNING:
DO NOT RUN THE PUMP BEFORE PRIMING IT; THE SEAL AND
IMPELLER COULD BE PERMANENTLY DAMAGED.
PRIMING
Note: You will need enough water to fill the suction line and cas-
ing. Priming time depends on distance from water source to pump
(5-15 min.).
Using an in-line check valve:
1. Open discharge valve on service line and nearby tap to monitor
water flow.
2. Pour clean water through priming plug opening at top of casing
until water starts flowing out the vent plug hole.
3. Install enclosed vent plug, tighten loosely with a wrench.
4. Continue filling pump until water flows out of the priming hole.
5. Install enclosed priming plug, hand tighten.
6. Start pump. If a tap is visible you may see a short discharge of
water which will last 5-10 seconds.
7. Run the pump for 2 minutes, and then shut it off. Remove the
vent plug and priming plug.
8. You have completed the first priming cycle, consisting of steps 2 to
7. This process will have to be repeated from 2 to 6 times, depend-
ing on the length of your suction line. (Approximately one priming
cycle for every 5 feet of suction line.) You will know when to stop
because the pump will begin to pump water continuously.
9. Once the pump begins pumping water continuously, firmly
tighten the vent plug and priming plug with a wrench.
10. If the pump does not draw water within 8 tries, shut it off and
check for suction leaks.
Using a foot valve:
1. Open discharge valve on service line and nearby tap to monitor
water flow.
2. Pour clean water through priming plug opening at top of casing
until the suction line is full and water starts flowing out the vent
plug hole. You will need approximately 1 liter of water for every
3 ft of suction line.
3. Follow steps 3 through 6 above. If within 2 minutes water is not
being pumped continuously, stop the pump. Remove vent plug
and priming plug. Repeat steps 2 through 6 above. If this does
not work, stop the pump and check the suction line for leaks.
4. Once the pump begins pumping water continuously, firmly
tighten the vent plug and priming plug with a wrench.
DRAINING
Should the unit be subject to freezing, it will be necessary to drain
the pump and tank. To do this, shut off the power to the pump at
the main electrical service panel. Open a tap in the water system to
release the pressure. Remove the drain and fill plugs from the pump
casing. Remove the pressure tank drain plug (if so equipped). Allow
ample time for the system to drain before reinstalling the plugs!
MAINTENANCE
WARNING - RISK OF ELECTRICAL SHOCK
Before servicing motor operated equipment, shut off the power
at the main electrical panel and disconnect the power supply
from motor and accessories. Use safe working practices during
servicing of equipment.
a) Lubrication: The pump requires none. Refer to motor manufac-
turer's instructions for motor lubrication.
b) Clean-out Plug: For applications where clogging is a problem, a
1/4" NPT plug has been provided for access to clean the nozzle/
venturi. This plug is located directly below the suction opening
in the front of the casing. IMPORTANT! Before removing the
clean-out plug, shut off the power to the pump at the main
electrical panel. Open a tap in the water system to release
the pressure.
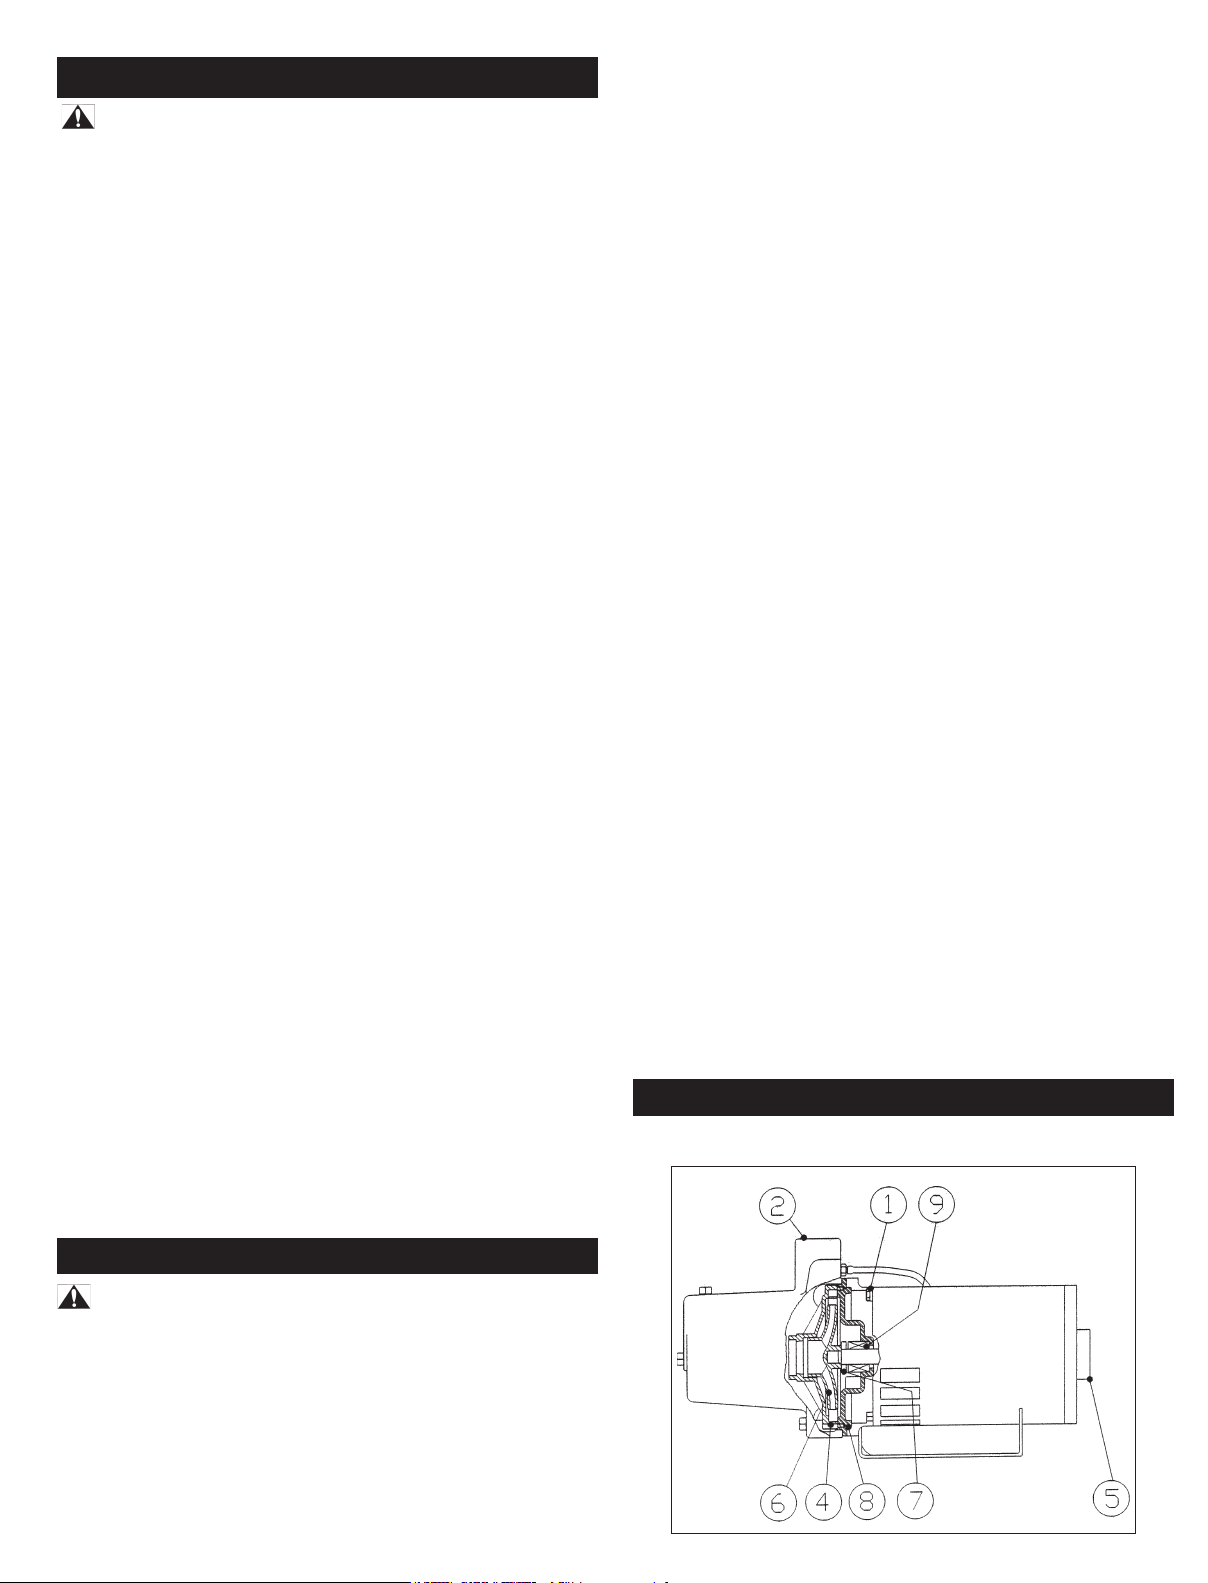
c) Replacing Mechanical Seal: (See Fig. 3)
Only duly qualified persons should perform maintenance on
electrical and/or mechanical devices.
Disassembly:
1) Shut off the power to the pump at the main service panel
and disconnect the power supply from motor.
2) Open a tap in the water system to release the pressure.
3) Remove the drain and fill plugs to allow the pump
to drain.
4) Disconnect the tube leading to the pressure switch.
5) Remove the four bolts (1) and remove casing (2).
6) Pry the diffuser (4) out of the casing using two slotted screw-
drivers for leverage.
7) Remove the cap (5) and insert a screwdriver to prevent the
shaft from turning while unscrewing the impeller (6). The
impeller has a right-hand thread. If the impeller cannot be
turned by hand, insert a flat object into the impeller vane.
8) Slip the rotating seal (7) off the shaft and remove the seal
plate (8).
9) Remove the ceramic seal seat (9) from the seal plate.
Reassembly:
1) Clean all the parts thoroughly before assembling.
2) Lightly lubricate (soapy water) the rubber cap on the ce-
ramic seal (9) and push it into the seal plate using thumbs
only. Make sure the smooth surface of the ceramic seat
faces outwards.
NOTE: If the pump will remain out of service for longer than
one week, the seal components must be installed dry
(no lubrication).
3) Put the seal plate back on the motor.
4) Lubricate the rotating seal (7) with soapy water and slip
it onto the shaft with the ‘carbon’ ring towards the
ceramic seat.
5) Replace the impeller (6) and the diffuser (4).
6) Replace the casing (2) making sure that the gasket is not
damaged and is in place.
7) Reconnect the tubes to the casing and to the
pressure switch.
8) Reconnect the power.
9) Prime pump, start, check for leaks.
TROUBLESHOOTING
a) Motor will not start:
Fig. 3
4
106905101_RJS-Prem_Series_OM_05-15.indd 4 6/3/15 7:57 AM
Loading ...
Loading ...
Loading ...