Home
Bookmarks
Home
Sony
Sony STR-DA3600ES User Manual
Page 31
Sony STR-DA3600ES Receiver
User Manual - Page 31
For STR-DA3600ES.
PDF File Manual
,
162 pages
,
Read Online
|
Download pdf file
Table of Contents
Description and location of parts
Getting Started
Checking the connection appropriate for your components
1: Installing speakers
2: Connecting the monitor
3: Connecting the video components
4: Connecting the audio components
5: Connecting the IR Blaster
6: Connecting the antennas (aerials)
7: Connecting to the network
8: Preparing the receiver and the remote
9: Setting the speakers
10: Calibrating the appropriate speaker settings automatically (Auto Calibration)
11: Configuring the network settings of the receiver
12: Preparing a computer to use as a server
Guide to on-screen display operation
Playback
Enjoying sound/images from the component connected to the receiver
Enjoying sound/images from the components connected to the DIGITAL MEDIA PORT
Operating the TDM-iP50 using the GUI menu of the receiver
Tuning
Listening to FM/AM radio
Presetting FM/AM radio stations
Listening to satellite radio (USA/Canadian model only)
Connecting a satellite radio tuner
Preparing to listen to a satellite radio
Selecting a channel of the satellite radio
Presetting satellite radio channels
Restricting access to specific channels (Parental Lock)
Enjoying Surround Sound
Playing back with 2-channel sound
Playing back with multi-channel surround
Enjoying a surround effect for music
Enjoying a surround effect for movies
Using Network Features
About the network functions of the receiver
Enjoying content stored on the server
Using a controller
Listening to Rhapsody
Listening to SHOUTcast
Features of the Setup Manager application software
Using Multi-zone Features
What you can do with the Multi-zone function
Making a multi-zone connection
Setting the speakers in zone 2
Switching the zone setting of the remote
Operating the receiver from another zone (ZONE 2/ZONE 3 operations)
Using Other Features
Using âBRAVIAâ Sync features
Outputting the HDMI signals even when the receiver is in standby mode (Pass Through)
Switching between digital and analog audio
Enjoying the sound/images from other inputs (Input Assign)
Using the sleep timer
Enjoying the surround effect at low volume levels (Night Mode)
Recording using the receiver
Switching the command mode of the receiver and the remote
Using a bi-amplifier connection
Adjusting Settings
Using the setting menu
Auto Calibration
Speaker settings
Surround settings
EQ settings
Multi Zone settings
Audio settings
Video settings
HDMI settings
Network settings
Quick Click settings
System settings
Operating without connecting to a TV
For Installation Purposes: Operating Each Component Using an External Control Device (Quick Click)
Operating components or lighting connected to the receiver using an external control device (Quick Click)
Using Quick Click
Setting components that are operated by an external control device
Performing several commands in sequence automatically with Quick Click (Macro Play)
Setting remote control codes that are not stored in Quick Click
Resetting the remote code for Quick Click
Operating Each Component Using the Multifunction Remote
Operating each component using the multifunction remote
Programming the remote
Performing several commands in sequence automatically (Macro Play)
Setting remote commander codes that are not stored in the remote
Clearing all the contents of the remoteâs memory
Additional Information
Precautions
Troubleshooting
Specifications
Index
Page 31/162
Page 1
Page 2
Page 3
Page 4
Page 5
Page 6
Page 7
Page 8
Page 9
Page 10
Page 11
Page 12
Page 13
Page 14
Page 15
Page 16
Page 17
Page 18
Page 19
Page 20
Page 21
Page 22
Page 23
Page 24
Page 25
Page 26
Page 27
Page 28
Page 29
Page 30
Page 31
Page 32
Page 33
Page 34
Page 35
Page 36
Page 37
Page 38
Page 39
Page 40
Page 41
Page 42
Page 43
Page 44
Page 45
Page 46
Page 47
Page 48
Page 49
Page 50
Page 51
Page 52
Page 53
Page 54
Page 55
Page 56
Page 57
Page 58
Page 59
Page 60
Page 61
Page 62
Page 63
Page 64
Page 65
Page 66
Page 67
Page 68
Page 69
Page 70
Page 71
Page 72
Page 73
Page 74
Page 75
Page 76
Page 77
Page 78
Page 79
Page 80
Page 81
Page 82
Page 83
Page 84
Page 85
Page 86
Page 87
Page 88
Page 89
Page 90
Page 91
Page 92
Page 93
Page 94
Page 95
Page 96
Page 97
Page 98
Page 99
Page 100
Page 101
Page 102
Page 103
Page 104
Page 105
Page 106
Page 107
Page 108
Page 109
Page 110
Page 111
Page 112
Page 113
Page 114
Page 115
Page 116
Page 117
Page 118
Page 119
Page 120
Page 121
Page 122
Page 123
Page 124
Page 125
Page 126
Page 127
Page 128
Page 129
Page 130
Page 131
Page 132
Page 133
Page 134
Page 135
Page 136
Page 137
Page 138
Page 139
Page 140
Page 141
Page 142
Page 143
Page 144
Page 145
Page 146
Page 147
Page 148
Page 149
Page 150
Page 151
Page 152
Page 153
Page 154
Page 155
Page 156
Page 157
Page 158
Page 159
Page 160
Page 161
Page 162
Contents
Table of Contents
Search
Previous
Next
Troubleshooting
Bookmarks
Loading ...
Loading ...
Loading ...
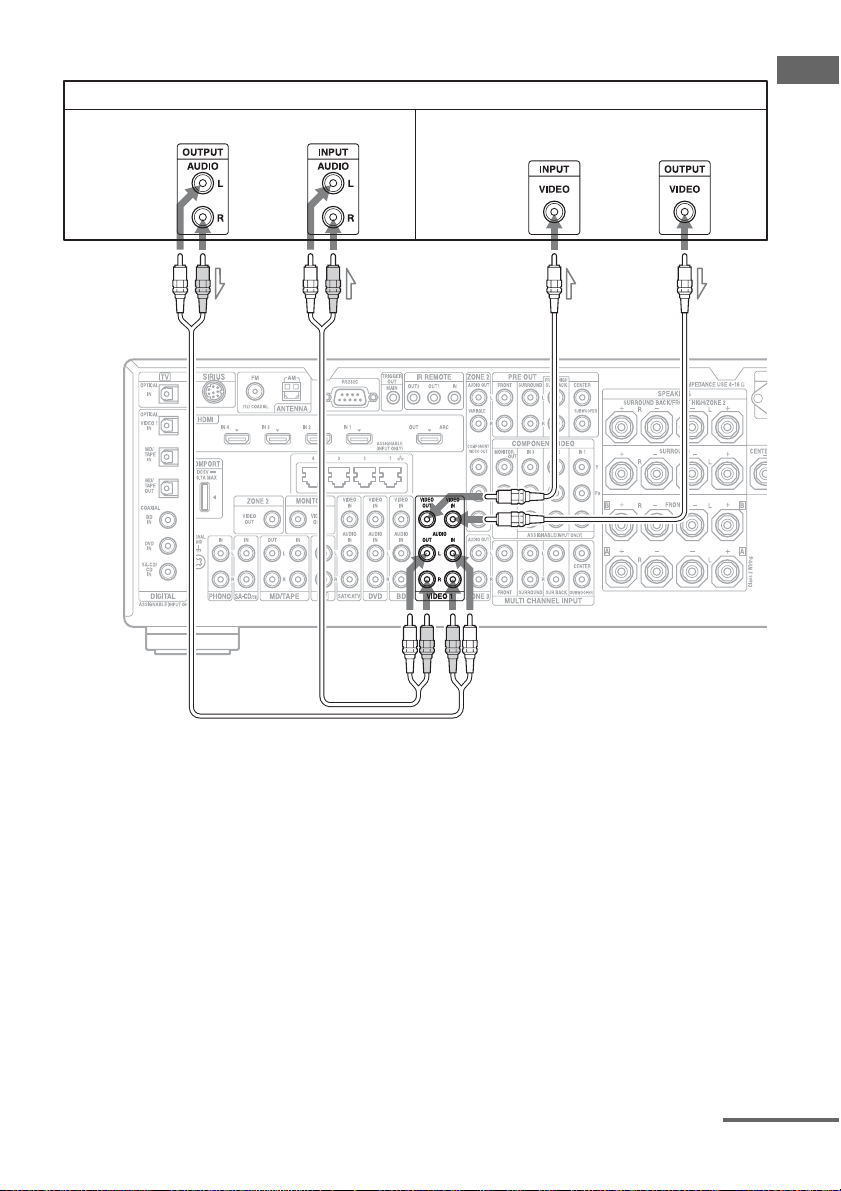
31
GB
Getting Started
T
o connect a
DVD r
ecorder
, VCR
A
A
udio cord (not supplied)
B
Video cord (not supplied)
D
VD re
corder, VCR
AB
Audio signals
Video sign
als
continued
Loading ...
Loading ...
Loading ...
File type: PDF
File name: 35549891_str-da3600es.pdf
File size: 15.64 MB
File Language: English
Pages: 162
Author: Sony
Published: 2021-02-19
Updated: 2023-06-21
Download File
Table of Contents
×
Table of Contents
6
Description and location of parts
8
Getting Started
19
Checking the connection appropriate for your components
19
1: Installing speakers
20
2: Connecting the monitor
24
3: Connecting the video components
25
4: Connecting the audio components
34
5: Connecting the IR Blaster
38
6: Connecting the antennas (aerials)
39
7: Connecting to the network
40
8: Preparing the receiver and the remote
42
9: Setting the speakers
43
10: Calibrating the appropriate speaker settings automatically (Auto Calibration)
46
11: Configuring the network settings of the receiver
52
12: Preparing a computer to use as a server
52
Guide to on-screen display operation
54
Playback
57
Enjoying sound/images from the component connected to the receiver
57
Enjoying sound/images from the components connected to the DIGITAL MEDIA PORT
58
Operating the TDM-iP50 using the GUI menu of the receiver
59
Tuning
62
Listening to FM/AM radio
62
Presetting FM/AM radio stations
64
Listening to satellite radio (USA/Canadian model only)
65
Connecting a satellite radio tuner
66
Preparing to listen to a satellite radio
66
Selecting a channel of the satellite radio
67
Presetting satellite radio channels
68
Restricting access to specific channels (Parental Lock)
69
Enjoying Surround Sound
72
Playing back with 2-channel sound
72
Playing back with multi-channel surround
73
Enjoying a surround effect for music
74
Enjoying a surround effect for movies
76
Using Network Features
79
About the network functions of the receiver
79
Enjoying content stored on the server
80
Using a controller
83
Listening to Rhapsody
84
Listening to SHOUTcast
87
Features of the Setup Manager application software
88
Using Multi-zone Features
90
What you can do with the Multi-zone function
90
Making a multi-zone connection
90
Setting the speakers in zone 2
92
Switching the zone setting of the remote
93
Operating the receiver from another zone (ZONE 2/ZONE 3 operations)
93
Using Other Features
95
Using âBRAVIAâ Sync features
95
Outputting the HDMI signals even when the receiver is in standby mode (Pass Through)
97
Switching between digital and analog audio
98
Enjoying the sound/images from other inputs (Input Assign)
99
Using the sleep timer
101
Enjoying the surround effect at low volume levels (Night Mode)
101
Recording using the receiver
101
Switching the command mode of the receiver and the remote
103
Using a bi-amplifier connection
104
Adjusting Settings
106
Using the setting menu
106
Auto Calibration
107
Speaker settings
109
Surround settings
113
EQ settings
114
Multi Zone settings
114
Audio settings
116
Video settings
118
HDMI settings
119
Network settings
121
Quick Click settings
123
System settings
124
Operating without connecting to a TV
125
For Installation Purposes: Operating Each Component Using an External Control Device (Quick Click)
133
Operating components or lighting connected to the receiver using an external control device (Quick Click)
133
Using Quick Click
134
Setting components that are operated by an external control device
135
Performing several commands in sequence automatically with Quick Click (Macro Play)
135
Setting remote control codes that are not stored in Quick Click
136
Resetting the remote code for Quick Click
137
Operating Each Component Using the Multifunction Remote
138
Operating each component using the multifunction remote
138
Programming the remote
139
Performing several commands in sequence automatically (Macro Play)
143
Setting remote commander codes that are not stored in the remote
144
Clearing all the contents of the remoteâs memory
146
Additional Information
147
Precautions
147
Troubleshooting
148
Specifications
155
Index
159
Search:
×
Search