Unpack oven, remove all packing material, and examine the oven for any damage such as dents, broken door latches or cracks in the door. Notify dealer immediately if unit is damaged. Do not install if unit is damaged.
Guarantee
2. Your receipt is your guarantee, please keep safely.
Cord
3. If the supply cord of this appliance is damaged, it must be replaced by the manufacturer or it’s service agent or a similarly qualified person in order to avoid a hazard.
Note: The appliance should be inspected for damage to the door seals and door seal areas. If these areas are damaged the appliance should not be operated until it has been repaired by a service technician trained by the manufacturer.
Placement of Your Oven
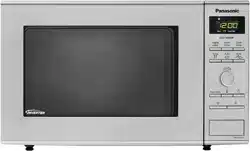
This oven is intended for household counter-top use only. It is not intended for built-in use or for use inside a cupboard.
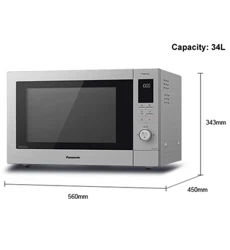
Oven must be placed on a flat, stable surface 85 cm / 33 ½ " above floor level. For proper operation, the oven must have sufficient air flow. i.e. 5 cm /2” at one side, the other being open; 15 cm /6” clear over the top; 10 cm /4” at the rear.
Do not place the microwave oven on a shelf directly above a gas or electric hob. This may be a safety hazard and the oven may be damaged.
Do not block the air vents on the sides and back of the oven. If these openings are blocked during operation the oven may overheat. In this case the oven is protected by a thermal safety device and resumes operation only after cooling down. The oven will remain inoperable with a blank display until it has cooled.
This appliance is intended to be used in household applications only.
Care & Cleaning of Your Oven
Important It is essential for the safe operation of the oven that it is kept clean, and wiped out after each use. Failure to maintain the oven in a clean condition could lead to deterioration of a surface that could adversely affect the life of the appliance and possibly result in a hazardous situation.
Switch the oven off before cleaning and unplug at socket if possible.
Keep the inside of the oven, door seals and door seal areas clean. When food splatters or spilled liquids adhere to oven walls, door seals and door seal areas wipe off with a damp cloth. Mild detergent may be used if they get very dirty. The use of harsh detergent or abrasives is not recommended. Take care when cleaning around the waveguide cover.
Your oven cavity is constructed of zinc coated steel, painted with an extremely durable coating. After use, the oven interior should be wiped out to remove any remaining water in order to reduce the risk of corrosion to the cavity and door. The cavity and door can be damaged by abrasive cleaners and sharp objects so care must be taken to avoid damage caused in this way. If the cavity or door become damaged the lining may begin to corrode. Providing the above precautions are taken regarding the cleaning and care of your oven the life of the cavity and door may be extended.
The outside oven surface should be cleaned with a damp cloth. To prevent damage to the operating parts inside the oven, water should not be allowed to seep into the ventilation openings.
If the control panel becomes dirty, clean with a soft, dry cloth. Do not use harsh detergents or abrasives on control panel. When cleaning the control panel, leave the oven door open to prevent the oven from accidentally turning on. After cleaning press Stop/Cancel button to clear display window.
Do not use harsh abrasive cleaners or sharp metal scrapers to clean the oven door glass since they can scratch the surface, which may result in shattering of the glass.
Keep air vents clear at all times. Check that no dust or other material is blocking any of the air vents on the top, bottom or rear of the oven. If air vents become blocked this could cause overheating which would affect the operation of the oven and possibly result in a hazardous situation.
If steam accumulates inside or around the outside of the oven door, wipe with a soft cloth. This may occur when the microwave oven is operated under high humidity conditions and in no way indicates a malfunction of the unit or microwave leakage.
It is occasionally necessary to remove the glass turntable for cleaning. Wash the glass turntable in warm soapy water.
The roller ring and oven cavity floor should be cleaned regularly to avoid excessive noise. Simply wipe the bottom surface of the oven with mild detergent and hot water then dry with a clean cloth. The roller ring may be washed in mild soapy water. After removing the roller ring from cavity floor for cleaning, be sure to replace it in the proper position.
A steam cleaner is not to be used for cleaning.
Users are advised to avoid any downward pressure on the microwave door when in the open position. There is a safety risk that the oven will tilt forward.
Maintenance of Your Oven
Service
1. When your oven requires a service call your local Panasonic engineer (Customer Communications Centre on 0344 844 3899 can recommend an engineer).
Door Seals
2. Do not attempt to tamper with or make any adjustments or repairs to door, control panel housing, safety interlock switches or any other part of the oven. Do not remove outer panel from oven. The door seals and door seal areas should always be kept clean – use a damp cloth.
Oven Light
3. The oven lamp must be replaced by a service technician trained by Panasonic. Do not attempt to remove the outer casing from the oven.
Warning!
The appliance should be inspected for damage to the door seals and door seal areas. If these areas are damaged the appliance should not be operated until it has been repaired by a service technician trained by the manufacturer. It is hazardous for anyone other than a competent person to carry out any service or repair operation which involves the removal of a cover which gives protection against exposure to microwave energy
Selected Spares and Accessories
4. These may be ordered direct; on line at www.panasonic.co.uk or by telephoning the Customer Communications Centre on 0344 844 3899. Most major credit and debit cards accepted. Ensure you quote the correct model number
Parts of Your Oven
Do not operate the oven without the roller ring and glass turntable in place.
Only use the glass turntable specifically designed for this oven. Do not substitute with any other glass turntable.
If glass turntable is hot, allow to cool before cleaning or placing in water.
Do not cook directly on glass turntable. Always place food in a microwave safe dish. The only exception to this is when cooking jacket potatoes or auto program jacket potatoes.
If food or utensils on the glass turntable touch the oven walls this will cause the turntable to stop moving. It will then automatically rotate in the opposite direction. This is normal. Open oven door, reposition the food and restart.
The glass turntable can rotate in either direction. The maximum weight that can be placed on the turntable is 3 kg (6 lb 10 oz, this includes total weight of food and dish).
While cooking by microwave the turntable may vibrate. This will not affect cooking performance.
Arcing may occur if the incorrect weight of food is used or a metal container has been used accidentally. If this occurs, stop the machine immediately
1. Door release: Push to open the door. Opening the door during cooking will stop the cooking process without cancelling the program. Cooking resumes as soon as the door is closed and Start button is pressed.
2. See-through oven window
3. Door safety lock system
4. Oven air vent
5. Waveguide cover (do not remove)
6. External oven air vents
7. Control panel
8. Power supply cord
9. Plug
10. Identification label
11. Glass turntable
12. Roller ring
(i). The roller ring and oven floor should be cleaned frequently to prevent excessive noise.
(ii). The roller ring must always be used together with the glass turntable for cooking.
13. Menu label
14. Warning label
Microwaving Principles
Microwaves are present in the atmosphere all the time, both naturally and from manmade sources. Manmade sources include radar, radio, television, telecommunication links and mobile phones.
In a microwave oven, electricity is converted into microwaves by the magnetron.
Reflection: The microwaves bounce off the metal walls and the metal door screen.
Transmission: Then they pass through the cooking containers to be absorbed by the water molecules in the food, all foods contain water to a more or lesser extent.
Note
The dish used to cook or reheat the food will get warm during cooking, as the heat conducts from the food. Even in microwaving, oven gloves are required!
Microwaves cannot pass through metal and therefore metal cooking utensils can never be used in a microwave, for cooking on microwave only.
How Microwaves cook food
The microwaves cause the water molecules to vibrate which causes friction, i.e. heat. This heat then cooks the food. Microwaves are also attracted to fat and sugar particles, and foods high in these will cook more quickly. Microwaves can only penetrate to a depth of 1½ -2 inches (4-5 cm) and as heat spreads through the food by conduction, just as in a traditional oven, the food cooks from the outside inwards.
Foods Not Suitable for Cooking by Microwave Only
Yorkshire Puddings and Souffles. This is because these foods rely on dry external heat to cook correctly, do not attempt to cook by microwave. Foods that require deep fat frying cannot be cooked either.
Standing Time
When a microwave oven is switched off, the food will continue to cook by conduction – Not by microwave energy, hence standing time is very important in microwaving, particularly for dense foods i.e. meat, cakes and reheated meals (refer to page 19).
Boiled eggs: Do not boil eggs in your microwave. Raw eggs boiled in their shells can explode and cause serious injury.
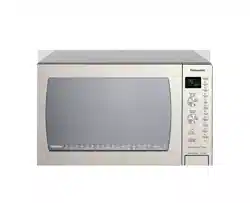
Control Panel NN-SD27HS
Display window
Microwave power levels button (page 24)
Chaos Defrost button (page 30-31)
Auto Reheat button (page 32-33)
Auto Cook button (page 32, 34)
Time/Weight dial
Aqua Clean button (page 28)
Timer button (page 27)
Clock button (page 23)
Stop/Cancel button:
Before cooking: One press clears your instructions
During cooking: One press temporarily stops the cooking program.
Another press cancels all your instructions and the time of day will appear in the display.
Start button Press to start operating the oven. If during cooking the door is opened or Stop/Cancel is pressed once, Start has to be pressed again to continue cooking.
Microwave heating category
Door release
This oven is equipped with an energy saving function
Containers to Use
Choosing the correct container is a very important factor in deciding the success or failure of your cooking.
Testing Dishes for Suitability
When unsure that a cooking container is suitable for use in your microwave, check by the following test:
Fill a microwave safe measuring jug with 300 ml (½ pt) cold water.
Place it on the turntable alongside the dish to be tested. If the dish you are testing is a large dish, then stand the measuring jug on top of the empty dish.
Heat on High power (1000 W) for 1 minute.
Result
If the dish is suitable for microwaving, it will remain cool, whilst the water in the jug will begin to feel warm. If the testing dish feels warm, do not use as it is obviously absorbing microwave energy.
Note: This test does not apply to plastic or metal based containers e.g. Le Creuset® style dishes, which should not be used as they are cast iron covered with enamel.
Setting the Clock
When the oven is first plugged in “88:88” appears in display window.
Notes
To reset time of day, repeat step 1 through to step 3, as above.
The clock will keep the time of day as long as the oven is plugged in and electricity is supplied.
This is a 24 hour clock, ie 2 pm = 14:00 not 2:00.
Child Lock
Using this system will make the oven controls inoperable; however, the door can be opened. Child Lock can be set when the display shows a colon or the time.
Press Start three times: The time of day will disappear. Actual time will not be lost. ‘Child’ is indicated in the display
Press Stop/Cancel three times: The time of day will reappear in the display
Using the Timer
The Timer can be used either before, during or after a cooking program. This feature can be used to set a standing time after cooking or to delay the start of your cooking.
1. To Set a Standing Time:
Note
Three stage cooking can be programmed including standing time.
If the oven door is opened during the standing time or minute timer, the time in the display window will continue to count down.
This feature may also be used as a minute timer. In this case press the Timer, set time and press Start.
Standing time cannot be programmed after an auto program.
If the programmed stand time exceeds one hour, the time will count down in units of minutes. If less than one hour, the time will count down in units of seconds.
2. To Set a Delay Start:
Note
Three stage cooking can be programmed including delay start cooking.
If the programmed delay time exceeds one hour, the time will count down in units of minutes. If less than one hour, the time will count down in units of seconds.
Delay start cannot be programmed before an auto program.
If the oven door is opened du
Using the Aqua Clean Program
This Program is to clean the cavity and remove any food odour from the microwave oven.
Note
Do not remove the glass turntable and roller ring during this Program.
To clean the glass turntable and roller ring, refer to page 11.
Repeat the above procedure as required.
Multistage Cooking
2 or 3 stage cooking
Notes
For 3 stage cooking, enter another cooking program before pressing Start.
During operation, one press on Stop/Cancel stops the operation. You can re-start it by pressing Start. A second press of Stop/Cancel will cancel the selected program.
Whilst not operating, one press of Stop/Cancel cancels the selected program.
Auto programs cannot be used with multi-stage cooking.
Auto Reheat / Cook Programs
This feature allows you to cook foods by setting the weight. The oven determines the microwave power level and then gives a cooking time; this cooking time has been developed following extensive testing by our Home Economists in our development kitchen.
Select the category of food and enter the weight.
Example:
Notes: The Auto Programs must only be used for foods described.
Only cook foods within the weight ranges described.
Always weigh the food rather than relying on the package information.
Most foods benefit from a standing time, after cooking on an auto program, to allow heat to continue conducting to the centre
To allow for some variations that occur in food, check that food is thoroughly cooked and piping hot before serving.
Auto Reheat Programs
Program
Weight
Instructions
4. Chilled soup
1 Press
150 g - 600 g
To reheat chilled soup. Place soup into a microwaveable bowl or container. Cover with lid or pierced cling film. Select program (1 press of Auto Reheat button), enter weight using the Time/Weight dial, then press Start. Stir at beeps. Allow to stand for 2 minutes. Ensure that the soup is piping hot. Stir the soup before serving.
5. Chilled meal
2 Presses
200 g - 800 g
To reheat a chilled convenience meal that can be stirred. Foods must be in a suitable shallow microwaveable container and have the film pierced. Select program (2 presses of Auto Reheat button), enter weight using the Time/Weight dial, then press Start. Stir at beeps. After cooking allow to stand for 2 minutes in the oven. Ensure that the food is piping hot. Stir before serving.
6. Frozen meal
3 Presses
200 g - 500 g
To reheat a frozen convenience meal that can be stirred. Foods must be in a suitable shallow microwaveable container and have the film pierced. Select program (3 presses of the Auto Reheat button), enter weight using the Time/Weight dial, then press Start. Stir at beeps. After cooking allow to stand for 2 minutes in the oven. Ensure that the food is piping hot. Stir before serving.
7. Fresh vegetables
1 Press
200 g - 800 g
To cook fresh vegetables. Place prepared vegetables into a shallow container on turntable.
Add 15 ml (1 tbsp) water per 100 g vegetables.
Cover with pierced cling film or lid. Select program (1 press of Auto Cook button), enter weight using the Time/Weight dial, then press Start. Stir at beeps.
8. Fresh fish
2 Presses
200 g - 800 g
To cook freshfish. Shield the thinner portions. Place in a shallow container on turntable. Add
15-45 ml (1-3 tbsp) liquid. Cover with pierced cling film or lid. Select program (2 presses of Auto Cook button), enter weight using the Time/Weight dial, then press Start. Stand for 1 to 2 minutes before serving.
9. Jacket potatoes
3 Presses
200 g - 1400 g
To cook jacket potatoes choose medium sized potatoes 200-250 g (7-9 oz). Wash and dry and prick with a fork several times. Arrange around edge of turntable. Select program (3 presses of Auto Cook button), enter weight using the Time/Weight dial, then press Start. Wrap in aluminium foil and allow to stand for 5 minutes after cooking.
10. Rice
4 Presses
100 g - 300 g
For cooking rice for savoury dishes, not rice puddings. Rinse the rice thoroughly before cooking. Use a large bowl. Add 2 times boiling water to rice. Add salt if desired. Cover with a lid or pierced cling film. Select program (4 presses of Auto Cook button), enter weight and press Start.Stir at the beeps. Allow to stand for 5 minutes after cooking.
Questions and Answers
Q: Why won’t my oven turn on?
A: When the oven does not turn on, check the following:
Is the oven plugged in securely? Remove the plug from the outlet, wait 10 seconds and reinsert.
Check the circuit breaker and the fuse. Reset the circuit breaker or replace the fuse if it is tripped or blown.
If the circuit breaker or fuse is all right, plug another appliance into the outlet. If the other appliance works, there probably is a problem with the oven.
If the other appliance does not work, there probably is a problem with the outlet. If it seems that there is a problem with the oven, contact an authorised Service Centre.
Q: My microwave oven causes interference with my TV. Is this normal?
A: Some radio, TV, Wi-Fi, cordless telephone, baby monitor, bluetooth or other wireless equipment interference might occur when you cook with the microwave oven. This interference is similar to the interference caused by small appliances such as mixers, vacuums, blow dryers, etc. It does not indicate a problem with your oven.
Q: The oven won’t accept my program. Why?
A: The oven is designed not to accept an incorrect program. For example, the oven will not accept a fourth stage, and will not accept an Auto program after delay start.
Q: Sometimes warm air comes from the oven vents. Why?
A: The heat given off from the food whilst cooking warms the air in the oven cavity. This warmed air is carried out of the oven by the air flow pattern in the oven. There are no microwaves in the air. The oven vents should never be blocked during cooking.
Q: The oven stops cooking by microwave and ‘H97’ or ‘H98’ appears in the display. Why?
A: This display indicates a problem with the microwave generation system. Please contact an authorised Service Centre.
Q: The fan continues to rotate after cooking. Why?
A: After using the oven, the fan motor may rotate to cool the electrical components. This is normal and you can continue using the oven at this time.
#1 My microwave oven causes interferencen with my TV. Is this normal?
Some radio, TV, Wi-Fi, cordless telephone, baby monitor, bluetooth or other wireless equipment interference might occur when you cook with the microwave oven. This interference is similar to the interference caused by small appliances such as mixers, vacuums, blow dryers, etc. It does notindicate a problem with your oven.
#2 The fan continues to rotate after cooking. Why?
After using the oven, the fan motor may rotate to cool the electrical components. This is normal and you can continue using the oven at this time.
When the oven does not turn on, check the following: 1. Is the oven plugged in securely? Remove the plug from the outlet, wait 10 seconds and reinsert. 2. Check the circuit breaker and the fuse. Reset the circuit breaker or replace thefuse if it is tripped or blown. 3. If the circuit breaker or fuse is all right, plug another appliance into the outlet. If the other appliance works, there probably is a problem with the oven. If the other appliance does not work, there probably is a problem with the outlet.
#4 Sometimes warm air comes from the oven vents. Why?
The heat given off from the food whilst cooking warms the air in the oven cavity. This warmed air is carried out of the oven by the air flow pattern in the oven. There are no microwaves in the air. The oven vents should never be blocked during cooking.
The oven is designed not to accept an incorrect program. For example, the oven will not accept a fourth stage, and will not accept an Auto program after delay start.
Switch the oven off before cleaning and unplug at socket if possible. Keep the inside of the oven, door seals and door seal areas clean. When food splatters or spilled liquids adhere to oven walls, door seals and door seal areas wipe off with a damp cloth. Mild detergent may be used if they get very dirty. The use of harsh detergent or abrasives is not recommended. Take care when cleaning around the waveguide cover. Your oven cavity is constructed of zinc coated steel, painted with an extremely durable coating. After use, the oven interior should be wiped out to remove any remaining water in order to reduce the risk of corrosion to the cavity and door. The cavity and door can be damaged by abrasive cleaners and sharp objects so care must be taken to avoid damage caused in this way. If the cavity or door become damaged the lining may begin to corrode. Providing the above precautions are taken regarding the cleaning and care of your oven the life of the cavity and door may be extended. The outside oven surface should be cleaned with a damp cloth. To prevent damage to the operating parts inside the oven, water should not be allowed to seep into the ventilation openings. If the control panel becomes dirty, clean with a soft, dry cloth. Do not use harsh detergents or abrasives on control panel. When cleaning the control panel, leave the oven door open to prevent the oven from accidentally turning on. After cleaning press Stop/Cancel button to clear display window. Do not use harsh abrasive cleaners or sharp metal scrapers to clean the oven door glass since they can scratch the surface, which may result in shattering of the glass. Keep air vents clear at all times. Check that no dust or other material is blocking any of the air vents on the top, bottom or rear of the oven. If air vents become blocked this could cause overheating which would affect the operation of the oven and possibly result in a hazardous situation. If steam accumulates inside or around the outside of the oven door, wipe with a soft cloth. This may occur when the microwave oven is operated under high humidity conditions and in no way indicates a malfunction of the unit or microwave leakage. It is occasionally necessary to remove the glass turntable for cleaning. Wash the glass turntable in warm soapy water. The roller ring and oven cavity floor should be cleaned regularly to avoid excessive noise. Simply wipe the bottom surface of the oven with mild detergent and hot water then dry with a clean cloth. The roller ring may be washed in mild soapy water. After removing the roller ring from cavity floor for cleaning, be sure to replace it in the proper position. A steam cleaner is not to be used for cleaning. Users are advised to avoid any downward pressure on the microwave door when in the open position. There is a safety risk that the oven will tilt forward.