| Refrigerator does not operate |
Refrigerator in defrost cycle. |
Wait about 30 minutes for defrost cycle to end.
|
| Either or both controls set to OFF. |
Set the controls to a lower temperature setting.
|
| Refrigerator is unplugged. |
Push the plug completely into the outlet.
|
| The fuse is blown/circuit breaker is tripped. |
Replace fuse or reset the breaker.
|
| Refrigerator is in showroom mode. |
Unplug the refrigerator and plug it back in.
|
| Vibration or rattling (slight vibration is normal) |
Rollers need adjusting. |
See Rollers section of the Owner’s Manual
|
| Motor operates for long periods or cycles on and off frequently. (Modern refrigerators with more storage space and a larger freezer require more operating time. They start and stop often to maintain even temperatures). |
Normal when refrigerator is first plugged in. |
Wait 24 hours for the refrigerator to completely cool down.
|
|
Often occurs when large amounts of food are placed in refrigerator.
|
This is normal.
|
|
Door left open.
|
Check to see if package is holding door open.
|
| Hot weather or frequent door openings. |
This is normal.
|
|
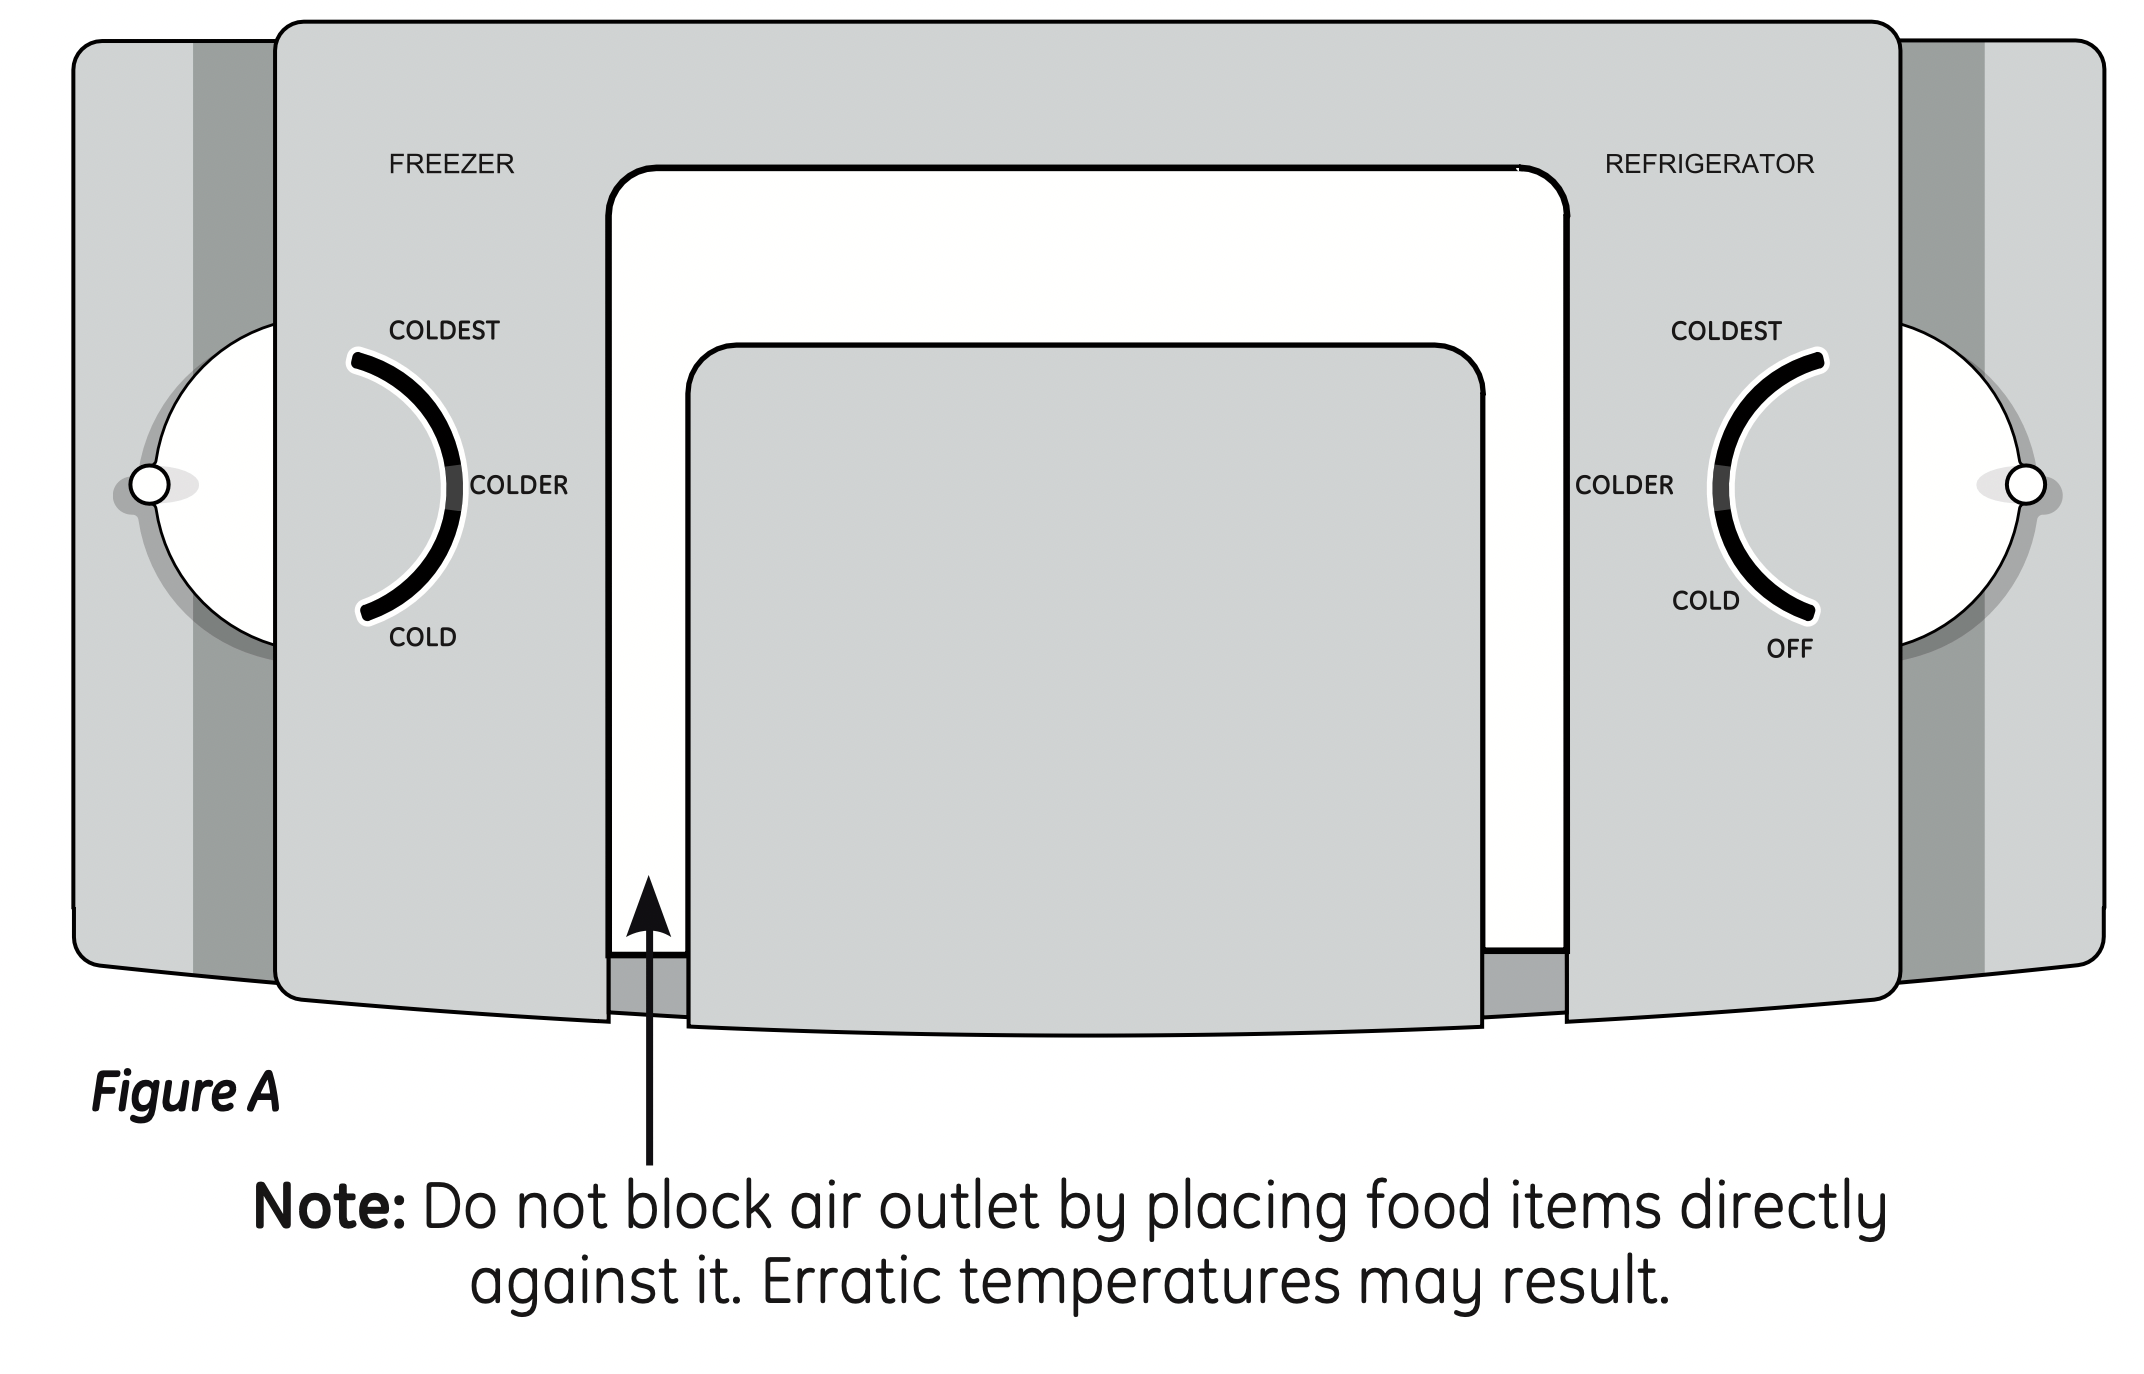
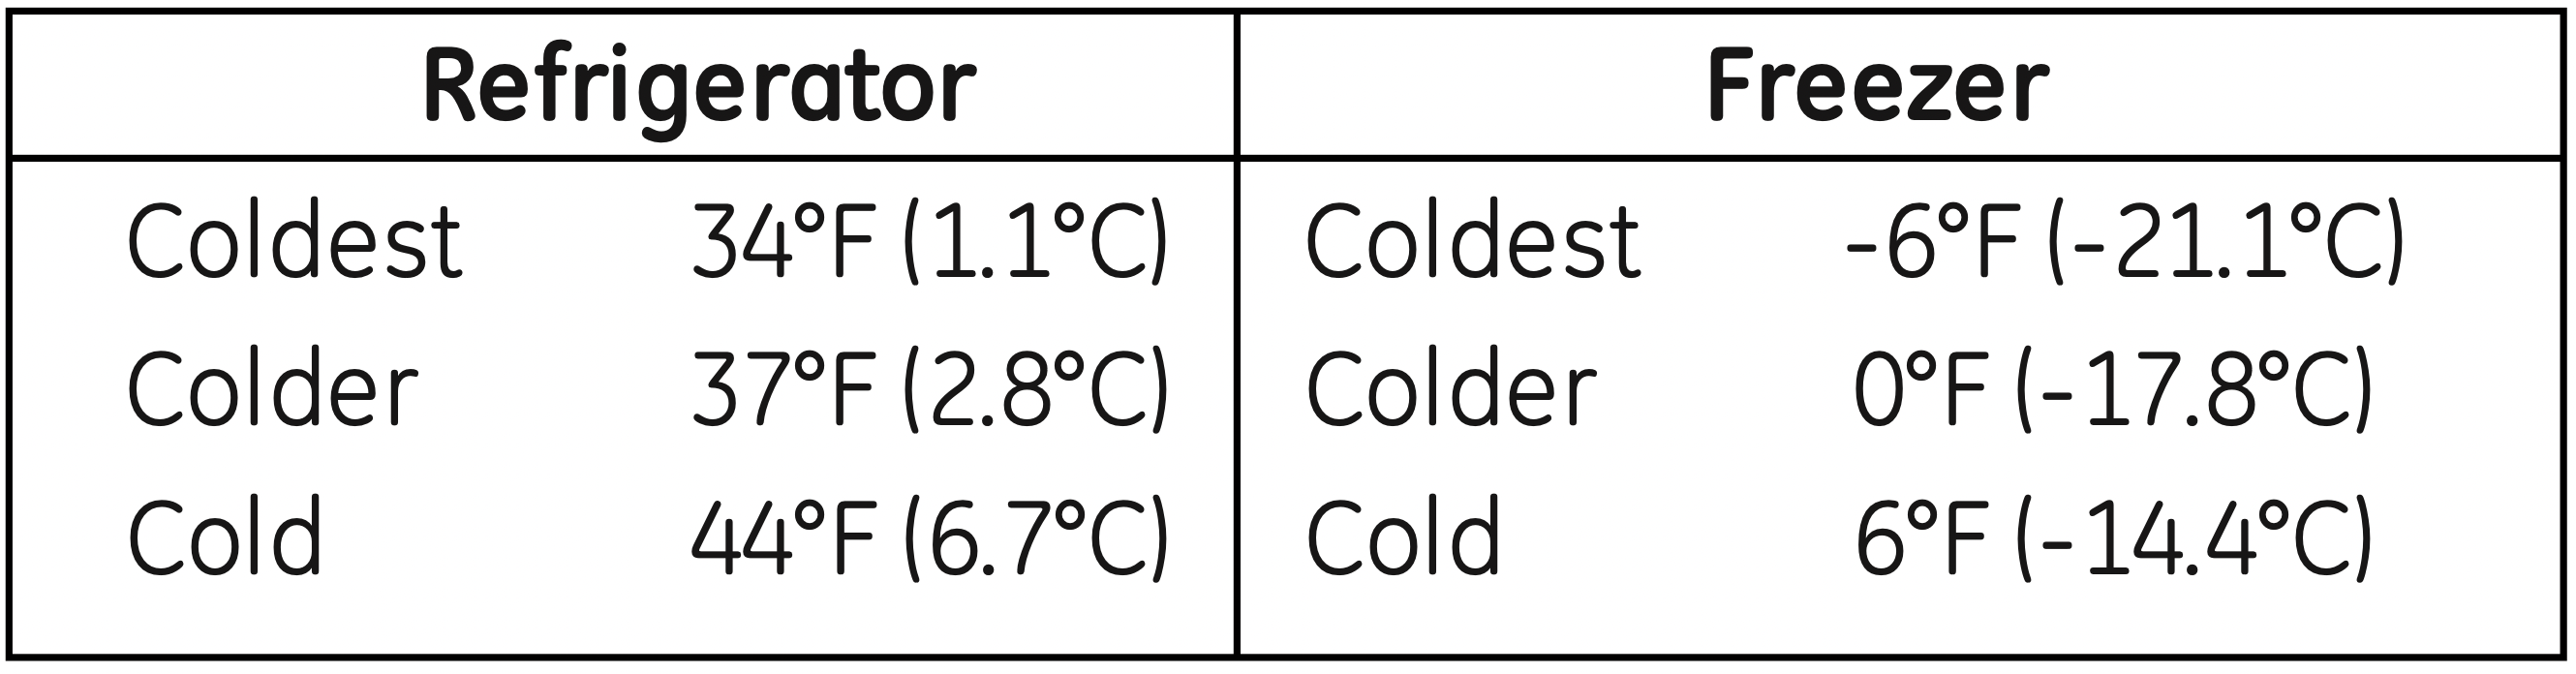
Temperature controls set at the coldest setting.
|
See About the controls section of the Owner’s Manual. |
| Refrigerator or freezer compartment too warm |
Temperature control not set cold enough. |
See About the controls section of the Owner’s Manual.
|
| Warm weather or frequent door openings. |
Set the temperature control one step colder. See About the controls section of the Owner’s Manual.
|
|
Door left open.
|
Check to see if package is holding door open.
|
| Frost or ice crystals on frozen food (frost within package is normal) |
Door left open. |
Check to see if package is holding door open.
|
|
Too frequent or too long door openings.
|
This is normal. |
|
Divider between refrigerator and freezer compartments feels warm
|
Automatic energy saver system circulates warm liquid around front edge of freezer compartment.
|
This helps prevent condensation on the outside. |
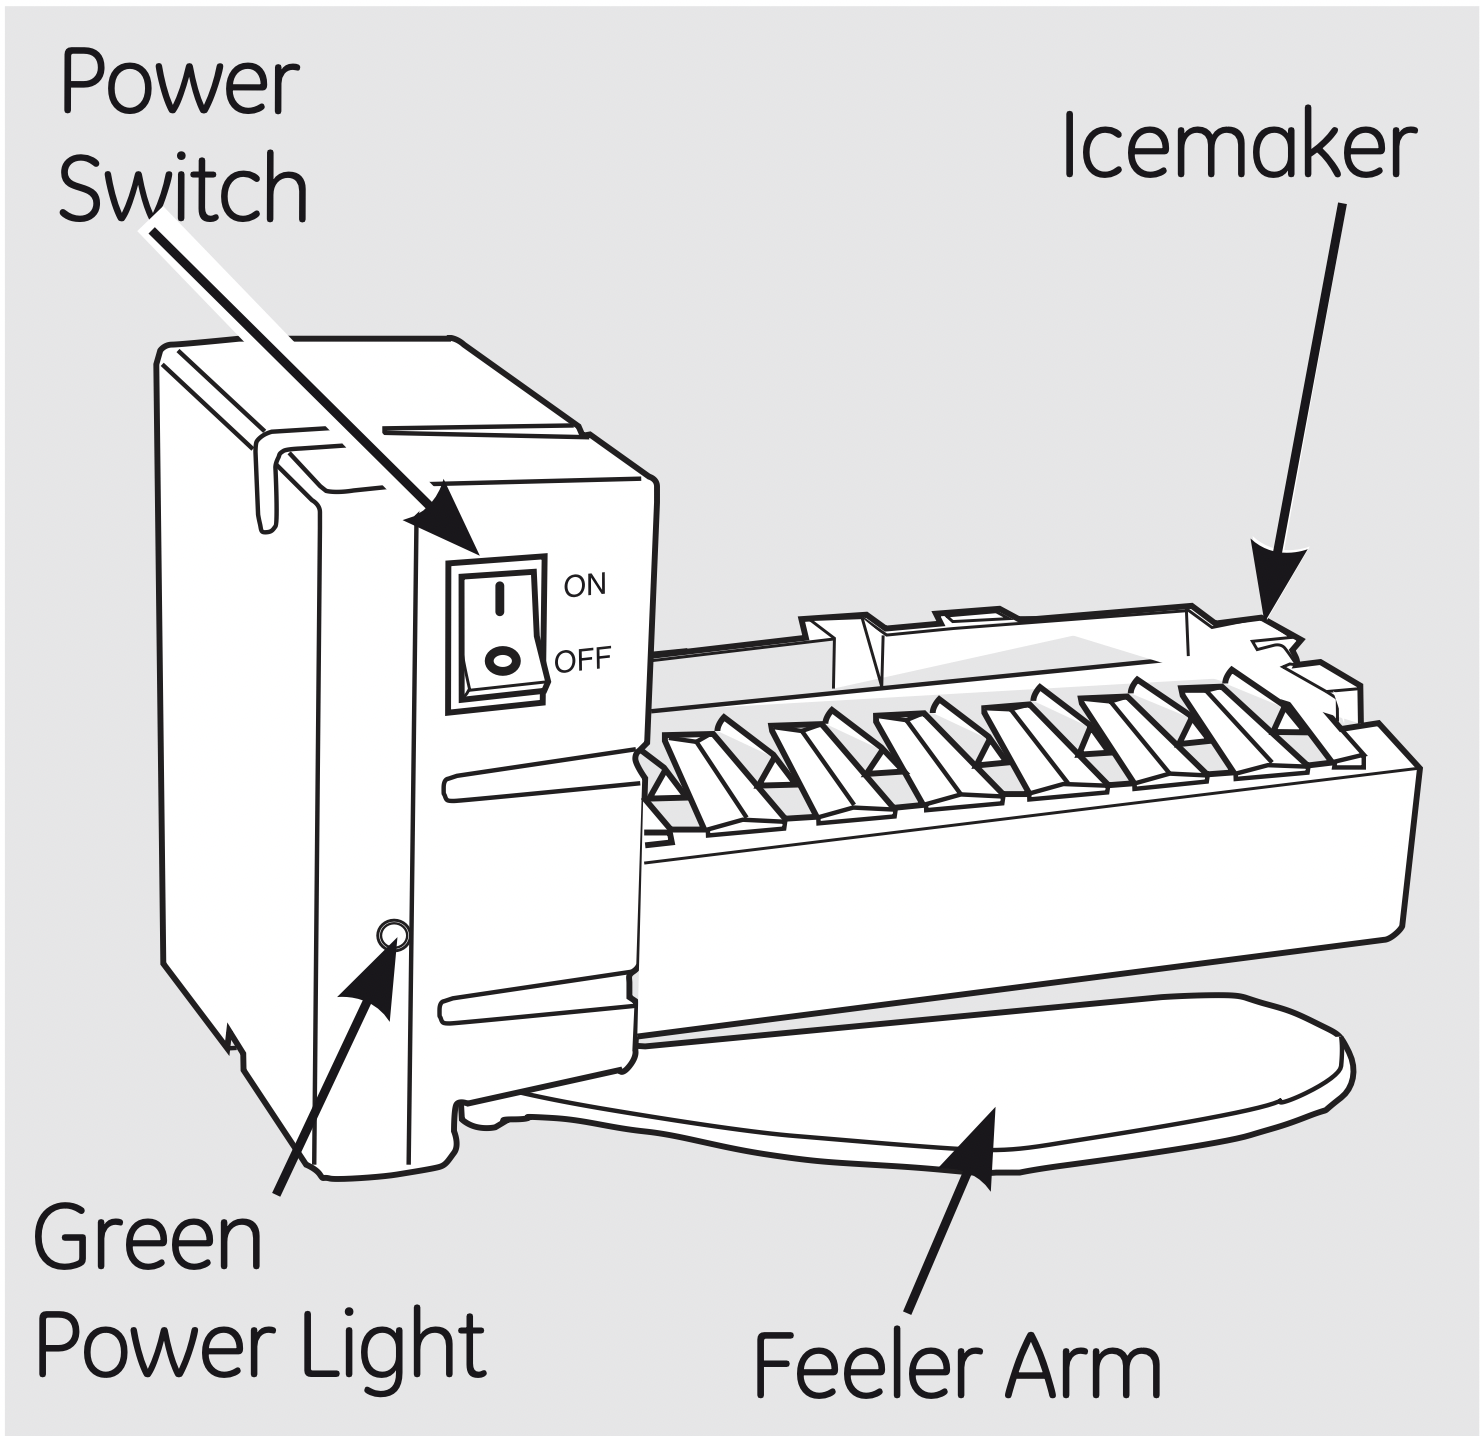
| Automatic ice maker does not work |
Ice maker power switch is in the OFF position. |
Set the power switch to the ON position.
|
| Water supply turned off or not connected. |
See Installing the water line section of the Owner’s Manual.
|
| Freezer compartment too warm. |
Wait 24 hours for the refrigerator to completelycool down.
|
|
Piled up cubes in the storage bin cause the ice maker to shut off.
|
Level cubes by hand.
|
| Ice cubes stuck in ice maker. |
Turn off the ice maker, remove cubes, and turn the ice maker back on.
|
| Ice cubes have odor/taste |
Ice storage bin needs cleaning. |
Empty and wash bin. Discard old cubes.
|
|
Food transmitting odor/taste to ice cubes.
|
Wrap foods well.
|
| Interior of refrigerator needs cleaning. |
See Care and cleaning section of the Owner’s Manual.
|
| Small or hollow cubes |
Water filter clogged. |
Replace filter cartridge with new cartridge or with plug.
|
| Slow ice cube freezing |
Door left open. |
Check to see if package is holding door open.
|
| Temperature control not set cold enough. |
See About the controls section of the Owner’s Manual.
|
| Frequent ‘buzzing sound” |
Ice maker power switch is in the 1 (on) position, but the water supply to the refrigerator has not been connected. |
Set the power switch to the 0 (off) position. Keeping it inthe 1 (on) position will damage the water valve.
|
| Orange glow in the freezer |
Defrost heater is on. |
This is normal.
|
| Water has poor taste/odor |
Water dispenser has not been used for a long time. |
Dispense water until all water in system is replenished.
|
| Water in first glass is warm |
Normal when refrigerator is first installed. |
Wait 24 hours for the refrigerator to completelycool down.
|
| Water dispenser has not been used for a long time. |
Dispense water until all water in system is replenished.
|
| Water system has been drained. |
Allow several hours for replenished supply to chill.
|
| Water dispenser does not work |
Water supply line turned off or not connected. |
See Installing the water line section of the Owner’s Manual.
|
| Water filter clogged. |
Replace filter cartridge or remove filter and install plug.
|
| Air may be trapped in the water system. |
Press the dispenser arm for at least two minutes.
|
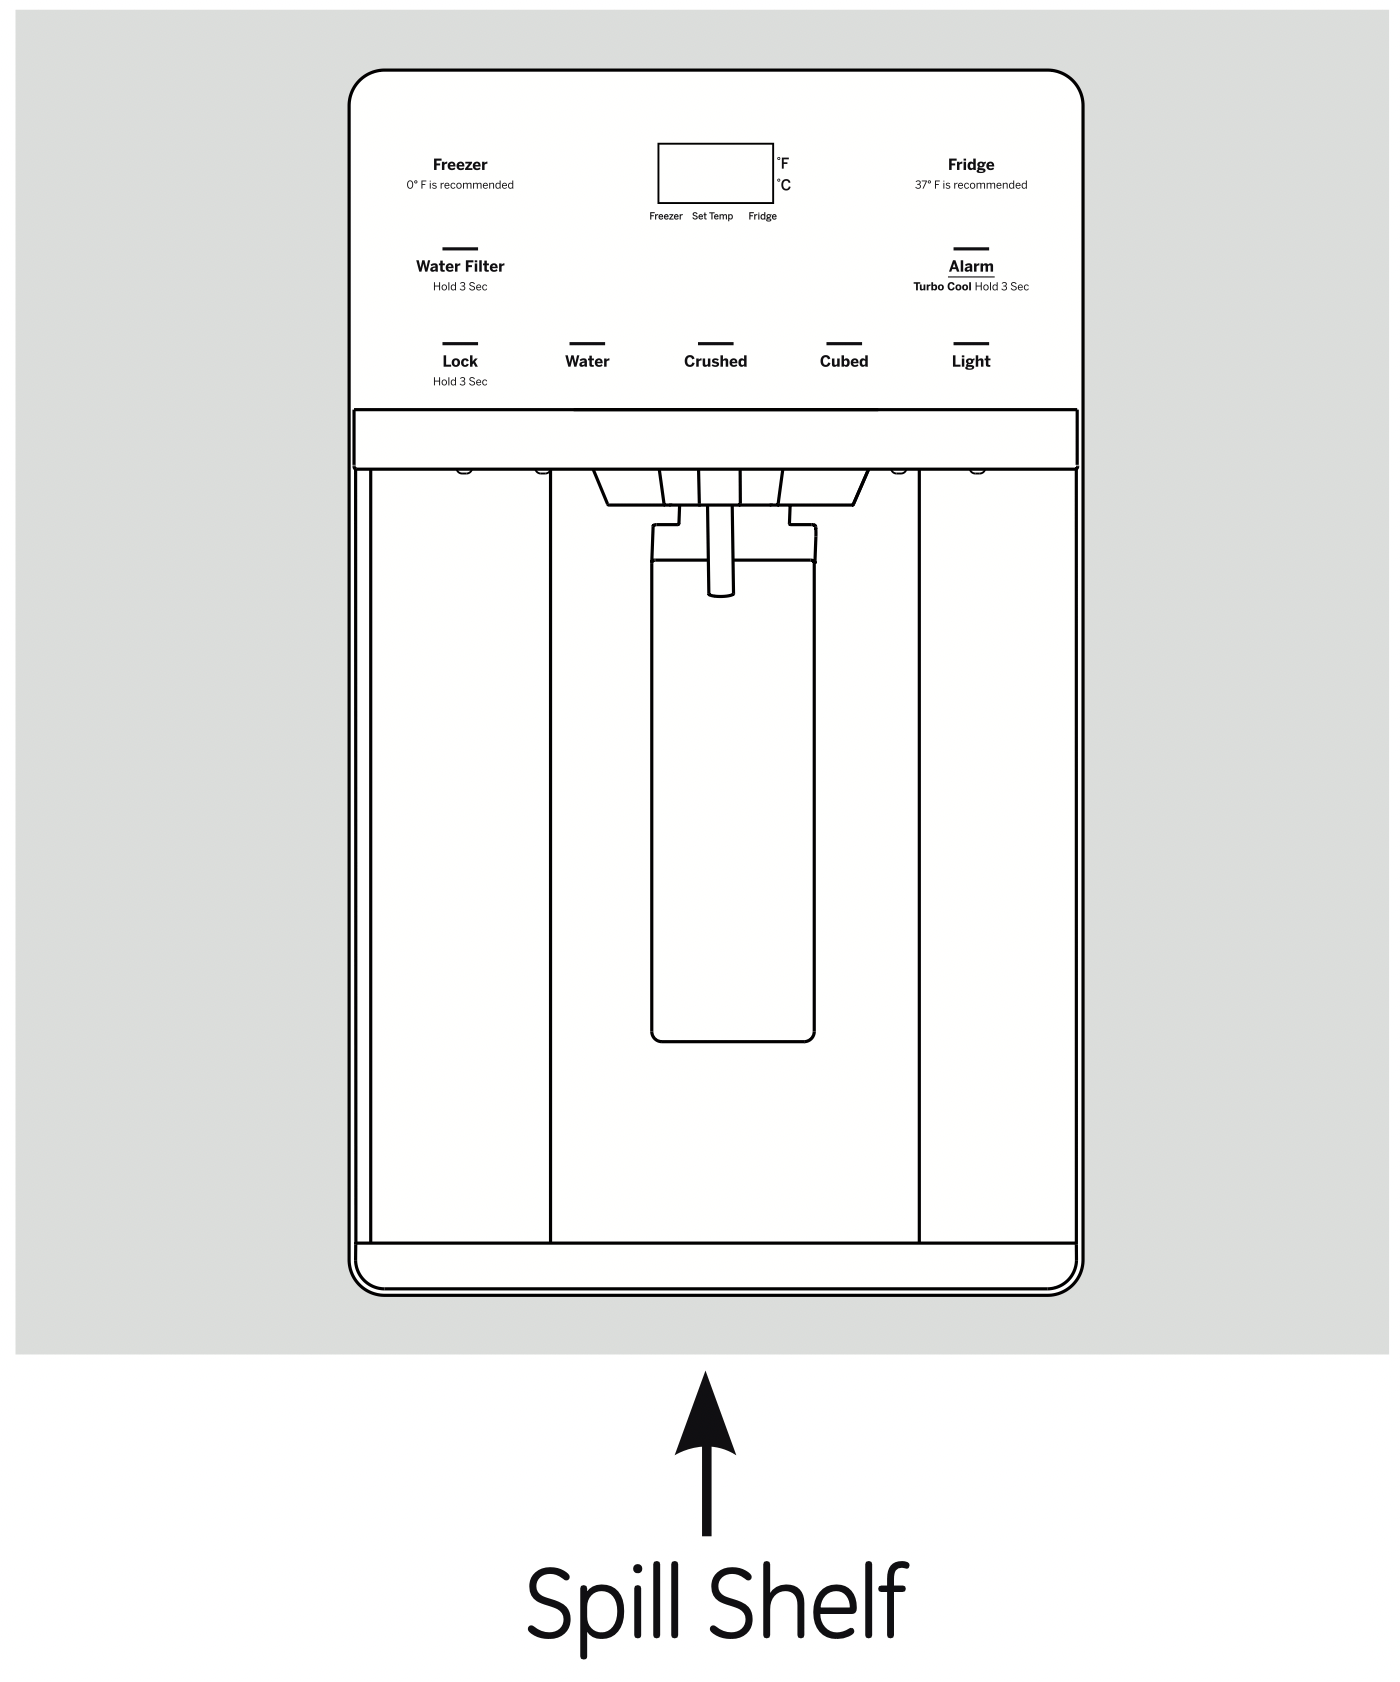
| Dispenser is LOCKED. |
Press and hold the LOCK CONTROLS pad for 3 seconds.
|
| Water spurting from dispenser |
Newly-installed filter cartridge. |
Run water from the dispenser for 3 minutes (aboutone and a half gallons).
|
| Water is not dispensed but ice maker is working |
Water in reservoir is frozen.
|
Call for service.
|
|
Refrigerator control setting is too cold.
|
Set to a warmer setting.
|
|
No water or ice cube production
|
Supply line or shutoff valve is clogged.
|
Call a plumber.
|
|
Water filter clogged.
|
Replace filter cartridge or remove filter and install plug.
|
|
Refrigerator has odor
|
Foods transmitting odor to refrigerator.
|
Foods with strong odors should be tightly wrapped.
|
|
Keep an open box of baking soda in the refrigerator; replace every three months.
|
|
Interior needs cleaning.
|
See Care and cleaning section of the Owner’s Manual.
|
|
Moisture forms on outside of refrigerator
|
Not unusual during periods of high humidity.
|
Wipe surface dry.
|
|
Moisture collects inside (in humid weather, air carries moisture into refrigerator when doors are opened)
|
Too frequent or too long door openings.
|
This is normal.
|
|
Due to the higher humidity in the refrigerator, you may on occasion experience fog or small amounts of moisture in the refrigerator compartment.
|
This is normal and may come and go as different food loads and environmental conditions change. Wipe dry with a paper towel if desired.
|
|
Interior light does not work
|
No power at outlet.
|
Replace fuse or reset the breaker.
|
|
Light bulb burned out.
|
See Replacing the light bulbs section of the Owner’s Manual.
|
|
For LED lights (on some models)
|
Call Service.
|
|
Hot air from bottom of refrigerator
|
Normal air flow cooling motor. In the refrigeration process, itis normal that heat be expelled in the area under the refrigerator. Some floor coverings are sensitive and will discolor at these normal and safe temperatures.
|
This is normal.
|
|
Refrigerator never shuts off but the temperatures are OK
|
Adaptive defrost keeps compressor running during door openings.
|
This is normal. The refrigerator will cycle off after the door remains closed for 2 hours.
|
|
Refrigerator is beeping
|
Door is open.
|
Close door.
|
|
Door not closing properly
|
Door gasket on hinge side sticking or folding over.
|
Apply paraffin wax to the face of the gasket.
|
|
Actual temperature not equal to Set temperature
|
Unit just plugged in.
|
Allow 24 hours for system to stabilize.
|
|
Door open for too long.
|
Allow 24 hours for system to stabilize.
|
|
Warm food added to refrigerator.
|
Allow 24 hours for system to stabilize.
|
|
Defrost cycle is in process.
|
Allow 24 hours for system to stabilize.
|
|
Door/drawer does not close by itself
|
Leveling legs need adjusting.
|
See Installing the Refrigerator.
|
|
Freezer door/drawer pops open when refrigerator door is closed
|
This is normal if, after popping open, the freezer door/drawer closed on its own.
|
This indicates that there is a good seal on the freezer door/ drawer. If the freezer door/drawer does not automatically close after popping open, then see the Problem: Door/drawer does not close by itself, above.
|
|
Food freezing in the refrigerator
|
Food too close to the air vent at the back of the refrigerator.
|
Move the food away from the air vent.
|
|
Refrigerator control is set too cold.
|
Move the refrigerator control to a warmer temperature set- ting one increment at a time.
|
|
Water is leaking from dispenser
|
Glass not being held under the dispenser long enough after button is released.
|
Hold the glass underneath the dispenser for 2–3 seconds after releasing the dispenser button. Water may continue to dispense after the button is released.
|
|
Air may be present in the water line system, causing water to drip after being dispensed.
|
Dispense water for at least 2 minutes to remove air from system.
|
|
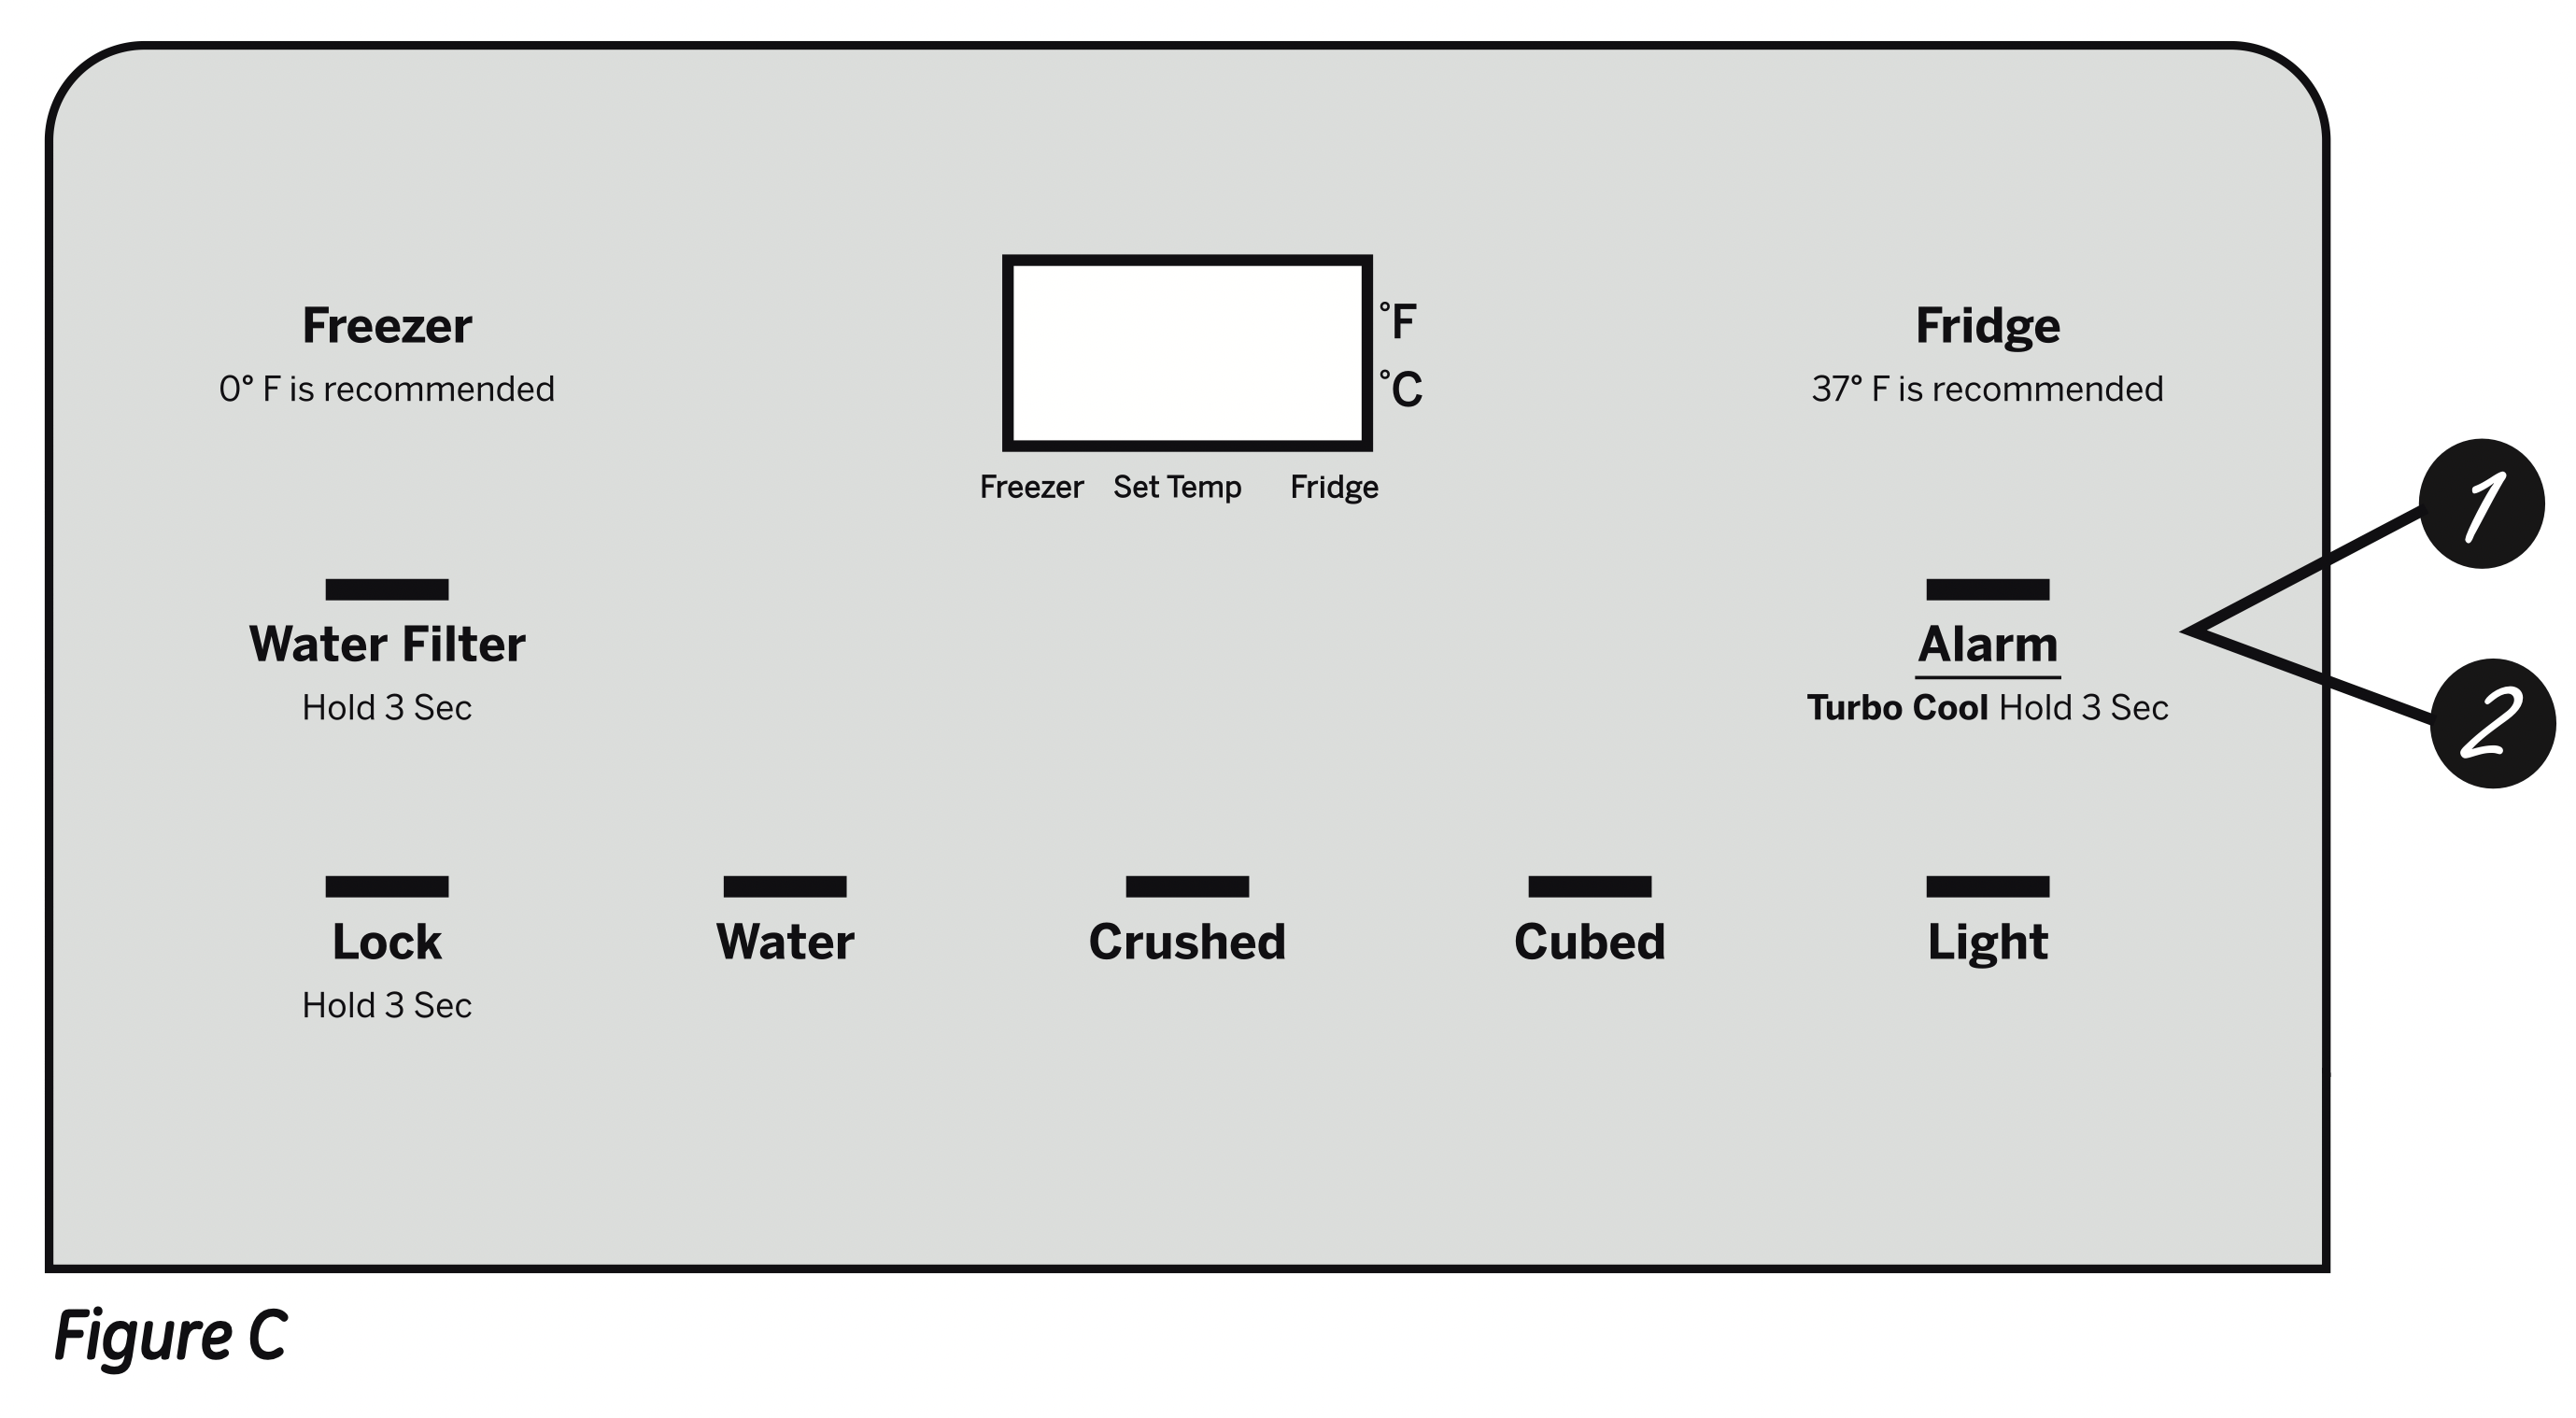
My display is showing
|
TurboCool function is activated.
|
See About TurboCool section of the Owner’s Manual.
|
|
Water filter indicator light changed color
|
This is normal.
|
See About the water filter section of the Owner’s Manual.
|
|
Water filter indicator light remains red even after replacing the water filter
|
Water filter indicator must be reset.
|
Press and hold the RESET WATER FILTER pad for 3 seconds. See About the water filter section of the Owner’s Manual.
|
|
Water filter indicator light is not lit
|
This is normal. This light will turn orange to tell you that you need to replace the filter soon. The filter cartridge should be replaced when the replacement indicator light turns red.
|
See About the water filter section of the Owner’s Manual.
|
|
Handle is loose / handle has a gap
|
Handle needs adjusting.
|
See Attach the Fresh Food handle and Attach the Freezer handle section of the Owner’s Manual.
|
| Control setting is not lit |
On some models, the light bulbs at the top of the refrigerator compartment light up the temperature control settings. |
If the control settings do not light up, check to see if the light bulbs are burned out, and replace if necessary.
|
| Refrigerator doors are not even (on Double Door models only) |
Doors need realigning. |
See Align Double Doors section located under Replacing the Door (Double Door Refrigerator Models only) section of the Owner’s Manual.
|
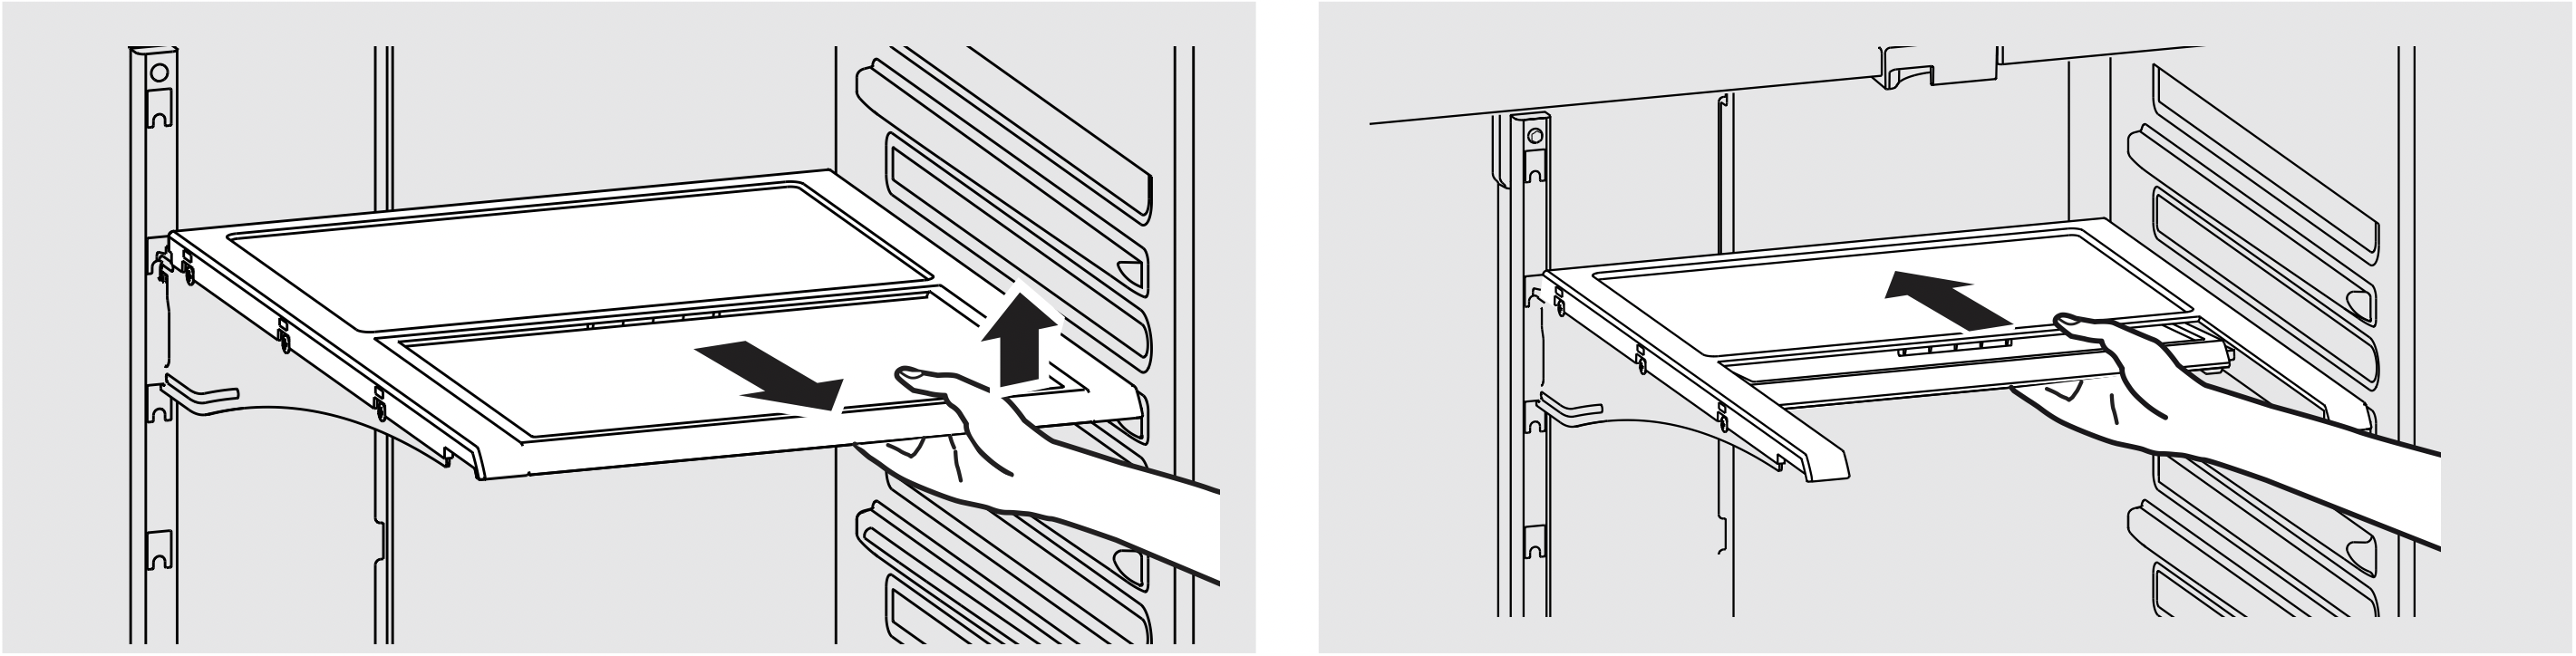
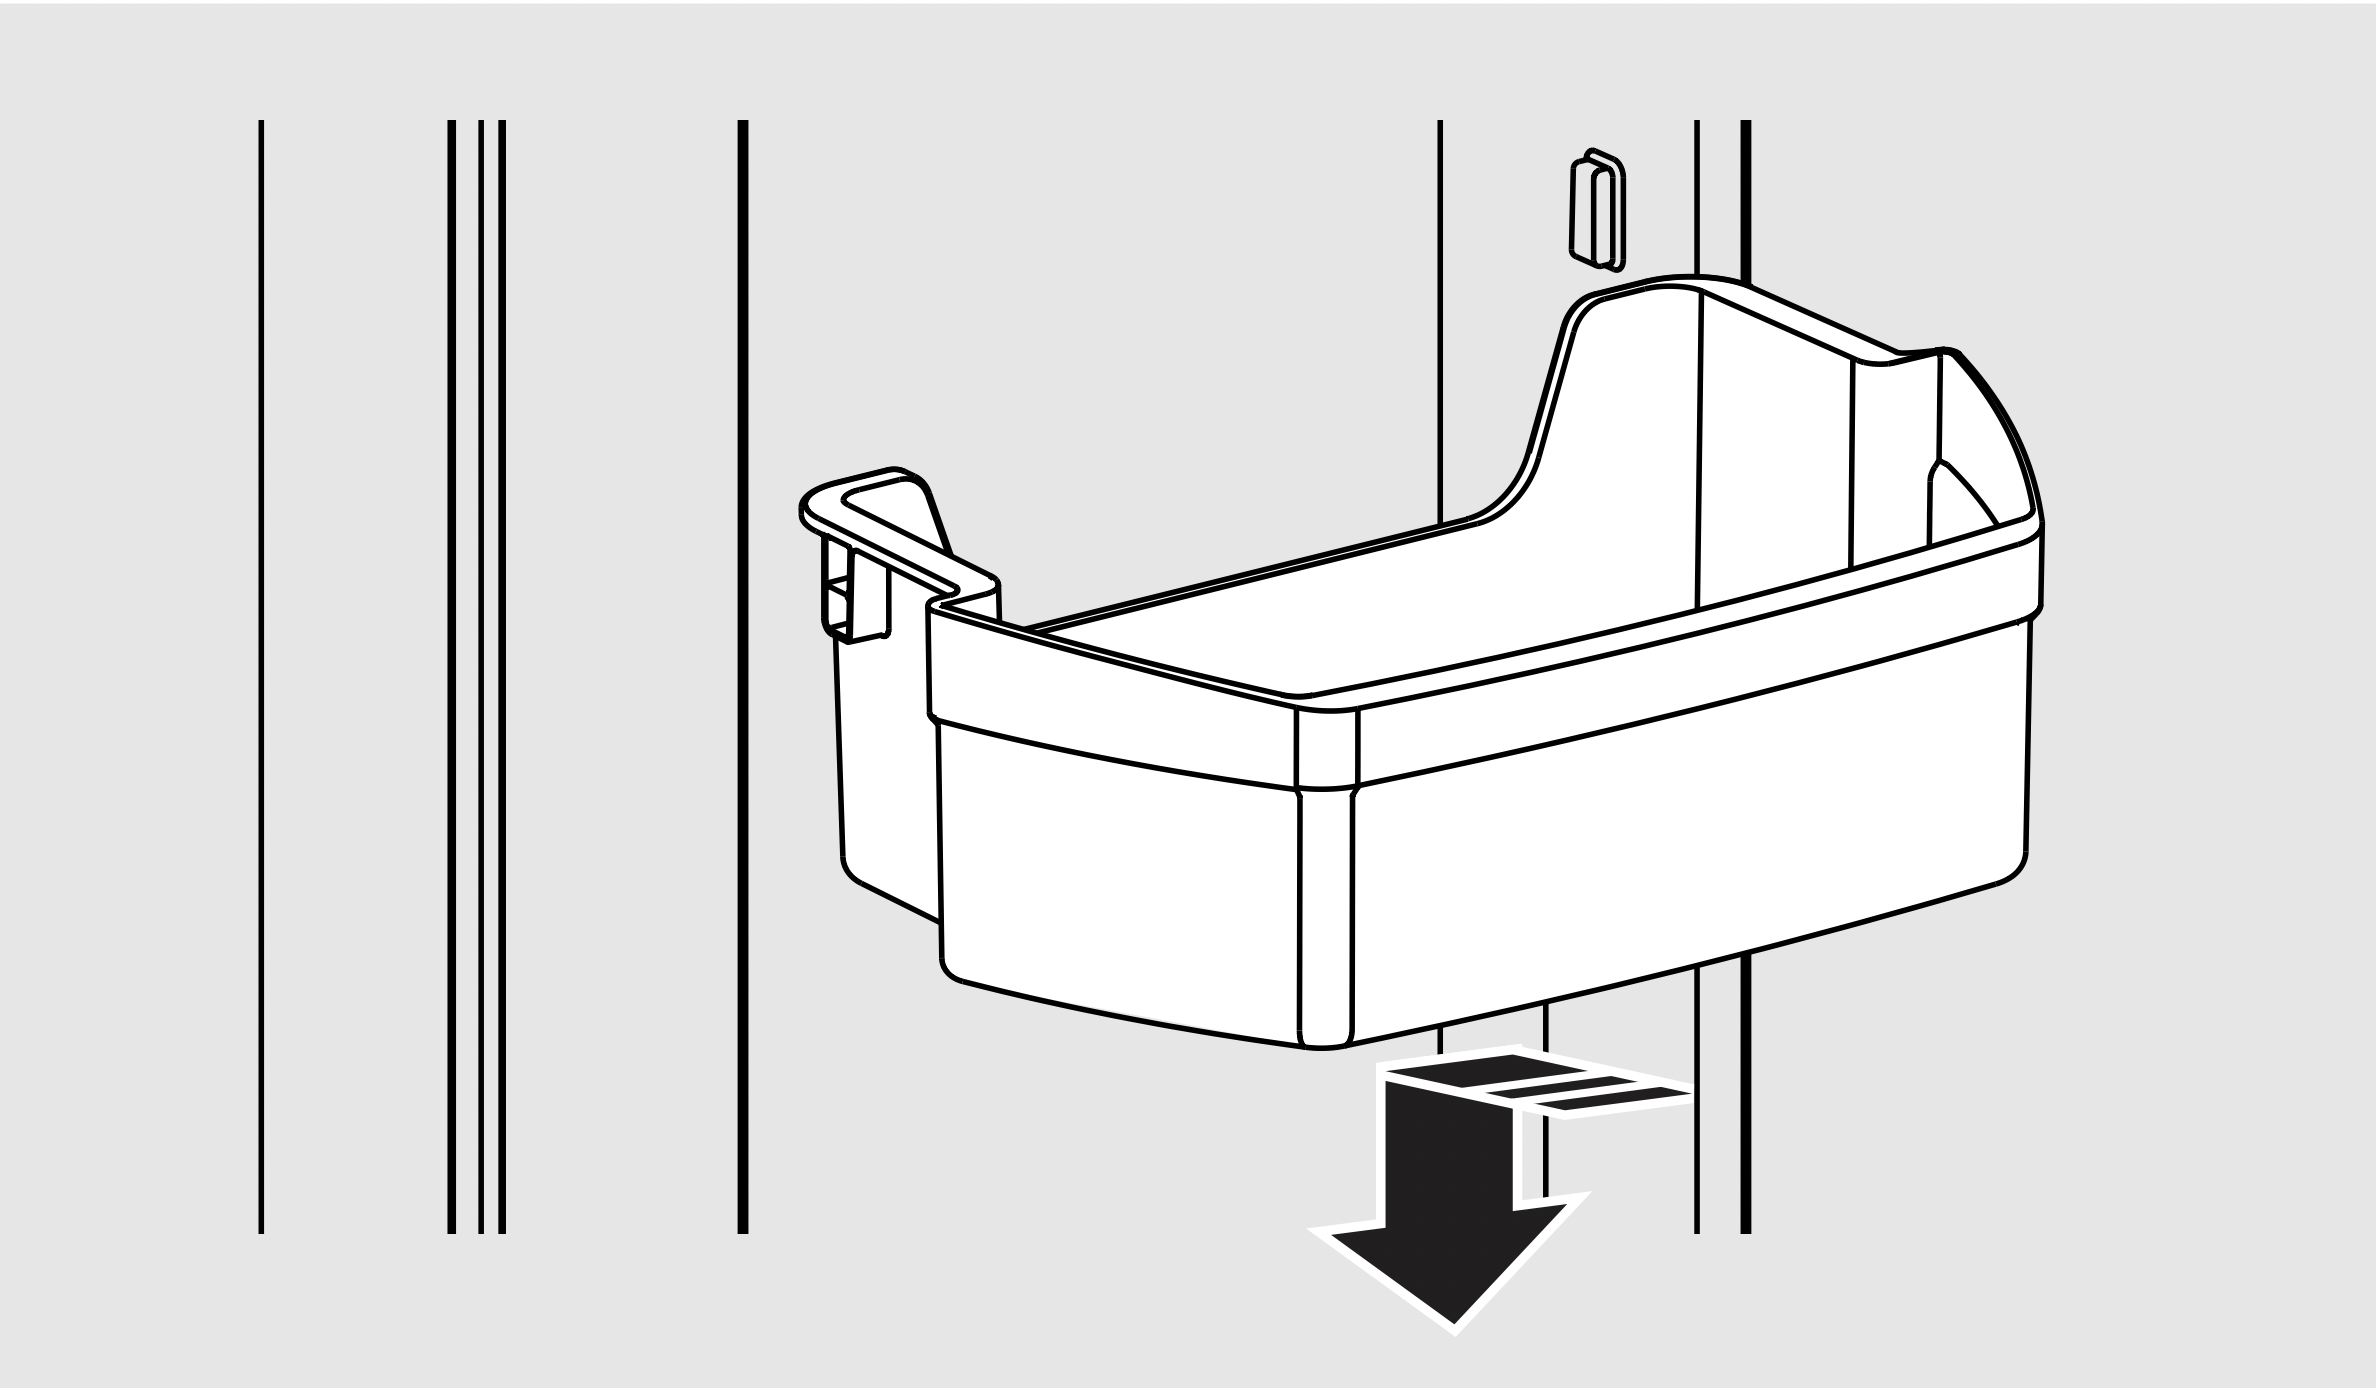
| Baskets stick or jam when opening or closing |
Baskets are too full. |
To open: remove some of the products from the basket when opened as far as possible. Readjust the products left in the basket and try to open the basket again.
To close: readjust products in the basket or remove any product that is above the rim of the basket and close the basket.
|