www.philips.com/support
User manual
Always there to help you
Register your product and get support at
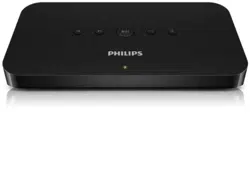
SW100M
Question?
Contact
Philips


1EN
Contents
1 Important 2
Safety 2
Notice 2
2 Your audio adapter 4
Introduction 4
What's in the box 4
What else you need 4
3 Overview of the main unit 5
4 Prepare 6
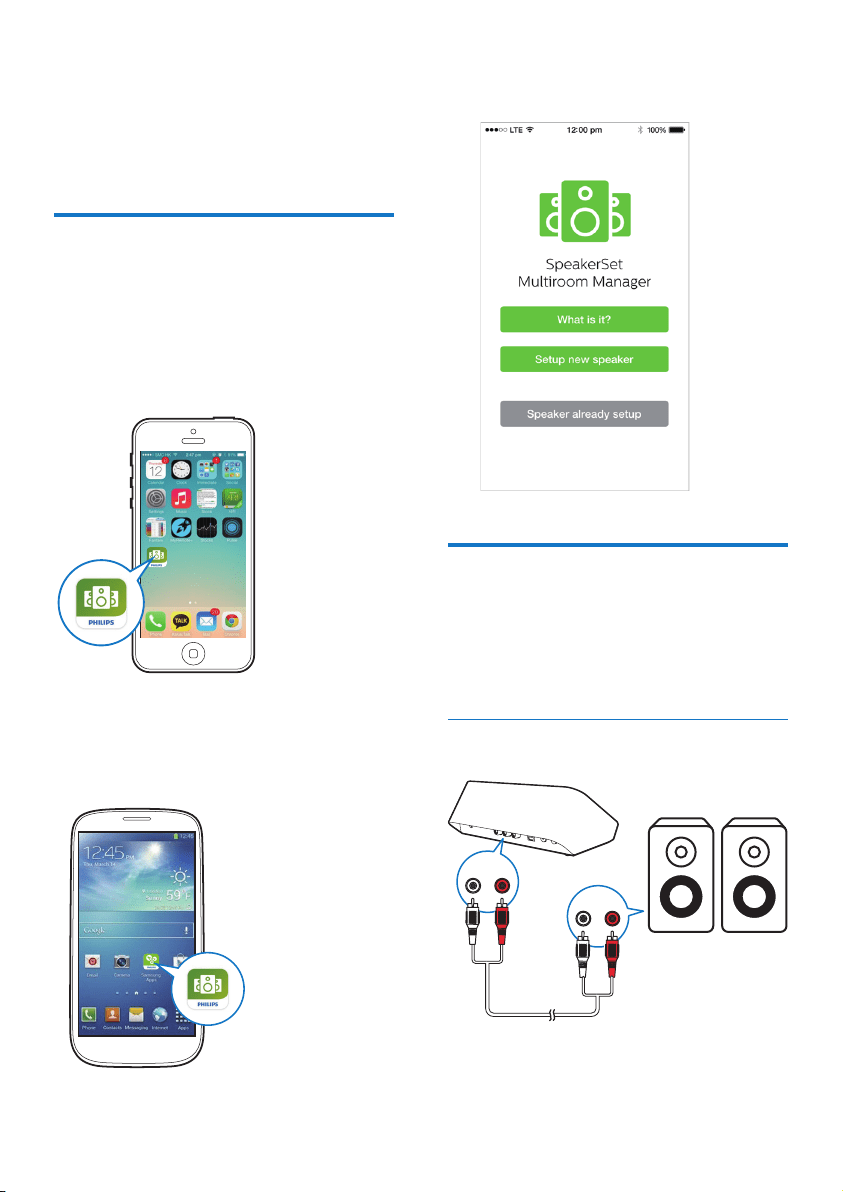
Download SpeakerSet Multiroom
Manager to your iOS or Android device 6
Connect to your audio system 6
Connect power and switch on 7
5 Connect SW100M to your home
Wi-Fi network 8
Option 1: Set up through an iOS device 9
Option 2: Set up through an Android
device 10
Option 3: Set up wireless connection
to a WPS router directly 11
Option 4: Set up through a PC/Mac
(advanced) 12
Rename speakers 12
6 Play 13
Enjoy Spotify music services through
SW100M 13
Stream music to multiple speakers/
audio adapters at the same time 14
7 Other features 18
Restore factory settings 18
Update software 19
8 Product information 20
Specications 20
9 Troubleshooting 21
10 Appendix: Understand meanings
of LED colors 22
Contents

2 EN
1 Important
Safety
• Onlyuseattachments/accessoriesspecied
by the manufacturer.
• Use only power supplies listed in the user
manual.
• The product shall not be exposed to
dripping or splashing.
• Do not place any sources of danger on the
product(e.g.liquidlledobjects,lighted
candles).
• Where the mains plug or an appliance
couplerisusedasthedisconnectdevice,
the disconnect device shall remain readily
operable.
Warning
• Never remove the casing of this apparatus.
• Never lubricate any part of this apparatus.
• Never place this apparatus on other electrical
equipment.
• Keepthisapparatusawayfromdirectsunlight,naked
amesorheat.
• Ensure that you always have easy access to the power
cord,plugoradaptortodisconnectthisapparatusfrom
the power.
Risk of overheating! Never install this
apparatusinaconnedspace.Always
leave a space of at least four inches around
this apparatus for ventilation. Ensure
curtains or other objects never cover
the ventilation slots on this apparatus.
Notice
Hereby,WOOXInnovationsdeclares
that this product is in compliance with
the essential requirements and other
relevant provisions of Directive 1999/5/
EC.YoucanndtheDeclarationof
Conformity on www.philips.com/support.
Anychangesormodicationsmadetothis
device that are not expressly approved by
WOOXInnovationsmayvoidtheuser’s
authority to operate the equipment.
PhilipsandthePhilips’ShieldEmblemare
registered trademarks of Koninklijke Philips N.V.
andareusedbyWOOXInnovationsLimited
under license from Koninklijke Philips N.V.
Specicationsaresubjecttochangewithout
notice.WOOXreservestherighttochange
products at any time without being obliged
to adjust earlier supplies accordingly.
Disposal of your old product
Your product is designed and manufactured
withhighqualitymaterialsandcomponents,
which can be recycled and reused.
This symbol on a product means that the
product is covered by European Directive
2012/19/EU. Inform yourself about the local
separate collection system for electrical and
electronic products. Follow local rules and
never dispose of the product with normal
household waste. Correct disposal of old
products helps prevent negative consequences
for the environment and human health.
Environmental information
All unnecessary packaging has been omitted.
We have tried to make the packaging easy
to separate into three materials: cardboard
(box),polystyrenefoam(buffer)and
polyethylene(bags,protectivefoamsheet.)
3EN
Your system consists of materials which
can be recycled and reused if disassembled
by a specialized company. Please observe
the local regulations regarding the
disposalofpackagingmaterials,exhausted
batteries and old equipment.
Trademark notice
iPad,iPhone,iPod,iPodclassic,iPodnano
andiPodtoucharetrademarksofAppleInc.,
registered in the U.S. and other countries.
LightningisatrademarkofAppleInc.
Android is a trademark of Google Inc. Use of
this trademark is subject to Google permissions.
Class II equipment symbol:
CLASSIIapparatuswithdoubleinsulation,
and no protective earth provided.
Note
• The type plate is located on the bottom of the
apparatus.

4 EN
2 Your audio
adapter
Congratulationsonyourpurchase,and
welcometoPhilips!Tofullybenetfrom
thesupportthatPhilipsoffers,registeryour
product at www.philips.com/welcome.
IfyoucontactPhilips,youwillbeasked
for the model and serial number of
this apparatus. The model number and
serial number are on the bottom of the
apparatus. Write the numbers here:
Model No. __________________________
Serial No. ___________________________
Introduction
After connection of this audio adapter
toyouraudiosystem,youcan:
• stream Spotify music wirelessly via
Spotify Connect with your iOS or
Android device as remote control
• listen to Spotify music everywhere
at your home through group
play (multiple Spotify Multiroom
speakers required)
What's in the box
Check and identify the contents
of your package:
• Audio adapter
• 1 x AC power adapter
• Printed materials
What else you need
To stream Spotify music wirelessly to the
audioadapterthroughWi-Fi,youneed:
• acertiedWi-Firouter
• aniOSorAndroiddevice,such
as an iPod touch/iPhone/iPad or
an Android phone or tablet
• the SpeakerSet and Spotify
(with a premium account) apps
available on Apple App Store
(for iOS devices) or Google Play
Store (for Android devices)
Your audio adapter should be connected
to the same local network as your iOS or
Android device through the Wi-Fi router.
5EN
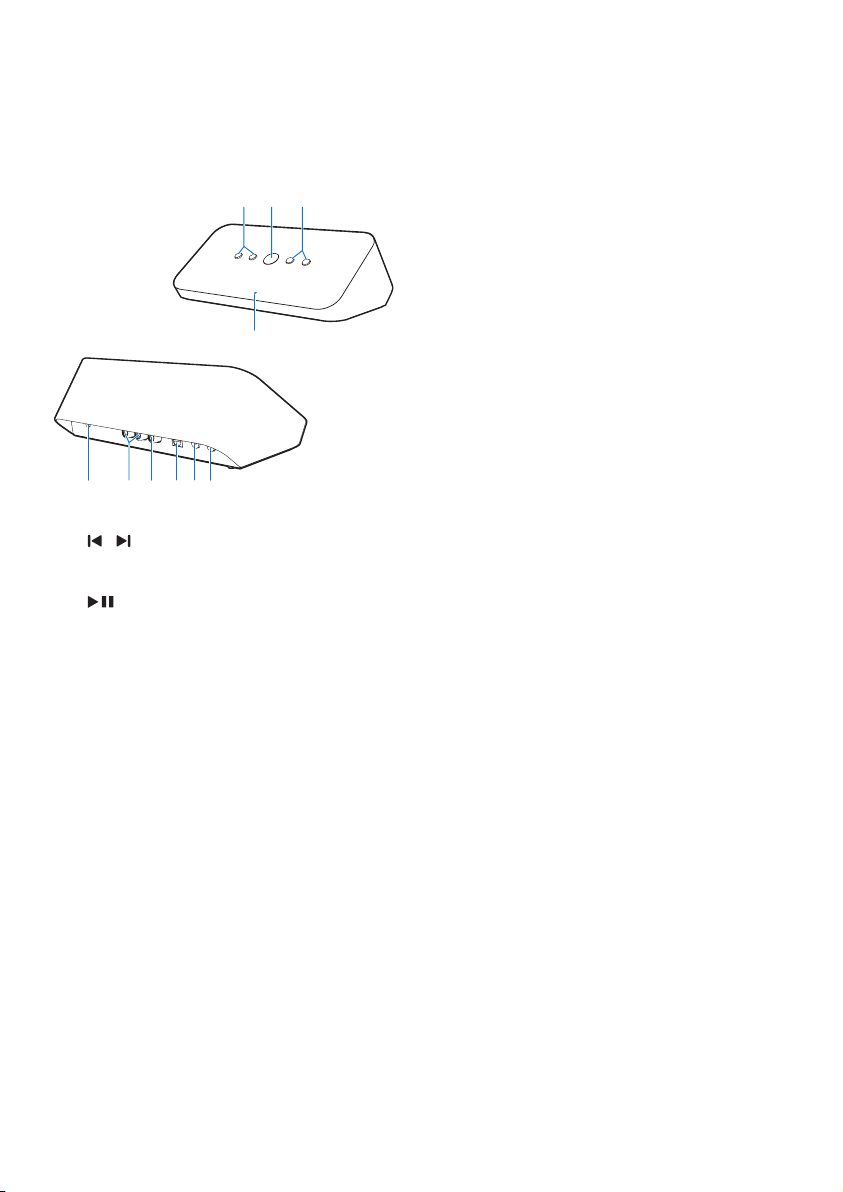
3 Overview of the
main unit
a /
• Skip to the previous/next song.
b
• Start or pause music play.
c -/+
• Adjust volume.
d System status indicator
• Show the current status of the audio
adapter.
e WPS button/indicator
• Enter WPS Setup mode for connection
of the audio adapter to a Wi-Fi
network.
• Show the Wi-Fi setup
status in WPS mode.
f SETUP button/indicator
• Enter App-Assisted Wi-Fi Setup mode
for connection of the audio adapter to
a Wi-Fi network.
• Show the Wi-Fi setup status.
ab c
d
ejihgf
g OPTICAL OUT
• Connect the audio adapter to your
audio system through an optical cable
(not supplied).
h COAX OUT
• Connect the audio adapter to your
audio system through a coaxial cable
(not supplied).
i AUX OUT
• Connect the audio adapter to your
audio system through RCA audio
cables (red/white; not supplied).
j DC IN
• Connect the power adapter.
6 EN
4 Prepare
Always follow the instructions in sequence.
Download SpeakerSet
Multiroom Manager to your
iOS or Android device
1 (For iPod touch/iPhone/iPad users) Install
SpeakerSet from Apple App Store
,and
then run the app.
(For users of Android smartphones or
tablets) Install SpeakerSet from Google
Play Store and then run the app.
2 Ontheinitialsetuppage,tapSetup a new
speaker.
Connect to your audio
system
Toenjoymusic,rstconnectthe
audio adapter to your audio system
in one of the following ways:
Option 1: Connect through AUX
OUT
LR
LR
7EN
Option 2: Connect through
COAXIAL OUT
Note
• Make sure that no cable is plugged in the AUX OUT
sockets.
Option 3: Connect through OPTICAL
OUT
Note
• Make sure that no cable is plugged in the AUX OUT
sockets.
OPTICAL OUT
Connect power and switch
on
Caution
• Risk of product damage! Make sure that the power
supply voltage matches the voltage printed on the
bottom of the audio adapter.
• Risk of electric shock! When you unplug the AC
adapter,alwayspulltheplugfromthesocket.Never
pull the cord.
• BeforeyouconnecttheACadapter,makesurethatyou
have completed all the other connections.
• Asinstructedontheappscreen,connect
the AC power adapter to
• the DC IN socket on the back of the
audio adapter.
• the wall power socket.
» The audio adapter switches on
automatically.
» The system status indicator on the
front panel blinks amber during boot-
up.
» If a Wi-Fi connection has been set
upfortheaudioadapter,thesystem
status indicator turns solid green after
successful connection.
Tip
• The audio adapter enters standby mode automatically
after 15 minutes of inactivity.
8 EN
5 Connect
SW100M to
your home Wi-
Fi network
To connect the audio adapter to your existing
homeWi-Finetwork,youneedtoapplyyour
home Wi-Fi settings to the audio adapter
in one of the following ways (depending on
the type of your smart device and whether
your Wi-Fi router is WPS enabled):
Devices
required
for speaker
setup
Setup method
iOS device
+ Wi-Fi
router
Choose option 1 (see
'Option 1: Set up through
an iOS device' on page 8).
Android
device
+ Wi-Fi
router
Choose option 2 (see
'Option 2: Set up through an
Android device' on page 9).
WPS Wi-Fi
router
Choose option 3 (see
'Option 3: Set up wireless
connection to a WPS router
directly' on page 10).
PC/Mac
with Wi-Fi
enabled
+ Wi-Fi
router
Choose option 4 (see 'Option
4: Set up through a PC/Mac
(advanced)' on page 11).
Before connection of the audio adapter to
yourhomeWi-Finetwork,makesurethat:
a your Wi-Fi router is powered
on and working properly.
b the audio adapter has been powered
on and booted up successfully.
c (for option 1, 2 and 4 only) you
have jotted down the password
of your home Wi-Fi router.
* If your Wi-Fi password contains
such special characters as #/:/;/', you
need to change your password.
Onceconnectedsuccessfully,theaudio
adapter will remember your home Wi-
Fi settings. Whenever the audio adapter
ispoweredon,itisconnectedtoyour
home Wi-Fi network automatically.
9EN
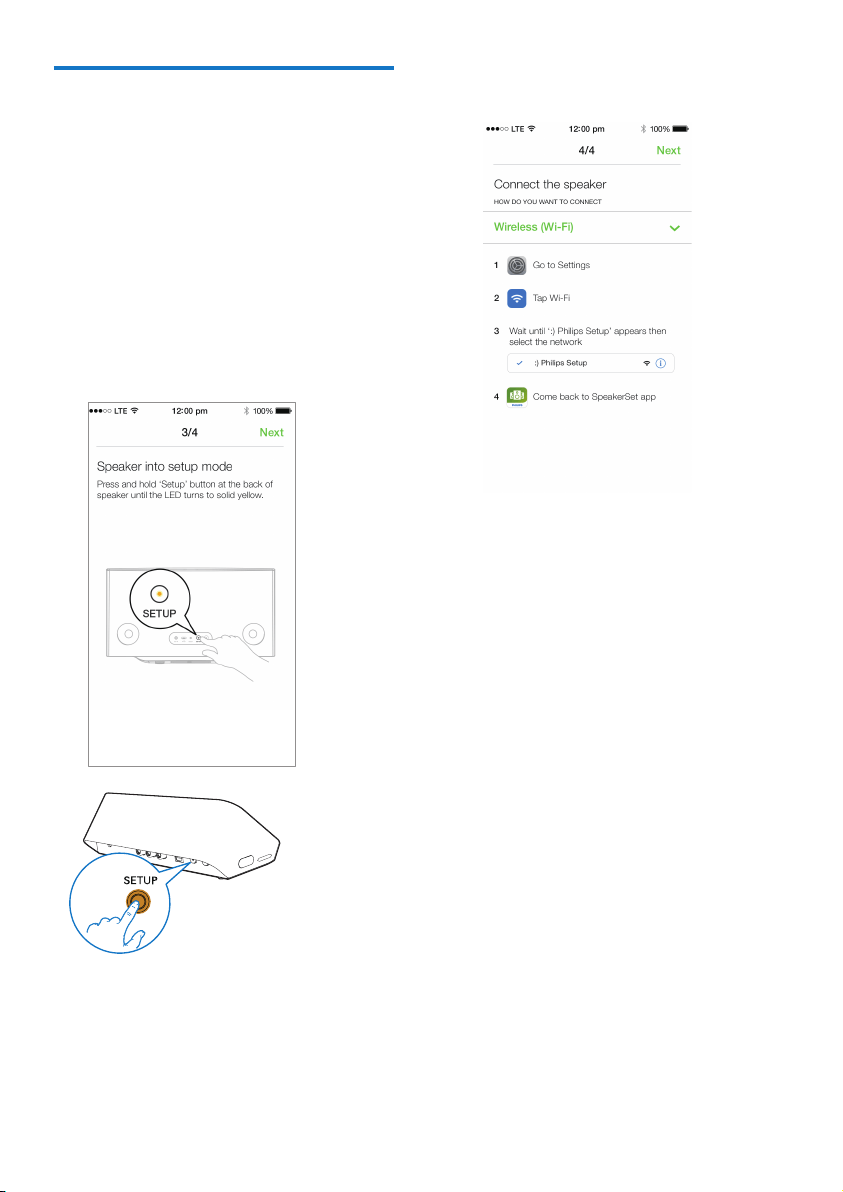
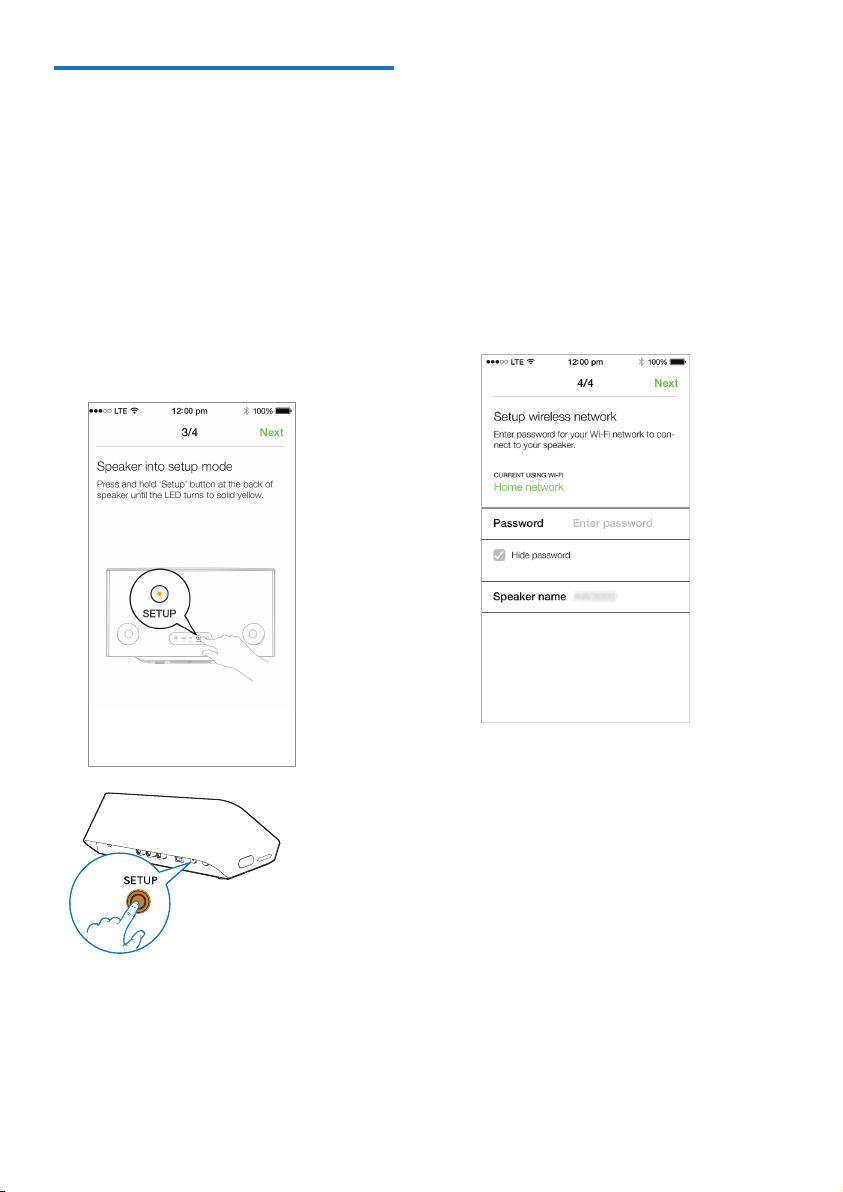
Option 1: Set up through an
iOS device
1 Beforesetup,makesurethatyouriOS
device is connected to your home Wi-Fi
network.
2 Asinstructedontheapp,pressandhold
SETUP on the back of the audio adapter
for more than 3 seconds.
» Both the system status indicator on
the front panel and the Wi-Fi status
indicator on the SETUP button turns
solid amber.
3 Tap Nextontheaboveappscreen,and
then read how to proceed with network
setup.
4 Select Wireless (Wi-Fi) under HOW DO
YOU WANT TO CONNECT?.
5 Asinstructed,exittheapp,andthenselect
:) Philips Setup from the list of available
Wi-Fi networks.
6 After automatic detection of the audio
adaptersuccessfully,opentheSpeakerSet
app again.
7 Select the name of your home Wi-Fi
network under Select a network to use
speaker.
8 Enter the password of your home Wi-Fi
network,andthentapDonetonish
setup.
9 Wait until successful connection of
the audio adapter to your home Wi-Fi
network.
» The Wi-Fi status indicator on the
SETUP button turns off.
» The system status indicator on the
front panel turns solid green.
10 EN
Option 2: Set up through an
Android device
1 Beforesetup,makesurethatyourAndroid
device is connected to your home Wi-Fi
network.
2 Asinstructedontheapp,pressandhold
SETUP on the back of the audio adapter
for more than 3 seconds.
» Both the system status indicator on
the front panel and the Wi-Fi status
indicator on the SETUP button turns
solid amber.
3 Tap Nextontheaboveappscreen,and
then read how to proceed with network
setup.
4 Select Wireless (Wi-Fi) under HOW DO
YOU WANT TO CONNECT?.
5 Select the name of your home Wi-Fi
network under Select a network to use
speaker.
6 Enter the password of your home Wi-Fi
network,andthentapDonetonish
setup.
7 Wait until successful connection of
the audio adapter to your home Wi-Fi
network.
» The Wi-Fi status indicator on the
SETUP button turns off.
» The system status indicator on the
front panel turns solid green.
11EN
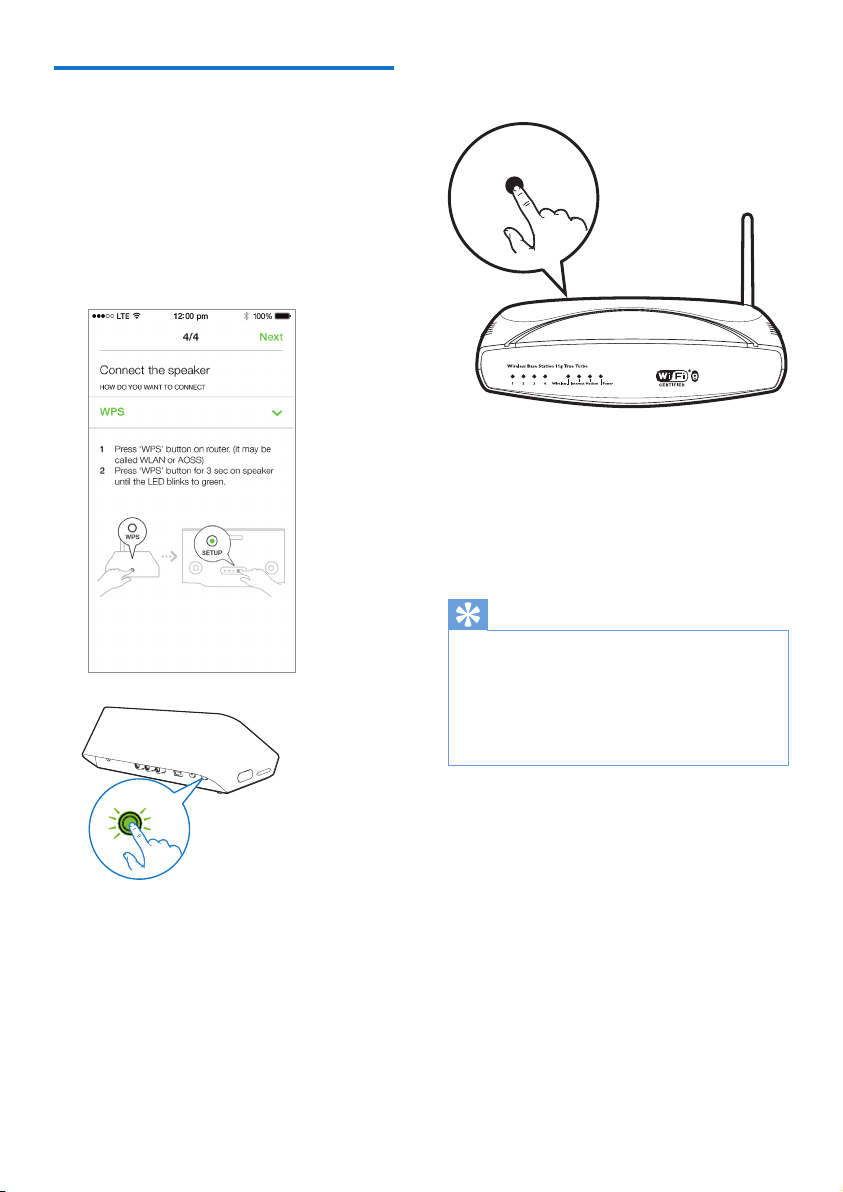
Option 3: Set up wireless
connection to a WPS router
directly
1 Asinstructedontheapp,pressandhold
WPS on the back of the audio adapter for
more than 3 seconds.
» The Wi-Fi status indicator on the WPS
button blinks green.
WPS
2 Press the WPS button on your home
Wi-Fi router.
3 Wait until successful connection of the
speaker to your home Wi-Fi network.
» The Wi-Fi status indicator on the WPS
button turns off.
» The system status indicator on the
front panel turns solid green.
Tip
• Only WPA and WPA2 are supported. If the wireless
securityisWEPornosecurityisapplied,theWPS
method does not work.
• ForsomeWi-Firouters,youmayneedtoholdthe
WPS button for Wi-Fi connection or enable the WPS
PBCfunctionfromtheroutercongurationpages.See
theusermanualsofthespecicroutersfordetails.
WPS
12 EN
Option 4: Set up through a
PC/Mac (advanced)
1 Go to your Wi-Fi enabled PC/Mac.
2 Press and hold SETUP on the back of the
audio adapter for more than 3 seconds.
» Both the system status indicator on
the front panel and the Wi-Fi status
indicator on the SETUP button turns
solid amber.
3 Select :) Philips Setup from the list of
available Wi-Fi networks on your PC/Mac.
4 Aftersuccessfulconnection,openaweb
browser on your PC/Mac.
5 Enter http://philips.speakers or 172.24.0.1
at the address bar and click the Enter key.
6 Make changes on the setup page and
conrmyoursettings.
» The Wi-Fi status indicator on the
SETUP button turns off.
» The system status indicator on the
front panel turns solid green.
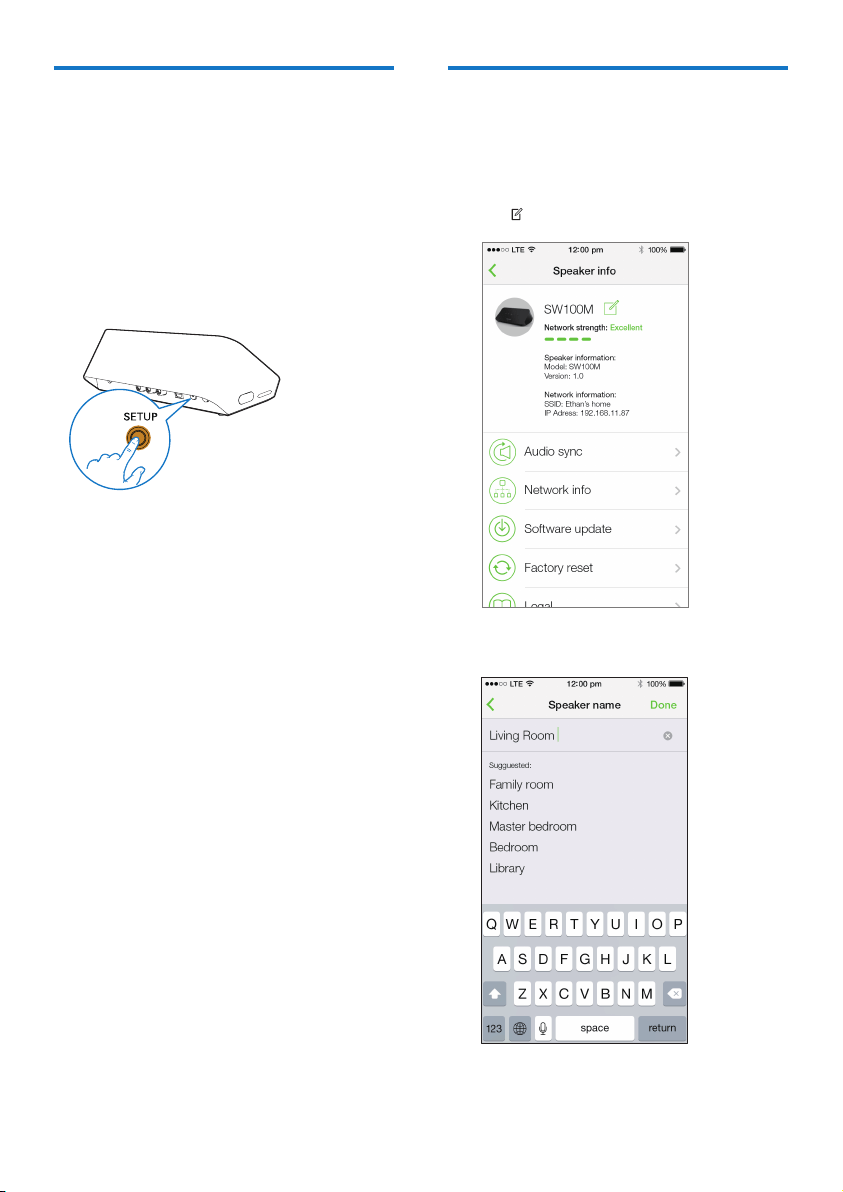
Rename speakers
1 AftersuccessfulWi-Fisetup,gotothe
home page and tap the speaker icon on
the app screen.
2 Tap beside the speaker name.
3 Rename the speaker as you like.
4 Tap Donetoconrm.
13EN
6 Play
Enjoy Spotify music services
through SW100M
Note
• WithSpotify,youcanenjoyunlimitedmusiconyour
newdevice.ThankstotheSpotifyConnectfeature,you
can play and control all this music wirelessly. Choose
musiconyourmobileortablet,andhearitonyour
brand new device.
• Make sure that the audio adapter is connected to your
home Wi-Fi network with Internet connection available.
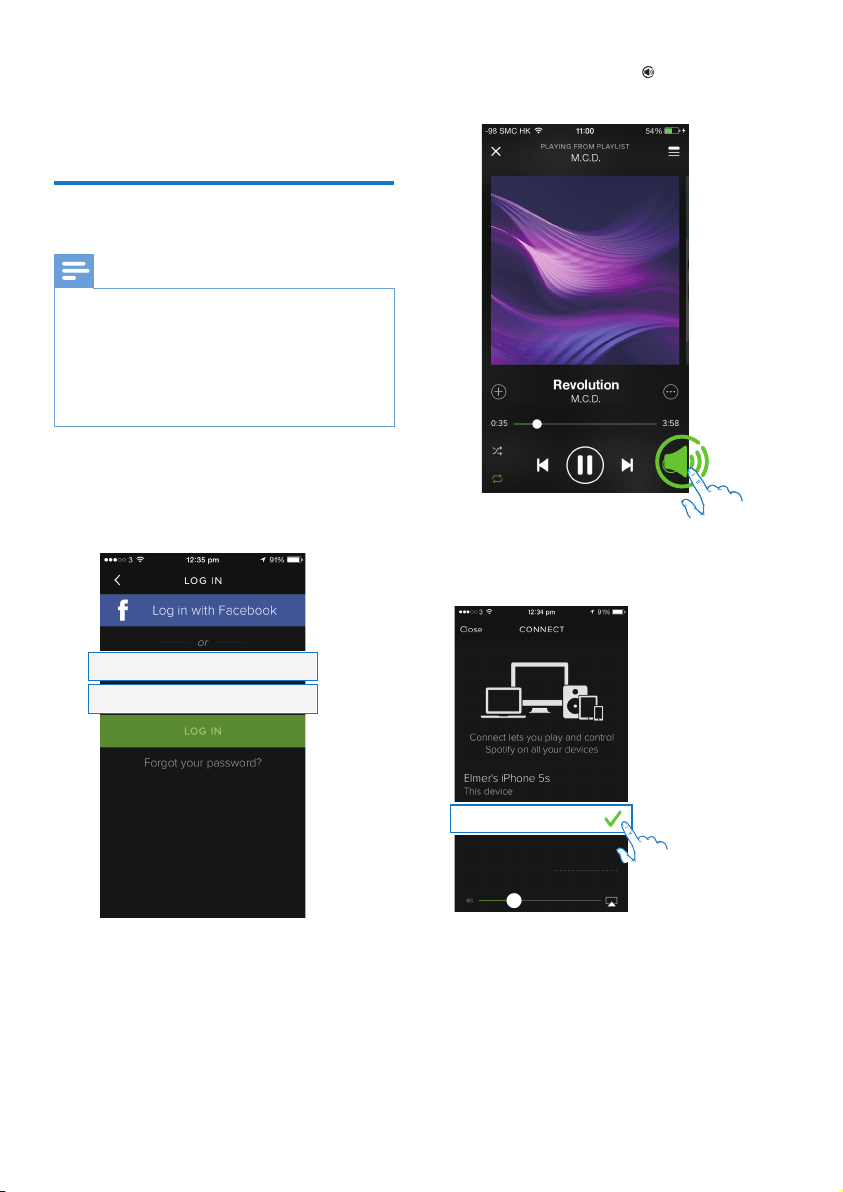
1 Switch to the Spotify app from SpeakerSet
or open the Spotify app directly.
2 LogintoyourSpotifypremiumaccount.
Username
Password
3 Tap the Connect icon on the play
screen.
4 Select the audio adapter for music
streaming.
5 Stream music from the Spotify app to the
audio adapter.
» You can enjoy music through your
audio system connected to the audio
adapter.
Philips SW100M xxxxxx
14 EN
Duringplay,youcan:
• press on the audio adapter to
pause/resume music play.
• press
/ on the audio adapter
to skip to the previous/next song.
• press +/- on the audio adapter
to adjust volume level.
Tip
• See the SpeakerSet app screen for more advanced
settings.
• You can take your iOS or Android device away from
thenetwork,orevenswitchitoff.Inthiscase,Spotify
music will continue to play on your audio adapter.
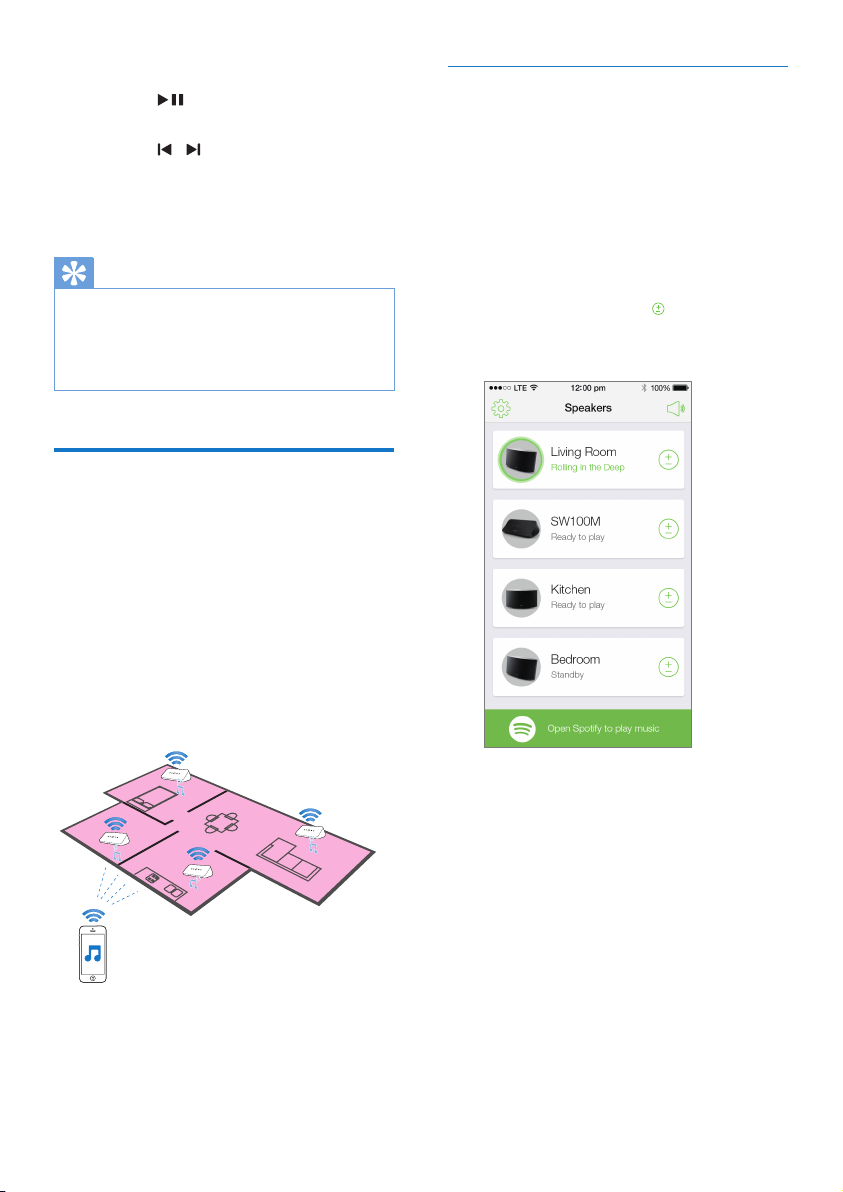
Stream music to multiple
speakers/audio adapters at
the same time
You can add multiple Spotify Multiroom
Speakers/audio adapters connected to the
sameWi-Finetworkintoagroup.Then,
you can stream music from Spotify on your
iOS or Android device in the same Wi-Fi
network to all speakers/audio adapters in
thegroupatthesametime.Inthisway,you
can enjoy music everywhere at your home.
Group and ungroup speakers/audio
adapters
1 Connect multiple Spotify Multiroom
Speakers/audio adapters to your home
Wi-Fi network (see 'Connect SW100M to
your home Wi-Fi network' on page 8).
2 Run SpeakerSet on your iOS/Android
smartphone or tablet.
3 Onthehomepage,tap beside a
speaker/audio adapter to act as the master
speaker of a group.
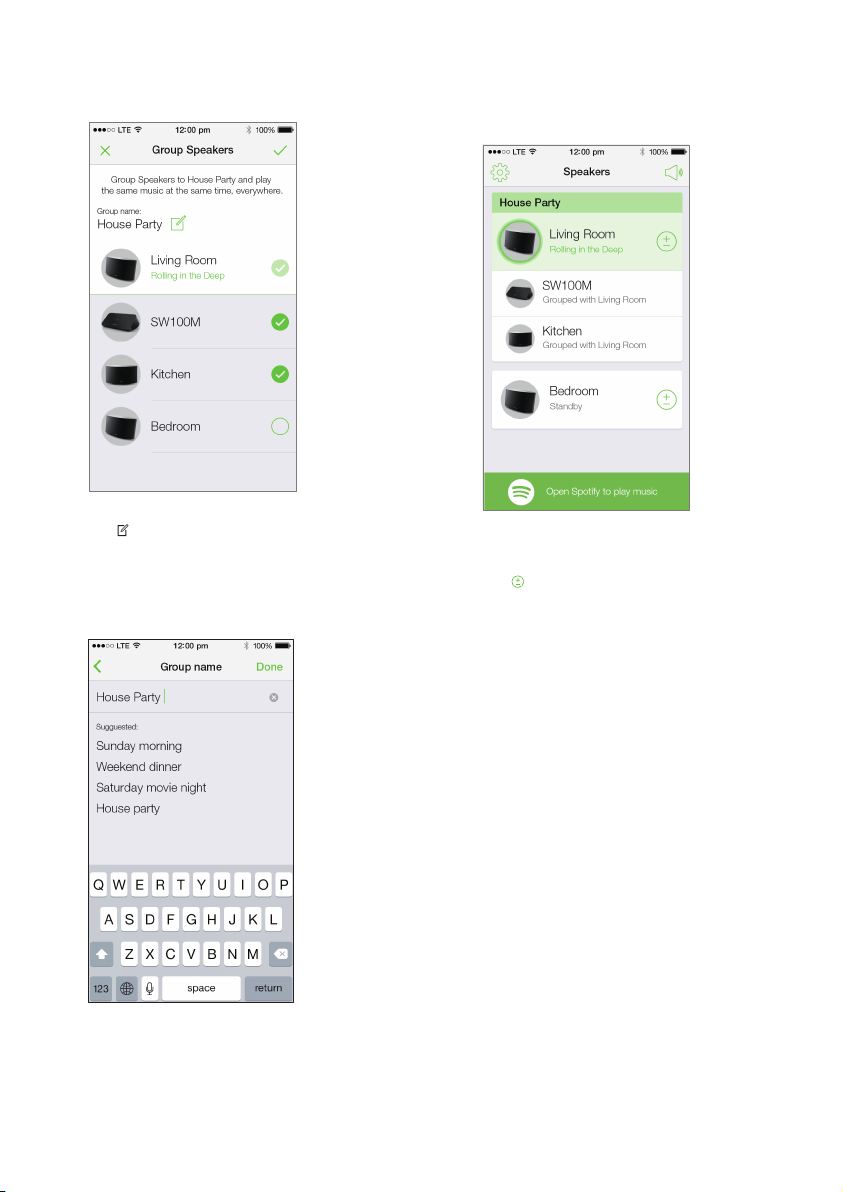
15EN
4 Tick circles beside the speakers/audio
adapters to add them into the group.
5 Tap beside the group name to enter the
edit page.
6 Edit the group name as you like on the edit
page.
7 Tap the check mark at the top right on the
aboveappscreen,andthenwaitformore
than10secondsuntilthegroupingnishes.
To ungroup speakers:
1 Tap beside the master speaker.
2 Untick the box beside the speaker/audio
adapter to be removed from the group.
16 EN
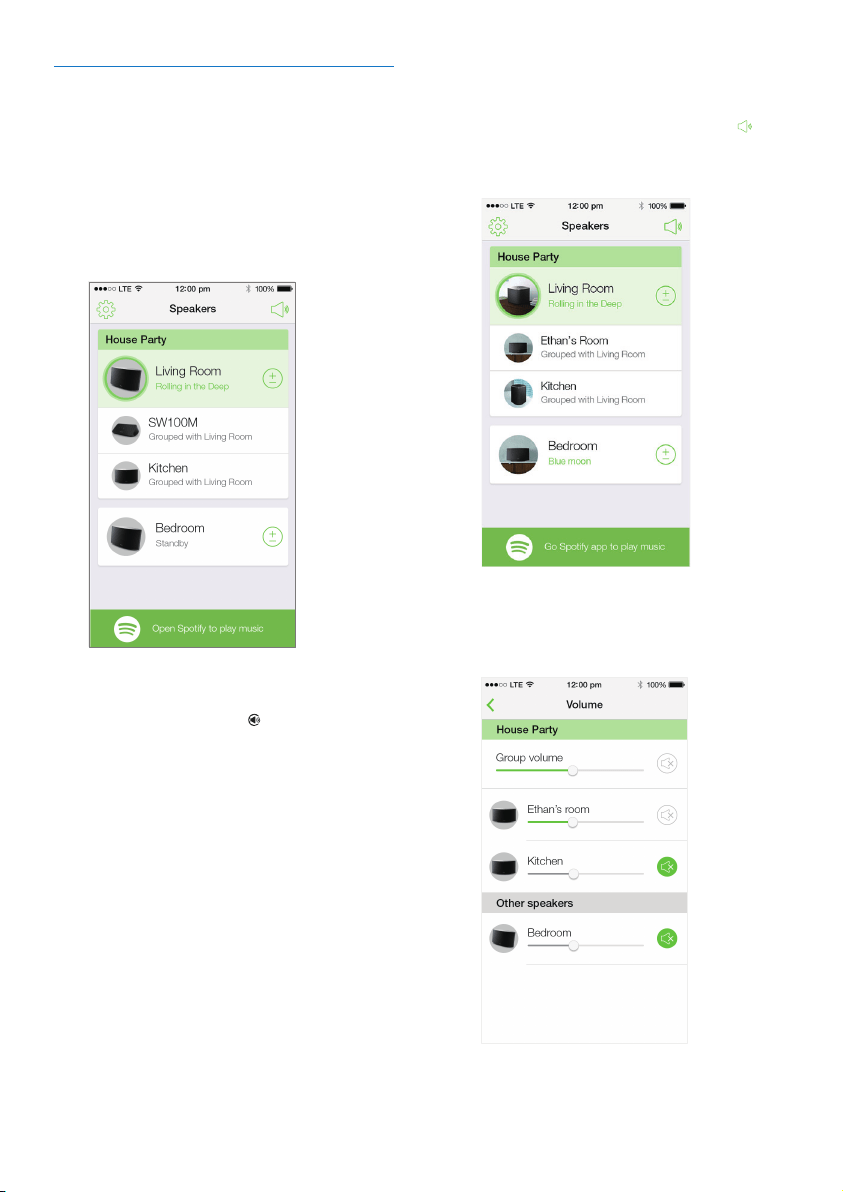
Enjoy music streamed to the group
speakers/audio adapters
1 Onthehomepage,taptheiconofthe
master speaker on the SpeakerSet app
screen.
2 Tap Go Spotify app to play music to
switch to the Spotify app.
3 LogintoyourSpotifypremiumaccount.
4 Tap the Connect icon to select the
master speaker.
5 Select and play your favorite music from
the Spotify app.
» You can enjoy music streamed to all
speakers/audio adapters in the same
group at the same time.
To adjust volume of all speakers/audio
adapters in a group at the same time:
1 Open the SpeakerSetapp,thentap
on the main page to enter the volume
adjustment page.
2 Move the group volume slider to adjust
volume of all speakers/audio adapters in
the group at the same time.
17EN
To adjust volume of an individual
speaker/audio adapter:
• Press +/- on the top panel of the speaker/
audio adapter.
• Open the SpeakerSet
app,thenmovethe
slider beside the speaker/audio adapter on
the above volume adjustment page directly.
To play/pause music play:
• Press
on the top panel of any speaker/
audio adapter in the group or use controls
on the Spotify app screen directly.
Tip
• On the volume adjustment page of the SpeakerSet app,
you can also tap beside a speaker/audio adapter to
mute/unmute its volume output.
• More music controls and sound settings are available
on the SpeakerSet
appscreen,suchasbass/treble
adjustment.
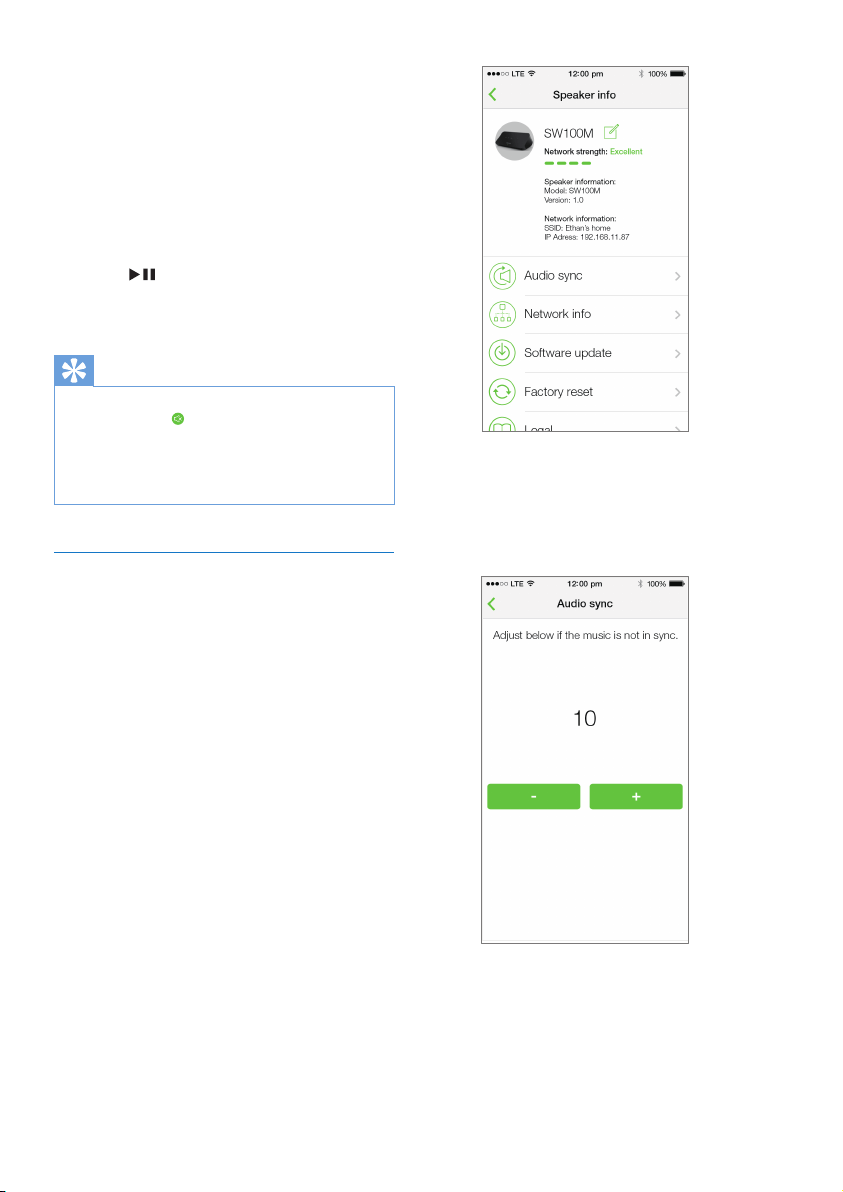
Adjust audio delay
Duringgroupplay,iftheaudiooutputfrom
your audio system connected to the audio
adapter is not synchronized with that from
theotherspeakersinthegroup,youcan
adjust the delay time for the audio adapter
to synchronize with the other speakers.
1 Open the SpeakerSetapp,thentapthe
image of the audio adapter on the main
page to see the available options.
2 Tap Audio sync to enter the audio
synchronization page.
3 Adjust the audio delay time until the sound
output is synchronized.
18 EN
7 Other features
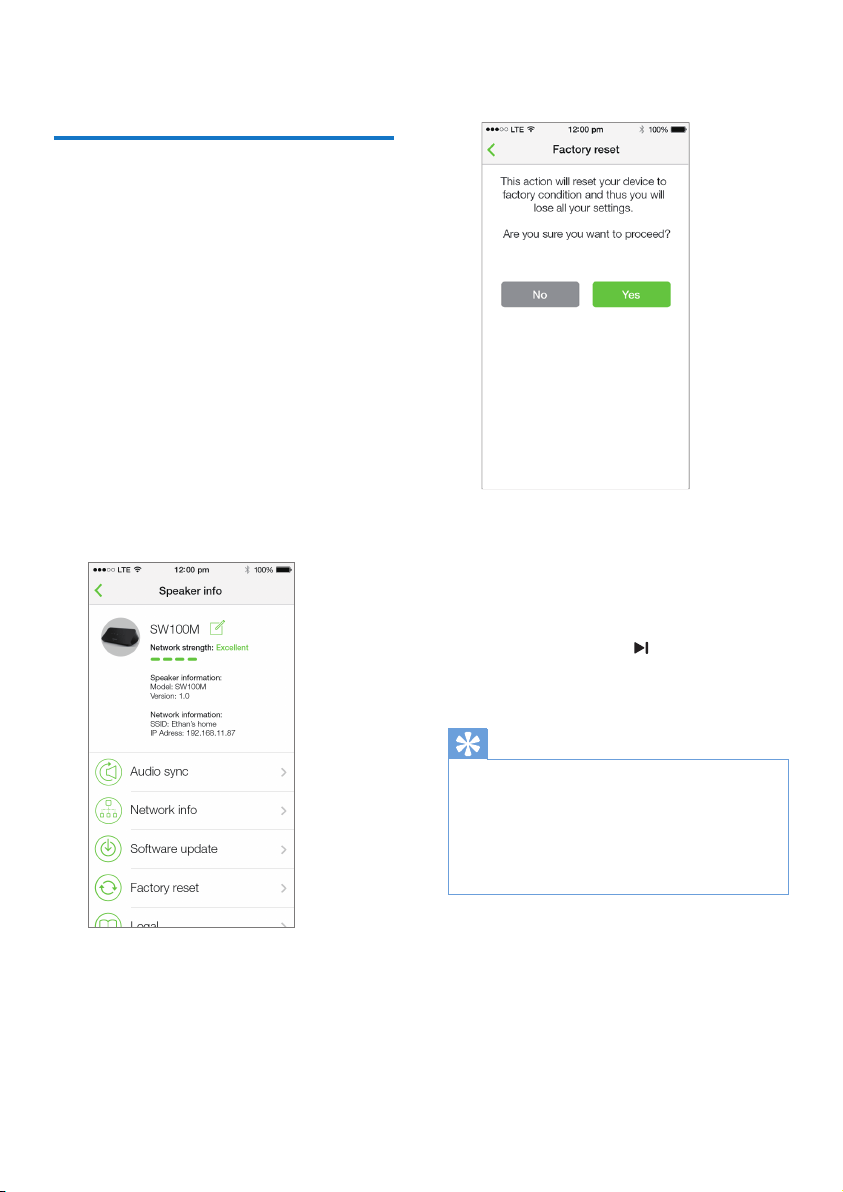
Restore factory settings
Insomecases,youmayneedtoresetthe
audioadapter,forexample,whenyouneed
to reset the Wi-Fi settings or log out from
the current Spotify premium account.
1 Make sure that the audio adapter is
powered on and connected to the same
Wi-Fi network as your smartphone or
tablet.
2 Make sure that your home Wi-Fi network
is connected to the Internet.
3 Run SpeakerSet on your iOS or Android
smartphone or tablet.
4 Tap the image of the audio adapter to see
the available options.
5 Tap Factory reset to enter the factory
reset page.
6 Tap Ye s to reset your audio adapter.
Iftheaboveoperationfails,youcanreset
the audio adapter in the following way:
1 Unplug the power cable.
2 Hold both the + and keys on the top
panel and then plug in the power cable
again.
Tip
• The audio adapter reboots after factory reset.
• Your Spotify account will be logged out after factory
reset.
• Iftheresetaudioadapterisrunninginagroup,itwillbe
ungrouped.Whenthemasterspeakerisreset,oneof
the other speakers in the group will serve as the master
speaker instead.
19EN
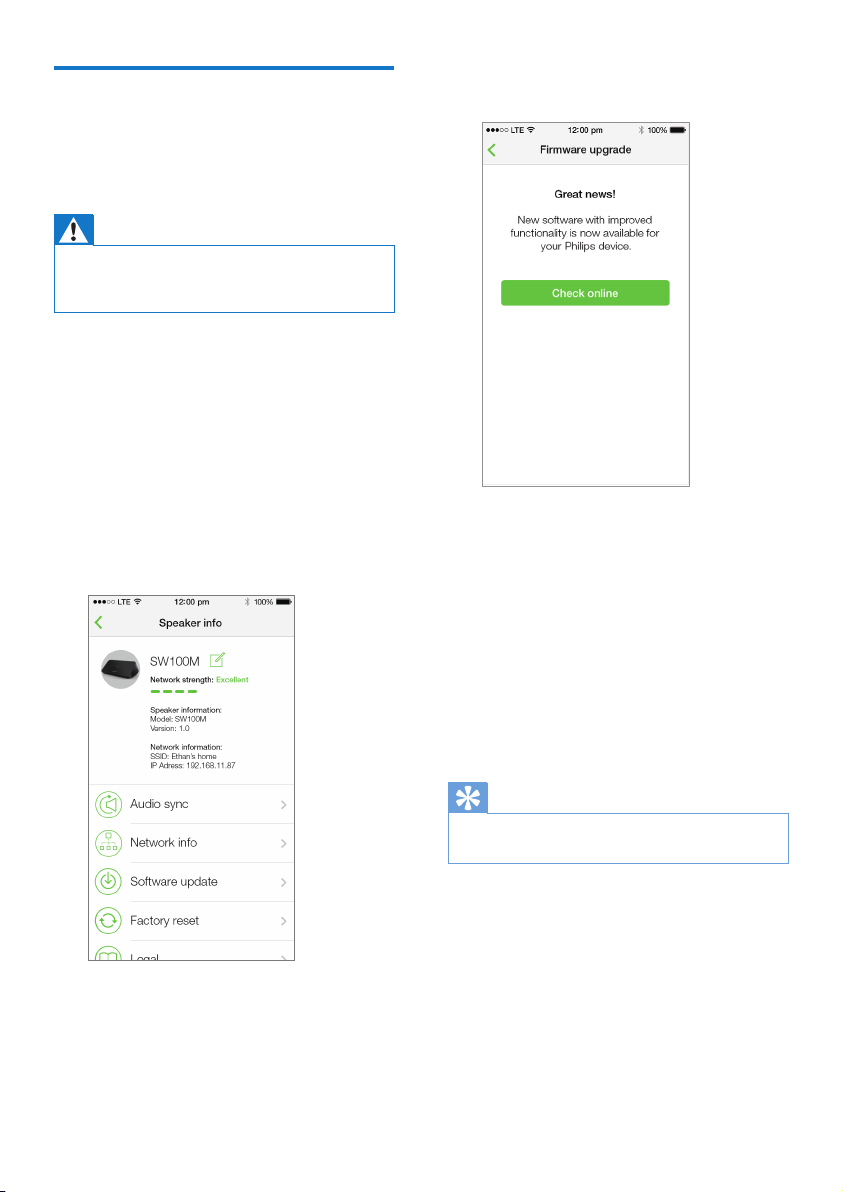
Update software
Toimproveproductperformance,
Philips may offer you new software for
you to update your audio adapter.
Warning
• Always connect your audio adapter to AC power for
rmwareupgrade.Neverpoweroffyouraudioadapter
norclosetheappduringrmwareupgrade.
1 Make sure that audio adapter is powered
on and connected to the same Wi-Fi
network as your smartphone or tablet.
2 Make sure that your home Wi-Fi network
is connected to the Internet.
3 Run SpeakerSet on your iOS or Android
smartphone or tablet.
4 Tap the image of the audio adapter to see
the available options.
5 Tap Software update to enter the software
update page.
6 Tap Check online to see whether any new
version of software is available.
7 Ifanewversionisavailable,tapUpdate to
start software update.
» The system status indicator on the
front panel blinks amber and red
alternately during this process.
8 Wait until the software update process
nishes,thentapOK to reboot the audio
adapter.
Tip
• Dependingonthenetworkconnection,itmaytake10
minutestonishupdate.
20 EN
8 Product
information
Note
• Product information is subject to change without prior
notice.
Specications
Audio output
Output Voltage 1000 mV RMS
Signal to Noise Ratio > 62 dBA
Total Harmonic Distortion < 2%
Wireless
Wireless
standard
802.11b/g/n
Wireless
security
WEP,10or26hexdigitkeys
WPA (TKIP) or WPA2 (TKIP /
AES) with 8 - 40 ASCII printable
characters passphrase
Frequency
range
2412 - 2462 MHz (CH1-
CH11)(for/37,/55)
2412 - 2472 MHz (CH1-CH13)
(for/12,/10,/05,/79,/98)
WPS
PBC (one
button
push)
Ye s
General information
AC power
PHILIPS
SWITCHING
POWERSUPPLY
Model:
S018KM0500200;
input: 100 - 240
V~,50/60Hz500
mA; output: 5.0
V
2000 mA
Operation Power
Consumption
< 10 W
Power Consumption
in Network Standby
< 2 W
Dimensions
-MainUnit(LxWxH) 179 x 105 x 66 mm
Weight
- Main Unit 0.4 kg

21EN
9 Troubleshooting
Warning
• Never remove the casing of this apparatus.
Tokeepthewarrantyvalid,nevertry
to repair the system yourself.
If you encounter problems when using this
apparatus,checkthefollowingpointsbefore
requesting service. If the problem remains
unsolved,gotothePhilipswebsite(www.
philips.com/welcome).WhenyoucontactPhilips,
ensure that the apparatus is nearby and the
model number and serial number are available.
No power
• Make sure that the AC power plug of the
audio adapter is connected properly.
• Make sure that there is power at the AC
outlet.
• Check whether the audio adapter is in
standby mode (see 'Connect power and
switch on' on page 7).
No sound
• Check whether the audio adapter is
correctly connected to your audio system.
• Check whether your audio system is
powered on.
• Check whether the audio adapter is muted
or the streamed music is still buffering. The
system status indicator blinks green when
the audio adapter is muted or during music
buffering.Iftheaudioadapterismuted,
adjust volume on the SpeakerSet app or
on the audio adapter directly.
• Check the Wi-Fi network connection.
Set up the network again if needed (see
'Connect SW100M to your home Wi-Fi
network' on page 8).
• If there is no sound from a speaker in a
group,checkwhetherthespeakerisoutof
range. You can check whether the wireless
connection of the speaker is poor on the
app screen directly.
No response from the speaker
• Restarttheaudioadapter,andthen
set up the Wi-Fi network for the audio
adapter again (see 'Connect SW100M to
your home Wi-Fi network' on page 8).
• Disconnect and reconnect the AC power
plug to switch on the speaker again.
• If there is no sound from a speaker in a
group,checkwhetherthespeakerisoutof
range. You can check whether the wireless
connection of the speaker is poor on the
app screen directly.
How can I recongure the Wi-Fi settings?
• Reset the speaker (see 'Restore
factory settings' on page 18
),and
then conguretheWi-Fisettingsagain
(see 'Connect SW100M to your
home Wi-Fi network' on page 8).
Occasional breaking of music streaming
Do one or all of the following:
• Move SW100M closer to your Wi-Fi router.
• Remove any obstacles between SW100M
and your Wi-Fi router.
• Avoid using Wi-Fi channel which is
overlapped by the nearby Wi-Fi network.
• Check if your network speed is fast enough
(in cases where multiple devices share the
samerouter,thewirelessperformancemay
be affected). Turn off the other devices
connected to your home router.
• Enable the Quality of Service (QoS)
option (if available on the Wi-Fi router).
• Turn off other Wi-Fi routers.
No response from the audio adapter
• Restarttheaudioadapter,andthen
set up the Wi-Fi network for the audio
adapter again (see 'Connect SW100M to
your home Wi-Fi network' on page 8).
• Disconnect and reconnect the AC power
plug to switch on the audio adapter again.
• If there is no sound from a speaker in a
group,checkwhetherthespeakerisoutof
range. You can check whether the wireless
connection of the speaker is poor on the
app screen directly.
22 EN
10 Appendix:
Understand
meanings of
LED colors
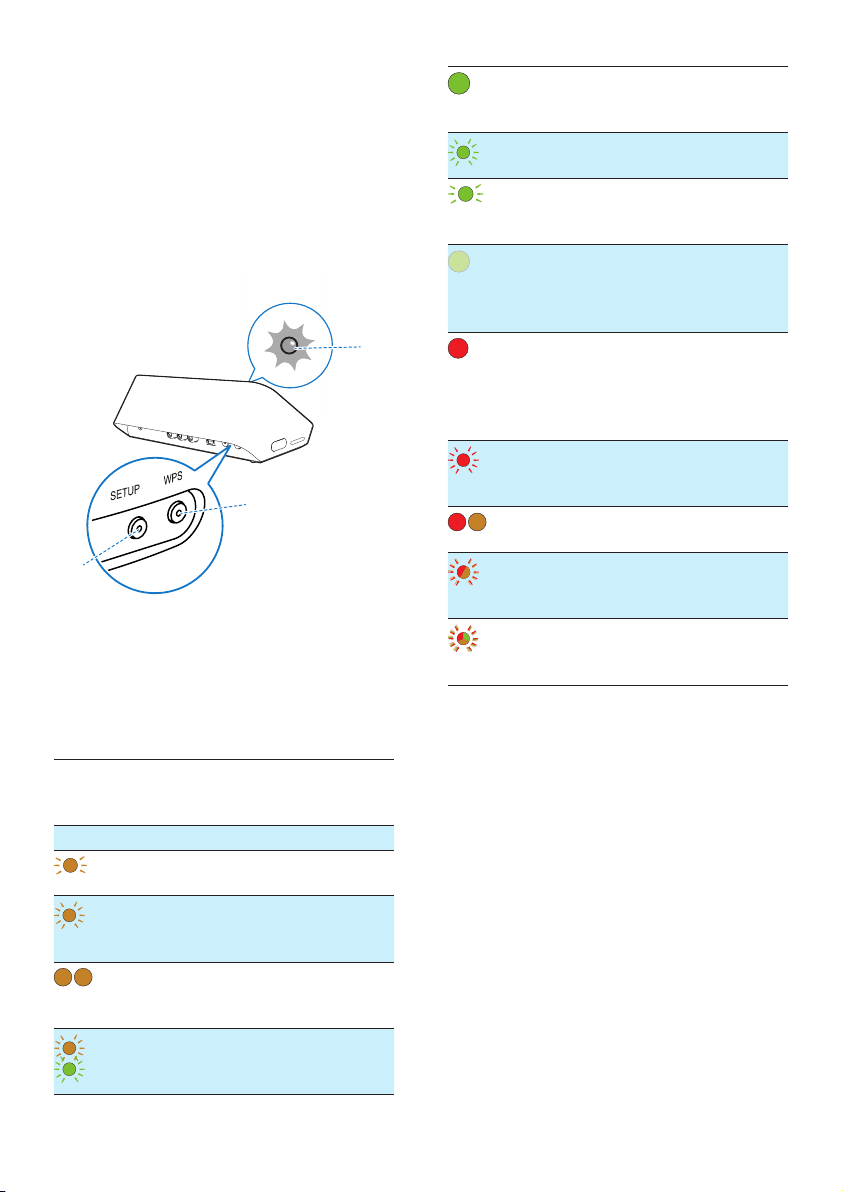
a System status indicator
(on the front panel)
b SETUP indicator (on the back panel)
c WPS indicator (on the back panel)
LED
colors
LED behavior Status of
the audio
adapter
No light Power off
1
1 blinking amber
slowly
Booting up
1
1 blinking amber
quickly
Connecting
to a
network
1 2
1 and 2 indicators
in solid amber
In app-
assisted Wi-Fi
setup mode
1
1
1 blinking amber
quickly,and3
blinking green
In WPS
mode
a
c
b
1
1 solid green Network
connection
successful
1
1 blinking green
quickly
During audio
buffering
1
1 blinking green
slowly
Muted or
playback
paused
1
1 dimmed by 50%
in solid green
In standby
mode with
network
connection
1
1 solid red In standby
mode
without
network
connection
1
1 blinking red Network
connection
failed
1 2
1solidred,and
2 solid amber
During
factory reset
1
1 blinking red
and amber
During
rmware
upgrade
1
1
1blinkingred,
amber and green
alternately
Firmware
upgrade
failed

Open Source Declaration for Philips
SW700M/SW750M/SW100M
ALAC
FLAC
Iperf
jQuery
JSBN 1.2
Jungo USB DFU Driver
Marvell WPS2 Client
mDNSResponder
OpenSSL
RSA MD5
zlib
getopt
Mongoose
Tremor
ALAC
http://alac.macosforge.org/
The Apple Lossless Audio Codec sources are available under the Apache license. Details can be
found here http://www.apache.org/licenses/LICENSE-2.0.
FLAC
https://xiph.org/flac/license.html
The FLAC and Ogg FLAC formats themselves, and their specifications, are fully open to the
public to be used for any purpose (the FLAC project reserves the right to set the FLAC
specification and certify compliance). They are free for commercial or noncommercial use. That
means that commercial developers may independently write FLAC or Ogg FLAC software which
is compatible with the specifications for no charge and without restrictions of any kind. There
are no licensing fees or royalties of any kind for use of the formats or their specifications, or for
distributing, selling, or streaming media in the FLAC or Ogg FLAC formats.
The FLAC project also makes available software that implements the formats, which is
distributed according to Open Source licenses as follows:

The reference implementation libraries are licensed under the New BSD License. In simple
terms, these libraries may be used by any application, Open or proprietary, linked or
incorporated in whole, so long as acknowledgement is made to Xiph.org Foundation when
using the source code in whole or in derived works. The Xiph License is free enough that the
libraries have been used in commercial products to implement FLAC, including in the firmware
of hardware devices where other Open Source licenses can be problematic. In the source code
these libraries are called libFLAC and libFLAC++.
The rest of the software that the FLAC project provides is licensed under the GNU General
Public License (GPL). This software includes various utilities for converting files to and from
FLAC format, plugins for audio players, et cetera. In general, the GPL allows redistribution as
long as derived works are also made available in source code form according to compatible
terms.
Neither the FLAC nor Ogg FLAC formats nor any of the implemented encoding/decoding
methods are covered by any known patent.
FLAC is one of a family of codecs of the Xiph.org Foundation, all created according to the same
free ideals. For some other codecs' descriptions of the Xiph License see
the Speex and Vorbis license pages.
Iperf
http://pirlwww.lpl.arizona.edu/resources/guide/software/iperf/
Copyright 1999,2000,2001,2002,2003
The Board of Trustees of the University of Illinois
All rights reserved
Permission is hereby granted, free of charge, to any person obtaining a copy of this software
(Iperf) and associated documentation files (the "Software"), to deal in the Software without
restriction, including without limitation the rights to use, copy, modify, merge, publish,
distribute, sublicense, and/or sell copies of the Software, and to permit persons to whom the
Software is furnished to do so, subject to the following conditions:
Redistributions of source code must retain the above copyright notice, this list of
conditions and the following disclaimers.
Redistributions in binary form must reproduce the above copyright notice, this list of
conditions and the following disclaimers in the documentation and/or other materials
provided with the distribution.

Neither the names of the University of Illinois, NCSA, nor the names of its contributors
may be used to endorse or promote products derived from this Software without
specific prior written permission.
THE SOFTWARE IS PROVIDED "AS IS", WITHOUT WARRANTY OF ANY KIND, EXPRESS OR IMPLIED,
INCLUDING BUT NOT LIMITED TO THE WARRANTIES OF MERCHANTABILITY, FITNESS FOR A
PARTICULAR PURPOSE AND NONINFRINGEMENT. IN NO EVENT SHALL THE CONTIBUTORS OR
COPYRIGHT HOLDERS BE LIABLE FOR ANY CLAIM, DAMAGES OR OTHER LIABILITY, WHETHER IN
AN ACTION OF CONTRACT, TORT OR OTHERWISE, ARISING FROM, OUT OF OR IN CONNECTION
WITH THE SOFTWARE OR THE USE OR OTHER DEALINGS IN THE SOFTWARE.
See UI License for complete details.
jQuery
http://jquery.org
jQuery projects are released under the terms of the MIT license.
The MIT License is simple and easy to understand and it places almost no restrictions on what
you can do with a jQuery project.
You are free to use any jQuery project in any other project (even commercial projects) as long
as the copyright header is left intact.
JSBN
jsbn is released under a BSD license. See LICENSE for details.
Licensing
---------
This software is covered under the following copyright:
/*
* Copyright (c) 2003-2005 Tom Wu
* All Rights Reserved.
*
* Permission is hereby granted, free of charge, to any person obtaining
* a copy of this software and associated documentation files (the
* "Software"), to deal in the Software without restriction, including

* without limitation the rights to use, copy, modify, merge, publish,
* distribute, sublicense, and/or sell copies of the Software, and to
* permit persons to whom the Software is furnished to do so, subject to
* the following conditions:
*
* The above copyright notice and this permission notice shall be
* included in all copies or substantial portions of the Software.
*
* THE SOFTWARE IS PROVIDED "AS-IS" AND WITHOUT WARRANTY OF ANY KIND,
* EXPRESS, IMPLIED OR OTHERWISE, INCLUDING WITHOUT LIMITATION, ANY
* WARRANTY OF MERCHANTABILITY OR FITNESS FOR A PARTICULAR PURPOSE.
*
* IN NO EVENT SHALL TOM WU BE LIABLE FOR ANY SPECIAL, INCIDENTAL,
* INDIRECT OR CONSEQUENTIAL DAMAGES OF ANY KIND, OR ANY DAMAGES WHATSOEVER
* RESULTING FROM LOSS OF USE, DATA OR PROFITS, WHETHER OR NOT ADVISED OF
* THE POSSIBILITY OF DAMAGE, AND ON ANY THEORY OF LIABILITY, ARISING OUT
* OF OR IN CONNECTION WITH THE USE OR PERFORMANCE OF THIS SOFTWARE.
*
* In addition, the following condition applies:
*
* All redistributions must retain an intact copy of this copyright notice
* and disclaimer.
*/
Address all questions regarding this license to:
Tom Wu
Jungo USB DFU Driver
http://www.jungo.com/st/products/drivercore-advanced-usb-drivers/
BSD license
Marvell WPS2 client
http://www.marvell.com/
BSD license
mDNSResponder

http://www.opensource.apple.com/source/mDNSResponder/mDNSResponder-320.10.80/
The majority of the source code in the mDNSResponder project is licensed
under the terms of the Apache License, Version 2.0, available from:
<http://www.apache.org/licenses/LICENSE-2.0>
To accommodate license compatibility with the widest possible range
of client code licenses, the shared library code, which is linked
at runtime into the same address space as the client using it, is
licensed under the terms of the "Three-Clause BSD License".
The Linux Name Service Switch code, contributed by National ICT
Australia Ltd (NICTA) is licensed under the terms of the NICTA Public
Software Licence (which is substantially similar to the "Three-Clause
BSD License", with some additional language pertaining to Australian law).
OpenSSL
http://www.openssl.org
OpenSSL is based on the SSLeay library developed by Eric Young and Tim Hudson. The OpenSSL
toolkit is licensed under an Apache-style licence which basically means that you are free to get
and use it for commercial and non-commercial purposes.
RSA MD5
/* MD5C.C - RSA Data Security, Inc., MD5 message-digest algorithm
*
* Copyright (C) 1991-2, RSA Data Security, Inc. Created 1991. All
* rights reserved.
*
* License to copy and use this software is granted provided that it
* is identified as the "RSA Data Security, Inc. MD5 Message-Digest
* Algorithm" in all material mentioning or referencing this software
* or this function.
*
* License is also granted to make and use derivative works provided
* that such works are identified as "derived from the RSA Data
* Security, Inc. MD5 Message-Digest Algorithm" in all material
* mentioning or referencing the derived work.
*
* RSA Data Security, Inc. makes no representations concerning either

* the merchantability of this software or the suitability of this
* software for any particular purpose. It is provided "as is"
* without express or implied warranty of any kind.
*
* These notices must be retained in any copies of any part of this
* documentation and/or software.
Zlib
http://www.zlib.net/
/* zlib.h -- interface of the 'zlib' general purpose compression library
version 1.2.8, April 28th, 2013
Copyright (C) 1995-2013 Jean-loup Gailly and Mark Adler
This software is provided 'as-is', without any express or implied
warranty. In no event will the authors be held liable for any damages
arising from the use of this software.
Permission is granted to anyone to use this software for any purpose,
including commercial applications, and to alter it and redistribute it
freely, subject to the following restrictions:
1. The origin of this software must not be misrepresented; you must not
claim that you wrote the original software. If you use this software
in a product, an acknowledgment in the product documentation would be
appreciated but is not required.
2. Altered source versions must be plainly marked as such, and must not be
misrepresented as being the original software.
3. This notice may not be removed or altered from any source distribution.
Jean-loup Gailly Mark Adler
*/
getopt
http://cvsweb.netbsd.org/bsdweb.cgi/src/lib/libc/stdlib/
BSD license

Mongoose
https://github.com/cesanta/mongoose/
Mongoose is released under commercial and GNU GPL v.2 open source licenses. The GPLv2
open source License does not generally permit incorporating this software into non-open
source programs. For those customers who do not wish to comply with the GPLv2 open source
license requirements,Cesanta Software offers a full, royalty-free commercial license and
professional support without any of the GPL restrictions.
Tremor
http://wiki.xiph.org/index.php/Tremor
BSD license


2015 © WOOX Innovations Limited.
All rights reserved.
Philips and the Philips’ Shield Emblem are registered
trademarks of Koninklijke Philips N.V. and are used
by WOOX Innovations Limited under license from
Koninklijke Philips N.V.
SW100M_UM_10_V2.0
