The product color and shape may vary depending on the model.
Do not block projector intake and exhaust vents.
When operating the projector in an enclosed space, allow at least 50 cm (19˝) clearance around the intake and exhaust vents.
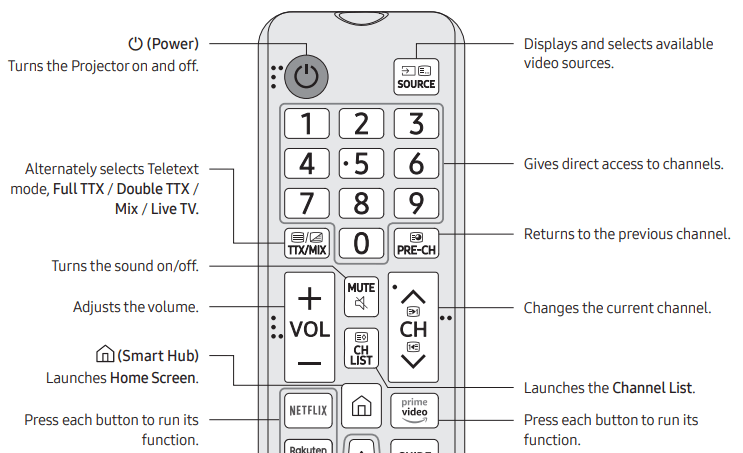
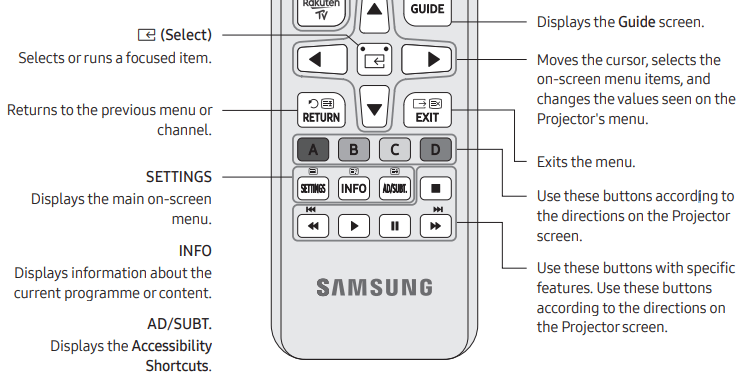
The Remote Control
About the Buttons on the Remote Control
• This remote control has Braille points on the Power, Channel, Volume, and Select buttons and can be used by visually impaired persons.
• The images, buttons, and functions of the remote control may differ depending on the model.
If you use the remote control that comes with your Projector to control another TV, some functions may not operate normally.
The Samsung Smart Remote
About the Buttons on the Samsung Smart Remote
The images, buttons, and functions of the Samsung Smart Remote may differ depending on the model.
The Universal Remote function operates normally only when you use the Samsung Smart Remote that comes with the Projector.
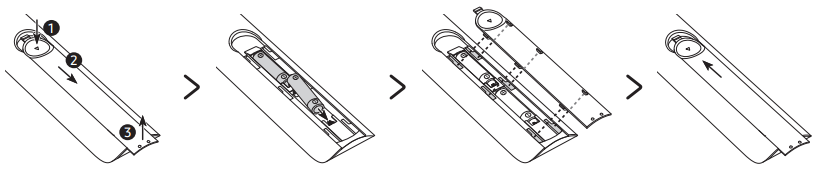
Installing batteries into the remote control (Battery size: AAA)
Match the polarities of the batteries to the symbols on the battery compartment.
• The colour and shape of the remote may vary depending on the model.
• Use the remote control within 7 m of the Projector.
• Bright lights may affect the performance of the remote control. Avoid using the remote control near special fluorescent lights or neon signs.
• Alkaline batteries are recommended for longer battery life.
1. Gently pull on the battery cover's notch and then remove the cover completely once it comes loose.
2. Insert 2 AAA alkaline batteries, making sure to align the positive and negative polarities correctly.
3. Place the battery cover on the remote control and insert the cover into the remote control.
4. Slide the battery cover in the order shown above so that the cover is completely attached to the remote control.
Pairing the Projector to the Samsung Smart Remote
When you turn on the Projector for the first time, the Samsung Smart Remote pairs to the Projector automatically. If the Samsung Smart Remote does not pair to the Projector automatically, point it at the remote control sensor of the Projector, and then press and hold the buttons labeled and as shown in the figure on the left simultaneously for 3 seconds or more.
• The Samsung Smart Remote can only be paired to one Projector at a time.
Installing batteries into the Samsung Smart Remote
To install the batteries, push the rear cover open in the direction of the arrow at the bottom of the illustration, and then insert the batteries as shown in the figure. Make sure that the positive and negative ends are facing in the correct direction. Close the rear cover as shown.
Alkaline batteries are recommended for longer battery life.
About the Samsung Smart Remote
When you start the Projector for the first time by pressing the (Power) button on the Samsung Smart Remote, the Projector automatically pairs with the Samsung Smart Remote. Once the Projector and Samsung Smart Remote have paired, you can use the Samsung Smart Remote to operate the Projector. We recommend using Samsung Smart Remote at a distance of less than 6 m. A usable distance may differ depending on the wireless environmental conditions.
Pairing the Projector to the Samsung Smart Remote
When you turn on the Projector for the first time, the Samsung Smart Remote pairs to the Projector automatically. If the Samsung Smart Remote does not pair to the Projector automatically, point it at the remote control sensor of the Projector, and then press and hold the and buttons simultaneously for 3 seconds or more.
• The Samsung Smart Remote can only be paired to one Projector at a time.
Connections
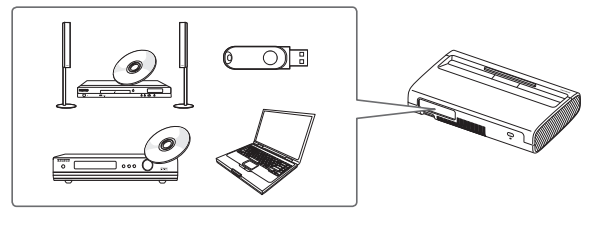
Connecting devices to your Projector
You can connect various external devices using the connectors located at the back of the product. Check the connectors and then refer to the Quick Guide for more instructions on supported external devices.
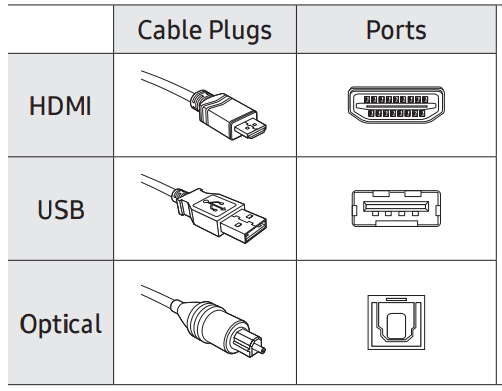
For more information about connections, see the e-Manual chapter "Guide > Connections". Make sure you have the correct cable before plugging it in. Illustrations of common plugs and ports are shown below.
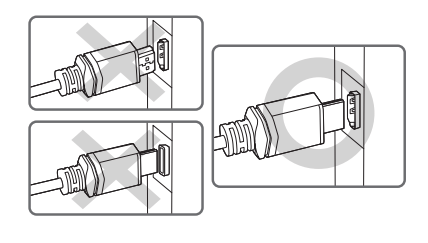
Warning
Do not plug cables in upside down. Be sure to check the orientation of the plug before plugging it in.
Connecting to the Internet
Connecting the Projector to a network gives you access to online services such as the Smart Hub, as well as software updates.
• For more information about Smart Hub, see the e-Manual chapter, "Guide > Smart Features > Using Smart Hub".
• The shape of the rear panel differs among the models.
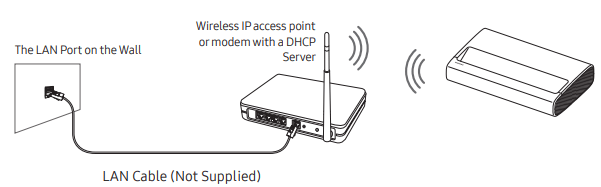
Network Connection - Wireless
Connect the Projector to the Internet using a wireless access point or modem.
Network Connection - Wired
There are three main ways to connect your Projector to your network using cable, depending on your network setup. They are illustrated starting below:
• The Projector will not be able to connect to the Internet if your network speed is below 10 Mbps.
• To connect a LAN cable, use a CAT 7 (*STP type) cable for the connection. (100/10 Mbps) * Shielded Twisted Pair
Installing the Projector
Install the projector horizontally on a flat surface to prevent it from being tilted. When the screen and the projector are not aligned horizontally and vertically, or the screen is curved, the display may get distorted.
1. Place the projector at an appropriate distance from the screen to be projected, connect with the power cable, and then turn it on.
• When you turn on your Projector for the first time, it immediately starts the Initial Setup. Follow the instructions displayed on the screen and configure the Projector's basic settings to suit your viewing environment.
– You can turn on the Projector with the power button at the rear of the Projector, and then use the Control menu. The Control menu appears when the power button is pressed while the Projector is On.
– When the screen looks skewed or blurred, adjust the display settings by following the next instruction.
The product color and shape may vary depending on the model.
2. Adjust the angle by moving the projector left or right or adjust the angle adjusting tilt-adjustment foot at the bottom to make the screen to be rectangular.
3. Move the projector forward or backward to adjust the projection distance for a desired screen size.
– When the projected screen is unclear, adjust in Settings > General > Projector Settings > Focus.
– When the projected screen is not a right angle, adjust in Projector Settings > Screen Adjustment. In this case, the screen resolution may decrease.
– For information about the screen sizes for each projection distance, refer to the following table.
Image size and projection distance
– The screen sizes for each projection distance may differ depending on the installation environment.
Using the Power button
You can turn on the Projector with the power button at the rear of the Projector, and then use the Control menu. The Control menu appears when the power button is pressed while the Projector is On. For more information about its usage, refer to the figure below.
Manipulate buttons on the side of the product so that the projected screen is not covered.
Be careful not to directly get the light emitted from the projector lens.
The product color and shape may vary depending on the model.
Mounting the Projector on a wall
In order to install the projector on a wall, be sure to consult with a professional service agency. Otherwise, the projector may slip or fall off, resulting in personal injury or damage to the product.
When installing a wall mount kit, we recommend you fasten all four screws.
The product color and shape may vary depending on the model.
Do not install your wall mount kit while your Projector is turned on. This may result in personal injury from electric shock.
Do not use screws that are longer than the standard dimension or do not comply with the standard screw specifications. Screws that are too long may cause damage to the inside of the Projector set.
For wall mounts that do not comply with the standard screw specifications, the length of the screws may differ depending on the wall mount specifications.
Do not fasten the screws too firmly. This may damage the product or cause the product to fall, leading to personal injury. Samsung is not liable for these kinds of accidents.
Samsung is not liable for product damage or personal injury when a non-specified wall mount is used or when the consumer fails to follow the product installation instructions.
Always have two people mount the Projector onto a wall.
Selecting Connected Devices
Changing the input signal
> Source
When you select a connected external device on the Source screen, the output of the selected device is displayed on the Projector's screen.
• For more information about selecting connected devices, see the e-Manual chapter "Guide > Connections > Switching between external devices connected to the Projector".
Editing external devices
You can change the port name for a connected external device or add it to Home Screen.
Move the focus to a connected external device.
Press the Up directional button. The following functions become available.
Available functions may differ depending on the port type.
Universal Remote: You can control external devices connected to the Projector using a Samsung remote control. To control external devices, register them by following the instructions on the screen.
Edit: You can rename the input ports and change the device icons.
Information: You can view the detailed information about the external devices connected to the Projector.
Add to Home: You can add the port of an external device to the Home Screen for quick switching.
Using additional functions
You can use the following features on the Source screen.
Remote Access: Use the Projector to access your PC via remote PC or Screen Sharing (Wireless).
Connection Guide: The guide to device connections
Universal Remote: Lets you register external devices to your Samsung remote control and control them using the Remote.
Troubleshooting and Maintenance
Troubleshooting
If the Projector seems to have a problem, first review this list of possible problems and solutions. Alternatively, review the Troubleshooting Section in the e-Manual. If none of the troubleshooting tips apply, please visit "samsung" and click Support or contact the Samsung service center listed on the back cover of this manual.
For detailed information on troubleshooting, watch the troubleshooting videos at samsung/spsn.
To keep your Projector in optimum condition, upgrade to the latest software. Use the Update Now or Auto Update functions on the Projector's menu ( > Settings > Support > Software Update > Update Now or Auto Update).
The Projector won’t turn on.
Make sure that the AC power cord is securely plugged in to the Projector and the wall outlet.
Make sure that the wall outlet is working and the power indicator at the front right of the Projector is lit and glowing a solid red.
Try pressing the Power button at the rear of the Projector to make sure that the problem is not with the remote control. If the Projector turns on, refer to “The remote control does not work.”
There is no picture/video/sound, or a distorted picture/video/sound from an external device, or "Weak or No Signal” is displayed on the Projector, or you cannot find a channel.
Perform a Projector self diagnosis to determine if the problem is caused by the Projector or the device ( > Settings > Support > Device Care > Self Diagnosis > Picture Test or Sound Test).
If the test results are normal, make sure the connection to the device is correct and that all cables are fully inserted.
Remove and reconnect all cables connected to the Projector and the external devices. Try new cables if possible and confirm that the correct input source has been selected ( > Source).
Reboot the connected devices by unplugging each device's power cord and then plugging it in again. If the issue persists, refer to the connection guide in the user manual of the connected device.
If you are not using a cable box or satellite box, and your Projector is receiving TV signals from an antenna or a cable wall connector, run Auto Program to search for channels ( > Settings > Broadcasting > Auto Program).
The remote control does not work.
Check if the power indicator at the front right of the Projector blinks when you press the remote's Power button. If it does not, replace the remote control's batteries.
Make sure that the batteries are installed with their poles (+/–) in the correct direction.
Try pointing the remote directly at the Projector from 5 ft. to 6 ft. (1.5-1.8 m) away.
If your Projector came with a Samsung Smart Remote (Bluetooth Remote), make sure to pair the remote to the Projector.


 and
and as shown in the figure on the left simultaneously for 3 seconds or more.
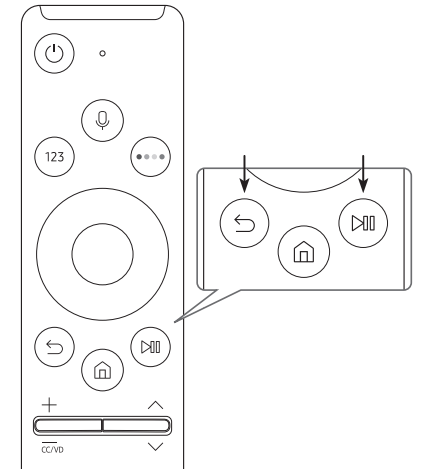

 (Power) button on the Samsung Smart Remote, the Projector automatically pairs with the Samsung Smart Remote. Once the Projector and Samsung Smart Remote have paired, you can use the Samsung Smart Remote to operate the Projector. We recommend using Samsung Smart Remote at a distance of less than 6 m. A usable distance may differ depending on the wireless environmental conditions.
 and
and  buttons simultaneously for 3 seconds or more.
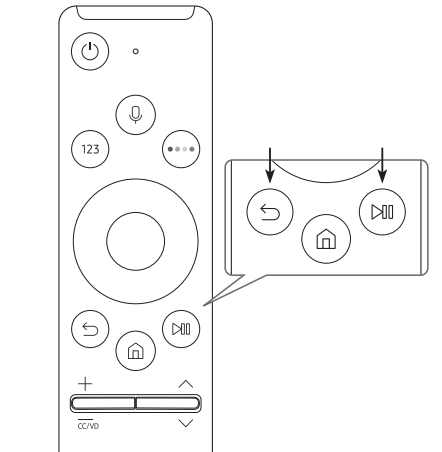


 Install the projector horizontally on a flat surface to prevent it from being tilted. When the screen and the projector are not aligned horizontally and vertically, or the screen is curved, the display may get distorted.

 Settings > General > Projector Settings > Focus.


 > Source
 > Settings > Support > Software Update > Update Now or Auto Update).