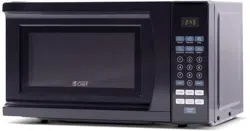
Outside Dimensions (H x W x D): 10 5/16” x 17 13/16” x 14 1/16”
Oven Cavity Dimensions (H x W x D): 8 11/16” x 12 3/8” x 11 9/16”
Oven Capacity: 0.7 cubic feet
Net Weight: Approx. 23.1 lbs.
INSTALLATION GUIDE
Make sure that all the packing materials are removed from the inside of the door.
Check the oven for any damage, such as misaligned or bent door, damaged door seals and sealing surfaces, broken or loose door hinges and latches, and dents inside the cavity or on the door. If there is any damage, do not operate the oven. Contact qualified service personnel.
This microwave oven must be placed on a flat, stable surface capable of supporting the weight of the oven plus the heaviest food likely to be cooked in the oven.
Do not place the oven where heat, moisture, or high humidity are generated, or near combustible materials.
To function correctly, the oven must have sufficient airflow on all sides. Allow 8" of space above the oven, 4” at back, and 2” at both sides. Do not cover or block any openings on the appliance. Do not remove feet on which oven stands.
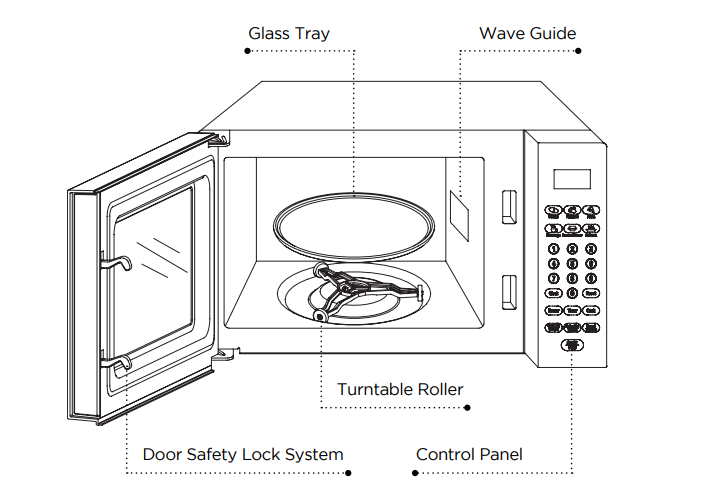
Do not operate the oven without glass tray, roller support, and shaft in their properpositions.
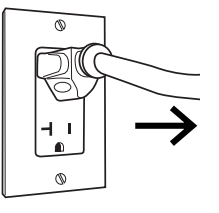
Make sure that the power supply cord is undamaged and does not run under the oven or over any hot or sharp surface.
The socket must be readily accessible so that the cord can be quickly reached and easily unplugged in an emergency.
NOTE: Do not remove the mica plate covering the wave guide in the oven cavity.
RADIO OR TV INTERFERENCE
If the microwave oven causes interference to your radio or TV,
Check that the microwave oven is on a different circuit
Relocate the radio or TV as far away from the oven as possible
Check position and signal of receiving antenna.
Clean door and sealing surface.
Move the microwave oven far away from the receiver.
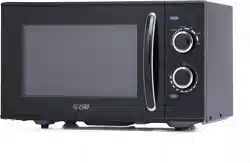
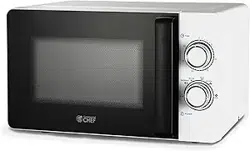
PARTS & FEATURES
This section lists which utensils can be used in the microwave, which have limited use, and which should not be used in the microwave at all.
Diagram for instructional purposes only.
Design may vary by model number.
NOTE: Do not remove the mica plate covering the wave guide in the oven cavity.
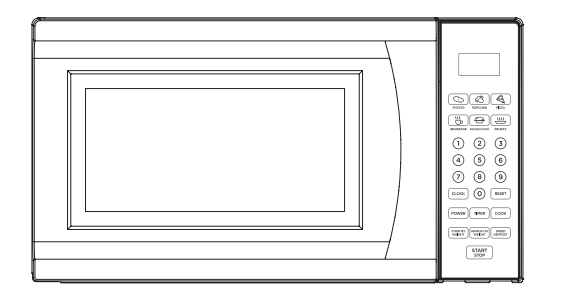
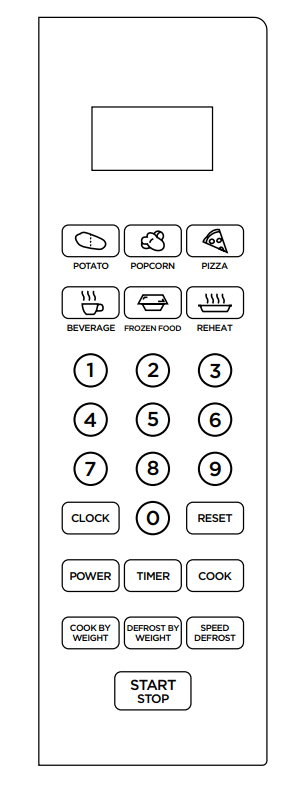
CONTROL PANEL
Display: Cooking time, power, indicators and present time are displayed.
Quick cook buttons: Instant settings to cook popular foods. See page 14 for setting.
Number pads (0-9): Touch to set times or weights.
Clock: Use to set the time of day or recall the time of day.
Reset: Use to clear all previous settings.
Power: Use to set power level. To check power level during cooking, touch POWER LEVEL pad.
Timer: Timer functions independently, even while a cooking program is in process.
Cook: Use for multi-stage cooking. Enables cooking at multiple power and time settings automatically.
Cook by weight: Programmed cooking based on the weight of the foods to be cooked.
Defrost by weight: Programmed defrosting based on the weight of the foods to be defrosted.
Speed defrost: Quick defrost function that alternates defrost and stand times to quickly and effectively defrost foods.
Start/stop: Touch to start or stop cooking.
NOTE: Please remove protective film from the control pad before using your microwave.
OPERATION INSTRUCTIONS
SIGNALS DURING OVEN SETTINGS
ONE SIGNAL: Oven accepts the entry.
TWO SIGNALS: Oven does not accept the entry, check and try again.
SETTING THE CLOCK
Touch CLOCK pad.
Use the number pads to enter the correct time.
Touch CLOCK pad again.
NOTE: This is a 12-hour cycle clock.
When the oven is first plugged in or when power resumes after a power interruption, the display will show ENTER CLOCK TIME. If you prefer not to have the clock displayed, touch RESET.
SETTING THE OVEN TIMER
Touch TIMER.
Enter the amount of time by touching the number pads.
Touch START/STOP.
NOTE:
The maximum time you can enter is 99 minutes and 99 seconds.
Time countdown can be seen in display before clock or cooking time returns to display.
Touch TIMER and then touch RESET to cancel TIMER during timing process.
SETTING A COOKING PROGRAM
A. One-stage Cooking
Use the number pads to set a cooking time. You can set a cooking time from one second to 99 minutes and 99 seconds.
If you want to set a power level other than 100% power, touch POWER, and then use the number pads to enter the power level.
Touch START/STOP to start cooking. Use the digits to set a cooking power level:
PRESS POWER LEVEL PAD
POWER
1,0
100%
9
90%
8
80%
7
70%
6
60%
5
50%
4
40%
3
30%
2
20%
1
10%
0
0%
B. Two-stage Cooking
Some recipes require different stages of cooking at different temperatures.
1.SET STAGE 1:
Follow steps 1 and 2 in "One-stage Cooking”. DO NOT TOUCH START/ STOP.
2. SET STAGE 2:
Touch COOK then enter proper cooking time and (lower) power level. (Most 2-stage recipes use lower power for second stage.)
3. Touch START/STOP.
NOTE: After total time has elapsed, signals sound and END appears in display. Touch any button or open oven door to clear END before starting another cooking function.
SPEED DEFROST
Touch SPEED DEFROST.
Enter desired defrosting time by touching correct number pads.
Touch START/STOP.
NOTE:
The longest defrosting time is 99 minutes and 99 seconds.
During defrosting program, the system will pause automatically and sound to remind users to turn meat over, after that touch START/STOP to resume the defrosting.
After time has elapsed signals sound and END appears in display. Touch any button or open oven door to clear END before starting another cooking function.
After setting SPEED DEFROST, oven can be programmed to automatically switch to one or two-stage cooking.
For speed defrost and one stage cooking, follow steps above. Before touching START/ STOP, touch COOK; enter time and power level and then touch START/STOP.
For speed defrost and two stage cooking, follow steps above. Before touching START/ STOP, touch COOK; enter two-stage cooking programs and then touch START/STOP.
COOK BY WEIGHT
Touch COOK BY WEIGHT.
Enter the one digit code by touching the correct number pad.
Use the number pads to enter weight.
Touch START/STOP.
Cook By Weight Code Description
CODE
TYPE
MAX WEIGHT
1
Beef
5 lb. 16 oz.
2
Mutton
5 lb. 16 oz.
3
Pork
5 lb. 4 oz.
Note:
Weight must be in pounds and ounces.
Ounce weights less than 10 must be preceded by a 0. If label gives weight in pounds only, change the fraction of a pound to ounces using the following chart. Converting Fractions of a Pound to Ounces
FRACTIONS OF A
OUNCES
Less than .03
0
.03 to .09
.10 to .15
2
.16 to .21
3
.22 to .27
4
.28 to .34
5
.35 to .40
6
.41 to .46
7
.47 to .53
8
.54 to 59
9
.60 to .65
10
.66 to .71
11
.72 to .78
12
.79 to .84
13
.85 to .90
14
.91 to .97
15
above .97
go to next even
During cooking, the system will pause automatically and sound to remind users to turn meat over, after that touch START/STOP to resume cooking.
After total cooking time, signals sound and END appears in display. Touch any button or open oven door to clear END before starting another cooking function.
DEFROST BY WEIGHT
Touch DEFROST BY WEIGHT pad.
Use the number pads to enter weight.
Touch START/STOP pad.
NOTE: Weight must be in pounds and ounces. Ounce weights less than 10 must be preceded by a 0. If label gives weight in pounds only, change the fraction of a pound to ounces using the chart on page 13.
The maximum weight you can enter is 5 lb. 16 oz.
During defrosting program, the system will pause automatically and sound to remind users to turn meat over, after that touch START/STOP to resume the defrosting.
After total defrosting time, signals sound and END appears in display. Touch any button or open oven door to clear END before starting another cooking function.
SETTING CHILD LOCK
The child lock prevents unsupervised operation by children.
To set: In standby mode, press and hold RESET for 3 seconds. Lock indication appears on the display.
To cancel: Press and hold RESET for 3 seconds. Lock indication disappears.
QUICK COOK SETTINGS
The QUICK COOK settings allow you to cook or reheat food automatically without entering power level or time.
For smaller portions, simply touch the applicable pad and START/STOP. For larger portions, press the pad twice.
FROZEN DINNER, BAKED POTATO and BEVERAGE allow you to cook multiple amounts of the same food. Simply touch pad once, and ENTER AMT appears in the display. Enter the amount of servings and start.
FROZEN DINNER
For one or two small (7-9 oz. per share) frozen dinners:
Touch FROZEN DINNER once.
For 1 entree, touch the number pad "1”. For 2 entrees, touch the number pad "2”.
Touch START/STOP pad.
Microwaving one or two larger (10-12 oz. per share) frozen dinners:
Touch FROZEN DINNER twice.
For 1 entree, touch the number pad "1”. For 2 entrees, touch the number pad "2”.
Touch START/STOP.
POTATO
For potatoes (4 - 6 oz. per entries):
Touch POTATO once.
Enter number of potatoes by touching number pads from 1 to 4.
Touch START/STOP.
For larger potatoes (8 - 10 oz. per entries):
Touch POTATO twice.
Enter number of potatoes by touching number pads from 1 to 4.
Touch START/STOP.
PIZZA
Reheating a slice of pizza:
Touch PIZZA once.
Touch START/STOP.
Heating a whole pizza:
Touch PIZZA twice.
Touch START/STOP.
POPCORN
Touch POPCORN. POPCORN automatically sets the cooking time for a 3.5 oz. bag of microwave popcorn.
Touch START/STOP.
NOTE: To change the preset POPCORN time: Touch POPCORN twice. ENTER TIME is displayed. Touch number pads to enter minutes and seconds. Touch START/STOP. This new cooking time will remain whenever you use the POPCORN setting until you reset,
BEVERAGE
For cups (5 - 7 oz. per share):
Touch BEVERAGE once.
Enter number of cups by touching number pads from 1 to 4.
Touch START/STOP.
For larger coffee mugs (9-11 oz. per share):
Touch BEVERAGE twice.
Enter number of mugs by touching number pads from 1 to 4.
Touch START/STOP.
REHEAT
Touch REHEAT pad.
Touch START/STOP.
NOTE: This setting lets you reheat a dinner plate of chilled leftovers with good results.
COOKING TECHNIQUES
STIRRING
Stir foods such as casseroles and vegetables while cooking to distribute heat evenly. Food at the outside of the dish absorbs more energy and heats more quickly, so stir from the outside to the center. The oven will turn off when you open the door to stir your food.
ARRANGEMENT
Arrange unevenly shaped foods, such as chicken pieces or chops, with the thicker, meatier parts toward the outside of the turntable where they receive more microwave energy. To prevent overcooking, place delicate areas, such as asparagus tips, toward the center of the turntable.
SHIELDING
Shield food with narrow strips of aluminium foil to prevent overcooking. Areas that need shielding include poultry wing-tips, the ends of poultry legs, and corners of square baking dishes. Use only small amounts of aluminium foil. Larger amounts can damage your oven.
TURNING
Turn foods over midway through cooking to expose all parts to microwave energy. This is especially important with large foods such as roasts.
STANDING
Foods cooked in the microwave build up internal heat and continue to cook for a few minutes after heating stops. Let foods stand to complete cooking, especially foods such as cakes and whole vegetables. Roasts need this time to complete cooking in the center without overcooking the outer areas. All liquids, such as soup or hot chocolate, should be shaken or stirred when cooking is complete. Let liquids stand a moment before serving. When heating baby food, stir well at removal and test the temperature before serving.
ADDING MOISTURE
Microwave energy is attracted to water molecules. Food that is uneven in moisture content should be covered or allowed to stand so that the heat disperses evenly. Add a small amount of water to dry food to help it cook.
CLEANING AND CARE
When cleaning surfaces of door and oven that comes together on closing the door, use only mild, nonabrasive soaps, or detergents apply with a sponge or soft cloth.
Turn off the oven and remove the power plug from the wall socket before cleaning.
Keep the inside of the oven clean. When food splatters or spilled liquids adhere to oven walls, wipe with a damp cloth. Mild detergent may be used if the oven gets very dirty. Avoid the use of spray and other harsh cleaners as they may stain, streak or dull the door surface.
The outside surfaces should be cleaned with a damp cloth. To prevent damage to the operating parts inside the oven, water should not be allowed to sweep into the ventilation openings.
Wipe the window on both sides with a damp cloth to remove any spills or spatters.
Do not allow the control panel to become wet. Clean with a soft, damp cloth. When cleaning the control panel, leave oven door open to prevent oven from accidentally turning on.
If steam accumulates inside or around the outside of the oven door, wipe with a soft cloth. This may occur when the microwave oven is operated under high humidity conditions, this is normal.
It is occasionally necessary to remove the glass tray for cleaning. Wash the tray in warm sudsy water or in a dishwasher.
The roller ring and oven floor should be cleaned regularly to avoid excessive noise. Simply wipe the bottom surface of the oven with mild detergent. The roller ring may be washed in mild sudsy water or dishwasher. When removing the roller ring from cavity floor for cleaning, be sure to replace in the proper position.
Remove odors from your oven by combining a cup of water with the juice and skin of one lemon in a deep bowl, microwave for 5 minutes. Wipe thoroughly and dry with a soft cloth.
When it becomes necessary to replace the oven light, please consult a dealer to have it replaced.
Please do not dispose this appliance into the domestic rubbish bin; it should be disposed to the particular disposal center provided by the municipalities.
TROUBLESHOOTING
BEFORE YOU CALL FOR SERVICE
IF THE OVEN FAILS TO OPERATE:
A) Check to make sure that the oven is plugged in securely. If it is not, remove the plug from the outlet, wait 10 seconds and plug it in again securely.
B) Check for a blown circuit fuse or a tripped main circuit breaker. If these seem to be operating properly, test the outlet with another appliance.
C) Check to make sure the control panel is programmed correctly and the timer is set.
D) Check to ensure that the door is securely closed engaging the door safety lock system. Otherwise, the microwave energy will not flow into the oven.
IF NONE OF THE ABOVE SOLVES THE PROBLEM, CONTACT A QUALIFIED TECHNICIAN. DO NOT TRY TO ADJUST OR REPAIR THE OVEN YOURSELF.
CUSTOMER SERVICE
IMPORTANT
DO NOT RETURN THIS PRODUCT TO THE STORE
If you have a problem with this product, please contact the W Appliance Co. Customer Satisfaction Center at 1-855-855-0294.
DATED PROOF OF PURCHASE, MODEL # AND SERIAL # REQUIRED FOR WARRANTY SERVICE
TROUBLESHOOTING
Troubleshoot your problem by using the chart below. If the microwave oven still does not work properly, contact W Appliance Co. customer service center or the nearest authorized service center. Customers must never troubleshoot internal components. Microwaves hold dangerous voltage (5000V) even after power is removed. Only a certified technician should attempt Microwave repair.
TROUBLE
POSSIBLE CAUSE
POSSIBLE REMEDY
Oven will not start
Electrical cord for oven is not plugged in.
Door is open.
Wrong operation is set.
Plug into the outlet.
Close the door and try again.
Check instructions.
Arcing or sparkling
Materials to be avoided
in microwave oven , such as metal, were used.
The oven is operated when empty.
Spilled food remains in the cavity.
Use microwave-safe cookware only.
Do not operate with oven empty.
Clean cavity with wet towel.
Unevenly cooked foods
Materials to be avoided in microwave oven were used.
Food is not defrosted completely.
Cooking time, power level is not suitable.
Food is not turned or stirred.
Use microwave-safe cookware only.
Completely defrost food.
Use correct cooking time, power level.
Turn or stir food.
Overcooked foods
Cooking time, power level is not suitable.
Use correct cooking time and power level.
Under cooked foods
Materials to be avoided in microwave oven were used.
Food is not defrosted completely.
Oven ventilation ports are restricted.
Cooking time, power level is not suitable.
Use microwave-safe cookware only.
Completely defrost food.
Check to see that oven ventilation ports are not restricted.
Use correct cooking time and power level.
Improper defrosting
Materials to be avoided in microwave oven were used.