Operating Instructions for Cordless Hard Floor Cleaner
Description of the Appliance
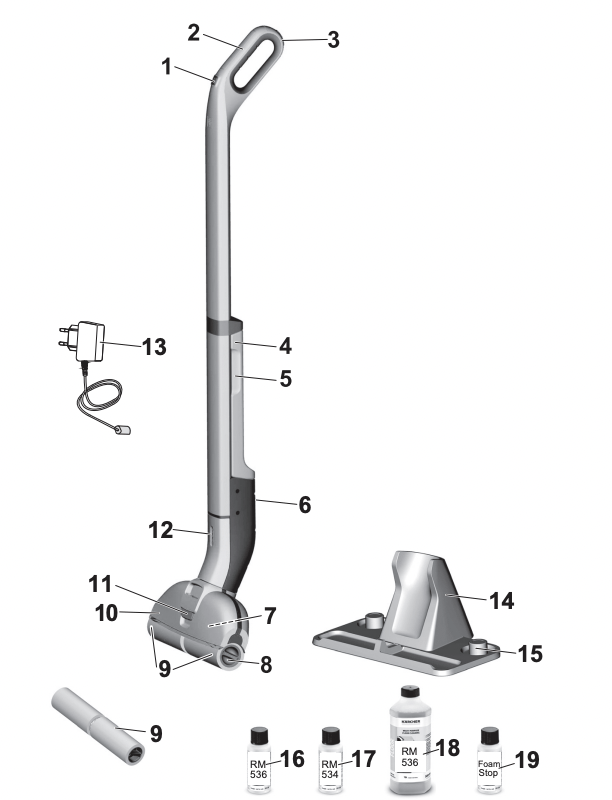
1 ON/OFF switch
2 Handle
3 Wall anti-slip handle
4 Fresh water tank
5 Fresh water tank recessed grip
6 Charging socket
7 Waste water tank
8 Recessed grip cleaning roller
9 Cleaning rollers
10 Floor head cover
11 Floor head cover lock
12 Battery indicator
13 Charger with charging cable
14 Parking station
15 Roller storage
16 * Detergent RM 536 30 ml
17 ** Detergent RM 534 30 ml
18 ** Detergent RM 536 500 ml
19 Defoamer FoamStop 30 ml
9 ** Cleaning rollers 2x
Assembly
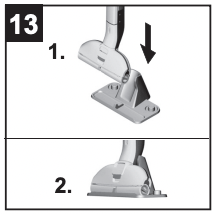
ATTENTION Take care to ensure that the power cable lies fully in the guide rail before fitting the handle bar.
Illustration 1
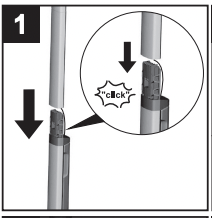
 Insert handle into the basic unit as far as it goes until it engages audibly. The handle must sit snugly into the appliance.
Commissioning
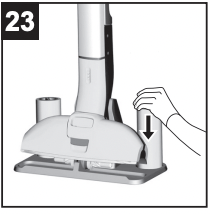
Illustration 2
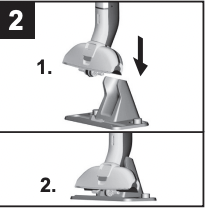
Place the device in the parking station for safe storage.
Installing the rollers
Illustration 3

Screw the cleaning rollers onto the threaded rod up to the mechanical stop.
Pay attention to the colour-codes on the inside of the roller and roller holder on the appliance (e.g. blue should match up with blue).
After the installation, check to ensure that the cleaning rollers sit snugly.
Charging process
Illustration 4
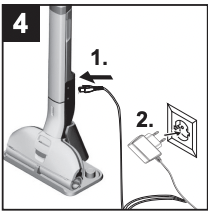
Plug the charging cable of the charger into the charging socket on the device.
Plug the mains plug of the charger into a power outlet.
Illustration 5
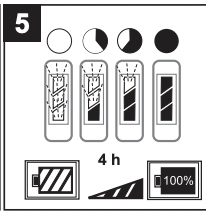
The LED indicator lights display the battery's current charging state.
- All 3 LED indicator lights flash from bottom to top when charging a completely empty battery.
- The lowermost LED lights up continuously when the battery is 1/3 charged, the two upper LEDs continue to flash.
- When the battery is 2/3 charged, the two lower LEDs light up continuously, the uppermost LED continues to flash.
- After the battery has been fully charged, the 3 LED indicator lights will continue to light constantly for minutes. After this time, the LED indicator lights go out.
Illustration 6
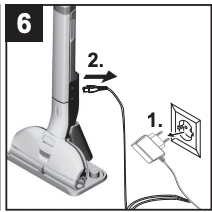
Once the battery is charged, pull the mains plug out of the socket and the charging cable out of the charging socket.
Fill fresh water reservoir
Illustration 2
Place the device in the parking station.
Illustration 7
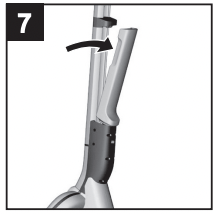
Grasp the fresh water tank by the recessed grip and remove it from the device.
Illustration 8
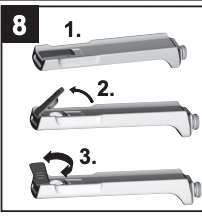
Open the tank cap and turn it to the side.
Illustration 9
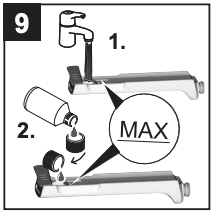
Fill the fresh water tank with cold or lukewarm tap water.
KÄRCHER detergents/care agents can also be added to the fresh water tank as required.*
Do not exceed the "MAX" marking when filling.
Close tank lock.
Illustration 10
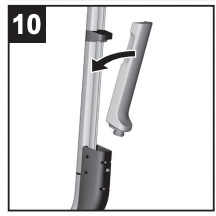
Insert the fresh water container into the appliance.
The fresh water tank must sit snugly into the appliance.
ATTENTION
Follow the recommended dosage instructions on the detergent/care agent.
Operation
General information on the operation
ATTENTION
Illustration A
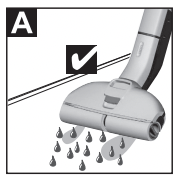
The device can only vacuum dried dirt and liquids (max. ml).
Illustration B
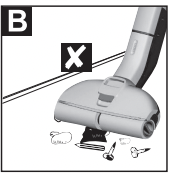
Brush or vacuum the floor before starting work. This removes dirt and loose particles from the floor before the wet cleaning commences.
Before use, check the floor for water consistency at suspect areas. Do not clean water-sensitive coatings, such as untreated cork floors (moisture ingress is possible which may damage the floor).
Illustration C
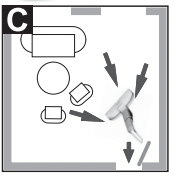
To avoid fresh footprints on the freshly-wiped floor, work backwards towards the door.
Clean the floor by moving the appliance back and forth at a similar speed as if you were vacuum cleaning.
If the floor is especially dirty, let the appliance glide slowly across the floor. Pressure does not need to be exerted on the device.
For scope of delivery of the roller pads in grey and yellow: Both roller pads have the same functionality, they can be used for different areas of application (colour distinction, e.g. for kitchen and bathroom).
Start working
ATTENTION
After switching on the appliance, the cleaning rollers will begin to rotate. Hold the handle tight to prevent the appliance from moving forwards by itself. Make sure the fresh water tank is filled with water and the waste water tank is fitted in the appliance.
Illustration 11
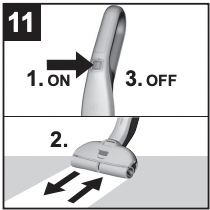
To switch on the appliance press the on/off switch.
Move the unit back and forth several times until the rollers are sufficiently moistened.
Battery service life
Illustration 12
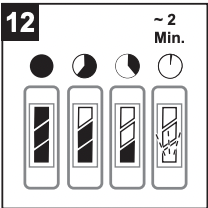
– 3 LEDs illuminated - 3/3 battery run time (full run time).
– 2 LEDs illuminated - 2/3 battery run time.
– 1 LEDs illuminated - 1/3 battery run time.
- The lowermost LED starts to flash approx. 2 minutes before the battery has to be charged.
- The last LED flashes quicker for 60 seconds when the battery is empty and the device has switched off.
Refill detergent
ATTENTION
Before filling the fresh water tank, please empty the waste water tank. In this way you can avoid overflowing of the waste water tank.
See chapter "Filling the fresh water tank".
See Chapter "Emptying the waste water tank".
Emptying the waste Water tank
Illustration 2
Place the device in the parking station.
Illustration 15
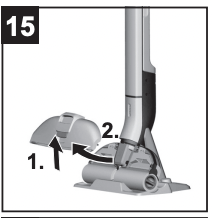
Actuate the floor head cover latch.
Remove the floor head cover.
Illustration 16
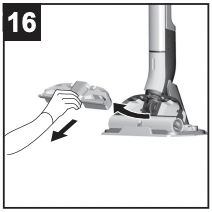
Remove the waste water tank from the floor head.
Illustration 17

Fold the flaps over the two waste water tank chambers.
Empty the waste water tank.
Illustration 18
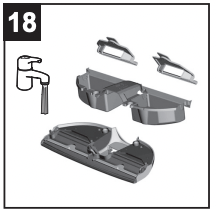
Clean the floor head cover and waste water tank with tap water, depending on the degree of soiling.
The flaps of the two waste water tank chambers can be removed and cleaned separately.
Re-insert and close the flaps of the two waste water tank chambers.
Illustration 21
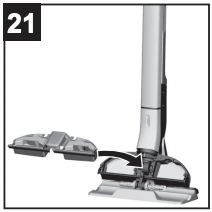
Insert the waste water tank into the floor head.
Illustration 22
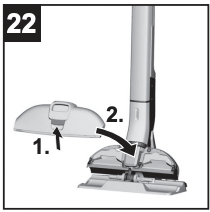
Actuate the latch on the floor head cover, fit the cover onto the floor head and then release the latch.
The waste water tank and floor head cover must sit firmly in and on the device.
Interrupting operation
ATTENTION To prevent damage to sensitive floors through wet rollers, we recommend placing the device in the parking station during longer work breaks.
Illustration 11
Switch off the appliance; press the on/off button to do so.
Illustration 2
Place the device in the parking station.
Turning Off the Appliance
Illustration 11
Switch off the appliance; press the on/off button to do so.
Illustration 2
Place the device in the parking station.
ATTENTION
Clean the device after completing the work.
Illustration 14
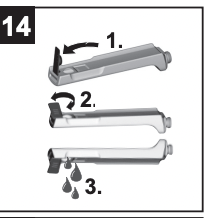
Drain any water remaining in the fresh water tank. Figure 15 to 24
Clean the waste water tank, floor head cover and cleaning rollers.
See chapter "Cleaning the waste water tank".
See chapter "Cleaning the floor head".
See chapter "Cleaning the rollers".
ATTENTION
To prevent odours developing, the fresh water and waste water tank must be completely emptied prior to storing the appliance.
Allow wet rollers to dry in the air (e.g. on the parking station), do not place wet rollers in closed cupboards to dry.
Illustration 2
Place the device in the parking station.
Illustration 24
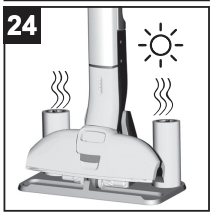
Place the wet rollers on the parking station to dry.
Store the appliance in a dry room.
Care and maintenance
DANGER
Illustration 28
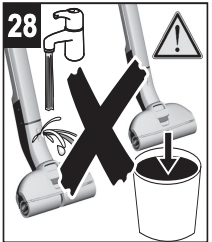
The device contains electrical components and must therefore never be held under running water or immersed in a container containing water - even for cleaning the device.
ATTENTION
Illustration 29
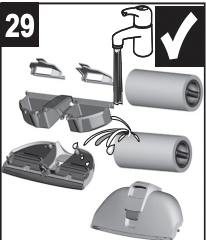
To clean the device, remove the individual components floor head cover, fresh water tank, waste water tank and rollers) and clean them separately. Wipe down the rest of the device with a moist cloth.
Clean the waste water tank
ATTENTION
The waste water tank must be cleaned regularly to ensure that dirt does not accumulate in the tank.
ATTENTION
Do not clean the floor head cover in a dishwasher: The basic function of the device can be impaired if the floor head cover is distorted by the dishwasher and the wiper edge no longer presses correctly onto the rollers. This will produce a worse cleaning result.
Illustration 11
Switch off the appliance; press the on/off button to do so.
Illustration 2
Place the device in the parking station.
Figure 15 to 18
Remove the waste water tank from the appliance. See Chapter "Emptying the waste water tank".
Clean the floor head cover, waste water tank and waste water tank flaps with tap water.
The flaps of the two waste water tank chambers can be removed and cleaned separately.
Alternatively, the waste water tank and waste water tank flaps can be cleaned in a dishwasher.
Note
The rubber inlays of the waste water tank flaps can become sticky when washed in a dishwasher. This does not affect their sealing ability.
Figure 19 to 20
Also clean the rollers if the device is not going to be used further. See chapter "Cleaning the rollers".
Figure 21 to 22
After cleaning, fit the waste water tank with flaps and floor head cover back into the device.
Cleaning the floor head
ATTENTION
Clean the floor head if dirty.
ATTENTION
Do not clean the floor head cover in a dishwasher: The basic function of the device can be impaired if the floor head cover is distorted by the dishwasher and the wiper edge no longer presses correctly onto the rollers. This will produce a worse cleaning result.
Illustration 11
Switch off the appliance; press the on/off button to do so.
Illustration 2
Place the device in the parking station.
Illustration 15
Actuate the floor head cover latch.
Remove the floor head cover.
Illustration 18
Rinse off the floor head cover under running water.
Clean the waste water tank and rollers.
See chapter "Cleaning the waste water tank".
See chapter "Cleaning the rollers".
Clean the roller drive with a moist cloth.
Illustration 22
Insert the floor head cover into the floor head.
Cleaning the rollers
ATTENTION
The rollers should be washed under a tap or cleaned in a washing machine after each use to prevent accumulation of detergent residues in the rollers that can lead to the formation of foam over time.
The fresh water tank and waste water tank must be emptied if the device is laid on the floor in order to remove the rollers. This prevents liquids from escaping from the tanks while the device is lying on the floor.
Illustration 11
Switch off the appliance; press the on/off button to do so.
Illustration 2
Place the device in the parking station.
Illustration 19
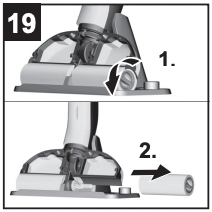
Twist out the cleaning rollers from the recessed grip.
Illustration 20
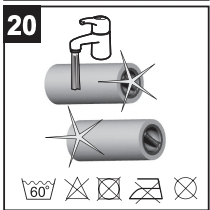
Clean the cleaning rollers under running water.
Wash the cleaning rollers in the washing machine up to 60°C.
ATTENTION
Do not use any soft detergents when cleaning in the washing machine. This avoids causing damage to the microfibres. It also preserves the high performance levels of the cleaning rollers.
The cleaning rollers are not suitable for the tumble dryer.
Figure 23 to 24
Once cleaned, place the rollers on the cleaning station storage and leave them to air dry.
Drying time can be minimized by wringing out the rollers beforehand.
Also clean the floor head cover and waste water tank if the device is not going to be used further.
Clean the roller drive with a moist cloth.
Detergents and care products
ATTENTION
The use of unsuitable cleaning and disinfecting agents can damage the appliance and will void the warranty.
Note
Add cleaning or disinfecting agent as required.
When dosing the detergent and care product, follow the manufacturer's dosage instructions.
To prevent foaming, first fill the fresh water tank with water then cleaning or disinfecting agent.
To avoid exceeding the "MAX" fill level on the fresh water tank, leave room for the cleaning or disinfecting agent when filling with water.
Troubleshooting
Often, failures have simple causes and you can do the troubleshooting yourself using the following overview. If you are in doubt or if the failure is not listed here please contact the authorized customer service
Battery is not charging
- Charging plug/mains plug not correctly connected.
Connect charging plug/mains plug correctly.
The device cannot be switched on
Charge the device.
- Check whether the charging cable is still plugged into the device.
Take out charging cable, operation is not possible while charging cable is plugged in.
LED fault display
Lowermost LED flashes when the device is switched on and does not start.
Charge the device.
All LEDs flash quickly simultaneously.
- The device has a motor blockage (e.g. due to excessive pressure on the rollers or through movement into a wall/corner).
Switch on/off the appliance again.
or
- Use of wrong or defective mains plug.
Use original mains plug/replace defective mains plug.
The three LEDs light up sequentially in a 1-second cycle.
- Device too hot during use (e.g. when operating in high ambient temperatures).
Take a break and let the device cool down.
- If the device also switches off:
Take a break and let the device cool down.
The device can only be switched on again once it has cooled down enough.
Rollers are too dry
Rollers are not being sufficiently moistened.
Moisten the rollers by moving back and forth over the same position.
The filter under the fresh water tank is incorrectly fitted or not fitted at all.
Ensure that the filter under the fresh water tank is correctly fitted in the device. The foam with the yellow pin in the middle must point upwards.
Note
If the filter is not present, it can be ordered as a spare part.
For information about accessories and spare parts, please visit kaercher
Appliance is not sucking up dirt
No water in the fresh water tank.
Refill water
Fresh water tank does not fit properly in the device.
Insert the fresh water tank so that it sits snugly in the appliance.
Cleaning rollers missing or not fitted correctly.
Fit the cleaning rollers or turn them onto the roller holder up to the mechanical stop.
Cleaning rollers are contaminated or worn.
Clean the cleaning rollers. or
Replace the cleaning rollers.
The detergent has been forgotten, an incorrect dosage is being used or the incorrect detergent is being used
Use only KÄRCHER detergent and be sure to use the correct dosage.
Floor head cover not installed correctly
Check that the floor head cover is correctly seated. For this, remove the cover and then fit it back in place.
Formation of foam in the floor head and on the floor
Note
Slight foam formation in the floor head during operation is normal and does not impair functionality. Further measures are only necessary when there is excessive foam formation (e.g. streaks of foam on the floor). Incorrect detergent or incorrect dosage.
Use only KÄRCHER detergent and be sure to use the correct dosage.
Device operation is based on the cleaning rollers removing dirt. Dirt and detergent residues from floor coverings collect in the waste water tank. This can lead to foam formation under some circumstances.
Remove all dirt and detergent residues from the rollers using water.
Illustration 25
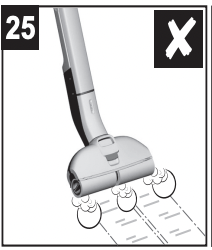
Illustration 26
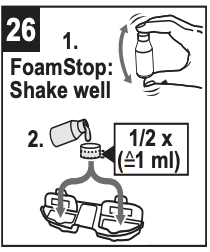
Illustration 27

In the event of excessive foam formation, add FoamStop to the empty waste water tank before starting cleaning. Please observe the dosage instructions on the bottle label.
Poor cleaning result
The rollers are dirty.
Clean the rollers.
Rollers are not being sufficiently moistened.
Moisten the rollers by moving back and forth over the same position.
Incorrect detergent or incorrect dosage.
Use only KÄRCHER detergent and be sure to use the correct dosage.
Foreign detergents are present on the floor.
Remove all detergent residues from the rollers using water.
Clean the floor several times using the device and clean rollers, without using detergent. This removes detergent residues from the floor
Rollers do not turn
Rollers are blocked.
Remove rollers and check if an object has become stuck in the rollers.
Check that the rollers are screwed in as far as they will go onto the roller holder.
Check that the floor head cover is correctly seated. For this, remove the cover and then fit it back in place.
Water vacuuming not optimum
Floor head cover not installed correctly
Check that the floor head cover is correctly seated. For this, remove the cover and then fit it back in place.
The rollers are worn out.
Replace the rollers.
Appliance is leaking waste water
Waste water tank is overfilled.
Empty the waste water tank right away. Waste water tank does not fit properly in the appliance.
Check that the floor head cover is firmly seated on the waste water tank.
Check that the waste water tank flaps are correctly closed.
Removing the handle from the basic unit
ATTENTION
Do not remove the handle from the basic unit once it has been assembled.
The handle may only be removed from the basic unit if the unit is sent out for service purposes.
Illustration 30
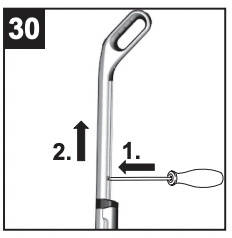
See illustration at the end of the operating instructions
Insert screwdriver at a 90 degree angle in the small opening at the rear side of the handle and remove handle.
ATTENTION
Please ensure that the connection cable between the basic unit and the handle are not damaged. Pull carefully to avoid damaging the device.