
www.philips.com/welcome
BDL5570EL
V2.00
User Manual (English)

BDL5570EL
ii
Safety Instructions
Safety precautions and maintenance
WARNING: Use of controls, adjustments or procedures other than those specied in this documentation may result in exposure to
shock, electrical hazards and/or mechanical hazards.
Read and follow these instructions when connecting and using your display:
Operation:
• Keepthedisplayoutofdirectsunlightandawayfromstovesoranyotherheatsources.
• Removeanyobjectthatcouldfallintoventilationholesorpreventpropercoolingofthedisplay’selectronics.
• Donotblocktheventilationholesonthecabinet.
• Whenpositioningthedisplay,makesurethepowerplugandoutletareeasilyaccessible.
• Whenturningoffthedisplaybydetachingthepowercord,wait6secondsbeforere-attachingthepowercordfornormaloperation.
• EnsuretheuseofanapprovedpowercordprovidedbyPhilipsatalltimes.Ifyourpowercordismissing,pleasecontactyourlocalservicecenter.
• Donotsubjectthedisplaytoseverevibrationorhighimpactconditionsduringoperation.
• Donotknockordropthedisplayduringoperationortransportation.
Maintenance:
• Toprotectyourdisplayfrompossibledamage,donotputexcessivepressureontheLCDpanel.Whenmovingyourdisplay,grasptheframetolift;do
notliftthedisplaybyplacingyourhandorngersontheLCDpanel.
• Unplugthedisplayifyouarenotgoingtouseitforanextensiveperiodoftime.
• Unplugthedisplayifyouneedtocleanitwithaslightlydampcloth.Thescreenmaybewipedwithadryclothwhenthepowerisoff.However,never
useorganicsolvent,suchas,alcohol,orammonia-basedliquidstocleanyourdisplay.
• Toavoidtheriskofshockorpermanentdamagetotheset,donotexposethedisplaytodust,rain,wateroranexcessivelymoistenvironment.
• Ifyourdisplaybecomeswet,wipeitwithdryclothassoonaspossible.
• Ifaforeignsubstanceorwatergetsinyourdisplay,turnthepoweroffimmediatelyanddisconnectthepowercord.Thenremovetheforeignsubstance
orwater,andsendtheunittothemaintenancecenter.
• Donotstoreorusethedisplayinlocationsexposedtoheat,directsunlightorextremecold.
• Inordertomaintainthebestperformanceofyourdisplayandensurealongerlifetime,westronglyrecommendusingthedisplayinalocationthatfalls
withinthefollowingtemperatureandhumidityranges.
- Temperature:0-40°C32-104°F
- Humidity:20-80%RH
IMPORTANT:Alwaysactivateamovingscreensaverprogramwhenyouleaveyourdisplayunattended.Alwaysactivateaperiodicscreenrefresh
applicationiftheunitwilldisplayunchangingstaticcontent.Uninterrupteddisplayofstillorstaticimagesoveranextendedperiodmaycause“burnin”,
alsoknownas“after-imaging”or“ghostimaging”,onyourscreen.Thisisawell-knownphenomenoninLCDpaneltechnology.Inmostcases,the“burned
in”or“after-imaging”or“ghostimaging”willdisappeargraduallyoveraperiodoftimeafterthepowerhasbeenswitchedoff.
WARNING:Severe“burn-in”or“after-image”or“ghostimage”symptomswillnotdisappearandcannotberepaired.Thisisalsonotcoveredunderthe
termsofyourwarranty.
Service:
• Thecasingcovershouldbeopenedonlybyqualiedservicepersonnel.
• Ifthereisanyneedforrepairorintegration,pleasecontactyourlocalservicecenter.
• Donotleaveyourdisplayunderdirectsunlight.
Ifyourdisplaydoesnotoperatenormally,havingfollowedtheinstructionssetoutinthisdocument,pleasecontactatechnicianoryour
localservicecenter.
BDL5570EL
iii
Read and follow these instructions when connecting and using your display:
• Unplugthedisplayifyouarenotgoingtouseitforanextensiveperiodoftime.
• Unplugthedisplayifyouneedtocleanitwithaslightlydampcloth.Thescreenmanybewipedwithadryclothwhenthepoweris
off.However,neverusealcohol,solventsorammonia-basedliquids.
• Consultaservicetechnicianifthedisplaydoesnotoperatenormallywhenyouhavefollowedtheinstructionsinthismanual.
• Thecasingcovershouldbeopenedonlybyqualiedservicepersonnel.
• Keepthedisplayoutofdirectsunlightandawayfromstovesoranyotherheatsources.
• Removeanyobjectthatcouldfallintotheventsorpreventpropercoolingofthedisplay’selectronics.
• Donotblocktheventilationholesonthecabinet.
• Keepthedisplaydry.Toavoidelectricshock,donotexposeittorainorexcessivemoisture.
• WhenturningoffthedisplaybydetachingthepowercableorDCpowercord,waitfor6secondsbeforere-attachingthepower
cableorDCpowercordfornormaloperation..
• Toavoidtheriskofshockorpermanentdamagetothesetdonotexposethedisplaytorainorexcessivemoisture.
• Whenpositioningthedisplay,makesurethepowerplugandoutletareeasilyaccessible.
• IMPORTANT:Alwaysactivateascreensaverprogramduringyourapplication.Ifastillimageinhighcontrastremainsonthe
screenforanextendedperiodoftime,itmayleavean‘after-image’or‘ghostimage’onthefrontofthescreen.Thisisawell-known
phenomenonthatiscausedbytheshortcomingsinherentinLCDtechnology.Inmostcasestheafterimagewilldisappeargradually
overaperiodoftimeafterthepowerhasbeenswitchedoff.Beawarethattheafter-imagesymptomcannotberepairedandisnot
coveredunderwarranty.
CE Declaration of Conformity
ThisdevicecomplieswiththerequirementssetoutintheCouncilDirectiveontheApproximationoftheLawsoftheMemberStatesrelatingto
ElectromagneticCompatibility(2014/30/EU),Low-voltageDirective(2014/35/EU)andRoHSdirective(2011/65/EU).
ThisproducthasbeentestedandfoundtocomplywiththeharmonizedstandardsforInformationTechnologyEquipment,theseharmonizedstandards
publishedunderDirectivesofOfcialJournaloftheEuropeanUnion.
Warning:
ThisequipmentiscompliantwithClassAofEN55032/CISPR32.Inaresidentialenvironmentthisequipmentmaycauseradiointerference.
Federal Communications Commission (FCC) Notice (U.S. Only)
NOTE:ThisequipmenthasbeentestedandfoundtocomplywiththelimitsforaClassAdigitaldevice,pursuanttopart15ofthe
FCCRules.Theselimitsaredesignedtoprovidereasonableprotectionagainstharmfulinterferencewhentheequipmentisoperated
inacommercialenvironment.Thisequipmentgenerates,uses,andcanradiateradiofrequencyenergyand,ifnotinstalledandusedin
accordancewiththeinstructionmanual,maycauseharmfulinterferencetoradiocommunications.Operationofthisequipmentina
residentialareaislikelytocauseharmfulinterferenceinwhichcasetheuserwillberequiredtocorrecttheinterferenceathisown
expense.
Changesormodicationsnotexpresslyapprovedbythepartyresponsibleforcompliancecouldvoidtheuser’sauthoritytooperatethe
equipment.
UseonlyanRFshieldedcablethatwassuppliedwiththedisplaywhenconnectingthisdisplaytoacomputerdevice.
Topreventdamagewhichmayresultinreorshockhazard,donotexposethisappliancetorainorexcessivemoisture.
ThisdevicecomplieswithPart15oftheFCCRules.Operationissubjecttothefollowingtwoconditions:(1)Thisdevicemaynotcauseharmful
interference,and(2)thisdevicemustacceptanyinterferencereceived,includinginterferencethatmaycauseundesiredoperation.
BDL5570EL
iv
Polish Center for Testing and Certication Notice
Theequipmentshoulddrawpowerfromasocketwithanattachedprotectioncircuit(athree-prongsocket).Allequipmentthatworkstogether(computer,
display,printer,andsoon)shouldhavethesamepowersupplysource.
Thephasingconductoroftheroom’selectricalinstallationshouldhaveareserveshort-circuitprotectiondeviceintheformofafusewithanominalvalue
nolargerthan16amperes(A).
Tocompletelyswitchofftheequipment,thepowersupplycablemustberemovedfromthepowersupplysocket,whichshouldbelocatednearthe
equipmentandeasilyaccessible.
Aprotectionmark“B”conrmsthattheequipmentisincompliancewiththeprotectionusagerequirementsofstandardsPN-93/T-42107andPN-89/
E-06251.
Electric, Magnetic and Electromagnetic Fields (“EMF”)
1. Wemanufactureandsellmanyproductstargetedatconsumers,which,likeanyelectronicapparatus,ingeneralhavetheabilitytoemitandreceive
electromagneticsignals.
2. OneofourleadingBusinessPrinciplesistotakeallnecessaryhealthandsafetymeasuresforourproducts,tocomplywithallapplicablelegal
requirementsandtostaywellwithintheEMFstandardsapplicableatthetimeofproducingtheproducts.
3. Wearecommittedtodevelop,produceandmarketproductsthatcausenoadversehealtheffects.
4. Weconrmthatifitsproductsarehandledproperlyfortheirintendeduse,theyaresafetouseaccordingtoscienticevidenceavailabletoday.
5. WeplayanactiveroleinthedevelopmentofinternationalEMFandsafetystandards,enablingustoanticipatefurtherdevelopmentsinstandardization
forearlyintegrationinitsproducts.
BDL5570EL
v
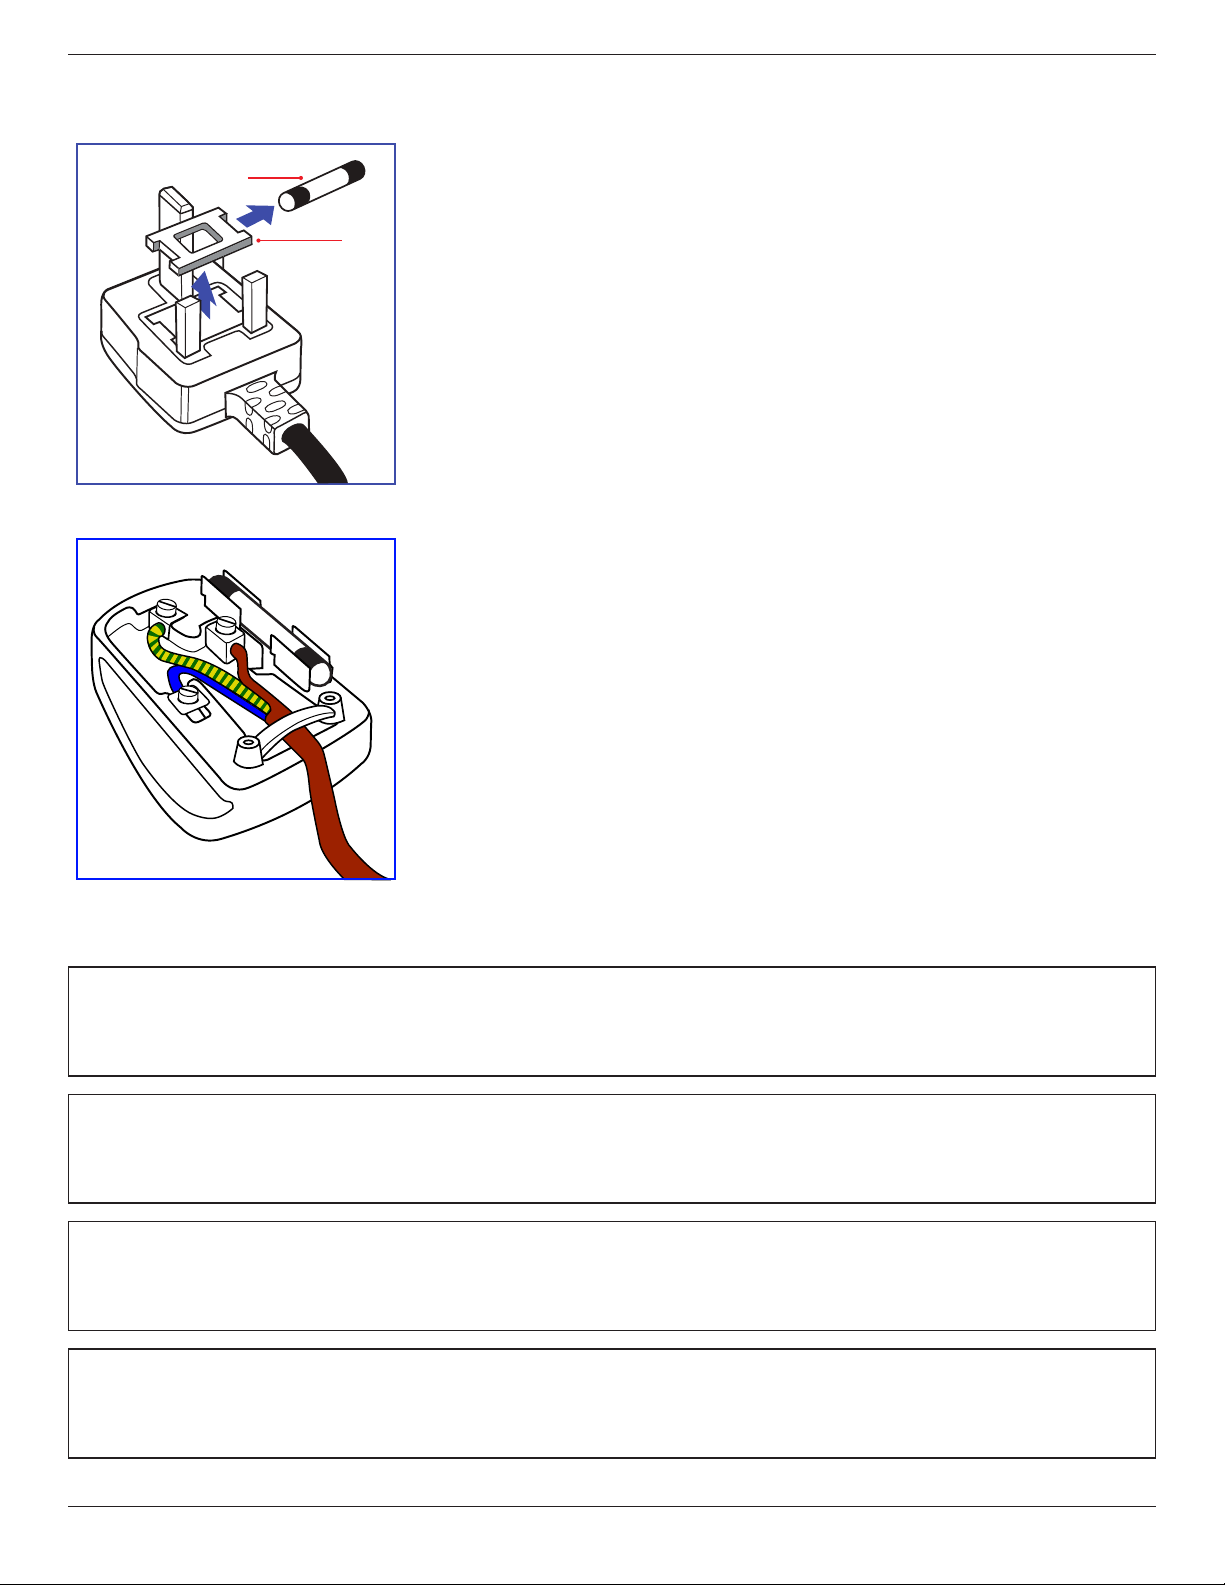
Information for U.K. only
(A)
(B)
WARNING - THIS APPLIANCE MUST BE EARTHED.
Important:
Thisapparatusissuppliedwithanapprovedmoulded13Aplug.Tochangeafuseinthistypeofplug
proceedasfollows:+
1. Removefusecoverandfuse.
2. FitnewfusewhichshouldbeaBS13625A,A.S.T.A.orBSIapprovedtype.
3. Retthefusecover.
Ifthettedplugisnotsuitableforyoursocketoutlets,itshouldbecutoffandanappropriate3-pin
plugttedinitsplace.
Ifthemainsplugcontainsafuse,thisshouldhaveavalueof5A.Ifaplugwithoutafuseisused,thefuse
atthedistributionboardshouldnotbegreaterthan5A.
NOTE: Theseveredplugmustbedestroyedtoavoidapossibleshockhazardshoulditbeinserted
intoa13Asocketelsewhere.
How to connect a plug
Thewiresinthemainsleadarecolouredinaccordancewiththefollowingcode:
BLUE-“NEUTRAL”(“N”)
BROWN-“LIVE”(“L”)
GREEN&YELLOW-“EARTH”(“E”)
1. TheGREEN&YELLOWwiremustbeconnectedtotheterminalintheplugwhichismarkedwith
theletter“E”orbytheEarthsymbolorcolouredGREENorGREEN&YELLOW.
2. TheBLUEwiremustbeconnectedtotheterminalwhichismarkedwiththeletter“N”orcoloured
BLACK.
3. TheBROWNwiremustbeconnectedtotheterminalwhichmarkedwiththeletter“L”or
colouredRED.
Beforereplacingtheplugcover,makecertainthatthecordgripisclampedoverthesheathofthelead
-notsimplyoverthethreewires.
North Europe (Nordic Countries) Information
Placering/Ventilation
VARNING:
FÖRSÄKRADIGOMATTHUVUDBRYTAREOCHUTTAGÄRLÄTÅTKOMLIGA,NÄRDUSTÄLLERDINUTRUSTNINGPÅPLATS.
Placering/Ventilation
ADVARSEL:
SØRGVEDPLACERINGENFOR,ATNETLEDNINGENSSTIKOGSTIKKONTAKTERNEMTTILGÆNGELIGE.
Paikka/Ilmankierto
VAROITUS:
SIJOITALAITESITEN,ETTÄVERKKOJOHTOVOIDAANTARVITTAESSAHELPOSTIIRROTTAAPISTORASIASTA.
Plassering/Ventilasjon
ADVARSEL:
NÅRDETTEUTSTYRETPLASSERES,MÅDUPASSEPÅATKONTAKTENEFORSTØMTILFØRSELERLETTEÅNÅ.
BDL5570EL
vi
China RoHS
电子电气产品有害物质限制使用标识要求 (中国RoHS法规标识要求) 产品中有害物质的名称及含量。
零部件名称
有害物质
铅
(Pb)
汞
(Hg)
镉
(Cd)
六价铬
(Cr (VI))
多溴联苯
(PBB)
多溴二苯醚
(PBDE)
塑料外框 O O O O O O
后壳 O O O O O O
LCD
panel
CCFL X X O O O O
LED X O O O O O
电路板组件* X O O O O O
底座 O O O O O O
电源线 X O O O O O
其他线材 X O O O O O
遥控器 X O O O O O
*:电路板组件包括印刷电路板及其构成的零部件,如电阻、电容、集成电路、连接器等。
本表格依据SJ/T 11364的规定编制。
O: 表示该有害物质在该部件所有均质材料中的含量均在 GB/T 26572 标准规定的限量要求以下.
X: 表示该有害物质至少在该部件的某一均质材料中的含量超出 GB/T 26572 标准规定的限量要求.
上 表 中 打“ X”的部件中,应功能需要,部分有害物质含量超出GB/T 26572规定的限量要求,但是符合欧盟
RoHS法规要求(属于豁免部分)。
备注:上表仅做为范例,实际标示时应依照各产品的实际部件及所含有害物质进行标示。
10
環保使用期限
此標識指期限(十年),電子电气產品中含有的有害物質在正常使用的條件下不會發生外泄或突變,
電子电气產品用戶使用該電子电气產品不會對環境造成嚴重污染或對其人身、財產造成嚴重損害的期限。
BDL5570EL
vii
《废弃电器电子产品回收处理管理条例》提示性说明
为了更好地关爱及保护地球,当用户不再需要此产品或产品寿命终止时,请遵守国家废弃电器电子产品
回收处理相关法律法规,将其交给当地具有国家认可的回收处理资质的厂商进行回收处理。
娤⌈
㨢᳸$䵥ᵥ⍿Ʋ◦䏝㯹䉭❁ᳫ濕媣ᵥ⍿⊭侻廞ノ㒞䵽䏳ⴰㄮƲ◦店䢋⾃濕⊭侻斾堿䏦ヵ
⪷ⴰㄮ悅⊔⩜⊭圊䕂㉨㑻Ʋ
單元
限用物質及其化學符號
鉛
(Pb)
汞
(Hg)
鎘
(Cd)
六價鉻
(Cr
+6
)
多溴聯苯
(PBB)
多溴二苯醚
(PBDE)
塑料外框 ○ ○ ○ ○ ○ ○
後殼 ○ ○ ○ ○ ○ ○
- ○ ○ ○ ○ ○
電路板組件 - ○ ○ ○ ○ ○
底座 ○ ○ ○ ○ ○ ○
電源線 - ○ ○ ○ ○ ○
其他線材 - ○ ○ ○ ○ ○
遙控器 - ○ ○ ○ ○ ○
備考1.〝○〞係指該項限用物質之百分比含量未超出百分比含量基準值。
備考2.〝-〞係指該項限用物質為排除項目。
液晶面板
警語 : 使用過度恐傷害視力。
注意事項 :
(1) 使用30分鐘請休息10分鐘。
(2) 未滿2歲幼兒不看螢幕,2歲以上每天看螢幕不要超過1小時。
警告使用者 :
此為甲類資訊技術設備 , 於居住環境中使用時 , 可能會造成射頻擾動 , 在此種情況下 , 使用者會被
要求採取某些適當的對策。
Turkey RoHS:
TürkiyeCumhuriyeti:EEEYönetmeliğineUygundur
Ukraine RoHS:
ОбладнаннявідповідаєвимогамТехнічногорегламентущодообмеженнявикористаннядеякихнебезпечнихречовинвелектричномута
електронномуобладнанні,затвердженогопостановоюКабінетуМіністрівУкраїнивід3грудня2008№1057

BDL5570EL
viii
End-of-Life Disposal
YournewPublicInformationDisplaycontainsmaterialsthatcanberecycledandreused.Specializedcompaniescanrecycleyourproducttoincreasethe
amountofreusablematerialsandtominimizetheamounttobedisposedof.
PleasendoutaboutthelocalregulationsonhowtodisposeofyourolddisplayfromyourlocalPhilipsdealer.
(For customers in Canada and U.S.A.)
Thisproductmaycontainleadand/ormercury.Disposeofinaccordancetolocal-stateandfederalregulations.Foradditionalinformationonrecycling
contactwww.eia.org(ConsumerEducationInitiative)
Waste Electrical and Electronic Equipment-WEEE
Attention users in European Union private households
Thismarkingontheproductoronitspackagingillustratesthat,underEuropeanDirective2012/19/EUgoverningusedelectricaland
electronicappliances,thisproductmaynotbedisposedofwithnormalhouseholdwaste.Youareresponsiblefordisposalofthis
equipmentthroughadesignatedwasteelectricalandelectronicequipmentcollection.Todeterminethelocationsfordroppingoffsuch
wasteelectricalandelectronic,contactyourlocalgovernmentofce,thewastedisposalorganizationthatservesyourhouseholdorthe
storeatwhichyoupurchasedtheproduct.
Attention users in United States:
PleasedisposeofaccordingtoallLocal,StateandFederalLaws.Forthedisposalorrecyclinginformation,contact:www.mygreenelectronics.comorwww.
eiae.org.
End of Life Directives-Recycling
YournewPublicInformationDisplaycontainsseveralmaterialsthatcanberecycledfornewusers.
PleasedisposeofaccordingtoallLocal,State,andFederallaws
AsanENERGYSTARPartner,wehavedeterminedthatthisproductmeetstheENERGYSTARguidelinesforenergyefciency.
Restriction on Hazardous Substances statement (India)
Thisproductcomplieswiththe“E-Waste(Management)Rules,2016”CHAPTERV,rule16,sub-rule(1).WhereasNewElectricalandElectronic
EquipmentandtheircomponentsorconsumablesorpartsorsparesdonotcontainLead,Mercury,Cadmium,HexavalentChromium,polybrominated
biphenylsandpolybrominateddiphenylethersbeyondamaximumconcentrationvalueof0.1%byweightinhomogenousmaterialsforlead,mercury,
hexavalentchromium,polybrominatedbiphenylsandpolybrominateddiphenylethersandof0.01%byweightinhomogenousmaterialsforcadmium.
exceptofexemptionssetinSchedule2oftheRule.
E-Waste Declaration for India
Thissymbolontheproductoronitspackagingindicatesthatthisproductmustnotbedisposedofwithyourotherhouseholdwaste.
Insteaditisyourresponsibilitytodisposeofyourwasteequipmentbyhandingitovertoadesignatedcollectionpointfortherecycling
ofwasteelectricalandelectronicequipment.Theseparatecollectionandrecyclingofyourwasteequipmentatthetimeofdisposal
willhelptoconservenaturalresourcesandensurethatitisrecycledinamannerthatprotectshumanhealthandtheenvironment.
FormoreinformationaboutE-wastepleasevisithttp://www.india.philips.com/about/sustainability/recycling/index.pageandtoknow
whereyoucandropoffyourwasteequipmentforrecyclinginIndiapleasecontactonbelowgivencontactdetails.
Helplinenumber:1800-425-6396(MondaytoSaturday,9a.m.to5:30pm)
CentralizedE-wastecollectioncenter
Address:TPVTechnologyIndiaPrivateLimited,
59,MaheswariNagar,1stMainRoad,MahadevapuraPost,WhiteeldRoad
Bangalore,Karnataka,PIN:560048,Tel:080-3023-1000
E-mail:[email protected]
BDL5570EL
ix
Batteries
ForEU:Thecrossed-outwheeledbinimpliesthatusedbatteriesshouldnotbeputtothegeneralhouseholdwaste!Thereisaseparate
collectionsystemforusedbatteries,toallowpropertreatmentandrecyclinginaccordancewithlegislation.
Pleasecontactyourlocalauthorityfordetailsonthecollectionandrecyclingschemes.
ForSwitzerland:Theusedbatteryistobereturnedtothesellingpoint.
Forothernon-EUcountries:Pleasecontactyourlocalauthorityforcorrectmethodofdisposaloftheusedbattery.
According to EU directive 2006/66/EC, the battery can’t be disposed improperly. The battery shall be separated
to collect by local service.
Após o uso, as pilhas
deverão ser entregues ao
estabelecimento comercial
ou
e/ou baterias
rede de assistência técnica
autorizada.
Information for EAC
Month and year of manufacturing
please refer information in Rating label.
Name and location of manufacturer ООО “Профтехника”
Адрес: 3-й Проезд Марьиной рощи, 40/1 офис 1. Москва, 127018, Россия
Importer and information Наименование организации: ООО “Профтехника”
Адрес: 3-й Проезд Марьиной рощи, 40/1 офис 1. Москва, 127018, Россия
Контактное лицо: Наталья Астафьева,
+7 495 640 20 20
nat@profdisplays.ru

BDL5570EL
x
Table Of Contents
1. Unpacking and Installation .......................................................1
1.1. Unpacking.........................................................................................1
1.2. PackageContents........................................................................1
1.3. InstallationNotes.........................................................................1
1.4. InstallingandRemovingTableStands(optional)........2
1.5. MountingonaWall....................................................................3
1.5.1. VESAGrid....................................................................3
1.6. MountinginPortraitPosition................................................4
1.6.1. Howtousethelogoguiderforportrait
position...........................................................................4
1.6.2. Howtoremovethelogo.....................................4
1.7. OperatingInstructionsofEdgeAlignmentKit............5
1.7.1. InstallingEdgeAlignmentKit..............................5
2. Parts and Functions ...................................................................7
2.1. ControlPanel.................................................................................7
2.2. Input/OutputTerminals.............................................................8
2.3. RemoteControl...........................................................................9
2.3.1. Generalfunctions.....................................................9
2.3.2. IDRemoteControl..............................................10
2.3.3. Insertingthebatteriesintheremote
control..........................................................................11
2.3.4. Handlingtheremotecontrol..........................11
2.3.5. Operatingrangeoftheremotecontrol...11
3. Connecting External Equipment.......................................... 12
3.1. ConnectingExternalEquipment(DVD/VCR/
VCD)...............................................................................................12
3.1.1. UsingCOMPONENTvideoinput..............12
3.1.2. UsingVideoSourceinput..................................12
3.1.3. UsingHDMIvideoinput...................................13
3.2. ConnectingaPC.......................................................................13
3.2.1. UsingVGAinput.....................................................13
3.2.2. UsingDVIinput......................................................13
3.2.3. UsingHDMIinput.................................................14
3.2.4. UsingDisplayPortinput.....................................14
3.3. ConnectingAudioEquipment...........................................14
3.3.1. Connectingexternalspeakers........................14
3.3.2. Connectinganexternalaudiodevice........15
3.4. ConnectingMultipleDisplaysinaDaisy-chain
Conguration..............................................................................15
3.4.1. Displaycontrolconnection..............................15
3.4.2. Digitalvideoconnection....................................15
3.4.3. Analogvideoconnection..................................16
3.5. IRconnection..............................................................................16
3.6. IRPass-throughConnection...............................................17
3.7. Wire-connectingtoNetwork...........................................17
4. Operation ................................................................................. 18
4.1. WatchtheConnectedVideoSource............................18
4.2. ChangePictureFormat.........................................................18
4.3. PlaymultimedialesviaLocalAreaNetwork..........18
4.3.1. Setupthenetwork..............................................18
4.3.2. HowtouseDLNA-DMP.................................18
4.3.3. HowtouseDLNA-DMRfromPC............19
4.4. PlaymultimedialesfromUSBdevice.........................19
4.5. Playoptions..................................................................................20
4.5.1. Playingmusicles..................................................20
4.5.2. Playingmovieles.................................................20
4.5.3. Playingphotoles.................................................20
4.6. HowtouseOperabrowser(HTML5).......................20
5. Change your settings ............................................................. 22
5.1. Settings............................................................................................22
5.1.1. Picture..........................................................................22
5.1.2. Sound...........................................................................23
5.1.3. Tiling..............................................................................23
5.1.4. Network.....................................................................24
5.1.5. Storage........................................................................25
5.1.6. Generalsettings......................................................26
5.1.7. Adv.................................................................................28
5.1.8. Webcontrol.............................................................28
5.1.9. FTPServer.................................................................32
6. USB device compatibility ....................................................... 33
7. Input Mode ............................................................................... 35
8. Pixel Defect Policy .................................................................. 36
8.1. PixelsandSub-Pixels...............................................................36
8.2. TypesofPixelDefects+DotDenition....................36
8.3. BrightDotDefects...................................................................36
8.4. DarkDotDefects.....................................................................37
8.5. ProximityofPixelDefects...................................................37
8.6. PixelDefectTolerances.........................................................37
8.7. MURA.............................................................................................37
9. Cleaning and Troubleshooting .............................................. 38
9.1. Cleaning..........................................................................................38
9.2. Troubleshooting.........................................................................39
10. Technical Specications ......................................................... 40
BDL5570EL
1
1. Unpacking and Installation
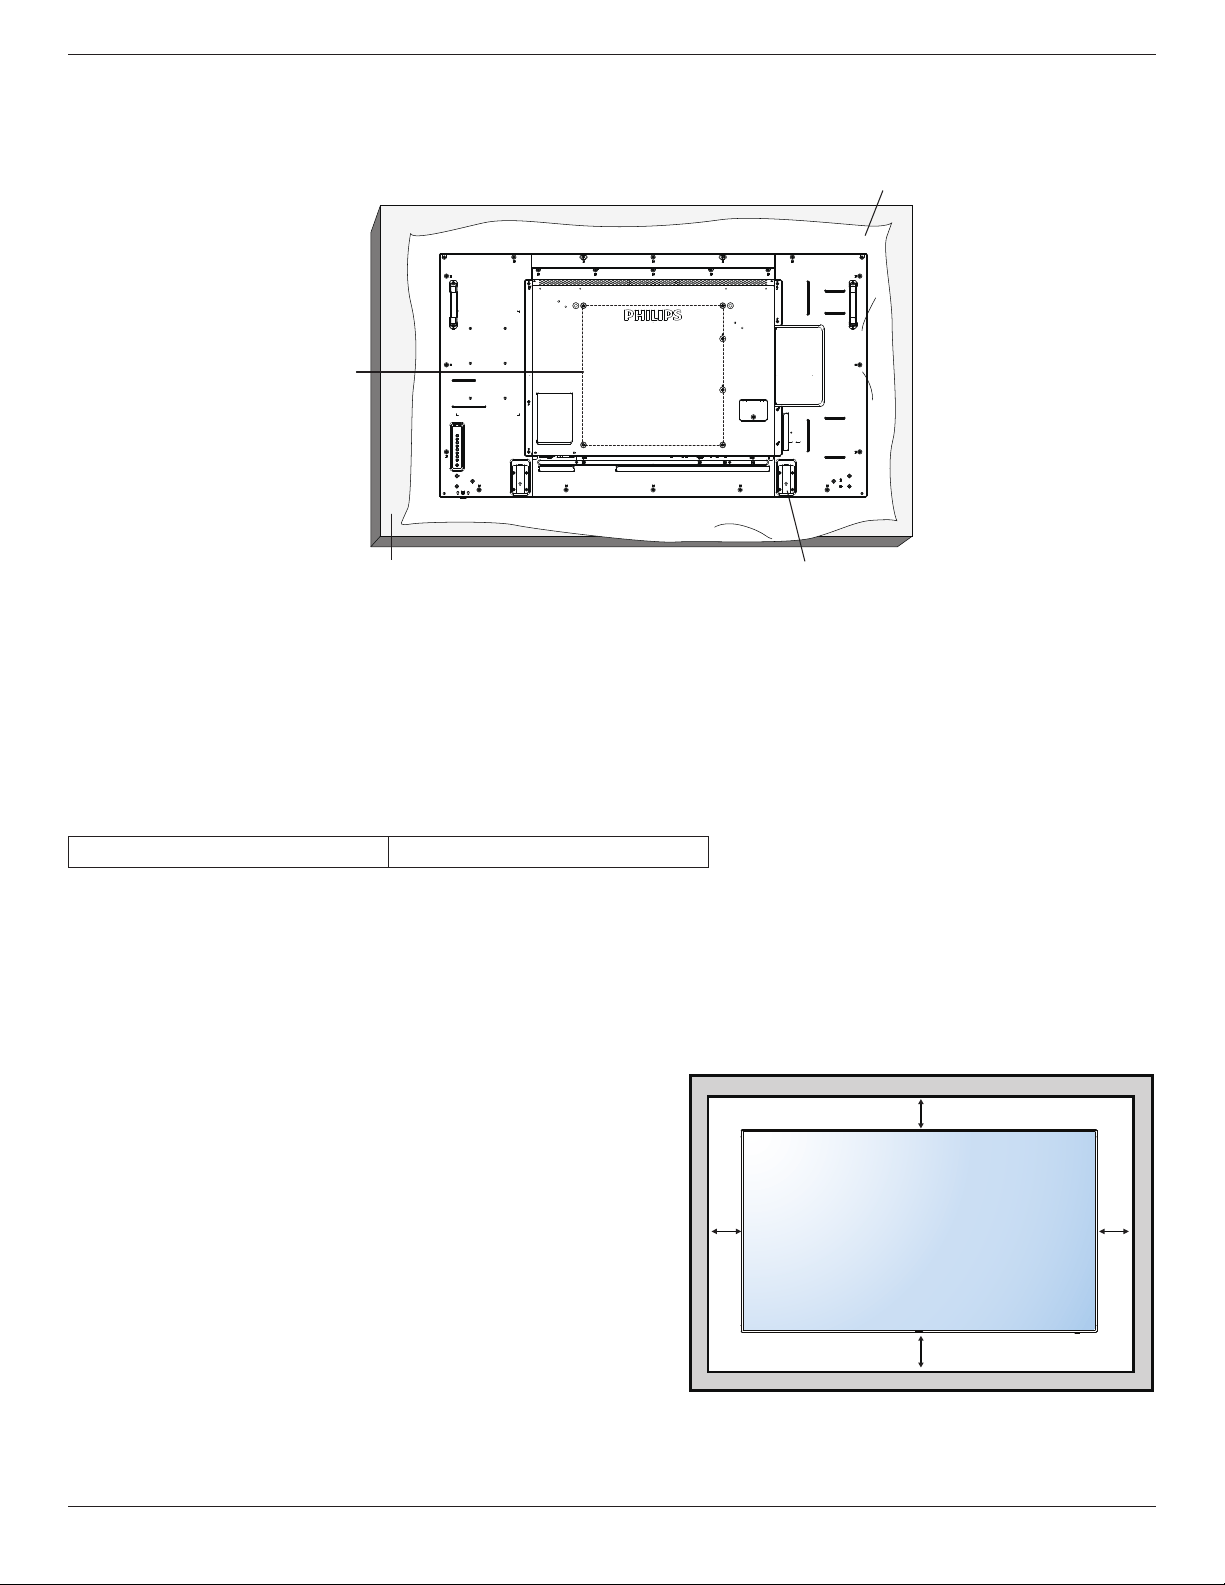
1.1. Unpacking
• Thisproductispackedinacarton,togetherwiththestandardaccessories.
• Anyotheroptionalaccessorieswillbepackedseparately.
• Duetothesizeandweightofthisdisplayitisrecommendedfortwopeopletomoveit.
• Afteropeningthecarton,ensurethatthecontentsarecompleteandingoodcondition.
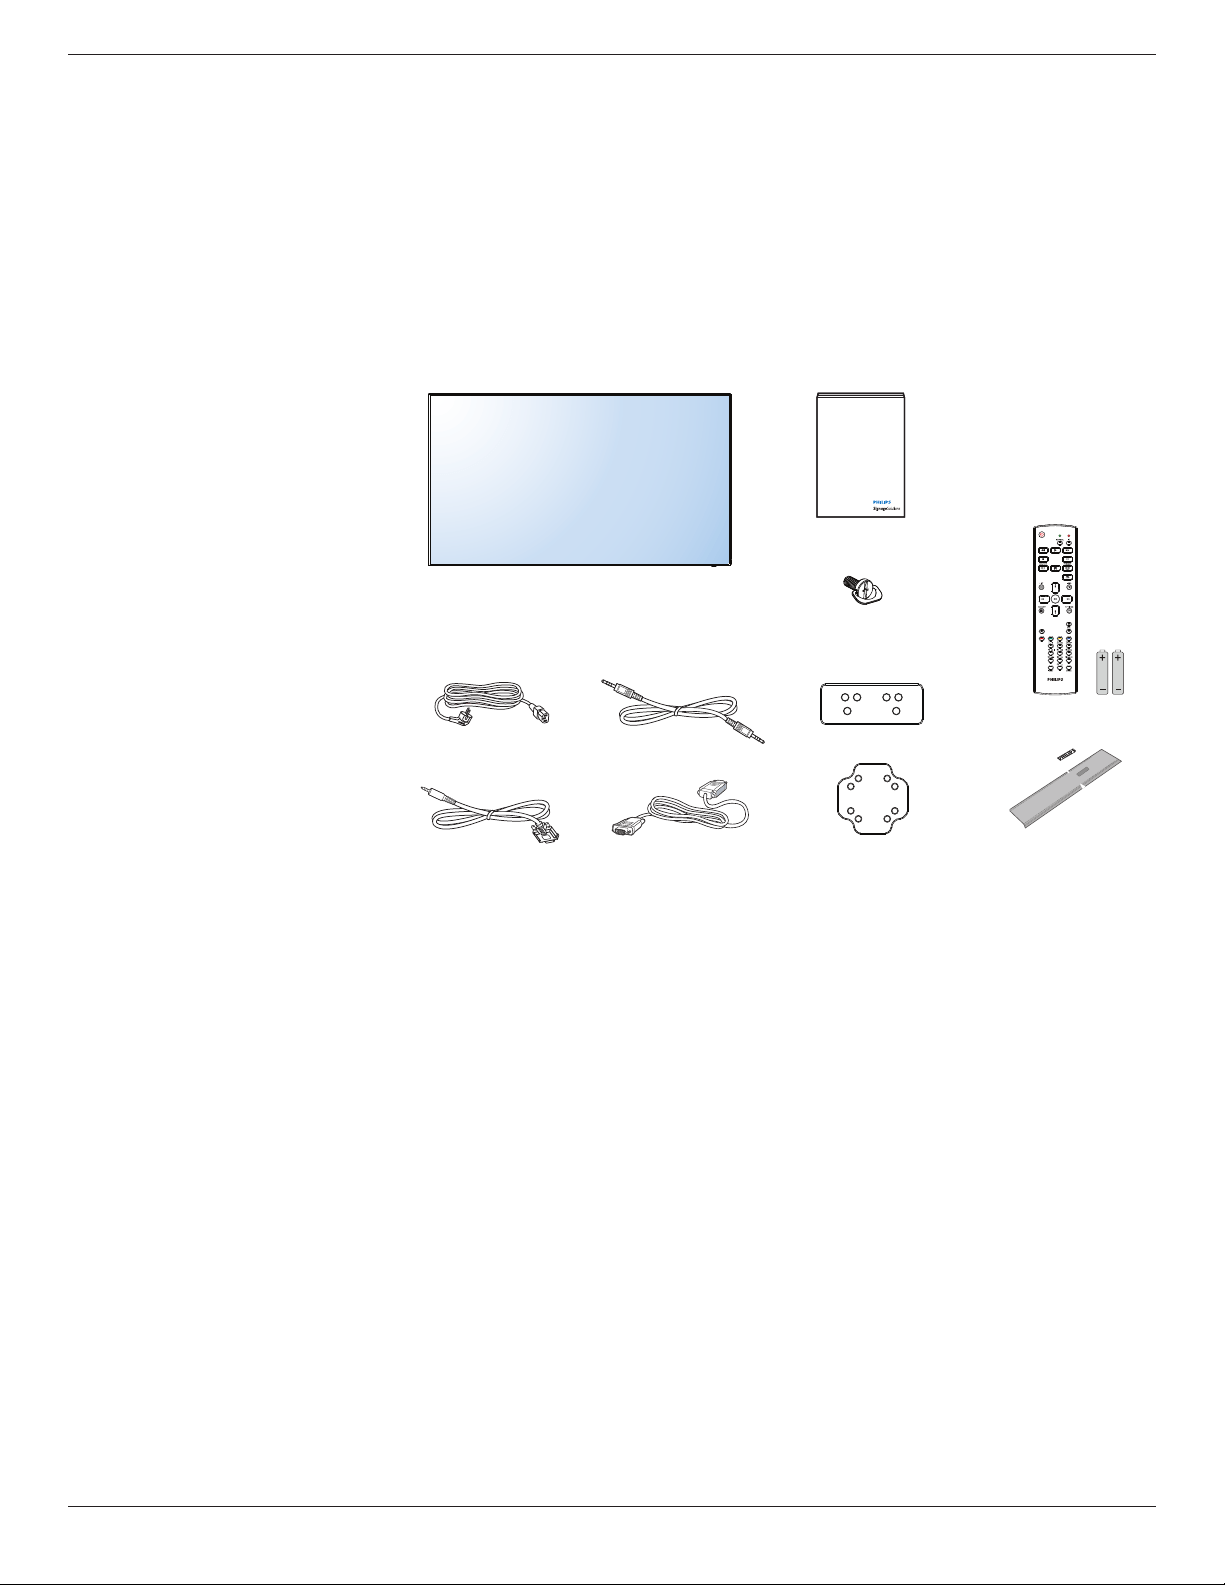
1.2. Package Contents
Pleaseverifythatyoureceivedthefollowingitemswithyourpackagecontent:
• LCDdisplay
• RemotecontrolwithAAAbatteries
• Powercord
• VGAcable
• RS232cable
• RS232daisy-chaincable
• Quickstartguide
• Logoguider
• EdgeAlignmentKit-1:2PCS
• EdgeAlignmentKit-2:1PCS
• ThumbScrew:8PCS
* The supplied power cord varies depending on destination.
Power Cord
Quick start guide
Edge Alignment Kit-1
Edge Alignment Kit-2
Thumb Screw
Remote Control
and AAA Batteries
RS232 Cable
RS232 daisy-chain cable
Video Signal Cable
(D-SUB to D-SUB Cable)
Logo guider
*Differencesaccordingtoregions
Displaydesignandaccessoriesmaydifferfromthoseillustratedabove.
NOTES:
• Forallotherregions,applyapowercordthatconformstotheACvoltageofthepowersocketandhasbeenapprovedbyandcomplieswiththe
safetyregulationsoftheparticularcountry.
• Youmightliketosavethepackageboxandpackingmaterialforshippingthedisplay.
1.3. Installation Notes
• Duetothehighpowerconsumption,alwaysusetheplugexclusivelydesignedforthisproduct.Ifanextendedlineisrequired,pleaseconsultyour
serviceagent.
• Theproductshouldbeinstalledonaatsurfacetoavoidtipping.Thedistancebetweenthebackoftheproductandthewallshouldbemaintained
forproperventilation.Avoidinstallingtheproductinthekitchen,bathroomoranyotherplaceswithhighhumiditysoasnottoshortentheservicelife
oftheelectroniccomponents.
• Theproductcannormallyoperateonlyunder3000minaltitude.Ininstallationsataltitudesabove3000m,someabnormalitiesmaybeexperienced.

BDL5570EL
2
1.4. Installing and Removing Table Stands (optional)
To install table stands:
1. Ensureyourdisplayispoweredoff.
2. Spreadaprotectivesheetonaatsurface.
3. Grabthecarryinghandlesandplacethedisplayface-downontheprotectivesheet.
4. Afterinsertingthestandintheguideblock,tightenthescrewsonbothsidesofthedisplay.
NOTE: Thelongersideofthestandshouldfacethefrontofthedisplay.
Carrying handle
Thumbscrews
Table stand
Longer portions face the front
To remove table stands:
1. Poweroffthedisplay.
2. Spreadaprotectivesheetonaatsurface.
3. Grabthecarryinghandlesandplacethedisplayface-downontheprotectivesheet.
4. Removescrewsusingascrewdriverandplacetheminasafeplaceforreuse.
BDL5570EL
3
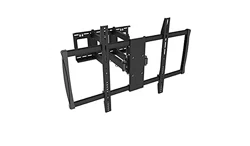
1.5. Mounting on a Wall
Tomountthisdisplaytoawall,youwillhavetoobtainastandardwall-mountingkit(commerciallyavailable).Werecommendusingamountinginterface
thatcomplieswithTUV-GSand/orUL1678standardinNorthAmerica.
Protective Sheet
Table
VESA Grid
Tabletop stand
1. Layaprotectivesheetonatable,whichwaswrappedaroundthedisplaywhenitwaspackaged,beneaththescreensurfacesoasnottoscratchthe
screenface.
2. Ensureyouhaveallaccessoriesformountingthisdisplay(wallmount,ceilingmount,tablestand,etc).
3. Followtheinstructionsthatcomewiththebasemountingkit.Failuretofollowcorrectmountingprocedurescouldresultindamagetotheequipment
orinjurytotheuserorinstaller.Productwarrantydoesnotcoverdamagecausedbyimproperinstallation.
4. Forthewall-mountingkit,useM6mountingscrews(havingalength10mmlongerthanthethicknessofthemountingbracket)andtightenthem
securely.
1.5.1. VESA Grid
BDL5570EL
400(H)x400(V)mm
Caution:
Topreventthedisplayfromfalling:
• Forwallorceilinginstallation,werecommendinstallingthedisplaywithmetalbracketswhicharecommerciallyavailable.Fordetailedinstallation
instructions,refertotheguidereceivedwiththerespectivebracket.
• Tolessentheprobabilityofinjuryanddamageresultingfromfallofthedisplayincaseofearthquakeorothernaturaldisaster,besuretoconsultthe
bracketmanufacturerforinstallationlocation.
Ventilation Requirements for enclosure locating
Toallowheattodisperse,leavespacebetweensurroundingobjectsasshowninthe
diagrambelow.
100 mm 100 mm
100 mm
100 mm
BDL5570EL
4
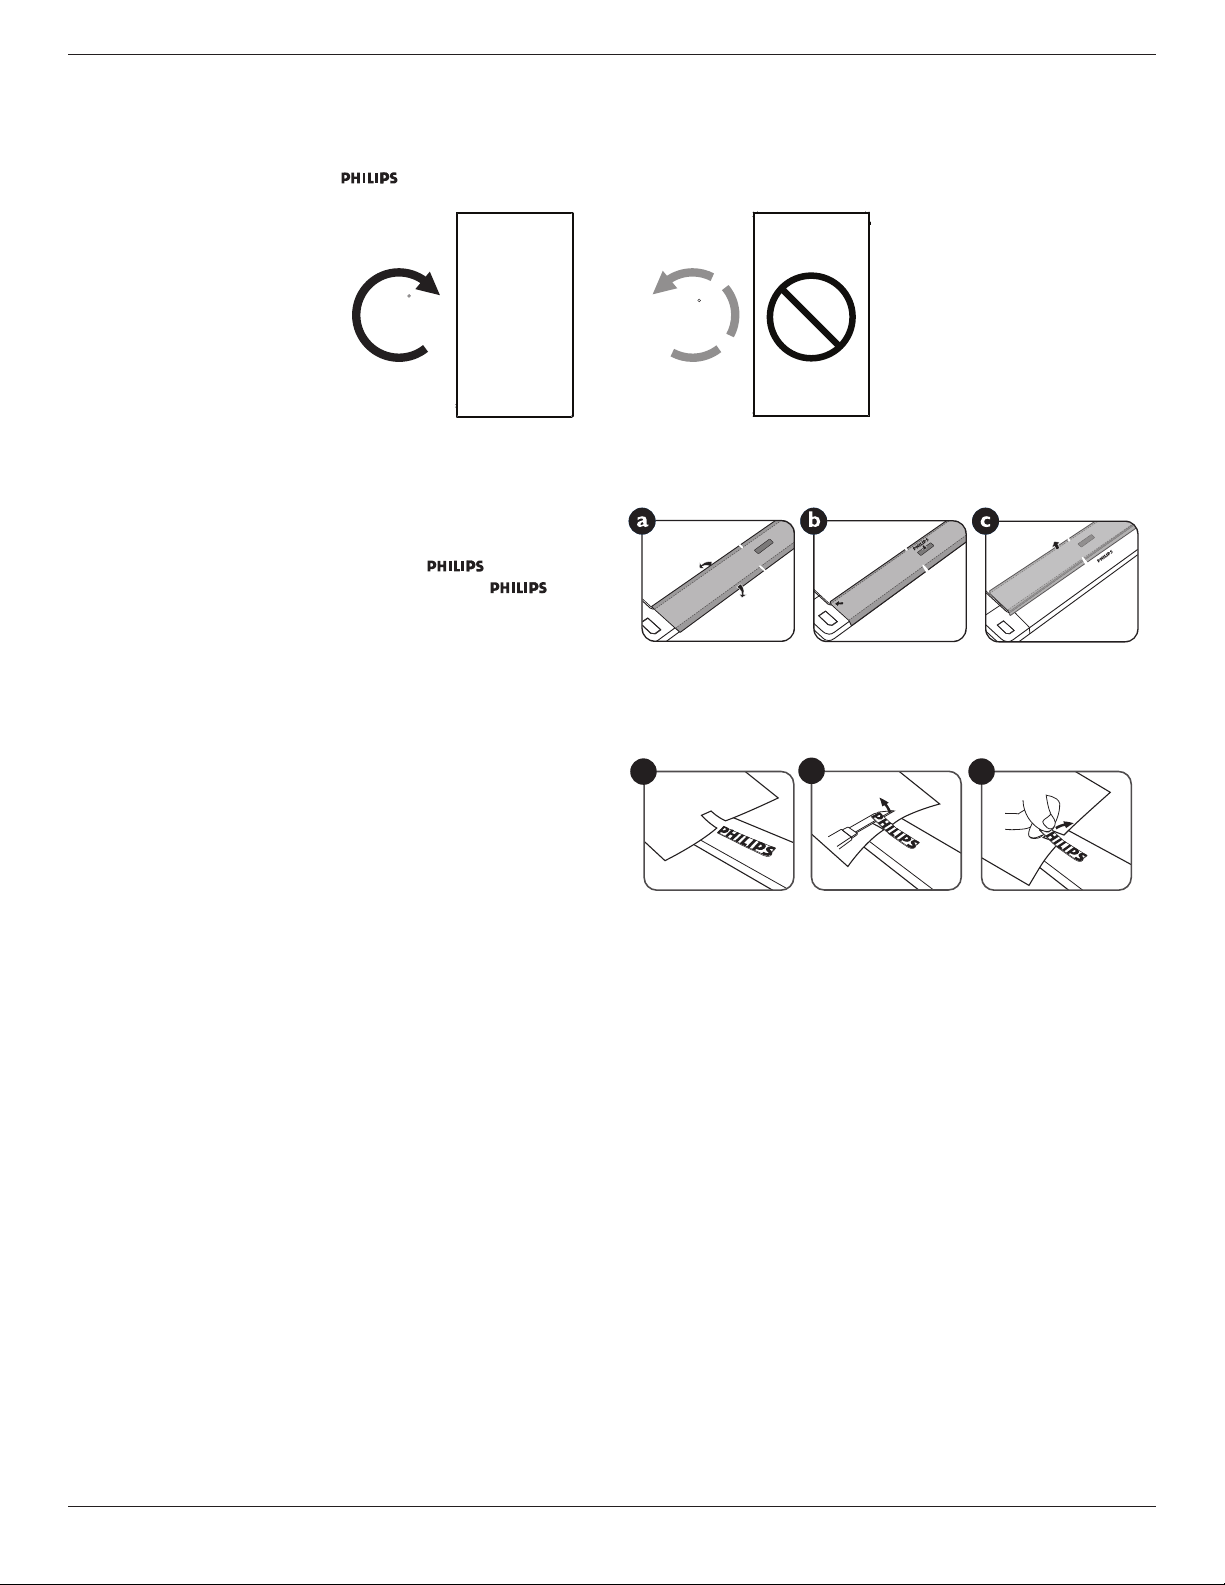
1.6. Mounting in Portrait Position
Thisdisplaycanbeinstalledinportraitposition.
1. Removethetablestand,ifattached.
2. Rotate90degreesclockwise.The“ ”logoshouldbeontheLEFTsidewhenfacingthedisplay.
90
90
1.6.1. How to use the logo guider for portrait position
1. Puttheguideronthelower-leftcornerofthefrontbezelofthedisplay.
Folddownbothofitsedges.
2. Peelofftheprotectivelmatthebackofthe“ ”logosticker.
Holdandpresstheguiderwithyourlefthand.Putthe“ ”logo
stickerwithitsadhesivesidedownintothelogoholewithyourright
hand,andpresstomakeitsticktightlyontothefrontbezel.
3. Removetheguider.
1.6.2. How to remove the logo
1. Prepareapieceofpaperwithacuttingareaoflogoasaprotectorto
preventthefrontbezelfromscratching.
2. Usingaknife,carefullyremovethelogostickerwiththepaperplacing
beneath.
3. Tearoffthelogosticker.
1
2
3
NOTE: Wheninstallingthedisplayonawall,pleaseconsultaprofessionaltechnicianforproperinstallation.Weacceptnoliabilityforinstallationsnot
performedbyaprofessionaltechnician.
BDL5570EL
5
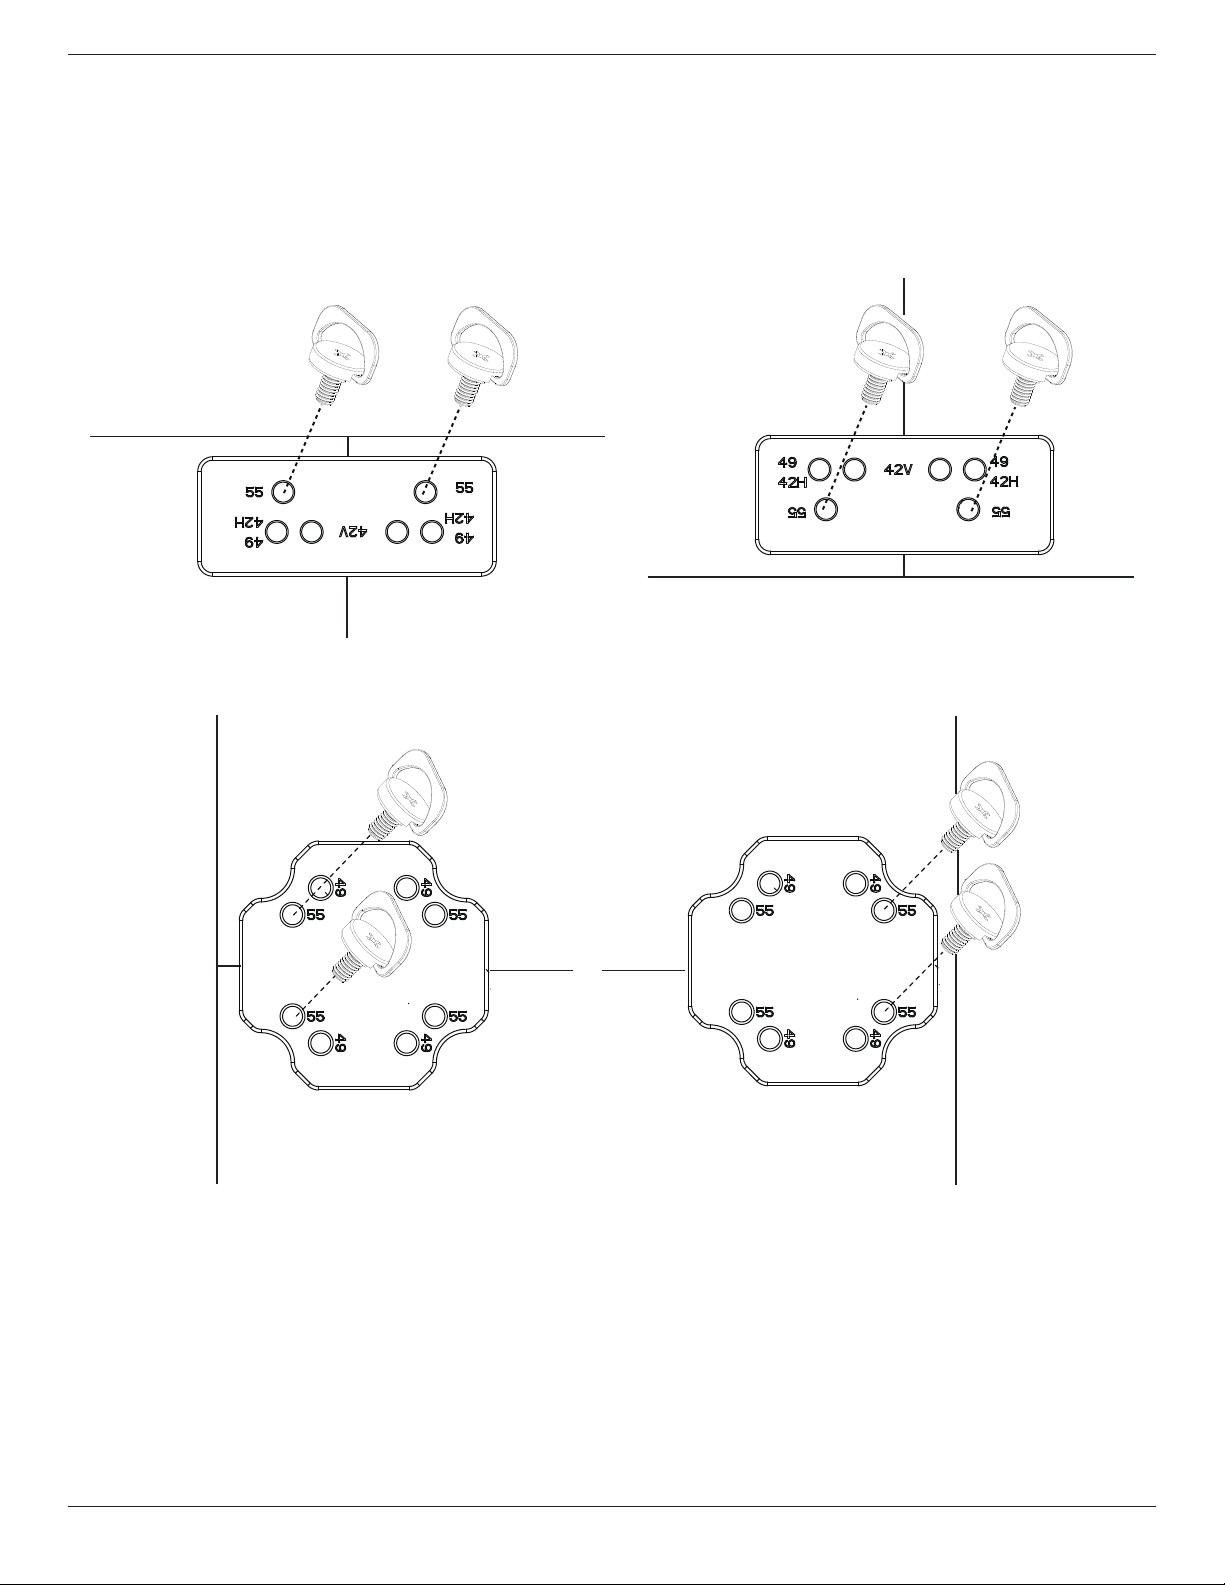
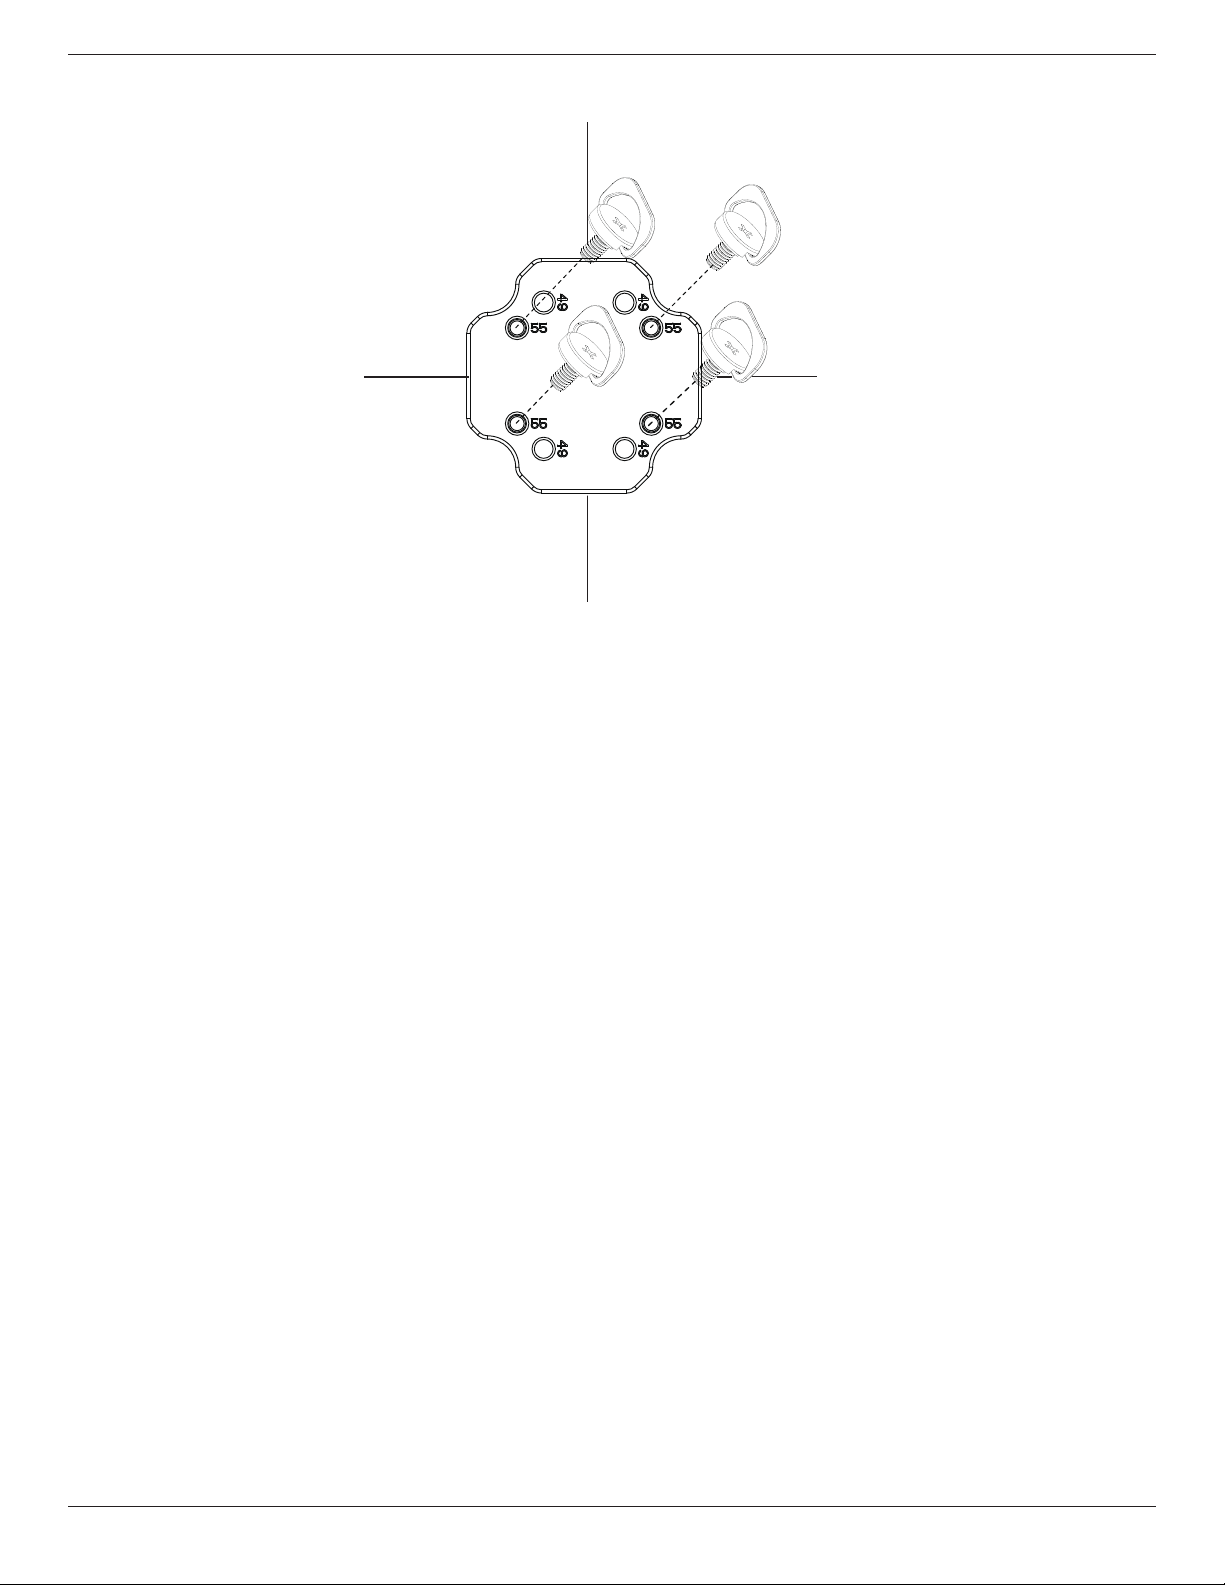
1.7. Operating Instructions of Edge Alignment Kit
1.7.1. Installing Edge Alignment Kit
• Beforeinstalledgealignmentkit,displaysmustbemountedtovideowallframecorrectly.
• Using“ThumbScrew”foreasyinstalling.
• Using“EdgeAlignmentKit-1”onthetopandbottomsideofadjacenttwodisplays.
Top Side
Bottom Side
Display 1
Display 2
Display 1
Display 2
• Using“EdgeAlignmentKit-2”ontheleftandrightsideofadjacenttwodisplays.
Display 1
Left Side
Right Side
Display 2
Display 1
Display 2
BDL5570EL
6
• Using“EdgeAlignmentKit-2”onadjacentfourdisplays.
Display 1
Display 3
Display 2
Display 4
NOTE: Wheninstallingtheedgealignmentkit,pleaseconsultaprofessionaltechnicianforproperinstallation.Weacceptnoliabilityforinstallationsnot
performedbyaprofessionaltechnician.

BDL5570EL
7
2. Parts and Functions
2.1. Control Panel
9
1
2
3
4
5
6
7
8
MUTE INPUT
MENU
1
[ ] button
Usethisbuttontoturnthedisplayonorputthedisplaytostandby.
2
[MUTE] button
SwitchtheaudiomuteON/OFF.
3
[INPUT] button
Choosetheinputsource.
• Usedas[ ]buttonintheOn-Screen-Displaymenu.
4
[ ] button
IncreasetheadjustmentwhileOSDmenuison,orincreasethe
audiooutputlevelwhileOSDmenuisoff.
5
[ ] button
DecreasetheadjustmentwhileOSDmenuison,ordecreasethe
audiooutputlevelwhileOSDmenuisoff.
6
[ ] button
MovethehighlightbaruptoadjusttheselecteditemwhileOSD
menuison.
7
[ ] button
MovethehighlightbardowntoadjusttheselecteditemwhileOSD
menuison.
8
[MENU] button
ReturntopreviousmenuwhileOSDmenuison,ortoactivatethe
OSDmenuwhenOSDmenuisoff.
9
Remote control sensor and power status indicator
• Receivescommandsignalsfromtheremotecontrol.
• IndicatestheoperatingstatusofthedisplaywithoutOPS:
- Lightsgreenwhenthedisplayisturnedon
- Lightsredwhenthedisplayisinstandbymode
- LightsamberwhenthedisplayentersAPMmode
- When{SCHEDULE}isenabled,thelightblinksgreenandred
- Ifthelightblinksred,itindicatesthatafailurehasbeen
detected
- Lightsoffwhenthemainpowerofthedisplayisturnedoff
BDL5570EL
8
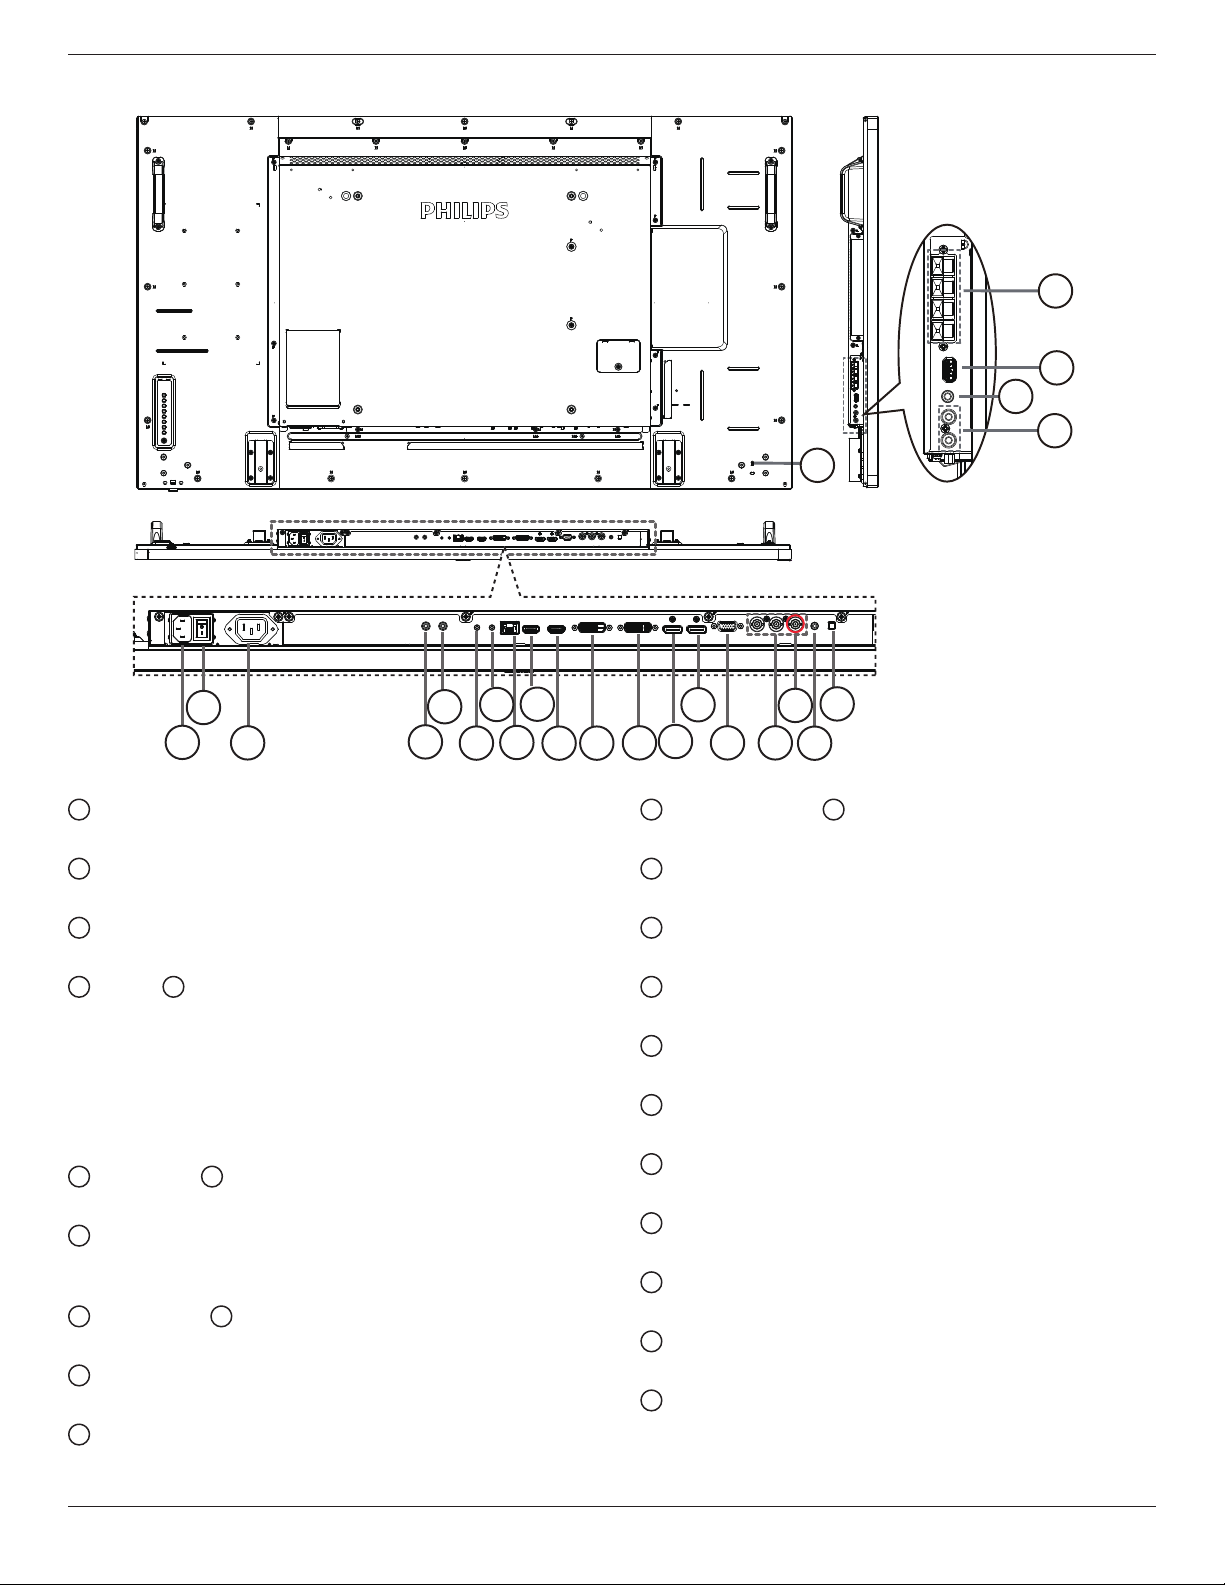
2.2. Input/Output Terminals
24
2
3
5
8
19
9
14
10 11
12
13
15 16
4
18
7
6
20
21
22
23
1
17
1
AC IN
ACpowerinputfromthewalloutlet.
2
MAIN POWER SWITCH
Switchthemainpoweron/off.
3
AC OUT
ACpowersupplytotheACINjackofamediaplayer.
4
IR IN /
5
IR OUT
IRsignalinput/outputfortheloop-throughfunction.
NOTES:
• Thisdisplay’sremote
controlsensorwillstopworkingifthejack
[IR IN]isconnected.
• ToremotelycontrolyourA/Vdeviceviathisdisplay,refertopage
17forIR Pass Throughconnection.
6
RS232 IN /
7
RS232 OUT
RS232networkinput/outputfortheloop-throughfunction.
8
RJ-45
LANcontrolfunctionfortheuseofremotecontrolsignalfrom
controlcenter.
9
HDMI1 IN /
10
HDMI2 IN
HDMIvideo/audioinput.
11
DVI IN
DVI-Dvideoinput.
12
DVI OUT
DVIorVGAvideooutput.
13
DisplayPort IN /
14
DisplayPort OUT
DisplayPortvideoinput/output.
15
VGA IN (D-Sub)
VGAvideoinput.
16
COMPONENT IN (BNC)
ComponentYPbPrvideosourceinput.
17
Y/CVBS
Videosourceinput.
18
PC LINE IN
AudioinputforVGAsource(3.5mmstereophone).
19
SPEAKER SWITCH
Internalspeakeron/offswitch.
20
AUDIO IN
AudioinputfromexternalAVdevice(RCA).
21
AUDIO OUT
AudiooutputtoexternalAVdevice.
22
USB PORT
ConnectyourUSBstoragedevice.
23
SPEAKERS OUT
Audiooutputtoexternalspeakers.
24
SECURITY LOCK
Usedforsecurityandtheftprevention.

BDL5570EL
9
2.3. Remote Control
2.3.1. General functions
1
2
3
4
5
6
7
8
10
9
12
14
15
11
13
16
1
[ ] POWER button
Turnthedisplayonorputthedisplaytostandby.
2
[PLAY] buttons
Controlplaybackofmediales.
3
[ ] SOURCE button
Chooseinputsource.Press[ ]or[ ]buttontochoosefrom
USB
,
Network
,
HDMI 1
,
HDMI 2
,
DisplayPort
,
Card
OPS
,
DVI-D
,
YPbPr
,
AV
,or
VGA
.Press[ ]buttonto
conrmandexit.
4
[ ] HOME button
AccesstheOSDmenu.
5
[ ] LIST button
Nofunction.
6
[ ] [ ] [ ] [ ] NAVIGATION buttons
Navigatethroughmenusandchooseitems.
7
[ ] button
Conrmanentryorselection.
8
[ ] ADJUST button
Accesscurrentlyavailableoptions,pictureandsoundmenus.
9
[ ] MUTE button
Presstoturnthemutefunctionon/off.
10
[ ] [ ] [ ] [ ] COLOR buttons
Choosetasksoroptions.
11
[Number/ ID SET/ ENTER] button
Entertextfornetworksetting.
PresstosetthedisplayID.Referto2.3.2. ID Remote Control
formoredetail.
12
[ ] FORMAT button
Changepictureformat.
13
[ ] BACK button
Returntothepreviousmenupageorexitfromtheprevious
function.
14
[ ] INFO button
Displayinformationaboutcurrentactivity.
15
[ ] OPTIONS button
Accesscurrentlyavailableoptions,pictureandsoundmenus.
16
[ ] [ ] VOLUME button
Adjustvolume.
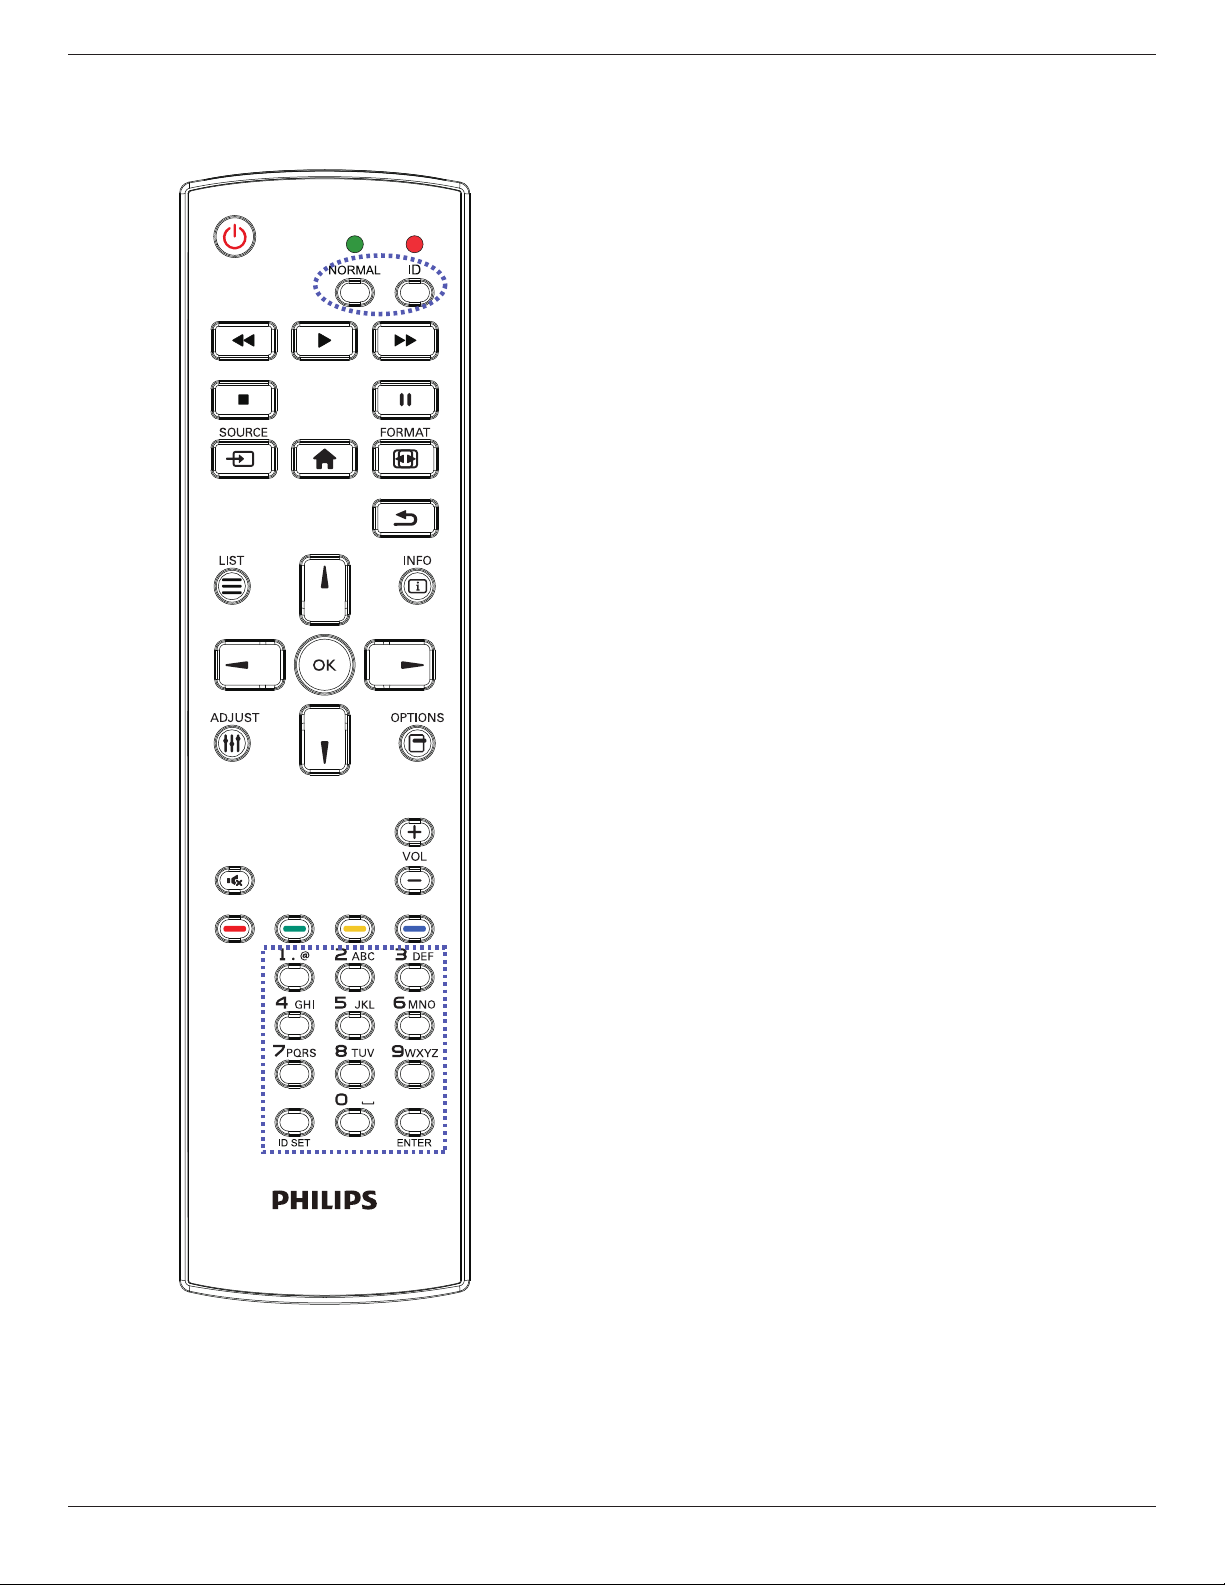
BDL5570EL
10
2.3.2. ID Remote Control
YoucansettheremotecontrolIDwhenyouwanttousethisremote
controlononeofseveraldifferentdisplays.
Press[ID]button.TheredLEDblinkstwice.
1. Press[IDSET]buttonformorethan1secondtoentertheID
Mode.TheredLEDlightsup.
Pressthe[IDSET]buttonagainwillexittheIDMode.TheredLED
lightsoff.
Pressthedigitnumbers[0]~[9]toselectthedisplayyouwantto
control.
Forexample:press[0]and[1]fordisplayNo.1,press[1]and[1]for
displayNo.11.
Thenumbersavailablearefrom[01]~[255].
2. Notpressinganybuttonwithin10secondswillexittheIDMode.
3. Ifanerrorpressingofbuttonsotherthanthedigitsoccured,wait
1secondaftertheredLEDlightsoffandthenlightsupagain,then
pressthecorrectdigitsagain.
4. Press[ENTER]buttontoconrm.TheredLEDblinkstwiceand
thenlightsoff.
NOTE:
• Press[NORMAL]button.ThegreenLEDblinkstwice,indicatingthe
displayisinnormaloperation.
• ItisnecessarytosetuptheIDnumberforeachdisplaybefore
selectingitsIDnumber.
BDL5570EL
11
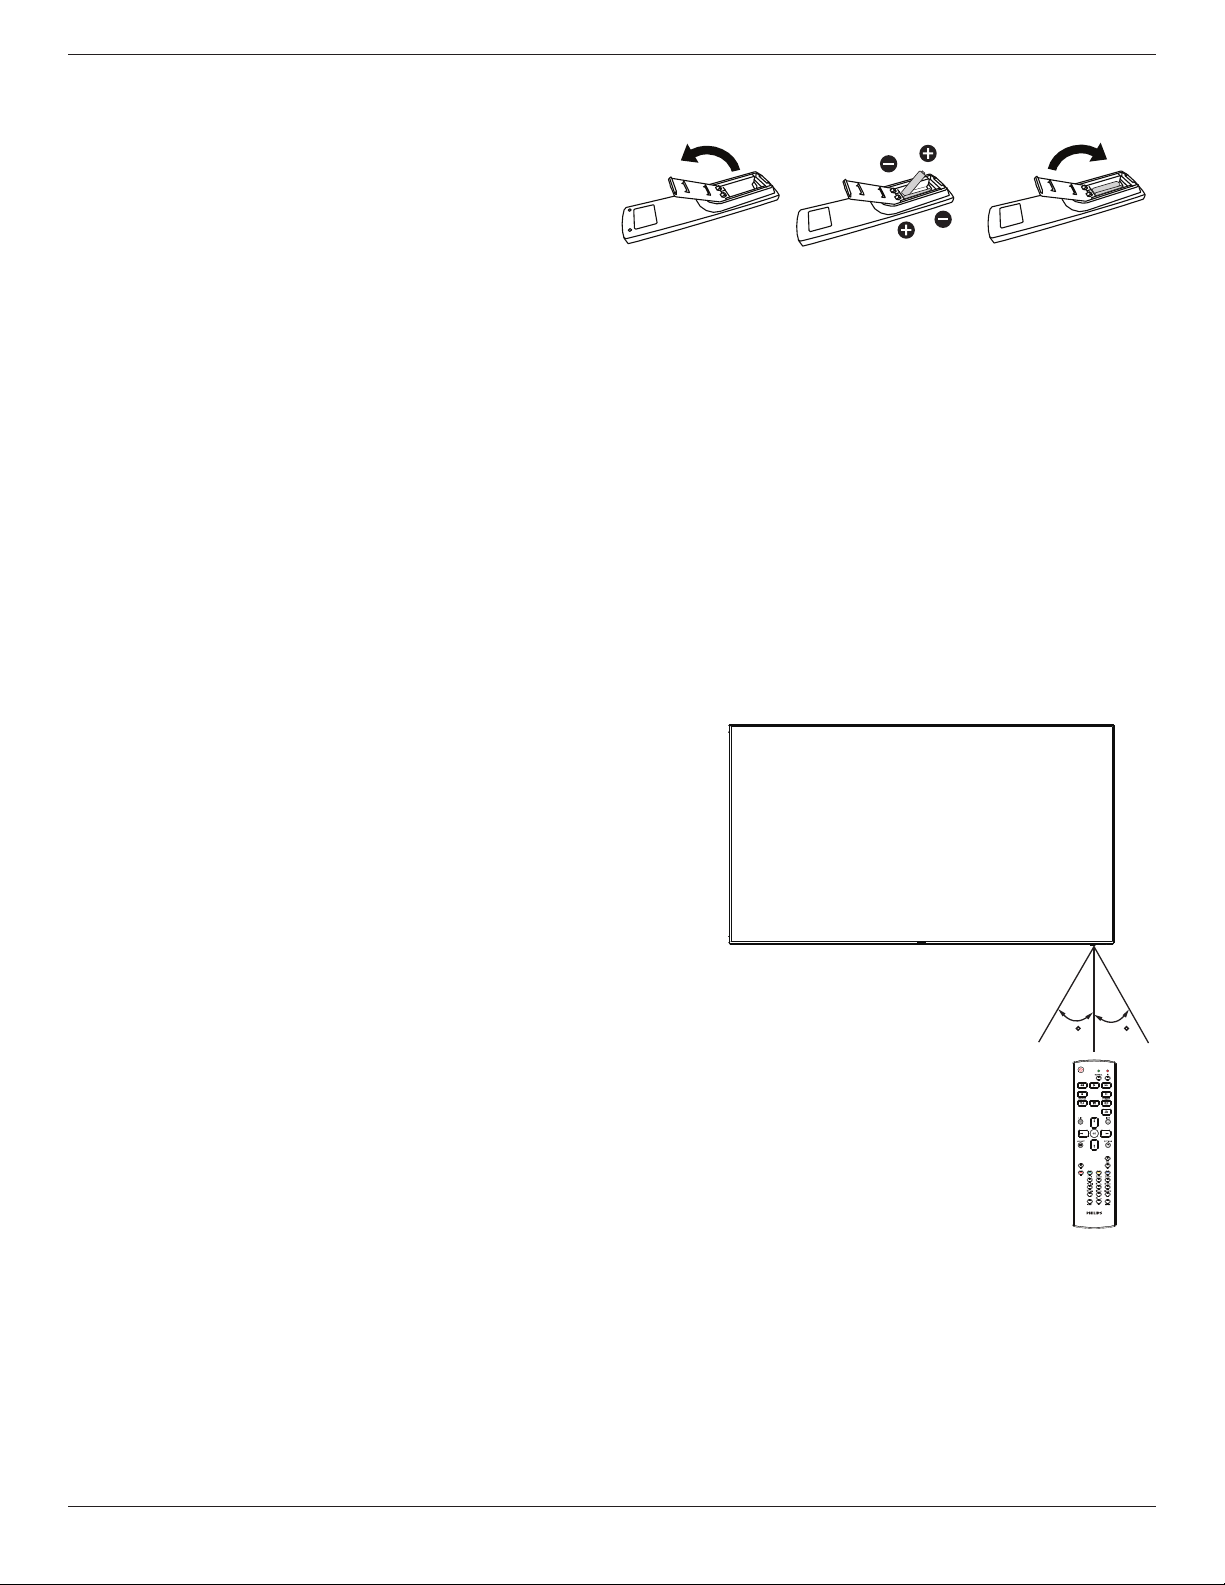
2.3.3. Inserting the batteries in the remote control
Theremotecontrolispoweredbytwo1.5VAAAbatteries.
Toinstallorreplacebatteries:
1. Pressandthenslidethecovertoopenit.
2. Alignthebatteriesaccordingtothe(+)and(–)indicationsinsidethe
batterycompartment.
3. Replacethecover.
Caution:
Theincorrectuseofbatteriescanresultinleaksorbursting.Besuretofollowtheseinstructions:
• Place“AAA”batteriesmatchingthe(+)and(–)signsoneachbatterytothe(+)and(–)signsofthebatterycompartment.
• Donotmixbatterytypes.
• Donotcombinenewbatterieswithusedones.Itcausesshorterlifeorleakageofbatteries.
• Removethedeadbatteriesimmediatelytopreventthemfromliquidleakinginthebatterycompartment.Don’ttouchexposedbatteryacid,asitcan
damageyourskin.
NOTE: Ifyoudonotintendtousetheremotecontrolforalongperiod,removethebatteries.
2.3.4. Handling the remote control
• Donotsubjecttostrongshock.
• Donotallowwaterorotherliquidtosplashtheremotecontrol.Iftheremotecontrolgetswet,wipeitdryimmediately.
• Avoidexposuretoheatandsteam.
• Otherthantoinstallthebatteries,donotopentheremotecontrol.
2.3.5. Operating range of the remote control
Pointthetopoftheremotecontroltowardthedisplay’sremotecontrolsensorwhen
pressingabutton.
Usetheremotecontrolwithinadistanceoflessthan8m/26ftfromthedisplay’ssensor,
andahorizontalandverticalangleoflessthan30degrees.
NOTE: Theremotecontrolmaynotfunctionproperlywhentheremotecontrol
sensoronthedisplayisunderdirectsunlightorstrongillumination,orwhen
thereisanobstacleinthepathofsignaltransmission.
30 30
BDL5570EL
12
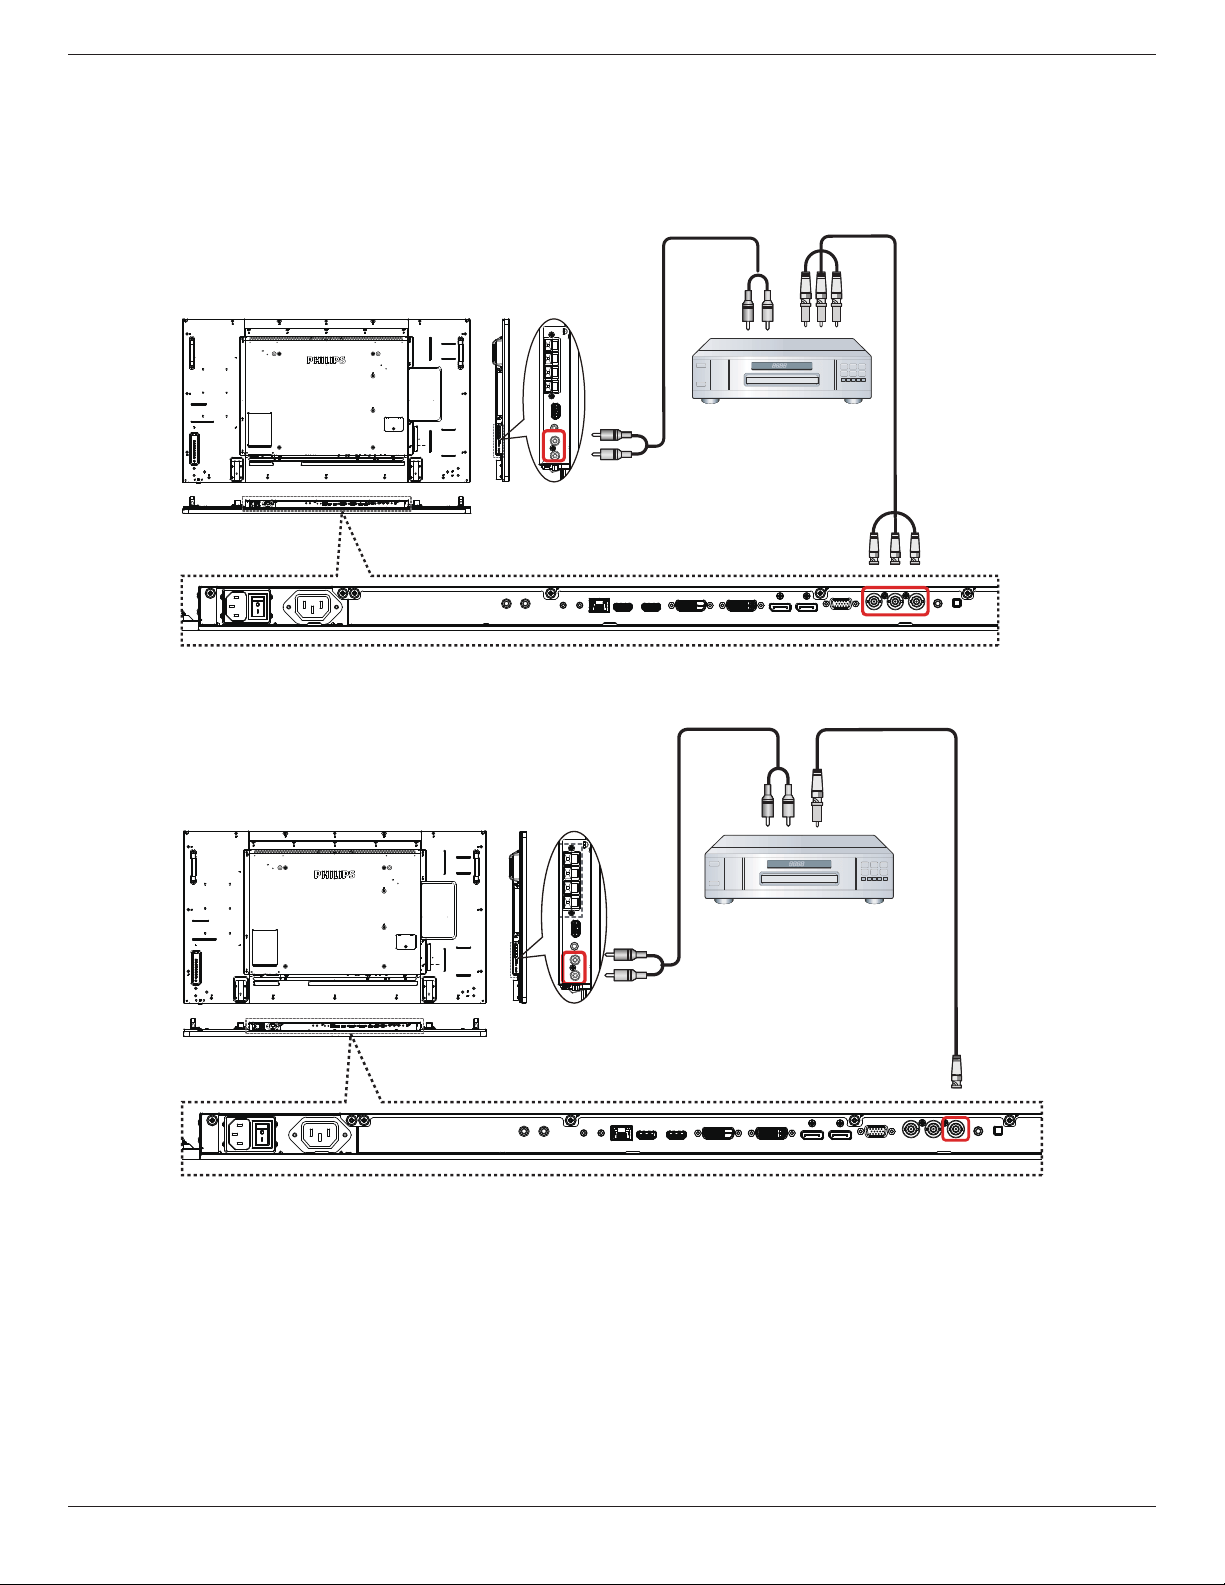
3. Connecting External Equipment
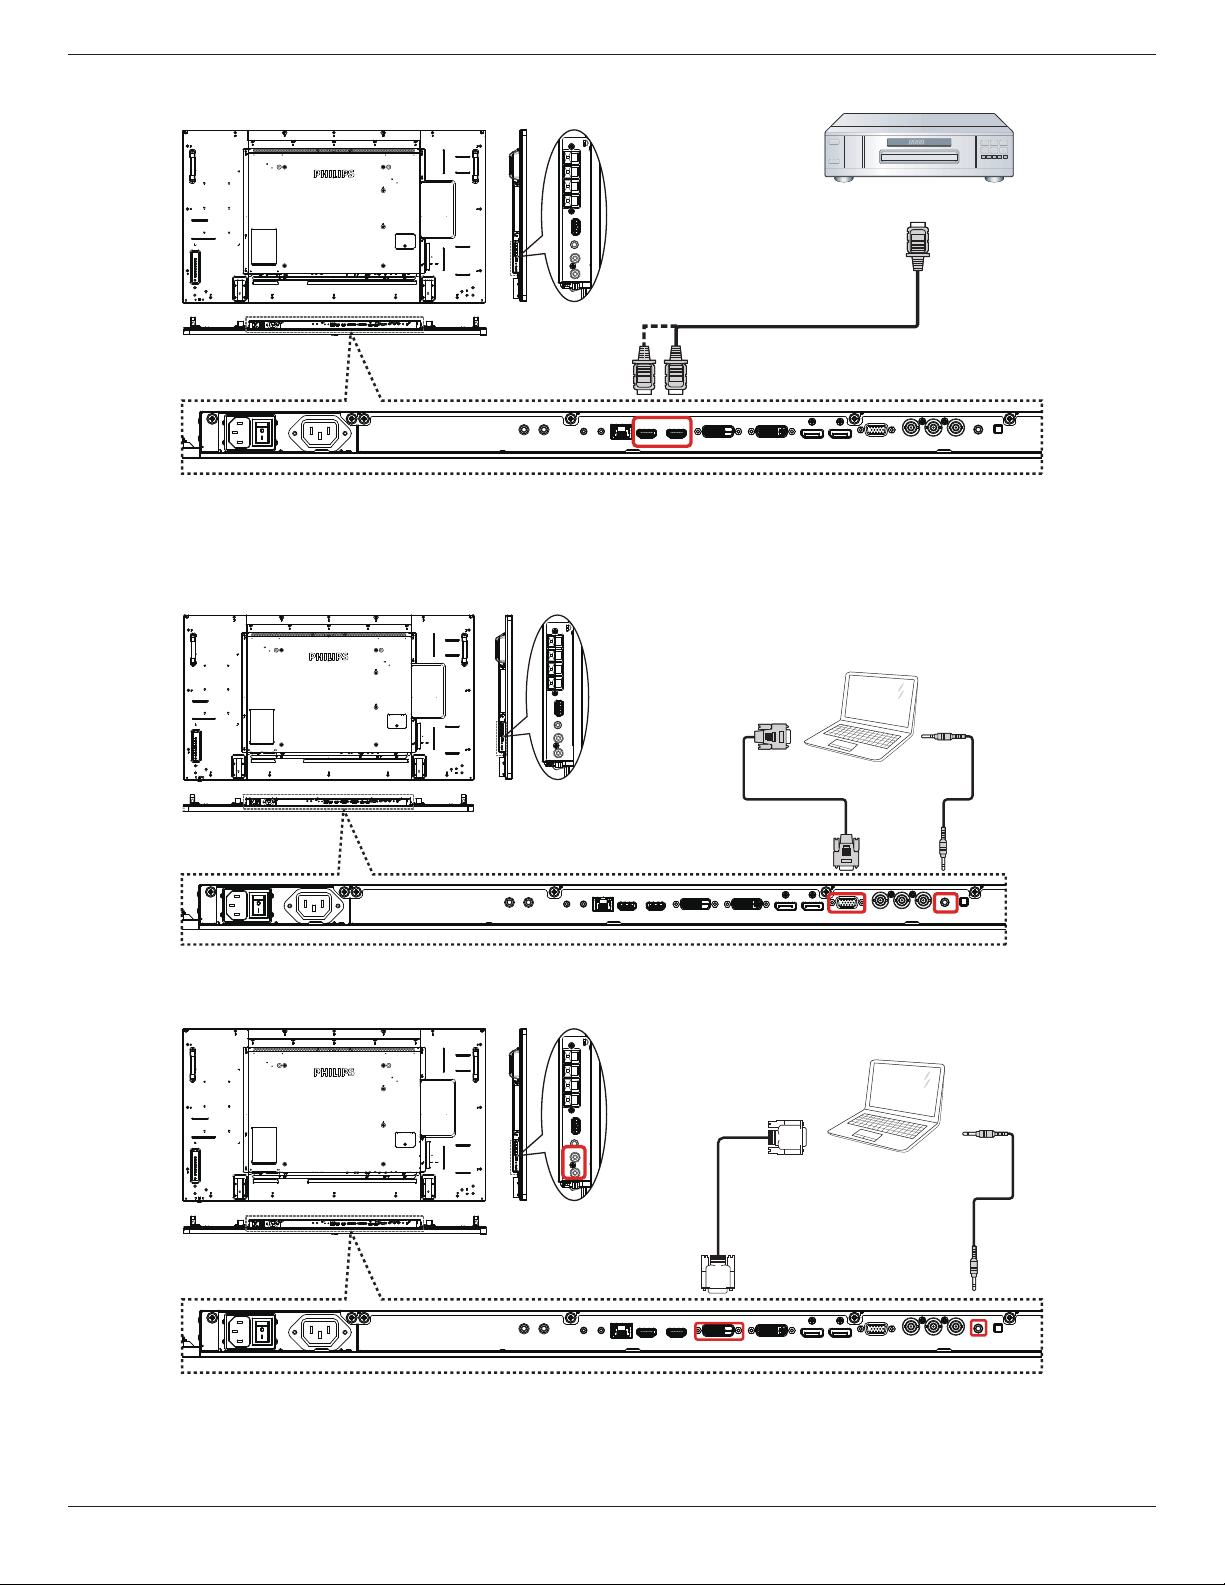
3.1. Connecting External Equipment (DVD/VCR/VCD)
3.1.1. Using COMPONENT video input
DVD / VCR / VCD
[AUDIO IN]
[COMPONENT IN]
(YPbPr)
COMPONENT Out
(YPbPr)
Audio Out
[R]
[L]
3.1.2. Using Video Source input
[Y/CVBS IN]
[AUDIO IN]
Y/CVBS Out
Audio Out
[R]
[L]
DVD / VCR / VCD
BDL5570EL
13
3.1.3. Using HDMI video input
DVD / VCR / VCD
HDMI Out
[HDMI IN]
3.2. Connecting a PC
3.2.1. Using VGA input
PC
[VGA IN]
[VGA AUDIO IN]
VGA Out
D-Sub 15 pin
Audio Out
3.2.2. Using DVI input
PC
[VGA AUDIO IN]
DVI Out
Audio Out
[DVI IN]
BDL5570EL
14
3.2.3. Using HDMI input
PC
HDMI Out
[HDMI IN]
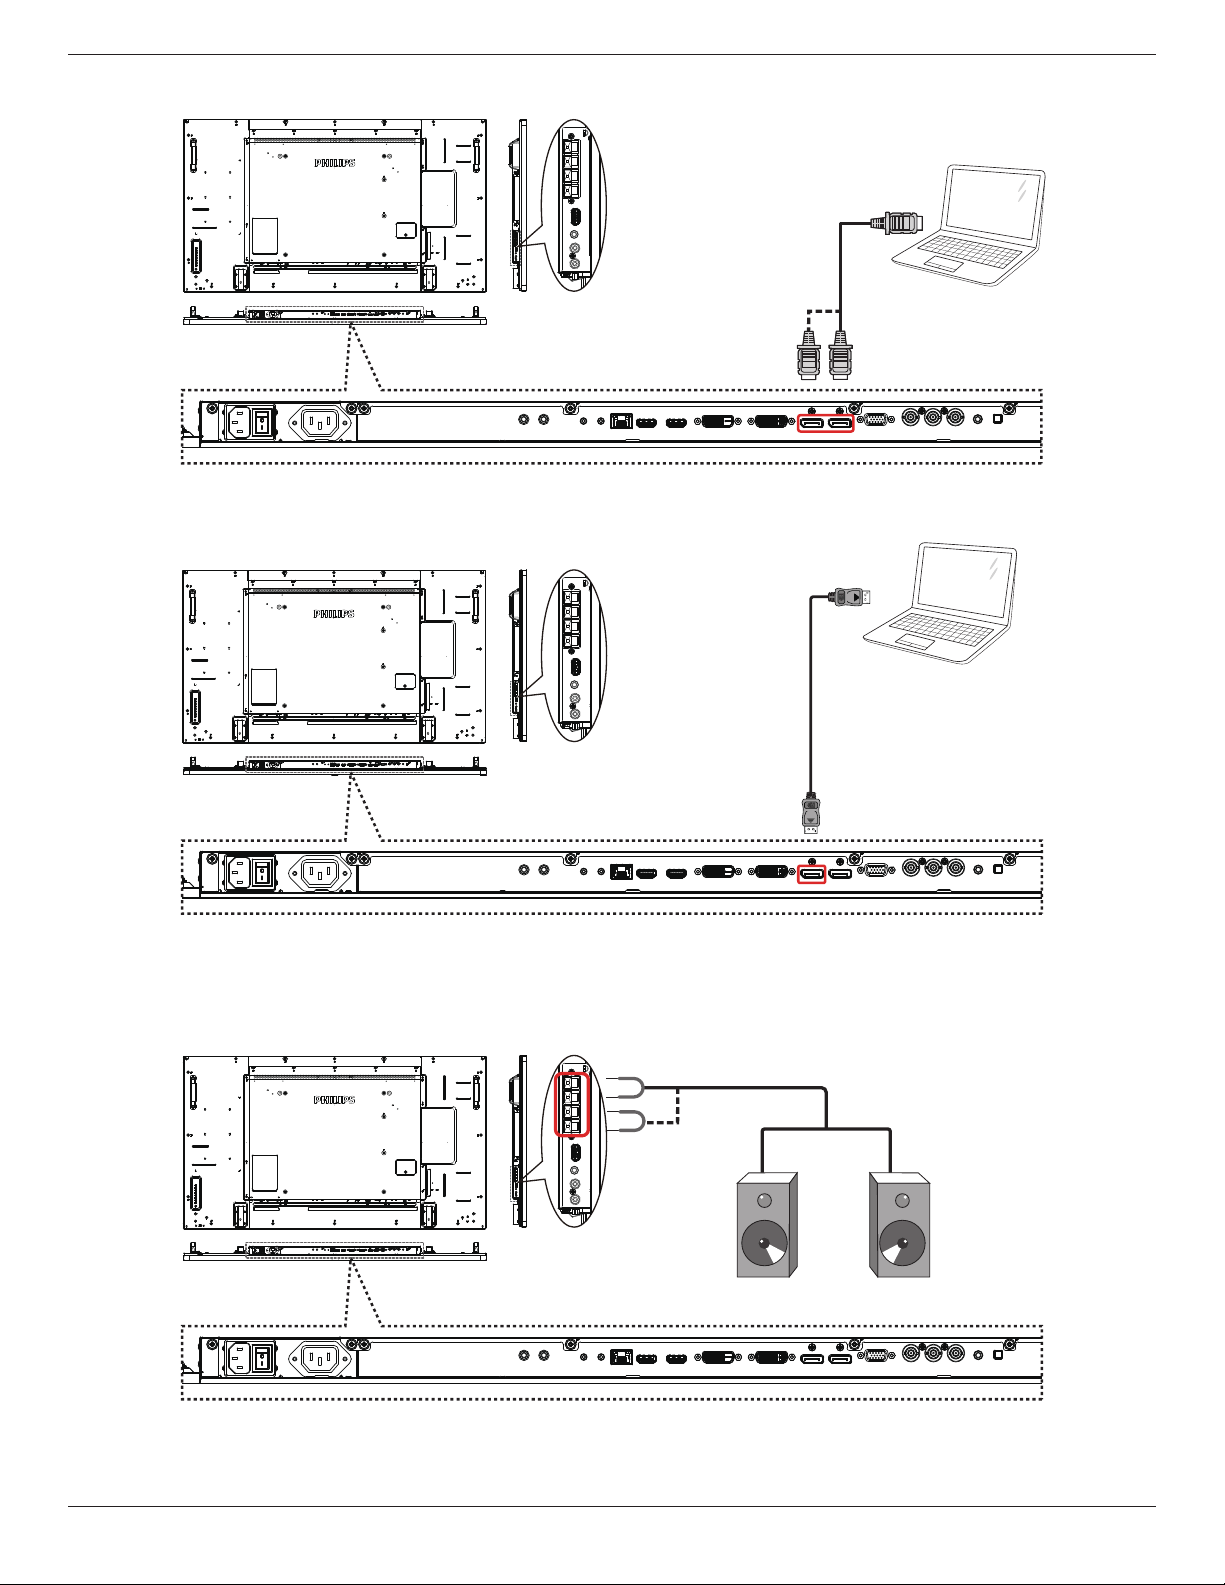
3.2.4. Using DisplayPort input
PC
DisplayPort Out
3.3. Connecting Audio Equipment
3.3.1. Connecting external speakers
External speakers
BDL5570EL
15
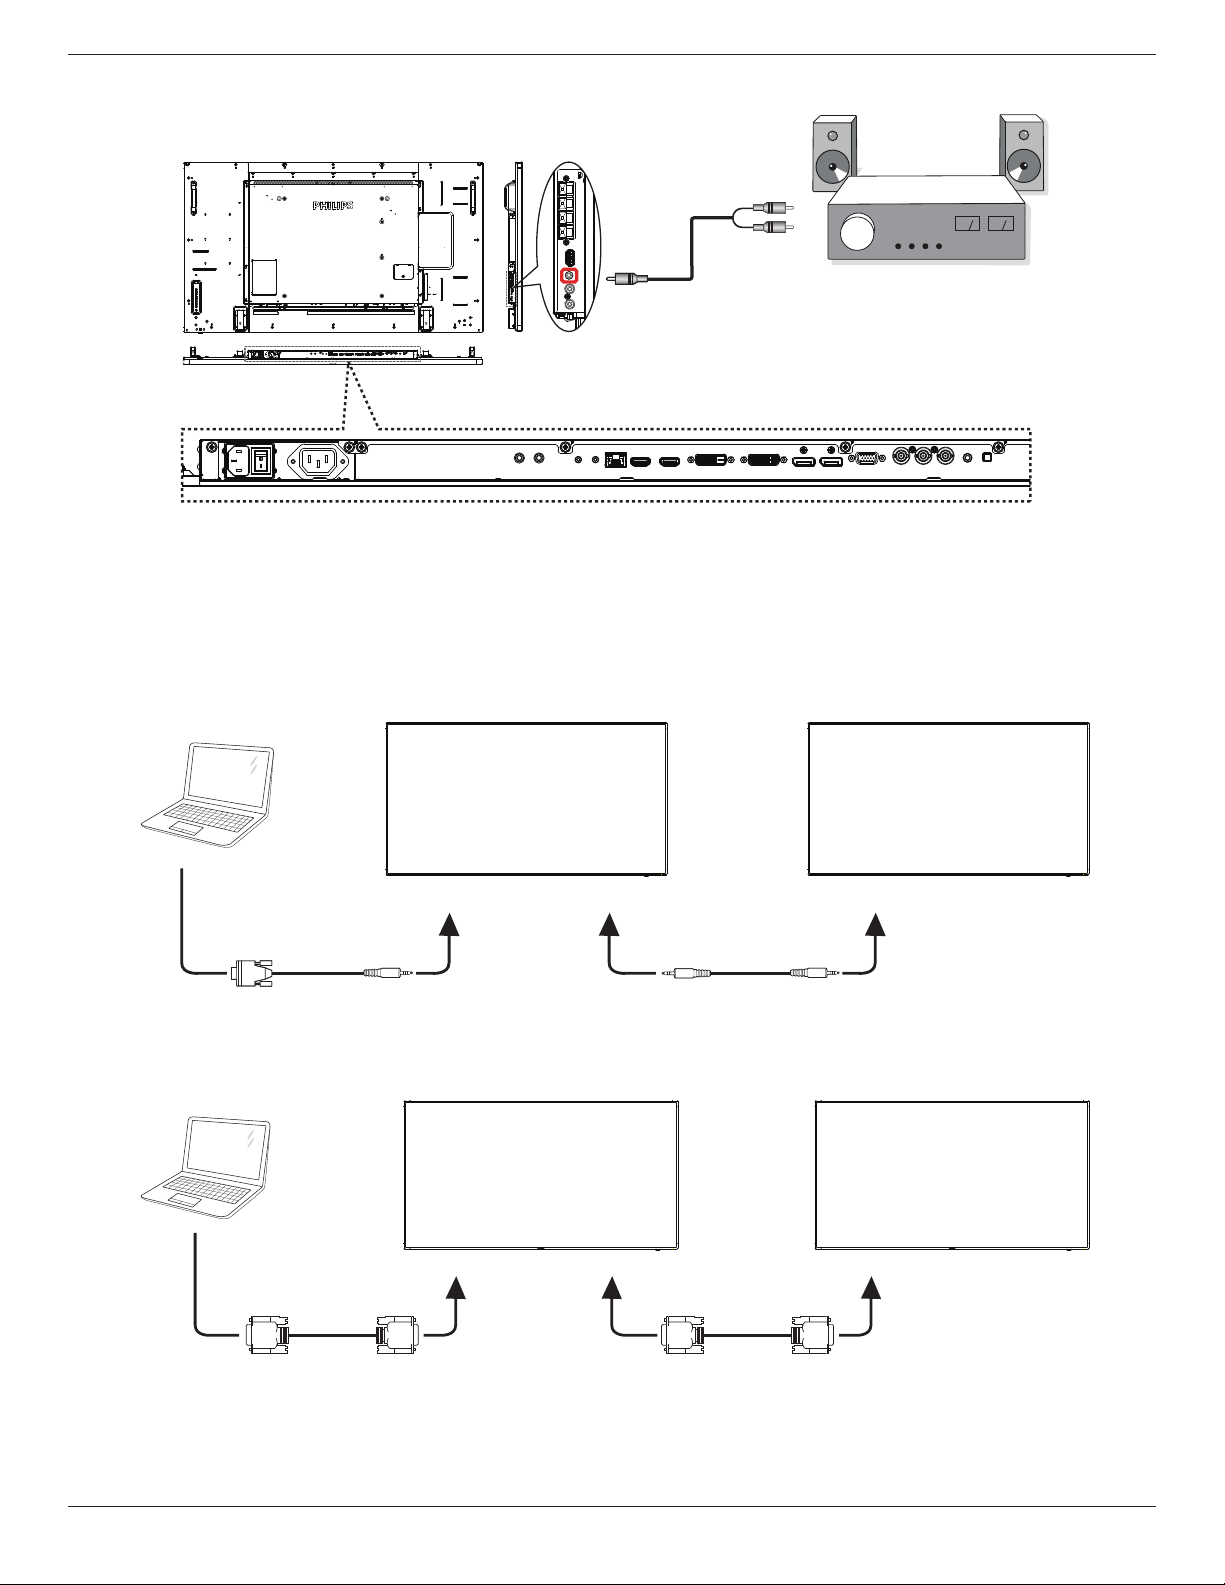
3.3.2. Connecting an external audio device
Stereo Amplifier
[AUDIO OUT]
Audio In
3.4. Connecting Multiple Displays in a Daisy-chain Configuration
Youcaninterconnectmultipledisplaystocreateadaisy-chaincongurationforapplicationssuchasavideowall.
NOTE: Maximum25displays(5x5)canbeusedinaDVIdaisy-chainconguration.ForVGAdaisy-chain,Maximum9displayscanbeused.
3.4.1. Display control connection
Connectthe[RS232OUT]connectorofDISPLAY1tothe[RS232IN]connectorofDISPLAY2.
DISPLAY 1 DISPLAY 2
PC
[RS-232C IN]
[RS-232C]
[RS-232C OUT] [RS-232C IN]
3.4.2. Digital video connection
Connectthe[DVIOUT/VGAOUT]connectorofDISPLAY1tothe[DVIIN]connectorofDISPLAY2.
PC
[DVI IN]
[DVI]
[DVI/VGA OUT] [DVI IN]
DISPLAY 1 DISPLAY 2
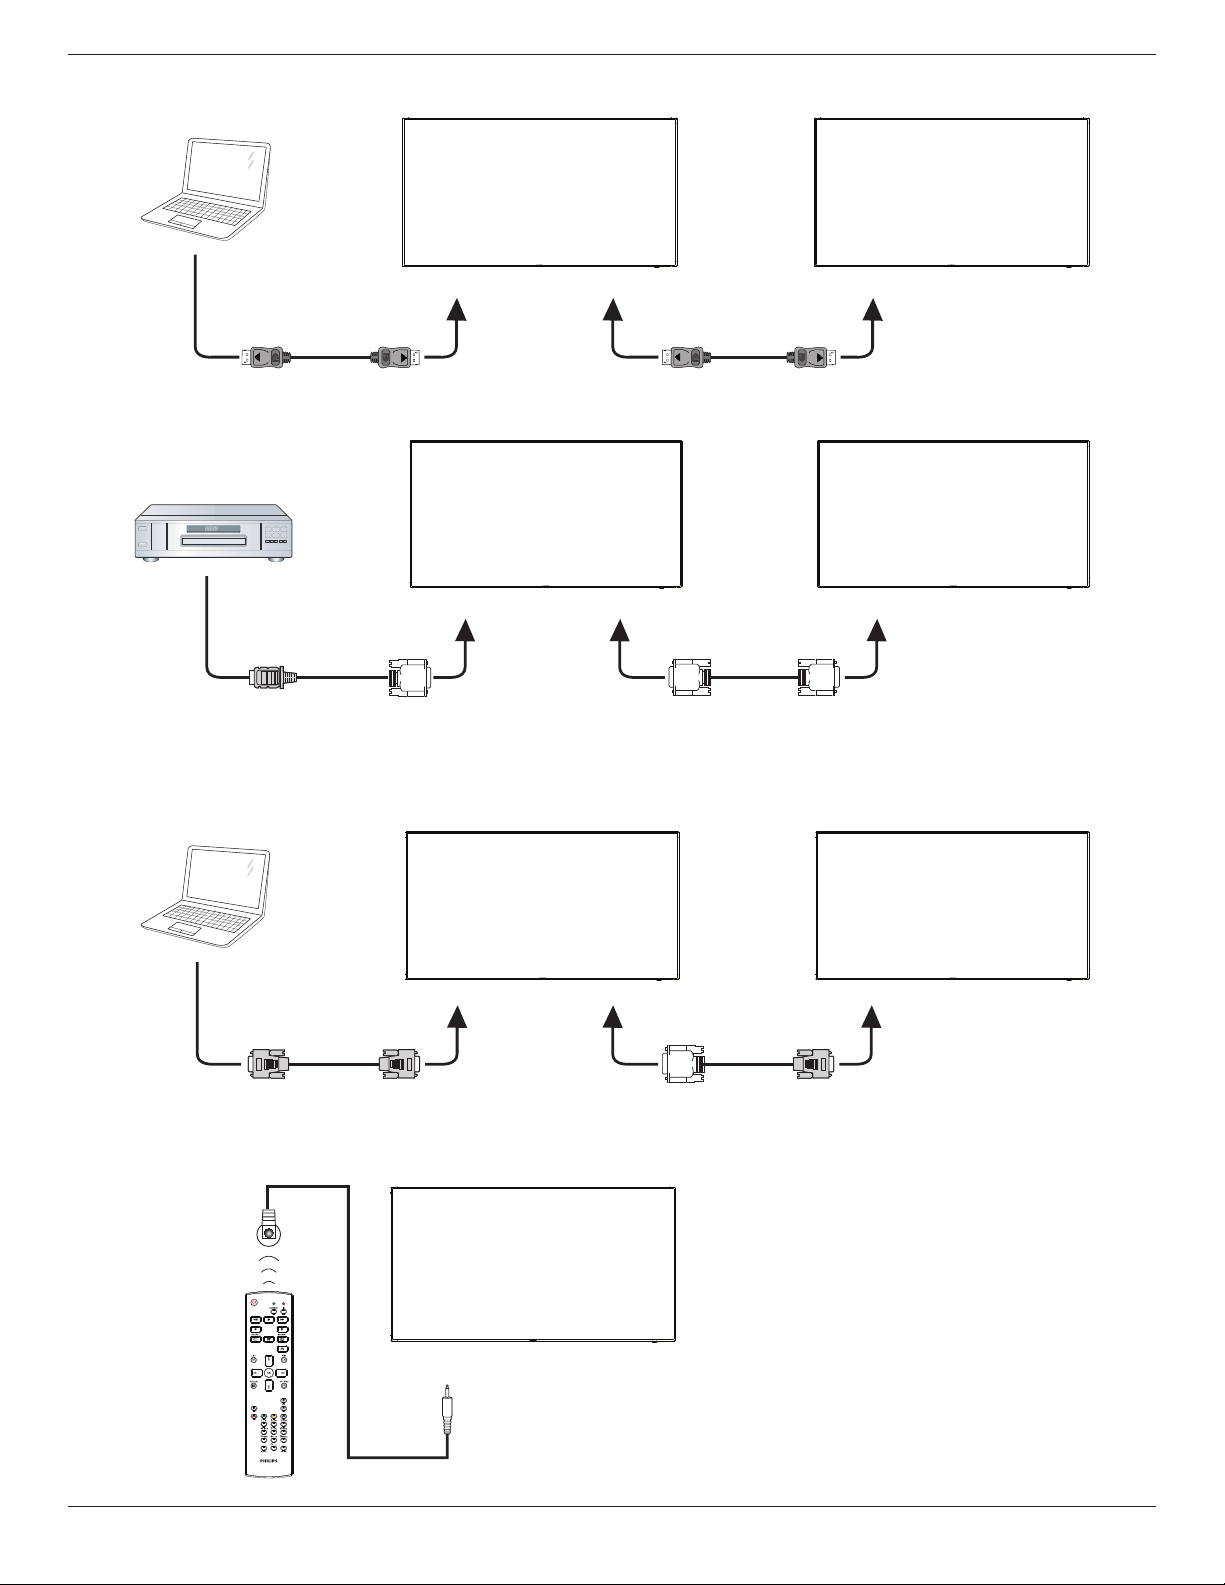
BDL5570EL
16
Connectthe[DPOUT]connectorofDISPLAY1tothe[DPIN]connectorofDISPLAY2.
PC
[DP IN]
[DP]
[DP OUT] [DP IN]
DISPLAY 1 DISPLAY 2
Connectthe[DVIOUT]connectorofDISPLAY1tothe[DVIIN]connectorofDISPLAY2.
[DVI IN]
[HDMI]
[DVI OUT] [DVI IN]
DVD / VCR / VCD
DISPLAY 1 DISPLAY 2
3.4.3. Analog video connection
Connectthe[DVIOUT/VGAOUT]connectorofDISPLAY1tothe[VGAIN]connectorofDISPLAY2.
PC
DISPLAY 1 DISPLAY 2
[VGA IN]
[VGA]
[DVI/VGA OUT] [VGA IN]
3.5. IR connection
DISPLAY 1
[IR IN]
External
IR Receiver
BDL5570EL
17
NOTE: Thisdisplay’sremotecontrolsensorwillstopworkingifthe[IR IN]isconnected.
3.6. IR Pass-through Connection
DVD / VCR / VCD
(DVD / VCR / VCD)
Remote Control
[IR OUT]
[IR IN]
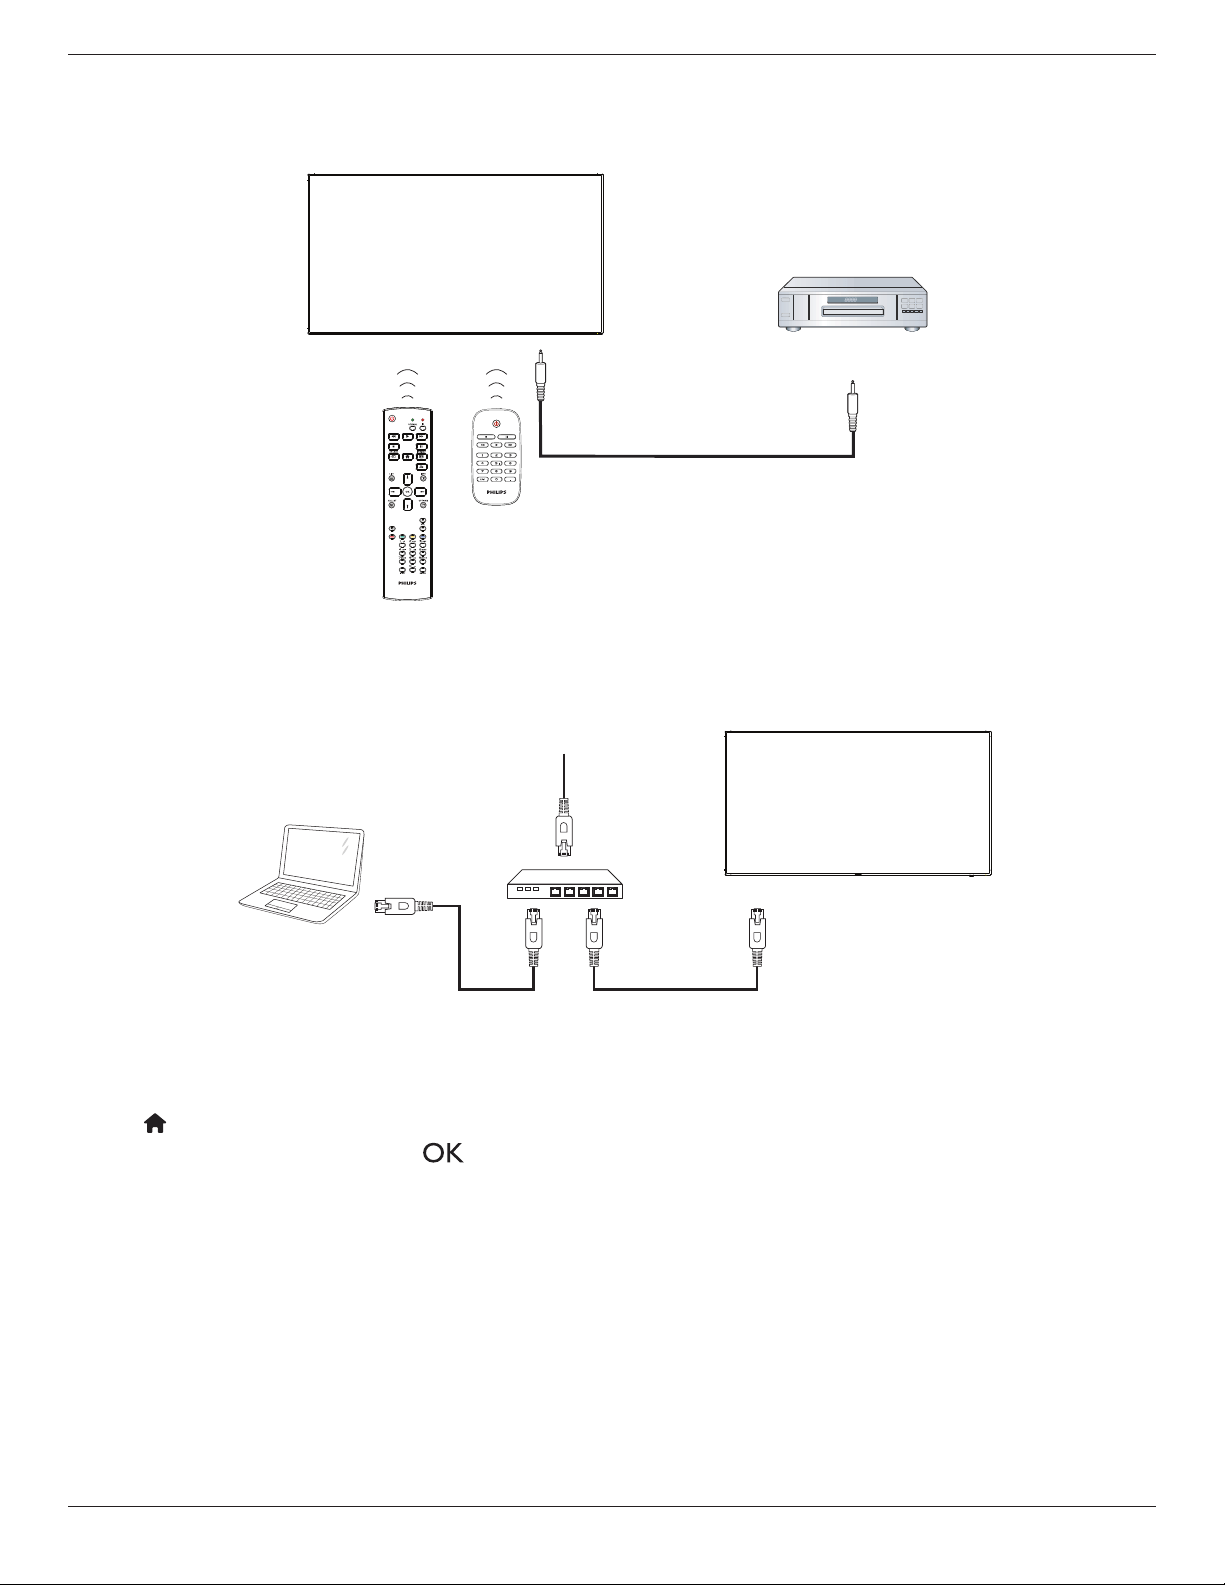
3.7. Wire-connecting to Network
Ifyouconnectthisdisplaytoahomenetwork,youcanplayphotos,musicandvideosfromyourcomputer.SeePlay multimedia les via Local Area Network
(Page18)formoredetail.
PC
[RJ-45]
[RJ-45]
ROUTER
INTERNET
To setup the network:
1. SwitchontherouterandswitchonitsDHCPsetting.
2. ConnecttheroutertothisdisplaywithanEthernetcable.
3. Press[ ] HOME
buttonontheremotecontrol,thenselect
Setup
.
4. Select
Connect to network
,thenpress[ ]button.
5. Followtheon-screeninstructionstoinstallthenetwork.
6. Waitforthisdisplaytondthenetworkconnection.
7. Ifyouareprompted,agreetothe“End User Licence Agreement”.
NOTE: ConnectingwithashieldedCAT-5EthernetcabletocomplywiththeEMCdirective.
BDL5570EL
18
4. Operation
NOTE: Thecontrolbuttondescribedinthissectionismainlyonthe
remotecontrolunlessspeciedotherwise.
4.1. Watch the Connected Video Source
Seepage12forexternalequipmentsconnection.
1. Press
[ ] SOURCEbutton.
2. Press[ ]
or[ ]buttontochooseadevice,thenpress[ ]
button.
4.2. Change Picture Format
Youcanchangethepictureformattosuitthevideosource.Eachvideo
sourcehasitsavailablepictureformats.
Theavailablepictureformatsdependonthevideosource:
1. Press[ ] FORMATbutton.
2. Press[ ]
or[ ]buttontochooseapictureformat,thenpress
[ ]button.
• {Auto zoom}:Enlargethepicturetollthescreen.
RecommendedforminimalscreendistortionbutnotforHDor
PC.
• {Movie expand 16:9}:Scale4:3formatto16:9.Not
recommendedforHDorPC.
• {Wide screen}:Showswidescreenformatcontentunstretched.
NotrecommendedforHDorPC.
• {Unscaled}:ProvidemaximumdetailforPC.Onlyavailable
whenPCmodeisselectedinthe{Picture}menu.
• {4:3}:Displaytheclassic4:3format.
• {Custom Zoom}:Choosetoapplycustomizezoomsettingsin
thePicture and edgessubmenu.
4.3. Play multimedia files via Local Area
Network
ToplaylesviaLocalAreaNetwork,youwillneed:
• Awiredhomenetwork,connectedwithaUniversalPlugandPlay
(uPnP)router.
• Optional:ALANcablethatconnectsyourdisplaytoyourhome
network.
• Amediaserverrunningonyourcomputer.
• Appropriatesettingsonyourcomputerrewalltoallowyoutorun
themediaserver.
4.3.1. Set up the network
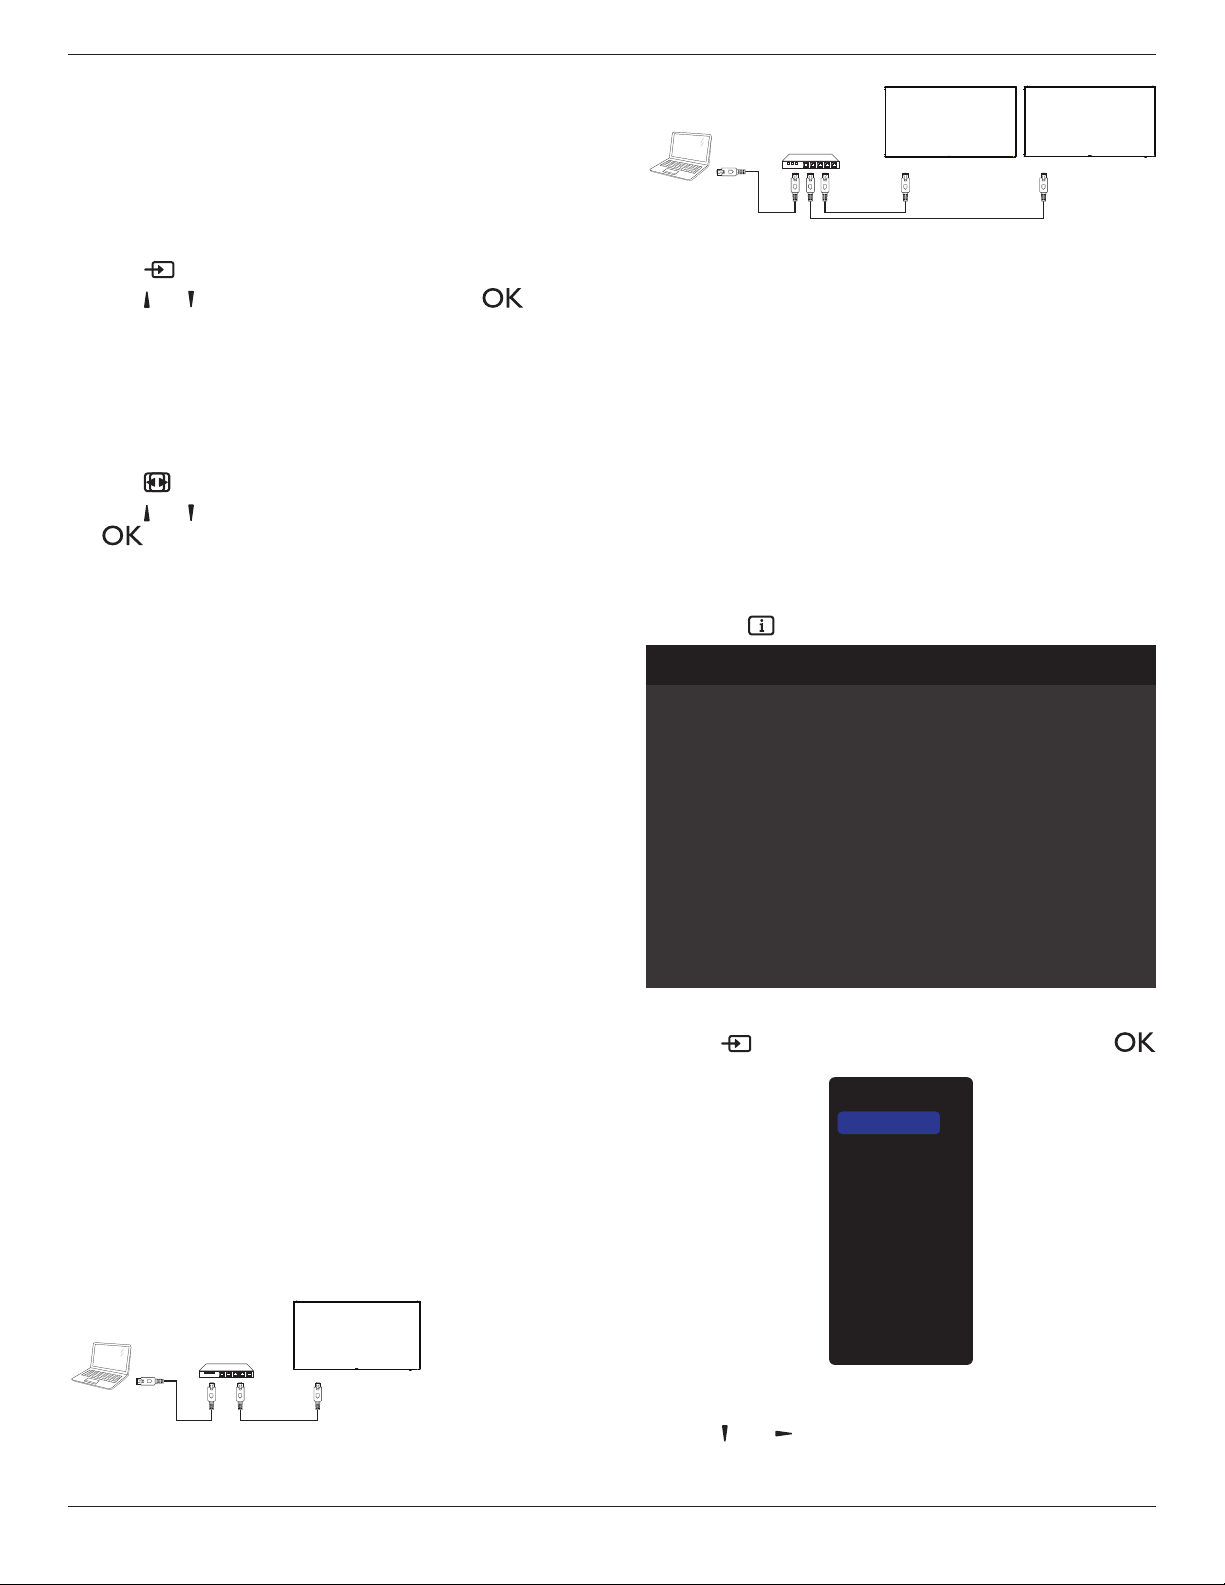
1. Connectyourdisplayandthecomputertothesamehomenetwork.
Seeillustrationbelowtoconnectyourdisplaytoanetwork.
2. Switchonyourcomputerandtherouter.
• Single display setup:
PC
[RJ-45]
[RJ-45]
ROUTER
• Multiple display setup:
PC
[RJ-45]
[RJ-45] [RJ-45]
ROUTER
DISPLAY 1 DISPLAY 2
NOTE: IftheapparatusdoesnotreturntoDLNAmodedueto
externalelectricaldisturbances(e.g.electrostaticdischarge),user
interventionisrequired.
Set up media sharing
1. Installamediaserveronyourcomputertosharemediales.These
aresomemediaservers:
• ForPC:WindowsMediaPlayer11(orhigher)orTVersity
• ForMac:Twonky
2. Switchonmediasharingonyourcomputerusingthemediaserver.
Formoreinformationonhowtosetupthemediaserver,referto
thewebsiteofthemediaserver.
4.3.2. How to use DLNA-DMP
Ensureyouhaveconnectedtothenetwork.
Youcanpress buttontodisplaytheconnectionofthenetwork.
Picture format
Picture style
Sound style
Smart power
Volume
Monitor group
Monitor ID
Model name
SWVersion
Serial no
Temperature
Cooling fan
Network configuration
IP address
Netmask
Gateway
Network name
Ethernet MAC address
Wide screen
Standard
Original
Off
20
1
1
BDL5570EL
1.05
33°C
0 RPM
DHCP
0.0.0.0
0.0.0.0
0.0.0.0
BDL5570EL
00:24:67:33:50:43
HDMI 1 1080p60 26/09/2014 Friday 09:32:00
Play les from display
1. Press[ ]SOURCEbutton,chooseNetwork,andpress[
]button.
USB
Network
Internet
SmartCMS
CVBS
YPbPr
VGA
HDMI 1
HDMI 2
DVI-D
Display Port
Card OPS
2. Now,youcanseeallthePC’sconnectedtothesamerouteronthe
screen.Choosetherightone.
3. Press[ ]and[ ]tochoosethedirectoryandlestoplay.
4. Youcanconnectupto4displaystothesamePCandplaysame
mediastream.
BDL5570EL
19
4.3.3. How to use DLNA-DMR from PC
1. Press[ ]HOMEbutton,chooseNetworkandpress[ ]
button.
Picture
Sound
Tiling
Network
Storage
General settings
Adv.
Network settings
Digital Media Rendere...
Network name
Mail Notification
FTP Setting
Clear Internet memory
2. Set
Digital Media Renderer DMR
as
ON
.
Network settings
Digital Media Rendere...
Network name
Mail Notification
FTP Setting
Clear Internet memory
Picture
Sound
Tiling
Network
Storage
General settings
Adv.
Off
On
3. Setthenameofyourdisplay.
Network settings
Digital Media Rendere...
Network name
Mail Notification
FTP Setting
Clear Internet memory
Picture
Sound
Tiling
Network
Storage
General settings
Adv.
Cancel
Done Clear
BDL5570EL
4. Press[ ] HOMEbutton,andgoto
Source
menu.Then,choose
Network
andpress[ ]button.
5. OnyourPC,goto
Network and Sharing Center
,andclick
Choose homegroup and sharing options
.
6. Checkthemediaformats.Then,click
Choose media
streaming options....
.
7. Goto
Advanced sharing settings
,andcheck
Turn on
network discovery
.
8. Now,gotothedirectoryofyourmediales.Choosethemedia
lebyrightclick.Onthesubmenufrom
Play To
,Youcanndall
displaysconnectedtoyournetwork.Choosethedisplay,andclick
themedialetoplay.
Play les
1. Press[ ] SOURCEbutton.
2. Choose
Browse network
,andpress[ ]button.
3. Choosealefromthecontentbrowser,andpress[ ]button
tostartplaying.
4. Pressthe[PLAY] buttonsontheremotecontroltocontrolplaying.
Tips:
• Choosethetopbartolteryourlesbytype.
• Choose
Sort
toarrangethelesbyalbumname,artist,orother
elds.
• Toclearthelistofofinemediaservers,press[ ] OPTIONS
button.Then,choose
Clear ofine servers
andpress[ ]
button.
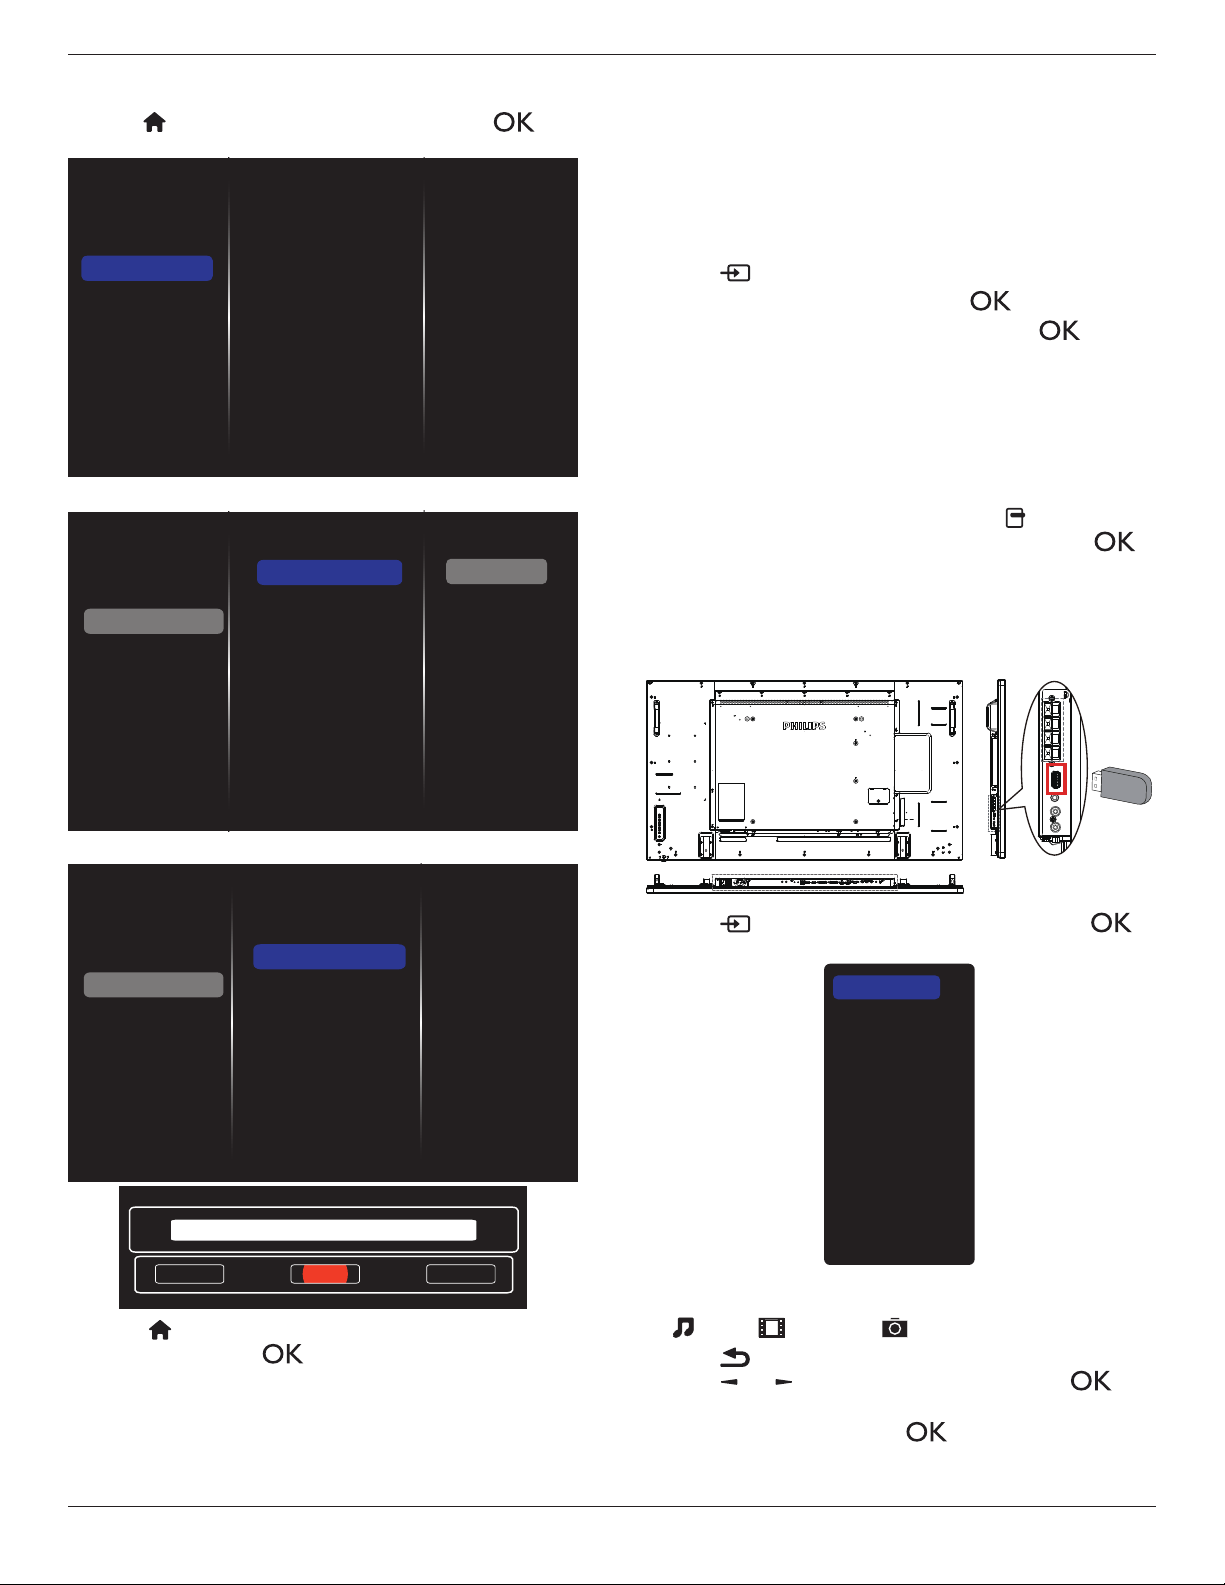
4.4. Play multimedia files from USB device
1. ConnectyourUSBdevicetotheUSBportonthedisplay.
USB
2. Press[
]
SOURCE
button,choose
USB
,andpress[ ]
button.
USB
Network
Internet
SmartCMS
CVBS
YPbPr
VGA
HDMI 1
HDMI 2
DVI-D
Display Port
Card OPS
3. TheconnectedUSBdeviceisdetectedautomaticallyforallits
playableles,whichwillbeautomaticallysortedinto3types:
Music
,
Movie
,and
Photo
.
4. Press[ ] BACKbuttontogouptothetoplayerinthescreen.
Press[ ]
or[ ]buttontochoosetheletype.Press[ ]
buttontoenteritsplaylist.
5. Choosetheleyouwant.Press[ ]buttontostartplaying.
6. Followtheon-screeninstructiontocontroltheplayoption.
7. Press[PLAY] buttons(
H F G I J
)tocontrolplaying.
BDL5570EL
20
4.5. Play options
4.5.1. Playing music files
1. Choose
Music
inthetopbar.
Music
2. Chooseonemusictrack,andpress[ ]button.
• Toplayallthetracksinafolder,chooseonemusicle.Then,
press[ ] to
Play All
.
• Toskiptothenextorprevioustrack,press[ ] or [ ]button.
• Topausethetrack,press[ ]button.Press[ ]button
againtoresumeplayback.
•
Toskipbackwardorforward10seconds,press[ ]or[ ]
button.
• Tosearchbackwardorforward,press[
G
]
or
[
J
]button,
pressrepeatedlytotogglebetweendifferentspeeds.
• Tostopthemusic,press[
H
]button.
Music options
Whileyouplaymusic,press[ ] OPTIONS button,thenpress[ ]
buttontochooseanoption:
• {Shufe}:Enableordisablerandomplayoftracks.
• {Repeat}:Choose{Repeat}toplayatrackoranalbumrepeatedly,
orchoose{Play once}toplayatrackonce.
NOTE: Toviewinformationaboutasong(forexample,title,artistor
duration),choosethesong,thenpress[ ] INFObutton.To
hidetheinformation,press[ ] INFO buttonagain.
4.5.2. Playing movie files
1. Choose
Movie
inthetopbar.
Movie
2. Chooseavideo,andpress[ ]button.
• Toplayallthevideosinafolder,chooseonevideole.Then,
press[ ] to
Play All
.
• Topausethevideo,press[ ]button.Press[ ]button
againtoresumeplayback.
•
Toskipbackwardorforward10seconds,press[ ]or[ ]
button.
• Tosearchbackwardorforward,press[
G
]
or
[
J
]button,
pressrepeatedlytotogglebetweendifferentspeeds.
• Tostopthevideo,press[
H
]button.
Movie options
Whileplayingvideo,press[ ] OPTIONSbutton,thenpress[ ]
buttontochooseanoption:
• {Subtitles}:Choosetheavailablesubtitlesettings.
• {Subtitle language}:Choosethelanguageforsubtitlesifavailable.
• {Shufe}:Enableordisablerandomplayofvideoles.
• {Repeat}:Choose{Repeat}toplaythevideolerepeatedlyor
{Playonce}toplaythevideoleonce.
• {Status}:Toviewinformationaboutavideo(forexample,played
position,duration,title,ordate).
4.5.3. Playing photo files
1. Choose
Photo
inthetopbar.
Photo
2. Chooseaphotothumbnail,thenpress ]button.
Start a slideshow
Iftherearemultiplephotosinafolder,chooseaphoto.Then,press
[ ] to
Play All
.
•
Toskiptothepreviousornextphoto,press[ ]or[ ]button,
andthenpress[ ]button.
• Tostoptheslideshow,press[
H
]button.
Slideshow options
Whileyouplayaslideshow,press[ ] OPTIONSbutton,thenpress
[ ]buttontochooseanoption:
• {Shufe}:Enableordisablerandomdisplayofpicturesinthe
slideshow.
• {Repeat}:Choose{Repeat}towatchaslideshowrepeatedlyor
{Play once}towatchonce.
• {Slideshow Time}:Choosethedisplayingtimeforeachphotointhe
slideshow.
• {Slideshow Transitions}:Choosethetransitionfromonephototo
thenext.
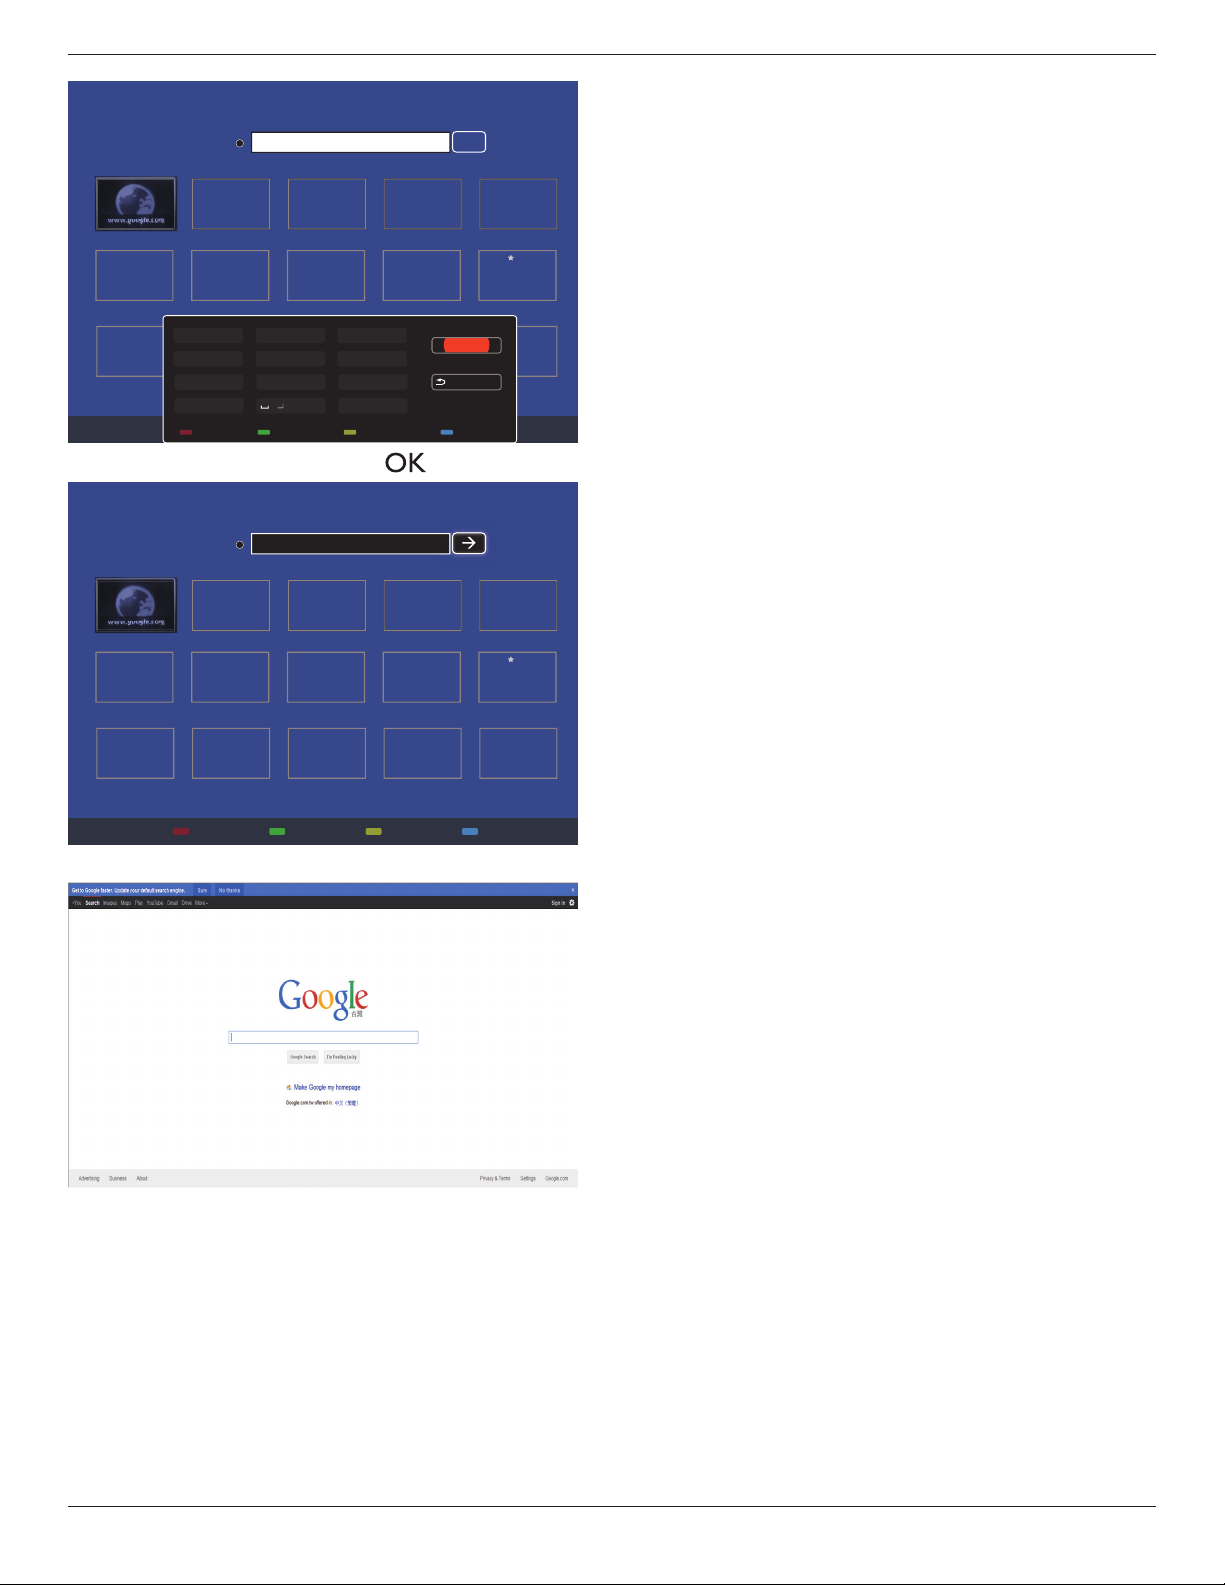
4.6. How to use Opera browser (HTML5)
1. Press[ ] HOMEbutton,andchoose
Internet
andpress
[ ] button.
USB
Network
Internet
SmartCMS
CVBS
YPbPr
VGA
HDMI 1
HDMI 2
DVI-D
Display Port
Card OPS
2. MovethecursortoURLaddressbar.Press[ ] buttonandit
willpopouttheon-screenkeyboard.Youcanmovethecursorto
entertheURLaddress.AfternishingtheURLaddress,choose
Done
.
BDL5570EL
21
History
Bookmark
Web Address:
X
Internet
www.google.com
http://
w
w
w
w
w
w
w
w
w
w
w
w
w
w
w
w
w
w
w
w
w
w
w
w
w
w
w
w
w
w
w
w
w
w
w
w
w
w
w
w
w
w
w
w
w
w
w
w
w
w
w
w
w
w
w
w
w
w
w
w
w
w
w
w
w
w
w
w
w
w
w
w
w
w
w
w
w
w
w
w
w
w
w
w
w
w
w
w
w
w
w
w
w
w
w
w
w
w
w
w
w
w
w
w
w
w
w
w
w
w
w
w
w
w
w
w
w
w
w
w
w
w
w
w
w
w
w
w
w
w
w
w
w
w
w
w
w
w
w
w
w
w
w
w
w
w
w
w
w
w
w
w
w
w
w
w
w
w
w
w
w
w
w
w
w
w
w
w
w
w
w
w
w
w
w
w
w
w
w
w
w
w
w
w
w
w
w
w
w
w
w
w
w
w
w
w
w
w
w
w
w
w
w
w
w
w
w
w
w
w
w
w
w
w
w
w
w
w
w
w
w
w
w
w
w
w
w
w
w
w
w
w
w
w
w
w
w
w
w
w
w
w
w
w
w
w
w
w
w
w
w
w
w
w
w
w
w
w
w
w
w
w
w
w
w
w
w
w
w
w
w
w
w
w
w
w
w
w
w
w
w
w
w
w
w
w
w
w
w
w
w
w
w
w
w
w
w
w
w
w
w
w
w
w
w
w
w
w
w
w
w
w
w
w
w
w
w
w
w
w
w
w
w
w
w
w
w
w
w
w
w
w
w
w
w
w
w
w
w
w
w
ww
w
w
w
w
w
w
w
w
w
w
w
w
w
w
w
w
w
w
w
w
w
w
w
w
w
w
w
w
w
w
w
w
w
w
w
w
w
w
w
w
w
w
w
w
w
w
w
w
w
w
w
w
w
w
w
w
w
w
w
w
w
w
w
w
w
w
w
w
w
w
w
w
w
w
w
w
w
w
w
w
w
w
w
w
w
w
w
w
w
w
w
w
w
w
w
w
w
w
w
w
w
w
w
w
w
w
w
w
w
w
w
w
w
w
w
w
w
w
w
w
w
w
w
w
w
w
w
w
w
w
w
w
w
w
w
w
w
w
w
w
w
w
w
w
w
w
w
w
w
w
w
w
w
w
w
w
w
w
w
w
w
w
w
w
w
w
w
w
w
w
w
w
w
w
.
.
.
.
g
g
g
g
g
g
g
g
g
g
g
g
g
g
g
g
g
g
g
g
g
g
g
g
g
g
g
g
g
g
g
g
g
g
g
g
g
g
g
g
g
g
g
g
g
g
g
g
g
g
g
g
g
g
g
g
g
g
g
g
g
g
g
g
g
g
g
g
g
g
g
g
g
g
g
g
g
g
g
g
g
g
g
g
g
g
g
g
g
g
g
g
g
g
g
g
g
g
g
g
g
g
g
g
g
g
g
g
g
g
g
g
g
g
g
g
g
g
g
g
g
g
g
g
g
g
g
g
g
g
g
g
g
g
o
o
o
o
o
o
o
o
o
o
o
o
o
o
o
o
o
o
o
o
o
o
o
o
o
o
o
o
o
o
o
o
o
o
o
o
o
o
o
o
o
o
o
o
o
o
o
o
o
o
o
o
o
o
o
o
o
o
o
o
o
o
o
o
o
o
o
o
o
o
o
o
o
o
o
o
o
o
o
o
o
o
o
o
o
o
o
o
o
o
o
o
o
o
o
o
o
o
o
o
o
o
o
o
o
o
o
o
o
o
o
o
o
o
o
o
o
o
o
o
o
o
o
o
o
o
o
o
o
o
o
o
o
o
o
o
o
o
o
o
o
o
o
o
o
o
o
o
o
o
o
o
o
o
o
o
o
o
o
o
o
o
o
o
o
o
o
o
o
o
o
o
o
o
o
o
o
o
o
o
o
o
o
o
o
o
o
o
o
o
o
o
o
o
o
o
o
o
o
o
o
o
o
o
o
o
o
o
o
o
o
o
o
o
o
o
o
o
o
o
o
o
o
o
o
o
o
o
o
o
o
o
o
o
o
o
o
o
o
o
o
o
o
o
o
o
o
o
o
o
o
o
o
o
o
o
o
o
o
o
o
o
o
o
o
o
o
o
o
o
o
o
o
o
o
o
o
o
o
o
o
o
o
o
o
o
o
o
o
o
o
o
o
o
o
o
o
o
o
o
o
o
o
o
o
o
o
o
o
o
o
o
o
o
g
g
g
g
g
g
g
g
g
g
g
g
g
g
g
g
g
g
g
g
g
g
g
g
g
g
g
g
g
g
g
g
g
g
g
g
g
g
g
g
g
g
g
g
g
g
g
g
g
g
g
g
g
g
g
g
g
g
g
g
g
g
g
g
g
g
g
g
g
g
g
g
g
g
g
g
g
g
g
g
g
g
g
g
g
g
g
g
g
g
g
g
g
g
g
g
g
g
g
g
g
g
g
g
g
g
g
g
g
g
g
g
g
l
l
l
l
l
l
l
l
l
l
l
l
l
l
l
l
l
l
l
l
l
l
l
l
l
l
l
l
l
l
l
l
l
l
l
l
l
l
l
l
l
l
l
l
l
l
l
l
l
l
l
l
l
l
l
l
l
l
l
l
l
l
l
l
l
l
l
l
l
l
l
l
l
l
l
l
l
e
e
e
e
e
e
e
e
e
e
e
e
e
e
e
e
e
e
e
ee
e
e
e
e
e
e
e
e
e
e
e
e
e
e
e
e
e
e
e
e
e
e
e
e
e
e
e
e
e
e
e
e
e
e
e
e
e
e
e
e
e
e
e
e
e
e
e
e
e
e
e
e
e
e
e
e
e
e
e
e
e
e
e
e
e
e
e
e
e
e
e
e
e
e
e
e
e
e
e
e
e
e
e
e
e
e
e
e
e
e
e
e
e
e
e
e
e
e
e
e
e
e
e
e
e
e
e
e
e
e
e
e
e
e
e
e
e
e
e
e
e
e
e
e
e
e
.
.
..
c
c
c
c
c
c
c
c
c
c
c
c
c
c
c
c
c
c
c
c
c
c
c
c
c
c
c
c
c
c
c
c
c
c
c
c
c
c
c
c
c
c
c
c
c
c
c
c
c
c
c
c
c
c
c
c
c
c
c
c
c
c
c
c
c
c
c
c
c
c
c
c
c
c
c
c
c
c
c
c
c
c
c
c
c
c
c
c
c
c
c
c
c
c
c
c
c
c
c
c
c
c
c
c
c
c
o
o
o
o
o
o
o
o
o
o
o
o
o
o
o
o
o
o
o
o
o
oo
o
o
o
o
o
o
o
o
o
o
o
o
o
o
o
o
o
o
o
o
o
o
o
o
o
o
o
o
o
o
o
o
o
o
o
o
o
o
o
o
o
o
o
o
o
o
o
o
o
o
o
o
o
o
o
o
o
o
o
o
o
o
o
o
o
o
o
m
m
m
m
m
m
m
m
m
m
m
m
m
m
m
m
m
m
m
m
m
m
m
m
m
m
m
m
m
m
m
m
m
m
m
m
m
m
m
m
m
m
m
m
m
m
m
m
m
m
m
m
m
m
m
m
m
m
m
m
m
m
m
m
m
m
m
m
m
m
m
m
m
m
m
m
m
m
m
m
m
m
m
m
m
m
m
m
m
m
m
m
m
m
m
m
m
m
m
m
m
m
m
m
m
m
m
m
m
m
m
m
m
m
m
m
m
m
Done
Hide
. , @ ‘
g h i
p q r s
a b c
j k l
t u v
? ! -
<
d e f
m n o
w x y z
abc ABC 123 www Backspace
3. Movethecursorto“
”iconandpress[ ] button.
History
Bookmark
Web Address:
X
Internet
www.google.com
http://www.google.com
w
w
w
w
w
w
w
w
w
w
w
w
w
w
w
w
w
w
w
w
w
w
w
w
w
w
w
w
w
w
w
w
w
w
w
w
w
w
w
w
w
w
w
w
w
w
w
w
w
w
w
w
w
w
w
w
w
w
w
w
w
w
w
w
w
w
w
w
w
w
w
w
w
w
w
w
w
w
w
w
w
ww
w
w
w
w
w
w
w
w
w
w
w
w
w
w
w
w
w
w
w
w
w
w
w
w
w
w
w
w
w
w
w
w
w
w
w
w
w
w
w
w
w
w
w
w
w
w
w
w
w
w
w
w
w
w
w
w
w
w
w
w
w
w
w
w
w
w
w
w
w
w
w
w
w
w
w
w
w
w
w
w
w
w
w
w
w
w
w
w
w
w
w
w
w
w
w
w
w
w
w
w
w
w
w
w
w
w
w
w
w
w
w
w
w
w
w
w
w
w
w
w
w
w
w
w
w
w
w
w
w
w
w
w
w
w
w
w
w
w
w
w
w
w
w
w
w
w
w
w
w
w
w
w
w
w
w
w
w
w
w
w
w
w
w
w
w
w
w
w
w
w
w
w
w
w
w
w
w
w
w
w
w
w
w
w
w
w
w
w
w
w
w
w
w
w
w
w
w
w
w
w
w
w
w
w
w
w
w
w
w
w
w
w
w
w
w
w
w
w
w
w
w
w
w
w
w
w
w
w
w
w
w
w
w
w
w
w
w
w
w
w
w
w
w
w
w
w
w
w
w
w
w
w
w
w
w
w
w
w
ww
w
w
w
w
w
w
w
w
w
w
w
w
w
w
w
w
w
w
w
w
w
w
w
w
w
w
w
w
w
w
w
w
w
w
w
w
w
w
w
w
w
w
w
w
w
w
w
w
w
w
w
w
w
w
w
w
w
w
w
w
w
w
w
w
w
w
w
w
w
w
w
w
w
w
w
w
w
w
w
w
w
w
w
w
w
w
w
w
w
w
w
w
w
w
w
w
w
w
w
w
w
w
w
w
w
w
w
w
w
w
w
w
w
w
w
w
w
w
w
w
w
w
w
w
w
w
w
w
w
w
w
w
w
w
w
w
w
w
w
w
w
w
w
w
w
w
w
w
w
w
w
w
w
w
w
w
w
w
w
w
w
w
w
w
w
w
w
w
w
w
w
w
w
w
.
.
.
.
g
g
g
g
g
g
g
gg
g
g
g
g
g
g
g
g
g
g
g
g
g
g
g
g
g
g
g
g
g
g
g
g
g
g
g
g
g
g
g
g
g
g
g
g
g
g
g
g
g
g
g
g
g
g
g
g
g
g
g
g
g
g
g
g
g
g
g
g
g
g
g
g
g
g
g
g
g
g
g
g
g
g
g
g
g
g
g
g
g
g
g
g
g
g
g
g
g
g
g
g
g
g
g
g
g
g
g
g
g
g
g
g
g
g
g
g
g
g
g
g
g
g
g
g
g
g
g
g
g
g
g
g
g
o
o
o
o
o
o
o
o
o
o
o
o
o
o
o
o
o
o
o
o
o
o
o
o
o
o
o
o
o
o
o
o
o
o
o
o
o
o
o
o
o
o
o
o
o
o
o
o
o
o
o
o
o
o
o
o
o
o
o
o
o
o
o
o
o
o
o
o
o
o
o
o
o
o
o
o
o
o
o
o
o
o
o
o
o
o
o
o
o
o
o
o
o
o
o
o
o
o
o
o
o
o
o
o
o
o
o
o
o
o
o
o
o
o
o
o
o
o
o
o
o
o
o
o
o
o
o
o
o
o
o
o
o
o
o
o
o
o
o
o
o
o
o
o
o
o
o
o
o
o
o
o
o
o
o
o
o
o
o
o
o
o
o
o
o
o
o
o
o
o
o
o
o
o
o
o
o
o
o
o
o
o
o
o
o
o
o
o
o
o
o
o
o
o
o
o
o
o
o
o
o
o
o
o
o
o
o
o
o
o
o
o
o
o
o
o
o
o
o
o
o
o
o
o
o
o
o
o
o
o
o
o
o
o
o
o
o
o
o
o
o
o
o
o
o
o
o
o
o
o
o
o
o
o
o
o
o
o
o
o
o
o
o
o
o
o
o
o
o
o
o
o
o
o
o
o
o
o
o
o
o
o
o
o
o
o
o
o
o
o
o
o
o
o
o
o
o
o
o
o
o
o
o
o
o
o
o
o
o
o
o
o
o
o
g
g
g
g
g
g
g
g
g
g
g
g
g
g
g
g
g
g
g
g
g
g
g
g
g
g
g
g
g
g
g
g
g
g
g
g
g
g
g
g
g
g
g
g
g
g
g
g
g
g
g
g
g
g
g
g
g
g
g
g
g
g
g
g
g
g
g
g
g
g
g
g
g
g
g
g
g
g
g
g
g
g
g
g
g
g
g
g
g
g
g
g
g
g
g
g
g
g
g
g
g
g
g
g
g
g
g
g
g
g
g
g
g
l
l
l
l
l
l
l
l
l
l
l
l
l
l
l
l
l
l
l
l
l
l
l
l
l
l
l
l
l
l
l
l
l
l
l
l
l
l
l
l
l
l
l
l
l
l
l
l
l
l
l
l
l
l
l
l
l
l
l
l
l
l
l
l
l
l
l
l
l
l
l
l
l
l
l
l
l
e
e
e
e
e
e
e
e
e
e
e
e
e
e
e
e
e
e
e
ee
e
e
e
e
e
e
e
e
e
e
e
e
e
e
e
e
e
e
e
e
e
e
e
e
e
e
e
e
e
e
e
e
e
e
e
e
e
e
e
e
e
e
e
e
e
e
e
e
e
e
e
e
e
e
e
e
e
e
e
e
e
e
e
e
e
e
e
e
e
e
e
e
e
e
e
e
e
e
e
e
e
e
e
e
e
e
e
e
e
e
e
e
e
e
e
e
e
e
e
e
e
e
e
e
e
e
e
e
e
e
e
e
e
e
e
e
e
e
e
e
e
e
e
e
e
e
.
.
..
c
c
c
c
c
c
c
c
c
c
c
c
c
c
c
c
c
c
c
c
c
c
c
c
c
c
c
c
c
c
c
c
c
c
c
c
c
c
c
c
c
c
c
c
c
c
c
c
c
c
c
c
c
c
c
c
c
c
c
c
c
c
c
c
c
c
c
c
c
c
c
c
c
c
c
c
c
c
c
c
c
c
c
c
c
c
c
c
c
c
c
c
c
c
c
c
c
c
c
c
c
c
c
c
c
c
o
o
o
o
o
o
o
o
o
o
o
o
o
o
o
o
o
o
o
o
o
oo
o
o
o
o
o
o
o
o
o
o
o
o
o
o
o
o
o
o
o
o
o
o
o
o
o
o
o
o
o
o
o
o
o
o
o
o
o
o
o
o
o
o
o
o
o
o
o
o
o
o
o
o
o
o
o
o
o
o
o
o
o
o
o
o
o
o
o
m
m
m
m
m
m
m
m
m
m
m
m
m
m
m
m
m
m
m
m
m
m
m
m
m
m
m
m
m
m
m
m
m
m
m
m
m
m
m
m
m
m
m
m
m
m
m
m
m
m
m
m
m
m
m
m
m
m
m
m
m
m
m
m
m
m
m
m
m
m
m
m
m
m
m
m
m
m
m
m
m
m
m
m
m
m
m
m
m
m
m
m
m
m
m
m
m
m
m
m
m
m
m
m
m
m
m
m
m
m
m
m
m
m
m
m
m
m
4. Now,youcanseethewebpage.
NOTES:
• TheOperabrowserdoesnotsupportFLASHformat.
• Thebrowserisnotavideosource.Itwillnotstayatthebrowser
screenafteryourestartthedisplay.

BDL5570EL
22
5. Change your settings
Using the remote control:
1. Press[ ] HOMEbuttontodisplaytheOSDmenu.
2. Press[ ] [ ] [ ] or[ ]buttontochooseitsmenuitemorto
adjustitsvalue.Press[ ]buttontoconrm.
3. Press[ ] BACKbuttontogobacktothepreviousmenulayer.
4. Press[ ] HOMEbuttontoexittheOSDmenu.
Using the display’s control buttons
MUTE INPUT
MENU
1. Press[ ]buttontodisplaytheOSDmenu.
2. Press[ ][ ][ ]or[ ]buttontochoosemenuitemoradjust
itsvalue.
3. Press[ ]buttontoconrmmenuselectionandenterits
submenu.
4. Press[ ]buttontoexittheOSDmenu.
5.1. Settings
Press[ ] HOMEbutton.
5.1.1. Picture
menu
Picture style
Backlight
Colour
Sharpness
Noise reduction
MPEG artifact reducti...
Picture enhancement
Advanced
Scan mode
Format and edges
Picture reset
Picture
Sound
Tiling
Network
Storage
General settings
Adv.
Picture style
Chooseapredenedpicturesetting.
Backlight
Adjustthebrightnessofthisdisplay’sbacklight.
Colour
Adjustthecoloursaturationofthepicture.
Sharpness
Adjustthesharpnessofthepicture.
Noise reduction
Choosetheamountofnoisereductionforthepicture.
MPEG artifact reduction
Smoothentransitionsandhazinessinthedigitalpicture.
Picture enhancement
Fine-tuneeachpixeltomatchsurroundingpixelsandproduceabrilliant,
high-denitionimage.
• {Advanced sharpness}:Enablesuperiorsharpness,especiallyon
linesandcontoursinthepicture.
• {Dynamic contrast}:Dynamicallyenhancethedetailsinthe
dark,mediumandlightareasofthepicture.
• {Colour enhancement}:Dynamicallyenhancethevividnessand
detailsofcolours.
Advanced
Accessadvancedsettingssuchasgamma,tint,videocontrastandsoon.
• {Gamma}:Adjustthenon-linearsettingforpictureluminance
andcontrast.
TheoptionsareNative, S gamma, 2.2, 2.4,andD-Image.
Note:D-ImageistosimulateDICOMcurveforX-rayphotos.
• {Tint}:Changethecolourbalance.
• {Custom tint}:Customisecolourbalancesetting.Onlyavailable
if{Tint}
{Custom}ischosen.
• {Video contrast}:Adjustvideocontrast.
• {Brightness}:Adjustscreenbrightness.
• {Hue}:Adjustscreenhue.
Scan mode
Changethedisplayareaoftheimage.
Format and edges
• {Picture format}:Changethepictureformat.
• {Zoom}:Expandsthehorizontalandverticalsizesoftheimage
simultaneously.
BDL5570EL
23
• {H Zoom}:Expandsthehorizontalsizeoftheimageonly.
• {V Zoom}:Expandstheverticalsizeoftheimageonly.
Note:Zoom,HZoomandVZoomarefunctionalonlywhenthe
PictureformatsettingissettoCustomZoom.
Seepage18forthedescriptionsabout
Picture format
.
Picture reset
Resetallyourpicturesettingstothefactorydefaults.
5.1.2. Sound
Sound style
Bass
Treble
Balance
Volume
Minimum volume
Maximum volume
Surround mode
Audio out (line out)
Advanced
Sync. Volume
Sound reset
Picture
Sound
Tiling
Network
Storage
General settings
Adv.
Sound style
Accesspredenedsoundsettings.
Bass
Adjusttoincreaseordecreaselower-pitchedsounds.
Treble
Adjusttoincreaseordecreasehigher-pitchedsounds.
Balance
Adjusttoemphasizeleftorrightaudiooutputbalance.
Volume
Adjusttoincreaseordecreasethevolume.
Minimum volume
SettheMinimumvolume.
Maximum volume
SettheMaximumvolume.
Surround mode
Setsurroundeffectsforaudioperformance.
Audio out (line out)
Adjustaudiooutputvolume.
Advanced
Accessadvancedsettingstoenhanceyouraudioexperience.
• {Auto volume leveling}:Enablethereductionofsuddenvolume
changes.
• {Speaker settings}:Turnonorofftheinternalspeakers.
• {Clear sound}:Enhancesoundquality.
• {Audio out format}:Choosethetypeofaudiooutputthrough
thedigitalaudiooutputconnector.(HDMIonly)
• {Audio out delay}:Automaticallysynctheimageonthisdisplay
totheaudiofromaconnectedhometheatre.
• {Audio out offset}:Adjustthesettingforaudiooutputdelay.
Availableif{Audio out delay}isswitchedon.
Sync. Volume
Chooseto{On}or{Off}theSync.Volumefunction.Set{On}to
synchronizethevolumeofinternalspeakerandline-out.Set{Off}to
adjustthevolumeofinternalspeakerandline-out,respectively.
Sound reset
Resettodefaultsetting.
5.1.3. Tiling
Enable
H monitors
V monitors
Position
Frame comp.
Switch on delay
Auto ID.
Picture
Sound
Tiling
Network
Storage
General settings
Adv.
Withthisfunctionyoucancreateasinglelarge-screenmatrix(video
wall)thatconsistsofupto225setsofthisdisplay(up to 15-sets on the
vertical and 15-sets on the horizontal sides).
Enable
Chooseto{On}or{Off}theTilingfunction.If{On},thedisplaywill
applythesettingsin{H monitors},{V monitors},{Position},and
{Frame comp.}.
H monitors
Adjustdisplaysonthehorizontalside.
V monitors
Adjustdisplaysontheverticalside.
Position
Adjustthepositionofthisdisplayinthescreenmatrix.
Example: 2 x 2 screen matrix (4 displays)
Hmonitors=2displays
Vmonitors=2displays
1 2
3 4
H monitors
V monitors
Position

BDL5570EL
24
Example: 5 x 5 screen matrix (25 displays)
Hmonitors=5displays
Vmonitors=5displays
1 2
6 7
3 4
8 9
5
10
11 12 13 14 15
16 17 18 19 20
21 22 23 24 25
H monitors
V monitors
Position
Frame comp.
Choosetoturntheframecompensationfunctiononoroff.Ifselected
{On},thedisplaywilladjusttheimagetocompensateforthewidthof
thedisplaybezelsinordertoaccuratelydisplaytheimage.
{On}
{Off}
Switch on delay
Adjustthepower-ondelayingtime(inseconds)allowsasequential
powering-onforeachdisplaybytheirIDnumberwhenmultipledisplays
areconnected.
Auto ID
Thesetupfunctionenablessettingup{MonitorID}ofconnected
machineaccordingto{Hmonitors}settings.
Example:Hmonitorssetsas4
1 2
5 6
3 4
7 8
9 10 11 12
13 14 15 16
Note:Tousethisfunction,serialconnectallmachineswithRS-232cable
andsettheirNetworkcontrolporttoRS-232too.
Note:TousethisfunctionforDP1.2connectivity,themaximum
resolutiononlysupport1920x1080/60Hz@4sets.For4Kx2K/30Hz
resolution,onlysupport2setsconnectivity.
5.1.4. Network
Picture
Sound
Tiling
Network
Storage
General settings
Adv.
Network settings
Digital Media Rendere...
Network name
Mail Notification
FTP Setting
Clear Internet memory
Network settings
{Network conguration}:Choosehowthisdisplayshouldassign
addressestothenetworkresources.
Theusercanchoose{DHCP & Auto IP}(suggested)or{Static IP}.
Digital Media Renderer - DMR
Receivemultimedialesfromtheconnecteddevicebyyournetwork.
Network name
Inthemultiple-displayconnection,youcanrenameeachdisplayforeasy
identication.
Usetheon-screenkeyboardortheremotecontrolkeypadtoenterthe
name.
Mail Notication
MailNoticationsupporttemperatureandinputsourcesignalevent.
Itwillsendyouanemail,notifyyouwhentemperatureistoohight,or
whensignalhasloss.

BDL5570EL
25
Picture
Sound
Tiling
Network
Storage
General settings
Adv.
Network settings
Digital Media Rende...
Network name
Mail Notification
FTP Setting
Clear Internet memory
Status
From
To
CC1
CC2
SMTP Setting
Send
• {From}:Yourfullemailaddress.
• {To}:Typetheemailaddressofthestrecipientyourwanttosend
themailtointhe“To”eld.
• {CC1}:Typetheemailaddressofthesecondrecipientyourwantto
sendthemailtointhe“CC1”eld.
• {CC2}:Typetheemailaddressofthethirdrecipientyourwantto
sendthemailtointhe“CC2”eld.
• {SMTPSetting}:Addandremoveaccountsorchangeexisting
connectionsettings.
• {Username}:Youremailaccount.
• {Password}:Thepasswordforthisemailaccount.
• {SMTPServer}:TheURLofyourmailserver.
• {Send}:Sendingatestmailtoyourself.
Notes:
• Thisfeaturerequiresanactiveinternetconnection.
• TheSMTPaddresswillprobablybeginwithsmtp://.Forexample,
smtp://smtp.example.com.
• Pleasereviewyourcompany’sinternalsecuritypolicyaboutusing
anexternalSMTPrelaytosendallyouremail.Asitmaynotbe
authorized.
FTP Setting
Addandremoveaccountsorchangeexistingconnectionsettings.
• {SmartCMS}:SetFTPUsernameandPasswordforSmartCMS.
• {USBAutoPlay}:SetFTPUsernameandPasswordforUSBAutoPlay.
Note:UsingSmartCMSandUSBAutoPlayfeature,youcanupload
medialesbyftpinsteadofUSBcopying.
Clear Internet memory
Clearallthecookies,bookmarks,historylistandtextusedforautoll.
5.1.5. Storage
Picture
Sound
Tiling
Network
Storage
General settings
Adv.
SmartCMS
USB AutoPlay
USB copying
USB cloning
Clear Internet memory
SmartCMS
SelectdefaultstoragelocationofcontentsforSmartCMS.
• {Internal}:Setinternalstorageasdefault.
• {External}:Setexternalstorageasdefault.
USB AutoPlay
SelectdefaultstoragelocationofcontentsforUSBAutoPlay.
• {Internal}:Setinternalstorageasdefault.
• {External}:Setexternalstorageasdefault.
USB copying
• USBcopyingisabletotransfermedialesbetweeninternal
memoryandUSBashdevice.Inaddition,itprovidesyouaneasy
waytoimporttheURLforinternet.
• {Import}:ImportmedialesandURLlistfromUSBashdeviceto
internalmemory.
• {Export}:ExportmedialesandURLlistfrominternalmemoryto
USBashdevice.
USB cloning
Import/Exportusersettings.
• {Import}:ImportusersettingsfromUSBashdevice.
• {Export}:BackupusersettingstoUSBashdevice.
Clear Internet memory
Deletingalldataontheinternalstorage,includingmusicandphotos.
Notes:
• BeforeusingimportfunctionofUSBcopyingforAutoPlay,createa
newfolderandnameit“philips”.Putallmedialesintothespecic
folderforAutoPlay.
• BeforeusingimportfunctionofUSBcopyingforURL,createanew
textdocumentandnameit“url_schedulinglist.txt”.Whenenteringa
URL,theformatmustfollowtheformatbelow:“SchedulingNumber,
URLaddress.“
• Forexample,SetURLofschedule1andschedule2towww.google.
comandtw.yahoo.com,respectively.
1,www.google.com2,tw.yahoo.com
BDL5570EL
26
5.1.6. General settings
Picture
Sound
Tiling
Network
Storage
General settings
Adv.
Menu language
Monitor Group
Monitor ID
Eco mode
Auto search
Clock
Scheduling
Sleep timer
OneWire
Local KB lock
RC lock
Menu language
ChooselanguageusedforOSDmenus.
Monitor group
Adjustthegrouprangebetween1to255.Thedefaultsettingis255.
Monitor ID
AdjusttheIDnumberforcontrollingthedisplayviatheRS232
connection.EachdisplaymusthaveauniqueIDnumberwhenmultiple
setsofthisdisplayareconnected.MonitorIDnumberrangeisbetween
1to255.Thedefaultsettingis1.
Eco mode
Setthisdisplaytoreducethepowerconsumptionautomatically.
Note:Factorydefaultsettingis“lowpowerstandby”,butusercouldnot
resetittodefaultaftersettingEcomodeto”Normal”by“Factoryreset”
inMENU.However,usercanstillchangetheECOmodebackto“low
powerstandby”manually.
Auto search
Choosetoletthisdisplaydetectanddisplayavailablesignalsources
automatically.
Clock
Setthecurrentdateandtimeforthedisplay’sinternalclock.
Scheduling
Thisfunctionallowsyoutoprogramupto7differentscheduledtime
intervalsforthisdisplaytoactivate.
Youcanset:
• Whichinputsourcethedisplaywilluseforeachscheduled
activationperiod.
• Thetimeforthedisplaytoturnonandturnoff.
• Thedaysinaweekforthedisplaytoactivate.
Notes:
• Werecommendyoutosetupcurrentdateandtimeinthe{Clock}
menubeforeusingthisfunction.
• Afterchangingthe{Clock}optioninthe{General settings}menu,
youneedtosetthis{Scheduling}again.
Picture
Sound
Tiling
Network
Storage
General settings
Adv.
Menu language
Monitor Group
Monitor ID
Eco mode
Auto search
Clock
Scheduling
Sleep timer
OneWire
Local KB lock
RC lock
1. Thereare7schedulecanbeset.Goto
Status
andchoose
On
.
Status
Source
On time
Off time
Repeat modes
Playlist setting
Off
On
Schedule 1
Schedule 2
Schedule 3
Schedule 4
Schedule 5
Schedule 6
Schedule 7
Slideshow durations
2. Goto
Source
andchooseinputsource.
If{Source}
{USB playlist}ischosen.Youneedtosetplayliist.
If{Source}
{Internet}ischosen.YouneedtosetURLaddress.
If{Source}
{USB AutoPlay}ischosen.Youneedtocreateafolder
named“philips”intheUSBandputallmedialesintothespecic
folderforautoplay.
Status
Source
On time
Off time
Repeat modes
Playlist setting
Schedule 1
Schedule 2
Schedule 3
Schedule 4
Schedule 5
Schedule 6
Schedule 7
Slideshow durations
USB playlist
CVBS
YPbPr
VGA
HDMI 1
HDMI 2
DVI-D
DisplayPort
Card OPS
Internet
SmartCMS
3. Set
On time
.
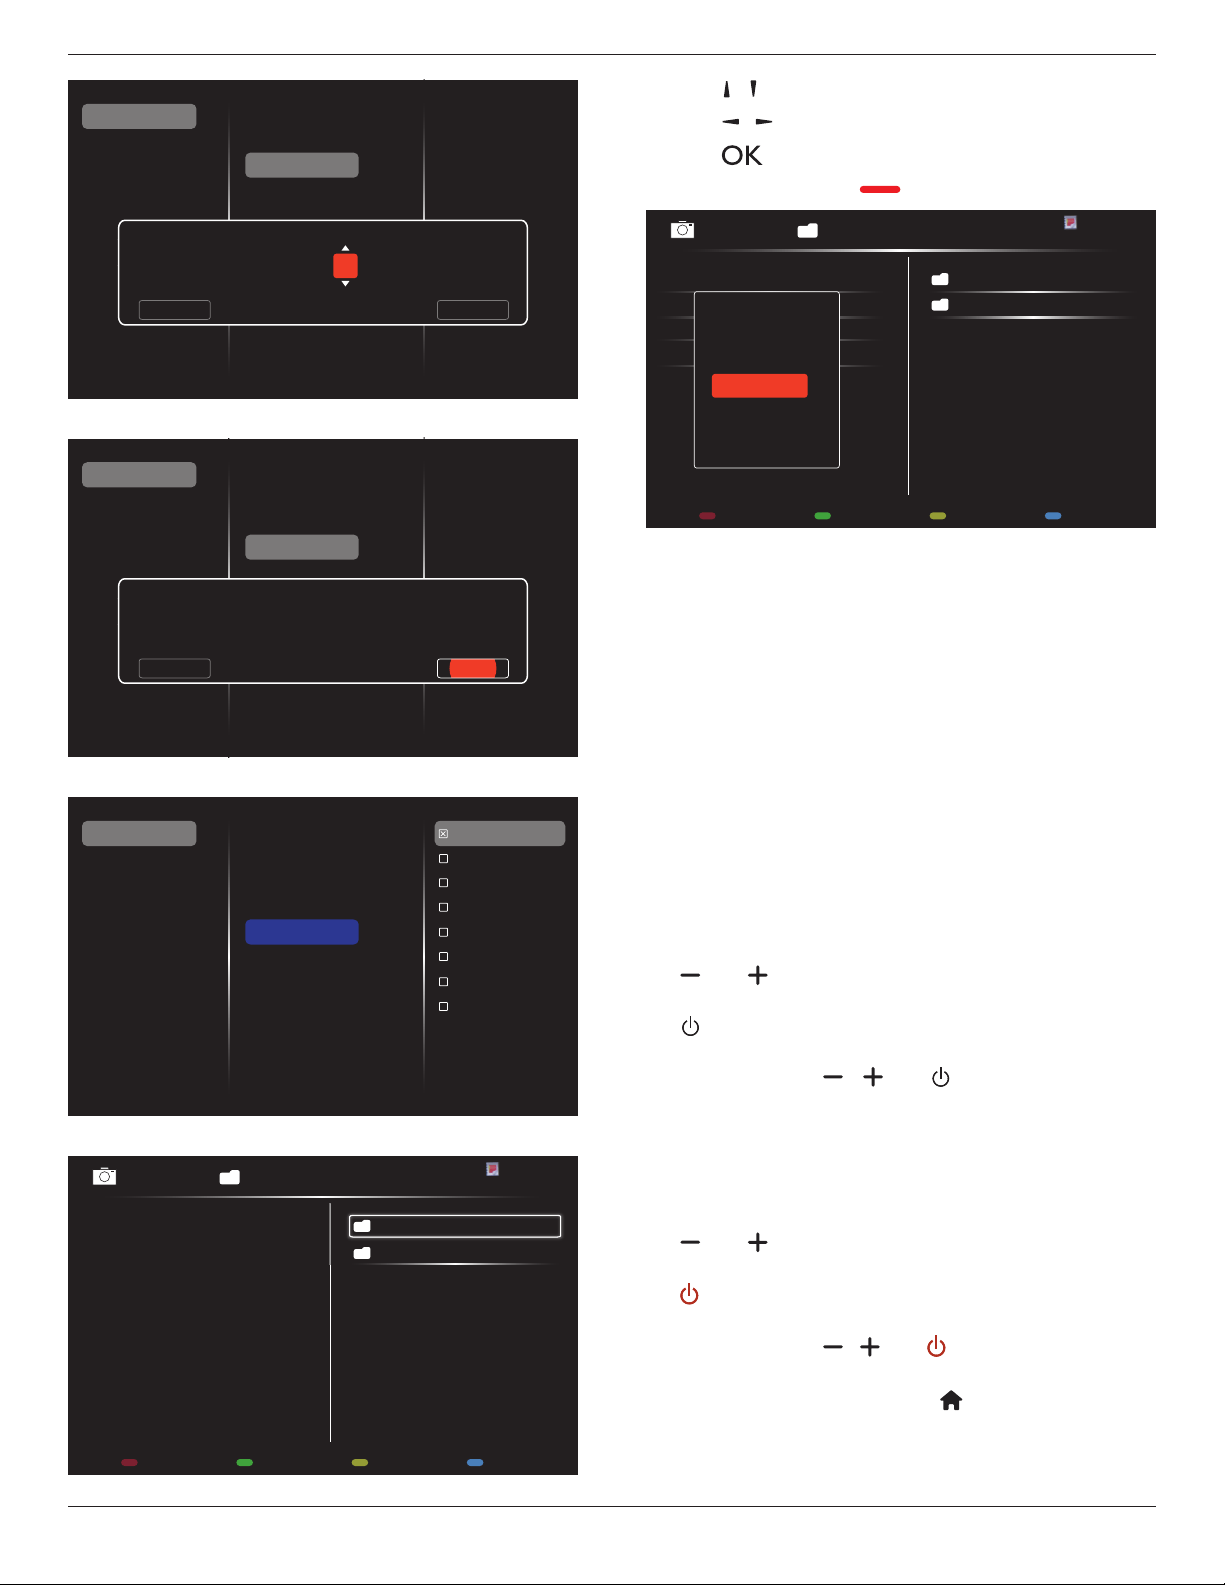
BDL5570EL
27
Status
Source
On time
Off time
Repeat modes
Playlist setting
Schedule 1
Schedule 2
Schedule 3
Schedule 4
Schedule 5
Schedule 6
Schedule 7
On time
Cancel Done
00 : 00
4. Set
Off time
.
Status
Source
On time
Off time
Repeat modes
Playlist setting
Schedule 1
Schedule 2
Schedule 3
Schedule 4
Schedule 5
Schedule 6
Schedule 7
Off time
Cancel
14 : 00
Done
5. Goto
Repeat modes
andchoose.
Status
Source
On time
Off time
Repeat modes
Playlist setting
Schedule 1
Schedule 2
Schedule 3
Schedule 4
Schedule 5
Schedule 6
Schedule 7
No repeat
Every Sunday
Every Monday
Every Tuesday
Every Wednesday
Every Thursday
Every Friday
Every Saturday
Slideshow durations
6. If{Source}
{USB playlist}ischosen.Goto
Playlist setting
.
0001/0002
Options Exit
Photo
Photo
Video
- Press[ ] [ ] buttonstochooseles.
- Press[ ] [ ]buttonstoswitchPlaylistandFileManager.
- Press[ ]buttontosetorcleartheplaylist.
7. Tosavetheplaylist,press[ ] andchoose
Save list
.
0004/0004
Options Exit
Photo
Photo
[..]
Movie.avi
\media\photo
Photo1.jpg
Photo2.jpg
Photo3.jpg
Sort
Recursive Parser
Media Type
Save list
NOTES:
• EachPlaylistsupportsupto30les.
• Playlistwillnotbeclearedafter{Factory settings}.Youhaveto
manuallyremovethelesordeleteusb_schedulinglist.txtinthe
USB.
Sleep timer
Switchoffthisdisplayafteraspeciedtime.
OneWire
ConnectandcontrolyourHDMI-CECcompliantdevicesthroughHDMI
porttothisdisplaywiththesameremotecontrol.
Local KB lock
Choosetoenableordisablethekeyboard(controlbuttons)functionof
thedisplay.
• {Unlock}:Enablethekeyboardfunction.
• {Lock all}:Lockallkeyboardfunction.
• {Lock but volume}:Disableallthekeyboardfunctionexceptthe
[ ] and [ ] button.
• {Lock but power}:Disableallthekeyboardfunctionexceptthe
[ ]button.
• {Lock all expect volume and power}:Disableallthekeyboard
functionexceptthe[ ], [ ] and [ ] button:
RC lock
Choosetoenableordisablethebuttonfunctionoftheremotecontrol.
• {Unlock}:Enablethekeyboardfunction.
• {Lock all}:Lockallkeyboardfunction.
• {Lock but volume}:Disableallthekeyboardfunctionexceptthe
[ ] and [ ] button.
• {Lock but power}:Disableallthekeyboardfunctionexceptthe
[ ] POWERbutton.
• {Lock all expect volume and power}:Disableallthekeyboard
functionexceptthe[ ] [ ] and [ ] POWER button:
NOTE: Todisablethelockfunctionfrom
Local KB lock
or
RC lock
item,pressbuttons[ ] and 1 9 9 8onthe
remotecontrol.
BDL5570EL
28
Pixel shift
Forvideoinputsources,youmaychoose{On}tomovethescreen
imageautomaticallytoprotectthedisplayfrom“burn-in”or“after-image”
symptoms30secondsafternotoperatingthedisplay.
Smart power
Chooseabacklightleveltooptimisedynamicpowerconsumptionand
picturecontrast.
Theoptionsare:{Off},{Standard},{Medium},{High}.
Wake on lan
Choose{On}andyoucanturnonthedisplaybynetwork.
Switch on state
Choosethedisplaystatususedforthenexttimeyouconnectthepower
cord.
• {On}-Thedisplaywillturnonwhenthepowercordisconnected
toawalloutlet.
• {Standby}-ThedisplaywillremainStandbywhenthepowercordis
connectedtoawalloutlet.
• {Last status}-Thedisplaywillreturntothepreviouspowerstatus
(on/off/standby)whenremovingandreplacingthepowercord.
Light sensor
Choose{On}andthedisplaywillautomaticallyadjustbacklight.
Power LED Light
Choose{Off}toturnofftheindicator.
Logo
Choose{Off}andthedisplaywillnotdisplaythe logowhenyou
switchon.
TheoptionsareOff, On,andUser.
Note:FortheoptionUser,usershavetocopytheLogole(*.png)to
USBashdeviceandnamedit“WelcomeLogo.png”.Afterthat,goto
StorageandchooseUSBcopyingandselectImportandpress[OK].
Advanced power management
Choose{On}.Then,whennosignal,thedisplaywillautomaticallyturnoff.
Source notication
Whenyoupress[ ] POWERbuttontoturnonthedisplayfrom
standbymodeorchangetheinputsignal,theinformationOSDis
displayedontheupperleftcornerofthescreen.
Choose{Off}toturnoffthisfunction.
DisplayPort Ver.
SettheDisplayPortversionto1.1aor1.2,thissettingisonlyvalidon
DisplayPortinputandoutput,
1.1a:SwitchDisplayPortVer.to1.1a(default),theDisplayPortoutputis
thecloneoftheDisplayPortinput.
1.2:SwitchDisplayPortVer.to1.2tosupportMST(Multi-Stream
Transport)
NOTE: IfthedisplayisblackscreenorabnormalunderDisplayPort
source,pleaseswitchto1.1aandturnACoffandon.
Cooling Fan
Select{On}toturnonthecoolingfanallthetime.Select{Auto}toturn
on/offthecoolingfanaccordingtothedisplay’stemperature.
NOTES:
• Thedefault{Auto}optionwillstartrunningthecoolingfanifthe
temperatureof60°C(140°F)isreached,.
• Ifthetemperatureexceeds70°C(158°F)over3minutesandthen
atemperaturewarningmessagewillbeshownonthescreenfor10
seconds,thedisplaywillbeshutdownautomaticallywithblinkingred
&greenLEDlights.
Network control port
ChoosetheRS232controlformCardOPSorembeddedRS232inPD
set.
Factory settings
Resetallyourcustomizedsettingstothefactorydefaults
5.1.7. Adv.
AdvancedsettingspageenablesyoutocongureHDMIandDVIsignal
settingsforimagequality.
Picture
Sound
Tiling
Network
Storage
General settings
Adv.
Jitter clean
VCO gain
Jitter clean
Turnon/offjittercleaningfunctionforHDMIandDVIsignalquality
enhancement.Thedefaultsettingison.
VCO gain
AdjustVCOgainautomaticallyormanually.ThedefaultsettingisAuto.
Note:WhenthesignalisunstableandlosethepicturefromHDMIinput,
youcanadjustVCOgaintogetgoodpicture.
5.1.8. Web control
A. Ensureyouhaveconnectedtothenetwork.YoucanpressINFO
buttontodisplaytheconnectionofthenetwork.
Picture format
Picture style
Sound style
Smart power
Volume
Monitor group
Monitor ID
Model name
SW Version
Serial no
Temperature
Network configuration
IP address
Netmask
Gateway
Network name
Ethernet MAC address
Auto zoom
Standard
Original
Off
20
1
1
BDL5570EL
0.07
39°C
DHCP
192.168.0.101
255.255.255.0
192.168.0.1
BDL5570EL
00:00:00:00:00:00
HDMI 1 1080p60 29/12/2014 Monday 16:10:14
FromthecomputerconnectedtothePD,rstopenyourWebbrowser.
ThenenterthePD’saddress(192.168.0.101)fornetworkadministration
inthewebaddresseldandhitentertoreachthehomepageofWeb
Control.

BDL5570EL
29
Note:DefaultUsernameisadminwithPassword1234.
B. ThedefaultMainPageofWebControlisPowerPage.Itprovidesyou
aneasywaytoturnthedisplayonorputthedisplaytostandby.
PowerOff:Putthedisplaytostandby.
PowerOn:Turnthedisplayon.
GetPowerstatus:Clickthisbuttontogetthedisplaystatus.
Note:PowerOnfunctiononlysupportedaftersettingEcomodeto
Normal.
C. ClickonvideotoswitchtoVideoPage.Itprovidesyouaneasyway
toadjustvideosettings.
Brightness:Adjusttheoverallimagebrightnessbychangingtheintensity
oftheLCDpanel’sbacklight.0(minimum)to100(maximum).
Videocontrast:Adjusttosharpenthepicturequality.Theblackportions
ofthepicturebecomericherindarknessandthewhitebecomebrighter.
0(minimum)to100(maximum).
Color:Adjusttoincreaseordecreasetheintensityofcolorsinthe
image.0(minimum)to100(maximum).
Sharpness:Adjusttoimproveimagedetail.0(minimum)to
100(maximum).
Hue:Adjustscreenhue.-50(minimum)to50(maximum).
Backlight:Adjustthebrightnessofthedisplay’sbacklight.0(minimum)to
100(maximum).
Gamma:Adjustthenon-linearsettingforpictureluminanceand
contrast.1(minimum)to4(maximum).
NoiseReduction:Adjusttoremovethenoiseintheimage.Youcan
selectasuitablenoisereductionlevel.Choosefrom:Off/Low/Medium/
High
PictureFormat:Changethedisplayareaoftheimage.Youcanselecta
suitableformat.Choosefrom:Autozoom/Moviesexpand16:9/Wide
screen/Unsealed/4:3
VideoSource:Chooseinputsource.ChoosefromUSB/Network/
Internet/SmartCMS/CVBS/YPbPr/VGA/HDMI/DVI-D
AutoAdjust:Usetheautoadjustfunctiontoautomaticallytooptimize
thedisplayoftheimageposition.
D. ClickAudiotoswitchtoAudioPage.Itprovidesyouaneasywayto
adjustaudiosettings.
Volume:Adjusttoincreaseordecreasethevolume.0(minimum)to60
(maximum).
Treble:Adjusttoincreaseordecreasehigher-pitchedsounds.
-8(minimum)to8(maximum).
Bass:Adjusttoincreaseordecreaselower-pitchedsounds.-8(minimum)
to8(maximum).
E. ClickonColortoswitchtoColorPage.Itprovidesyouaneasyway
toadjustcolorsettings.
BDL5570EL
30
Tint:Changethecolorbalance.ChoosefromCool/Normal/Warm/
Custom
Customtint:Withthisfunctionyoucanadjustthecolortonesofthe
imagepreciselybychangingtheR(Red),G(Green)andB(Blue)settings,
respectively.
Note:CustomtintonlyavailablewhenTintissettoCustom.
F. ClickonTilingtoswitchtoTilingPage.Withthisfunctionyoucan
createasinglelarge-screenmatrix(videowall)thatconsistsofup
to225setsofthisdisplay(upto15-setsontheverticaland15-sets
onthehorizontalsides).
HMonitor:Adjustdisplaysonthehorizontalside.
VMonitor:Adjustdisplaysontheverticalside.
Position:Adjustthepositionofthisdisplayinthescreenmatrix.
FrameComp.:Choosetoturntheframecompensationfunctiononor
off.
Enable:Chooseto{On}or{Off}theTilingfunction.
Switchondelay:Adjustthepower-ondelayingtimeallowsasequential
powering-onforeachdisplay
Note:
2x2screenmatrix(4displays)
Hmonitors=2displays
Vmonitors=2displays
1 2
3 4
H monitors
V monitors
Position
5x5screenmatrix(25displays)
Hmonitors=5displays
Vmonitors=5displays
1 2
6 7
3 4
8 9
5
10
11 12 13 14 15
16 17 18 19 20
21 22 23 24 25
H monitors
V monitors
Position
Framecomp.On
Framecomp.Off
Off
G. ClickonDateandTimetoswitchtoDateandTimePage.It
BDL5570EL
31
providesyouaneasywaytosetdateandtimeforthedisplay’s
internalclock.
H. ClickonScheduletoswitchtoSchedulePage.Thefunctionallows
youtoprogramupto7differentscheduledtimeintervalsforthis
displaytoactivate.
Note:SeeschedulingonPage21forthedetaildescriptionsabout
Schedulingsetting.
I. ClickSecuritytoswitchtoSecurityPage.Itprovidesyouaneasyway
tochangeyourusernameandpassword.
EnteryournewUsernameandPasswordintotheUsernameand
PasswordeldsandthenclickontheSetbuttontosetyournew
usernameandpassword.
J. ClickonAdvancedSettingtoswitchtoAdvancedSettingsPage.
LocalKBlock:Choosetoenableordisablethekeyboard(controlbuttons)
functionofthedisplay
RClock:Choosetoenableordisablethebuttonfunctionoftheremote
control.
MonitorGroup:Adjustthegrouprangebetween1to255.Thedefault
settingis1
MonitorID:AdjusttheIDnumberforcontrollingthedisplayviatheRS232
connection.EachdisplaymusthaveaIDnumberwhenmultiplesetsof
thisdisplayareconnected.MonitorIDnumberrangeisbetween1to255.
TheDefaultsettingis1.
K. ClickonNetworkSettingtoswitchtoNetworkSettingPage.
HostName:Inthemultiple-displayconnection,youcanrenameeach
displayforeasyidentication.
DHCP:Choosehowthisdisplayshouldassignaddresstothenetwork
resource.(On:DHCP&AutoIP,Off:StaticIP).IfDHCPissettoOn,
devicewillrequestandbeassignedanaddresseverytimeit’sbootedup.
Otherwise,youneedtoaskyournetworkadministratorfortheappropriate
IPsettings.
L. ClickonSysteminformationtoswitchtoSysteminformationPage.
Gettingthedisplayinformation.SuchasSerialnumber,runningtimeand
TemperatureviatheRS232/Network.
BDL5570EL
32
Note:
1.Somebrowserissuesmaybecausedbythebrowseritself.For
optimalviewingandsecuritywerecommendthatyoukeepyour
browseruptodate.
2.WerecommendthatyouuseIEforoptimalperformancewithWeb
Control.
5.1.9. FTP Server
A. Ensureyouhaveconnectedtothenetwork.YoucanpressINFO
buttontodisplaytheconnectionofthenetwork.
Picture format
Picture style
Sound style
Smart power
Volume
Monitor group
Monitor ID
Model name
SW Version
Serial no
Temperature
Network configuration
IP address
Netmask
Gateway
Network name
Ethernet MAC address
Wide screen
Standard
Personal
Off
0
1
1
BDL5570EL
1.51
25°C
DHCP & Auto IP
192.168.1.116
255.255.255.0
192.168.1.1
BDL5570EL
FF:FF:FF:FF:FF:FF
HDMI 1 1080p60 26/09/2014 Friday 16:10:14
B. OpenInternetExplorerandentertheaddressoftheFTPsiteinthe
addressbar.
C. Inputtheusernameandpasswordfortheaccountyouwishto
connecttoandclickLog On.
D. NowyouhaveanopenFTPconnection.
Note:
1.Theaddresswillprobablybeginwithftp://(itshouldnotbeginwith
http://).
2.Forinternalmemory,theUsernameisphilipswithPasswordphilips.
3.ForexternalUSBdevice,UsernameisusbwithPasswordusb.
4.UsingUSBAutoPlayfeature,youcanuploadmedialesbyftpinstead
ofUSBcopying.

BDL5570EL
33
6. USB device compatibility
USB Video Subtitle Formats (for language subtitles, etc.)
File
Extensions
Container Videocodec Maximumresolution Max.FrameRate(fps)
Max.BitRate
(Mbps)
Audiocodec
.mpg
mpeg
.vob
PS
MPEG-1 1920x1080 25p,30p,50i,60i 30
MPEG-1(L1&L2),
MPEG-1,2,2.5L3,
AAC/HE-AAC(v1&v2),
DVD-PCM,AC3
MPEG-2 1920x1080 25p,30p,50i,60i 30
MPEG-4ASP 1920x1080 25p,30p,50i,60i 30
H.264 1920x1080 25p,30p,50p,60p,60i 30
.ts TS
MPEG-2 1920x1080 25p,30p,50i,60i 30
MPEG-1(L1&L2),
MPEG-1,2,2.5L3,
AAC/HE-AAC(v1&v2),
AC3,E-AC3,
DolbyPulse
MPEG-4ASP 1920x1080 25p,30p,50i,60i 30
H.264 1920x1080 25p,30p,50p,60p,60i 30
MVC
1920x1080i@eldrate=50,60Hz
1920x1080p@framerate=24,25,30Hz
1280x720p@framerate=50,60Hz
- 30
.ts
.m2ts
.mts
.mt2
MaTSTTS
MPEG-2 1920x1080 25p,30p,50i,60i 30
MPEG-1(L1&L2),
MPEG-1,2,2.5L3,
AAC/HE-AAC(v1&v2),
AC3,E-AC3,
DolbyPulse
MPEG-4ASP 1920x1080 25p,30p,50i,60i 30
H.264 1920x1080 25p,30p,50p,60p,60i 30
MVC
1920x1080i@eldrate=50,60Hz
1920x1080p@framerate=24,25,30Hz
1280x720p@framerate=50,60Hz
- 30
.ts
.m2ts
.mts
AVCHD
MPEG-2 1920x1080 25p,30p,50i,60i 30
MPEG-1(L1&L2),
MPEG-1,2,2.5L3,
AAC/HE-AAC(v1&v2),
AC3,E-AC3,
DolbyPulse
MPEG-4ASP 1920x1080 25p,30p,50i,60i 30
H.264 1920x1080 25p,30p,50p,60p,60i 30
.ts
.m2ts
.mts
AVCHD MVC
1920x1080i@eldrate=50,60Hz
1920x1080p@framerate=24,25,30Hz
1280x720p@framerate=50,60Hz
- 30
MPEG-1(L1&L2),
MPEG-1,2,2.5L3,
AAC/HE-AAC(v1&v2),
AC3,E-AC3,
DolbyPulse
.m4v M4V H.264 1920x1080 25p,30p,50p,60p,60i 30 AAC
.ism/Manifest
.mpd
fragMP4
H.264 1920x1080 25p,30p,50p,60p,60i 30
AAC/HE-AAC(v1&v2),
AC3,E-AC3,WMA,
WMA-PRO
MVC
1920x1080i@eldrate=50,60Hz
1920x1080p@framerate=24,25,30Hz
1280x720p@framerate=50,60Hz
- 30
.mp4 MP4
MPEG-4ASP 1920x1080 25p,30p,50i,60i 30
AAC/HE-AAC(v1&v2),
AC3,E-AC3,WMA,
WMA-PRO
H.264 1920x1080 30
MVC
1920x1080i@eldrate=50,60Hz
1920x1080p@framerate=24,25,30Hz
1280x720p@framerate=50,60Hz
- 30
WMV9/VC1 1920x1080 30p,60i 30
.mkv
.mk3d
MKV
MPEG-4ASP 1920x1080 25p,30p,50i,60i 30
MPEG-1(L1&L2),
MPEG-1,2,2.5L3,
AAC/HE-AAC(v1&v2),
AC3,E-AC3,WMA,
WMA-PRO
H.264 1920x1080 30

BDL5570EL
34
USB Multimedia Formats
FileExtensions Container Videocodec Maximumresolution
Frequency
(kHz)
Max.BitRate
(Mbps)
Audiocodec
.mp3 MP3 - - 48 384 MPEG-1,2,2.5L3
.wma
.asf
WMA
(V2uptoV9.2)
- - 48 192 WMA
.wma WMAPro - - 96 768 WMA,WMAPro
.wav(PC) LPCM - - 192 768 LPCM
.aif(mac)
.aiff(mac)
LPCM - - 192 768 LPCM
.aac
.mp4
.m4a
AAC - - 48 1024 AAC,HE-AAC(v1&v2)
.pls
.m3u
Playlists - - - - -
.m4a M4A - - 48 1024 AAC,HE-AAC(v1&v2)
USB Photo Formats
File
Extensions
Container Video
codec
MaximumResolution Frequency Max.Bit
Rate
Audio
codec
jpg/jpeg JPEG baseline:
colormode=444,
size<=32768x16128
colormode=422v,
size<=16384x16128
colormode=other,notsupport
- - -
bmp BMP 4096x3072_4bit,
2730x2500_8bit,
2048x1536_16bit,
1500x1200_32bit
- - -
png PNG 4096x3072_4bit,
2730x2500_8bit,
2048x1536_16bit,
1500x1200_32bit
- - -
gif GIF 4096x3072_4bit,
2730x2500_8bit,
2048x1536_16bit,
1500x1200_32bit
- - -
NOTES:
• Soundorvideomaynotworkifthecontentshaveastandardbitrate/framerateabovethecompatibleFrame/seclistedinthetableabove.
• VideocontentwithaBitrateorFrameratelargerthantheratespeciedinthetableabovecancausechoppyvideoduringplayback.
BDL5570EL
35
7. Input Mode
VGA Resolution:
Standard
Resolution
ActiveResolution
RefreshRate PixelRate AspectRatio StandforMode
HPixels VLines
VGA 640 480
60Hz 25.175MHz
4:3 VideoGraphicArray72Hz 31.5MHz
75Hz 31.5MHz
WVGA 720 400 70Hz 33.75MHz 16:9 WideVideoGraphicArray
SVGA 800 600
60Hz 40MHz
4:3 SuperVGA
75Hz 49.5MHz
XGA 1024 768
60Hz 65MHz
4:3 ExtendedGraphicArray
75Hz 78.75MHz
WXGA 1280 768 60Hz 79.5MHz 5:3 WideXGA
WXGA 1280 800 60Hz 79.5MHz 16:10 WideXGA
SXGA 1280 1024 60Hz 108MHz 5:4 SuperXGA
WXGA 1360 768 60Hz 85.5MHz 16:9 WideXGA
UXGA 1600 1200 60Hz 162MHz 4:3 UltraXGA
HD1080 1920 1080 60Hz 148.5MHz 16:9 HD1080
SDTV Resolution:
Standard
Resolution
ActiveResolution
RefreshRate PixelRate AspectRatio StandforMode
HPixels VLines
480i
720 480 59.94Hz 27MHz 4:3 ModiedNTSCStandard
480p
576i
720 576 50Hz 27MHz 4:3 ModiedPALStandard
576p
HDTV Resolution:
Standard
Resolution
ActiveResolution
RefreshRate PixelRate AspectRatio StandforMode
HPixels VLines
720p 1280 720
50Hz
74.25MHz 16:9 NormallyDVBMode
60Hz
1080i 1920 1080
50Hz 74.25MHz
16:9 NormallyATSCMode
60Hz 74.176MHz
1080p 1920 1080
50Hz 148.5MHz
16:9 NormallyATSCMode
60Hz 148.325MHz
• ThePCtextqualityisoptimuminHD1080mode(1920x1080,60Hz).
• YourPCdisplayscreenmightappeardifferentdependingonthemanufacturer(andyourparticularversionofWindows).
• CheckyourPCinstructionbookforinformationaboutconnectingyourPCtoadisplay.
• Ifaverticalandhorizontalfrequency-selectmodeexists,select60Hz(vertical)and31.5KHz(horizontal).Insomecases,abnormalsignals(suchas
stripes)mightappearonthescreenwhenthePCpoweristurnedoff(orifthePCisdisconnected).Ifso,pressthe[INPUT]buttontoenterthe
videomode.Also,makesurethatthePCisconnected.
• WhenhorizontalsynchronoussignalsseemirregularinRGBmode,checkPCpowersavingmodeorcableconnections.
• ThedisplaysettingstablecompliestotheIBM/VESAstandards,andbasedontheanaloginput.
• TheDVIsupportmodeisregardedassametothePCsupportmode.
• Thebesttimingfortheverticalfrequencytoeachmodeis60Hz.
BDL5570EL
36
8. Pixel Defect Policy
Westrivetodeliverthehighestqualityproductsandusesomeoftheindustry’smostadvancedmanufacturingprocesseswhilstpracticingstringentquality
control.However,pixelorsub-pixeldefectsonthePDP/TFTpanelsusedinPlasma-&LCD-displaysaresometimesunavoidable.Nomanufacturercan
guaranteethatallpanelswillbefreefrompixeldefects,butPhilipsguaranteesthatanyPlasma-&LCD-displayswithanunacceptablenumberofdefects
willberepairedduringthewarrantyperiodinlinewithyourlocalguaranteeconditions.
ThisnoticeexplainsthedifferenttypesofpixeldefectsanddenestheacceptabledefectlevelfortheLCDscreen.Inordertoqualifyforrepairunder
warranty,thenumberofpixeldefectsmustexceedacertainlevelasshowninthereferencetable.IftheLCDscreeniswithinspecicationawarranty
exchange/claimbackwillberefused.Additionally,becausesometypesorcombinationsofpixeldefectsaremorenoticeablethanothers,Philipssetseven
higherqualitystandardsforthose.
8.1. Pixels and Sub-Pixels
subpixel
pixel
Apixel,orpictureelement,iscomposedofthreesub-pixelsintheprimarycolorsofred,greenand
blue.Manypixelstogetherformanimage.Whenallsub-pixelsofapixelarelit,thethreecolored
sub-pixelstogetherappearasasinglewhitepixel.Whenallaredark,thethreecoloredsub-pixels
togetherappearasasingleblackpixel.Othercombinationsoflitanddarksub-pixelsappearas
singlepixelsofothercolors.
8.2. Types of Pixel Defects + Dot Definition
Pixelandsub-pixeldefectsappearonthescreenindifferentways.Therearethreecategoriesofpixeldefectsandseveraltypesofsub-pixeldefectswithin
eachcategory.
Dot denition = What is a defective “Dot”? :
Oneormoredefective,adjacentsub-pixelaredenedasone“dot”.Theno.ofdefectivesub-pixelsarenotrelevanttodeneadefectivedot.Thismeans
thatadefectivedotcanconsistofone,twoorthreedefectivesub-pixelswhichcanbedarkorlit.
RR G B
Onedot=OnePixel;consistsofthreesub-pixelsofRed,Green,andBlue.
8.3. Bright Dot Defects
Brightdotdefectsappearaspixelsorsub-pixelsthatarealwayslitor“on”.Thesearetheexamplesofbrightdotdefects:
Onelitred,greenorbluesubpixel Twoadjacentlitsubpixels:
Red+Blue=Purple
Red+Green=Yellow
Green+Blue=Cyan(LightBlue)
Threeadjacentlitsubpixels(onewhitepixel)
BDL5570EL
37
8.4. Dark Dot Defects
Blackdotdefectsappearaspixelsorsub-pixelsthatarealwaysdarkor“off”.Thesearetheexamplesofblackdotdefects:
Onedarkdot Twoadjacentdarkdots=1pairofdarkdots Twodarkdots,specicationsdenesthe
minimumdistancebetweendarkdots
8.5. Proximity of Pixel Defects
Becausepixelandsub-pixelsdefectsofthesametypethatarenearbyoneanothermaybemorenoticeable,Philipsalsospeciestolerancesforthe
proximityofpixeldefects.Inthetablebelowyoucanndspecicationsabout:
• Allowedamountofadjacentdarkdots=(adjacentdarkdots=1pairofdarkdots)
• Minimumdistancebetweendarkdots
• Totalno.ofalldefectivedots
8.6. Pixel Defect Tolerances
Inordertoqualifyforrepairduetopixeldefectsduringthewarrantyperiod,aPDP/TFTpanelinaPhilipsPlasma/LCD-displaymusthavepixelorsub-
pixeldefectsexceedingthetoleranceslistedinthefollowingtable.
BRIGHTDOTEFFECT ACCEPTABLELEVEL
1litsubpixel 2
BLACKDOTEFFECT ACCEPTABLELEVEL
1darksubpixel 10
TOTALDOTDEFECTSOFALLTYPES 12
NOTE:*1or2adjacentsubpixeldefects=1dotdefect
8.7. MURA
Darkspotsorpatchesmayoccasionallyappearonsomeliquidcrystaldisplay(LCD)panels.ThisisknownwithintheindustryasMura,whichisaJapanese
termfor“unevenness.”Itisusedtodescribeanirregularpatternorareainwhichunevenscreenuniformityappearsundercertainconditions.Muraisa
resultofthedeteriorationoftheliquidcrystalalignmentlayerandismostcommonlycausedbylong-termoperationunderhighambienttemperatures.It
isanindustry-widephenomenonandMuraisnotrepairable.Itisalsonotcoveredbyourwarrantyterms.
MurahasbeenaroundsincetheintroductionofLCDtechnologyandwithscreensgettingbiggerandinoperation24/7,manydisplaysarerunninginlow
lightconditions.ThisalladdstothepossibilityofMuraaffectingdisplays.
HOW TO SPOT MURA
TherearemanysymptomsofMuraandalsomultiplecauses.Severalofthesearelistedbelow:
• Impuritiesorforeignparticlesinthecrystalmatrix
• UnevendistributionofLCDmatrixduringmanufacturing
• Non-uniformluminancedistributionofthebacklight
• Panelassemblyinducedstress
• FlawswithintheLCDcells
• Thermalinducedstress-hightemperatureoperationoverlongperiodsoftime
HOW TO AVOID MURA
AlthoughwecannotguaranteethecompleteeradicationofMuraeverytime,ingeneraltheappearanceofMuracanbeminimizedbythesemethods:
• Lowerthebacklightbrightness
• Useascreensaver
• Reducetheambienttemperaturearoundtheunit

BDL5570EL
38
9. Cleaning and Troubleshooting
9.1. Cleaning
Caution When Using the Display
• Donotbringyourhands,faceorobjectsclosetotheventilationholesofthedisplay.Thetopofthedisplayisusuallyveryhotduetothehigh
temperatureofexhaustairbeingreleasedthroughtheventilationholes.Burnsorpersonalinjuriesmayoccurifanybodypartsarebroughttoo
close.Placinganyobjectnearthetopofthedisplaycouldalsoresultinheatrelateddamagetotheobjectaswellasthedisplayitself.
• Besuretodisconnectallcablesbeforemovingthedisplay.Movingthedisplaywithitscablesattachedmaydamagethecablesandthuscausere
orelectricshock.
• Disconnectthepowerplugfromthewalloutletasasafetyprecautionbeforecarryingoutanytypeofcleaningormaintenanceprocedure.
Front Panel Cleaning Instructions
• Thefrontofthedisplayhasbeenspeciallytreated.Wipethesurfacegentlyusingonlyacleaningclothorasoft,lint-freecloth.
• Ifthesurfacebecomesdirty,soakasoft,lint-freeclothinamilddetergentsolution.Wringtheclothtoremoveexcessliquid.Wipethesurfaceof
thedisplaytoremovedirt.Thenuseadryclothofthesametypetodry.
• Donotscratchorhitthesurfaceofthepanelwithngersorhardobjectsofanykind.
• Donotusevolatilesubstancessuchasinsertsprays,solventsandthinners.
Cabinet Cleaning Instructions
• Ifthecabinetbecomesdirty,wipethecabinetwithasoft,drycloth.
• Ifthecabinetisextremelydirty,soakalint-freeclothinamilddetergentsolution.Wringtheclothtoremoveasmuchmoistureaspossible.Wipe
thecabinet.Useanotherdryclothtowipeoveruntilthesurfaceisdry.
• Donotallowanywaterordetergenttocomeintocontactwiththesurfaceofthedisplay.Ifwaterormoisturegetsinsidetheunit,operating
problems,electricalandshockhazardsmayresult.
• Donotscratchorhitthecabinetwithngersorhardobjectsofanykind.
• Donotusevolatilesubstancessuchasinsertsprays,solventsandthinnersonthecabinet.
• DonotplaceanythingmadefromrubberorPVCnearthecabinetforanyextendedperiodsoftime.

BDL5570EL
39
9.2. Troubleshooting
Symptom Possible Cause Remedy
No picture is displayed 1. Thepowercordisdisconnected.
2. Themainpowerswitchonthebackofthe
displayisnotswitchedon.
3. Theselectedinputhasnoconnection.
4. Thedisplayisinstandbymode.
1. Pluginthepowercord.
2. Makesurethepowerswitchisswitchedon.
3. Connectasignalconnectiontothedisplay.
Interference displayed on the display or audible
noise is heard
Causedbysurroundingelectricalappliancesor
uorescentlights.
Movethedisplaytoanotherlocationtoseeisthe
interferenceisreduced.
Color is abnormal Thesignalcableisnotconnectedproperly. Makesurethatthesignalcableisattachedrmly
tothebackofthedisplay.
Picture is distorted with abnormal patterns 1. Thesignalcableisnotconnectedproperly.
2. Theinputsignalisbeyondthecapabilitiesof
thedisplay.
1. Makesurethatthesignalcableisattached
rmly.
2. Checkthevideosignalsourcetoseeifit
isbeyondtherangeofthedisplay.Please
verifyitsspecicationswiththisdisplay’s
specicationsection.
Display image doesn’t ll up the full size of the
screen
1. Thezoommodeisnotsetcorrectly.
2. ScanModemaybesetincorrectlyto
underscan.
3. Iftheimageexceedsthescreensize,Scan
ModemayneedtobesettoUnderscan.
UsetheZoommodeorCustomzoomfunction
intheScreenmenutonetunedisplaygeometry
andtimefrequencyparameter.
Can hear sound, but no picture Improperlyconnectedsourcesignalcable. Makesurethatbothvideoinputsandsound
inputsarecorrectlyconnected.
Can see picture but no sound is heard 1. Improperlyconnectedsourcesignalcable.
2. Volumeisturnedallthewaydown.
3. {Mute}isturnedon.
4. Noexternalspeakerconnected.
1. Makesurethatbothvideoinputsandsound
inputsarecorrectlyconnected.
2. Press[ ]or[ ]buttontohearsound.
3. SwitchMUTEoffbyusingthe[ ]button.
4. Connectexternalspeakersandadjustthe
volumetoasuitablelevel.
Some picture elements do not light up Somepixelsofthedisplaymaynotturnon. Thisdisplayismanufacturedusinganextremely
highlevelofprecisiontechnology:however,
sometimessomepixelsofthedisplaymaynot
display.Thisisnotamalfunction.
After-Images can still be seen on the display
after the display is powered off. (Examples
of still pictures include logos, video games,
computer images, and images displayed in 4:3
normal mode)
Astillpictureisdisplayedforanoverextended
periodoftime
Donotallowastillimagetobedisplayedfor
anextendedperiodoftimeasthiscancausea
permanentafter-imagetoremainonthedisplay.

BDL5570EL
40
10. Technical Specifications
Display:
Item Specications
ScreenSize(ActiveArea) 54.6”(138.7cm)LCD
AspectRatio 16:9
Numberofpixels 1920(H)x1080(V)
Pixelpitch 0.55926(H)x0.55926(V)[mm]
Displayablecolors 10bits(D),1.07Billioncolors
Brightness(typical) 500cd/m
2
Contrastratio(typical) 1300:1
Viewingangle 178degrees
In/Out Terminals:
Item Specications
SpeakerOutput InternalSpeakers
ExternalSpeakers
10W(L)+10W(R)[RMS]/8Ω
1Way1SpeakerSystem
82dB/W/M/160Hz~13KHz
AudioOutput
PhoneJackx1 0.5V[rms](Normal)/2Channel(L+R)
AudioInput RCAJackx2
3.5mmStereox1
0.5V[rms](Normal)/2Channel(L+R)
RS232 2.5mmPhonejackx2 RS232in/RS232out
RJ-45 RJ-45Jackx1(8pin)
10/100LANPort
HDMIInput HDMIJackx2
(TypeA)(18pin)
DigitalRGB:TMDS(Video+Audio)
MAX:
Video-720p,1080p,1920x1080/60Hz(WUXGA)
Audio-48KHz/2Channel(L+R)
SupportsLPCMonly
DVI-DInput DVI-Djack DigitalRGB:TMDS(Video)
VGAInput D-SubJackx1(15pin) AnalogRGB:0.7V[p-p](75Ω),H/CS/V:TTL(2.2kΩ),SOG:1V[p-p](75Ω)
MAX:720p,1080p,1920x1080/60Hz(WUXGA)
DVI-I(DVI-D&VGA)
Output
DVI-IJackx1(29pin) DigitalRGB:TMDS(Video)
AnalogRGB:0.7V[p-p](75Ω),H/CS/V:TTL(2.2kΩ),SOG:1V[p-p](75Ω)
MAX:720p,1080p,1920x1080/60Hz(WUXGA)
ComponentInput BNCJackx3 Y:1V[p-p](75Ω),Pb:0.7V[p-p](75Ω),Pr:0.7V[p-p](75Ω)
MAX:480i,576i,480p,576p,720p,1080i,1080p
VideoInput BNCx1(Sharewith
Component_Y)
Composite1V[p-p](75Ω)
Displayportin/out DisplayportJackx2
(20pin)
DigitalRGB:TMDS(Video+Audio)
MAX:
Video-720p,1080p,1920x1080/60Hz(WUXGA)
Audio-48KHz/2Channel(L+R)
SupportsLPCMonly
BDL5570EL
41
General:
Item Specications
Internalmemory 16GBeMMC(12GBusable)
PowerSupply AC100-240V,50-60Hz
PowerConsumption(Max) 230W
PowerConsumption(typ.) 120W
PowerConsumption(Standby&Off) <0.5W(RS232inactive)
Dimensions(WithStand)[WxHxD] 1228.6x734.32x329.6mm
Dimensions(WithoutStand)[WxHxD] 1228.6x699.4x71.1mm(@Handle)/56.8(@WallMount)
Weight(WithStand) 26.4Kg
Weight(WithoutStand) 24.7Kg
GrossWeight(WithoutStand) 31.2Kg
Environmental Condition:
Item Specications
Temperature Operational 0~40°C
Storage -20~60°C
Humidity Operational 20~80%RH(Nocondensation)
Storage 5~95%RH(Nocondensation)
Altitude Operational 0~3,000m
Storage/Shipment 0~9,000m
Internal Speaker:
Item Specications
Type 1Way1Speaker
Input 10W(RMS)
Impedance 8Ω
OutputSoundPressure 82dB/W/M
FrequencyResponse 160Hz~13KHz

2015 © Koninklijke Philips N.V. All rights reserved.
Philips and the Philips Shield Emblem are registered trademarks of
Koninklijke Philips N.V. and are used under license from
Koninklijke Philips N.V.
Specications are subject to change without notice.