2. Touch fields.There are sensors under the touch fields. Touching the symbol calls up the respective function.
3. Refrigerator compartment temperature display Indicates the set temperature in °C/°F.
4. Freezer compartment temperature display Indicates the set temperature in °C/°F. " button
5. button Opens the Settings menu. ~ "Settings menu" on page 12
6. button Opens the menu for changing the temperature.
Settings menu
Press button to open the menu.
In the Settings menu you will find:
■Appliance settings
■Cleaning mode
■Vacation mode
■Ice cube production
■Reset water filter counter?
■Eco mode
■Self-test
■Sabbath mode (if activated)
~ "Operating the appliance" on page 15
Appliance settings menu
This is how to navigate to the Appliance settings
menu:
1.Press button.
2.Use button to move to the Appliance settings
menu.
3.Open the menu using button.
In the Appliance settings menu you will find the following sub-menus and setting options:
Brightness
Key press sound Key volume
Signal tone volume Automatic clean lock
Automatic door opening refrigerator compartment Automatic door opening freezer compartment Water filter counter
Condensation protection (only on 3-door appliance)
Theater mode Temperature unit Language
Home network
Factory settings
Demo Mode
Sabbath mode
~ "Operating the appliance" on page 15
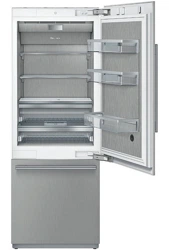
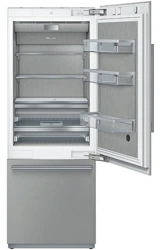
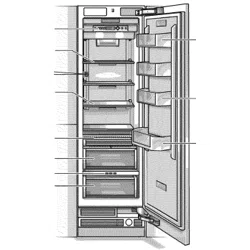
Equipment(not all models)
Storage compartment
You can remove and adjust the height of the storage compartments:
1. Lift up the storage compartment and remove.
2. When re-inserting, insert hooks on back of storage compartment at same height to make it level.
Note: Insert the storage compartment carefully to avoid scratching the appliance.
Shelf
You can remove and adjust the shelf:
1.Lift shelf and remove.
2.When re-inserting, insert hooks on back of shelf at same height to make it level.
Note: Insert shelf carefully to avoid scratching the appliance.
Container
You can remove the container:
■Press container to the rear,
■lift the container at the rear and remove.
You can insert the bin:
■Pull out the telescopic rails all the way.
■Place the bin on the telescopic rails and push into the appliance until it engages.
Ice pack
In the event of a power failure or a fault:
■The ice pack delays the warming of stored frozen food.
You can take out the ice pack to temporarily keep food cool, e.g. in a cool bag.
Ice maker
Ice cube production starts as soon as the appliance has reached the set temperature.
Notes
■Ice cube production stops automatically when the ice cube container is full.
■When using the appliance for the first time, discard ice cubes produced within the first 24 hours for hygiene reasons.
■If you have stopped ice cube production for several days, discard the first 30-40 ice cubes produced for hygiene reasons.
Information about switching ice cube production on and off
~ "Switching ice cube production on or off" on page 16
Water filter
Change the water filter after 6 months at the latest.
If the ice tastes stale, discard the rest of the ice cubes and the ones produced over the next 24 hours. If the ice still tastes stale, change the water filter.
Note: If you use an external water filter system, you can also operate the appliance without a water filter.Replace the water filter with a bypass cartridge. Switch off the water filter counter. There is no need to change the bypass cartridge.
A new water filter or bypass cartridge can be obtained from customer service or a specialist dealer.
Exchange water filter or replace with bypass cartridge
You can change the water filter, or replace it with a bypass cartridge. The bypass cartridge can remain in the appliance permanently: it does not need to be changed.
Note: After installing a water filter or a bypass cartridge, discard all ice cubes produced over the first 24 hours.
1.Turn the cap of the water filter counter-clockwise.
2.Take the water filter out.
3.Remove the protective cap of the new water filter or the new bypass cartridge.
4.Take off the cap of the used water filter and put it on the new water filter or bypass cartridge.
5.Slide the new water filter or bypass cartridge to the stop in the filter opening.
Note: The cap must be vertical here.
6.Turn the water filter or bypass cartridge clockwise to the mark.
Note: If you do not turn the water filter or bypass cartridge far enough, damage will be caused by escaping water.
7.When installing a water filter: reset water filter counter.
When installing a bypass cartridge: switch off water filter counter.
8.Discard ice cubes produced over the first 24 hours.
9.Drain the water out of the used water filter.
Note: You can dispose of the used water filter with your household garbage.
Operating the appliance
Switching the appliance on
Press the main On/Off switch. The appliance starts cooling and the light is switched on when the door is open.
Set the required temperature. → "Setting the temperature" on page 15
Operating tips
When the appliance has been switched on, it may take several hours until the set temperatures have been reached. Do not put in any food until the selected temperature has been reached.
The fully automatic NoFrost system ensures that the freezer compartment remains frost-free. Defrosting is not required.
The front sides of the housing are partly heated slightly. This prevents condensation in the area of the door seal.
If the freezer compartment door cannot be immediately re-opened after it has been closed, wait until the resulting low pressure has equalized.
Switching off and disconnecting the appliance
Switching off the appliance
Press the main On/Off switch. The appliance is no longer cooling.
Disconnecting the appliance
If you do not use the appliance for a prolonged period:
Turn off the water supply to the appliance and wait 3 hours.
Remove groceries.
Press the main On/Off switch.
Pull out the mains plug or switch off the fuse. The appliance is no longer cooling.
Empty the ice cube container and clean the appliance. → "Cleaning" on page 23
Leave appliance open.
Setting the temperature
Recommended temperature
Cooling compartment: +39 °F (+4 °C)
Freezer compartment: 0 °F (–18 °C)
Setting the refrigerator and freezer compartment temperature
To open the menu for setting the temperature, press button.
Use button to select the required compartment.
Repeatedly press -/+ button until the display indicates the required temperature.
Confirm the selection by pressing button. If the button is not pressed, the appliance stores the setting and automatically returns to the main screen after a few seconds.
Super cooling
Super cooling cools the refrigerator compartment as cold as possible.
Switch on super cooling, e.g.:
Before placing large quantities of food into the compartment
For cooling drinks quickly
Note: When super cooling is switched on, increased operating noises may occur.
After approx. 6 hours, the appliance switches to normal operation.
Switch on super cooling:
To open the menu for setting the temperature, press button.
Press button. When super cooling is switched on, the symbol / appears on the display.
Confirm the selection by pressing button. If the button is not pressed, the appliance stores the setting and automatically returns to the main screen after a few seconds.
Switch off super cooling:
To open the menu for setting the temperature, press button.
Press button. When super cooling is switched off, the symbol / disappears from the display.
Confirm the selection by pressing button. If the button is not pressed, the appliance stores the setting and automatically returns to the main screen after a few seconds.
Super freezing
Super freezing cools the freezer compartment as cold as possible.
Switch on super freezing, e.g.:
■to quickly freeze food right through to the center
■4 ... 6 hours before freezing food weighing 2 kg or more
Note: When super freezing is switched on, increased operating noise may occur.
After approx. 2 1/2 days the appliance switches to normal operation.
Switch on super freezing:
1.To open the menu for setting the temperature, press button.
2.Use button to select the required compartment.
3.Press button.
When super freezing is switched on, the symbol appears on the display.
4.Confirm the selection by pressing button. If the button is not pressed, the appliance stores the setting and automatically returns to the main screen after a few seconds.
Switch off super freezing:
1.To open the menu for setting the temperature, press button.
2.Use button to select the required compartment.
3.Press button.
When super cooling is switched off, the symbol disappears from the display.
4.Confirm the selection by pressing button. If the button is not pressed, the appliance stores the setting and automatically returns to the main screen after a few seconds.
Clean lock
You can use this function to switch off the touch function of the controls for 10 seconds. During this time you can clean the display. ~ "Cleaning the display" on page 27
1.Press button to open the Settings menu.
2.Press button.
The cleaning display appears, and the countdown starts.
Automatic clean lock
You can use this function to select whether the automatic clean lock is switched on automatically when the door is opened.
1.Press button to open the Settings menu.
2.Use button to move to the menu item Appliance settings.
3.Press button.
4.Press button to move to the menu item Automatic clean lock.
5.To change the setting, press button.
Setting the brightness of the control panel
Press button to open the Settings menu.
Use button to move to the menu item Appliance settings
Press button.
Press button to open the menu item Brightness.
Press buttons to set the required brightness.
Press button. The setting is saved.
Press button to exit the menu.
Switching key press sound on or off
You can switch the sounds generated when pressing keys off and back on again.
Pressbutton to open the Settings menu.
Use button to move to the menu item Appliance settings.
Press button to open the menu item.
Press button to move to the menu item Key press sound.
Press button to open the menu item.
Use buttons to select the required setting.
Press button. The setting is saved.
Press button to exit the menu.
Setting the key volume
You can adjust the volume level of the sounds generated when pressing keys.
Press button to open the Settings menu.
Use button to move to the menu item Appliance settings.
Press button to open the menu item.
Use button to move to the menu item Key volume.
Press button to open the menu item.
Use buttons to select the required setting.
Press button. The setting is saved.
Press button to exit the menu.
Setting the signal tone volume
You can adjust the volume level of the signal tones generated e.g. with alarms.
Press button to open the Settings menu.
Use button to move to the menu item Appliance settings.
Press button to open the menu item.
Use button to move to the menu item Signal tone volume.
Press button to open the menu item.
Use buttons to select the required setting.
Press button. The setting is saved.
Press button to exit the menu.
Cleaning
Cleaning the display
The change in temperature and humidity can cause the controls to steam up.
Switch the clean lock on before cleaning. → "Clean lock" on page 16
Use a clean micro-fiber cloth for cleaning.
Cleaning the appliance interior
Proceed as follows:
Press the main On/Off switch.
Take out food and store in a cool location. Place ice pack (if available) on the food.
Clean the appliance with a soft cloth, lukewarm water and a little pH-neutral washing-up liquid.
Wipe door seal with clear water and dry thoroughly with a cloth.
Switch appliance back on and put in food.
Cleaning the equipment
To clean, take the removable parts out of the appliance. →"Equipment" on page 12
Care instructions for stainless steel surfaces
When taking care of and cleaning stainless steel surfaces, use only cleaning agents suitable for stainless steel and a stainless steel cleaning cloth.
You can purchase a suitable stainless steel cleaning cloth from customer service.
To prevent visible scratches, clean the stainless steel surface in the direction of the structure.
Odors
If you experience unpleasant odors:
1.Switch off the appliance with the main On/Off switch.
2.Take all food out of the appliance.
3.Clean the inside.
~ "Cleaning" on page 27
4.Clean all packaging.
5.Seal strong-smelling food in order to prevent odors from forming.
6.Switch the appliance on again.
7.Store food in the appliance.
8.Check whether the formation of odors is still occurring after 24 hours.
9.Change the odor filter.
~ "Changing the odor filter" on page 28
Changing the odor filter
Replacement filters are available from your customer service.
1. Open the filter holder with a slotted screwdriver.
2. Remove the used odor filter and replace with a new odor filter.
3. Close the filter holder.
Faults – what to do?
Before you call customer service, use this table to check whether you can rectify the fault yourself.
Appliance
Temperature differs greatly from the set value.
Switch off appliance for 5 minutes.
→ "Switching off and disconnecting the appliance" on page 15
If the temperature is too warm, check temperature again after a couple of hours.
If the temperature is too cold, check temperature again on the following day.
Displays do not light up.
The power plug has not been inserted properly.
Connect the power plug.
The fuse has tripped.
Check the fuses.
The power has failed.
Check whether the power is on.
The refrigeration unit is switching on more frequently and for longer.
The appliance was opened frequently.
Do not open the appliance unnecessarily.
The ventilation openings are covered up.
Remove obstacles.
Large quantities of fresh food have been put in.
Switch on super cooling promptly in advance.
Appliance is not cooling, display and lighting are lit.
Demo mode is switched on.
Switch demo mode off.
→ "Switching demo mode on or off" on page 19
The door does not open when pressed.
A special mode has switched off automatic door opening.
To open the door, reach from below underneath the bottom panel of the unit or switch off special mode.
→ "Switching Sabbath mode on or off" on page 20
Pull-to-open is switched on.
Switch the appliance to Push-to-open.
→ "Automatic door opening" on page 18
The opening force is set too high.
Select a lower setting for the opening force.
→ "Automatic door opening" on page 18
The fuse has tripped.
Check the fuses.
The power has failed.
Check whether the power is on.
Ice maker
The ice maker is not functioning.
Ice cube production is switched off.
Switch on ice cube production.
Freezer compartment is too warm.
Set the temperature lower.
→ "Operating the appliance" on page 15
Ice cube container is not properly inserted.
Insert ice cube container fully.
Ice maker without power.
Call customer service.
→ "Customer service" on page 27
No water supply.
Check water connection and contact technician if necessary.
Low water pressure.
Only connect appliance to pipes with sufficient water pressure.
Kink in water hose.
Turn off water supply, straighten out kink. Replace water hose, if necessary.
Too few or deformed ice cubes, water pressure lower than usual.
After switching on or removing many ice cubes, there will be too few in the ice cube container.
It takes around 24 hours for an empty ice cube container to fill up.
Ice cube production stops even though the ice cube container is still not full.
Do not store the ice shovel on the ice in the ice cube container. Otherwise, the sensor will not detect the actual fill level of the container.
Low water pressure.
Only connect appliance to pipes with sufficient water pressure.
The water filter is blocked or needs to be replaced.
Replace water filter.
Freezer compartment is too warm.
Set the temperature lower.
→ "Operating the appliance" on page 15
Water is leaking out of the appliance.
Water connection is not tight.
Check if the connections are fastened firmly and the water hose is undamaged.
If the water hose is damaged, contact customer service and have it replaced. Replacement must be performed by customer service or a similarly qualified person only.Use original parts supplied by the manufacturer only.


 button Opens the Settings menu. ~ "Settings menu" on page 12
 button Opens the menu for changing the temperature.
 button to move to the Appliance settings


 button to select the required compartment.
 button. When super cooling is switched on, the symbol / appears on the display.
 button. When super cooling is switched off, the symbol / disappears from the display.
 button.
 button.
 button.
 button to move to the menu item Automatic clean lock.
 button.
 buttons to set the required brightness.
 button to exit the menu.