When the power button (located on the side of the unit) is switched on. the unit will be in standby mode. The unit will automatically begin preheating. all available functions on the display will light. and the unit will automatically begin preheating. (NOTE: If the milk reservoir is not on the unit. only the Single and Double Espresso buttons will display.)
When you make your drink selection. only that button will remain illuminated. and it will blink during the remaining preheating time. (Do not press the button again or that will cancel your selection.)
Your selected drink button will turn solid when preheating has finished and the brew cycle has begun.
When the brew cycle is complete. the unit will beep three times; all buttons will light up and the unit will be return to standby mode. If no longer using the espresso machine. you may wish to turn it off.
After 20 minutes of no action. the unit will go into sleep mode. and just the CLEAN icon (not the text) will be lit. Press the CLEAN icon to wake the unit up.
When the FROTH button is pressed. the froth function will run for 30 seconds. (All other function lights will turn off.) You can end frothing before 30 seconds by pressing the FROTH button again.
Fill the water reservoir to between the “Min” and “Max” markings on the tank.
Remove the milk reservoir. Fill the milk reservoir with water (not milk) to between the “Min” and Max” markings on the tank and return it to unit.
Place a large heatproof cup or mug on the metal coaster set over the drip tray.
Set the froth strength to “Extra”. Use the silver froth dispensing tube lever to position the milk dispensing tube inside the cup.
Place an empty portafilter basket in the portafilter, then lock the portafilter into place on the brew head according to the directions at right.
Plug in the unit and turn it on.
Press the DOUBLE CAPPUCCINO button.
Let the cup fill with water from the brew head and from the froth dispensing tube. When brew cycle ends, carefully dispose of the water in the cup and in the milk reservoir. The unit is now primed and ready for use.
HOW TO PACK THE PORTAFILTER WITH COFFEE
Put a basket in the portafilIter and fill it with finely ground coffee.
Using the tamper. press on the grinds firmly and evenly.
Clean excess grinds from the portafilter rim to ensure a proper fit.
HOW TO PLACE THE PORTAFILTER ON THE BREW HEAD
Position portafilter underneath the brew head with handle facing to the left.
Insert the portafilter up into the brew head. lining up handle with the open lock icon on the unit.
Slowly turn the handle to the right until resistance is felt and the handle is aligned with the locked icon on the unit.
HOW TO MAKE AN ESPRESSO
With 15 bars of pressure. the Espresso Maker brews a rich cup of espresso.
Fill the water reservoir between the “Min” and Max” lines.
Fill the portafilter with ground coffee and attach it to the brew head.
Place a heatproof cup or demitasse on the metal coaster over the drip tray.
Press the single or double espresso button. The button will blink to signify the unit is preheating. turn solid during brew cycle. and then beep three times to indicate the brew cycle is complete.
HOW TO MAKE A CAPPUCCINO
Fill the water reservoir between the “Min” and “Max” lines.
Fill the milk reservoir with milk and insert it onto the unit.
Set the froth strength to "Standard".
Place a medium size heatproof cup or mug on the metal coaster over the drip tray. then move the silver froth dispensing tube lever to position the tube over the cup.
Fill the portafilter with ground coffee and attach it to the brew head.
Press the single or double cappuccino button. The button will blink to signify the unit is preheating. turn solid during brew cycle. and then beep three times to indicate the brew cycle is complete.
CLEANING AND MAINTENANCE
It’s important to clean the Espresso Maker regularly.
Follow the directions in the User Guide beginning on p. 17.
NOTE: When you use the clean function. hot water and steam will come out in bursts. Do not remove the cup until the clean cycle has completely ended (unit will beep three times and other function buttons will light up). If the clean cycle is canceled before finishing. wait a few minutes before removing the cup as more hot water and steam may be expelled.
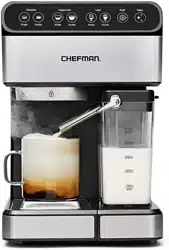
FEATURES
Water Reservoir Cover
Removable Water Reservoir
Control Panel
Group/Brew Head
On/Off Switch (On Side)
Froth Strength Control
Milk Reservoir Lid
Froth Dispensing Tube Lever
Removable Milk Reservoir
Froth Dispensing Tube
Removable Reversible Metal Coaster
Removable Drip Tray
Portafilter
Portafilter Basket Retention Clip
Portafilter Handle
Portafilter Double Shot Basket
Portafilter Single Shot Basket
Coffee Measuring Scoop and Tamper
CONTROL PANEL
When the power button (located on the side of the unit) is switched on, the unit will beep three times and be in standby mode. The unit will automatically begin preheating, all available functions on the display will light, and the unit will automatically begin preheating. (NOTE: If the milk reservoir is not on the unit, only the Single and Double Espresso buttons will display.)
When you make your drink selection, only that button will remain illuminated, and it will blink during the remaining preheating time. (Do not press the button again or that will cancel your selection.)
Your selected drink button will turn solid when preheating has finished and the brew drink cycle has begun.
When the brew cycle is complete, the unit will beep three times; all buttons will light up and the unit will be return to standby mode. If no longer using the espresso machine, you may wish to turn it off.
After 20 minutes of no action, the unit will go into sleep mode, and just the CLEAN icon not the text) will be lit. Press the CLEAN icon to wake the unit up.
When the FROTH button is pressed, the froth function will run for 30 seconds. (All other function lights will turn off.) You can end frothing before 30 seconds by pressing the FROTH button again.
OPERATING INSTRUCTIONS
BEFORE FIRST USE
Remove all packaging materials and check to ensure that all parts and accessories are accounted for. Read all stickers and remove ones that are not permanent.
Remove and hand wash the water reservoir, the milk reservoir, the portafilter, filter baskets, measuring scoop, and removable coaster with a mild detergent and water. Only the metal baskets and coaster are top-rack dishwasher safe. All other parts are not dishwasher safe.
Before first use, you must prime the unit according to the directions below
IMPORTANT–PRIME THE UNIT BEFORE FIRST USE
To prime the unit, follow these steps:
Fill the water reservoir to between the “Min” and “Max” markings on the tank.
Remove the milk reservoir. (Tilt it up first, then pull out.) Fill the milk reservoir with water not milk) to between the “Min” and “Max” markings on the tank and return it to unit. (To insert it, tilt down and push it firmly into place.)
Place a large heatproof cup or mug on the metal coaster set over the drip tray. (Note the coaster is reversible to make the height adjustable.)
Set the froth strength to Extra. Use the silver froth tube lever to position the froth dispensing tube inside the cup.
Place an empty portafilter basket in the portafilter.
Fit the portafilter onto the brew head unit, being sure it’s locked in place. (See p. 11 for more information on placing the portafilter.)
Plug in the unit and turn it on. (The power button is located on the side toward the bottom.)
Press the DOUBLE CAPPUCCINO button.
The button will blink as the unit preheats; do not press the button again or you will cancel the function.
Let the cup fill with water from the brew head and from the froth dispensing tube. When the brew cycle function ends, the unit will beep three times. Carefully dispose of the water in the cup and in the milk reservoir. The unit is now primed and ready for use.
CHOOSE THE RIGHT SIZE CUP
With 15 bars of pressure, the Espresso Maker allows for a wide variety of coffee drinks from a tiny espresso to a large latte. See the graph below to choose the right size cup. Be aware that the actual amount will vary depending on such variables as the coffee grind and froth amount. Note that you can flip the metal coaster over the drip tray over to change the height of the cup under the brew head.
DRINK
SHOTS
VOLUME (APPROX.)
Espresso
Single
1.75 oz
Espresso
Double
3.25 oz
Cappuccino
Single
3.5 oz
Cappuccino
Double
5.75 oz
Latte
Single
5.75 oz
Latte
Double
10 oz
CHOOSE THE RIGHT THE COFFEE AND GRIND
For best results, use freshly ground espresso beans as pre-ground beans lose their flavor fast. The grind should be fine, like table salt. If the grind is too fine (it will feel powdery when rubbed between fingers), the water will not flow through even under pressure. If the grind is too coarse, the water will flow through too fast, resulting in a weak flavor. Finding your preferred grind may take some practice.
HOW TO FILL THE WATER RESERVOIR
To fill the reservoir with water, you may either use a jar to fill it while on the unit or remove it from the unit and to fill it up at the sink. Open the lid and fill the reservoir with the desired amount of cold water between the “Min” and “Max” markings on the tank. Never use warm or hot water to fill the water reservoir. Close the water reservoir lid and place it back in the unit, if necessary, ensuring it fits tightly in place.
HOW TO FILL THE MILK RESERVOIR
If you plan to prepare cappuccino or latte, you will need to fill the milk reservoir; it can be left empty or even off the unit for espresso.
To remove the milk reservoir from the unit, tilt it up before pulling it out. Fill it with cold milk to between the “Min” and
Max” markings on the tank. To put the milk reservoir back on the unit, tilt it down before sliding it firmly back into place.
NOTE: You can use any type of milk—whole, skim, soy, oat— to make froth.
HOW TO CHOOSE AND INSERT THE PORTAFILER BASKET
To insert the basket into the portafilter, simply drop the basket into it.
Use the smaller basket for a single shot of espresso.
Use the larger basket for either when making a larger size drink or to have a double dose of espresso in a smaller size drink or.
HOW TO PACK THE PORTAFILTER WITH COFFEE
Use the coffee measuring spoon to fill the basket with finely ground espresso beans do not overfill).
Using the tamper end of the measuring spoon, press on the grinds firmly and evenly. Be sure the surface is smooth and flat.
Clean any excess grinds from the rim of the portafilter to ensure proper fit in the brew head.
HOW TO PLACE THE PORTAFILTER ON THE BREW HEAD
Position the portafilter underneath the brew head with its handle facing to the left.
Insert the portafilter up into the brew head, lining up handle with the open lock icon on the unit.
Slowly turn the handle to the right until resistance is felt and the handle is aligned with the locked icon on the unit; the handle will be at an approximate 90° angle to the machine.
CAUTION: To avoid possible burns to body parts and/or other injury from hot steam and water or damages to the unit, never remove the water reservoir or the portafilter while your espresso/cappuccino maker is brewing coffee or frothing. If you intend to make a second cup of coffee, be sure the unit is in standby mode—all buttons will be lit and solid— before removing or inserting portafilter. If you need to add more water or milk to the reservoirs, switch off the unit by pressing the button on the side of the unit.
HOW TO MAKE AN ESPRESSO
Espresso is a unique method of coffee brewing in which hot water is forced through finely ground coffee beans for a richer and more full-bodied brew than regular drip. Because of its strength, espresso is usually served in small (1 ½ to 2 oz) portions in demitasse cups.
Make sure the unit is plugged in.
Turn the unit on by pressing the power button located on the side of the unit.
Fill the water reservoir as directed on p. 9.
Fill the portafilter with finely ground coffee beans and attach it to the brew head as directed on p. 10 and p. 11.
Place a heatproof cup or demitasse on the metal coaster over the drip tray.
Choose to brew a single or double espresso by pressing the appropriate button. The button will blink to signify the unit is preheating. The button will turn solid during the brew cycle. When brewing is complete, the unit will beep three times, and your espresso will be ready to enjoy.
When the brew cycle ends, the unit will go into standby mode and will be preheating in the background. If no button is pressed within 20 minutes, it will go in to sleep mode.
To discard spent grinds, remove the portafilter and let it cool. Hold the portafilter basket in place by flipping up the portafilter basket retention clip to partially cover the lip of the basket and portafilter. Press on the clip with your thumb to hold the basket in place as you empty the grinds.
HOW TO MAKE A CAPPUCCINO
A cappuccino is a delicious beverage made with equal parts espresso, steamed milk, and froth. When using the cappuccino presets, there is no need to manually froth the milk; it will occur automatically.
Make sure the unit is plugged in.
Turn the unit on by pressing the power button located on the side of the unit.
Fill the water reservoir as directed on p. 9.
Fill the milk reservoir with milk between the “Min” and “Max” lines and insert it onto the unit. (If the milk reservoir is not on the unit, the cappuccino function will not work.)
Set the froth strength to Standard.
Place a heatproof cup or mug on the metal coaster over the drip tray.
Use the silver froth tube lever to position the froth dispensing tube over the cup.
Fill the portafilter with ground coffee and attach it to the brew head as directed on p. 10 and p. 11.
Choose whether to brew a single or double cappuccino by pressing the appropriate button. The button will blink to signify the unit is preheating. The button will turn solid during the brew cycle. When brewing is complete, the unit will beep three times, and your cappuccino will be ready to enjoy
When the brew cycle ends, the unit will go into standby mode and will be preheating in the background. If no button is pressed within 20 minutes, it will go in to sleep mode.
To discard spent grinds, remove the portafilter and let cool. Hold the portafilter basket in place by flipping up the portafilter basket retention clip to partially cover the lip of the basket and portafilter. Press on the clip with your thumb to hold the basket in place as you empty the grinds. NOTE: Be sure to clean the froth dispensing tube after every use following the directions on p. 18.
HOW TO MAKE A LATTE
A latte is a larger coffee drink made with mostly steamed milk and a little espresso. When using the latte presets, there is no need to manually froth the milk; it will occur automatically.
Make sure unit is plugged in.
Turn unit on by pressing the power button located on the side of the unit.
Fill water reservoir as directed on p. 9.
Fill the milk reservoir with milk to between the “Min” and “Max” lines and insert it into the unit. (If the milk reservoir is not on the unit, the latte function will not work.)
Set the froth strength to Standard.
Place a large heatproof cup or mug on the metal coaster over drip tray. NOTE: Be sure to use a large mug, especially with a double latte, which can yield as much as 10 oz.
Use the silver froth tube lever to position the froth dispensing tube over the cup.
Fill the portafilter with ground coffee and attach it to the brew head as directed on p. 10 and p. 11.
Choose whether to brew a single or double latte by pressing the appropriate button. The button will blink to signify the unit is preheating. The button will turn solid during the brew cycle. When brewing is complete, the unit will beep three times, and your latte will be ready to enjoy.
When the brew cycle ends, the unit will go into standby mode and will be preheating in the background. If no button is pressed within 20 minutes, it will go in to sleep mode.
To discard spent grinds, remove the portafilter and let cool. Hold the portafilter basket in place by flipping up the portafilter basket retention clip to partially cover the lip of the basket and portafilter. Press on the clip with your thumb to hold the basket in place as you empty the grinds. NOTE: Be sure to clean the froth dispensing tube after every use following the directions on p. 18.
HOW TO ADD MORE FROTH OR FROTH MILK SEPARATELY
The Espresso Maker also allows you to add more frothed milk to your coffee drink and to prepare froth milk on its own to use to make a macchiato or to add to hot chocolate. Be sure the cup is positioned with the froth dispensing tube over it, then simply press the FROTH button. The milk will froth for about 30 seconds. If you want less time, simply press the FROTH button again to stop frothing.
NOTE: Be sure to clean the froth dispensing tube after every use following the directions on p. 18.
TROUBLESHOOTING
PROBLEM
POSSIBLE CAUSES
SOLUTIONS
Coffee does not come out
Appliance not turned on or plugged in
No water in reservoir.
Coffee is ground too fine.
Too much coffee in filter basket
Coffee has been tamped down too much
Unit has not been used for a while
Plug in unit and turn it on
Add water
Grind less fine
Add less coffee
Refill filter and tamp less
Unit needs priming; follow directions on p. 7
Coffee comes out around the edge of the portafilter
Portafilter not rotated to full lock position
Coffee grounds were left around the filter basket rim
Too much coffee in filter basket
Rotate portafilter to locked position
Wipe off rim
Fill with less coffee
Milk is not foamy after frothing or is not coming out of tube
Ran out of steam
Milk is not cold enough
Frothing tube is blocked
Ensure there is enough water in the reservoir
Chill milk and frothing reservoir
Follow the instructions to clean the milk reservoir and the frothing tube
Coffee comes out too quickly
Coffee grind is too coarse
Not enough coffee in filter
Use a finer grind
Add more coffee
Coffee is too weak
Using single filter basket for double shot
Coffee grind is too coarse
Use double filter basket for double shot
Use a finer grind
CLEANING AND MAINTENANCE
HOW TO CLEAN THE PORTAFILTER AND BREW HEAD
NOTE: This method of cleaning is useful if you make espresso only. If you make cappuccino or latte or use the milk frothing tube separately, you can clean both the brew head, portafilter, and frothing tube all at the same time following the directions starting at the bottom of p. 18.
Before cleaning, turn off the unit and unplug it. Some of the metal parts might still be hot. Do not touch them with your hands until they have cooled.
If not already out, remove the portafilter and discard the used coffee grounds. To hold the basket in place while emptying grinds, flip up the portafilter basket retention clip and hold it down with your thumb as you empty the basket.
Rinse the basket and portafilter with warm soapy water and rinse well. Single and double shot baskets are top-rack dishwasher safe, but the portafilter is not.
Wipe the underside of the brew head with a damp cloth or paper towel to remove any coffee grounds that might have been left behind
HOW TO CLEAN THE MILK RESERVOIR AND FROTHING TUBE
Remove the milk reservoir from the unit (tilt it up before pulling it out). Transfer any remaining milk to another container and refrigerate.
Wash the milk reservoir and its lid thoroughly with warm soapy water. Rinse well. Do not use abrasive cleaners and scouring pads, as they will scratch the finish. The milk reservoir is NOT dishwasher safe.
Attach the portafilter with an empty basket in it to the brew head in the unit.
Place a large empty cup under the brew head and be sure there is water in the water reservoir.
Add fresh water to the milk reservoir and return it to the unit.
Set the froth strength to Extra. Use the silver froth tube lever to position the froth dispensing tube over the cup.
Press the CLEAN button. Hot water and steam will come out in bursts. Do not remove the cup until the clean cycle has completely ended (unit will beep three times and other function buttons will light up). NOTE: If the clean cycle is canceled before finishing, wait a few minutes before removing the cup as more hot water and steam may be expelled.
After the cycle ends, dispose of the water in the mug and any water left in the milk and water reservoirs.
HOW TO CLEAN THE WATER RESERVOIR
Empty the water reservoir between uses. Discard the remaining water by removing the reservoir emptying it into the sink. Wash the water reservoir as needed with soapy water, rinse it well and wipe it dry. The water reservoir is NOT dishwasher safe
HOW TO CLEAN THE HOUSING AND STORE THE UNIT
Wipe the housing with a soft wet cloth. Do not use abrasive cleaners or scouring pads, as they can scratch the finish. CAUTION: Do not immerse appliance, cord, or plug in water.
Do not store the portafilter in the brew head. This can adversely affect the seal between the brew head and the porta-filter while brewing espresso.
Decalcify the unit as needed according to directions on p. 20.
HOW TO DEALCIFY
Mineral deposits built-up in the unit will affect the operation of the appliance.
Your appliance must be decalcified when you notice an increase in the time required to brew espresso, or when there is excessive steaming. Also, you may notice a build-up of white deposits on the surface of the brew head. The frequency of cleaning depends upon the hardness of you water.
TO DECALCIFY INTERNAL PARTS:
Be sure unit is cool, off, and unplugged.
Fill the water reservoir with white vinegar to between the “Min” and “Max” markings on the tank. Fill the milk reservoir with water and slide it into unit.
Put a large cup or jar on the drip tray and position the froth dispensing tube in the cup.
Insert the portafilter with an empty basket in it into the brew head.
Plug in the unit and turn it on.
Press the CLEAN button
Repeat Steps 1-6 as necessary using only fresh water to rinse any remaining traces of vinegar out of the machine.
HOW TO DECALFIFY THE WATER RESERVOIR
Fill the water reservoir with fresh, undiluted white vinegar.
Let sit for at least 8 hours; reservoir may be placed on unit for this time.
Discard vinegar then rinse the water reservoir thoroughly with fresh water.
Well, most of the body and where you put water and milk are made of plastic. I just washed all of the parts really well and just don't have that "plastic" smell or taste. I hope you can resolve your issue, because this is a great machine. I'm drinking a fantastic latte as I write this.