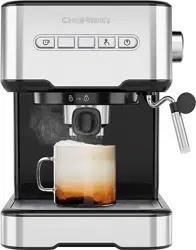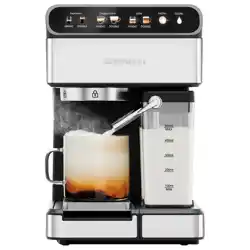
Barista Pro
Espresso
Machine
RJ54-V2-I-SV
2
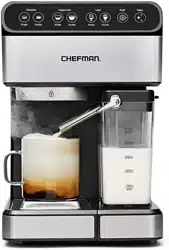
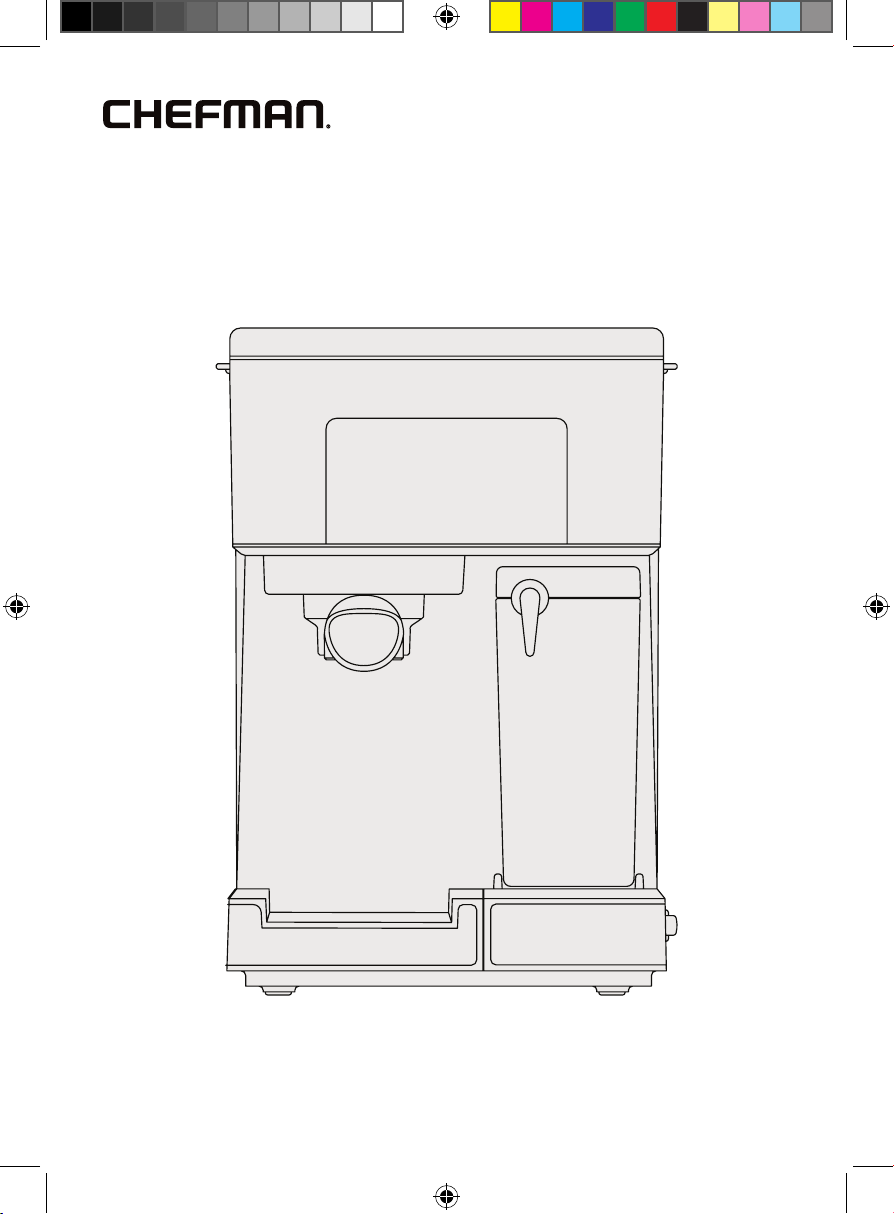
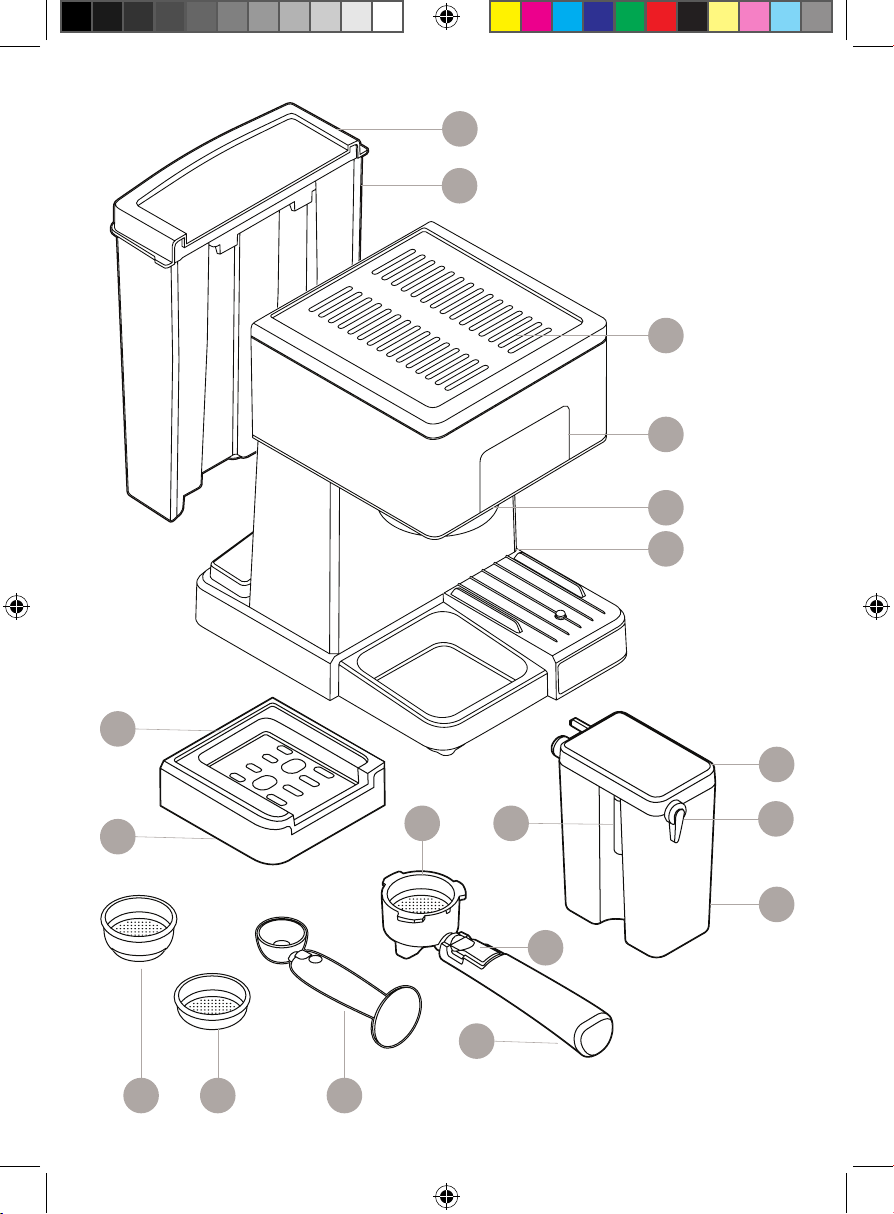
Get to Know Your
Espresso Machine
1. Water reservoir cover
2. Removable water reservoir
3. Integrated mug warming tray
4. Control panel
5. Brew head
6. Power switch (on side)
7. Milk reservoir lid
8. Froth dispensing tube lever
9. Removable milk reservoir
10. Froth dispensing tube
11. Removable reversible
metal coaster
12. Removable drip tray
13. Portafilter
14. Portafilter basket retention clip
15. Portafilter handle
16. Coffee measuring scoop and tamper
17. Portafilter single-shot basket
18. Portafilter double-shot basket
READ ALL INSTRUCTIONS BEFORE USE
For your safety and continued enjoyment of this product,
always read the instruction manual before using.
3
Get to Know Your Espresso Machine
1
4
5
6
7
8
14
10
11
12
15
2
13
161718
9
3
4
Control Panel
• When the power is switched on, the unit will beep three times and be
in standby mode. The unit will automatically begin preheating and all
available functions on the display will light. (NOTE: If the milk reservoir is
not on the unit, only the SINGLE and DOUBLE ESPRESSO buttons will display.)
• When you make your drink selection, only that button will remain
illuminated, and it will blink during the remaining preheating time. (Do not
press the button again or you will cancel your selection.)
• Your selected drink button will turn solid when preheating has fi nished and
the brew drink cycle has begun.
• When the brew cycle is complete, the unit will beep three times; all buttons
will light up and the unit will return to standby mode. If no longer using the
espresso machine, you may wish to turn it off.
• After 5 minutes of no action, the unit will go into sleep mode, and just the
CLEAN icon (not the text) will be lit. Press the CLEAN icon to wake the unit up.
• When the FROTH button is pressed, the froth function will run for 10 seconds.
(All other function lights will turn off.) You can end frothing before 10
seconds by pressing the FROTH button again.

5
Safety Instructions &
Important Safeguards
WARNING: When using electrical appliances, basic safety precautions should
always be followed to reduce the risk of fire, electrical shock, and/or injury,
including the following:
1. Read all instructions.
2. Do NOT touch hot surfaces. Use handles or knobs.
3. To protect against electrical shock, do NOT place cord, plugs, or
appliance in water or other liquids.
4. Close supervision is necessary when any appliance is used by or
near children.
5. Unplug from the outlet when not in use and before cleaning. Allow to cool
before putting on or taking off parts, and before cleaning the appliance.
6. Do NOT operate any appliance with a damaged cord or plug, or after the
appliance malfunctions or has been damaged in any manner. In such
cases, contact Chefman® Customer Support for examination, repair,
or adjustment.
7. The use of an accessory not evaluated for use with this appliance may
cause injuries.
8. Do NOT use outdoors.
9. Do NOT let the cord hang over the edge of a table or counter or touch
hot surfaces.
10. Do NOT place on or near a hot gas or electric burner, or in a heated oven.
11. Always attach the plug to the appliance first, then plug the cord into the
wall outlet. To disconnect, turn any control to the off position, then remove
the plug from the wall outlet.
12. Do NOT use the appliance for other than its intended use.
Save these instructions
For household use only

6
Safety Instructions &
Important Safeguards
WARNING: This appliance has a polarized plug (one blade is wider than the
other). This plug is intended to fit into a polarized outlet only one way. If the plug
does not fit fully into the outlet, reverse the plug. If it still does not fit, contact a
qualified electrician. Do NOT attempt to modify the plug in any way or force it
into the outlet. This could result in injury or electrical shock.
Short Cord Instructions
A short power-supply cord is provided to reduce the hazards of entanglement
or tripping over a longer cord. Longer detachable power-supply cords or
extension cords are available and may be used if care is exercised in their
use. If a longer detachable power-supply extension cord is used:
1. The marked electrical rating of the extension cord should be at least
as great as the electrical rating of the appliance.
2. The longer cord should be arranged so that it will not drape over
the countertop or tabletop where it can be pulled on by children or
tripped over.
7
California Proposition 65:
(Applicable for California Residents only)
WARNING: Cancer and Reproductive Harm
www.P65Warnings.ca.gov
Do not place the appliance on a
stovetop or any other heatable surface,
even if stovetop is not on.
Doing so is a fire hazard.
Safety Instructions &
Important Safeguards
Power Cord Safety Tips
1. Never pull or yank on the cord or the appliance.
2. To insert the plug, grasp it firmly and guide it into the outlet.
3. To disconnect the appliance, grasp the plug and remove it from the outlet.
4. Never use the product if the power cord shows signs of abrasion or
excessive wear. Contact Chefman® Customer Support for additional
guidance and support.
5. Never wrap the cord tightly around the appliance, as this could place
undue stress on the cord where it enters the appliance and cause it to
fray and break.
DO NOT OPERATE THE APPLIANCE IF THE POWER CORD SHOWS ANY DAMAGE
OR IF THE APPLIANCE WORKS INTERMITTENTLY OR STOPS WORKING ENTIRELY.
8
How to Use the Espresso Machine
Before First Use
1. Remove all packaging materials and check to ensure that all parts and
accessories are accounted for. Read all stickers and remove ones that are
not permanent.
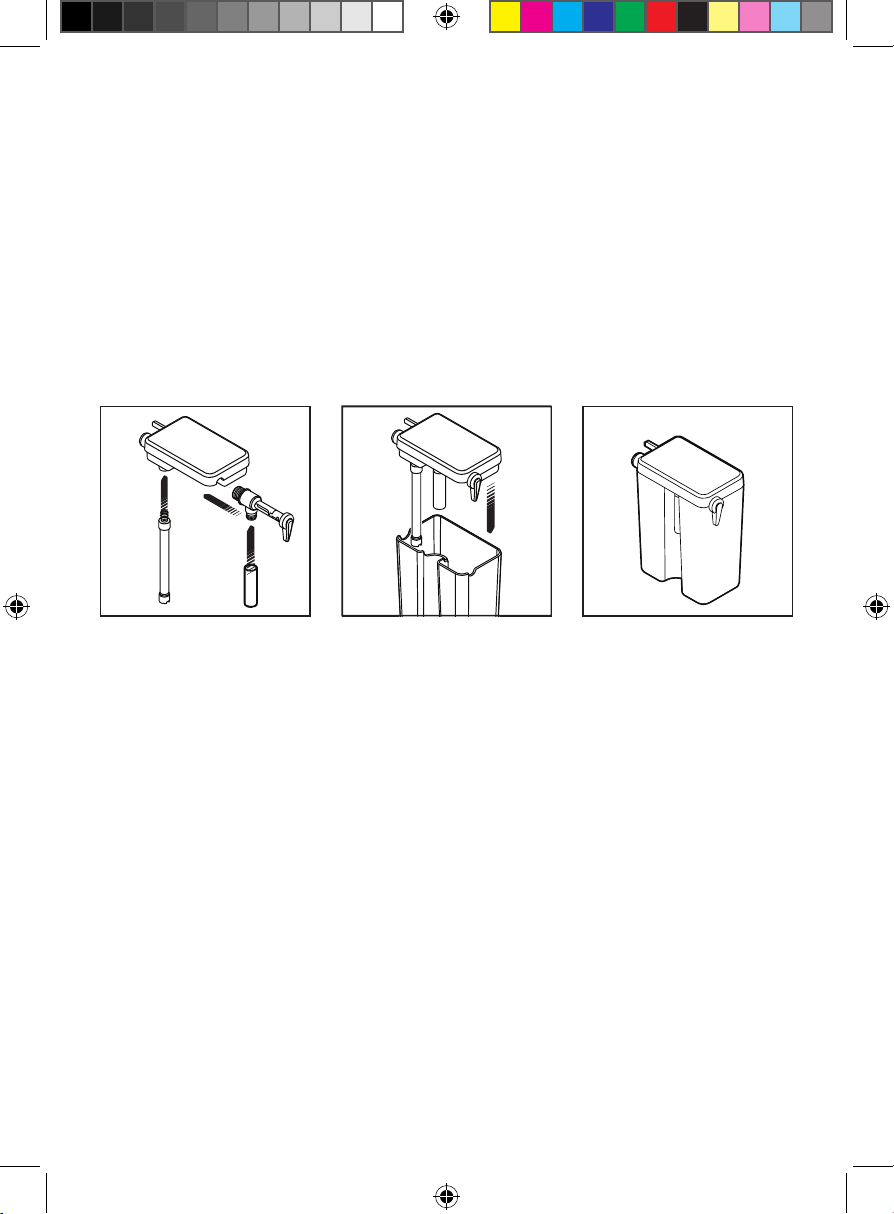
2. Remove and hand wash the water reservoir, milk reservoir, portafilter,
portafilter baskets, measuring scoop, drip tray, and removable coaster
with a mild detergent and water. Rinse and dry well. NOTE: The four main
parts of the milk reservoir lid can come apart and are easily reassembled.
To reassemble, follow the diagrams below.
Choose the Right Coffee Grind
For best results, use freshly ground espresso beans; pre-ground beans lose
their flavor quickly. The grind should be fine, like table salt. If the grind is too
fine (it will feel powdery when rubbed between fingers), the water will not
flow through even under pressure. If the grind is too coarse, the water will flow
through too fast, resulting in a weak flavor. Finding your preferred grind may
take some practice.
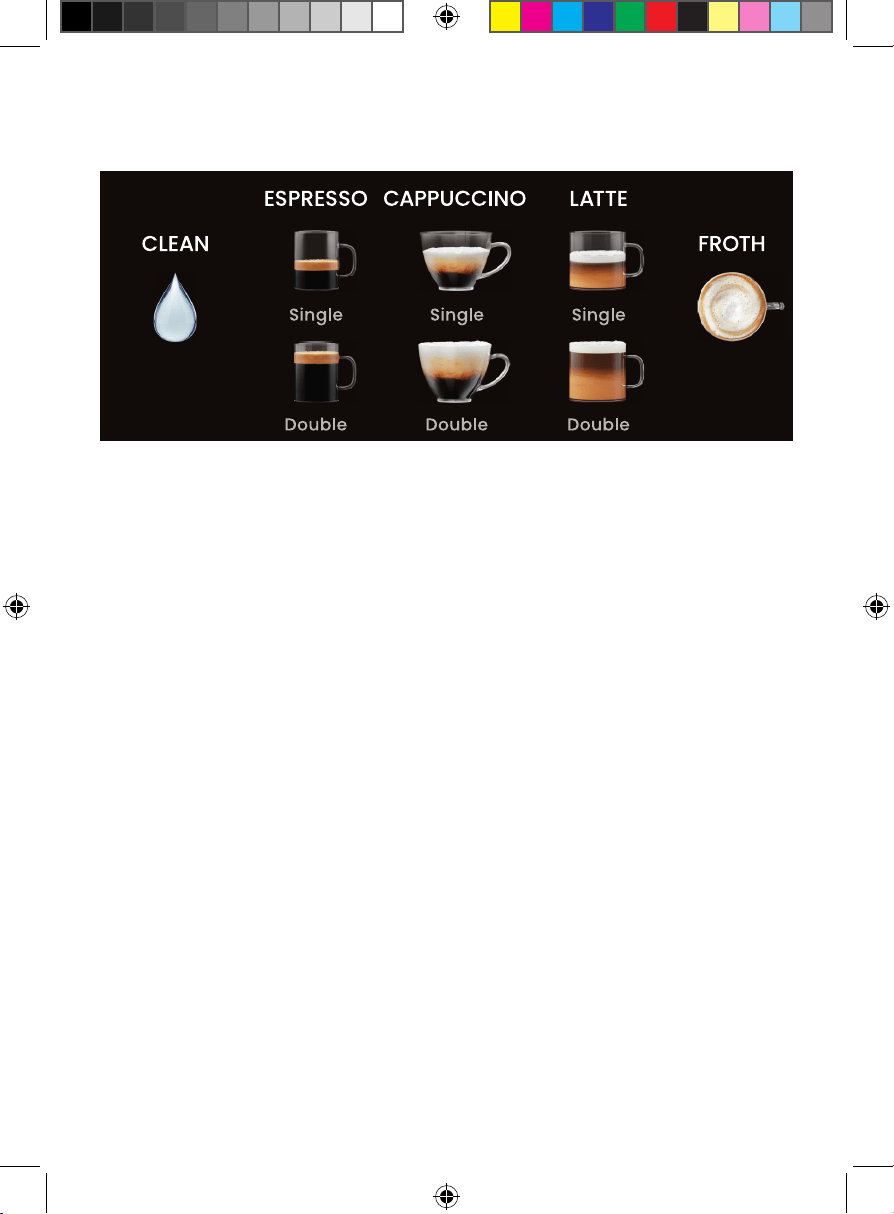
Choose the Right Cup Size
With 20 bars of pressure, the espresso machine can make a wide variety
of coffee drinks from a tiny espresso to a large latte. Use the chart on
p. 13 to choose the right size cup. Be aware that the actual amount will
vary depending on such variables as the coffee grind and froth amount.
NOTE: You can flip over the metal coaster of the drip tray to change the
height of the cup under the brew head.
a. b. c.
9
Quick Start: How to Make Coffee
Fill the Water Reservoir
To fill the reservoir with water, you may either use
a pitcher to fill it while on the unit or remove it from
the unit to fill it up at the sink. Open the lid and fill
the reservoir with the desired amount of room-
temperature water between the MIN and MAX
markings on the tank. Never use warm or hot water
to fill the water reservoir. Close the water reservoir
lid and place it back in the unit, if necessary,
ensuring it fits tightly in place.
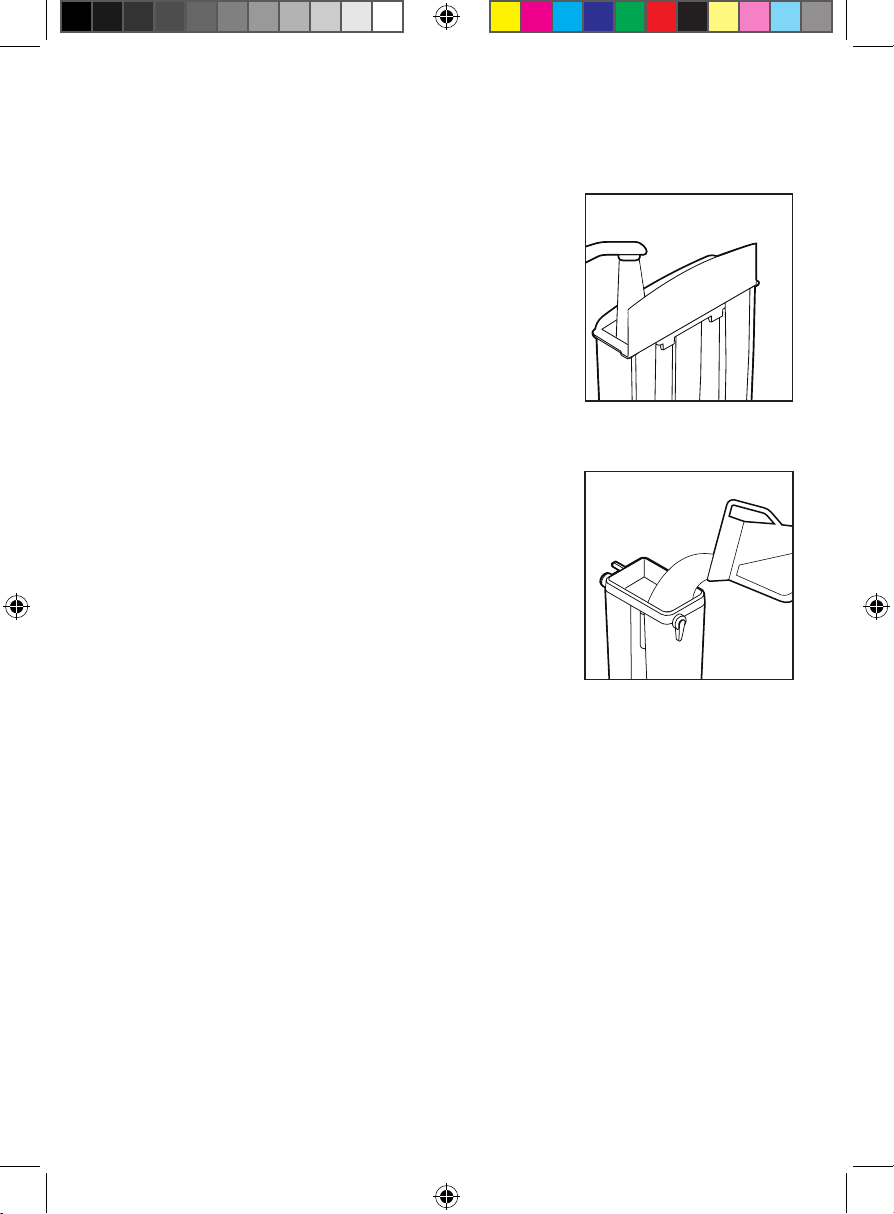
Fill the Milk Reservoir
If you plan to prepare cappuccino or latte, you will
need to fill the milk reservoir; it can be left empty
or even off the unit when preparing espresso.
To remove the milk reservoir from the unit, tilt it up
before pulling it out. Fill it with cold milk to between
the MIN and MAX markings on the tank. To put the
milk reservoir back on the unit, tilt it down before
sliding it firmly back into place. NOTE: You can use
any type of milk—whole, skim, soy, oat—to make froth.
Choose and Insert the Portafilter Basket
To insert the basket into the portafilter, simply drop the basket into it. Use the
smaller basket for a single shot of espresso. Use the larger basket for either
making a larger size drink or to have a double dose of espresso in a smaller
size drink.
10
Quick Start: How to Make Coffee
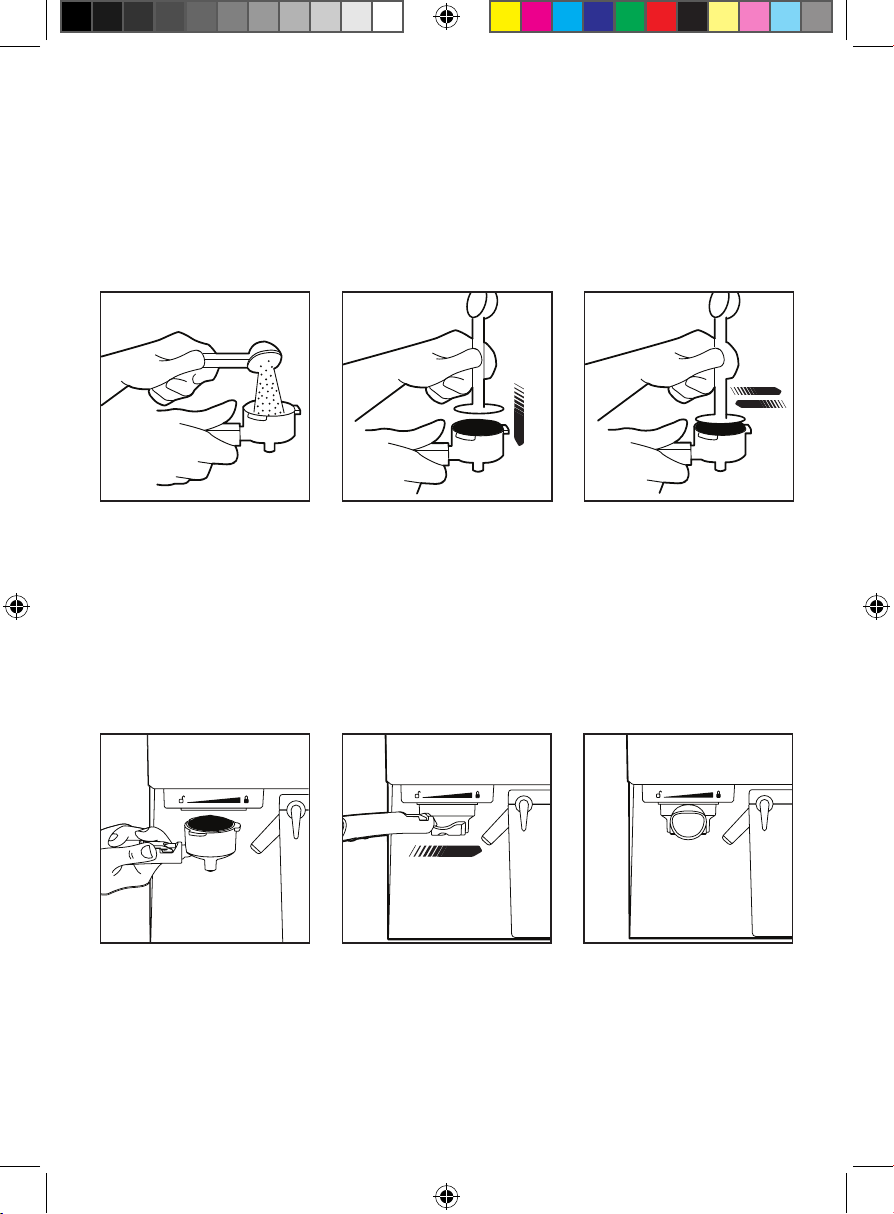
Pack the Portafilter with Coffee
1. Use the coffee measuring scoop to fill the basket with finely ground
espresso beans (do not overfill).
2. Using the tamper end of the measuring scoop, press on the grounds firmly
and evenly. Be sure the surface is smooth and flat.
3. Clean any excess grounds from the portafilter rim to ensure a proper fit in
the brew head.
Place the Portafilter on the Brew Head
1. Position the portafilter beneath the brew head with its handle pointing left.
2. With one hand on top of the unit to steady it, insert the portafilter up into
the brew head, lining up the handle with the open lock icon on the unit.
3. Slowly turn the handle to the right until you feel resistance and the
handle aligns with the locked icon on the unit; the handle will pointing
straight forward.
CAUTION: To avoid burns from steam and hot water or damage to the unit,
never remove the water reservoir or the portafilter while brewing or frothing. The
portafilter will be pressurized immediately after use. Please wait 60 seconds after
the brew cycle has finished before removing the portafilter slowly and carefully
to release pressure. If making a second cup, be sure the unit is in standby mode
(all buttons lit and solid) before removing or inserting the portafilter.
2. 3.1.
1.
3.2.

11
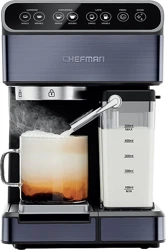
Quick Start: How to Make Coffee
To Make an Espresso
Espresso is a unique method of coffee brewing in which hot water is forced
through finely ground coffee beans for a richer and more full-bodied brew than
regular drip. Because of its strength, espresso is usually served in small portions
in demitasse cups.
1. Make sure the unit is plugged in.
2. Turn the unit on using the power switch located on its side.
3. Fill the water reservoir with fresh water.
4. Fill the portafilter with finely ground coffee beans and attach it to the
brew head.
5. Place a heatproof cup or demitasse on the metal coaster over the
drip tray.
6. Choose to brew a single or double espresso by pressing the appropriate
button. The button will blink to signify the unit is preheating. The button will
turn solid during the brew cycle. When brewing is complete, the unit will
beep three times, and your espresso will be ready to enjoy.
7. When the brew cycle ends, the unit will go into standby mode and will be
preheating in the background. If no button is pressed within 5 minutes, it
will switch to sleep mode.
8. To discard spent grounds, wait at least 60 seconds after the previous brew
cycle has finished, then remove the portafilter and let it cool. Hold the
portafilter basket in place by flipping up the portafilter basket retention
clip to partially cover the lip of the basket and portafilter. Press on the clip
with your thumb to hold the basket in place as you empty the grounds.

12
Quick Start: How to Make Coffee
To Make a Cappuccino or Latte
A cappuccino is a delicious beverage made with equal parts espresso,
steamed milk, and milk foam, while a latte is a larger coffee drink made with
mostly steamed milk and a little espresso. When using these presets, there is
no need to manually froth the milk; it will occur automatically.
1. Make sure the unit is plugged in.
2. Turn the unit on using the power switch located on its side.
3. Fill the water reservoir with fresh water.
4. Fill the milk reservoir with milk between the MIN and MAX lines and insert
it onto the unit. (If the milk reservoir is not on the unit, the cappuccino and
latte functions will not work.)
5. Place a heatproof cup or mug on the metal coaster over the drip tray.
NOTE: Be sure to use a large mug for a latte, especially with a double latte
which can yield as much as 12 fl oz (see chart at right).
6. Use the silver froth dispensing tube lever to position the froth dispensing
tube over the cup.
7. Fill the portafilter with ground coffee and attach it to the brew head.
8. Choose to brew a single or double cappuccino or latte by pressing the
appropriate button. The button will blink to signify the unit is preheating.
The button will turn solid during the brew cycle. When brewing is
complete, the unit will beep three times, and your drink will be ready
to enjoy.
9. When the brew cycle ends, the unit will go into standby mode and will be
preheating in the background. If no button is pressed within 5 minutes, it
will switch to sleep mode.
10. To discard spent grounds, wait at least 60 seconds after the previous
brew cycle has finished, then remove the portafilter and let it cool.
Hold the portafilter basket in place by flipping up the portafilter basket
retention clip to partially cover the lip of the basket and portafilter.
Press on the clip with your thumb to hold the basket in place as you
empty the grounds. NOTE: Be sure to clean the froth dispensing tube
after every use following the directions on p. 15.

13
Quick Start: How to Make Coffee
How to Add More Froth or Froth Milk Separately
The espresso machine allows you to add more frothed milk to your coffee
drink and prepare frothed milk on its own to use for a macchiato or hot
chocolate. Be sure the froth dispensing tube is positioned over the cup, then
simply press the FROTH button. The milk will froth for about 10 seconds. If you
want less time, simply press the FROTH button again to stop frothing. NOTE: Be
sure to clean the froth dispensing tube after every use following the directions
on p. 15.
Coffee Drink Sizes at a Glance
Use this chart as a guide for how much ground coffee to use and what
volume to expect in your drink. Be sure to use a cup that can accommodate
the final volume.
Drink Shots Coffee Grounds (g) Brewed Volume (fl oz)
Espresso Single 8 1
Double 16 2
Cappuccino Single 8 4.5
Double 16 6.5
Latte Single 8 7
Double 16 12

1414
Keep it Clean
How to Clean the Portafilter and Brew Head
This method of cleaning is useful if you make espresso only. If you make
cappuccino or latte or use the froth dispensing tube separately, you can clean
both the brew head, portafilter, and froth dispensing tube all at the same time
following the directions on p. 15.
1. Before cleaning, turn off the unit and unplug it. Some of the metal
parts might still be hot. Do NOT touch them with your hands until they
have cooled.
2. If not already out, remove the portafilter and discard the used coffee
grounds. To hold the basket in place while emptying grounds, flip up the
portafilter basket retention clip and hold it down with your thumb as you
empty the basket.
3. Rinse the basket and portafilter with warm, soapy water and rinse well.
Single- and double-shot baskets are top-rack dishwasher safe, but the
portafilter is NOT.
4. Wipe the underside of the brew head with a damp cloth or paper towel
to remove any stray coffee grounds.

15
Keep it Clean
How to Clean the Milk Reservoir and Froth Dispensing Tube
1. Remove the milk reservoir from the unit (tilt it up before pulling it out).
Transfer any remaining milk to another container and refrigerate.
2. Wash the milk reservoir and its lid thoroughly with warm, soapy water.
Rinse well. Do NOT use abrasive cleansers and scouring pads, as they
will scratch the finish. The milk reservoir is NOT dishwasher safe.
3. Attach the portafilter with an empty basket in it to the brew head on
the unit.
4. Place a large empty cup under the brew head, and be sure there is water
in the water reservoir.
5. Add fresh water to the milk reservoir and return it to the unit.
6. Use the silver froth dispensing tube lever to position the froth dispensing
tube over the cup.
7. Press the CLEAN button. Hot water and steam will come out in bursts.
Do NOT remove the cup until the clean cycle has completely ended
(the unit will beep three times and other function buttons will light up).
NOTE: If the clean cycle is canceled before finishing, wait a few minutes
before removing the cup as more hot water and steam may be expelled.
8. After the cycle ends, discard the water in the mug and any water left in
the milk and water reservoirs.
How to Clean the Water Reservoir
Empty the water reservoir between uses. Discard the remaining water by
removing the reservoir and emptying it into the sink. Wash the water reservoir
as needed with soapy water, rinse it well, and wipe it dry. The water reservoir is
NOT dishwasher safe.
How to Clean the Housing and Store the Unit
1. Wipe the housing with a soft wet cloth. Do NOT use abrasive cleansers
or scouring pads, as they can scratch the finish. Do NOT immerse the
appliance, cord, or plug in water.
2. Do NOT store the portafilter in the brew head. This can adversely affect the
seal between the brew head and the portafilter while brewing espresso.
3. Decalcify the unit as needed according to directions on p. 17.
16
Keep it Clean
How to Clean Milk Frother Internal Parts
Over time, milk residue can build up in the frother’s internal parts, requiring
a deep cleaning. Depending on frequency of use, we recommend doing this
deep cleaning a few times per year, or whenever you notice a decrease in the
amount or quality of the milk foam.
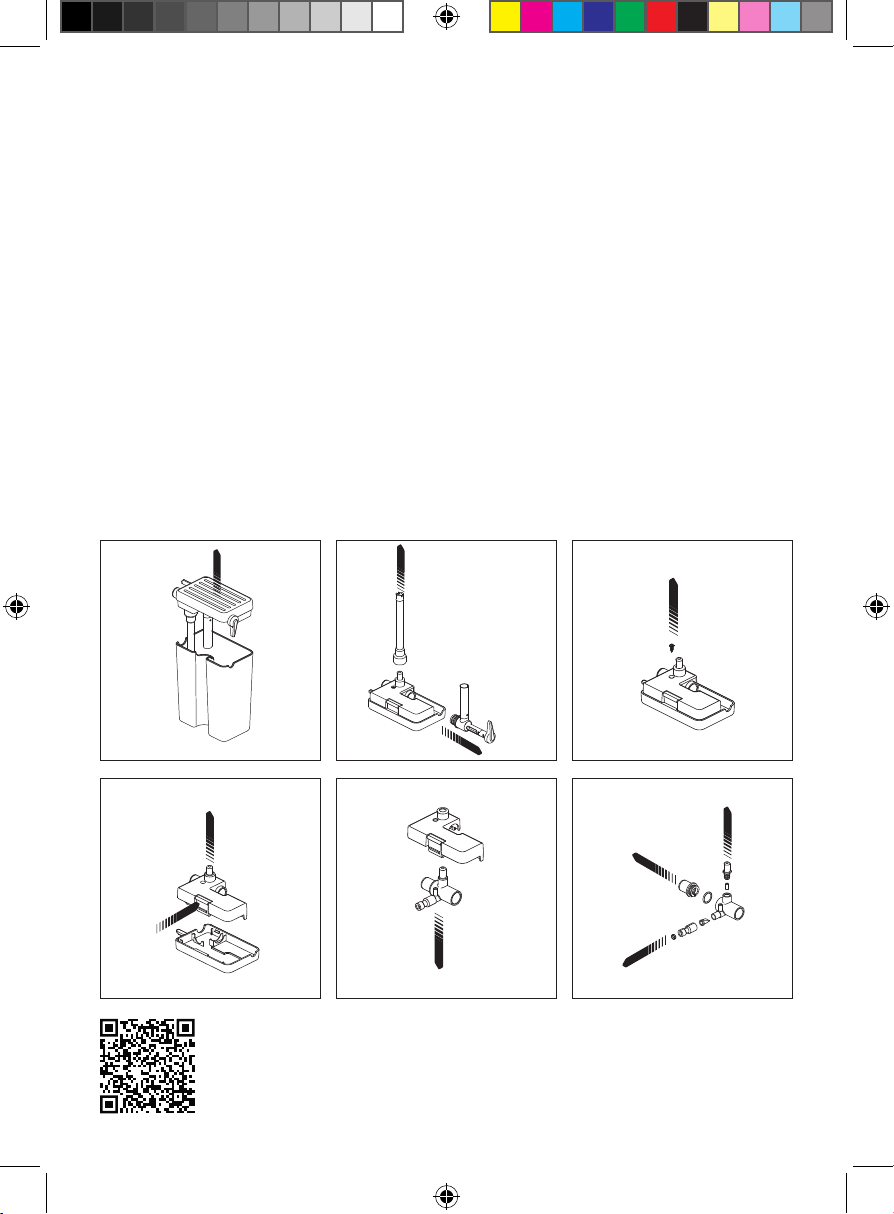
To Clean Frother Internal Parts
1. Remove the milk reservoir from the unit (tilt it up before pulling it out).
Remove the lid assembly and transfer any remaining milk to another
container and refrigerate.
2. Remove the froth dispensing tube and suction straw by pulling outward.
3. Use a small Phillips head screwdriver to remove the fastening screw.
4. Squeeze the tab on the side and lift to separate the covers.
5. Lift the froth assembly away from the lower lid cover.
6. Gently pull outward on the froth assembly to separate all the silicone and
plastic parts.
1. 2. 3.
4. 5. 6.
Frother Cleaning Guide
Scan here for a
step-by-step video of the
frother cleaning process.

17
Keep it Clean
7. Carefully remove all the small components and rinse all parts thoroughly
with warm, soapy water. (We recommend washing individually by hand
in a bowl so as not to lose any parts.)
8. Reassemble all parts by pushing them back into place as shown in the
diagram. Snap the upper and lower lid covers together. Use a small
Phillips head screwdriver to affix the fastening screw.
9. Re-insert the froth dispensing tube and suction straw into the lid and
return the lid to the milk reservoir.
How to Decalcify
Mineral deposits built up in the unit will affect the operation of the appliance.
Your appliance must be decalcified when you notice an increase in the time
required to brew espresso or when there is excessive steaming. Also, you
may notice a buildup of white deposits on the surface of the brew head.
The frequency of cleaning depends upon the hardness of your water.
To Decalcify Internal Parts:
1. Be sure the unit is cool, off, and unplugged.
2. Fill the water reservoir with white vinegar to between the MIN and MAX
markings on the tank. Fill the milk reservoir with water and slide it into
the unit.
3. Put a large cup or jar on the drip tray and position the froth dispensing
tube in the cup.
4. Insert the portafilter with an empty basket in it into the brew head.
5. Plug in the unit and turn it on.
6. Press the CLEAN button.
7. Repeat steps 1–6 as necessary using only fresh water to rinse any
remaining traces of vinegar out of the machine.
To Decalcify the Water Reservoir:
1. Fill the water reservoir with fresh, undiluted white vinegar.
2. Let sit for at least 8 hours; the reservoir may be placed on the unit for
this time.
3. Discard the vinegar, then rinse the water reservoir thoroughly with
fresh water.
1818
Having Trouble?
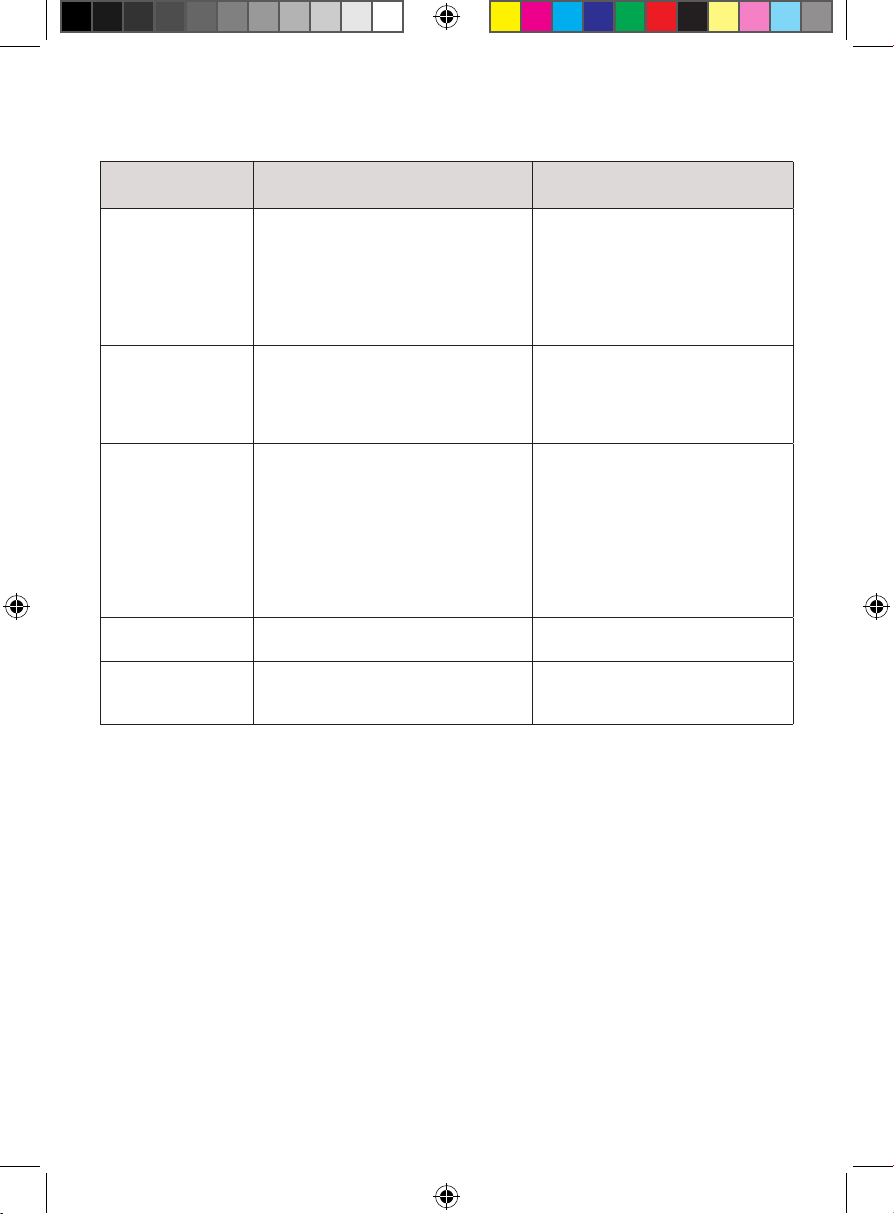
Problem Likely Cause Solution
Coffee does not
come out
1. Appliance not turned on or
plugged in
2. No water in reservoir
3. Coffee grind is too fine
4. Too much coffee in filter basket
5. Coffee has been tamped down
too much
1. Plug in unit and turn it on
2. Add water
3. Grind less fine
4. Add less coffee
5. Refill filter and tamp less
Coffee comes out
around the edge of
the portafilter
1. Portafilter not rotated to full lock
position
2. Coffee grounds were left around
the filter basket rim
3. Too much coffee in filter basket
1. Rotate portafilter to locked
position
2. Wipe off rim
3. Fill with less coffee
Milk is not foamy
after frothing or is
not coming out of
the tube
1. Unit ran out of steam
2. Milk is not cold enough
3. Froth dispensing tube is blocked
4. Internal parts of frother need
cleaning.
1. Ensure there is enough milk in
the reservoir
2. Chill milk and frothing
reservoir
3. Follow the instructions on p. 15
to clean the milk reservoir and
the froth dispensing tube
4. Follow the instructions on p. 16
to clean frother internal parts
Coffee comes out
too quickly
1. Coffee grind is too coarse
2. Not enough coffee in filter
1. Use a finer grind
2. Add more coffee
Coffee is too weak 1. Using single-filter basket for
double shot
2. Coffee grind is too coarse
1. Use double-filter basket for
double shot
2. Use a finer grind
19
Notes

20
Terms & Conditions
Limited Warranty
RJ Brands, LLC d/b/a Chefman® offers a limited 1-year Warranty (the “Warranty”)
available on sales through authorized distributors and retailers only. Please
note that this Warranty becomes valid from the date of initial retail purchase
and that the Warranty is nontransferable and applies only to the
original purchaser.
This Warranty is void without proof of purchase within the United States and
Canada. Please be aware that this Warranty supersedes all other warranties
and constitutes the entire agreement between the consumer and Chefman®.
Any changes to the Terms and Conditions of this Warranty must be in writing,
signed by a representative of Chefman®. No other party has the right or ability
to alter or change the Terms and Conditions of this Warranty.
We may ask you to please submit, via email, photos and/or video of the issue
you are experiencing. This is to help us better assess the matter and possibly
offer a quick fix. Photos and/or video may also be required to determine
Warranty eligibility.
We encourage you to register your product. Registering can make the Warranty
process easier and can keep you informed of any updates or recalls on your
product. To register, follow the directions on the Chefman® Warranty Registration
page in the Chefman® User Guide. Please retain your proof of purchase even
after registering. In the event that you do not have proof of your purchase date,
we may declare your Warranty void or we may, at our sole discretion, apply the
date of manufacture as the purchase date for purposes of this Warranty.

21
Terms & Conditions
What the Warranty Covers
• Manufacturer Defects - Chefman® products are warranted against defects
in material and workmanship, under normal household use, for a period of
1 year from the date of purchase when used in accordance with the
directions listed in the Chefman® User Guide. If your product does not work
as it should, please contact Customer Support at support@chefman.com so
that we may assist you.
This Warranty Does Not Cover
• Misuse
Damage that occurs from neglectful or improper use of products, including,
but not limited to, damage that occurs as a result of usage with incompatible
voltage, regardless of whether the product was used with a converter or
adapter. See Safety Instructions in the Chefman® User Guide for information
on proper use of product;
• Poor Maintenance
General lack of proper care. We encourage you to take care of your
Chefman® products so that you may continue to enjoy them. Please see
Keep it Clean directions in this Chefman® User Guide for information on
proper maintenance;
• Commercial Use
Damage that occurs from commercial use;
• Normal Wear and Tear
Damage or degradation expected to occur due to normal use over time;
• Altered Products
Damage that occurs from alterations or modifications by any entity other
than Chefman® such as the removal of the rating label affixed to the product;
• Catastrophic Events
Damage that occurs from fire, floods, or natural disasters; or
• Loss of Interest
Claims of loss of interest or enjoyment.
22
Terms & Conditions
For product information, please visit us at Chefman.com.
EXCEPT WHERE SUCH LIABILITY IS REQUIRED BY LAW, THIS WARRANTY DOES NOT
COVER, AND CHEFMAN® SHALL NOT BE LIABLE FOR, INCIDENTAL, INDIRECT, SPECIAL,
OR CONSEQUENTIAL DAMAGES, INCLUDING WITHOUT LIMITATION, DAMAGE TO, OR
LOSS OF USE OF THE PRODUCT, OR LOST SALES OR PROFITS OR DELAY OR FAILURE TO
PERFORM THIS WARRANTY OBLIGATION. THE REMEDIES PROVIDED HEREIN ARE THE
EXCLUSIVE REMEDIES UNDER THIS WARRANTY, WHETHER BASED ON CONTRACT,
TORT OR OTHERWISE.
23
How do I register my product?
All you need to do is fill out a simple Chefman® registration form.
You can easily access the form in one of the two ways listed below:
• Visit Chefman.com/register.
• Scan the QR code to the right to access site.
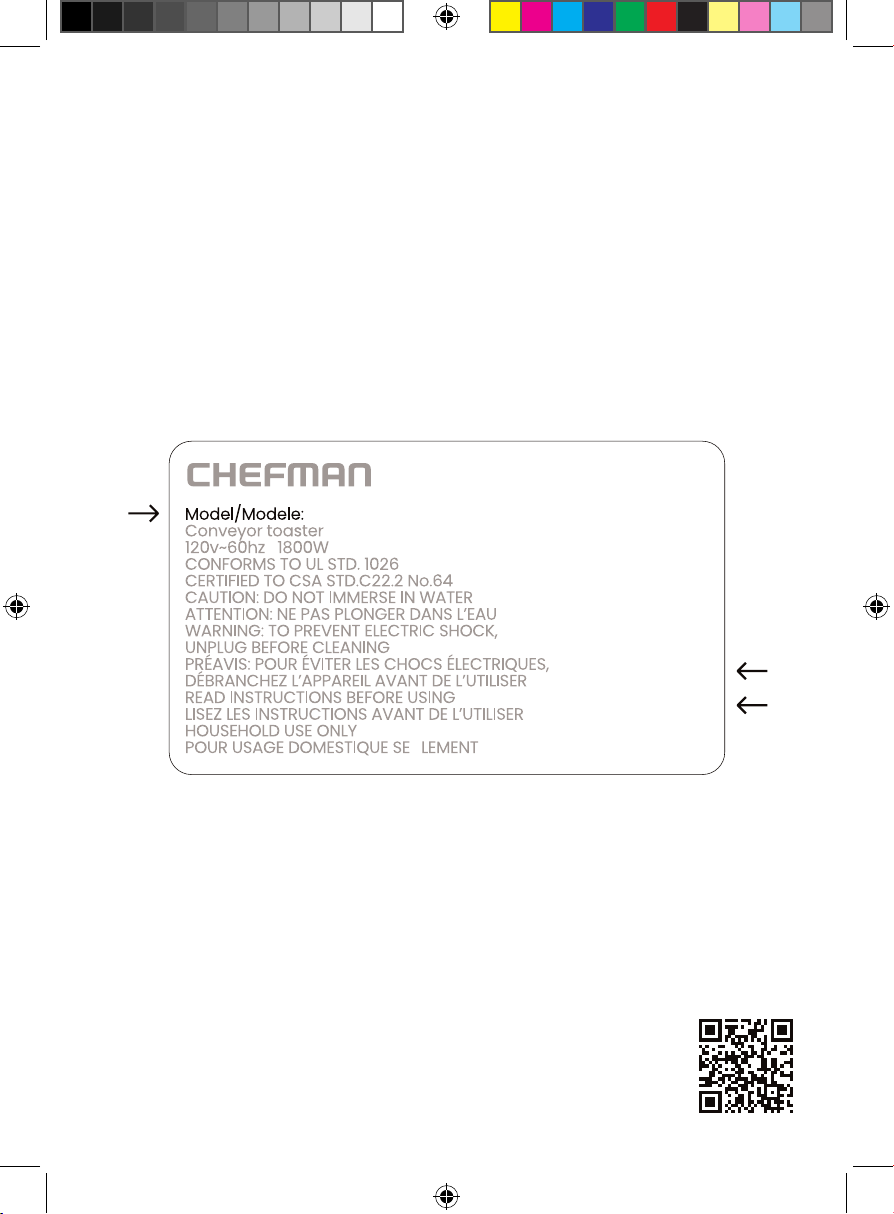
NOTE: Label depicted here is an example.
Please see label on your product for actual model/date code/access code.
Warranty Registration
What do I need to register my product?
• Contact Information
• Model Number (see example below)
• Proof of Purchase (online confirmation, receipt, gift receipt)
• Date Code (see example below)
• Access Code (see example below)
Date Code:
0000
Access Code:
Xxxxxxxx
Made in China/Fabrique en Chine
AC Only/ AC Seulement
XXXXX
RJ54V2ISVUG030824
Barista Pro
Espresso Machine
Chefman® is a registered trademark of RJ Brands, LLC.