Owner’s Manual
Battery Powered
Submersible Utility Pump
General Safety . . . . . . . . . . . . . . . . . . . . 2
Specications. . . . . . . . . . . . . . . . . . . . . 3
Installation. . . . . . . . . . . . . . . . . . . . 4 & 5
Troubleshooting . . . . . . . . . . . . . . . . . . . 6
Warranty. . . . . . . . . . . . . . . . . . . . . . . . . 7
TABLE OF CONTENTS

A pump is an electrical device designed to
operate in inherently wet environments.
ALWAYS USE EXTREME CAUTION
when installing or maintaining this product!
Important Safety Instructions
Carefully read and follow all safety
instructions in this manual and on pump.
SAVE THESE INSTRUCTIONS – This manual
contains important instructions that should be
followed during installation, operation, and
maintenance of the product.
Save this manual for future reference.
Safety Labels
This is the safety alert symbol. When you
see this symbol on your pump or in this manual,
look for one of the following signal words and be
alert to the potential for personal injury!
Indicates a hazard which, if
not avoided, will result in death or serious injury.
Indicates a hazard which,
if not avoided, could result in death or serious
injury.
Indicates a hazard which, if
not avoided, could result in minor or moderate
injury.
NOTICE indicates practices not related to per-
sonal injury.
Keep safety labels in good condition. Replace
missing or damaged safety labels.
General Safety
Risk of burns. Do not
touch an operating motor. Motors are de-
signed to operate at high temperatures. To
avoid burns when servicing pump, allow it to
cool for 20 minutes after shut-down before
handling.
Do not allow pump or any system compo-
nent to freeze. To do so will void warranty.
Pump water only with this pump.
Periodically inspect pump and system com-
ponents.
Wear safety glasses at all times when work-
ing on pumps.
2
GENERAL SAFETY
STOP
Before you start
3
APPLICATIONS
Ideal for High-Volume Water Removal from Basement Sump Pits and Window Wells
SPECIFICATIONS & PERFORMANCE
Capacity Hose
Model HP Volt Amps (GPH at 0’) Max Head Construction Impeller Length
WABUP 1/55 4.5 DC 3.0 138 2.7’ Thermoplastic Thermoplastic 42”
Article #1000 000 000
Modèle #XXX-XXX
GUIDE D'UTI LISATION ET D'ENTRE TIEN
POMPE SUBMERSI BLE PO RTATIVE
Questions, problèmes, pièces manqu antes? Avant de retourner au m agasin,
appelez le service à la clientèle de Everbilt
8 - 18h, h eures normales de l'Est, Lundi - Vend redi
1-800-305-1726
HOMEDEPOT.COM
MERCI
Nous apprécions la con
ance que vous avez placée dans Everbilt par l'achat de cette pompe submersible portable. Nous nous efforçons
continuellement de créer des produits de qualité conçus pour améliorer votre m aison. Visitez- nous en ligne pour voir notre gamm e complète de
produits disponibles pour vos besoins de rénovation. Merci d'avoir choisi Everbilt!
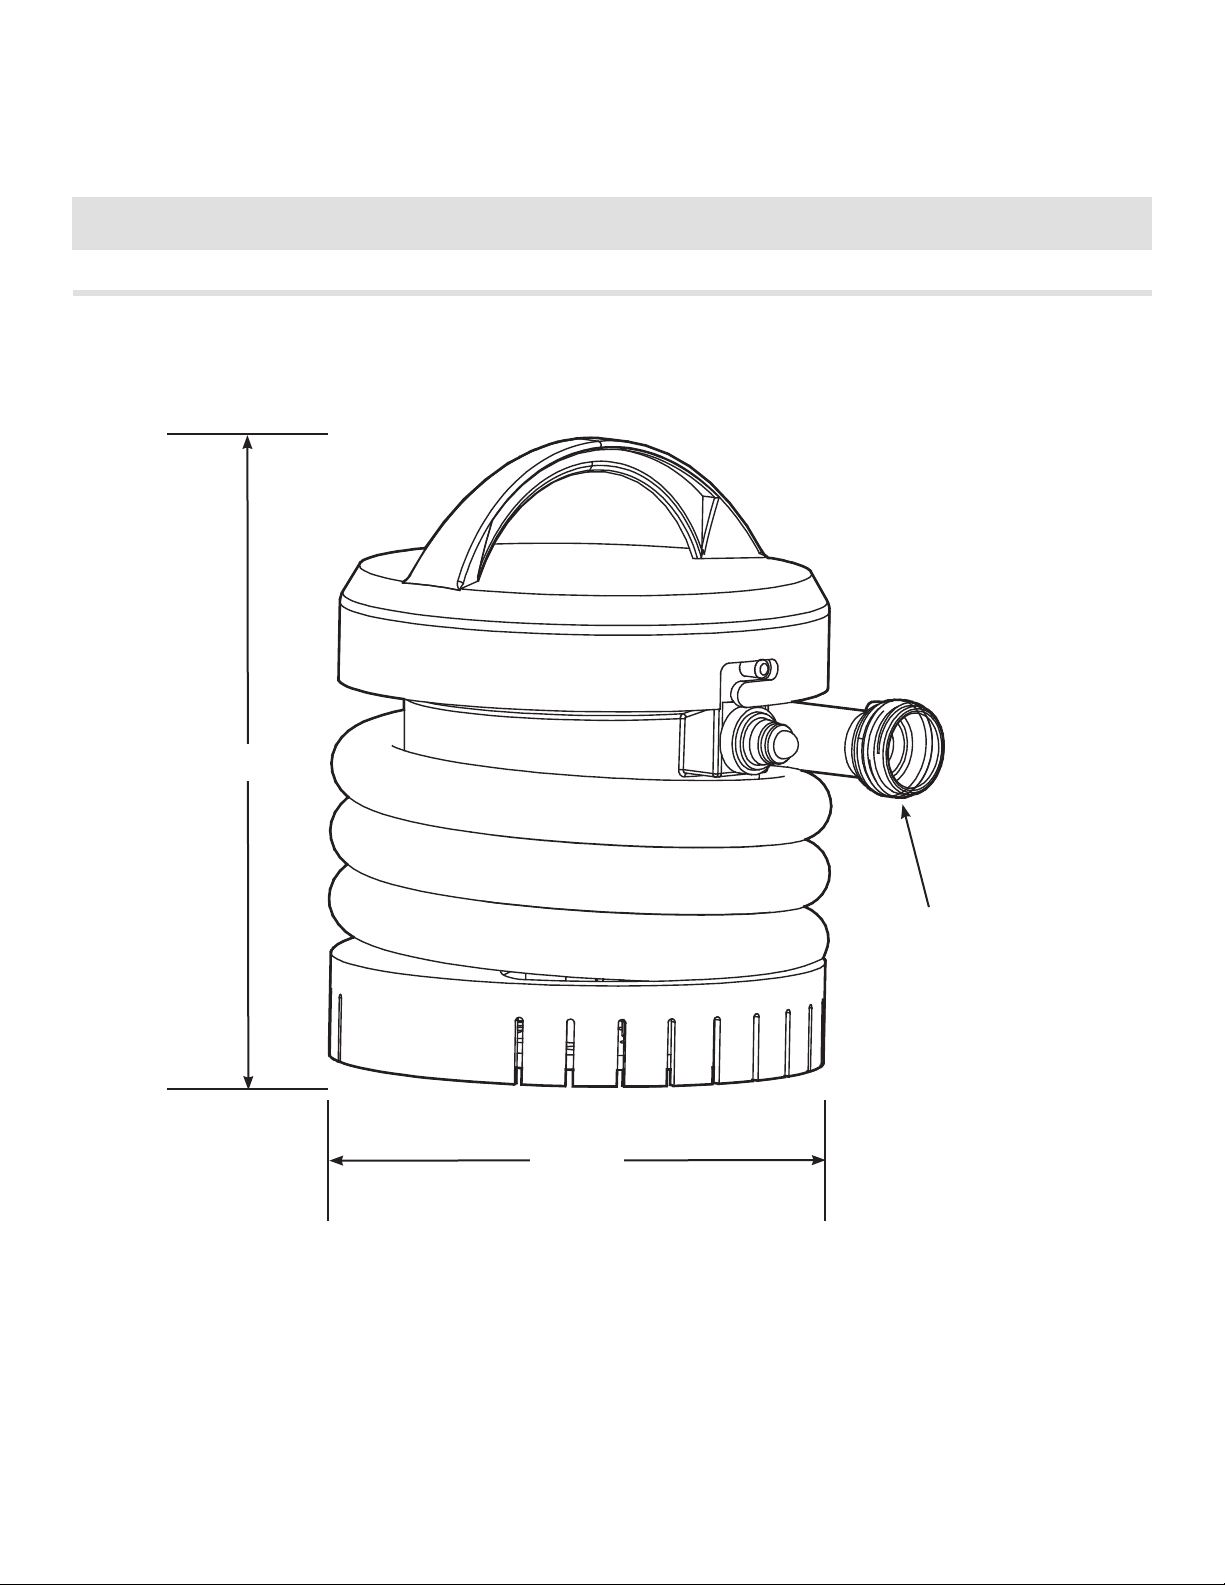
5-1/4”
6-1/2”
42” Garden Hose
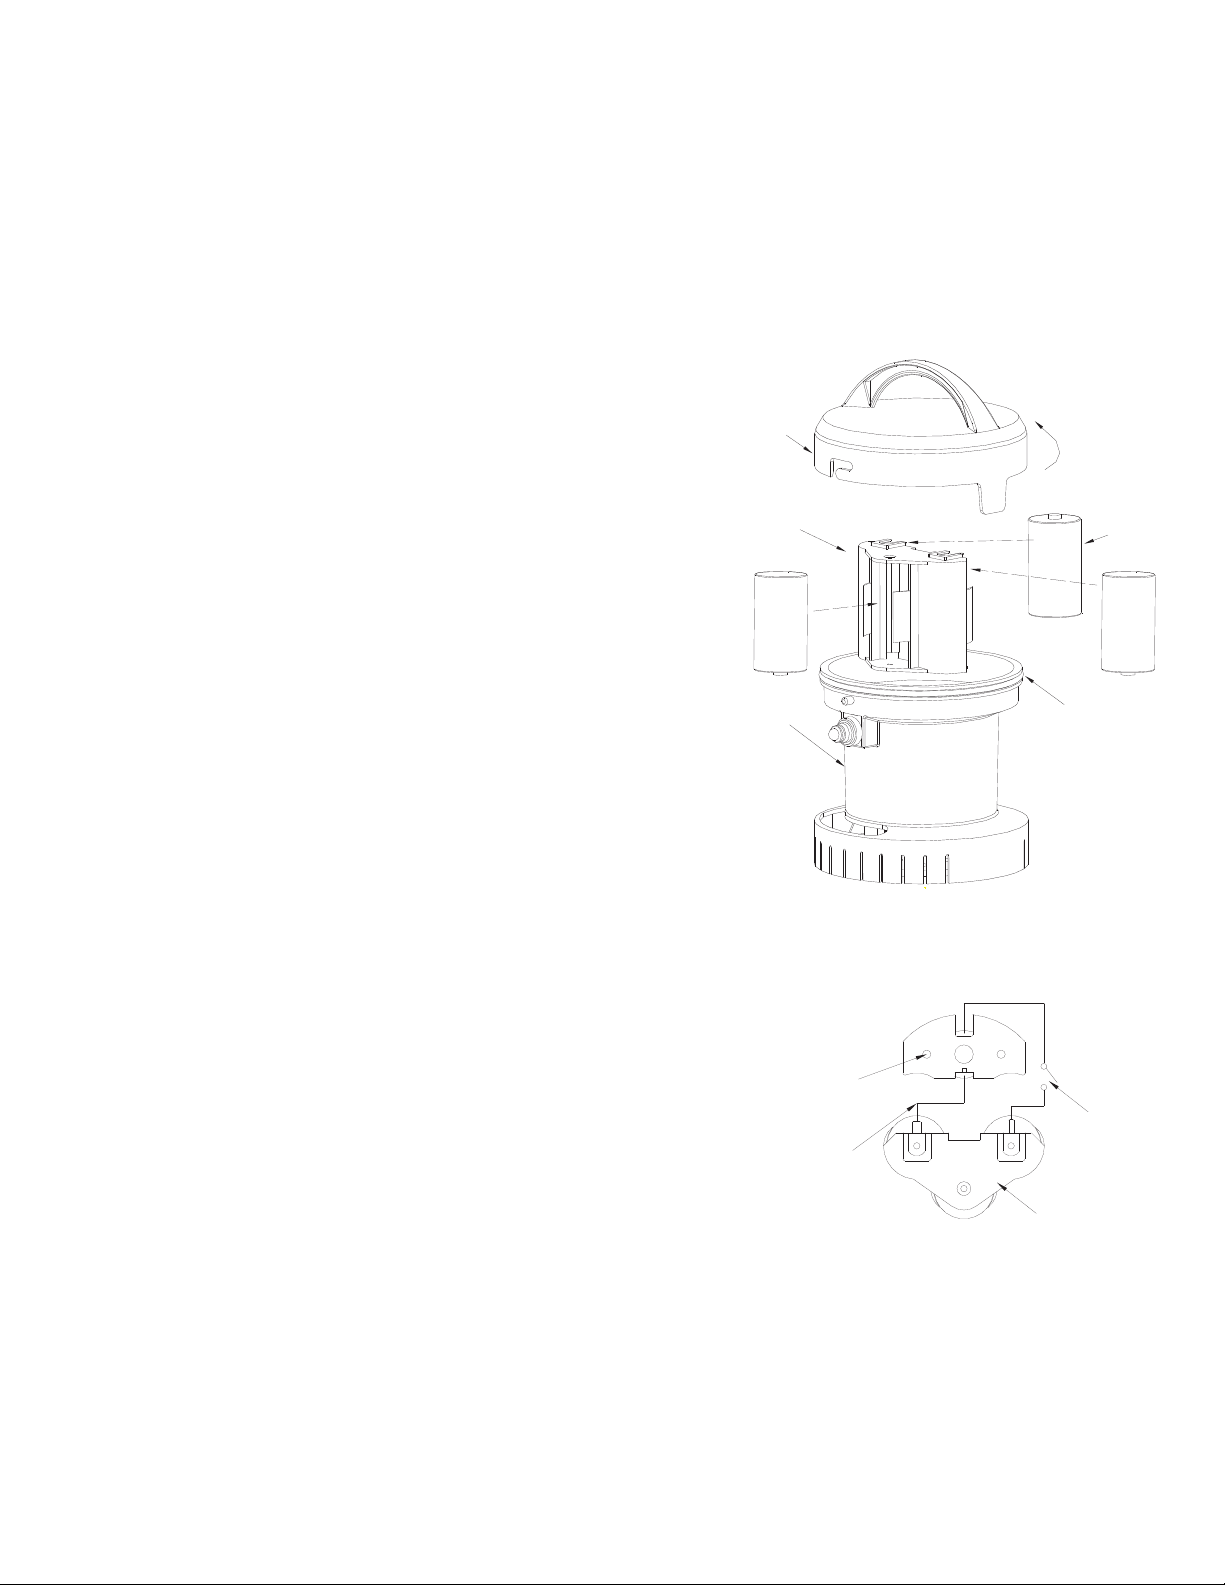
Top Cover
Battery
Retainer
To Open
Batteries
Bottom
Cover
O-ring
This pump is a compact, submersible pump. It is extremely handy around the dock, the house or farm.
And, it’s ideal for removing water from dinghies, inatable, peddle boats and kayaks.
This pump will lift water to a maximum height of 2.7 feet and pump in excess of 138 gallons per hour
with fresh batteries.
The pump is made of high-impact plastic. It is completely portable and ready for use when 3 “D” size
alkaline batteries are installed (batteries not included). It comes complete with a 42” hose and a male
hose tting for attachment to your garden hose.
OPERATING INSTRUCTIONS
IMPORTANT: To avoid airlock (ow stoppage),
submerge pump in water before turning on. If pump
must be turned on before submerged, it may take 10-30
seconds for the water to begin to ow (allowing pump
to clear airlock).
1.To install batteries, remove top cover of pump by
turning the handle counter-clockwise (See Figure1).
Unplug the wire leads and remove battery retainer
(See Figure 2 detail). Insert three (3) alkaline “D” size
batteries in position as indicated on the battery
retainer. Replace battery retainer, re-attach wire
leads and lock cover in place (wire leads are dierent
sizes to prevent improper wiring). The pump is completely
portable and ready for use when batteries are installed.
2. Place pump into water at the deepest point possible.
Make sure the pump is located in area free of debris to
avoid clogging. With bottom lter plate attached, pump
will sink. If you want the pump to oat, remove bottom plate
by removing the four screws. The pump will then naturally oat
in an upright position.
NOTE: oating the pump is desired when you wish to pump out an
area that has debris at the bottom. See Step 1 under servicing
instructions. Some possible uses are: emptying aquarium
without picking up aquarium gravel; lling livewell with the
same water as being shed; pumping out pools or reservoirs
of greater depth than the pump hose length and pumping
out basement sump reservoir to avoid sludge at the bottom.
IMPORTANT: keep pump tethered to prevent it from oating
out of reach.
3. To start pump, push switch located directly below cover. Hold
pump in position until the water begins owing out of the hose.
Check frequently to be sure water is owing properly and pump
is free from debris.
4. If water is owing slowly, check hose for kinks or debris. Turn
pump o if it is necessary to remove debris. To remove debris, simply remove pump from water and
turn it upside down, looking for obvious obstructions. If further inspection is necessary, consult
servicing instructions.
NOTE: after use, always ush the pump thoroughly with fresh clean water, especially after pumping
sea water or chlorine treated water.
Figure 1
DESCRIPTION
4
(+)
(+)
(-)
(-)
Battery
Retainer
Switch
Motor
Unit
Wire
Lead
Figure 2
5
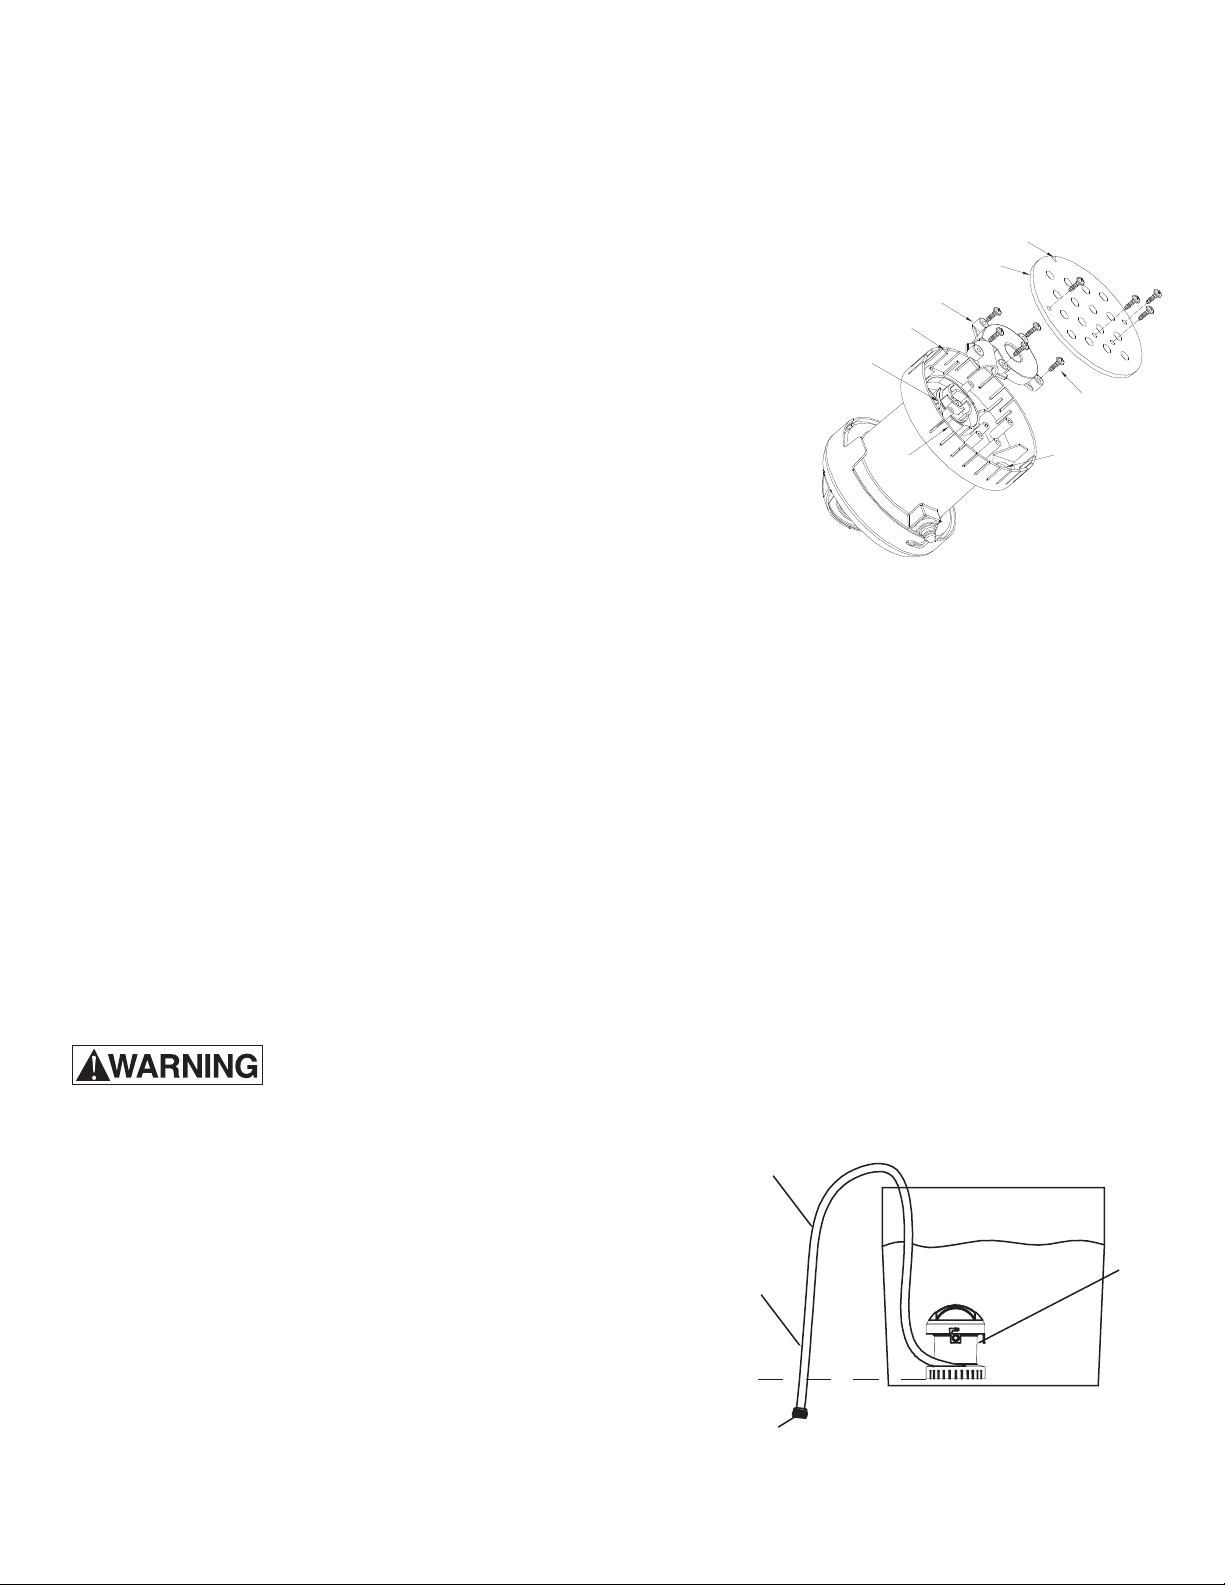
Filter Screen
Notch
Impeller Chamber Cap
V-Shape Protrusion
End of Ribbed
Section
Screws
Hose Opening
BATTERY & PUMP TIPS
1.Install fresh, name-brand alkaline batteries in this pump. While they may cost a bit more, tests
have shown that they will run this pump continuously for up to 5 hours, while standard “D”
batteries will only last a 1/2 hour or less.
2.Remove batteries from the pump when they are
discharged or if the pump will be stored for an extended
period. Discharged batteries occasionally leak, which will
destroy the electrical circuit of the pump.
3. Dispose of used batteries in a safe place. Follow battery
manufacture’s recommendations. Do not burn them because
they can explode. Do not throw in lakes, streams or rivers.
4. Keep the inside of the pump dry at all times. If it does
get wet inside, dry it immediately. A hair dryer held 12”
(30.48cm) away works well. Make certain the cover is tight
before immersing the pump. Keep the o-ring lubricated with
petroleum jelly.
SERVICING INSTRUCTIONS FOR CLEANING
OUT DEBRIS AND HOSE PLACEMENT
1.Turn the pump upside down and remove the lter screen by removing the four screws with a
Phillips screwdriver. Remove all debris.
2.Remove the impeller chamber cap by removing all four screws. Remove all possible debris (See Fig 3).
NOTE: the correct rotation of the impeller is counterclockwise, when viewing from the bottom of the
pump. If the impeller rotates clockwise, or not at all, check the batteries for correct insertion.
3. When replacing the hose, remove impeller chamber cap (See Step 2 above). Remove existing hose
and thread replacement hose clockwise through the hose opening in pump housing.
4.Place the end of the hose to the end of the ribbed section of the impeller chamber (See Figure 2).
Make sure there are no kinks in the hose.
5.To keep the hose in place, brace the hose with your thumb just outside the impeller chamber. Replace
the impeller chamber cover and secure it by bracing your thumb on top of it. Replace and install
screws. DO NOT OVER TIGHTEN.
6.Replace the lter screen by lining up the screw holes with the screw posts and the notch in the screen
with the V-shaped protrusion in the pump housing. Replace and install screws.
DO NOT OVER TIGHTEN.
This pump is intended for pumping water only. Do not use to pump gasoline,
diesel fuels or chemicals of any kind. Fluids other than water may destroy
this pump and /or create a re hazard. This portable pump is not intended for permanent installation in a
bilge or sump area. It should not be used in situations where risk of personal injury or property
damage could result from pump or battery failure. Do not
use any power source other than three “D” size alkaline
batteries to power the pump. Do not attempt to recharge
batteries while installed in this product.
NOTE: To conserve batteries, you may use a siphon
action (see Figure 4). The discharge end of the hose
must be below the water level. To completely drain water,
it must be below the lowest water level. With the pump and
hose as shown, turn the pump on until water ows, then turn
the pump o. Water will continue to ow, but at a slower
rate. This method can also increase the pumping rate with
the pump turned on.
Figure 3
Figure 4
BSUP Pump
Hose
Keep end of hose between
lowest water level
Siphon
Action

TROUBLESHOOTING CHECKLIST
PROBLEMS
PUMP RUNS BUT DOES
NOT DELIVER WATER
PUMP RUNS BUT ONLY
DELIVERS A SMALL
AMOUNT OF WATER
MOTOR RUNS FOR A
SHORT TIME, THEN
STOPS
POSSIBLE CAUSES/SOLUTIONS
• Impeller or volute openings are fully or partially clogged.
Remove pump and clean.
• Pump is air-locked. Check for clogged vent hole in pump case.
• Inlet holes in pump base are clogged. Remove pump and clean the
openings.
• Vertical pumping distance is too high. Reduce distance or change the
discharge ttings of the pump.
• Pump is air-locked. Check for clogged vent hole in pump case.
• Vertical pumping distance is too high. Reduce distance or change the
discharge tting of the pump. Inlet holes in pump base are clogged.
Remove pump and clean the strainer and openings.
• Impeller or volute openings are fully or partially clogged.
Remove pump and clean.
• Pump impeller is partially clogged with tar or paint, causing motor to
run slow and overload. Remove pump and clean.
• Inlet holes in pump base are clogged. Remove pump and clean the
openings.
• Pump impeller is partially clogged causing motor to run slow and
overload. Remove pump and clean.
• Motor stator may be defective.
• Impeller or volute openings are fully or partially clogged.
Remove pump and clean. Also clean the strainer if one is installed.

7
WARRANTY
Retain Original Purchase Receipt for Warranty Eligibility
Limited Warranty
Manufacturer warrants to the original consumer purchaser (“Purchaser” or “You”) that its products are free from defects in
material and workmanship for a period of twelve (12) months from the date of the original consumer purchase. If, within
twelve (12) months from the original consumer purchase, any such product shall prove to be defective, it shall be repaired
or replaced at manufacturer’s option, subject to the terms and conditions set forth herein. Note that this limited warranty
applies to manufacturing defects only and not to ordinary wear and tear. All mechanical devices need periodic parts and
service to perform well. This limited warranty does not cover repair when normal use has exhausted the life of a part or
the equipment.
The original purchase receipt and product warranty information label are required to determine warranty eligibility. Eligibil-
ity is based on purchase date or original product – not the date of replacement under warranty. The warranty is limited to
repair or replacement of original purchased product only, not replacement product (i.e. one warranty replacement allowed
per purchase).
Purchaser pays all removal, installation, labor, shipping, and incidental charges.
Claims made under this warranty shall be made by returning the product to the retail outlet where it was purchased or to
the factory immediately after the discovery or any alleged defect. Manufacturer will subsequently take corrective action as
promptly as reasonably possible. No requests for service will be accepted if received more than 30 days after the warranty
expires. Warranty is not transferable and does not apply to products used in commercial/rental applications.
General Terms and Conditions; Limitations of Remedies
You must pay all labor and shipping charges necessary to replace product covered by this warranty. This warranty does
not apply to the following: (1) acts of God; (2) products which, in manufacturer’s sole judgment, have been subject to
negligence, abuse, accident, misapplication, tampering, or alteration; (3) failures due to improper installation, operation,
maintenance or storage; (4) atypical or unapproved application, use or service; (5) failures caused by corrosion, rust or
other foreign materials in the system, or operation at pressures in excess of recommended maximums.
This warranty sets forth manufacturer’s sole obligation and purchaser’s exclusive remedy for defective products.
MANUFACTURER SHALL NOT BE LIABLE FOR ANY CONSEQUENTIAL, INCIDENTAL, OR CONTINGENT DAMAGES
WHATSOEVER. THE FOREGOING LIMITED WARRANTIES ARE EXCLUSIVE AND IN LIEU OF ALL OTHER EXPRESS
AND IMPLIED WARRANTIES, INCLUDING BUT NOT LIMITED TO IMPLIED WARRANTIES OF MERCHANTABILITY
AND FITNESS FOR A PARTICULAR PURPOSE. THE FOREGOING LIMITED WARRANTIES SHALL NOT EXTEND
BEYOND THE DURATION PROVIDED HEREIN.
Some states do not allow the exclusion or limitation of incidental or consequential damages or limitations on how long an
implied warranty lasts, so the above limitations or exclusions may not apply to You. This warranty gives You specic legal
rights and You may also have other rights which vary from state to state.

1899 Cottage Street
Ashland, Ohio 44805
Telephone: 1-844-394-2604