
Nikon View Reference Manual
Overview
• Overview
• Before You Begin
• Installation Guide
• Connecting to computer
• Confirming device registration
• Starting Nikon View
Set-up
• Nikon Transfer(Windows)
• Nikon Transfer(Macintosh)
• Nikon Browser
• Nikon Viewer
• Nikon Editor
Applications
• Standard RGB Profile Supported in Nikon Editor
• Large Preview Creator for NEF(Windows)
• Nikon NEF Plug-in
• Troubleshooting
• Connecting the Camera and Inserting Memory Cards
• Reinstalling Nikon View
• Panorama Maker 3.0
Appendix
1
Overview
Welcome to Nikon View ! Before using Nikon View , be sure to read this manual thoroughly.
Use Nikon View to transfer images from a Nikon digital camera (hereafter camera) to a computer. To transfer images, connect the camera to
your computer with the appropriate cable or remove the memory card from the camera and insert it into a card reader or card slot.
Transferred images are displayed as a list of thumbnails. Click a thumbnail to open the corresponding image. Images can be edited, printed,
viewed in a slide show, uploaded to the Internet or sent to another computer using e-mail.
Nikon View supports the COOLPIX series and D100, D1, D1x, D1
H cameras that support USB connection.
The following file types recorded by supported cameras can be displayed in Nikon View: JPEG, TIFF (RGB), TIFF (YCbCr), RAW (NEF),
QuickTime movie, WAV (Voice memo).
Refer also to the documentation provided with your camera when using Nikon View.
Copyright
2002 Pixology Ltd. All rights reserved. Pixology IRISS is a trademark of Pixology Ltd.
Microsoft
®
and Windows
®
are registered trademarks of Microsoft Corporation in the United States of America and other countries.
IBM is a registered trademark of International Business Machines Corporation.
Adobe and Adobe Photoshop are trademarks or registered trademarks of Adobe Systems, Inc.
Pentium is a trademark of Intel Corporation.
Macintosh, Mac OS, and QuickTime are trademarks of Apple Computer, Inc.
All other trade names mentioned in this manual or other documentation provided with your Nikon product are trademarks or registered trademarks of their
respective holders.
The content of this reference manual applies to both the
COOLPIX series and D100, D1, D1x, D1
H cameras. We ask
for your understanding that certain parts of this manual
may not apply to your camera.
2
To make it easier to find the information you need, the following
symbols and conventions are used:
Background Knowledge
This manual assumes familiarity with operations common to the
Macintosh or Windows operating systems.
If you are in doubt about the meaning of any of the terms used
here, refer to the documentation or the Help provided with your
operating system.
Illustrations
While the majority of the illustrations are taken from the Windows
version of the product (Windows XP Professional), save where
otherwise noted the operations described apply to both the
Macintosh and Windows versions.
Printing This Manual
If desired, portions of this manual can be printed for ease of
reference using the Print… command in the Adobe Acrobat
Reader File menu.
Life-Long Learning
As part of Nikon's "Life-Long Learning" commitment to ongoing
product support and education, continually-updated information is
available on-line at the following web-sites:
• For users in the United States of America:
http://www.nikonusa.com/
• For users in Europe:
http://www.nikon-euro.com/
• For users in Asia, Oceania, the Middle East, and Africa:
http://www.nikon-asia.com/
Visit these sites to keep up-to-date with the latest product information
and general advice on digital imaging and photography. For more
information, please contact your nearest Nikon representative:
http://www.nikon-image.com/eng/
This icon marks cautions, information that you should read
before use to prevent damage to your Nikon product.
This icon marks notes, information that you should read
before using Nikon View 6.
This icon marks tips, information that you may find helpful
when using Nikon View 6.
This icon indicates that more information is available
elsewhere in this manual or in other documentation.
This symbol indicates that the cross-reference marked with
the icon is to the Nikon View 6 Reference Manual (this
manual).
Blue text indicates a link to another part of this manual or to
a web page. An Internet connection is required to view
web pages.

3
Nikon View - Set-up
To install and use Nikon View, follow the steps below: Click the step titles for more detailed information.
Install
(Win XP) (Mac OS X)
Install Nikon View on your computer.
Connect a camera to the computer or
insert a card in a card reader or card slot.
Confirm that the computer has correctly
registered the camera.
(Windows only)
Use Nikon View
Use Nikon Transfer, Nikon Browser,
Nikon Viewer and Nikon Editor.
Confirm device registration
If Nikon Transfer does not
start automatically...
(Windows only)
Connect camera to computer

4
Before You Begin
System Requirements
Windows
Before installing Nikon View 6, make sure that your computer system satisfies the following requirements:
*1
Only pre-installed versions are supported.
*2
Consult the documentation provided with your camera as to whether it supports RAW data.
*3
The camera may not function as expected when connected to IEEE 1394 or USB hubs.
*4
Use only compatible interface boards. For further information, see the web page address below.
Support and updates
For the latest information and updates, visit http://www.nikonusa.com/, http://www.nikon-euro.com/, http://www.nikon-asia.com/
CPU Pentium 300 MHz or higher
Operating system
Windows XP Home Edition/Professional
*1,
,Windows 2000 Professional
*1
, Windows Millennium Edition
(Me)
*1
,Windows 98 Second Edition (SE)
*1
Hard disk space
60 MB or more free disk space required to install Nikon View 6
10 MB plus twice the capacity of the memory card in use are required to run Nikon View 6 (Startup Disk)
Memory (RAM)
When working with RAW data
*2
images: 128 MB or more
When not working with RAW data
*2
images: 64 MB or more
Video resolution 800 × 600 pixels or higher with 16-bit (High Color) or more
IEEE 1394 interface
(D1/D1x/D1
H)
Only boards compliant with Open Host Controller Interface (OHCI) are supported
*3,4
(An interface board
is needed to connect the camera to the computer.)
USB interface
(COOLPIX series/D100)
Only built-in USB ports supported
*3
Miscellaneous
CD-ROM drive required for installation
Internet connection and appropriate software required to upload images to the Web
Internet connection and appropriate software required to send images by e-mail

5
Macintosh
Before installing Nikon View 5, make sure that your computer system satisfies the following requirements:
*1
Built-in FireWire (IEEE 1394) or USB interface may be required depending on the camera.
*2
When using Mac OS 10.1.2, you can not use the (TRANSFER) button on the camera. To transfer images to the computer, use the
button in Nikon View. To transfer images with the (TRANSFER) button, use Mac OS Version10.1.3 or later.
*3
Consult the documentation provided with your camera as to whether it supports RAW data.
*4
The camera may not function as expected when connected to FireWire (IEEE 1394) or USB hubs.
Support and updates
For the latest information and updates, visit: http://www.nikonusa.com/, http://www.nikon-euro.com/, http://www.nikon-asia.com/
Model
iMac
*1
, iMac DV
*1
, Power Macintosh G3 (Blue & White)
*1
,
Power Macintosh G4 or later
*1
, iBook
*1
, PowerBook G3 or later
*1
Operating system
Mac OS 9.0, Mac OS 9.1, Mac OS 9.2, Mac OS X (Version 10.1.2 or later)
*2
Hard disk space
55 MB or more free disk space required to install Nikon View 5
10 MB plus twice the capacity of the memory card in use are required to run Nikon View 5 (Startup Disk)
Memory (RAM)
When working with RAW data
*3
images: 128 MB or more
When not working with RAW data
*3
images: 64 MB or more
Video resolution 800 × 600 pixels or higher with 16-bit color (thousands of colors) or higher
FireWire interface
(D1/D1x/D1
H )
Only built-in FireWire ports supported
*4
(A FireWire port is needed to connect the camera to the computer.)
USB interface
(COOLPIX series/D100)
Only built-in USB ports supported
*4
Miscellaneous
CD-ROM drive required for installation
Internet connection and appropriate software required to upload images to the Web
Internet connection and appropriate software required to send images by e-mail

6
Nikon View Installation Guide
Installing Nikon View and Supporting Software
Windows / Macintosh
If you have already completed installation of Nikon View, click top and proceed to “Connecting to a Computer”.
Click the below for complete installation instructions.
Camera Operating system
COOLPIX Series
(USB Interface)
Windows XP Home Edition / Professional
Windows 2000 Professional
Windows Millennium Edition (Me)
Windows 98 Second Edition (SE) / Windows 98*
Mac OS 9.0 ~ 9.2
Mac OS X (ver. 10.1.2 or later)

7
Installing Nikon View 6 under Windows — Overview
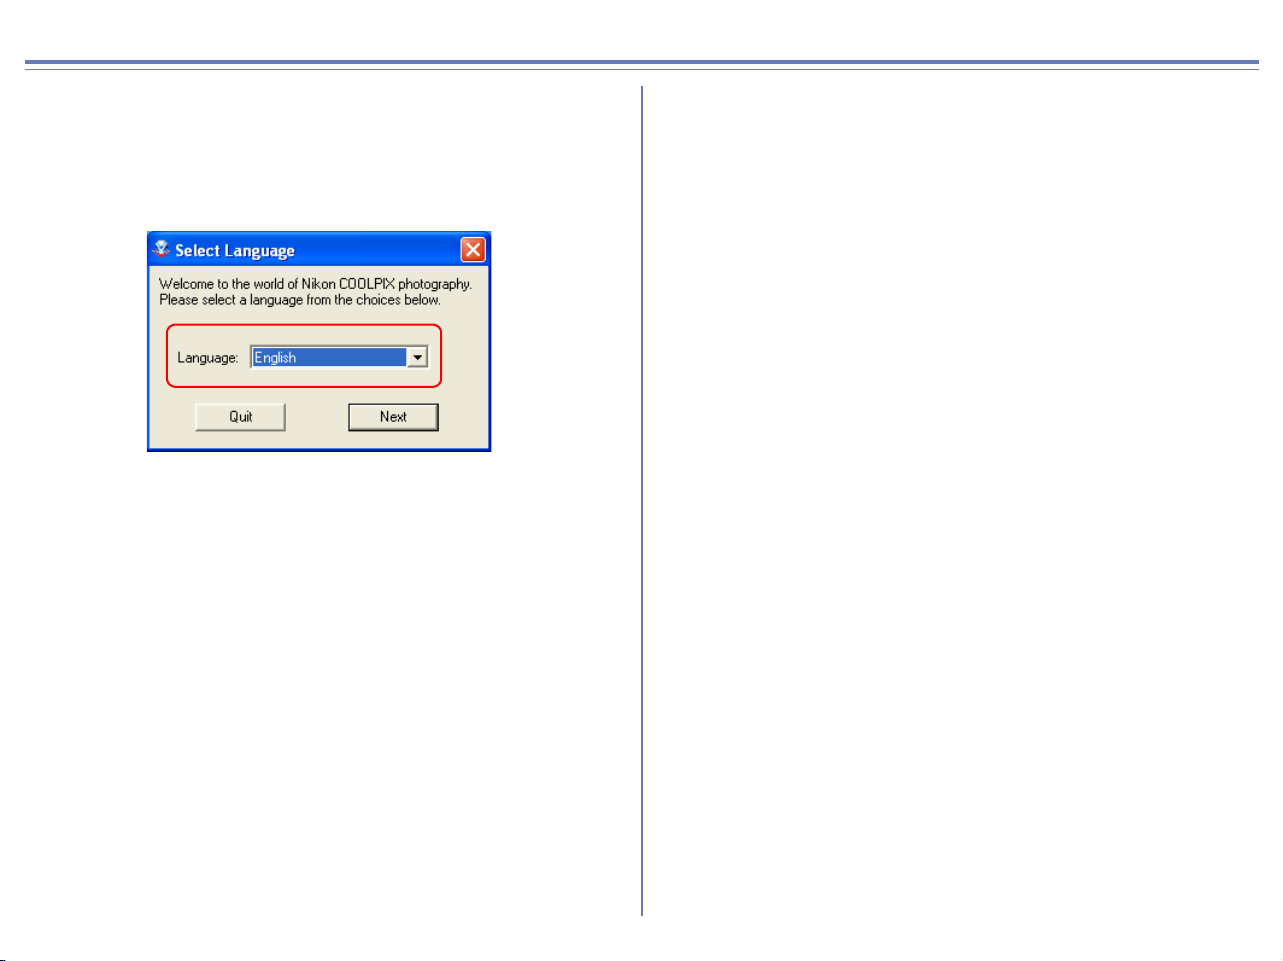
When you insert the Nikon View CD into the CD-ROM drive, the Select Language dialog box appears. After you have selected your
language, the Install Center window will appear, allowing you to select either Easy install or Custom install as the method of installation.
*1
Windows XP only,
*2
Windows 98SE
Existing versions of Nikon View and Nikon Capture
If an older version of Nikon View, or a version of Nikon Capture 1.x is installed on your computer, it must be uninstalled before installing Nikon View 6.
Cameras that are not supported by Nikon View 6
Nikon View 6 does not support connection of COOLPIX950, 910, 900, 800, or 700 digital cameras. Nikon View 6 can however be used to
view photographs taken with these cameras if the camera memory card is inserted into a digital camera that Nikon View 6 supports.
Windows XP Home Edition / Professional / Windows 2000 Professional
Log on as Computer Administrator when installing Nikon View 6 on Windows XP Home Edition/Professional or as Administrator when
installing Nikon View 6 on Windows 2000 Professional.
Easy install
Easy Install
installs following software, in the order shown below.
1. PTP Driver
*1
2. Coolpix Camera Drivers
*2
(all models except 990 and 880)
3. Panorama Maker
4. QuickTime 5
5. Nikon View 6
Custom install
Custom Install
allows you to select and install the desired
software from the list below. The selected software will be
installed in the order of display.
1. PTP Driver
*1
5. Panorama Maker
2. Coolpix Camera Drivers
*2
(all models except 990 and 880)
3.
Drivers for COOLPIX880 and 990
4.
Drivers for D1 Series Cameras
6. QuickTime 5
7. Nikon View 6
8
Installing Nikon View 6 under Windows — Installation Instructions
i — Select a language
Select the language of your choice from the pull-down menu. After
you select a language, click Next to display the Install Center
window.
9
ii — Select Easy Install or Custom Install
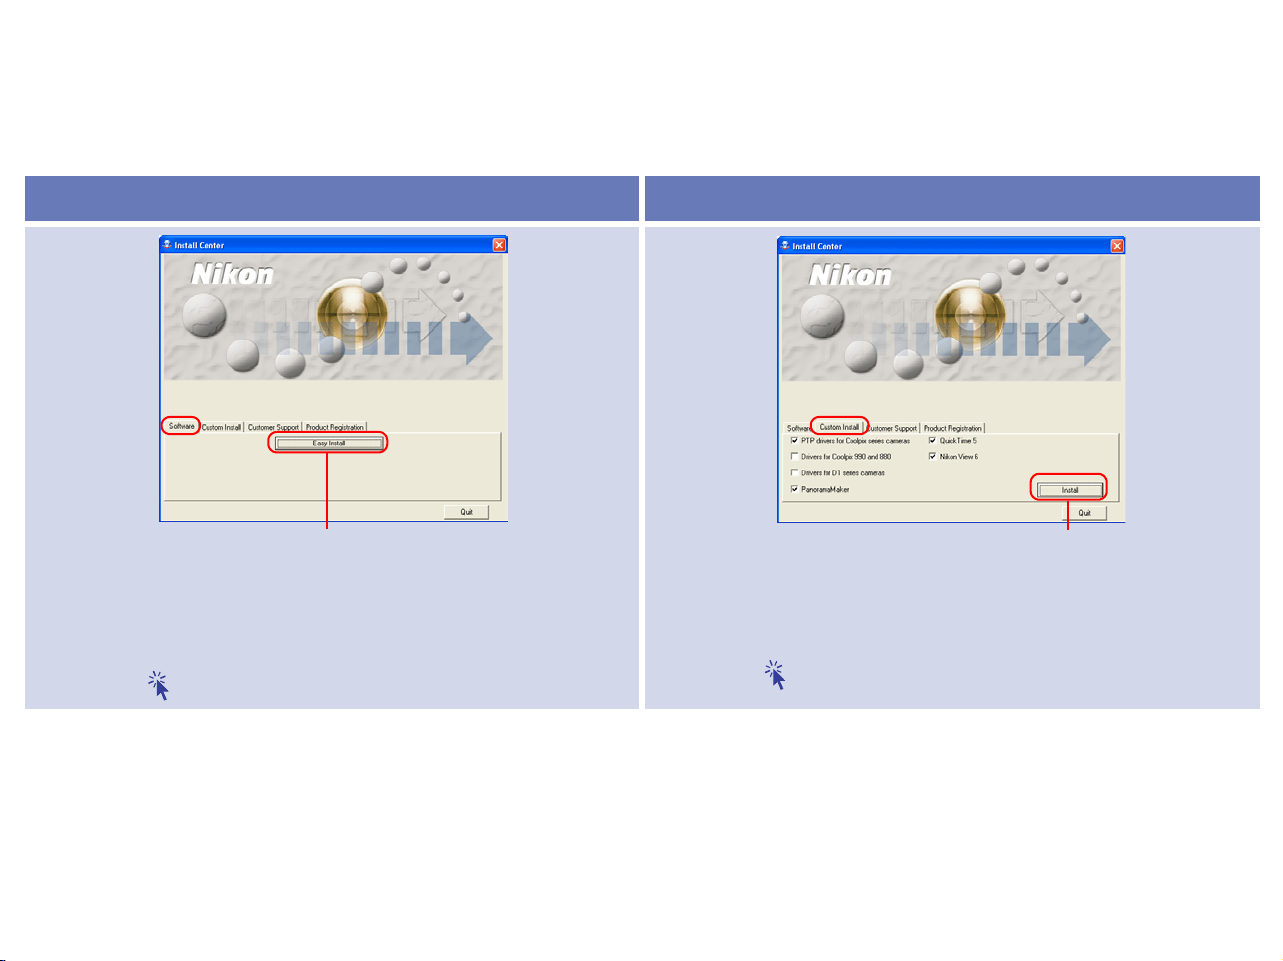
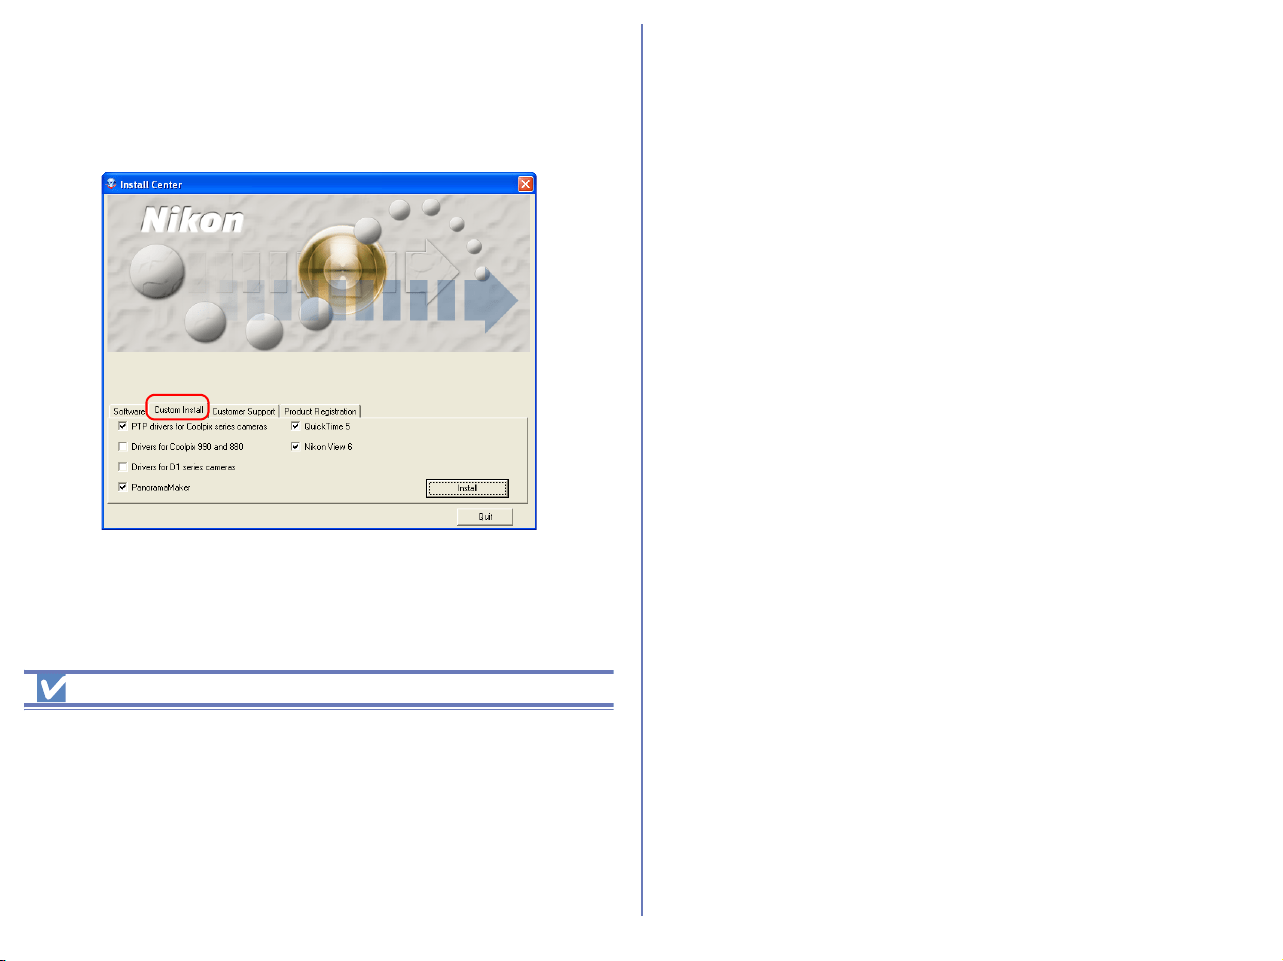
The Install Center window contains four tabs; Software, Custom Install, Customer Support and Product Registration.
The Easy Install button is in the Software tab. The Custom Install button is in the Custom Install Tab.
Click Quit if you want to close the Install Center window and cancel installation.
*1
Windows XP only,
*2
Windows 98SE only
Software Custom Install
Click this button to install the PTP Driver
*1
, Coolpix Camera
Drivers
*2
(all models except 990 and 880), Panorama Maker,
QuickTime 5 and Nikon View 6.
Click here for Easy Install instructions
The Custom Install tab gives you a choice of programs to install.
Select the check box next to each of the programs you wish to
use, then click Install.
Click here for Custom Install instructions
Easy Install button Custom Install button
10
If the Install Center dialog box does not appear
If the Install Center dialog box does not appear when the CD-ROM is inserted in the drive:
1. Under Windows XP, click the My Computer icon from Start menu. If you are using other OS, double click the My Computer icon on the desktop.
2. In the My Computer window, use the right mouse button to click on the icon for the CD-ROM drive containing the Nikon View 6 CD.
3. Select AutoPlay from the menu that appears.
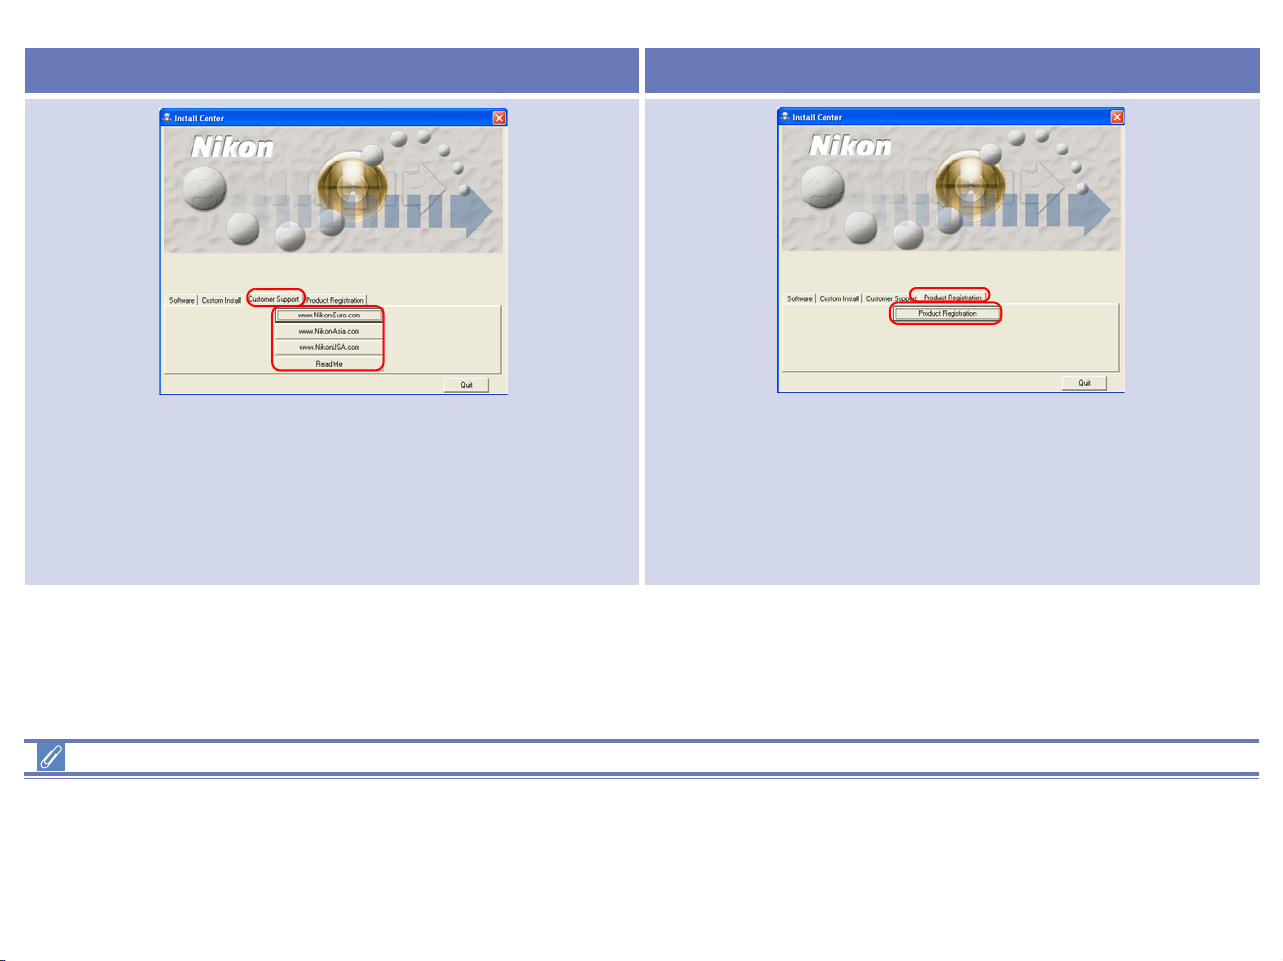
Customer Support Product Registration
Click the button for your area to view one of the Nikon technical
support Web sites (your computer must be configured for
connection to the Internet).
Click Read Me to open the Read Me file. Be sure to read it
before installation.
Click Product Registration button to view Nikon Product
Registration Web site (your computer must be configured for
connection to the Internet).
11
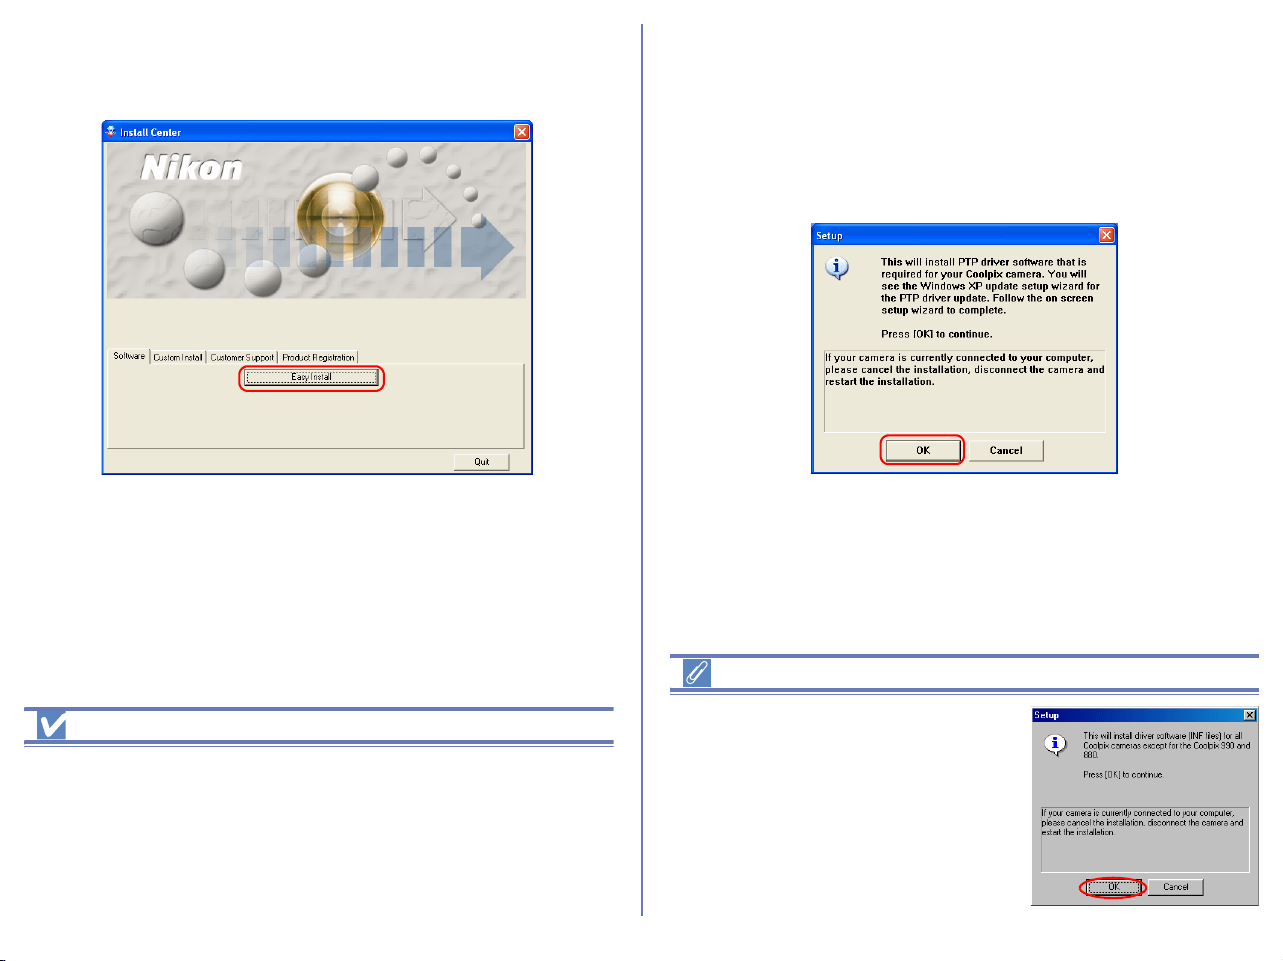
Easy Install
Step 1; Select Easy Install
Click Easy install in the Software tab to start the installation of the
PTP Driver
*1
,Coolpix Camera Drivers
*2
(all models except 990 and
880), Panorama Maker, QuickTime 5 and Nikon View 6.
*1
Windows XP only
*2
Windows 98SE only
Before installation
-
Before installing Nikon View 6 and the device driver, make sure the
camera is disconnected from the computer. If the Device Wizard
launches when you connect a camera, click
Cancel
to exit the Wizard.
- You have turned off any virus-checking software that may be
running.
- You have exited all other applications.
Step 2; Install the Software
2.1 — Install device driver
If you are using Windows XP, the installation of the PTP driver will
start. The Setup dialog box below is displayed, asking you to
confirm that a camera is not connected to your computer. Make
sure a camera is not connected, and click OK to begin installation.
Windows 98SE
If you are using Windows 98SE, the
Coolpix Camera Drivers (all models
except 990 and 880) will be installed
under Easy Install. The dialog box
shown right will be displayed.
Click OK to continue.
12
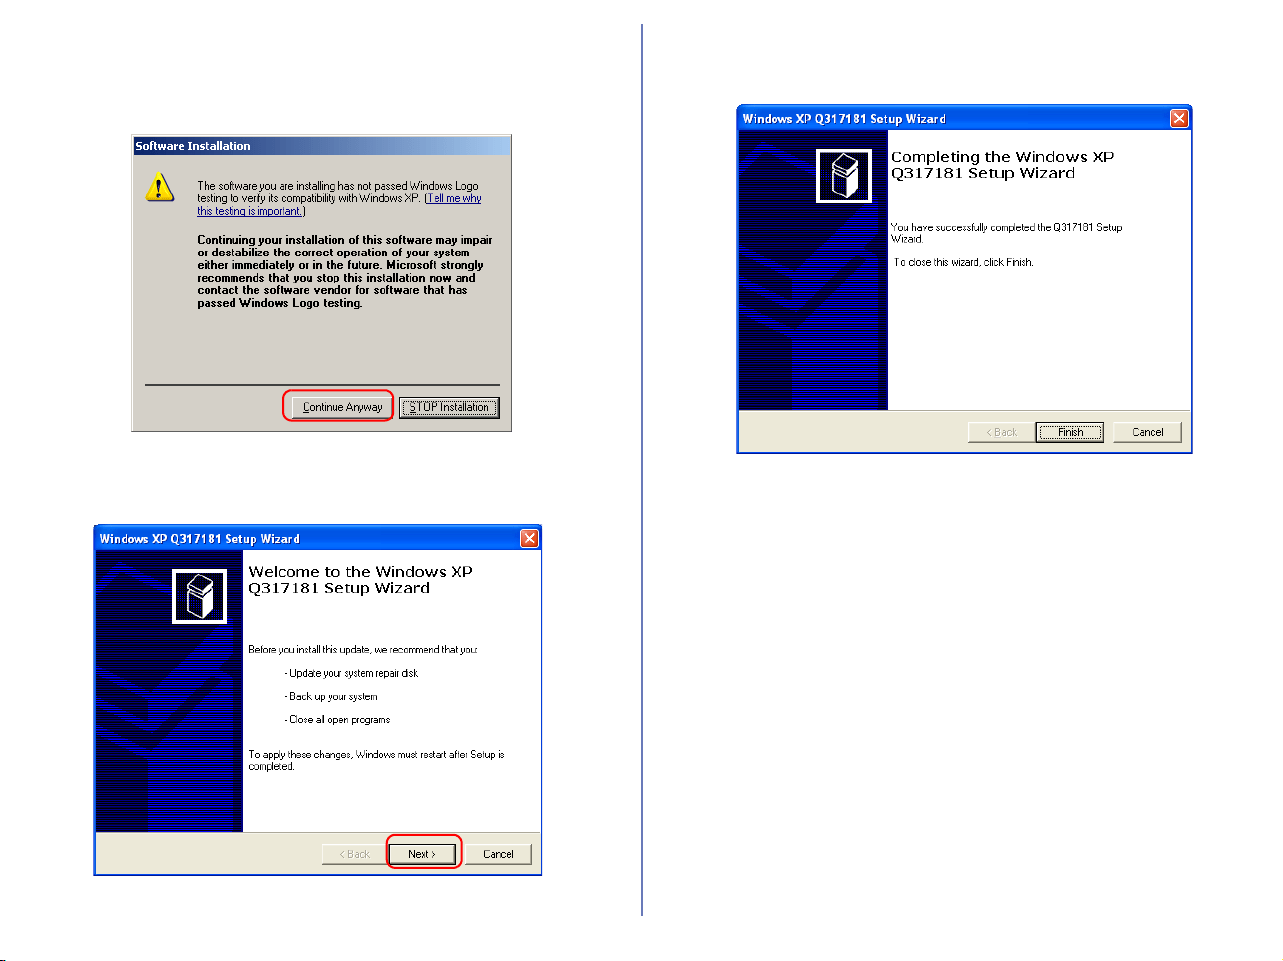
When you install the device driver, the dialog box shown below
may be displayed. Click Continue Anyway or Yes to continue
installation.
After the PTP drivers have been installed, the Setup wizard may
start automatically. Click Next.
If the wizard starts, follow the instructions on the screen. When the
final screen appears, click Finish to complete the wizard. Do not
restart your computer even if instructed to do so.
13
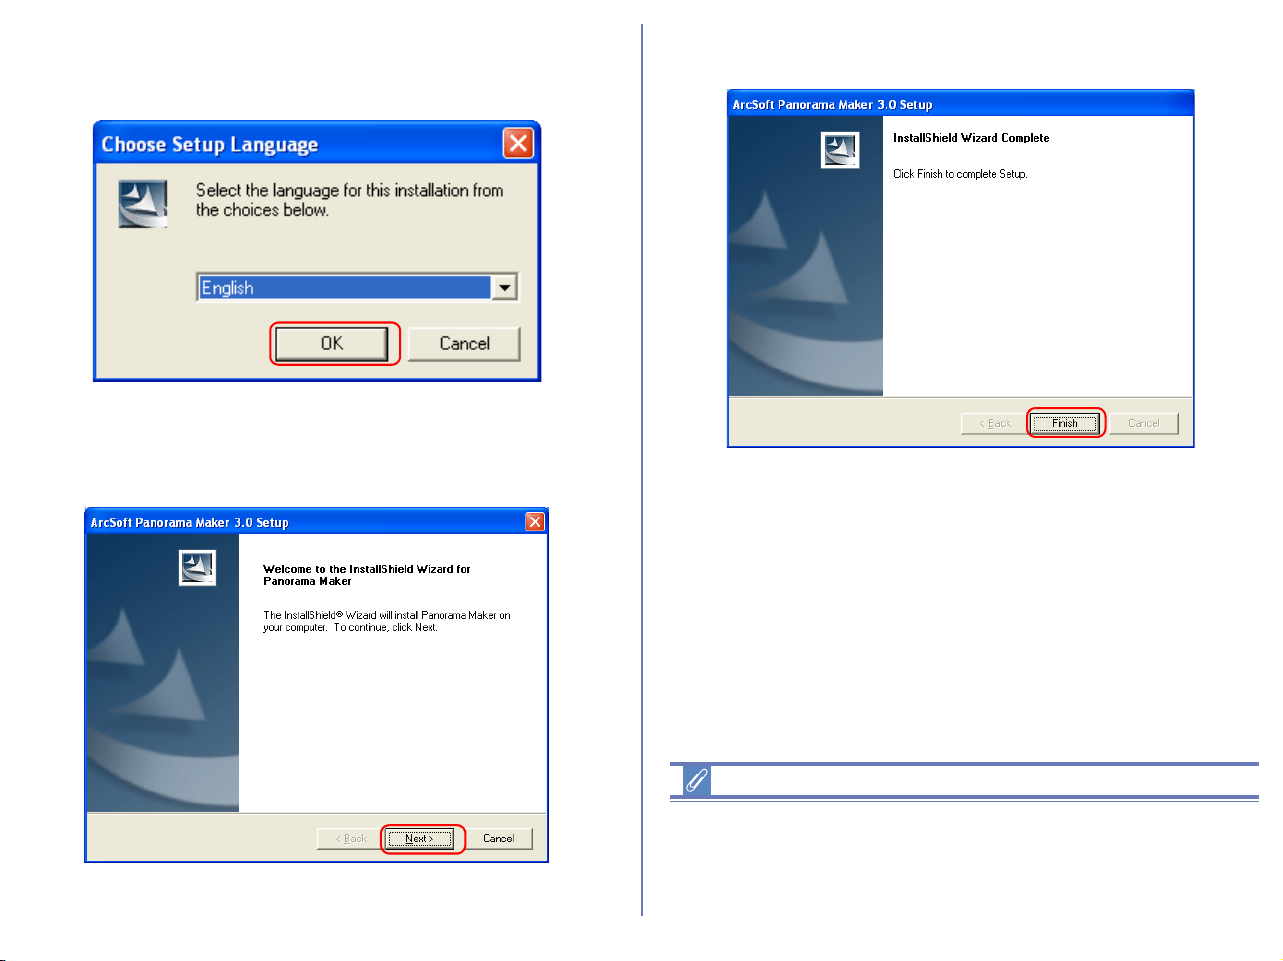
2.2 — Install Panorama Maker
The dialog box below, asking you to select a language for
installation, may appear. Select the desired language and click OK.
The dialog below is displayed, showing that you are now installing
Panorama Maker.
Follow the on screen instructions to continue the installation.
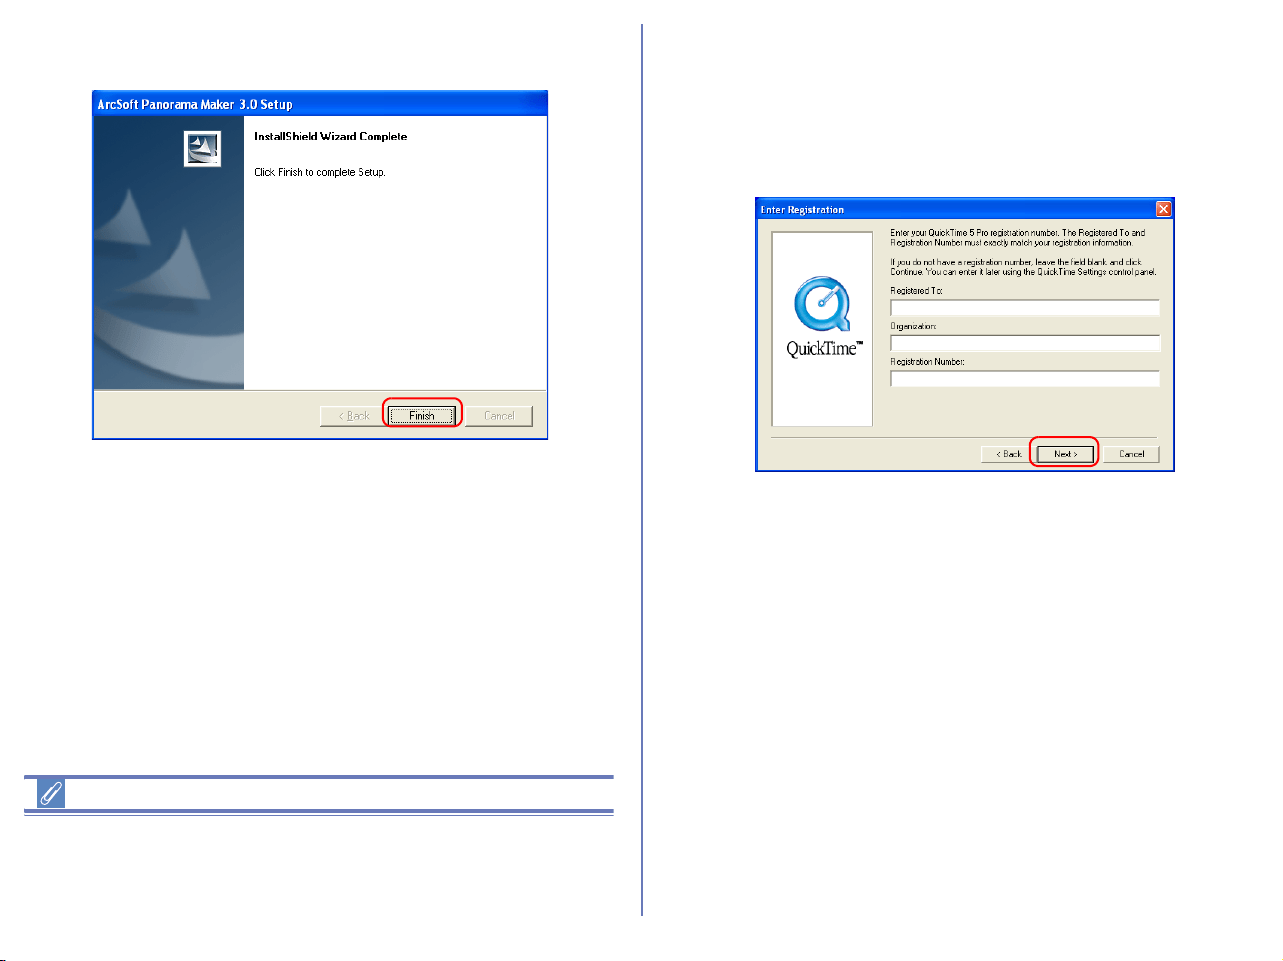
When the dialog box shown below appears, click Finish to
complete the installation.
About Panorama Maker
You can use Panorama Maker to combine separate images into a
Panorama. This software is particularly useful if your COOLPIX
camera has a Panorama Assist mode.
14
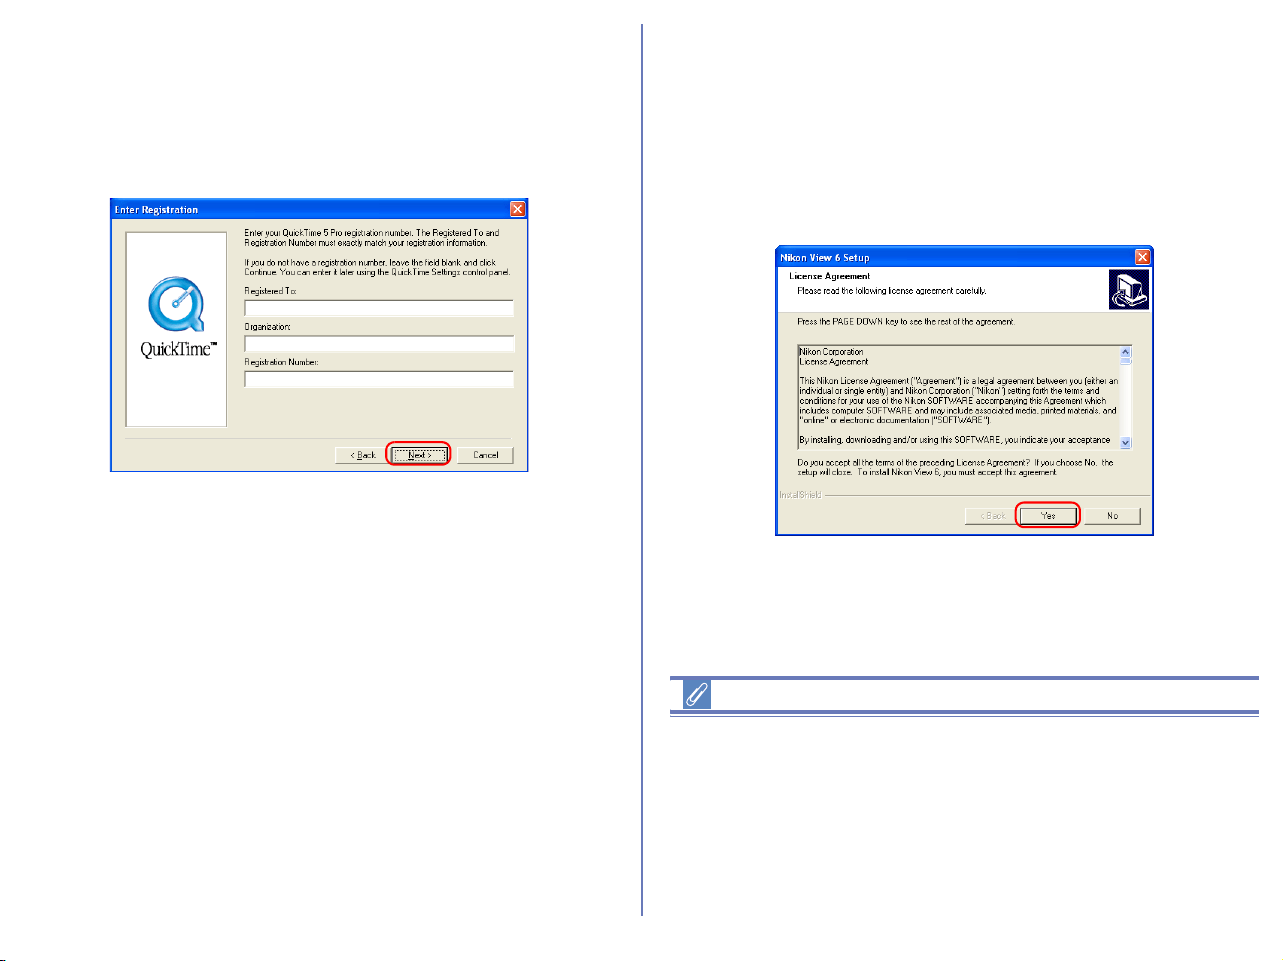
2.3 — Installing QuickTime 5
The Enter Registration dialog box (see below) appears showing
that you are now installing QuickTime 5. Note that you do not enter
registration information. Click Next to continue. Follow the
remaining on-screen instructions to complete installation and
proceed to the next step.
2.4 — Installing Nikon View 6
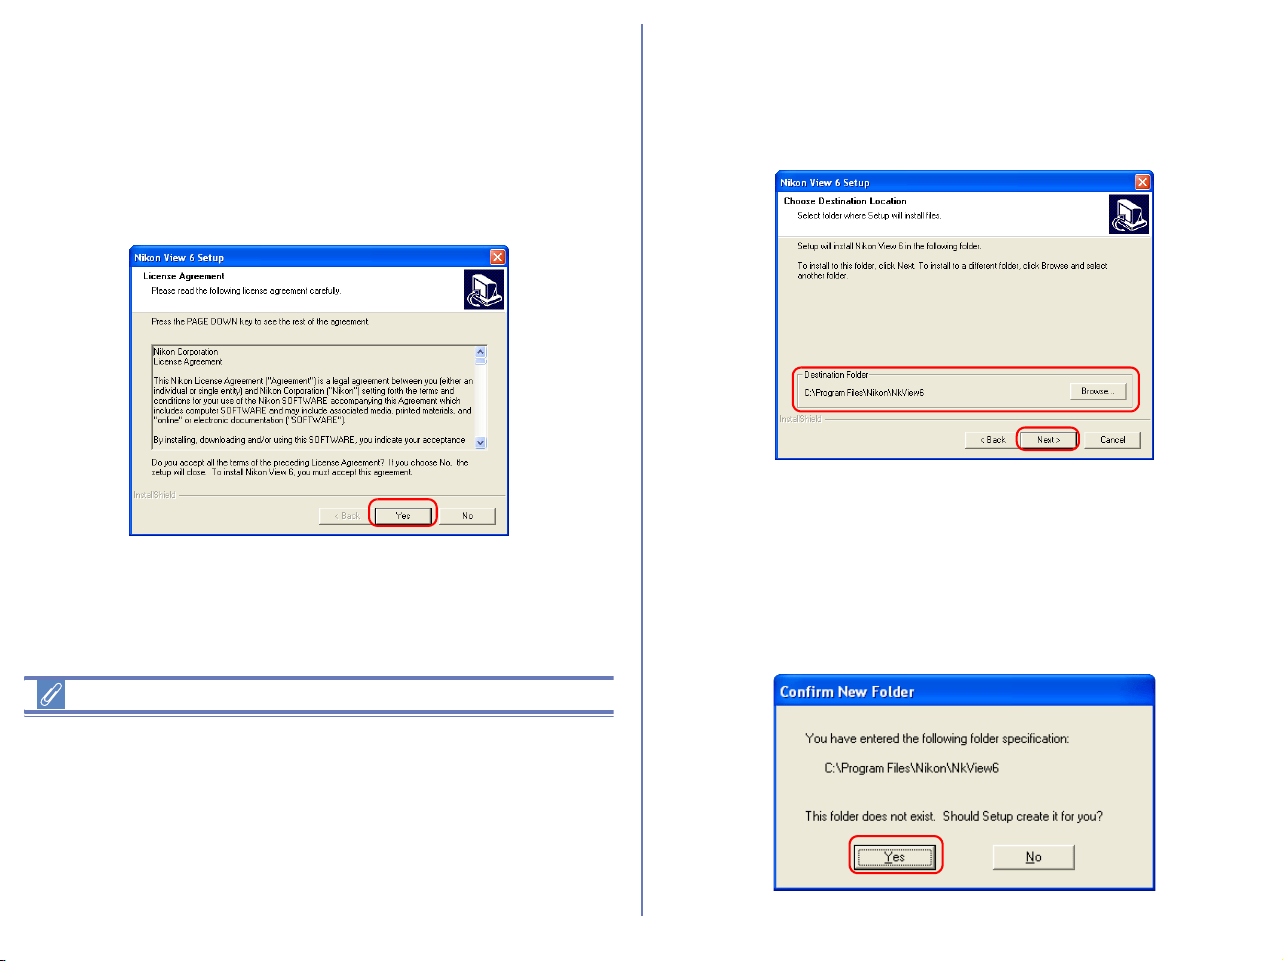
The license agreement (see below) appears showing that you are
now Installing Nikon View 6.
1 — Accept the license agreement
When you start installation of Nikon View 6, the license agreement
is displayed. Read the agreement carefully, and click Yes if you
wish to continue installation.
Existing versions of Nikon View
If an older version of Nikon View is installed on your computer, it
must be uninstalled before installing Nikon View 6.
Nikon View 6 does not support connection of COOLPIX950, 910,
900, 800, or 700 digital cameras.
Nikon View 6 can however be used to view photographs taken with
these cameras if the camera memory card is inserted into a digital
camera that Nikon View 6 supports.

15
2 — Choose a location for Nikon View 6
The folder to which Nikon View 6 will be installed is shown in the
Destination Folder area. To install to this folder, click Next.
To select a new folder, click the Browse button and navigate to the
desired location.
3 — Confirm New Folder
If the folder destination folder specified in the previous step has not
yet been created, you will be asked whether you want to create the
folder. Click Yes to create the folder automatically and proceed to
the next step.
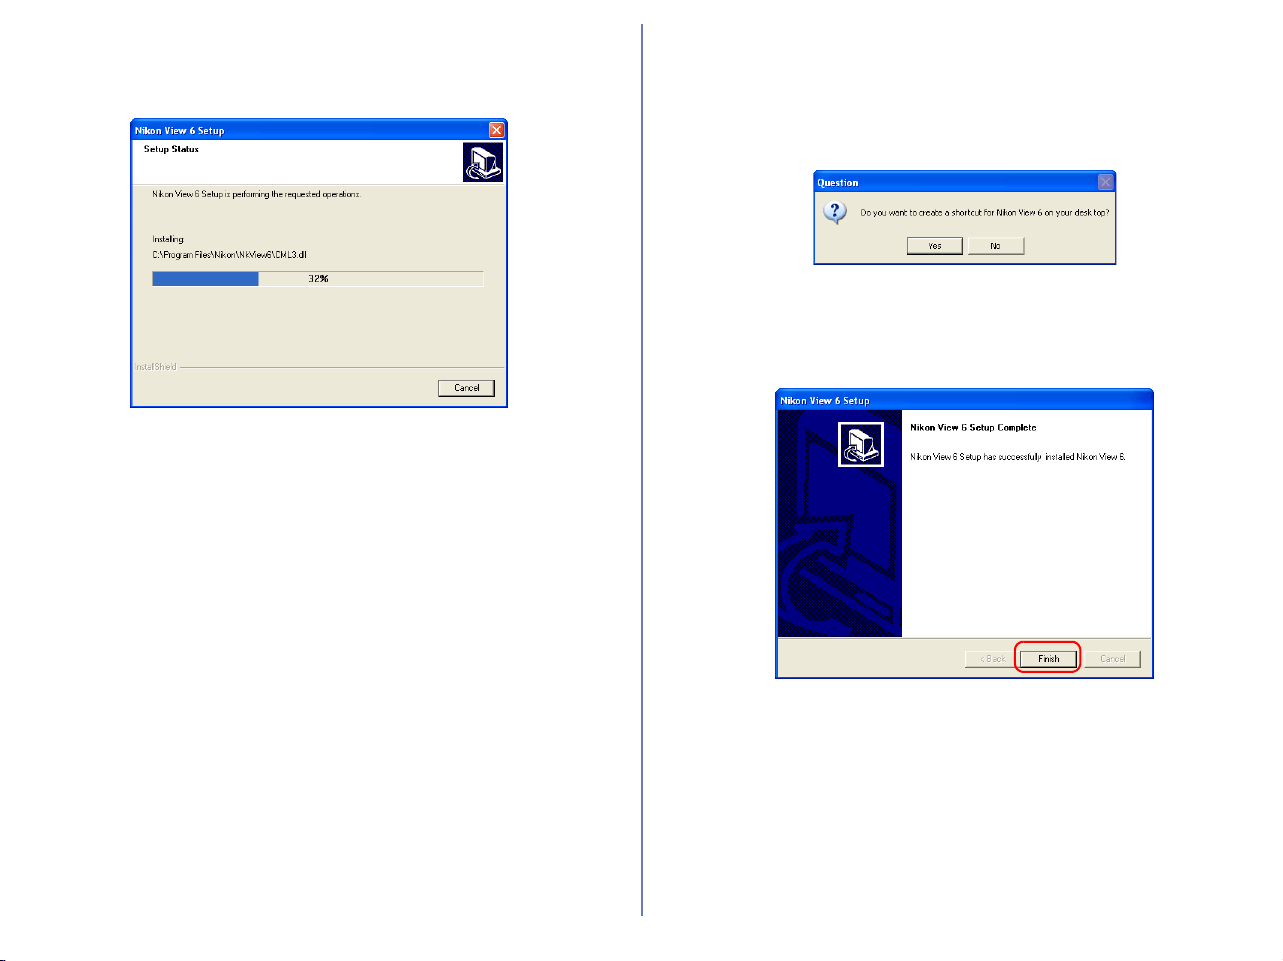
4 — Start installation
While installation is in progress, the dialog shown below will be
displayed.
5 — Create a shortcut icon
When the progress indicator reaches 100%, the dialog shown
below appears. Click Yes to create a shortcut, allowing you to start
Nikon View 6 directly from an icon on the desktop. If you do not
want to create a shortcut, click No.
16
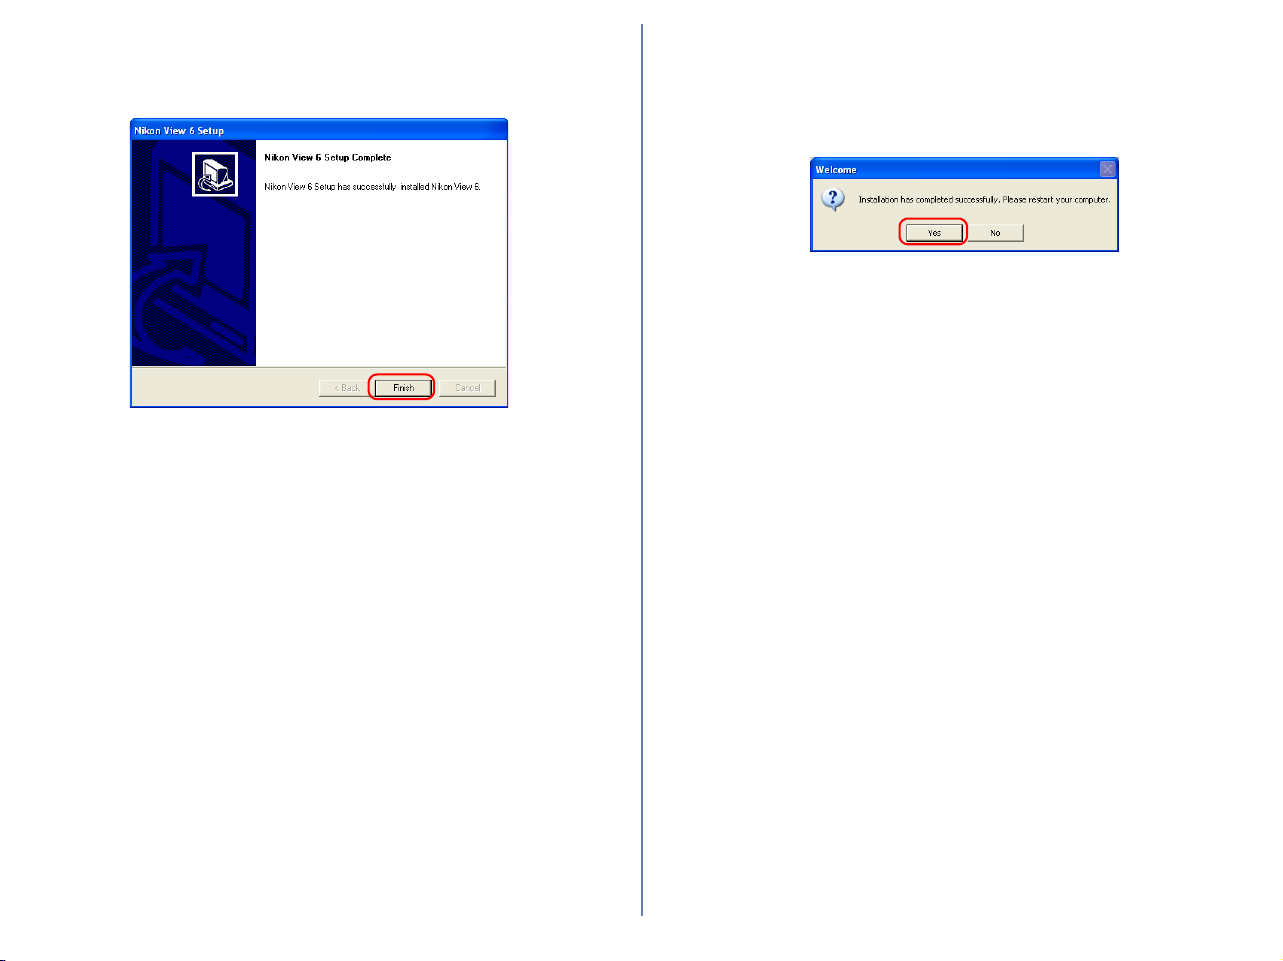
6 — Complete the installation
A dialog box appears indicating that installation of Nikon View 6 is
complete. Click Finish.
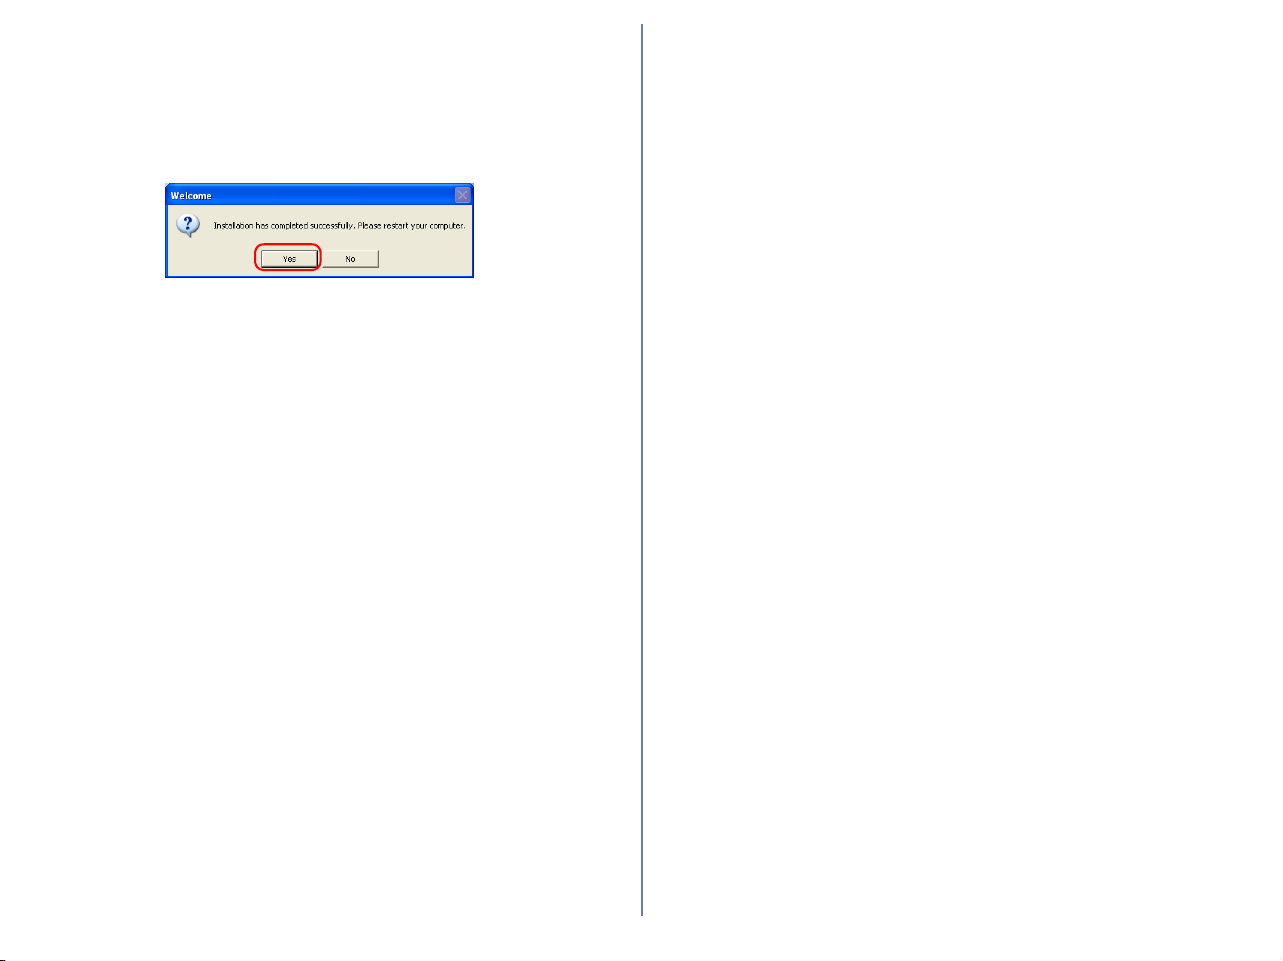
2.5 — Restart your computer
The dialog box shown below appears. Select Yes to restart your
computer.
The Easy Install procedure is now complete.
2.6 — Removing CD-ROM
Remove Nikon View installer CD from the CD-ROM drive after
restarting the computer. If the Welcome window is displayed after
restart, click Exit button and remove the CD after closing the
window.
17
Custom Install
Step 1; Select the software to be installed.
Select the programs you want to install from the list in the Custom
Install tab.
Before installation
• Before installing Nikon View 6 and the device driver, make sure
the camera is disconnected from the computer. If the Device
Wizard launches when you connect a camera, click Cancel to
exit the Wizard.
• You have turned off any virus-checking software that may be
running.
• You have exited all other applications.
PTP Drivers
Select this check box to install PTP drivers. This check box is only
displayed if you are using Windows XP.
Coolpix Camera Drivers (all models except 990 and 880)
Select this check box to install the driver for COOLPIX series
cameras (excluding 990/880). This check box only appears if you
are using Windows 98 Second Edition.
Drivers for Coolpix 990 and 880
Select this check box to install the drivers for the COOLPIX990/
880.
Drivers for D1 series cameras
Select this check box to install the drivers for the D1/D1
X/D1H
cameras.
Panorama Maker
Select this check box to install PanoramaMaker, an application
which allows you to combine separate images into a panorama.
The installation of this application is particularly recommended if
you are using a camera with a Panorama Assist mode.
QuickTime 5
Select this check box to install Apple Computer's QuickTime 5.
Nikon View 6
Select this check box to install Nikon View 6.
18
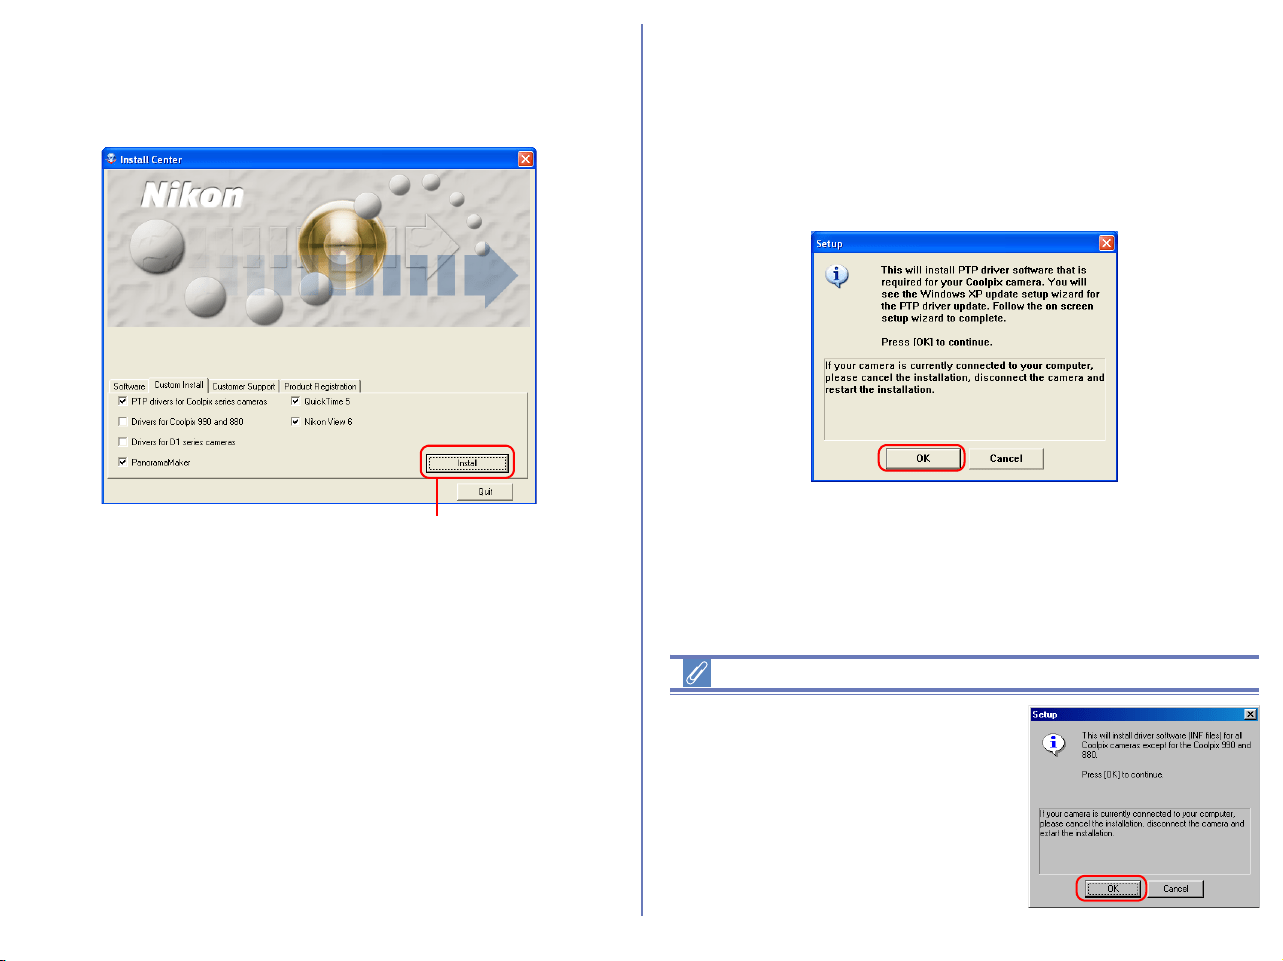
Step 2; Install the software.
After selecting the programs you want to install, click Install. If you
have chosen more than one program, the programs are installed in
the order of display.
2.1 — Install PTP Driver (Windows XP only)
Check that the camera is disconnected
If you selected the PTP Driver, the installation of the driver will
start. The Setup dialog box below is displayed, asking you to
confirm that a camera is not connected to your computer. Make
sure a camera is not connected, and click OK to begin installation.
Windows 98SE
If you are using Windows 98SE, drivers
for all Coolpix cameras (all models
except 990 and 880) will be installed if
selected. The dialog box shown right
will be displayed. Click OK to continue.
Install button
19
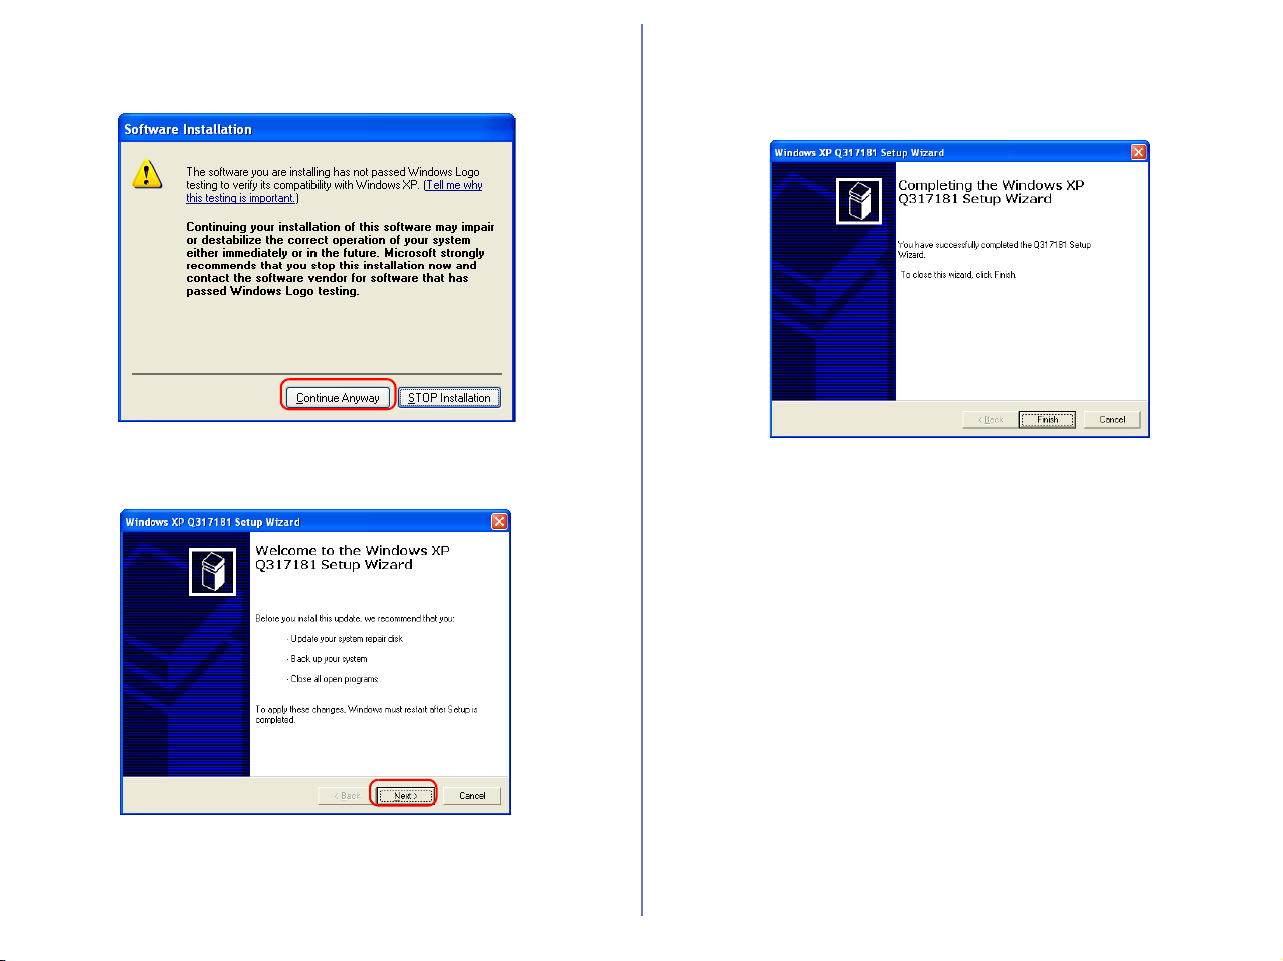
When you install the device driver, the dialog box shown below
may be displayed. Click Continue Anyway or Yes to continue
installation.
After the PTP drivers have been installed, the Set up wizard may
start automatically.
If the wizard starts, follow the instructions on the screen. When the
final screen appears, click Finish to complete the wizard. Do not
restart your computer even if instructed to do so.
20
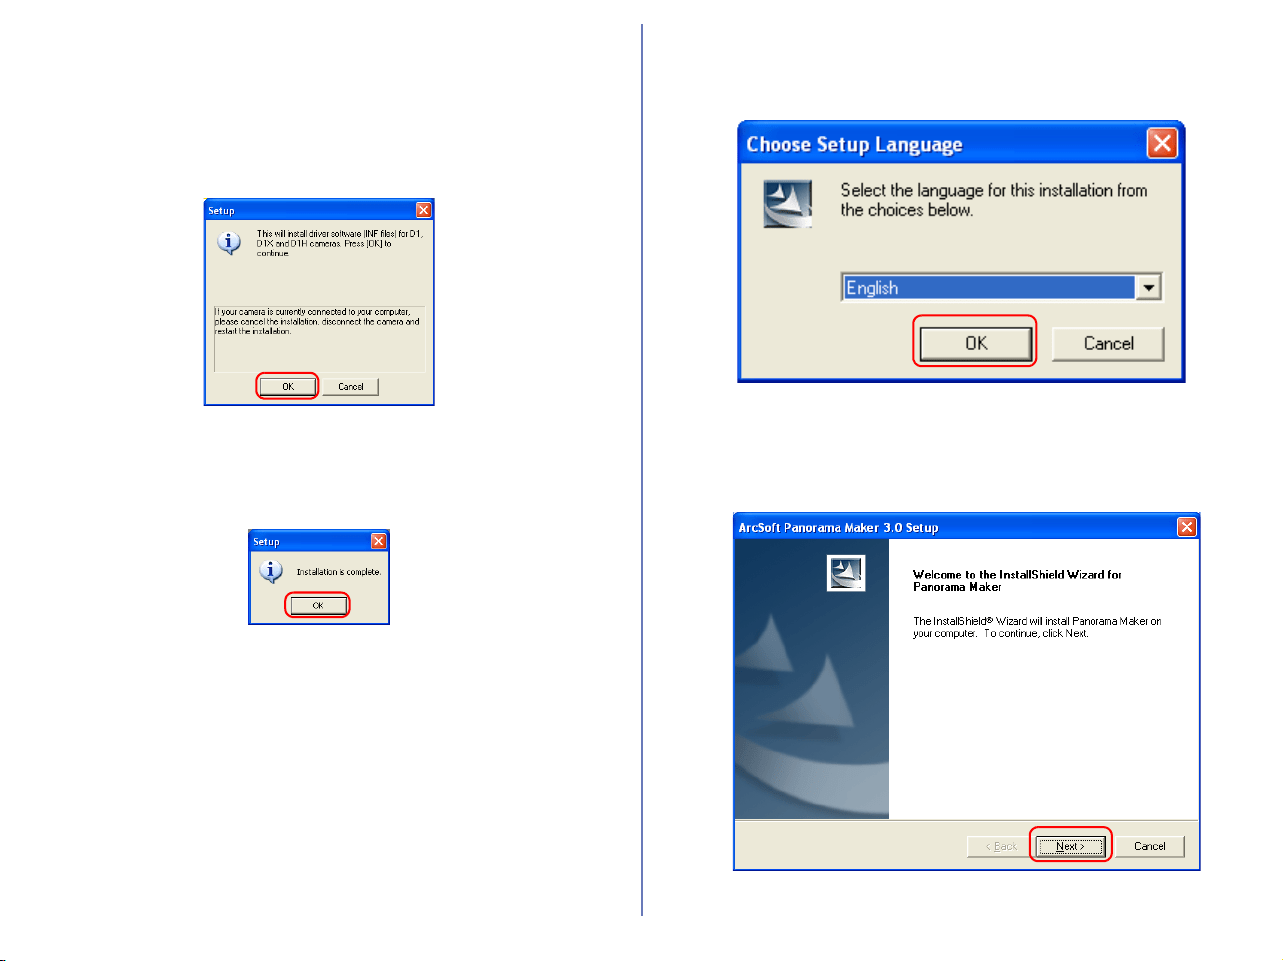
2.2 — Install Other drivers
If you selected Drivers for Coolpix 990 and 880, or Drivers for
D1 series cameras, the installation of the device driver starts. The
Setup dialog box below is displayed, asking you to confirm that a
camera is not connected to your computer. Make sure a camera is
not connected, and click OK to begin installation.
1 — Complete the installation of other drivers
A dialog box appears, indicating that installation is complete. Click
OK.
2.3 — Install Panorama Maker
The dialog box below, asking you to select a language for
installation, may appear. Select the desired language and click OK.
The dialog below is displayed, showing that you are now installing
Panorama Maker.
Follow the on screen instructions to continue the installation.
21
When the dialog box shown below appears, click Finish to
complete the installation.
About Panorama Maker
You can use Panorama Maker to combine separate images into a
Panorama. This software is particularly useful if your COOLPIX
camera has a Panorama Assist mode.
2.4 — Installing QuickTime 5
If you selected QuickTime 5, the Enter Registration dialog box
(see below) appears, showing that you are now installing the
selected software. Note that you do not enter registration
information. Click Next to continue. Follow the remaining on-
screen instructions to complete installation.
22
2.5 — Installing Nikon View 6
If you selected Nikon View 6, the license agreement appears,
showing that you are now installing the selected software.
1 — Accept the license agreement
When you start installation of Nikon View 6, the license agreement
is displayed. Read the agreement carefully, and click Yes if you
wish to continue installation.
Existing versions of Nikon View
If an older version of Nikon View is installed on your computer, it
must be uninstalled before installing Nikon View 6.
Nikon View 6 does not support connection of COOLPIX950, 910,
900, 800, or 700 digital cameras.
Nikon View 6 can however be used to view photographs taken with
these cameras if the camera memory card is inserted into a digital
camera that Nikon View 6 supports.
2 — Choose a location for Nikon View 6
The folder to which Nikon View 6 will be installed is shown in the
Destination Folder area. To install to this folder, click Next.
To select a new folder, click Browse and navigate to the desired
location.
3 — Confirm New Folder
If the folder destination folder specified in the previous step has not
yet been created, you will be asked whether you want to create the
folder. Click Yes to create the folder automatically and proceed to
the next step.
23
4 — Start installation
While installation is in progress, the dialog shown below will be
displayed.
5 — Create a shortcut icon
When the progress indicator reaches 100%, the dialog shown
below appears. Click Yes to create a shortcut, allowing you to start
Nikon View 6 directly from an icon on the desktop. If you do not
want to create a shortcut, click No.
6 — Complete the installation
A dialog box appears indicating that installation of Nikon View 6 is
complete. Click Finish.
24
2.6 — Restart your computer
You have now installed all the programs selected in the Software
tab.
The dialog box shown below appears. Select Yes to restart your
computer.
The custom install procedure is now complete.
2.7 — Removing CD-ROM
Remove Nikon View installer CD from the CD-ROM drive after
restarting the computer. If the Welcome window is displayed after
restart, click Exit button and remove the CD after closing the
window.
25
Installing Nikon View 5 on a Macintosh — Overview
Insert the Nikon View CD into the CD-ROM. If you are using Mac OS 9.0 ~ 9.2, the Select Language appears automatically. If you are
using Mac OS X, the dialog boxes will appear when you double-click the Nikon View 5 icon on the desktop, and then double-click the
Welcome icon. After you select the desired language the Install Center window will appear, allowing you to select and install the desired
software.
Existing versions of Nikon View and Nikon Capture
If an older version of Nikon View, or a version of Nikon Capture 1.x is installed on your computer, it must be uninstalled before installing Nikon View 5.
Cameras that are not supported by Nikon View 5
Nikon View 5 does not support connection of COOLPIX950, 910, 900, 800, or 700 digital cameras. Nikon View 5 can however be used to
view photographs taken with these cameras if the camera memory card is inserted into a digital camera that Nikon View 5 supports.
Mac OS X
Log on as Administrator when installing Nikon View 5 under Mac OS X.
Easy Install
Easy Install installs following software, in the order shown below.
1. Panorama Maker
2. Nikon View 5
3. QuickTime 5
*1
*1
If you are using Mac OS X, QuickTime 5 will not
install.
Custom install
Custom install allows you to select and install the desired
software from the list below. The selected software will be
installed in the order of display.
*1
If you are using Mac OS X, Quick Time 5 will not
be available for selection.
1. Panorama Maker
2. Nikon View 5
3. Quick Time 5
*1
26
Installing Nikon View 5 on a Macintosh — Installation Instructions
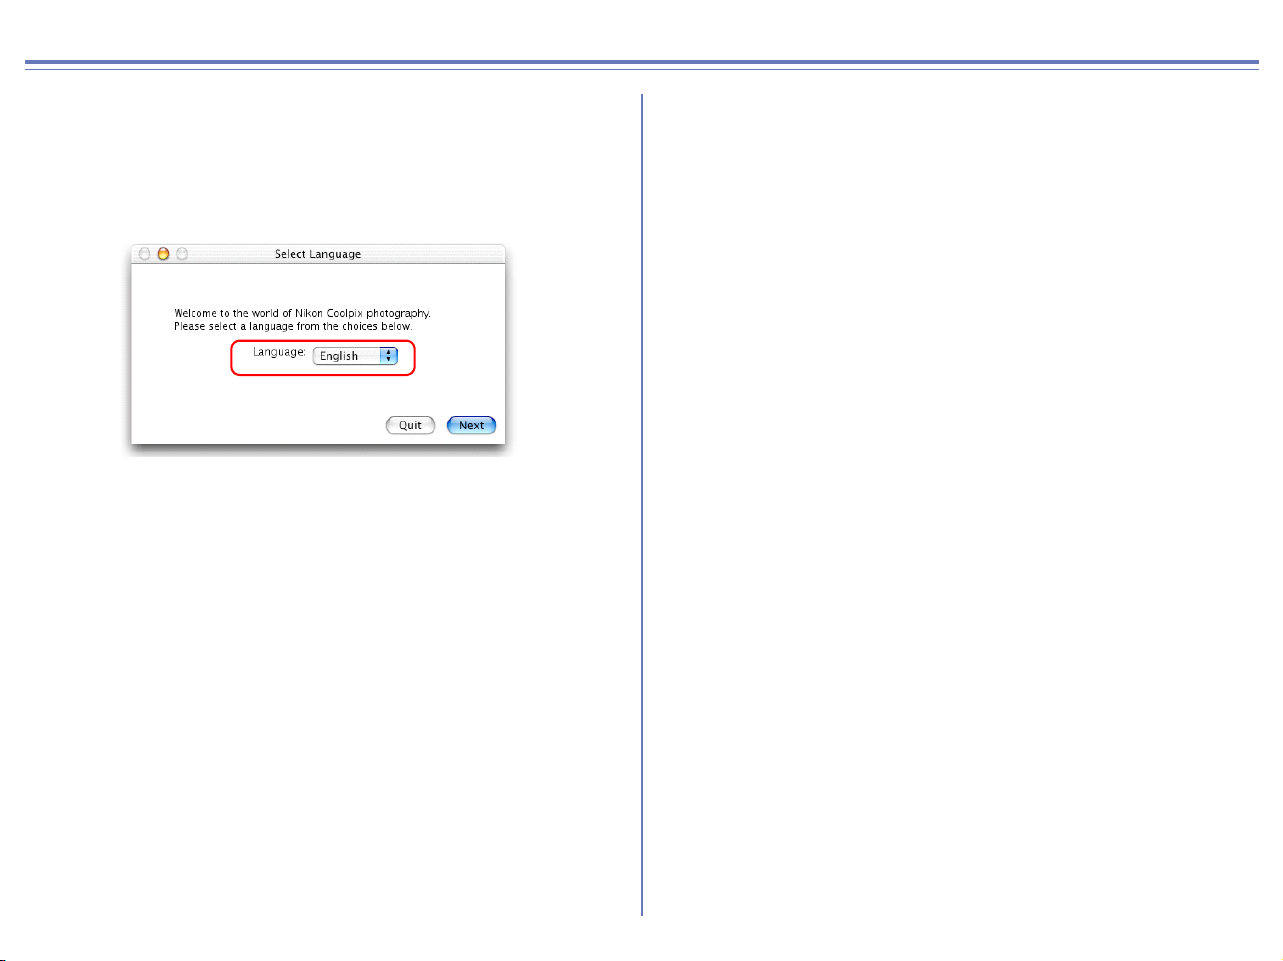
i - Select a language
Select the language of your choice from the pull-down menu. After
you select a language, click Next to display the Install Center
window.
27
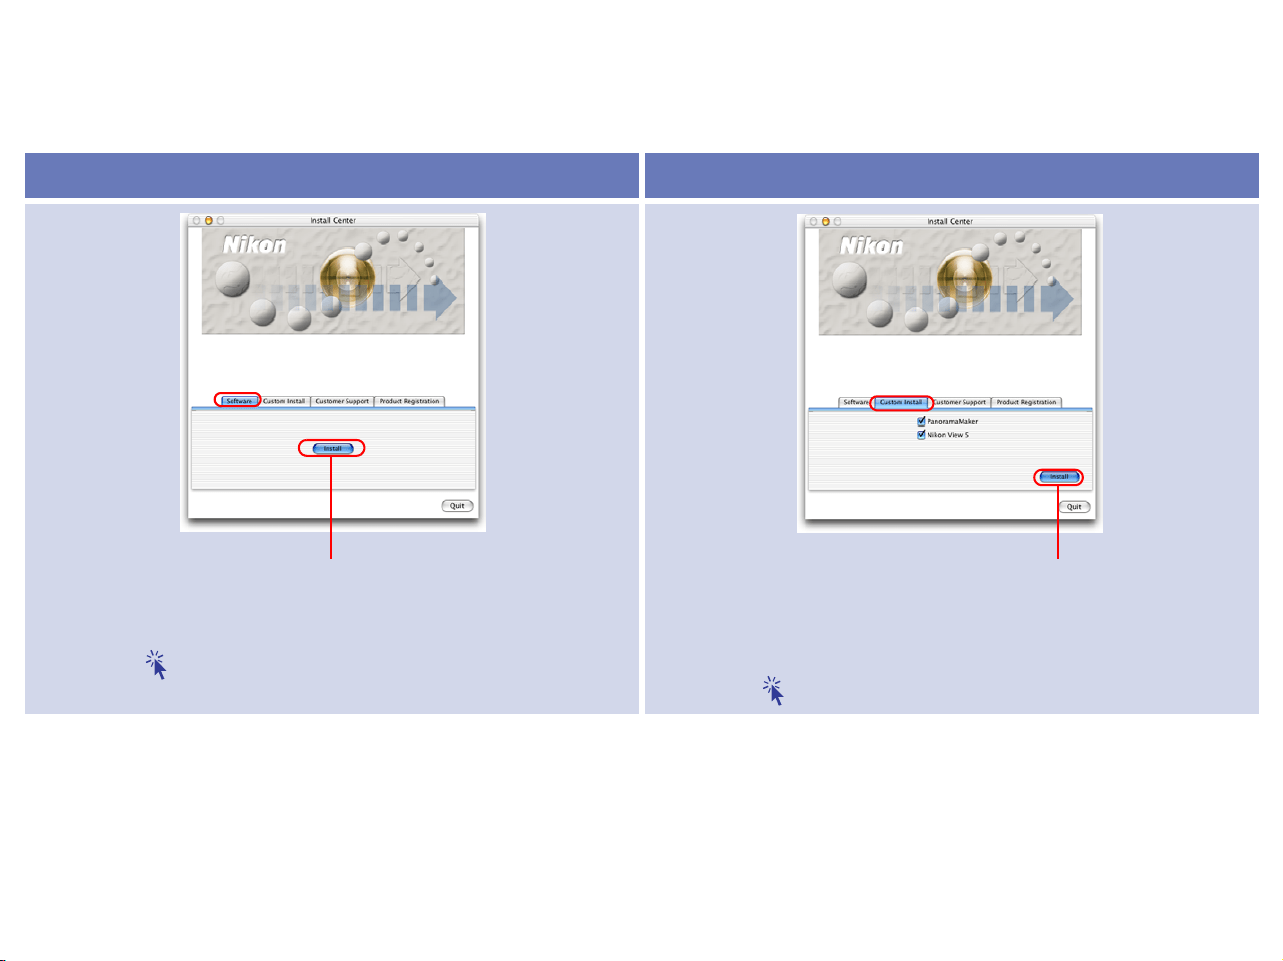
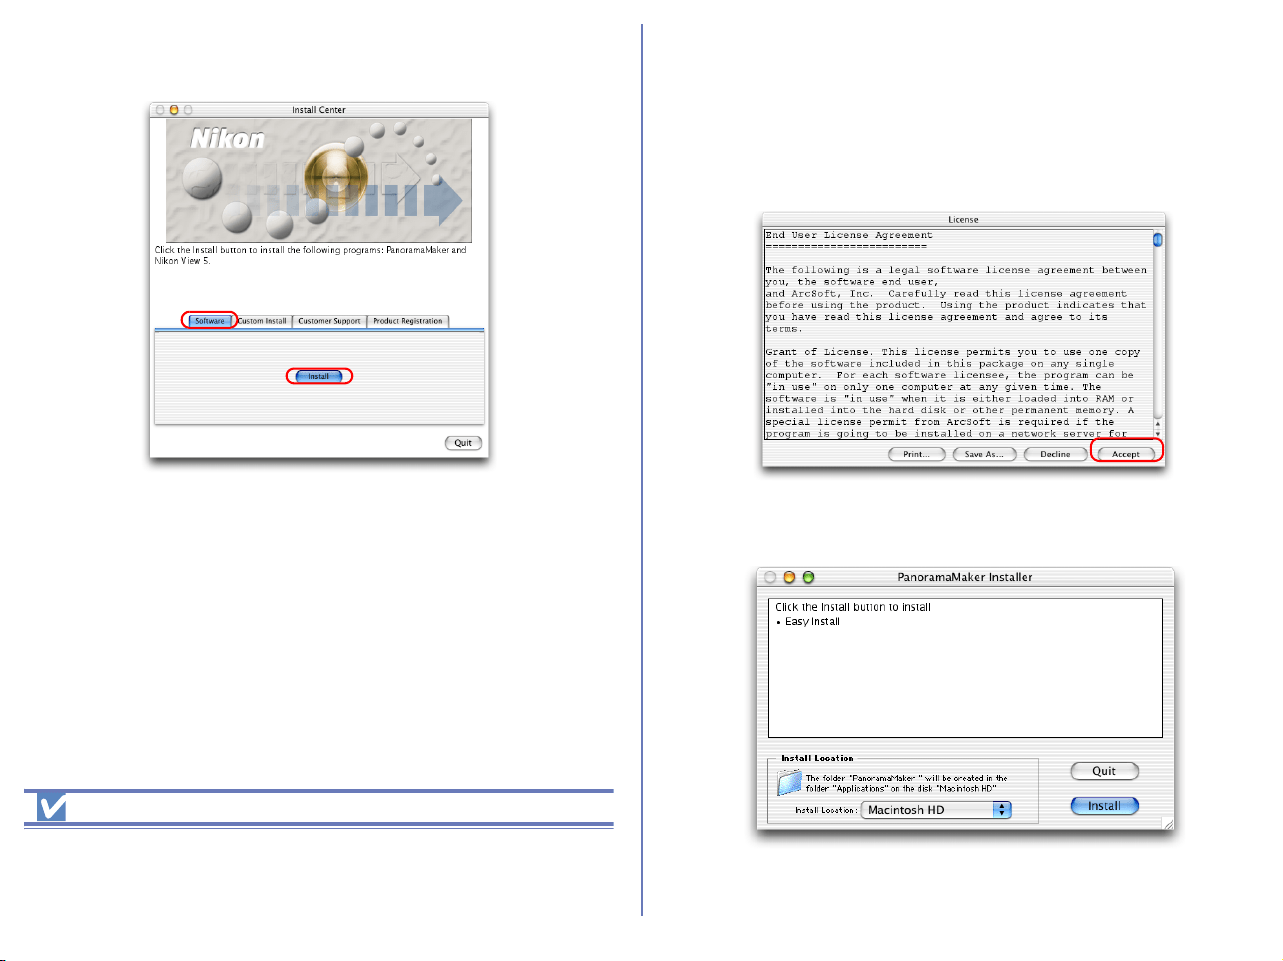
iii - Select the software you wish to install
The Install Center window contains four tabs; Software, Custom Install, Customer Support and Product Registration.
Click Quit if you want to close the Install Center window and cancel installation.
Software Custom Install
Click this button to install the Panorama Maker, Nikon View 5,
and Quick Time 5.
Click here for Easy Install instructions
The Custom Install tab gives you a choice programs to install.
Select the check box next to each of the programs you wish to
use, then click Install.
Click here for Custom Install instructions
Easy Install button Custom Install button
28
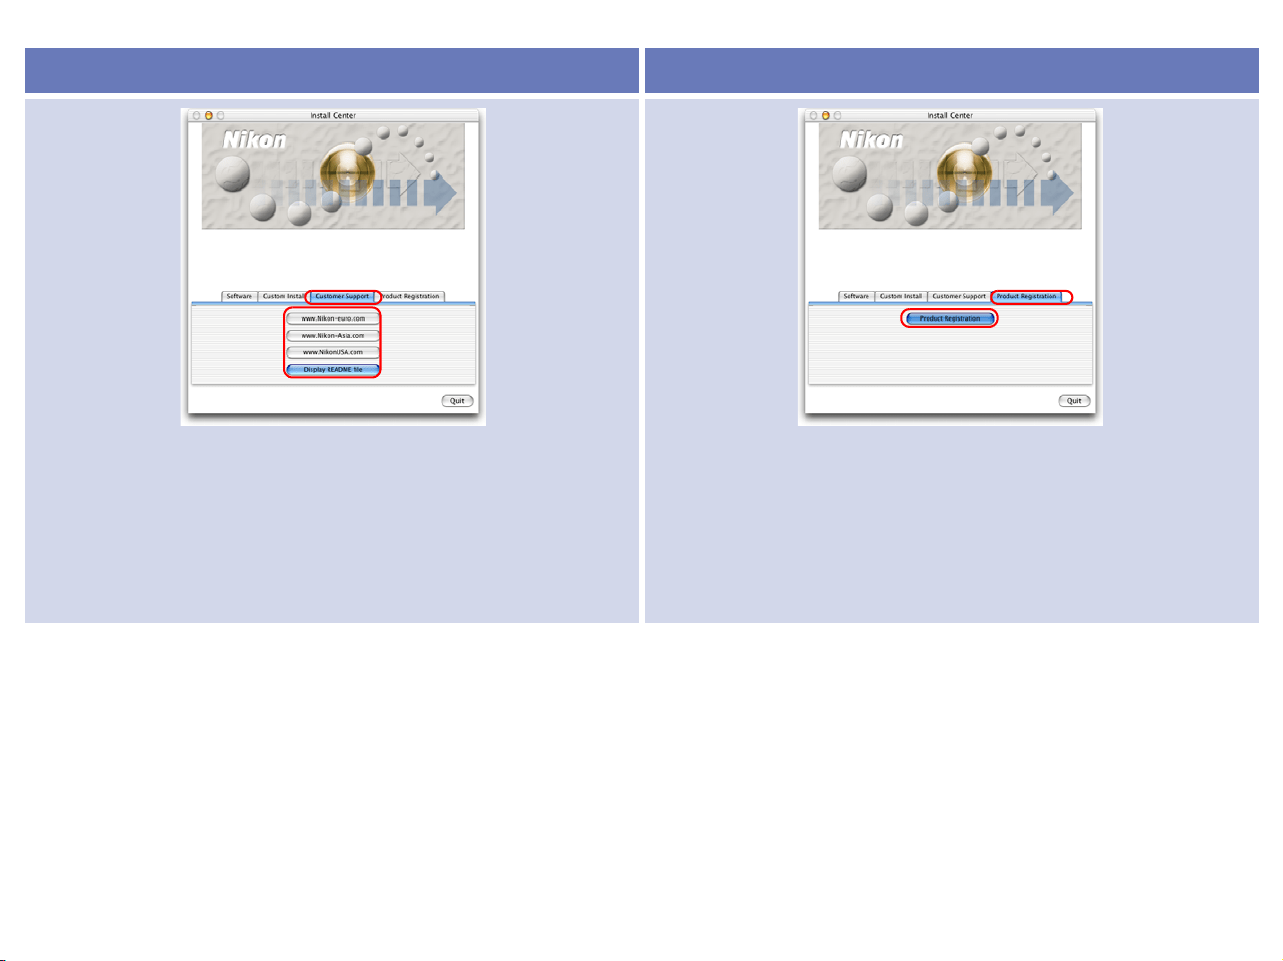
Customer Support Product Registration
Click the button for your area to view one of the Nikon technical
support Web sites (your computer must be configured for
connection to the Internet).
Click Display Readme file to open the Read Me file. Be sure to
read it before installation.
Click Product Registration button to view Nikon Product
Registration Web site (your computer must be configured for
connection to the Internet).
29
Easy Install
Step 1; Click Install
Click Install in the Software tab to start the installation of the
Panorama Maker, Nikon View 5, and Quick Time 5.
Before installation
• You have turned off any virus-checking software that may be
running.
• You have exited all other applications.
Step 2; Install the software
2.1 — Install Panorama Maker
The license agreement shown below will appear. Read the
agreement carefully and click Accept if you wish to continue the
installation.
When you accept the agreement the dialog below is displayed.
30
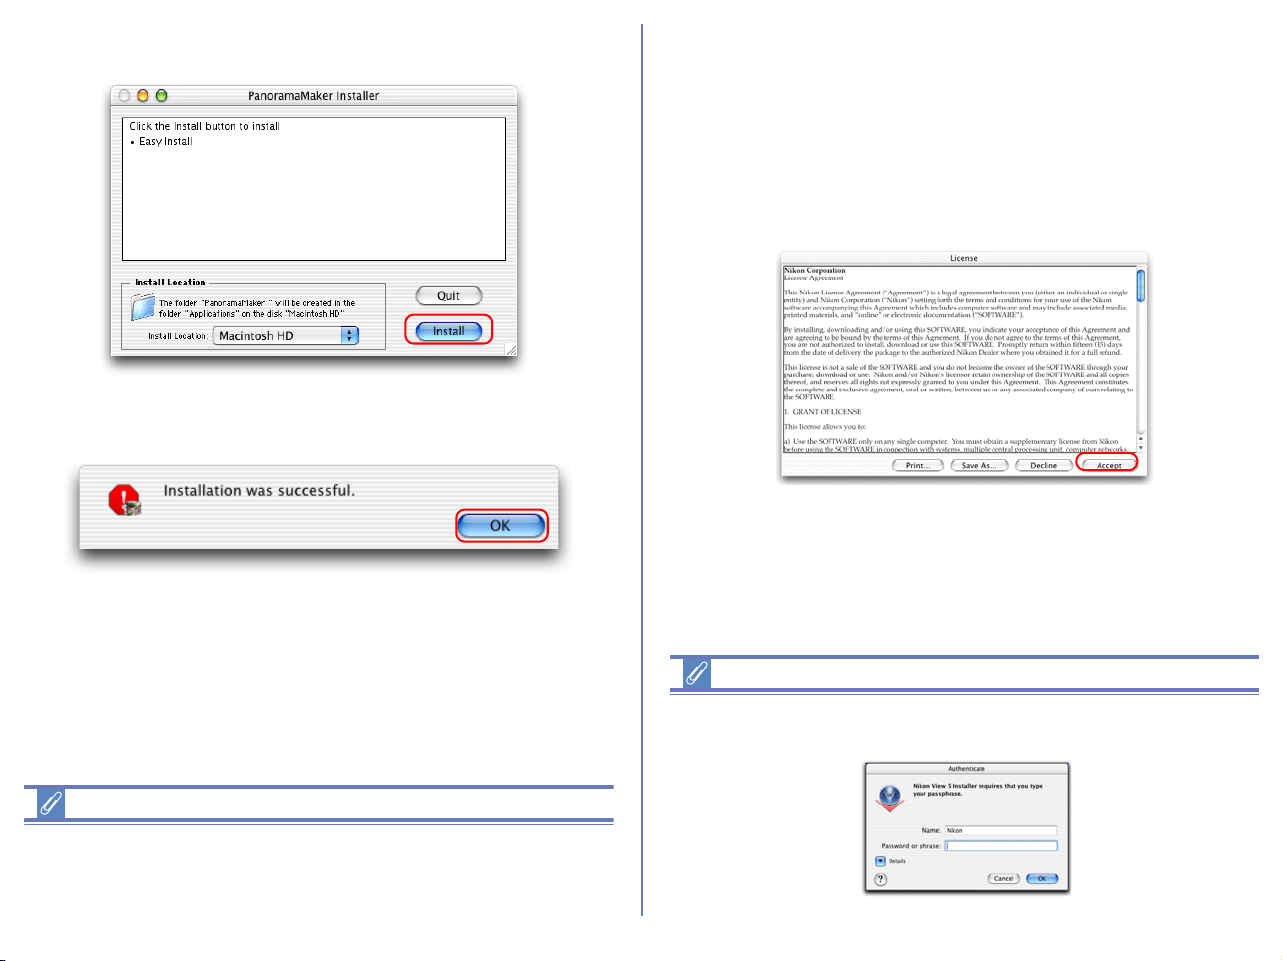
Click Install, and follow the on-screen instructions.
When the installation is complete, the dialog shown below
appears. Click OK.
About Panorama Maker
You can use Panorama Maker to combine separate images into a
Panorama. This software is particularly useful if your COOLPIX
camera has a Pan-orama Assist mode.
2.2 — Install Nikon View 5
The license agreement (see below) will appear, showing that you
are now Installing Nikon View 5.
1 — Accept the license agreement
When you start installation of Nikon View 5, the license agreement
is displayed. Read the agreement carefully, and click Accept if you
wish to continue installation.
When you accept the agreement, the ReadMe window is displayed.
Take a few moments to view this file, which may contain important
information that could not be included in this manual.
Click Continue.
Installing Nikon View 5 under MacOS X
You need the administrator password to install Nikon View 5 under
MacOS X.
31
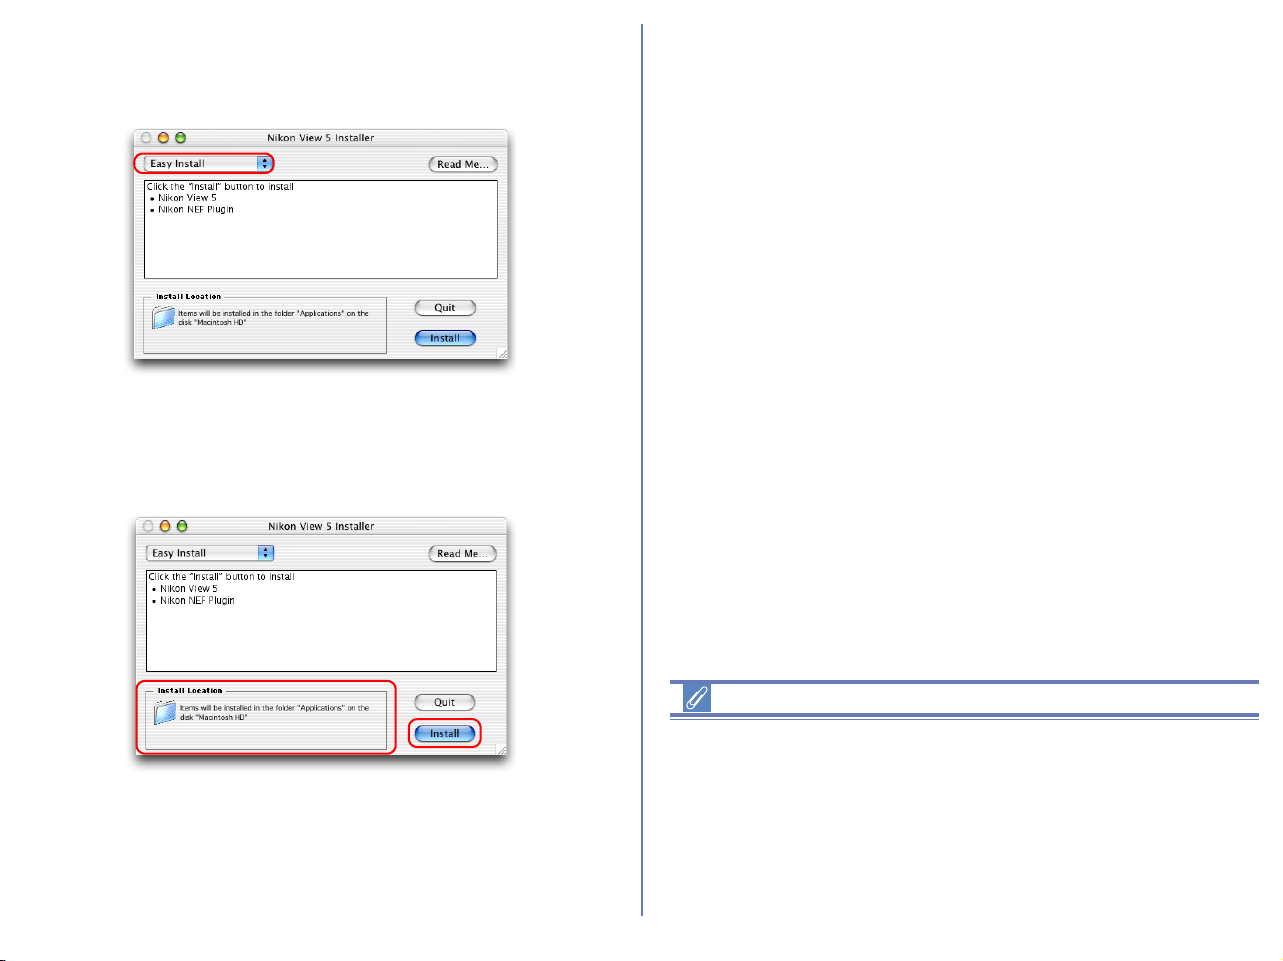
2 — Choose a location for Nikon View 5
Select Easy Install from the pull-down menu in the top left corner
of the Nikon View 5 Installer dialog box.
3 — Confirm the install destination
The disk and folder to which Nikon View 5 will be installed are
shown in the Install Location area.
Existing versions of Nikon View
If an older version of Nikon View is installed on your computer, it
must be uninstalled before installing Nikon View 5.
Nikon View 5 does not support connection of COOLPIX950, 910,
900, 800, or 700 digital cameras.
Nikon View can however be used to view photographs taken with
these cameras if the camera memory card is inserted into a digital
camera that Nikon View 5 supports.
32
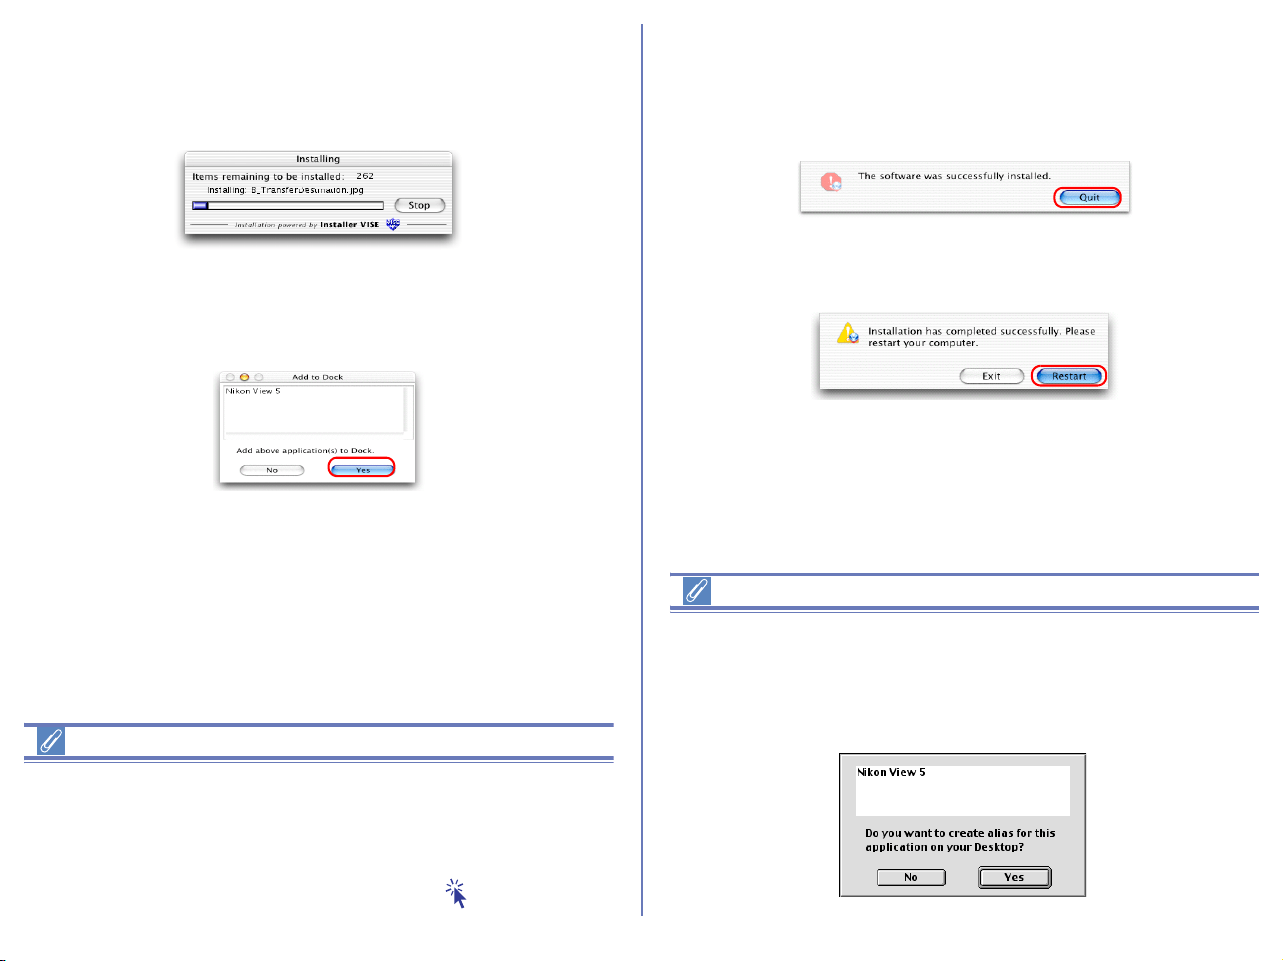
4 — Start installation
To install Nikon View 5 to the selected location, click Install in the
Nikon View 5 Installer dialog box. A progress meter will be displayed
during installation.
The dialog box shown below will appear when the installation of
files is complete. Click Yes to create an alias, which will allow you
to start Nikon View 5 directly from an icon on the Dock.
If multiple versions of Photoshop (version 5.0 or later) are installed
When more than one version of Photoshop (version 5.0 or later) is
installed on your Macintosh, you will be asked to select the version
to which you wish to install the plug-in from a list that will appear on
screen.
For more information on NEF plug-in, click here .
5 — Complete the installation
The dialog below will appear indicating that the installation is
complete.
Click Quit to complete the installation of Nikon View 5.
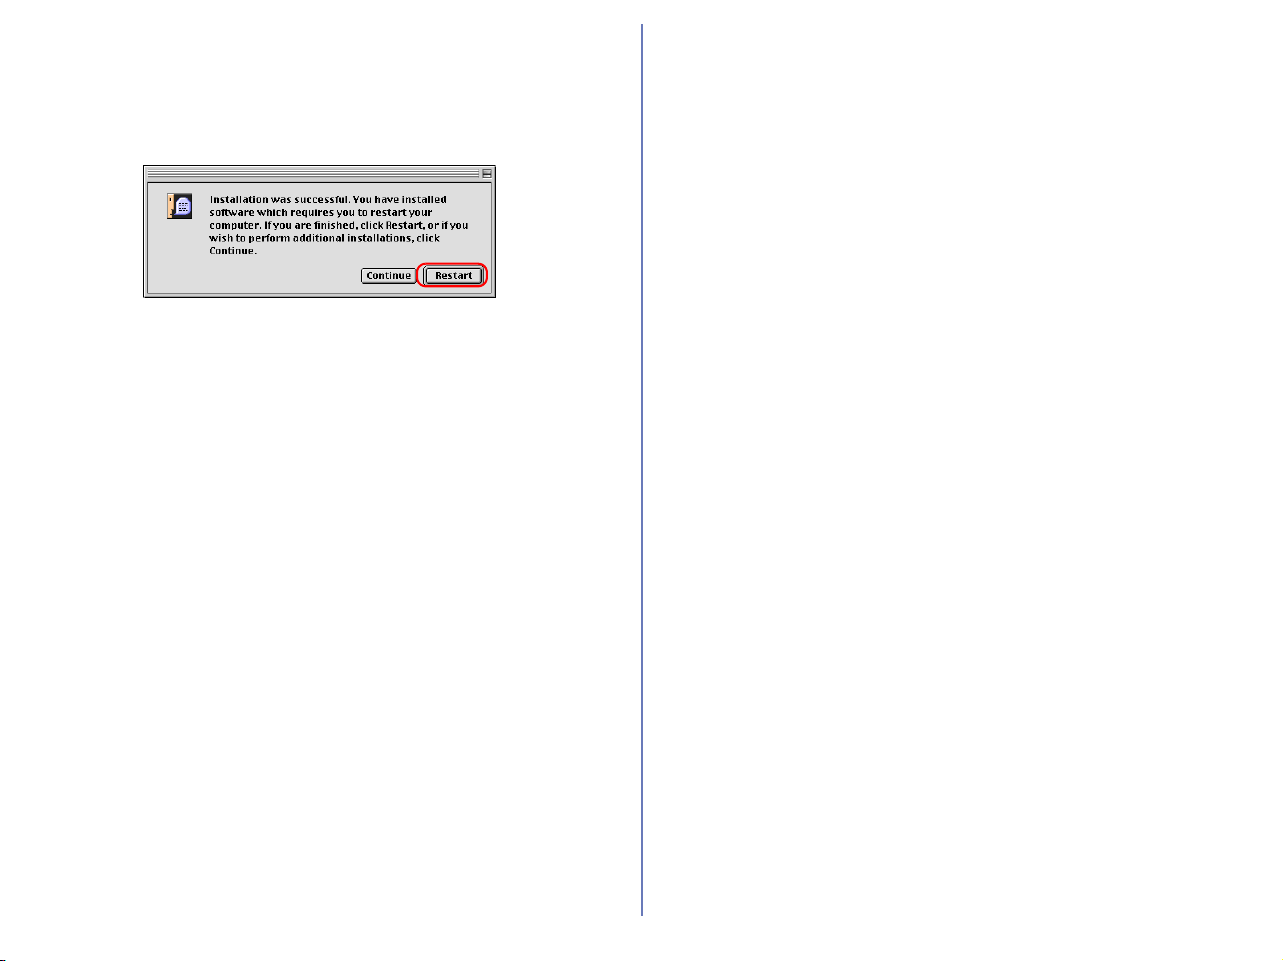
If the dialog shown below appears, click Restart to restart your
computer.
Create Aliases (Mac OS 9 Only)
After you click Install in the Nikon View 5 Installer dialog, a dialog
will be displayed asking whether you wish to create an alias for
Nikon View on the desktop. Click Yes to create the alias, or No to
exit without creating the alias.
33
2.3 — Installing QuickTime 5 (Mac OS 9.x only)
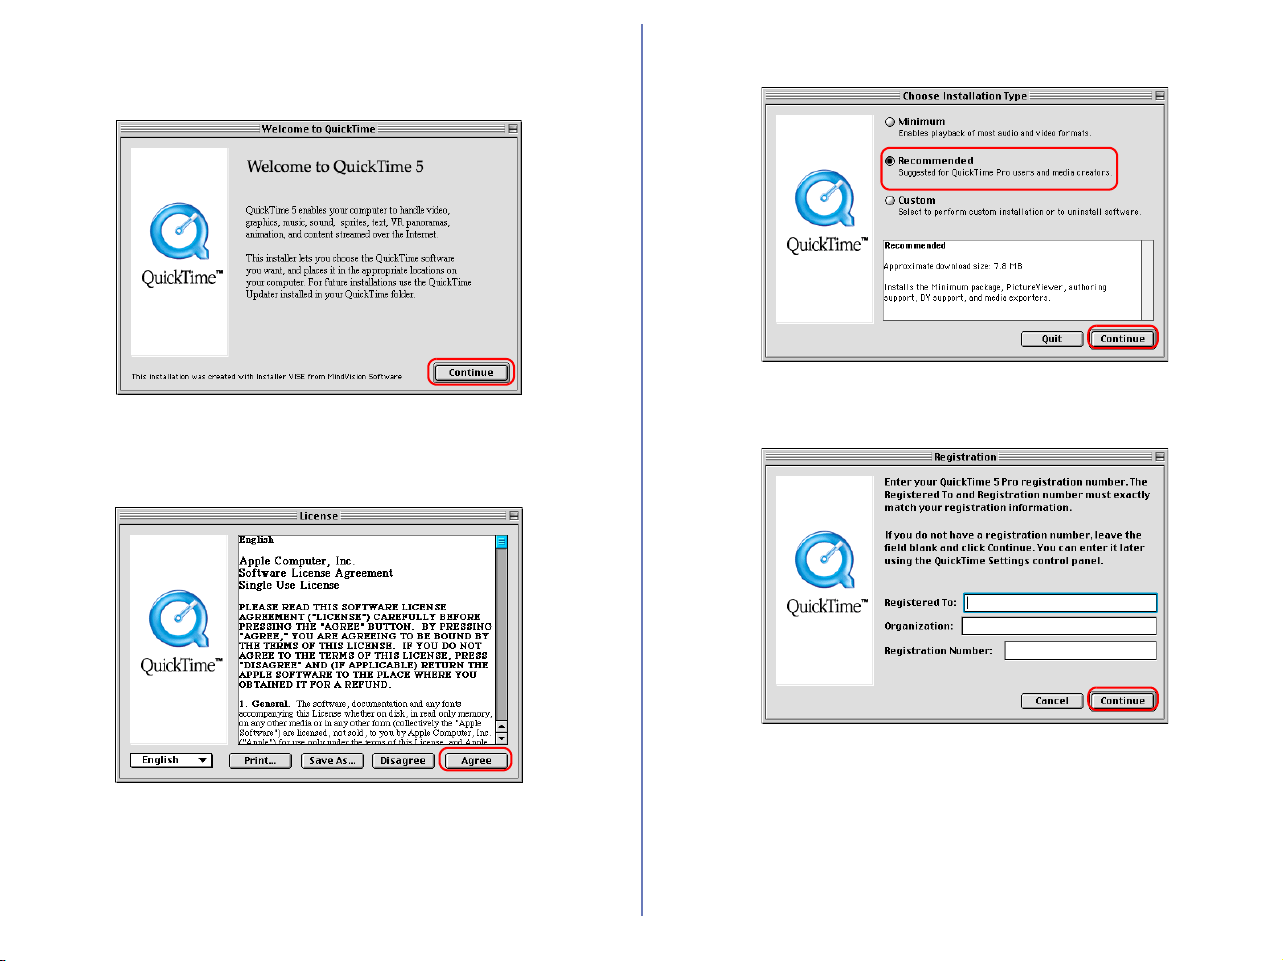
The Welcome to QuickTime dialog box appears, showing that
you are now installing QuickTime 5. Click Continue.
The Quick Time 5 license will appear. Read the license carefully. If
you accept the terms of the license and wish to continue with the
installation, click Agree.
The Choose Installation Type dialog box will be displayed. Select
Recommended and click Continue.
The Registration dialog box will be displayed. Leave the entry
fields blank and click Continue.

34
When the installation is complete the dialog box shown below will
be displayed. Click Restart to end the installation and restart your
computer. When your computer restarts, the QuickTime settings
dialog box will be displayed. For information on QuickTime
settings, refer to the instructions provided with the software.
2.4 — Removing CD- ROM
Remove Nikon View installer CD from the CD-ROM drive after
restarting the computer. If the Welcome window is displayed after
restart, click Exit button and remove the CD after closing the
window.

35
Custom Install
Step 1; Select the software to be installed.
Select the programs you want to install from the list in the Custom
Install tab.
Before installation
• You have turned off any virus-checking software that may be
running.
• You have exited all other applications.
Panorama Maker
Select this check box to install Panorama Maker, an application
which allows you to combine separate images into a panorama.
The installation of this application is particularly recommended if
you are using a camera with a Panorama Assist mode.
Nikon View 5
Select this check box to install Nikon View 5.
QuickTime 5 (Mac OS 9.x only)
Select this check box to install Apple Computer's QuickTime 5.
36
Step 2; Install the software
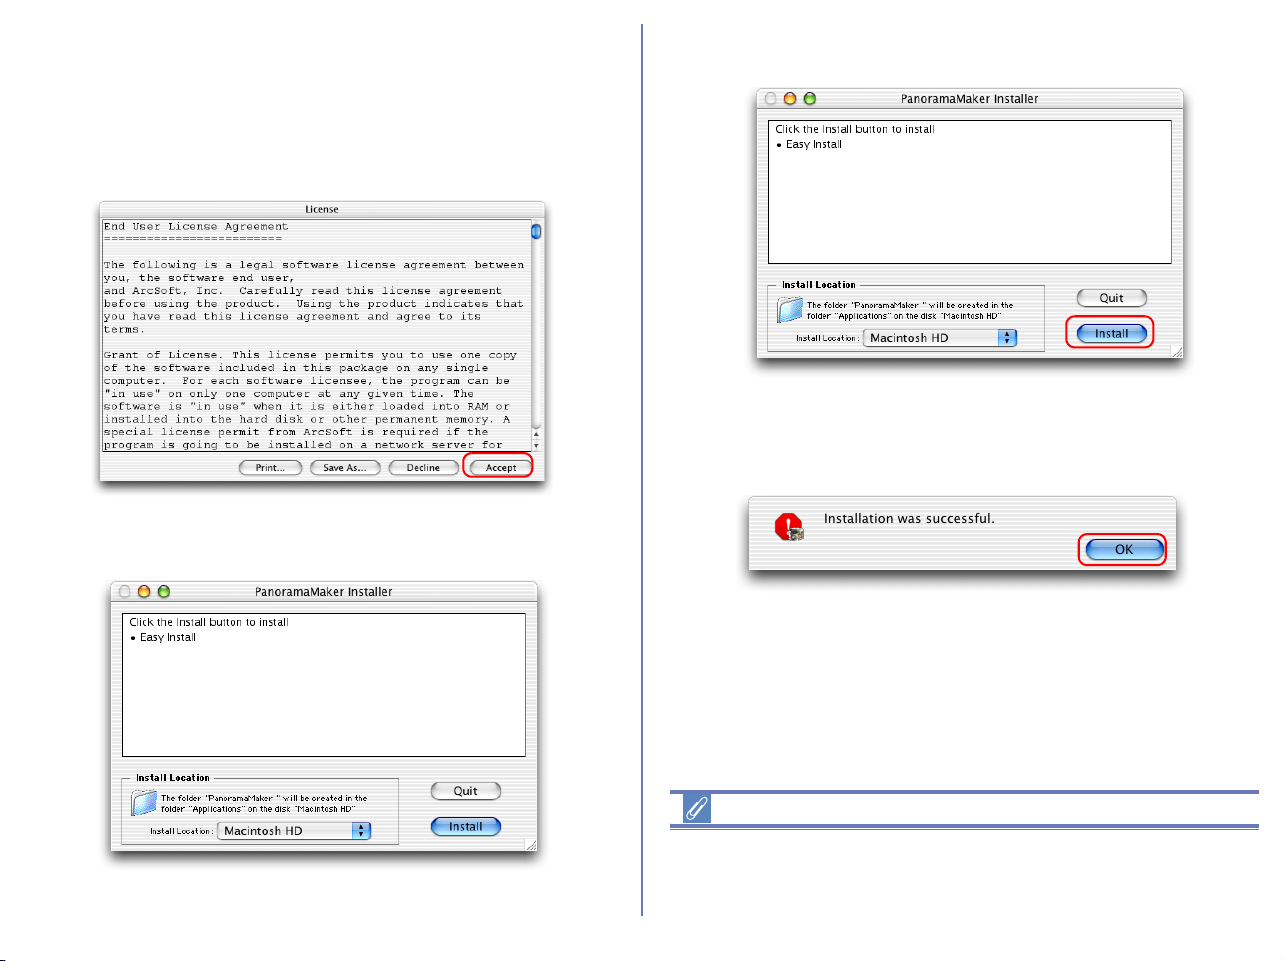
2.1 — Install Panorama Maker
The license agreement shown below will appear. Read the
agreement care-fully and click Accept if you wish to continue the
installation.
When you accept the agreement the dialog below is displayed.
Click Install, and follow the on-screen instructions.
When the installation is complete, the dialog shown below
appears. Click OK.
About Panorama Maker
You can use Panorama Maker to combine separate images into a
Panorama. This software is particularly useful if your COOLPIX
camera has a Panorama Assist mode.
37
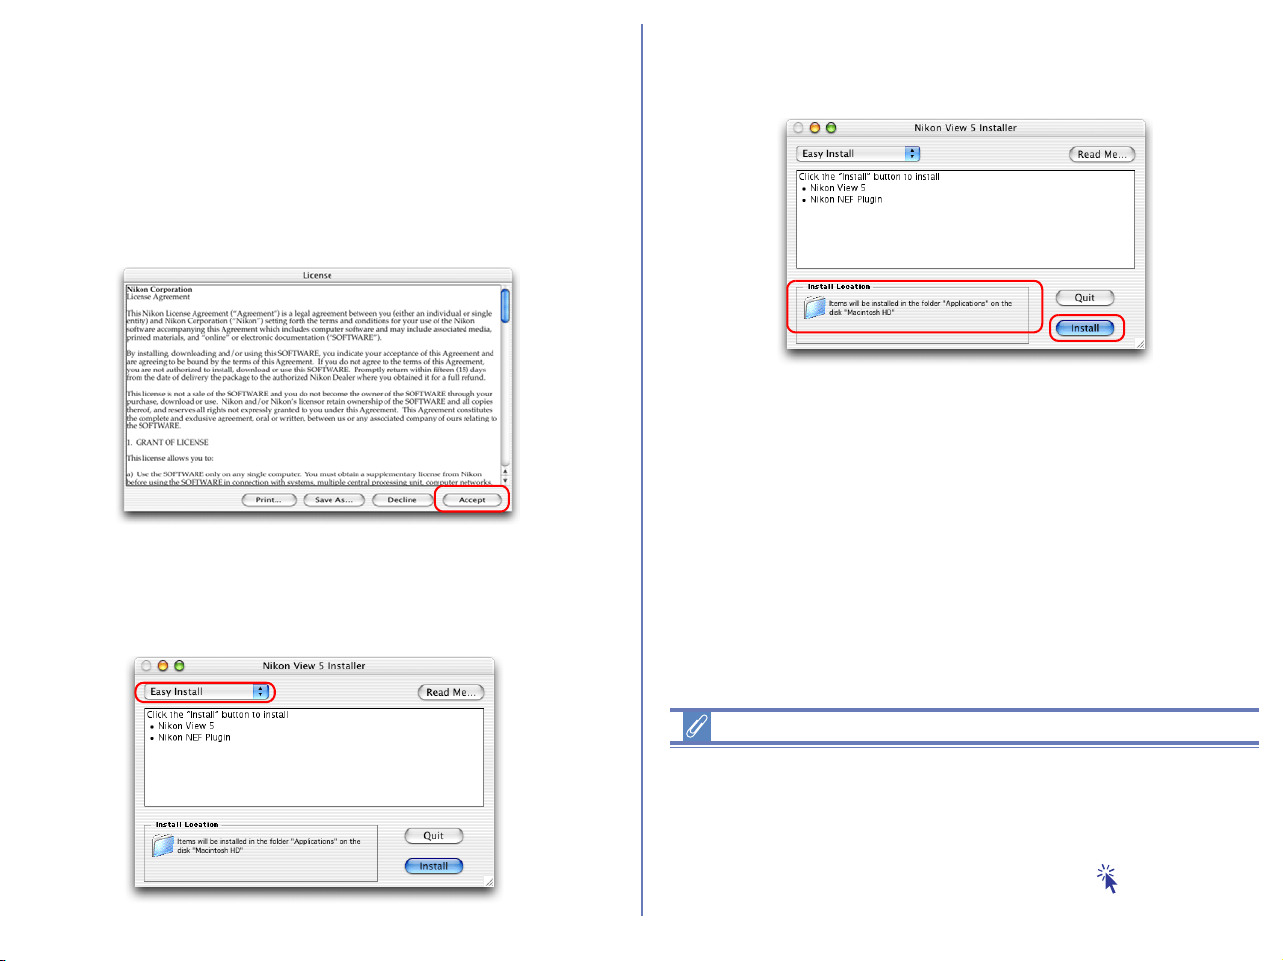
2.2 — Install Nikon View 5
The license agreement (see below) will appear, showing that you
are now Installing Nikon View 5.
1 — Accept the license agreement
When you start installation of Nikon View 5, the license agreement
is displayed. Read the agreement carefully, and click Accept if you
wish to continue installation.
2 — Choose a location for Nikon View 5
Select Custom Install from the pull-down menu in the top left
corner of the Nikon View 5 Installer dialog box.
3 — Confirm the install destination
The disk and folder to which Nikon View 5 will be installed are
shown in the Install Location area.
If multiple versions of Photoshop (version 5.0 or later) are installed
When more than one version of Photoshop (version 5.0 or later) is
installed on your Macintosh, you will be asked to select the version
to which you wish to install the plug-in from a list that will appear on
screen.
For more information on NEF plug-in, click here .
38
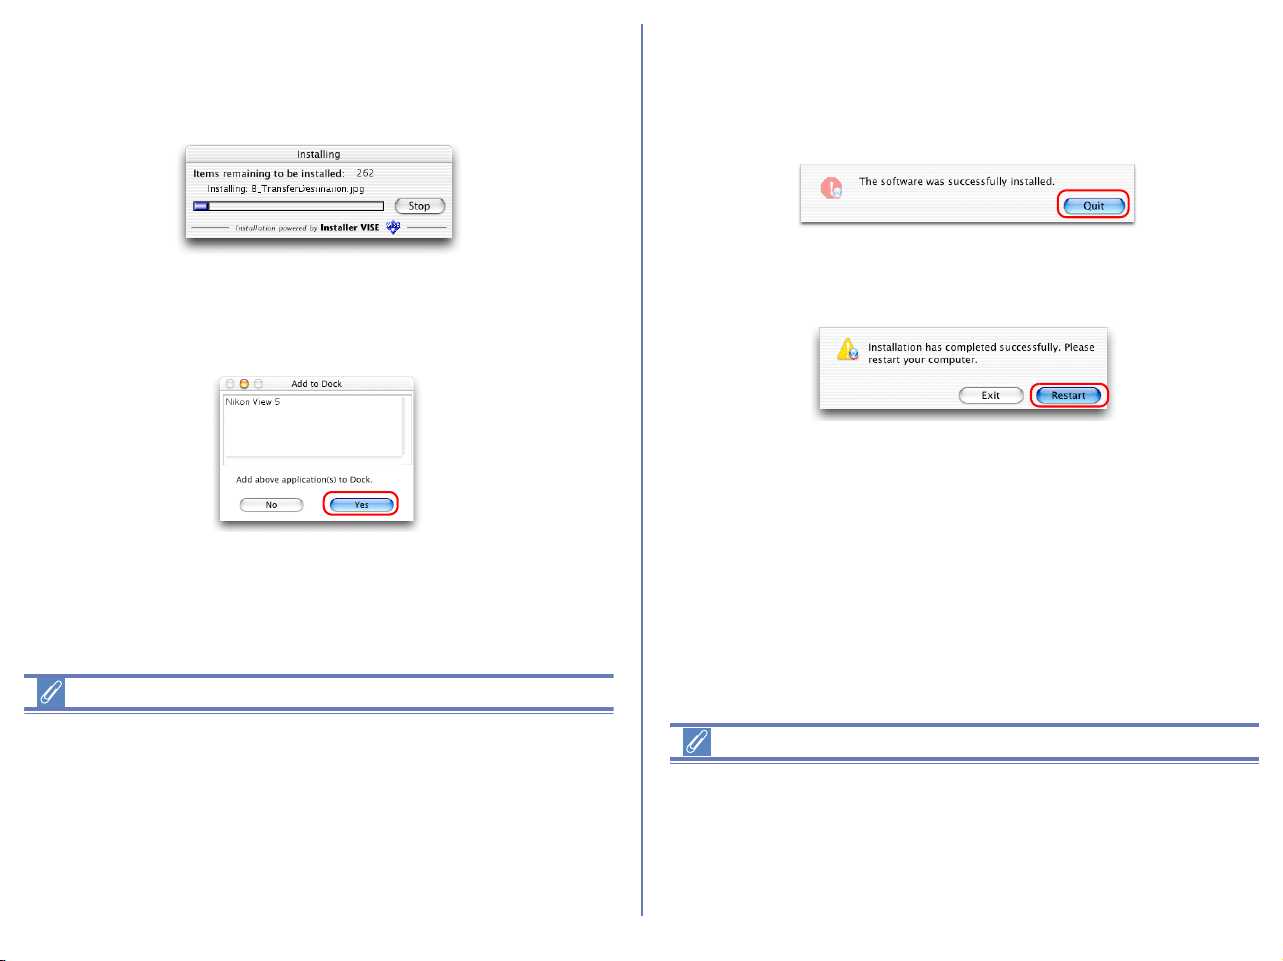
4 — Start installation
To install Nikon View 5 to the selected location, click Install in the
Nikon View 5 Installer dialog box. A progress meter will be
displayed during installation.
The dialog box shown below will appear when the installation of
files is complete. Click Yes to create an alias, which will allow you
to start Nikon View 5 directly from an icon on the desktop.
Existing versions of Nikon View
If an older version of Nikon View is installed on your computer, it
must be uninstalled before installing Nikon View 5.
Nikon View 5 does not support connection of COOLPIX950, 910,
900, 800, or 700 digital cameras.
Nikon View 5 can however be used to view photographs taken with
these cameras if the camera memory card is inserted into a digital
camera that Nikon View 5 supports.
5 — Complete the installation
The dialog below will appear indicating that the installation is
complete.
Click Quit to complete the installation of Nikon View 5.
If the dialog shown below appears, click Restart to restart your
computer.
Other Ways of Starting Nikon View
Nikon View can be started by double-clicking the Nikon View in the
folder to which you installed Nikon View (Windows, Mac OS 9). If
Nikon View was registered in the Dock during installation. Mac OS
X users will be able to start Nikon View by clicking the Nikon View
in the Dock.

39
2.3 — Installing QuickTime 5 (Mac OS 9.x only)
The Welcome to QuickTime dialog box appears, showing that
you are now installing QuickTime 5. Click Continue.
The Quick Time 5 license will appear. Read the license carefully. If
you accept the terms of the license and wish to continue with the
installation, click Agree.
The Choose Installation Type dialog box will be displayed. Select
Recommended and click Continue.
The Registration dialog box will be displayed. Leave the entry
fields blank and click Continue.
40
When the installation is complete the dialog box shown below will
be displayed. Click Restart to end the installation and restart your
computer. When your computer restarts, the QuickTime settings
dialog box will be displayed. For information on QuickTime
settings, refer to the instructions provided with the software.
2.4 — Removing CD- ROM
Remove Nikon View installer CD from the CD-ROM drive after
restarting the computer. If the Welcome window is displayed after
restart, click Exit button and remove the CD after closing the
window.
41
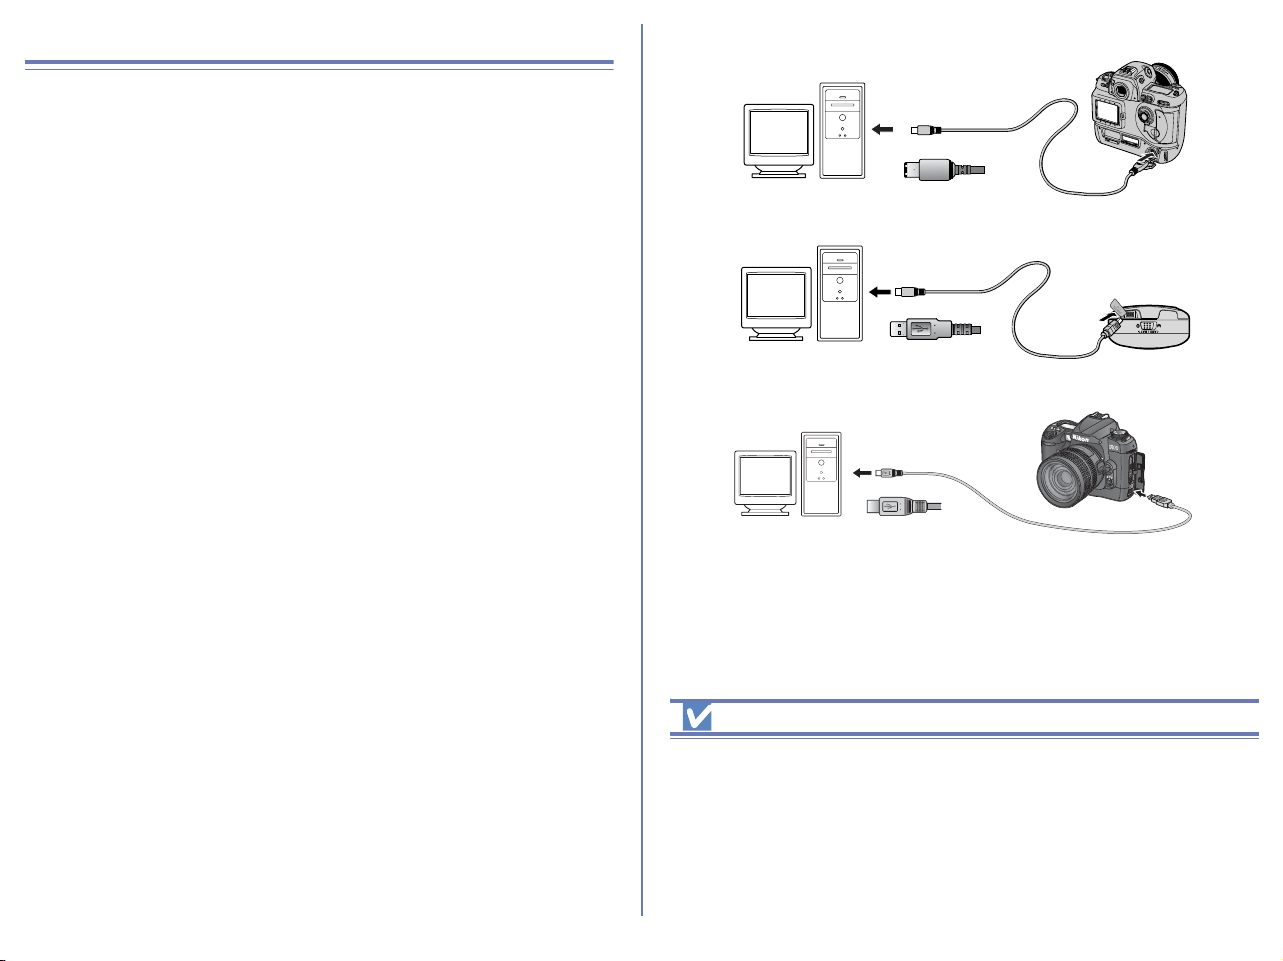
Connecting to a computer
If you are using a computer running Windows, make sure that you
install Nikon View before connecting your camera to the computer
for the first time. After installing Nikon View, connect the camera to
the computer and turn it on, or insert the memory card into a card
reader or a card slot.
For more information about connecting your camera to a computer,
see the Guide to Digital Photography provided with your camera.
D1/ D1
X/D1H (IEEE 1394/FireWire interface)
COOLPIX series (USB interface)
D100 (USB interface)
Using a Reliable Power Source
When transferring data from the camera to the computer use Nikon
dedicated AC adapter (available separately). If you decide to transfer
images to the computer using a camera running on a battery, be sure
that the battery is fully charged. If in doubt, recharge the battery before
beginning transfer. If battery power runs out during transfer, the transfer
will be interrupted and data may be lost.
COOLPIX2500
42
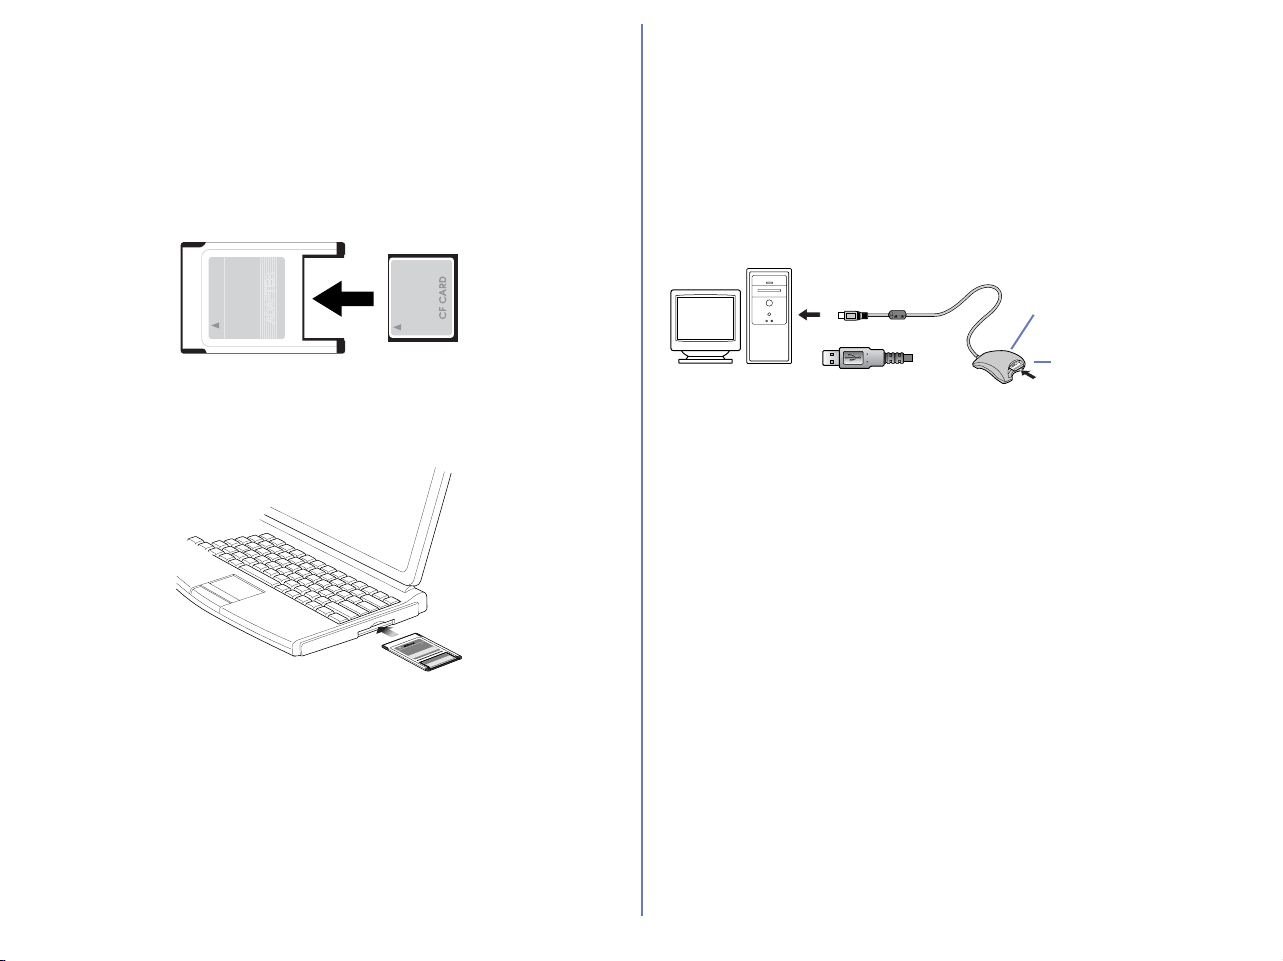
Using a card slot
When inserted in a PC-card adapter (available separately), the
camera memory card functions as a Type II PCMCIA ATA card,
allowing images to be read from the card.
Inserting a memory card
Remove the memory card from the camera and insert it in the
adapter.
Insert the adapter into a PCMCIA TYPE II ATA card slot on your
computer. For more information on inserting the adapter, see the
documentation provided with your computer.
Depending on your computer's operating environment, you may
need to install software, register the card adapter, or adjust OS
settings when the adapter is inserted into the card slot. For more
information, refer to the instruction manual for your operating
system.
Using a Card Reader
Images on the memory card can also be viewed using a card
reader.
Inserting a memory card
After removing the memory card from the camera, insert it in the
card reader and connect the reader to the computer. See the
documentation provided with the card reader for more information
on connecting it to a computer.
Card reader (USB interface)
CompactFlash Card
TM
EC-64CF
CompactFlash
Card
TM
EC-AD1
ADAPTER
Card reader
Memory card

43
Confirming the device registration (if Nikon Transfer does not start)
Registering your camera with Windows
Windows
Instructions for installing or updating device drivers are divided according to camera type and the operating system used.
* If your computer is running Windows XP, you can select MassStorage or PTP for USB connections. To switch USB connections, see the
operation manual for your camera.
Camera Operating system
COOLPIX series
For PTP connections*
Windows XP Home Edition /Professional
COOLPIX series (excluding 990/880)
/ D100
For Mass storage connections*
Windows XP Home Edition /Professional
Windows 2000 Professional
Windows Millennium Edition (Me) Windows 98 Second Edition (SE)
COOLPIX990
COOLPIX880
Windows XP Home Edition /Professional
Windows 2000 Professional
Windows Millennium Edition (Me) Windows 98 Second Edition (SE)
Nikon D1
Nikon D1
X
Nikon D1H
Windows XP Home Edition /Professional
Windows 2000 Professional
Windows Millennium Edition (Me) Windows 98 Second Edition (SE)
D1 (driver update for those who are
using the camera with existing copies
of Nikon View DX or Nikon Capture)
Windows 2000 Professional Windows Millennium Edition (Me)
Windows 98 Second Edition (SE)

44
COOLPIX series/D100 Windows XP
Confirming the device registration (For PTP connections)
The following explanation uses COOLPIX2500 as an example.
After installing Nikon View 6 (device driver) and restarting the
computer, connect your camera to the computer using a USB cable
and turn on the camera. The camera is registered automatically.
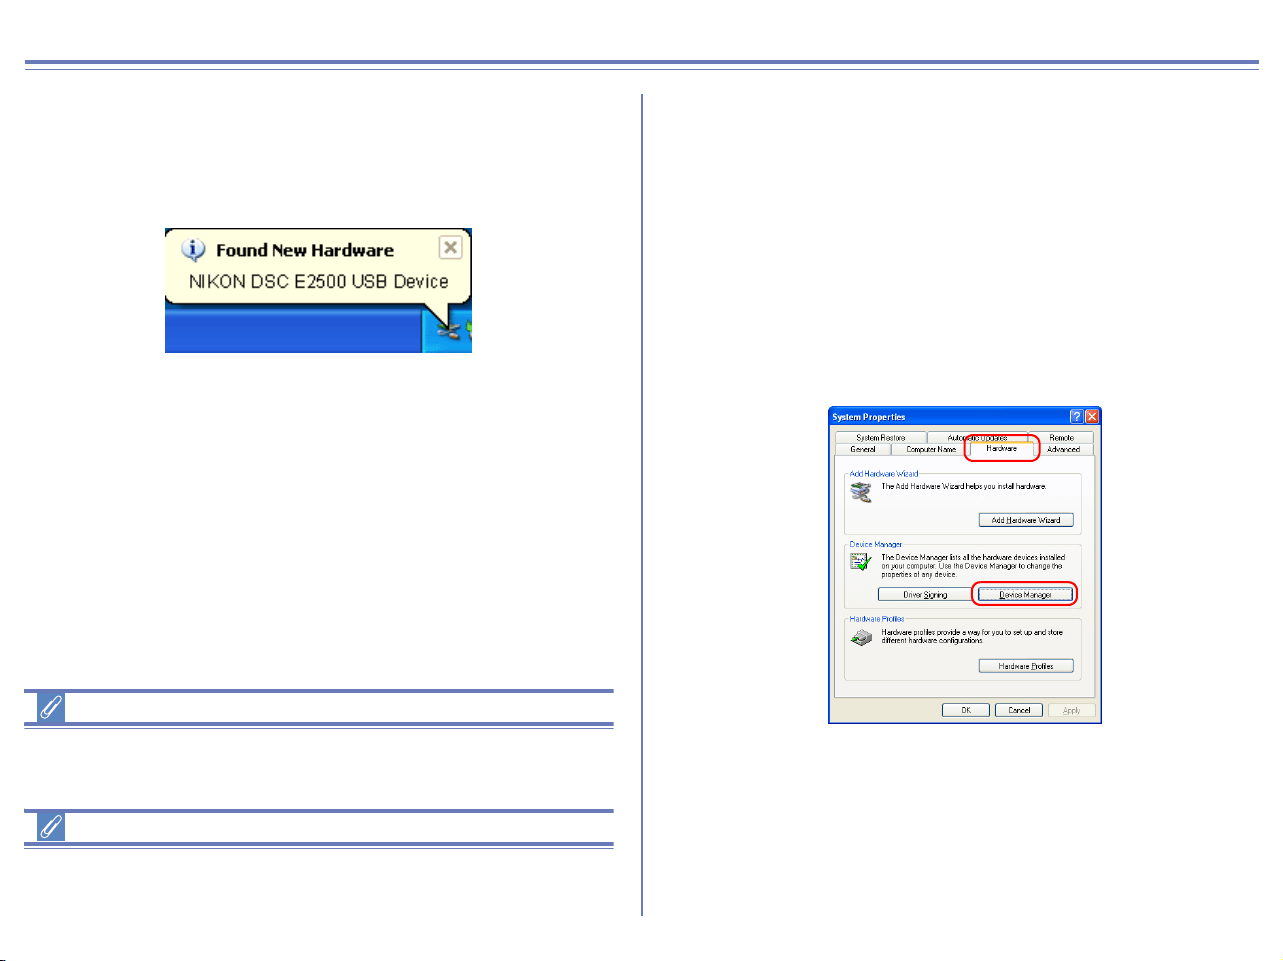
If the Removable disk dialog box is displayed after registration,
click the Cancel button and close the dialog box.
Log on
You will need to log on as Computer Administrator to register the
camera.
Before connecting the camera to the computer
Be sure to install Nikon View 6 (device driver) before connecting
your camera to the computer.
Follow the instructions below to check that the camera has been
correctly registered with the system.
Step 1
Select Control Panel from the Start menu to open the Control
Panel window.
Click the Performance and Maintenance icon inside the Control
Panel window to open the Performance and Maintenance window.
Click the System icon inside the Performance and Maintenance
window to open the System Properties window.
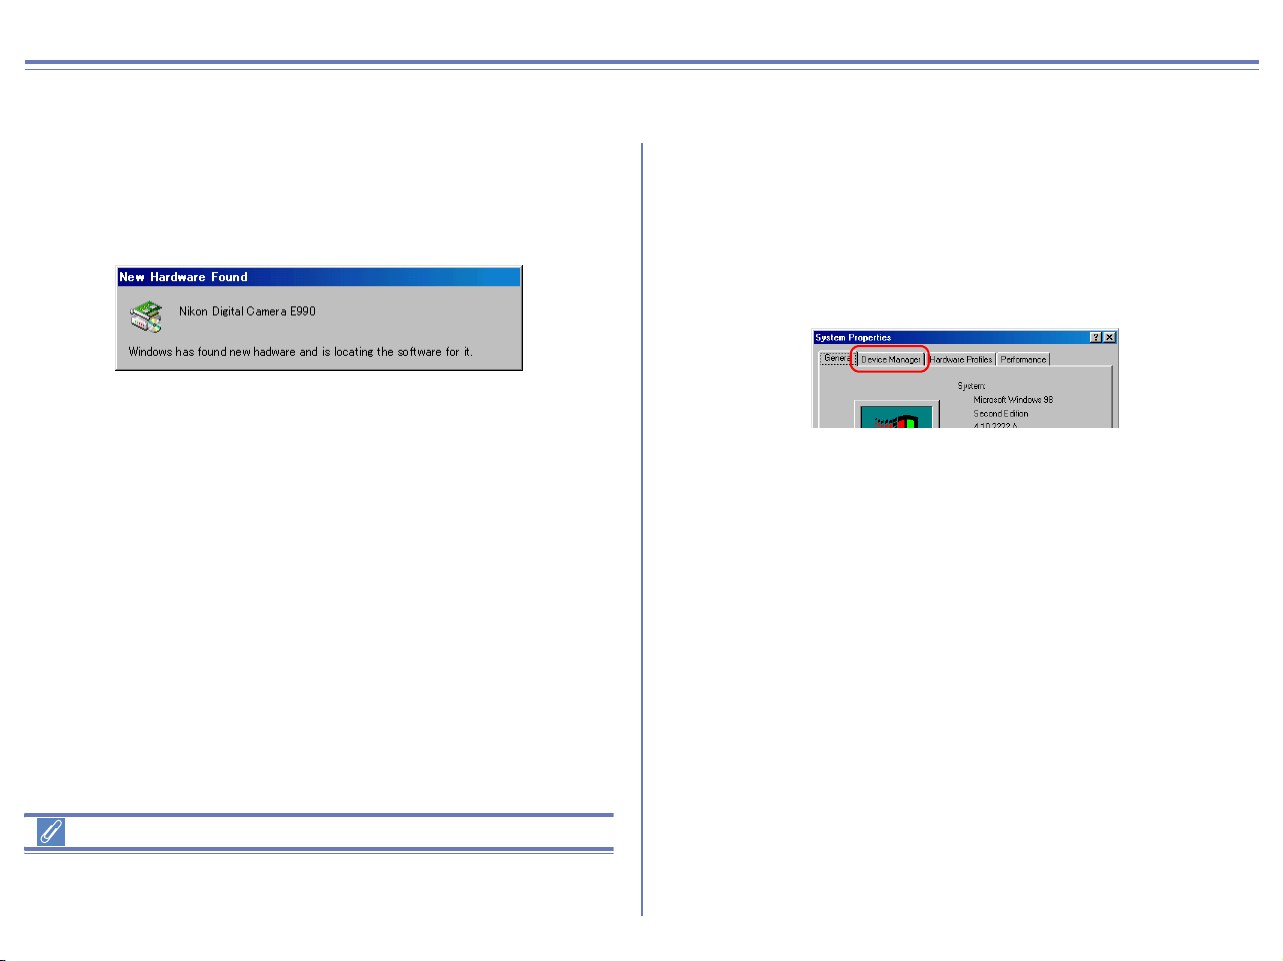
Open the Hardware tab and click the Device Manager button in
the Device Manager area.
45
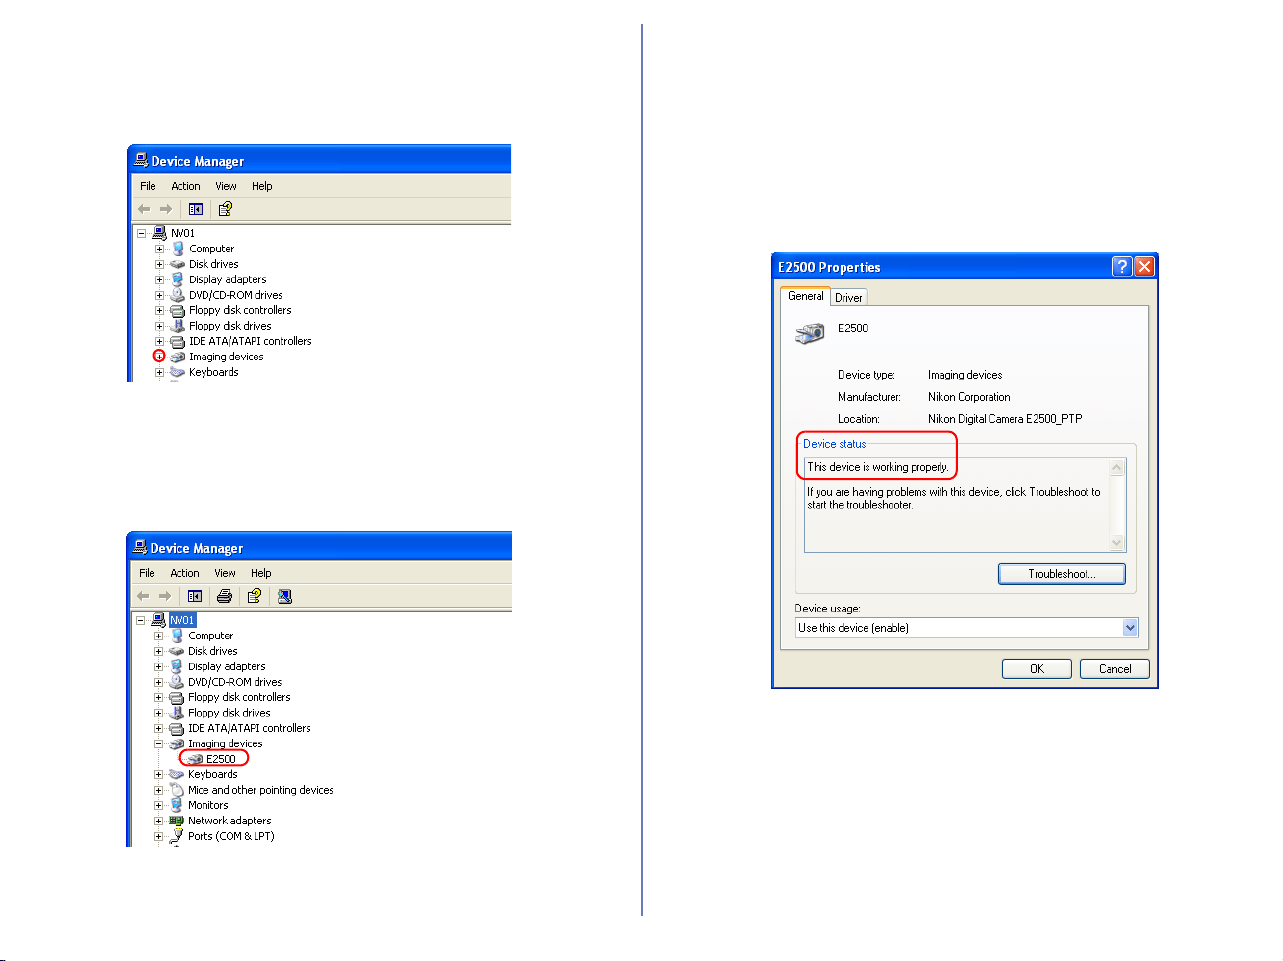
Step 2
When the Device Manager dialog box is displayed, verify that
"Imaging Devices" is listed in the Device Manager, and then click
[+] next to the name of the device.
Step 3
Verify that E2500 is listed and double-click it to display the E2500
Properties window. If E2500 is listed under "Other Devices",
remove it and power cycle your camera.
If the E2500 is listed under Other devices, delete E2500, then turn
off the camera and turn it on again.
Step 4
When the E2500 Properties window is displayed, verify that "This
device is working properly" is displayed under Device State in the
General tab, and then click OK button.
Click OK button on the System Properties dialog box to close the
dialog box.
46
COOLPIX series/D100 Windows XP
Confirming the device registration (For MassStorage connections)
The following explanation uses COOLPIX3500 as an example.
After installing Nikon View 6 (device driver) and restarting the
computer, connect your camera to the computer using a USB cable
and turn on the camera. The camera is registered automatically.
If the Removable disk dialog box is displayed after registration,
click the Cancel button and close the dialog box.
Log on
You will need to log on as Computer Administrator to register the
camera.
Before connecting the camera to the computer
Be sure to install Nikon View 6 (device driver) before connecting
your camera to the computer.
Follow the instructions below to check that the camera has been
correctly registered with the system.
Step 1
Select Control Panel from the Start menu to open the Control
Panel window.
Click the Performance and Maintenance icon inside the Control
Panel window to open the Performance and Maintenance window.
Click the System icon inside the Performance and Maintenance
window to open the System Properties window.
Open the Hardware tab and click the Device Manager button in
the Device Manager area.
47
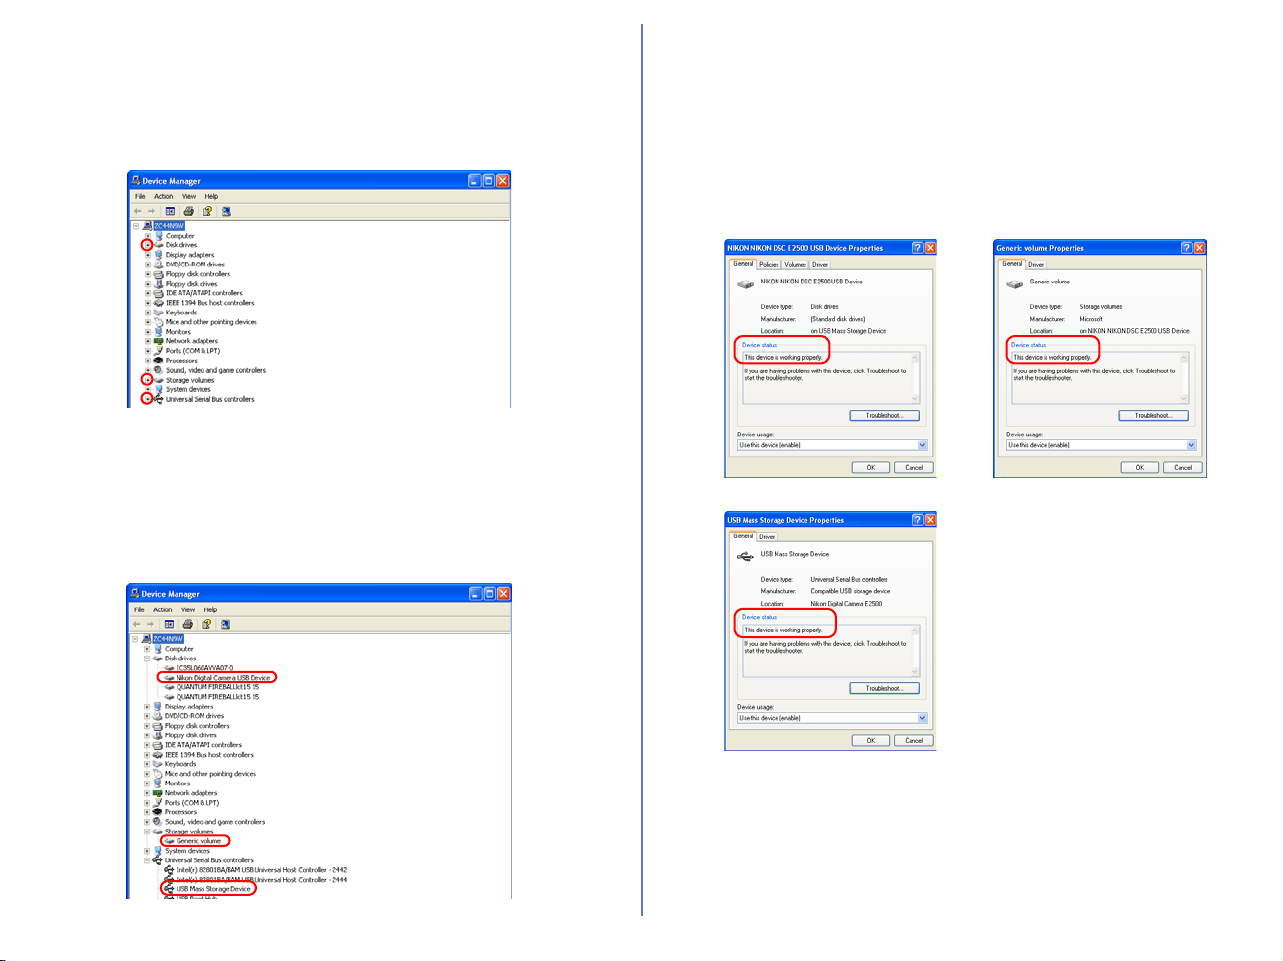
Step 2
The Device Manager will be displayed.
Confirm that Disk drives, Storage volumes, and Universal Serial
Bus controllers are listed in Device Manager. Then, click the plus
sign (+) next to each of these device types.
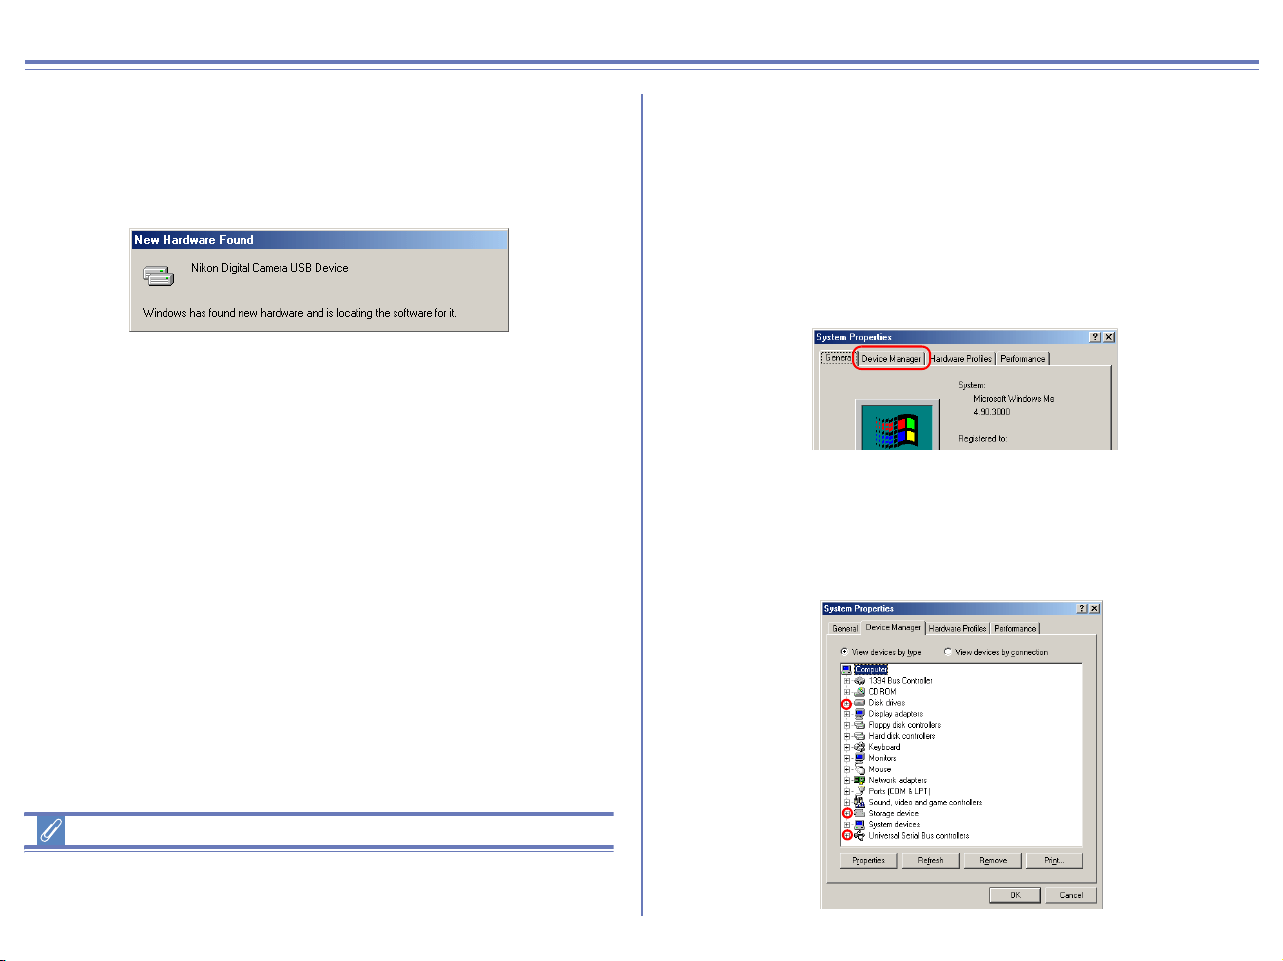
Step 3
Confirm that
Nikon Digital Camera USB Device
,
Generic Volume
, and
USB Mass Storage Device
are listed respectively under
Disk drives
,
Storage volumes
, and
Universal Serial Bus controllers
. Double-click
each of these listings to open the associated
Properties
window.
If the Nikon Digital Camera E2500 is listed under Other devices,
delete Nikon Digital Camera E2500, then turn off the camera and
turn it on again.
Step 4
The Properties for the selected device are displayed.
Click the General tab and confirm that This device is working
properly appears under Device status. Click OK.
Click OK to close the System Properties dialog box.
48
COOLPIX series/D100 Windows 2000 Confirming the device registration
The following explanation uses COOLPIX2500 as an example.
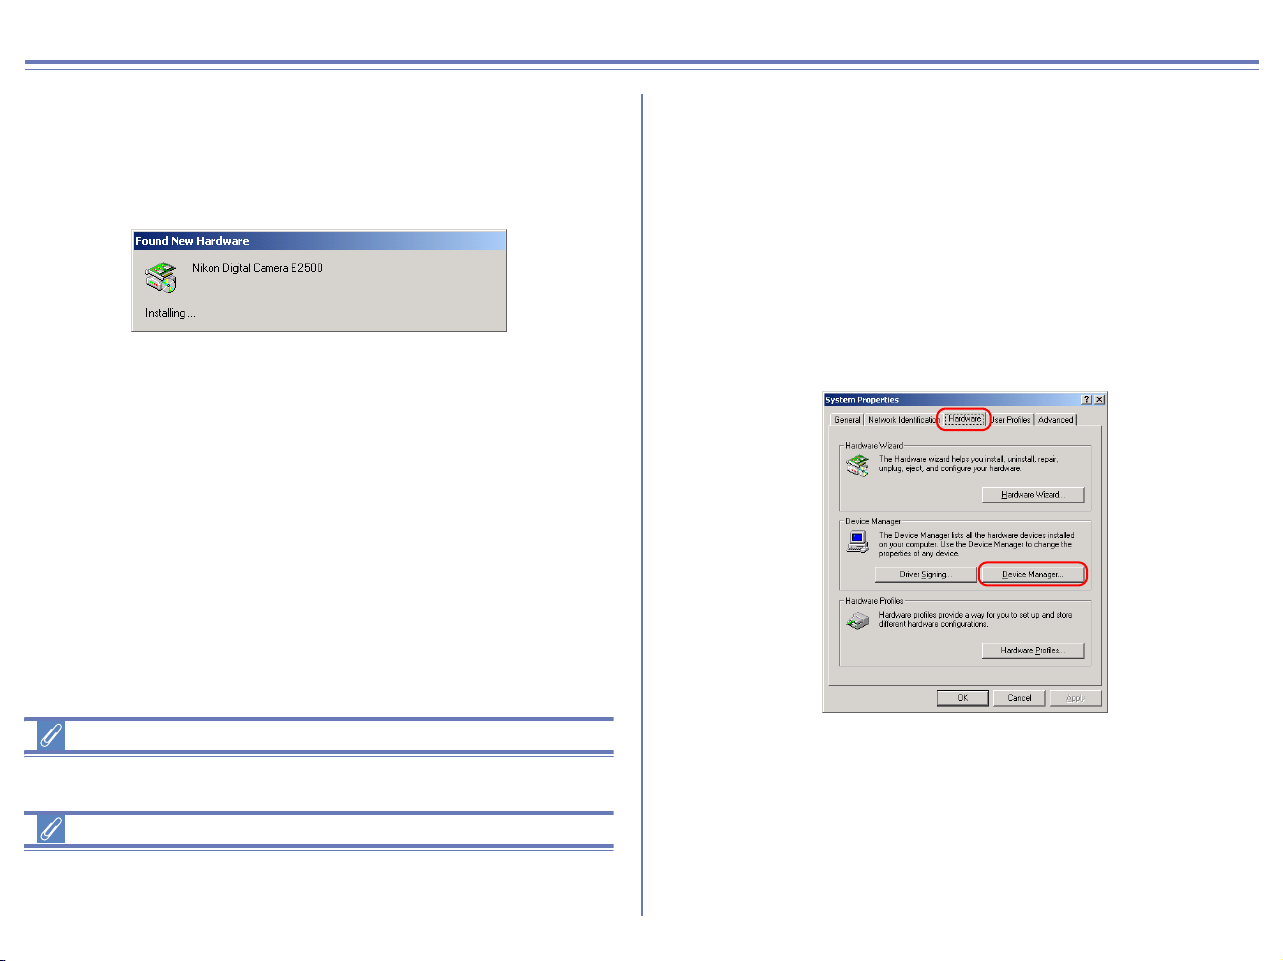
After installing Nikon View 6 (device driver) and restarting the
computer, connect your camera to the computer using a USB cable
and turn on the camera. The camera is registered automatically.
Log On
Log on as Administrator to register the camera.
Before connecting the camera to the computer
Be sure to install Nikon View 6 (device driver) before connecting
your camera to the computer.
Follow the instructions below to check that the camera has been
correctly registered with the system.
Step 1
Right-click the My Computer icon on the desktop. Select Properties
from the menu which appears. The System Properties dialog box
opens.
Open the Hardware tab and click the Device Manager button in
the Device Manager area.
49
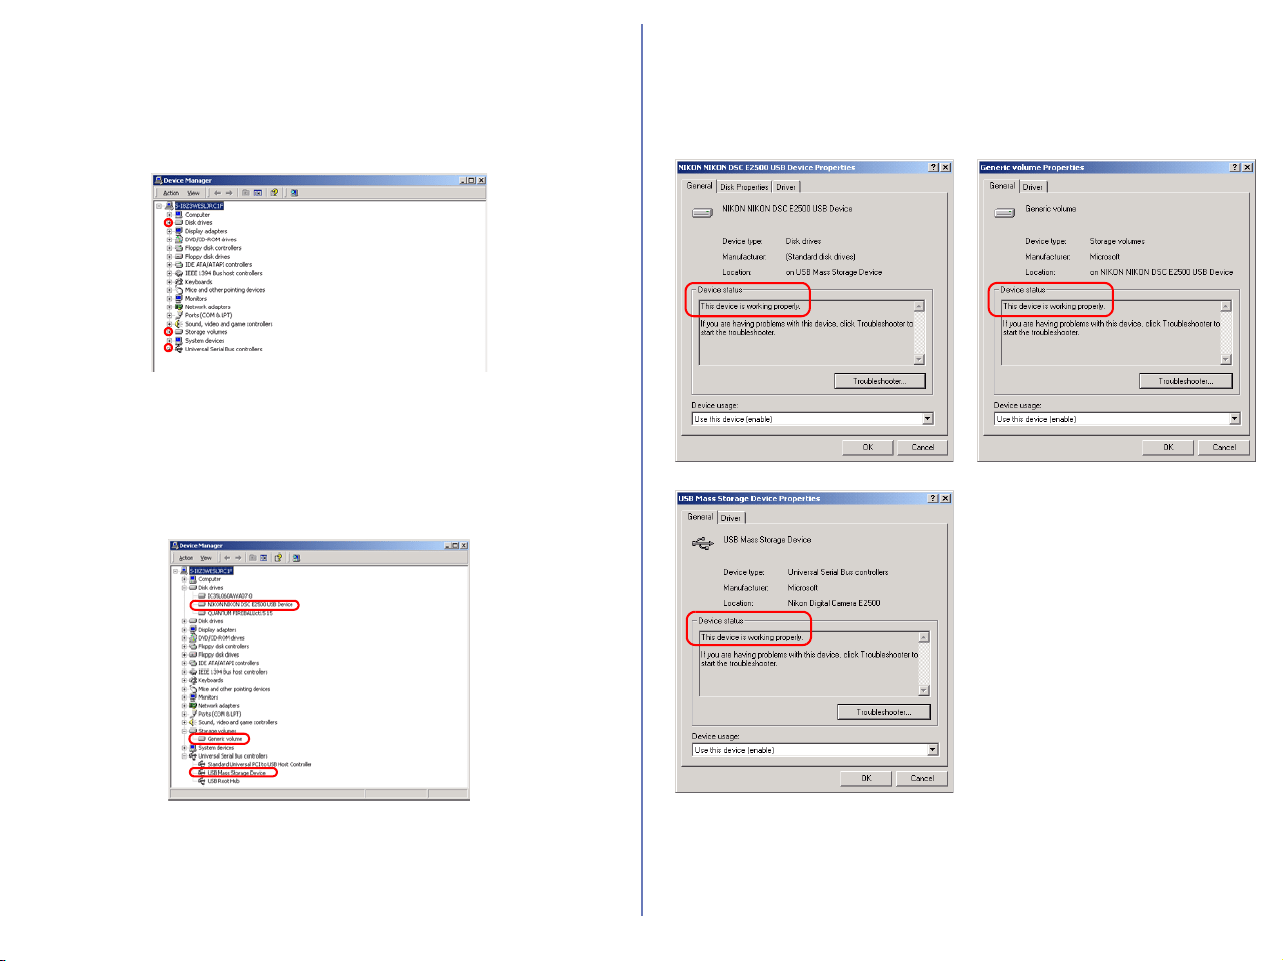
Step 2
The Device Manager will be displayed.
Confirm that Disk drives, Storage volumes, and Universal Serial
Bus controllers are listed in Device Manager, then click the plus
sign (+) next to each of these device types.
Step 3
Confirm that
NIKON NIKON DSC E2500 USB Device
,
Generic volume
,
and
USB Mass Storage Device
are listed respectively under
Disk drives
,
Storage volumes
, and
Universal Serial Bus controllers
. Double-click
each of these listings to open the associated
Properties
window.
If NIKON NIKON DSC E2500 USB Device appears under Other
devices, delete NIKON NIKON DSC E2500 USB Device, then
turn off the camera and turn it on again.
Step 4
The properties for the selected device are displayed.
Click the General tab and confirm that This device is working
properly appears under Device status. Click OK.
Click OK to close the System Properties dialog box.
50
COOLPIX series/D100 Windows Me Confirming the device registration
The following explanation uses COOLPIX2500 as an example.
After installing Nikon View 6 (device driver) and restarting the computer,
connect your camera to the computer using a USB cable and turn on
the camera. The camera is registered automatically.
Before connecting the camera to the computer
Be sure to install Nikon View 6 (device driver) before connecting
your camera to the computer.
Follow the instructions below to check that the camera has been
correctly registered with the system.
Step 1
Right-click the My Computer icon on the desktop. Select Properties
from the menu which appears. The System Properties dialog box
opens. Click the Device Manager tab.
Step 2
Confirm that Disk drives, Storage device, and Universal Serial
Bus controllers are listed in the Device Manager tab, then click
the plus sign (+) next to each of these device types.
51
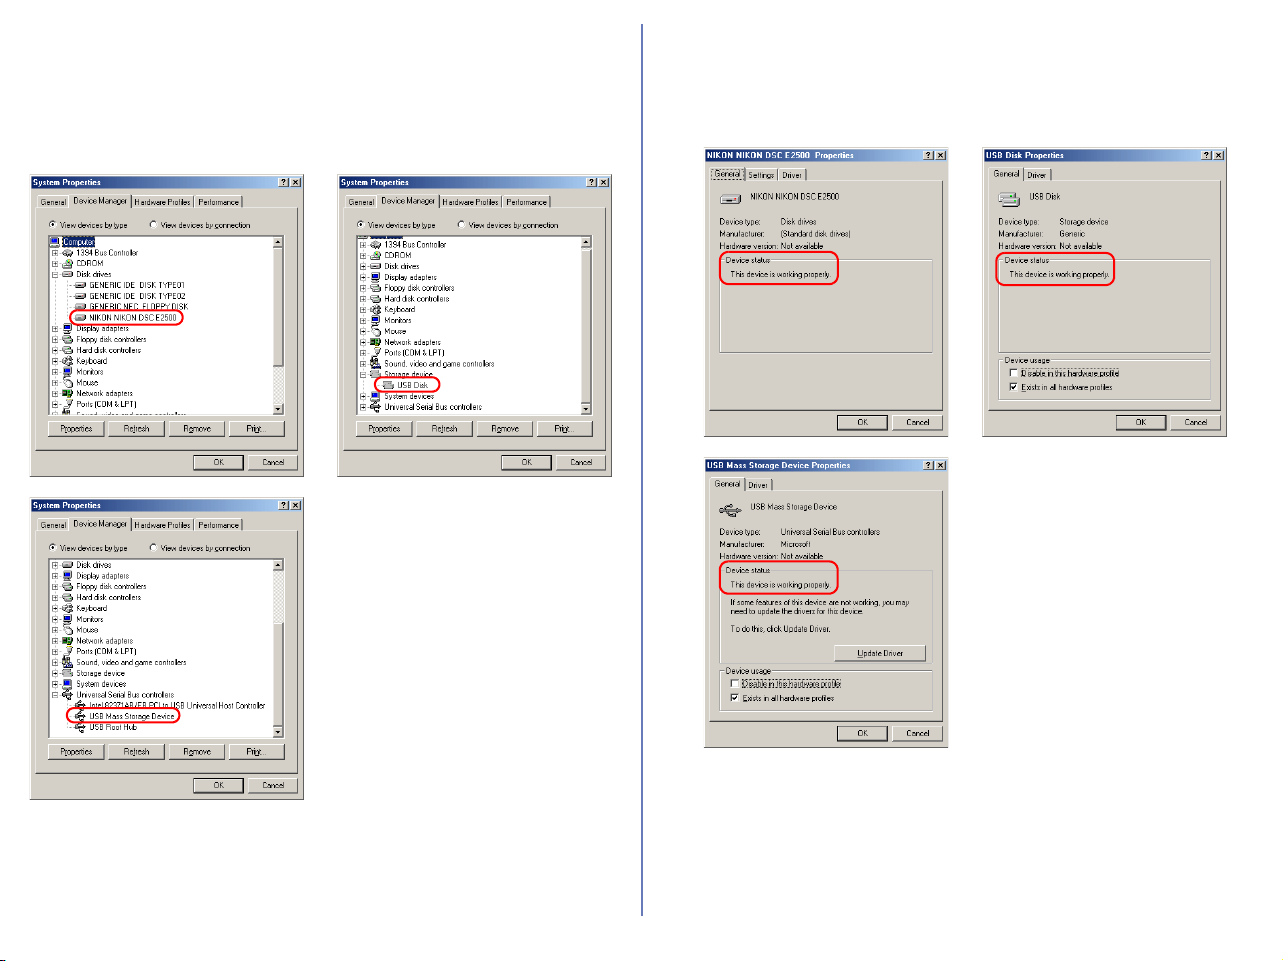
Step 3
Confirm that NIKON NIKON DSC E2500, USB Disk, and USB Mass
Storage Device are listed respectively under Disk drives, Storage
device, and Universal Serial Bus controllers. Double-click each of
these listings to display the associated Properties window.
If the NIKON NIKON DSC E2500 is listed under Other devices,
delete NIKON NIKON DSC E2500, then turn off the camera and
turn it on again.
Step 4
The properties for the selected device are displayed. Click the
General tab and confirm that This device is working properly
appears under Device status. Click OK.
Click OK to close the System Properties dialog box.
52
COOLPIX series/D100 Windows 98SE
Confirming the device registration
The following explanation uses COOLPIX2500 as an example.
After installing Nikon View 6 (device driver) and restarting the
computer, connect your camera to the computer using a USB cable
and turn on the camera. The camera is registered automatically.
Before connecting the camera to the computer
Be sure to install Nikon View 6 (device driver) before connecting
your camera to the computer.
Follow the instructions below to check that the camera has been
correctly registered with the system.
Step 1
Right-click the My Computer icon on the desktop. Select Properties
from the menu which appears. The System Properties dialog box
opens. Click the Device Manager tab.
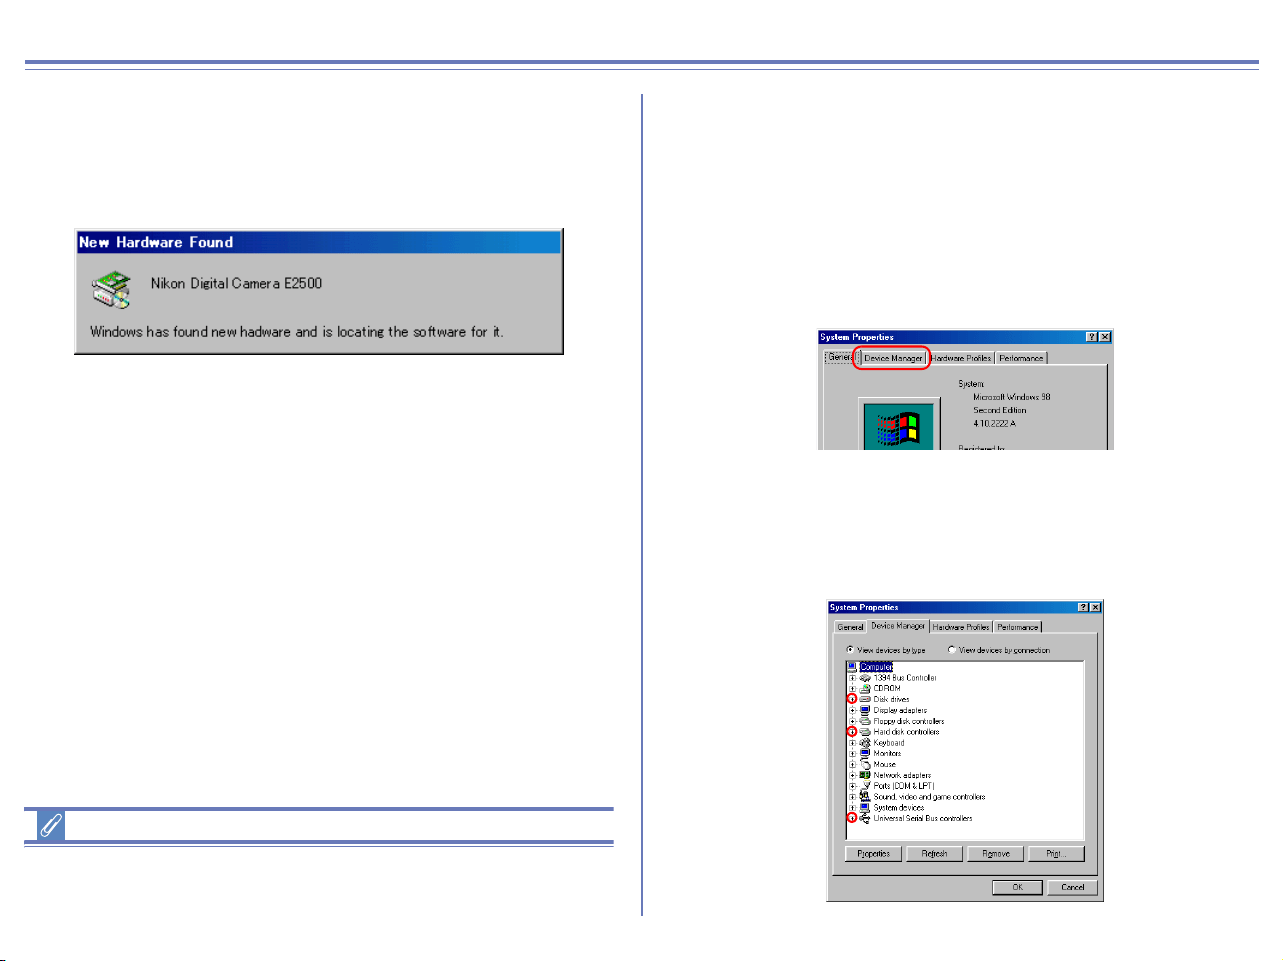
Step 2
Confirm that Disk drives, Hard disk controllers, and Universal
Serial Bus controllers are listed in the Device Manager tab, then
click the plus sign (+) next to each of these device types.
53
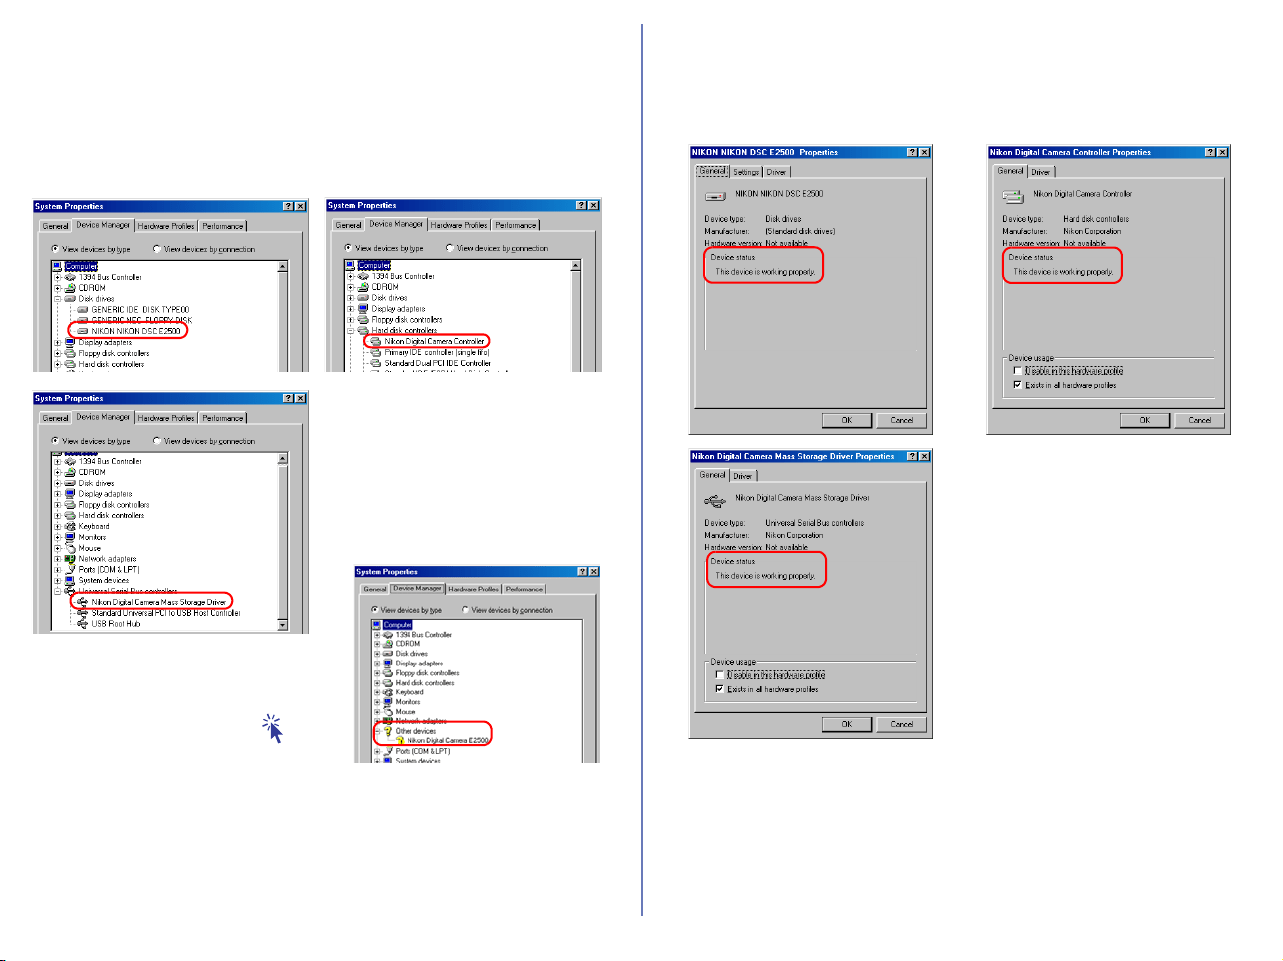
Step 3
Confirm that NIKON NIKON DSC E2500, Nikon Digital Camera
Controller, and Nikon Digital Camera Mass Storage Driver are
listed respectively under Disk drives, Hard disk controllers, and
Universal Serial Bus controllers. Double-click each of these
listings to open the associated Properties window.
If the three drivers above are not listed in the Device Manager and
Nikon Digital Camera E2500 is not listed under Other devices,
disconnect the camera, and restart the computer. When the
computer has restarted, reconnect the camera to the computer.
Step 4
The properties for the selected device are displayed. Click the
General tab and confirm that This device is working properly
appears under Device status. Click OK.
Click OK to close the System Properties dialog box.
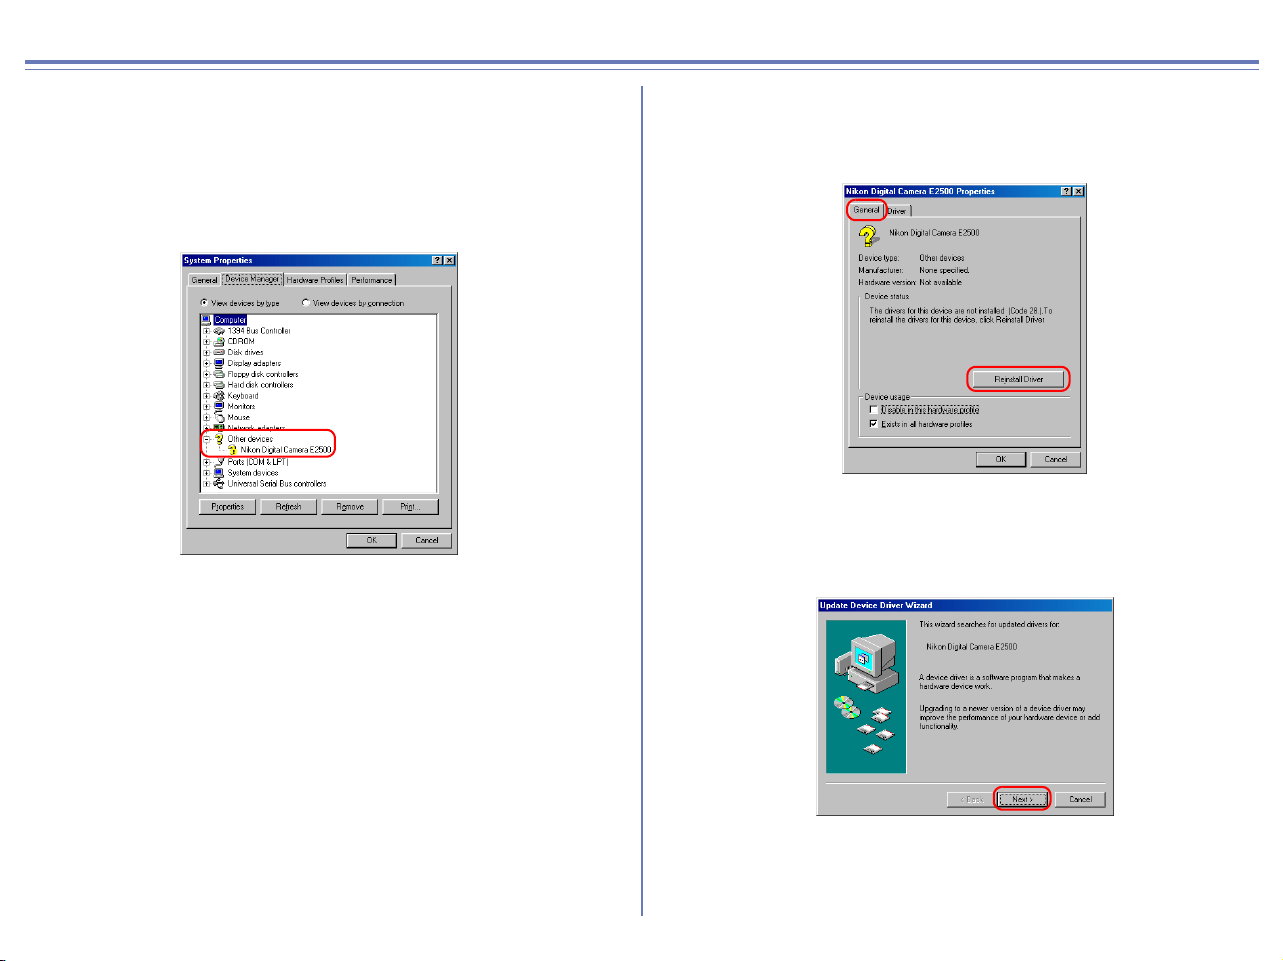
If Nikon Digital Camera E2500
is listed under Other devices,
as shown right, click here to
reinstall the drivers.
54
COOLPIX series/D100 Windows 98SE Reinstalling the device driver
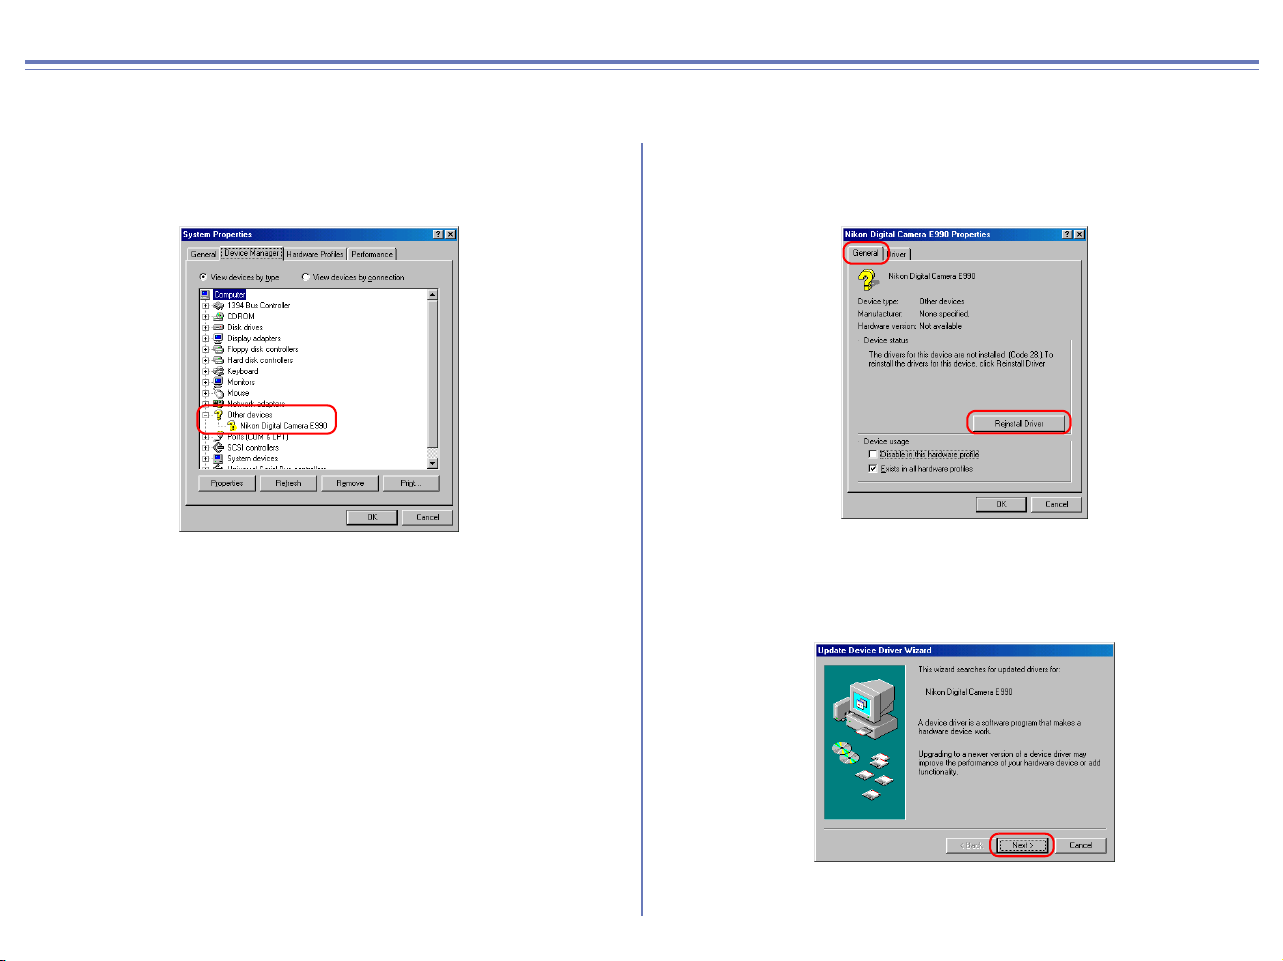
If Nikon Digital Camera E2500 is listed under Other devices, you
need to reinstall the device driver.
Step 1
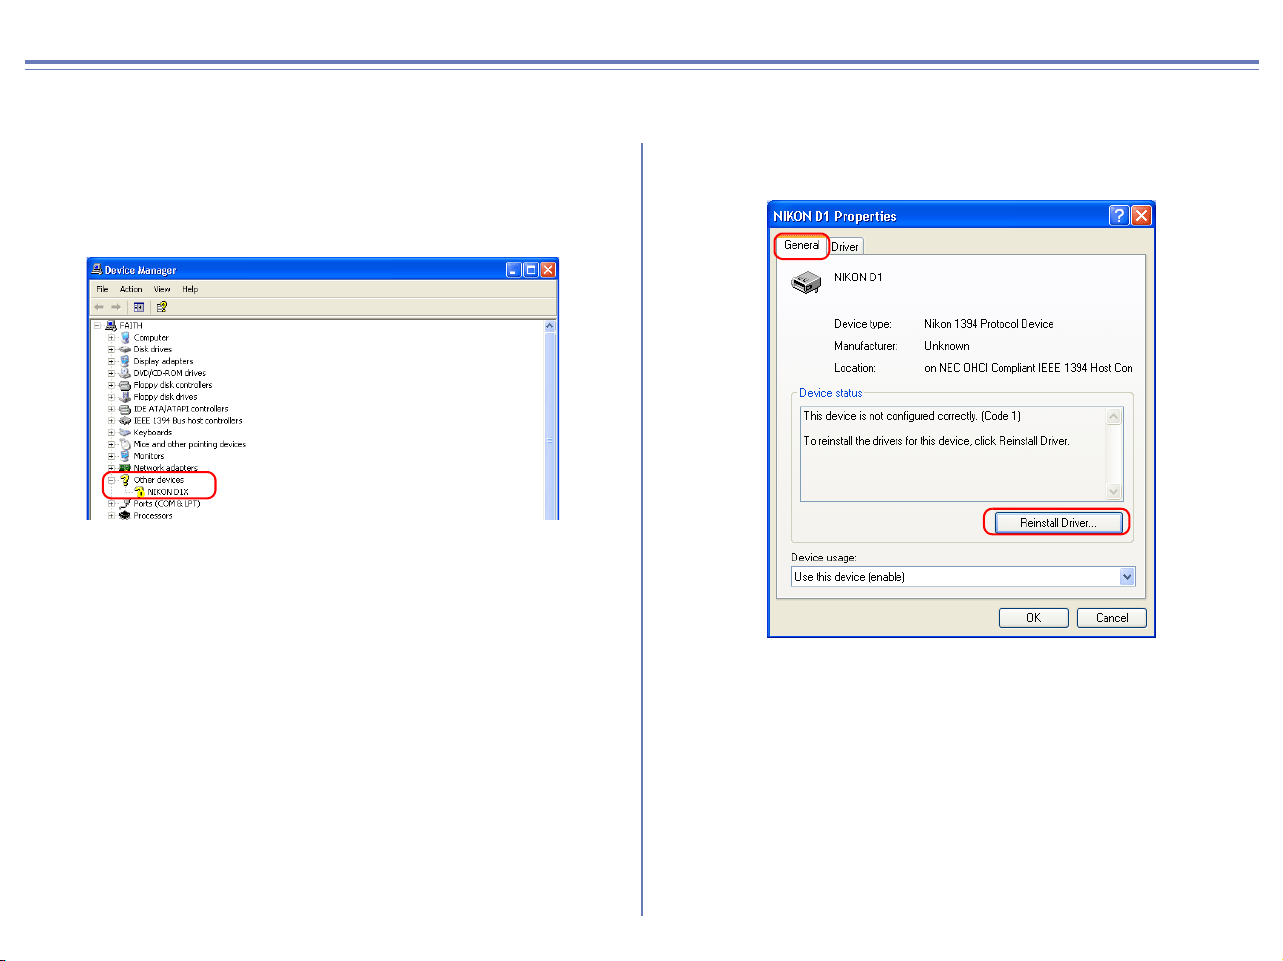
Double-click the listing for the Nikon Digital Camera E2500 that
appears under Other devices.
Step 2
The Nikon Digital Camera E2500 Properties dialog will be displayed.
Open the General tab and click Reinstall Driver.
Step 3
The Windows Update Device Driver Wizard will be displayed;
click Next.

55
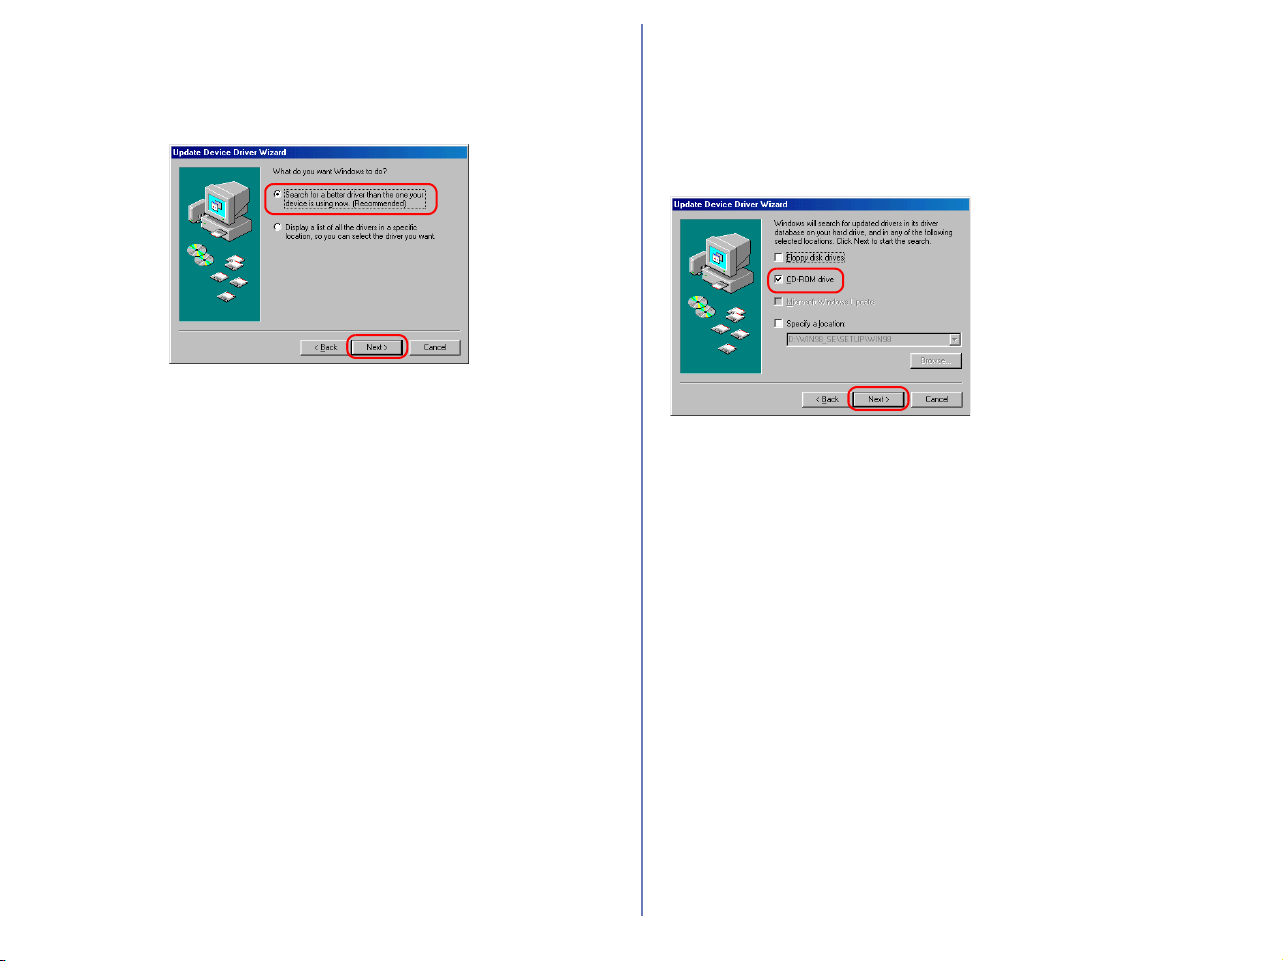
Step 4
The dialog box shown below will be displayed.
Select Search for a better driver than the one your device is
using now and click Next.
Step 5
Insert the Nikon View 6 CD into the CD-ROM drive. You can prevent
the Welcome dialog from opening automatically by holding down the
SHIFT key while inserting the CD. Select the CD-ROM drive check
box and click Next.
If the Welcome dialog appears
when the CD-ROM is inserted,
close the dialog by clicking the
Exit button.
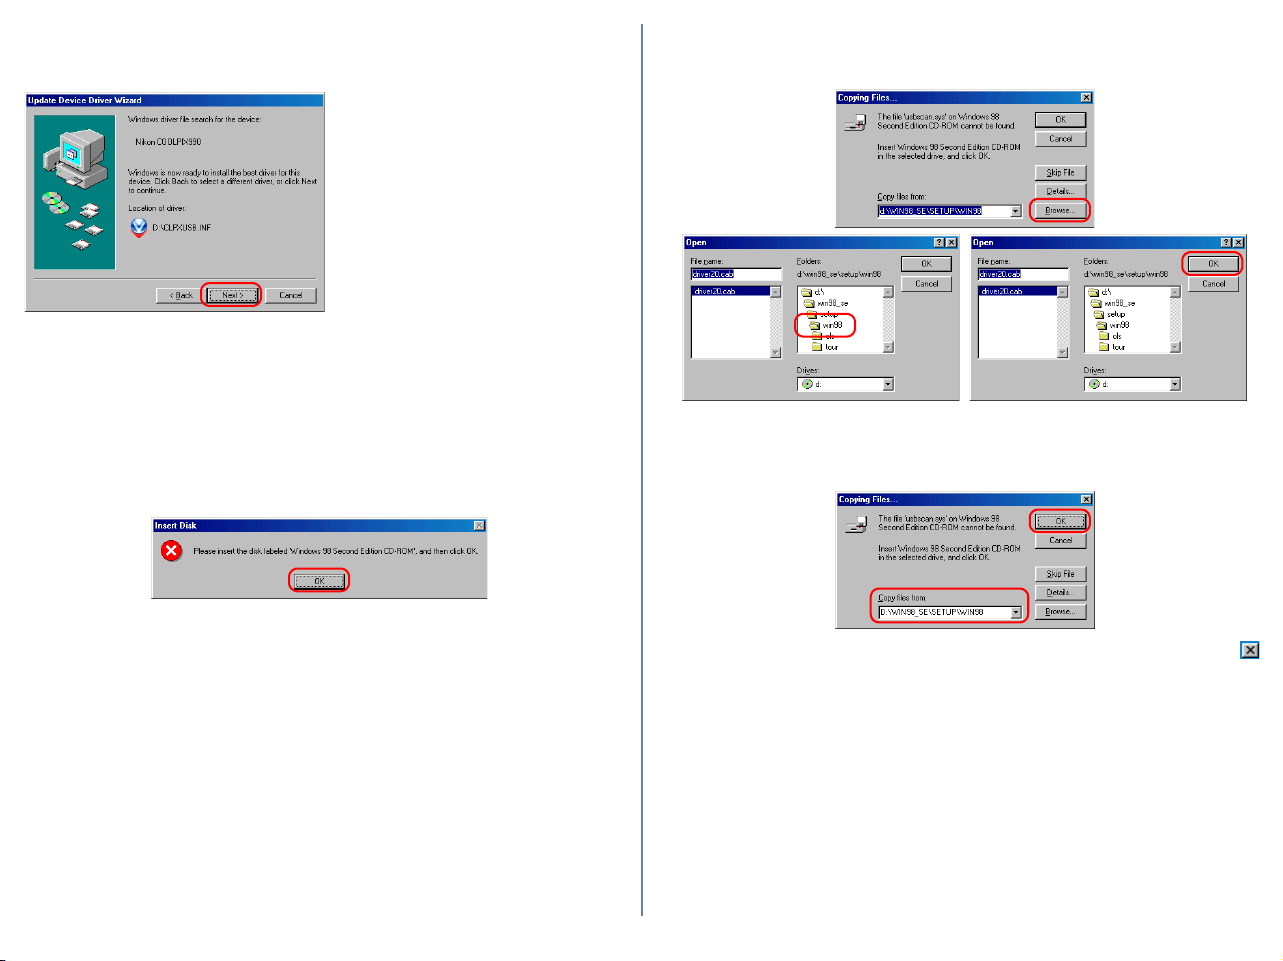
Step 6
The dialog box shown below will be displayed. Click Next.
If the message, Windows was
unable to find a suitable driver
for this device, is displayed, this
may indicate that the Nikon View
6 CD was not correctly inserted
in the CD-ROM drive or that the
appropriate check box was not
selected. Click Back to return to
the dialog shown in Step 5, and
confirm that your settings are
correct.
Step 7
A dialog box will be displayed indicating that the driver was
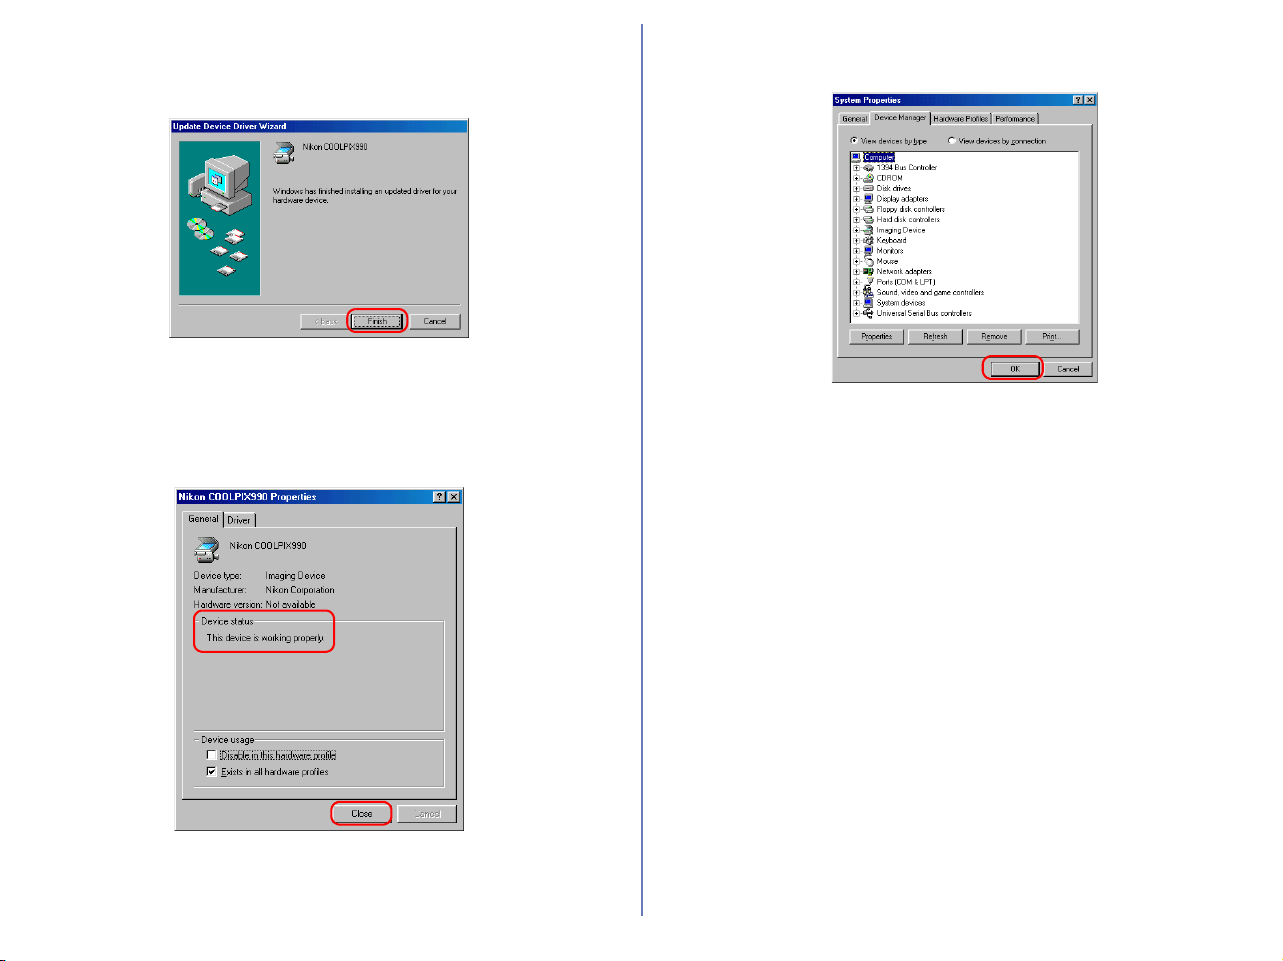
successfully updated. Click Finish to close the dialog box.
56
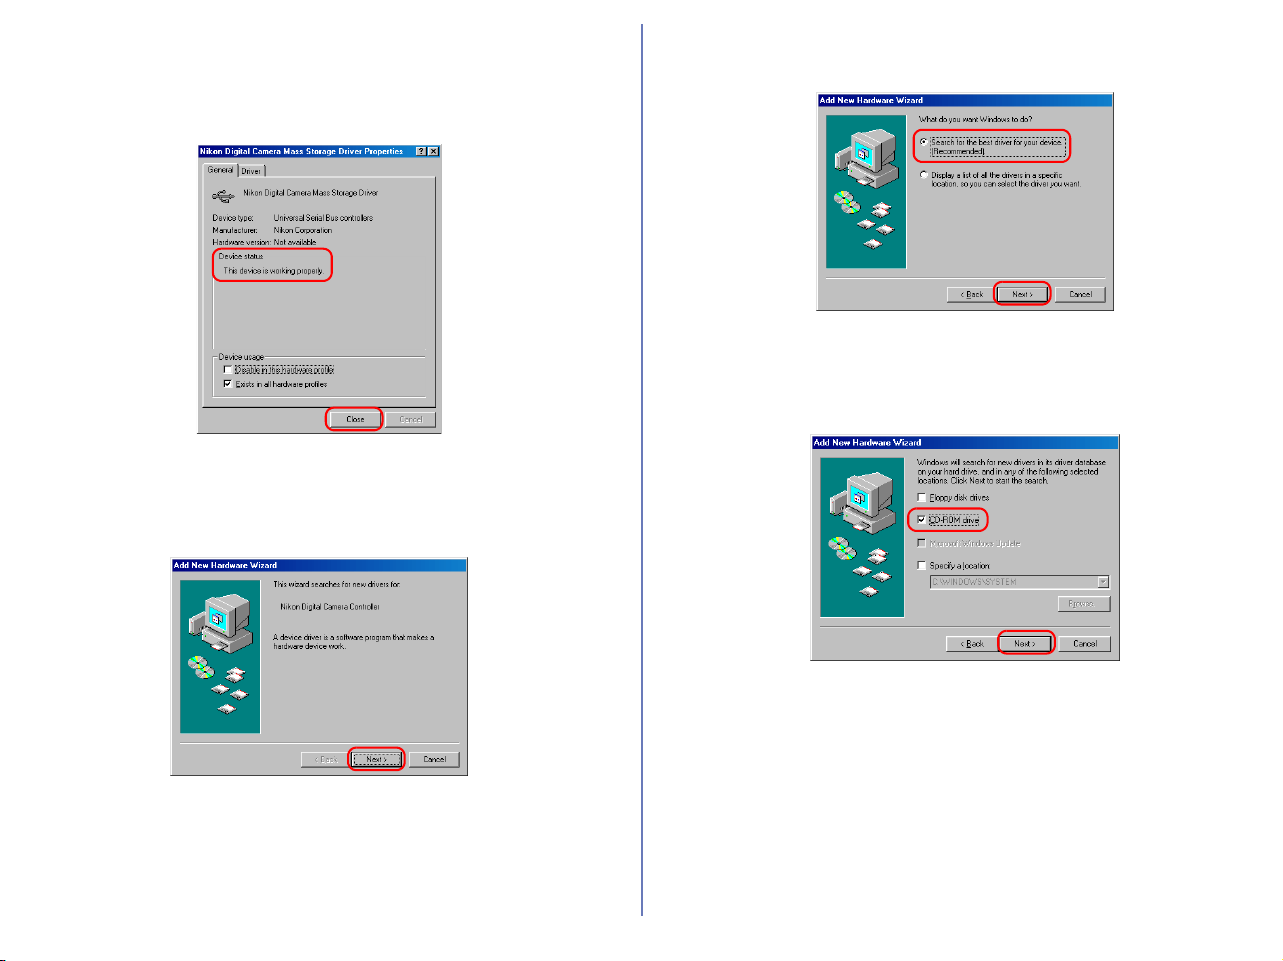
Step 8
Click the General tab of the Nikon Digital Camera Mass Storage
Driver dialog box, and confirm that This device is working properly
appears under Device status. Click Close.
Step 9
The wizard will now start installation of the Nikon Digital Camera
Controller with the dialog shown below. Click Next.
Step 10
Select Search for the best driver for your device and click Next.
Step 11
Make sure the Nikon View 6 CD is inserted in the CD-ROM drive.
Select the CD-ROM drive check box and click Next.
57
Step 12
A dialog will be displayed stating that Windows has found the
drivers for "Nikon Digital Camera Controller"; click Next.
If the message, Windows was
unable to find a suitable driver
for this device, is displayed, this
may indicate that the Nikon View
6 CD was not correctly inserted
in the CD-ROM drive or that the
appropriate check box was not
selected. Click Back to return to
the dialog shown in Step 11, and
confirm that your settings are
correct.
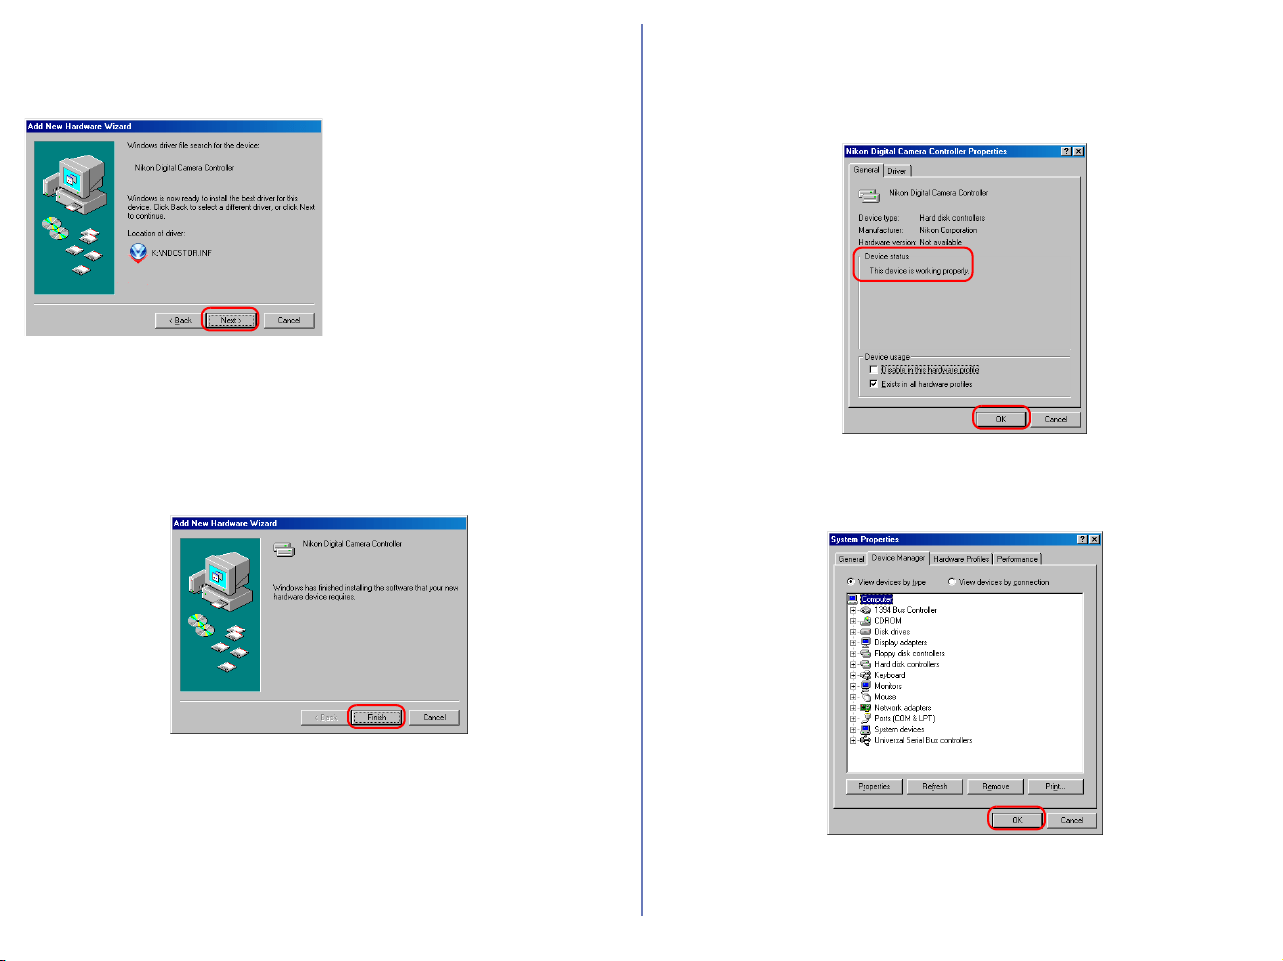
Step 13
A dialog will be displayed indicating that the driver was successfully
installed. Click Finish to close the dialog box.
Step 14
Click the General tab of the Nikon Digital Camera Controller
Properties dialog box, and confirm that This device is working
properly appears under Device status. Click OK.
Step 15
Click OK to close the System Properties dialog box.

58
COOLPIX990/880 Windows XP Confirming the device registration
The following explanation uses COOLPIX990 as an example.
Install Nikon View 6 (device driver) and restart your computer.
After the restart, connect your camera to the computer using a
USB cable and turn on the camera. The camera is registered
automatically.
When the camera is not registered automatically...
If the computer fails to register the camera automatically, a message
instructing you to insert the OS disk will appear. Insert the Windows
XP CD into the CD-ROM drive and click OK. When you click OK, a
warning dialog may appear on screen. Click Continue Anyway to
install the device drivers.
Log on
You will need to log on as Computer Administrator to register the
camera.
Before connecting the camera to the computer
Be sure to install Nikon View 6 (device driver) before connecting
your camera to the computer.
Follow the instructions below to check that the camera has been
correctly registered with the system.
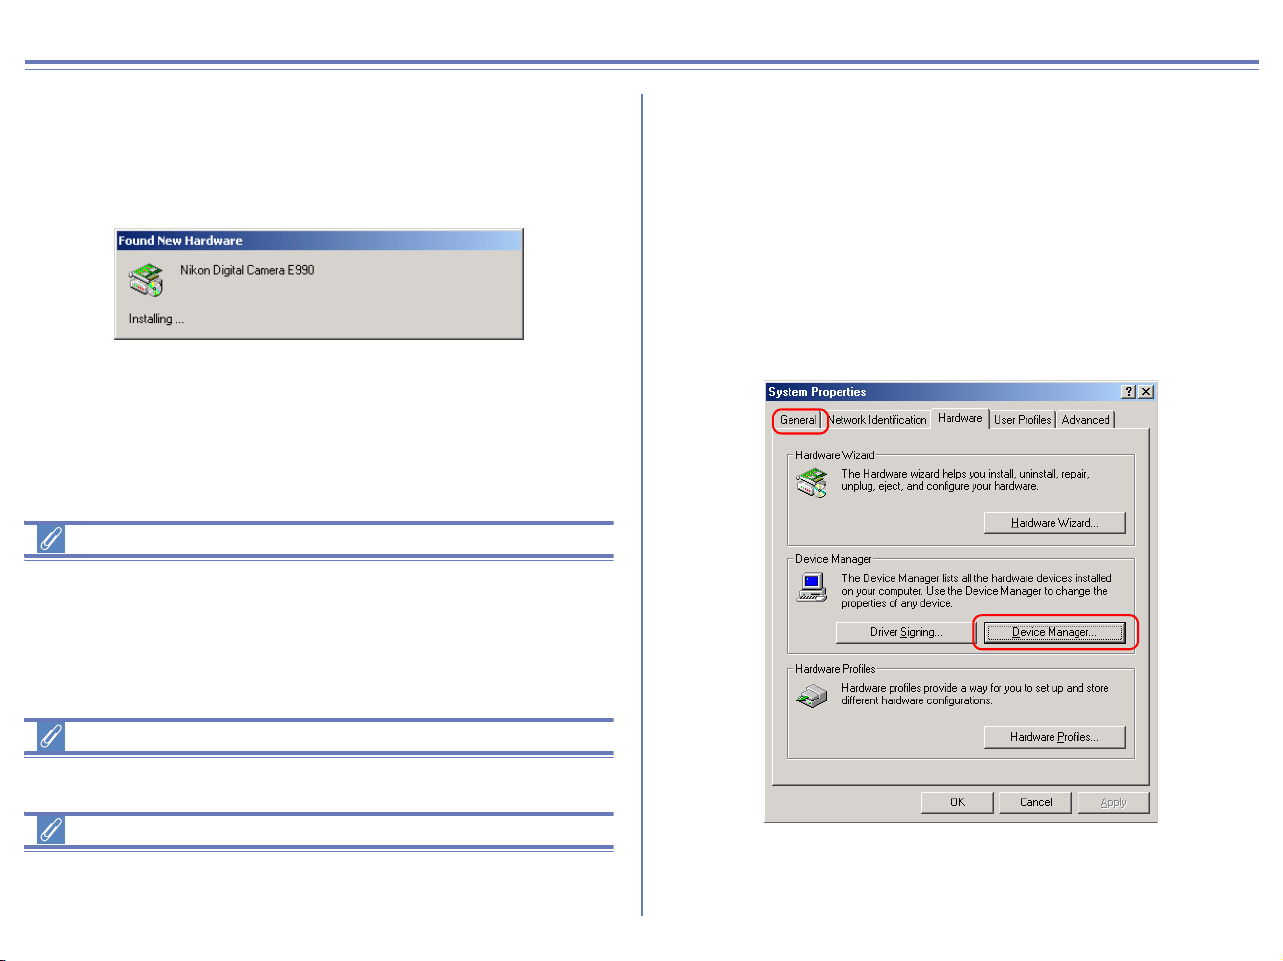
Step 1
Select Control Panel from the Start menu to open the Control
Panel window.
Click the Performance and Maintenance icon inside the Control
Panel window to open the Performance and Maintenance window.
Click the System icon inside the Performance and Maintenance
window to open the System Properties window.
Open the Hardware tab and click the Device Manager button in
the Device Manager area.
59
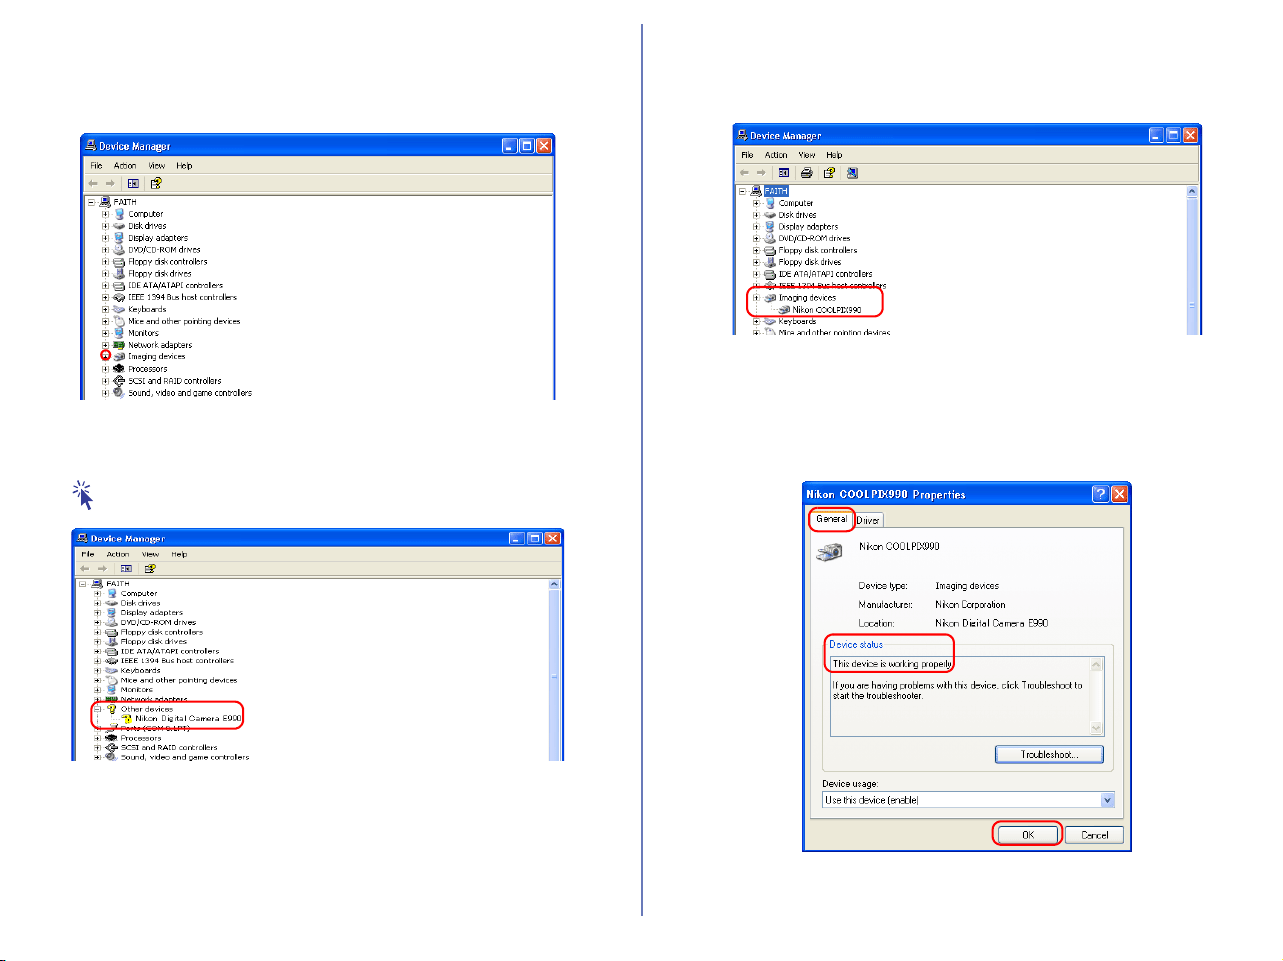
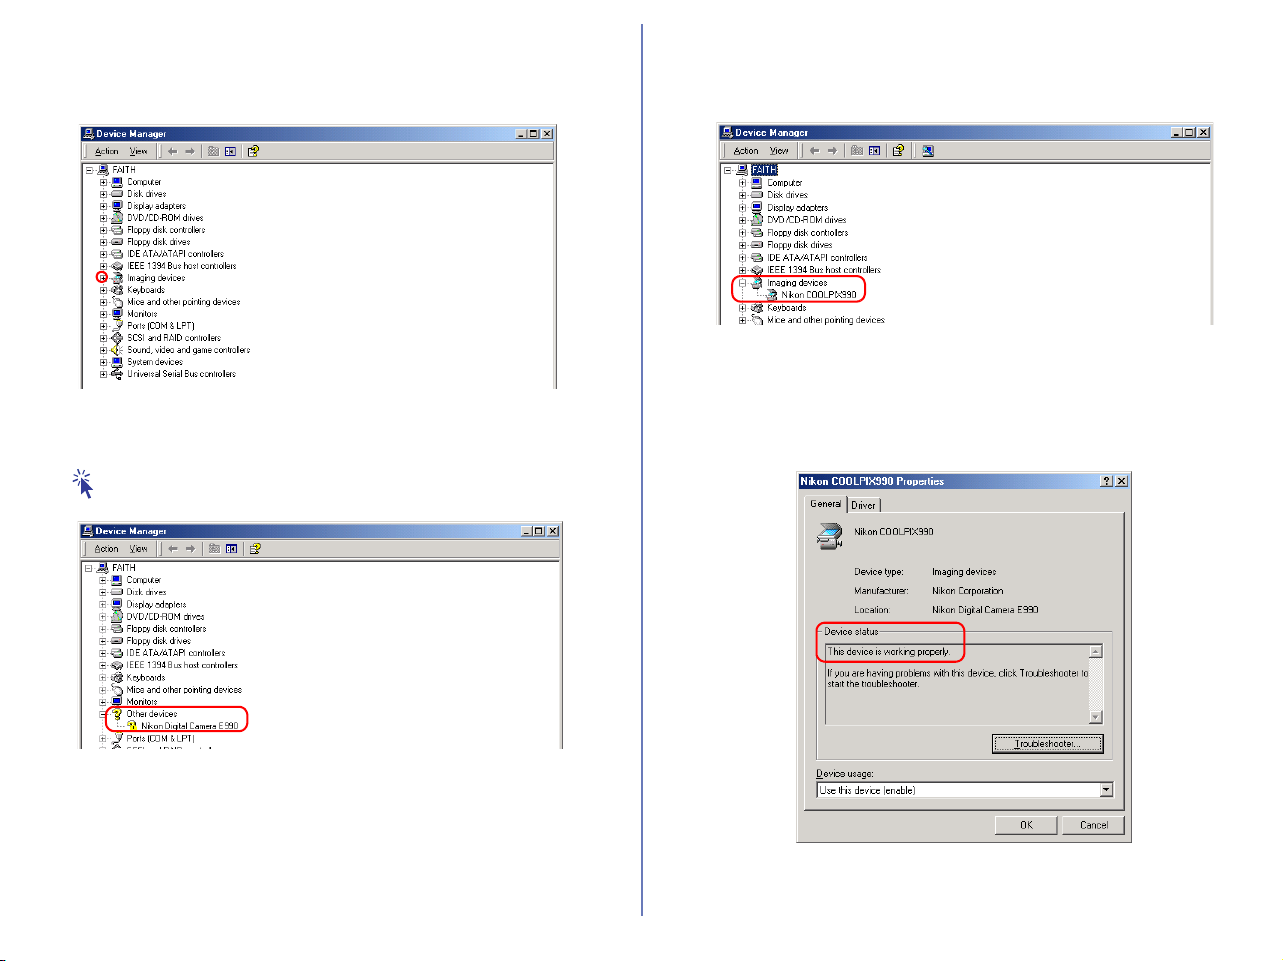
Step 2
Confirm that Imaging devices is listed in the Device Manager
dialog box, then click the plus sign (+) next to Imaging devices.
If Imaging Device does not appear
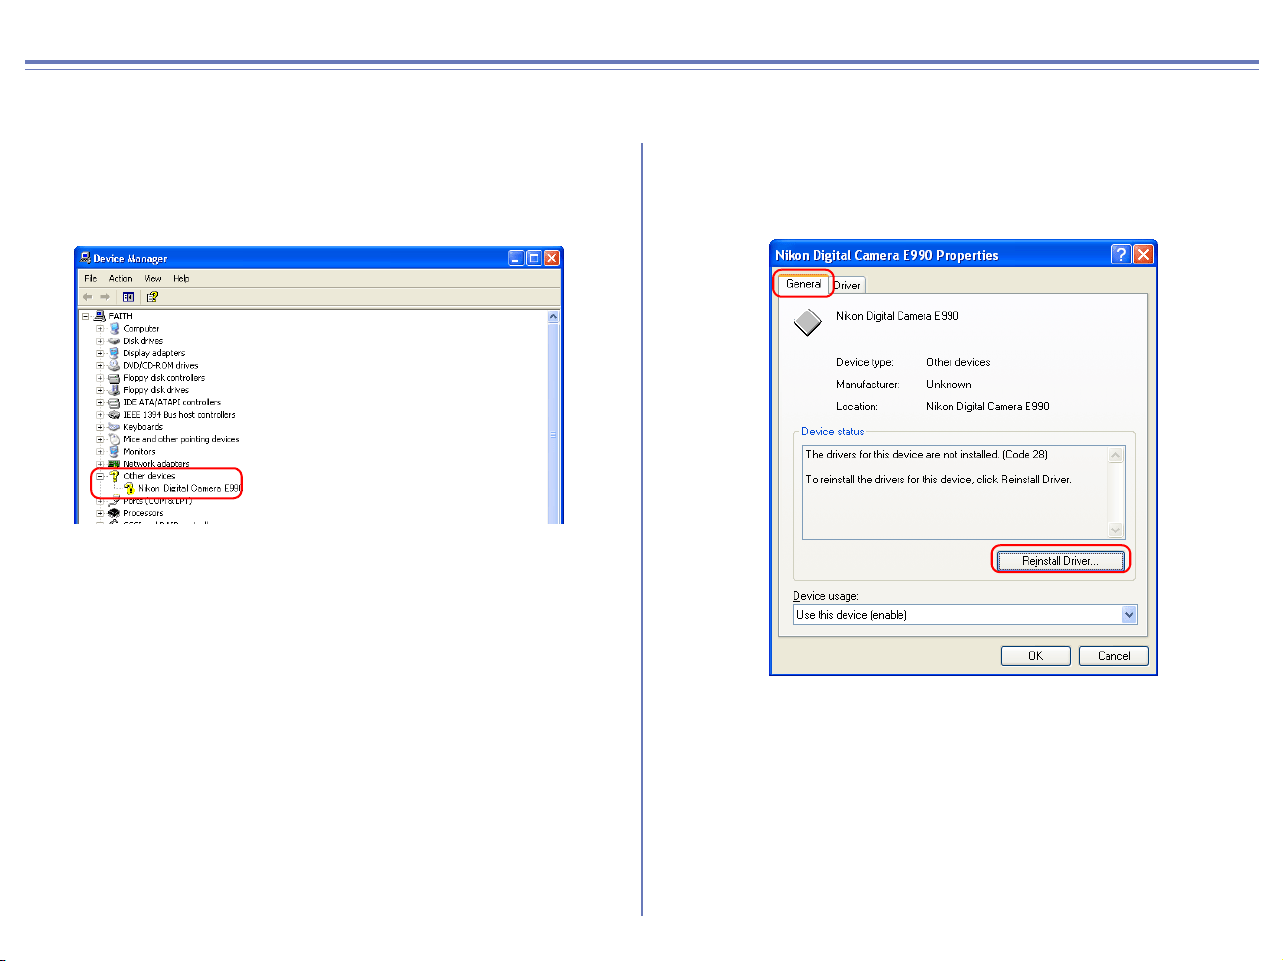
If Nikon Digital Camera E990 is listed under Other devices, click
here .
If Imaging devices is not listed in the Device Manager and Nikon
Digital Camera E990 is not listed under Other devices, disconnect
the camera, and restart the computer. When the computer has
restarted, reconnect the camera to the computer.
Step 3
After confirming that NikonCOOLPIX990 is listed under Imaging
devices, double-click the listing to open the Properties window.
Step 4
Click the General tab in the Nikon COOLPIX990 Properties
dialog box and confirm that This device is working properly
appears under Device status. Click OK.
Click OK to close the System Properties dialog box.
60
COOLPIX990/880 Windows XP Reinstalling the device driver
If Nikon Digital Camera E990(E880) is listed under Other devices, you need to reinstall the device driver.
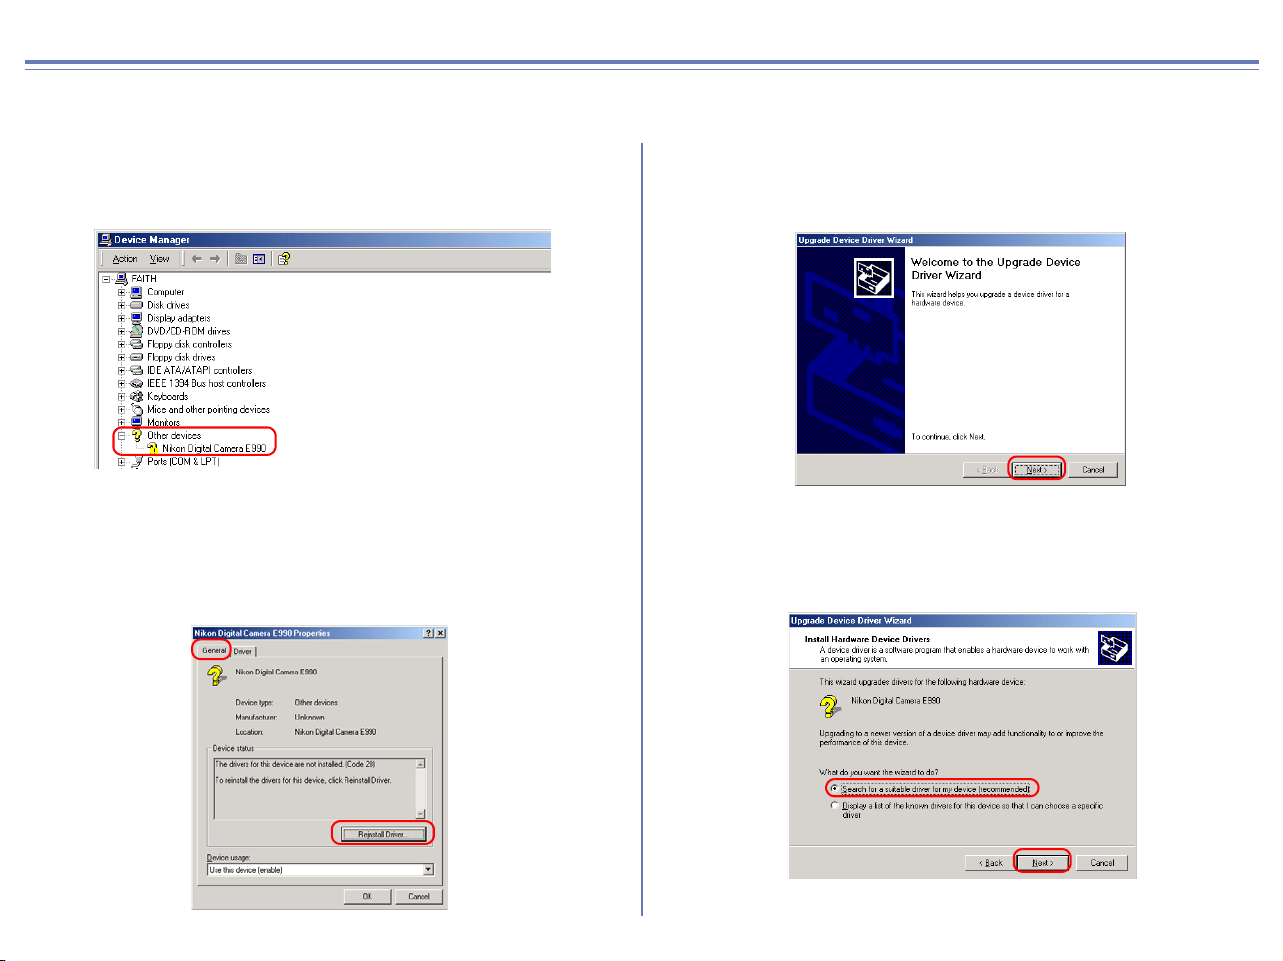
Step 1
Double-click the listing for the Nikon Digital Camera E990 that
appears under Other devices.
Step 2
The Nikon Digital Camera E990 Properties dialog box will be
displayed. Open the General tab and click Reinstall Driver.
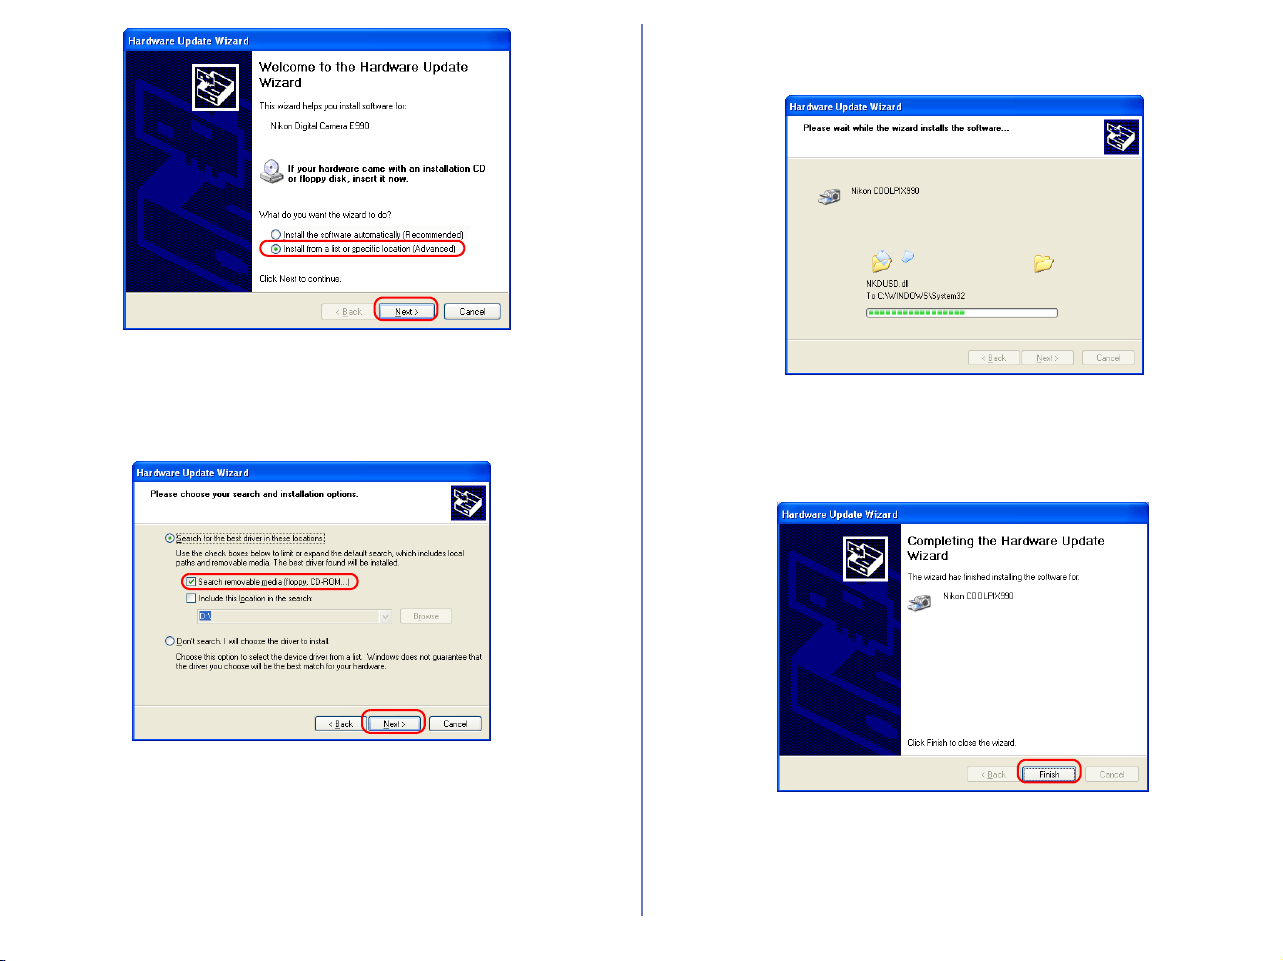
Step 3
The Hardware Update Wizard will be displayed.
Select the
Install from a list or specific location
check box and click
Next
.
61
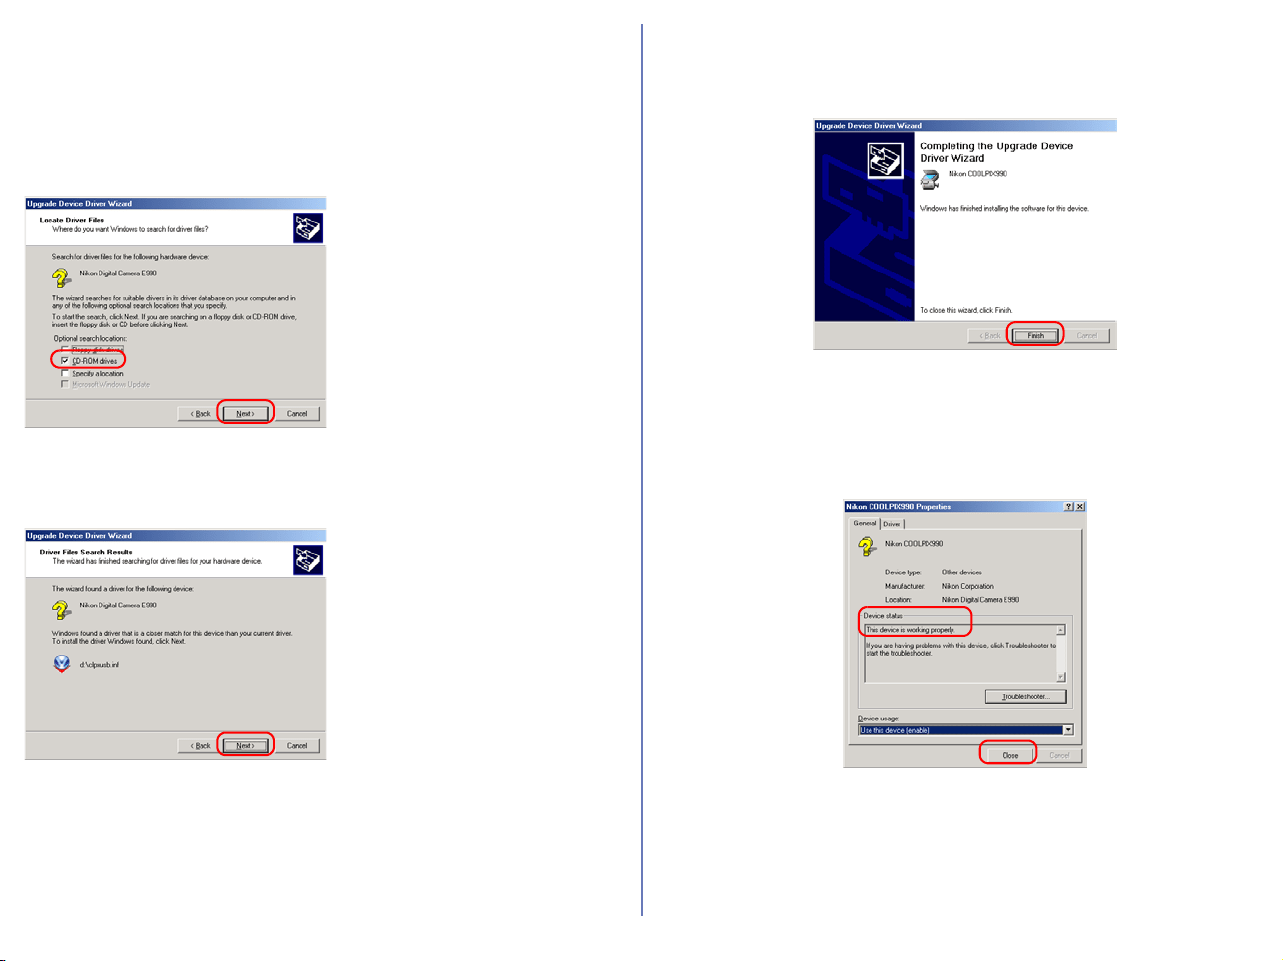
Step 4
The dialog box shown below will be displayed. Select the Search
removable media (floppy, CD-ROM) check box and click Next.
Step 5
The dialog box shown below will be displayed.
Step 6
A dialog box will be displayed indicating that the driver was
successfully updated. Click Finish to close the dialog box.
62
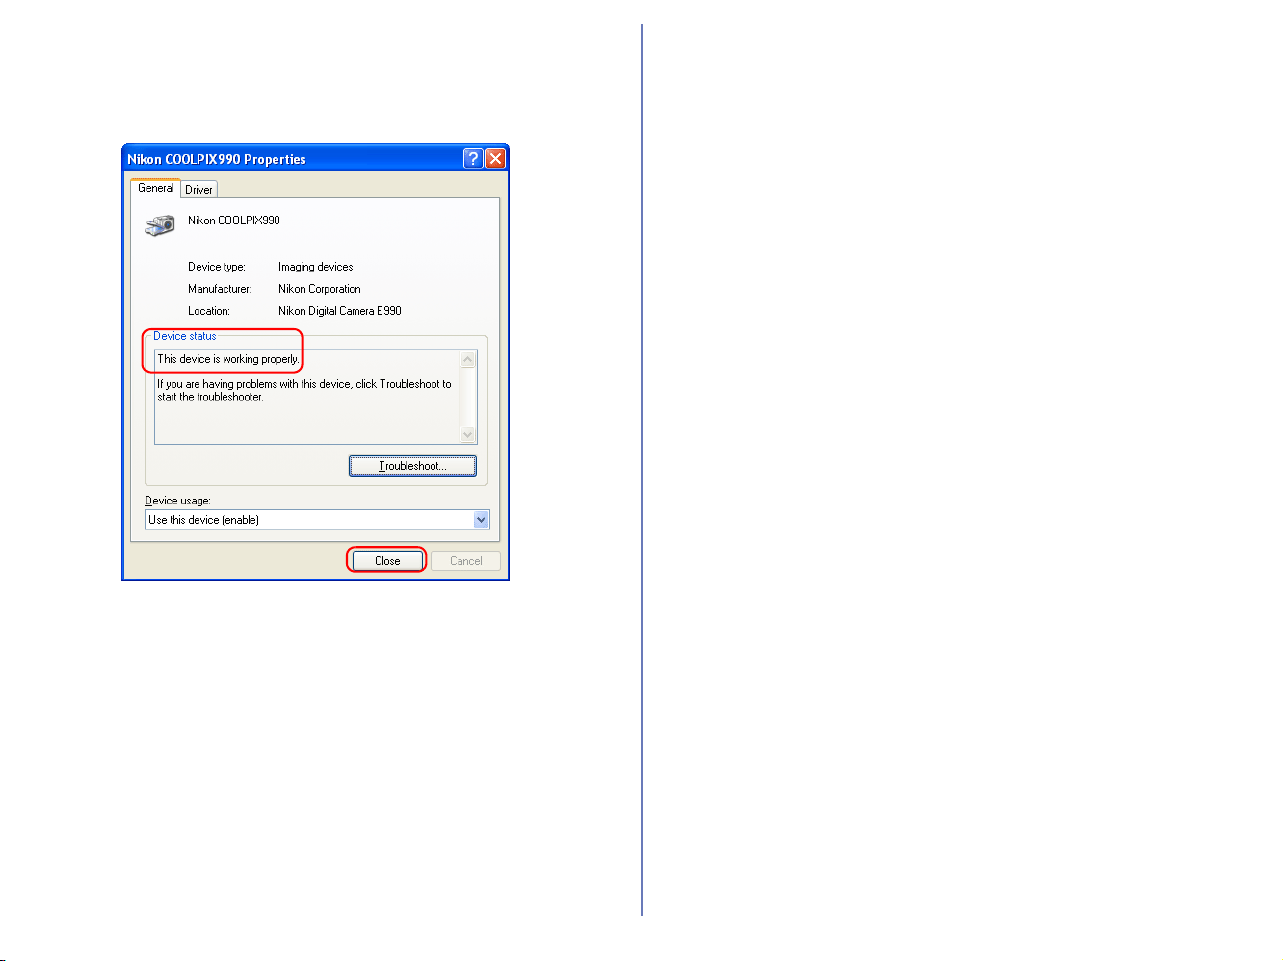
Step 7
Click the General tab of the Nikon COOLPIX990 Properties
dialog box, and confirm that This device is working properly
appears under Device status. Click Close.
Click OK to close the System Properties dialog box.
63
COOLPIX990/880 Windows 2000 Confirming the device registration
The following explanation uses COOLPIX990 as an example.
After installing Nikon View 6 (device driver) and restarting the computer,
connect your camera to the computer using a USB cable and turn on
the camera. The camera is registered automatically.
When the camera is not registered automatically...
If the computer fails to register the camera automatically, a
message instructing you to insert the OS disk will appear. Insert
the Windows 2000 Professional CD into the CD-ROM drive and
click OK. When you click OK, a warning dialog may appear on
screen. Click Yes to install the device drivers.
Log on
You will need to log on as Administrator to register the camera.
Before connecting the camera to the computer
Be sure to install Nikon View 6 (device driver) before connecting
your camera to the computer.
Follow the instructions below to check that the camera has been
correctly registered with the system.
Step 1
Right-click the My Computer icon on the desktop. Select Properties
from the menu which appears. The System Properties dialog box
opens.
Open the Hardware tab and click the Device Manager button in
the Device Manager area.
64
Step 2
Confirm that Imaging devices is listed in the Device Manager
dialog box, then click the plus sign (+) next to Imaging devices.
If Imaging Device does not appear
If Nikon Digital Camera E990 is listed under Other devices, click
here .
If Imaging devices is not listed in the Device Manager and Nikon
Digital Camera E990 is not listed under Other devices, disconnect
the camera, and restart the computer. When the computer has
restarted, reconnect the camera to the computer.
Step 3
After confirming that Nikon COOLPIX990 is listed under Imaging
devices, double-click the listing to open the Properties window.
Step 4
Click the General tab of the Nikon COOLPIX990 Properties dialog
box and confirm that This device is working properly appears
under Device status. Click OK.
Click OK to close the System Properties dialog box.
65
COOLPIX990/880 Windows 2000 Reinstalling the device driver
If Nikon Digital Camera E990(E880) is listed under Other devices, you need to reinstall the device driver.
Step 1
Double-click the listing for the Nikon Digital Camera E990 that
appears under Other devices.
Step 2
The Nikon Digital Camera E990 Properties dialog box will be
displayed.
Open the General tab and click Reinstall Driver.
Step 3
The Windows Upgrade Device Driver Wizard will be displayed;
click Next.
Step 4
The dialog box shown below will be displayed. Select the Search
for a suitable driver for my device option and click Next.
66
Step 5
The dialog shown below will be displayed.
Insert the Nikon View 6 CD into the CD-ROM drive. You can
prevent the Welcome dialog from opening automatically by holding
down the SHIFT key while inserting the CD. Select the CD-ROM
drives check box and click Next.
If the
Welcome
dialog box appears
when the CD-ROM is inserted,
close the dialog by clicking the
Exit
button.
Step 6
The dialog shown below will be displayed. Click Next.
If the message, Windows was
unable to find a suitable driver
for this device, is displayed,
this may indicate that the Nikon
View 6 CD was not correctly
inserted in the CD-ROM drive or
that the appropriate check box
was not selected. Click Back to
return to the dialog shown in
Step 5, and confirm that your
settings are correct.
Step 7
A dialog box will be displayed indicating that the driver was
successfully updated. Click Finish to close the dialog box.
Step 8
Click the General tab of the Nikon COOLPIX990 Properties dialog
box, and confirm that This device is working properly appears
under Device status. Click Close.
Click OK to close the System Properties dialog box.

67
COOLPIX990/880 Windows Me Confirming the device registration
The following explanation uses COOLPIX990 as an example.
After installing Nikon View 6 (device driver) and restarting the
computer, connect your camera to the computer using a USB cable
and turn on the camera. The camera is registered automatically.
Before connecting the camera to the computer
Be sure to install Nikon View 6 (device driver) before connecting
your camera to the computer.
Follow the instructions below to check that the camera has been
correctly registered with the system.
Step 1
Right-click the My Computer icon on the desktop. Select Properties
from the menu which appears. The System Properties dialog box
opens. Click the Device Manager tab.

68
Step 2
Confirm that Imaging Device is listed in the Device Manager tab,
then click the plus sign (+) next to Imaging Device.
If Imaging Device does not appear
If Nikon Digital Camera E990 is listed under Other devices, click
here .
If Imaging devices is not listed in the Device Manager and Nikon
Digital Camera E990 is not listed under Other devices, disconnect
the camera, and restart the computer. When the computer has
restarted, reconnect the camera to the computer.
Step 3
After confirming that Nikon COOLPIX990 is listed under Imaging
Device, double click the listing to open the Properties window.
Step 4
The Nikon COOLPIX990 Properties dialog will be displayed.
Click the General tab and confirm that This device is working
properly appears under Device status. Click OK.
Click OK to close the System Properties dialog box.

69
COOLPIX990/880 Windows Me Reinstalling the device driver
If Nikon Digital Camera E990(E880) is listed under Other devices, you need to reinstall the device driver.
Step 1
Double-click the listing for the Nikon Digital Camera E990 that
appears under Other devices.
Step 2
The Nikon Digital Camera E990 Properties dialog box will be
displayed. Open the General tab and click Reinstall Driver.
70
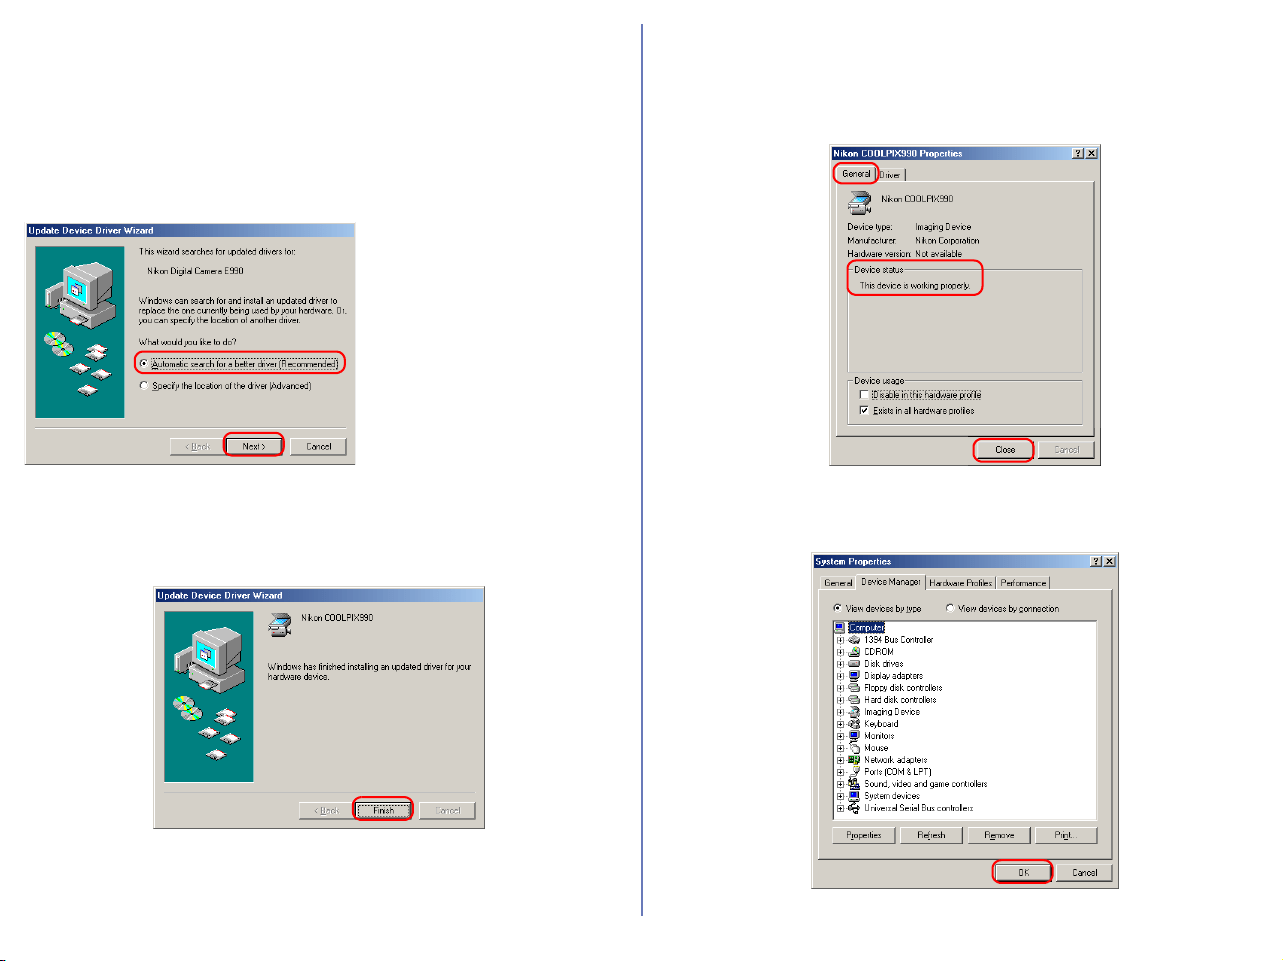
Step 3
The Windows Update Device Driver Wizard will be displayed.
Insert the Nikon View 6 CD into the CD-ROM drive.You can
prevent the Welcome dialog from opening automatically by holding
down the SHIFT key while inserting the CD. Make sure Automatic
search for a better driver is selected, and click Next to update the
device driver automatically.
If the Welcome dialog box
appears when the CD-ROM
is inserted, close the dialog
box by clicking the Exit
button.
Step 4
A dialog box will be displayed indicating that the driver was
successfully updated. Click Finish to close the dialog box.
Step 5
Click the General of the Nikon COOLPIX990 Properties dialog
box, and confirm that This device is working properly appears
under Device status. Click Close.
Step 6
Click OK to close the System Properties dialog box.
71
COOLPIX990/880 Windows 98SE Confirming the device registration
The following explanation uses COOLPIX990 as an example.
After installing Nikon View 6 (device driver) and restarting the
computer, connect your camera to the computer using a USB cable
and turn on the camera. The camera is registered automatically.
Before connecting the camera to the computer
Be sure to install Nikon View 6 (device driver) before connecting
your camera to the computer.
Follow the instructions below to check that the camera has been
correctly registered with the system.
Step 1
Right-click the My Computer icon on the desktop. Select Properties
from the menu which appears. The System Properties dialog box
opens. Click the Device Manager tab.

72
Step 2
Confirm that Imaging Device is listed in the Device Manager tab,
then click the plus sign (+) next to Imaging Device.
If Imaging Device does not appear
If Nikon Digital Camera E990 is listed under Other devices, click
here .
If Imaging devices is not listed in the Device Manager and Nikon
Digital Camera E990 is not listed under Other devices, disconnect
the camera, and restart the computer. When the computer has
restarted, reconnect the camera to the computer.
Step 3
After confirming that Nikon COOLPIX990 is listed under Imaging
Device, double-click the listing to open the Properties window.
Step 4
The Nikon COOLPIX990 Properties dialog box will be displayed.
Click the General tab and confirm that This device is working
properly appears under Device status. Click OK.
Click OK to close the System Properties dialog box.
73
COOLPIX990/880 Windows 98SE Reinstalling the device driver
If Nikon Digital Camera E990(E880) is listed under Other devices, you need to reinstall the device driver.
Step 1
Double-click the listing for the Nikon Digital Camera E990 that
appears under Other devices.
Step 2
The Nikon Digital Camera E990 Properties dialog box will be
displayed. Open the General tab and click Reinstall Driver.
Step 3
The Windows Update Device Driver Wizard will be displayed;
click Next.
74
Step 4
The dialog box shown below will be displayed. Select Search for a
better driver than the one your device is using now and click
Next.
Step 5
The dialog shown below will be displayed.
Insert the Nikon View 6 CD into the CD-ROM drive. You can
prevent the Welcome dialog from opening automatically by holding
down the SHIFT key while inserting the CD. Select the CD-ROM
drive check box and click Next.
If the Welcome dialog box
appears when the CD-ROM is
inserted, close the dialog box
by clicking the Exit button.
75
Step 6
The dialog box shown below will be displayed; click Next.
If the message, Windows was
unable to find a suitable driver
for this device, is displayed, this
may indicate that the Nikon View
6 CD was not correctly inserted
in the CD-ROM drive or that the
appropriate check box was not
selected. Click Back to return to
the dialog box shown in Step 5,
and confirm that your settings
are correct.
If an Insert Disk message appears
If an Insert Disk message appears, insert the Windows 98
(Second Edition) CD-ROM and click OK.
If the Copying Files dialog box appears, click Browse, double-
click win98 in the CD-ROM drive folder list, then click OK.
Confirm that the win98 folder on the CD-ROM is displayed under
Copy files from and click OK.
* If the Windows 98 (Second Edition) CD-ROM starts up click
to close the window.
76
Step 7
A dialog box will be displayed indicating that the driver was
successfully updated. Click Finish to close the dialog box.
Step 8
Click the General tab for the Nikon COOLPIX990 Properties, and
confirm that This device is working properly appears under
Device status. Click Close.
Step 9
Click OK to close the System Properties dialog box.
77
D1/D1X/D1H Windows XP Registering the device driver
Installing Windows Hardware Drivers for the D1/D1X/D1H
Before You Begin
Confirm that your OHCI-compliant IEEE 1394 interface board or
card has been correctly registered with the system.
Select
Control Panel
from the
Start
menu to open the Control Panel window.
Click the Performance and Maintenance icon inside the Control
Panel window to open the Performance and Maintenance window.
Click the System icon inside the Performance and Maintenance
window to open the System Properties window.
Select the Hardware tab and click the Device Manager button to
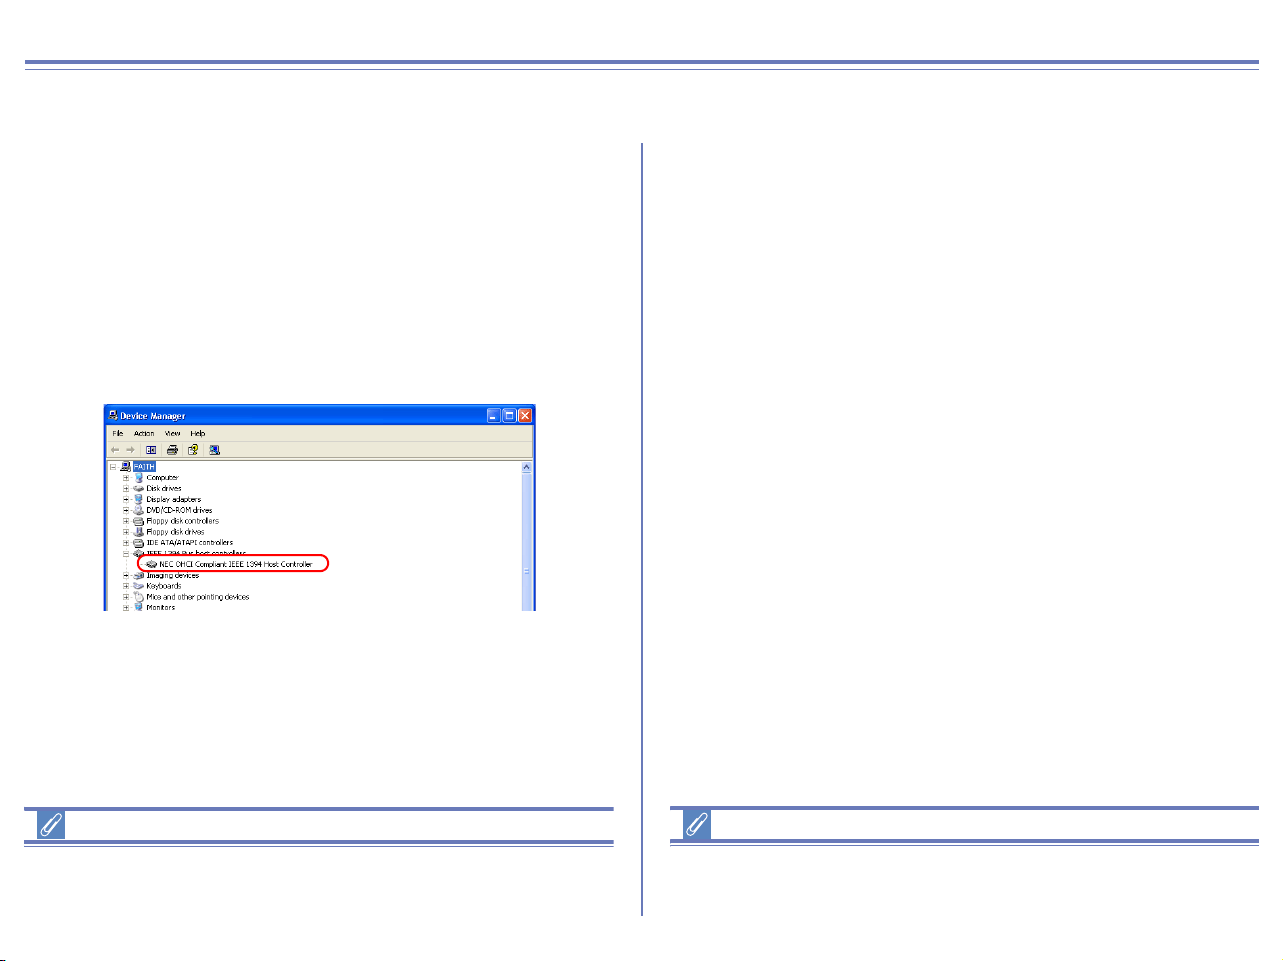
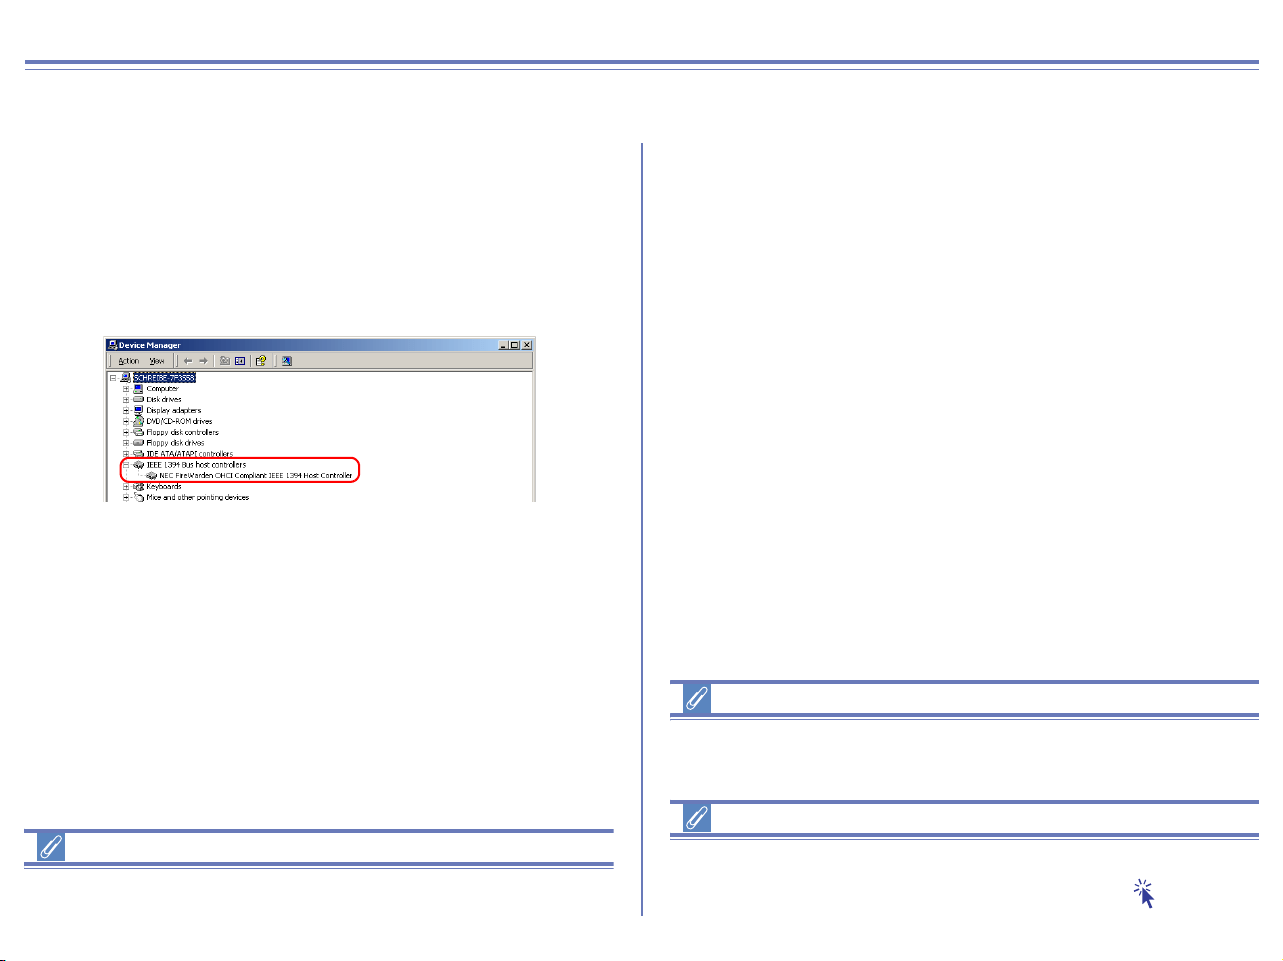
open Device Manager window shown below.
If "IEEE 1394 Bus host controllers" is not listed in the Device
Manager, or if your IEEE 1394 interface board or card is listed as
an unknown or miscellaneous device or is preceded by a red or
yellow warning icon, follow the instructions in the manual provided
with the board to ensure that the drivers are properly installed.
Log On
You will need to log on as the "Computer Administrator" to register
your camera.
After installing Nikon View 6 (device driver) and restarting the
computer, connect your camera to the computer using an IEEE 1394
cable and turn on the camera. The camera is registered automatically.
Before connecting the camera to the computer
Be sure to install Nikon View 6 (device driver) before connecting
your camera to the computer.
If the camera has been correctly registered with the system, the
controller for your camera should appear under 1394 Bus Controller.
78
Follow the instructions below to check that the camera has been
correctly registered with the system.
Step 1
Select Control Panel from the Start menu to open the Control
Panel window.
Click the Performance and Maintenance icon inside the Control
Panel window to open the Performance and Maintenance window.
Click the System icon inside the Performance and Maintenance
window to open the System Properties window.
Select the Hardware tab and click the Device Manager button to
open Device Manager window shown below.
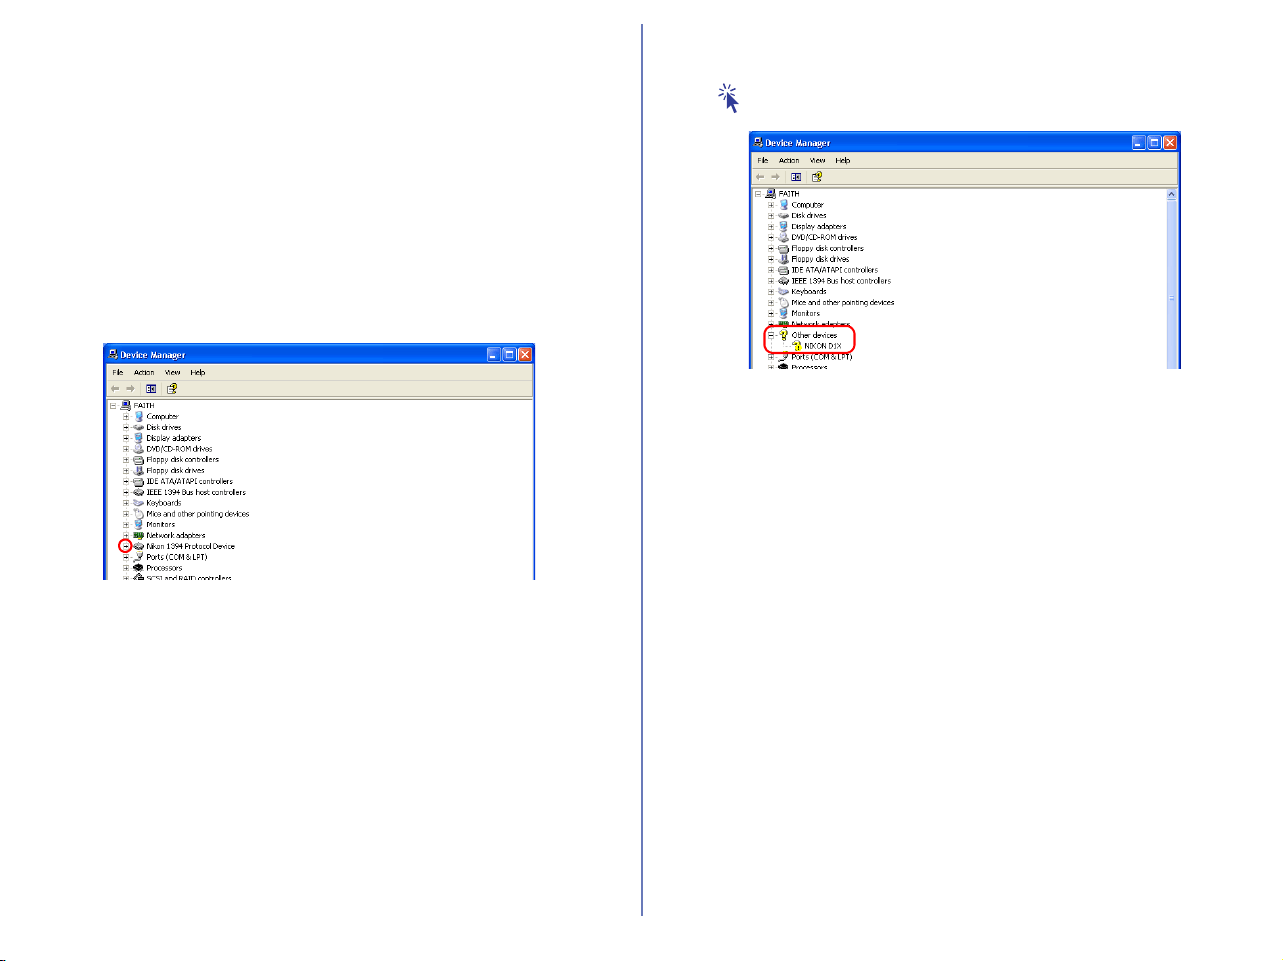
The Device Manager will be displayed. After confirming that
"Nikon 1394 Protocol Device" is listed in the Device Manager, click
the "+" sign to its left.
If "Nikon 1394 Protocol Device" does not appear
If "NIKON D1X (D1/D1H)" is listed under "Other devices", click
here , and reinstall the device drivers.
If "Nikon 1394 Protocol Device" is not listed in the Device Manager
and "NIKON D1
X (D1/D1H)" is not listed under Other Devices,
disconnect the camera, and restart the computer. When the
computer has restarted, reconnect the camera to the computer.
79
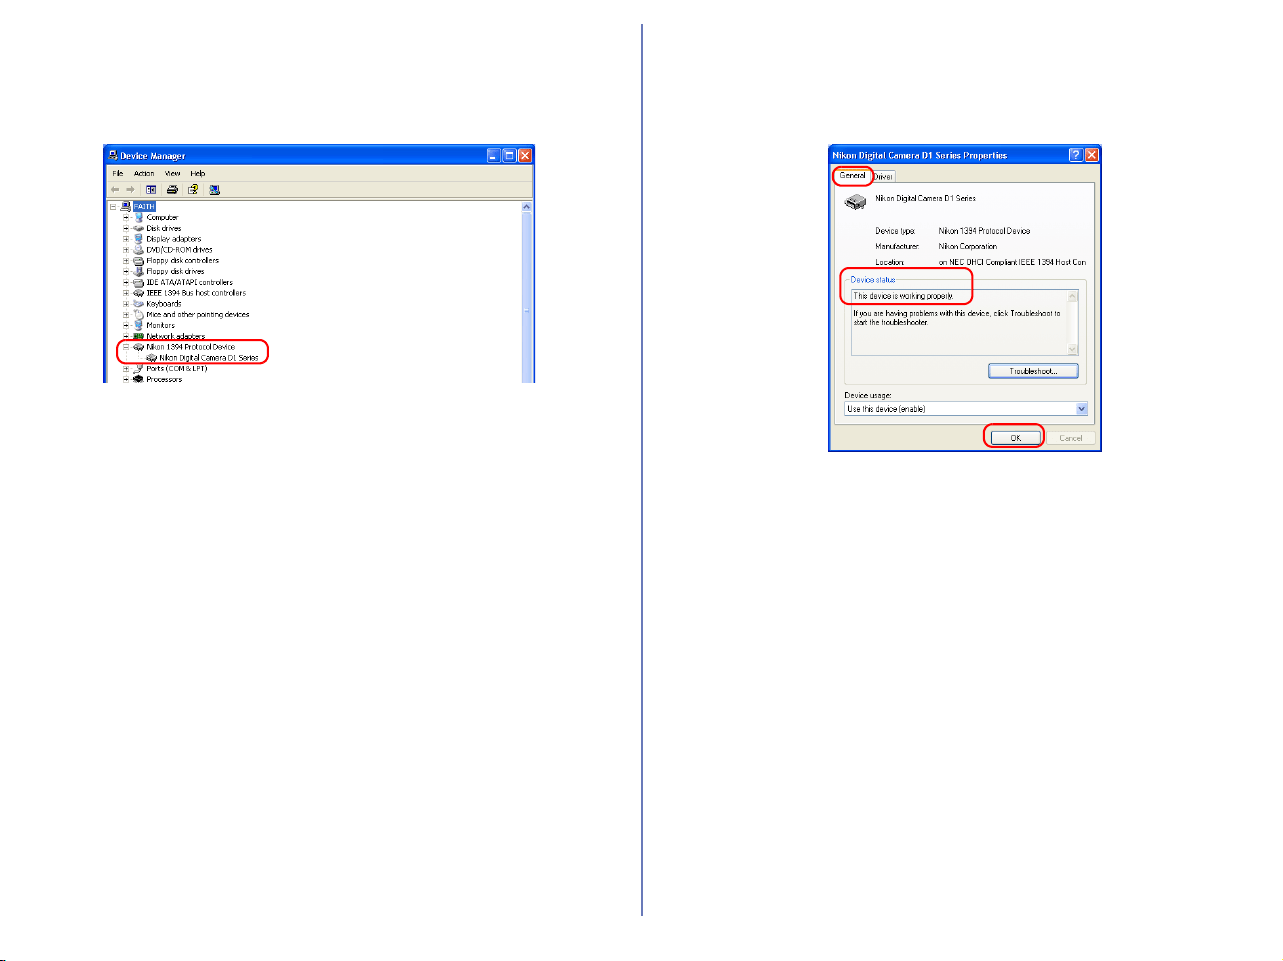
Step 2
After confirming that "Nikon Digital Camera D1 Series" is listed
under "Nikon 1394 Protocol Device," double-click the listing to
open the Properties window.
Step 3
The Nikon Digital Camera D1 Series Properties dialog will be
displayed. Click the General tab and confirm that "This device is
working properly" appears under "Device status". Click OK.
Close the Device Manager, then click OK to close the System
Properties window. Device registration is now complete.
80
D1/D1X/D1H Windows XP Reinstalling the device driver
If NIKON D1X (D1/D1H) appears under "Other Devices" reinstall the device drivers as instructed below.
Step 1
Open the Device Manager dialog. Double-click the listing for the
NIKON D1
X (D1/D1H) that appears under "Other devices"; the
Properties dialog will be displayed.
Step 2
Open the General tab and click Reinstall Driver....
81
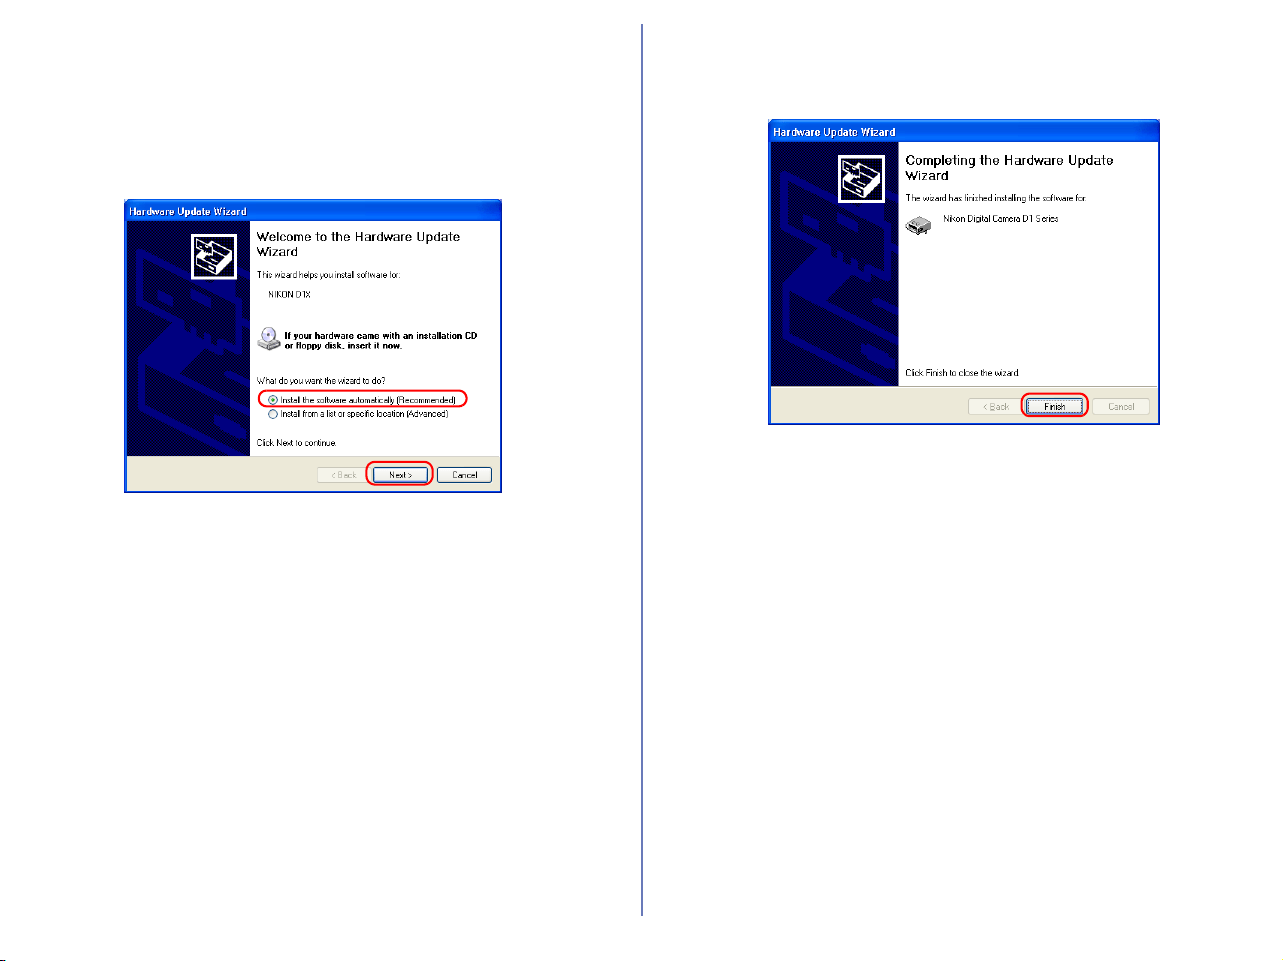
Step 3
The "Hardware Update Wizard" dialog will appear. Holding down the
shift key to prevent the Welcome dialog from opening automatically,
insert the Nikon View 6 CD into the CD-ROM drive. (If the shift key is
not held down, the Welcome dialog will appear when the CD-ROM is
inserted.) Select "Install the software automatically", and click Next.
Step 4
When the driver installation has been completed, the dialog shown
below will be displayed; click Finish to close the wizard.
82
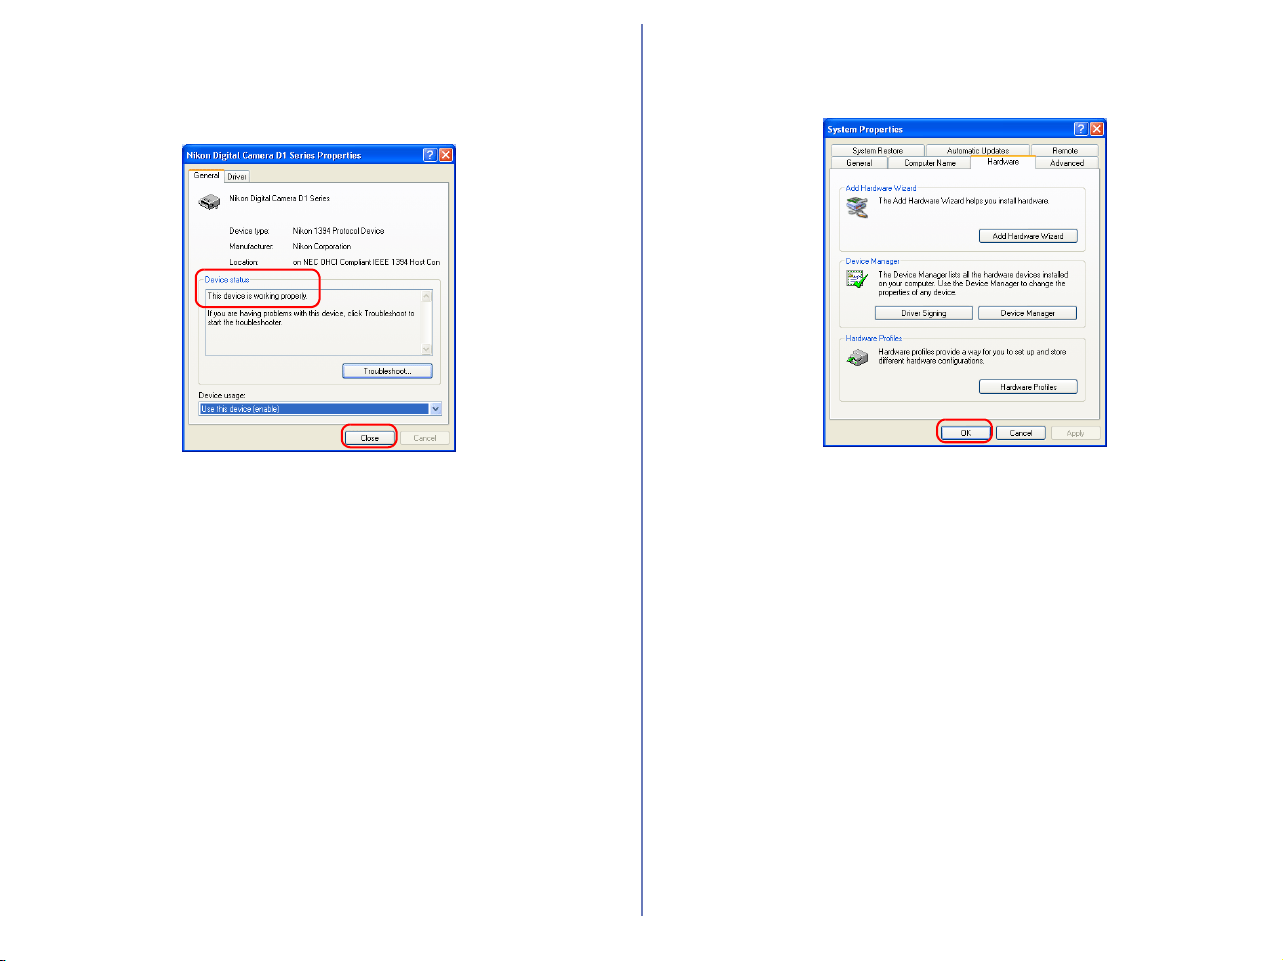
Step 5
Confirm that "This device is working properly" appears under
"Device status" in the General Tab of the Nikon Digital Camera D1
Series Properties dialog. Click Close.
Step 6
Close the Device Manager, then click OK to close the System
Properties window.
83
D1/D1X/D1H Windows 2000 Registering the device driver
Installing Windows Hardware Drivers for the D1/D1x/D1H
Before You Begin
Confirm that your OHCI-compliant IEEE 1394 interface board or
card has been correctly registered with the system.
Click the My Computer icon on the desktop with the right mouse
button and select Properties from the menu that appears to display
the System Properties dialog. Open the Hardware tab and click
the Device Manager... button in the Device Manager section.
If "1394 Bus Host Controller" is not listed in the Device Manager, or
if your IEEE 1394 interface board or card is listed as an unknown
or miscellaneous device or is preceded by a red or yellow warning
icon, follow the instructions in the manual provided with the board
to ensure that the drivers are properly installed.
Log On
You will need to log on as "Administrator" to register the D1/D1X/D1H.
After installing Nikon View 6 (device driver) and restarting the
computer, connect your camera to the computer using an IEEE
1394 cable and turn on the camera. The camera is registered
automatically.
Before connecting the camera to the computer
Be sure to install Nikon View 6 (device driver) before connecting
your camera to the computer.
Updating Drivers for the D1
If you are already using the D1 with Nikon View DX or Nikon Capture,
you will need to update the camera drivers. Click here .
The bus controller for your IEEE 1394 board or card
should be listed under "1394 Bus Host Controller"
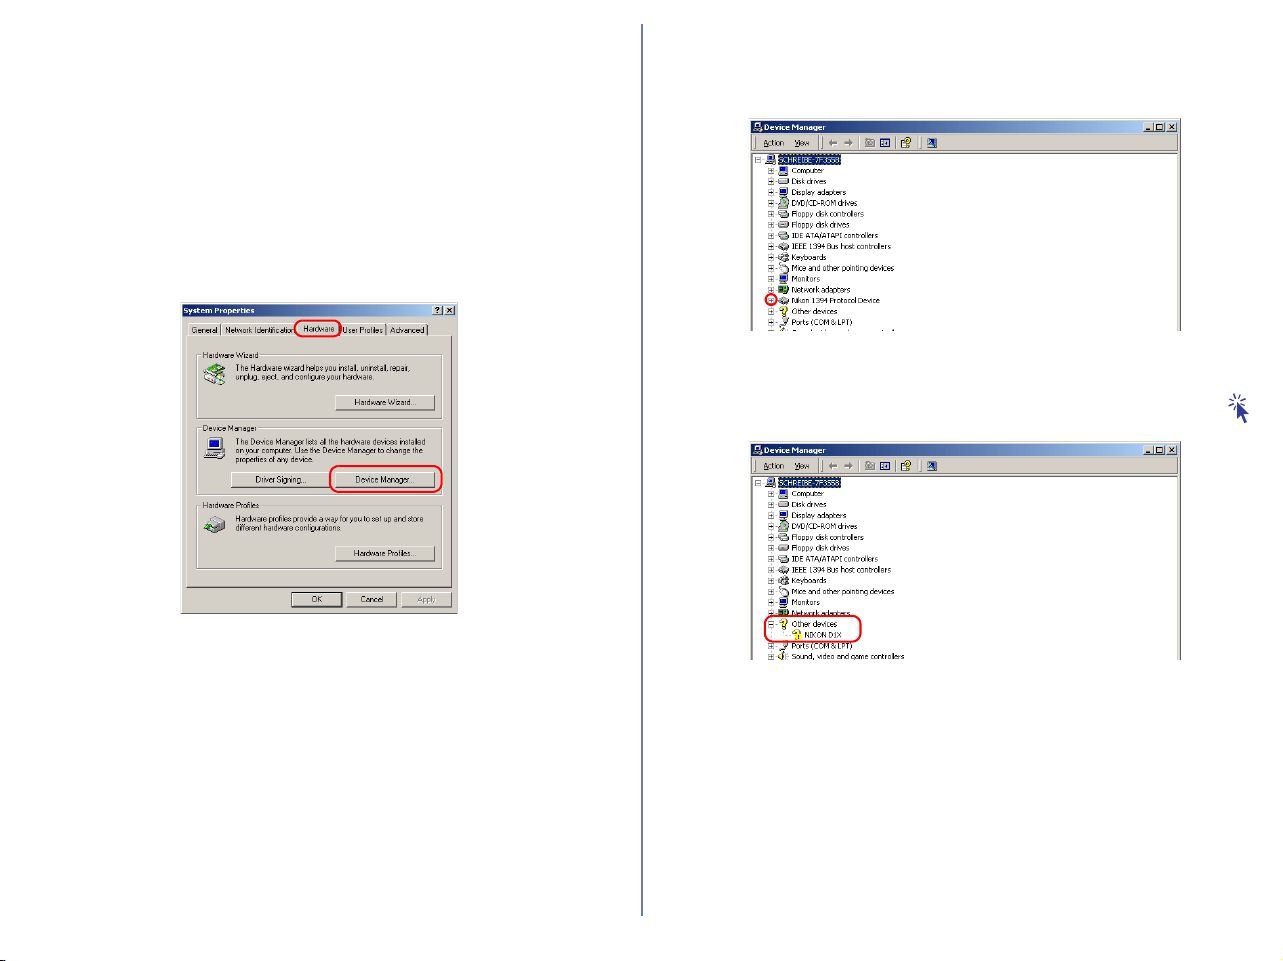
84
Follow the instructions below to check that the camera has been
correctly registered with the system.
Step 1
In the following steps, you are confirming that the registration of the
camera has completed property.
Click the My Computer icon on the desktop with the right mouse
button and select Properties from the menu that appears to display
the System Properties dialog. Open the Hardware tab and click
the Device Manager... button in the Device Manager section.
Step 2
After confirming that "Nikon 1394 Protocol Device" is listed in the
Device Manager, click the "+" sign to its left.
If "Nikon 1394 Protocol Device" does not appear
If "NIKON D1
X
(D1/D1
H
)" is listed under "Other Devices", click
here
.
If "Nikon 1394 Protocol Device" is not listed in the Device Manager
and "NIKON D1
X(D1/D1H)" is not listed under Other Devices,
disconnect the camera, and restart the computer. When the
computer has restarted, reconnect the camera to the computer.

85
Step 3
After confirming that "Nikon Digital Camera D1 Series" is listed
under "Nikon 1394 Protocol Device," double-click the listing to
open the Properties window.
Step 4
The Nikon Digital Camera D1 Series Properties dialog will be
displayed. Click the General tab and confirm that "This device is
working properly" appears under "Device status". Click OK.
Close the Device Manager, then click OK to close the System
Properties window.
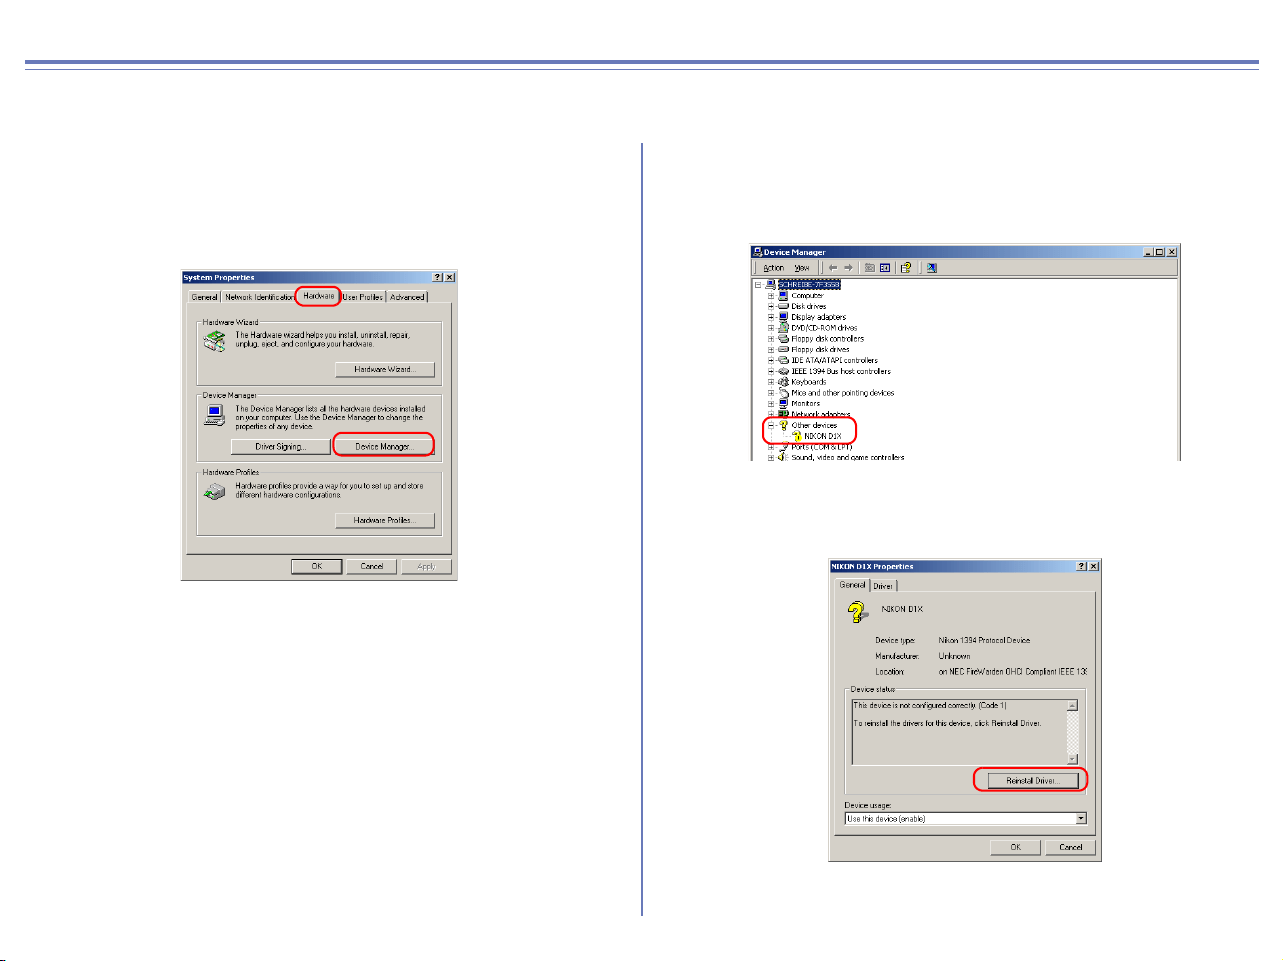
86
D1/D1X/D1H Windows 2000 What to Do if the Hardware Wizard is not Displayed
- Windows 2000 Professional-
Step 1
Click the My Computer icon on the desktop with the right mouse
button and select Properties from the menu that appears to display
the System Properties dialog. Open the Hardware tab and click
the Device Manager... button in the Device Manager section.
Step 2
The Device Manager will be displayed. Double-click the listing for
the NIKON D1 (D1
X/D1H) that appears under "Other Devices" or
"Miscellaneous Devices".
Step 3
Open the General tab and click Reinstall Driver....
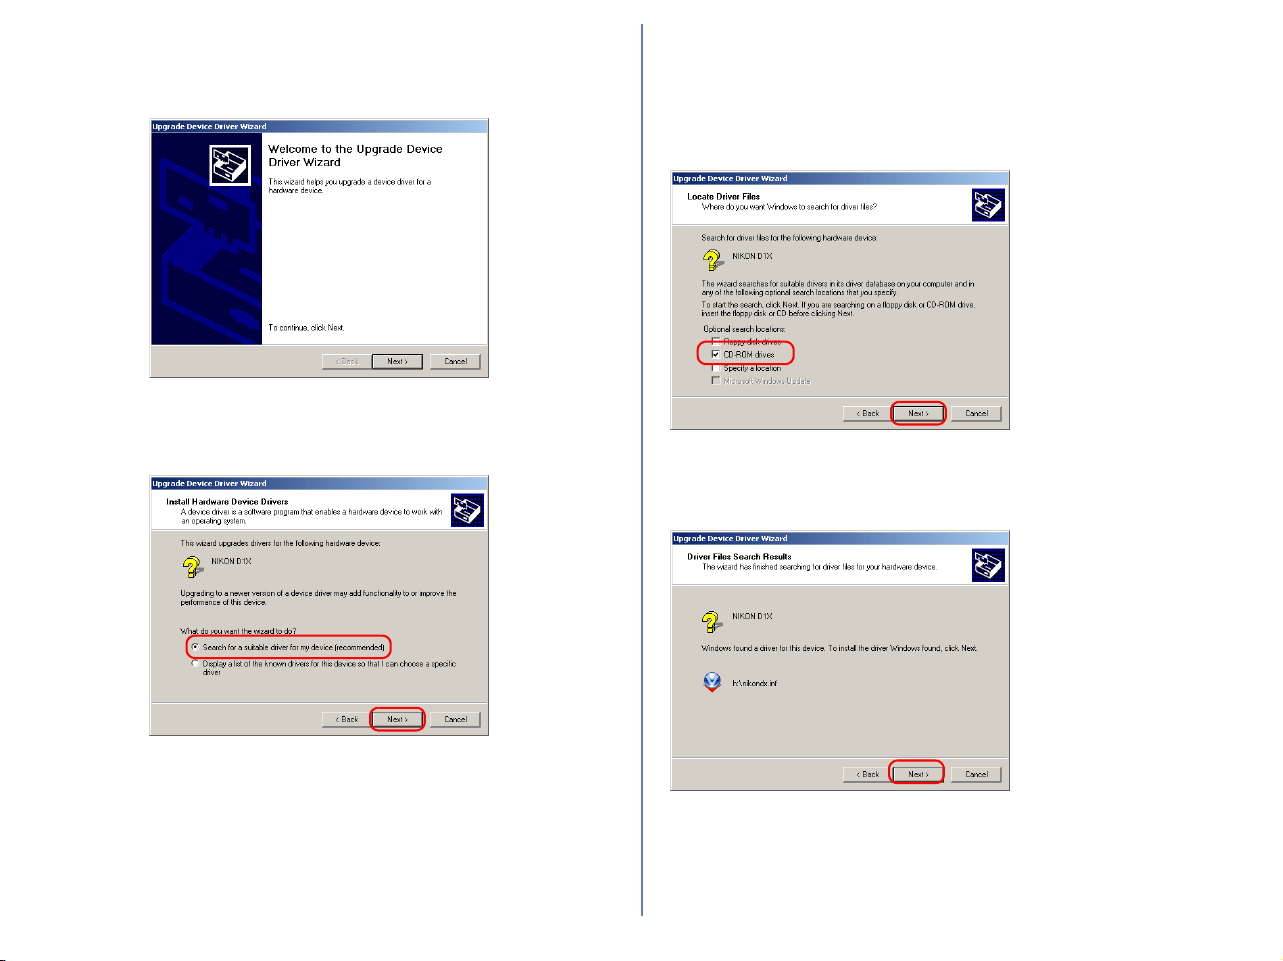
87
Step 4
The Windows update device driver wizard will be displayed; click
Next.
Step 5
Select the search option and click Next.
Step 6
The dialog shown below will be displayed. Holding down the shift
key to prevent the Welcome dialog from opening automatically,
insert the Nikon View 6 CD into the CD-ROM drive. Select CD-
ROM drives and click Next.
If the Welcome dialog
appears when the CD-ROM
is inserted, close the dialog
by clicking the Quit button.
Step 7
The dialog shown below will be displayed; click Next.
If the message, "Windows
was unable to find a suitable
driver for this device," is
displayed, this may indicate
that the Nikon View 6 CD
was not correctly inserted in
the CD-ROM drive or that
the correct search location
was not specified. Click
Back
to return to the dialog
shown in Step 6, where you
can confirm that the correct
location has been specified.

88
Step 8
The dialog shown below will be displayed; click Finish.
Step 9
Confirm that "This device is working properly" appears under
"Device status" in the General Tab of the Nikon Digital Camera D1
Series Properties dialog. Click Close.
Step 10
Close the Device Manager, then click OK to close the System
Properties window.
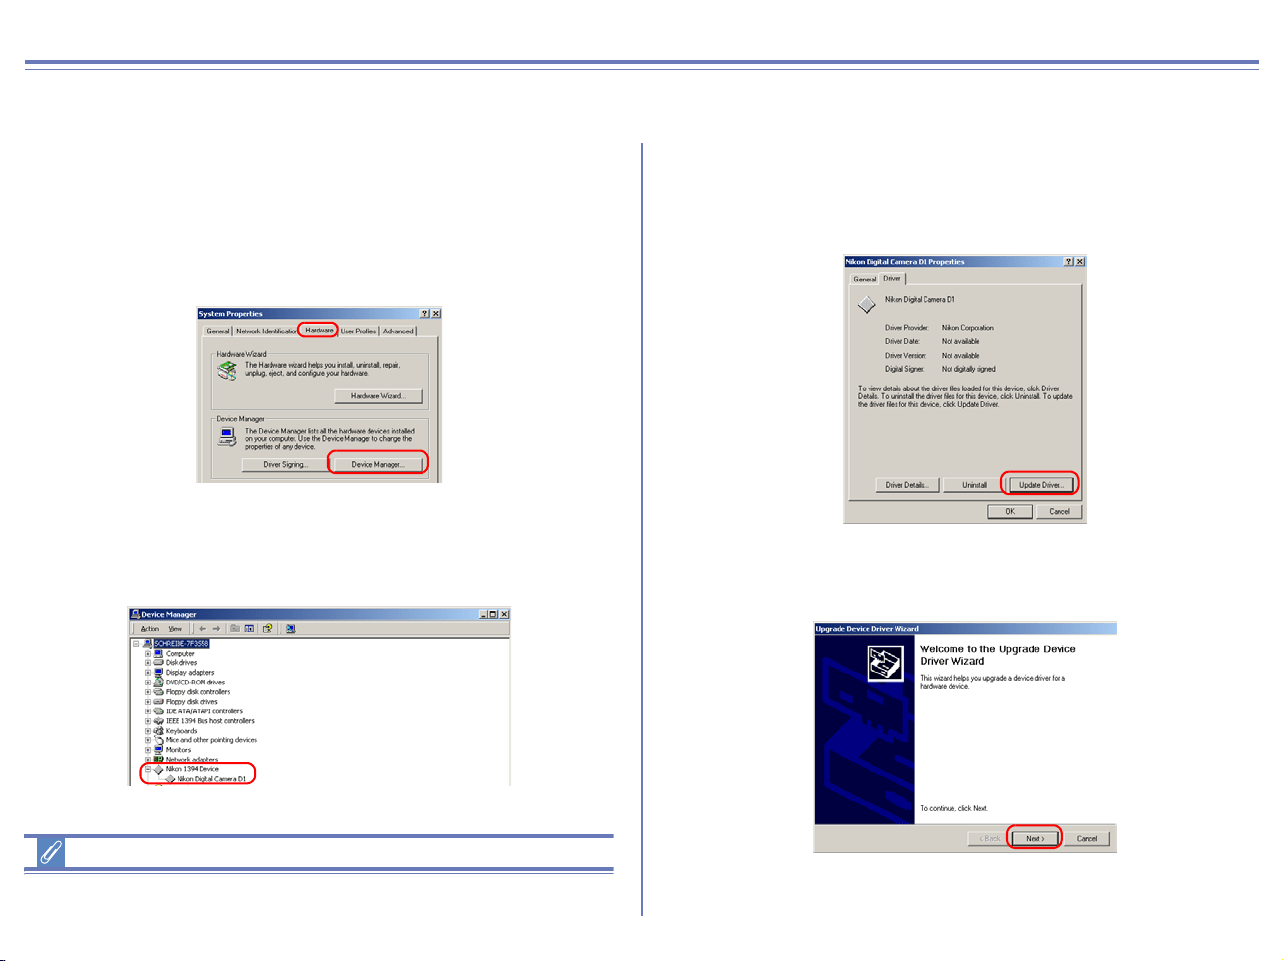
89
D1/D1X/D1H Windows 2000 Updating the device driver
For Users Who Are Already Using the D1 with Nikon View DX or Nikon Capture
If you are already using the D1 with Nikon View DX or Nikon Capture, you will need to update the camera drivers.
Step 1
Click the My Computer icon on the desktop with the right mouse
button and select Properties from the menu that appears to display
the System Properties dialog. Open the Hardware tab and click
the Device Manager... button in the Device Manager section.
Step 2
The Device Manager will be displayed. Under the entry "Nikon
1394 Device," double-click "Nikon Digital Camera D1."
Log On
You will need to log on as "Administrator" to update the D1 drivers.
Step 3
The Nikon Digital Camera D1 Properties dialog will be displayed.
Open the Driver tab and click Update Driver....
Step 4
The Upgrade Device Driver Wizard will be displayed; click Next.
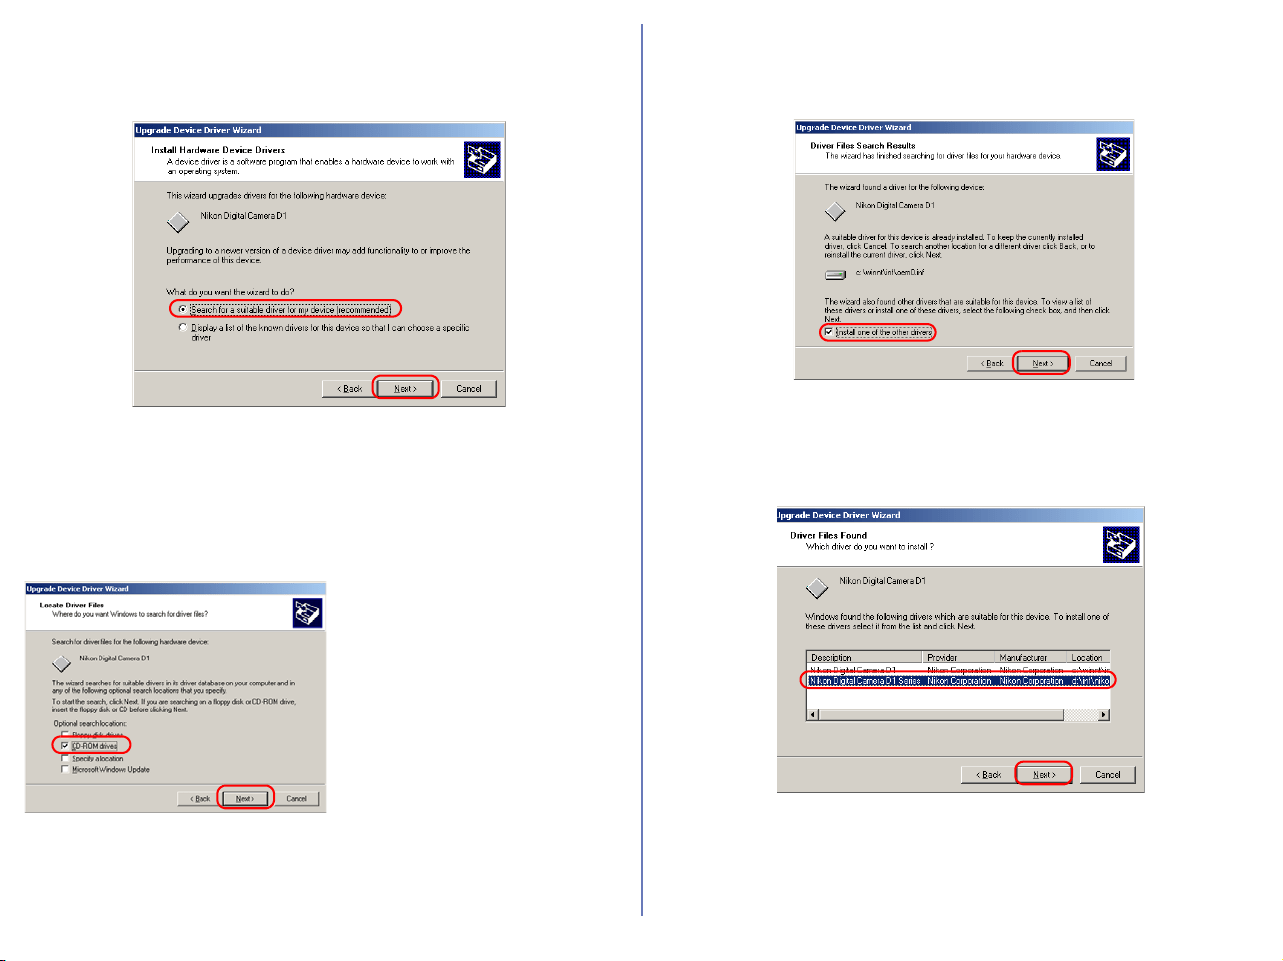
90
Step 5
The dialog shown below will be displayed. Select the search option
and click Next.
Step 6
The dialog shown below will be displayed. Holding down the shift
key to prevent the Welcome dialog from opening automatically,
insert the Nikon View 6 CD into the CD-ROM drive. Select CD-
ROM drives and click Next.
If the Welcome dialog appears
when the CD-ROM is inserted,
close the dialog by clicking the
Quit button.
Step 7
The dialog shown below will be displayed. Select "Install one of
the other drivers" and click Next.
Step 8
Select Nikon Digital Camera D1 Series from the dialog below and
click Next.

91
Step 9
The dialog shown below will be displayed; click Finish.
Step 10
Confirm that "This device is working properly" appears under
"Device status" in the General Tab of the Nikon Digital Camera D1
Series Properties dialog. Click Close.
Step 11
Close the Device Manager, then click OK to close the System
Properties window.
Troubleshooting
• If "1394 Bus host Controller" is not displayed in the Device
Manager, if the IEEE 1394 board or card is listed under
"Other Devices" or "Miscellaneous Devices," or if the listing
for the IEEE 1394 board or card is preceded by a red or
yellow warning icon...
...the computer does not recognize the IEEE 1394 board or
card. Refer to the documentation provided with your
computer or IEEE 1394 board or card for information on
registering the board or card with the system.
• If "1394 Bus host Controller" is listed in the Device Manager
but the entry for the Nikon D1 (D1x/D1
H) does not appear...
...check the following:
• Is the camera on?
• Is the battery fully charged? If you are using an AC
adapter (available separately), is it properly connected?
• Is the mode dial set to "PC"?
• Is the IEEE 1394 cable properly connected?
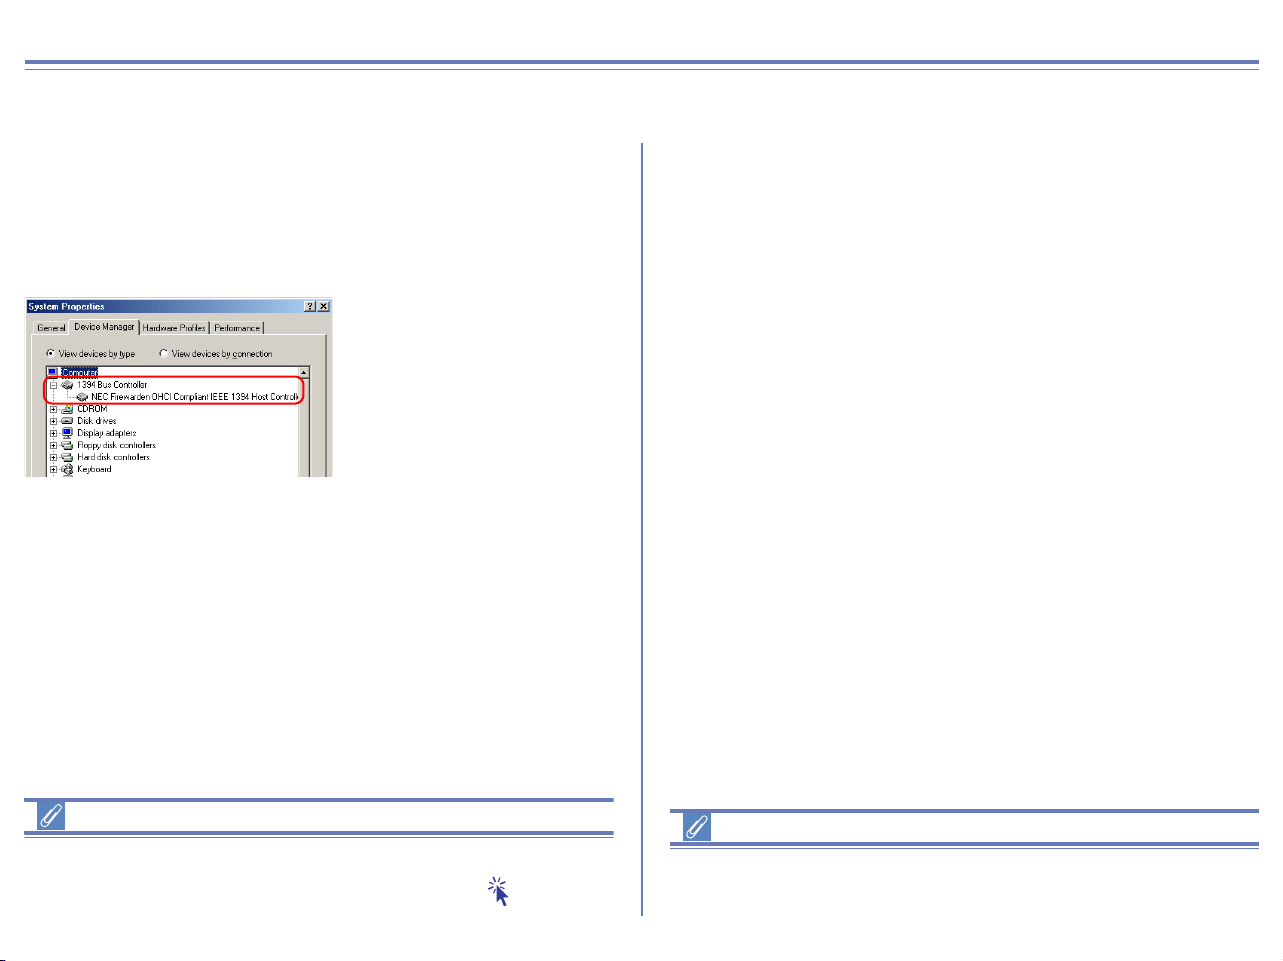
92
D1/D1X/D1H Windows Me Registering the device driver
Installing Windows Hardware Drivers for the D1/D1X/D1H
Before You Begin
Confirm that the OHCI-compliant IEEE 1394 interface board has
been correctly registered with the system.
Click the My Computer icon on the desktop with the right mouse button
and select Properties from the menu that appears. The System
Properties dialog will be displayed; click the Device Manager tab.
The IEEE 1394 board or card
installed on your system
should be listed under "1394
Bus Controller"
If "1394 Bus Controller" is not listed in the Device Manager, or if
your IEEE 1394 interface board or card is listed as an unknown or
miscellaneous device or is preceded by red or yellow warning
icons, follow the instructions in the manual provided with the board
to ensure that the drivers are properly installed.
Updating Drivers for the D1
If you are already using the D1 with Nikon View DX or Nikon Capture,
you will need to update the camera drivers. Click here .
After installing Nikon View 6 (device driver) and restarting the
computer, connect your camera to the computer using an IEEE
1394 cable and turn on the camera. The camera is registered
automatically.
Before connecting the camera to the computer
Be sure to install Nikon View 6 (device driver) before connecting
your camera to the computer.
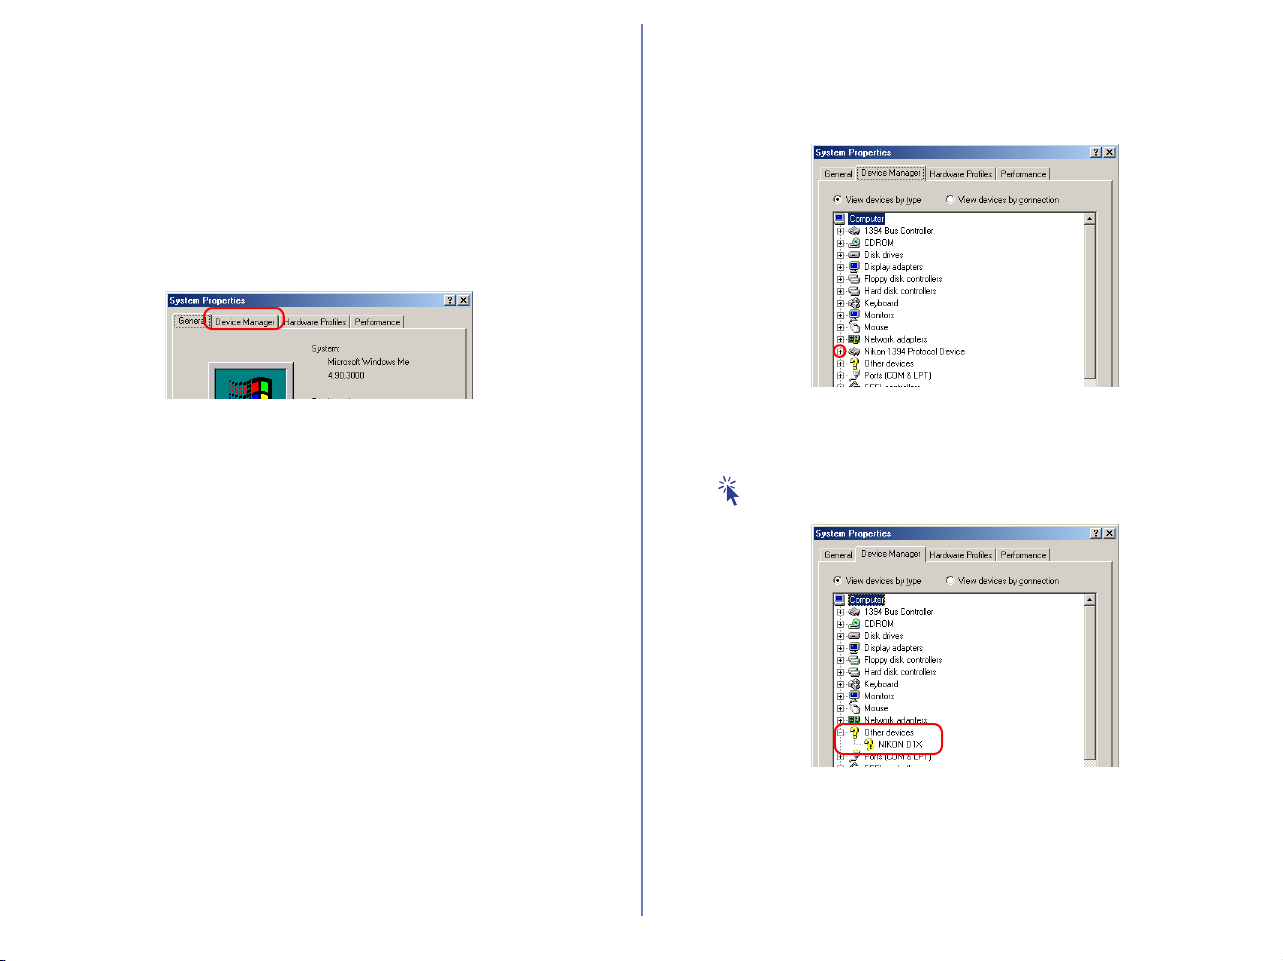
93
Follow the instructions below to check that the camera has been
correctly registered with the system.
Step 1
In the following steps, you are confirming that the registration of the
camera has completed property.
Click the My Computer icon on the desktop with the right mouse
button and select Properties from the menu that appears. The
System Properties dialog will be displayed; click the Device
Manager tab.
Step 2
The Device Manager sheet will be displayed. After confirming that
"Nikon 1394 Protocol Device" is listed in the Device Manager, click
the "+" sign to its left.
If "Nikon 1394 Protocol Device" does not appear
If "NIKON D1X(D1/D1H)" is listed under "Other Devices", click
here .
If "Nikon 1394 Protocol Device" is not listed in the Device Manager
and "NIKON D1
X(D1/D1H)" is not listed under Other Devices,
disconnect the camera, and restart the computer. When the
computer has restarted, reconnect the camera to the computer.
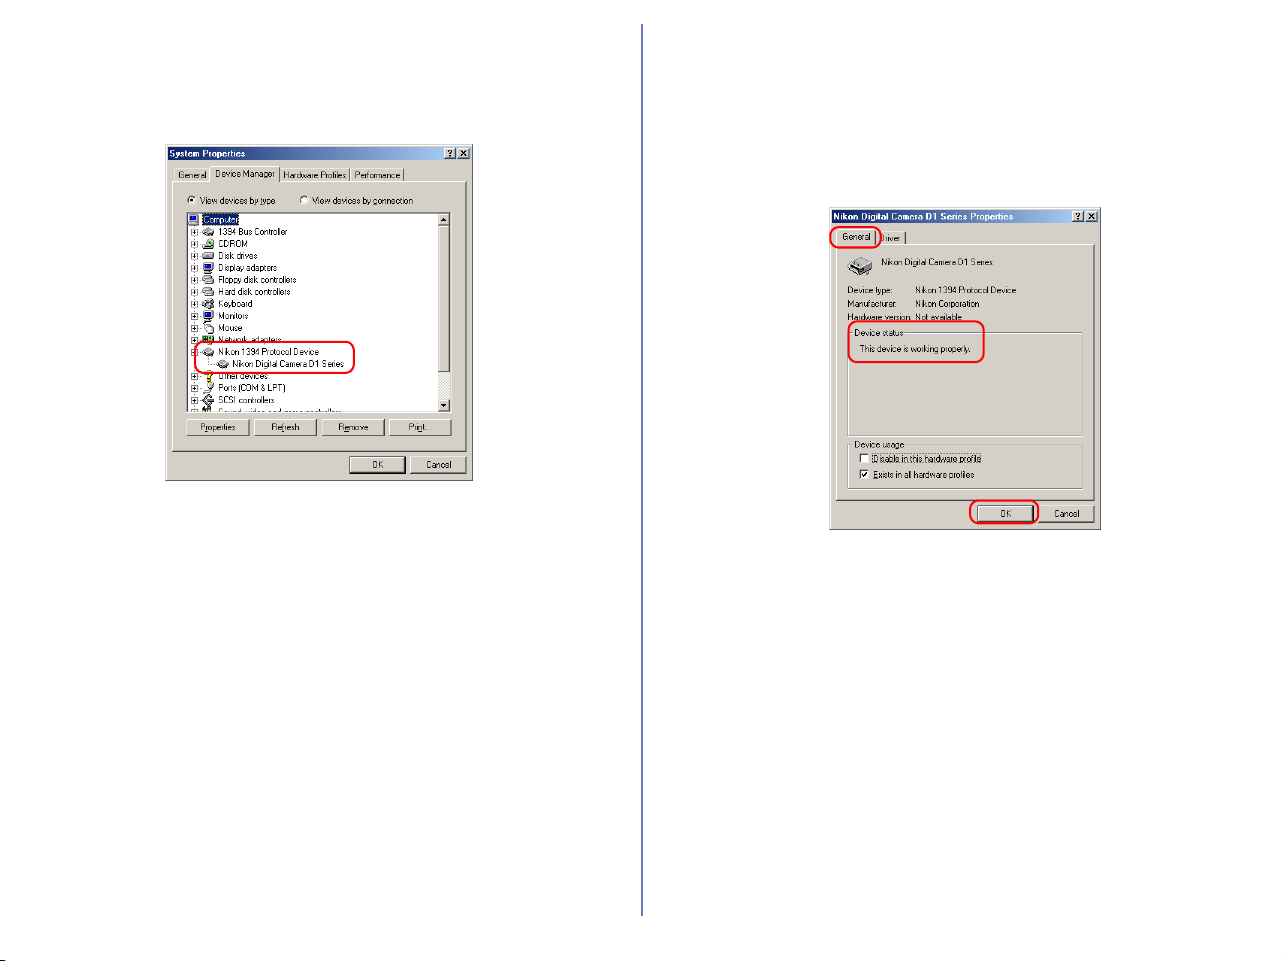
94
Step 3
After confirming that "Nikon Digital Camera D1 Series" is listed
under "Nikon 1394 Protocol Device," double click the listing to
open the Properties window.
Step 4
The Nikon Digital Camera D1 Series Properties dialog will be
displayed. Click the General tab and confirm that "This device is
working properly" appears under "Device status."
Click OK to close the Nikon Digital Camera D1 Series Properties
window.
Click OK to close the System Properties window.
Device registration is now complete.
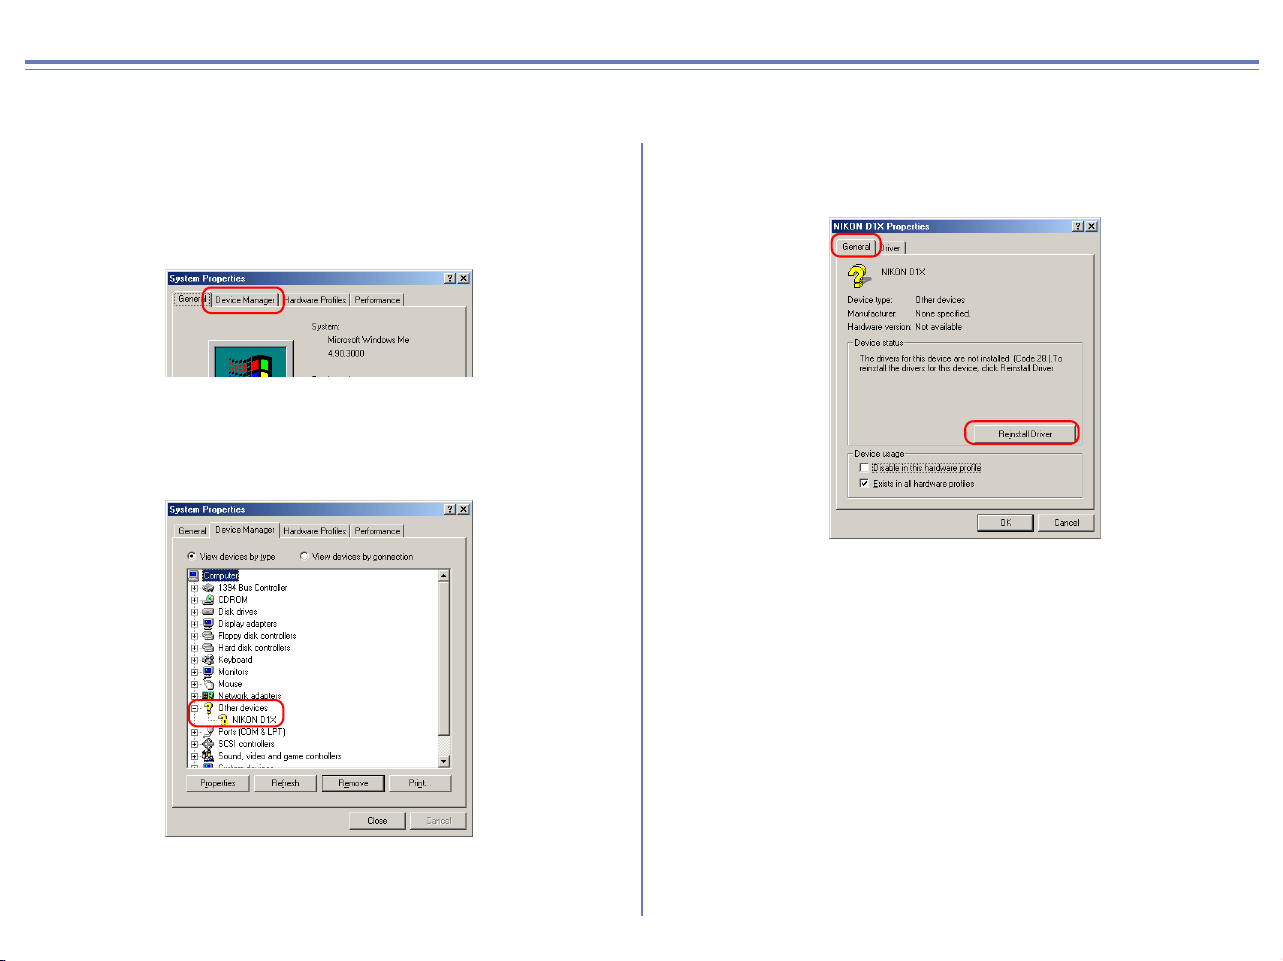
95
D1/D1X/D1H Windows Me What to Do if the Hardware Wizard is not Displayed
- Windows Millennium Edition (Me) -
Step 1
Click the My Computer icon on the desktop with the right mouse
button and select Properties from the menu that appears. The
System Properties dialog will be displayed; click the Device
Manager tab.
Step 2
Double-click the listing for the NIKON D1X (D1/D1H) that appears
under "Other Devices" or "Miscellaneous Devices."
Step 3
The NIKON D1X (D1/D1H) Properties dialog will be displayed.
Open the General tab and click Reinstall Driver....
Step 4
The Windows update device driver wizard will be displayed. Holding
down the shift key to prevent the Welcome dialog from opening
automatically, insert the Nikon View 6 CD into the CD-ROM drive.
Confirm that "Automatic search for a better driver(Recommended)"
is selected and click Next. The wizard will automatically update the
device drivers.
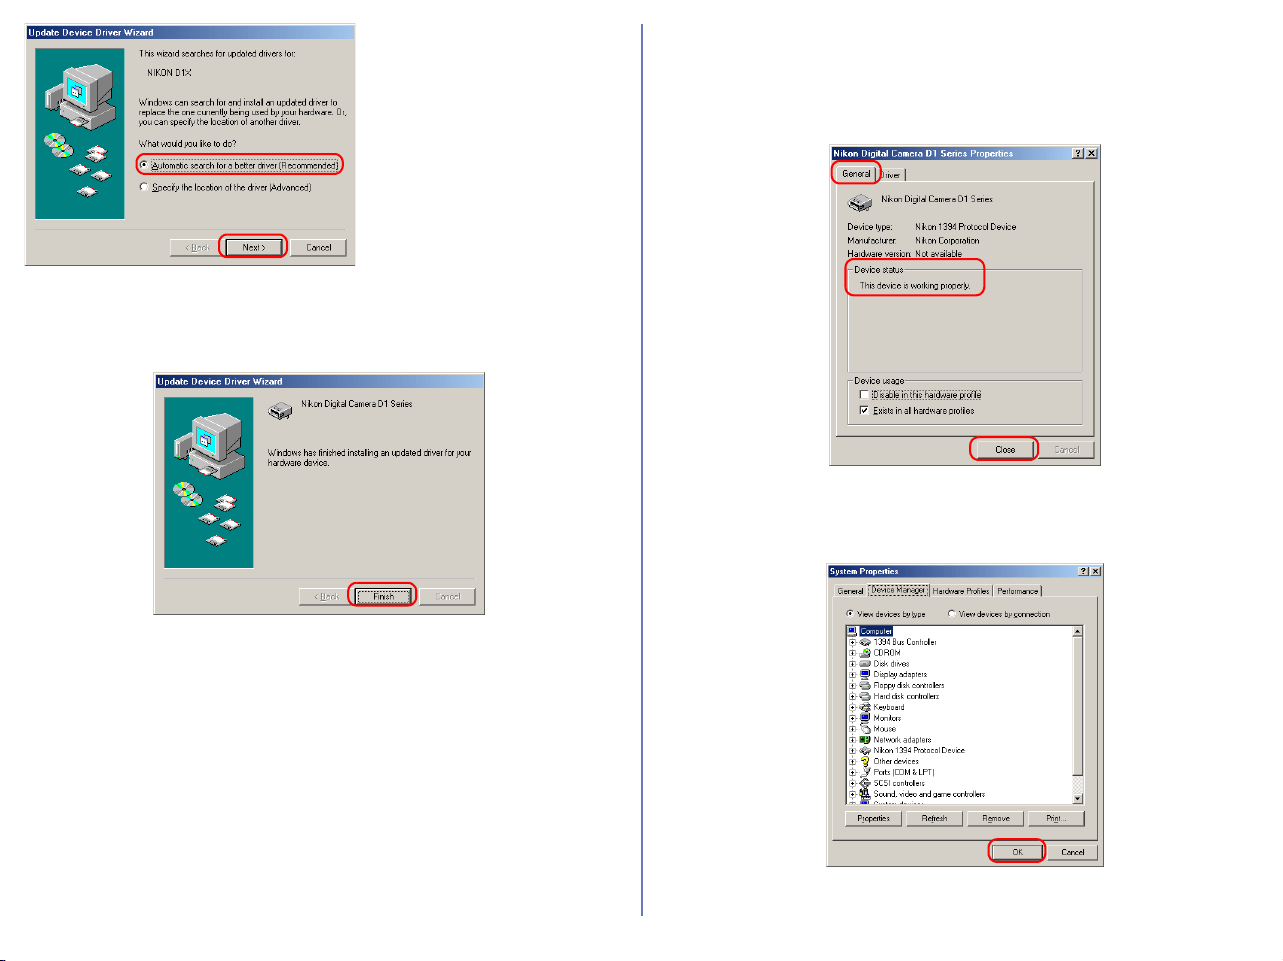
96
If the Welcome dialog appears
when the CD-ROM is inserted,
close the dialog by clicking the
Quit
button.
Step 5
The dialog shown below will be displayed; click Finish.
Step 6
Confirm that "This device is working properly" appears under
"Device status" in the General Tab of the Nikon Digital Camera D1
Series Properties dialog. Click Close.
Step 7
Click OK to close the System Properties window.
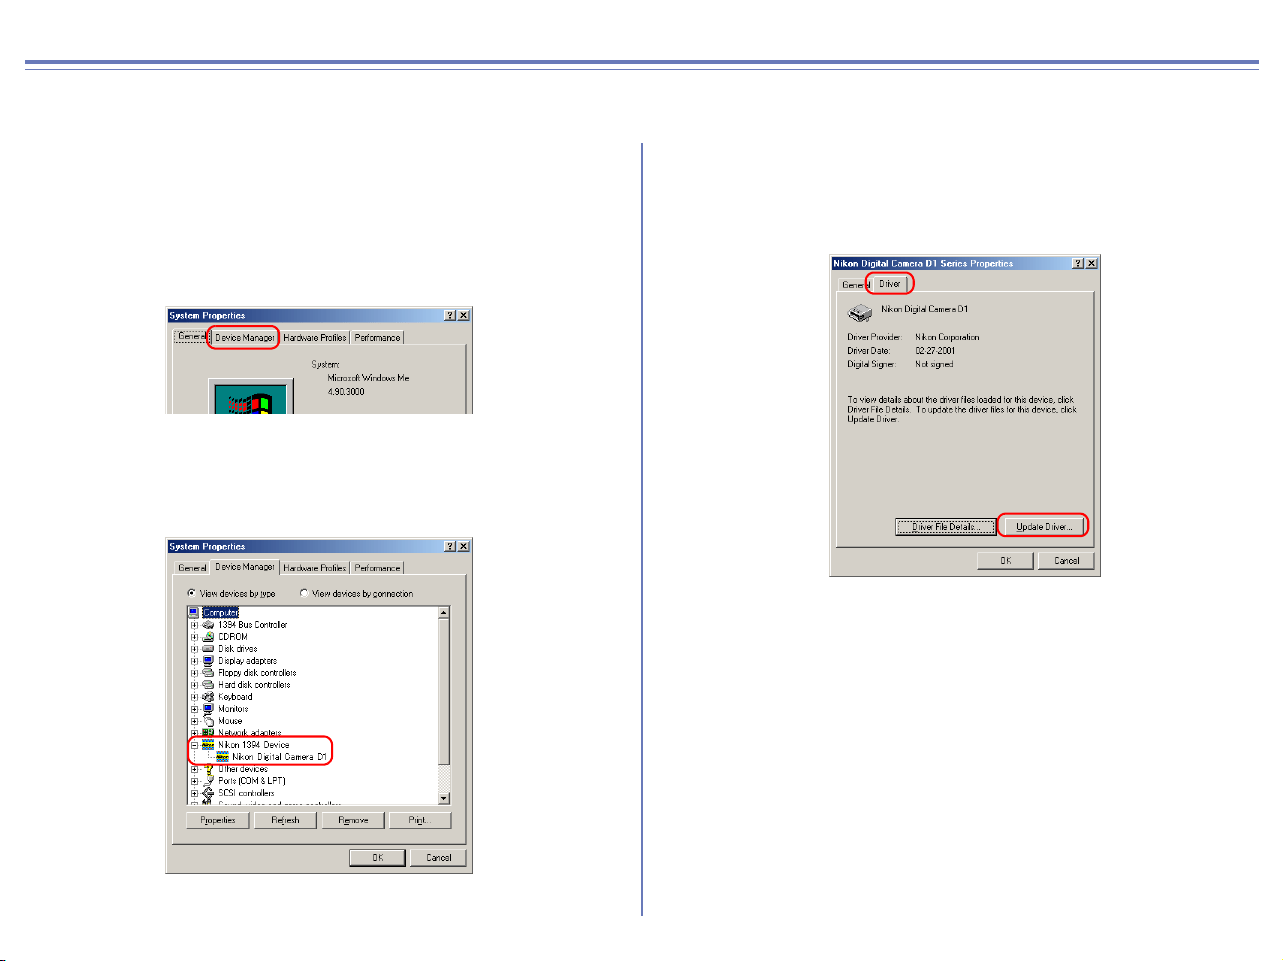
97
D1/D1X/D1H Windows Me Updating the device driver
For Users Who Are Already Using the D1 with Nikon View DX or Nikon Capture
If you are already using the D1 with Nikon View DX or Nikon Capture, you will need to update the camera drivers.
Step 1
Click the My Computer icon on the desktop with the right mouse
button and select Properties from the menu that appears. The
System Properties dialog will be displayed; click the Device
Manager tab.
Step 2
The Device Manager sheet will be displayed. Under the entry
"Nikon 1394 Device," double-click "Nikon Digital Camera D1."
Step 3
The Nikon Digital Camera D1 Series Properties dialog will be
displayed. Open the Driver tab and click Update Driver....

98
Step 4
The Windows update device driver wizard will be displayed. Holding
down the shift key to prevent the Welcome dialog from opening
automatically, insert the Nikon View 6 CD into the CD-ROM drive,
select Automatic Search for a Better Driver (Recommended), and
click Next. The wizard will automatically update the device drivers.
If the Welcome dialog appears
when the CD-ROM is inserted,
close the dialog by clicking the
Quit button.
Step 5
The dialog shown below will be displayed. Select the driver located
at "(Drive letter for CD-ROM drive):\" and click OK.
Step 6
The dialog shown below will be displayed; click Finish.
Step 7
Confirm that "This device is working properly" appears under
"Device status" in the General Tab of the Nikon Digital Camera D1
Series Properties dialog. Click Close.
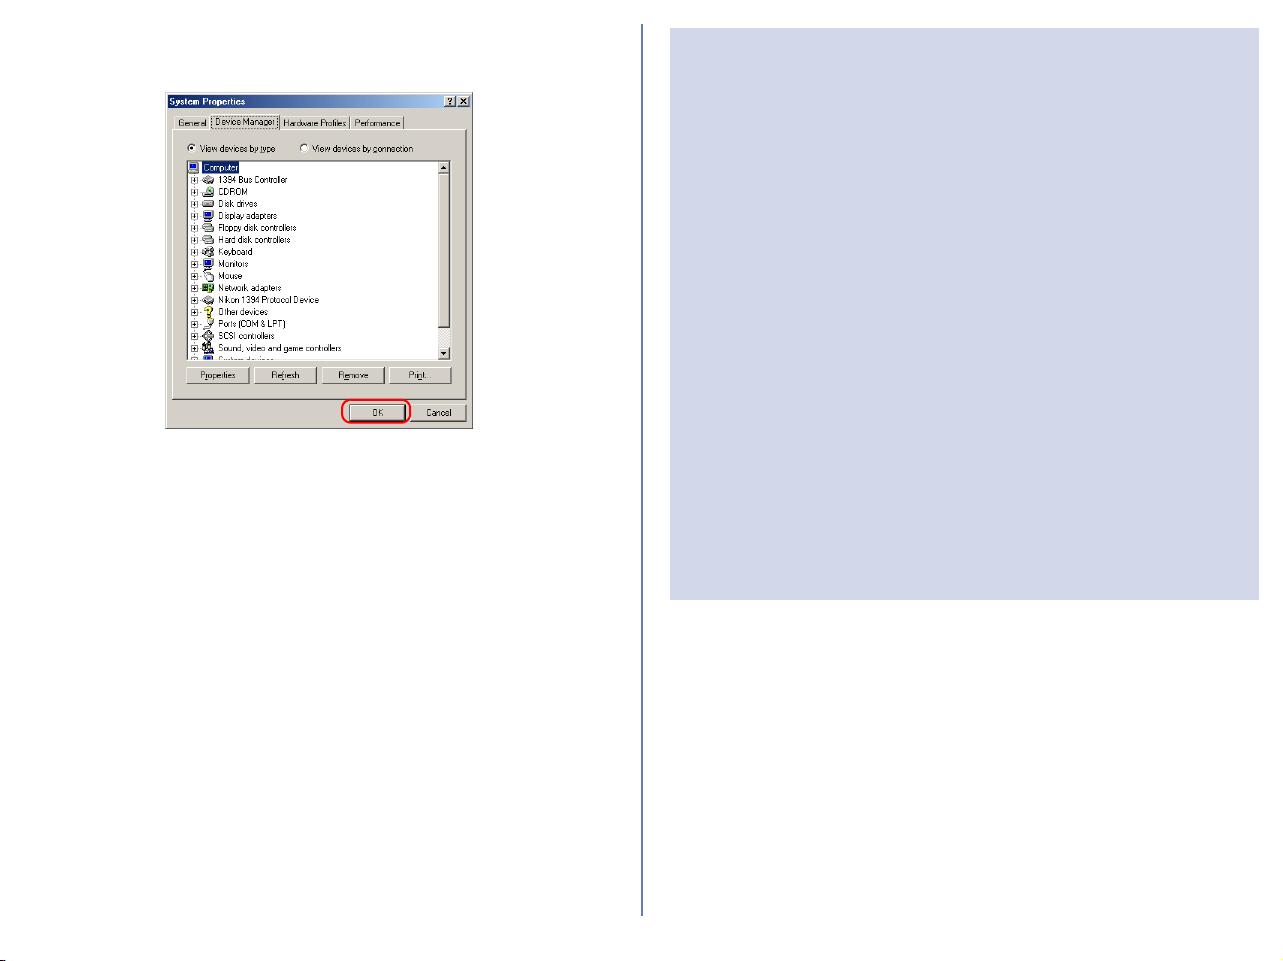
99
Step 8
Click OK to close the System Properties window.
Troubleshooting
• If "1394 Bus Controller" is not displayed in the Device
Manager, if the IEEE 1394 board or card is listed under
"Other Devices" or "Miscellaneous Devices," or if the listing
for the IEEE 1394 board or card is preceded by a red or
yellow warning icon...
...the computer does not recognize the IEEE 1394 board or
card. Refer to the documentation provided with your
computer or IEEE 1394 board or card for information on
registering the board or card with the system.
• If "1394 Bus Controller" is listed in the Device Manager but
the entry for the Nikon D1 (D1
X/D1H) does not appear...
...check the following:
• Is the camera on?
• Is the battery fully charged? If you are using an AC
adapter (available separately), is it properly connected?
• Is the mode dial set to "PC"?
• Is the IEEE 1394 cable properly connected?
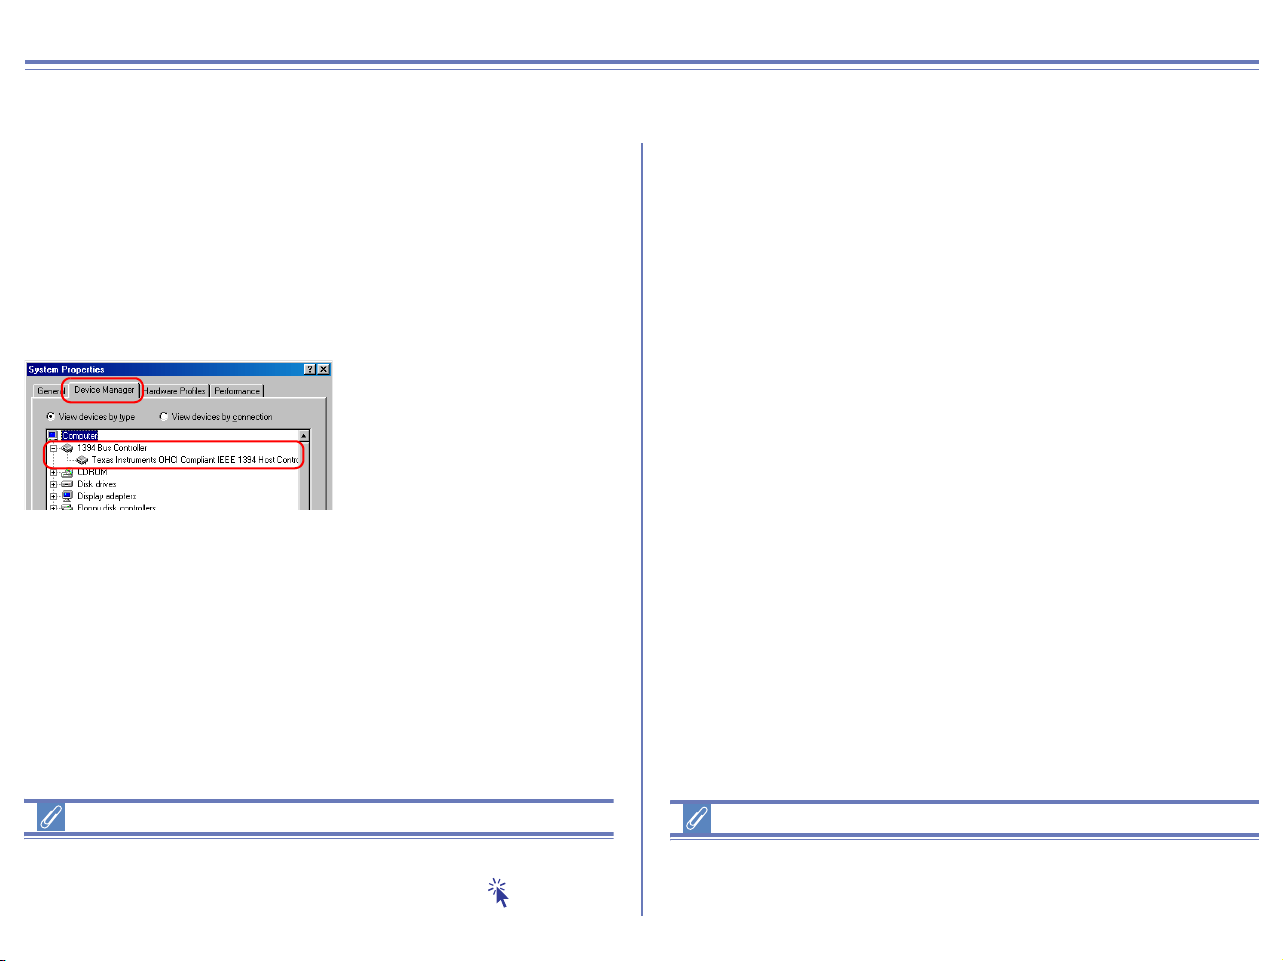
100
D1/D1X/D1H Windows 98SE Registering the device driver
Installing Windows Hardware Drivers for the D1/D1X/D1H
Before You Begin
Confirm that your OHCI-compliant IEEE 1394 interface board or
card has been correctly registered with the system.
Click the My Computer icon on the desktop with the right mouse
button and select Properties from the menu that appears. The
System Properties dialog will be displayed; click the Device
Manager tab.
The bus controller for your
IEEE 1394 board or card
should be listed under "1394
Bus Controller"
If "1394 Bus Controller" is not listed in the Device Manager, or if
your IEEE 1394 interface board or card is listed as an unknown or
miscellaneous device or is preceded by a red or yellow warning
icon, follow the instructions in the manual provided with the board
to ensure that the drivers are properly installed.
Updating Drivers for the D1
If you are already using the D1 with Nikon View DX or Nikon Capture,
you will need to update the camera drivers. Click here .
After installing Nikon View 6 (device driver) and restarting the
computer, connect your camera to the computer using an IEEE
1394 cable and turn on the camera. The camera is registered
automatically.
Before connecting the camera to the computer
Be sure to install Nikon View 6 (device driver) before connecting
your camera to the computer.
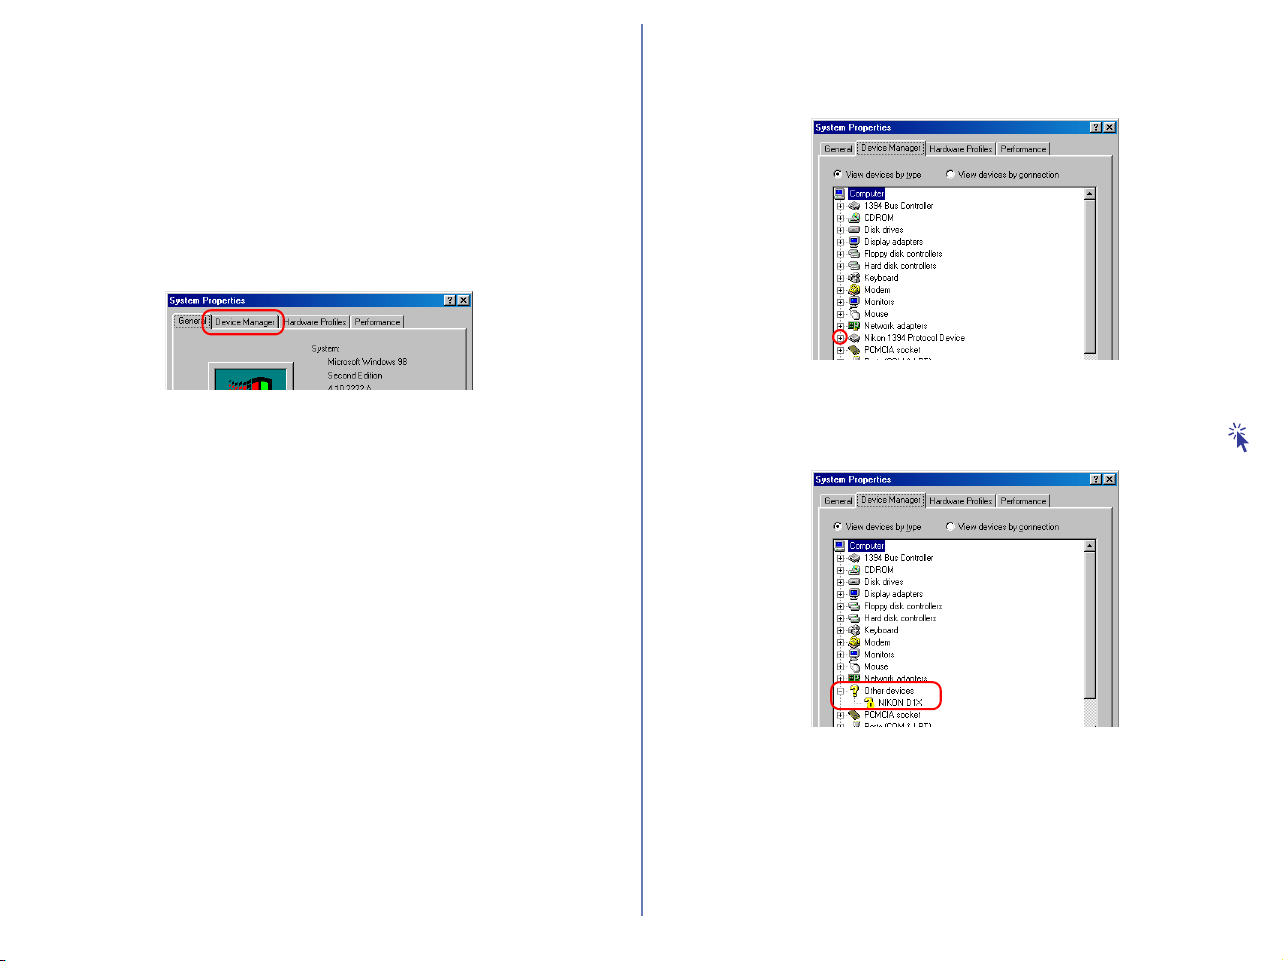
101
Follow the instructions below to check that the camera has been
correctly registered with the system.
Step 1
In the following steps, you are confirming that the registration of the
camera has completed property.
Click the My Computer icon on the desktop with the right mouse
button and select Properties from the menu that appears. The
System Properties dialog will be displayed; click the Device
Manager tab.
Step 2
After confirming that "Nikon 1394 Protocol Device" is listed in the
Device Manager, click the "+" sign to its left.
If "Nikon 1394 Protocol Device" does not appear
If "NIKON D1
X
(D1/D1
H
)" is listed under "Other Devices", click
here
.
If "Nikon 1394 Protocol Device" is not listed in the Device Manager
and "NIKON D1
X(D1/D1H)" is not listed under Other Devices,
disconnect the camera, and restart the computer. When the
computer has restarted, reconnect the camera to the computer.
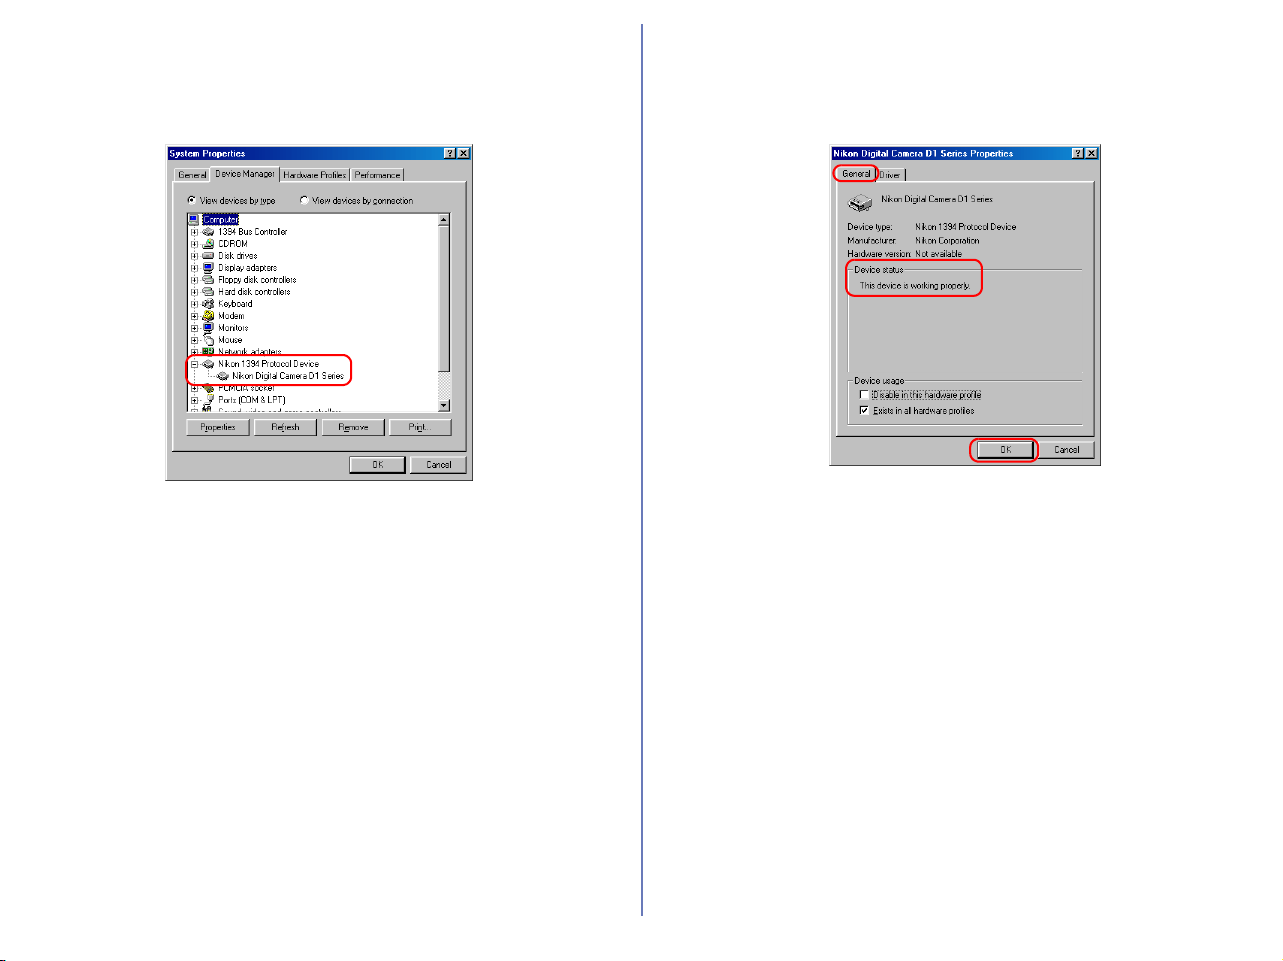
102
Step 3
After confirming that "Nikon Digital Camera D1 Series" is listed
under "Nikon 1394 Protocol Device," double click the listing to
open the Properties window.
Step 4
The Nikon Digital Camera D1 Series Properties dialog will be
displayed. Click the General tab and confirm that "This device is
working properly" appears under "Device status". Click OK.
Click OK to close the System Properties window.
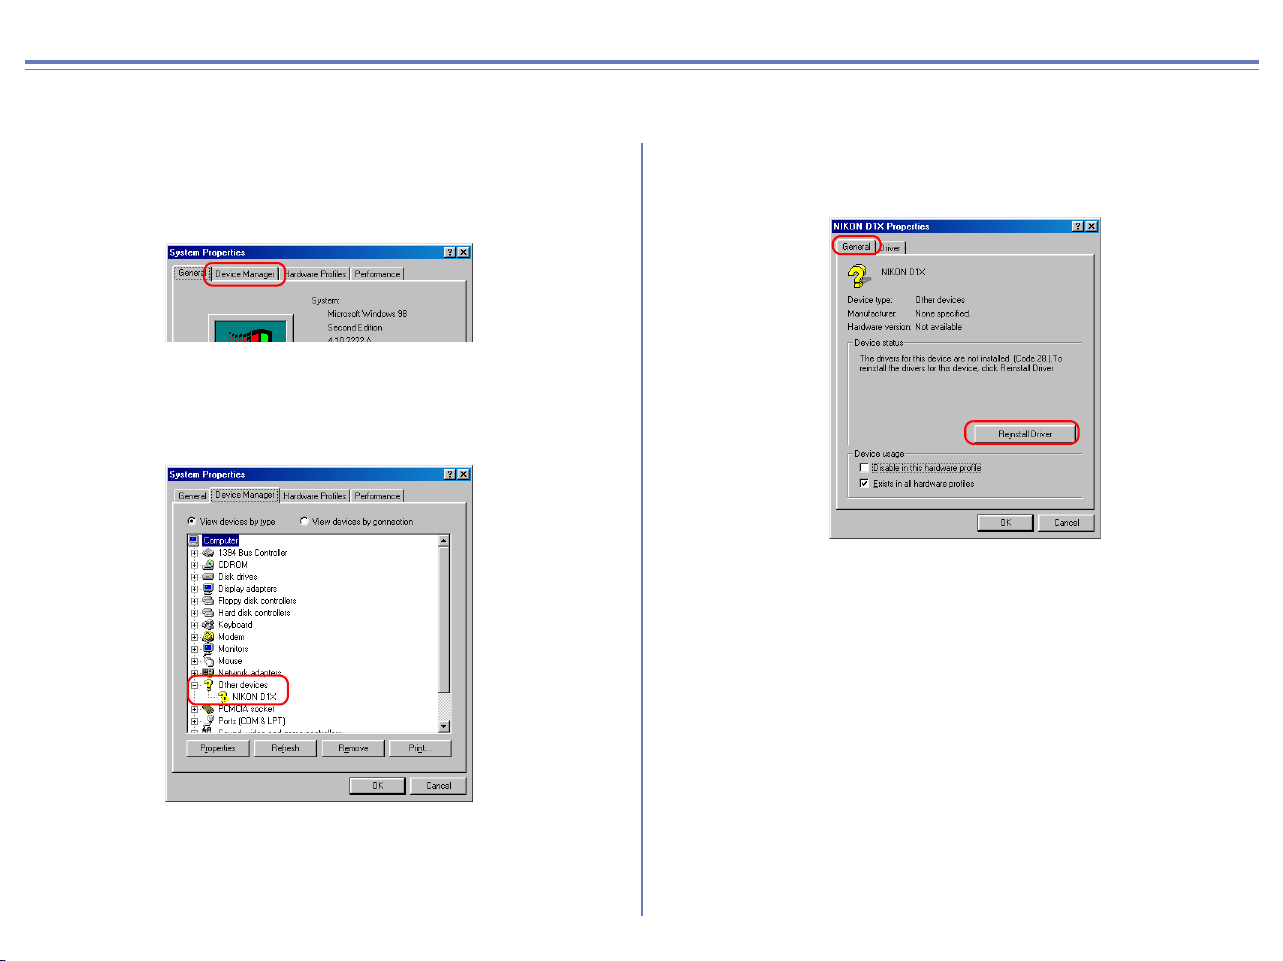
103
D1/D1X/D1H Windows 98SE What to Do if the Hardware Wizard is not Displayed
- Windows 98 Second Edition (SE) -
Step 1
Click the My Computer icon on the desktop with the right mouse
button and select Properties from the menu that appears. The System
Properties dialog will be displayed; click the Device Manager tab.
Step 2
Double-click the listing for the NIKON D1X (D1/D1H) that appears
under "Other Devices" or "Miscellaneous Devices."
Step 3
The NIKON D1X (D1/D1H) Properties dialog will be displayed.
Open the General tab and click Reinstall Driver.

104
Step 4
The Windows update device driver wizard will be displayed; click
Next.
Step 5
The dialog shown below will be displayed. Select "Search for a better
driver than the one your device is using now.(Recommended)" and
click Next.
Step 6
The dialog shown below will be displayed. Holding down the shift key
to prevent the Welcome dialog from opening automatically, insert the
Nikon View 6 CD into the CD-ROM drive. Select CD-ROM drive and
click Next.
If the Welcome dialog appears
when the CD-ROM is inserted,
close the dialog by clicking the
Quit
button.
Step 7
A dialog will be displayed stating that Windows has found the
drivers for "Nikon Digital Camera D1 Series"; click Next.
I
f the message, "Windows
was unable to find a
suitable driver for this
device," is displayed, this
may indicate that the Nikon
View 6 CD was not
correctly inserted in the CD-
ROM drive or that the
correct search location was
not specified. Click Back to
return to the dialog shown
in Step 6, where you can
confirm that the correct
location has been specified.
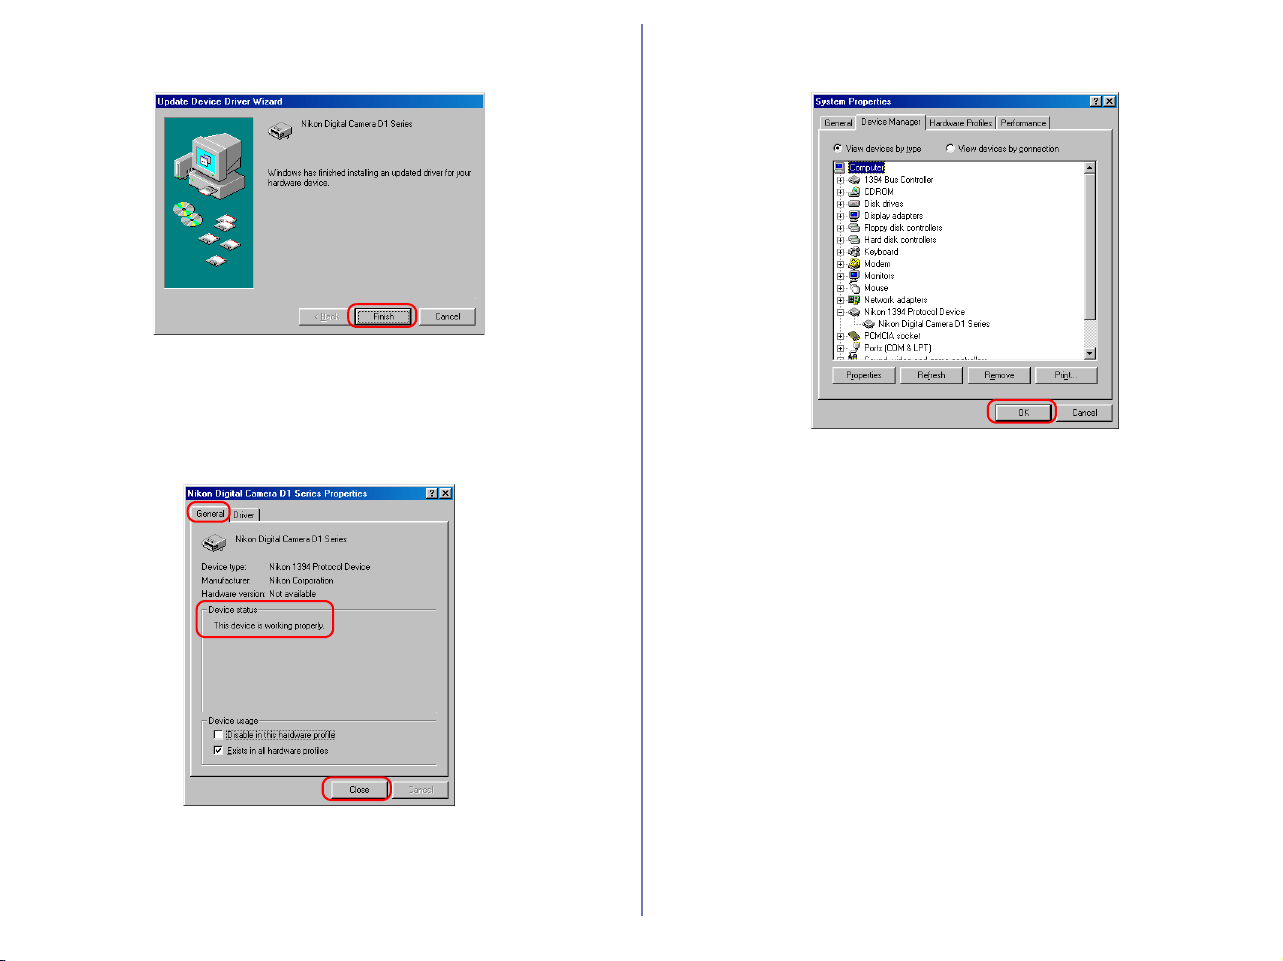
105
Step 8
The dialog shown below will be displayed; click Finish.
Step 9
Confirm that "This device is working properly" appears under
"Device status" in the General Tab of the Nikon Digital Camera D1
Series Properties dialog. Click Close.
Step 10
Click OK to close the System Properties window.
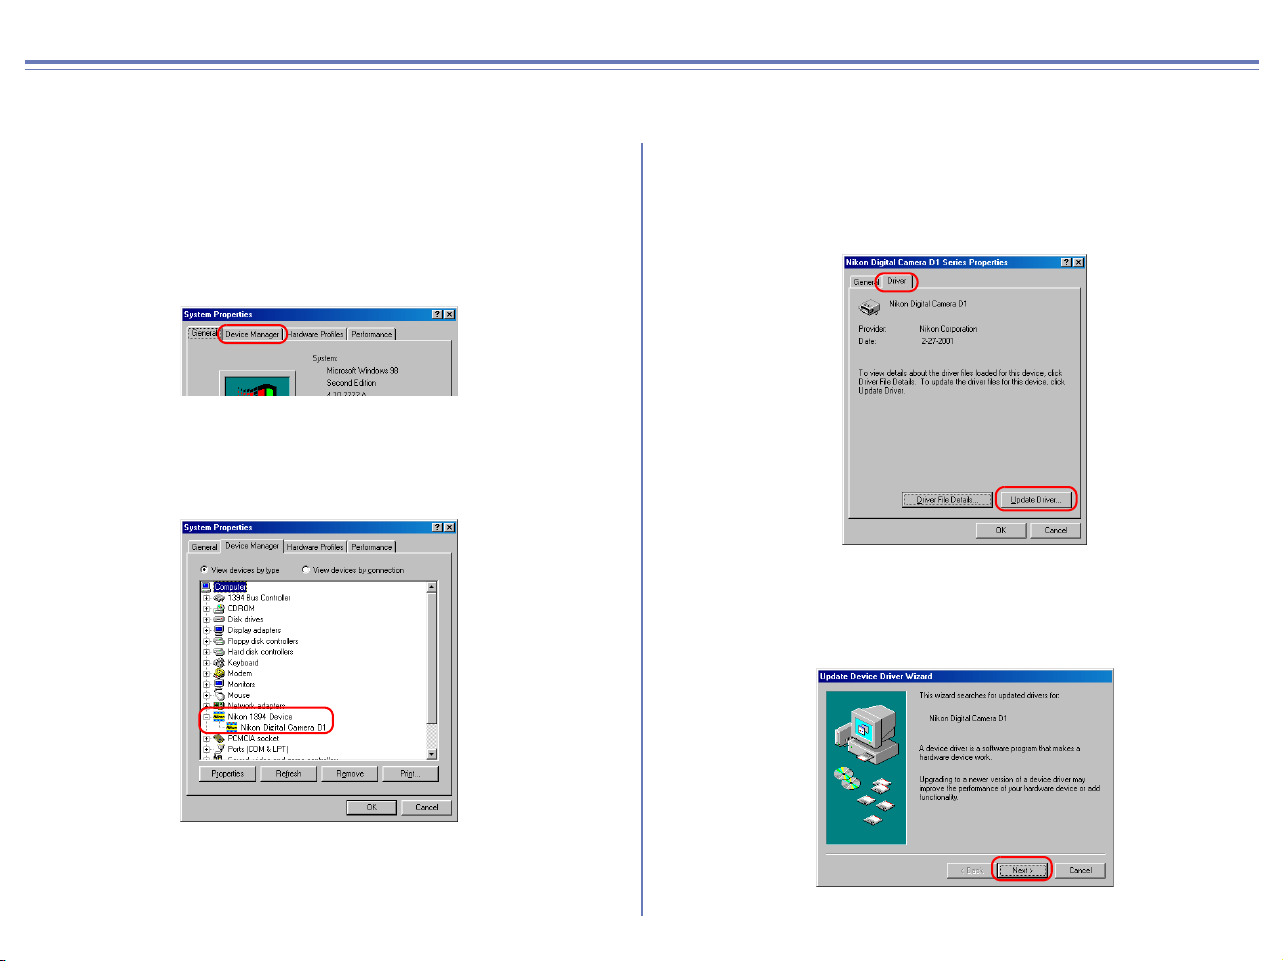
106
D1/D1X/D1H Windows 98SE Updating the device driver
For Users Who Are Already Using the D1 with Nikon View DX or Nikon Capture
If you are already using the D1 with Nikon View DX or Nikon Capture, you will need to update the camera drivers.
Step 1
Click the My Computer icon on the desktop with the right mouse
button and select Properties from the menu that appears. The
System Properties dialog will be displayed; click the Device Manager
tab.
Step 2
The Device Manager sheet will be displayed. Under the entry
"Nikon 1394 Device," double-click "Nikon Digital Camera D1."
Step 3
The Nikon Digital Camera D1 Series Properties dialog will be
displayed. Open the Driver tab and click Update Driver....
Step 4
The Windows update device driver wizard will be displayed; click
Next.
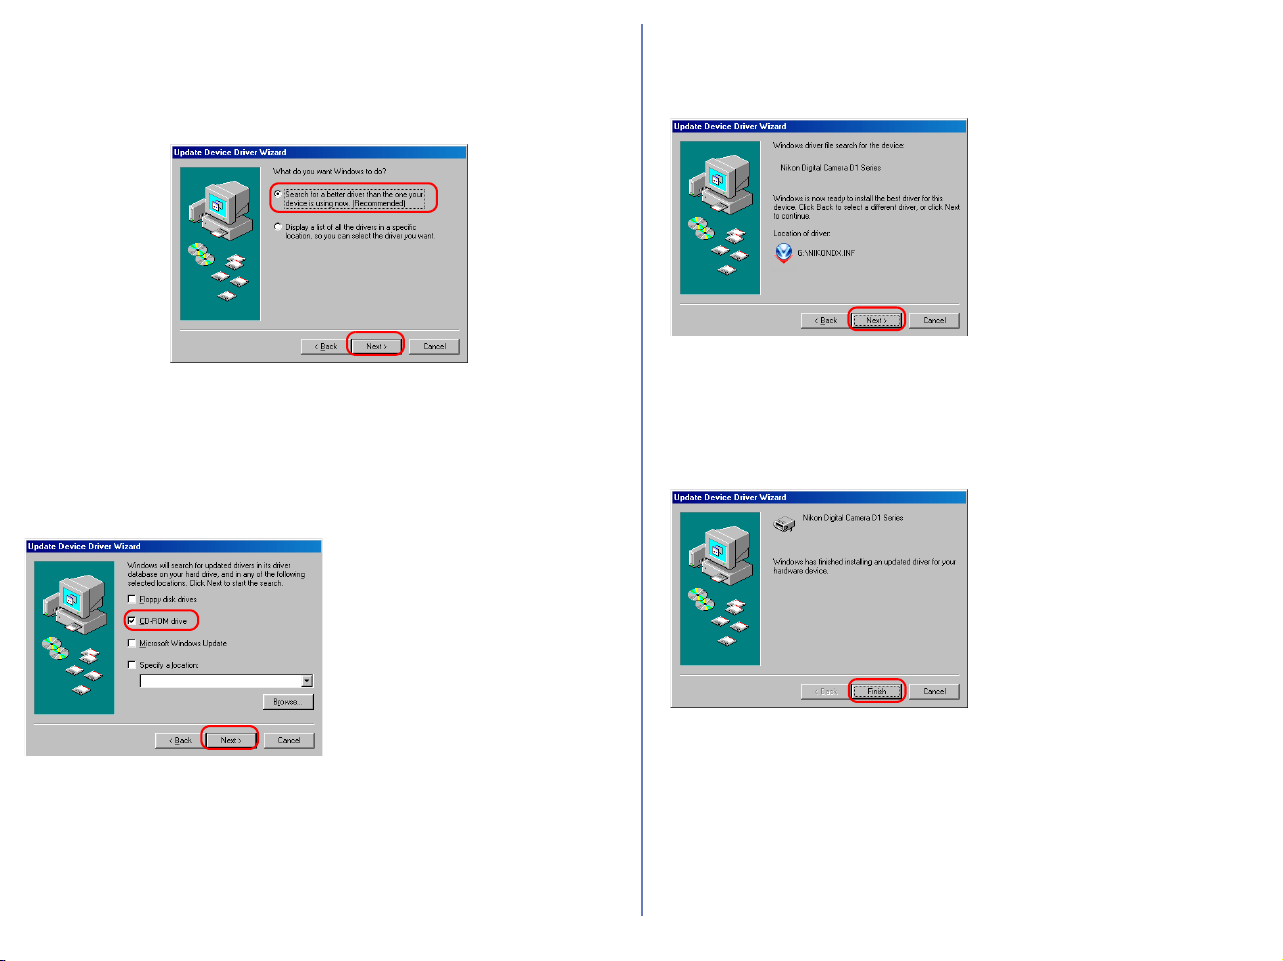
107
Step 5
The dialog shown below will be displayed. Select "Search for a better
driver than the one your device is using now. (Recommended)" and
click Next.
Step 6
The dialog shown below will be displayed. Holding down the shift
key to prevent the Welcome dialog from opening automatically,
insert the Nikon View 6 CD into the CD-ROM drive. Select CD-
ROM drive and click Next.
If the Welcome dialog appears
when the CD-ROM is inserted,
close the dialog by clicking the
Quit button.
Step 7
A dialog will be displayed stating that Windows has found the
drivers for "Nikon Digital Camera D1 Series"; click Next.
If the message, "Windows was
unable to find a suitable driver for
this device," is displayed, this
may indicate that the Nikon View
6 CD was not correctly inserted
in the CD-ROM drive or that the
correct search location was not
specified. Click Back to return to
the dialog shown in Step 6 where
you can confirm that the correct
location has been specified.
Step 8
The dialog shown below will be displayed; click Finish.
If a message is displayed
prompting you to restart
Windows, click Restart.
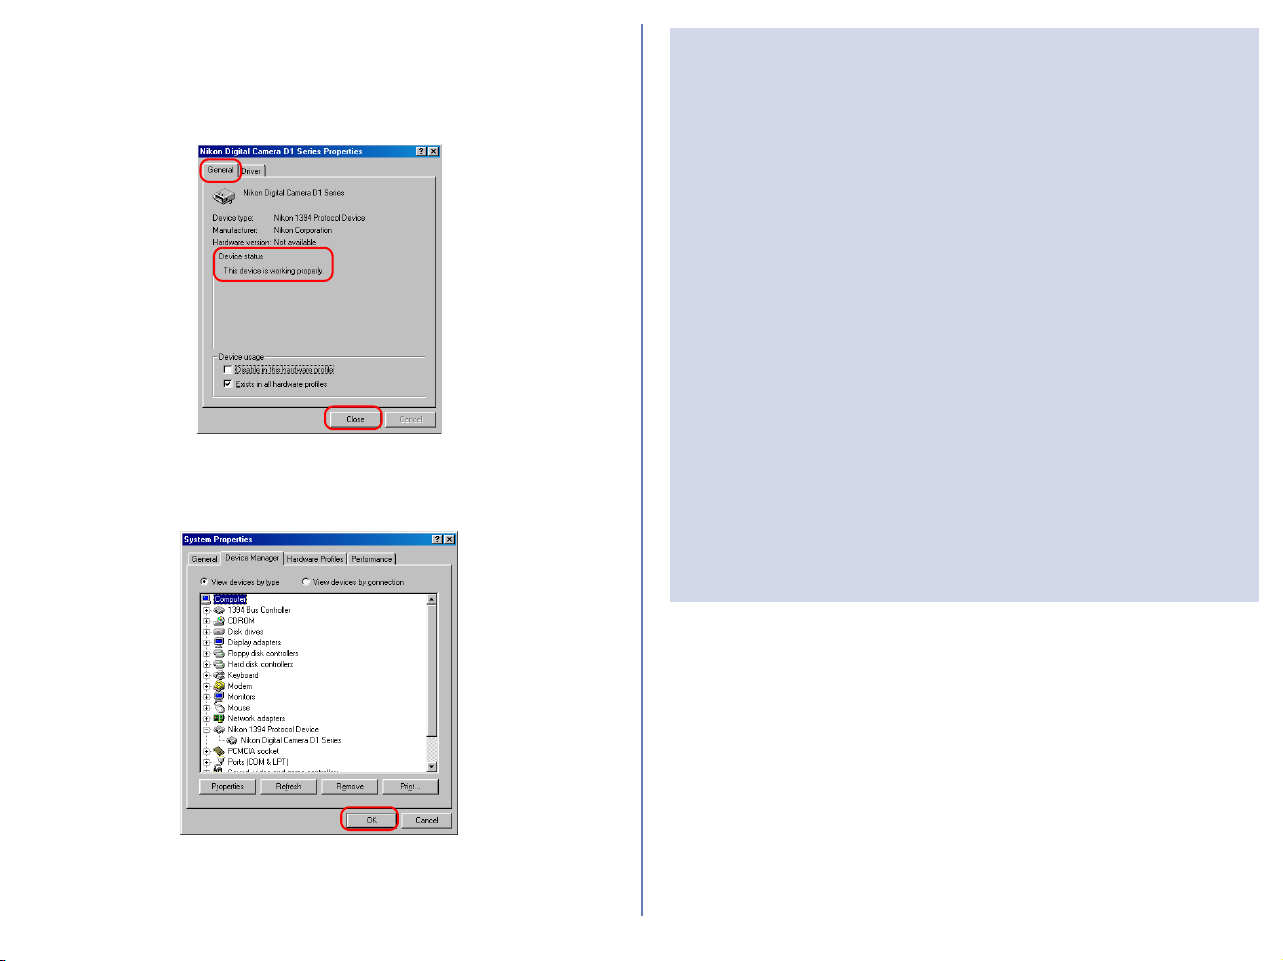
108
Step 9
Confirm that "This device is working properly" appears under
"Device status" in the General Tab of the Nikon Digital Camera D1
Series Properties dialog. Click Close.
Step 10
Click OK to close the System Properties window.
Troubleshooting
• If "1394 Bus Controller" is not displayed in the Device
Manager, if the IEEE 1394 board or card is listed under
"Other Devices" or "Miscellaneous Devices," or if the listing
for the IEEE 1394 board or card is preceded by a red or
yellow warning icon...
...the computer does not recognize the IEEE 1394 board or
card. Refer to the documentation provided with your
computer or IEEE 1394 board or card for information on
registering the board or card with the system.
• If "1394 Bus Controller" is listed in the Device Manager but
the entry for the Nikon D1 (D1
X/D1H) does not appear...
...check the following
• Is the camera on?
• Is the battery fully charged? If you are using an AC
adapter (available separately), is it properly connected?
• Is the mode dial set to "PC"?
• Is the IEEE 1394 cable properly connected?
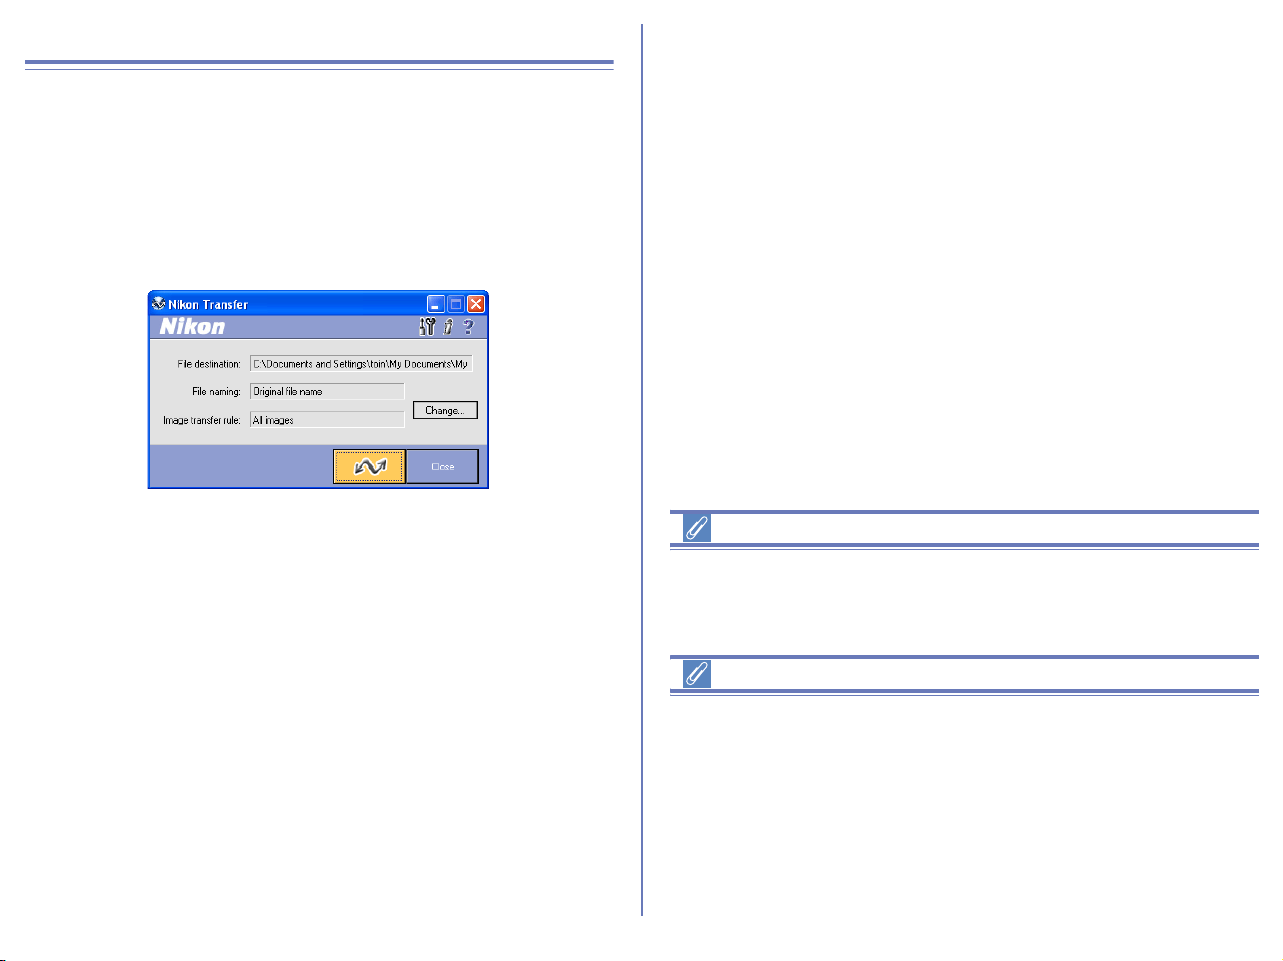
109
Starting Nikon View
Starting Nikon Transfer
Once installation is complete, Nikon Transfer will start automatically
whenever your Nikon digital camera is connected to your computer
and turned on, or when the camera memory card is inserted in a card
slot or in a card reader connected to the computer. Note that only one
camera can be connected to the computer at a time.
On a Macintosh, Nikon Transfer starts after Nikon Browser.
If Nikon Transfer does not start
If Nikon Transfer does not start, refer to Device Registration to
confirm that the camera is registered as a device with your
computer.
Auto start
Nikon Transfer will start automatically when:
• A supported camera is connected while on and with a memory
card in place
• A supported camera with a memory card in place is connected
and then turned on
• A memory card from the COOLPIX series (excluding
COOLPIX600) or D1 series is inserted in a card reader or card
slot

110
Starting Nikon View under Windows XP
If your computer is running Windows XP Home Edition/
Professional, procedures to start Nikon View 6 are different from
other operating systems.
Under Windows XP, the Removable Disk dialog box is displayed
when you connect the camera to the computer or insert the
memory card into the card reader or card slot. Select Copy
pictures to a folder on my computer (using Nikon View 6) in
this dialog box to start Nikon Transfer.
Removable Disk dialog
The Removable Disk dialog
If you connect a D1,D1×, D1H, or COOLPIX990/880 :
The Removable Disk dialog is not displayed. Nikon Transfer will
start automatically.
If you connect a camera using a PTP connection :
The
Select the program to launch for this action
dialog will be displayed.
If you connect a camera using Mass Storage connection :
The Removable Disk dialog is displayed automatically if the
memory card contains images (and they are not all hidden). If there
are no images on the memory card, or if all the images on the
memory card are hidden, the Removable Disk window will not be
displayed.
Start Procedure
To start Nikon Transfer under Windows XP, follow the steps below.
1. Connect the camera to your computer using an interface cable
or insert the memory card in a card reader or card slot.
2. Turn the camera on.
3. The Removable Disk dialog box is displayed.
4. Select Copy pictures to a folder on my computer (using Nikon
View 6).
5. Click OK.
6. Nikon Transfer starts.
Select
Nikon View 6
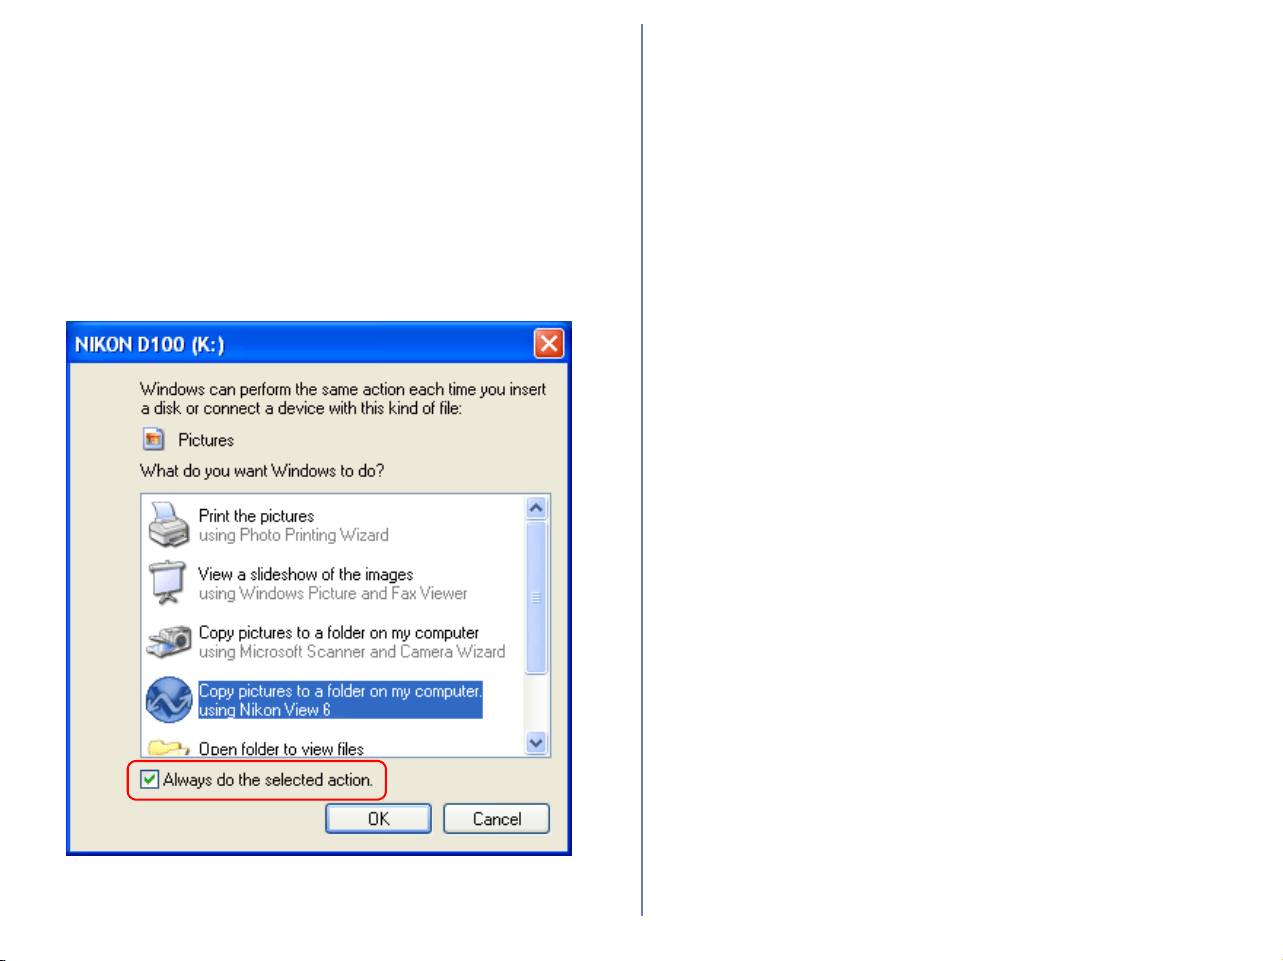
111
Always do the selected action check box
In the Removable Disk dialog box, if you select Copy pictures to
a folder on my computer (using Nikon View 6) and the Always
do the selected action check box, the Removable Disk dialog
box will not be displayed the next time you connect a camera to the
computer or insert a memory card in a card reader or card slot.
Nikon Transfer starts automatically.
If you clear the Always do the selected action check box, the
Removable Disk dialog box will be displayed.
Even if the Always do the selected action box is checked, the
Removable Disk dialog box will appear if :
• you are using a different camera from the one you were using
when you checked the check box.
• you are using a different USB port from the one you were using
when you checked the check box.
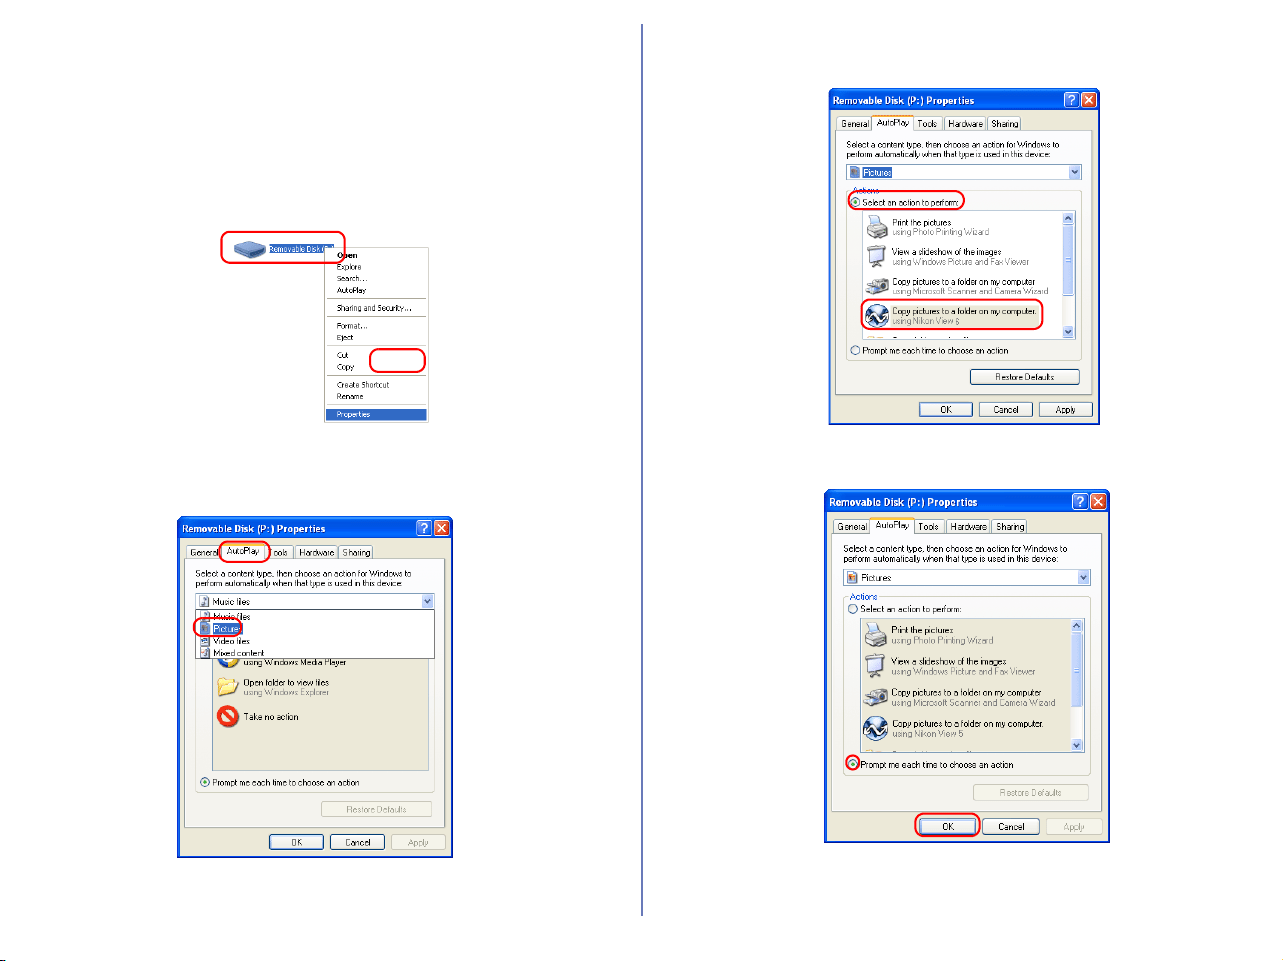
112
Displaying the AutoPlay Window
To display the AutoPlay window after selecting Always do the
selected action, connect the camera to the computer or insert a
memory card from a Nikon digital camera into a card reader or PC
card slot and select My Computer from the Start menu. Click on
the removable disk corresponding to the camera with the right
mouse button and select Properties from the menu that appears.
The Removable Disk Properties dialog will be displayed. Open the
AutoPlay tab and select Pictures from the list of content types.
A list of actions will be displayed with Copy pictures to a folder
on my computer using Nikon View 6 selected.
Check Prompt me each time to choose an action.
Click OK to close the Removable Disk Properties dialog.
Right click
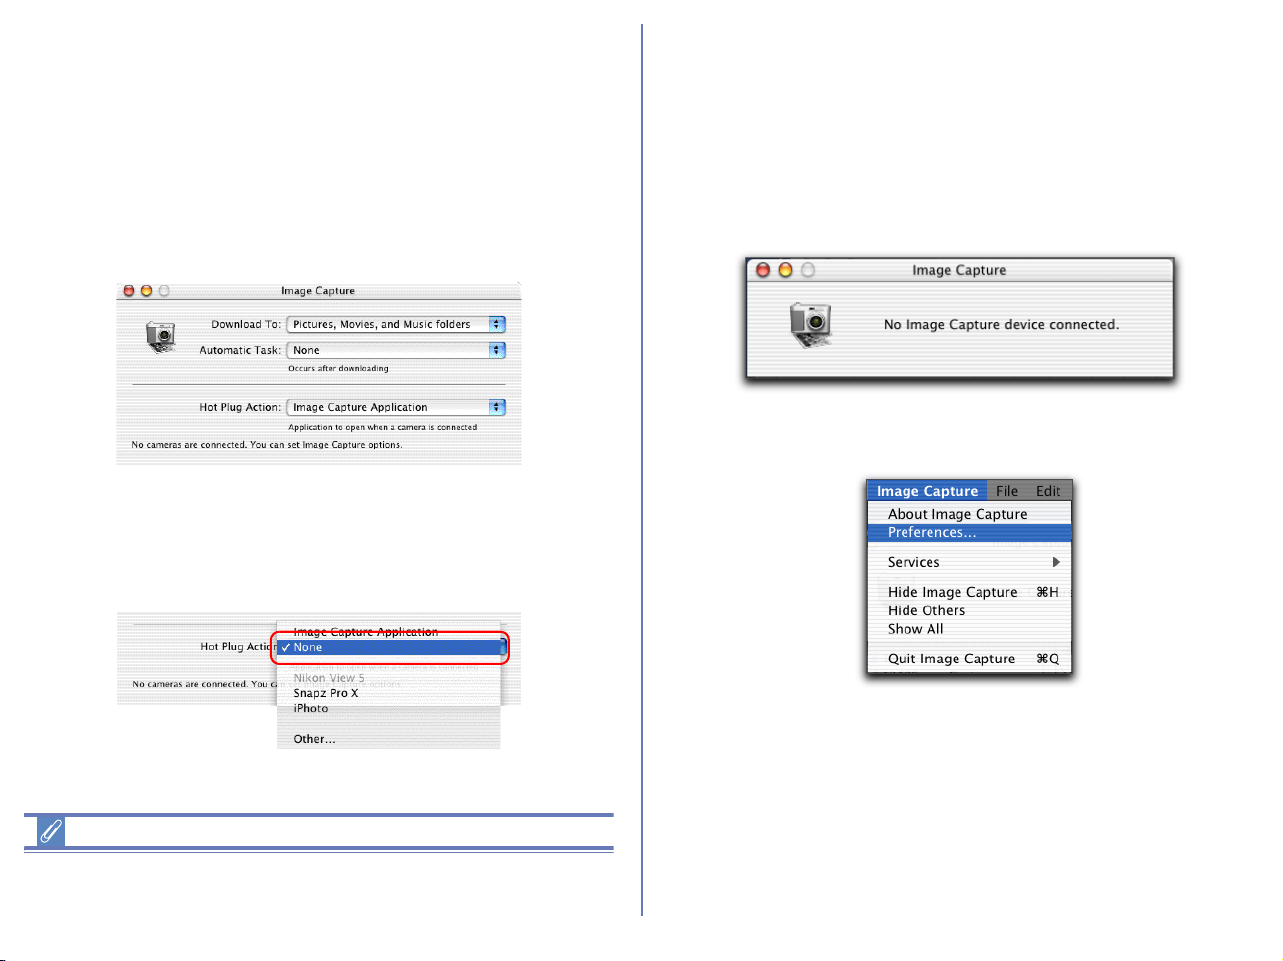
113
Starting Nikon View under Mac OS X (10.1.2
to 10.1.5)
If the operating system on your computer is Mac OS X, it is
recommended that you follow the steps below before connecting
your camera to the computer for the first time.
1. Start up Image Capture
Select Applications from the Finder Go menu. Double click the
Image Capture icon to display the dialog box below.
2. Select None for Automatic Task and Hot Plug Action. (If you
install Apple iPhoto software after you install Nikon View 5,
please repeat steps 1 and 2 to prevent both iPhoto and Nikon
View 5 from starting when you connect your camera.) Close the
Image Capture dialog.
3. Connect your camera to the computer and turn the computer on
to automatically start Nikon Transfer.
Starting Image Capture
You can also start Image Capture by double-clicking its icon in the
Applications folder.
Mac OS X (10.2 or later)
If your computer is running Mac OS X (10.2 or later), do the
following steps before connecting with the camera for the first time.
1. Launch Image Capture
Select Applications from the Move menu in Finder and then
double-click the Image Capture icon to display the following
window:
2. Select Preferences... from the Image Capture menu to display
Image Capture Preferences window.
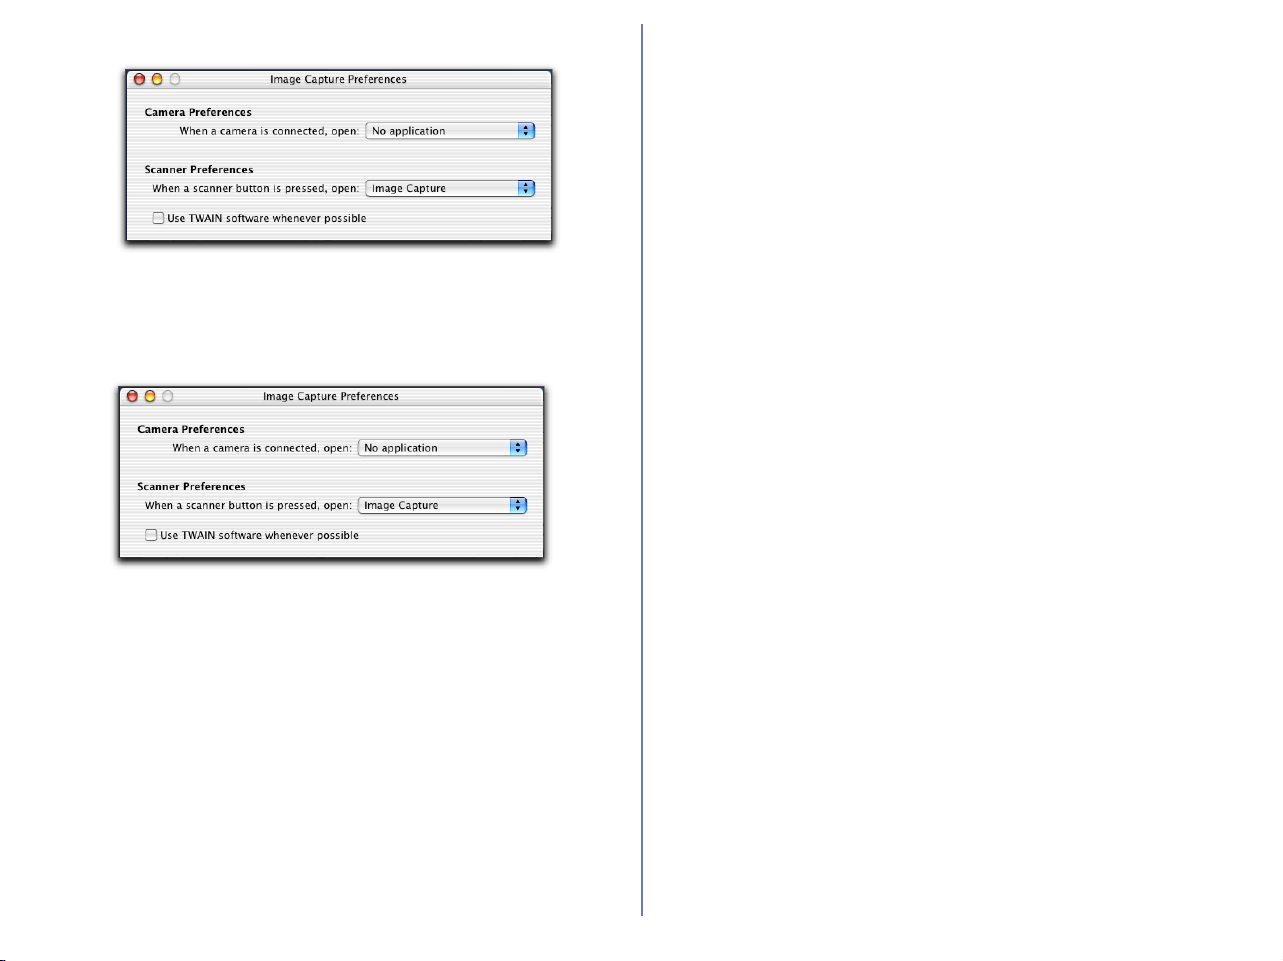
114
3. Select No application from When a camera is connected,
open under Camera Preferences. When Apple iPhoto has
been installed after installation of Nikon View, follow the steps 1
to 3.
4. When you power on the camera after connecting to the
computer, only Nikon Transfer launches automatically.
115
If Nikon Transfer Does Not Start
This section describes the possible causes and solutions when Nikon Transfer does not start. If the problem persists, contact your retailer or
our User Support Center.
The procedure for installing Nikon View varies with your operating system and make of camera. Click the links below for complete
installation instructions. After reading these instructions, you will be returned to the present manual.
If nothing is displayed
If a window other than Nikon Transfer is displayed
Possible Cause
A memory card is not inserted in the camera, card reader or card slot.
The images on the memory card were taken with a make of camera not supported under Nikon View .
The camera is not properly registered (Windows version only).
Disable auto launch is selected in the Auto launch tab of the Preferences dialog box.
Your computer is running Nikon Capture 2 or Nikon Capture 3 Camera Control.
Connecting to a Computer
Starting Nikon View
Device Registration
Nikon Browser — Preferences
—
Possible Cause
The icon on the desktop was used to start the program.
The Start menu was used to start the program (Windows version only).
The icon in Nikon Software folder was used to start the program (Macintosh version only).
The operating system on your computer is Windows XP.
The operating system on your computer is Mac OS X.
Nikon Transfer
Nikon Transfer
Nikon Transfer
Starting Nikon View under
Windows XP
Starting Nikon View under
Mac OS X (10.1.2) or later

116
Nikon View - Applications
Nikon View contains four separate applications; Nikon Transfer, Nikon Browser, Nikon Viewer and Nikon Editor. Click the illustrations below
for detailed instructions on how to use each application.
A -Pictures taken with a
Nikon Digital Camera
Nikon Transfer
Transfer Button
Nikon Editor
Nikon Viewer
Nikon Transfer starts automatically
when camera is connected to the
computer.
B -Pictures taken with a
Nikon Digital Camera
Connect the camera to
your computer and
transfer your pictures
using the TRANSFER
button.
Select the image you
want to edit from the
Browser thumbnail list
and click the icon.
Choose the image you
want to view from the
Browser thumbnail list
and click the icon.
Nikon Browser
Print out
Slideshow
E-mail
Upload
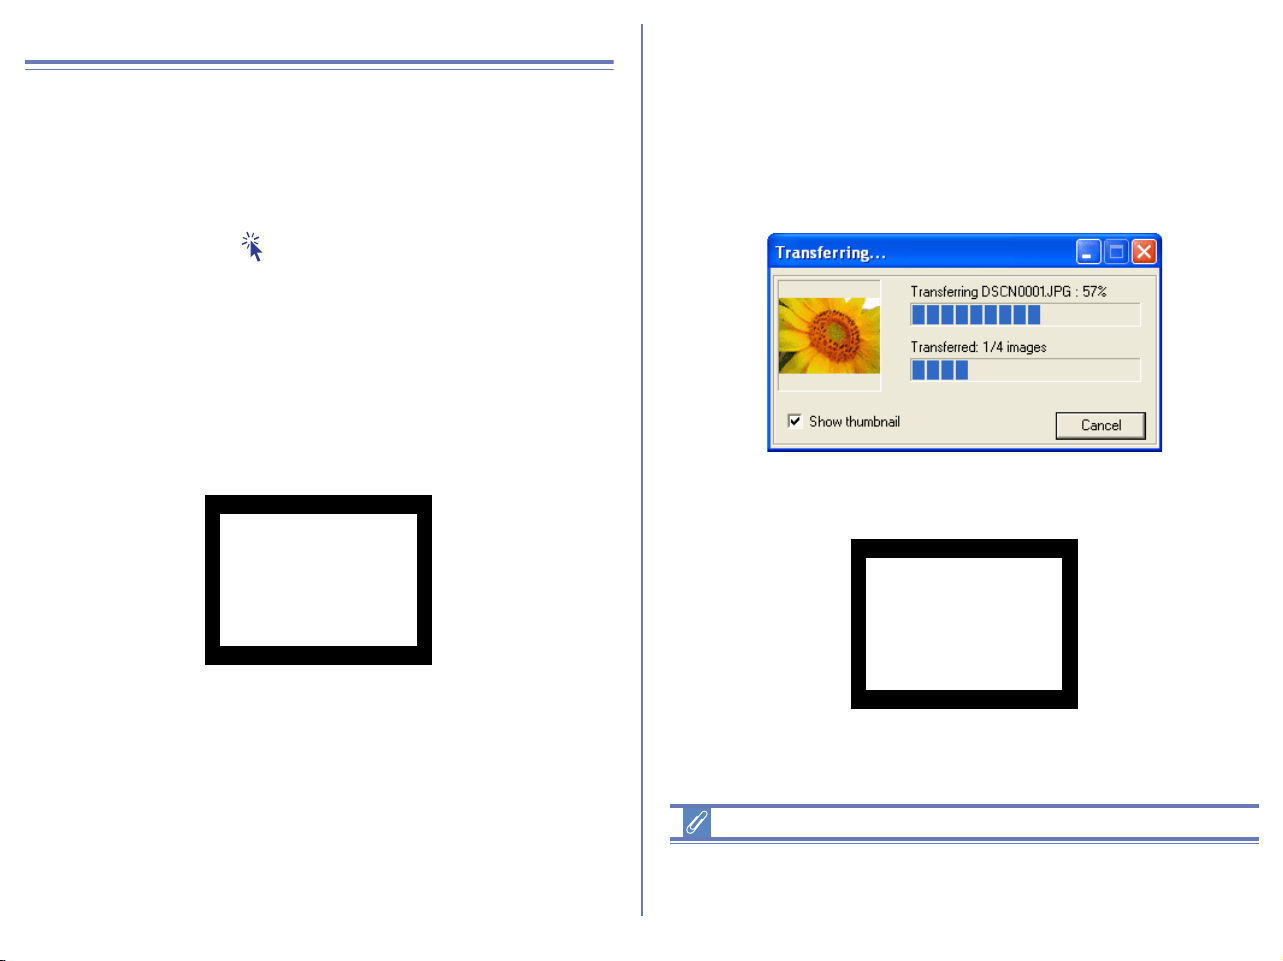
117
Transferring images using the TRANSFER button
Images recorded on the memory card in the camera can be
transferred to a computer by pressing the TRANSFER button on
the back of the camera.
Before starting transfer, ensure that Nikon Transfer is running.
If Nikon Transfer does not start when you connect the camera to
the computer, click here to confirm that the camera is registered
as a device with your computer.
Step 1 : Start transferring the images
When you press the TRANSFER button on the camera, the
selected images are transferred. Refer to the camera manual for
details on how to select images for transfer.
When you press the TRANSFER button, the message PREPARING
TO TRANSFER appears in the camera monitor.
Step 2 : While transfer is in progress
A progress indicator is displayed while the images are being transferred.
A thumbnail preview of the image currently being transferred is also
displayed.
When multiple images are transferred, an indicator showing the
overall progress of the transfer is displayed, as well as an indicator
showing the progress of each image.
In the camera monitor, the message TRANSFERRING IMAGE TO
COMPUTER is displayed.
No other operations can be performed on Nikon View while the
above window is displayed.
Transferring Images
Nikon Transfer allows you to specify whether the images should be
erased from the memory card after they are transferred to the computer.
PREPARING
TO TRANSFER
TRANSFERRING
IMAGE TO
COMPUTER

118
Step 3 : Finish transferring the images
When image transfer is complete, the message TRANSFER
COMPLETED appears in the camera monitor.
You can now turn off the camera or unplug the interface cable.
Disconnecting the Camera
Before turning the camera off or disconnecting the interface cable,
be sure that transfer is complete and that the camera displays the
message "TRANSFER COMPLETED." While transfer is in
progress, do not disconnect the USB cable, turn the camera off, or
remove the memory card from the camera.
Nikon Transfer settings
When you use the TRANSFER button on the camera, the images
set for transfer in the camera are transferred regardless of the
image transfer rule specified in Nikon Transfer.
TRANSFER COMPLETED

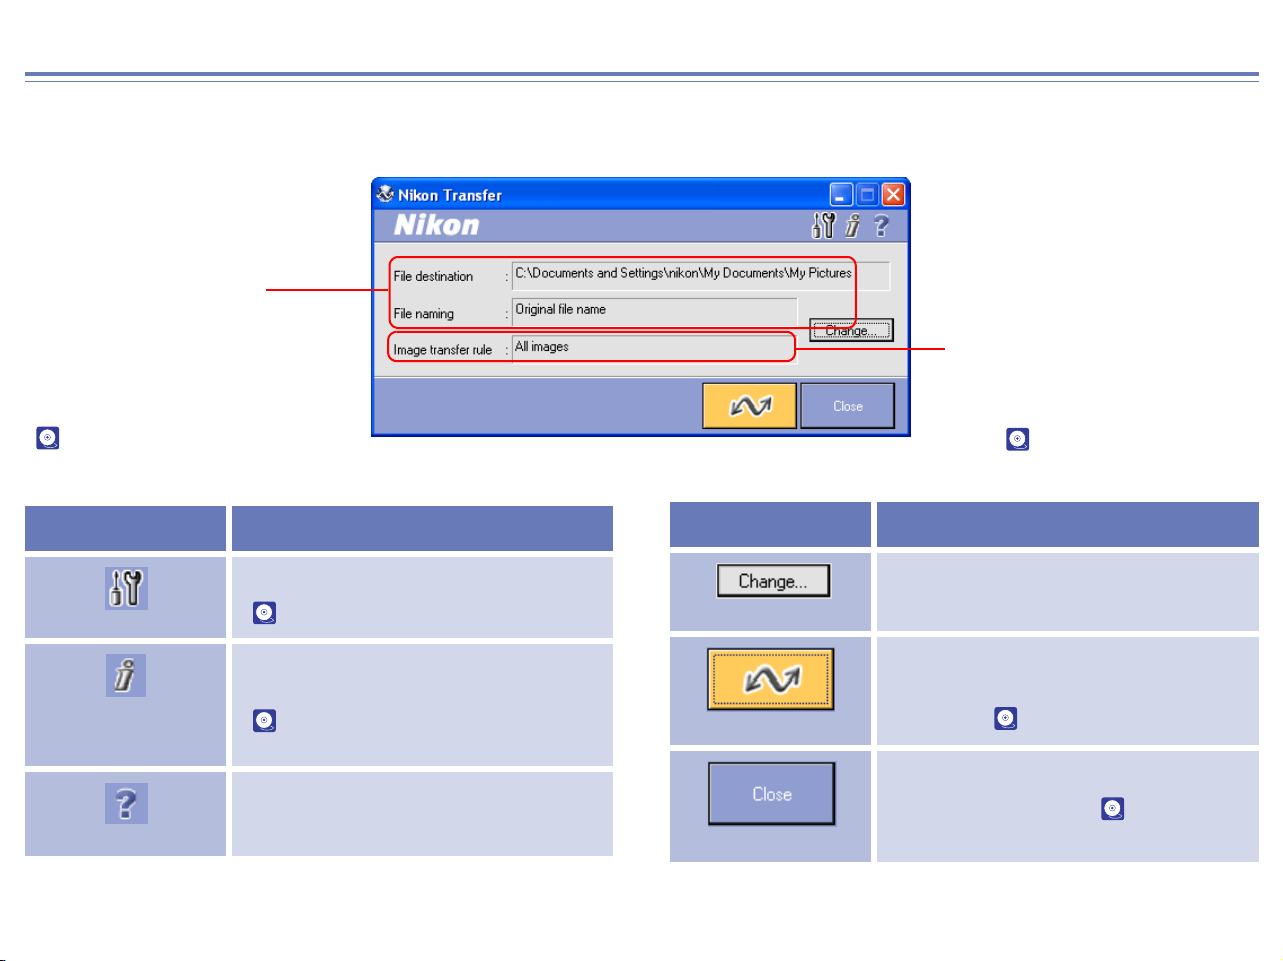
120
Nikon Transfer Overview
Using Nikon Transfer
Functions and controls:
Image transfer rule
Specifies which image files should
be transferred from the memory
card ( p. 127).
File destination and
naming
Allows you to confirm and
change the destination and
name of images for transfer
( p. 121).
Button Function
Transfer options
Sets transfer conditions and actions
( p. 129).
Add additional
information (IPTC
field) to images
Adds file information to the image files
( p. 132).
Help
Displays help for Nikon View 6 .
Change
Changes the transfer destination or the
name of image files.
Transfer
Starts transferring image files to the
computer according to the specified
conditions ( p. 135).
Close
Closes Nikon Transfer ( p. 136).
Button Function
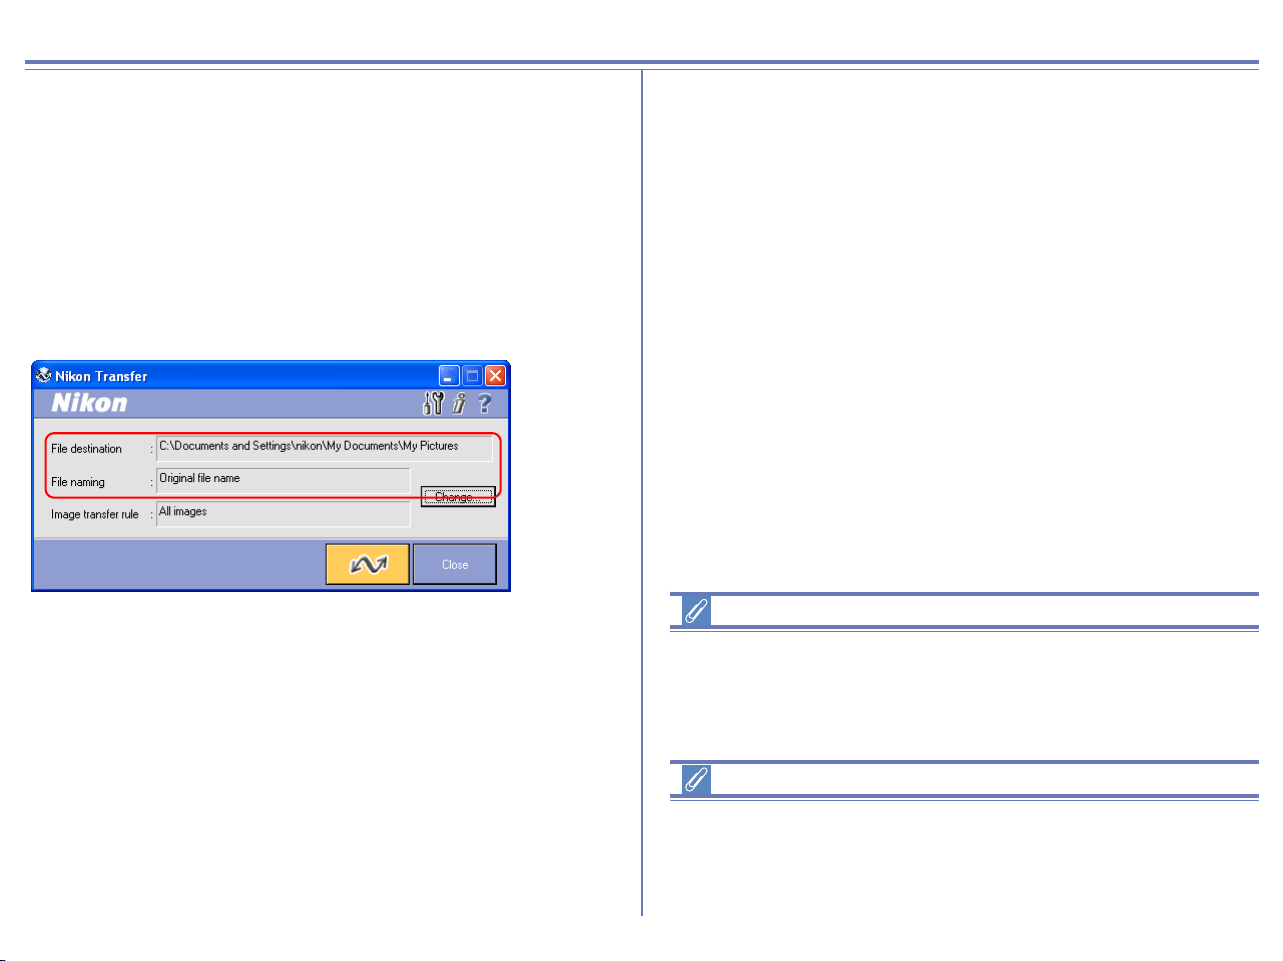
121
Transferring Images Using Nikon Transfer
This section describes how to use Nikon Transfer to transfer image
files to your computer from a memory card inserted in a camera,
card reader, or card slot.
Step 1; File destination and naming
You can use the File destination and naming dialog to change
the destination folder for transferred images. You can also set how
file names are assigned to transferred images.
Click Change button to edit settings.
File destination
Displays the current destination of the files which are about to be
transferred. At installation, default destinations are as follows.
My Pictures\Nikon View\Images
(“My Documents\Nikon View\Images” if there is no “My Pictures
folder”)
File naming
Displays Original file name or Automatically created file name.
If Original file name is displayed, the file is transferred as the
original file name used in the camera.
Automatically created file name is displayed when you changed
the file name.
Change button
To change settings for the transfer destination or the name of
image files, click Change button to display the File Destination
and Naming dialog box where you can change settings.
Transfer destination
We recommend that you do not consider changing the file
destination from the default location. Other applications may
expect images to be stored in the default folder.
If a file with the same name already exists in the destination folder
To avoid overwriting the original file, any new files bearing the
same name will have a sequential number added to the end of the
file name.
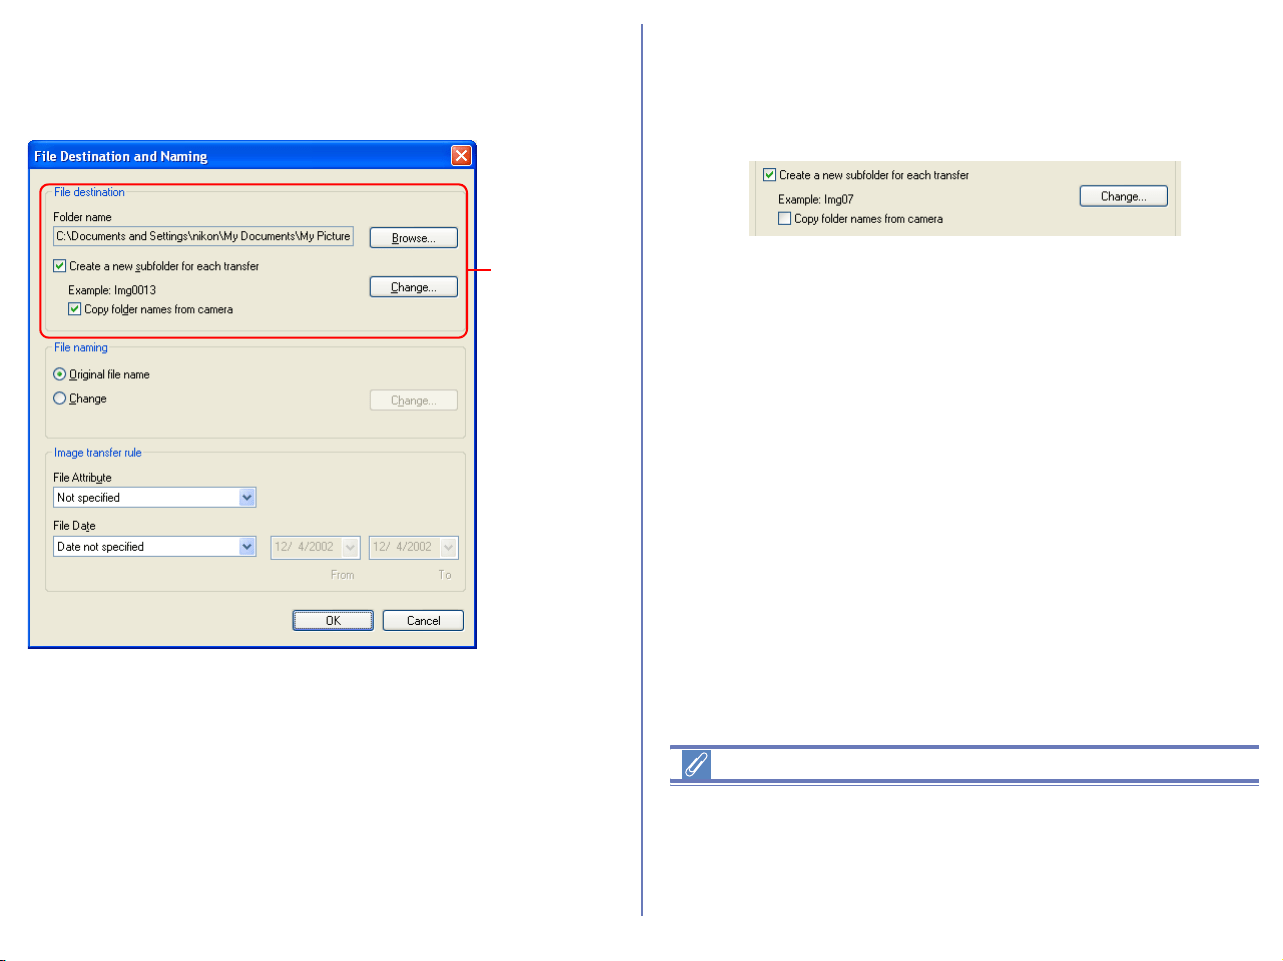
122
Specifying a transfer destination
The destination folder for transferred images is specified in the File
destination area of the File Destination and Naming dialog box.
Folder name
Displays the current destination (a folder for stored image files) of
the files which are about to be transferred. If you wish to alter the
transfer destination, click Browse and select another folder.
Create a new subfolder for each transfer
Check this box to create a new subfolder with the name described
in Example field. The subfolder will be transfer destination. Click
Change to alter the subfolder name in Example field.
Create a new subfolder
Create a new subfolder to keep contents of each memory card
separate, as if the cards were rolls of film. After each transfer
session, the images will appear in a new folder bearing an
ascending sequence number (e.g. card001, card002).
File
destina-
tion
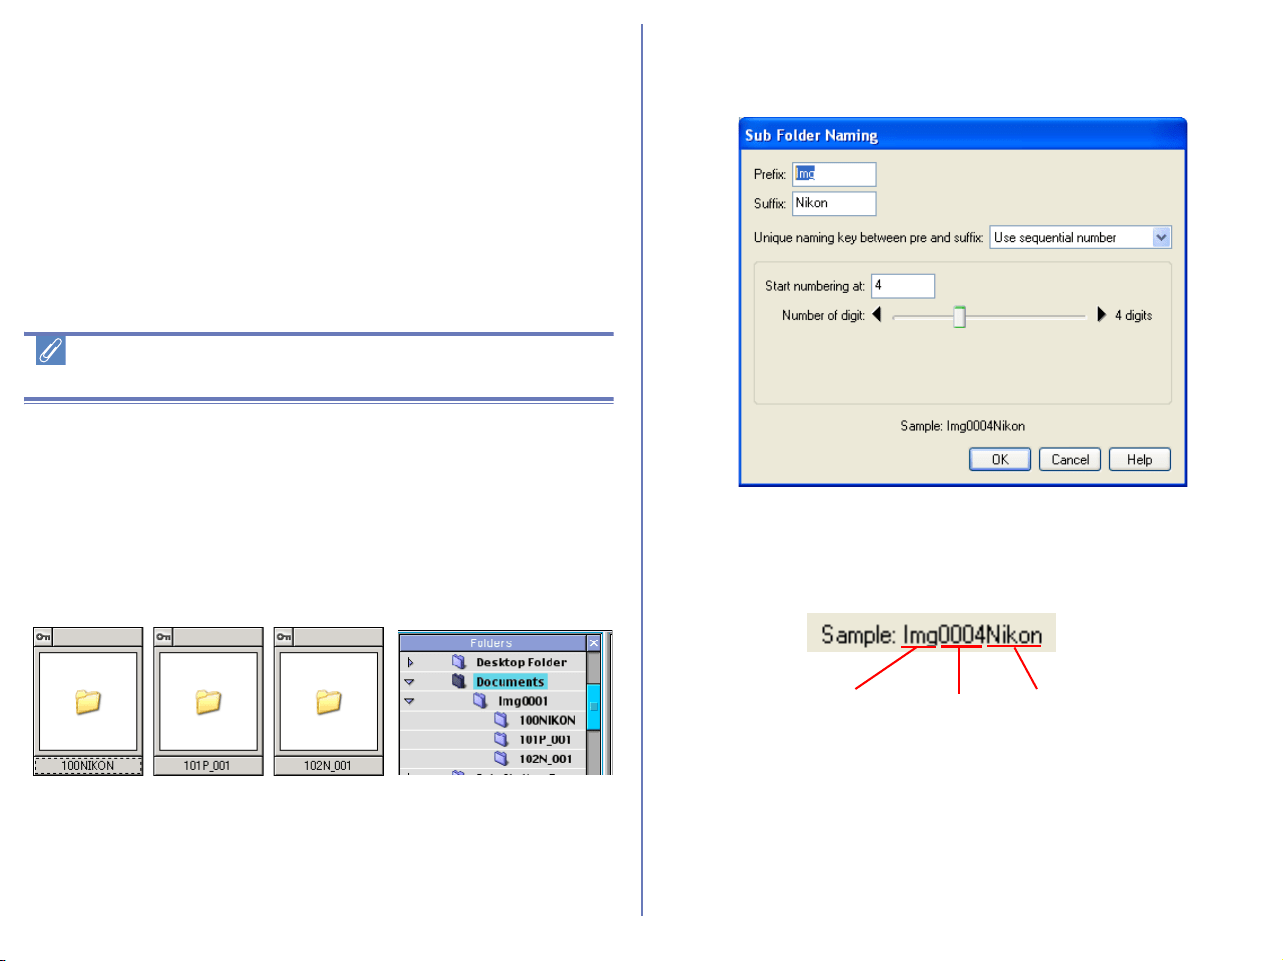
123
Copy folder names from camera
Images may be stored on the camera in one main folder, or in a set
of separate folders. This check box allows the images to be
transferred such that they appear on the computer in the same
folder structure as they are stored on the camera. This check box
is only enabled when Create a new subfolder for each transfer
is selected.
Copying files at a setting of Panorama Assist or
Ultra HS
Before transferring pictures to the computer for the first time, make
sure you check Copy folder names from camera.This will ensure
that each sequence of pictures created at settings of Panorama
Assist or Ultra HS will be copied to a separate folder on your
computer.
Folder icons will be displayed in the thumbnail list window, and
folders will be displayed in Folders area.
Sub Folder Naming
Click Change in the Folder area to display the Sub Folder
Naming dialog box.
Folders are named as follows: “prefix + identifier + suffix”. An
identifier can be a unique number, date, or date and time. Use the
Unique naming key between pre and suffix pull down menu to
specify the identifier.
Prefix
Specify the characters you want to append to the beginning of the
folder name.
Suffix
Specify the characters you want to append to the end of the folder
name.
Standard
image
folder
Panorama
image folder
Ultra HS
image folder
Prefix Identifier
Suffix
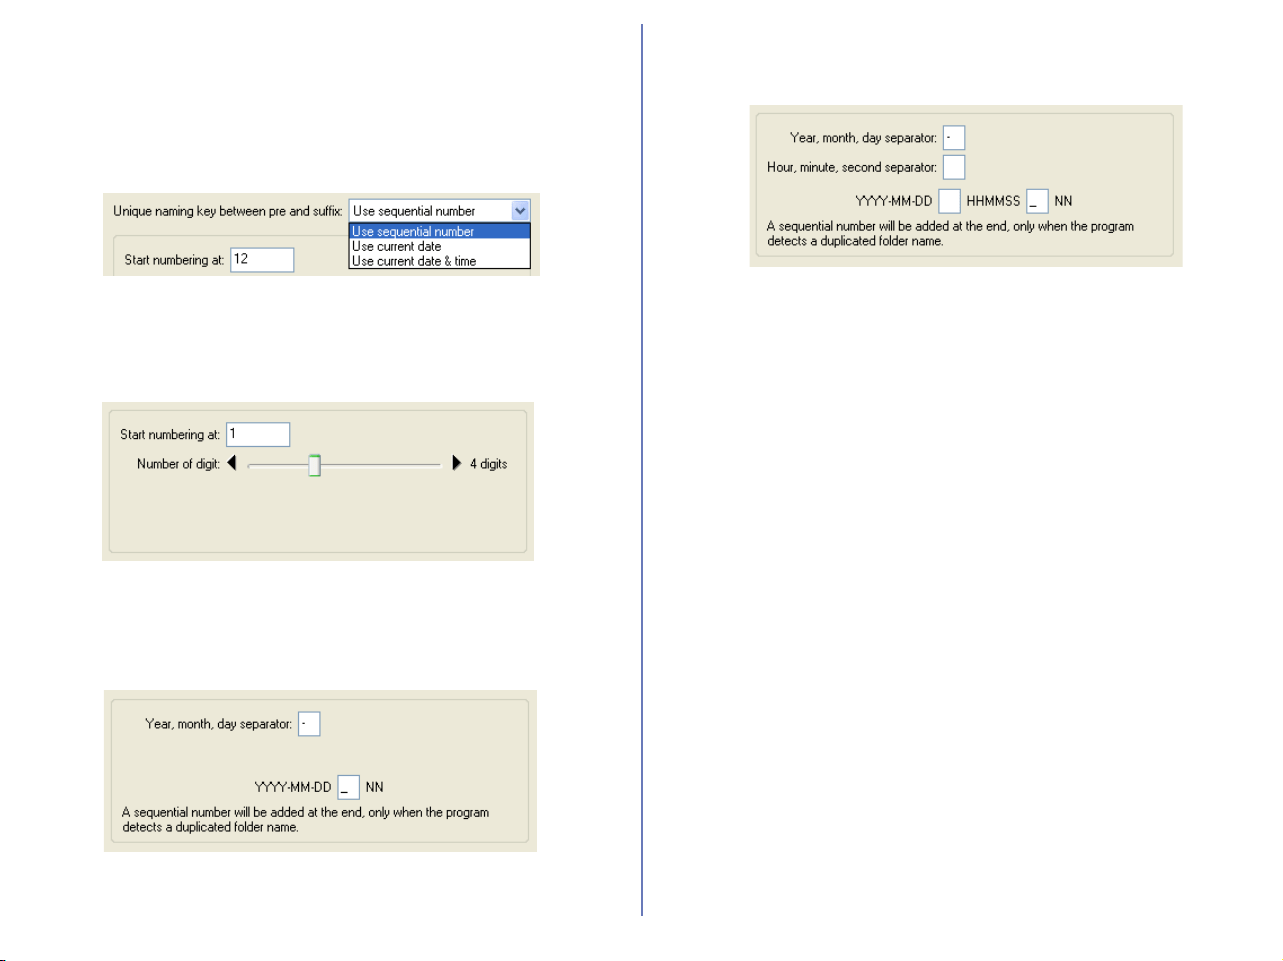
124
Unique naming key between pre and suffix
Select the identifier you want to use for the folder name. Choose
from Use sequential number, Use current date, or Use current
date & time. The dialog box will show different options depending
on the identifier you choose.
When you select Use sequential number, names will be assigned
to folders in ascending order beginning with the starting number
and number of digits you specify.
When you select Use current date, the folder name will include
the date of transfer.
When you select Use current date & time, the folder name will
include the date and time of transfer.
The date and time is of the form YYYY-MM-DD-HH-MM-SS-NN,
where YYYY denotes the year, MM the month, DD the day of the
month, HH the hour, MM the minute, SS the second, and NN the
serial number added when a folder name already exists. For a
delimiter, not only a hyphen, but any other symbol can also be
used.
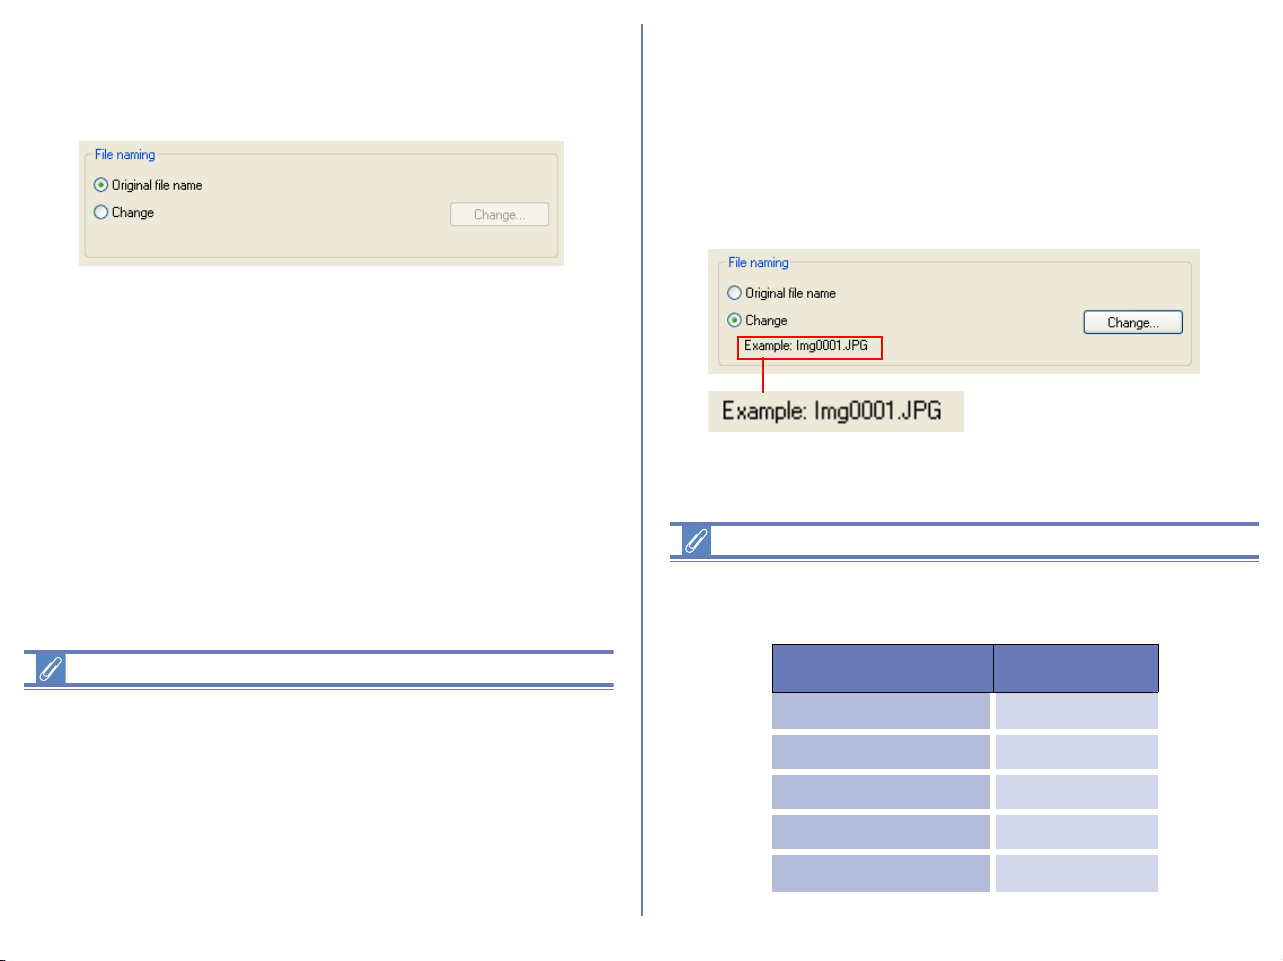
125
Specifying the file name
You can set the file name in the File naming section of the File
Destination and Naming dialog box.
File naming limitations
• With a version of Windows that supports long file names (255
characters or less including the path name), the following
characters cannot be used:
\ / : * ? " < > |
• In an operating environment that does not support long file
names, a file name should be within 8 characters; spaces and
the following characters cannot be used:
\ / : , ; * ? " < > |
Original file name
Select this option to use the image file name recorded in the
camera when saving the transferred files.
Change
Select this option to save the transferred files with an automatically
generated file name shown in Example field. Click Change to alter
the file name in Example field.
Extensions
Depending on the file type, one of the following extensions will be
assigned:
File Format Extension
JPEG .JPG
TIFF .TIF
RAW .NEF
Movie .MOV
Sound (Voice memo) .WAV
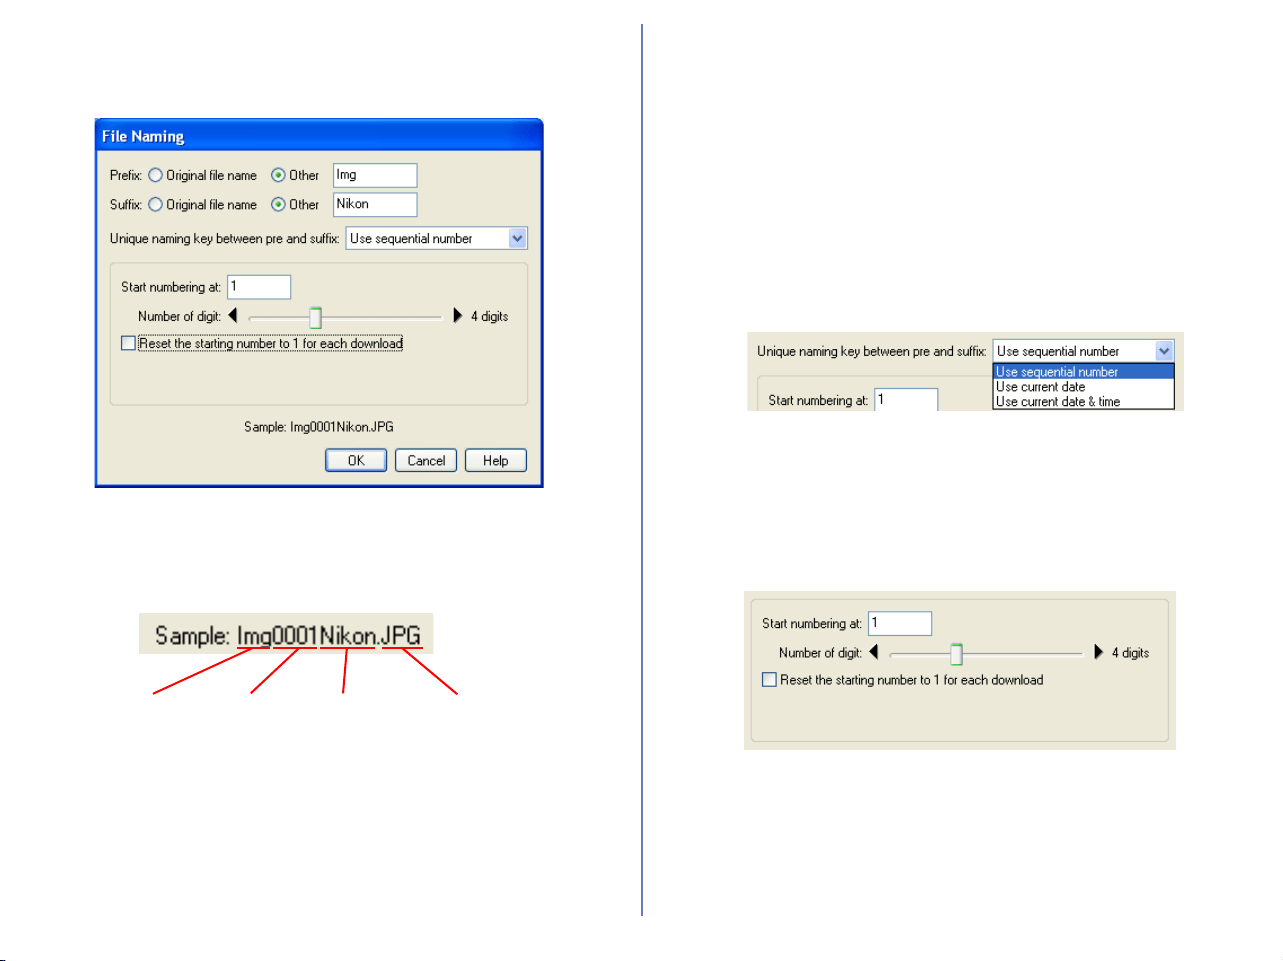
126
File naming
When you select Change and click Change button in the File
Naming area, the File Naming dialog appears.
Folders are named as follows: “prefix + identifier + suffix”. An
identifier can be a unique number, date, or date and time. Use the
Unique naming key between pre and suffix pull down menu to
specify the identifier.
Prefix
Select Original file name to append the file name assigned in the
camera to the beginning of the transferred file name. Select Other
to append characters of your choice to the beginning of the file
name.
Suffix
Select Original file name to append the file name assigned in the
camera to the end of the transferred file name. Select Other to
append characters of your choice to the end of the file name.
Unique naming key between pre and suffix pull-down
menu
Select the identifier you want to use for the file name from Use
sequential number, Use current date, or Use current date &
time. The dialog box will show different options depending on the
identifier you choose
When you select Use sequential number, names will be assigned
to the transferred files in ascending order, beginning with the
number and number of digits you specify. Check Reset the
starting number to 1 for each download check box to start
numbering again from 1 every time you transfer images.
When you select Use current date, the file name will include the
date of shooting.
Prefix Identifier Suffix Extension

127
When you select Use current date & time, the file name will
include the date and time of shooting.
The date and time is of the form YYYY-MM-DD-HH-MM-SS-NN,
where YYYY denotes the year, MM the month, DD the day of the
month, HH the hour, MM the minute, SS the second, and NN the
serial number added when a file name already exists. For a
delimiter, not only a hyphen, but any other symbol can also be
used.
Step 2; Rules
Select a transfer rule from the Image transfer rule.
You can specify a transfer rule for image files by combination of the
File Attribute and File Date settings.
If you are using a camera equipped with a TRANSFER button
You can also transfer image files using the TRANSFER button on
your camera. For further information see the camera manual for
details.
Image
Transfer
rule

128
[File Attribute]
You can specify the following rules:
*1
Note that if the Copy all images marked as “hidden” check box in the
Transfer tab of the Transfer Options dialog box is not checked, hidden
images will not be transferred when you click the transfer button. (When
using a PTP connection, all images, including hidden images, will be
transferred, irrespective of the check box setting.)
[File Date]
You can specify the following rules:
Rule Description
Not specified
Transfers images irrespective of its file
attribute
*1
Marked for
transfer
Transfers only the images that have
been marked for transfer using the
camera menus.
Marked for
protection
Transfers only the images that are
marked for protection using the camera
menus.
Unmarked for
Protection
Transfers only the images that are not
marked for protection using the camera
menus.
Rule Description
Date not specified
Transfers images irrespective of its file
date.
Today only
Transfers only the images that have
been taken by the camera today.
Within a week
Transfers only the images that have
been taken by the camera within a
week.
Within a month
Transfers only the images that have
been taken by the camera within a
month.
Within a year
Transfers only the images that have
been taken by the camera within a
year.
Specify dates
Transfers only the images that have
been taken by the camera on the
specified date.
User defined
Transfers only the images that have
been taken by the camera in the
specified period.
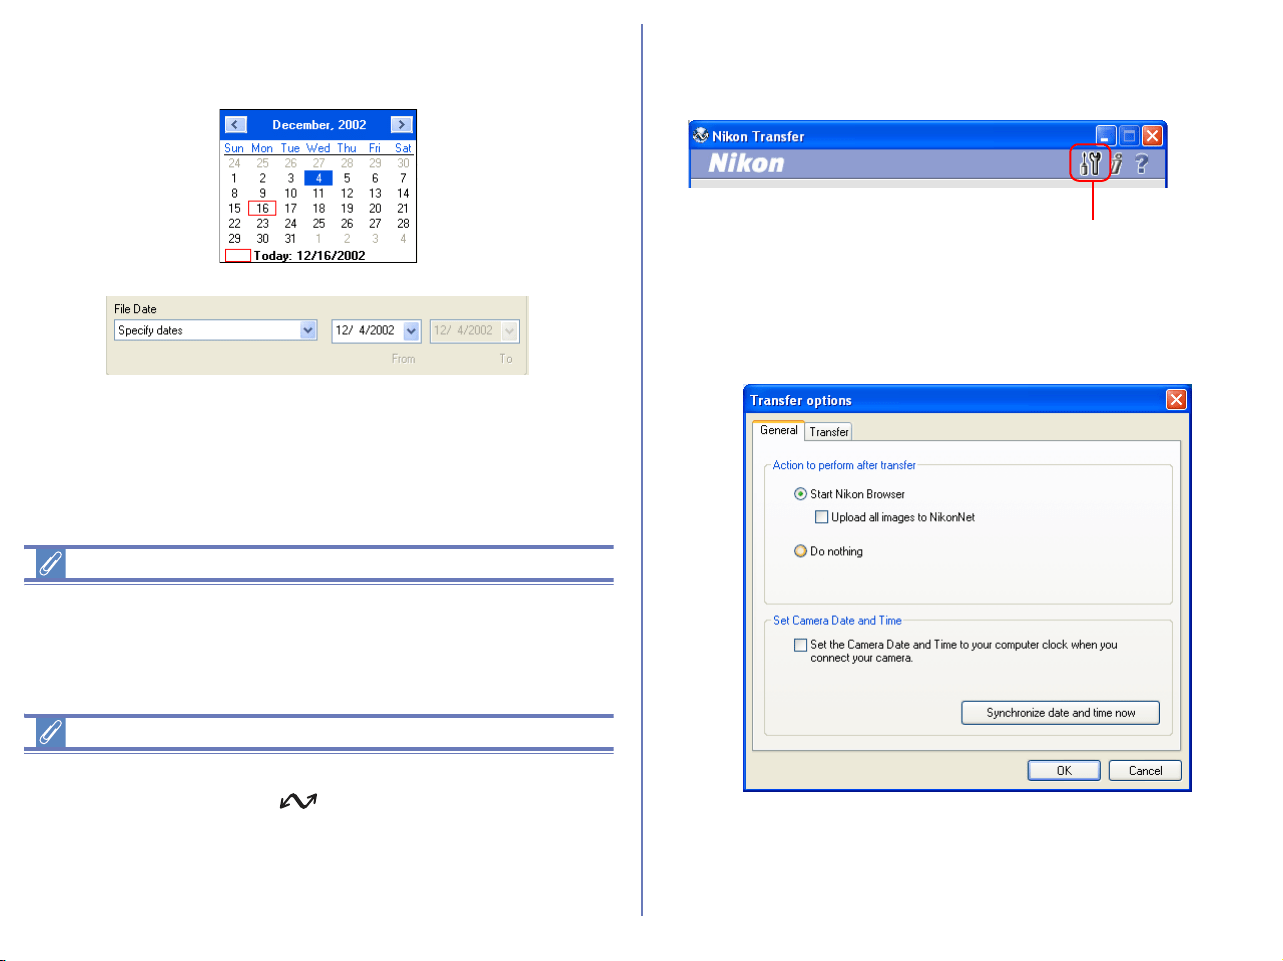
129
If Specify dates and User defined are selected, Calendar dialog
will appear by clicking the date and the specified date will be
selected.
Note
If you want to transfer all image files in the memory card, specify
Not specified for File Attribute and Date not specified for File
Date, respectively.
Setting the transfer mark (COOLPIX series)
The transfer mark can be set using the Auto Transfer function on
your camera, or using the button. Some cameras may not
support setting of the transfer mark. Consult the documentation
provided with your camera on how to set the transfer mark.
To transfer all image on CF card, set both File Attribute and File
Date to Not specified.
Step 3; Set up the transfer options
Click the Transfer options button in Nikon Transfer to display the
Transfer options dialog box.
The Transfer options dialog box
The Transfer options dialog box has the following tabs:
• General
• Transfer
The changes you make in this dialog box take effect when you click
the OK button. Clicking the Cancel button closes the Transfer
options dialog box without applying the changes you made in the
dialog box.
Trunsfer options button
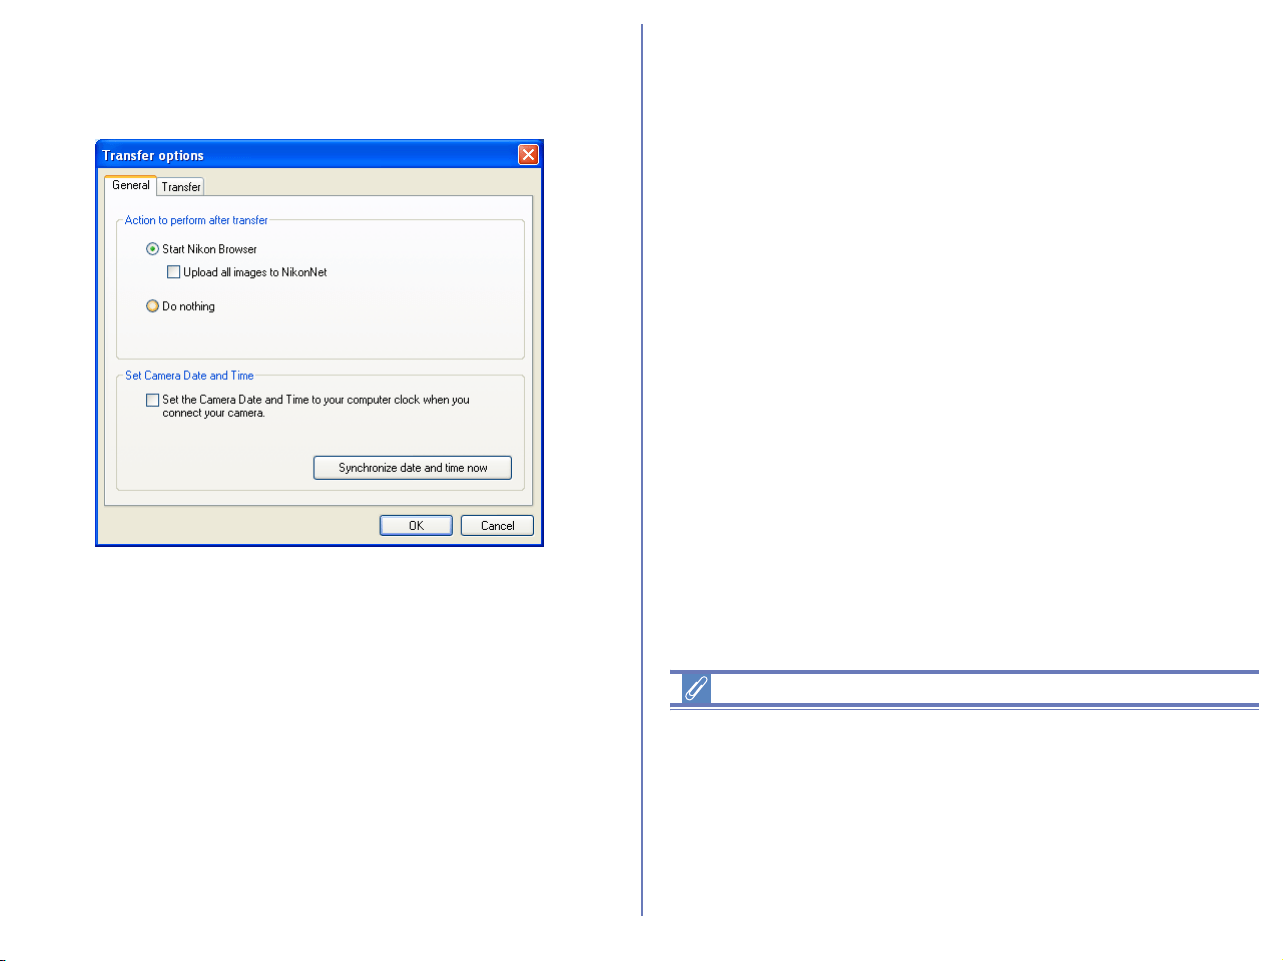
130
The General tab
This tab allows you to choose what you want the computer to do
after transferring image files.
Start Nikon Browser (for European resident)
Select this option to start Nikon Browser after the image files are
transferred. When you select this option, the Upload all images to
FotoShare check box becomes enabled.
Start Nikon Browser (for North and South American
resident)
Select this option to start Nikon Browser after the image files are
transferred. When you select this option, the Upload all images to
NikonNet check box becomes enabled.
Upload all images to FotoShare (for European resident)
Check this check box to upload all the transferred image files to
FotoShare (http://www.nikonfotoshare.com).
Upload all images to NikonNet
Check this check box to upload all the transferred image files to
NikonNet (http://www.nikonnet.com).
Do nothing
Select this option if you want Nikon View 6 to do nothing after the
transfer of the image files is complete.
Set camera Date and Time (Windows Only)
Check this check box to configure the date and time set in your
computer to the camera automatically when Nikon Transfer starts
up.
Note
When configuring date and time automatically, make sure that date
and time are configured correctly in your computer. This feature is
available for D1 series cameras that support IEEE1349 interface
and some of cameras that support PTP connections through USB
interface. For more information on supported cameras, see Nikon
Support & Service (http://www.nikonusa.com/, http://www.nikon-
euro.com/, http://www.nikon-asia.com/).
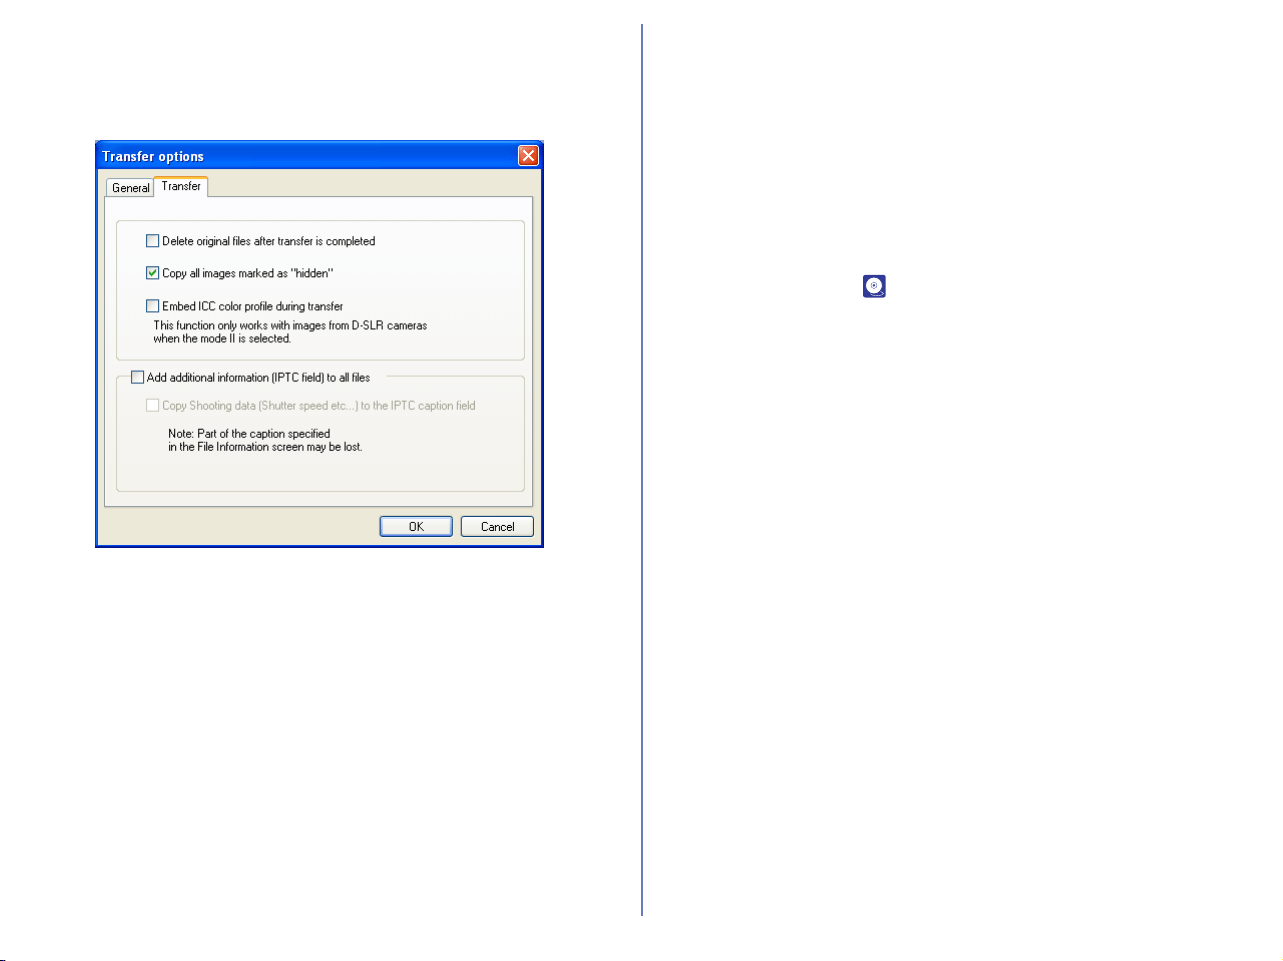
131
The Transfer tab
This tab allows you to adjust settings for the images about to be
transferred.
Delete original files after transfer is completed
Check this check box to delete the image files from the memory
card after they are transferred to your computer. Protected image
files and image files that are not transferred are not deleted. If this
check box is cleared, the original files will be left untouched in the
memory card after they are transferred.
Copy all images marked as "hidden"
Check this check box to transfer all the image files that are marked
as "hidden". The hidden files are not transferred if the check box is
cleared.
Embed ICC color profile during transfer
Check this check box to transfer images captured by D1or D100
series with embedded ICC color profile. This function will be
effective only for images captured by D1 series (NTSC) or images
captured by D100 series with Mode II color setting (Adobe RGB).
ICC profile cannot be embedded to images captured by Mode I or
III optimized for sRGB or COOLPIX series.
Add additional information (IPTC field) to all files
Check this check box to add the file information set in the IPTC
Information dialog ( p. 132) to the transferred image files.
When you select this option, the Copy Shooting data (Shutter
speed etc...) to the IPTC caption field check box becomes
enabled.
Copy Shooting data (Shutter speed etc...) to the IPTC
caption field
Check this check box to copy the shooting data to the transferred
image file as a caption.
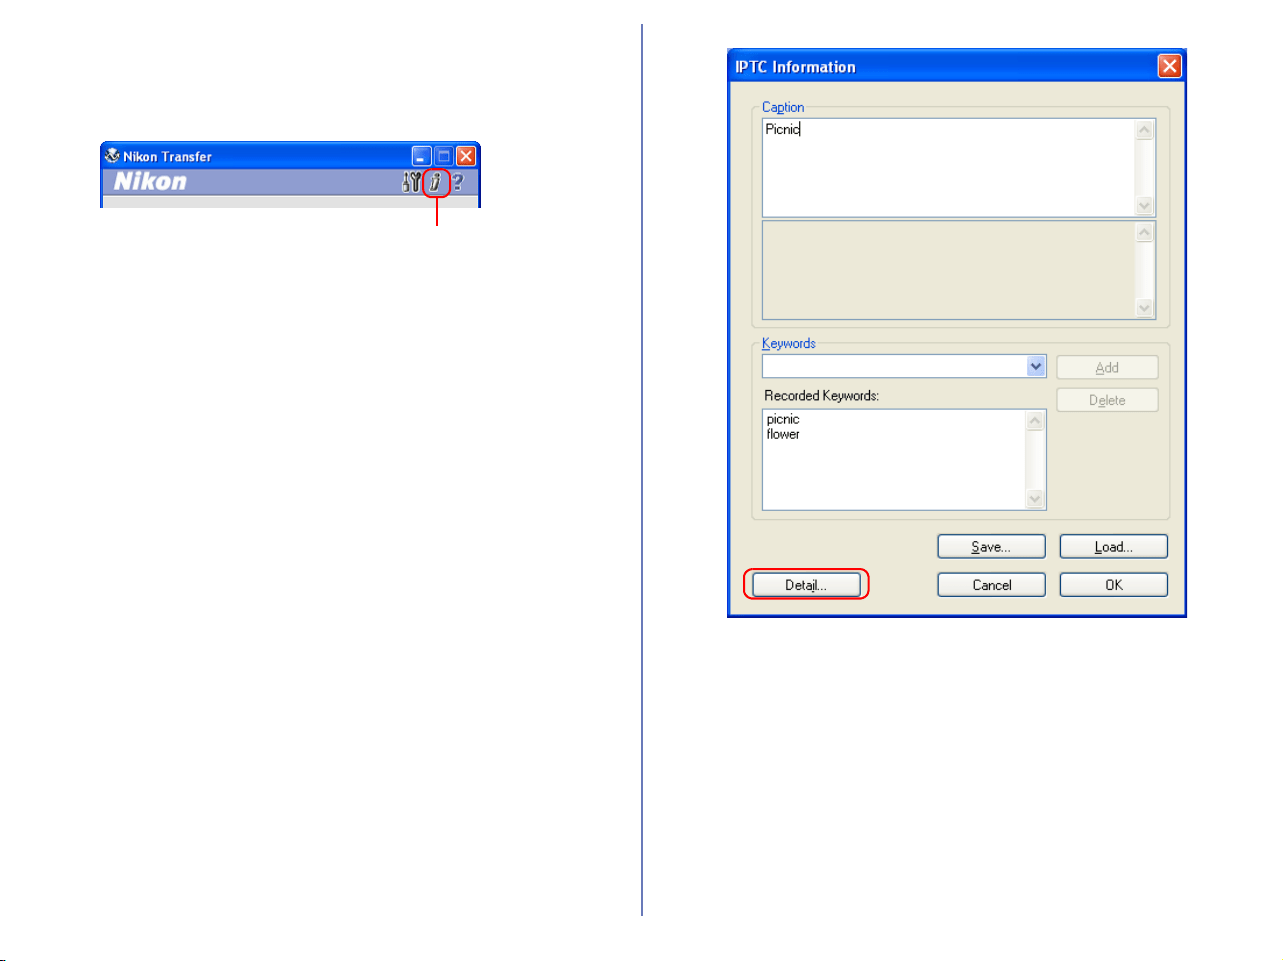
132
Step 4; Add additional file information
Click the Add additional information (IPTC field) to images
button to display the IPTC Information dialog box.
You can add various information to each file by using file
information (IPTC information). The file information can include
shooter data, captions, or Keywords. These added information
can be read out with graphic application (file: information) such as
Photoshop. On File information dialog in Nikon View, you can
select Simple mode or Detail mode.
Add additional information
(IPTC field) to images button
Simple mode
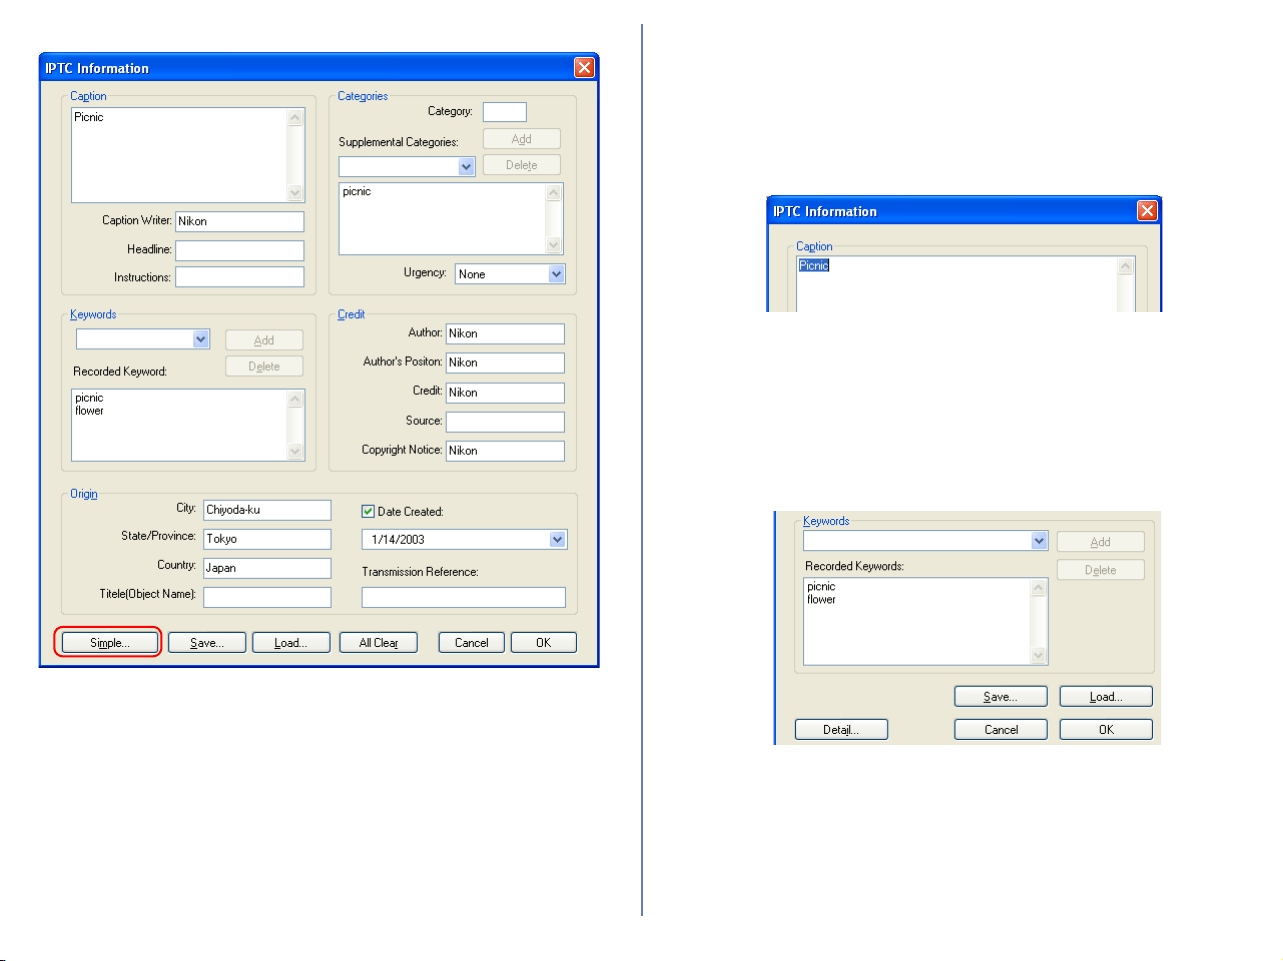
133
Click Detail and Simple to toggle between the two modes.
After the files are transferred, you can view the set information in
Nikon Browser, Nikon Viewer, or Nikon Editor.
Setting the IPTC Information dialog box (Simple
mode)
Caption
Enter a caption of your choice in this text box. The caption is
registered with the image to be transferred.
Keywords
You can enter keywords that you want to add to the file information.
To add keywords, enter keywords in the text box and click Add.
The Recorded Keywords text box displays all the previously
added keywords in a list. The maximum number of keywords you
can add is 20.
To save the file information you entered, click Save. To open
previously saved file information, click Load.
Click Detail to display the IPTC Information dialog box in the
Detail mode. In Detail mode, you can enter more detailed
information such as credits and locations.
Detail mode
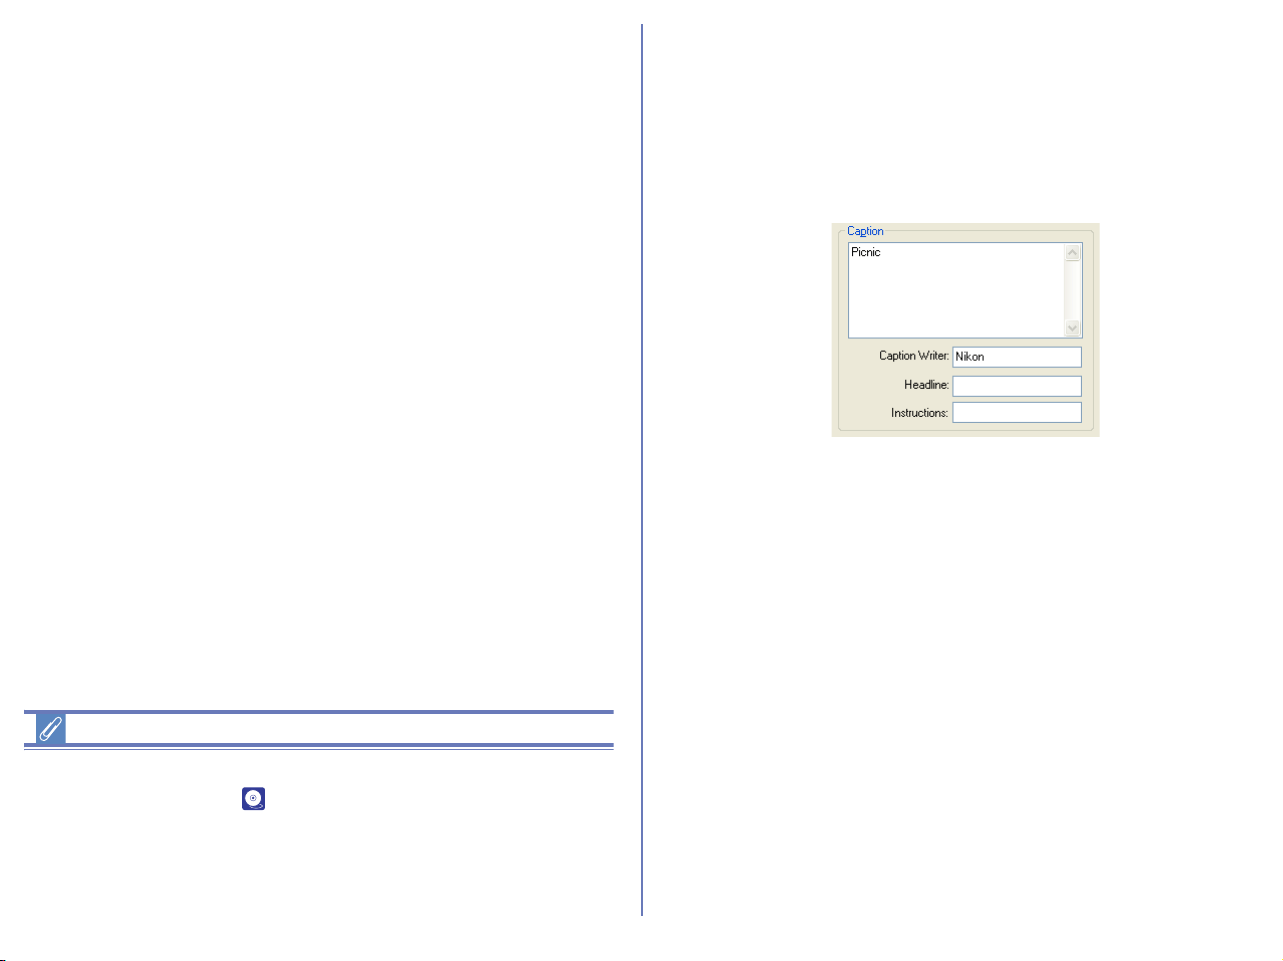
134
Adding file information
If the Add additional information (IPTC field) to all files check
box in the Transfer tab ( p. 131) of the Transfer options dialog
box is selected, the settings in the IPTC Information dialog box
are added to the files during transfer.
You cannot add file information to movie files.
Setting the IPTC Information dialog box (Detail
mode)
Caption
Enter a caption of your choice in this text box. The caption is
registered with the image to be transferred. You can also specify
the writer of the caption, a headline, and special instructions.
Keyword
You can enter keywords that you want to add to the file information.
To add keywords, enter keywords in the text box and click Add.
The Recorded Keywords text box displays all the previously
added keywords in a list. The maximum number of keywords you
can add is 20.
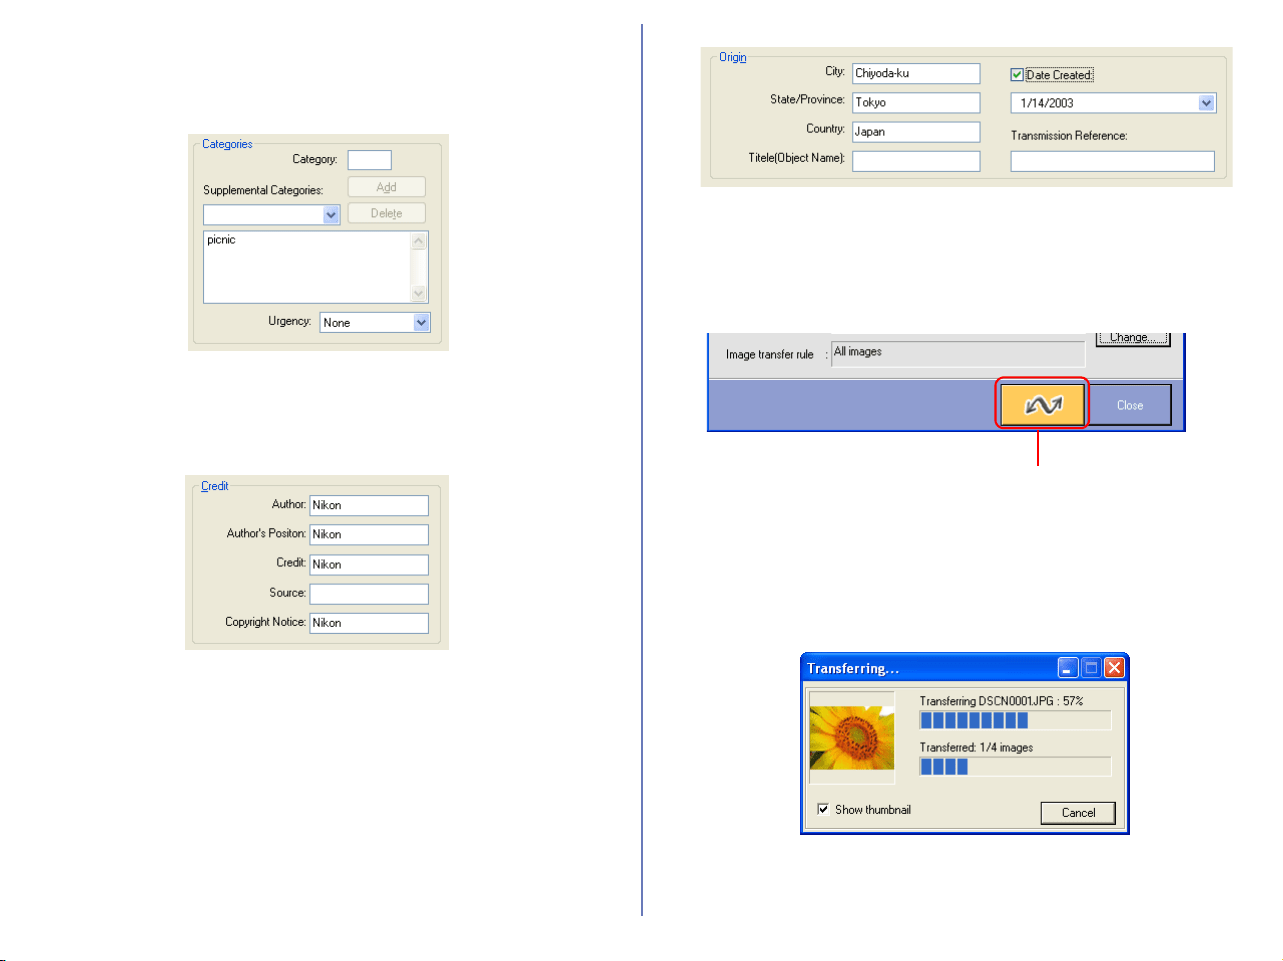
135
Categories
Add an image category and importance (urgency) rating to the file
information. Categories are entered in the same way as keywords.
Credit
Add credits to the file information. You can enter the by-line, by-line
title, credit, source and copyright.
Origin
Add location information to the file information. You can specify the
City, State/Province and Country in which the file was created. You
can also specify the Object Name, Date Created and Original
Transmission.
Step 5; Transfer image files
Click the Transfer button to start the transfer of image files with the
specified transfer settings.
The Transferring dialog box is displayed during transfer. The
thumbnail of the file being transferred is displayed in this dialog
box. Clear the Show thumbnail check box to stop the thumbnail
from being displayed.
The Nikon Transfer window will be automatically closed after
transferring the image.
Transfer button
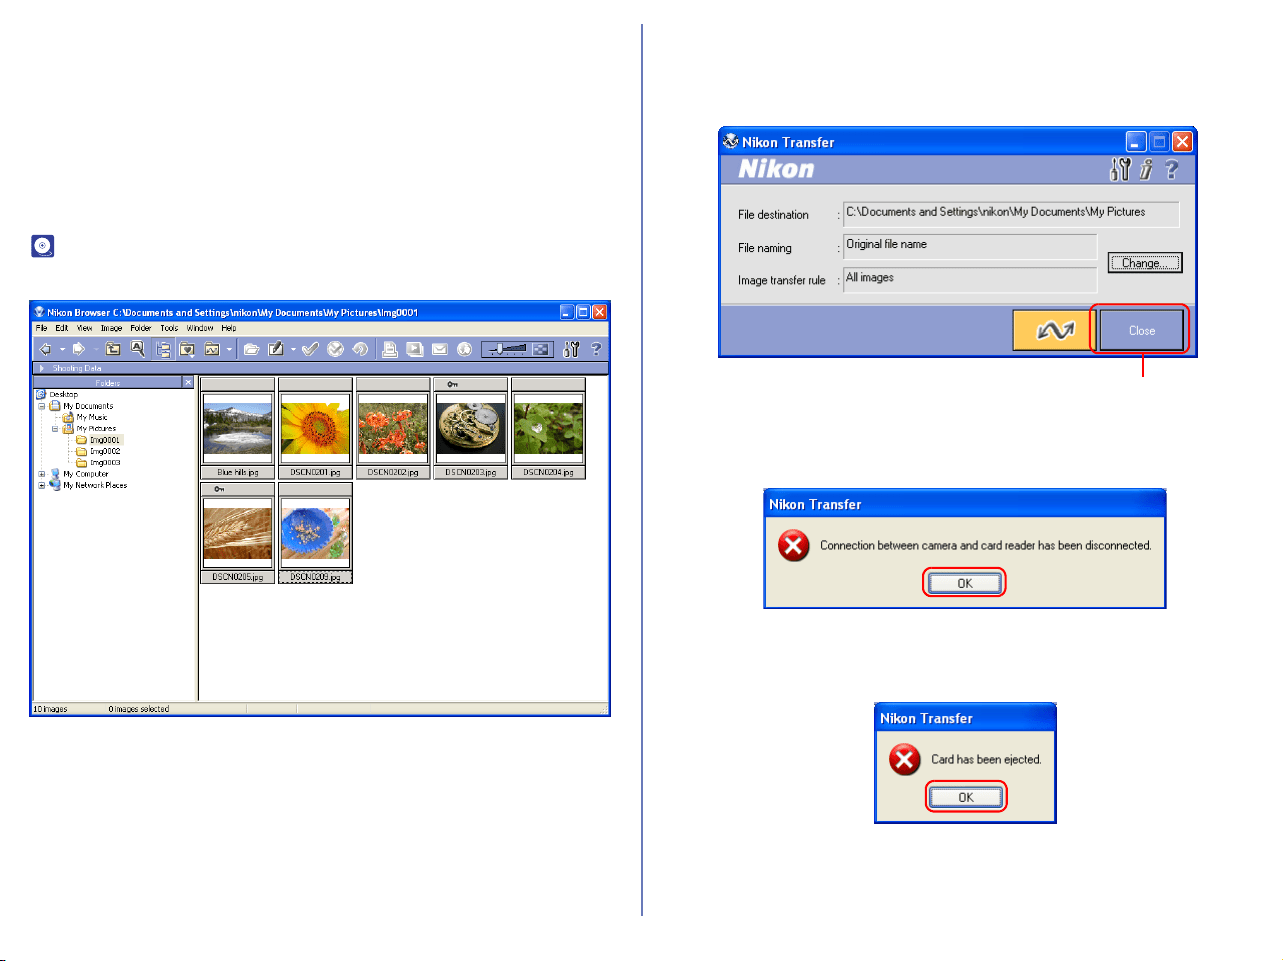
136
Cancelling during transfer
To cancel transfer of the image files, click Cancel or press Escape.
When you are transferring multiple image files, the images that
have already been transferred at the time transfer is cancelled are
saved in the destination folder.
Action to perform after transfer
When transfer is completed, the action specified in the General tab
( p. 130) of the Transfer options dialog box is processed. By
default the transferred images will be displayed in Nikon Browser.
Exiting Nikon Transfer
To exit Nikon Transfer, click Close. Nikon Transfer will close
immediately; no confirmation message will be displayed.
If you:
• turn the camera off, or disconnect the cable connecting the
computer and camera or card reader
or
• remove the memory card from the camera, card slot or card
reader
while Nikon Transfer is in use, the warning messages shown
above will be displayed.
Click OK to close the warning and exit Nikon Transfer.
Close button
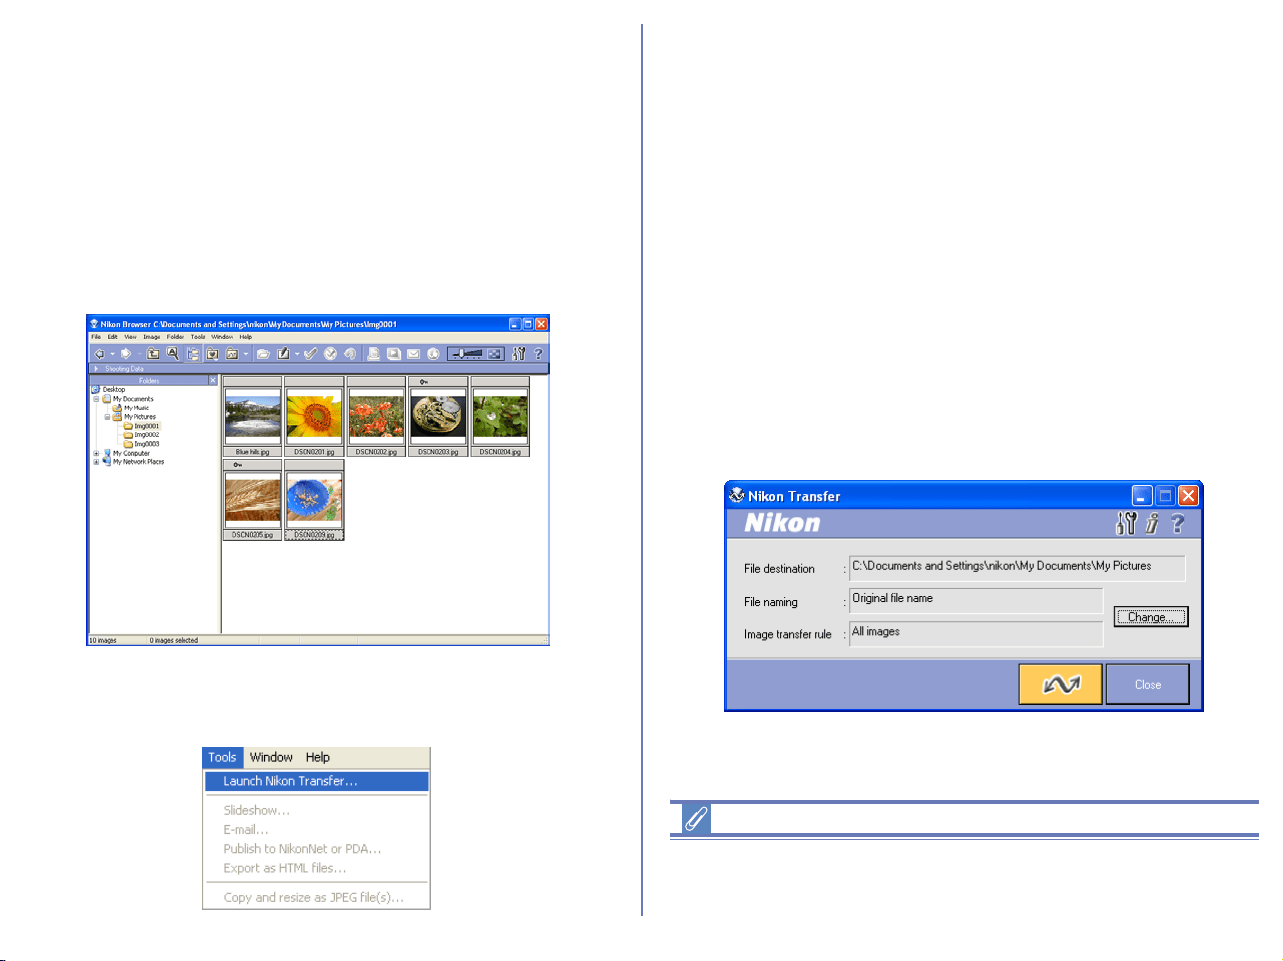
137
Restarting Nikon Transfer
Nikon Transfer can be restarted using the methods described
below.
If you exited Nikon Transfer while the camera and
computer were connected:
• start Nikon View 6 using the Start menu or the desktop icon.
When you start the program this way Nikon Browser will be
displayed.
To start Nikon Transfer from Nikon Browser, select Launch Nikon
Transfer from the Tools menu.
If you exited Nikon Transfer —
by turning the camera off:
• start Nikon View 6 by turning the camera back on.
by disconnecting the camera from the computer:
• start Nikon View 6 by reconnecting the camera to the computer.
Check that the camera is turned off before you reconnect it.
by removing the memory card from the camera:
• Insert the memory card in the camera and turn the camera on.
by removing the memory card from the card reader
or card slot:
• start Nikon View by inserting the memory card in a card reader
or card slot.
Nikon Transfer launches when a camera is connected or memory
card inserted.
Disconnecting the camera
To disconnect the camera from the computer, see the operation
manual for your camera

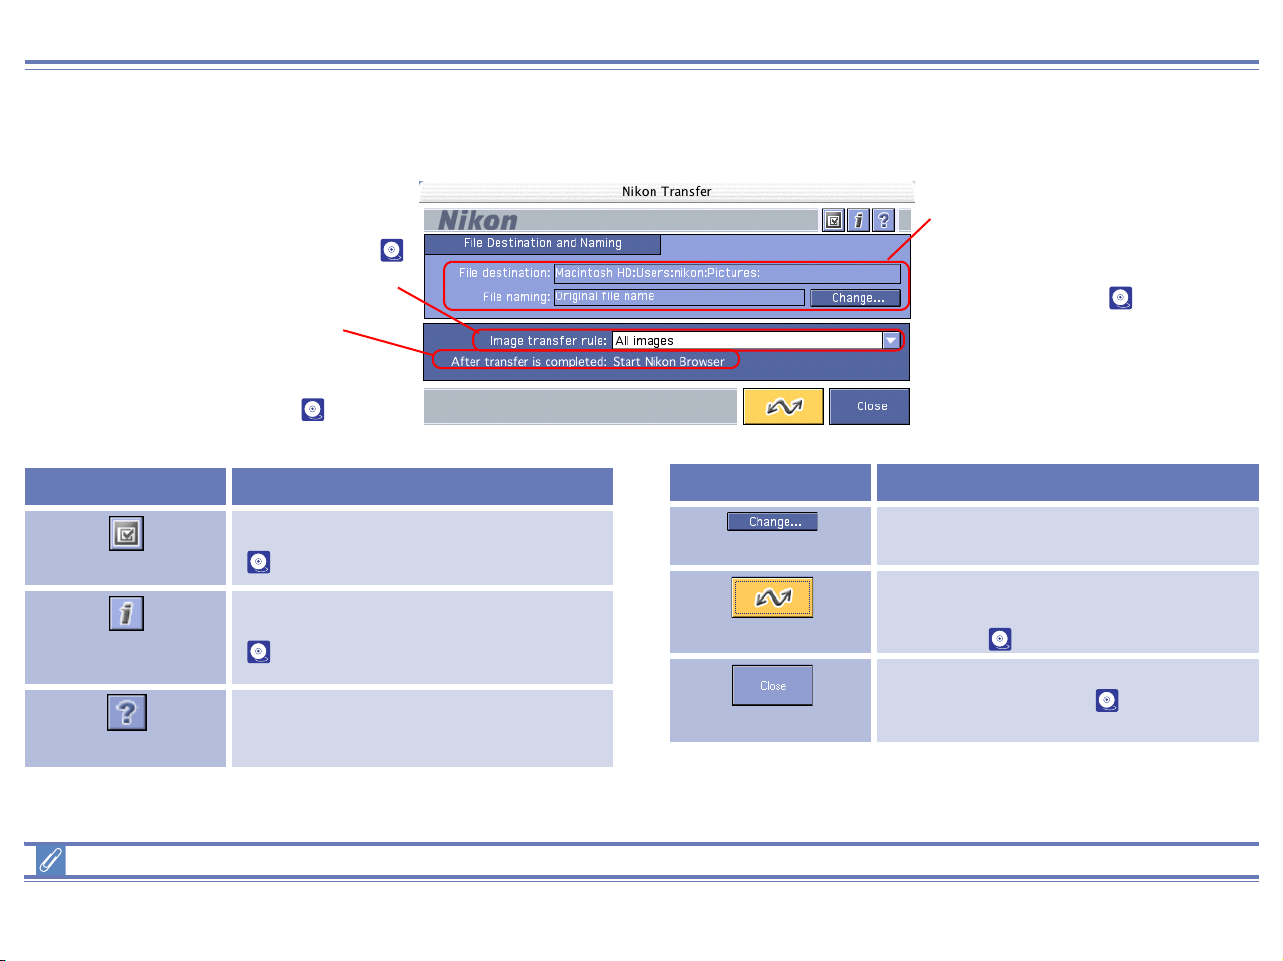
139
Nikon Transfer — Overview
Using Nikon Transfer
Functions and controls:
Menu operation for Macintosh
The Macintosh version of Nikon View 5 has menu commands that duplicate the functions of the tool buttons.
Image transfer rule
Specifies which image files should be
transferred from the memory card (
p.140).
After transfer is completed
Displays actions to be performed after
transfer, as set in the General tab of the
Transfer options dialog box ( p.146).
File destination and naming
Allows you to confirm and change
the destination and name of
images for transfer ( p.141).
Button Function
Transfer options
Sets transfer conditions and actions
( p.146).
Add additional information
(IPTC field) to images
Adds file information to the image files
( p.149).
Help
Displays help for Nikon View .
Change
Changes the transfer destination or the
name of image files.
Transfer
Starts transferring image files to the
computer according to the specified
conditions ( p.151).
Close
Closes Nikon Transfer ( p.152).
Button Function
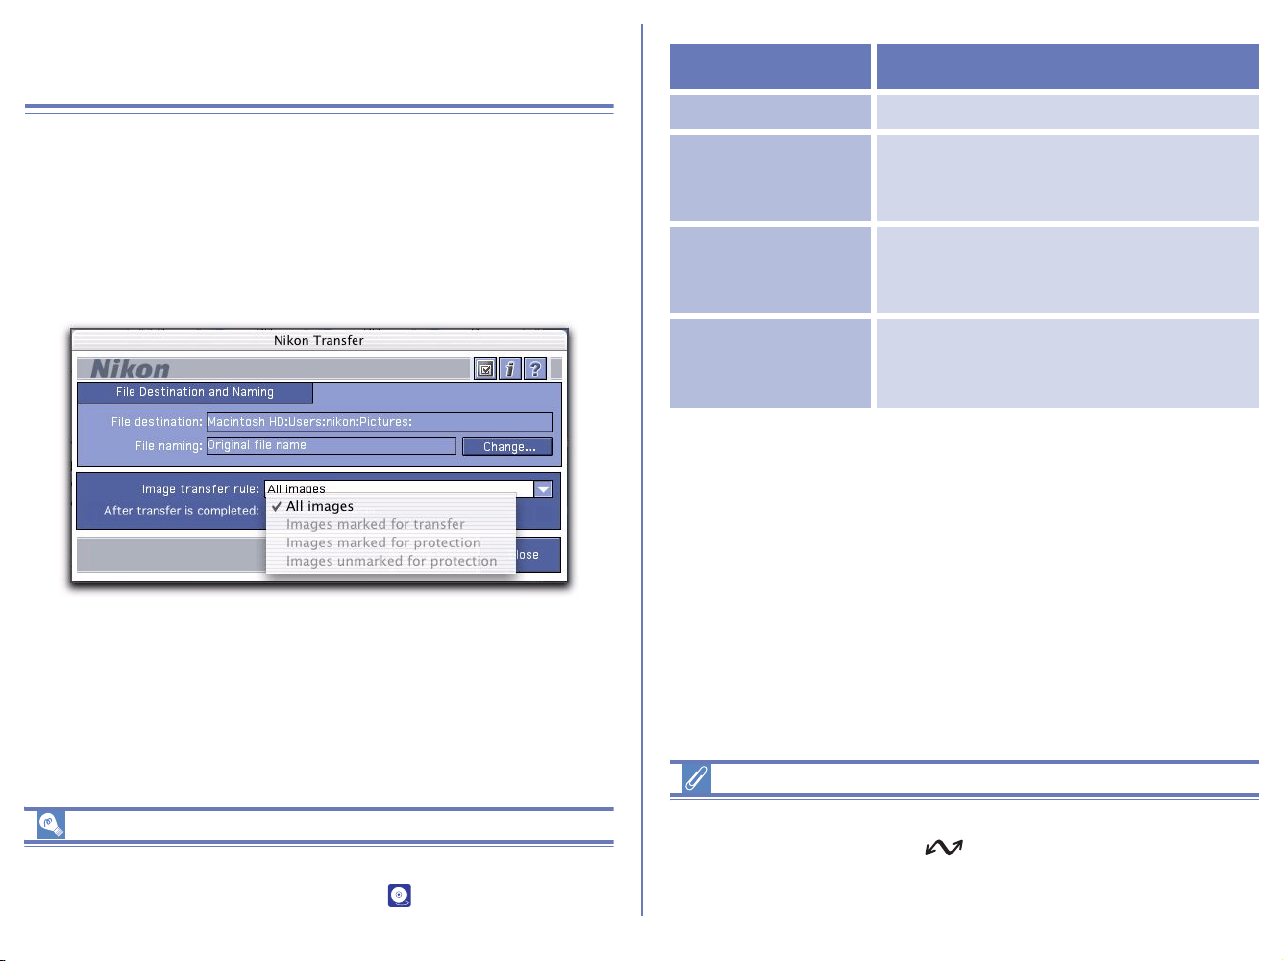
140
Transferring Images Using Nikon
Transfer
This section describes how to use Nikon Transfer to transfer image
files to your computer from a memory card inserted in a camera,
card reader, or card slot.
Step 1; Specify the image transfer rule
Select a transfer rule from the Image transfer rule pull-down
menu.
If you are using a camera equipped with a TRANSFER button
You can also transfer image files using the TRANSFER button on
your camera. For further information see p.117.
The following rules are available:
Setting the transfer mark (COOLPIX series)
The transfer mark can be set using the Auto Transfer function on
your camera, or using the button. Some cameras may not
support setting of the transfer mark. Consult the documentation
provided with your camera on how to set the transfer mark.
Rule Description
All Images Transfers all images
Images marked for
transfer
Transfers only the images that have
been marked for transfer using the
camera menus.
Images marked for
protection
Transfers only the images that are
marked for protection using the camera
menus.
Images unmarked
for protection
Transfers only the images that are not
marked for protection using the camera
menus.
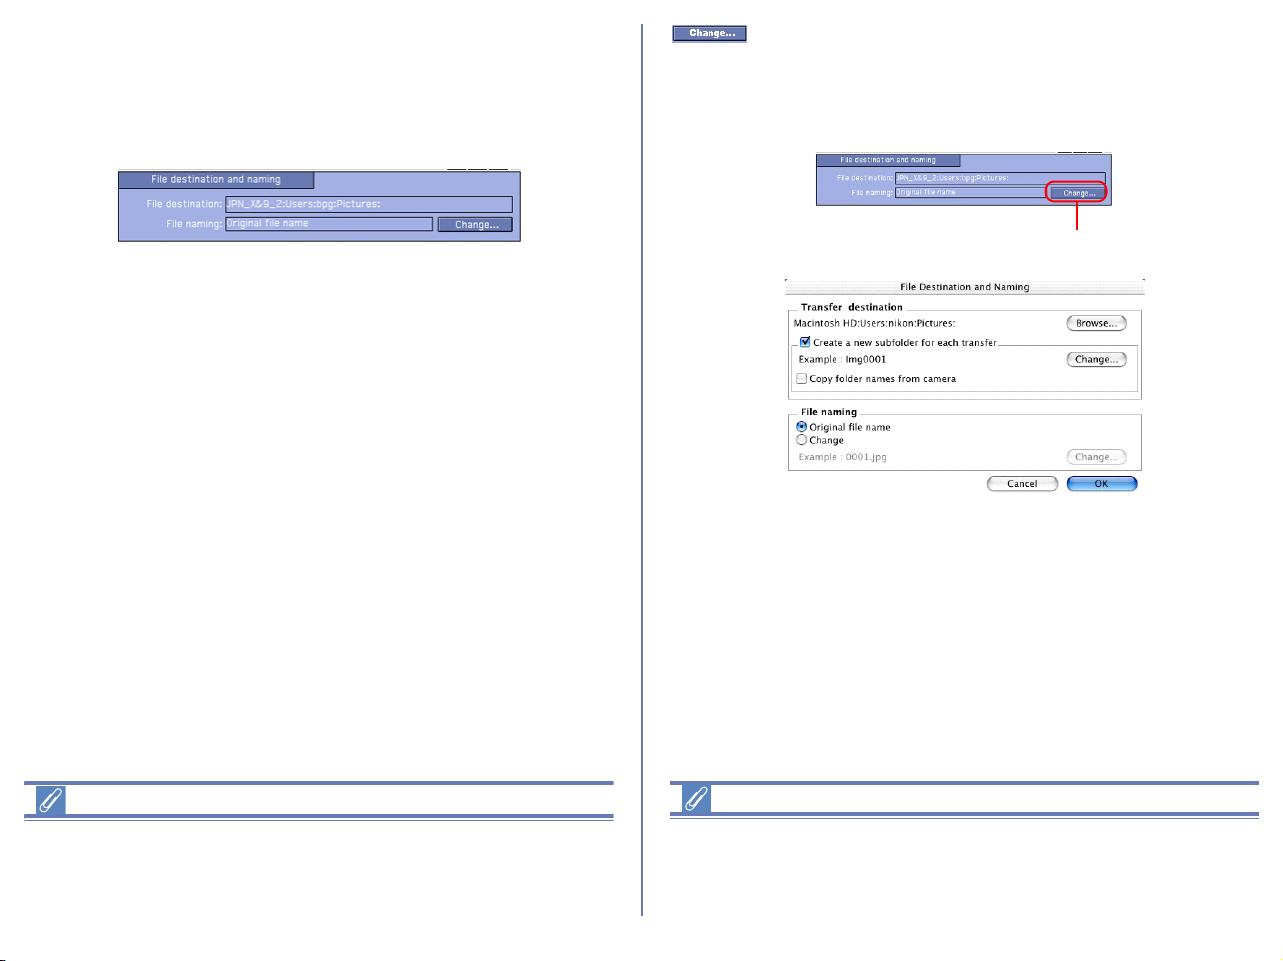
141
Step 2; Set up the transfer destination and file
name
You can use the File destination and naming area to change the
destination folder for transferred images. You can also set how file
names are assigned to transferred images.
File destination and naming area
File destination
Displays the current destination of the files which are about to be
transferred. At installation, default destinations are as follows.
• Mac OS 9.x Documents
• Mac OS X Pictures
File naming
Displays Original file name or Automatically created file name.
If Original file name is displayed, the file is transferred as the
original file name used in the camera.
Transfer destination
We recommend that you do not consider changing the file
destination from the default location. Other applications may
expect images to be stored in the default folder.
To make changes to the file destination or file naming settings,
click Change button.The File Destination and Naming dialog box
will appear. Changes made are reflected in the File destination
and File naming area.
If a file with the same name already exists in the destination folder
To avoid overwriting the original file, any new files bearing the
same name will have a sequential number added to the end of the
file name.
Change Button
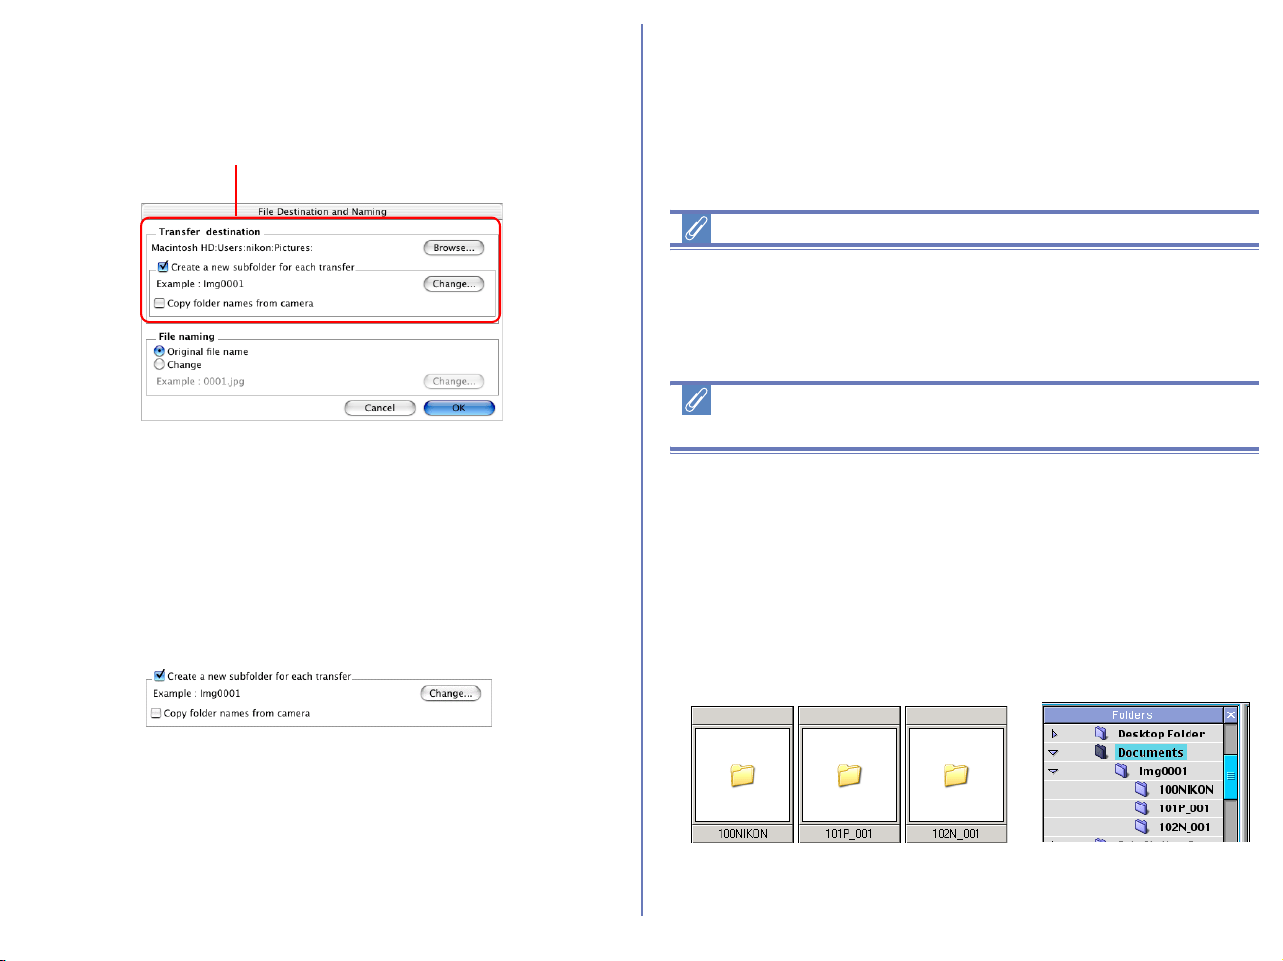
142
Specifying a transfer destination
The destination folder for transferred images is specified in the
Transfer destination area of the File Destination and Naming
dialog box
.
Transfer destination
Displays the current destination of the files which are about to be
transferred. If you wish to alter the transfer destination, click
Browse and select another folder.
Create a new subfolder for each transfer
Check this box to create a new subfolder with the name described
in Example field. The subfolder will be transfer destination. Click
Change to alter the subfolder name in Example field.
Create a new subfolder
Create a new subfolder to keep contents of each memory card
separate, as if the cards were rolls of film. After each transfer
session, the images will appear in a new folder bearing an
ascending sequence number (e.g. card001, card002).
Copying files at a setting of Panorama Assist or
Ultra HS
This will ensure that each sequence of pictures created at settings
of COOLPIX series' Panorama Assist or Ultra HS functions will be
copied to a separate folder on your computer. Before transferring
pictures to the computer for the first time, make sure you check
Copy folder names from camera.This will ensure that each
sequence of pictures created at settings of Panorama Assist or
Ultra HS will be copied to a separate folder on your computer.
Folder icons will be displayed in the thumbnail list window, and
folders will be displayed in Folders area.
Transfer destination
Standard
image folder
Panorama
image folder
Ultra HS
image folder
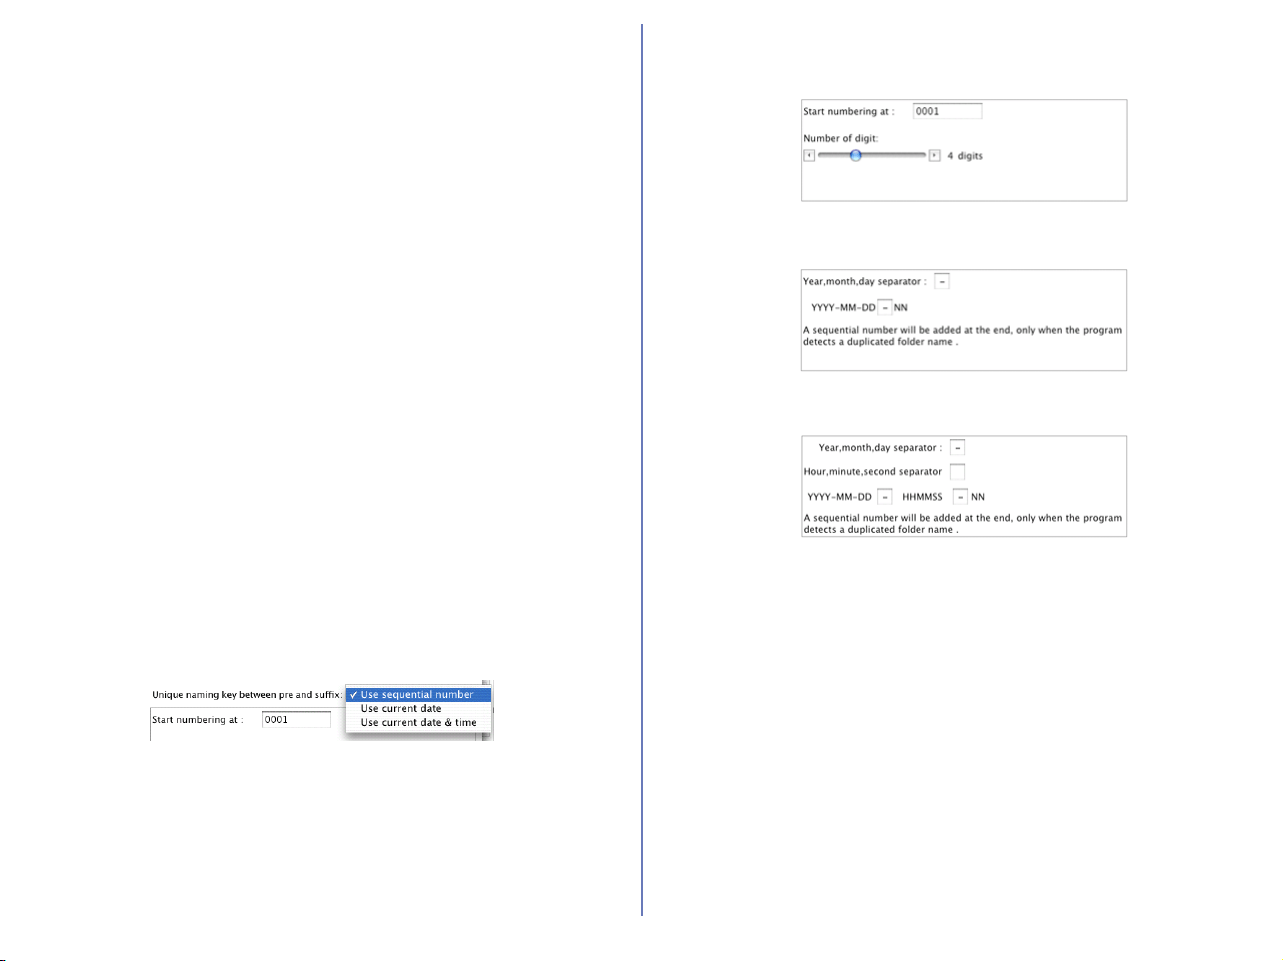
143
Copy folder names from camera
Images may be stored on the camera in one main folder, or in a set
of separate folders. This check box allows the images to be
transferred such that they appear on the computer in the same
folder structure as they are stored on the camera. This check box
is only enabled when Create a new subfolder for each transfer
is selected.
Sub Folder Naming
Click Change in the Folder area to display the Sub Folder
Naming dialog box.
The names of folders consist of "prefix", "identifier", and "suffix". You
can choose different identifier from sequential number, date, or
date and time using the pull down menu
Prefix
Specify the characters you want to append to the beginning of the
folder name.
Suffix
Specify the characters you want to append to the end of the folder
name.
Unique naming key between pre and suffix
Select the identifier you want to use for the folder name. Choose
from Use sequential number, Use current date, or Use current
date & time. The dialog box will show different options depending
on the identifier you choose.
When you select Use sequential number, names will be assigned
to folders in ascending order beginning with the starting number
and number of digits you specify.
When you select Use current date, the folder name will include
the date of transfer.
When you select Use current date & time, the folder name will
include the date and time of transfer.
The date and time is of the form YYYY-MM-DD-HH-MM-SS-NN,
where YYYY denotes the year, MM the month, DD the day of the
month, HH the hour, MM the minute, SS the second, and NN the
serial number added when a folder name already exists.
For a delimiter, you can also use any symbol other than a hyphen.
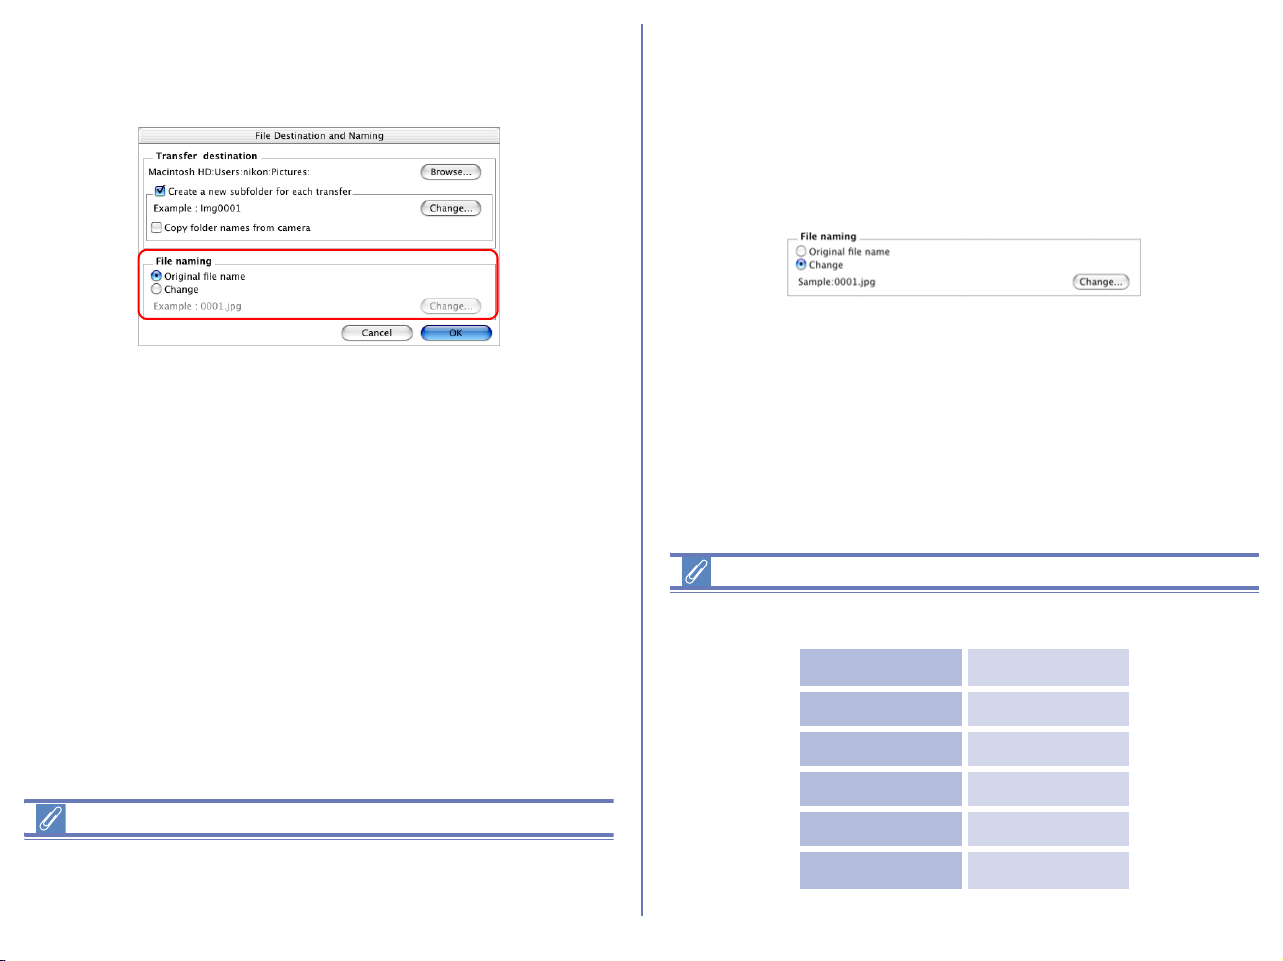
144
Specifying the file name
You can set the file name in the File naming area of the File
Destination and Naming dialog box.
File naming limitations
A file name should be within 31 characters.; colons (:) cannot be
used in a file name.
Original file name
Select this option to use the image file name recorded in the
camera when saving the transferred files.
Change
Select this option to save the transferred file with an automatically
generated file name shown in Example field. Click Change to alter
the file name in Example field.
Extensions
Depending on the file type, one of the following extensions will be
assigned:
File Format Extension
JPEG .JPG
TIFF .TIF
RAW .NEF
Movie .MOV
Sound (Voice memo)
.WAV
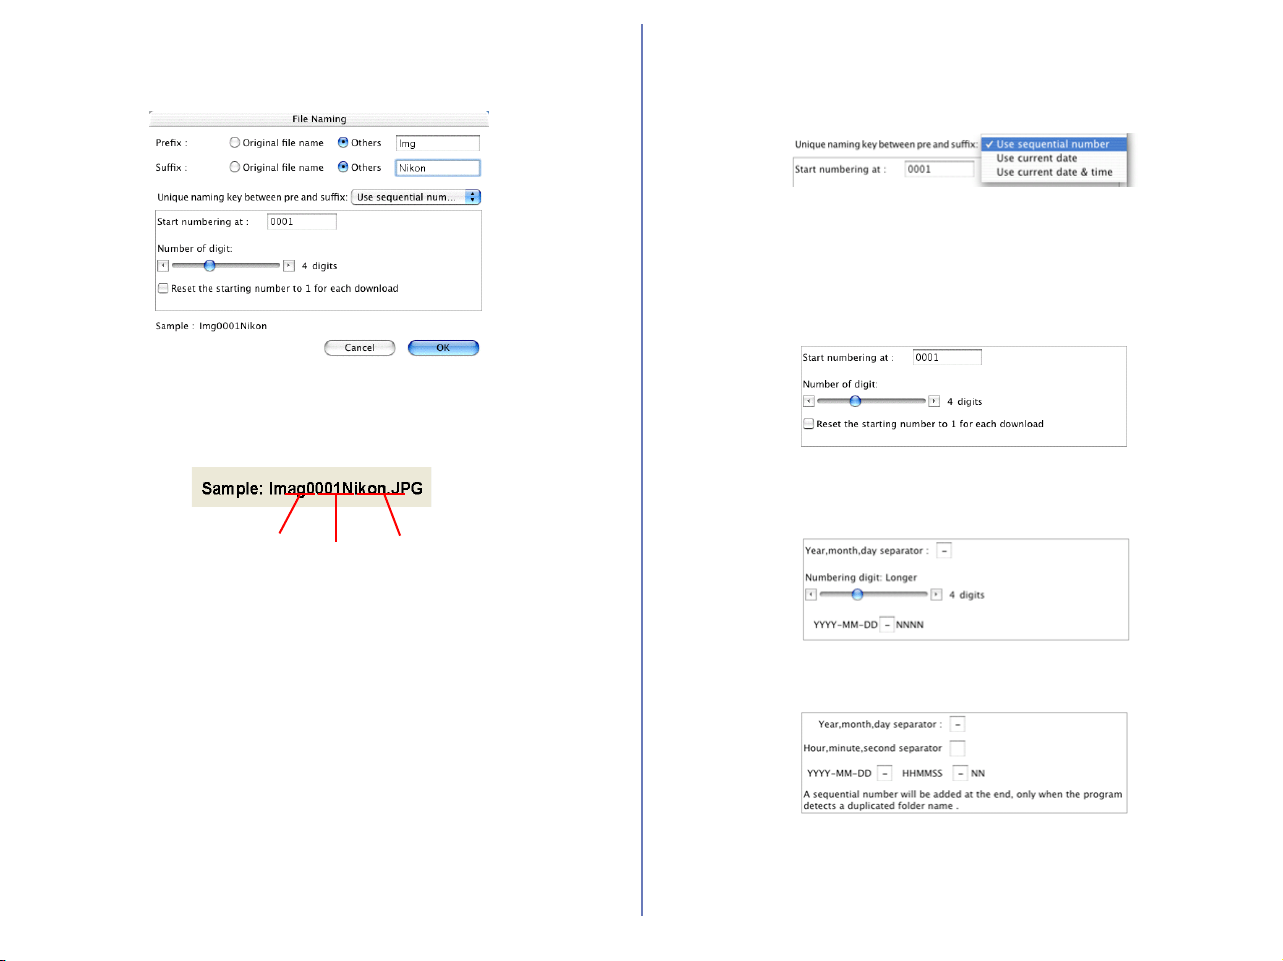
145
File naming
When you select Change and click Change button in the File
naming area, the File Naming dialog is displayed.
The names of folders consist of "prefix", "identifier", and "suffix".
You can choose different identifier from sequential number, date,
or date and time using the pull down menu.
Prefix
Select Original file name to append the file name assigned in the
camera to the beginning of the transferred file name. Select Other
to append characters of your choice to the beginning of the file
name.
Suffix
Select Original file name to append the file name assigned in the
camera to the end of the transferred file name. Select Other to
append characters of your choice to the end of the file name.
Unique naming key between pre and suffix pull-down menu
Select the identifier you want to use for the file name from
Use sequential
number, Use current date,
or
Use current date & time.
The dialog box
will show different options depending on the identifier you choose
When you select Use sequential number, names will be assigned
to the transferred files in ascending order, beginning with the
number and number of digits you specify. Select Reset the
starting number to 1 for each download to start numbering
again from 1 every time you transfer images.
When you select Use current date, the file name will include the
date of shooting.
When you select Use current date & time, the file name will
include the date and time of shooting.
Prefix
Identifier
Suffix
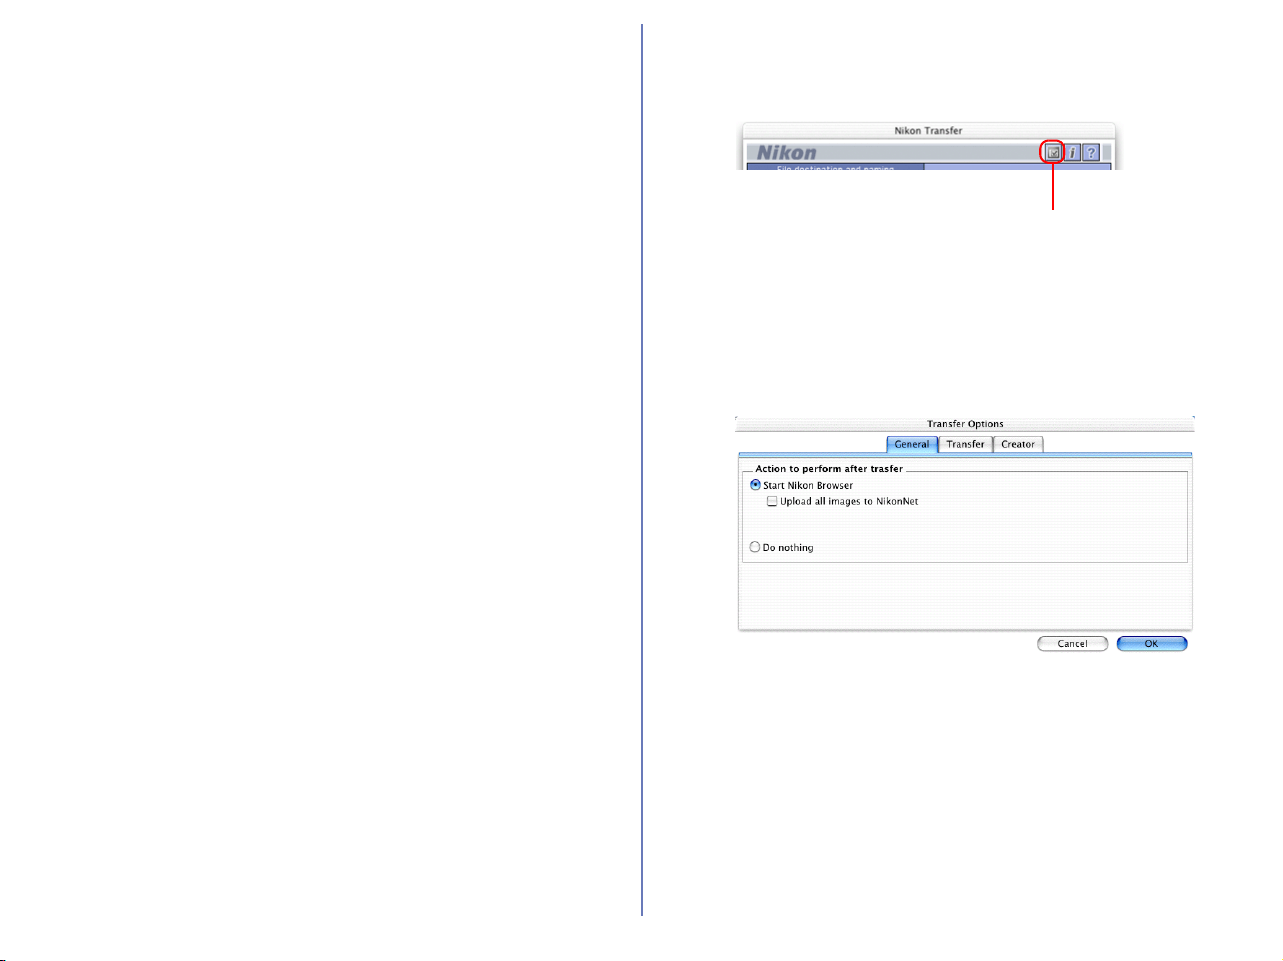
146
The date and time is of the form YYYY-MM-DD-HH-MM-SS-NN,
where YYYY denotes the year, MM the month, DD the day of the
month, HH the hour, MM the minute, SS the second, and NN the
serial number added when a file name already exists. For a
delimiter, you can also use a symbol other than a hyphen.
Step 3; Set up the transfer options
Click the Transfer options button in Nikon Transfer to display the
Transfer options dialog box.
The Transfer options dialog box
The Transfer options dialog box has the following tabs:
• General
•Transfer
•Creator
The changes you make in this dialog box take effect when you click
the OK button. Clicking the Cancel button closes the Transfer
options dialog box without applying the changes you made in the
dialog box.
Transfer options button

147
The General tab
This tab allows you to choose what you want the computer to do
after transferring image files.
Start Nikon Browser
Select this option to start Nikon Browser after the image files are
transferred. When you select this option, the Upload all images to
NikonNet check box becomes enabled.
Upload all images to NikonNet
Check this check box to upload all the transferred image files to
NikonNet (http://www.nikonnet.com/).
Do nothing
Select this option if you want Nikon View to do nothing after the
transfer of the image files is complete. On a Macintosh, the
thumbnail display in Nikon Browser is not updated when the
images are transferred to your computer.
The Transfer tab
This tab allows you to adjust settings for the images about to be
transferred.
Delete original files after transfer is completed
Select this check box to delete the image files from the memory
card after they are transferred to your computer. Protected image
files and image files that are not transferred are not deleted. (Note
that if you are using Mac OS X protected image files will also be
deleted.) If this check box is cleared, the original files will be left
untouched in the memory card after they are transferred.
Add thumbnail icon
Select this check box to add thumbnail icons to the transferred
image files.
Embed ICC color profile during transfer
Check this check box to transfer images captured by D1 or D100
series with embedded ICC color profile. This function will be
effective only for images captured by DI series (NTSC) or images
captured by D100 series with Mode II color setting (Adobe RGB).
ICC profile cannot be embedded to images captured by Mode I or
III optimized for sRGB or COOLPIX series.
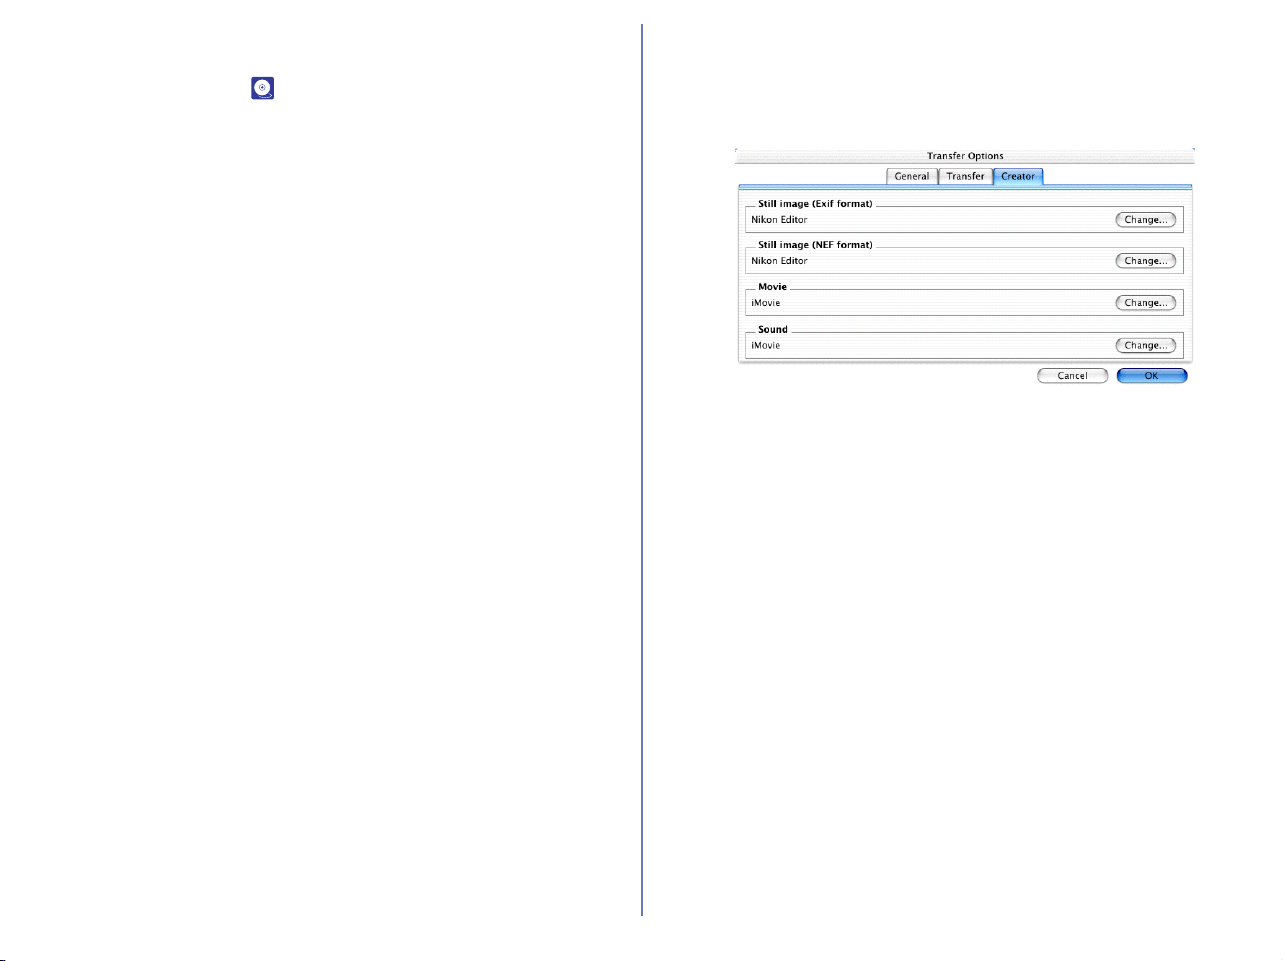
148
Add additional information (IPTC field) to all files
Select this check box to add the file information set in the IPTC
Information dialog box ( p.149) to the transferred image files.
When you select this option, the Copy Shooting data (Shutter
speed etc...) to the IPTC caption field check box becomes
enabled.
Copy Shooting data (Shutter speed etc...) to the IPTC
caption
Select this check box to copy the shooting data to the transferred
image files as a caption.
The Creator tab
This tab allows you to set the programs you want to associate with
the transferred image files. Once you make settings in this tab,
double-clicking the image file opens it in the associated program.
Still image (Exif format)
Specify the program to associate with either ".JPG" or ".TIF" image
files.
Still image (NEF format)
Specify the program to associate with RAW (".NEF") image files.
Movie
Specify the program to associate with ".MOV" movie files.
Sound
Specify the program to associate with ".WAV" sound (voice memo)
files.
Click the respective Change button for each format to specify the
desired program.
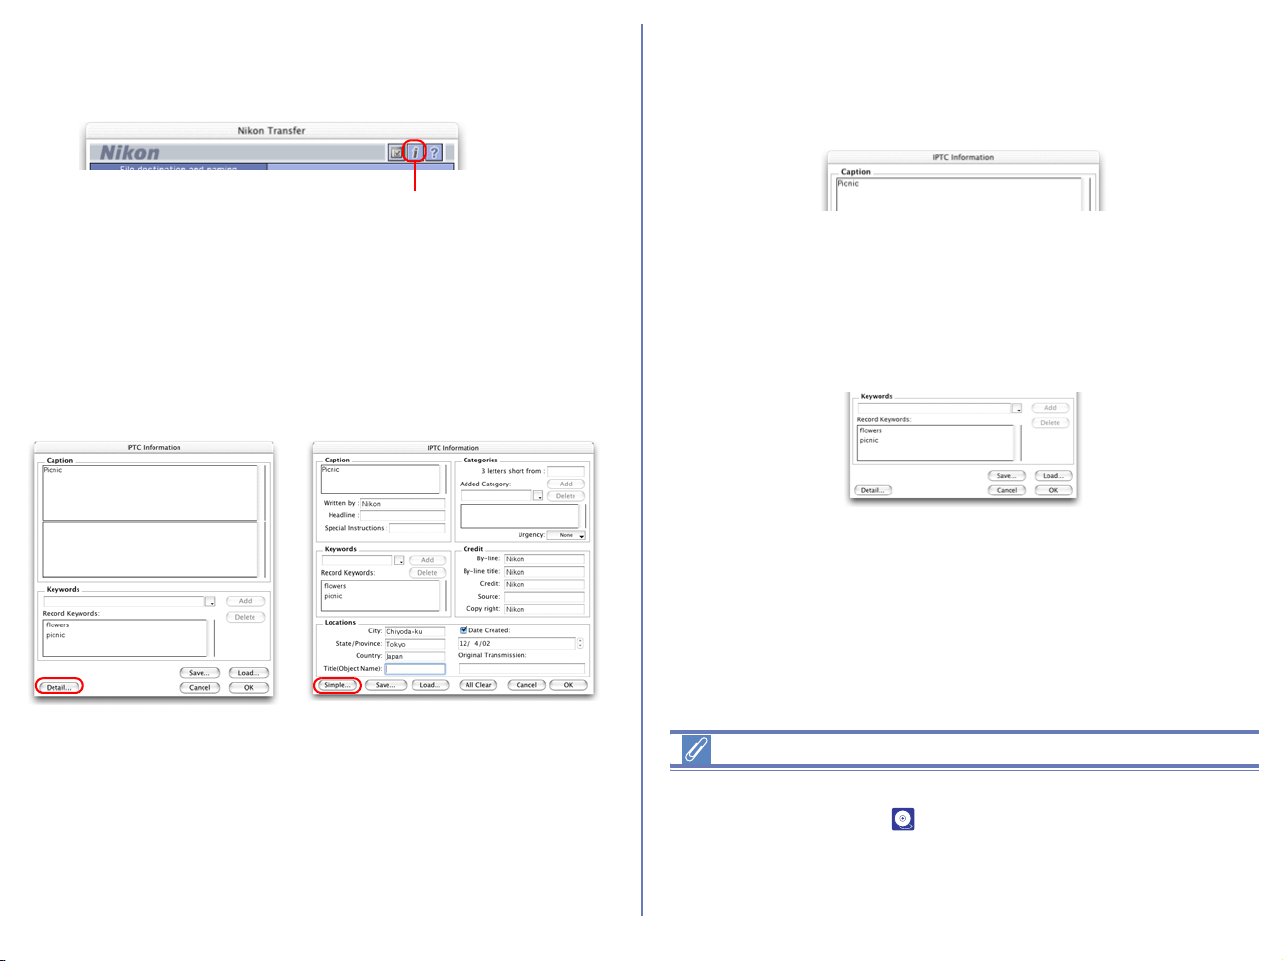
149
Step 4; Add additional file information
Click the Add additional information (IPTC field) to images
button to display the IPTC Information dialog box.
IPTC information is a useful method of storing additional data
within each image. Other applications, such as Photoshop, (under
File:Info), or Fotostation can read this information, which can
include items such as user data, keywords and caption. Nikon
View can display a limited set of IPTC information for normal use
(Simple mode), or a more detailed display for professional use
(Detail mode).
Click Detail and Simple to toggle between the two modes.
After the files are transferred, you can view the set information in
Nikon Browser, Nikon Viewer, or Nikon Editor.
Setting the IPTC Information dialog box (Simple mode)
Caption area
Enter a caption of your choice in this text box. The caption is
registered with the image to be transferred.
Keywords area
You can enter keywords that you want to add to the file information.
To add keywords, enter keywords in the text box and click Add.
The Recorded Keywords text box displays all the previously
added keywords in a list. The maximum number of keywords you
can add is 20.
To save the file information you entered, click Save. To open
previously saved file information, click Load.
Click Detail to display the IPTC Information dialog box in the
Detail mode. In Detail mode, you can enter more detailed
information such as credits and locations.
Adding file information
If the Add additional information (IPTC field) to all files check
box in the Transfer tab ( p.147) of the Transfer options dialog
box is selected, the settings in the IPTC Information dialog box
are added to the files during transfer.
You cannot add file information to movie files.
Add additional information
(IPTC field) to images button
Simple mode
Detail mode
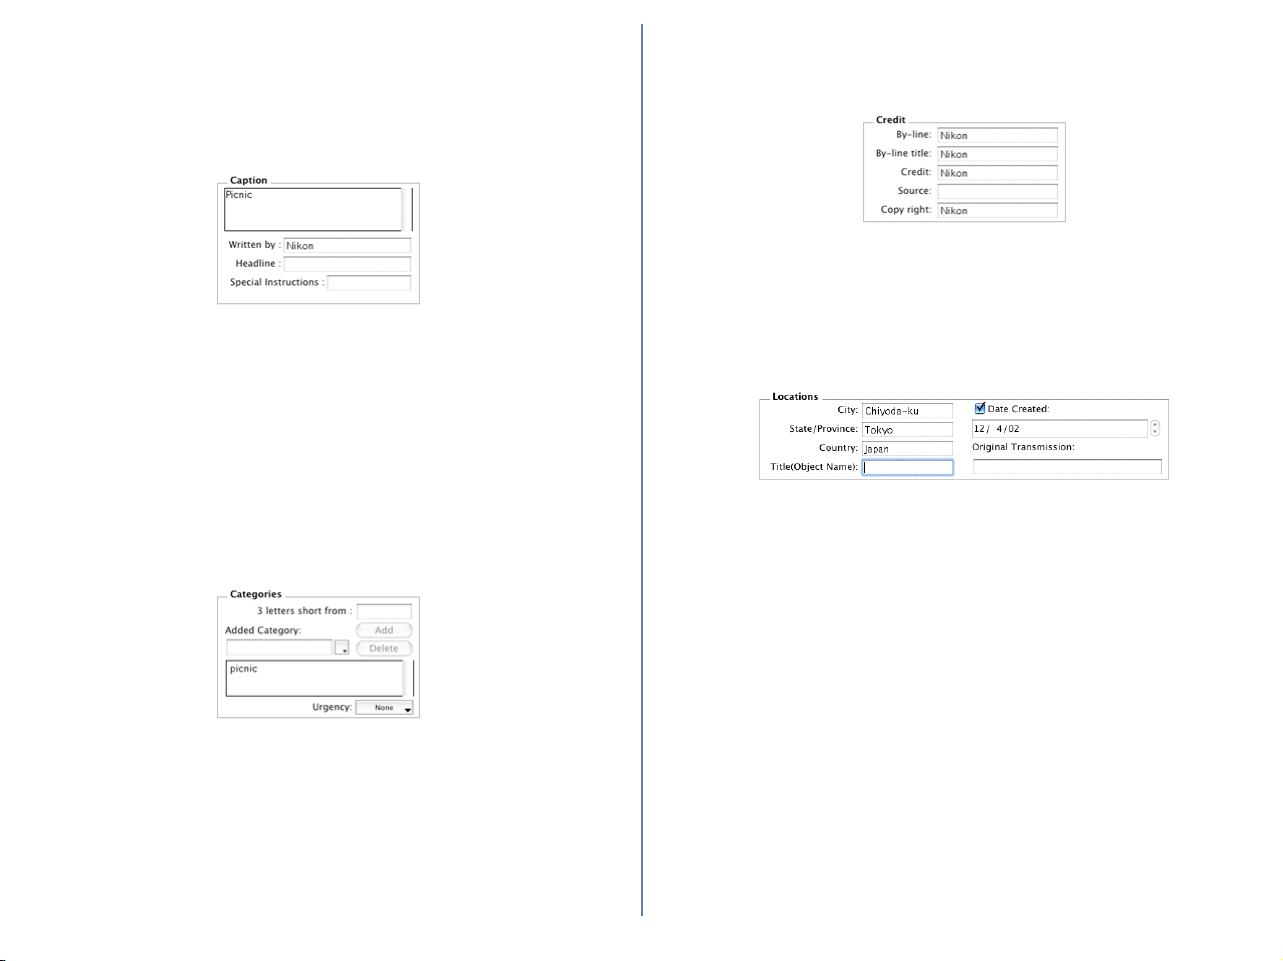
150
Setting the IPTC Information dialog box (Detail mode)
Caption
Enter a caption of your choice in this text box. The caption is
registered with the image to be transferred. You can also specify
the writer of the caption, a headline, and special instructions.
Keyword
You can enter keywords that you want to add to the file information.
To add keywords, enter keywords in the text box and click Add.
The Recorded Keywords text box displays all the previously
added keywords in a list. The maximum number of keywords you
can add is 20.
Categories
Add an image category and importance (urgency) rating to the file
information. Categories are entered in the same way as keywords.
Credit
Add credits to the file information. You can enter the by-line, by-line
title, credit, source and copyright.
Locations
Add location information to the file information. You can specify the
City, State/Province and Country in which the file was created. You
can also specify the Object Name, Date Created and Original
Transmission.
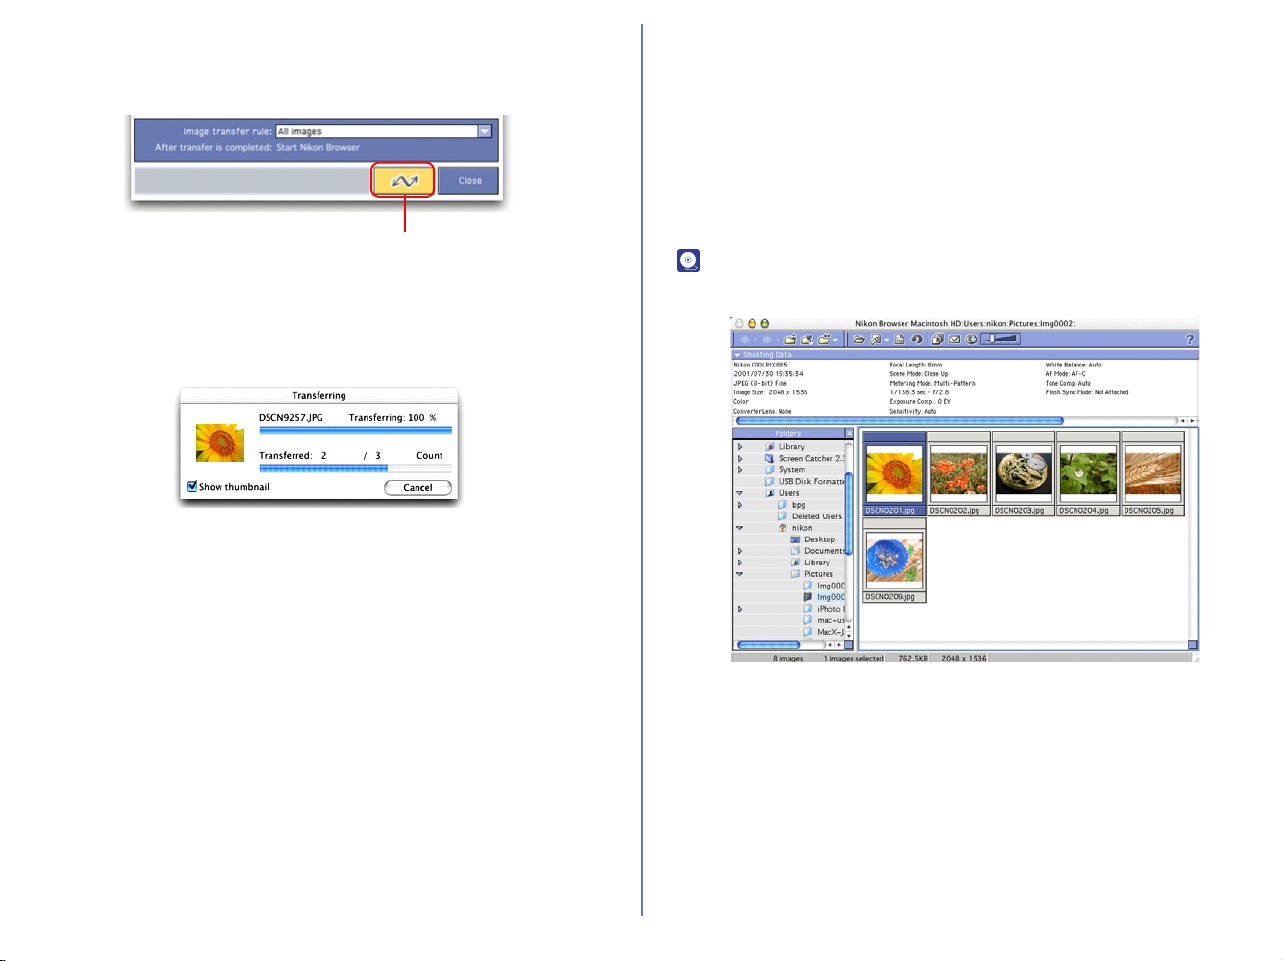
151
Step 5; Transfer image files
Click the Transfer button to start the transfer of image files with the
specified transfer settings.
The Transferring dialog box is displayed during transfer. The
thumbnail of the file being transferred is displayed in this dialog
box. Clear the Show thumbnail check box to stop the thumbnail
from being displayed.
The Nikon Transfer window will be automatically closed after
transferring the image.
Cancelling during transfer
To cancel transfer of the image files, click Cancel or press Escape.
When you are transferring multiple image files, the images that
have already been transferred at the time transfer is cancelled are
saved in the destination folder.
Action to perform after transfer
When transfer is completed, the action specified in the General tab
( p.146) of the Transfer options dialog box is processed. By
default the transferred images will be displayed in Nikon Browser.
Transfer button
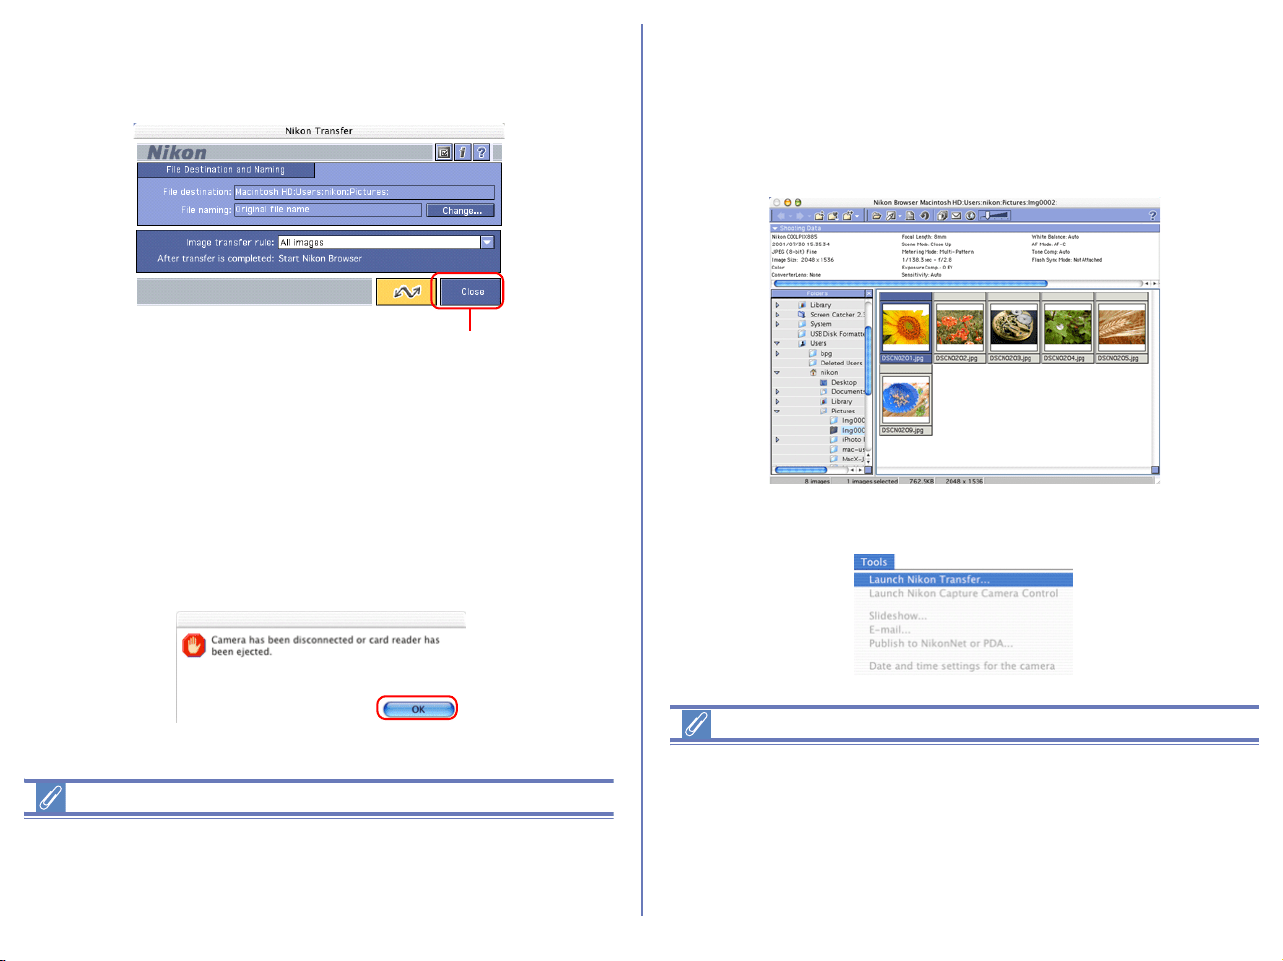
152
Exiting Nikon Transfer
To exit Nikon Transfer, click Close. Nikon Transfer will close
immediately; no confirmation message will be displayed.
If you:
• turn the camera off, or disconnect the cable connecting the
computer and camera or card reader
or
• remove the memory card from the camera, card slot or card reader
while Nikon Transfer is in use, the warning message shown below
will be displayed.
Click OK to close the warning and exit Nikon Transfer.
Exiting Nikon Transfer with Macintosh
With Macintosh, you can exit Nikon Transfer from the application
menu. Select Quit from File menu under Mac OS 9 and Quit
Nikon View 5 from Nikon View 5 menu under Mac OS X.
Restarting Nikon Transfer
Nikon Transfer can be restarted using the methods described below.
If you exited Nikon Transfer while the camera and
computer were connected:
• start Nikon View 5 using or the desktop icon. When you start the
program this way Nikon Browser will be displayed.
To start Nikon Transfer from Nikon Browser, select Launch Nikon
Transfer from the Tools menu.
Restarting Nikon Transfer under Mac OS X
Under Mac OS X, images cannot be transferred when you launch
Nikon Transfer by selecting Display Transfer from Tool menu on
Nikon Browser. Power cycle your camera when you want to launch
Nikon Transfer with you camera connected to the computer. When
using the card leader or PC card slot, remove the compact flash
card and reinsert it.
Close button
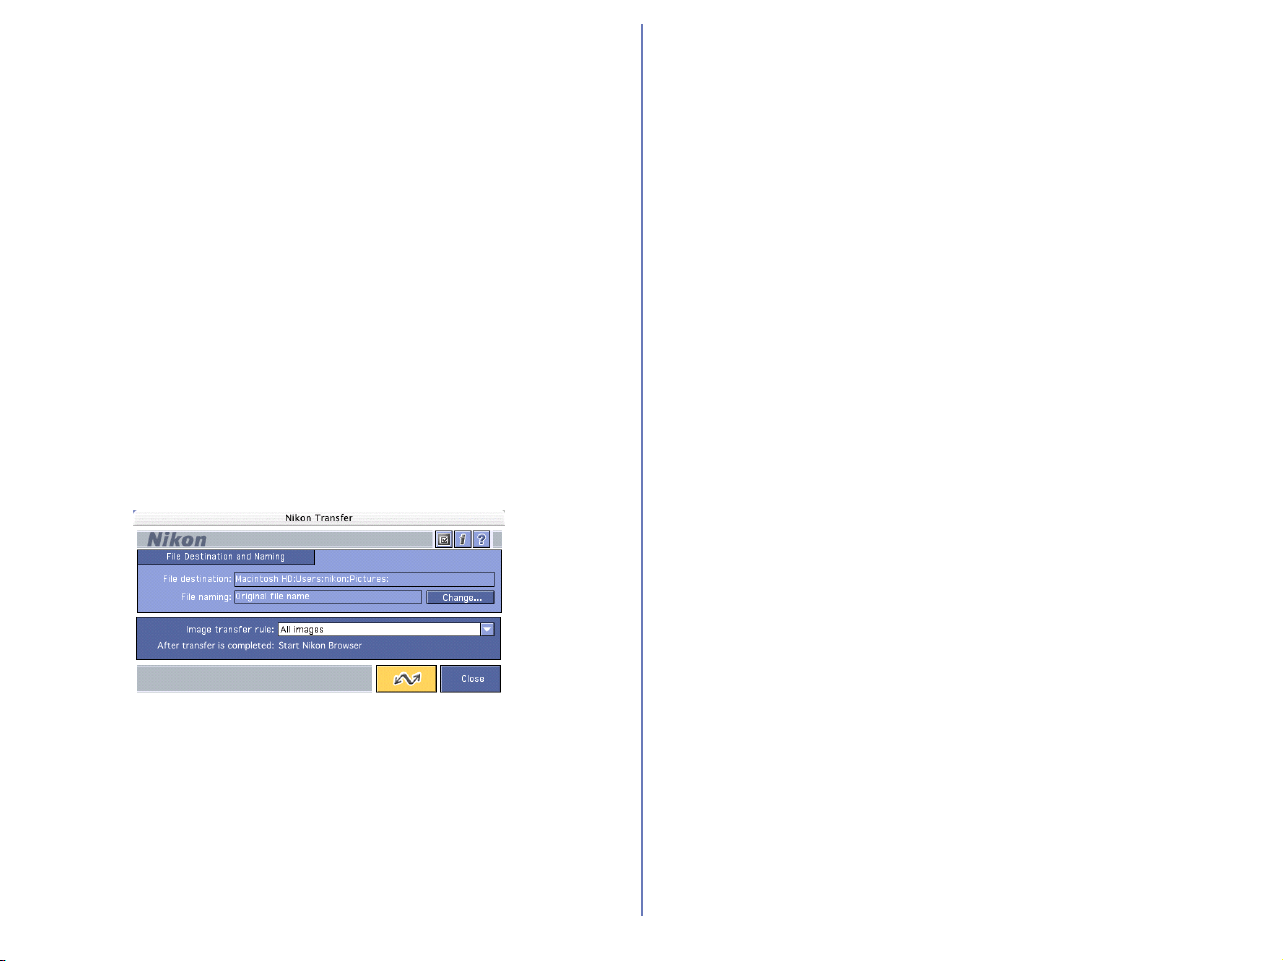
153
If you exited Nikon Transfer —
by turning the camera off:
• start Nikon View 5 by turning the camera back on.
by disconnecting the camera from the computer:
• start Nikon View 5 by reconnecting the camera to the computer.
Check that the camera is turned off before you reconnect it.
by removing the memory card from the camera
• Insert the memory card in the camera and turn the camera on.
by removing the memory card from the card reader or
card slot:
• start Nikon View by inserting the memory card in a card reader
or card slot.
Nikon Transfer launches when a camera is connected or memory
card inserted.
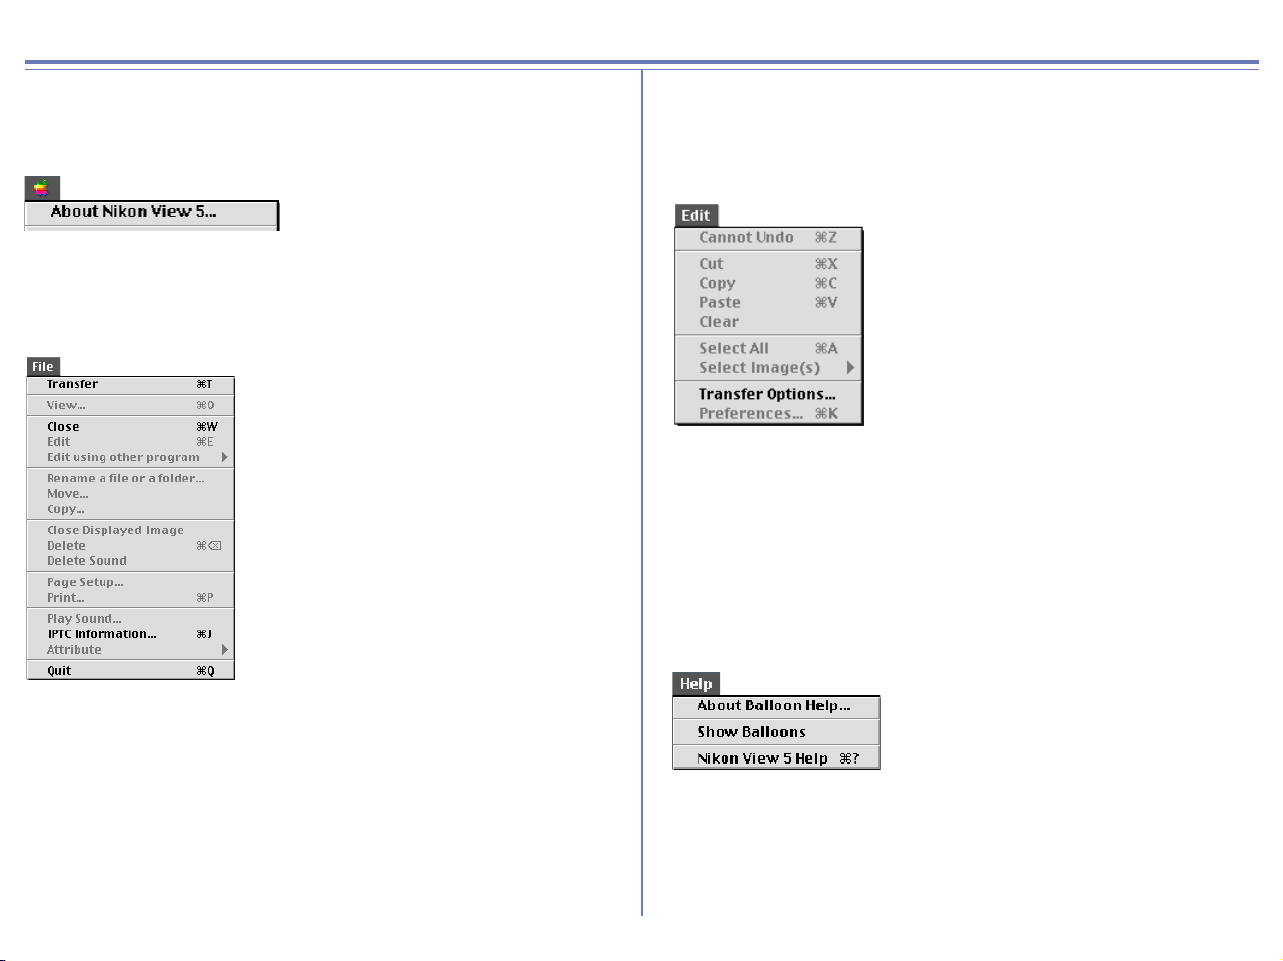
154
Nikon Transfer Menus
Mac OS 9 menus
Apple menu
About Nikon View 5...
Display version and copyright information for Nikon View 5.
File menu
Transfer
Transfer images from the memory card to the computer.
Close
Closes Nikon Transfer.
IPTC information...
Displays the file information. You can also add additional information
Quit
Quits Nikon View 5.
Edit menu
Undo / Cut / Copy / Paste / Clear / Select All / Select
Used when editing text in a dialog box (e.g. Options inside the File
Destination and Naming dialog box.)
Transfer Options...
Displays the Transfer Options dialog box, in which you can set
transfer conditions and actions.
Help menu
Show Balloons
Displays Balloon Help.
Nikon View 5 Help
Open the Nikon View 5 help file.
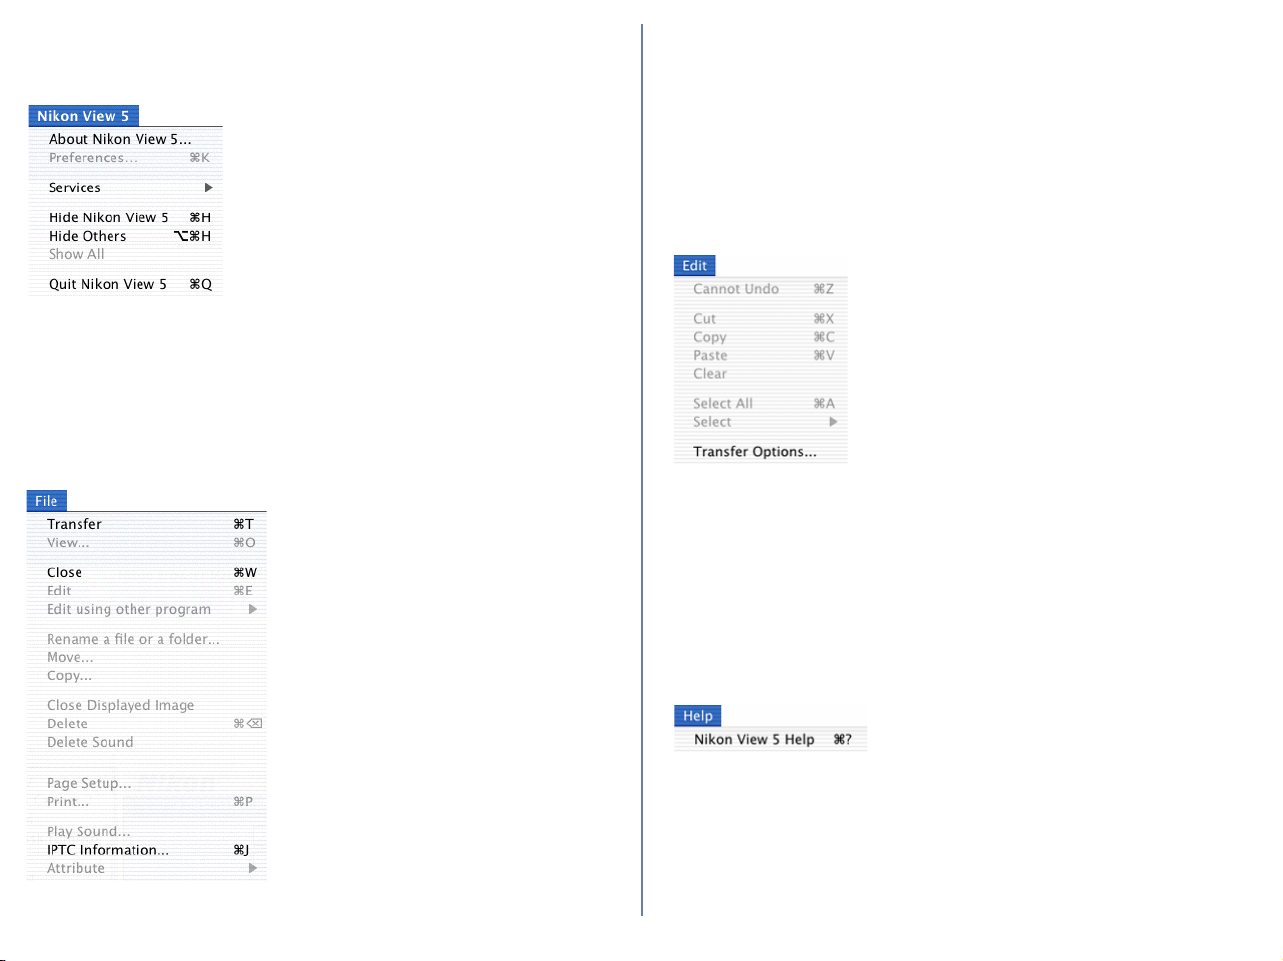
155
Mac OS X Menus
Nikon View 5 menu
About Nikon View 5...
Display version and copyright information for Nikon View 5.
Quit Nikon View 5
Quits Nikon View 5.
File menu
Transfer
Transfer images from the memory card to the computer.
Close
Closes Nikon Transfer.
IPTC Information...
Displays the file information. You can also add additional information.
Edit menu
Undo / Cut / Copy / Paste / Clear / Select All / Select
Used when editing text in a dialog box (e.g. Options inside the File
Destination and Naming dialog box.)
Transfer Options...
Displays the Transfer Options dialog box, in which you can set
transfer conditions and actions.
Help menu
Nikon View 5 Help
Open the Nikon View 5 help file.

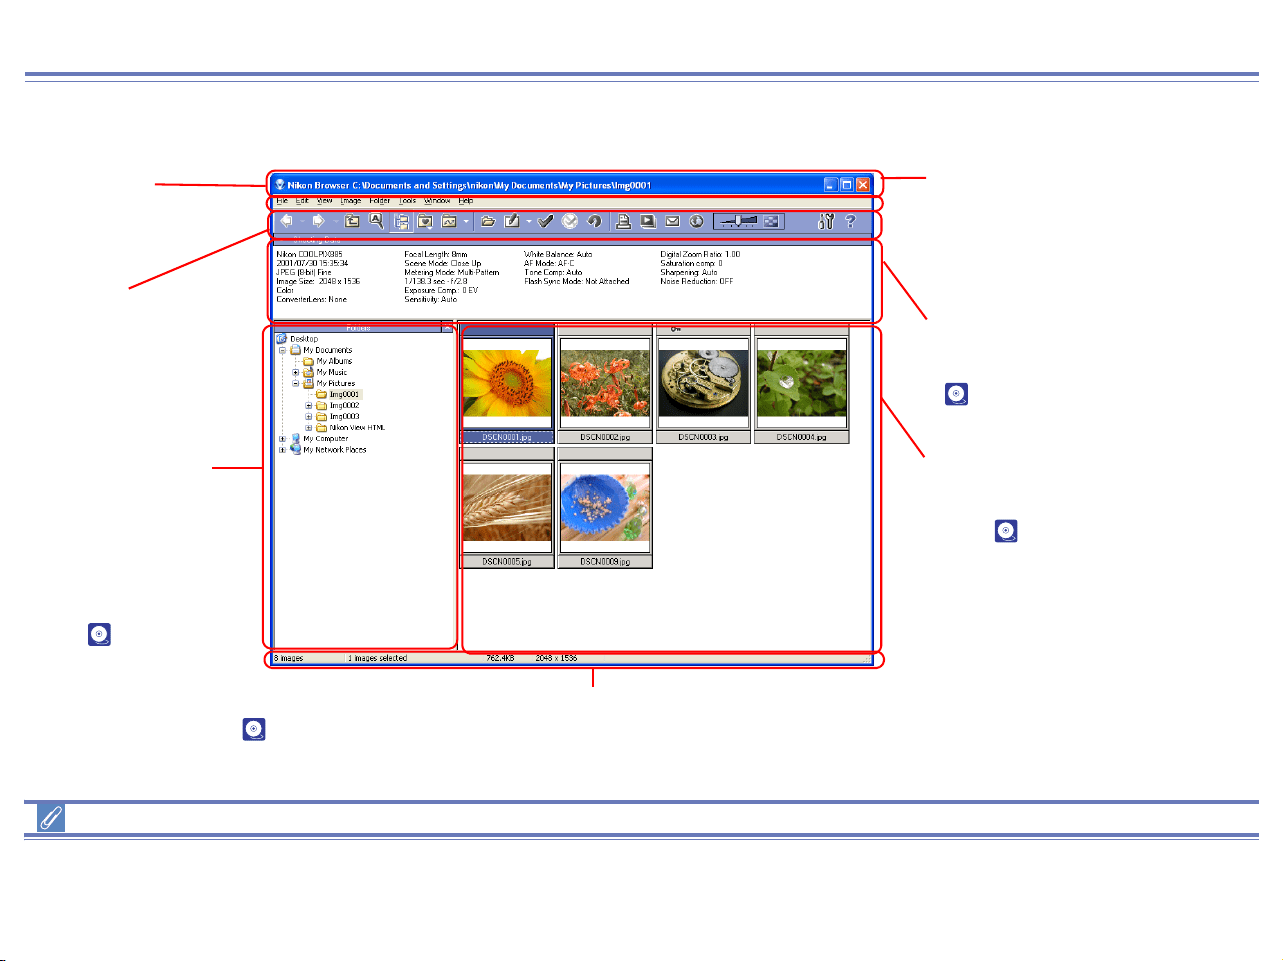
157
Nikon Browser Overview
Using Nikon Browser (Windows)
Functions and Controls:
Menu Bar and Tool Buttons
The majority of operations in Nikon Browser are performed using the menu bar and tool buttons. In the case of operations that can be
performed by means of both menus and tool buttons, the explanation in this manual gives priority to the tool buttons.
Title Bar
Displays the name of
the current folder.
Toolbar
Contains buttons for
operations that can be
performed in Nikon
Browser.
Shooting data area
Displays shooting data for
the selected image
( p. 174).
Navigation area
Displays the Folders
tree or the Search
Control. Folders tree
displays the drives and
folders in the system as
a tree ( p. 162)
Status bar
Displays such information as the number of image files in the selected
folder and the number of items selected in the thumbnail list.
Thumbnail list area
Displays thumbnails for
the images in the current
folder ( p. 169).
Menu bar
Contains menus for the
operations that can be
performed in Nikon Browser.
Search Control allows you to search image files
specifying various rules( p. 175). To switch the display,
click Folders button or Search button in the Toolbar.
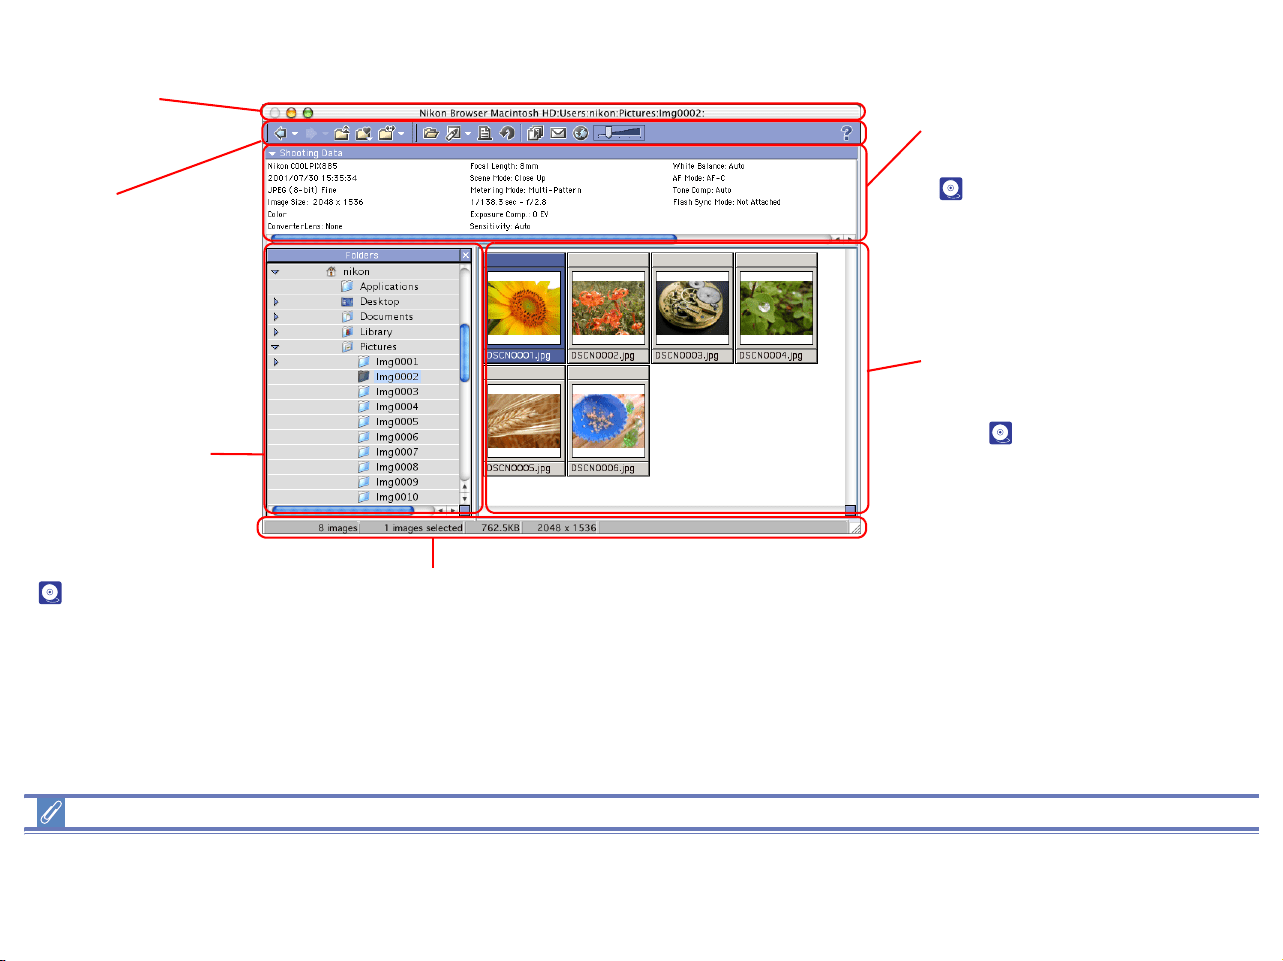
158
Using Nikon Browser (Macintosh)
Functions and Controls:
Menu Bar and Tool Buttons
The majority of operations in Nikon Browser are performed using the menu bar and tool buttons. In the case of operations that can be
performed by means of both menus and tool buttons, the explanation in this manual gives priority to the tool buttons.
Title Bar
Displays the name of
the current folder.
Toolbar
Contains buttons for
operations that can
be performed in
Nikon Browser.
Shooting data area
Displays shooting data for
the selected image
( p. 174).
Navigation area
Displays the Folders.
Folders tree displays
the drives and folders
in the system as a tree
( p. 162)
Status bar
Displays such information as the number of image files in the selected
folder and the number of items selected in the thumbnail list.
Thumbnail list area
Displays thumbnails for
the images in the current
folder ( p. 169).
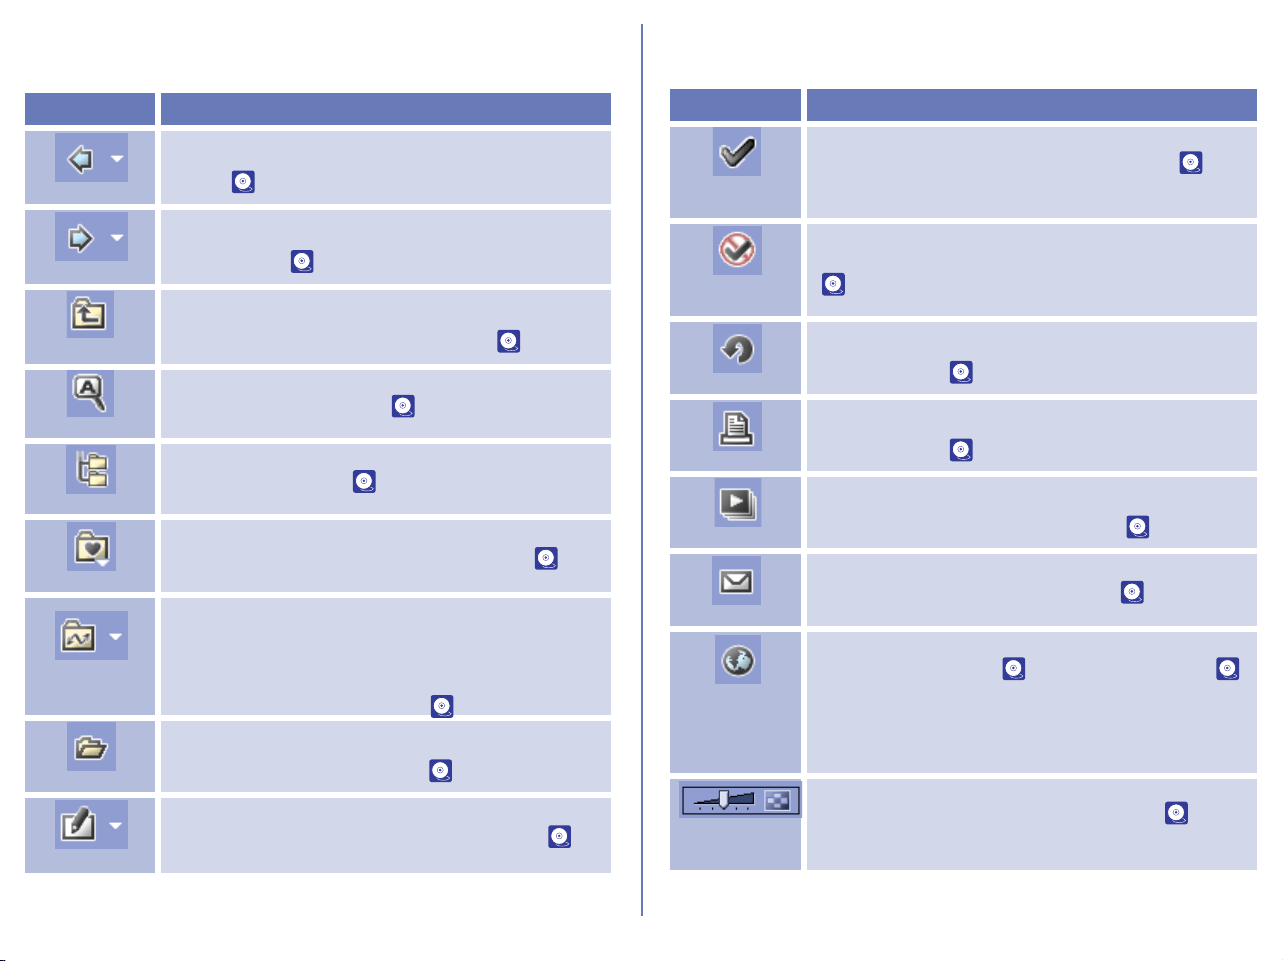
159
Windows
Nikon Browser contains the following buttons:
Button Function
Back
Returns to the folder selected before the current
folder ( p. 163).
Forward
Returns to where you were when you clicked the
Back button ( p. 163).
Up one level
Selects the folder one level higher than the
current folder in the folder hierarchy ( p. 163).
Search
Displays Search control ( p. 175).
Folders
Display folders tree.( p. 175).
Favorites
Adds the selected folder to the Favorites or
selects a folder from the list of Favorites ( p.
167).
Transfer
Destination
Displays a list of 10 most recent destination
folders for image files that were transferred using
Nikon Transfer. When you select a folder from
the list, the applicable folder in the folder tree
area will also be in selection ( p. 163).
View
Displays the image files selected from the
thumbnail list in Nikon View. ( p. 179).
Edit
Opens the image file selected in the thumbnail list
area in the designated image editing program (
p.
183).
Add Tag
Mark
Put the tag mark label on the image file ( p.
172).
Remove Tag
Mark
Remove the tag mark label from the image file
( p. 172).
Rotation
Rotates the still image files selected from the
thumbnail list. ( p. 173).
Print
Prints the still image files selected from the
thumbnail list. ( p. 185).
Slideshow
Plays back the image files selected in the
thumbnail list area as a slideshow ( p. 193).
E-mail
Sends selected images by e-mail ( p. 197).
Publish to
FotoShare /
NikonNet or
PDA
Uploads the selected images to an online photo
album at FotoShare ( p. 200) or NikonNet (
p. 207). Can also send images to a Palm
organizer or Pocket PC connected to your
computer (North and South American resident
only).
Thumbnail
Size
Adjusts the display size of thumbnails. ( p.
170).
Button Function

160
Preferences
Display NikonView 6 preference dialog.
Button Function
Help
Displays help for Nikon View 6.
Button Function
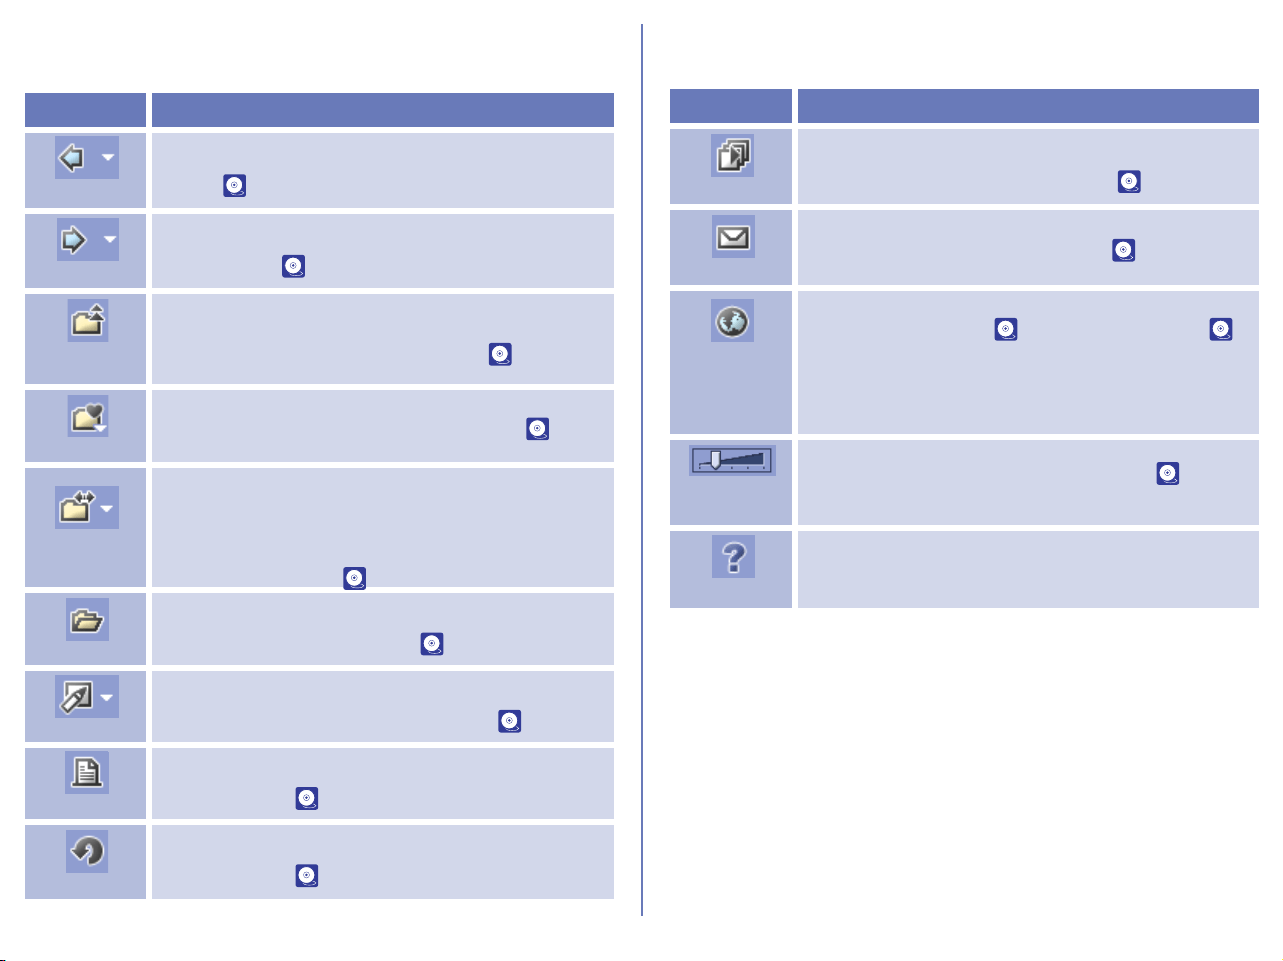
161
Macintosh
Nikon Browser contains the following buttons:
Button Function
Back
Returns to the folder selected before the current
folder ( p. 163).
Forward
Returns to where you were when you clicked the
Back button ( p. 163).
Up one
level
Selects the folder one level higher than the
current folder in the folder hierarchy ( p. 163).
Favorites
Adds the selected folder to the Favorites or
selects a folder from the list of Favorites ( p.
167).
Transfer
Destination
Displays a list of 10 most recent destination
folders for image files that were transferred using
Nikon Transfer. When you select a folder from the
list, the applicable folder in the folder tree area will
also be in selection ( p. 163).
View
Displays the image files selected from the
thumbnail list in Nikon View. ( p. 179).
Edit
Opens the image file selected in the thumbnail list area
in the designated image editing program (
p. 183).
Print
Prints the still image files selected from the
thumbnail list. ( p. 185).
Rotation
Rotates the still image files selected from the
thumbnail list. ( p. 173).
Slideshow
Plays back the image files selected in the
thumbnail list area as a slideshow ( p. 193).
E-mail
Sends selected images by e-mail ( p. 197).
Publish to
FotoShare /
NikonNet or
PDA
Uploads the selected images to an online photo
album at FotoShare ( p. 200) or NikonNet (
p. 207). Can also send images to a Palm
organizer or Pocket PC connected to your
computer (North and South American resident
only).
Thumbnail
Size
Adjusts the display size of thumbnails. ( p.
170).
Help
Displays help for Nikon View 5.
Button Function

162
Using Nikon Browser
Working with folders
When you display the folder tree in the navigation area and you
select a folder from the folder tree, the thumbnails of image files in
the folder tree displayed in the thumbnail list area.
You can close the folder tree by clicking the Close button in the
upper right corner. To re-display the image, select View menu >
Navigation > View Folders or View Search Control for Windows. In
Macintosh, select View Folders from View menu.
Supported File Formats
Nikon Browser can be used to view files created with supported
cameras and images previously saved using Nikon Capture 3
Editor, Nikon Capture 3 Camera Control, Nikon View 6 Editor, or
Nikon Capture version 2 or earlier. For information on the file
formats supported for still images, see ( p. 287).
Selecting a folder using the keyboard
In Windows, you can select a folder using the following keys
instead of the tool buttons:
• HOME: Selects the Desktop icon displayed at the root of the
folder tree.
• END: Selects the folder or drive displayed at the bottom of the
folder tree area.
• BACKSPACE: Selects the folder one level higher than the
current folder in the folder tree.
Close Button
Folder tree
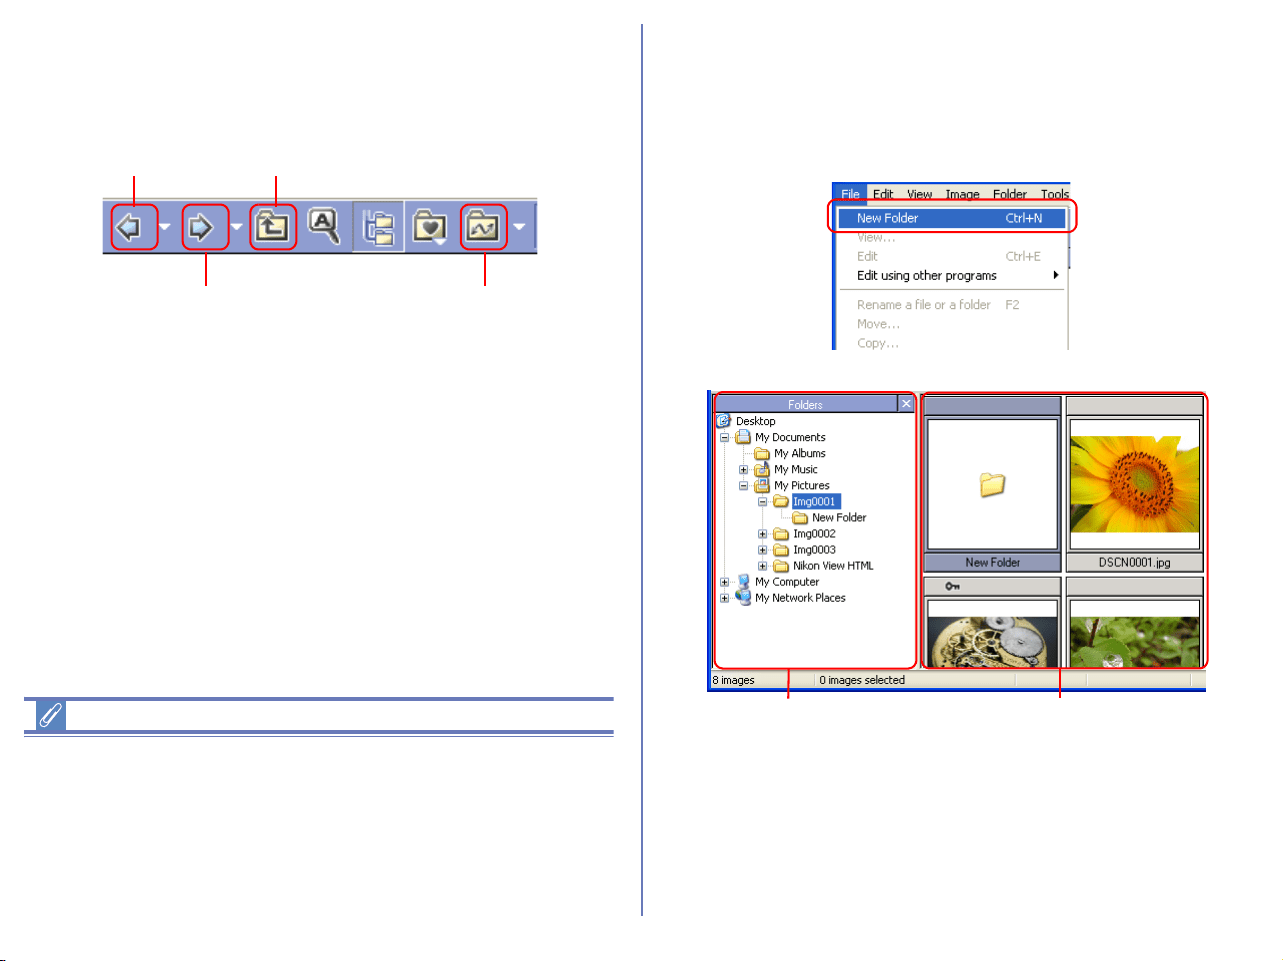
163
Choosing a folder
The folder tree area displays drives and folders in your computer
as a tree from the desktop down. In the folder tree area, you can
only select one folder at a time.
You can go back to the previous folder by clicking the Back button
on the toolbar. You can also select from up to 10 previous folders
by clicking the drop-down arrow on the right.
Use the Forward button to go back to where you were when you
clicked the Back button. You can also select from up to 10 folders
by clicking the drop-down arrow on the right.
Click the Up one level button to select a folder one level higher
than the current folder in the folder hierarchy.
Click the Transfer destination button to view a list of 10 most
recent destination folders for image files that were transferred
using Nikon Transfer. When you select a folder from the list, the
applicable folder in the folder tree area will also be in selection.
Opening folders in Explorer or Finder
In Windows, if you choose Open in Explorer from Folder menu
selecting the folder, Explorer is displayed while the selected folder
is open.
In Macintosh, if you choose Open in Finder from Folder menu
selecting the thumbnail, Finder is displayed while the selected
folder is open.
Creating new folders (Windows only)
Select New Folder in the File menu to create new folders. The
newly created folders are added to the current directory and
displayed in the folder tree in the navigation area and the
thumbnail list area.
Back button Up one level button
Forward button
Transfer Destination button
Creating a new folder in the
folder tree in the navigation
area
Creating a new folder
in the thumbnail list
area
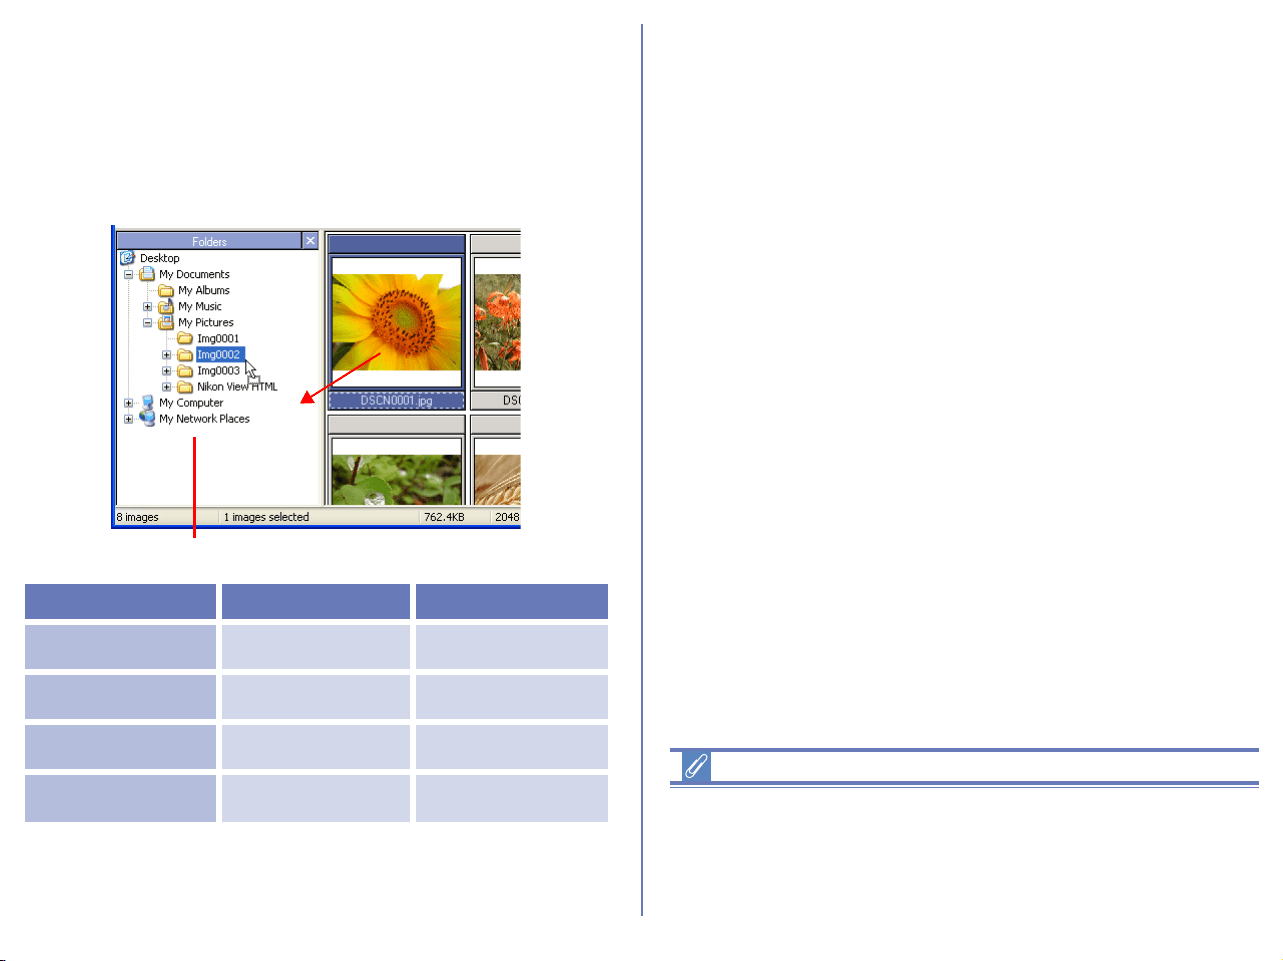
164
Moving image files
Moving files between folders
You can move image files by dragging and dropping thumbnails
from the thumbnail list area to a folder in the folder tree in the
navigation area.
Deleting folders
To delete a folder, select the folder one level higher than the folder
you want to delete. The folder you want to delete will be displayed
in the thumbnail list area. Select the folder, then select Delete from
the File menu.
Action Windows Macintosh
Moving within the
same drive
Drop Drop
Copying within
the same drive
CTRL + drop OPTION + drop
Moving between
separate drives
SHIFT + drop -
Copying between
separate drives
Drop Drop
Drag and drop

165
Copy/Move/Rename Multiple Image Files
Rename
You can change the image file name and the folder name.
To change the name of a file or a folder (Windows)
Select an image file or a folder you want to rename in the
thumbnails list section and then select Rename a file or a folder in
File menu to change the name.
To change the name of a file or a folder (Macintosh)
Select an image file or a folder you want to rename in the
thumbnails list section and then select Rename a file or a folder in
File menu to display the Rename file dialog box where you can
change the name.
To change the names of multiple files or folders
(Windows, Macintosh)
Select multiple files or folders you want to change in the
thumbnails list section and then select Rename a file or a folder in
File menu to display the Rename file(s) dialog box where you can
specify how to change the name.
Windows
Macintosh
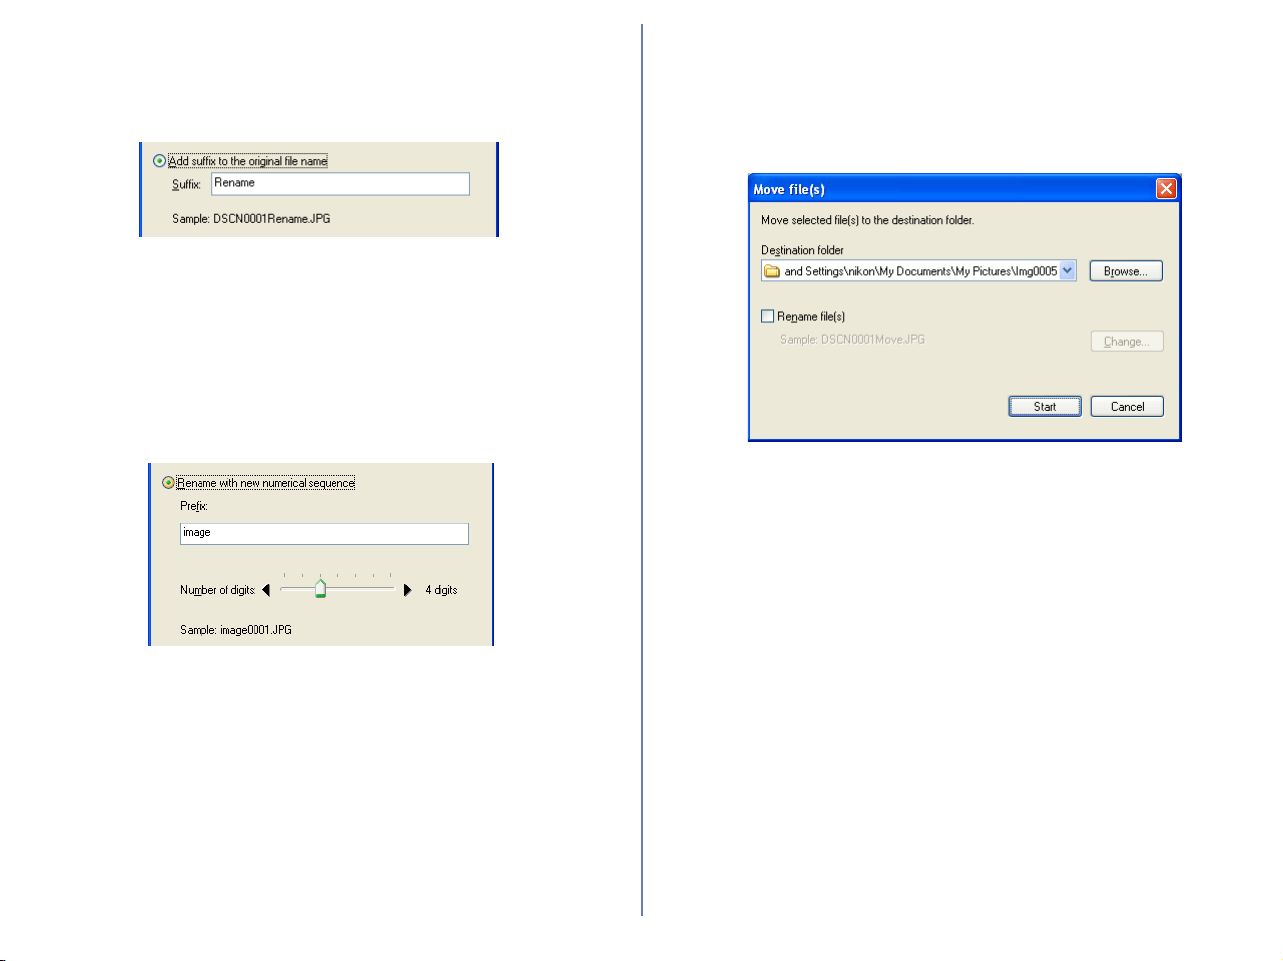
166
Add suffix to the original file name:
Select this option to append the characters you enter in the Suffix
text box to the end of the current file name.
Rename with new numerical sequence:
Select this option to append serial numbers to the characters you
enter in the Prefix text box. You can specify the digit of numbers
using slide-bar. Serial numbers are added to the prefix in the
ascending order according to the displaying order of the image files
in the Thumbnails list area.
Click OK button to start renaming the selected files or folders.
Move
You can move one or more files or folders. Also, you can change
the name of multiple files or folders at that time.
Select one or more files or folders in the thumbnails list section and
then click Move in File menu to display Move file(s) dialog box.
Destination folder:
The currently specified destination folder is displayed. To change
the folder, click Browse button. When the Browse For Folder
dialog is displayed, specify a different folder.
Rename files:
You can change the Move multiple image files when Rename
file(s) check box is checked. If multiple folders are selected in
Windows, you cannot change the names of folders. In Macintosh,
you can do it.
Click Change to display Rename file(s) dialog box.
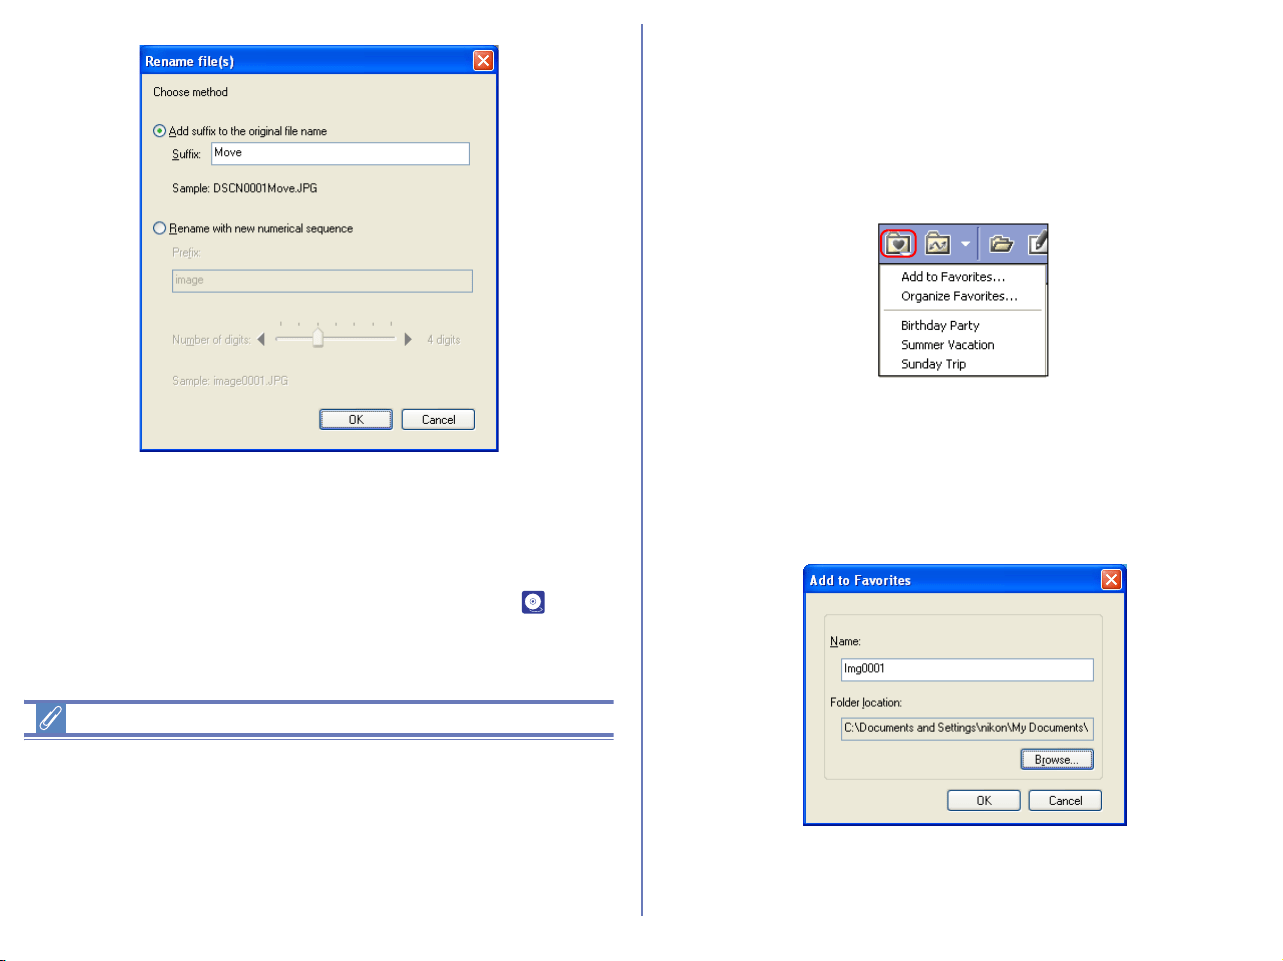
167
Copy
You can copy more than one file or folder at a time. Select images
or folders in the Thumbnails list area and click Copy in the File
menu to display the Copy file(s) dialog box.
For more information on the Copy file(s) dialog box, see p. 165.
Handling image files with sound files
If sound files are embedded to the image files you want to delete,
copy, move, or rename in Nikon Browser window, there may be a
difference between the number of the selected items displayed on
the status bar and the number of those in the message dialog. This
is because the sound files embedded to the images files are
counted for such file operation.
Adding folders to Favorites
In Nikon Browser, you can add folders containing transferred
images to Favorites. Folders to be added to Favorites can be
selected using either the Favorites tool button or the Favorites
option in the Folder menu. Up to 30 folders can be listed in
Favorites.
Add to Favorites
To add a folder to Favorites, use the folder tree area to select the
desired folder, then click the Favorites button on the toolbar. You
can also select Favorites > Add to Favorites from the Folder
menu. The Add to Favorites dialog box will be displayed.
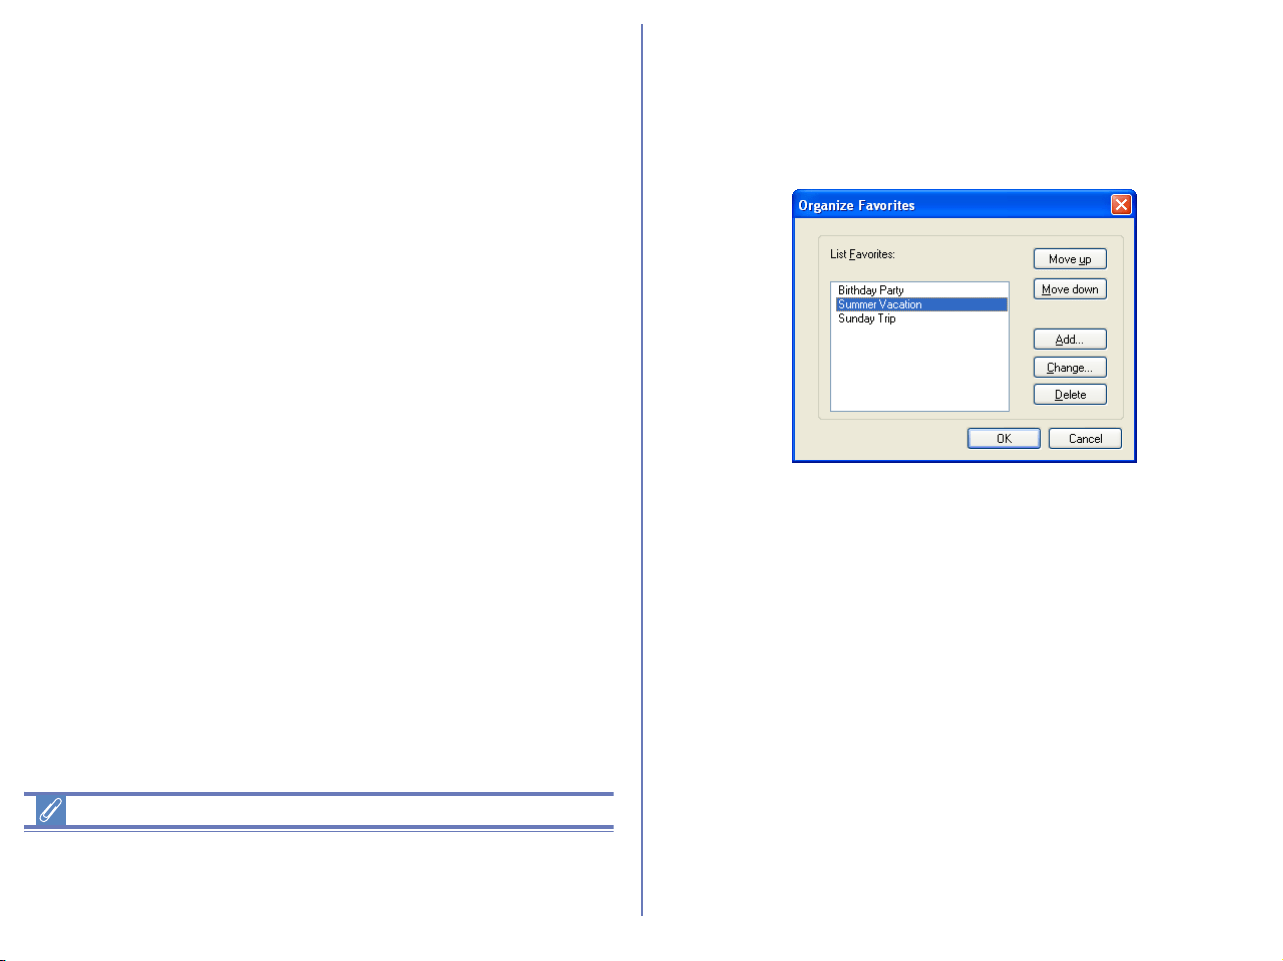
168
Name
Displays the name of the folder to be added to favorites.
In this dialog box, you can change the name of folders listed in
Favorites.
This does not affect the name of the original folder.
Folder location
Displays the location of the folder to be added to favorites. If you
want to specify a different folder, click Browse. The name of the
new folder will be displayed automatically under Name. Click OK to
register the selected folder.
Folder name
If you change a folder name using Name in Add to Favorites
dialog box, the actual folder name will not be changed.
Organize Favorites
To organize folders within Favorites, click the Favorites button on
the toolbar, or select Favorites > Organize Favorites from the
Folder menu. The Organize Favorites dialog box will be
displayed.
List Favorites
The folders that have been added to Favorites are displayed in the
list.
Move up / Move down
Click to move the selected folder in List Favorites up and down.
The folders will be displayed in Folder > Favorites in the order you
specify in this list.
Add
Click to display the Add to Favorites dialog box. In this dialog box,
you can add folders to the Favorites.
Change
Click to display the Change Favorites dialog box.
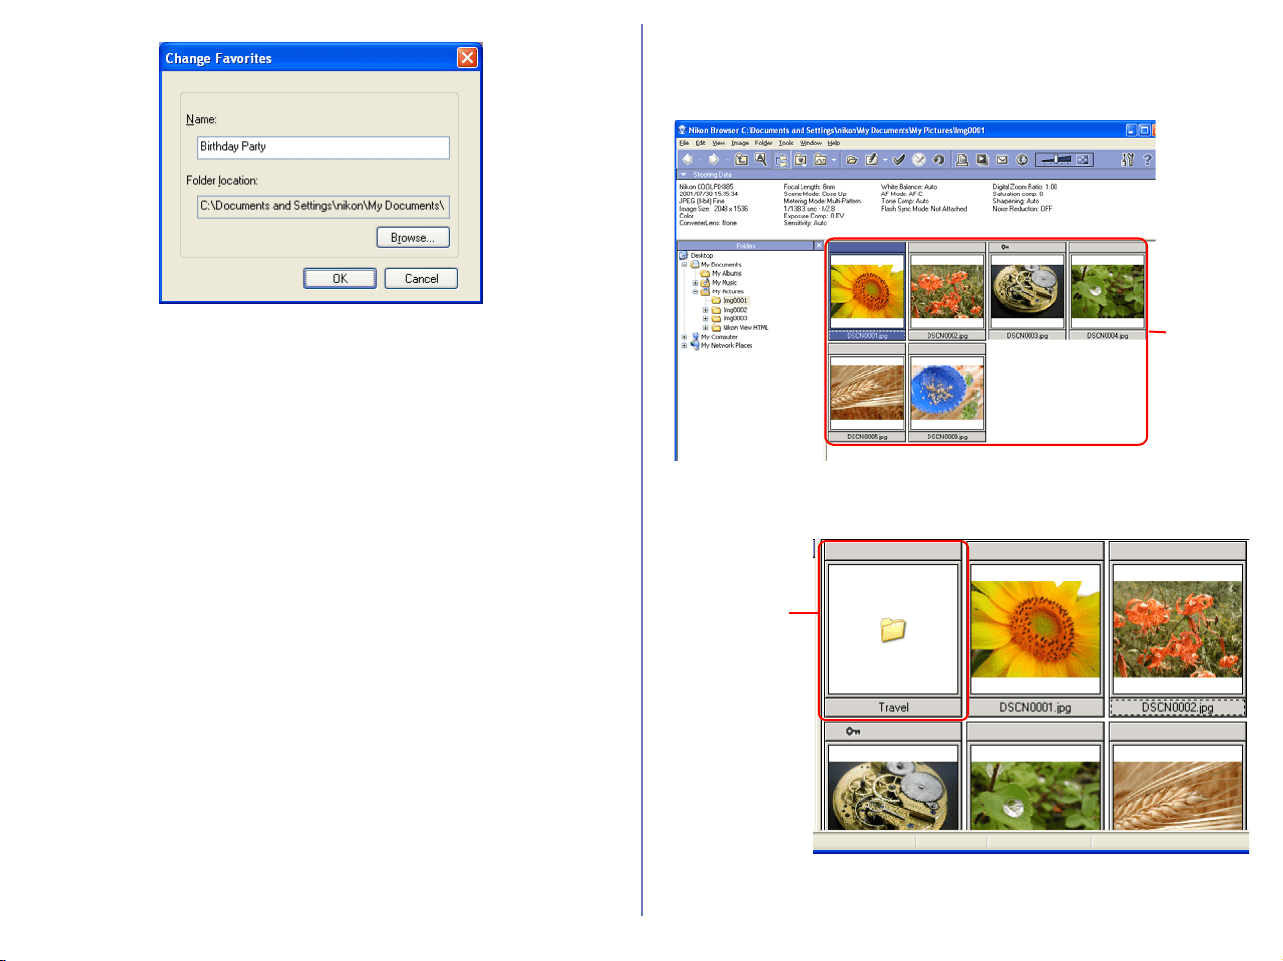
169
In this dialog box, you can change the name of folders listed in
Favorites.
This does not affect the name of the original folder.
Delete
Click to remove the selected folder from Favorites. The original
folder is not deleted from your computer.
Working with thumbnails
The thumbnail list area displays thumbnails for all images stored in
the selected folder.
Note also that a folder icon is displayed in the thumbnail list area if
the current folder contains a subfolder(s).
Thumb-
nail
list area
Folder icon
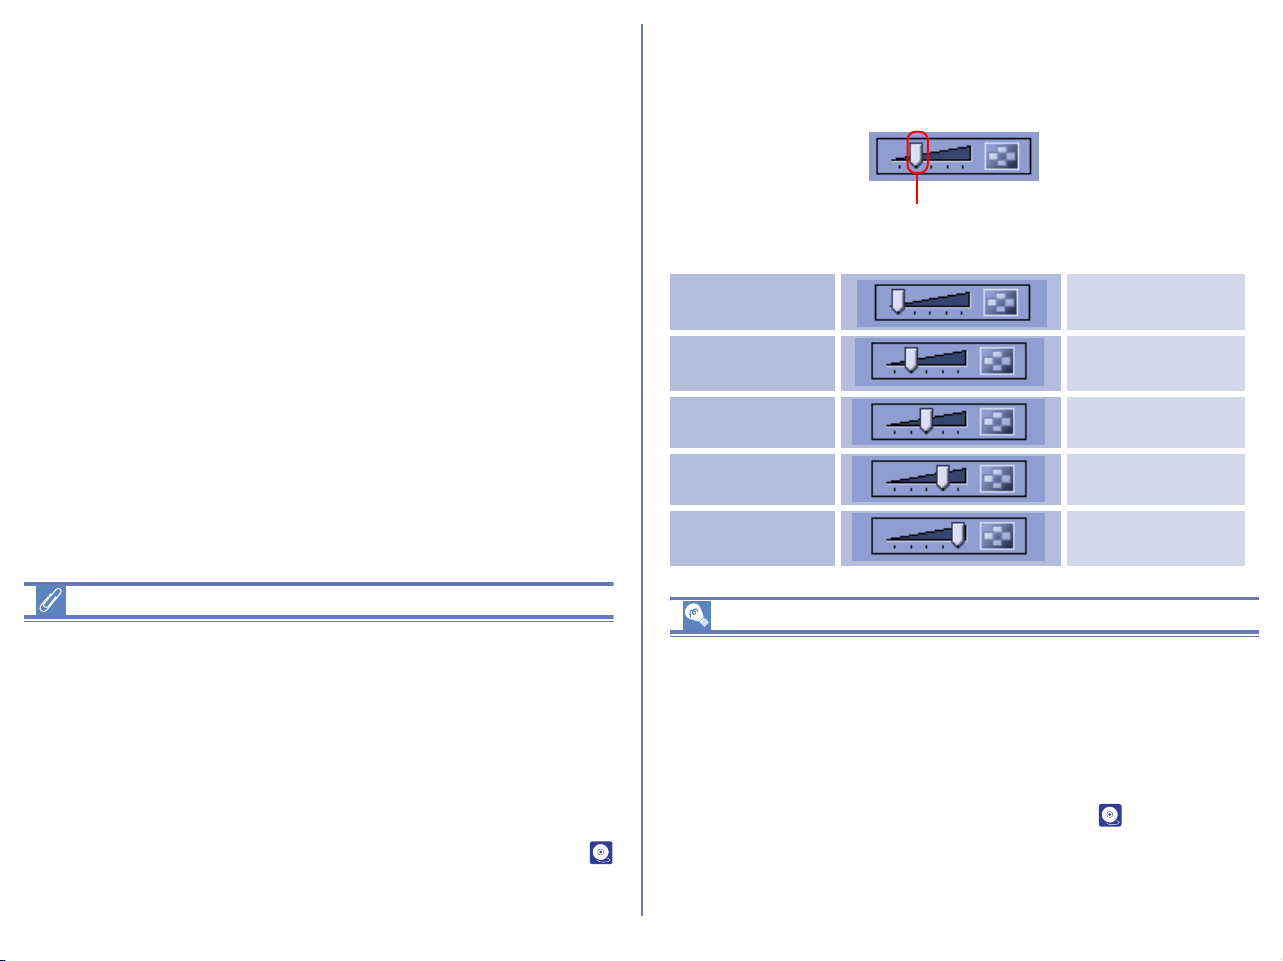
170
To display the contents of the folder in the thumbnail list area,
select the folder icon in the thumbnail list area and double-click it or
click the View button on the toolbar.
Creating Thumbnails (Macintosh)
Sometimes, a generic file icon is displayed instead of a thumbnail
in the thumbnail list area. This is because some image editing
programs remove the thumbnail data appended to the image file.
If this happens, select the generic thumbnails in the thumbnail list
and choose Create thumbnails from actual image data from the
View menu. The new thumbnail will be created from the actual
image and displayed in the thumbnail list area.
You can also create thumbnails by checking Re-create
thumbnails from actual image data in the Thumbnails tab (
p. 224) of the Preferences dialog.
Changing the thumbnail size
You can change the display size of thumbnails in the thumbnail list
area by using the slider on the toolbar or the View Size option in
the View menu.
The following five sizes are available:
Thumbnail Size
Images created with certain cameras, such as the D1, include only
one thumbnail 160 x 120 pixels in size.
If a larger size is selected, the existing thumbnail data will be
enlarged to display at the selected size. To create a less ragged
(but needed more time to be displayed) thumbnail, select Re-
create thumbnails from actual image data in the Thumbnails
tab of the Nikon Browser Preferences dialog ( p. 224). This is
not necessary when displaying pictures created with cameras such
as the D1
X, D1H, D100, E5000, and the E5700, which include
larger thumbnails with the original image.
Minimum 64 x 64 pixels
Small 96 x 96 pixels
Normal 128 x 128 pixels
Large 192 x 192 pixels
Maximum 256 x 256 pixels
Slider
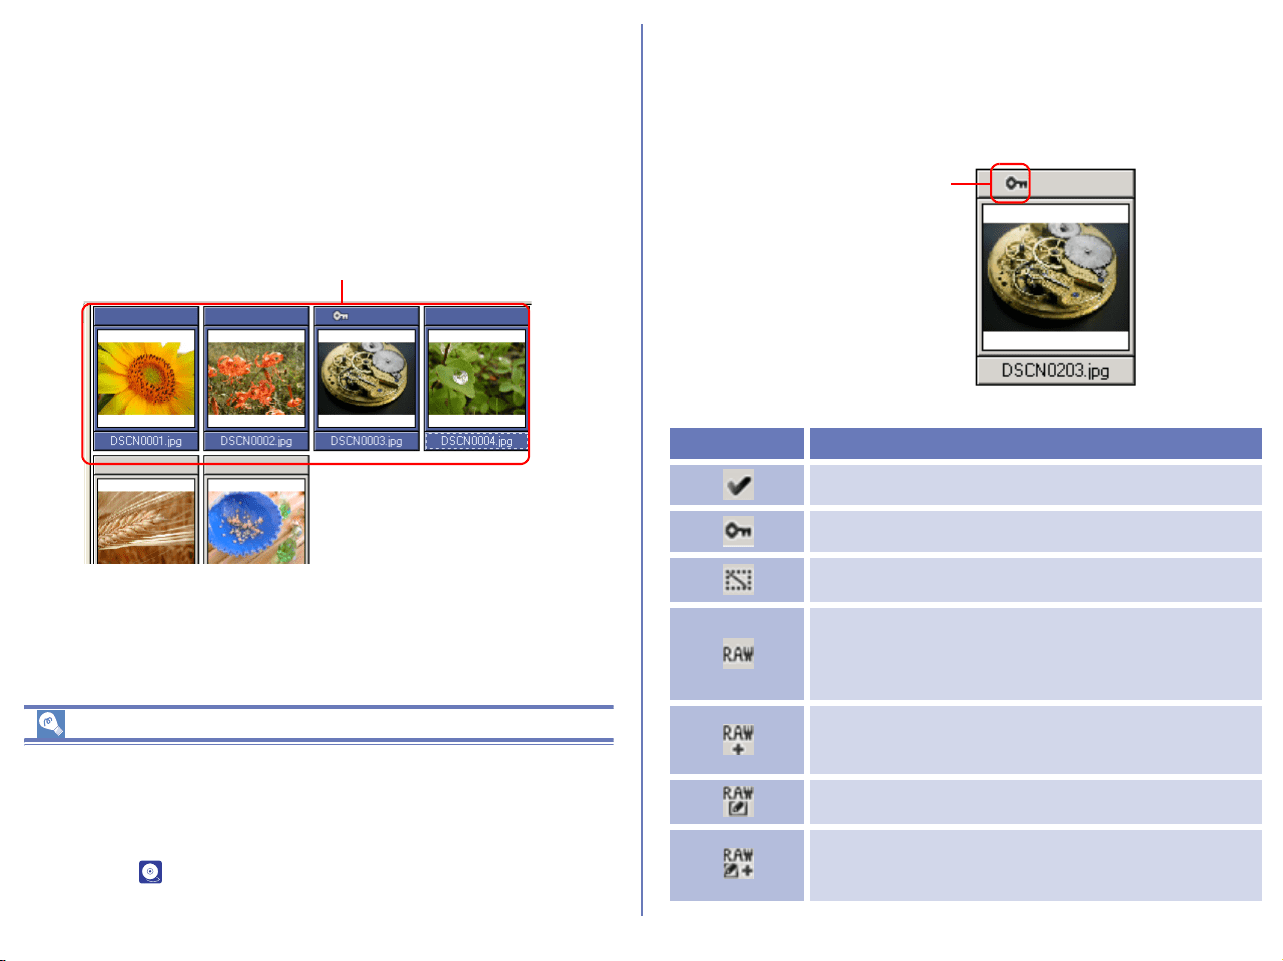
171
Selecting thumbnails
Thumbnail previews of the images in the selected folder are shown
in the thumbnail list area. Click a thumbnail to select it.
To select multiple thumbnails, hold down the CTRL key (Windows)
or the Command key (Macintosh) while clicking on each of the
thumbnails.
You can also drag the mouse and select multiple thumbnails.
Selecting Images
You can select all image files and folders in the thumbnail list area
by selecting Select All in the Edit menu. To select all image files
instead of folders, click Select Image(s) and select Select All.
In this submenu, you can also select a condition for the files you
want to edit ( p. 238).
Thumbnail attributes
If image files are protected or with voice memo, the attributes icon
is displayed on the top of the thumbnail. There are 11 types of icon:
Tag mark (Windows only), Protection, Hide (Windows only), etc.
Selected thumbnails
Icon Description
Image with Tag mark (Windows only).
Image is protected and cannot be overwritten.
Image is hidden and will not be displayed in
Windows Explorer.
RAW image - not saved with Nikon Capture
(The images rotated with Nikon Browser
rotation function are not assumed as edited
files and this icon is displayed.) (Windows only)
RAW image - not saved with Nikon Capture
and with preview image created Large Preview
Generator for NEF. (Windows only)
RAW image - saved with Nikon Capture
(Windows only)
RAW image - saved with Nikon Capture and
with preview image created by Large Preview
Generator for NEF. (Windows only)
Attributes icon
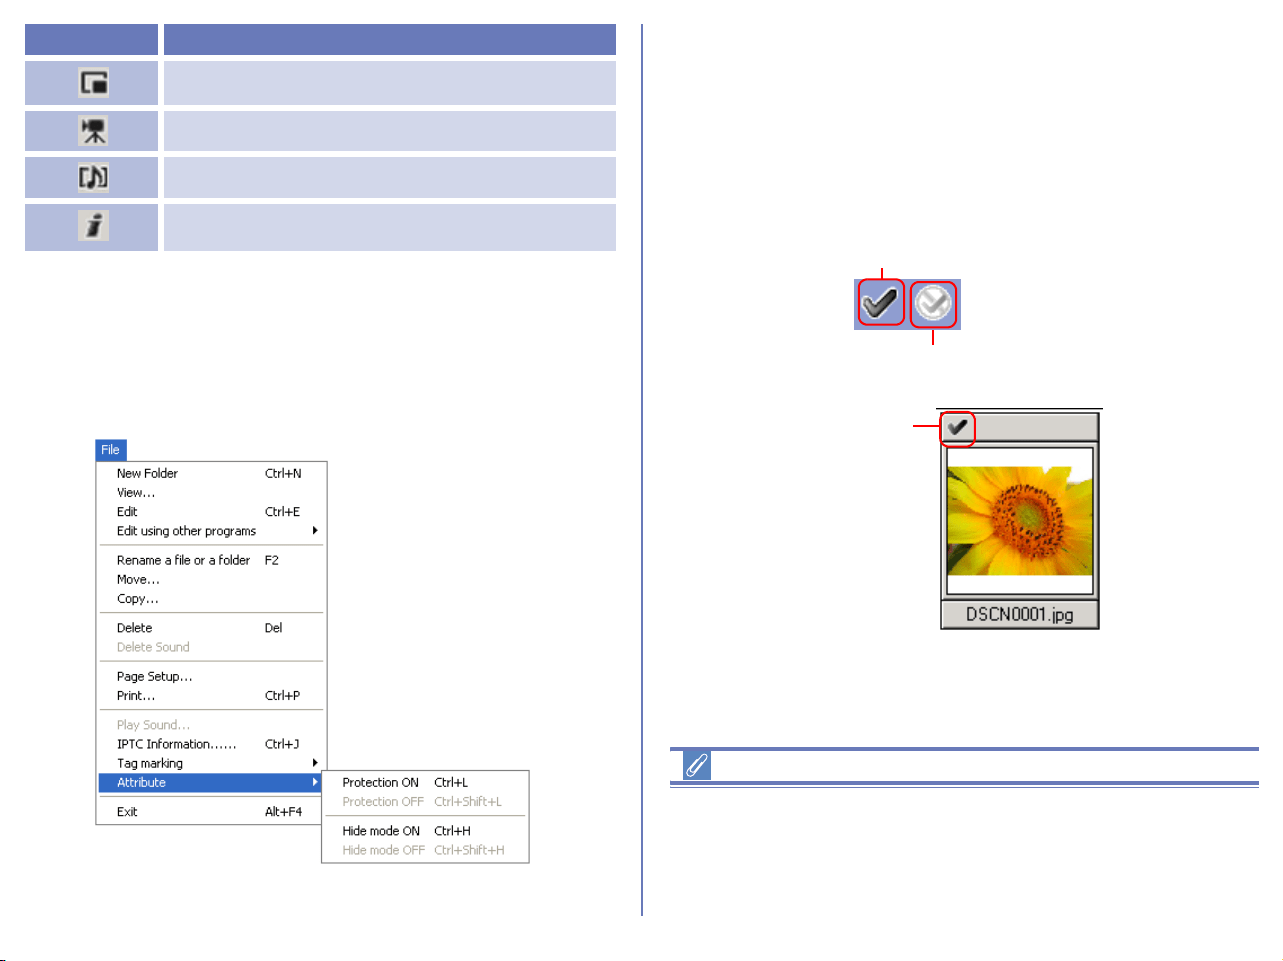
172
You can also protect (Windows and Macintosh) or hide (Windows
only) images associated with the selected thumbnail by selecting
Attribute from the File menu. Protecting an image prevents it from
accidental deletion. Hiding an image prevents it from being shown
in Explorer.
Using a Tag mark (Windows Only)
Select a thumbnail in the thumbnail list area, and then click the Add
Tag mark button on the toolbar or select Tag marking in File menu
to put the tag mark on the image file. The Tag mark icon will display
on the thumbnail attribute.
Tag mark function is not applicable to the image files on the
network or removable disk.
Select a thumbnail and click the Remove Tag mark button to
remove the Tag mark on the image file.
Using a Tag mark (Windows only)
You can display only images with tag marks in the thumbnail list
area by selecting Select Images in Edit menu. Or you can find
images with tag marks by clicking on the Search button on the
toolbar.
Small JPEG file less than 640 pixel. (Windows
only)
Image is movie file.
Voice memo is attached to image.
File information (IPTC) is attached to image.
(Windows only)
Icon Description
Add Tag mark button
Remove Tag mark button
Tag mark
icon

173
Rotating thumbnails
In the thumbnail list area, you can rotate selected thumbnails. The
rotation applied to a thumbnail is also reflected in the associated
image file. Use the Rotate Image(s) dialog box to rotate
thumbnails.
To display the Rotate Image(s) dialog box, click the Rotation
button on the toolbar, or select Rotate from the Image menu.
In the Rotate Image(s) dialog box, click CCW90° button to rotate
the thumbnail 90 degrees counterclockwise or CW90° button to
rotate 90 degrees clockwise. Click the same button twice if you
want to rotate the thumbnail 180 degrees. You can check the
results in the preview area.
When one thumbnail is selected
Click Apply or Apply to All to rotate the image file and then close
the dialog box.
When multiple thumbnails are selected
Click Apply to specify the rotation orientation of the preview image
and rotate it. The next thumbnail is displayed.
Click Skip to display the next thumbnail preview. Rotation is not
applied to the skipped images.
Click Apply to All to rotate the images that are not specified for
rotation orientation according to the orientation of the preview
image. (Rotation is not applied to the images that were skipped or
not specified for rotation orientation.)
Rotating JPEG Images
Nikon Browser rotates and flips JPEG images without
decompressing them first, and no drop in image quality results. We
recommend that you flip or rotate JPEG images in Nikon Browser
before opening them in Nikon Editor or another application. NEF
and TIFF images do not degrade when rotated or saved.
Rotating movies
Movies cannot be rotated. If a movie file is included among the
selected thumbnails, the movie file is not displayed in the Rotate
Image(s) dialog box.
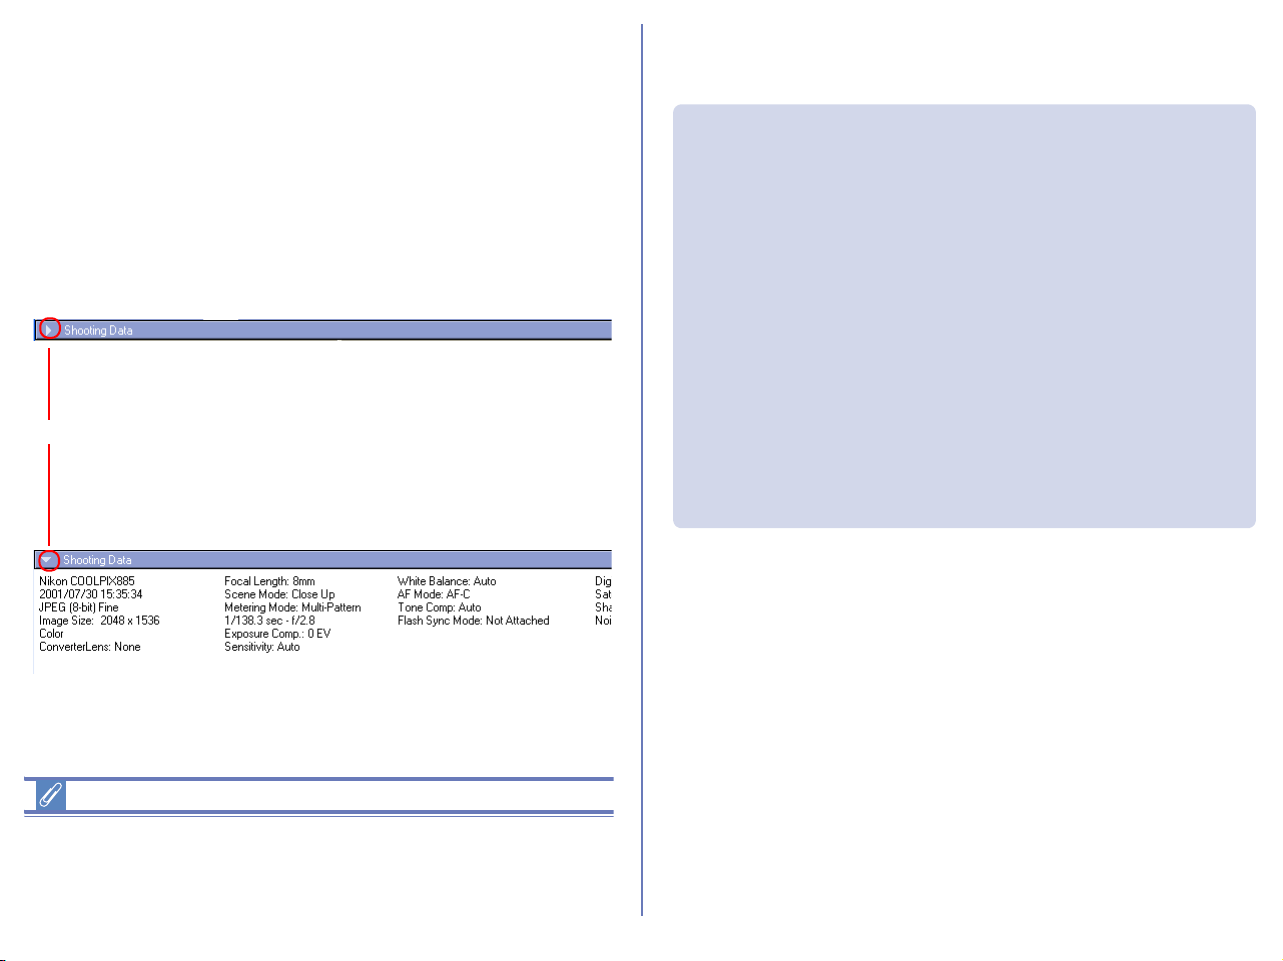
174
Displaying shooting data
When you select a single thumbnail and click Toggle button to
rotate down the triangle icon, shooting data is displayed in the
Shooting Data area. No shooting data is displayed if no thumbnail
is selected or if multiple thumbnails are selected.
You can show or hide the shooting data by selecting View
Shooting Data from the View menu. You can also expand or
collapse the Shooting Data area by clicking the toggle button (a
small triangle) in the upper left corner.
Shooting data
Depending on the image file type, it may not be possible to display
shooting data after saving images in some image editing
applications.
The information displayed includes the following items. Available
information varies according to the model of the camera.
Toggle button
Shooting Data area expanded
Shooting Data area collapsed
Camera Name / Date and Time / Image Quality /
Image Size / Color / Converter Lens / Lens /
Focal Length / Exposure Mode (Scene Mode) /
Metering Mode /
Shutter Speed, Aperture / Exposure Compensation /
Sensitivity / White Balance / AF Mode /
Tone Compensation / Flash Sync Mode /
Flash Mode / Auto Flash Comp. / Digital Zoom Ratio /
Saturation Control / Color Mode / Hue Adjustment /
Image Sharpening / Noise Reduction /
Image Comment / Latitude (GPS) / Longitude (GPS) /
Altitude (GPS)

175
Searching Image Files (Windows only)
Click the search button on the toolbar, or select Navigation - Show
search control from the View menu to change the Navigation area
to the Search panel.
Display Folder tree
Click the Folders button on the toolbar, or select Navigation - Show
folder tree from the View menu to change the Search panel to the
Folder tree in the navigation area.
Search button
Folders button
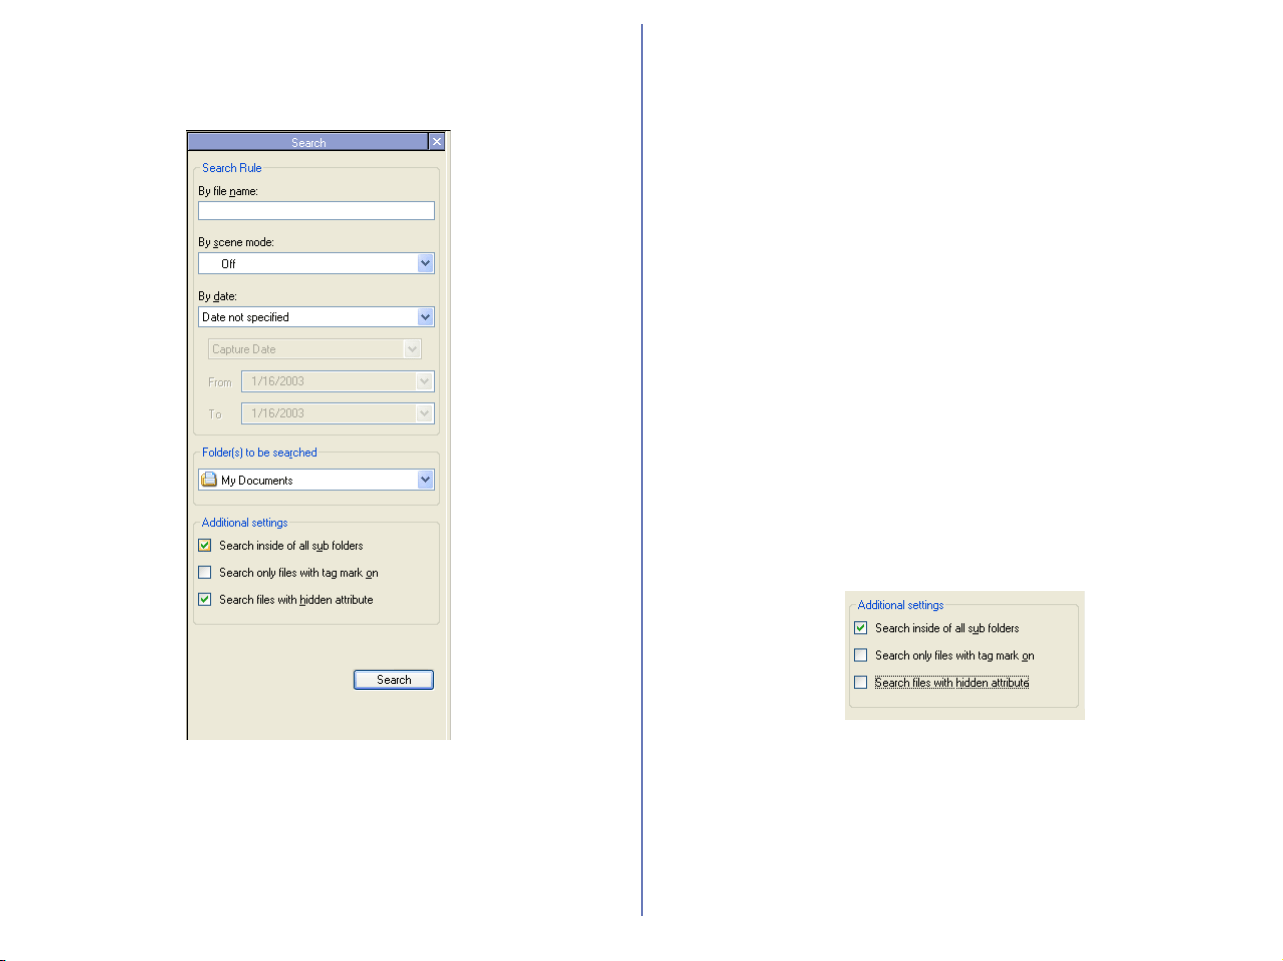
176
In the Search area, specify search rules, Folder(s) to be searched
and other conditions then click Search button to find image files
and display thumbnails in the thumbnails list area.
By file name:
Specify key strings in the target file and folder names.
You can use "*" and "?" as wildcard to specify the file name.
By scene mode:
Select Scene mode to find. Only the images taken by the camera
that supports and is set on Scene mode can be found. You can see
whether or not the image is taken on Scene mode in the shooting
data area.
By date:
Select and specify shooting date or updated date of the target file.
Folder(s) to be searched
Select the target drive or file location.
Additional settings
Following Additional settings are available for search.
Search inside of all sub folders
If there are sub folders in the find location, image files in the sub
folders are intended for search.
Search only files with tag mark on
Only if image files with a sticky label are intended for search.
Search files with hidden attribute
If image files with hide mode ON are also intended for search.
Viewing file information
In Nikon Browser, you can use the IPTC Information dialog box to
view the file information added to an image file during transfer.
Displaying the IPTC Information dialog box
To open the IPTC Information dialog box, select a thumbnail in the
thumbnail list area and click IPTC Information on the File menu.
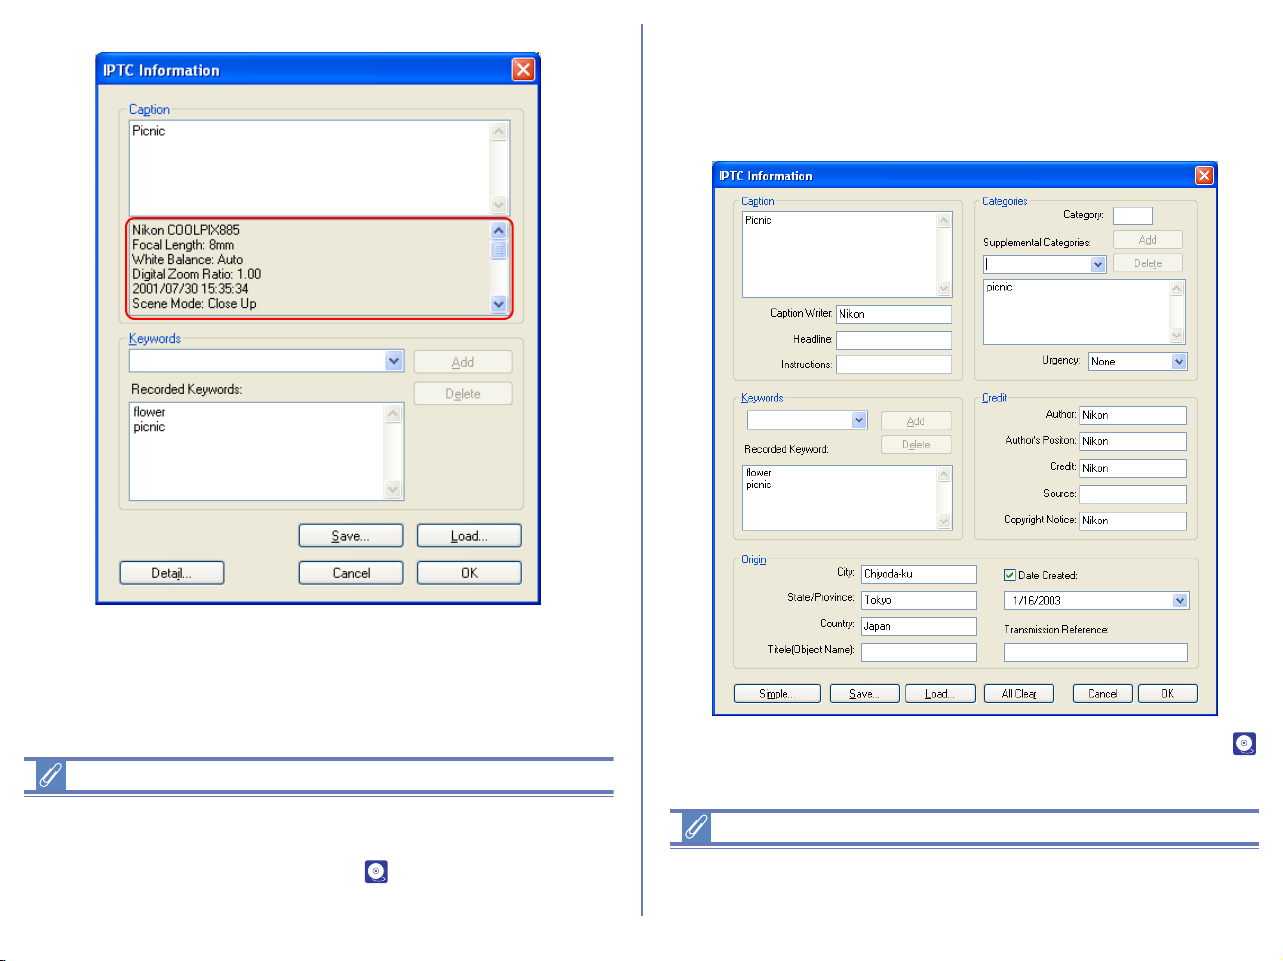
177
In the lower part of the Caption area in the IPTC Information
dialog box, the shooting data added to the image file during
transfer is displayed.
Registering shooting data
Shooting data is added to the image file during transfer when the
Copy Shooting data (Shutter speed etc...) to the IPTC caption
field check box in the Transfer tab ( p. 131) of the Transfer
options dialog box is selected.
You can view the IPTC Information dialog box in Simple or Detail
mode.
Click the Simple/Detail button to toggle between Simple and Detail
mode.
For more information on the IPTC Information dialog box, see (
p. 132) in "Nikon Transfer."
File information from Nikon Browser
IPTC information displayed in Nikon Browser cannot be edited.
Note that there is no file information attached to movies.
Simple mode
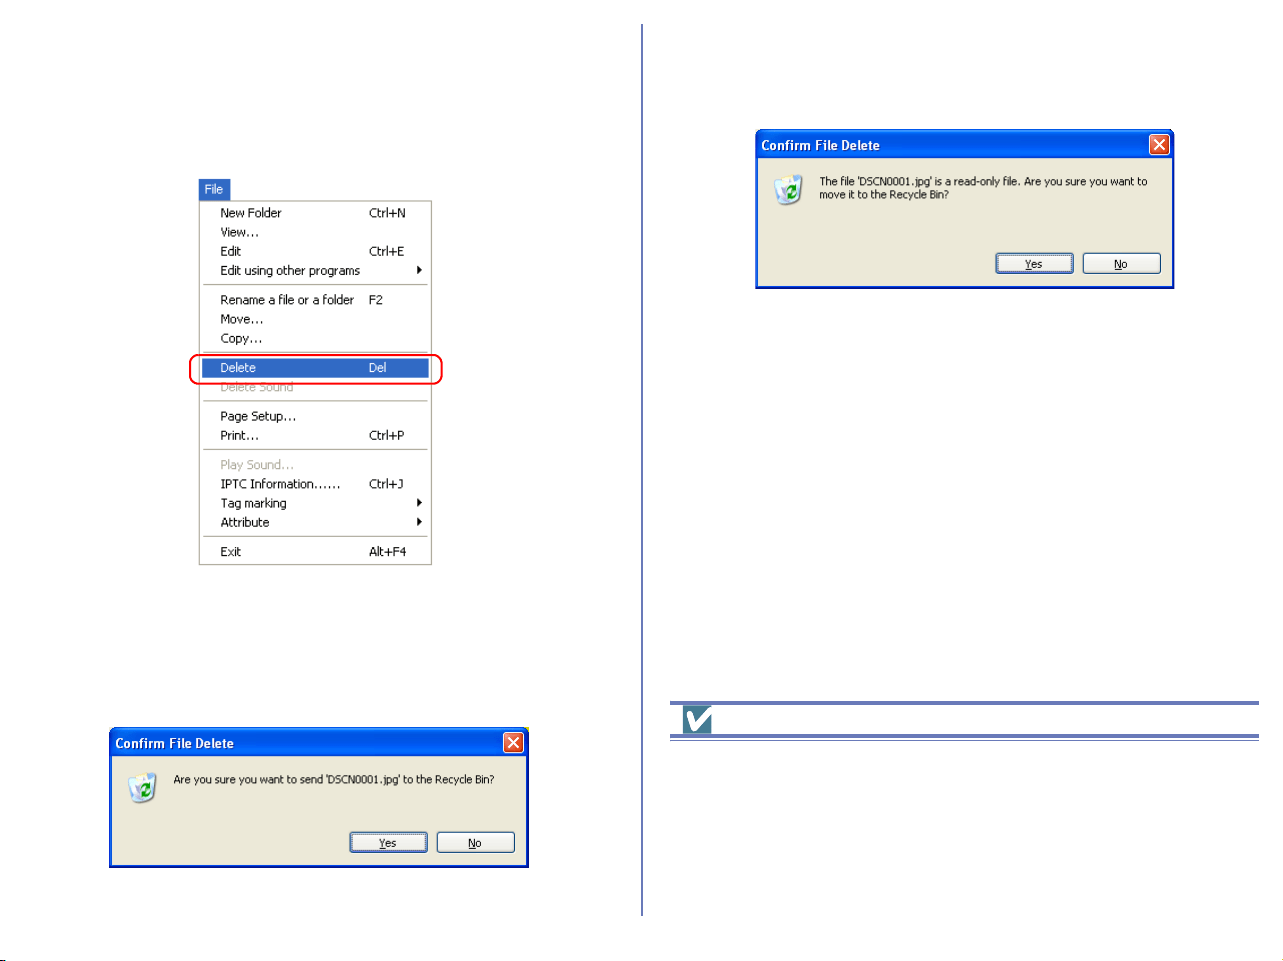
178
Deleting image files
To delete image files in Nikon Browser, select the associated
thumbnails in the thumbnail list area and select Delete from the
File menu.
You can attain the same results by pressing the DELETE key
(Windows) or COMMAND + DELETE keys (Macintosh).
The following dialog will appear confirming the deletion. Click Yes
to go ahead with the deletion.
If there are any protected images among the images selected for
deletion, the dialog shown below will appear. Click Yes to go
ahead with the deletion.
If a folder thumbnail is displayed in the thumbnail list area, you can
select the folder to delete the folder and all its contents (Windows
version only).
Deleted image files
Deleted image files are moved to the Recycle Bin (Windows) or the
Trash (Macintosh). To cancel the deletion, open the Recycle Bin or
the Trash and put the deleted files back to the original location. In
Windows, if you delete image files from a memory card inserted in
the camera, card slot, or card reader, or from a network folder, the
image files are permanently erased and cannot be recovered.
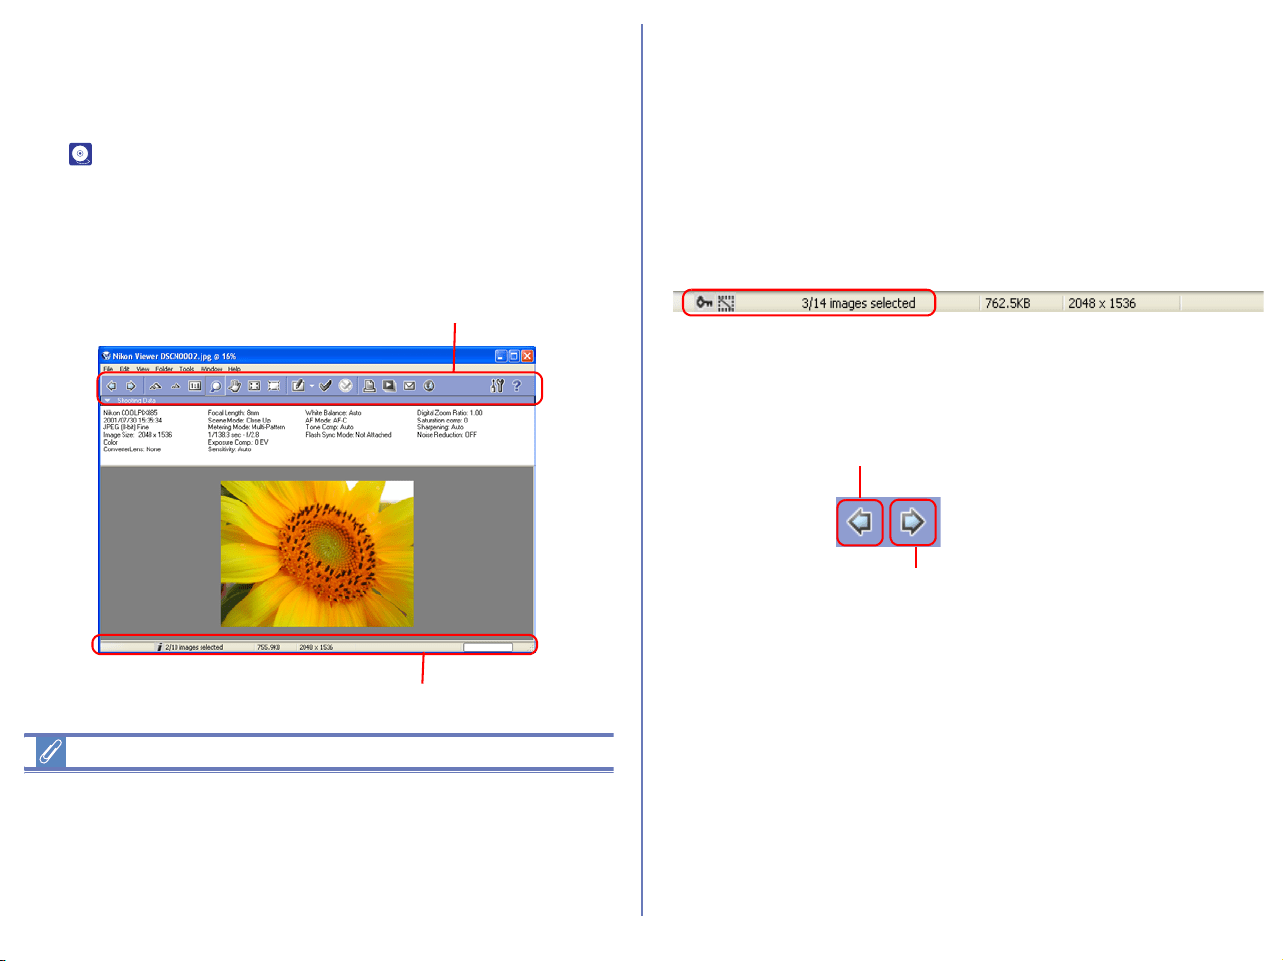
179
Displaying Images
When you select a thumbnail in the thumbnail list area, still images
are displayed in Nikon Viewer while movie files are played back in
the program selected in the Movie Tab of the Preferences dialog
box ( p. 228).
Viewing still images
To view a still image, double click its thumbnail in the thumbnail list
area. Nikon Viewer launches and displays the image.
Other ways of viewing images
You can also open an image in Nikon Viewer by:
• selecting its thumbnail, and clicking the View button on the
toolbar or selecting View from the File menu.
• selecting its thumbnail and pressing the ENTER key (Windows)
or the RETURN key (Macintosh).
Displaying images in Nikon Viewer
Images opened in Nikon Viewer can only be displayed one at a
time.
If multiple thumbnails are selected, you can display one of them in
the window and switch to other images by clicking the Next Image
Selected button.
You can use the Nikon Viewer status bar to check the number of
the selected images and the status of the currently displayed
image including the attribute of the image file.
You can change the displayed image using the Previous Image
Selected and Next Image Selected buttons on the toolbar of
Nikon Viewer or the left and right cursor keys on the keyboard.
In Windows, even if you open only one thumbnail in the thumbnail
list area, you can browse through all the still images stored in the
same folder as the selected image by using the Previous Image
Selected and Next Image Selected buttons.
Toolbar
Status bar
Previous Image Selected button
Next Image Selected button

180
Displays with Nikon Browser and Nikon
Viewer
You can select how to arrange images in Nikon Browser and Nikon
Viewer windows in the Window menu of Nikon Browser or Nikon
Viewer.
Cascade
Arrange the Nikon Browser and Nikon Viewer windows in cascade.
Horizontal
Arrange the Nikon Browser and Nikon Viewer windows in
horizontal.
Vertical
Arrange the Nikon Browser and Nikon Viewer windows in vertical.
Display one-line thumbnails at top
Arrange the image thumbnails in one line at the top and the Nikon
Viewer window under them.
Display one-line thumbnails at side
Arrange the image thumbnails in one line at the left and the Nikon
Viewer window to the right.
The following examples show the thumbnails arranged horizontally
in a row and vertically in a column.
Arranged horizontally in a row
Arranged vertically in a column
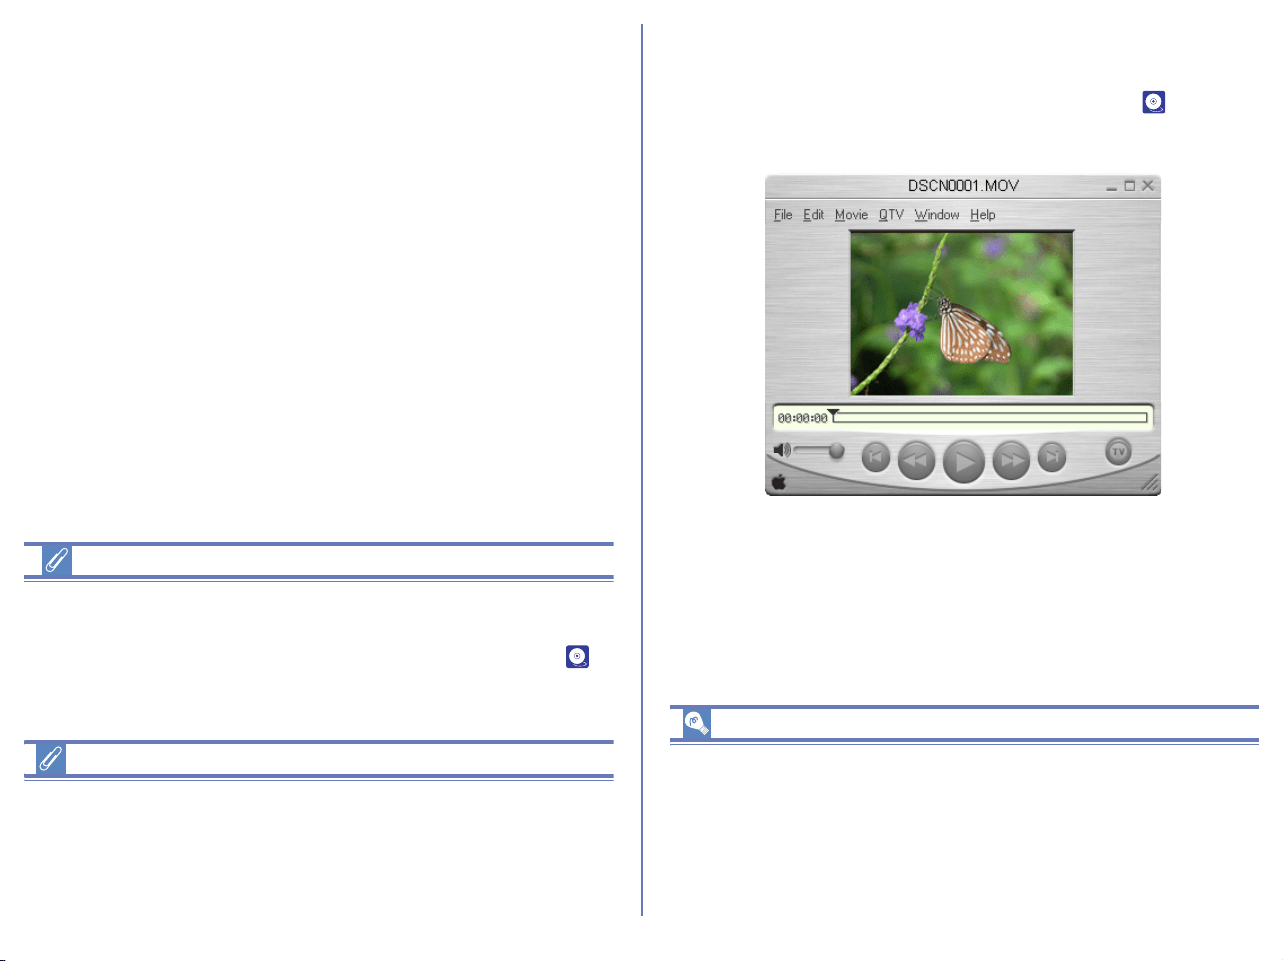
181
If you open Nikon Browser and Nikon Editor at a time, click on the
thumbnail image in Nikon Browser window to allow the same
image to display in Nikon Viewer window.
Image Editing Programs
To edit a still image, select its thumbnail and click the Edit button
on the toolbar or select Edit from the File menu. This will launch
the Image Editing Program specified in the Still image tab ( p.
226) of the Preferences dialog box.
Restoring Thumbnails
Arran
gement (Windows only)
If you select Display one-line thumbnails at top or in the Window
menu, a check mark appears in the selected item. To restore
thumbnails arrangement, select the same option, removing the
check mark from the menu.
Playing back movies
To play back a movie, double click its thumbnail in the thumbnail
list area. The application specified in the Movie tab ( p. 228) of
the Preferences dialog box launches and plays back the movie.
Other ways to play back movies
You can also play back a movie by:
• selecting its thumbnail, and clicking View button on the toolbar,
or select View from the File menu.
• Selecting the thumbnail and pressing the ENTER key
(Windows) or the RETURN key (Macintosh).
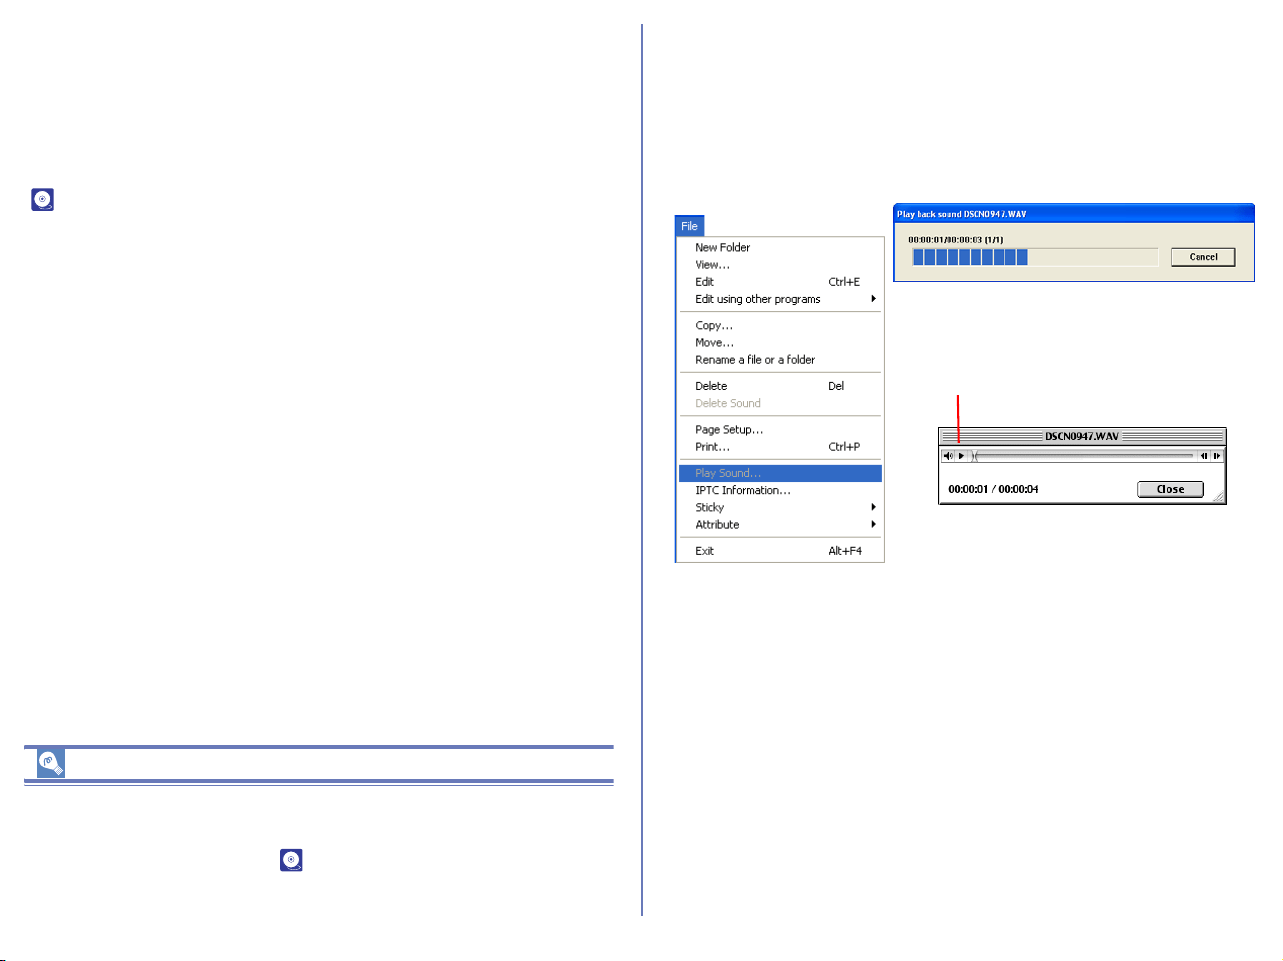
182
Installing QuickTime
In Windows, you cannot use Windows Media Player to play back
movies recorded with the COOLPIX series digital cameras. If a
movie player program is not installed, install the version of
QuickTime bundled with Nikon View (COOLPIX series only).
For more information on installation, see Nikon View Installation Guide
( p. 6)
.
Program to edit movies
To edit a movie, select its thumbnail and click the Edit button on the
toolbar or click Edit on the File menu. This will launch the program
specified in the Movie tab ( p. 228) of the Preferences dialog
box.
Playing back sound
To play back sound on the application specified by the Sound tab
of Preferences (Windows), select the image file with sound data in
the thumbnails list area and select Play Sound in the File menu. If
Use Nikon View is selected in the Sound tab, Nikon View will start
automatically to play back the sound.
On a Macintosh, click the play button to start playback.
Play button
On a Macintosh, click the play button to
start playback.
Windows
Macintosh

183
Editing image files
Select a thumbnail, then click the Edit button on the Toolbar, or
select Edit from the File menu to display and edit the selected
image using the image editing program specified in the
Preferences dialog box.
If you have not yet specified or registered an image editing
program, the Add/Remove editing program dialog box will
appear automatically. To open the dialog box on subsequent
occasions, see the instructions below.
Selecting the image editing program
You can select an image editing program from the Editing button
pull-down menu. One or more image editing programs can be
registered and selected for the type of images. To select an image
editing program, select Add/Remove editing program from the pull-
down menu.
Displaying the Add/Remove editing program dialog box
The Edit button pull down menu and the Edit using other
program option can also be used to display the Add/Remove
editing program dialog box.
Edit button

184
Add/Remove editing program
Program lists
The registered programs are displayed in the list.
Move up / Move down
Click to move the selected program in the Program list up and
down. You can modify the order of the registered programs that
are displayed by clicking the Edit tool button or selecting Edit
using other programs from the File menu.
Add
Click to display the Add program dialog box. In the Add program
dialog box, you can select and register programs.
Change
Click to display the Change program dialog box. In the Change
program dialog box, you can change the name of the registered
programs.
Delete
Click to remove the selected program from the Program list. Note
that the program itself is not uninstalled.
Add program
Name
You can assign a name to the program selected in Executable file.
The program is added to the Program list with this name instead
of the actual program name.
Executable file
Displays the path and file name of the program to add.
To add a different program to the Program list, click Browse and
select the program you want to add. Click OK to add the selected
program to the Program list.
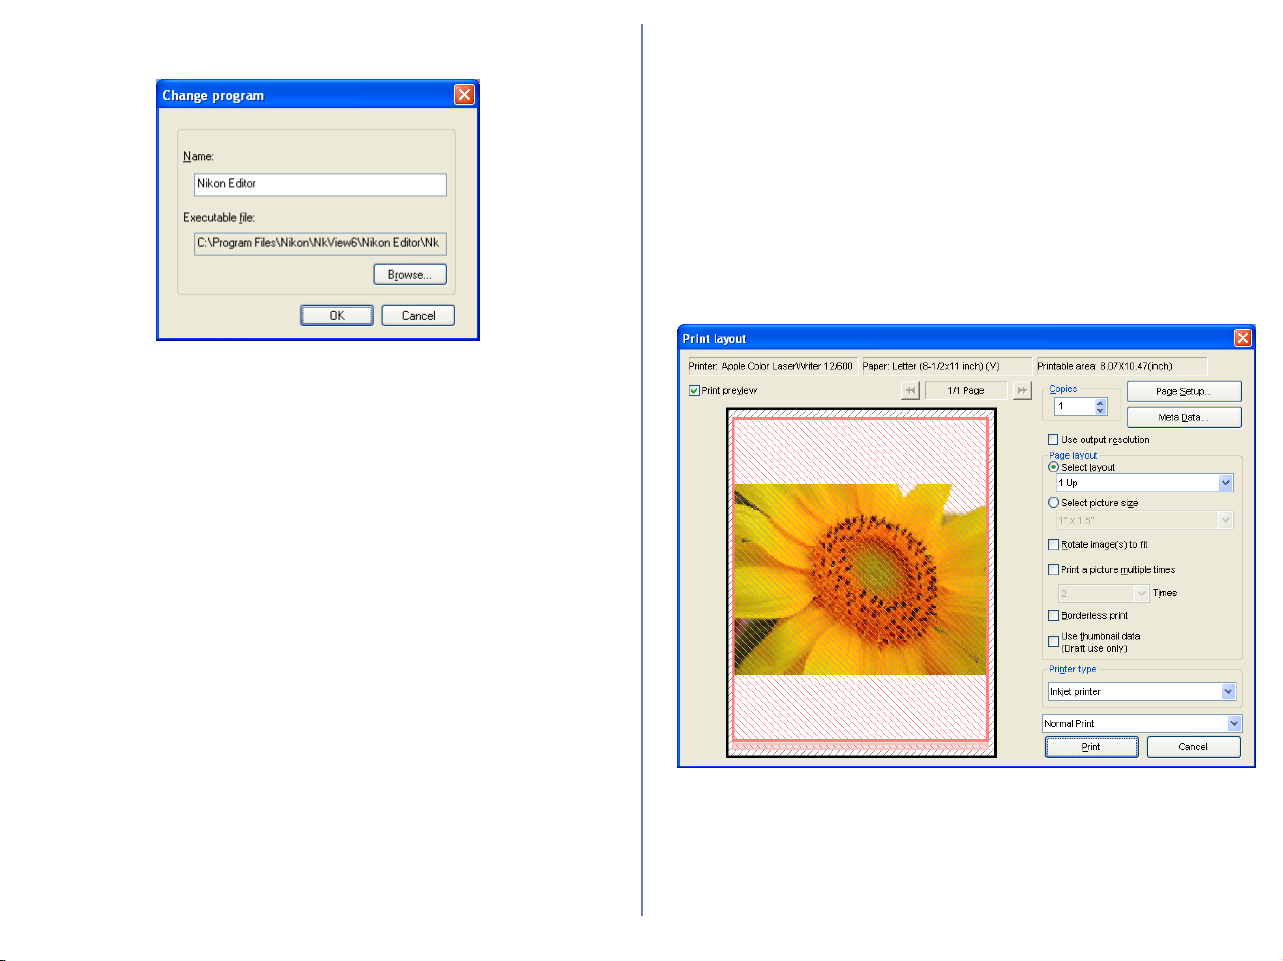
185
Change program
In the Change program dialog box, you can change the name of
the program that appears in the Edit tool button pull down menu,
and in the Edit using other programs submenu. This does not
affect the name of the original program.
Printing images
Nikon Browser allows you to print;
i) A single image
ii) Multiple copies of the same image
iii) An index (catalog) print made up of several different images
To select an image for printing, click the image once. To select
more than one image, click each image once while holding down
the shift key. After selecting the desired images, click the Print
button. The Printer layout dialog appears, allowing the specific
printer and various layout, print and paper sizes to be chosen.

186
Color management for printing
Windows
Printing is executed according to the settings specified in the Color
Management panel of the Preferences dialog box with Nikon
Browser, Nikon Viewer or Nikon Editor.
Macintosh
Printing is executed according to the settings specified in the (
p. 233) panel of the Preferences dialog box with Nikon Editor.
When you have made all the necessary settings, click Print to start
printing.
Clicking Cancel closes the Print layout dialog box without
printing.
The Print layout dialog box
When you click Setting, the Printer settings dialog box is
displayed. The settings you make in this dialog box are applied to
the following items:
Print preview check box
Check this checkbox to preview selected images.
Click Page Forwarding button to preview the selected files in order.
Copies box (Windows only)
Specify the number of copies to print. You can print anywhere from
1 to 100 copies.
If you are using a Macintosh, specify the number of copies to print
in the dialog box that appears after you click Print.
Setting button
Click to display the Printer settings dialog box in which you can
modify the printer and paper settings. If you are using a
Macintosh, a different Printer settings dialog box will appear for
each printer in use. The changes made are reflected in the Printer,
Paper, and Printable area fields.
Info setting button
Click Info setting button in the Print dialog to display Information
setting dialog box.
Printer
Displays the name of the currently selected
printer.
Paper Displays the currently selected paper size.
Printable Area
Displays the printable area for the selected
paper size.

187
Check the check boxes you need and click OK button to complete
print information setting.
Printing information
Specified information is printed. If you want to change font for
printing information, click Change button.
Shooting date imprint
Check Imprint shooting date to imprint the shooting date on the
output image. Check Imprint shooting date with time to add the
shooting time on the output image. If you want to change font for
these information, click Change button.
Use output resolution check box
Select this check box to print the image by its own resolution.
Check this check box to print the image file by its own resolution
information. For example, if 1600x1200-pixel image file has 300-
dpi resolution information, its image is output with the size of 15.7 x
11.8 cm. This function is available only for one image selected.
When this check box is checked, you cannot configure the settings
for Page layout section.
Page layout area
Choose from either Select layout or Select picture size.
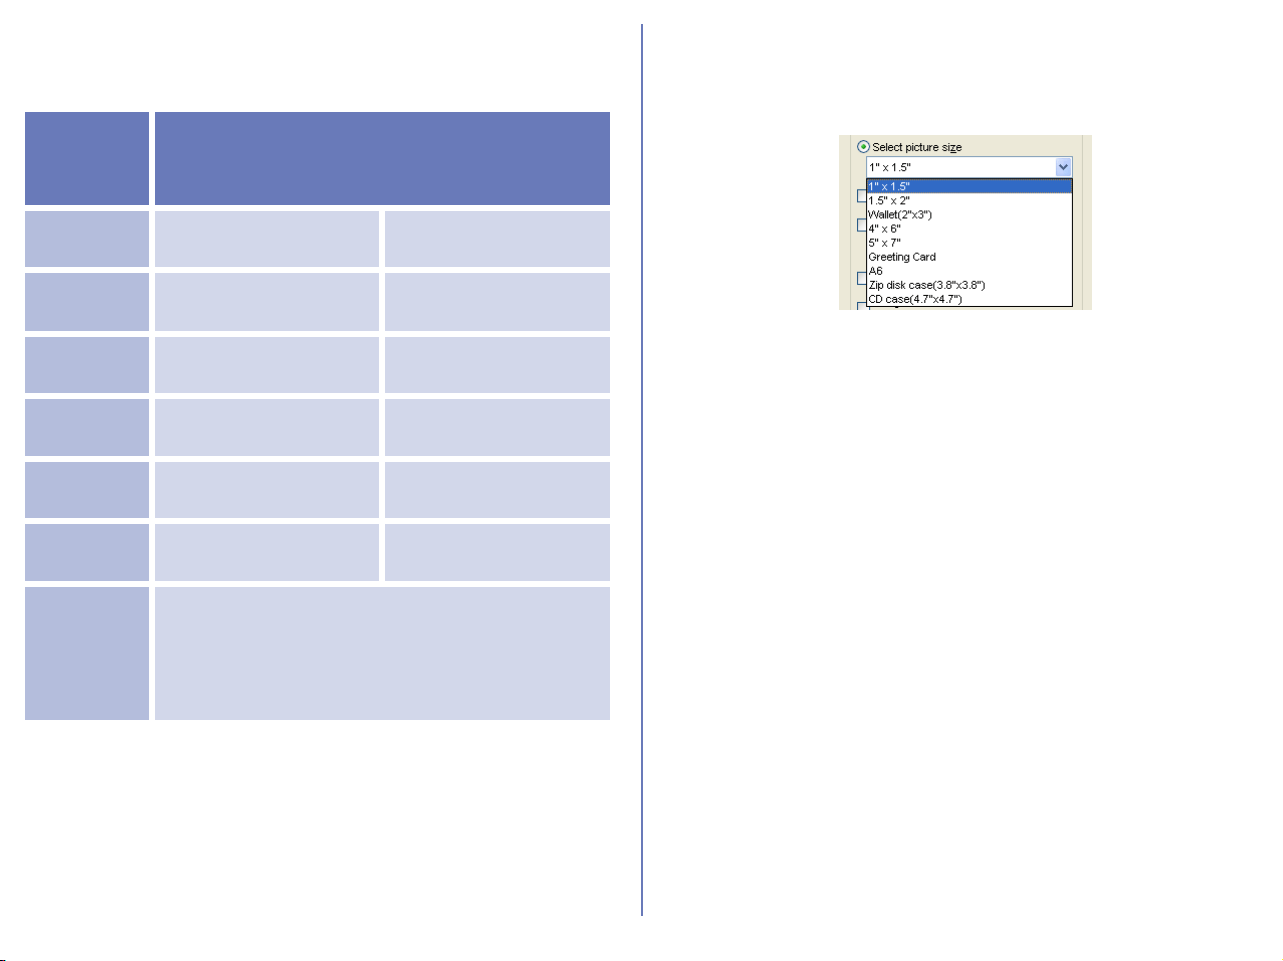
188
Select layout
Select this option if you want to select the number of images to
print on one page from the list.
The size of the images are automatically adjusted according to the
layout.
Select picture size
Select this option if you want to select the size of the image from
the list.
Selecting this option also enables you to rotate the image to adjust
the margin or print the same image multiple times.
Rotate image(s) to fit
Select this check box to automatically rotate each image so as to
minimize the unused space inside each image frame.
Print a picture multiple times
To print an image the desired number of times, select this check
box and select a number from between two and ten from the pull
down menu.
If The whole page is selected, multiple images are output on a
single page at the size specified by Select layout or Select picture
size.
Borderless print
Select this check box to adjust the image size so that it fits exactly
inside the red border, without leaving any white space. If the aspect
ratio of the box and the image differ, part of the image may not be
printed.
Use the slider to adjust the balance between the speed and quality
of printing.
Number of
images
per page
Paper Orientation
(portrait) (landscape)
1 1 in the center 1 in the center
2
2 pictures one on top
of the other
2 pictures side by
side
4 2 rows x 2 columns 2 rows x 2 columns
8 4 rows x 2 columns 2 rows x 4 columns
16 4 rows x 4 columns 4 rows x 4 columns
25 5 rows x 5 columns 5 rows x 5 columns
Image
information
list
If Image information list is selected, the
following data is added to the output:
Filename / Date and Time / Maker, Model /
Shutter, F number / Exposure Program / White
Balance
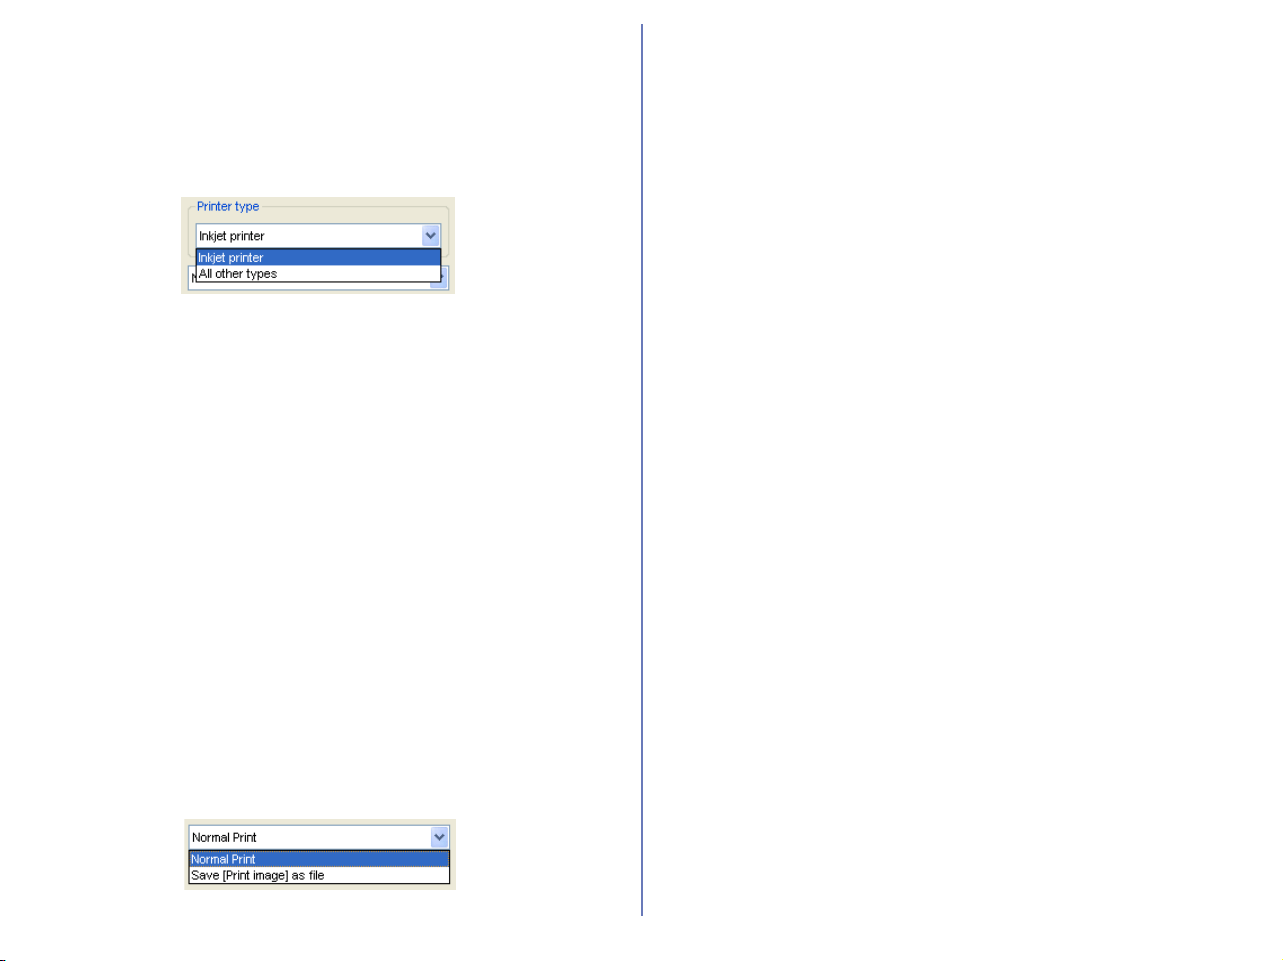
189
Use thumbnail data (Draft use only)
Select this check box to print thumbnail images.
Printer Option
Choose Inkjet printer or All other types depending on the printer
in use.
Inkjet printer
Prints images at the resolution of 360dpi; printing is fast and image
quality is high. Note however that if the maximum resolution of the
current printer driver is less than 360dpi, then the image can only
be printed at this maximum resolution.
When printing color images with ink jet printer or color laser printer,
Inkjet printer is recommended.
All other types
Prints images at the maximum resolution of the current printer
driver.
When printing color images with dye sublimation printers or silver
bromide printers, choose All other types.
Note that choosing All other types using an ink jet printer may
extend printing time.
Normal Print / Save [Print Image] as file
Select whether to print images on a printer, or whether to save
images as a single JPEG file.
Print
Outputs the selected images to a printer.
Save [Print Image] as file
Saves the selected image(s) as a JPEG file in the layout specified
under Page Layout. The Save Image(s) dialog box will appear.
Select a location to which the images will be saved. When saving
images, Image Quality can be set to Maximum, High, Medium or
Low.
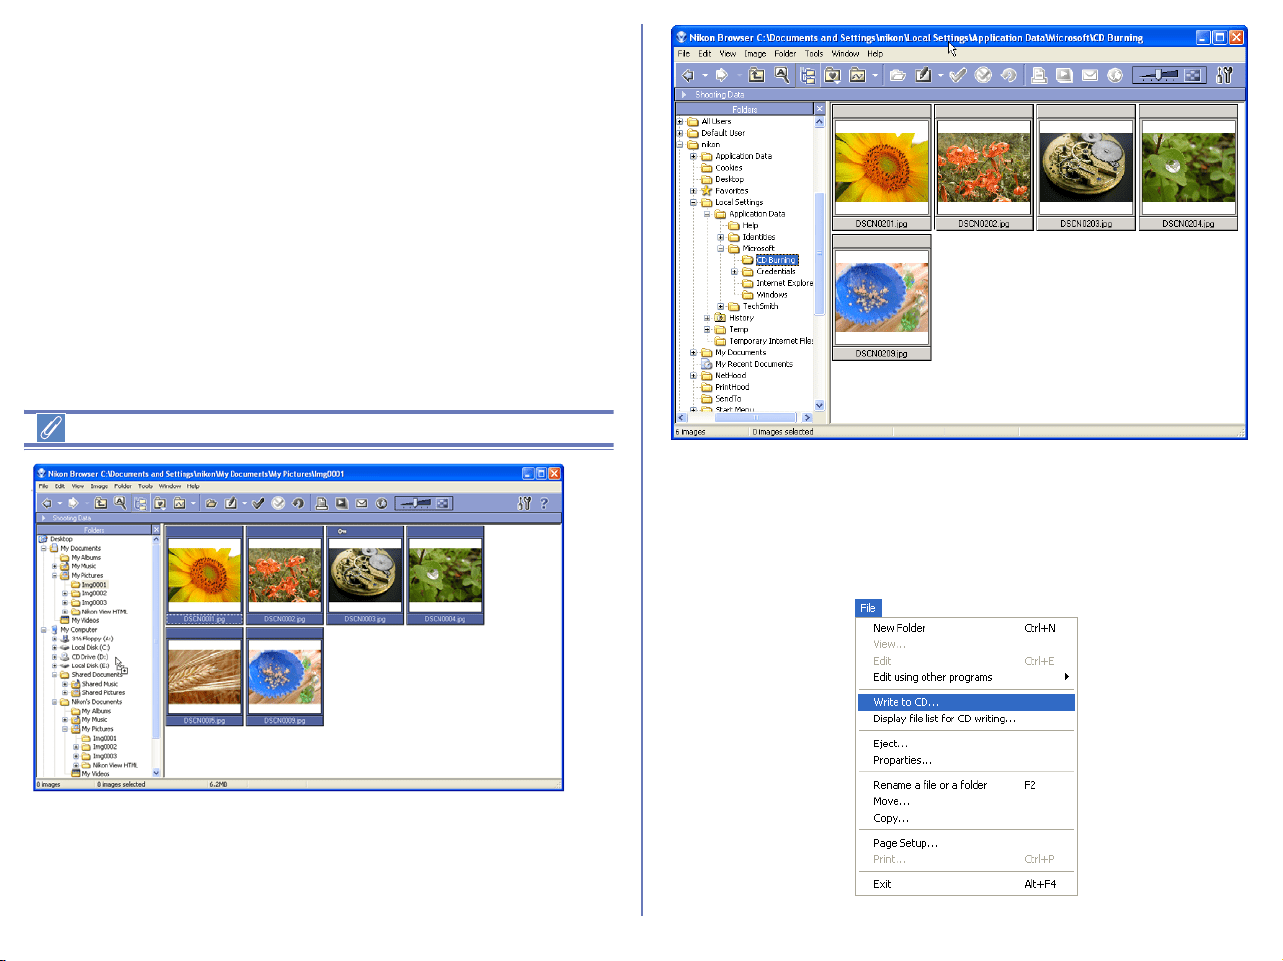
190
CD-R Publishing (WindowsXP Only)
You can create image CD using selected images in Nikon View 6.
Writing CD-R
1. In the thumbnail list area, select one or more image file
thumbnail to write to the CD.
2. Drag the selected thumbnails. Drop to the CD-R drive in folder
tree area.
Display file list for CD writing
You can check the file list for CD writing in advance. Click CD-R
drive in folder tree area and select Display file list for CD writing
from File menu, or right click CD-R drive in folder tree area and
select Display file list for CD writing menu.
3. Click CD-R drive in folder tree area and select Write to CD from
File menu, or right click CD-R drive in folder tree area and
select Write to CD menu.
CD Writing Wizard dialog box will be display.
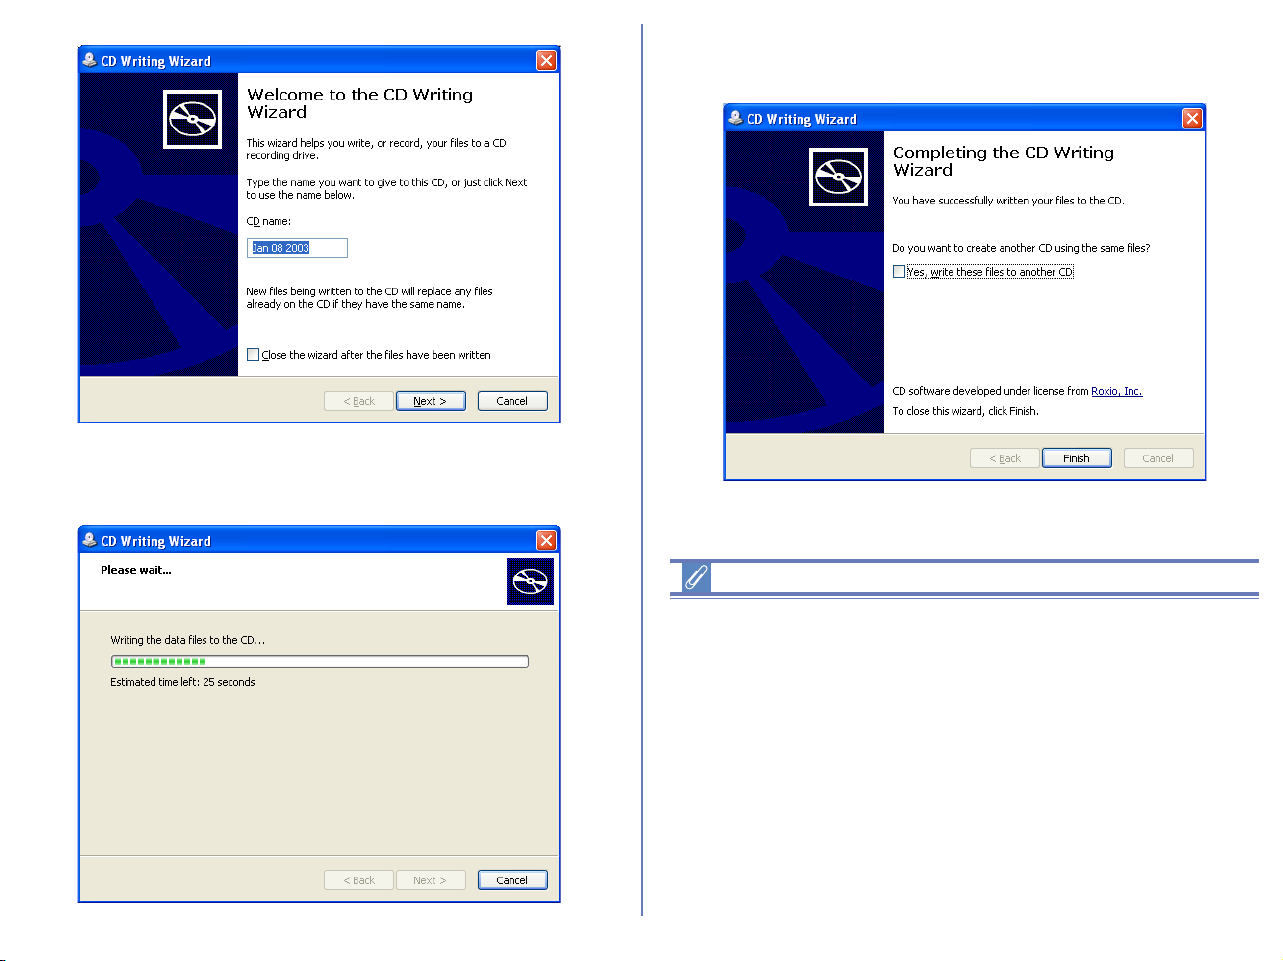
191
4. Enter the name of CD and click Next button to start writing the
image file to the CD.
5. Completing the CD Writing Wizard dialog box will be display.
Click Finish button.
Before CD writing
• Before CD writing, check the CD-R drive for writing. If multiple
CD-R drive installed in your PC, only one CD-R drive can use
for CD writing. Check Enable in Write tab of CD-R properties
dialog box.
• When creating a CD, Windows uses available free space on
your hard disk to store temporary files. The amount of free disk
space required depends on the amount of image data to be
copied to the CD.
• If you add more file to the CD, you must check the available CD
space before writing. To check the available disk space on the
CD, in My Computer, right-click the CD recording drive, and
then click Properties.

192
Copy and resize as JPEG file(s) (Windows only)
You can output the image file in JPEG format. In the thumbnails list
section, select one or more thumbnails of the image files to be
exported, and then select Copy and resize as JPEG file(s) from
Tools menu. Copy and resize as JPEG file(s) dialog box will
appear. TIFF, NEF and other non-JPEG images files can be
converted to JPEG files and changed in image size and
compression rate. JPEG files can be changed in image size and
compression rate.
Image size
You can define the image size to be exported in JPEG format.
Select Keep the original size, Fit to the new fixed frame size, or
Apply a fixed reduction ratio to all images from the list box.
Size unchanged
The output image size will not change when select this option.
Set new size
When this option selected, you can change the output JPEG image
size by pixels. Select Small (160x120 pixels) thru Large
(1600x1200 pixels) in a slide bar.
Set new size with specified ratio
When this option selected, you can change the output JPEG image
size by specific ratio. Select Small (1/25) thru Large (1/4) in a slide
bar
Destination folder
The currently specified destination folder is displayed. To change
the folder, click Browse button. When the Browse For Folder
dialog is displayed, specify a different folder.
Rename files
You can change the output file names collectively when Rename
files check box is selected. Click Change to display Rename all
files dialog box ( p. 165).

193
Quality settings
Use slide-bar to specify the quality (compression ratio) of JPEG
image. High compression ratio will reduce file size however decline
quality at the same time. Select Low (high compression ratio, small
file size) thru High (low compression ratio, large file size).
Click Run to output JPEG files.
If an image file is output in JPEG format, an ICC profile is added to
the file.
About sRGB profile change
When outputting the image file in JPEG format, you can convert
automatically the color space of the file to sRGB profile. For more
information, see p. 231 of Nikon Browser Preference settings.
Playing a slideshow
In Nikon Browser, you can view the image files associated with the
selected thumbnails as a slideshow.
Displaying the Slideshow Properties dialog box
To view a slideshow, select the thumbnails of the image files you
want to view in the thumbnail list area, then click the Slideshow
button on the tool bar or select Slideshow from the Tools menu.
When one thumbnail is selected
In Windows, if you select only one thumbnail in the thumbnail list
area, all the images in the same folder are played back in the
slideshow.
In Macintosh, only the selected images are played back in the
slideshow.
Slideshow button
Slideshow button
Macintosh
Windows
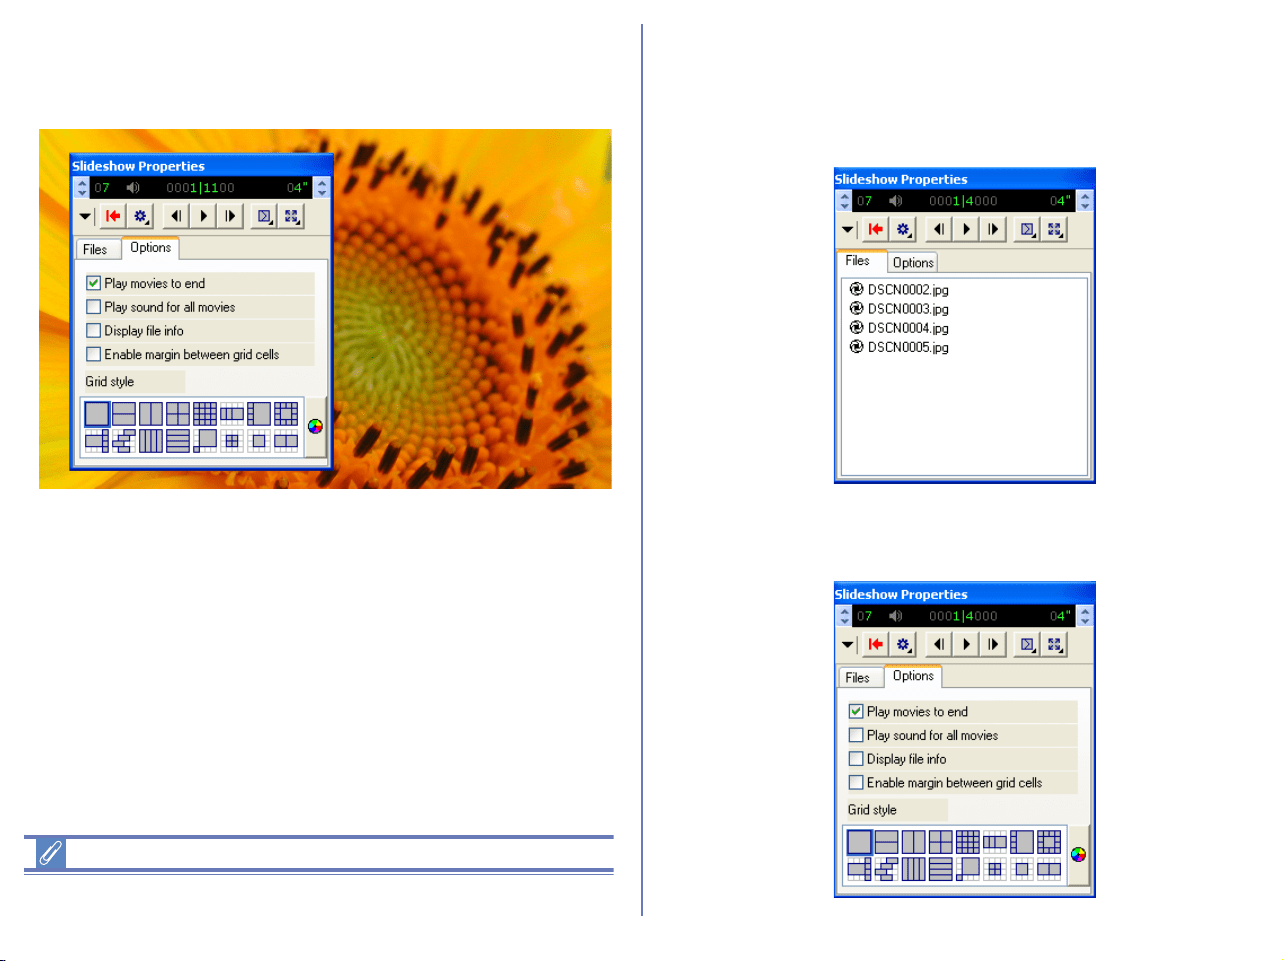
194
The slideshow window is displayed with the Slideshow Properties
dialog box displayed in front of the slides. You can change the
slideshow settings using this Slideshow Properties dialog box.
You can show or hide the Slideshow Properties dialog box by
pressing the TAB key.
Slideshow
Slideshow technology licensed from iView Multimedia Ltd 2002.
Setting the Slideshow Properties dialog box
Files tab
Displays a list of file names of the image files that are currently
displayed in the slideshow.
Options tab
Use this tab to set how each slide is displayed.
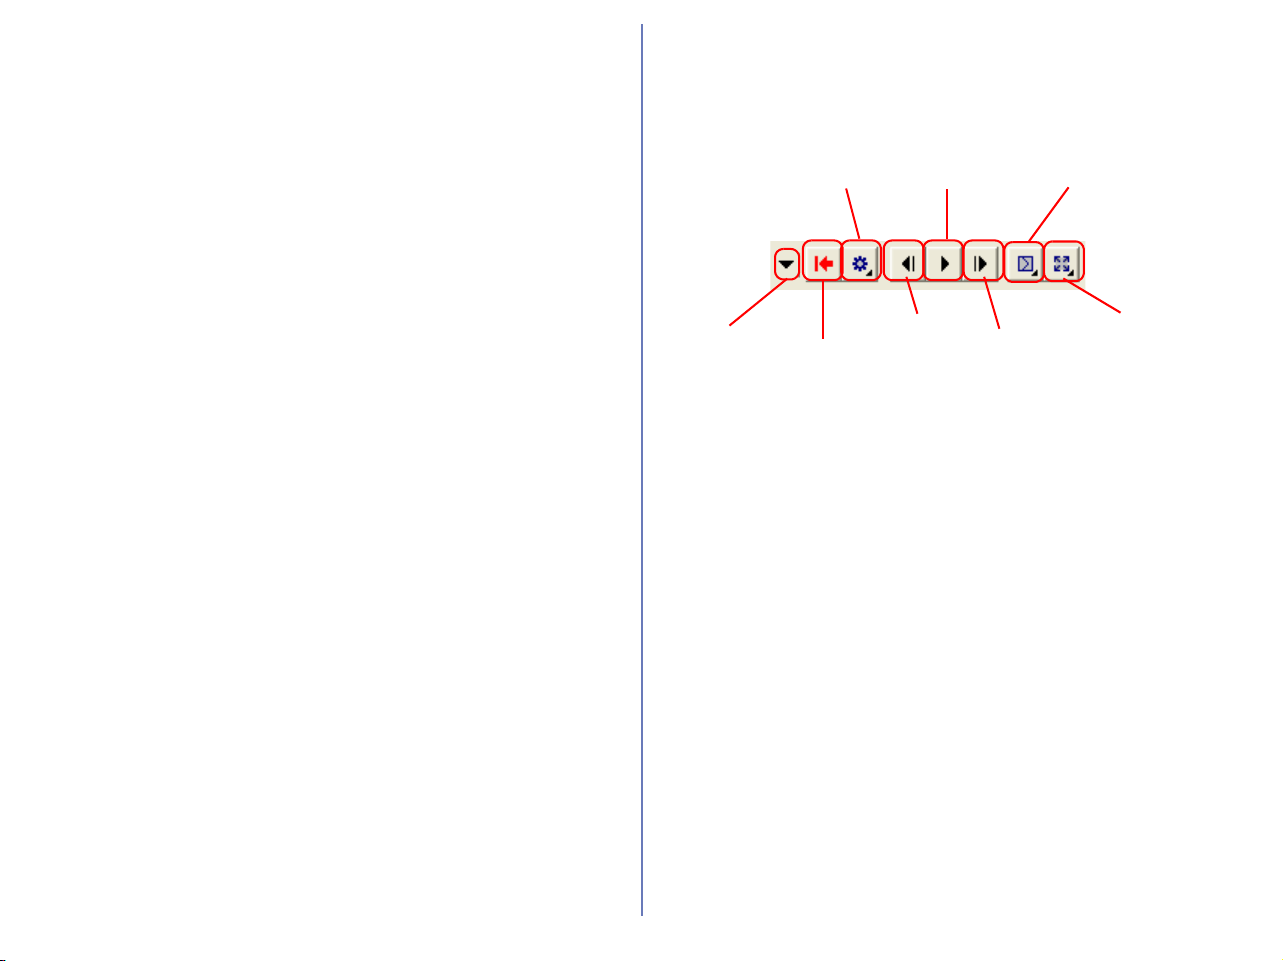
195
Play movies to end
Select this check box to play the movie to the end before showing
the next slide. If you clear this check box, the next slide is shown
after the specified time even if the movie has not finished.
Play sound for all movies
Select this check box to play back sound with all the movie files
included in the slideshow.
Display file info
Select this check box to display the file location, size, and zoom
ratio under each slide.
Enable margin between grid cells
If you selected a stage grid option that displays multiple slides at
the same time, selecting this check box creates margins between
slides. Clear this check box to remove the margins.
Grid style
Select the format and number of slides to display at the same time.
Using the toolbar
The toolbar has buttons to control the playback of the slideshow,
and buttons to specify how the slides are displayed.
Toggle button
Expands and collapses ths Slideshow Properties dialog box.
Exit button
Exits the slideshow.
Play mode button
Use this button to set how to play back the slideshow.
Select Click to advance to switch slides interactively by clicking
the mouse button.
Select Continuous to play the slideshow again after the last slide
is displayed.
Select Random to play the slideshow in random order.
Back button
Displays the previous slide.
Play mode
button
Play/Pause
button
Fade
button
Toggle
button
Exit
button
Back
button
Forward
button
Resize
button
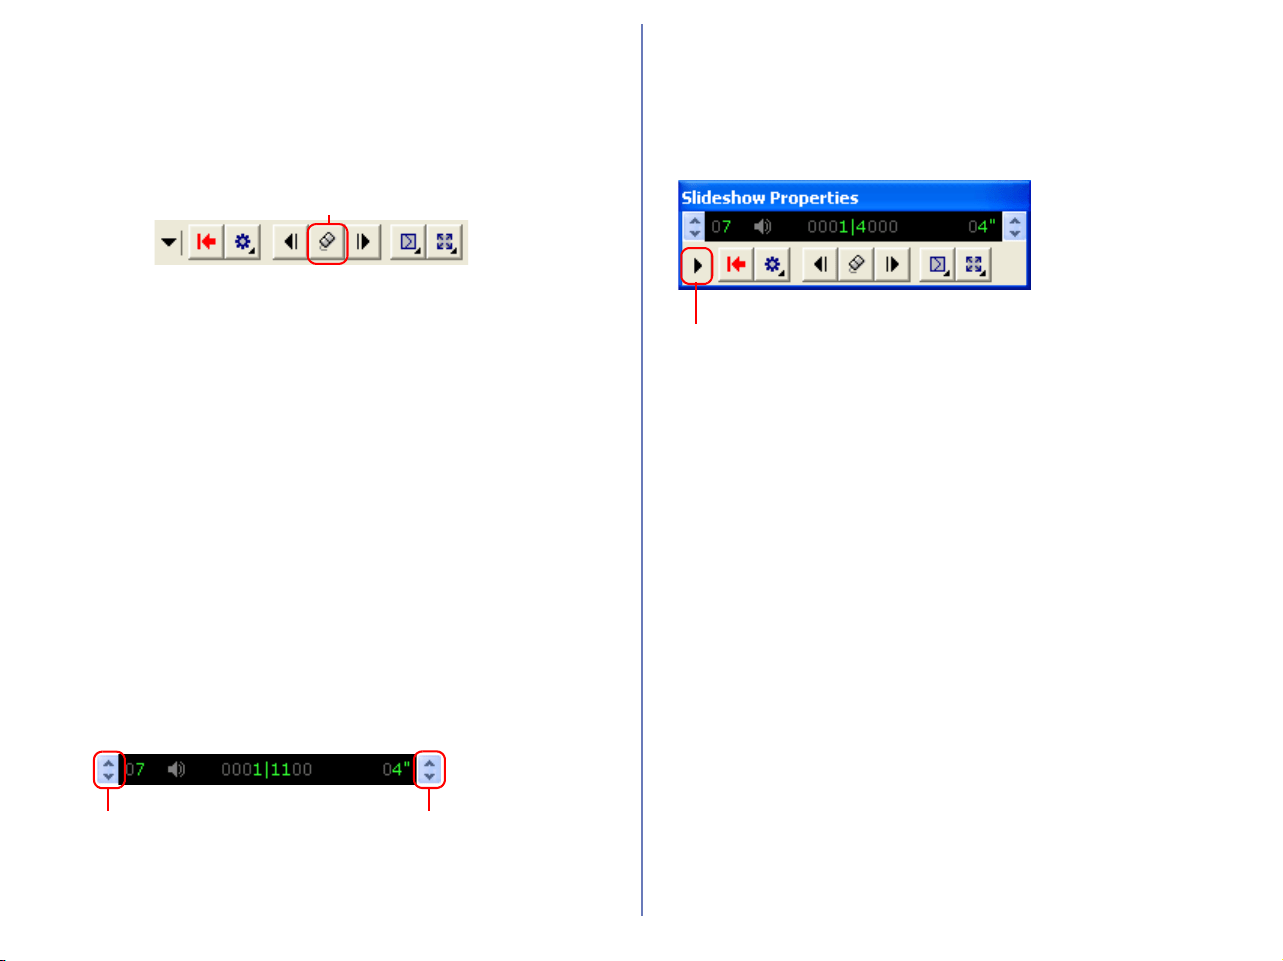
196
Play/Pause button
Pauses the slideshow when playing or starts it again when paused.
When you select Click to advance in the Play mode button, the
button icon takes the shape of a computer mouse, on which you
can click to display the next slide.
Forward button
Displays the next slide.
Fade button
Use this button to select how one slide fades into or out of another.
Resize button
Use this button to select the zoom ratio of the slides. You can also
adjust the aspect ratio, or adjust the size of the slides to fit the
screen.
Status bar
You can control the sound volume on the status bar. You can also
check the number of the remaining slides and the total number of
slides.
You can also specify the interval between slide changes, in the
range of 1 to 60 seconds.
Switching the Slideshow Properties dialog box
display
You can expand or collapse the Slideshow Properties dialog box
by clisking the Toggle button on the toolbar.
Mouse icon
Volume control Time display control
Slideshow Properties
dialog box (collapsed)
Toggle button
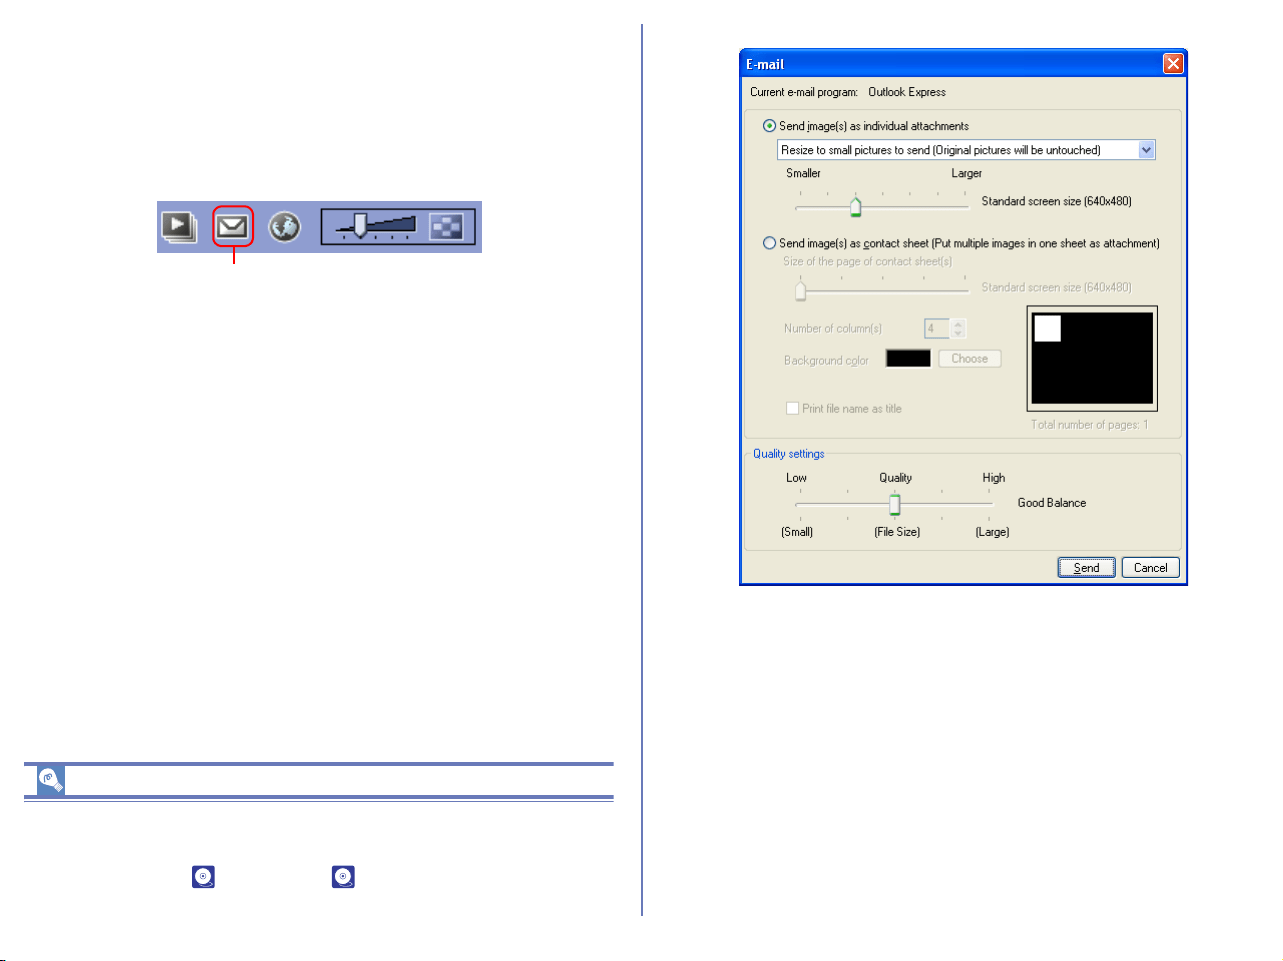
197
E-mailing images
Images displayed in Nikon Browser or Nikon Viewer can be sent by
e-mail. Send the images not formatted in JPEG after converting
them to JPEG format. To send images, click the E-mail button on
the tool bar or select E-mail from the Tools menu.
Settings, including the size of the image to be e-mailed, can be
adjusted in the E-mail dialog box.
About sRGB profile change
When transmitting an image file by e-mail, you can convert
automatically the color space of the file to sRGB profile. For more
information, see ( p. 231 or p. 233) of Nikon Browser
Preferences.
E-mail button
Windows
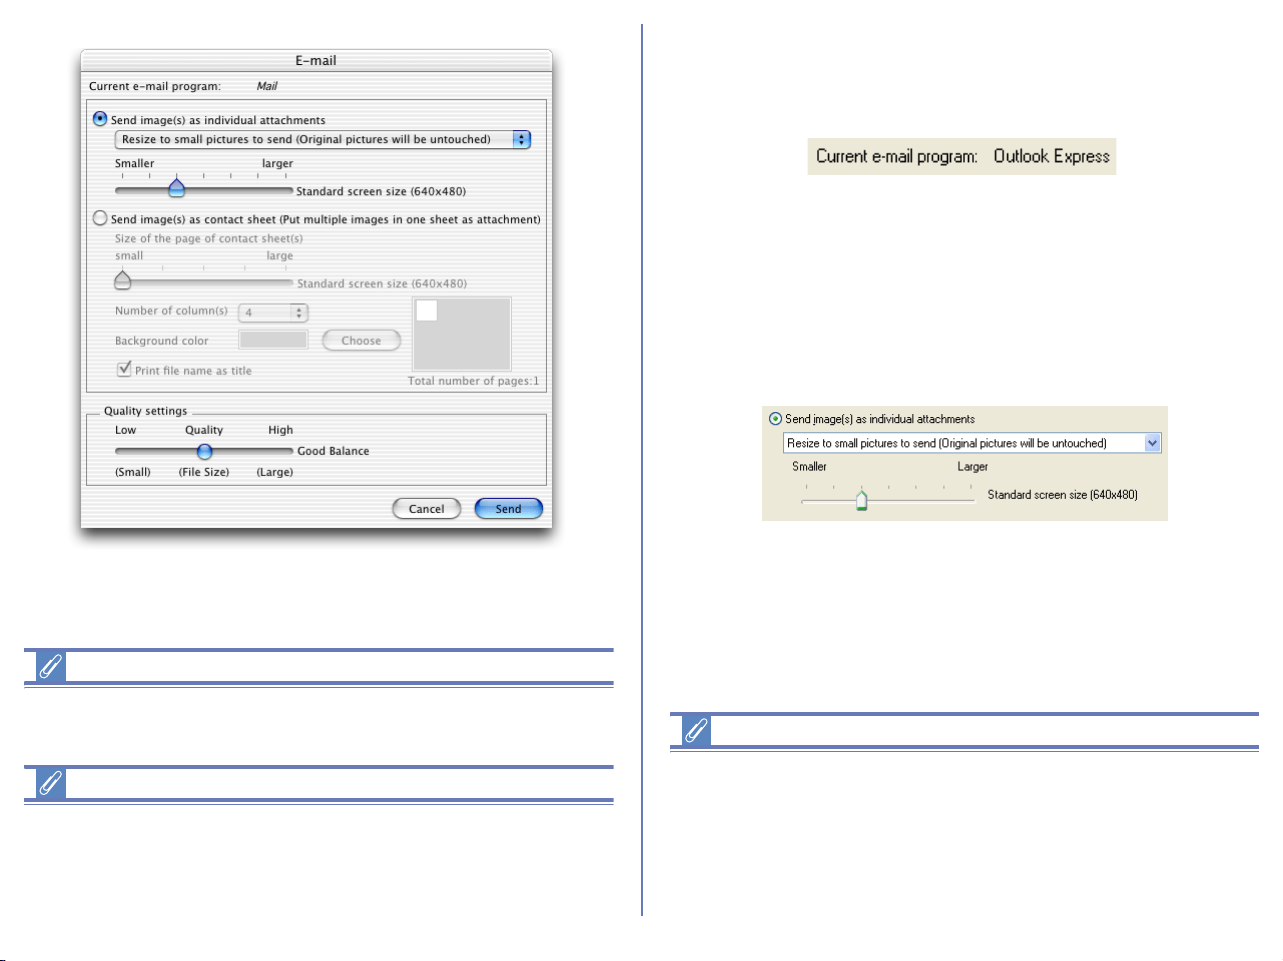
198
Voice memo
Voice memos attached to Exif files can not be sent by e-mail.
Using e-mail
In order to use Nikon View 6’s e-mail function, your computer must
be correctly configured to send e-mail. Note that you may incur
charges from your internet service provider and telephone
company when you send e-mail.
Current e-mail program
When you click Send, your e-mail will be sent using the program
shown here.
To change the e-mail program under Mac OS 9, alter the setting in
the Control Panels> Internet> E-mail tab. (System
Preferences> Internet> Email tab under Mac OS X.)
Image attachment
Each selected image will be sent as an individual attachment. If
you select Make all pictures small, you can use the slide-bar to
specify the size of the image in pixel.
Specification with slide-bar
You cannot specify the quality using the slide-bar if three following
conditions are met:
1. JPEG file is selected.
2. Keep the original size is selected in the Image attachment field.
3. Color space cannot be converted.
Macintosh
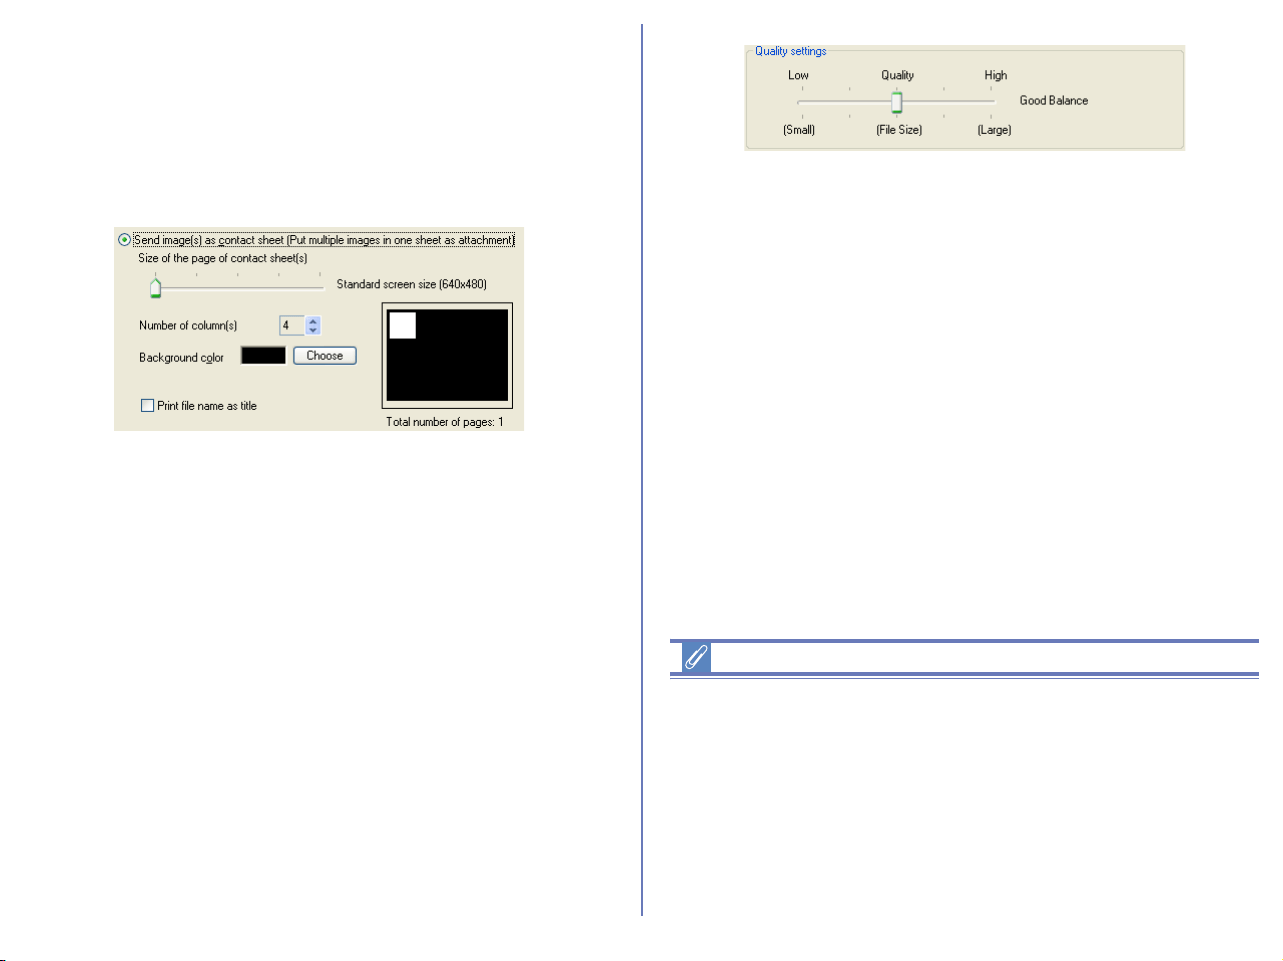
199
Contact sheet
You can create a "contact sheet" where all the selected images are
included in the same attachment.
Size of the image of contact sheet(s)
Specify the size of the contact sheet. You can select from 640x480,
800x600, 1024x768, 1280x960 or 1600x1200 using the slide-bar.
Number of column(s)
Determine the number of columns to arrange the selected images
on a single contact sheet. You can specify one to eight columns.
Background color
Display the background color of the contact sheet. Click Choose
button to display the Color dialog where you can specify the color.
Print file name as title
Use this option to display the file name under the thumbnail as a
title.
Quality settings
Use slide-bar to specify the compression ratio of the image file you
want to send.
Supported e-mail programs
Windows
Outlook Express, Outlook, Eudora*
Macintosh OS 9.0, 9.1, 9.2
Outlook Express, Eudora, Entourage
Mac OS X
Outlook Express, Entourage X, Mail
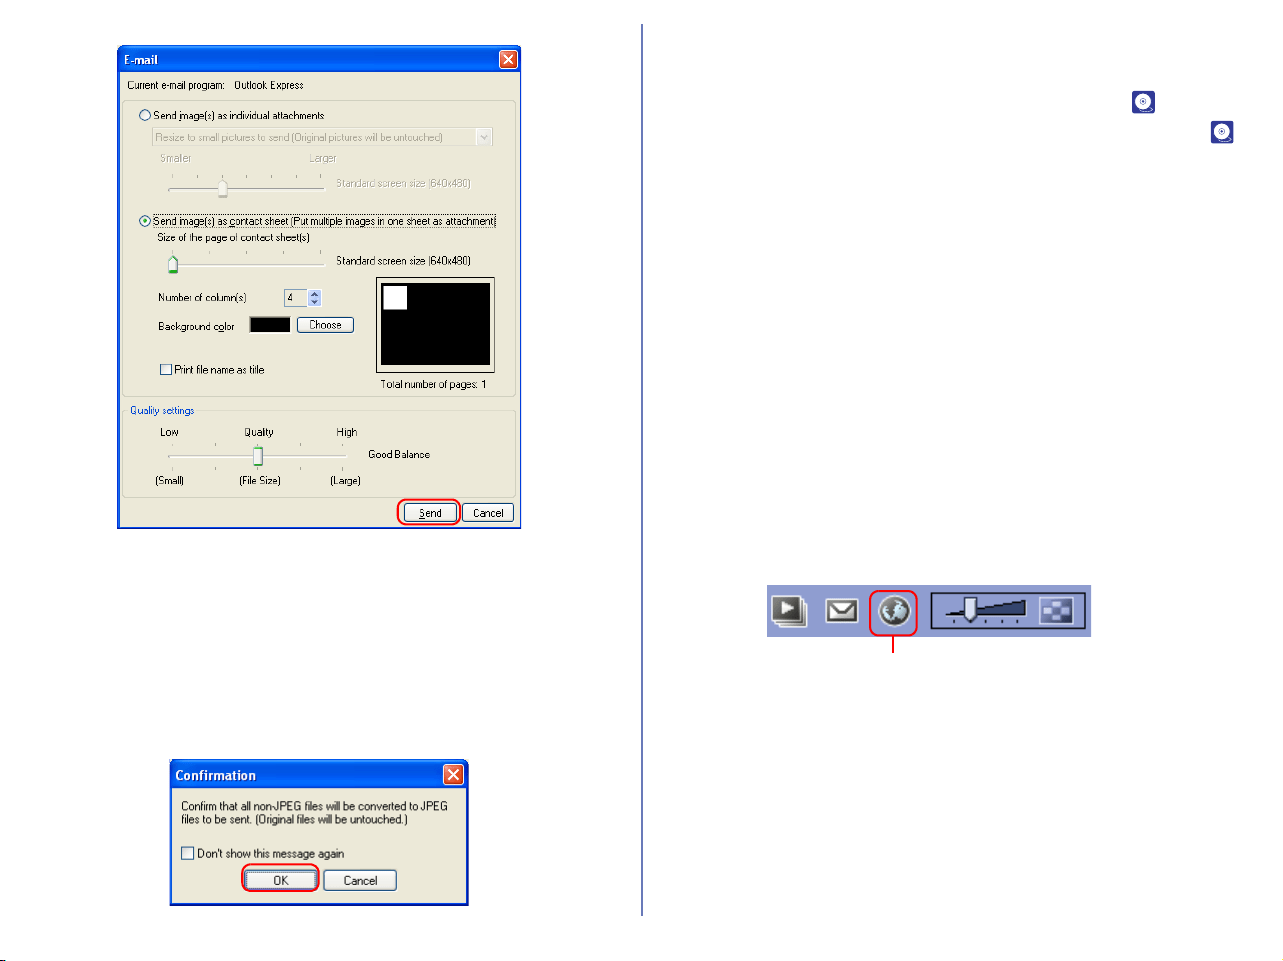
200
Click Send to start up the application specified in the Current E-
mail program.
If you are e-mailing images at a reduced size, or if you are e-
mailing images that are not in JPEG format, the dialog box shown
below will be displayed, informing you that the images you are
sending will be compressed into JPEG format. Click OK to close
the dialog and e-mail your images.
Uploading images
There are some regional differences as for this function of Nikon
View. If you are a resident in European region, see p. 200 or if
you are resident in North and South American region, see p.
207.
Uploading images (for European resident)
In Nikon View 6, you can upload still images to an online photo
album at the FotoShare site (http://www.nikonfotoshare.com/).
Note that membership registration is required in order to use an
online album. For more information on online photo albums, see
the FotoShare web site (http://www.nikonfotoshare.com/).
Uploading images to FotoShare
1. In the thumbnail list area, select one or more thumbnails to be
uploaded.
2. Click the Publish to FotoShare button on the toolbar, or select
Publish to FotoShare from the Tools menu.
Publish to FotoShare button
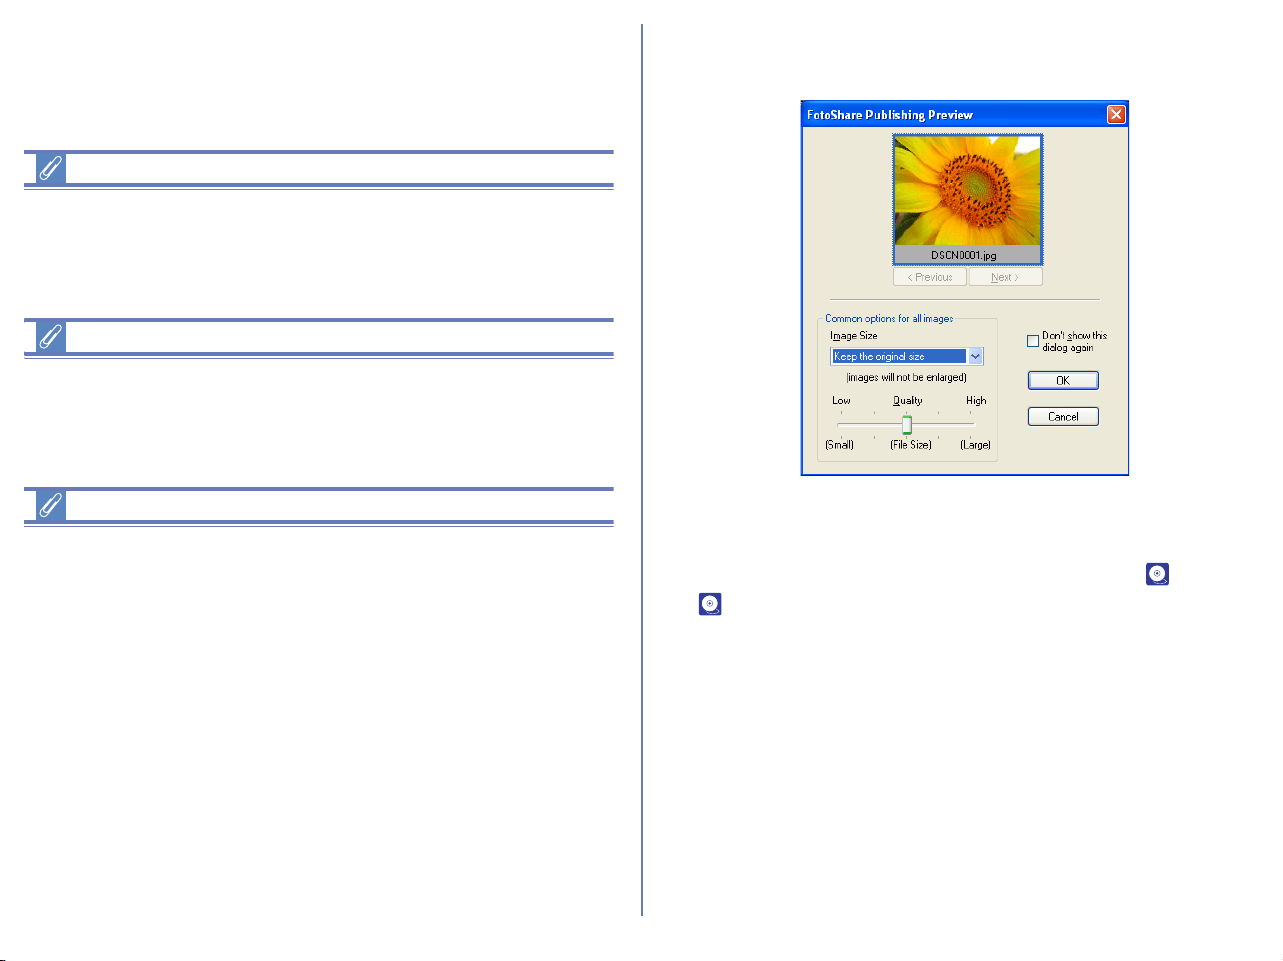
201
Disconnecting communications
If you are publishing to FotoShare through a modem or ISDN
terminal adopter, Nikon View will not disconnect communications
after uploading images. You must disconnect it manually.
Internet Explorer Version
If you are using Internet Explorer and wish to use the NikonView
Internet Registration function, please make sure your browser
version is 5 or higher.
Setting the proxy server in Macintosh
For the Web publishing in Macintosh, you may need to set the
proxy server to connect the internet. The proxy server cannot be
specified by server name. Please use the IP address. Please
follow the instructions below:
OS 9
Click Control Panels>Internet>Advanced and then specify the IP
address (e.g. aaa.bbb.ccc.ddd) for the proxy server in the Firewalls
area.
OS X
Click System Preferences > Network and then specify the IP
address (e.g. aaa.bbb.ccc.ddd) for the proxy server in the Proxies
tab.
3. The FotoShare Publishing Preview dialog box will be
displayed.
In the FotoShare Publishing Preview dialog box, you can
preview all images using the Next button or the Previous
button, or you can select the size and quality of the images.
Click OK to continue. For more information, see ( p. 207 or
p. 204).
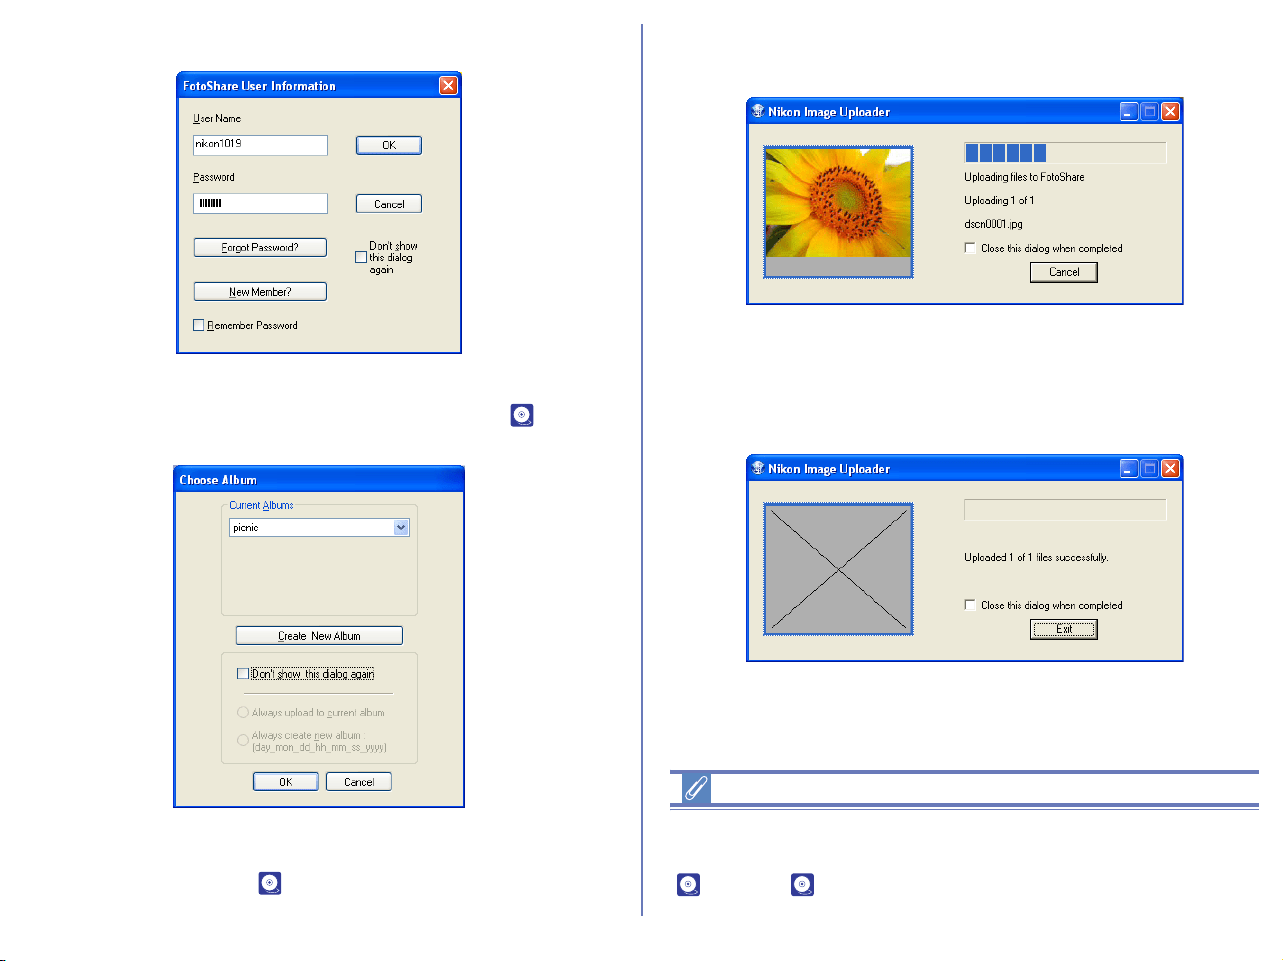
202
4. The FotoShare User Information dialog box will be displayed.
5. Enter your User Name and Password as you registered.
Click OK to continue. For more information, see ( p. 203).
The Choose Album dialog box will be displayed.
In the Choose Album dialog box, you can select the album for
the images, or create a new album. Click OK to continue. For
more information, see( p. 213).
6. The Nikon Image Uploader dialog box will be displayed to show
you the progress of the uploading.
Click Cancel to abort the uploading.
7. When the uploading is finished successfully, click Exit to close
the dialog box.
The images are added to the album.
Converting profile to sRGB
When uploading an image file, you can convert automatically the
color space of the file to sRGB profile. For more information, see
( p. 231 or p. 233) of Nikon Browser Preferences.
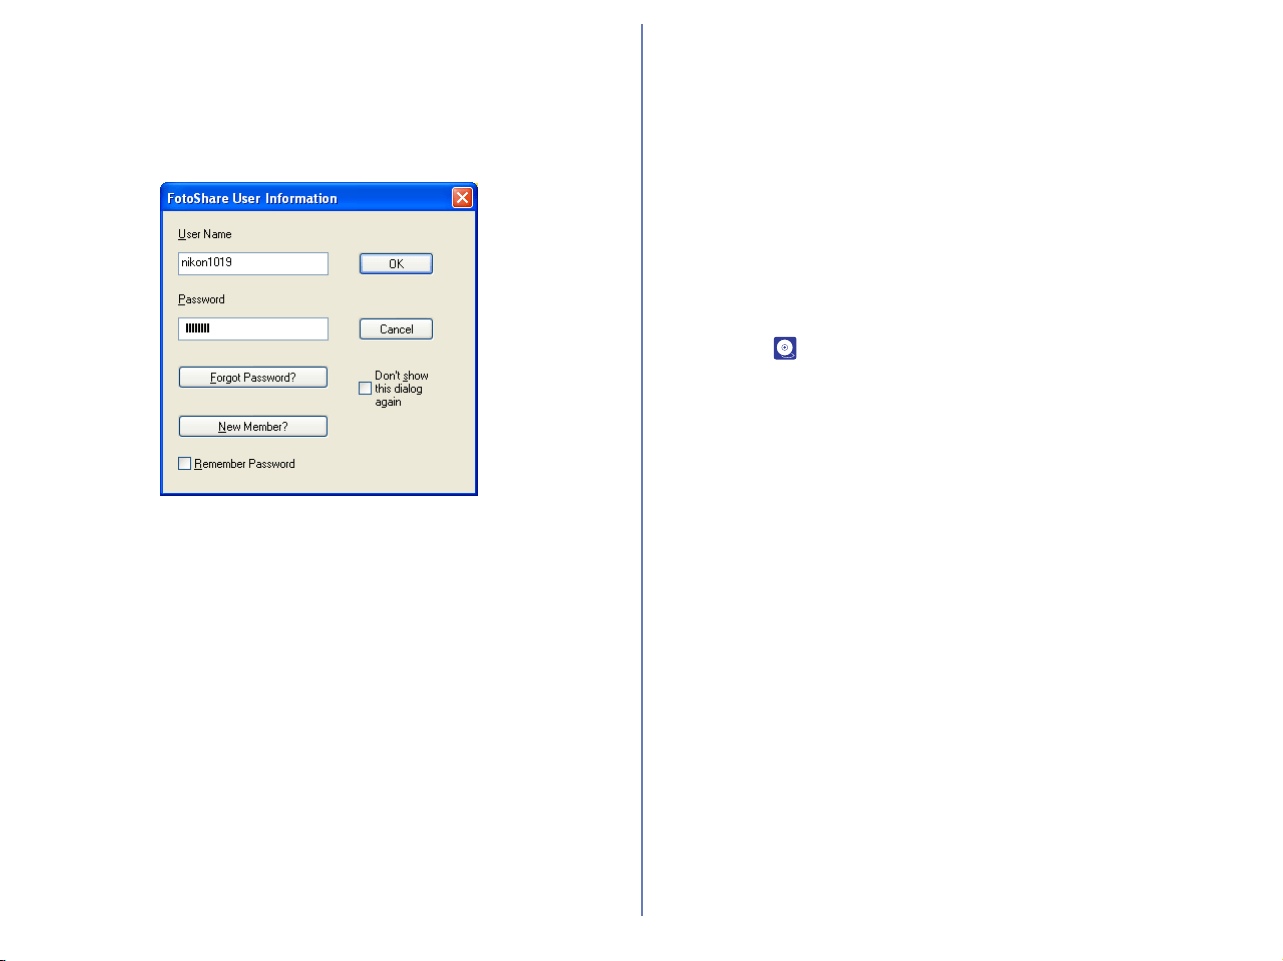
203
Uploader Dialog boxes
The FotoShare User Information dialog box
In the FotoShare User Information dialog box, enter your
FotoShare user name and password.
Click OK to close the dialog box and to continue the uploading
process.
Click Cancel to cancel the uploading.
User Name
Enter your user name.
Password
Enter your login password.
Forgot Password?
Click this button to display the FotoShare password assistance
page in your Web browser. If you forget your password, click this
button and supply the necessary information.
New Member?
Click to display the FotoShare user registration page in your Web
browser. If you are not a registered member, click this button to
register as a new member.
Remember Password
If you check this option, your password will be entered
automatically the next time the dialog appears.
Don't show this dialog again
If you check this option, the dialog box will not be displayed in the
next time you upload. To display the dialog box again, click the
Clear button in the Publish to FotoShare tab in the Preferences
dialog box ( p. 233).
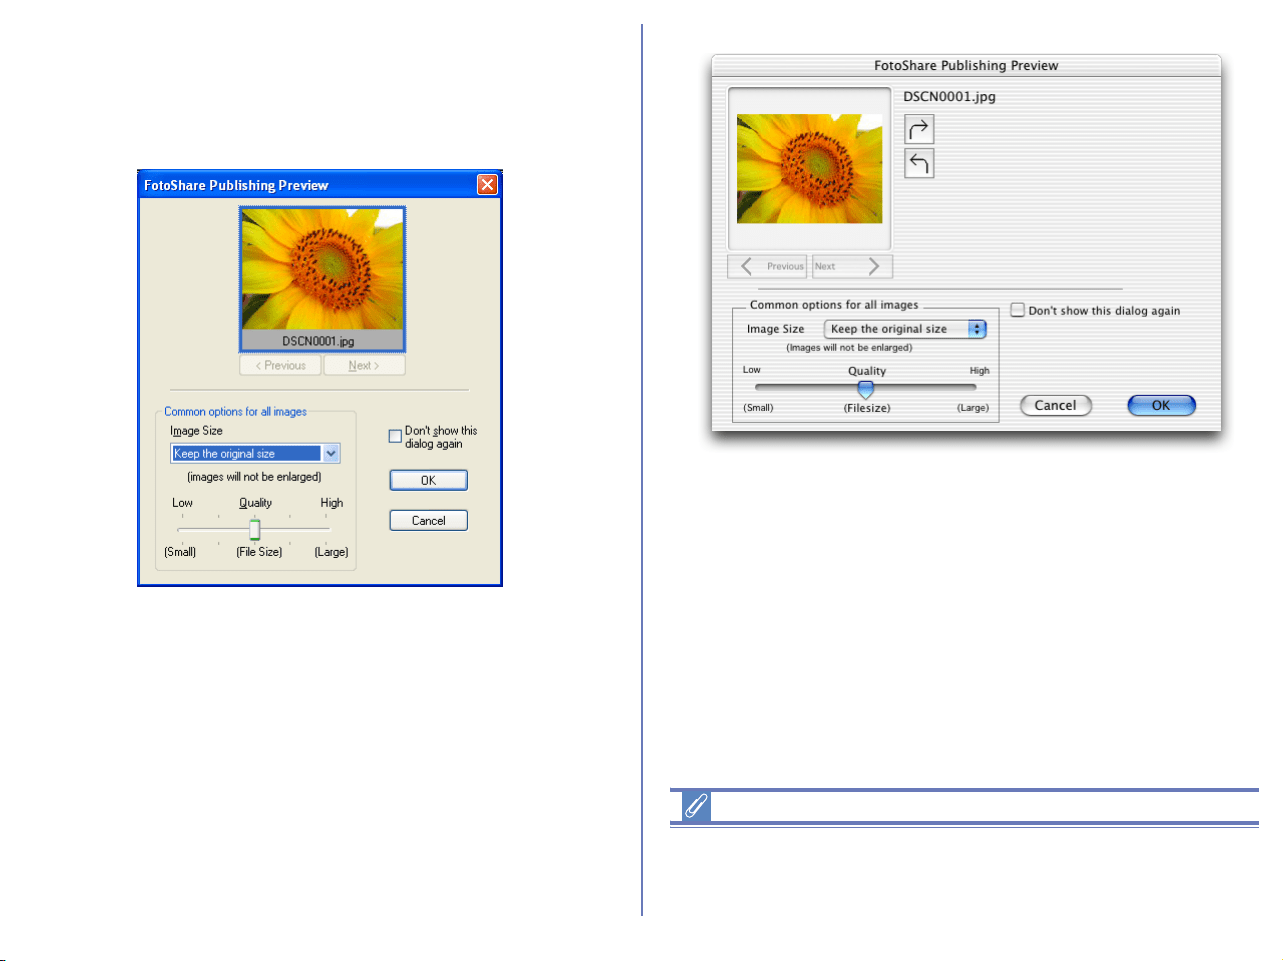
204
The FotoShare Publishing dialog box
In the FotoShare Publishing Preview dialog box, you can
preview all images to be published to the FotoShare site and you
can select the size and quality of the images.
Click OK to close this dialog box and to continue the uploading
process.
Click Cancel to cancel upload.
Notes on publishing to FotoShare
An Internet connection is required to publish your images to
NikonNet. Note that telephone charges and ISP fees may be
charged.
Windows
Macintosh
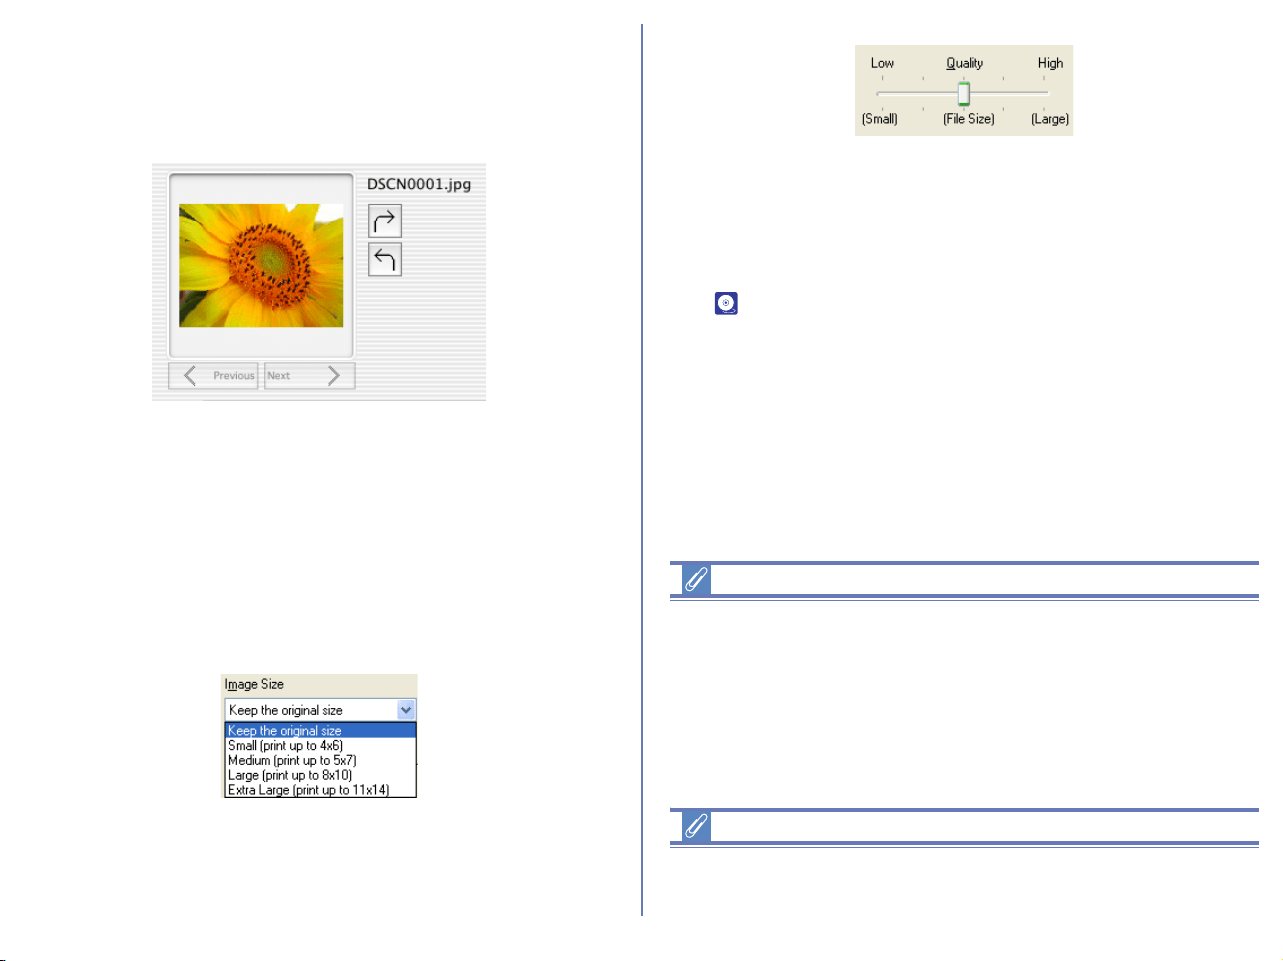
205
Previous / Next button
Click the button to switch the preview of the selected images one
by one.
Image Rotation button (Macintosh only)
By clicking the button, you can rotates the image clockwise or
counterclockwise.
Common Options for all images
You can set the size and quality of the images for the online album.
Image size
Select the image size for the online album from the pull-down
menu.
There are 5 options for the image size.
You can also select the quality (file size) of the images using the
slider.
Note that you cannot enlarge the image.
Don't show this dialog again
If you select this check box, the dialog box will not be displayed the
next time you upload. To display the dialog box again, click Clear
button in the Publish to FotoShare tab in the Preferences dialog
box ( p. 233).
Specification with slide- bar
You cannot specify the quality using the slide- bar if all three
following conditions are met:
1. JPEG file is selected.
2. Keep the original size is selected in the Image attachment
field.
3. Color space cannot be converted.
RAW (NEF) and TIFF images
RAW (NEF) and TIFF images are converted to JPEG files before
being uploaded.
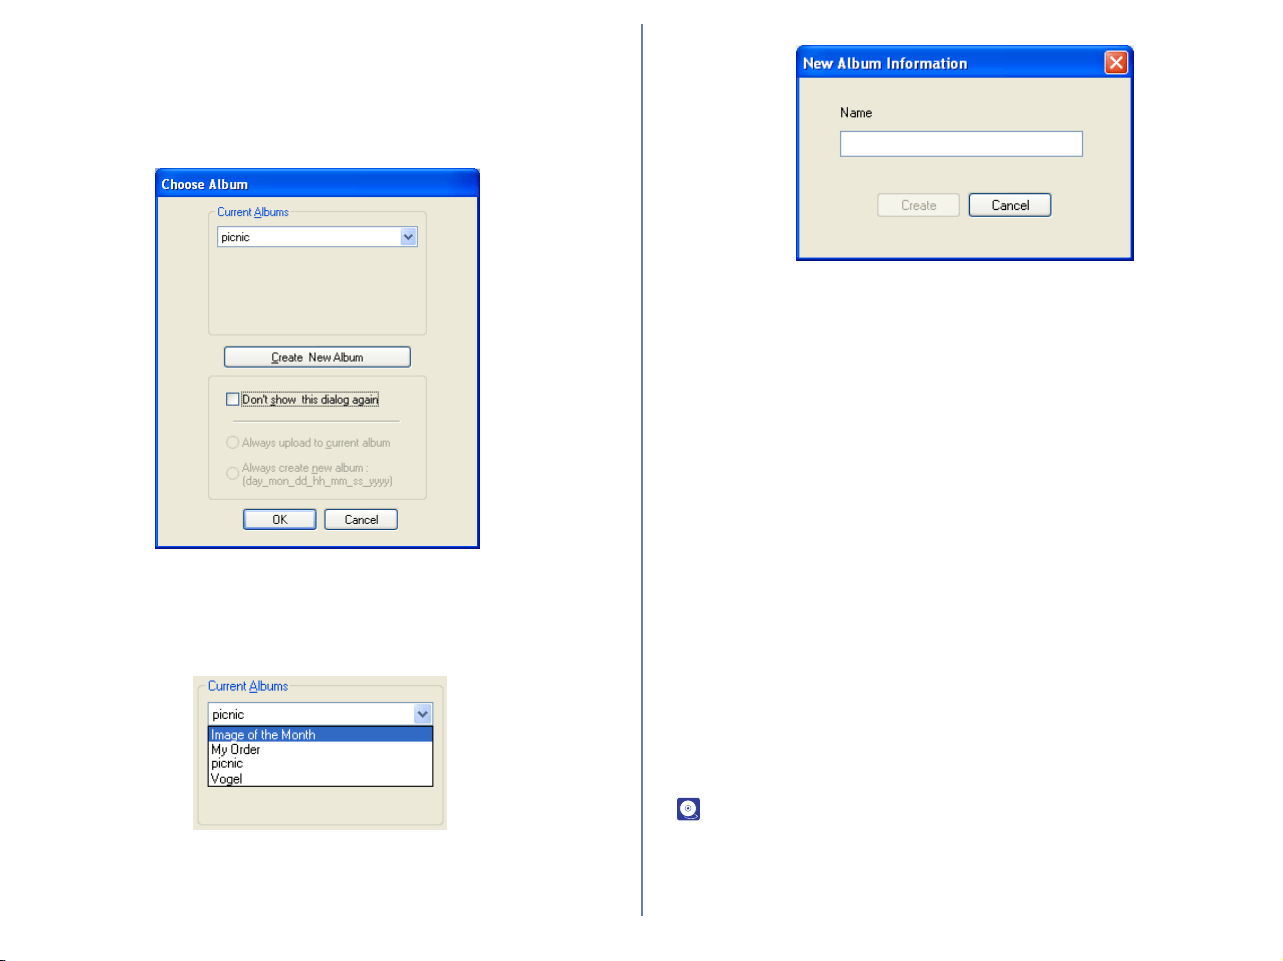
206
The Choose Album dialog box
In the Choose Album dialog box, you can select to which online
photo album you upload your image files. You can also create a
new album to upload image files.
Current Albums
Select the online photo album from the pull-down menu. The image
files are uploaded to the selected album.
You can also create a new album by clicking Create New Album
button. The New Album Information dialog box will be displayed.
Enter the name for the new album and click Create button to add
the new album to the pull-down menu.
Click OK once you specified the album. The images will be
uploaded to the album.
Click Cancel to cancel the uploading process.
Don't show this dialog again check box
If you check this option, the Choose Album dialog box will not be
displayed in future and you need to choose Always upload to
current album option or Always create new album option.
Always upload to current album
Select this option to upload the image files to the most recently
used album.
Always create new album
Select this option to create a new album every time you upload the
image files.
To display the Choose Album dialog box again, click Clear button
in the Publish to FotoShare tab in the Preferences dialog box
( p. 233).
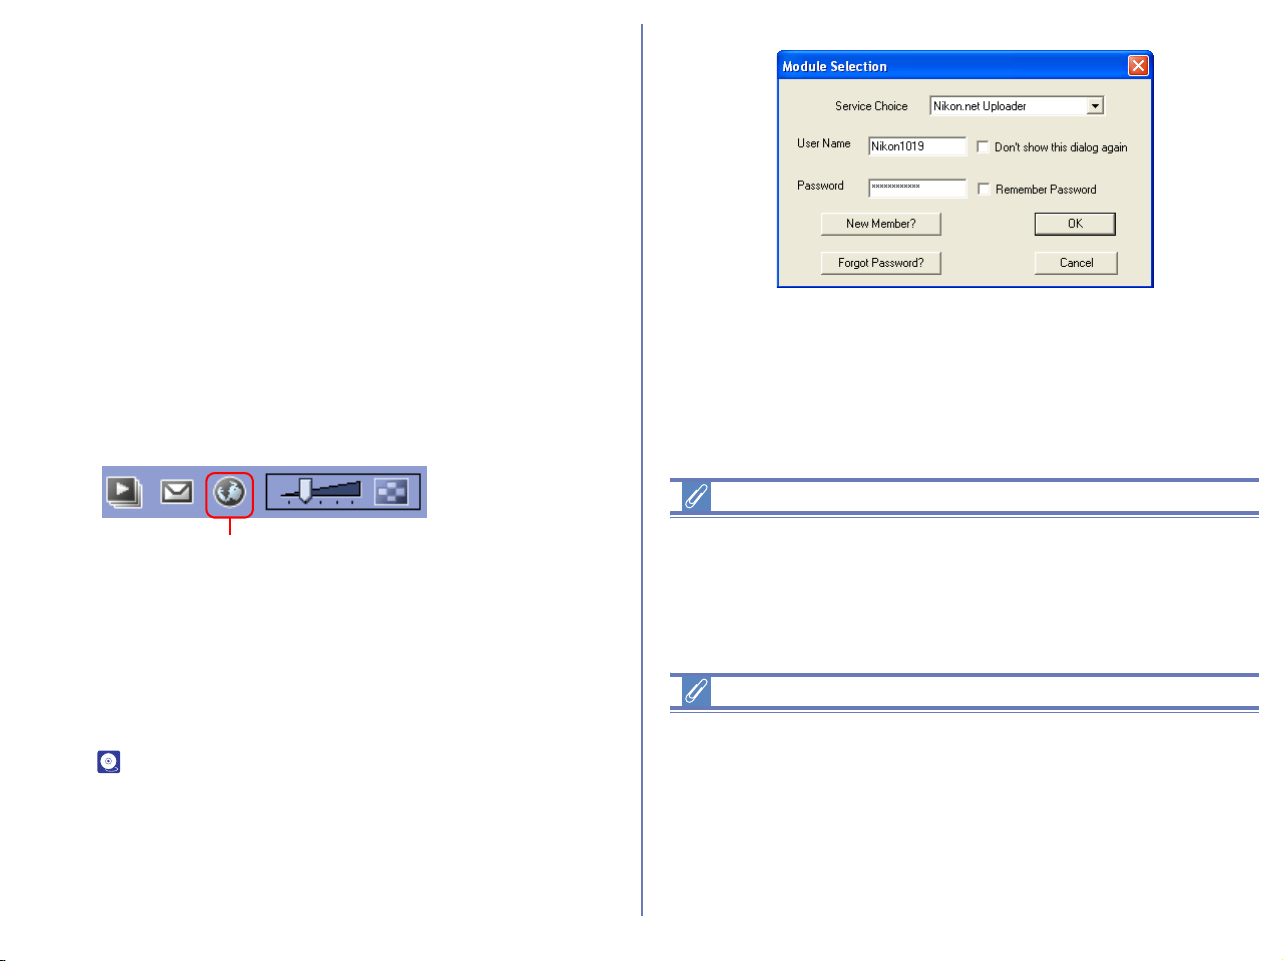
207
Uploading images (for North and South
American resident)
In Nikon View 6, you can upload still images to an online photo
album at the NikonNet site (http://www.nikonnet.com/).
Note that membership registration is required in order to use an
online album. For more information on online photo albums, see
the Help and FAQ sections at the NikonNet web site (http://
www.nikonnet.com/).
Uploading images to NikonNet
1. In the thumbnail list area, select one or more image file
thumbnails to upload.
2. Click the Publish to NikonNet or PDA button on the toolbar, or
select Publish to NikonNet or PDA from the Tools menu.
3. If a handheld device is connected to your computer, the Module
Selection dialog box will be displayed. If there are no handheld
devices connected to your computer, proceed to Step 4. Select
Nikon.net Uploader from the Service Choice pull-down menu,
and enter your user name and password for NikonNet. Click
OK. If you want to transfer your images to a handheld device,
see ( p. 210).
Disconnecting communications
If you are publishing to NikonNet or PDA through a modem or
ISDN terminal adopter, Nikon View will not disconnect
communications after uploading images. You must disconnect it
manually.
Transferring your images to a Palm Pilot or Pocket PC
Transferring images to a Palm organizer
*1
In order to transfer images to a Palm organizer, Palm Desk Top*
2
and Photobase for Palm
*2
should be installed on your computer
before Nikon View version 6 is installed. Having installed the
software and Nikon View version 6, transfer images to your
handheld device as follows:
Publish to NikonNet or PDA button
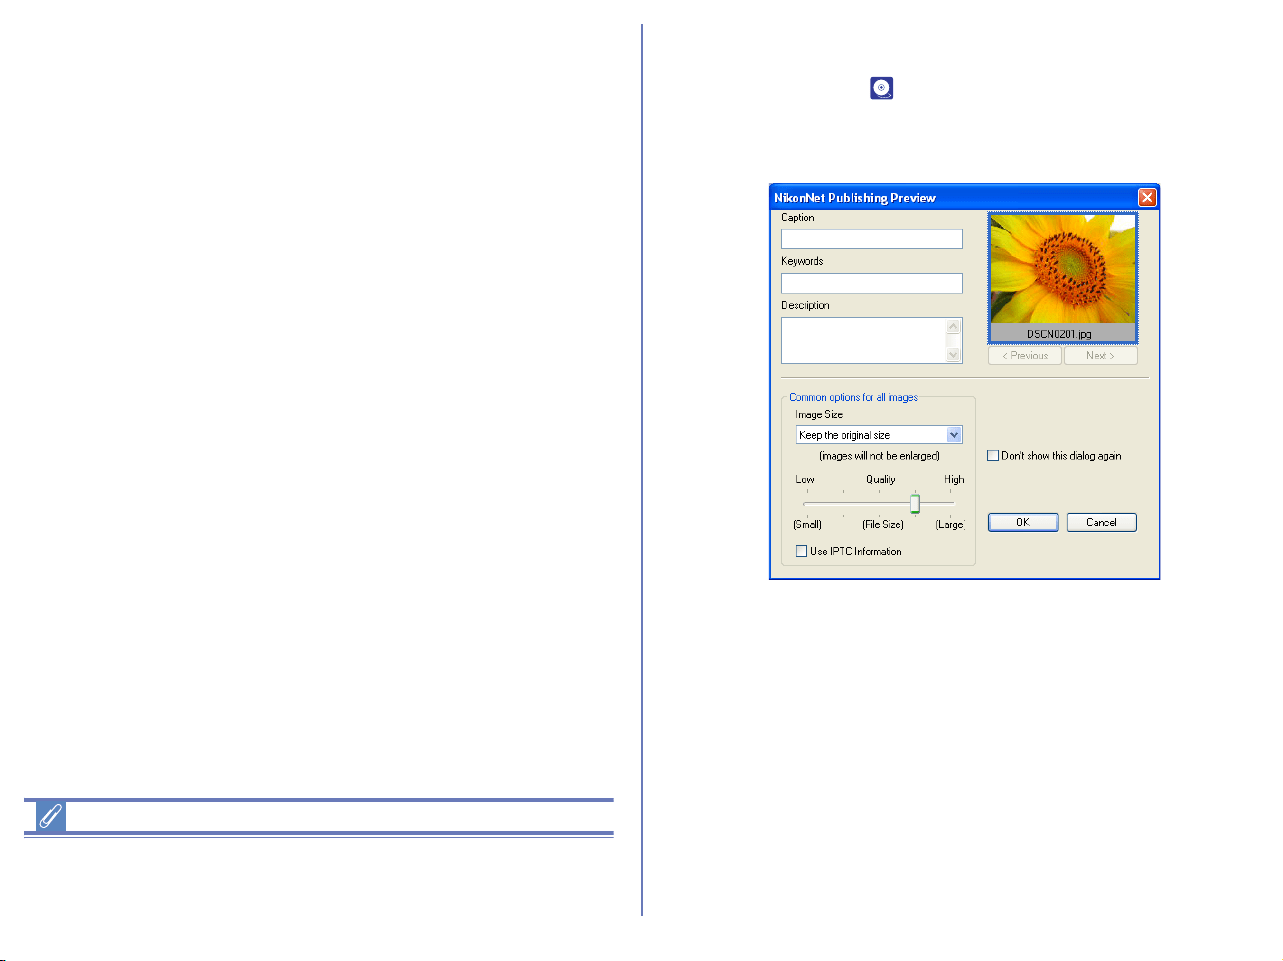
208
• Select Photo Base for Palm Sync. from the Service Choice pull-
down menu in Step 3. After making sure that your Palm is inserted
in the cradle, and the cradle is connected correctly, click OK.
• To transfer the images, press the Hot Sync.
®
button on the
cradle. Transferred images can be viewed on the device
screen.
You do not need to follow the rest of the steps in the Uploading
image files section.
Transferring images to a Pocket PC
*1
(Windows only)
In order to transfer images to a Pocket PC, Active Sync.
*2
and
Photobase for Pocket PC
*2
should be installed on your computer
before Nikon View version 6 is installed. Having installed the
software and Nikon View version 6, transfer images to your
handheld device as follows:
•Select Photo Base for Pocket PC from the Service Choice
pull-down menu in Step 3. After making sure that your Pocket
PC is connected correctly, click OK.
• Use Microsoft Active Sync. to transfer the images to your
Pocket PC. Transferred images can be viewed on the device
screen.
You do not need to follow the rest of the steps in the Uploading
image files section.
*1
For instructions on synchronization, refer to the documentation
provided with your handheld device
*2
For instructions on how to install and use the software
mentioned above, refer to the documentation provided with the
software.
Hot Sync.
®
Hot Sync.
®
is a registered trademark of Palm Inc.
The Upload Preview dialog box will be displayed. Add information
to the image files or resize the images. Click OK to continue. For
more information see ( p. 211).
If you check Use IPTC Info from Nikon View, read file information
(Title, Caption, Keyword) to use upload information.
Windows
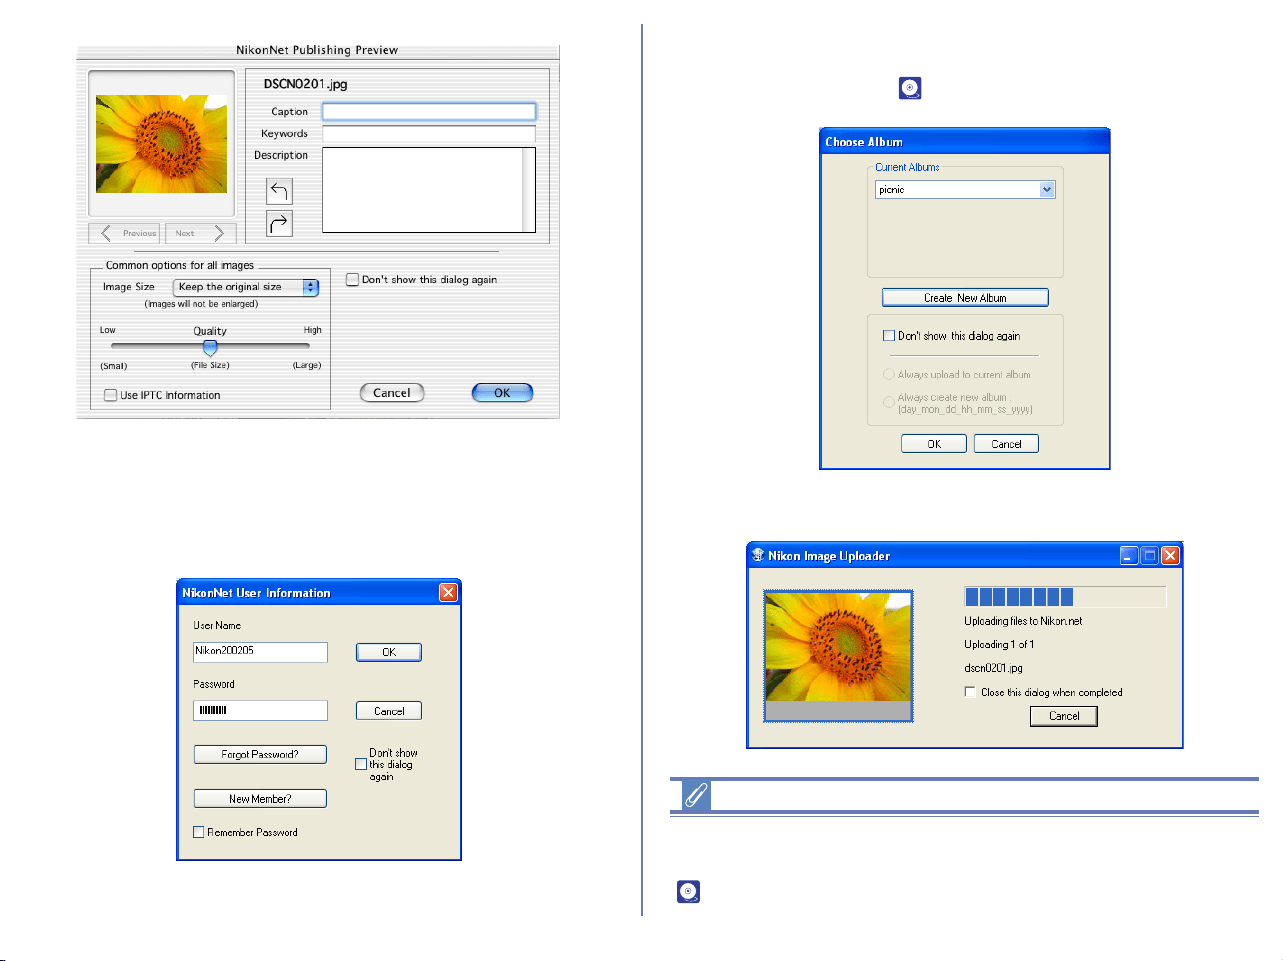
209
If the Module Selection dialog box was not displayed in Step 3 on
the previous page, the NikonNet User Information dialog box will
appear asking you to enter your name and password.
4. In the Choose Album dialog box, select the album to add the
images to, or create a new album. Click OK to continue. For
more information see ( p. 213).
5. The images are added to the album.
Converting profile to sRGB
When uploading an image file, you can convert automatically the
color space of the file to sRGB profile. For more information, see
( p. 231) of Nikon Browser's Preferences.
Macintosh

210
Uploader Dialog boxes
The Module Selection dialog box
In the Module Selection dialog box, enter your NikonNet user
name and password.
Click OK to close this dialog box and upload the image file with the
specified settings.
Click Cancel to cancel upload.
User Name
Enter your user name.
Don't show this dialog again
If you select this check box, the dialog box will not be displayed the
next time you upload. To display the dialog box again, click the
Clear button in the Publish to NikonNet or PDA tab of the
Preferences dialog box.
Password
Enter your login password.
Remember Password
If you select this check box, your password will be entered
automatically the next time the dialog appears.
New Member?
Click to display the NikonNet user registration page in your Web
browser.
If you are not yet a member, click this button to register as a new
member.
Forgot Password?
Click to display the NikonNet password assistance page in your
Web browser. If you forget your password, click this button and
supply the necessary information.
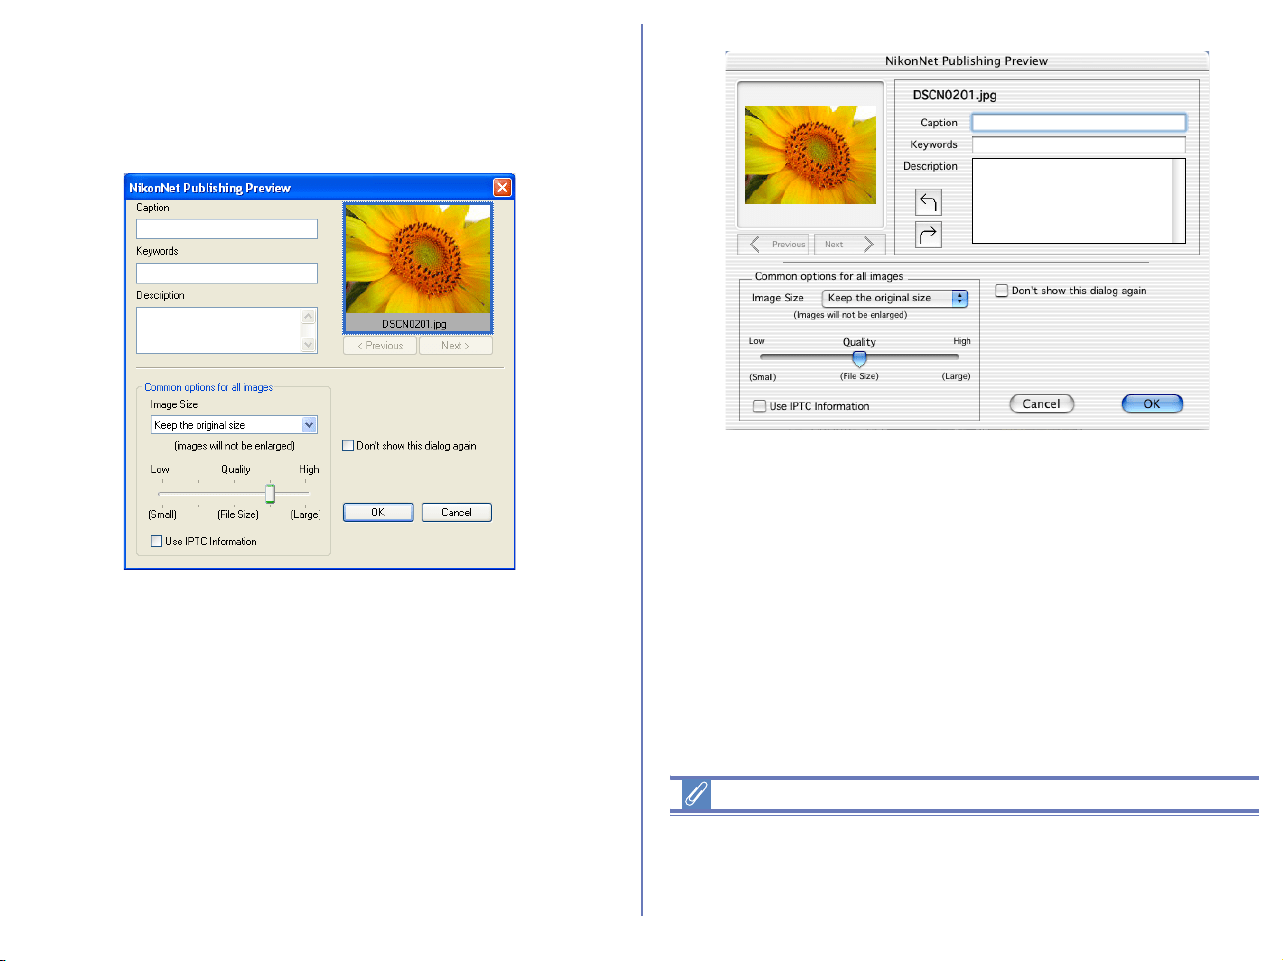
211
The Upload Preview dialog box
In the Upload Preview dialog box, you can add such information
as the caption, keywords and a description to the image you add to
the album. You can also resize the image.
Click OK to close this dialog box and upload the image file with the
specified settings. Click Cancel to cancel upload.
Check this check box to load automatically the title (object name),
keyword, and caption (comment) from the file information added to
the image file and input them to corresponding files.
Notes on publishing to NikonNet
An Internet connection is required to publish your images to
NikonNet. Note that telephone charges and ISP fees may be
charged.
Windows
Macintosh

212
Caption
Enter the text you want to add to the uploaded image file as a
caption. The caption will be used in the album.
Keyword
Enter keywords you want to add to the uploaded image file. The
keywords will be used in the album.
Description
Enter the description of the image file to be uploaded. The
description will be used in the album.
Image Rotation button (Macintosh only)
Rotates the image clockwise or counterclockwise.
Options (Applied to all Uploaded Images)
Sets the upload image files for image size, quality in JPEG format
(file size), and file information loading.
The image will be adjusted to the size you specify here at the time
of upload. You cannot select a size larger than the original size.
When uploading multiple images, you can specify the size for each
image using the option buttons under the thumbnail.
Don't show this dialog again
If you select this check box, the dialog box will not be displayed the
next time you upload. To display the dialog box again, click Clear
in the Publish to NikonNet or PDA tab of the Preferences dialog
box ( p. 234).
Specification with slide-bar
You cannot specify the quality using the slide-bar if all three
following conditions are met:
1. JPEG file is selected.
2. Keep the original size is selected in the Image attachment
field.
3. Color space cannot be converted.
RAW (NEF) and TIFF images
RAW (NEF) and TIFF images are converted to JPEG files before
being uploaded.
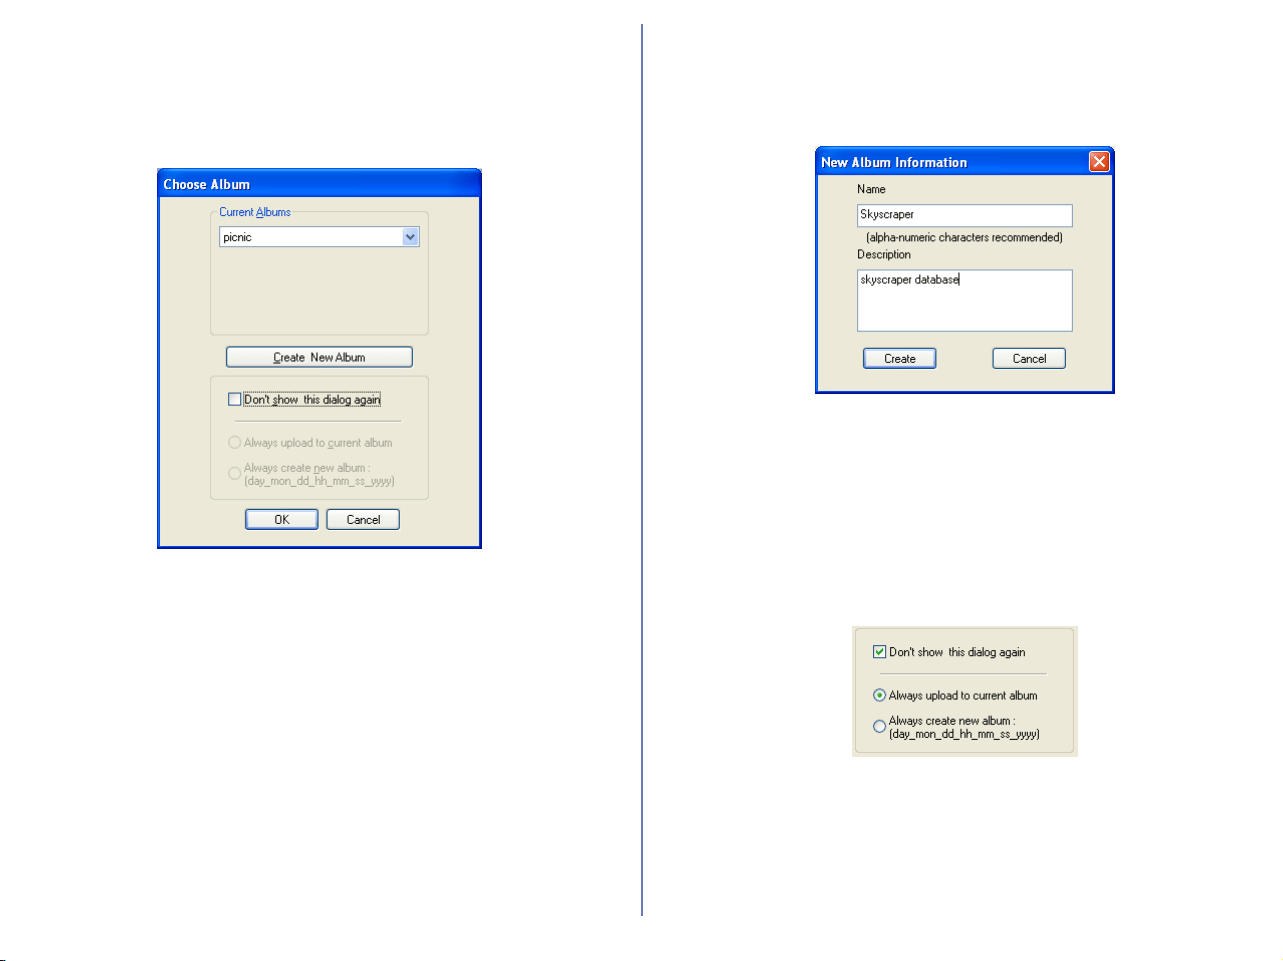
213
The Choose Album dialog box
In the Choose Album dialog box, you can select to which online
photo album you upload your image files. You can also create a
new album to upload image files.
The Current Albums area
Specify the online photo album to which you want to upload your
image files. Click OK to add the image files to the album specified
in the dialog box.
To change the destination album, select another album from the
pull-down menu.
Click Cancel to cancel upload.
New Album Information
You can create a new online album if you do not want to upload
images to an existing album.
Name
Enter the name of the new album.
Description
Enter the description of the new album.
Create
Click to create the new album.

214
Don't show this dialog again check box
If you select this check box, the dialog box will not be displayed the
next time you upload. Selecting this check box also enables
Always upload to current album, and Always create new
album options.
To display the dialog box again, click Clear in the Publish to
NikonNet or PDA tab of the Preferences dialog box ( p. 234).
Always upload to current album
Select this option to always upload the files to the most recently
used album.
Always create new album
Select this option to create a new album every time you upload the
image files.
Creating an HTML Album (Windows only)
You can create an HTML album by exporting images as HTML
files. Detailed image will be displayed when you click the thumbnail
in the HTML files.
Export as HTML files
1. In the thumbnail list area, select one or more thumbnails of the
image files to be exported.
2. Select Export as HTML files from Tools menu.
3. Export HTML (1/3) dialog box will be displayed. Specify
thumbnails of the image files to be exported. Click Next to
continue.
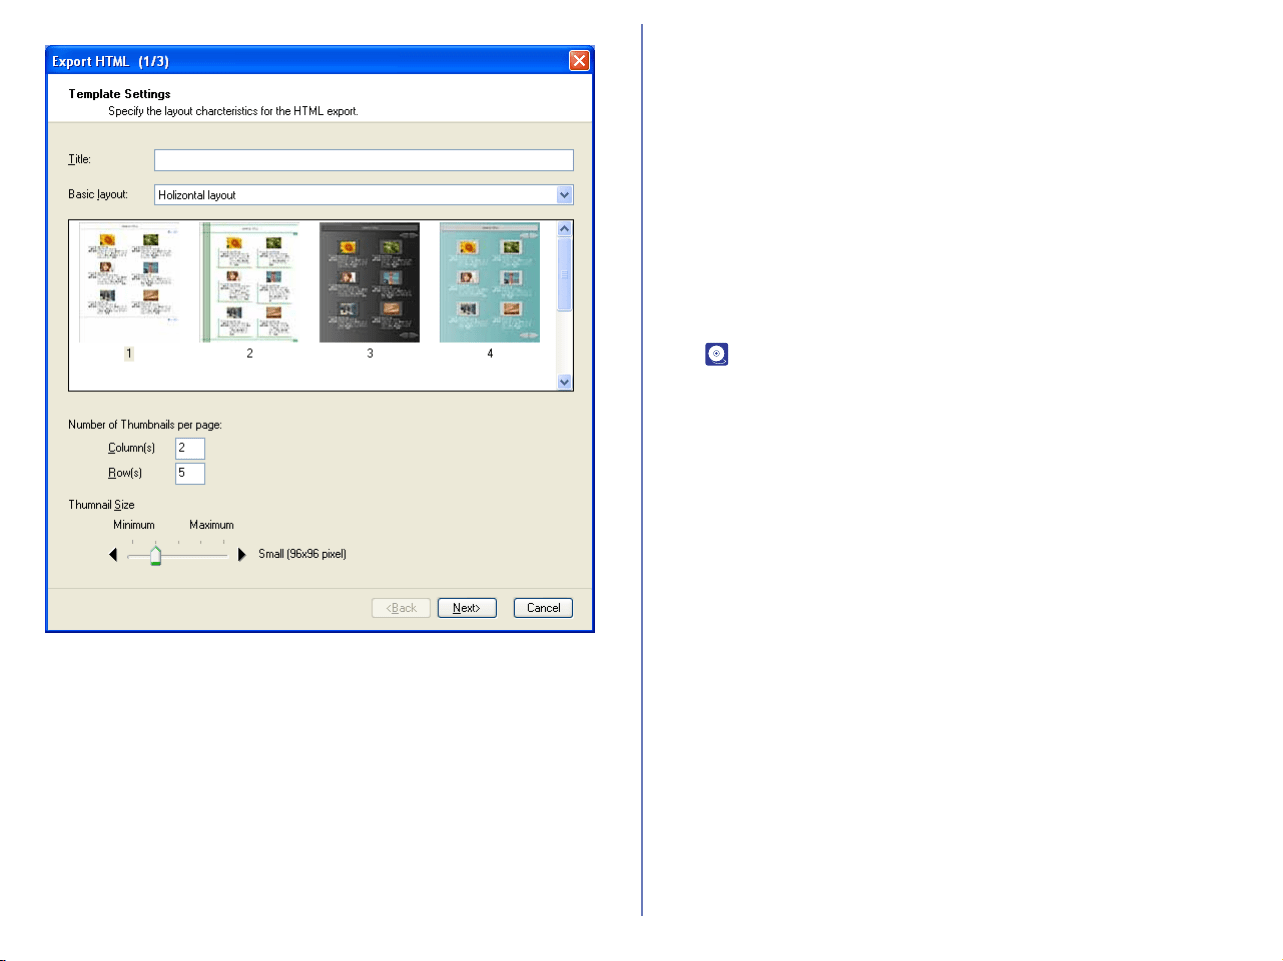
215
Title:
Enter the title of an HTML album that will be displayed on the top of
each HTML page.
Basic layout:
Specify the type of HTML (List or Spread) and choose your
preferred template from the preview list. If you select Horizontal
layout, thumbnails are displayed in rows and columns. If you select
Vertical layout, those are arranged in a column.
Number of Thumbnails per page:
Specify the number of rows and columns for thumbnails to arrange
on HTML page. In List, you can specify the number of rows and
columns for thumbnails on a page. In Spread, you can specify the
number of thumbnails in a column.
Thumbnail size:
Select the size of the thumbnails. Using slide-bar to specify the
size of the thumbnail from Minimum (64x64) to Maximum
(256x256).
4. Specify an indication of the HTML file in Export HTML (2/3)
dialog box. Check File name, Date and Time, IPTC information
( p. 132) and Shooting information as necessary.
Click Next to continue.
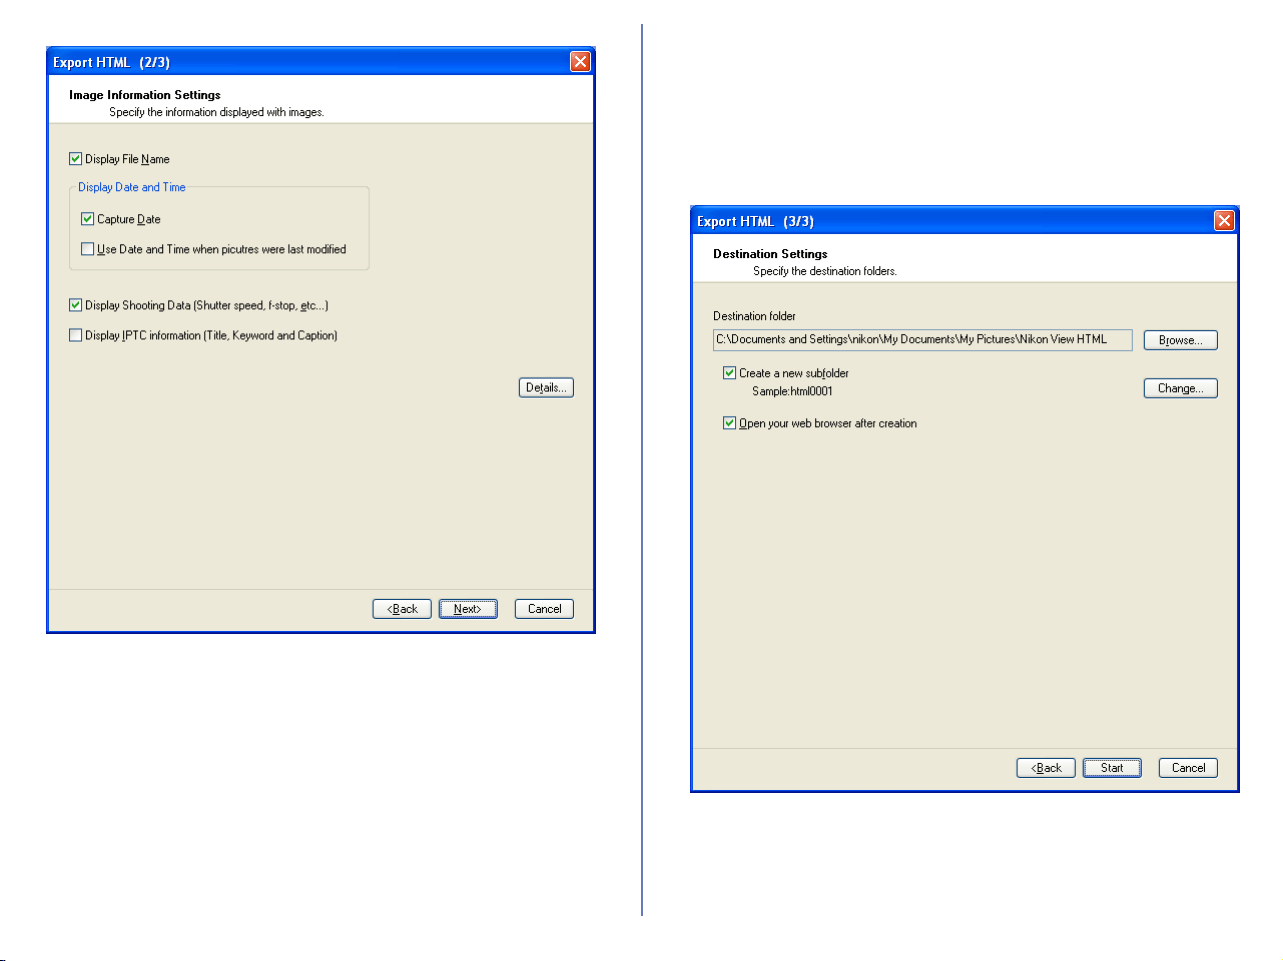
216
Display File Name:
Check this option to display file name with the thumbnail.
Click the file name on the HTML file to display the original file.
Display Date and Time:
Check Capture Date to display shooting date with the thumbnail.
Check Use Date and Time when picture were last modified to
display updated date and time with the thumbnail.
Display Shooting Data:
Check this option to display shooting data with the thumbnail.
Display IPTC Information:
Check this option to display IPTC information with the thumbnail.
You can edit the information in IPTC Information of File menu.
5. Select destination folder for HTML files in Export HTML (3/3)
dialog box.
Destination folder:
The currently specified destination folder for the HTML files is
displayed. To change the folder, click Browse button. When the
Browse For Folder dialog is displayed, specify a different folder.
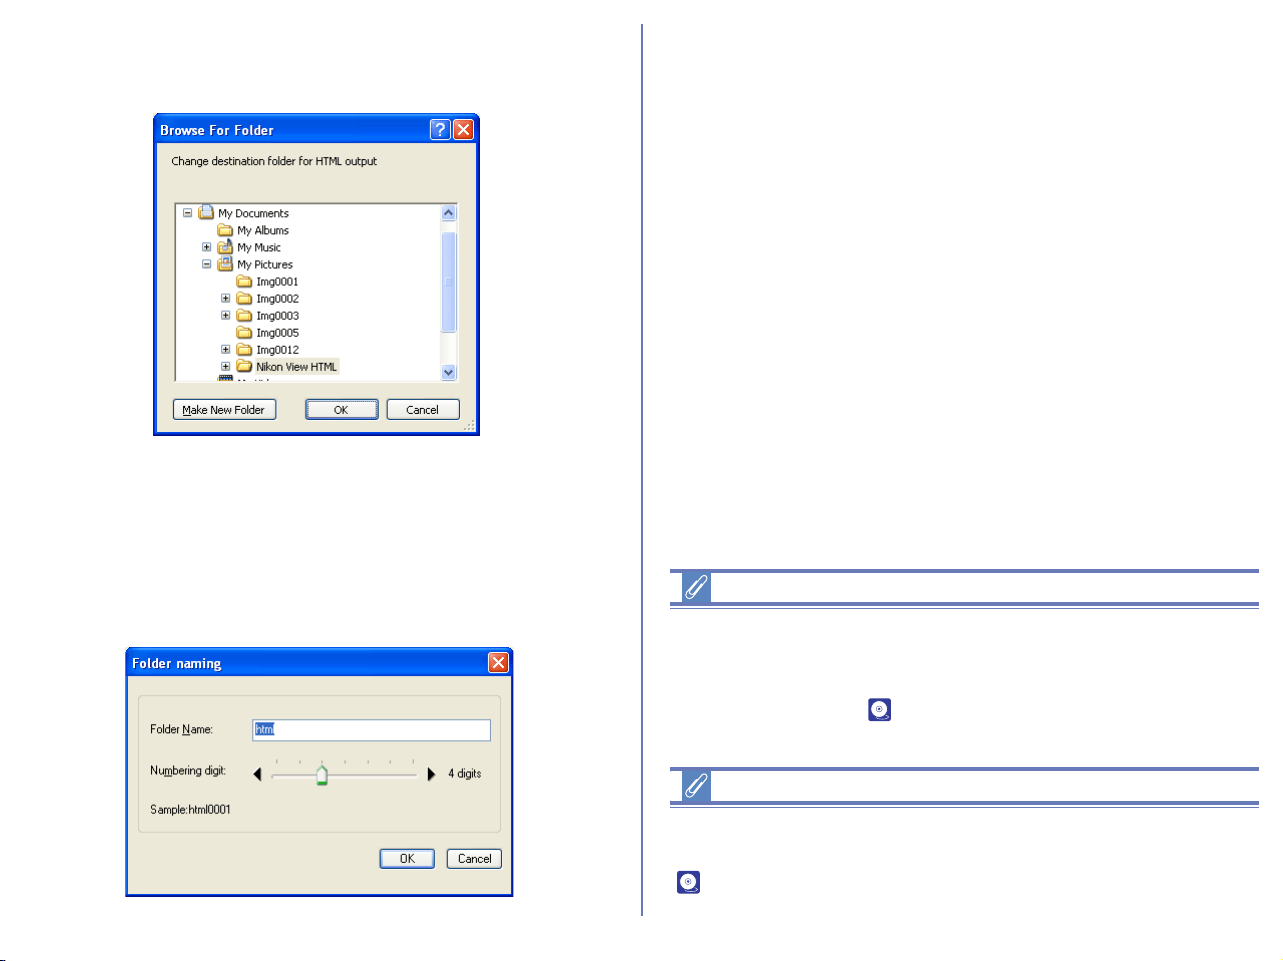
217
Browse button:
Click Browse to change the current destination folder. Specify
different folder from the folder list.
Create a new subfolder:
Check this option to create a new subfolder with the name
described in Example field. The subfolder will be output
destination.
Change button:
Click change button to display Folder naming dialog box which
allows you to specify naming rule for folders.
Folder Naming dialog box
Creating sub folder name will be determined by Folder Name and
Numbering digit. (Ex. book0001)
Folder Name:
Specify the creating sub folder name.
Numbering digit:
Using slide-bar to specify the number of digit for the sub folder
name.
Open your web Browser after Creation:
Open HTML file in your web Browser after Creation.
6. Click Run button to create HTML file.
File name compatible ISO9660 level 1
If Change file name compatible ISO9660 level 1 is selected in File
name Tab of Altitude setting dialog box, folder name and
numbering digit allows less than 4 letters (total 8 letters). About
ISO9660 level 1, see ( p. 220) of Altitude setting dialog box.
About sRGB profile change
When creating an HTML file, you can convert automatically the
color space of the file to sRGB profile. For more information, see
( p. 231) of Nikon Browser's Preferences.

218
Viewing HTML file
You can display image in detail when you click the thumbnail of
created HTML file. If your WWW browser does not support viewing
images, the image file names will display.
Supported Web browser
It is verified that HTML files created in Nikon Browser can be
viewed in Microsoft Internet Explorer Version 5.0 or later and
Netscape Navigator 4.0 or later.
Details dialog box
In Export HTML (2/3) dialog box, click Details button to open
Altitude setting dialog box.
There are three tabs in the dialog box to configure details setting of
HTML file.
Still images Tab
Specify image size and compression ratio of still images. If voice
memo is attached to the image, you can select output voice date or
not.
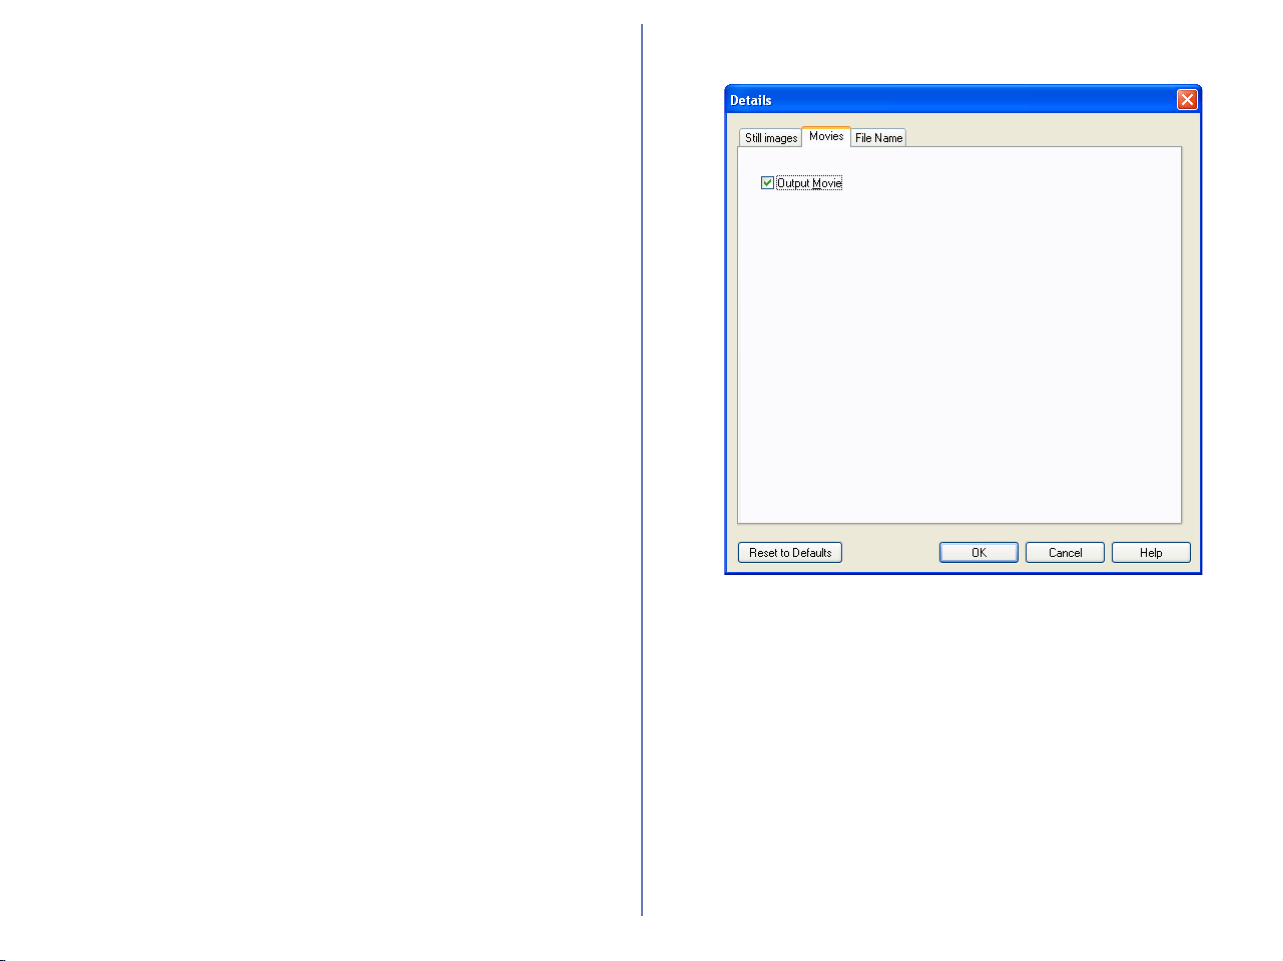
219
Set image size:
You can change the output HTML image size. Select Size
unchanged, Set new size, or Set new size with specified ratio from
the list box.
Keep the original size:
The output image size will not change when select this option.
Fit to the new fixed frame size:
When this option selected, you can change the output JPEG image
size by pixel. Select Small (160x120 pixel) thru Large (1600x1200
pixel) in a slide bar
Apply a fixed reduction ratio to all images:
When this option selected, you can change the output JPEG image
size by specific ratio. Select Small (1/25) thru Large (1/4) in a slide
bar
Compression Ratio:
Use slide-bar to specify the quality of JPEG image in the HTML file.
High compression ratio will reduce file size however decline quality
at the same time. Select Low (high compression ratio, small file
size) thru High (low compression ratio, large file size).
Include Sound(s):
Use this option to output an image file with the associated voice
memo to HTML file. The HTML file includes thumbnails of image
files and the Play Sound button on which you click to play the voice
memo.
Movies Tab
Output Movie:
Use this option to output a movie taken by movie-supported
cameras to HTML file. The HTML file includes thumbnails of image
files and the Output Movie button on which you click to play the
move.
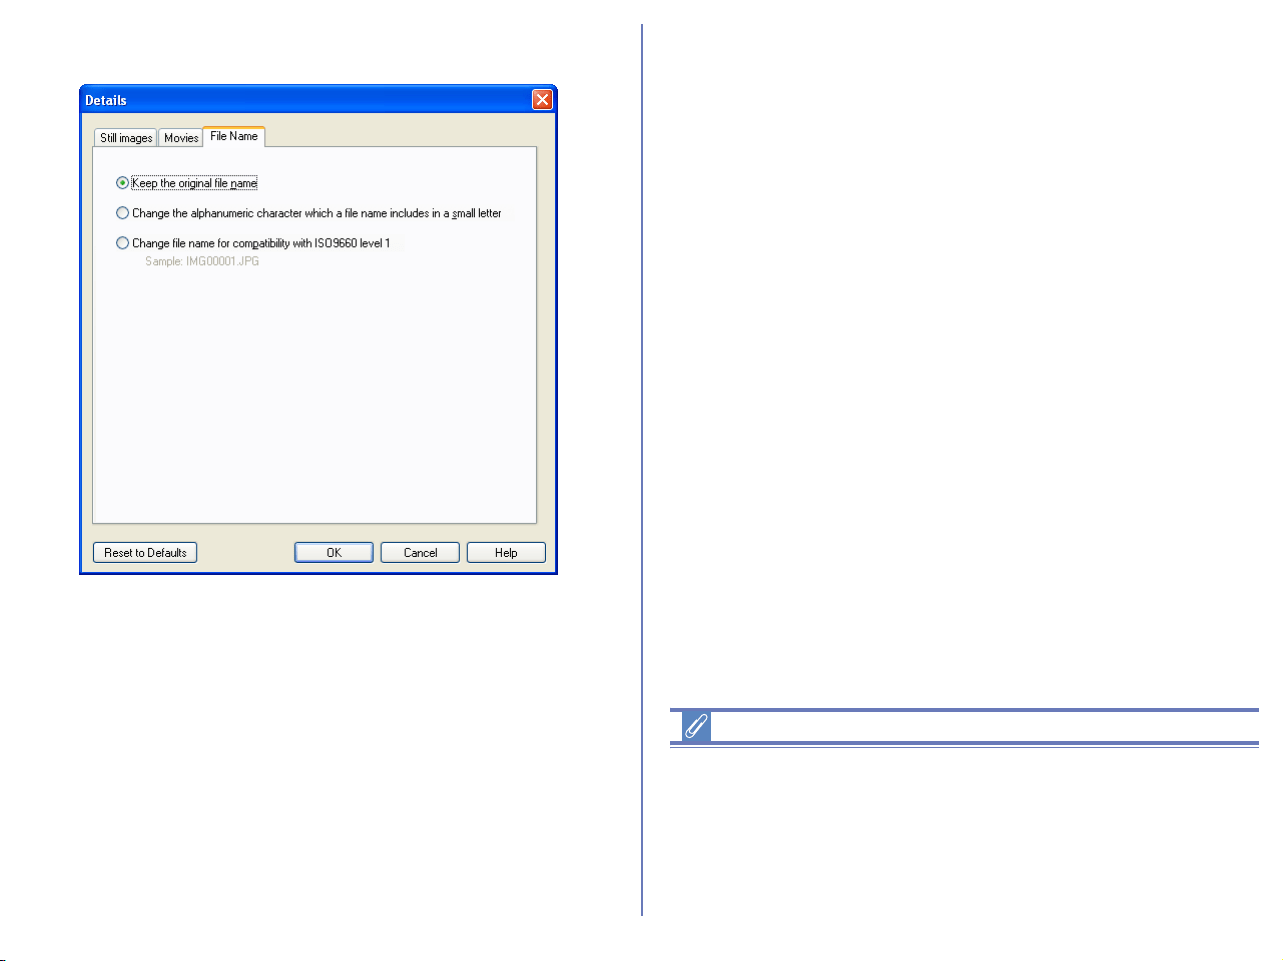
220
File Name Tab
Using this panel, you can convert the names of files to use them
compatibly between different file systems. Some file names may
not be displayed correctly depending on operating systems or file
systems. In such case, you can display file names correctly
between different systems by changing character cases or
converting file names to those compatible with ISO9660 Level 1.
Choose either radio button to select how to change file names.
Keep the original file name
Select this radio button if you want to keep the original file names.
Change the alphanumeric character which a file name
includes in a small letter:
Select this radio button to change all upper-case characters
included in the names of files that are related to HTML files to
lower-case characters. Generally, Web servers have case
sensitive. You may not open HTML files unless all upper-case
characters are changed to lower-case ones. For more information,
contact your subscribed Internet providers.
Change file name for compatibility with ISO9660 level 1:
Select this radio button to converting file names to those
compatible ISO9660 Level 1. File names that do not follow
ISO9660 Level 1 system (8 characters of filename + a 3 character
extension) may not be displayed correctly depending on operating
systems or file systems. If you select this option, the file names are
changed forcibly to ISO9660 Level 1 compatible file names:
thm00001.jpg, thm00002.jpg ... for the names of thumbnail files
and img00001.jpg, img00002.jpg... for those of image files,
respectively.
To support compatibility in various OS and file system
Follow the instructions below to support compatibility in various OS
and file system:
• Use same WWW browser for creating and viewing the HTML
image.
• Avoid to use the characters that peculiar to OS.

221
Reset to Default button
Click Reset to Default button to display the message of reset the
settings of this dialog box. Click OK to reset the settings of Altitude
setting dialog box.
Click OK button to settle the settings of this dialog box.
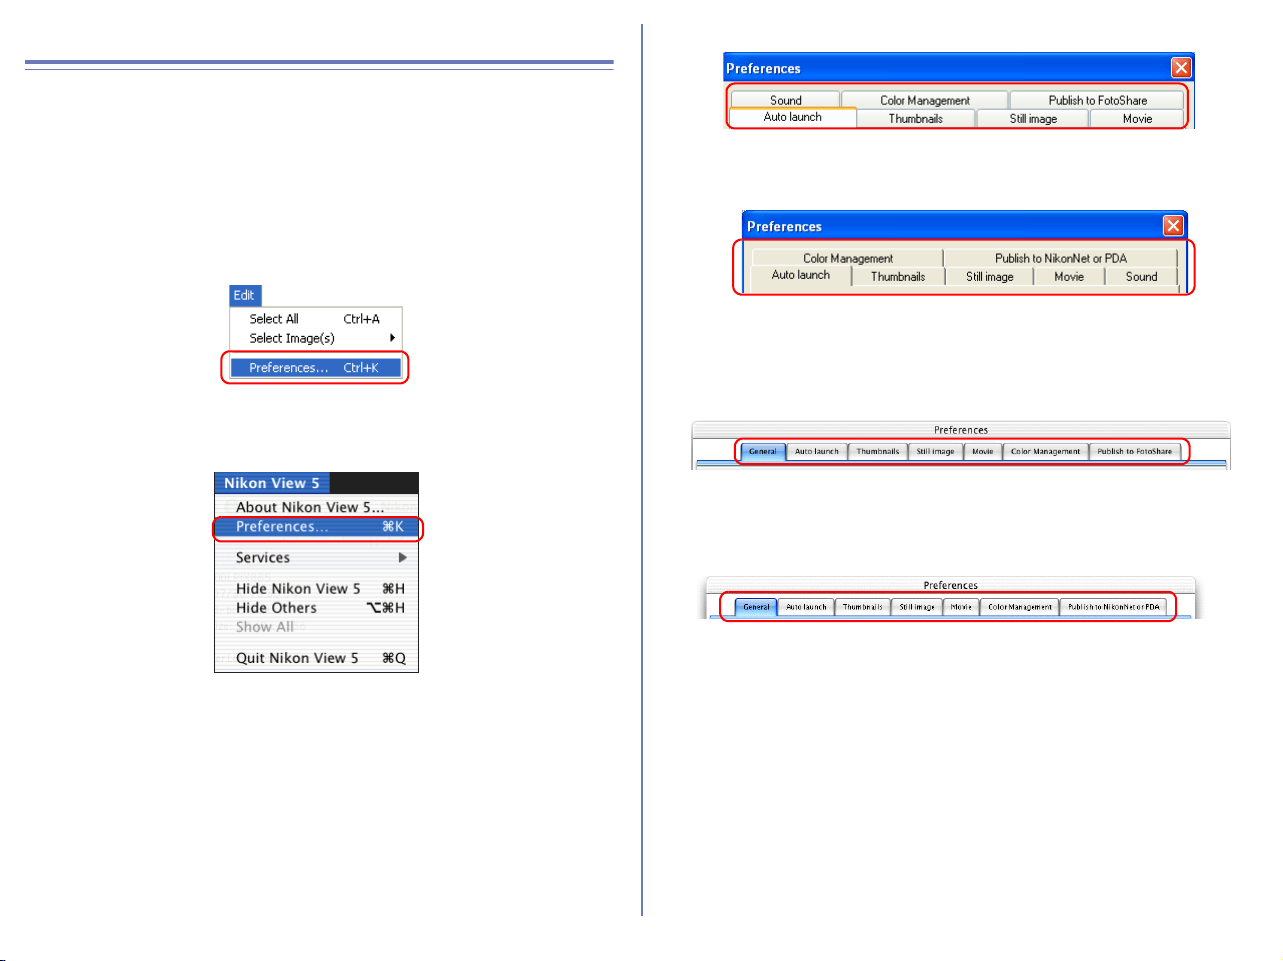
222
Nikon Browser Preferences
Nikon Browser's Preferences
To display the Preferences dialog box, select Preferences from
the Edit menu. Nikon Viewer's Preferences dialog is the same as
for Nikon Browser. In Windows, you can display the Preferences
dialog box by clicking the Preferences tool button.
The Preferences dialog box contains the following tabs: General
(Macintosh version Only), Auto launch, Thumbnails, Still image,
Movie, Sound (Windows version Only), Color Management
(Windows version Only) and Publish to FotoShare (for European
resident) or NikonNet/PDA (for North and South American
resident).
Changes to the settings in the Preferences dialog box only take
effect when you confirm the changes by clicking .
Click Cancel to close the Preferences dialog box and keep the
original settings.
Windows
Macintosh
Windows
for European resident
for North and South American resident
Macintosh
for European resident
for North and South American resident
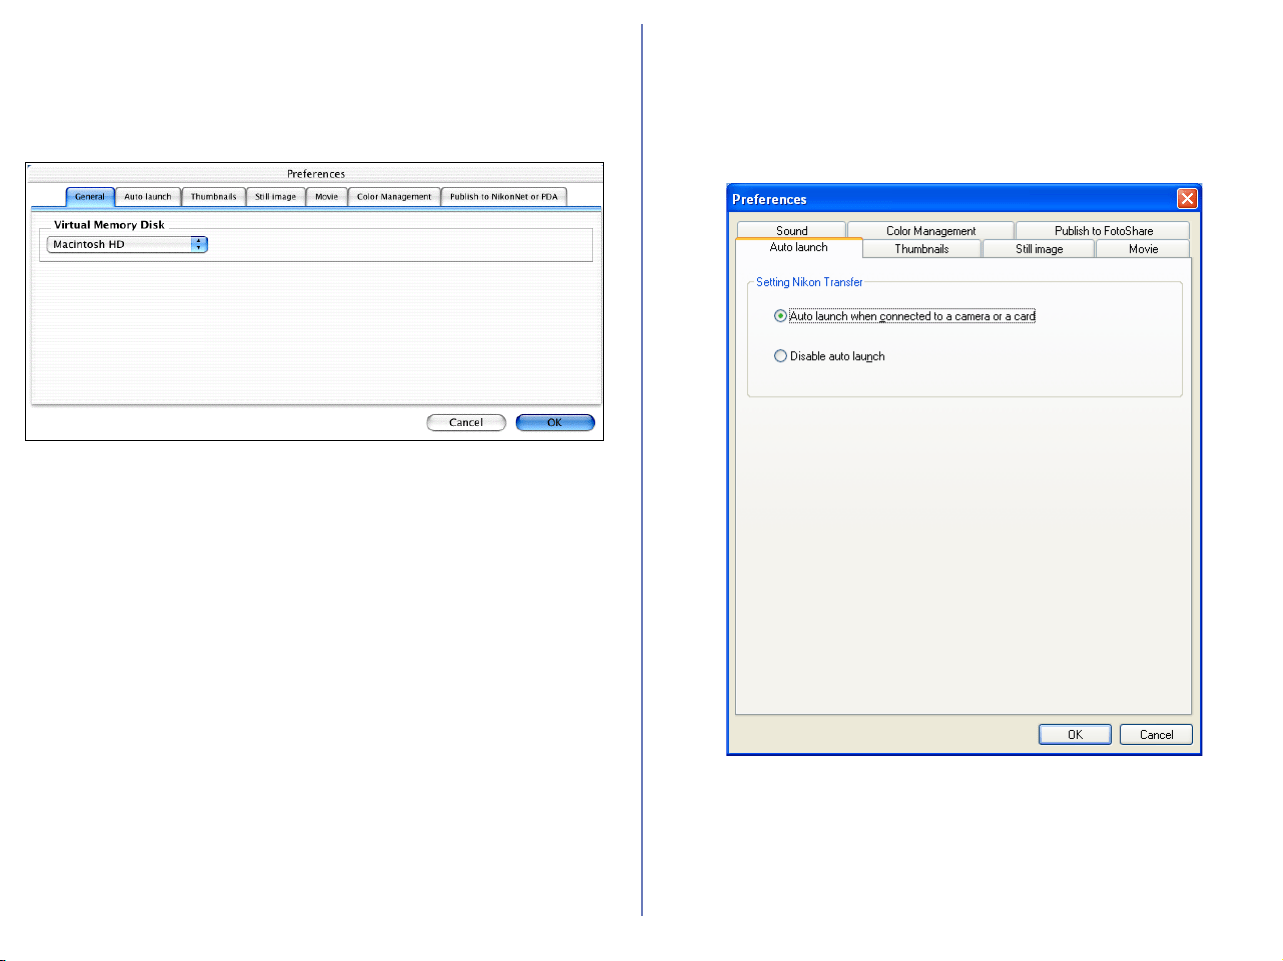
223
The General Tab (Macintosh only)
Temporary data storage settings
Temporary image data will be stored to the folder specified in the
General tab.
Use the pulldown menu in the general tab to select the drive which
will be used to store cache and other temporary image data. The
default setting is the Virtual Memory Disk specified by the
operating system.
The Auto Launch Tab
Nikon Transfer launch settings
In the Auto launch tab, you can set how you want Nikon Transfer
to launch.
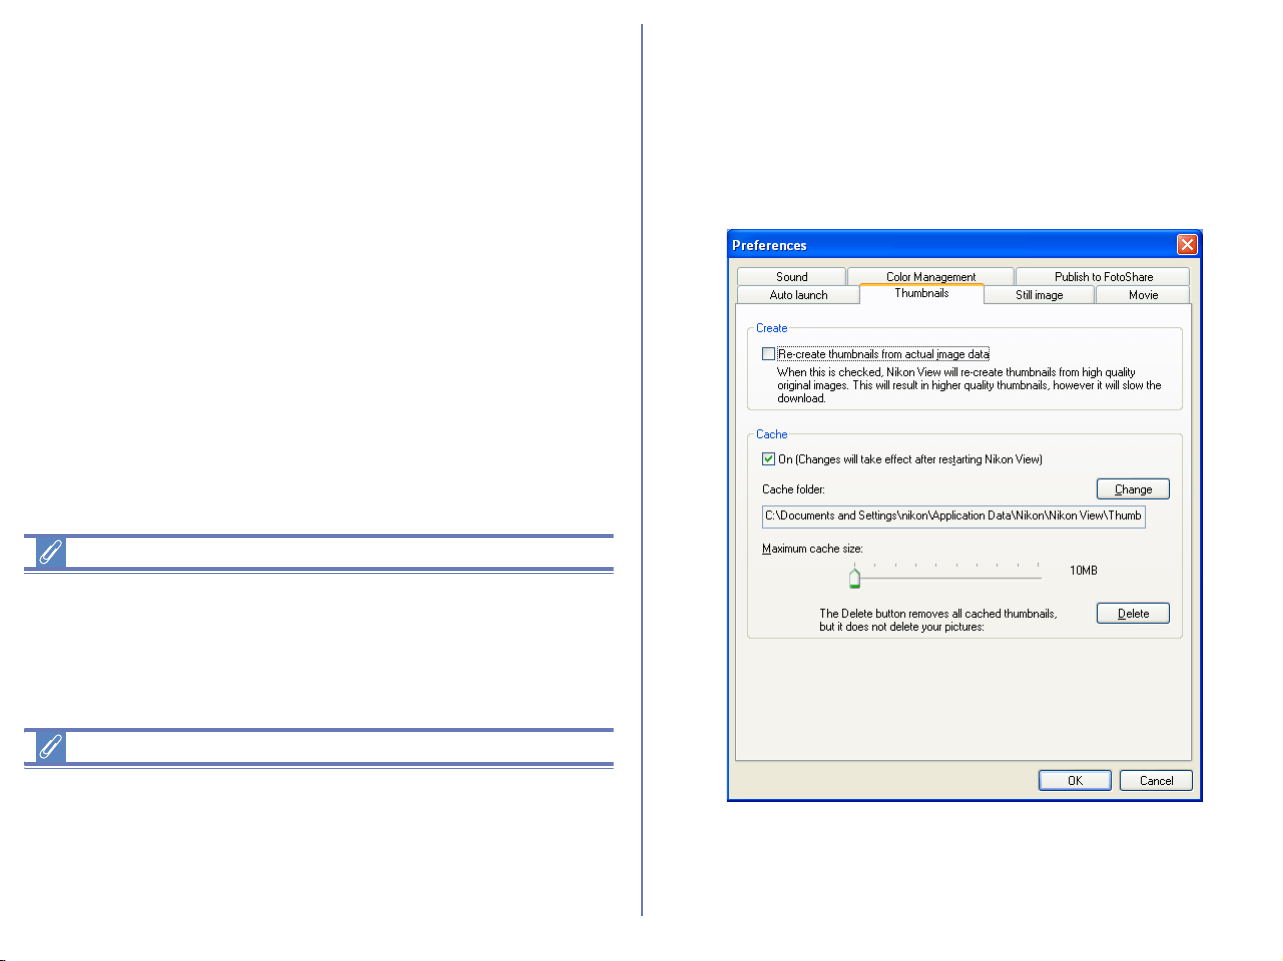
224
Auto launch when connected to a camera or a card
Select this option to launch Nikon View 6 automatically when you
turn the camera after connecting it to your computer or when you
insert the memory card into the card reader or card slot. When
Nikon View 6 launches, it displays Nikon Transfer.
Disable auto launch
Select this option if you do not want Nikon Transfer to launch
automatically when a camera is connected or memory card is
inserted.
The Disable auto launch option in Windows XP
Under Windows XP, the Disable auto launch option is effective
only with the D1/D1
X/D1H and COOLPIX990/880 cameras. When
other cameras are connected, the Disable auto launch option is
ignored and Nikon Transfer launches automatically.
Mac OS X
Under Mac OS X, images cannot be transferred when you launch
Nikon Transfer from the Tool menu.
Always select the Auto launch when connected to a camera or
a card option to transfer images.
The Thumbnails Tab
Thumbnails data settings
The Thumbnails tab contains options that determine how the
thumbnails displayed in the Nikon Browser thumbnail list area are
created and how to re-create them from cash data.
Windows
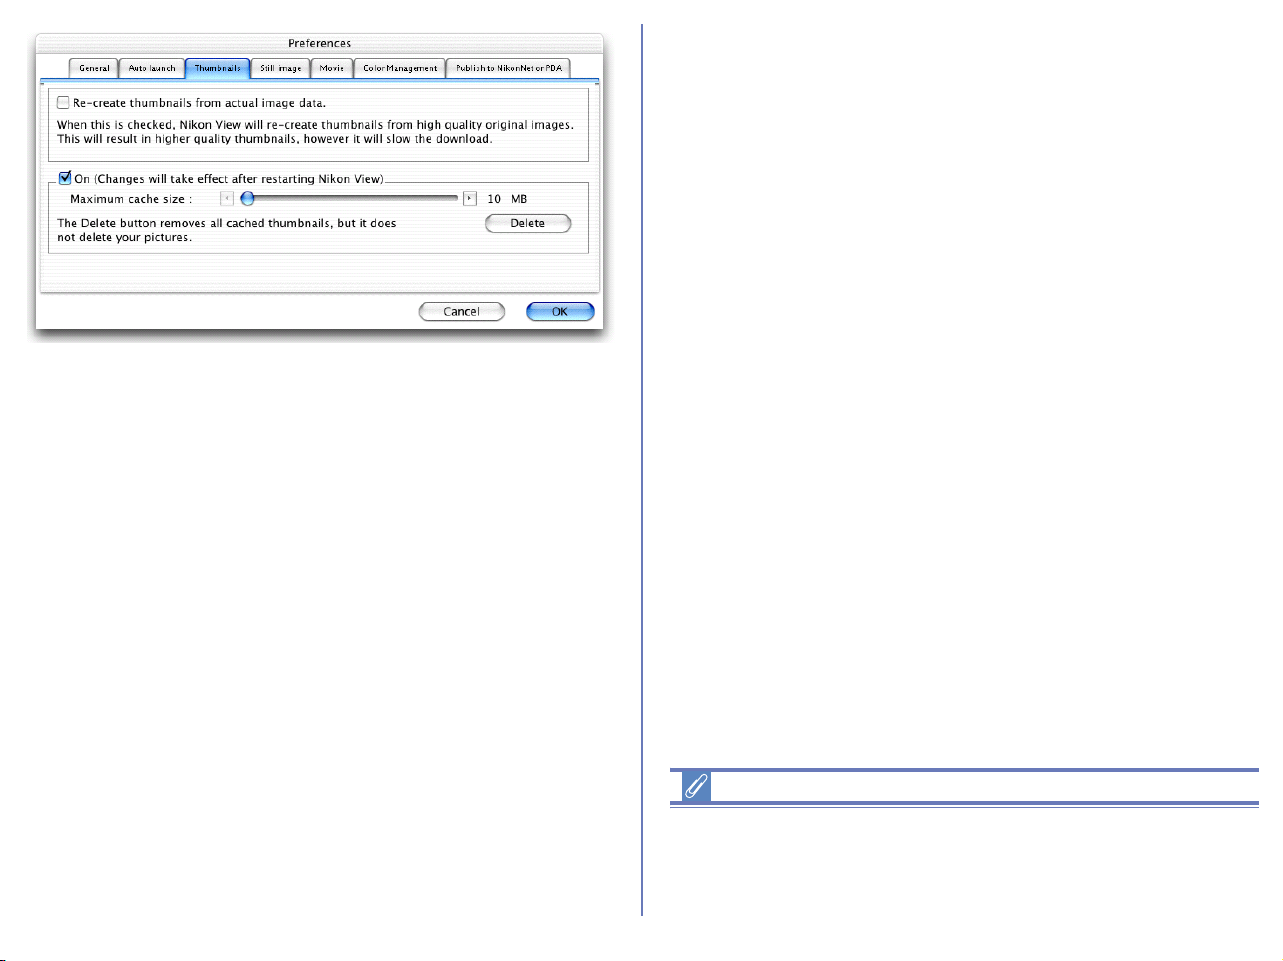
225
Create area
Re-create thumbnails from actual image data
Select this check box to regenerate a high quality thumbnail from
the original image data.
If this check box is cleared, then the thumbnail data present in the
image file is used for display. If there is no thumbnail data, the
operating system's generic file icons may appear in the thumbnail
list area.
Cache area
On (Changes will take effect after restarting Nikon View)
If you select this check box, thumbnails that have already been
displayed in Nikon Browser will be created from the cache data,
decreasing the amount of time needed to display the thumbnails.
Cache folder (Windows only)
The cache folder field specifies the location to which cache files will
be saved. If you wish to change the location, click Change and
specify a new location.
Maximum cache size slider
Use the slider to set the maximum size of the cache file. The
maximum size can be set in the range of 10 MB to 100MB, at 10
MB intervals. If you reduce the maximum cache size, the current
cache data will be deleted (Windows only).
Delete all thumbnails saved in cache
Click this button to delete all cached data before launching Nikon
Browser next time.
Cache settings
Changes to cache settings are not put into effect until Nikon
Browser is restarted.
Macintosh
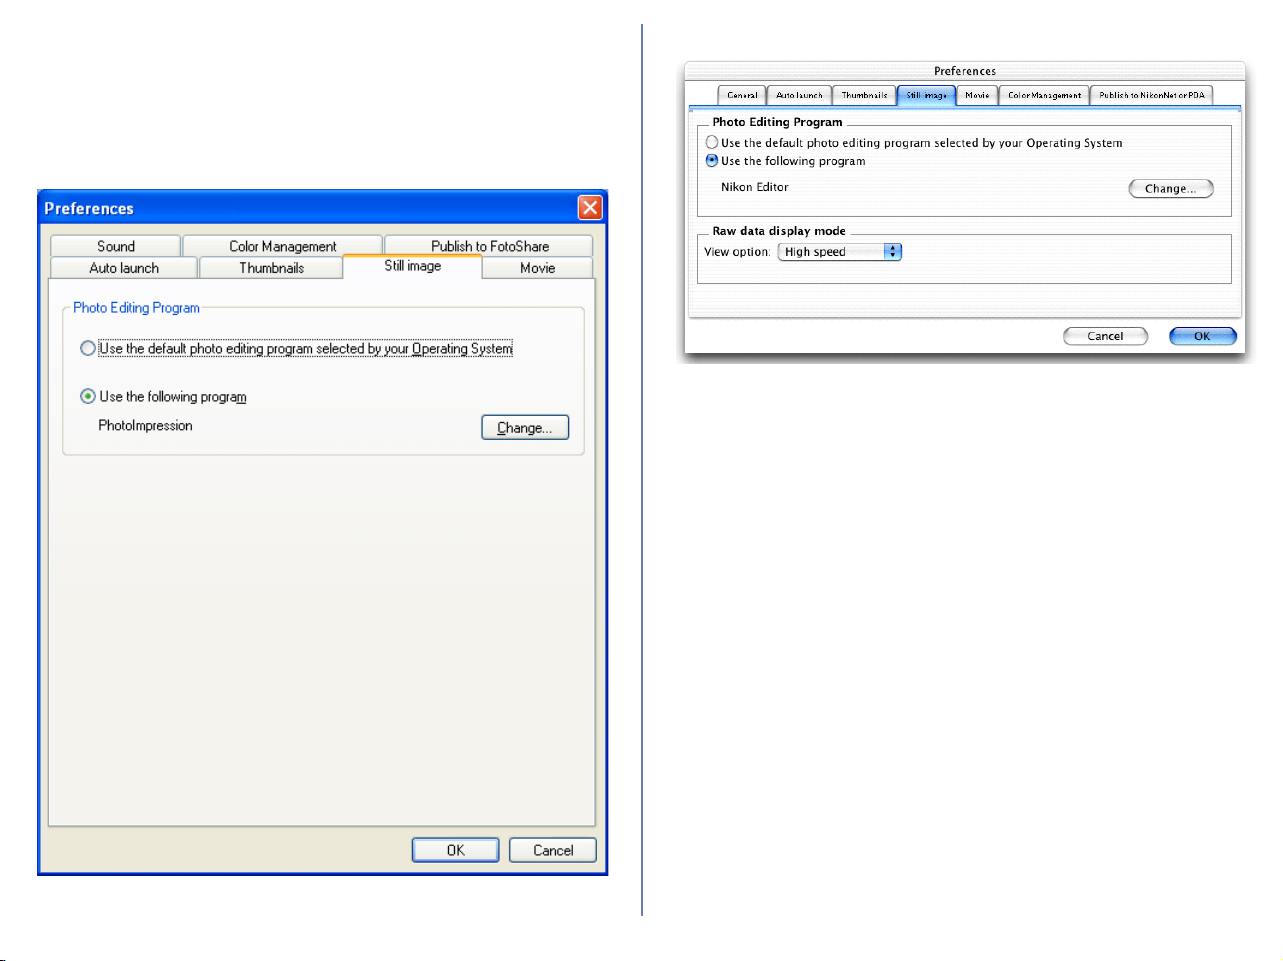
226
The Still Image Tab
Selecting an image editing program
In the Still Image tab you can specify a program to edit still
images. The specified program will launch when you select Edit
from the File menu of Nikon Browser or Nikon Viewer.
Photo Editing Program area
Use the default photo editing program selected by your
Operating System
Select this option if you want the operating system to display the
selected image in the default image editing program.
Use the following program
Select this option if you want the operating system to display the
selected image in a specified image editing program. To specify a
program, click Change and select the program in the Select
program dialog box.
Windows
Macintosh

227
When you select a program, its name is displayed.
RAW data display mode (Macintosh only)
Select the mode to display RAW(NEF) image files. You can choose
from either High quality or High speed.
High quality
Choose this option to maximize image quality when images are
viewed in close up. The time taken to display images will increase.
High speed
Choose this option to reduce the time that it takes to display RAW
images. Some images may seem rough and uneven at higher
zoom ratios. For improved display times, an image based on a
small preview embedded in the original picture may sometimes be
substituted for the real image. When this occurs, "Draft Display"
will appear in the title bar. If you have selected Save large
previews for NEF files in the Nikon Capture 3 Editor (not bundled)
Preferences dialog, a large preview 1,600 pixels on its longest side
will be embedded in the original image, allowing the image to be
rapidly scaled to fit the Viewer window. Zooming in on this image
will cancel draft mode, and the zoom ratio will be displayed in the
title bar.
Windows
Macintosh
When displayed image is zoomed in
zoom ratio
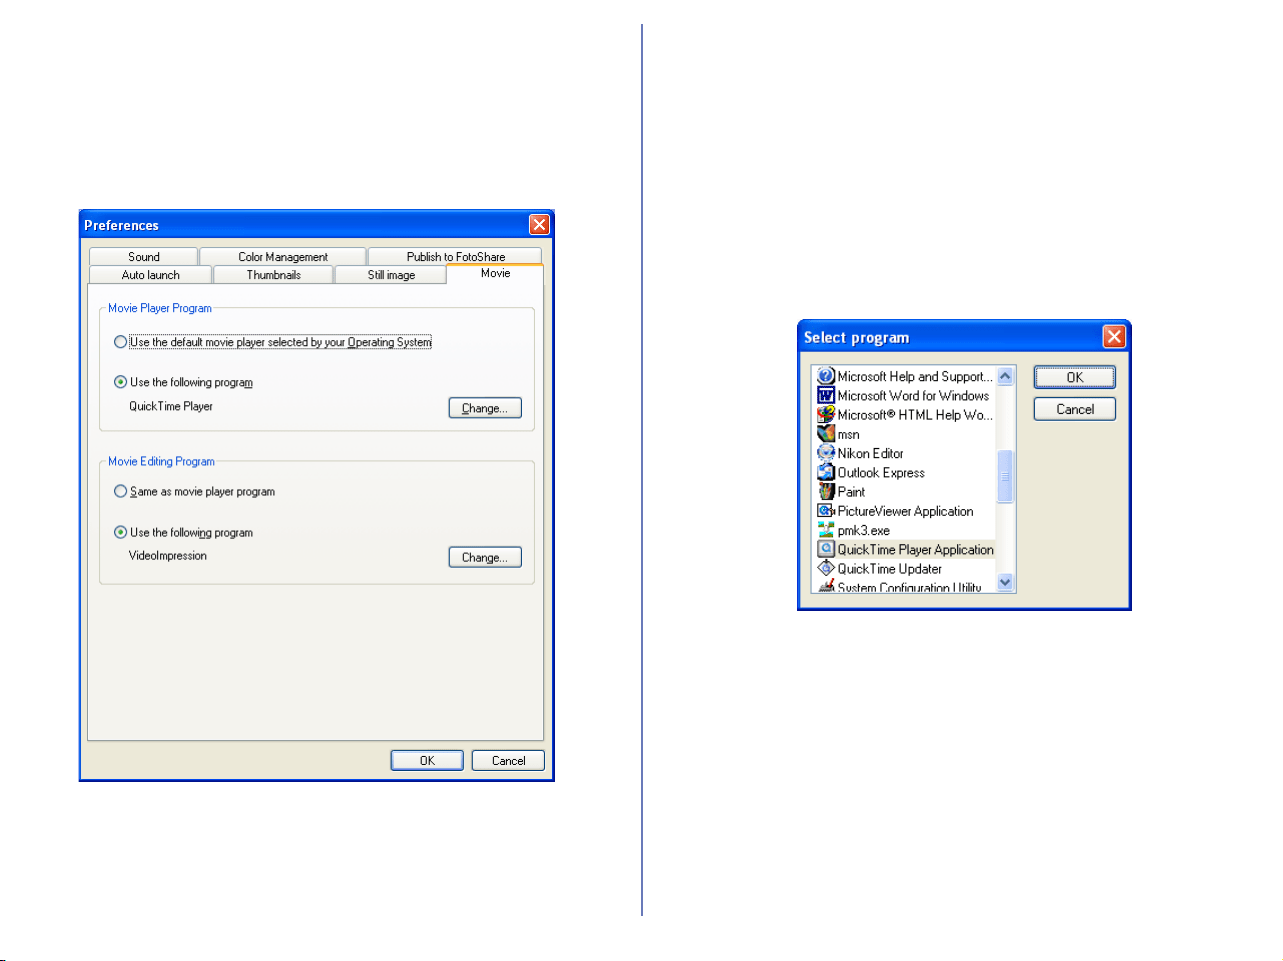
228
The Movie Tab
Selecting a movie player program
In the Movie tab, you can specify a program to play back or edit
movies. The selected program will launch when you select a movie
file thumbnail in Nikon Browser's thumbnail list area.
Movie Player Program area
Use the default movie player selected by your Operating
System
Select this option if you want the operating system to play back the
movie in the default program.
Use the following program
Select this option if you want the specified program to launch and
play back the movie. To specify a program, click Change and
select the program in the Select program dialog box.
Windows
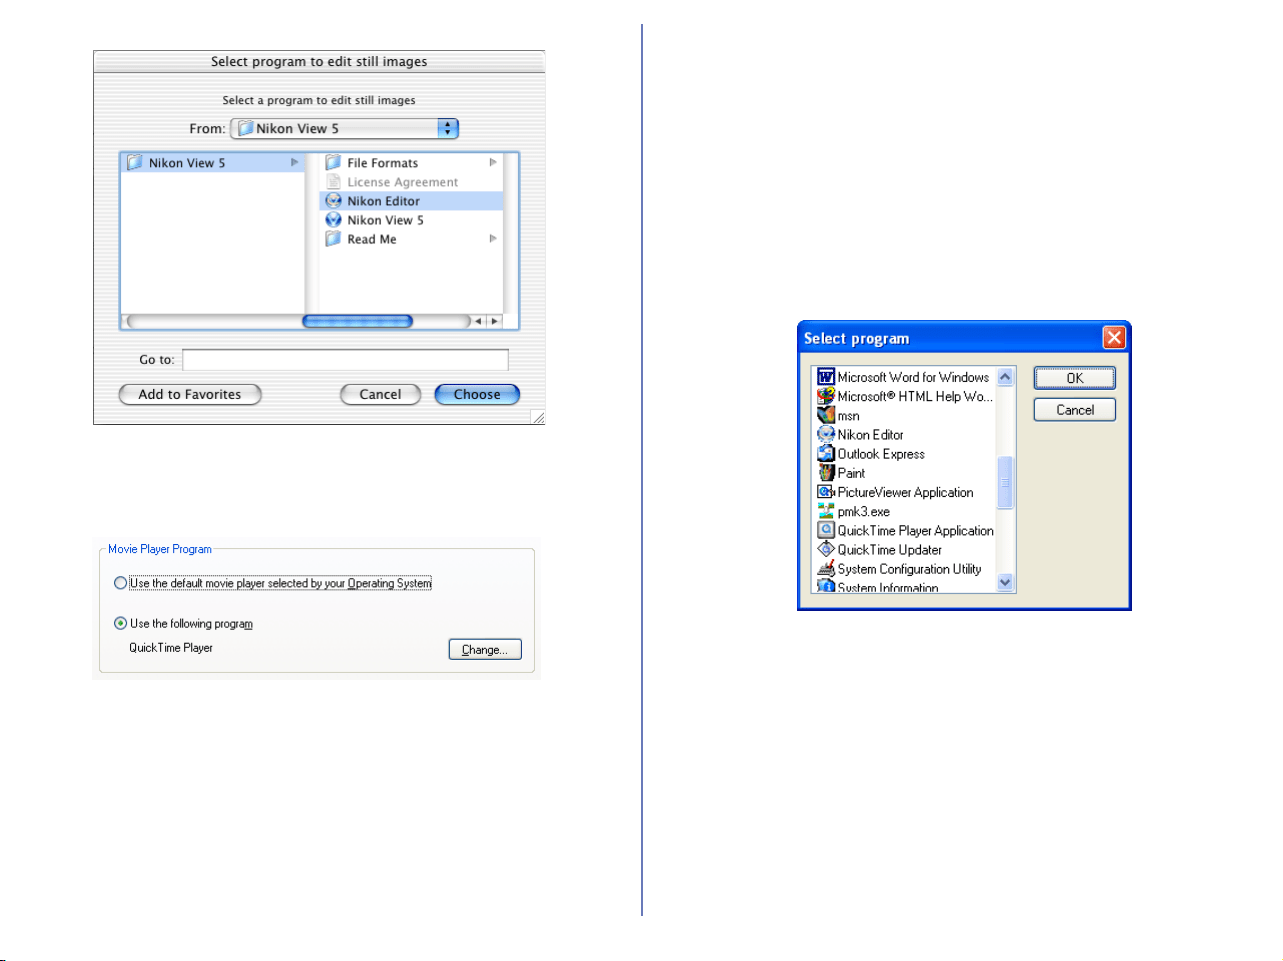
229
When you select a program, its name is displayed.
Movie Editing Program area
Same as movie player program
Select this option if you want the program specified in the Movie
Player Program area to launch and display the movie for editing.
Use the following program
Select this option if you want the specified program to launch and
display the movie for editing. To specify a program, click Change
and select the program in the Select program dialog box. When
you select a program, its name is displayed.
Macintosh
Windows
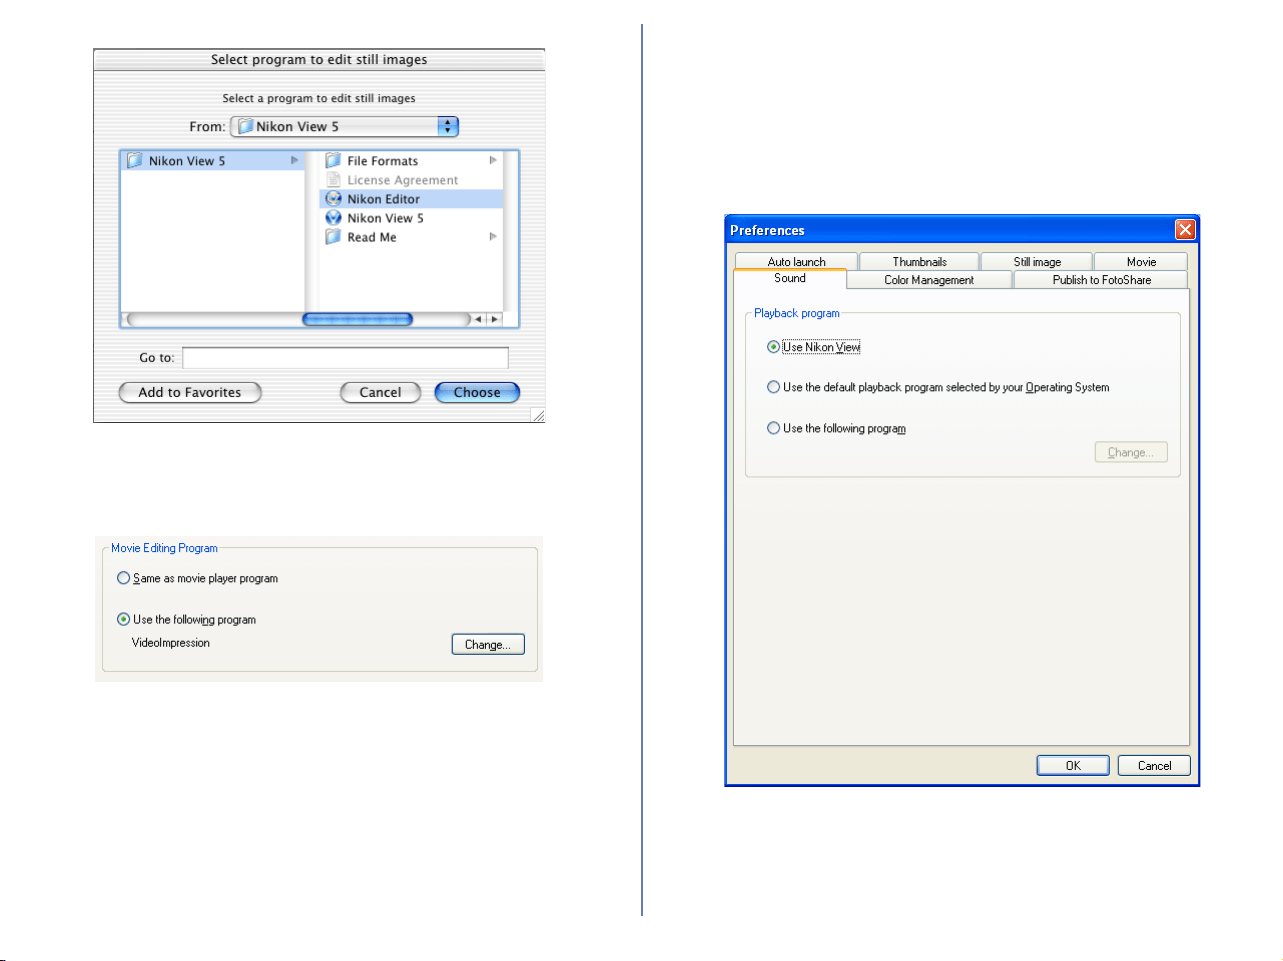
230
When you select a program, its name is displayed.
The Sound Tab (Windows only)
Selecting a program to play back voice memos
Use the Sound tab to specify which program will be used to play
back the voice memo when an image file containing a voice memo
is selected in Nikon Browser.
Macintosh
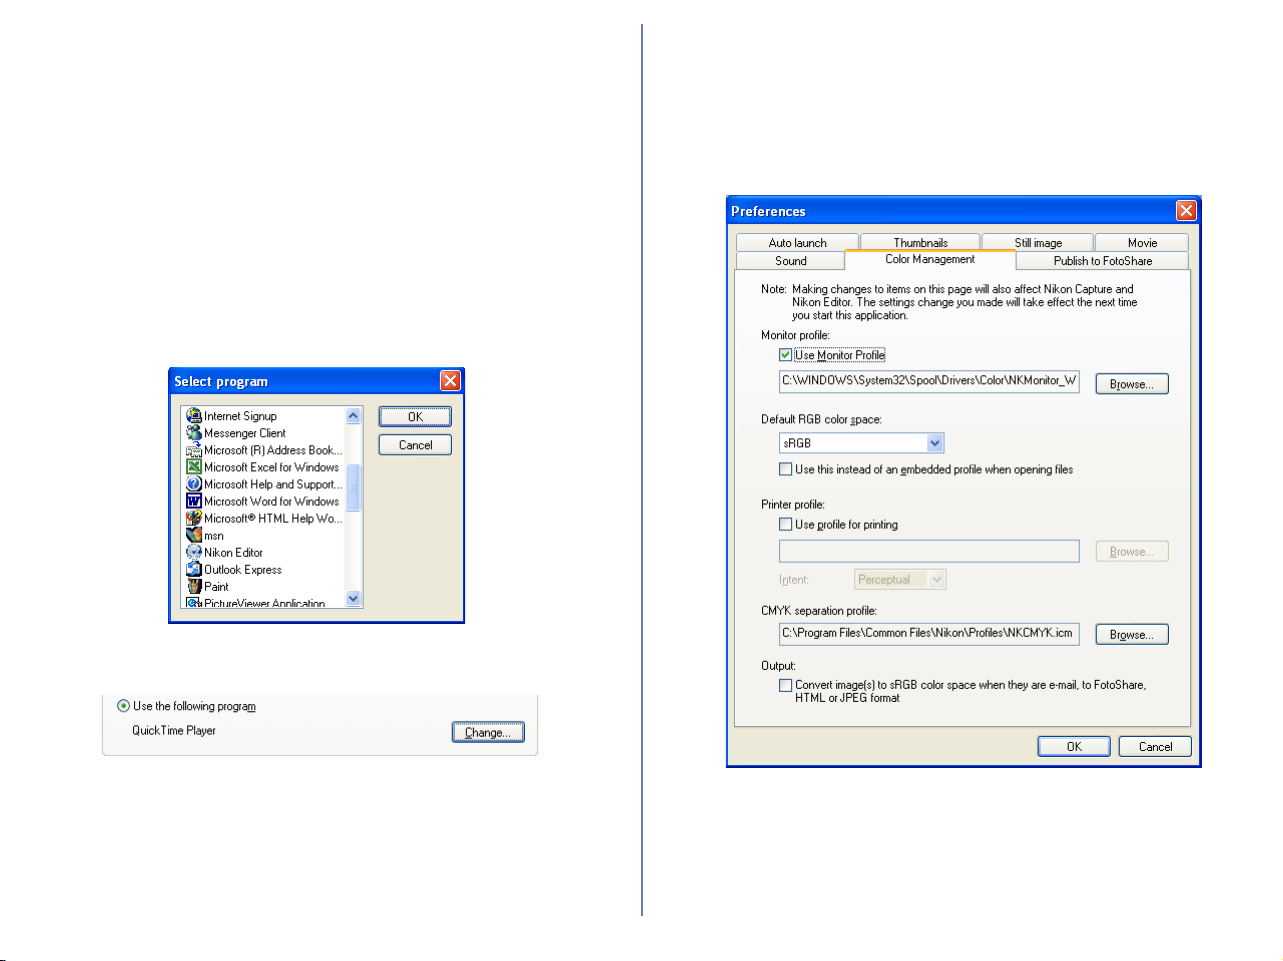
231
Playback Program area
Use Nikon View
Voice memos will be played back in Nikon View.
Use the default playback program selected by your
Operating System
The application assigned by the OS to the selected image file will
start and play back the voice memo.
Use the following program
The specified application will start and play back the voice memo.
To specify the application, click Change and select an application
from the list in the dialog box which appears.
When you select a program, its name is displayed.
The Color Management Tab (Windows)
The Color Management tab is where you specify the color
management profiles used for displaying images on your monitor,
editing and saving RGB images, and saving and printing CMYK
images.
Monitor profile
The ICC monitor profile used to adjust the display for the non-linear
characteristics of your monitor is displayed here. To choose a
different profile, click the Browse... button.
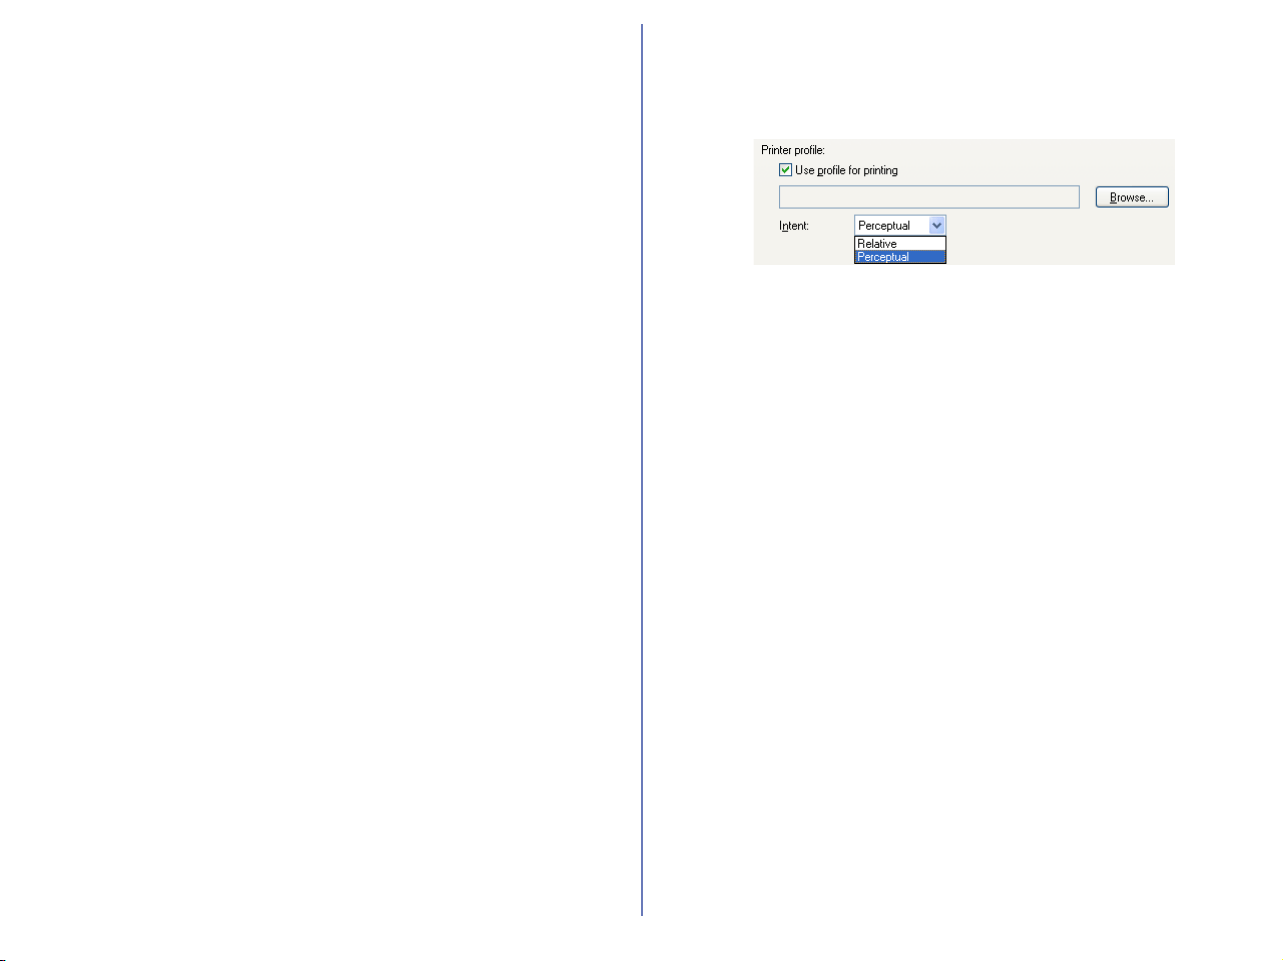
232
Default RGB color space
The output color-space profile used when working with RGB
images can be selected from sRGB, Bruce RGB, NTSC (1953),
Adobe RGB (1998), CIE RGB, Adobe Wide RGB, Apple RGB, and
Color Match RGB.
If Use this instead of an embedded profile when opening files
is checked, this RGB color space profile will be used for all images.
If it is not checked, the profile embedded in each image will be
used.
Printer Profile
Specifies the printer profile to be used when printing images.
Use profile for printing
If this option is checked, you can choose a profile for printing by
clicking the Browse... button. The selected profile will appear in
the adjacent text box. If this option is not checked, the default
RGB color space will be used.
Intent
If you have chosen to use a printer profile, the type of matching to
be performed can be selected from Relative and Perceptual.
(Depending on the profile, changing the matching method may
produce no change in output. This option is not supported with
some profiles; consult the manufacturer for details.)
Relative
Colors not in the gamut of the selected printer profile will be printed
using the closest colors available. Other colors are not affected.
Perceptual
If the image contains colors not in the gamut of the selected printer
profile, all colors in the image will be compressed to fit the gamut.
CMYK separation profile
Lists the profile used to convert RGB images to CMYK when
saving images in CMYK-TIFF format. To choose a different profile,
click the Browse... button.
When you change a setting in the Color Management tab, you will
need to restart Nikon Editor in order for the changes to take effect.
After you change the settings and click OK, the dialog box will be
displayed. Click OK to close the dialog box, and then restart the
application.
Output
Check this option to convert the color space of image(s) to sRGB
when you sent the image(s) by e-mail, upload to FotoShare (for
European resident) or NikonNet (for North and South American
resident) export as HTML file, save as JPEG file, or download to
PDA devices.
If the color space of the image(s) is already sRGB no conversion of
the color space will be done.
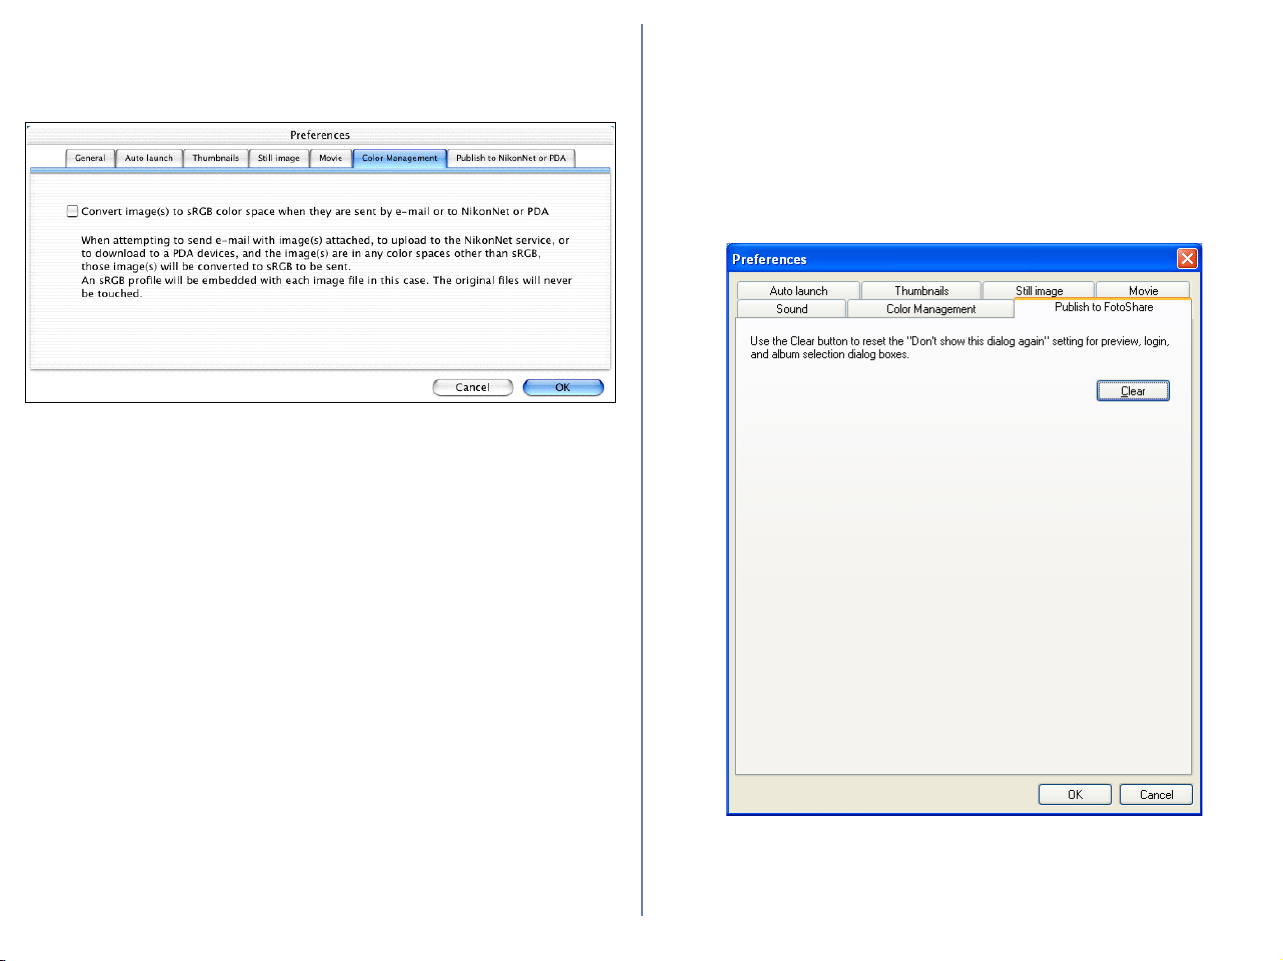
233
The Color Management Tab (Macintosh)
The color management tab in Macintosh allows you to specify the
settings on color space conversion.
Convert image(s) sRGB color space when they are sent
by e-mail or to FotoShare (for European resident)
Check this option to convert the color space of image(s) to sRGB
when you send the image(s) by e-mail, upload FotoShare.
If the color space of the image(s) is already sRGB, no conversion
of the color space will be done.
Convert image(s) sRGB color space when they are sent
by e-mail or to NikonNet or PDA (for North and South
American resident)
Check this option to convert the color space of image(s) to sRGB
when you send the image(s) by e-mail, upload to NikonNet, or
download to PDA devices.
If the color space of the image(s) is already sRGB, no conversion
of the color space will be done.
The Publish to FotoShare Tab (for European
resident)
Resetting the dialog box option
In the Publish to FotoShare tab, you can reset the setting for the
Don't show this dialog again check box in the dialog boxes that
appear when uploading images to FotoShare.
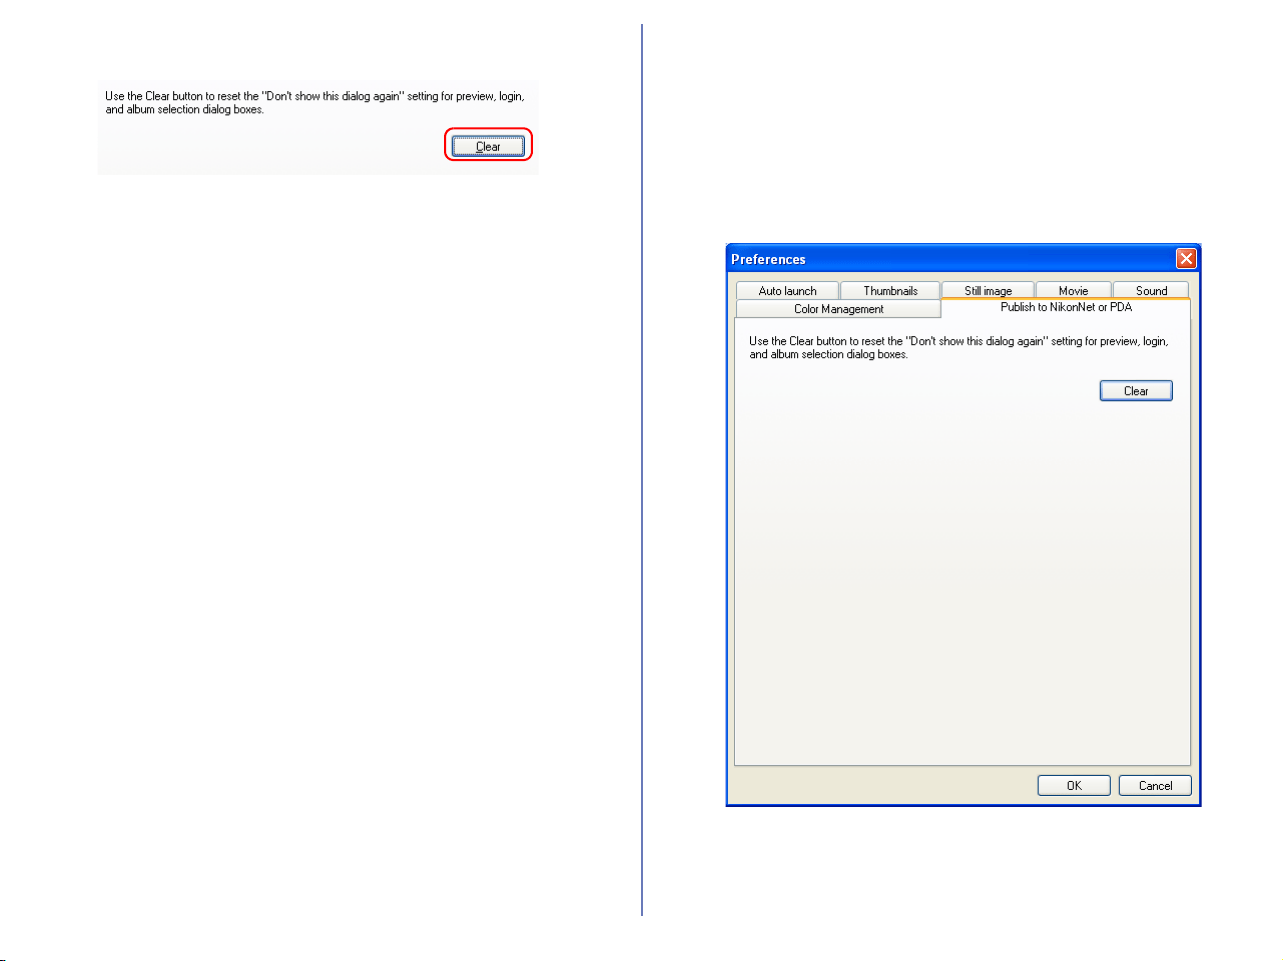
234
Clear button
Click to clear the Don't show this dialog again check boxes in the
following dialog boxes: Module Selection, Upload Preview,
FotoShare User Information, and Choose Album.
The Publish to NikonNet or PDA Tab (for
North and South American resident)
Resetting the dialog box option
In the Publish to NikonNet or PDA tab, you can reset the setting
for the Don't show this dialog again check box in the dialog
boxes that appear when uploading images to NikonNet.
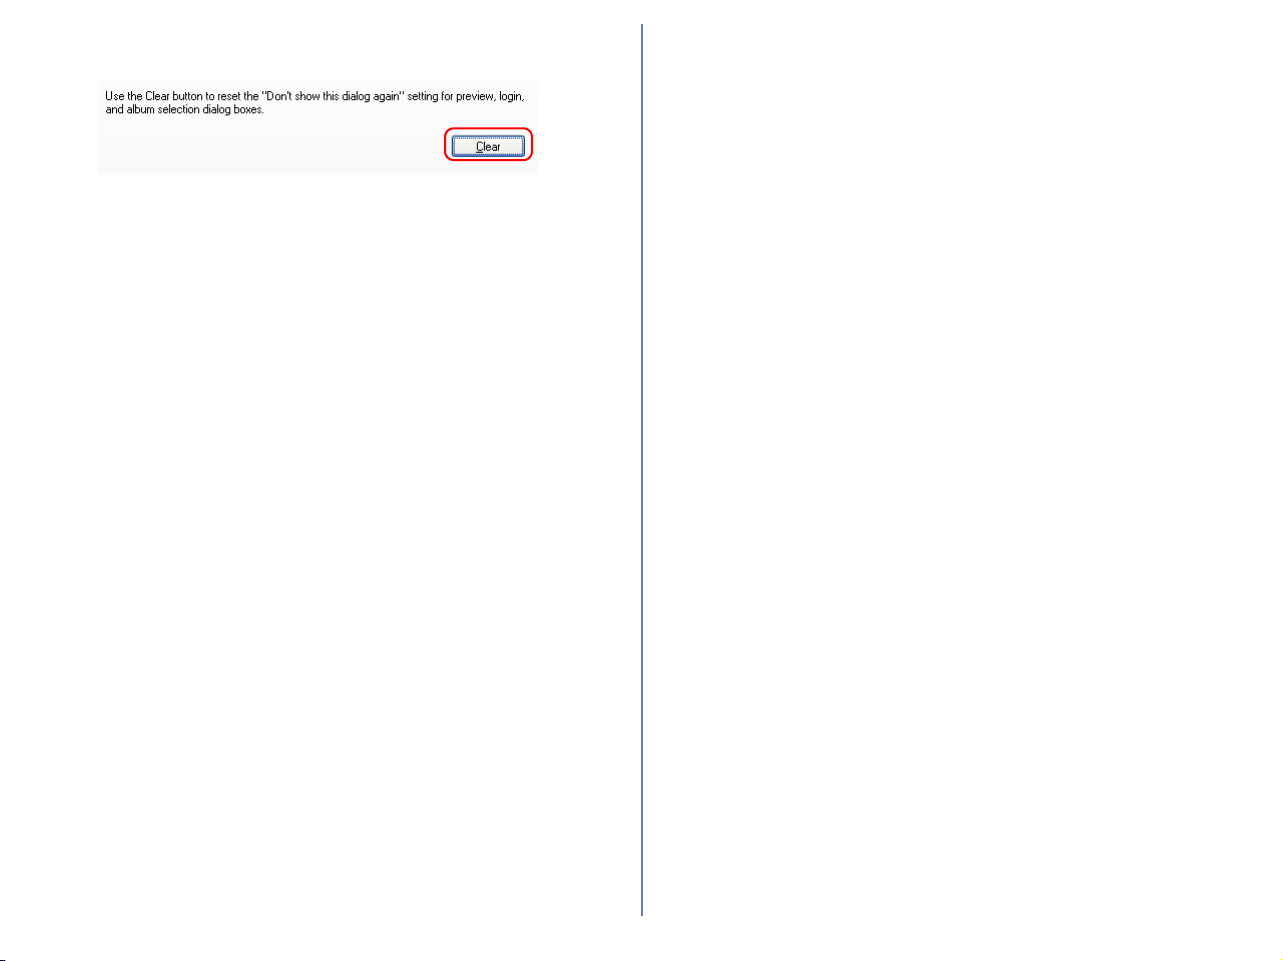
235
Clear button
Click to clear the Don't show this dialog again check boxes in the
following dialog boxes: Module Selection, Upload Preview,
NikonNet User Information, and Choose Album.
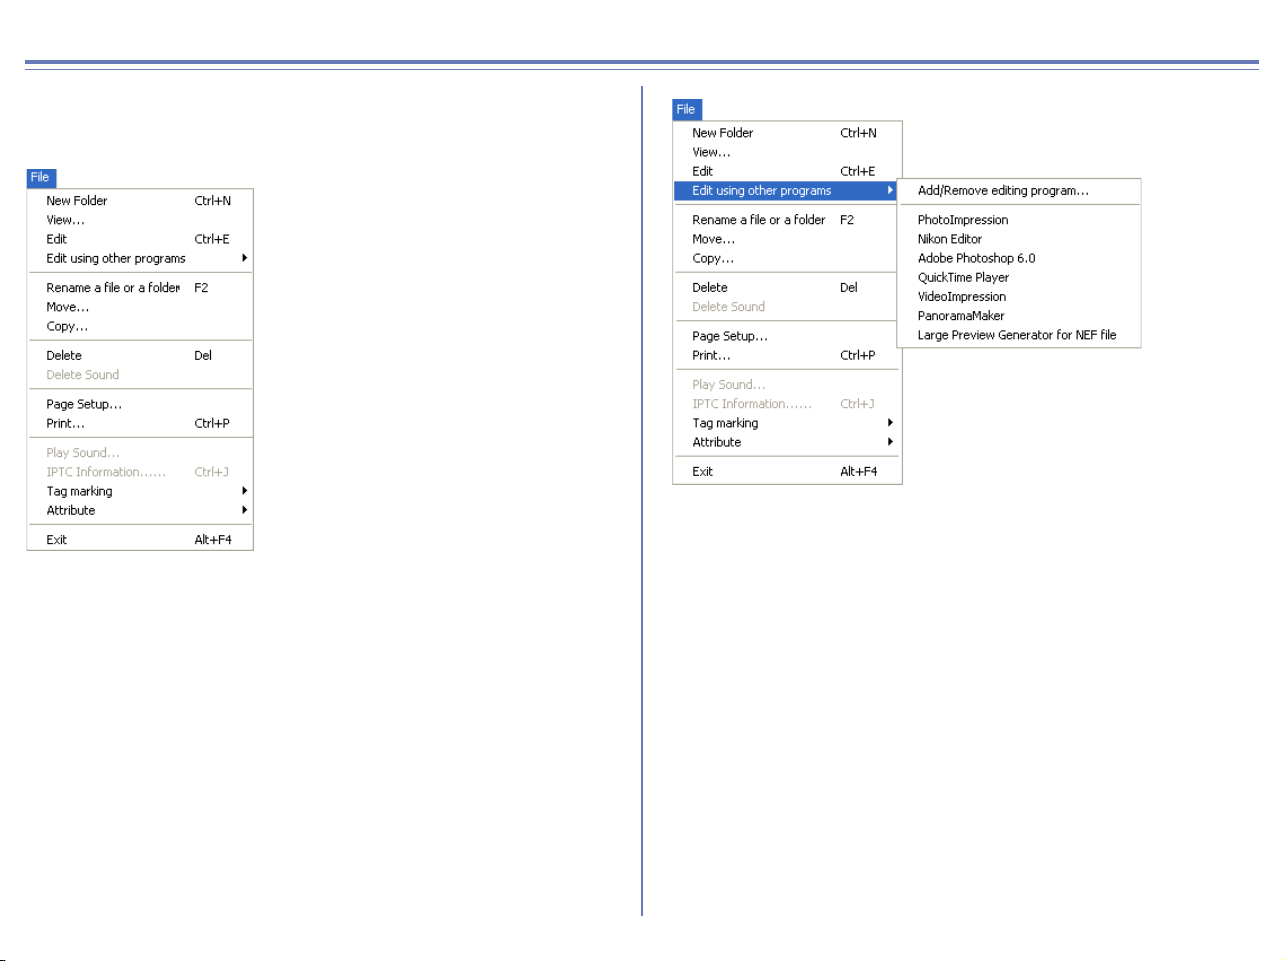
236
Nikon Browser Menus
Windows
File Menu
New Folder
Creates a new folder.
View
Opens the image file associated with the selected thumbnail in
Nikon Viewer.
Edit
Edits the image file associated with the selected thumbnail using
the specified program.
Edit using other programs
Displays the Add/Remove editing program command in the
submenu, which allows you to register image-editing programs.
Add/Remove editing program
Registers image editing programs. Also allow you to change the
name of the program displayed in the menu.
Rename a file or a folder
Changes the name of selected image file or folder.
Move
Move the image file associated with the selected thumbnail.
Copy
Copy the image file associated with the selected thumbnail.
Delete
Deletes the image file associated with the selected thumbnail.
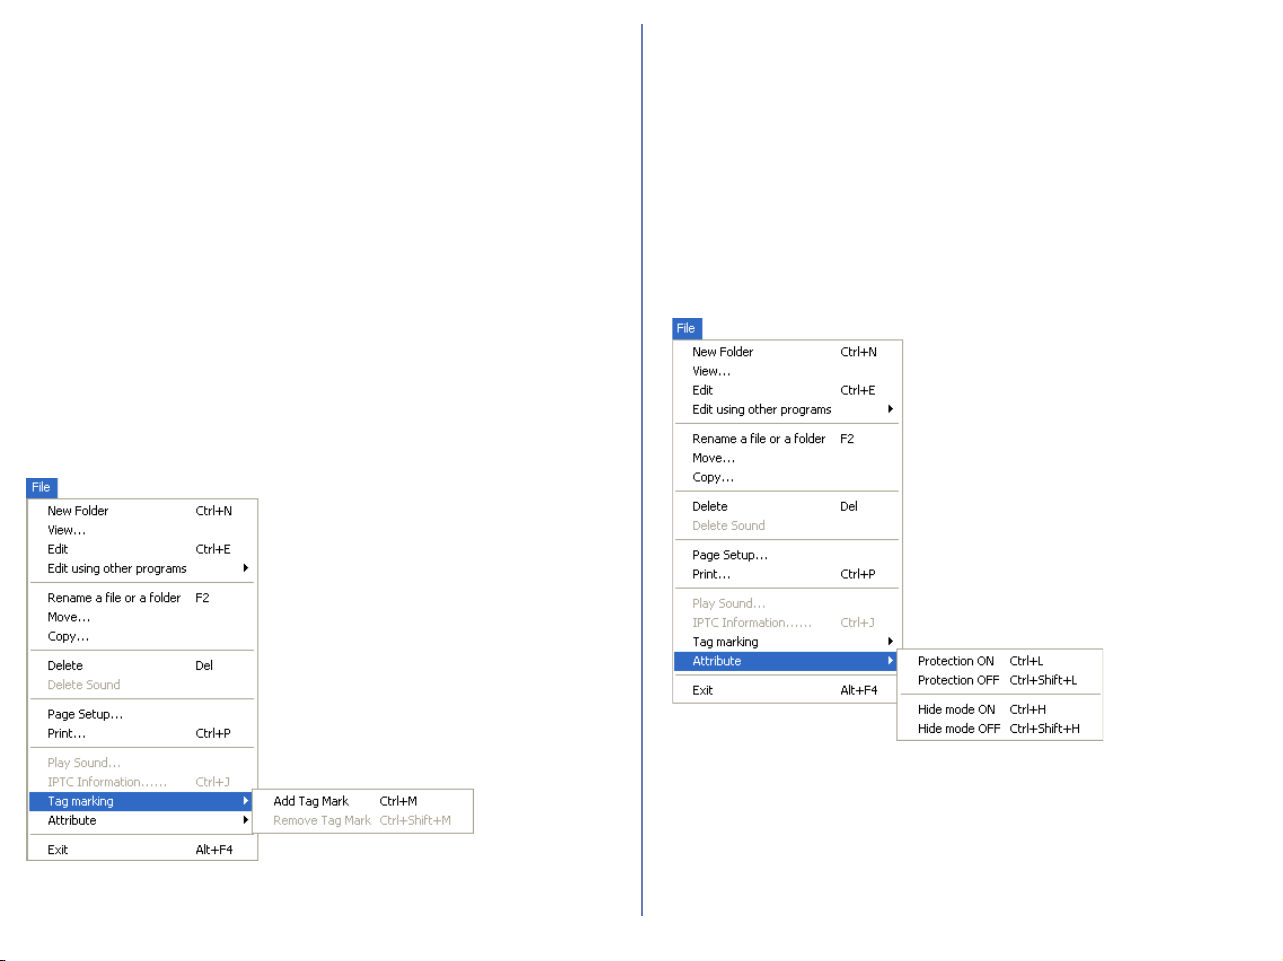
237
Windows — Cont'd
Delete Sound
Deletes the voice memo attached to current image.
Page Setup
Sets the page size for printing.
Print
Prints the selected image(s).
Play Sound
Plays voice memo attached to current image.
IPTC Information
Displays the file information.
Tag marking
Use the commands to toggle Add or Remove the tag mark of the
selected image. Displays the following commands in the submenu:
Add Tag mark and Remove Tag mark.
Add Tag Mark
Add Tag mark to the selected image file.
Remove Tag Mark
Remove Tag mark from the selected image file.
Attribute
Use the commands to toggle the attributes of the selected image
on and off. Displays the following commands in the submenu:
Protection attribute ON, Protection attribute OFF, Hide mode ON,
and Hide mode OFF.
Protection ON
Turns deletion protection on.
Protection OFF
Removes the protection setting from the selected file.
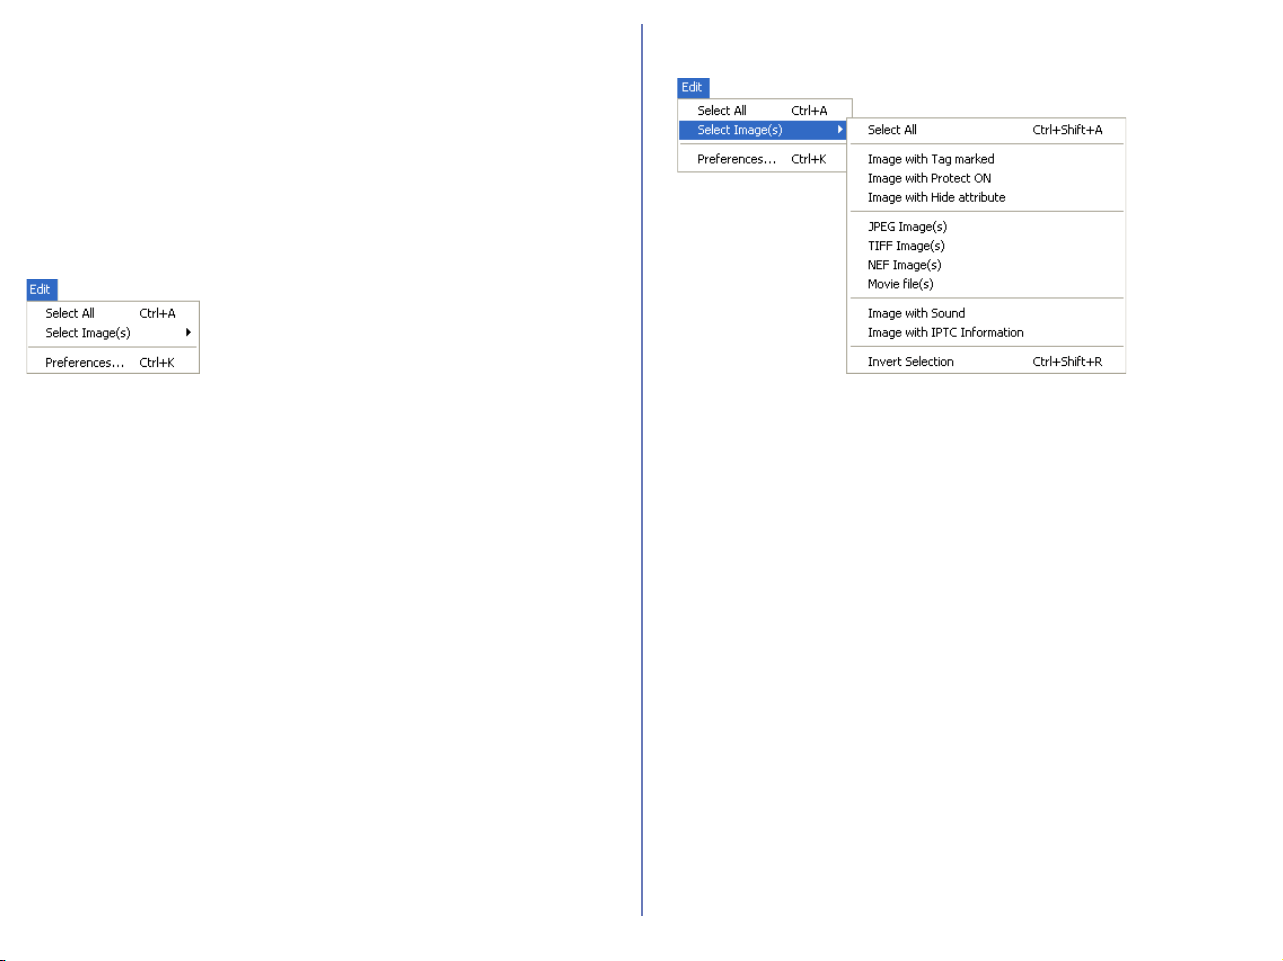
238
Windows — Cont'd
Hide mode ON
Hides the selected file.
Hide mode OFF
Removes hide setting from selected file.
Exit
Quits Nikon View 6.
Edit Menu
Select All
Selects all the displayed thumbnails.
Select Image(s)
Displays the following commands in the submenu: Select All
Images, Image with Tag marked, Image with Protect ON, Image
with Hide attribute, JPEG Images, TIFF Image(s), NEF Image(s),
Movie file(s), Image with Sound, Image with IPTC Information, and
Invert Selection. Use the commands to select all the thumbnails
that have the same attribute.
Select All
Selects all the displayed thumbnails.
Image with Tag marked
Selects all images with Tag mark.
Image with Protect ON
Selects all protected thumbnails.
Image with Hide attribute
Selects all hidden thumbnails.
JPEG Image(s)
Selects all thumbnails of JPEG image.
TIFF Image(s)
Selects all thumbnails of TIFF image.
NEF Image(s)
Selects all thumbnails of NEF image.
Movie file(s)
Selects all thumbnails of Movie file.
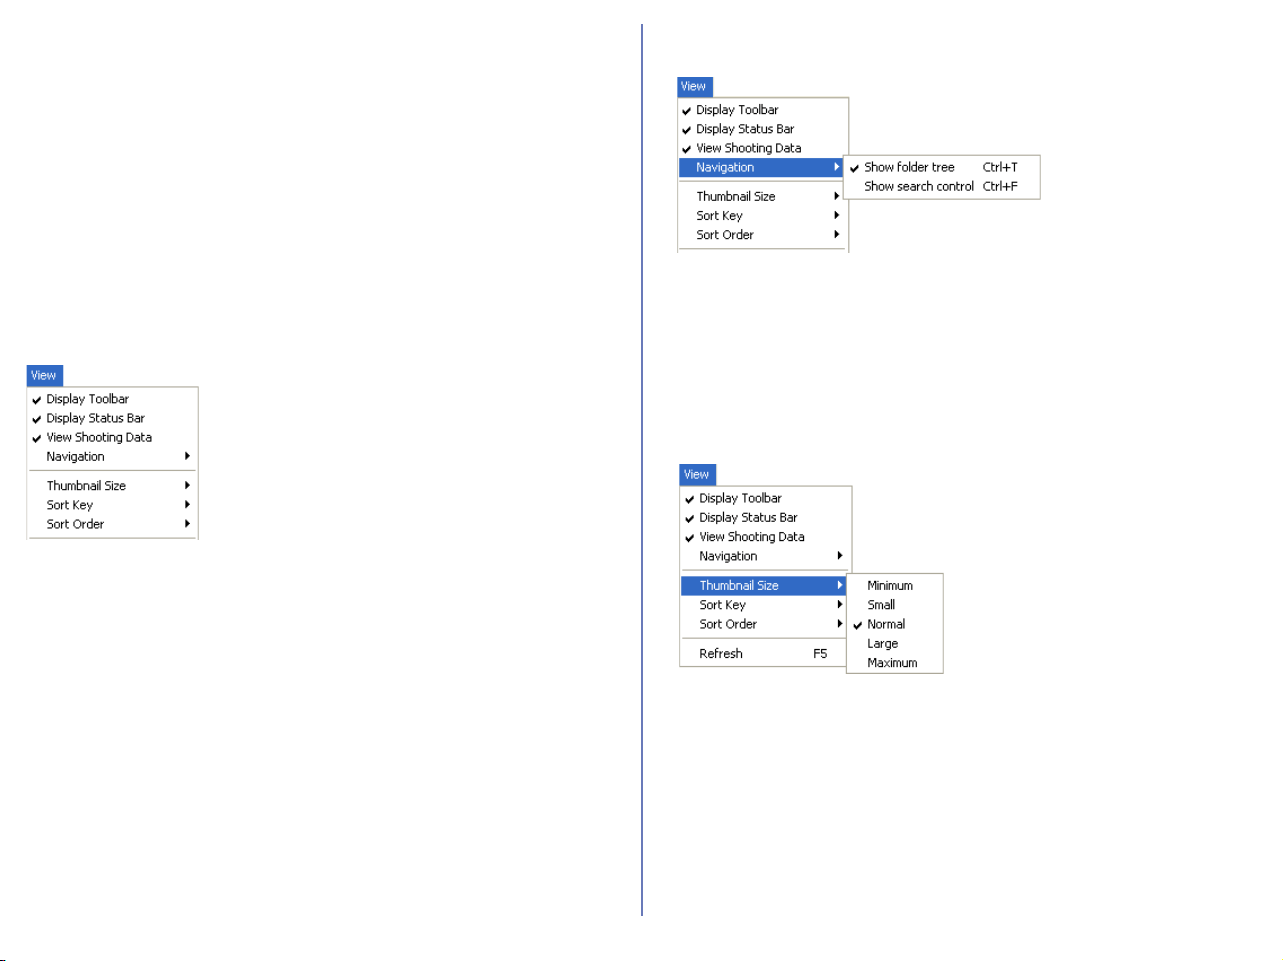
239
Windows — Cont'd
Image with Sound
Selects all thumbnails attached with sound.
Image with IPTC Information
Selects all thumbnails attached with file information.
Invert Selection
Invert the current selection.
Preferences
Displays the Preferences dialog box.
View Menu
Display Toolbar
Shows or hides the toolbar.
Display Status Bar
Shows or hides the status bar.
View Shooting Data
Shows or hides the Shooting Data area.
Navigation
Displays the following commands in the submenu: View Folders,
Show Find.
Use the commands to Show Folders or Find panel.
Show folder tree
Display folders tree.
Show search control
Display Find panel to specify the terms of file search.
Thumbnail Size
Displays the thumbnail size submenu:
Use the submenu to change the size of the thumbnails.
Minimum
Sets the size of thumbnails to 64 x 64 pixels.
Small
Sets the size of thumbnails to 96 x 96 pixels.
Normal
Sets the size of thumbnails to 128 x 128 pixels.
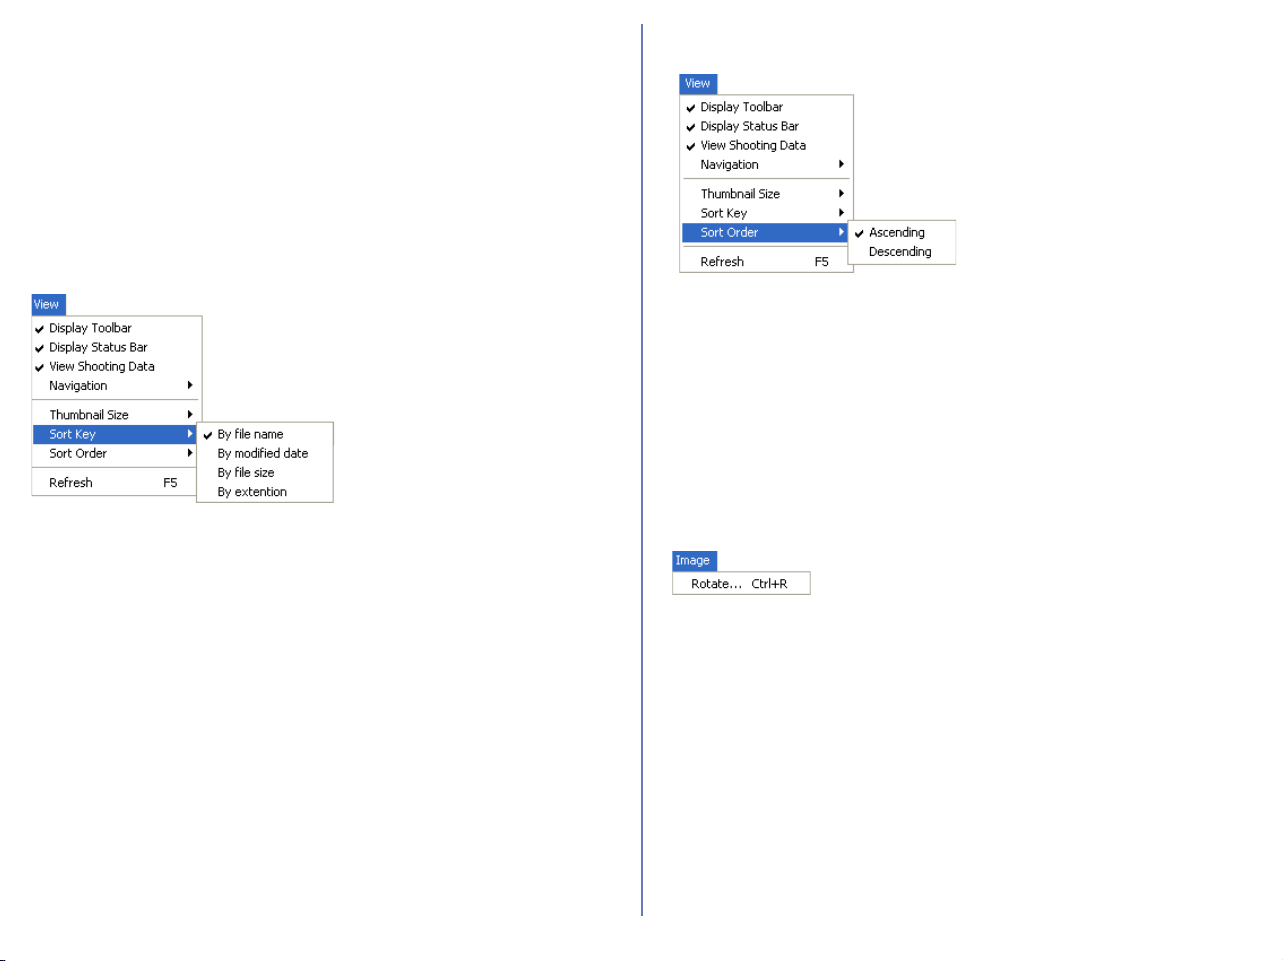
240
Windows — Cont'd
Large
Sets the size of thumbnails to 192 x 192 pixels.
Maximum
Sets the size of thumbnails to 256 x 256 pixels.
Sort Key
Displays the File name and Updated date and time commands in
the submenu. Use the commands to sort the thumbnails based on
the specified condition.
By file name
Sorts thumbnails based on the file names.
By modified date
Sorts thumbnails based on the up-dated date and time.
By file size
Sorts thumbnails based on the file size.
By extension
Sorts thumbnails based on the file Extension.
Sort Order
Displays the Ascending and Descending commands in the
submenu.
Ascending
Sorts thumbnails in ascending order of the selected Sort key.
Descending
Sorts thumbnails in descending order of the selected Sort key.
Refresh
Refreshes the information in the folder tree, thumbnail and
shooting information areas.
Image Menu
Rotate
Rotates selected thumbnails and associated images.
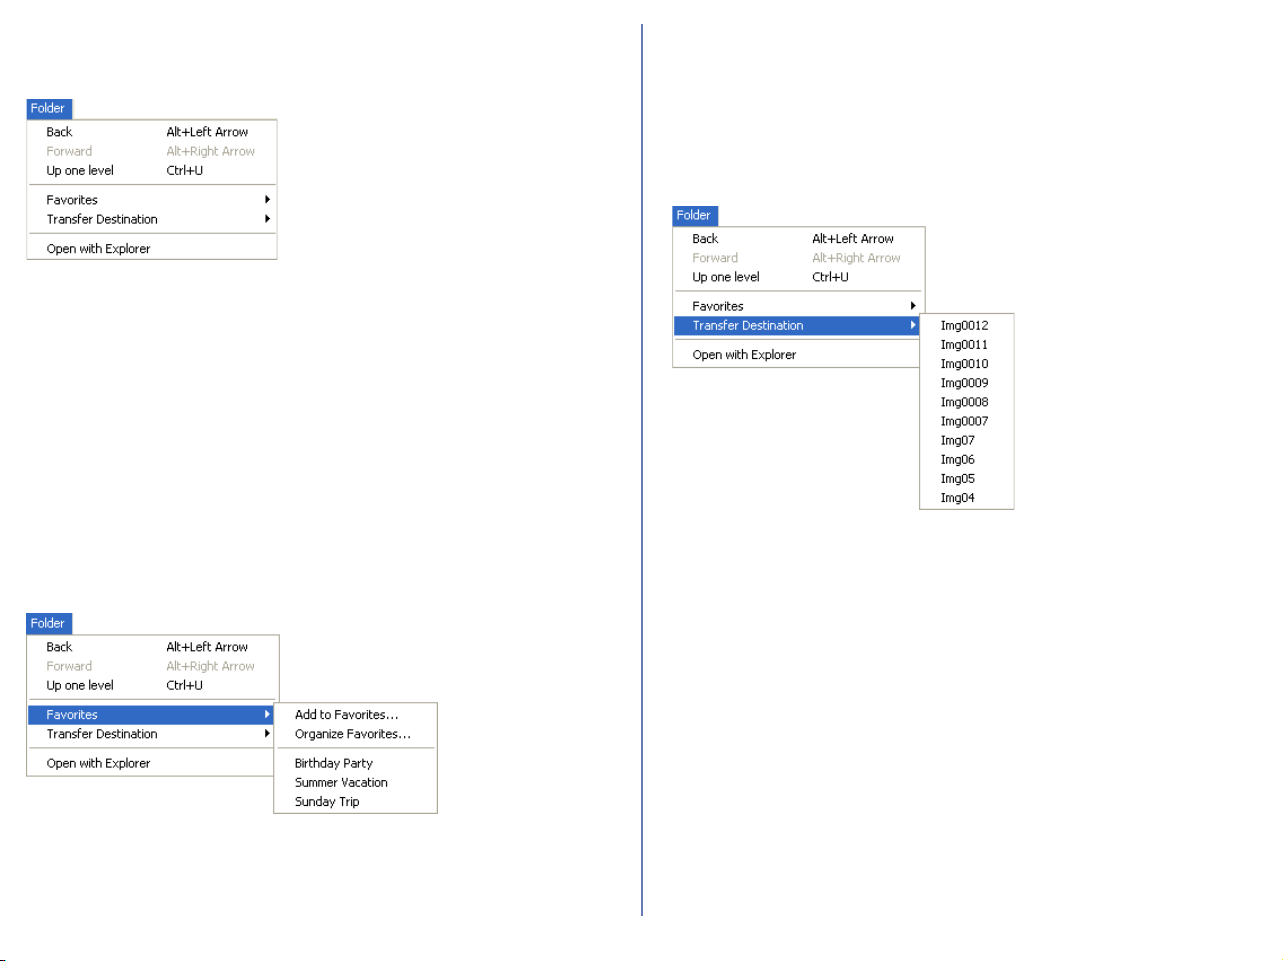
241
Windows — Cont'd
Folder Menu
Back
Goes back to the previously selected folder.
Forward
Takes you back to where you were when you selected the Back
command.
Up one level
Moves to the folder one level higher than the current folder in the
folder hierarchy.
Favorites
Displays the Add to Favorites and Organize Favorites commands
in the submenu. Use the commands to add the selected folder to
the Favorites or organize the folders you added.
Add to Favorites
Adds the selected folder to the Favorites. You can add up to 30
folders.
Organize Favorites
Organizes the folders added to Favorites. You can change the
name and order of the folders displayed in Favorites.
Transfer destination
Displays the 10 most recent transfer destinations.
Open with Explorer
Opens the folder that holds the selected thumbnail in Explorer.

242
Windows — Cont'd
Tools Menu
Launches Nikon Transfer
Launches Nikon Transfer.
Slideshow
Plays the selected thumbnails as a slideshow.
E-mail
E-mails the selected images using the application specified in the
Preferences dialog box.
Publish to FotoShare (for European resident)
Uploads the current image to FotoShare.
Publish to NikonNet or PDA (for North and South American
resident)
Uploads the current image to NikonNet, or sends the current image
to a PDA connected to your computer.
Export as HTML files
Creates HTML file with thumbnail using selected images.
Copy and resize as JPEG file(s)
Creates JPEG file from selected images.
Window Menu
Cascade
Arrange Nikon Browser and Nikon Viewer in cascade.
Horizontal
Arrange Nikon Browser and Nikon Viewer in horizontal.
Vertical
Arrange Nikon Browser and Nikon Viewer in vertical.
Display one-line of thumbnails at top
Arrange the image thumbnails in a row.
Display one-line of thumbnails at side
Arrange the image thumbnails in a column.
Help Menu
Help topics
Displays Nikon View 6 help topics.
About Nikon View
Displays version and copyright information for Nikon View 6.
for European resident
for North and South American
resident
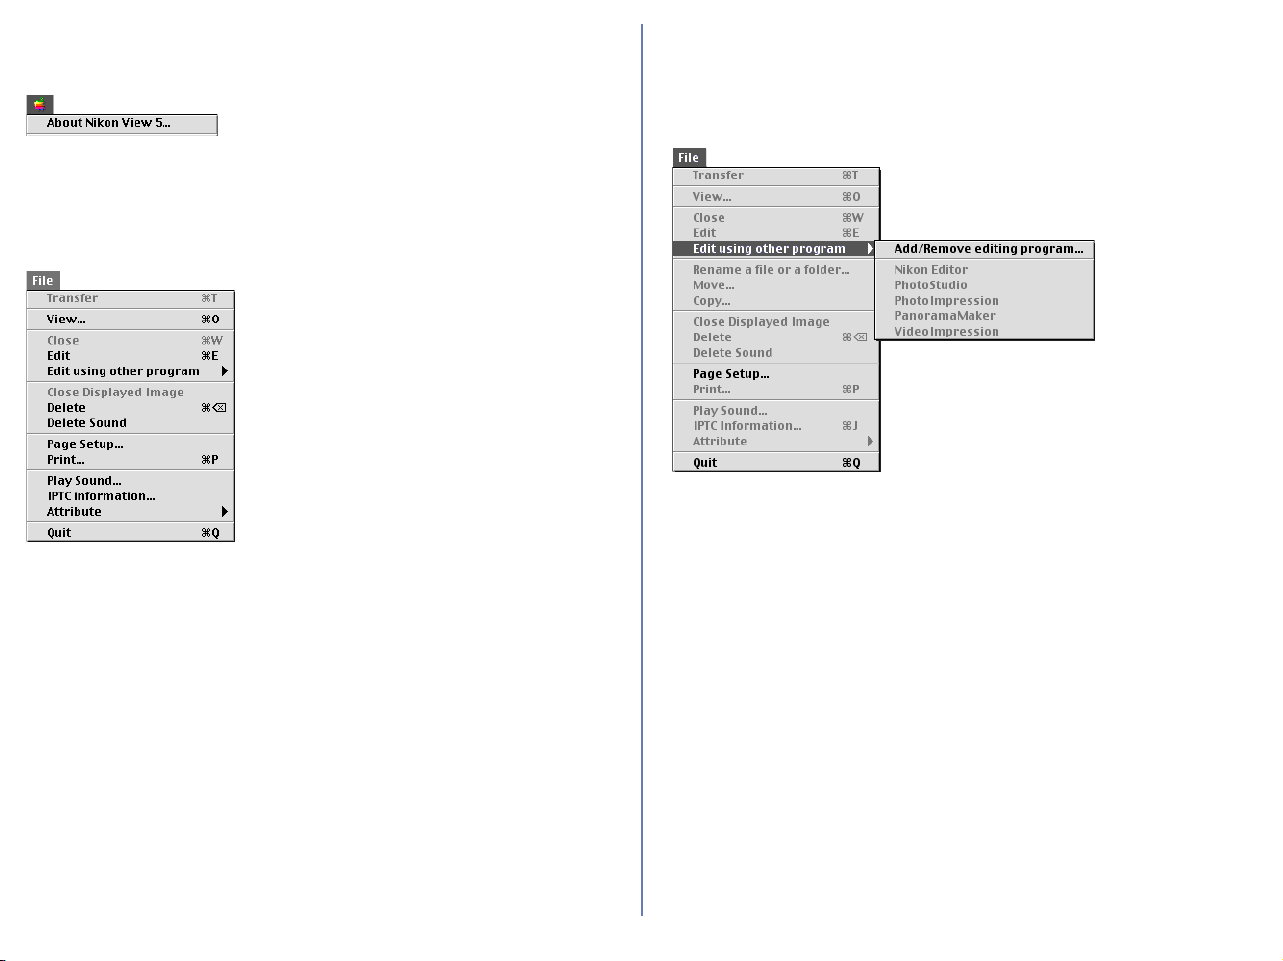
243
Macintosh (Mac OS 9)
Apple Menu
About Nikon View 5
Displays version and copyright information for Nikon View 5.
File Menu
View
Opens the image file associated with the selected thumbnail.
Edit
Edits the image file associated with the selected thumbnail using
the specified program.
Edit using other program
Displays the
Add/Remove editing program
command in the submenu.
Select the command to add editing programs.
Add/Remove editing program
You can add programs for editing images, or change the name of
the program displayed in the menu. The menu also displays up to
10 registered programs.
Delete
Deletes the image file associated with the selected thumbnail.
Delete Sound
Deletes the voice memo attached to current image.
Page Setup
Sets the page size for printing.
Print
Prints the selected image(s).
Play Sound
Plays voice memo attached to current image.
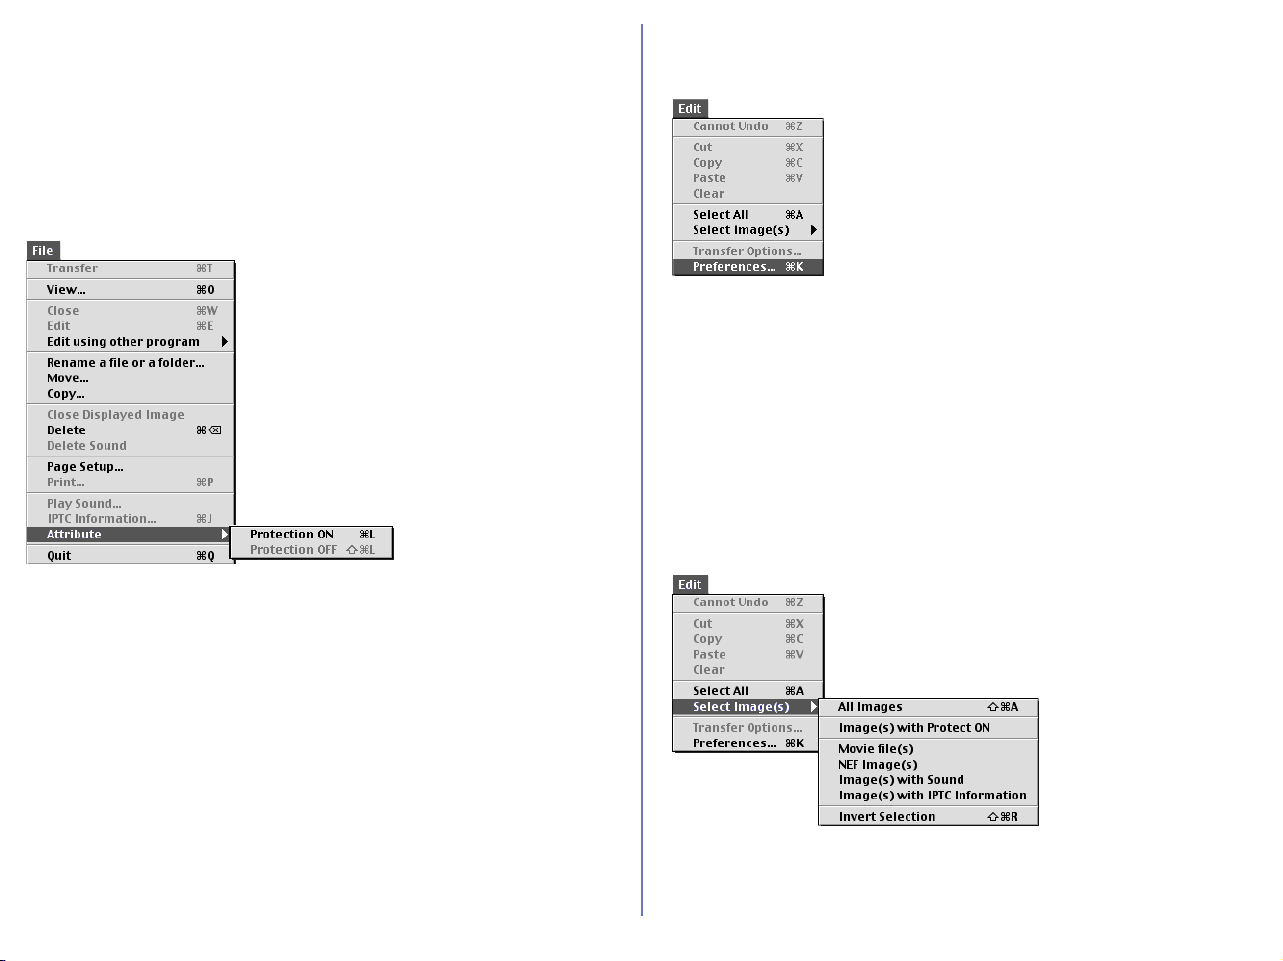
244
Macintosh (Mac OS 9) — Cont'd
IPTC information
Displays the file information.
Attribute
Displays the Protection attribute ON and Protection attribute
OFF commands in the submenu. Use the commands to toggle the
attributes of the selected image on and off.
Protection attribute ON
Sets the Protection attribute to an image file.
Protection attribute OFF
Clears the Protection attribute of an image file.
Quit
Quits Nikon View 5.
Edit Menu
Cannot Undo / Cut / Copy / Paste / Clear
Used when entering text in a text field, for example, file and folder
names. You can cancel commands, cut, paste, or delete the selected
text, and select all text.
Select All
Selects all the displayed thumbnails.
Select Image(s)
Displays the
Image with Protection attribute ON
and
Image with
Protection attribute OFF
commands in the submenu. Use the commands
to select all the thumbnails in the list that have the same attribute.
Image(s) with Protection attribute ON
Selects all the protected thumbnails.
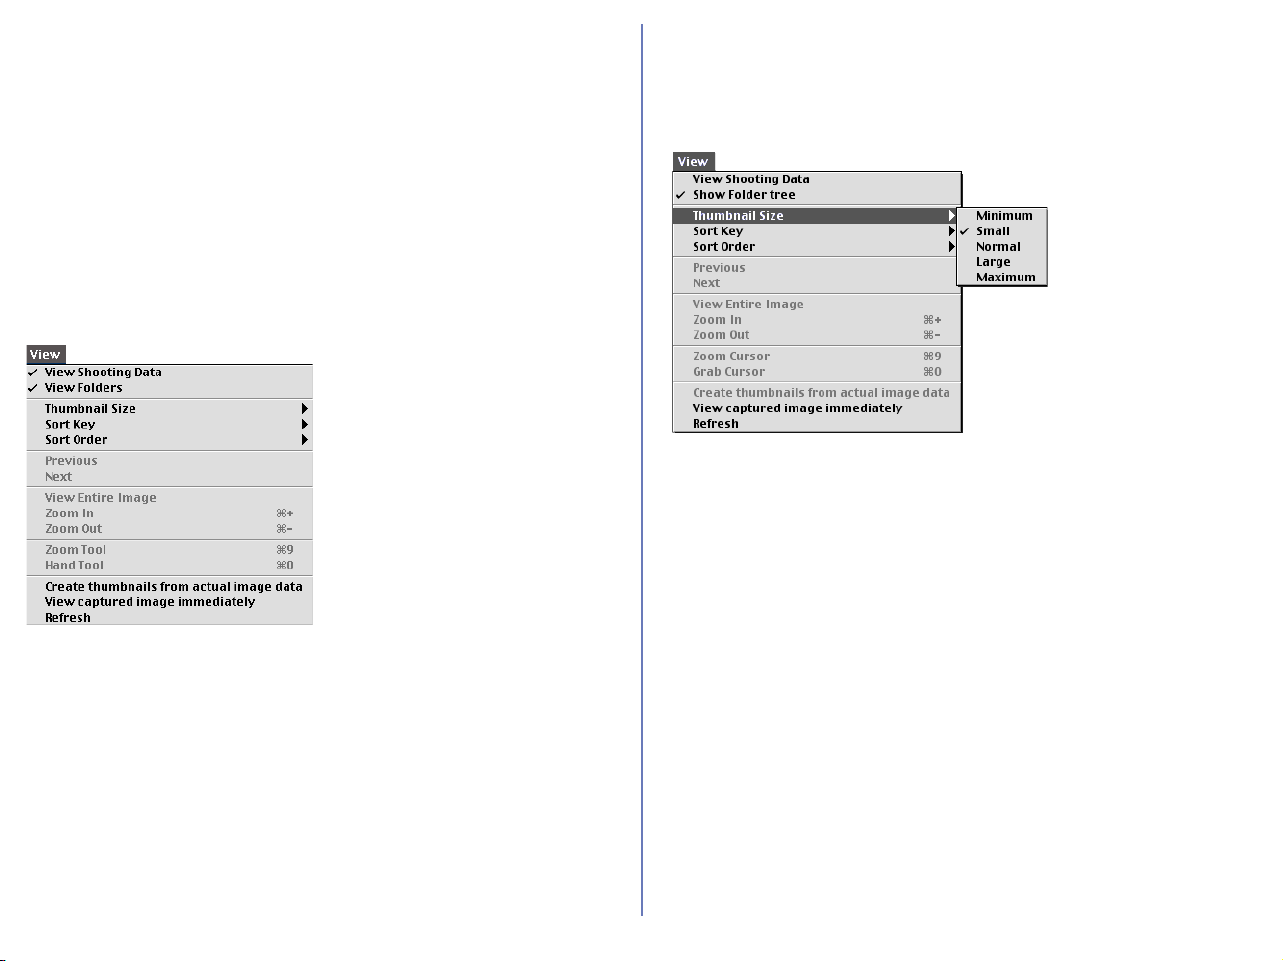
245
Macintosh (Mac OS 9) — Cont'd
Imovie file(s)
NEF Image file(s)
Image(s) with Sound
Image(s) with IPTC Information
Invert Selection
Preferences
Displays the Preferences dialog box.
View Menu
View Shooting Data
Shows or hides the Shooting Data area.
View Folders
Shows or hides the folder tree area.
Thumbnail Size
Displays the thumbnail size submenu: Use the submenu to change
the size of thumbnails.
Minimum
Sets the size of the thumbnails to 64 x 64 pixels.
Small
Sets the size of the thumbnails to 96 x 96 pixels.
Normal
Sets the size of the thumbnails to 128 x 128 pixels.
Large
Sets the size of the thumbnails to 192 x 192 pixels.
Maximum
Sets the size of the thumbnails to 256 x 256 pixels.
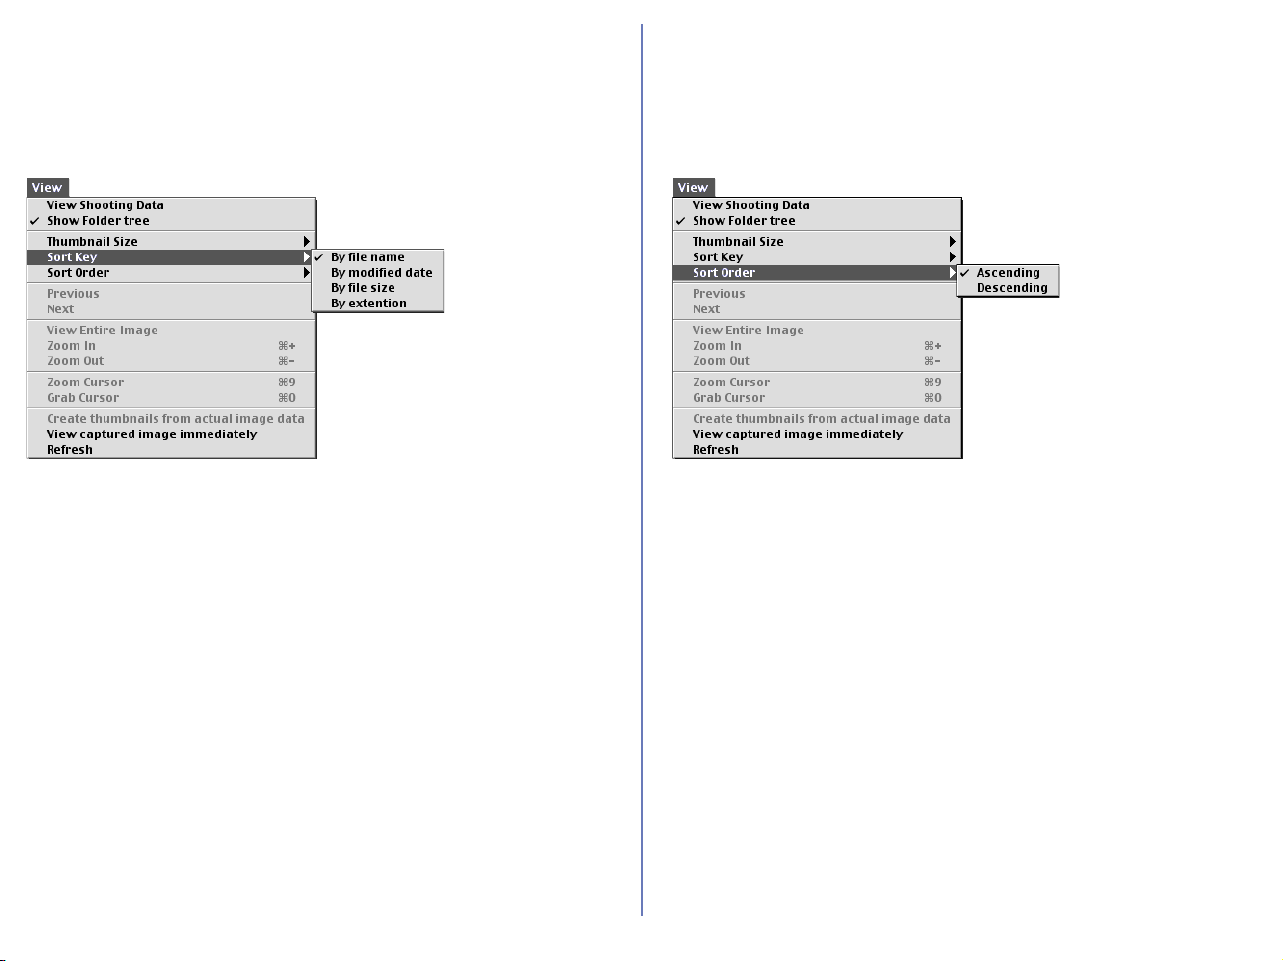
246
Macintosh (Mac OS 9) — Cont'd
Sort Key
Displays the
File name
and
Updated Date and Time
commands in the
submenu. Use the commands to sort the thumbnails based on the specified
condition.
File Name
Sorts the thumbnails based on the file names.
Updated Date and Time
Sorts the thumbnails based on the updated date and time.
Sort Order
Displays the
Ascending
and
Descending
commands in the submenu.
Use the commands to sort the thumbnails in the ascending or descend-
ing order.
Ascending
Sorts the thumbnails in ascending order of the selected Sort Key.
Descending
Sorts the thumbnails in descending order of the selected Sort Key.
Create thumbnails from actual image data
Creates thumbnails from the actual image data and displays them in
the thumbnail list area.
View captured image immediately
Refresh
Refreshes the information of the folder tree, thumbnail list, and
Shooting Data areas.
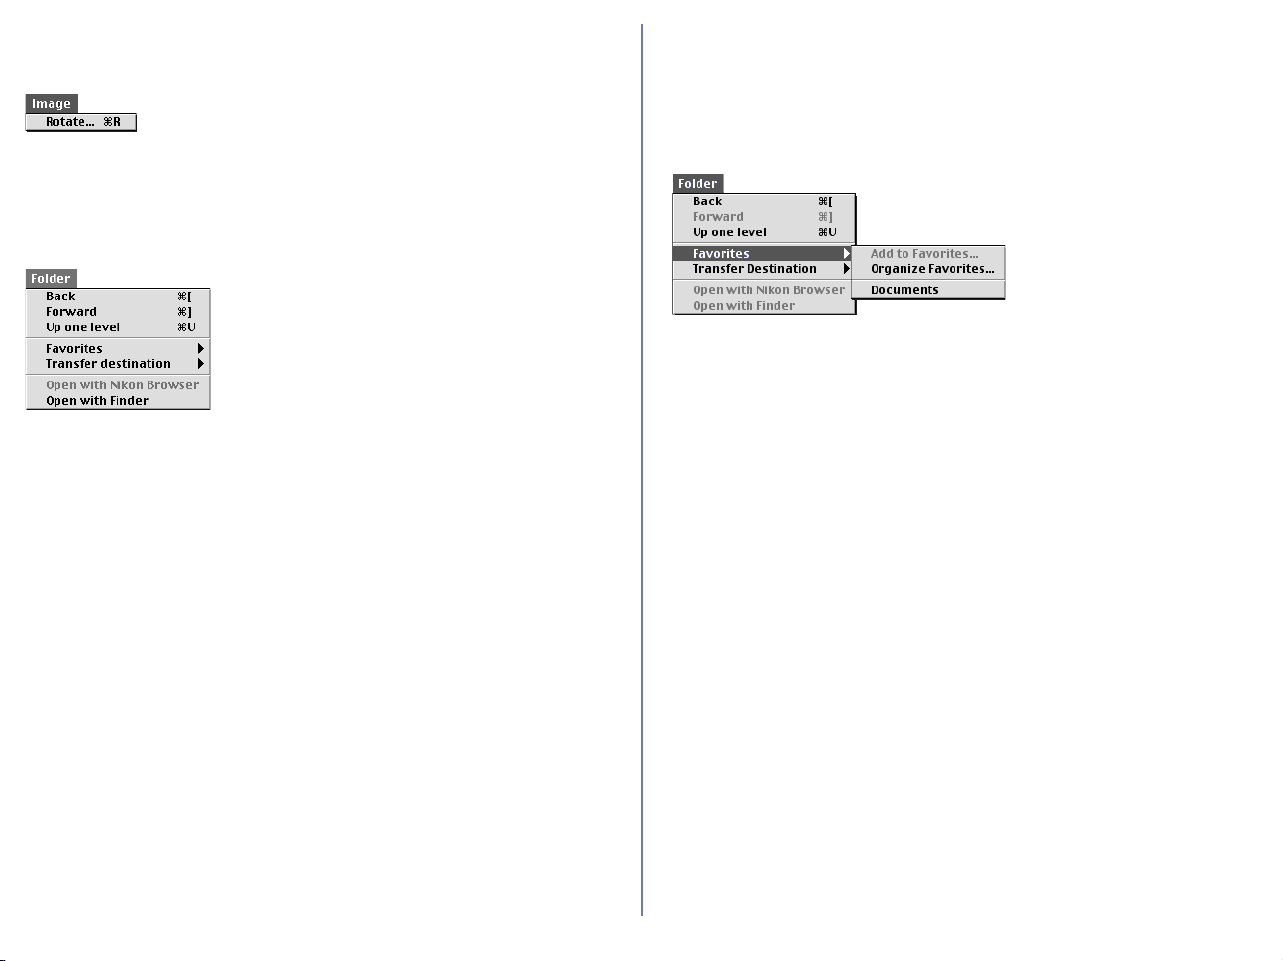
247
Macintosh (Mac OS 9) — Cont'd
Image Menu
Rotate
Rotates the selected thumbnails and the associated images.
Folder Menu
Back
Goes back to the previously selected folder.
Forward
Takes you back to where you were when you selected the Back
command.
Up one level
Moves to the folder one level higher than the current folder in the
folder hierarchy.
Favorites
Displays the Add to Favorites and Organize Favorites commands in
the submenu. Use the commands to add the selected folder to
Favorites or organize the list of Favorites.
Add to Favorites
Adds the selected folder to Favorites. You can add up to 30 folders.
Organize Favorites
Organizes the folders added to Favorites. You can change the
name and order of the folders displayed in Favorites.
Transfer Destination
Displays the 10 most recent transfer destinations.
Open with Finder
Opens the folder that holds the selected thumbnail with the Finder.

248
Macintosh (Mac OS 9) — Cont'd
Tools Menu
Launch Nikon Transfer
Displays Nikon Transfer.
Slideshow
Plays the selected thumbnails as a slideshow.
E-mail
E-mails the selected images using the application specified in the
Preferences dialog box.
Publish to Fotoshare (for European resident)
Uploads the current image to Fotoshare.
Publish to NikonNet or PDA (for North and South American
resident)
Uploads the current image to NikonNet, or sends the current image to
a PDA connected to your computer.
Help Menu
About Balloon Help
Show Balloons
Displays Balloon Help.
Nikon View 5 Help
Opens the Nikon View 5 help file.
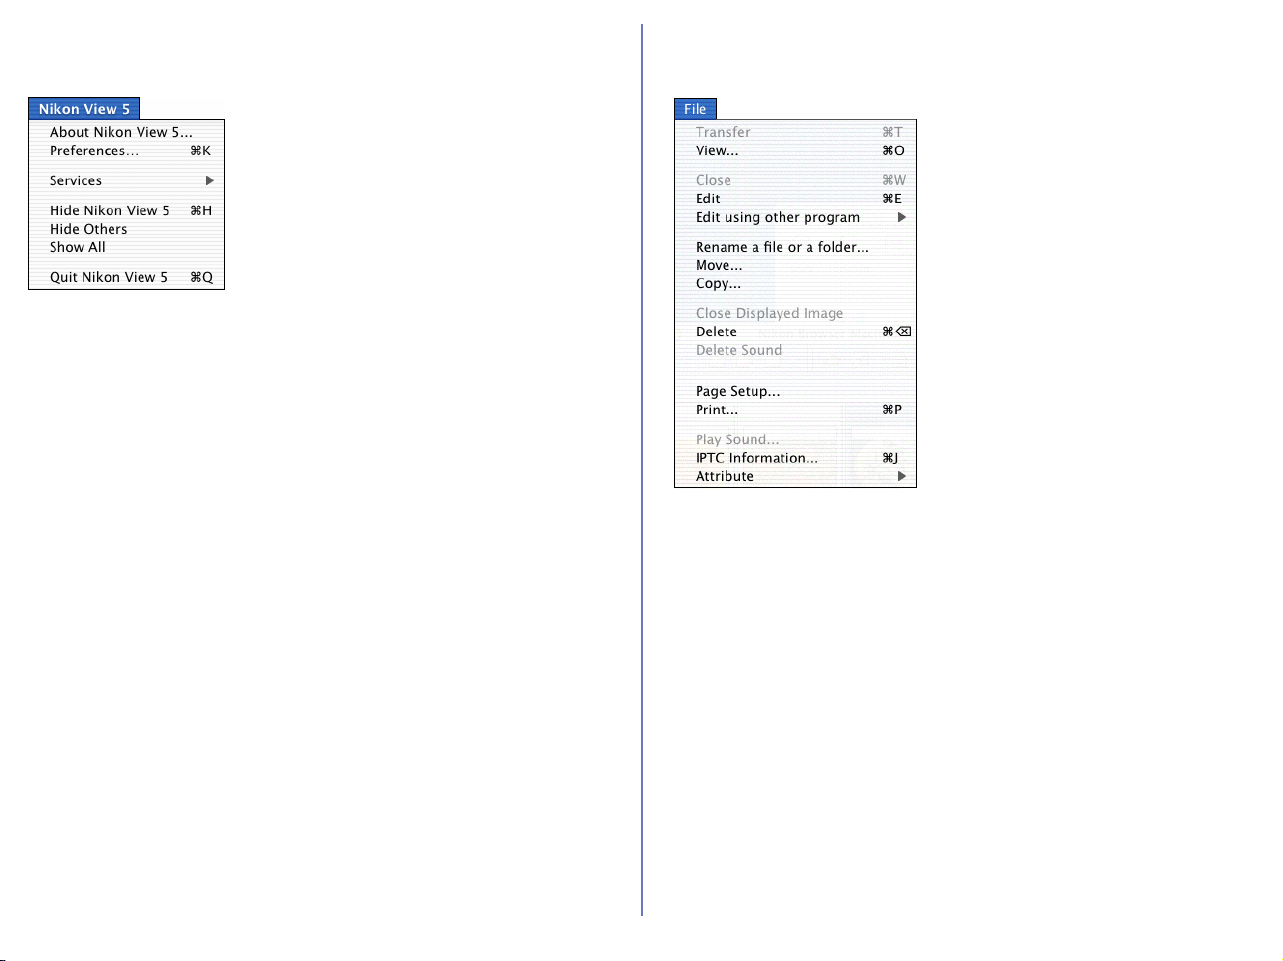
249
Macintosh (Mac OS X)
Nikon View 5 Menu
About Nikon View 5
Displays version and copyright information for Nikon View 5.
Preferences
Displays the Preferences dialog box.
Services
Hide Nikon View 5
Hide Others
Show All
Quit Nikon View 5
Quits Nikon View 5.
File Menu
Transfer
View
Opens the image file associated with the selected thumbnail in
Nikon Viewer.
Close
Edit
Edits the image file associated with the selected thumbnail using
the specified program.
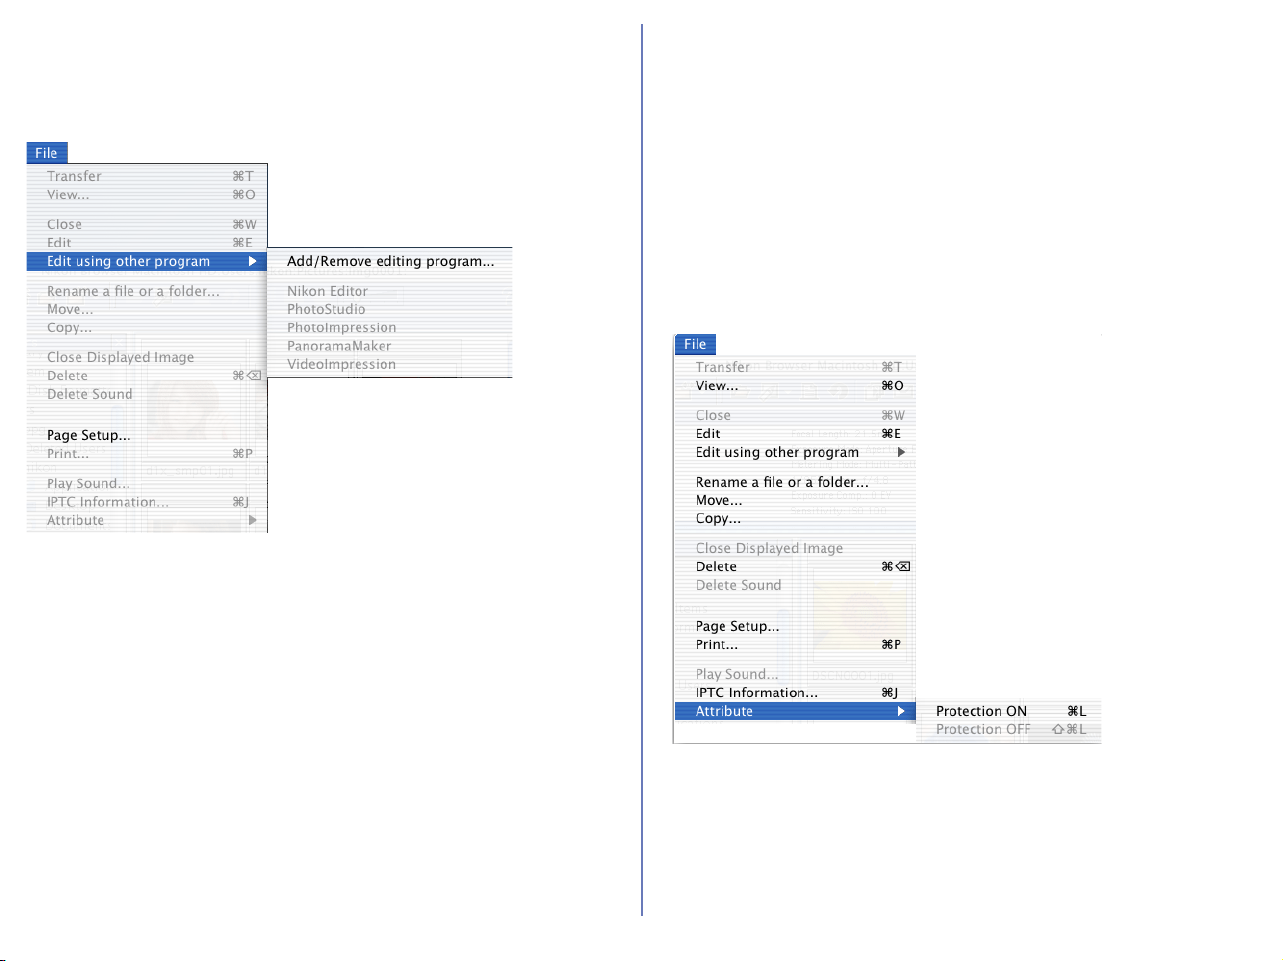
250
Macintosh (Mac OS X) — Cont'd
Edit using other program
Displays the Add/Remove editing program command in the
submenu which allows you to register image editing programs.
Add/Remove editing program
Registers image editing programs. Also allows you to change the
name of the program displayed in the menu.
Rename a file or folder
Move
Copy
Close Displayed Image
Delete
Deletes the image file associated with the selected thumbnail.
Delete Sound
Deletes the voice memo attached to current image.
Page Setup
Sets the page size for printing.
Print
Prints the selected image(s).
Play Sound
Plays the voice memo attached to current image.
IPTC Information
Displays the file information.
Attribute
Displays the Protection attribute ON and Protection attribute
OFF commands in the submenu. Use the commands to toggle the
attributes of the selected image on and off.
Protection attribute ON
Sets the Protection attribute to an image file.
Protection attribute OFF
Clears the Protection attribute of an image file.
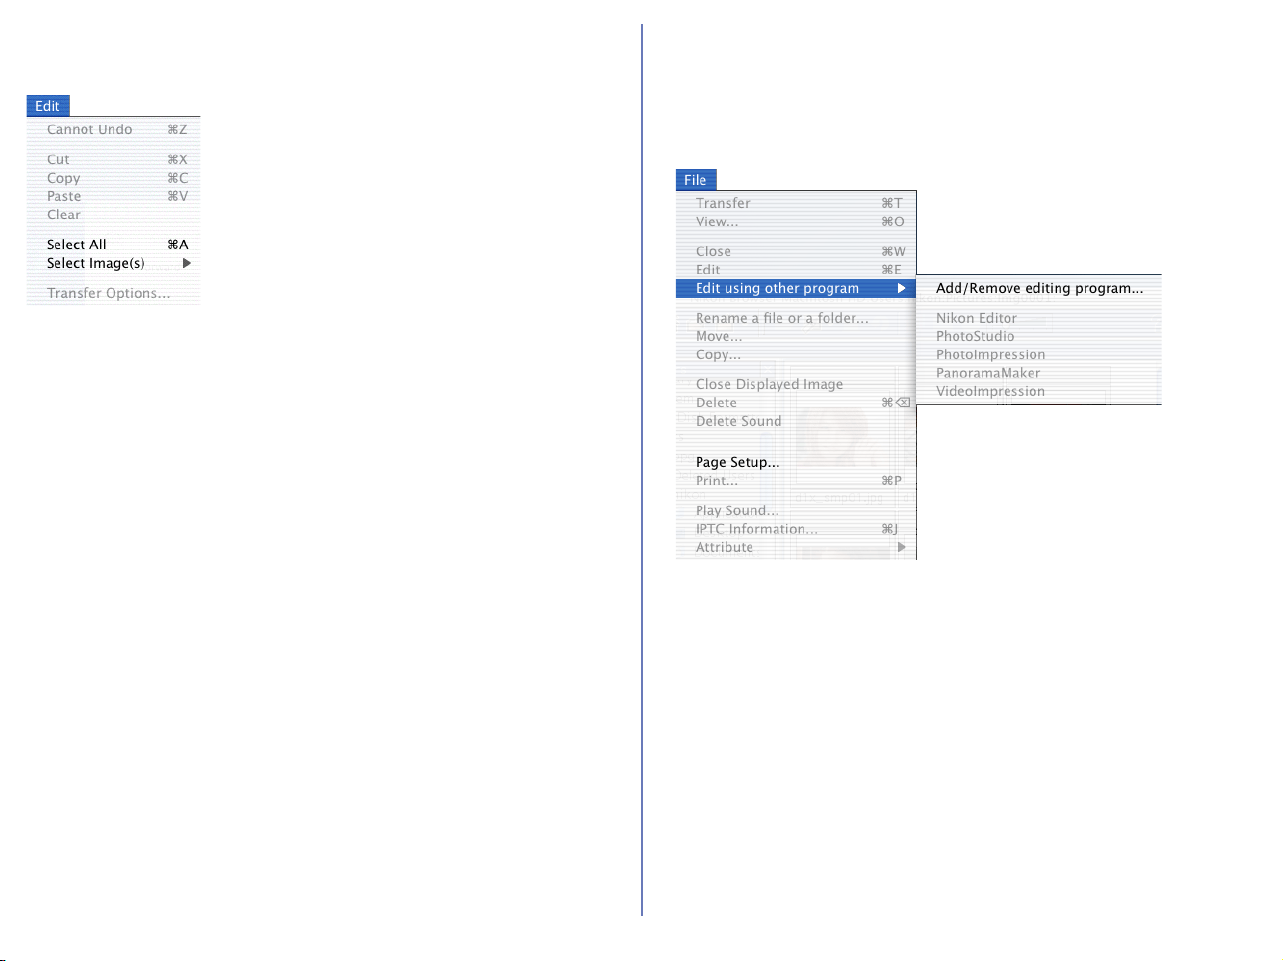
251
Macintosh (Mac OS X) — Cont'd
Edit Menu
Cannot Undo
Undo / Cut / Copy / Paste / Clear
Used when entering text in a text field, for example, file and folder
names. You can cancel commands, cut, paste, or delete the selected
text, and select all text.
Select All
Selects all the displayed thumbnails.
Select Image(s)
Displays the
Image with Protection attribute ON
and
Image with
Protection attribute OFF
commands in the submenu. Use the commands
to select all the thumbnails in the list that have the same attribute.
All Images
Image with Protection attribute ON
Selects all the protected thumbnails.
Movie file(s)
NEF Image(s)
Image(s) with Sound
Image(s) with IPTC Information
Invert Selection
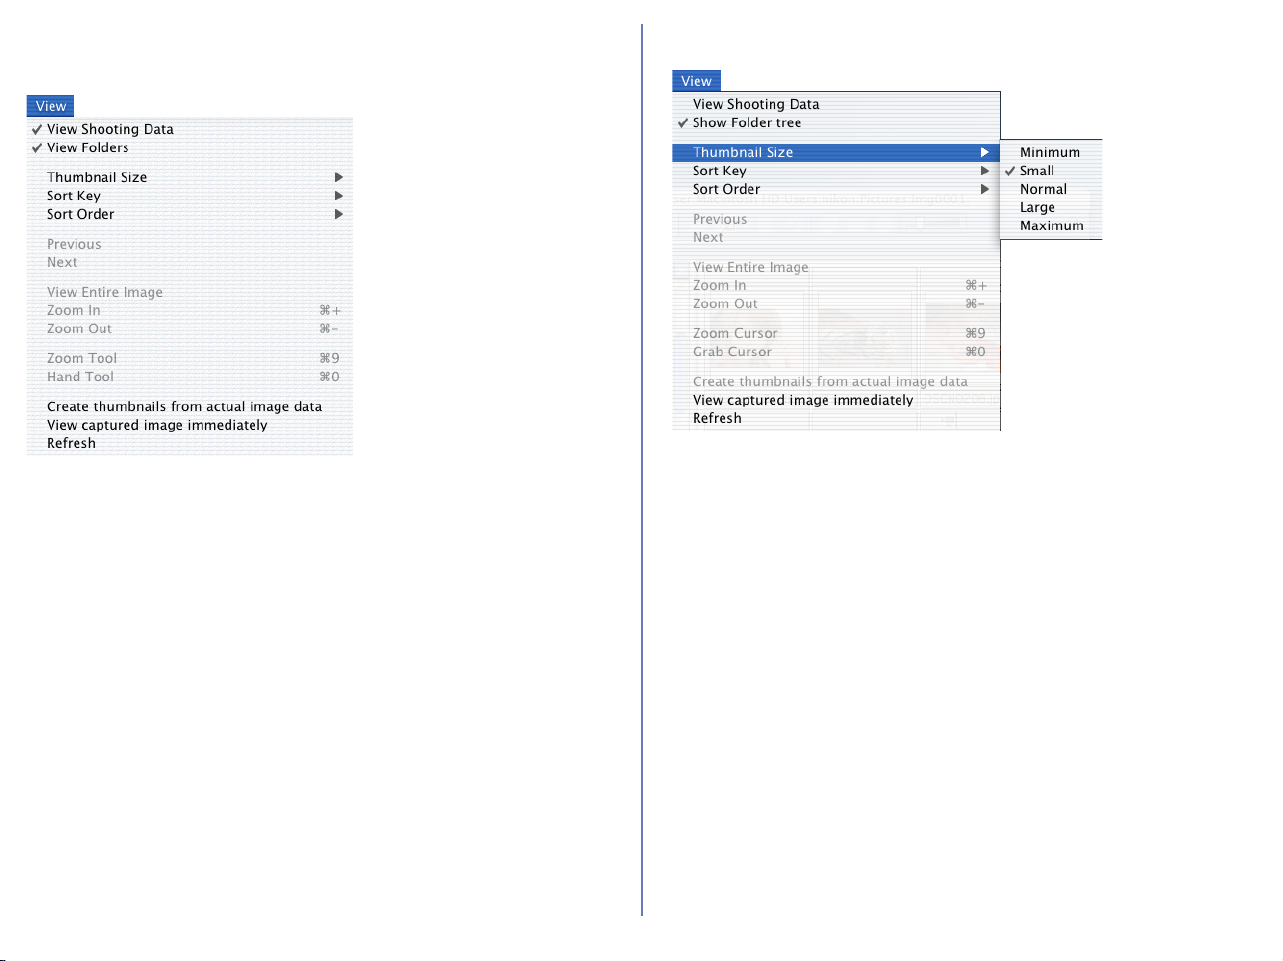
252
Macintosh (Mac OS X) — Cont'd
View Menu
View Shooting Data
Shows or hides the Shooting Data area.
View Folders
Shows or hides the folder tree area.
Thumbnail Size
Displays the thumbnail size submenu: Use the submenu to change the size
of thumbnails.
Minimum
Sets the size of the thumbnails to 64 x 64 pixels.
Small
Sets the size of the thumbnails to 96 x 96 pixels.
Normal
Sets the size of the thumbnails to 128 x 128 pixels.
Large
Sets the size of the thumbnails to 192 x 192 pixels.
Maximum
Sets the size of the thumbnails to 256 x 256 pixels.
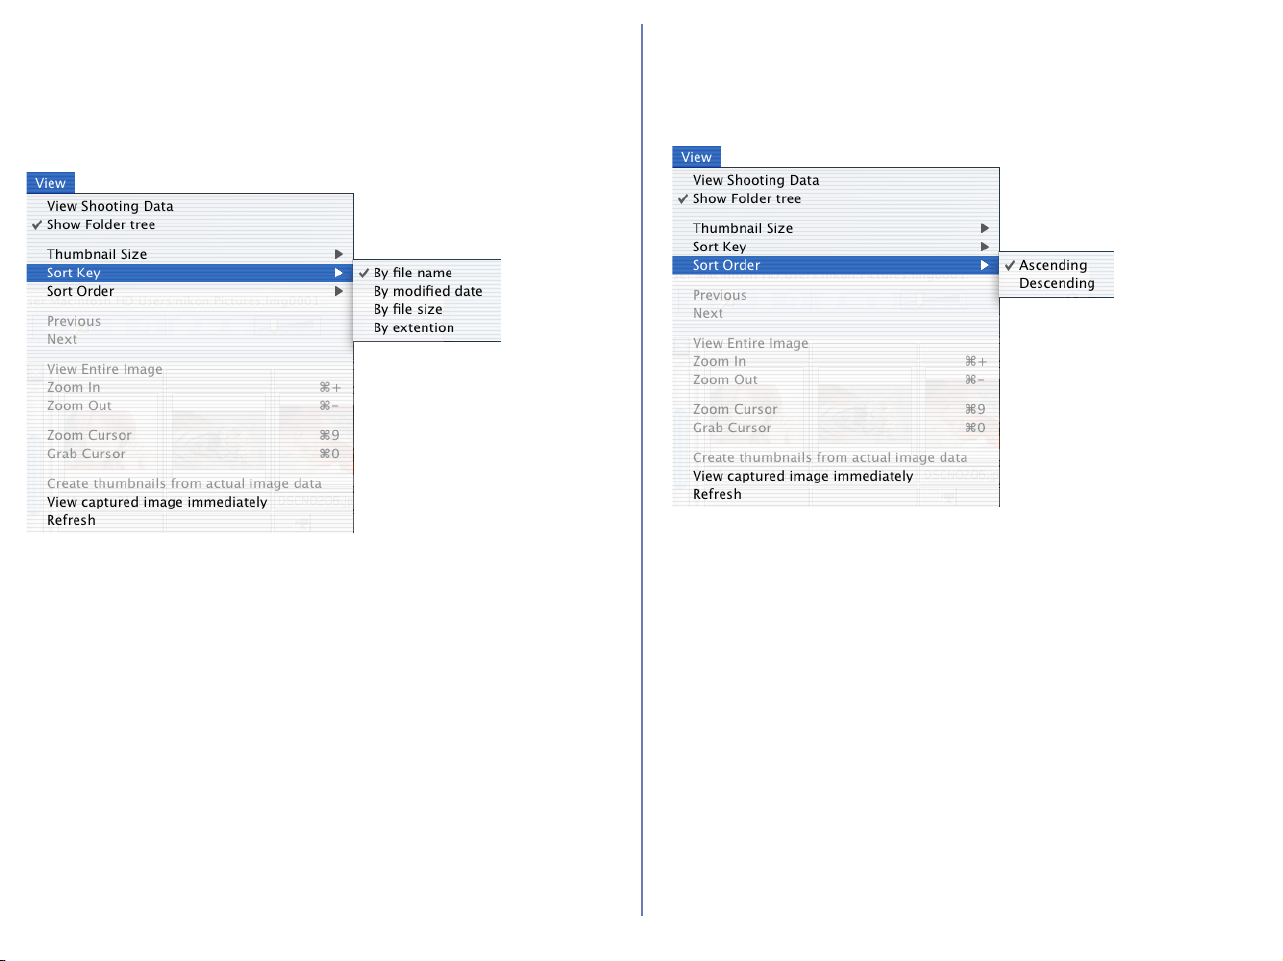
253
Macintosh (Mac OS X) — Cont'd
Sort Key
Displays the
File name
and
Updated Date and Time
commands in the
submenu. Use the commands to sort the thumbnails based on the specified
condition.
By file name
Sorts the thumbnails based on the file names.
By modified date
Sorts the thumbnails based on the updated date and time.
Sort Order
Displays the
Ascending
and
Descending
commands in the submenu. Use
the commands to sort the thumbnails in the ascending or descending order.
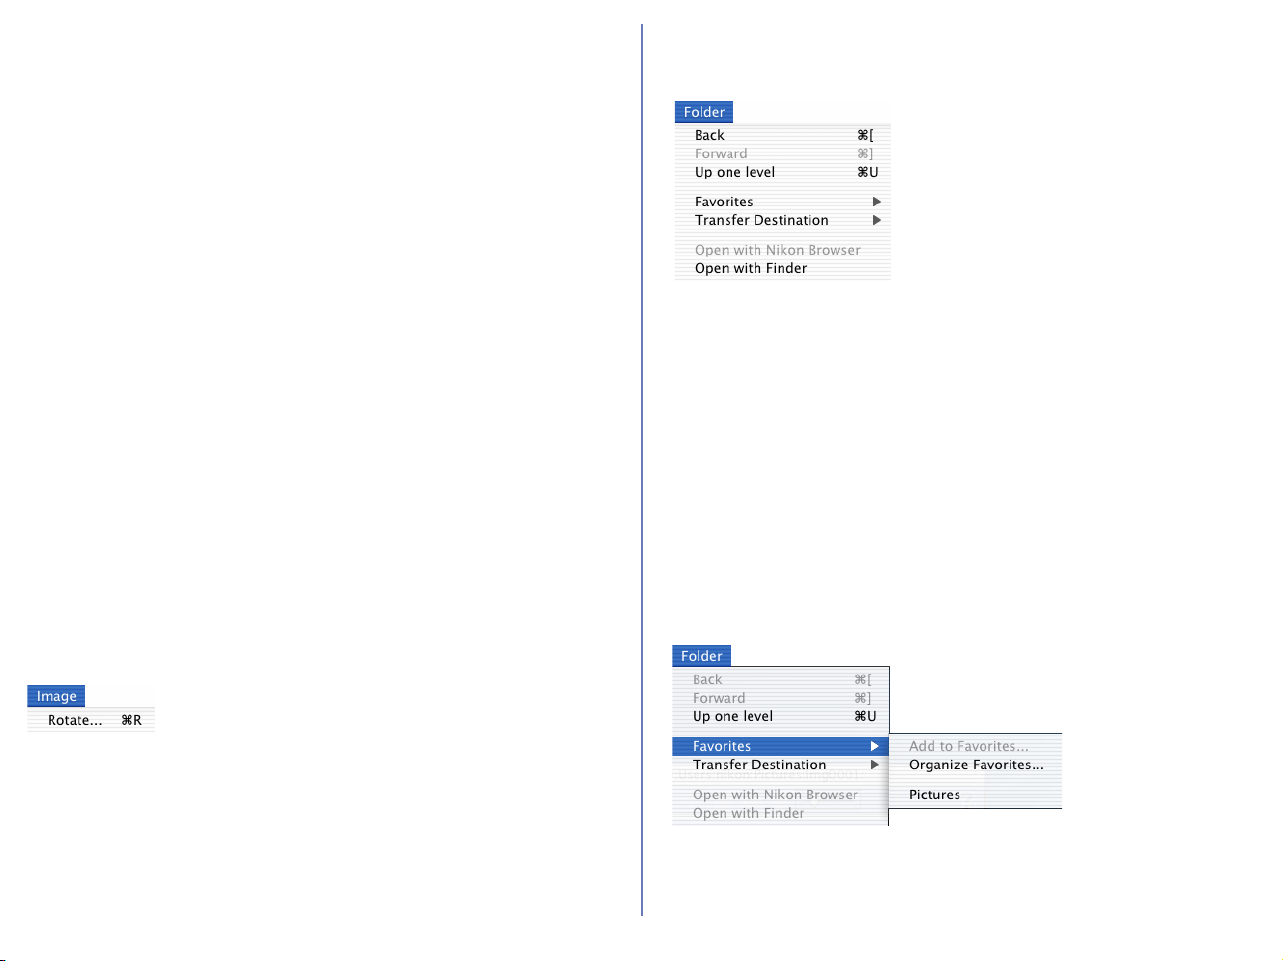
254
Macintosh (Mac OS X) — Cont'd
Ascending
Sorts the thumbnails in ascending order of the selected Sort Key.
Descending
Sorts the thumbnails in descending order of the selected Sort Key.
Previous
Next
View Entire Image
Zoom In
Zoom Out
Zoom Tool
Hand Tool
Create thumbnails from actual image data
Creates thumbnails from the actual image data and displays thumbnails
in the thumbnail list area.
Refresh
Refreshes the information of the folder tree, thumbnail list, and
shooting data areas.
Image Menu
Rotate
Rotates the selected thumbnails and the associated images.
Folder Menu
Back
Goes back to the previously selected folder.
Forward
Takes you back to where you were when you selected the Back
command.
Up one level
Moves to the folder one level higher than the current folder in the
folder hierarchy.
Favorites
Displays the Add to Favorites and Organize Favorites commands in
the submenu. Use the commands to add the selected folder to
Favorites or organize the list of Favorites.
Add to Favorites
Adds the selected folder to Favorites. You can add up to 30 folders.
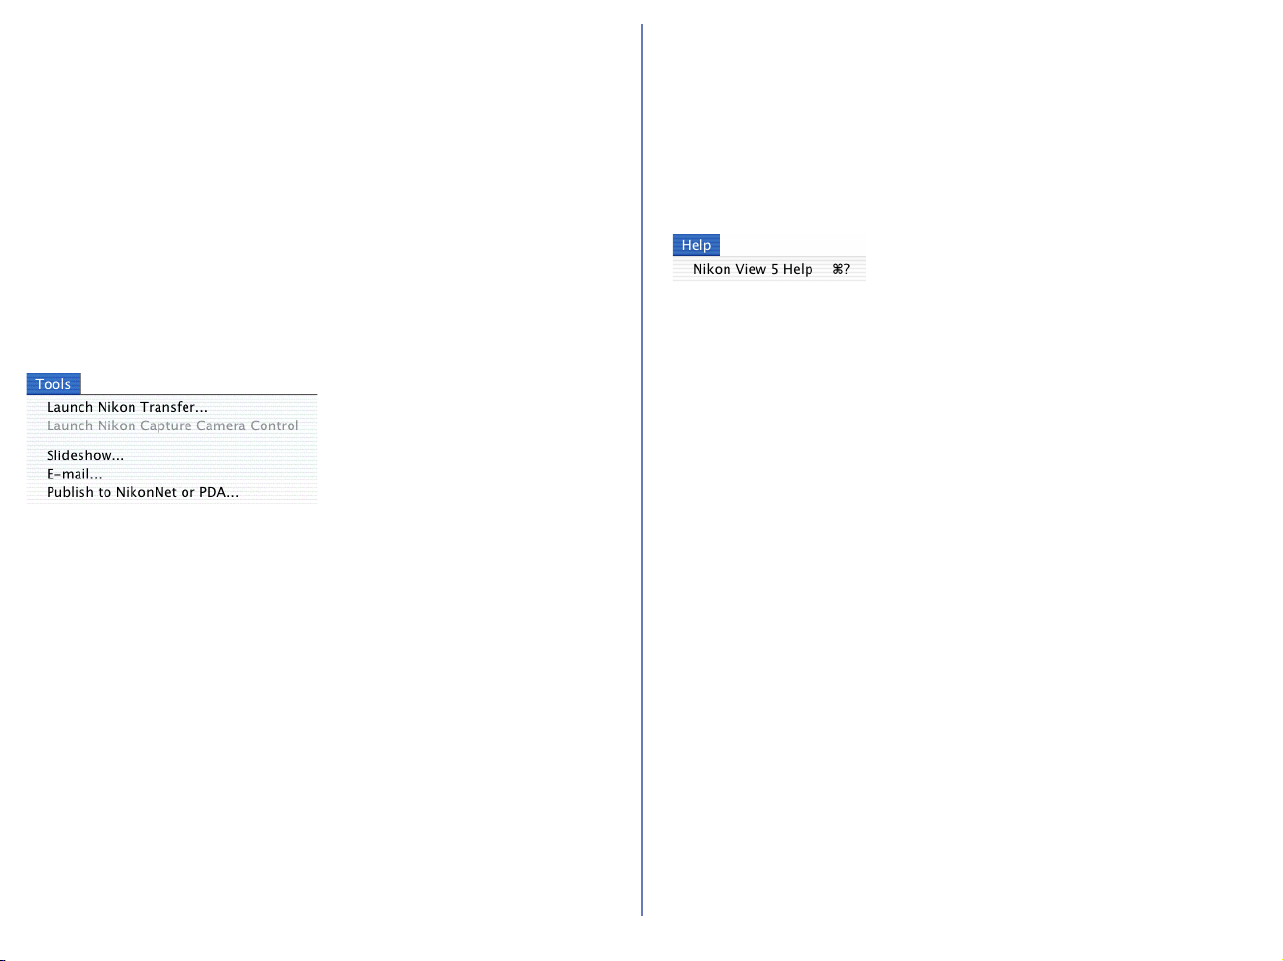
255
Macintosh (Mac OS X) — Cont'd
Organize Favorites
Organizes the folders added to Favorites. You can change the
name and order of the folders displayed in Favorites.
Transfer Destination
Displays the 10 most recent transfer destinations.
Open with Nikon Browser
Open with Finder
Opens the folder that holds the selected thumbnail in the Finder.
Tools Menu
Launch Nikon Transfer
Displays Nikon Transfer.
Launch Nikon Capture Camera Control
Slideshow
Plays the selected thumbnails as a slideshow.
E-mail
E-mails the selected images using the application specified in the
Preferences dialog box.
Publish to Fotoshare (for European resident)
Uploads the current image to Fotoshare.
Publish to NikonNet or PDA (for North and South American
resident)
Uploads the current image to NikonNet, or sends the current image
to a PDA connected to your computer.
Help Menu
Nikon View 5 Help
Opens the Nikon View 5 help file.

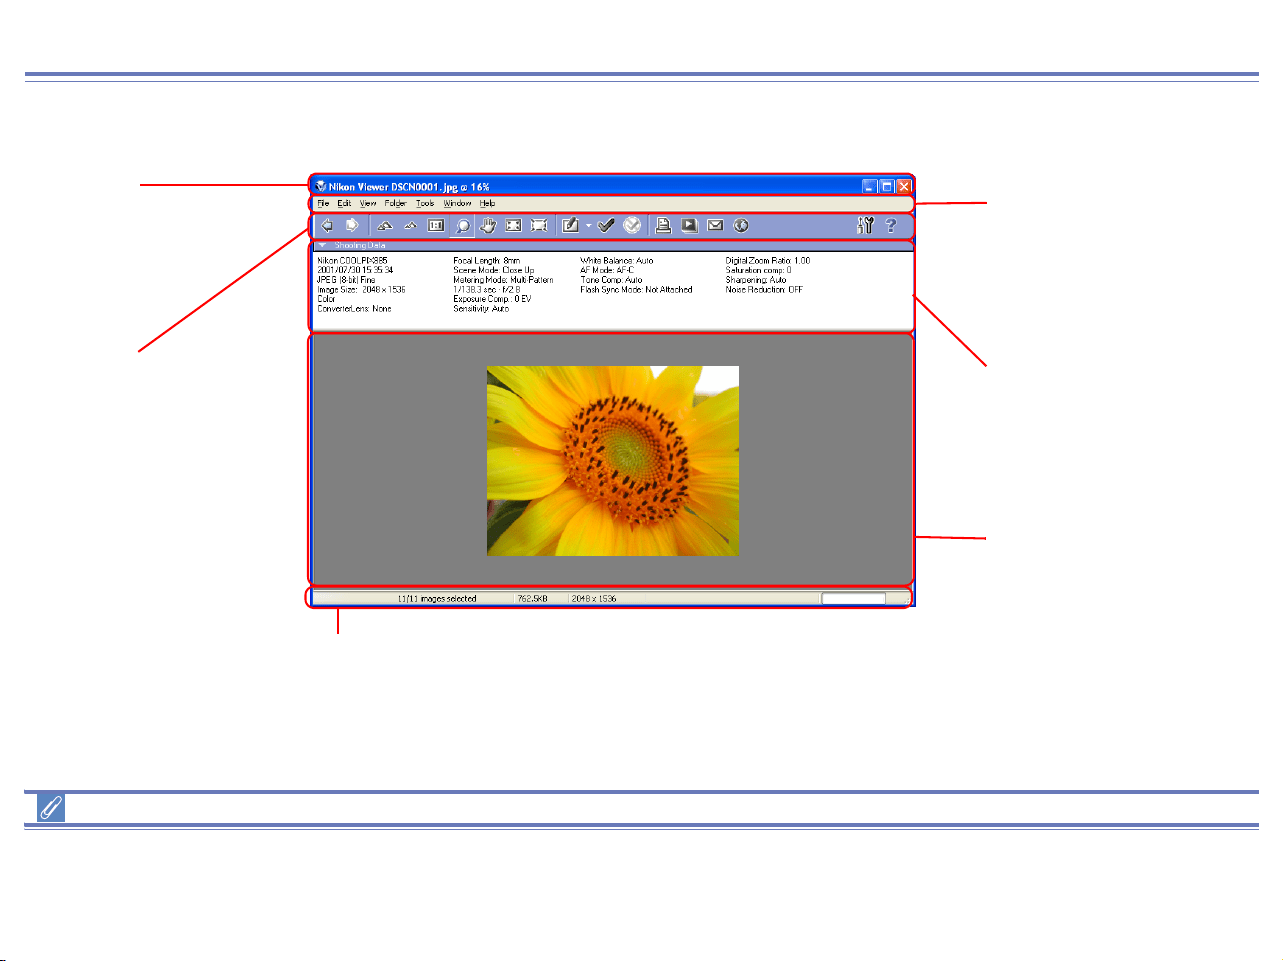
257
Nikon Viewer Overview
Functions and Controls:(Windows)
Nikon Viewer contains the following items:
Menus bar and tool buttons
The majority of operations in Nikon Viewer are performed using the menu bar and tool buttons. In the case of operations that can be
performed by means of both menus and tool buttons, the explanation in this manual gives priority to the tool buttons.
Title Bar
Displays the file name and
zoom ratio of the currently
displayed image.
Toolbar
Contains buttons for the
operations that can be
performed in Nikon Viewer.
Menu bar
Contains menus for
operations that can
be performed in
Nikon Viewer.
Shooting Data Area
Displays shooting data for
the image currently
displayed in the view
area.
View Area
Displays images.
Status bar
Displays such information as the number of all the images that
can be displayed, the position of the currently displayed images
among them, and the file size of the currently displayed image.
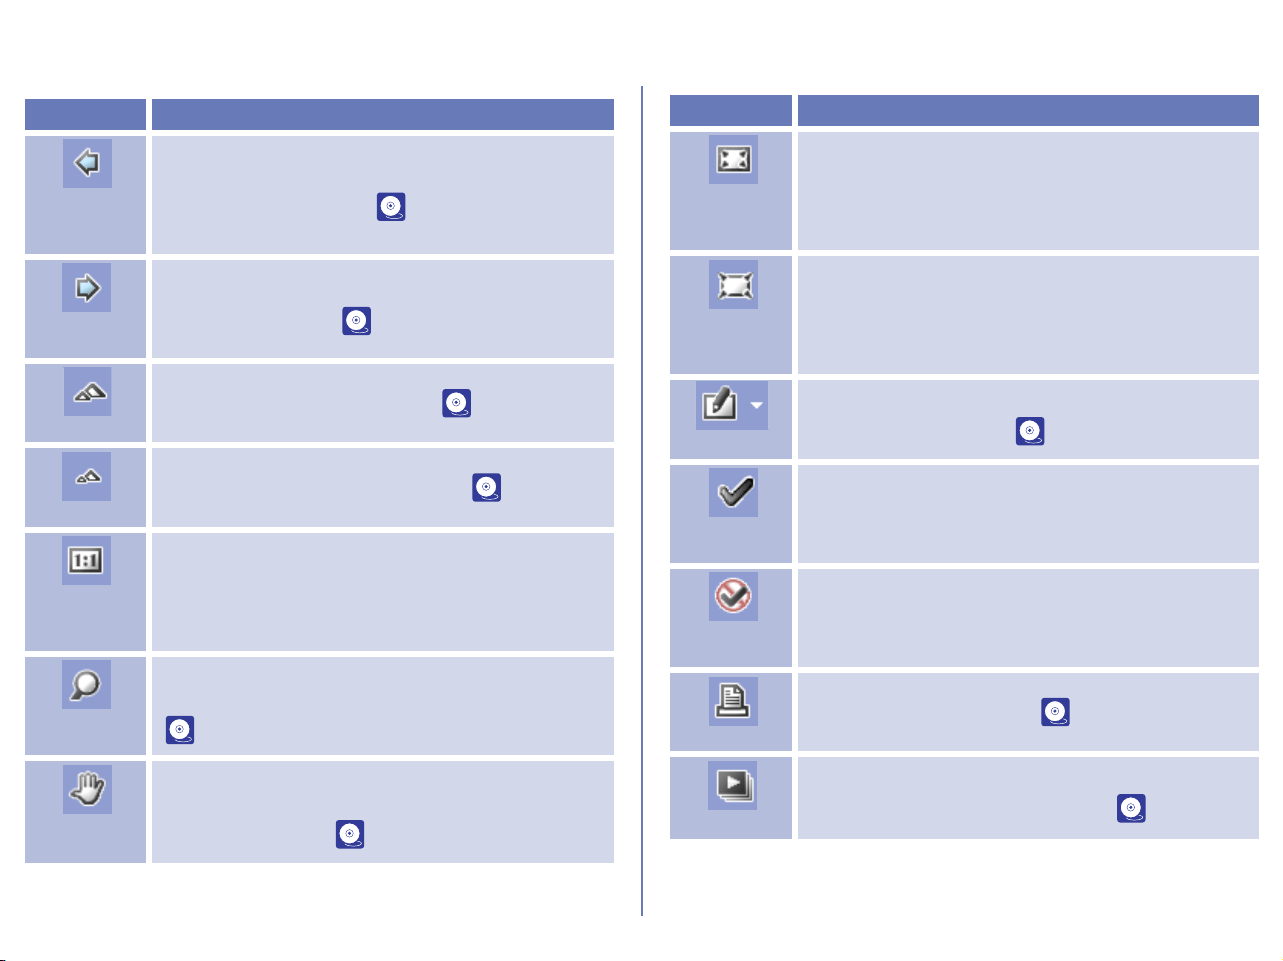
258
The Nikon Viewer contains the following buttons:
Windows
Button Function
Previous
Image
Selected
Displays the previous image when multiple images
are selected for display ( p. 261).
Next Image
Selected
Displays the next image when multiple images are
selected for display ( p. 261).
Zoom In
Zooms in on the current image ( p. 262).
Zoom Out
Zooms out from the current image ( p. 262).
Display at
the Original
Size
Display the image in original 1:1 size.
Zoom
Cursor
Zooms in and out of the current image. When in
use, the mouse pointer changes to a Zoom cursor
( p. 263).
Grab
Cursor
Pans image to display areas not currently visible in
the view area. When in use, mouse pointer
changes to a hand ( p. 263).
Fit Image to
Window
Adjust the zoom ratio of the current image to fit the
Nikon Viewer Window.
Fit Image to
Desktop
Adjust the zoom ratio of the current image to fit the
desktop.
Edit
Opens the selected image with the designated
image editing program ( p. 264).
Add Tag
Mark
Put the Tag mark label on the image file.
Remove
Tag Mark
Remove the Tag mark label from the image file.
Print
Prints the selected image ( p. 264).
Slideshow
Plays back the selected image, and other images
in the same folder, as a slideshow ( p. 265).
Button Function

259
E-mail
Sends selected images by e-mail. ( p. 266).
Publish to
FotoShare /
NikonNet or
PDA
Uploads the selected images to an online photo
album at FotoShare ( p. 200) or NikonNet (
p. 207). Can also send images to a Palm
Organizer or Pocket PC connected to your
computer (North and South American resident
only).
Button Function
Preferences
Display Nikon View 6 preference dialog.
Help
Displays help for Nikon Viewe ( p. 270).
Button Function
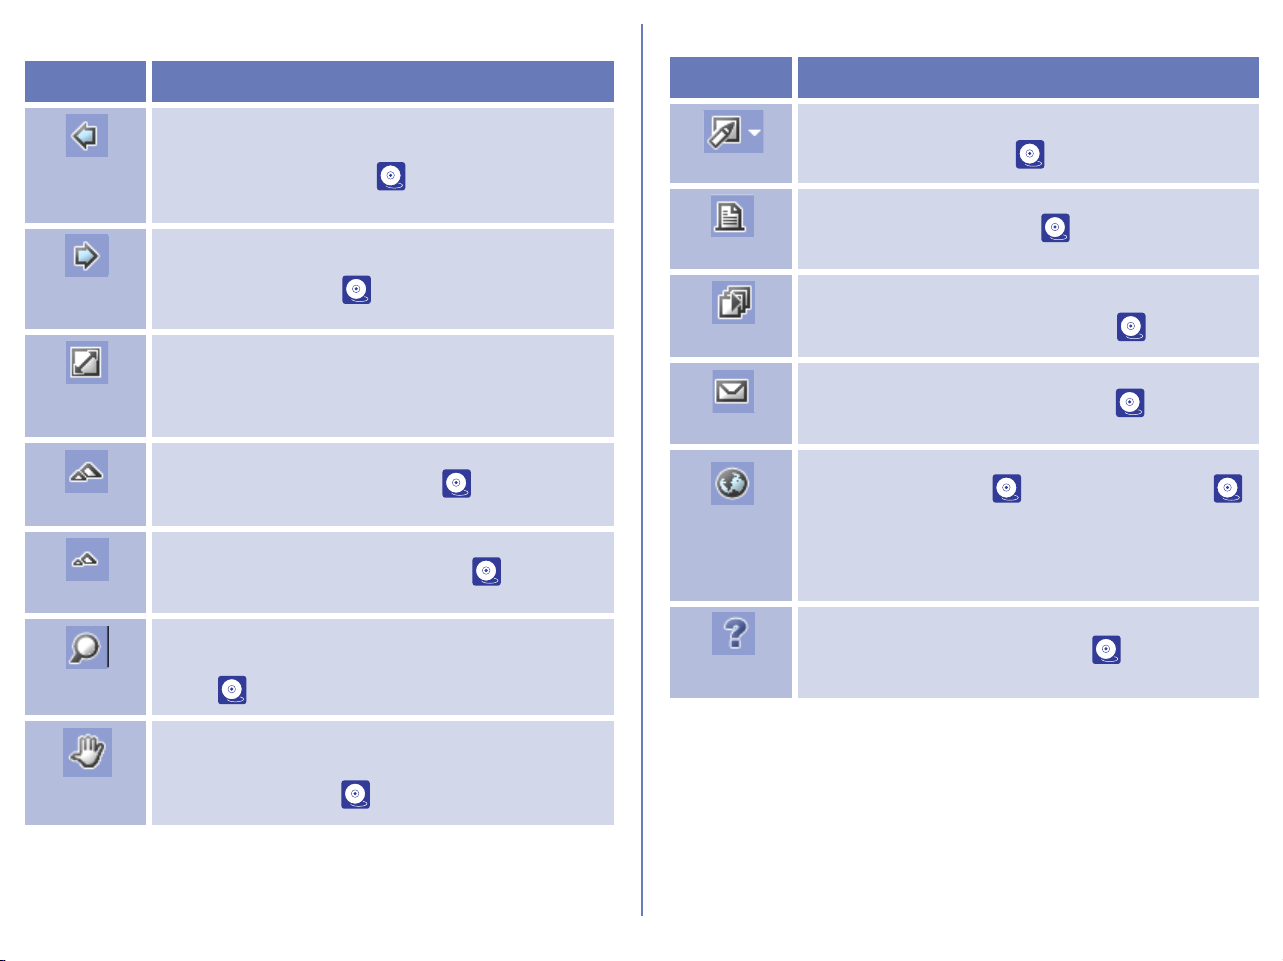
260
Macintosh
Button Function
Previous
Image
Selected
Displays the previous image when multiple images
are selected for display ( p. 261).
Next Image
Selected
Displays the next image when multiple images are
selected for display ( p. 261).
Fit Image to
Window
Fits the displayed image to the window.
Zoom In
Zooms in on the current image ( p. 262).
Zoom Out
Zooms out from the current image ( p. 262).
Zoom
Cursor
Zooms in and out of the current image. When in
use, the mouse pointer changes to a magnifying
glass ( p. 263).
Grab
Cursor
Pans image to display areas not currently visible in
the view area. When in use, mouse pointer
changes to a hand. ( p. 263).
Edit
Opens the selected image with the designated
image editing program ( p. 264).
Print
Prints the selected image ( p. 264).
Slideshow
Plays back the selected image, and other images
in the same folder, as a slideshow ( p. 265).
E-mail
Sends selected images by e-mail. ( p. 266).
Publish to
FotoShare /
NikonNet or
PDA
Uploads the selected images to an online photo
album at FotoShare ( p. 200) or NikonNet (
p. 207). Can also send images to a Palm
Organizer or Pocket PC connected to your
computer (North and South American resident
only).
Help
Displays help for Nikon Viewer. ( p. 270).
Button Function
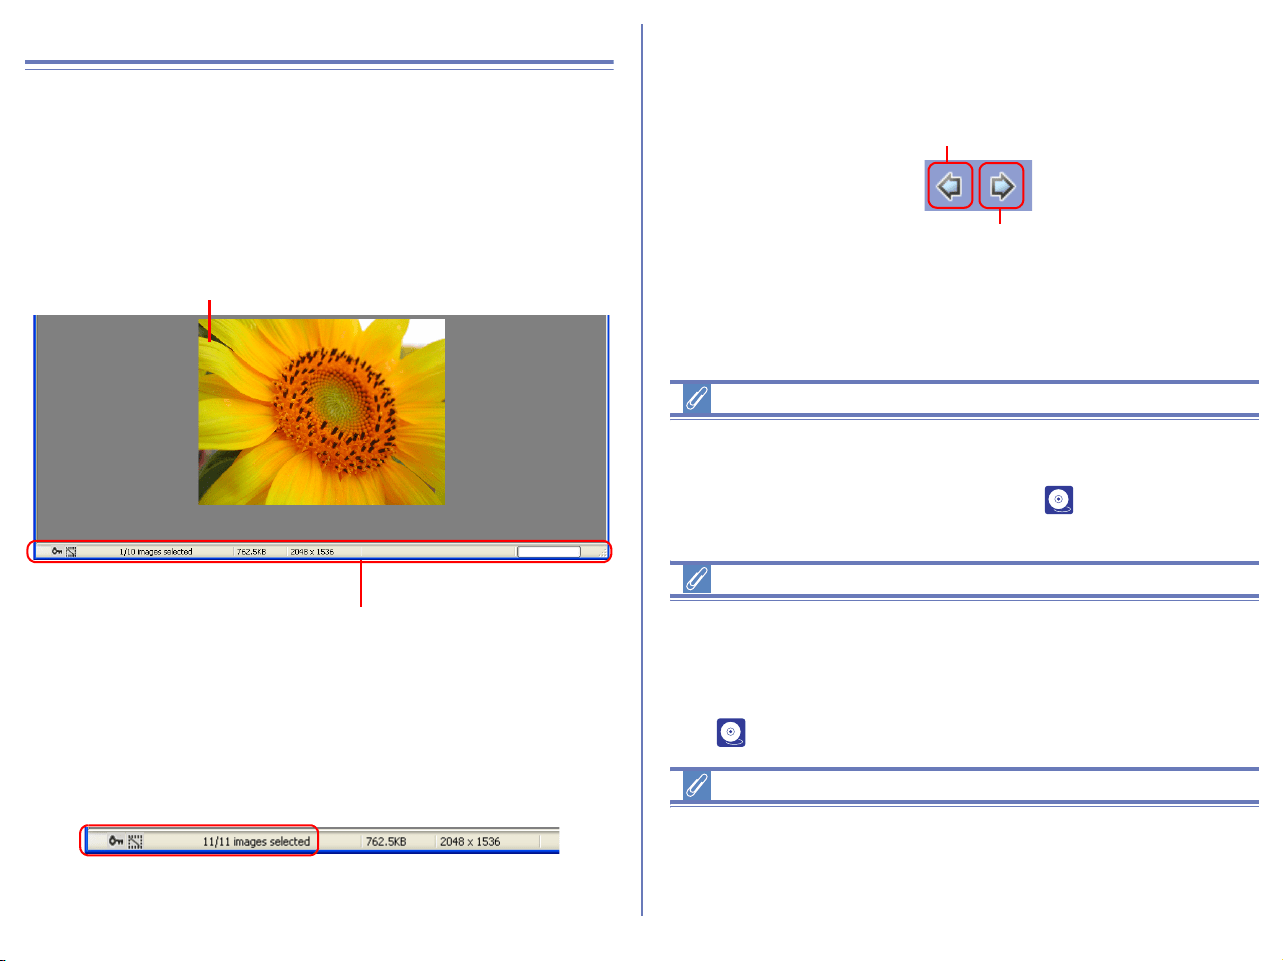
261
Using Nikon Viewer
Displaying images in detail
An image appears in the Nikon Viewer view area when its
thumbnail is double clicked in Nikon Browser. (Note that only still
images and not movie files can be displayed in Nikon Browser. )
Only one image can be displayed at a time. You can zoom in to
and out from images displayed in the viewer.
If more than one thumbnail is selected, only one image is
displayed. Use the Previous Image Selected and Next Image
Selected buttons to display other selected images.
In the status bar of Nikon Viewer, you can check the number of the
selected images and the status of the currently displayed image
including the attribute of the image file.
Use the Previous Image Selected and Next Image Selected
buttons on the toolbar or left and right cursor keys on the keyboard
to view the other images when more than one image is selected.
The order of display is the same as the order of display in the
thumbnail list area of Nikon Browser.
Attribute icon
Attribute icons displayed in the status bar are identical with these
displayed in Nikon Browser.
For information on file attribute, see ( p. 171) in “Nikon
Browser”.
Supported File Formats
Nikon Viewer can be used to view files created with supported
cameras and images previously saved using Nikon Editor, Nikon
Capture 3 Camera Control, Nikon View 5 Editor, or Nikon Capture
version 2 or earlier. For information on the file formats supported,
see ( p. 287).
When one thumbnail is selected
In Windows, even if you open only one thumbnail in the thumbnail
list area, you can browse through all the still images stored in the
same folder as the selected image.
Image area
Status bar
Previous Image Selected button
Next Image Selected button
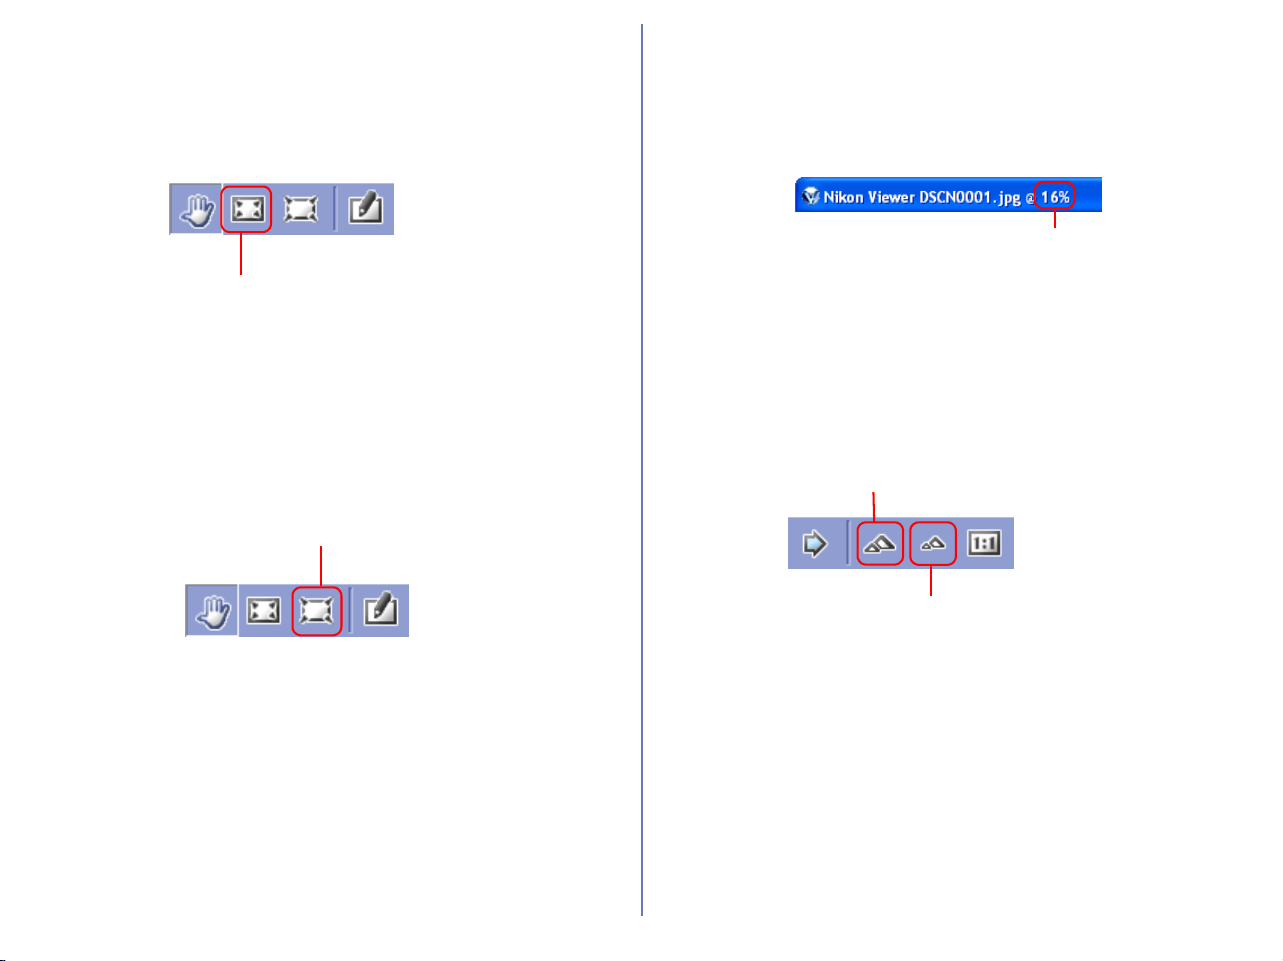
262
Fit Image to Window (Windows only)
You can make the entire image fit to into the Nikon Viewer Window
by clicking the Fit Image to Window button or selecting Fit Image to
Window from View menu.
Fit Image to Desktop
You can make the entire image fit to into the desktop by clicking the
Fit Image to Desktop button or selecting Fit Image to Desktop from
View menu.
Zooming into or out of an image
You can zoom in or out of the image that is displayed in the view
area. To zoom in and out, use the tools described below. The zoom
ratio of the displayed image is displayed in the window title bar.
Zoom In / Zoom Out buttons
Click the Zoom In button to zoom into the image. Click Zoom Out
to zoom out of the image. You can perform the same operations by
selecting Zoom In or Zoom Out from the View menu the View
menu or using the mouse wheel with ALT key pressed (Windows
only).
Fit Image to Window
button
Fit Image to Desktop
button
Zoom ratio
Zoom Out button
Zoom In button
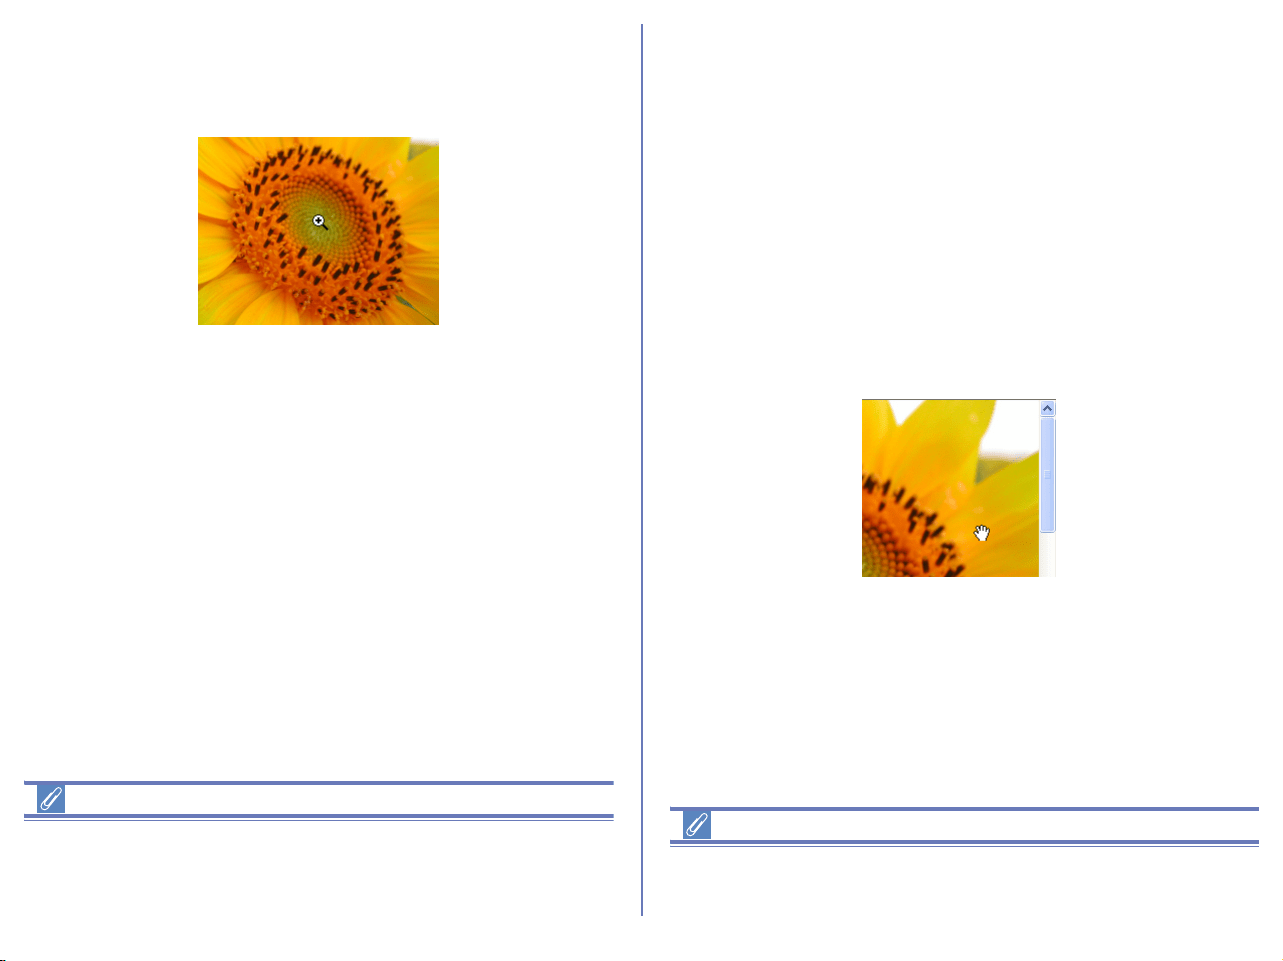
263
Zoom Cursor button
To select the zoom cursor, click the Zoom Cursor button. The
mouse pointer will change into a Zoom cursor.
Position the zoom cursor over the current image and click the
mouse to zoom in one step. Hold down Alt (Windows) or option
(Macintosh) and click the mouse to zoom out one step. Whether
zooming in or zooming out, the center of the displayed area is
determined by the position of the zoom cursor. When zooming in, a
"+" mark is displayed in the zoom cursor. When zooming out, a "-"
mark is displayed.
Double-clicking Button
Double-clicking Zoom Tool button to display the image in the actual
size (1:1). In Windows, the image is displayed fitting to the viewer
window. In Macintosh, all image is displayed. Palm Tool button.
Moving the image around
When you zoom in, the image area will show only part of the
current image. Use the Grab Cursor to move the image around
and display areas that are not currently visible.
Click the Grab Cursor button on the Toolbar, or select Grab
Cursor from the View menu. The mouse pointer will change into a
hand.
To scroll the image, drag the mouse in the direction you want to go.
You can also scroll the image using the scroll bars below and right
of the image area. Or, you can scroll the image in the horizontal
direction using the mouse wheel with Ctrl key pressed. The scroll
travel will be greater by pressing Shift key simultaneously.
Grab Cursor and Zoom Cursor
The Grab and Zoom cursors can not be used at the same time.
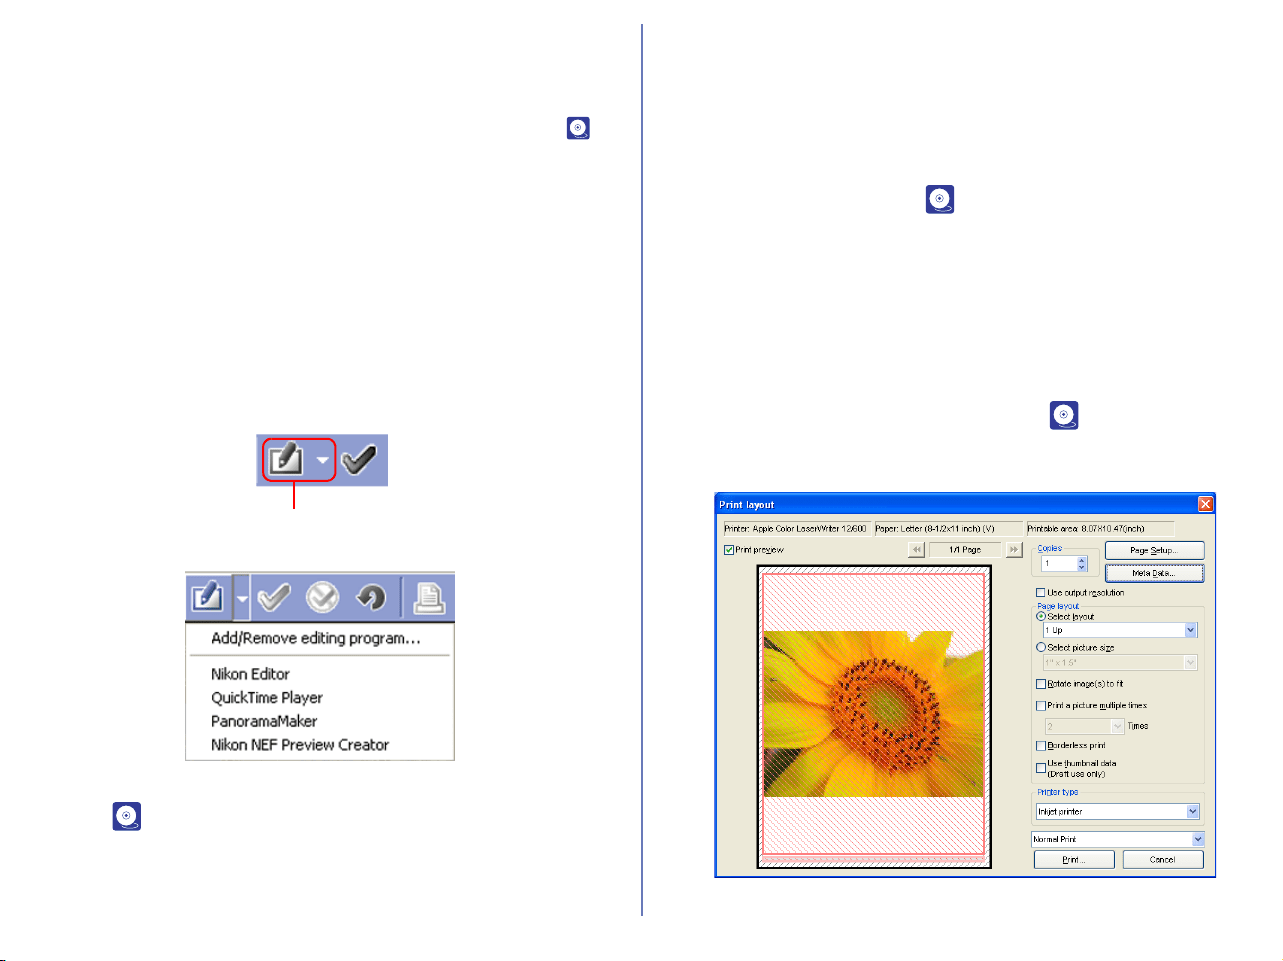
264
Editing image files
You can open and edit the image displayed in the view area with
the program specified in the Still image tab of the Preferences
dialog box. For more information on the Still image tab, see ( p.
226) in "Nikon Browser".
To open the image in the specified program, click the Edit button
on the toolbar.
If you register a program using the Add/Remove editing program
dialog box, you can also edit the image with a program other than
the one specified in the Preferences dialog box.
To display the Add/Remove editing program dialog box, click the
drop-down arrow on the Edit tool button and select Add/Remove
editing program from the menu.
For more information on the Add/Remove editing program dialog
box, see ( p. 184) in "Nikon Browser".
Appending Tag mark on Images (Windows
only)
Click Tag mark On on the tool bar to append Tag mark on image
files. When the Tag mark is appended on the file, Tag mark icon
appears on the status bar.
For further information, see ( p. 172) in "Nikon Browser".
Printing images
You can print the image displayed in the view area. Use the Print
layout dialog box to print the image.
To display the Print layout dialog box, click the Print button on the
toolbar, or select Print from the File menu.
For more information on printing, see ( p. 185) in "Nikon
Browser".
Edit button
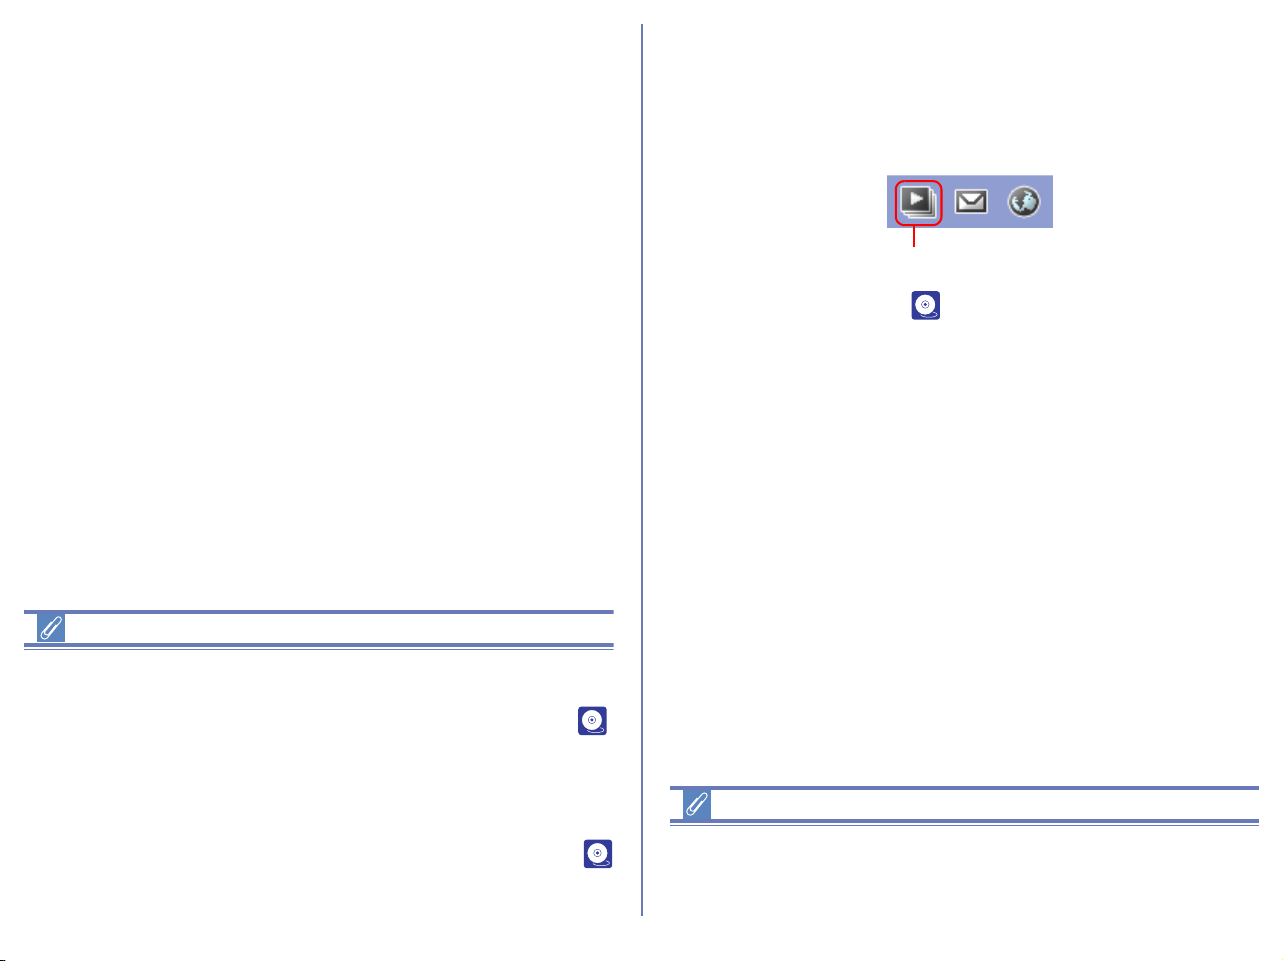
265
Color Management for Printing
Windows
Printing is executed according to the settings specified in the (
p. 231) of the Preferences dialog box with Nikon Browser, Nikon
Viewer or Nikon Editor.
Macintosh
Printing is executed according to the settings specified in the (
p. 233) of the Preferences dialog box with Nikon Editor.
Viewing a slideshow
You can view the images opened in the view area as a slideshow.
To view a slideshow, click the Slideshow button on the toolbar, or
select Slideshow from the Tools menu.
For more information, see ( p. 193) in "Nikon Browser".
Note
If you computer is running Windows operation system, you can
display on Nikon Viewer all still images in the folder that stores the
image file by clicking one thumbnail in the thumbnails list.
Slideshow button
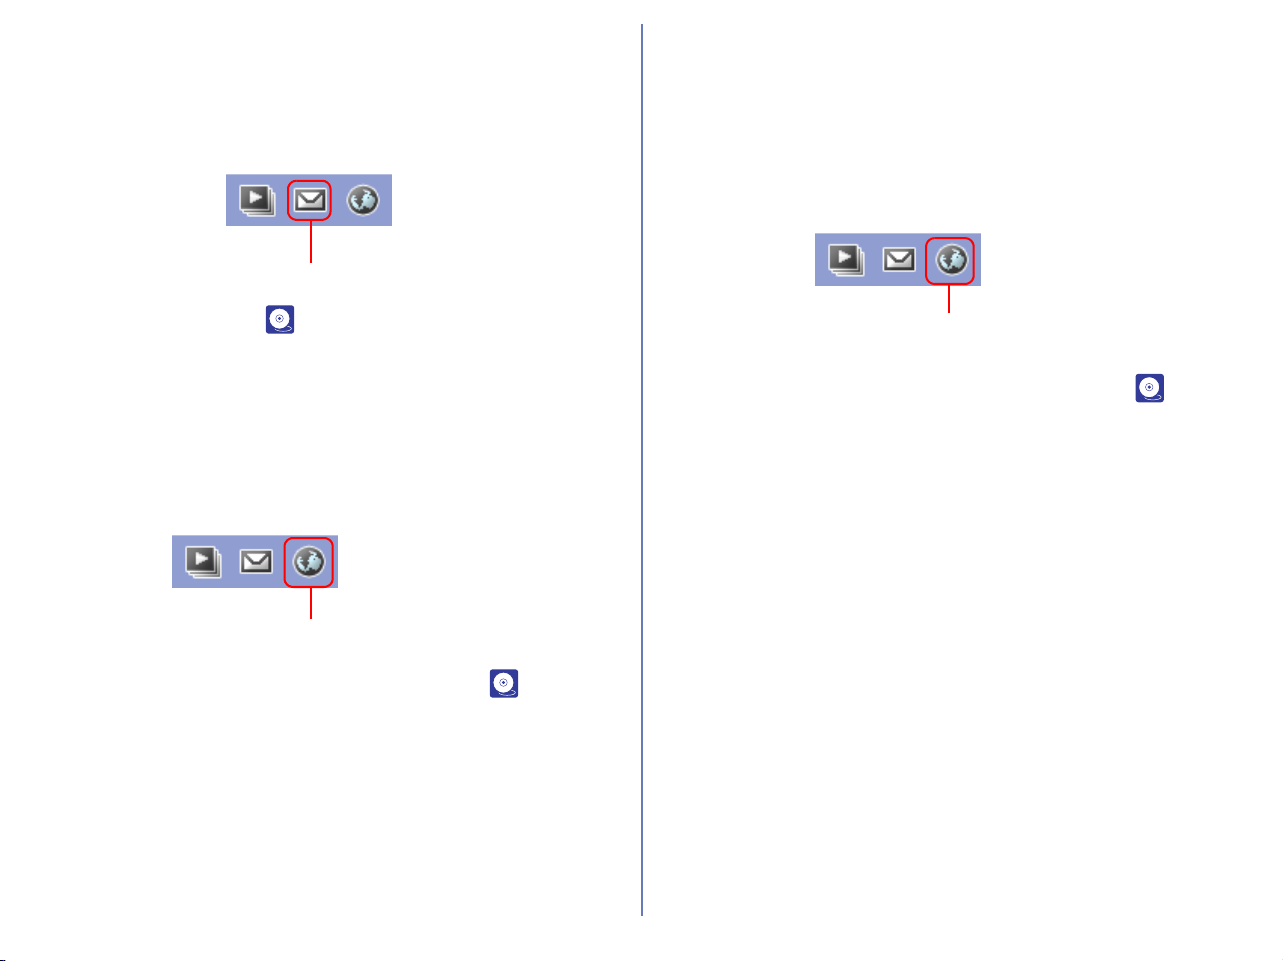
266
E-mailing images
Images displayed in the Image Area can be sent by e-mail. To
send images, click the E-mail button on the tool bar or select E-
mail from the Tools menu.
For more information, see ( p. 197) in "Nikon Browser".
Uploading images (for European resident)
You can upload the image displayed in the view area to the online
album at the FotoShare site. To upload the image, click the
Publish to FotoShare button on the toolbar, or select Publish to
FotoShare from the Tools menu
.
For more information on publishing to the Web, see ( p. 200) in
"Nikon Browser".
Uploading images (for North and South
American resident)
You can upload the image displayed in the view area to the online
album at the Nikon Net site. To upload the image, click the Publish
to NikonNet or PDA button on the toolbar, or select Publish to
NikonNet or PDA from the Tools menu
.
For more information on publishing to the Web, see ( p. 207) in
"Nikon Browser".
E-mail button
Publish to FotoShare button
Publish to NikonNet or PDA
button
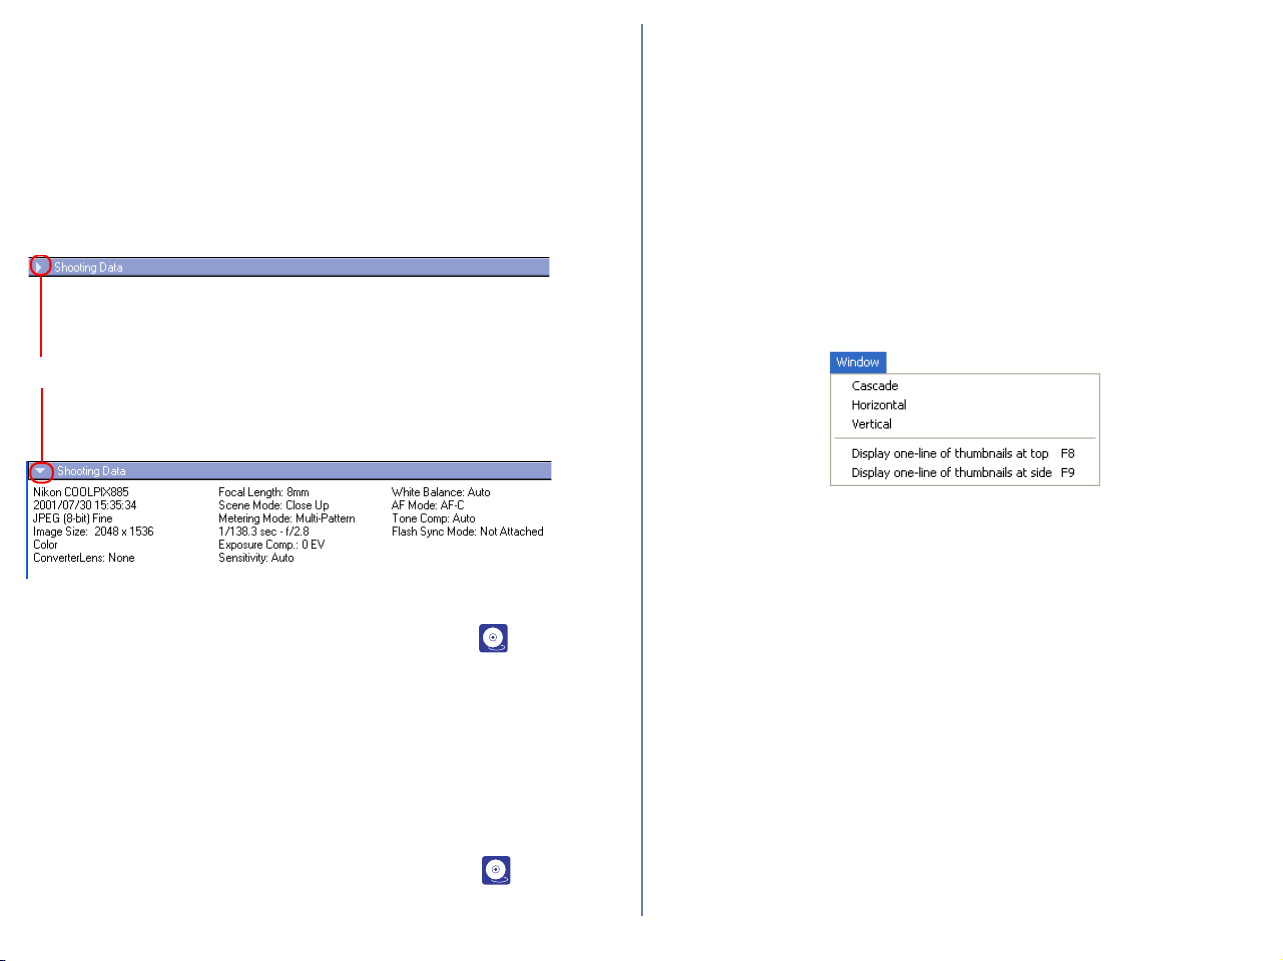
267
Displaying shooting data
When you select a single thumbnail, shooting data is displayed in
the Shooting Data area.
No shooting data is displayed if no thumbnail is selected or if
multiple thumbnails are selected. You can expand or collapse the
shooting data by selecting View Shooting Data on the View
menu. You can also expand or collapse the Shooting Data area by
clicking the toggle button (a small triangle) in the upper left corner.
For more information on the shooting data, see ( p. 174) in
“Nikon Browser”.
Viewing file information
In Nikon Viewer, you can display the file information for the image
displayed in the view area. To view the file information, select IPTC
Information on the File menu to display the IPTC Information
dialog box.
For more information on the file information, see ( p. 176) in
“Nikon Browser”.
Opening folders in Nikon Browser
The folder containing the image currently displayed in the view
area can be opened in Nikon Browser. To open the folder in Nikon
Browser, select Open with Browser from the Folder menu.
Displays with Nikon Browser and Nikon
Viewer
You can select how to arrange images in Nikon Browser and Nikon
Viewer windows in the Window menu of Nikon Browser or Nikon
Viewer
Cascade
Arrange the Nikon Browser and Nikon Viewer windows in cascade.
Horizontal
Arrange the Nikon Browser and Nikon Viewer windows in
horizontal.
Vertical
Arrange the Nikon Browser and Nikon Viewer windows in vertical.
Display one-line thumbnails at top
Arrange the image thumbnails in one line at the top and the Nikon
Viewer window under them.
Shooting Data area collapsed
Toggle button
Shooting Data area expanded
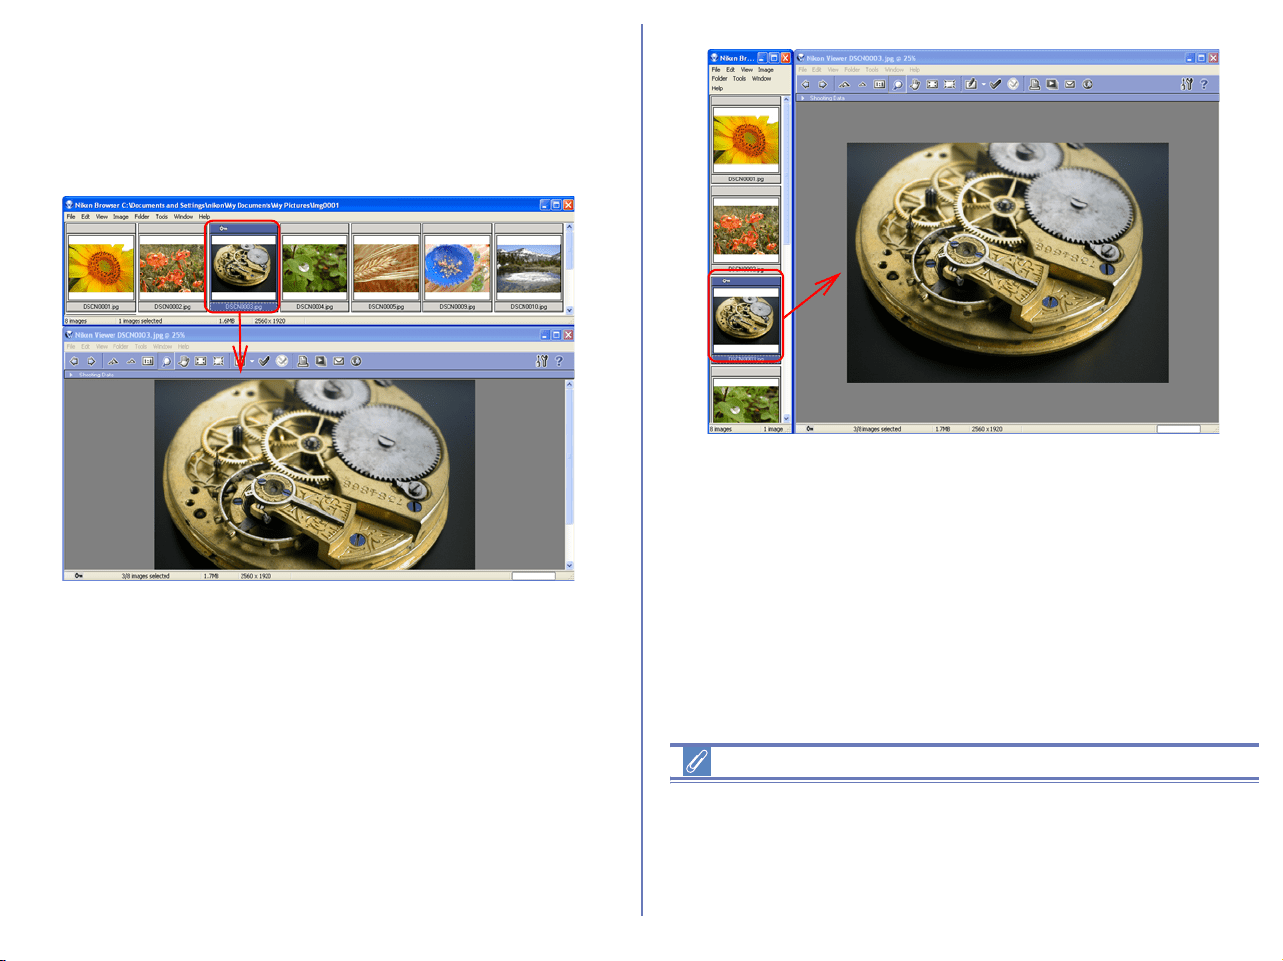
268
Display one-line thumbnails at side
Arrange the image thumbnails in one line at the left and the Nikon
Viewer window to the right.
The following examples show the thumbnails arranged horizontally
in a row and vertically in a column.
If you open Nikon Browser and Nikon Editor at a time, click on the
thumbnail image in Nikon Browser window to allow the same
image to display in Nikon Viewer window.
Restoring Thumbnails Arrangement
If you select Arrange thumbnails in a row or Arrange
thumbnails in a column in the Window menu, a check mark
appears in the selected item. To restore thumbnails arrangement,
select the same option, removing the check mark from the menu.
Arranged horizontally in a row
Arranged vertically in a column
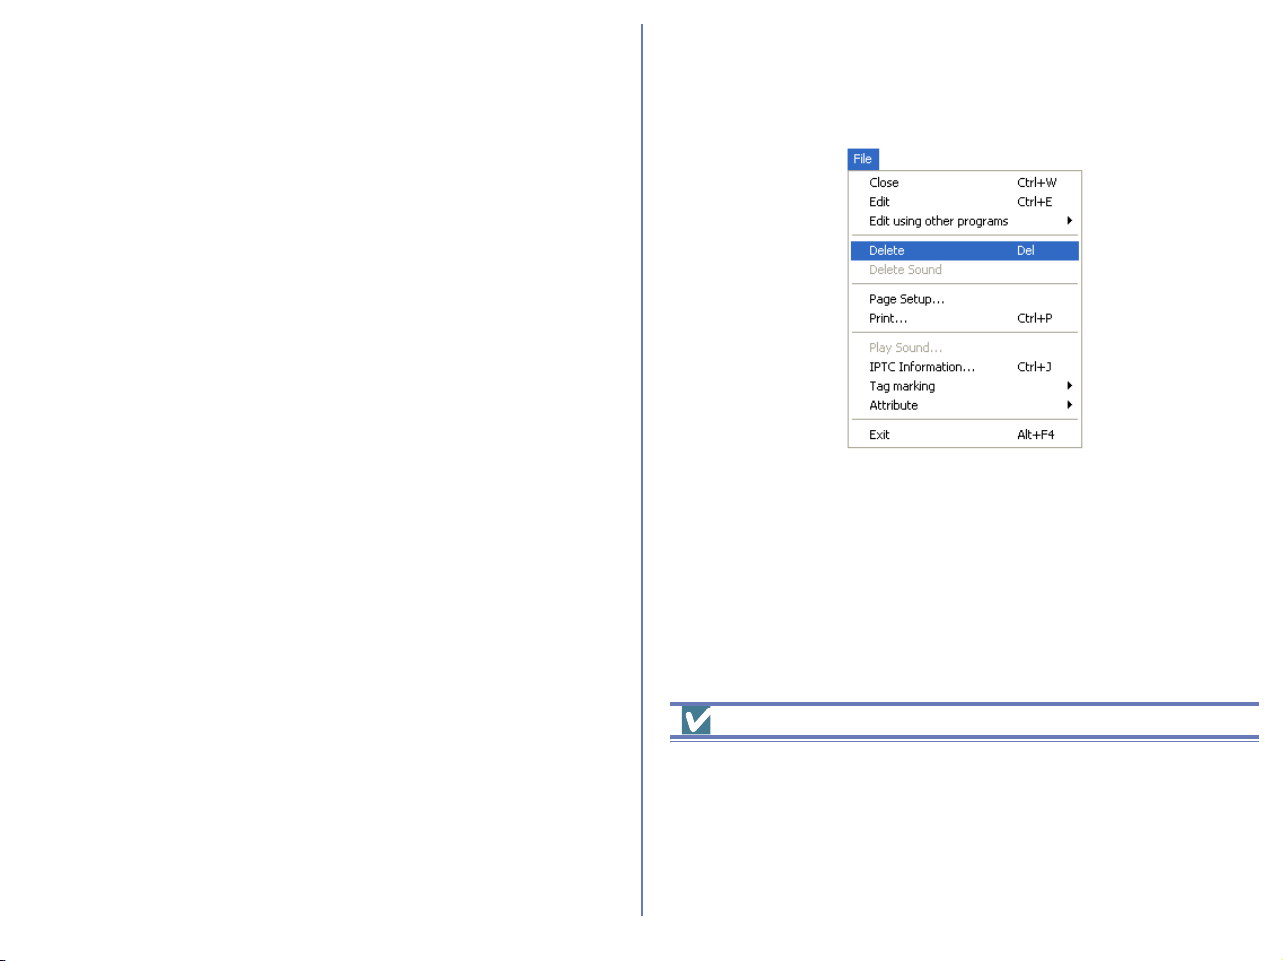
269
Opening folders in Explorer (Windows) or
Finder (Macintosh)
In Windows, the folder containing the image currently displayed in
the view area can be opened in Explorer by selecting Open with
Explorer from the Folder menu.
With Macintosh, the folder containing the image currently displayed
in the view area can be opened in Finder by selecting Open with
Finder from the Folder menu. You can select the image displayed
in Nikon Browser from Finder.
Deleting image files
To delete the image file displayed in the view area, select Delete
from the File menu or press the Delete key.
The deleted image file is moved to the Recycle Bin (Windows) or
the Trash (Macintosh).
When the displayed image is deleted, Nikon Viewer displays the
next image in Nikon Browser's thumbnail list area. If the deleted
image was the last image and there are no following files, then
nothing is displayed in the view area.
Deleted image files
Deleted image files are moved to the Recycle Bin (Windows) or the
Trash (Macintosh). To cancel the deletion, open the Recycle Bin or
the Trash and put the deleted files back in their original location. In
Windows, if you delete image files from the memory card inserted
in the camera, card slot, or card reader, or from a network folder,
the image files are permanently erased and cannot be recovered.

270
Viewing Help
To view Nikon View Help, click the Help button on the toolbar, or
use the Help menu.
Windows
Click the Help button on the toolbar, or select Help topics on the
Help menu to display the Help topics window.
Macintosh
Click the Help button on the toolbar, or select Nikon View Help on
the Help menu to display "Nikon View Help."
Select Show Balloons on the Help menu to enable balloon help.
Only Mac OS default balloon help is available.
Viewing help in Nikon View
Clicking Help in Nikon Transfer, Nikon Browser, Nikon Viewer or
Nikon Editor displays the same help file.
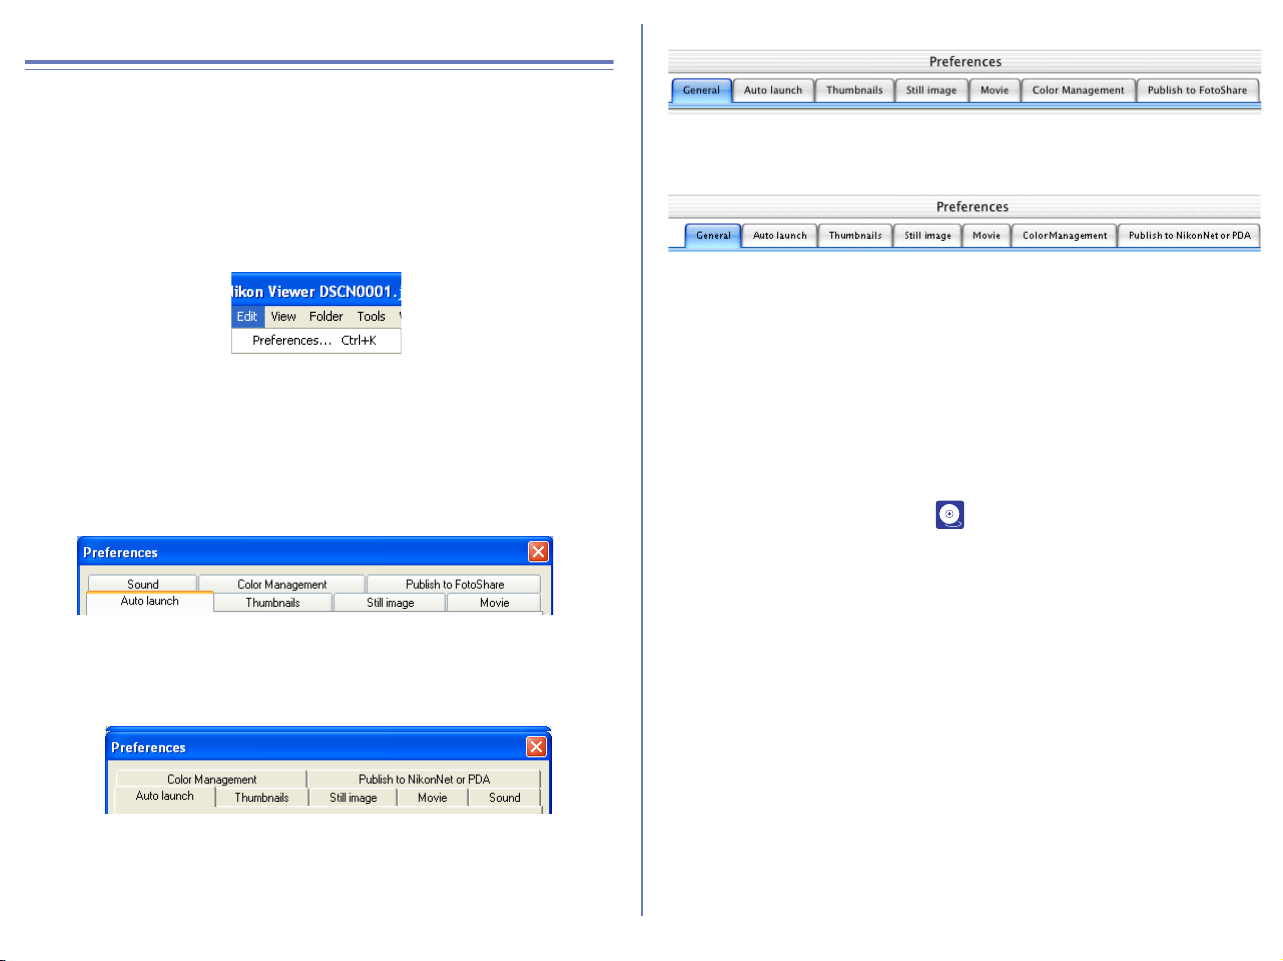
271
Preferences
Displaying the Preferences dialog box
To display the Preferences dialog box, select Preferences from the
Edit menu. Preferences can also be displayed in Nikon Browser.
You cannot display the dialog box from within Nikon Transfer or
Nikon Editor.
The Preferences dialog box contains the following tabs: General
(Macintosh version Only), Auto launch, Thumbnails, Still image,
Movie, Sound (Windows version Only), Color Management
(Windows version Only) and FotoShare (for European resident)
or NikonNet/PDA (for North and South American resident).
Changes to the settings take effect not as they are made, but only
when you click OK in the Preferences dialog box.
Click Cancel to close the Preferences dialog box and keep the
original settings.
For detailed information, see ( p. 222).
Windows
for European resident
for North and South American resident
Macintosh
for European resident
for North and South American resident
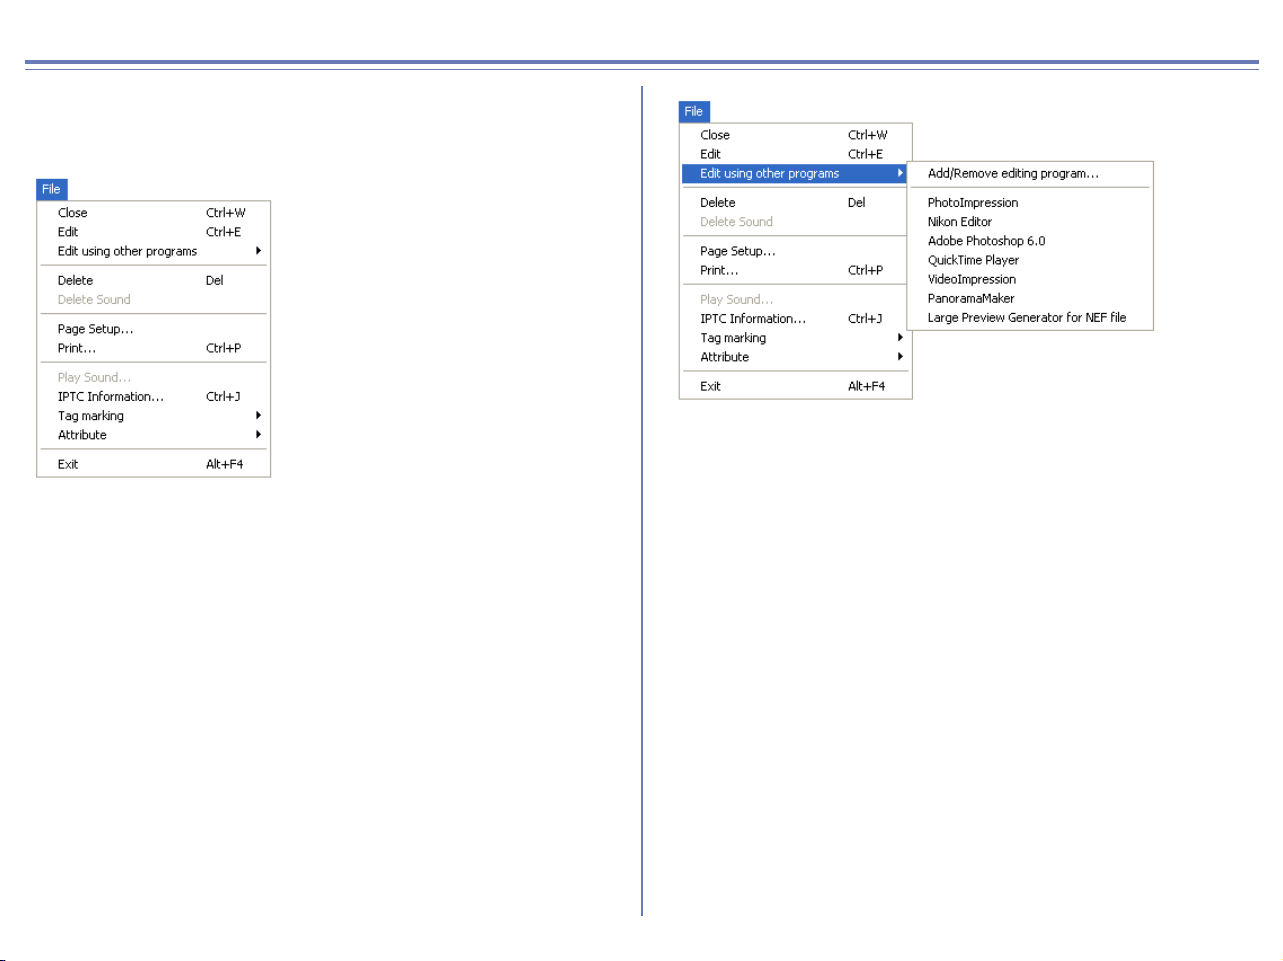
272
Nikon Viewer Menus
Windows
File Menu
Close
Closes the image displayed in the view area.
Edit
Edits the image file associated with the selected thumbnail using
the specified program.
Edit using other programs
Displays the Add/Remove editing program command in the
submenu, which allows you to register image-editing programs.
Add/Remove editing program
Registers image editing programs. Also allow you to change the
name of the program displayed in the menu.
Delete
Deletes the displayed image.
Delete Sound
Deletes the voice file associated with current image.
Page Setup
Sets the page size for printing.
Print
Prints the selected image(s).
Play Sound
Plays back the voice file associated with current image.
IPTC Information
Displays the IPTC Information dialog box.
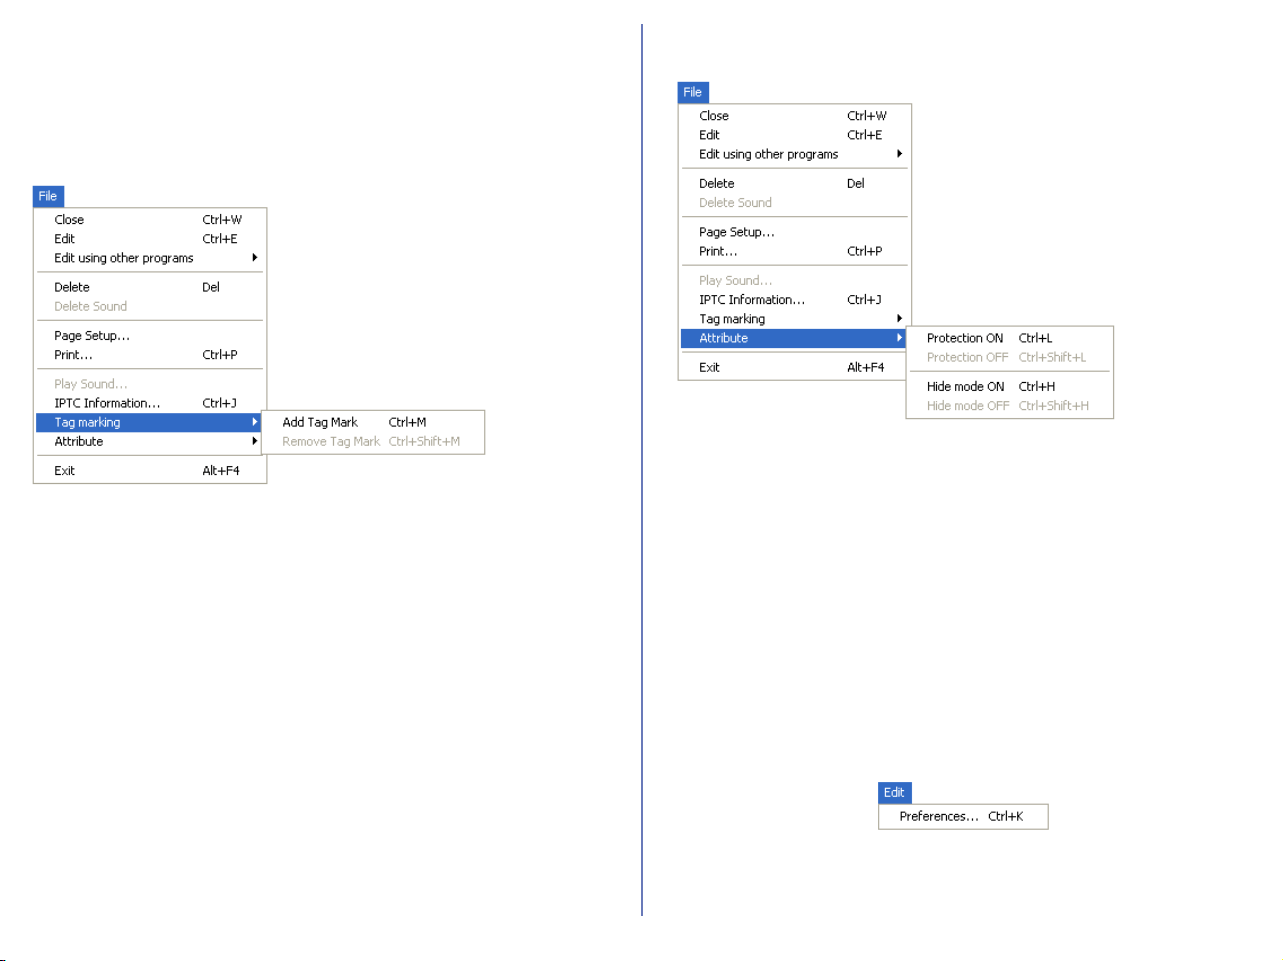
273
Windows — Cont'd
Tag marking
Displays the following commands in the submenu: Add Tag mark
and Remove Tag mark. Use the commands to add or remove the
tag mark on the selected image.
Add Tag mark
Add Tag mark to the selected image file.
Remove Tag mark
Remove Tag mark from the selected image file.
Attribute
Use the commands to toggle the attributes of the selected image
on and off. Displays the following commands in the submenu:
Protection attribute ON, Protection attribute OFF, Hide mode ON,
and Hide mode OFF.
Protection ON
Turns deletion protection on.
Protection OFF
Removes the protection setting from the selected file.
Hide mode ON
Hides the selected file.
Hide mode OFF
Removes hide setting from selected file.
Exit
Closes Nikon Viewer.
Edit Menu
Preferences
Displays the Preferences dialog box.

274
Windows - Cont'd
View Menu
Display Toolbar
Shows or hides the toolbar.
Display Status bar
Shows or hides the status bar.
View Shooting Data
Shows or hides the Shooting Data area.
Previous
Displays the image previous to the current image. The images are
displayed in the order of thumbnails in the Thumbnails list area.
Next
Displays the image next to the current image. The images are
displayed in the order of thumbnails in the Thumbnails list area.
Zoom In
Zooms into the displayed image.
Zoom Out
Zooms out of the displayed image.
Display at the Original Size
Display the image in original 1:1 size.
Zoom Cursor
Zooms into the image, centering the display around the point you
click.
Grab Cursor
Pans around the image when the entire image is not displayed.
Fit Image to Window
Adjust the zoom ratio of the current image to fit the Nikon Viewer
Window.
Fit Image to Desktop
Adjust the zoom ratio of the current image to fit the desktop.
Refresh
Refreshes the display of the view area, Shooting Data area, and
the status bar.
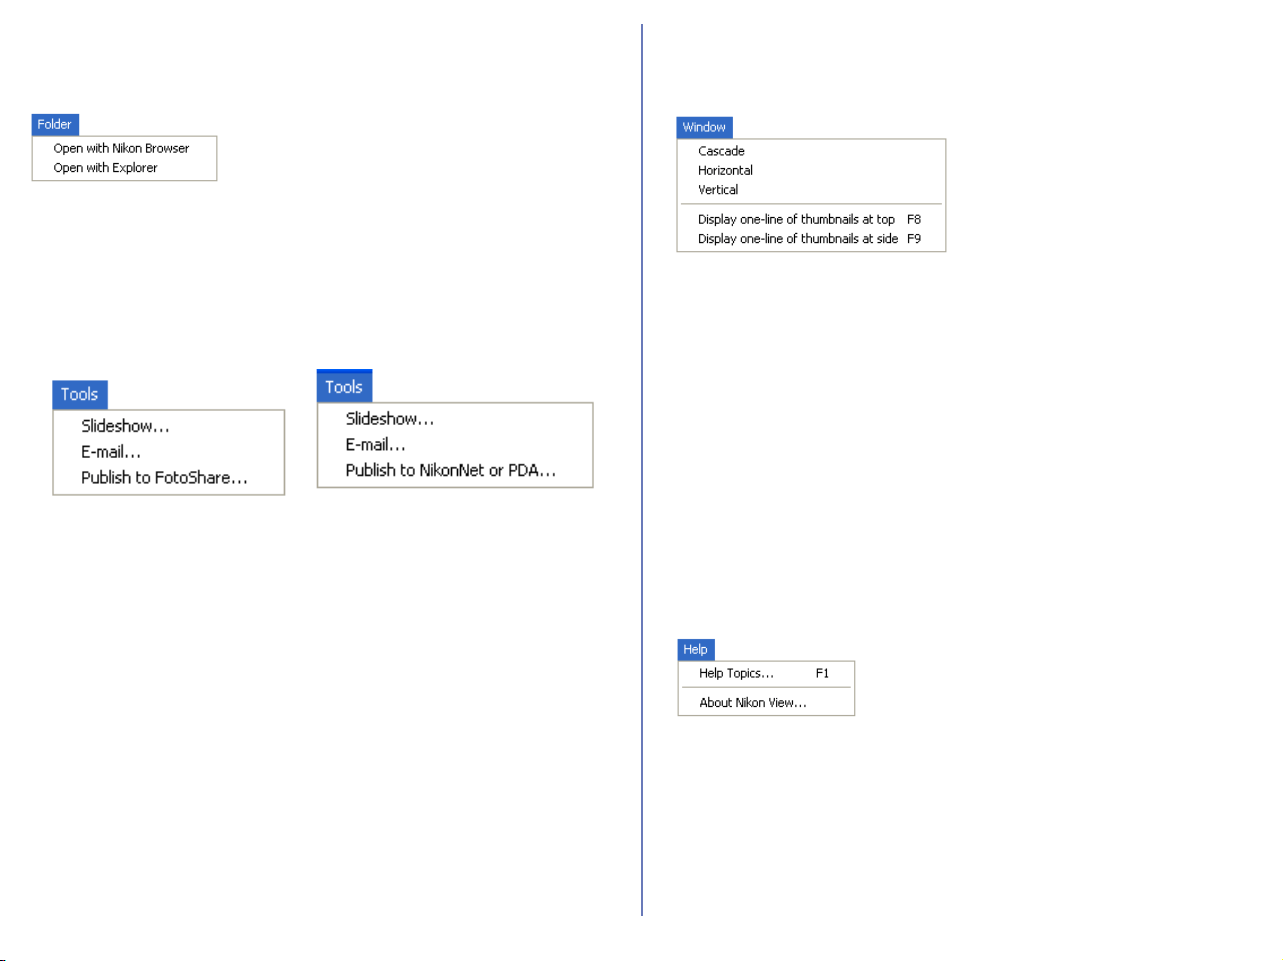
275
Windows - Cont'd
Folder Menu
Open with Nikon Browser
Opens the folder containing the displayed image in Nikon Browser.
Open with Explorer
Opens the folder containing the displayed image in Explorer.
Tools Menu
Slideshow
Play the selected thumbnails as a slideshow.
E-mail
Sends the current image by e-mail.
Publish to Fotoshare (for European resident)
Uploads the current image to FotoShare.
Publish to NikonNet or PDA (for North and South American
resident)
Uploads the current image to an online photo album, or sends the
current image to a PDA connected to your computer.
Window Menu
Cascade
Arrange Nikon Browser and Nikon Viewer in cascade.
Horizontal
Arrange Nikon Browser and Nikon Viewer in horizontal.
Vertical
Arrange Nikon Browser and Nikon Viewer in vertical.
Display one-line thumbnails at top
Arrange the image thumbnails in a row.
Display one-line thumbnails at side
Arrange the image thumbnails in a column.
Help Menu
Help Topics
Displays Nikon View 6 help topics.
About Nikon View
Displays version and copyright information for Nikon View 6.
for European resident
for North and South
American resident
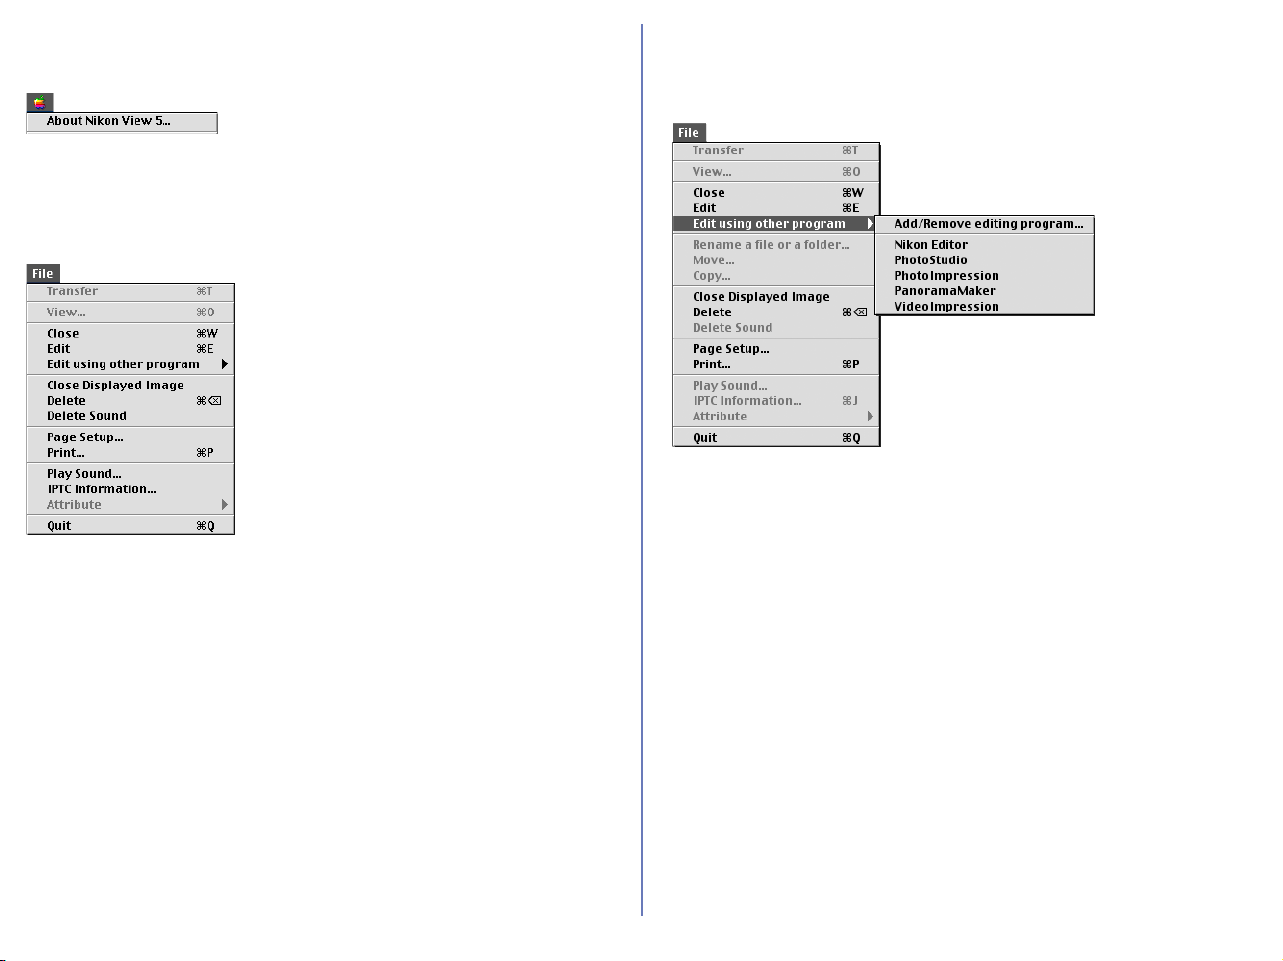
276
Macintosh (Mac OS 9)
Apple menu
About Nikon View 5
Displays version information for Nikon View 5.
File menu
Close
Closes Nikon Viewer.
Edit
Opens and edits the image file associated with the selected thumbnail using
the specified program.
Edit using other programs
Displays the Add/Remove editing program command in the submenu
which allows you to register image editing programs.
Add/Remove editing program
Registers image editing programs and allows you to change the
name of the program displayed in the menu.
Also displays the name of the registered programs up to 10.
Close Displayed Image
Closes the displayed image.
Delete
Deletes the displayed image.
Delete Sound
Deletes the voice memo attached to current image.
Page Setup
Sets the page size for printing.
Print
Prints the selected image(s).
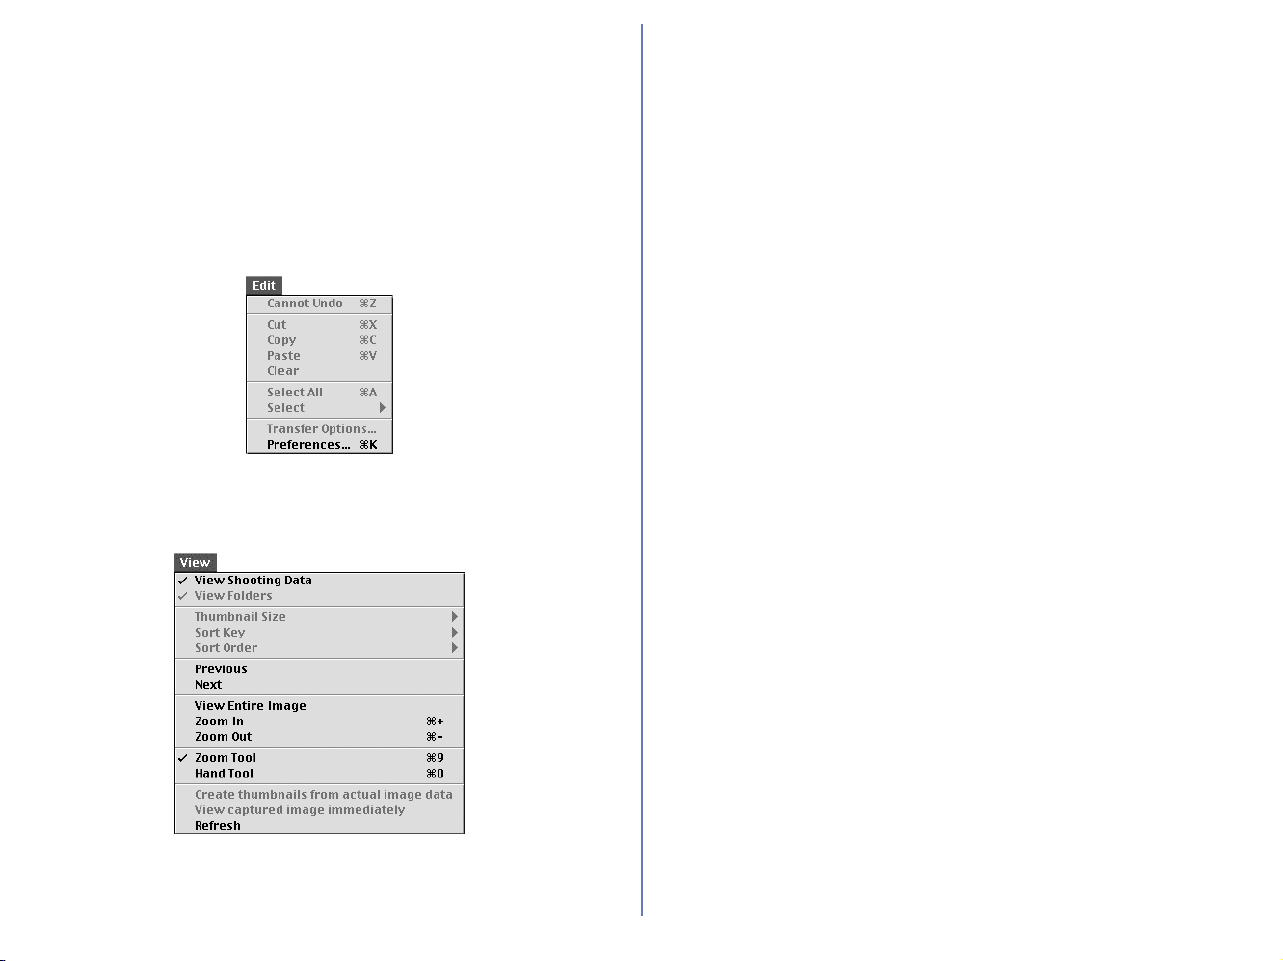
277
Macintosh (Mac OS 9) - Cont'd
Play Sound
Plays voice memo attached to current image.
IPTC information
Displays the IPTC Information dialog box.
Quit
Quits Nikon View 5.
Edit menu
Preferences
Displays the Preferences dialog box.
View menu
View Shooting Data
Shows or hides the Shooting Data area.
Previous
Displays the previous image.
Next
Displays the next image.
View Entire Image
Zooms out of the image to display the entire image.
Zoom In
Zooms into the displayed image.
Zoom Out
Zooms out of the displayed image.
Zoom Tool
Zooms into the image, centering the display around the point you
click. The shape of the mouse pointer changes to the shape of a
magnifying glass.
Hand Tool
Pans around the image when the entire image is not displayed.
Refresh
Refreshes the display of the view area, Shooting Data area, and
the status bar.
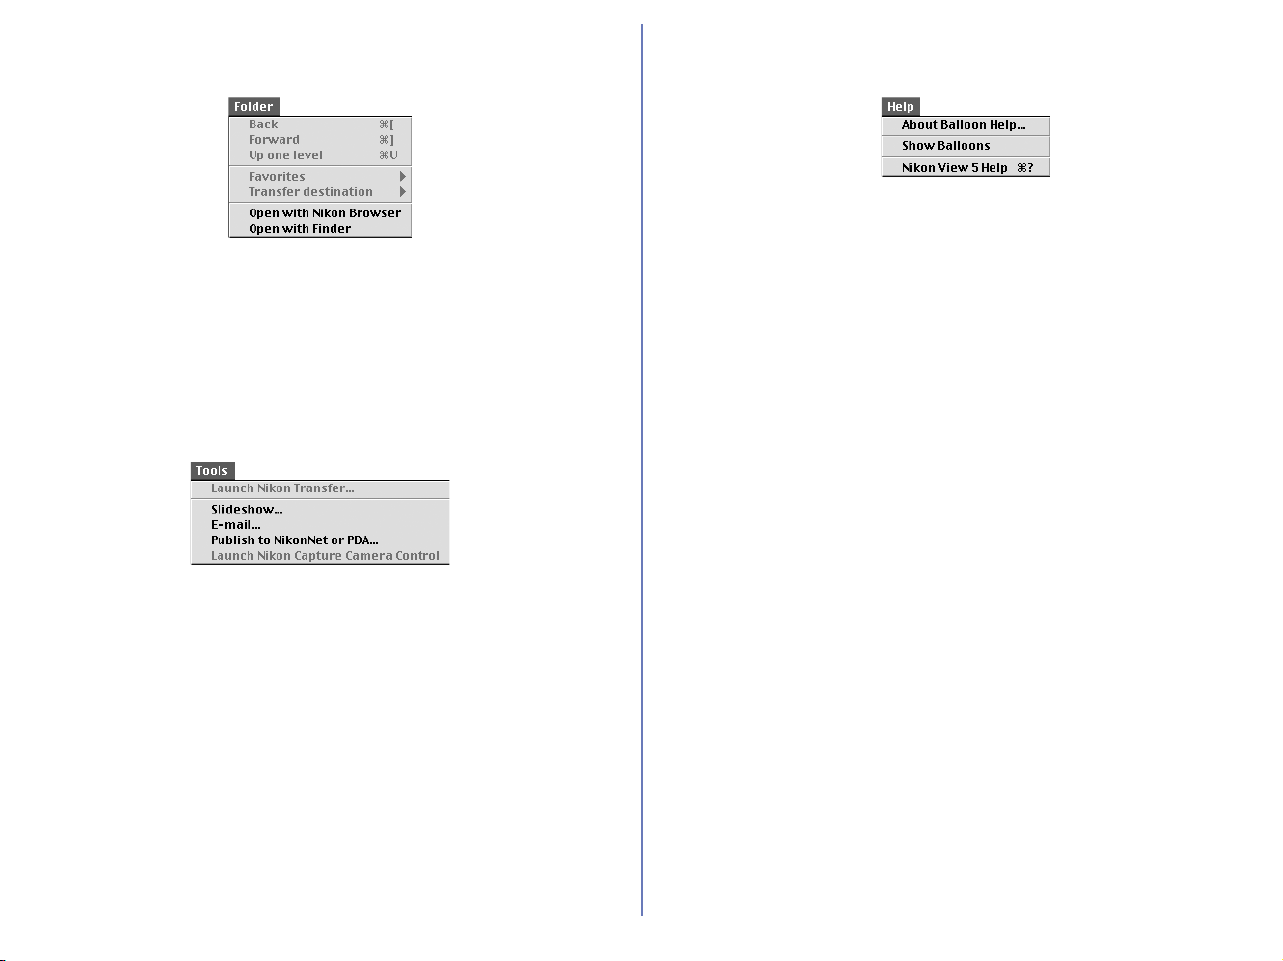
278
Macintosh (Mac OS 9) - Cont'd
Folder menu
Open with Nikon Browser
Opens the folder containing the displayed image in Nikon Browser.
Open with Finder
Opens in the Finder the folder containing the image displayed in
Nikon Viewer.
Tools menu
Slideshow
Plays the selected images in a slideshow.
E-mail
Sends the current image by e-mail.
Publish to Fotoshare (for European reisdent)
Uploads the current image to Fotoshare.
Publish to NikonNet or PDA (for North and South American
reisdent)
Uploads the current image to an online photo album, or sends the
current image to a PDA connected to your computer.
Help menu
About Balloon Help
Explains how to use Balloon Help.
Show Balloons
Displays Balloon Help.
Nikon View 5 Help
Opens the Nikon View 5 help file.
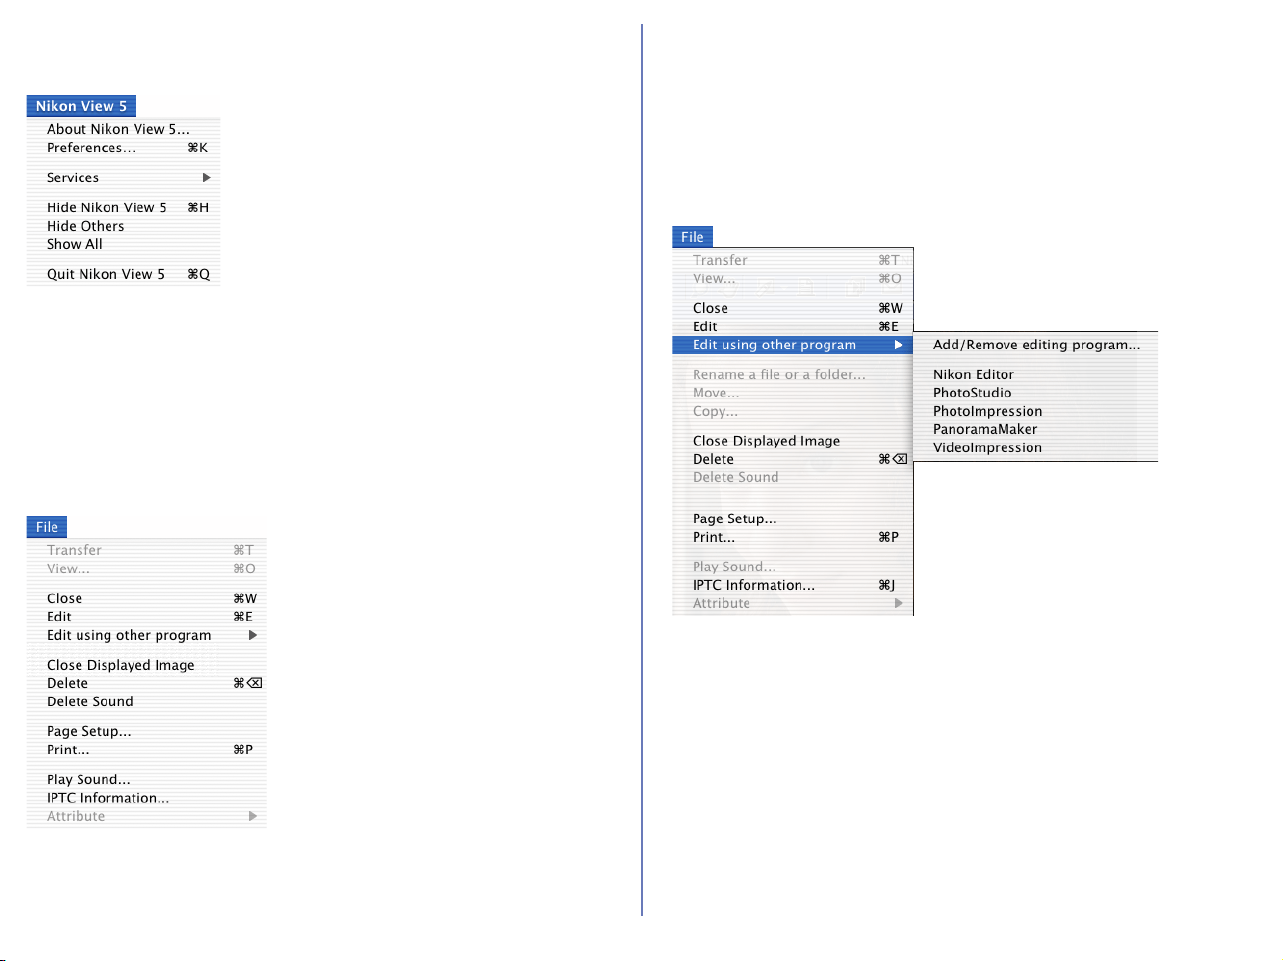
279
Macintosh (Mac OS X)
Nikon View 5 menu
About Nikon View 5
Displays version information for Nikon View 5.
Preferences
Displays the Preferences dialog box.
Quit Nikon View 5
Quits Nikon View 5.
File menu
Close
Closes Nikon Viewer.
Edit
Opens and edits the image file associated with the selected
thumbnail using the specified program.
Edit using other program
Displays the Add/Remove editing program command in the
submenu which allows you to register image editing programs.
Add/Remove editing program
Registers image editing programs and allows you to change the
name of the program displayed in the menu.
Also displays the name of the registered programs up to 10.
Close Displayed Image
Closes the displayed image.
Delete
Deletes the displayed image.
Delete Sound
Deletes the voice memo attached to current image.

280
Macintosh (Mac OS X) - Cont'd
Page Setup
Sets the page size for printing.
Print
Prints the selected image(s).
Play Sound
Plays voice memo attached to current image.
IPTC Information
Displays the IPTC Information dialog box.
View menu
View Shooting Data
Shows or hides the Shooting Data area.
Previous
Takes you back to where you were.
Next
Displays the next image.
View Entire Image
Zooms out of the image to display the entire image.
Zoom In
Zooms into the displayed image.
Zoom Out
Zooms out of the displayed image.
Zoom Tool
Zooms into the image, centering the display around the point you
click. The shape of the mouse pointer changes to the shape of a
magnifying glass.
Hand Tool
Pans around the image when the entire image is not displayed.
Refresh
Refreshes the display of the view area, Shooting Data area, and
the status bar.
Folder menu
Open with Nikon Browser
Opens the folder containing the displayed image in Nikon Browser.
Open with Finder
Opens in the Finder the folder containing the image displayed in
Nikon Viewer.

281
Macintosh (Mac OS X) - Cont'd
Tools menu
Slideshow
Plays the images in the folder containing the currently displayed
image in a slideshow.
E-mail
Sends the current image by e-mail.
Publish to Fotoshare (for European resident)
Uploads the current image to Fotoshare.
Publish to NikonNet or PDA (for North and South American
resident)
Uploads the current image to an online photo album, or sends the
current image to a PDA connected to your computer.
Help menu
Nikon View 5 Help
Opens the Nikon View 5 help file.

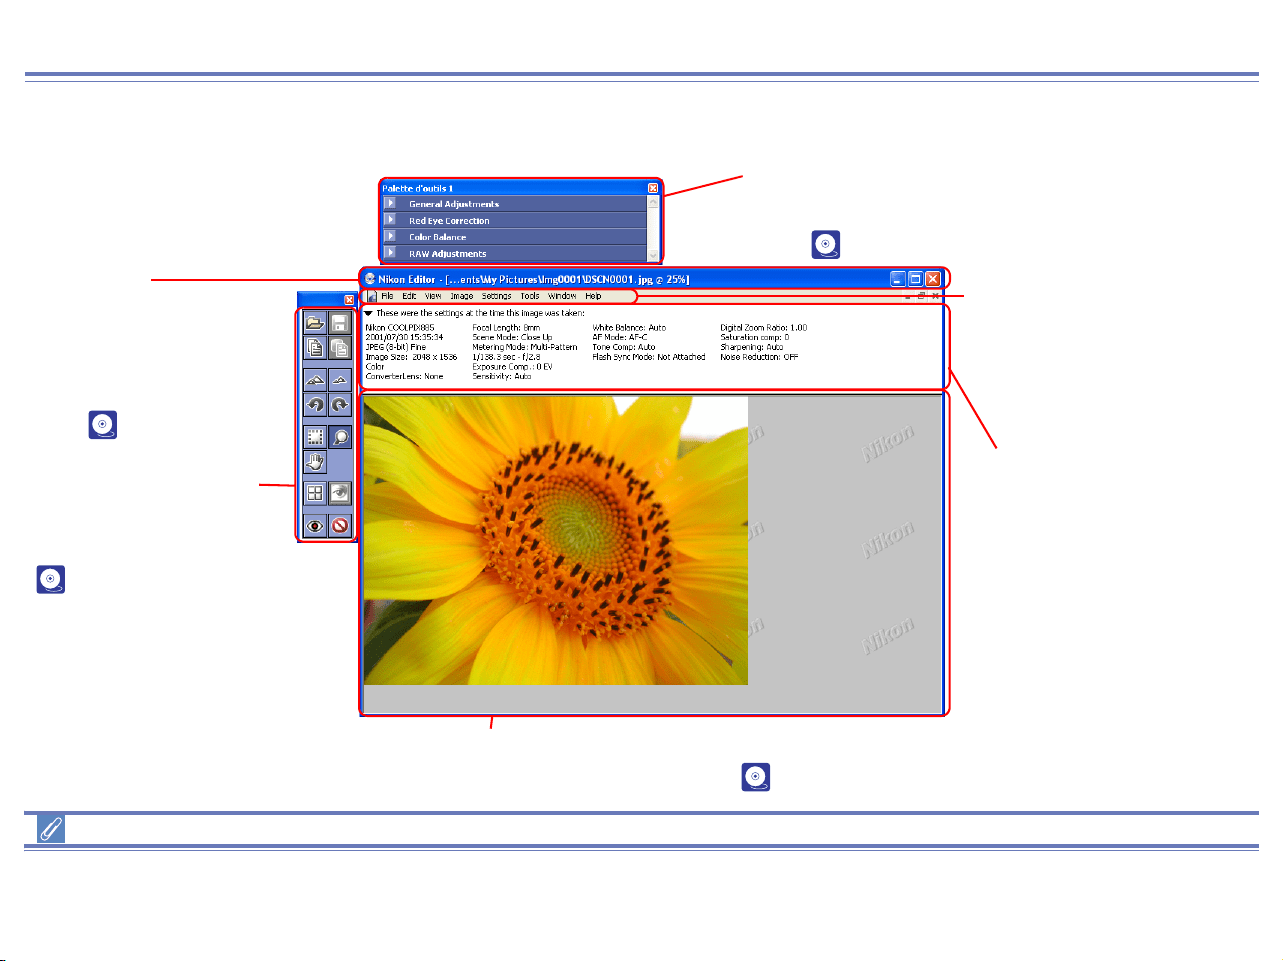
283
Nikon Editor Overview
Using Nikon Editor
Functions and Controls :
Using the Menu Bar, Quick Tools and the Tool Palette
The majority of operations in Nikon Editor are performed using the buttons in the Menu Bar, Quick Tools and Tool Palette. In the case of
operations that can be performed by means of both menus and tool buttons, the explanation in this manual gives priority to the tool buttons.
Title Bar
Displays the name, folder
and zoom ratio of the
image file currently
displayed in the image
area. ( p. 291).
Quick Tools Palette
Contains buttons for various
Nikon Editor operations
( p. 284).
Tool Palette
Contains tools for editing the currently selected
image ( p. 296).
Menu Bar
Contains menus for
various Nikon Editor
operations.
Shooting Data Area
Shows shooting data for the
image currently displayed in
the image area.
Image Area
Shows the image now being edited ( p. 286).
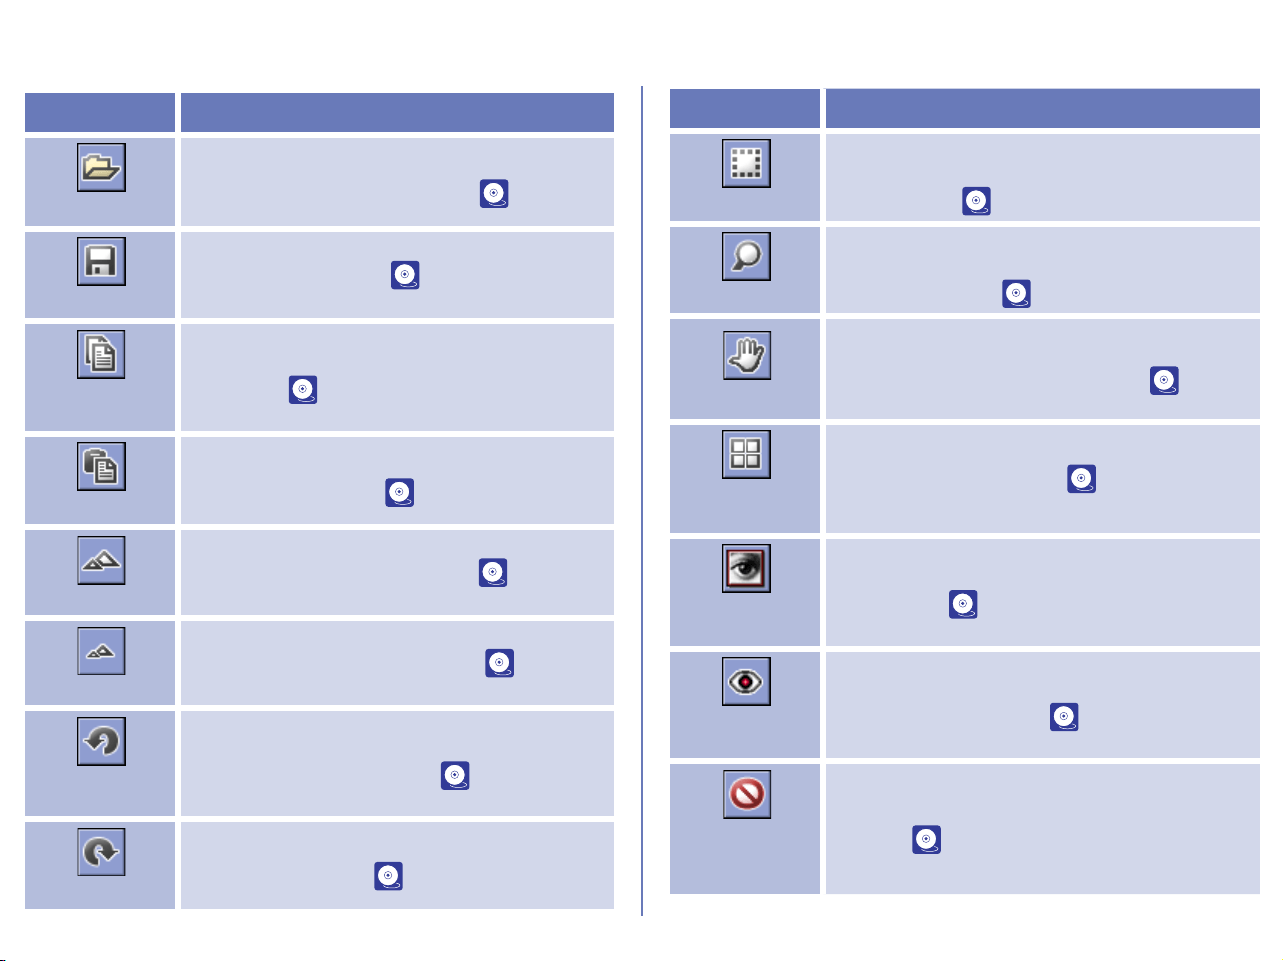
284
Quick Tools (Windows)
Use the buttons in the Quick Tools palette to carry out frequently performed operations quickly and easily, without using the menus.
Button Function
Open
Opens dialog box, which allows you to select
images to open in Nikon Editor ( p. 287).
Save
Saves current image ( p. 288).
Copy All
Adjustments
Copies the current editing settings to the
clipboard ( p. 291).
Paste
Applies the settings copied on the clipboard
to the current image ( p. 291).
Zoom In
Zooms in on the current image ( p. 291).
Zoom Out
Zooms out of the current image ( p. 291).
Rotate 90
CCW
Rotates the current image 90 degrees in a
counterclockwise direction ( p. 293).
Rotate 90 CW
Rotates the current image 90 degrees in a
clockwise direction ( p. 293).
Crop Cursor
Crop the specified part of the current image.
When in use, the mouse pointer changes to a
Crop Cursor ( p. 290).
Zoom Cursor
Zooms in and out of the current image. When
in use, the mouse pointer changes to a
magnifying glass ( p. 291).
Grab Cursor
Pans image to display areas not currently
visible in the view area. When in use, the
mouse pointer changes to a hand ( p.
292).
Show Nikon
Browser
Starts up Nikon Browser ( p. 293).
Open in
Photoshop
Opens the current image in Adobe
Photoshop ( p. 295).
Auto Red Eye
Correction
Automatically correct Red Eye of the current
image. (Windows only)( p. 299).
Show
Original
Image Data
Displays the current image as it was before
editing ( p. 294).
Button Function
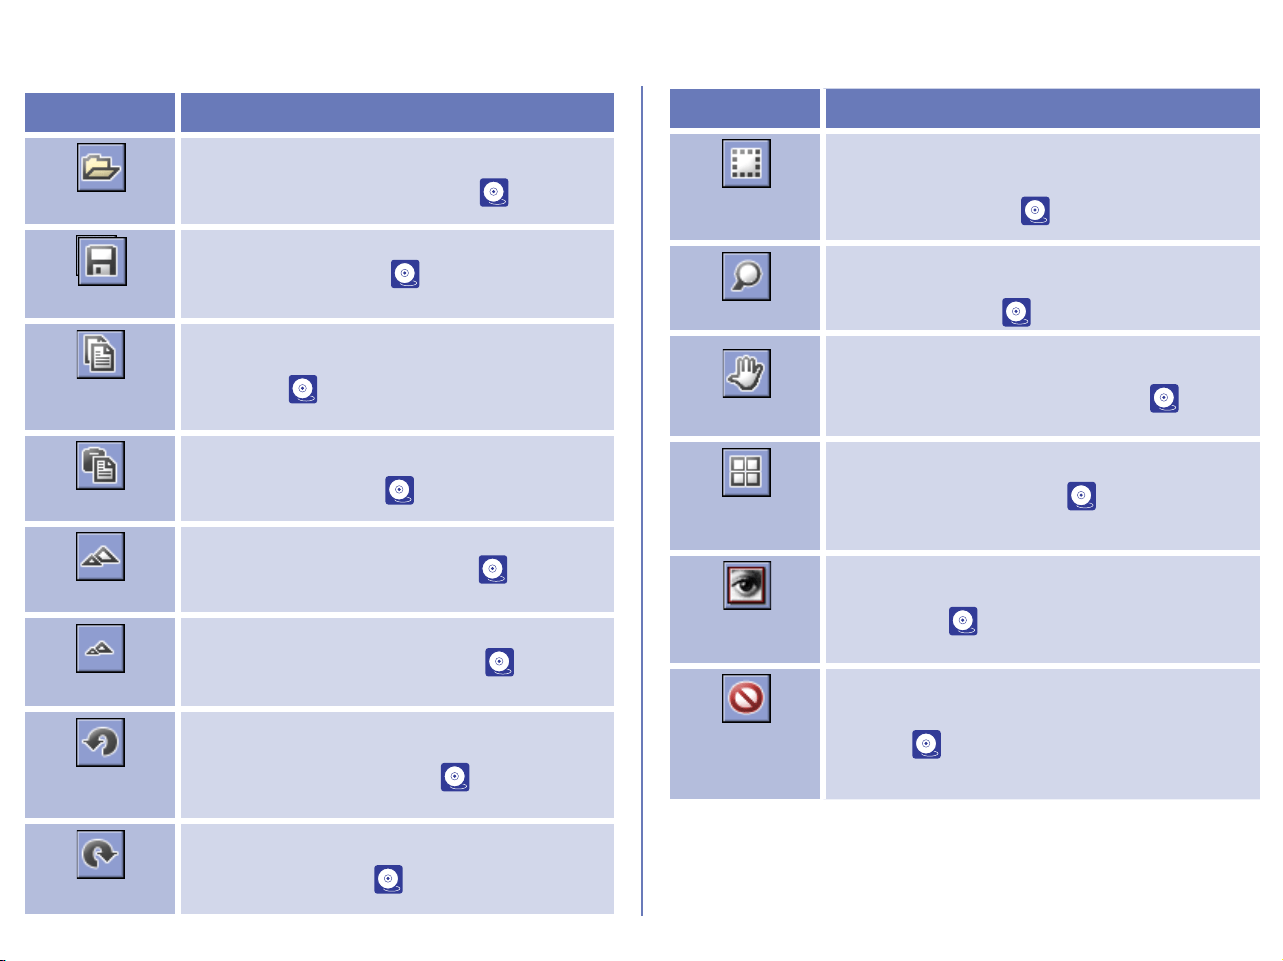
285
Quick Tools (Macintosh)
Use the buttons in the Quick Tools palette to carry out frequently performed operations quickly and easily, without using the menus.
Button Function
Open
Opens dialog box, which allows you to select
images to open in Nikon Editor ( p. 287).
Save
Saves current image ( p. 288).
Copy All
Adjustments
Copies the current editing settings to the
clipboard ( p. 291).
Paste
Applies the settings copied on the clipboard
to the current image ( p. 291).
Zoom In
Zooms in on the current image ( p. 291).
Zoom Out
Zooms out of the current image ( p. 291).
Rotate 90
CCW
Rotates the current image 90 degrees in a
counterclockwise direction ( p. 293).
Rotate 90 CW
Rotates the current image 90 degrees in a
clockwise direction ( p. 293).
Selection
Cursor
Selects the specified part of the current
image. When in use, the mouse pointer
changes to a cross ( p. 290).
Zoom Cursor
Zooms in and out of the current image. When
in use, the mouse pointer changes to a
magnifying glass ( p. 291).
Grab Cursor
Pans image to display areas not currently
visible in the view area. When in use, the
mouse pointer changes to a hand ( p.
292).
Show Nikon
Browser
Starts up Nikon Browser ( p. 293).
Open in
Photoshop
Opens the current image in Adobe
Photoshop ( p. 295).
Show
Original
Image Data
Displays the current image as it was before
editing ( p. 294).
Button Function
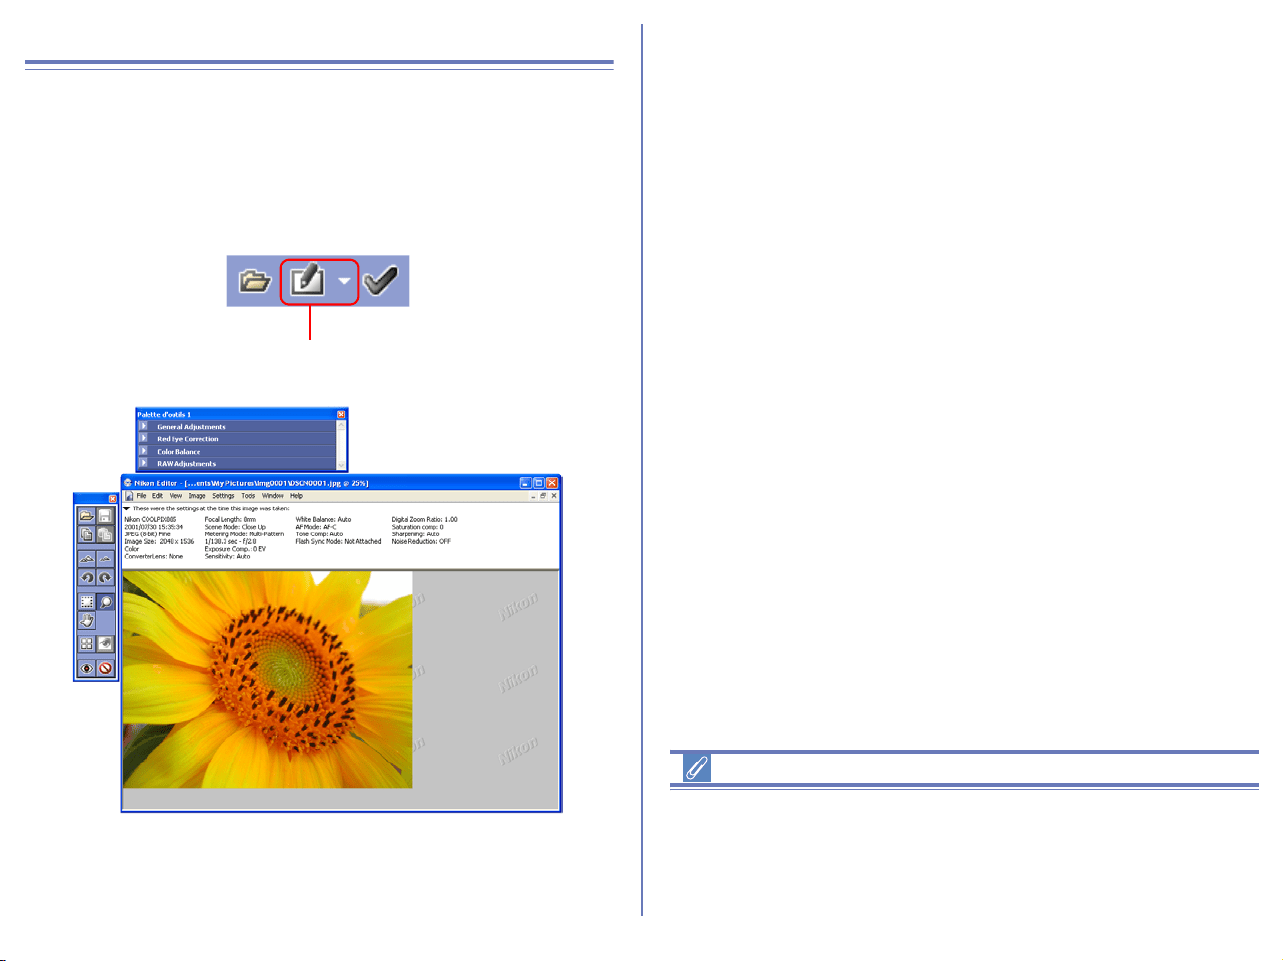
286
Using Nikon Editor
Opening images in Nikon Editor
Use Nikon Browser to select the still image that you want to edit.
Having selected the desired image, click the Edit button or select
Edit from the File menu to open the image in Nikon Editor.
Selecting an alternative image editing application
If you have selected an application other than Nikon Editor in the
Still Images tab of the Preferences dialog box for Nikon Browser,
then the selected image will be opened in the corresponding
application when you follow the steps above.
Edit button
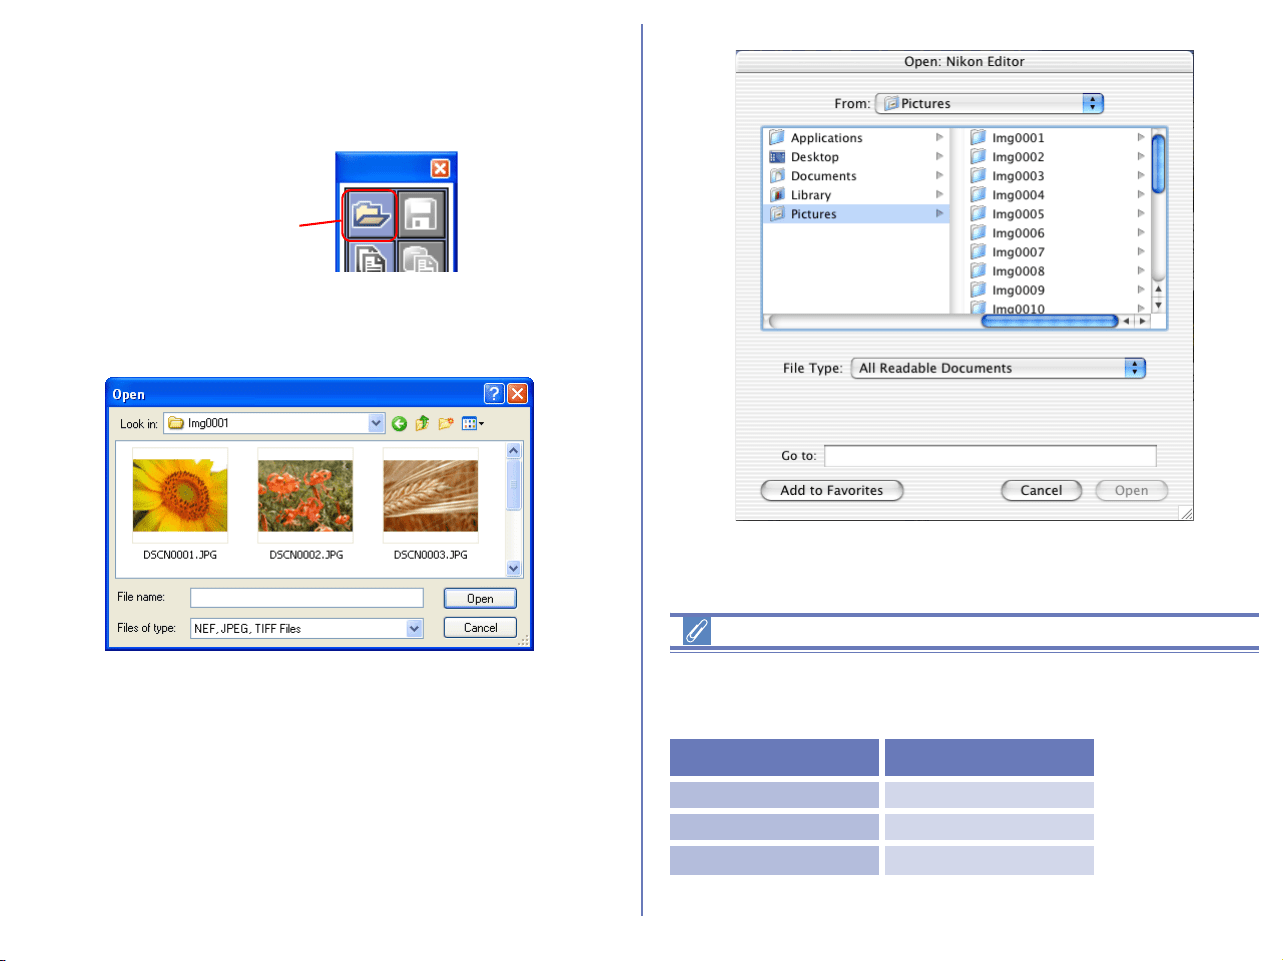
287
Opening a new image in Nikon Editor
To open a new image when Nikon Editor is already running, click
the Open button, or select Open from the File menu.
The Open dialog box will be displayed. Select the image that you
want to edit.
Nikon Editor : Compatible file formats
Only Nikon Digital camera images, in the file formats listed below,
can be opened in Nikon Editor.
Open button
Windows
File Format Extension
JPEG .JPG
TIFF (RGB) .TIF
RAW .NEF
Macintosh
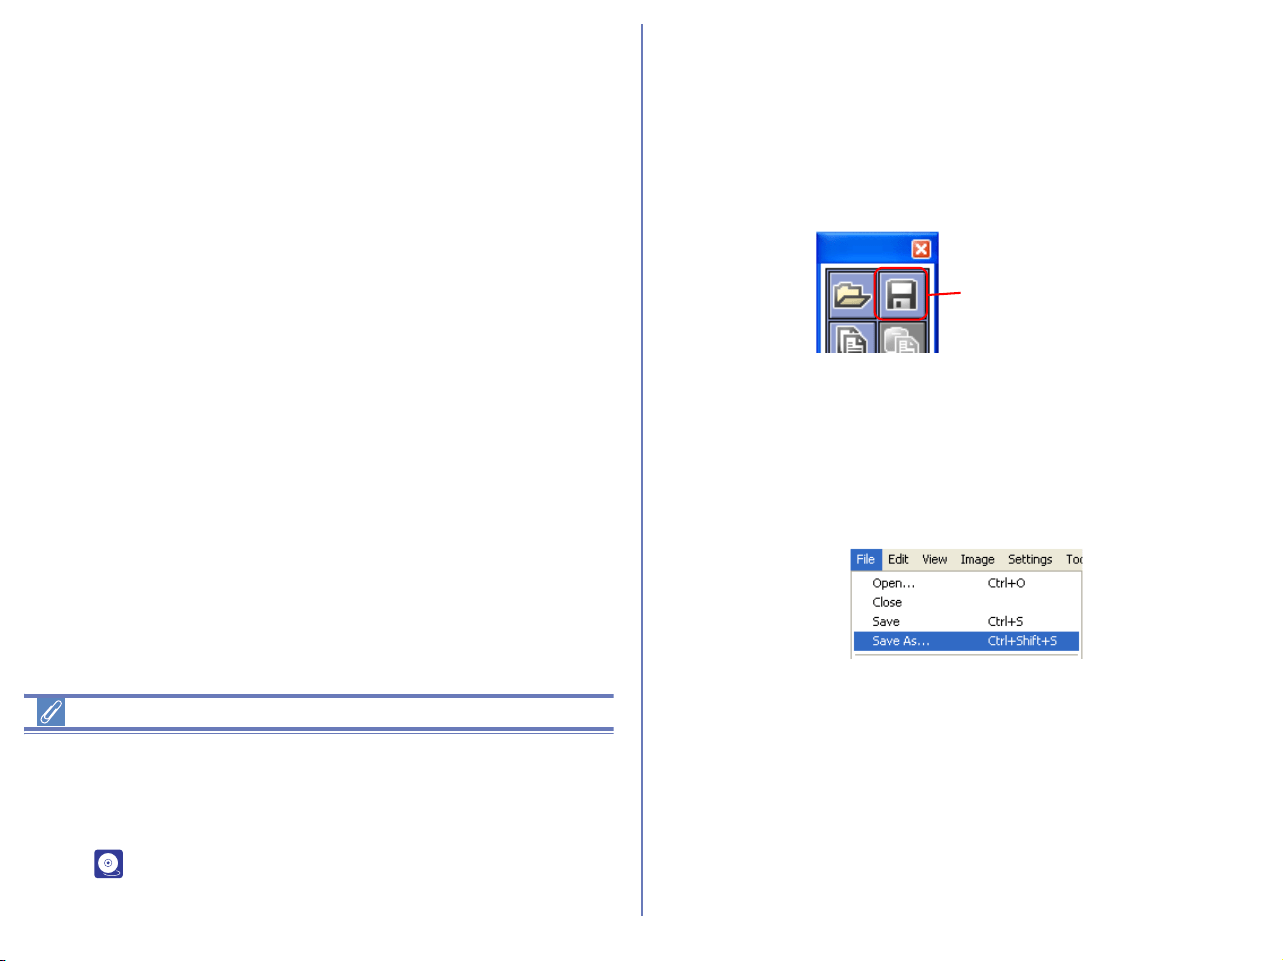
288
RAW Images Created with the D1X
The default size for RAW images created with the D1X when
opened in Nikon Capture 3 Editor can be chosen using the By
default,
a D1
X RAW file will be option in the General tab of the Nikon Editor
dialog ( p. 304). Choose from six megapixels (3008 x 1960
pixels) and ten megapixels (4016 x 2616).
Saving edited images
When you have finished editing an image, save your modifications
by clicking the Save button or selecting Save from the File menu.
The image will be saved with the same file name, overwriting the
old image Note that if you are saving a RAW image, the old image
will not be overwritten.
Save As
If you wish to preserve the original image select Save as ... from
the File menu open the Save dialog box. The Save dialog box
allows you to save the current image under a new file name, and/or
in a different location.
Save button
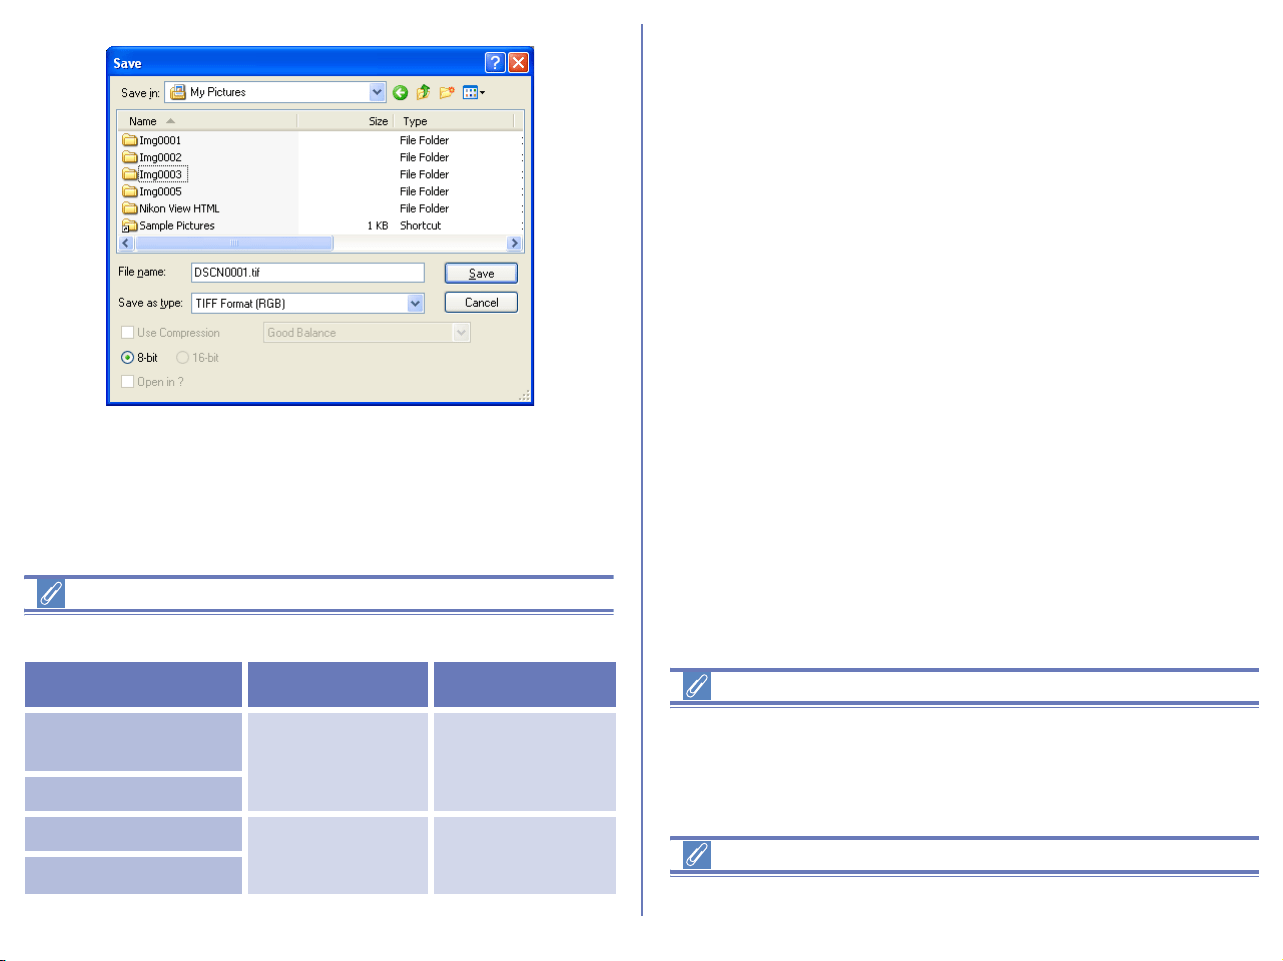
289
Graphic formats for saving files with Nikon Editor
Nikon Editor can save files in the following graphic formats:
TIFF
Use TIFF when saving images for high-quality output or publishing.
Although the lack of compression will result in larger files, image
quality will be maintained at a high level. TIFF also preserves the
ICC profile and caption information. This format is supported by a
wide variety of applications on a variety of platforms. In addition,
RAW images can be save in 16-bit TIFF.
JPEG
This file type is adequate for images that will be output at low
resolution for Web pages. Compression allows more images to be
saved in the same amount of disk space while preserving the ICC
profile and caption information. Note, however, that JPEG
compression results in loss of image information that can not
afterwards be restored. Save files at the lowest compression ratio
possible; if necessary, you can always save them again at a lower
compression ratio. Exif is an extension of the JPEG format that
allows thumbnail data and information about the image to be
included in a JPEG file.
Saving Image files
Editing with Nikon Editor cannot reflect on media such as hard disk
or CD-R/W until the file is saved. If you quit Nikon Editor without
saving the file, editing is not added to the file.
Image files saved in Nikon Editor
Image files saved in Nikon Editor cannot be viewed on a camera.
File Type Compression Extension
16-bit TIFF (RGB)
8-bit TIFF (RGB)
Uncompressed .TIF
TIFF (CMYK)
JPEG (Exif-compliant)
Compressed .JPG
JPEG (JFIF-compliant)
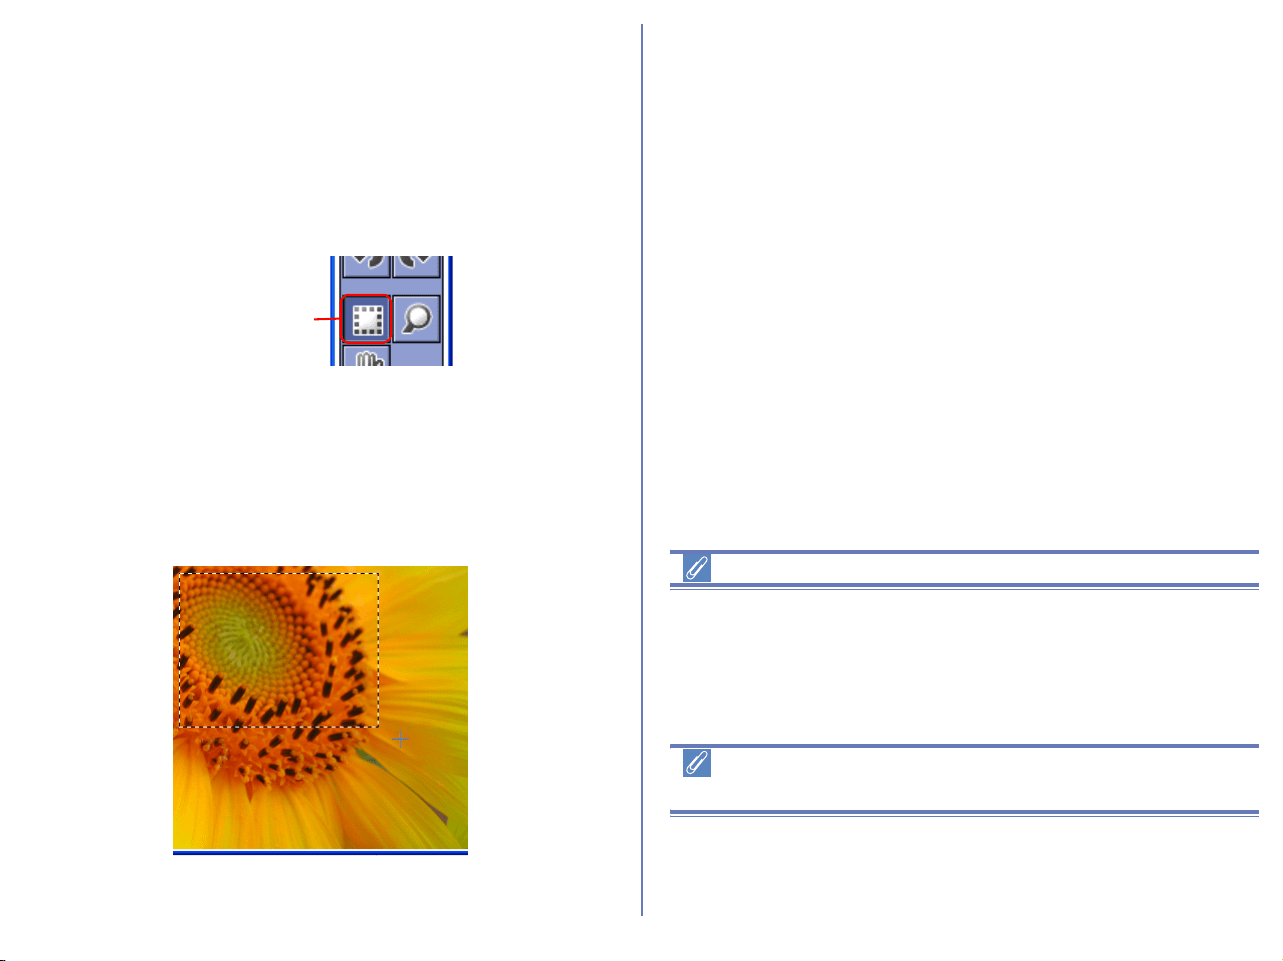
290
Save selection
Nikon Editor can be used to save only the part of the image
selected by the Crop Cursor.
To use the Crop Cursor, click the Crop Cursor button in the Quick
Tools Palette or select Crop Cursor from the View menu.
When the Crop Cursor is selected the mouse pointer will change
to a cross.
To specify a selection, drag the Crop Cursor over the desired area
of the image. The dotted line which appears indicates the selected
area. To cancel the selection specified by the Selection Cursor,
double-click on the image. To move the selection, place the mouse
pointer within the selection and drag it. To scale the selection, click
and hold the handle (dotted line) to drag it.
Important
If you save the file while specifying the selection by the Crop
Cursor, the selected part of image is lost in the saved file. Once the
file is saved, you cannot restore the original image and so take
care fully when saving the edited file.
Selecting the Crop Cursor, Zoom Cursor or Grab
Cursor
The Selection Cursor, Zoom Cursor and Grab Cursor can not be
selected concurrently. These three tools can only be used one at a
time.
Crop Cursor
button

291
Copy all adjustments
Nikon Editor allows you to copy the Tool Palette ( p. 296)
settings for the current image to the clipboard, then apply them to
another image. When editing more than one image it may be
convenient to apply settings relevant to one image to other images
within a group. For example, if one image requires a white balance
adjustment because the original white balance was incorrect, then
all other images that were taken in the same location may be
corrected by simply copying and then pasting the settings to the
other images.
To copy image adjustments to the clipboard, click the Copy All
Adjustments button (Windows), or select Copy Image
Adjustments (Macintosh) from the Edit menu.
Apply copied settings
Select the image to which you want to apply the saved settings.
Click the Paste button, or select Paste from the Edit menu to apply
the settings on the clipboard to this image.
Zooming
To zoom in or zoom out of the current image, either use the Zoom
Cursor, or click the Zoom In or Zoom Out button on the Quick
Tools Palette.
The zoom ratio is displayed in the Nikon Editor title bar.
Zoom In / Zoom Out buttons
Click the Zoom In button to display the current image at
progressively higher zoom ratios (zoom in step by step).
Click the Zoom Out button to display the current image at
progressively lower zoom ratios (zoom out step by step). The
Zoom In and Zoom Out options in the View menu perform the
same operations as the zoom buttons.
Zoom Cursor button
Click the Zoom Cursor button on the Quick Tools Palette, or select
Zoom Cursor from the View menu. The mouse pointer will change
into a magnifying glass.
Copy All Adjustments
button
Paste button
Zoom Ratio
Zoom In
button
Zoom Out
button
Zoom Cursor
button
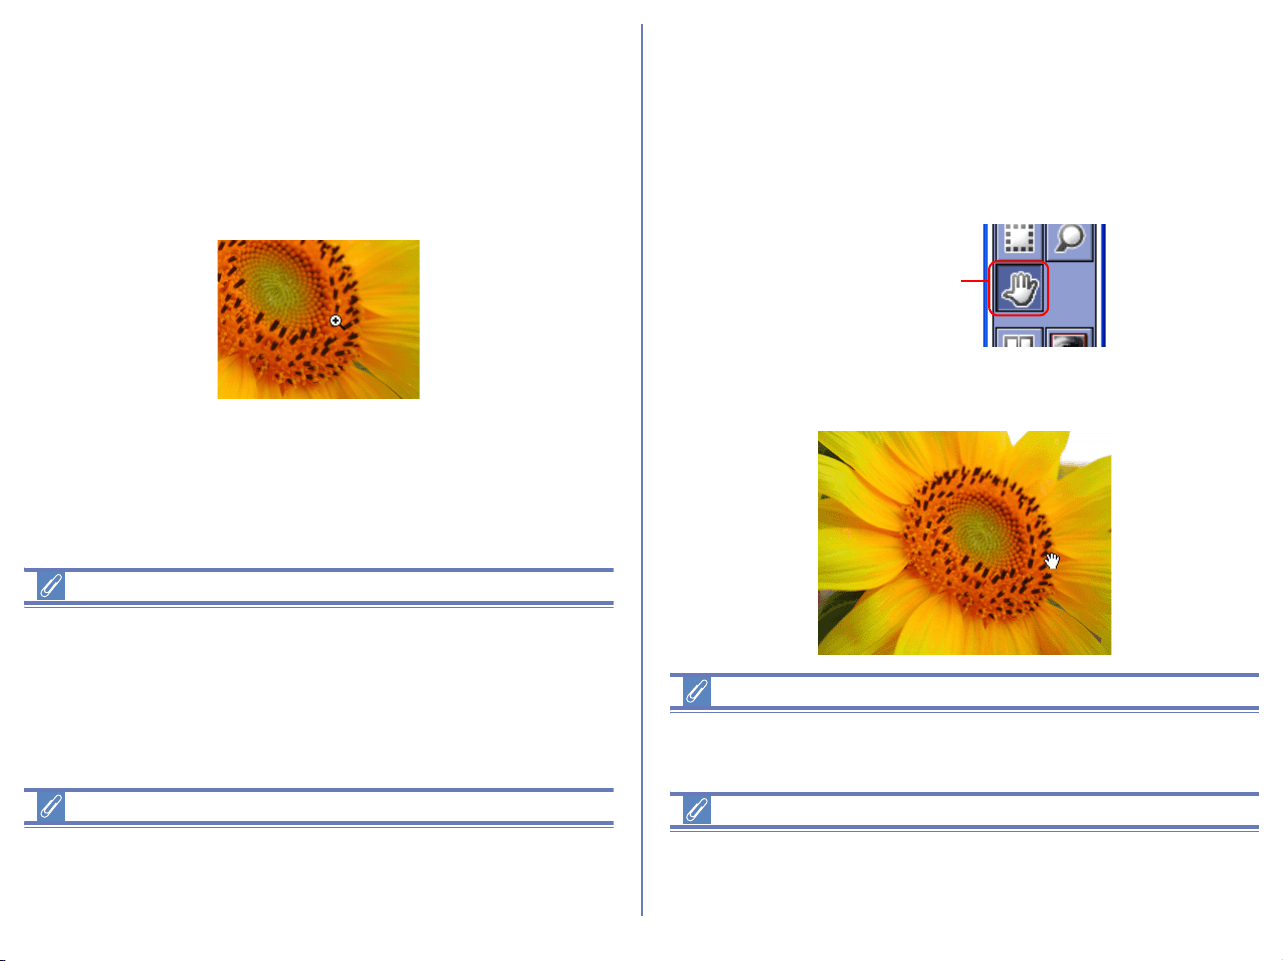
292
Position the Zoom Cursor over the current image and click the
mouse to zoom in one step. Hold down Alt (Windows) or option
(Macintosh) and click the mouse to zoom out one step. Whether
zooming in or zooming out, the center of the displayed area is
determined by the position of the Zoom Cursor. When zooming in,
a "+" mark is displayed in the Zoom Cursor.
When zooming out, a "-" mark is displayed.
Additional Information
The mouse pointer changes to the Zoom-in Cursor while holding
down Ctrl key (Windows) or command key (Macintosh) and to the
Zoom-out Cursor while holding down Alt key (Windows) or option
key (Macintosh). The mouse pointer changes to the Grab Cursor
while holding down the space bar.
Selecting the Crop Cursor, Zoom Cursor or Grab Cursor
The Selection Cursor, Zoom Cursor and Grab Cursor can not be
selected concurrently. These three tools can only be used one at a
time.
Moving the image around
When you zoom in, the Image Area will show only part of the
current image. Use the Grab Cursor to move the image around and
display areas that are not currently visible.
Click the Grab Cursor button on the Quick Tools Palette, or select
Grab Cursor from the View menu. The mouse pointer will change
into a hand.
To scroll the image, drag the mouse in the direction you want to go.
You can also scroll the image using the scroll bars below and right
of the Image Area.
Additional Information
Double-click the Grab Cursor button on the tool bar to fit the image
to the window.
Selecting the Crop Cursor, Zoom Cursor or Grab Cursor
The Selection Cursor, Zoom Cursor and Grab Cursor can not be
selected concurrently. These three tools can only be used one at a
time.
Grab Cursor
button

293
Rotating and flipping images
Rotating images
To rotate images 90 degrees counterclockwise, click the Rotate 90
CCW button on the Quick Tool Palette, or select 90 degrees CCW
from the Image menu. To rotate images 90 degrees clockwise,
click Rotate 90 CW button or select 90 degrees CW.
Select 180 degrees from the Rotation option in the Image menu
to rotate images 180 degrees.
Flipping images
Select Flip from the Image menu to create a mirror image of the
current picture. Images can be flipped horizontally or vertically.
Show Current Folder in Nikon Browser
Click the Show Nikon Browser button on the Quick Tools Palette,
or select Show Current Folder in Nikon Browser from the Tools
menu.
Nikon Browser will start and display the contents of the current
folder in the thumbnail list window. (The browser will select the
folder that stores the image currently displayed in the image area.)
Auto Red Eye Correction (Windows only)
Click the Auto Red Eye Correction button on the Quick Tools
Palette to automatically correct Red Eye of the current
image.( p. 299)
Rotate 90 CCW
button
Rotate 90 CW
button
Show Nikon Browser button
Auto Red Eye Correction button
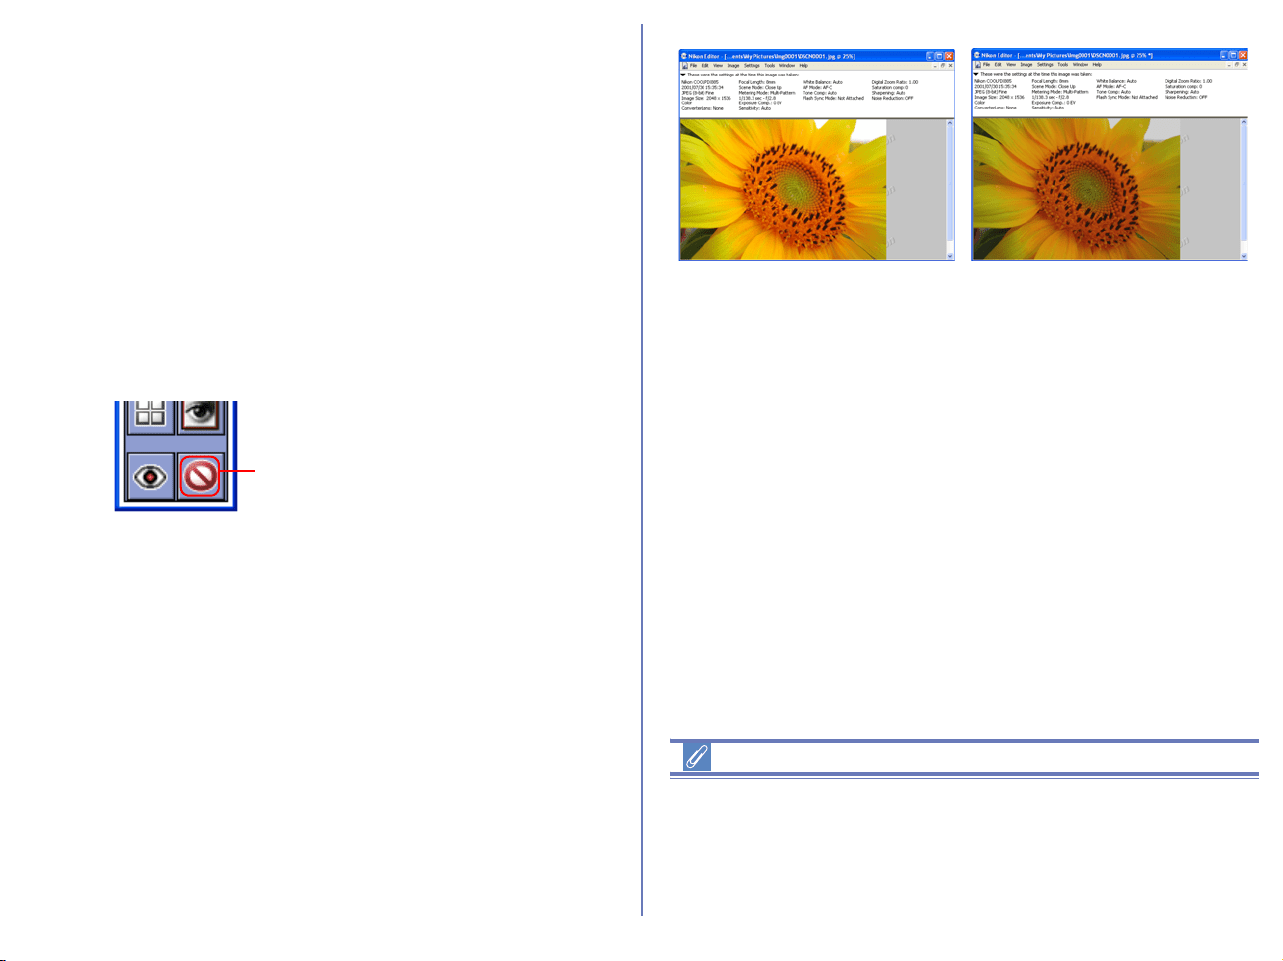
294
Show Original Image
The Show Original Image button removes the effects of any
modifications you have made to the current image file, and
displays the image as it was before editing. As long as you do not
close the file, you can continue to display the original image, even
after saving. However, when you close the file, the image data as it
was before saving will be overwritten. The next time you open the
file, you cannot display this data with the Show Original Image
button.
Hold the mouse button down over the Show Original Image
button to display the image as it was when you opened the file.
Release the mouse button to return to the display of the edited
image.
Show Original Image
When the selected image is rotated or flipped, you cannot show
the original image if the Show Original Image button has been
pressed.
Show Original Image button cannot be used for RAW images
created by the COOLPIX series cameras.
Show Original Image button
Original image displayed
as long as mouse button
is held down.
Release mouse button to
return to display of edited
image.

295
Open in Photoshop
Open the current image in Adobe Photoshop. The files are passed
to Adobe Photoshop after being adapted Nikon Editor image
processing (Auto contrast, Color balance, etc.). To use this
command, Adobe Photoshop 5.02 or later must be installed on
your computer for Windows and 5.0 or later for Macintosh.
Photoshop LE and Photoshop Elements do not support this
feature. Adobe Photoshop is used, regardless of settings by
selecting Preferences > General panel > Open saved image in.
NEF Plug-in
When you install Nikon View, the NEF Plug-in will be installed to
the same folder *
1
as the main Nikon View application. If you
install Photoshop after installing Nikon View, and you want to open
NEF files in Photoshop, copy “Nikon NEF Plugin.8Bi” *
2
to the
Photoshop folder listed below. If you want to open YCbCr-TIFF
files in Photoshop, copy “Nikon YCC TIFF.8BI” *
2
to the Photoshop
folder listed below.
*
1
On a Macintosh, the plug-in will be created inside a sub folder
entitled File Formats.
*
2
On a Macintosh, the Photoshop plug in folders do not have the
.8Bi extension.
Windows
Photoshop 7.0: Plug-ins\Formats (Plug-ins\File Formats)
Photoshop 6.0: Plug-ins\Adobe Photoshop Only\File Formats
Photoshop 5.5: Plug-ins\File Formats
Photoshop 5.0.2: Plug-ins\File Formats
Macintosh
Photoshop 7.0: Plug-ins\Adobe Photoshop Only\File Formats
Photoshop 6.0: Plug-ins\Adobe Photoshop Only\File Formats
Photoshop 5.5: Plug-ins\Adobe Photoshop Only\File Formats
Photoshop 5.0: Plug-ins\File Formats
* If Photoshop is already installed when you install Nikon View 6,
the plug-in will be copied to the above folder automatically.
For more information on using the Nikon NEF plug-in, see ( p.
328).
Open in Photoshop button
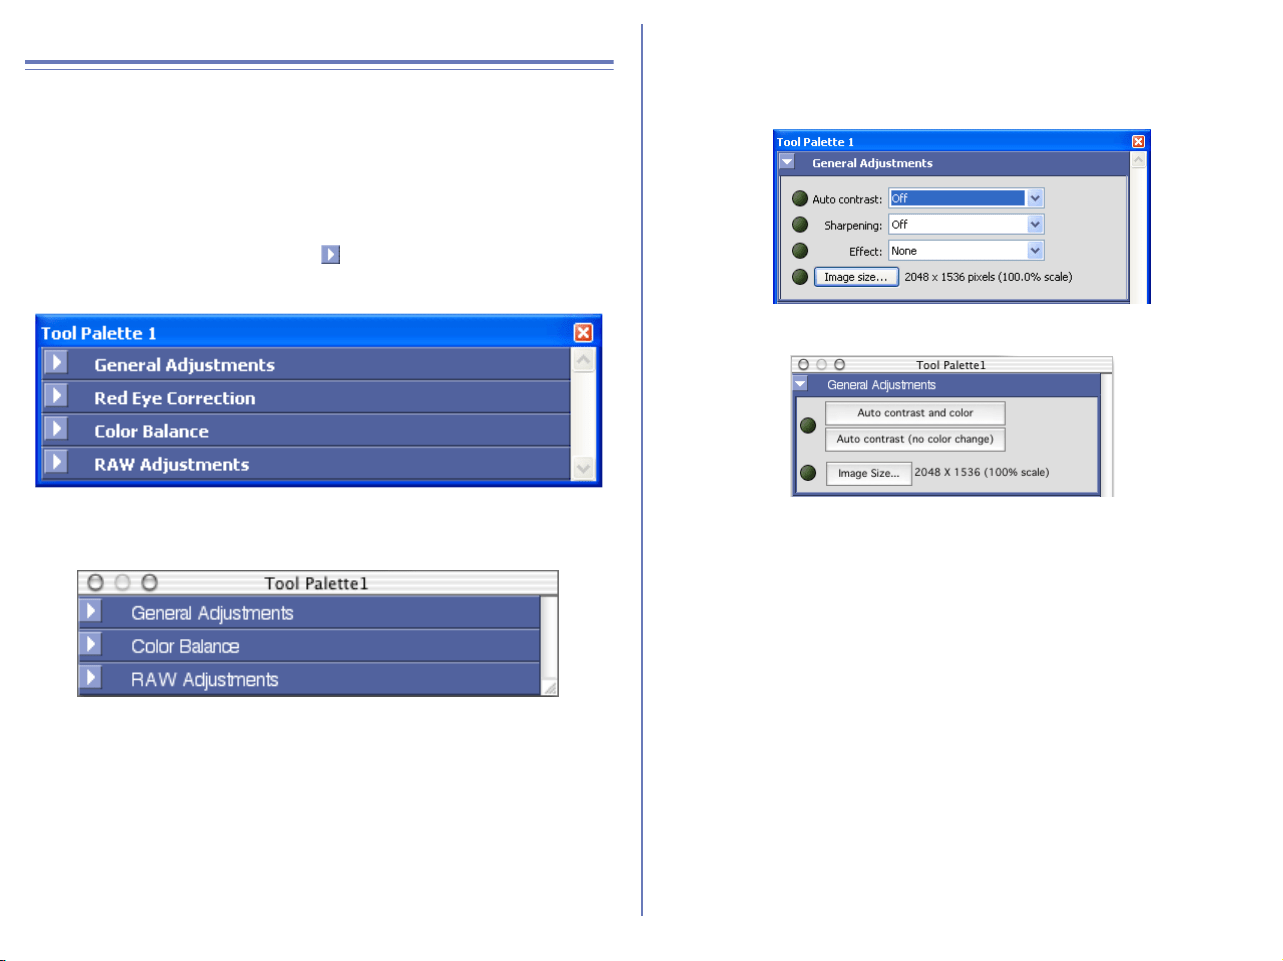
296
Tool Palette
Four palettes are contained within the Tool Palette; the General
Adjustments palette, the Auto Red Eye Reduction palette the
Color Balance palette, and the RAW Adjustments palette. By
dragging a palette's title bar, you can alter the order of palettes
inside the Tool Palette. You can also drag a palette outside of the
Tool Palette to create a separate palette.
Open each palette by clicking the button on the palette's title bar.
General Adjustments
Use the General Adjustments palette to make changes to the
current image.
Auto contrast
Select Color Balance to automatically adjust contrast of the
image.This option adjusts properly the contrast of the image based
on the lightest part and the darkest part of the image. Color tone
may be changed by tone change.
Select Tone Adjustment change to automatically correct for color
casts and balance the red, green and blue color channels.
Select With no color change to automatically adjust contrast for the
master channel. This option adjusts the contrast range of the
image as a whole, but does not affect the balance of the individual
color channels. You can adapt contrast process to all colors as a
whole by using master channel to adjust the contrast without
changing color tone.
Select Off to cancel the previous adjustments.
Windows
Macintosh
Windows
Macintosh
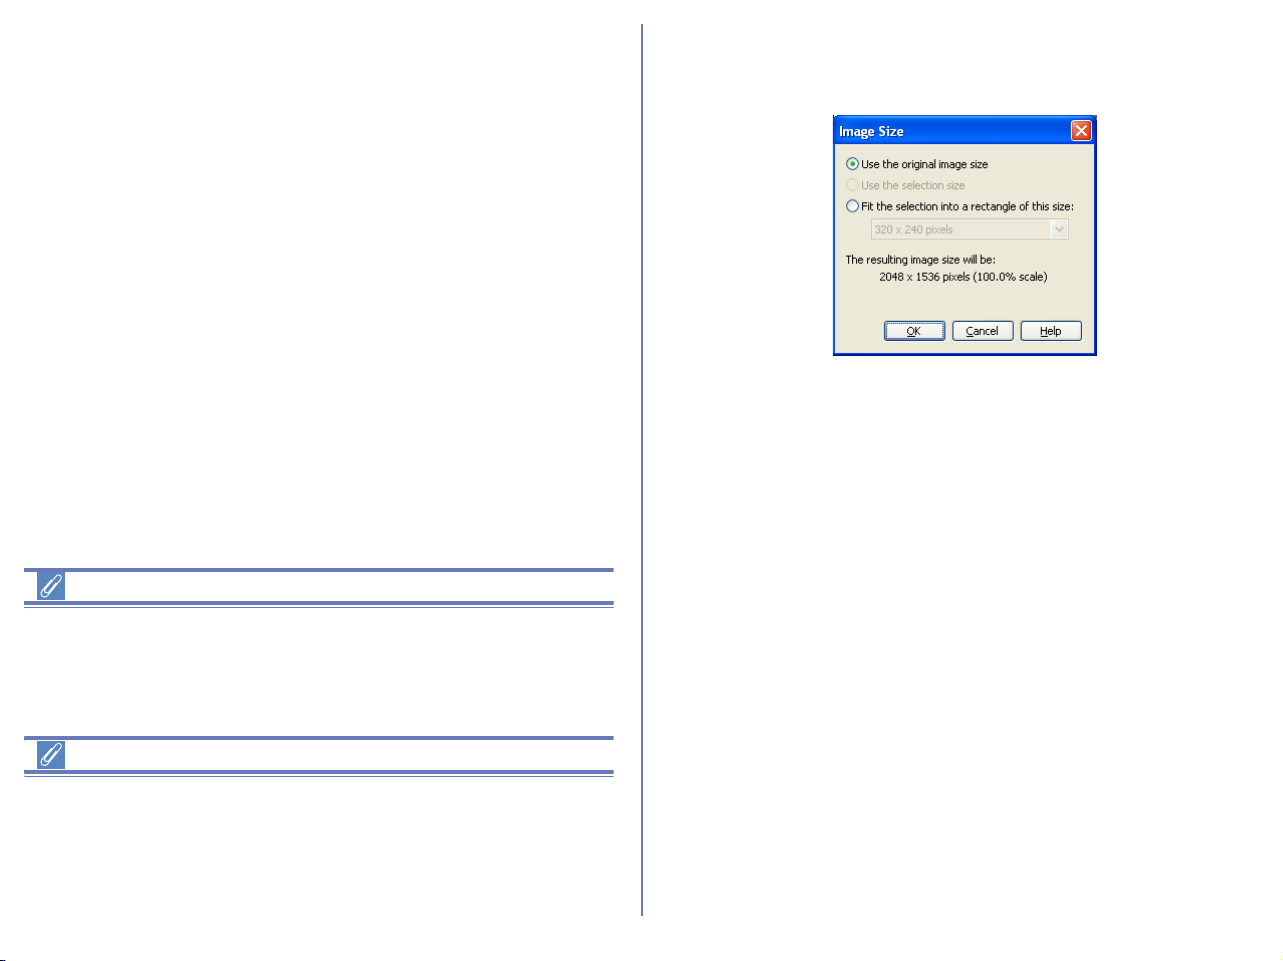
297
Sharpening (Windows)
You can sharpen the outline of the current image. Select any of Not
specified, Low, Normal, or High in popup menu.
Tone Change (Macintosh)
Change color tone of the image to Black and White or Sepia.
Select Off to cancel the previous change.
Auto Contrast
If you select either of With color change or With no color change
options and color process results are not preferable, try to select
another option.
Channels and Master channel
In the display monitor and printer, colors are reproduced
separating natural colors into some elements. The channel refers
to these elements. When using master channel, all color elements
are processed at a time instead of processing each element
separately.
Image Size
Click this button to display the Image Size dialog box. Use this
dialog box to adjust the size at which images will be saved.
Use the original image size
Use this option to save the entire image at its original size.
Use the selection size
Use this option to save the selection specified with the Selection
Cursor. The selection will be saved as a separate file, at its original
size. This option is selected automatically when you specify a
selection, and is not available otherwise.
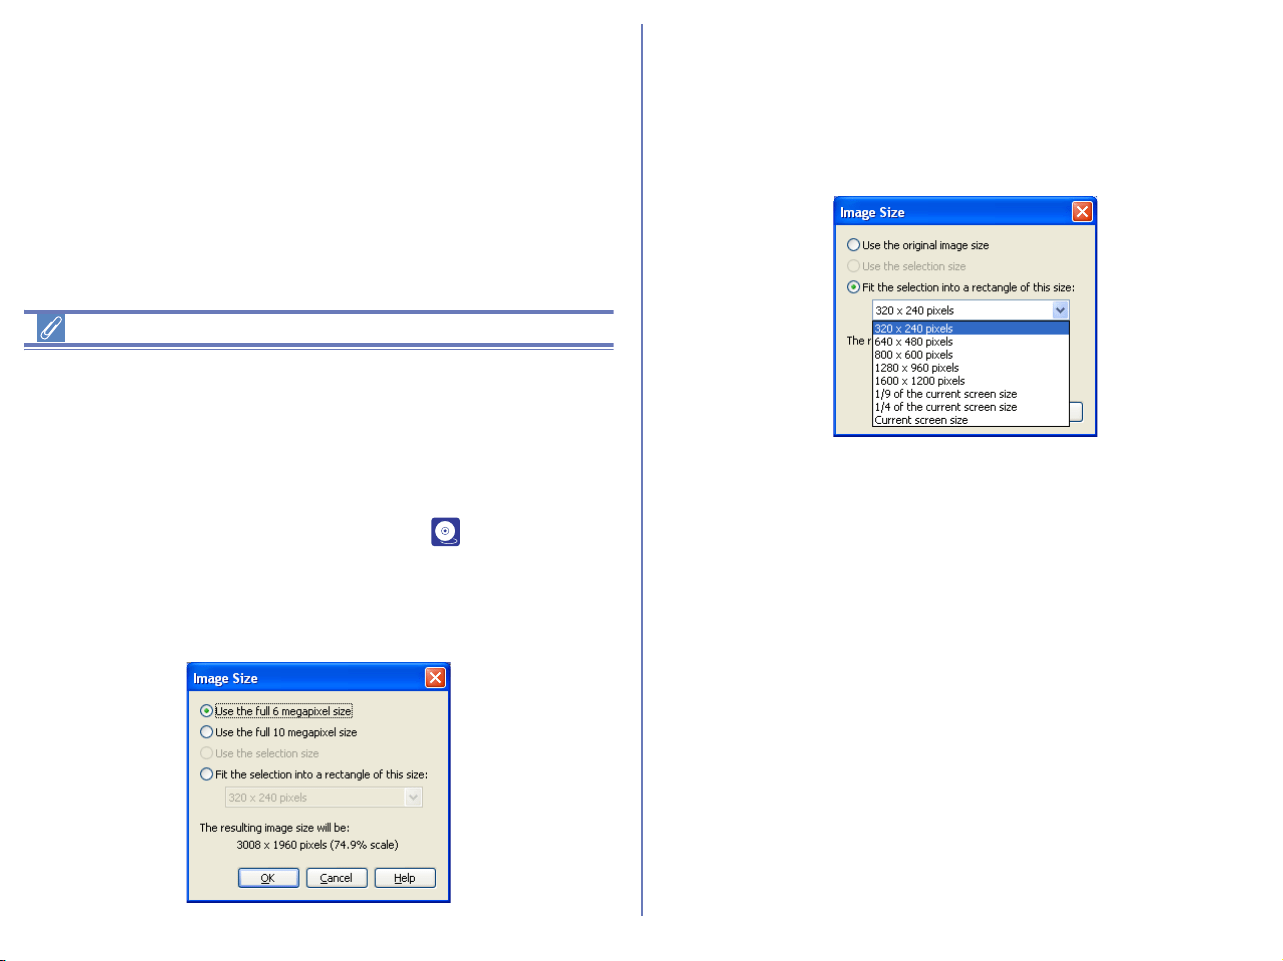
298
RAW images created with the D1X
To ensure maximum image quality, the D1X uses 4,016 pixels on
the horizontal axis of the CCD when recording RAW images. In
Nikon editor, if 4016 x 2616 pixels (ten megapixels) are set, only
the pixels on the vertical axis is corrected while preserving those
on the horizontal axis. When opening RAW images created by the
D1
X in Nikon Editor, you can define a default size of the image by
By default, a D1
X RAW file will be see ( p. 304) in the
Preference dialog box.
After opening images, you can specify 3008 x 1960 pixels (six
megapixels) or 4016 x 2616 pixels (ten megapixels) by using
Image Size dialog box.
Fit the selection into a rectangle of this size:
Using this option allows you to select the size of the saved image
from the pull-down menu.
The size of the image to be saved will be displayed under The
resulting image size will be.
The following sizes are available:
• 320 x 240 pixels
*1
• 640 x 480 pixels
*1
• 800 x 600 pixels
*1
• 1280x 960 pixels
*1
• 1600 x 1200 pixels
*1
• 1/9 of current screen size
• 1/4 of current screen size
• Current screen size
*1
If the aspect ratio of the selection does not correspond to the
aspect ratio of the selected size, the shorter side of the image will
be adjusted, and the crop will be distorted.
This option is not available unless a selection is specified with the
Crop Cursor.
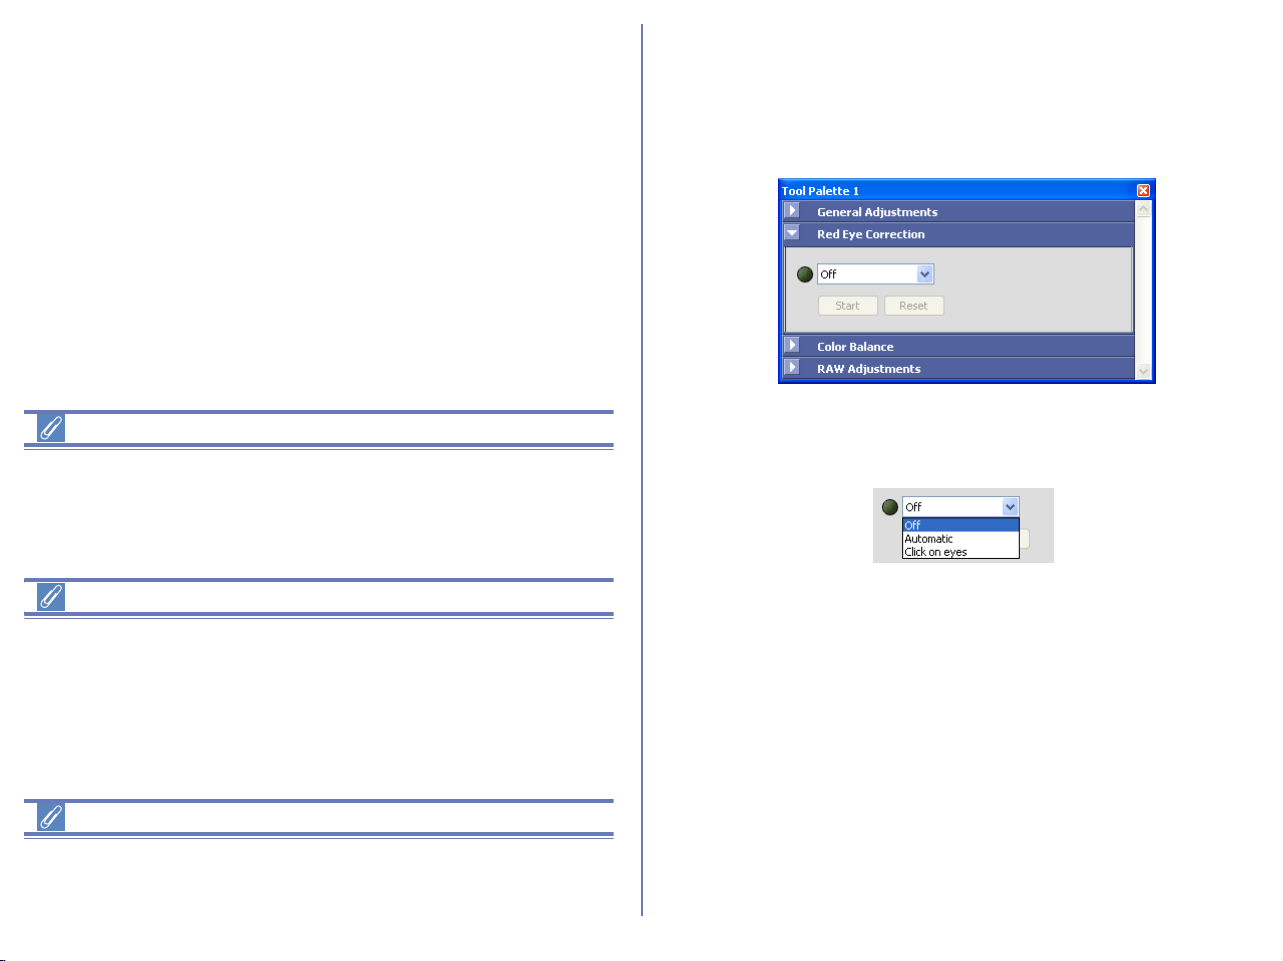
299
Auto contrast
If you do not obtain a preferable result in contrast by selecting
either of With color change or With no change options, try to select
another options of them.
Channels and Master channel
In the display monitor and printer, colors are reproduced
separating natural colors into some elements. The channel refers
to these elements. When using master channel, all color elements
are processed at a time instead of processing each element
separately.
Specified with Selection Cursor
The selection specified with Selection Cursor is scaled to the size
shown under The Resulting image size will be.
Red Eye Correction palette (Windows only)
Use the Red Eye Correction palette to correct the red-eyes occurs
when light from a camera flash reflects off an individual's retinas
back onto film.
Select Off, Automatic, or Click On Eyes mode from pull-down
menu.
Off
Dose not correct red eyes. After correcting eyes on other modes,
you can select this option to cancel the correction results.
Automatic
Detects an outline of the portrait and correct the red-eyes
automatically.
Click On Eyes
Select this option if you did not obtain a good result of red-eyes
correction on Automatic mode.
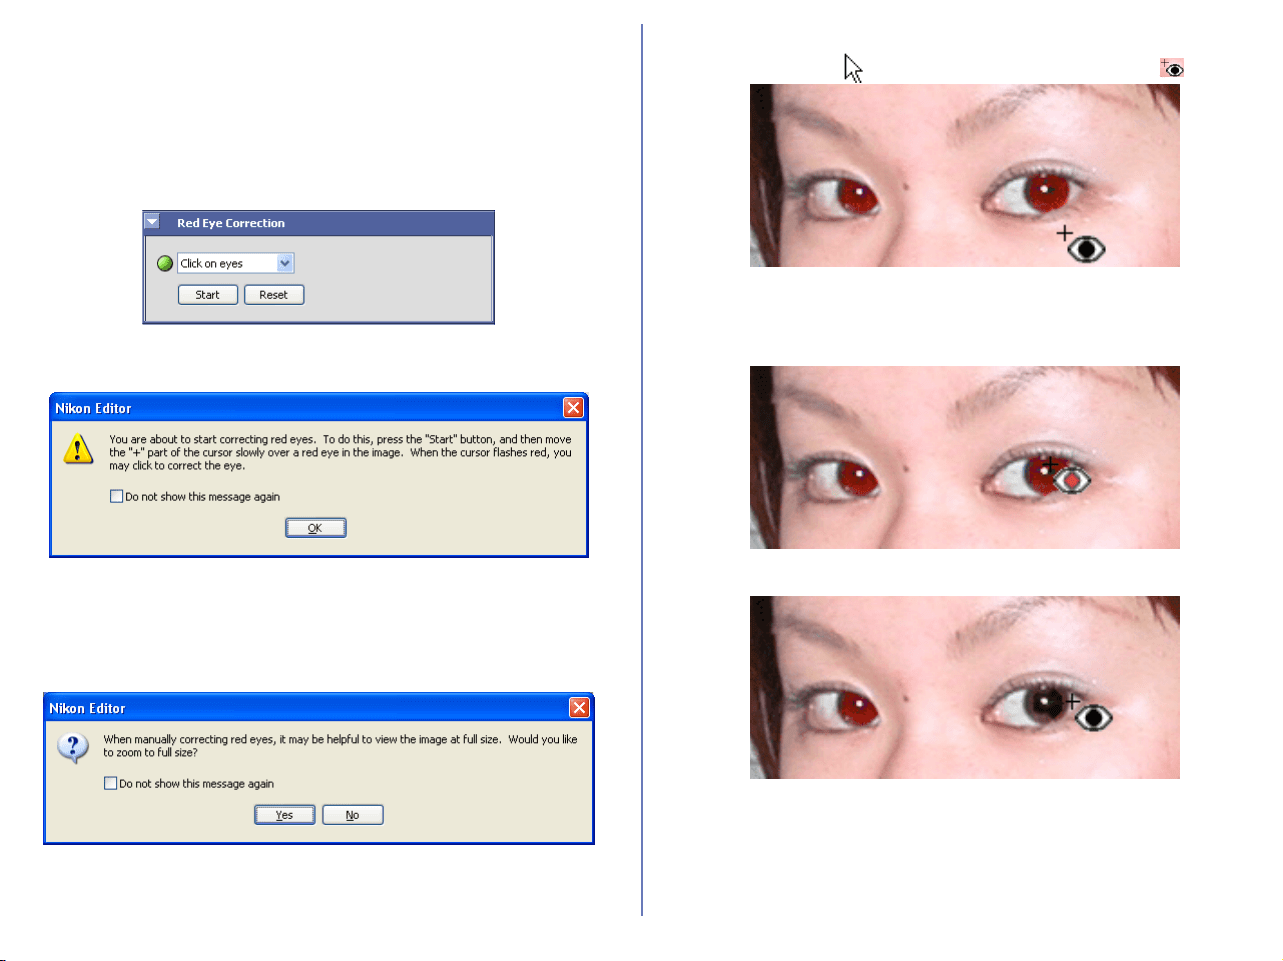
300
Start button
Starts red-eye correction on Click On Eyes mode. Use this button
if red-eyes cannot be detected correctly on Automatic mode.
Operation steps
1Select Click On Eyes from the pull-down menu to switch to
Click On Eyes mode.
2 A message dialog will appear to prompt that you are about to
start Red Eye Correction.
Click OK to continue.
3 Click Start button in the Red Eye Correction palette. If the
image is not displayed at 100%, a message dialog will appear
to prompt you to display the full size of image.
Select Yes to display the image at 100% or No to continue
operation.
4 When you move the mouse cursor onto the image you want to
edit, the cursor changes to the eye-point cursor .
5 Move the eye-point cursor to place the cursor’s cross onto the
red eye. If Nikon Editor evaluates the eye as red eye, the eye
point cursor flashes in red.
6 Click it during cursor flashing to correct the red eye.
After correcting the red eyes, click Finish to complete red-eye
correction on Click On Eyes mode.

301
Reset button
Click Reset button to cancel the correction result on Click on Eyes.
About RAW and 16-bit TIFF images
Red Eye Correction is not available for RAW or 16-bit TIFF images.
Red eye detection
In Nikon Editor red-eye detection, detection sensitivity on Click on
Eyes mode is higher than those on Automatic mode so that the
portions other than red eyes may be evaluated as red eyes. In this
case, do not click it.
Stop and Restart on Clock on Eyes mode
After completing some red-eye corrections on Click on Eyes
mode, you can suspend the process by clicking Stop button. To
restart the process, click Restart button. the process goes back to
and restarts from where it was suspend.
Automatic and Click on Eyes modes
When you select Click on Eyes mode after correcting red eye on
Automatic mode , the correction are canceled. Similarly , when
you select Click on Eyes mode after correcting red eye on Click
on Eyes mode, the corrections are canceled.
Color Balance palette
The Color Balance palette allows you to use sliders to alter the
brightness and contrast of the image as a whole, and the color
balance of the separate red, green and blue channels. Sliders can
be adjusted in the range -50 to +50.
Adjusting overall brightness
Use the Brightness slider to adjust the brightness of the entire
image. Drag the slider towards the "+" mark to brighten all the
colors in the image, making the image as a whole more white. Drag
the slider towards the "-" mark to make the image as a whole
darker and less distinct.
Adjusting image contrast
Use the Contrast slider to adjust highlights and shadows over the
whole image. Drag the slider towards the "+" mark to emphasize
the difference between highlights and shadows, and increase
contrast. Drag the slider towards the "-" to soften the effect of
highlights and shadows and give the image a flat monotone effect.
Brightness
Contrast
Red
Green
Blue
Sliders Text Box
(displays numerical value)
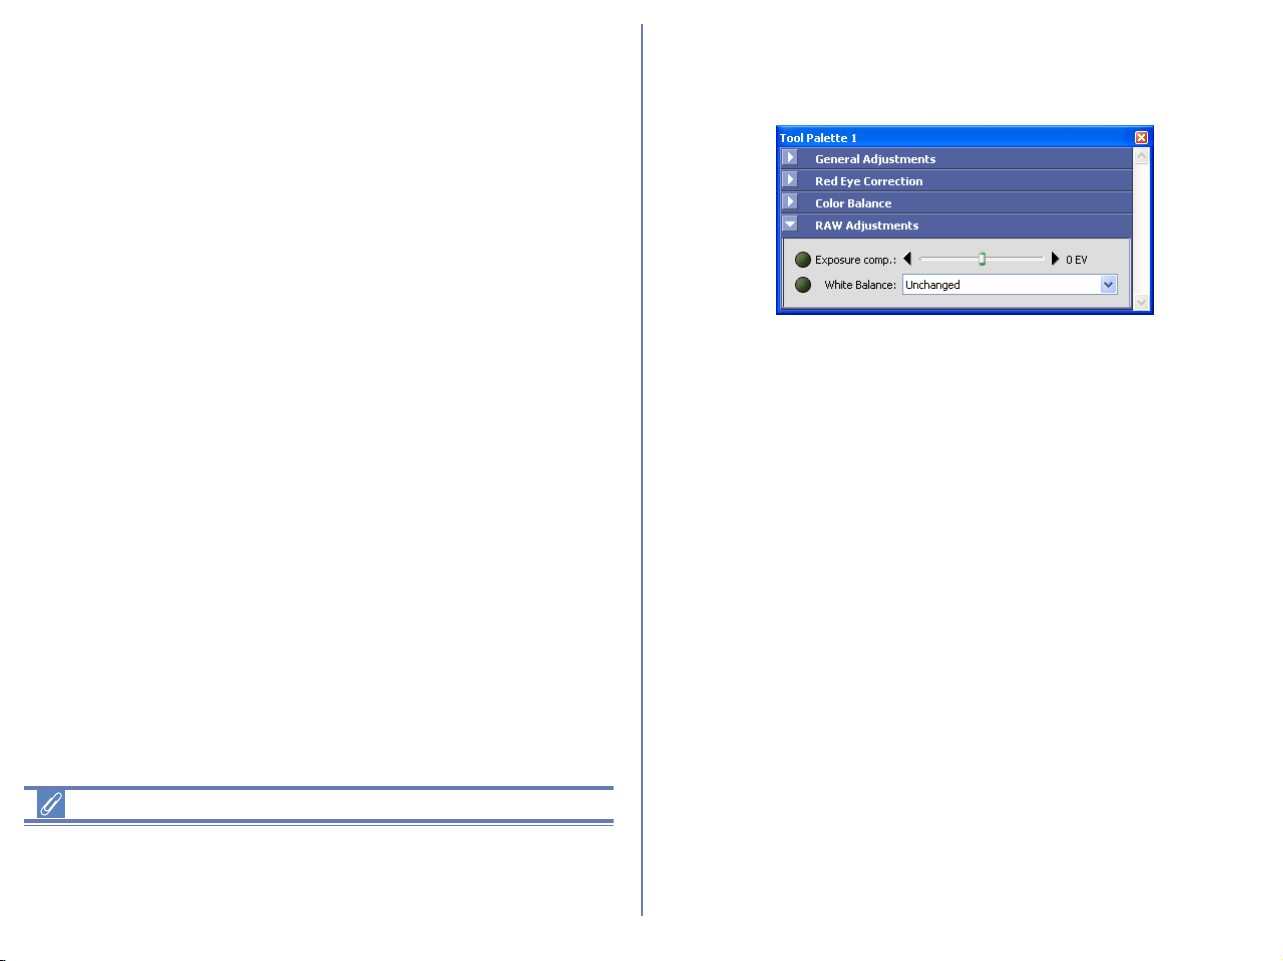
302
Adjusting color balance
The Red, Green and Blue sliders allow you to control color
balance by individually altering the brightness of each color
channel. For example, if you drag the Red slider towards the "+"
mark, the red channel will increase in brightness, and the image
will take on a reddish cast. If you drag the Red slider towards the "-
" mark, the red channel will decrease in brightness, brining out the
Cyan. There is the same relationship between the green slider and
magenta and between the blue slider and yellow.
Numerical Values for Color Balance Sliders
Numerical values in the palette's text boxes change as you drag
the sliders. Inserting numbers directly into the text boxes has the
same effect as dragging the sliders.
RAW Adjustments
The RAW Adjustments palette allows you to make simple
changes to images in RAW (NEF) format.
Exposure compensation
Use the Exposure comp. slider to adjust exposure compensation
in steps of 1/3 EV, from -2.0 to +2.0. When the slider is set to zero,
the exposure compensation will be set to the value chosen when
the photograph was taken.
White Balance
This option allows you to adjust the white balance of an image
saved in RAW data format. Select a White Balance mode from the
pull down menu. (White Balance is an adjustment that preserves
natural looking colors regardless of the light source.)
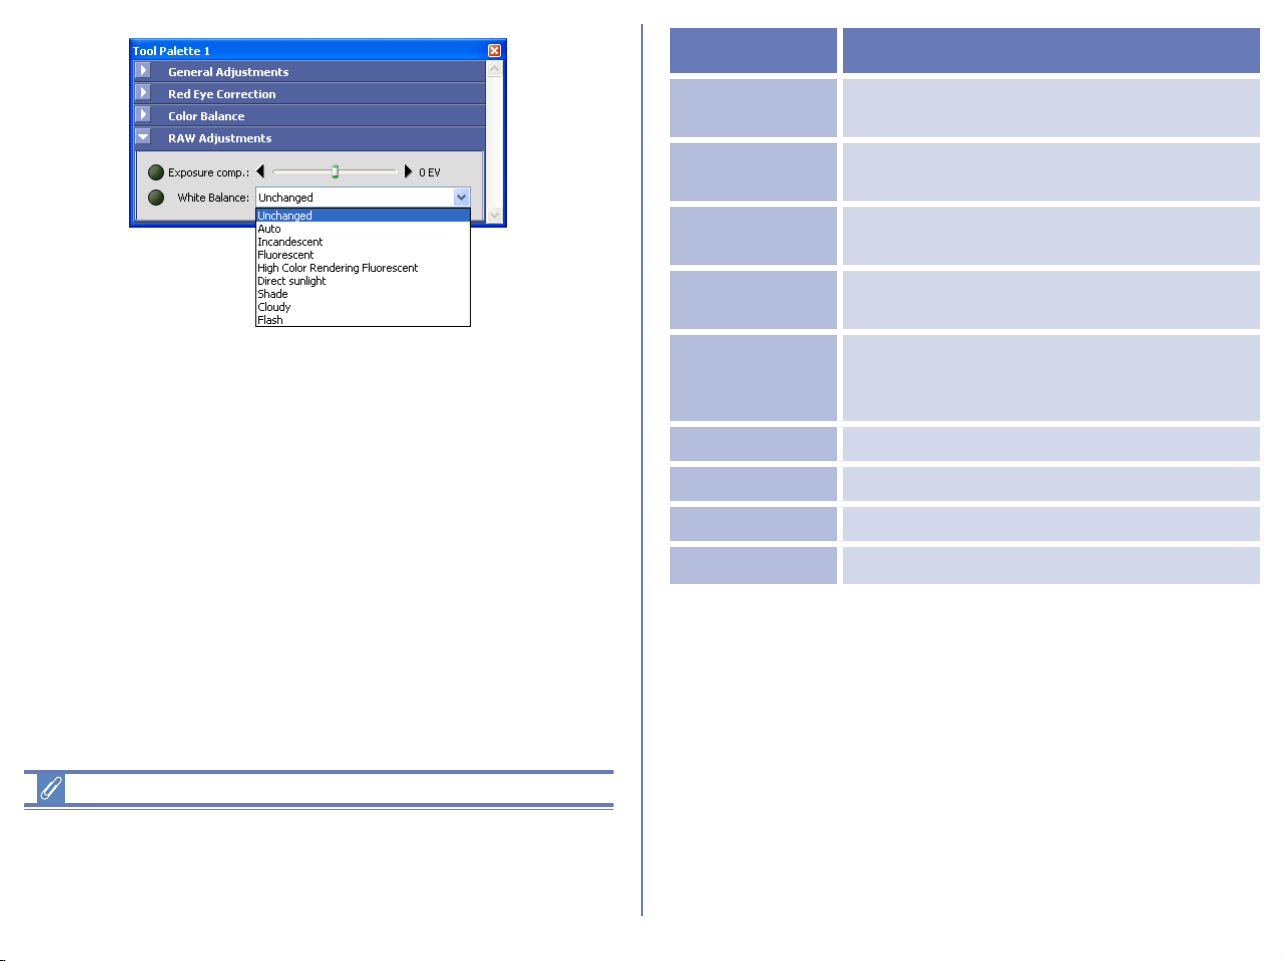
303
Note
Note that if RAW or RAW data is not listed in the index of your
camera's Guide to Digital Photography, then your camera does not
support RAW images.
*Auto is not available for images taken with COOLPIX series
cameras.
Setting Use...
Unchanged
...
to preserve the original White Balance
setting.
Auto*
The camera sets white balance
automatically.
Incandescent
...for images taken under an incandescent
light
Fluorescent
...for images taken under an fluorescent
light
High Color
Rendering
Fluorescent
...for images taken under an high color
rendering fluorescent light
Direct sunlight ...for images taken under direct sunlight
Shade ...for images taken in the shade
Cloudy ...for images taken under cloudy skies.
Flash ...for images taken with a Nikon speedlight
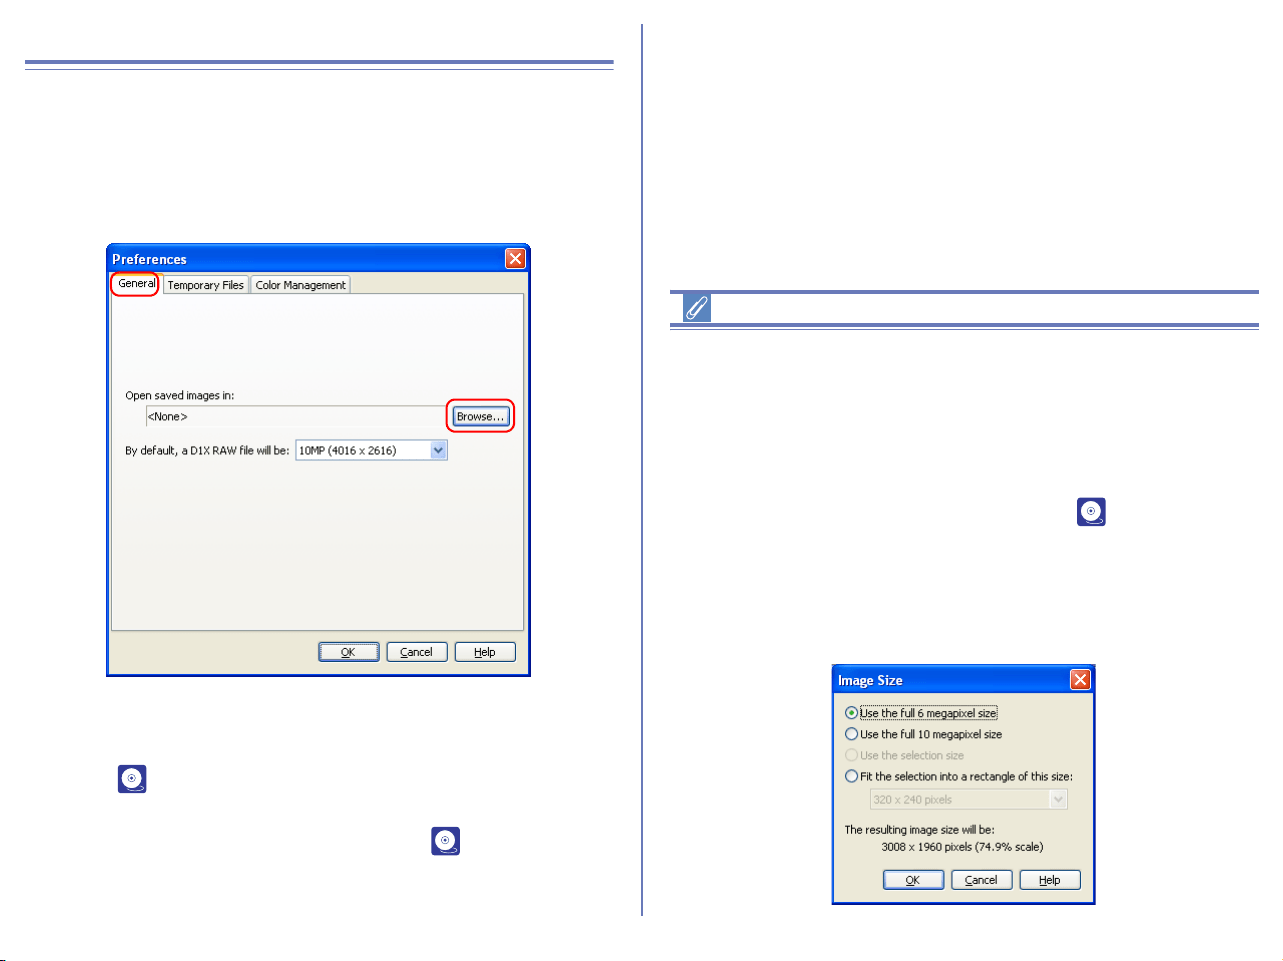
304
Nikon Editor Preferences
Select Preferences from the Edit menu to display the
Preferences dialog box. Use this dialog box to adjust default
settings for Nikon Editor.
General Tab
Open saved image in
Select a program for Open in External Application when performing
Save as ( p. 288). To change the application used to open
saved images, click the Browse button and navigate to the desired
application. This setting has no effect on the ( p. 295) button in
the Quick Tools palette.
Default size of D1x Raw file
This option controls the default size for RAW images taken with the
D1
X. Choose 10MP (4016 x 2616) or 6MP (3008 x 1960).
RAW images created with the D1X
To ensure maximum image quality, the D1X uses 4,016 pixels on
the horizontal axis of the CCD when recording RAW images. In
Nikon editor, if 4016 x 2616 pixels (ten megapixels) are set, only
the pixels on the vertical axis is corrected while preserving those
on the horizontal axis. When opening RAW images created by the
D1
X in Nikon Editor, you can define a default size of the image by
By default, a D1
X RAW file will be see ( p. 304) in the
Preference dialog box.
After opening images, you can specify 3008 x 1960 pixels (six
megapixels) or 4016 x 2616 pixels (ten megapixels) by using
Image Size dialog box.
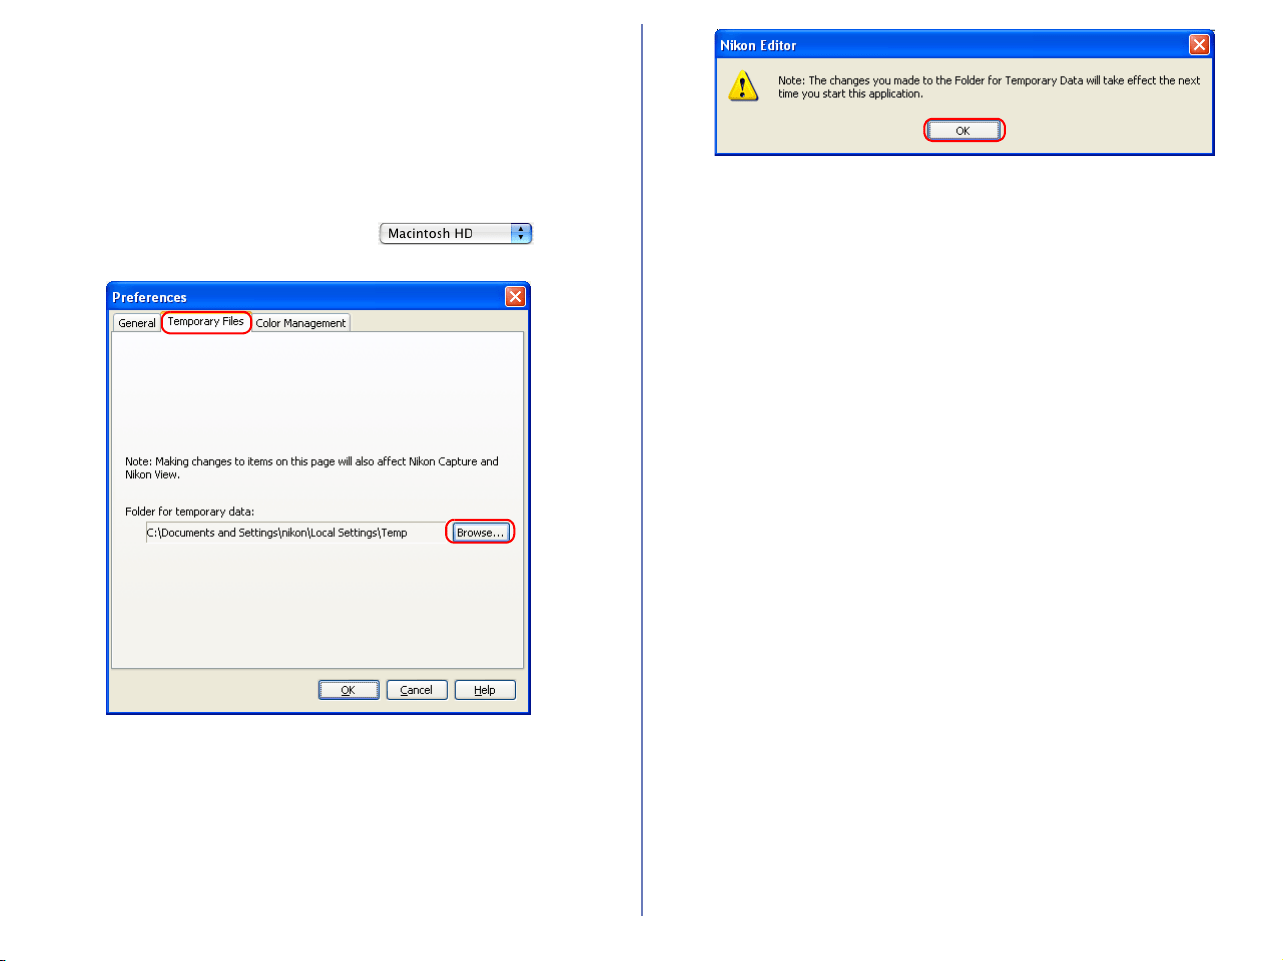
305
Temporary Files Tab
Specify the folder (Windows) or volume (Macintosh) in which
temporary data, such as image cache data, will be stored. The
default folder for Windows is the “TEMP” folder in the Windows
directory, while the default volume for the Macintosh is the start-up
disk. To choose a different folder in the Windows version of the
program, click the Browse button and navigate to the desired
location. In the Macintosh version, click button.
When you change the setting in the Temporary Files tab, you will
need to restart Nikon Editor in order for the change to take effect.
After you change the setting and click OK, the dialog box shown
below will be displayed. Click OK to close the dialog box, then
restart the application.
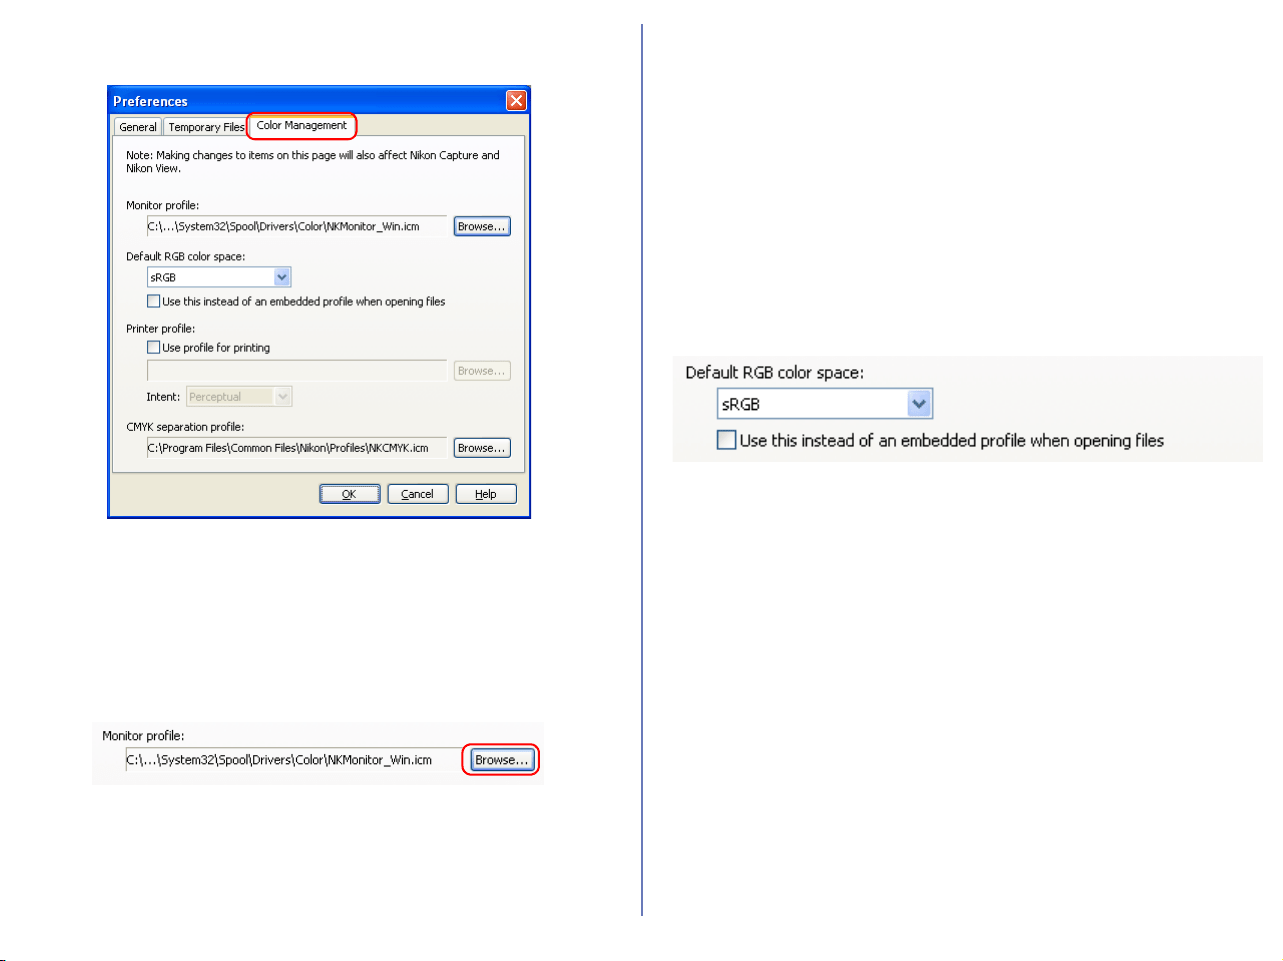
306
Color Management Tab (Windows)
You can set the items related to Nikon Color Management system
in Windows Color Management panel.
Monitor Profile
Select a monitor profile used to correct the characteristics of your
monitor. If you wish to change the monitor profile, click Browse
button to the right to specify a new profile.
Default RGB color space
Use this option to specify the color space profile that will be applied
images in Nikon Editor. Choose one of the following color spaces
from the pull-down menu: sRGB; Bruce RGB; NTSC (1953) RGB;
Adobe RGB (1998); CID RGB; Adobe Wide RGB; Apple RGB;
Color Match RGB.
If you check the Use this instead of embedded profile when
opening files check box, the option selected from the pull-down
menu above will be applied to images when they are opened. If
you do not check the box, the image’s embedded color space
profile will be used.
Printer profile
Specifies the printer profile to be used when printing images. If the
applied RGB color space is used, uncheck the Use profile for
printing check box. If the printer profile is used, check this option
and choose a profile for printing by clicking the Browse button.
When Use profile for printing is checked, the color conversion
(matching) procedure used to print images can be set to either
Relative or Perceptual. This setting determines the way that colors
will appear in the printed file.
Relative: Colors not in the gamut of the selected printer profile will
be printed using the closest colors available. Other colors are not
affected.
Perceptual: If the image contains colors not in the gamut of the
selected printer profile, all colors in
the image will be compressed to fit the gamut.
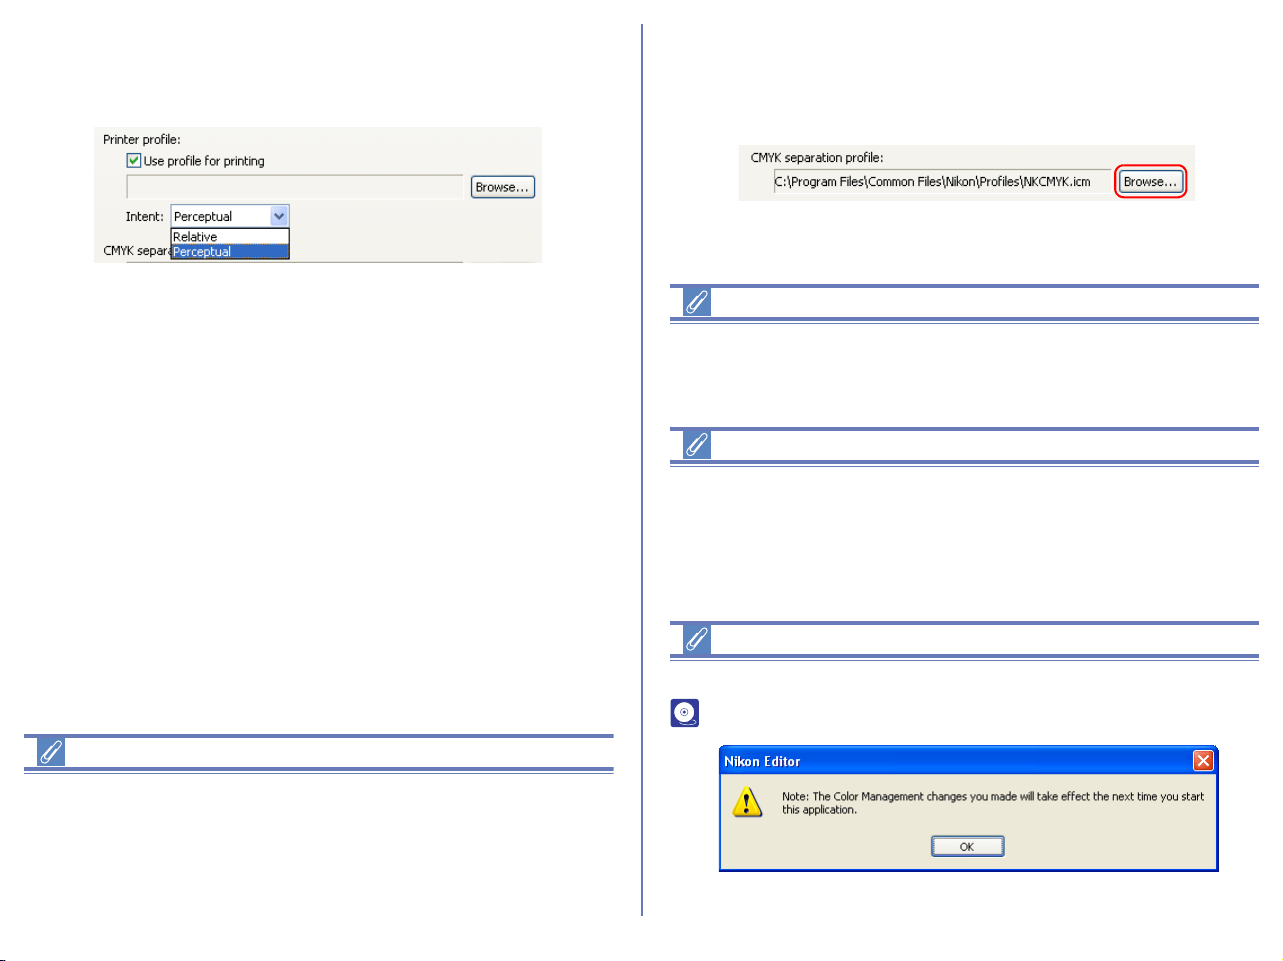
307
Depending on the profile, changing the matching method may
produce no change in output. This option is not supported with
some profiles; consult the manufacturer for details.
Caution
In Color Management panel, only ICC profile is used as monitor
profile, printer profile, and CMYK profile. When setting CMYK
profile, especially, note that profiles other than ICC profile may be
included depending on your computer environments.
CMYK separation profile
Lists the profile used to convert RGB images to CMYK when
saving images in TIFF-CMYK format. To choose a different profile,
click the Browse button.
Multiple Displays (Windows)
In a multiple display environment, choose a single profile suited to
all displays.
Additional Information
In Windows, settings changed in the Color Management panel
are shared among Nikon Browser, Nikon Viewer, and Nikon Editor,
affecting the settings on the Color Management panel of each
program. If settings are changed, programs must be restarted.
Additional Information
For a standard RBG color space supported by Nikon Editor, see
p. 324.
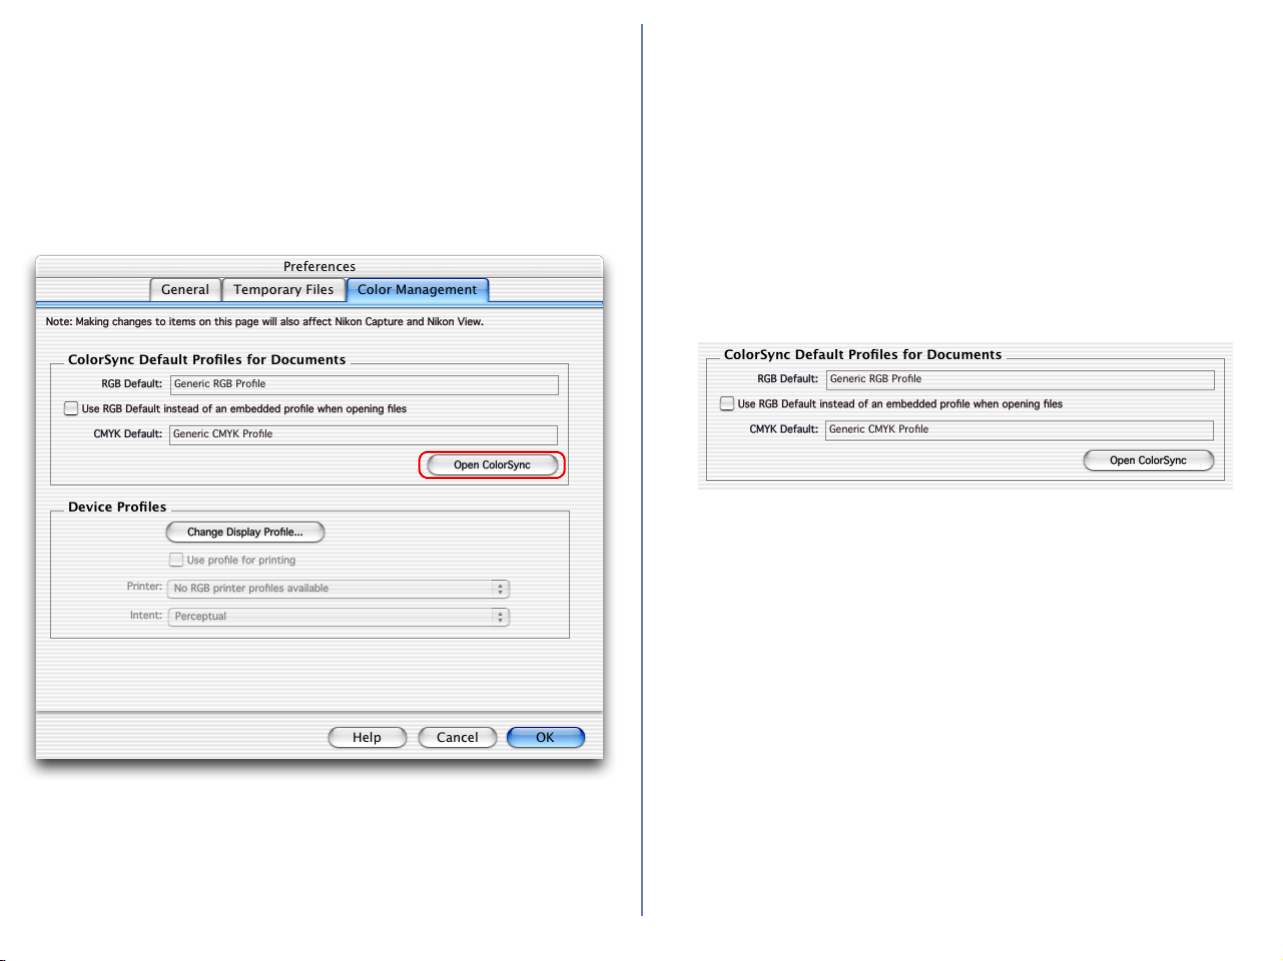
308
Color Management Tab (Macintosh)
In Macintosh, the profile set in ColorSync dialog box has effect on
the Color Management panel. All profiles are displayed with the
names of color spaces in each profile. Also, the monitor profile is
affected by the profile set in the Displays section of the System
Preferences dialog (Mac OS X) or Monitor control panel
(Mac OS 9).
RGB Default
Lists the default output RGB color space profile (ICC profile name)
for images opened in Nikon Editor. If you check the Use this
instead of embedded profile when opening files check box, the
option selected from the pull-down menu above will be applied to
images when they are opened. If you do not check the box, the
image’s embedded color space profile will be used.
CMYK Default
Displays CMYK profile name that is used to convert RGB data to
CMYK data when saving files in TIFF-CMYK format.
Open ColorSync
Click this button to open the ColorSync dialog to a panel where
you can choose the color-space profiles used. The profile selected
in the ColorSync dialog is effective the next time you launch Nikon
Editor.
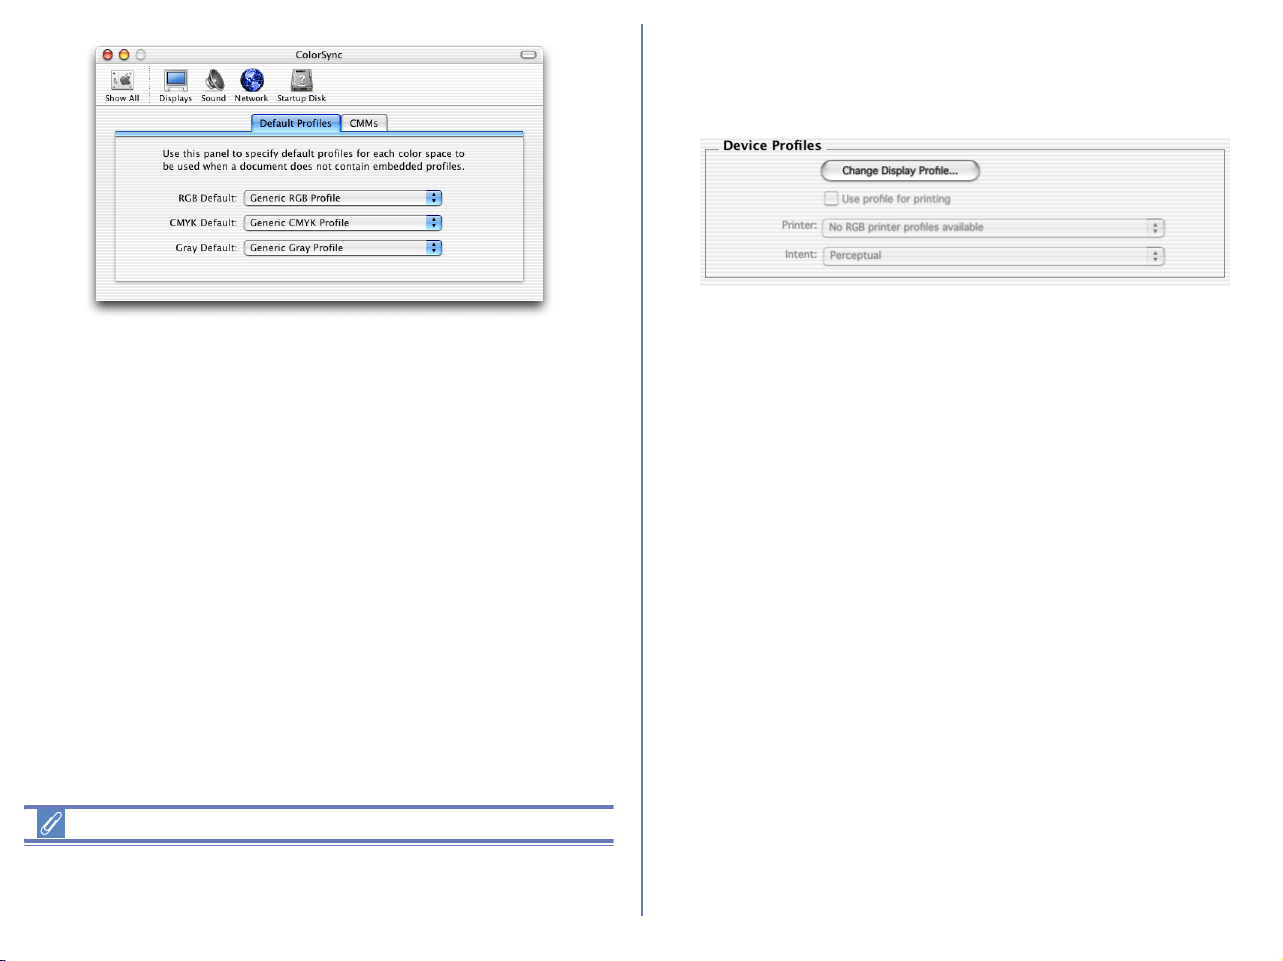
309
Additional Information
If a profile for input is set in RGB default, Nikon Editor operates
assuming that sRGB color space is set.
Device Profiles Area
Set the color-space profiles for monitors and printers in this
section.
Change Display Profile
Click the button to open the Displays section of the System
Preferences dialog (Mac OS X) or the Monitor control panel (Mac
OS 9). Open the Color panel (Mac OS X) or click the Color button
(Mac OS 9) to choose a monitor profile you want to view or
change.
Use profile for printing
If this option is checked, the work color space defined by RGB
default will be used when printing images.

310
Multiple displays (Macintosh)
In a multiple display environment, the image will be displayed using
the profile of the display that is displaying the lager image. This
allows you to choose a separate profile for each monitor.
Changes in ColorSync dialog (Macintosh)
If you open ColorSync dialog from Finder menu to change settings
while using Nikon Editor, those changes are not effective unless
Nikon Editor is restarted. If you launch ColorSync without using
Open ColorSync button in the Color Management panel, Nikon
Editor must be restarted.
Additional Information
For a standard RBG color space supported by Nikon Editor, see
Appendix A Standard RGB Color Space Supported in Nikon Editor
( p. 324).
MEMO:
Nikon Editor does not support profiles created base on the latest
ICC color profile regulation Ver.4.
If these profiles is set, setting items are as follows:
• RGB default: NksRGB.icm is selected.
• CMYK default: NkCMYK.icm is selected.
• Display: NkMonitor_Mac.icm is selected.
• Output: Use profile for printing check box cannot be changed.
Additional Information
In Macintosh, change settings for Color Management using Nikon
Editor Preferences ( p. 304).
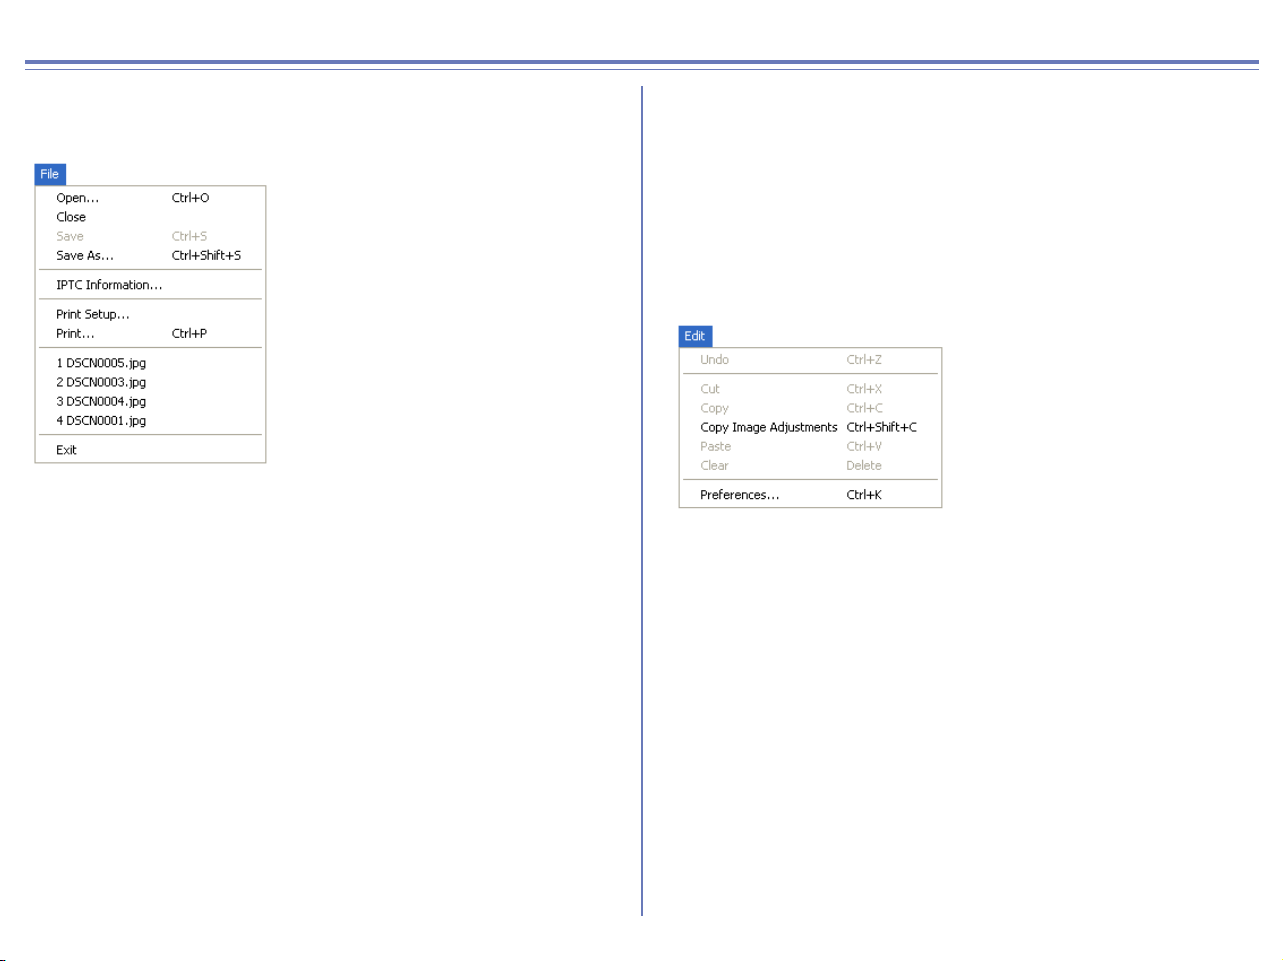
311
Nikon Editor Menus
Windows
File menu
Open...
Opens a new image, taken with Nikon Digital Camera, in Nikon
Editor.
Close
Closes the image currently displayed in the Image Area.
Save
Saves the image currently displayed in the Image Area.
Save As...
Saves the currently displayed image under a different name.
IPTC Information...
Opens the file information dialog box.
Print Setup...
Selects paper size for printing.
Print...
Prints the selected image.
(Recently displayed files)
Displays up to four names of recently opened files.
Exit
Exits Nikon Editor.
Edit menu
Undo
Undo previous text editing operation.
Cut
Removes selected text to the clipboard.
Copy
Copies selected text to the clipboard.
Copy Image Adjustments
Copies the current editing settings to the clipboard.
Paste
If editing text, pastes the text on the clipboard into the text at the
current insertion point.
If editing images, applies the adjustments saved on the clipboard
to the current image.

312
Windows — Cont'd
Clear
Deletes selected text.
Preferences...
Opens the Preferences dialog box.
View menu
View Entire Image
Displays the whole of the current image in the Image Area.
Fit Window to Image
Changes the size of the Image Window to fit the current image.
Auto Fit Window to Image
Changes the size of the Image Window automatically every time
the size of the current image is altered, or the image is rotated.
Crop Cursor
Mouse pointer turns into a cross allowing you to specify a selected
area of the current image to be saved in a file.
Zoom Cursor
Mouse pointer turns into a magnifying glass, allowing you to zoom
in and out of the current image.
Grab Cursor
Mouse pointer turns into a hand, allowing you to view areas of the
image that are not currently visible.
Zoom In
Zooms in on the current image.
Zoom Out
Zooms out from the current image.
Show Shooting Data
Displays or hides shooting data.
Show Tool Palette 1
Displays or hides the Tool Palette.
Show Quick Tools
Displays or hides Quick Tools.
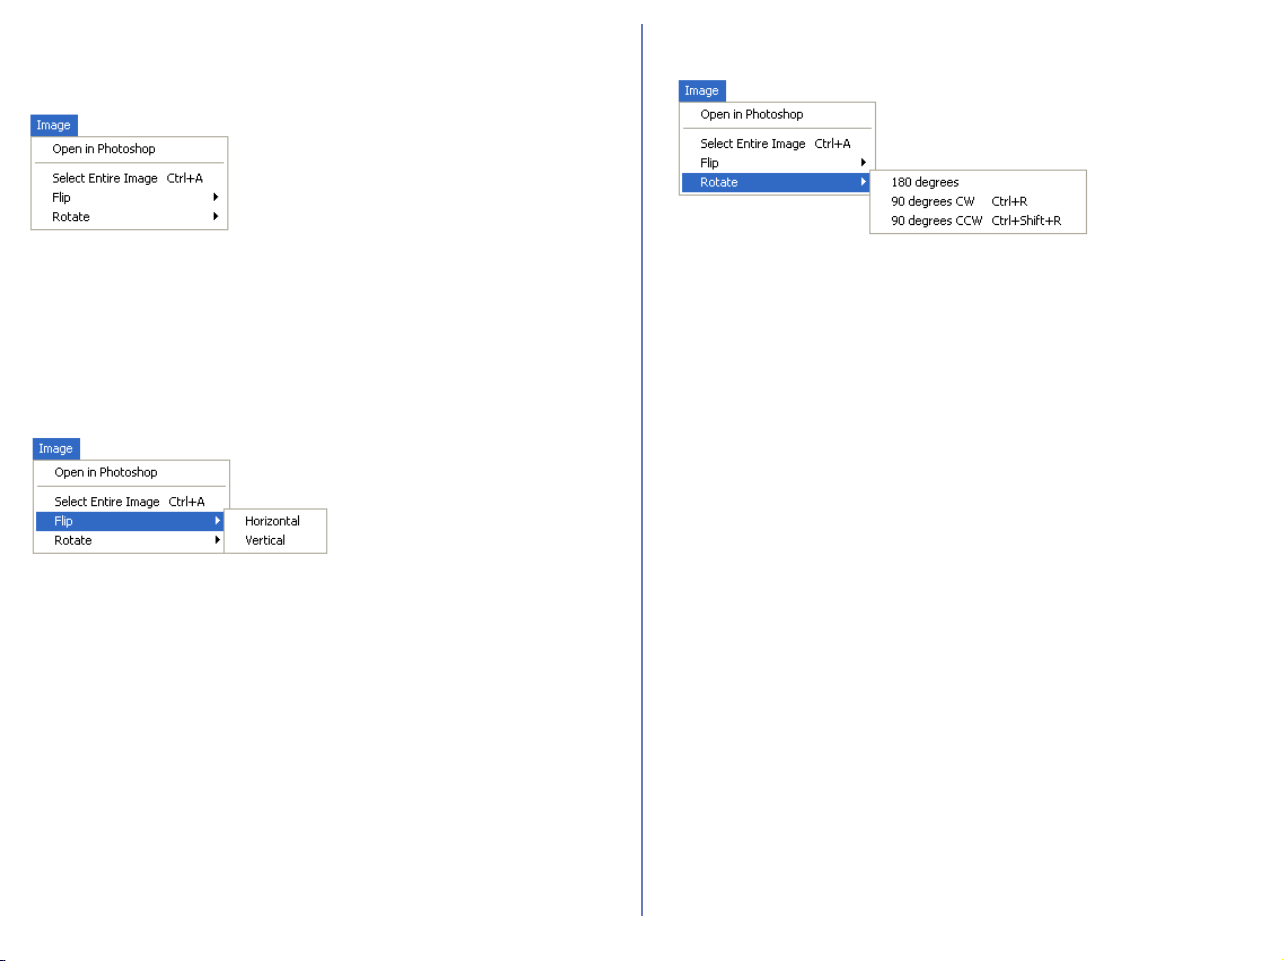
313
Windows — Cont'd
Image menu
Open in Photoshop
Opens current image in Adobe Photoshop.
Select Entire Image
Selects all of the current image.
Flip
Flips (creates a mirror image of) the current picture.
Horizontal
Flips the current image horizontally.
Vertical
Flips the current image vertically.
Rotate
Rotates the current image through 90° clockwise, 90° counter
clockwise or 180° .
180 degrees
Rotates current image through180°.
90 degrees CW
Rotates current image 90° clockwise.
90 degrees CCW
Rotates current image 90° couter clockwise.
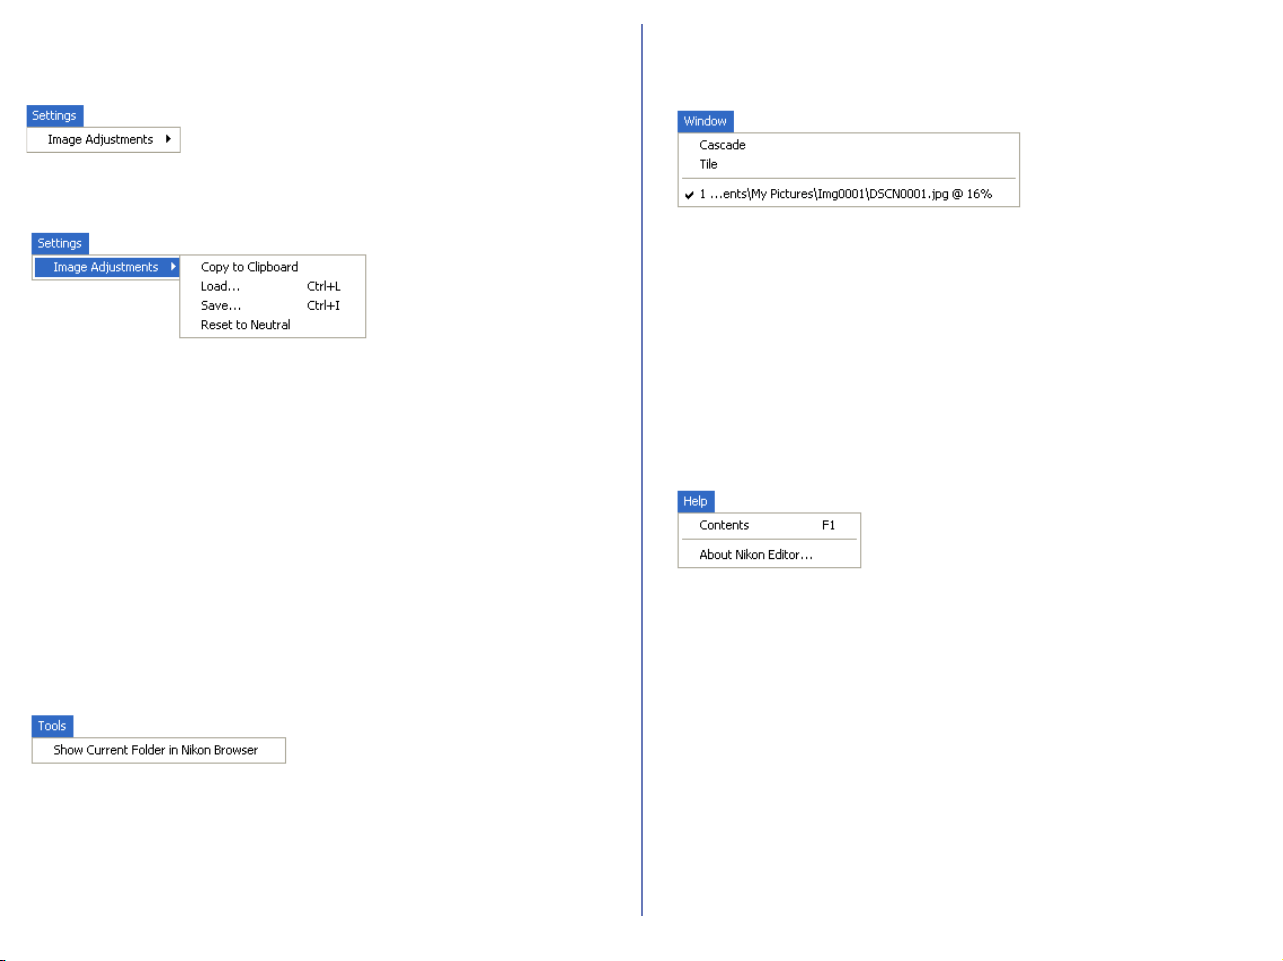
314
Windows — Cont'd
Settings menu
Image Adjustments
Contains the four submenus listed below.
Copy to Clipboard
Copies all current image adjustment settings to the clipboard.
Load...
Loads file containing saved image adjustment settings and applies
them to the current image.
Save...
Saves all current image adjustment settings as a separate file.
Reset to Neutral
Resets all current image adjustment settings to their default
values.
Tools menu
Show Current Folder in Nikon Browser
Starts Nikon Browser and displays the contents of the current
folder in Nikon Browser.
If you are already running Nikon Browser, the Nikon Browser
window will move to the front of the screen.
Window menu
Cascade
Arranges all currently open image windows in a diagonal line, one
on top of the other.
Tile
Arranges all currently open image windows such that the whole of
each window can be viewed. The size of each window may be
reduced to fit all of the images on the screen.
Help menu
Contents
Displays the Nikon View 6 Help file.
About Nikon Editor
Displays information about Nikon Editor together with copyright
information.
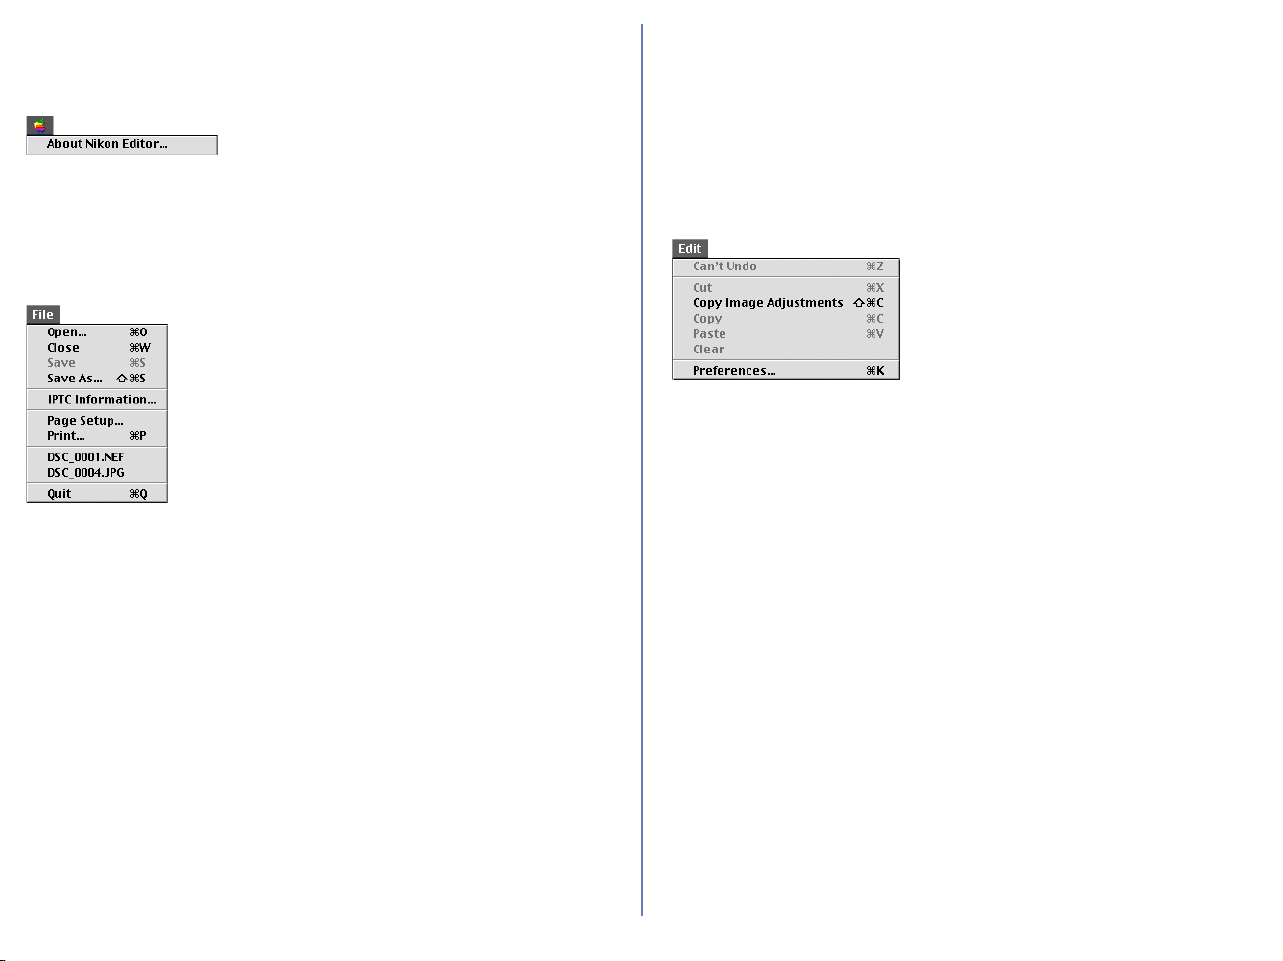
315
Macintosh (Mac OS 9)
Apple menu
About Nikon Editor...
Displays information about Nikon Editor, together with copyright
information.
File menu
Open...
Opens a new image, taken with Nikon Digital Camera, in Nikon
Editor.
Close
Closes the image currently displayed in the Image Area.
Save
Saves the image currently displayed in the Image Area.
Save As...
Saves the currently displayed image under a different name.
IPTC Information
Opens the File Information dialog box.
Print Setup...
Selects paper size for printing.
Print...
Prints the selected image.
Quit
Exits Nikon Editor.
Edit menu
Paste
If editing text, pastes the text on the clipboard into the text at the
current insertion point.
If editing images, applies the adjustments
saved on the clipboard to the
current image.
Clear
Deletes selected text.
Preferences...
Opens the Preferences dialog box.

316
Macintosh (Mac OS 9) — Cont'd
View menu
View Entire Image
Displays the whole of the current image in the Image Area
Fit Window to Image
Changes the size of the Image Window to fit the current image.
Auto Fit Window to Image
Changes the size of the Image Window automatically every time
the size of the current image is altered, or the image is rotated.
Selection Cursor
Mouse pointer turns into a cross allowing you to specify a selected
area of the current image to be saved in a file.
Zoom Cursor
Mouse pointer turns into a magnifying glass, allowing you to zoom
in and out of the current image.
Grab Cursor
Mouse pointer turns into a hand, allowing you to view areas of the
image that are not currently visible.
Zoom In
Zooms in on the current image.
Zoom Out
Zooms out from the current image.
Show Shooting Data
Displays or hides shooting data.
Show Tool Palette 1
Displays or hides the Tool Palette.
Show Quick Tools
Displays or hides Quick Tools.
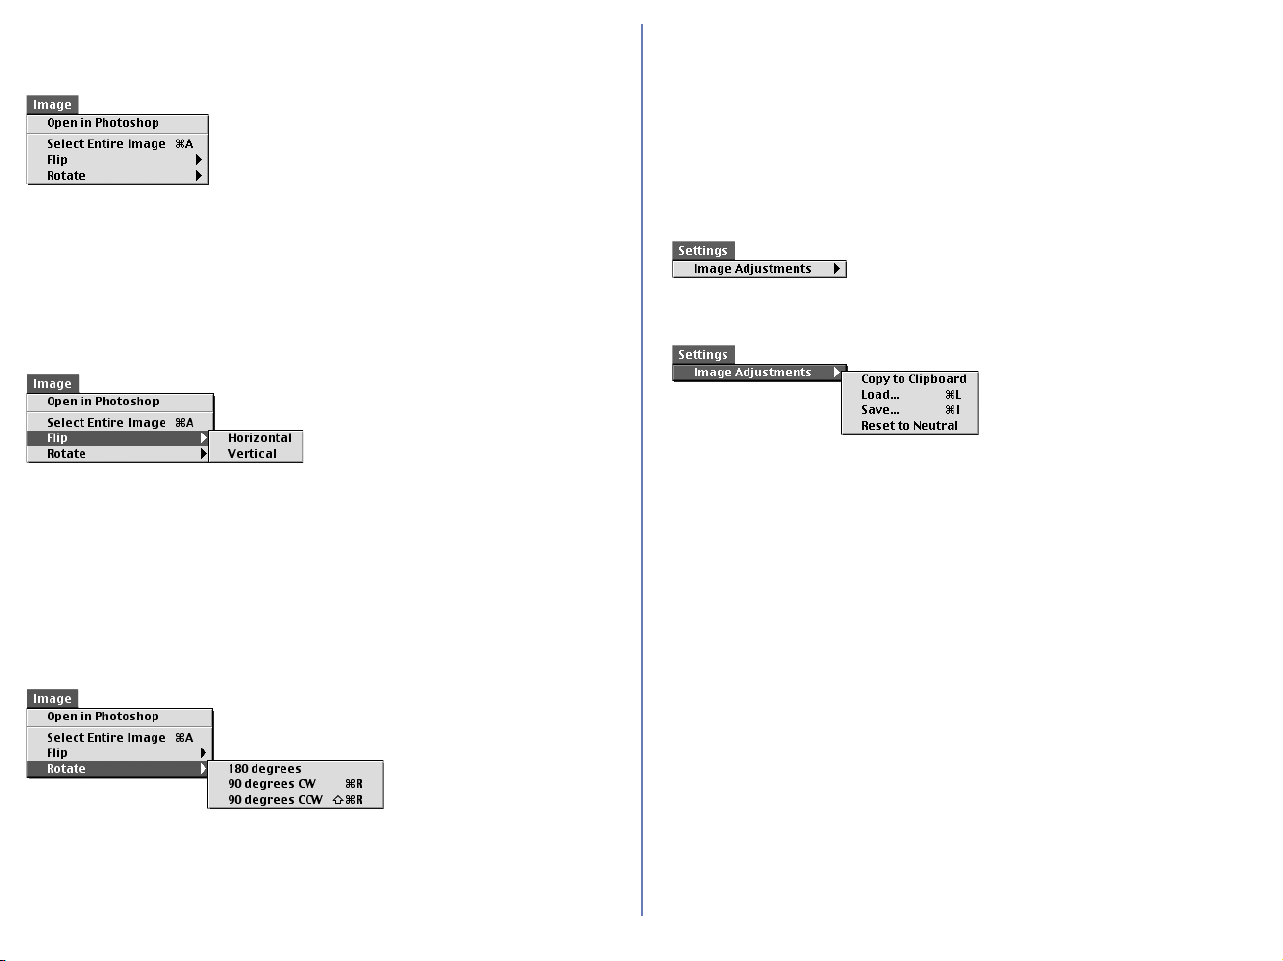
317
Macintosh (Mac OS 9) — Cont'd
Image menu
Open in Photoshop
Opens current image in Adobe Photoshop.
Select Entire Image
Selects all of the current image.
Flip
Flips (creates a mirror image of) the current picture.
Horizontal
Flips the current image horizontally.
Vertical
Flips the current image vertically.
Rotate
Rotates the current image through 90°clockwise, 90° counter
clockwise or 180°
.
180 degrees
Rotates current image through180°.
90 degrees CW
Rotates current image 90° clockwise.
90 degrees CCW
Rotates current image 90° counter clockwise.
Settings menu
Image Adjustments
Contains the four submenus listed below.
Copy to Clipboard
Copies all current image adjustment settings to the clipboard.
Load...
Loads file containing saved image adjustment settings, (see
below), and applies them to the current image.
Save...
Saves all current image adjustment settings as a separate file.
Reset to Neutral
Resets all current image adjustment settings to their default
values.

318
Macintosh (Mac OS 9) — Cont'd
Tools menu
Show Current Folder in Nikon Browser
Starts Nikon Browser and displays the contents of the current
folder in Nikon Browser.
If you are already running Nikon Browser, the Nikon Browser
window will move to the front of the screen.
Window menu
Stack
Shows all currently open image windows one on top of the other .
Help menu
About Balloon Help...
Explains how to use Balloon Help.
Show Balloons
Displays Balloon Help.
Nikon Editor Help
Opens the Nikon View 5 help file.

319
Macintosh (Mac OS X)
Nikon Editor menu
About Nikon Editor...
Displays information about Nikon Editor, together with copyright
information.
Preferences...
Opens the Preferences dialog box.
Quit Nikon Editor
Exits Nikon Editor.
File menu
Open...
Opens a new image, taken with Nikon Digital Camera, in Nikon
Editor.
Close
Closes the image currently displayed in the Image Area.
Save
Saves the image currently displayed in the Image Area.
Save As...
Saves the currently displayed image under a different name.
IPTC Information...
Opens the File Information dialog box.
Page Setup...
Selects paper size for printing.
Print...
Prints the selected image.
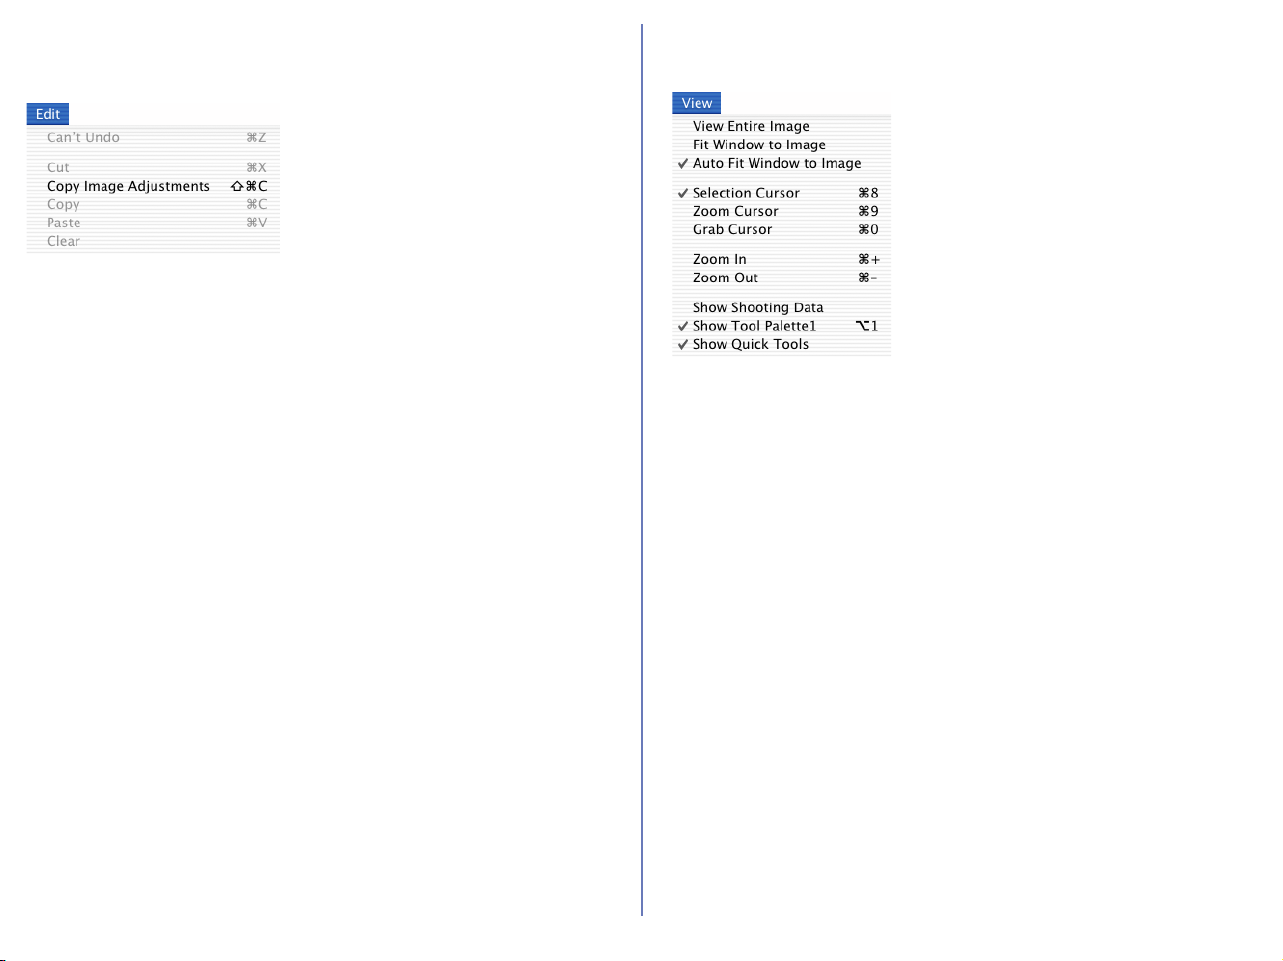
320
Macintosh (Mac OS X) — Cont'd
Edit menu
Undo
Undo previous text editing operation.
Cut
Removes selected text to the clipboard.
Copy Image Adjustments
Copies the currently editing settings to the clipboard.
Copy
Copies selected text to the clipboard.
Paste
If editing text, pastes the text on the clipboard into the text at the
current insertion point.
If editing images, applies the adjustments saved on the clipboard
to the current image.
Clear
Deletes selected text.
View menu
View Entire Image
Displays the whole of the current image in the Image Area
Fit Window to Image
Changes the size of the Image Window to fit the current image.
Auto Fit Window to Image
Changes the size of the Image Window automatically every time
the size of the current image is altered, or the image is rotated.
Selection Cursor
Mouse pointer turns into a cross allowing you to specify a selected
area of the current image to be saved in a file.
Zoom Cursor
Mouse pointer turns into a magnifying glass, allowing you to zoom
in and out of the current image.
Grab Cursor
Mouse pointer turns into a hand, allowing you to view areas of the
image that are not currently visible.
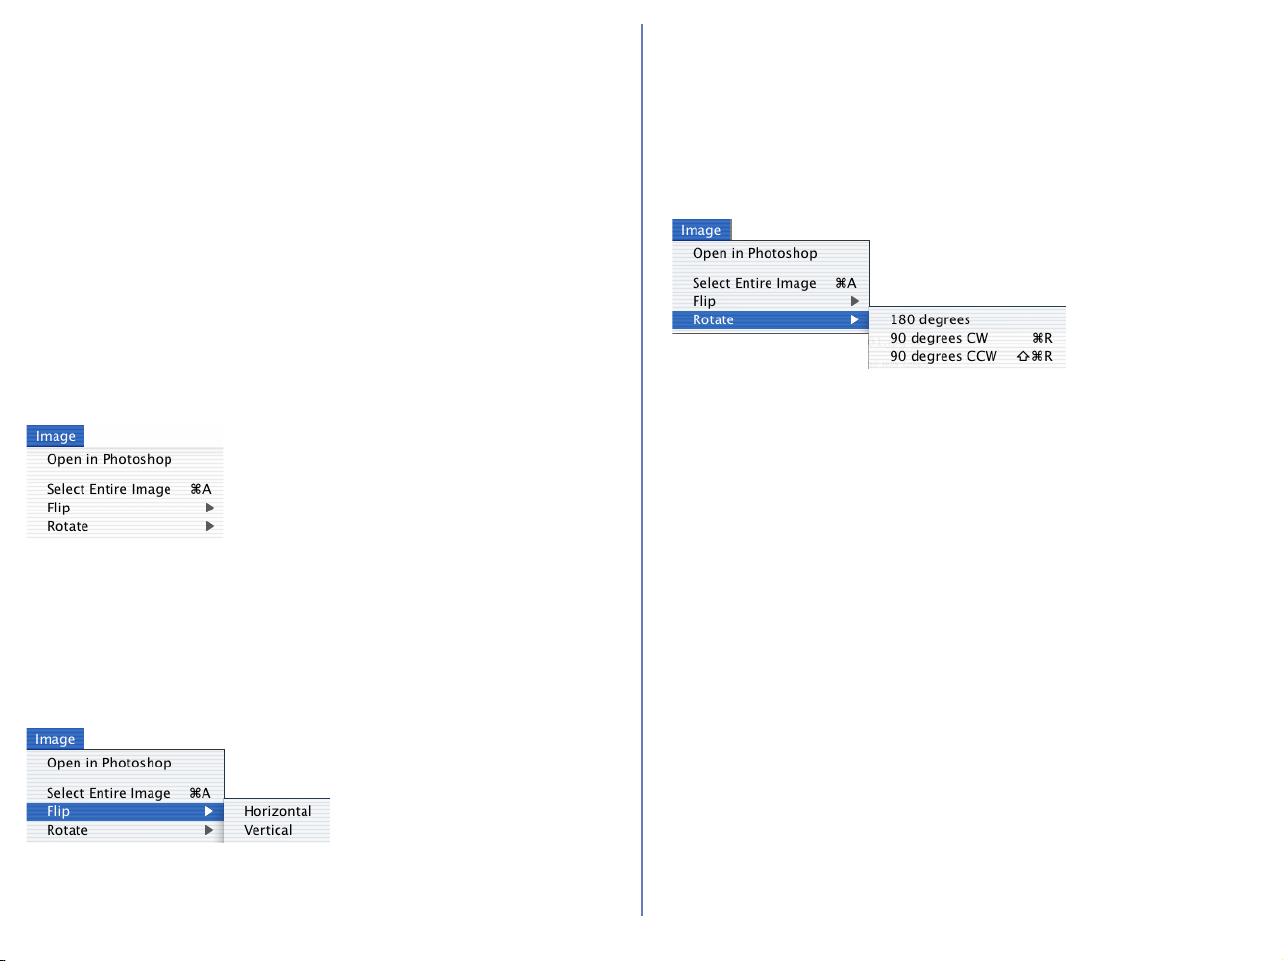
321
Macintosh (Mac OS X) — Cont'd
Zoom In
Zooms in on the current image.
Zoom Out
Zooms out from the current image.
Show Shooting Data
Displays or hides shooting data.
Show Tool Palette 1
Displays or hides the Tool Palette.
Show Quick Tools
Displays or hides Quick Tools.
Image menu
Open in Photoshop
Opens current image in Adobe Photoshop.
Select Entire Image
Selects all of the current image.
Flip
Flips (creates a mirror image of) the current picture.
Horizontal
Flips the current image horizontally.
Vertical
Flips the current image vertically.
Rotate
Rotates the current image through 90° clockwise, 90° counter
clockwise or 180°.
180 degrees
Rotates current image through180°.
90 degrees CW
Rotates current image 90° clockwise.
90 degrees CCW
Rotates current image 90° counter clockwise.
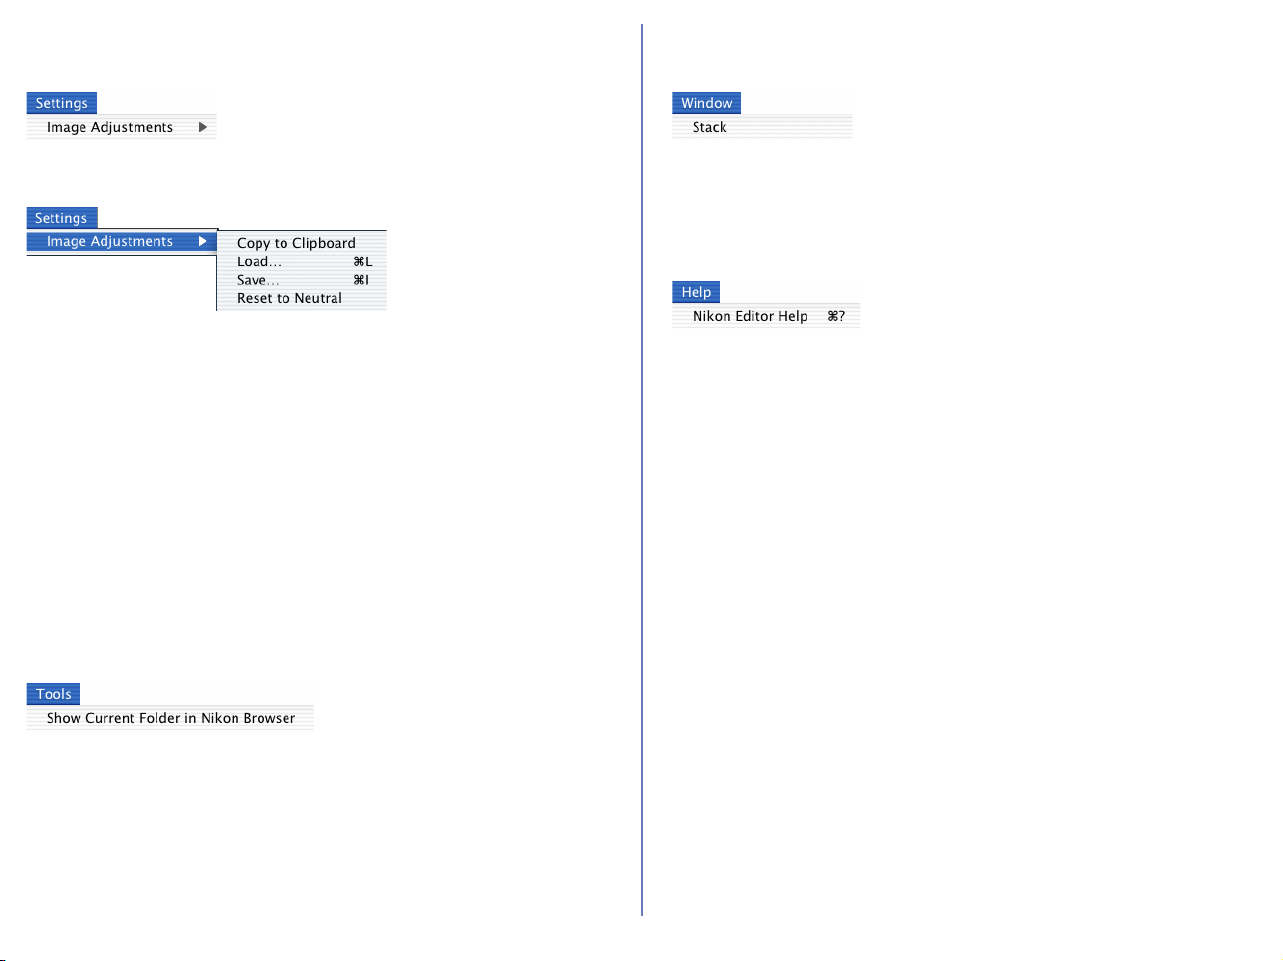
322
Macintosh (Mac OS X) — Cont'd
Settings menu
Image Adjustments
Contains the four submenus listed below.
Copy to Clipboard
Copies all current image adjustment settings to the clipboard.
Load...
Loads file containing saved image adjustment settings, (see
below), and applies them to the current image.
Save...
Saves all current image adjustment settings as a separate file.
Reset to Neutral
Resets all current image adjustment settings to their default
values.
Tools menu
Show Current Folder in Nikon Browser
Starts Nikon Browser and displays the contents of the current
folder in Nikon Browser.
If you are already running Nikon Browser, the Nikon Browser
window will move to the front of the screen.
Window menu
Stack
Shows all currently open image windows one on top of the other.
Help menu
Nikon Editor Help
Opens the Nikon View help file.

323
Appendix
Appendix A : Standard RGB Profiles Supported in Nikon Editor
Appendix B : Large Preview Generator for NEF (Windows only)
Appendix C : Nikon NEF Plug-in
Appendix D : Troubleshooting
Appendix E : Connecting the Camera and Inserting Memory Cards
Appendix F : Reinstalling Nikon View
Appendix G : Panorama Maker 3.0

324
Appendix A : Standard RGB Profiles Supported in Nikon Editor
A.1 Profiles with a Gamma Value of 1.8
Apple RGB
This profile is used in desk-top publishing applications and in
Adobe Photoshop versions 4.0 or earlier, and is the typical RGB
profile for Macintosh monitors. The corresponding RGB setting in
Adobe Photoshop is "Apple RGB." This profile is suitable for
working with images displayed on the Macintosh.
ColorMatch RGB
The ColorMatch profile is native to Radius PressView monitors. It
has a wider gamut than Apple RGB, with a particularly wide area
devoted to the reproduction of blues. The corresponding RGB
setting in Adobe Photoshop is "Color Match RGB."
A.2 Profiles with a Gamma Value of 2.2
sRGB
This RGB profile is used in the majority of Windows monitors. It
closely resembles the RGB commonly used in color television, and
is also used in the digital television broadcasting system that is on
its way to becoming the industry standard in the United States of
America. Software and hardware manufacturers use it as a default
color profile and guarantee operation when it used. It is also on its
way to becoming the standard for images on the web. This profile
is suited to users who plan to use their digital images "as is,"
without editing or printing them. It however suffers from the
drawback of a narrow gamut with a limited area available for
reproducing blues. The corresponding RGB setting in Adobe
Photoshop 5.0 and 5.5 is "sRGB," the corresponding setting in
Adobe Photoshop 6.0 "sRGB IWC61966-2.1."
Bruce RGB
This color profile attempts to expand on the ColorMatch RGB
gamut by defining the chromaticity for G as lying between the
values for G in the Adobe RGB and ColorMatch color-space
profiles. It was proposed by Bruce Fraser, who claims that it
includes most of the colors in the SWOP CMYK gamut. The R and
B used in the Bruce RGB and Adobe RGB color-space profiles
match.
NTSC (1953)
This is the color space for video defined by the National Television
Standards Committee (NTSC) in 1953 and used in early color
televisions. This color space is also used in some Far-East
newspaper and printing organizations. The corresponding RGB
setting in Adobe Photoshop is "NTSC (1953).
Adobe RGB (1998)
A color-space profile defined in Adobe Photoshop 5.0. It has a
wider gamut than sRGB and includes the colors found in most
CMYK gamuts, making it suitable for users involved in desktop
publishing. The corresponding RGB setting in Adobe Photoshop
5.0 is "SMPTE-240M," the corresponding setting in Adobe
Photoshop 5.5 or later "Adobe RGB (1998)."
CIE RGB
A video color-space profile established by the Commission
Internationale de l’Éclairage (CIE). While it boasts a fairly wide
gamut, it suffers from the drawback that the area devoted to the
reproduction of cyan is relatively small. The corresponding RGB
setting in Adobe Photoshop is "CIE RGB."

325
Wide Gamut RGB
This color-space profile, designed by Adobe, incorporates most of
the visible colors. This however has the consequence that most of
the colors it can express can not be reproduced on standard
monitors and printers. The corresponding RGB setting in Adobe
Photoshop 5.0 or later is "Wide Gamut RGB."
The gamut of colors that can be expressed in the above color-
space profiles is shown in the following chromaticity (x, y) graph.
The greater the area enclosed by the triangle that represents the
color-space profile, the wider its gamut.
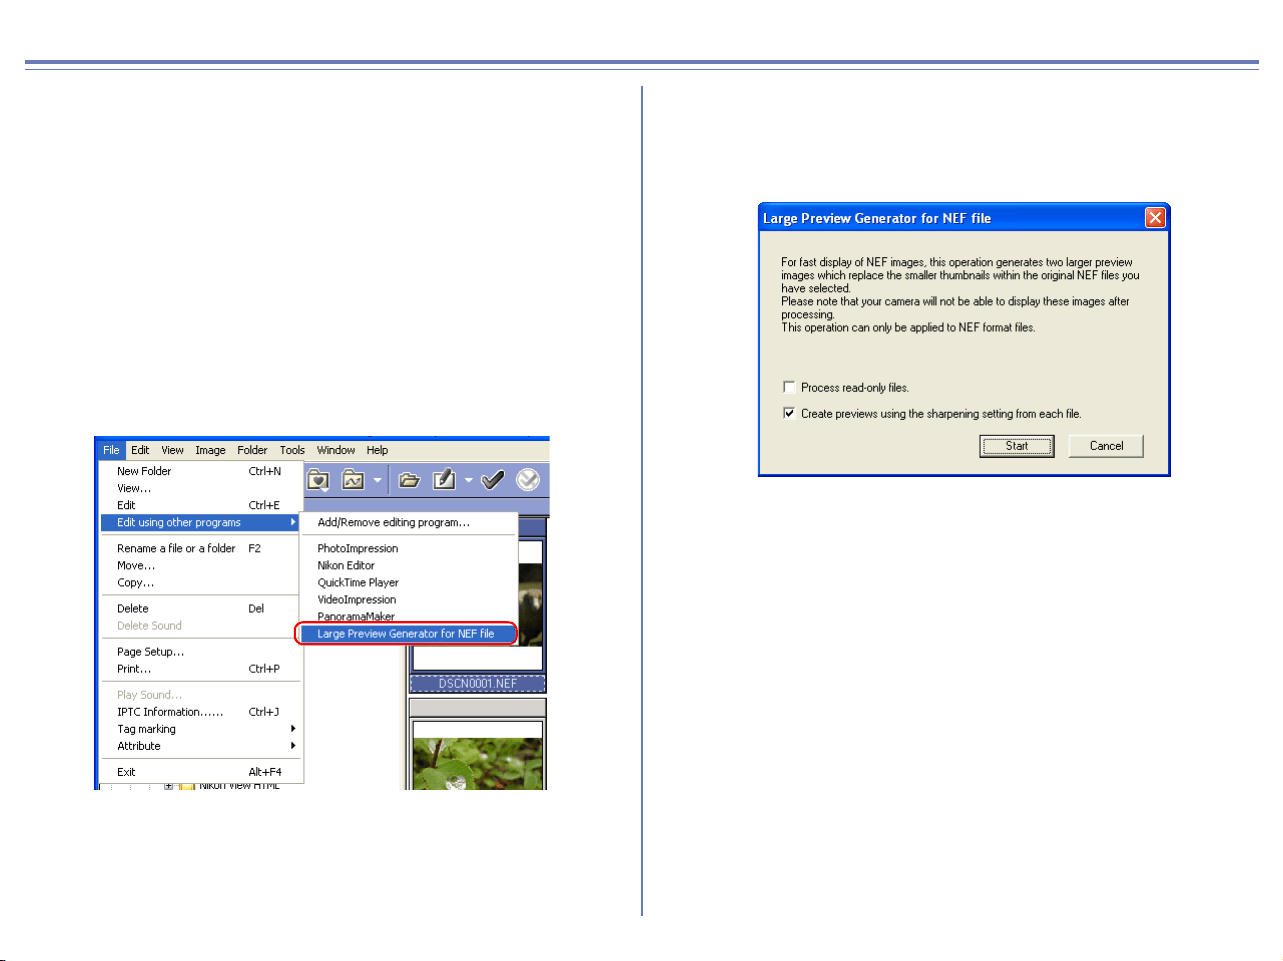
326
Appendix B : Large Preview Generator for NEF (Windows only)
Large Preview for NEF file can attach a large preview image with
1,600 pixels on its longer side to the RAW (NEF) image shot by
Nikon digital cameras. If an image is displayed as reference in
Nikon Viewer, you can scale the image rapidly to fit it to the Viewer
window by appending the large preview image to RAW (NEF)
image.
To append a large preview image, do the following steps:
Step 1;
In the thumbnail list area, select one or more image file thumbnail
to attach the preview. Select either of the following processes by
checking the check box.
Step 2;
The Large Preview Generator for NEF file dialog box. will open.
Check the options you need for processing and click Start button.
Process read-only files
Allows you to process read-only files. However, the files on read-
only media such as CD-ROM cannot be processed.
Create previews using the sharpening setting from each
file.
Allows you to sharpen outlines for RAW (NEF) images files.
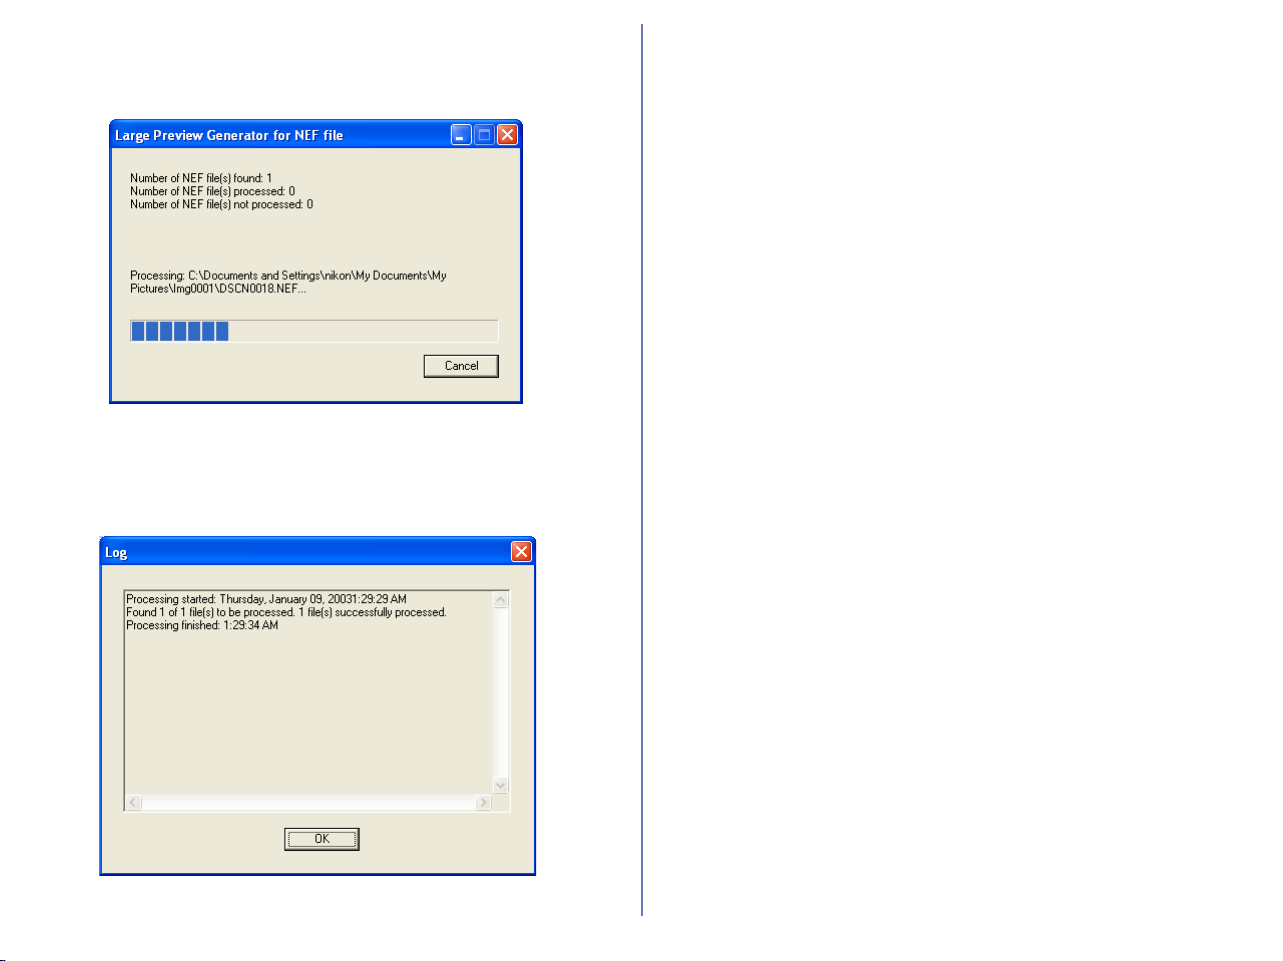
327
Step 3;
A dialog showing a processing progress will open.
Step 4;
After process, Log dialog box will appear. Click OK button.
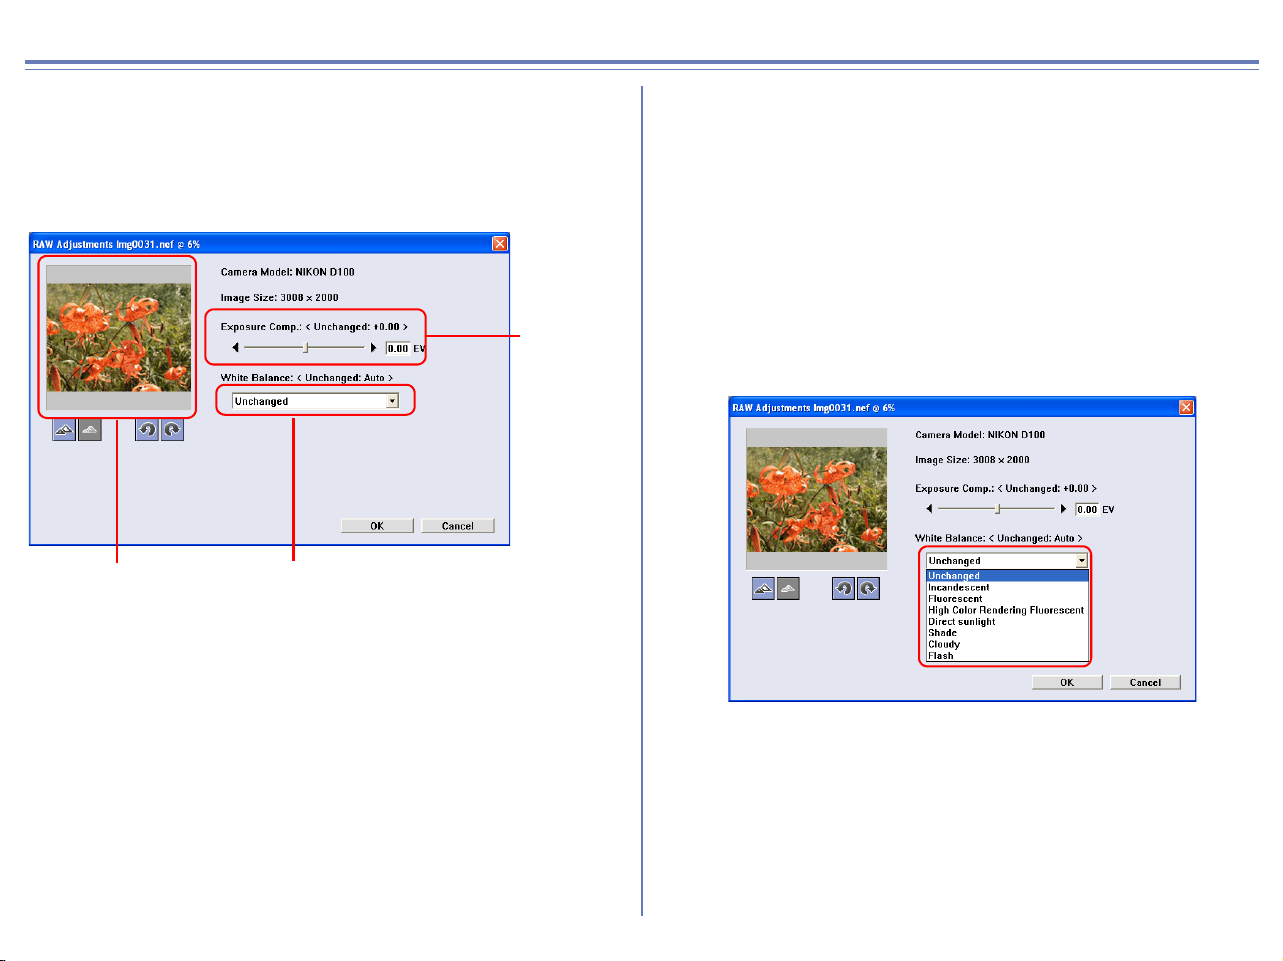
328
Appendix C : Nikon NEF Plug-in
The Nikon NEF plug-in allows you to open RAW (NEF) pictures
taken with a Nikon digital camera in Adobe Photoshop.
When you try to open an RAW file in Photoshop (6.0 or later in
Windows, all supported version in Macintosh) the RAW
adjustments dialog box will be displayed.
Camera Model
Shows the model of camera with which the current image was
taken.
Image Size
Shows the actual size of the current image. Size is displayed in
pixels (width X height.)
If the software version of Adobe Potoshop that is running in
Windows is earlier than 6.0, an RAW file is opened without
displaying the RAW adjustments dialog box.
Exposure compensation
The current image's exposure compensation can be adjusted
between -2 EV to +2 EV. To adjust exposure compensation, drag
the exposure compensation slider, or enter the desired exposure
compensation value directly into the text box.
Leave the slider at zero to use the exposure compensation setting
chosen when the picture was taken.
White Balance
Select the desired option from the pull down menu to change the
current image's white balance setting.
Slider
Text boxPreview image
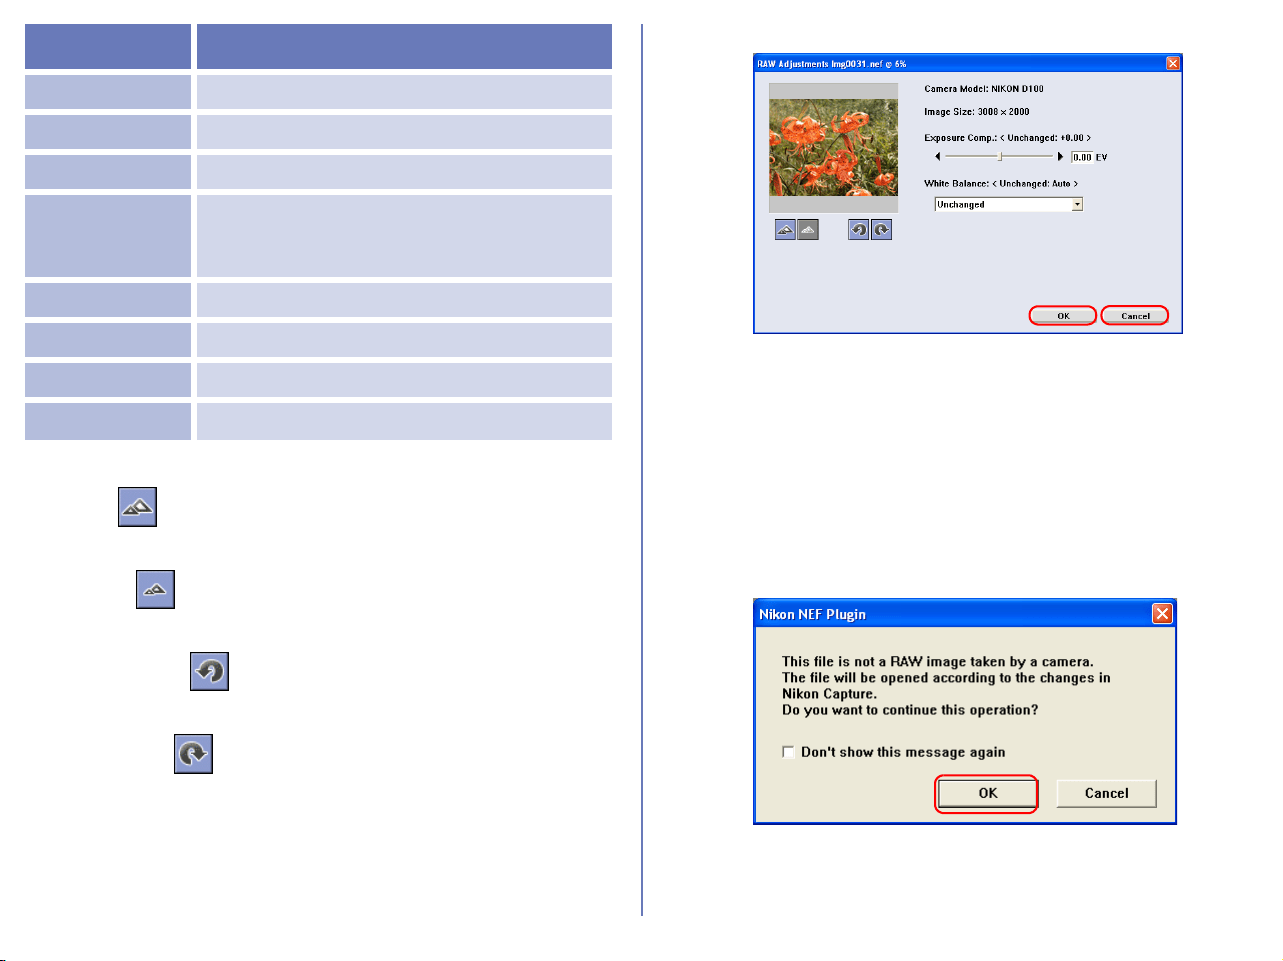
329
Quick Tools
Zoom In
Zooms in on the current image.
Zoom Out
Zooms out of the current image.
Rotate 90 CCW
Rotates the current image 90° in a counterclockwise direction.
Rotate 90 CW
Rotates the current image 90° in a clockwise direction.
Exiting the RAW adjustments dialog box
Click OK to open the image in Photoshop. The image displayed in
Photoshop will reflect the changes made in the RAW adjustments
dialog box.
Click Cancel to exit the dialog box without opening the image in
Photoshop.
If you try to open an NEF image that is not a RAW image using the
Nikon NEF plug-in, the dialog box shown below will be displayed.
Click OK to open the image using Nikon Capture settings.
Setting Use
Unchanged ...
to preserve the original White Balance setting.
Incandescent ...
for images taken under an incandescent light
Fluorescent ...for images taken under an fluorescent light
High Color
Rendering
Fluorescent
...for images taken under an high color
rendering fluorescent light
Direct sunlight ...for images taken under Direct sunlight
Shade ...for images taken in the shade
Cloudy ...for images taken under cloudy skies
Flash ...for images taken with a flash

330
Appendix D : Troubleshooting
The following pages describe possible problems you may encounter while using Nikon View. If the problem persists, contact your retailer or a
Nikon service representative.
Problem Possible Cause References
Nikon View does not start
automatically when a camera or
card reader is connected.
• A memory card is not inserted in the camera
or card reader.
• The images on the memory card were taken
with a make of camera not supported under
Nikon View.
• The camera is not properly installed
(Windows only)
• Disable Auto Launch is selected in the Auto
launch tab of the Preferences dialog.
• Your computer is running Nikon Capture 2 or
Nikon Capture 3 camera control with your
camera connected to the computer.
Refer to “Nikon View Reference Manual”.
( p. 222) ;
Nikon Browser
The thumbnail list is not
displayed.
• The selected folder contains no images.
• A folder containing images taken with a Nikon
digital camera has not been selected.
( p. 162) ;
Nikon Browser
Movies cannot be played back
• A movie player program is not installed.
( p. 181);
Nikon Browser
Can not find image files which
have been transferred to the
computer.
• The destination folder specified in the File
Destination and Naming dialog box has
been changed.
( p. 121) ;
Nikon Transfer

331
Life-Long Learning
As part of Nikon's "Life-Long Learning" commitment to ongoing
product support and education, continually-updated information is
available on-line at the following web-sites:
• For users in the United States of America:
http://www.nikonusa.com/
• For users in Europe:
http://www.nikon-euro.com/
• For users in Asia, Oceania, the Middle East, and Africa:
http://www.nikon-asia.com/
Visit these sites to keep up-to-date with the latest product
information and general advice on digital imaging and
photography.
For more information, please contact your nearest Nikon
representative.
http://www.nikon-image.com/eng/
ArcSoft
®
Customer Service
U.S.A
Phone: 510-440-9901 (Monday-Friday 8:30am-5:30pm PST)
Fax: 510-440-1270
Web: http://www.arcsoft.com/
E-Mail: [email protected]
Mail:
ArcSoft, Inc.
46601 Fremont Blvd.
Fremont, CA 94538
U.S.A.
China
Europe
Japan
Taiwan
Latin America
ArcSoft Beijing
Representative Office
Tel: +10-6849-1368
Fax: +10-6849-1367
No 6 South Capital Gym
Rd.
E-Mail: [email protected]
Beijing New Century
Hotel, #2910 Beijing
100044, P.R. China
Unit 14, Shannon
Industrial Estate
Tel: +353-0-61-702087
Fax: +353-0-61-702001
Shannon, Co. Clare,
Ireland
E-Mail: eurosupport@arcsoft.com
Japan Support Center
(M.D.S., Inc.)
Tel: +81-3-3834-5256
Fax: +81-3-5816-4730
JTT Bldg. 3F Web: http://www.arcsoft.jp/
3-3-4 Ueno, Taito-ku E-Mail: support@arcsoft.jp
Tokyo, 110-0005 Japan
ArcSoftInc. Taiwan
Branch
Tel: +866(0)-2-2718-1869
Fax: +866(0) 2-2719-0256
E-Mail: [email protected].tw
Tel (Brazil): +00817-200-0709
Tel (Chile): +800-202-797
E-Mail: [email protected]

332
Appendix E : Connecting the Camera and Inserting Memory Cards
If you are using a COOLPIX series digital camera (excluding 990/
880) or a D100 camera, note the following points when connecting
the camera to a computer.
When a digital camera with a memory card is
connected, or when a memory card is inserted in a
card reader or card slot:
Windows
The computer will show the camera or memory card as a new drive
in the My Computer window. Opening the drive will reveal the
folder DCIM, which holds further folders (for example, 100NIKON)
containing images taken with the camera. Note that if you are
connecting a camera to the computer for the first time, the camera
must be registered as a device with Windows.
Macintosh
The camera or memory card will appear on the desktop as an
untitled (OS X:NO_NAME) volume. Opening this volume will
reveal the folder DCIM, which holds further folders (for example,
100NIKON) containing images taken with the camera. Note that
memory cards formatted on a D100 will appear on the desktop not
as an untitled volume, but as a volume labeled NIKON D100.
Before disconnecting or turning a digital camera
off, or removing a memory card from a card reader
or card slot:
To disconnect your camera from the computer, power off the
camera before removing the USB cable if PTP is selected for USB
communication. If Mass Storage is selected, be sure to do the
following operation before removing the USB cable with your
camera powered off:
Windows XP Home Edition/Professional
Click the Safely Remove Hardware icon on the task bar in the
bottom right of the screen, then select Safely Remove USB Mass
Storage Device from the menu that appears.
Windows Millennium Edition
Click the Unplug or Eject Hardware icon on the task bar in the
bottom right of the screen, then select Stop USB Disk from the
menu that appears.
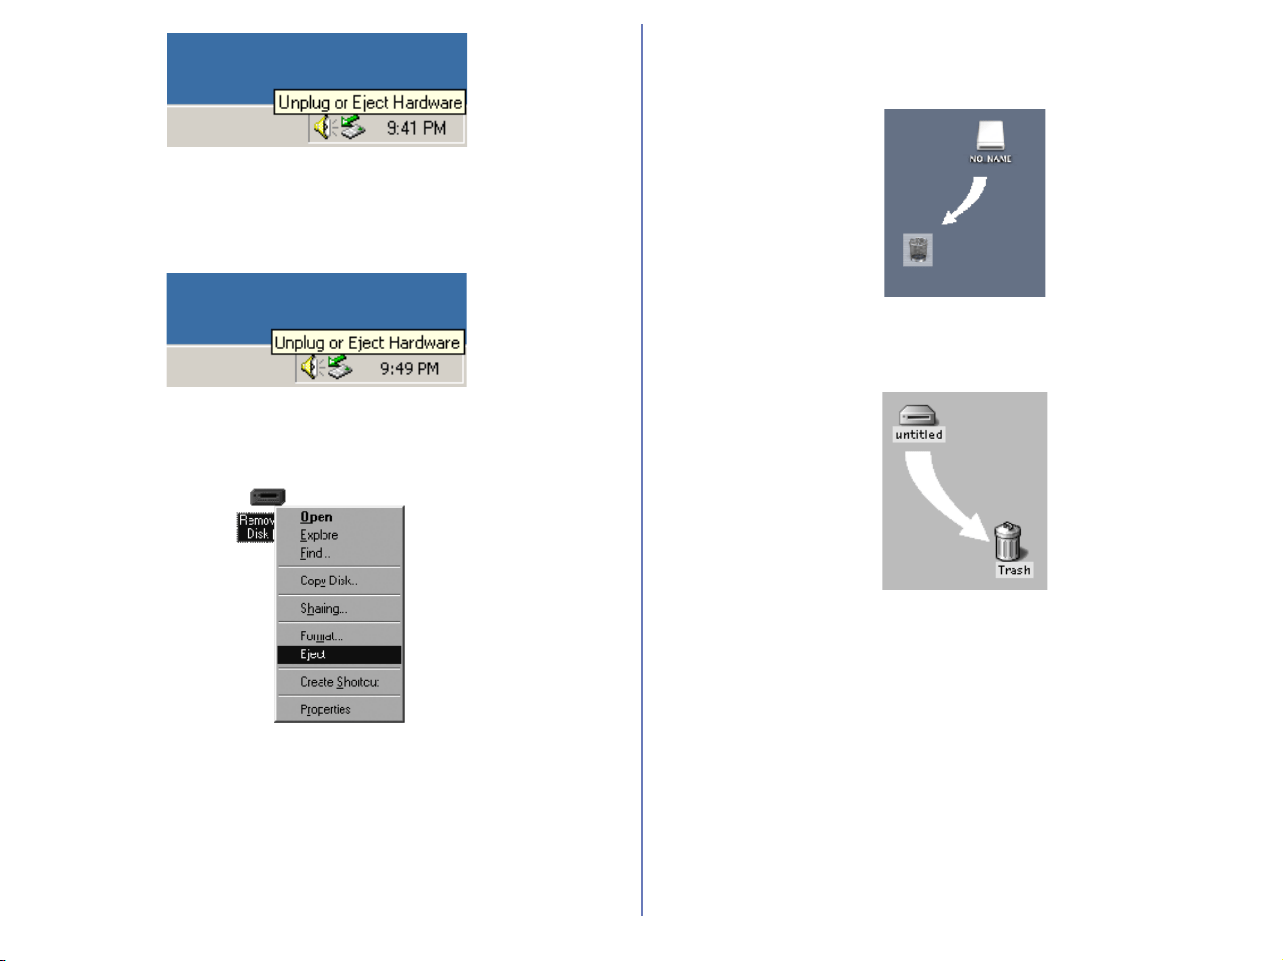
333
Windows 2000 Professional
Click the Unplug or Eject Hardware icon on the task bar in the
bottom right of the screen, then select Stop USB Mass Storage
Device from the menu that appears.
Windows 98 Second Edition
In My Computer, right click the removable disk icon corresponding
to the camera, then select Eject from the menu which appears.
Read E drive here as the actual drive name on your computer.
Mac OS X
Drag the “NO_NAME” camera volume into the Trash.
Mac OS 9
Drag the “Untitled” camera volume into the Trash.
* If you are using a memory cards formatted on a D1 series or
D100 camera, the following icon is displayed:
D1: NIKON_D1 (Mac OS X) NIKON D1 (Mac OS 9)
D1
X: NIKON_D1X (Mac OS X) NIKON D1X (Mac OS 9)
D1
H: NIKON_D1H (Mac OS X) NIKON D1H (Mac OS 9)
D100: NIKON_D100 (Mac OS X) NIKON D100 (Mac OS 9)
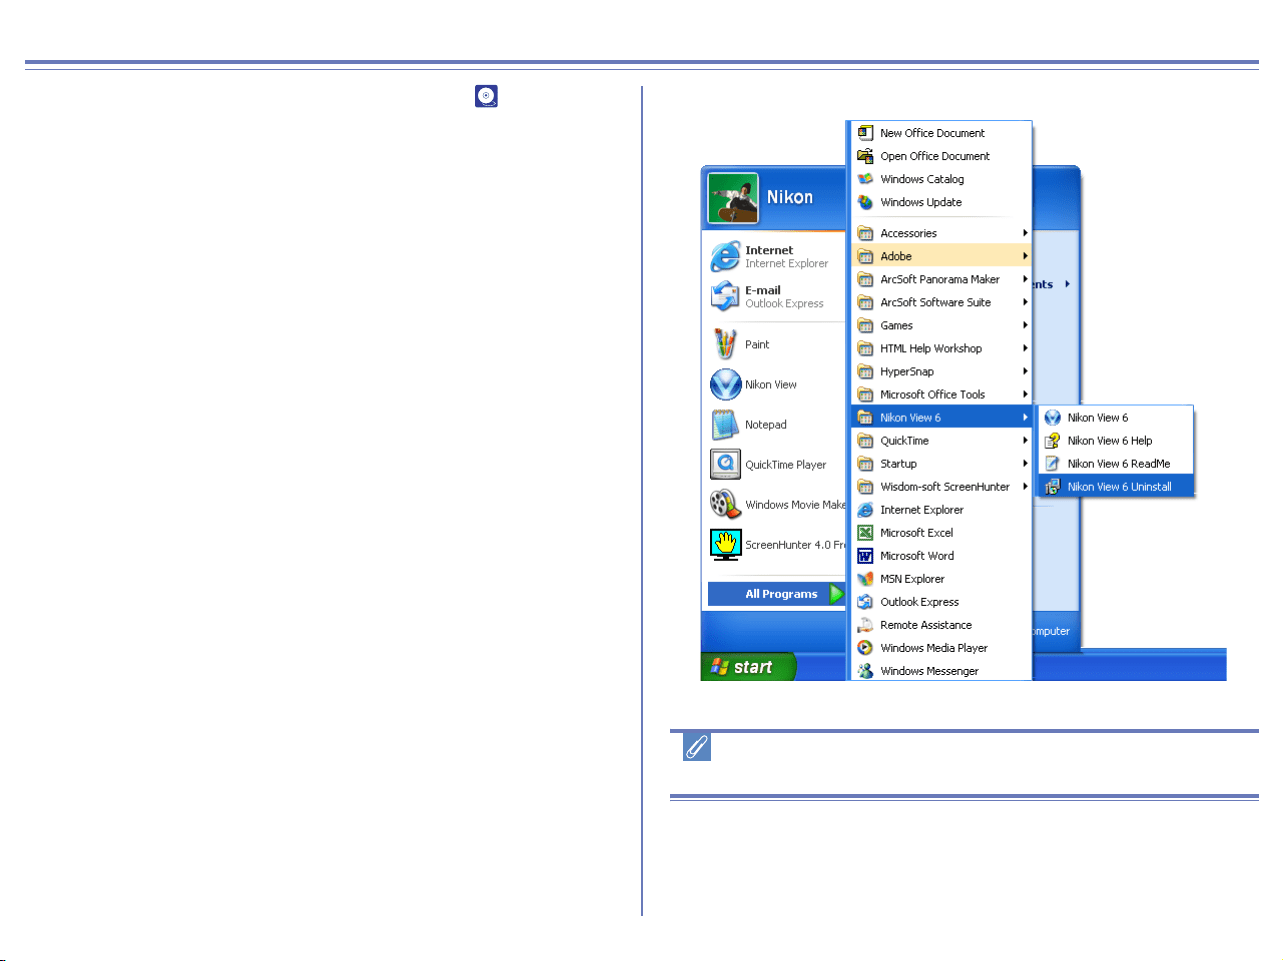
334
Appendix F : Reinstalling Nikon View
When Nikon View does not function as expected ( p. 330), you
may have to reinstall the program. This appendix describes how to
uninstall and reinstall Nikon View on both the Macintosh and
Windows platforms.
Reinstalling Nikon View
Before reinstalling Nikon View, you will need to uninstall the
program.
Windows
Step 1; Uninstall Nikon View
From the Start menu, select Programs > Nikon View 6 > Nikon
View 6 Uninstall.
Windows XP Home Edition/Professional
Windows 2000 Professional
Log on as Administrator when uninstalling Nikon View 6 from
Windows 2000 Professional or as Computer Administrator when
uninstalling Nikon View 6 from Windows XP Home Edition/
Professional.

335
Step 2; Confirm deletion of files
When the message, "Do you want to completely remove the
selected application and all of its components?" appears, click
OK to begin the process of uninstalling Nikon View 6.
Step 3; Detect Shared components
If any of the components used by Nikon View 6 are also used by
another program, a confirmation dialog will be displayed. Click Yes
to confirm deletion, click No to leave the file in place.
Step 4; Restart your computer
The dialog shown below will be displayed when the process of
uninstalling Nikon View 6 is complete.
Confirm that Yes, I want to restart my computer now is selected
and click Finish to restart your computer.
Step 5; Reinstall Nikon View 6
Reinstall Nikon View 6 as described in the Nikon View 6 Installation
Guide.
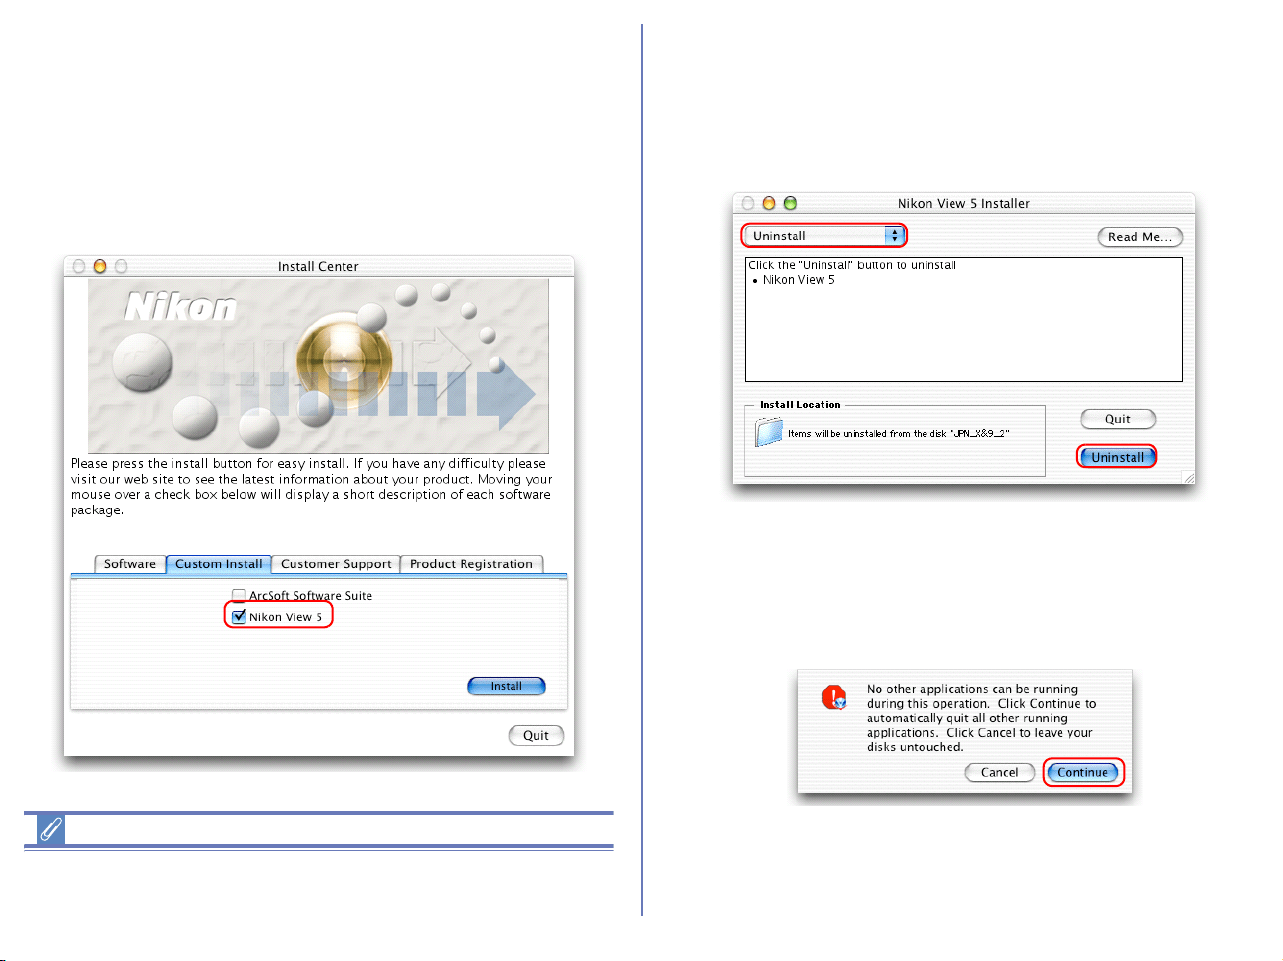
336
Macintosh
Step 1; Start the installer
Insert the Nikon View 5 CD into the CD-ROM drive, and select
Nikon View 5 in the Custom Install tab of the Install Center
dialog box. The license agreement and ReadMe windows will be
displayed. Click Accept and Continue to proceed to the installer
dialog shown in Step 2.
Mac OS X
You will be required to enter Administrator password to install
Nikon View 5 under Mac OS X.
Step 2; Unistall Nikon View 5
To start the process of uninstalling Nikon View 5, select Uninstall
from the pull-down menu in the top left corner of the installer dialog
box and then click the Uninstall button in the bottom right corner.
Step 3; Exit other applications
Click Continue to automatically quit all other applications and
continue the process of uninstalling Nikon View 5.
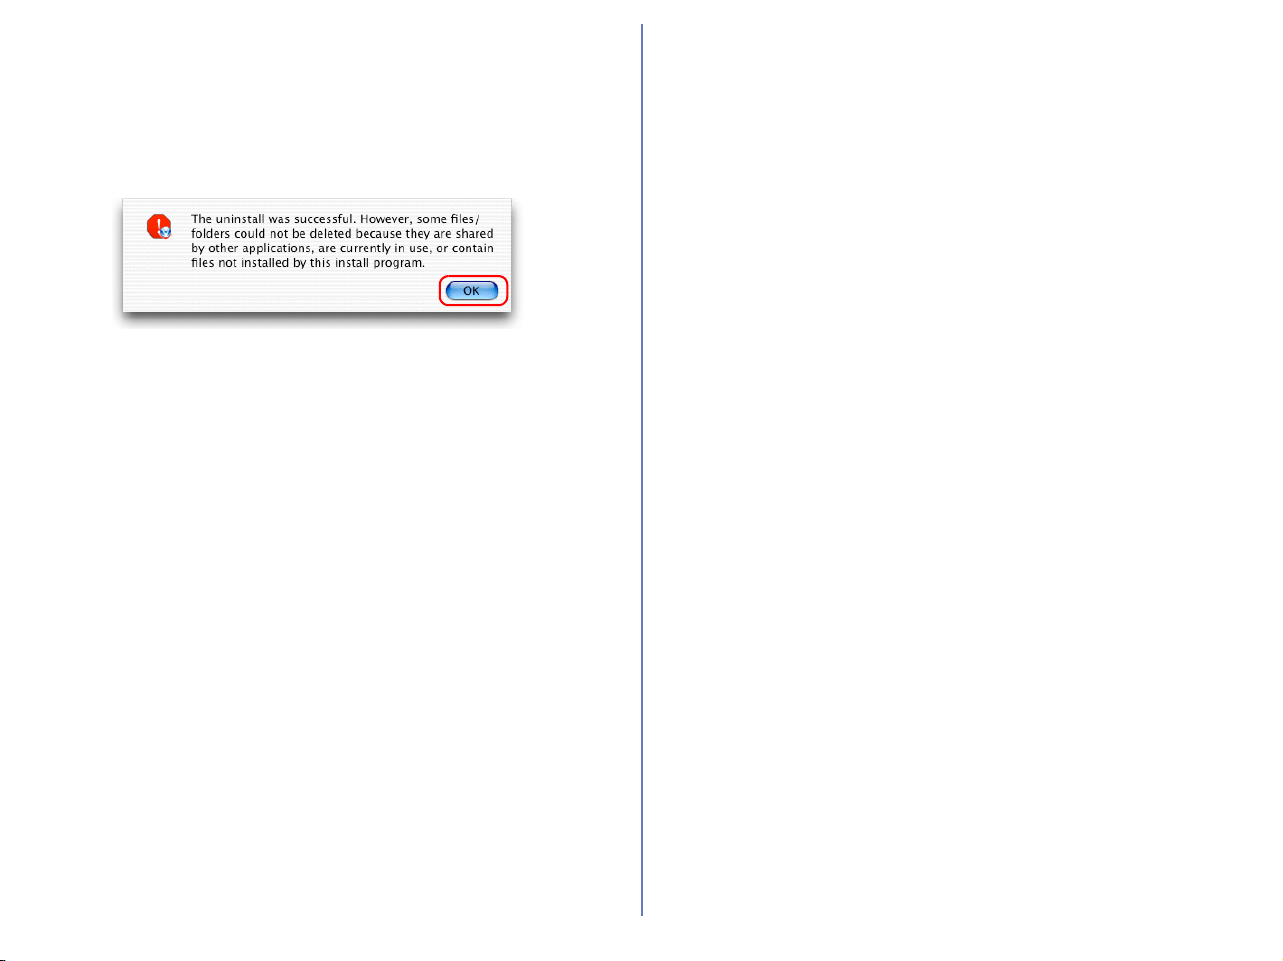
337
Step 4; Exit the uninstaller
Once the process of uninstalling Nikon View 5 is complete, a
message will be displayed.
Click OK to exit the uninstaller.
Step 5; Restart your computer
Restart your computer.
Step 6; Reinstall Nikon View 5
Reinstall Nikon View 5 as described in the Nikon View 5 Installation
Guide.
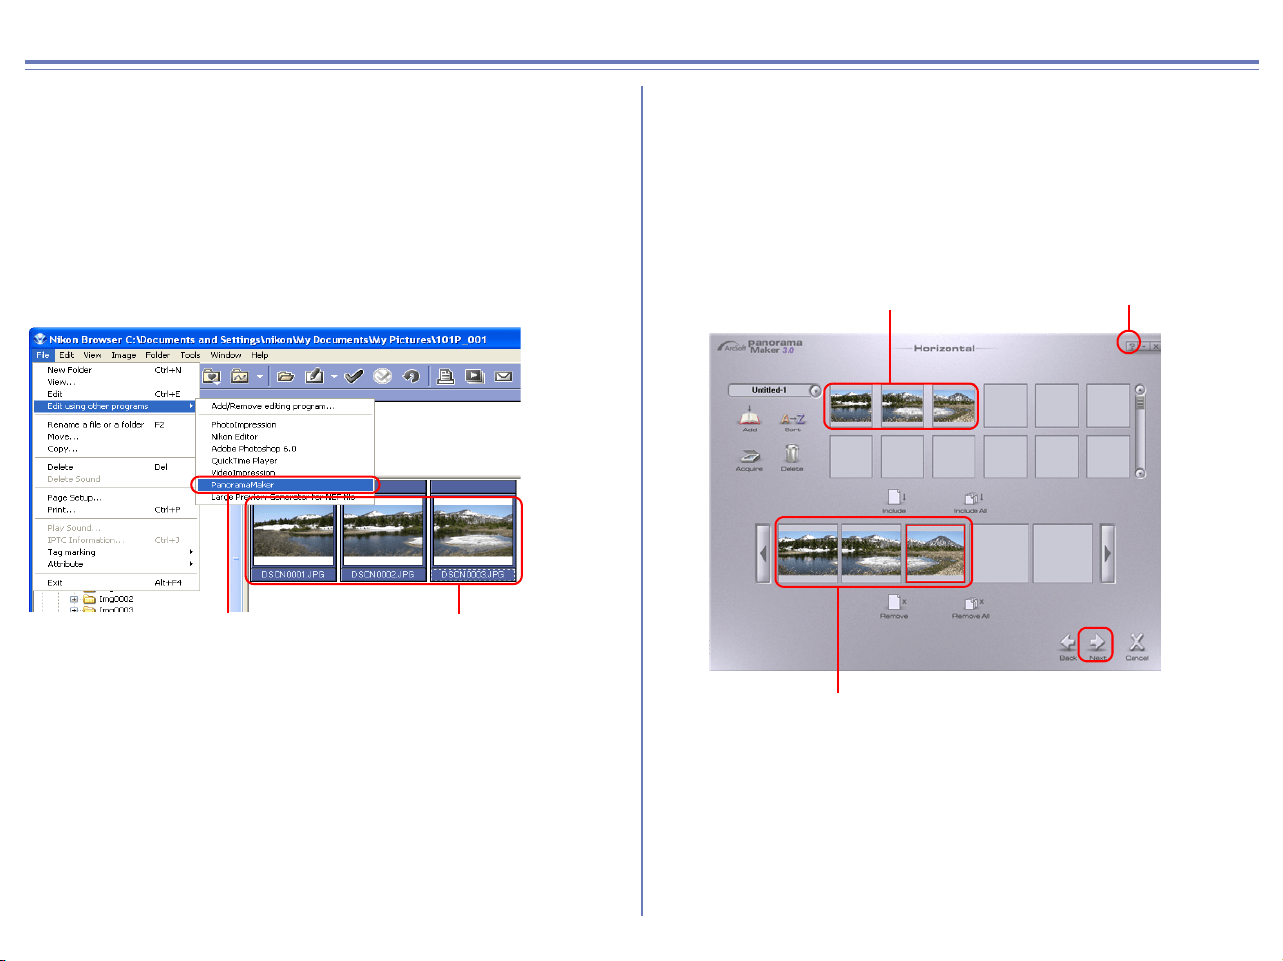
338
Appendix G : Panorama Maker 3.0
The pictures can be combined into a seamless Panorama using
ArcSoft's Panorama Maker.
Step 1;
From the thumbnail list area in Nikon Browser, select a series of
images taken with Panorama Assist. Select Edit using other
program from the File menu. Select Panorama Maker 3.0 from the
list which appears. If Panorama Maker is not listed, use Add/
Remove Editing program to register Panorama Maker.
Step 2;
Panorama Maker 3.0 will start. The software will automatically
detect the correct layout and image order necessary to create a
panorama from all currently selected images. The example below
shows a horizontal panorama.
Click Next to continue.
For further information on Panorama Maker 3.0, click the Help
button and refer to the Help file.
Select
Panorama Maker 3.0
Select more than
one image.
Images selected in Nikon
Browser
Images used to make panorama
Help button
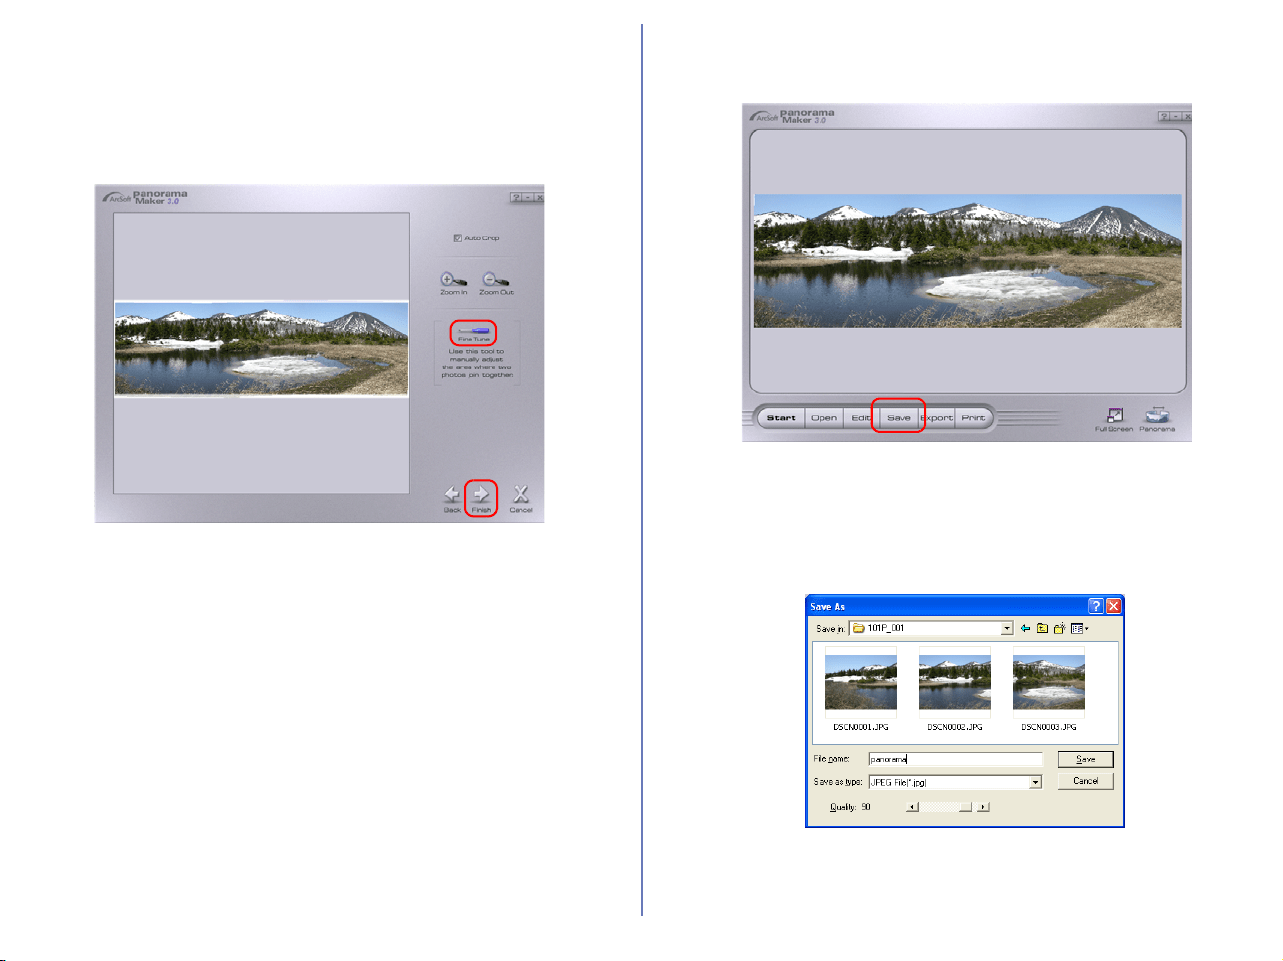
339
Step 3;
A preview of the completed panorama is displayed. Use the Fine
Tune tool to digitally adjust the "join" between the individual images
in the panorama.
Click Finish to display the completed panorama.
Step 4;
Click Save to save the panorama.
Step 5;
In the Save As dialog box, enter the desired file name for the
newly created panorama.
Under Save in: choose where you would like to save the image.

340
Step 6;
Quit Panorama Maker.