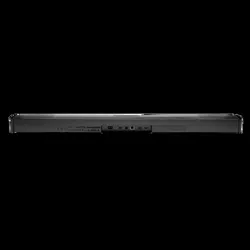
Press and hold to decrease or increase the volume continuously
Press the two buttons together to mute or unmute
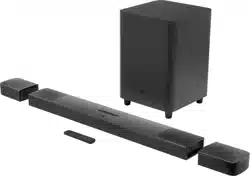
(Source)
Select a sound source: TV (default, for audio input from TV connection where the connector is prioritized over the connector), Bluetooth or HDMI IN.
Microphone
For audio calibration (wireless surround sound)
Status display
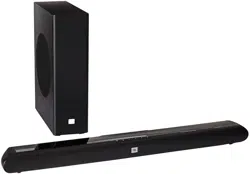
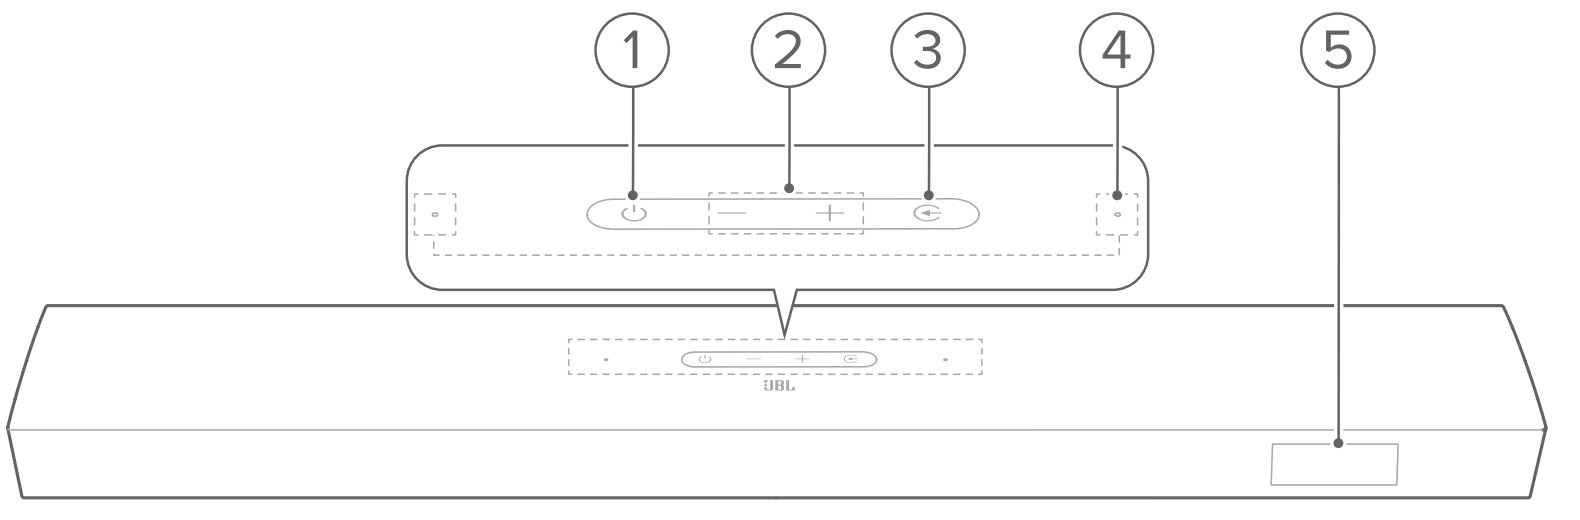
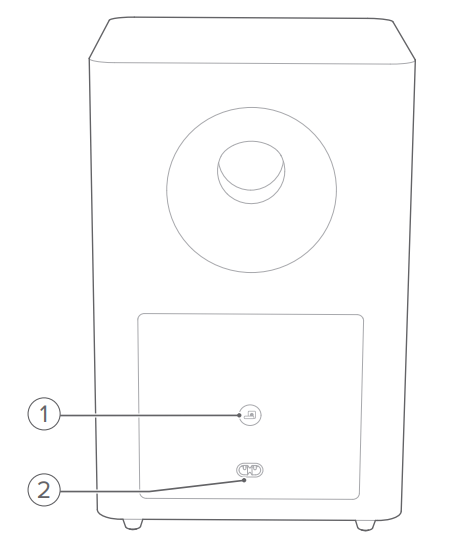
Rear connectors
POWER Connect to power (with the supplied power cord)
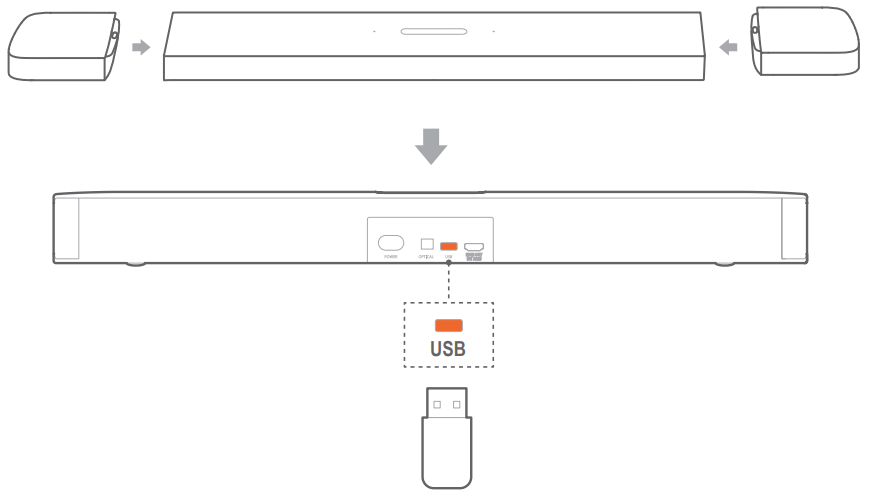
USB USB connector for software update
Connect to a USB storage device for MP3 file playback for US version only)
OPTICAL Connect to the optical output on your TV or digital device
ETHERNET Connect to your home network through an Ethernet cable
HDMI OUT (TV ARC) Connect to the HDMI ARC / HDMI eARC input on your TV
HDMI IN Connect to the HDMI output on your digital device
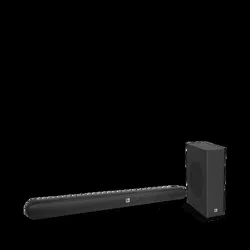
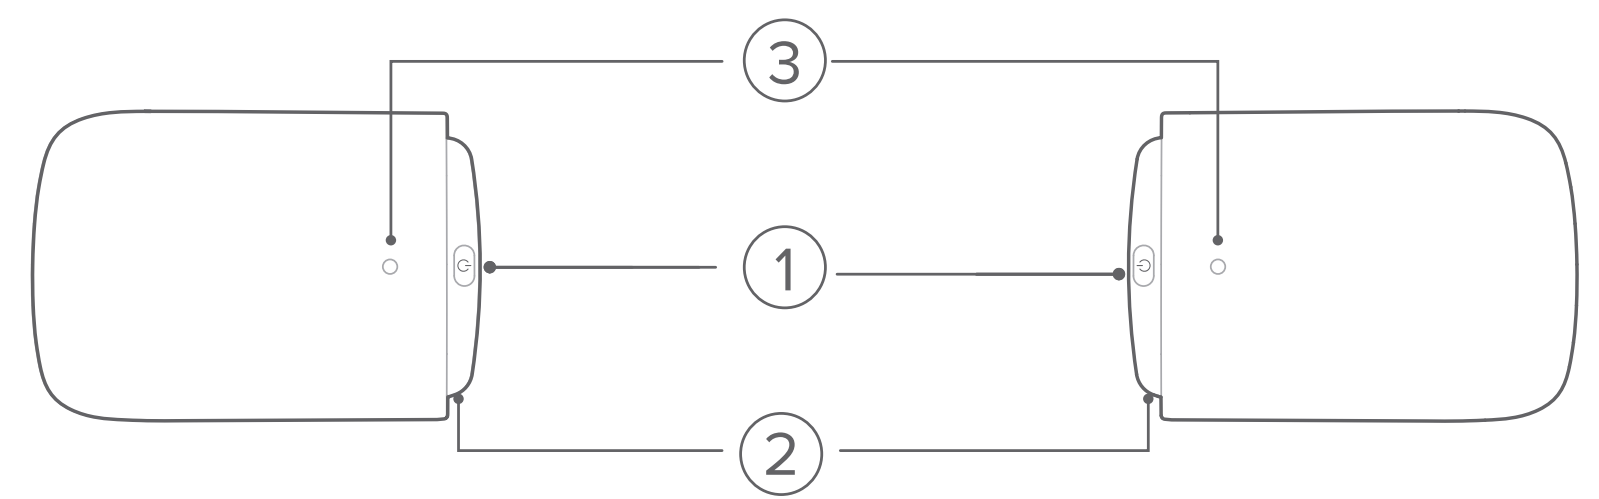
Detachable speakers
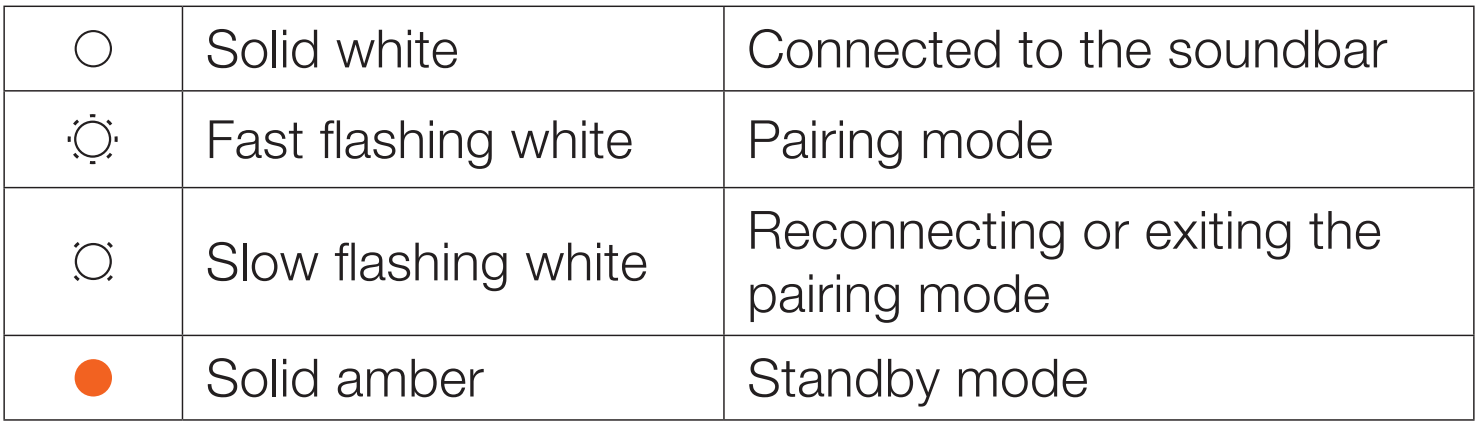
Connect: Press to reconnect to the soundbar
Micro USB connector For battery charging
Status indicator
For battery power
For wireless connection status
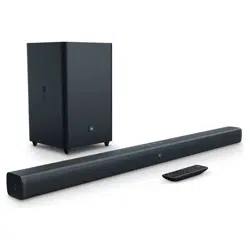
Subwoofer
1.
Connection status indicator
2. POWER
Connect to power (with the supplied power cord)
Remote control
Switch on or to standby
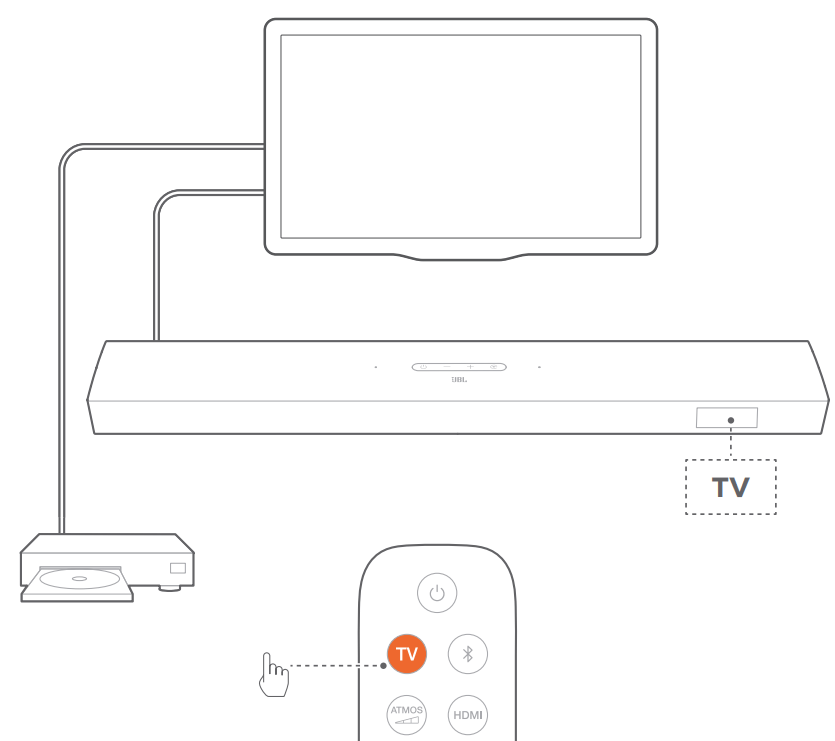
TV
Select the TV source (default, for audio input from TV connection where the HDMI OUT (TV ARC) connector is prioritized over the OPTICAL connector)
Bluetooth
Select the Bluetooth source
Press and hold to connect another Bluetooth device
Select the level of Dolby Atmos/DTS:X effect: middle default), high or low
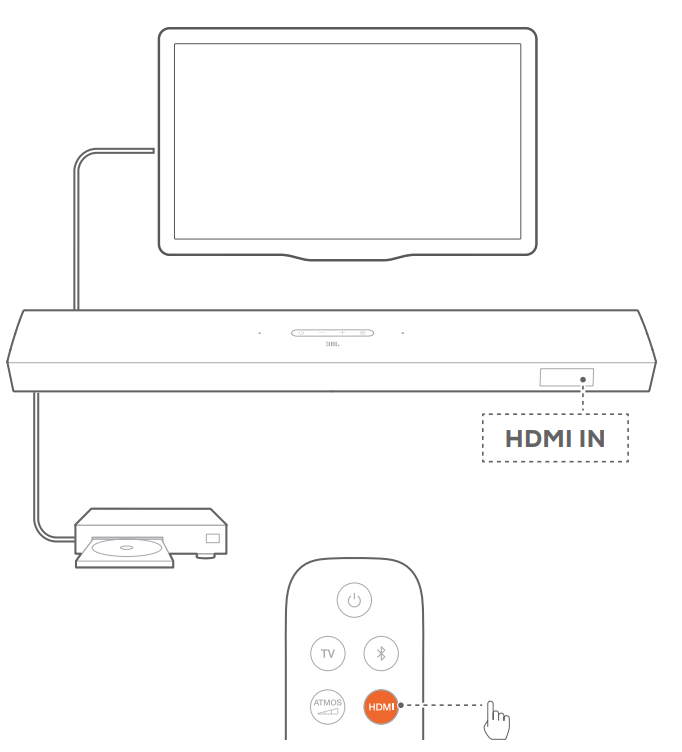
HDMI
Select the HDMI IN source
Press and hold for more than 5 seconds to enter the calibration mode for wireless surround sound
+ / -
Increase or decrease the volume
Press and hold to increase or decrease the volume continuously.
Mute: Mute/unmute
Select the bass level for subwoofer: 1/2/3 (default)/4/5
Select the surround sound level for rear speakers: middle default), high or low
CONNECT
Connection with your TV and digital devices
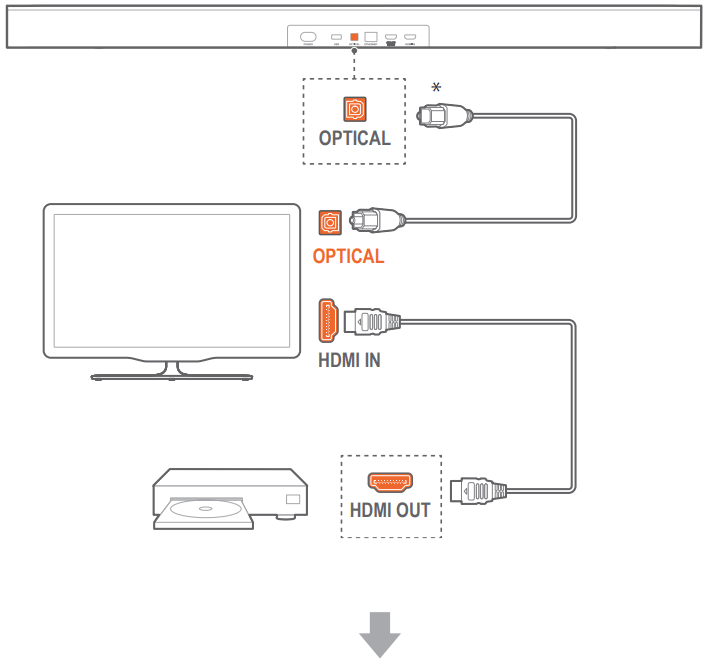
For audio playback through the soundbar, connect the soundbar with your TV through the supplied HDMI cable or an optical cable (sold separately).
An HDMI connection supports digital audio and video with a single connection. HDMI connectivity is the best option for your soundbar
TV (HDMI ARC)
Connect the soundbar with the HDMI IN (ARC) connector on your TV by using the supplied HDMI cable.
On your TV, check that HDMI-CEC and HDMI ARC have been enabled. Refer to the owner’s manual of your TV for more information.
Use an HDMI cable (V2.0 or later) to connect the soundbar with your digital device, such as a set-top box, DVD/Blu-ray player or game console.
On your digital device, check that HDMI-CEC has been enabled. Refer to the owner’s manual of your digital device for more information.
On your digital device, select “Bitstream” or “Raw data” in the audio output settings for the best Dolby Atmos experience.
To play audio from the digital device connected to the soundbar, select HDMI on the remote control.
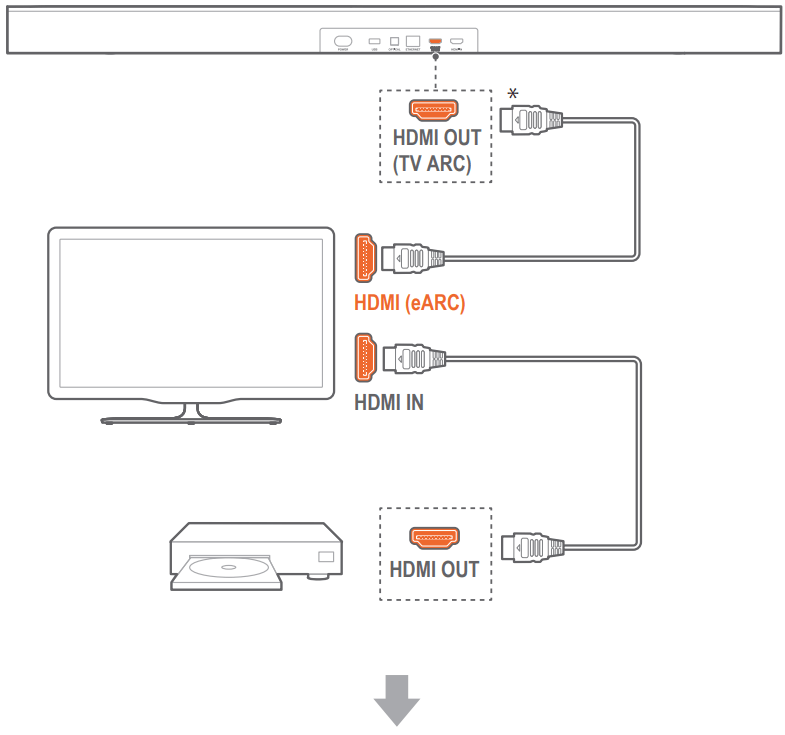
TV (HDMI eARC)
Connect the soundbar with the HDMI IN (eARC) connector on your TV by using the supplied HDMI cable.
On your TV, check that HDMI-CEC and HDMI ARC have been enabled. Refer to the owner’s manual of your TV for more information.
Use an HDMI cable (eARC compatible, V2.0 or later) to connect your TV with your digital device, such as a streaming device, set-top box, DVD/Blu-ray player or game console.
On your digital device, check that HDMI-CEC has been enabled. Refer to the owner’s manual of your digital device for more information.
On your TV and digital device, select “Bitstream” or “Raw data” in the audio output settings for the best Dolby
Atmos experience.
To play audio from the digital device connected to your TV, select TV on the remote control.
OPTICAL
NOTES: With the 4 up-firing speakers and the detachable surround speaker design, the Dolby surround upmixer of the soundbar can expand the legacy channel-based audio of Dolby Digital format, including 5.1 and 7.1 content, and provide an immersive 3D Atmos experience.
Connect the soundbar with your TV by using an optical cable.
Use an HDMI cable (V2.0 or later) to connect your TV with your digital device, such as a streaming device, set-top box, DVD/Blu-ray player or game console.
To play audio through the optical cable, select on the remote control.
NOTES:
The HDMI cable (for digital device connection) and the optical cable are sold separately.
Full compatibility with all HDMI-CEC devices is not guaranteed.
When both HDMI ARC and optical cables are connected to the soundbar for audio input from TV connection, the HDMI ARC connection is prioritized.
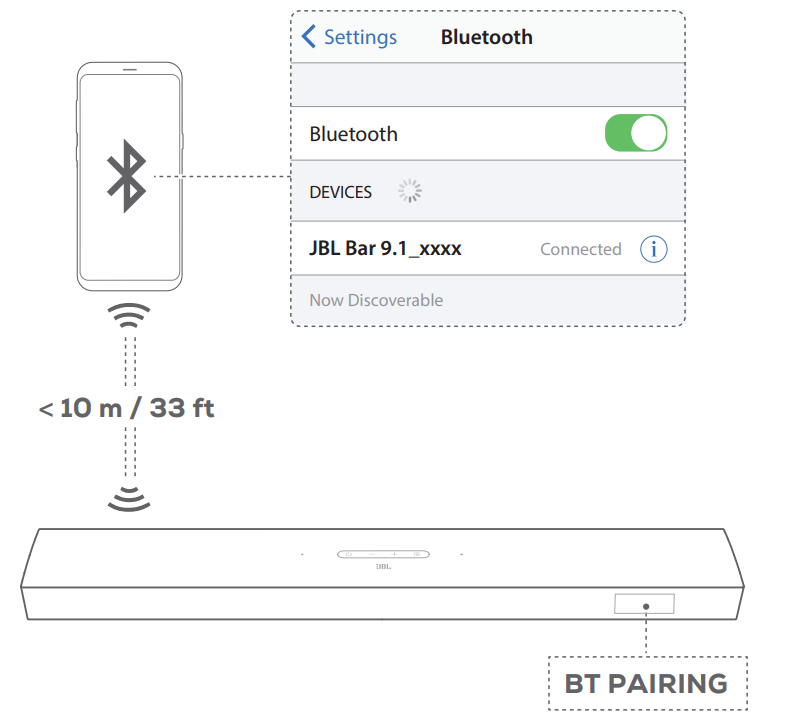
Bluetooth connection
Through Bluetooth, connect the soundbar with your Bluetooth device, such as a smartphone, tablet and laptop.
Connect a Bluetooth device
Press to switch on
To select Bluetooth source, press on the soundbar or on the remote control. → “BT PAIRING”: Ready for BT pairing
On your Bluetooth device, enable Bluetooth and search for “JBL Bar 9.1-xxxx” within three minutes.
→ Successful connection: The device name is displayed if your device is named in English. A confirmation tone is heard.
To reconnect the last paired device
Your Bluetooth device is retained as a paired device when the soundbar goes to standby mode. Next time you switch to the
Bluetooth source, the soundbar reconnects the last paired device automatically.
To connect to another Bluetooth device
In the Bluetooth source, press and hold on the soundbar or on the remote control until “BT PAIRING” is displayed.
The previously paired device is cleared from the soundbar.
The soundbar enters the Bluetooth pairing mode.
Follow the Step 3 under “Connect a Bluetooth device”.
If the device has ever been paired with the soundbar, first unpair “JBL Bar 9.1-xxxx” on the device.
NOTES:
The Bluetooth connection will be lost if the distance between the soundbar and Bluetooth device exceeds 33 ft (10 m).
Electronic devices may cause radio interference. Devices that generate electromagnetic waves must be kept away from the Soundbar, such as microwaves and wireless LAN devices.
Connection with your home network
Through Wi-Fi or an Ethernet cable, connect the soundbar to your home network. With Chromecast built-in and AirPlay supported, the soundbar allows you to stream audio on smartphones or tablets through the soundbar speakers.
On the soundbar, enter the Wi-Fi setup mode:
Press to switch on (See “Power-on/Auto standby/Auto wakeup/Power-saving mode” in the “PLAY” chapter).
→ If the soundbar has not been connected to a network, the screen shows “HELLO” and then, “SETUP WIFI”.
To re-enter the Wi-Fi setup mode, press and hold until “RESET WIFI” is displayed.
On your Android or iOS device, add the soundbar to your home Wi-Fi network.
Through the Google Home app
Connect your Android or iOS device to your home Wi-Fi network. Download the Google Home app. Sign in with your Google account. If you do not have, create a new one.
Follow the app instructions to complete setup.
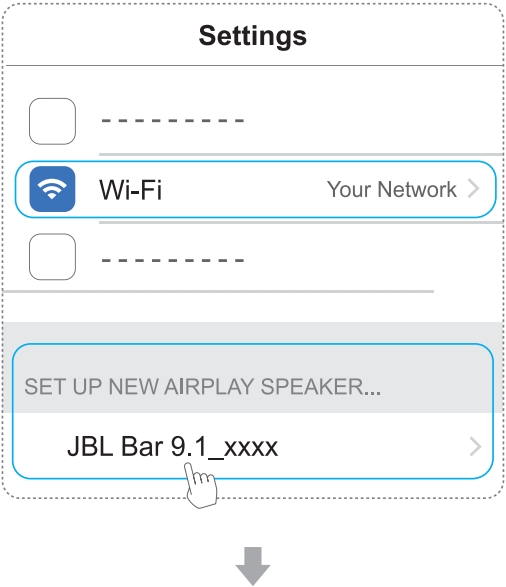
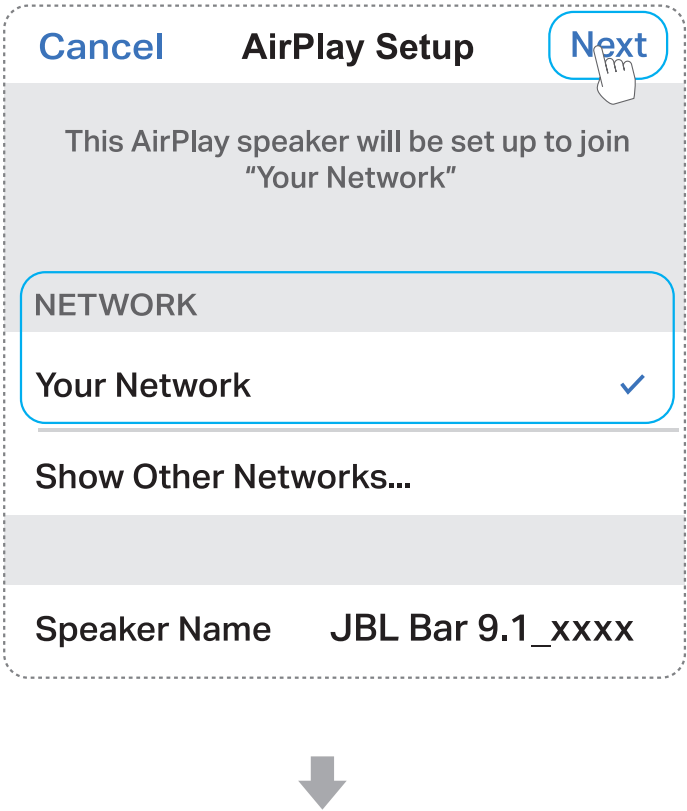
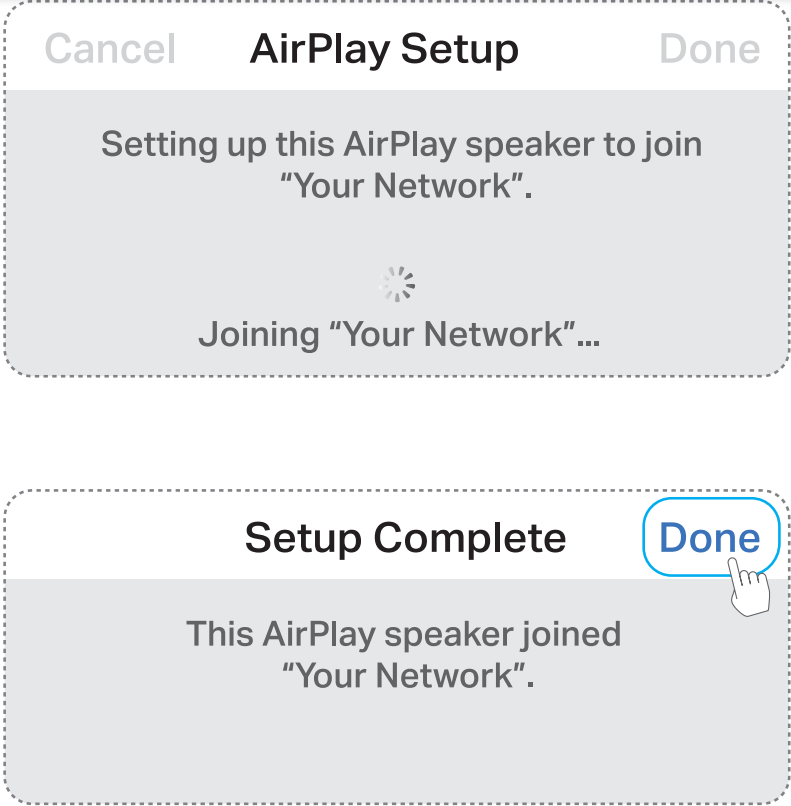
*Through AirPlay setup on an iOS device
Connect your iOS device to your home Wi-Fi network.
On your iOS device, go to Settings > Wi-Fi. Under SET UP NEW AIRPLAY SPEAKER…, select “JBL Bar 9.1-xxxx” and follow onscreen instructions to complete setup.
3. If necessary, use an Ethernet cable to connect the soundbar to your home network.
Make sure that you connect to the same network as you did during the setup.
NOTES:
During the Wi-Fi setup through the Google Home app, you can name the soundbar and organize it by room.
On your iOS device, add the soundbar to the Apple Home app and manage it together with other AirPlay 2-compatible speakers.
On your iOS device, if the soundbar has been added to your home Wi-Fi network through the Google Home app, skip the steps under
Through AirPlay setup on an iOS device” and you can start AirPlay streaming from an AirPlay-compatible app (See “Play through AirPlay” in the “PLAY” chapter).
SETUP
Connect the detachable rear speakers and subwoofer
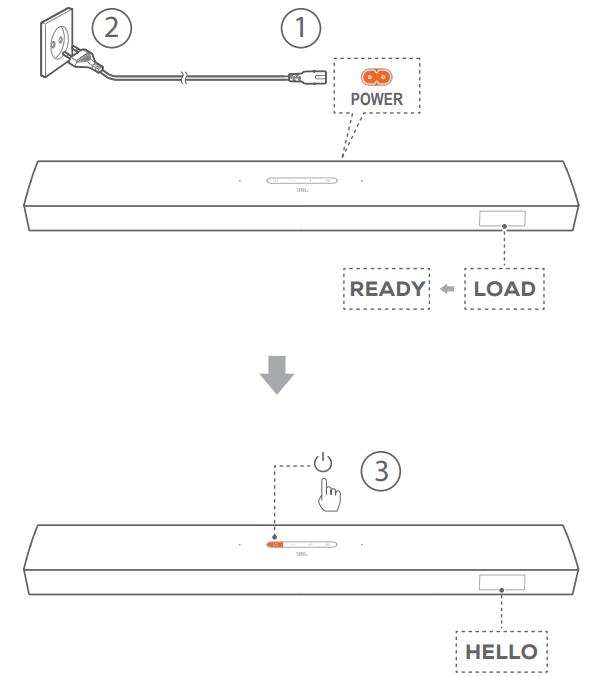
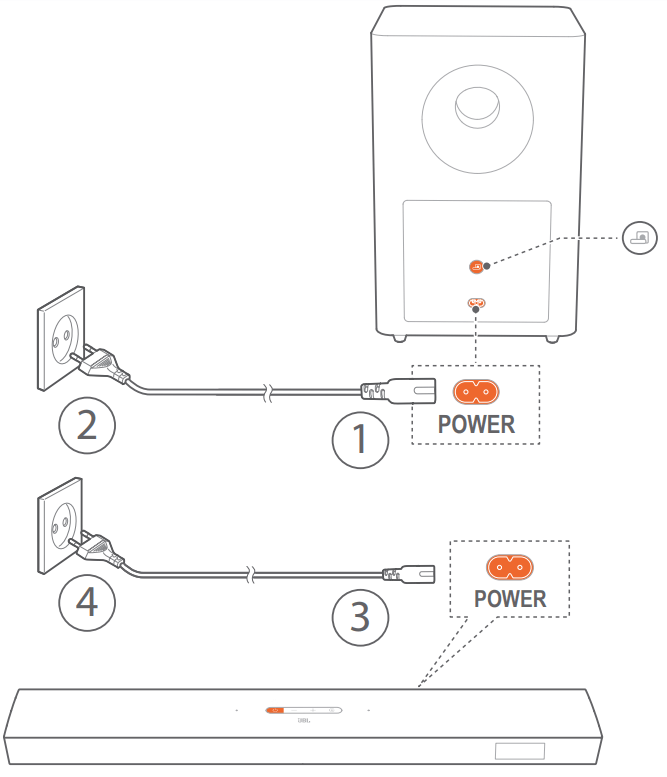
1. Connect the soundbar to power by using the supplied power cord.
→The screen on the soundbar shows “LOAD” and then “READY”.
2. Do the following to start the connection:
Connect the subwoofer to power by using the supplied power cords;
On the soundbar, press to switch on;
Dock the detachable speakers onto the soundbar, or press on the detachable speakers to fast re-connect to the soundbar.
→The soundbar connects the subwoofer automatically. Connected: turns solid white on the subwoofer.
→The soundbar connects the detachable speakers automatically. Connected: The status indicator turns solid white () on the detachable speakers.
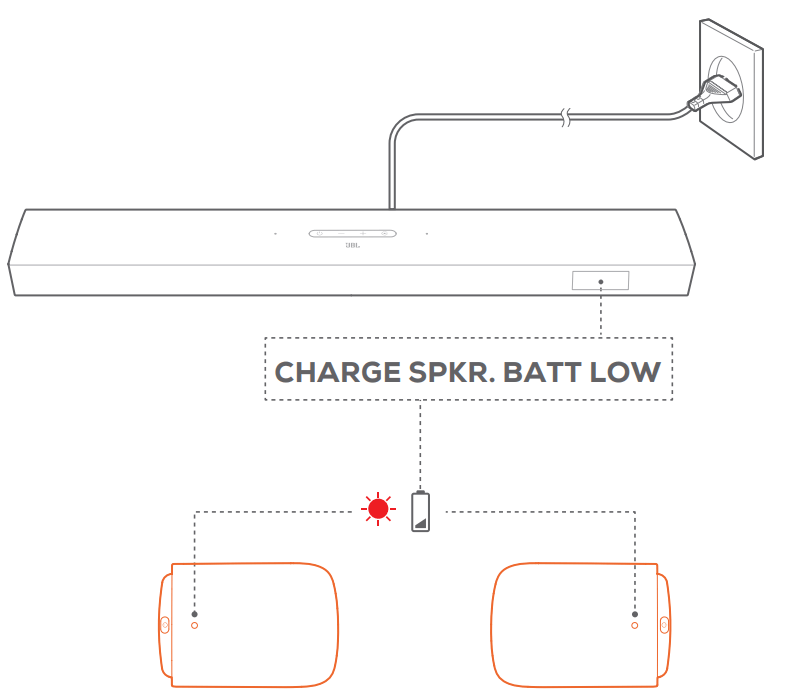
Charge the detachable speakers
Wi-Fi and Bluetooth connection will be off and the soundbar will enter into power saving mode when the detachable surround speakers are out of battery.
The first time you use the two detachable speakers, charge them for more than 3 hours to ensure sufficient battery power.
→When the battery power runs low, the status indicator flashes red on the detachable surround speakers and “CHARGE SPKR.BATT LOW" is displayed on the soundbar.
→When the battery power runs out, “DPCL S[LR” or “DETECTING SPKR” is displayed on the soundbar.
Charge by docking the detachable speakers
With the detachable speakers docked, the soundbar will enter the charging mode after switching to standby mode.
→ STDBY: The detachable speakers are fully charged ( turns off). The soundbar returns to standby mode.
→ The charging mode exits when the soundbar is switched on (after auto wake-up or by your pressing on the soundbar or remote control).
→ It takes about 3 hours for the empty battery to be fully charged.
Charge through a USB cable
Use a USB cable to connect the detachable speakers to power respectively.
For the detachable speakers, the status indicator is used for status indication of both battery power and wireless connection
Sound calibration
For sound calibration, do the following:
Make sure that your room is quiet;
Make sure that the soundbar and the two detachable rear speakers are fully in sight of each other, without obstacles in between.
Make sure that the left and right rear speakers are properly placed, the L speaker on the left and the R speaker on the right.
Wireless surround sound
1) Calibrate the listening zone
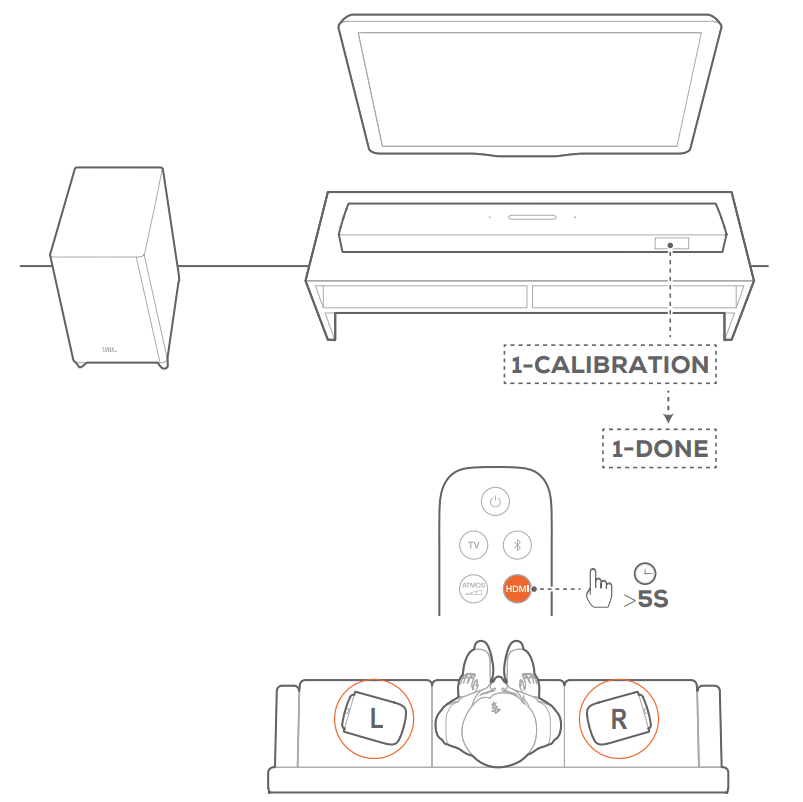
1. Place the detachable rear speakers beside your seating position.
Make sure that the two detachable speakers have been connected to the soundbar 2. On the remote control, press and hold HDMI until “1-CALIBRATION” is displayed on the soundbar. → Countdown starts from 5 to 1. → Calibration tone is heard. Audio calibration starts. → “CALIBRATING”: Calibration ongoing. → “1-DONE”: Calibration of the listening zone is completed successfully.
2) Calibrate the speaker position
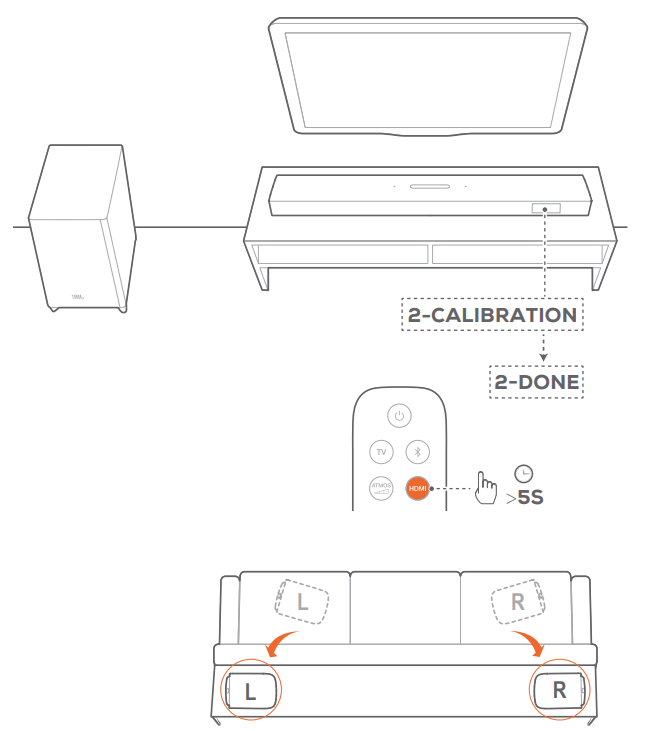
1. Place the detachable rear speakers in your desired location.
2. On the remote control, press and hold HDMI until “2-CALIBRATION” is displayed on the soundbar.
→ Countdown starts from 5 to 1. → Calibration tone is heard. Audio calibration starts. → “CALIBRATING”: Calibration ongoing. → “2-DONE”: Calibration of the speaker position is completed successfully.
3. To select suitable surround sound, press repeatedly to switch between high, low or middle (default). NOTES:
During calibration, all buttons on the remote control are disabled except for and HDMI.
“SETUP FAILED” is displayed if calibration failed.
Dolby Atmos® / DTS:X®
With Dolby Atmos or DTS:X, overhead audio distribution is provided for powerful 3D sound immersion.
1. To play the surround sound of DOLBY ATMOS or DTS:X, connect and play your Blu-ray player or streaming device as described under “Connection with your TV and digital devices” in the “CONNECT” chapter.
2. To select suitable strength for Dolby Atmos or DTS:X, press on remote control to switch between middle (default), high, low or off.
→ The subwoofer is reconnected to the soundbar automatically. Connected: turns solid white.
→ On the detachable speakers, press to reconnect to the soundbar.
Auto standby
If the soundbar is inactive for more than 10 minutes, it will switch to standby mode automatically. “STCBY” is displayed.
→ The subwoofer also goes to standby, and turns solid amber.
→ 10 minutes later, the detachable speakers switches to standby, and the status indicator turns off for wireless connection status.
→ Next time you switch on the soundbar, it returns to the last selected source.
Auto wakeup
In standby mode, the soundbar will wake up automatically when
the soundbar is connected to your TV through the HDMI ARC connection and your TV is switched on;
the soundbar is connected to your TV through an optical cable and audio signals are detected from the optical cable;
the soundbar is connected to your TV through the HDMI ARC connection and through the HDMI connection, is also connected to your digital device such as a set-top box, DVD/Blu-ray player or game console, and your digital device is switched on;
the soundbar is connected to your home network and audio is streamed to the soundbar through Chromecast or AirPlay.
Power-saving mode
In power-saving mode, Wi-Fi and Bluetooth are disabled on the soundbar. You cannot wake up the soundbar by playing music through Chromecast or AirPlay.
The soundbar will switch to standby, and then enter powersaving mode if the detachable speakers
run out of power; or
lose wireless connection.
On the detachable speakers, the status indicator flashes red; on the soundbar, “DOCK SPKR” or “DETECTING SPKR” is displayed. Charge the detachable speakers by docking them onto the soundbar or though USB cables (See “Charge the detachable speakers” in the “SETUP” chapter). If necessary, press on the detachable speakers to re-connect to the soundbar.
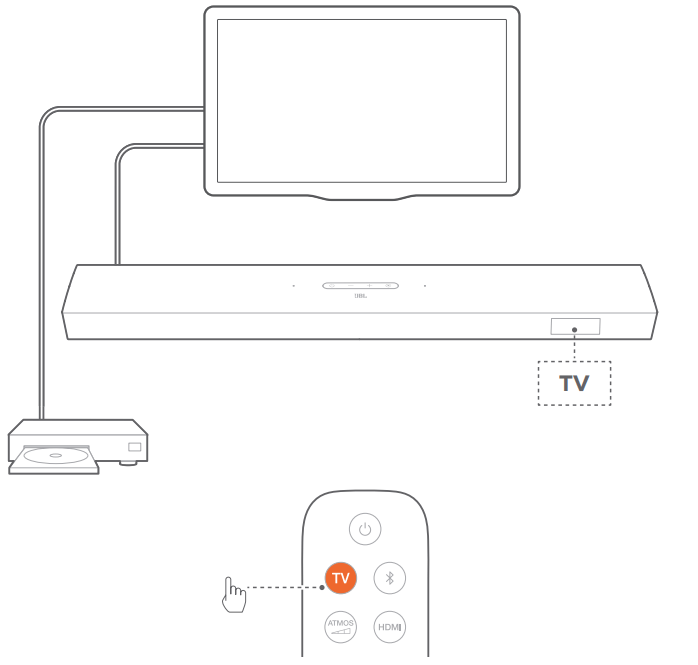
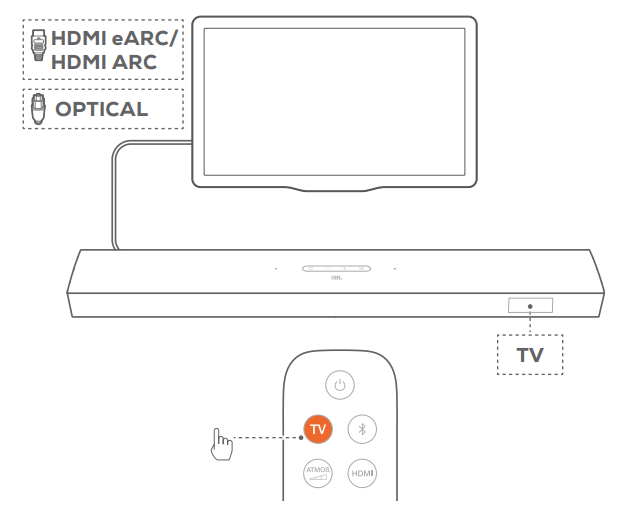
Play from the TV source
With the soundbar connected, you can enjoy TV audio from the soundbar speakers.
Make sure that your TV is set to support external speakers and the built-in TV speakers are muted. Refer to the owner’s manual of your TV for more information.
Make sure that the soundbar has been properly connected to your TV.
To select the TV source, press on the soundbar or TV on the remote control. → “TV ”: The TV source is selected.
In the factory settings, the TV source is selected by default.
NOTES: If the soundbar is connected to your TV through both an HDMI cable and an optical cable, the HDMI cable source is selected for the TV connection.
TV remote control setup
To use your TV remote control for both your TV and the soundbar, check that your TV supports HDMI-CEC. If your TV does not support HDMI-CEC, follow the steps under “TV remote control learning”.
HDMI-CEC
If your TV supports HDMI-CEC, enable the functions as instructed in your TV user manual. You can control the volume +/-, mute/ unmute, and power on/standby functions on your soundbar through the TV remote control.
TV remote control learning
On the soundbar, press and hold and + until “LEARNING” is displayed. → You enter the TV remote control learning mode.
Within 15 seconds, do the following on the soundbar and your TV remote control:
On the soundbar: press one of the following buttons +, -, and - together (for the mute/unmute function), and .
On your TV remote control: press the desired button. is displayed on the soundbar.
→ “WAIT” is displayed on the soundbar
→ “DONE”: The function of the soundbar button is learnt by your TV remote control button.
Repeat Step 2 to complete the button learning.
To exit the TV remote control learning mode, press and hold and + on the soundbar until “EXIT LEARNING” is displayed.
→ The soundbar returns to the last selected source.
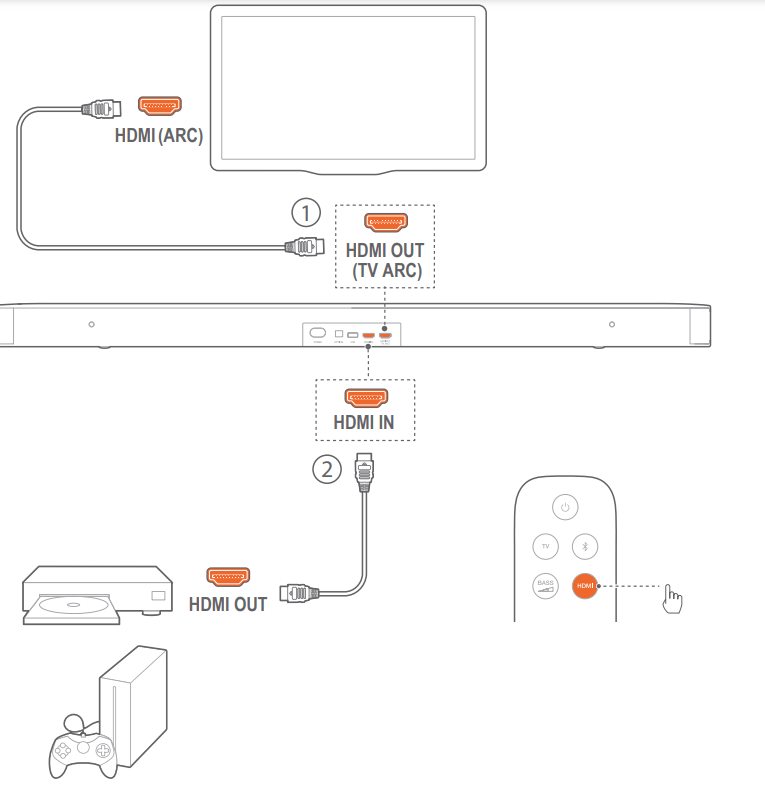
Play from the HDMI IN source
With the soundbar connected as shown, your digital device can play video on your TV and audio from the soundbar speakers.
Make sure that the soundbar has been properly connected to your TV and digital device
Switch on your digital device.
→ Your TV and the soundbar wake up from standby mode and switch to the input source automatically.
To select the source on the soundbar, press on the soundbar or on the remote control.
Switch your TV to standby mode.
→ The soundbar and source device are switched to standby mode.
NOTES: Full compatibility with all HDMI-CEC devices is not guaranteed.
Play from the Bluetooth source
Through Bluetooth, stream audio play on your Bluetooth device to the soundbar. Check that the soundbar has been properly connected toyour Bluetooth device
To select the Bluetooth source, press on the soundbar or on the remote control.
Start audio play on your Bluetooth device.
Adjust the volume on the soundbar or your Bluetooth device.
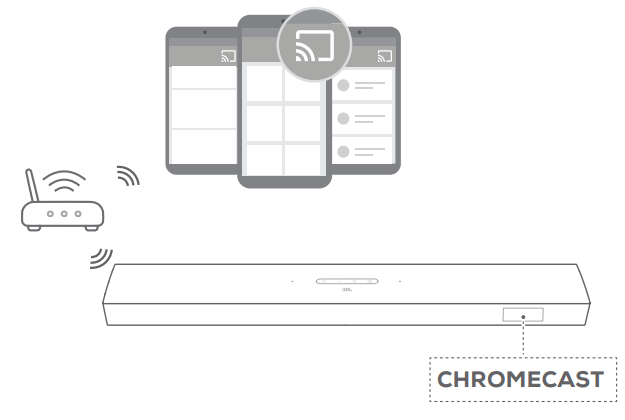
Play through Chromecast
Through Chromecast, stream audio on your Android or iOS device to the soundbar. On the soundbar,
Check that the soundbar has been properly connected to your home network (See “Connection with your home network” in the “CONNECT” chapter).
Check that the soundbar has been switched on or to standby mode.
On your Android or iOS device,
Check that your Android or iOS device has been connected to the same network as the soundbar.
On a Chromecast-enabled app, play music, tap the cast icon and select the connected soundbar.
To exit from the music playback, switch to other sources.
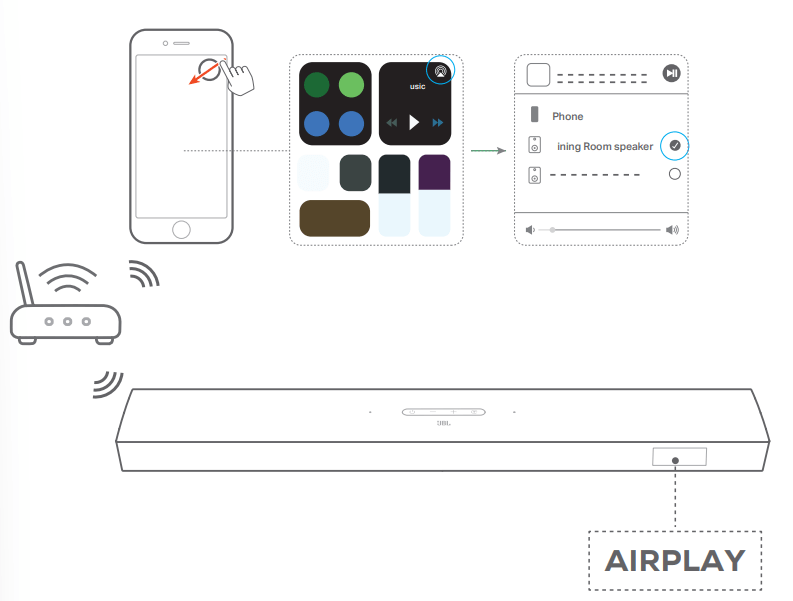
Play through AirPlay
On the soundbar, Check that the soundbar has been properly connected to your home network (See “Connection with your home network” in the “CONNECT” chapter).
On your iOS device,
Check that your iOS device has been connected to the same network as the soundbar.
To enter the Control Center on an iOS device, swipe down from the upper right corner (iOS 12 or later) or swipe up from the bottom edge (iOS 11 or earlier). Tap to select the connected soundbar and then, start audio streaming from an app.
To exit from the music playback, switch to other sources.
NOTES:
The soundbar can support audio streaming and cannot support video streaming.
During Chromecast or AirPlay, music playback pauses on the current connected device when you start music playback on a second connected device.
When the soundbar switches between your home Wi-Fi and wired network during AirPlay 2, music playback pauses and will resume in a few minutes, depending on the bandwidth condition of broadband.
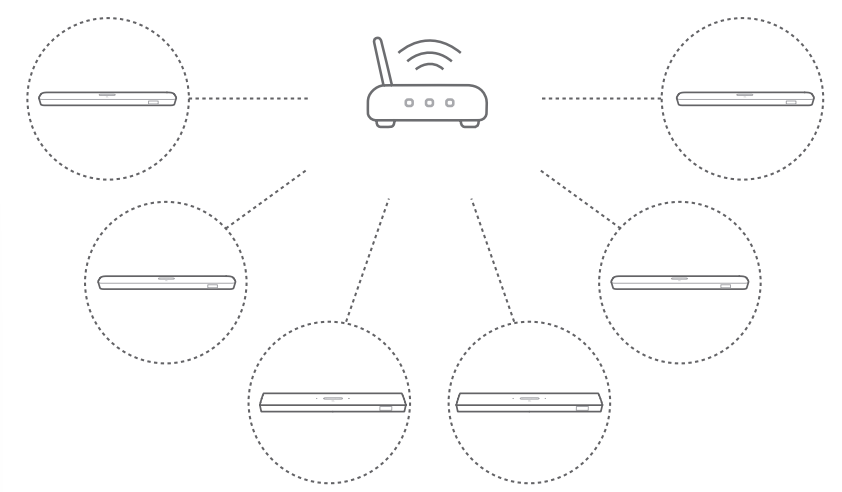
Multi-room playback
With the multi-room playback, you can stream music on your Android or iOS device to multiple Chromecast / AirPlay speakers.
Chromecast
Through the Google Home app, connect multiple Chromecast speakers to the same network, assign them to multiple rooms, and create groups as needed.
Run a Chromecast-enabled app on your smartphone or tablet.
Play music. Press and select the grouped speakers.
NOTES: − Refer to the Google Home app for more details. − Depending on the bandwidth of your local network, you can stream music to up to 6 Chromecast speakers.
AirPlay
1. On an iOS device, enter the Control Center. 2. Tap to select multiple connected speakers as needed. 3. Start music streaming from an app.
SOUND SETTINGS
Bass adjustment
Check that the soundbar and subwoofer are properly connected.
On the remote control, press repeatedly to switch between bass levels.
→ “LVL1” to “LVL5” is displayed (default: “LVL3”).
Audio sync
With the audio sync function, you can synchronize audio and video to make sure that no delay is heard from your video content.
On the remote control, press and hold TV for more than three seconds and then, press +.
Within five seconds, press + or - on the remote control to adjust the audio delay and match with video.
The audio sync timing is displayed.
NOTES: If no action is taken within five seconds, you will exit the audio sync mode.
Smart mode
With the smart mode enabled by default, you can enjoy TV programs with rich sound effects. For TV programs such as news and weather forecasts, you can reduce sound effects by disabling the smart mode and switching to the standard mode.
Smart mode: EQ settings and JBL Surround Sound are applied for rich sound effects.
Standard mode: The preset EQ settings are applied for standard sound effects.
To disable the smart mode, do the following:
On the remote control, press and hold for more than three seconds. Press +.
→ "STANDARD MODE: The standard mode is enabled.
→ Next time you switch on the soundbar, the smart mode is enabled again automatically.
RESTORE FACTORY SETTINGS
By restoring the default settings defined at factories. you remove all your personalized settings from the soundbar.
On the soundbar, press and hold and for more than 10 seconds.
→ “RESET” is displayed.
→ The soundbar shows “LOAD” and “READY” and then, goes to standby mode.
SOFTWARE UPDATE
Updating online
• On the soundbar, mount the two detachable speakers when “UPDATE FOUND” is displayed.
→ “UPDATING”: Software updating underway
→ “DONE”: Software updating completed
NOTES: − For automatic online upgrading when update software is available, make sure that the two detachable speakers have been docked onto the soundbar.
Updating through a USB storage device
Check that you have saved the software update file to the root directory of a USB storage device.
Check that you have docked the detachable speakers onto the soundbar. Connect the USB device.
3. To enter the software update mode, press and hold and - on the soundbar for more than 10 seconds.
→ “UPDATE MODE” is displayed. → “WAIT”: Software updating underway → “DONE”: Software updating completed → The soundbar returns to the last selected source.
NOTES:
Keep the soundbar powered on and the USB storage device mounted before software updating is complete.
“UPDATE FOUND DOCK SPKR” is displayed if the two detachable speakers are not properly mounted onto the soundbar.
“PLUG IN USB” is displayed if no USB storage device is detected, and 5 minutes later, the soundbar exits the software update mode.
"Error”is displayed if software updating has failed twice.
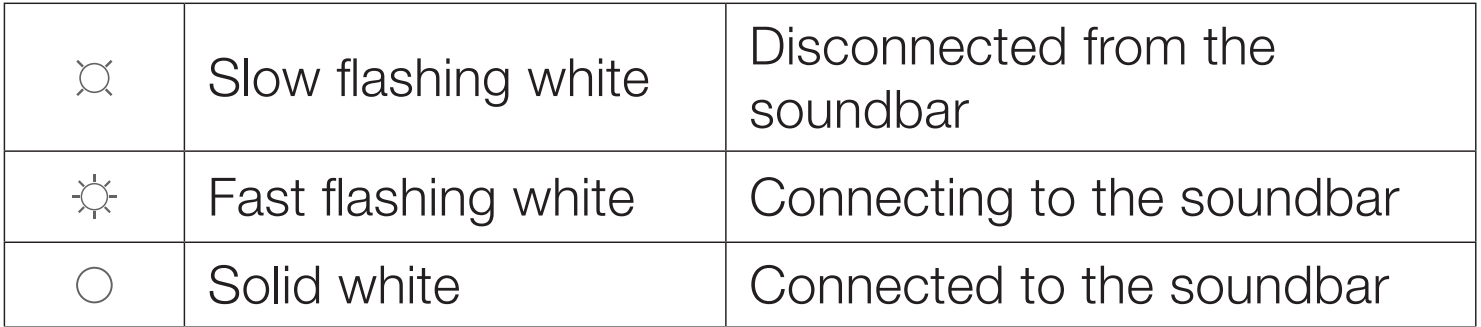
RE-CONNECT THE SUBWOOFER
The soundbar and subwoofer are paired at factories. After power-on, they are paired and connected automatically. In some special cases, you may need to pair them again.
To re-enter the subwoofer pairing mode
On the rear panel of subwoofer, press and hold until it turns fast flashing white.
To enter the subwoofer pairing mode on the soundbar, press and hold on the remote control for more than five seconds.
Press - on the remote control.
→ “PAIRING”: The subwoofer is ready for pairing.
→ “CONNECTED”: The subwoofer is connected.
NOTES: The subwoofer will exit the pairing mode in three minutes if pairing and connection are not completed. turns from fast flashing white to slow flashing white.
TROUBLESHOOTING
Never try to repair the product yourself. If you have problems using this product, check the following points before you request services.
System
The unit will not turn on.
Check if the power cord is plugged into power and the soundbar.
The soundbar has no response to button pressing.
Restore the soundbar to factory settings
Sound
No sound from soundbar
Make sure that the soundbar is not muted.
Select the correct audio input source on the remote control.
Connect the soundbar to your TV or other devices properly
Restore the soundbar to its factory settings by pressing and holding on the soundbar for more than 10 seconds.
Distorted sound or echo
If you play audio from your TV through the soundbar, make sure that your TV is muted or the built-in TV speaker is disabled.
Audio and video are not synchronized.
Enable the audio sync function to synchronize audio and video (See “Audio sync” in the “SOUND SETTINGS” chapter).
Bluetooth
A device cannot be connected with the soundbar.
Check if you have enabled Bluetooth on the device.
If the soundbar has been paired with another Bluetooth device, reset Bluetooth
If your Bluetooth device has ever been paired with the soundbar, reset Bluetooth on the soundbar, unpair the soundbar on the Bluetooth device, and then, pair the
Bluetooth device with the soundbar again
Poor audio quality from a connected Bluetooth device
The Bluetooth reception is poor. Move the source device closer to the soundbar, or remove any obstacle between the source device and the soundbar.
The connected Bluetooth device connects and disconnects constantly.
The Bluetooth reception is poor. Move the source device closer to the soundbar, or remove any obstacle between the source device and the soundbar.
Wi-Fi
Failed to connect to Wi-Fi
Make sure that Wi-Fi is turned on.
Make sure that you have selected the right network and entered the correct password.
Make sure that your router or modem is turned on and within the range.
Make sure that your soundbar is connected to the same wireless LAN as your smartphone or tablet.
On the soundbar that you have connected to Wi-Fi through the AirPlay speaker setup on an iOS device, make sure that you connect the soundbar to the same Wi-Fi network when you set up Chromecast through the Google Home app.
The Google Home app cannot find the device.
Make sure that your soundbar is powered on.
Make sure that your network is working properly.
Make sure that your router or modem is powered on and within the range.
Music streaming
Failed to stream music from Chromecast or AirPlay
Wi-Fi and Bluetooth connection will be off and the soundbar will enter into power saving mode when the detachable surround speakers are out of battery. Charge the two detachable speakers in time to ensure sufficient battery power.
Remote control
The remote control does not work.
Check if the batteries are drained. If so, replace them with new ones.
Reduce the distance and angle between the remote control and the main unit.
hanks for the question, Caroline! The JBL Bar 9.1 does not have Spotify Connect integration built-in but it does support both Chromecast and Airplay2 for wifi media streaming.
If you would like any other information on the JBL Bar 9.1, please feel free to reach out to one of our Product Specialists over on support.jbl.com. They can be reached via email or live chat, depending upon your availability. I hope this helped answer your question!
#2 According to the instructions, we were suppose to get brackets to mount the wireless speakers. Anyone found good third party brackets that will work?
I wouldn’t get brackets for the wireless speakers. You have to plug them into the main unit to charge them. Also, the surround speakers have forward facing and up facing speakers. I would set them on a end table. Or some easy to remove stand. Just sit them in top of some type of stand.
#3 What direction do the rear speakers face?, Do the magnetic pins face toward the TV or toward the back wall?
It would depend on where you're placing the detachable wireless speakers. Simply put, you just need to have the wireless speakers' "front" face towards listening spot.
 (Power) Switch on or to standby
 (Source)


 Switch on or to standby
 Bluetooth
 Mute: Mute/unmute
 Select the bass level for subwoofer: 1/2/3 (default)/4/5
 Select the surround sound level for rear speakers: middle default), high or low
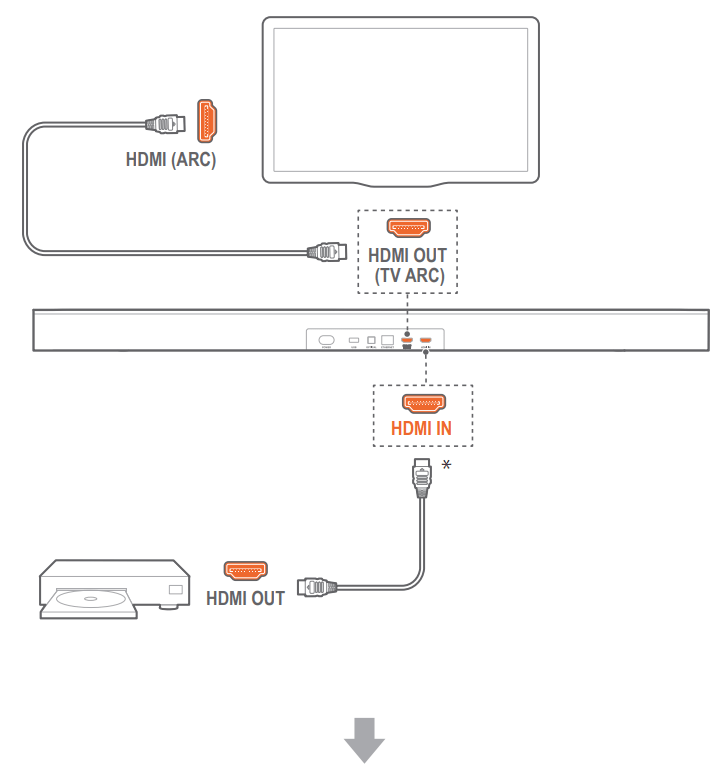
 to switch on
 on the soundbar or on the remote control. → “BT PAIRING”: Ready for BT pairing
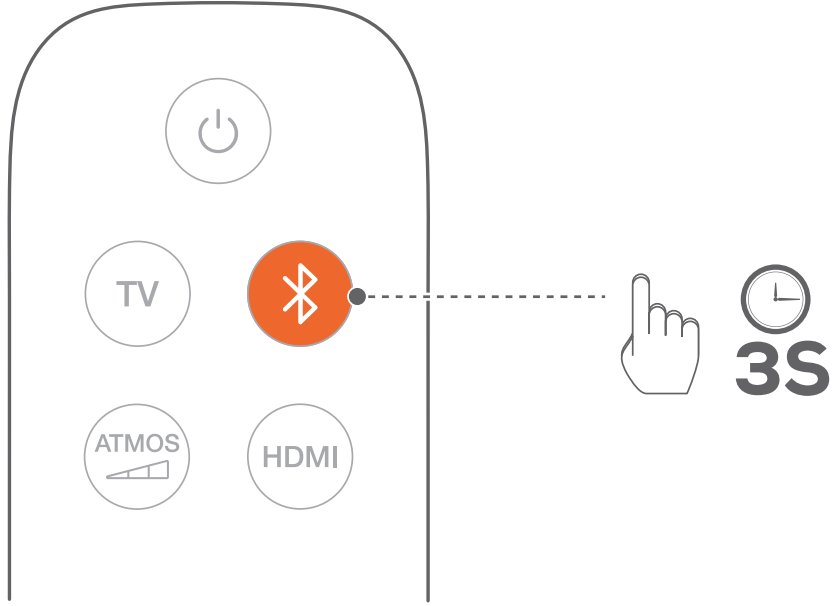
 on the remote control until “BT PAIRING” is displayed.
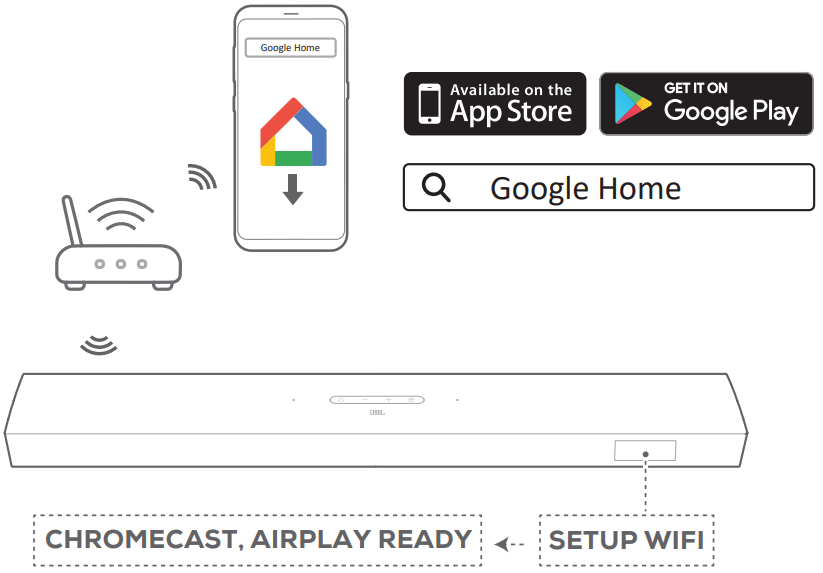
 turns solid white on the subwoofer.
 ) on the detachable speakers.
 turns off). The soundbar returns to standby mode.
 repeatedly to switch between high, low or middle (default).
 on remote control to switch between middle (default), high, low or off.
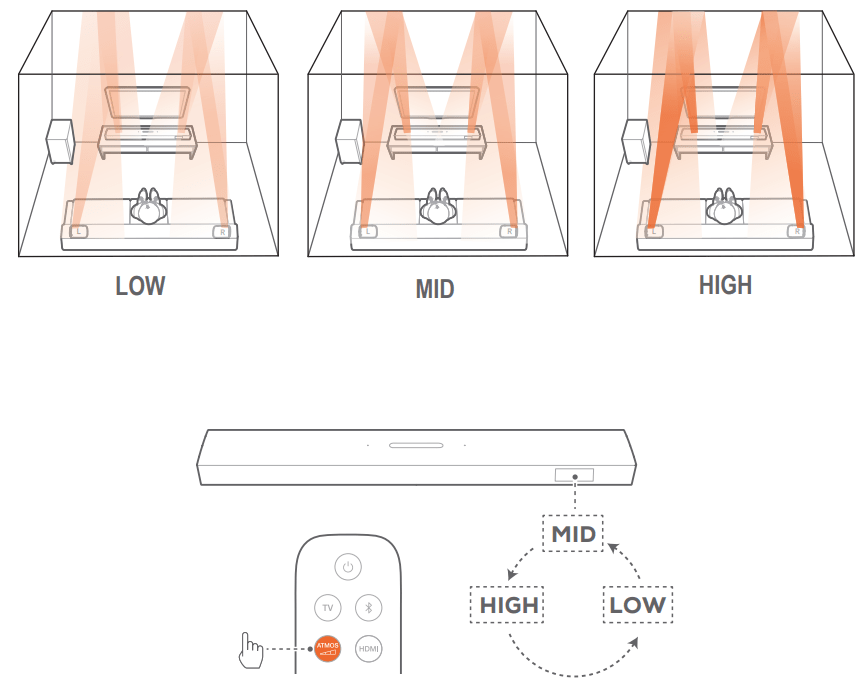
 on the soundbar or TV on the remote control. → “TV ”: The TV source is selected.
 .
.
 and select the grouped speakers.
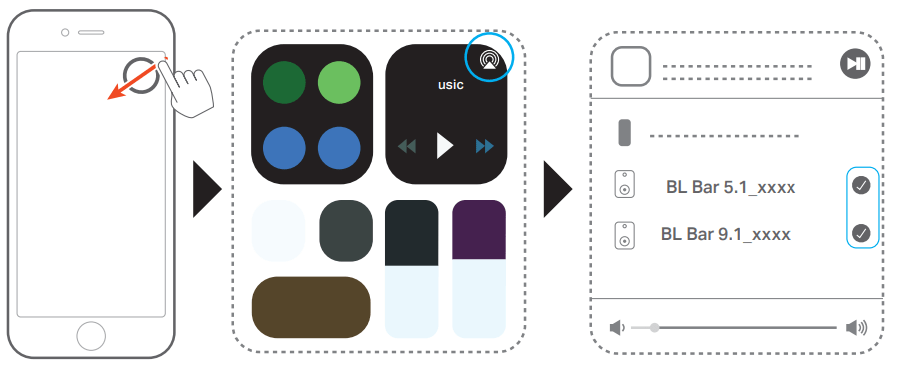
 to select multiple connected speakers as needed.
 repeatedly to switch between bass levels.
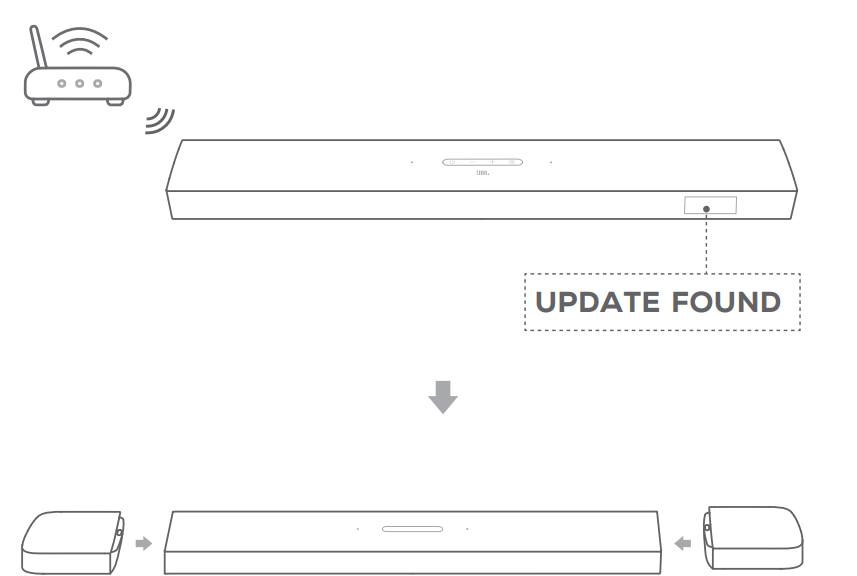
 until it turns fast flashing white.
 on the remote control for more than five seconds.
 turns from fast flashing white to slow flashing white.
 on the soundbar for more than 10 seconds.