Loading ...
Loading ...
Loading ...
9
EN
CHAPTER 5
SETTING UP
INSTALLATION
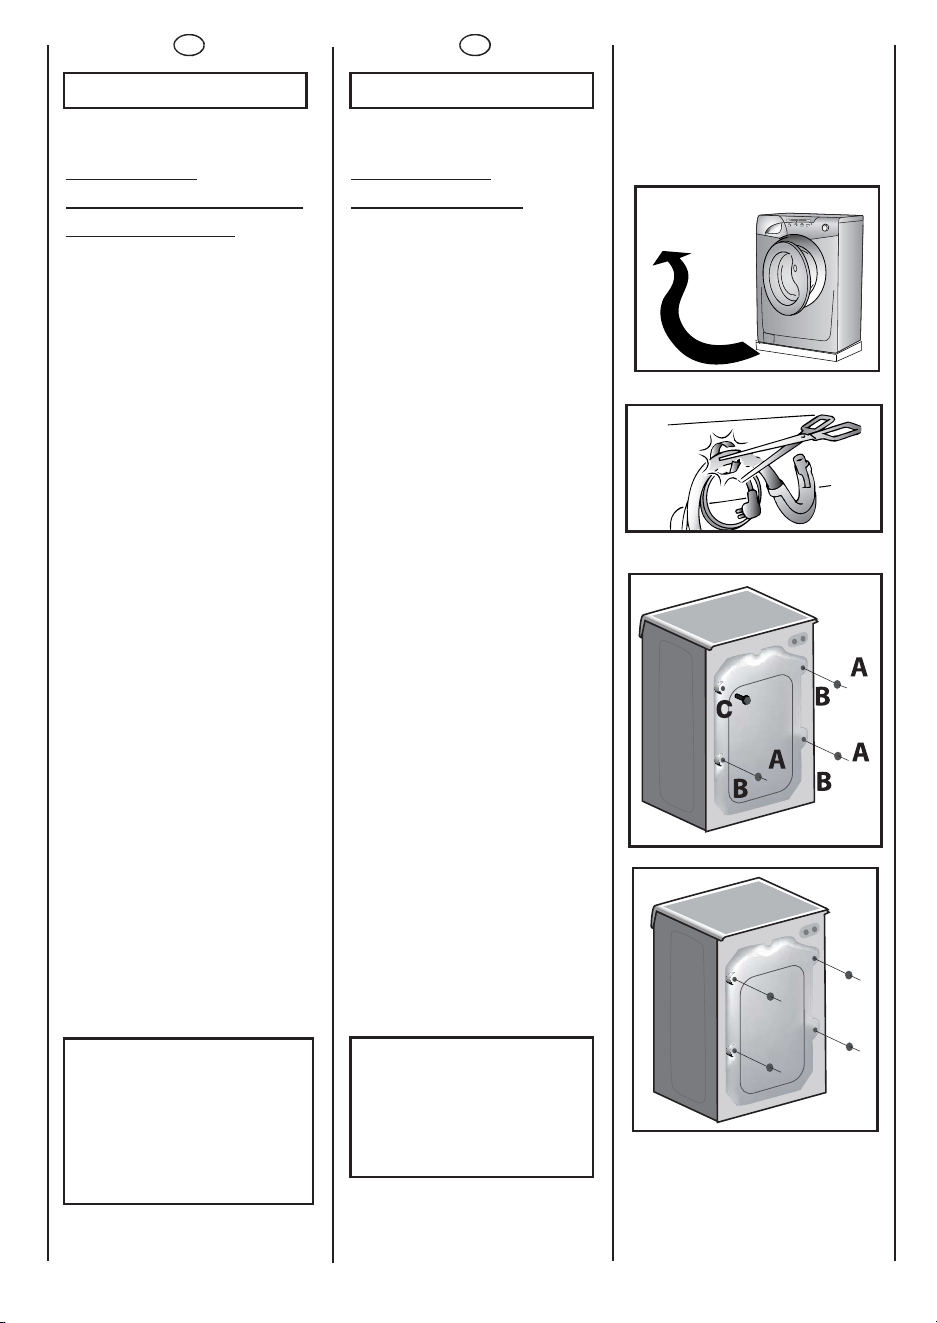
Move the machine near its
permanent position without
the packaging base.
Carefully cut the securing
strap that holds the main
cord and the drain hose.
Remove the 3 fixing screws
marked (A) and remove the
3 spacers marked (B)
Remove the screw (C).
A spacer will fall inside the
machine.
By tilting the machine,
remove the above
mentioned spacer.
Cover the 4 holes using the
caps provided in the
instruction booklet pack.
WARNING:
DO NOT LEAVE THE
PACKAGING IN THE
REACH OF CHILDREN
AS IT IS A POTENTIAL
SOURCE OF DANGER.
8
EN
CHAPTER 4
MAXIMUM WASH
LOAD DRY
NORMAL WATER LEVEL
POWER INPUT
ENERGY CONSUMPTION
(PROG. 90°C)
POWER CURRENT FUSE
AMP
SPIN
r.p.m.
WATER PRESSURE
SUPPLY VOLTAGE
TECHNICAL DATA
kg 6
6÷15
2150
1,8
10
min. 0,05
max. 0,8
220 - 240
l
W
kWh
A
VER TARJETA DE DATOS
SEE RATING PLATE
MPa
V
9
Lavado
Washing
Secado
Drying
60 cm
60 cm
85
cm
DATOS TÉCNICOS
ES
CAPÍTULO 4
CAPACIDAD DE ROPA
SECA
NIVEL NORMAL DE AGUA
POTENCIA
ABSORBIDA
CONSUMO DE ENERGÍA
(PROG.90°C)
AMPERIOS DEL FUSIBLE DE
LA RED
REVOLUCIONES DE
CENTRIFUGADO (Rev./min.)
PRESIÓ N EN EL CIRCUITO
HIDRÁ ULICO
TENSION
ES
CAPÍTULO 5
PUESTA EN
FUNCIONAMIENTO
INSTALACIÓ N
Ponga la má quina cerca
del lugar de uso sin la base
del embalaje.
Cortar las cintas que rodean
el tubo, prestando atenció n
de no dañ ar el mismo ni el
cable electrico.
Destornille los 3 tornillos (A)
del lado posterior y extraer
los 3 distanciales (B)
Desenrroscar el tornillo (C).
De esta manera caerá en el
interior de la má quina un
distancial.
Inclinar hacia delante la
má quina y extraer el
distancial arriba descrito.
Tapar los 4 orificios utilizando
los tapones contenidos en
la bolsa de instrucciones.
ATENCIÓ N:
NO DEJE AL ALCANCE
DE LOS NIÑ OS LOS
ELEMENTOS DE
EMBALAJE YA QUE
PUEDEN SER
PELIGROSOS.
Loading ...
Loading ...
Loading ...