Loading ...
Loading ...
Loading ...
11
EN
Use the 4 feet to level the
machine with the floor:
a) Turn the nut clockwise to
release the screw adjuster of
the foot.
b) Rotate foot to raise or
lower it until it stands firmly on
the ground.
c) Lock the foot in position
by turning the nut anti-
clockwise until it comes up
against the bottom of the
machine.
Ensure that the knob is on the
“OFF” position and the load
door is closed
Insert the plug.
ATTENTION:
should it be necessary to
replace the supply cord,
connect the wire in
accordance with the
following colours/codes:
BLUE - NEUTRAL (N)
BROWN - LIVE (L)
YELLOW-GREEN - EARTH ( )
After installation, the
appliance must be
positioned so that the plug is
accessible.
A
B
C
10
min 50 cm
max 85 cm
+2,6 mt max
max 100 cm
min 4 cm
EN
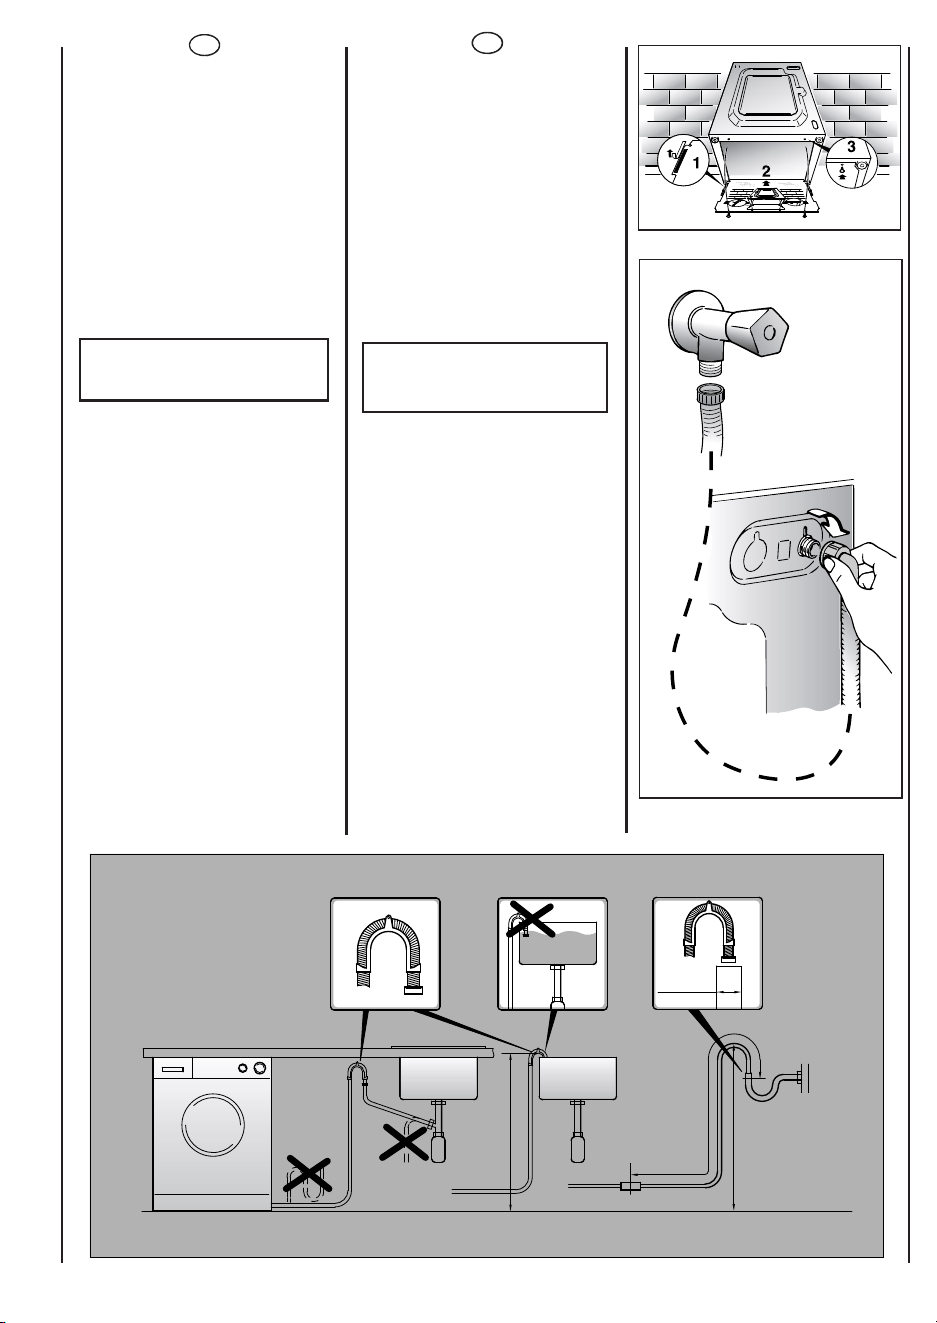
Fix the sheet of corrugated
material on the bottom as
shown in picture.
Connect the fill hose
to the tap.
The appliance must be
connected to the water
mains using new hose-sets.
The old hose-sets should not
be reused.
IMPORTANT:
DO NOT TURN THE TAP
ON AT THIS TIME.
Position the washing
machine next to the wall.
Hook the outlet tube to the
edge of the bath tub,
paying attention that there
are no bends or
contractions along the tube.
It is better to connect the
discharge hose to a fixed
outlet of a diameter greater
than that of the outlet tube
and at a height of min. 50
cm. If is necessary to use the
plastic sleeve supplied.
The appliance must not be
installed behind a lockable
door, a sliding door or a door
with a hinge on the opposite
side to that of the washer
dryer.
Aplique la lamina de
polionda como se muestra
en la figura.
Conecte el tubo del agua al
grifo.
El aparato debe ser
conectado a la red
hidraulica só lo con los
nuevos tubos de carga
disponibles en dotació n.
Los viejos tubos de carga no
tienen que ser reutilizados.
ATENCIÓ N:
NO ABRA EL GRIFO.
Acerque la lavadora a la
pared procurando que no se
formen curvas o
estrangulamientos, fije el
tubo desagü e al borde de la
pila.
o mejor aú n, a un desagü e
fijo, con un diá metro mayor
que el del tubo de la
lavadora, a una altura
mínima de 50 cm.
En caso necesario, utilice la
curva rígida adjunta.
El aparato no debe ser
instalado detrá s de de una
puerta que pueda ser
cerrada con llave, una
puerta corredera o una
puerta con bisagra en el
lado opuesto al de la
lavasecadora.
ES
ES
Nivele la má quina con los 4
pies.
a) Girar la tuerca en el sentido
de las agujas del reloj para
desbloquear el tornillo del pie.
b) Girar el pie y hacerlo bajar
o subir hasta conseguir su
perfecta adherencia al suelo.
c) Bloquear el pie girando la
tuerca en el sentido contrario
a las agujas del reloj hasta
que se adhiera al fondo de la
lavadora.
Verificar que el mando de los
porgramas esté en posició n
OFF y que la escotilla esté
cerrada.
Enchú fela.
ATENCIÓ N:
En el caso que sea necesario
sustituir el cable de
alimentació n, asegurese de
respetar el siguiente có digo
de colores durante la
conexió n de cada cable:
AZUL - NEUTRO (N)
MARRÓ N - FASE (L)
AMARILLO-VERDE - TIERRA ( )
El aparato tiene que ser
colocado de forma que el
enchufe sea accesible una
vez instalado.
Loading ...
Loading ...
Loading ...