
WEEE Number: 80133970
INSTALLATION INSTRUCTION
FAN COIL THERMOSTATS SMART CONTROL
INTRODUCTION
Multi-Language Manual - QR CODE
Please scan the QR code to access the manual
in multiple languages.
Thank you for selecting and buying V-TAC product. V-TAC will serve you
the best. Please read these instructions carefully before starting the
installation and keep this manual handy for future reference. If you have
any another query, please contact our dealer or local vendor from whom
you have purchased the product. They are trained and ready to serve you
at the best.
PACKAGE
TECHNICAL DATA
FUNCTION
Thermostat (1PC)
User Manual (1PC)
Screws (1PC)
Wall Plate (1PC)
1. 0.5°C Accuracy keeps temperature within the level you set
2. Data stored will be saved even when the device is turned off.
3. 5 weekdays + 2 weekends in programmable schedule and can set into
6 periods max per day.
4. Create thermostat group to centrally control.
5. Voice Control: Integrated with Amazon Alexa and Google Assitant
6. Supports device sharing.
7. All setting languages synchronize to your time zone, address and
langauge.
8. No limit to add room.
9. Supports smart scene.
10. Unit size: 86mm hidden box and European 60mm round box is
suitable
Power Supply: 95~240 VAC, 50/60Hz
Fan Relay Amps Resistance: 5A; Inductive: 3A
Valve Relay Amps Resistance: 3A; Inductive: 1A
Sensor: NTC 3950, 10K
Accuracy: +0.5°C
Set Temp. Range: 5-35°C
Display Temp. Range: 5~99°C
Ambient Temp.: 0~45°C
Ambient Humidity: 5~95%
RH (Non Condensing)
Storage Temp.: -5~ 45°C
Power Consumption: <1.5W
Timing Error: <1%
Shell Material: PC + ABS(Fireproof)
Wire Terminals: Wire 2 x 1.5mm2
or 1 x 2.5mm2
Protection Class: IP20
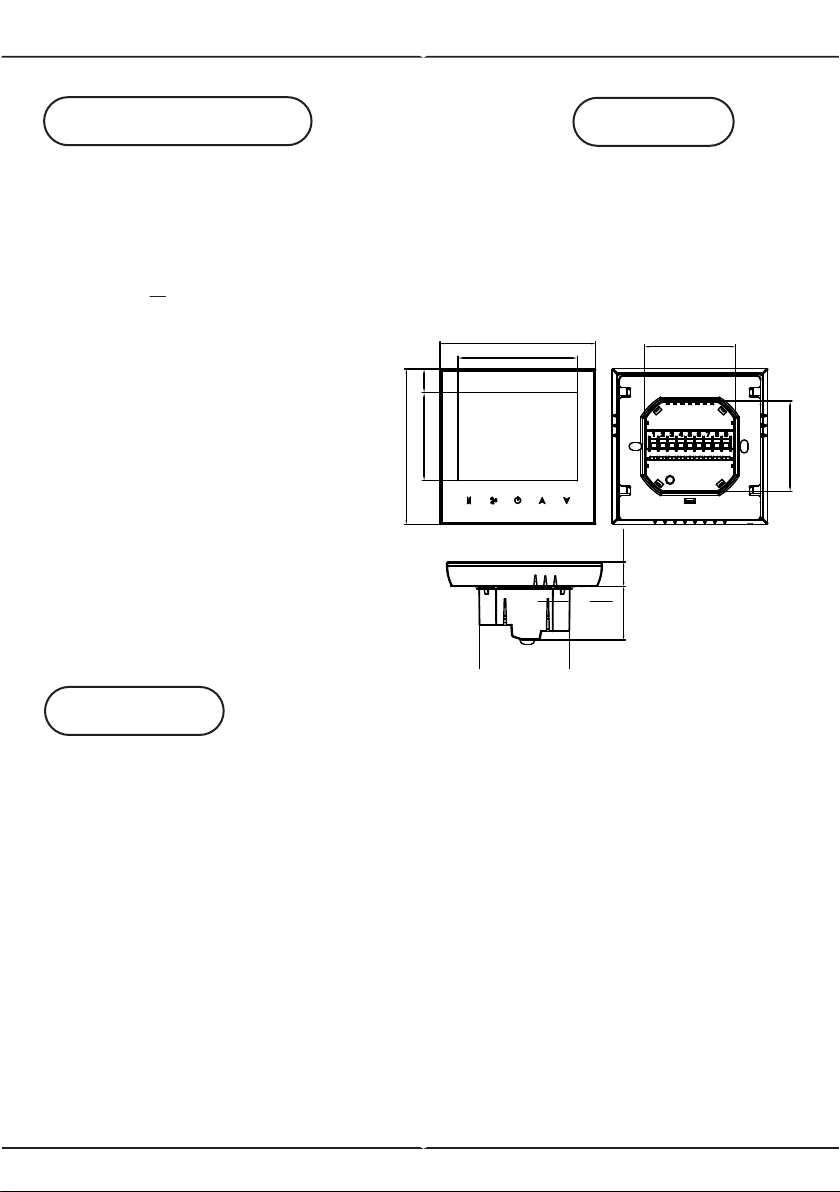
86.0
86.0
65.9
48.6
13.2
13.2
29.6
49.6
50.0
50.0
Unit: mm
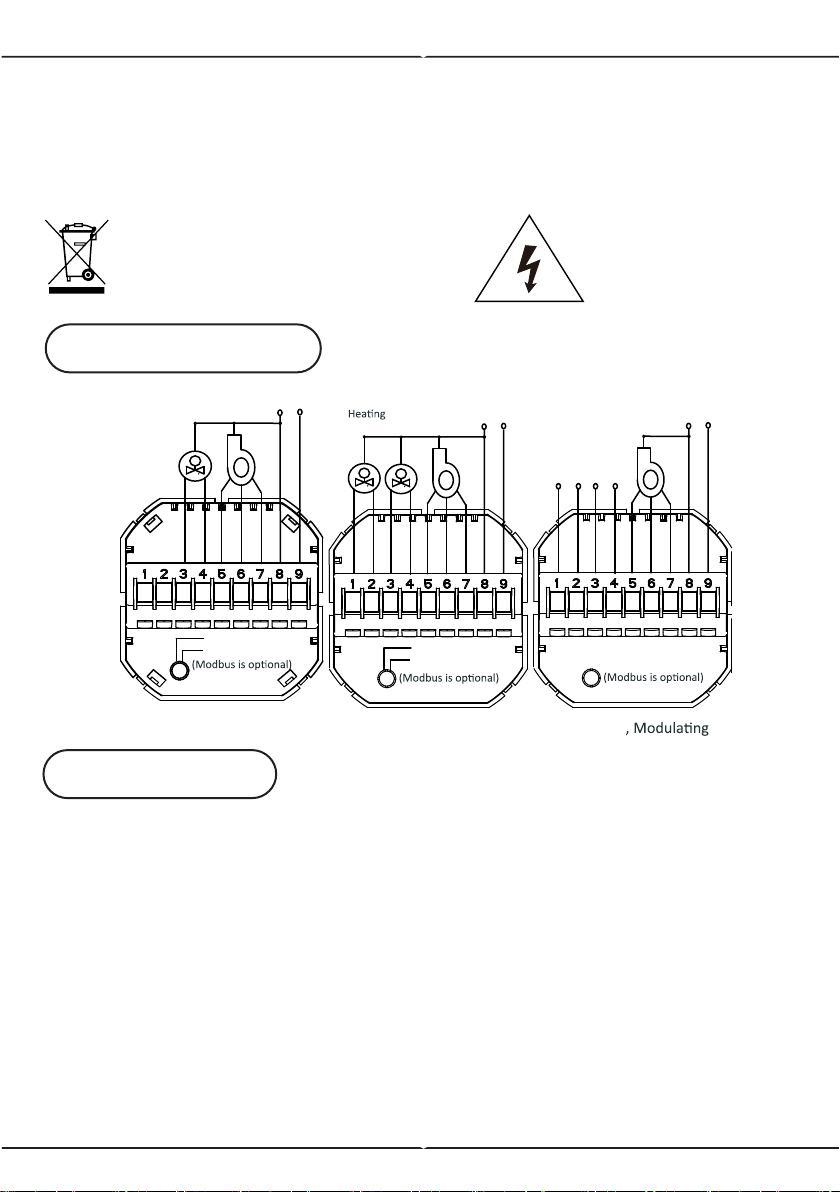
WIRING DIAGRAM
INSTALLATION
L
N
L
N
L
N
M
Valve
A (RED)
Modbus
B (WHITE)
AC95-240V 50~60Hz
Fan
hgiH
deM
wo
L
nep
O
esolC
Close
M
M
A (RED)
Modbus
B (WHITE)
Fan
Open
Close
Open
Low
Med
High
Two Pipe, On/off
AC95-240V 50~60Hz
Four Pipe , On/off
Valve
Cooling
Valve
Fan
Close
Open
Low
Med
High
AC95-240V 50~60Hz
Two Pipe
Modbus
0-10V
Valve
+-AB
This marking indicates that this
product should not be disposed
of with other household wastes.
Caution, risk of
electric shock.
Warning!
1) Please make sure to turn off the power before starting the installation.
2) Check the ratings given in the instructions and on the product to make
sure the product is suitable for your application.
3) Install only by certified Electrician.
Note: Thermostat is suitable for installation within a standard
86m pattress box or European 60mm pattress box.
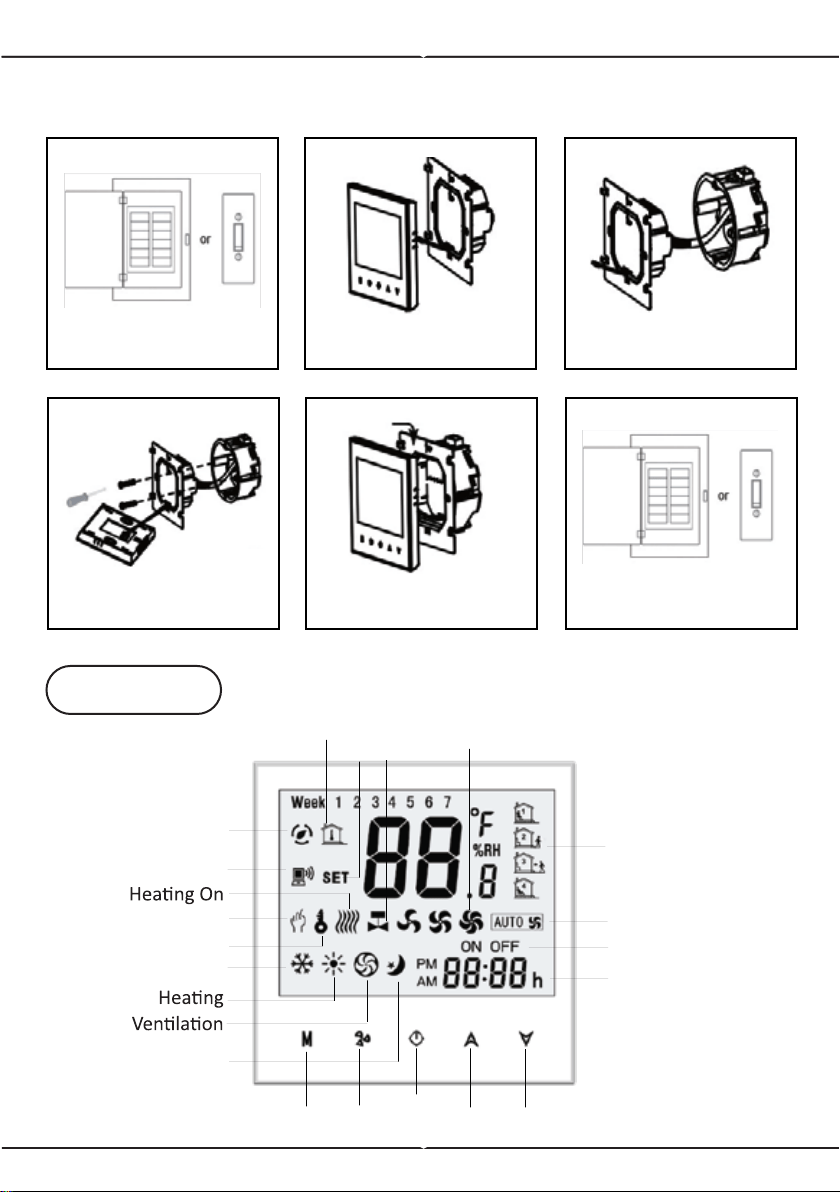
Step 1: Switch off the power before starting the installation
(Refer to Fig1).
Step 2: Remove the mounting plate by rotating the LCD part
(Refer to Fig2).
Step 3: Connect the wires according to the wiring diagram then connect
the device to the power supply (Refer to Fig3).
Step 4: Fix the mounting plate into the wall then screw it properly inside
the box (Refer to Fig4).
Step 5: Fasten the body of thermostat and the mounting plate
(Refer to Fig5).
Step 6: Switch on the power and test the device.
INSTALLATION DIAGRAM
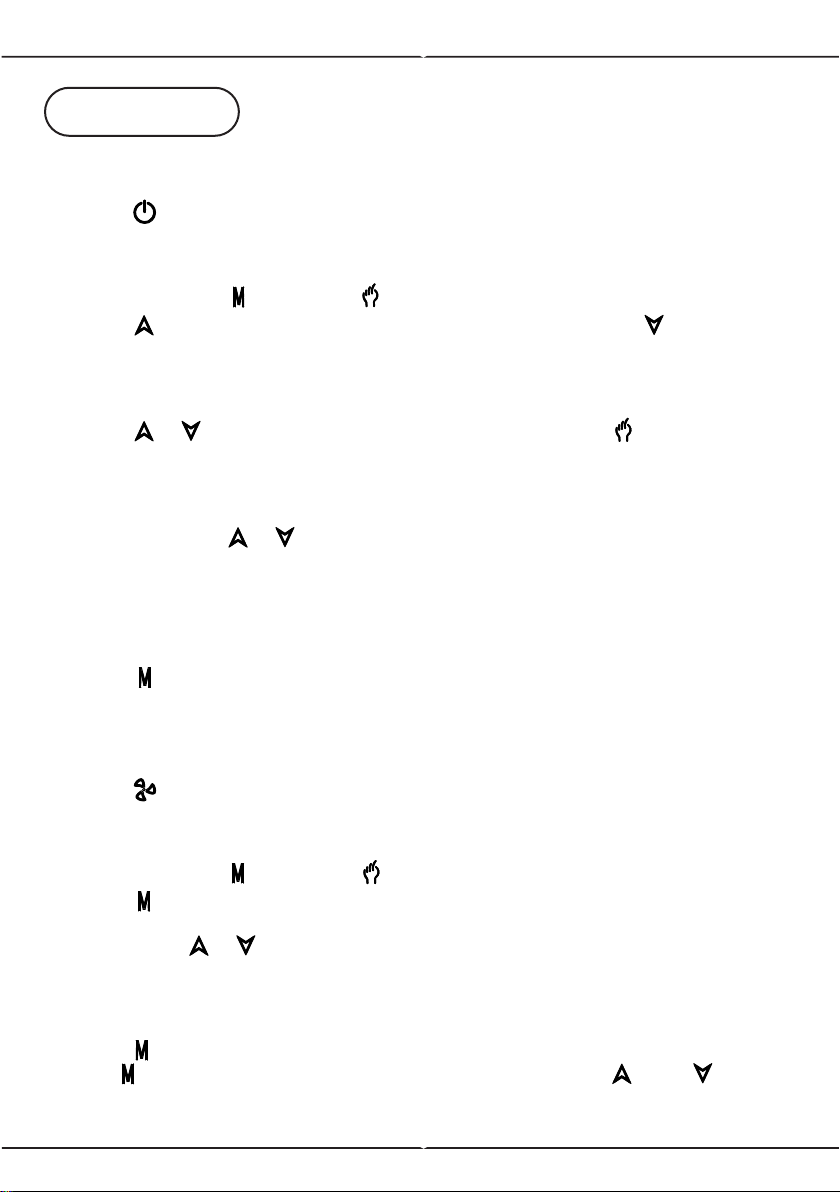
OVERVIEW
Power
On/off
Up
Fan
Mode
Clock
Auto Fan
Timing On/Off
Cooling
Energy s
aving
Network
Room
Temp.
Fan
Speed
Manual
Lock
Period
Sleeping
Valve
On/off
Down
Set
Temp.
FIGURE 1
Switch OFF
Switch ON
FIGURE 3FIGURE 2
FIGURE 4
FIGURE 6
FIGURE 5
OPERATION
1. Power On/Off
- Press ( ) power button to turn on/off the thermostat.
2. Manual & Programmable
- Press and hold ( ) button, ( ) flash icon will appear on the screen.
- Press ( ) arrow up button to select manual then press ( ) arrow down
button to select weekly programmable
3. Temperature Settings
- Press ( )( ) arrow button to set the temperature. ( ) will display in
the left corner of screen
4. Lock mode Settings
- Press and hold ( )( ) button for 5 seconds to lock/unlock your
thermostat.
- In items 3 of high senior options, you can select full lock or half lock
5. Selecting the system mode
- Press ( ) to change the system mode heating, cooling, and ventilation.
- In the Ventiallation mode - the valve is off but the fan runs.
6. Setting the Fan Speed
- Press ( ) button to select the fans speed options AUTO-HIGH-MED-LOW
7. Adjusting/Setting the Clock
- Press and hold ( ) button, ( ) will flash on the screen.
- Press ( ) to set the MINUTE, HOUR, WEEKDAYS (1= Monday, 2= Tues-
day, 3=Wednesday, 4=Thursday, 5=Friday, 6=Saturday, and 7=Sunday)
by using the ( )( ) arrow button. After 3 seconds the value will be
confirmed automatically.
8. Adjusting temperature in Weekly Programmable
- Press ( ) button to do the adjustment of weekly programmable. Then
press ( ) button to change the different items. Press ( ) or ( ) to set
relative values.
DEFAULT PROGRAM SCHEDULE SETTINGS
Note: Programmable mode - The set temperature and time cannot
be adjusted.
NOTE: Thermostat provides 6 scheduled heating and cooling periods each
day - three comfort periods - 1, 3 & 5 (the temperature required when
room is occupied) and three economical period - 2, 4 & 6 (the tempera-
ture required when room is unoccupied).
You can set both the time and temperature for each of these six daily
periods. Adjusting /setting the schedules can only be carried out when in
program mode. Press ( ) button to change between manual mode and
programmable mode. In manual mode, ( ) icon will appear on the
screen. Press the ( ) button for 4x until the weekday schedule appear
on the screen. Weekday schedule settings are 1,2,3,4, and 5. Use
( )( ) arrow button to control/adjust the time for the 1st period (Com-
fort). Then, press the ( ) button and use the ( )( ) arrow button to
set the desired temperature for 1st period. You can repeat this process in
2 - 6 periods. press ( ) button once more to enter the weekend schedule
settings (6 & 7 will show along the top of the screen). Repeat the above
process to set the weekend schedule. Press ( ) button once more to
confirm and exit.
TIME TEMPERATURE TIME TEMPERATURE TIME TEMPERATURE
Period 1 06:00 20°C 06:00 20°C 06:00 20°C
Period 2 08:00 15°C 08:00 20°C 08:00 20°C
Period 3 11:30 15°C 11:30 20°C 11:30 20°C
Period 4 13:30 15°C 13:30 20°C 13:30 20°C
Period 5 17:00 22°C 17:00 20°C 17:00 20°C
Period 6 22:00 15°C 22:00 15°C 22:00 15°C
TIME
DISPLAY
WEEKDAY (MON-FRI)
(1 2 3 4 5 shows on
screen)
WEEKEND (SAT)
(6 shows on screen)
WEEKEND (SUN)
(7 shows on screen)
FUNCTIONS & OPTIONS SETTINGS
When the power is off, press and hold ( ) button and ( ) Fan button at the
same time for 5 seconds in order to reach the system function. Then, press ( )
button to change the different items.
Note: All the settings will confirm automatically when power is on.
Code Function Default
1
Temperature
Compensation
-1
2 Fan Control
00: When room
temperature reaches
the set point, the fan
will turn off.
01: When room
temperature reaches
the set point, the fan
will turn to low speed
0
3 Locking Button
00: All buttons are
locked except power
button.
01: All buttons are
locked.
01
4 Heat / Cool 00: Cool Only 01: Heat/Cold 01
5
Min Set
Temperature
05
6
Max Set
Temperature
35
-7 to 7°C
5 to 15°C
15 to 35°C
Setting & Options
7 12/24 Hours 00: 12 Hours 01: 24 Hours 01
8 Display Mode
00: Display both set
temperature and
room temperature
01: Display set
temperature only
00
9
Energy saving
mode
00: Non-energy
saving mode
01: Energy Saving
mode, set
temperature and
keep economy
temperature.
00
A
Heating
economy
temperature
20
B
Cooling
economy
temperature
26
C
Deadband
temperature
1
10 to 30°C
1 to 5°C
10 to 30°C
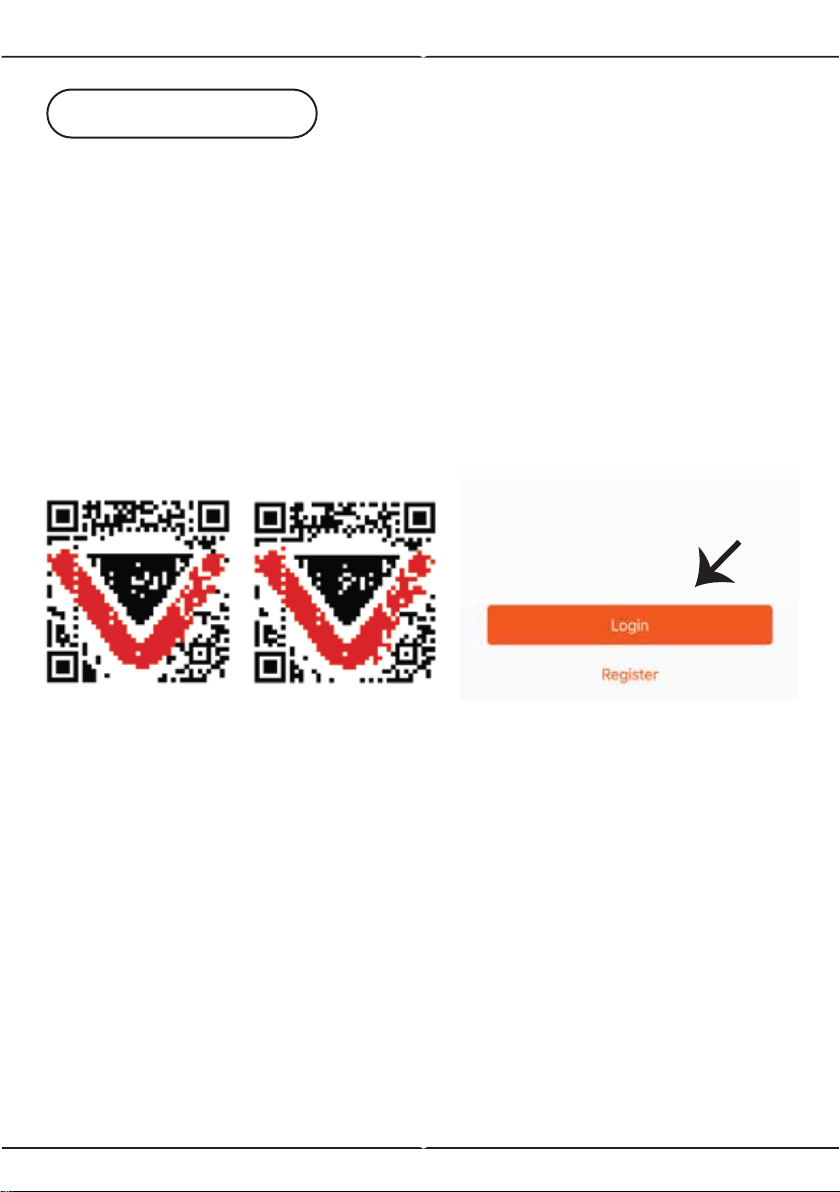
APP INSTALLATION
Step 1: Turn the power button ON of the device.
Step 2: Scan the given QR code, or download “V-TAC Smart Light’ from
the App Store (iOS) or the Google Play Store (Android).
Step 3: Open the V-TAC Smart Light app and tap on register for creating
a new account. If you already have an existing account, please proceed
to please proceed to logging in (Ref Fig 1).
For ANDROID For IOS
Step 4:
A) Mobile Number: Select the country, then enter your mobile number.
Once done, tap ‘Next’ (Ref Fig 2).
B) E-Mail: Enter your email id and tap on ‘Next’ (Ref Fig 2).
Step 5: Enter the verification code which will be sent to your mobile
number/email id, then assign a new password to your account and tap on
“Confirm” to complete the registration process (Ref Fig 3). Once done you
will be redirected to V-TAC Smart Light Home page.
Step 6: Tap on ‘Add Device’ or the + sign. Make sure the device is
switched on.
Fig 1
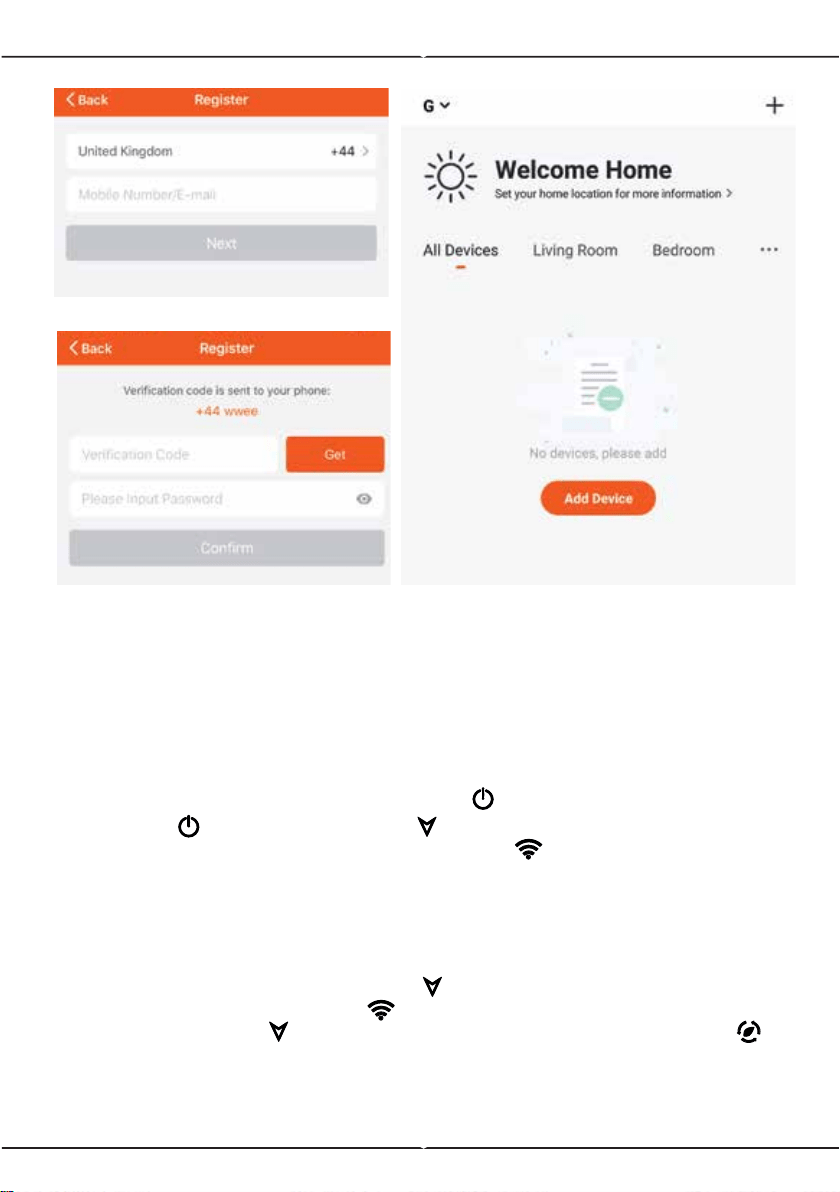
Fig 2
Fig 3
Fig 4
Step 7: To select the device, tap on Home appliances, and then choose
“Thermostat” to start Pairing process of the device to the app (Ref Fig 5).
Step 8: Pairing Process
EZ MODE:
A) Turn On the thermostat by pressing the ( ) power button.
B) Hold the ( ) power button and ( ) arrow down button for 8
seconds. The backlight will power on and the ( ) wifi icon will start
flashing one time per second.
C) On the App, Confirm if the light blinks rapidly, Enter wifi password and
click "Confirm" (Ref Fig 6 & 7).
AP MODE:
A) With power off, press and hold the ( ) arrow for eight (8) seconds. The
backlight will be on and the icon ( ) will flash one time per second.
B) Press and hold the ( ) arrow for eight (8) seconds again. The icon ( )
will flash one time every (3) seconds.
C) On the App, Confirm if the light blinks rapidly, Enter wifi password and
click "Confirm" (Ref Fig 6 & 7).

8
Fig 5
Fig 8
Fig 6
Fig 7
Step 9: Once you have successfully
completed step 8, you will be redirect-
ed to “Connecting Now” page, where
the App searches, registers and
initializes the device (ref Fig 8). Once
it is completed your device will be
successfully paired.
Step10: Once your device is success-
fully paired, rename the device to your
preference. And then tap on complet-
ed.
Step11: You can now start controlling
your device with the App. Tap the
device name on the home page to
enter the controls and features of the
device.

8
PROGRAMMING YOUR THERMOSTAT
When your room is established successfully, it will display on the home
screen. The round button is to turn on/off your room. Click the line to
enter into thermostat programming mode.
( ) Power on/off button. When the screen is bright, it is power on; when
the screen is dark, it is power off.
( ) Mode button. In this mode you can set cooling, heating and ventila-
tion. ( ) is heating, ( ) is cooling, and ( ) is ventilation.
( ) Fan speed button. Press this button to select auto, low, medium
and high speed. ( ) is auto speed, ( ) is low speed, ( ) is medium
spead, and ( ) is high speed.
( ) Manual button - In this mode the heating can be set manually (i.e.
NOT using the pre-programmed settings)
( ) Program button - When this button shows, your thermostat is in
program mode and will follow any pre-set heating schedule. When in
Manual mode, press the ( ) button to select mode ( ) and vice versa.
( ) Economy button - In this mode, the temperature will be at 26
degrees. This temperature cannot be changed or adjusted.
( ) Lock/Unlock button. If the button is green, the screen is "locked". If
button is grey, the screen is "Unlocked".
*Slide the yellow button backwards or forwards to manually adjust the
temperature, the temperature will show in the centre of the page. After a
few seconds the current room temperature will show.
*When in program mode, click on the schedule setting(at the bottom of
the page) to be taken to be schedule page where you can simply click on
the working days (MON-FRI) and then the time/temperature. to adjust to
your preferred schedule.
* You can set 6 periods - time and temperature
* Repeat the above after clicking on the Weekend (SAT-SUN) settings at
the top of the page
* Once your schedule has been set, click on SAVE and the app will send
the programming to your thermostat and confirm the schedule has been
saved.
Aut o
8
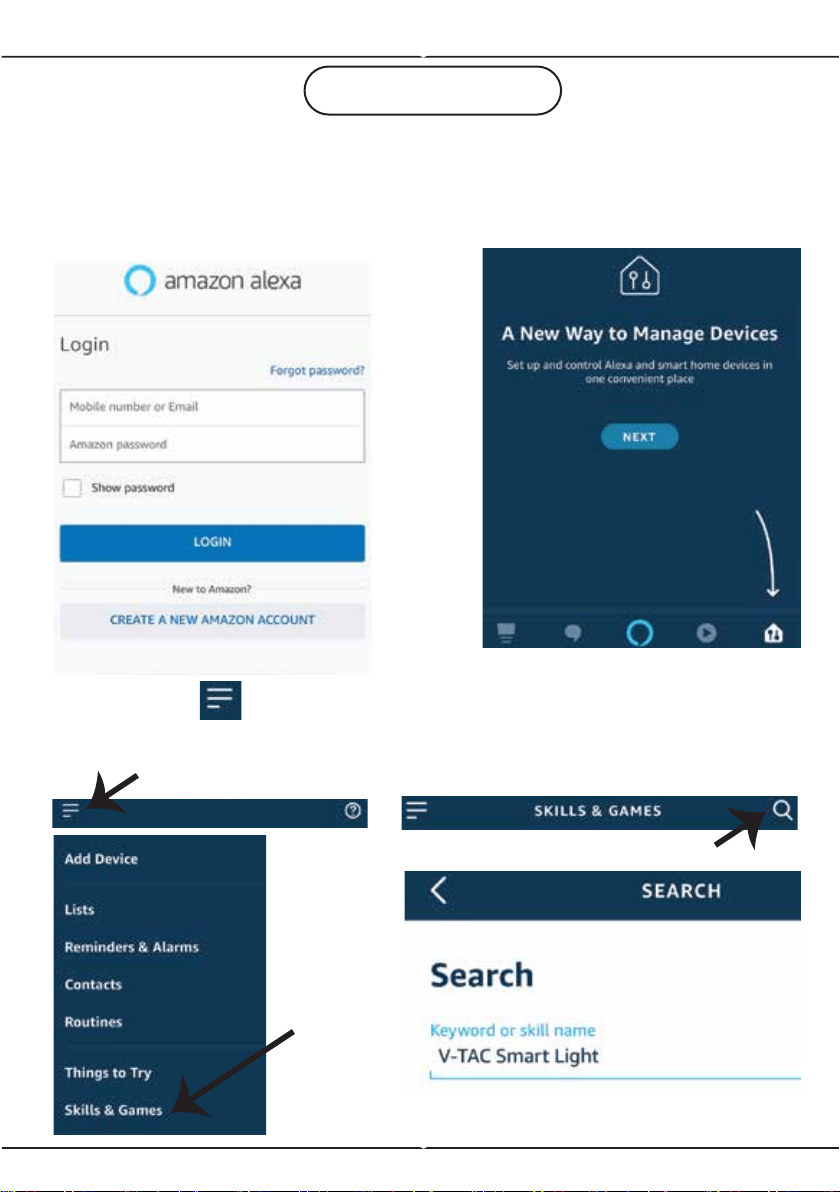
Step1:Install the Amazon Alexa app via
the App Store(iOS) or the Play Store
(Android) and register. If you already
have an existing account with Amazon
Alexa, please proceed to logging in.
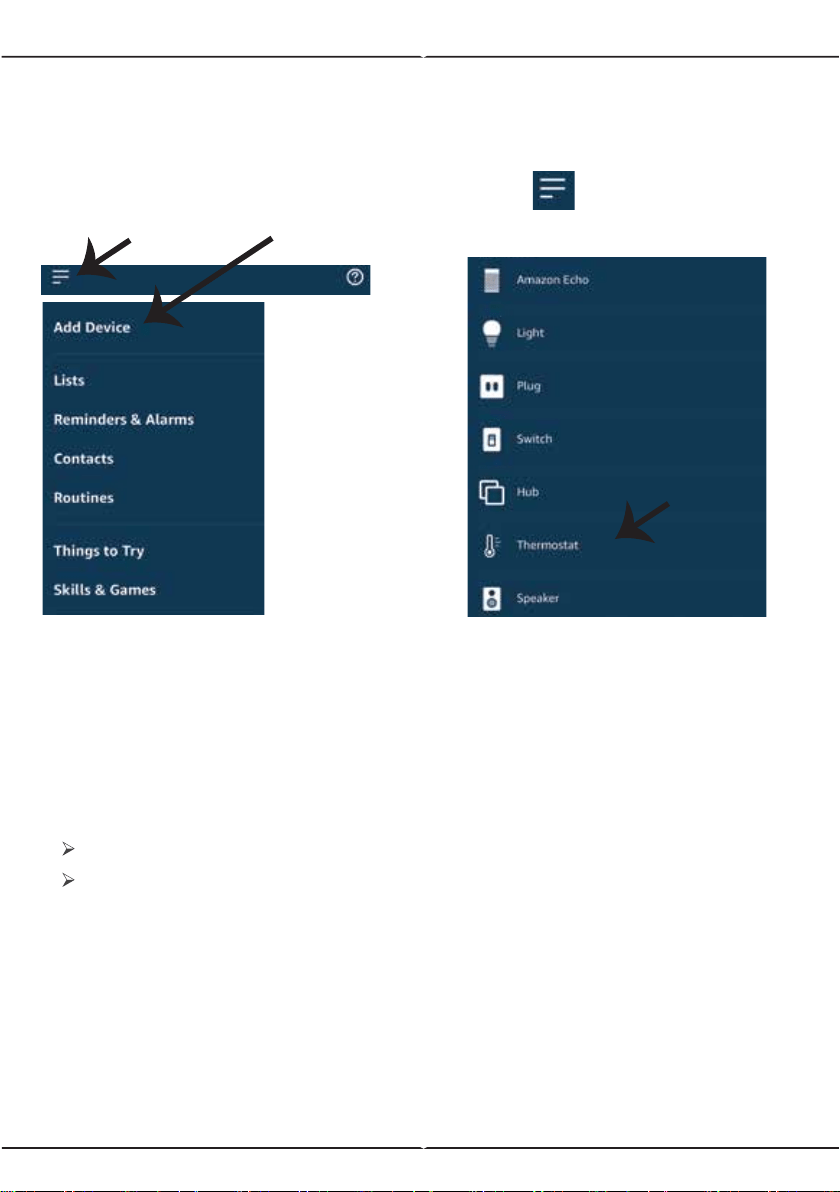
Step3: Tap on settings
and tap on “skills and games”
as shown below.
Step4: Search for ‘V-TAC Smart
Light’ on the “Skills & Games” page
as shown below.
Step2: Once you are on the Amazon
Alexa home page, tap on the lower
right icon –– where the arrow is
pointed–– to add a new device and
skill.
ALEXA SETTINGS
8
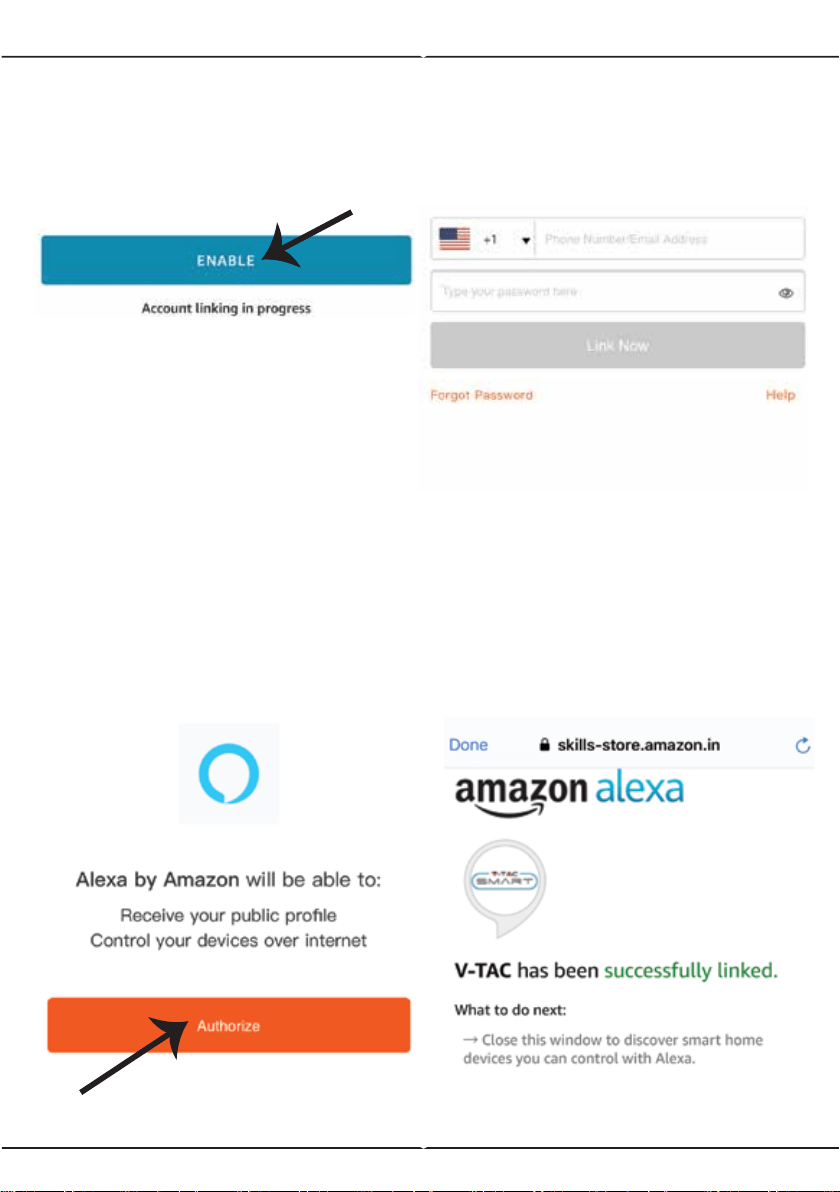
Step5: Enable the Skill.
Step6: Enter your V-TAC Smart
Light login ID and password and
tap on “Link Now”
Step7: Once you tap on Link Now,
you will be redirected to a new page
requesting for authorization (Ref
Image below). Tap on “Authorize”
Step8: You will receive confirma-
tion of the account being linked
successfully (Ref Image below).
8
Now, you can control your smart device using voice commands on Alexa. Below are a few
example commands of how you can use:
Note: Discovering the device must be done every time the device’s name is changed on
the app.
! Alexa, turn on/off the thermostat.
! Alexa, set the temperature to 22°C
2. Make sure you have Amazon Alexa Device(including Echo, Echo Tap, or Echo Dot)
4. Stable Wifi network
1. V-TAC Smart Light App & Amazon Alexa App
3. Smart Device - Thermostat
ALEXA Commands
THINGS TO REMEMBER BEFORE STARTING INSTALLATION:
Step8: Discover your smart device on Alexa. Once you have enabled the skill
A) You can use voice command ”Alexa discover devices” to the Alexa device
which you have.
B) To add device manually on home page tap on and tap on Add
device , select the device which you are adding and tap on discover device.
Note: Set the temperature unit based on your requirement of Celsius/Fahrenheit.
Once this has been set, you can now command your device to change the temperature.
8
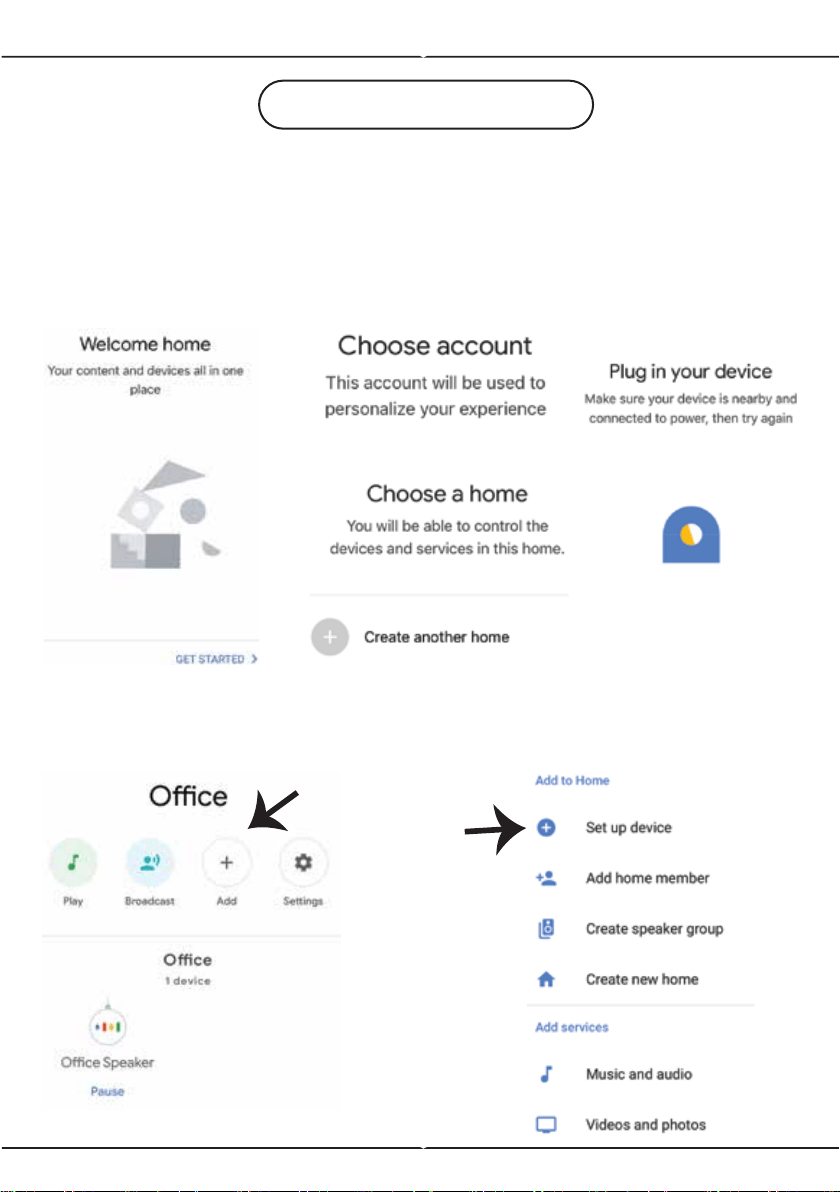
Step2: Once you are on the Google home page, tap on the Add “+” icon– to
add a new device and skill. And then tap on Set up device as shown in below
image.
GOOGLE HOME SETTINGS
Step1:
a&b) Install the Google Home app via the App Store (iOS) or the Play Store
(Android) and register. If you already have an existing account with Google
Home, please proceed to logging in.
c) Create a New Home/Choose from the existing home if any.
d) Power ON the Google Home device and connect it to the App
(Then Proceed to step 2).
a. b.
c.
d.
a.
b.
8
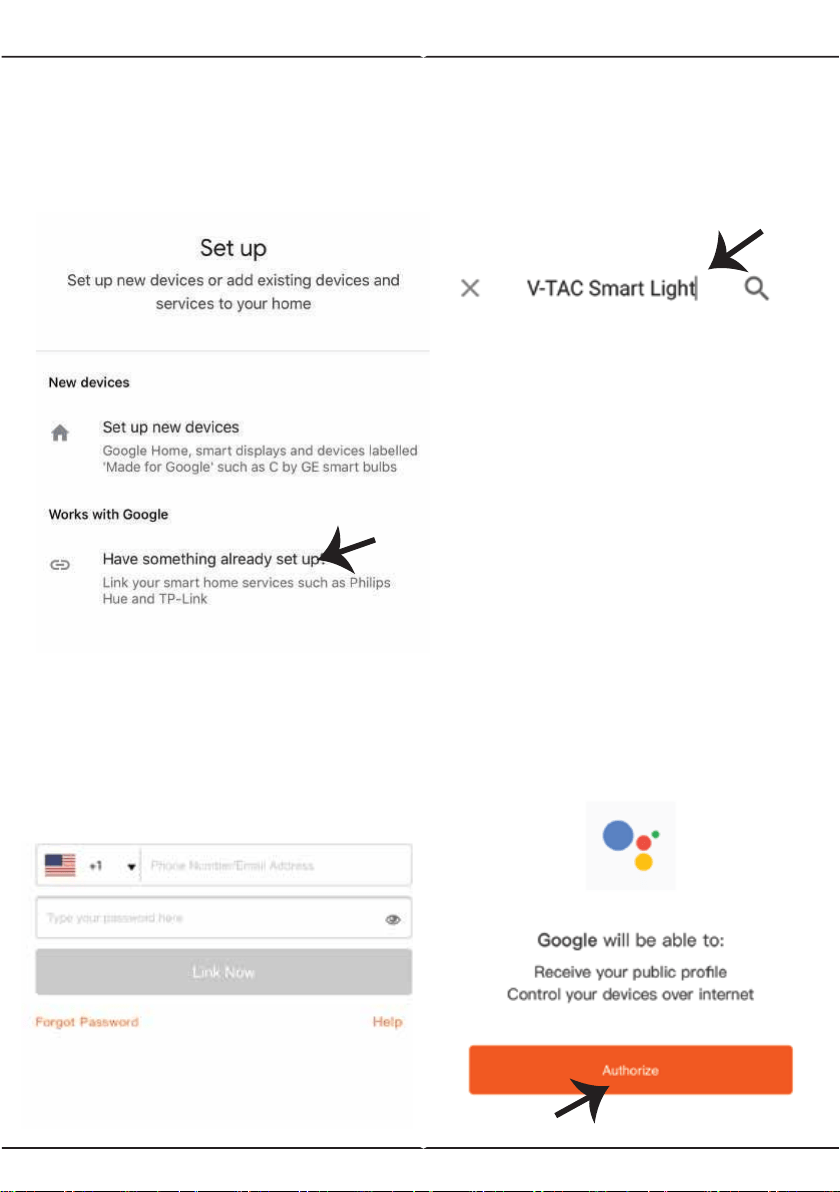
Step3: Make sure the Thermostat is
paired with V-TAC Smart Light app
before starting step 3. Tap on the
arrow section as highlighted in the
below image.
Step5: Sign In with your V-TAC
Smart Light Login credentials to Link
the Smart Light device
Step6: Tap on Authorize in order
to proceed to linking the device.
Step4: Type “V-TAC Smart Light” on
the search bar and tap on the icon of
“V-TAC Smart Light”.
8
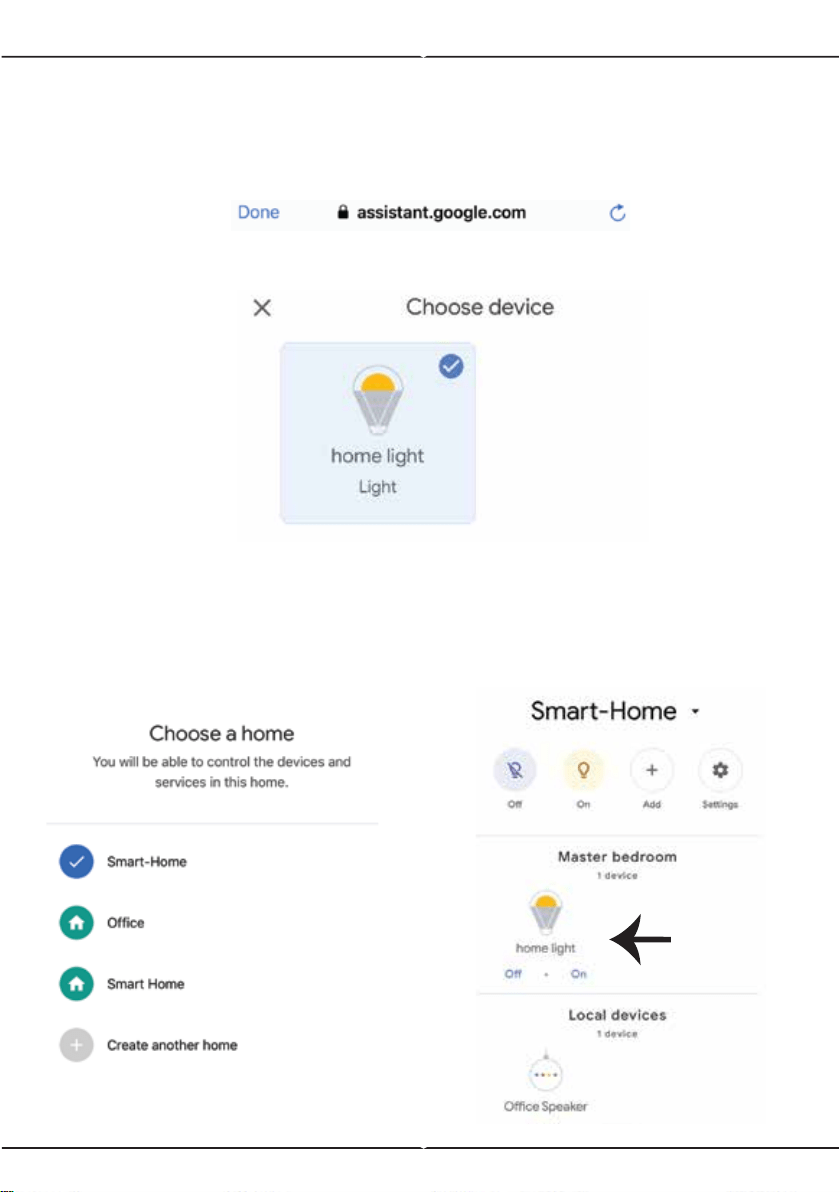
Step7
a. Account will now be linked, please stay on the page you will be redirected
in few seconds to select the device to add to your home.
b. Select the device and tap on Next as show in image b.
Step8: Select the Home where you
would like to add the Smart Light
under. (Or) you can create a New
home in order to add the Smart Light
to it.
Step9: You have succesfully added
Smart Light device to your Google
home App.
Account is now Linked
a.
b.
In case of any query/issue with the product please reach out to us at [email protected]
V-TAC EUROPE LTD, Bulgaria, Plovdiv 4000, bul.L.Karavelow 9B
Now, you can control your smart device using voice commands on Google Home. Below are a
few example commands of how you can use your google home device:
! OK Google, turn on/off the thermostat
! OK Google, set the temperature to 22°C
2. Make sure you have Google Home Device
4. Stable Wifi network
1. V-TAC Smart Light App & Google Home App
3. Smart Device - Thermostat
Google Commands:
THINGS TO REMEMBER BEFORE STARTING INSTALLATION:
Note: Set the temperature unit based on your requirement of Celsius/Fahrenheit.
Once this has been set, you can now command your device to change the temperature.