User Manual TV
TV components
Jacks
Your TV may have any of the following items:
| ITEM |
DESCRIPTION |
FUNCTION |
 |
Power/Input button |
Power—Press to turn on your TV when your TV is off (in standby mode). Press and hold to turn off your TV when your TV is on.
Warning: When your TV is off, power still flows through it. To
completely disconnect power, unplug the power cord.
Input—When your TV is turned on, short press to open the
FUNCTION list. Short press this button to move between functions and highlight the function you want, then press and hold this button to select the function. Your can select:
- Exit to close the FUNCTION list.
- Input Source to open the INPUT SOURCE list and select a video input source.
- Channel List to open the channel list and select a channel.
- VOL+ to increase the volume.
- VOL– to decrease the volume.
|
 |
Digital OPTICAL output jack |
Connect a sound bar, digital speaker system, or home theater system to this jack to listen to TV audio through external speakers. See Digital audio on page 13. |
 |
Digital COAXIAL output jack |
 |
Headphone jack OR AUDIO OUT jack |
On some TVs the headphone jack and audio out jack are combined into one jack. Connect headphones, a sound bar, analog speaker system, or a home theater system to this jack to listen to TV audio through external speakers. See Analog audio on page 14. |
 |
Antenna/Cable in jac |
Connect an antenna or cable TV to this jack. See Coaxial (good) on page 9 or Connecting an antenna or cable TV (no box) on page 9. |
 |
Analog video and audio (AV) jacks |
Connect the video and audio for an AV device to these jacks. See AV (good) on page 8, 10, or 11. |
 |
USB |
Connect a USB flash drive to this jack to view compatible JPEG picture files. See Connecting a USB flash drive on page 12 and Using a USB flash drive on page 22. |
 |
HDMI |
Connect an HDMI device to this jack. See HDMI (best) on page 8, 10, or 11, or Connecting a computer on page 12. |
 |
HDMI/ARC |
Connect an ARC-enabled home theater receiver to this jack.
OR
Connect an HDMI device to this jack. See HDMI (best) on page 8, 10, or 11, or Connecting a computer on page 12.
|
| |
RESET |
Press to reset your TV to the factory defaults. If this button is in a recessed hole, use a thin item, like a paper clip, to press the button. |
| |
SERVICE |
Do not connect a device to this jack. Do not insert anything into this jack. |
CAUTIONS:
- Check the jacks for position and type before making any connections.
- Loose connections can cause poor audio or video quality. Make sure that all connections are tight and secure.
- The external audio/video equipment shown may be different from your equipment. If you have questions, refer to the documentation that came with your equipment.
- Always unplug the power cord when connecting external equipment.
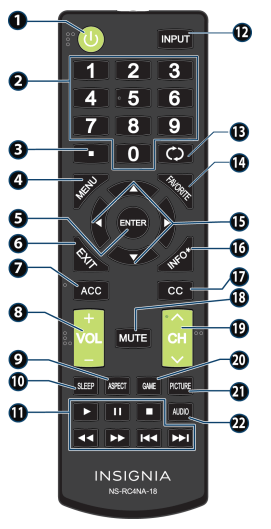
Remote control
| # |
BUTTON |
PRESS TO... |
| 1 |
 (power) (power) |
Turn your TV on or off (standby mode). Warning: When your TV is off, power still flows through it. To disconnect power, unplug the power cord |
| 2 |
Numbers |
Enter channel numbers and the parental control password. |
| 3 |
 |
Enter a digital sub-channel number. See Selecting a channel on page 20. |
| 4 |
MENU |
Open the on-screen menu. |
| 5 |
ENTER |
Confirm selections or changes in TV menus. |
| 6 |
ACC |
Close the on-screen TV menu. |
| 7 |
ACC |
Open the Accessibility menu. See Adjusting accessibility settings on page 30. |
| 8 |
VOL+/VOL– |
TV: Adjusts the volume.
TV menu: Navigate left or right.
USB: Control a photo slideshow.
|
| 9 |
ASPECT |
TV: Change how the pictures appears on the screen.
USB: Zoom when displaying a photo.
|
| 10 |
SLEEP |
Set the sleep timer. You can select Off, 5, 10, 15, 30, 60, 90, 120, 180, or 240 minutes. |
| 11 |
Media controls |
Control INlink-compatible (HDMI CEC) devices. See Using INlink on page 21. |
| 12 |
INPUT |
Open the INPUT SOURCE list and select a video input source. See Selecting the video input source on page 19. |
| 13 |
 (return) (return) |
Return to the previous channel. |
| 14 |
FAVORITE |
Set up the Favorite channel list or open the existing Favorite channel list. See the Favorite Channel Setup and Favorite Channel List options in Changing channel settings on page 27. |
| 15 |
 |
TV menus—Navigate on-screen TV menus and adjust settings.
USB—Control a photo slideshow.
|
| 16 |
INFO* |
Display TV status information, such as the channel number, channel name (if available), or signal source. See Viewing channel information on page 20. |
| 17 |
CC |
Turn closed captioning on or off. You can select CC Off, CC On, or CC On when mute. See the Caption Control option in Using closed captioning on p |
| 18 |
MUTE |
Mute or un-mute the sound. |
| 19 |
 |
TV: Change to the next higher or lower channel in the channel list.
TV menu: Navigate up or down.
|
| 20 |
AUDIO |
Change the picture mode to Game mode. |
| 21 |
AUDIO |
Select the picture mode. You can select Vivid, Standard, Energy Savings, Movie, Game, or Custom. See the Picture Mode option in Adjusting the TV picture on page 23. |
| 22 |
AUDIO |
Select the audio mode. You can select Standard, Theater, Music, News, or Custom. See the Audio Mode option in Adjusting sound settings on page 25. |
Using a universal remote control
This section covers:
- Programming universal remote controls
- Viewing universal remote control codes
Programming universal remote controls
You can operate your Insignia TV with a new or existing universal remote control.
1 See Viewing universal remote control codes on page 15 for common codes. If you have problems programming your remote or need a different remote control code:
- Contact the universal remote control or cable/satellite company of the remote control you are trying to program.
- Visit insigniaproducts.com/remotecodes for the latest remote control code information.
- Call the Insignia Customer Care Center at 1-877-467-4289.
2 Follow your universal remote control’s instructions to enter the TV code you found in Step 1.
Tips:
• If your universal remote control has a code search feature, run a code search to identify a code that matches your TV. See your universal remote control’s instructions for details.
• If your universal remote control has a “Learn” feature, you can manually program it using the Insignia TV remote to “teach” the commands one at a time. See your universal remote control’s instructions for details.
Viewing universal remote control codes
You can view a list of universal remote control codes in the on-screen menu.
Tips:
• The brand name is often visible on the front of the universal remote control, and the model number is often visible on the back.
• If your universal remote control isn’t listed on the chart, refer to your universal remote control’s instructions and try codes for the brands Orion, Emerson, Memorex, Sansui, Sylvania, or Zenith. You may need to try several codes before finding a match.
1 Select the HELP menu, then select Learn More.
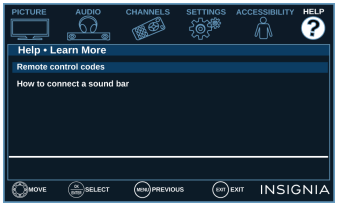
2 Select Remote control codes. Your TV displays information about the universal remote codes that you can use to make your TV work with a universal remote.
3 Press ENTER or  . Your TV displays a list of remote control codes for various brands of universal remote controls.
4 Press MENU to return to the previous menu, or press EXIT to close the menu.
Turning on your TV for the first time
The first time you turn on your TV, the Easy Setup wizard opens. The wizard guides you through setting up basic settings including the menu language, time setting, picture mode, TV signal source, and the channel list.
1 Make sure that you have:
• Installed the remote control batteries.
• Connected an antenna, cable TV, or satellite TV. (See page 8 through page 9.)
2 Press  (power) to turn on your TV. The Easy Setup wizard opens.
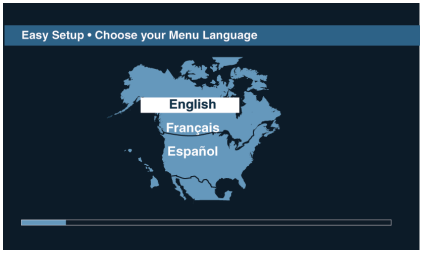
3 Press  or
or  to highlight a language, then press ENTER.
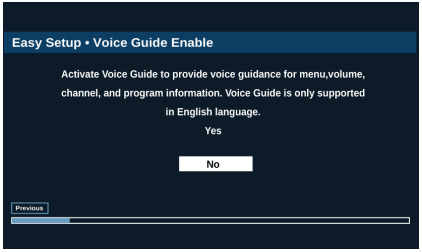
4 Press or to select Yes (to turn on the Voice Guide) or No (to turn off the Voice Guide), then press ENTER.

5 Press  or to highlight Home Use Mode or Store Display Mode, then press ENTER.
If you selected Store Display Mode, a message asks if you are sure you want this mode. Select OK to continue using Store Display Mode, or select Cancel to change to Home Use Mode. Store Display Mode is not an energy savings mode.
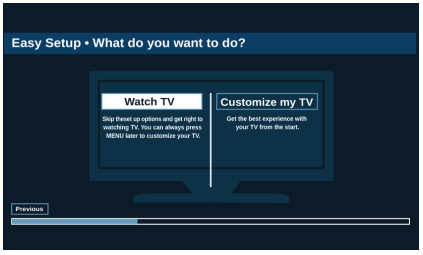
6 Press or to highlight an option, then press ENTER. You can select:
• Watch TV to skip the customization options. You can press MENU later to customize settings. Go to Finish the wizard on page 17.
• Customize my TV to set options to maximize your experience. Go to Customize my TV on page 16.
Customize my TV
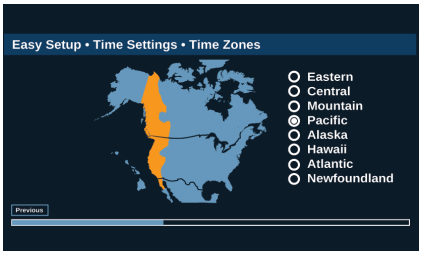
7 Press or to highlight a time zone, then press ENTER.
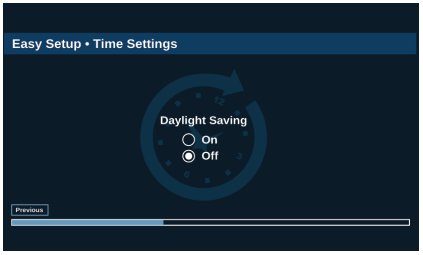
8 Press or to select On to turn on Daylight Saving or Off to turn off Daylight Saving, then press ENTER.
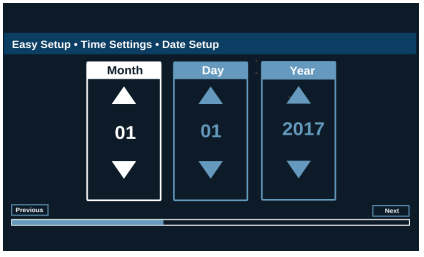
9 Press or to highlight Month, Day, or Year, press or to adjust the setting, then press ENTER one or
more times to highlight Next. When Next is highlighted, press ENTER again.
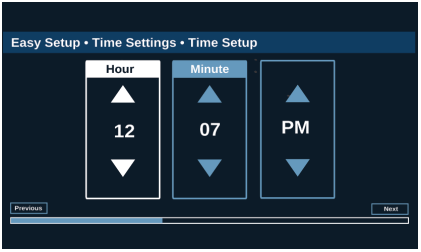
10 Press or to highlight Hour, Minute, or the AM/PM field, press or adjust the option, then press ENTER one or more times to highlight Next. When Next is highlighted, press ENTER again.
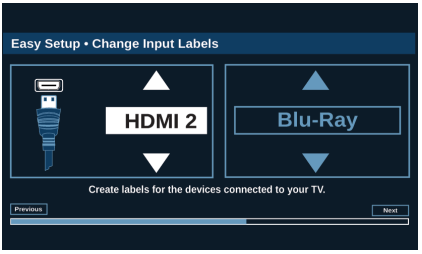
11 Press or to highlight a video input source, then press to move to the label area.
12 Press or to highlight a preset label or Custom.
13 If you select a preset label, press to select Next, then press ENTER.
OR
If you select Custom, press ENTER, then press or to enter the first character in your custom label. Press or to move to the previous or next character position. Use the arrow buttons to enter additional characters. You can enter 12 characters (letters or numbers). When you have finished creating your label, press ENTER, press to select Next, then press ENTER again.
Finish the wizard
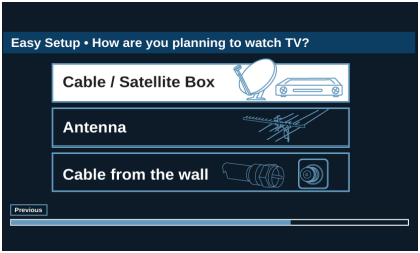
14 Press or to highlight Cable/Satellite Box, Cable from the wall, or Antenna, then press ENTER.
• If you select Cable/Satellite Box, the screen that opens shows you the ways you can connect the box.
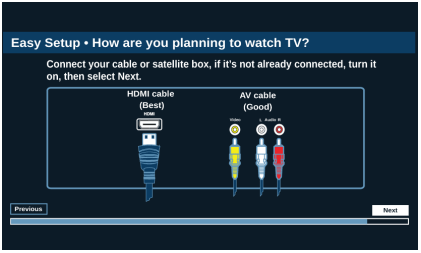
Press ENTER.

• If you select Cable from the wall or Antenna your TV starts scanning for channels and displays a progress screen.
Note: You can press EXIT to stop the auto channel search, but you will need to run the auto channel search again to create a channel list.
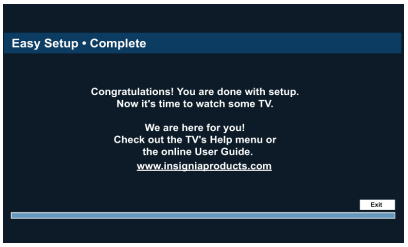
15 Press ENTER to close the wizard. If you selected:
• Cable from the wall or Antenna, your TV tunes to the first channel it found in the scan.
• Cable/Satellite box, press INPUT to open the INPUT SOURCE list, press or to select the video input (HDMI or AV) you connected the box to, then press ENTER. Your TV switches to the input you selected.
Understanding the basics
Turning your TV on or off
1 Make sure that the power cord is connected to a power outlet.
2 Press (power) to turn on your TV. The power indicator turns off.
3 Press (power) again to turn off your TV. Your TV enters standby mode, and the power indicator turns red.
WARNING: When your TV is in standby mode, it is still receiving power. To completely disconnect power, unplug the power cord.
Note: If your TV does not receive an input signal for several minutes, it automatically goes into standby mode.
Selecting the video input source
Note: Your TV automatically detects and displays which video jacks have devices connected to them when the devices are turned on. You can turn this feature off to always display all inputs. See Adjusting menu settings on page 30.
1 Turn on your TV.
2 If you want to use a device connected to a video input (such as a DVD or Blu-ray player), turn on the device.
3 Press INPUT, then select a video input source.
On-screen menu overview
Notes:
• Depending on the signal source selected, you may see different options on your screen.
• Menu items that are not selectable are grayed out.
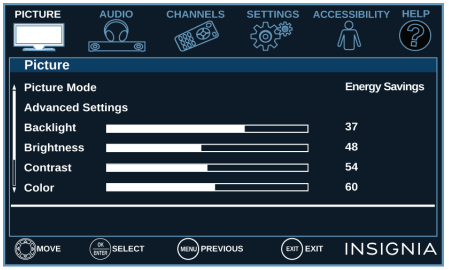
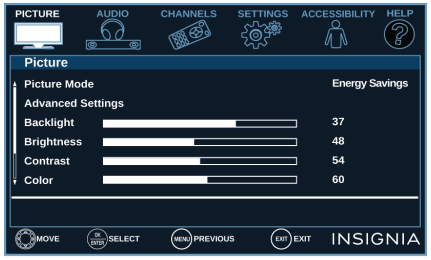
Picture menu (TV mode)
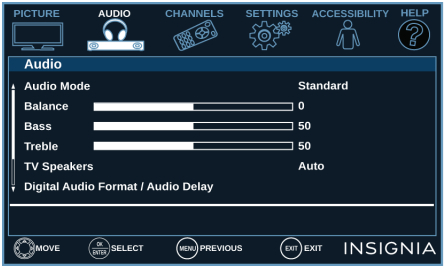
Audio menu (TV mode)
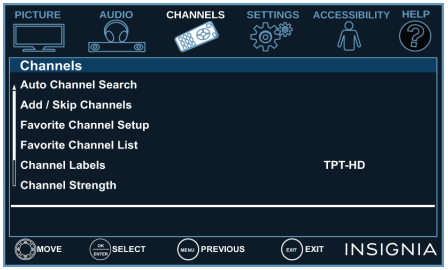
Channels menu (TV mode)
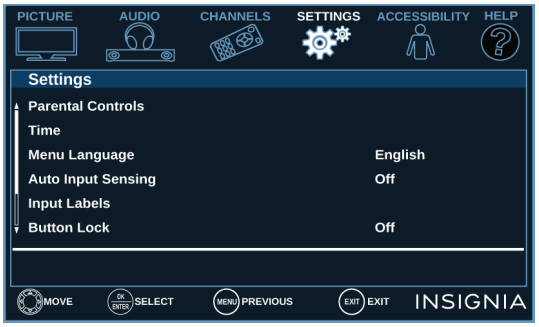
Settings menu (TV mode)
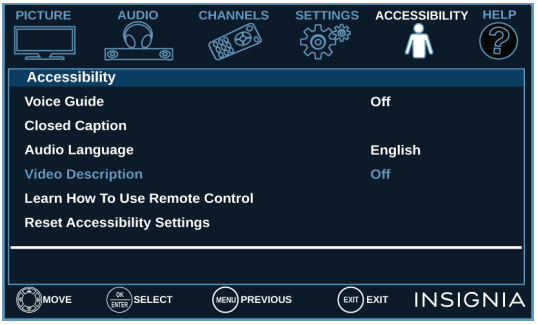
Accessibility menu
Help menu

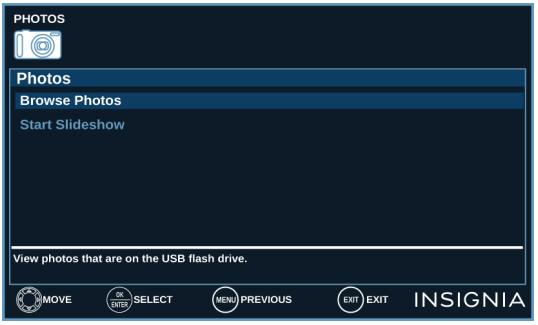
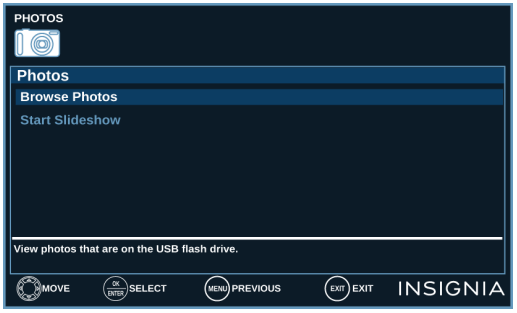
PHOTOS menu (USB mode)
Selecting a channel
• Press to go to the next or previous channel on the memorized channel list.
• Press the number buttons to enter the channel number you want, then wait for the channel to change or press ENTER to immediately change the channel.
• To select a digital sub-channel, press the number buttons to select the main digital channel, press
- (sub-channel), then press the number button for the sub-channel. Wait for the channel to change, or press ENTER to immediately change the channel. For example, to tune to channel 5.1, press 5,
- (sub-channel), then 1.
Note: Button presses must be within three seconds of each other.
• Press (return) to go to the last viewed channel.
Adjusting the volume
• Press VOL+ or VOL– to increase or decrease the volume.
• Press MUTE to turn off the sound. Press MUTE again to turn the sound back on.
Viewing channel information
• Press INFO* to view an information banner. The information banner shows the current program information, such as channel number, video input source, and resolution.
• Digital channel information—Displays the channel number, station name, channel label, broadcast program name, TV rating, signal type, audio information, resolution, current time, signal strength, day of the week, date, and current program start and end times, if provided by the broadcaster.
• Analog channel information—Displays channel number, channel label (if present), signal type, audio information, day of the week, date, and resolution, if provided by the broadcaster.
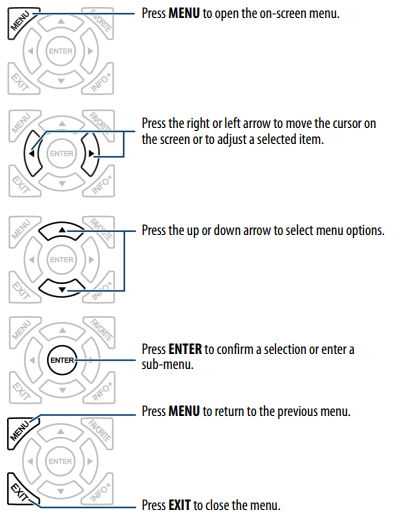
Navigating the menus
Adjusting settings
1 Press MENU to open the on-screen menu.
2 Press or to highlight a menu, then press ENTER.
3 Press or to select an option, then press ENTER. If the menu has more options than it can display on a screen, use the to view the other options.
4 If a sub-menu opens, press or to select an option, then press ENTER. If the menu has more options than it can display on a screen, use the to view the other options.
5 Use the arrow buttons to adjust the option setting, then press ENTER.
6 Press MENU to return to the previous menu, or press EXIT to close the menu.
Using INlink
INlink lets you control HDMI CEC-compatible devices connected to the HDMI jacks on your TV using the remote control that came with your TV.
Note: You can use the media buttons on your remote control to control playback.
To use INlink, you must set the INlink Control option on the INlink menu to On.
Notes:
• HDMI cables must be used to connect HDMI CEC-compatible devices to your TV.
• The connected device’s HDMI CEC feature must be turned on.
• If you connect an HDMI device that is not HDMI CEC-compatible, none of the INlink Control features work.
• Depending on the connected HDMI device, some INlink Control features may not work.
1 Select the SETTINGS menu, then select INlink(HDMI-CEC).
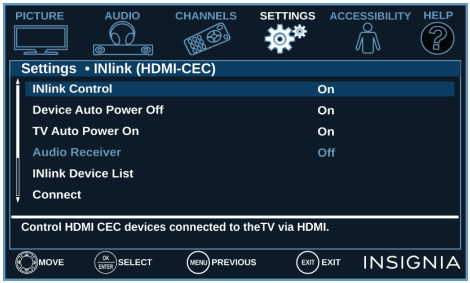
2 Select an option, then adjust the setting. You can select:
• INlink Control—Turns the INlink feature on or off. You must set this option to On to use the other INlink options.
• Device Auto Power Off—Automatically turns off HDMI CEC devices when you turn off your TV.
• TV Auto Power On—Automatically turns on your TV when an HDMI CEC device is turned on, if the device has this feature.
• Audio Receiver—Lets you use your TV’s remote control to control the volume on an HDMI CEC-compatible audio receiver connected to your TV.
• INlink Device List—Lets you display a list of HDMI CEC devices that are connected to your TV.
• Connect—When you have more than one INlink-compatible device connected, lets you select the device you want to use.
• Root Menu—Lets you open an INlink-compatible device’s root menu, then use your TV’s remote control to control the device, if the device has this feature.
3 Press MENU to return to the previous menu, or press EXIT to close the menu.
Using a USB flash drive
You can connect a USB flash drive to your TV to view compatible JPEG pictures.
Notes:
• Never remove the USB flash drive or turn off your TV while viewing JPEG pictures.
• The JPEG picture viewer only supports JPEG format images (with “.jpg” file extensions) and not all JPEG files are compatible with your TV.
Switching to USB mode
1 Make sure that you have connected the USB flash drive to the USB port on your TV.
2 Press or to highlight Yes in the message that appears, then press ENTER.
OR
If you connected the USB flash drive, then changed to a different video input source, press INPUT, select USB(Photos), then press ENTER.
Note: To exit USB mode, press INPUT, then select another input source.
3 Select one of the following options:
• Browse Photos
• Start Slideshow
Browse Photos
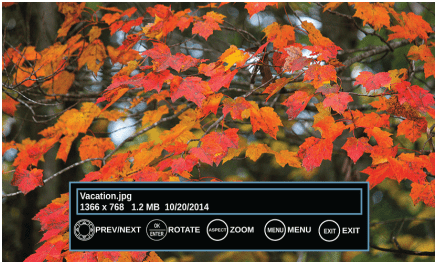
Browse Photos displays folder names and photo files stored on the USB flash drive in a thumbnail index with the first folder or file highlighted. A control bar appears at the bottom of the screen.
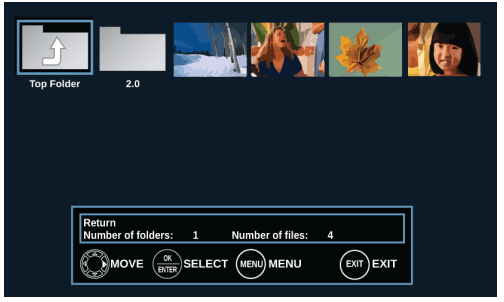
Note: Photos are shown in the order they appear on the USB flash drive. They may not be listed in file name order.
To navigate the thumbnail index screen, press:
| PRESS... |
TO... |
| or |
Browse through the files and folders. |
| ENTER |
View a highlighted photo full-screen or open a highlighted folder. |
| MENU or EXIT |
Open the PHOTOS menu. |
When a photo is displayed full-screen, a control bar appears at the bottom of the photo. The file name, picture resolution, size, and date are displayed on the bottom of the control bar. If you do not press a button within eight seconds, the control bar closes. Press INFO* to open the control bar again.
| PRESS... |
TO... |
|
Go to the previous photo. |
|
Go to the next photo. |
| ENTER |
Rotate the photo clockwise. |
| ASPECT |
Enlarge the image by 2×, or 4× or to select Fill (to fill the screen). You can press or to pan the photo. |
| EXIT |
Return to the thumbnail index. |
| MENU |
Return to the PHOTOS menu. |
Start Slideshow
Start Slideshow displays photos in a slideshow. If the photos you want to view are in a folder on the USB flash drive, select the folder.
To control the slideshow:
| PRESS... |
TO... |
| MENU |
Open the PHOTOS menu. |
| ENTER |
Pause the slideshow. Press again to resume the slideshow. |
| EXIT |
Stop the slideshow and return to the thumbnail index. |
Adjusting the sound
Adjusting sound settings
You can adjust sound settings to improve the sound quality. You also can reset all sound settings to the factory default. 1 Select the AUDIO menu.
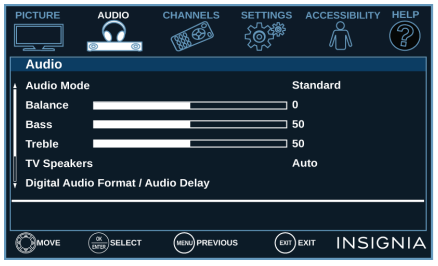
2 Select an option, then adjust the setting. You can select:
• Audio Mode—Selects the sound mode. You can select:
• Standard—Balances treble and bass. This setting is good for watching standard TV broadcasts.
• Theater—Enhances treble and bass for a rich sound experience. This setting is good for watching DVDs, Blu-ray discs, and HDTV.
• Music—Preserves the original sound. This setting is good for listening to music.
• News—Enhances vocals for TV audio. This setting is good for watching news broadcasts.
• Custom—Lets you manually adjust sound settings.
Note: You can also press AUDIO to select the audio mode.
• Balance—Adjusts the balance between the left and right audio channels.
• Bass—Adjusts the low sounds.
• Treble—Adjusts the high sounds.
• TV Speakers—Selects where to play TV audio. When you connect headphones to your TV, audio plays through both the headphones and the TV speakers. You can select:
- Auto (default setting)—Automatically turns off the TV speakers when you connect a device to the
 / AUDIO OUT jack. When you disconnect the device, the TV speakers turn on automatically.
- On—Always plays the audio through the TV speakers. If a device is connected to the / AUDIO OUT jack, the audio is played through both the TV speakers and the device.
- Off—Turns off the TV speakers and plays the audio only through the device connected to the / AUDIO OUT jack. If you disconnect the device, the TV speakers remain turned off.
• Digital Audio Format/Audio Delay—Adjusts the digital audio sent to an external audio system. You can select:
- Audio Format—Selects the digital audio format sent to an external audio system. You can select:
- Pass Thru (to pass through the original digital audio sound).
- PCM (to output audio in 2-channel stereo).
- Audio Delay—Fine tunes the audio when it is not in sync with the video.
• MTS/SAP—(Analog channels only) Selects the audio mode. You can select:
• Mono—Select this option if there is noise or static on weak stereo broadcasts.
• Stereo—Select this option for programs broadcast in stereo.
• SAP—Select this option to listen to a secondary audio program, if available.
• Audio Language—(Digital channels only) Selects an alternate audio language, if available.
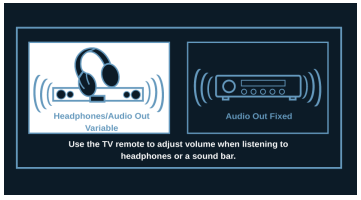
• Headphones / Audio Out—You can use the / AUDIO OUT jack on your TV to connect headphones, a home theater system, soundbar, or external speaker system. When a device is connected to the / AUDIO OUT jack, the TV speakers are muted. You can select:
• Headphones/Audio Out Variable—Select this option to use the remote control that came with your TV to control the audio from headphones, a home theater system, a soundbar, or an external speaker system you connected to the / AUDIO OUT jack.
• Audio Out Fixed—Select this option to use the remote control that came with the home theater system, soundbar, or external speaker system you connected to the/ AUDIO OUT jack to control the audio.
• Reset Audio Settings—Reset all audio settings to factory defaults.
3 Press MENU to return to the previous menu, or press EXIT to close the menu.
Selecting the audio out mode
If your TV is on when you connect a device to the / AUDIO OUT jack on your TV, a screen opens where you select which audio out mode you want to use.
1 Connect headphones, a home theater system, soundbar, or external speaker system to the / AUDIO OUT jack on your TV.
2 Select an audio out mode. You can select:
• Headphones / Audio Out Variable—Select this option to use the remote control that came with your TV to control the audio from headphones, a home theater system, or a soundbar you connected to the/ AUDIO OUT jack.
• Audio Out Fixed—Select this option to use the remote control that came with the home theater system, soundbar, or external speaker system you connected to the / AUDIO OUT jack to control the audio.
Playing TV audio only
You can turn off the picture on your TV and listen to the program audio only.
1 Select the CHANNELS menu, then select Audio Only.
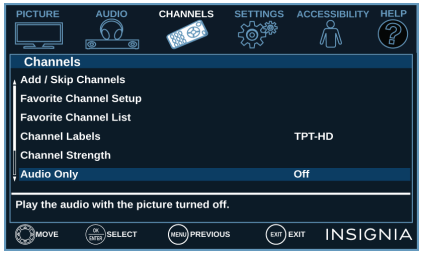
2 Select On.
3 Press MENU, ENTER, or to return to the previous menu, or press EXIT to close the menu.
Notes:
• The picture turns off in about five seconds.
• Audio Only works only when the input source is TV, and your TV is receiving a broadcast signal.
• To exit audio only mode, press any button. When you exit audio only mode, the Audio Only option is automatically reset to Off.
Setting parental controls
Parental controls let you prevent your children from watching inappropriate material on TV. When set, parental controls read the rating of the program (with some exceptions, such as news and sports) and deny access to programs that exceed the ratings level you select. To watch programs that exceed the selected rating, you must enter a password.
1 Select the SETTINGS menu, then select Parental Controls.
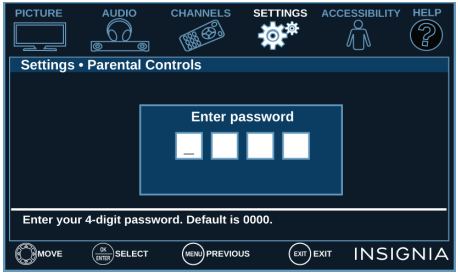
2 Use the number buttons to enter your parental controls password. The default password is 0000.
Notes:
• You should change the default password to a number you can remember.
• If you forget your password, enter 9999.
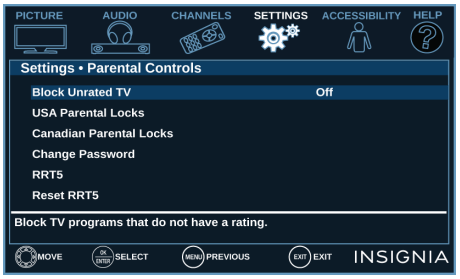
3 Select an option, then adjust the setting. You can select:
• Block Unrated TV—Some TV programs, such as news and sports shows are not rated. When Block Unrated TV is turned on, TV programs that do not have ratings are blocked. When you try to watch a blocked program, you are prompted to enter the parental controls password.
• USA Parental Locks—Lets you block U.S. TV shows based on ratings and content types and movies based on MPAA ratings.
Note: When you block a rating, that rating and all higher ratings are blocked.
| U.S. TV RATINGS |
| NONE |
Not rated |
| TV-Y |
All children |
| TV-Y |
Suitable for children 7 and older |
| TV-G |
General audiences |
| TV-G |
Parental guidance suggested |
| TV-G |
Parental guidance strongly suggested |
| TV-G |
Mature audiences only |
| U.S. TV CONTENT RATINGS |
| All |
All ratings are blocked |
| FV |
Fantasy violence |
| L |
Strong language |
| S |
Sexual situations |
| V |
Violence |
| D |
Suggestive dialog |
| U.S. MOVIE (MPAA) RATINGS |
| NONE |
Movie not rated |
| G |
General audiences |
| PG |
Parental guidance suggested |
| PG-13 |
Suitable for children 13 and older |
| R |
Parental guidance suggested for children under 17 |
| NC-17 |
Not suitable for children under 17 |
| X |
Adults only |
• Canadian Parental Locks—Lets you block Canadian TV shows based on ratings and content types.
Note: When you block a rating, that rating and all higher ratings are blocked.
| CANADIAN ENGLISH RATINGS |
| E |
Exempt programming |
| C |
Suitable for all children |
| C8+ |
Suitable for children 8 and older |
| G |
General audiences |
| PG |
Parental guidance suggested |
| 14+ |
Suitable for children 14 and older |
| 18+ |
Adult only |
| CANADIAN FRENCH RATINGS |
| E |
Exempt programming |
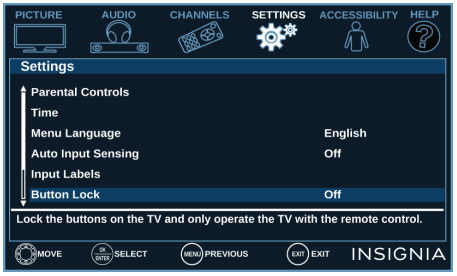
Locking the power button on your TV
When the button lock is turned On, the power button on your TV is locked, and you can only turn your TV on or off or change the video input source using the remote control.
1 Select the SETTINGS menu, then select Button Lock.
2 Select On (locks the power button) or Off (unlocks the power button).
3 Press MENU to return to the previous menu, or press EXIT to close the menu.
Adjusting time settings
You can set the clock or turn on the sleep timer.
1 Select the SETTINGS menu, then select Time.
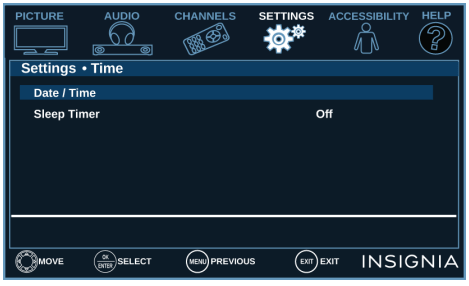
2 Select an option, then adjust the setting. You can select:
• Date/Time—Lets you set the time zone, date, and time.
If you skipped the steps in the Easy Setup wizard for setting the date and time or if you move your TV to a different time zone, you need to reset the clock to the correct time.
• Sleep Timer—Let you specify the amount of time before your TV automatically turns off. You can select Off, 5, 10, 15, 30, 60, 90, 120, 180, or 240 minutes.
Note: You can also press SLEEP to set the sleep timer.
3 Press MENU to return to the previous menu, or press EXIT to close the menu.
You can adjust how the TV menus look by:
- Selecting the menu language
- Turning the Input Sensor on or off
- Labeling an input source.
1 Select the SETTINGS menu.
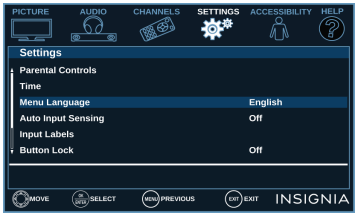
2 Select an option, then adjust the setting. You can
select:
- Menu Language—Your TV can display the on-screen menu in English, French, or Spanish. When you set up your TV for the first time, you selected the language. You can change the menu language to a different language.
- Auto Input Sensing—When the Input Sensor feature is turned on, your TV automatically detects which video jacks have devices connected to them and turned on. Your TV uses this information to determine what options you can select on the INPUT SOURCE list when you press INPUT.
- Input Labels—You can add a label to an input source to make it easier to identify. The next time you press INPUT, your label appears in the INPUT SOURCE list.
3 Press MENU to return to the previous menu, or press EXIT to close the menu.
Adjusting accessibility settings
Your TV provides audio descriptions of menus and some remote control functions. Depending on the broadcaster,
audio narration of key elements in programs may also be available.
1 Select the ACCESSIBILITY menu.
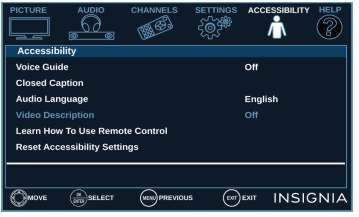
2 Select an option, then adjust the setting. You can select:
- Voice Guide—Audibly narrates menu selections and some remote control functions. You can select On or Off.
Note: The Voice Guide option is only available in the English language.
- Closed Caption—Displays a text version of the TV program audio or displays information provided by the broadcaster. See Using closed captioning on page 29 for instructions about using closed captioning features.
- Audio Language— Digital channels only) Selects an alternate audio language, if available.
- Video Description—Audibly narrates key visual elements in TV programs (not available on all broadcasts). You can select On or Off.
- Learn How To Use Remote Control—Provides information about using the remote control.
- Reset Accessibility Settings—Resets all accessibility settings to factory mode.
3 Press MENU to return to the previous menu, or press EXIT to close the menu.
Maintaining
- Do not use your TV in areas that are too hot or too cold, because the cabinet may warp or the screen may malfunction. Your TV works best in temperatures that are comfortable to you.
- Storage temperatures are 32° to 122°F (0° to 50°C).
- Working temperatures are 41° to 104°F (5° to 40°C).
- Do not place your TV in direct sunlight or near a heat source.
Cleaning the TV cabinet
Clean the cabinet with a soft, lint-free cloth. If the cabinet is especially dirty, moisten a soft, lint-free cloth in a weak
detergent solution, squeeze the excess moisture from the cloth, then wipe the cabinet with the cloth. Use a clean
cloth to dry the cabinet.
Cleaning the TV screen
Clean the screen with a soft, lint-free cloth.
Troubleshooting
Using the HELP menu
The HELP menu provides information about frequently asked questions.
1 Select the HELP menu.
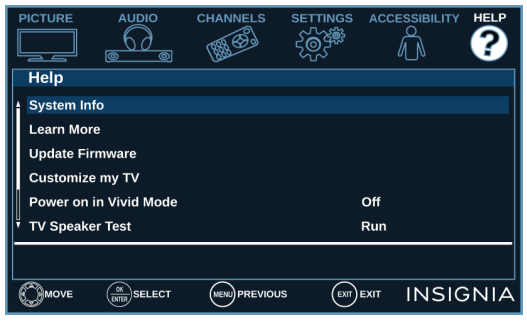
2 Select an option. You can select:
• System Info—Displays system information during troubleshooting. If your TV uses open source code, press ENTER to display the open source code information.
• Learn More—Displays remote control codes and information about connecting a soundbar.
• Update Firmware—If your TV is behaving oddly and you have tried all the solutions in the troubleshooting pages, lets you update your TV’s firmware. To update the TV firmware, you need a:
- Computer with an available USB port
- High-speed Internet connection
- USB flash drive
CAUTIONS:
- Make sure that you have tried all other solutions before you upgrade the firmware.
- While the firmware is updating, do not turn off your TV.
Notes:
- Firmware updates may not be available for your model.
- If you see a message that says the firmware file is incorrect, make sure that you have downloaded the correct file for your model.
- If you see a message that says the update failed or the TV screen is blank and the power LED blinks red then blue, turn your TV off and on, then run the upgrade again.
• Customize my TV—If you did not complete the customization part of the Easy Setup wizard the first time you turned on your TV, run the wizard again to customize settings.
• TV Speaker Test—Tests your TV’s speakers to make sure that they are working correctly.
• Reset to Default—Resets all settings (except parental controls) to the factory defaults and runs the Easy Setup wizard. See Turning on your TV for the first time.
Video and audio
| PROBLEM |
SOLUTION |
| Picture does not fill the screen. There are black bars around the picture. |
• Change the aspect ratio. See the Aspect Ratio option in Adjusting the TV picture . |
| No picture (screen is not lit) and no sound. |
• Press on the TV or the remote control.
• Make sure that the Audio Only option is set to Off. See Playing TV audio only on page 26.
• Make sure that the video cables are connected correctly and securely to your TV.
• Adjust the contrast and brightness. See Adjusting the TV picture on page 23.
• Make sure that the power cord is plugged into a working outlet.
• Press INPUT and make sure that the correct video input source is selected. See Selecting the video input source on page 19.
• Try another channel. The station may be experiencing problems.
• Make sure that the incoming signal is compatible.
• Make sure that the antenna or cable TV is connected correctly and securely. See Connecting a cable or satellite box on page 8 or Connecting an antenna or cable TV (no box) on page 9.
• Check the closed caption settings. Some TEXT modes can block the screen. See Using closed captioning on page 29.
|
| Dark, poor, or no picture (screen is lit), but sound is good. |
• Try another channel. The station may be experiencing problems.
• Make sure that the antenna or cable TV is connected correctly and securely. See Connecting a cable or satellite box on page 8 or Connecting an antenna or cable TV (no box) on page 9.
• Adjust the brightness. See Adjusting the TV picture on page 23.
• Press PICTURE to change to a different picture mode. See Adjusting the TV picture on page 23.
• If you are using an antenna, the digital channel signal may be low. To check the digital channel signal strength, see the Channel Strength option in Changing channel settings on page 27.
• If you are using an antenna and the signal strength is low, adjust the antenna or use a highly directional outdoor antenna or set-top antenna with a built-in amplifier.
• Make sure that the video cables are connected correctly and securely to your TV.
• The video cable(s) you are using may be bad. Try a new set. |
| No color, dark picture, or color is not correct. |
• Try another channel. The station may be experiencing problems.
• Adjust the color settings. See Adjusting the TV picture on page 23.
• Make sure that the video cables are connected correctly and securely to your TV.
• Make sure that the antenna or cable TV is connected correctly and securely. See Connecting a cable or satellite box on page 8 or Connecting an antenna or cable TV (no box) on page 9.
• If you are using an antenna, the digital channel signal may be low. To check the digital channel signal strength, see Channel Strength option in Changing channel settings on page 27.
• If you are using an antenna and the signal strength is low, adjust the antenna or use a highly directional outdoor antenna or set-top antenna with a built-in amplifier. |
| Picture quality is good on some channels and poor on others. Sound is good. |
• The problem may be caused by a poor or weak signal from the broadcaster or cable TV provider.
• If you connect to cable TV without a set-top box and experience poor picture quality, you may need to install a set-top box to improve signal reception and picture quality. Contact your cable TV provider about upgrading to a set-top box.
|
| Dotted lines or stripes appear on the screen. |
• Make sure that the antenna or cable TV is connected correctly and securely. See Connecting a cable or satellite box on page 8 or Connecting an antenna or cable TV (no box) on page 9.
• If you are using an antenna, the digital channel signal may be low. To check the digital channel signal strength, see Channel Strength option in Changing channel settings on page 27.
• If you are using an antenna and the signal strength is low, adjust the antenna or use a highly directional outdoor antenna or set-top antenna with a built-in amplifier.
• Make sure that the video cables are connected correctly and securely to your TV.
• The video cable(s) you are using may be bad. Try a new set.
• Other devices (for example, a surround sound receiver, external speakers, fans, or hair dryers) may be interfering with your TV. Try turning off one device at a time to determine which device is causing interference. After you have determined which device is causing interference, move it further from the TV to eliminate the interference.
|
| The picture has a few bright or dark spots |
• A few bright or dark spots on an LCD screen is normal. It does not affect the operation of your TV. |
| Video description or voice guide does not work. |
• Make sure that your TV is not muted and the volume is turned up.
• Make sure that the options listed under the Accessibility menu are turned on. See Adjusting accessibility settings on page 30.
• Video descriptions are not available on all broadcasts.
• Some remote functions are not narrated.
|
| Good picture, but no sound. |
• Increase the volume.
• Make sure that the sound is not muted.
• Make sure that you do not have headphones connected. When headphones are connected, no sound comes from the TV speakers.
• Change to a different audio mode. See the Audio Mode option in Adjusting sound settings on page 25.
• If you are using a home theater system, soundbar, or external speaker system, make sure that it is turned on and is not muted.
• If you are using a home theater system, soundbar, or external speaker system, make sure that you have selected the correct output mode.
• If you are using a home theater system, soundbar, or external speaker system and have connected it with a digital audio cable, select Digital Audio Format/Audio Delay on the Audio menu, then set Audio Format to PCM. See the Digital Audio Format/Audio Delay option in Adjusting sound settings on page 25.
• Make sure that the audio cables are connected correctly and securely to your TV.
• Make sure that the antenna or cable TV is connected correctly and securely. See Connecting a cable or satellite box on page 8 or Connecting an antenna or cable TV (no box) on page 9.
• If you are using an antenna, the digital channel signal may be low. To check the digital channel signal strength, see Channel Strength option in Changing channel settings on page 27.
• If you are using an antenna and the signal strength is low, adjust the antenna or use a highly directional outdoor antenna or set-top antenna with a built-in amplifier.
• The audio cables you are using may be bad. Try a new set.
|
| Poor picture. |
• Make sure that the room is not too bright. Light reflecting off the screen can make the picture difficult to see.
• If an S-VHS camera or a camcorder is connected while another connected device is turned on, the picture may be poor. Turn off one or more devices.
|
| Good sound, but poor color. |
• Adjust the contrast, color, and brightness settings. See Adjusting the TV picture on page 23. |
| Audio noise. |
• Other devices (for example, a surround sound receiver, external speakers, fans, or hair dryers) may be interfering with your TV. Try turning off one device at a time to determine which device is causing interference. After you have determined which device is causing interference, move it further from the TV to eliminate the interference. |
| No output from one of the speakers |
• Adjust the audio balance. See Adjusting sound settings on page 25.
• Test the TV’s speakers. See the TV Speaker Test option in Using the HELP menu on page 31. If one or both of the speakers fails, try one of the following solutions:
• Make sure that the audio cables are connected correctly and securely to your TV.
• Make sure that the audio cables are connected to the AUDIO OUT jacks on the connected device.
• Try a different set of audio cables.
• Make sure that the sound on the connected device is not muted.
• Try connecting the device to a different TV. If you do not hear sound, the problem is with the device.
|
| After images appear |
• Do not display a still image, such as a logo, game, or computer image, for an extended period of time. This can cause a permanent after-image to be burned into the screen. This type of damage is not covered by your warranty. |
Remote control
| PROBLEM |
SOLUTION |
| Remote control does not work. |
• Make sure that the power cord is plugged into a working outlet.
• Make sure that there are no obstructions between the remote control and the remote control sensor on the front of the TV.
• Point the remote control directly at the remote control sensor on your TV.
• The supplied batteries are wrapped tightly in clear plastic. Make sure that you have removed this plastic from the batteries.
• Make sure that the batteries are installed correctly.
• Replace dead batteries with new batteries.
|
| Trouble programming your existing universal remote control. |
• See instructions in Programming universal remote controls on page 15.
• Codes are subject to change. For up-to-date codes, go to Viewing universal remote control codes on page 15 or visit www.insigniaproducts.com/remotecodes
• Replace dead batteries with new batteries.
• Refer to the User Guide that accompanied your universal remote control and contact the manufacturer if problems persist.
|
General
| PROBLEM |
SOLUTION |
| No power. |
• Make sure that the power cord is plugged into a working outlet.
• Unplug the power cord, wait 60 seconds, then plug the cord back in and turn on your TV.
• Other devices (for example, a surround sound receiver, external speakers, fans, or hair dryers) may be interfering with your TV. Try turning off one device at a time to determine which device is causing interference. After you have determined which device is causing interference, move it further from the TV to eliminate the interference.
|
| “No signal” error message is displayed. |
• Press INPUT and make sure that you have selected the correct input for the device or service you are trying to use.
• If you are using a cable or satellite box, use the remote that came with that box to change channels.
|
| After Auto Channel Search, there are no channels. |
• Reception can vary by channel depending on the broadcast power level of a given station. Contact your cable or satellite TV provider.
• Make sure that the antenna or cable/satellite TV is connected securely to your TV.
• Try replacing the cable between the antenna/cable or cable/satellite box and your TV.
|
| When I press INPUT, I cannot select my device (it is grayed out). |
• Turn on the device. Your TV automatically detects and displays which video jacks have devices connected to them when the devices are turned on.
• Turn off Auto Input Sensing. See Adjusting menu settings on page 30.
|
| One or more channels do not display. |
• Make sure that the channels are not blocked. See Setting parental controls on page 27.
• Make sure that the channels are not hidden. The channel may have been deleted from the channel list. You can tune to the channel by pressing the number buttons or you can add the channel back to the channel list. See the Add/Skip Channels option in Changing channel settings on page 27.
• If you are using a cable or satellite box, use the remote that came with that box to change channels.
• Press INPUT and make sure that you have selected the correct input for the device or service you are trying to use.
• If you are using an antenna, the digital channel signal may be low. To check the digital channel signal strength, see the Channel Strength option in Changing channel settings on page 27.
|
| Password is lost |
• Enter 9999 to access parental controls, then set a new password. See the Change Password option in Changing channel settings on page 27. |
| Some settings cannot be accessed. |
• If a setting is grayed, the setting is not available in the current video input mode (for example TV mode). Change to a different video input source. See Selecting the video input source on page 19. |
| TV cabinet creaks. |
• When the TV is in use, the temperature rises naturally and may cause the cabinet to expand or contract which can cause a creaking noise. This is not a malfunction. |
| button does not work |
• Make sure that the Button Lock option is set to Off. See Locking the power button on your TV on page 29.
• Unplug the power cord, wait a few seconds, then plug the cord back in and turn on your TV.
|
| TV keeps turning off. |
• Make sure that the sleep timer is not turned on. See the Sleep Timer option in Adjusting time settings on page 29. |
| A retail banner is displayed. |
• You selected Store Display Mode when you ran the Easy Setup wizard. Run the Easy Setup wizard and select Home User Mode on the Viewing Environment screen. See the Customize my TV option in Using the HELP menu on page 31. |
INlink (CEC-compatible) device
| PROBLEM |
SOLUTION |
| My TV is not displaying the video from the connected CEC device. |
• Make sure that the HDMI cable is connected securely to your TV and the device.
• Make sure that the device is connected to your TV with an HDMI cable.
• Make sure that the device is a CEC device. See the documentation that came with the device for more information.
• Press INPUT and make sure that the correct video input source is selected. See Selecting the video input source on page 19.
• Make sure that the INlink feature is turned on. See the INlink Control option in Using INlink on page 21.
• Try adjusting the TV picture. See Adjusting the TV picture on page 23.
|
| My TV is not playing the audio from the connected CEC device. |
• Make sure that the HDMI cable is connected securely to your TV and the device.
• Make sure that the device is connected to your TV with an HDMI cable.
• Make sure that the device is a CEC device. See the documentation that came with the device.
• Make sure that the TV volume is turned up and not muted.
• Try adjusting the TV sound. See Adjusting sound settings on page 25.
• Make sure that the TV speakers are turned on and not muted. See Adjusting sound settings on page 25.
• Make sure that the INlink feature is turned on. See INlink Control option in Using INlink on page 21.
• If you have connected an HDMI CEC audio receiver, adjust the volume on the receiver. When your TV detects an audio receiver, the TV speakers turn off and sound plays through receiver speakers only.
• If you are using a home theater system, soundbar, or external speaker system, make sure that it is turned on and is not muted.
• If you are using a home theater system, soundbar, or external speaker system, make sure that you have selected the correct output mode.
• If you are using a home theater system, soundbar, or external speaker system and have connected it with a digital audio cable, select Digital Audio Format/Audio Delay on the Audio menu, then set Audio Format to PCM. See the Digital Audio Format/Audio Delay option in Adjusting sound settings on page 25.
|
| My TV’s remote control does not control the device. |
• Make sure that there are no obstructions between the remote control and the remote control sensors on your TV and the device.
• Depending on the device, all the buttons may not work.
• After you switch to an INlink device, use the remote control that came with the device to control playback.
• Make sure that the INlink feature is turned on. See INlink Control option in Using INlink on page 21.
• If you are trying to control the volume on an HDMI CEC audio receiver using your TV remote control, make sure that the TV Speakers option on the Audio menu is set to On. See Adjusting sound settings on page 25.
• If you are trying to control the volume on an HDMI CEC audio receiver using your TV remote control, make sure that the Audio Receiver option on the INlink menu is set to On. See the Audio Receiver option in Using INlink on page 21.
• The device may not support this feature. See the documentation that came with the device for more information.
|
| The device does not show up in the INlink Device list. |
• Make sure that the device is turned on.
• Make sure that the HDMI cable is connected securely to your TV and the device.
• Make sure that the device is connected to your TV with an HDMI cable.
• Make sure that the INlink feature is turned on. See the INlink Control option in Using INlink on page 21.
• Make sure that the device is a CEC device. See the documentation that came with the device.
|
| My device does not turn off when I turn off my TV. |
• Make sure that the INlink feature is turned on. See the INlink Control option in Using INlink on page 21.
• Make sure that Device Auto Power Off is set to On on the INlink menu. See the Device Auto Power Off option in Using INlink on page 21.
• The device may not support this feature. See the documentation that came with the device for more information.
|
| My TV does not turn on when I turn on my device. |
• Make sure that the INlink feature is turned on. See the INlink Control option in Using INlink on page 21.
• Make sure that TV Auto Power On is set to On on the INlink menu. See the TV Auto Power On option in Using INlink on page 21.
• The device may not support this feature. See the documentation that came with the device for more information.
|
| The Audio Receiver setting on the INlink menu keeps turning back on after it is turned off. |
• When Audio Receiver is set to Off and INlink Control is set to On and you make an adjustment to the audio receiver (for example, turn the volume knob or press a button), Audio Receiver is automatically set to On. To prevent this from happening, turn off the INlink feature. See the INlink Control option in Using INlink on page 21. |
| Two volume bars appear when adjusting the volume. |
• When you adjust the volume on the audio receiver or with the TV remote control, a double volume bar appears, one for the TV volume and one for the audio receiver volume. |
|
I cannot select the Root Menu option on the INlink menu.
OR
The device’s root menu does not open when I select Root Menu on the INlink menu.
|
• The device may not support this feature. See the documentation that came with the device for more information. |
|
Note: If the problem is not solved by using these troubleshooting instructions, turn off your TV, then turn it on again.
|