Loading ...
Loading ...
Loading ...
- 6 -
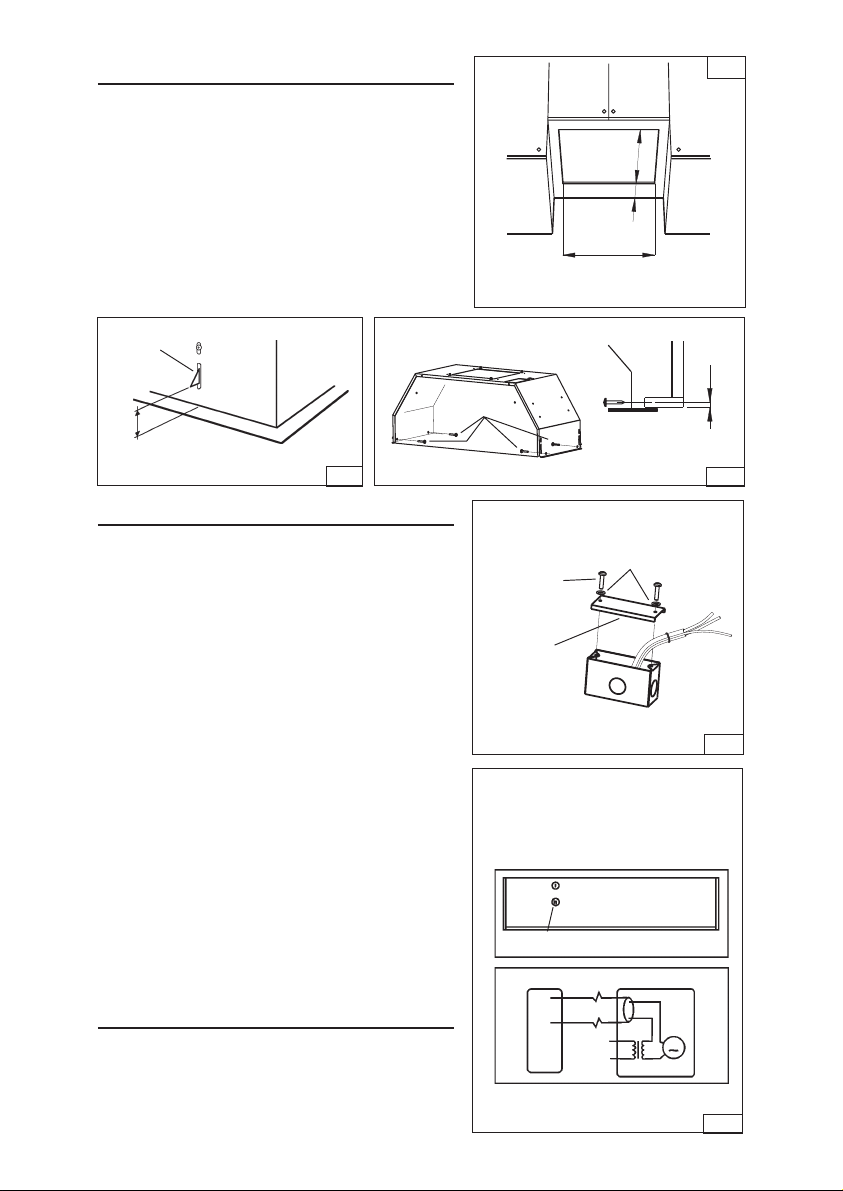
X
10 ¼”
1”
X=
19-½” For Version P195P1M52
X=26- ” For Version P195PM70 Models
5/8
INSTALL THE HOOD
1. Cut a hole in the bottom of the cabinet.
See Fig.5
2. To install the hood, adjust the position of
the clasping side spring by turning the
screws, according to the thickness of the
cabinet to which it is going to be anchored.
See Fig.6
3. Insert the hood in the cabinet and lock into
position using the side spring.
4. Use the holes in the hood, secure it with (4)
mounting screws (B) - 3.2 x 16mm. See Fig.7
A= min 7/16”- max 13/16”
CLASPING SIDE
SPRING
A
MOUNTING SCREWS
(3.2x16mm)
Fig.5
Fig.6
Fig.7
WIRING
Note: This range hood must be properly
grounded. The unit should be installed by a
qualified electrician in accordance with all
applicable national and local electrical codes.
• 120 VAC INPUT (FIG.8)
1. Secure the conduit to the wiring box through
a conduit connector.
2. Make electrical connections. Connect white
to white, black to black and green to green.
3. Install wiring box cover and secure it with (2)
screws 3,9 x 6 mm and (2) washers. Make sure
that wires are not pinched between cover
and box.
•
MAKE-UP AIR DAMPER ALTERNATE
CONNECTION (FIG.9)
The hood is compatible with Broan Make-Up Air
Damper Model MD6T or Model MD8T (optional).
Purchase separately.
Make the connection to the Make-Up Air Damper
with low voltage wiring, as shown. See Make-
Up Air Damper instructions for additional
information.
WIRING
BOX
COVER
(2) SCREWS
(3,9 x 6mm)
WASHER
MAKE-UP AIR
DAMPER
CONNECTION
120 VAC INPUT
Fig.8
Fig.9
2 Mounting screws on
each side (as shown)
Dimension from bottom
edge of cabinet to center
line of screw/hole
0,3”- 0,4”
B
LOW-VOLTAGE CONNECTOR
FOR MAKE-UP AIR DAMPER
RANGE
HOOD
LOW-VOLTAGE
WIRES
TOP OF HOOD
MAKE-UP AIR
DAMPER
120
VAC
24
VAC
DAMPER
MOTOR
CONNECT DUCTWORK
1. Use 6"or 8” round metal duct to connect
the duct connector on the hood to the
ductwork above.
2. Use duct tape to make all joints secure and
air tight.
Loading ...
Loading ...
Loading ...