Loading ...
Loading ...
Loading ...
- 5 -
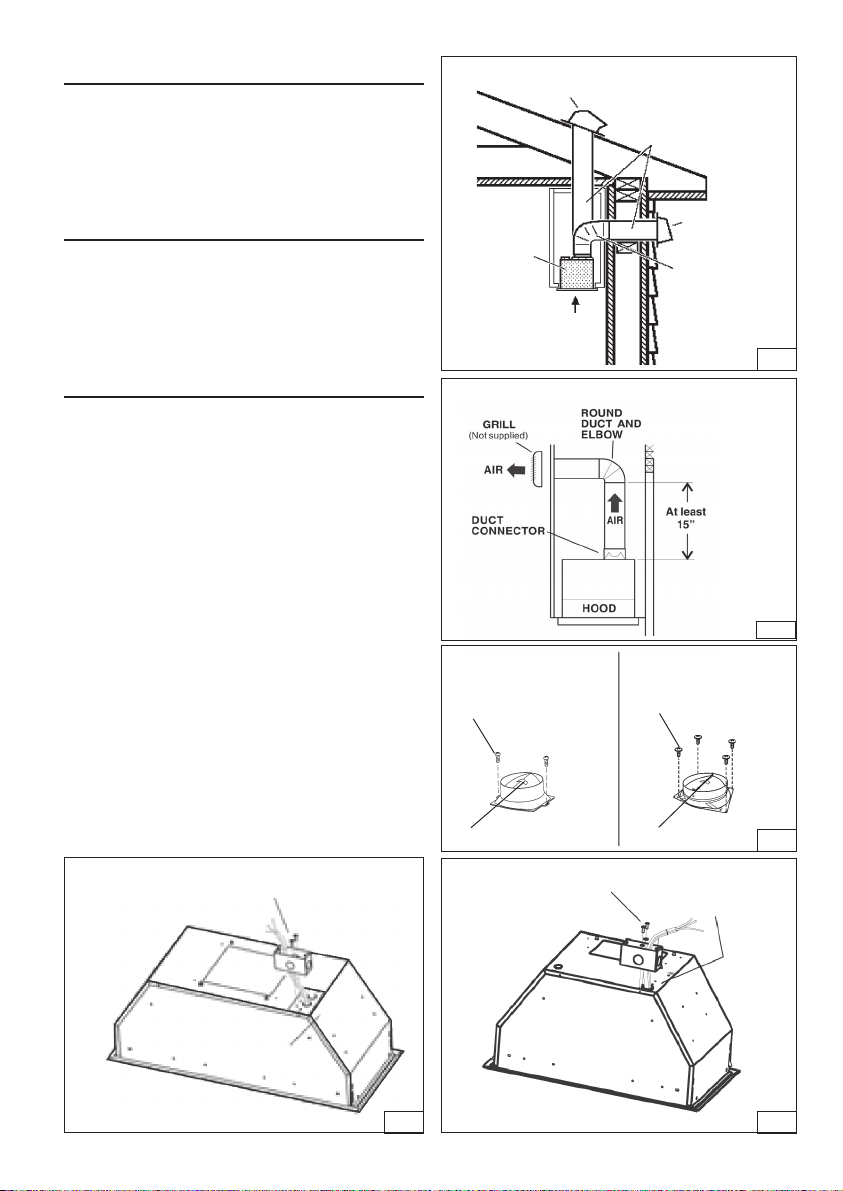
INSTALL THE DUCTWORK
NOTE: To reduce the risk of fire, use only
metal ductwork.
1. Decide where to install the duct.
2. A straight, short duct will allow the hood to
perform most efficiently.
3. Long duct, elbows, and transitions will
reduce the performance of the hood. Use
as few of them as possible.
4. Use duct tape to seal the joints between
ductwork sections.
Ducted configuration
(shown in Fig.1a):
Install a roof or wall cap. Connect the round metal
ductwork to cap and work back towards hood
location.
Non-Ducted configuration
(shown in Fig.1b):
Install a decorative grill (not supplied by Best).
You may need to purchase a metal round-to-
rectangular transition depending on your
application.
DUCTED CONFIGURATION
ROOF CAP
ROUND
DUCT
WALL
CAP
HOOD
24” TO 30” ABOVE
COOKING SURFACE
ROUND
ELBOW
INSTALL JUNCTION BOXE
In the area marked “120 VAC INPUT”, place
a junction box on the top of the hood. Run the
wires through the hole below and secure with
(2) 3,9 x9,5 screws and (2) washers. See
Fig.3-4.
MOUNTING SCREWS
(3.9x9.5mm)
REMOVE THE TAPE
INSTALL DUCT CONNECTOR
1. Install the damper duct connector onto the
hood using mounting screws (3,9x9,5mm)
as shown in Fig.2
2. Remove the tape located on the damper.
See Fig.2.
Fig.1a
Fig.2
Fig.3
Fig.4
Fig.1b
NON-DUCTED CONFIGURATION
REMOVE THE TAPE
MOUNTING SCREWS
(3.9x9.5mm)
Model:
P195P1M52 - P195P1M70
(6” DUCT CONNECTOR)
Model:
P195P2M70
(8” DUCT CONNECTOR)
MOUNTING SCREWS
(3,9 x 9,5mm)
P195PM70 Models
MARKED
“120 VAC INPUT”
MOUNTING SCREWS
(3,9 x 9,5mm)
MARKED
“120 VAC INPUT”
P195P1M52 Model
Loading ...
Loading ...
Loading ...