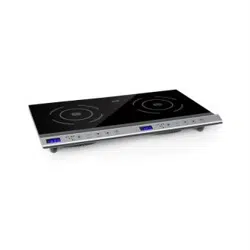
User Gudie Klarstein 10034503 Induction Hob
Product Data Sheet
- Number of cooking zones and/or areas
- Heating technology induction cooking zones and cooking areas, radiant cooking zones, solid plates)
- Induction cooking zone
- For circular cooking zones or area: diameter of useful surface area per electric heated cooking zone, rounded to the nearest 5 mm left right
- For non-circular cooking zones or areas: length and width of useful surface area per electric heated cooking zone or area, rounded to the nearest 5 mm
- N/A
- N/A cm
- Energy consumption per cooking zone or area calculated per kg
- Electric
- Cooking Hob left right
- Wh/kg
- Energy consumption for the hob calculated per kg
Safety Instructions
Electrical Shock Hazard
- Disconnect the appliance from the mains electricity supply before carrying out any work or maintenance on it.
- Connection to a good earth wiring system is essential and mandatory.
- Alterations to the domestic wiring system must only be made by a qualifi ed electrician.
- Failure to follow this advice may result in electrical shock or death.
General Instructions
- Read these instructions carefully before installing or using this appliance.
- No combustible material or products should be placed on this appliance at any time.
- Please make this information available to the person responsible for installing the appliance as it could reduce your installation costs.
- In order to avoid a hazard, this appliance must be installed according to these instructions for installation.
- This appliance is to be properly installed and earthed only by a suitably qualifi ed person.
- This appliance should be connected to a circuit which incorporates an isolating switch providing full disconnection from the power supply.
- Failure to install the appliance correctly could invalidate any warranty or liability claims.
- This device may be only used by children 8 years old or older and persons with limited physical, sensory and mental capabilities and / or lack of experience and knowledge, provided that they have been instructed in use of the device by a responsible person who understands the associated risks.
- Children shall not play with the appliance. Cleaning and user maintenance shall not be made by children without supervision.
- If the supply cord is damaged, it must be replaced by the manufacturer, its service agent or similarly qualifi ed persons in order to avoid a hazard.
Instructions on Use and Maintenance
Electrical Shock Hazard
- Do not cook on a broken or cracked cooktop. If the cooktop surface should break or crack, switch the appliance off immediately at the mains power supply (wall switch) and contact a qualifi ed technician.
- Switch the cooktop off at the wall before cleaning or maintenance.
- Failure to follow this advice may result in electrical shock or death.
Health Hazard
- This appliance complies with electromagnetic safety standards.
- However, persons with cardiac pacemakers or other electrical implants (such as insulin pumps) must consult with their doctor or implant manufacturer before using this appliance to make sure that their implants will not be affected by the electromagnetic fi eld.
- Failure to follow this advice may result in death.
CAUTION
- Risk of burns! During use, accessible parts of this appliance will become hot enough to cause burns. Do not let your body, clothing or any item other than suitable cookware contact the Induction glass until the surface is cool.
- Keep children away.
- Handles of saucepans may be hot to touch. Check saucepan handles do not overhang other cooking zones that are on.
- Keep handles out of reach of children.
- Failure to follow this advice could result in burns and scalds.
WARNING
- Risk of injury! The razor-sharp blade of a cooktop scraper is exposed when the safety cover is retracted. Use with extreme care and always store safely and out of reach of children. Failure to use caution could result in injury or cuts.
General Instructions
- Never leave the appliance unattended when in use. Boilover causes smoking and greasy spillovers that may ignite.
- Never use your appliance as a work or storage surface.
- Never leave any objects or utensils on the appliance.
- Do not place or leave any magnetisable objects (e.g. credit cards, memory cards) or electronic devices (e.g. computers, MP3 players) near the appliance, as they may be affected by its electromagnetic fi eld.
- Never use your appliance for warming or heating the room.
- After use, always turn off the cooking zones and the cooktop as described in this manual (i.e. by using the touch controls).
- Do not rely on the pan detection feature to turn off the cooking zones when you remove the pans.
- Do not allow children to play with the appliance or sit, stand, or climb on it.
- Do not store items of interest to children in cabinets above the appliance. Children climbing on the cooktop could be seriously injured.
- Do not leave children alone or unattended in the area where the appliance is in use.
OPERATING ELEMENTS
- Place the induction hob on a flat surface in such a way that the openings for air intake and outflow are not covered. The distance between the wall and the induction hob must be at least 10 cm.
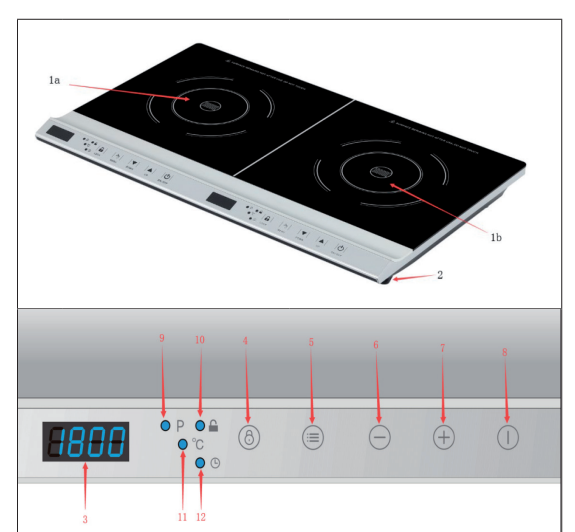
Switching on
- After plugging the induction hob into the socket, you will hear a beep and [L] will appear on the display.
- Press the ON/OFF button. The display shows [ON].
- The induction hob will detect whether you are using the correct cookware. If this is the case, [ON] appears on the display. Press the MENU button and you can select the cooking level. The hob turns on.
- If you are using the wrong cookware, you cannot select a cooking level after pressing the MENU button. You will hear a repeated signal and the [E0] warning will appear on the display. The induction hob switches to standby mode after a few seconds.
Setting the Power Level
- Press the MENU button and the power supply indicator [P] will light.
- After power on, the power level is automatically set to 1200W.
- Set the desired power level with the UP/DOWN buttons. The power can be set from 200-1300 W in 10 steps.
Setting the temperature
- Press the MENU button twice and the temperature control lamp [C] will light up.
- After switching on, the temperature is automatically set to 240 °C.
- Use the UP/DOWN buttons to set the temperature. The temperature can be adjusted from 60-240 °C in 10 steps.
Setting the timer
- When the power is set:
- Press the MENU button for the third time, the power indicator will light and the time control on the display will show [0:00].
- Set the desired time in the range of 0:01-3:00 hours in 1-minute increments.
- After setting the timer, wait until the display shows the default 1200W power setting. Then use the UP/DOWN buttons to set the desired power level.
When the temperature is set:
- Press the MENU button for the fourth time, the temperature indicator will light and the display will show [0:00].
- Use the UP/DOWN buttons to set the desired time in the range from 0:01-3:00 hours in 1-minute increments.
- After setting the timer, wait until the display shows the preset temperature of
- Then use the buttons UP/DOWN to set the desired temperature.
Switch off
- When you have finished cooking, turn off the induction hob by pressing the ON/
- OFF button. The display shows [H]. The fan will continue to run for a while to cool the appliance.
- When the fan is off, unplug the power cord and allow the unit to cool completely.
OPERATION OF THE BIG COOKING ZONE
Switching on
- After plugging the induction hob into the socket, you will hear a beep and [L] will appear on the display.
- Press the ON/OFF button. The display shows [ON].
- The induction hob will detect whether you are using the correct cookware. If this is the case, [ON] appears on the display. Press the MENU button and you can select the cooking level. The hob turns on.
- If you are using the wrong cookware, you cannot select a cooking level after pressing the MENU button. You will hear a repeated signal and the [E0] warning will appear on the display. The induction hob switches to standby mode after a few seconds.
Setting the Power Level
- Press the MENU button and the power supply indicator [P] will light.
- After power on, the power level is automatically set to 1600W.
- Set the desired power level with the UP/DOWN buttons. The power can be set from 200-1800 W in 10 steps.
Setting the temperature
- Press the MENU button twice and the temperature control lamp [C] will light up.
- After switching on, the temperature is automatically set to 240 °C.
- Use the UP/DOWN buttons to set the temperature. The temperature can be adjusted from 60-240 °C in 10 steps.
Setting the timer
- When the power is set:
- Press the MENU button for the third time, the power indicator will light and the time control on the display will show [0:00].
- Set the desired time in the range of 0:01-3:00 hours in 1-minute increments.
- After setting the timer, wait until the display shows the default 1600W power setting. Then use the UP/DOWN buttons to set the desired power level.
When the temperature is set:
- Press the MENU button for the fourth time, the temperature indicator will light and the display will show [0:00].
- Use the UP/DOWN buttons to set the desired time in the range from 0:01-3:00 hours in 1-minute increments.
- After setting the timer, wait until the display shows the preset temperature of
- C. Then use the buttons UP/DOWN to set the desired temperature.
Switch off
- When you have finished cooking, turn off the induction hob by pressing the ON/
- OFF button. The display shows [H]. The fan will continue to run for a while to cool the appliance.
- When the fan is off, unplug the power cord and allow the unit to cool completely
CHOOSING THE RIGHT COOKWARE
- Only use cookware with a base suitable for induction cooking. Look for the induction symbol on the packaging or on the bottom of the pan. Always lift the pot off the induction hob. Do not pull on the pot as this may scratch the glass.
- Cookware made from the following materials is not suitable: pure stainless steel, aluminium or copper without a magnetic base, glass, wood, porcelain, ceramic, and earthenware. Do not use cookware with jagged edges or a curved base.
- Make sure that the base of your pan is smooth, sits flat against the glass, and is the same size as the cooking zone.
- Use pans whose diameter is as large as the graphic of the zone selected. Using a pot a slightly wider energy will be used at its maximum efficiency.
- If you use smaller pot efficiency could be less than expected. Pot less than 140 mm could be undetected by the hob. Always centre your pan on the cooking zone.
- You can check whether your cookware is suitable by carrying out a magnet test. Move a magnet towards the base of the pan. If it is attracted, the pan is suitable for induction.
Cleaning and Care
Boilovers, melts, and hot sugary spills on the glass
Remove these immediately with a fish slice, palette knife or razor blade scraper suitable for ceramic glass cooktops, but beware of hot cooking zone surfaces:
1. Switch the power to the cooktop off at the wall.
2. Hold the blade or utensil at a 30° angle and scrape the soiling or spill to a cool area of the cooktop.
3. Clean the soiling or spill up with a dish cloth or paper towel.
4. Follow steps 2 to 4 for ‘Everyday soiling on glass’ above.
• Remove stains left by melts and sugary food or spillovers as soon as possible. If left to cool on the glass, they may be difficult to remove or even permanently damage the glass surface.
• Cut hazard: when the safety cover is retracted, the blade in a scraper is razor-sharp. Use with extreme care and always store safely and out of reach of children.
Spillovers on the touch controls.
1. Switch the power to the cooktop off.
2. Soak up the spill
3. Wipe the touch control area with a clean damp sponge or cloth.
4. Wipe the area completely dry with a paper towel.
5. Switch the power to the cooktop back on. The cooktop may beep and turn itself off, and the touch controls may not function while there is liquid on them. Make sure you wipe the touch control area dry before turning the cooktop back on.
Boilovers, melts, and hot sugary spills on the glass
and hot sugary spills on the glass Remove these immediately with a fish slice, palette knife or razor blade scraper suitable for ceramic glass cooktops, but beware of hot cooking zone surfaces
1. Switch the power to the cooktop off at the wall.
2. Hold the blade or utensil at a 30° angle and scrape the soiling or spill to a cool area of the cooktop.
3. Clean the soiling or spill up with a dish cloth or paper towel.
4. Follow steps 2 to 4 for ‘Everyday soiling on glass’ above.
- Remove stains left by melts and sugary food or spillovers as soon as possible. If left to cool on the glass, they may be difficult to remove or even permanently damage the glass surface.
- Cut hazard: when the safety cover is retracted, the blade in a scraper is razor-sharp. Use with extreme care and always store safely and out of reach of children.
Troubleshooting
Wrong pot
Circuit malfunction.
Problem with the temperature sensor.
Surge (more than 275 V).
- Check the power circuit and find a suitable power supply
The airflow has been interrupted.
- Check the airflow vents and clean them from the outside. If the problem persists, contact a professional.
Hints on Disposal
- If there is a legal regulation for the disposal of electrical and electronic devices in your country, this symbol on the product or on the packaging indicates that this product must not be disposed of with household waste. Instead, it must be taken to a collection point for the recycling of electrical and electronic equipment.
- By disposing of it in accordance with the rules, you are protecting the environment and the health of your fellow human beings from negative consequences.
- For information about the recycling and disposal of this product, please contact your local authority or your household waste disposal service.
Manufacturer & Importer (UK)
Manufacturer:
- Chal-Tec GmbH, Wallstrasse 16, 10179 Berlin, Germany.
- Importer for Great Britain: Chal-Tec UK limited Unit 6 Riverside Business
- Centre Brighton Road Shoreham-by-Sea BN43 6RE United Kingdom