Loading ...
Loading ...
Loading ...
4
MIC
(5V
(5V
1.0A)
1.0A)
100-120V~ 50/60Hz 1050W
100-120V~ 50/60Hz 1050W
12V FUSE
12V FUSE
100-120V~ 50/60Hz , MAX 1000W(COMBINED)
100-120V~ 50/60Hz , MAX 1000W(COMBINED)
T12.5AL 250V~
T12.5AL 250V~
12V
12V
10A
10A
T10AL 250V~
T10AL 250V~
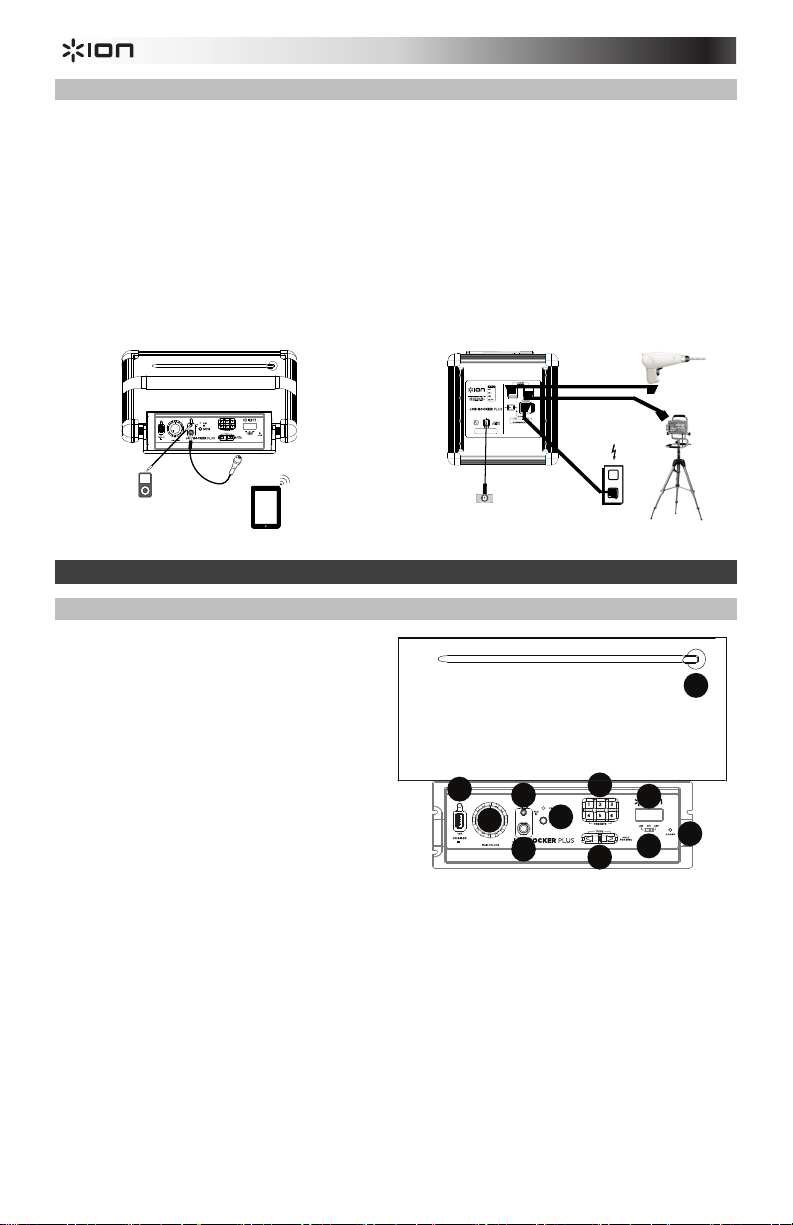
Quick Setup / Connection Diagram
1. Make sure all items listed in the Box Contents at the beginning of this guide are included in the box.
2. READ SAFETY INSTRUCTION BOOKLET BEFORE USING THE PRODUCT.
3. MAKE SURE THAT YOU HAVE COMPLETELY CHARGED THE BATTERY PRIOR TO FIRST USE
FOR MAXIMUM BATTERY LIFE.
4. Turn down the volume on the Job Rocker Plus.
5. Connect your music player with an audio cable or Bluetooth (see Connecting with a Bluetooth Device
for more details on this).
6. Adjust the volume on the music player and on Job Rocker Plus as needed.
7. Turn off Job Rocker Plus when not in use.
Items not listed under the Box Contents are sold separately.
Features
Front Panel
1. USB Charging Port: Connect your device’s
charge cable here to charge it. USB
charging only functions when the unit’s
power is turned on.
2. Master Volume Knob: Controls the overall
volume for the Bluetooth source, the AUX
input, and the radio.
3. 1/8
”
Aux Input: This stereo 1/8” input can
be used to connect a smartphone, MP3
player, or other audio source.
4. Microphone Input:
Connect a dynamic
microphone to this 1/4” input.
5. Bluetooth: The Paired LED will be lit when
a device is connected to Job Rocker Plus.
This LED will not be lit when Job Rocker
Plus is first powered on (unless it was
previously connected with a device). Press
the Bluetooth Disconnect button to disconnect a connected Bluetooth device.
6. Tuner: Use these buttons to search for a radio station. To "seek" (jump to the next available station),
hold this down for a few seconds until it starts to seek a station. The unit will remember the last station
you were on and start at that station when you power off and power on again.
7. Radio Preset Buttons: There are 6 storage locations for FM stations, and 6 storage locations for AM
stations. When you move the am/fm/off switch to AM or FM, that action changes the bank of presets
you are on.
8. LCD: Displays the current radio station.
9. Radio Selector: This switch sets the tuner to AM or FM or turns the tuner off.
Note: This switch does not turn the unit's power off – just the tuner.
10. Power LED: Indicates whether Job Rocker Plus is powered on or off.
11. Antenna: Adjust this FM antenna to get the best radio reception. To improve AM reception, move the
entire unit.
Note: To prevent accidental damage, we recommend rotating the antenna only when it is extended
horizontally. Lay the antenna down in its holder when the Tuner is not in use.
Rear Panel
Front Panel
MP3
Player
Micro
p
hone
Drill
Power
The AC outlets work when
wall power is connected.
Work Light
12V DC
MIC
12V FUSE
100-120V~ 50/60Hz MAX 10A, MAX 1000W(COMBINED)
100-120V~ 50/60Hz 1050W
T12.5AL 250V~
12V 5A
T5AL 250V~
(5V
(5V
1.0A)
1.0A)
2
3
6
8
9
1
22
6
5
3
4
1
5
11
11
4
10
10
7
Tablet
Loading ...
Loading ...
Loading ...