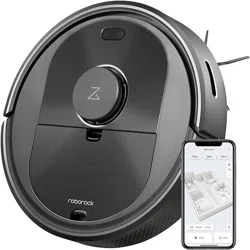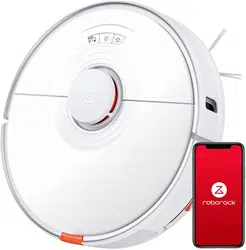
Roborock S7
Read this user manual carefully before using this product and
store it properly for future reference.
Robotic Vacuum Cleaner User Manual
English 004
Français 045
Español 087

Contents
005 Safety Information
008 FCC IC Statement
010 Battery and Charging
011 Holiday Energy Saving Function
012 Product Overview
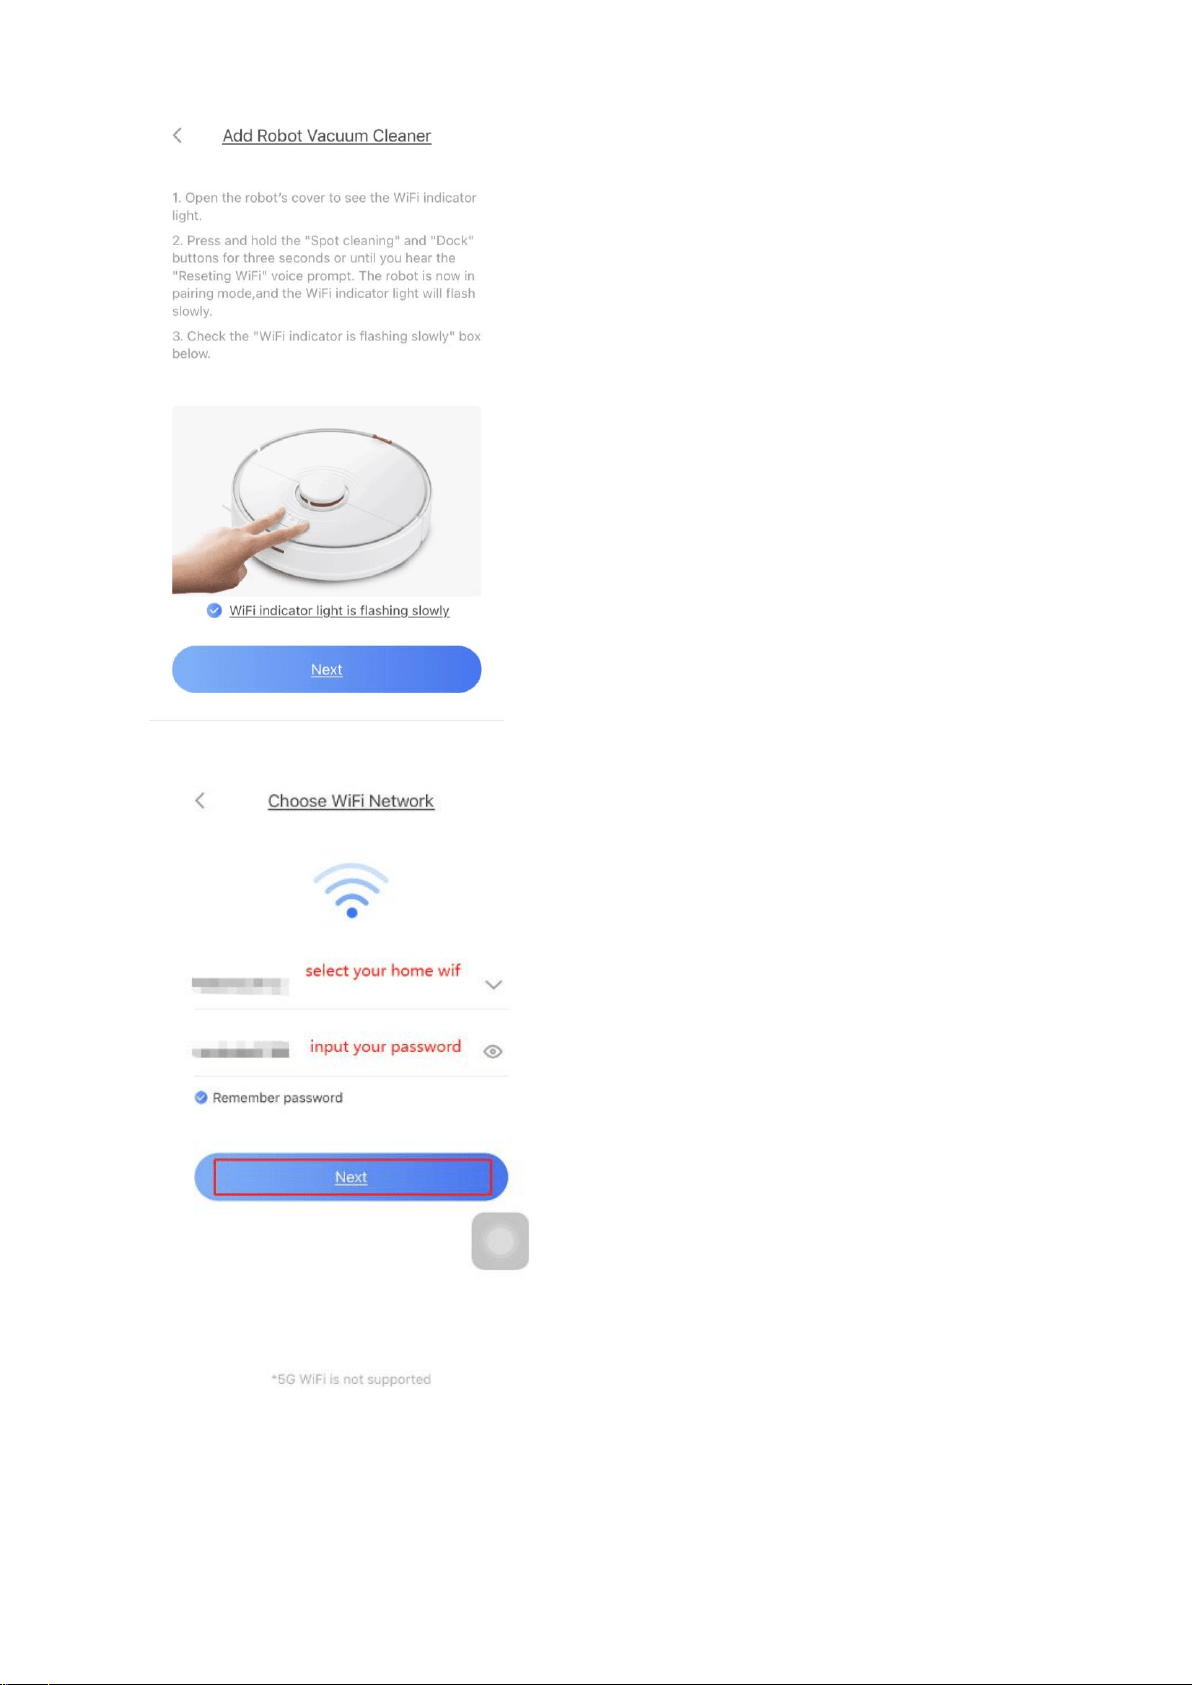
018 Installation
023 Connect to the App
025 Instructions
029 Routine Maintenance
039 Basic Parameters
040 Errors
042 Common Issues
005
IMPORTANT SAFETY INSTRUCTIONS
WARNING
Safety Information
When using an electrical appliance, basic precautions should always be followed, including the following: READ ALL IN-
STRUCTIONS BEFORE USING (THIS APPLIANCE). Failure to follow the warnings and instructions may result in electric shock,
Do not use outdoors or on wet surfaces.
Do not allow to be used as a toy. Close attention is necessary when used by or near children, pets or plants.
Use only as described in this manual. Use only manufacturer’s recommended attachments.
Do not use with damaged cord or plug. If appliance is not working as it should, has been dropped, damaged, left
outdoors, or dropped into water, return it to a service center.
Do not pull or carry by cord, use cord as a handle, close a door on cord, or pull cord around sharp edges or corners.
Do not run appliance over cord. Keep cord away from heated surfaces.
Do not unplug by pulling on cord. To unplug, grasp the plug, not the cord.
Do not handle charger, including charger plug, and charger terminals with wet hands.
Do not pick up anything that is burning or smoking, such as cigarettes, matches, or hot ashes.
Do not use without dust bag.
on invites accidents.

006
Safety Information
measures reduce the risk of starting the appliance accidentally.
Follow all charging instructions and do not charge the battery pack or appliance outside of the temperature range
safety of the product is maintained.
care.
Place the cords from other appliances out of the area to be cleaned.
Do not operate the vacuum in a room where an infant or child is sleeping.
Do not operate the vacuum in a room that has lit candles on furniture that the vacuum may accidentally hit or bump into.
Do not allow children to sit on the vacuum.

007
Safety Information
SAVE THESE INSTRUCTIONS
Household use only.
Laser Safety

FCC IC Statement
Compliance Information
Correspondence of the responsible party in USA
Product Name Robotic Vacuum Cleaner with Dock Charger
Robotic Vacuum Cleaner Model:
roborock S7
Dock Charger Model: CDZ11RR or CDZ12RR
This device complies with part 15 of the FCC Rules.
-
(1) This device may not cause harmful interference, and (2) this device must accept
any interference received, including interference that may cause undesired operation.
Roborock Technology Co.
support@roborock.com
Product Model
Compliance Statement
Company
Address
Email

Warning
FCC Rules. These limits are designed to provide reasonable protection against harmful interference in a residential instal-
with the instructions, may cause harmful interference to radio communications. However, there is no guarantee that inter-
interference by one or more of the following measures:
—Reorient or relocate the receiving antenna.
FCC IC Statement
MPE Requirements
antenna of this device and persons during device operation. To ensure compliance, operations at closer than this distance is
not recommended.

010
Battery and Charging
Keep the charging dock away from heat (such as radiators).
Do not wipe the charging contacts with wet cloth or wet hands.
every three months to prevent the battery over discharging.
Battery pack charging temperature
When stored at 25°C (77°F) the
robot should be recharged every
three months.
-20°C - 60°C (-4°F - 140°F)
@Less than 70% RH
Long Storage (3months)
Long Storage (1year)
Storage (1month)
-20°C - 45°C (-4°F - 113°F)
@Less than 70% RH
@Less than 70% RH
Battery pack using temperature
Battery pack
storage
temperature

011
When the robot is docked, press and hold “Dock” for 10 seconds or until you hear an alert sound. This will activate Holiday mode.
stopping of all non-charging related functions including cleaning, remote control over WiFi, and more.
To deactivate Holiday mode, press and hold “Dock” for 10 seconds until the LED indicator brightens.
Holiday Energy Saving Function

012
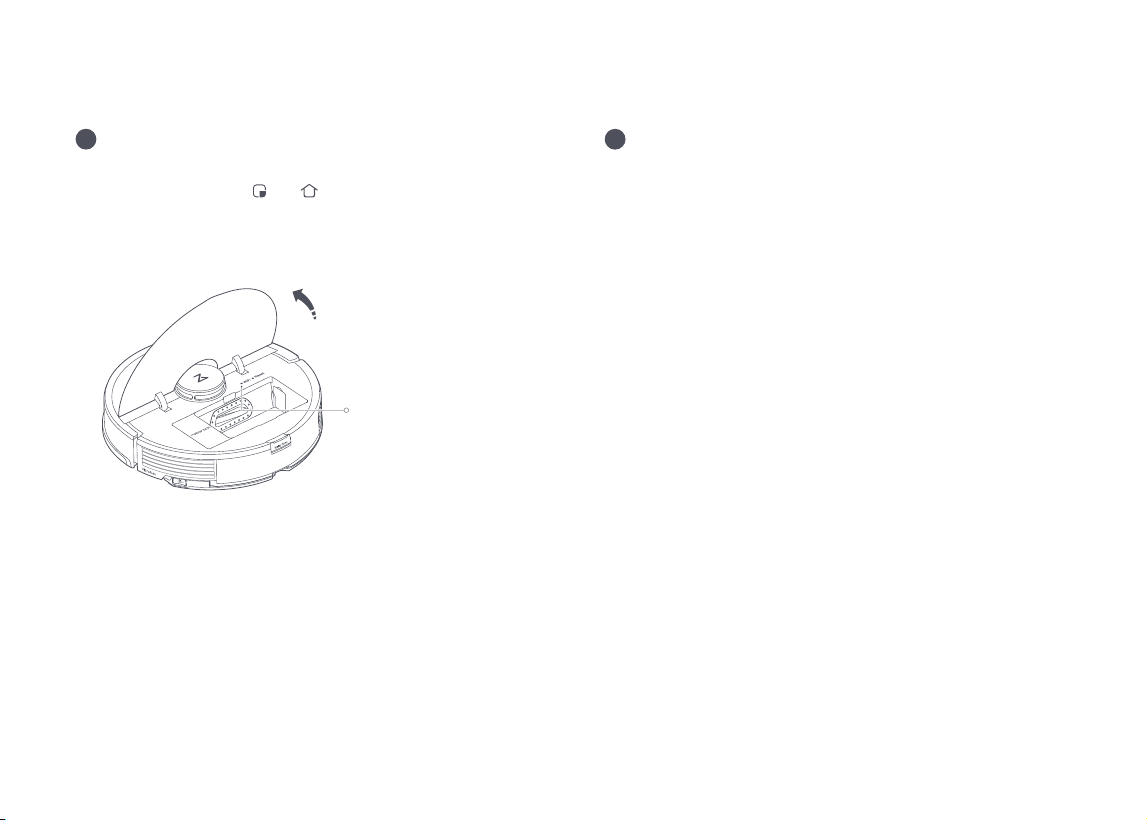
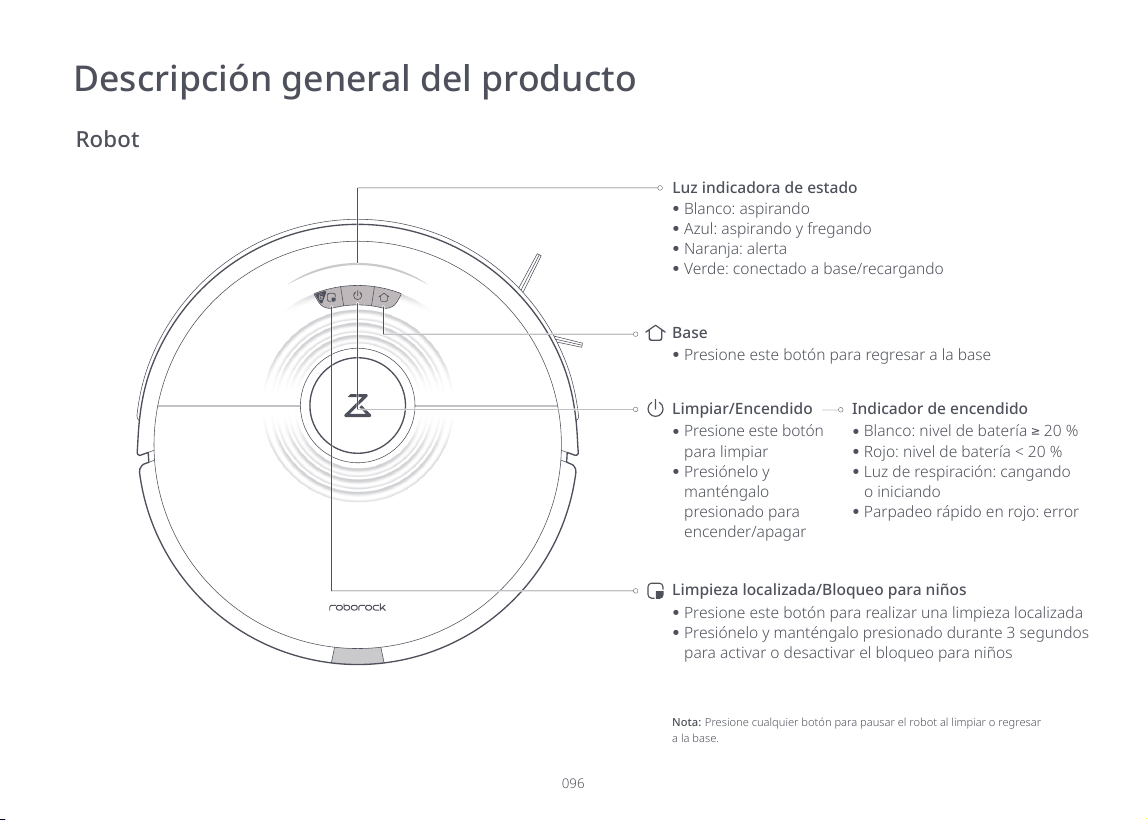
Robot
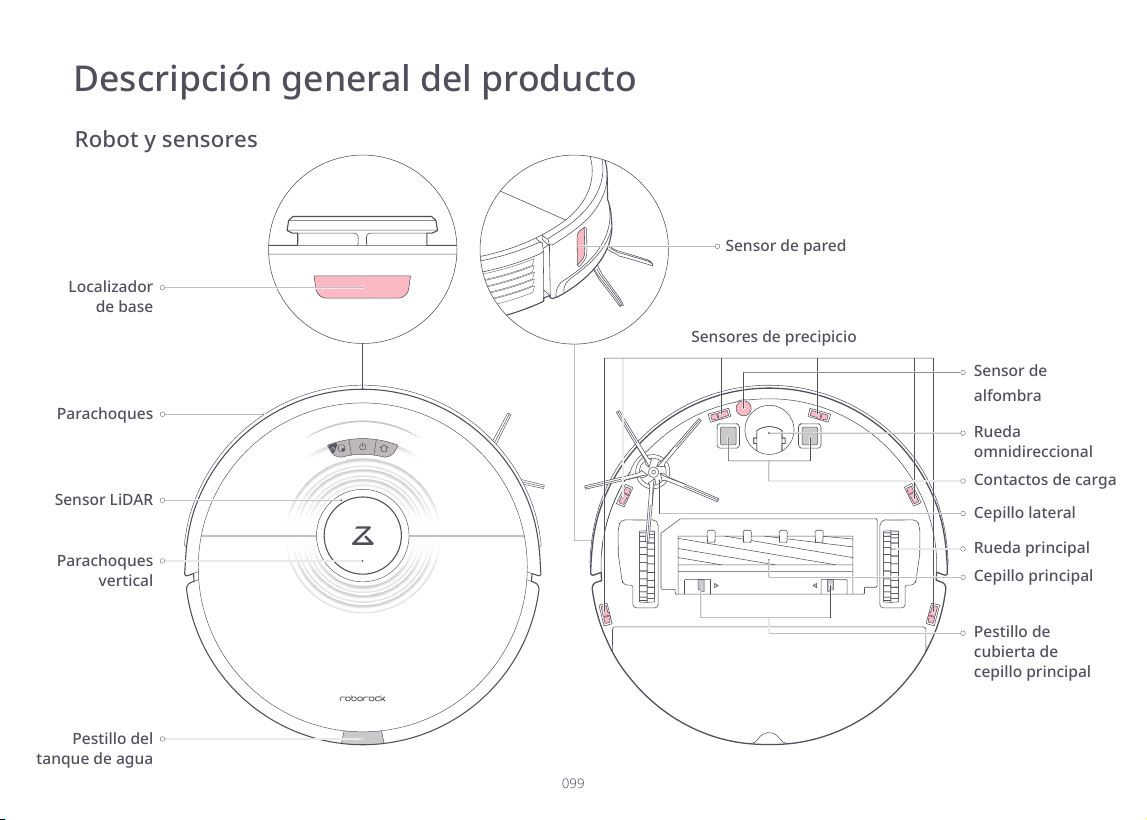
Clean/Power
Press to clean
Press and hold to
Power Indicator
Dock
Press to return to the dock
Note: Press any button to pause the robot when cleaning or returning to
the dock.
Spot Clean/Child Lock
Press to Spot clean
Press and hold for 3 seconds
White: Vacuuming
Blue: Vacuuming and mopping
Orange: Alert
Status Indicator Light
Product Overview
White: Battery level
20%
Red: Battery level < 20%
Breathing: Charging or
starting up

013
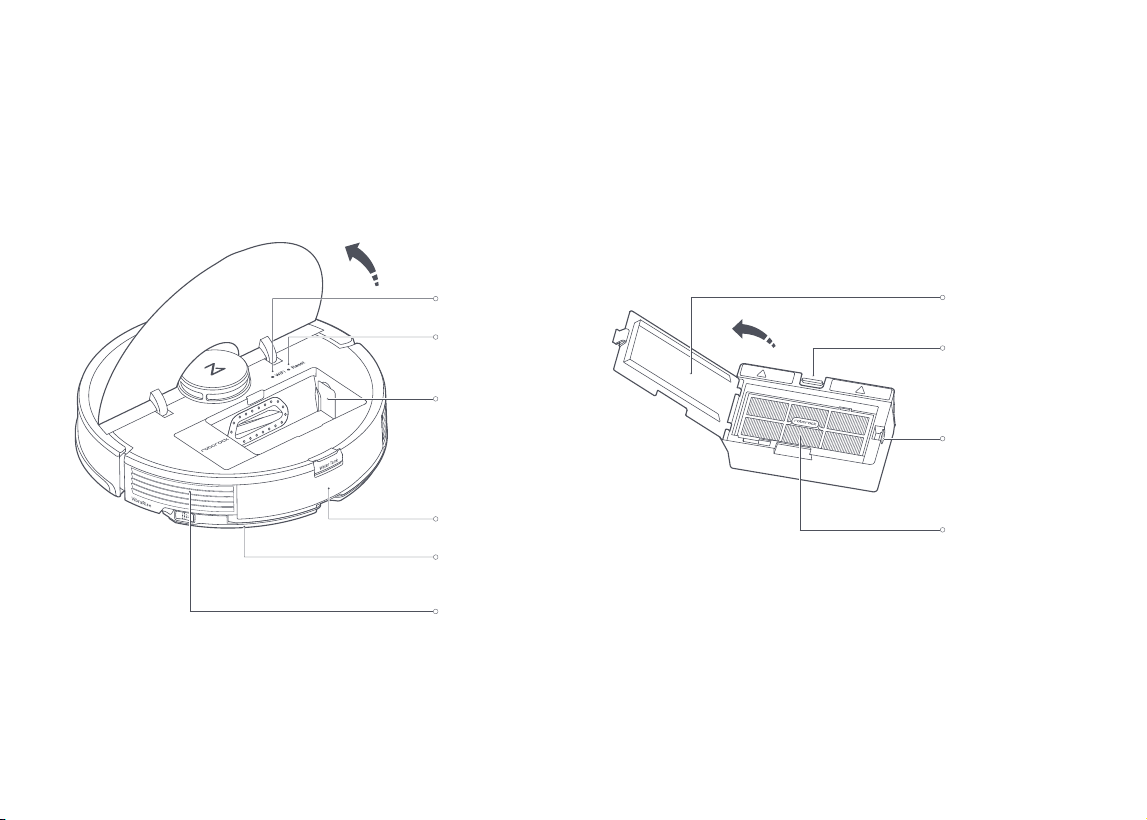
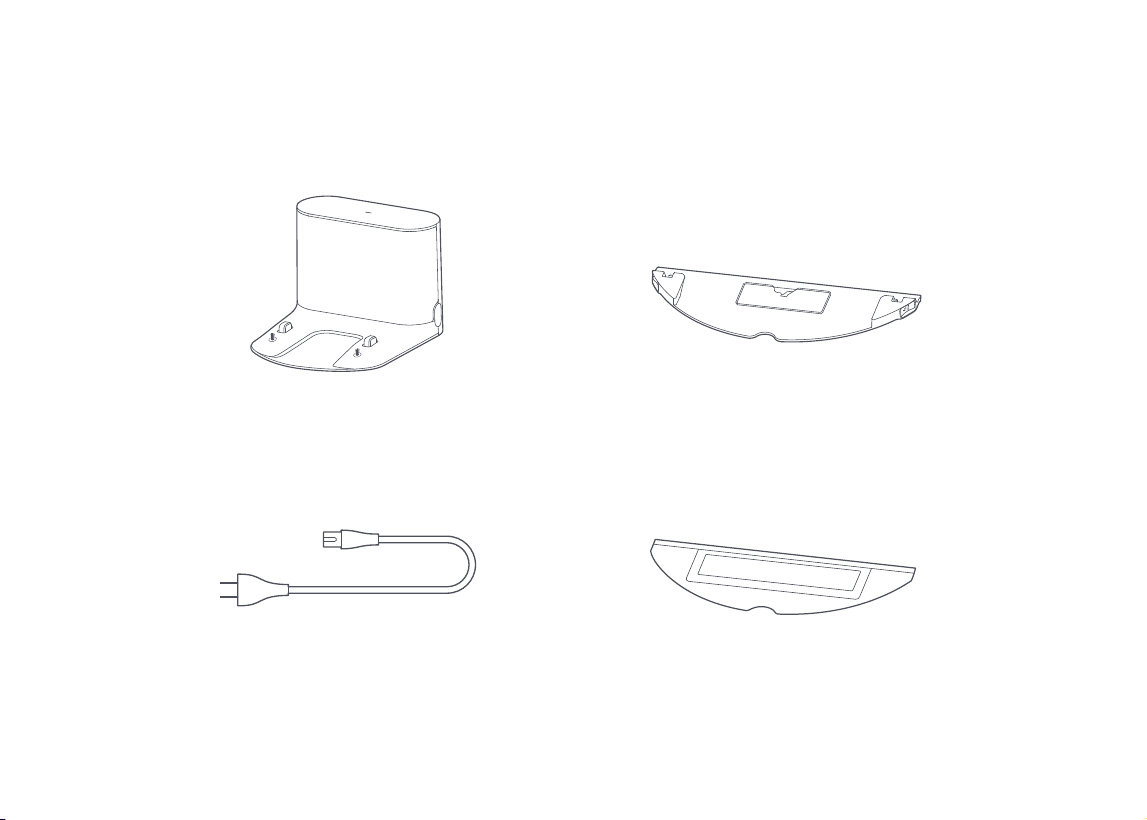
Parts List
Charging Dock VibraRise Mop Cloth Mount
VibraRise Mop ClothPower Cable
Product Overview
014
Robot
System Reset
Air Vent
VibraRise Mop
Cloth Mount
Water Tank
WiFi Indicator
Dustbin
Filter Cover
Dustbin Latch
Washable Filter
Filter Cover Latch
Product Overview
Note: Remove this piece if using
the Roborock Auto-Empty Dock.
Available for purchase separately.
Visit www.roborock.com for
details.
015
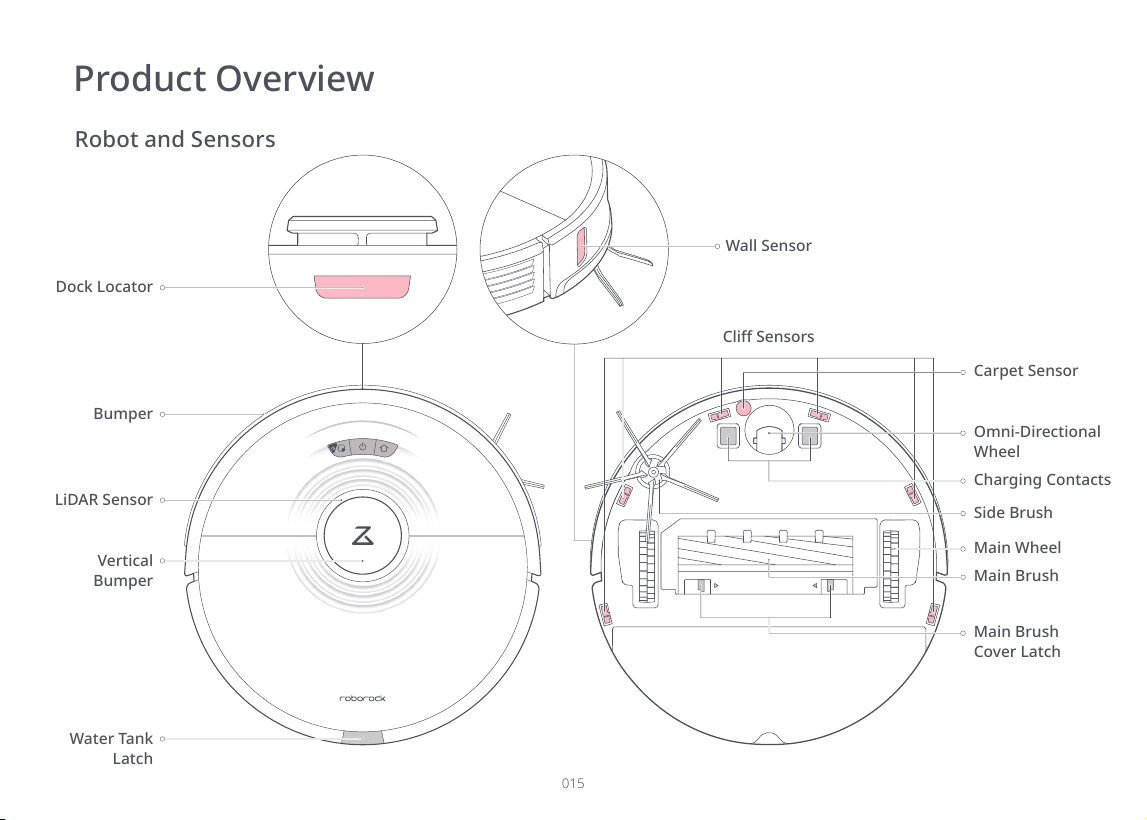
Robot and Sensors
Dock Locator
Bumper
LiDAR Sensor
Vertical
Bumper
Water Tank
Latch
Omni-Directional
Wheel
Wall Sensor
Charging Contacts
Carpet Sensor
Side Brush
Main Wheel
Main Brush
Main Brush
Cover Latch
Product Overview

016
VibraRise Module
Water Tank Stopper
Water Filter
Electric Water Tank
Water Tank Latch
Mop Cloth Attachment Slot
VibraRise Mop Cloth Mount
VibraRise Mop Cloth
Attachment Area
Mop Cloth Mount Latch
Vibration Module
Product Overview

017
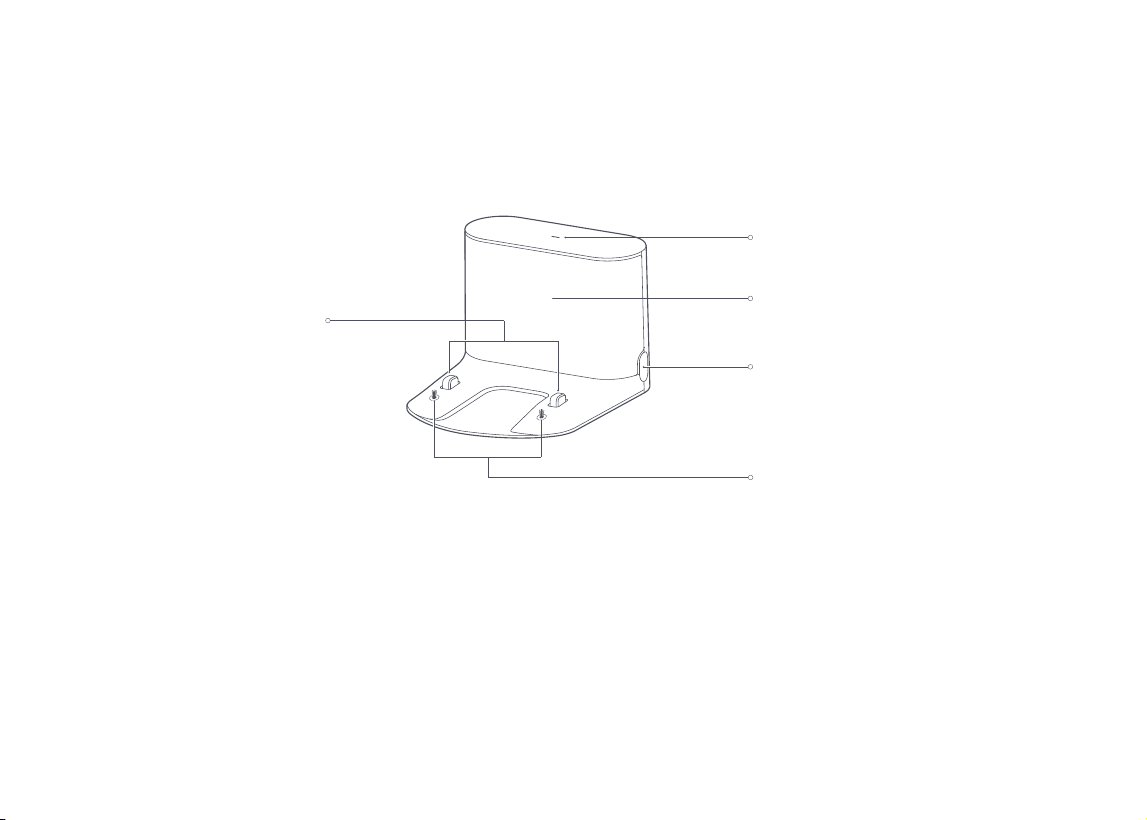
Charging Dock
Dock Location Beacon
Power Socket
Charging Dock Power Indicator
Charging Contacts
Electrode Brushes
Product Overview
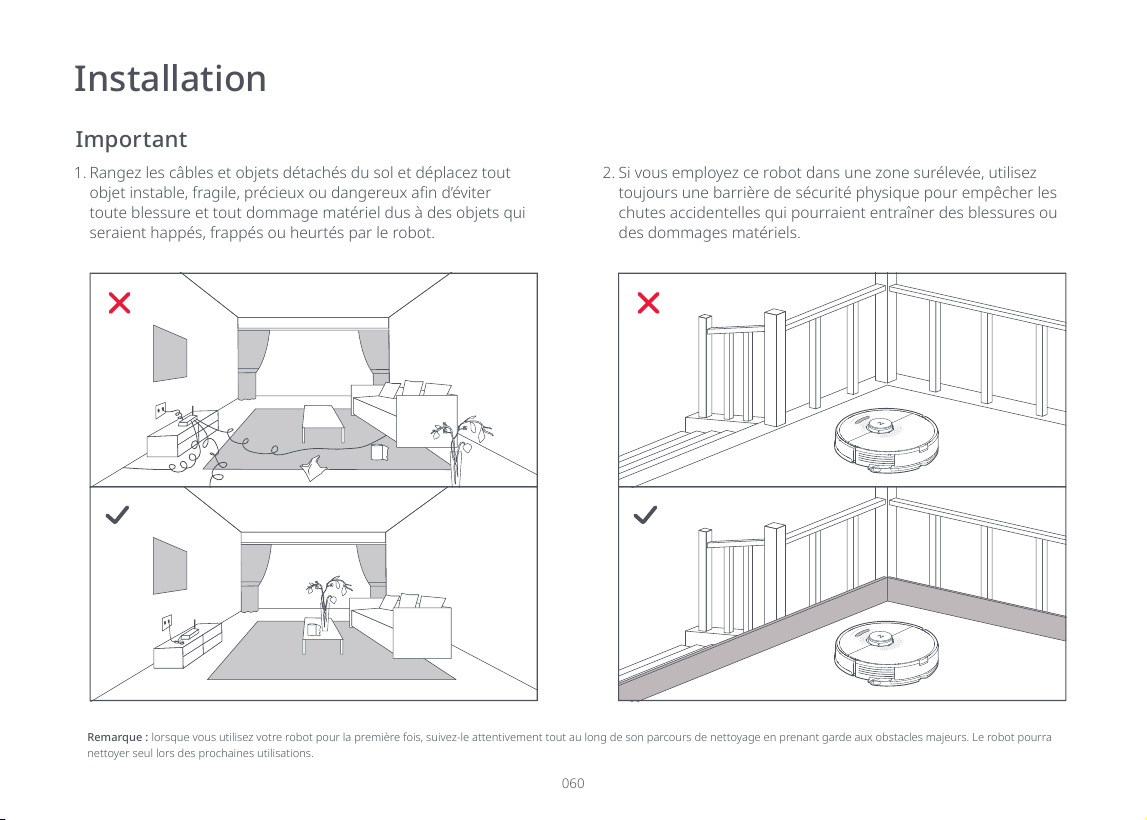
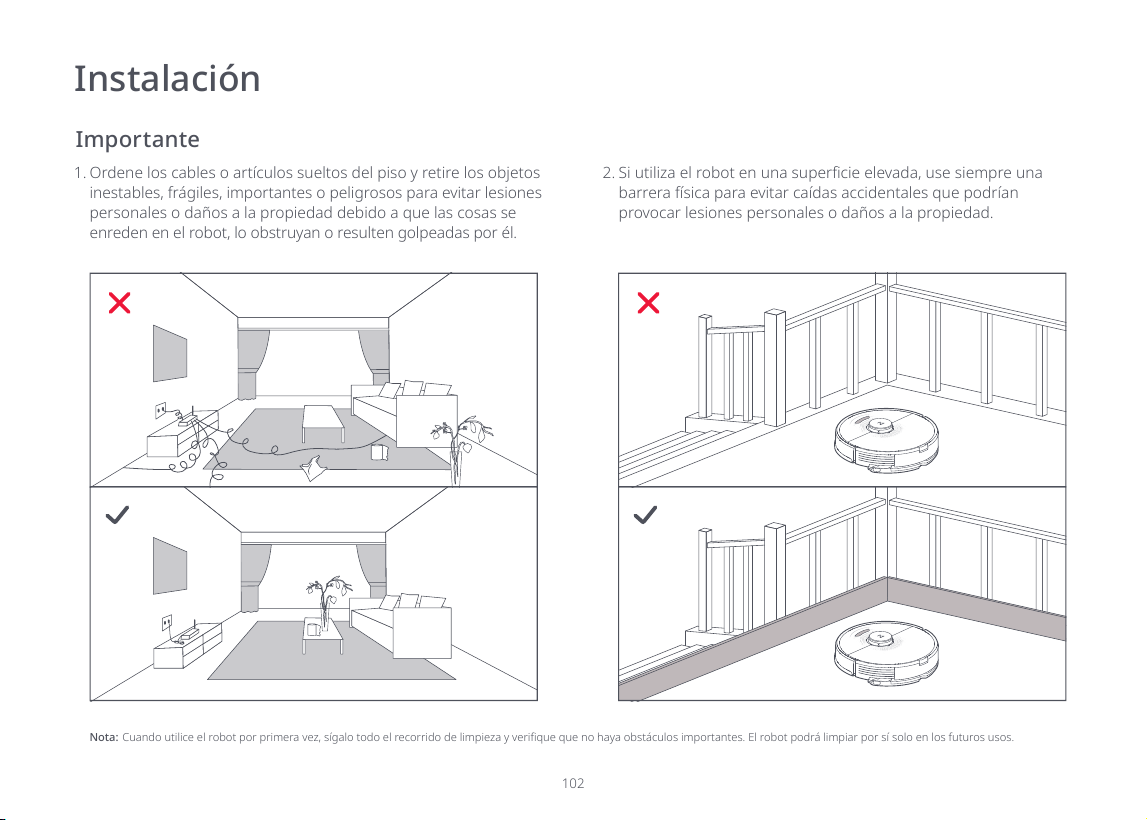
Important
Tidy cables and loose items from the ground and move any
tangled in, struck by, or knocked over by the robot.
1. If using this robot in a raised area, always use a secure physical
barrier to prevent accidental falls that may result in personal
2.
Note:
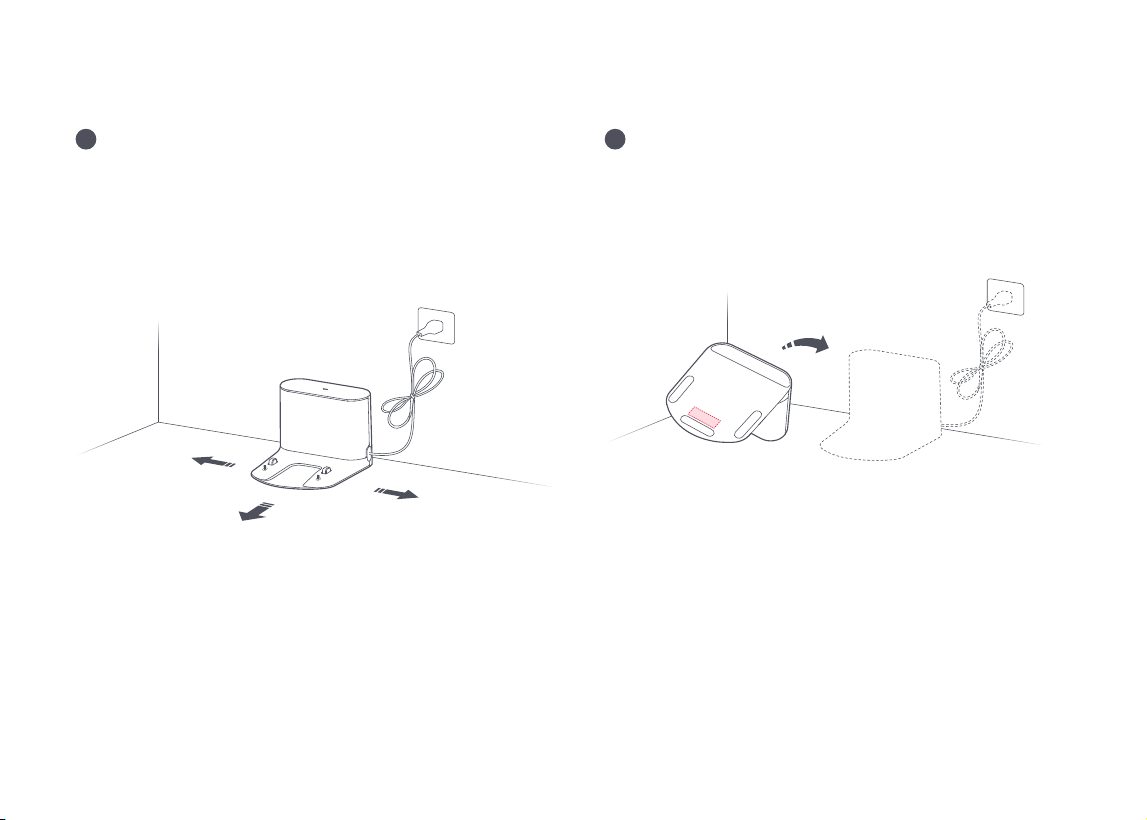
Installation
More than 0.5m (1.6ft)
More than 0.5m (1.6ft)
More than 1.5m (4.9ft)
Secure the charging dock with the
adhesive tape
placed with a dry cloth, then secure the dock in place using
double-sided tape at the bottom of the dock.
Position the charging dock
Connect the power cable to the Charging Dock and tidy cables
mobile app, place the Charging Dock in an area with good WiFi
coverage.
Note:
front of the Charging Dock.
If the power cable hangs vertical to the ground, it may be caught by the robot, caus-
ing the Charging Dock to be disconnected.
the robot is charging.
not block the Location Beacon. Otherwise the robot may not be able to automatically
return to the Charging Dock.
Use double-sided tape to stick the Charging Dock down.
Note:
Use of the double-sided tape to secure the charging dock is optional.
When necessary, remove the double-sided adhesive tape slowly to reduce residue glue.
Installation
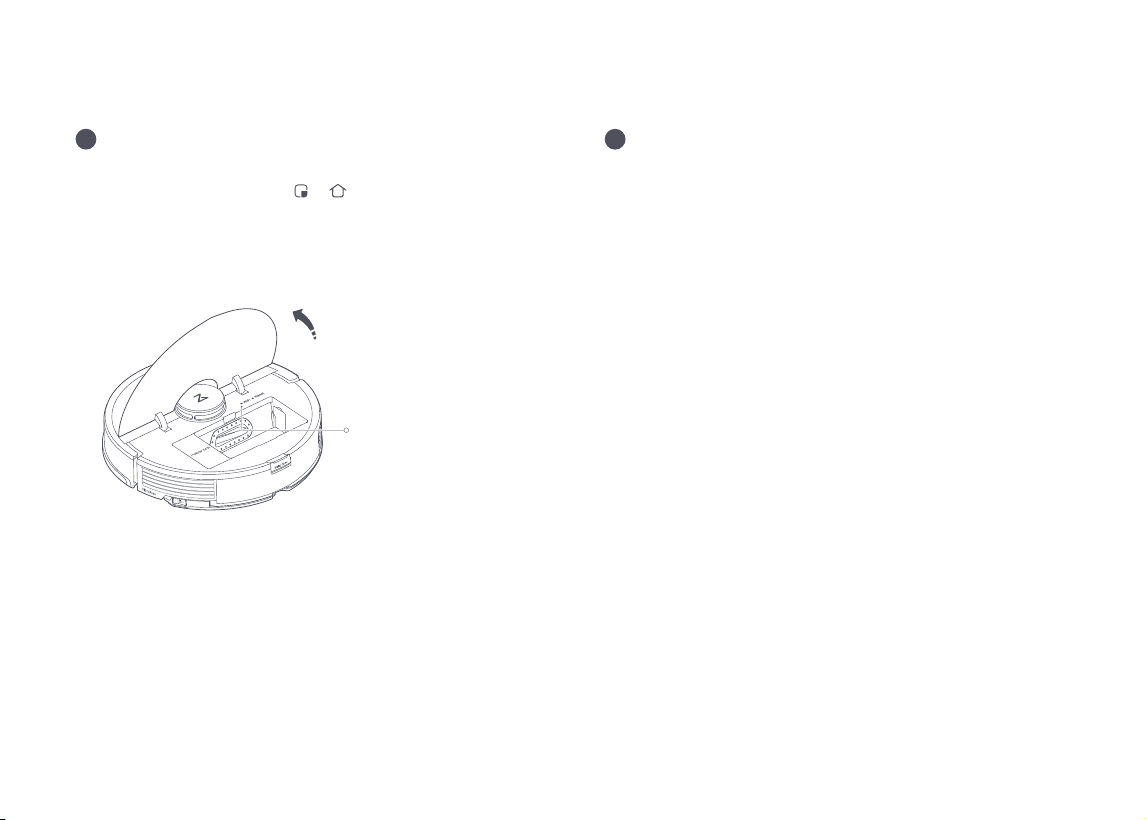
1
2
020
Note:
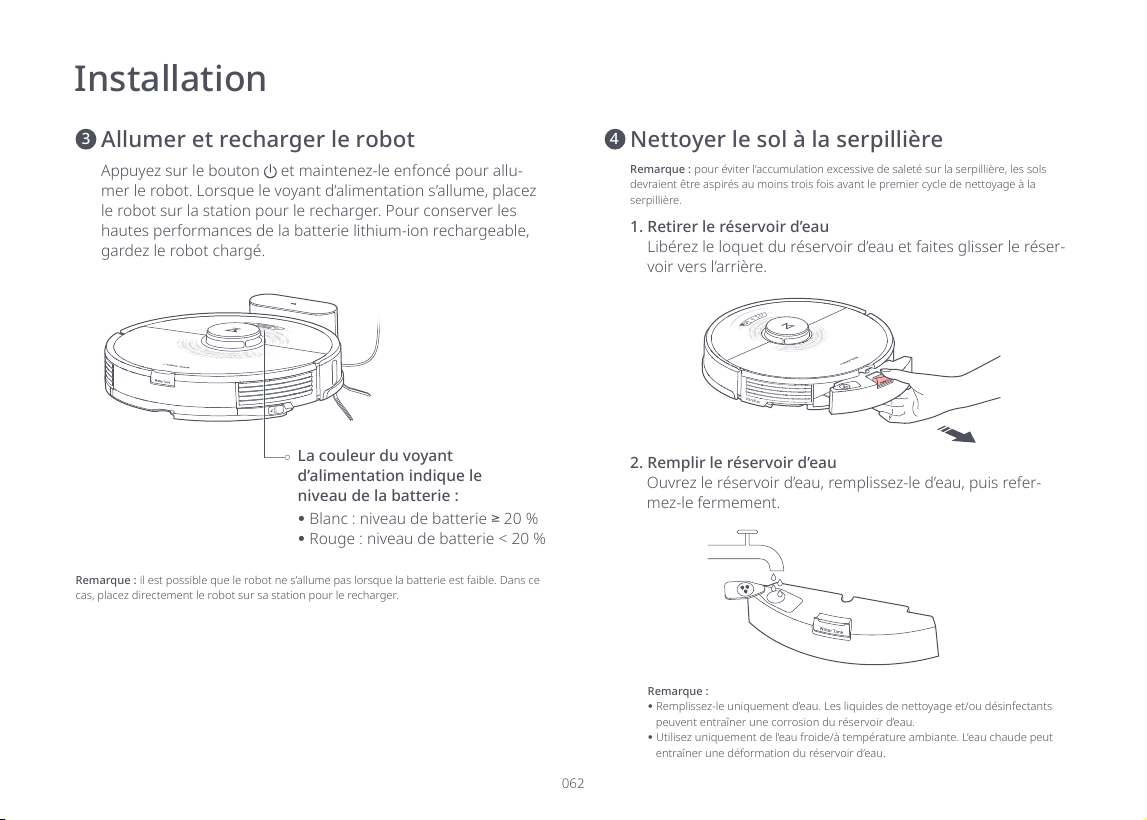
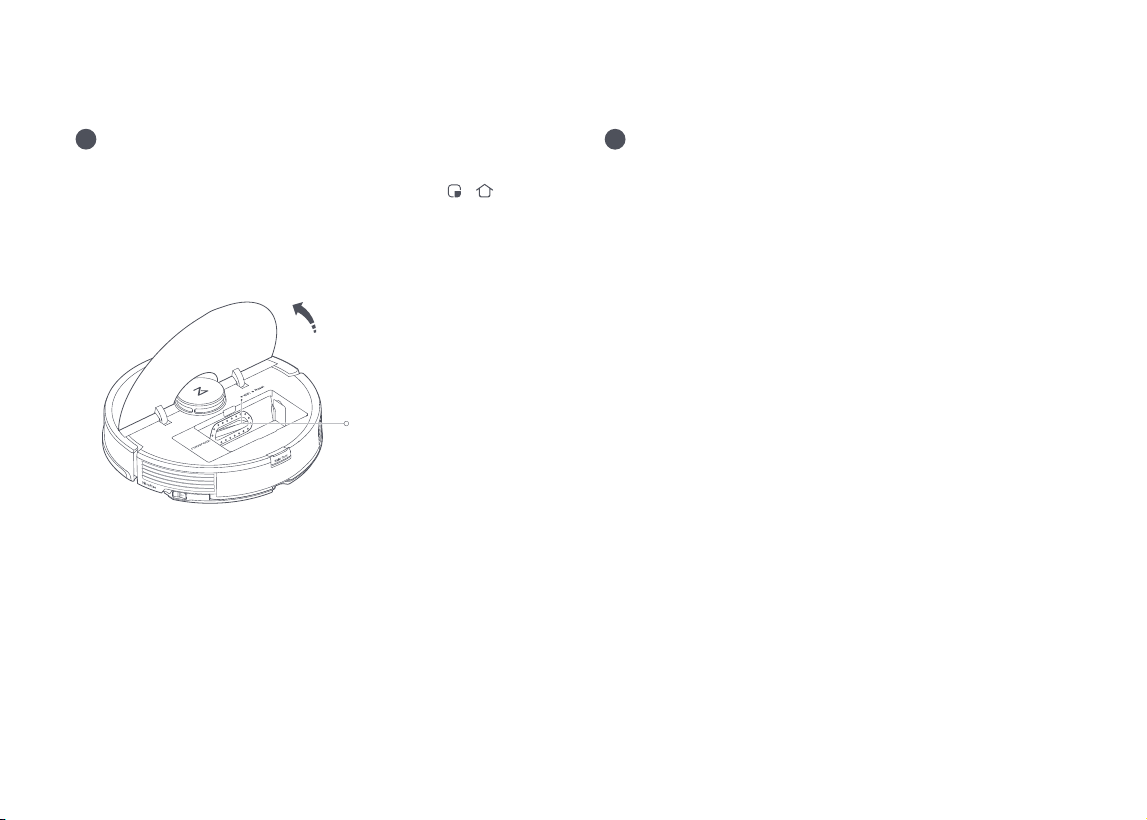
1. Remove the water tank
2. Fill the water tank
Release the water tank latch and slide the tank backward.
Note:
4
Power on and charge the robot
Press and hold the button to power on the robot. When
the power light goes on, place it on the dock to charge. To
maintain the performance of the high-performance lithium-ion
rechargeable battery pack, keep the robot charged.
Note: The robot may not turn on when the battery is low. In this case, place the robot
directly onto the dock to charge.
3
The power indicator color
indicates the battery level:
White: Battery level
20%
Red: Battery level < 20%
Installation
021
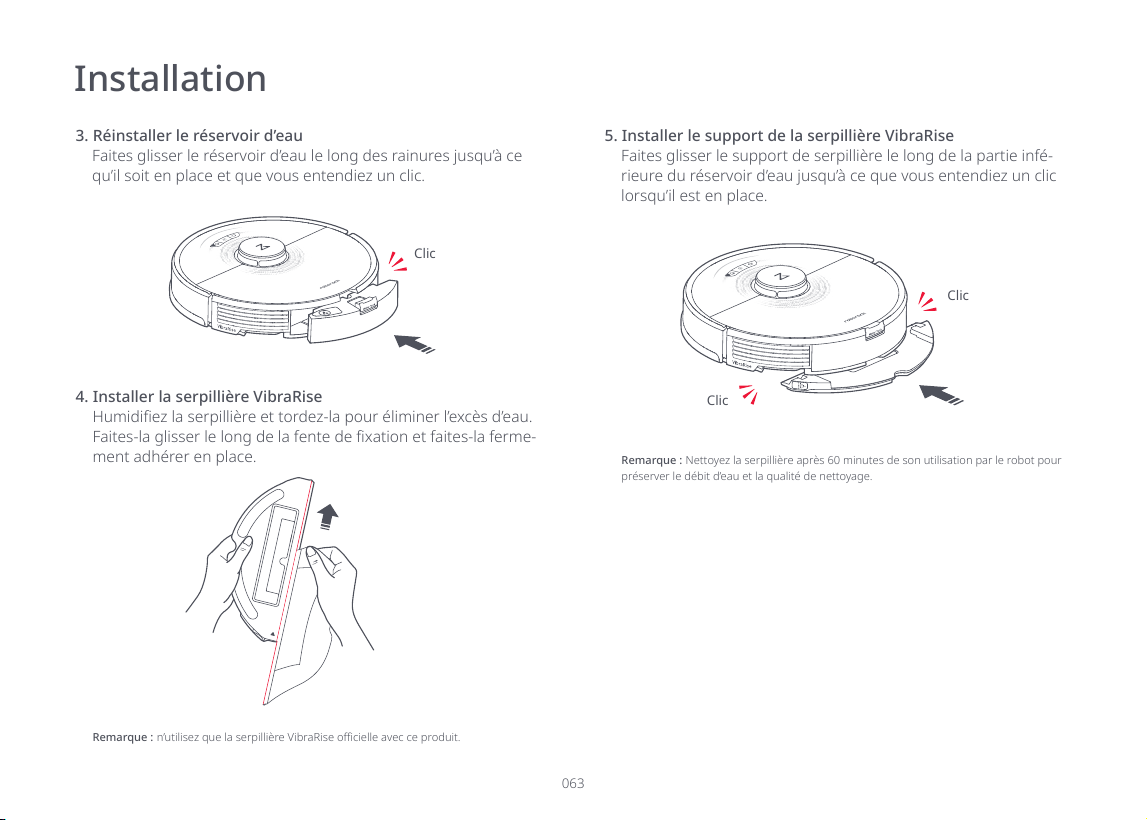
3. Reinstall the water tank
Slide the water tank along the grooves until you hear it click in
place.
4. Install the VibraRise mop cloth
-
Installation
Note:
5. Install the VibraRise mop cloth mount
Slide the VibraRise mop cloth mount along the bottom of the
water tank until you hear it click in place.
Note:
Click
Click
Click
022
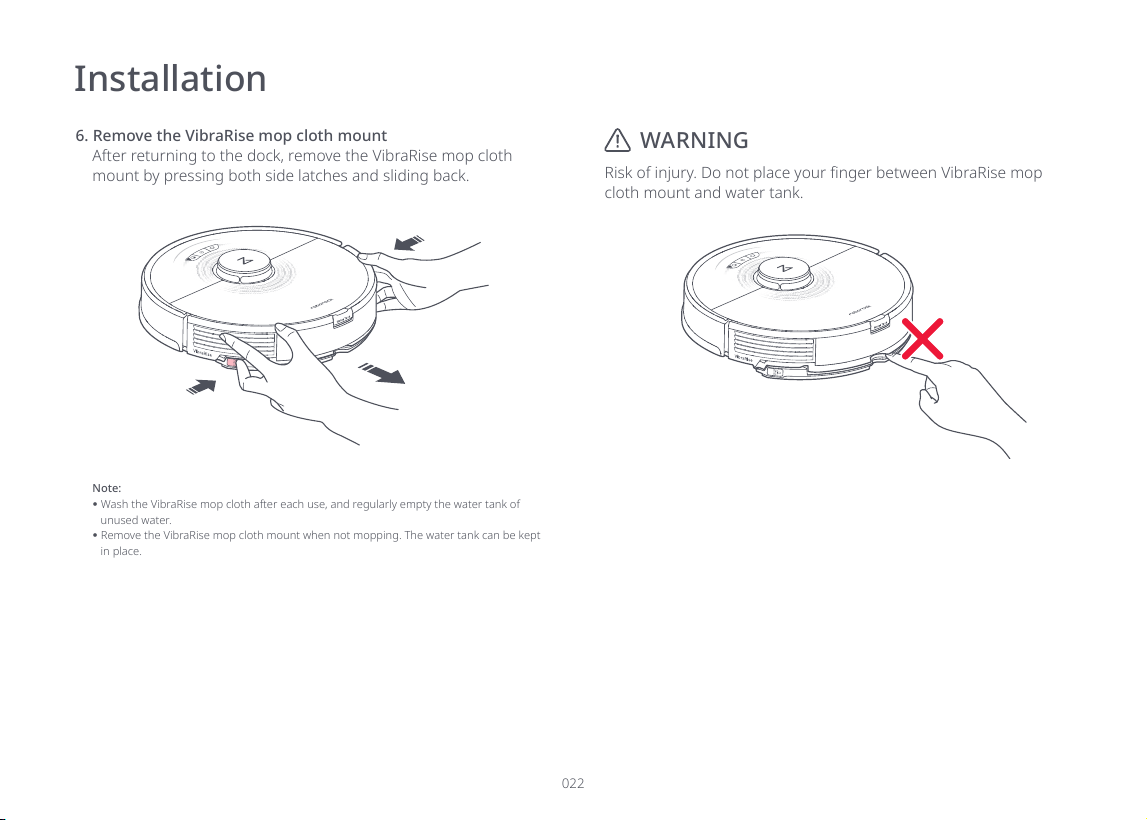
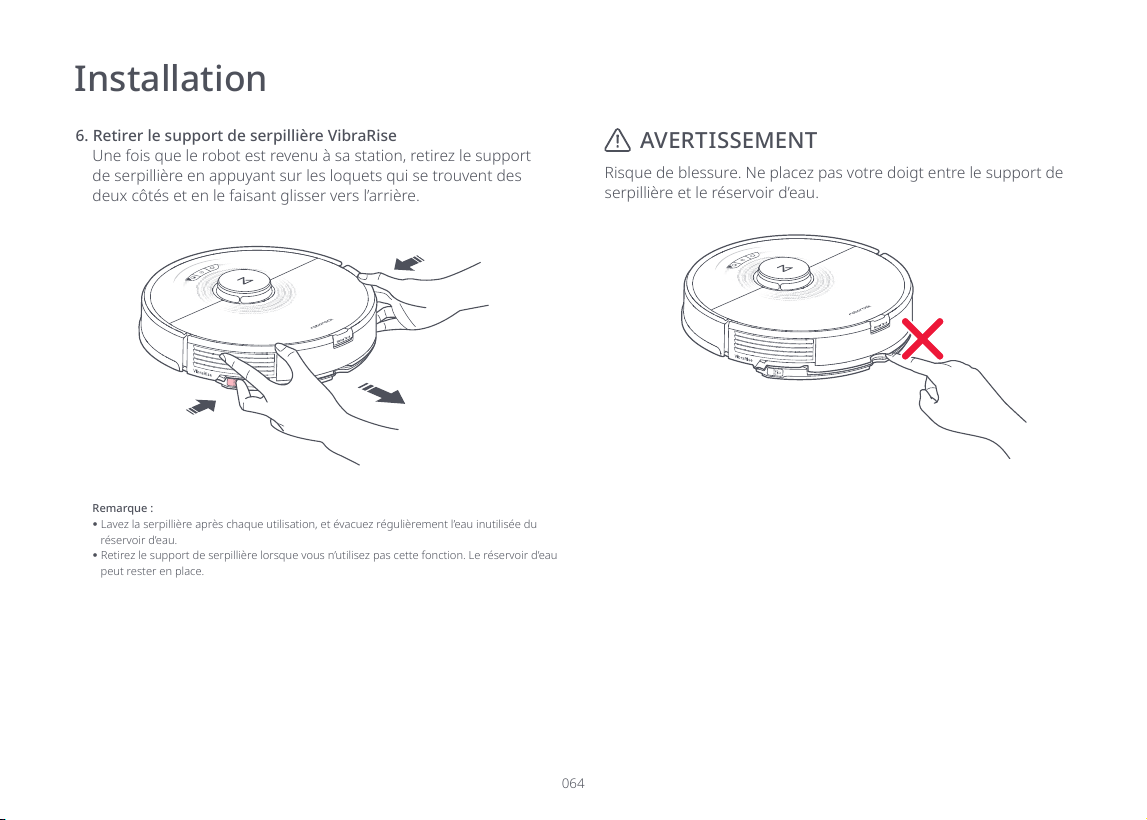
6. Remove the VibraRise mop cloth mount
After returning to the dock, remove the VibraRise mop cloth
mount by pressing both side latches and sliding back.
Note:
Wash the VibraRise mop cloth after each use, and regularly empty the water tank of
unused water.
Remove the VibraRise mop cloth mount when not mopping. The water tank can be kept
in place.
Installation
cloth mount and water tank.
WARNING

023
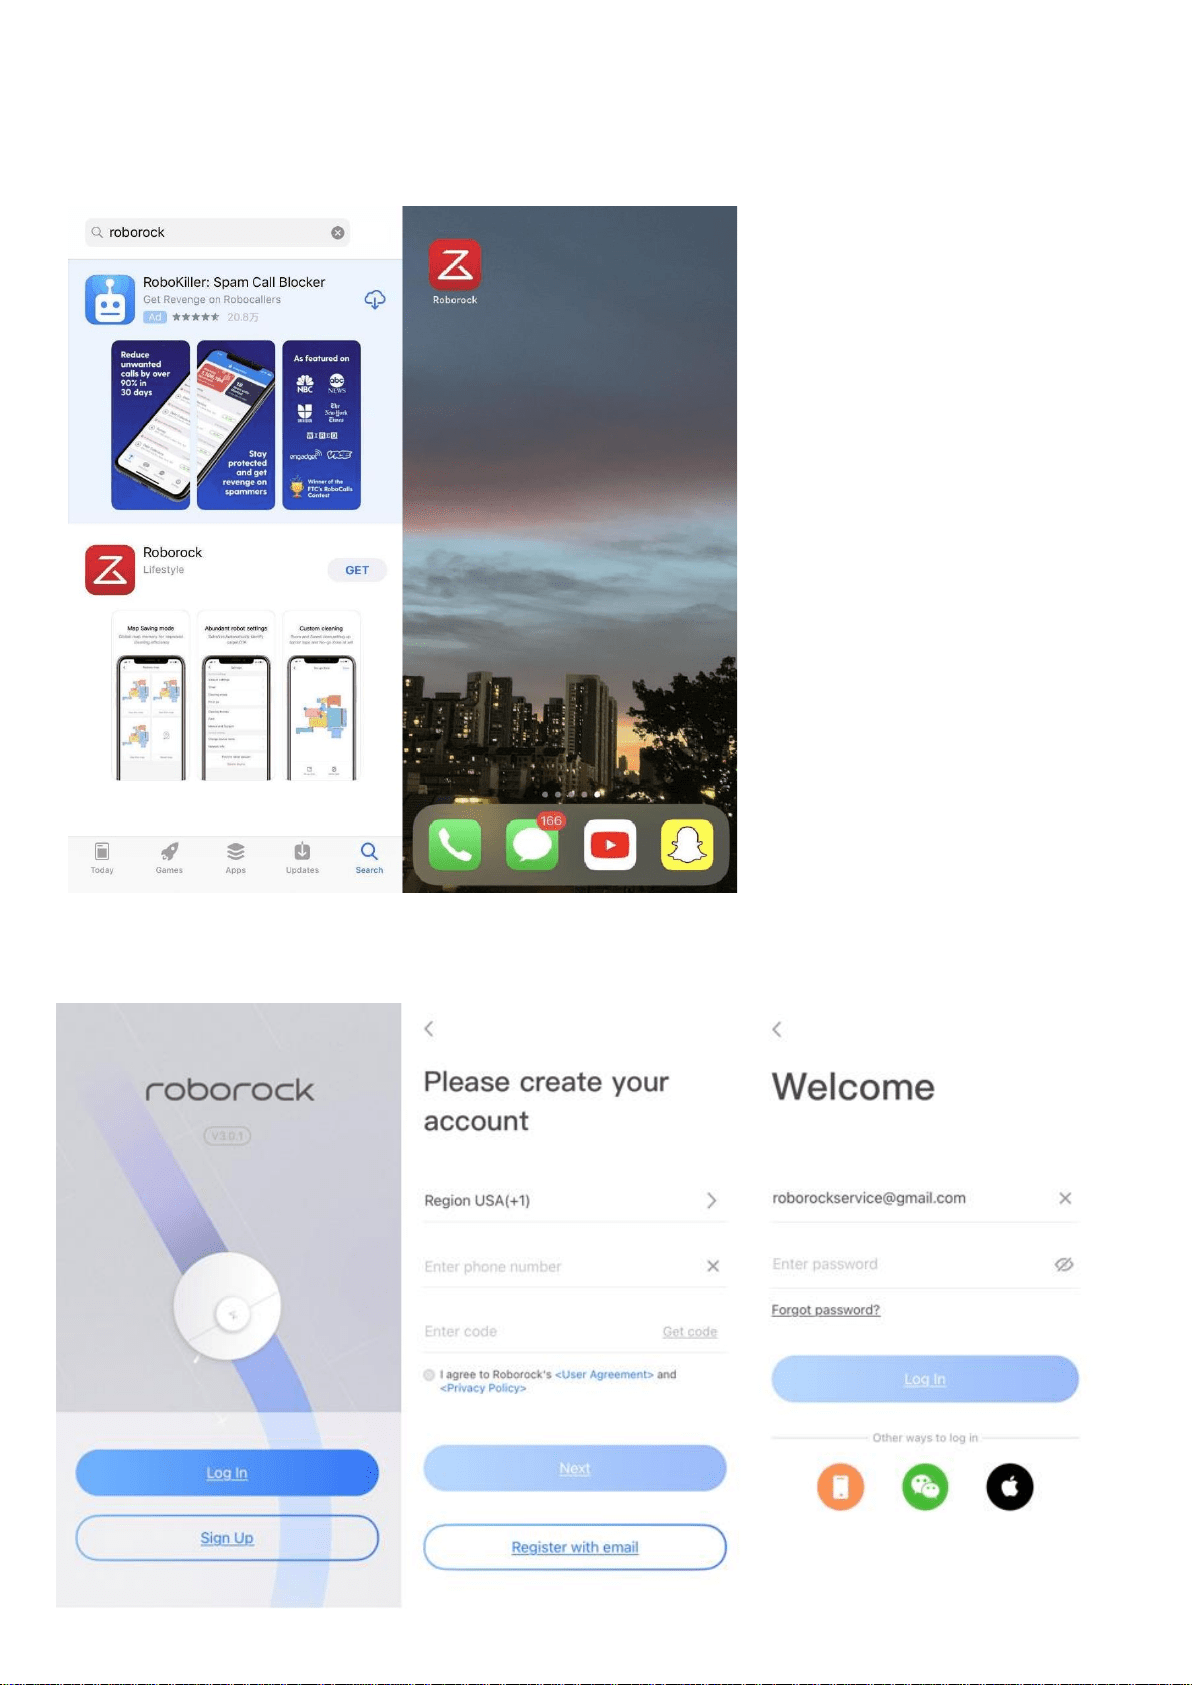
This robot supports both Roborock and Mi Home apps. Choose the one that best meets your needs.
1. Search for “Roborock” in the App Store or Google Play or
scan the QR code to download and install the app.
2. Search for “Mi Home” in the App Store or Google Play or
scan the QR code to download and install the app.
Connect to the App
Download the app
1
024
2. Press and hold the
and buttons until you hear the
“Resetting WiFi” voice alert. The reset is complete when the
connection.
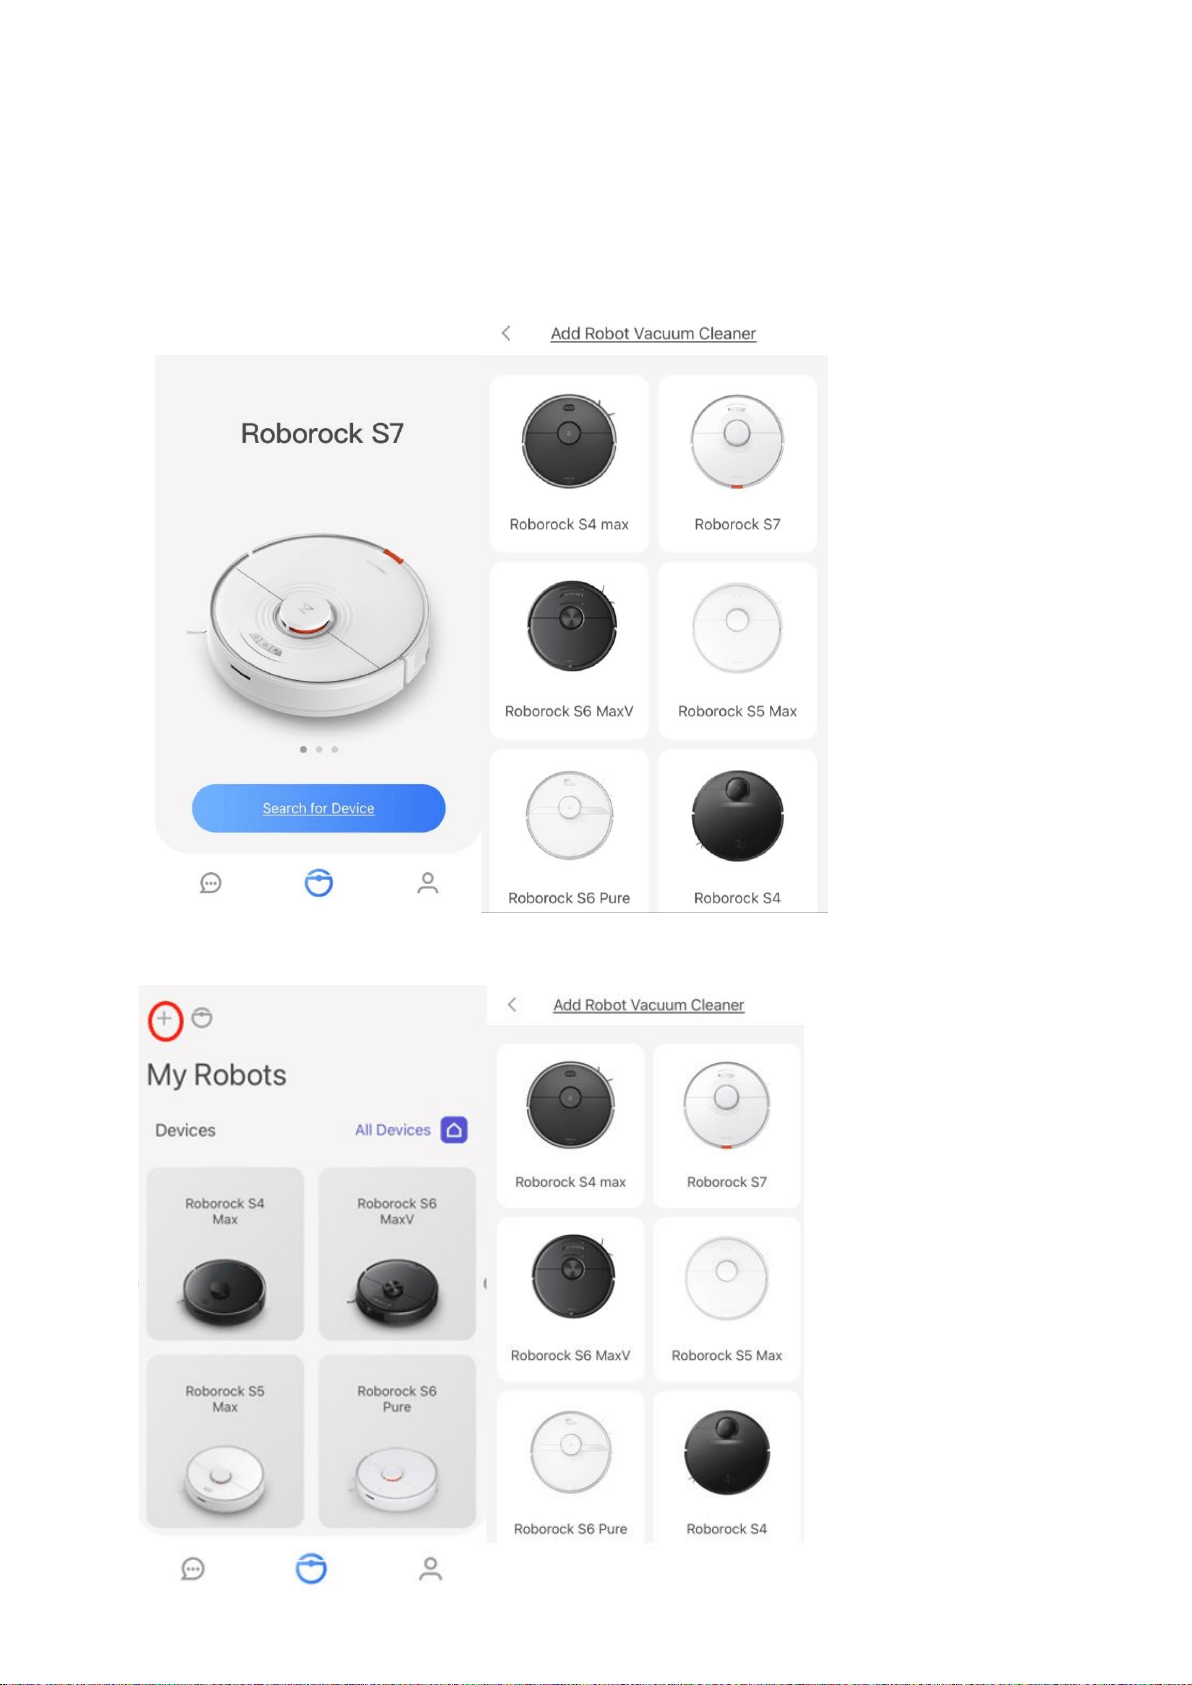
On the app homepage, tap “+” in the top right corner and
follow the prompts to add a device.
Flashing slowly: Waiting for
connection
Steady: WiFi connected
Note:
The actual process may vary due to ongoing app updates. Follow the instructions
provided in the app.
If the robot waits more than 1 hour for a connection, WiFi will be automatically dis-
abled. If you need to reconnect, reset the WiFi before proceeding.
Note:
password, or any other reason, reset the WiFi and add your robot as a new device.
WiFi indicator light
Reset WiFi
Add device
2
3
Connect to the App
025
Press and hold the button to turn on the robot. The power in-
dicator will turn on, and the robot will enter standby mode. Press
and hold the
cleaning cycle.
Note:
Note:
Cleaning cannot start if the battery level is too low. Allow the robot to charge before start-
ing cleanup.
Before cleaning, tidy cables (including the charging dock power cable) and fragile items
-
tion or damage to wires and property.
If cleaning is completed within 10 minutes, the area will be cleaned twice.
If the battery runs low during the clean, the robot will automatically return to the charging
If the VibraRise mop cloth mount is attached, the robot will lift the mount to clean carpeted
areas.
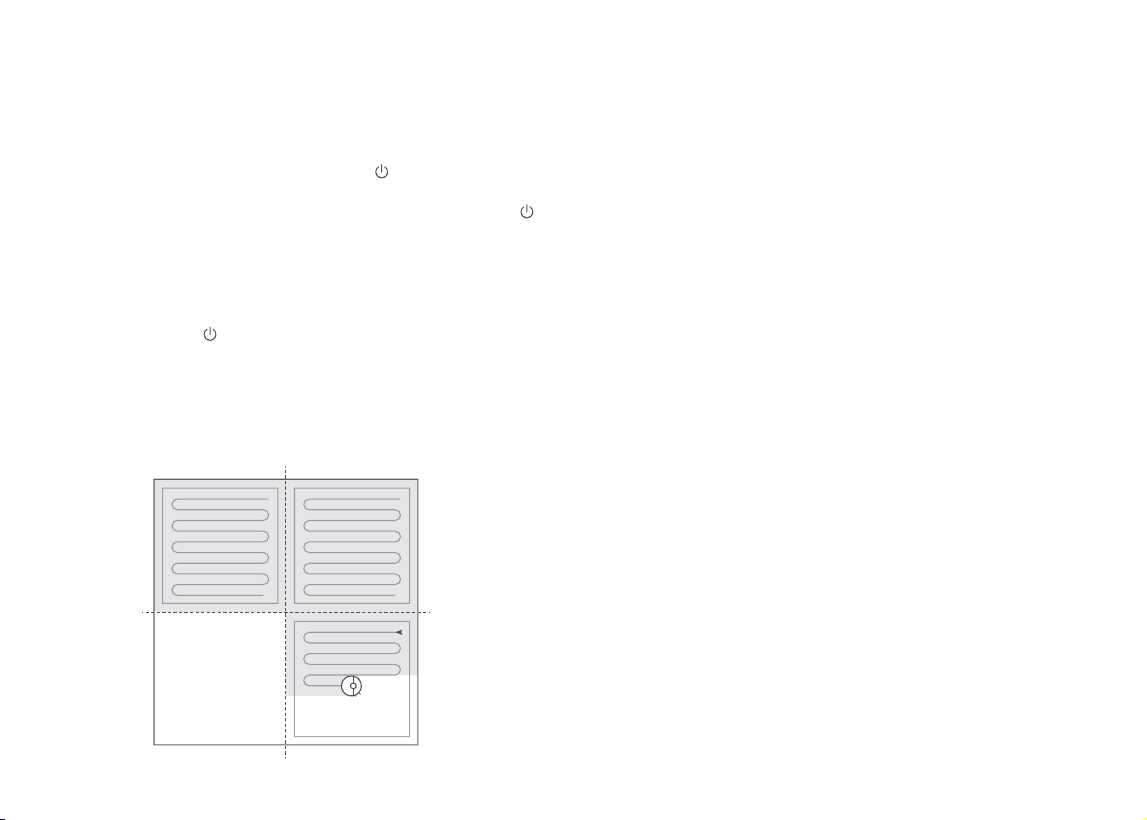
Zone 1 – Cleaned
Zone 4 – Next Zone
Zone 2 – Cleaned
Zone 3 – In Progress
Start Cleaning
Press the button to start cleaning. The robot will plan its route
based on its scan of the room. It then splits each room into
Mode Setting
Instructions
026
Spot Clean
Press to start Spot cleaning.
Note: After spot cleaning, the robot will return to the starting point and enter Standby mode.
1.5m
1.5m
Do Not Disturb (DND) mode
stopped, voice prompts are silenced, and the power indicator
dims.
Child Lock
With the child lock on, all buttons are locked when the robot is
stationary.
Pause
During a clean, press any button to pause, press to continue, or
press
to send the robot back to the dock.
Note: Placing a paused robot on the charging dock will end the current cleanup.
Sleep
If the robot is inactive for over 10 minutes, it will enter the Sleep
Press any button to wake it up.
Note:
The robot will not enter Sleep mode when charging.
The robot will automatically shut down if left in Sleep mode for more than 12 hours.
Instructions
VibraRise Mop Cloth
To add water or clean the VibraRise mop cloth, press any button
to stop the robot and remove the mopping module. After adding
water or cleaning the VibraRise mop cloth, reinstall the mopping
module and press the
button to continue.

027
The robot will clean the areas selected in the app.
Charging
The robot will return to the charging dock automatically after
button to send it to the
charging dock. The power indicator will breathe as the robot
charges.
Note:
location. Place the robot on the charging dock manually to recharge.
Error
voice alert sounds. See “Errors” for solutions.
Note:
The robot will automatically enter Sleep mode if left in an error state for over 10 minutes.
Placing the robot on the charging dock in an error state will stop the current cleanup.
System Reset
If the robot does not respond to button presses or cannot be
Note: After a system reset, cleaning schedules, WiFi, and other settings will be restored to
factory settings.
Restore Factory Settings
If the robot is not functioning after a system reset, turn it on. Press
and hold the
button and at the same time press Reset button
until you hear the “Restoring the initial version” voice prompt. The
robot will then be restored to factory settings.
Zone Cleaning
The robot will clean the Zone(s) drawn in-app.
Note:
Selective Room Cleaning
Note:
Map Saving mode must be switched on, and a full clean completed before this function can
be used.
The robot may enter unselected areas during cleaning. Clear obstacles from the ground
around the selected rooms as the robot may enter these areas.
Instructions
Instructions
Scheduled Cleaning
clean and return to the dock.
Note:
Only in-app No-Go Zones and Invisible Wall are supported.
Map Saving mode must be switched on, and a full clean completed before this function can
be used.
the loss of No-Go Zones, No-Mop Zones, and Invisible Wall.
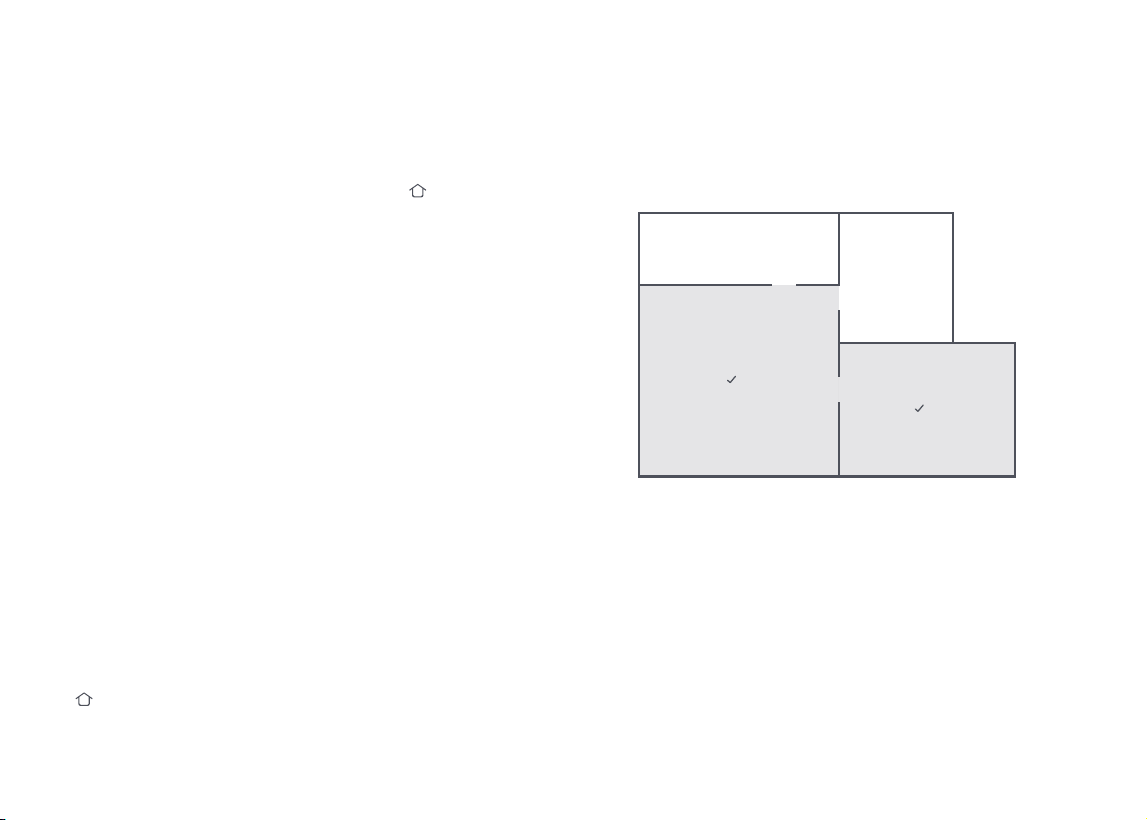
No-Go Zones, No-Mop Zones, and
Invisible Wall
Use No-Go Zones, and Invisible Wall created in-app to prevent
access to certain areas and rooms. By default, No-Mop Zones will
activate when the VibraRise mop cloth mount is in place.
Invisible Wall
No-Go Zones No-Mop Zones
More App Functions
Real-Time Map View Cleaning History
Carpet Boost
Maintenance Schedule
View Robot Status
Map Management
Note:
upgrades.
Firmware Updates
is on the charging dock and has at least 20% battery power. The
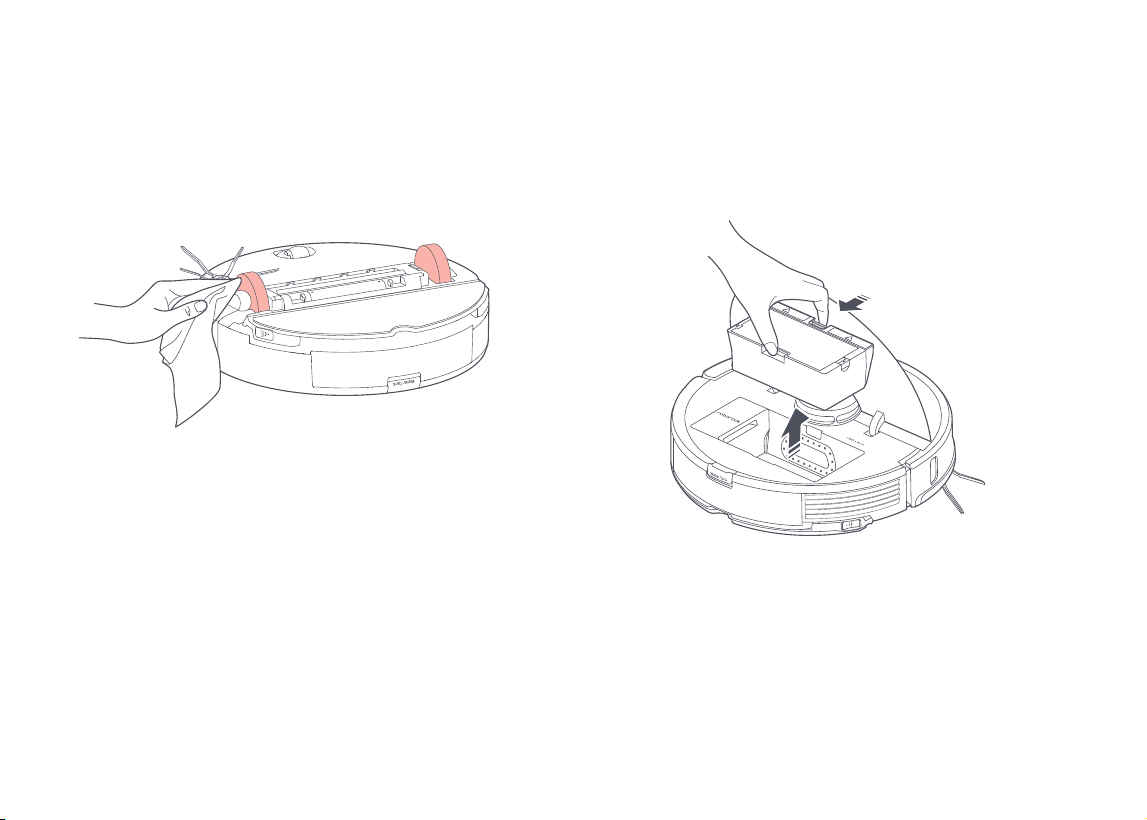
Routine Maintenance
To maintain optimum performance, maintain the robot according to the following guidelines:
Part
Maintenance
Frequency
Omni-Directional
Wheel
Rinse, allow to dry and press the wheel back in place.
Charging Contacts (Robot) Wipe clean with a soft dry cloth.Monthly
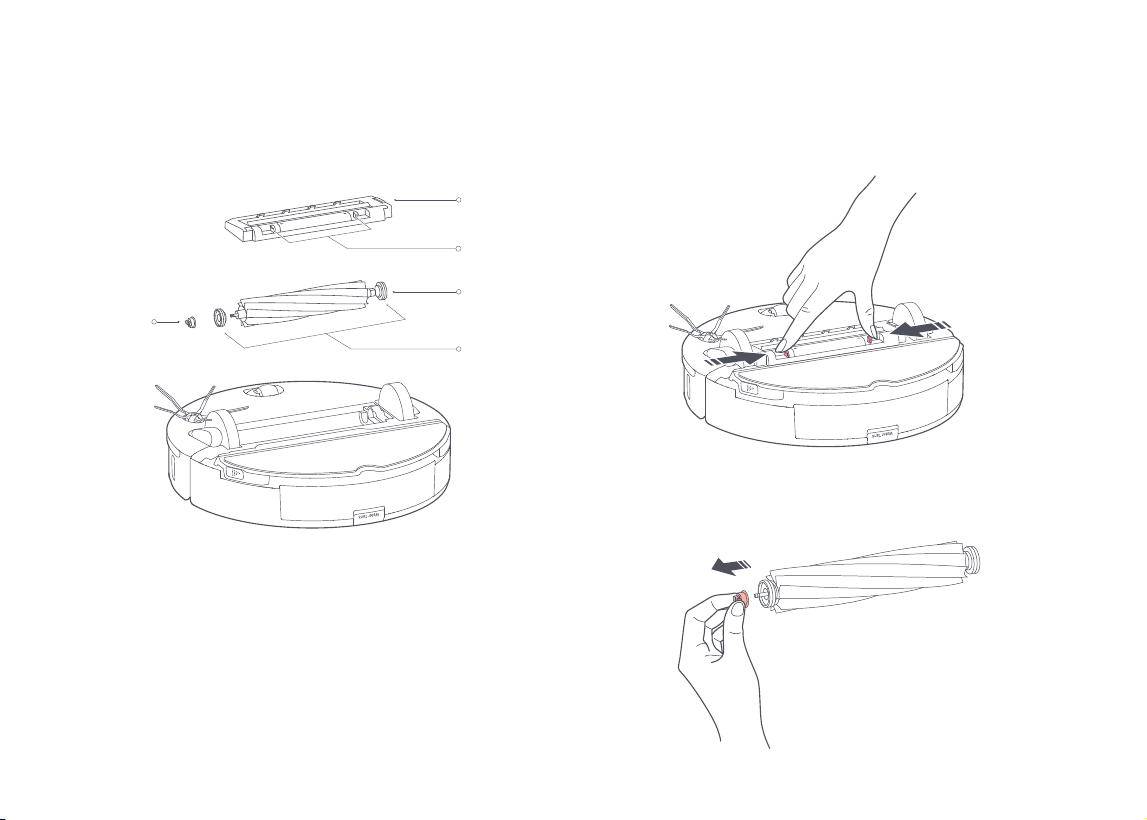
Wipe clean with a soft dry cloth.Monthly
Main Brush
Rotate the fasteners of the main brush caps in the
unlocking direction and take them down. After removing
the debris wrapped around the brush, reinstall the main
brush caps in the locking direction.
2 weeks 6-12 months
Charging Contacts
(Charging Dock)
Wipe clean with a soft dry cloth.Monthly
Carpet Sensor Wipe clean with a soft dry cloth.Monthly
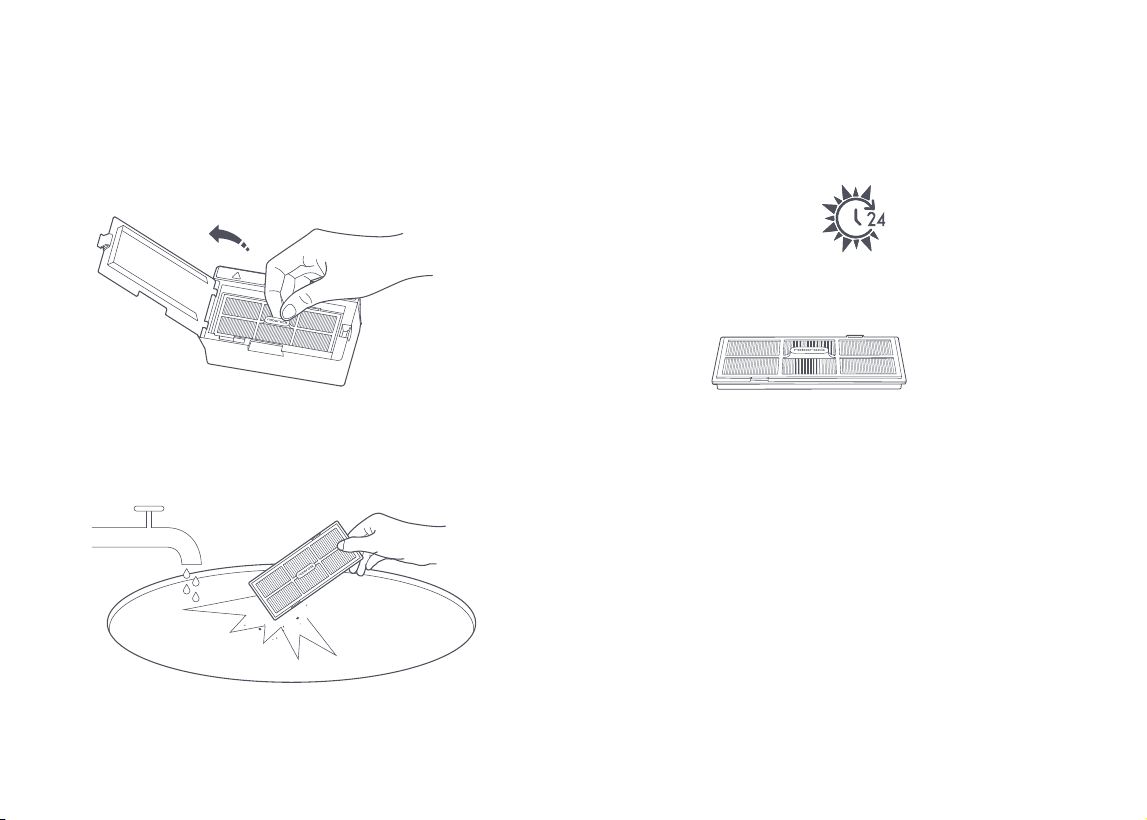
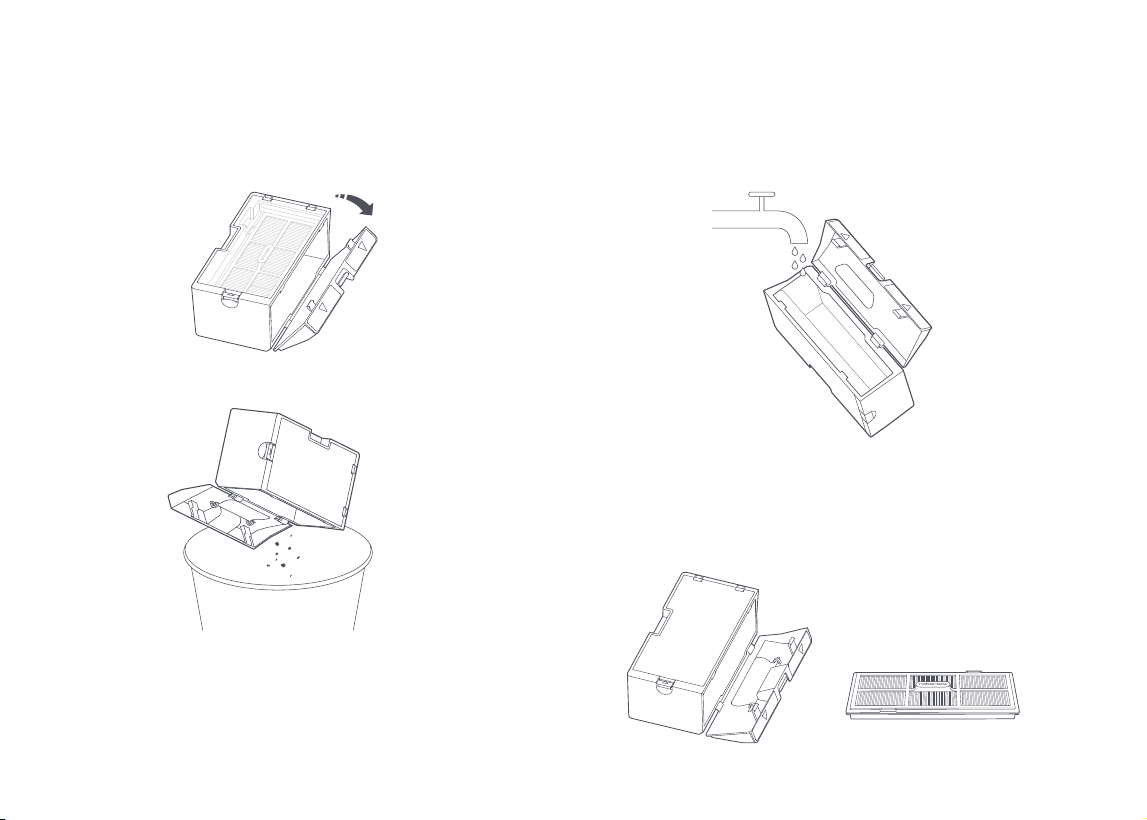
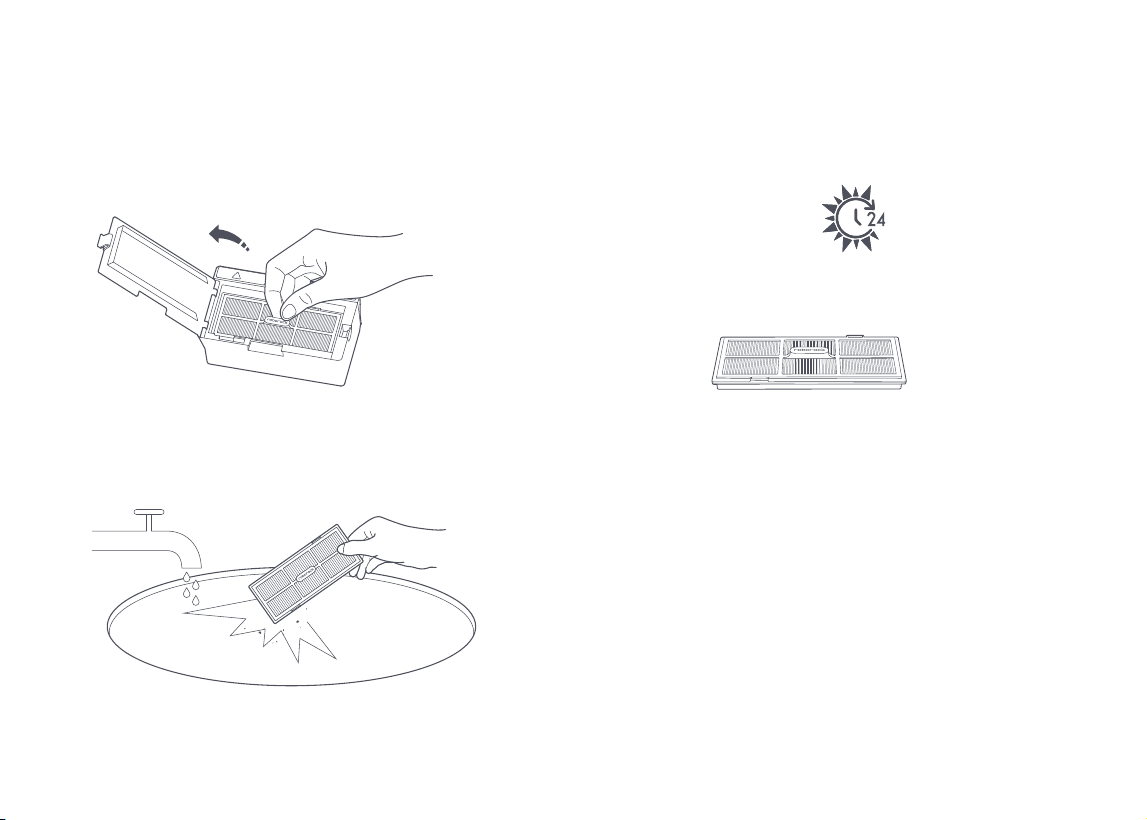
Washable Filter 2 weeks 6-12 months
Remove and rinse, gently tapping to remove any dirt.
Air-dry for at least 24h before reuse.
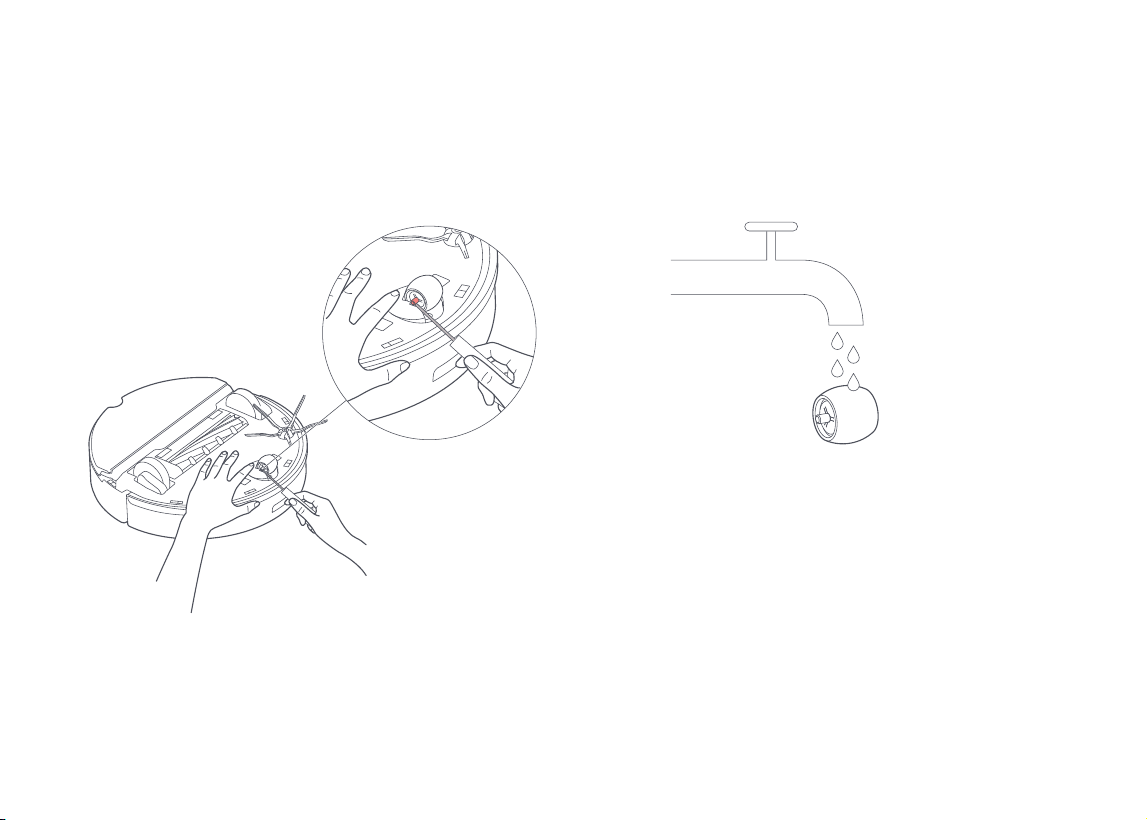
Use a screwdriver to unscrew the side brush. Remove any
entangled dirt and screw it back in place.
Side Brush Monthly 3-6 months
Remove and clean the mop cloth after each use.VibraRise Mop Cloth After each use 3-6 months
Dock Locator Wipe clean with a soft dry cloth.Monthly
Main Wheels Wipe clean with a soft dry cloth.Monthly
Replacement
Frequency
Maintenance Method
Note:

030
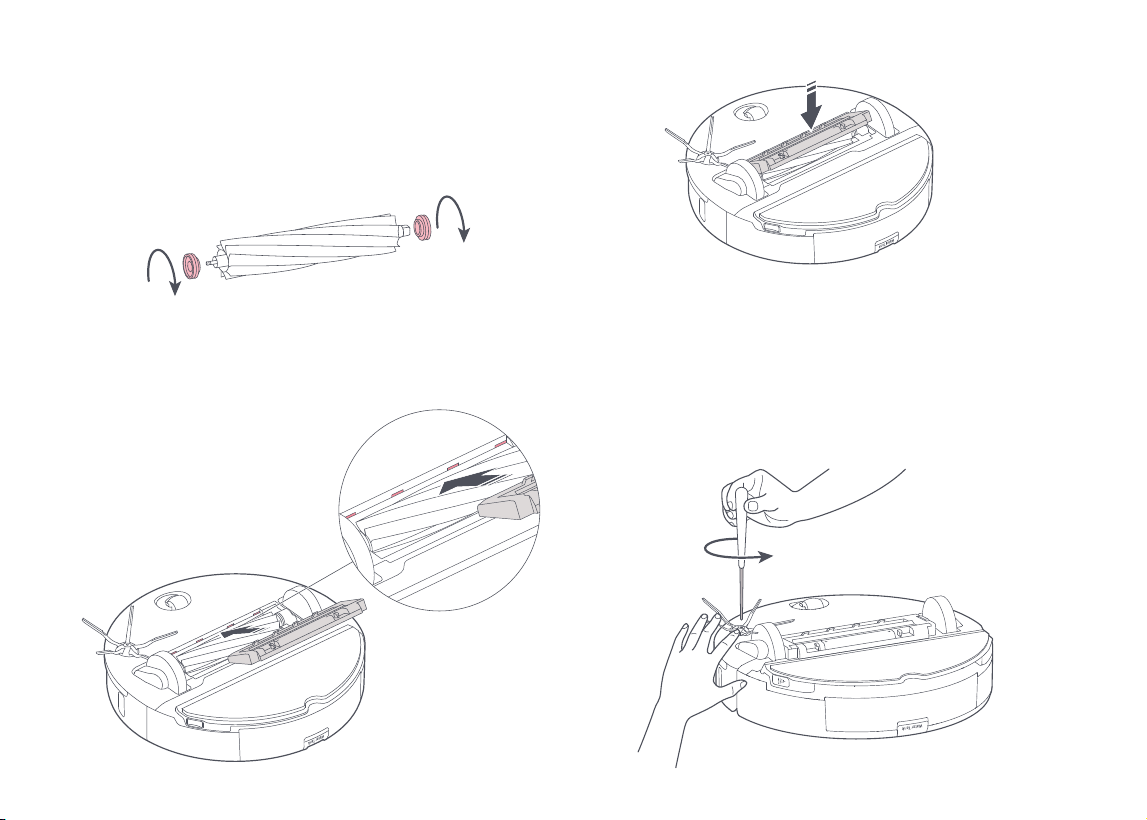
Main Brush
1. Turn the robot over, then unlatch and remove the main
brush cover.
Main brush
cover
Main brush
bearing
Latch
Main brush
Main brush cap
Routine Maintenance
2. Take out the main brush, then remove and clean the bearings.

031
Note:
Use a wet cloth to wipe the main brush. Dry thoroughly before use while avoiding direct
Do not use corrosive detergent or disinfectant to clean the main brush.
3. Remove the main brush cap, rotating in the unlock direction.
After cleaning, reattach it turning in the lock direction.
4. After removing the tangled hair or dirt at both ends of the main
brush, reinstall it, press on the main brush cover to lock it in
place.
Side Brush
1. Unscrew the side brush and remove any entangled dirt.
2. Reinstall and tighten in place.
Routine Maintenance

032
remove the wheel.
Omni-Directional Wheel
Note: The omni-directional wheel bracket cannot be removed.
Routine Maintenance
033
Main Wheels
Use a soft dry cloth to wipe and clean the main wheels.
Dustbin
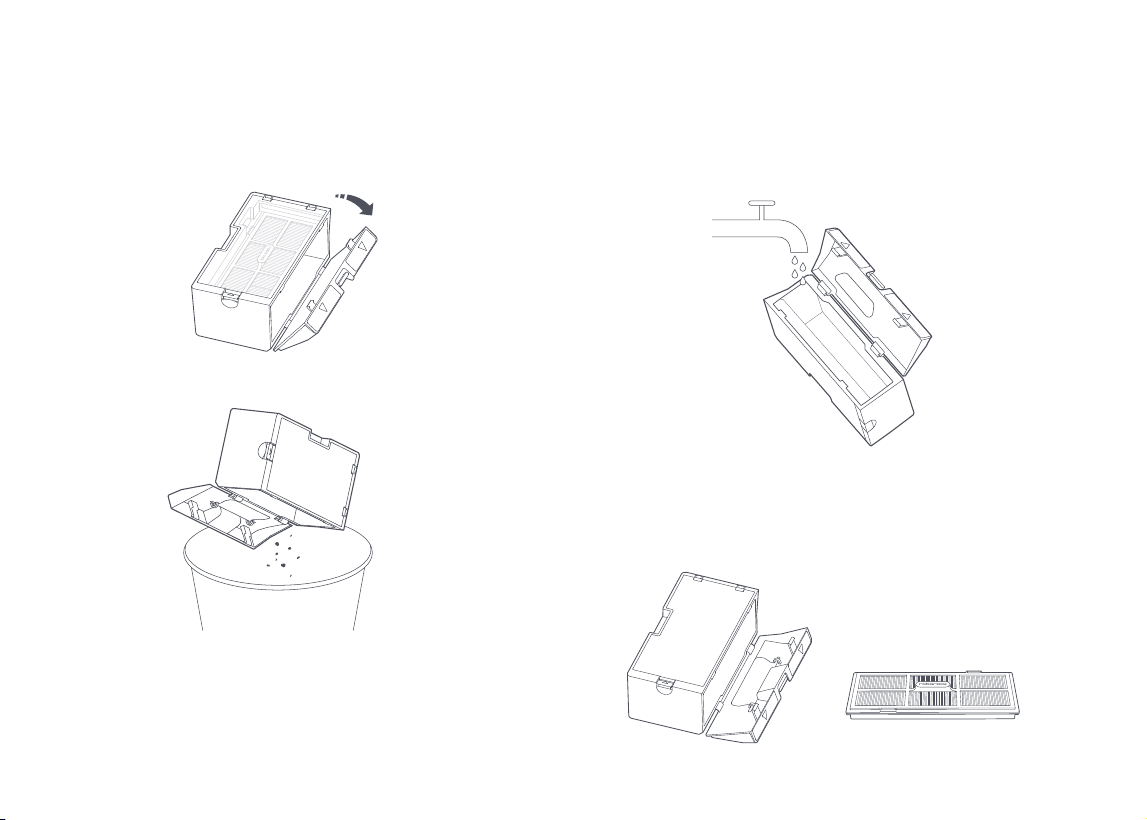
1. Open the top cover of the robot and remove the dustbin.
Routine Maintenance

034
2. Open the lid and empty the dustbin. 3. Fill it with clean water and close the lid. Gently shake the dust-
bin, then pour out the dirty water.
Routine Maintenance
Note:

035
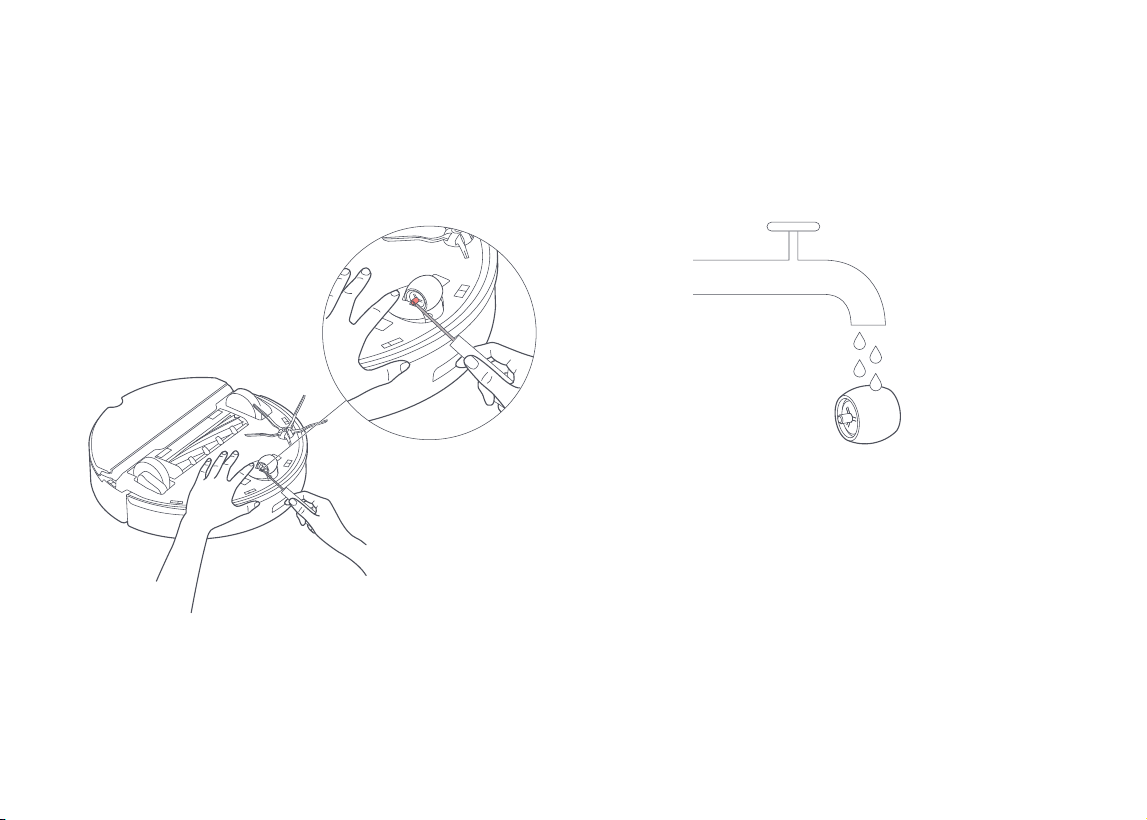
Washable Filter
dirt as possible.
Note:
Note:
Routine Maintenance

036
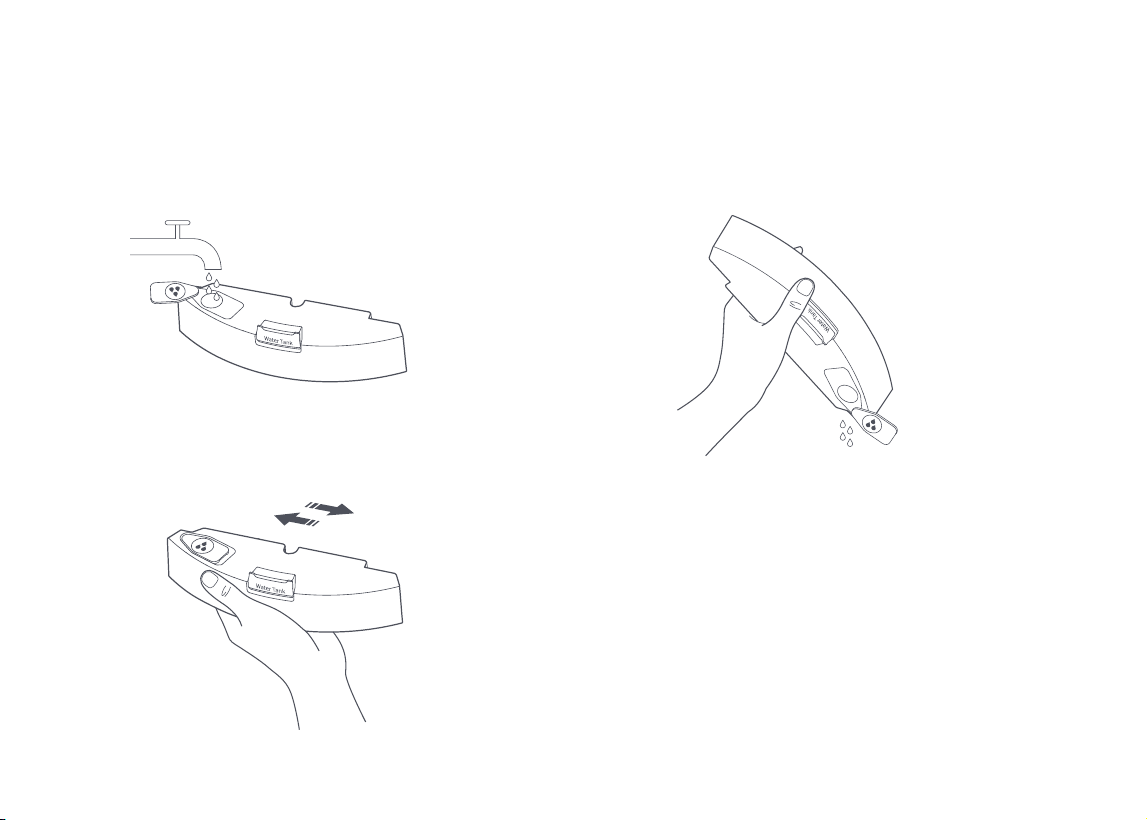
Water Tank
2. Close up the water tank and shake it gently.
3. Pour out dirty water.
Routine Maintenance

037
VibraRise Mop Cloth
1. Remove the VibraRise mop cloth from the VibraRise mop cloth
mount.
2. Clean the VibraRise mop cloth and air-dry it.
Note:
clean cloth.
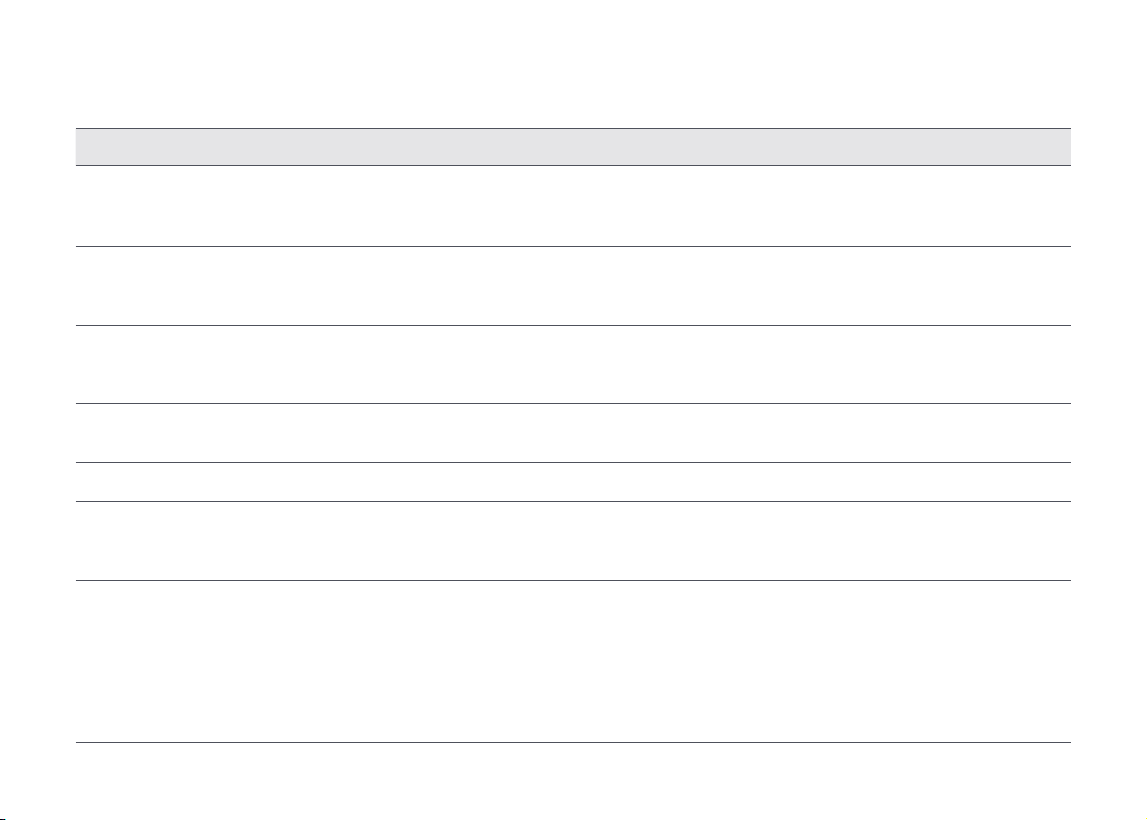
Robot Sensors
Use a soft dry cloth to wipe and clean all sensors, including:
1. The dock locator.
2. The wall sensor.
3. The carpet sensor.
Routine Maintenance
Dock Locator
Wall Sensor
Carpet Sensor
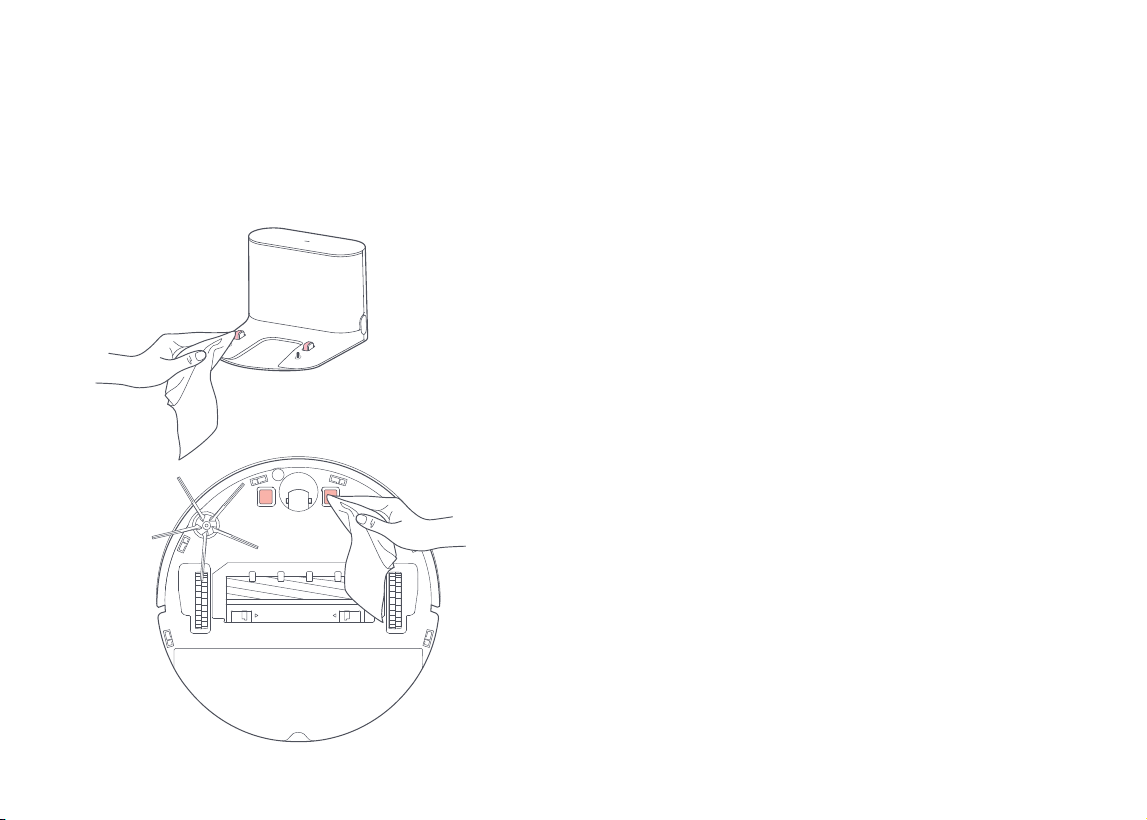
Charging Contact Areas
Use a soft dry cloth to wipe the charging contacts on the charging
dock and the robot.
Battery
-
chargeable battery pack. To maintain battery performance, keep
the robot charged.
Note:
every three months to avoid battery damage caused by over-discharging.
Routine Maintenance

Robot Charging Dock
Model
Dimensions
Battery
Weight
Wireless Connection
Rated Input
Charging Time
roborock S7
WiFi Smart Connect
20VDC 1.2A
< 6 hours
Model
Dimensions
Rated Power
Rated Input
Rated Output
Charging Battery
CDZ11RR or CDZ12RR
100-240VAC
20VDC 1.2A
Note: The serial number is on a sticker on the underside of the robot.
Basic Parameters

040
Errors
Refer to the following table for troubleshooting.
1. After resolving any of the following errors, relocate your robot and restart cleaning.
2. After any sensor errors, clean the sensor and retry.
3. If the battery is at an abnormal temperature, wait for it to return to normal before use.
Error 1: LiDAR turret or laser blocked. Check for obstruction and retry.
Error 2: Bumper stuck. Clean it and lightly tap to release it.
Error 3: Wheels suspended. Move robot and restart.
Error 4:
Error 5:
Error 6:
Error 7:
Error 8: Robot trapped. Clear obstacles surrounding robot.
Error 9:
Error 12: Low battery. Recharge and retry.
Error 13: Charging error. Clean charging contacts and retry.
Error 14: Battery error.
Error 15: Wall sensor dirty. Clean wall sensor.

041
Errors
Note: A system reset may resolve some problems.
If the problem persists after using the recommendations in the table above, please email our after-sales service team:
Europe Support: support@roborock-eu.com
Error 16: Robot tilted. Move to level ground and restart.
Error 17: Side brush error. Reset robot.
Error 18: Fan error. Reset robot.
Error 21: Vertical bumper pressed. Move robot and retry.
Error 22: Dock locator error. Clean and retry .
Error 23: Could not return to dock. Clean dock location beacon and retry.
Error 27:
Error 28:
Filter blocked or wet. Clean, dry, and retry.
Cannot cross carpet. Move robot across carpet and restart.
Internal error. Reset the robot.

042
Common Issues
Unable to power on
The battery level is low. Put the robot on the charging dock and charge it before use.
The battery temperature is too low or too high. Only use the robot within the range of
Unable to charge
Check the power indicator light turns on and both ends of the power cabel are properly
connected.
If contact is poor, clean the contact areas on the charging dock and the robot.
Slow charging
When used at high or low temperatures, the robot will automatically reduce its charging
The charging contacts may be dirty. Wipe them with a dry cloth.
Unable to dock
There are too many obstacles near the charging dock. Move it to an open area.
The robot is too far from the charging dock. Place it closer and retry.
Abnormal behavior
Restart the robot.
Noise during cleaning
Unable to connect to WiFi
WiFi is disabled. Reset the WiFi and try again.
The WiFi signal is poor. Move the robot to an area with good WiFi reception.
Abnormal WiFi connection. Reset the WiFi, download the latest mobile app, and retry.
Unable to connect to WiFi abruptly. There may be an error with your router settings.
Contact Roborock customer service for additional support.
Problem Solution

043
Common Issues
Scheduled cleaning is not working
Keep the robot charged. Scheduled cleaning can only begin when the battery level is
above 20%.
Is power always being drawn when the
robot is on the charging dock?
The robot will draw power while it is docked to maintain battery performance, but
power consumption is minimal.
Does the robot need to be charged for
used?
No. The robot can be used any time after it has been fully charged.
No or little water during mopping
Check whether there is water in the water tank and use the mobile app to set the
scrub intensity or check the manual for full instructions on how to correctly install the
mop cloth and mop cloth mount.
Cleaning does not resume after
recharging
Make sure that the robot is not in DND mode. DND mode will prevent cleanup. When
charging dock before it returned to the dock automatically, it will not be able to con-
tinue cleanup.
The robot cannot return to the charging
dock after Spot cleaning or when it has
been moved manually
map. If the charging dock is too far away, it may not be able to return to recharge
and must be placed on the charging dock manually.
The robot has begun to miss certain spots
Problem Solution
Poor cleaning ability or dust falling out
The dustbin is full and needs emptying.


045
Lisez attentivement ce manuel d’utilisation avant d’utiliser le produit et
rangez-le soigneusement pour référence future.
Roborock S7 Manuel d’utilisation de
l’aspirateur robot
Français

046
Contenu
047 Consignes de sécurité
050 Déclaration FCC/IC
052 Batterie et rechargement
053 Fonction d'économie d'énergie de vacances
054 Présentation du produit
060 Installation
065 Se connecter à l’application
067 Instructions
071 Entretien de routine
081 Paramètres de base
082 Erreurs
084 Problèmes courants

047
IMPORTANTES MESURES DE SÉCURITÉ
AVERTISSEMENT
Consignes de sécurité
fabricant.
Le cordon ne doit pas être utilisé comme une poignée ou pour tirer, traîner ou soulever l’appareil. Ne pas faire passer
mur ou d’une autre arête vive et le tenir à distance des surfaces chaudes.

cendres chaudes.
façon de faire garantira la sécurité du produit.
batterie, de lever ou de déplacer l’appareil. Transporter l’appareil en gardant un doigt sur l’interrupteur, ou mettre sous
tension un appareil dont l’interrupteur est à la position marche peut causer un accident.
utilisé avec une autre batterie.
courtcircuit des bornes des batteries peut causer des brûlures ou un incendie.
Consignes de sécurité

Consignes de sécurité
d’utilisation et d’entretien.
d'utilisation et d'entretien.
bousculer ou heurter accidentellement.
ou la réparation.
substance collante sur le sol.
CONSERVEZ CES INSTRUCTIONS
Sécurité laser
-

050
Déclaration FCC/IC
Informations de conformité
Coordonnées de la partie responsable aux USA
Nom du produit Robot aspirateur-laveur avec station de rechargement
roborock S7
le brouillage est susceptible d'en compromettre le fonctionnement.
Roborock Technology Co.
support@roborock.com
Déclaration de conformité
Société
Adresse
E-mail

051
Déclaration FCC/IC
Avertissement
-
-
-
corriger les interférences par une ou plusieurs des mesures suivantes :
Critères MPE
pendant son functionnement.
052
Batterie et rechargement
substance collante sur le sol.
Température de charge de la batterie
-
bot doit être rechargé tous les trois mois.
de -20 °C à 60 °C (de -4 °F à 140 °F)
avec moins de 70 % d'humidité relative
Stockage longue durée
(3 mois)
Stockage longue durée
(1 an)
Stockage (1 mois)
de -20 °C à 45°C (de -4 °F à 113°F)
avec moins de 70 % d'humidité relative
avec moins de 70 % d'humidité relative
Température de fonctionnement de la batterie
Température
de stockage de
la batterie

053
une alerte sonore. Le mode Vacances sera alors activé.
Dans ce mode, le robot passera en mode de faible consommation pour minimiser la consommation d'énergie. Cela inclut l'atténuation du
voyant LED.
Fonction d'économie d'énergie de vacances
054
Robot
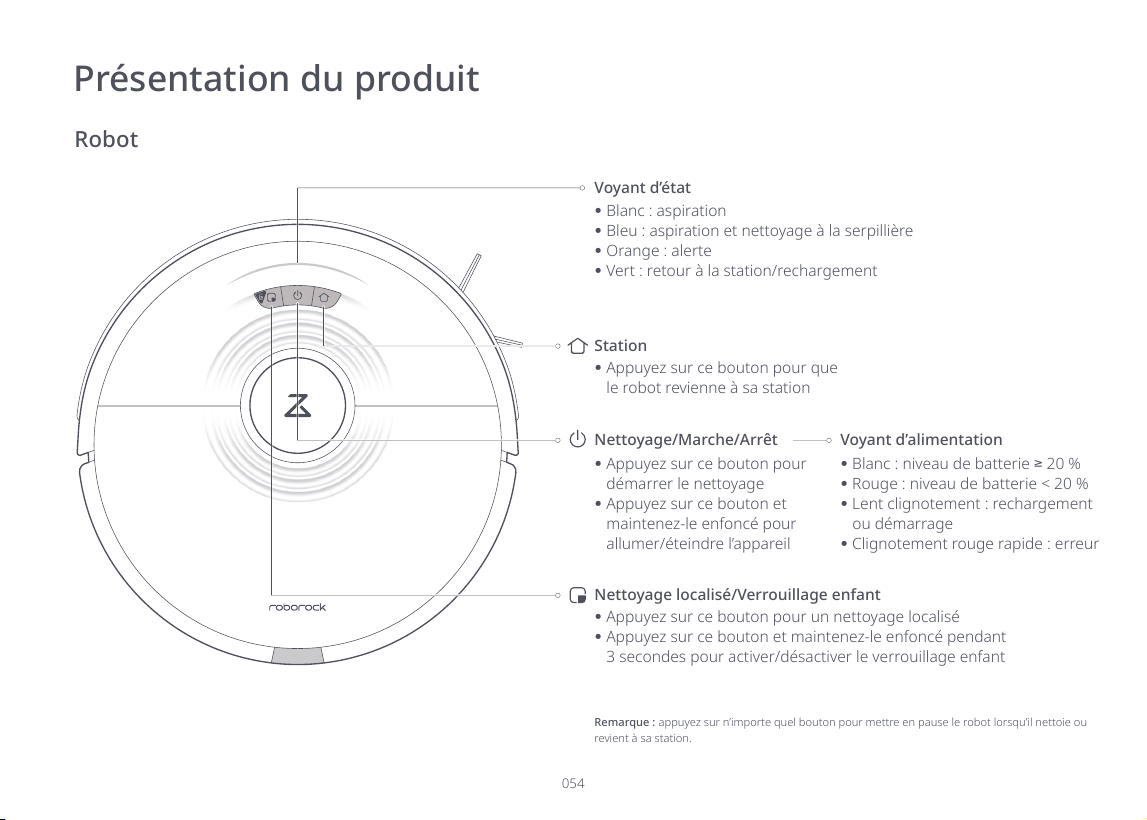
Nettoyage/Marche/Arrêt
démarrer le nettoyage
Voyant d’alimentation
Station
le robot revienne à sa station
Remarque :
revient à sa station.
Nettoyage localisé/Verrouillage enfant
Blanc : aspiration
Orange : alerte
Voyant d’état
Présentation du produit
Blanc : niveau de batterie
20 %
Rouge : niveau de batterie < 20 %
Lent clignotement : rechargement
ou démarrage
Clignotement rouge rapide : erreur

055
Liste des pièces
Station de chargement Support de serpillière VibraRise
Serpillière VibraRiseCâble d’alimentation
Présentation du produit

056
-
sur www.roborock.com pour
plus de détails.
Robot
Réinitialisation
système
Aération
Support de serpillière
VibraRise
Réservoir d’eau
Voyant WiFi
Bac à poussière
Loquet du bac
à poussière
Filtre lavable
Loquet du cache
Présentation du produit
Entrée d’air
Remarque :
057
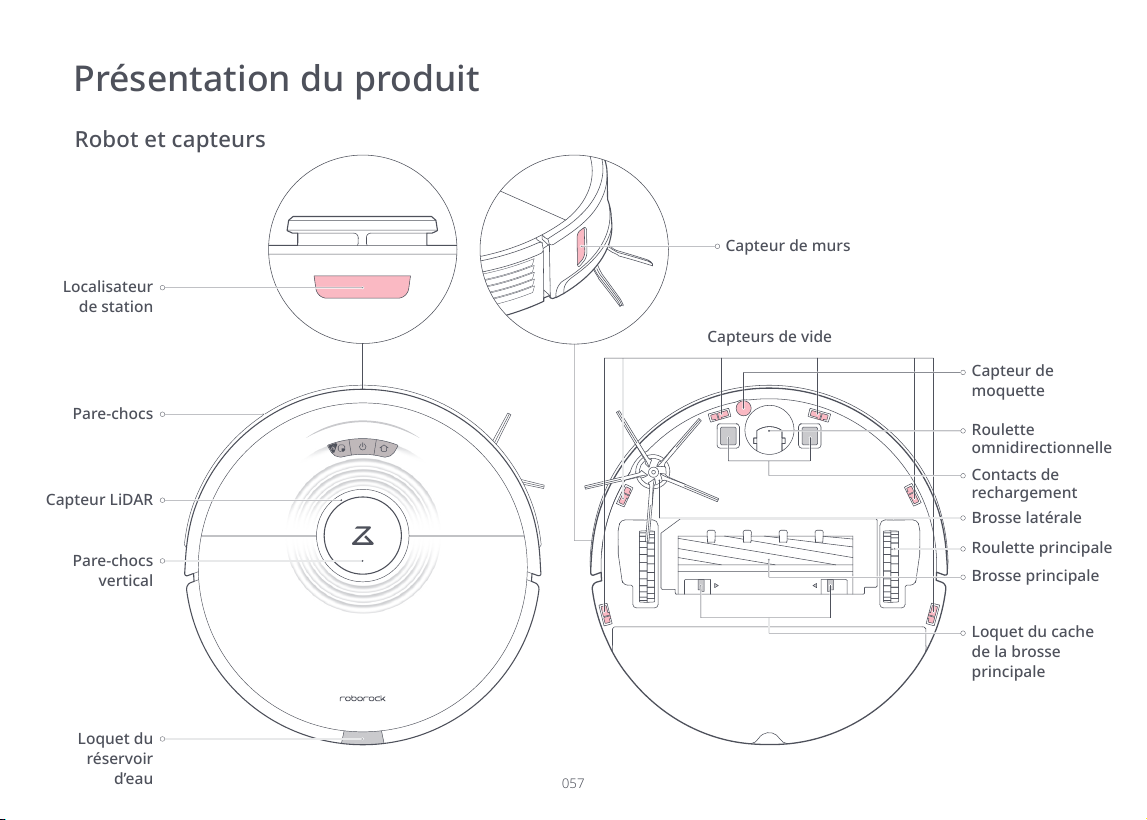
Robot et capteurs
Localisateur
de station
Pare-chocs
Capteur LiDAR
Pare-chocs
vertical
Loquet du
réservoir
d’eau
Capteurs de vide
Roulette
omnidirectionnelle
Capteur de murs
Contacts de
rechargement
Capteur de
moquette
Brosse latérale
Roulette principale
Brosse principale
Loquet du cache
de la brosse
principale
Présentation du produit
Module VibraRise
Bouchon du réservoir d’eau
Filtre à eau
Réservoir d’eau électrique
Loquet du réservoir d’eau
Support de serpillière VibraRise
Serpillière VibraRise
Loquet du support de la
serpillière
Module de vibration
Présentation du produit

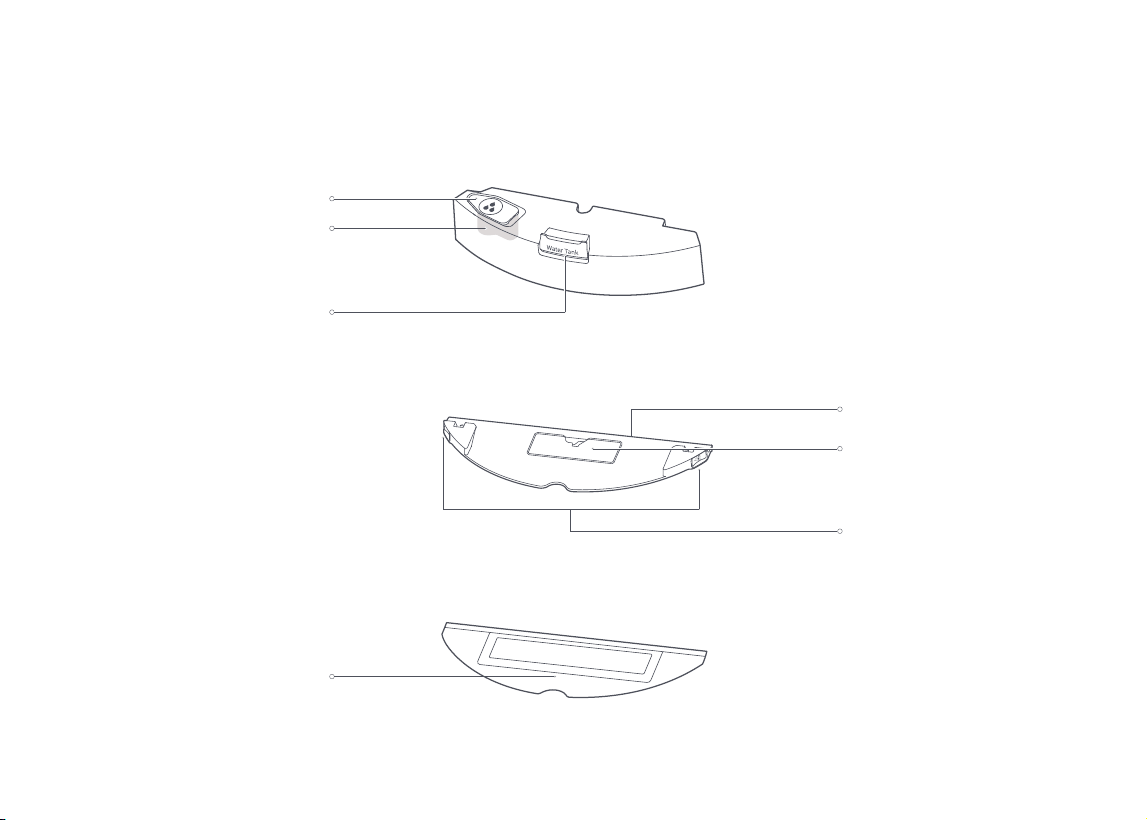
Station de chargement
Balise de localisation de la station
Voyant d’alimentation de la station
de chargement
Contacts de rechargement
Brosses à électrodes
Présentation du produit
Prise électrique
060
Important
seraient happés, frappés ou heurtés par le robot.
1.
des dommages matériels.
2.
nettoyer seul lors des prochaines utilisations.
Remarque :
Installation
061
Plus de 0,5 m (1,6 pi)
Plus de 0,5 m (1,6 pi)
Plus de 1,5 m (4,9 pi)
Fixer la station de chargement avec du
ruban adhésif
-
apposant du ruban adhésif double face au bas de la station.
Positionner la station de chargement
-
disposant d’une bonne couverture WiFi.
Remarque :
station de chargement.
robot charge.
Remarque :
Installation
1
2
062
devraient être aspirés au moins trois fois avant le premier cycle de nettoyage à la
Nettoyer le sol à la serpillière
Remarque :
1. Retirer le réservoir d’eau
-
2. Remplir le réservoir d’eau
-
Remarque :
peuvent entraîner une corrosion du réservoir d’eau.
entraîner une déformation du réservoir d’eau.
4
Allumer et recharger le robot
-
le robot sur la station pour le recharger. Pour conserver les
hautes performances de la batterie lithium-ion rechargeable,
Remarque :
3
La couleur du voyant
d’alimentation indique le
niveau de la batterie :
Blanc : niveau de batterie
20 %
Rouge : niveau de batterie < 20 %
Installation
063
3. Réinstaller le réservoir d’eau
4. Installer la serpillière VibraRise
-
ment adhérer en place.
Installation
Remarque :
5. Installer le support de la serpillière VibraRise
-
Remarque :
Clic
Clic
Clic
064
6. Retirer le support de serpillière VibraRise
Remarque :
réservoir d’eau.
peut rester en place.
Installation
AVERTISSEMENT

065
l’application.
l’application.
Se connecter à l’application
Télécharger l’application
1
066
et
WiFi clignote lentement. Le robot sera alors en attente de
un appareil.
Éteint : WiFi désactivé
Lent clignotement : en attente
Clignotement rapide :
Remarque :
-
-
avant de poursuivre.
-
Remarque :
Voyant WiFi
Réinitialiser le WiFi
Ajouter l’appareil
2
3
Se connecter à l’application
067
Marche/Arrêt
le robot. Le voyant d’alimentation s’allumera et le robot entrera
Remarque :
Remarque :
robot charger avant de démarrer le nettoyage.
station pour se recharger et continuera là où il s’est arrêté.
Zone 1 – Nettoyée
Zone 4 – Zone suivante
Zone 2 – Nettoyée
Zone 3 – En cours
Démarrer le nettoyage
pour démarrer le nettoyage. Le robot
Choisir le mode
puissance de vibration.
Instructions
Nettoyage localisé
pour démarrer un nettoyage localisé.
Remarque :
mode Veille.
1,5 m
1,5 m
Mode Ne pas déranger (NPD)
désactivé ou personnalisé dans l’application. En mode NPD, le
nettoyage est arrêté, les annonces vocales sont en sourdine, et la
luminosité du voyant d’alimentation est réduite.
Verrouillage enfant
-
Pause
pour continuer, ou ap-
pour renvoyer le robot à sa station.
Remarque :
nettoyage en cours.
Veille
Si le robot est inactif pendant plus de 10 minutes, il entrera en
mode Veille, avec son indicateur d’alimentation clignotant une fois
pour le sortir de veille.
Remarque :
Instructions
Remplir le réservoir d'eau ou nettoyer la
serpillière
pour continuer.

Recharger
-
ton
robot est en charge, le voyant d’alimentation clignote lentement.
Remarque : si le robot ne parvient pas à retrouver sa station de chargement, il reviendra à
-
ment pour le recharger.
Erreur
Si une erreur se produit, le voyant d’alimentation clignote rapide-
-
Remarque :
10 minutes.
Réinitialisation système
Remarque : -
Restaurer les paramètres d’usine
seront alors restaurés.
Nettoyage de zones
Remarque :
nettoyer.
Nettoyage sélectif de pièces
Remarque :
Instructions

070
raison des mises à niveau et du développement continus.
Instructions
robot nettoiera et reviendra à sa station.
Remarque :
en charge.
Zones interdites, Zones sans serpillière et
Murs invisibles
-
Murs invisibles
Zones interdites Zones sans serpillière
Fonctions supplémentaires de l’application
temps réel
maintenance
Nettoyage personnalisé
Gestion des cartes
Remarque :
Mises à jour du logiciel
pour personnaliser l’espace à nettoyer. Ces éléments ne doivent pas être utilisés pour
isoler des dangers.
Le déplacement du robot à la main ou l’apport de changements considérables à l’environ-
Murs invisibles.
071
Entretien de routine
Pièce
Fréquence
d’entretien
Roulette
omnidirectionnelle
Selon les besoins
Contacts de rechargement
(Robot)
Tous les mois
Capteurs de vide Tous les mois
Brosse principale
Faites tourner les attaches des capuchons des brosses principales dans
principale dans le sens du verrouillage.
2 semaines 6 à 12 mois
Contacts de rechargement
(station de chargement)
Tous les mois
Tous les mois
Filtre lavable 2 semaines 6 à 12 mois
Brosse latérale Tous les mois 3 à 6 mois
3 à 6 mois
Localisateur de station Tous les mois
Roulettes principales Tous les mois
Fréquence de
remplacement
Méthode d’entretien
Remarque :
072
Brosse principale
brosse principale.
Cache de la
brosse principale
Roulement
de la brosse
principale
Loquet
Brosse
principale
Capuchon
de la brosse
principale
Entretien de routine
073
Remarque :
faisant tourner dans le sens horaire.
sur son cache pour la verrouiller en place.
Brosse latérale
Entretien de routine
074
saleté.
Roulette omnidirectionnelle
Remarque : le support de la roulette omnidirectionnelle ne peut pas être retiré.
Entretien de routine

075
Roulettes principales
principales.
Bac à poussière
Entretien de routine
076
l’eau sale.
Entretien de routine
Remarque :
077
Filtre lavable
Remarque :
Remarque :
Entretien de routine

Réservoir d’eau
Entretien de routine

Serpillière VibraRise
Remarque :
Capteurs du robot
capteurs, notamment :
1. Le localisateur de station.
2. Le capteur de murs.
Entretien de routine
Localisateur
de station
Capteur de murs
Capteur de
moquette
Capteurs de vide

Zones de contact de rechargement
-
gement de la station et du robot.
Batterie
-
mances de la batterie.
Remarque :
Entretien de routine

Robot Station de chargement
Dimensions
Batterie
Poids
Entrée nominale
Durée de rechargement
roborock S7
Environ 4,7 kg
WiFi Smart Connect
20 VCC, 1,2 A
< 6 heures
Dimensions
Puissance nominale
Entrée nominale
Régime nominal
Rechargement de la batterie
CDZ11RR ou CDZ12RR
100 – 240 VCA
20 VCC, 1,2 A
Remarque :
Paramètres de base

Erreurs
-
Erreur 1 :
Erreur 2 :
Erreur 3 :
Erreur 4 :
Erreur 5 :
Erreur 6 :
Erreur 7 :
Erreur 8 :
Erreur 9 :
Erreur 12 :
Erreur 13 :
Erreur 14 : erreur de batterie.
Erreur 15 :

Erreurs
Remarque :
Assistance en Europe : support@roborock-eu.com
Erreur 16 :
Erreur 17 :
Erreur 18 :
Erreur 21 :
Erreur 22 :
Erreur 23 :
Erreur 27 :
Erreur 28 :

Problèmes courants
Impossible d’allumer
l’appareil
avant utilisation.
Impossible de
recharger l’appareil
sont correctement branchées.
Rechargement lent
sa vitesse de chargement pour prolonger la durée de vie de la batterie.
Impossible de revenir
à la station
Comportement anormal
Bruit durant le
nettoyage
La brosse principale, la brosse latérale, les roulettes principales ou la roulette omnidirectionnelle
Impossible de se connec-
ter au WiFi
dans l’application.
Problème Solution
Problèmes courants
niveau de la batterie est supérieur à 20 %.
-
chargement ?
performances de la batterie, mais cette consommation d’alimentation est minimale.
Le robot doit-il être rechargé pendant au
rechargé.
Pas d’eau ou peu d’eau lors d’un net-
la marche suivre pour installer correctement la serpillire et le support de la serpillire.
rechargement
Le robot ne peut pas revenir à la station de
regénérera la carte. Si la station de chargement est trop loin, il ne sera peut-être pas
en mesure d’y revenir pour se recharger et devra alors y être placé manuellement.
points
Le remplissage du réservoir d’eau prend
beaucoup de temps
Problème Solution
Mauvaise capacité de nettoyage ou de la
La brosse principale est coincée et doit être nettoyée.


Lea este manual del usuario con atención antes de usar el producto y
guárdelo adecuadamente para consultas futuras.
Roborock S7 Manual del usuario de la
aspiradora robótica
Español

Índice
089 Información de seguridad
092 Declaración de FCC IC
094 Batería y carga
095 Función de ahorro de energía en vacaciones
096 Descripción general del producto
102 Instalación
107 Conectar con la aplicación
109 Instrucciones
113 Mantenimiento rutinario
123 Parámetros básicos
124 Errores
126 Problemas comunes

INSTRUCCIONES DE SEGURIDAD IMPORTANTES
ADVERTENCIA
Información de seguridad
Al usar un electrodoméstico eléctrico, siempre deben respetarse las precauciones básicas, incluidas las siguientes:
LEA TODAS LAS INSTRUCCIONES ANTES DE USAR (ESTE ELECTRODOMÉSTICO). Si no se siguen las instrucciones y las
advertencias, puede producirse una descarga eléctrica, incendios o lesiones graves.
Para reducir el riesgo de incendios, descargas eléctricas o lesiones:
mascotas o plantas.
Úselo solo como se describe en este manual. Use solo los accesorios recomendados por el fabricante.
No lo desenchufe tirando del cable. Para desenchufarlo, tome el enchufe, no el cable.
No lo use sin la bolsa de polvo.

cuando está encendido, puede haber accidentes.
preventivas reducen el riesgo de encender el electrodoméstico accidentalmente.
cuidado.
Información de seguridad

Información de seguridad
va a limpiar.
pueda tocar o chocar accidentalmente.
mantenimiento.
GUARDE ESTAS INSTRUCCIONES
Solo para uso doméstico.
Seguridad láser
Producto láser de clase 1, cumple con las normas 21 CFR 1040.10 y 1040.11 de la FDA, salvo en conformidad con IEC

Declaración de FCC IC
Información de cumplimiento
Correspondencia de la parte responsable en EE. UU.
Nombre del producto
roborock S7
Modelo de cargador base: CDZ11RR o CDZ12RR
Este dispositivo cumple con la parte 15 de las Reglas FCC.
Development Canada.
un funcionamiento no deseado.
Roborock Technology Co.
support@roborock.com
Modelo del producto
cumplimiento
Empresa

Declaración de FCC IC
Advertencia
conectar la interferencia con una o más de las siguientes medidas:
Requisitos de MPE
recomienda ponerlo en funcionamiento a menos de esta distancia.

Batería y carga
Si guarda el robot, cárguelo por completo y apáguelo antes de colocarlo en un lugar seco y fresco. Recárguelo, al menos,
Cuando se almacena a 25 °C
(77 °F), el robot debe recargarse
cada tres meses.
-20 °C - 60 °C (-4 °F - 140 °F)
con menos de 70 % de HR
Almacenamiento
prolongado (3 meses)
Almacenamiento
Almacenamiento
(1 mes)
-20 °C - 45 °C (-4 °F - 113 °F)
con menos de 70 % de HR
con menos de 70 % de HR
Temperatura
de almacena-
miento de la

vacaciones.
Función de ahorro de energía en vacaciones
Robot
Limpiar/Encendido
para limpiar
manténgalo
presionado para
Indicador de encendido
Base
Nota:
a la base.
Limpieza localizada/Bloqueo para niños
Blanco: aspirando
Luz indicadora de estado
Descripción general del producto
20 %
o iniciando
Lista de partes
Base de carga Montaje del fregador VibraRise
Fregador VibraRiseCable de alimentación
Descripción general del producto

Robot
Restablecimiento
del sistema
Ventilación de
aire
Montaje del
fregador VibraRise
Tanque de agua
Indicador de WiFi
Contenedor de polvo
Cubierta de
Pestillo del
contenedor de
polvo
Filtro lavable
Pestillo de cubierta
Descripción general del producto
Nota:
de vaciado automático de Roborock.
Disponible para comprar por
separado. Visite www.roborock.com
para obtener detalles.
Robot y sensores
Localizador
de base
Parachoques
Sensor LiDAR
Parachoques
vertical
Pestillo del
tanque de agua
Sensores de precipicio
Rueda
omnidireccional
Sensor de pared
Contactos de carga
Sensor de
alfombra
Cepillo lateral
Rueda principal
Cepillo principal
Pestillo de
cubierta de
cepillo principal
Descripción general del producto

100
Módulo VibraRise
Tapón del tanque de agua
Filtro de agua
Tanque de agua eléctrico
Pestillo del tanque de agua
Ranura para acoplar el fregador
Montaje del fregador VibraRise
Fregador VibraRise
Área de acoplamiento
Pestillo de montaje del fregador
Módulo de vibración
Descripción general del producto
101
Base de carga
Luz de aviso de ubicación de base
Tomacorriente
Indicador de encendido de la base de carga
Contactos de carga
Cepillos de electrodo
Descripción general del producto
102
Importante
inestables, frágiles, importantes o peligrosos para evitar lesiones
enreden en el robot, lo obstruyan o resulten golpeadas por él.
1.
2.
Nota:
Instalación

103
Más de 0,5 m (1,6 pies)
Más de 0,5 m (1,6 pies)
Más de 1,5 m (4,9 pies)
Fijar la base de carga con la cinta
adhesiva
Posicionar la base de carga
Nota:
El indicador de la base de carga está encendido cuando ésta recibe electricidad y
apagado cuando el robot está en carga.
el robot no regrese automáticamente a la base de carga.
Nota:
de pegamento.
Instalación
1
2
104
Fregar el piso
Nota:
deben aspirar al menos tres veces antes del primer ciclo de fregado.
1. Retirar el tanque de agua
2. Llenar el tanque de agua
hacia atrás.
Nota:
4
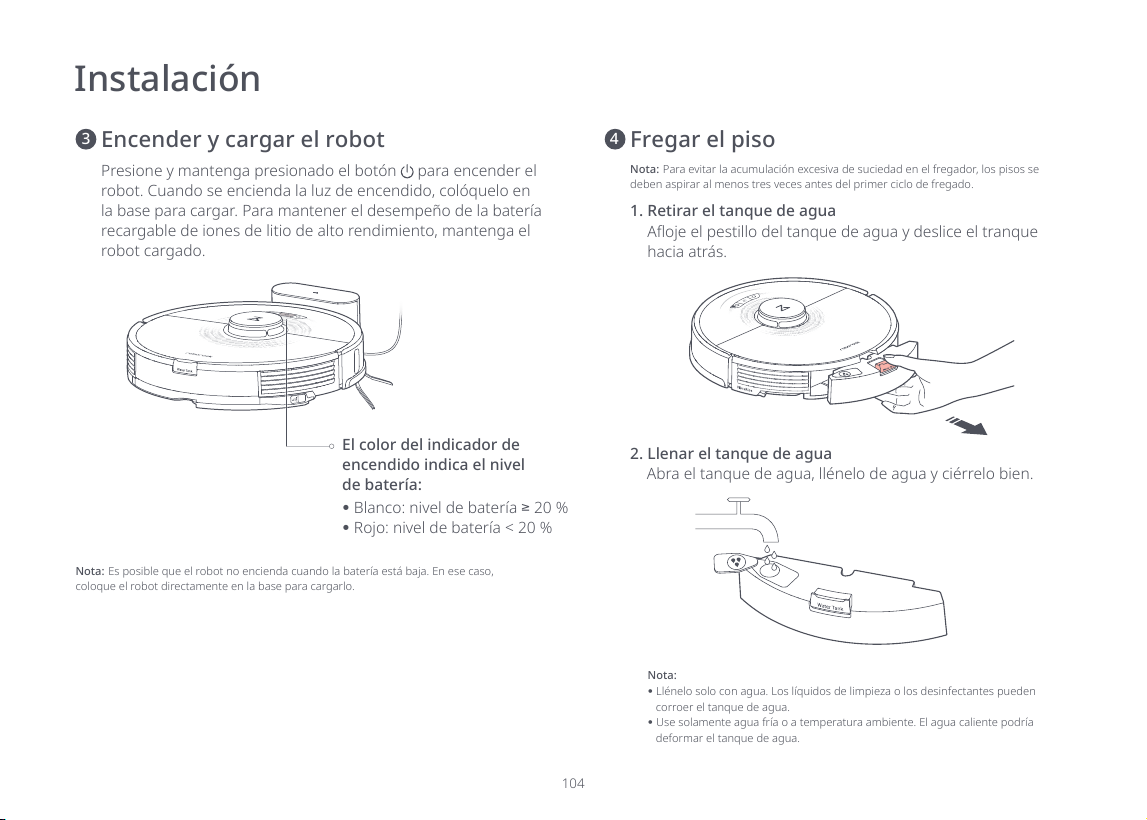
Encender y cargar el robot
para encender el
recargable de iones de litio de alto rendimiento, mantenga el
robot cargado.
Nota:
3
El color del indicador de
encendido indica el nivel
de batería:
20 %
Instalación
105
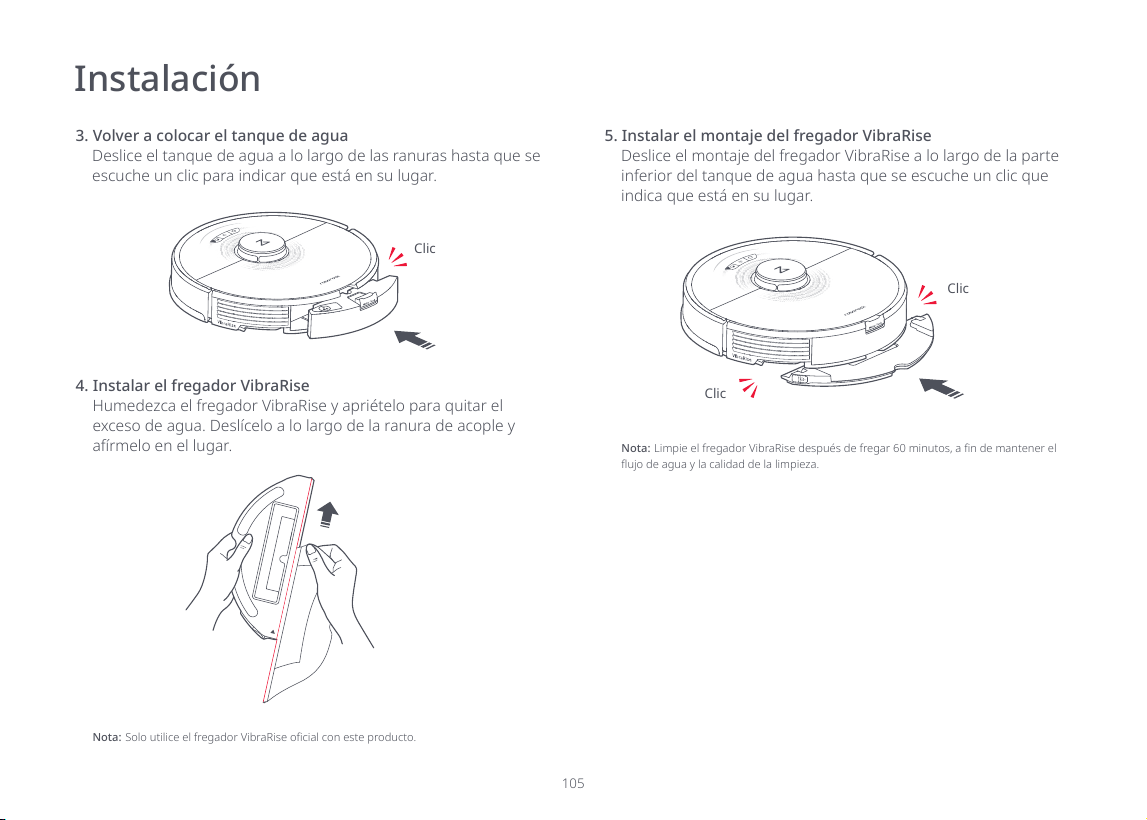
3. Volver a colocar el tanque de agua
4. Instalar el fregador VibraRise
Instalación
Nota:
5. Instalar el montaje del fregador VibraRise
Nota:
Clic
Clic
Clic
106
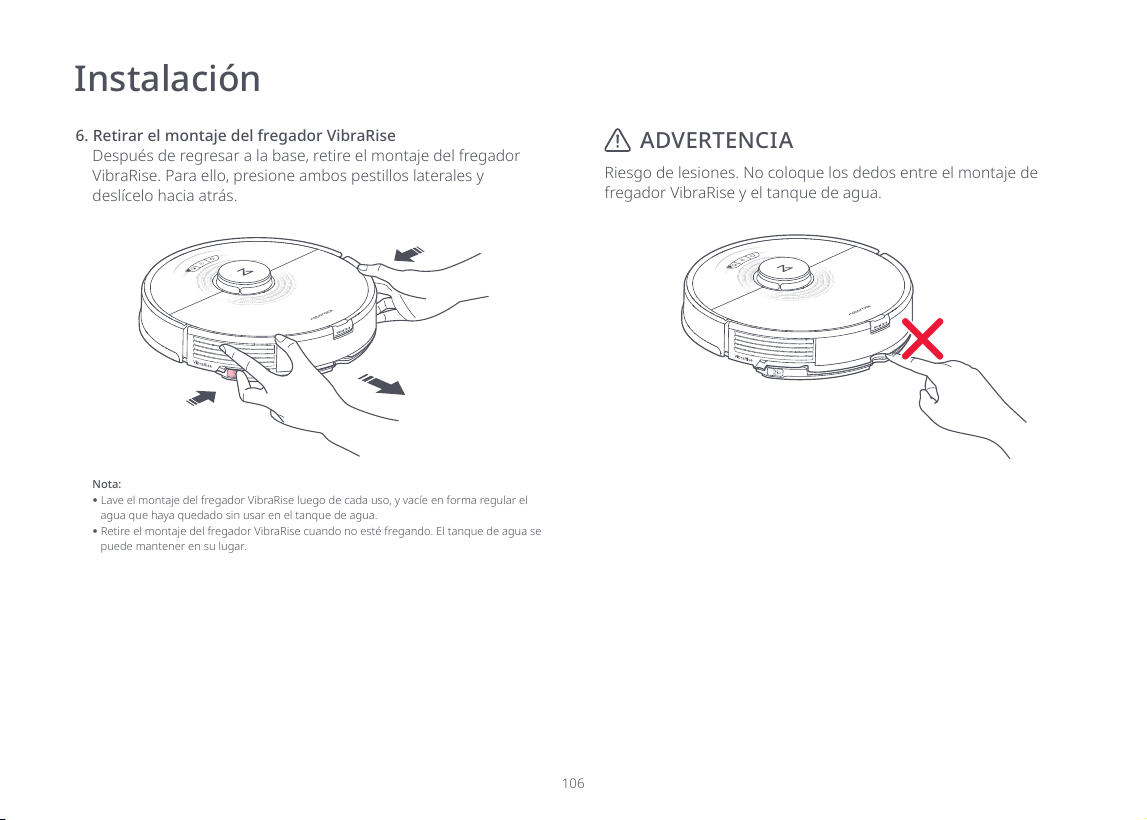
6. Retirar el montaje del fregador VibraRise
VibraRise. Para ello, presione ambos pestillos laterales y
Nota:
puede mantener en su lugar.
Instalación
ADVERTENCIA
107
Conectar con la aplicación
Descargar la aplicación
1
2. Presione y mantenga presionados los botones
y hasta
WiFi). El restablecimiento está completo cuando el indicador
de WiFi parpadea lentamente. El robot luego esperará una
superior derecha y siga las indicaciones para agregar un
dispositivo.
Apagada: WiFi deshabilitado
Parpadea lentamente: esperando
Parpadea rápido: conectando
Nota:
Nota:
robot como un nuevo dispositivo.
Luz indicadora de WiFi
Restablecer la conexión WiFi
Agregar el dispositivo
2
3
Conectar con la aplicación
Encendido/Apagado
para encender el
robot. El indicador de encendido se encenderá, y el robot entrará
Nota: El robot no se puede apagar cuando está en carga.
Nota:
las áreas con alfombras.
Zona 1: limpia
Zona 4: próxima zona
Zona 2: limpia
Zona 3: en curso
Comenzar a limpiar
Ajuste de modo
Instrucciones

110
Limpieza localizada
Presione
Nota:
de espera.
1,5 m
1,5 m
Modo No molestar (DND)
El modo DND se habilita de manera predeterminada entre
Bloqueo para niños
Pausa
presione
para continuar o presione para enviar el robot de
regreso a la base.
Nota:
Suspendido
Si el robot está inactivo durante más de 10 minutos, entrará en el
modo Suspendido, y el indicador de encendido parpadeará una
Nota:
El robot no ingresará en modo Suspendido cuando está en carga.
12 horas.
Instrucciones
Rellenar el tanque de agua o limpiar el fre-
gador VibraRise
Para agregar agua o limpiar el fregador VibraRise, presione
para
continuar.
111
Carga
El robot regresará a la base de carga automáticamente después
para enviarlo
a la base de carga. El indicador de encendido respirará a medida
Nota:
Error
Si se produce un error, el indicador de encendido parpadeará en
Nota:
error durante más de 10 minutos.
Restablecimiento del sistema
Si el robot no responde a las presiones de los botones o no se
Nota:
Restaurar a los ajustes de fábrica
Si el robot no funciona después de un restablecimiento del
Limpieza de zonas
Nota:
Limpieza de habitaciones selectivas
Nota:
estas áreas.
Instrucciones

112
Instrucciones
Limpieza programada
robot limpiará y regresará a la base.
Nota:
Zonas de no ingreso, zonas de no fregado y
paredes virtuales
-
Paredes virtuales
Zonas de no ingreso Zonas de no fregado
Más funciones de la aplicación
Vista de mapa en tiempo real
Programa de mantenimiento
Ver estado del robot
Nota:
Actualizaciones de Firmware
cuando el robot esté en la base de carga y tenga al menos un

113
Mantenimiento rutinario
Parte
Frecuencia de
mantenimiento
Rueda omnidireccional
Contactos de carga (robot) Todos los meses
Sensores de precipicio Todos los meses
Cepillo principal
2 semanas 6 a 12 meses
Contactos de carga
(base de carga)
Todos los meses
Sensor de alfombra Todos los meses
Filtro lavable 2 semanas 6 a 12 meses
suciedad atrapada y vuelva a enroscarlo en su lugar.
Cepillo lateral Todos los meses 3 a 6 meses
Retire y limpie el fregador después de cada uso.Fregador VibraRise Después de cada uso 3 a 6 meses
Todos los meses
Ruedas principales Todos los meses
Frecuencia de
reemplazo
Método de mantenimiento
Nota:

114
Cepillo principal
cepillo principal.
Cubierta de
cepillo principal
Cojinete
del cepillo
principal
Pestillo
Cepillo principal
Tapón del cepillo
principal
Mantenimiento rutinario
115
Nota:
No use detergente corrosivo o desinfectante para limpiar el cepillo principal.
lugar.
Cepillo lateral
Mantenimiento rutinario
116
hasta colocarla en su lugar.
Rueda omnidireccional
Nota:
Mantenimiento rutinario

117
Ruedas principales
Contenedor de polvo
polvo.
Mantenimiento rutinario
3. Llénelo con agua limpia y cierre la tapa. Agite suavemente el
contenedor de polvo y luego vierta el agua sucia.
Mantenimiento rutinario
Nota:
Filtro lavable
tanta suciedad como sea posible.
Nota:
Nota:
Mantenimiento rutinario
120
Tanque de agua
3. Vierta el agua sucia.
Mantenimiento rutinario
121
Fregador VibraRise
Nota:
siempre con un fregador limpio.
Sensores del robot
2. El sensor de pared.
3. El sensor de alfombra.
4. Los seis sensores de precipicio.
Mantenimiento rutinario
Localizador
de base
Sensor de
pared
Sensor de
alfombra
Sensores de precipicio

122
Áreas de contactos de carga
la base de carga y del robot.
Batería
Nota:
Mantenimiento rutinario

123
Robot Base de carga
Modelo
Dimensiones
Peso
Entrada nominal
Tiempo de carga
roborock S7
WiFi Smart Connect
20 VCC 1,2 A
Menos de 6 horas
Modelo
Dimensiones
Potencia nominal
Entrada nominal
Salida nominal
Frecuencia nominal
CDZ11RR o CDZ12RR
100-240 VCA
20 VCC 1,2 A
Nota:
Parámetros básicos

124
Errores
2. Después de los errores del sensor, limpie el sensor y vuelva a intentarlo.
Error 1:
Error 2:
Error 3:
Error 4:
Error 5:
Error 6:
Error 7:
Error 8: Robot atascado. Libere los obstáculos cerca del robot.
Error 9:
Error 12:
Error 13: Error de carga. Limpie los contactos de carga y vuelva a intentarlo.
Error 14:
Error 15: Sensor de pared sucio. Limpie el sensor de pared.

125
Errores
Nota: Un restablecimiento del sistema puede solucionar algunos problemas.
Soporte europeo: support@roborock-eu.com
Error 16:
Error 17:
Error 18:
Error 21:
Error 22:
Error 23:
Error 27:
Error 28: Robot está en la alformbra. Mueva el robot hasta el piso y vuelva a intentarlo.
126
Problemas comunes
No es posible encender
No es posible cargar
Si el contacto es débil, limpie el área de los contactos en la base de carga y en el robot.
Carga lenta
No es posible volver a la base
Hay demasiados obstáculos cerca de la base de carga. Llévela a un espacio abierto.
Comportamiento anormal
Reinicie el robot.
Ruido al limpiar
No es posible conectar a WiFi
vuelva a intentarlo.
Problema Solución

127
Problemas comunes
funcionando
robot está en la base de carga?
¿El robot debe cargarse durante al menos
completo.
En el fregado no hay agua o hay muy poca
recarga
en la base de carga antes de regresar automáticamente a la base, no podrá
El robot no puede regresar a la base de
cuando se haya movido manualmente
pueda regresar para volver a cargarse y se debe colocar sobre la base de carga
manualmente.
puntos
tiempo en llenarse
Problema Solución
polvo se cae
El contenedor de polvo está lleno, y debe vaciarlo.

Product Model: roborock S7
For more product information, visit our website: www.roborock.com
For after-sales support, email our after-sales service team:
Europe Support: support@roborock-eu.com
Robotic Vacuum Cleaner