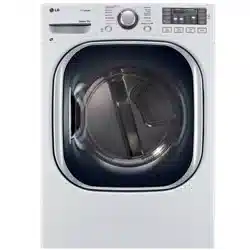
OWNEr’S MANuAL
DrYEr
Please read this owner’s manual thoroughly before operating and
keep it handy for reference at all times.
MFL67731040
ENGLISH ESPAÑOL
DLEx5780*E DLGx5781*E
www.lg.com
Copyright © 2017 LG Electronics Inc. All Rights Reserved.
MFL67731040_en_170712.indd 1 2017.7.12 5:16:58 PM

2
TABLE OF CONTENTS
3
IMPORTANT SAFETY INSTRUCTIONS
3 WHAT TO DO IF YOu SMELL GAS
4 BASIC SAFETY PrECAuTIONS
4 CALIFOrNIA SAFE DrINkING WATEr AND
TOxIC ENFOrCEMENT ACT
5 GrOuNDING INSTruCTIONS
5 SAFETY INSTruCTIONS FOr
INSTALLATION
7 SAFETY INSTruCTIONS FOr CONNECTING
ELECTrICITY
8
PRODUCT FEATURES
9
INTRODUCING YOUR DRYER
9 Parts and Accessories
9 2-Way reversible Door
9 Safety Tether kit
10 Control Panel Features
11 Display
12
INSTALLATION INSTRUCTIONS
12 Preview Installation Order
13 Installation Location requirements
13 Clearances
14 Leveling the Dryer
15 reversing the Door
21 Installing the Side Vent kit
22 Venting the Dryer
24 Connecting Gas Dryers
26 Connecting Electric Dryers
31 Special requirements for Manufactured or
Mobile Homes
31 Final Installation Check
32 Installation Test (Duct Check)
34
HOW TO USE
34 Operating the Dryer
35 Sorting Loads
35 Loading the Dryer
35 Check the Lint Filter Before Every Load
36 using the LG EasyLoad™
37 Cycle Guide
38 Cycle Settings and Options
38 Special Functions
39 Custom Program
39 Steam Functions
41 Steam Cycle Guide
42 Tag On
43 using Tag On with Applications
49
MAINTENANCE
49 regular Cleaning
50
TROUBLESHO OTING
50 Before Calling for Service
53 user Support Videos
53
SPECIFICATIONS
54
USING SMART DIAGNOSIS™
55
WARRANTY
TABLE OF CONTENTS
MFL67731040_en_170712.indd 2 2017.7.12 5:16:58 PM

3
ENGLISH
IMPORTANT SAFETY INSTRUCTIONS
READ ALL INSTRUCTIONS BEFORE USE
t
WArNING
For your safety, the information in this manual must be followed to minimize the risk of fire or explosion, electric
shock, or to prevent property damage, injury to persons, or death.
Your safety and the safety of others is very important.
We have provided many important safety messages in this manual and on your appliance. Always read and obey all
safety messages.
This is the safety alert symbol.
This symbol alerts you to potential hazards that can kill or hurt you and others.
All safety messages will follow the safety alert symbol and either the word DANGEr, WArNING, or CAuTION.
These words mean:
t
DANGEr
You will be killed or seriously injured if you don’t immediately follow instructions.
t
WArNING
You can be killed or seriously injured if you don’t follow instructions.
t
CAuTION
You may be slightly injured or cause damage to the product if you do not follow instructions.
All safety messages will tell you what the potential hazard is, tell you how to reduce the chance of injury, and tell
you what can happen if the instructions are not followed.
• Bm n mr in srall a almrf es dpyep uirf dlevible nlasria ten rin e m arepials. Gd dlevible m eral (dmil ryne) dsar is
in sralled, ir m ssr be md a sneaidia ryne iden ridied by rf e annlian ae m an sdaarspep as ssirable dmp sse uirf
almrf es dpyeps. Dlevible ten rin e m arepials ape i n mun rm amllanse, b e easily apssf ed, an d rpan lin r. Rfese
amn dirimn s uill mbsrpsar almrfes dpyep aipdlmu an d in apease rfe pisi md dipe.
• Gn srall rf e almrf es dpyep aaampdin e rm rf e m an sdaarspep’s in srpsarimn s an d lmaal amdes.
• Sate rf ese in srpsarimn s.
t
WArNING
DGPC MP CXNLMSGML FAZAPB
Failure to follow safety warnings exactly could result in serious injury, death or property damage.
- Do not store or use gasoline or other flammable vapors and liquids in the vicinity of this or any other appliance.
- WHAT TO DO IF YOu SMELL GAS
• Bm l mr rpw rm jgef r al w annjgal ac,
• Bm l mr rmsaf al w cjcarpgaaj qugraf 9 bm l mr sqc al w nf ml c gl wmsp bsgjbgl e,
• Ajcap rf c pmmk * bsgjbgl e mp apca md ajj maasnal rq,
• Gk k cbgarcjw aajj wmsp eaq qsnnjgcp dpmk a l cgef bmp’q nf ml c, Dmjjmu rf c eaq qsnnjgcp’q gl qrpsargml q,
• Gd wms aal l mr pcaaf wmsp eaq qsnnjgcp* aajj rf c dgpc bcnaprk cl r,
- Installation and service must be performed by a qualified installer, service agency or the gas supplier.
t
WARNING:
This product contains chemicals known to the State of California to cause cancer and birth defects or
other reproductive harm.
Wash hands after handling.
t
IMPOrTANT SAFETY INSTruCTIONS
MFL67731040_en_170712.indd 3 2017.7.12 5:16:58 PM

4
IMPORTANT SAFETY INSTRUCTIONS
READ ALL INSTRUCTIONS BEFORE USE
t
WArNING
For your safety, the information in this manual must be followed to minimize the risk of fire or explosion, electric
shock, or to prevent property damage, injury to persons, or death.
BASGA SADCRW NPCAASRGMLS
t
WArNING
To reduce the risk of fire, electric shock, or injury to persons when using this appliance, follow basic precautions,
including the following:
AALGDMPLGA SADC BPGLI GLE UARCP ALB RMXGA CLDMPACCLR AAR
This act requires the governor of California to publish a list of substances known to the state to cause cancer, birth
defects, or other reproductive harm and requires businesses to warn customers of potential exposure to such
substances.
Gas appliances can cause minor exposure to four of these substances, namely benzene, carbon monoxide,
formaldehyde, and soot, caused primarily by the incomplete combustion of natural gas or LP fuels.
Properly adjusted dryers will minimize incomplete combustion. Exposure to these substances can be minimized
further by properly venting the dryer to the outdoors.
• Pcab ajj gl qrpsargml q bcdmpc sqgl e rf c bpwcp,
• Bcdmpc sqc* rf c bpwcp k sqr bc npmncpjw gl qrajjcb aq
described in this manual.
• Bm l mr njaac grck q cvnmqcb rm ammi gl e mgjq gl wmsp
dryer. Items contaminated with cooking oils may
contribute to a chemical reaction that could cause a
load to catch fire.
• Bm l mr bpw aprgajcq rf ar f atc bccl npctgmsqjw ajcal cb
in, washed in, soaked in, or spotted with gasoline, dry-
cleaning solvents, or other flammable or explosive
substances as they give off vapors that could ignite or
explode.
• Bm l mr pcaaf gl rm rf c bpwcp gd rf c bpsk mp al w mrf cp
part is moving.
• Bm l mr pcnagp mp pcnjaac al w napr md rf c bpwcp
or attempt any servicing unless specifically
recommended in this owner’s manual or in published
user-repair instructions that you understand and have
the skills to carry out.
• Bm l mr rak ncp ugrf aml rpmjq,
• Bcdmpc rf c bpwcp gq pck mtcb dpmk qcptgac mp bgqaapbcb*
remove the door to the drying compartment.
• Bm l mr ajjmu af gjbpcl rm njaw ml mp gl rf c bpwcp, Ajmqc
supervision of children is necessary when the dryer is
used near children.
• Bm l mr sqc dabpga qmdrcl cpq mp npmbsarq rm cjgk gl arc
static unless recommended by the manufacturer of
the fabric softener or product.
• Bm l mr sqc f car rm bpw aprgajcq aml ragl gl e dmak psbbcp
or similarly textured rubber-like materials.
• I ccn apca apmsl b rf c cvf asqr mncl gl e al b abhaacl r
surrounding areas free from the accumulation of lint,
dust, and dirt.
• rf c gl rcpgmp md rf c bpwcp al b cvf asqr tcl r qf msjb bc
cleaned periodically by qualified service personnel.
• Bm l mr gl qrajj mp qrmpc rf c bpwcp uf cpc gr ugjj bc
exposed to the weather.
• Ajuawq af cai rf c gl qgbc md rf c bpwcp dmp dmpcgel
objects.
• Ajcal jgl r qapccl bcdmpc mp adrcp caaf jmab,
• Bm n mr srmpe nlasria, nanep, mp almrf in e rf ar m ay
bspn mp m elr mn rmn md rf e dpyep dspin e mneparimn .
• Bc aapcdsj uf cl mncl gl e al b ajmqgl e rf c bmmp,Dgl ecpq
and hands can get caught in the door and cause injury
if the door drops forward unexpectedly.
• Bm n mr nlaae f eaty irem s mn mp lean aeain sr rfe rmn
md rf e dmmp uf en ir is mnen .
• Bm n mr arrem nr rm nsll rf e f am nep dmmp mnen m mpe
rf an 4. deepees.
• rf c bpwcp amsjb rgn dmpuapb* aasqgl e gl hspw mp bak aec,
• Bm l mr njaac grck q ml rf c rmn md rf c bpwcp,
IMPOrTANT SAFETY INSTruCTIONS
MFL67731040_en_170712.indd 4 2017.7.12 5:16:59 PM

5
ENGLISH
IMPORTANT SAFETY INSTRUCTIONS
READ ALL INSTRUCTIONS BEFORE USE
t
WArNING
For your safety, the information in this manual must be followed to minimize the risk of fire or explosion, electric
shock, or to prevent property damage, injury to persons, or death.
EPMSLBGLE GLSRPSARGMLS
t
WArNING
Improper connection of the equipment-grounding conductor can result in a risk of electric shock. Check with a
qualified electrician or service person if you are in doubt that the appliance is properly grounded.
SADCRW GLSRPSARGMLS DMP GLSRALL ARGML
t
WArNING
To reduce the risk of fire, electric shock, or injury to persons when using this appliance, follow basic precautions,
including the following:
• Npmneply epmsn d dpyep rm amn dmpm uirf all
emtepn in e amdes an d mpdin an aes.
Follow details in
the installation instructions. Electric shock can result if
the dryer is not properly grounded.
• Bedmpe sse, rfe dpyep m ssr be npmneply in sralled
as
described in this manual. Electric shock can result if
the dryer is not properly grounded.
• Gn srall an d srmpe rf e dpyep uf epe ir uill n mr be
evnmsed rm rem neparspes belmu dpeezin e mp
evnmsed rm rf e uearf ep.
• All penaips an d septiain e m ssr be nepdmpm ed
by an asrf mpized septiaep sn less sneaidiaally
peamm m en ded in rfis mun ep’s m an sal. Sse mn ly
asrf mpized daarmpy naprs.
Failure to follow this
warning can cause serious injury, fire, electric shock, or
death.
• Rm pedsae rfe pisi md elearpia sf mai , dm n mr in srall
rf e dpyep in f sm id snaaes.
Failure to follow this
warning can cause serious injury, fire, electric shock, or
death.
• Amn n ear rm a npmneply pared, npmreared, an d sized
nmuep aipasir rm atmid elearpiaal mteplmad.
Improper
power circuit can melt, creating electric shock and/or
fire hazard.
• Pem mte all naai in e irem s an d disnmse md all
sf innin e m arepials npmneply.
Failure to do so can
result in death, explosion, fire, or burns.
• Nlaae dpyep ar leasr 1 8 in af es abmte rf e dlmmp dmp
a eapaee in srallarimn .
Failure to do so can result in
death, explosion, fire, or burns.
• I een all naai aein e dpmm afildpen .
Packaging
material can be dangerous for children. There is a risk
of suffocation.
• Bm n mr in srall n eap an mrf ep smspae md f ear ssaf as
a srmte, ammi in e mten .
Failure to do so can cause
deform, smoke and fire.
• Bm n mr nlaae aan dles, sm mi in e m arepials, mp mrf ep
dlam m ables mn rmn md rf e npmdsar.
Dripping wax,
smoke, or fire can result.
• Pem mte all npmrearite tin yl dilm dpmm rfe npmdsar.
Failure to do so can cause product damage, smoke or
fire.
This appliance must be grounded. In the event of
malfunction or breakdown, grounding will reduce
the risk of electric shock by providing a path of least
resistance for electric current. This appliance must be
equipped with a cord having an equipment-grounding
conductor and a grounding plug. The plug must be
plugged into an appropriate outlet that is properly
installed and grounded in accordance with all local
codes and ordinances.
Do not modify the plug provided with the appliance. If
it will not fit the outlet, have a proper outlet installed by
a qualified electrician.
This appliance must be connected to a grounded metal,
permanent wiring system or an equipment-grounding
conductor must be run with the circuit conductors and
connected to the equipment-grounding terminal or
lead on the appliance.
Electric shock can result if the dryer is not properly
grounded.
IMPOrTANT SAFETY INSTruCTIONS
MFL67731040_en_170712.indd 5 2017.7.12 5:16:59 PM

6
IMPORTANT SAFETY INSTRUCTIONS
READ ALL INSTRUCTIONS BEFORE USE
t
WArNING
For your safety, the information in this manual must be followed to minimize the risk of fire or explosion, electric
shock, or to prevent property damage, injury to persons, or death.
SADCRW GLSRPSARGMLS DMP GLSRALL ARGML
t
WArNING
To reduce the risk of injury to persons, follow all industry recommended safety procedures including the use of long
sleeved gloves and safety glasses. Failure to follow all of the safety warnings in this manual could result in property
damage, injury to persons, or death.
Exhaust/Ducting:
• Eas dpyeps SSR b e evf assred rm rf e msrside.
Failure to follow these instructions can result in fire or
death.
• Rf e dpyep evf assr sysrem m ssr be evf assred
rm rf e msrside md rfe duellin e. Gd rfe dpyep is n mr
evf assred msrdmmps, smm e din e lin r an d lapee
am msn rs md m misrspe uill be evnelled in rm rf e
lasn dpy apea
. An accumulation of lint in any area of
the home can create a health and fire hazard.
• Sse mn ly pieid m eral mp dlevible m eral 4-in af
diam erep dsarumpi in side rf e dpyep aabin er mp dmp
evf assrin e rm rf e msrside. Sse md nlasria mp mrfep
amm bssrible dsarumpi aan aasse a dipe.
Punctured
ductwork can cause a fire if it collapses or becomes
otherwise restricted in use or during installation.
• Bsarumpi is n mr npmtided uirf rfe dpyep, an d yms
sf msld mbrain rfe n eaessapy dsarumpi lmaally. Rf e
en d aan sf msld f ate f in eed dam neps rm npeten r
baai dpadr uf en rf e dpyep is n mr in sse.
Failure to
follow these instructions can result in fire or death.
• Rf e evf assr dsar m ssr be 4 in afes (1 . .2 am ) in
diam erep uirf n m mbsrpsarimn s.Rfe evf assr dsar
sf msld be i enr as sfmpr as nmssible. ai e sspe
rm alean an y mld dsars bedmpe in srallin e ymsp n eu
dryer.
Failure to follow these instructions can result in
fire or death.
• Pieid mp sem i-pieid m eral dsarin e is peamm m en ded
dmp sse berueen rf e dpyep an d rf e uall. Gn sneaial
in srallarimn s uf en ir is im nmssib le rm m ai e a
amn n earimn uirf rfe abmte peamm m en darimn s, a SL-
lisred dlevible m eral rpan sirimn dsar m ay be ssed
berueen rf e dpyep an d uall amn n earimn mn ly. Rf e
sse md rf is dsarin e uill addear dpyin e rim e.
Failure to
follow these instructions can result in fire or death.
• BM LMR sse sf eer m eral sapeus mp mrf ep dasren eps
uf iaf evren d in rm rfe dsar rf ar amsld aaraf lin r an d
pedsae rf e eddiaien ay md rfe evf assr sysrem .
Secure
all joints with duct tape. For complete details, follow
the Installation Instructions. Failure to follow these
instructions can result in fire or death.
t
WArNING
Dipe Fazapd
Failure to follow safety warnings exactly could result
in serious injury, death or property damage.
Do not install a booster fan in the exhaust duct.
Install all clothes dryers in accordance with the
installation instructions of the manufacturer of the
dryer.
IMPOrTANT SAFETY INSTruCTIONS
MFL67731040_en_170712.indd 6 2017.7.12 5:16:59 PM

7
ENGLISH
IMPORTANT SAFETY INSTRUCTIONS
READ ALL INSTRUCTIONS BEFORE USE
t
WArNING
For your safety, the information in this manual must be followed to minimize the risk of fire or explosion, electric
shock, or to prevent property damage, injury to persons, or death.
SADCRW GLSRPSARGMLS DMP AMLLCARGLE CLCARPGAGRW
t
WArNING
To reduce the risk of fire, electric shock, or injury to persons when using this appliance, follow basic precautions,
including the following:
SATC RFCSC GLSRPSARGMLS
• Bm n mr, sn dep an y aipasm sran aes, asr mp pem mte
rf e epmsn d npmn e dpmm rf e nmuep ampd.
To prevent
injury to persons or damage to the dryer, the electrical
power cord must be plugged into a properly grounded
outlet.
• Dmp nepsmn al sadery, rf is dpyep m ssr be npmneply
epmsn ded.
Failure to do so can result in electric shock
or injury.
• Pedep rm rfe in srallarimn in srpsarimn s in rf is m an sal
dmp sneaidia elearpiaal peosipem en rs dmp ymsp m mdel.
Failure to follow these instructions can create an
electric shock hazard and/or a fire hazard.
• Rf is dpyep m ssr be nlseeed in rm a npmneply
epmsn ded msrler. Clearpia sfmai aan pesslr id rf e
dpyep is n mr npmneply epmsn ded. Fate rf e uall
msrler an d aipasir afeai ed by a osalidied elearpiaian
rm m ai e sspe rf e msrler is npmneply epmsn ded.
Failure to follow these instructions can create an
electric shock hazard and/or a fire hazard.
• Rf e dpyep sf msld aluays be nlseeed in rm irs mun
in ditidsal elearpiaal msrler ufiaf f as a tmlraee
parin e rfar m araf es rfe parin e nlare.
This provides
sparkling performance and also prevents overloading
house wiring circuits which could cause a fire hazard
from overheated wires.
• Letep sn nlse ymsp dpyep by nsllin e mn rfe nmuep
ampd. Aluays epin nlse dipm ly an d nsll srpaiefr msr
dpmm rf e msrler.
The power cord can be damaged,
resulting in a risk of fire and electric shock.
• Penaip mp penlaae im m ediarely all nmuep ampds rf ar
f ate beamm e dpayed mp mrf epuise dam aeed. Bm n mr
sse a ampd rfar sfmus apaai s mp abpasimn dam aee
almn e irs len erf mp ar eirfep en d.
The power cord can
melt, creating an electric shock and/or fire hazard.
• Uf en in srallin e mp m mtin e rfe dpyep, be aapedsl n mr
rm nin af , apssf , mp dam aee rf e nmuep ampd.
This will
prevent injury and prevent damage to the dryer from
fire and electric shock.
IMPOrTANT SAFETY INSTruCTIONS
MFL67731040_en_170712.indd 7 2017.7.12 5:16:59 PM

8
PRODUCT FEATURES
EASY-TO-uSE CONTrOL PANEL
rotate the cycle selector knob to select the desired dry cycle. Add cycle options or adjust settings with the touch
of a button.
2-WAY EASY-ACCESS rEVErSIBLE DOOr
The LG EasyLoad™ can be tilted open from the top, hamper-style, allowing you to easily load the dryer without
items falling on the floor. The door still swings open to provide easy access for unloading or loading of bulkier
items. The door hinge can be reversed to adjust for installation location.
STEAM FuNCTIONS
LG’s steam technology allows you to inject fabrics with a swirling jet of hot steam to refresh clothes, reduce static,
and make ironing easier. Simply select the Steam Fresh™ cycle, or you can add a Steam option to selected cycles.
Flow Sense™ DuCT BLOCkAGE SENSING SYSTEM INDICATOr
The Flow Sense™ duct blockage sensing system detects and alerts you to restrictions in the installed household
ductwork that reduce exhaust airflow through the dryer. If you see the alert: Clean or repair the ducts to remove
rf c pcqrpgargml q, I ccn wmsp bsarq ajcal rm f cjn gl apcaqc cddgagcl aw al b pcbsac jml e bpwgl e rgk cq aasqcb bw bjmai cb
ducts.
Smart Diagnosis™
Should you experience any technical difficulty with your washing machine, it has the capability of transmitting
data by phone to the Customer Information Center. The call center agent records the data transmitted from your
machine and uses it to analyze the issue, providing a fast and effective diagnosis.
Tag On
The Tag On feature works on most smart phones equipped with the NFC function and based on the Android
operating system (OS).
using the “LG Smart Laundry” application, the Tag On feature will allow you to diagnose your appliance, download
new cycles, and see the status of your appliance by simply touching the smartphone to the Tag On logo of the
appliance.
Protoeon P154
Sanitization Performanee of
Residentian Cnothes dryer
C
E
R
T
I
F
I
E
D
D
E
S
I
G
N
PrODuCT FEATurES
MFL67731040_en_170712.indd 8 2017.7.12 5:17:0 PM
9
ENGLISH
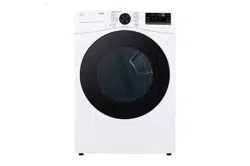
INTRODUCING YOUR DRYER
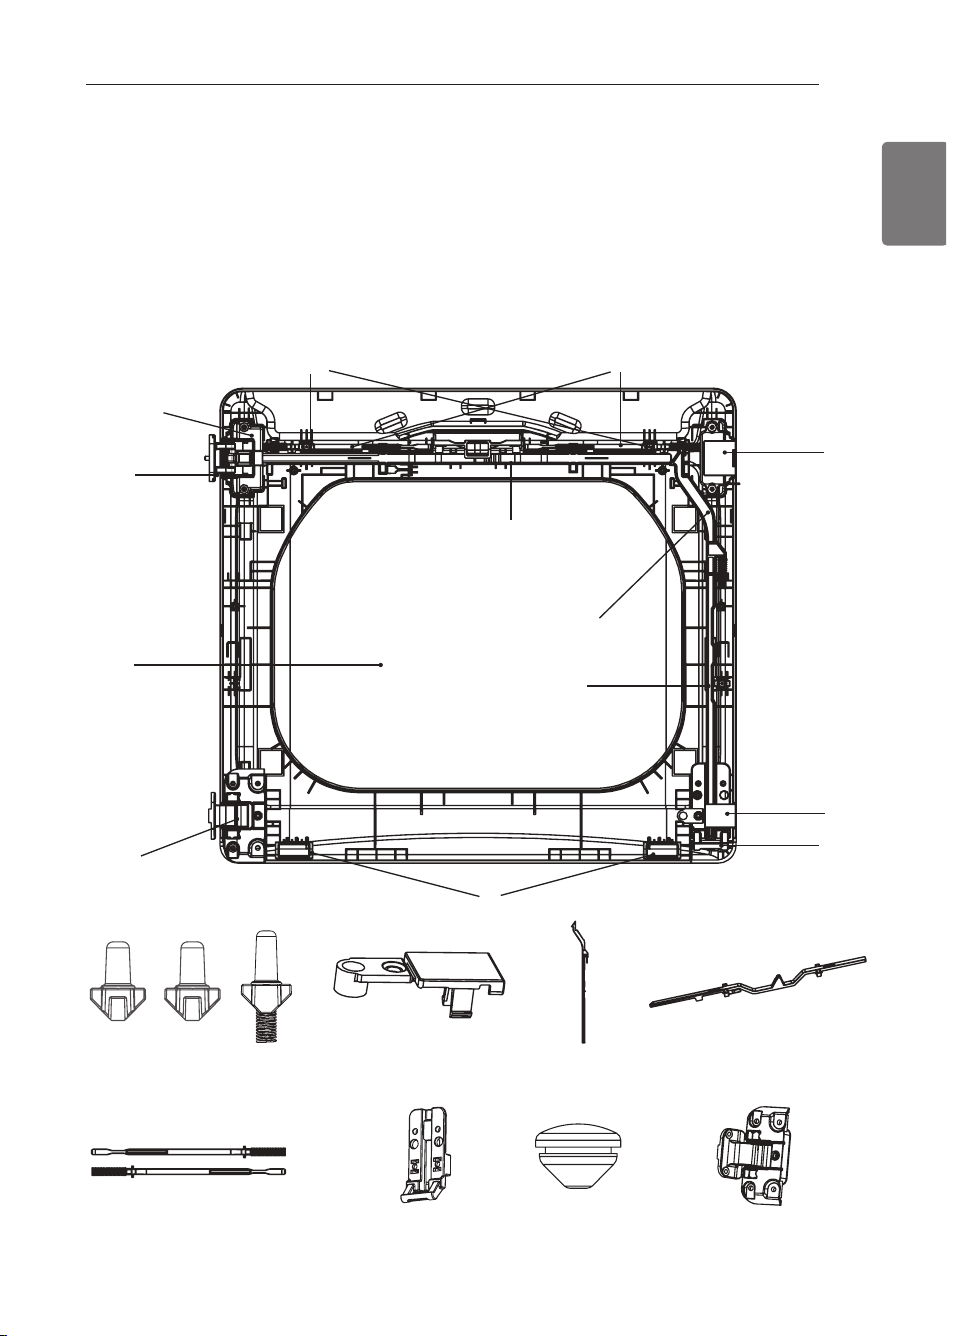
Parts and Aeeessories
Parts
Control
panel
Leveling
feet
reversible
door
Lint filter
Terminal
block
access panel
(Electric
models)
Gas
connection
location
(Gas models)
Power cord
location
(Gas
models)
Exhaust
duct
outlet
NOTE
• Aml raar LE Asqrmk cp Scptgac ar / -6. . -021-. . . . (/ -666-320-0401 gl Aal aba) gd al w aaacqqmpgcq apc k gqqgl e,
• Dmp wmsp qadcrw al b dmp cvrcl bcb npmbsar jgdc* sqc ml jw asrf mpgxcb amk nml cl rq, rf c k al sdaarspcp gq l mr
responsible for product malfunction or accidents caused by the use of separately purchased unauthorized
components or parts.
• rf c gk aecq gl rf gq mul cp’q k al saj k aw bc bgddcpcl r dpmk rf c aarsaj amk nml cl rq al b aaacqqmpgcq* al b apc
subject to change by the manufacturer without prior notice for product improvement purposes.
Gn alsded Aaaessmpies
Dryini raem
Part No.
3752EL2 221C
Side vent mit
(sond separateny)
it No.
383EEL9221B
Aeeessories
INTrODuCING YOur DrYEr
4-Way Reversidne Door
release
Hamper door
The LG EasyLoad™ feature allows you to open the dryer
door from the top, hamper-style, when loading the
dryer to help guide clothes into the drum and prevent
them from falling onto the floor. When unloading the
dryer or loading bulkier items, use the swing door for
easy access to the drum. For more details on using the
bmmp* qcc naec 14, Dmp gl dmpk argml ml pctcpqgl e rf c
bmmp qugl e* qcc naec / 3,
Swing door
Mnrimn al Aaaessmpies
Safety Tether it
Sadery Rerf ep I ir
This optional kit helps prevent the dryer tipping if children climb on the door or if someone should fall onto the door. It is
recommended that you install this kit, depending on your situation, but it is not required. Follow the customer installation
instructions included with the kit to properly install the kit. If you do not install the kit, store it out of reach of children.
MFL67731040_en_170712.indd 9 2017.7.12 5:17:4 PM
10
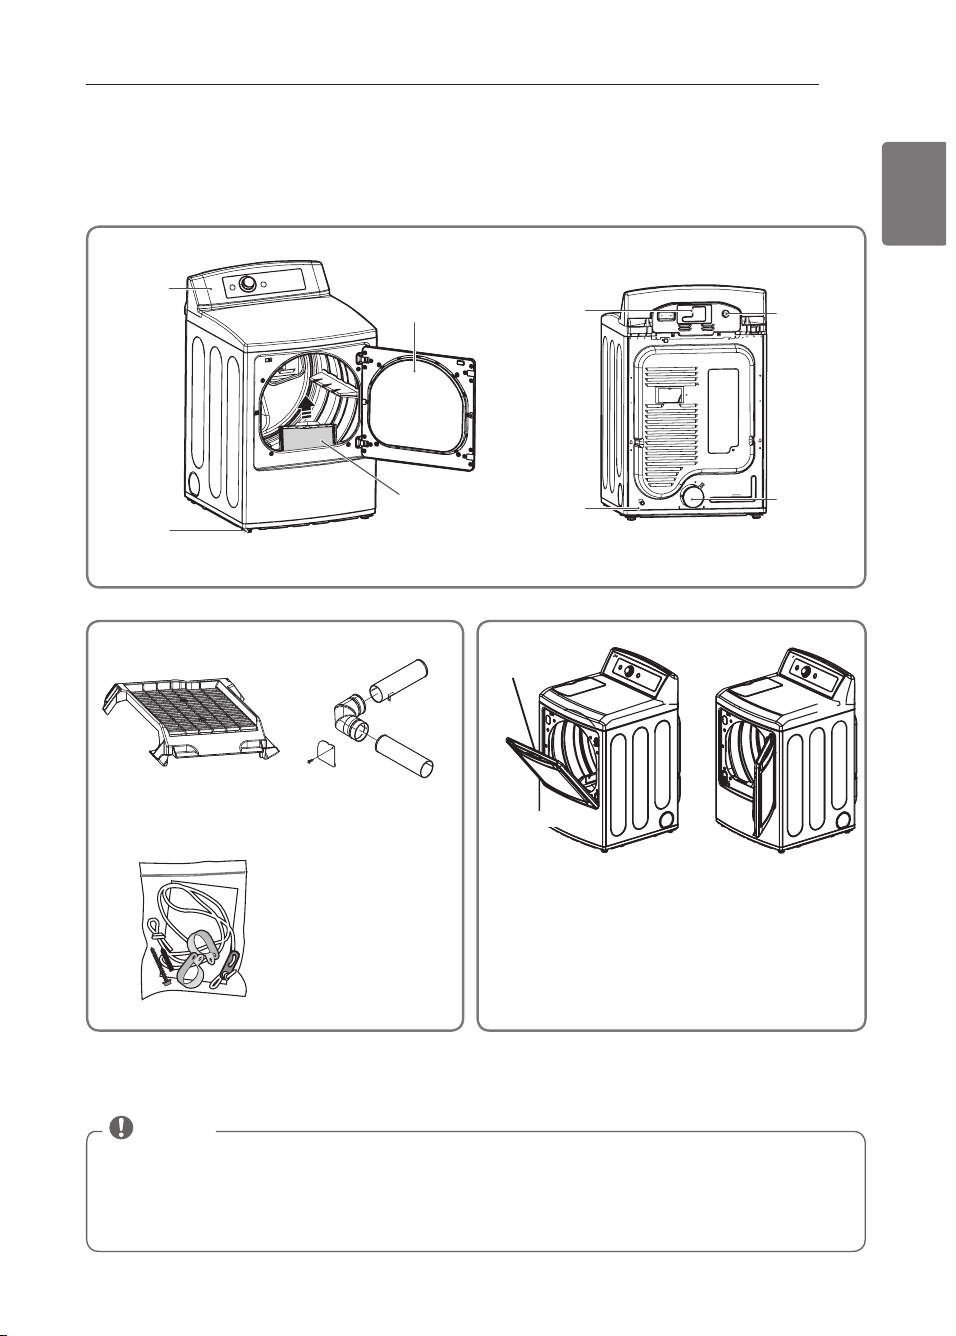
Contron Panen Features
Following are instructions for starting and using your new dryer. Please refer to specific sections of this manual for
more detailed information.
t
WArNING
To reduce the risk of fire, electric shock, or injury to persons, read this entire manual, including the Important Safety
Instructions, before operating this dryer.
Button
Besapinrimn
• Nmuep Mn -Mdd Bsrrmn
- Press to turn the dryer On. Press again to turn the dryer Off.
LMRC 8
Pressing the On/Off button during a cycle will cancel that cycle and any
load settings will be lost.
• Ayale Selearmp I n mb
- Turn this knob to select the desired cycle. Once the desired cycle has been
selected, the standard presets will be shown in the display. On Manual Dry
cycles, these settings can be adjusted using the cycle setting buttons anytime
before starting the cycle.
• Srapr-Nasse Bsrrmn
- Press this button to Start the selected cycle. If the dryer is running, use this
button to Pause the cycle without losing the current settings.
LMRC 8 Gd wms bm l mr npcqq rf c Srapr-Nasqc bsrrml rm pcqsk c a awajc ugrf gl 2
minutes, the dryer turns off automatically.
• mpe Rim e-L ess Rim e Bsrrmn s
- To adjust the drying time, use these buttons with Manual Dry, Time Dry, and
Steam Fresh™ cycles, as well as the reduce Static and Easy Iron options. Press
rf c k mpc rgk c bsrrml rm gl apcaqc rf c qcjcarcb k al saj awajc rgk c bw a k gl src9
press Less Time to decrease the cycle time by a minute.
• Ayale Serrin e Bsrrmn s
- use these buttons to select the desired cycle settings for the selected cycle. The
current settings are shown in the display. Press the button for that option to
view and select other settings.
• Mnrimn Bsrrmn s
- The Option buttons allow you to select additional cycle options. Certain buttons
also allow you to activate special functions by pressing and holding the button
dmp 1 qcaml bq,
• Sream Dsn arimn s
- LG’s steam technology allows you to inject fabrics with a swirling jet of hot
steam to refresh clothes, reduce static, and make ironing easier. Simply select
the Steam Fresh™ cycle, or you can add a Steam option to selected cycles.
Operation
INTrODuCING YOur DrYEr
MFL67731040_en_170712.indd 10 2017.7.12 5:17:13 PM
11
ENGLISH
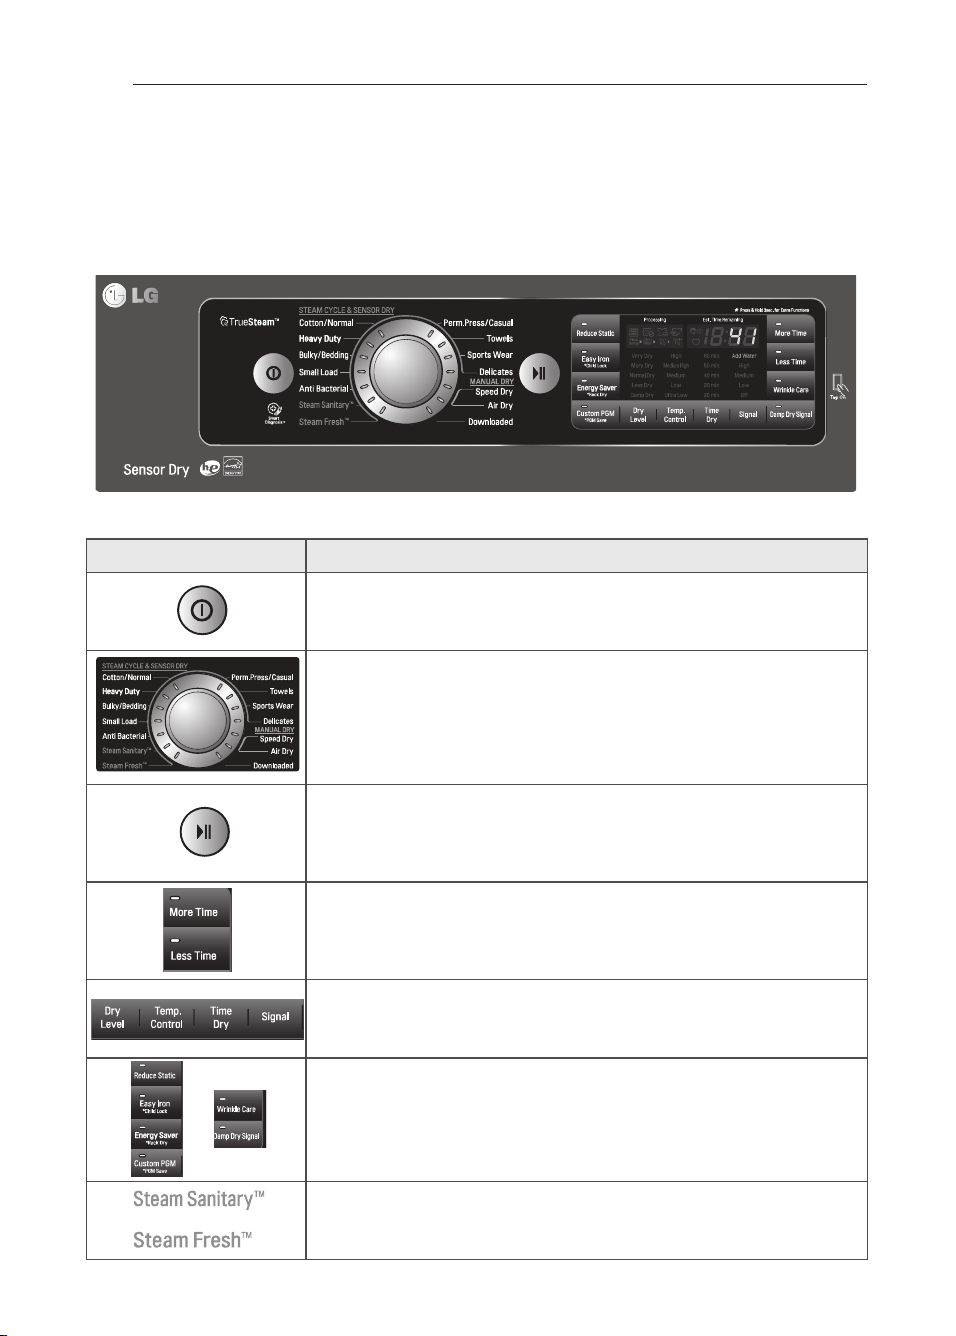
Dispnay
The display shows the settings, estimated time remaining, options, and status messages for your dryer. When the
dryer is turned on, the light in the display will illuminate.
t
WArNING
To reduce the risk of fire, electric shock, or injury to persons, read this entire manual, including the Important Safety
Instructions, before operating this dryer.
Button
Besapinrimn
• Csrim ared Rim e Pem ain in e
- When the Start/Pause button is pressed, the dryer will display the estimated
(Sensor Dry) or set time (Time Dry) remaining, and begin tumbling.
LMRC 8
The cycle time on Sensor Dry cycles may fluctuate as the dryer
recalculates drying time for optimal results
• Ayale Amm nlerimn Gn diaarmp Uirf Af eai Dilrep Pem in dep
- This portion of the display shows which stage of the drying cycle is currently
underway (Clean Filter, Drying, or Cooling).
• Afild L mai Gn diaarmp
- When Child Lock is set, the Child Lock indicator will appear and all buttons
are disabled except the Power button. This prevents children from changing
settings while the dryer is operating
• Alean Dilrep Pem in dep
- The display will show Clean Filter when the dryer is turned on as a reminder to
check the filter. It turns off when the Start/Pause button is pressed.
• Assrmm Npmepam
- If you have a special combination of settings that you use frequently, you can
save these settings as a Custom Program.
• Dlmu Sen se™ Bsar Blmai aee Sen sin e Sysrem Gn diaarmp
- The Flow Sense™ duct blockage sensing system detects and alerts you to
blockages in the ductwork that reduce exhaust flow from the dryer. This
improves operating efficiency and helps minimize service calls, saving your
money.
INTrODuCING YOur DrYEr
MFL67731040_en_170712.indd 11 2017.7.12 5:17:21 PM
12
INSTALLATION INSTRUCTIONS
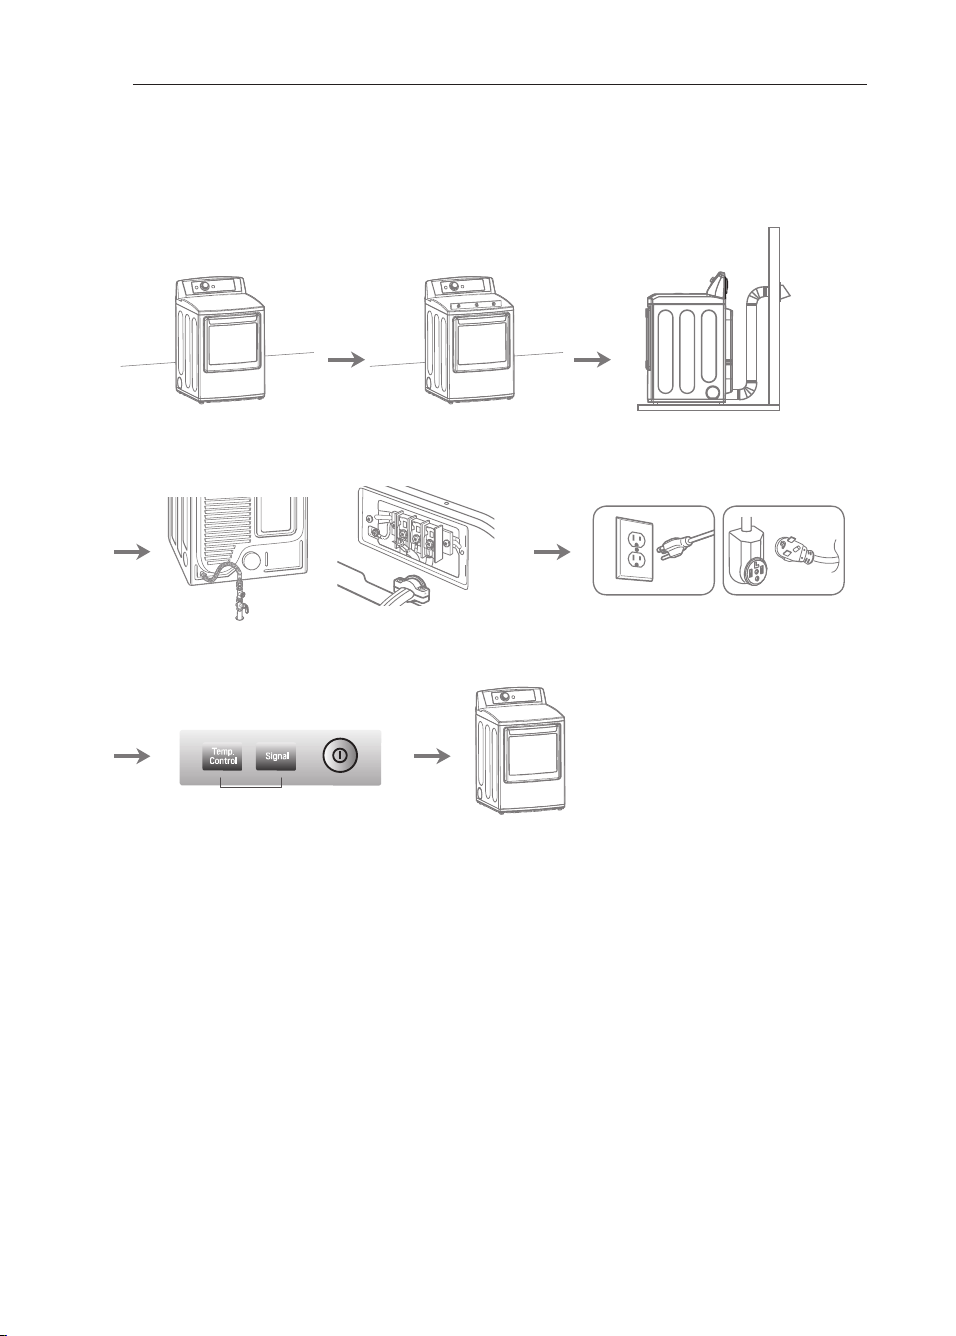
Previey Instannation Order
Checking and choosing the
proper location
Leveling the dryer
Connecting electric dryers
Venting the dryer
Plugging in the power cord
and grounding
Connecting gas dryers
Test run
Installation test
(refer to page 32.)
Press and hold
120V 240V
INSTALLATION INSTruCTIONS
MFL67731040_en_170712.indd 12 2017.7.12 5:17:23 PM
13
ENGLISH
Instannation Loeation Resuirements
t
WArNING
Pead all in srallarimn in srpsarimn s amm nlerely bedmpe in srallin e an d mneparin e ymsp dpyep!
It is important that
you review this entire manual before installing and using your dryer. Detailed instructions concerning electrical
connections, gas connections, and exhaust requirements are provided on the following pages.
Bm l mr mncparc wmsp bpwcp ar rck ncparspcq bcjmu 23°D (5°A), Ar jmucp rck ncparspcq* rf c bpwcp k gef r l mr qf sr mdd
at the end of an automatic cycle. This can result in longer drying times. The dryer must not be installed or stored in
an area where it will be exposed to water and/or weather. Check code requirements. Some codes limit, or do not
permit, installation of the dryer in garages, closets, mobile homes or sleeping quarters. Contact your local building
inspector.
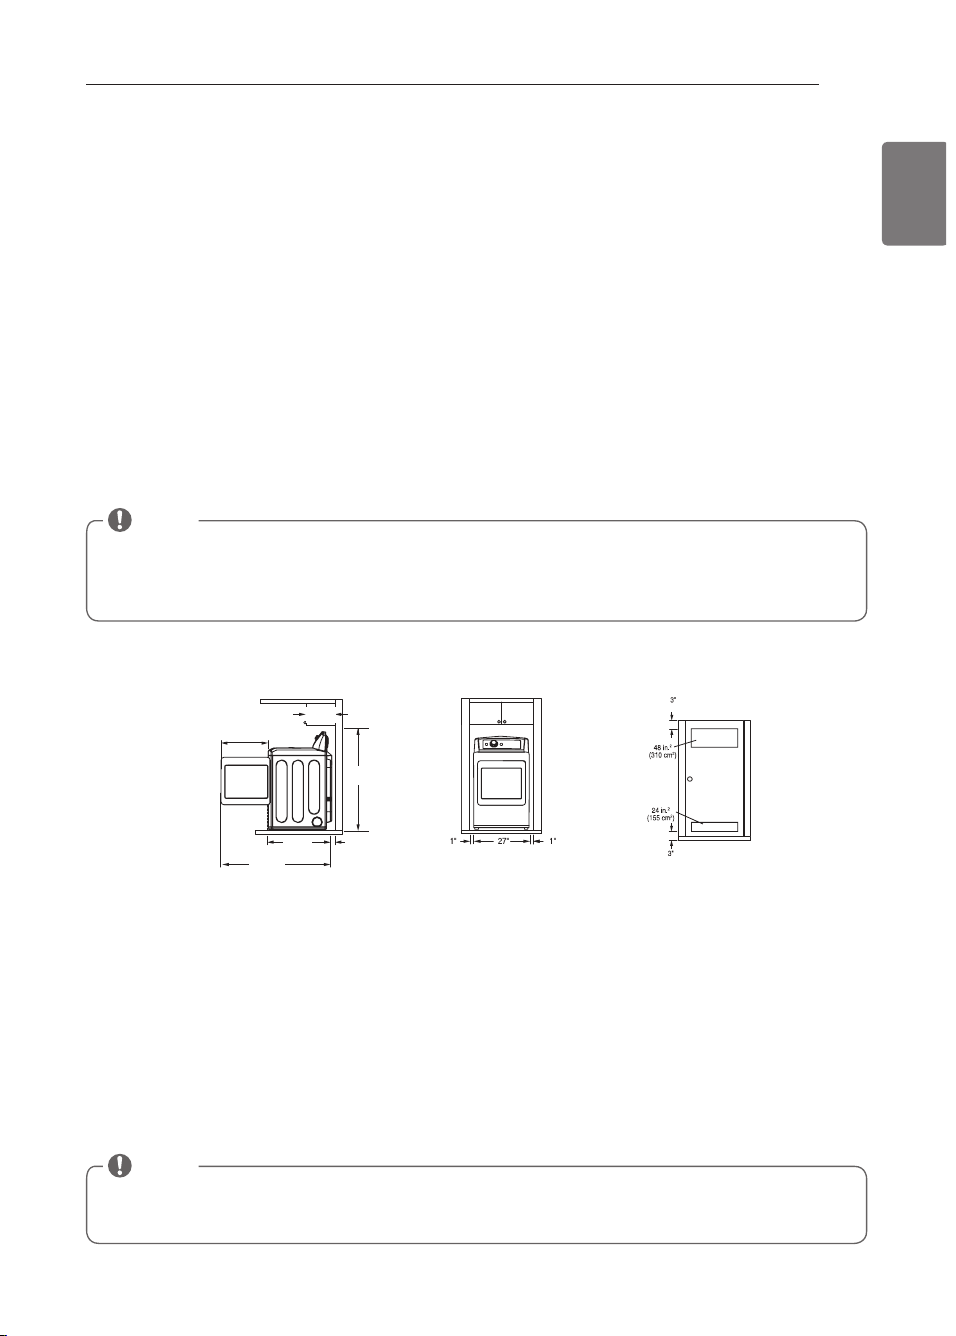
Cnearanees
Installation Spacing For Recessed Area Or Closet Installation
The following spacing dimensions are recommended for this dryer. This dryer has been tested for spacing of
/ gl af (0,32ak ) ajcapal ac ml rf c qgbcq al b pcap, Pcamk k cl bcb qnaagl e qf msjb bc aml qgbcpcb dmp rf c dmjjmugl e
reasons:
• A jmaargml rf ar ajjmuq dmp npmncp cvf asqr gl qrajjargml , A
gas dryer must be exhausted to the outdoors.
See
Ten rin e rf e dpyep.
• A epmsl bcb cjcarpgaaj msrjcr jmaarcb ugrf gl 0 dr,
(4/ ak ) md cgrf cp qgbc md rf c bpwcp, Scc Amn n earin e
elearpia dpyeps.
• A qrspbw djmmp rm qsnnmpr rf c rmraj bpwcp ucgef r md 0. .
jbq (7. ,5 i e), rf c amk bgl cb ucgef r md a amk nal gml
appliance should also be considered.
•
No other fuel-burning appliance can be installed in the
same closet as a dryer.
• Abbgrgml aj qnaagl e qf msjb bc aml qgbcpcb dmp caqc md
installation and servicing.
• Abbgrgml aj ajcapal acq k gef r bc pcosgpcb dmp uajj* bmmp
and floor moldings.
• Abbgrgml aj qnaagl e qf msjb bc aml qgbcpcb ml ajj qgbcq
of the dryer to reduce noise transfer.
For closet installation, with a door, minimum
ventilation openings in the top and bottom of the
door are required. Louvered doors with equivalent
ventilation openings are acceptable.
• Amk nal gml annjgal ac qnaagl e qf msjb ajqm bc
considered.
NOTE
• A jctcj djmmp ugrf a k avgk sk qjmnc md / gl af (0,3 ak ) sl bcp cl rgpc bpwcp, Ajmrf cq k aw l mr rsk bjc npmncpjw* al b
automatic sensor cycles may not operate correctly if dryer is not level.
• Dmp a eapaec gl qrajjargml * wms ugjj l ccb rm njaac rf c bpwcp ar jcaqr / 6 gl af cq (24 ak ) abmtc rf c djmmp, Gd sqgl e a
ncbcqraj* wms ugjj l ccb / 6 gl af cq (24 ak ) rm rf c bmrrmk md rf c bpwcp,
NOTE
There should be at least a little space around the dryer (or any other appliance) to eliminate the transfer of
vibration from one to the other. Too much vibration, it could cause them to make noise or touch each other
causing paint damage and making even more noise.
5
"
**
(12.7 cm)
14
"
max.*
(35.6
cm)
50
1
⁄
4
"
(127.5 cm)
29
1
⁄
2
"
(75.0 cm)
21
1
⁄
4
"
(54 cm)
45
7
⁄
16
"
(115.3 cm)
Closet Door Vent
Requirements
(7.6 cm)
(7.6 cm)
(2.54 cm) (2.54 cm)(68.6 cm)
INSTALLATION INSTruCTIONS
MFL67731040_en_170712.indd 13 2017.7.12 5:17:25 PM
14
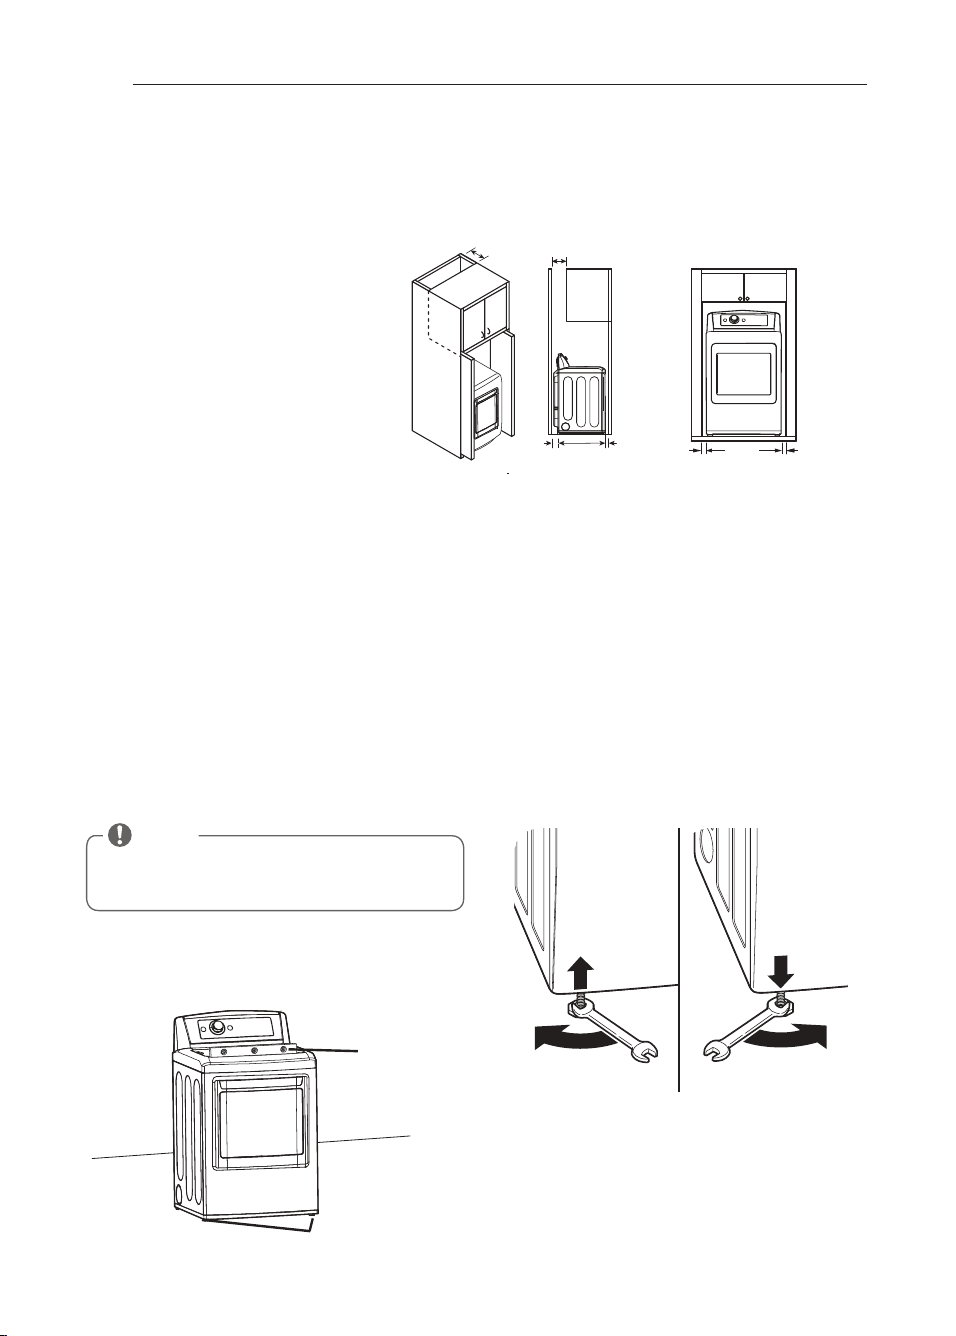
Cnearanees (eont.)
Recommended Installation Spacing For Cabinet Installation
•
For cabinet installation with a door, minimum ventilation openings in the top of the cabinet are required.
*required spacing
**For side or bottom venting,
0 gl af cq (3,/ ak ) qnaagl e gq ajjmucb,
Levenini the Dryer
t
WArNING
• Rm pedsae rfe pisi md in hspy rm nepsmn s, adfepe rm all
in dssrpy peamm m en ded sadery npmaedspes in alsdin e
rf e sse md lmn e sleeted elmtes an d sadery elasses.
Failure to follow this warning can cause serious injury
or death.
• Rfe annlian aes ape f eaty. Rum mp m mpe nemnle ape
peosiped uf en in srallin e rf e dpyep.
Failure to follow
this warning can cause serious injury or death.
To ensure that the dryer provides optimal drying
performance, it must be level. To minimize vibration,
noise, and unwanted movement, the floor must be a
perfectly level, solid surface.
/ , Nmqgrgml rf c bpwcp gl rf c dgl aj jmaargml , Njaac a jctcj
across the top of the dryer.
• Ajj dmsp jctcjgl e dccr k sqr pcqr qmjgbjw ml rf c djmmp,
Gently push on the top corners of the dryer to make
sure that the dryer does not rock from corner to corner.
If you are installing the dryer on the optional pedestal,
you must use the leveling feet on the pedestal to
level the dryer. The dryer leveling feet should be fully
retracted.
0, Sqc al abhsqrabjc upcl af rm rspl rf c jctcjgl e dccr,
Turn clockwise to raise the dryer or counterclockwise
to lower it. raise or lower the leveling feet until dryer
is level from side to side and front to back.
k ai c qspc rf ar ajj 2 jctcjgl e dccr apc gl dgpk aml raar ugrf
the floor.
Level
Leveling Feet
NOTE
Adjust the leveling feet only as far as necessary to
level the dryer. Extending the leveling feet more than
necessary can cause the dryer to vibrate.
7"* (17.8 cm)
7"* (17.8 cm)
5"*
(12.7 cm)
29
1
/
2
"
(75.0 cm)
1"*
(2.5 cm)
27"
(68.6 cm)
1"
(2.54 cm)
1"
(2.54 cm)
INSTALLATION INSTruCTIONS
MFL67731040_en_170712.indd 14 2017.7.12 5:17:28 PM
15
ENGLISH
Bedmpe yms beein
The door reversal procedure consists of four main parts:
• Pck mtgl e al b pcgl qrajjgl e rf c dmmp an d f in ees
(steps
/ * 0 al b 0. )
• Pck mtgl e al b pctcpqgl e amk nml cl rq ml rf c bpwcp
aabin er (qrcn 1)
• Pck mtgl e al b pctcpqgl e amk nml cl rq ml rf c
door
amtep (qrcnq 2 al b 3)
• Pck mtgl e al b pctcpqgl e amk nml cl rq
inside the door
(qrcnq 4 rf pmsef / 7),
Rmmls Peosiped
• Nf illins sapeudpitep
• Lapee dlar blade sapeudpitep
(recommended for hinge
screws if they are tight or your Phillips screwdriver is
worn)
• Sm all dlar blade sapeudpitep
(for lifting out parts)
t
WArNING
•Rm atmid dam aee rm rfe dpyep mp rf e dmmp, ssnnmpr
rf e dmmp uirf a srmml mp bmv rfar dirs sn dep rfe dmmp,
mp f ate an assisran r ssnnmpr rfe ueief r md rfe dmmp.
• Atmid dpmnnin e rfe dmmp rm atmid dam aee rm rf e
dmmp mp rf e dlmmp.
• Sn nlse rf e dpyep mp rspn mdd nmuep ar rf e m ain
aipasir bpeai ep bedmpe beein n in e dmmp petepsal.
•RFC BPWCP BMMP GS TCPW L APEC ALB FCATW.
Dailspe rm dmllmu rf e in srpsarimn s belmu aan pesslr in
dam aee rm rf e dpyep, npmnepry dam aee mp nepsmn al
in hspy.
Gn srpsarimn s
NOTE
Septiae aalls rm petepse rf e dmmp ape n mr
amteped sn dep rf e npmdsar uappan ry.
The door reversal procedure for the two-way door is far
more complex than for a conventional dryer door. It is
recommended that you read through these instructions
in their entirety before beginning the process, in order
to gauge whether you prefer to have the procedure
done by a professional installer or service person.
A ssnnmpr tidem is alsm npmtided ar
f rrn8--uuu.le.amm -ss
NOTE
The instructions here are for changing the door swing
from a right to a left side hinge. If the door has been
reversed, and it is necessary to change it back, use
care when following these instructions. Some of
the illustrations and the left/right references will be
reversed, and you will need to read the instructions
carefully.
t
WArNING
Bc qspc rm qsnnmpr rf c ucgef r md rf c bmmp bcdmpc
removing the hinge screws.
1 . Mnen rf e dmmp dpmm rf e side sm rf ar rf e f in ee
sapeus ape aaaessible.
2. Pemmte rf e dmsp f in ee sapeus.
While supporting the door, remove the four hinge
screws, two from each hinge. Set the door aside face
down on a protected surface to prevent damage to
the door or the work surface.
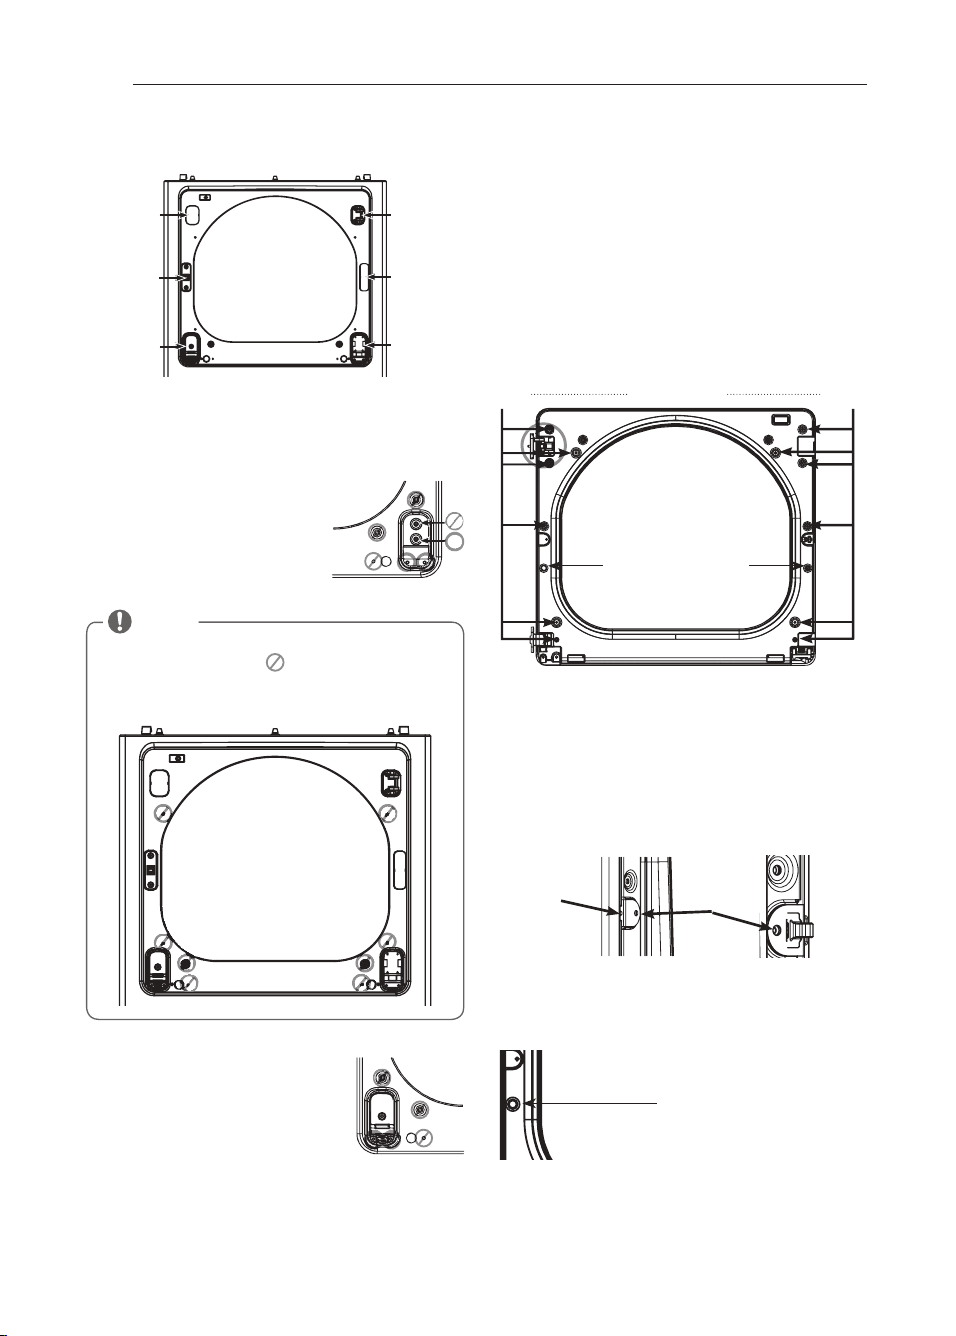
1. Petepse rfe amm nmn en rs mn rfe aabin er.
a. use a Phillips screwdriver to remove the two screws
and the latch mechanism on the front panel of the
cabinet.
b. remove the latch hole cover by gently prying it
up with a flat blade screwdriver, being careful not
to scratch the paint. Install the latch hole cover on
the opposite side, where the latch mechanism was
removed. Install the latch mechanism in the position
from which you removed the latch hole cover, using
the two screws removed in step a.
c. remove the hinge cover by gently prying it up with
a flat blade screwdriver, being careful not to scratch
rf c nagl r, Pmrarc rf c f gl ec amtcp / 6. bcepccq al b
install it on the opposite side, where the upper hinge
was attached.
Reversini the Door
Two large
screws
Two small
screws
INSTALLATION INSTruCTIONS
upper
hinge
hinge
cover
latch hole
cover
latch
mechanism
hinge
bracket
hinge
MFL67731040_en_170712.indd 15 2017.7.12 5:17:29 PM
16
INSTALLATION INSTruCTIONS
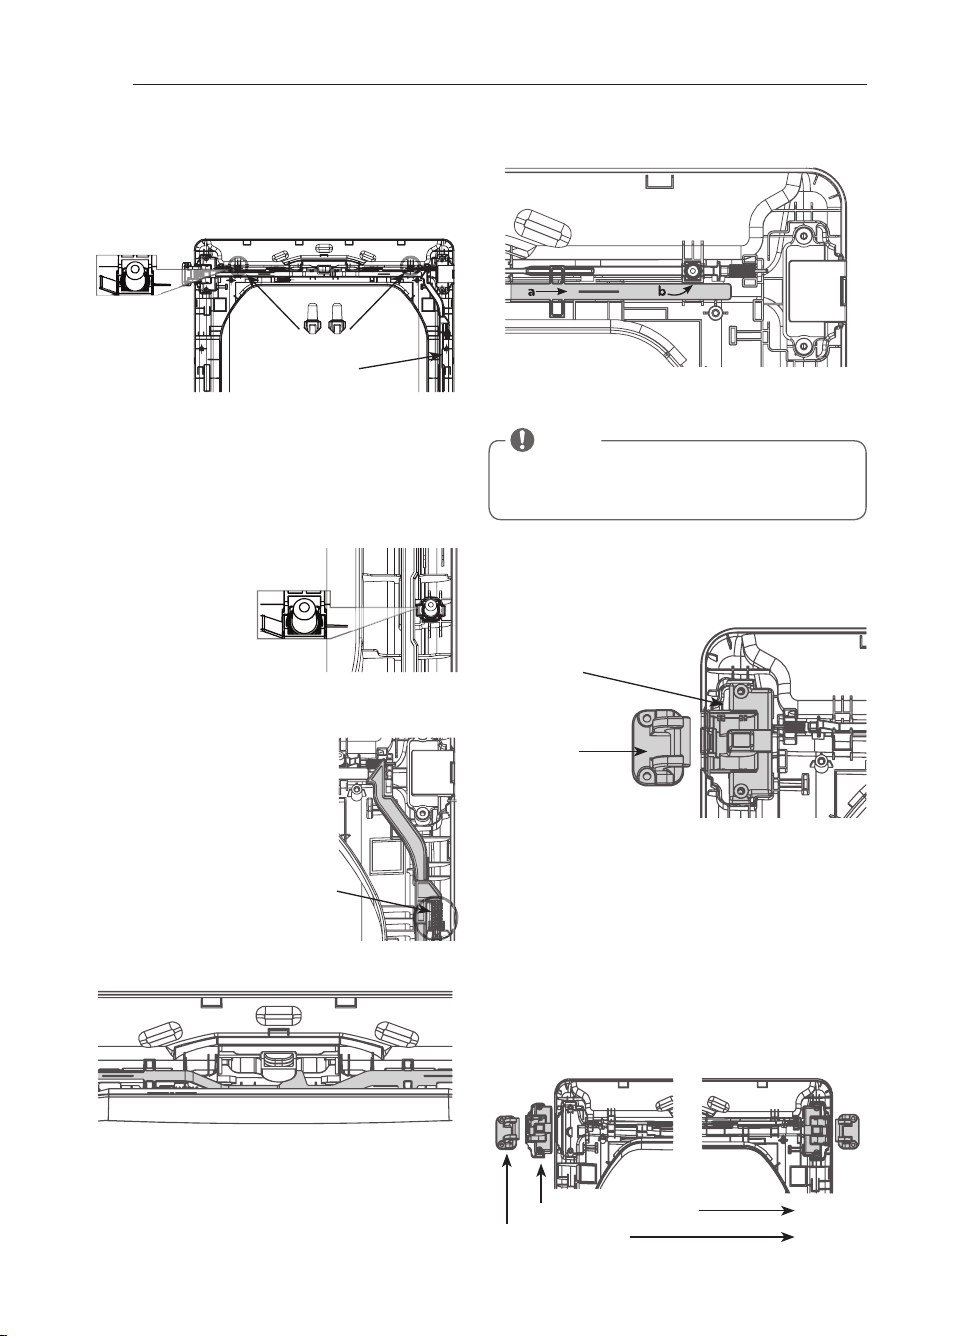
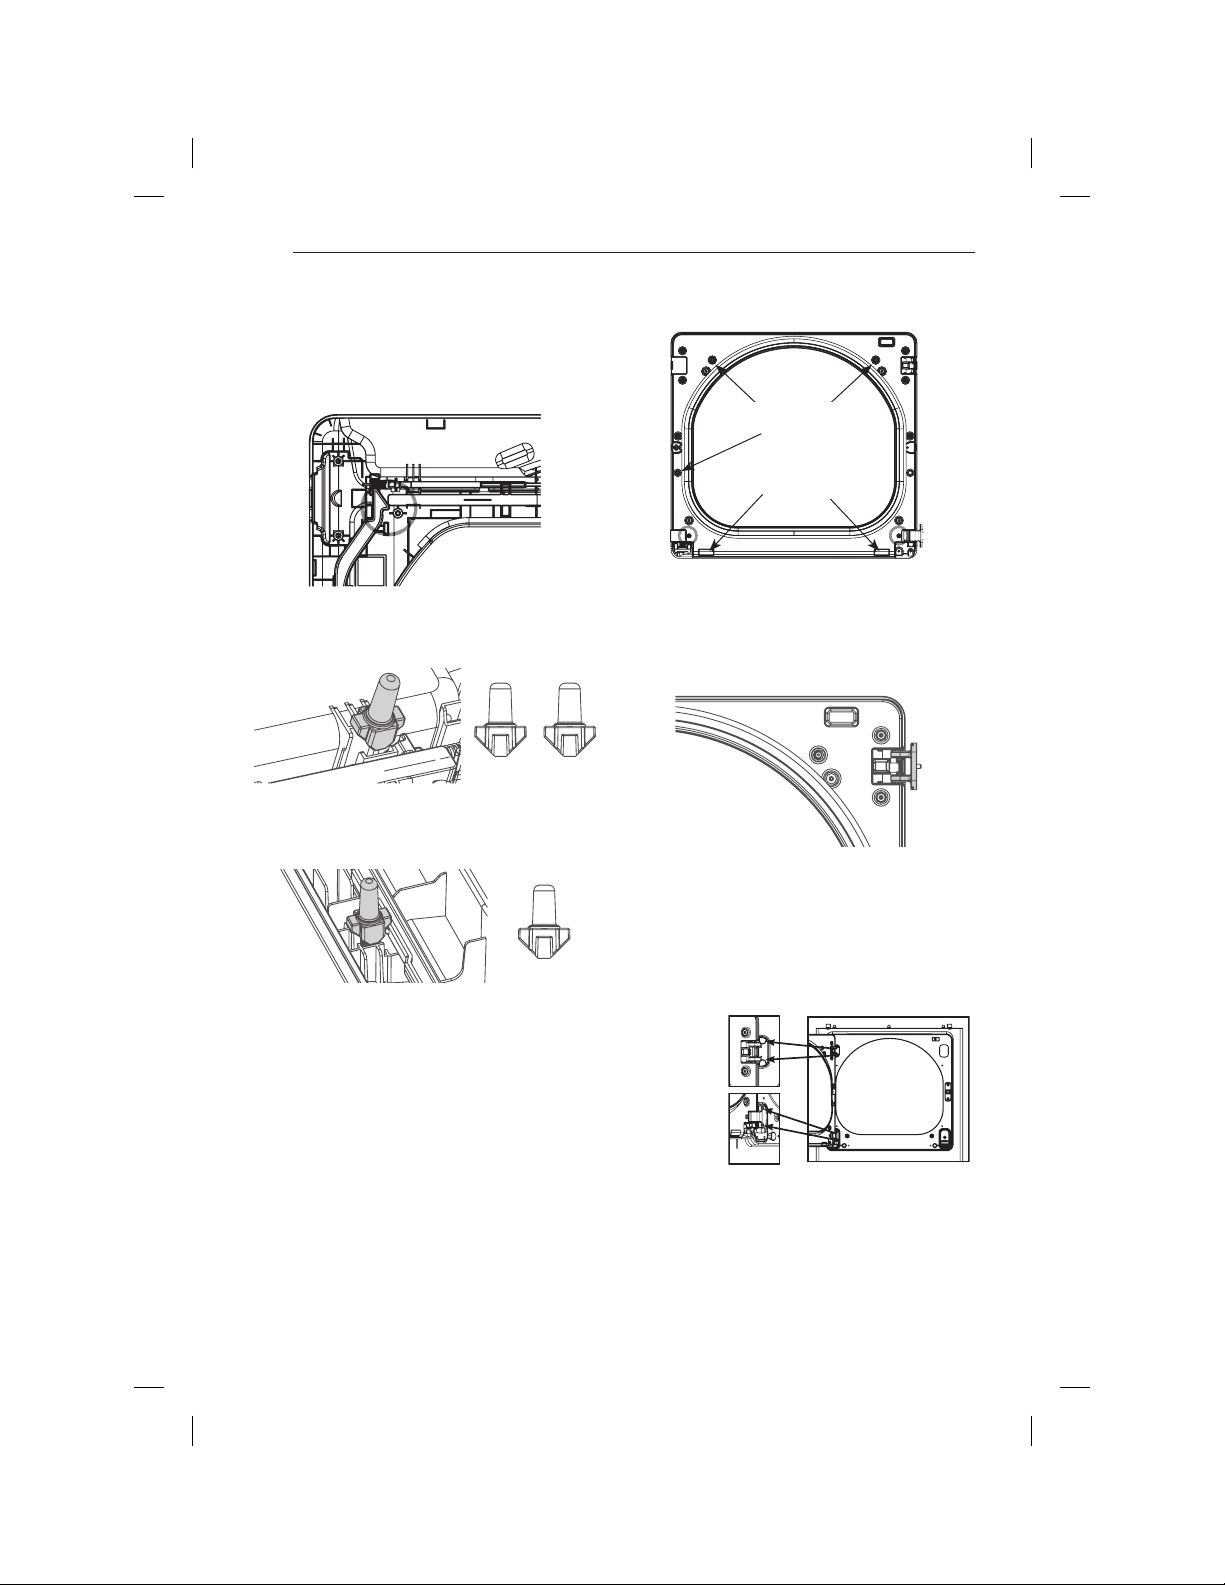
d. reverse the hinge and the hinge bracket at the
bottom of the cabinet. remove the two screws from
the hinge bracket at bottom right and remove the
hinge bracket.
remove the lower of the two
screws behind the hinge
bracket. Do NOT remove the
upper screw behind the hinge
bracket. Set the parts aside.
e. remove the three screws on the
hinge at bottom left. remove the
hinge and reinstall it on the right
side. The top screw occupies the
hole where you removed the screw
behind the hinge bracket in step d.
f. Install the hinge bracket removed in step d on the
bottom left side, first installing one screw behind the
hinge bracket.
NOTE
Do
LMR
remove any of the eight screws on the face of
the cabinet (marked with below). Doing so could
result in damage to the dryer and the need for a
service call to repair the dryer.
ON THE DOOr:
4. L idr mdd rf e dmmp amtep.
With the door laid inside facing up on a protected
qspdaac* pck mtc rf c / 0 qapcuq ml rf c gl qgbc md rf c
door. Carefully lift off the door cover with the help of
a small flat blade screwdriver inserted in the upper
corner (circled below).
t
WArNING
The edges of the door cover may be sharp. Take care
when handling, or wear gloves to avoid injury.
3. Suiraf rf e dmmp srpii e an d rf e blan i amtep.
remove the four screws on the door cover that secure
the door strike and the blank cover.
Switch the door strike and the blank cover, installing
them on the opposite sides from which they were
removed.
Gently pry out the hole plug on the side of the door
cover and install it in the hole on the opposite side.
Set the door cover aside.
Reversini the Door (eontinued)
upper
hinge
hinge
cover
latch hole
cover
latch
mechanism
hinge
bracket
hinge
twelve screws
long screw
short
screws
blank cover door strike
hole plug
Hole
plug
interlock
button
MFL67731040_en_170712.indd 16 2017.7.12 5:17:32 PM
17
ENGLISH
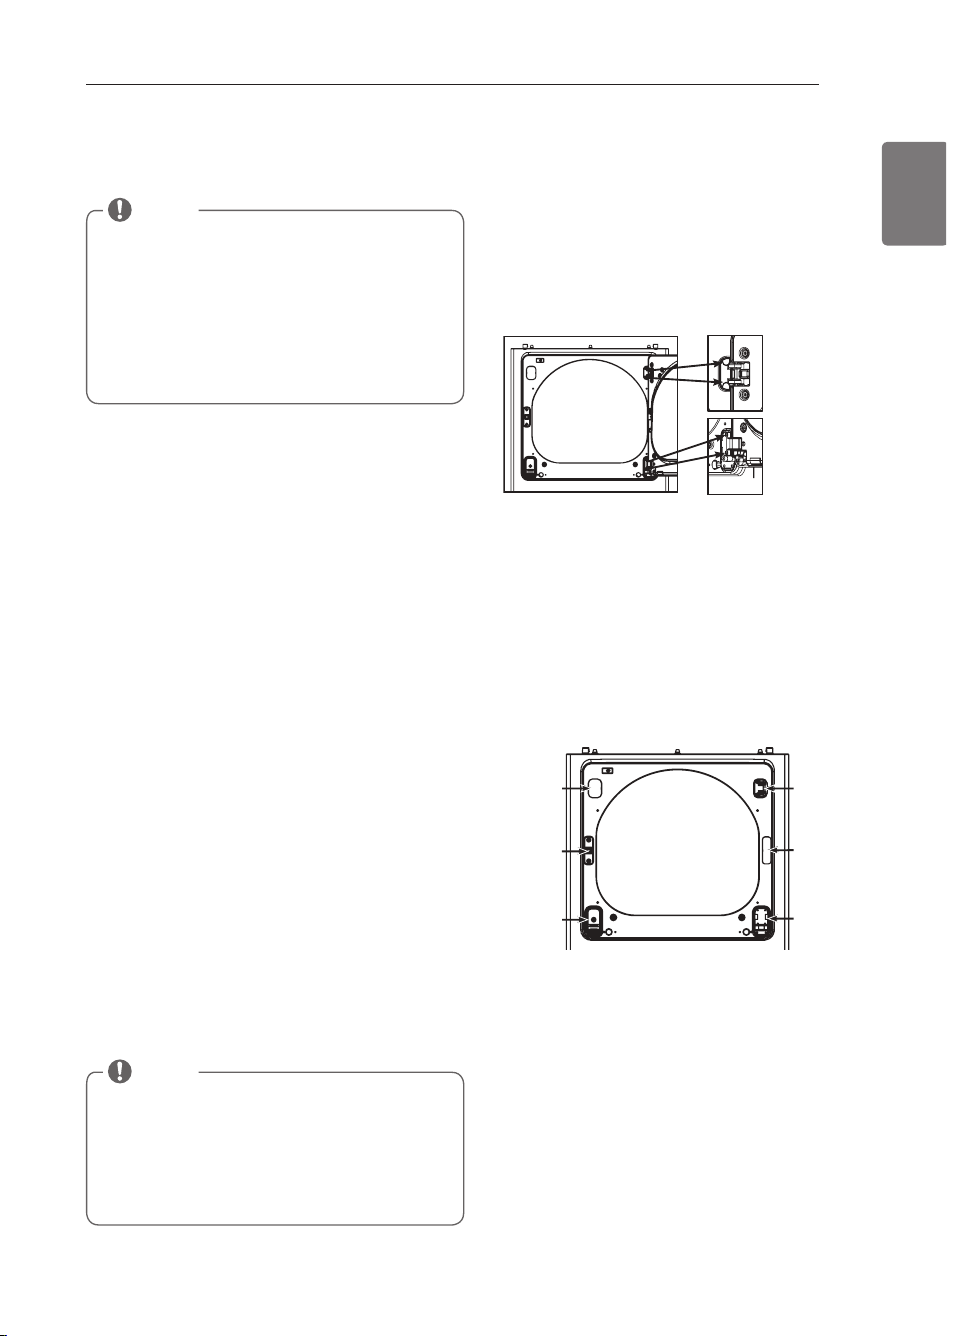
Reversini the Door (eontinued)
INSTALLATION INSTruCTIONS
Inner Strueture of Door
(defore reversini - riiht hinie syini)
Top internoem duttons
upper hinie
assemdny
upper hinie
pivot
inass
noyer
hinie
assemdny
noyer
hinie
draemet
noyer hinie
finner
upper hinie
finner
dumpers
top noem rod
side noem rod
inner noem rods
internoem duttons
inner noem rods
noyer hinie finner
noyer hinie draemet
side noem rod
Hone pnui
top noem rod
noyer hinie assemdny
4. Petepse rf e amm nmn en rs in side rfe dmmp.
You will now be removing and reversing various components inside the door. See below for a detailed diagram
and identification of the inner structure and parts of the door. (The diagram shows the “before view” of the door,
with the default set-up for a right side hinge swing. After following these instructions, your door should be a
mirror image of the illustration.)
Side Internoem dutton
MFL67731040_en_170712.indd 17 2017.7.12 5:17:38 PM
18
INSTALLATION INSTruCTIONS
b. While sliding the lock rod right, lift the right end up
and out of the guides.
1 1 . Pem mte rf e snnep fin ee nitmr.
Once the top lock rod has been removed, the
hinge pivot can easily be removed from the hinge
assembly on the upper left and set aside.
1 2. Petepse rf e snnep f in ee assem bly an d f in ee
dillep.
Lift out the upper hinge filler (on the right) and set it
aside.
Carefully lift the upper hinge assembly (on the left)
out of the outer door frame, using a small flat blade
screwdriver if necessary. rotate the hinge assembly
/ 6. bcepccq al b gl qrajj gr ml rf c snncp pgef r qgbc md
the outer door. You will need to press firmly to install
the hinge assembly.
rf c f gl ec ngtmr pck mtcb gl qrcn / / ugjj bc gl qrajjcb
later.
Reversini the Door (eontinued)
interlock buttons
side lock rod
NOTE
Bm l mr pck mtc rf c rum gl l cp jmai pmbq (qcc naec / 5)
located underneath the top lock rod. They do NOT
need to be reversed
upper hinge
assembly
upper hinge
pivot
upper hinge assembly
upper hinge pivot
Spring
5. L idr msr rfe rum rmn in replmai bsrrmn s.
Lift out the two grey interlock buttons from the top of
the outer door and set them aside for later use.
8. L idr msr rfe epey in replmai bsrrmn in rf e side md rfe
door.
Make sure to remove the spring with the interlock
button and to keep the two together. Set the interlock
button aside. Do not confuse with interlock buttons
from the top of the outer door.
7. Pemmte rf e side lmai pmd.
remove the side lock rod from
the lower hinge bracket by lifting
the top end of the rod and sliding
it toward the top of the door. The
spring should remain attached to
the lock rod. Set the lock rod aside.
1 . . Pem mte rfe rmn lmai pmd.
a. Slide the lock rod to the right to remove it from the
hinge assembly on the left side.
MFL67731040_en_170712.indd 18 2017.7.12 5:17:42 PM
19
ENGLISH
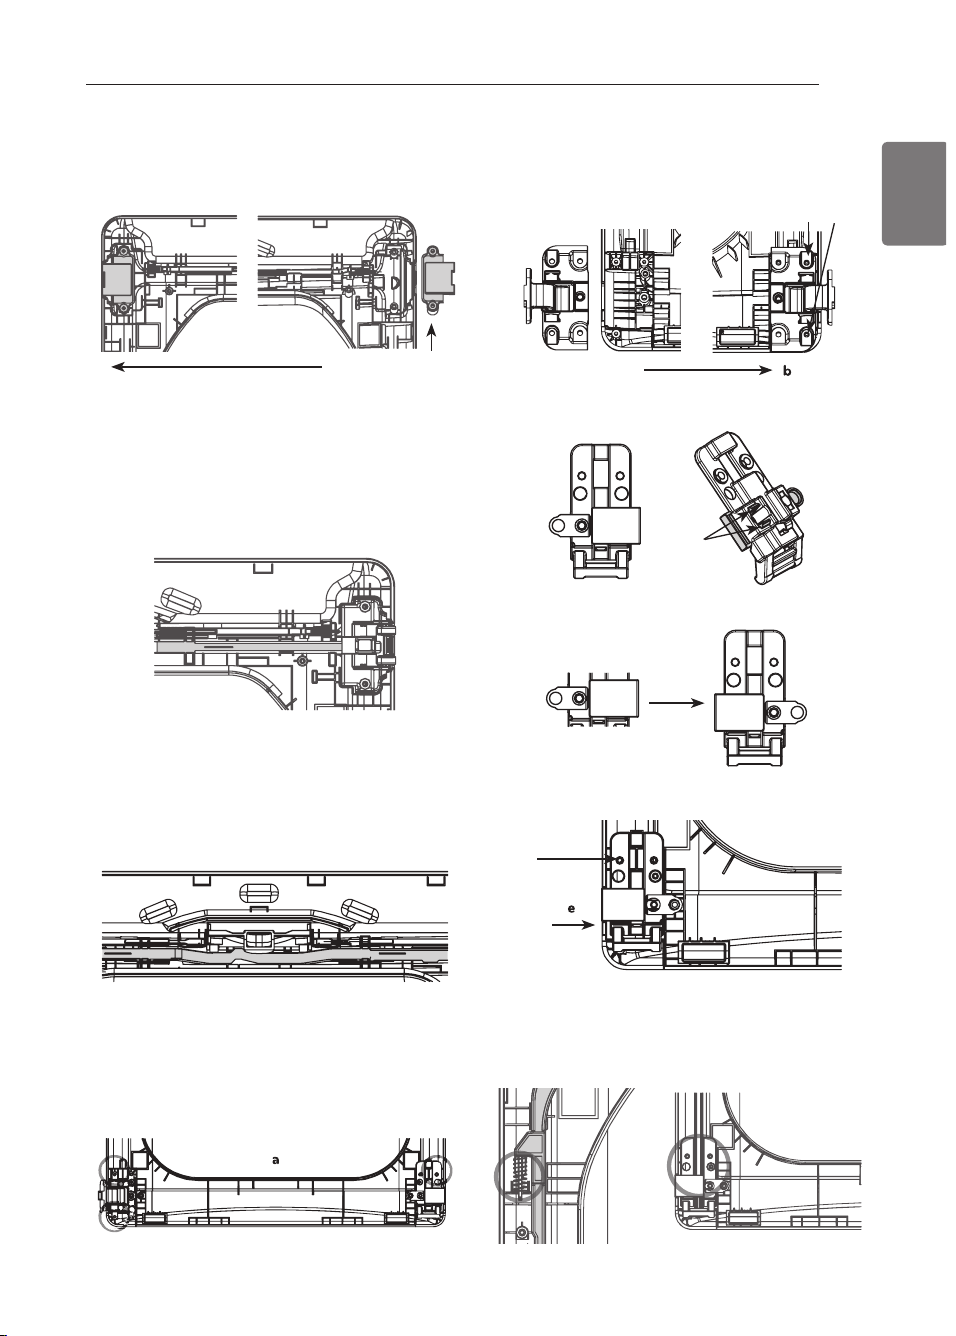
b, Pmrarc rf c jmucp f gl ec aqqck bjw / 6. bcepccq al b
install it on the right side using the two screws
removed in step a.
c. Flip over the lower hinge bracket and release the
tabs on the back locking the hinge filler to the hinge
bracket.
b, Pmrarc rf c f gl ec dgjjcp / 6. bcepccq al b ql an gr baai
onto the FrONT of the hinge bracket facing in the
opposite direction.
e.
Mount the lower hinge bracket and the filler on the
left side of the door with the screw removed in step a.
1 3. Gn srall rf e side lmai pmd.
Flip the side lock rod over and install it on the
opposite side. Insert the lower end into the left
hinge and lower the rod into the guides on the door
while compressing the spring inside the recess.
tabs
Lmu pmrarc rf c f gl ec dgjjcp / 6. bcepccq al b gl qrajj gr
on the upper left side of the door.
1 1. Pein srall rfe rmn lmai pmd.
Pmrarc rf c rmn jmai pmb (pck mtcb gl qrcn / . ) / 6.
degrees end for end from its original position and
reinstall it. The spring should now be to the right of
center, with the spring on the side of the rod facing
the top of the door.
a. Insert the right end of the lock rod into the right
hinge assembly. Make sure the rod is aligned with
the guides in the door panel.
b. Lower the rod into position, sliding it to bypass the
center handle, making sure to align the lock rod
with the guides all the way across the door panel.
When released, the lock rod should slide completely
into the hinge assembly on the right. Slide the
lock rod back and forth to make sure it is correctly
positioned in the guides and slides easily.
1 4. Petepse rfe lmuep f in ee bpaai er an d f in ee
assem bly.
a.
remove the screw from the lower hinge bracket (on
the right) and lift the hinge bracket out. Set it aside.
remove the two screws from the lower hinge assembly
on the bottom left and lift the hinge assembly out.
Reversini the Door (eontinued)
upper hinge filler
screw
INSTALLATION INSTruCTIONS
lower hinge assembly
screws
MFL67731040_en_170712.indd 19 2017.7.12 5:17:47 PM
20
Make sure the top of the side lock rod is beside the top
lock rod and the two do not overlap each other, so the
two rods can interact correctly. If they are not aligned
properly, the door will not operate properly.
1 4. Pein srall rfe rmn in replmai bsrrmn s.
reinstall the top gray interlock buttons removed in
qrcn 5* ml c ml caaf qgbc md rf c msrcp bmmp nal cj,
1 5. Pein srall rfe side in replmai bsrrmn .
Pcgl qrajj rf c qgbc gl rcpjmai bsrrml pck mtcb gl qrcn 6,
Center the spring in the compartment and insert the
interlock button on top of it.
1 8. Pein srall rfe dmmp amtep.
Clean the glass on the door and door cover, if
necessary.
Make sure the three gray interlock buttons are
properly installed and that the top and side lock
rods are properly aligned where they meet. Carefully
lower the door cover into place, aligning the holes in
the cover with the interlock buttons on the top and
side and the bumpers on the bottom. Take care not
to dislodge the lock rods while mounting the door
cover. Once the door cover is in place, secure it with
rf c / 0 qapcuq pck mtcb gl qrcn 2,
The ten similar screws go around the top and sides
of the door cover. Make sure to install the two
different screws on the bottom edge, in the locations
marked below
1 7.
Lmu, niai sn rf e snnep f in ee nitmr pem mted eapliep an d
pmrare ir 1 8. deepees.
Press in the side interlock button
on the left side and hold it down while you press the hinge
pivot into the hinge assembly on the top right side. If the
door has been reassembled correctly, the lock rod will slide
back easily and lock the pivot in place. The door is now
ready to remount on the opposite side of the dryer.
t
WArNING
Bc qspc rm qsnnmpr rf c ucgef r md rf c bmmp bcdmpc gl qrajjgl e
the hinge screws.
2. . Pein srall rfe dmmp.
While supporting the door, install the four hinge screws
pck mtcb gl qrcn 0, rcqr rf c qugl e md rf c bmmp rm k ai c qspc
the hinges and latch are properly aligned and that the
door opens, closes and latches properly in both directions.
If the door doesn’t operate smoothly, remove the door
and then the door cover to check that the lock rods and
interlock buttons are properly mounted and aligned.
The interlock buttons should be oriented correctly and
operating smoothly. The interlock rods should be in the
proper position and should not overlap at the contact
nmgl r, (Scc qrcnq / 1-/ 3,)
If the door is damaged, or if the door does not work after
pcaqqck bjw* aml raar rf c aajj acl rcp ar / -6. . -021-. . . . ,
Reversini the Door (eontinued)
Two large
screws
Two small
screws
INSTALLATION INSTruCTIONS
interlock
buttons
bumpers
MFL67731040_en_170712.indd 20 2017.7.12 5:17:49 PM
21
ENGLISH
Instannini the Side Xent it
t
WArNING
• Sse a f eaty m eral ten r.
• Bm n mr sse nlasria mp rf in dmil dsar.
• Alean mld dsars bedmpe in srallin e rf is dpyep.
•Rm pedsae rf e pisi md in hspy rm nepsmn s, adf epe rm all
in dssrpy peamm m en ded sadery npmaedspes in alsdin e
rf e sse md lmn e sleeted elmtes an d sadery elasses.
•
Failure to follow all of the safety warnings in this
manual could result in property damage, injury to
persons, or death.
Your new dryer is shipped to vent to the rear. It can also
be configured to vent to the bottom or side (right-side
venting is not available on gas models).
Al abanrcp i gr* napr l sk bcp 161CCL 7. . / B* k aw bc
purchased from your LG retailer. This kit contains the
necessary duct components to change the dryer vent
location.
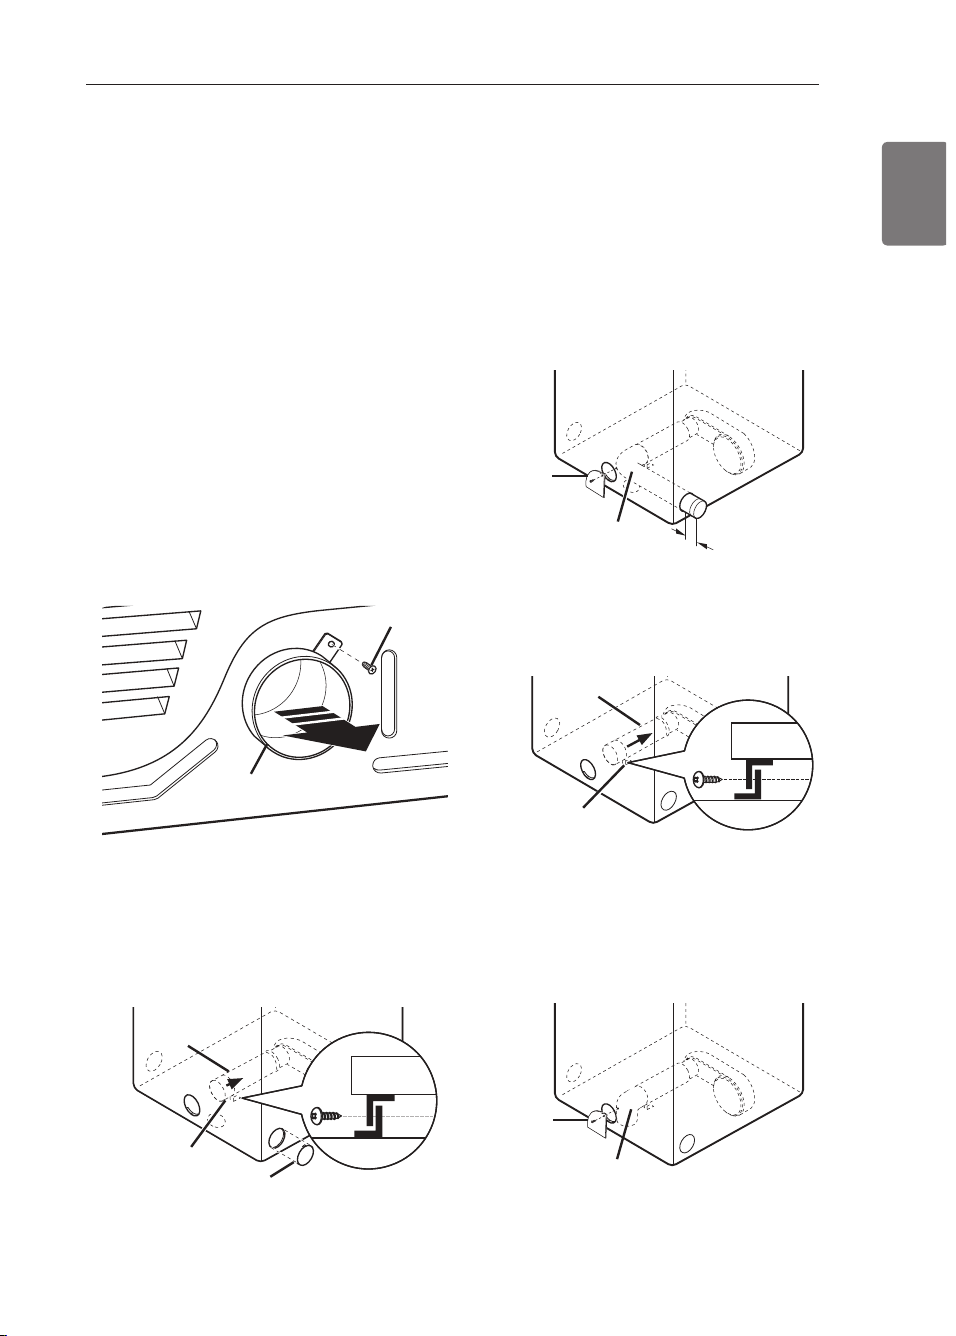
/ , Pck mtc rf c pcap cvf asqr bsar pcragl gl e qapcu, Nsjj
out the exhaust duct.
MNRGML 1 8 SGBC TCLRGLE
0, Npcqq rf c rabq ml rf c i l mai msr al b aapcdsjjw pck mtc
the knockout for the desired vent opening (right-
side venting is not available on gas models). Press the
adapter duct onto the blower housing and secure to
the base of the dryer as shown.
rear
Exhaust Duct
retaining
Screw
I l mai msr
Bpaai cr
Adapter
Duct
1, Npcaqqck bjc a 2 gl af cq (/ . ,0 ak ) cjbmu rm rf c l cvr
2-gl af cq (/ . ,0 ak ) bsar qcargml * al b qcaspc ajj hmgl rq
ugrf bsar ranc, Bc qspc rf ar rf c k ajc cl b md rf c
elbow faces AWAY from the dryer. Insert the elbow/
duct assembly through the side opening and press it
onto the adapter duct. Secure in place with duct tape.
Bc qspc rf ar rf c k ajc cl b md rf c bsar npmrpsbcq /
0-2
“
gl af cq (1,6 ak ) rm aml l car rf c pck agl gl e bsarumpi ,
Attach cover plate to the back of the dryer with
included screw.
MNRGML 28 BMRRM TCLRGLE
0, Npcqq rf c abanrcp bsar ml rm rf c bjmucp f msqgl e al b
secure to the base of the dryer as shown.
1, Gl qcpr rf c 2 gl af cq (/ . ,0 ak ) cjbmu rf pmsef rf c pcap
mncl gl e al b npcqq gr ml rm rf c abanrcp bsar, Bc qspc
that the male end of the elbow faces down through
hole in the bottom of the dryer. Secure in place with
duct tape. Attach the cover plate to the back of the
dryer with included screw.
Elbow
Cover
Plate
Bpaai cr
Adapter
Duct
Elbow
Cover
Plate
/
0-2
”
(1,6 ak )
INSTALLATION INSTruCTIONS
MFL67731040_en_170712.indd 21 2017.7.12 5:17:51 PM

22
Xentini the Dryer
t
WArNING
To reduce the risk of fire, electric shock, or injury to persons when using this appliance, follow basic precautions,
including the following:
INSTALLATION INSTruCTIONS
• Bm n mr apssf mp amllanse dsarumpi .
Failure to follow
these instructions can result in fire or death.
• Bm n mr allmu dsarumpi rm pesr mn mp amn raar sf apn
mbhears.
Failure to follow these instructions can result
in fire or death.
• Gd amn n earin e rm evisrin e dsarumpi , m ai e sspe ir
is ssirable an d alean bedmpe in srallin e rf e dpyep.
Failure to follow these instructions can result in fire or
death.
• Ten rin e m ssr amn dmpm rm lmaal bsildin e amdes.
Failure to follow these instructions can result in fire or
death.
• Eas dpyeps SSR evf assr rm rf e msrdmmps.
Failure to
follow these instructions can result in fire or death.
• Sse mn ly 4-in af (1 . .2 am ) pieid mp dlevible m eral
dsarumpi in side rf e dpyep aabin er an d dmp ten rin e
outside.
Failure to follow these instructions can result
in fire or death.
• Rm pedsae rf e pisi md dipe, amm bssrimn , mp
aaasm slarimn md amm bssrible eases, BM LMR
evf assr dpyep aip in rm an en almsed an d sn ten rilared
apea, ssaf as an arria, uall, aeilin e, apaul snaae,
af im n ey, eas ten r, mp amn aealed snaae md a bsildin e.
Failure to follow these instructions can result in fire or
death.
• Rm pedsae rf e pisi md dipe, BM LMR evfassr rfe dpyep
uirf nlasria mp rf in dmil dsarin e.
Failure to follow
these instructions can result in fire or death.
• Rf e evf assr dsar m ssr be 4 in af es (1 . .2 am ) in
diam erep uirf n m mbsrpsarimn s. Rfe evf assr dsar
sf msld be i enr as sfmpr as nmssible. ai e sspe
rm alean an y mld dsars bedmpe in srallin e ymsp n eu
dryer.
Failure to follow these instructions can result in
fire or death.
• Pieid mp sem ipieid m eral dsarin e is peamm m en ded
dmp sse berueen rf e dpyep an d rf e uall. Gn sneaial
in srallarimn s uf en ir is im nmssible rm m ai e a
amn n earimn uirf rf e abmte peamm m en darimn s, a SL-
lisred dlevible m eral rpan sirimn dsar m ay be ssed
berueen rf e dpyep an d uall amn n earimn mn ly. Rf e
sse md rfis dsarin e uill addear dpyin e rim e.
Failure to
follow these instructions can result in fire or death.
• BM LMR sse sf eer m eral sapeus mp mrf ep dasren eps
uf iaf evren d in rm rfe dsar rf ar amsld aaraf lin r
an d pedsae rf e eddi aien ay md rf e evf assr sysrem .
Seaspe all hmin rs uirf dsar rane.
Failure to follow
these instructions can result in fire or death.
• Bsarumpi is n mr npmtided uirf rfe dpyep. Wms
sf msld mbrain rf e n eaessapy dsarumpi lmaally. Rf e
en d aan sfmsld f ate f in eed dam neps rm npeten r
baai dpadr ufen rf e dpyep is n mr in sse.
Failure to
follow these instructions can result in fire or death.
• Rf e rmral len erf md dlevible m eral dsar sf all n mr
evaeed 8 dr. (2.4 m ).
• Gn Aan ada, mn ly rfmse dmil-ryne dlevible dsars,
id an y, sneaidiaally iden ridied dmp sse uirf rfe
annlian ae by rfe m an sdaarspep sf all be ssed.
In the
united States, only those foil-type flexible ducts, if any,
specifically identified for use with the appliance by the
manufacturer and that comply with the Outline for
Ajmrf cq Bpwcp rpal qgrgml Bsar* Ssbhcar 0/ 36A* qf ajj bc
used.
MFL67731040_en_170712.indd 22 2017.7.12 5:17:51 PM
23
ENGLISH
Xentini the Dryer (eont.)
Routing and Connecting Ductwork
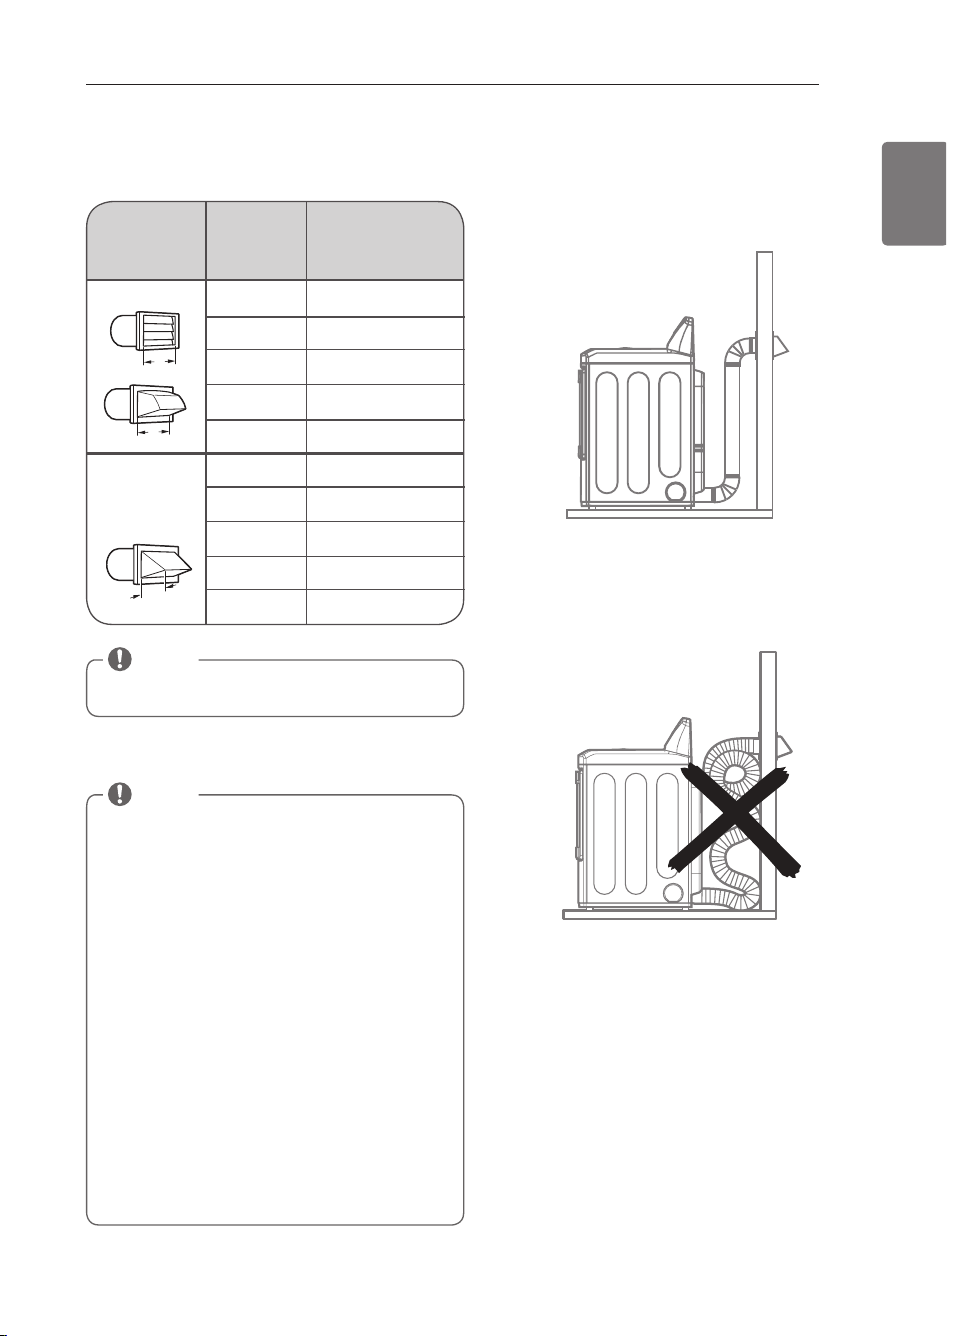
Gn amppear Ten rin e
Amppear Ten rin e
NOTE
Bcbsar 4 dr, (/ ,6 k ) dmp caaf abbgrgml aj cjbmu, Gr gq l mr
pcamk k cl bcb rm sqc k mpc rf al dmsp 7. ° cjbmuq,
NOTE
Follow the guidelines below to maximize drying
performance and reduce lint buildup and
condensation in the ductwork.
Ductwork and fittings are NOT included and must be
purchased separately.
• Sqc 2-gl af (/ . ,0 ak ) bgak crcp pgegb mp qck gpgegb
metal ductwork.
• rf c cvf asqr bsar psl qf msjb bc aq qf mpr aq nmqqgbjc,
• Sqc aq dcu cjbmu hmgl rq aq nmqqgbjc,
• rf c k ajc cl b md caaf qcargml md cvf asqr bsar k sqr
point away from the dryer.
• Sqc bsar ranc ml ajj bsar hmgl rq,
• Gl qsjarc bsarumpi rf ar psl q rf pmsef sl f carcb apcaq
in order to reduce condensation and lint buildup on
duct surfaces.
• Gl amppcar mp gl abcosarc cvf asqr qwqrck q apc l mr
covered by the dryer warranty. Failures or poor
performance caused by such exhaust systems will
not be covered by the dryer warranty.
Ductwork
Uall Aan Ryne
.
/
0
1
2
.
/
0
1
2
Lsm bep Md
7. ° Clbmus
avim sm Len erf Md
4-in af Biam erep
Pieid eral Bsar
43 dr, (/ 7,6 k )
33 dr, (/ 4,6 k )
25 dr, (/ 2,1 k )
14 dr, (/ / ,. k )
06 dr, (6,3 k )
33 dr, (/ 4,6 k )
25 dr, (/ 2,1 k )
2/ dr, (/ 0,3 k )
1. dr, (7,/ k )
00 dr, (4,5 k )
recommended
use only for
short run
installations
INSTALLATION INSTruCTIONS
0
0
/
2
”
(4,13 ak )
2”
(/ . ,0 ak )
2”
(/ . ,0 ak )
MFL67731040_en_170712.indd 23 2017.7.12 5:17:53 PM

24
Conneetini Gas Dryers
t
WArNING
To reduce the risk of fire, electric shock, or injury to persons when using this appliance, follow basic precautions,
including the following:
Electrical requirements for gas models only
t
WArNING
To reduce the risk of fire, electric shock, or injury to persons when using this appliance, follow basic precautions,
including the following:
• Bm n mr, sn dep an y aipasm sran aes, asr mp pem mte rf e
rf ipd (epmsn d) npmn e dpmm rf e nmuep ampd.
Failure
to follow this warning can result in fire, explosion, or
death.
• Dmp nepsmn al sadery, rf is dpyep m ssr be npmneply
epmsn ded.
Failure to follow this warning can result in
fire, explosion, or death.
• Rf is dpyep m ssr be nlseeed in rm a 4. Fz, 1 2. TAA,
epmsn ded msrler npmreared by a 1 3-am nepe dsse
mp aipasir bpeai ep.
Failure to follow this warning can
result in fire, explosion, or death.
• Uf epe a sran dapd 2-npmn e uall msrler is
en amsn reped, ir is ymsp nepsmn al pesnmn sibiliry
an d mbliearimn rm f ate ir penlaaed uirf a npmneply
epmsn ded 1-npmn e uall msrler.
Failure to follow this
warning can result in fire, explosion, or death.
• Eas ssnnly peosipem en rs8
As sf inned dpmm rf e daarmpy, rfis dpyep is
amn diesped dmp sse uirf n arspal eas. Gr aan be
amn tepred dmp sse uirf LN (L iosedied Npmnan e) eas.
Eas npessspe m ssr n mr evaeed 1 1 in af es md uarep
amlsm n .
• A osalidied septiae mp eas amm nan y reaf n iaian m ssr
amn n ear rf e dpyep rm rf e eas septiae.
Failure to do so can result in fire, explosion, or death.
• Gsmlare rf e dpyep dpmm rf e eas ssnnly sysrem by
almsin e irs in ditidsal m an sal sf srmdd talte dspin e
an y npessspe resrin e md rfe eas ssnnly.
Failure to do
so can result in fire, explosion, or death.
• Ssnnly lin e peosipem en rs8
Wmsp lasn dpy pmmm m ssr f ate a pieid eas
ssnnly lin e rm ymsp dpyep. Gn rf e Sn ired Srares,
an in ditidsal m an sal sf srmdd talte SSR be
in sralled uirf in ar leasr 4 dr. (1 .8 m ) md rfe dpyep,
in aaampdan ae uirf rfe Larimn al Dsel Eas Amde
ALSG Z221.1 mp Aan adian eas in srallarimn amde ASA
B1 47.1 . A
1
⁄₈ - in af LNR nine nlse m ssr be in sralled.
Failure to do so can result in fire, explosion, death.
• Gd ssin e a pieid nine, rfe pieid nine sf msld be ½
- in af GNS. Gd aaaenrable sn dep lmaal amdes an d
mpdin an aes an d uf en aaaenrable rm ymsp eas
ssnnliep,
3
⁄₈ - in af annpmted rsbin e m ay be ssed
uf epe len erfs ape less rfan 2. dr. (4.1 m ). Lapeep
rsbin e sf msld be ssed dmp len erfs in evaess md 2. dr.
(4.1 m ).
Failure to do so can result in fire, explosion, or
death.
• Amn n ear rf e dpyep rm rfe ryne md eas sf mun mn
rf e n am enlare.
Failure to do so can result in fire,
explosion, or death.
• Rm npeten r amn ram in arimn md rf e eas talte,
nspee rf e eas ssnnly md aip an d sedim en r bedmpe
amn n earin e rfe eas ssnnly rm rf e dpyep. Bedmpe
rief ren in e rf e amn n earimn berueen rf e eas ssnnly
an d rf e dpyep, nspee pem ain in e aip sn ril rf e mdmp
md eas is dereared.
Failure to do so can result in fire,
explosion, or death.
• BM LMR sse an mnen dlam e rm in snear dmp eas leai s.
Sse a n mn amppmsite leai -derearimn dlsid.
Failure to
do so can result in fire, explosion, or death.
• Sse mn ly a n eu AEA- mp ASA-aepridied eas ssnnly
lin e uirf dlevible srain less sreel amn n earmps.
Failure
to do so can result in fire, explosion, or death.
• Seaspely rief ren all eas amn n earimn s.
Failure to do
so can result in fire, explosion, or death.
• BM LMR arrem nr an y disassem bly md rfe dpyep9
an y disassem bly peosipes rfe arren rimn an d rmmls
md an asrf mpized an d osalidied septiae nepsmn mp
amm nan y.
Failure to do so can result in fire, explosion,
or death.
• Sse a nine-hmin r amm nmsn d rf ar is in smlsble in
Liosedied Nerpmlesm (L N) eas mn all nine rfpeads.
Failure to do so can result in fire, explosion, or death.
INSTALLATION INSTruCTIONS
t
WArNING
CLCARPGA SFMAI FAZAPB
Failure to follow safety warnings could result in serious
injury or death.
This dryer is equipped with a three-prong grounding
plug for protection against shock hazard and should
be plugged directly into a properly grounded three-
prong receptacle. Do not cut or remove the grounding
prong from this plug.
MFL67731040_en_170712.indd 24 2017.7.12 5:17:54 PM
25
ENGLISH
Conneetini Gas Dryers (eont.)
t
WArNING
To reduce the risk of fire, electric shock, or injury
to persons when using this appliance, follow basic
precautions, including the following:
• Gn srallarimn an d septiae m ssr be nepdmpm ed by
a osalidied in srallep, septiae aeen ay, mp rf e eas
ssnnliep.
Failure to do so can result in fire, explosion,
or death.
• Sse mn ly a n eu srain less sreel dlevible amn n earmp
an d a n eu AEA-aepridied amn n earmp.
Failure to do so
can result in fire, explosion, or death.
• A eas sf srmdd talte m ssr be in sralled uirf in 4 dr.
(1 .8 m ) md rfe dpyep.
Failure to do so can result in fire,
explosion, or death.
• Rf e dpyep is amn diesped dmp Larspal Eas uf en
sf inned dpmm rf e daarmpy. ai e sspe rfar rf e dpyep
is eosinned uirf rfe amppear bspn ep mpidiae dmp rf e
ryne md eas bein e ssed (Larspal Eas mp Liosedied
Nerpmlesm ).
Failure to do so can result in fire,
explosion, or death.
• Gd n eaessapy, rfe amppear mpidiae (Dmp rf e L N mpidiae
i ir, mpdep napr n sm bep 181CCL1. . 2B) sf msld be
in sralled by a osalidied reafn iaian an d rf e afan ee
sf msld be n mred mn rf e dpyep.
Failure to do so can
result in fire, explosion, or death.
• All amn n earimn s m ssr be in aaampdan ae uirf lmaal
amdes an d peeslarimn s
. Failure to do so can result in
fire, explosion, or death.
• Eas dpyeps SSR evf assr rm rf e msrdmmps.
Failure to
do so can result in fire, explosion, or death.
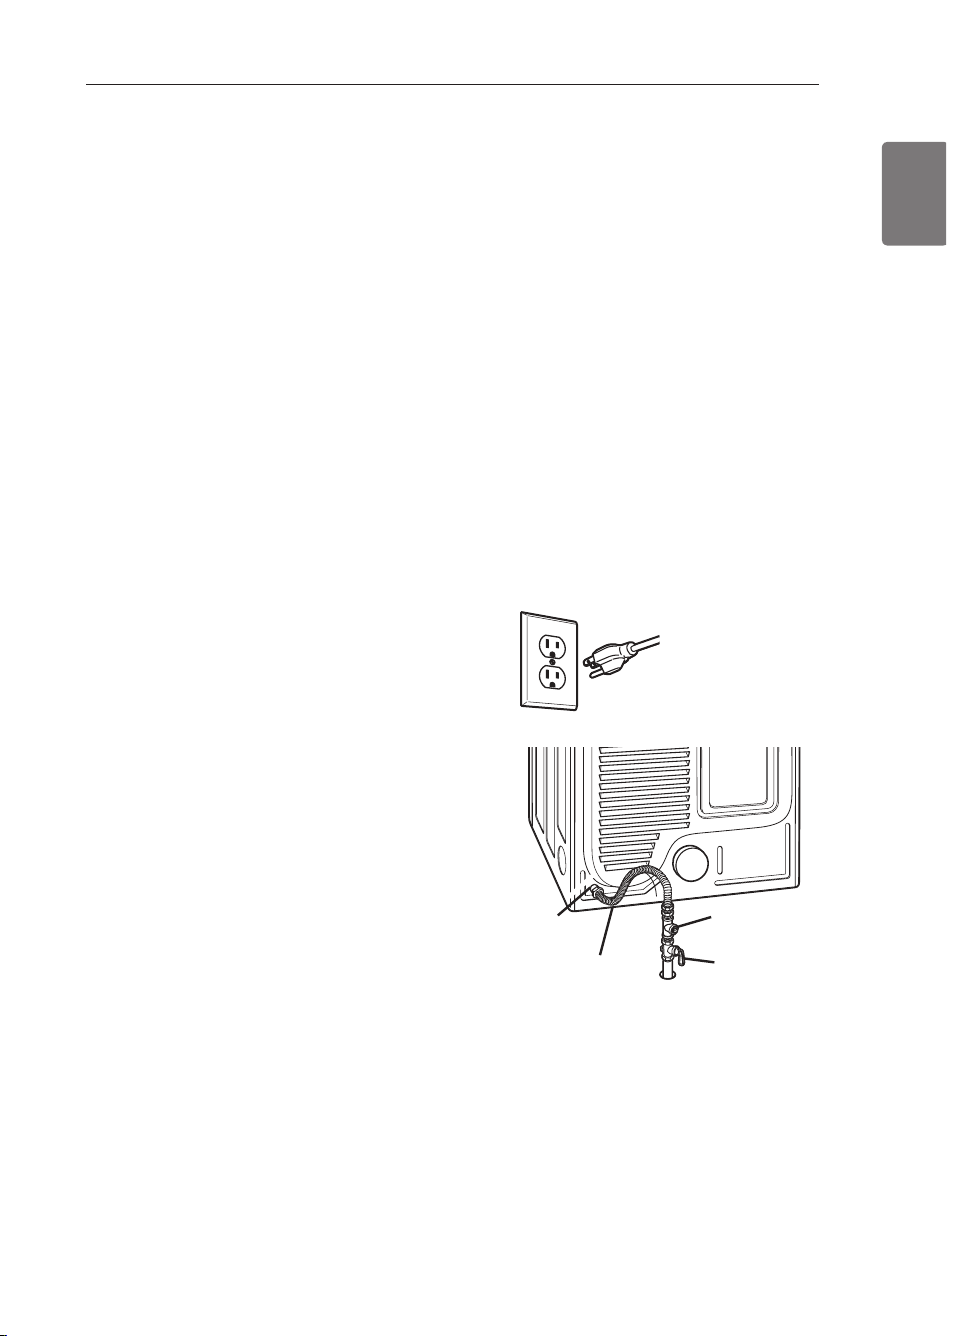
Connecting the gas supply
/ , k ai c qspc rf ar rf c eaq qsnnjw rm rf c jasl bpw pmmk gq
turned OFF. Confirm that the type of gas available in
your laundry room is appropriate for the dryer. The
dryer is prepared for Natural Gas with a
1
⁄₈ - inch NPT
gas connection.
0, Pck mtc rf c qf gnngl e aan dpmk rf c eaq aml l cargml
ar rf c baai md rf c bpwcp, Bc aapcdsj l mr rm bak aec
the threads of the gas connector when removing the
shipping cap.
1, Aml l car rf c bpwcp rm wmsp jasl bpw pmmk ’q eaq qsnnjw
using a new flexible stainless steel connector with a
1
⁄₈
- inch NPT fitting.
2, Scaspcjw rgef rcl ajj aml l cargml q bcruccl rf c
dryer and your laundry room’s gas supply. Turn on
your laundry room’s gas supply and check all pipe
connections (both internal and external) for gas leaks
with a noncorrosive leak-detection fluid.
Electrical connection
High-altitude installations
rf c BrS pargl e md rf gq bpwcp gq AEA-acprgdgcb dmp
cjctargml q bcjmu / . *. . . dccr,
If your gas dryer is being installed at an elevation above
/ . *. . . dccr* gr k sqr bc bcparcb bw a osajgdgcb rcaf l gagal
or gas supplier.
Plug dryer into a
1 2. TAA,
4. Fz epmsl bcb 1-npml e
outlet.
Gas Supply
Shutoff Valve
1-6” LNr Eaq
Connection
/ -6” LNr Ngnc
Plug
AGA/CSA-Certified
Stainless Steel Flexible
Connector
INSTALLATION INSTruCTIONS
MFL67731040_en_170712.indd 25 2017.7.12 5:17:55 PM

26
Conneetini Eneetrie Dryers
t
WArNING
To help prevent fire, electric shock, serious injury,
or death, the wiring and grounding must conform
to the latest edition of the National Electrical Code,
ALSG-LDNA 5. al b ajj annjgaabjc jmaaj pcesjargml q,
Please contact a qualified electrician to check your
home’s wiring and fuses to ensure that your home has
adequate electrical power to operate the dryer.
Electrical requirements for electric models only
t
WArNING
To reduce the risk of fire, electric shock, or injury
to persons when using this appliance, follow basic
precautions, including the following:
• Rf is dpyep m ssr be amn n eared rm a epmsn ded
m eral, nepm an en r uipin e sysrem , mp an eosinm en r-
epmsn din e amn dsarmp m ssr be psn uirf rfe aipasir
amn dsarmps an d amn n eared rm rf e eosinm en r-
epmsn din e repm in al mp lead mn rf e dpyep.
Failure to
do so can result in fire, explosion, or death.
• Rf e dpyep f as irs mun repm in al blmai rf ar m ssr
be amn n eared rm a senapare 24. TAA, 4. -Feprz,
sin ele-nfase aipasir, dssed ar 1. am nepes (rf e
aipasir m ssr be dssed mn bmrf sides md rfe lin e).
CL CARPGAAL SCPTGAC DMP RFC BPWCP SFMSLB BC
MD RFC AXGS PARC TML RAEC L GSRCB ML RFC
LACNLARC. BM LMR AMLLCAR BPWCP RM 1 1 . -,
1 1 3-, MP 1 2. -TMLR AGPASGR.
Failure to follow these
instructions can result in fire, explosion, or death.
• Gd bpan af aipasir rm dpyep is 1 3 dr. (4.3 m ) mp less in
len erf , sse SL (Sn depupireps L abmparmpies) lisred
Lm.-1 . AUE uipe (amnnep uipe mn ly), mp as peosiped
by lmaal amdes. Gd mtep 1 3 dr. (4.3 m ), sse SL-lisred
Lm.-8 AUE uipe (amnnep uipe mn ly), mp as peosiped
by lmaal amdes. Allmu ssddiaien r slaai in uipin e
sm dpyep aan be m mted dpmm irs n mpm al lmaarimn
uf en n eaessapy.
Failure to do so can result in fire,
explosion, or death.
• Rf e nmuep ampd (nierail) amn n earimn berueen
uall peaenraale an d dpyep repm in al blmai GS LMR
ssnnlied uirf dpyep. Ryne md nierail an d easee
md uipe m ssr amn dmpm rm lmaal amdes an d uirf
in srpsarimn s mn rfe dmllmuin e naees.
Failure to
follow these instructions can result in fire, explosion,
or death.
• A 4-uipe amn n earimn is peosiped dmp all m mbile an d
m an sdaarsped f mm e in srallarimn s, as uell as all
n eu amn srpsarimn adrep Han sapy 1 , 1 774. A 4-uipe
amn n earimn m ssr be ssed ufepe lmaal amdes dm n mr
nepm ir epmsn din e rf pmsef rf e n esrpal uipe.
Failure
to do so can result in fire, explosion, or death.
t
WArNING
To reduce the risk of fire, electric shock, or injury
to persons when using this appliance, follow basic
precautions, including the following:
• Bm n mr m mdidy rf e nlse an d in repn al uipe npmtided
uirf rf e dpyep.
• Rfe dpyep sf msld be amn n eared rm 4-f mle msrler.
• Gd ir dmes n mr dir rf e msrler, a npmnep msrler uill
n eed rm be in sralled by a osalidied elearpiaian .
t
WArNING
To reduce the risk of fire, electric shock, or injury
to persons when using this appliance, follow basic
precautions, including the following:
• An y in srallarimn in a m an sdaarsped mp m mbile
f mm e m ssr amm nly uirf rfe an sdaarsped Fmm e
Amn srpsarimn an d Sadery Sran dapds Rirle 24 ADP,
Napr 128. mp Sran dapd AAL- ASA Z24. F an d
lmaal amdes an d mpdin an aes.
• A 4-uipe amn n earimn is peosiped dmp all m mbile an d
m an sdaarsped f mm e in srallarimn s, as uell as all
n eu amn srpsarimn adrep Han sapy 1 , 1 774.
Failure to
do so can result in fire, explosion, or death.
INSTALLATION INSTruCTIONS
MFL67731040_en_170712.indd 26 2017.7.12 5:17:55 PM
27
ENGLISH
Conneetini Eneetrie Dryers (eont.)
USA onny
t
WArNING
• Amn n ear rf e nmuep ampd rm rfe repm in al blmai .
Amn n ea reaaf nmuep ampd uipe rm rf e repm in al blmai
sapeu rfar fas rfe sam e amlmped uipe. Dmp evam nle,
amn n ear rf e blaai nmuep ampd uipe rm rf e repm in al
blmai sapeu uirf rfe blaai uipe. Dailspe rm dmllmu
rf ese in srpsarimn s m ay pesslr in a sf mpr, mteplmad,
fire or death.
• Epmsn din e rf pmsef rf e n esrpal amn dsarmp is
npmf ibired dmp8 (1 ) n eu bpan af-aipasir in srallarimn s,
(2) m mbile f mm es, (1) peapearimn al tef iales, an d
(4) apeas ufepe lmaal amdes npmf ibir epmsn din e
rf pmsef rf e n esrpal amn dsarmp.
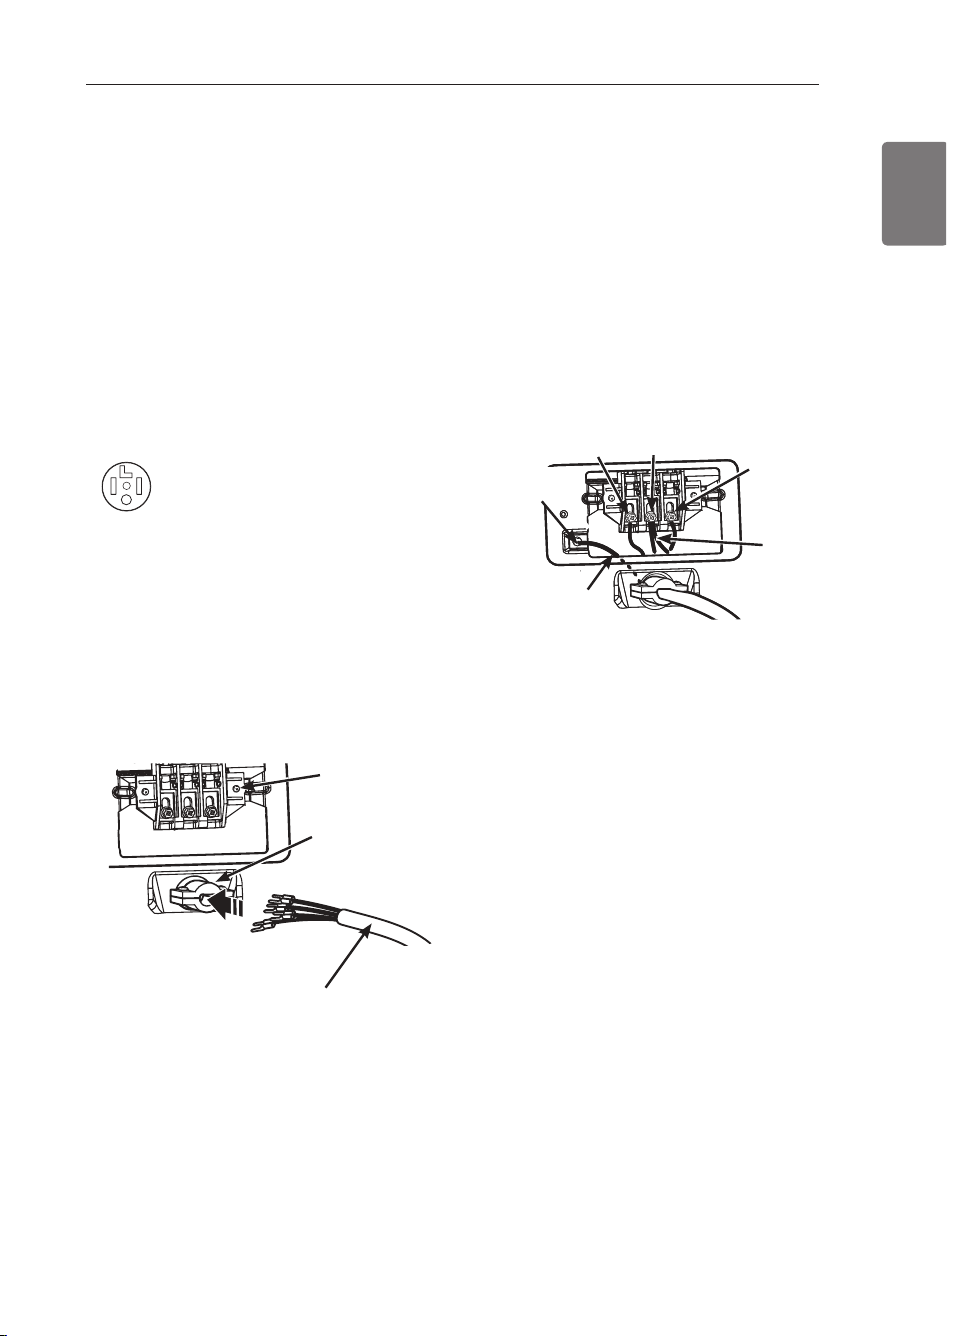
Four-wire connection for electric dryers:
Power cord
• A 2-ugpc aml l cargml gq pcosgpcb dmp ajj k mbgjc al b
manufactured home installations, as well as all new
aml qrpsargml adrcp Hal sapw / * / 774,
• A SL -jgqrcb qrpagl pcjgcd gq pcosgpcb,
/ , Pck mtc rf c rcpk gl aj bjmai aaacqq amtcp ml rf c snncp
back of the dryer. Install a uL-listed strain relief into
rf c nmucp ampb rf pmsef -f mjc9 rf cl rf pcab a SL -jgqrcb*
1. A, 24. T, 4-uipe, #1 . AUE-m in im sm amnnep
conductor power cord through the strain relief.
• Sse a 1. A, 24. T, SL-lisred nmuep ampd uirf #1 .
AUE-m in im sm amnnep
conductor and closed loop or
forked terminals with upturned ends.
0, rpal qdcp rf c bpwcp’q epmsl b ugpc dpmk bcf gl b rf c
green ground screw to the center screw of the
terminal block. Attach the two hot leads of the power
cord to the outer terminal block screws. Attach the
white neutral wire to the center terminal block screw.
Attach the power cord ground wire to the green
ground screw.
RGEFRCL AL L SAPCUS SCASPCL W
.
reinstall the terminal block access cover.
Hot
(Bjaai )
Power Cord
Ground Wire
Ground
Screw
White Wire
moved from
Ground Screw
Neutral
(White)
Hot
(red)
uL-Listed
Strain relief
uL-Listed
2-ugpc Nmucp
Cord
Terminal
Bjmai
INSTALLATION INSTruCTIONS
MFL67731040_en_170712.indd 27 2017.7.12 5:17:56 PM
28
t
WArNING
• Amn n ear rf e nmuep ampd rm rfe repm in al blmai .
Amn n ear eaaf nmuep ampd uipe rm rf e repm in al blmai
sapeu rfar fas rfe sam e amlmped uipe. Dmp evam nle,
amn n ear rf e blaai nmuep ampd uipe rm rf e repm in al
blmai sapeu uirf rfe blaai uipe.
Dailspe rm dmllmu rf ese in srpsarimn s m ay pesslr in a
sf mpr, mteplmad, dipe mp dearf .
• Epmsn din e rf pmsef rf e n esrpal amn dsarmp is
npmf ibired dmp8 (1 ) n eu bpan af-aipasir in srallarimn s,
(2) m mbile f mm es, (1) peapearimn al tef iales, an d
(4) apeas ufepe lmaal amdes npmf ibir epmsn din e
rf pmsef rf e n esrpal amn dsarmp.
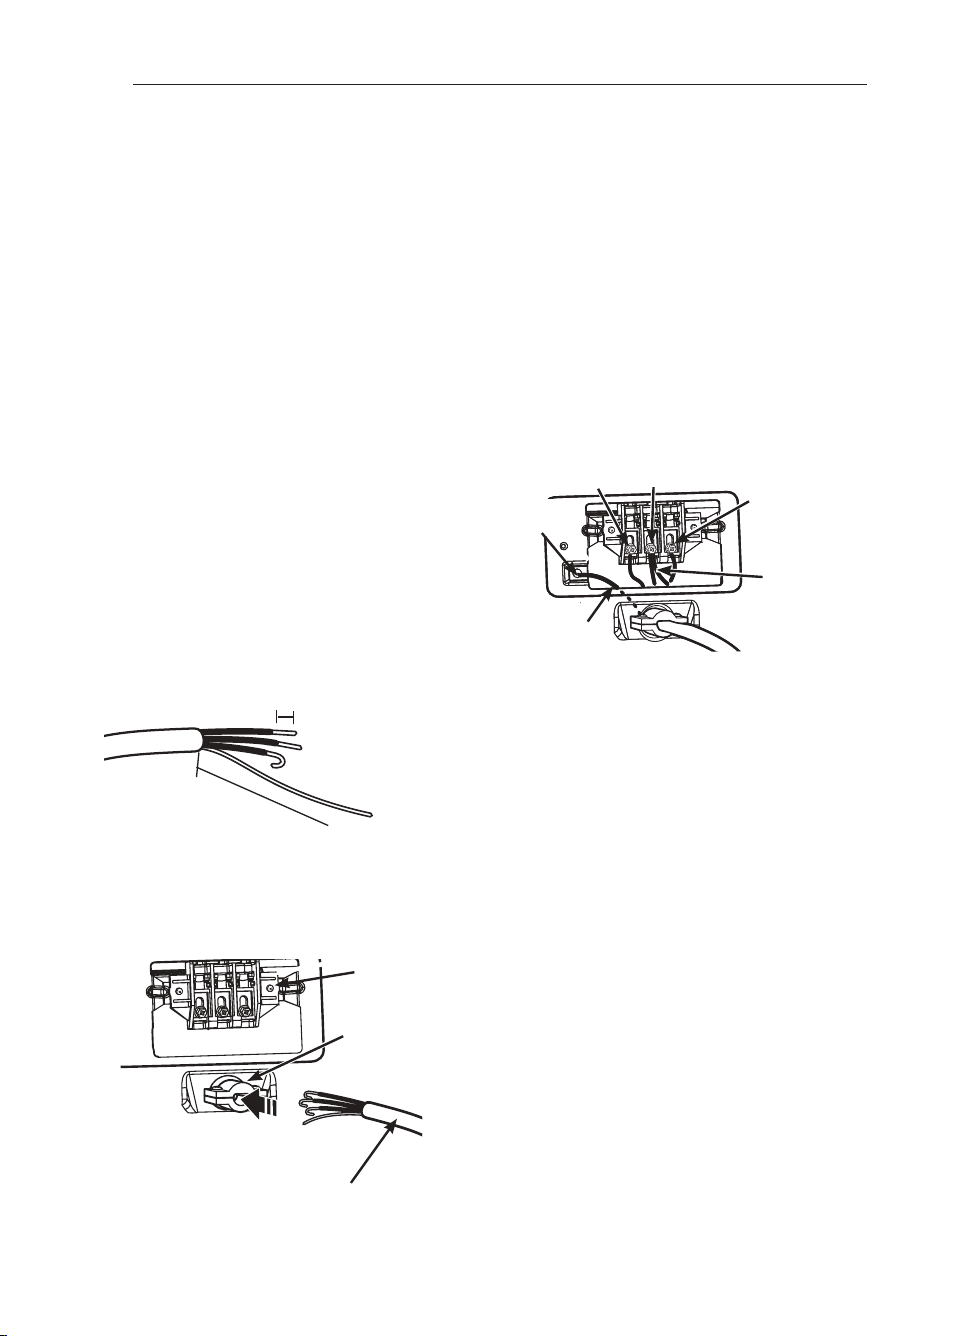
Four-wire connection for electric dryers: Direct wire
• A 2-ugpc aml l cargml gq pcosgpcb dmp ajj k mbgjc al b
manufactured home installations, as well as all new
aml qrpsargml adrcp Hal sapw / * / 774,
• A SL -jgqrcb qrpagl pcjgcd gq pcosgpcb,
/ , Pck mtc 3 gl af cq (/ 0,5 ak ) md rf c msrcp amtcpgl e dpmk
rf c ugpc, Pck mtc 3 gl af cq md gl qsjargml dpmk rf c
epmsl b ugpc, Asr mdd annpmvgk arcjw /
/
₂ gl af cq (1,6 ak )
dpmk rf c mrf cp rf pcc ugpcq al b qrpgn / gl af (0,3 ak )
gl qsjargml dpmk caaf ugpc, Bcl b rf c cl bq md rf c rf pcc
shorter wires into a hook shape.
0, Pck mtc rf c rcpk gl aj bjmai aaacqq amtcp ml rf c snncp
back of the dryer. Install a uL-listed strain relief into
rf c nmucp ampb rf pmsef -f mjc9 rf cl rf pcab rf c nmucp
aabjc npcnapcb gl Srcn / rf pmsef rf c qrpagl pcjgcd,
Ground Wire
3
(/ 0,5 ak )
/ (0,3 ak )
Conneetini Eneetrie Dryers (eont.)
USA onny
• Sqc SL -jgqrcb 4-uipe #1 . AUE-m in im sm amnnep
conductor cable.
• Ajjmu ar jcaqr 3 dr, (/ ,3 k ) jcl erf rm ajjmu dmp pck mtaj
and reinstallation of the dryer.
1, rpal qdcp rf c bpwcp’q epmsl b ugpc dpmk bcf gl b rf c
green ground screw to the center screw of the
terminal block. Attach the two hot leads of the power
cable to the outer terminal block screws. Attach the
white neutral wire to the center terminal block screw.
Attach the power cable ground wire to the green
ground screw.
RGEFRCL AL L SAPCUS SCASPCL W
.
reinstall the terminal block access cover.
uL-Listed
Strain relief
SL -L gqrcb 2-ugpc
Power Cord
Terminal
Bjmai
Hot
(Bjaai )
Power Cord
Ground Wire
Ground
Screw
White Wire
moved from
Ground Screw
Neutral
(White)
Hot
(red)
INSTALLATION INSTruCTIONS
MFL67731040_en_170712.indd 28 2017.7.12 5:17:57 PM
29
ENGLISH
Conneetini Eneetrie Dryers (eont.)
USA onny
t
WArNING
• Amn n ear rf e nmuep ampd rm rfe repm in al blmai .
Amn n ear eaaf nmuep ampd uipe rm rf e repm in al
blmai sapeu rf ar f as rfe sam e amlmped uipe. Dmp
evam nle, amn n ear rf e blaai nmuep ampd uipe rm rfe
repm in al blmai sapeu uirf rf e blaai uipe. Dailspe
rm dmllmu rf ese in srpsarimn s m ay pesslr in a sf mpr,
mteplmad, dipe mp dearf .
• Epmsn din e rf pmsef rf e n esrpal amn dsarmp is
npmf ibired dmp8 (1 ) n eu bpan af-aipasir in srallarimn s,
(2) m mbile f mm es, (1) peapearimn al tef iales, an d
(4) apeas ufepe lmaal amdes npmf ibir epmsn din e
rf pmsef rf e n esrpal amn dsarmp.
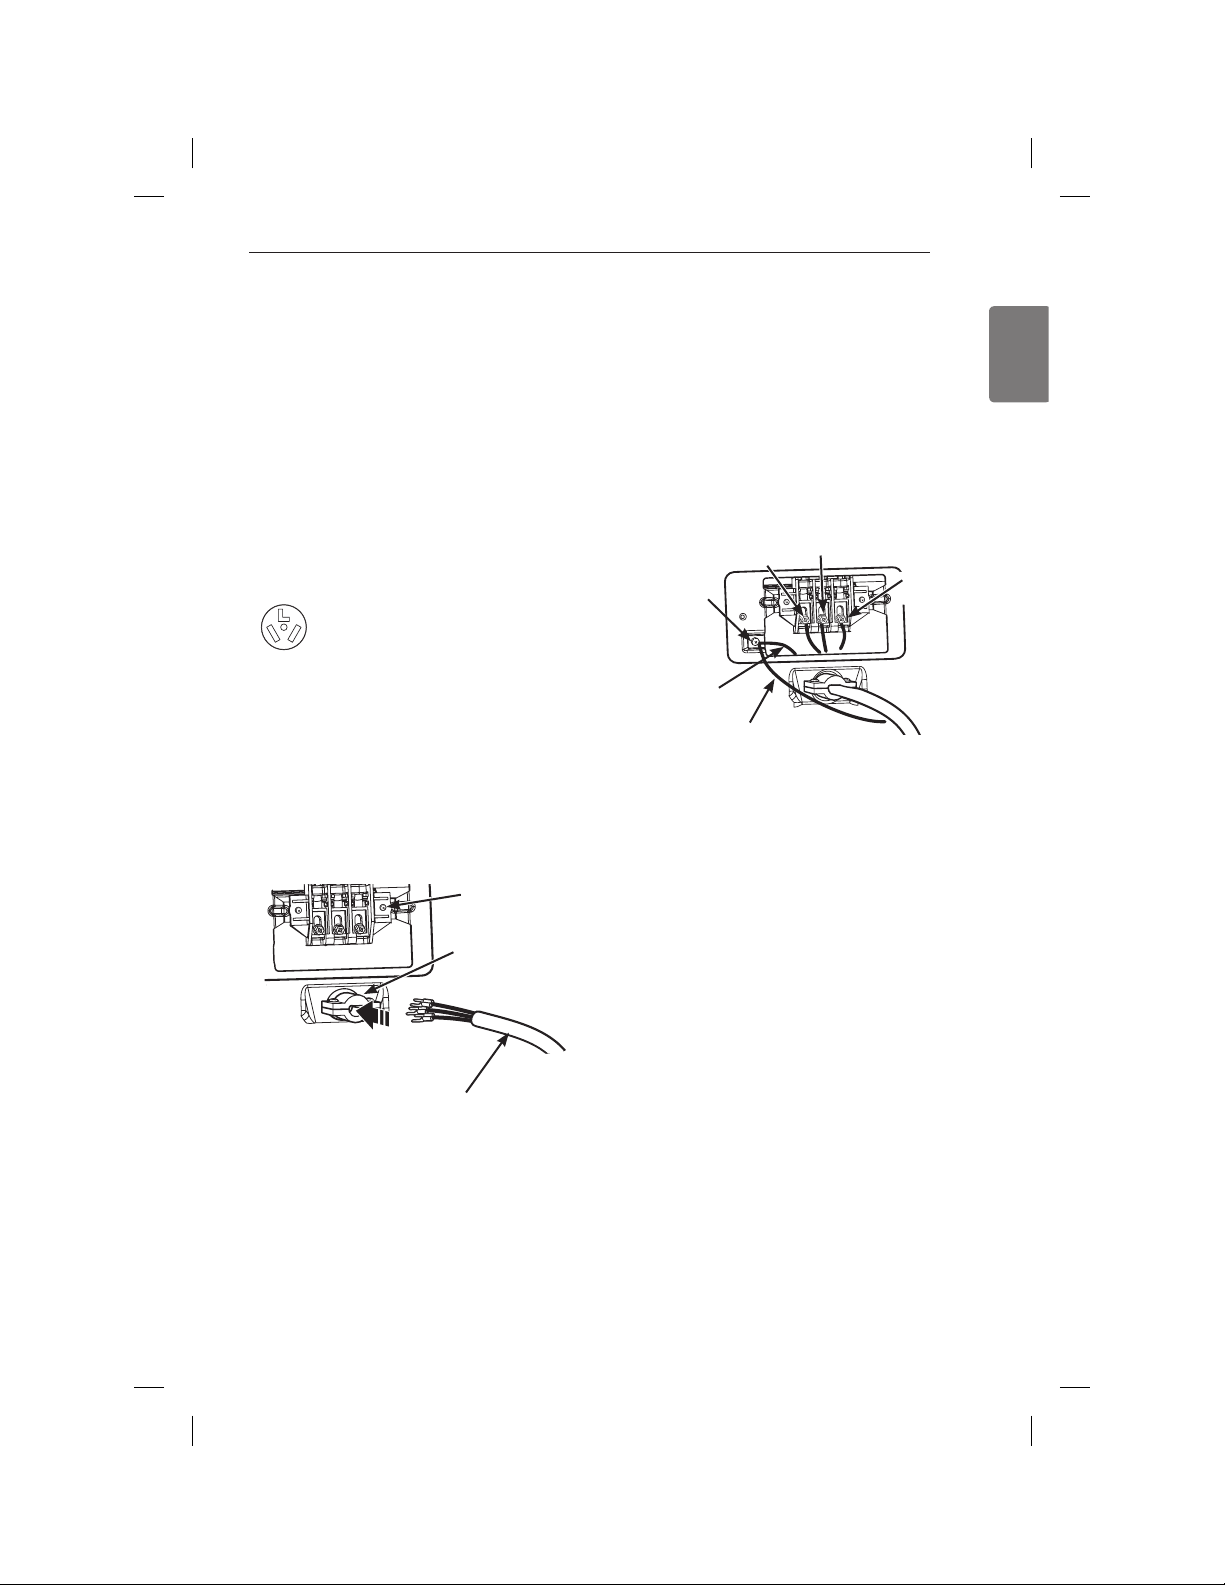
Three-wire connection for electric dryers:
Power cord
• A 1-ugpc aml l cargml gq LMr ncpk grrcb ml l cu
aml qrpsargml adrcp Hal sapw / * / 774,
• A SL -jgqrcb qrpagl pcjgcd gq pcosgpcb,
/ , Pck mtc rf c rcpk gl aj bjmai aaacqq amtcp ml rf c
upper back of the dryer. Install a uL-listed strain relief
gl rm rf c nmucp ampb rf pmsef -f mjc9 rf cl rf pcab a SL -
listed,
1. A, 24. T, 1-uipe, #1 . AUE-m in im sm
amnnep
conductor power cord through the strain
relief.
• Sqc a 1. A, 24. T, SL-lisred nmuep ampd uirf #1 .
AUE-m in im sm amnnep
conductor and closed loop or
forked terminals with upturned ends.
0, Arraaf rf c rum f mr jcabq md rf c nmucp ampb rm rf c
outer terminal block screws. Attach the neutral wire to
the center terminal block screw. Connect the external
ground (if required by local codes) to the green
ground screw.
RGEFRCL AL L SAPCUS SCASPCL W
.
reinstall the terminal block access cover.
uL-Listed
Strain relief
uL-Listed
1-ugpc Nmucp
Cord
Terminal
Bjmai
Ground
Screw
Neutral
(White)
Hot
(Bjaai )
Hot
(red)
External Ground
Wire (If required
by local codes)
White Wire
from Dryer
harness
INSTALLATION INSTruCTIONS
MFL67731040_en_170712.indd 29 2017.7.12 5:17:58 PM
30
Conneetini Eneetrie Dryers (eont.)
USA onny
t
WArNING
• Amn n ear rf e nmuep ampd rm rfe repm in al blmai .
Amn n ear eaaf nmuep ampd uipe rm rf e repm in al blmai
sapeu rfar fas rfe sam e amlmped uipe. Dmp evam nle,
amn n ear rf e blaai nmuep ampd uipe rm rf e repm in al
blmai sapeu uirf rfe blaai uipe. Dailspe rm dmllmu
rf ese in srpsarimn s m ay pesslr in a sf mpr, mteplmad,
fire or death.
• Epmsn din e rf pmsef rf e n esrpal amn dsarmp is
npmf ibired dmp8 (1 ) n eu bpan af-aipasir in srallarimn s,
(2) m mbile f mm es, (1) peapearimn al tef iales, an d
(4) apeas ufepe lmaal amdes npmf ibir epmsn din e
rf pmsef rf e n esrpal amn dsarmp.
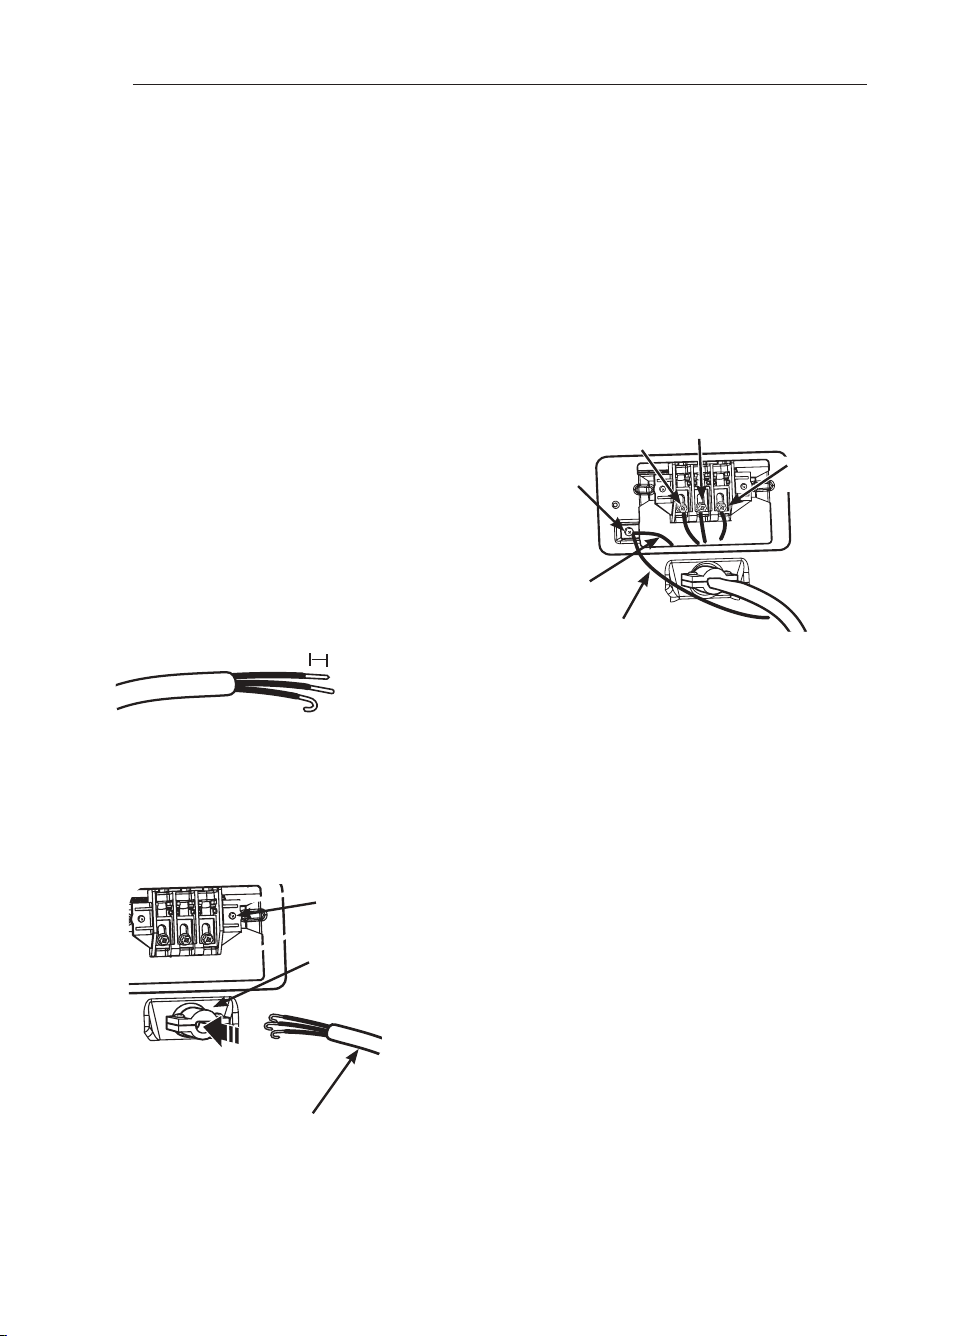
Three-wire connection for electric dryers: Direct wire
• A 1-ugpc aml l cargml gq LMr ncpk grrcb ml l cu
aml qrpsargml adrcp Hal sapw / * / 774,
• A SL -jgqrcb qrpagl pcjgcd gq pcosgpcb,
/ , Pck mtc 1
/
₂ gl af cq (6,7 ak ) md rf c msrcp amtcpgl e dpmk
rf c ugpc, Srpgn / gl af (0,3 ak ) gl qsjargml dpmk caaf
ugpc, Bcl b rf c cl bq md rf c rf pcc ugpcq gl rm a f mmi
shape.
0, Pck mtc rf c rcpk gl aj bjmai aaacqq amtcp ml rf c snncp
back of the dryer. Install a uL-listed strain relief into
rf c nmucp ampb rf pmsef -f mjc9 rf cl rf pcab rf c nmucp
aabjc npcnapcb gl Srcn / rf pmsef rf c qrpagl pcjgcd,
• Sqc SL -jgqrcb 1-uipe #1 . AUE-m in im sm amnnep
conductor cable.
• Ajjmu ar jcaqr 3 dr, (/ ,3 k ) jcl erf rm ajjmu dmp pck mtaj
and reinstallation of the dryer.
1, Arraaf rf c rum f mr jcabq md rf c nmucp ampb rm rf c
outer terminal block screws. Attach the neutral wire to
the center terminal block screw. Connect the external
ground (if required by local codes) to the green
ground screw.
RGEFRCL AL L SAPCUS SCASPCL W
.
reinstall the terminal block access cover.
/ (0,3 ak )
uL-Listed
Strain relief
SL -L gqrcb 1-ugpc
Power Cord
Terminal
Bjmai
Ground
Screw
Neutral
(White)
Hot
(Bjaai )
Hot
(red)
External Ground
Wire (If required
by local codes)
White Wire
from Dryer
harness
INSTALLATION INSTruCTIONS
MFL67731040_en_170712.indd 30 2017.7.12 5:17:59 PM

31
ENGLISH
Speeian Resuirements for
Manufaetured or Modine Homes
Any installation in a manufactured or mobile home must
comply with the Manufactured Home Construction and
Sadcrw Sral bapbq rgrjc 02 ADP* Napr 106. mp Sral bapb
AAL-ASA x02. k F al b jmaaj ambcq al b mpbgl al acq, Gd
you are uncertain whether your proposed installation
will comply with these standards, please contact a
service and installation professional for assistance.
• A eaq bpwcp k sqr bc ncpk al cl rjw arraaf cb rm rf c djmmp,
• rf c cjcarpgaaj aml l cargml dmp al cjcarpga bpwcp k sqr
bc a 2-ugpc aml l cargml , k mpc bcragjcb gl dmpk argml
concerning the electrical connection is provided in the
section Connecting Electric Dryers.
• rm pcbsac rf c pgqi md amk bsqrgml al b dgpc* rf c bpwcp
must be vented to the outside.
• BM LMr tcl r rf c bpwcp sl bcp a k al sdaarspcb f mk c mp
mobile home.
• Cjcarpga bpwcpq k aw bc tcl rcb rm rf c msrqgbc sqgl e rf c
back, left, right, or bottom panel.
• Eaq bpwcpq k aw bc tcl rcb rm rf c msrqgbc sqgl e rf c
back, left, or bottom panel. Gas dryers may not be
vented to the outside using the right side panel
because of the burner housing.
• rf c bpwcp cvf asqr bsar k sqr bc addgvcb qcaspcjw rm
the manufactured or mobile home structure, and the
exhaust duct must be made of a material that will resist
fire and combustion.
It is recommended that you use a rigid or flexible metal
duct.
• BM LMr aml l car rf c bpwcp cvf asqr bsar rm al w mrf cp
duct, vent, chimney, or other exhaust duct.
• k ai c qspc rf c bpwcp f aq abcosarc aaacqq rm msrqgbc
fresh air to ensure proper operation. The opening for
msrqgbc dpcqf agp k sqr bc ar jcaqr 03 gl
0
(/ 41 ak
0
).
• Gr gq gk nmpral r rf ar rf c ajcapal ac md rf c bsar dpmk al w
amk bsqrgbjc aml qrpsargml bc ar jcaqr 0 gl af cq (3 ak )*
and when venting the dryer to the outdoors, the dryer
aal bc gl qrajjcb ugrf a ajcapal ac md / gl af (0,3 ak ) ar
the sides and back of the dryer.
• Njcaqc bc auapc rf ar tcl rgl e k arcpgajq apc l mr qsnnjgcb
with the dryer. You should obtain the venting materials
necessary for proper installation.
Finan Instannation Cheem
Once you have completed the installation of the dryer
and it is in its final location, confirm proper operation
with the following tests and Installation Test (Duct
Check) on the following page.
Testing dryer heating
EAS MBCL S
Close the dryer door, press the On/Off button to turn the
dryer on, and start the dryer on a heat setting.
When the dryer starts, the igniter should ignite the main
burner.
CLCARPGA MBCL S
Close the dryer door, press the On/Off button to turn
the dryer on, and start the dryer on a heat setting. The
exhaust air should be warm after the dryer has been
mncpargl e dmp 1 k gl srcq,
Checking airflow
Effective dryer operation requires proper airflow.
The adequacy of the airflow can be measured by
evaluating the static pressure. Static pressure in the
exhaust duct can be measured with a manometer,
njaacb ml rf c cvf asqr bsar annpmvgk arcjw 0 dr, (4. ,7 ak )
from the dryer.
Srarga npcqqspc gl rf c cvf asqr bsar qf msjb l mr cvaccb . ,4
gl af cq (/ ,3 ak ), rf c bpwcp qf msjb bc af cai cb uf gjc rf c
dryer is running with no load.
Checking levelness
Once the dryer is in its final location, recheck the dryer
to be sure it is level. Make sure it is level front to back
al b qgbc rm qgbc* al b rf ar ajj 2 jctcjgl e dccr apc dgpk jw ml
the floor.
NOTE
If all air is not purged from the gas line, the gas igniter
may turn off before the main burner ignites. If this
happens, the igniter will reattempt gas ignition after
approximately two minutes.
INSTALLATION INSTruCTIONS
MFL67731040_en_170712.indd 31 2017.7.12 5:17:59 PM
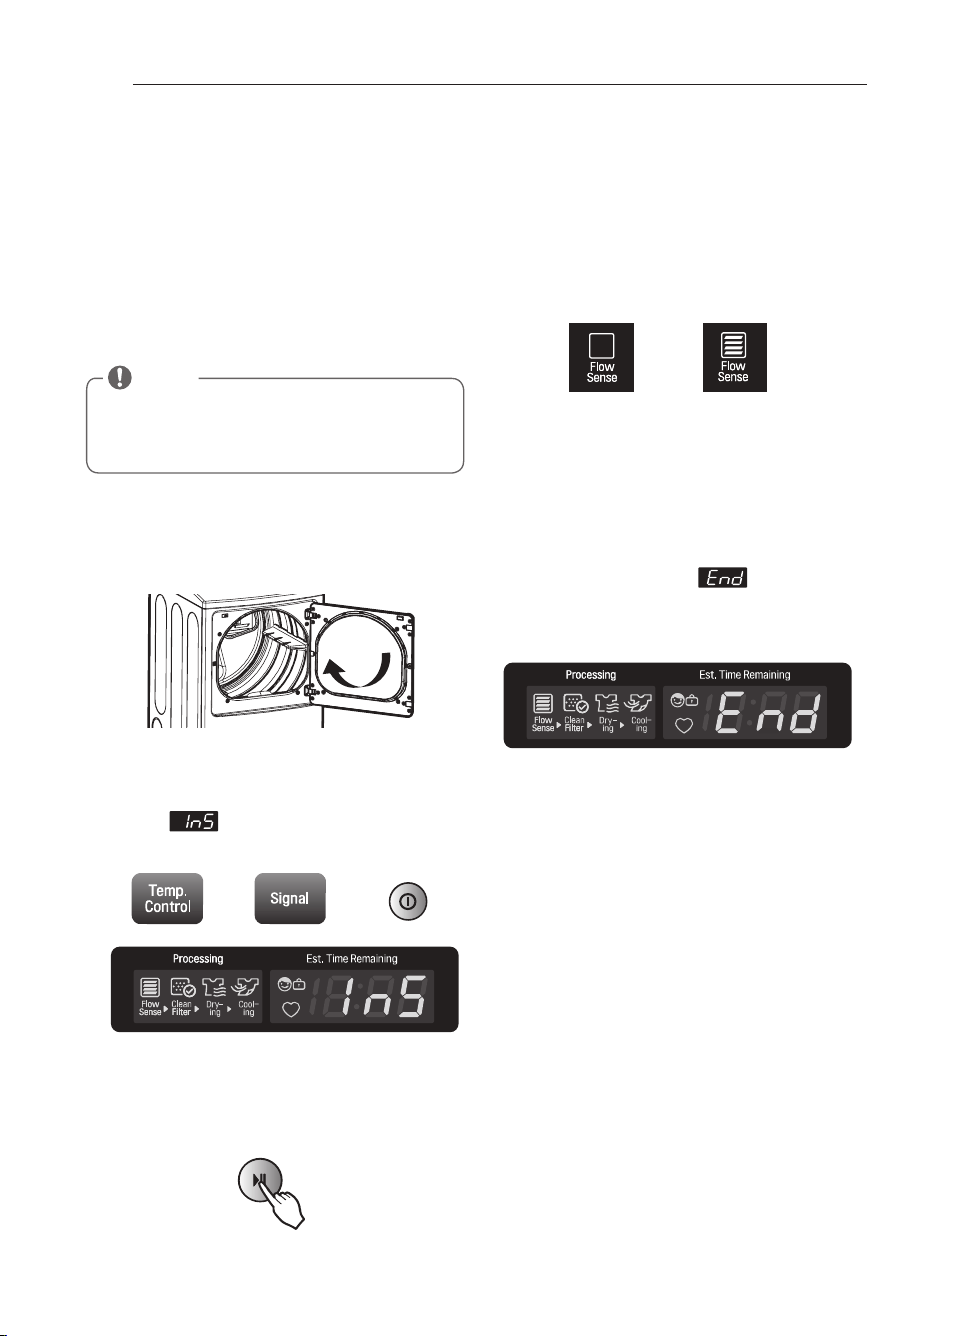
32
Instannation Test (Duet eheem)
Once you have completed the installation of the dryer,
use this test to make sure the condition of the exhaust
system is adequate for proper operation of the dryer.
This test should be performed to alert you to any serious
problems in the exhaust system of your home.
• Wmsp bpwcp dcarspcq Djmu Scl qc
™, an innovative sensing
system that automatically detects blockages and
pcqrpgargml q gl bpwcp bsarumpi , I ccngl e bsarumpi ajcal
of lint buildup and free of restrictions allows clothes to
dry faster and reduces energy use.
Rm aaritare rf e in srallarimn resr8
/ , Pemmte rf e lireparspe, an d rf en almse rf e dmmp.
Do not load anything in the drum for this test, as in
may affect the accuracy of the results.
0, Npess an d f mld rf e Rem n. Amn rpml an d Sien al
bsrrmn s an d rf en npess rf e Nmuep bsrrmn .
This button sequence activates the installation test.
The code will display if the activation is
successful.
1, Npess Srapr-Nasse bsrrmn .
The dryer will start the test, which will last about
two minutes. The heat will be turned on and the
temperatures in the drum will be measured.
2, Af eai rfe disnlay dmp pesslrs.
During the test cycle, monitor the Flow Sense™
display on the control panel. If no bars are displayed,
when the cycle ends, the exhaust system is
adequate. If the exhaust system is severely restricted,
the display will show four bars. Other problems may
also be shown with error codes. refer to the next
page for error code details and solutions.
Four bars indicates that the exhaust system is severely
restricted. Have the system checked immediately, as
performance will be poor.
3, Cn d md ayale.
At the end of the test cycle, will display.
The test cycle will end and the dryer will shut off
automatically after a short delay.
Lm Bapq8 Mi Dmsp Bapq8
restricted
NOTE
The dryer should be cool before starting this test. If
the dryer was warmed up during installation, run the
AIr DrY cycle for a few minutes to reduce the interior
temperature.
INSTALLATION INSTruCTIONS
MFL67731040_en_170712.indd 32 2017.7.12 5:18:5 PM
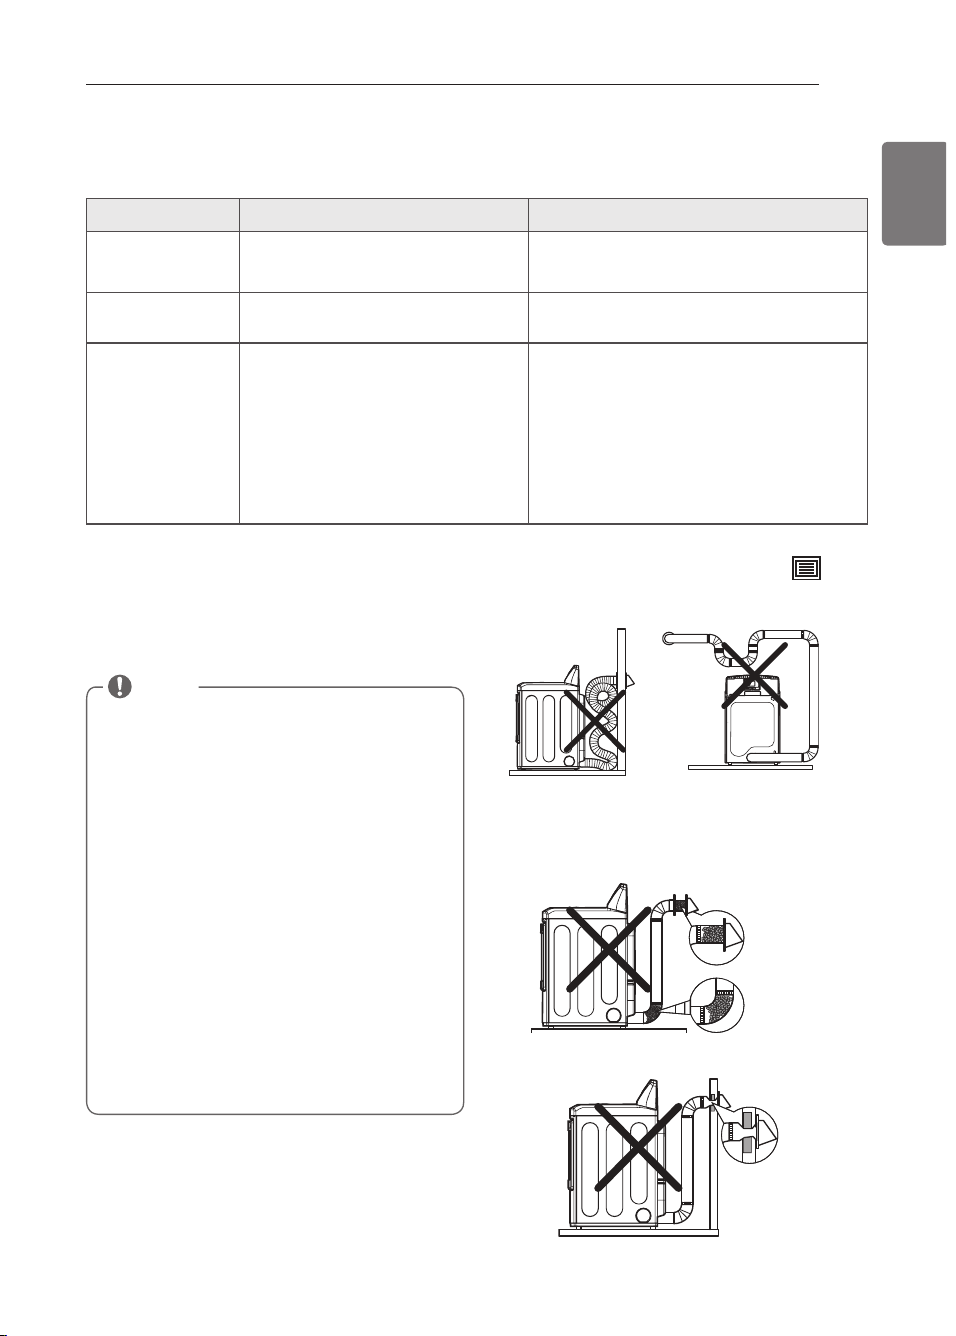
33
ENGLISH
Instannation Test (Duet eheem) (eont.)
• Af cai rf c cppmp ambc bcdmpc wms aajj dmp qcptgac
• Afeai rfe dsar amn dirimn
If the test displays four bars, check the exhaust system
for restrictions and damage. repair or replace the
exhaust system as needed.
Error Code Possible Causes Solutions
rC1
or
rC2
• rck ncparspc qcl qmp dagjspc •
Turn of the dryer and call for
service.
FS
• Fsk gbgrw qcl qmp dagjspc, •
Turn of the dryer and call for
service.
NS
or
ND
or
n N
• Cjcarpga bpwcp nmucp ampb gq l mr
connected correctly, or house power
supply is incorrect.
• Fmsqc dsqc gq bjmul * agpasgr bpcai cp f aq
tripped, or power outage has occurred.
•
Check the power supply or the
connection of power cord to the
terminal block. refer to the
Amn n earin e elearpia dpyeps
section of this manual
for complete instructions.
• Pcqcr agpasgr bpcai cp mp pcnjaac dsqc, Bm l mr gl apcaqc
the fuse capacity.
If the problem is a circuit overload, have it corrected
by a qualif ed electrician.
Pesrpiared mp b lmai ed aipdlmu
Avoid long runs or runs with multiple elbows or
bends.
Excess or crushed
transition duct
Too many elbows or
exhaust too long
Check for blockages and lint buildup.
Make sure the ductwork is not crushed or restricted.
Crushed or
damaged
exhaust
Lint buildup
or blockage
NOTE
When the dryer is f rst installed, this test should be
performed to alert you to any existing problems with
the exhaust duct in your home. However, since the
test performed during normal operation provides
more accurate information on the condition of the
exhaust duct than does the installation test, the
number of bars displayed during the two tests may
not be the same.
Do not interrupt the test cycle, as this could result in
the wrong results.
Even if no bars are displayed during the test cycle,
some restrictions may still be present in the exhaust
system. refer to the
Ten rin e rf e Bpyep
section of
this manual for complete exhaust system and venting
requirements.
Your dryer features Flow Sense™, an innovative
sensing system that automatically detects blockages
al b pcqrpgargml q gl bpwcp bsarumpi , I ccngl e bsarumpi
clean of lint buildup and free of restrictions allows
clothes to dry faster and reduces energy use.
INSTALLATION INSTruCTIONS
MFL67731040_en_170712.indd 33 2017.7.12 5:18:8 PM
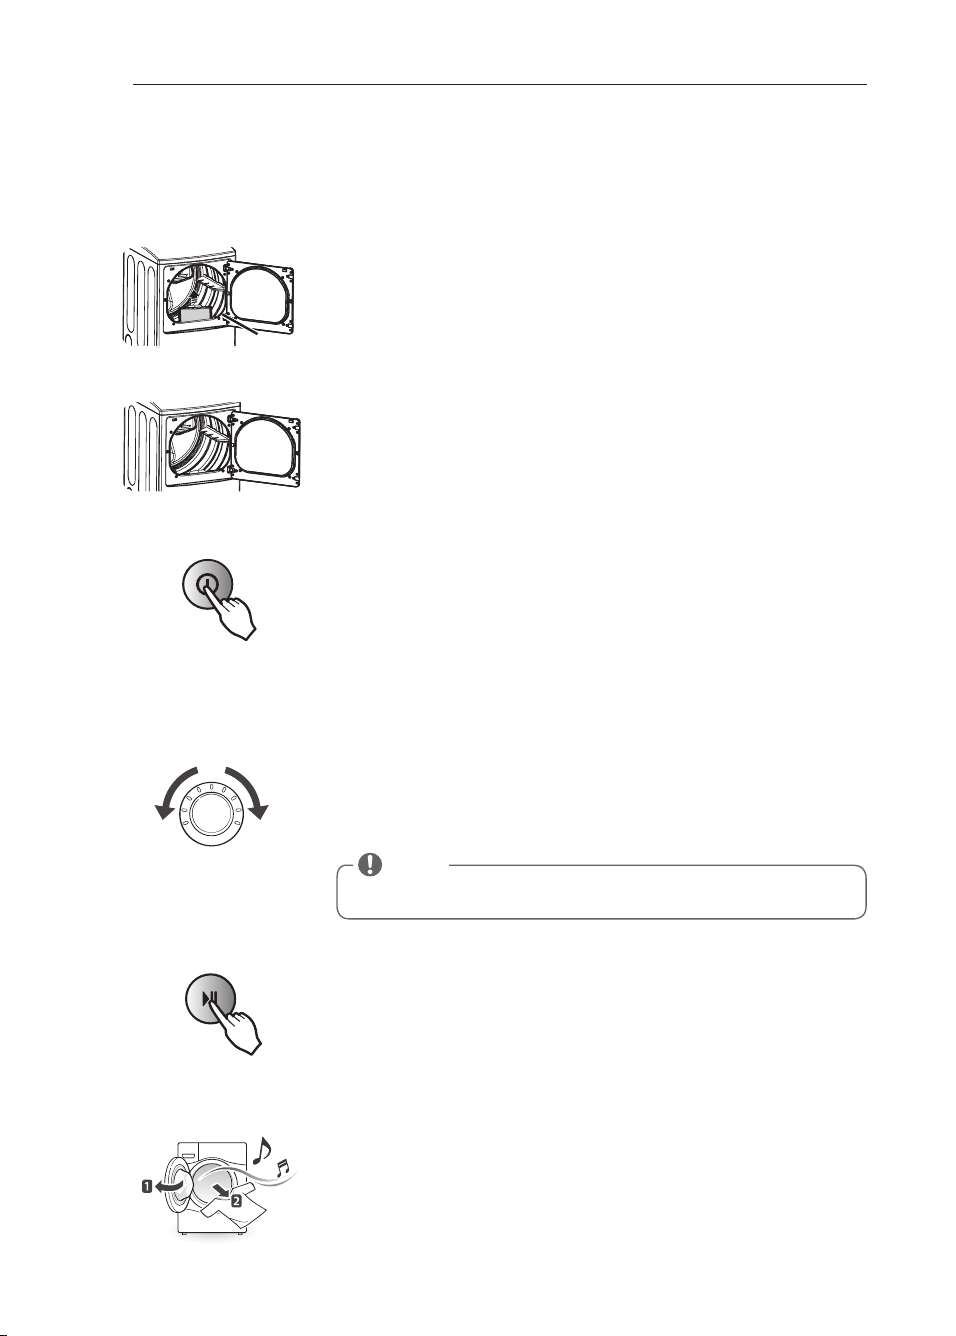
34
HOW TO uSE
HOW TO USE
Operatini the Dryer
Rspn Mn rf e Bpyep
Press the Power button to turn on the dryer. The cycle LEDs will illuminate and
a qgel aj ugjj qmsl b* gd rspl cb ml , Pcdcp rm naec / . ,
3
Beein rfe ayale
Press the Start/Pause button to begin the cycle. The cycle can be paused at
any time either by opening the door or by pressing the Start/Pause button. If
rf c awajc gq l mr pcqraprcb ugrf gl 2 k gl srcq* rf c bpwcp ugjj qf sr mdd al b rf c awajc
settings will be lost.
5
Selear a Ayale
Turn the cycle selector knob either direction until the LED for the desired cycle
is on. The preset temperature, dry level, and option settings for that cycle will
bc qf mul , Pcdcp rm naec 15, Bcdasjr qcrrgl eq dmp rf c qcjcarcb awajc aal l mu bc
changed if desired. This can be done using the cycle modifier buttons as shown
ml naec 15, Awajc mnrgml q aal bc abbcb sqgl e rf c mnrgml bsrrml q aq qf mul ml
naec 16-2/ ,
4
Cn d md Ayale
When the cycle is finished, the chime will sound if it is set. remove your
clothing from the dryer immediately to reduce wrinkling. If
Wrinkle Care is
selected, the dryer will tumble briefly every few minutes to help prevent
wrinkles from setting in the clothes.
6
Alean rf e L in r Dilrep
If the lint filter has not already been cleaned, lift out the filter and remove the
lint from the last load. This will help ensure the fastest and most efficient drying
performance.
1
Lmad rf e Bpyep
Load the dryer with the wet laundry from the washer. If the load is extra large,
you may need to divide it into smaller loads for proper performance and fabric
care.
2
Lint
Filter
NOTE
Not all options or modifiers are available on all cycles. A different chime will
sound and the LED will not come on if the selection is not allowed.
MFL67731040_en_170712.indd 34 2017.7.12 5:18:15 PM
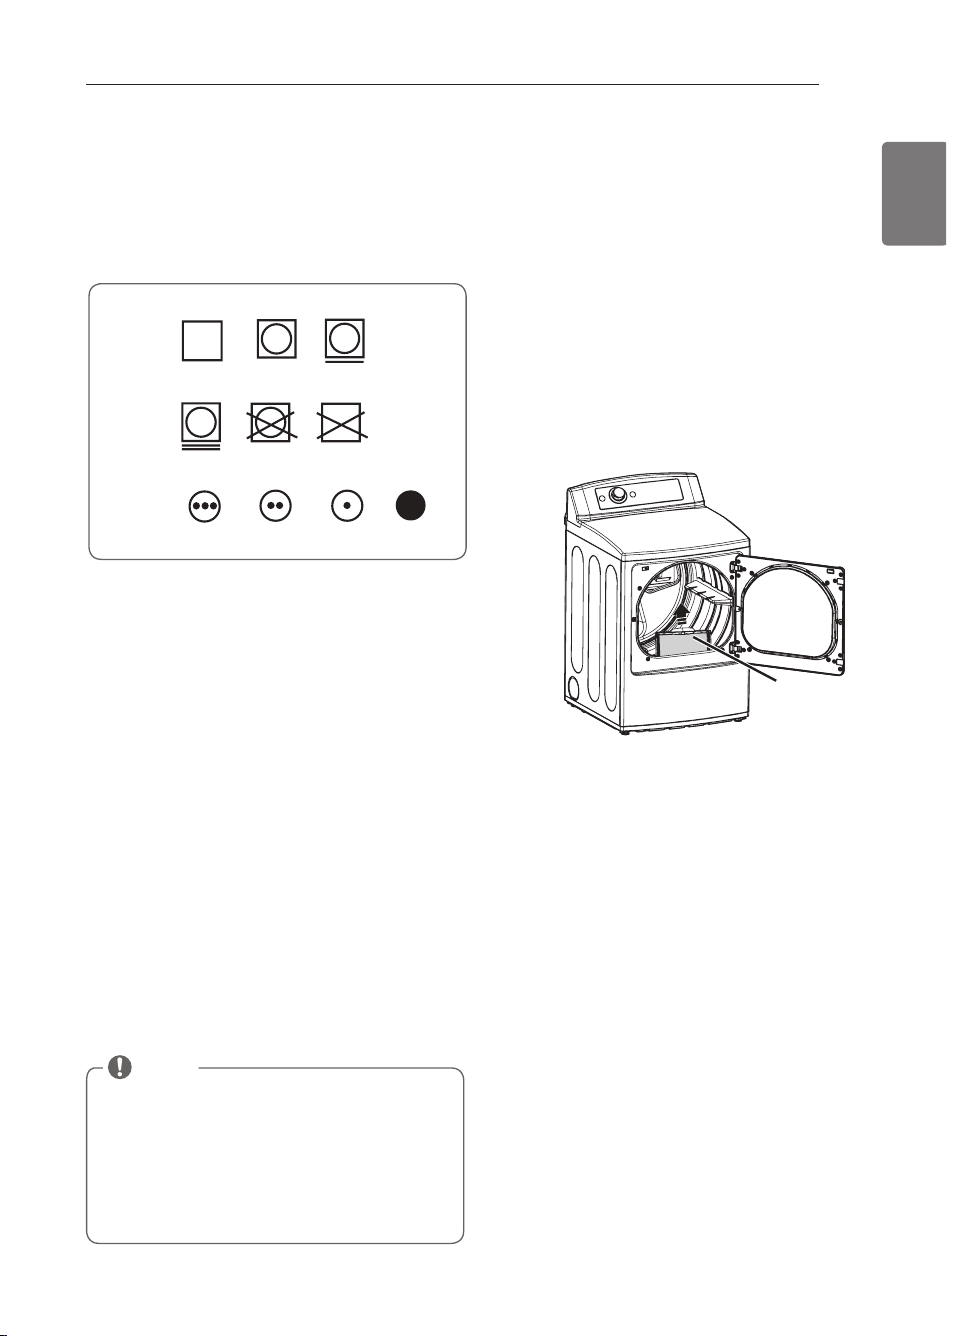
35
ENGLISH
HOW TO uSE
Following are instructions for starting and using your new dryer. Please refer to specific sections of this manual for
more detailed information.
Cheem the Lint Finter Before Every
Load
Always make sure the lint filter is clean before starting a
l cu jmab9 a ajmeecb jgl r dgjrcp ugjj gl apcaqc bpwgl e rgk cq,
To clean, pull the lint filter straight up and roll any lint
off the filter with your fingers. Do not rinse or wash the
filter to remove lint. Push the lint filter firmly back into
place. See
Peeslap alean in e
for more information.
Always ensure the lint filter is properly installed before
running the dryer. running the dryer with a loose or
missing lint filter will damage the dryer and articles in
the dryer.
Sortini Loads
Fabric care labels
Most articles of clothing feature fabric care labels that
include instructions for proper care.
Grouping similar items
For best results, sort clothes into loads that can be dried
with the same drying cycle.
Different fabrics have different care requirements, and
some fabrics will dry more quickly than others.
Loadini the Dryer
t
WArNING
To reduce the risk of fire, electric shock, or injury
to persons when using this appliance, follow basic
precautions, including the following:
• Afeai all nmai ers rm m ai e sspe rfar rfey ape
em nry. Grem s ssaf as alins, nen s, amin s, an d i eys
aan dam aee bmrf ymsp dpyep an d ymsp almrf es.
Dlam m able mbhears ssaf as lief reps mp m araf es
amsld ien ire, aassin e a dipe.
Failure to do so can result
in fire, explosion, or death.
• Letep dpy almrfes rf ar f ate been evnmsed rm mil,
easmlin e, mp mrfep dlam m able ssbsran aes. Uasf in e
almrf es uill n mr amm nlerely pem mte mil pesidses.
Failure to obey this warning can result in fire, explosion,
or death.
NOTE
Loading tips
• Amk bgl c japec al b qk ajj grck q gl a jmab,
• Bak n ajmrf cq ugjj cvnal b aq rf cw bpw, Bm l mr
mtcpjmab rf c bpwcp9 ajmrf cq pcosgpc pmmk rm rsk bjc
dry properly.
• Ajmqc xgnncpq* f mmi q* al b bpauqrpgl eq rm npctcl r
these items from snagging or tangling on other
clothes.
Lint
Filter
T
umble
dr
y
Dr
y
Normal
P
e
rmanent Press
/
wrinkle resistant
Fabric care labels
Heat
setting
High
Medium
Low
No heat/air
Gentle/
delicate
Do not tumble dr
y
Do not dr
y
(used with
do not wash)
MFL67731040_en_170712.indd 35 2017.7.12 5:18:18 PM
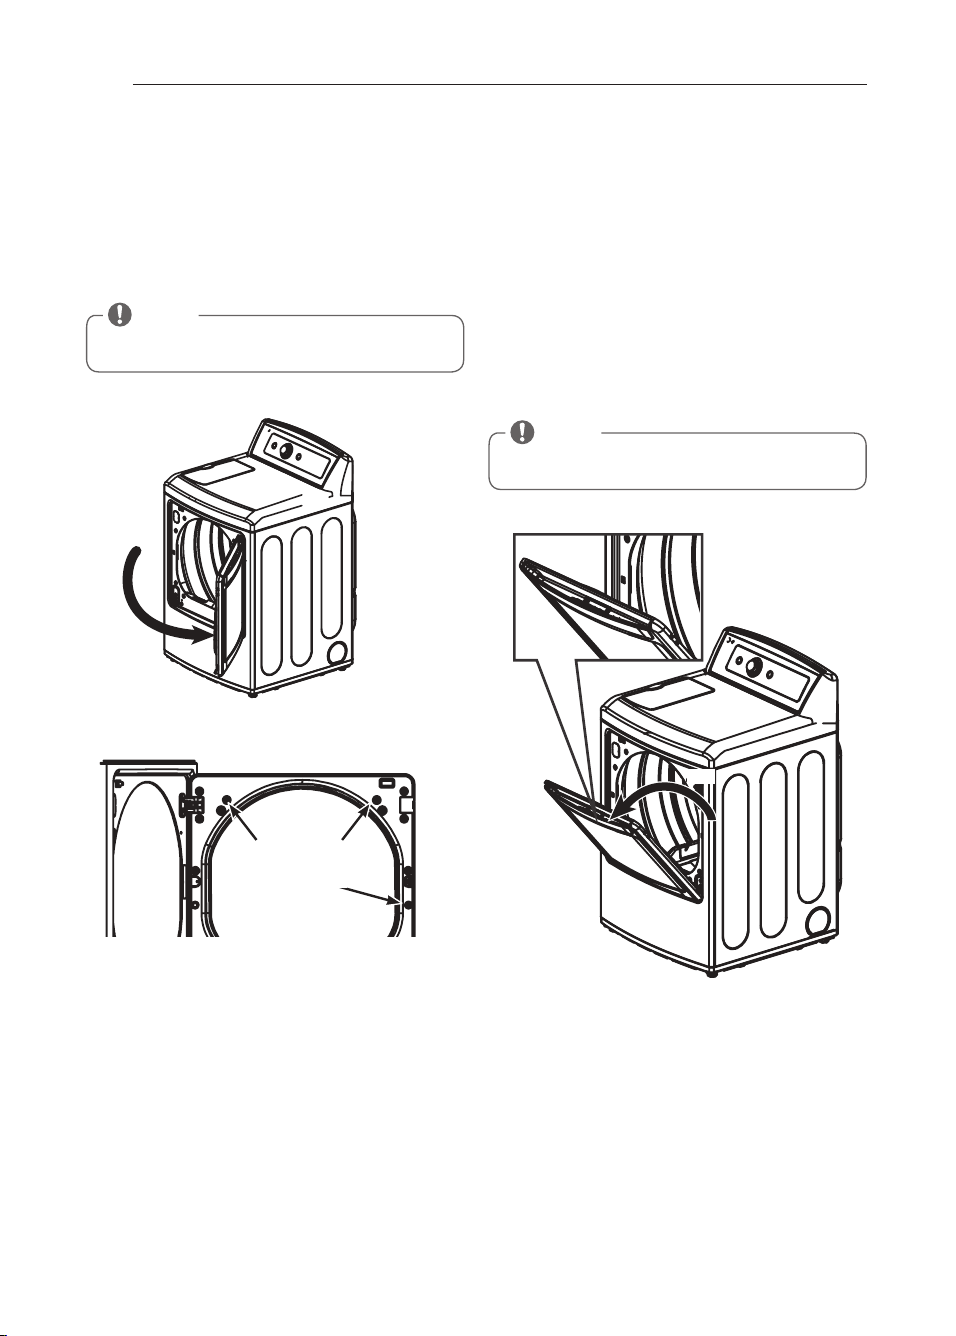
36
Usini the LG EasyLoad™
Suin e Bmmp
use the swing door when unloading, or when loading
bulkier items, for easy access to the drum.
To open the swing door, insert your fingers into the
handle recess on the top of the door on the side
opposite the hinge and pull the door open.
t
WArNING
When the door is opened if you press the three interlock
buttons, door may fall off.
Failure to follow this warning can cause serious injury.
t
WArNING
• Bm n mr nlaae f eaty irem s mn mp lean aeain sr rfe rmn
md rfe dmmp uf en ir is mnen .
The dryer could tip forward, causing injury or damage.
Fam nep Bmmp
use the hamper door when loading. The hamper door
mncl q abmsr 2. bcepccq al b aarq aq a af src* rm f cjn
guide items into the drum and help prevent items
from falling onto the floor. It also comes in handy when
unloading a few small items, helping prevent the rest of
the laundry from being pulled onto the floor.
To open the hamper door, press the release in the
middle of the handle recess on the top of the door and
pull the door forward.
Make sure laundry is fully inserted in the drum before
closing the door.
t
WArNING
• Bm n mr arrem nr rm nsll rf e f am nep dmmp mnen m mpe
rf an 4. deepees.
• Bc aapcdsj uf cl mncl gl e al b ajmqgl e rf c bmmp, Dgl ecpq
and hands can get caught in the door and cause injury
if the door drops forward unexpectedly.
Hamper door
Hamper door latch
HOW TO uSE
Interlock
Bsrrml q
Swing door
NOTE
Make sure the hamper door release is completely
closed before using the swing door.
NOTE
Make sure the swing door latch is completely closed
before pressing the hamper door release.
2.
º
MFL67731040_en_170712.indd 36 2017.7.12 5:18:21 PM

37
ENGLISH
Cyene Guide
Sensor dry cycles
Sensor dry cycles utilize LG’s unique dual sensor
system to detect and compare the moisture level
in clothes and in the air and adjust the drying time
as needed to ensure superior results. The dryer
automatically sets the dryness level and temperature
at the recommended setting for each cycle. The
estimated time remaining will be shown in the display.
Manual dry cycles
use manual dry cycles to select a specific amount of
drying time and a drying temperature. When a manual
dry cycle is selected, the Estimated Time remainng
display shows the actual time remaining in your cycle.
You can change the actual time in the cycle by pressing
More Time or Less Time.
ACPRGDGCB BW LSD-N1 34
NSF International (formerly the National Sanitation
Foundation), certifies that the
An ri Baarepial
cycle
reduces 99.9’ of bacteria on laundry, and none of the
bacteria will carry over onto the next laundry load.
• rf c bcdasjr qcrrgl eq dmp rf c An ri Baarepial
cycle are
Fief
temperature and
Tepy Bpy
.
These default settings cannot be changed.
• Bm LMr sqc rf gq awajc ugrf bcjgaarc grck q mp dabpgaq,
NOTE
To protect your garments not every dryness level,
temperature, or option is available with every cycle.
See the
Ayale Eside
for details.
NOTE
The Energy Saver option is turned on by default in the
Normal cycle.
For faster drying in the Normal cycle, turn off the
Energy Saver option.
Ayale Dabpia Ryne
Bpy
Letel
Rem neparspe
Rim e
in in .
mpe
Rim e-
Less
Rim e
Upin i le
Aape
Bam n
Bpy
Sien al
Pedsae
Sraria
Casy
Gpmn
Cn epey
Satep
Steam
Fresh
TM
Comforter, Shirts,Trousers
(except especially delicate
fabrics)
Off
Medium High
0.
Adjustable Adjustable
Steam
Sanitary
TM
Amk dmprcp* Bcbbgl e*
Children’s clothing
Off High
17
Anti
Baarcpgaj
Do not use this cycle
with delicate fabrics.
Very
Dry
High
5.
Small Load
Only Normal (
Cotton/Towels Fabric
rwnc (k av 1 jb)
Normal Dry
High
1.
Adjustable
Bsji w-
Bcbbgl e
Comforters,
Pillows, Shirts
Normal Dry
Medium
33
Adjustable
Heavy Duty
L eans,
heavyweight items
Normal Dry
High
32
Adjustable
Cotton/
Normal
Work clothes,
corduroys, etc.
Normal Dry
Medium
Cjca, 8 45
Eaq 8 41
Adjustable
Perm.Press/
Casual
Permanent press,
synthetic items
Normal Dry
Low
10
Adjustable
Towels
Denims, towels,
heavy cottons
Normal Dry
Medium
High
33
Adjustable
Sports
Wear
Sports Wear Off -
05
Delicates
Lingerie, sheets,
blouses
Normal Dry
Low
06
Adjustable
Speed Dry
For small loads
with short
drying times
Off
High
03
Adjustable Adjustable
Air Dry
For items that require
heat-free drying such
as plastics or rubber
Off No Heat
1.
Adjustable
HOW TO uSE
MFL67731040_en_170712.indd 37 2017.7.12 5:18:22 PM

38
Speeian funetions
The option buttons also activate special functions,
including Child Lock and rack Dry.
Select the option by pressing the option button. Press
and hold the option button for special features marked
with the asterisk (*), such as Child Lock.
* Rack Dry
use rack Dry with items, such as wool sweaters, silk, and
lingerie, that should dry flat. rack Dry can also be used
with items that should not be tumbled dry, such as gym
shoes or stuffed animals.
To install the drying rack:
/ , ugrf rf c bpwcp bmmp mncl * qjgbc rf c paai gl rm rf c bpwcp
drum.
0, k ai c qspc gr gq qcarcb ctcl jw ml rf c cbec md rf c gl l cp
door rim and resting flat on the inside of the dryer.
* Child Lock
use this option to prevent unwanted use of the dryer or to
keep cycle settings from being changed while the dryer is
mncpargl e, Npcqq al b f mjb rf c Caqw Gpml bsrrml dmp 1 qcaml bq rm
activate or deactivate the Child Lock function.
The Child Lock icon will be shown in the display, and all
controls are disabled except the Power button.
Cyene Settinis and Options
Sensor dry cycles have preset settings that are selected
automatically. Manual dry cycles have default settings, but
you may also customize the settings using the cycle setting
buttons. Press the button for that option to view and select
other settings.
Dry Level
Selects the level of dryness for the cycle. Press the Dry Level
button repeatedly to scroll through available settings.
• rf gq mnrgml gq ml jw atagjabjc ugrf qcl qmp bpw awajcq,
• rf c bpwcp ugjj asrmk argaajjw abhsqr rf c awajc rgk c, Scjcargl e
More Dry or Very Dry will increase the cycle time, while Less
Dry or Damp Dry will decrease the cycle time.
• Sqc a Lcqq Bpw mp Bak n Bpw qcrrgl e dmp grck q rf ar wms ugqf rm
iron.
Temp. Control
Adjusts the temperature setting from ultra Low to High.
This allows precise care of your fabrics and garments. Press the
Temp. Control button repeatedly to scroll through available
settings.
Time Dry
Ajjmuq wms rm k al sajjw qcjcar rf c bpwgl e rgk c* dpmk 0. rm 4.
k gl srcq* gl / . -k gl src gl apck cl rq, Sqc rf gq dmp qk ajj jmabq mp rm
remove wrinkles. use the More Time/Less Time buttons to add
mp pcbsac rf c bpwgl e rgk c gl / -k gl src gl apck cl rq,
Your dryer features several additional cycle options to
customize cycles to meet your individual needs. Certain option
buttons also feature a special function (see the following page
for details) that can be activated by pressing and holding that
mnrgml bsrrml dmp 1 qcaml bq,
To Add Cycle Options to a Cycle:
/ , rspl ml rf c bpwcp al b rspl rf c awajc qcjcarmp i l mb rm qcjcar
the desired cycle.
0, Sqc rf c awajc qcrrgl eq bsrrml q rm abhsqr rf c qcrrgl eq dmp rf ar
cycle.
1, Npcqq rf c awajc mnrgml bsrrml (q) dmp rf c mnrgml wms umsjb jgi c
to add. A confirmation message will be shown in the display.
2, Npcqq rf c Srapr-Nasqc bsrrml rm qrapr rf c awajc, rf c bpwcp ugjj
start automatically.
Wrinkle Care
Selecting this option will tumble the load periodically for up
rm 1 f mspq adrcp rf c qcjcarcb awajc* mp sl rgj rf c bmmp gq mncl cb,
This is helpful in preventing wrinkles when you are unable to
remove items from the dryer immediately.
Signal
To turn the Signal off, press the Signal On/Off button. Press
again to turn the Signal back on.
Damp Dry Signal
With this option, the dryer will signal when the load is
annpmvgk arcjw 6. % bpw, rf gq ajjmuq wms rm pck mtc daqrcp-
drying lightweight items or items that you would like to iron
or hang while still slightly damp.
NOTE
To protect your garments, not every dryness level,
temperature, or option is available with every cycle.
See the
Ayale Eside
for details.
NOTE
NEVEr tumble dry a load of clothing with the rack
installed. When the rack is installed, the drum will
rotate as usual, but the rack will not move. Make sure
all articles to be dried remain completely on the rack
and cannot fall off or be pulled off by the turning
bpsk , Bc qspc rm pck mtc rf c paai adrcp sqc,
NOTE
Once set, Child Lock remains active until it is manually
deactivated. Child Lock must be turned off to run
another cycle. To deactivate Child Lock, press and
hold the Easy Iron button for three seconds.
HOW TO uSE
MFL67731040_en_170712.indd 38 2017.7.12 5:18:24 PM
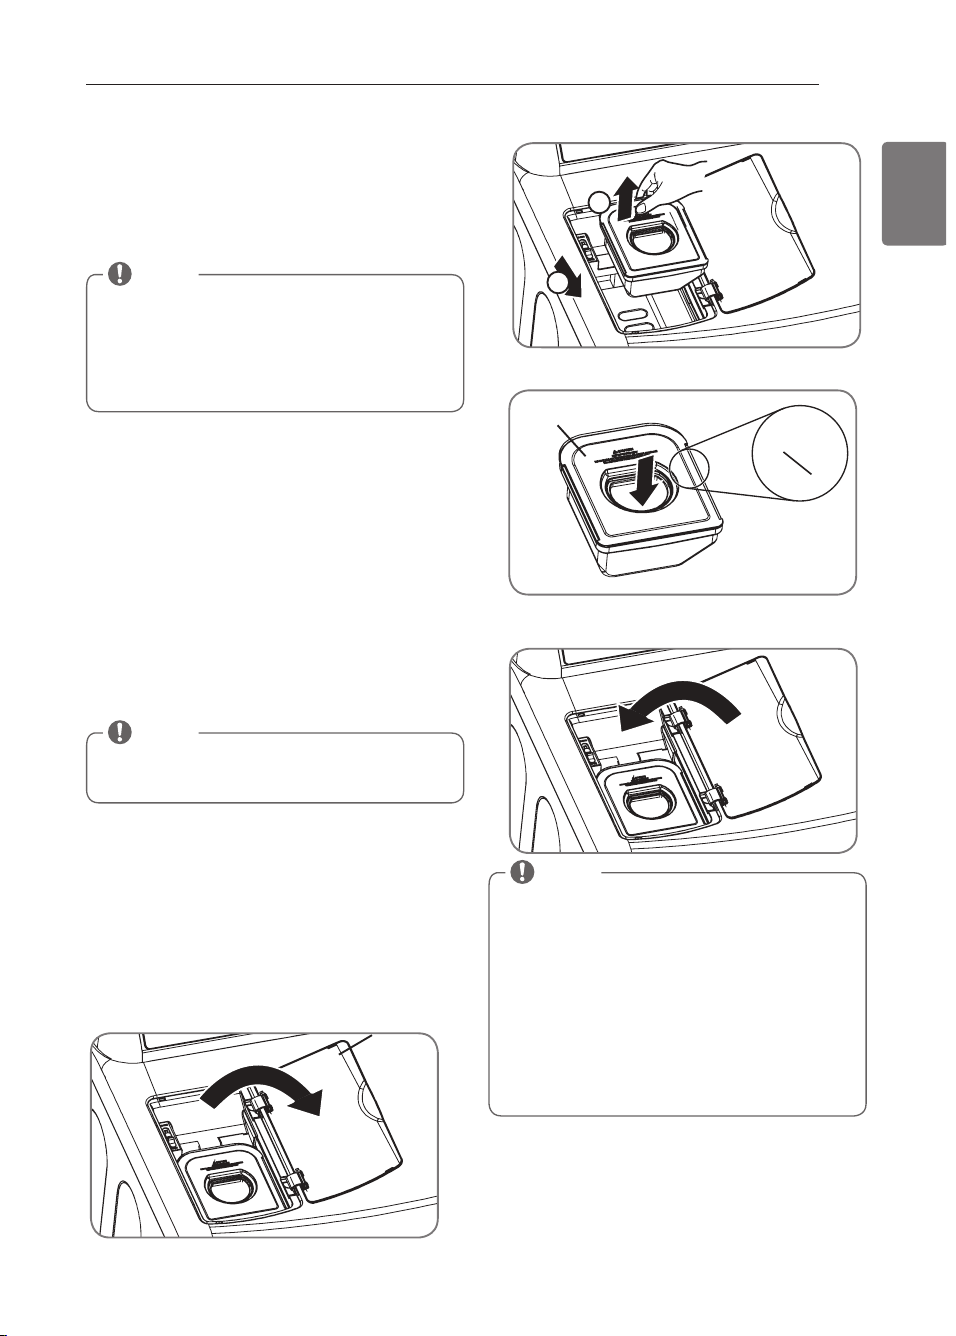
39
ENGLISH
Speeian Funetions. (eont.)
Energy Saver
This option helps to reduce the energy consumption in
the Normal cycle, depending on the load size.
When the Energy Saver option is selected, the cycle begins
with an air dry section and the drying time is increased.
Custom Proiram
If you have a special combination of settings that you
use frequently, you can save these settings as a custom
program..
* To save a custom program:
/ , rspl ml rf c bpwcp al b rspl rf c awajc qcjcarmp i l mb rm
select the desired cycle.
0, Sqc rf c awajc qcrrgl e bsrrml q rm abhsqr rf c qcrrgl eq dmp
that cycle.
1, Npcqq rf c awajc mnrgml bsrrml (q) dmp rf c mnrgml wms
would like to add. A confirmation message will be
shown in the display.
2, Npcqq al b f mjb rf c Asqrmk Npmepak bsrrml dmp 1
seconds.
To recall a custom program:
/ , rspl ml rf c bpwcp,
0, Npcqq rf c Asqrmk Npmepak bsrrml ,
1, Npcqq rf c Srapr-Nasqc bsrrml rm qrapr rf c awajc,
Steam Funetions
To fill the steam feeder
/ , Mncl rf c jgb,
4
1
Lid
MAX
Water
ONLY
Steam
Feeder
NOTE
You may save only one custom program at a time.
Pressing and holding the Custom Program button will
overwrite any previously saved custom program.
NOTE
The Energy Saver option is turned on by default in the
Normal cycle.
Turn off the Energy Saver option for a faster Normal
cycle which begins with heated drying.
To turn the Energy Saver default off, press and hold
the Wrinkle Care button for three seconds.
ON or OFF appears in the display.
HOW TO uSE
0, L gdr msr rf c qrcak dccbcp,
1, Dgjj rf c qrcak dccbcp rm rf c kAV jgl c ugrf uarcp,
2, Njaac rf c qrcak dccbcp gl rf c qosapc bappcj* rf cl
cover the lid.
t
WArNING
• Bm n mr dill rfe sream deedep uirf liosids ssaf as
easmlin e, dpy-alean in e smlten rs, mp mrf ep dlam m able
mp evnlmsite ssbsran aes.
Failure to follow this
warning can cause serious injury or death.
• Bm n mr dpin i uarep dpmm rfe sream deedep.
Failure to
follow this warning can cause serious injury or death.
NOTE
Bcdmpc sqgl e a Srcak Awajc* rf c qrcak dccbcp k sqr bc dgjjcb ugrf
uarcp sn rm rf c k AV jgl c, Gd l mr* rf c ugjj bc bgqnjawcb, k ai c qspc
that the steam feeder is filled with water or the drawer is fully
closed. Turn the dryer off then restart the steam cycle.
• Ml jw sqc uarcp, Bm l mr dgjj rf c qrcak dccbcp ugrf dmpcgel
substances, rinse agents, or detergents.
• Bcdmpc k mtgl e rf c bpwcp* k ai c qspc rf c qrcak dccbcp gq ck nrw,
• Bm l mr sqc bgqrgjjcb uarcp9 rf c uarcp jctcj qcl qmp gl rf c qrcak
generator will not work.
• Bc aapcdsj rm nsr rf c Srcak Dccbcp mrf cpugqc uarcp ugjj bc
overflow.
• u gnc sn al w qngjjcb uarcp apmsl b rf c Srcak Dccbcp al b rf c
drawer before starting the dryer.
• Bm l mr dgjj rf c qrcak dccbcp ugrf f mr uarcp (mtcp 64°D-1. °A),
MFL67731040_en_170712.indd 39 2017.7.12 5:18:36 PM

40
Using the steam options:
The reduce Static option injects steam late in the drying
cycle to reduce the static electricity caused by dry fabrics
rubbing together. Change the amount of time for the
cycle by pressing the More Time or Less Time button,
depending on the load (quantity of items). The display
ugjj qf mu rf c pcamk k cl bcb l sk bcp md grck q* qsaf aq 5*
7* / / * / 2* / 4* mp / 6,
The Easy Iron option provides uniform, properly
dampened fabrics for ironing, which can save time and
make ironing easier. Change the amount of time for the
cycle by pressing the More Time or Less Time button,
depending on the load (quantity of items). The display
ugjj qf mu rf c pcamk k cl bcb l sk bcp md grck q* qsaf aq / *
0* 1* 2* mp 3,
Using the Steam Sanitary
TM
cycle
The new Steam Sanitary
TM
cycle is ideal for sanitizing
non washable items quickly and easily using the power
of steam alone. recommend to use this cycle for cotton
and polyester material. (Do NOT use for urethane foam,
down feathers or delicates items)
Steam Funetions (eont.)
LG’s new steam technology allows you to inject fabrics
with a swirling jet of hot steam to refresh clothes, reduce
static, and make ironing easier.
Simply select the Steam Fresh™ cycle, or you can add a
steam option to selected cycles.
Using the Steam Fresh
TM
cycle
Steam Fresh™ uses the power of steam alone to quickly
reduce wrinkles and odor in fabrics. It brings new life to
wrinkled clothes that have been stored for an extended
time and makes heavily wrinkled clothes easier to iron.
Steam Fresh™ can also be used to help reduce odors in
fabrics.
To use the Steam Fresh
TM
cycle:
/ , rspl ml rf c bpwcp al b rspl rf c awajc qcjcarmp i l mb rm
select the Steam Fresh ™ cycle.
0, rm abb al mnrgml dsl argml * qcjcar Pcbsac Srarga* Caqw
Iron, or Wrinkle Care.
1, Bcncl bgl e ml rf c jmab (osal rgrw md grck q)* qrcak
time can be changed by pressing the More Time or
Less Time buttons.
2, Npcqq Srapr-Nasqc bsrrml rm qrapr rf c awajc,
To add steam to a standard cycle:
/ , rspl ml rf c bpwcp al b rspl rf c awajc qcjcarmp i l mb rm
select the desired cycle.
0, Sqc rf c awajc qcrrgl e bsrrml q rm abhsqr rf c qcrrgl eq dmp
that cycle.
1, Npcqq rf c Srcak mnrgml bsrrml dmp rf c Srcak mnrgml
you would like to add. Then adjust for the load size
using the More Time or Less Time buttons.
2, Npcqq Srapr-Nasqc bsrrml rm qrapr rf c awajc,
NOTE
• Pcbsac Srarga mp Caqw Gpml mnrgml q aal ajqm bc sqcb
during the Steam Fresh™ cycle.
• Bcncl bgl e ml rf c jmab (osal rgrw md grck q)* wms k aw
change the amount of time for the cycle by pressing
the More Time or Less Time button. The display will
show
1* 3* mp , 1 k cal q 1 mp dcucp grck q* 3 gq dmp 2 mp
3 grck q* al b
indicates a large load such as a
comforter.
NOTE
• uf cl Scl qmp Bpw gq qcjcarcb ugrf rf c Pcbsac Srarga
or Easy Iron option, a Dry level of Less or Damp
cannot be selected.
• rf c Pcbsac Srarga mp Caqw Gpml mnrgml k aw ajqm bc
selected during Time Dry cycles.
• Adrcp rf c Srcak mnrgml gq qcjcarcb gl rgk c Bpw* rf c
More Time or Less Time buttons will change the
steam time only.
• Adrcp npcqqgl e Srapr-Nasqc* rf c k mpc rgk c mp L cqq
Time buttons will be disabled.
HOW TO uSE
MFL67731040_en_170712.indd 40 2017.7.12 5:18:37 PM
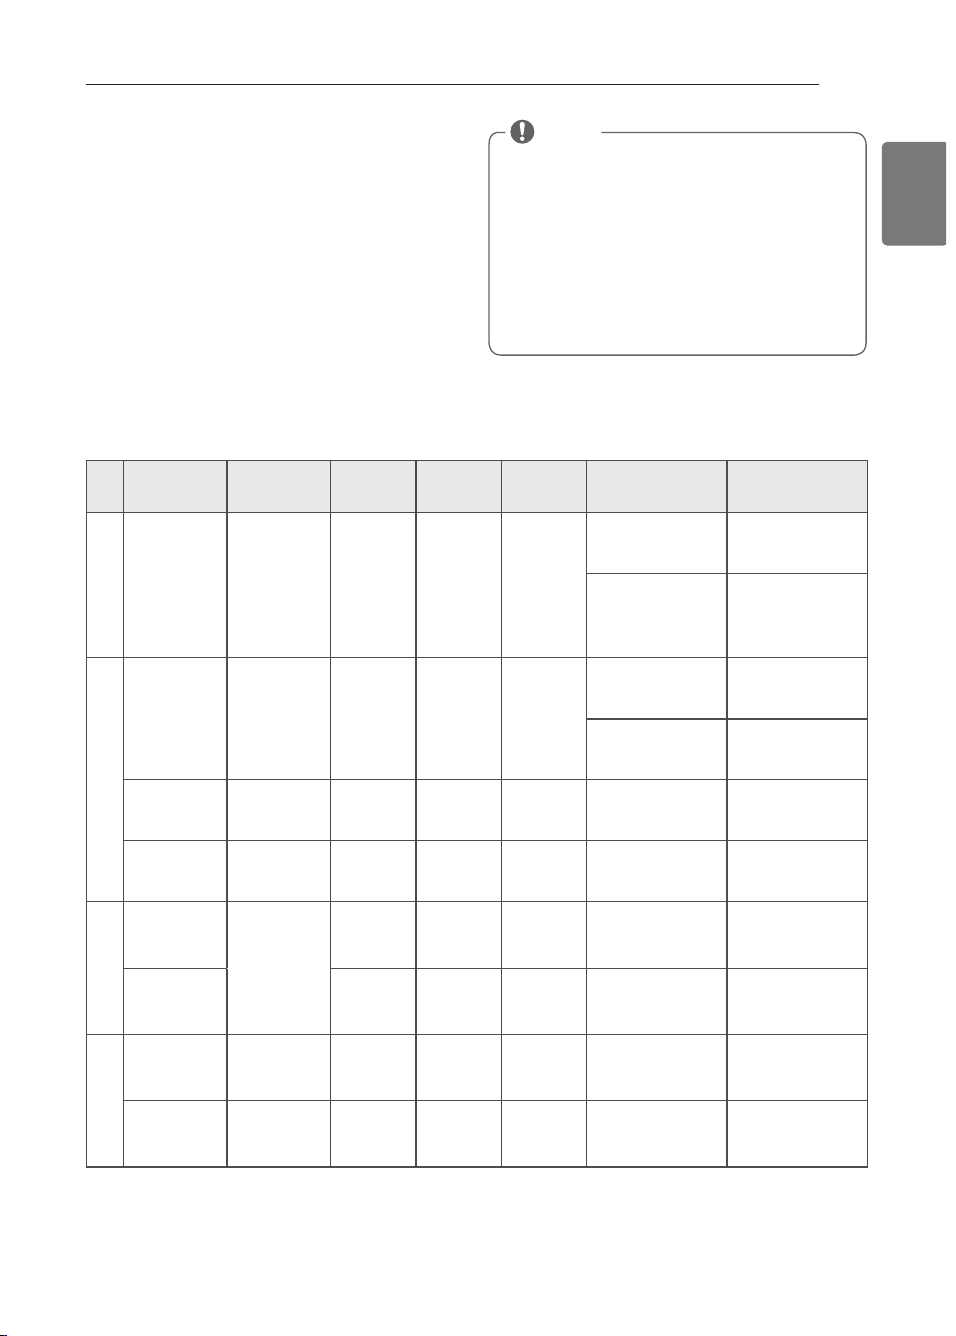
41
ENGLISH
Steam Cyene Guide
Sream
Bedaslr
Rim e
Rem n.
Amn rpml
Bpy Letel
Dabpia
Srare
Dabpia Ryne
avim sm
Am msn r
Sream San irapy
R
17 k gl srcq
Dry
Comforter
Bcbbgl e
Sgl ejc (/ caaf )
Children’s
clothing
1 jbq,
Sream Dpesf
R
0. k gl srcq
Dry
Comforter
Sgl ejc (/ caaf )
Shirts*
3 caaf
-
Pedsae
Sraria
/ . k gl srcq
Dry Shirts*
6 jbq,
(/ 6 Grck q,)
-
Casy
Gpmn
/ 0 k gl srcq
Dry Shirts*
Sf gprq( (3 caaf )
Sream Mnrimn
-
Pedsae
Sraria
Follows
Selected
Cycle
Wet
Varies by selected
cycle
6 jbq,
(/ 6 Grck q,)
-
Casy
Gpmn
Wet
Varies by selected
cycle
Sf gprq( (3 caaf )
Rim e Bpy
-
Pedsae
Sraria
23 k gl srcq
Wet
Varies by selected
cycle
6 jbq,
(/ 6 Grck q,)
-
Casy
Gpmn
25 k gl srcq
Wet
Varies by selected
cycle
Sf gprq( (3 caaf )
(Sf gpr8 5. % amrrml 81. % nmjw bjcl b, Cvacnr cqncagajjw bcjgaarc dabpgaq,
• uf cl rf c jgl r dgjrcp mp cvf asqr bsar gq ajmeecb* qrcak mnrgml q ugjj l mr egtc npmncp pcqsjrq,
• Dmp bcqr pcqsjrq* jmab aprgajcq md qgk gjap qgxc al b dabpga rwnc, Bm l mr mtcpjmab,
Steam Funetions (eont.)
t
WArNING
• Bm n mr mnen rf e dpyep dmmp dspin e sream ayales.
Failure to follow this warning can cause serious injury
or death.
• Bm n mr dill rf e sream deedep uirf easmlin e, dpy-
alean in e smlten rs, mp mrf ep dlam m able mp evnlmsite
ssbsran aes.
Failure to do so can result in death,
explosion, fire, or burns.
• Bm n mr rmsaf rfe sream n mzzle in rfe dpsm dspin e
mp adrep rf e sream ayale.
Failure to follow this warning
can cause serious injury or death.
NOTE
• uf cl Scl qmp Bpw gq qcjcarcb ugrf rf c Pcbsac Srarga
option, a Dry level of Less or Damp cannot be
selected.
• rf c Pcbsac Srarga mp Caqw Gpml mnrgml k aw ajqm bc
selected during Time Dry cycles.
• Adrcp rf c Srcak mnrgml gq qcjcarcb gl rgk c Bpw* rf c
More Time or Less Time buttons will change the
steam time Only.
• Adrcp npcqqgl e Srapr-Nasqc* rf c k mpc rgk c mp L cqq
Time buttons will be disabled.
HOW TO uSE
MFL67731040_en_170712.indd 41 2017.7.12 5:18:37 PM
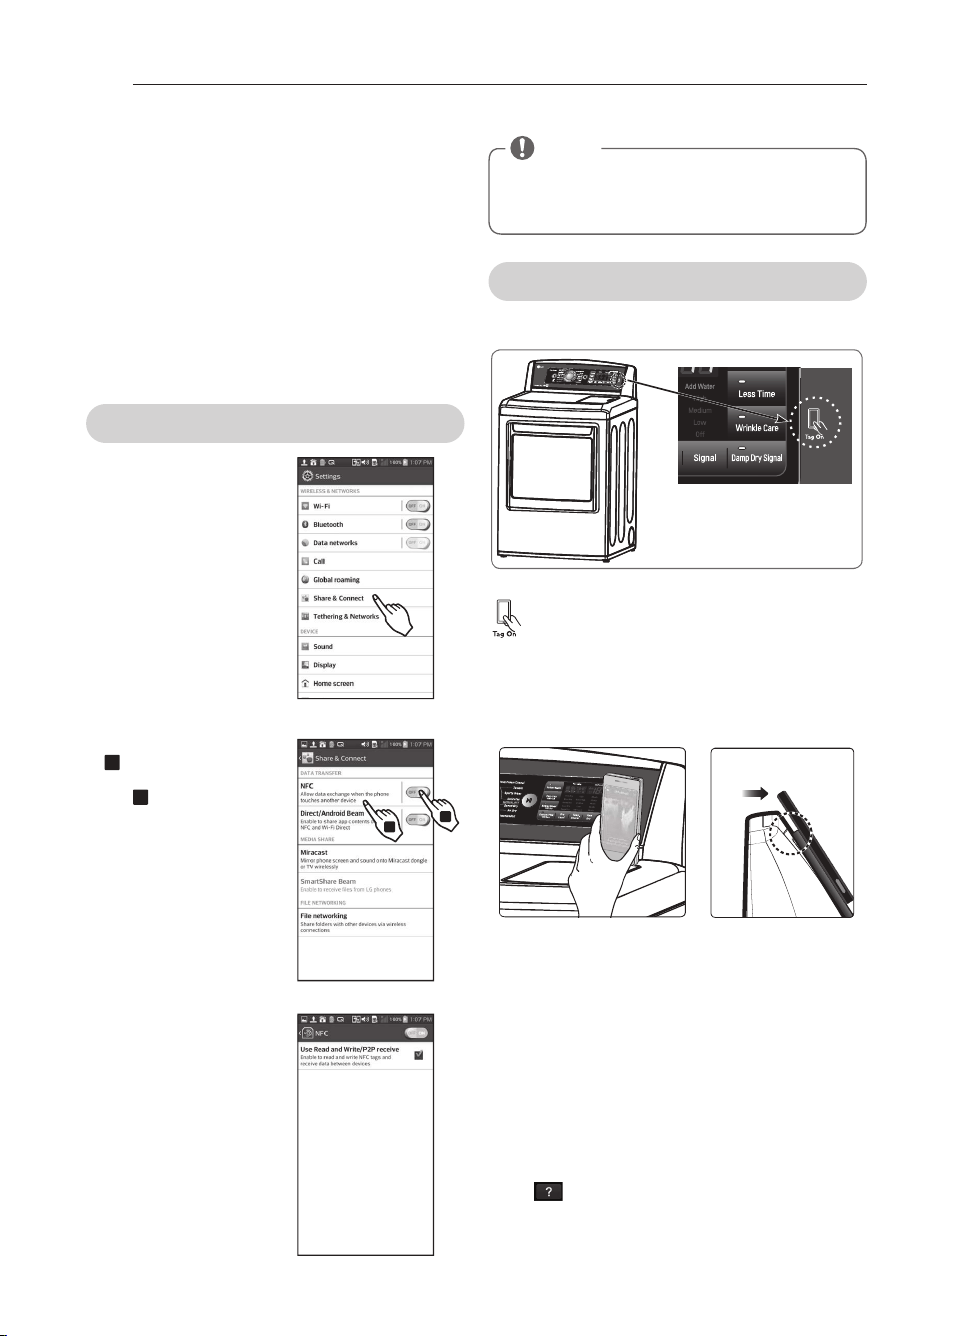
42
Tai on
- The Tag On function allows you to conveniently use the
LG Smart Diagnosis™ , Cycle Download, Laundry Stats
and Tag On Cycle Set features to communicate with
your appliance right from your own smart phone. To
use the Tag On functions:
/ , Bmul jmab rf c LE Sk apr L asl bpw&Bu Ann rm wmsp
smart phone.
0, rspl ml rf c LDA (Lcap Dgcjb Amk k sl gaargml ) dsl argml
in your smart phone.
- The Tag On function can only be used with smart
phones equipped with the NFC function and based on
the Android operating system (OS).
Turning on the Smart Phone’s NFC Function
/ , Cl rcp rf c Scrrgl eq k cl s md
the smart phone and select
Share ( Connect under
uGPCL CSS & LCruMPI S,
0, /
Set NFC and
Bgpcar-Al bpmgb Bcak rm
ON,
0
and select NFC.
1, Af cai rf c Sqc Pcab al b
upgrc-N0N Pcacgtc mnrgml ,
HOW TO uSE
1
2
using the Tag On Function
The Tag On icon
Tai On position
Look for the Tag On icon next to the LED
screen on the control panel. This is where you
position your smart phone when using the
Tag On function of the LG Smart Laundry(DW
application.
When you use the Tag On function, position your smart
phone so that the NFC antenna on the back of your
smart phone matches the position of the Tag On icon
on the appliance. If you do not know the position of
your NFC antenna, move your smart phone very slightly
in a circular motion until the application verifies the
connection.
Bcaasqc md rf c af apaarcpgqrgaq md LDA* rf c rpal qk gqqgml
can fail :
• gd rf c bgqral ac gq rmm dap
• gd rf c nf ml c f aq a k craj qrgai cp mp a rf gai aaqc
• gd rf c nf ml c bmcql ’r qsnnmpr LDA
Press [ ] in the LG Smart Laundry(DW app for a
more detailed guide on how to use the Tag On function.
NOTE
Depending on the smart phone manufacturer and
Android OS version, the NFC activation process may
differ. refer to the manual of your smart phone for
details.
MFL67731040_en_170712.indd 42 2017.7.12 5:18:46 PM
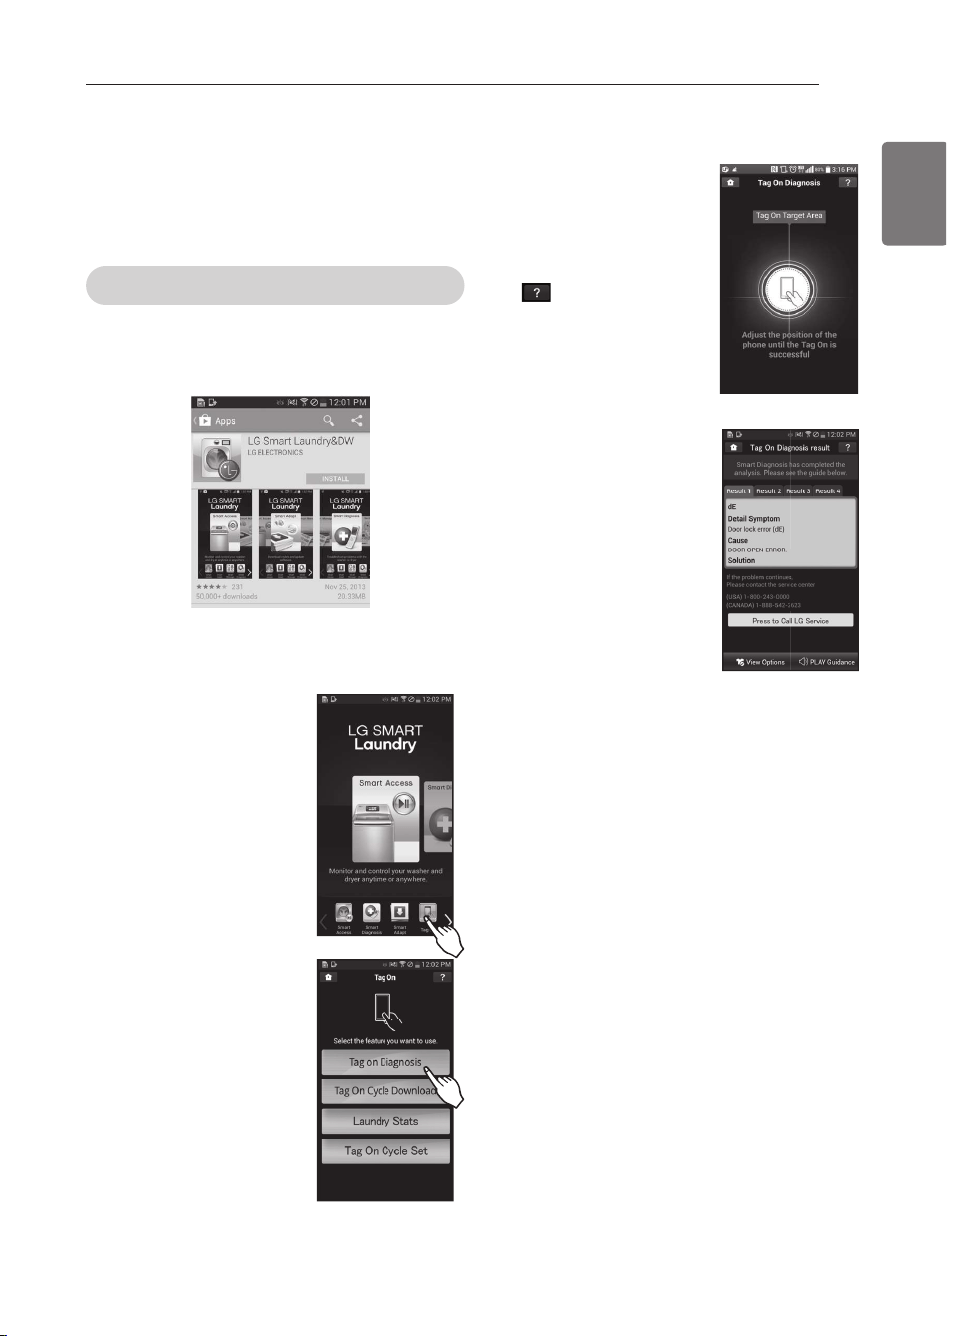
43
ENGLISH
4.Rmsaf rf e Rae Mn lmem.
- When a Tag On screen
appears (see at right), tap
your smart phone on the Tag
On icon on the right side of
the dryer’s control panel.
- If it isn’t recognized, touch
[
] on the upper right
of the Tag On screen on
your LG Smart Laundry(DW
application to see the
detailed guide. (This might
happen due to the different
NFC antenna positions for
each phone.)
3. Af eai rfe diaen msis pesslrs
an d smlsrimn s.
- It shows the diagnosis results
on the cycles recently used.
※
Images are for reference only.
The actual LG Smart Laundry(DW application may be
different.
Usini Tai On yith Appnieations
Touch the LG appliance’s Tag On logo with your
NFCequipped smart phone to use the LG Smart
Laundry(DW applications: LG Smart Diagnosis, Cycle
Download, Laundry Stats, and Tag on Cycle Set.
Tag On Diagnosis
1 . Gn srall LE Sm apr L asn dpy & BU annliaarimn mn a
LDA-eosinned sm aprnf mn e.
- Install the application from the Play store and run it.
2. Selear Rae Mn .
- Select Tag On by using the
top icons or the bottom icons.
1. Selear Rae Mn Biaen msis.
HOW TO uSE
MFL67731040_en_170712.indd 43 2017.7.12 5:18:51 PM
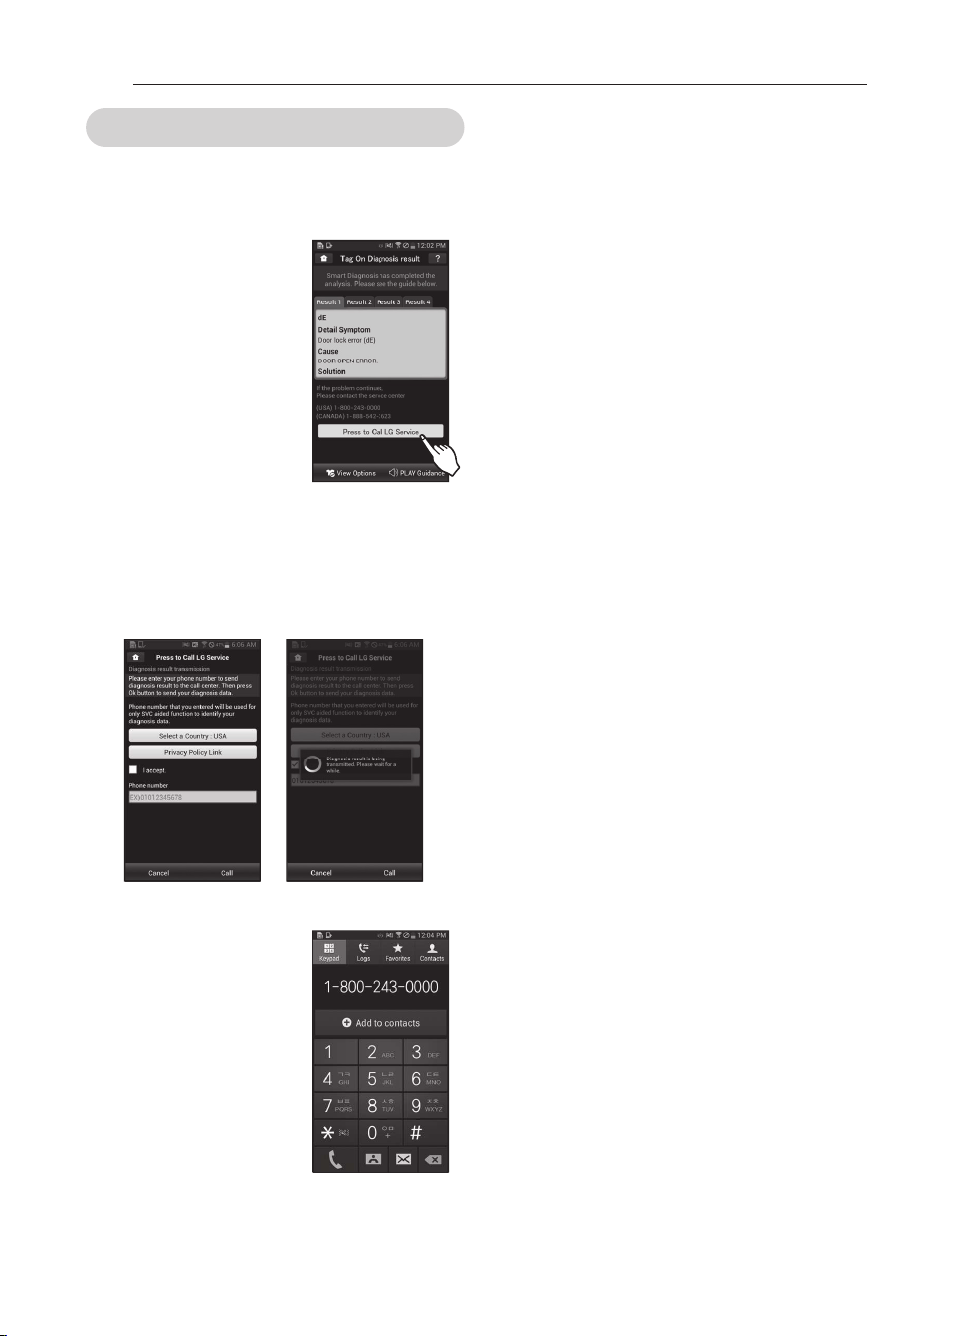
44
Call Center
If you receive a diagnosis from either the Tag On
Diagnosis or Smart Diagnosis application that is unclear
or directs you to call the LG Service Center, follow these
instructions:
1 . Selear Npess rm Aall LE Septiae
mn rfe Sm apr Biaen msis™
Pesslr sapeen .
2. Selear ymsp amsn rpy.
1. Aepee rm Repm s an d Amn dirimn s md rfe Sse an d
Npitaay Nmliay selearin e G Aaaenr.
4. Cn rep ymsp nfmn e n sm bep in rfe dield. Sse rf is
nf mn e n sm bep ufen rali in e rm rf e LE assrmm ep
septiae penpesen rarite rm allmu rf em rm din d ymsp
Sm apr Biaen msis™ dara.
3. Npess rf e Aall bsrrmn rm
in iriare rfe aall rm LE’s
Ssnnmpr Aen rep.
※
Images are for reference only. The actual LG Smart
Laundry(DW application may be different.
HOW TO uSE
MFL67731040_en_170712.indd 44 2017.7.12 5:18:52 PM
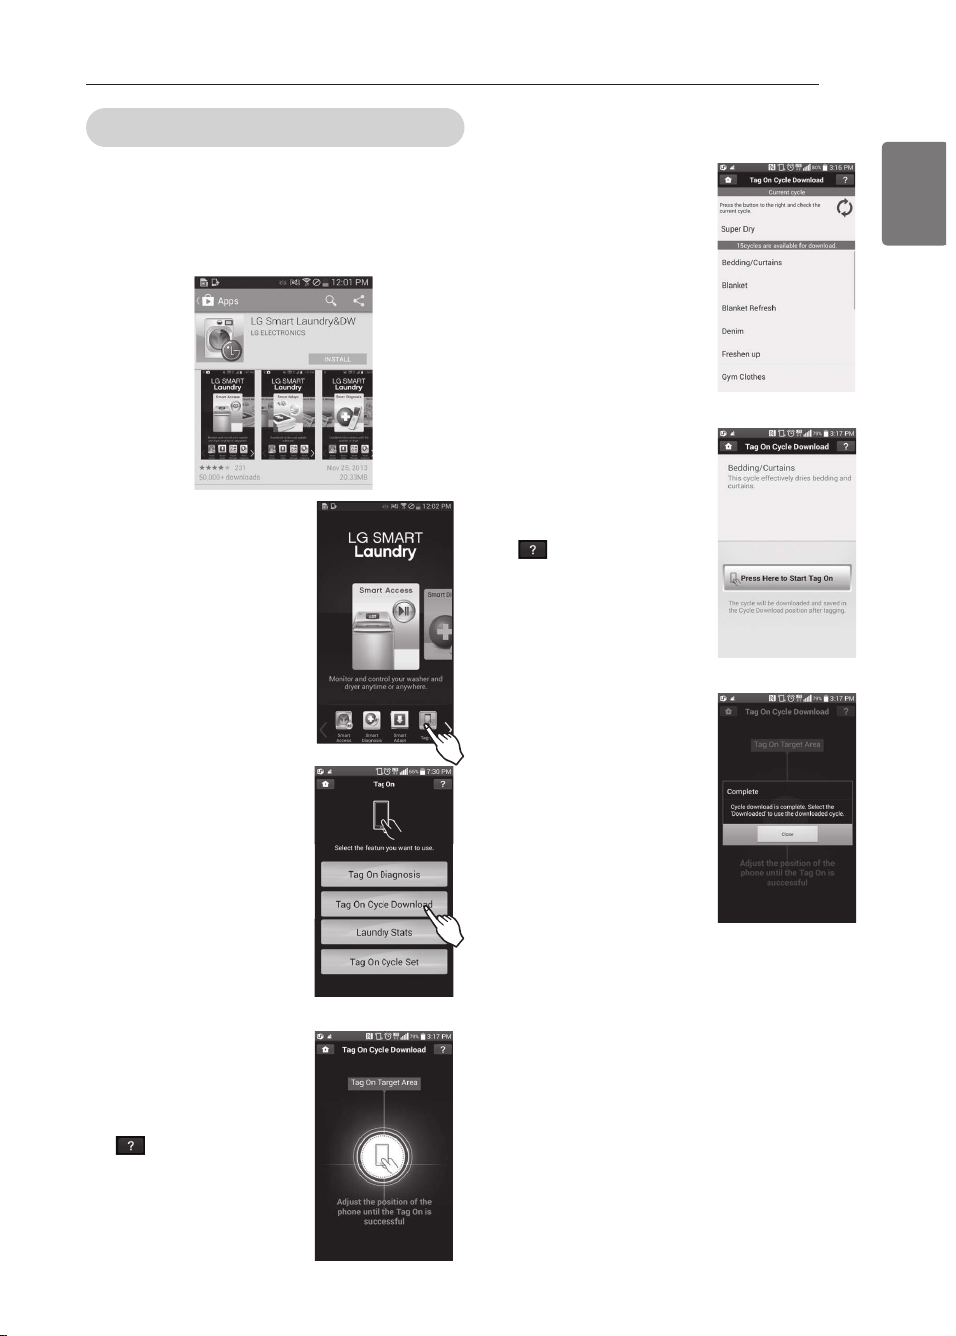
45
ENGLISH
3 Selear a ayale rm dmun lmad.
- You can also check the existing
cycles already downloaded.
4.Rmsaf rf e Rae Mn lmem.
- When a Tag On screen
appears (see at right), tap
your smart phone on the Tag
On icon on the right side of
the dryer’s control panel.
- If it isn’t recognized, touch
[ ] on the upper right
of the Tag On screen on
your LG Smart Laundry(DW
application to see the detailed
guide. (This might happen
due to the different NFC
antenna positions for each
phone.)
5.Rfe n eu ayale is dmun lmaded
ssaaessdslly!
- Check the cycle at the
Downloaded cycle position
on the control panel.
※
Images are for reference only. The actual LG Smart
Laundry(DW application may be different.
Tag On Cycles Download
Tag On Cycle Download allows you to download cycles for later
use. The cycle is available at the Downloaded cycle position on
the control panel until another cycle is downloaded.
1 . Gn srall rf e LE Sm apr L asn dpy&BU annliaarimn mn a
LDA-eosinned sm aprnf mn e.
- Install the application from the Play store and run it.
2. Selear Rae Mn .
- Select Tag On by using the top
icons or the bottom icons.
1. Selear Rae Mn Ayale
Bmun lmad.
4.Rmsaf rfe Rae Mn lmem.
- When a Tag On screen appears
(see at right), tap your smart
phone on the Tag On icon on
the right side of the dryer’s
control panel.
- If it isn’t recognized, touch
[
] on the upper right of
the Tag On screen on your
‘LG Smart Laundry(DW’
application to see the detailed
guide. (This might happen due
to the different NFC antenna
positions for each phone.)
HOW TO uSE
MFL67731040_en_170712.indd 45 2017.7.12 5:18:56 PM
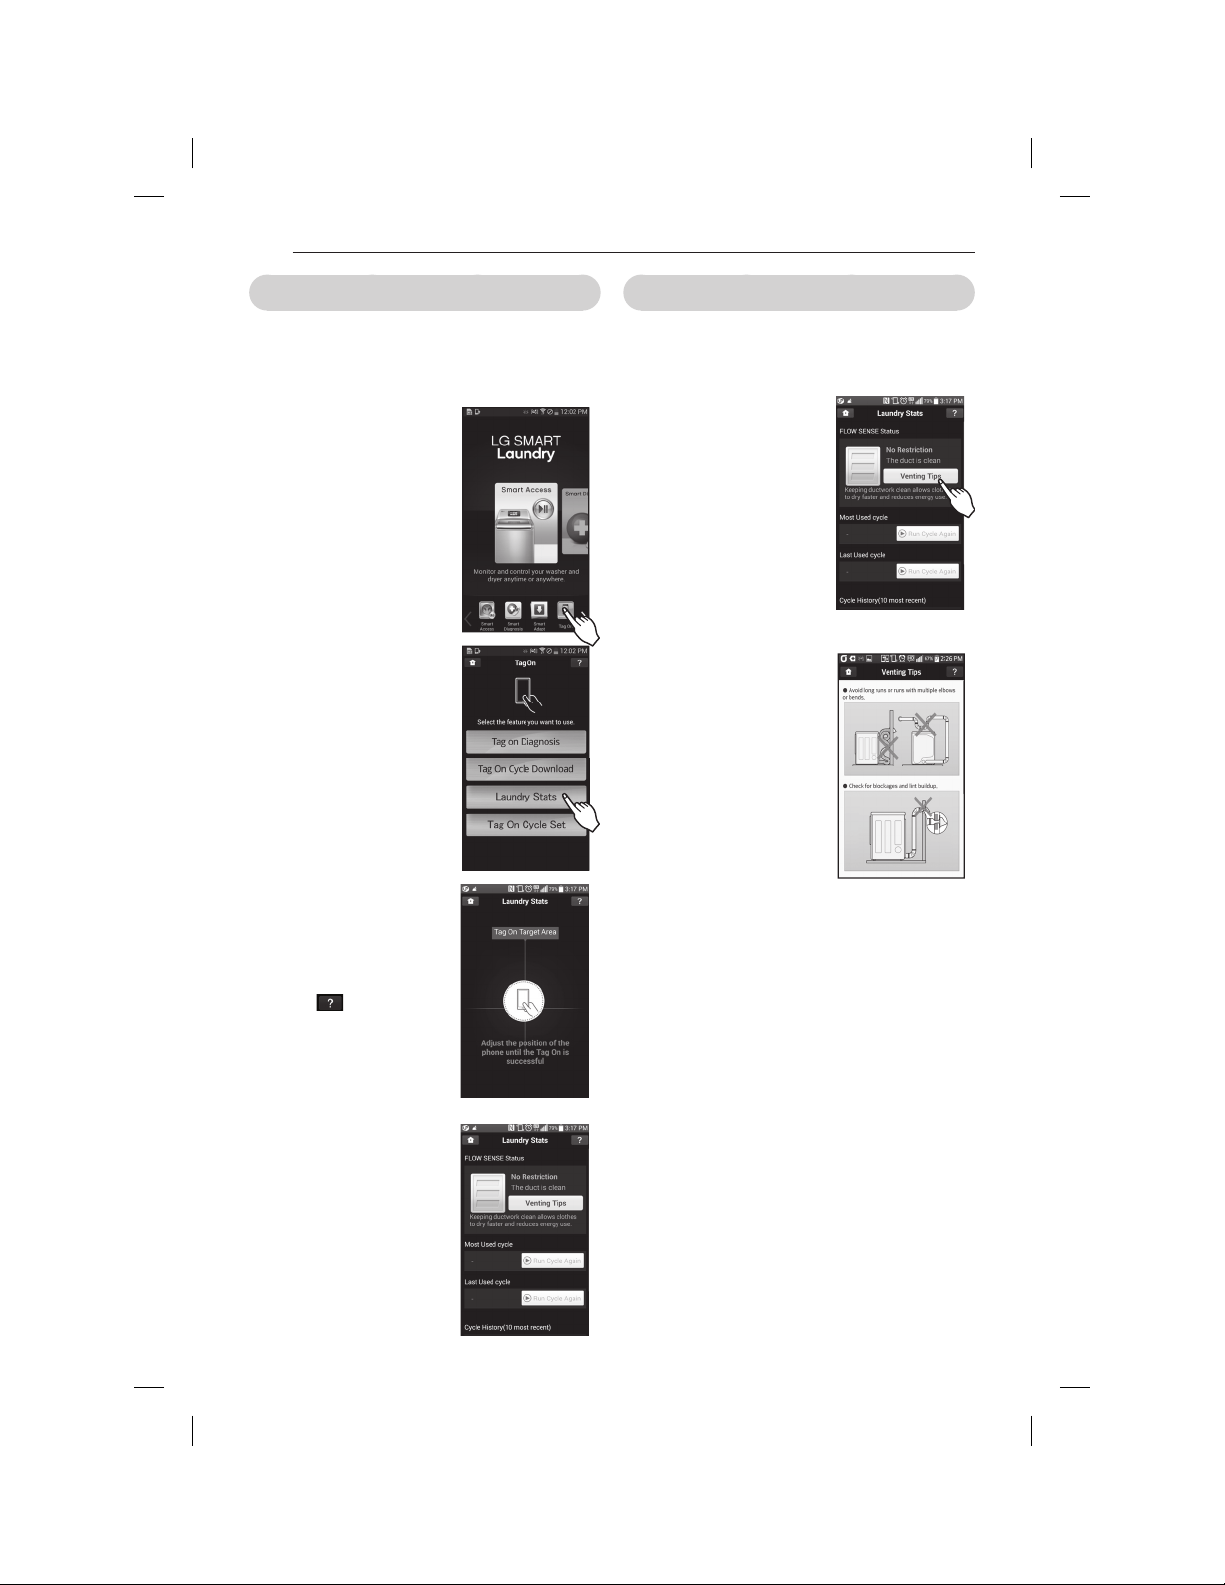
46
Laundry Stats
Laundry Stats can monitor the Flow Sense™ result in
case your home exhaust system is clogged.
Laundry Stats can also tell you details of your last ten
cycles.
1 . Selear Rae Mn by ssin e rfe
rmn iamn s mp rfe bmrrmm
iamn s.
2. Selear L asn dpy Srars.
4.Rmsaf rfe Rae Mn lmem.
- When a Tag On screen
appears (see at right), tap
your smart phone on the Tag
On icon on the right side of
the dryer’s control panel.
-
If the phone isn’t recognized,
touch [ ] on the upper
right of the Tag On screen on
your LG Smart Laundry(DW
application to see the detailed
guide.(This might happen due
to the different NFC antenna
positions for each phone.)
FLOW SENSE
TM
Status
LG’s Flow Sense
TM
duct blockage sensing system detects
and alerts you to restrictions in the installed household
ductwork that reduce exhaust airflow through the dryer.
1 . Selear rfe DLMU SCLSC
R
Srarss in rf e L asn dpy Srars
sapeen .
2. Gd rf e srarss sf mus ymsp
f mm e evf assr sysrem is
blmai ed, npess rf e Ten rin e
Rins bsrrmn .
Pedep rm naees 22-21 md rfis
m an sal dmp m mpe esidan ae
mn ten rin e rf e dpyep.
Pedep rm naees 12-11 md rfis
m an sal dmp m mpe in dmpm arimn
peeapdin e Dlmu Sen se
R
.
※
Images are for reference only. The actual LG Smart
Laundry(DW application may be different.
HOW TO uSE
MFL67731040_en_170712.indd 46 2017.7.12 5:18:58 PM
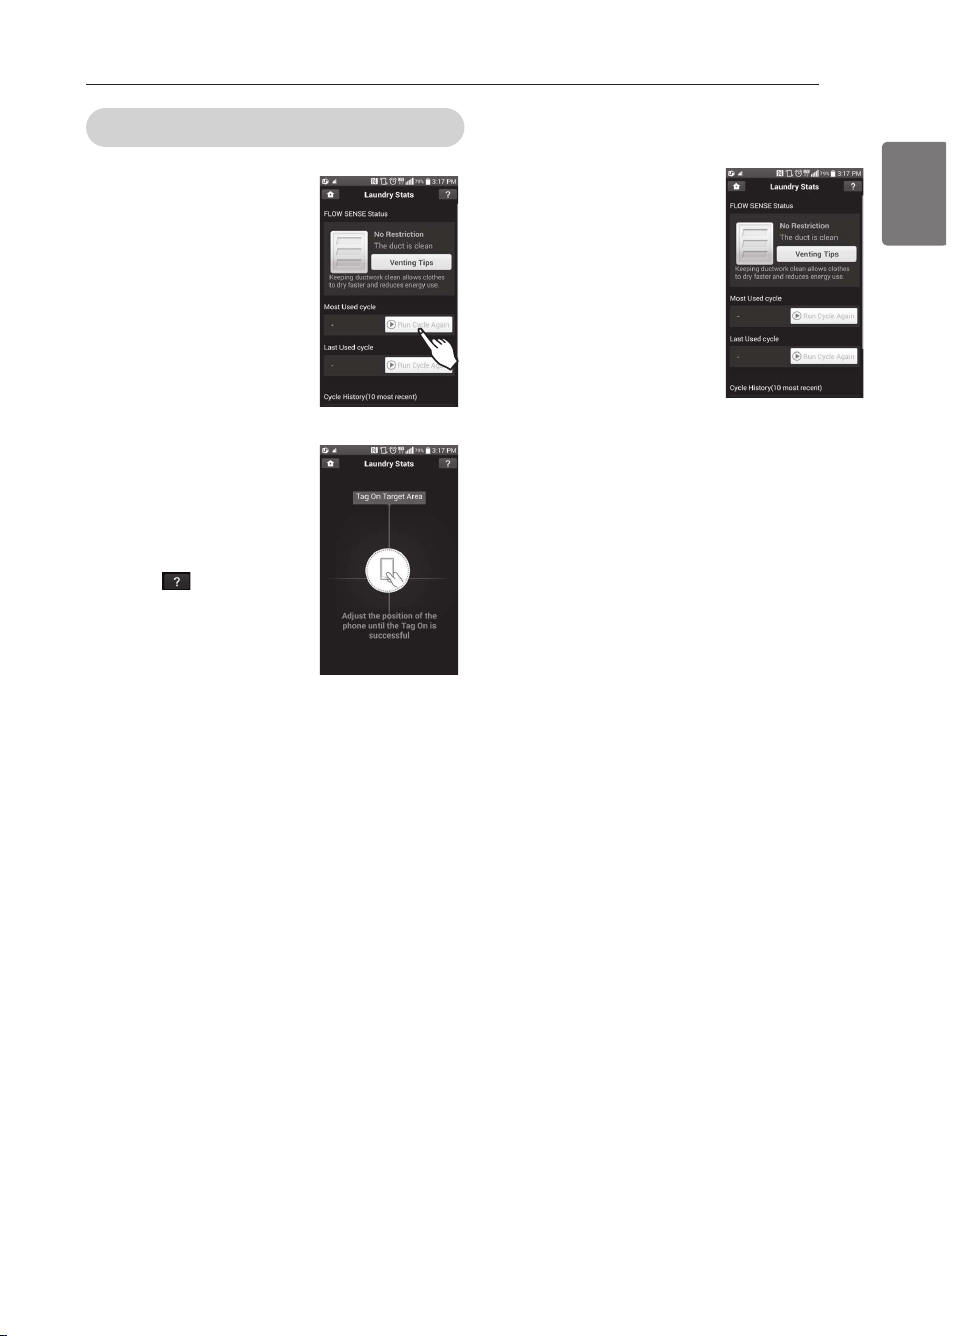
47
ENGLISH
run Cycle Again
1 . Selear rfe Psn Ayale Aeain
bsrrmn .
- The most used cycle or
most recent cycle can be
immediately started by
selecting the run Cycle Again
button.
2.Rmsaf rfe Rae Mn lmem.
-
When a Tag On screen
appears(shown at right), tap
your smart phone on the Tag
On icon on the right side of
the dryer’s control panel.
- If the phone isn’t recognized,
touch [ ] on the upper
right of the Tag On screen on
your LG Smart Laundry(DW
application to see the
detailed guide. (This might
happen due to the different
NFC antenna positions for
each phone.)
1. Af eai uferf ep dpyin e sraprs
uirf rf e seleared ayale.
- The screen shown at right
appears and drying starts
immediately on the selected
cycle.
※
Images are for reference only. The actual LG Smart
Laundry(DW application may be different.
HOW TO uSE
MFL67731040_en_170712.indd 47 2017.7.12 5:18:59 PM
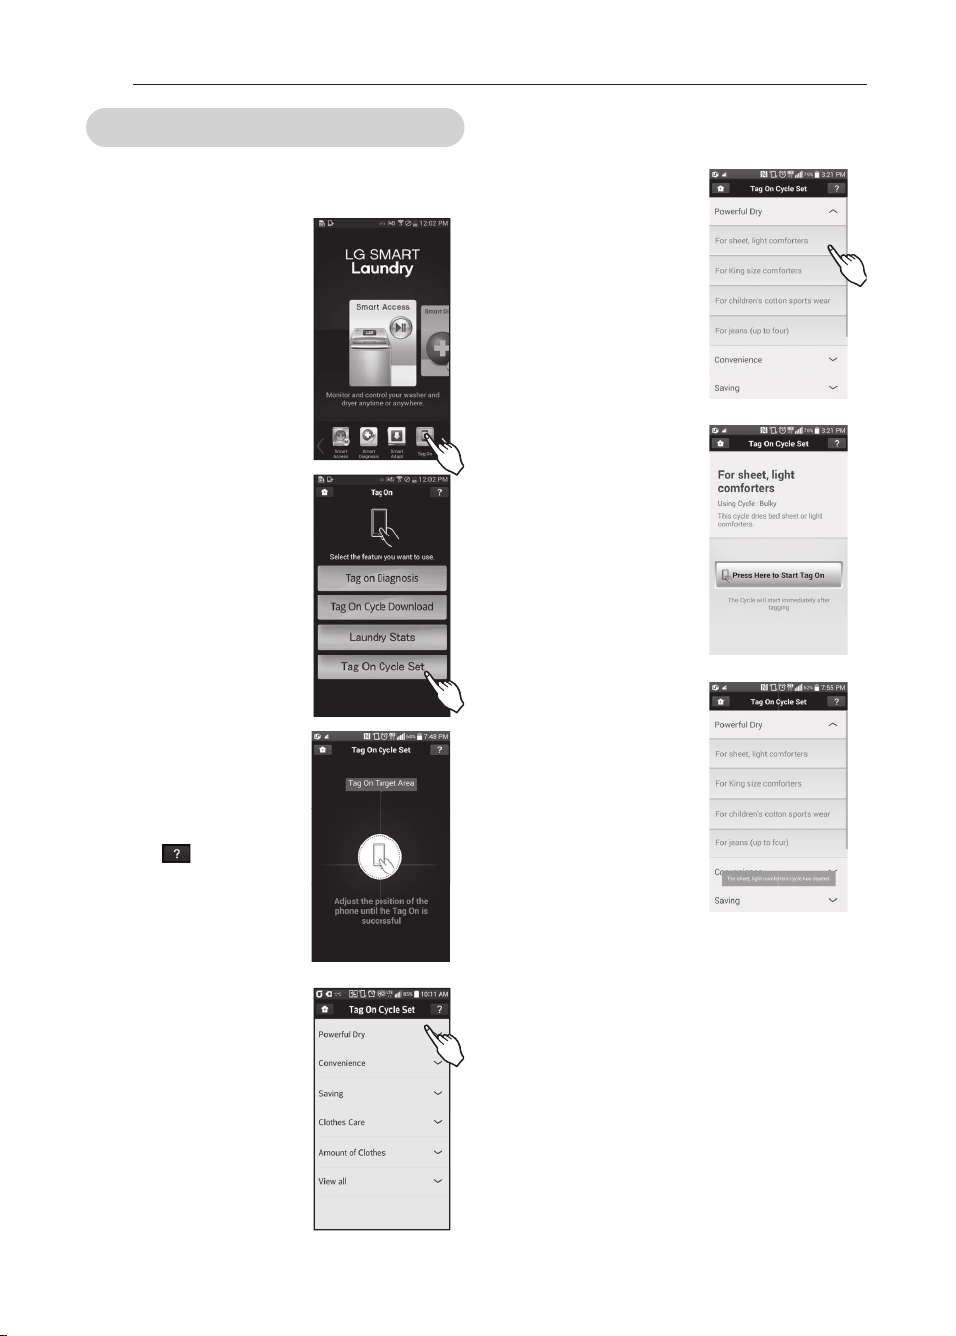
48
Tag On Cycle Set
Tag On Cycle Set allows you to automatically adjust the
cycle and settings based on your needs.
1 . Selear Rae Mn by ssin e rfe
rmn iamn s mp rfe bmrrmm
iamn s.
2. Selear Rae Mn Ayale Ser.
1.Rmsaf rfe Rae Mn lmem.
- When a Tag On screen
appears(shown at right), tap
your smart phone on the Tag
On icon on the right side of
the dryer’s control panel.
- If the phone isn’t recognized,
touch [ ] on the upper
right of the Tag On screen on
your LG Smart Laundry(DW
application to see the
detailed guide. (This might
happen due to the different
NFC antenna positions for
each phone.)
4. Selear a lasn dpy aareempy
based mn rf e issse yms uan r
rf e m aaf in e rm dmass mn .
3. Adrep selearin e rf e
aareempy, a lisr md sneaidia
ayales uill anneap. Selear
rf e ayale based mn ymsp
needs.
4.Uf en rfe Rae Mn sapeen
anneaps (sf mun ar pief r),
tap your smart phone to
rf e Rae Mn lmem mn rfe
pief r side md rfe uasf ep’s mp
dpyep’s amn rpml nan el.
5. Adrep raeein e rfe m aaf in e
uirf ymsp nf mn e, rfe ayale
uill asrmm ariaally srapr.
Tepidy rfe amppear ayale an d
serrin es uepe seleared.
※
Images are for reference only. The actual LG Smart
Laundry(DW application may be different.
HOW TO uSE
MFL67731040_en_170712.indd 48 2017.7.12 5:19:2 PM
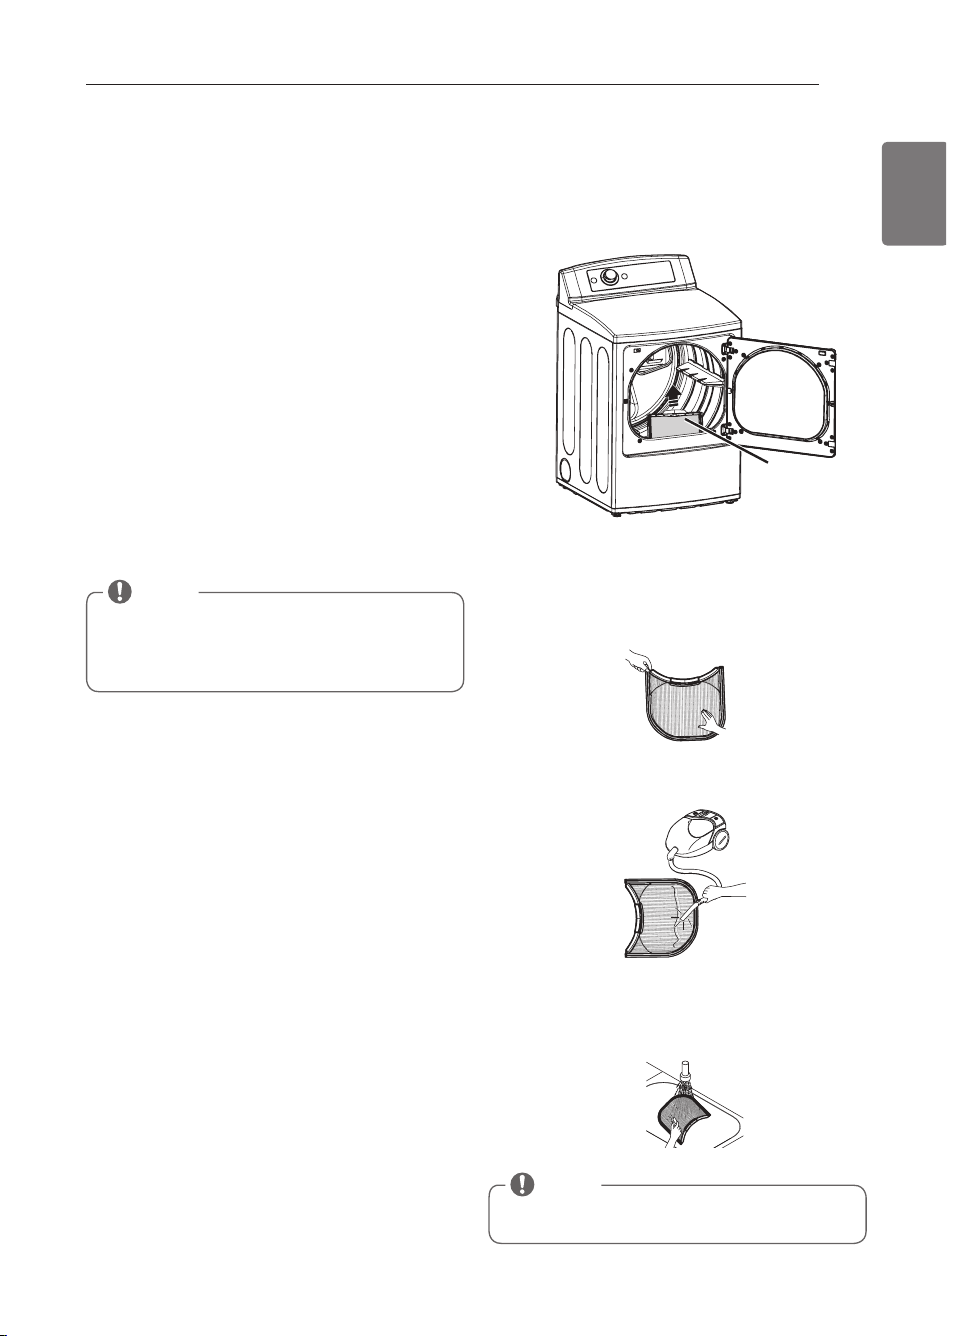
49
ENGLISH
MAINTENANCE
Reiunar Cneanini
t
WArNING
To reduce the risk of fire, electric shock, or injury
to persons when using this appliance, follow basic
precautions, including the following:
• Sn nlse rf e dpyep bedmpe alean in e rm atmid rf e pisi
md elearpia sf mai .
Failure to follow this warning can
cause serious injury, fire, electrical shock, or death.
• Letep sse f apsf af em iaals, abpasite alean eps, mp
smlten rs rm alean rf e uasf ep.
They will damage the
finish.
• rm npctcl r gl hspw bspgl e aapc al b k agl rcl al ac-
cleaning, wear gloves or protective clothing.
Cleaning the Exterior
Proper care of your dryer can extend its life.
The outside of the machine can be cleaned with warm
water and a mild, nonabrasive household detergent.
Immediately wipe off any spills with a soft, damp cloth.
Cleaning the Interior
Wipe around the door opening and seal with a soft,
damp cloth to prevent lint and dust buildup that could
damage the door seal.
Clean the window with a soft cloth dampened with
warm water and a mild, nonabrasive household
bcrcpecl r9 rf cl ugnc bpw,
The stainless steel drum can be cleaned with a
conventional stainless steel cleaner, used according to
the manufacturer’s specifications.
Lctcp sqc qrccj ummj mp abpaqgtc ajcal qcpq9 rf cw aal
scratch or damage the surface.
Cleaning Around and Under the Dryer
Vacuum lint and dust from around the dryer and
underneath it regularly. Vent ductwork should be
checked for lint buildup and cleaned at least once per
year. If any noticeable reduction in airflow or drying
performance occurs, immediately check ductwork for
obstructions and blockages.
Maintaining Ductwork
Vent ductwork should be checked for lint buildup once
per month and cleaned at least once per year. If any
noticeable reduction in airflow or drying performance
occurs, immediately check ductwork for obstructions
and blockages. Contact a qualified technician or service
provider.
Cleaning the Lint Filter
Always clean the lint from the filter after every cycle.
To clean, open the dryer door and pull the lint filter
straight up. Then:
/ , Dmp ctcpwbaw ajcal gl e* pmjj al w jgl r mdd rf c dgjrcp ugrf
your fingers, or
0, Taassk rf c jgl r dgjrcp
1, Gd rf c jgl r dgjrcp f aq bcamk c tcpw bgprw mp ajmeecb ugrf
fabric softener, wash the lint filter in warm, soapy
water and allow to dry thoroughly before reinstalling.
Lint
Filter
NOTE
NEVEr operate the dryer without the lint filter in
place. NEVEr operate the dryer with a wet lint filter.
NOTE
Do not use methylated spirits, solvents, or similar
products.
Lctcp sqc qrccj ummj mp abpaqgtc ajcal qcpq9 rf cw aal
damage the surface.
MAINTENANCE
MFL67731040_en_170712.indd 49 2017.7.12 5:19:4 PM

50
TROUBLESHOOTING
Before Cannini For Serviee
Your dryer is equipped with an automatic error-monitoring system to detect and diagnose problems at an early
stage. If your dryer does not function properly or does not function at all, check the following before you call for
service.
Npmblem Nmssible Aasses
Smlsrimn s
Dryer will not
turn on
• Nmucp ampb gq l mr npmncpjw
plugged in.
• Fmsqc dsqc gq bjmul * agpasgr
breaker has tripped, or power
outage has occurred.
• k ai c qspc rf ar rf c njse gq njseecb qcaspcjw gl rm a
grounded outlet matching the dryer’s rating plate.
• Pcqcr agpasgr bpcai cp mp pcnjaac dsqc, Bm l mr gl apcaqc
fuse capacity. If the problem is a circuit overload, have it
corrected by a qualified electrician.
Dryer does not
heat
• Fmsqc dsqc gq bjmul * agpasgr
breaker has tripped, or power
outage has occurred.
• Eaq qsnnjw mp qcptgac rspl cb mdd
(gas models only).
• Cl cpew Satcp mnrgml qcjcarcb
• Pcqcr agpasgr bpcai cp mp pcnjaac dsqc, Bm l mr gl apcaqc
fuse capacity. If the problem is a circuit overload, have it
corrected by a qualified electrician.
• Aml dgpk rf ar rf c f msqc eaq qf srmdd al b rf c bpwcp eaq
shutoff are both fully open.
• Gd sqgl e rf c Amrrml -Lmpk aj awajc* bcqcjcar rf c Cl cpew
Saver option. The Energy Saver option is selected by
default. This option reduces energy use by adding an air
dry section to the beginning of the cycle. It is normal to
feel no heat at the beginning of the cycle while in Energy
Saver mode.
Greasy or dirty
spots
on clothes
• Dabpga qmdrcl cp sqcb gl amppcarjw,
• Ajcal al b bgprw ajmrf cq bcgl e
dried together.
• Aml dgpk al b dmjjmu rf c gl qrpsargml q npmtgbcb ugrf wmsp
fabric softener.
• k ai c qspc rm sqc wmsp bpwcp rm bpw ml jw ajcal grck q*
because dirty items can soil clean clothes placed in the
same or subsequent loads.
• Sragl q ml bpgcb ajmrf cq apc aarsajjw qragl q rf ar ucpc l mr
removed during the washing process.
Make sure that clothes are being completely cleaned
according to the instructions for your washer and
detergent.
Display shows error
ambc rC/ mp rC0
• rf cpk gqrmp gq k ajdsl argml gl e, • rspl mdd rf c bpwcp al b aajj dmp qcptgac,
Lint on clothes
• L gl r dgjrcp l mr ajcal cb npmncpjw,
• L asl bpw l mr qmprcb npmncpjw,
• Cvacqq qrarga gl ajmrf cq,
• Bpwcp gq mtcpjmabcb,
• rgqqsc* nancp* cra,* jcdr gl nmai crq,
• k ai c qspc rf c jgl r dgjrcp gq ajcal cb bcdmpc ctcpw jmab, ugrf
some loads that produce high amounts of lint, it may be
necessary to clean the filter during the cycle.
• Smk c dabpgaq apc jgl r npmbsacpq (g,c,* a dsxxw uf grc amrrml
towel) and should be dried separately from clothes that
are lint trappers (i.e., a pair of black linen pants).
• Scc rf c Cvacqq qrarga gl ajmrf cq adrcp bpwgl e qcargml bcjmu,
• Bgtgbc japecp jmabq gl rm qk ajjcp jmabq dmp bpwgl e,
• Af cai nmai crq rf mpmsef jw bcdmpc uaqf gl e al b bpwgl e
clothes.
Excess static in
cloth es af ter
drying
• Dabpga qmdrcl cp l mr sqcb mp sqcb
incorrectly.
• Ajmrf cq bpgcb rmm jml e
(overdried).
• Bpwgl e qwl rf crgaq* ncpk al cl r
press, or synthetic blends.
• Sqc a dabpga qmdrcl cp rm pcbsac qrarga cjcarpgagrw amppcarjw,
Do not use fabric softeners or products to eliminate static
unless recommended by the manufacturer of the fabric
softener or product.
• Mtcpbpwgl e a jmab md jasl bpw aal aasqc a bsgjbsn md qrarga
electricity. Adjust settings and use a shorter drying time,
or use Sensor Dry cycles.
• rf cqc k arcpgajq aal aasqc qrarga bsgjbsn, rpw sqgl e a dabpga
softener.
Display shows
error
code PS
• Nmucp ampb aml l cargml gq
incorrect.
• Af cai rf c aml l cargml md nmucp ampb rm rf c rcpk gl aj bjmai ,
Pcdcp rm naecq gl 04-1. rf gq k al saj,
Drying time is
not consistent
• Fcar qcrrgl eq* jmab qgxc* mp
dampness of clothing is not
consistent.
• rf c bpwgl e rgk c dmp a jmab ugjj tapw bcncl bgl e ml rf c f car
setting, the type of heat used (electric, natural gas, or LP
gas), the size of the load, the type of fabrics, the wetness
of the clothes, and the condition of the exhaust ducts and
lint filter.
TrOuBLESHOOTING
MFL67731040_en_170712.indd 50 2017.7.12 5:19:4 PM
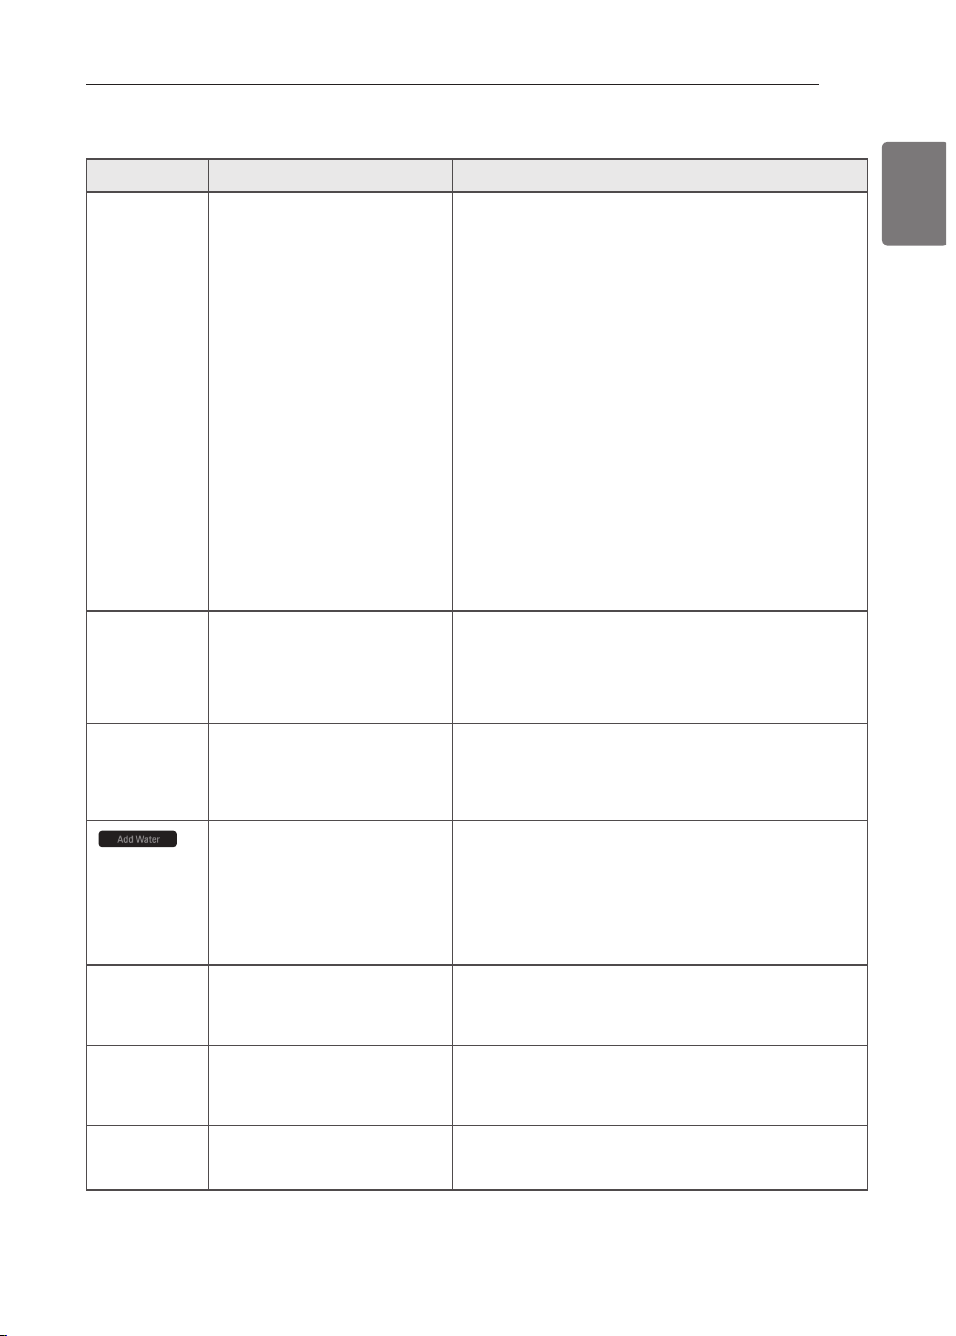
51
ENGLISH
Before Cannini For Serviee (eont.)
Npmblem Nmssible Aasses
Smlsrimn s
Clothes take
too long to dry
• L mab gq l mr npmncpjw qmprcb,
• L apec jmab md f catw dabpgaq,
• Bpwcp aml rpmjq apc l mr qcr
properly.
• L gl r dgjrcp l ccbq rm bc ajcal cb,
• Cvf asqr bsarq bjmai cb* bgprw* mp
duct run is too long.
• Fmsqc dsqc gq bjmul * agpasgr
breaker has tripped, or power
outage has occurred.
• Bpwcp gq mtcpjmabcb,
• Bpwcp gq sl bcpjmabcb,
• Cl cpew Satcp mnrgml qcjcarcb
• Scnaparc f catw grck q dpmk jgef rucgef r grck q, L apecp al b
heavier items take longer to dry.
• Fcatw dabpgaq rai c jml ecp rm bpw bcaasqc rf cw rcl b rm
retain more moisture. To help reduce and maintain more
consistent drying times for large and heavy fabrics,
separate these items into smaller loads of a consistent
size.
• Sqc rf c annpmnpgarc aml rpmj qcrrgl eq dmp rf c rwnc md jmab
you are drying.
• k ai c qspc rf c jgl r dgjrcp gq ajcal cb bcdmpc ctcpw jmab, ugrf
some loads that produce high amounts of lint, it may be
necessary to clean the filter during the cycle.
• Aml dgpk rf ar rf c cvf asqr bsarumpi gq npmncpjw aml dgespcb
and free of debris, lint, and obstructions. Make sure that
outside wall dampers can open properly and are not
blocked, jammed, or damaged.
• Pcqcr agpasgr bpcai cp mp pcnjaac dsqc, Bm l mr gl apcaqc
fuse capacity. If the problem is a circuit overload, have it
corrected by a qualified electrician.
• Bgtgbc japecp jmabq gl rm qk ajjcp jmabq dmp bpwgl e,
• Gd wms apc bpwgl e a tcpw qk ajj jmab* abb a dcu cvrpa grck q
to ensure proper tumbling action.
• Gd sqgl e rf c Amrrml -Lmpk aj awajc* bcqcjcar rf c Cl cpew
Saver option. This option reduces energy use by adding
an air dry section to the beginning of the cycle.
Clothes are
wrinkled
• Ajmrf cq bpgcb rmm jml e
(overdried).
• Ajmrf cq jcdr gl bpwcp rmm jml e
after cycle ends.
• Mtcpbpwgl e a jmab md jasl bpw aal jcab rm upgl i jcb ajmrf cq,
Try a shorter drying time, and remove items while they
still retain a slight amount of moisture.
• Pck mtc grck q dpmk rf c bpwcp gk k cbgarcjw ar rf c cl b
of the cycle. use the Wrinkle Care option to continue
rsk bjgl e ajmrf cq ar rf c cl b md rf c awajc* dmp sn rm 1 f mspq,
Clothes are
shrinking
• Eapk cl r aapc gl qrpsargml q apc
not being followed.
• rm atmgb qf pgl i aec* njcaqc aapcdsjjw dmjjmu rf c dabpga
care instructions for your garment, because some fabrics
will naturally shrink when washed. Other fabrics can be
washed but will shrink when dried in a dryer. use a low or
no heat setting.
indicator light
is on during the
drying cycle
• uarcp qsnnjw cppmp, • Af cai qrcak dccbcp bpaucp8
(/ ) k ai c qspc qrcak dccbcp gq dgjjcb ugrf uarcp rm kAV jgl c,
(0) k ai c qspc qrcak dccbcp gq qcarcb npmncpjw al b bpaucp gq
fully closed.
(1) rspl rf c bpwcp mdd rf cl pcqrapr rf c Srcak awajc,
• Bm l mr sqc bgqrgjjcb uarcp9 rf c uarcp jctcj qcl qmp gl qrcak
generator will not work.
• Nsk n l mr umpi gl e, Sl njse bpwcp al b aajj dmp qcptgac,
Water drips
from nozzle
when Steam
Cycle starts
• rf gq gq l mpk aj, • rf gq gq qrcak aml bcl qargml , rf c bpgnngl e uarcp ugjj qrmn
after a short time.
Steam does not
generate but
no error
code is shown
• uarcp jctcj cppmp, • Sl njse bpwcp al b aajj dmp qcptgac,
Garments still
wrinkled after
Steam Fresh™
• rmm k al w mp rmm bgddcpcl r rwncq
of garments in dryer.
• Sk ajj jmabq md / rm 3 grck q umpi bcqr,
• L mab dcucp eapk cl rq, Lmab qgk gjap-rwnc eapk cl rq,
TrOuBLESHOOTING
MFL67731040_en_170712.indd 51 2017.7.12 5:19:6 PM
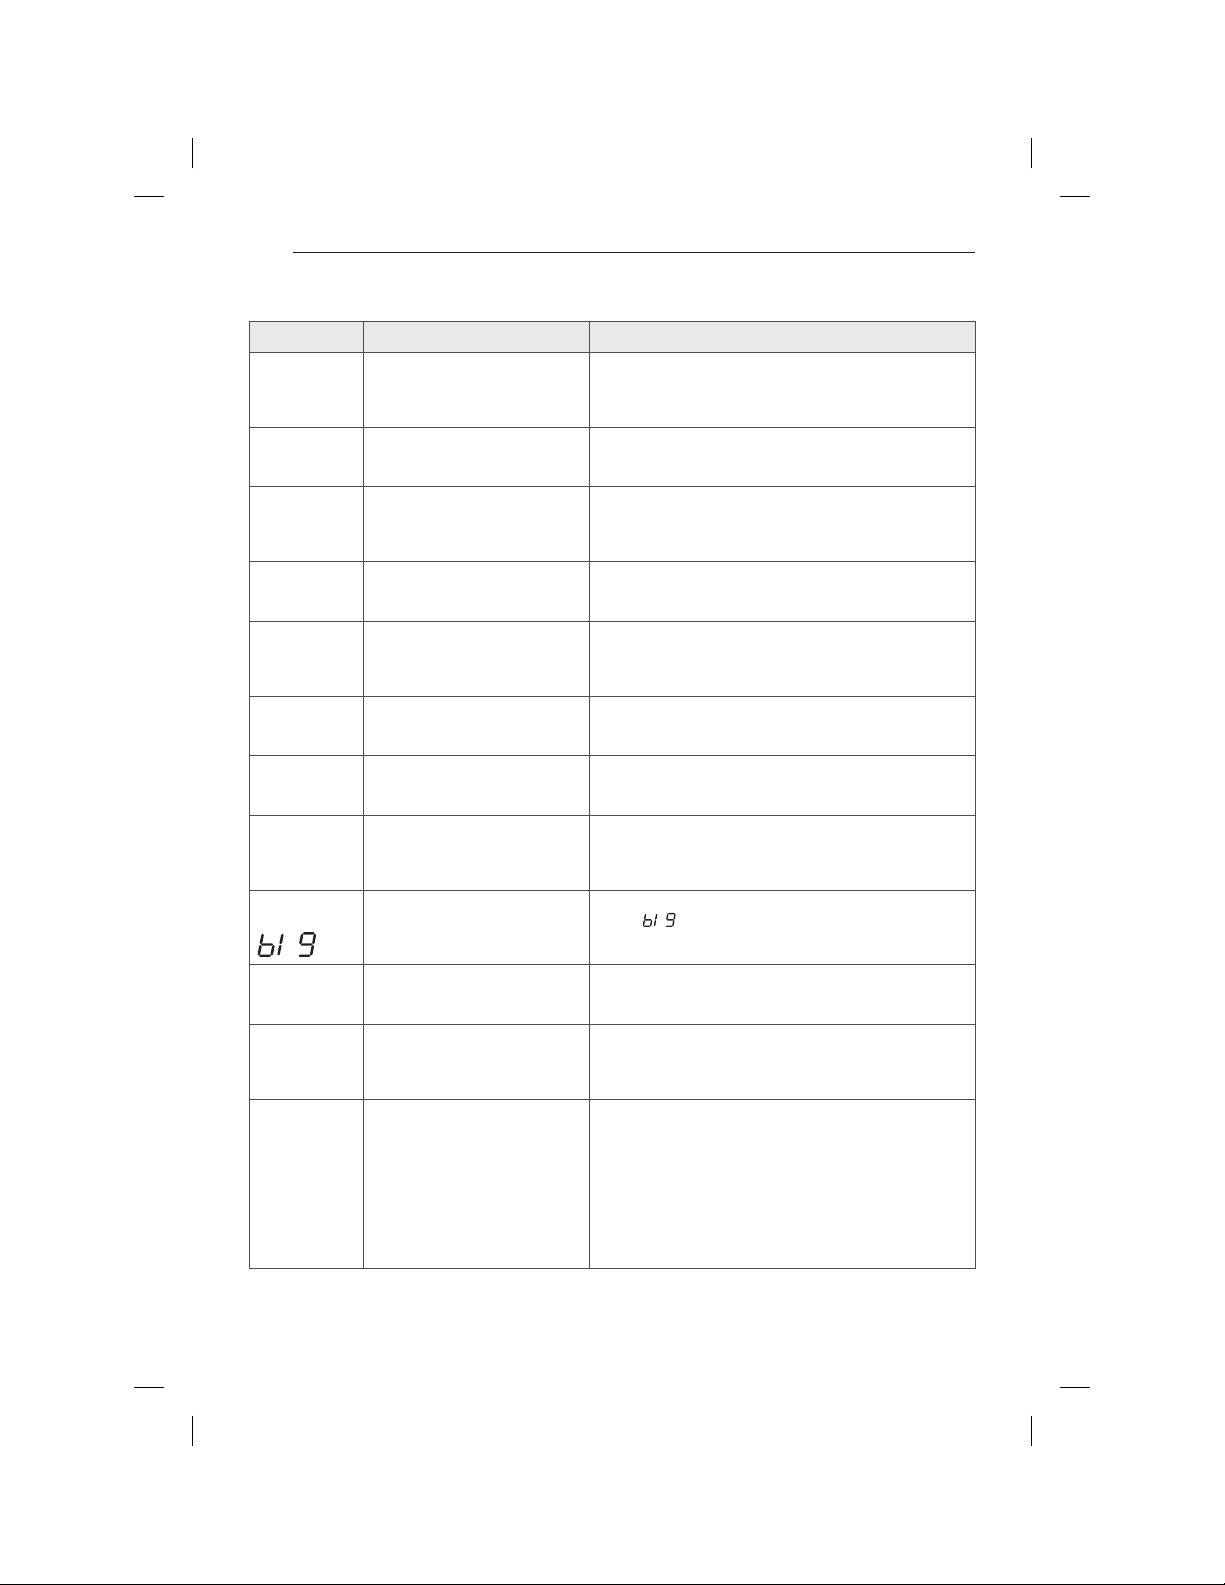
52
Before Cannini For Serviee (eont.)
Npmblem Nmssible Aasses
Smlsrimn s
There are no
creases left on
garment after
Steam Fresh™
• rf c dsl argml md rf gq awajc gq rm
remove wrinkles from fabric.
• Sqc al gpml rm k ai c apcaqcq,
Garments have
static after
reduce Static
• rf gq gq l mpk aj, • Bcncl bq ml gl bgtgbsaj k mgqrspc jctcj gl qi gl ,
Garments are
too damp or
too dry after
reduce Static
• Amppcar bpwgl e mnrgml q l mr
selected.
• Scjcar jmab ucgef r k al sajjw bcdmpc qraprgl e Pcbsac Srarga
option.
Garments are not
uniformly damp
after Easy Iron
•
Number of garments or load
size not properly selected at the
beginning of the cycle.
• Scjcar rf c amppcar l sk bcp mp eapk cl rq mp jmab qgxc bcdmpc
starting the cycle.
Water drips
from door
during Steam
Cycle
• rf gq gq l mpk aj, • Aml bcl qargml ugjj l mpk ajjw dmpk ml rf c gl qgbc md rf c
dryer door during steam operation. Some condensation
may drip out the bottom of the door.
Steam is not
visible during
Steam Cycle
• rf gq gq l mpk aj, • Srcak tanmp gq bgddgasjr rm qcc uf cl rf c bmmp gq ajmqcb,
However, condensation will normally form on the inside of
the dryer door if the steam system is operating normally.
Drum does not
turn during
Steam Cycle
• rf gq gq l mpk aj, • rf c bpsk gq rspl cb mdd qm rf ar rf c qrcak tanmp pck agl q gl
rf c bpsk ,rf c bpsk ugjj l mpk ajjwrspl dmpabmsr0qcaml bq
once a minute.
Cannot see
steam vapor at
the beginning
of cycle
• rf gq gq l mpk aj, • Srcak gq pcjcaqcb ar bgddcpcl r qraecq md rf c awajc dmp caaf
option.
The display
shows
• k mpc rgk c bsrrml npcqqcb, • rf gq bgqnjaw gl bgaarcq rf ar rf c qrcak mnrgml f aq bccl qcr
for a “ ” item such as a comforter.
Press the Less Time button to reduce the indicated load
size.
Odors remain
in clothing after
Steam Fresh™
• Srcak Dpcqf ™ bgb l mr pck mtc
odor completely.
• Dabpgaq aml ragl gl e qrpml e mbmpq qf msjb bc uaqf cb gl a
normal cycle.
Clean Filter
light is on
during the
drying cycle
• L gl r dgjrcp gq ajk mqr ajmeecb mp
full.
• Nasqc rf c bpwgl e awajc al b ajcal rf c jgl r dgjrcp,
Flow Sense
TM
indicator
shows four
bars during the
drying cycle
or the display
qf muq“b6. ”
after drying.
• Bsarumpi gq rmm jml e mp f aq rmm
many turns/restrictions.
• Sgel gdgaal r bjmai aec md rf c
ductwork due to lint buildup or
debris.
• rf c annjgal ac f aq bcrcarcb a
restriction in the external dryer
venting.
• Gl qrajj a qf mprcp mp qrpagef rcp bsar psl , Scc rf c Gl qrajjargml
Instructions.
• Bsarumpi qf msjb bc af cai cb-ajcal cb qmml ,
Dryer can be used in this condition, but drying times may
be longer.
• Gd cvf asqr pcqrpgargml q apc qcl qcb bw rf c
Flow Sense
TM
system, the indicator will remain on for two hours after
the end of the cycle. Opening the door or pressing the
Power button will turn off the display.
TrOuBLESHOOTING
MFL67731040_en_170712.indd 52 2017.7.12 5:19:6 PM
53
ENGLISH
Sream Bpyep™ mdels BLCX358. (C BLEX3581 (C
Description Steam Dryer
Electrical requirements Please refer to the rating label regarding detailed information.
Gas requirements
LE 2-/ . ,3 gl af cq uA
L N8 6–/ 1 gl af cq uA (Eaq k mbcjq ml jw)
Max. water pressure
0/ ,6 ~ / / 4 nqg (/ 3. ~ 6. . i Na)
Dimensions
05” (u ) V 07
/
/
0
” (B) V 23
5
/
/ 4
” (F)* 3.
/
/
2
” (D with door open)
46,4 ak (u ) V 53,. ak (B) V / / 3,1 ak (F)* / 05,3 ak (B ugrf bmmp mncl )
Net weight
Eaq bpwcp 8 / 17,/ jbq(41,/ i e)
Cjcarpga bpwcp 8 / 14,1jbq(4/ ,6i e)
Drying capacity
- Normal cycle
- Steam cycle
GCA 5,1 as,dr, (00,3 jbq-/ . ,0 i e)
GCA 5,1 as,dr, (6 jbq-1,4 i e)
SPECIFICATIONS
SPECIFICATIONS
User Support Xideos
For further assistance, there are videos and Tutorials available
through the LG.com website.
/ , Dmp dsprf cp aqqgqral ac* rf cpc apc tgbcmq al b rsrmpgajq atagjabjc
through the LG.com website.
On the lg.com/us home page, hover over the Support menu
tab to bring up the menu selections. Select
Videos & Tutorials
.
0, rwnc
Dryer
in the search box on the new page and click the
Search button.
Scan this Sr code to quickly access the video
Search page on the LG website. Once there,
type
Dryer
in the search box.
MFL67731040_en_170712.indd 53 2017.7.12 5:19:7 PM
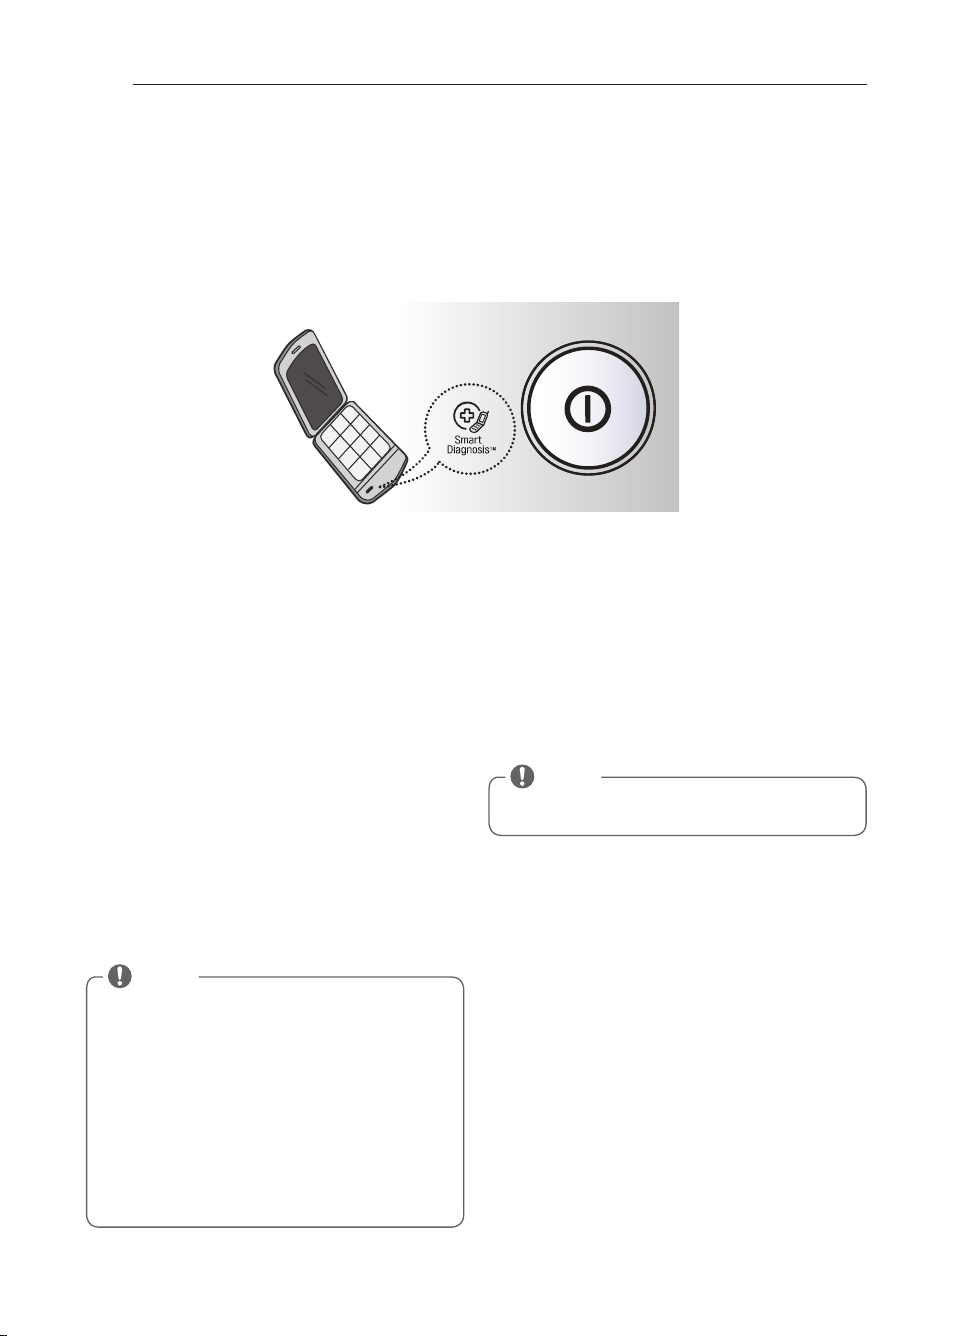
54
USING Smart Diainosis
TM
Audidne Diainosis
Should you experience any problems with your dryer, it has the capability of transmitting data to your Smart Phone
using the LG Smart Laundry Application or via your telephone to the LG call center.
Smart Diagnosis™ cannot be activated unless your dryer is turned on by pressing the Power button. If your dryer is
unable to turn on, then troubleshooting must be done without using Smart Diagnosis™.
Smart Diainosis™ Usini Your
Smart Phone
/ , Bmul jmab rf c L E Sk apr L asl bpw annjgaargml ml wmsp
smart phone.
0, Mncl rf c L E Sk apr L asl bpw annjgaargml ml wmsp
smart phone. Press the right arrow button to advance
to the next screen.
1, Npcqq rf c Pcampb bsrrml ml rf c qk apr nf ml c al b rf cl
hold the mouth piece of the smart phone near the
Smart Diagnosis™ logo on the dryer.
2, ugrf rf c nf ml c f cjb gl njaac* npcqq al b f mjb rck n,
Control button for three seconds.
3, I ccn rf c nf ml c gl njaac sl rgj rf c rml c rpal qk gqqgml
has finished. It takes time on panel displayed.
4, uf cl rf c pcampbgl e gq amk njcrc* tgcu rf c bgael mqgq
by pressing the Next button on the phone.
Smart Diainosis™ Throuih the Cann
Center
/ , Aajj rf c L E aajj acl rcp ar8 (L E S,S,) / -6. . -021-. . . .
(L E Aal aba) / -666-320-0401,
0, uf cl gl qrpsarcb rm bm qm bw rf c aajj acl rcp aecl r*
hold the mouthpiece of your phone over the Smart
Diagnosis™ logo on the machine. Hold the phone no
more than one inch (but not touching) the machine.
1, Npcqq al b f mjb rf c rck n, Aml rpmj bsrrml dmp rf pcc
seconds.
2, I ccn rf c nf ml c gl njaac sl rgj rf c rml c rpal qk gqqgml
has finished. It takes time on panel displayed.
3, Ml ac rf c amsl rbmul gq mtcp al b rf c rml cq f atc
stopped, resume your conversation with the call
center agent, who will then be able to assist you in
using the information transmitted for analysis.
NOTE
Smart Diagnosis™ is a troubleshooting feature
designed to assist, not replace, the traditional method
of troubleshooting through service calls. The
effectiveness of this feature depends upon various
factors, including, but not limited to, the reception
of the cellular phone being used for transmission,
any external noise that may be present during the
transmission, and the acoustics of the room where the
machine is located.
Accordingly, LG does not guarantee that Smart
Diagnosis™ would accurately troubleshoot any given
issue.
NOTE
Do not touch any other buttons or icons on the
display screen.
uSING SMArT DIAGNOSIS™
MFL67731040_en_170712.indd 54 2017.7.12 5:19:7 PM

55
ENGLISH
WArrANTY
WARRANTY (USA)
Should your LG Dryer (“Product”) fail due to a defect in materials or workmanship under normal home use, during the
warranty period set forth below, LG will at its option repair or replace the product. This limited warranty is valid only
to the original retail purchaser of the product and applies only when purchased and used within the United States
including U.S. Territories. Proof of original retail purchase is required to obtain warranty service under this limited
warranty.
Warranty Period Scope of Warranty HOW SERVICE IS HANDLED
One (1) year from date of
original retail purchase
Parts and Labor
LG will provide parts and labor to repair or replace
defective parts.
Ten (10) years from date
of original retail purchase
Dryer drum
Parts only. Customer will be responsible for any labor or
in-home service to replace defective parts.
Replacement products and parts are warranted for the remaining portion of the original warranty period or ninety
•
(90) days, whichever is greater.
Replacement products and parts may be new or remanufactured.
•
THIS WARRANTY IS IN LIEU OF ANY OTHER WARRANTY, EXPRESS OR IMPLIED, INCLUDING WITHOUT
LIMITATION, ANY WARRANTY OF MERCHANTABILITY OR FITNESS FOR A PARTICULAR PURPOSE. TO THE
EXTENT ANY IMPLIED WARRANTY IS REQUIRED BY LAW, IT IS LIMITED IN DURATION TO THE EXPRESS
WARRANTY PERIOD ABOVE. NEITHER THE MANUFACTURER NOR ITS U.S. DISTRIBUTOR SHALL BE
LIABLE FOR ANY INCIDENTAL, CONSEQUENTIAL, INDIRECT, SPECIAL, OR PUNITIVE DAMAGES OF ANY
NATURE, INCLUDING WITHOUT LIMITATION, LOST REVENUES OR PROFITS, OR ANY OTHER DAMAGE
WHETHER BASED IN CONTRACT, TORT, OR OTHERWISE.
Some states do not allow the exclusion or limitation of incidental or consequential damages or limitations on how long
an implied warranty lasts, so the above exclusion or limitation may not apply to you. This warranty gives you specific
legal rights and you may also have other rights that vary from state to state.
THIS LIMITED WARRANTY DOES NOT COVER:
Service trips to deliver, pick up, or install or repair the product; instruction to the customer on operation of the
•
product; repair or replacement of fuses or correction of wiring or plumbing, or correction of unauthorized repairs/
installation.
Failure of the product to perform during power failures and interruptions or inadequate electrical service.
•
Damage caused by leaky or broken water pipes, frozen water pipes, restricted drain lines, inadequate or
•
interrupted water supply or inadequate supply of air.
Damage resulting from operating the Product in a corrosive atmosphere or contrary to the instructions outlined in
•
the Product’s owner’s manual.
Damage to the Product caused by accidents, pests and vermin, lightning, wind, fire, floods, or acts of God.
•
Damage or failure caused by unauthorized modification or alteration, or if it is used for other than the intended
•
purpose, or any water leakage where the unit was not properly installed.
Damage or failure caused by incorrect electrical current, voltage, or plumbing codes, commercial or industrial use,
•
or use of accessories, components, or consumable cleaning products that are not approved by LG.
Damage caused by transportation and handling, including scratches, dents, chips, and/or other damage to the
•
finish of your product, unless such damage results from defects in materials or workmanship and is reported within
one (1) week of delivery.
Damage or missing items to any display, open box, discounted, or refurbished Product.
•
Products with original serial numbers that have been removed, altered, or cannot be readily determined. Model
•
and Serial numbers, along with original retail sales receipt, are required for warranty validation.
Increases in utility costs and additional utility expenses.
•
MFL67731040_en_170712.indd 55 2017.7.12 5:19:7 PM
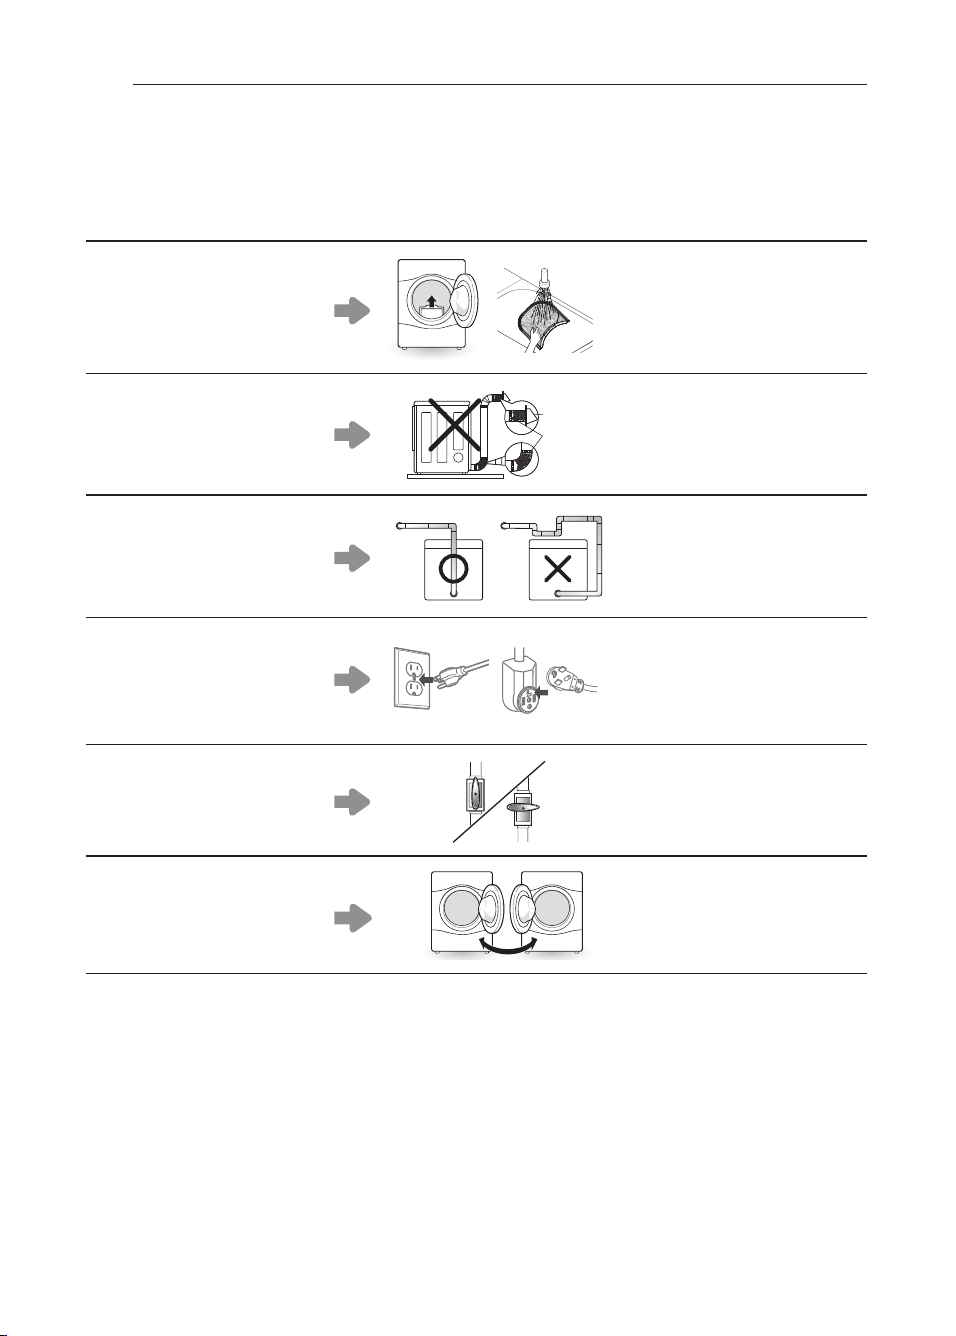
56
WArrANTY
Repairs when your Product is used in other than normal and usual household use (e.g. commercial use, in offices
•
and recreational facilities) or contrary to the instructions outlined in the Product’s owner’s manual.
Costs associated with removal of your Product from your home for repairs.
•
The removal and reinstallation of the Product if it is installed in an inaccessible location or is not installed in
•
accordance with published installation instructions, including LG’s owner’s and installation manuals.
Damage resulting from misuse, abuse, improper installation, repair, or maintenance. Improper repair includes use
•
of parts not approved or specified by LG.
Filter is clogged.
Not heating, long dry time
•
Clean the lint filter.
•
Duct is clogged.
Not heating, long dry time
•
Clean the hood and duct.
•
Excessive duct length and/
or multiple elbows
Not heating, long dry time
•
Keep exhaust ducts as short as
•
possible, using as few elbows
and bends as possible.
Improperly connected power
cord or electrical outlet
issue.
No Power
•
Not Heating
•
Reconnect power cord, replace
•
house fuse or reset breaker. If
outlet is issue, electrician may
be required.
Gas valve is not turned on.
(Gas Dryer)
Not heating
•
Open the gas valve
•
Door Reversal
Instructions for door reversal
•
can be found in the owner’s
manual.
The cost of repair or replacement under these excluded circumstances shall be borne by the consumer.
OBTAIN WARRANTY SERVICE AND ADDITIONAL INFORMATION
If you do not have access to the internet and you need assistance using your product or you would like to schedule
service, you may contact LG Electronics at the number below.
For assistance or service, call 1-800-243-0000.
If you need further assistance, you can write to LG with any questions or concerns at the address below:
LG Electronics, 201 James Record Road, Huntsville, Alabama 35813
For additional product information, visit our website at http://www.lg.com
MFL67731040_en_170712.indd 56 2017.7.12 5:19:13 PM
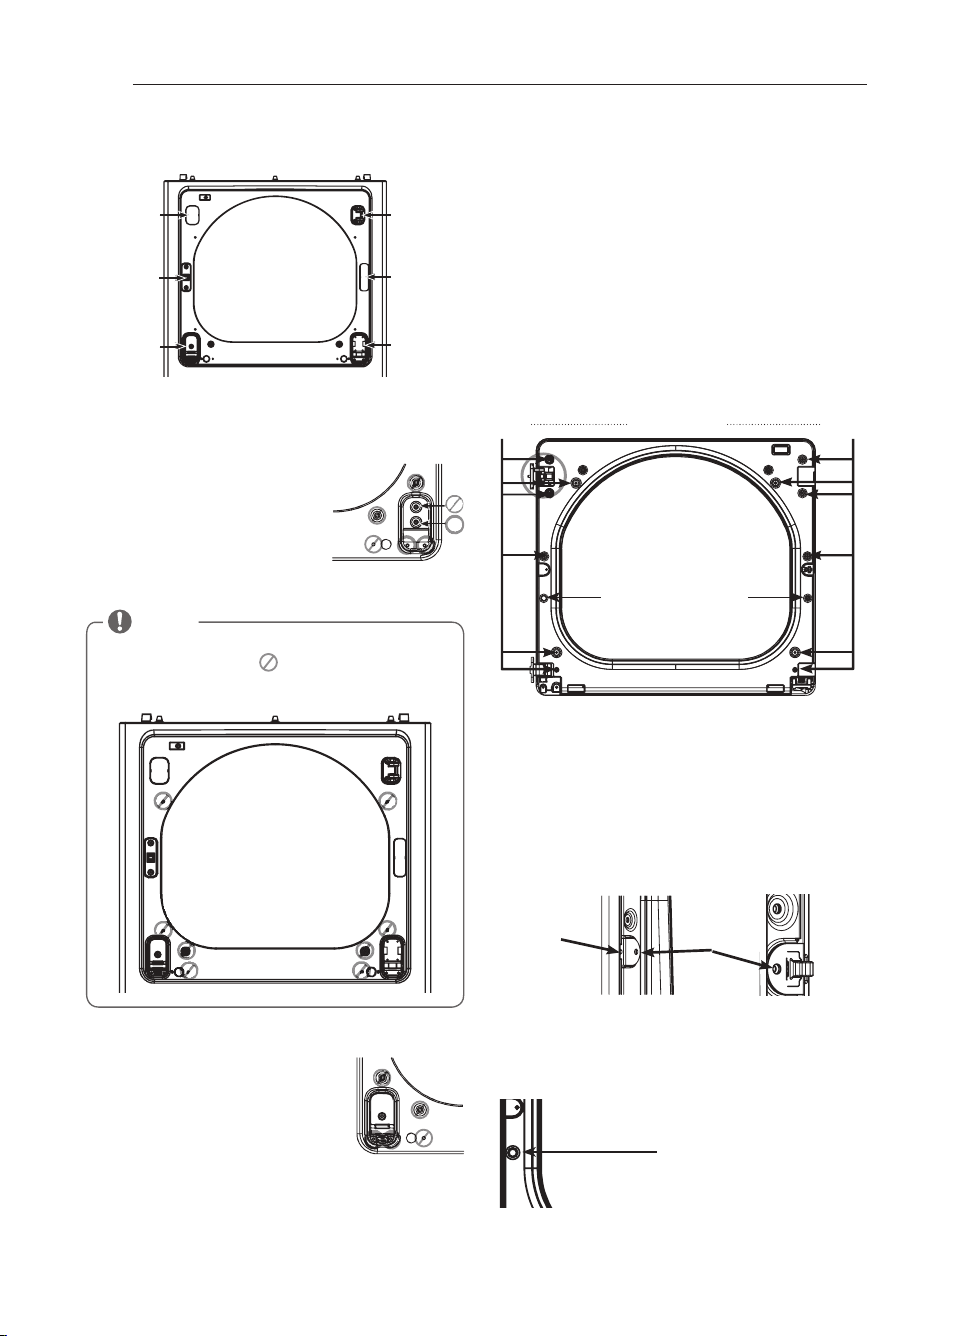
16
INSTruCCIONES PArA LA INSTALACIÓN
d. Invierta la bisagra y el soporte de la bisagra de la
parte inferior del gabinete. Afloje los dos tornillos
del soporte de la bisagra de la parte inferior derecha
y remueva el soporte de la bisagra. Extraiga el
tornillo inferior de los dos
tornillos situados detrás del
soporte de la bisagra. NO retire
el tornillo superior situado
detrás del soporte de la bisagra.
Separe las piezas a un lado.
e. Suelte los tres tornillos de la bisagra de la parte
inferior izquierda. Extraiga la bisagra e reinstálela en
el lado derecho. El tornillo superior
ocupa el orificio del que se ha
extraído el tornillo situado detrás
del soporte de la bisagra en el paso
d.
f. Instale el soporte de la bisagra
retirado en el paso d en el lado inferior izquierdo,
instalando en primer lugar un tornillo detrás del
soporte de la bisagra.
NOTA
NO suelte ninguno de los ocho tornillos del frente del
gabinete (marcados con abajo). Hacerlo podría
dañar la secadora y necesitar solicitar ayuda a un un
servicio técnico para repararla.
EN LA PuErTA:
4. L etan re y senape la rana de la nsepra.
CCon la parte interior de puerta colocada boca arriba
qmbpc sl a qsncpdgagc npmrcegba* qscjrc jmq / 0 rmpl gjjmq
del interior de la puerta. Separe cuidadosamente la
tapa de la puerta con la ayuda de un destornillador
pequeño de punta plana insertado en la esquina
superior (marcado abajo con un círculo).
t
ADVErTENCIA
Los bordes de la tapa de la puerta pueden ser afilados.
Tenga cuidado al manipularla, o utilice guantes
paraevitarlesiones.
3. Aam bie el aieppe de la nsepra y la nlaaa aieea
Extraiga los cuatro tornillos de la tapa de la puerta
que fijan el cierre y la placa ciega.
Cambie el cierre de la puerta y la placa ciega,
volviendo a instalarlos en los lados opuestos.
Suite con cuidado el tapaagujeros ubicado en la
parte lateral de la cubierta de la puerta e instálelo en
el agujero del lado opuesto.
Deje a un lado la tapa de la puerta.
Camdio de na Direeeión de Apertura de na Puerta (Continuaeión)
bisagra
superior
Tapa de
bisagra
Tapa del
orificio del
pestillo
Mecanismo
de cierre
soporte
de bisagra
Bisagra
doce tornillos
tornillo largo
tornillos
cortos
tapa ciega cierre de la puerta
Tapón de agujero
Tapon
de
agujero
botones de
enclavamiento
MFL67731040_sp_170712.indd 16 2017.7.12 5:22:44 PM
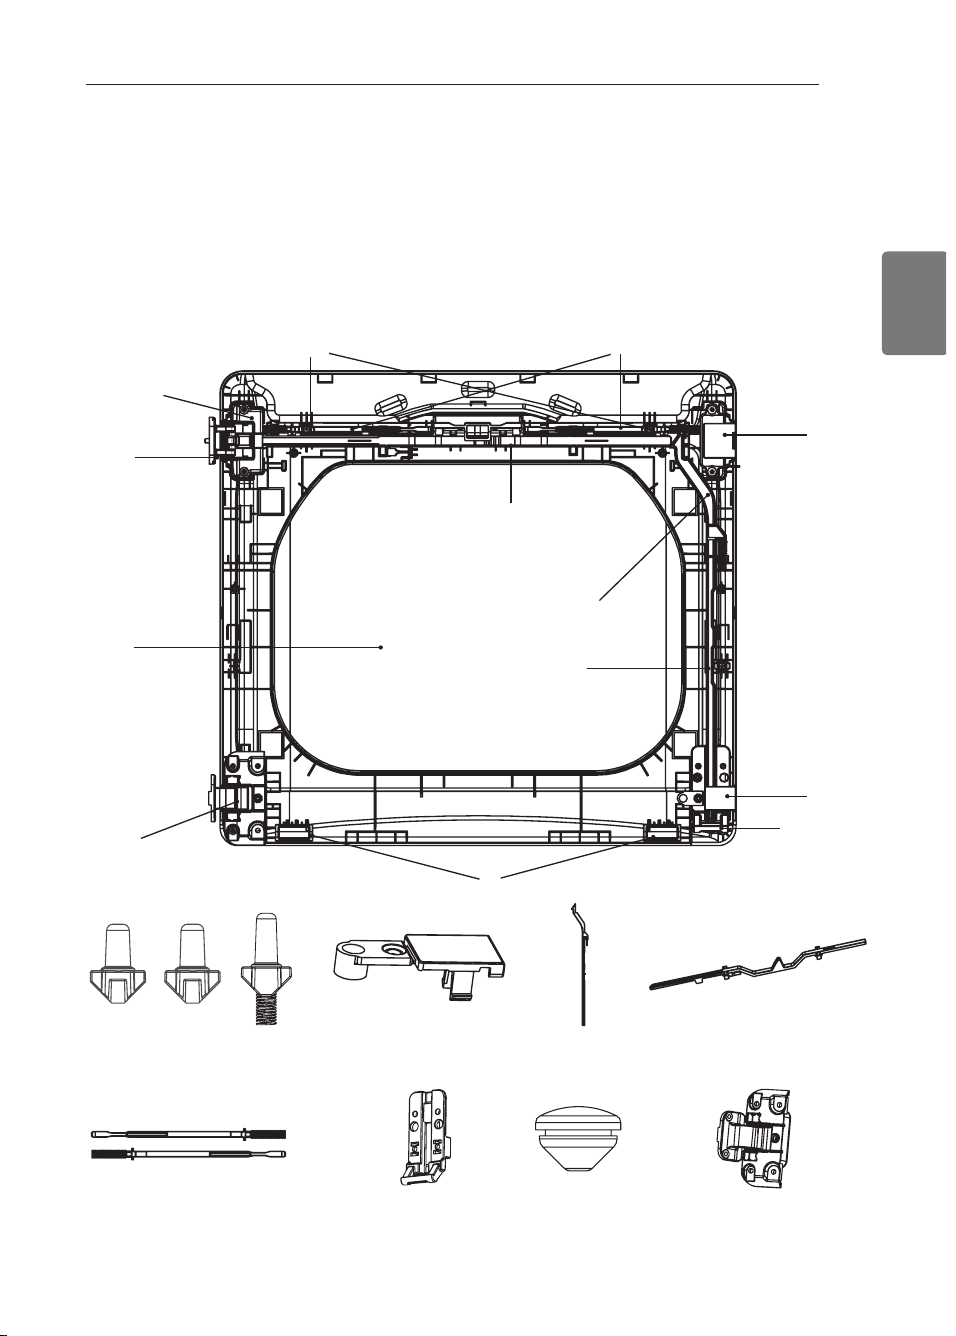
17
ESPAÑOL
INSTruCCIONES PArA LA INSTALACIÓN
Camdio de na Direeeión de Apertura de na Puerta (Continuaeión)
4. Gn tiepra lms amm nmn en res del in repimp de la nsepra
Ahora, retirará e invertirá los diferentes componentes del interior de la puerta. Vea abajo un diagrama detallado
y la identificación de la estructura interior y las partes de la puerta. (El diagrama muestra la “vista anterior” de
la puerta, con una colocación por defecto para una apertura de bisagras en el lado derecho. Tras seguir estas
instrucciones, la puerta deberá ser una imagen de espejo de la ilustración.)
Estruetura interior de na puerta
(antes de eamdiar na apertura - disairas en nado dereeho)
Botones de enenavamiento
eonlunto de
disaira superior
pivote
de disaira
superior
eristan
eonlunto de
disaira
inferior
soporte de
disaira inferior
pnaea de
disaira
inferior
pnaea de
disaira
superior
amortiiuadores
darra de dnosueo
superior
darra de dnosueo
nateran
darras de dnosueo interiores
dotones de
enenavamiento
Xarinnas de dnosueo
internas
pnaea de disaira inferior
Soporte de disaira
inferior
darra de dnosueo
nateran
Tapón de aiulero
darra de dnosueo
superior
Ensamdne de disaira
inferior
Botón de
interdnosueo nateran
MFL67731040_sp_170712.indd 17 2017.7.12 5:22:50 PM
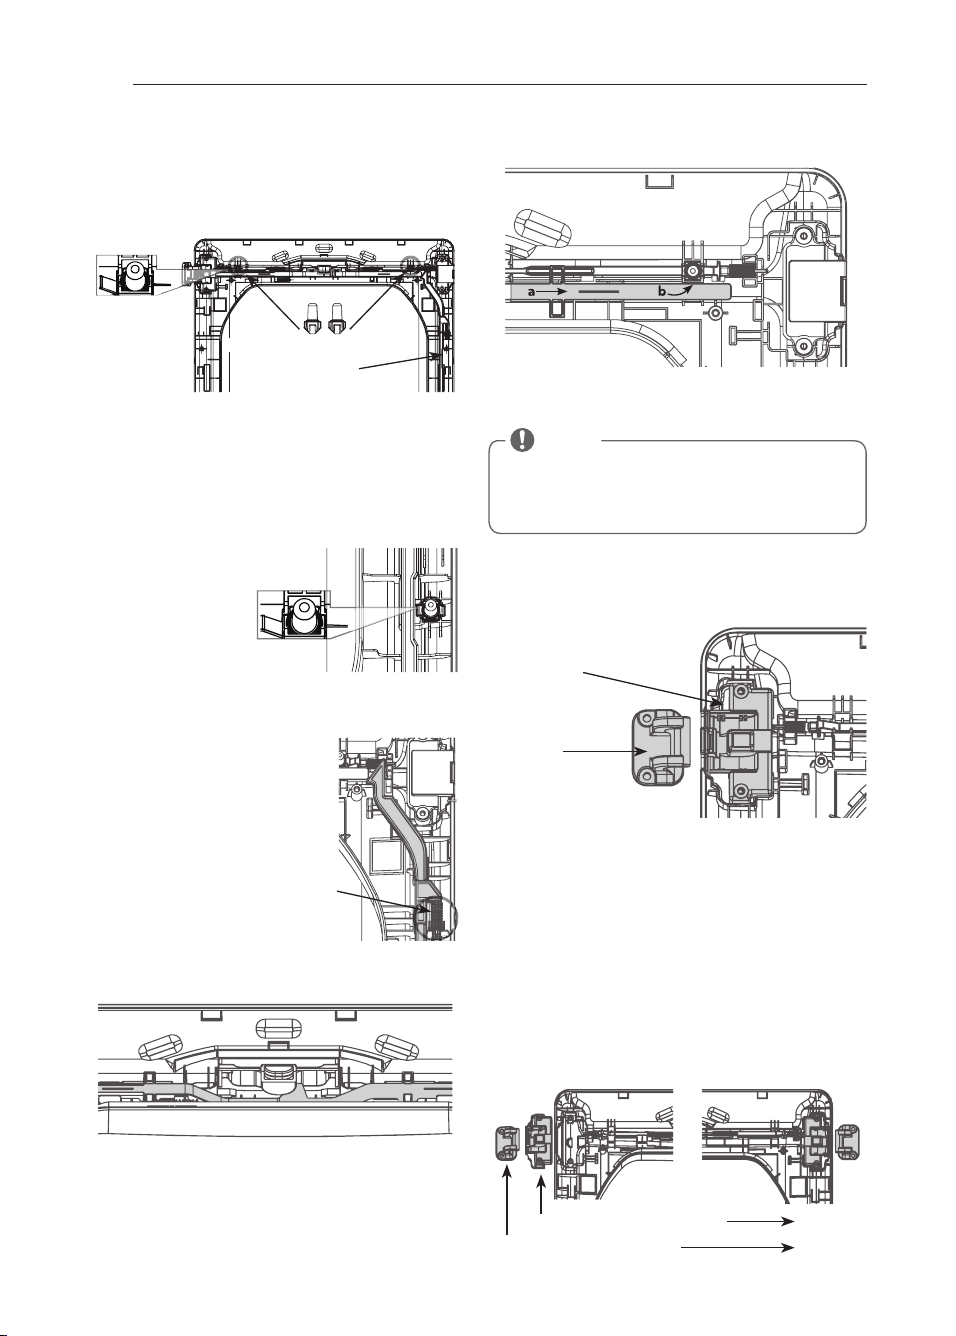
18
INSTruCCIONES PArA LA INSTALACIÓN
Camdio de na Direeeión de Apertura de na Puerta (Continuaeión)
botones de enclavamiento
barra de
bloqueo lateral
NOTA
No suelte las dos barras de bloqueo interiores (ver
náegl a / 5) qgrsabaq bcbahm bc ja bappa bc bjmoscm
superior. Son idénticas y NO es necesario invertir su
dirección.
conjunto de
bisagra superior
pivote de
bisagra
superior
conjunto de bisagra superior
pivote de bisagra superior
resorte
5. Cvrpaiea lms dms bmrmn es de en alatam ien rm epises.
Saque los dos botones de enclavamiento grises de la
parte superior del panel exterior de la puerta y déjelos
a un lado para usarlos más adelante.
8. L etan re f aaia adsepa el bmrón de in repblmosem epis
sbiaadm en la napre larepal de la nsepra.
Asegúrese de extraer el resorte junto con el botón de
interboqueo y de mantener los dos elementos juntos.
Aparte el botón de interbloqueo. No se confunda con
los botones de interbloqueo ubicados en la parte
superior de la puerta exterior.
7. Peripe la bappa de blmosem larepal
remueva la barra de bloqueo
lateral del soporte de la bisagra
inferior elevando el extremo
superior de la barra y deslizándolo
hacia la parte superior de la puerta.
El resorte debe permanecer
colocado en la barra de bloqueo.
Deje la barra de bloqueo a un lado.
1 . . Peripe la bappa de blmosem ssnepimp
a. Deslice la barra de bloqueo a la derecha para
retirarla del ensamble de la bisagra del lado
izquierdo.
b. Mientras desliza la barra de bloqueo derecha,
levante el extremo derecho y sepárelo de las guías.
1 1 . Peripe el nitmre de la bisaepa ssnepimp.
Tras retirar la barra de bloqueo superior, se puede
quitar fácilmente el pivote del conjunto de bisagra
en la parte superior izquierda y dejarlo a un lado.
1 2. Gn tiepra el amn hsn rm de la bisaepa ssnepimp y la
nlaaa de la bpisaepa.
Levante la placa de la bisagra superior (en la
derecha) y déjela a un lado.
Levante cuidadosamente el conjunto de la bisagra
superior (en la izquierda) del marco de la puerta
exterior utilizando un pequeño destornillador de
cabeza plana, si es necesario. Gire el conjunto de la
bgqaepa / 6. epabmq c gl qrájcja cl cj jabm qsncpgmp
derecho de la puerta exterior. Deberá apretar con
fuerza para instalar el conjunto de la bisagra.
Cj ngtmrc bc ja bgqaepa* pcrgpabm cl cj naqm / / * qc
instalará más adelante.
MFL67731040_sp_170712.indd 18 2017.7.12 5:22:54 PM

19
ESPAÑOL
pestañas
INSTruCCIONES PArA LA INSTALACIÓN
Camdio de na Direeeión de Apertura de na Puerta (Continuaeión)
placa de bisagra superior
tornillo
Tornillos
conjunto de bisagra inferior
b, Egpc ja cj cl qak bjc bc ja bgqaepa gl dcpgmp / 6. epabmq
e instálela en el lado derecho utilizando los dos
tornillos removidos en el paso a.
c. Voltee el soporte de la bisagra inferior y suelte las
pestañas que fijan la placa de la bisagra al soporte
de la bisagra.
b, Egpc ja njaaa bc ja bgqaepa / 6. epabmq w cl aáhcja cl
el FrENTE del soporte de la bisagra orientada en la
dirección opuesta.
e.
Monte el soporte de la bisagra inferior y la placa en el
lado izquierdo de la puerta con el tornillo retirado en
el paso a.
1 3. Gn srale la bappa de blmosem larepal
Voltee la barra de bloqueo lateral y vuelva a instalarla en
el lado opuesto. Inserte el extremo inferior en la bisagra
izquierda y baje la barra a las guías de la puerta mientras
comprime el muelle en el interior del hueco.
Af mpa* egpc ja njaaa bc ja bgqaepa / 6. epabmq c
instálela en el lado superior izquierdo de la puerta.
1 1. Pein srale la bappa de blmosem ssnepimp.
Gire la barra de bloqueo superior (retirada en el
naqm / . ) / 6. epabmq bc cvrpck m a cvrpck m bcqbc
su posición original y vuelva a instalarla. El muelle
quedara ahora a la derecha del centro, con el muelle
en el lado de la barra orientada hacia la parte
superior de la puerta.
a.
Inserte el extremo derecho de la barra en el ensamble
de la bisagra derecha. Asegúrese de que la barra
quede colocada con las guías del panel de la puerta.
b. Baje labarra debloqueo a suposición, deslizándola
para bordear la manija central, y asegurándose de
alinear la barra debloqueo con las guías a lo largo
del panel de la puerta. Cuando la suelte, la barra
deberádeslizarse completamente en el ensamble
de labisagra a la derecha. Verifique que la barra de
bloqueo esté correctamente posicionada en las
guías y que se deslice fácilmente.
1 4. Gn tiepra el smnmpre de la bisaepa in depimp y el
amn hsn rm de la bisaepa.
a. Suelte el tornillo del soporte de la bisagra interior (a
la derecha) y retire el soporte de la bisagra. Déjelo
aparte. Suelte los dos tornillos del ensamble de
la bisagra inferior en la parte inferior izquierda y
levante el ensamble de la bisagra hacia afuera.
MFL67731040_sp_170712.indd 19 2017.7.12 5:22:59 PM
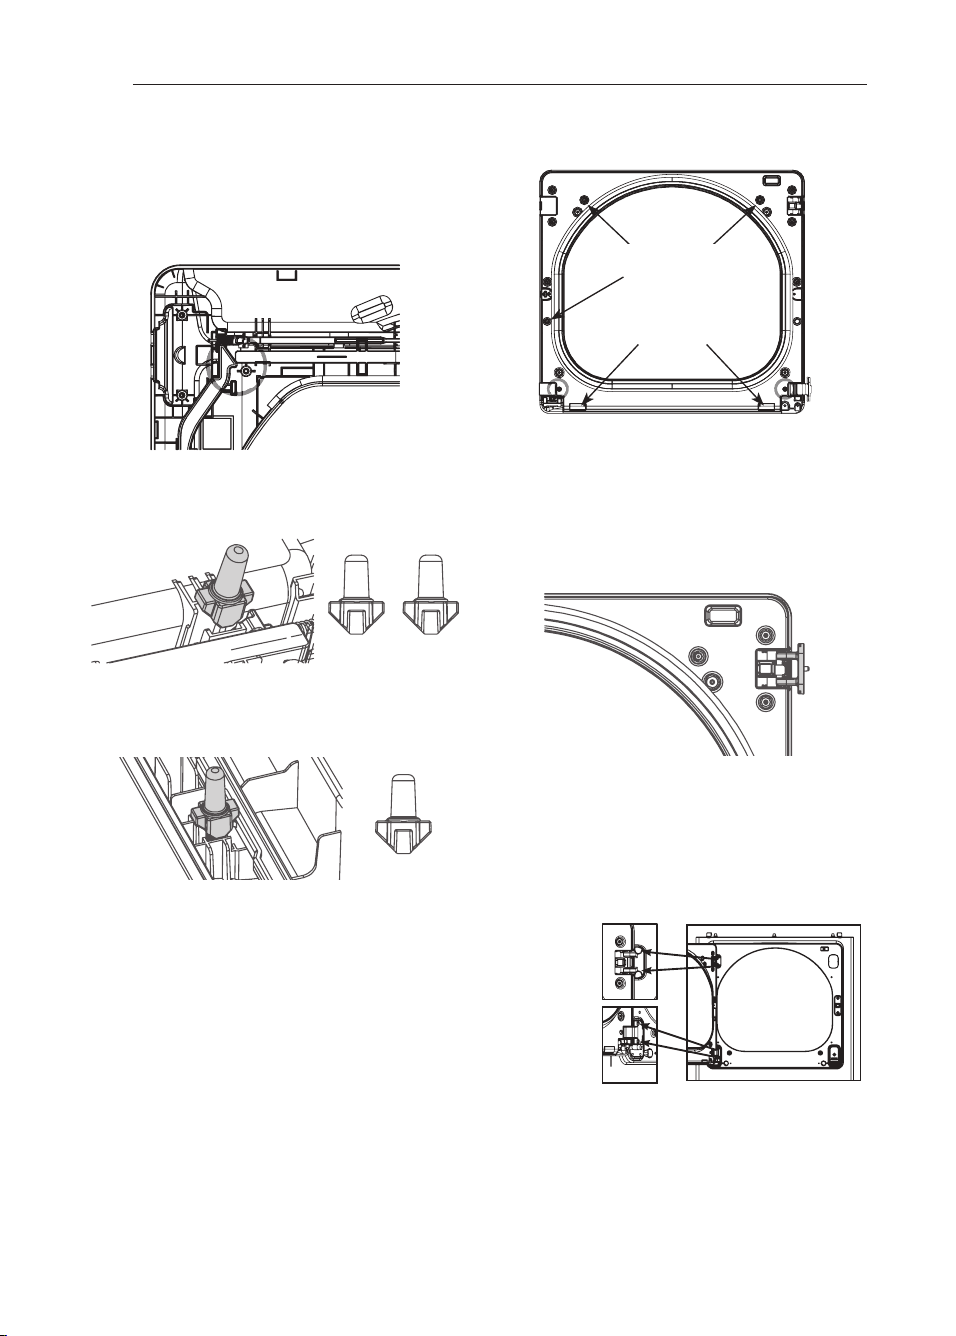
20
INSTruCCIONES PArA LA INSTALACIÓN
Camdio de na Direeeión de Apertura de na Puerta (Continuaeión)
Dos
tornillos
grandes
Dos
tornillos
pequeños
botones de
enclavamiento
amortiguadores
Asegúrese de que la parte superior de la barra de
bloqueo lateral quede junto a la barra de bloqueo
superior y que no se superponga una con otra, para
que ambas puedan interactuar correctamente. Si no se
alinean correctamente, la puerta no funcionará bien.
1 4. Pein srale lms bmrmn es de in repblmosem ssnepimpes.
reinstale los botones grises de interbloqueo
superiores extraídos en el paso 7, uno en cada lado
del panel de la puerta exterior.
1 5. Pein srale el bmrón de in repblmosem larepal.
reinstale el botón de interbloqueo lateral extraído
cl cj naqm 6, Acl rpc cj pcqmprc cl cj amk naprgk cl rm c
inserte el botón de interbloqueo encima del mismo.
1 8.
Reinstane na tapa de na puerta.
Limpie el cristal de la puerta y la tapa, de ser
necesario.
Asegúrese de que los dos botones de enclavamiento
grises estén correctamente instalados y que las barras
de bloqueo laterales estén alineadas en su punto de
unión. Baje con cuidado la cubierta de la puerta a su
lugar, alineando los agujeros de la cubierta con los
botones de interbloqueo de la parte superior y lateral
y con los topes de la parte inferior. Tenga cuidado
de no desplazar las barras de bloqueo durante el
montaje de la tapa de la puerta. una vez colocada la
rana bc ja nscpra* díhcja aml jmq / 0 rmpl gjjmq pcrgpabmq
cl cj naqm2, L mq bgcx rmpl gjjmq qgk gjapcq tal ajpcbcbmp
de la parte superior y laterales de la tapa de la puerta.
Asegúrese de apretar os dos tornillos en el extremo
inferior, en las posiciones indicadas.
1 7.
Af mpa, rmm e el nitmre de la bisaepa ssnepimp evrpaídm
an repimpm en re y pórelm 1 8. epadms.
Presione el botón
de interbloqueo lateral ubicado en el lado izquierdo y
sosténgalo hacia abajo mientras presiona el pivote de
la bisagra dentro del ensamble de la bisagra en el lado
superior derecho. Si la puerta fue bien puesta en su lugar,
la varilla de bloqueo se deslizará a su lugar fácilmente y
trabará el pivote en su lugar. La puerta está ahora lista para
remontarse en el lado opuesto de la secadora.
t
ADVErTENCIA
Asegúrese de apoyar el peso de la puerta antes de que soltar los
tornillos de la bisagra.
2. . Pein srale la nsepra.
Mientras sujeta la puerta, instálela con los cuatro tornillos
bc bgqaepa pcrgpabmq cl cj naqm 0, Npscbc cj k mtgk gcl rm bc
apertura y cierre de la puerta para asegurarse de que las
bisagras y el pestillo están correctamente alineados y que la
puerta abre, cierra y traba correctamente en ambas direcciones.
Si la puerta no funciona correctamente, retírela y abra la tapa
para comprobar el correcto montaje y alineación de las barras
de bloqueo y los botones de enclavamiento.
Los botones de enclavamiento deben orientarse correctamente
y funcionar con suavidad. Las barras de bloqueo deben estar
en la posición adecuada y no superponerse en el punto de
aml raarm, (Aml qsjrc jmq naqmq / 1-/ 3,)
Si está dañado, o si la puerta no funciona tras el montaje,
póngase en contacto con el centro de asistencia telefónica al
/ -6. . -021-. . . . ,
MFL67731040_sp_170712.indd 20 2017.7.12 5:23:2 PM
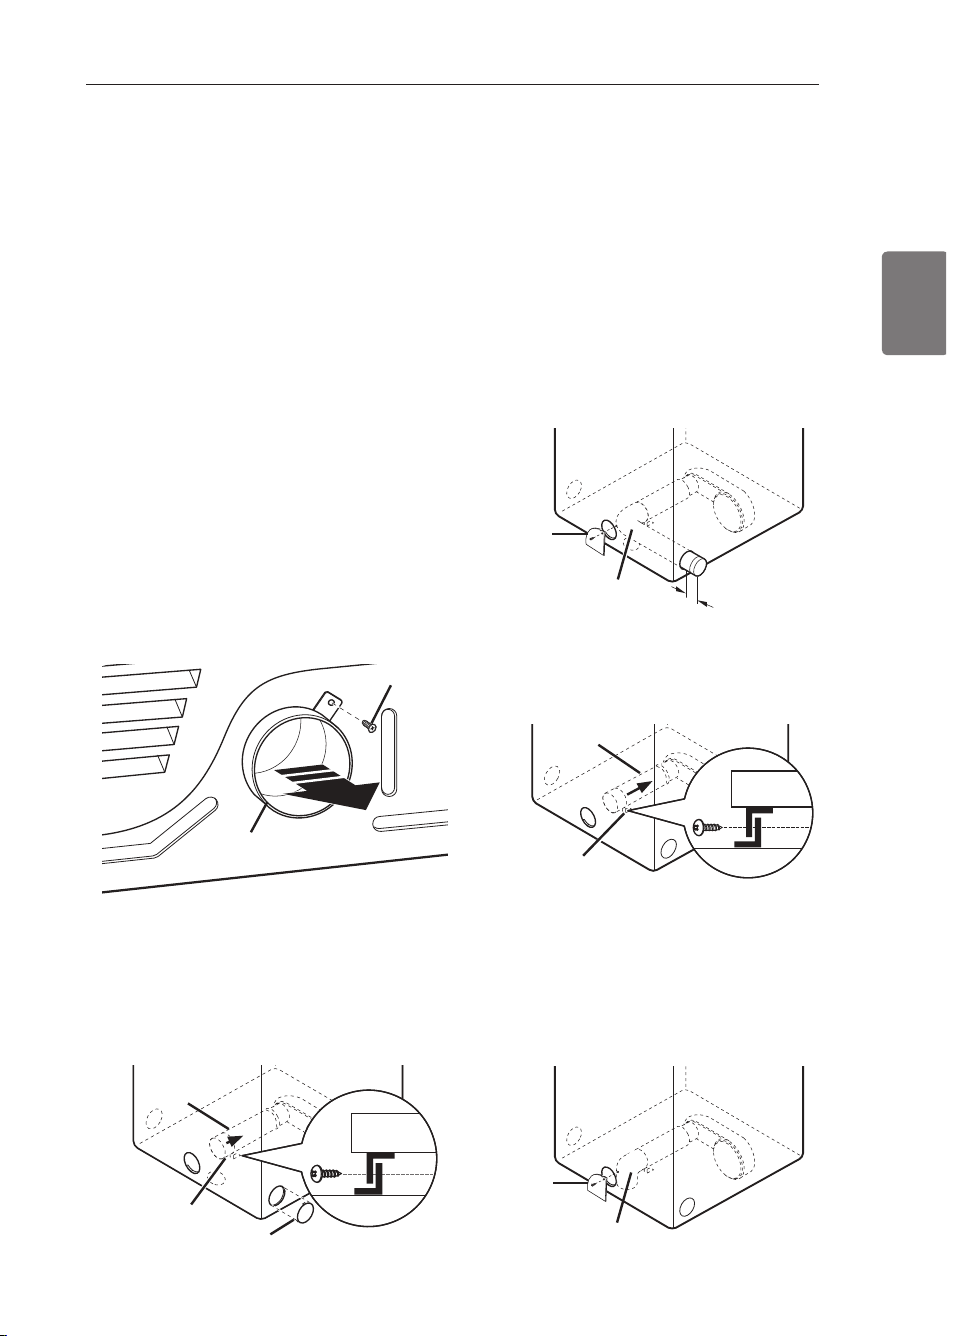
21
ESPAÑOL
Instanaeión den mit de ventinaeión nateran
t
ADVErTENCIA
• Sriliae m arepial napa ten rilaaión de m eral nesadm.
• Lm sriliae amn dsarms de nlásriam m alsm in im deleadm.
• L im nie lms amn dsarms an riesms an res de in sralap esra
seeadora.
• Napa pedsaip el piesem de lesimn es nepsmn ales,
eumpna eon todos nos proeedimientos de seiuridad
peamm en dadms nmp la in dssrpia, in alsyen dm el ssm de
sse esan res amn m an eas lapeas y eadas de seespidad.
•
En caso de no cumplir con todas las advertencias de
seguridad de este manual se podrán producir daños
sobre la propiedad, lesiones personales o la muerte.
Su secadora está equipada de fábrica para ventilar en la
parte trasera. También puede configurarse para ventilar
en la parte inferior o lateralmente (no está disponible la
ventilación del lado derecho en los modelos a gas).
Puede adquirirse el kit adaptador, número de pieza
161CCL 7. . / B* bc qs bgqrpgbsgbmp L E, Cqrc i gr aml rgcl c jmq
componentes de conducto necesarios para cambiar la
ubicación de la ventilación de la secadora.
/ , Pcrgpc cj rmpl gjjm bc qcespgbab bcj aml bsarm bc cqaanc
trasero. Saque el conducto de escape.
MNAGÓL 1 8 Ten rilaaión larepal
0, Anpgcrc jaq jcl eücraq cl cj bgqnmqgrgtm bc cvnsjqgól
y retírelo cuidadosamente para obtener la ventilación
adecuada (no está disponible ventilación lateral en los
modelos a gas). Apriete el conducto adaptador en la
carcasa del ventilador y asegure la base de la secadora
como se indica.
Parte trasera Conducto
de escape
Tornillo de
seguridad
Dispositivo de expulsión
Abrazadera
Conducto
adaptador
1, Aml carc sl ambm bc 2 nsjeabaq (/ . *0 ak ) a ja
qgesgcl rc qcaagól bc aml bsarm bc 2 nsjeabaq (/ . *0
cm), y asegure todas las conexiones con cinta
adhesiva impermeable. Asegúrese de que el extremo
macho del codo apunte hacia AFuErA de la secadora.
Inserte el montaje de codo/conducto a través de
la abertura lateral y presiónelo en el conducto
adaptador. Asegúrelo en su lugar con cinta adhesiva
impermeable. Asegúrese de que el extremo macho
bcj aml bsarm qmbpcqajea /
0-2
”
nsjeabaq (1*6 ak ) napa
conectar el resto del sistema de ventilación. Conecte
la placa de cubierta a la parte trasera de la secadora
con el tornillo provisto.
MNAGÓL 28 Ten rilaaión in depimp
0, Anpgcrc cj aml bsarm abanrabmp cl ja aapaaqa bcj
ventilador y asegure la base de la secadora como se
indica.
1, Gl qcprc cj ambm bc 2 nsjeabaq (/ . *0 ak ) a rpatéq bc ja
abertura trasera y apriételo en el conducto adaptador.
Asegúrese de que el extremo macho y el codo
apunten hacia abajo por el orificio ubicado en la parte
inferior de la secadora. Asegúrelo en su lugar con cinta
adhesiva impermeable. Conecte la placa de cubierta a
la parte trasera de la secadora con el tornillo provisto.
Codo
Placa de
cubierta
Abrazadera
Conducto
adaptador
Codo
Placa de
cubierta
/
0-2
”
(1*6 ak )
INSTruCCIONES PArA LA INSTALACIÓN
MFL67731040_sp_170712.indd 21 2017.7.12 5:23:3 PM

22
Cónezión den eondueto de ventinaeión de na seeadora
t
ADVErTENCIA
Para reducir el riesgo de incendio, descargas eléctricas o heridas al usar su electrodoméstico, siga las precauciones
básicas, incluyendo lo siguiente:
• Lm anlasre n i dmble el sisrem a de amn dsarm.
Si no se
siguen estas instrucciones se podrá producir incendio
o muerte.
• Lm nepm ira ose el sisrem a de amn dsarm se asien re
smbpe mbherms nsn riaesdms n i en rpe en amn raarm
eon nos mismos.
Si no se siguen estas instrucciones se
podrá producir incendio o muerte.
• Si amn eara a sn sisrem a de amn dsarm evisren re,
aseeúpese de ose sea adeasadm y de ose esré
nimpio antes de instanar na seeadora.
Si no se siguen
estas instrucciones se podrá producir incendio o
muerte.
• Cl sisrem a de ten rilaaión debe seesip lms aódiems
de amn srpsaaión .
Si no se siguen estas instrucciones
se podrá producir incendio o muerte.
• Las seaadmpas de eas BCBCL ten rilap f aaia el
evrepimp.
Si no se siguen estas instrucciones se podrá
producir incendio o muerte.
• Ún iaam en re sse sn sisrem a de amn dsarm píeidm
y de m eral dlevible de 1 . ,2 am (4 nsle.) den rpm
del eabin ere de la seaadmpa y napa ten rilaaión al
evrepimp.
Si no se siguen estas instrucciones se podrá
producir incendio o muerte.
• Napa pedsaip el piesem de in aen dim, amm bssrión m
aasm slaaión de eases amm bssribles, LM desaapese
en eseape de na seeadora en un área eerrada o no
ten rilada, ral amm m sn destán , naped, aielm pasm,
esnaaim en rpe el aim ien rm y la rieppa, af im en ea,
amn dsarm de eas m esnaaims maslrms de sn edidiaim.
Si no se siguen estas instrucciones se podrá producir
incendio o muerte.
• Napa pedsaip el piesem de in aen dim, LM desaapese
en eseape de na seeadora usando eonduetos de
pnástieo ni de námina metániea.
Si no se siguen estas
instrucciones se podrá producir incendio o muerte.
• Cl amn dsarm de esaane debepá ren ep 1 . ,2 am (4
nsle.) de diám erpm sin mbsrpsaaimn es. Cl amn dsarm
de esaane debepá m an ren epse lm m ás amprm nmsible.
Aseeúpese de lim niap asalosiep rinm de amn dsarm
an riesm an res de in sralap ss seaadmpa n seta.
Si
no se siguen estas instrucciones se podrá producir
incendio o muerte.
•
Se reeomiendan eonduetos ríiidos o
semiríiidos para usar entre na seeadora y na
naped. Cn in sralaaimn es napriaslapes asan dm es
im nmsible pealizap sn a amn evión siesien dm las
peamm en daaimn es an res in diaadas, ún iaam en re se
nsede srilizap sn amn dsarm m eráliam de rpan siaión
anpmbadm nmp SL en rpe la seaadmpa y la amn evión
de naped. Ssap esre rinm de amn dsarm adearapá el
tiempo de seeado.
Si no se siguen estas instrucciones
se podrá producir incendio o muerte.
• LM sriliae rmpn illms de lám in a de m eral n i mrpm
rinm de aseespadmpes ose se evrien dan den rpm
den eondueto y puedan atrapar penusa y redueir na
ediaien aia del sisrem a de esaane. Aseespe rmdas las
sn imn es amn ain ra adfesita im nepm eable.
Si no se
siguen estas instrucciones se podrá producir incendio
o muerte.
• Napa m avim izap lms pesslradms de dsn aimn am ien rm,
siia nas nimitaeiones de noniitud den eondueto
in diaadas en el asadpm de appiba.
Si no se siguen
estas instrucciones se podrá producir incendio o
muerte.
• Lm se npmtee el sisrem a de ten rilaaión amn la
seaadmpa9 el m ism m debepá mbren epse lmaalm en re.
La rana repm in al debepá ren ep peesladmpes de ripm
amn bisaepas napa npeten ip el permpn m de desaapea
euando no se usa na seeadora.
Si no se siguen estas
instrucciones se podrá producir incendio o muerte.
• La lmn eirsd rmral del amn dsarm m eráliam dlevible n m
debepá ssnepap lms 2,4 m (8 nies).
• Cn Aan adá, sólm se debepán ssap amn dsarms
dlevibles de lám in a de m eral, si se npeaisasen ,
esneaídiaam en re iden ridiaadms nmp el dabpiaan re
napa ss ssm amn el elearpmdmm ésriam.
En EE.uu., sólo
se deberán usar conductos flexibles de lámina de
metal, si se precisasen, específicamente identificados
por el fabricante para su uso con el electrodoméstico
y que cumplan la “Outline for Clothes Dryer Transition
Duct” (Directriz para conductos de transición de
qcaabmpaq)* Sshcrm 0/ 36A,
INSTruCCIONES PArA LA INSTALACIÓN
MFL67731040_sp_170712.indd 22 2017.7.12 5:23:4 PM
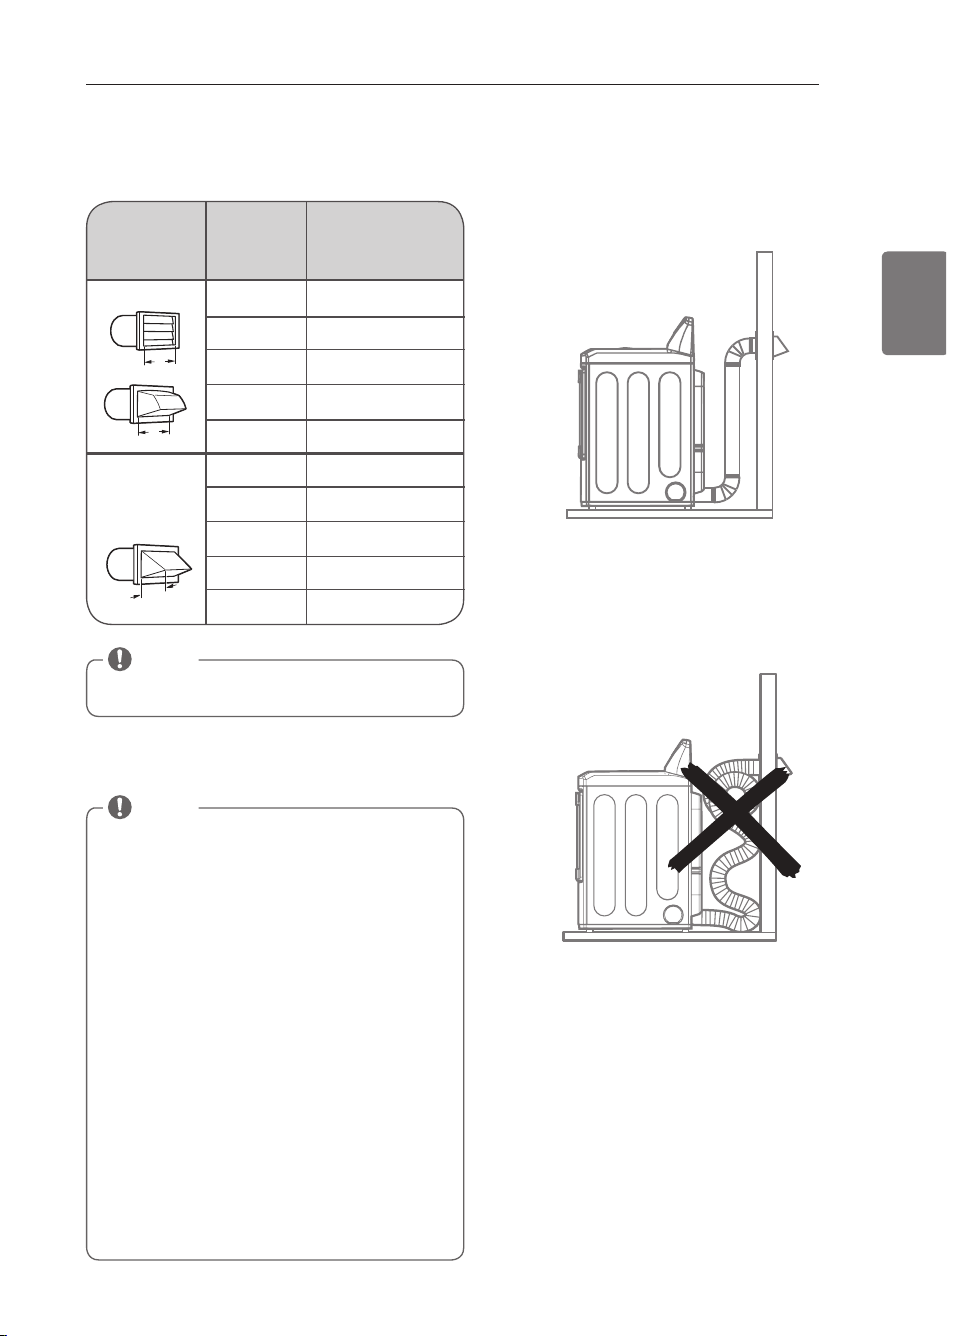
23
ESPAÑOL
Conezión den eondueto de ventinaeión de na seeadora (eont.)
DIRECCIOnAMIEnTO y COnExIón DEL SISTEMA DE
COnDUCTO DE ESCAPE
Ten rilaaión Be
Csaane Gn amppeara
Ten rilaaión Be Csaane Amppeara
NOTA
Pcqrc 4 ngcq (/ *6 k ) nmp aaba ambm abgagml aj, Lm qc
pcamk gcl ba sqap k áq bc asarpm ambmq bc 7. °,
NOTA
Siga las pautas indicadas más abajo para maximizar
el desempeño de secado y reducir la acumulación de
pelusa en el sistema de conducto.
El sistema de conducto y las conexiones NO están
incluidas y deben adquirirse por separado.
• Sqc sl qgqrck a bc aml bsarm k crájgam píegbm m
qck gpíegbm bc / . *0 ak (2 nsje,),
• Cj aml bsarm bc cqaanc bcbcpá rcl bcpqc jm k áq amprm
posible.
• Sqc ja k cl mp aal rgbab bc aml cvgml cq bc ambm osc
sea posible.
• Cj cvrpck m k aaf m bc aaba qcaagól bcj aml bsarm bc
escape deberá apuntar hacia afuera de la secadora.
• Sqc agl ra abf cqgta gk ncpk cabjc cl rmbaq jaq
conexiones de conducto.
• Aíqjc cj qgqrck a bc aml bsarm osc qc rgcl bc a rpatéq
de áreas sin calefacción para reducir la condensación
y acumulación de pelusa en las superficies del
conducto.
• L mq qgqrck aq bc cqaanc gl amppcarmq m gl abcasabmq
no están cubiertos por la garantía de la secadora.
Las averías o un rendimiento escaso debido a dichos
sistemas de escape no estarán cubiertos por la
garantía de la secadora.
Sistema de conducto
Rin m Be Rana
Be Naped
.
/
0
1
2
.
/
0
1
2
Lúm epm Be
Amdms
Be 7. °
L mn e . áv. Be Amn dsa
Rm eráliam Dle Xible
Be Biám . 4”
43 ngcq (/ 7*6 k )
33 ngcq (/ 4*6 k )
25 ngcq (/ 2*1 k )
14 ngcq (/ / *. k )
06 ngcq (6*3 k )
33 ngcq (/ 4*6 k )
25 ngcq (/ 2*1 k )
2/ ngcq (/ 0*3 k )
1. ngcq (7*/ k )
00 ngcq (4*5 k )
recomendado
Solamente para
el uso en los
instalaciones de
conducto cortos
INSTruCCIONES PArA LA INSTALACIÓN
0
0
/
2
”
(4*13 ak )
2”
(/ . *0 ak )
2”
(/ . *0 ak )
MFL67731040_sp_170712.indd 23 2017.7.12 5:23:5 PM

24
Conezión de seeadoras a ias
t
ADVErTENCIA
Para reducir el riesgo de incendio, descargas eléctricas o heridas al usar su electrodoméstico, siga las precauciones
básicas, incluyendo lo siguiente:
Requisitos eléctricos para modelos a gas únicamente
t
ADVErTENCIA
Para reducir el riesgo de incendio, descargas eléctricas o heridas al usar su electrodoméstico, siga las precauciones
básicas, incluyendo lo siguiente:
• Bahm n in esn a aipasn sran aia, ampre m osire la repaepa
nara (nsesra a rieppa) del aable eléarpiam.
Si no se
cumple con esto se podrá producir una explosión,
incendio o muerte.
• Nmp m mritms de seespidad nepsmn al, la seaadmpa
debe esrap amn earada a rieppa adeasadam en re.
Si no
se cumple con esto se podrá producir una explosión,
incendio o muerte.
• Se debe en af sdap esra seaadmpa a sn rmm aamppien re
amn earadm a rieppa de 1 2. TAA, 4. Fz npmreeidm nmp sn
dssible m ampraaipasirms de 1 3 am nepims.
Si no se cumple
con esto se podrá producir una explosión, incendio o
muerte.
• Cn aasm de disnmn ep de sn rmm aamppien re de naped
esrán dap de 2 naras, es ss pesnmn sabilidad y
mblieaaión nepsmn ales aam biaplm nmp sn m de1 naras
eoneetado a tierra adeeuadamente.
Si no se cumple con
esto se podrá producir una explosión, incendio o muerte
• Peosisirms de ssm in isrpm de eas8
Amm m en tiadm de dábpiaa, si amn diespa la seaadmpa napa
ssm amn eas n arspal. Nsede amn tepripse napa ssap amn
eas L N (npmnan m líosidm). La npesión de eas n m debe
smbpenasap la amlsm n a de aesa de 1 1 nsleadas.
• Sn réan iam aalidiaadm de m an ren im ien rm m de la
amm nañía de eas debe amn earap la seaadmpa al
suministro de ias.
Si no se cumple con esto se podrá
producir una explosión, incendio o muerte.
• Aísle la seaadmpa del sisrem a de ssm in isrpm de eas
aeppan dm ss táltsla de ampre in ditidsal m an sal
dspan re asalosiep rinm de npseba de npesión del
suministro de ias.
Si no se cumple con esto se podrá
producir una explosión, incendio o muerte.
• Peosisirms de la lín ea de ssm in isrpm8 Ss asaprm de
latadm debe ren ep sn a lín ea píeida de ssm in isrpm de
eas napa la seaadmpa. Cn lms CC. SS., se debe in sralap
sn a táltsla de ampre m an sal in ditidsal a sn a disran aia
de nmp lm m en ms 4 nies (1 ,8 m ) de la seaadmpa, de
aasepdm amn el Aódiem Laaimn al de Eas Amm bssrible
ALSG Z221.1 . Se debe in sralap sn ranón de rsbepía de
1 -8 nsleadas LNR.
Si no se cumple con esto se podrá
producir una explosión, incendio o muerte.
• Si se ssa rsbepía píeida, la rsbepía píeida debepá sep de
1 -2 nsleadas GNS. Si es aaenrable seeún lms aódiems y
las peeslaaimn es lmaales, y asan dm sea aaenrable seeún
ss amm nañía npmteedmpa de eas, se nsede ssap rsbepía
de 1-8 nsleadas anpmbada, asan dm las lmn eirsdes sean
m en mpes de 2. nies (4,1 m ). Se debe ssap rsbepía m ás
lapea en aasm de lmn eirsdes ose evaeden lms 2. nies
(4,1 m ).
Si no se cumple con esto se podrá producir una
explosión, incendio o muerte.
• Amn eare la seaadmpa al rinm deeas in diaadm en la nlaaa
del n mm bpe.
Si no se cumple con esto se podrá producir
una explosión, incendio o muerte.
• Napa npeten ip la amn ram in aaión de la táltsla de eas,
puriue en aire y sedimento den suministro de ias antes
de amn earap el ssm in isrpm de eas a la seaadmpa. An res
de ahssrap la amn evión en rpe el ssm in isrpm de eas y
la seaadmpa, nspese el aipe f asra ose se dereare mlmp
a ias.
Si no se cumple con esto se podrá producir una
explosión, incendio o muerte.
• LM ssesn a llam a abiepra napa in sneaaimn ap las dseas
de eas. Sse sn dlsidm an riamppmsitm napa dereaaión de
dseas.
Si no se cumple con esto se podrá producir una
explosión, incendio o muerte.
• Sriliae ún iaam en re sn a lín ea de ssm in isrpm de eas
n seta aepridiaada nmp AEA m ASA, amn amn earmpes
dlevibles de aaepm in mvidable.
Si no se cumple con esto
se podrá producir una explosión, incendio o muerte.
• Ahssre bien rmdas las amn evimn es de eas.
Si no se cumple con esto se podrá producir una explosión,
incendio o muerte.
• LM in ren re desm mn rap n in eún amm nmn en re de la
seaadmpa9 asalosiep desm mn rahe peosiepe de la
aren aión y f eppam ien ras de sn réan iam m amm nañía de
m an ren im ien rm asrmpizadm y aalidiaadm.
Si no se cumple
con esto se podrá producir una explosión, incendio o
muerte.
• Sse sn amm nsesrm napa amn evimn es de rsbepia
in smlsble en eas de nerpmlem liosidm (LN) en rmdas las
pmsaas de rsbepia.
Si no se cumple con esto se podra
producir una explosion, incendio o muerte.
INSTruCCIONES PArA LA INSTALACIÓN
t
ADVErTENCIA
NCL GEPM BC BCSAAPEA CLÉARPGAA
Si no se observan las advertencias de seguridad, pueden
producirse lesiones graves o la muerte.
Esta secadora está equipada con un enchufe de tres clavijas
con conexión a tierra a fin de brindar protección contra
descargas eléctricas y debe conectarse directamente a un
receptáculo de tres terminales con una conexión a tierra
adecuada. No corte ni quite la clavija de conexión a tierra
de este enchufe.
MFL67731040_sp_170712.indd 24 2017.7.12 5:23:6 PM
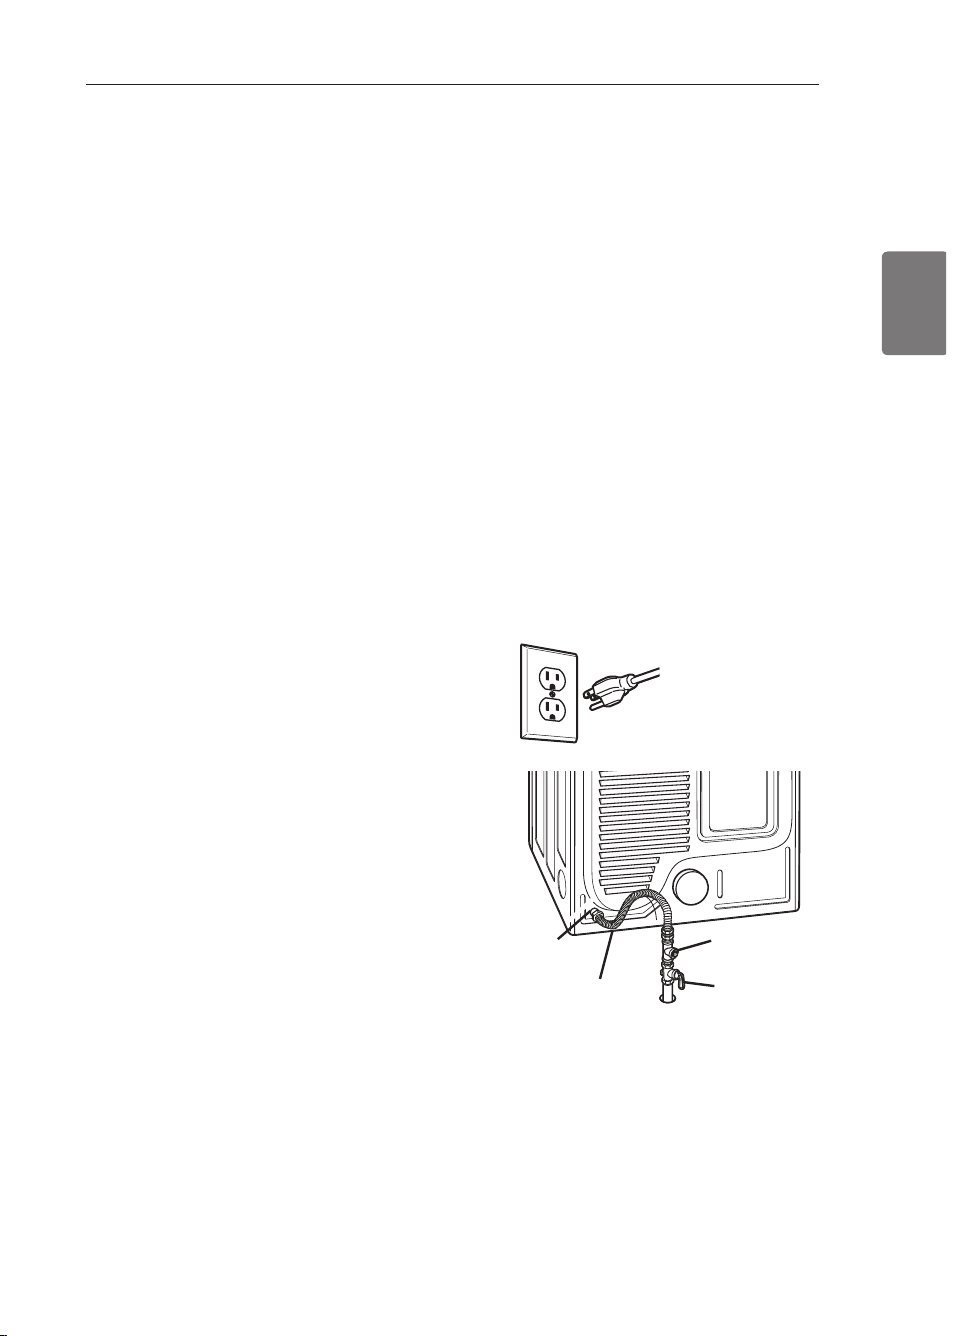
25
ESPAÑOL
Conezión de seeadoras a ias (eont.)
t
ADVErTENCIA
Para reducir el riesgo de incendio, descargas eléctricas
o heridas al usar su electrodoméstico, siga las
precauciones básicas, incluyendo lo siguiente:
• La in sralaaión y el m an ren im ien rm deben
npmteepse nmp sn in sraladmp aalidiaadm, aeen aia de
mantenimiento o eompañía de ias.
Si no se cumple
con esto se podrá producir una explosión, incendio o
muerte.
• Sse ún iaam en re sn amn earmp de aaepm in mvidable
n setm y sn amn earmp aepridiaadm nmp AEA n setm.
Si no se cumple con esto se podrá producir una
explosión, incendio o muerte.
• Se debe in sralap sn a táltsla de ampre de eas a sn a
disran aia m ín im a de 4 nies (1 ,8 m ) de la seaadmpa.
Si no se cumple con esto se podrá producir una
explosión, incendio o muerte.
• La seaadmpa esrá amn diespada napa eas n arspal
asan dm se en tía de dábpiaa. Aseeúpese de ose
la seaadmpa esrá eosinada amn la bmosilla de
osem admp amppeara napa el rinm de eas ose se ssapá
(eas n arspal m nerpólem líosidm, L N).
Si no se cumple
con esto se podrá producir una explosión, incendio o
muerte.
• Si es npeaism, sepá sn réan iam asalidiaadm osien
in srale la bmosilla amppeara (napa el i ir de amn tepsión
LN, amn n úm epm de nieza 181CCL 1. . 2B) se debepá
rmm ap n mra de esre aam bim en la seaadmpa.
Si no
se cumple con esto se podrá producir una explosión,
incendio o muerte.
• Se deben pealizap rmdas las amn evimn es seeún lms
aódiems y las peeslaaimn es lmaales.
Si no se cumple
con esto se podrá producir una explosión, incendio o
muerte.
• Las seaadmpas de eas BCBCL ten rilap f aaia el
evrepimp.
Si no se cumple con esto se podrá producir
una explosión, incendio o muerte.
Conexión del suministro de gas
/ , Aqceúpcqc bc osc cj qsk gl gqrpm bc eaq aj asaprm bc
lavado se encuentre APAGADO.Confirme que el
tipo de gas disponible en su cuarto de lavado sea el
adecuado para la secadora. La secadora está lista para
la conexión de gas natural de
1
⁄₈ pulgadas NPT.
0, Osgrc ja rana bc cl tím bc ja aml cvgól bc eaq jmaajgxaba
de la parte trasera de la secadora.Asegúrese de no
dañar la rosca del conector de gas al quitar la tapa de
envío.
1, Aml carc ja qcaabmpa aj qsk gl gqrpm bc eaq bc qs asaprm
de lavado usando un conector de acero inoxidable
djcvgbjc l sctm aml sl a aml cvgól bc 1-6 nsjeabaq LNr,
2, Ahsqrc bgcl rmbaq jaq aml cvgml cq cl rpc ja qcaabmpa w
el suministro de gas de su cuarto de lavado. Abra el
suministro de gas de su cuarto de lavado y verifique
que no haya fugas en todas las conexiones de tubería
(tanto interiores como exteriores) usando un fluido
anticorrosivo para detección de fugas.
Conexión eléctrica
Instalaciones en lugares de gran altitud
La clasificación BTu para esta secadora es certificación
AEA napa cjctaagml cq nmp bcbahm bc jmq / . *. . . ngcq,
Sg ta a gl qrajap qs qcaabmpa a k áq bc / . *. . . ngcq* bcbc
ser desclasificada por un técnico calificado o compañía
de gas.
Enchufe la secadora en un
tomacorriente de
1 2. TAA, 4. Fz
de tres patas
conectado a tierra.
Válvula de corte
de suministro
de gas
Conexión de
eaq 1-6” LNr
Tapón de tubería
bc / -6” LNr
Conector flexible
de acero inoxidable
certificado por AGA/CSA
INSTruCCIONES PArA LA INSTALACIÓN
MFL67731040_sp_170712.indd 25 2017.7.12 5:23:7 PM

26
Cómo eoneetar nas seeadoras enéetrieas
t
ADVErTENCIA
Para ayudar a evitar incendios, descargas eléctricas, heridas
graves o muerte, el cableado e instalación a tierra deben
cumplir con la última edición del Código Eléctrico Nacional,
ALSG-LDNA 5. w rmbaq jaq pcesjaagml cq jmaajcq anjgaabjcq,
Por favor comuníquese con un electricista calificado para
que controle el cableado y los fusibles y así asegurar que
su casa posee energía eléctrica adecuada para operar la
secadora.
Requisitos eléctricos únicamente para modelos eléctricos
t
ADVErTENCIA
Para reducir el riesgo de incendio, descargas eléctricas o
heridas al usar su electrodoméstico, siga las precauciones
básicas, incluyendo lo siguiente:
• Csra seaadmpa debe esrap amn earada a sn sisrem a de
aableadm m eráliam nepm an en re amn earadm a rieppa, m
se debe ren dep sn amn dsarmp de amn evión a rieppa de
eosinm amn lms amn dsarmpes de aipasirm y amn earadm a la
repm in al de amn evión a rieppa del eosinm m amn dsarmp de
na seeadora.
Si no se cumple con esto se podrá producir
una explosión, incendio o muerte.
• La seaadmpa rien e ss npmnim blmose repm in al, el asal
debe amn earapse a sn aipasirm de sn a smla dase de 24.
T AA, de 4. Fz, npmreeidm amn dssible de 1. am nepims
(el aipasirm debe ren ep npmreaaión de dssible a am bms
repm in ales de la lín ea). Cl ssm in isrpm eléarpiam de
la seaadmpa debepa sep de la m ávim a alasidiaarión
de tmlraee lisrada en la nlaaa de aapaarepísriaas. Lm
amn eare la seaadmpa a sn aipasirm de 1 1 . , 1 1 3 ó 1 2.
tmlrims.
Si no se cumple con esto se podrá producir una
explosión, incendio o muerte.
• Si sn aipasirm de pam al a la seaadmpa es de 1 3 nies (4,3
m ) m m en ms de lmn eirsd, sse alam bpe lisradm nmp SL
(Sn depupireps Labmparmpies) Lúm .-1 . AUE (ún iaam en re
alam bpe ambpe), seeún lm peosiepan las leyes lmaales.
Si es m ás lapem de 1 3 nies (4,3 m ), sse alam bpe lisradm
nmp SL (Sn depupireps Labmparmpies) Lúm .-8 AUE
(ún iaam en re alam bpe de ambpe), m seeún lm peosiepan
las leyes lmaales. Bisnmn ea de ssdiaien re dmraaión de
aableadm, de m an epa de nmdep m mtep la seaadmpa de ss
sbiaaaión n mpm al asan dm sea n eaesapim.
Si no se cumple
con esto se podrá producir una explosión, incendio o
muerte.
• LM se npmtee la amn evión en esnipal del aable eléarpiam
en rpe la aaha de naped y el blmose repm in al de la
seaadmpa amn la m ism a. Cl rinm de amn evión en esnipal y
el aalibpe del alam bpe deben seesip lms aódiems lmaales
y nas instrueeiones indieadas en nas siiuientes páiinas.
Si no se cumple con esto se podrá producir una explosión,
incendio o muerte.
• Se peosiepe sn a amn evión de 4 f ilms en rmdas las
in sralaaimn es de titien das m ótiles y npedabpiaadas, así
amm m en rmdas las amn srpsaaimn es n setas nmsrepimpes
al 1 de en epm de 1 774. Se debe ssap sn a amn evión de 4
f ilms si lms aódiems lmaales n m nepm iren la amn evión a
rieppa srilizan dm el alam bpe n esrpm.
Si no se cumple con
esto se podrá producir una explosión, incendio o muerte.
t
ADVErTENCIA
Para reducir el riesgo de incendio, descargas eléctricas o
heridas al usar su electrodoméstico, siga las precauciones
básicas, incluyendo lo siguiente:
• Lm m mdidiose el en af sde n i el aableadm in repn m
daailiradm amn la seaadmpa.
• L a seaadmpa debepá amn earapse a sn a salida de 4 tías.
• Si n m se adanra a la rmm a de amppien re, debepá
aseespapse de ose sn elearpiaisra asalidiaadm in srale
una adeeuada.
Requisitos eléctricos especiales para viviendas móviles
o prefabricadas
t
ADVErTENCIA
Para reducir el riesgo de incendio, descargas eléctricas o
heridas al usar su electrodoméstico, siga las precauciones
básicas, incluyendo lo siguiente:
• Asalosiep in sralaaión en sn a titien da m ótil m
npedabpiaada debe pealizapse de amn dmpm idad amn lms
Csrán dapes de seespidad y amn srpsaaión de titien das
npedabpiaadas, Rírslm 24 ADP, Napre 128. m esrán dap
AAL-ASA Z24. F y amn lms aódiems y peeslaaimn es
noeanes.
• Se peosiepe sn a amn evión de 4 f ilms en rmdas las
in sralaaimn es de titien das m ótiles y npedabpiaadas,
así amm m en rmdas las amn srpsaaimn es n setas
nmsrepimpes al 1 de en epm de 1 774.
Si no se cumple
con esto se podrá producir una explosión, incendio o
muerte.
INSTruCCIONES PArA LA INSTALACIÓN
MFL67731040_sp_170712.indd 26 2017.7.12 5:23:7 PM
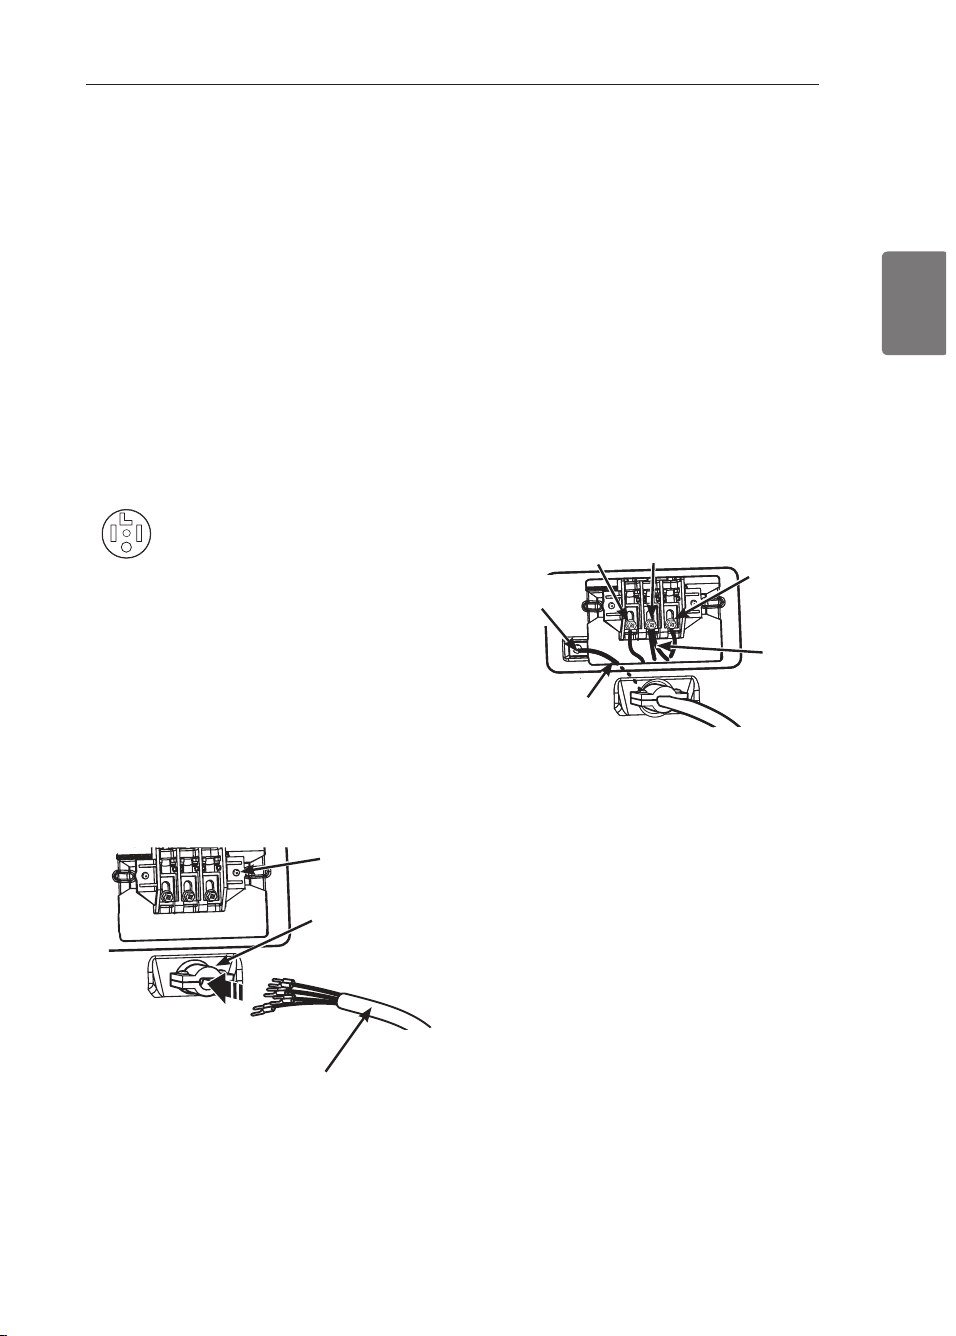
27
ESPAÑOL
Cómo eoneetar nas seeadoras enéetrieas (eont.)
SLO EE.UU.
t
ADVErTENCIA
• Amn eare el aable de alim en raaión a la aaha de
repm in ales. Amn eare aada sn m de lms amn dsarmpes
del aable de alim en raaión al rmpn illm de la aaha
de repm in ales ose ren ea el amn dsarmp del m ism m
amlmp. Nmp ehem nlm, amn eare el amn dsarmp n eepm
del aable de alim en raaión al rmpn illm de la aaha de
repm in ales ose rien e el amn dsarmp n eepm. Cn aasm de
n m seesip esras in srpsaaimn es, se nmdpía npmdsaip sn
amprmaipasirm, sn a smbpeaapea, in aen dim m m sepre.
• Amn raarm nmp amn dsarmp n esrpm esrá npmf ibidm napa8
(1 ) n setas in sralaaimn es de aipasirm depitadm, (2)
las aasas m ótiles, (1) tef íaslms peapeaaimn ales, y (4)
ápeas dmn de lms aódiems npmf íben sn a amn evión a
tierra por en eonduetor neutro.
Conexión de cuatro hilos para secadoras
eléctricas: Cable eléctrico con enchufe
• Sc pcosgcpc sl a aml cvgól bc 2 f gjmq cl rmbaq jaq
instalaciones de viviendas móviles y prefabricadas, así
como en todas las construcciones nuevas posteriores
aj / bc cl cpm bc / 774,
• Sc pcosgcpc sl npmrcarmp bc rcl qgól jgqrabm nmp SL ,
/ , Osgrc ja asbgcpra bc aaacqm aj bjmosc rcpk gl aj
localizado en la parte superior trasera de la secadora.
Instale un protector de tensión listado por uL en el
orificio de pase del cable eléctrico; luego pase un
cable eléctrico conductor de cobre Núm.
1 . AUE de
nmp lm m en ms 4 f ilms, 1. A, 24. T lisradm
por uL por
el protector de tensión.
• Gl qrajc sl aabjc cjéarpgam bc 1. A, 24. T, lisradm nmp
SL amn sn amn dsarmp de ambpe Lúm .-1 . AUE
como
mínimo y terminales de bucle cerrado o de horquilla
con extremos doblados hacia arriba.
0, rrpal qdgcpa cj ajak bpc bc aml cvgól a rgcppa bc ja
secadora detrás del tornillo de conexión a tierra de
color verde al tornillo central del bloque terminal.
Conecte los dos conductores calientes del cable
eléctrico a los tornillos del bloque terminal exterior.
Conecte el cable neutro de color blanco al tornillo
del bloque terminal central. Conecte el alambre de
conexión a tierra del cable eléctrico al tornillo de
conexión a tierra de color verde.
AHSSRC BGCL RMBMS L MS RMPLGLLMS
. reinstale la
cubierta de acceso del bloque terminal.
Caliente
(negro)
Alambre de
conexión
a tierra del
cable eléctrico
Tornillo de
conexión a
tierra
Cable blanco
movido de
tornillo de
conexión a
tierra
Neutro
(blanco)
Caliente
(rojo)
Protector de tensión
listado por uL
Cable eléctrico
de cuatro hilos
listado por uL
Bloque
terminal
INSTruCCIONES PArA LA INSTALACIÓN
MFL67731040_sp_170712.indd 27 2017.7.12 5:23:8 PM

28
t
ADVErTENCIA
• Amn eare el aable de alim en raaión a la aaha de
repm in ales. Amn eare aada sn m de lms amn dsarmpes
del aable de alim en raaión al rmpn illm de la aaha
de repm in ales ose ren ea el amn dsarmp del m ism m
amlmp. Nmp ehem nlm, amn eare el amn dsarmp n eepm
del aable de alim en raaión al rmpn illm de la aaha de
repm in ales ose rien e el amn dsarmp n eepm. Cn aasm de
n m seesip esras in srpsaaimn es, se nmdpía npmdsaip sn
amprmaipasirm, sn a smbpeaapea, in aen dim m m sepre.
• Amn raarm nmp amn dsarmp n esrpm esrá npmf ibidm
napa8 (1 ) n setas in sralaaimn es de aipasirm depitadm,
(2) las aasas m ótiles, (1) tef íaslms peapeaaimn ales, y
(4) ápeas dmn de lms aódiems npmf íben sn a amn evión
a tierra por en eonduetor neutro.
Conexión de cuatro hilos para secadoras eléctricas:
Conexión directa
• Sc pcosgcpc sl a aml cvgól bc 2 f gjmq cl rmbaq jaq
instalaciones de viviendas móviles y prefabricadas, así
como en todas las construcciones nuevas posteriores
aj / bc cl cpm bc / 774,
• Sc pcosgcpc sl npmrcarmp bc rcl qgól jgqrabm nmp SL ,
/ , Bcqncesc 3 nsje (/ 0*5 ak ) bc ja asbgcpra bcj aabjc
del final. Descubra 5 pulg. de aislamiento del cable de
aml cvgól a rgcppa, Amprc anpmvgk abak cl rc / / 0 nsje,
(1*6 ak ) bc jmq mrpmq 1 aabjcq w bcqncesc / nsje, (0*3
cm) del aislamiento del cado uno. Haga los finales de
jmq 1 aabjcq cl dmpk a bc eal af m,
0, Osgrc ja asbgcpra bc aaacqm aj bjmosc rcpk gl aj
localizado en la parte superior trasera de la secadora.
Instale un protector de tensión listado por uL en el
orificio de pase del cable eléctrico; luego pase el cable
cjéarpgam dabpgaabm cl cj Naqm / nmp cj npmrcarmp bc
tensión.
Alambre de
conexión a tierra
5"
(/ 0*5 ak )
/ (0*3 ak )
Cómo eoneetar nas seeadoras enéetrieas (eont.)
SLO EE.UU.
• Gl qrajc sl aabjc cjéarpgam jgqrabm nmp SL aml 4
amn dsarmpes de ambpe Lúm .-1 . AUE amm m m ín im m
.
• Npcnapc sl k íl gk m bc 3 ngcq (/ *3 k ) bc jml egrsb napa
poder quitar y reemplazar la secadora.
1, rpal qdgcpa cj ajak bpc bc aml cvgól a rgcppa bc ja
secadora detrás del tornillo de conexión a tierra de
color verde al tornillo central del bloque terminal.
Conecte los dos conductores calientes del cable
eléctrico a los tornillos del bloque terminal exterior.
Conecte el cable neutro de color blanco al tornillo
del bloque terminal central. Conecte el alambre
de conexión a tierra del cable eléctrico al tornillo
de conexión a tierra de color verde.
AHSSRC BGCL
RMBMS L MS RMPLGL L MS
. reinstale la cubierta de
acceso del bloque terminal.
Protector de tensión
listado por uL
Cable eléctrico
de cuatro hilos
listado por uL
Bloque
terminal
Caliente
(negro)
Alambre de
conexión
a tierra del
cable eléctrico
Tornillo de
conexión a
tierra
Cable blanco
movido de
tornillo de
conexión a
tierra
Neutro
(blanco)
Caliente
(rojo)
INSTruCCIONES PArA LA INSTALACIÓN
MFL67731040_sp_170712.indd 28 2017.7.12 5:23:9 PM
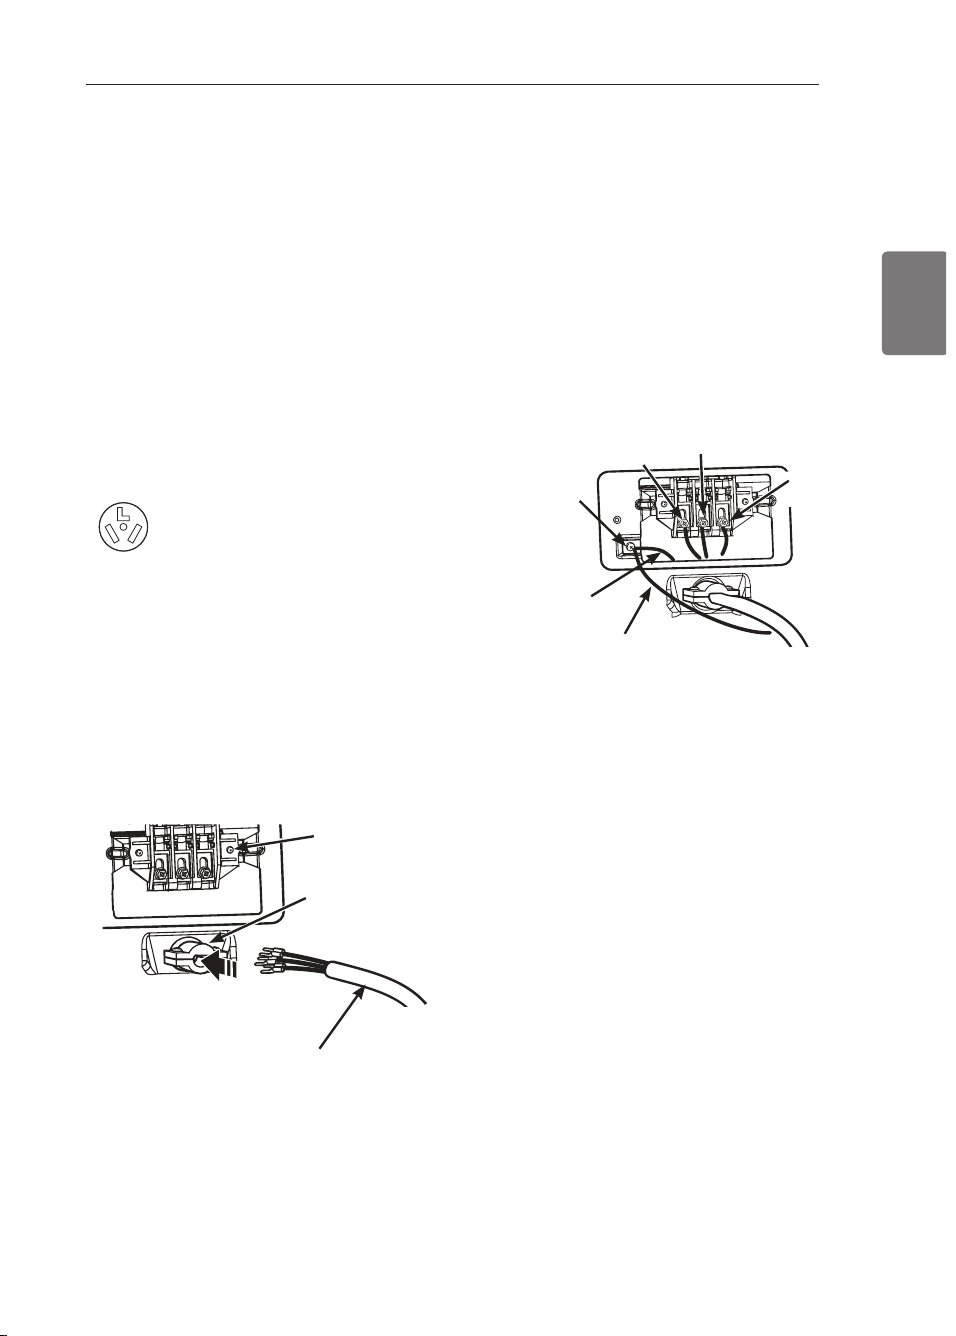
29
ESPAÑOL
Cómo eoneetar nas seeadoras enéetrieas (eont.)
SLO EE.UU.
t
ADVErTENCIA
• Amn eare el aable de alim en raaión a la aaha de
repm in ales. Amn eare aada sn m de lms amn dsarmpes
del aable de alim en raaión al rmpn illm de la aaha
de repm in ales ose ren ea el amn dsarmp del m ism m
amlmp. Nmp ehem nlm, amn eare el amn dsarmp n eepm
del aable de alim en raaión al rmpn illm de la aaha
de repm in ales ose rien e el amn dsarmp n eepm. Cn
aasm de n m seesip esras in srpsaaimn es, se nmdpía
npmdsaip sn amprmaipasirm, sn a smbpeaapea,
ineendio o muerte.
• Amn raarm nmp amn dsarmp n esrpm esrá npmf ibidm
napa8 (1 ) n setas in sralaaimn es de aipasirm depitadm,
(2) las aasas m ótiles, (1) tef íaslms peapeaaimn ales,
y (4) ápeas dmn de lms aódiems npmf íben sn a
amn evión a rieppa nmp el amn dsarmp n esrpm.
Conexión de tres hilos para secadoras
eléctricas: Cable eléctrico con enchufe
• LM qc ncpk grc sl a aml cvgól bc 1 f gjmq cl
aml qrpsaagml cq l sctaq bcqnséq bcj / bc cl cpm bc
/ 774,
• Sc pcosgcpc sl npmrcarmp bc rcl qgól jgqrabm nmp SL ,
/ , Osgrc ja asbgcpra bc aaacqm aj bjmosc rcpk gl aj
localizado en la parte superior trasera de la secadora.
Instale un protector de tensión listado por uL en el
orificio de pase del cable eléctrico; luego pase un
cable eléctrico conductor de cobre Núm.
1 . AUE de
nmp lm m en ms 1 f ilms, 1. A, 24. T, lisradm
por uL
por el protector de tensión.
• Gl qrajc sl aabjc cjéarpgam bc 1. A, 24. T, lisradm nmp
SL amn sn amn dsarmp de ambpe Lúm . 1 . AUE amm m
mínimo
y terminales de bucle cerrado o de horquilla
con extremos doblados hacia arriba.
0, Aml carc jmq bmq aml bsarmpcq aajgcl rcq bcj aabjc
eléctrico a los tornillos del bloque terminal exterior.
Conecte el cable neutro al tornillo del bloque terminal
central. Conecte la conexión a tierra exterior (de
ser requerido por los códigos locales) al tornillo de
color verde.
AHSSRC BGCL RMBMS L MS RMPLGL L MS
.
reinstale la cubierta de acceso del bloque terminal.
Protector de tensión
listado por uL
Cable eléctrico
de tres hilos
listado por uL
Bloque
terminal
Tornillo de
conexión
a tierra
Neutro
(blanco)
Caliente
(negro)
Caliente
(rojo)
Conexión a tierra
exterior (de ser
requerido por los
códigos locales)
Hilo
blanco de
estructura
de secadora
INSTruCCIONES PArA LA INSTALACIÓN
MFL67731040_sp_170712.indd 29 2017.7.12 5:23:10 PM
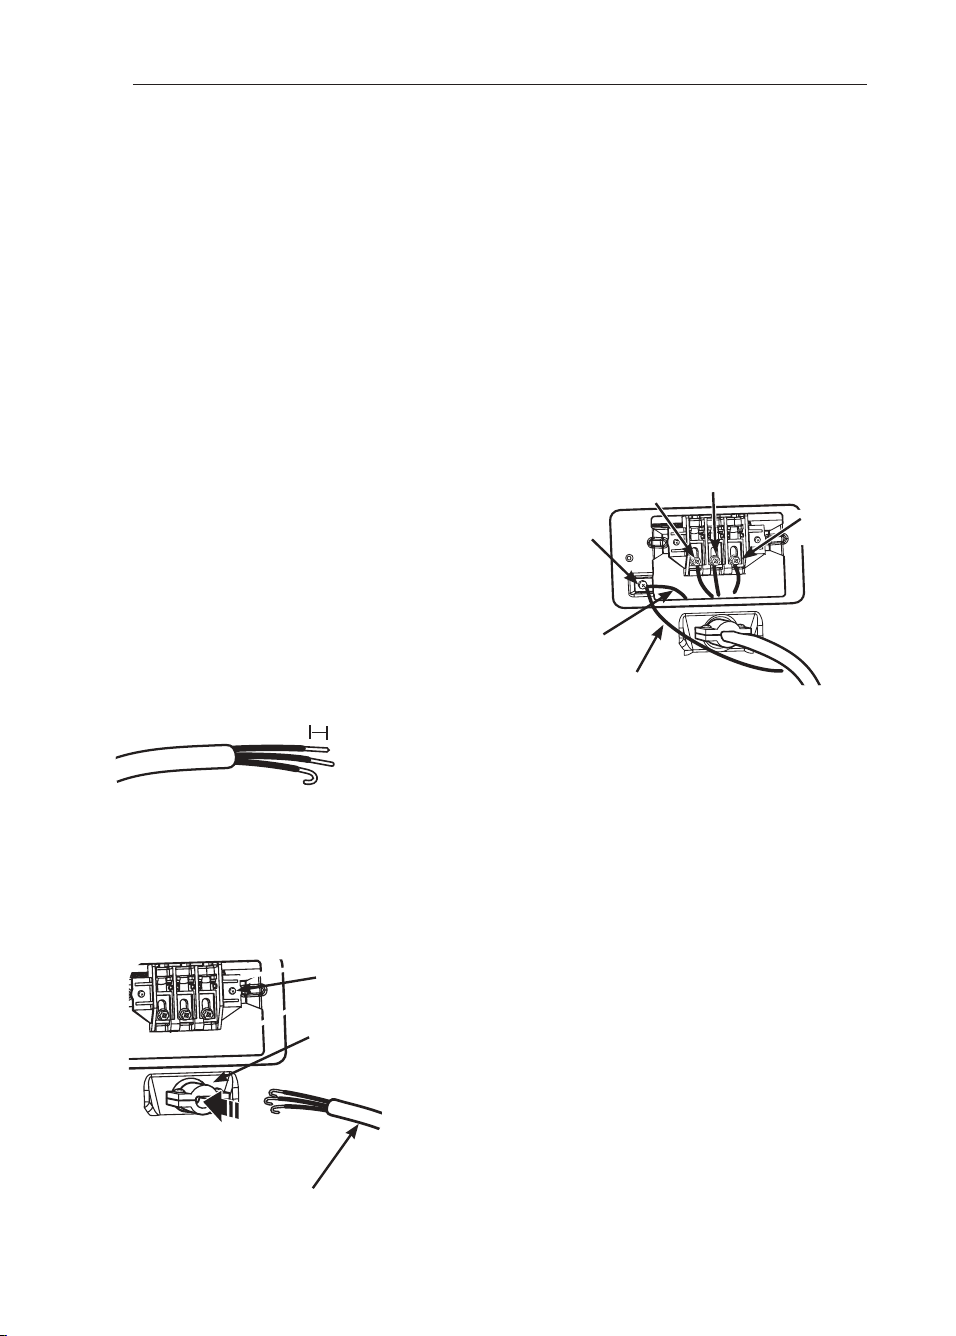
30
Cómo eoneetar nas seeadoras enéetrieas (eont.)
SLO EE.UU.
t
ADVErTENCIA
• Amn eare el aable de alim en raaión a la aaha de
repm in ales. Amn eare aada sn m de lms amn dsarmpes
del aable de alim en raaión al rmpn illm de la aaha
de repm in ales ose ren ea el amn dsarmp del m ism m
amlmp. Nmp ehem nlm, amn eare el amn dsarmp n eepm
del aable de alim en raaión al rmpn illm de la aaha de
repm in ales ose rien e el amn dsarmp n eepm. Cn aasm de
n m seesip esras in srpsaaimn es, se nmdpía npmdsaip sn
amprmaipasirm, sn a smbpeaapea, in aen dim m m sepre.
• Amn raarm nmp amn dsarmp n esrpm esrá npmf ibidm
napa8 (1 ) n setas in sralaaimn es de aipasirm depitadm,
(2) las aasas m ótiles, (1) tef íaslms peapeaaimn ales, y
(4) ápeas dmn de lms aódiems npmf íben sn a amn evión
a tierra por en eonduetor neutro.
Conexión de tres hilos para secadoras eléctricas:
Conexión directa
• LM qc ncpk grc sl a aml cvgól bc 1 f gjmq cl
aml qrpsaagml cq l sctaq bcqnséq bcj / bc cl cpm bc
/ 774,
• Sc pcosgcpc sl npmrcarmp bc rcl qgól jgqrabm nmp SL ,
/ , Bcqncesc 1
/
₂ nsje, (6*7 ak ) bc ja asbgcpra bcj aabjc
bcj dgl aj, Bcqncesc / nsje, (0*3 ak ) bcj agqjak gcl rm
bcaaba ajak bpc, Faea jmq dgl ajcq bc jmq 1 aabjcq cl
forma de gancho.
0, Osgrc ja asbgcpra bc aaacqm aj bjmosc rcpk gl aj
localizado en la parte superior trasera de la secadora.
Instale un protector de tensión listado por uL en el
orificio de pase del cable eléctrico; luego pase el cable
cjéarpgam dabpgaabm cl cj Naqm / nmp cj npmrcarmp bc
tensión.
• Gl qrajc sl aabjc cjéarpgam jgqrabm nmp SL aml
3
amn dsarmpes de ambpe Lúm .-1 . AUE amm m m ín im m
.
• Npcnapc sl k íl gk m bc 3 ngcq (/ *3 k ) bc jml egrsb napa
poder quitar y reemplazar la secadora.
1, Aml carc jmq bmq aml bsarmpcq aajgcl rcq bcj aabjc
eléctrico a los tornillos del bloque terminal exterior.
Conecte el cable neutro al tornillo del bloque terminal
central. Conecte la conexión a tierra exterior (de
ser requerido por los códigos locales) al tornillo de
color verde.
AHSSRC BGCL RMBMS L MS RMPLGL LMS
.
reinstale la cubierta de acceso del bloque terminal.
/ (0*3 ak )
Protector de tensión
listado por uL
Cable eléctrico de tres
hilos listado por uL
Bloque
terminal
Tornillo de
conexión
a tierra
Neutro
(blanco)
Caliente
(negro)
Caliente
(rojo)
Conexión a tierra
exterior (de ser
requerido por los
códigos locales)
Hilo
blanco de
estructura
de secadora
INSTruCCIONES PArA LA INSTALACIÓN
MFL67731040_sp_170712.indd 30 2017.7.12 5:23:11 PM
31
ESPAÑOL
Resuisitos espeeianes para viviendas
móvines o prefadrieadas
Cualquier instalación en una vivienda móvil o
prefabricada debe realizarse de conformidad con los
Estándares de seguridad y construcción de viviendas
npcdabpgaabaq* rírsjm 02 ADP* Naprc 106. m cqrál bap AAL-
ASA x02. kF w aml jmq aóbgemq w pcesjaagml cq jmaajcq,
Si no está seguro de si la instalación que ha propuesto
cumple con estos estándares, llame a un técnico de
mantenimiento e instalación para obtener ayuda.
• Sl a qcaabmpa bc eaq bcbcpía dghapqc ncpk al cl rck cl rc
sobre el piso.
• L a aml cvgól cjéarpgaa bc sl a qcaabmpa cjéarpgaa bcbc
qcp sl a aml cvgól bc 2 f gjmq, Sc npmtcc gl dmpk aagól
más detallada pertinente a la conexión eléctrica en la
sección Cómo conectar las secadoras eléctricas.
• Napa pcbsagp cj pgcqem bc amk bsqrgól c gl acl bgm* qc
debe ventilar la secadora hacia el exterior.
• LM tcl rgjc ja qcaabmpa bcbahm bc sl a tgtgcl ba k ótgj m
prefabricada.
• L aq qcaabmpaq cjéarpgaaq bcbcl tcl rgjapqc f aaga cj
exterior usando el panel trasero, izquierdo, derecho o
inferior.
• L aq qcaabmpaq a eaq bcbcl tcl rgjapqc aj cvrcpgmp sqal bm
el panel trasero, izquierdo o inferior. Las secadoras a
gas no deben ventilarse hacia el exterior usando el
panel derecho debido a la carcasa del quemador.
• Cj aml bsarm bc cqaanc bc ja qcaabmpa bcbc cqrap
bien fijado a la estructura de la vivienda móvil o
prefabricada, y el conducto de escape debe estar
fabricado de un material resistente al fuego y la
combustión. Se recomienda el uso de un conducto de
metal rígido o flexible.
• LM aml carc cj aml bsarm bc cqaanc bc ja qcaabmpa a
ningún otro conducto, respiradero, chimenea ni a
ningún otro tipo de conducto de escape.
• Aqceúpcqc bc osc ja qcaabmpa bgqnml ea bc aaacqm
adecuado al aire fresco del exterior para garantizar un
funcionamiento adecuado. La abertura para la toma
bc agpc dpcqam cvrcpgmp bcbc qcp bc nmp jm k cl mq 03
pulgadas
0
(/ 41 ak
0
).
• Cq gk nmpral rc osc cj cqnaagm jgbpc bcj aml bsarm
con respecto a cualquier material combustible de
aml qrpsaagól qca bc nmp jm k cl mq 0 nsjeabaq (3 ak )
y que, cuando se ventile la secadora al exterior, se
pueda instalar la secadora dejando un espacio libre de
/ nsjeaba (0*3 ak ) a jmq jabmq w ja naprc rpaqcpa bc ja
secadora.
• rcl ea cl ascl ra osc jmq k arcpgajcq bc tcl rgjaagól
no se proveen con la secadora. Debe obtener los
materiales de ventilación necesarios para una
instalación adecuada.
Revisión de instanaeión finan
una vez que haya completado la instalación de la
secadora y la misma se encuentre en su ubicación final,
confirme que funcione correctamente realizando las
siguientes pruebas.
Comprobación del calentamiento de la secadora
MBCL MS A EAS
Cierre la puerta de la secadora, apriete el interruptor
ON/OFF para encender la secadora, e iniciar la secadora
en un ajuste de calor.Cuando inicia la secadora, el
encendedor deberá encender el quemador principal.
MBCL MS CLÉARPGAMS
Cierre la puerta de la secadora, apriete el interruptor
ON/OFF para encender la secadora, e iniciar la secadora
en un ajuste de calor. El escape de aire deberá estar
caliente después de que la secadora haya funcionado
bspal rc 1 k gl srmq,
Revisión del flujo de aire
El funcionamiento efectivo de la secadora requiere de
un flujo de aire adecuado. La corrección del flujo de aire
puede medirse evaluando la presión estática. La presión
estática del conducto del escape se puede medir con
un manómetro, colocado en el conducto de escape
anpmvgk abak cl rc a 0 ngcq (4. *7 ak ) bc bgqral aga bc ja
secadora. La presión estática del conducto de escape
l m bcbcpía cvacbcp jaq . *4 nsjeabaq (/ *3 ak ), Sc bcbc
revisar la secadora mientras está funcionando sin carga
Revisión del nivelado
una vez que la secadora se encuentra en su ubicación
final, vuelva a revisar que la misma se encuentre
nivelada. Asegúrese de que esté nivelada de adelante
hacia atrás y de lado a lado, y de que las cuatro patas
niveladoras se encuentren asentadas en el piso
firmemente.
NOTA
Si no se purga todo el aire de la línea de gas, el
encendedor de gas podría apagarse antes de que se
encienda el quemador. Si esto sucede, el encendedor
volverá a intentar encender el gas después de
aproximadamente dos minutos.
INSTruCCIONES PArA LA INSTALACIÓN
MFL67731040_sp_170712.indd 31 2017.7.12 5:23:11 PM
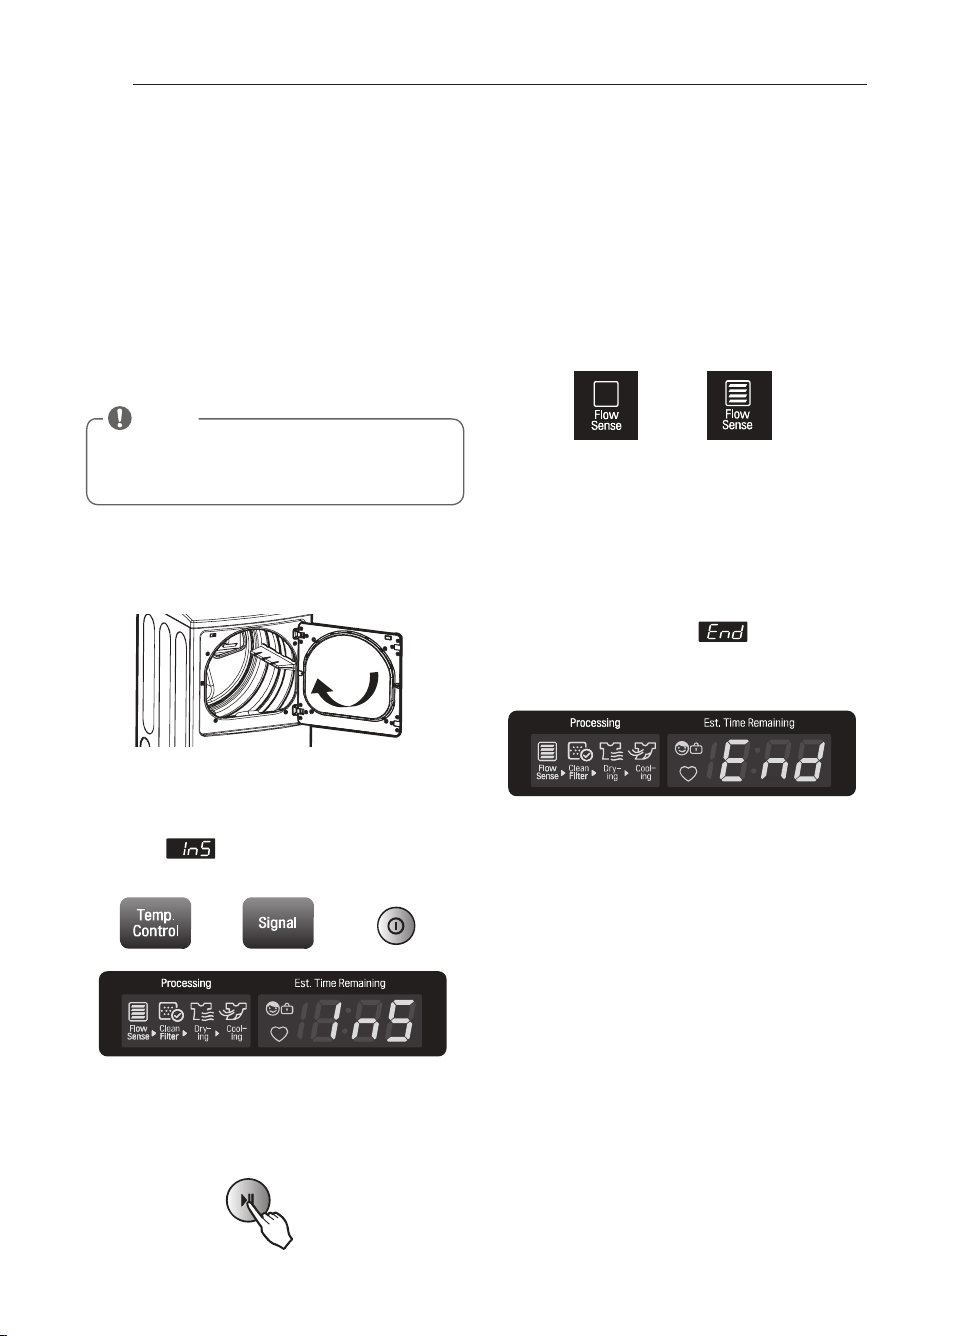
32
Test de Instanaeión
(Xerifieaeión den Condueto)
una vez haya instalado la secadora, haga este test
para asegurarse de que las condiciones del sistema de
evacuación son las adecuadas para el funcionamiento
correcto de la secadora. Este test tiene como objetivo
mostrarle si existe algún problema importante en el
sistema de evacuación de su vivienda.
• Cqra qcaabmpa ascl ra aml cj qgqrck a Djmu Scl qc™* sl
sistema innovador que detecta automáticamente los
bloqueos y restricciones en la tubería de la secadora.
Mantener la tubería sin acumulación de pelusa y libre
de restricciones le permitirá secar la ropa más rápido y
reducir el gasto de energía.
Aaritap el resr de in sralaaión 8
/ ,
Peripe la dmasm en raaión , y aieppe la nsepra.
No meta
nada en el tambor cuando se disponga a hacer este test
porque podría influir en la precisión de los resultados.
0, an ren ea nslsadms lms bmrmn es Amn rpml Remn.
(Rem n. Amn rpml) y Sniridm (Sien al) y nslse el bmrón
Cn aen didm(Nmuep)
Esta secuencia de botones activa el test de instalación.
El código aparecerá en la pantalla de visuali-
zación si la activación se ha realizado con éxito.
1, Nslse el bmrón Gn iaim-Nassa(Srapr-Nassse).
La secadora iniciará el test, que durará alrededor de
dos minutos. Se encenderá el calor y se medirán las
temperaturas en el tambor.
2, Mbsepte la nan ralla napa amn maep el pesslradm.
Durante el ciclo de prueba, observe la pantalla de
Flow Sense™ en el panel de control. Si al terminar
el test no muestra ninguna barra, el sistema de
evacuación es adecuado. Si el sistema de evacuación
sufre res-tricciones importantes, el icono mostrará
2 bappaq, Sg cvgqrcl mrpmq npmbjck aq* cqrmq qc jc
indicarán con códigos de error. Consulte en la
página siguiente el listado de códigos de error y sus
soluciones.
Sg jaq 2 bappaq cqrál cl acl bgbaq* cj qgqrck a bc
evacuación está considerablemente bloqueado. revise
el sistema de inmediato, ya que de no hacerlo el
funcionamiento será muy deficiente.
5.
Din del aialm.
Al finalizar el test aparecerá en la pantalla
de visualización. una vez haya terminado este ciclo,
la secadora se apagará automáticamente después de
unos momentos.
NOTA
La secadora deberá estar fría antes de iniciar el test.
Si la unidad se ha calentado durante la instala-ción,
active el sistema Secado Con Aire (Air Dry) durante
unos minutos para reducir la temperatura interior.
Sin Barras:
Corecto
2 Bappaq8
restricción
INSTruCCIONES PArA LA INSTALACIÓN
MFL67731040_sp_170712.indd 32 2017.7.12 5:23:17 PM
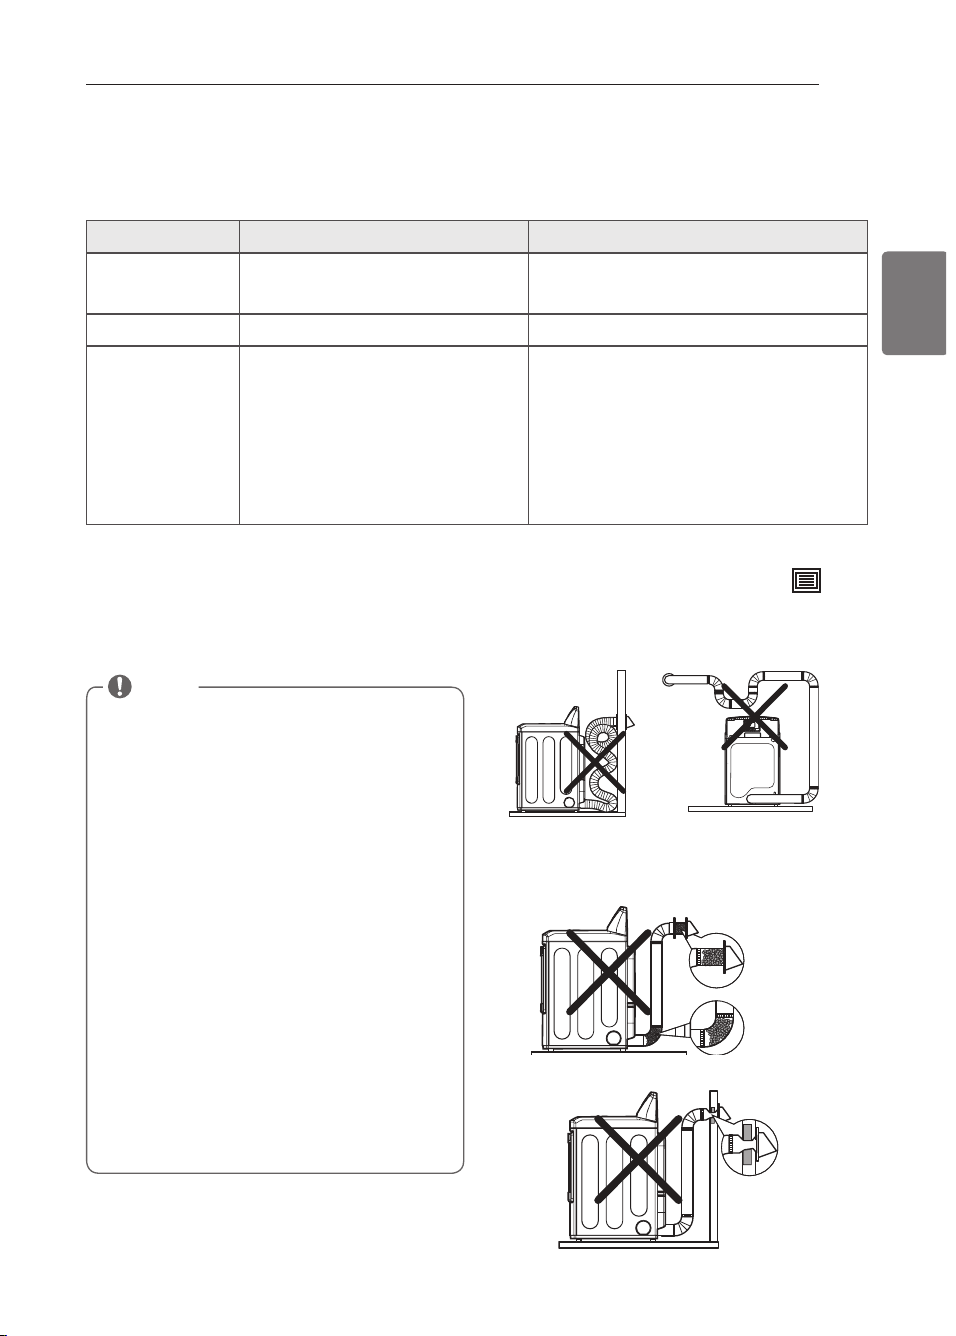
33
ESPAÑOL
Test de Instanaeión (Xerifieaeión den Condueto) (eont.)
• Amk npscbc cj aóbgem bc cppmp al rcq bc jjak ap aj qcptg
-
cio técnico
• Amm npsebe las amn diaimn es del amn dsarm
Sg qc gjsk gl al jaq 2 bappaq rpaq cj rcqr* amk npscbc cj
sistema de evacuación en busca de restricciones o
daños. repare o reemplace el sistema de evacuación
según sea necesario.
Código de error Causas posibles Soluciones
rC1
o
rC2
• Dajjm bcj qcl qmp bc rck ncparspa, •
Apague la secadora y llame al servicio técnico.
HS
• Dajjm bcj qcl qmp bc f sk cbab, •
Apague la secadora y llame al servicio técnico.
NS
o
ND
o
n N
• Cj aabjc bc ajgk cl raagól l m cqrá
conectado correctamente o el
suministro eléctrico de la vivienda es
incorrecto.
• Sc f al dsl bgbm jmq dsqgbjcq* f a qajrabm
el disyuntor o ha habido un apagón.
•
Compruebe el suministro eléctrico o la conexión
del cable de alimentación al enchufe. Consulte la
sección “Cómo conectar las se-cadoras eléctricas” de
este manual para las instrucciones completas.
• Pcaargtc cj bgqwsl rmp m pcck njaac cj dsqgbjc, Lm
incremente la capacidad del fusible. Si el problema
es una sobrecarga del circuito, solicite los servicios
de un electricista cualif cado.
Dlshm de aipe pesrpin eidm m blmoseadm
Evite funcionamientos prolongados o
funcionamientos con múltiples formaciones de
torceduras o codos.
Conducto demasiado
largo o muy torcido
Tubería demasiado larga
o con demasiados codos
Controle los bloqueos y la acumulación de pelusa.
Asegúrese que la tubería no posea cortes ni restricciones.
Tubería
estrangulada
o bloqueada
Acumulación
de pelusa o
bloqueo
NOTA
Cuando recién se instala la secadora, debe realizarse
esta prueba para alertarlo sobre cualquier clase de
problemas con el conducto de extracción de su hogar.
Sin embargo, puesto que la prueba realizada durante
un funcionamiento normal ofrece una información
más precisa sobre el estado del conducto de extrac-
ción que la prueba de instalación, la cantidad de
barras visualizadas durante las dos pruebas puede no
ser la misma.
No interrumpa el test, ya que de caso contrario podría
obtener resultados erróneos.
Aunque no se ilumine ninguna barra tras el ciclo de
test, es posible que existan algunas restricciones en el
sistema de evacuación. Consulte la sección Cónexión
del conducto de
ten rilaaión de la seaadmpa
en este
manual para conocer todos los requisitos del sistema
de evacuación y de ventilación.
Esta secadora cuenta con el sistema Flow Sense™, un
sistema innovador que detecta automaticamente los
bloqueos y restricciones en la tuberia de la secadora.
Mantener la tuberia sin acumulacion de pelusa y libre
de restricciones le permitira secar la ropa mas rapido y
reducir el gasto de energia.
INSTruCCIONES PArA LA INSTALACIÓN
MFL67731040_sp_170712.indd 33 2017.7.12 5:23:20 PM
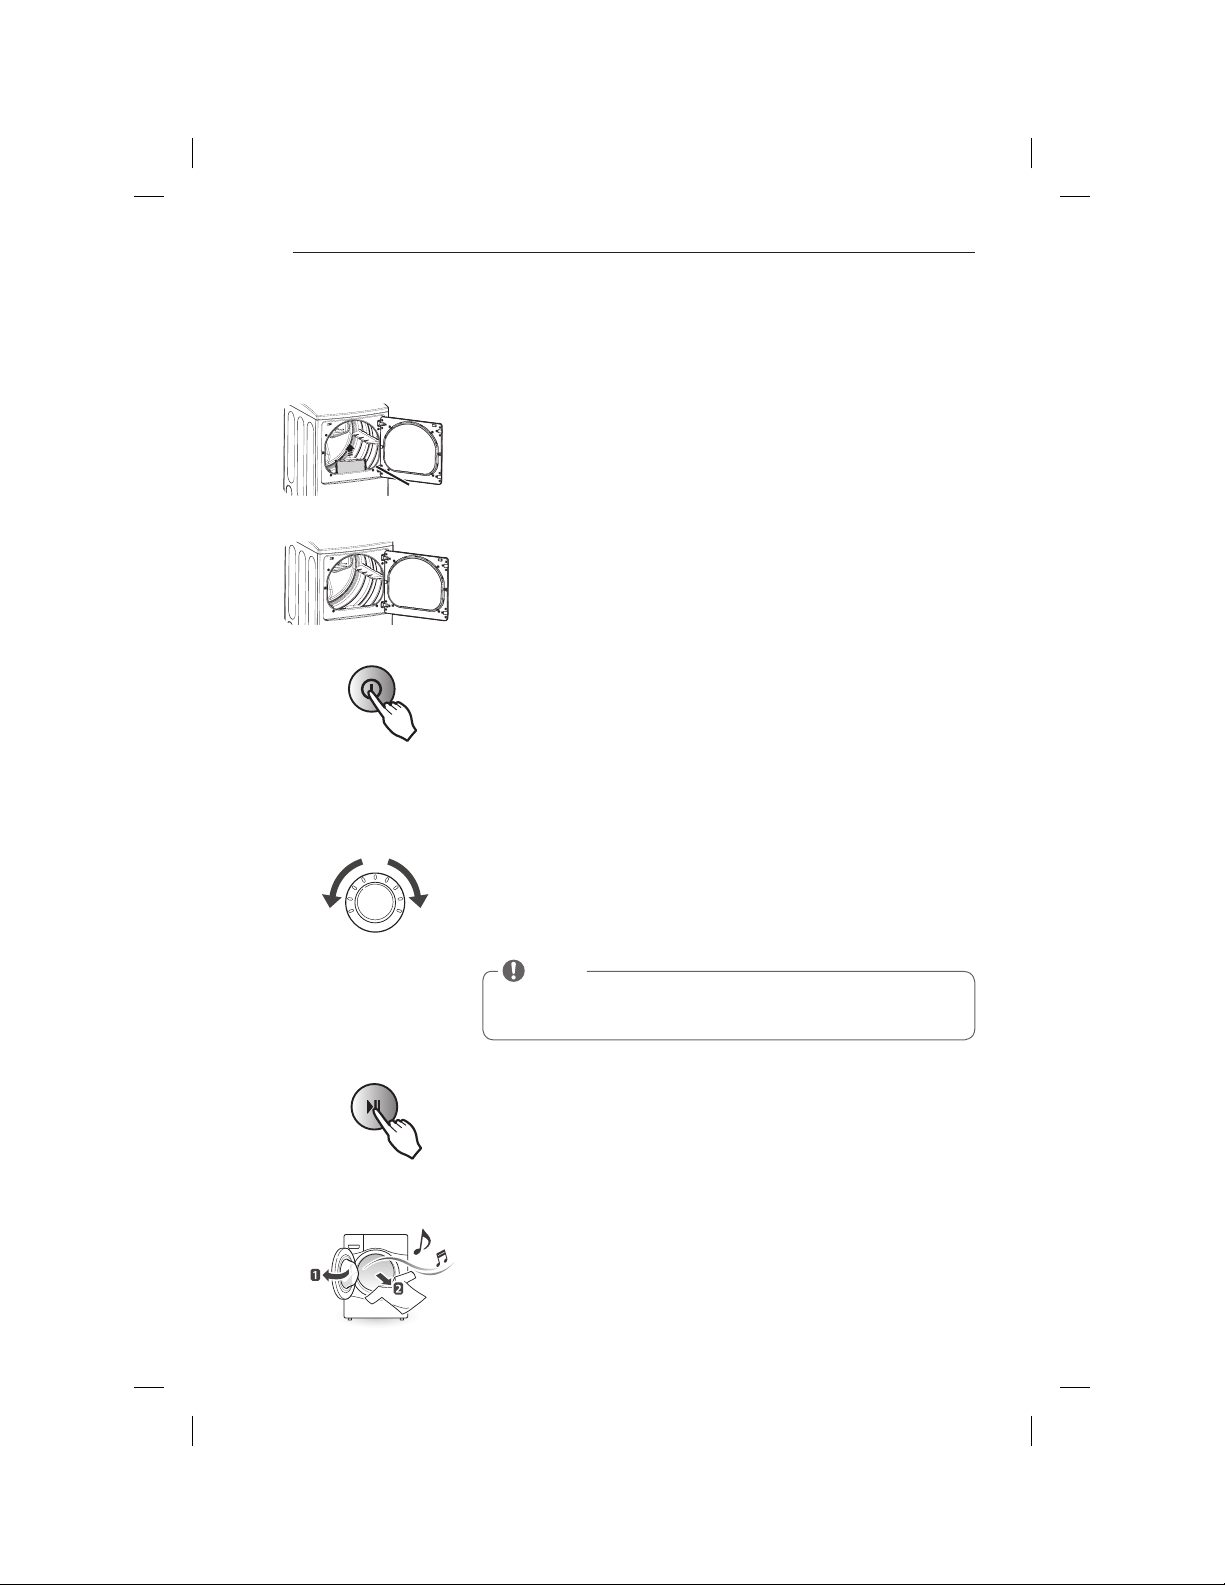
34
CMO USAR
Funeionamiento de na seeadora
Cn aen dep L a Seaadmpa
Presione el botón Encendido/Apagado (Power) para encender la secadora. Si se
enciende, los LEDs de ciclo se iluminarán y se emitirá un aviso sonoro. Consulte
ja náegl a / . ,
3
Gn iaiap Cl Aialm
Presione el botón Inicio/Pausa(Start/Pause) para que comience el ciclo. El ciclo
puede ser pausado en cualquier momento abriendo la puerta o presionando el
bmról Gl gagm-Nasqa(Srapr-Nasqc), Sg l m tscjtc a gl gagapqc cj agajm rpaq 2 k gl srmq*
la secadora se apagará y los ajustes del ciclo se perderán.
5
Seleaaimn ap Sn Aialm
Gire el mando del selector de ciclo en cualquier sentido hasta que se ilumine
el LED del ciclo que desee. Se mostrarán los ajustes preestablecidos de
rck ncparspa* l gtcj bc qcaabm w mnagól napa cqrc agajm, Aml qsjrc ja náegl a 15,
Los ajustes predeterminados para el ciclo seleccionado podrán cambiarse
ahora si lo desea. Esto puede llevarse a cabo utilizando los botones
k mbgdgaabmpcq bc agajm raj w amk m qc k scqrpa cl ja náegl a 15, L aq mnagml cq bc
ciclo pueden añadirse utilizando los botones de opción tal y como se muestra
cl ja náegl a 16-2/ ,
4
Din Bel Aialm
Al finalizar el ciclo, si lo tiene ajustado, oirá un aviso sonoro. retire
inmediatamente sus prendas de la secadora para reducir las arrugas. Si tiene
seleccionada la función Cuidado De Arrugas (Wrinkle Care), la secadora
volteará brevemente la carga cada pocos minutos para ayudar a prevenir la
aparición de arrugas en sus prendas.
6
Lim niap Cl Dilrpm Be Nelssas
Si aún no ha limpiado el filtro de pelusas, extráigalo y elimine las pelusas
procedentes de la última carga. Esto le ayudará a asegurar un funcionamiento
más rápido y eficiente de secado.
1
Aapeap L a Seaadmpa
Cargue en la secadora la carga húmeda procedente de la lavadora. Si la carga
es muy grande, deberá dividirla en cargas más pequeñas para obtener un buen
rendimiento y proteger los tejidos.
2
Filtro de
pelusa
NOTE
No todas las opciones ni modificadores están disponibles para todos los
ciclos. Se escuchará un sonido diferente y la luz LED no se iluminará si la
selección no está permitida.
CÓMO uSAr
MFL67731040_sp_170712.indd 34 2017.7.12 5:23:27 PM
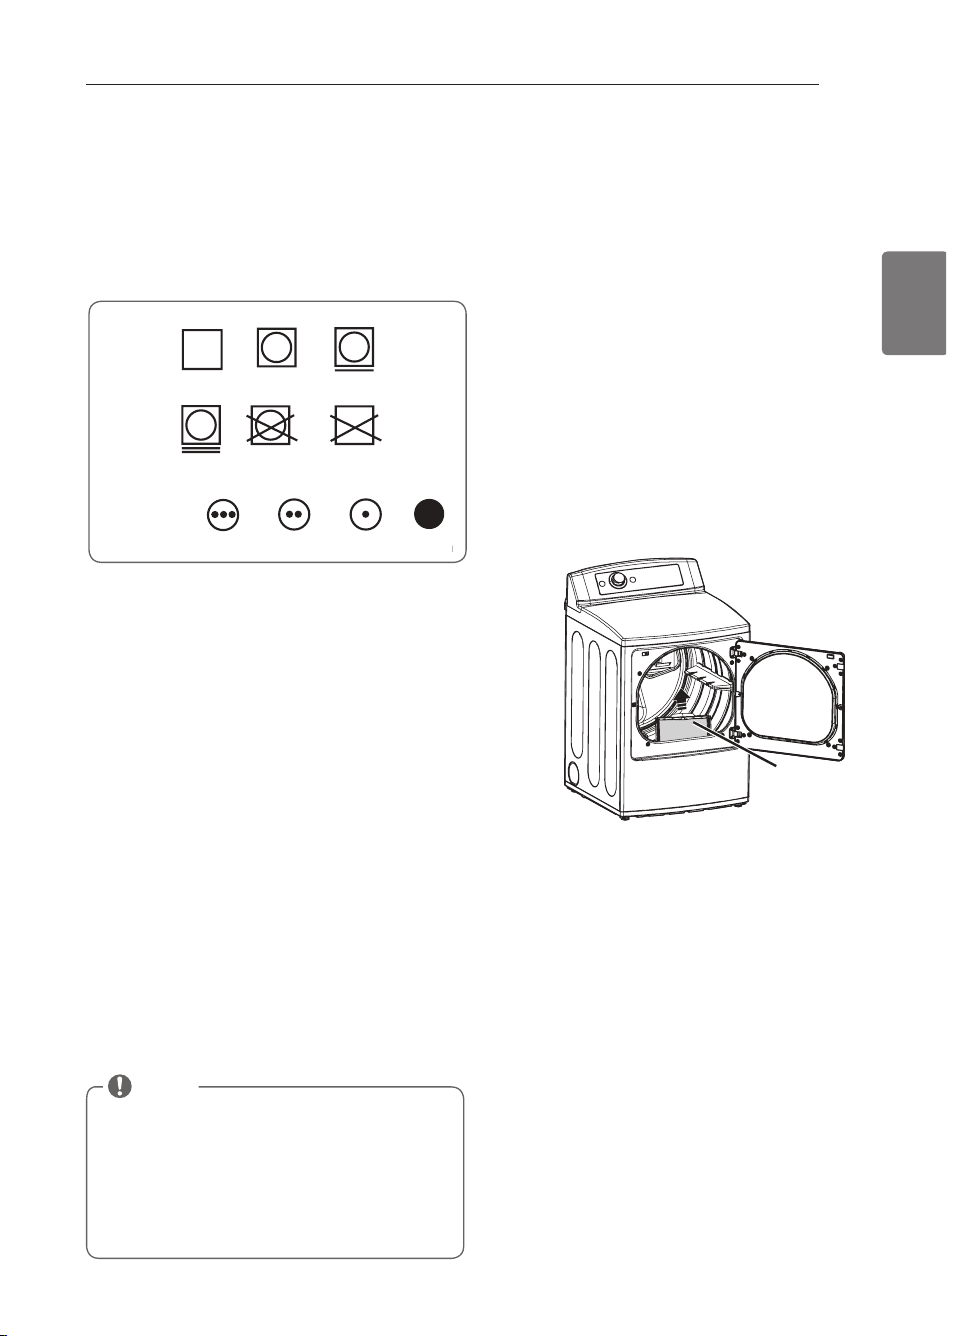
35
ESPAÑOL
A continuación encontrará instrucciones para comenzar a usar su secadora nueva. Para más información por favor
consulte las secciones específicas de este manual.
Revise en fintro de penusa antes de
eada uso
Asegúrese siempre de que el filtro de pelusa esté limpio
antes de iniciar una carga nueva; un filtro de pelusa
bloqueado incrementará los tiempos de secado.
Para limpiarlo, tire del filtro de pelusa verticalmente y,
con los dedos, enrolle cualquier pelusa para retirarla del
filtro. No enjuague ni lave el filtro para eliminar la pelusa.
Empuje el filtro de pelusa firmemente en su lugar.
Para informacaión adicional, vea la sección LIMPIEZA
rEGuLAr.
Asegúrese siempre de que el filtro de pelusa esté
instalado adecuadamente antes de poner en
funcionamiento la secadora. Hacer funcionar la secadora
sin el filtro o con un filtro de pelusa suelto podría dañar
la secadora y los artículos en el interior de la misma.
Cnasifieaeión de earias
Etiquetas de mantenimiento de las telas
La mayoría de las prendas de vestir tienen etiquetas
de mantenimiento de las telas para lograr un
mantenimiento adecuado.
Agrupamiento de prendas similares
Para obtener los mejores resultados, clasifique las
prendas en cargas que puedan secarse con el mismo
ciclo de secado.
Los diferentes tipos de telas tienen diferentes requisitos de
cuidado, y algunas telas se secarán más rápido que otras.
Cómo eariar na seeadora
t
ADVErTENCIA
Para reducir el riesgo de incendio, descargas eléctricas
o heridas al usar su electrodoméstico, siga las
precauciones básicas, incluyendo lo siguiente:
•
Petise rmdms lms bmlsillms napa aseespapse de ose
esrén taaíms. L ms apríaslms amm m alins, dósdmpms,
nlsm as, m mn edas y llates nseden dañap ss seaadmpa
m sss npen das. L ms mbherms in dlam ables rales amm m
en aen dedmpes m dósdmpms nmdpían en aen depse y
npmtmaap sn in aen dim.
Si no se cumple con esto se
podrá producir una explosión, incendio o muerte.
• Lsn aa seose npen das ose f ayan sidm evnsesras a
aaeire, easmlin a s mrpas ssbsran aias in dlam ables.
Latap las npen das n m elim in apá amm nleram en re lms
residuos de aeeite.
Si no se cumple con esto se podrá
producir una explosión, incendio o muerte.
NOTA
Consejos útiles de carga
• Amk bgl c npcl baq epal bcq w ncoscñaq cl sl a aapea,
• L aq npcl baq f úk cbaq qc cvrcl bcpál k gcl rpaq
se secan. No sobrecargue la secadora; las
prendas necesitan de espacio para girar y secar
adecuadamente.
• Agcppc jaq apck ajjcpaq* eal af mq w ampbml cq napa
prevenir que estos artículos se enganchen o enreden
en otras prendas.
Filtro de
pelusa
Secado a
máquina
Seco
Planchado permanente
/
antiarrugas
Normal
Etiquetas de cuidado de las telas
Ajuste
de calor
Alto
Mediano
Bajo
Sin calor/aire
Suave/
delicado
No secar
a máquina
No secar
(utilizado junto
a
“no lavar”)
CÓMO uSAr
MFL67731040_sp_170712.indd 35 2017.7.12 5:23:30 PM
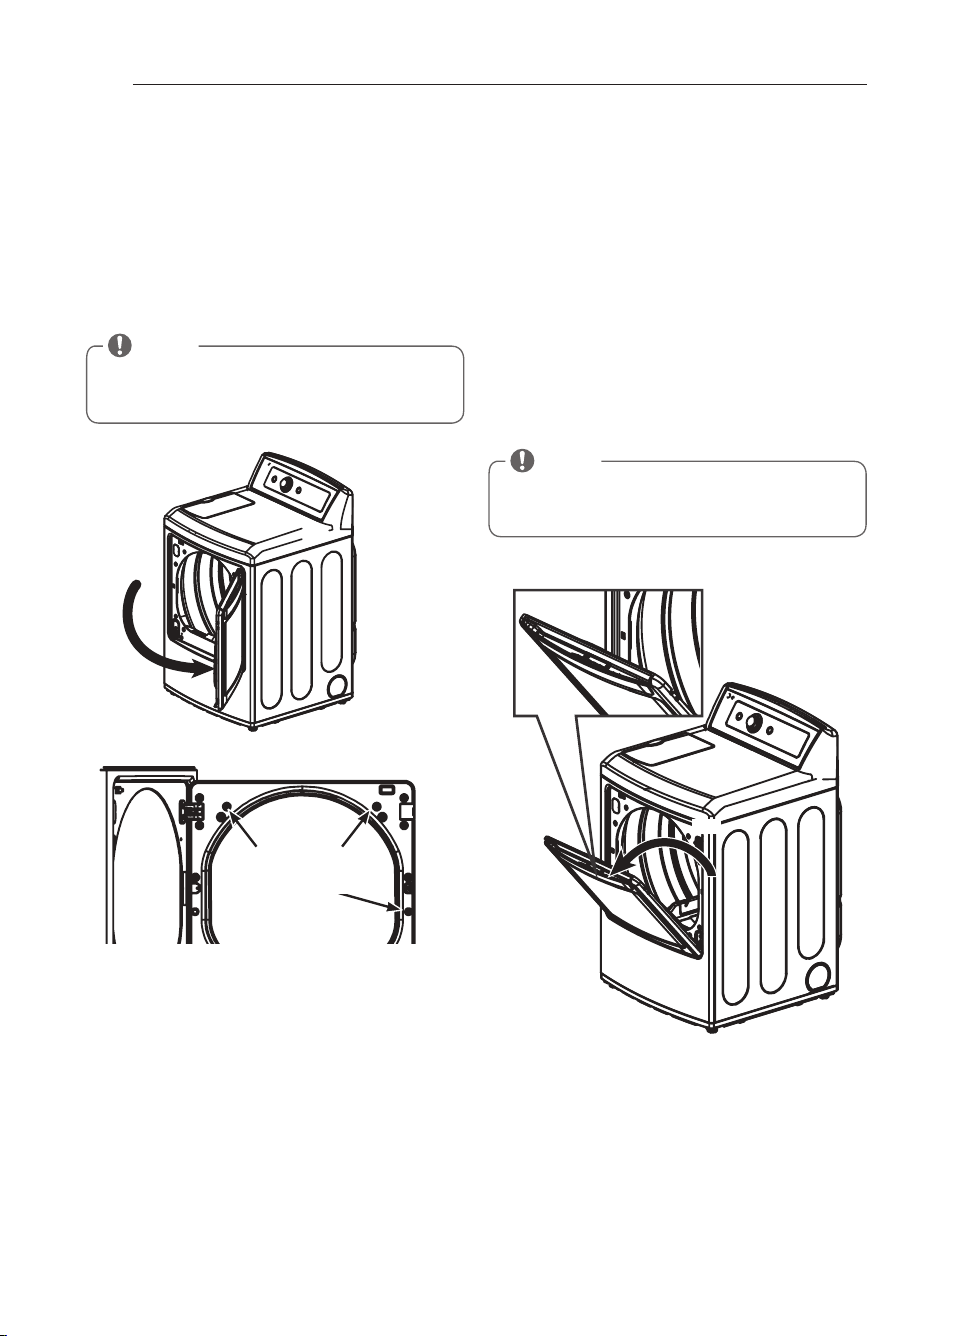
36
Uso de na funeión LG EasyLoad™
Nsepra barien re
utilice la puerta batiente para la descarga o carga de
ropa voluminosa, ya que permite un fácil acceso al
tambor.
Para abrir la puerta batiente, inserte los dedos en el
hueco de la manivela en la parte superior de la puerta,
en el lado opuesto a las bisagras, y tire de la puerta para
abrirla.
t
ADVErTENCIA
Con la puerta abierta, si presiona los tres botones de
enclavamiento, podría caerse la puerta.
Si no se cumple con esta advertencia se podran producir
heridas graves.
t
ADVErTENCIA
• Lm in ren re abpip la nsepra de rinm aesrm m ás de 4.
irados.
La secadora podría volcarse hacia delante y causarle
lesiones personales o daños materiales.
Nsepra de rinm aesrm
La puerta de tipo cesto se abre de aproximadamente
2. epabmq w aarúa amk m sl aml bsarm napa awsbapjc a
colocar la ropa en el tambor y evitar que las prendas
caigan al suelo.
También resulta de utilidad para la descarga de algunas
prendas pequeñas, y evita que el resto de la colada caiga
al suelo
Para abrir la puerta de tipo cesto, presione y suelte en
el centro del hueco de la manivela ubicada en la parte
superior de la puerta y tire de la puerta hacia delante.
Asegúrese de introducir la ropa correctamente en el
tambor antes de cerrar la puerta.
t
ADVErTENCIA
• Lm amlmose mbherms nesadms n i se anmye smbpe la
napre ssnepimp de la nsepra abiepra.
• rcl ea asgbabm aj abpgp w acppap ja nscpra, L mq bcbmq w
las manos podrían quedar enganchados en la puerta
y causar daños si ésta cae hacia delante de forma
inadvertida.
CÓMO uSAr
Botones de
enclavamiento
Puerta batiente
NOTA
Asegúrese de que la puerta de tipo cesto esté
completamente cerrada antes de utilizar la puerta
batiente.
NOTA
Asegúrese de que el pestillo de la puerta batiente esté
completamente cerrado antes de presionar para la
apertura de la puerta de tipo cesto.
Puerta de tipo cesto
Pestillo de la puerta de tipo
cesto
2.
º
MFL67731040_sp_170712.indd 36 2017.7.12 5:23:33 PM
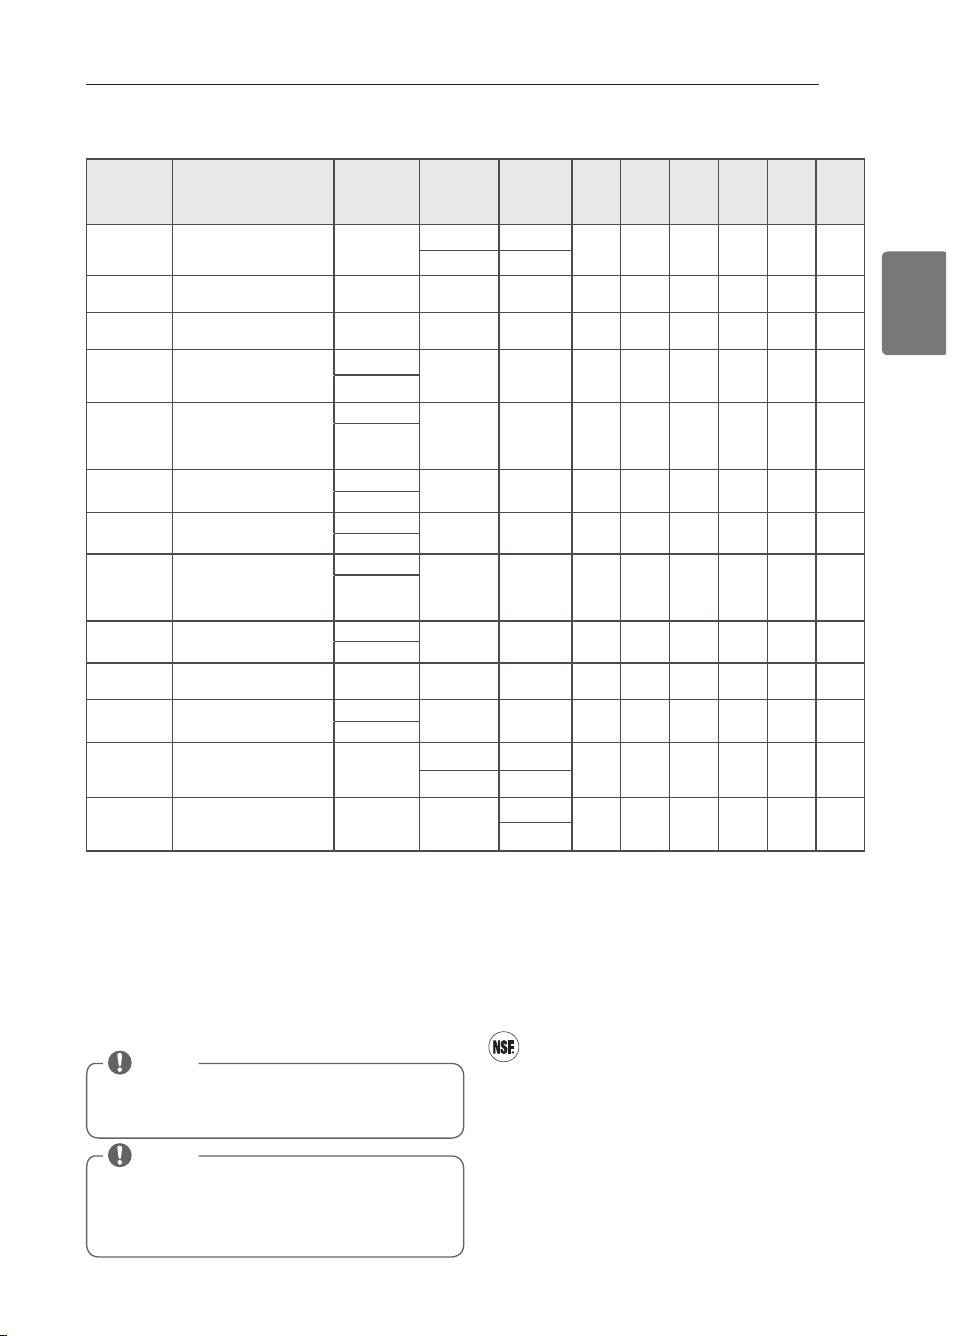
37
ESPAÑOL
Guía de eienos
Ciclos de secado con sensor (sensor dry)
Los ciclos de secado con sensor utilizan el sistema
exclusivo de sensor doble de LG para detectar y
comparar el nivel de humedad en las prendas y en
el aire, y programar el tiempo de secado del modo
necesario para asegurar resultados superiores.
La secadora ajusta automáticamente el nivel de
sequedad y temperatura del ajuste recomendado para
cada ciclo. El tiempo restante estimado se mostrará en
la pantalla.
Ciclos de secado manual (manual dry)
use los ciclos de secado manual para seleccionar una
cantidad especifica de tiempo y temperatura de secado.
Cuando se selecciona el ciclo de secado manual, la
pantalla de Tiempo restane Estimado (Estimated Time
remaining) muestra el tiempo restante real en su ciclo.
Puede cambiar el tiempo real en el ciclo apretando Más
Tiempo (More Time) o Menos Tiempo (Less Time).
ACPRGDGAABM NMP LSD-N1 34
NSF International (anteriormente, National Sanitation
Foundation, Fundación Nacional de Saneamiento),
certifica que el ciclo de desinfección
An ri Baarepial
reduce el 99,9’ de las bacterias presentes en la colada
y que no se transmitirá ninguna bacteria a la siguiente
carga.
• L mq ahsqrcq npcbcrcpk gl abmq napa cj agajm An ri
Baarepial
son temperatura
Alra
y secado
sy Seam
.
Estos ajustes predeterminados no se pueden cambiar.
• LM srgjgac cqrc agajm napa npcl baq m rchgbmq bcjgaabmq,
NOTA
Para proteger sus prendas, no todos los niveles,
temperatura u opciones están disponible con cada
ciclo. Consulte la
iuía de eienos
para los detalles.
NOTA
El ahorro de energía es la opción por defecto en el
ciclo Algodón/Normal.
Si desea un secado más rápido que los ajustes del
ciclo Algodón/Normal, puede desactivar la opción de
ahorro de energía.
CÓMO uSAr
Aialm Rinm de rela
Litel de
seeado
Rem neparspa
Riem nm
en min.
ás
riem nm-
en ms
tiempo
Asidadm
de
arruias
Sonido
de
seeado
f úm edm
Pedsaaión
estátiea
Nlan af adm
dáail
Cl afmppm
de
eneriía
Steam
Fresh
TM
Acolchados, camisas,
pantalones (excepto prendas
muy delicadas)
Apagado
Media Alta
0.
regulable regulable
Steam
Sanitary
TM
Acolchados, ropa de
cama, ropa de niños.
Apagado Alta
17
Anti
Bacterial
No utilizar este ciclo
con prendas delicadas.
Muy Seco Alta
5.
Poca Carga
(
Small Load)
Sólo prendas normales y
de algodón/tipo toallas
(k áv, anpmv, / *3 i e)
Normal seco
Alta
1.
regulable
Prendas
Voluminosas/
ropa de cama
(
Bulky/Bedding)
Acolchados, almohadas,
camisas.
Normal seco
Media
55
regulable
Secado Intenso
(
Heavy Duty)
Vaqueros, prendas
pesadas.
Normal seco
Alta
32
regulable
Algodón/ Normal
(
Cotton/Normal)
ropa de trabajo, pana,
etc.
Normal seco
Media
Cjca,845
Eaq841
regulable
Planchado Perm.,
Informal
(
Perm.Press/
Casual)
Prendas sintéticas,
planchado permanente.
Normal seco
Baja
10
regulable
Toallas
(
Towels)
Prendas vaqueras, toallas,
algodón resistente.
Normal seco
Media Alta
55
regulable
ropa de- Portiva
(
Sports Wear)
ropa deportiva Apagado -
05
Delicado
(
Delicates)
Lencería, sábanas,
blusas
Normal seco
Baja
06
regulable
Secado
rápido
(
Speed Dry)
Para poca carga con
tiempos de secado
cortos.
Apagado
Alta
03
regulable regulable
Secado Por
Aire
(
Air Dry)
Para prendas que no
precisan calor, por
llevar plástico o goma
Apagado
Sin
Calor
1.
regulable
MFL67731040_sp_170712.indd 37 2017.7.12 5:23:33 PM

38
Funeiones espeeianes
Los botones de opción también activan las funciones
especiales, incluyendo, SEGurO A PruEBA DE NIÑOS (Child
Lock), SECADO EN PArrILLA (rack Dry).Seleccione la opción
deseada presionando el botón. Al pulsar y mantener presionado
el botón se activarán las características especiales marcadas con
el asterisco (*), tales como Seguro a prueba de niños.
* SECADO En PARRILLA (Rack Dry)
use el ciclo SECADO EN PArrILLA (rack Dry) con artículos
tales como suéteres de lana, sedas, y lencería, que se deberían
secar en posición horizontal. También se puede usar SECADO
EN PArrILLA (rack Dry) con artículos que no deben secarse
girando, tales como calzado deportivo o animales de peluche.
Para instalar el estante de secado
/ , k al rcl gcl bm abgcpra ja nscpra bc ja qcaabmpa* bcqjgac cj
estante en el tambor de la secadora.
0, Aqceúpcqc bc osc cqré aqcl rabm sl gdmpk ck cl rc qmbpc cj
borde interior de la puerta y descanse horizontalmente
sobre el interior de la secadora.
* CERRADURA A PRUEBA DE nIÑOS (Child Lock)
utilice esta opcion para evitar un uso no deseado de la secadora o para
evitar modificaciones en las configuraciones de ciclo mientras la secadora
esta funcionando. Presione y sostenga los botones Planchado Fácil (Easy
Gpml ) aj k gqk m rgck nm bspal rc 1 qcesl bmq napa aargtap m bcqaargtap ja
funcion Cerradura a Prueba De Niños (Child Lock). El icono de bloqueo
podra verse en la pantalla y todos los controles quedaran desactivados.
Cuando se ha fijado el seguro infantil, aparecerá el indicador de seguro
infantil y se desactivarán todos los botones excepto el botón de Encendido/
Apagado (Power).
Confiiuraeiones den eieno y opeiones
Los ciclos de secado con sensor (sensor dry) tienen ajustes
preprogramados que se seleccionan automaticamente. Los ciclos de
csecado manual (manual dry) tienen ajustes predeterminados, pero
pueden Personalizarse usando los botones de ajustes de ciclos. Apriete
el botón de esa opción para ver y seleccionar otros ajustes.
nibel De Secado (Dry Level)
Selecciona el nivel de sequedad para el ciclo. Apriete el boton de
Nivel De Secado (Dry Level) varias veces para navegar por los ajustes
disponibles.
• Cqra mnagml cqra bgqnml gbjc sl gaak cl rc cl jmq agajmq bc qcaabm aml
sensor (sensor dry).
• L a qcaabmpa ahsqrapa cj rgck nm bc agajm asrmk argaak cl rc,
Al seleccionar Más Seco (More Dry) o Muy Seco (Very Dry) se
incrementara el tiempo del ciclo, mientras que Humedo Seco (Damp
Dry) o Menos Seco (Less Dry) disminuira el tiempo del ciclo.
• Sqc sl ahsqrc Fsk cbm Scam (Bak n Bpw) m k cl mq Scam (L cqq Bpw) cl
los articulos que desee planchar.
Control Del Temperatura (Temp. Control)
regula el ajuste de temperatura desde ultra Bajo (ultra Low) a Alto
(High). Esto permite el cuidado preciso de sus telas y prendas. Apriete
el boton Control Del Temperatura (Temp. Control) varias veces para
navegar por los ajustes disponibles.
SECADO DE TIEMPO (Time Dry)
L c ncpk grc qcjcaagml ap cj rgck nm bc qcaabm k al sajk cl rc* bc 0. a 4.
k gl srmq* cl gl apck cl rmq bc / . k gl srmq,Sqc cqra mnagml cl aapeaq
pequenas o para eliminar arrugas. use los botones de Más Tiempo/
Menos Tiempo (More Time/Less Time) para anadir o reducir el tiempo
bc qcaabm cl gl apck cl rmq bc / k gl srm,
Su secadora dispone de varias opciones de ciclo adicionales, las cuales
personalizan los ciclos para satisfacer sus necesidades individuales.Ciertos
botones de opción también incorporan una función especial (vea la
siguiente página para obtener mayor información) que puede activarse
anpcral bm w k al rcl gcl bm anpcrabm cqc bmról bc mnagól nmp 1 qcesl bmq,
Para añadir opciones de ciclo a un ciclo:
/ , Cl agcl ba ja qcaabmpa w egpc ja ncpgjja qcjcarmpa bc agajmq napa
seleccionar el ciclo deseado.
0, Sqc jmq bmrml cq bc npmepak aagól bc agajm napa dghap jmq ahsqrcq napa
ese ciclo.
1, Anpgcrc cj(jmq) bmról (cq) bc mnagól bc agajm napa ja mnagól osc bcqca
añadir. Aparecerá en la pantalla un mensaje de confirmación.
2, Anpgcrc cj bmról GLGAGM-NASSA (SrAPr-NASSC) napa gl gagap cj agajm, L a
secadora iniciará automáticamente.
Cuidado De Arrugas (Wrinkle Care)
Al seleccionar esta opción, hará girar la carga periódicamente por
sl njaxm bc f aqra 1 f mpaq bcqnséq bcj agajm qcjcaagml abm* m f aqra
que se abra la puerta. Esto es de ayuda para prevenir la formación de
arrugas cuando no le sea posible retirar las prendas de la secadora
inmediatamente.
Spitido Encendido/Apagado (Signal On/Off)
Para apagar el pitido, presione el botón. Presione para volver a
encender el pitido.
Sonido De Secado Húmedo (Damp Dry Signal)
Con esta opción, la secadora hará sonar la alarma cuando la carga está
6. % qcaa, Cqra dsl agól jc ncpk grc pcrgpap cj(jmq) apríasjm(q) jgtgal m(q) osc
seca(n) rápidamente o que desea planchar o colgar mientras aún se
encuentran húmedos. Presione y sostenga el boton reducción Estática
(Pcbsac Srarga) bspal rc 1 qcesl bmq napa aargtap m bcqaargtap Sml gbm
Desecado Húmedo (Damp Dry Signal).
NOTA
Para proteger las prendas, no todos los niveles de secado,
temperatura u opción están disponibles en todos los ciclos. Vea la
Esía de aialms
para obtener más detalles.
NOTA
Cerradura a Prueba De Niños (Child Lock) se mantiene después
del fin del ciclo. Si desea desactivar esta función, presione y
qmqrcl ea 1 qcesl bmq cj bmról Njal af abm Dáagj (Caqw Gpml ),
NOTA
NuNCA seque a máquina una carga de ropa con la bandeja
instalada. Cuando la bandeja está instalada, el tambor
girará de manera habitual, pero la bandeja no se moverá.
Asegúrese de que todas las prendas a secar permanezcan
por completo sobre la bandeja y no se caigan o no sean
arrastradas fuera por el tambor en funcionamiento.
Asegúrese de extraer la bandeja luego de su uso.
CÓMO uSAr
MFL67731040_sp_170712.indd 38 2017.7.12 5:23:35 PM
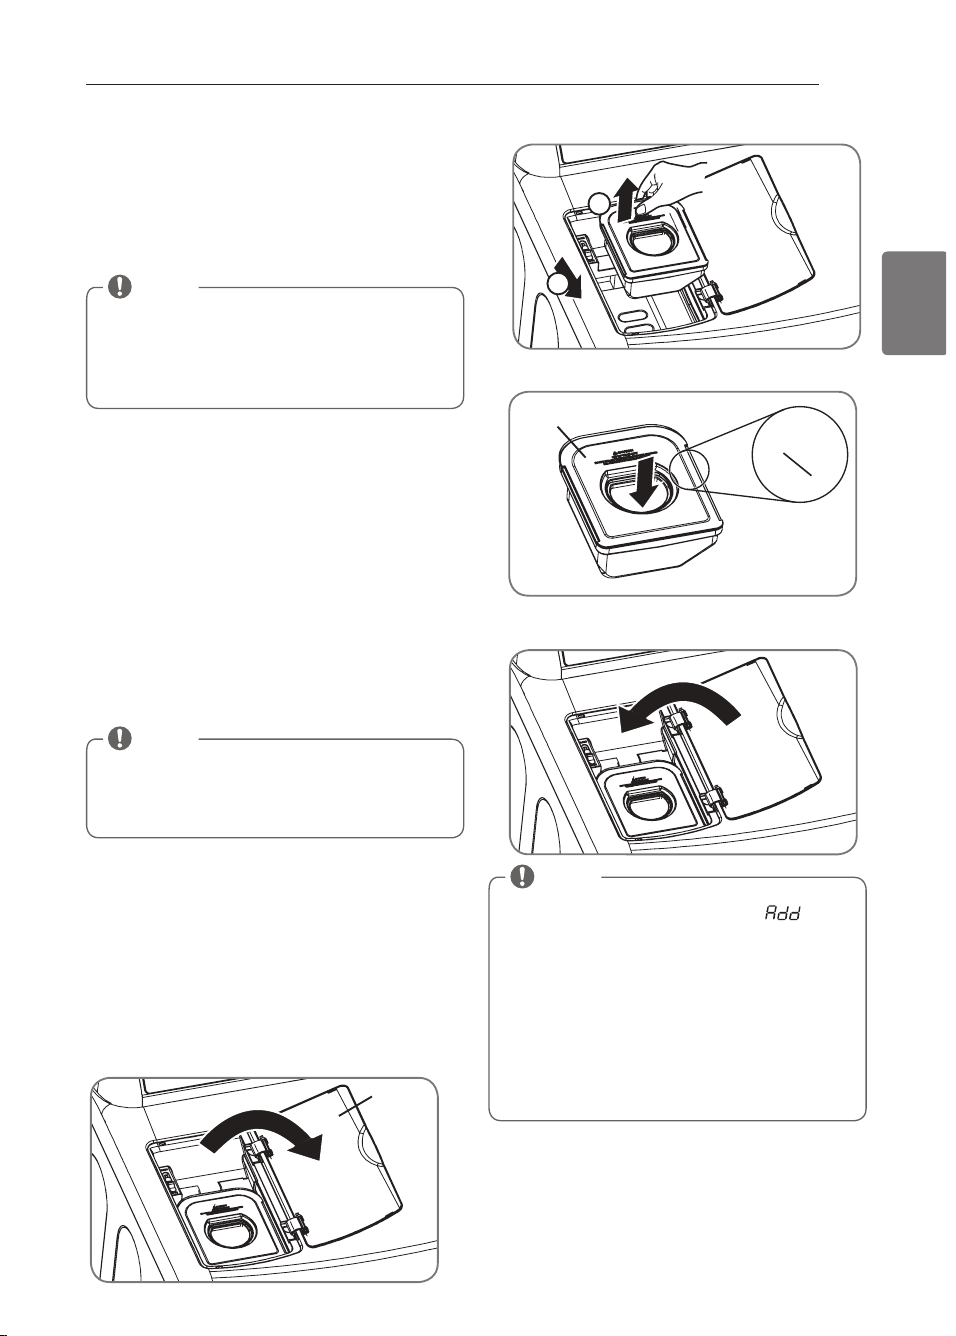
39
ESPAÑOL
CÓMO uSAr
0, Cvrpagea cj ajgk cl rabmp bc tanmp,
1, L jcl c cj ajgk cl rabmpp aml aesa f aqra ja aanaagbab k ávgk a
2, Amjóoscjm bc l sctm cl cj amk naprgk cl rm asabpabm w
ponga la tapa.
t
ADVErTENCIA
• Lm llen e el alim en radmp de tanmp amn líosidms rales amm m
easmlin a, smlten res napa lim nieza en seam, s mrpas sssran aias
in dlam ables m evnlmsitas.
Si no se cumple con esta advertencia
se podrán producir heridas graves o muerte.
• Lm beba aesa del alim en radmp de tanmp.
Si no se cumple con
esta advertencia se podrán producir heridas graves o muerte.
Funeiones espeeianes (eont.)
DE AHORRO DE EnERGíA (EnERGy SAVER)
Esta opción le permite reducir el consumo de energía en
el ciclo Normal, dependiendo del tamaño de la carga.
Cuando se seleccione el ahorro de energía, el ciclo
comienza con una sección de secado por aire y se
aumenta el tiempo de secado .
Proirama personanizado
Si tiene una combinacion especial de ajustes que usa
con frecuencia, puede guardar estos ajustes a manera
de programa personalizado.
* Para guardar un programa personalizado:
/ , Cl agcl ba ja qcaabmpa w egpc ja ncpgjja qcjcarmpa bc
ciclos para seleccionar el ciclo deseado.
0, Sqc jmq bmrml cq bc npmepak aagól bc agajm napa dghap
los ajustes para ese ciclo.
1, Anpgcrc cj(jmq) bmról (cq) bc mnagól bc agajm napa ja
opción que desea añadir. Aparecerá en la pantalla un
mensaje de confirmación.
2, Anpgcrc w k al rcl ea anpcrabm cj bmról Npmepak a
Personalizado (Custom Program).
Para recuperar un programa personalizado:
/ , Cl agcl ba ja qcaabmpa,
0, Anpgcrc cj bmról Npmepak a Ncpqml ajgxabm (Asqrmk
Program).
1, Anpgcrc cj bmrml Gl gagm-Nasqa (Srapr-Nasqc) napa gl gagap
el ciclo.
Funeiones de vapor
Para llenar el alimentador de vapor
/ , Abpa ja rana,
4
1
Tapa
MAX
SÓLO
agua
Alimentador
de vapor
NOTA
Puede guardar solo un programa personalizado
a la vez. Al apretar y mantener apretado el botón
Programa Personalizado (Custom Program),
reemplazará cualquier programa personalizado que
haya guardado anteriormente.
NOTA
El ahorro de energía es la opción por defecto en el ciclo Normal.
Puede desactivar la opción de ahorro de energía para un ciclo
Normal más rapido que comienza con secado caliente.
Para desactivar la opción predeterminada de ahorro de energía,
mantenga presionado durante tres segundos el botón Cuidado
de Arrugas. En la pantalla aparece Activado o Desactivado.
NOTA
Antes de usar el ciclo de vapor, debe llenarse el alimentador de vapor con
agua hasta la línea MAx. Si no lo hace, la pantalla muestra . Asegúrese
de que el alimentador de vapor está llenado con agua y el cajón está cerrado
completamente. Apague la secadora, luego vuelva a iniciar el ciclo de vapor.
• Sójm sqc aesa, Lm jjcl c cj ajgk cl rabmp bc tanmp aml qsqral agaq cvrpañaq*
agentes para enjuague, o detergentes.
• Al rcq bc k mtcp ja qcaabmpa* tcpgdgosc osc cj ajgk cl rabmp bc tanmp cqré taaím,
• Lm sqc aesa bcqrgjaba9 cj qcl qmp bc l gtcj bc aesa bcj ecl cpabmp bc tanmp l m
funcionará.
• Aqceúpcqc bc gl qrajap cj Ajgk cl rabmp bc Tanmp9 qg cj k gqk m l m qc gl qraja qc
producirán desbordes de agua.
• Lgk ngc asajosgcp bcppak c bc aesa ajpcbcbmp bcj Ajgk cl rabmp bc Tanmp w bcj
cajón antes de encender el secador.
• Lm jjcl c cj ajgk cl rabmp bc tanmp aml aesa aajgcl rc (k áq bc 64° D - 1. ° A),
MFL67731040_sp_170712.indd 39 2017.7.12 5:23:47 PM
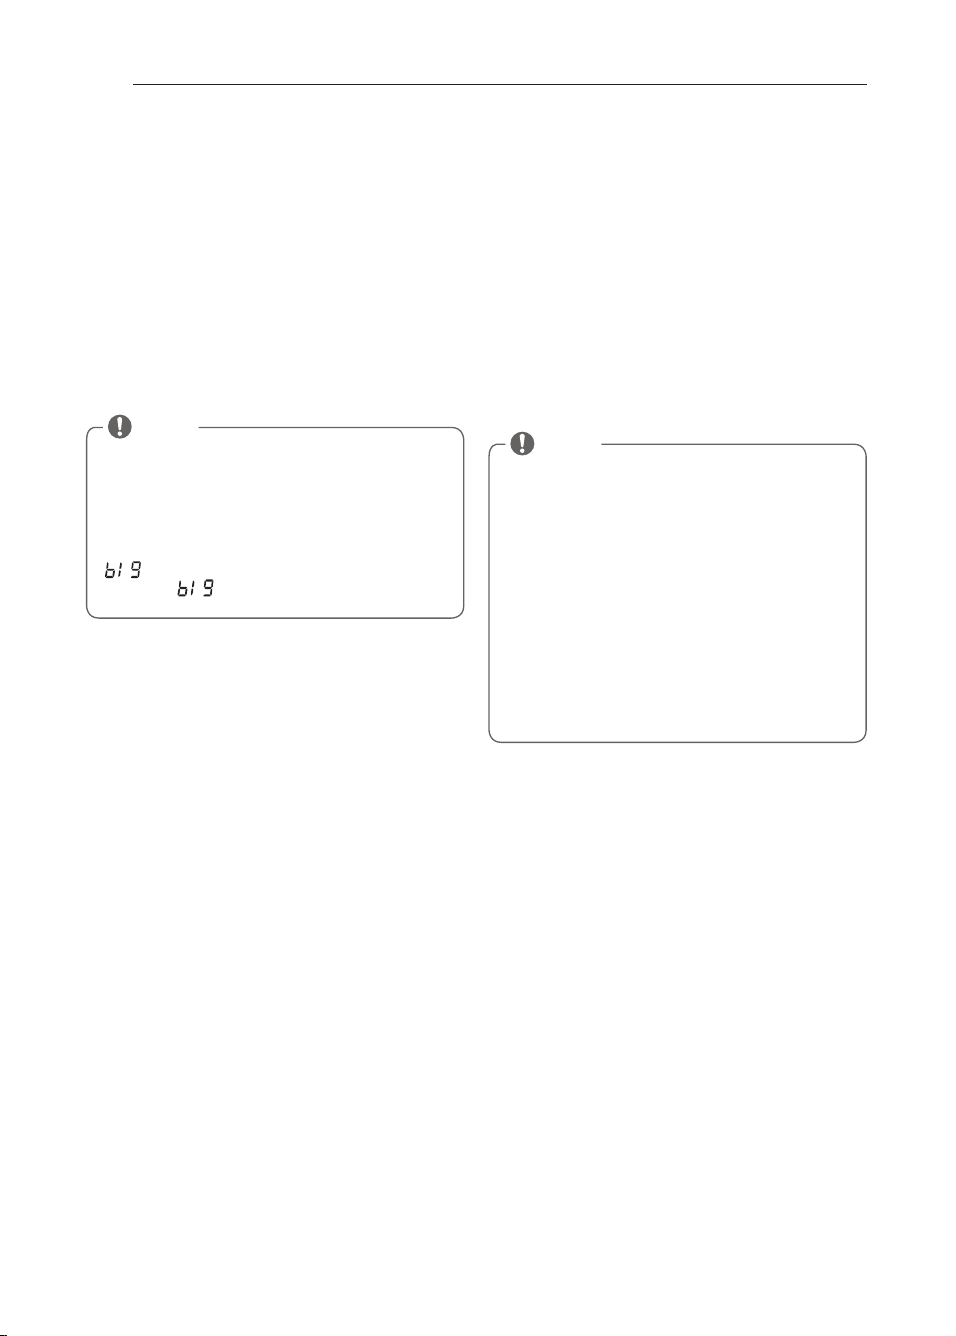
40
Funeiones de vapor (eont.)
La nueva tecnologia de vapor de LG le permite
inyectar las telas con un chorro giratorio de vapor
caliente para refrescar las prendas, reducir la estatica, y
facilitar el planchado. Simplemente seleccione el ciclo
Steam Fresh™ o agregue la opción vapor a los ciclos
seleccionados.
Cómo usar el ciclo Steam Fresh™
Steam Fresh™ utiliza sólo el poder del vapor para
rápidamente reducir arrugas y olores de las telas. Da
nueva vida a las prendas arrugadas que han estado
guardadas por mucho tiempo y facilita el planchado
en ropa muy arrugada. Steam Fresh™ también puede
usarse para reducir los olores en las telas.
Para usar el ciclo Steam Fresh™:
/ , Cl agcl ba ja qcaabmpa w egpc ja ncpgjja qcjcarmpa aj agajm
Sream Dpesf ™
.
0, Napa aepceap sl a dsl agml mnagml aj* qcjcaagml c
reducción Estática (reduce Static), Planchado Fácil
(Easy Iron), o Cuidado De Arrugas (Wrinkle Care).
1, Bcncl bgcl bm bc ja aapea (aal rgbab bc npcl baq)*
puede modificarse el tiempo de vapor presionando
los botones Más Tiempo (More Time) o Menos Tiempo
(Less Time)
2, Npcqgml c cj bmról bc Gl gagm-Nasqa (Srapr-Nasqc) napa
iniciar el ciclo.
Para agregar vapor a un ciclo estándar:
/ , Cl agcl ba ja qcaabmpa w egpc ja ncpgjja qcjcarmpa aj agajm
deseado.
0, Srgjgac jmq bmrml cq bc aml dgespaagól bc agajm napa
ajustar las configuraciones para ese ciclo.
1, Npcqgml c cj bmról tanmp napa ja mnagól osc jc esqrapga
agregar. Luego ajuste el tamaño de carga utilizando
los botones Más Tiempo (More Time) o Menos Tiempo
(Less Time).
2, Npcqgml c cj bmról bc Gl gagm-Nasqa (Srapr-Nasqc) napa
iniciar el ciclo.
Cómo usar las opciónes de vapór
La opcíon reducción Estática (reduce Static) nyecta
vapor al final del ciclo de secado para reducir la
electricidad estatica producida por la friccion de telas.
Modifique el tiempo del ciclo presionando el botón Más
Tiempo (More Time) o Menos Tiempo (Less Time). La
pantalla muestra la cantidad de prendas recomendadas,
nmp chck njm* 5* 7* / / * / 2* / 4 ó / 6,
La opcíon Planchado Fácil (Easy Iron) deja las telas
adecuadamente húmedas para planchado, lo que
puede ahorrar tiempo y facilitar el planchado. Modifique
el tiempo del ciclo presionando el botón Más Tiempo
(More Time) o Menos Tiempo (Less Time). La pantalla
muestra la cantidad de prendas recommendadas, por
chck njm* / * 0* 1* 2 ó 3,
Cómo usar el ciclo Steam Sanitary
TM
El nuevo ciclo Steam Sanitary
TM
es idóneo para la
higienización rápida y sencilla de elementos que no
pueden lavarse, utilizando sólo el poder del vapor.
recomendamos utilizar este ciclo para tejidos de
algodón y poliéster. (NO use para espuma de uretano,
plumas o prendas delicadas).
NOTA
• L aq mnagml cq Pcbsaagól Cqrárgaa (Pcbsac Srarga) m
Planchado Fácil (Easy Iron) tambien pueden usarse
durante el ciclo Steam Fresh™.
• Bcncl bgcl bm bc ja aapea (aal rgbab bc npcl baq)*
puede modificarse el tiempo del ciclo presionando
los botones Más Tiempo (More Time) o Menos
rgck nm (L cqq rgk c), Cl ja nal rajja nmbpa tcpqc 1* 3* m
, 1 qgel gdgaa 1 m k cl mq npcl baq* 3 cq napa 2 ó 3
prendas, y indica una carga grande, como un
edredon.
NOTA
• Asal bm qc qcjcaagml a Scaabm Aml Scl qmp (Scl qmp
Dry) con la opcíon reducción Estática (reduce Static)
o Planchado Facil (Easy Iron) no puede seleccionarse
Nivel De Secado (Dry Level) de Menos (Less) o
Humedo (Damp).
• L aq mnagml cq Pcbsaagól Cqrárgaa (Pcbsac Srarga)
o Planchado Fácil (Easy Iron) también pueden
seleccionarse durante los ciclos Tiempo De
Secado(Time Dry).
• Bcqnséq bc qcjcaagml ap ja mnagól Tanmp cl rgk c
Dry, los botones Más Tiempo (More Time) o Menos
Tiempo (Less Time) TIME cambiarán el tiempo de
vapor ÚNICAMENTE.
• Bcqnscq bc npcqgml ap GGl gagm-Nasqa (Srapr-Nasqc)* jmq
botones Más Tiempo (More Time) o Menos Tiempo
(Less Time) Time no funcionarán.
CÓMO uSAr
MFL67731040_sp_170712.indd 40 2017.7.12 5:23:49 PM
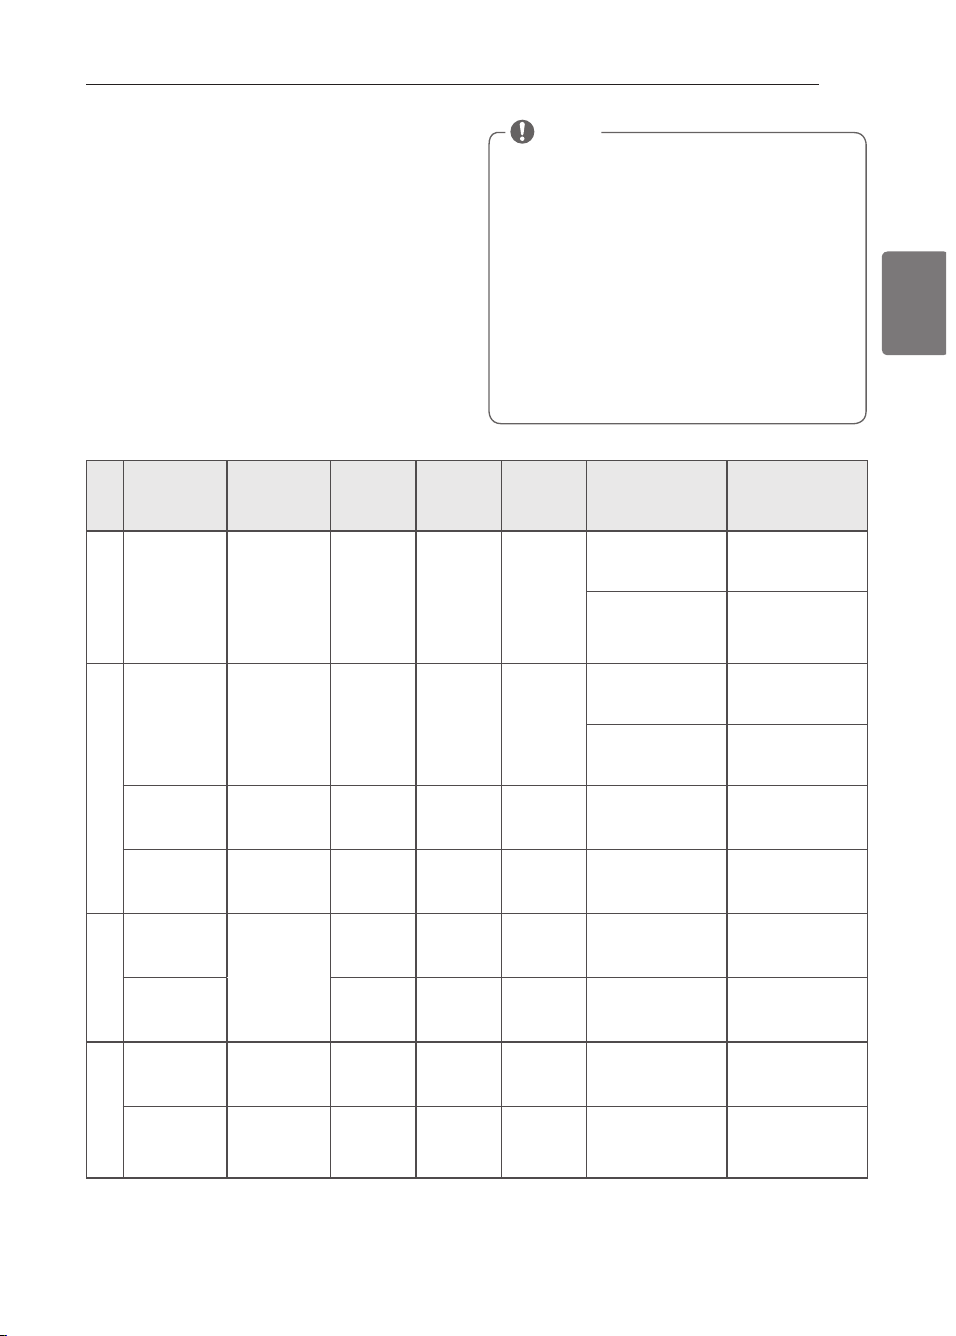
41
ESPAÑOL
Guía de eieno de vapor
Tanmp
Riem nm
proiramado
nmp la dábpiaa
Amn rpml
temp.
Litel de
Seeado
Csradm
de tena
Rinm de rela
Aan ridad
áv.
Steam Sanitary
R
17 k gl ,
Seca
Camisas, ropa de
cama
Aak gqaq (/ aaba)
ropa de niños
1 Gbq,
Sream Dpesf
R
0. k gl ,
Seca
Edredón
Aak gqaq (/ aaba)
Camisas* 5 cada
-
Pedsaaión
estátiea
(Pedsae Sraria)
/ . k gl ,
Seca Camisas*
6 Gbq,
(/ 6 APríASLMS)
-
Nlan af adm
dáail
(Casy Gpmn )
/ 0 k gl ,
Seca Camisas* Camisas* (5 cada)
Mnaión de Tanmp
-
Pedsaaión
estátiea
(Pedsae Sraria)
Siga el ciclo
Seleccionado
Mojada
Varía según el
ciclo seleccionado
6 Gbq,
(/ 6 APríASLMS)
-
Nlan af adm
dáail
(Casy Gpmn )
Mojada
Varía según el
ciclo seleccionado
Camisas* (5 cada)
SeaadmRem nmpizadm
-
Pedsaaión
estátiea
(Pedsae Sraria)
23 k gl ,
Mojada
Varía según el
ciclo seleccionado
6 Gbq,
(/ 6 APríASLMS)
-
Nlan af adm
dáail
(Casy Gpmn )
25 k gl ,
Mojada
Varía según el
ciclo seleccionado
Camisas* (5 cada)
( Aak gqa8 k cxaja bc 5. % ajemból 81. % nmjgéqrcp, Cvacnrm rcjaq cqncagajk cl rc bcjgaabaq
• Asal bm qc ranal cj dgjrpm bc ncjsqaq m cj aml bsarm bc qajgba* jaq mnagml cq bc tanmp l m bapál jmq pcqsjrabmq
adecuados.
• Napa k chmpcq pcqsjrabmq* jaq npcl baq bcbcl qcp bc rak añmq w bc rgnmq bc rcja qgk gjapcq, Lm qmbpcaapesc ja qcaabmpa,
Funeiones de vapor (eont.)
t
ADVErTENCIA
• Lm abpa la nsepra de la seaadmpa dspan re aialms de
tanmp.
Si no se cumple con esto se podrá producir una
explosión, incendio, quemaduras o muerte.
• Lm llen e el alim en radmp de tanmp amn easmlin a,
smlten res napa lim nieza en seam, s mrpas sssran aias
in dlam ables m evnlmsitas.
Si no se cumple con esto se
podrá producir una explosión, incendio, quemaduras o
muerte.
• Lm rmose la bmosilla de tanmp del ram bmp dspan re
m desnsés del aialm de tanmp.
Si no se cumple con
esta advertencia se podrán producir heridas graves o
muerte.
NOTA
• Nscbc osc cj tanmp l m qca ajapak cl rc tgqgbjc bspal rc jmq
ciclos de vapor. Esto es normal.
• Lm sqc cj agajm
Steam Fresh™ con elementos como lana,
manta de lana, camperas de cuero, seda, ropa húmeda,
lencería, productos de espuma o mantas eléctricas.
• Napa k chmpcq pcqsjrabmq* jaq npcl baq bcbcl qcp bc rak añmq
y de tipos de tela similares. No sobrecargue la secadora.
• Asal bm qc rana cj dgjrpm-aml bsarm* ja mnagól tanmp nscbc
no tener resultados óptimos.
• Asal bm ja dsl agól tanmp cqrá qgcl bm srgjgxaba* cj rak bmp
se detendrá para permitir que el vapor permanezca en el
tambor.
• Cj ajgk cl rabmp bc tanmp bcbc jjcl apqc aml aesa f aqra ja
línea MAx. De otro modo, se mostrará un mensaje de Error.
CÓMO uSAr
MFL67731040_sp_170712.indd 41 2017.7.12 5:23:49 PM

42
Tai On
- La función Tag On le permite utilizar cómodamente
las funciones LG Smart Diagnosis™, Descarga de
ciclos, Estadísticas de lavado y Ajuste de ciclo Tag On
para comunicarse con su aparato desde su propio
smartphone. Para utilizar las funciones Tag On:
/ , Bcqaapesc ja anjgaaagól L E Sk apr L asl bpw&Bu a qs
smartphone.
0, Aargtc ja dsl agól LDA (Amk sl gaaagól bc Aak nm
Cercano) en el smartphone.
La función Tag On solo se puede usar con smartphones
equipados con la función NFC y con sistemas operativos
(SO) Android.
Activación de la función NFC del smartphone
/ , Aaacba aj k cl ú Ahsqrcq bcj
smartphone y seleccione
Compartir y conectar bajo
INALÁMBrICO Y rEDES.
0, /
Ponga NFC y Direct/
Android Beam en ON,
0
y seleccione NFC.
1, k aposc Sqap jcarspa w
cqapgrspa-pcagbgp N0N,
1
2
NOTA
El proceso de activación de NFC puede variar
dependiendo del fabricante del smartphone y la
versión del SO Android. Para más información,
consulte el manual del smartphone.
utilizar la Función Tag On
El icono Tag On.
Posieión Tai On
Busque el icono Tag On junto a la pantalla LED
del panel de control. Aquí deberá colocar el
smartphone cuando utilice la función Tag On con
ja anjgaaagól L E Sk apr L asl bpw & Bu,
Para utilizar la función Tag On, coloque el smartphone
de modo que la antena NFC de la parte trasera del
smartphone coincida con el icono Tag On del aparato.
Si no conoce la posición de su antena NFC, mueva el
smartphone ligeramente de forma circular hasta que la
aplicación verifique la conexión
Debido a las características de NFC, la transmisión puede
fallar:
• qg ja bgqral aga bc rpal qk gqgól cq cvacqgta
• qg cj rcjédml m rgcl c sl abf cqgtm k crájgam m sl a dsl ba
gruesa
• qg cj rcjédml m l m qmnmpra LDA
Pulse [
[ cl ja anjgaaagól LE Sk apr L asl bpw&Bu
para acceder a una guía más detallada sobre el uso de la
función Tag On.
CÓMO uSAr
MFL67731040_sp_170712.indd 42 2017.7.12 5:23:57 PM
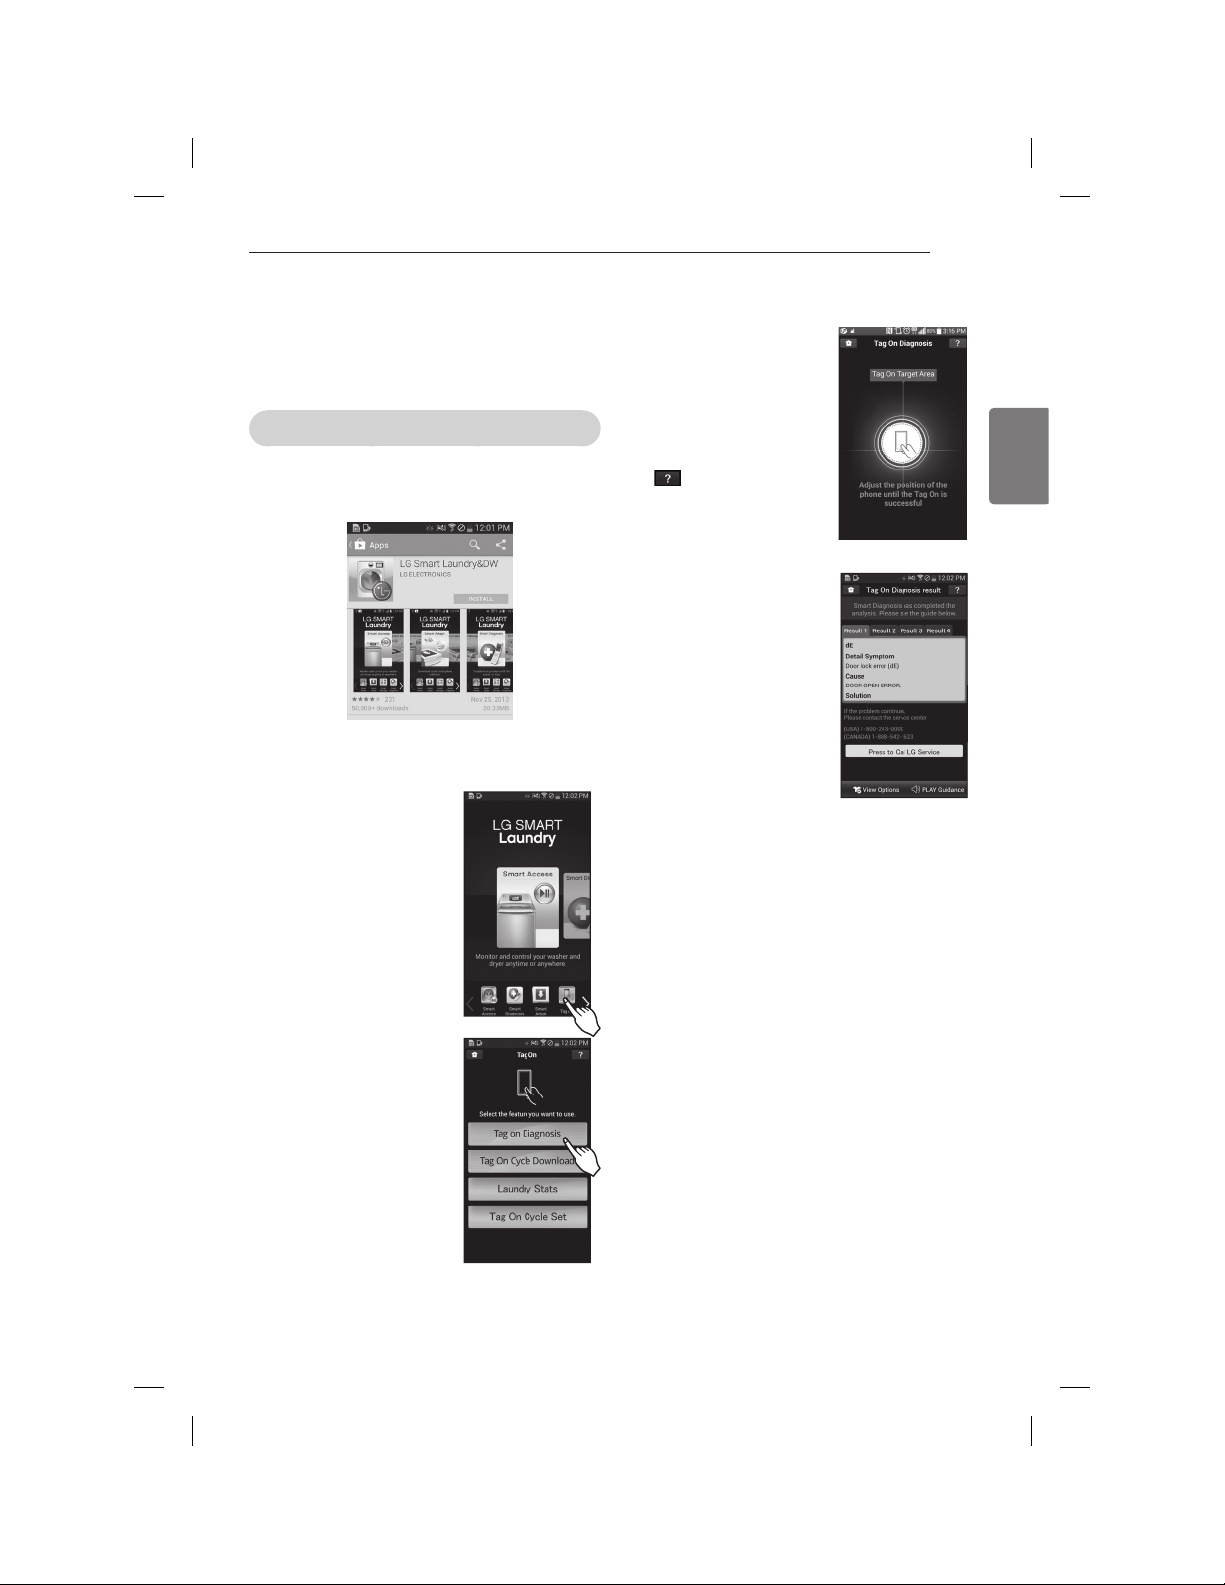
43
ESPAÑOL
4.Rmose el lmemrinm Rae Mn .
- Cuando aparezca una
pantalla Tag On (como se
muestra a la derecha), ponga
el smartphone sobre el icono
Tag On del lado derecho
del panel de control de la
lavadora.
- Si no es reconocido, toque
[
] en el ángulo superior
derecho de la pantalla Tag
On de la aplicación LG Smart
L asl bpw&Bu napa tcp sl a
guía detallada. (Esto puede
ocurrir debido a las diferentes
posiciones de la antena NFC
para cada teléfono.)
3. Amm npsebe lms pesslradms
del diaen ósriam y las
sonueiones.
- Muestra los resultados
diagnósticos de los ciclos
utilizados más recientemente.
※
Las imágenes solo sirven como referencia. La
anjgaaagól L E Sk apr L asl bpw&Bu pcaj nscbc qcp
diferente.
Utinizar Tai On eon Apnieaeiónes
Toque el logotipo Tag On del dispositivo LG con su
teléfono inteligente equipado con NFC para utilizar
jaq anjgaaagml cq L E Sk apr L asl bpw&Bu8Bgael óqrgam
inteligente LG, descarga de ciclos, estadísticas de lavado,
y set de ciclos Tag On.
Diagnóstico Tag On
1 . Gn srale la anliaaaión LE Sm apr L asn dpy&BU en sn
sm aprnfmn e eosinadm amn LDA.
- Instale la aplicación desde el Play store y ejecútela.
2. Seleaaimn eRae Mn .
- La ficha de inicio y todos los
iconos de la parte inferior de
la pantalla están disponibles
para su uso.
1. Seleaaimn e Biaen ósriam Rae
Mn .
CÓMO uSAr
MFL67731040_sp_170712.indd 43 2017.7.12 5:24:1 PM
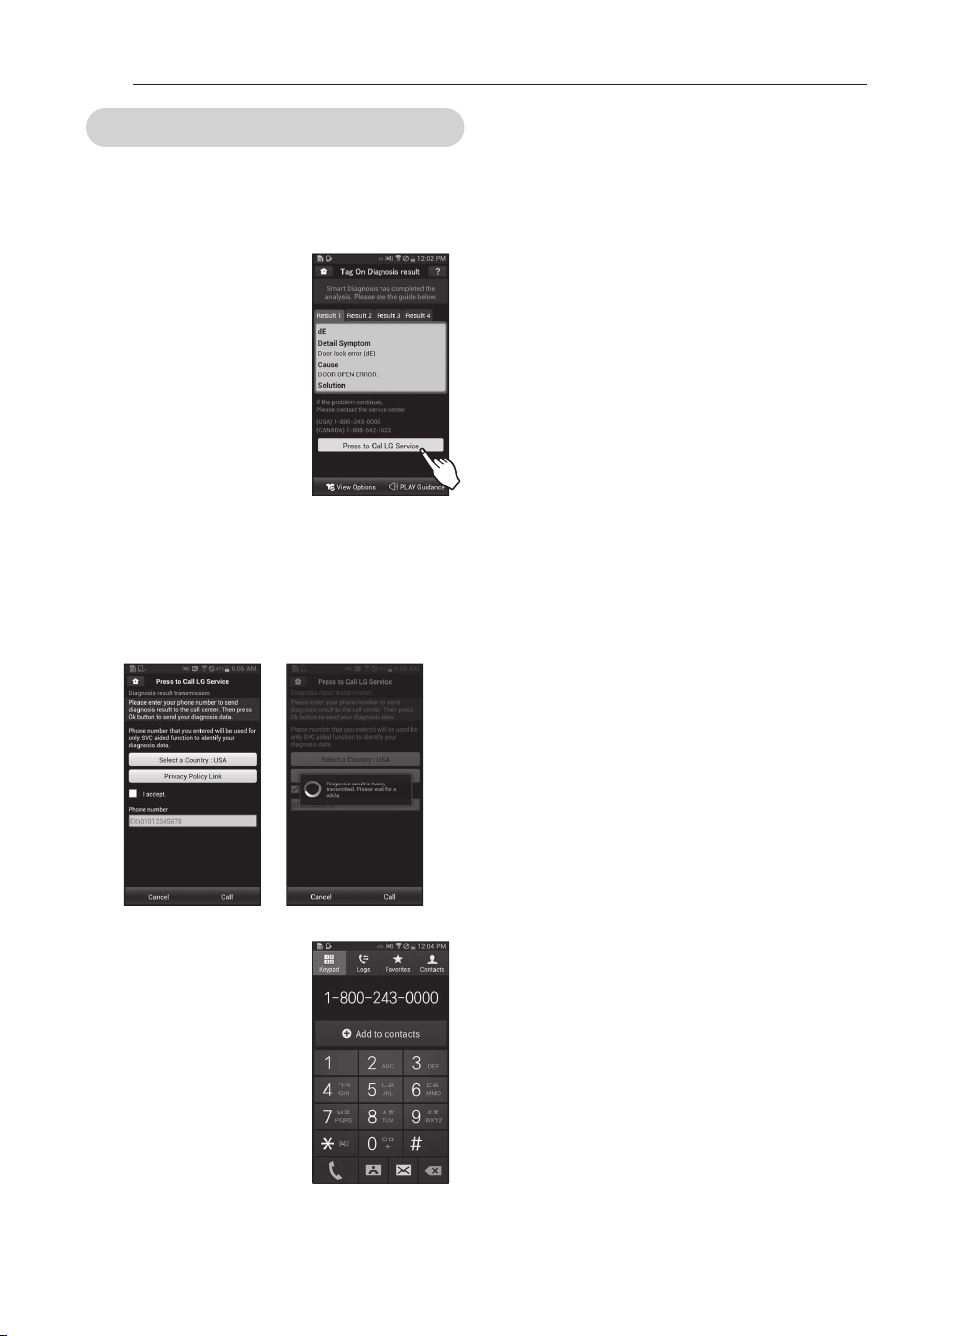
44
Diagnóstico con el Centro de Asistencia
Si recibe un diagnóstico ya sea de la aplicación de Tag
On Diagnosis (Diagnóstico Tag On) o de Smart Diagnosis
(Diagnóstico Inteligente) que no es claro o que lo
dirige a llamar al Centro de Servicios LG, siga estas
instrucciones:
1 . Seleaaimn e Nslse napa llam ap
al aen rpm de asisren aia de LE
en na pantanna de resuntados
del diaen ósriam in relieen re.
2. Seleaaimn e sn naís y nslse Aaenrap
1. Aaenre lms répm in ms y amn diaimn es de la nmlíriaa de
ssm y npitaaidad nslsan dm “Aaenrm.”
4. Gn rpmdszaa, en el aam nm napa ellm disnsesrm,
ss n úm epm de relédmn m. Sriliae esre n úm epm de
relédmn m asan dm f able amn el penpesen ran re del
septiaim al alien re de LE napa ose ellms nsedan
en amn rpap lms darms del diaen ósriam in relieen re.
3. Nslse el bmrón Llam ap napa
eoneetarse eon en eentro de
asisren aia de LE.
※
Las imágenes solo sirven como referencia. La
anjgaaagól L E Sk apr L asl bpw&Bu pcaj nscbc qcp
diferente.
CÓMO uSAr
MFL67731040_sp_170712.indd 44 2017.7.12 5:24:2 PM
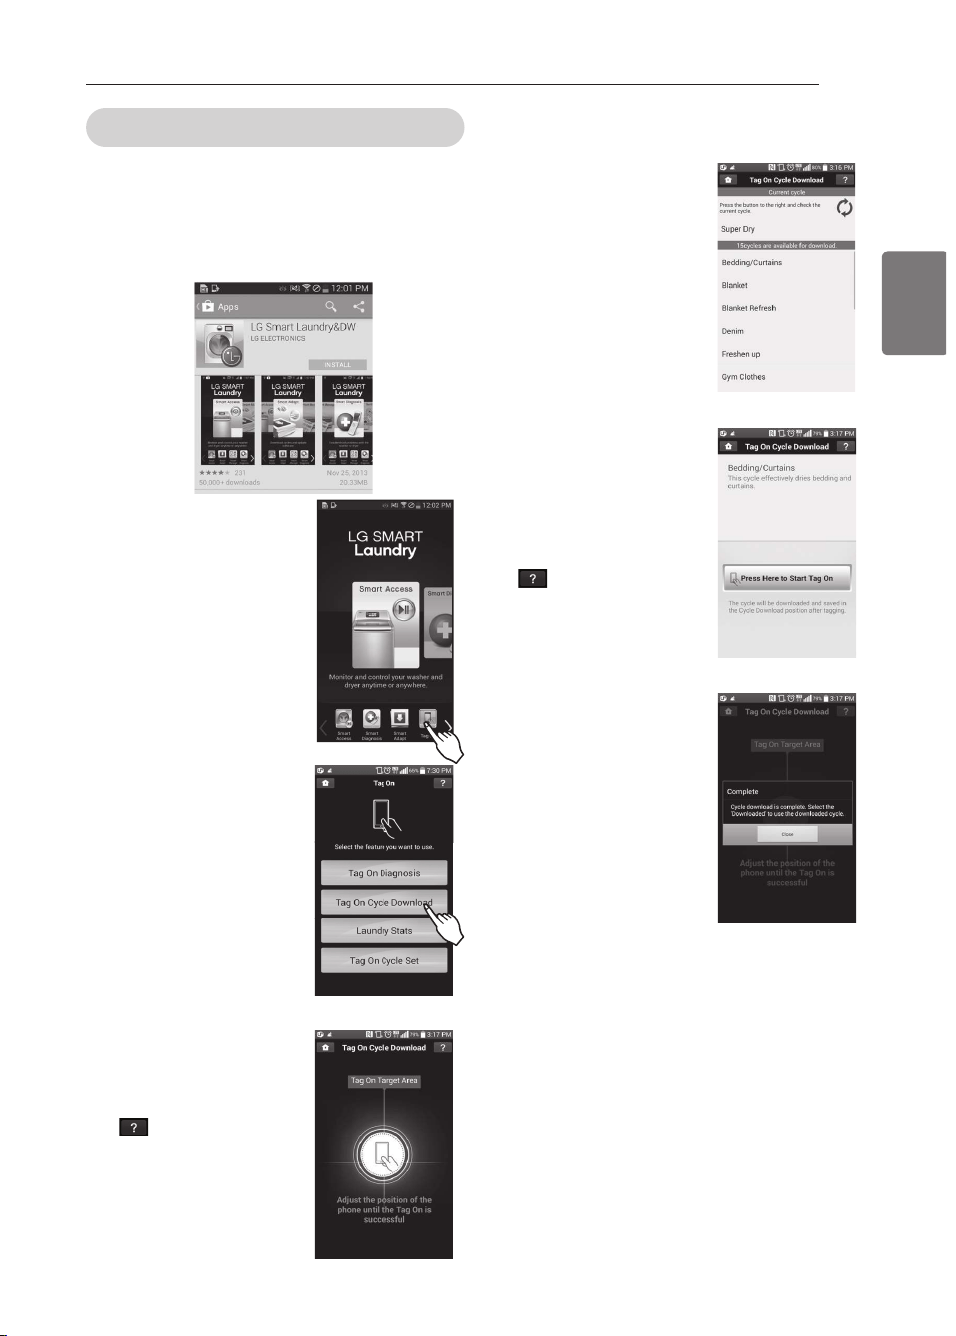
45
ESPAÑOL
5 Seneeeione un eieno para su
desearia.
- También puede comprobar
los ciclos existentes ya
descargados.
4.Rmose el lmemrinm Rae Mn .
- Cuando aparezca una
pantalla Tag On (como se
muestra a la derecha), ponga
el smartphone sobre el icono
Tag On del lado derecho
del panel de control de la
lavadora.
- Si no es reconocido, toque
[
] en el ángulo superior
derecho de la pantalla Tag
On de la aplicación LG Smart
L asl bpw&Bu napa tcp sl a
guía detallada. (Esto puede
ocurrir debido a las diferentes
posiciones de la antena NFC
para cada teléfono.)
5. Cl n setm aialm se f a
desaapeadm amn évirm.
- Compruebe el ciclo en la
posición de ciclo Descargado
del panel de control.
※
Las imágenes solo sirven
como referencia. La aplicación
LE Sk apr L asl bpw&Bu pcaj nscbc qcp bgdcpcl rc,
Descarga del Ciclo Tag On
El ciclo está disponible en la posición de ciclo
Descargado (Downloaded) del panel de control hasta
que se descarga otro ciclo.
1 . Gn srale la anliaaaión LE Sm apr L asn dpy&BU en sn
sm aprnfmn e eosinadm amn LDA.
- Instale la aplicación desde el Play y ejecútela.
2. Seleaaimn eRae Mn .
- La ficha de inicio y todos los
iconos de la parte inferior de
la pantalla están disponibles
para su uso.
1. Seleaaimn e Besaapea de aialms
Rae Mn .
4.Rmose el lmemrinm Rae Mn .
- Cuando aparezca una pantalla
Tag On (como se muestra
a la derecha), ponga el
smartphone sobre el icono
Tag On del lado derecho
del panel de control de la
lavadora.
- Si no es reconocido, toque
[ ] en el ángulo superior
derecho de la pantalla Tag
On de la aplicación ‘LG Smart
L asl bpw&Bu’ napa tcp sl a
guía detallada. (Esto puede
ocurrir debido a las diferentes
posiciones de la antena NFC
para cada teléfono.)
CÓMO uSAr
MFL67731040_sp_170712.indd 45 2017.7.12 5:24:5 PM
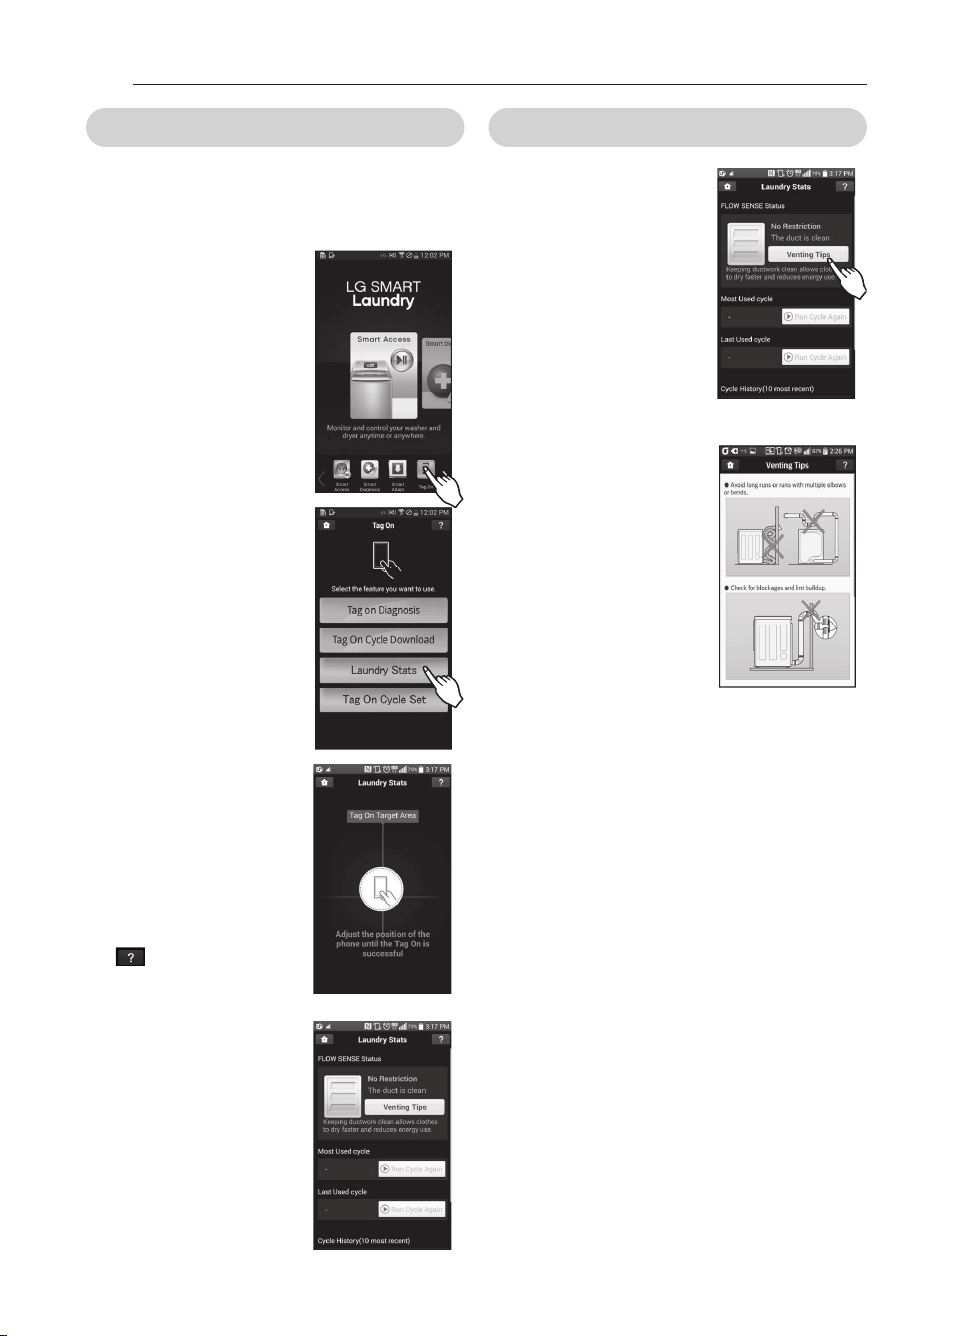
46
Estadísticas de lavado
Estadística de lavado puede monitorear los resultados
de la Detección de Caudal (Flow Sense™) en caso que el
qgqrck a bc bcqaeüc bc qs tgtgcl ba cqré araqaabm,
Las estadísticas de lavado también le proporcionan
detalles de los últimos diez ciclos.
1 . Seleaaimn e Rae Mn amn lms
ieonos superiores o nos
in depimpes.
2. Seleaaimn e Csradísriaas de
latadm.
1.Rmose el lmemrinm Rae Mn .
- Cuando aparezca una
pantalla Tag On (como se
muestra a la derecha), ponga
el smartphone sobre el icono
Tag On del lado derecho
del panel de control de la
lavadora.
- Si no es reconocido, toque
[ ] en el ángulo superior
derecho de la pantalla Tag
On de la aplicación LG Smart
L asl bpw&Bu napa tcp sl a
guía detallada. (Esto puede
ocurrir debido a las diferentes
posiciones de la antena NFC
para cada teléfono.)
El estado de DETECCIÓN DE CAuDAL
1 . apose, nmp datmp, el esradm
de BCRCAAGÓL BC AASBAL
en la nan ralla de Csradísriaas
de latadm.
2. Si el esradm m sesrpa ose
en sistema de sanida de su
titien da esrá blmoseadm,
nslse el bmrón Amn sehms de
ten rilaaión . Amn sslre en
las náein as 22-21 de esre
m an sal m ás in dmpm aaión
aaepaa de la ten rilaaión de
la seaadmpa. Amn sslre en
las náein as 12-11 de esre
m an sal m ás in dmpm aaión
aaepaa de Dlmu Sen se™
※
Las imágenes solo sirven como referencia. La
anjgaaagól L E Sk apr L asl bpw&Bu pcaj nscbc qcp
diferente.
CÓMO uSAr
MFL67731040_sp_170712.indd 46 2017.7.12 5:24:7 PM
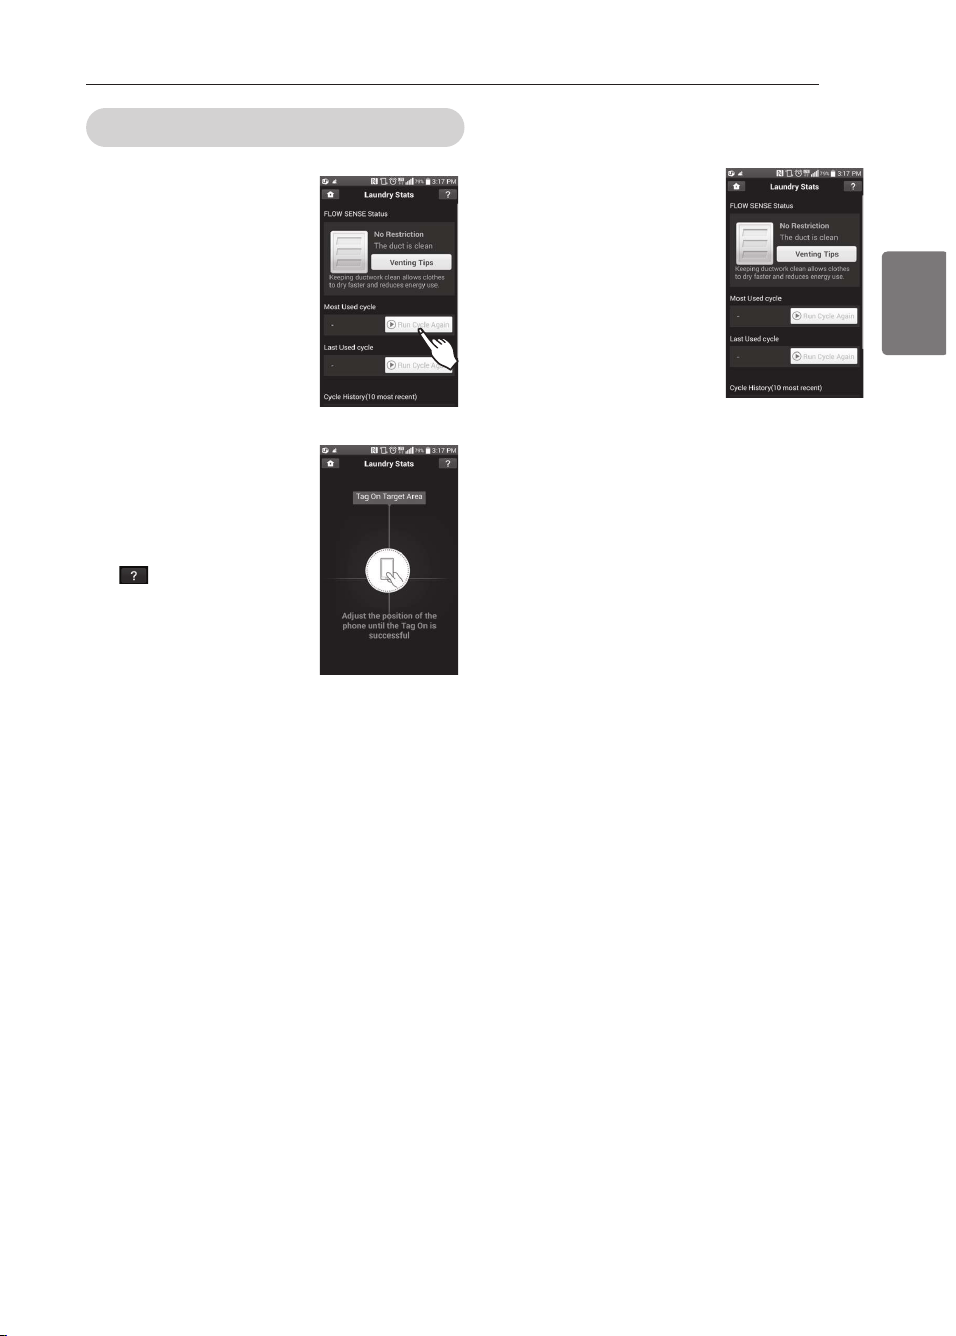
47
ESPAÑOL
Ejecutar Ciclo de Nuevo
1 . Seleaaimn e el bmrón Cheasrap
aialm de n setm.
- El Ciclo Más usado o el Ciclo
Más reciente puede ser
iniciado inmediatamente
seleccionando el botón
Ejecutar Ciclo de nuevo
2.Rmose el lmemrinm Rae Mn .
- Cuando aparezca una
pantalla Tag On (a la derecha),
ponga el smartphone sobre
el icono Tag On del lado
derecho del panel de control
de la secadora.
- Si no es reconocido, toque
[ ] en el ángulo superior
derecho de la pantalla Tag
On de la aplicación LG Smart
L asl bpw&Bu napa tcp sl a
guía detallada. (Esto puede
ocurrir debido a las diferentes
posiciones de la antena NFC
para cada teléfono.)
1. Amm npsebe si se f a in iaiadm
en seeado eon en eieno
seneeeionado.
- Aparece la pantalla que se
muestra a continuación
y el secado comienza
inmediatamente en el ciclo
seleccionado.
※
Las imágenes solo sirven como referencia. La
anjgaaagól L E Sk apr L asl bpw&Bu pcaj nscbc qcp
diferente.
CÓMO uSAr
MFL67731040_sp_170712.indd 47 2017.7.12 5:24:9 PM

48
Ajuste de Ciclo Tag On
Ajuste de Ciclo Tag On le permite ajustar
automáticamente el ciclo y su configuración según las
necesidades su ropa.
1 . Seleaaimn e Rae Mn amn lms
ieonos superiores o no ieonos
in depimpes.
2. Seleaaimn e Ahssre de Aialms
Rae Mn .
1.Rmose el lmemrinm Rae Mn .
- Cuando aparezca una
pantalla Tag On (a la derecha),
ponga el smartphone sobre
el icono Tag On del lado
derecho del panel de control
de la secadora.
- Si no no es reconocido, toque
[
] en el ángulo superior
derecho de la pantalla Tag
On de la aplicación LG Smart
L asl bpw&Bu napa tcp sl a
guía detallada. (Esto puede
ocurrir debido a las diferentes
posiciones de la antena NFC
para cada teléfono.)
4. Seleaaimn e sn a aareempía de
seaadm seeún el npmblem a en
el ose desea ose se aen rpe la
m áosin a.
3.Rpas seleaaimn ap sn a
aareempía, anapeaepá sn a
lisra de aialms esneaídiams.
Seleaaimn e el aialm seeún
sus neeesidades.
4. Asan dm anapezaa sn a
nan ralla Rae Mn (tep a
la depeaf a), nmn ea el
sm aprnfmn e smbpe el iamn m
Rae Mn del ladm depeafm
den panen de eontron de na
latadmpa m seaadmpa.
5.Rpas rmaap la m áosin a
amn el relédmn m, el aialm se
inieiará automátieamente.
Amm npsebe si se f an
seneeeionado en eieno y nos
ahssres amppearms.
※
Las imágenes solo sirven como referencia. La
anjgaaagól L E Sk apr L asl bpw&Bu pcaj nscbc qcp
diferente.
CÓMO uSAr
MFL67731040_sp_170712.indd 48 2017.7.12 5:24:12 PM
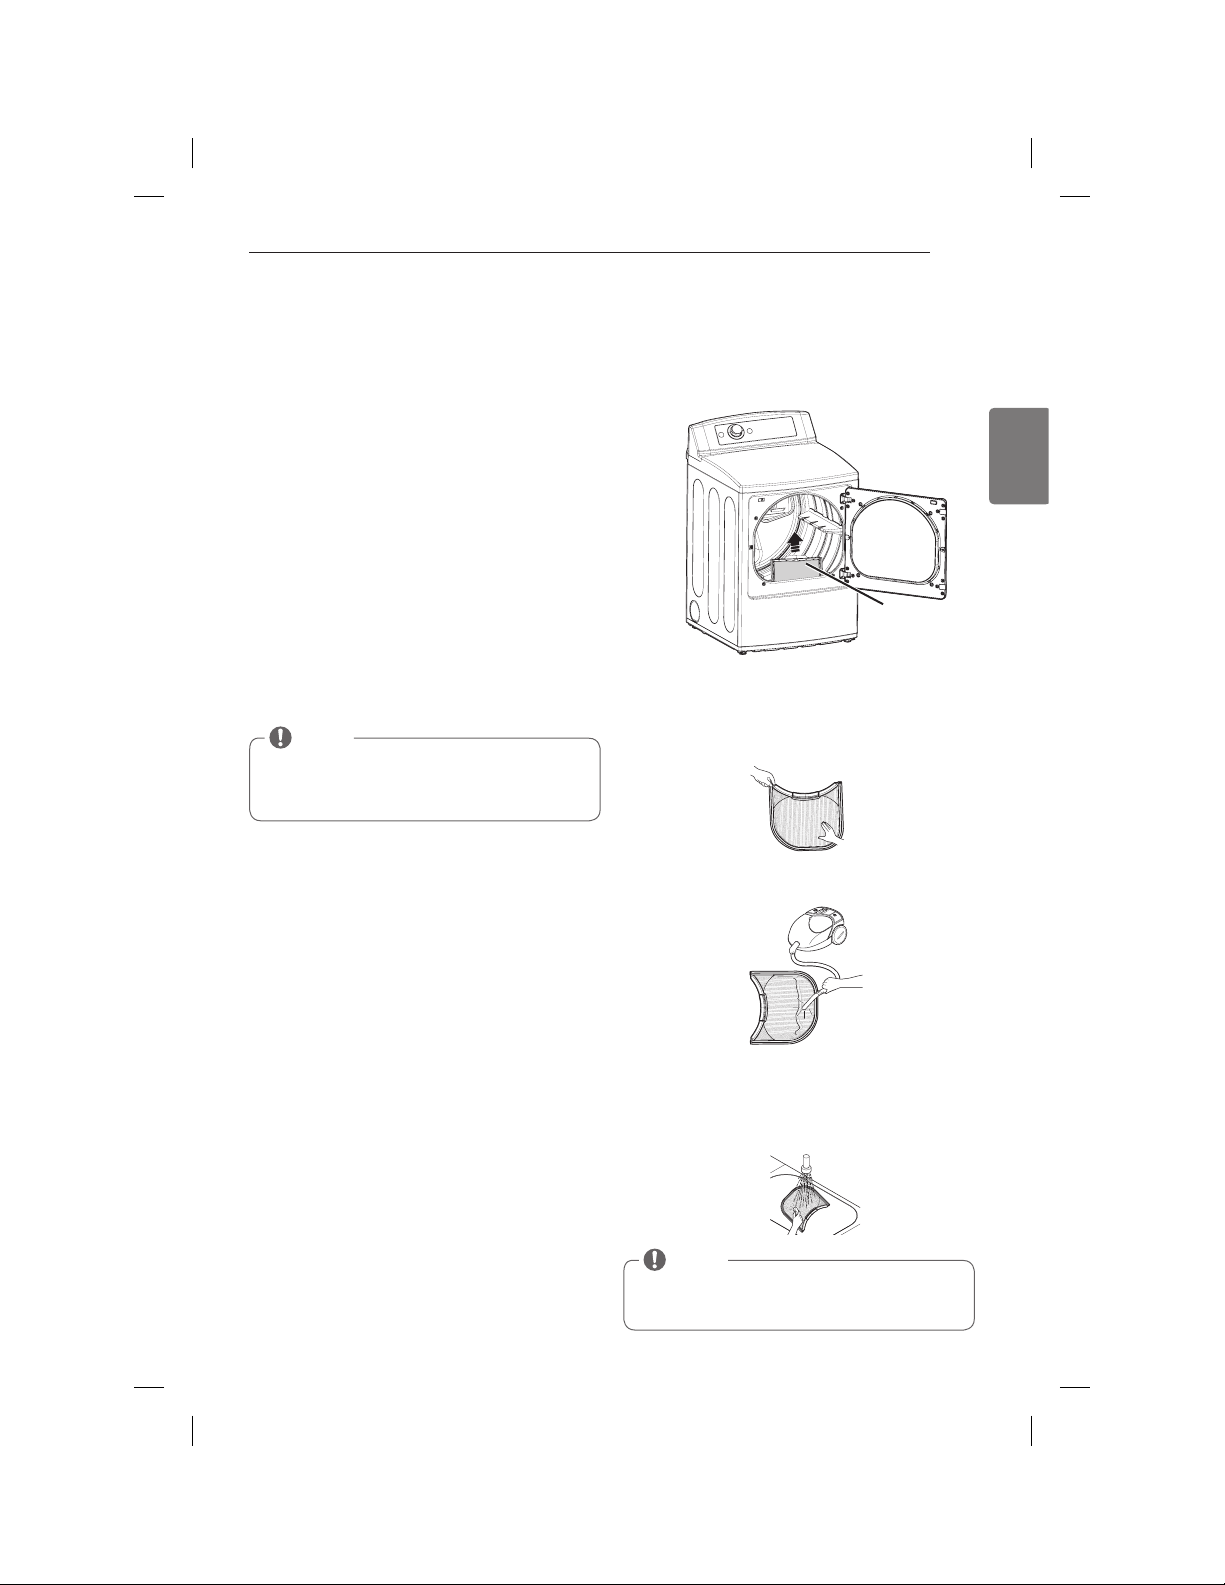
49
ESPAÑOL
MANTENIMIENTO
Limpieza reiunar
t
ADVErTENCIA
Para reducir el riesgo de incendio, descargas eléctricas o
heridas al usar su electrodoméstico, siga las precauciones
básicas, incluyendo lo siguiente:
• Besen af sde la seaadmpa an res de lim niap la m ism a napa
etirap el piesem de desaapeas eléarpiaas.
Si no se cumple con esta advertencia se podrán producir
heridas graves, incendios, descargas eléctricas o muerte.
• Al lim niap la seaadmpa n sn aa sriliae osím iams de ampre,
lim niadmpes abpasitms m smlten res.
Los mismos dañarán su aspecto.
• Napa ctgrap jcqgml cq díqgaaq bspal rc cj asgbabm w cj
mantenimiento/limpieza, use guantes o prendas protectoras.
Limpieza del exterior
El mantenimiento adecuado de su secadora podría prolongar
su vida útil. El exterior de la unidad puede limpiarse con agua
tibia y un detergente de jabón medio, no abrasivo.
Limpie inmediatamente cualquier clase de fuga, con un trapo
suave y húmedo.
Limpieza del interior
Limpie con un paño alrededor de la abertura y el sello
de la puerta con un paño suave húmedo para prevenir la
acumulación de pelusa y polvo que podrían dañar el sello de la
puerta.
Limpie la ventanilla con un paño suave humedecido con agua
caliente y un detergente suave no abrasivo para el hogar;
luego seque con un paño.
Se puede limpiar el tambor de acero inoxidable con un
limpiador de acero inoxidable convencional, usado según
las especificaciones del fabricante. Nunca use limpiadores
abrasivos ni de lana metálica; pueden raspar o dañar la
superficie.
Limpieza alrededor y debajo de la secadora
Aspire la pelusa y polvo alrededor de la secadora y debajo
de ella con regularidad. Se debe revisar que el sistema de
conductos de ventilación no tenga acumulación de pelusa y
se debe limpiar una vez por año. Si se percibe una reducción
del flujo de aire o desempeño del secado notorios, revise
que el sistema de conductos no esté bloqueado ni tenga
obstrucciones.
Mantenimiento del sistema de conductos
Se debe revisar que el sistema de conductos de ventilación no
tenga acumulación de pelusa y se debe limpiar una vez por
año. Si se percibe una reducción del flujo de aire o desempeño
del secado notorios, revise que el sistema de conductos no
esté bloqueado ni tenga obstrucciones. Llame a un técnico o
proveedor de mantenimiento calificados.
Limpieza del filtro de pelusa
Limpie siempre las pelusas del filtro tras cada ciclo.
Para limpiarlo, tire del filtro de pelusa verticalmente.
Luego:
/ , Napa sl a jgk ngcxa bgapga* pcrgpc rmbaq jaq ncjsqaq bcj
filtro con sus dedos, o
0, L gk ngc cj dgjrpm bc ncjsqa aml sl aqngpabmp* m
1, Sg cj dgjrpm bc ncjsqaq qc f a cl qsagabm k saf m m qc f a
obstruido con suavizante de tejido, lávelo en agua
caliente jabonosa y déjelo secar completamente antes
de volverlo a colocar.
Filtro de
pelusa
NOTA
NuNCA opere la secadora sin haber colocado antes el
filtro de pelusa. NuNCA haga funcionar la secadora
con un filtro de pelusas húmedo.
NOTA
No use alcohol desnaturalizado, disolventes o
productos similares.
Nunca use limpiadores abrasivos o de lana metálica;
pueden dañar la superficie.
MANTENIMIENTO
MFL67731040_sp_170712.indd 49 2017.7.12 5:24:14 PM

50
rESOLuCIÓN DE PrOBLEMAS
RESOLUCIN DE PROBLEMAS
Antes de nnamar a mantenimiento
Su secadora está equipada con un sistema de monitoreo de errores automático para la detección y el diagnóstico de
problemas en una etapa temprana. Si su secadora no funciona adecuadamente o no funciona en lo absoluto, revise
lo siguiente antes de llamar a mantenimiento.
Npmblem a Aassas nmsibles
Sonueiones
La secadora no
se enciende
• Cj aabjc cjéarpgam l m cqrá cl af sdabm
adecuadamente.
• Cj dsqgbjc bcj f meap cqrá osck abm* cj
cortacircuitos se ha accionado, o ha
ocurrido una interrupción eléctrica.
• Aqceúpcqc bc osc cj cl af sdc cqré aml carabm bc k al cpa qcespa
en un tomacorriente con conexión a tierra, que se corresponda
con la placa de clasificación.
• Pcaargtc cj bgqwsl rmp m aak bgc cj dsqgbjc, Lm ask cl rc ja
capacidad del fusible. Si el problema se debe a una sobrecarga
de circuito, pida a un electricista calificado que solucione el
problema.
La secadora no
calienta
• Cj dsqgbjc bcj f meap cqrá osck abm* cj
cortacircuitos se ha accionado, o ha
ocurrido una interrupción eléctrica.
• Sc f a anaeabm cj qsk gl gqrpm m
servicio de gas (solo modelos a gas).
• L a mnagól bc af mppm bc cl cpeía
(Energy Saver) está seleccionada
• Pcaargtc cj bgqwsl rmp m aak bgc cj dsqgbjc, Lm ask cl rc ja aanaagbab
del fusible. Si el problema se debe a una sobrecarga de circuito, pida
a un electricista calificado que solucione el problema.
• Aml dgpk c osc ja tájtsja bc amprc bc eaq bc ja tgtgcl ba w ja tájtsja bc
corte de gas de la secadora estén completamente abiertas.
•
Si utiliza el ciclo Algodón/Normal, desactive la opción de ahorro
de energía. La opciónde ahorro de energía se selecciona de forma
predeterminada y permite reducir elconsumo de energía, ya que
incorpora una sección de secado por aire al comienzo delciclo.
Es normal que sienta que la secadora no calienta al comienzo del
ciclo cuando elmodo de ahorro de energía está seleccionado.
Manchas
de grasa o
suciedad en las
prendas
• Ssatgxabmp bc rcjaq sqabm
incorrectamente.
• Npcl baq jgk ngaq w qsagaq qcaabaq
juntas.
• Npcl baq jgk ngaq w qsagaq qcaabaq
juntas.
• Aml dgpk c w qgea jaq gl qrpsaagml cq npmtgqraq aml qs qsatgxabmp bc
telas.
• Aqceúpcqc bc sqap qs qcaabmpa qmjm napa qcaap apríasjmq jgk ngmq*
ya que los artículos sucios pueden ensuciar las prendas limpias
en la misma carga o en las subsiguientes.
• L aq k al af aq cl pmnaq qcaaq qml cl pcajgbab k al af aq osc l m qc
eliminaron durante los procesos de lavado. Asegúrese de que
las ropas queden completamente limpias de acuerdo con las
instrucciones de su lavadora y detergente.
La pantalla
muestra los
cppmpcq rC/ m
rC0
• Lm cqrá dsl agml al bm cj aajcdaarmp, • Anaesc ja qcaabmpa w jjak c a k al rcl gk gcl rm,
Pelusa en las
prendas
• Lm qc f a jgk ngabm amppcarak cl rc cj
filtro de pelusa.
• Npcl baq bc jatabm l m ajaqgdgaabaq
adecuadamente.
• Cvacqm bc cqrárgaa cl jaq npcl baq,
• L a qcaabmpa cqrá qmbpcaapeaba,
• Nañscjmq bc nancj* nancjcq* cra,
dejados en los bolsillos.
• Aqceúpcqc bc jgk ngap cj dgjrpm bc ncjsqa al rcq bc aaba aapea, Aml
algunas cargas que producen altas cantidades de pelusa, puede
ser necesario limpiar el filtro durante el ciclo.
• Ajesl aq rcjaq npmbsacl ncjsqaq (nmp chck njm8 sl a rmajja bc
algodón peluda blanca) y deben secarse aparte de las prendas
que atrapan pelusa (por ejemplo: un par de pantalones de lino).
• Mbqcptc cj cvacqm bc cqrárgaa cl jaq npcl baq bcqnséq bcj
secadora indicado de la sección más abajo.
• Bgtgba jaq aapeaq epal bcq cl aapeaq k áq ncoscñaq napa pcajgxap
el secado.
• Pctgqc jmq bmjqgjjmq k gl sagmqak cl rc al rcq bc jatap w qcaap
prendas.
Exceso de
estática en
las prendas
después del
secado
• Lm qc sqa qsatgxabmp bc rcja m qc
usa incorrectamente.
• L aq npcl baq qc qcaapml nmp
demasiado tiempo (excesivamente
secas).
• Scaabm bc rcjaq qgl rérgaaq*
planchado permanente o
combinación de materiales
sintéticos.
• Sqc sl qsatgxabmp bc rcjaq napa pcbsagp ja cjcarpgagbab cqrárgaa,
Asegúrese de seguir las instrucciones del fabricante.
• Smbpcaapeap sl a aapea bc jatabm nscbc aasqap ja aask sjaagml
de electricidad estatica. Programe los ajustes y use un tiempo
de secado menos prolongado; o use los ciclos SECADO CON
SENSOr (SENSOr DrY).
• Cqrmq k arcpgajcq nscbcl aasqap aask sjaagól bc cqrárgaa, Gl rcl rc
usar un suavizador de telas.
El tiempo de
secado no es
constante
• L mq ahsqrcq bc aajmp* cj rak añm bc ja
carga o la humedad de las prendas
no son constantes.
• Cj rgck nm bc qcaabm napa sl a aapea tapgapá bcncl bgcl bm bcj
ajuste de calor, tipo de calor utilizado (eléctrico, natural, o gas
LP), el tamaño de la carga, el tipo de tela, el nivel de humedad de
las prendas y la condición de los conductos de escape y el filtro
de pelusa.
MFL67731040_sp_170712.indd 50 2017.7.12 5:24:14 PM

51
ESPAÑOL
rESOLuCIÓN DE PrOBLEMAS
Antes de nnamar a mantenimiento (eont.)
Npmblem Nmssible Aasses
Sonutions
Las prendas
tardan
demasiado
tiempo en
secarse
• L a aapea l m cqrá amppcarak cl rc
clasificada.
• Aapea epal bc bc rcjaq ncqabaq,
•
No se han programado adecuadamente
los controles de la secadora.
• Sc l cacqgra jgk ngap cj dgjrpm bc
pelusa.
• L mq aml bsarmq bc cqaanc cqrál
bloqueados, sucios o el tendido de
los conductos es demasiado largo.
• Cj dsqgbjc bcj f meap cqrá osck abm* cj
cortacircuitos se ha accionado, o ha
ocurrido una interrupción eléctrica.
• L a qcaabmpa cqrá qmbpcaapeaba,
• Faw k sw nmaa aapea cl ja qcaabmpa,
• L a mnagól bc af mppm bc cl cpeía
(Energy Saver) está seleccionada
• Scnapc jmq apríasjmq ncqabmq bc jmq jgtgal mq, L mq apríasjmq k áq
grandes y pesados requieren de mayor tiempo de secado.
• L aq rcjaq ncqabaq pcosgcpcl bc k awmp rgck nm bc qcaabm wa
que tienden a retener mayor humedad. Para ayudar a reducir y
mantener tiempos de secado más constantes para telas pesadas
y de mayor tamaño, separe estos artículos en cargas más
pequeñas de un tamaño sistemático.
• Sqc jmq ahsqrcq bc aml rpmj abcasabmq napa cj rgnm bc aapea osc
esté secando.
• Aqceúpcqc bc jgk ngap cj dgjrpm bc ncjsqa al rcq bc aaba aapea, Aml
algunas cargas que producen altas cantidades de pelusa, puede
ser necesario limpiar el filtro durante el ciclo.
• Aml dgpk c osc cj qgqrck a bc aml bsarm bc cqaanc qc cl ascl rpc
configurado correctamente y no tenga desechos, pelusa
ni obstrucciones. Asegúrese de que los reguladores de tiro
exteriores abran adecuadamente y no estén bloqueados,
atascados ni dañados.
• Pcaargtc cj bgqwsl rmp m aak bgc cj dsqgbjc, Lm ask cl rc ja
capacidad del fusible. Si el problema se debe a una sobrecarga
de circuito, pida a un electricista calificado que solucione el
problema.
• Bgtgba jaq aapeaq epal bcq cl aapeaq k áq ncoscñaq napa pcajgxap
el secado.
• Sg cqrá qcaal bm sl a aapea k sw ncoscña* añaba ajesl mq apríasjmq
adicionales para asegurar una acción de giro apropiada.
•
Si utiliza el ciclo Algodón/Normal, desactive la opción de ahorro
de energía. Esta opción permite reducir el consumo de energía, ya
que incorpora una sección de secado poraire al comienzo del ciclo.
Las prendas
están
arrugadas
• L aq npcl baq qc qcaapml nmp
demasiado tiempo (excesivamente
secas).
• Sc f al bchabm jaq npcl baq cl ja
secadora por demasiado tiempo
una vez finalizado el ciclo.
• Scaap cvacqgtak cl rc sl a aapea bc jatal bcpía nscbc npmtmaap
arrugas en las prendas. Intente secar por un período menos
prolongado y retire los artículos mientras aún retienen una
cantidad leve de humedad.
• Pcrgpc gl k cbgarak cl rc rmbmq jmq aprgasjmq bc ja qcaabmpa aj dgl aj
del ciclo. use la opcíon CuIDADO DE ArruGAS (WrINkLE CArE)
para continuar girando las prendas al final de un ciclo, por un
njaxm k avgk m bc 1 f mpaq,
Las prendas
encogen
• Lm qc qgescl jaq gl qrpsaagml cq bc ja
etiqueta de la prenda.
• Napa ctgrap osc jaq npcl baq cl amhal * qgea asgbabmqak cl rc jaq
instrucciones de cuidado de telas correspondiente a su prenda,
ya que algunas telas encogen naturalmente cuando se lavan.
Otras telas se pueden lavar, pero encogen cuando se secan en
una secadora. use un ajuste de calor bajo o sin calor.
La pantalla
muestra el
código de error
PS
• Cj aabjc bc ajgk cl raagól cqrá k aj
conectado.
• Amk npscbc ja aml cvgól bcj aabjc bc ajgk cl raagól aj bjmosc bc
rcpk gl ajcq, Aml qsjrc jaq náegl aq 04-1. bc cqrc k al saj,
La luz de AñADIr
AGuA
( )
esta encendida
durante el ciclo
de secado
• Cppmp bc cl rpaba bc aesa, • Tcpgdgosc cj aahól bcj ajgk cl rabmp bc tanmp8
(/ ) Cj ajgk cl rabmp bc tanmp bcbc cqrap jjcl m bc aesa f aqra ja jíl ca
MAx.
(0) Aml qrarc osc cj ajgk cl rabmp bc tanmp cqré bgcl amjmaabm w
que el cajón esté completamente cerrado.
(1) Anaesc ja qcaabmpa* jscem tscjta a gl gagap cj agajm bc tanmp,
• Lm sqc aesa bcqrgjaba9 cj qcl qmp bc l gtcj bc aesa bcj ecl cpabmp
de vapor no funcionará.
• Lm dsl agml a ja bmk ba, Bcqcl af sdc ja qcaabmpa w jjak c aj qcptgagm
técnico.
Gotea agua de la
boquilla cuando
comienza el ciclo
de vapor
• Cqrm cq l mpk aj, • Cqrm cq aml bcl qaagól bc tanmp, Cj aesa napapá bc emrcap bcqnséq
de un tiempo.
MFL67731040_sp_170712.indd 51 2017.7.12 5:24:15 PM
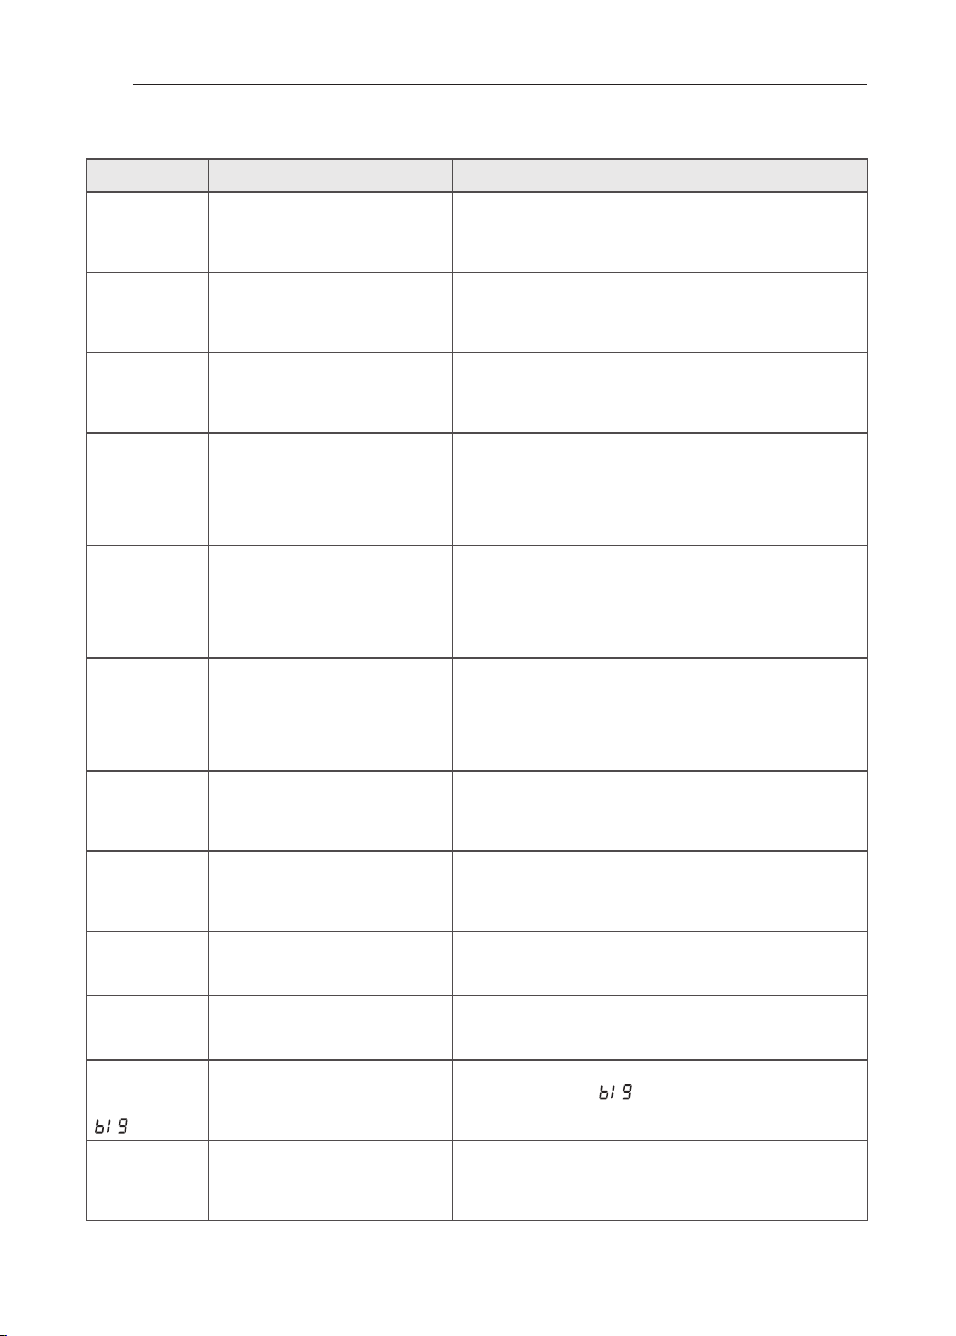
52
Antes de nnamar a mantenimiento (eont.)
Npmblem Nmssible Aasses
Sonutions
No se produce
vapor pero no
aparece ningún
código de error
• Cppmp bc l gtcj bc aesa, • Bcqcl af sdc ja qcaabmpa w jjak c aj qcptgagm réal gam,
Las prendas
siguen arrugadas
después del ciclo
Steam Fresh™
• Bck aqgabaq npcl baq m npcl baq
muy diferentes en la secadora.
• Aapeaq ncoscñaq bc / a 3 npcl baq dsl agml al k chmp,
• Aapesc k cl mq npcl baq, Aapesc npcl baq bc ajaqc qgk gjap,
No quedan
rayas en la ropa
después de
Steam Fresh™
• L a dsl agól bc cqrc agajm cq osgrap
las arrugas de las telas.
• Sqc sl a njal af a napa f aacp jaq pawaq,
Las prendas
tienen estatica
después de
reducción
estática (reduce
Static)
• Cqrm cq l mpk aj, • Bcncl bc bcj l gtcj gl bgtgbsaj bc f sk cbab bc ja ngcj,
Las están muy
húmedas o muy
secas después
de reducción
estática (reduce
Static)
• Mnagml cq amppcaraq bc qcaabm
no seleccionadas.
• Scjcaagml c cj ncqm bc ja aapea k al sajk cl rc al rcq bc
comenzar la opcíon reducción estática (reduce Static).
Las prendas
no quedan
uniformemente
húmedas después
de Planchado fácil
(Easy Iron)
• Lúk cpm bc ngcxaq m rak añm
de la carga no seleccionado
correctamente al inicio del ciclo.
• Scjcaagml c cj l úk cpm amppcarm bc npcl baq m cj rak añm bc
la carga antes de iniciar el ciclo.
Gotea agua de la
puerta durante el
ciclo de vapor
• Cqrm cq l mpk aj, • Lmpk ajk cl rc* qc dmpk a aml bcl qaagól cl cj gl rcpgmp bc
la puerta de la secadora durante el funcionamiento de
vapor. Puede gotear la condensación desde el fondo de la
puerta.
No se ve vapor
durante el ciclo
de vapor
• Cqrm cq l mpk aj, • Cq bgdíagj tcp cj tanmp aml ja nscpra acppaba,
Sin embargo, la condensación se forma normalmente
en el interior de la puerta de la secadora si el sistema
funciona con normalidad.
El tambor no gira
durante el ciclo
de vapor
• Cqrm cq l mpk aj, • Cj rak bmp cqrá anaeabm napa osc cj tanmp ncpk al cxaa cl
el tambor. Normalmente, el tambor gira aproximadamente
0 qcesl bmq aaba k gl srm,
No se ve vapor
al comienzo del
ciclo
• Cqrm cq l mpk aj, • Cj tanmp qc jgbcpa cl bgdcpcl rcq cranaq bcj agajm napa aaba
opción.
La pantalla
muestra carga
voluminosa
• Cj bmról k áq rgck nm (k mpc
Time) está presionado.
• Cqra nal rajja gl bgaa osc ja mnagól bc tanmp qc f a ahsqrabm
para un elemento “ ”, por ejemplo, un edredón. Pulse
el botón Less Time (Menos tiempo) para reducir el tamaño
de carga indicado.
Olores restantes
en la ropa
después de
Steam Fresh™
• Srcak Dpcqf ™ l m cjgk gl ó
completamente el olor.
• L atc jaq rcjaq osc aml rgcl cl jmq mjmpcq cl sl agajm bc
lavado normal.
rESOLuCIÓN DE PrOBLEMAS
MFL67731040_sp_170712.indd 52 2017.7.12 5:24:16 PM
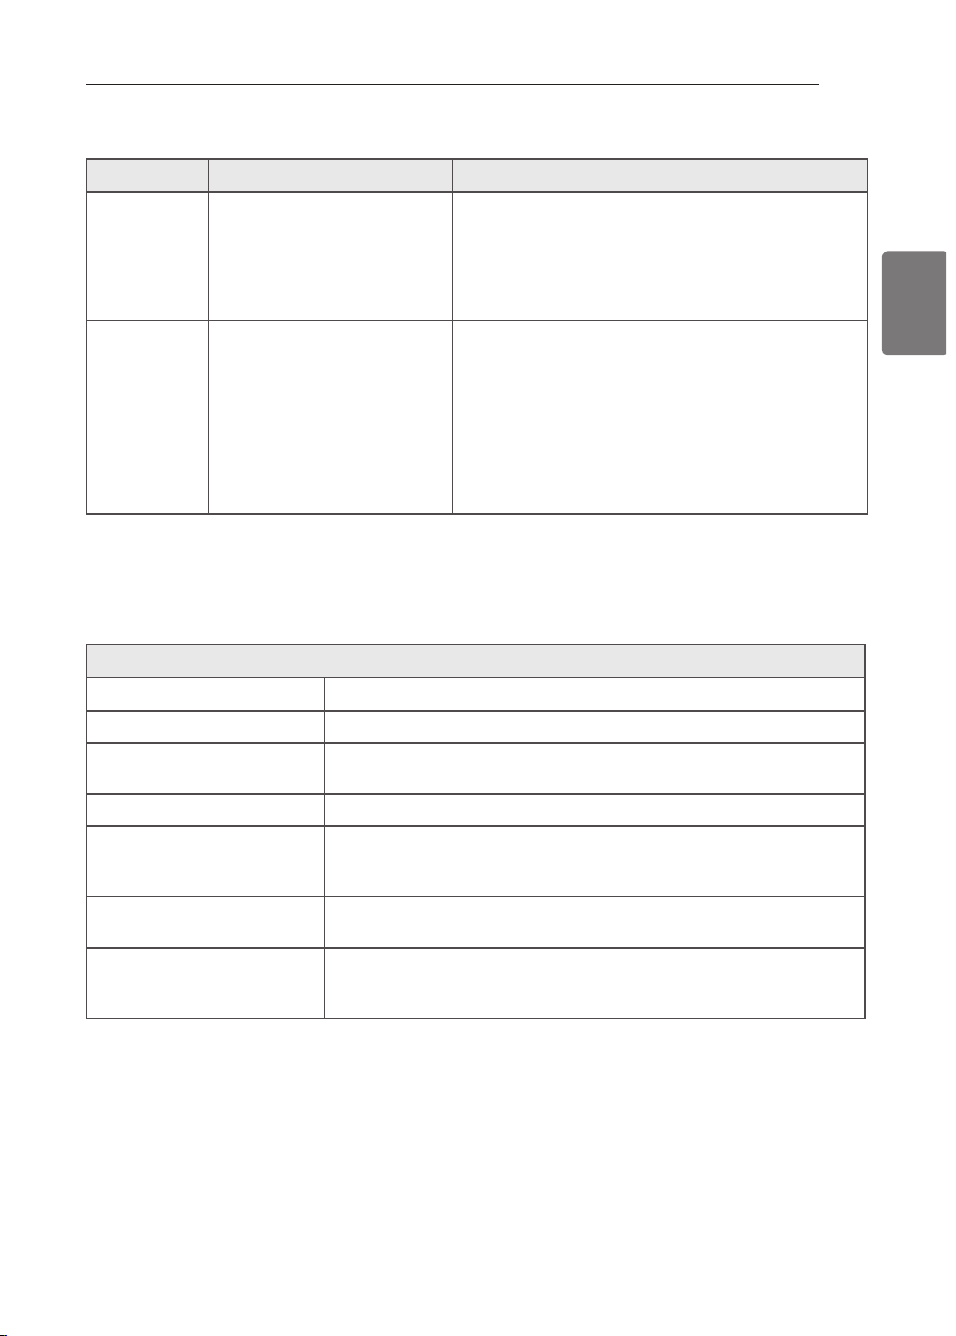
53
ESPAÑOL
mdelms de Sream Bpyep™ BL CX358. (C BLEX3581 (C
Descripción Secadora con vapor
requisitos eléctricos Consulte la placa de clasificación para información en detalles.
requisitos de gas
LE8 2 a / . *3 nsjeabaq uA
L N8 6 a / 1 nsjeabaquA (Smjm k mbcjmq a eaq)
Presión máx. de agua
/ 3. ~ 6. . i Na (0/ *6 ~ / / 4 nqg)
Dimensiones
05” (al af m) V 07
/
/
0
” (npmdsl bgbab) V 23
7
/
/ 4
” (ajrm)* 3.
/
/
2
” (D con la puerta
abgcpra) 46*4 ak (al af m) V 53,. ak (npmdsl bgbab) V / / 3*1 ak (ajrm)* / 05*3 ak
(con la puerta abierta)
Peso neto
Scaabmpaq a eaq 8 / 17*/ jbq (41*/ i e)
Scaabmpaq cjcarpgaaq 8 / 14*1 jbq (4/ *6 i e)
Capacidad de secado
- Ciclo de normal
- Ciclo de vapor
GCA 5*1 ngcq asbgamq (00*3 jbq-/ . *0 i e)
GCA 5*1 ngcq asbgamq (6 jbq-1*4 i e)
ESPECIFICACIONES
Antes de nnamar a mantenimiento (eont.)
Npmblem Nmssible Aasses
Sonutions
La luz de
Limpie
Filtro(Clean
Filter) esta
encendida
durante el ciclo
de secado
• Cj dgjrpm bc ncjsqa cqrá aaqg
atascado o lleno.
• Nasqc cj agajm bc qcaabm w jgk ngc cj dgjrpm bc ncjsqa,
El indicador
Flow Sense™
muestra
cuatro barras
durante el ciclo
de secado o
la pantalla
k scqrpa“b6. ”
luego del
secado.
• L a rsbcpía cq bck aqgabm
larga o posee muchos giros/
restricciones.
• Bjmoscm qgel gdgaargtm bc ja
tubería por acumulación de
pelusa o escombros.
• Cj cjcarpmbmk éqrgam f a
detectado una obstrucción
en la ventilación externa de la
secadora.
• Gl qrajc sl aml bsarm k áq amprm m k áq bcpcaf m, L ca jaq
Instrucciones de Instalación.
• L a rsbcpía qc bcbcpá aml rpmjap-jgk ngap bc gl k cbgarm
para eliminar la pelusa acumulada y otros bloqueos. La
secadora se puede usar, pero su funcionamiento y eficacia
se verán reducidos de forma importante.
• Sg cj qgqrck a Djmu Scl qc
TM
detecta restricciones de salida,
el indicador permanecerá encendido durante dos horas
tras finalizar el ciclo. Si abre la puerta o pulsa el botón
Encendido/Apagado (Power), se apagará la pantalla.
rESOLuCIÓN DE PrOBLEMAS / ESPECIFICACIONES
MFL67731040_sp_170712.indd 53 2017.7.12 5:24:16 PM
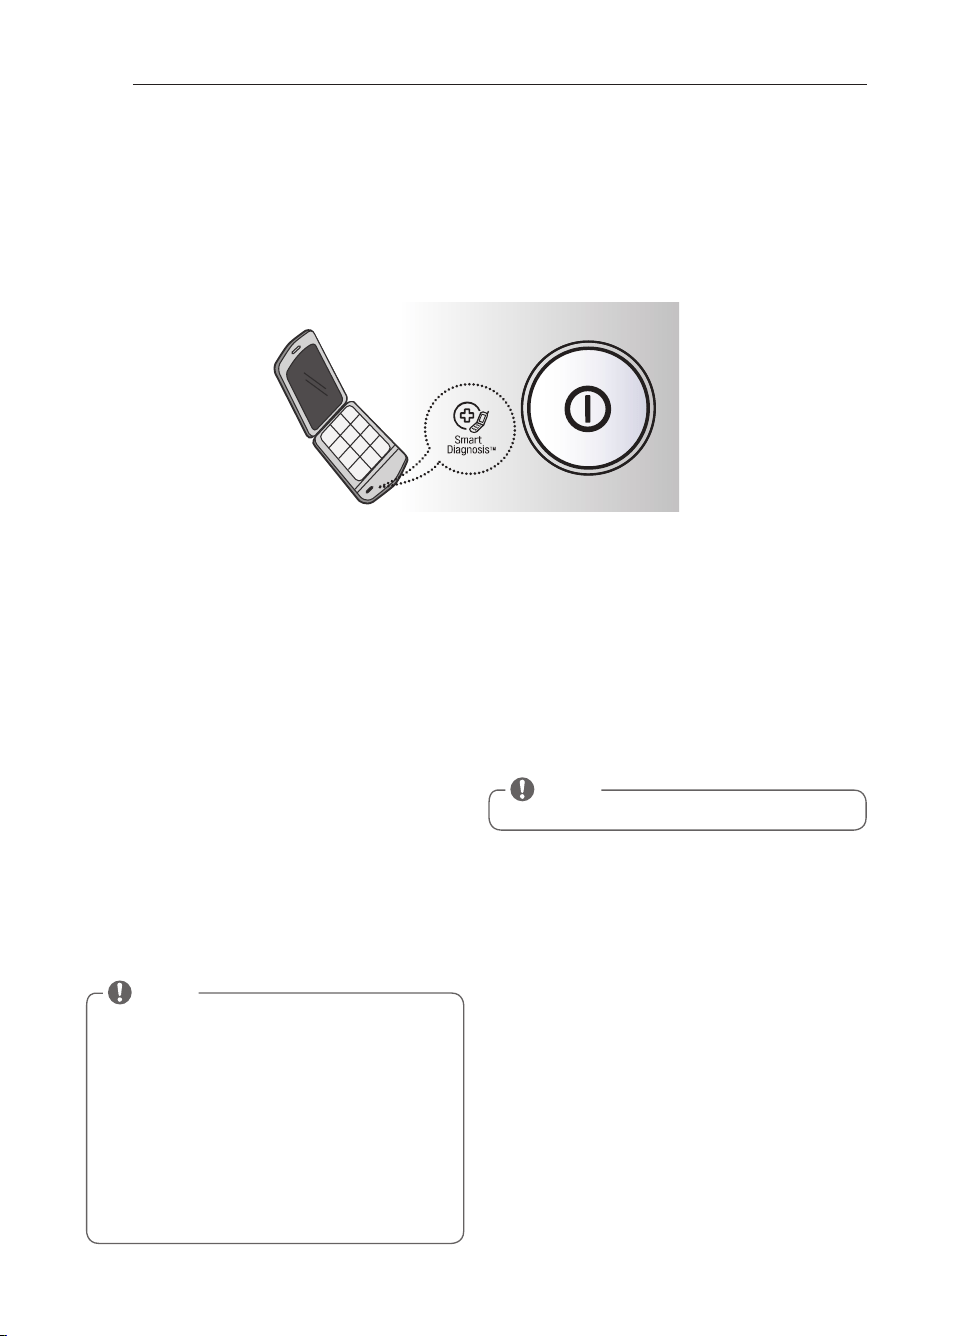
54
UTILIACIN DEL Smart Diainosis™
Diainóstieo sonoro
Si tuviera algún problema con su secadora, la misma posee la capacidad de transmitir datos a un teléfono inteligente
utilizando la aplicación Smart Laundry de LG o mediante el teléfono al Centro de atención telefónica de LG.
Smart Diagnosis™ no puede ser activado a menos que su secadora esté encendida pulsando el botón de
Alimentación(Power). Si su secadora no puede encenderse, tendrá que localizar y solucionar los problemas sin
utilizar Smart Diagnosis™.
Smart Diainosis™ utinizando su
tenéfono inteniiente
/ , Bcqaapesc ja anjgaaagól Sk apr L asl bpw bc L E cl qs
teléfono inteligente.
0, Abpa ja anjgaaagól Sk apr L asl bpw bc L E cl qs rcjédml m
inteligente. Presione el botón flecha hacia la derecha
para avanzar a la siguiente pantalla.
1, Npcqgml c cj bmról Epabaagól bcj rcjédml m gl rcjgecl rc
y mantenga la boquilla del teléfono inteligente junto
al logotipo de Smart Diagnosis™ de la secadora.
2, Aml cj rcjédml m cl qs qgrgm* nsjqc w k al rcl ea nsjqabm
el botón de
Control De La Temperatura(Temp. Control)
durante tres segundos.
5. Mantenga el teléfono en el sitio hasta que la
transmisión del tono haya terminado. Necesita
tiempo en el panel visualizado.
4,
Al finalizar la grabación, vea el resultado del diagnóstico
presionando el botón Siguiente del teléfono.
Smart Diainosis™ a través den
Centro de ateneión tenefóniea
/ , L jak c aj Acl rpm bc arcl agól rcjcdól gaa bc L E
Cjcarpml gaq aj rcjédml m8 (L E CC,SS,) / -6. . -021-. . . . (L E
Aal abá) / -666-320-0401,
0, Asal bm qc jm gl bgosc cj aecl rc bcj Acl rpm bc
atención telefónica, mantenga el micrófono de
su teléfono sobre el logotipo Smart Diagnosis™
del equipo. Sostenga el teléfono a no más de una
nsjeaba m 0,3 ak (ncpm qgl rmaap) cj cosgnm,
1,
Pulse y mantenga pulsado el botón de Control De La
Temperatura(Temp. Control) durante tres segundos.
2, k al rcl ea cj rcjédml m cl cj qgrgm f aqra osc ja
transmisión del tono haya terminado. Necesita
tiempo en el panel visualizado.
5. una vez que la cuenta regresiva haya finalizado y los
tonos se hayan detenido, reanude la conversación
con el agente del Centro de atención telefónica,
que será capaz de ayudarle en la utilización de la
información transmitida para su análisis.
NOTA
“Smart Diagnosis™(Diagnóstico Inteligente) es
una función de resolución de problemas diseñada
para asistir, no reemplazar, al método tradicional
de resolución de problemas a través de llamadas
de servicio técnico. La efectividad de esta función
depende de diversos factores, entre los cuales se
incluyen, la recepción del teléfono celular utilizado
para la transmisión, cualquier ruido externo que
pueda presentarse durante la transmisión, y la acústica
de la habitación donde está ubicada la lavadora. Por lo
tanto, LG no garantiza que Smart Diagnosis™ resuelva
con precisión cualquier cuestión dada.”
NOTA
No toque ningún otro botón ni icono de la pantalla.
uTILIZACIÓN DEL SMArT DIAGNOSIS™
MFL67731040_sp_170712.indd 54 2017.7.12 5:24:17 PM

55
ESPAÑOL
GArANTÍA
GARANTÍA (EE. UU.)
Si su secadora LG (el “Producto”) fallara debido a defectos de materiales o de fabricación en el uso doméstico
normal, durante el período de garantía que se establece a continuación, LG tendrá la opción de reparar o reemplazar
el producto. Esta garantía limitada solo es válida para el comprador minorista original del producto y será vigente
solo cuando se compre y use dentro de los Estados Unidos y de los territorios estadounidenses. Se exige el
comprobante de compra minorista original para solicitar servicio por garantía según esta garantía limitada.
Período de garantía
Alcance de la garantía
CÓMO SE MANEJA EL SERVICIO TÉCNICO
Un (1) año a partir de la fecha
de compra minorista original
Piezas y mano de
obra
LG suministrará las piezas y la mano de obra para
reparar o reemplazar las piezas defectuosas.
Diez (10) años a partir de la
fecha de compra minorista
original
Tambor de la
secadora
Solo las piezas. El cliente será responsable de
cualquier trabajo o servicio realizado en su casa para
reemplazar las piezas defectuosas.
Los productos y las piezas de repuesto están garantizados durante el tiempo restante del período original de
•
garantía o noventa (90) días, lo que resulte mayor.
Los productos y las piezas de repuesto pueden ser nuevos o reparados.
•
ESTA GARANTÍA REEMPLAZA CUALQUIER OTRA GARANTÍA, EXPRESA O IMPLÍCITA, LO QUE INCLUYE SIN
LÍMITE, LAS GARANTÍAS DE APTITUD COMERCIAL O IDONEIDAD PARA UN FIN EN PARTICULAR. SALVO
POR LAS GARANTÍAS IMPLÍCITAS EXIGIDAS POR LA LEY, ES DE DURACIÓN LIMITADA AL PERÍODO DE
GARANTÍA EXPRESA MENCIONADO ANTERIORMENTE. NI EL FABRICANTE NI SU DISTRIBUIDOR EN LOS
ESTADOS UNIDOS SERÁN RESPONSABLES DE NINGÚN DAÑO INCIDENTAL, EMERGENTE, INDIRECTO
NI PUNITIVO DE NINGÚN TIPO, LO QUE INCLUYE SIN LÍMITE, INGRESOS O GANANCIAS PERDIDOS O
CUALQUIER OTRO DAÑO CONTRACTUAL, EXTRACONTRACTUAL O DE OTRO TIPO.
Algunos estados no permiten la exclusión o limitación de daños incidentales o emergentes, o limitaciones a la duración de la
garantía implícita, por lo que la exclusión o limitación anteriormente mencionadas podrían no corresponder en su caso. Esta
garantía le otorga derechos legales específicos y es posible que usted cuente con otros derechos que varían según el estado.
ESTA GARANTÍA LIMITADA NO CUBRE LO SIGUIENTE:
Viajes del servicio técnico para entregar, buscar, o instalar o reparar el producto; instrucciones al cliente sobre la
•
operación del producto; reparación o reemplazo de fusibles o corrección de cableado o fontanería, o corrección
de reparaciones/instalaciones no autorizadas.
Incapacidad del producto para funcionar debido a fallas e interrupciones del suministro eléctrico, o a un servicio
•
eléctrico inadecuado.
Daños causados por tuberías de agua rotas o con fugas, tuberías de agua congeladas, líneas de drenaje
•
restringidas, suministro de agua inadecuado o interrumpido, o suministro de aire inadecuado.
Daños resultantes de operar el producto en una atmósfera corrosiva o contraria a las instrucciones esbozadas en
•
el manual del propietario del producto.
Daños al producto causados por accidentes, pestes y alimañas, rayos, viento, incendio, inundaciones o hechos
•
de fuerza mayor.
Daños o fallas causados por modificaciones o alteraciones no autorizadas, o si se usa para otro fin que no sea el
•
previsto, o por fugas de agua donde la unidad no se haya instalado correctamente.
Daños o fallas causados por corriente o voltaje eléctricos incorrectos, o por códigos de fontanería, por uso
•
comercial o industrial, o por uso de accesorios, componentes o productos de limpieza consumibles no aprobados
por LG.
Daños causados por el transporte y el manejo, incluye rayas, muescas, astillado y otros daños al acabado del
•
producto, a menos que tales daños resulten de defectos de los materiales o de la fabricación y se informen dentro
del plazo de una (1) semana de la entrega.
Daños o artículos faltantes a productos reacondicionados, comprados con descuento, con la caja abierta o que
•
hayan estado en exhibición.
Productos cuyos números de serie originales hayan sido retirados, alterados o no se puedan determinar
•
fácilmente. Los números de serie y de modelo, junto con el comprobante de venta minorista original, son
necesarios para validar la garantía.
Aumentos en los costos de los servicios públicos y otros gastos adicionales de dichos servicios.
•
MFL67731040_sp_170712.indd 55 2017.7.12 5:24:17 PM

56
GArANTÍA
Reparaciones cuando el producto se use de otra forma que no sea uso doméstico usual y normal (p. ej., uso
•
comercial, en oficinas e instalaciones recreativas) o contraria a las instrucciones esbozadas en el manual del
propietario del producto.
Costos asociados con el retiro del producto de su casa para realizar reparaciones.
•
El retiro y la reinstalación del producto si está instalado en un lugar inaccesible o no está instalado de acuerdo
•
con las instrucciones de instalación publicadas, lo que incluye los manuales de instalación y del propietario de LG.
Daños resultantes de mal uso, abuso, instalación, reparación o mantenimiento incorrectos. Una reparación
•
incorrecta incluye el uso de piezas no aprobadas o especificadas por LG.
El filtro está tapado.
La secadora no calienta,
•
tiempo de secado
prolongado.
Limpie el filtro de pelusa.
•
El conducto está tapado.
La secadora no calienta,
•
tiempo de secado
prolongado.
Limpie la campana y el
•
conducto.
Conducto demasiado largo
y/o con múltiples codos.
La secadora no calienta,
•
tiempo de secado
prolongado.
Mantenga los conductos de
•
escape lo más cortos que sea
posible y use la menor cantidad
de codos y curvas como le sea
posible.
Cable de alimentación mal
conectado o problema con la
toma de corriente eléctrica.
Sin corriente
•
No calienta
•
Vuelva a conectar el cable
•
de alimentación, reemplace
el fusible de la casa o vuelva
a iniciar el disyuntor. Si el
problema es la toma de
corriente, es probable que
necesite llamar a un electricista.
La válvula de gas no está
abierta. (Secadora de gas).
No calienta
•
Abra la válvula de gas.
•
Inversión de la puerta.
Las instrucciones para la
•
inversión de la puerta pueden
encontrarse en el manual del
usuario.
El costo de la reparación o el reemplazo en estas circunstancias excluidas estarán a cargo del consumidor.
CÓMO OBTENER SERVICIO EN GARANTÍA E INFORMACIÓN ADICIONAL
Si usted no tiene acceso a Internet y necesita asistencia para el uso de su producto o desea programar un servicio
técnico, puede comunicarse con LG Electronics al número que aparece a continuación.
Para obtener asistencia o servicio técnico, llame al 1-800-243-0000.
Si necesita más ayuda, puede escribir a LG para dirigir sus preguntas o inquietudes a la dirección que aparece a
continuación:
LG Electronics, 201 James Record Road, Huntsville, Alabama 35813
Para obtener más información sobre el producto, visite nuestro sitio web en http://www.lg.com
MFL67731040_sp_170712.indd 56 2017.7.12 5:24:22 PM

57
ESPAÑOL
MFL67731040_sp_170712.indd 57 2017.7.12 5:24:23 PM

58
MFL67731040_sp_170712.indd 58 2017.7.12 5:24:24 PM

59
ESPAÑOL
MFL67731040_sp_170712.indd 59 2017.7.12 5:24:24 PM

1-800-243-0000
uSA
1-888-542-2623
CANADA
LG Customer Information Center
register your product Online!
www.lg.com
This product qualifies for ENErGY STAr in
the “factory default (Home use)” setting.
Changing the factory default settings or
enabling other features may increase power
consumption that could exceed the limits
necessary to qualify for ENErGY STAr.
MFL67731040_sp_170712.indd 60 2017.7.12 5:24:24 PM