HDV 820 | 1
HDV 820
Instruction manual
Digital headphone amplifier

2 | HDV 820
Contents
Contents
Important safety instructions .......................................................... 3
The HVE 820 headphone amplifier .................................................. 6
Package contents .............................................................................. 7
Product overview ............................................................................... 8
Overview of the front panel ............................................................ 8
Overview of the rear panel .............................................................. 8
Putting the HDV 820 into operation ................................................. 9
Setting up the headphone amplifier .............................................. 9
Connecting the headphone amplifier to audio sources .............. 9
Using the headphone amplifier connected to a Mac/PC ........... 12
Connecting the headphone amplifier to
a power amplifier or to active loudspeakers ............................... 17
Connecting the headphone amplifier to
the power supply system ............................................................... 18
Using the HDV 820 .......................................................................... 19
Switching the HDV 820 on/off ...................................................... 19
Connecting headphones ............................................................... 20
Selecting the audio source ............................................................ 21
Adjusting the signal level of the RCA input (UNBAL) ................ 22
Adjusting the volume ..................................................................... 22
Cleaning and maintaining the HDV 820 ........................................ 23
Installing firmware updates .......................................................... 23
If a problem occurs ... ...................................................................... 24
Specifications .................................................................................. 25
Manufacturer Declarations ............................................................ 27

Important safety instructions
HDV 820 | 3
Important safety instructions
1. Read these safety instructions.
2. Keep these safety instructions. Always include these safety
instructions when passing the product on to third parties.
3. Heed all warnings.
4. Follow all instructions.
5. Do not use the product near water.
6. Only clean the product when it is not connected to the power sup-
ply system. Clean only with a dry cloth.
7. Ensure circulating ventilation. The product generates heat which
is dissipated through the housing. Install in accordance with the
manufacturer's instructions.
8. Do not install near any heat sources such as radiators, heat reg-
isters, stoves, or other products that produce heat and do not
expose to direct sunlight.
9. Do not defeat the safety purpose of the polarized or grounding-
type plug. A polarized plug has two blades with one wider than
the other. A grounding type plug has two blades and a third
grounding prong. The wide blade or the third prong are provided
for your safety. If the provided plug does not fit into your outlet,
consult an electrician for replacement of the obsolete outlet.
10. Protect the power supply cord from being walked on or pinched,
particularly at plugs, convenience receptacles, and the point
where it exits from the product.
11. Use only attachments/accessories/spare parts supplied or
recommended by Sennheiser.
12. Use only with shelves, racks, or tables that can safely support the
weight the product (see
“Specifications” on page 25).
13. Unplug the product during lightning storms or when unused for
long periods of time.
14. Refer all servicing to qualified service personnel. Servicing is
required when the product has been damaged in any way, such as
power supply cord or plug is damaged, liquid has been spilled or
objects have fallen into the product, when the product has been
exposed to rain or moisture, does not operate normally, or has
been dropped.
15.WARNING: To reduce the risk of fire and electric shock, do not
expose the product to dripping or splashing and ensure that no
objects filled with liquids, such as vases, are placed on the
product.
16. To completely disconnect this product from the AC mains, dis-
connect the power supply cord plug from the AC receptacle.
17. The plug of the power supply cord shall remain readily accessible.

Important safety instructions
4 | HDV 820
Hazard warnings on the bottom of the product
The label shown on the left is attached to the bottom of the product.
The symbols on this label have the following meaning:
Presence of uninsulated dangerous voltage within the product's
enclosure that may be of sufficient magnitude to constitute a risk of
fire or electric shock.
Read and follow the safety and operating instructions contained in
this instruction manual.
Never open the product. There is a risk of electric shock when touch-
ing live parts. There are no user serviceable parts inside the product.
Refer repairs to an authorized Sennheiser service partner.
Preventing damage to health and accidents
▷ Protect your hearing from high volume levels. Permanent hearing
damage may occur when headphones are used at high volume
levels for long periods of time. Sennheiser headphones sound
exceptionally good at low and medium volume levels.
▷ Keep the product, accessories and packaging parts out of reach
of children and pets to prevent accidents and choking hazards.
▷ Do not use the product in an environment that requires your spe-
cial attention (e.g. when performing skilled jobs).
Preventing damage to the product and malfunctions
▷ Allow the product to stand for at least 2 hours before putting it
into operation. Condensation can form inside the product if it is
moved from a cold environment to a warm environment.
Notes on the use and disposal of storage media
You can use the supplied USB flash drive for storing personal data. If
the flash drive is sold/passed on or disposed of, the data once stored
on it and then deleted using a standard delete method can be recov
-
ered with special software and be misused.
We therefore recommend using special software for secure deletion
of data to ensure that personal data is not misused.
We recommend backing up the data saved on your flash drive regu-
larly. Sennheiser does not accept liability for damage or loss of data.

Important safety instructions
HDV 820 | 5
Notes on driver and firmware updates
We recommend using the latest DAC (digital-to-analog converter)
firmware for your headphone amplifier and the latest driver for your
operating system (MacOS), Windows).
DAC firmware and driver updates can be downloaded free of charge
from the Internet at www.sennheiser.com/download or can be
obtained from your Sennheiser partner.
Intended use/Liability
This amplifier for dynamic headphones has been designed for music
reproduction from analog and digital high-end devices such as
SACD, DVD-A, Blu-ray or CD players or for the reproduction of high-
resolution music files from your Mac or PC.
This product is intended for private domestic use only. It is not
intended for commercial use.
It is considered improper use when this product is used for any appli-
cation not named in this instruction manual.
Sennheiser is not liable for damages to USB devices that are not con-
sistent with the USB specifications.
Sennheiser does not accept liability for damage arising from abuse
or misuse of this product and its attachments/accessories.
Before putting the product into operation, please observe the
respective country-specific regulations.
HDV 820
UPDATE

The HVE 820 headphone amplifier
6 | HDV 820
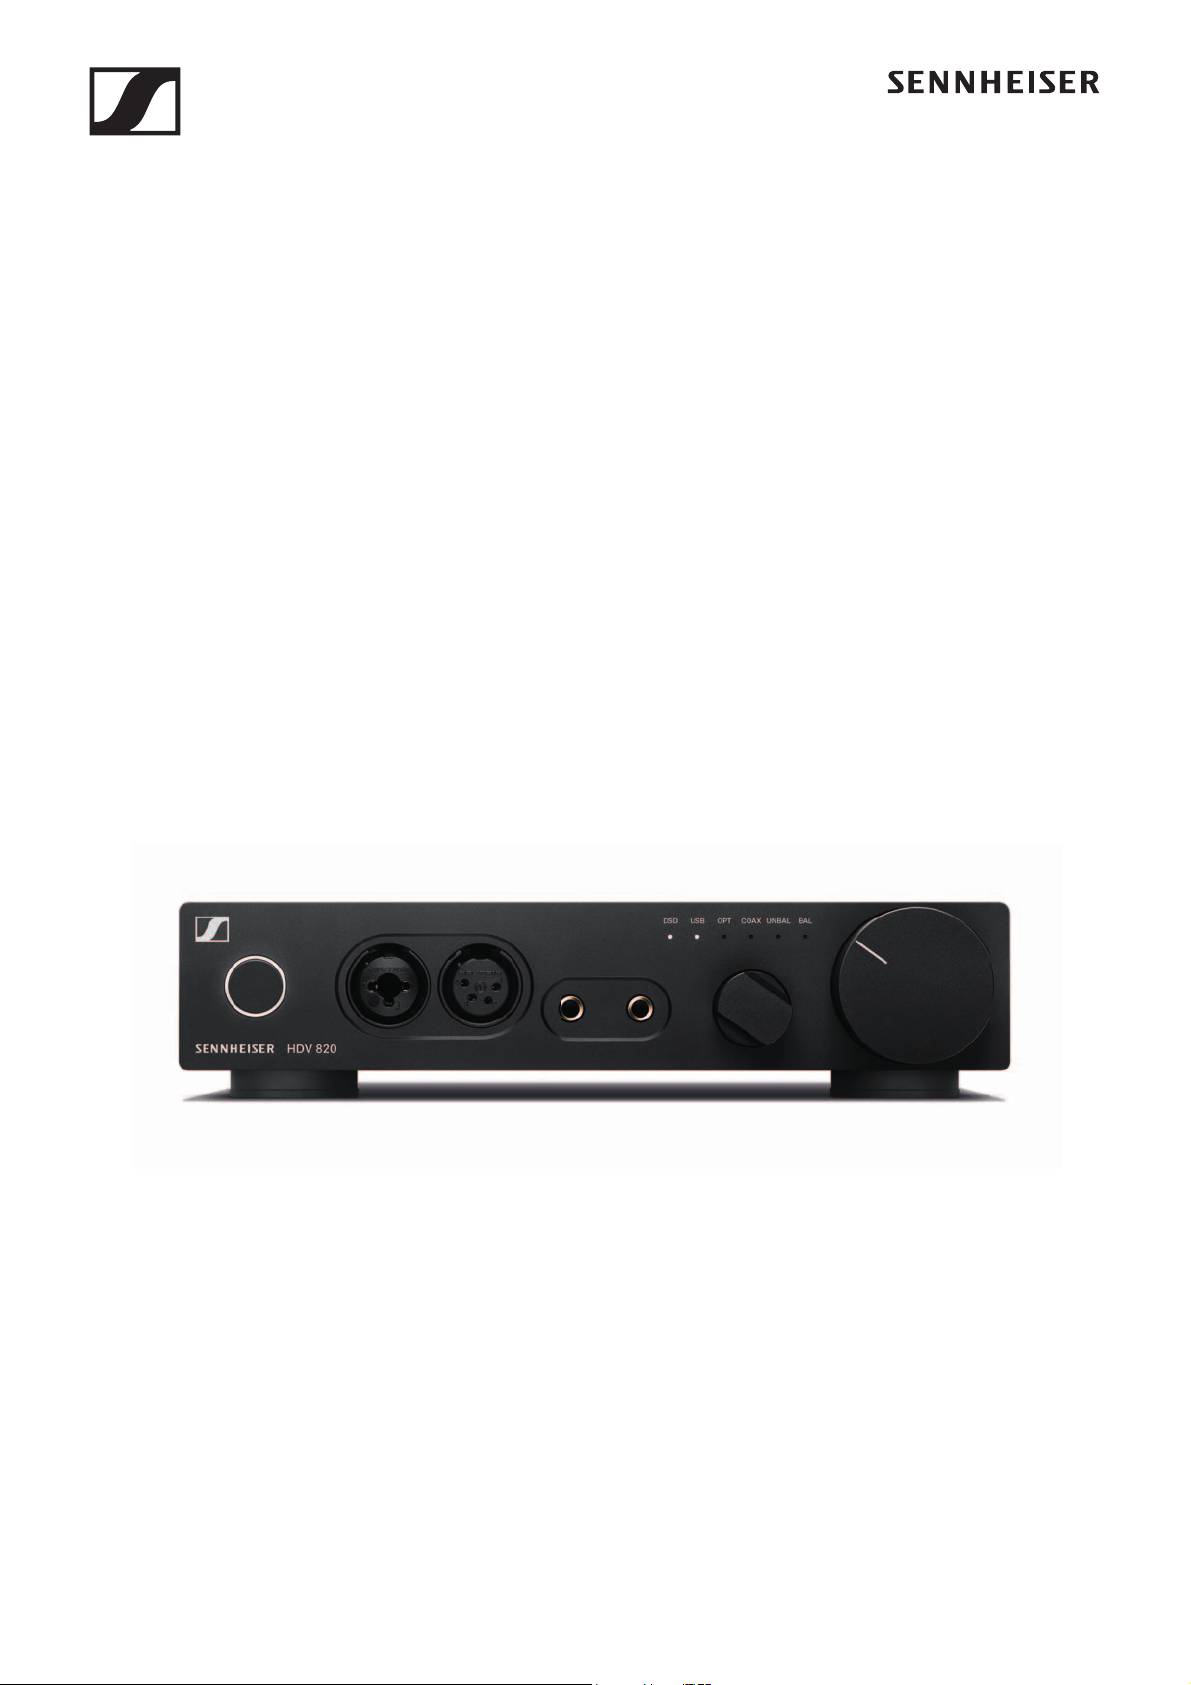
The HVE 820 headphone amplifier
The HDV 820 headphone amplifier is the result of Sennheiser's many
years of audio expertise and the perfect complement to its high-end
audiophile headphone range for the ultimate in sound quality and
performance. The HDV 820 offers consistently symmetrical signal
processing and extremely low harmonic distortion to ensure
unadulterated and perfect music enjoyment. Designed and
manufactured in Germany, the HDV 820 continues the success story
of its predecessor, the HDVD 800, and convinces with its black
design and enhanced components that provide even greater
precision and sound quality.
The HDV 820 is equipped with a high-resolution ESS SABRE
32
DAC
(digital-to-analog converter) that has a resolution of 32 bits and a
sampling rate of up to 384 kHz. The amplifier can also process
DSD256 files with a frequency of up to 12.3 MHz and features various
audio inputs and outputs, allowing you to choose the optimum
connection for your audio devices and headphones. The HDV 820
reproduces both digital and analog audio sources with superb sound
quality.
Fittingly for a product that gives such an incredibly pure sound
experience, the HDV 820 also inspires by its design. With its black
anodized housing and white LEDs, the HDV 820 perfectly matches
Sennheiser's HD 800 S flagship high-end headphones to deliver the
ultimate audiophile listening experience.
Features
• Symmetrical signal processing with exact signal transmission
over the entire frequency spectrum and extremely low harmonic
distortion
• Dynamic range of more than 120 dB, wide bandwidth and high
transient response due to short signal paths
• Outstanding ESS SABRE
32
DAC (digital-analog converter) with a
resolution of 32 bits and a sampling rate of up to 384 kHz
• Automatic adjustment of the sampling rate (44.1 kHz to 384 kHz)
• USB Audio (up to 32 Bit/384 kHz and up to DSD256)
• Can be used with up to four dynamic headphones
• 3 balanced headphone sockets (2 x 4.4 mm Pentaconn jack
socket, 1 x XLR-4 socket)
•High-quality XLR-3/¼"
(6.35 mm) jack combo socket for connec-
tion of unbalanced headphones
• High flexibility due to different connection possibilities:
– Digital inputs: S/PDIF coaxial/optical, USB
– Analog inputs: balanced XLR-3, unbalanced RCA
•Analog output: balanced XLR-3, level adjustable (for connection
of active loudspeakers or a power amplifier)
• Engineered and handcrafted in Germany
Package contents
HDV 820 | 7
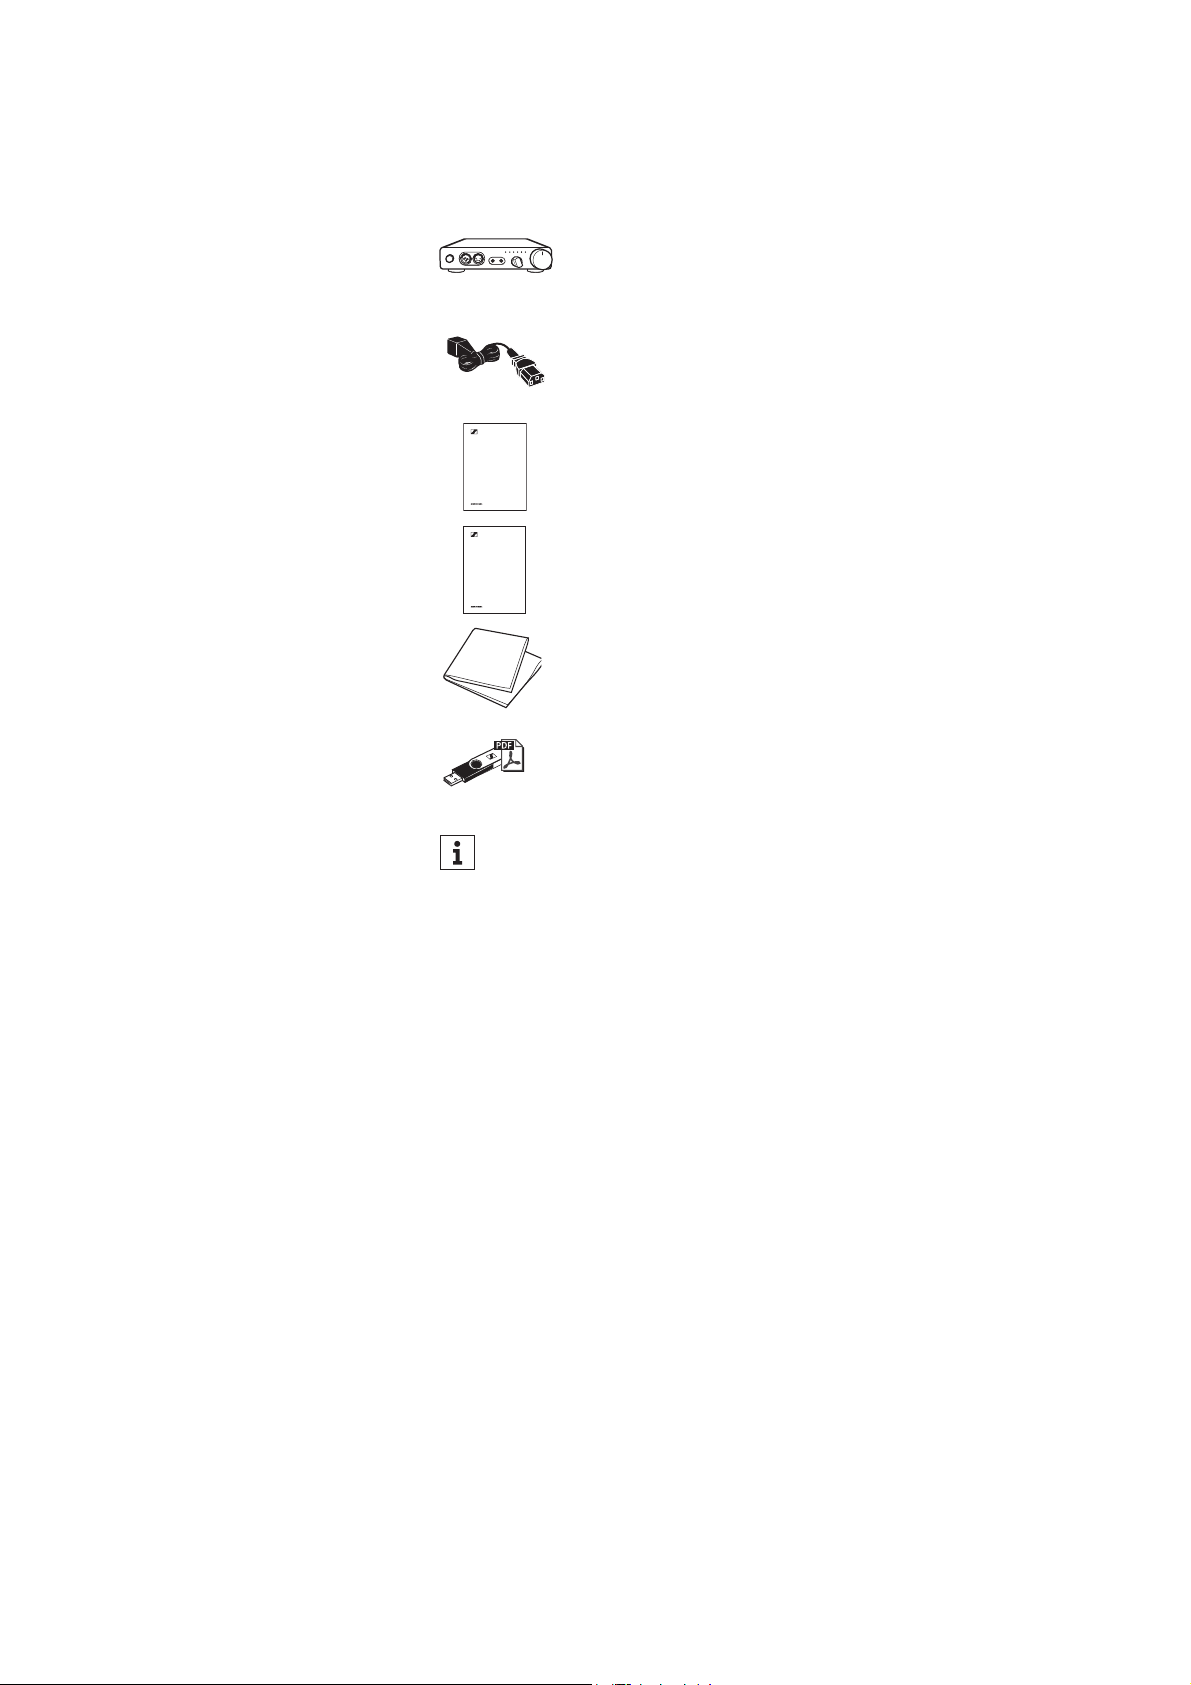
Package contents
HVE 820 headphone amplifier
Power supply cable
(depending on region; EU, UK, US, CN, KR)
Quick guide
Safety guide
Microfiber cloth
USB flash drive (SD-U16L version) with
instruction manual (as PDF file) and driver software
for Microsoft Windows operating systems
A list of accessories can be found on the HDV 820 product page
at www.sennheiser.com. Contact your local Sennheiser
partner: www.sennheiser.com > “Sales Partner”.
Quick guide
Safety guide
Product overview
8 | HDV 820
Product overview
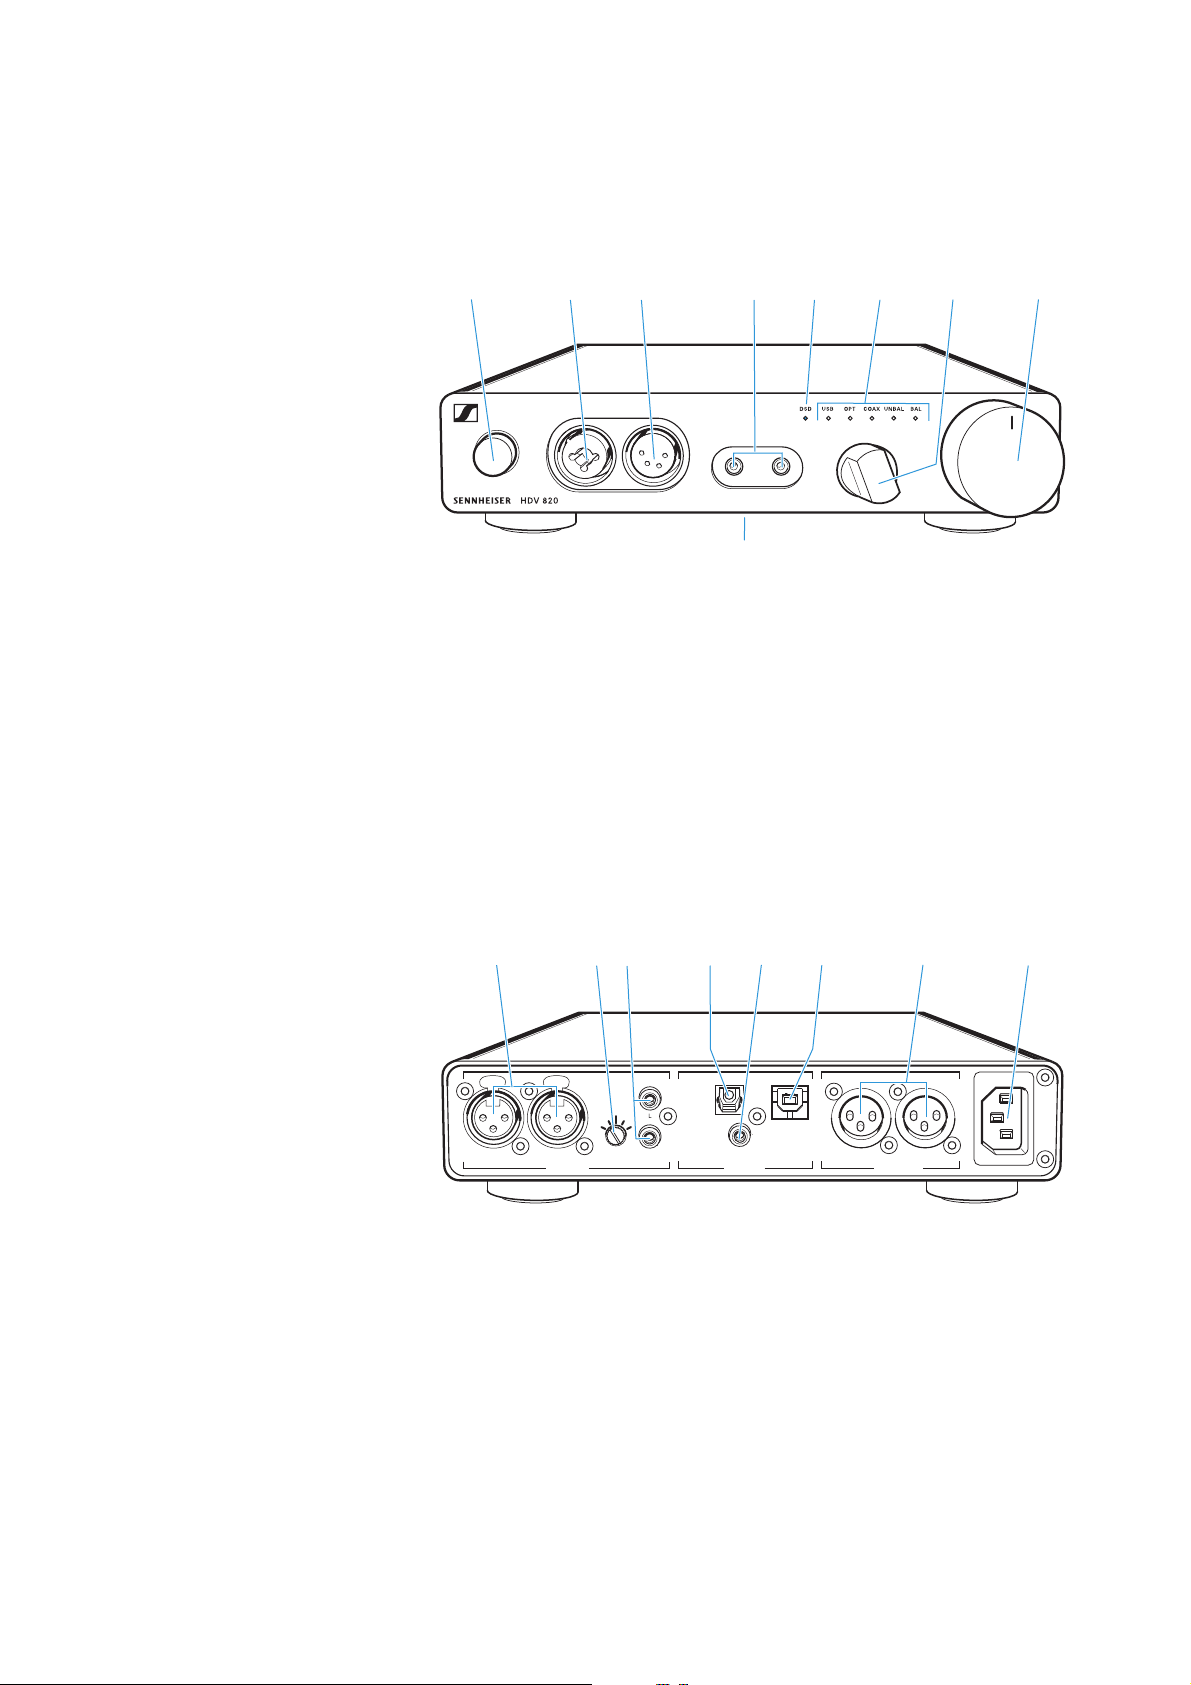
Overview of the front panel
Overview of the rear panel
1 On/off button with LED
2 Headphone output,
XLR-3/¼" (6.35 mm) jack
combo socket, unbalanced
3 Headphone output,
XLR-4 socket, balanced
4 Headphone outputs,
4.4 mm Pentaconn jack socket,
balanced
5 DSD reproduction LED
6 Input selection LED
7 Input selection rotary
switch
8 Volume control
9 Type plate (bottom)
1
3
4
8
9
2
7
5
6
0 XLR-3 input socket,
balanced (
BAL R, L)
A Input gain rotary switch
(
–GAIN+) for RCA input
B RCA input socket,
unbalanced (
UNBAL L, R)
C S/PDIF input,
optical (
OPT)
D S/PDIF input,
coaxial (
COAX)
E USB input,
Type B (
USB)
F XLR-3 output socket,
balanced (
BAL R, L)
G IEC mains socket
~100-240 VAC 50/60 Hz
ANALOG OUT
~100-240 VAC 50/60Hz
R
LRLR
ANALOG IN
DIGITAL IN
- GAIN +
BAL UNBAL BALOPT USB
COAX
A
G
E
D
C
B
F
0
Putting the HDV 820 into operation
HDV 820 | 9
Putting the HDV 820 into
operation
Setting up the headphone amplifier
▷ Place the headphone amplifier on a flat, horizontal surface.
▷ Ensure circulating ventilation. The headphone amplifier gener-
ates heat which is dissipated through the housing.
Connecting the headphone amplifier to
audio sources
You can connect several audio sources to the headphone amplifier
and switch between these connected sources using the Input selec
-
tion rotary switch.
▷ Switch your audio sources off before connecting the headphone
amplifier.
▷ Select a suitable high-quality connection cable for your audio
source. For an optimal listening experience, Sennheiser recom-
mends using cables with a length of 3 m.
▷ To connect the headphone amplifier to your audio source, refer to
the connection diagram suitable for your audio source (see the
following chapters):
CAUTION
Risk of staining of furniture surfaces!
Varnish or furniture polish may degrade the feet of the product,
which could stain your furniture.
▷ Do not place the product on delicate surfaces; if necessary, use a
non-slip pad under the product.
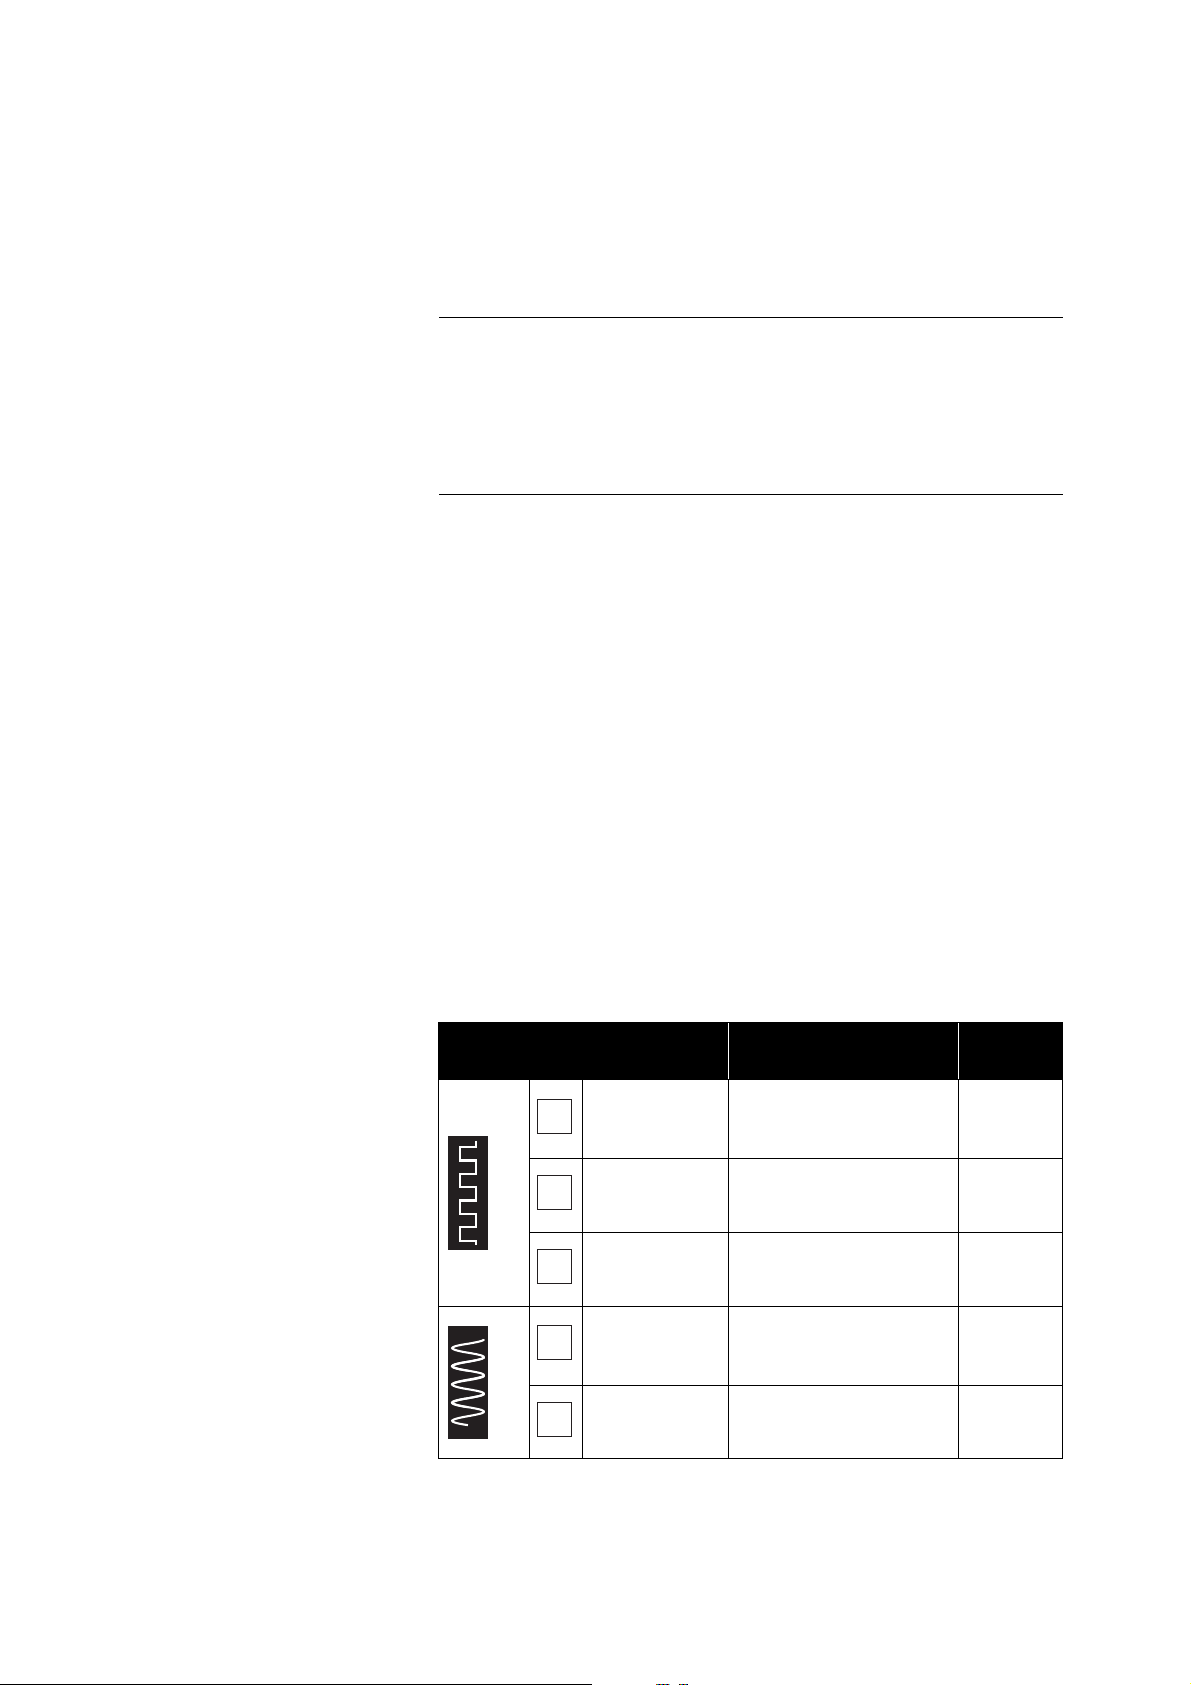
Connection possibility
of the audio source (OUT)
Connection cable
Page
DIGITAL
USB (USB)
USB 2.0 certified cable
with Type A and Type B
connector
10
Optical (OPT) Optical cable 10
Coaxial
(
COAX)
Coaxial cable (75 )10
ANALOG
RCA (UNBAL)
Stereo audio cable
with 2 RCA connectors
at each end
11
XLR-3 (
BAL)
2 balanced XLR-3
cables
12
A
B
C
D
E
Putting the HDV 820 into operation
10 | HDV 820
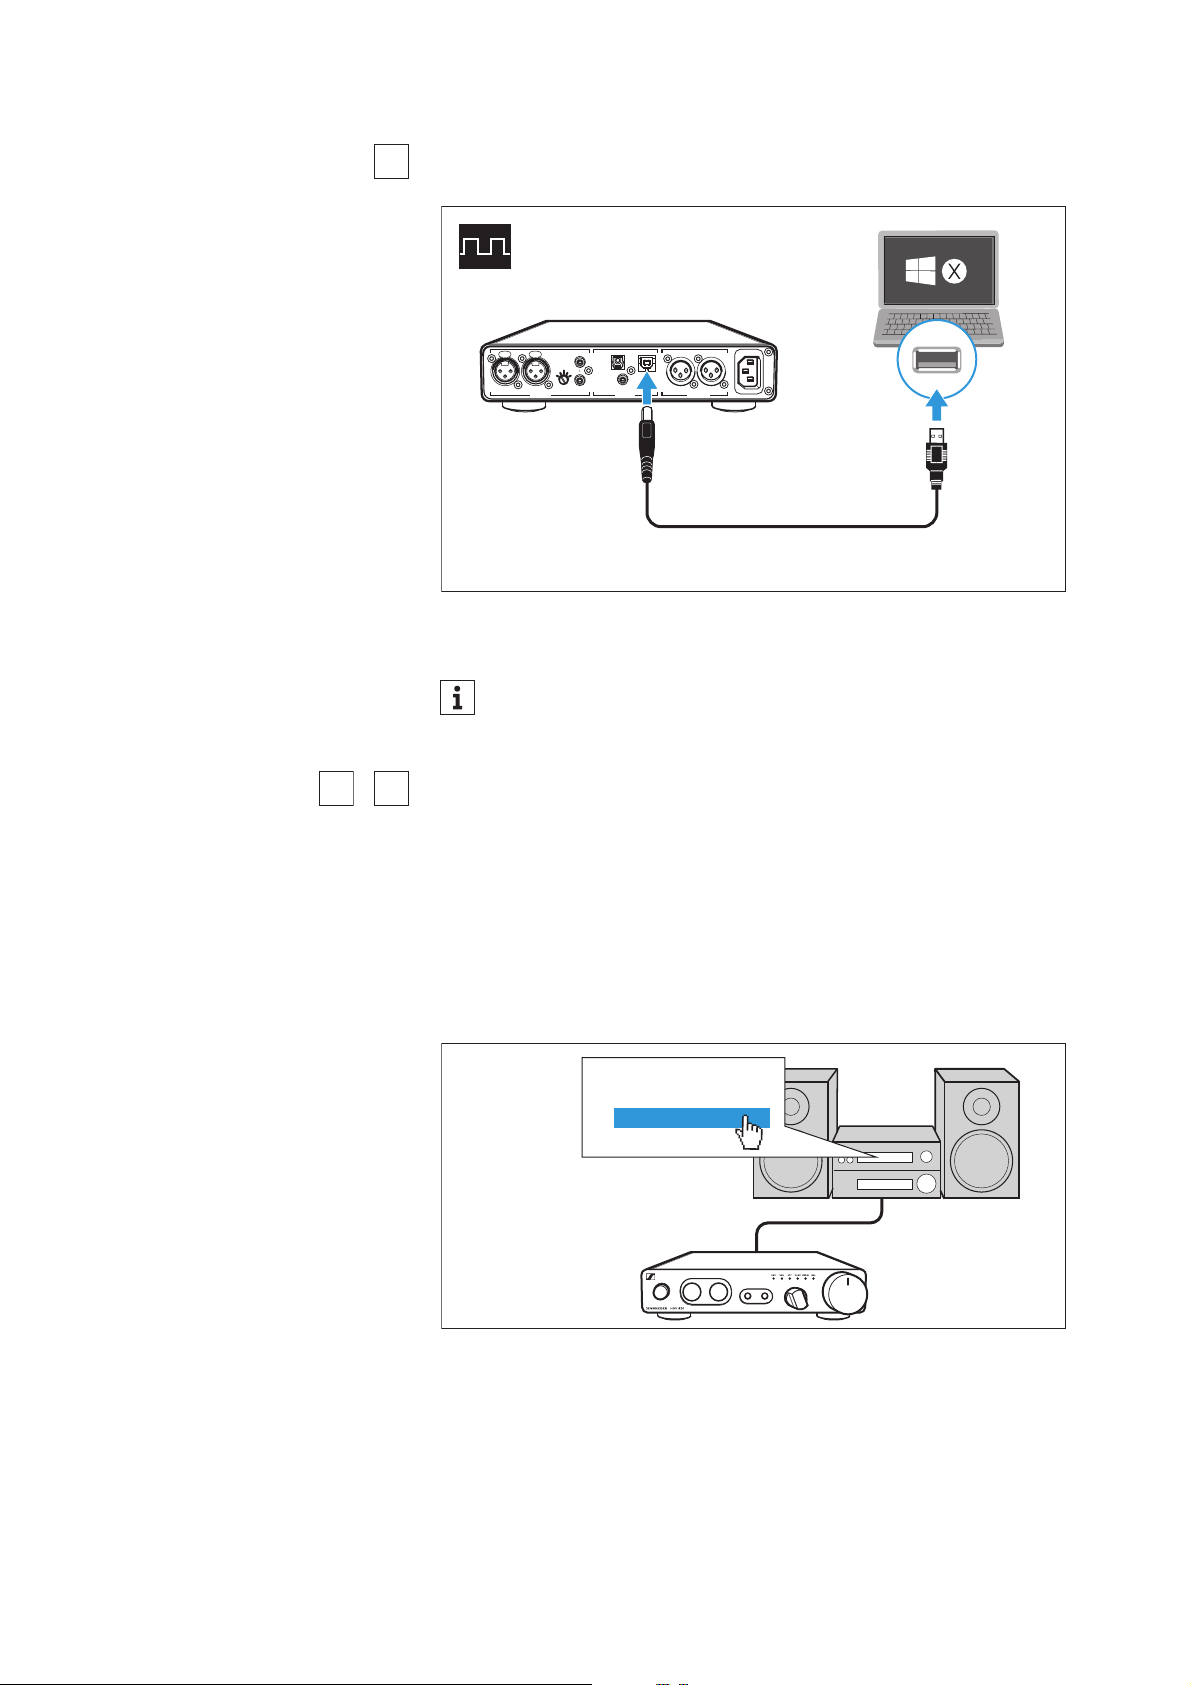
Connection possibility of the audio source: digital,
USB connection
▷ More information on using the headphone amplifier connected to
a Mac or PC can be found on page 12.
Requirements for digital connections
The digital audio inputs DIGITAL IN (OPT or COAX) can receive digital
audio signals in PCM format (supported sampling rates: optical: up
to 96
kHz, coaxial: up to 192 kHz).
Information on how to set the audio signal of the connected device
to PCM can be found in the Sound or Settings menu or in the instruc
-
tion manual of your device.
If an incompatible digital audio signal is being received, the Input
selection LED
(OPT or COAX) lights up white and the DSD reproduc-
tion LED flashes white. Music cannot be reproduced.
* The appearance of the Sound menu can vary depending on the
device you are using.
A
For best signal transmission and audio quality, use a USB OTG
cable (USB On-the-Go; available from your specialist dealer) to
connect your mobile HiRes audio player or smartphone.
ANALOG OUT
~100 -24 0 VAC 50/60 Hz
R
LRLR
ANALOG IN DIGITAL IN
- GAIN +
BAL UNBAL BALOPT USB
USB
COAX
Connection cable: USB 2.0 certified cable with Type B connector
for connection to the headphone amplifier
B
C
Sound menu*
Digital sound
Bitstream
PCM
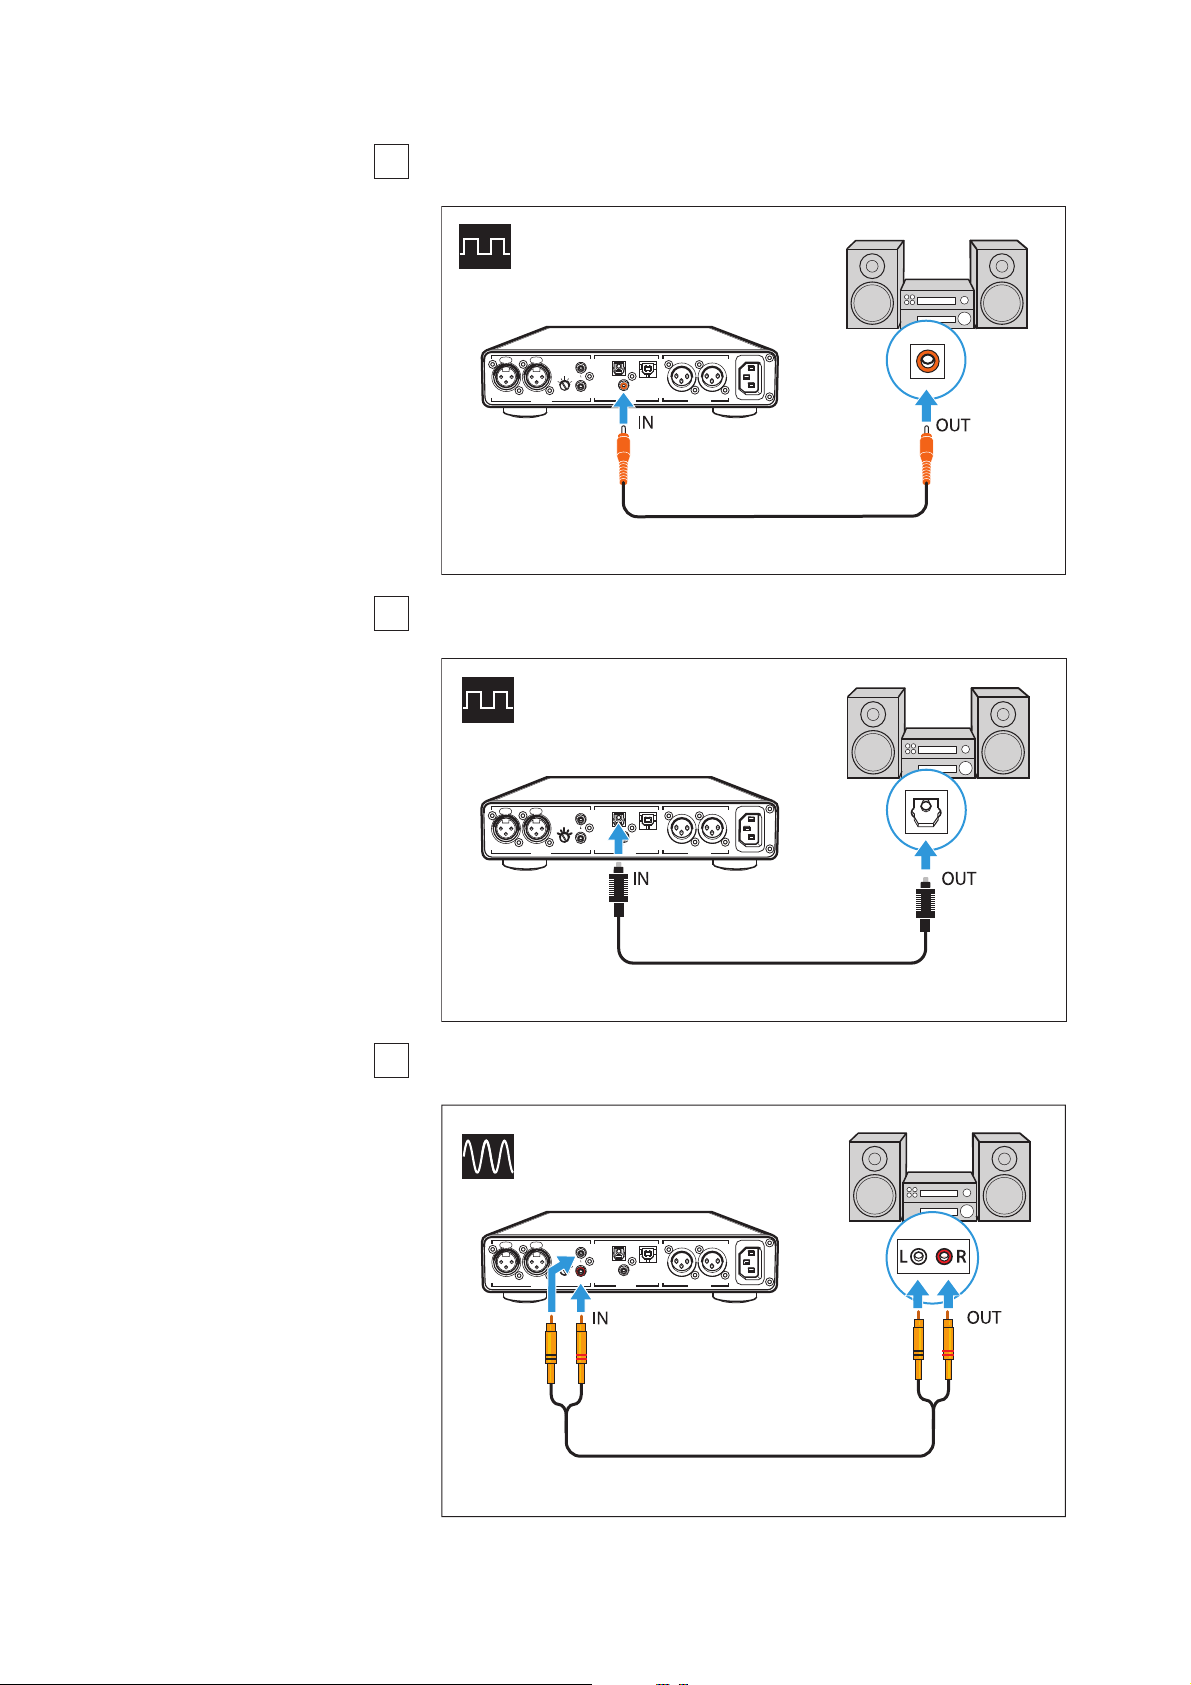
Putting the HDV 820 into operation
HDV 820 | 11
Connection possibility of the audio source: digital,
coaxial connection
Connection possibility of the audio source: digital,
optical connection
Connection possibility of the audio source: analog,
RCA, unbalanced
B
COAX
ANALOG OUT
~100 -24 0 VAC 50/6 0Hz
R
LRLR
ANALOG IN DIGITAL IN
- GAIN +
BAL UNBAL BALOPT USB
COAX
Connection cable: coaxial cable (75 Ω)
C
COAX
ANALOG OUT
~100 -24 0 VAC 50/6 0Hz
R
LRLR
ANALOG IN DIGITAL IN
- GAIN +
BAL UNBAL BALOPT USB
OPT
Connection cable: optical cable
D
ANALOG OUT
~100 -24 0 VAC 50/6 0Hz
R
LRLR
ANALOG IN DIGITAL IN
- GAIN +
BAL UNBAL BALOPT USB
UNBAL
COAX
RL
LR
Connection cable: stereo audio cable with 2 RCA connectors at
each end
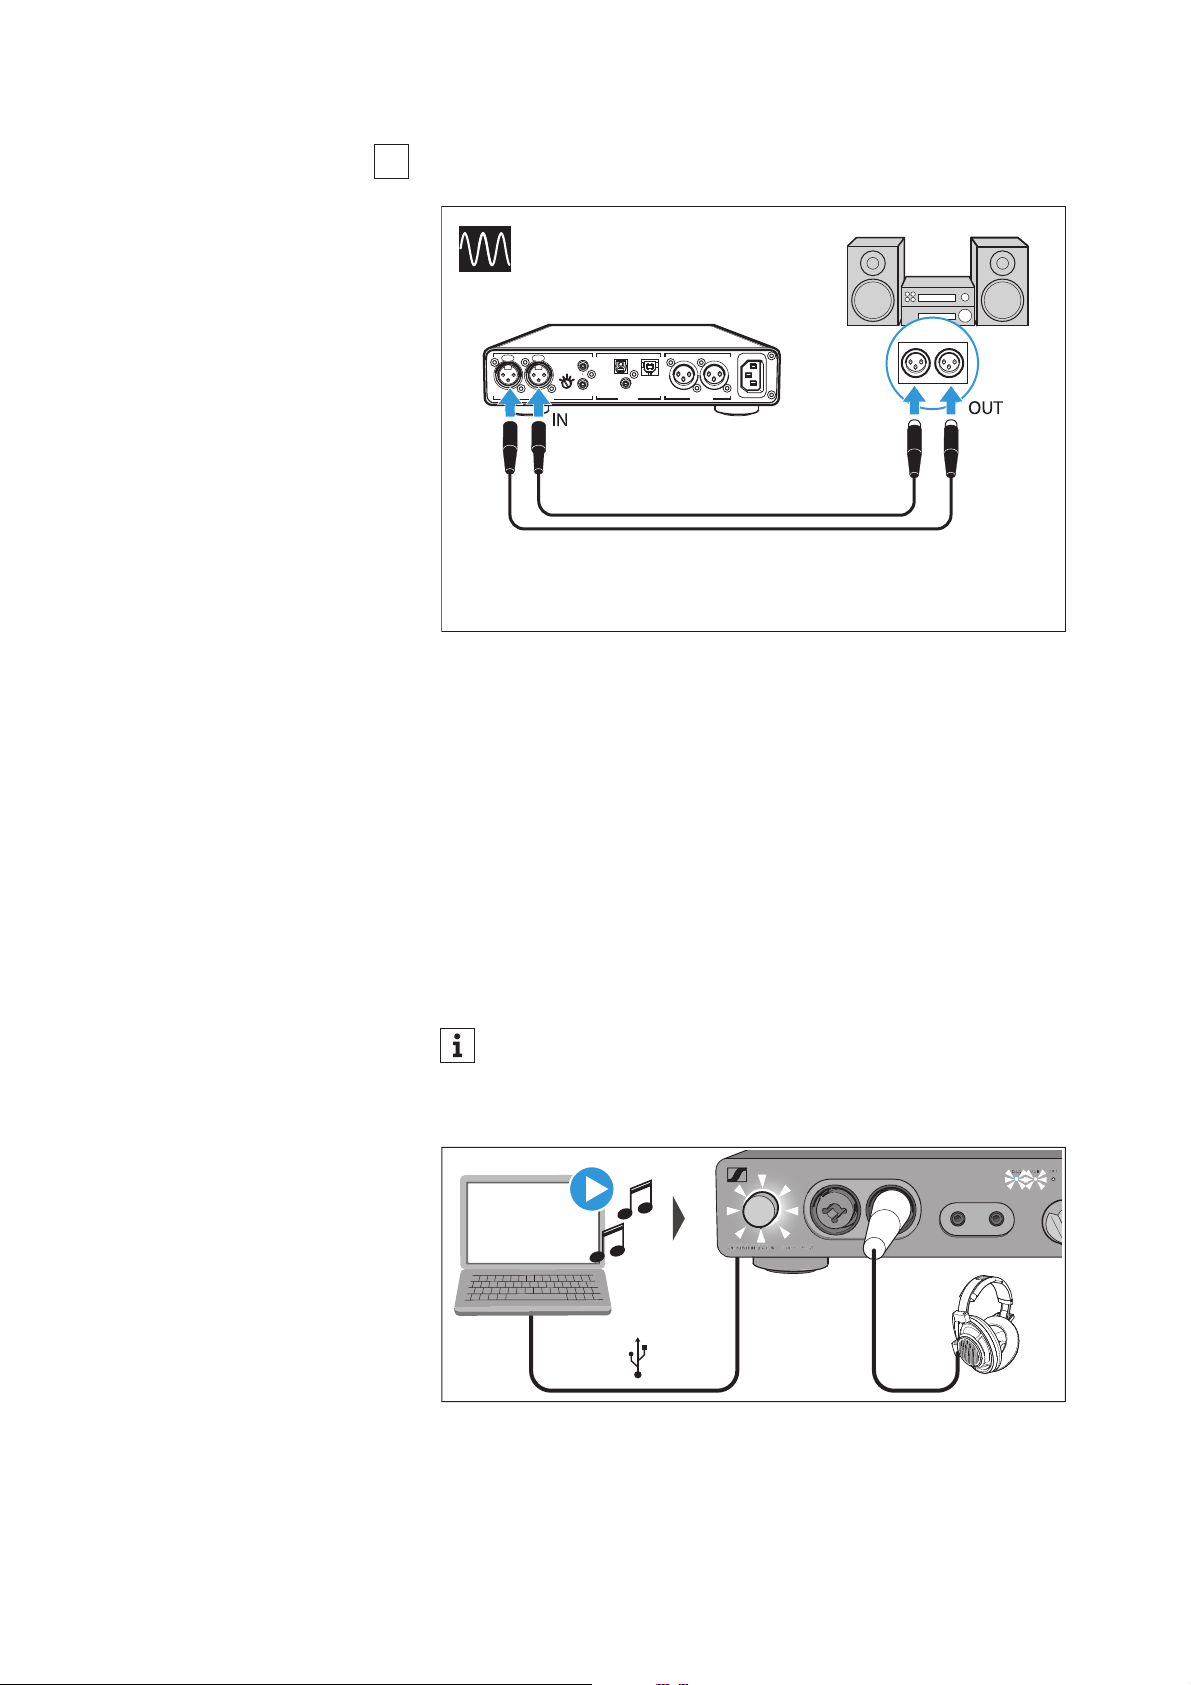
Putting the HDV 820 into operation
12 | HDV 820
Connection possibility of the audio source: analog,
XLR-3, balanced
Using the headphone amplifier connected
to a Mac/PC
You can connect the HDV 820 via USB (see page 10) directly to your
Mac or PC and use it as an audio output device. Depending on the
driver and settings used, high-resolution music files can be repro
-
duced via the high-quality DAC (digital-to-analog converter) of the
HDV 820.
Notes on DSD reproduction
If you are using your Mac or PC for native reproduction of DSD music
files, the DSD reproduction LED on the headphone amplifier lights
up, indicating the DSD mode of the DAC.
E
ANALOG OUT
~100 -24 0 VAC 50/60 Hz
R
LRLR
ANALOG IN DIGITAL IN
- GAIN +
BAL UNBAL BALOPT USB
BAL
RL
RL
COAX
Connection cables: 2 balanced XLR-3 cables
Information on the possible configuration options for your Mac
or PC for native reproduction of DSD music files using third-
party software can be found on the HDV 820 product page or
at www.sennheiser.com/download.
DSD
Playback
Putting the HDV 820 into operation
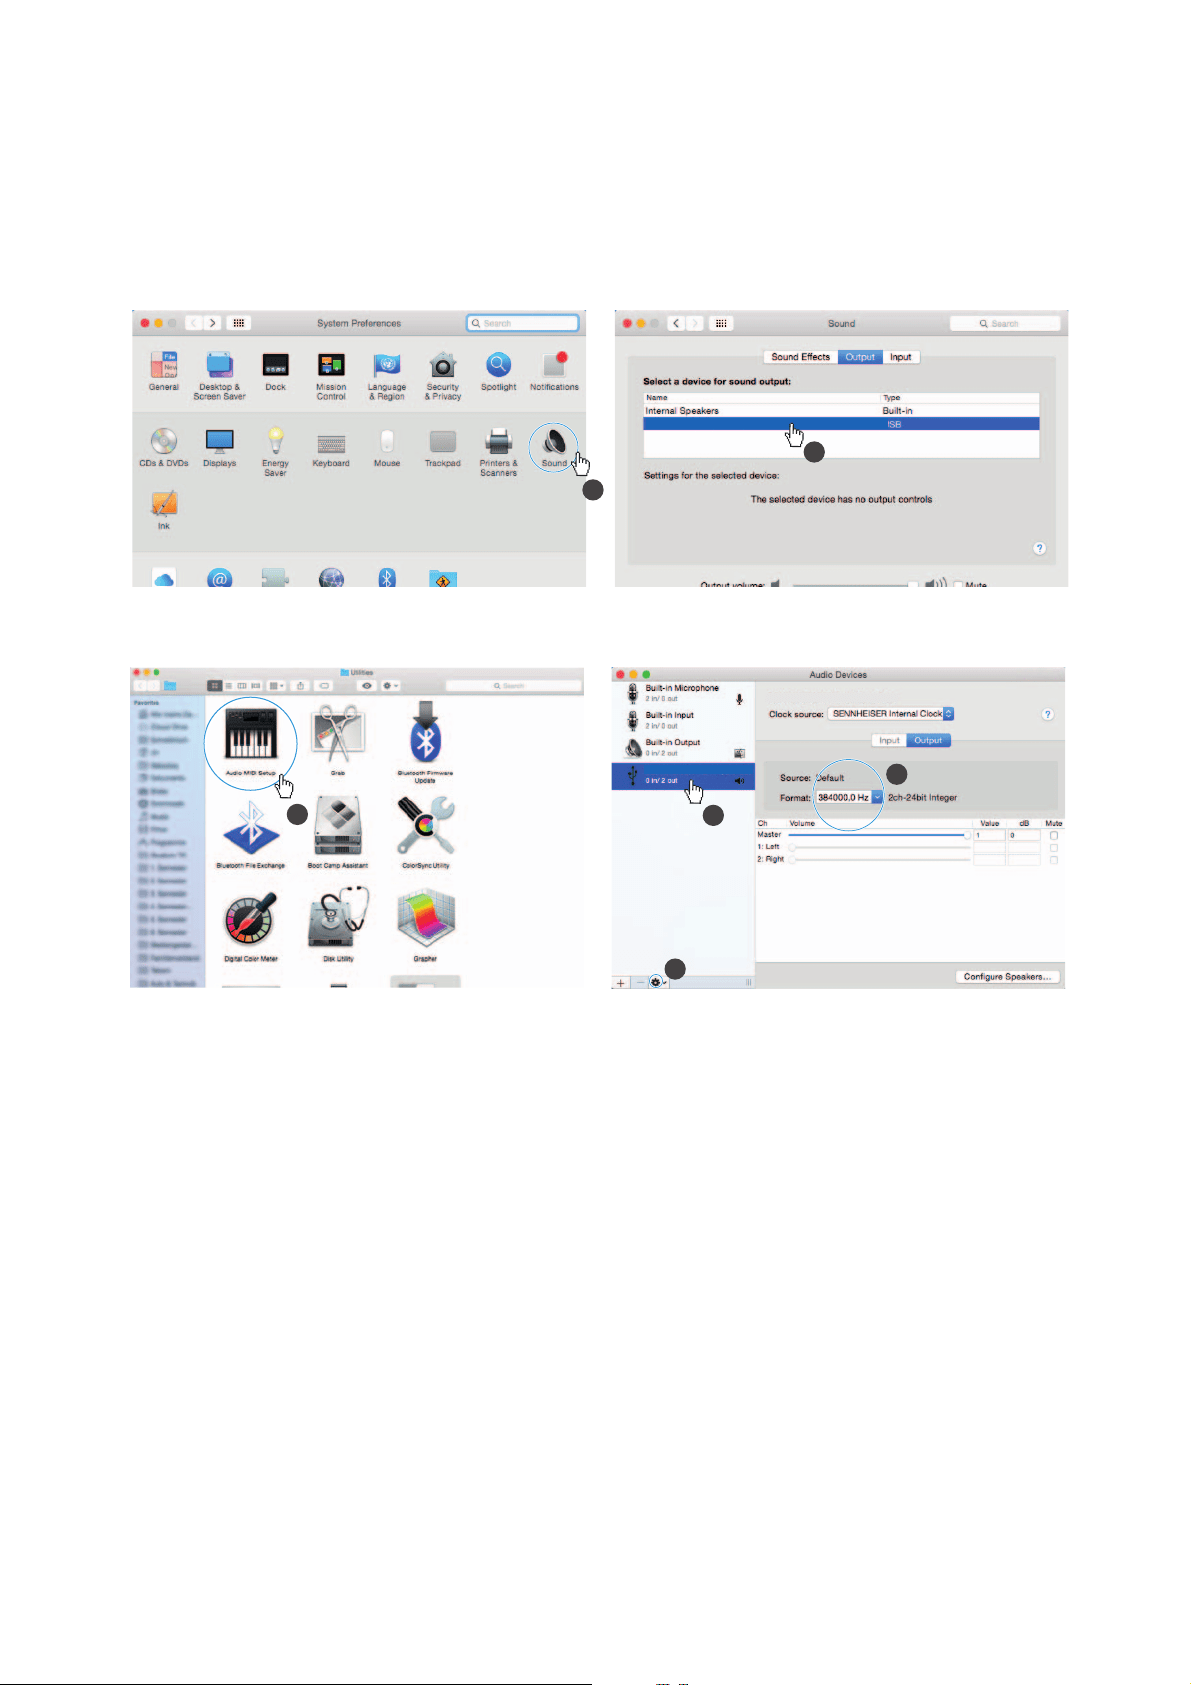
HDV 820 | 13
Apple OS X operating system
For an Apple Mac OS X operating system from version 10.6 onwards,
you do not have to install a driver. The HDV 820 is recognized auto
-
matically.
▷ From the System Preferences, select “Sound” and then select
“Sennheiser HDV 820” as the default audio output device.
▷ Open the “Audio Midi Setup” utility program and select
“Sennheiser HDV 820” from the left-side column.
▷ From the drop-down menu, select “Use this device for sound out-
put”.
▷ In the device settings, select the maximum sample rate from the
“Format” drop-down list. Select “384000 Hz” for the best possible
sound quality.
Microsoft Windows operating system
If you use a Microsoft Windows operating system, you have to install
USB Audio drivers that come with the “HDV 820 USB Audio Software
Package”. After installation of the drivers, the HDV 820 is recognized
automatically.
System requirements
• Intel Core 2 processor with 1.6 GHz (minimum) or similar proces-
sor
•2 GB RAM (minimum)
• Microsoft Windows 7/8/8.1/10 operating system (32 or 64 bits)
•HDV 820 USB Audio Software Package
1
2
SENNHEISER HDV820 Audio Out
3
1
2
4
SENNHEISER HDV820 Audio
SENNHEISER HDV820 Audio Out

Putting the HDV 820 into operation
14 | HDV 820
The software package contains the following components:
• WDM USB audio driver
• ASIO USB audio driver
• Control Panel
•HDV 820 Updater
Notes on the USB audio modes
If you use standard software (e.g. Windows Media Player or Apple
iTunes), the best possible transmission mode is limited by the oper
-
ating system (the played music file is mixed with System Sounds and
adapted to the sample rate and bit depth set for the WDM driver).
For native reproduction of high-resolution files (without driver-
induced adaptation of sample rate and bit depth; 32
bits/up to
384
kHz or DSD files), you require an ASIO driver and special third-
party software, which transmits the music file natively from the
player software to the DAC of the HDV 820 (see page
12).
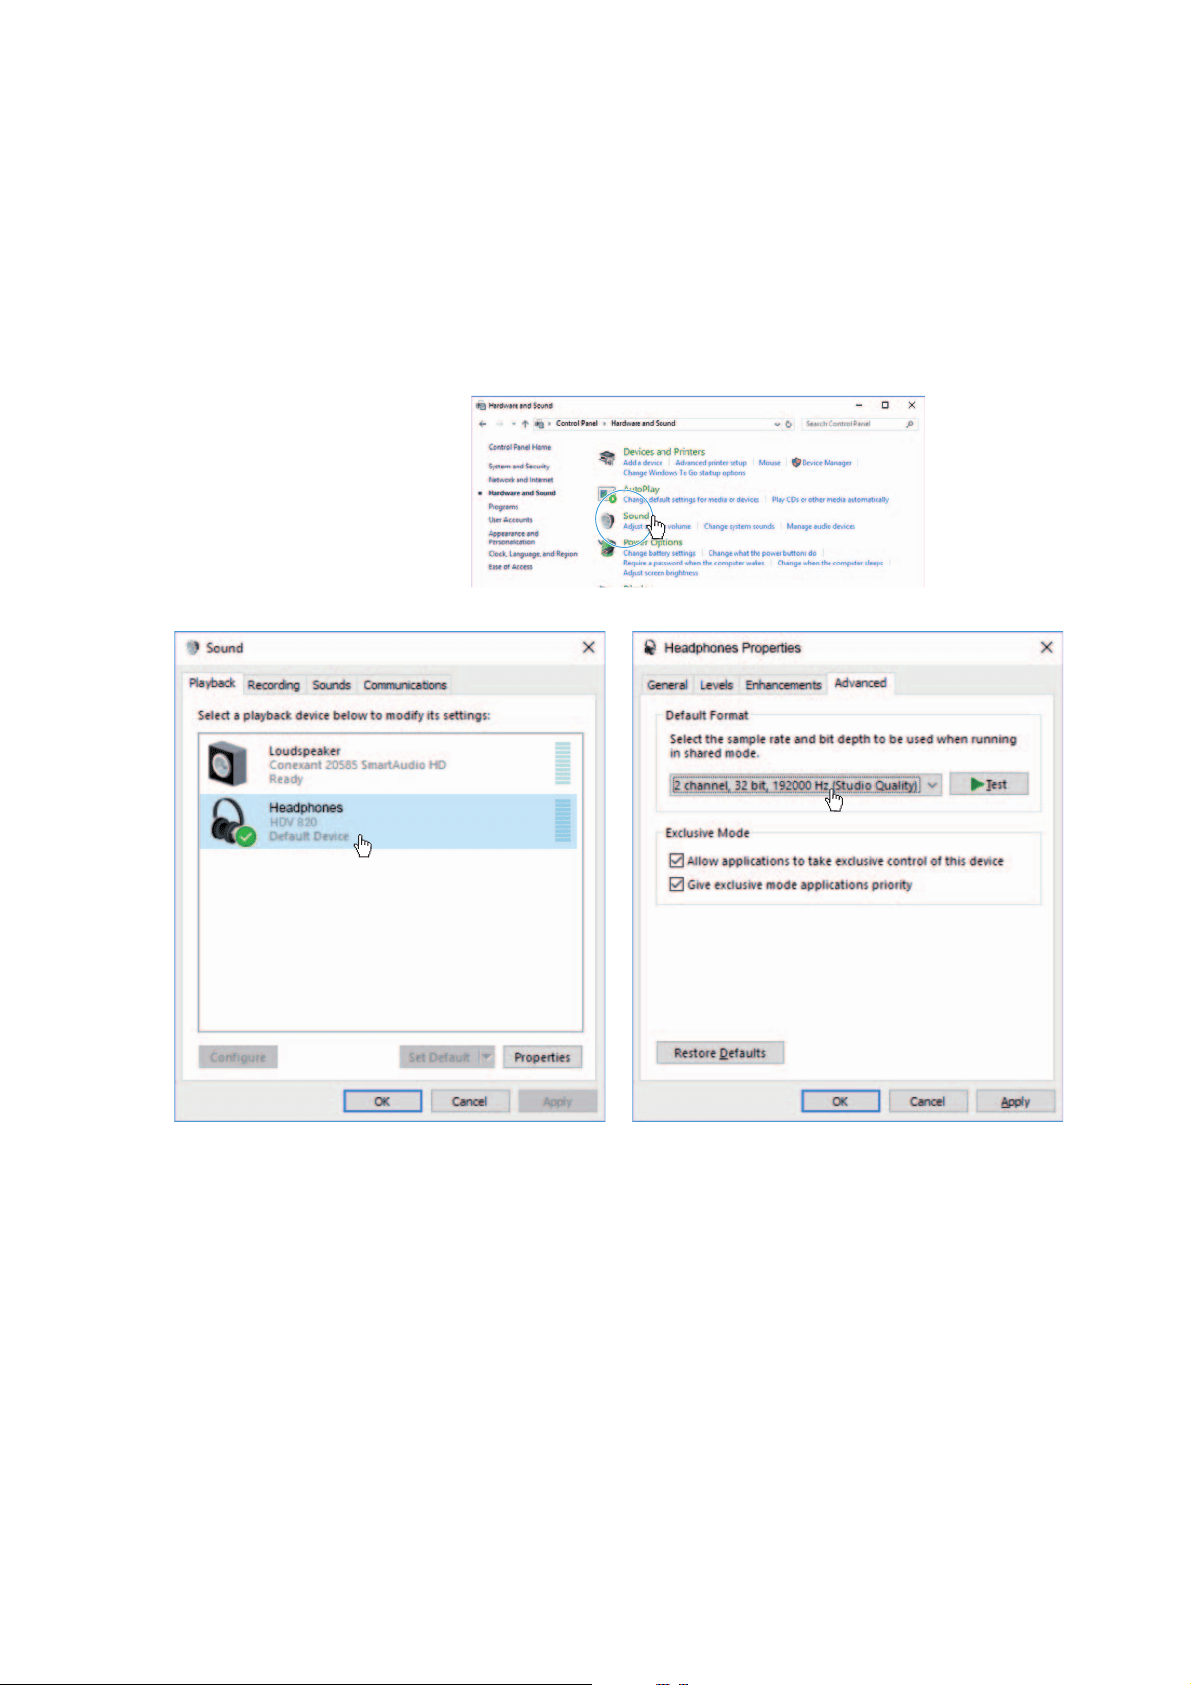
Putting the HDV 820 into operation
HDV 820 | 15
Example: Microsoft Windows 10
To install the “HDV 820 USB Audio Software Package” and to set the
HDV 820 as the default audio output device:
▷ Install the “HDV 820 USB Audio Software Package” from the USB
flash drive (supplied). The software package can also be down-
loaded from the Internet at www.sennheiser.com/download or be
obtained from your Sennheiser partner. You need administrator
rights for installation.
▷ Open the Control Panel and select “Sound”.
The “Sound” window opens.
▷ Select “HDV 820” as the default audio output device.
▷ Click on “Properties” and, in the “Advanced” tab, select the maxi-
mum sample rate from the “Default Format” drop-down list.
Select “32 bit, 192000 Hz (studio quality)” for the best possible
sound quality.
▷ Click on “OK” to apply the settings.
Putting the HDV 820 into operation
16 | HDV 820
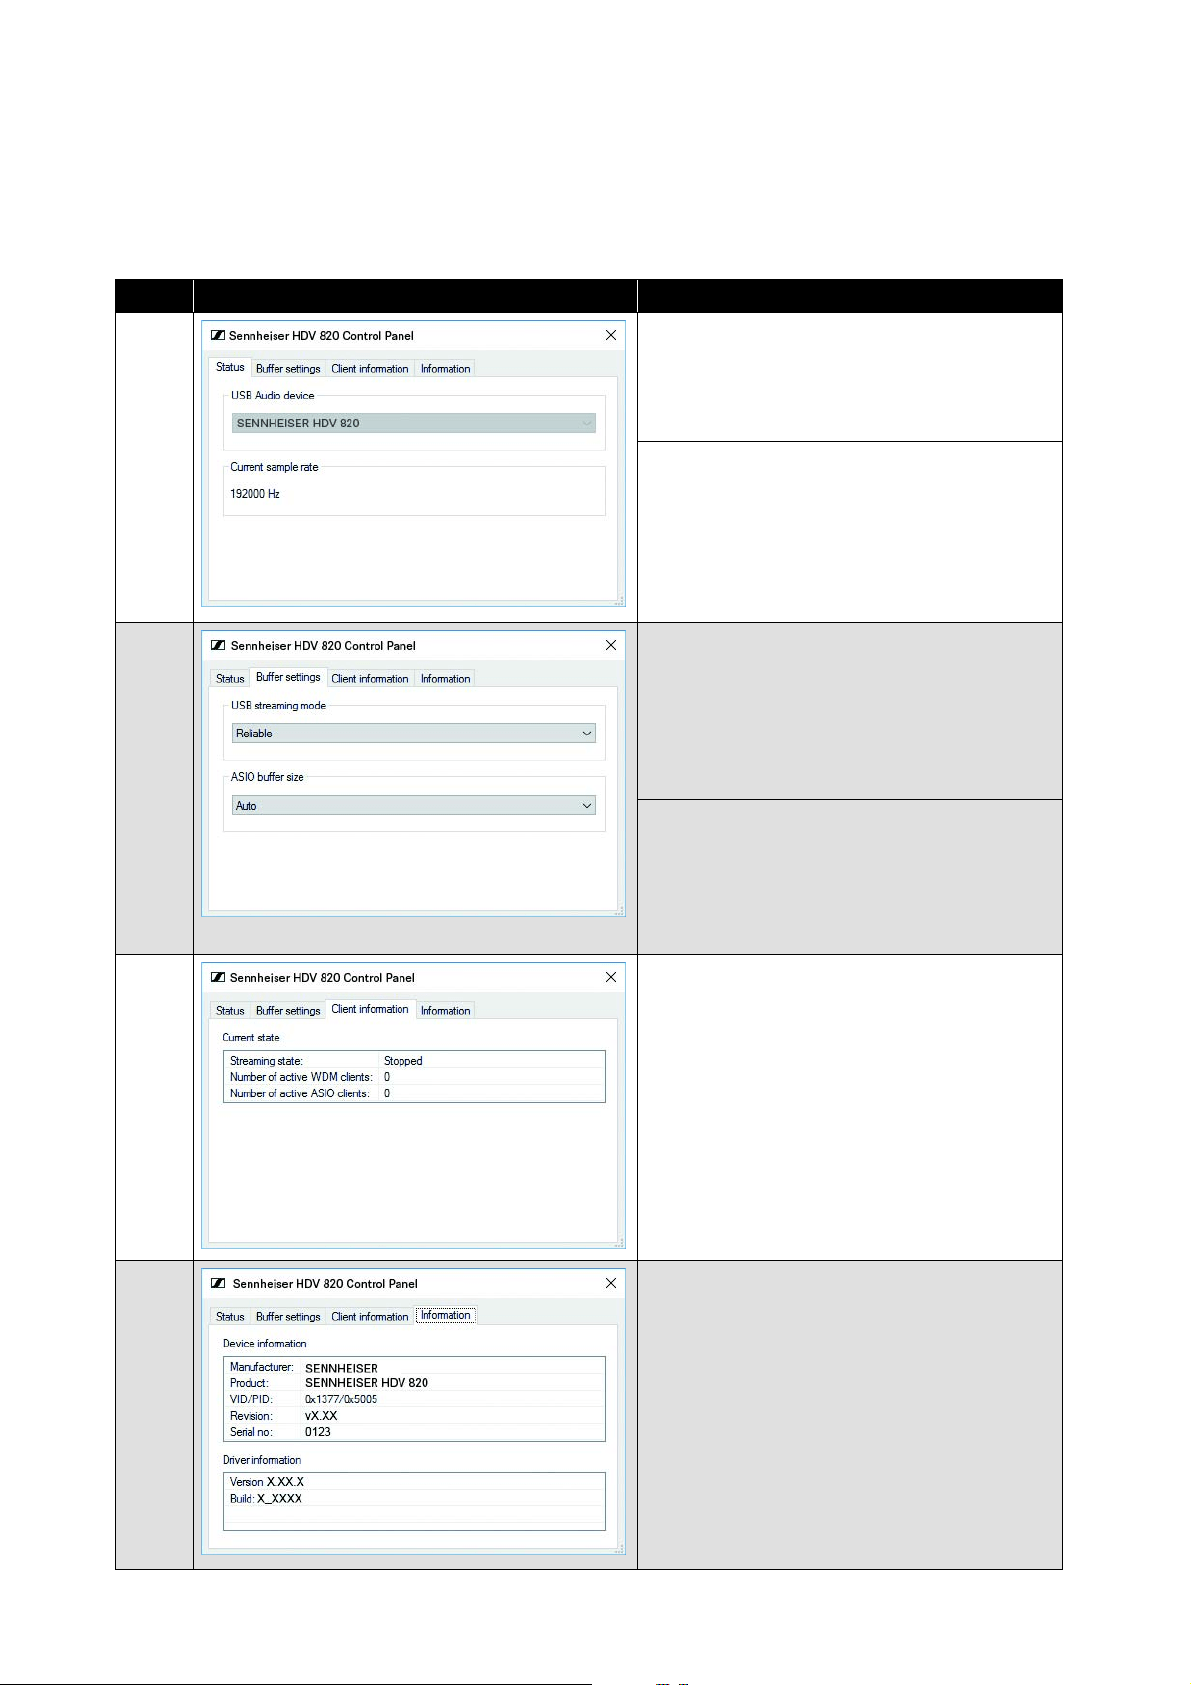
Using the Sennheiser Control Panel
The Control Panel allows you to configure the HDV 820 for the repro-
duction of high-resolution music f
iles and to monitor the current
operating state.
USB Audio device
Currently connected and
used device. If
several devices devices are connected
simultaneously, you can select the desired
device here.
Current sample rate
PCM: 44100, 48000, 88200, 96000, 176400,
1
92000, 352800, 384000 Hz
DSD: 2822400, 5644800, 11289600 Hz
USB streaming mode
The buffer of the USB streaming mode
controls the latency of the music signal from
the file source (PC client) and the DAC (HDV
820). The lower the latency, the more CPU
power the PC client has to allocate to this
process. Recommended setting: “Reliable”.
ASIO buffer size
The ASIO buffer size controls the data
tr
ansfer between the driver and the playback
software. The ASIO buffer size depends on
the buffer of the USB streaming mode.
Recommended setting: “Auto”.
Current state
Information on the PC client on which the
Control Panel is
installed and on the
streaming state (“Active” or “Stopped”).
The type of driver used is displayed via the
number of active WDM or ASIO clients.
Device information/Driver information
Information on the currently connected
devi
ce and the driver.
Tab Control Panel view
Display/Setting option
StatusBuffer settingsClient informationInformation
Putting the HDV 820 into operation
HDV 820 | 17
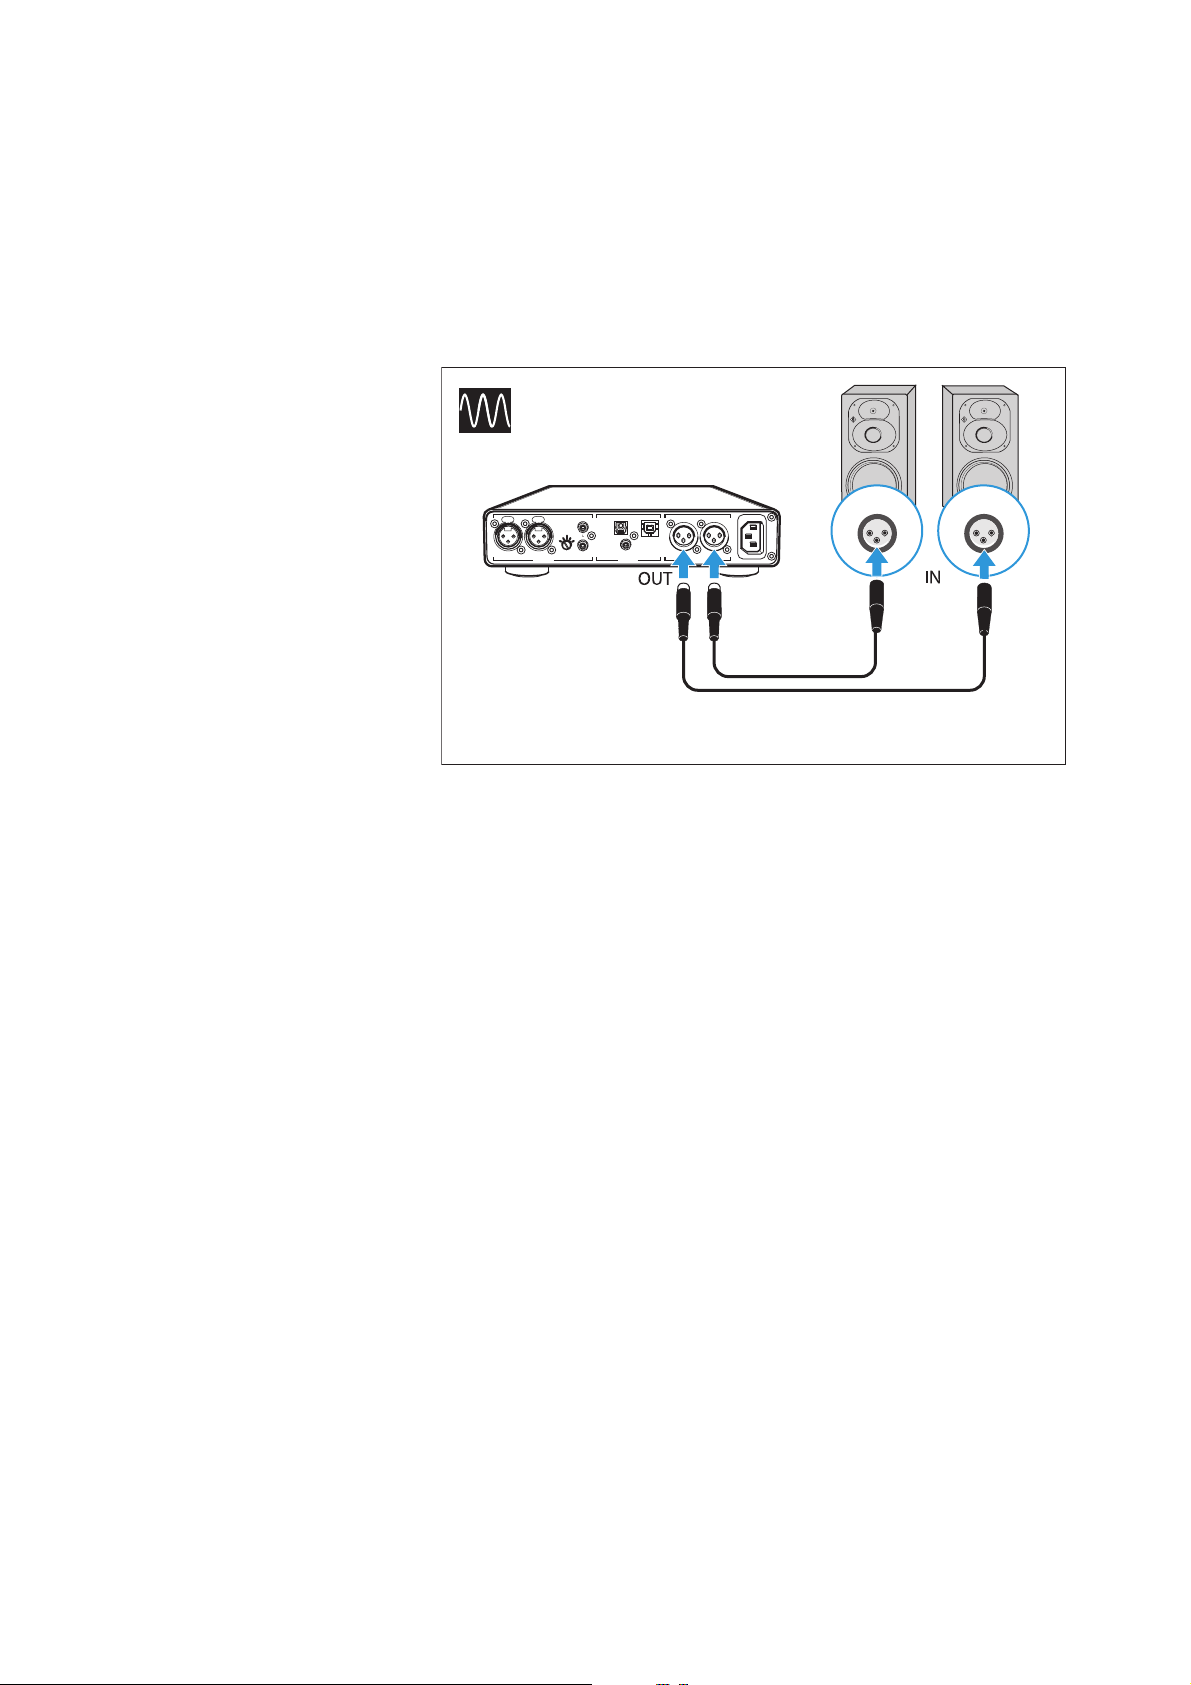
Connecting the headphone amplifier to a
power amplifier or to active loudspeakers
You can use the headphone amplifier as a preamplifier and connect
it to a power amplifier or to active loudspeakers using analog XLR-3
cables. The output level can be adjusted via the Volume control.
▷ Switch your audio devices off before connecting the headphone
amplifier.
ANALOG OUT
~100 -24 0 VAC 50/6 0Hz
R
LRLR
ANALOG IN DIGITAL IN
- GAIN +
BAL UNBAL BALOPT USB
BAL
RL RL
COAX
Connection cables: 2 balanced XLR-3 cables
Putting the HDV 820 into operation
18 | HDV 820
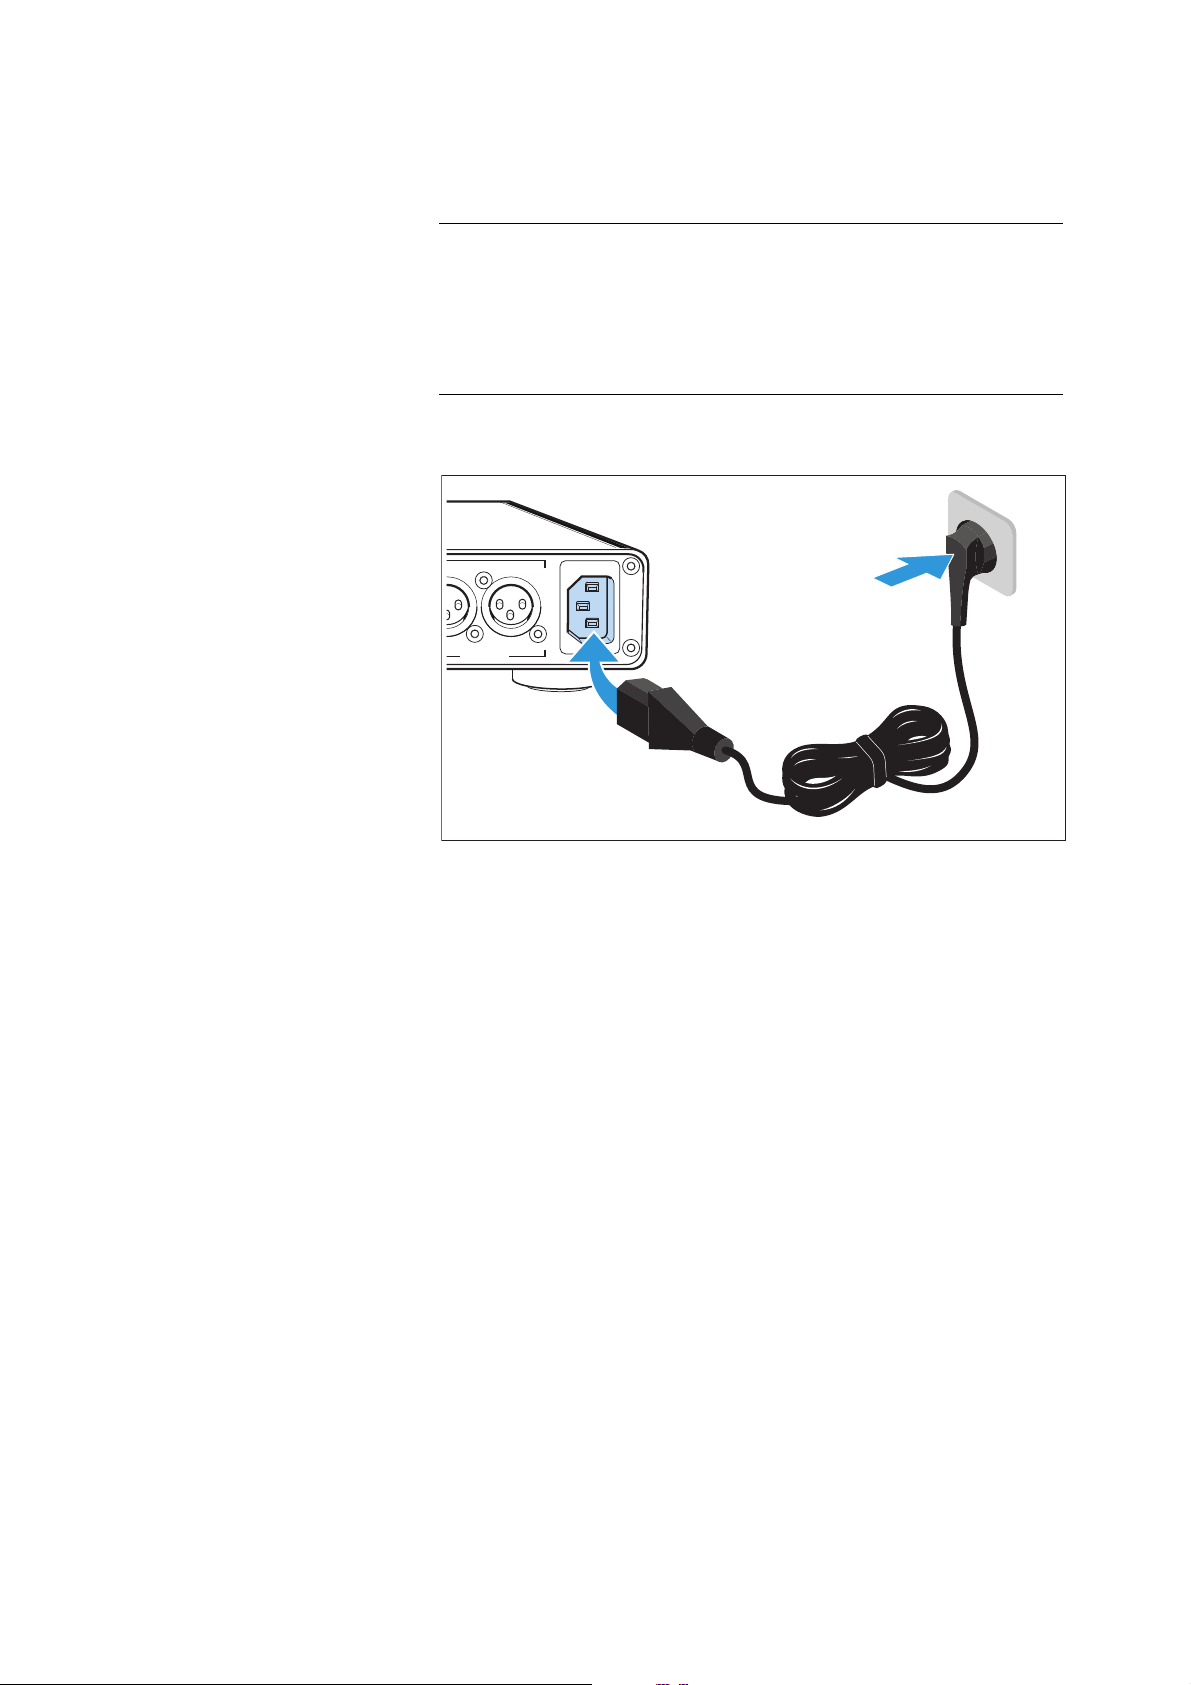
Connecting the headphone amplifier to
the power supply system
▷ Connect a suitable power cable (supplied) to the IEC mains
socket and a wall socket.
To completely disconnect the headphone amplifier from the power
supply system:
▷ Unplug the power supply unit from the wall socket.
CAUTION
Danger of damage to the product!
If you connect to an unsuitable power supply, the product can be
damaged.
▷ Use a suitable power cable (supplied) to connect the product to
the power supply system (100 to 240 V AC, 50 or 60 Hz).
ANALOG OUT
~100-240 VAC 50/60Hz
LR
BAL
Using the HDV 820
HDV 820 | 19
Using the HDV 820
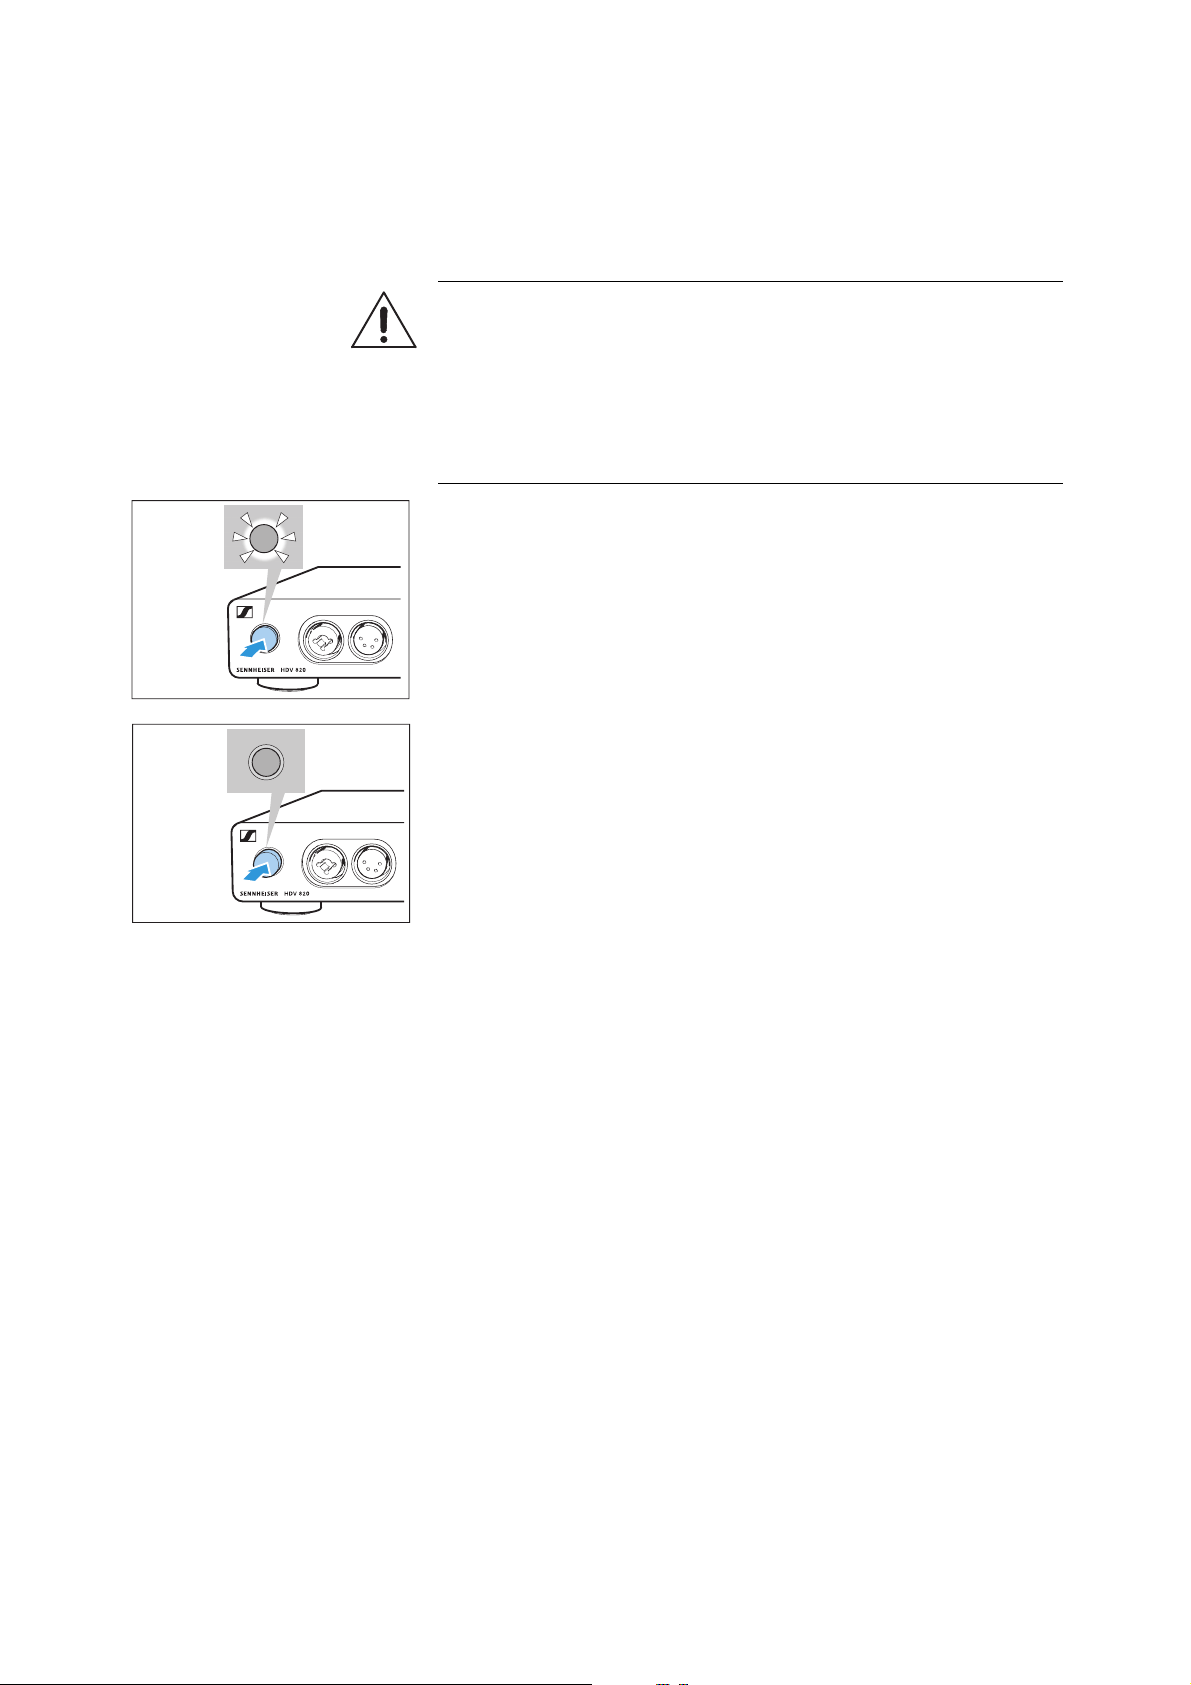
Switching the HDV 820 on/off
To switch the HDV 820 on:
▷ Press the on/off button.
When the headphone amplifier is switched on, the on/off button
is backlit in white.
To switch the HDV 820 off after use:
▷ Press the on/off button.
The headphone amplifier and all LEDs go off.
To completely disconnect the HDV 820 from the power supply sys-
tem:
▷ Unplug the power plug from the wall socket,
WARNING
Danger of hearing damage!
Listening at high volume levels for long periods of time can lead to
permanent hearing defects.
▷ Before putting your headphones on, adjust the volume to a low
level (see page 22).
▷ Do not continuously expose yourself to high volume levels.
ON
OFF

Using the HDV 820
20 | HDV 820
Connecting headphones
The HDV 820 features a total of 4 headphone sockets for dynamic
headphones:
• 1 unbalanced XLR-3/¼" (6.35 mm) jack combo socket
•1 balanced XLR-4 socket
• 2 balanced 4.4 mm Pentaconn jack sockets
The volume setting and the settings of the audio source apply to all
headphones. For an optimal listening experience, Sennheiser recom
-
mends using high-impedance headphones and cables with a length
of 3 m.
▷ Connect one or several pairs of headphones.
6.35 mm
4.4 mm
4.4 mm
XLR-3
XLR-4
Using the HDV 820
HDV 820 | 21
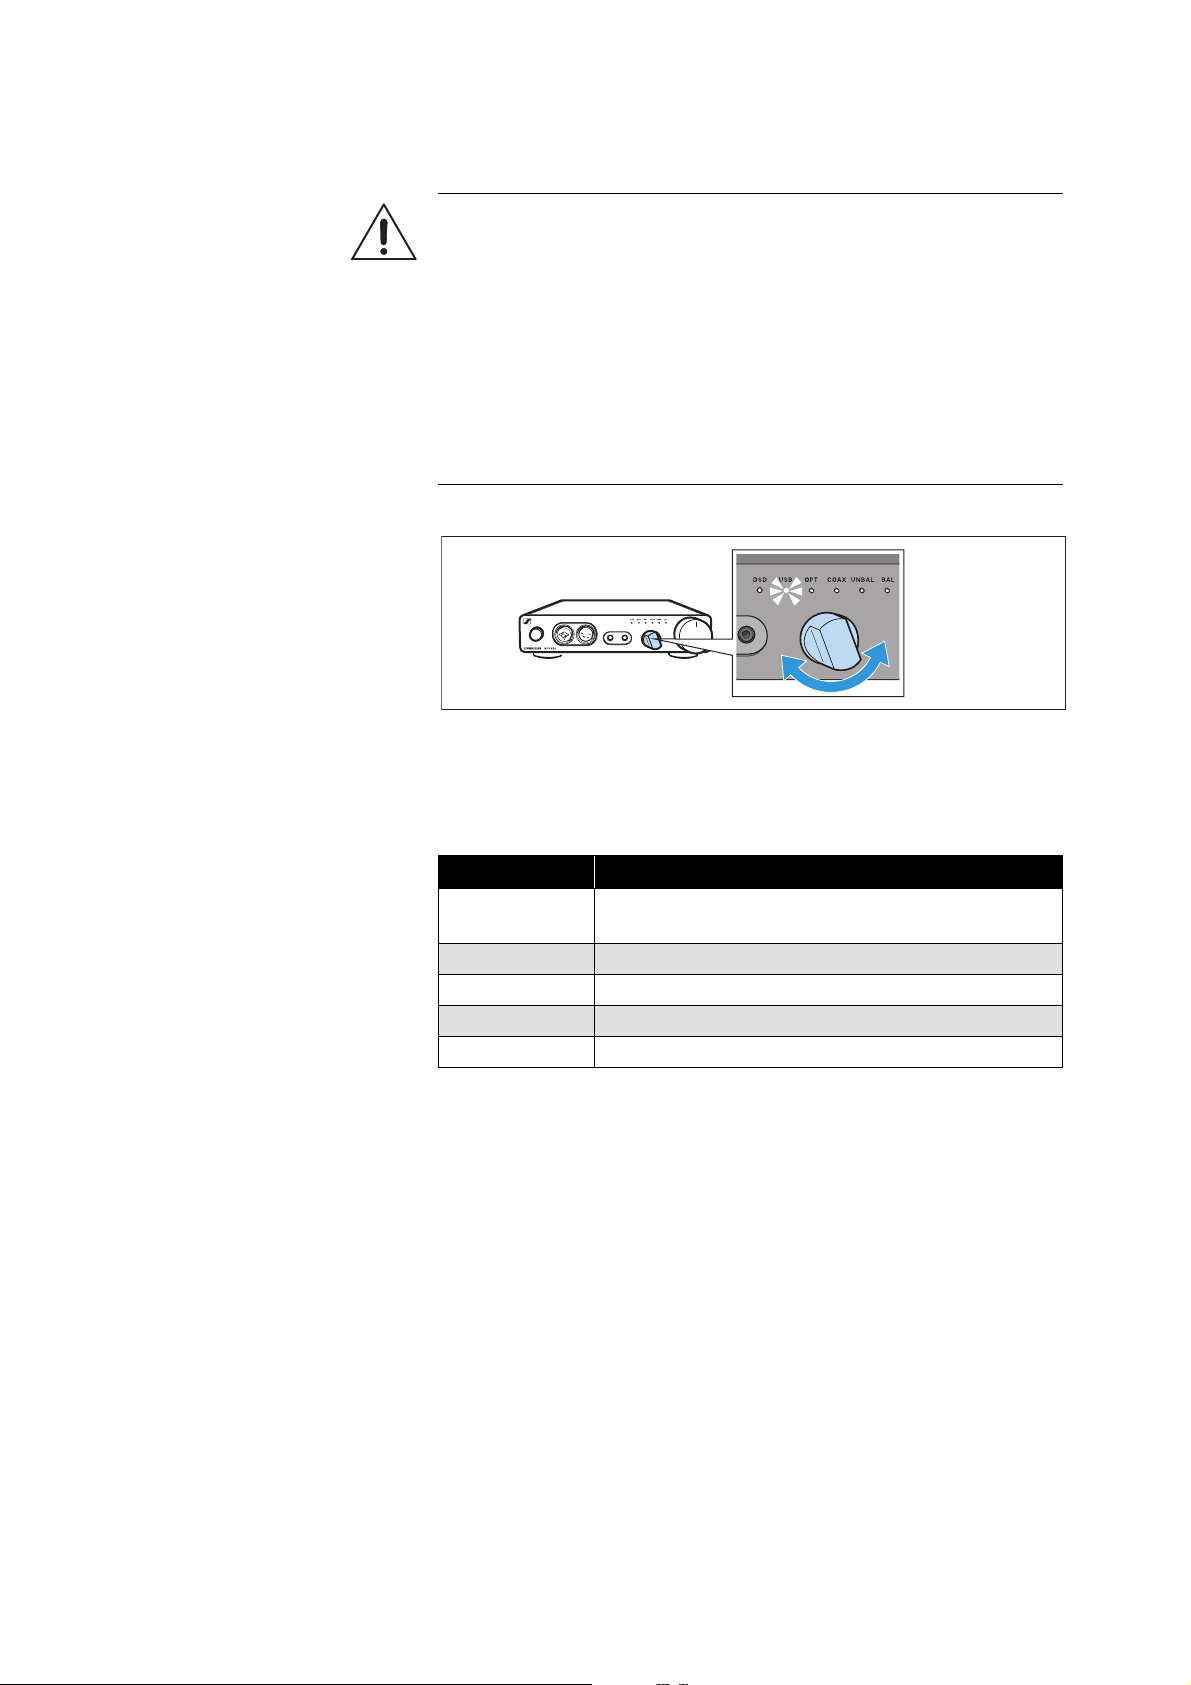
Selecting the audio source
▷ Use the Input selection rotary switch to select your connected
audio source.
The Input selection LED lights up white, indicating the selected
audio source.
o
WARNING
Danger of hearing damage!
Before switching to a different audio source, first set the volume on
the headphone amplifier to a low level. Different audio sources and
different listening material (e.g. different pieces of music on different
CDs/sound carriers) can have widely varying signal levels. In the
case where you switch to a higher level audio source from a lower
one without first reducing the volume level this can lead to high vol-
ume levels in the headphones and could damage your hearing.
▷ Set the volume on the headphone amplifier to a low level (see
page 22) before switching to a different audio source.
Selection
Selected audio source on the headphone amplifier
USB
USB (digital), the DSD reproduction LED might
also light up white (see page 12)
OPT Optical (digital)
COAX Coaxial (digital)
UNBAL RCA (analog)
BAL XLR-3 (analog)

Using the HDV 820
22 | HDV 820
Adjusting the signal level of the RCA input
(UNBAL)
In order to optimally set the gain of the headphone amplifier, you can
use the input gain rotary switch to adjust the signal level of the RCA
input (UNBAL).
▷ Turn the input gain rotary switch (– GAIN +) towards the
+ sign: if the signal is too low or
– sign: if the signal is overmodulated.
Adjusting the volume
▷ Use the Volume control to adjust the desired volume.
The volume setting applies to the headphone connections and the
audio outputs (
ANALOG OUT). If you have connected several identi-
cal headphones to the headphone amplifier, the volume setting
applies to all headphones.
ANALOG OUT
~100-240 VAC 50/60Hz
R
LRLR
ANALOG IN DIGITAL IN
- GAIN +
BAL UNBAL BALOPT USB
COAX
GAIN
GAIN
WARNING
Danger of hearing damage!
Listening at high volume levels for long periods of time can lead to
permanent hearing defects.
▷ Before putting your headphones on, adjust the volume to a low
level.
▷ Do not continuously expose yourself to high volume levels.
Cleaning and maintaining the HDV 820
HDV 820 | 23
Cleaning and maintaining the
HDV
820
▷ Disconnect the product from the power supply system before
cleaning.
▷ Clean the product with a soft, dry cloth (supplied).
Installing firmware updates
The DAC (digital-to-analog converter) firmware can be updated
using the free of charge “Sennheiser HDV
820 Updater” program.
The program can be downloaded from the Internet at
www.sennheiser.com/download or obtained from your Sennheiser
partner. The program is available for Windows and Mac operating
systems.
▷ Make sure that the HDV 820 is connected to your Mac or PC via
USB and that it is switched on.
▷ From Windows or MacOS, start the “Sennheiser HDV 820
Updater” program and follow the instructions on the screen.
▷ The program automatically checks if the new DAC firmware is
compatible with your HDV 820. If this is the case, the program
guides you through the installation steps and then confirms suc-
cessful installation.
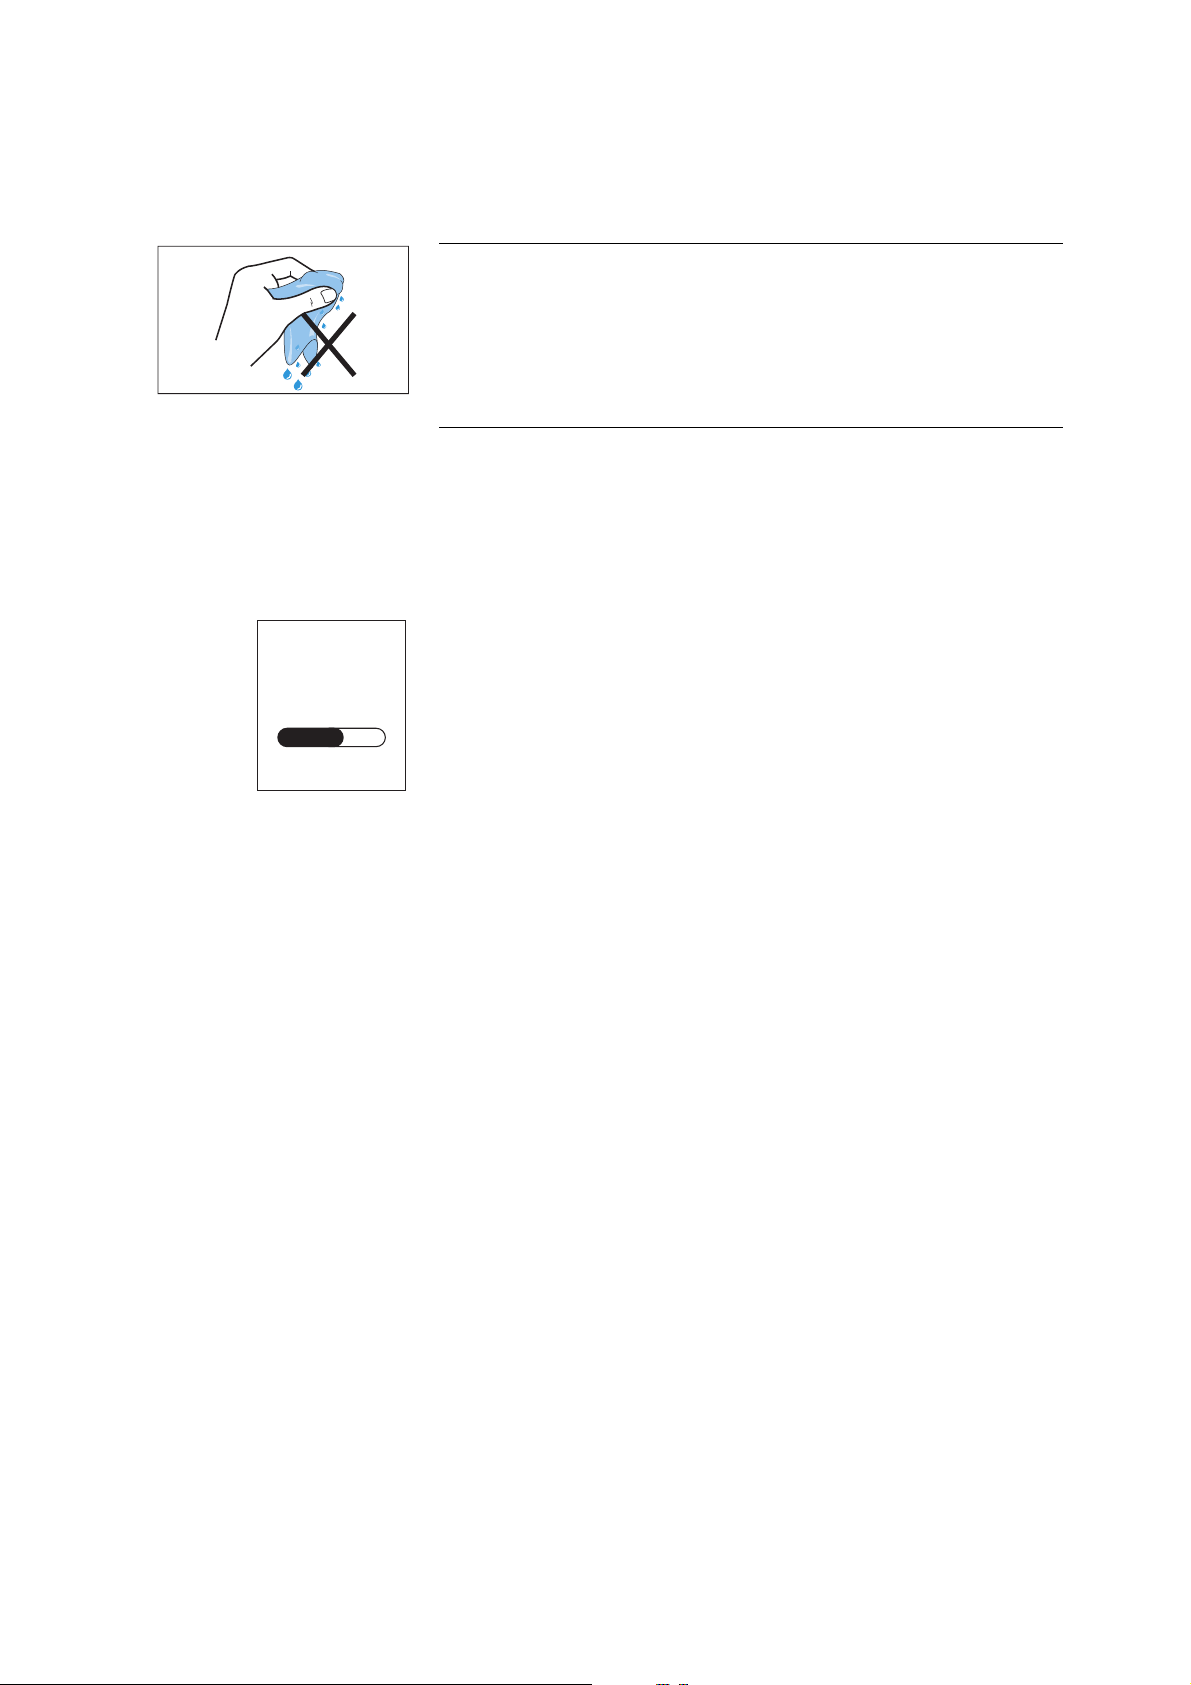
CAUTION
Liquids can damage the electronics of the product!
Liquids entering the housing of the product can cause a short-circuit
and damage the electronics.
▷ Keep all liquids far away from the product.
▷ Do not use any solvents or cleansing agents.
HDV 820
UPDATE
If a problem occurs ...
24 | HDV 820
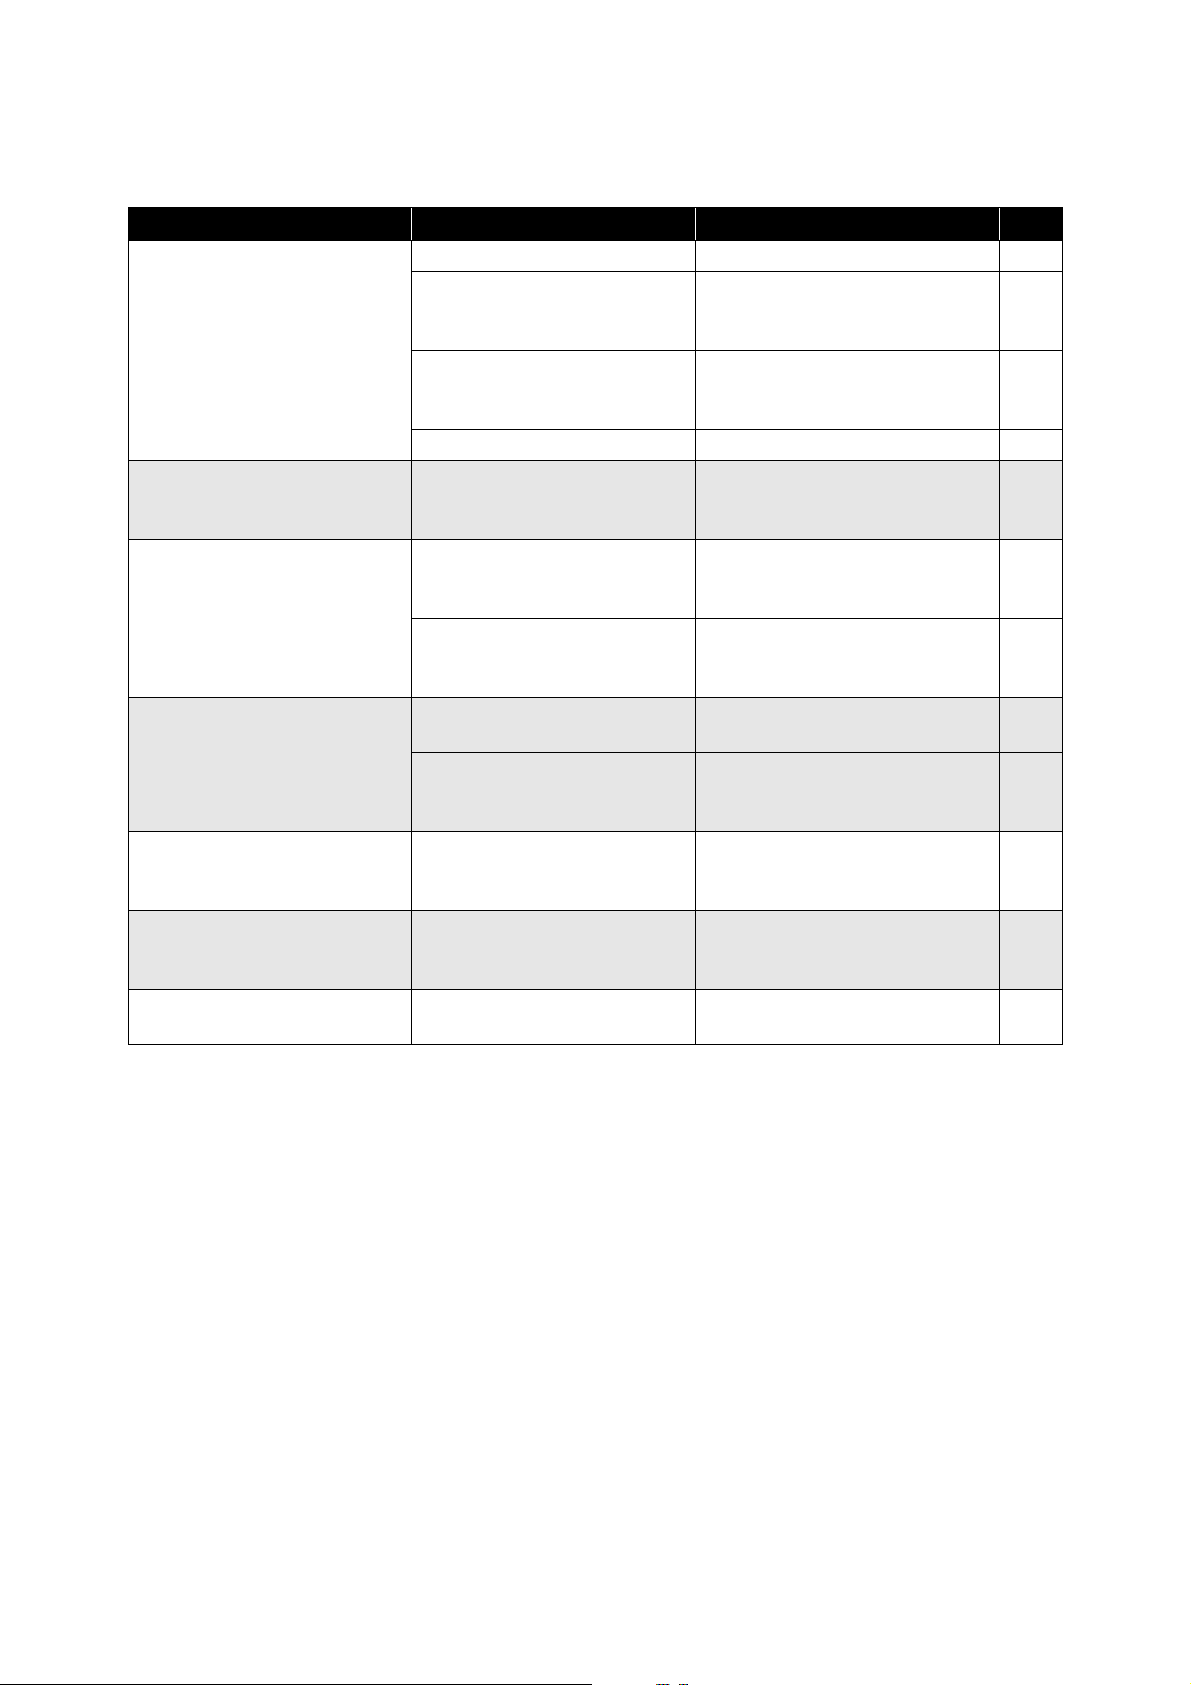
If a problem occurs ...
If a problem occurs that is not listed in the above table or if the problem cannot be solved with the pro-
posed solutions, please contact your Sennheiser partner for assistance.
To find a Sennheiser partner in your country, search at www.sennheiser.com > “Service & Support”.
Problem Possible cause Corrective action Page
No audio signal
The HDV 820 is switched off Switch the HDV 820 on. 19
The Input selection rotary
switch is set to a different
audio source
Set the Input selection rotary
switch to the desired audio
source.
21
The Input selection rotary
switch is between two
positions
Set the Input selection rotary
switch to one of the two inputs.
21
The volume is adjusted to low Increase the volume. 22
No sound when the digital
input (OPT or COAX) is
selected
The data format of the digital
audio source is not PCM
Set the audio source to PCM
data format.
–
The audio signal is very low
or distorted when an analog
audio source is connected
The volume of the audio
signal on the audio source is
adjusted too low or too high
If possible, adjust the volume of
the audio signal on the audio
source to a medium level.
–
The signal level of the audio
input is adjusted too low/too
high
Increase or reduce the signal
level of the ANALOG IN UNBAL
audio input.
22
Audio signal only on one ear
The analog audio cable is not
properly connected
Properly connect the audio
cable to the audio device.
9
The headphone plug is not
properly connected
Properly connect the
headphones to the headphone
amplifier.
20
The PC does not recognize
the HDV 820 as the audio
output device
No driver is installed Install the USB Audio driver.
12
No audio signal when the
HDV 820 is connected to a
PC or Mac via USB
Another audio output device
is selected on the PC or Mac
Select “Sennheiser HDV 820”
as the audio output device.
12
Sound dropouts when
connected via USB
The USB cable is not
sufficiently shielded
Use a USB cable that is at least
USB 2.0 certified.
–
Specifications
HDV 820 | 25
Specifications
Dimensions (W x H x D) approx. 224 x 44 x 306 mm
Weight approx. 2.25 kg
Max. output power approx. 480 mW @ 1 kHz and 600
Ω load at the XLR-4 output
Frequency response < 10 Hz to > 100 kHz
Crosstalk attenuation min. 93 dB @ 1 kHz
THD + N < 0.001 %
Gain
UNBAL input/XLR-4 output
adjustable
14 dB, 22 dB, 30 dB, 38 dB, 46 dB
Gain
BAL input/XLR-4 output
16 dB
Dynamic range
> 115 dB @ 600
Ω load
(A-weighted)
Temperature range operation: 5 to 45 °C
storage: -20 to 70 °C
Relative air humidity (non-
condensing)
operation: 10 to 80 %
storage: 10 to 90 %
Power supply
Voltage range 100 – 240 V ~, 50 – 60 Hz
Power consumption 12 W nominal
(2 x 300 Ω headphones connected
to the 4.4 mm outputs)
max. 18 W
(2 x 16 Ω headphones connected
to the 4.4 mm outputs)
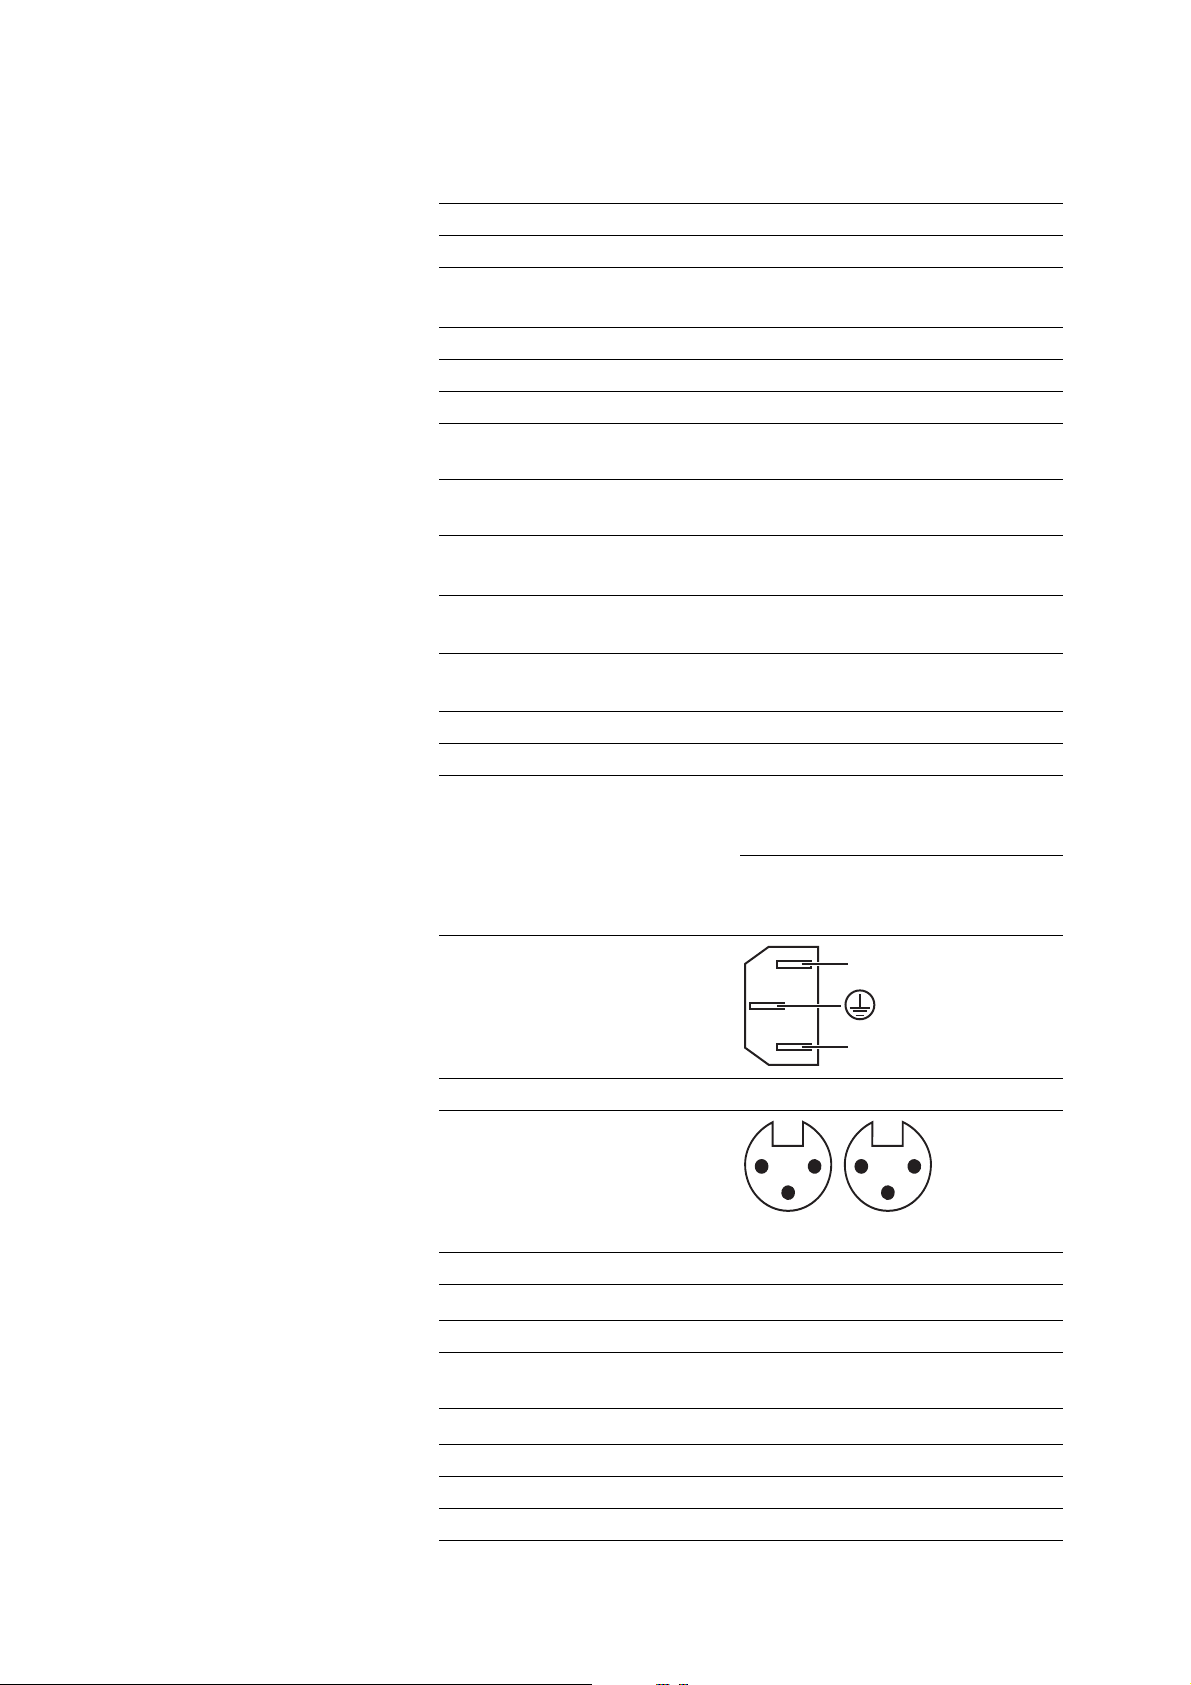
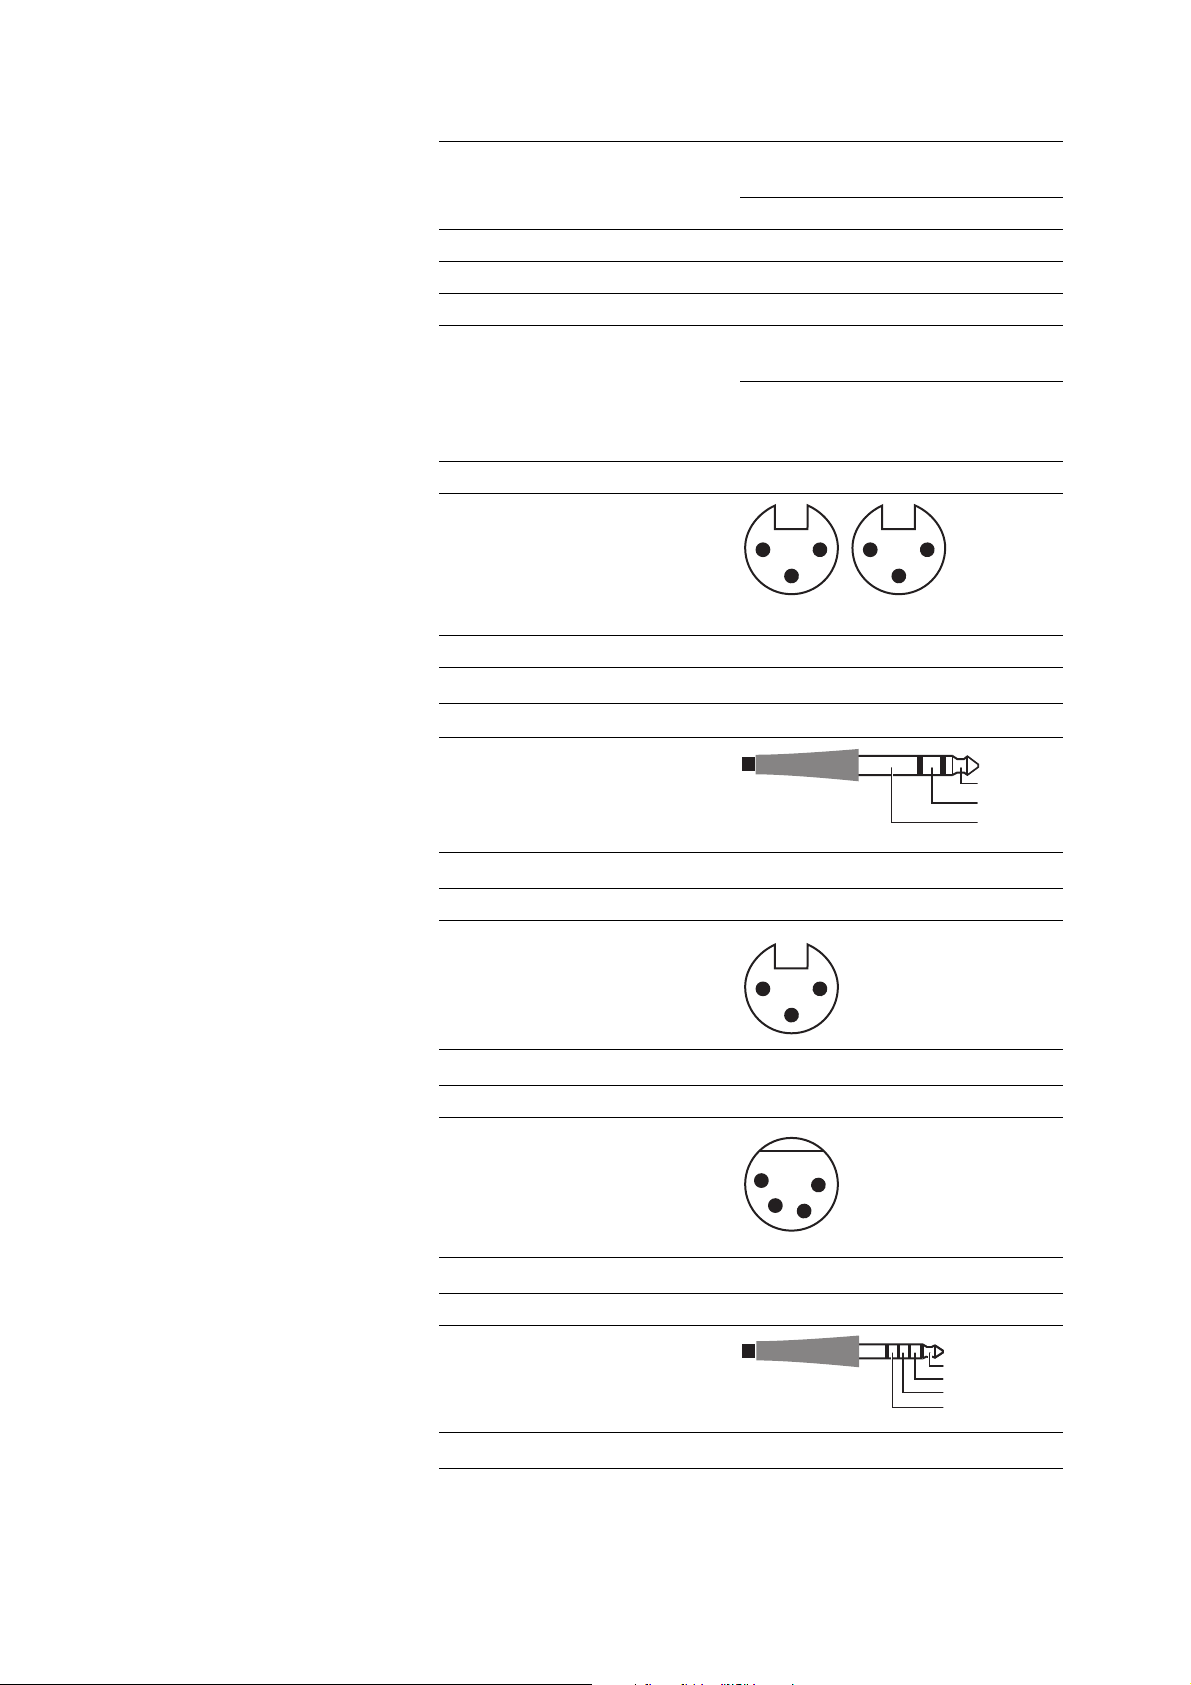
Pin assignment of IEC mains
socket
Analog input BAL (XLR-3)
Pin assignment
Max. input level 18 dBV
Input impedance
20 k
Ω
Analog input UNBAL (RCA)
Max. input level 20 dBV (with minimum
amplification GAIN)
Input resistance
10 k
Ω
Digital inputs COAX/OPT (coaxial/optical)
Standard S/PDIF
Supported data streams PCM
N
L
1: GND
2: +
3: −
12
3
R
12
3
L
Specifications
26 | HDV 820
Supported sample rates coaxial/optical:
44.1; 48; 88.2; 96 kHz
coaxial: 176.4; 192 kHz
Digital input USB (USB Type B)
USB standard min. USB 2.0
USB audio class USB Audio Class 2
Supported file formats PCM:
32 bits, 44.1; 48; 88.2; 96;
176.4; 192; 352.8; 384 kHz
DSD: 64 (2,822,400 Hz),
128 (5,644,800 Hz),
256 (11,289,600 Hz),
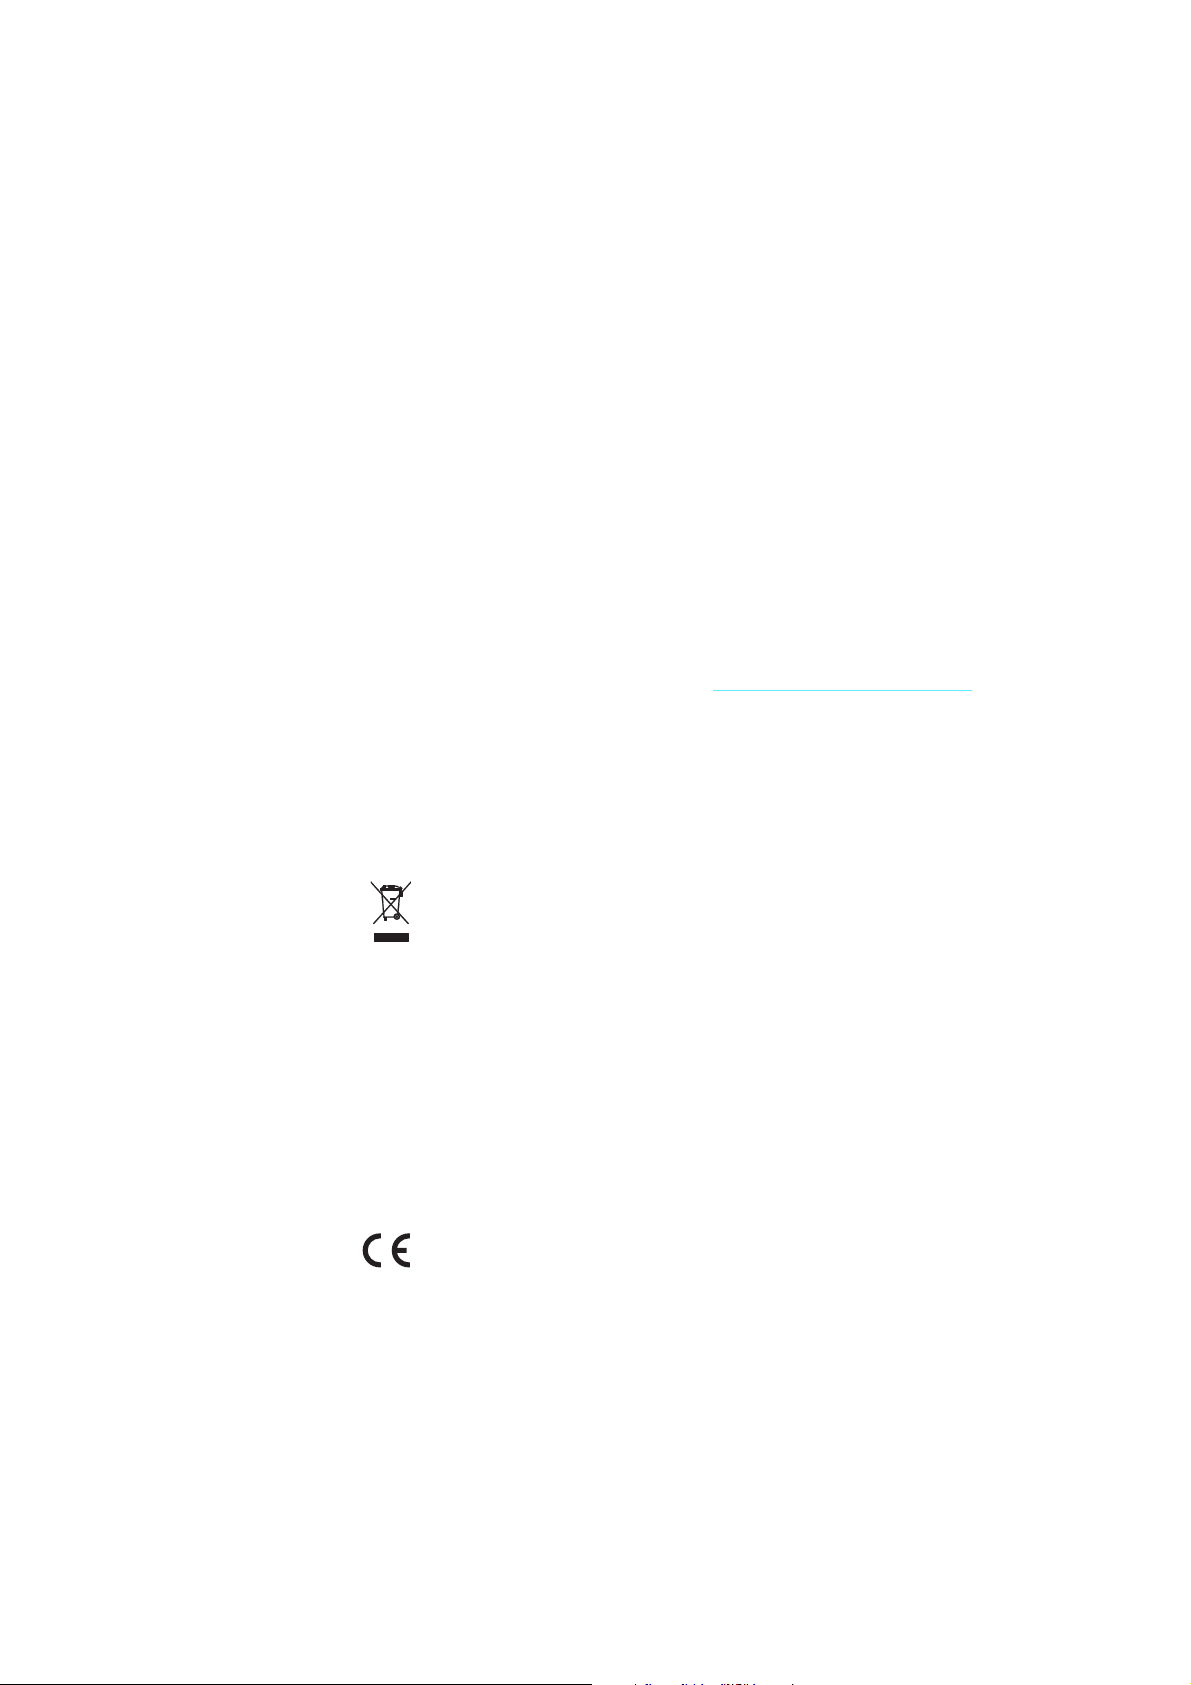
Analog output BAL (XLR-3)
Pin assignment
Max. output level 20 dBV
Output impedance
270
Ω
Headphone output (¼" (6.35 mm) jack socket)
Pin assignment
Impedance
min. 16
Ω
Headphone output (XLR-3)
Pin assignment
Impedance
min. 16
Ω
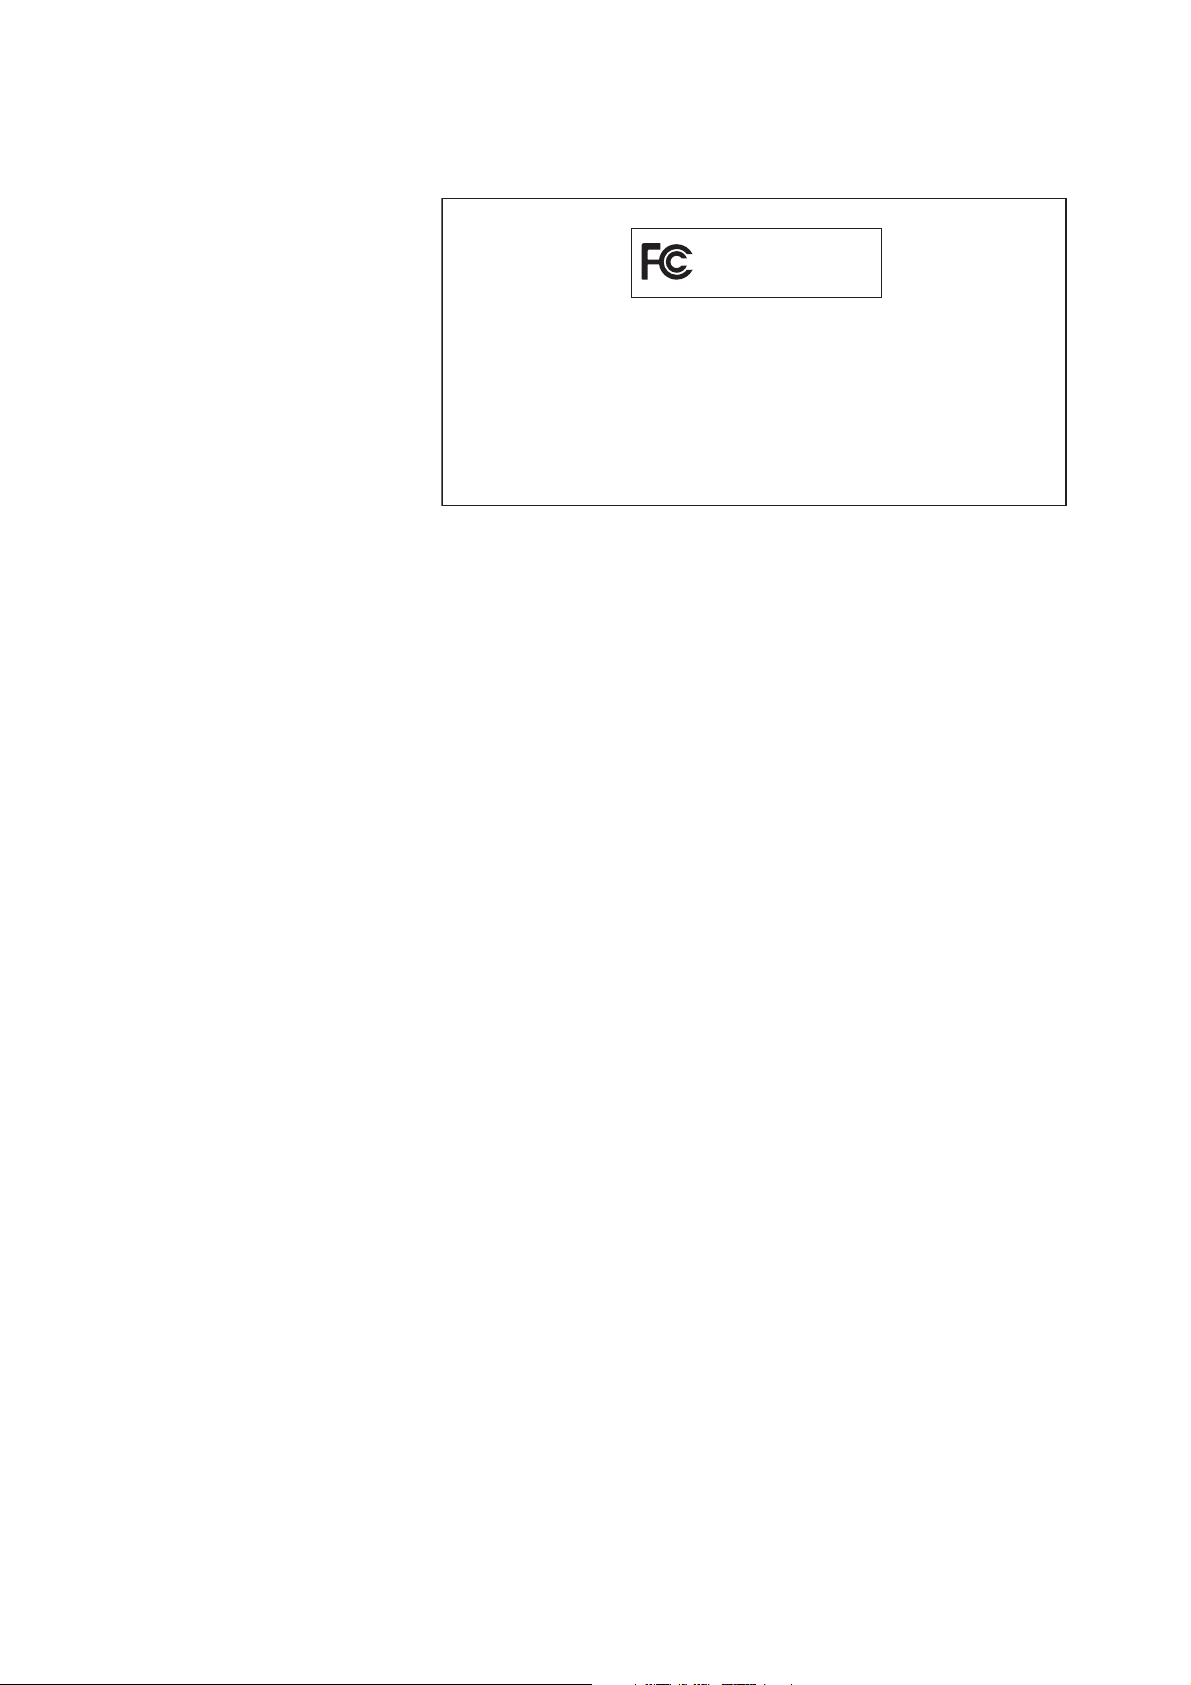
Headphone output (XLR-4)
Pin assignment
Impedance
min. 16
Ω
Headphone outputs (Pentaconn, 4.4 mm)
Pin assignment
Impedance
min. 16
Ω
1: GND
2: +
3: −
12
3
R
12
3
L
L
R
GND
0: Chassis
1: GND
2: L+
3: R+
12
3
0
0: Chassis
1: L+
2: L−
3: R+
4: R−
1
2
3
0
4
L+
L–
R+
R–
Manufacturer Declarations
HDV 820 | 27
Manufacturer Declarations
Warranty
Sennheiser electronic GmbH & Co. KG gives a warranty of 24 months
on this product.
For the current warranty conditions, please visit our website at
www.sennheiser.com or contact your Sennheiser partner.
FOR AUSTRALIA ONLY
Sennheiser’s goods come with guarantees that cannot be excluded
under the Australian Consumer Law. You are entitled to a replace
-
ment or refund for a major failure and compensation for any other
reasonably foreseeable loss or damage. You are also entitled to have
the goods repaired or replaced if the goods fail to be of acceptable
quality and the failure does not amount to a major failure. This war
-
ranty is in addition to other rights or remedies under law. Nothing in
this warranty excludes, limits or modifies any liability of Sennheiser
which is imposed by law, or limits or modifies any remedy available
to the consumer which is granted by law.
To make a claim under this warranty, contact Sennheiser Australia
Pty Ltd, Unit 3, 31 Gibbes Street, Chatswood NSW 2067, AUSTRALIA
Phone: (02) 9910 6700, email:
service@sennheiser.com.au.
All expenses of claiming the warranty will be borne by the person
making the claim.
The Sennheiser International Warranty is provided by Sennheiser
Australia Pty Ltd (ABN 68 165 388 312), Unit 3, 31 Gibbes Street,
Chatswood NSW 2067 Australia.
In compliance with the following requirements
• WEEE Directive (2012/19/EU)
The symbol of the crossed-out wheeled bin indicates that disposal of
this product via municipal waste is not permitted at the end of its
operational lifetime. Waste of electrical and electronic equipment
(WEEE) needs to be disposed of separately in accordance with the
national/communal regulations. The product can be disposed of at a
collection point for electrical and electronic waste in your area.
The separate collection of electrical and electronic equipment is
used to promote reuse, material recycling or other forms of recycling
of WEEE and to avoid potential effects that may be caused by the
presence of hazardous substances. Herewith you make an important
contribution to the protection of our environment and human health.
EU declaration of conformity
• EMC Directive (2014/30/EU)
• ErP Directive (2009/125/EC)
• Low Voltage Directive (2014/35/EU)
• RoHS Directive (2011/65/EU)
The declaration is available at www.sennheiser.com/download.
Manufacturer Declarations
28 | HDV 820
Statements regarding FCC and Industry Canada
Déclaration requise par la FCC et l'Industrie Canada
This device complies with Part 15 of the FCC rules. Operation is sub-
ject to the following two conditions: 1) this device may not cause
harmful interference, and 2) this device must accept any interfer
-
ence received, including interference that may cause undesired
operation.
Changes or modifications made to this equipment not expressly
approved by Sennheiser electronic Corp. may void FCC authorization
to operate this equipment.
Cet appareil est conforme à la Partie 15 des réglementations de la
FCC. L'utilisation de l'appareil doit respecter les deux conditions sui
-
vantes : (1) L'appareil ne doit pas produire d'interférences nuisibles,
et, (2) il doit accepter toutes interférences reçues, y compris celles
qui pourraient avoir des effets non désirés sur son fonctionnement.
Toute modification non expressément approuvée par Sennheiser
electronic Corp. peut annuler le droit de l'utilisateur à l'emploi de
l'équipement en question.
Trademarks and licenses
Sennheiser is a registered trade mark of
Sennheiser electronic GmbH & Co. KG.
Other product and company names mentioned in this instruction
manual may be the trademarks or registered trademarks of their
respective holders.
SENNHEISER
Model No:
FCC Declaration of Conformity (DoC)
We,
Sennheiser Electronic Corporation
One Enterprise Drive • Old Lyme •
CT 06371 • USA
Tel: +1 (860) 434 9190
Fax: +1 (860) 434 1759
declare the above device comply with the requirements of Federal Communications Commission.
This device complies with Part 15 of the FCC rules. Operation is subjected to the following two conditions:
1) This device may not cause harmful interference, and
2) This device must accept any interference received, including interference that may cause undesired operation.
Responsible Party: Markus Warlitz
HDV 820, SD-U16L

Sennheiser electronic GmbH & Co. KG
Am Labor 1, 30900 Wedemark, Germany
www.sennheiser.com
Publ. 08/17, 570794/A01