Belt Drive Turntable System
Instruction Manual
1byone Products Inc.
1230 E Belmont Street, Ontario, CA, USA 91761
Customer Service: +1 909-391-3888
www.1byonebros.com
Made in China

1
Introduction
Thank you for purchasing 1byone Belt Drive Turntable System. This instruction manual
contains important information about safety, usage and disposal. Use the product as
described and keep this manual for future reference. If you sell this turntable or pass it
on, also give this manual to the new owner.
Important Safety Instructions
1. Read all instructions before use.
2. Keep these instructions for later use.
3. Follow all instructions.
4. Heed all warnings.
5. Do not use this product near water.
6. Clean only with a dry cloth.
7. Do not block any ventilation openings. Install in accordance with the manufacturer.
8. Do not place near any heat sources such as radiators, heat registers, or stoves.
9. Do not defeat the safety purpose of the polarized or grounding-type plug. A
polarized plug has two flat prongs with one wider than the other. A grounding
type plug has two flat prongs and a third grounding prong. The wide prong or the
third prong is provided for your safety. If your outlets are not compatible with this
product’s power plug, consult an electrician about replacing the obsolete outlets.
10. Protect the power cord from being pinched or walked on, particularly close to the
power plug or the point at which the power cord connects to the product.
11. Unplug this product during lightning storms or when unused for long periods of time.
12. Do not overload the electrical outlet. Use only power source as indicated.
13. Only use attachments / accessories specified by the manufacturer.
14. Refer all servicing to qualified service personnel. Servicing is required when the
product has been damaged in any way, such as if the power cord is damaged, if
liquid has been spilled or objects have fallen onto/into the product, if the product
has been exposed to rain or moisture, if the product has been dropped, or if the
product has been malfunctioning or not operating normally.
15. This product should not be exposed to dripping or splashing water and objects
filled with liquids, such as vases or bowls, should not be placed on the product.
16. Use replacement parts as specified by the manufacturer.
17. Upon completion of any service or repairs to this product, ask the service
technician to perform safety checks.
WARNING: Cancer and Reproductive Harm - HYPERLINK "http://www.
P65Warnings.ca.gov."
For more information go to HYPERLINK "http://www.1byonebros.com/
Compliance/Prop65".
2 3
Product Description
1. Counterweight
2. Anti-skating Stick
3. Turntable Platter
4. Tonearm Lift Lever
5. Tonearm Rest
6. 33/45 RPM Selector
7. Tonearm
8. Stop/Start Dial
9. Cartridge
1
2
3
4
5
6
7
8
9
1110 12 13 14 1516 17 18
L
R
USB-PC
DC IN 12V
PHONO
LINE
ON
OFF
19
10. Lid
11. Lid Hinge
12. Ground Connector
13. PHONO & Line Out Jacks
14. PHONO & Line Out Switch
15. Anti-skating Weight
16. USB-PC Port
17. AC-DC Power Jack
18. Bluetooth Indicator
19. Power Switch
Upon opening the turntable’s package, locate all of the following included items.
1) Turntable Unit
2) Power Adapter
3) Lid
4) Counterweight
5) Anti-skating Weight
6) Platter with Belt
7) 45 RPM Adaptor
8) Slip Mat
9) Cartridge Alignment Protractor
10) USB-PC Cable
11) Instruction Manual
This turntable is supplied with a factory-fitted cartridge that’s already adjusted.
Note: Instructions provided in this manual for adjusting the cartridge are provided in
case the cartridge is replaced at a later date by a different model.
Installing the Lid
Install the
Lid
carefully over the hinge prongs.
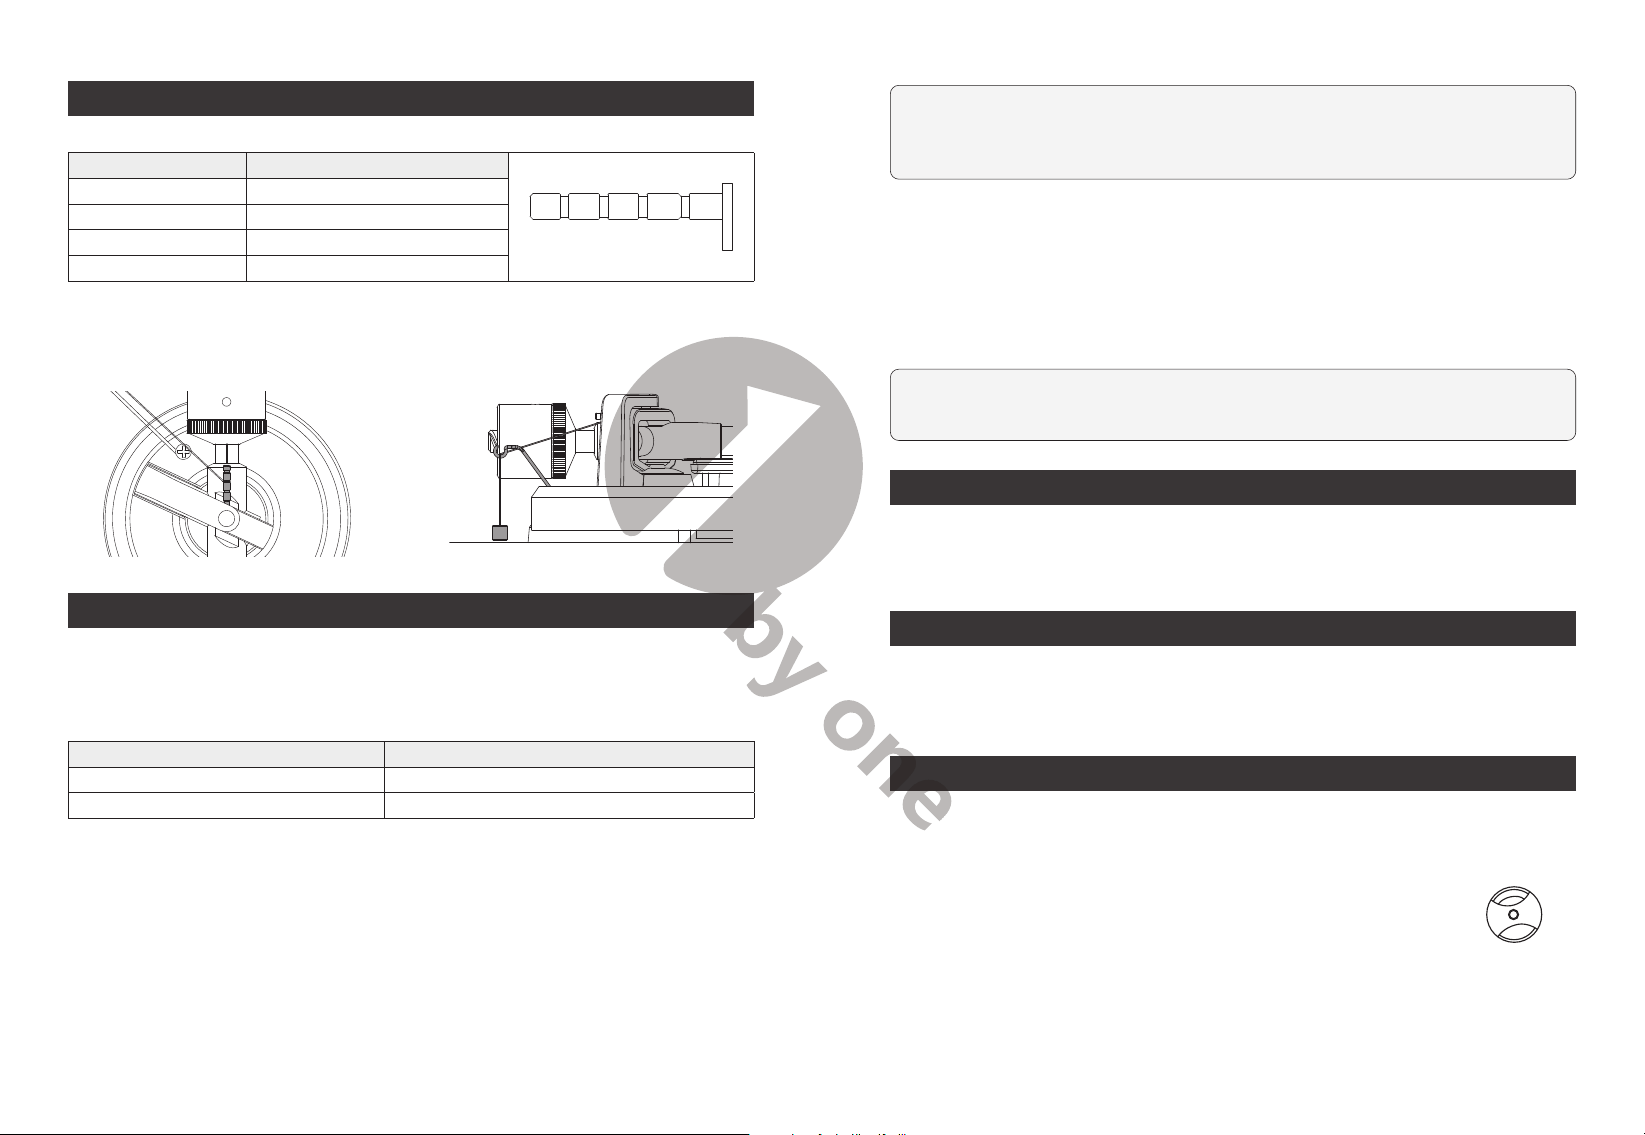
Turntable Platter and Belt Setup
1. Set the platter on the spindle.
• Make sure that the platter is fully seated on the spindle.
PlatterOpening
Motor pulley
Spindle
2. Place the belt on the motor pulley.
• Align one of the platter openings with the motor pulley, and, while pulling both
ends of the red ribbon that comes attached to the belt, place the belt on the
motor pulley, as per the diagram. When doing this, be careful not to twist the belt.
Belt
Motor pulley
Red ribbon
Straight Twisted
2 3
Product Description
1. Counterweight
2. Anti-skating Stick
3. Turntable Platter
4. Tonearm Lift Lever
5. Tonearm Rest
6. 33/45 RPM Selector
7. Tonearm
8. Stop/Start Dial
9. Cartridge
1
2
3
4
5
6
7
8
9
1110 12 13 14 1516 17 18
L
R
USB-PC
DC IN 12V
PHONO
LINE
ON
OFF
19
10. Lid
11. Lid Hinge
12. Ground Connector
13. PHONO & Line Out Jacks
14. PHONO & Line Out Switch
15. Anti-skating Weight
16. USB-PC Port
17. AC-DC Power Jack
18. Bluetooth Indicator
19. Power Switch
Upon opening the turntable’s package, locate all of the following included items.
1) Turntable Unit
2) Power Adapter
3) Lid
4) Counterweight
5) Anti-skating Weight
6) Platter with Belt
7) 45 RPM Adaptor
8) Slip Mat
9) Cartridge Alignment Protractor
10) USB-PC Cable
11) Instruction Manual
This turntable is supplied with a factory-fitted cartridge that’s already adjusted.
Note: Instructions provided in this manual for adjusting the cartridge are provided in
case the cartridge is replaced at a later date by a different model.
Installing the Lid
Install the
Lid
carefully over the hinge prongs.
Turntable Platter and Belt Setup
1. Set the platter on the spindle.
• Make sure that the platter is fully seated on the spindle.
PlatterOpening
Motor pulley
Spindle
2. Place the belt on the motor pulley.
• Align one of the platter openings with the motor pulley, and, while pulling both
ends of the red ribbon that comes attached to the belt, place the belt on the
motor pulley, as per the diagram. When doing this, be careful not to twist the belt.
Belt
Motor pulley
Red ribbon
Straight Twisted

4 5
3. Remove the red ribbon from the belt.
4. Place the slip mat on the platter.
Slip mat
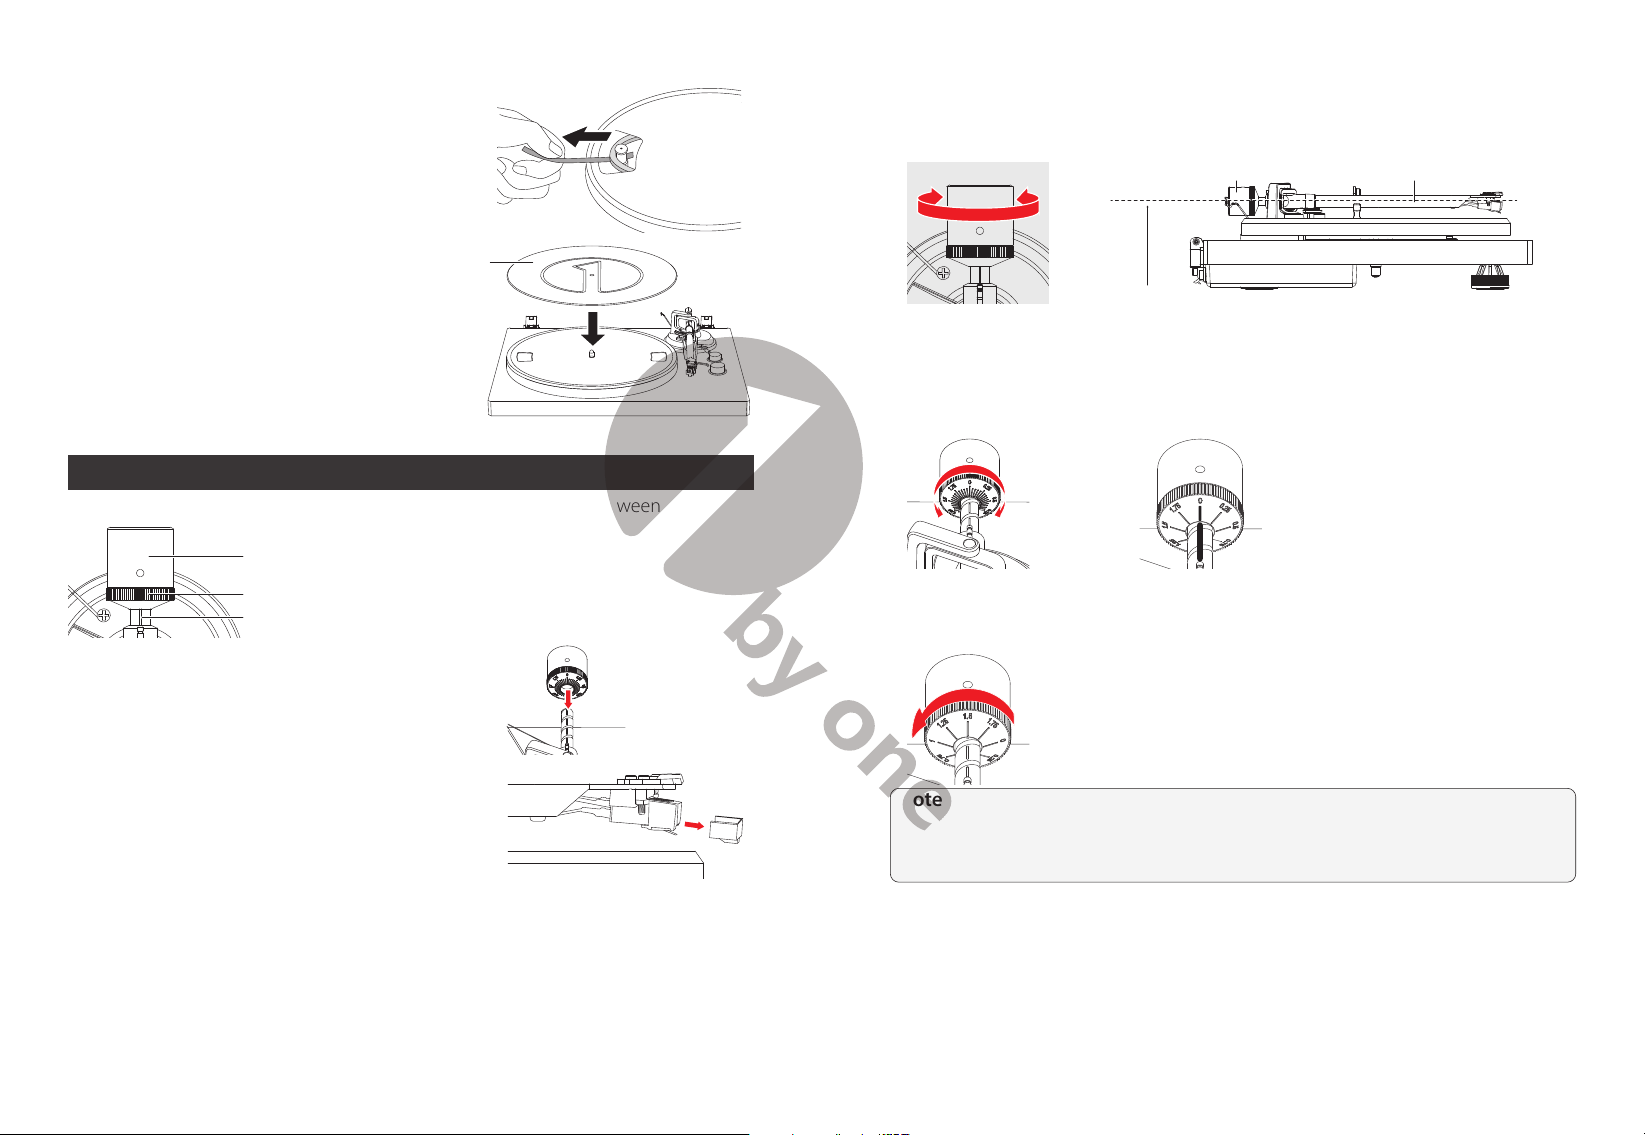
Cartridge Tracking Force Adjustment
The supplied
Counterweight
is suitable for cartridges weighing between 3.0-6.0g.
Counterweight
Center Line
Tracking Force Dial
1. Gently push and turn the Counterweight onto the
rear of the tonearm (with the dial facing towards the
front of the turntable).
2. Remove the cartridge protection cap.
3. Remove the tie-wrap and unlock the tone arm.
4. Lower the tonearm lift and position the cartridge in the space between the tonearm
rest and platter.
5. Carefully rotate the
Counterweight
until the tonearm achieves a neutral, level
balance. The tonearm should return to this balanced position if it is moved up or
down. Perform this adjustment carefully.
TonearmCounterweight
Adjust so the tonearm is level
6. Once the tonearm is correctly balanced, return and lock it to the tonearm rest. Next,
“Zero” the tonearm by holding the
Counterweight
still and gently rotating only
the
tracking force dial
so the “0” is centered over the black line on the top of the
tonearm
. After, unlock the tonearm and check that it still maintains a level balance.
7. Rotate the counterweight counterclockwise (seen from the front) to adjust the
tracking force according to the cartridge manufacturer’s recommendations.
Note:
Each mark on the dial represents 0.05g. The recommended tracking force for
the factory-installed cartridge is 3.5g±0.5g. The cartridge only goes up to 2g for one
rotation of the tracking force dial, meaning you will need to make more than one
rotation to reach 3.5g.
4 5
3. Remove the red ribbon from the belt.
4. Place the slip mat on the platter.
Slip mat
Cartridge Tracking Force Adjustment
The supplied
Counterweight
is suitable for cartridges weighing between 3.0-6.0g.
Counterweight
Center Line
Tracking Force Dial
1. Gently push and turn the Counterweight onto the
rear of the tonearm (with the dial facing towards the
front of the turntable).
2. Remove the cartridge protection cap.
3. Remove the tie-wrap and unlock the tone arm.
4. Lower the tonearm lift and position the cartridge in the space between the tonearm
rest and platter.
5. Carefully rotate the
Counterweight
until the tonearm achieves a neutral, level
balance. The tonearm should return to this balanced position if it is moved up or
down. Perform this adjustment carefully.
TonearmCounterweight
Adjust so the tonearm is level
6. Once the tonearm is correctly balanced, return and lock it to the tonearm rest. Next,
“Zero” the tonearm by holding the
Counterweight
still and gently rotating only
the
tracking force dial
so the “0” is centered over the black line on the top of the
tonearm
. After, unlock the tonearm and check that it still maintains a level balance.
7. Rotate the counterweight counterclockwise (seen from the front) to adjust the
tracking force according to the cartridge manufacturer’s recommendations.
Note:
Each mark on the dial represents 0.05g. The recommended tracking force for
the factory-installed cartridge is 3.5g±0.5g. The cartridge only goes up to 2g for one
rotation of the tracking force dial, meaning you will need to make more than one
rotation to reach 3.5g.

6 7
Anti-skating Force Adjustment
The anti-skating force must be adjusted corresponding to the tracking force as follows:
Tracking Force Groove in the stub
④ ③ ② ①
5-10 mN 1st from bearing ring
10-15 mN 2nd from the bearing ring
15-20mN 3rd from the bearing ring
20mN and larger 4th from the bearing ring
1. Slip the loop of the anti-skating weight's
thread over the
3rd
groove of the stick
to set the correct anti-skating force for
the factory-fitted cartridge.
2. Feed the thread through the hook of
the wire support.
Setting Phono-Line Out Switch
This product has a built-in phono equalizer function. You can use the turntable, even
if you do not have a phono amplifier or connectable equipment with a built-in phono
amplifier.
Use the
Phono-Line Out Switch
to set the output, as shown below.
Connectable device being used Position of Phono-Line Out Switch
Device with phono input Phono
Device without phono input Line
Connection to an Amplifier (Device with Phono input, PHONO mode)
This turntable uses a moving magnetic cartridge. Set the
PHONO & Line Out Switch
on PHONO mode. Connect the phono out cables to the phono input on your amplifier
of pre-amplifier (phono stage).
Line inputs such as CD, Tuner, Tape, or Video are
not suitable for phono inputs.
Make sure the amplification of the selected input
matches the type of cartridge being used. The factory installed cartridge is 47k ohms /
MM-input.
NOTE:
If your amplifier does not have an input suitable for phono cartridges, you
will need to purchase a separate phono amplifier for moving magnetic cartridges.
This separate phono amplifier will then connect between your turntable and your
amplifier.
Stereo System Connection (Device without phono input, LINE mode)
Set the
PHONO & Line Out Switch
to LINE mode. The RCA
PHONO & Line Out
Jacks
output analog line-level signals and can be connected directly with a par of
active/powered speakers of the appropriate input of your stereo system.
The Red plug connects with the Right channel and the White plug connects with the
Left channel.
NOTE:
The RCA Jacks are not designed to be connected directly to passive/
unpowered speakers in LINE mode. If connected to the passive speakers, no sound
will come out.
Main Power Connection
Unpack the power adapter from the foam packing material and plug the small end
into the
DC power jack
located on the back of the turntable. Plug the power adapter
plug into an electrical outlet.
Power Management Function
The turntable will automatically go into standby mode after 20 minutes of inactivity.
To resume operation, simply press the power switch off, then press it to the "ON"
position after 1 second.
Operation
Turntable Operation
1. After connecting to power, press the power switch to the “ON” position.
2. Remove the stylus protector from the stylus.
3. Place the slip mat on the platter and place a record on the slip
mat. If using 45 RPM records, put the 45 RPM adapter on the center
spindle before placing the record on the platter.
4. Set the 33/45 RPM Selector according to the type of record.
45RPM Adapter
5. Turn the Start/Stop dial to the Start position. The platter will start spinning.
6. Unlock the tonearm clip and set the Lift Lever to the up position.
8 9
7. Position the tonearm over the desired location (groove) on the record.
8. Move the tonearm lift lever to the down position to move the tonearm toward the
record. Alternatively, place the needle over the desired location on the record.
9. Carefully lower the tonearm on the record.
10. When you are finished playing the record, raise the tonearm, return it to rest on the
arm clip, and turn the Start/Stop dial to the Stop.
Bluetooth Operation
This turntable has a Bluetooth transmitter to wirelessly send audio to a Bluetooth
speaker.
1. Power on your Bluetooth speaker and ensure it is in pairing mode.
2. Power on the turntable. BT will auto search when the turntable turns on and the BT
LED indicator light will flash.
3. When pairing, the light will flash twice per second and will become solid when
paired successfully.
4. To disconnect pairing, power off the turntable or turn off Bluetooth pairing on your
Bluetooth speaker.
5. This turntable will connect to the nearest Bluetooth speaker. If after 2 minutes no
Bluetooth speaker can be found to pair with, the Bluetooth transmitter will become
inactive and the LED will turn off. If you need to connect again, power off the turntable
and the speaker then power on again.
Bluetooth Indicator Bluetooth Stauts
Flash Auto searching and pairing
Solid Paired successfully
Off Inactive
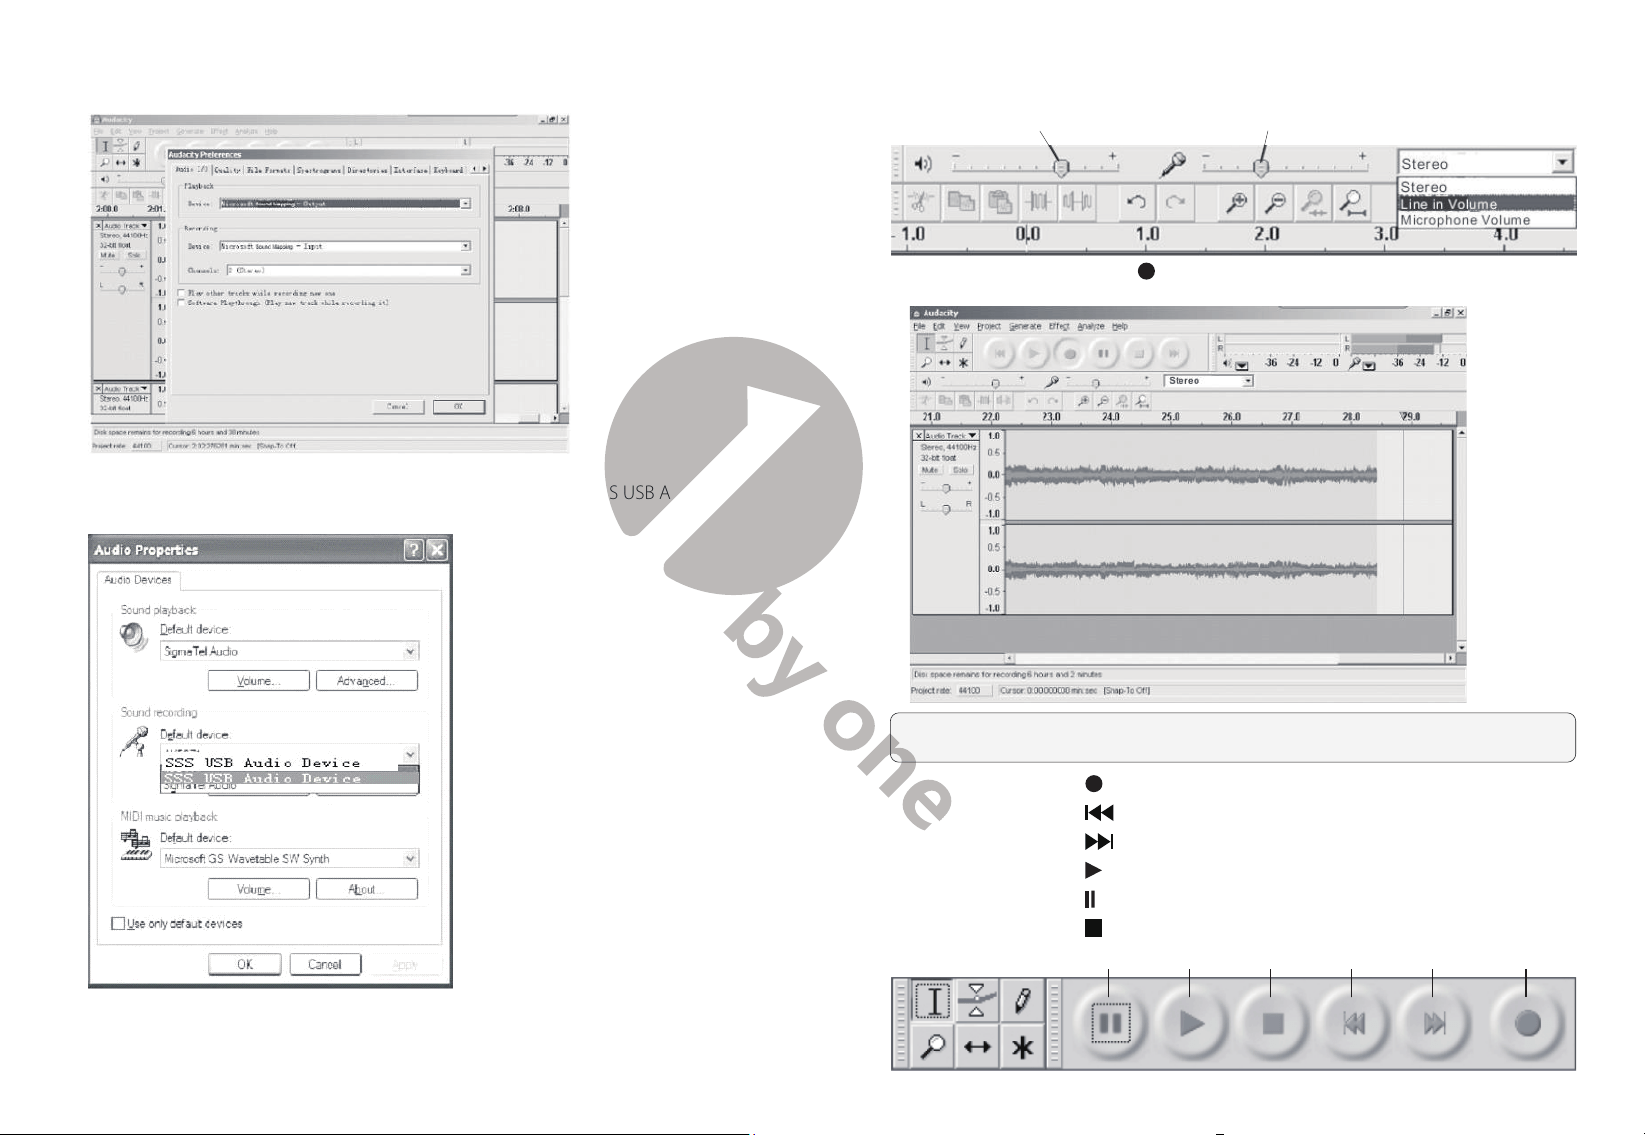
Recording onto a PC through USB Jack:
For installing and recording instructions, refer to the BRIEF INTRODUCTION OF
AUDACITY webpage at
https://www.audacityteam.org/download/
Recording the vinyl to your computer:
1). Follow the instructions in this manual to play the vinyl.
2). Open Audacity on your computer and follow the recording steps as instructed on
the Audacity webpage referenced above.
Audacity and USB Connection
Audacity supports Windows95 / Window XP / Window 7 / Vista or more advanced
version, with the EMS memory more than 128MB and Audacity take space of 5MB.
Instructions for PC Encoding After Recording
Software instructions
1. Connect the USB cable to your turntable and your computer. No extra drivers are
required.
2. Recording
2.1) Open Audacity
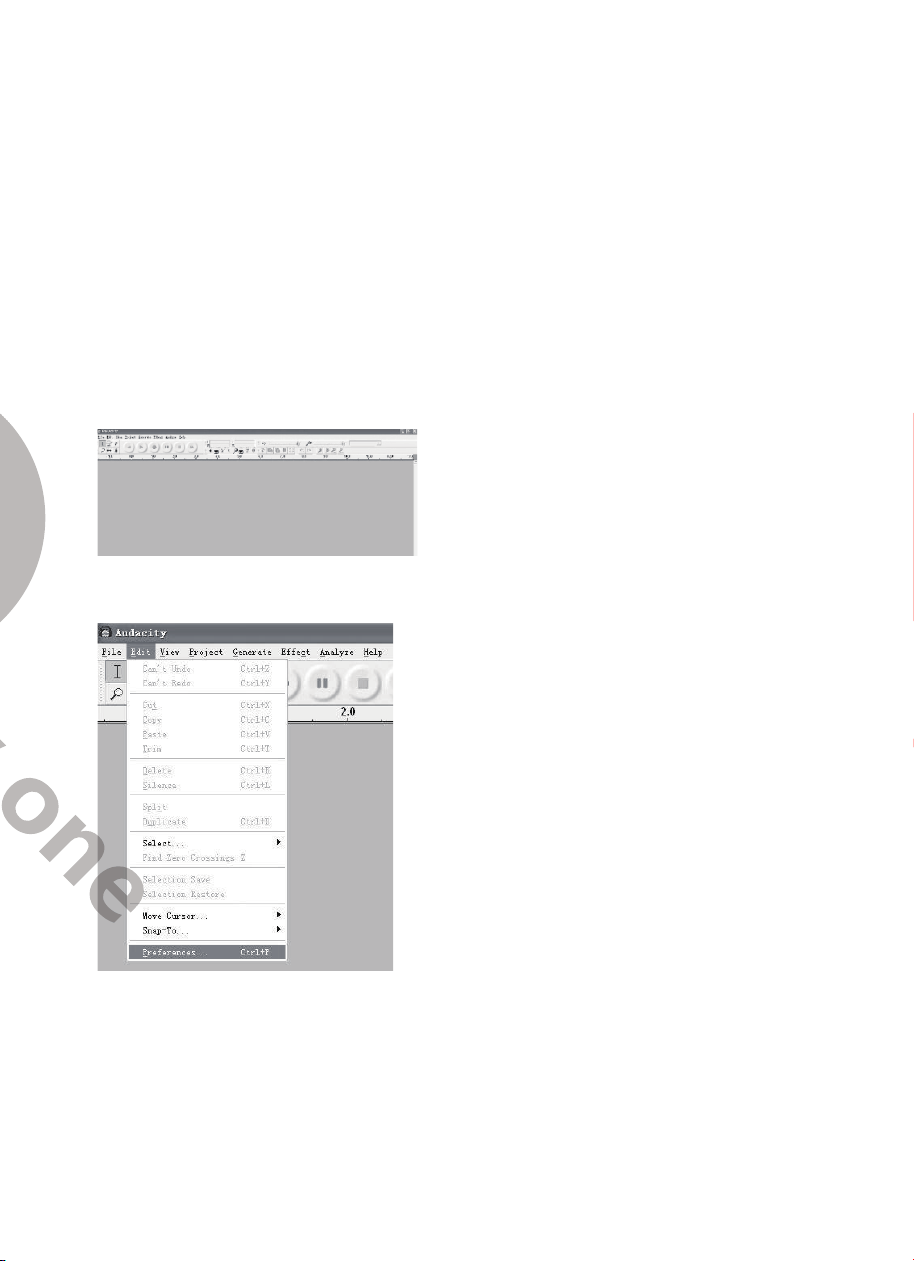
2.2) Open the “Edit” menu, then choose “Preferences”
8 9
7. Position the tonearm over the desired location (groove) on the record.
8. Move the tonearm lift lever to the down position to move the tonearm toward the
record. Alternatively, place the needle over the desired location on the record.
9. Carefully lower the tonearm on the record.
10. When you are finished playing the record, raise the tonearm, return it to rest on the
arm clip, and turn the Start/Stop dial to the Stop.
Bluetooth Operation
This turntable has a Bluetooth transmitter to wirelessly send audio to a Bluetooth
speaker.
1. Power on your Bluetooth speaker and ensure it is in pairing mode.
2. Power on the turntable. BT will auto search when the turntable turns on and the BT
LED indicator light will flash.
3. When pairing, the light will flash twice per second and will become solid when
paired successfully.
4. To disconnect pairing, power off the turntable or turn off Bluetooth pairing on your
Bluetooth speaker.
5. This turntable will connect to the nearest Bluetooth speaker. If after 2 minutes no
Bluetooth speaker can be found to pair with, the Bluetooth transmitter will become
inactive and the LED will turn off. If you need to connect again, power off the turntable
and the speaker then power on again.
Bluetooth Indicator Bluetooth Stauts
Flash Auto searching and pairing
Solid Paired successfully
Off Inactive
Recording onto a PC through USB Jack:
For installing and recording instructions, refer to the BRIEF INTRODUCTION OF
AUDACITY webpage at
https://www.audacityteam.org/download/
Recording the vinyl to your computer:
1). Follow the instructions in this manual to play the vinyl.
2). Open Audacity on your computer and follow the recording steps as instructed on
the Audacity webpage referenced above.
Audacity and USB Connection
Audacity supports Windows95 / Window XP / Window 7 / Vista or more advanced
version, with the EMS memory more than 128MB and Audacity take space of 5MB.
Instructions for PC Encoding After Recording
Software instructions
1. Connect the USB cable to your turntable and your computer. No extra drivers are
required.
2. Recording
2.1) Open Audacity
2.2) Open the “Edit” menu, then choose “Preferences”
10 11
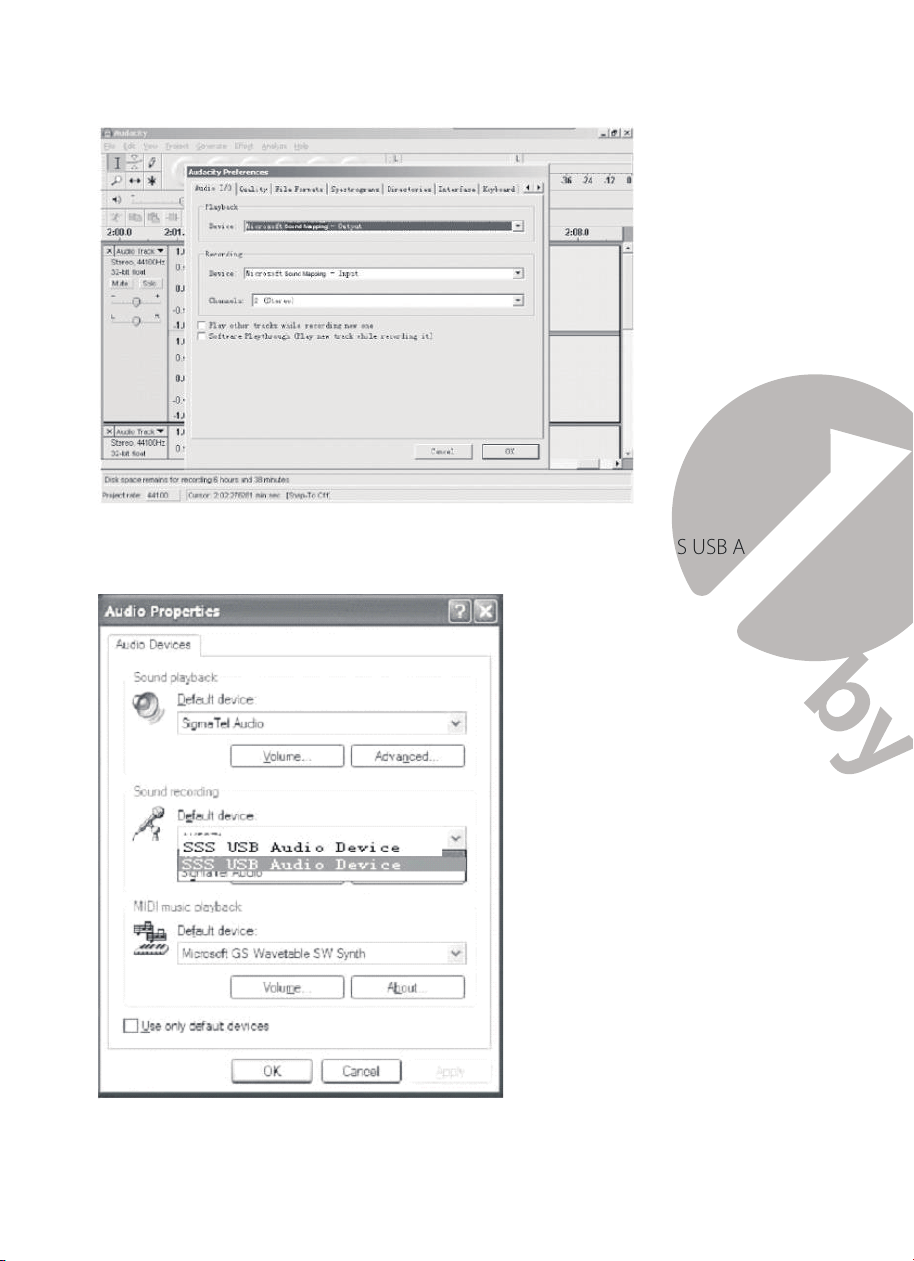
2.3) Set your preferences as desired
Note:
Check your computer’s audio properties and make sure “SSS USB Audio
Device” is selected as shown below:
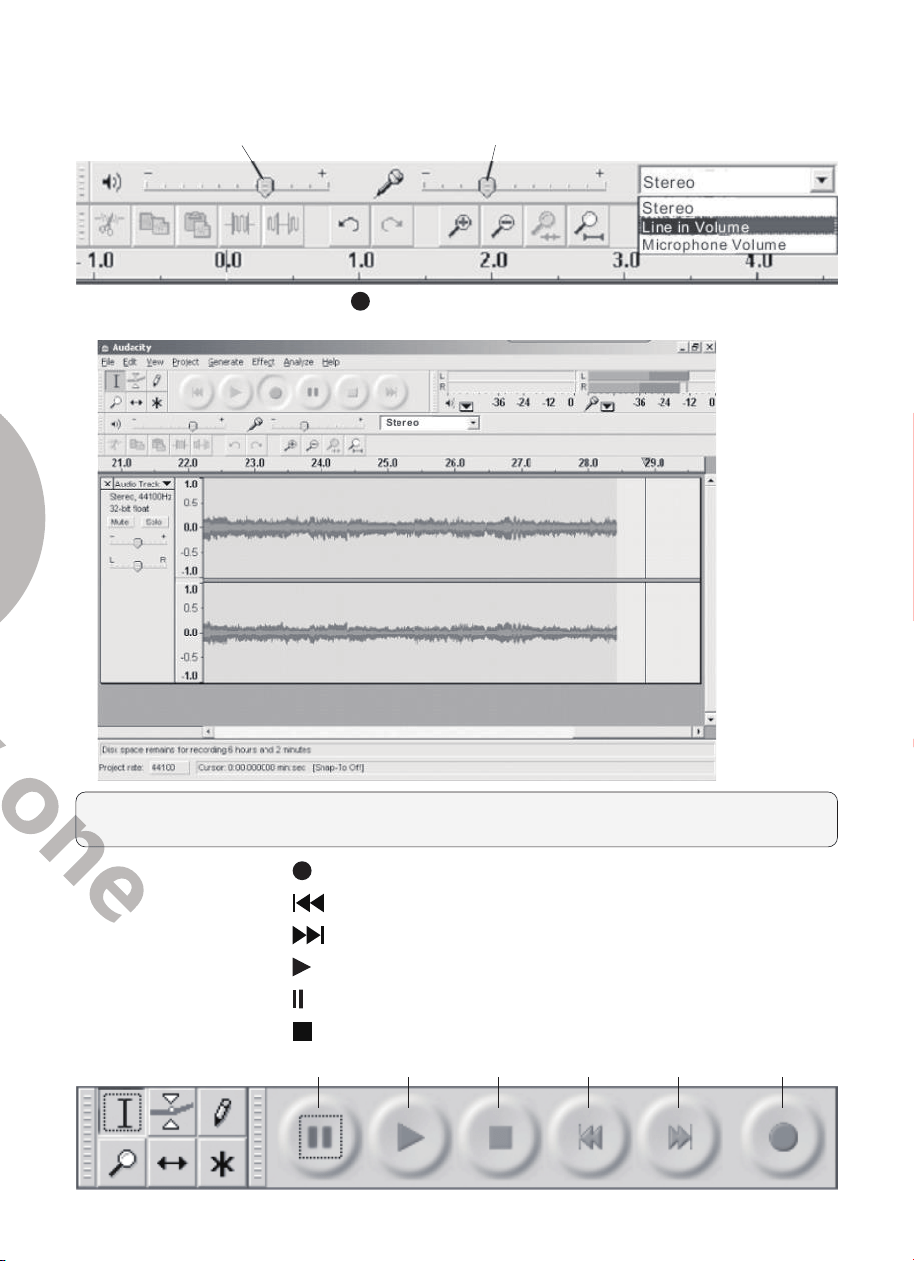
2.4) Adjust the output and input volume
Output Volume Input Volume
2.5) Press the Record button and the left and right tracks will appear on the
interface
Note:
If you do not see the sound wave on the interface when recording, please
adjust the line in volume to an appropriate level.
2.5.1
⑤
Press the button to start recording;
2.5.2
⑥
Press the
button to skip to start;
2.5.3
⑦
Press the
button to skip to end;
2.5.4
⑧
Press the
button to play;
2.5.5
⑨
Press the
button to pause recording;
2.5.6
⑩
Press the
button to stop recording.
⑨ ⑧ ⑩ ⑥ ⑦ ⑤
10 11
2.3) Set your preferences as desired
Note:
Check your computer’s audio properties and make sure “SSS USB Audio
Device” is selected as shown below:
2.4) Adjust the output and input volume
Output Volume Input Volume
2.5) Press the Record button and the left and right tracks will appear on the
interface
Note:
If you do not see the sound wave on the interface when recording, please
adjust the line in volume to an appropriate level.
2.5.1
⑤
Press the button to start recording;
2.5.2
⑥
Press the
button to skip to start;
2.5.3
⑦
Press the
button to skip to end;
2.5.4
⑧
Press the
button to play;
2.5.5
⑨
Press the
button to pause recording;
2.5.6
⑩
Press the
button to stop recording.
⑨ ⑧ ⑩ ⑥ ⑦ ⑤
12 13
3. Export the Music Files to Your Preferred Format
• Once you have finished recording, you should save your music to the computer.
• Open the “File” menu and choose “Export” to export to WAV, MP3 or Ogg formats.
WAV format, MP3 format or Ogg format.
• Choose a file format and write a file name to save the music recording.
Note:
Audacity does not export MP3 files directly; you should download the LAME
MP3 encoder. A link to find LAME MP3 can be found at
https://www.audacityteam.org/download/
Instructions for Installing LAME MP3 Encoder
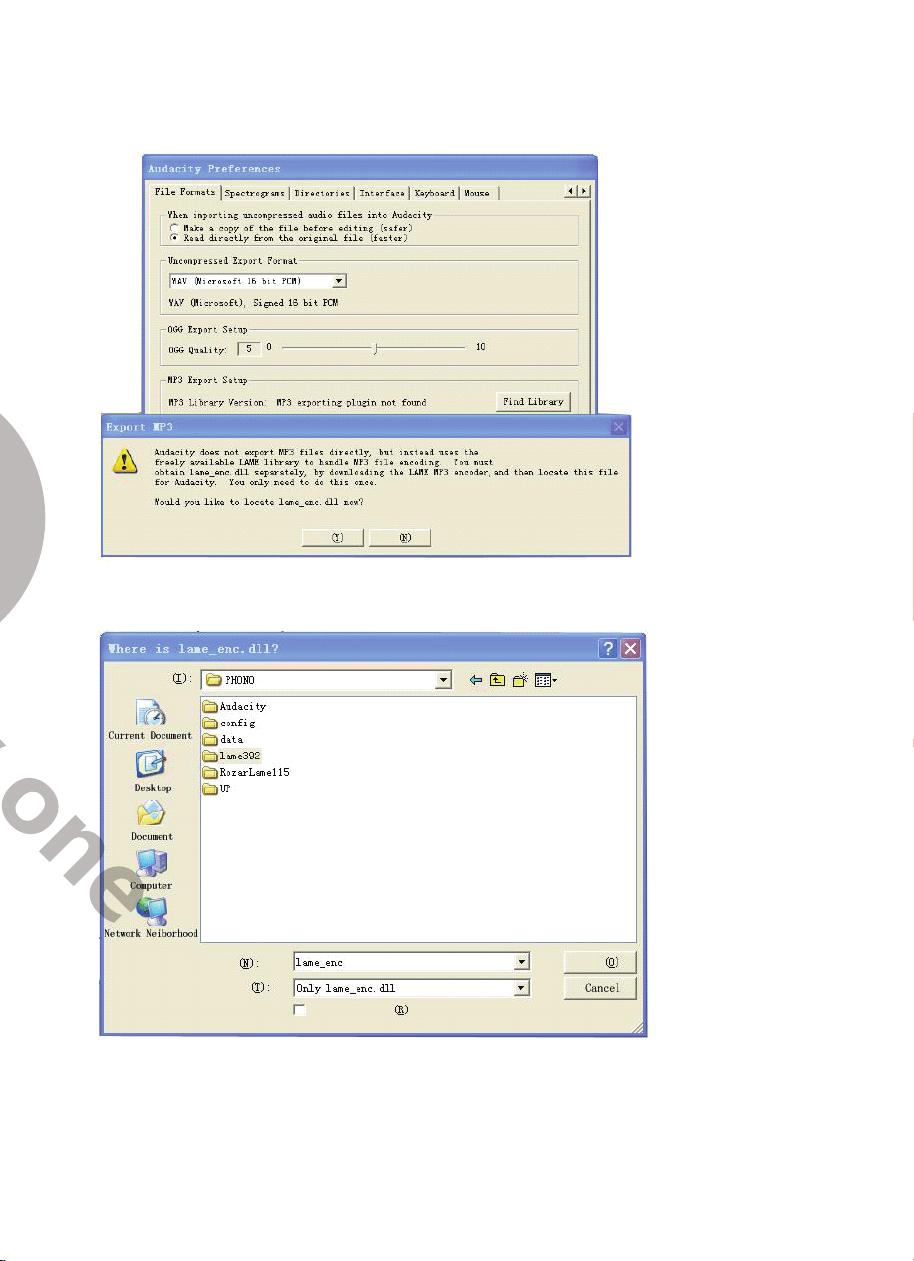
1) Download “lame_enc.dll” file, and install it to the software list.
2) Open Audacity, click the Main Menu, select “Edit”, then “Parameter, then “File
Formats”, and finally click “Searcher.”
3) After opened, it will come to the following menu, click “YES” to go to “Llame_enc.dll”,
and find the file’s location.
4) After finding the“lame_enc.dl” file, open it and click “Y” to finish installation.
12 13
3. Export the Music Files to Your Preferred Format
• Once you have finished recording, you should save your music to the computer.
• Open the “File” menu and choose “Export” to export to WAV, MP3 or Ogg formats.
WAV format, MP3 format or Ogg format.
• Choose a file format and write a file name to save the music recording.
Note:
Audacity does not export MP3 files directly; you should download the LAME
MP3 encoder. A link to find LAME MP3 can be found at
https://www.audacityteam.org/download/
Instructions for Installing LAME MP3 Encoder
1) Download “lame_enc.dll” file, and install it to the software list.
2) Open Audacity, click the Main Menu, select “Edit”, then “Parameter, then “File
Formats”, and finally click “Searcher.”
3) After opened, it will come to the following menu, click “YES” to go to “Llame_enc.dll”,
and find the file’s location.
4) After finding the“lame_enc.dl” file, open it and click “Y” to finish installation.
14 15
Maintenance and Cleaning
NOTE:
Disconnect the power cable plug from the outlet as a precaution before
maintenance.
Turntable Body
Your turntable requires little of no regular maintenance. Remove dust with a slightly
damp antistatic cloth; never use a dry cloth as this will create static electricity and
attract more dust! Antistatic cleaning agents are available at specialist stores, but must
be applied sparingly to avoid damage to rubber parts. It is recommended to install the
needle cover before cleaning or maintenance is carried out to avoid damage.
If the turntable is not used over a long period of time, the drive belt should be
removed to prevent unequal stretching.
NOTE:
Always disconnect the record player from the power supply as a precaution
before maintenance!
Useful Tips
The turntable should be positioned on a low-resonance surface such as wood or
multiple layer ply board to avoid structural vibrations disturbing playback.
Stylus Tip
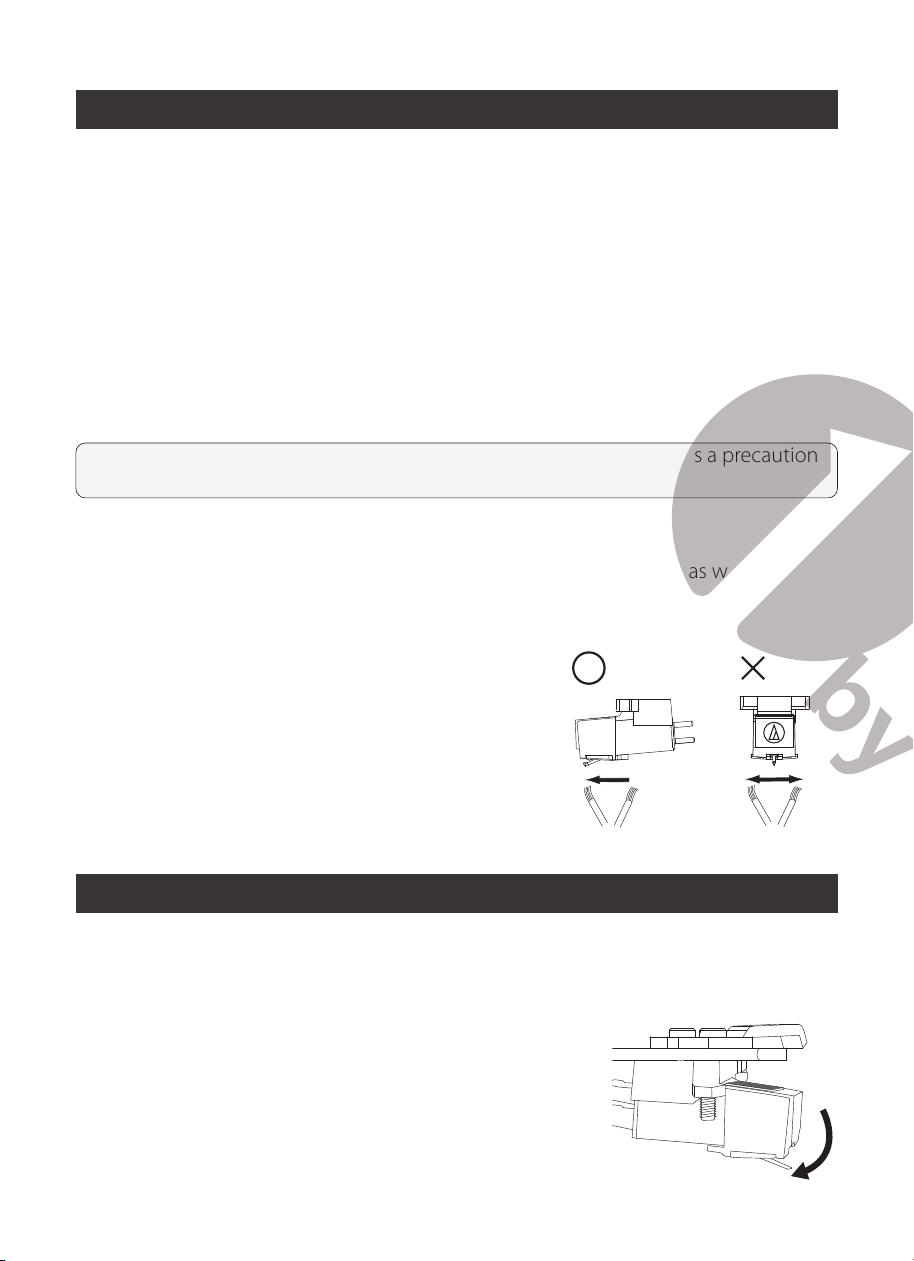
• If dirt and grime are stuck to the stylus tip, clean it
with a commercially-sold brush.
• We recommend using a stylus cleaner (not
included) if the stylus tip is considerably dirty.
Clean the stylus tip by moving the brush from the
rear to the front of the stylus tip.
Replacing the Stylus
Removing the Stylus
• In addition to the deterioration of sound quality, records may also be damaged as
the cartridge’s stylus tip wears down.
• As a rule of thumb, replace the stylus after 300 to 500
hours of use.
• Be sure to disconnect the product’s power cable plug
from the outlet.
1. Remove the protector from the cartridge.
2. Remove the stylus by pulling in the direction of the arrow.
Installing a New Replacement Stylus
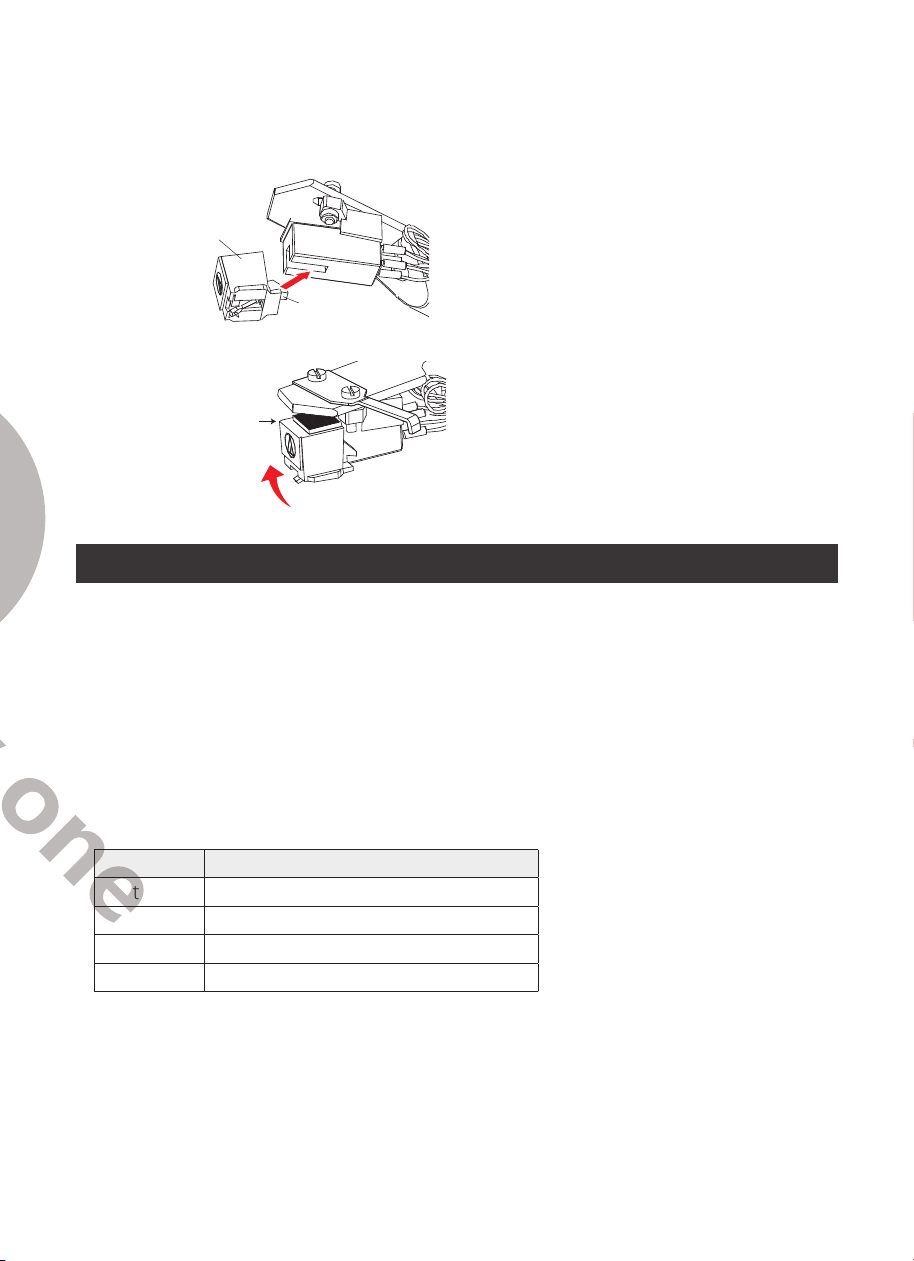
1. Grasp both sides of the stylus holder and insert the stylus grip into the rear tab of
the cartridge.
Stylus holder ②
Stylus grip ①
Engage the rear tab rst
2. Push up the stylus holder until it clicks and locks completely in place.
Do not leave any space
Cartridge Replacement
1. Before replacement, put the stylus protector back on the stylus to prevent damage
to the stylus during the replacement process.
2. Carefully remove the wire leads from the original cartridge.
3. Loosen the two screws on the headshell that are securing the cartridge and then
remove the original cartridge.
4. Mount the new cartridge to the headshell and tighten it lightly. Do not completely
tighten the screws at this moment.
5. Connect the wire leads to the new cartridge’s terminals .The wire lead color codes
are as below:
Wire Channel
White Left channel positive (L+)
Black Left channel negative (L–)
Red Right channel positive (R+)
Black Right channel negative (R-)
6. Adjust the cartridge’s position to make sure it is precisely aligned on the headshell
so that the stylus will be tracking the grooves in parallel perfectly.
To achieve this, place the included paper
cartridge alignment protractor
over
the turntable spindle, carefully lift the tone arm and place the tip of the stylus on the
points marked 130mm and 250mm respectively. Fine tune the cartridge’s position
on the headshell until the cartridge is perfectly in parallel with the reference lines at
both points.
14 15
Maintenance and Cleaning
NOTE:
Disconnect the power cable plug from the outlet as a precaution before
maintenance.
Turntable Body
Your turntable requires little of no regular maintenance. Remove dust with a slightly
damp antistatic cloth; never use a dry cloth as this will create static electricity and
attract more dust! Antistatic cleaning agents are available at specialist stores, but must
be applied sparingly to avoid damage to rubber parts. It is recommended to install the
needle cover before cleaning or maintenance is carried out to avoid damage.
If the turntable is not used over a long period of time, the drive belt should be
removed to prevent unequal stretching.
NOTE:
Always disconnect the record player from the power supply as a precaution
before maintenance!
Useful Tips
The turntable should be positioned on a low-resonance surface such as wood or
multiple layer ply board to avoid structural vibrations disturbing playback.
Stylus Tip
• If dirt and grime are stuck to the stylus tip, clean it
with a commercially-sold brush.
• We recommend using a stylus cleaner (not
included) if the stylus tip is considerably dirty.
Clean the stylus tip by moving the brush from the
rear to the front of the stylus tip.
Replacing the Stylus
Removing the Stylus
• In addition to the deterioration of sound quality, records may also be damaged as
the cartridge’s stylus tip wears down.
• As a rule of thumb, replace the stylus after 300 to 500
hours of use.
• Be sure to disconnect the product’s power cable plug
from the outlet.
1. Remove the protector from the cartridge.
2. Remove the stylus by pulling in the direction of the arrow.
Installing a New Replacement Stylus
1. Grasp both sides of the stylus holder and insert the stylus grip into the rear tab of
the cartridge.
Stylus holder ②
Stylus grip ①
Engage the rear tab rst
2. Push up the stylus holder until it clicks and locks completely in place.
Do not leave any space
Cartridge Replacement
1. Before replacement, put the stylus protector back on the stylus to prevent damage
to the stylus during the replacement process.
2. Carefully remove the wire leads from the original cartridge.
3. Loosen the two screws on the headshell that are securing the cartridge and then
remove the original cartridge.
4. Mount the new cartridge to the headshell and tighten it lightly. Do not completely
tighten the screws at this moment.
5. Connect the wire leads to the new cartridge’s terminals .The wire lead color codes
are as below:
Wire Channel
White Left channel positive (L+)
Black Left channel negative (L–)
Red Right channel positive (R+)
Black Right channel negative (R-)
6. Adjust the cartridge’s position to make sure it is precisely aligned on the headshell
so that the stylus will be tracking the grooves in parallel perfectly.
To achieve this, place the included paper
cartridge alignment protractor
over
the turntable spindle, carefully lift the tone arm and place the tip of the stylus on the
points marked 130mm and 250mm respectively. Fine tune the cartridge’s position
on the headshell until the cartridge is perfectly in parallel with the reference lines at
both points.
16 17
7. Tighten the screws completely once the perfect alignment is achieved.
NOTE:
If you are unfamiliar or uncomfortable with completing this procedure, we
recommend consulting with a professional to perform the installation.
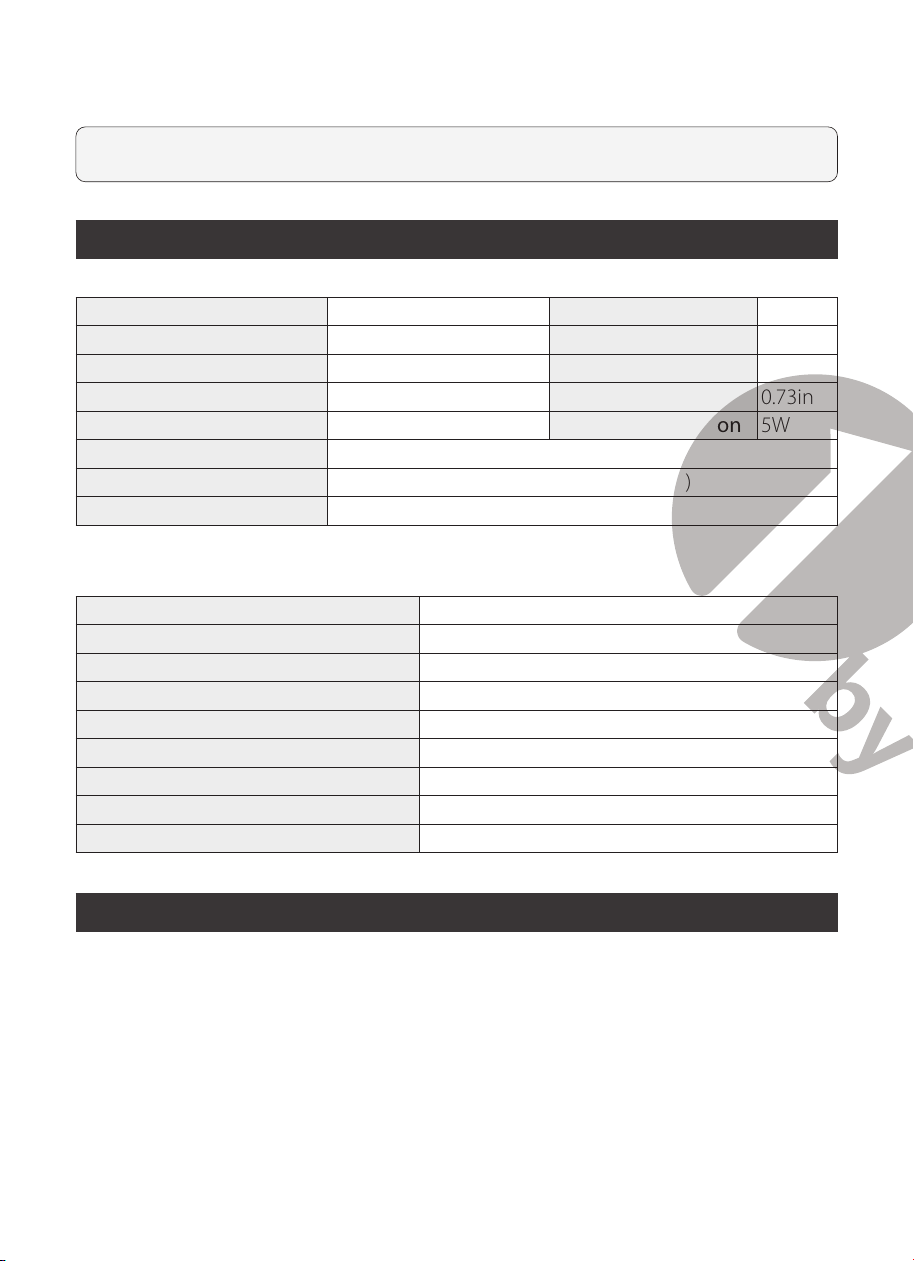
Technical Specications
Turntable
Model 1-AD07US01,H005 Speed Variance ±1.5%
Nominal Speeds 33 1/3 & 45RPM Wow and Flutter ≤0.15%
Eective Tonearm Length 8.6” (218.5mm) Signal to Noise 55dB
Tracking Force Range 3.0-6.0g Overhang 0.73in
Outboard Power Supply 12V/ 500mA AC-DC Power Consumption 5W
AC Power Adapter Input: 100-240V 50/60Hz, Max. 200mA
Dimensions (W x H x D) 16.34” x 10.2” x 4.44” (415 x 340 x 148mm)
Weight 13.67lbs (6.2kg)
Cartridge
Stylus Model Audio Technica AT-3600L
Frequency Response 20Hz-20kHz
Recommended Load Resistance 47kohms
Channel Balance
<
2.5dB
Amplier Connection MM - input
Channel Separation
>
18dB
Recommended Tracking Force 3.5±0.5g
Output Voltage 2.5mV
Weight 5g
Potential Incorrect Use and Fault Conditions
This turntable is manufactured to the highest standards and undergoes strict quality
controls before leaving the factory. Faults that may possibly occur are not necessarily
due to material or production faults but can sometimes be caused by incorrect use or
unfortunate circumstances. Therefore the following list of common fault symptoms
has been included here.
There is no power:
- The turntable is not connected to the power adapter.
- No power at the outlet.
The platter doesn’t turn although the unit is switched on:
- The unit is not connected to the main power supply.
- No power at the outlet.
- Drive belt is not installed or has slipped off.
No signal through one or both channels:
- Phono input not selected on amplifier.
- Amplifier not switched on.
- Amplifier or speakers muted.
- No connection to the speakers.
- No connection between turntable and amplifier.
- Wire leads not connected the cartridge.
Strong hum on phono input:
- No ground connection from cartridge, arm, or arm cable to amplifier or ground loop.
- Turntable is too close to speakers.
Distorted or inconsistent sound from one or both channels:
- Turntable is connected to wrong input of the amplifier.
- Needle or cantilever damaged.
- Drive belt overstretched or dirty.
- Platter bearing without oil, dirty or damaged.
- Dust on stylus.
- MM / MC switch on pre-amplifier set incorrectly.
Cannot connect with Bluetooth speaker:
- The turntable is not in pairing mode.
- Your Bluetooth speaker is not in pairing mode.
- The Bluetooth transmitter has turned off because Bluetooth is not connected in 2
minutes.

16 17
7. Tighten the screws completely once the perfect alignment is achieved.
NOTE:
If you are unfamiliar or uncomfortable with completing this procedure, we
recommend consulting with a professional to perform the installation.
Technical Specications
Turntable
Model 1-AD07US01,H005 Speed Variance ±1.5%
Nominal Speeds 33 1/3 & 45RPM Wow and Flutter ≤0.15%
Eective Tonearm Length 8.6” (218.5mm) Signal to Noise 55dB
Tracking Force Range 3.0-6.0g Overhang 0.73in
Outboard Power Supply 12V/ 500mA AC-DC Power Consumption 5W
AC Power Adapter Input: 100-240V 50/60Hz, Max. 200mA
Dimensions (W x H x D) 16.34” x 10.2” x 4.44” (415 x 340 x 148mm)
Weight 13.67lbs (6.2kg)
Cartridge
Stylus Model Audio Technica AT-3600L
Frequency Response 20Hz-20kHz
Recommended Load Resistance 47kohms
Channel Balance
<
2.5dB
Amplier Connection MM - input
Channel Separation
>
18dB
Recommended Tracking Force 3.5±0.5g
Output Voltage 2.5mV
Weight 5g
Potential Incorrect Use and Fault Conditions
This turntable is manufactured to the highest standards and undergoes strict quality
controls before leaving the factory. Faults that may possibly occur are not necessarily
due to material or production faults but can sometimes be caused by incorrect use or
unfortunate circumstances. Therefore the following list of common fault symptoms
has been included here.
There is no power:
- The turntable is not connected to the power adapter.
- No power at the outlet.
The platter doesn’t turn although the unit is switched on:
- The unit is not connected to the main power supply.
- No power at the outlet.
- Drive belt is not installed or has slipped off.
No signal through one or both channels:
- Phono input not selected on amplifier.
- Amplifier not switched on.
- Amplifier or speakers muted.
- No connection to the speakers.
- No connection between turntable and amplifier.
- Wire leads not connected the cartridge.
Strong hum on phono input:
- No ground connection from cartridge, arm, or arm cable to amplifier or ground loop.
- Turntable is too close to speakers.
Distorted or inconsistent sound from one or both channels:
- Turntable is connected to wrong input of the amplifier.
- Needle or cantilever damaged.
- Drive belt overstretched or dirty.
- Platter bearing without oil, dirty or damaged.
- Dust on stylus.
- MM / MC switch on pre-amplifier set incorrectly.
Cannot connect with Bluetooth speaker:
- The turntable is not in pairing mode.
- Your Bluetooth speaker is not in pairing mode.
- The Bluetooth transmitter has turned off because Bluetooth is not connected in 2
minutes.
18 19
Needle isn't touching the record:
- The screw on the tonearm rest may have loosened during transport. Gently turn this
screw clockwise to move the needle stylus closer to the record.
Needle is scratching the record's surface:
- Gently turn the tonearm rest screw anticlockwise to move the needle stylus away
from the turntable.
NOTE:
Factory screw tightness is based on the thickness of the included slip mat.
If a thinner or thicker 3rd-party slip mat is used, gently adjust the screw as needed
following the steps in the last two situations.
This product’s packaging is made from environmentally friendly material
and can be disposed of at your local recycling plant.
Customer Service/Kundenservice
Service Clients/Atención al cliente/Assistenza Clienti
UNITED STATES
Phone: +1 909-391-3888 (Mon-Fri 9:00am - 5:00pm PST)
Email: ushelp@1byonebros.com
CANADA
Email: cahelp@1byonebros.com
UNITED KINGDOM
Phone: +44 158 241 2681 (Mon-Fri 9:00am - 6:00pm UTC)
Email: ukhelp@1byonebros.com
GERMANY/FRANCE
ITALY/SPAIN
Email: euhelp@1byonebros.com
BRAND OWNER
1byone Products Inc.
1230 E Belmont Street, Ontario, CA, USA 91761
Customer Service: +1 909-391-3888
www.1byonebros.com
18 19
Needle isn't touching the record:
- The screw on the tonearm rest may have loosened during transport. Gently turn this
screw clockwise to move the needle stylus closer to the record.
Needle is scratching the record's surface:
- Gently turn the tonearm rest screw anticlockwise to move the needle stylus away
from the turntable.
NOTE:
Factory screw tightness is based on the thickness of the included slip mat.
If a thinner or thicker 3rd-party slip mat is used, gently adjust the screw as needed
following the steps in the last two situations.
This product’s packaging is made from environmentally friendly material
and can be disposed of at your local recycling plant.
Customer Service/Kundenservice
Service Clients/Atención al cliente/Assistenza Clienti
UNITED STATES
Phone: +1 909-391-3888 (Mon-Fri 9:00am - 5:00pm PST)
Email: ushelp@1byonebros.com
CANADA
Email: cahelp@1byonebros.com
UNITED KINGDOM
Phone: +44 158 241 2681 (Mon-Fri 9:00am - 6:00pm UTC)
Email: [email protected]
GERMANY/FRANCE
ITALY/SPAIN
Email: euhelp@1byonebros.com
BRAND OWNER
1byone Products Inc.
1230 E Belmont Street, Ontario, CA, USA 91761
Customer Service: +1 909-391-3888
www.1byonebros.com

Belt Drive Turntable System
Instruction Manual
1byone Products Inc.
1230 E Belmont Street, Ontario, CA, USA 91761
Customer Service: +1 909-391-3888
www.1byonebros.com
Made in China