Loading ...
Loading ...
Loading ...
SAFETY AWARENESS
4
● To prevent a possible re, do not block
air intakes or exhaust in any manner. DO
NOT use on so surfaces, like a bed,
where opening may become blocked.
● The heater has hot and arcing or
sparking parts inside. DO NOT use it in
areas where gasoline, paint or
ammable liquids are used or stored.
● Use this heater only as described in the
manual. Any other use not
recommended by the manufacturer
may cause re, electric shock or injury
to persons.
● Always plug heaters directly into a wall
outlet/receptacle. NEVER use with an
extension cord or relocatable power tap
(outlet/ power strip).
● This heater is for use on 120 volts.
● KEEP THESE INSTRUCTIONS.
HEATER LOCATION
● When choosing a locaon for your new
heater, ensure that the general
instrucons are followed. Also, for
best eect, install the heater out of
direct sunlight. Cold climate installaon
recommendaon: when installing this
unit against a non-insulated exterior
wall or chase, it is mandatory that the
outer walls be insulated to conform to
applicable insulaon codes.
ELECTRICAL CONNECTION
● A 15 AMP, 120 Volt, 60 Hz circuit with
a properly grounded outlet is required.
Preferably, the heater will be on a
dedicated circuit as other appliances
on the same circuit may cause the circuit
breaker to trip or the fuse to blow when
the heater is in operaon. The unit
comes standard with 6 feet (1.8 m) three
wire cord, exing from the rear of the
heater.
● CAUTION: Do not exceed the current
rang of the current tap. Always
plug heaters directly into a wall outlet/
receptacle. Never use with an extension
cord or relocatable power tap (outlet/
power strip).
CLEARANCE TO COMBUSTIBLES
Keep electrical cords, drapery, furniture
and other combusbles at least 3 feet
(0.9 m) from the front of the heater and
away from the sides.
MAINTENANCE
● WARNING: Make sure the power is
turned o before proceeding. Any
electrical repairs or rewiring of this
unit should be carried out by a licensed
electrician in accordance with naonal
and local codes.
● If repairing or replacing any electrical
component or wiring, the original wire
roung, color coding and securing
locaons must be followed.
● WARNING: Electrical outlet wiring must
comply with local building codes and
other applicable regulaons to reduce
the risk of re, electrical shock and
injury to persons.
● WARNING: Do not use this heater if any
part of it has been under water.
Immediately call a qualied service
technician to inspect the heater and
replace any part of the electrical system.
● WARNING: Disconnect power before
aempng any maintenance or cleaning
to reduce the risk of re, electrical shock
or personal injury.
● WARNING: During any service of this
appliance, the power to the unit must be
turned o. First turn the main power
switch to the “OFF” posion. Then
remove the electrical plug from the
wall outlet.
OPERATING & CONTROL
5
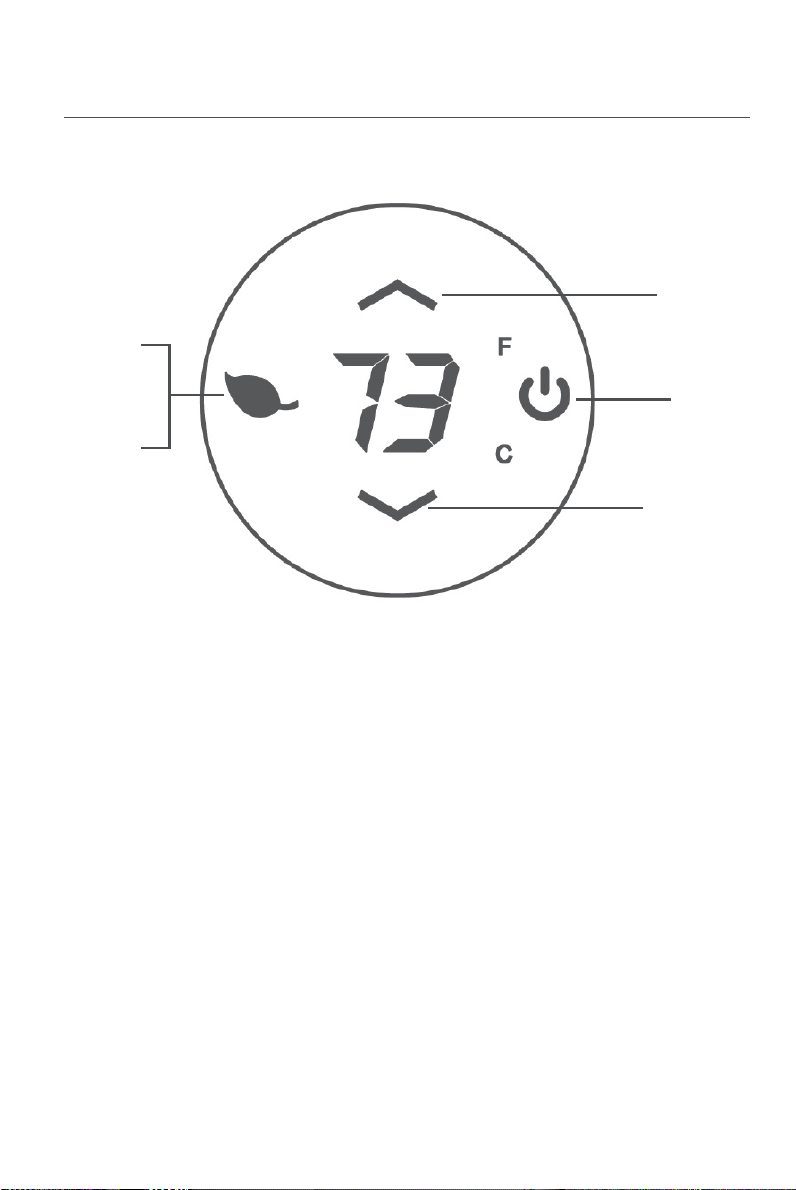
Control Panel (see gure 1 below)
The control panel can be accessed on the front of the heater.
POWER
Once the heater is plugged into the outlet it will be in standby mode.
● The On/Off button needs to be pressed in order to turn on the heater and operate the
remote control.
● The power is automacally adjusted by the built-in program and works as follows
1. If the room temperature is 1 °F or 1 °C higher than the preset temperature, it
switches o all heang power, but the On/O light will remain on(red) and the leaf
light be o.
2. If the room temperature is 1 °F or 1 °C lower than the preset temperature, it will
turn on all heang elements (full power), the On/O light will be red, and the leaf
light is On(red).
3. If the room temperature is between upper temp and lower temp, it switches on only
one group of heang elements (half power), the On/O light will be red, and the leaf
light is On(green)
For instance:
Preset temperature: 72 °F
If room temperature is 74 °F, no heang (no power)
If room temperature is 71 °F, or 72 °F, or 73 °F, half heang power (green leaf)
If room temperature is lower than 71 °F (70 °F, 69 °F....) , full power (red leaf)
Red Leaf =
Full Power
On/O
Buon
Increase
Temperature
Decrease
Temperature
Green Leaf =
Half Power
Loading ...
Loading ...
Loading ...