Loading ...
Loading ...
Loading ...
30 49-1000585 Rev. 1
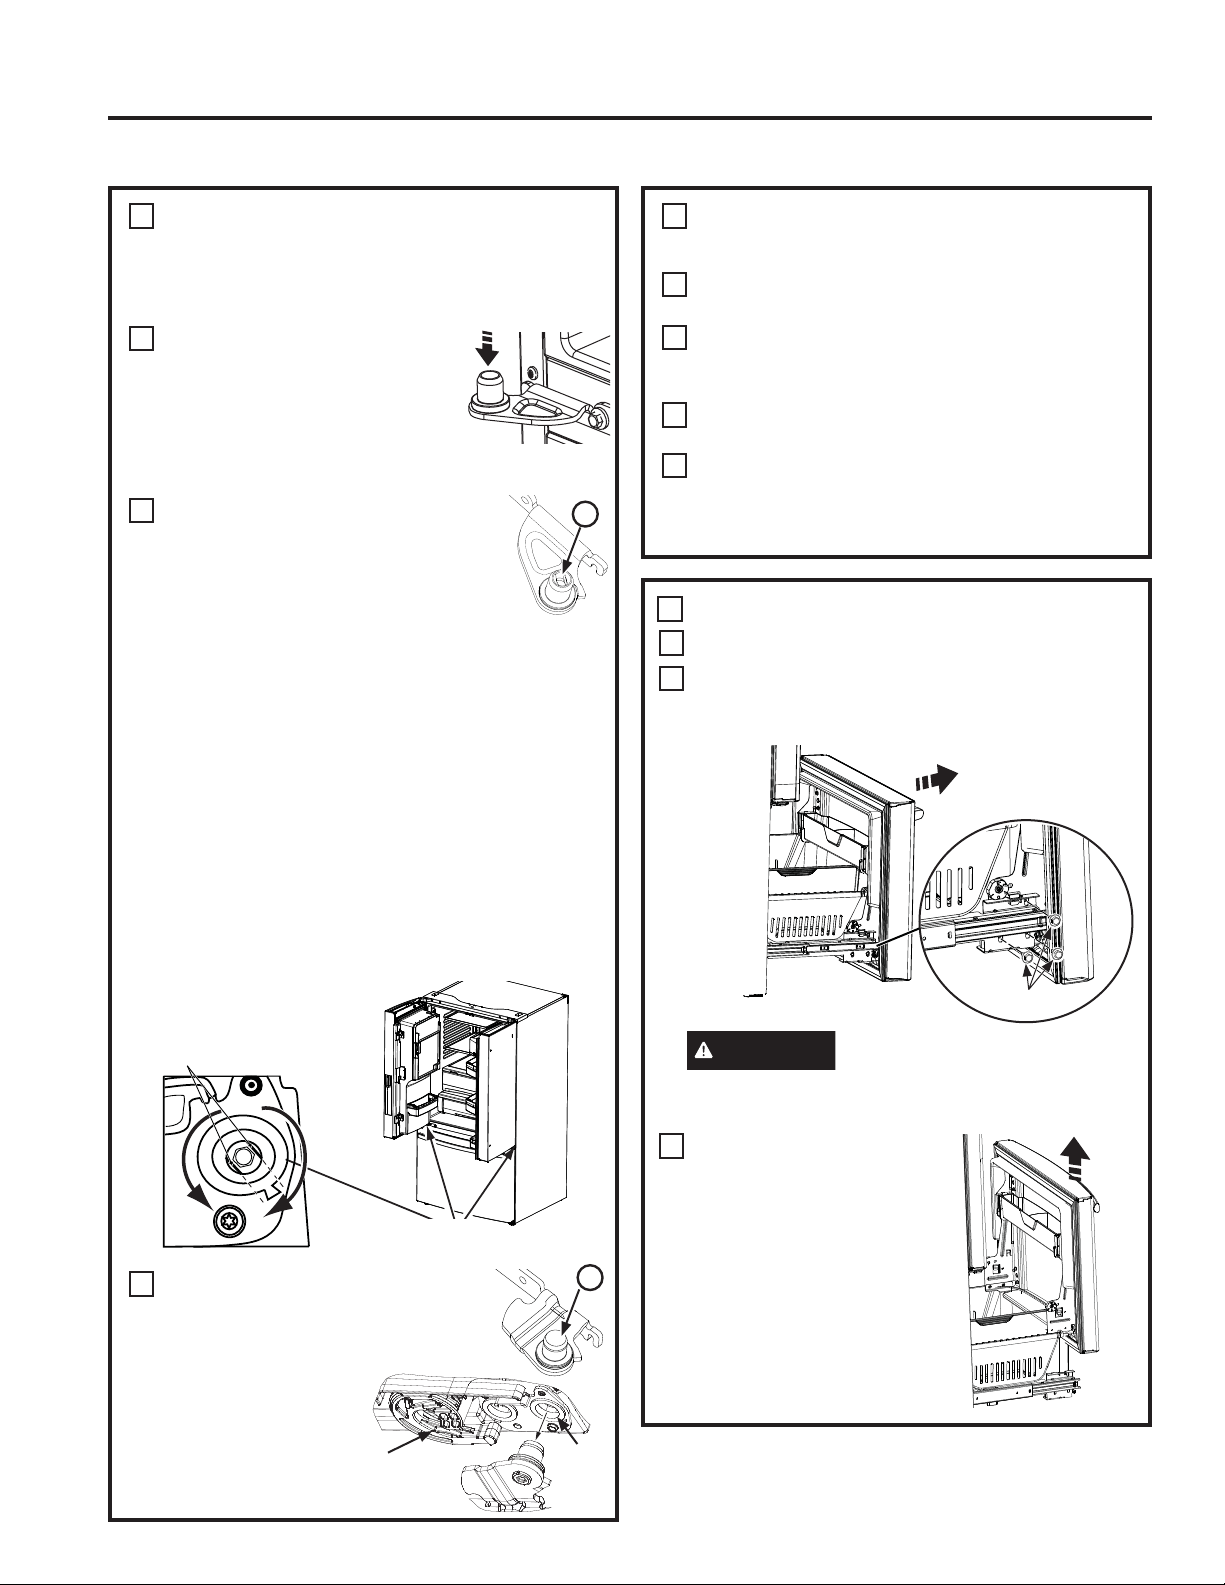
REINSTALLING THE
REFRIGERATOR DOORS
Reverse steps 1 through 4 to reinstall refrigerator
doors, follow details below for critical alignments.
A
Reinstall center hinge first and
torque the large screws to 65 in-lbs
1PDQGVPDOOVFUHZWR
LQOEV1P5RWDWLQJWKH
VFUHZE\WXUQDIWHULWLVIOXVK
with mating surface will achieve
these torques.
B
If the hinge on your refrigerator
has a slot that looks like image B
on the right, follow the steps
below. Otherwise, skip to step C.
With the LH door at 90º + to the front of
the case, lower the refrigerator door. Ensure the door
and hinge align correctly. Rotate door closed and
make sure moveable center sealing portion of the
GRRUDOLJQVZLWKWKHVWULNHU,IGRRUFDQQRWEHLQVWDOOHG
at 90ºIROORZWKHVHQH[WVWHSV,QVWDOOGRRUDWº
WRFDVHIURQW,IVSDFHRUPRGHOOLPLWVRSHQLQJGRRU
to less than 180º, remove door and carefully turn
door upside down. Check alignment of door closure
mechanism shaft on underside of door. The flats
on the shaft should correspond to alignment tab on
SODVWLFULQJRQERWWRPHQGFDS,IVKDIWLVQRWDOLJQHG
WRWDEXVLQJ´$OOHQZUHQFKURWDWHGRRUFORVXUH
mechanism shaft counterclockwise for right door and
FORFNZLVHIRUOHIWGRRU7KHQDOLJQIODWZLWKWDE,QVWDOO
the door at 90º.
C
If the hinge on your refrigerator
does not have a slot and looks
like image C on the right, then
simply lower the outer hole of the
door on the hinge pin.
REINSTALLING THE
REFRIGERATOR DOORS (cont.)
'
Securely tape the door shut with masking tape
or have a second person support the door.
E
)ROORZWKHVDPHSURFHGXUHWRLQVWDOOWKHRSSRVLWH
door. There are no wires, water lines or center
hinge covers on the opposite door.
)
Be sure to reinstall the ground wire and strain
relief to the top hinge.
G
Reinstall hinge cover. NOTE: Ensure wires are
not pinched or under screw bosses before
tightening screws.
2 2
Installation Instructions
INSTALLING THE REFRIGERATOR (Cont.)
INSTALLATION INSTRUCTIONS
REMOVE THE FREEZER DOOR
A
3XOOWKHIUHH]HUGRRURSHQWRIXOOH[WHQVLRQ
B
Remove 3 attachment screws, located at the
ERWWRPRQHDFKVLGHRIWKHIUHH]HUGRRUXVLQJD
ñ»´RUPP»๛´KH[VRFNHWGULYHU
CAUTION
Lifting Hazard
Freezer door is heavy Use both hands to
secure the door before lifting.
C
/LIWWKHIUHH]HUGRRU
to disengage it from
the slide mechanism
The door can safely
rest on the bottom.
'RQRWUHVWWKH
door on any other
surfaces to avoid
scratches.
3
3 Screws
8QGHUVLGHRI
5HIULJHUDWRU'RRU
Outer
hole
Align flats with tab.
8QGHUVLGH2)
5HIULJHUDWRU'RRU
B
C
Loading ...
Loading ...
Loading ...