GARMIN CATALYST
™
Driving Performance Optimizer
Owner’s Manual

© 2022 Garmin Ltd. or its subsidiaries
All rights reserved. Under the copyright laws, this manual may not be copied, in whole or in part, without the written consent of Garmin. Garmin reserves the right to change or
improve its products and to make changes in the content of this manual without obligation to notify any person or organization of such changes or improvements. Go to
www.garmin.com for current updates and supplemental information concerning the use of this product.
Garmin
®
and the Garmin logo are trademarks of Garmin Ltd. or its subsidiaries, registered in the USA and other countries. Garmin Catalyst
™
, Garmin Connect
™
, and Garmin
Express
™
are trademarks of Garmin Ltd. or its subsidiaries. These trademarks may not be used without the express permission of Garmin.
Apple
®
and Mac
®
are trademarks of Apple Inc, registered in the U.S. and other countries. The Bluetooth
®
word mark and logos are owned by the Bluetooth SIG, Inc., and any use of
such name by Garmin is under license. microSD
®
is a trademark of SD-3C. Wi‑Fi
®
is a registered trademark of Wi-Fi Alliance. Windows
®
is a registered trademark of Microsoft
Corporation in the United States and other countries.

Table of Contents
Getting Started.................................1
Installation....................................... 1
Installing the Magnetic Mount in Your
Vehicle..................................................... 1
Connecting the Mount to Vehicle
Power.......................................................2
Bare Wire USB Cable........................... 2
Camera Mounting Considerations.........2
Installing the Polarizing Filter on the
Camera.................................................... 3
Removing the Polarizing Filter from
the Camera.......................................... 3
Installing the Remote Cam on Your
Windshield............................................... 4
Connecting the Camera Cable............... 6
Connecting the Device to the Magnetic
Mount...................................................... 7
Installing the Screw-Down Ball Mount on
the Dashboard.........................................8
Device Overview...............................9
Using the Touchscreen........................ 10
Home Screen........................................ 10
Status Bar Icons................................ 11
Synchronizing Session Data with
Garmin Connect................................ 11
Viewing Track Information............... 11
Viewing the Weather Forecast......... 11
Starting a Drive Session................. 12
Pausing a Drive Session....................... 12
Drive Session Audio Settings............... 13
Audible Prompt and Coaching
Settings..............................................13
Race Timer............................................ 14
Adding a Track...................................... 14
Adding a Track Configuration.............. 15
Adding a Driver Profile..........................15
Editing a Driver Profile...................... 15
Changing the Units of Measure....... 15
Adding or Editing a Car Profile.............15
Selecting a Car or Driver Profile........... 15
Reviewing Drive Sessions...............16
Session Summary................................. 16
Viewing a Session Video.................. 16
Saving a Session Video.................... 17
Comparing Sessions.........................17
Deleting Sessions............................. 17
Viewing Opportunities.......................... 17
Opportunities.....................................18
Adding Opportunity Information to the
Race Coach....................................... 18
Reviewing Laps..................................... 19
Laps................................................... 19
Viewing Lap Speed Data...................19
Viewing Acceleration and
Deceleration Data............................. 19
Comparing Laps................................20
Settings......................................... 20
Connecting to a Wireless Network...... 20
Enabling Bluetooth Wireless
Technology............................................20
Pairing a Wireless Headset or Car
Stereo................................................ 20
Display Settings.................................... 20
Sound and Notification Settings.......... 20
Adjusting Sound and Notification
Volume.............................................. 21
Setting the Text Language................... 21
Date and Time Settings........................ 21
Device Settings..................................... 21
Resetting Data and Settings................ 21
Device Information......................... 21
Viewing E-label Regulatory and
Compliance Information...................... 21
Specifications....................................... 22
Charging the Device............................. 22
Device Maintenance....................... 22
Garmin Support Center.........................22
Updating Software Using a Wi‑Fi
Network................................................. 22
Updating Software with Garmin
Express™............................................... 23
Installing Garmin Express................ 24
Updating the Camera Software........... 24
Device Care........................................... 24
Cleaning the Outer Casing................24
Table of Contents i

Cleaning the Touchscreen............... 24
Cleaning the Camera Lens............... 24
Avoiding Theft................................... 25
Restarting the Device........................... 25
Removing the Device, Mount, and
Suction Cup........................................... 25
Removing the Mount from the Suction
Cup..................................................... 25
Removing the Suction Cup from the
Windshield......................................... 25
Removing the Adhesive Camera
Mount.................................................... 25
Troubleshooting.............................25
The suction cup will not stay on my
windshield............................................. 25
The mount does not hold my device in
place while I drive................................. 25
My device is not acquiring satellite
signals................................................... 25
The device does not charge in my
vehicle................................................... 26
My battery does not stay charged for
very long................................................ 26
My camera feels warm while it is
operating............................................... 26
My video recordings are blurry............ 26
Appendix........................................26
Data Management................................ 26
Memory Cards...................................26
Replacing the Memory Card............. 27
Formatting the Memory Card........... 27
Deleting Videos from the Memory
Card................................................... 27
Connecting the Device to Your
Computer........................................... 28
Transferring Data From Your
Computer........................................... 28
Disconnecting the USB Cable.......... 28
Purchasing Accessories...................... 28
Index..............................................29
ii Table of Contents
Getting Started
WARNING
See the Important Safety and Product Information guide in the product box for product warnings and other
important information.
This device is only intended for recreational use in a circuit environment. Never use this device on public
roadways. Failure to follow this warning may result in an accident causing property damage, serious personal
injury, or death. You are responsible for using this device in a safe and prudent manner.
The first time you turn on your device, it guides you through the initial setup steps with on-screen prompts. You
should complete these steps before using the device for the first time.
1 Turn on the device, and follow the on-screen instructions.
2 Update your device software (Updating Software Using a Wi‑Fi Network, page 22).
Installation
Installing the Magnetic Mount in Your Vehicle
WARNING
This product contains a lithium-ion battery. To prevent the possibility of personal injury or product damage
caused by battery exposure to extreme heat, store the device out of direct sunlight.
Both the device and its mount contain magnets. Under certain circumstances, magnets may cause interference
with some internal medical devices and electronic devices, including pacemakers, insulin pumps, or hard drives
in laptop computers. Keep the device away from medical devices and electronic devices.
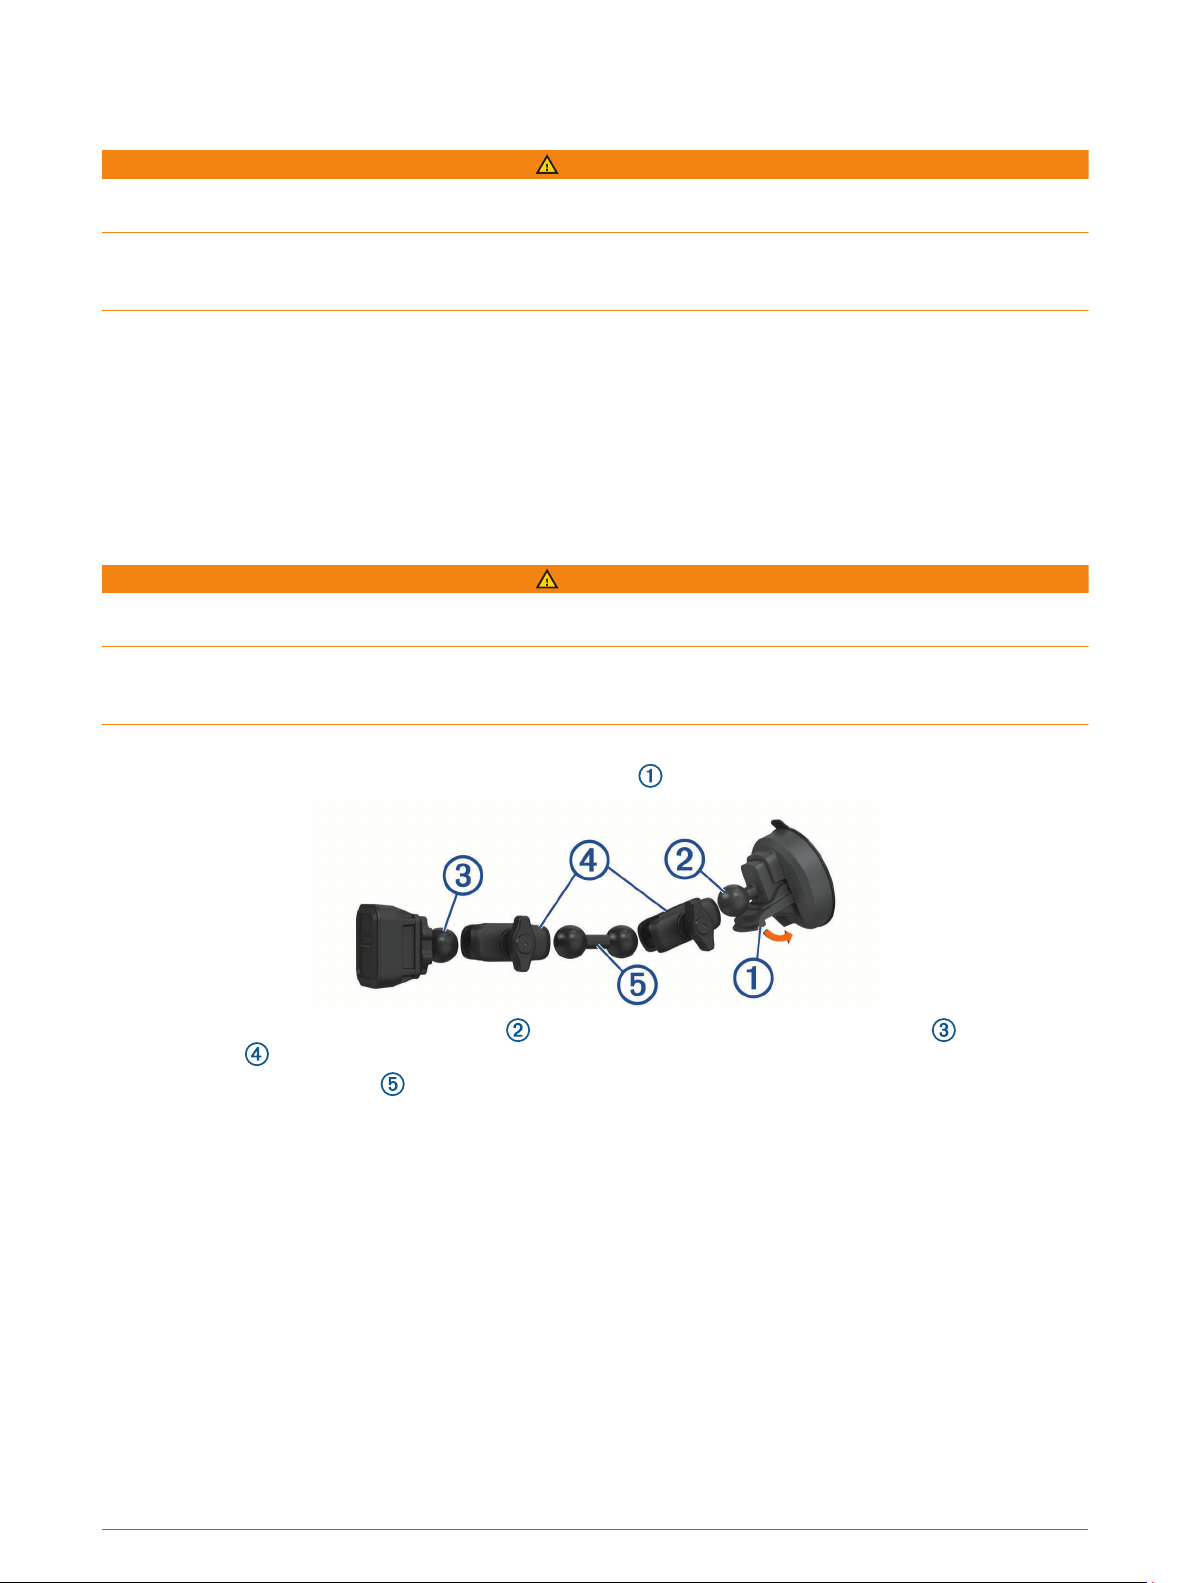
1 Clean and dry your windshield and the suction cup with a lint-free cloth.
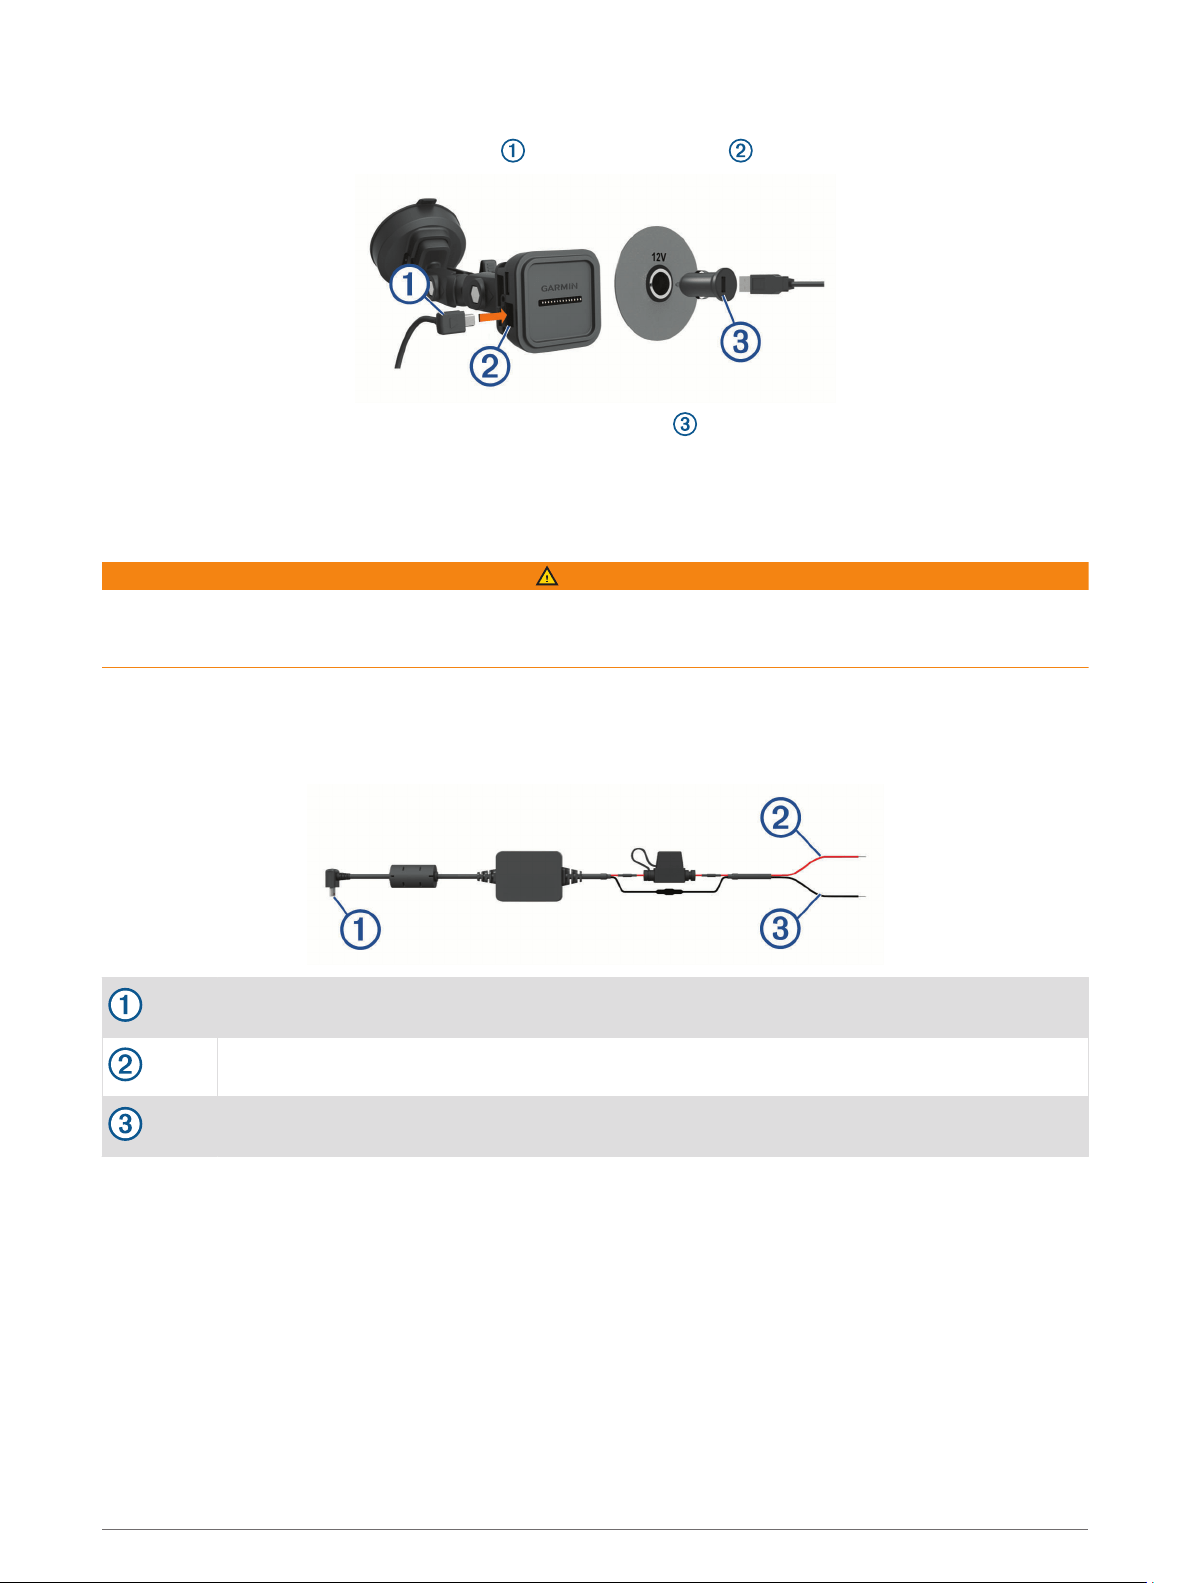
2 Press the suction cup to the windshield, and flip the lever .
3 Connect the ball of the suction cup mount and the ball of the powered magnetic mount to the double-
socket arms .
4 Connect the double-ball link to both double-socket arms.
5 Tighten the knobs on both double-socket arms slightly.
6 If necessary, rotate the powered magnetic mount so the Garmin
®
logo faces right-side up, and adjust the
mount for better viewing and operation.
7 Tighten the knobs to secure the mount.
Getting Started 1
Connecting the Mount to Vehicle Power
1 Plug the mini-USB end of the power cable into the mini-USB port on the powered mount.
2 Plug the power cable into the included vehicle power adapter .
3 Plug the vehicle power adapter into the power outlet in your vehicle.
4 If necessary, turn on the vehicle ignition switch to provide power to the power outlet in your vehicle.
Bare Wire USB Cable
WARNING
Garmin strongly recommends having an experienced installer with the proper knowledge of electrical systems
install the device. Incorrectly wiring the power cable can result in damage to the vehicle or the battery and can
cause bodily injury.
The device includes a bare wire power adapter for use in vehicles that are not equipped with a CLA power
outlet. You can also use this cable in applications where a hardwired permanent power source is preferred. The
device must be mounted in a suitable and secure location in your vehicle, based on available power sources
and safe cable routing.
Device mini-USB connector
10 to 30 Vdc system input power (red)
System ground (black)
Camera Mounting Considerations
The first time you turn on your device, it provides information to help you mount the camera. The camera
affixes to the windshield using the included adhesive mount. The adhesive mount is difficult to remove after it
is installed. You should carefully consider the mounting location before you install the mount.
• Do not mount the camera in a location that interferes with the driver's view of the road.
• You should choose a mounting location that provides the camera a clear view of the road ahead.
• You should choose a mounting location that is as high as possible on the center of the windshield.
• You should verify the area of the windshield in front of the camera is cleared by the windshield wipers.
• You should avoid placing the camera behind a tinted area of the windshield.
2 Installation
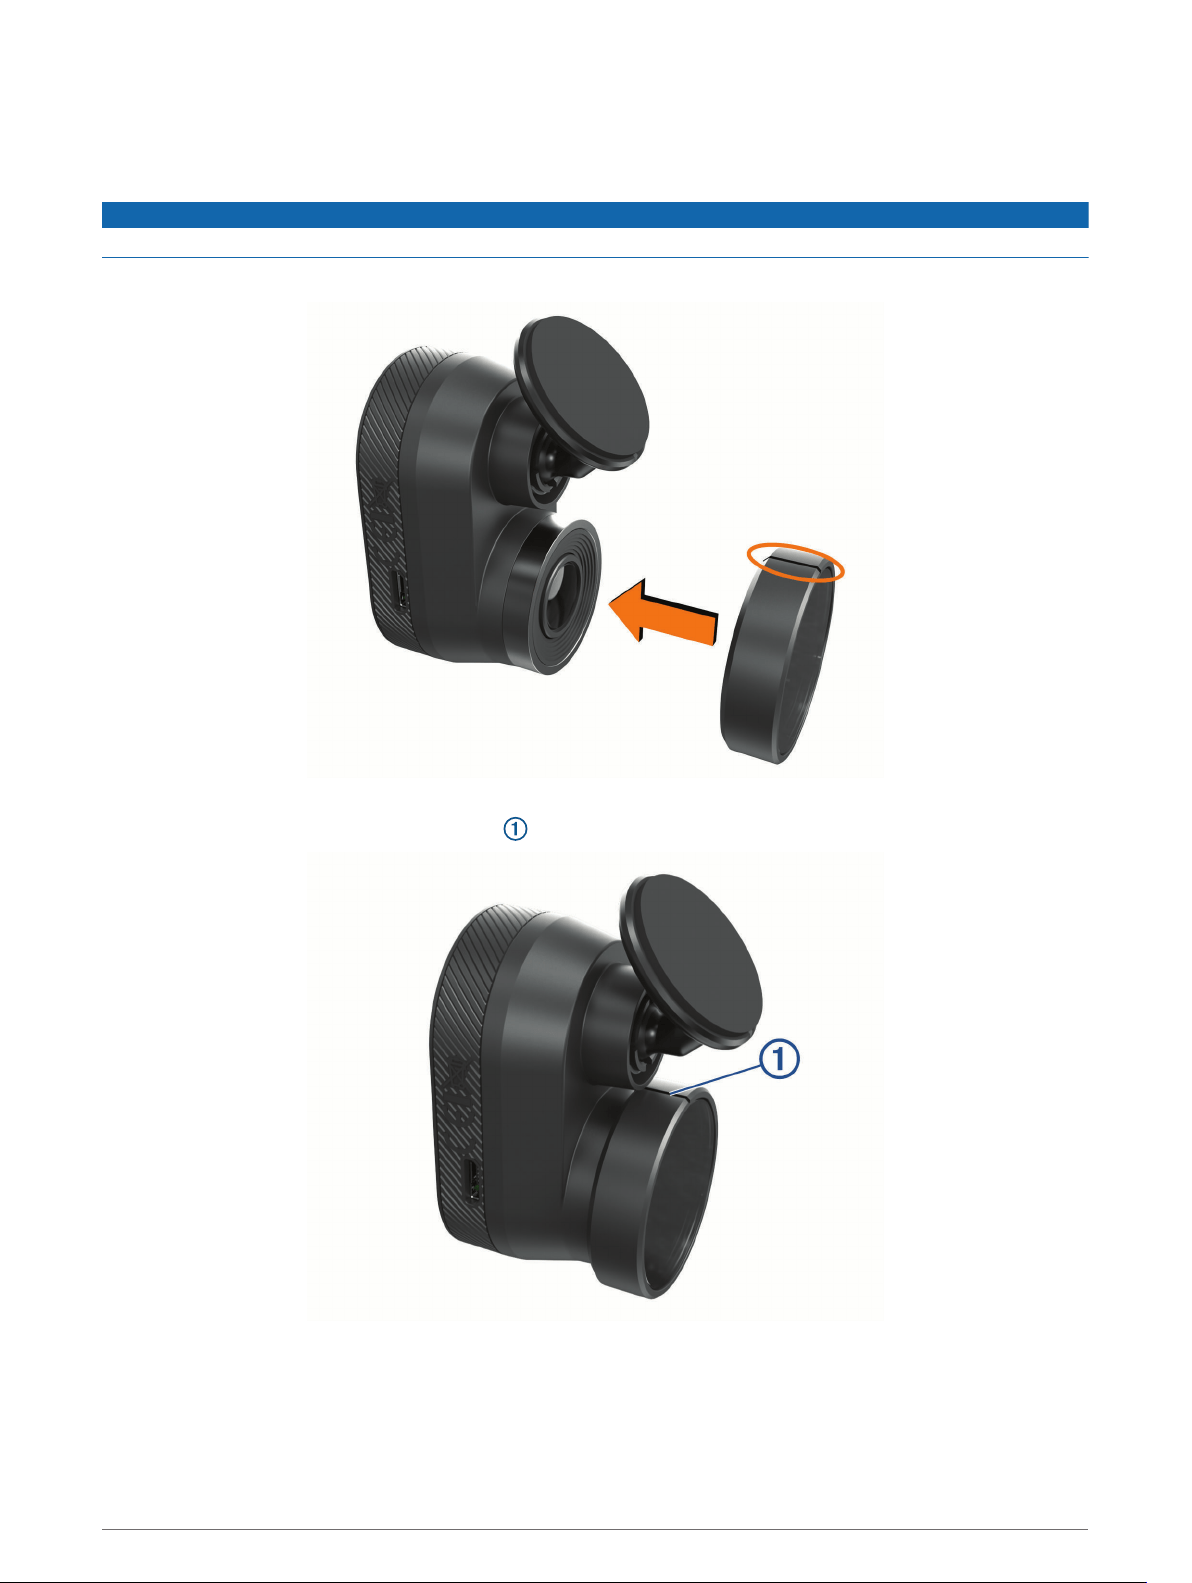
Installing the Polarizing Filter on the Camera
The camera comes with a polarizing filter pre-installed over the lens to help reduce glare from your windshield.
If you remove the polarizing filter, you can re-install it.
NOTICE
Do not rotate the lens cover while it is installed on the camera.
1 Position the filter so the line on the outer rim is facing up.
2 Place the filter firmly onto the camera lens.
3 Verify the line on the outer rim of the filter is facing up and the Garmin logo is right side up.
Removing the Polarizing Filter from the Camera
1 Firmly grip the camera in one hand and the polarizing filter in the other hand.
2 Pull the filter away from the camera.
Installation 3
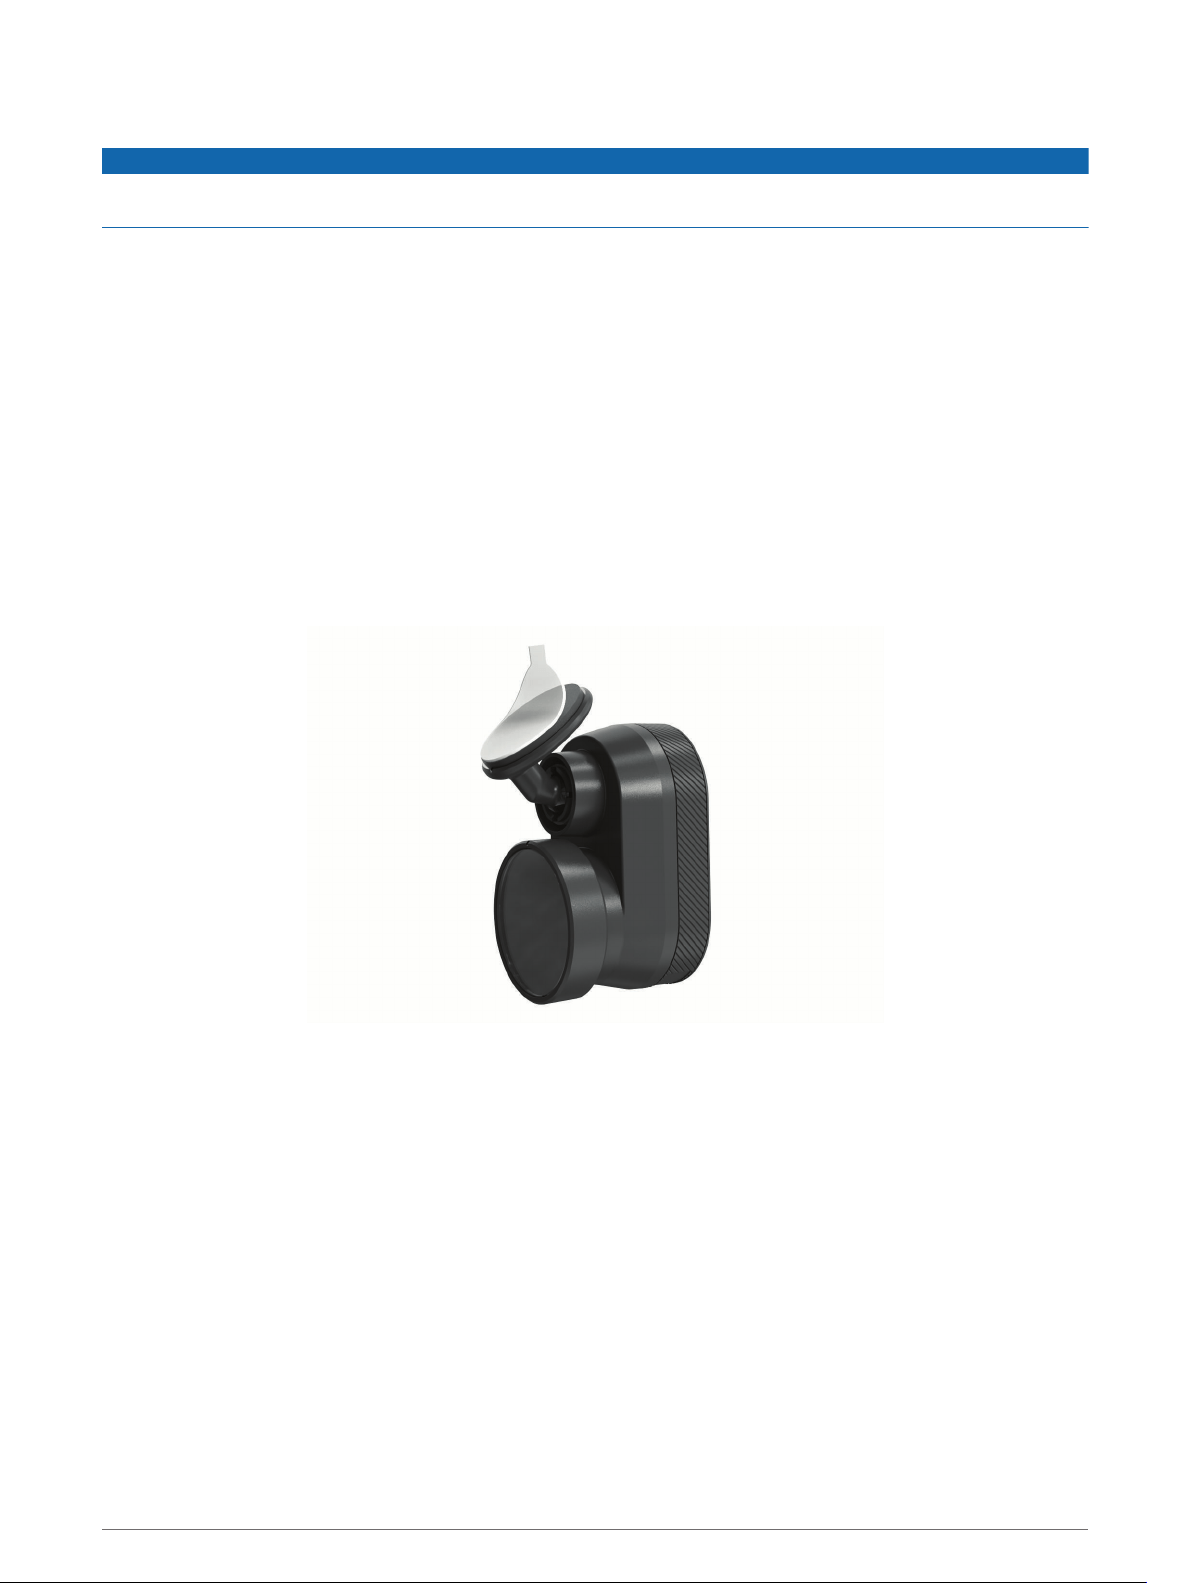
Installing the Remote Cam on Your Windshield
NOTICE
The adhesive mount is intended for a long-term installation and can be difficult to remove. You should carefully
consider the mounting location before you install the mount.
Before you can install the adhesive mount onto your windshield, you should review the windshield mounting
considerations (Camera Mounting Considerations, page 2).
For the best results, the ambient temperature should be from 21° to 38°C (from 70° to 100°F) while installing
the camera on your windshield. The adhesive may not bond correctly if the temperature is outside this range. If
you need to install the camera at lower temperatures, you must clear all snow, ice, and moisture from the
windshield and warm the windshield using the vehicle defroster before installing the camera.
The camera attaches to the windshield using the included adhesive mount.
1 Clean the inside of the windshield using water or alcohol, and a lint-free cloth.
The windshield must be free of dust, wax, oils, or coatings.
2 Hold the camera in the desired mounting location on the windshield, and verify the camera has a clear,
unimpeded view.
TIP: For best results, you should mount the camera as high as possible in the center of the windshield.
3 After you have selected a mounting location with a clear view, remove the protective film from the mount
adhesive.
4 Position the mount over the mounting location.
TIP: The adhesive is extremely sticky. Avoid touching the adhesive to the windshield until the mount is
properly positioned.
5 Press the mount firmly onto the windshield, and maintain pressure for 30 seconds.
This helps to ensure the mount adhesive has proper contact with the windshield.
4 Installation

Installation 5
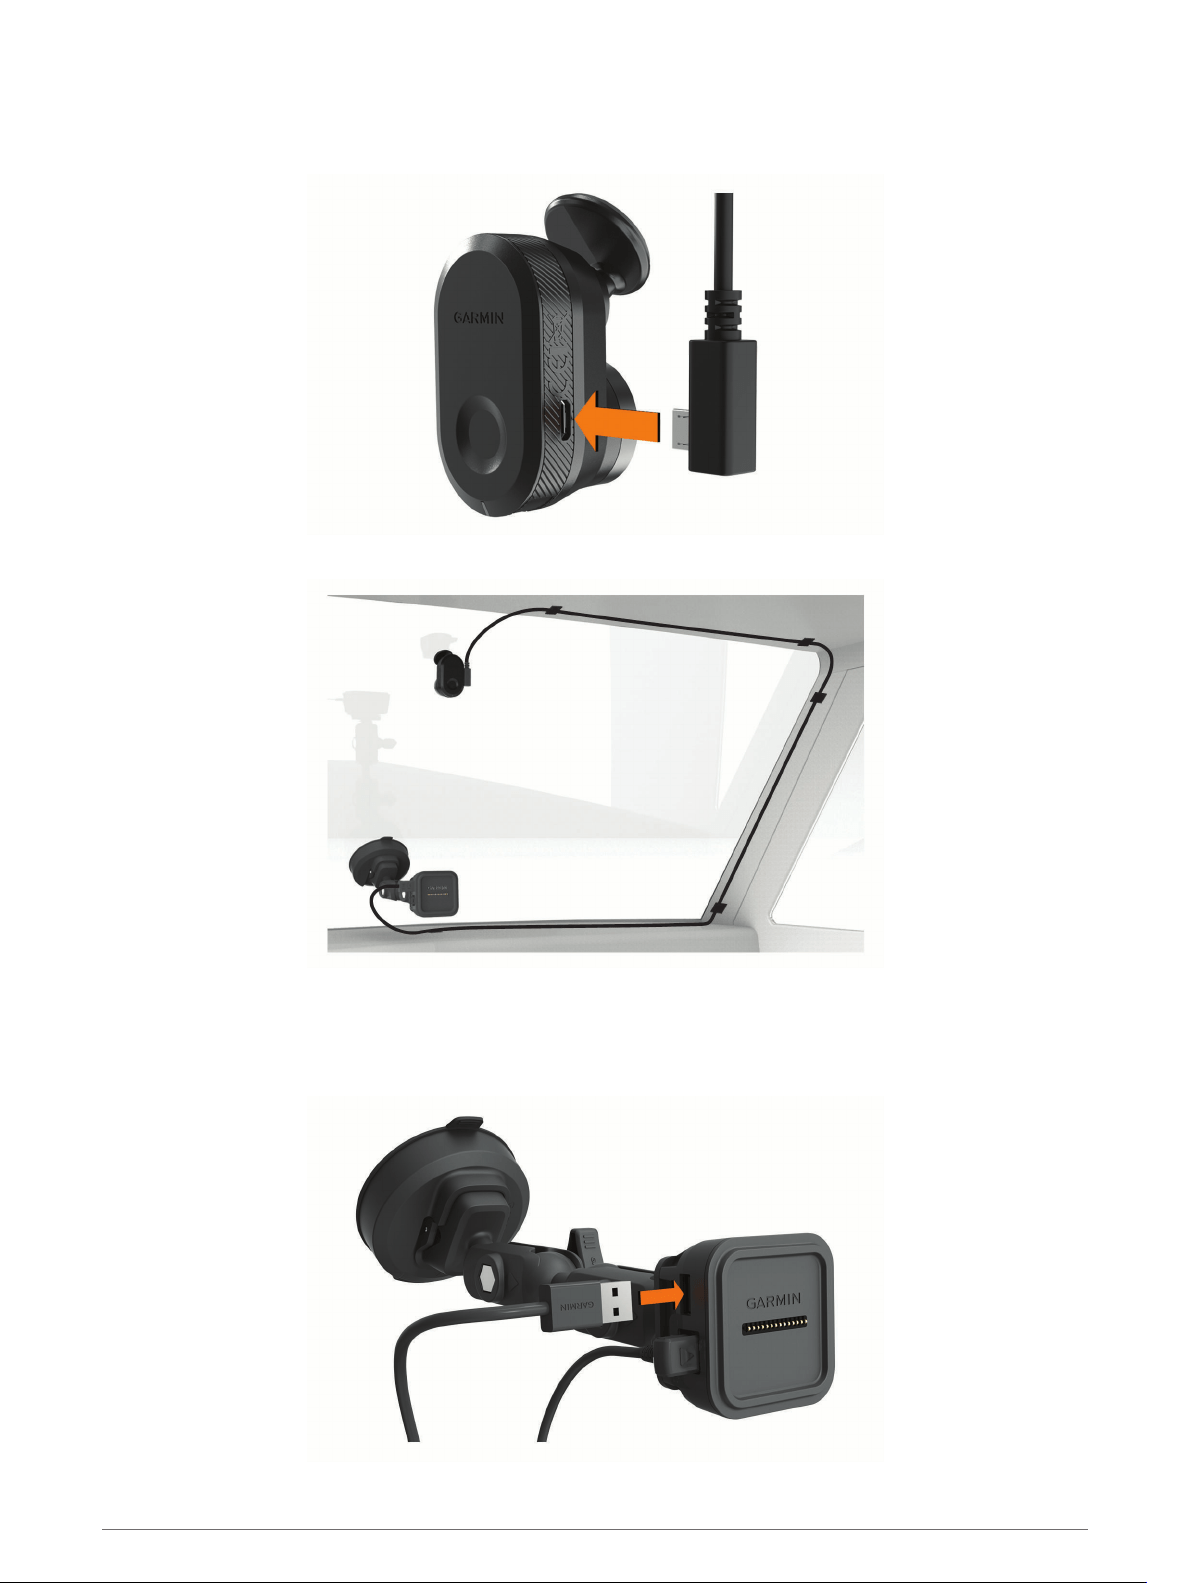
Connecting the Camera Cable
1 Plug the camera cable into the micro-USB port on the camera.
2 Route the camera cable around your windshield so it does not obstruct your view of the track.
The cable is designed to be routed out of sight. To hide the cable, route it behind the vehicle trim along the
windshield, doorframe, or dash.
3 If necessary, use the included adhesive cable clips to secure the camera cable to the frame of your vehicle.
4 Connect the camera cable to the USB port on the magnetic mount.
6 Installation
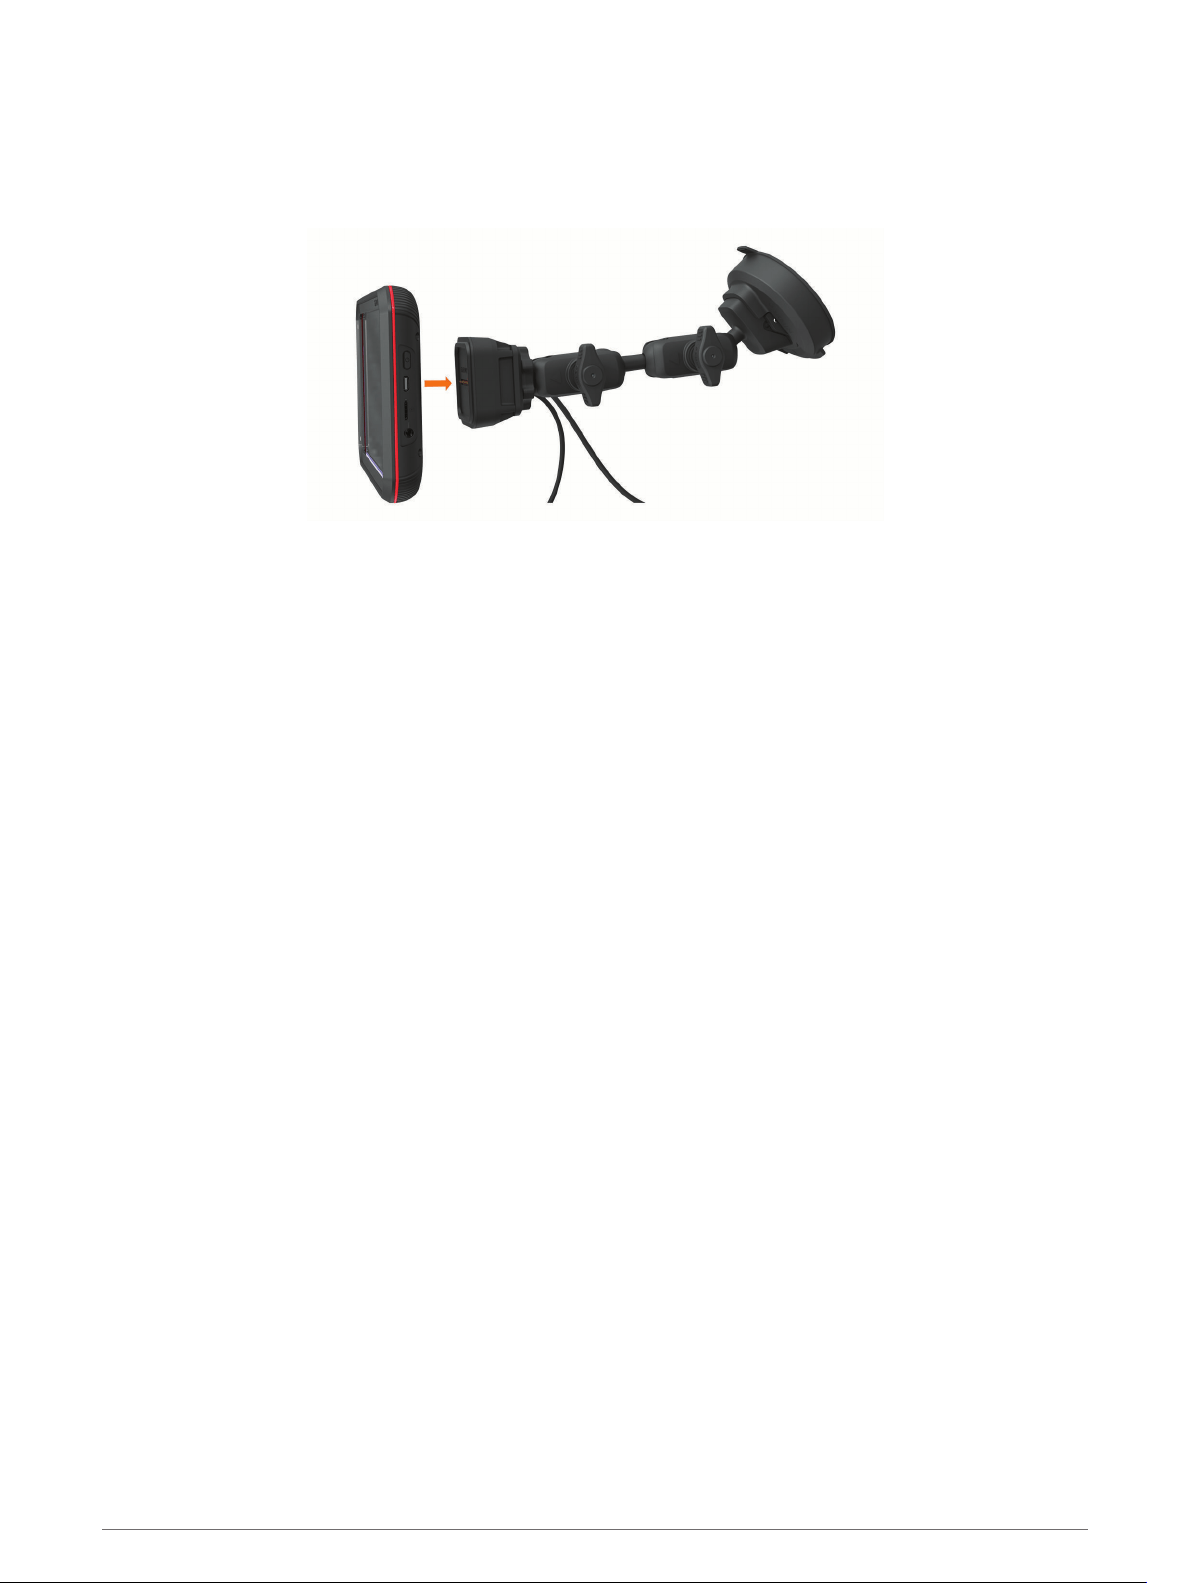
Connecting the Device to the Magnetic Mount
The magnetic mount supplies power to the Garmin Catalyst
™
device. Before you use your device on battery
power, you should charge it.
Place the back of the device onto the magnetic mount.
Installation 7
Installing the Screw-Down Ball Mount on the Dashboard
Before you can attach the screw-down ball mount to your dashboard, you must select a suitable location on the
dashboard and purchase the appropriate hardware for your mounting surface.
WARNING
It is your responsibility to ensure the mounting location complies with all applicable laws and ordinances, and
does not block your view of the road during the safe operation of your vehicle.
NOTICE
Avoid wires, gauges, air bags, air bag covers, HVAC, and other items when drilling pilot holes and attaching the
mount to the vehicle. Garmin is not responsible for any damages or consequences arising from the installation.
NOTICE
Garmin recommends professional installation of the screw-down ball mount.
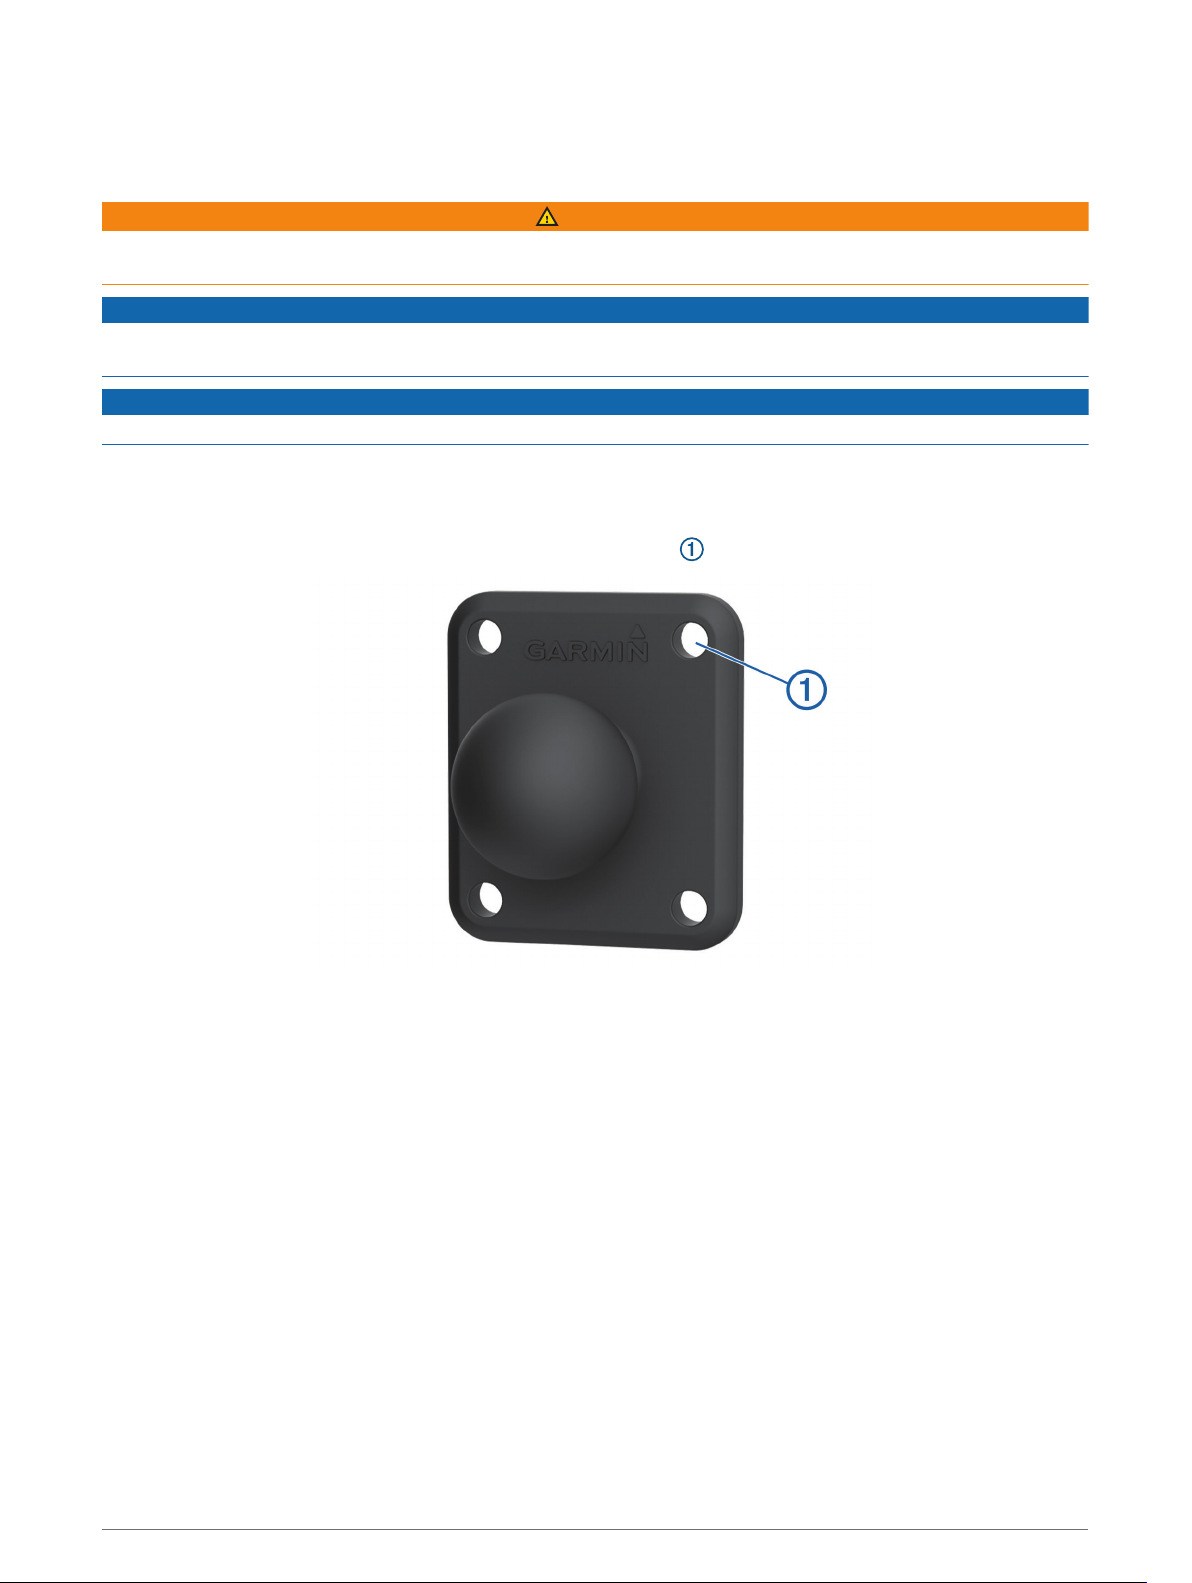
The device includes an optional 4-hole AMPS pattern mount that you can secure to the dash board in place of
the suction cup. This can be useful if you are unable to mount the device to a windshield.
1 Place the mount on the selected location.
2 Using the mount as a template, mark the four screw locations .
3 If necessary for your mounting surface, drill pilot holes.
NOTE: Do not drill through the mount.
4 Securely fasten the mount to the surface using M4 or #8 screws suitable for your mounting surface.
8 Installation
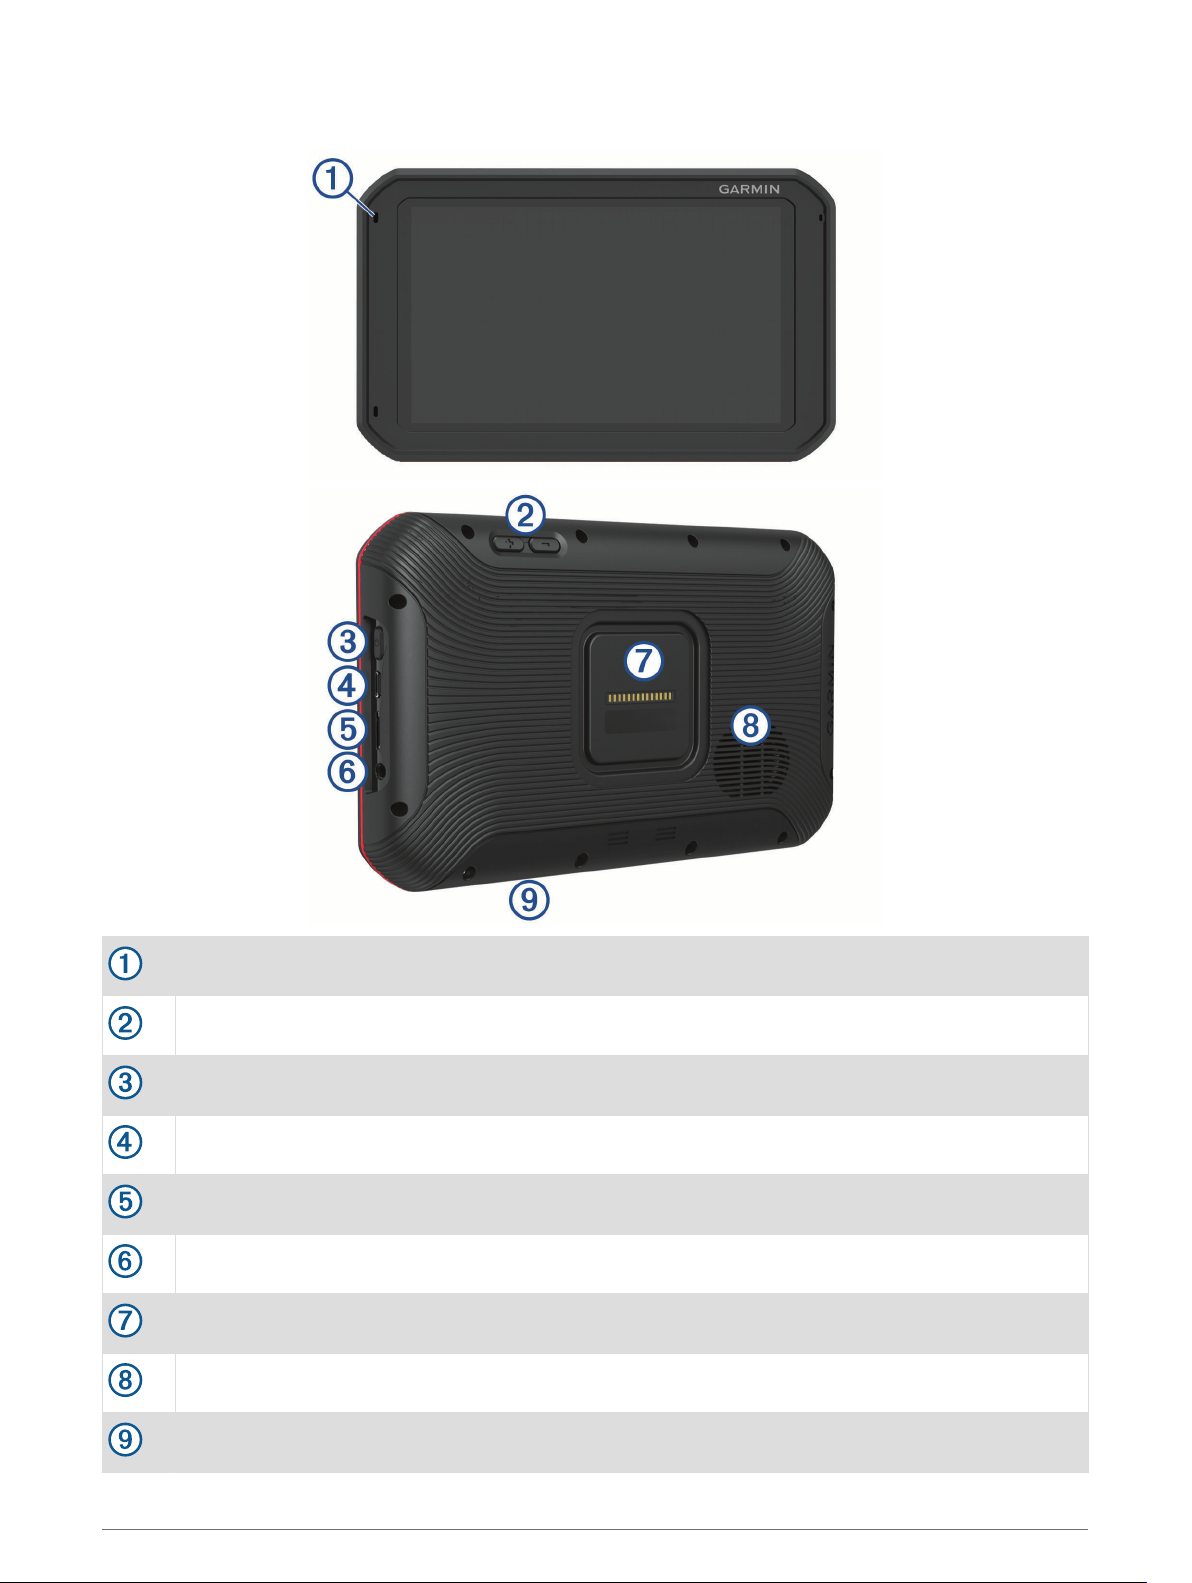
Device Overview
Microphone
Volume control
Power button
Micro USB power and data port
Auxiliary memory card slot (for additional memory)
3.5 mm audio jack
Magnetic mount interface with 14-pin connector
Speaker
Memory card slot with pre-installed microSD
®
card (under cover)
Device Overview 9
Using the Touchscreen
• Tap the screen to select an item.
• Drag or swipe your finger across the screen to pan or scroll.
• Pinch two fingers together to zoom out.
• Spread two fingers apart to zoom in.
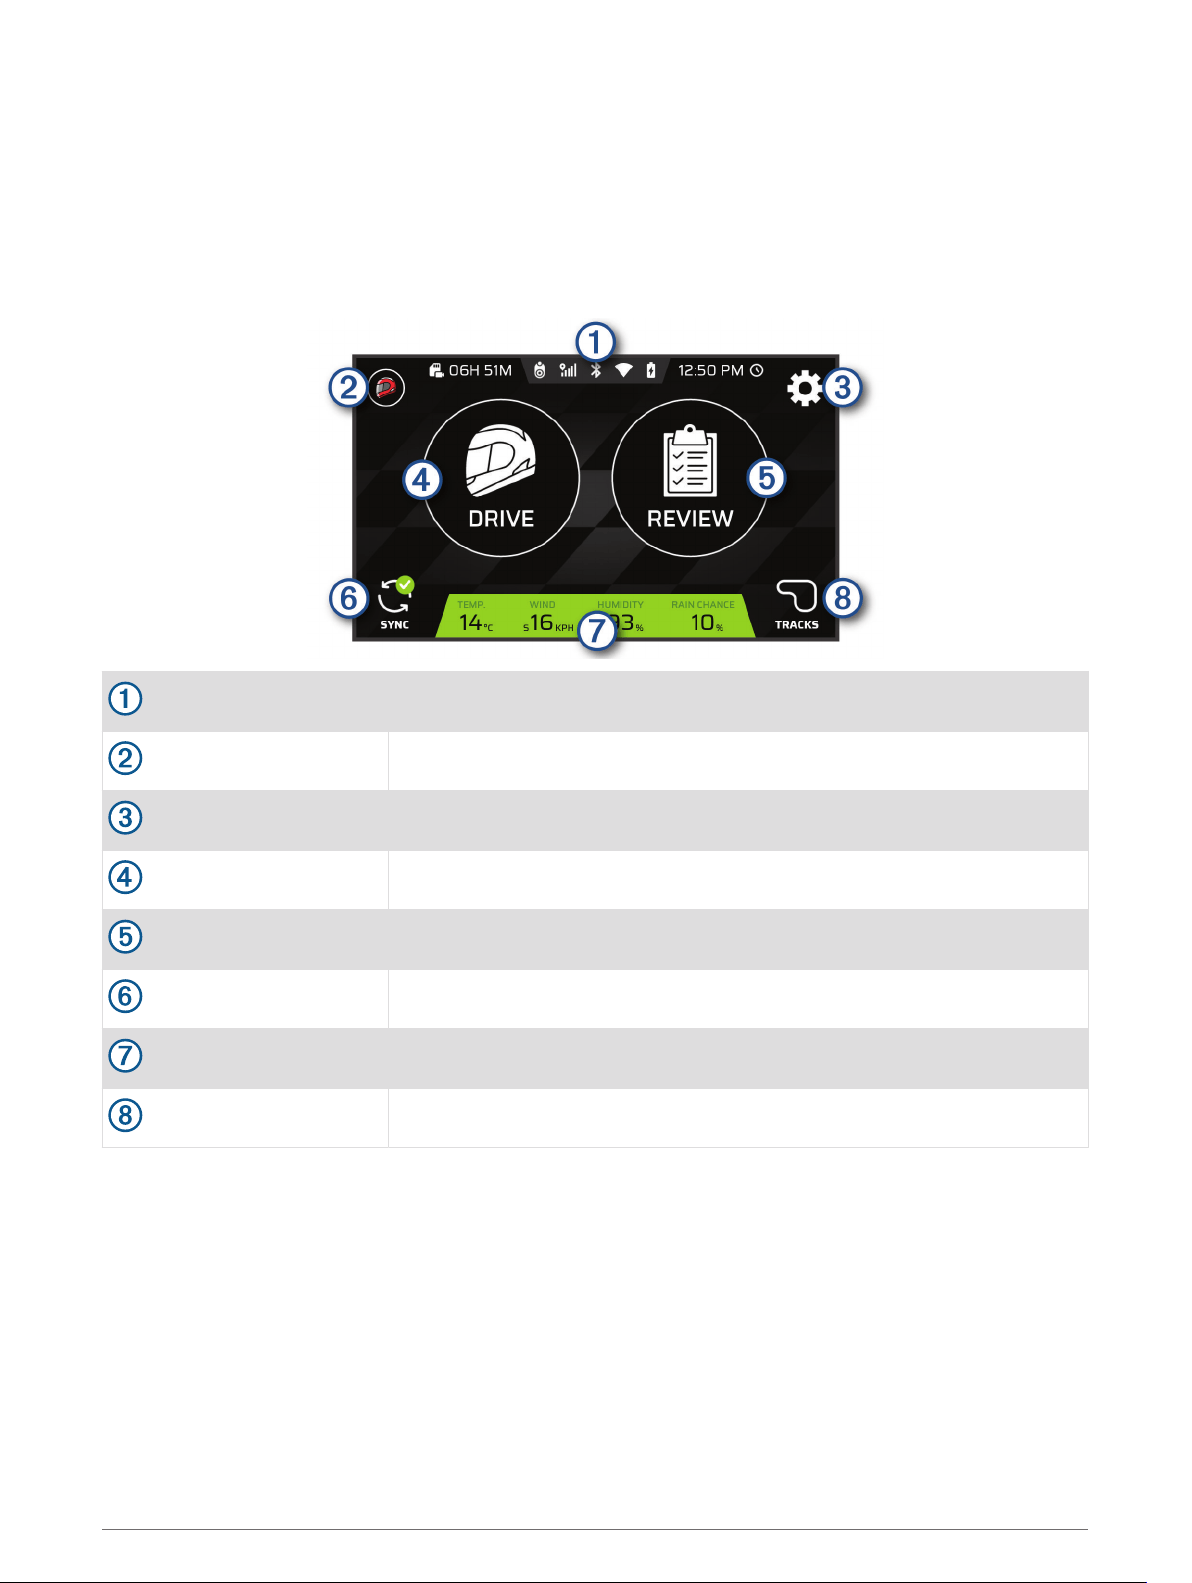
Home Screen
Status bar
Select an icon to view more information.
Race profile
Select to configure your driver or car profile.
Settings
Select to change the device settings.
DRIVE
Select to start a drive session.
REVIEW
Select to review the details of your recent drive sessions.
SYNC
Select to synchronize data with your Garmin Connect
™
account.
Weather information
Displays the weather conditions at the closest track.
TRACKS
Select to view information about any track on the device.
10 Device Overview
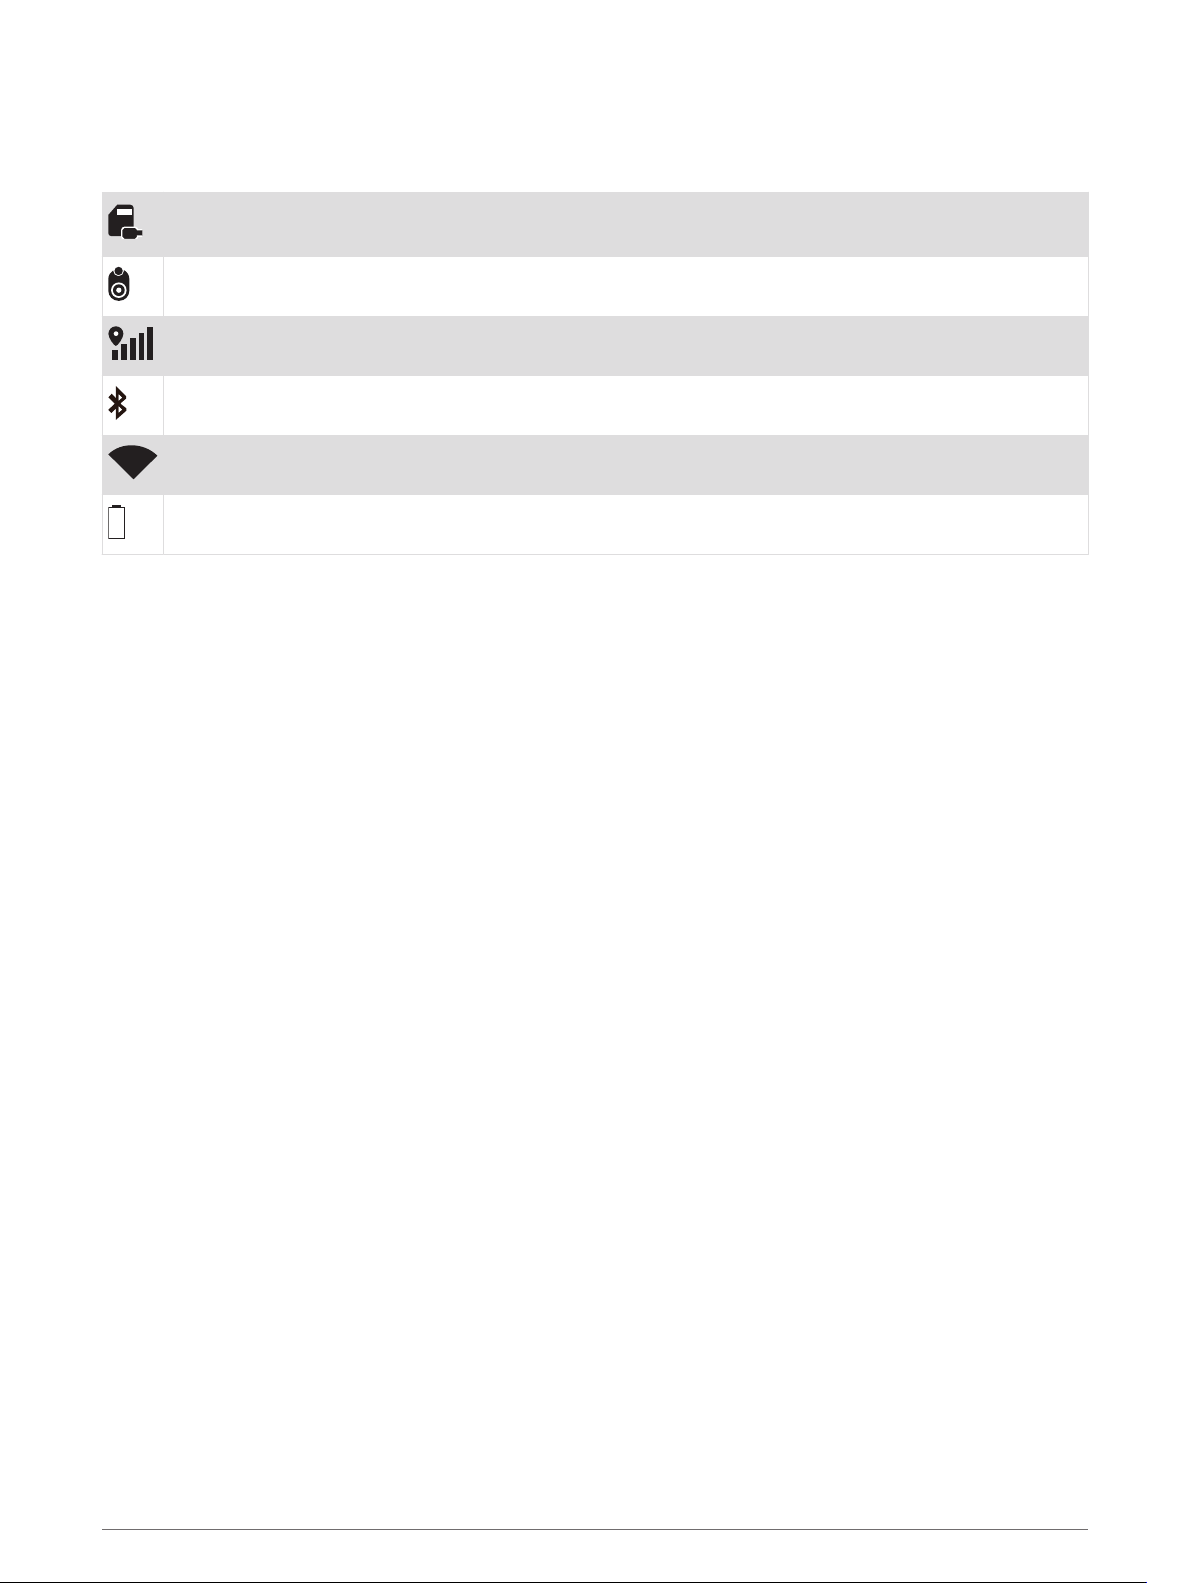
Status Bar Icons
The status bar is located at the top of the main menu. The status bar icons display information about features
on the device. You can select some icons to change settings or view additional information.
Camera storage. The timer shows the estimated recording time remaining on the memory card. Select
to clear space on the memory card.
Camera status. Select to align the camera.
GPS signal status. Select to view location accuracy and acquired satellite information.
Bluetooth
®
technology status. Select to view the Bluetooth settings.
Wi-fi signal strength. Select to change the wi-fi settings.
Battery charge level.
Synchronizing Session Data with Garmin Connect
Before your Garmin Catalyst device can sync session data with your Garmin Connect account, you must have a
Garmin Connect account and a Wi‑Fi
®
connection.
Your Garmin Catalyst device automatically syncs session data with your Garmin Connect account. This allows
you to view drive session and performance data on your computer or mobile device.
NOTE: The device does not sync video footage.
1 If the device does not automatically sync session data, select SYNC.
2 Select an option:
• If the device prompts you to sign in to Garmin Connect, select Sign In or Create a New Account.
• If the device prompts you to connect to Wi‑Fi, select CONNECT.
3 Follow the on-screen instructions.
Multi-Factor Authentication
The multi-factor authentication feature uses a second factor to verify your identity when you log in to your
Garmin Connect account, such as your phone or e-mail.
NOTE: You must enable multi-factor authentication in your Garmin Connect account to use this feature.
Viewing Track Information
You can view information and statistics about all race tracks that are available in the device memory.
1 From the home screen, select TRACKS.
2 Select the search bar.
3 Enter all or part of a track name.
Suggested track names appear below the search bar.
4 Select a track.
Viewing the Weather Forecast
Before you can use this feature, you must connect your device to the internet and sign in to your Garmin
Connect account.
1 From the home screen, select the weather bar.
The device displays the current weather conditions and an hourly forecast for your current location.
2 Select a tab to view additional weather forecast data.
Device Overview 11

Starting a Drive Session
Before you can start a drive session, your device must acquire satellite signals. You can select in the status
bar to check the current signal strength and accuracy.
1 From the home screen, select DRIVE.
2 Select a track.
3 Select an option:
• To change your driver profile, select .
• To change your vehicle profile, select .
• To configure audio features, select .
• To change your track conditions, select or .
• To configure lap timer settings, select .
• To enable or disable audio recording, select .
4 Select CHECK ALIGNMENT, and follow the on-screen instructions to adjust your camera alignment.
5 Select START.
6 Start driving.
The timer starts automatically when you cross the starting line.
Pausing a Drive Session
You can pause a drive session that is already in progress. When you pause a drive session, the device stops
recording audio and video and stops recording some race data. This is useful if your vehicle breaks down on
the track, or if you make a long pit stop.
When you come to a stop, the device automatically prompts you to pause the drive session.
1 Stop the vehicle.
2 From the race timer, select an option:
• When the device prompts you, select PAUSE.
• If the device does not prompt you, select STOP > PAUSE.
The session automatically resumes when you begin driving again.
12 Starting a Drive Session

Drive Session Audio Settings
Before you start a race, you can select CHECK AUDIO to adjust audio settings for the drive session.
RECORD CAMERA AUDIO: Enables or disables camera audio recording for drive session videos.
AUDIBLE PROMPTS: Sets the level of audio coaching feedback and audible prompts you receive during a drive
session (Audible Prompt and Coaching Settings, page 13).
AUDIO OUTPUT: Sets the audio output device.
VOLUME: Sets the volume level for audio prompts. You can move the slider left or right to adjust the volume.
TEST AUDIO: Plays a sample audio clip to test the function and volume of your audio configuration.
Audible Prompt and Coaching Settings
WARNING
The Advanced Race Coach feature is intended for use by experienced high-speed drivers only. Use of the
feature by an inexperienced driver could result in an accident involving property damage, personal injury, or
death. Any use of or reliance on suggestions provided by the advanced race coach is at your own risk.
You can set the amount of audible coaching feedback you receive during a drive session. Before you start a
drive session, select CHECK AUDIO > AUDIBLE PROMPTS.
ADVANCED RACE COACH: Sets the device to automatically give advanced coaching feedback as you drive,
such as braking and turning advice.
RACE COACH: Sets the device to give you basic coaching feedback based on your performance. You can add
additional prompts to your race coach feedback after you review your drive session (Adding Opportunity
Information to the Race Coach, page 18).
LAP TIMES ONLY: Sets the device to provide audio prompts that contain only lap time information.
OFF: Disables audio prompts.
Starting a Drive Session 13
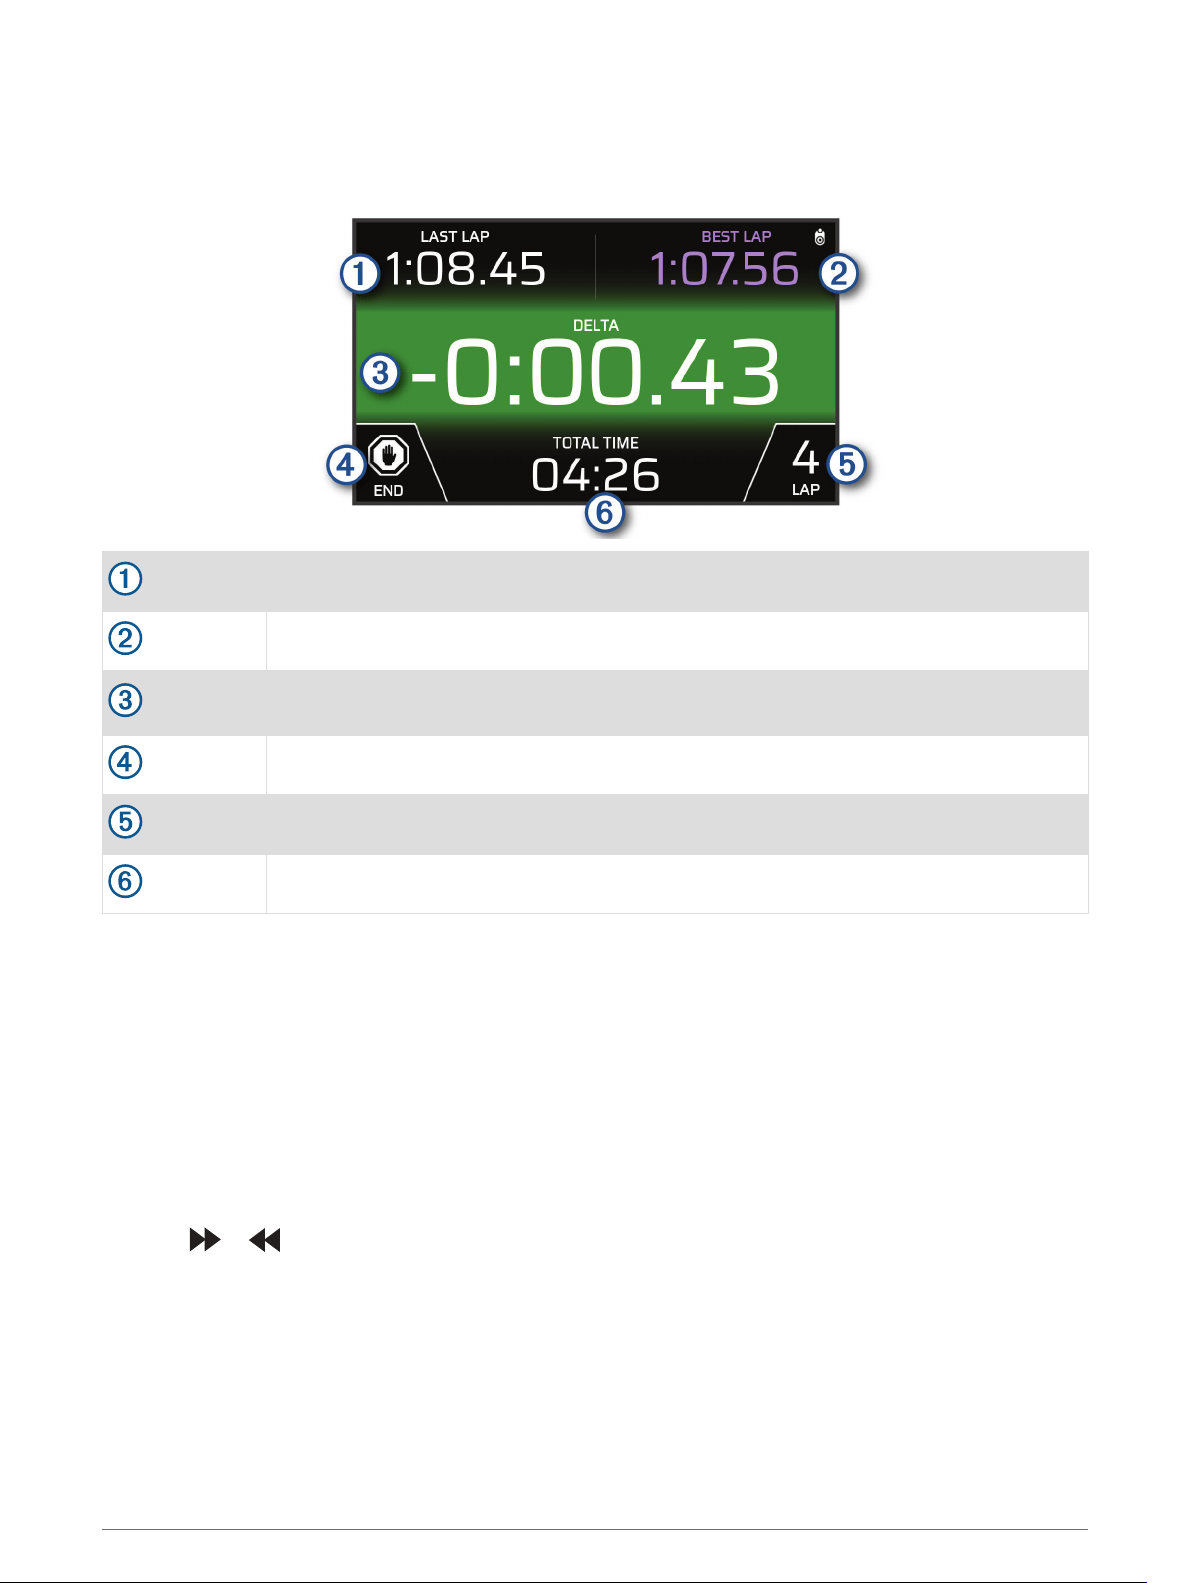
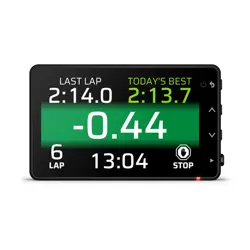
Race Timer
As you drive, the device keeps track of your progress and gives you audible coaching tips. The race timer keeps
track of your lap number and shows your best lap times.
LAST LAP
Displays the last lap time during the current session.
BEST LAP
Displays the best lap time for the current session.
DELTA
Displays the time difference between the current lap and the best lap during the current
session.
END
Select to end the current session.
LAP
Displays the current lap number.
TOTAL TIME
Displays the total lap time.
Adding a Track
You can add a track that is not already loaded on your device. The device uses your GPS location and your
vehicle's movements to create a map of the track.
1 Select DRIVE > ADD A TRACK.
2 Follow the on-screen instructions to enter track details and information about your drive session.
3 Select START.
4 Start driving.
Once you exit the pit area and enter the track, you must drive in a straight line for at least 0.5 seconds at a
minimum of 55 mph (90 km/h), and complete one full lap.
5 Select END after you have completed the drive session.
6 Select or to position the starting line on the map.
7 Select SAVE.
14 Starting a Drive Session

Adding a Track Configuration
You can add additional configurations for tracks that are stored on your device.
1 Select DRIVE.
2 Select a track.
3 Select ADD A TRACK CONFIGURATION.
4 Follow the on-screen instructions to enter track details and information about your drive session.
5 Select START.
6 Start driving.
7 Select END after you have completed the drive session.
8 Select or to position the starting line on the map.
9 Select SAVE.
Adding a Driver Profile
1 From the home screen, select the race profile icon (Home Screen, page 10).
2 Select DRIVER.
3 Select ADD A PROFILE.
4 Follow the on-screen instructions.
Editing a Driver Profile
You can edit a driver profile to adjust preferences and change units of measure.
1 From the home screen, select the race profile icon (Home Screen, page 10).
2 Select DRIVER.
3 Select .
4 Select a field to edit its contents.
Changing the Units of Measure
You can customize the units of measure displayed on the device.
1 From the home screen, select the race profile icon (Home Screen, page 10).
2 Select DRIVER > > UNITS.
3 Select a unit of measure.
Adding or Editing a Car Profile
1 From the home screen, select the race profile icon (Home Screen, page 10).
2 Select CAR.
3 Select an option:
• To add a car profile, select ADD A CAR.
• To edit a car profile, select .
4 Select a field to enter information about the make, model, and year of your vehicle.
5 Select DONE.
Selecting a Car or Driver Profile
1 From the home screen, select the race profile icon (Home Screen, page 10).
2 Select an option:
• To change the driver profile, select DRIVER.
• To change the car profile, select CAR.
3 Select a car or driver.
Starting a Drive Session 15
Reviewing Drive Sessions
WARNING
Do not review any drive sessions while driving. Failure to pay attention to your surroundings and road
conditions can result in serious personal injury or death.
The device records detailed information about each drive session. You can view the results of each drive
session individually or compare data with another session. The device prompts you to review each drive
session automatically at the end of each session.
1 From the home screen, select REVIEW.
2 Select a track.
3 Follow the on-screen prompts to select a drive session.
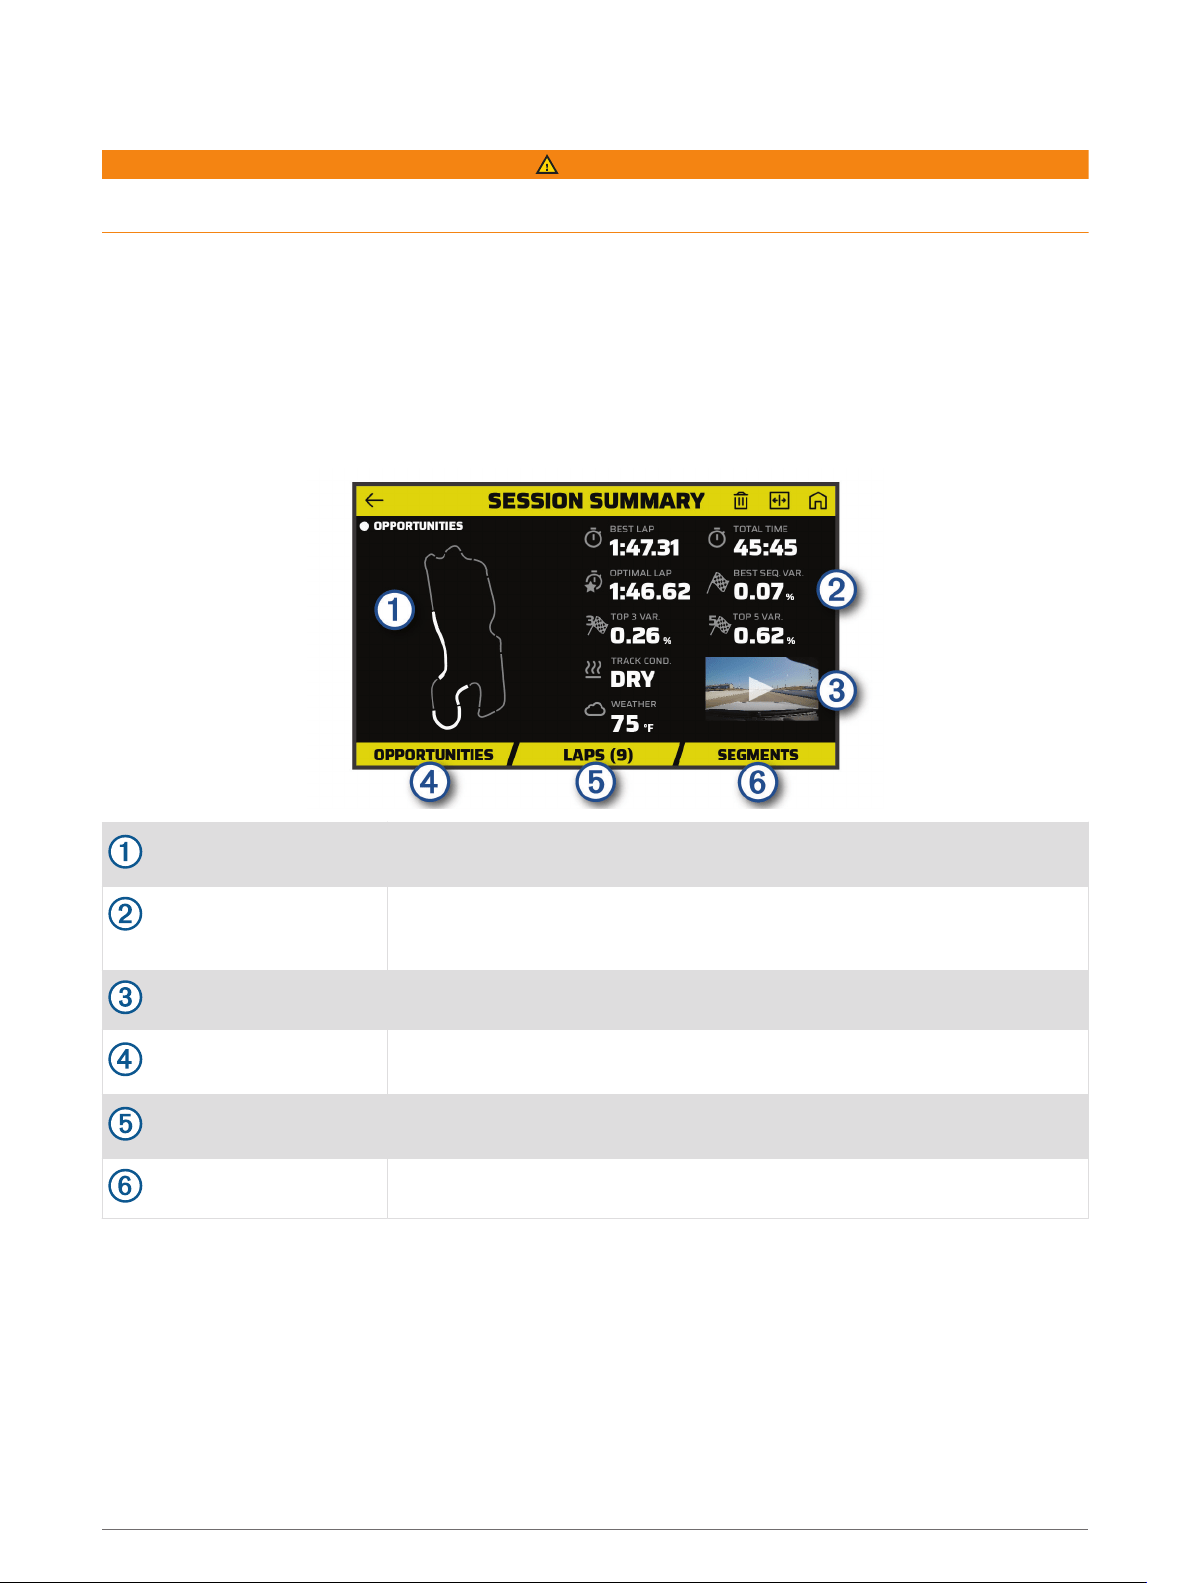
Session Summary
Track map
Displays a map of the track. You can select a highlighted segment to view
opportunities for that segment.
Session summary statis
tics
Displays a summary of track conditions and performance metrics for the
selected session.
Session video thumbnail
Select to view a video of the entire session.
OPPORTUNITIES
Select to view all opportunities for improvement for the selected session
(Opportunities, page 18).
LAPS
Select to view detailed information about each lap (Reviewing Laps,
page 19).
SEGMENTS
Select to view detailed information about each track segment.
Viewing a Session Video
While you drive, the device records video of your drive session. You can view the recorded footage for each
session. This can be useful to help you visualize your performance data.
From the session summary screen, select the video thumbnail (Session Summary, page 16).
16 Reviewing Drive Sessions

Saving a Session Video
You can save a recorded session video with data overlays to your memory card.
1 From the session summary screen, select the video thumbnail, and select (Session Summary, page 16).
2 Select a data overlay option, and select NEXT.
3 Select a delta timer option, and select SAVE VIDEO.
Comparing Sessions
You can compare the results of two drive sessions. This can help you to see areas of improvement between
two sessions.
1 From the session summary screen, select > Yes.
2 Select a session.
Deleting Sessions
You can delete drive sessions to clear space on your memory card. You cannot recover deleted drive sessions.
From the session summary screen, select .
Viewing Opportunities
During a drive session, the device analyzes your performance and records opportunities for improvement.
Opportunities are coaching tips that help you decrease your lap time. The opportunity page enables you to
review opportunities and offers tips for improvement.
From the session summary page, select OPPORTUNITIES.
Reviewing Drive Sessions 17
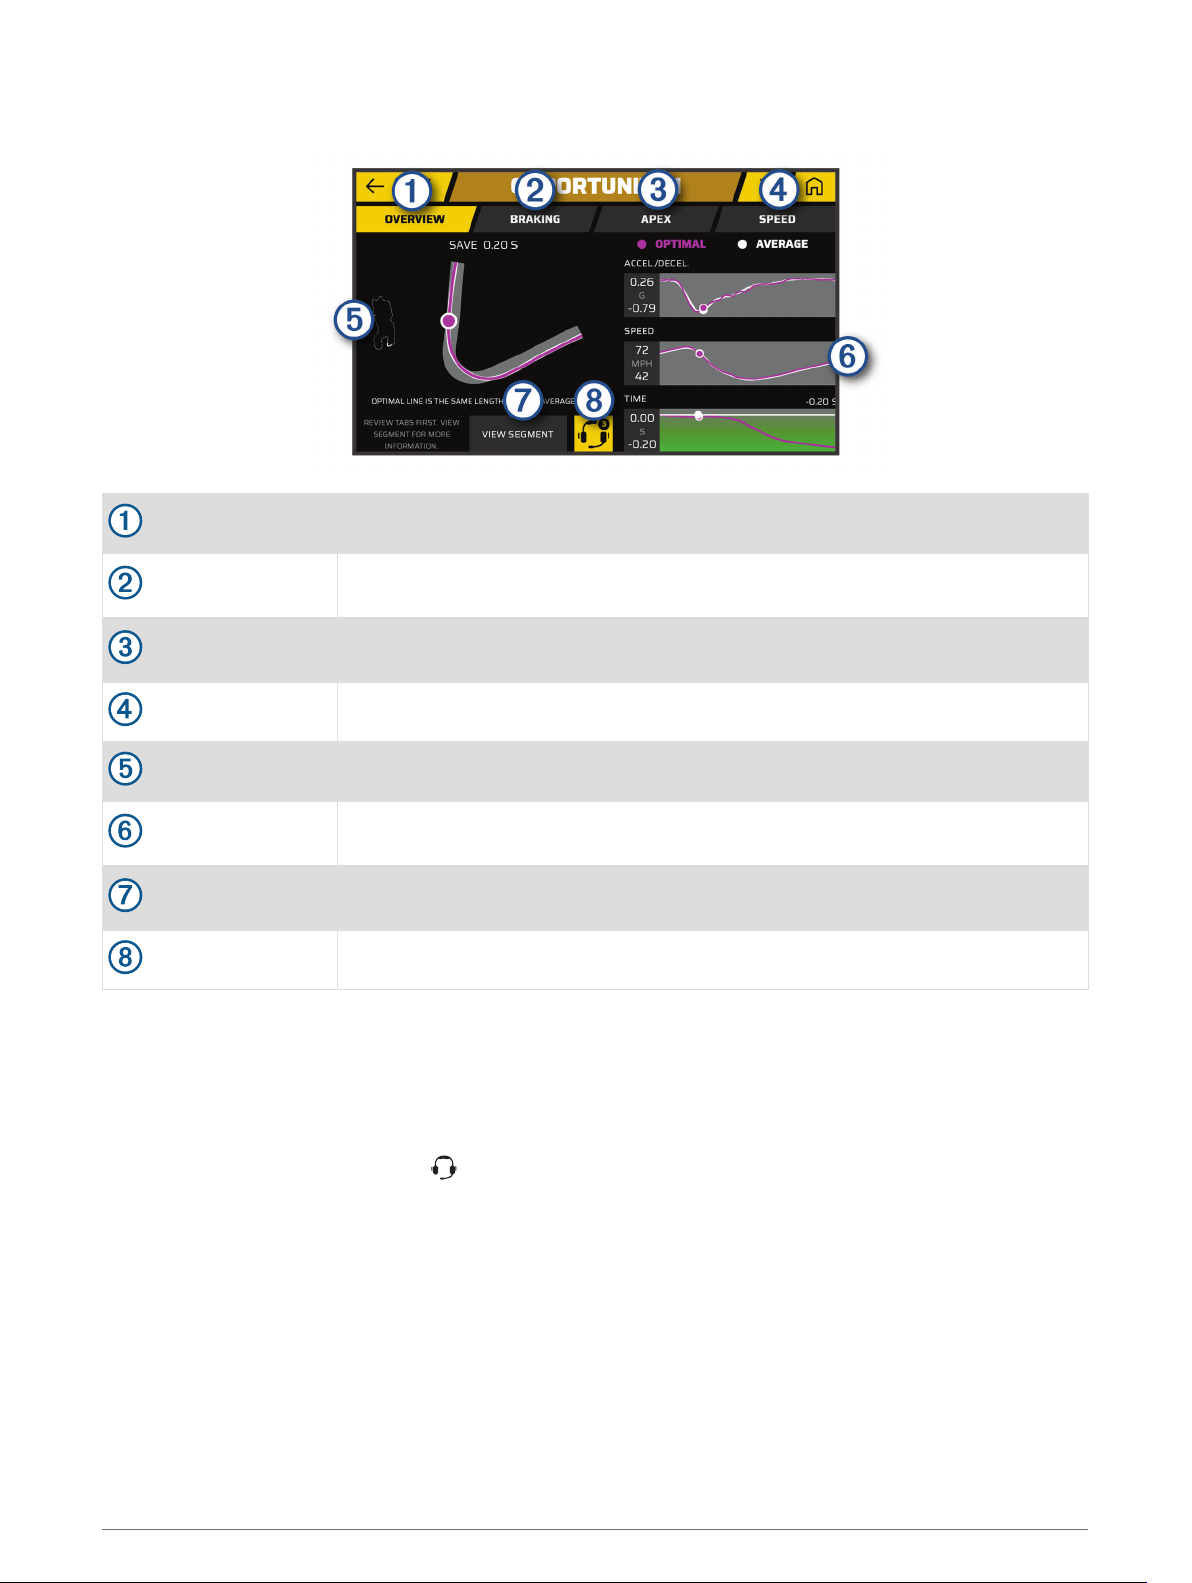
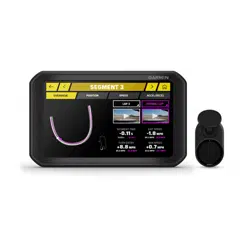
Opportunities
OVERVIEW
Select to view an overview of the opportunity.
BRAKING
Select to view optimal brake timing and coaching advice for the selected track
segment.
APEX
Select to view optimal track usage and coaching advice for the selected track
segment.
SPEED
Select to view optimal speed and coaching advice for the selected track segment.
Track segment map
Displays an animated map of your performance on the selected track segment.
Data graphs
Displays graphs that show the acceleration, speed, or time in comparison to the
optimal data.
VIEW SEGMENT
Select to view additional details about the current track segment, such as video
clips and speed information.
Add all opportunities
Select to add all available opportunities to the race coach.
Adding Opportunity Information to the Race Coach
You can add recorded opportunities to the race coach feature. The next time you approach the saved track
segment, the device provides coaching information using your paired headset or car stereo.
1 From the session summary page, select OPPORTUNITIES.
2 Select an option:
• To add all opportunities, select .
NOTE: You must enable ADVANCED RACE COACH when you start the drive session to use this feature
(Audible Prompt and Coaching Settings, page 13).
• To add one opportunity at a time, select an opportunity.
3 Select an option:
• To view information about brake timing, select BRAKING.
• To view information about track usage during a turn, select APEX.
• To view information about speed, select SPEED.
4 Select ADD TO RACE COACH.
18 Reviewing Drive Sessions
Reviewing Laps
The Laps page lets you review lap time and speed information for each lap. You can compare any two laps
from the same session.
From the session summary page, select LAPS.
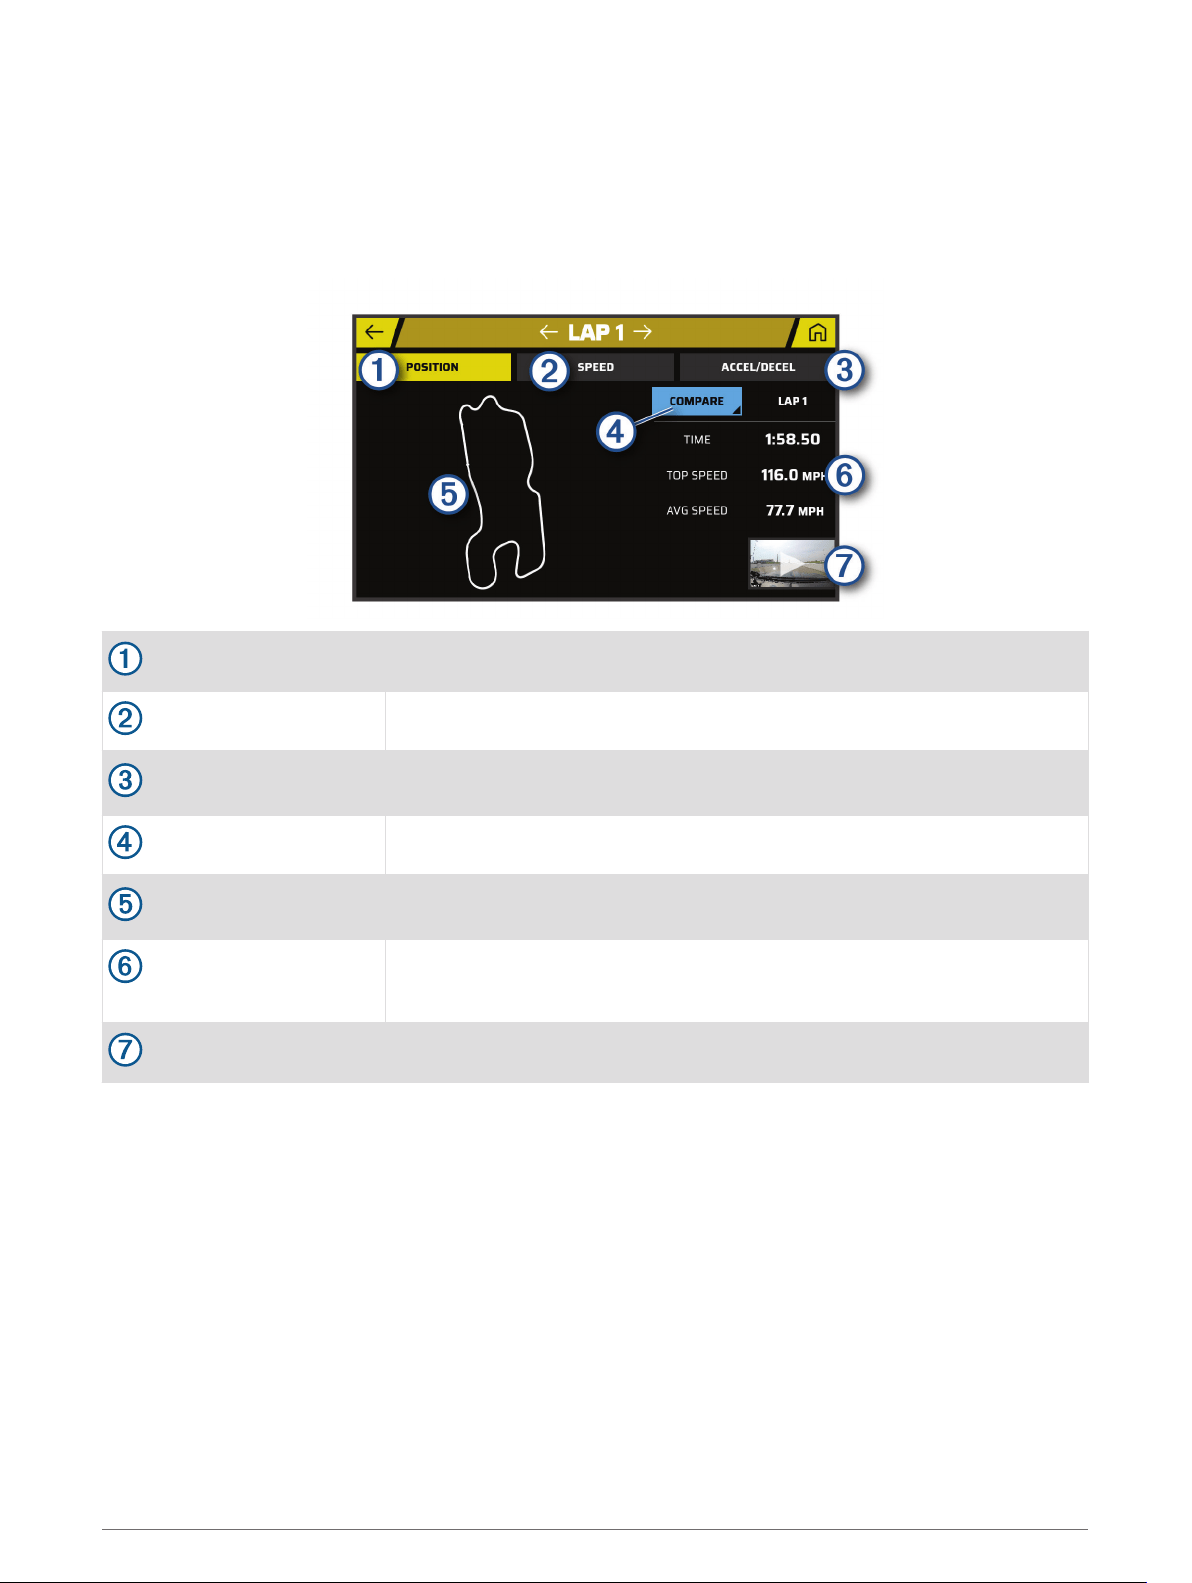
Laps
POSITION
Select to view a map of your track position during the lap.
SPEED
Select to view a map showing your speed at different points during the lap.
ACCEL./DECEL.
Select to view a map showing rates of acceleration or deceleration at
different points during the lap.
COMPARE
Select to compare the selected lap with another lap.
Track map
Use the touchscreen controls (Using the Touchscreen, page 10) to adjust your
view of the lap data.
Time and speed informa
tion
Displays the lap time, top speed, and average speed.
Video thumbnail
Select to view a video of the selected lap.
Viewing Lap Speed Data
You can view a map of detailed speed data at different points during the lap.
1 From the session summary page, select LAPS.
2 Select a lap.
3 Select SPEED.
Viewing Acceleration and Deceleration Data
You can view a map of detailed acceleration data at different points during the lap.
1 From the session summary page, select LAPS.
2 Select a lap.
3 Select ACCEL./DECEL..
Reviewing Drive Sessions 19

Comparing Laps
You can compare any two laps from the same session.
1 From the session summary page, select LAPS.
2 Select a lap.
3 Select COMPARE.
4 Select a lap, and select OK.
Settings
Connecting to a Wireless Network
1 Select > Wi-Fi.
2 If necessary, select the toggle switch to turn on wireless network technology.
3 Select a wireless network.
4 If necessary, enter the encryption key.
The device connects to the wireless network. The device remembers the network information and connects
automatically when you return to this location in the future.
Enabling Bluetooth Wireless Technology
Select > Bluetooth.
Pairing a Wireless Headset or Car Stereo
1 Place your headset and your Garmin Catalyst device within 33 ft. (10 m) of each other.
2 On your Garmin Catalyst device, select > Bluetooth.
3 On your Garmin Catalyst device, verify Bluetooth wireless technology is enabled.
4 On your headset, enable Bluetooth wireless technology and make it visible to other Bluetooth devices.
5 Select your headset from the list of devices.
TIP: If your headset does not appear in the list, you can select > Refresh to refresh the list of Bluetooth
devices.
6 Follow the on-screen instructions to complete the pairing process.
Display Settings
Select > Display.
Brightness Level: Sets the display brightness level on your device.
Adaptive Brightness: Automatically adjusts the backlight brightness based on the ambient light when the
device is out of the mount.
Sleep: Allows you to set the amount of idle time before your device enters sleep mode while using battery
power.
Screenshot: Allows you to take a picture of the device screen. Screenshots are saved in the Screenshot folder
of the device storage.
Sound and Notification Settings
Select > Sound & Notification.
Volume Sliders: Set the volume levels for audio features.
Other sounds: Allows you to enable or disable sounds for other device interactions, such as screen touches,
screen locking, or charging.
20 Settings

Adjusting Sound and Notification Volume
1 Select > Sound & Notification.
2 Use the slider bars to adjust the sound and notification volume.
Setting the Text Language
You can select the language for text in the device software.
1 Select > Language & Input > Language.
2 Select a language.
Date and Time Settings
Select > Date & Time.
Automatic time zone: Automatically sets the time zone based on information from the connected network.
Select time zone: Sets the time zone on your device when Automatic time zone is disabled.
Use 24-hour format: Enables or disables the 24-hour time format.
Device Settings
Select > About device.
Status: Displays the system status and network information.
Legal Information: Allows you to view the end-user license agreement (EULA) and software license
information.
Regulatory information: Displays e-label regulatory and compliance information.
Garmin device information: Displays hardware and software version information.
Device Data Reporting: Shares anonymous data to improve the device.
Resetting Data and Settings
The device offers several options for deleting your user data and resetting all settings to the factory default
values.
1 Select .
2 Select an option:
• To remove all saved wireless networks and paired devices, select Device Reset > Network settings reset.
This option does not delete any other user data.
• To delete all user data and reset all settings to the factory default values, select Device Reset > Factory
data reset.
This option deletes your travel history, apps, accounts, settings, saved networks, paired devices, and all
other user data. Installed maps are not deleted. User files in the Garmin folder may not be deleted.
Device Information
Viewing E-label Regulatory and Compliance Information
1 From the settings menu, swipe to the bottom of the menu.
2 Select About device > Regulatory information.
Device Information 21

Specifications
Operating temperature range From -20° to 55°C (from -4° to 131°F)
Charging temperature range From 0° to 45°C (from 32° to 113°F)
Radio frequency/protocol 2.4 GHz @ 19.5 dBm
Power input
Vehicle power using the included vehicle power cable. AC power using an
optional accessory (for home and office use only).
Battery type Rechargeable lithium-ion
Charging the Device
NOTE: This Class III product shall be powered by an LPS power supply.
You can charge the battery in the device using any of these methods.
• Install the device in the mount, and connect the mount to vehicle power.
• Connect the device to an optional power adapter accessory, such as a wall power adapter.
You can purchase an approved Garmin AC-DC adapter suitable for home or office use from a Garmin dealer
or www.garmin.com. The device may charge slowly when connected to a third-party adapter.
Device Maintenance
Garmin Support Center
Go to support.garmin.com for help and information, such as product manuals, frequently asked questions,
videos, and customer support.
Updating Software Using a Wi‑Fi Network
NOTICE
Software updates may require the device to download large files. Regular data limits or charges from your
internet service provider apply. Contact your internet service provider for more information about data limits or
charges.
You can update the software by connecting your device to a Wi‑Fi network that provides access to the internet.
This allows you to keep your device up to date without connecting it to a computer.
1 Using the included USB cable, connect the device to external power.
NOTE: A USB power adapter is not included. Go to the product page on garmin.com to purchase a power
adapter accessory.
2 Connect the device to a Wi‑Fi network (Connecting to a Wireless Network, page 20).
While connected to a Wi‑Fi network, the device checks for available updates automatically and displays a
notification when an update is available.
3 Select > System updates.
The device displays available software updates. When an update is available, Update Available appears
below Software.
4 Select Download.
5 If necessary, read the license agreements, and select Accept All to accept the agreements.
NOTE: If you do not agree with the license terms, you can select Reject. This stops the update process. You
cannot install updates until you accept the license agreements.
6 Keep the device connected to external power and within range of the Wi‑Fi network until the update process
is complete.
22 Device Maintenance
Updating Software with Garmin Express
™
You can use the Garmin Express application to download and install the latest software updates for your
device.
1 If you do not have the Garmin Express application installed on your computer, go to garmin.com/express
and follow the on-screen instructions to install it (Installing Garmin Express, page 24).
2 Open the Garmin Express application.
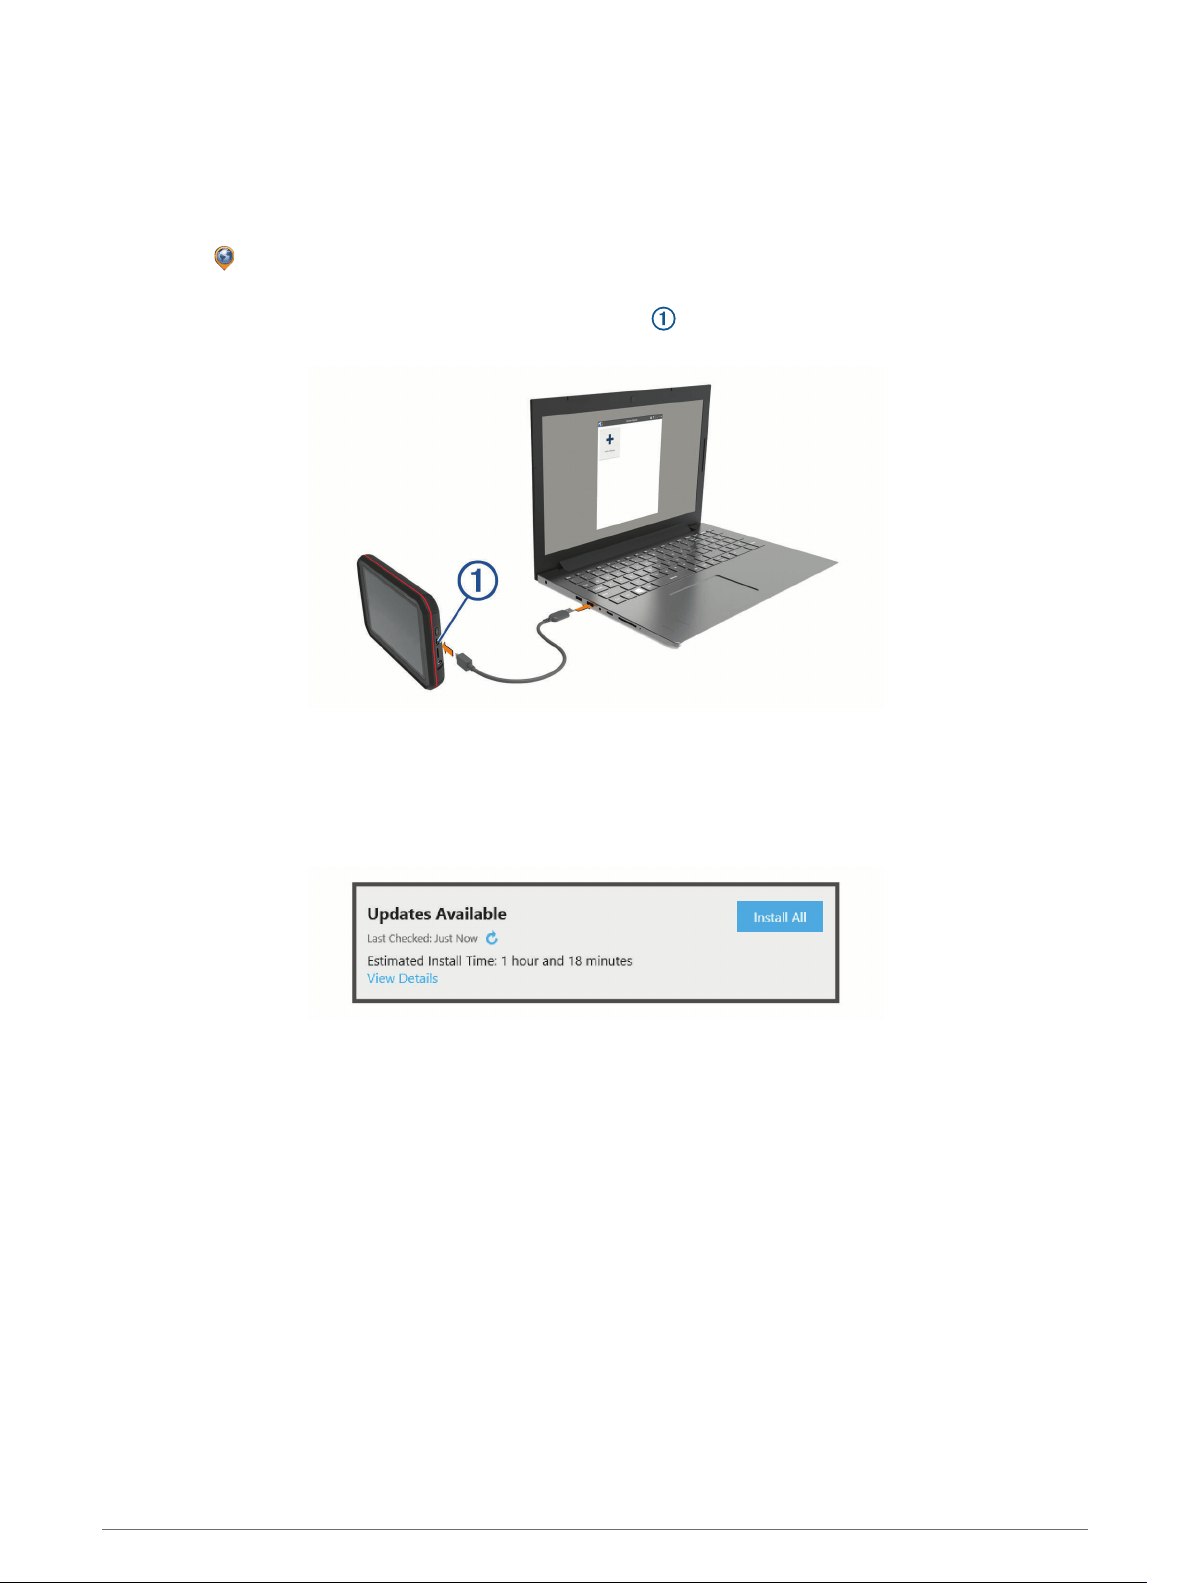
3 Connect your device to your computer using a micro-USB cable.
The small end of the cable connects to the micro-USB port on your Garmin Catalyst device, and the large
end connects to an available USB port on your computer.
4 In the Garmin Express application, click Add a Device.
The Garmin Express application searches for your device and displays the device name and serial number.
5 Click Add Device, and follow the on-screen instructions to add your device to the Garmin Express
application.
When setup is complete, the Garmin Express application displays the updates available for your device.
6 Select an option:
• To install all available updates, click Install All.
• To install a specific update, click View Details, and click Install next to the update you want.
The Garmin Express application downloads and installs the updates onto your device.
7 Follow the on-screen instructions during the update process to finish installing updates.
For example, during the update process, the Garmin Express application may instruct you to disconnect and
reconnect your device.
Device Maintenance 23

Installing Garmin Express
The Garmin Express application is available for Windows
®
and Mac
®
computers.
1 On your computer, go to garmin.com/express.
2 Select an option:
• To view the system requirements and verify the Garmin Express application is compatible with your
computer, select System Requirements.
• To install on a Windows computer, select Download for Windows.
• To install on a Mac computer, select Download for Mac.
3 Open the downloaded file, and follow the on-screen instructions to complete the installation.
Updating the Camera Software
Software updates for your Garmin Catalyst device may include software updates for the remote camera. The
device prompts you to install updates for the camera the next time you connect it to the powered magnetic
mount.
1 Update the software on your Garmin Catalyst device (Updating Software Using a Wi‑Fi Network, page 22).
2 Connect the Garmin Catalyst device to the powered magnetic mount.
3 If necessary, turn on the ignition in your vehicle to provide power to the mount and camera.
If camera updates are available, the device prompts you to update the camera.
4 Follow the on-screen instructions to update the camera software.
Device Care
NOTICE
Avoid dropping your device.
Do not store the device where prolonged exposure to extreme temperatures can occur, because it can cause
permanent damage.
Never use a hard or sharp object to operate the touchscreen, or damage may result.
Do not expose the device to water.
Cleaning the Outer Casing
NOTICE
Avoid chemical cleaners and solvents that can damage plastic components.
1 Clean the outer casing of the device (not the touchscreen) using a cloth dampened with a mild detergent
solution.
2 Wipe the device dry.
Cleaning the Touchscreen
1 Use a soft, clean, lint-free cloth.
2 If necessary, lightly dampen the cloth with water.
3 If using a dampened cloth, turn off the device and disconnect the device from power.
4 Gently wipe the screen with the cloth.
Cleaning the Camera Lens
NOTICE
Avoid chemical cleaners and solvents that can damage plastic components.
You should clean the camera lens regularly to improve the quality of recorded video.
1 Wipe the lens with a non-scratch lens cloth, optionally dampened with isopropyl alcohol.
2 Allow the lens to air dry.
24 Device Maintenance

Avoiding Theft
• Remove the device and mount from sight when not in use.
• Remove the residue left on the windshield by the suction cup.
• Do not keep your unit in the glove compartment.
• Register your device using the Garmin Express software (garmin.com/express).
Restarting the Device
You can restart your device if it stops functioning.
Hold the power key for 10 seconds.
Removing the Device, Mount, and Suction Cup
Removing the Mount from the Suction Cup
1 Loosen the nut that secures the magnetic powered mount to the suction cup ball.
2 Turn the device mount to the right or left.
3 Apply pressure until the socket on the mount releases the ball on the suction cup.
Removing the Suction Cup from the Windshield
1 Flip the lever on the suction cup toward you.
2 Pull the tab on the suction cup toward you.
Removing the Adhesive Camera Mount
The adhesive camera mount is intended for a long-term installation and can be difficult to remove.
1 Firmly grip the mount.
2 Pull the mount up and away from the window or surface, applying steady pressure until the adhesive
releases.
3 Remove all remaining adhesive from the surface.
Troubleshooting
The suction cup will not stay on my windshield
1 Clean the suction cup and windshield with rubbing alcohol.
2 Dry with a clean, dry cloth.
3 Mount the suction cup.
The mount does not hold my device in place while I drive
For the best results, you should keep the vehicle mount clean and position the device close to the suction cup.
If the device shifts position while you are driving, you should complete these actions.
• Remove the powered mount from the suction cup arm, and wipe the ball and socket with a cloth.
Dust and other debris may reduce the friction in the ball and socket joint and allow the joint to shift while you
are driving.
• Rotate the hinged arm toward the suction cup as far as your windshield angle allows.
Positioning the device closer to the windshield reduces the effect of jarring and vibration from the road.
My device is not acquiring satellite signals
• Take your device out of parking garages and away from tall buildings and trees.
• Remain stationary for several minutes.
Troubleshooting 25

The device does not charge in my vehicle
• Verify the vehicle is turned on and is supplying power to the power outlet.
• Verify the interior temperature of the vehicle is within the charging temperature range indicated in the
specifications.
• In the vehicle fuse box, verify the fuse for the vehicle power outlet is not broken.
My battery does not stay charged for very long
• Decrease the screen brightness (Display Settings, page 20).
• Shorten the display timeout (Display Settings, page 20).
• Decrease the volume (Adjusting Sound and Notification Volume, page 21).
• Turn off the wi-fi radio when it is not in use (Connecting to a Wireless Network, page 20).
• Put the device in power saving mode when not in use.
• Keep your device away from extreme temperatures.
• Do not leave your device in direct sunlight.
My camera feels warm while it is operating
Garmin cameras are designed for the automotive environment. It is normal and expected for the products to
become warm or hot and remain safe for use in warm climates with full sun exposure. The temperature of the
device itself can exceed the specified maximum operating ambient temperature for the device and remain safe
for use. Always follow the device use and care instructions contained in the product manual.
My video recordings are blurry
• Clean the camera lens (Cleaning the Camera Lens, page 24).
• Clean the windshield in front of the camera.
• Verify the area of the windshield in front of the camera is cleared by the windshield wipers, and move the
device, if necessary.
Appendix
Data Management
The device has a memory card slot for additional data storage.
NOTE: The device is compatible with Windows 7 and newer, and Mac OS 10.4 and newer.
Memory Cards
You can purchase memory cards from an electronics supplier. Memory cards can be used to store video
footage and data from your drive sessions.
26 Appendix
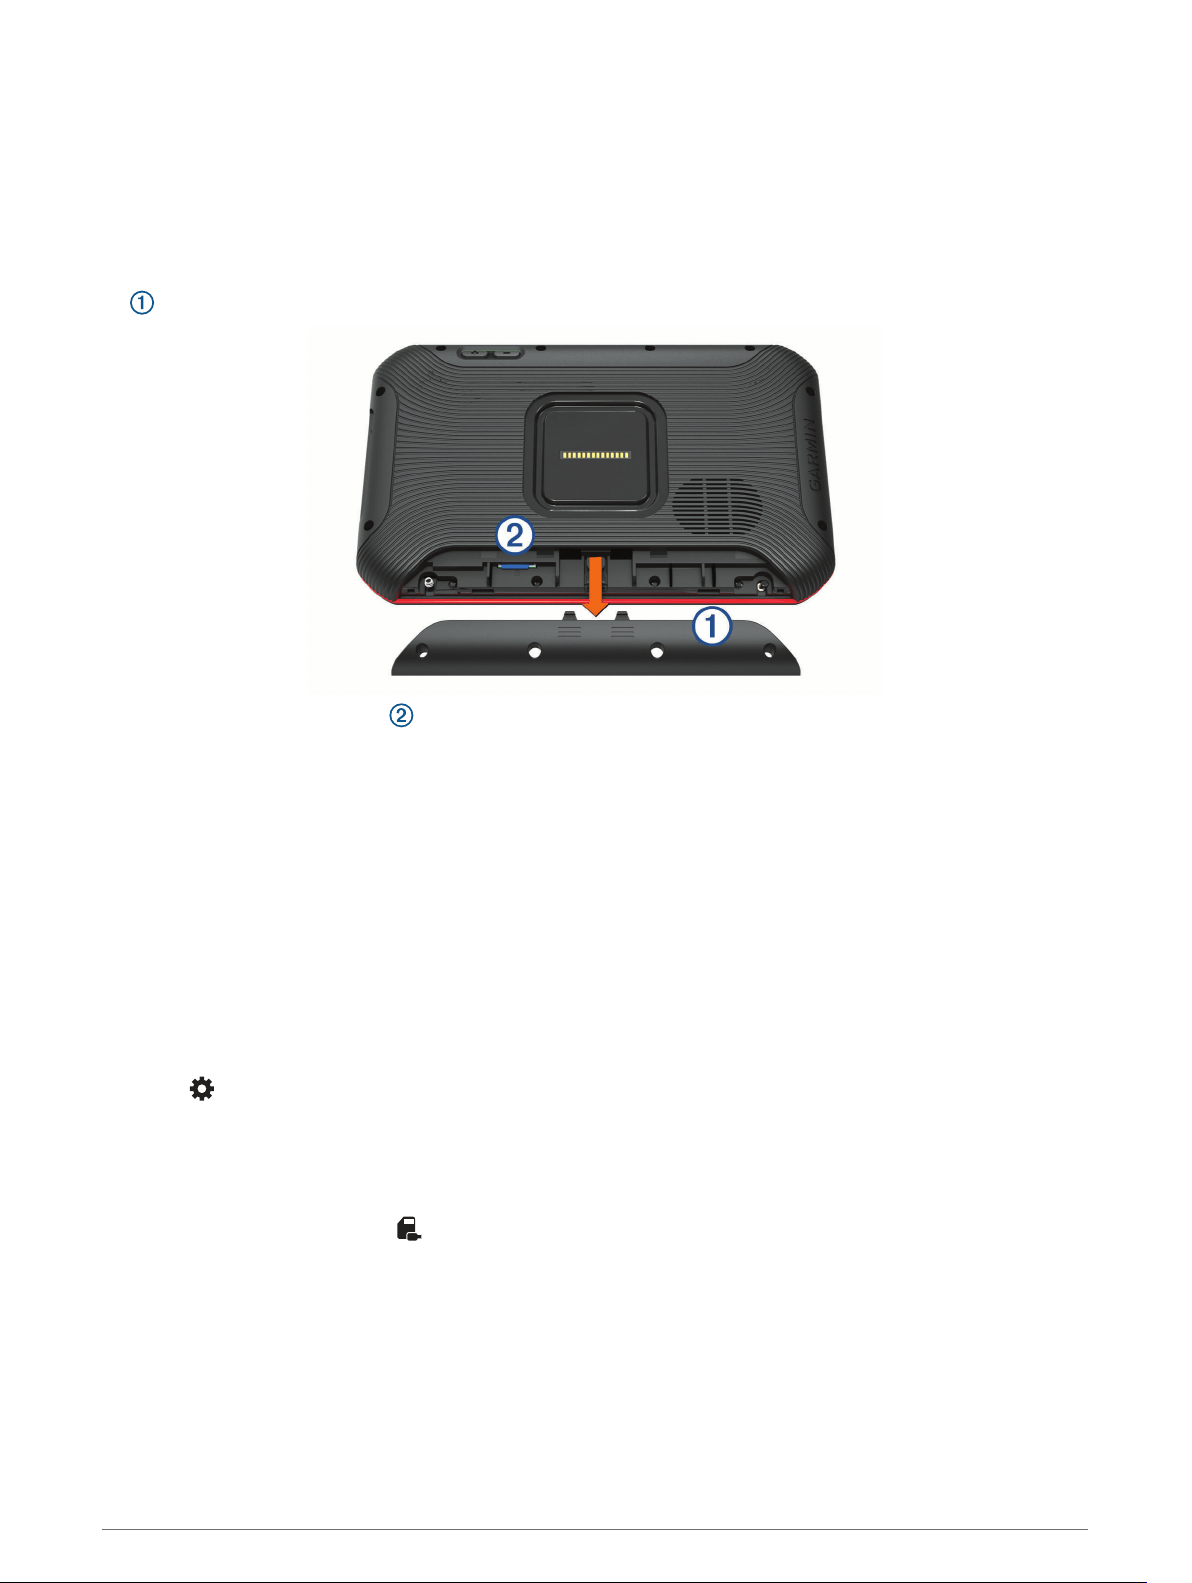
Replacing the Memory Card
You can replace the memory card to increase the storage capacity or to replace a card that has reached the
end of its useful life. The camera requires a microSD memory card from 32 to 256 GB with a speed rating of
Class 10 or higher.
You can replace the memory card from either of the two memory card slots located on the device (Device
Overview, page 9).
1 To replace the memory card under the back panel, press on the two marked areas, and slide the back panel
down to open it.
2 Locate the memory card slot .
3 Press the existing memory card in until it clicks, and release it.
The existing memory card ejects from the slot.
4 Remove the existing card from the slot
5 Insert the new memory card into the slot.
6 Press the card in until it clicks.
7 Replace the panel, and slide it upward until the panel clicks into place.
Formatting the Memory Card
The device requires a memory card formatted using the FAT32 file system. You can use the device to format
your card using this file system.
You must format a brand new memory card if it is not formatted using the FAT32 file system.
NOTE: Formatting the memory card deletes all data on the card.
1 Select > Device Reset > Format memory card.
2 Select ERASE & FORMAT.
Deleting Videos from the Memory Card
You can delete videos from the device to clear space on the installed memory card.
1 From the home screen, select .
2 Select an option:
• To automatically delete all saved videos, select AUTO DELETE.
• To select the videos you want to delete, select SELECT VIDEOS.
3 If necessary, select the videos you want to delete, and select DELETE.
Appendix 27

Connecting the Device to Your Computer
You can connect the device to your computer using a USB cable.
1 Plug the small end of the USB cable into the port on the device.
2 Plug the larger end of the USB cable into a port on your computer.
Depending on your computer operating system, the device appears as either a portable device, a removable
drive, or a removable volume.
Transferring Data From Your Computer
1 Connect the device to your computer (Connecting the Device to Your Computer, page 28).
Depending on your computer operating system, the device appears as either a portable device, a removable
drive, or a removable volume.
2 On your computer, open the file browser.
3 Select a file.
4 Select Edit > Copy.
5 Browse to a folder on the device.
NOTE: For a removable drive or volume, you should not place files in the Garmin folder.
6 Select Edit > Paste.
Disconnecting the USB Cable
If your device is connected to your computer as a removable drive or volume, you must safely disconnect your
device from your computer to avoid data loss. If your device is connected to your Windows computer as a
portable device, it is not necessary to safely disconnect the device.
1 Complete an action:
• For Windows computers, select the Safely Remove Hardware icon in the system tray, and select your
device.
• For Apple
®
computers, select the device, and select File > Eject.
2 Disconnect the cable from your computer.
Purchasing Accessories
Go to garmin.com/accessories.
28 Appendix

Index
A
acceleration 19
accessories 28
alarm volume 21
audio 13
audio prompts 13
B
battery
charging 1, 7, 22, 26
maximizing 26
problems 26
Bluetooth technology, enabling 20
C
cables 2
charging the device 1, 7, 22, 26
cleaning, device 24, 26
cleaning the device 24
cleaning the touchscreen 24
computer, connecting 26, 28
D
data, backing up 11
deceleration 19
deleting, all user data 21
device care 24
display settings 20
E
EULAs 21
F
files, transferring 28
G
Garmin Express 24
updating software 23, 24
H
headset, pairing 20
home screen 10
I
icons, status bar 11
ID number 21
L
language 21
lap time 14
laps 19, 20
M
maps, updating 22
media volume 21
memory card 9, 26, 27
formatting 27
microSD card 9
installing 27
mount, removing 25
mounting, windshield 4
mounting the device 25
automobile 1, 7
suction cup 1, 7, 25
multi-factor authentication 11
N
notification volume 21
O
operating temperature 26
opportunities 17, 18
P
pairing, headset 20
pausing a drive 12
power cables 22
vehicle 1, 7
power key 9
profile
car 15
driver 15
R
race sessions 16
race track 11, 14, 15
removing mount 25
resetting, device 25
resetting the device 21
reviewing 16
laps 19
S
sessions
comparing 17
deleting 17
settings 13, 15, 20, 21
setup 2, 3, 6
software
updating 22–24
version 21, 25
sound 21
specifications 22
speed 19
starting a drive 12
suction cup 25
summary 16
T
theft, avoiding 25
time settings 21
touchscreen 10
travel history 21
troubleshooting 25, 26
U
unit ID 21
units of measure 15
updating
maps 22
software 22–24
USB, disconnecting 28
V
vehicle power cable 1, 7
video 16, 17
deleting 27
quality 26
volume 21
W
weather 11
Wi-Fi, connecting 20
Wi‑Fi 22
Index 29

support.garmin.com
GUID-16C78876-E016-40FD-8A0A-049BA52B462B v5May 2021