Documents: Go to download!
User Manual
- Owner's manual - (English, French, Spanish)

- PARTS
- INSTALLING/REPLACING THE GUIDE BAR AND CHAIN
- OPERATION
- Cutting Tips
- MAINTENANCE
- TROUBLESHOOTING
- DAILY CHECKLIST, CLEANING AND STORAGE
Table of contents
POLE CHAIN SAW USER MANUAL
PARTS
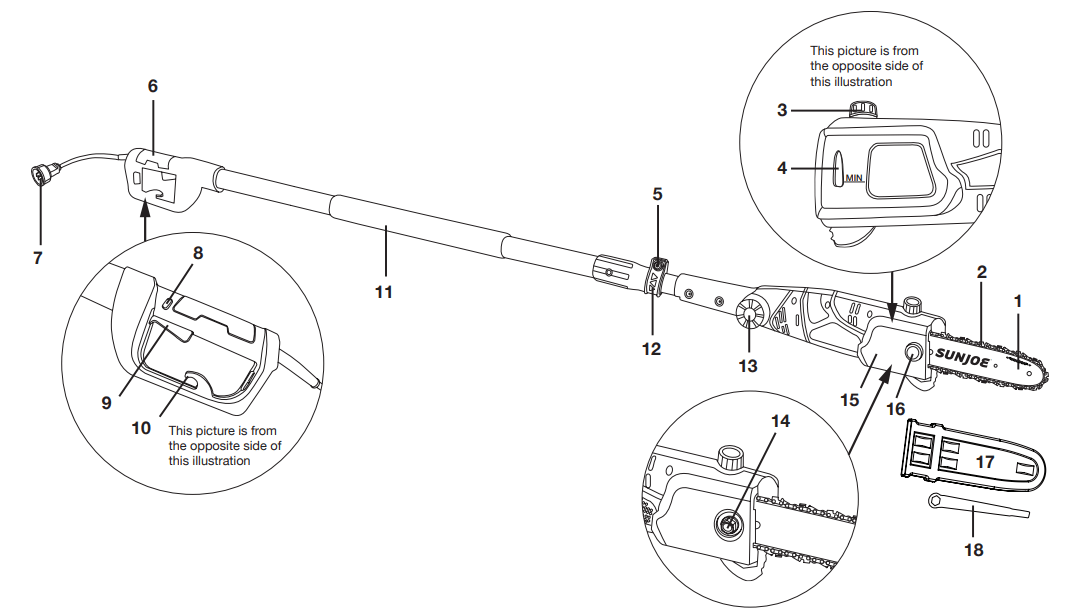
1. 10 in. guide bar
2. 10 in. chain
3. Oil tank cap
4. Oil level indicator window
5. Cam-lock nut for telescoping pole
6. Rear handle
See other models: 24V-HCS-CT 24V-HCS-LTE 24V-PS8-CT 24V-PS8-LTE SPX1500
7. Appliance cord
8. Safety lock button
9. Trigger switch
10. Extension cord restraint hook
11. Pole foam grip
12. Cam-lock for telescopic pole
13. Multi-angle head adjustment dial
14. End cover nut (beneath the cap)
15. Chain/sprocket end cover
16. End cover nut cap
17. Cutting bar sheath
18. Hex key wrench/blade screwdriver
INSTALLING/REPLACING THE GUIDE BAR AND CHAIN
Tools and supplies required:
• Dual-tipped hex key wrench/blade screwdriver (supplied)
• Heavy-duty work gloves
NOTE: When replacing the guide bar and chain, use only identical replacement parts. Make sure the pole chain saw is disconnected from the power supply before proceeding with installation.
1. Using the supplied flat-tip blade screwdriver, remove the end cover nut cap from the chain/sprocket end cover to expose the end cover nut (Figs. 1 & 2).
TIP: When replacing the chain, slide on the cutting bar sheath temporarily for added protection.

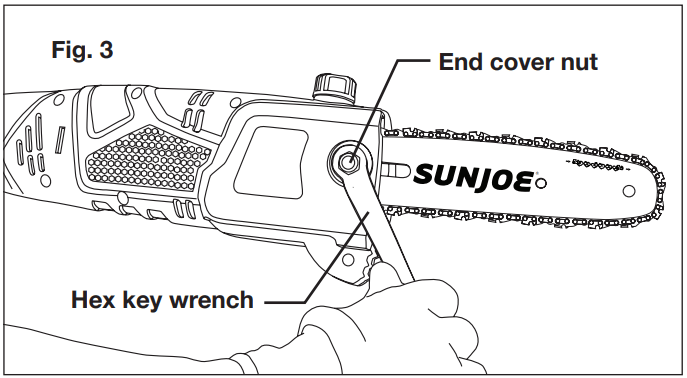
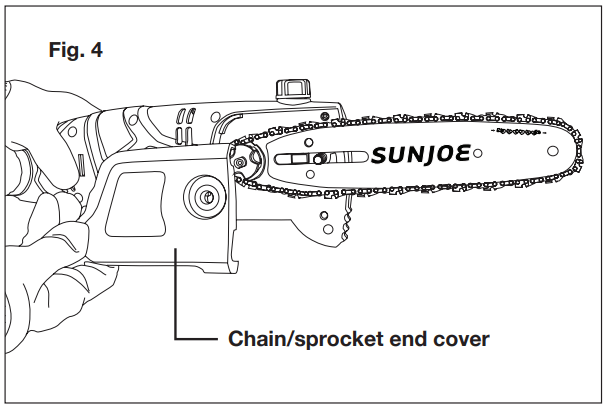
2. Using the supplied hex key wrench, unscrew the end cover nut and remove the chain/sprocket end cover (Figs. 3 & 4).
3. Remove the cutting bar and chain from the mounting surface (Fig. 5).

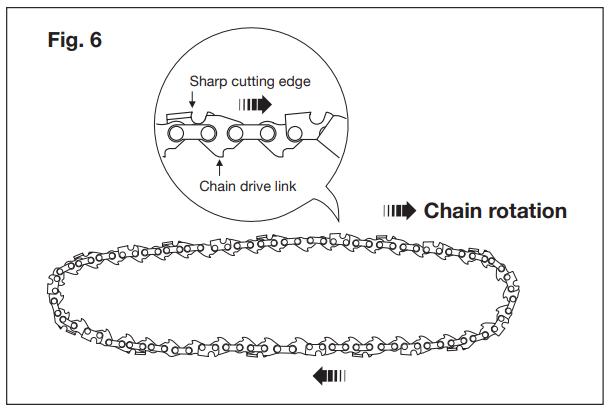
4. Remove the old chain from the bar. 5. Lay out the new saw chain in a loop and straighten any kinks. THE SHARP SIDE OF THE TEETH MUST FACE AWAY FROM YOU IN THE DIRECTION OF THE CHAIN ROTATION INDICATED ON THE GUIDE BAR  . If the teeth face backwards, turn the loop over (Fig. 6).
6. Starting at the tip, mount the chain drive links into the bar groove, leaving a loop at the back of the bar. The chain will loosely fit until it is placed on the sprocket (Figs. 7 & 8). NOTE: Make certain of the direction of the chain  . If the chain is mounted backwards, the saw will vibrate abnormally and will not cut.

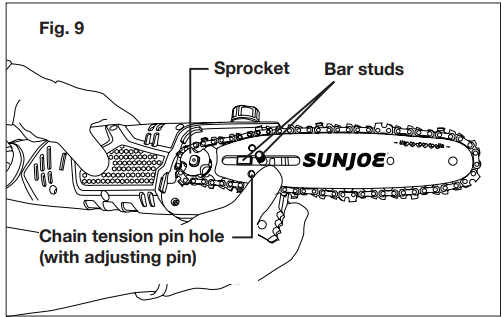
7. Hold the chain in position on the bar and place the loop around the sprocket. Fit the bar flush against the mounting surface so that the bar studs are in the long slot of the bar and the adjusting pin is in the chain tension pin hole (Fig. 9).
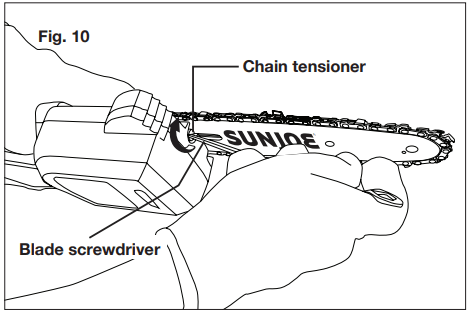
8. Adjust the chain tension as needed by adjusting the chain tensioner screw with the supplied flat-tip blade screwdriver. Make sure to align the chain tensioner screw with the pin hole (Fig. 10).
9. Replace the chain/sprocket end cover by inserting the rear tab first into the rear tab slot and position the cover onto the saw head. Tighten the end cover nut, but leave the bar free to move for tension adjustment (Fig. 11).

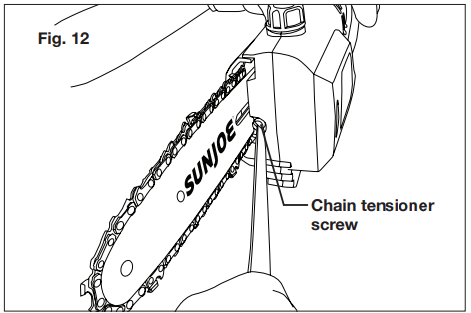
10. Remove all slack from the chain by turning the chain tensioner screw clockwise until the chain seats snugly against the bar with the drive links in the bar groove (Fig. 12). NOTE: The chain is correctly tensioned when there is no sag on the underside of the guide bar; the chain is snug, but can be rotated by hand without binding.
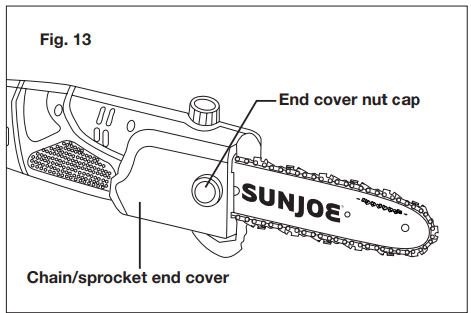
11. Tighten the end cover nut using the hex key wrench (Fig. 11), then replace the end cover nut cap to secure the chain/sprocket end cover (Fig. 13).
NOTE: If the chain is too tight, it will not rotate. Loosen the end cover nut slightly and turn the chain tensioner 1/4 turn counterclockwise. Lift the tip of the guide bar up and retighten the end cover nut. Ensure that the chain can be rotated by hand without binding.
NOTE: A new chain tends to stretch; check the chain tension frequently, and adjust tension as required.
OPERATION
Starting and Stopping
CAUTION! • Before starting the saw, remove the oil tank cap and add bar & chain oil to the top of the oil level window (Fig. 14). One minute of use will consume approximately 0.15 fl oz (4 ml) of oil. Refill when the oil level drops to 1/4 of a tank.
NOTE: Your electric pole chain saw is equipped with an automatic oil pump for bar and chain oiling. You must add bar and chain oil or your pole chain saw will not function.

Starting, stopping, and restarting an electric motor repeatedly within a few seconds can generate a great deal of heat and damage the motor. To protect the life of your electric pole chain saw, always wait at least five seconds after stopping before restarting the saw.
WARNING! Be certain that the chain is not in contact with any object when you start the motor.
WARNING! Keep hands away from chain. Keep hands on handles. Do not overreach.
A good, firm grip on the tool using both hands will help you maintain control. When using the pole chain saw, place one hand on the front handle foam grip and the other hand on the rear handle with your thumbs and fingers encircling the pole and handle. A firm grip combined with proper positioning of the handle against your body will help you maintain control of the saw. Do not let go of the pole chain saw while it is in operation.
WARNING! Do not operate the pole chain saw in a tree, on a ladder, or on a scaffold. Using the tool under such circumstances is extremely dangerous.
CAUTION! The chain will continue to run for several seconds after turning off the tool.
Do not use the pole chain saw under wet conditions. Use extreme caution when cutting small brush, saplings, or limbs under tension because slender and tense material may catch the saw and be whipped toward you, pull you off balance, or spring back.
Do not use the pole chain saw to cut vines and/or small underbrush.
WARNING! Do not let familiarity with this type of tool prevent you from taking all necessary precautions. Remember that a careless fraction of a second is sufficient to inflict serious injury.
WARNING! Do not cut trees near electrical wires.
WARNING! Failure to lubricate the chain will cause damage to the bar and chain. Use only a good quality bar and chain oil designed specifically for use with chain saws. One minute of use will consume approximately 0.15 fl oz. (4 ml) of oil.
NOTE: It is normal for oil to seep from the saw when not in use. To prevent seepage, empty the oil tank after each use. When storing the unit for a long period of time (3 months or longer), be sure the chain is lightly lubricated; this will prevent rust on the chain and bar sprocket.
WARNING! Be aware of the cord while operating the saw. Keep the cord away from the chain. Be careful not to trip over the extension cord.

WARNING! Kickback may occur when the moving chain contacts an object at the upper portion of the tip of the guide bar or when the wood closes in and pinches the chain saw in the cut (Fig. 15). Contact at the upper portion of the tip of the guide bar can cause the chain to dig into the object and stop the chain for an instant. The result is a lightning-fast reverse reaction, which kicks the guide bar up and back toward the operator. If the chain saw is pinched along the top of the guide bar, the guide bar can be driven rapidly back toward the operator. Either of these reactions can cause loss of saw control, which can throw the operator off balance and result in serious injury. Do not rely exclusively upon the safety devices built into the saw. As a user, you should take several precautions to keep your cutting jobs free from accident or injury.
1. Prior to each cutting session, run through the daily checklist
2. Connect the electric pole chain saw to a working 120 V outlet using a heavy-duty outdoor extension power cord.
3. Make a loop in the power cord and push it up through the hole in the handle and around the cord restraint hook (Fig. 16), then connect the extension cord to the appliance cord.
4. To turn the tool ON, push and hold the safety lock button (located on the rear handle) with your thumb and then squeeze the trigger with your fingers. Once the tool is running, you can release the safety lock button (Fig. 16).
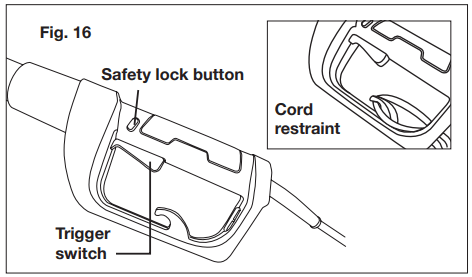
5. To turn the tool OFF, release the trigger switch (Fig. 16). NOTE: Do not press the trigger switch until you are ready to make a cut.
Adjusting the Telescoping Pole
1. Disconnect the saw from the power supply.
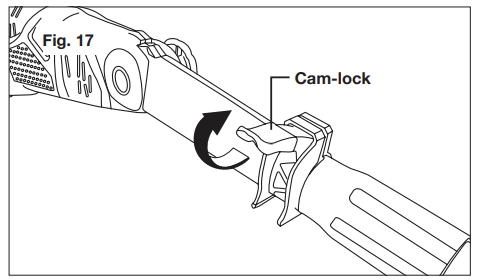
2. Unclip the cam-lock to release the pole (Fig. 17).
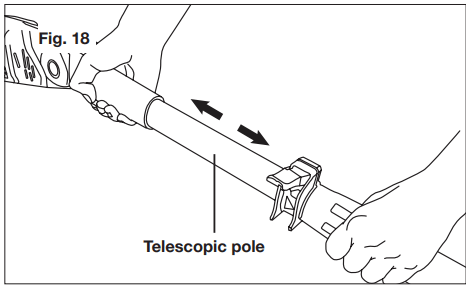
3. Extend the pole to the desired length (Fig. 18).
NOTE: Push poles toward each other to shorten the pole or pull them away from each other to lengthen the pole. Only extend the pole to the minimum length required to reach the limb to be cut.
4. Lock the pole in position by closing the cam-lock (Fig. 19), and ensure that the pole is secure. If the pole telescopes when the cam-lock is closed, the nut may need tightening.
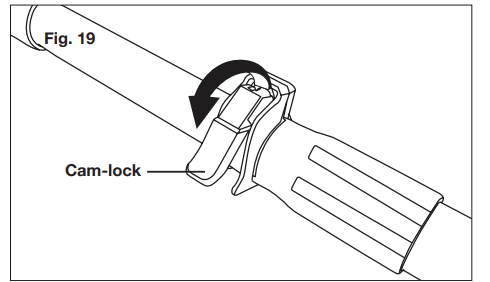
WARNING! Failure to lock the telescopic pole cam-lock as directed could result in personal injury.
Tightening the Bolt
The retaining bolt may need tightening to secure the telescopic pole in place.
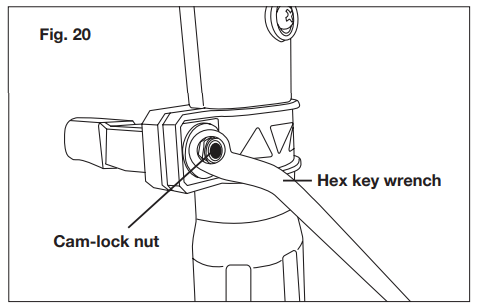
1. Unclip the cam-lock. Using the hex key wrench, tighten the cam-lock nut, then close the cam-lock. Ensure that the pole is secure. The wrench may be required to loosen the cam-lock nut if you need to adjust the pole to a different height (Fig. 20).
Adjusting the Multi-Angle Head
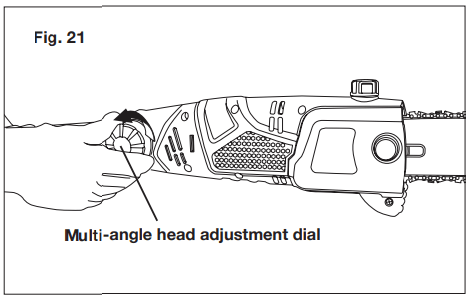
The pole chain saw head can be rotated for different cutting angles from 0º to 30º.
1. Disconnect the pole chain saw from the power supply.
2. Turn the multi-angle head adjustment dial counterclockwise to loosen the head (Fig. 21).
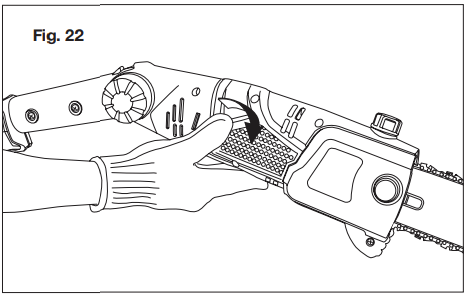
3. Adjust the head to the desired position (Fig. 22).
4. Turn the dial clockwise to tighten and secure the head in place (Fig. 23).
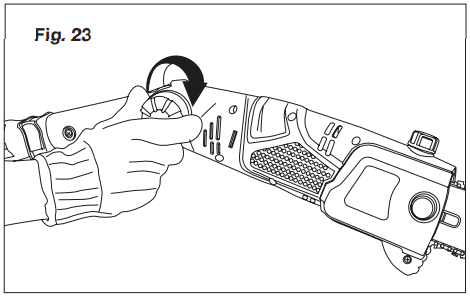
NOTE: Failure to properly secure the head adjustment dial may result in personal injury and/or property damage.
Cutting Tips
Proper Cutting Stance
- Balance your weight with both feet on solid ground.
- Your body should always be to the left of the chain line.
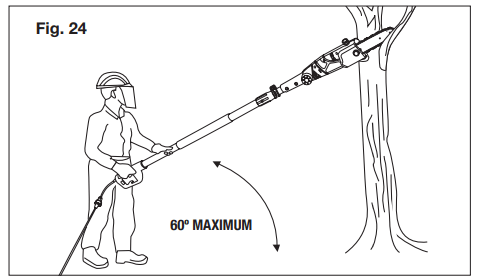
- The most typical cutting application is to position the unit at an angle of 60° or less depending on the specific situation (Fig. 24). As the angle of the pole chain saw shaft to the ground increases, the difficulty of making the first cut (from the underside of limb) increases.
Basic Cutting Procedure
This unit is designed for trimming small branches and limbs up to 9.5 in. (24.1 cm) in diameter depending on the wood type. Practice cutting a few small limbs using the following technique to get the “feel” of using the saw before you begin a major sawing operation.
- Take the proper stance in front of the tree with the saw OFF (Fig. 24).
- Squeeze the trigger and let the chain accelerate to full speed before entering the cut.
- Keep the saw running the entire time you are cutting; maintain a steady speed.
- Allow the chain to cut for you; exert only light downward pressure. If you force the cut, damage to the bar, chain, or unit can result.
- PUSH and PULL – This reaction force is always opposite to the direction the chain is moving when it is in contact with the wood. Thus, the operator must be ready to control the PULL when cutting on the bottom edge of the bar, and PUSH when cutting along the top edge.
- Do not put pressure on the saw at the end of the cut.
Pruning
Pruning is the process of trimming limbs from a live tree.
- Remove long branches in several stages.
- Cut lower branches first to allow the top branches more room to fall.
- When pruning trees, it is important not to make the finishing cut next to the main limb or trunk until you have cut off the farthest lying limb. This will reduce the weight and prevent stripping the bark from the main member.
- Under cut the branch 1/3 through for your first cut. Your second cut should over cut to drop the branch off Fig. 25). Be prepared to balance the weight of the pole chain saw when the limb falls.

- Now make your finishing cut from the topside of the branch smoothly and neatly against the main member so the bark will grow back to seal the wound.
- Release the trigger ON/OFF switch as soon as the cut is completed. Failure to follow proper cutting procedures will result in the bar and chain binding and becoming pinched or trapped in the limb.
Limbing
Limbing is the process of removing branches from a fallen tree.
- You should cut limbs one at a time. Remove the cut limbs from the work area often to help keep the work area clean and safe.
- Cut branches under tension from the bottom up to avoid binding the pole chain saw.
- Keep the tree between you and the pole chain saw while limbing. Cut from the side of the tree opposite the branch you are cutting.
If the Saw Becomes Pinched or Trapped
1. Wait for the blade to stop, wait five minutes for the saw to cool, unplug the power cord, and wear gloves to protect your hands from the chain teeth.
2. If you can reach the limb from the ground, lift the limb while holding the saw. This should release the “pinch” and free the saw.
3. If the saw is still trapped, call a professional for assistance.
Minimize Kickback
Kickback may occur when the moving chain contacts an object at the upper portion of the tip of the guide bar or when the wood closes in and pinches the pole chain saw in the cut. Contact at the upper portion of the tip of the guide bar can cause the chain to dig into the object and stop the chain for an instant. The result is a lightning-fast reverse reaction, which kicks the guide bar up and back toward the operator. If the pole chain saw is pinched along the top of the guide bar, the guide bar can be driven rapidly back toward the operator.
Either of these reactions can cause loss of saw control, which can result in serious injury. Do not rely exclusively upon the safety devices built into the saw. As a pole chain saw user, you should take several steps to keep your cutting jobs free from accident or injury.
Take the following precautions to minimize kickback:
- Before you start the unit, make sure the pole chain saw is not contacting any object.
- Always grip the pole and handle firmly with both hands when the unit is running. Place one hand on the pole and your other hand on the rear handle with your thumbs and fingers encircling the pole and handle. A firm grip combined with proper positioning of the handle against your body will help you maintain control of the saw if kickback occurs.
- Make sure that the area in which you are cutting is free from obstructions.
- Do not let the kickback danger zone area of the guide bar contact a log, branch, fence, or any other obstruction that could be hit while you are operating the pole chain saw Fig. 15).
- Always cut with the unit running at full speed. Fully squeeze the ON/OFF trigger and maintain a steady cutting speed.
- Wear non-slip gloves for maximum grip and protection.
- Extend the pole only to the length required to reach the limb cut. Do not extend the rear handle above waist height.
MAINTENANCE
WARNING! For your safety and that of others:
- Correct maintenance is essential to maintain the original efficiency and safety of the machine over time.
- Keep all nuts, bolts, and screws tight to be sure the equipment is in safe working condition.
- Never use the machine with worn or damaged parts.
- Damaged parts are to be replaced and never repaired.
- Only use original Snow Joe® + Sun Joe® replacement parts. Parts that are not of the same quality can seriously damage the equipment, compromise safety, and invalidate the warranty
WARNING! Always unplug the power cord before performing any adjustments, maintenance, or repairs to your pole chain saw.
- Use protective gloves when handling the bar and chain.
- Keep the bar encased in its sheath, except when working directly on the bar or the chain.
- Never dispose of oils or other polluting materials in unauthorized places.
Motor Cooling
To avoid overheating and damage to the motor, always keep the cooling air vents clean and free of sawdust and debris.
Chain Tension
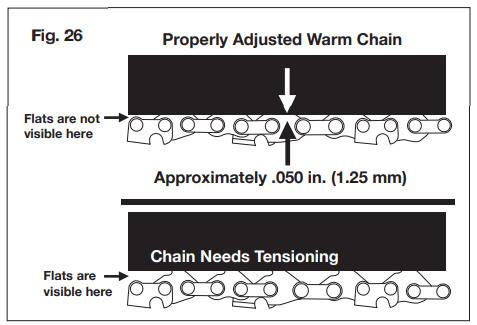
Check the chain tension before using the saw when the chain is cold. The correct tension of a cold chain is when there is no slack on the underside of the guide bar; the chain is snug, but you can rotate it by hand without binding.
During normal saw operation, the temperature of the chain will increase. The drive links of a correctly tensioned warm chain will hang approximately 0.050 in. (1.25 mm) out of the bar groove (Fig. 26). Be aware that a chain tensioned while warm, may be too tight upon cooling. Check the “cold tension” before next use. The chain must be re-tensioned whenever the flats on the drive links hang out of the bar groove (Fig. 26).
NOTE: A new chain tends to stretch. Check the chain tension frequently and re-tension as needed.
Nuts and Screws
Periodically check that all the nuts and screws are tightened securely. Check that the cam-lock that controls the telescoping pole is intact and in proper working order.
Chain Sharpening
WARNING! To ensure that the chain saw works safely and efficiently, it is essential that the cutting components are well-sharpened. It is highly recommended to replace the chain once it loses its ability to cut cleanly and safely. It is possible, however, to sharpen the existing chain if the sharpening is carefully performed. Any work on the chain and bar requires specific experience and special tools.
Sharpening is necessary when: the sawdust looks like dust; cutting becomes more difficult; the cut is not straight; vibrations increase.
An authorized service center will sharpen the chain using the right tools to ensure minimum removal of material and even sharpness on all the cutting edges. You need a certain amount of skill and experience to avoid damaging the cutting edges.
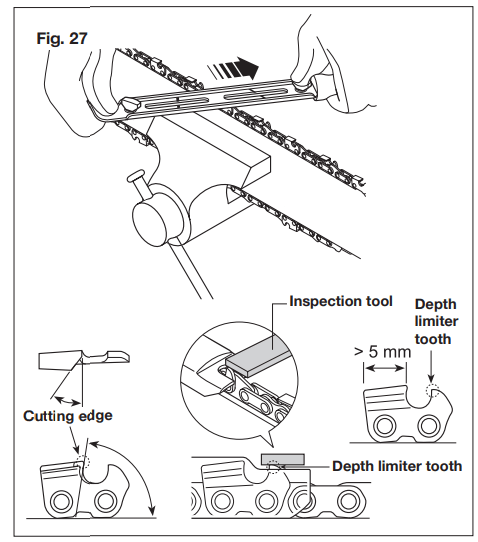
Sharpen the chain as follows (Fig. 27):
- Secure the bar firmly, with the chain mounted, in a suitable vise.
- Tighten the chain if it is loose.
- Mount the file in the guide and then insert it in the tooth at a constant angle from the cutting edge.
- Sharpen in a forward motion a few times and repeat this on all the cutting edges facing the same way (right or left).
- To move the chain forward, use a screwdriver.
- Turn the bar over in the vise and repeat on all the other cutting edges.
- Check that the depth limiter tooth does not stick out farther than the inspection tool and file any projecting parts with a flat file, rounding off the edges (Fig. 27).
- After sharpening, remove all traces of filing and dust and lubricate the chain in an oil bath. Replace the chain whenever: the length of the cutting edges decreases to 5 mm or less; there is too much play between the links and the rivets.
Guide Bar Maintenance
When the guide bar shows signs of wear, turn it over on the saw to distribute the wear for maximum bar life. Feathering or burring of the bar rails is a normal process of bar wear. You should smooth such faults with a file as soon as they occur.
Replace a bar with any of the following faults:
- wear inside the bar rails permitting the chain to lay over sideways
- bent guide bar
- cracked or broken rails
- spread rails
Turn the saw over, check the underside of the guide bar, and make sure that the lubrication holes and chain groove are free from impurities.
Chain Sprocket
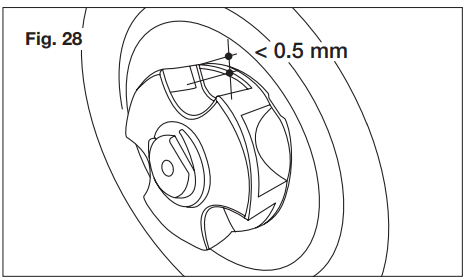
Regularly check the condition of the sprocket and replace it when wear exceeds 0.5 mm (Fig. 28). Do not mount a new chain with a worn sprocket or vice-versa.
TROUBLESHOOTING
| Problems | Corrective Action |
| The saw motor fails to start |
• Check that you installed the extension cord properly into the pole saw power cord receptacle and that you plugged the extension cord into a live 120 V outlet. • Make sure that you fully depress and hold the safety lock button before squeezing the ON/OFF trigger switch. |
| The saw runs, but the chain speed is low | • The chain is too tight; re-tension. |
| Bar and chain running hot and smoking |
• The chain tension is too tight; re-tension. • The chain oil tank is empty; refill. • The lubrication holes are plugged; clean them out |
| The saw motor runs, but the chain is not turning |
• The chain tension is too tight; re-tension. • The guide bar or chain is damaged; inspect and replace the damaged part. |
DAILY CHECKLIST, CLEANING AND STORAGE
Daily Checklist
To help maintain your electric pole chain saw for optimum performance, we recommend you complete this checklist prior to each work session. mWARNING! Do not plug in the power cord until you have completed all of the daily checks.
- Inspect for any visible damage to the chain, guide bar, or motor housing.
- Inspect the oil port and guide bar rails and clean them to remove any debris.
- Check the chain tension.
- Check the chain teeth for sharpness.
- Check the bar and chain oil level; fill with only new chain oil specifically formulated for chain saws.
NOTE: If you notice anything unusual, such as a vibration or odd sound, shut the saw OFF immediately. Remove the power cord and check the saw for any damage.
CAUTION!
Remove the power cord and wait at least five minutes for the saw to cool before servicing or storing your unit.
If you drop the saw, carefully inspect it for damage. If the guide bar is bent, the housing is cracked, the handle is broken, or if you see any other condition that may affect the saw’s operation, DO NOT USE the tool.
Cleaning
Use only mild soap and a damp cloth to clean the pole chain saw. Never let any liquid get inside the motor housing and NEVER immerse any part of the saw housing in liquid.
Storage
Ensure that the guide bar cover is in place when storing. Do not store the pole chain saw near chemicals, such as fertilizers or other harsh solvents. Do not expose the plastic parts of the unit to brake fluids, gasoline, petroleum-based products, penetrating oils, or the like. These products are often highly corrosive and may cause permanent damage, weaken, or destroy the plastic parts of your pole chain saw.
• When not in use, your electric pole chain saw should be stored indoors in a dry and high or locked-up place, out of the reach of children.
