Installation and User Manual
Instrucciones de instalación y
Manual del usuario
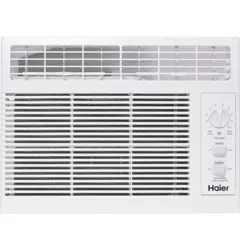
QHV05LX
Room Air Conditioner
Acondicionadores de aire Para Sala
49-7813
01-18 GEA


TABLE OF CONTENTS
ENGLISH
AIR CONDITIONER SAFETY ................................................................................. 2
PARTS AND FEATURES ...................................................................................... 3
INSTALLATION REQUIREMENTS ............................................................................ 3
Tools and Parts .............................................................................................. 3
Electrical Requirements ...................................................................................... 4
INSTALLATION INSTRUCTIONS ............................................................................. 5
Step 1 - Unpack Air Conditioner .............................................................................. 5
Step 2 -Window Requirements ............................................................................... 5
Step 3 - Storm Window Requirements ........................................................................ 5
Step 4 - Prepare the Air Conditioner .......................................................................... 6
Step 5 - Install the Air Conditioner in the Window ............................................................. 6
Step 6 - Install Window Locking Bracket and Foam Top Window Gasket ........................................ 7
Step 7 - Complete Installation ............................................................................... 7
CONTROL PANEL ........................................................................................... 8
AIR CONDITIONER CARE ................................................................................... 9
Cleaning ....................................................................................................9
Air Filters .................................................................................................... 8
Storage ..................................................................................................... 9
TROUBLESHOOTING . . . . . . . . . . . . . . . . . . . . . . . . . . . . . . . . . . . . . . . . . . . . . . . . . . . . . . . . . . . . . . . . . . . . . . . . . . . . . . . . . . . . . . 10
LIMITED WARRANTY ......................................................................................11
RECORD KEEPING ......................................................................................... 1
1
RECORD KEEPING
Thank you for purchasing this Haier product. This user manual will
help you get the best performance from your new air conditioner.
For future reference, record the model and serial number located on
the label on the side of your air conditioner, and the date of purchase.
Staple your proof of purchase to this manual to aid in obtaining war-
ranty service if needed.
_______________________________________
Model number
_______________________________________
Serial number
_______________________________________
Date of purchase
READ AND SAVE THESE INSTRUCTIONS
WARNING
For your safety, the information in this manual must be followed to minimize the risk of fire, electric
shock or personal injury.
Ŷ Use this appliance only for its intended purpose as
described in this Owner’s Manual.
Ŷ This air conditioner must be properly installed in
accordance with the Installation Instructions before it is
used.
Ŷ Never unplug your air conditioner by pulling on the
power cord. Always grip plug firmly and pull straight out
from the receptacle.
Ŷ Replace immediately all electric service cords that have
become frayed or otherwise damaged. A damaged
power supply cord must be replaced with a new power
supply cord obtained from the manufacturer and
not repaired. Do not use a cord that shows cracks or
abrasion damage along its length or at either the plug or
connector end.
Ŷ Turn the unit OFF and unplug your air conditioner before
cleaning.
Ŷ GE Appliances does not support any servicing of the air
conditioner. We strongly recommend that you do not
attempt to service the air conditioner yourself.
Ŷ For your safety…do not store or use combustible
materials, gasoline or other flammable vapors or liquids
in the vicinity of this or any other appliance.
Ŷ All air conditioners contain refrigerants, which under
federal law must be removed prior to product disposal.
If you are getting rid of an old product with refrigerants,
check with the company handling disposal about what
to do.
Ŷ If the receptacle does not match the plug, the receptacle
must be changed out by a qualified electrician.
Ŷ These R410A air conditioning systems require
contractors and technicians to use tools, equipment and
safety standards approved for use with this refrigerant.
DO NOT use equipment certified for R22 refrigerant
only.
WARNING
USE OF EXTENSION CORDS
RISK OF FIRE. Could cause serious injury or death.
Ŷ DO NOT use an extension cord with this Window Air
Conditioner.
Ŷ DO NOT use surge protectors or multi-outlet adaptors
with this Window Air Conditioner.
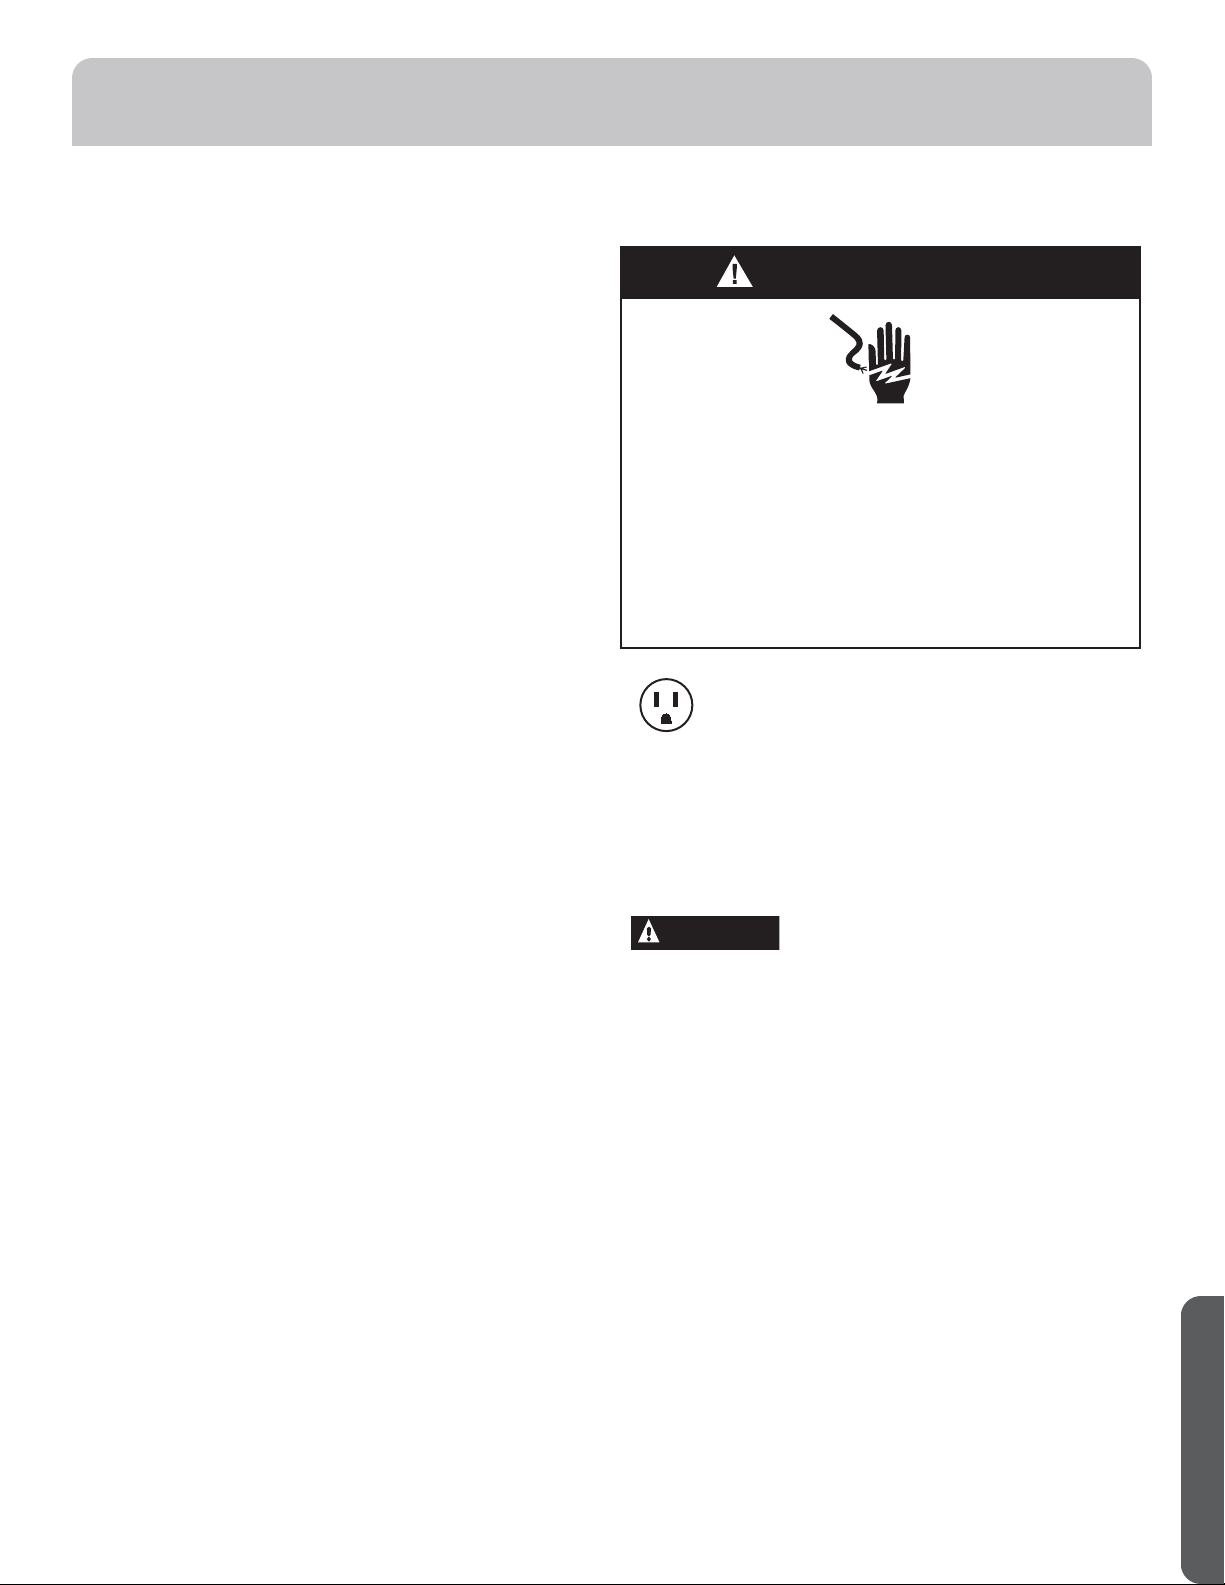
HOW TO CONNECT ELECTRICITY
'RQRWXQGHUDQ\FLUFXPVWDQFHVFXWRUUHPRYHWKHWKLUG
JURXQGSURQJIURPWKHSRZHUFRUG)RUSHUVRQDOVDIHW\
WKLVDSSOLDQFHPXVWEHSURSHUO\JURXQGHG
DO NOT use an adapter plug with this appliance.
7KHSRZHUFRUGRIWKLVDSSOLDQFHLVHTXLSSHGZLWKD
SURQJJURXQGLQJSOXJZKLFKPDWHVZLWKDVWDQGDUG
SURQJJURXQGLQJZDOORXWOHWWRPLQLPL]HWKHSRVVLELOLW\
RIHOHFWULFVKRFNKD]DUGIURPWKLVDSSOLDQFH
3RZHUFRUGLQFOXGHVDFXUUHQWLQWHUUXSWHUGHYLFH$
WHVWDQGUHVHWEXWWRQLVSURYLGHGRQWKHSOXJFDVH7KH
GHYLFHVKRXOGEHWHVWHGRQDSHULRGLFEDVLVE\ILUVW
SUHVVLQJWKHTESTEXWWRQDQGWKHQWKHRESETEXWWRQ
ZKLOHSOXJJHGLQWRWKHRXWOHW,IWKHTESTEXWWRQGRHV
QRWWULSRULIWKHRESETEXWWRQZLOOQRWVWD\HQJDJHG
GLVFRQWLQXHXVHRIWKHDLUFRQGLWLRQHUDQGFRQWDFWD
TXDOLILHGVHUYLFHWHFKQLFLDQ
+DYHWKHZDOORXWOHWDQGFLUFXLWFKHFNHGE\DTXDOLILHG
HOHFWULFLDQWRPDNHVXUHWKHRXWOHWLVSURSHUO\JURXQGHG
:KHUHDSURQJZDOORXWOHWLVHQFRXQWHUHGLWLV\RXU
SHUVRQDOUHVSRQVLELOLW\DQGREOLJDWLRQWRKDYHLWUHSODFHG
ZLWKDSURSHUO\JURXQGHGSURQJZDOORXWOHW
7KHDLUFRQGLWLRQHUVKRXOGDOZD\VEHSOXJJHGLQWRLWV
RZQLQGLYLGXDOHOHFWULFDORXWOHWZKLFKKDVDYROWDJHUDWLQJ
WKDWPDWFKHVWKHUDWLQJSODWH
7KLVSURYLGHVWKHEHVWSHUIRUPDQFHDQGDOVRSUHYHQWV
RYHUORDGLQJKRXVHZLULQJFLUFXLWVZKLFKFRXOGFDXVHD
ILUHKD]DUGIURPRYHUKHDWHGZLUHV
6HHWKH,QVWDOODWLRQ,QVWUXFWLRQVElectrical
Requirements VHFWLRQIRUVSHFLILFHOHFWULFDOFRQQHFWLRQ
UHTXLUHPHQWV
AIR CONDITIONER SAFETY
ENGLISH
2
INSTALLATION REQUIREMENTS
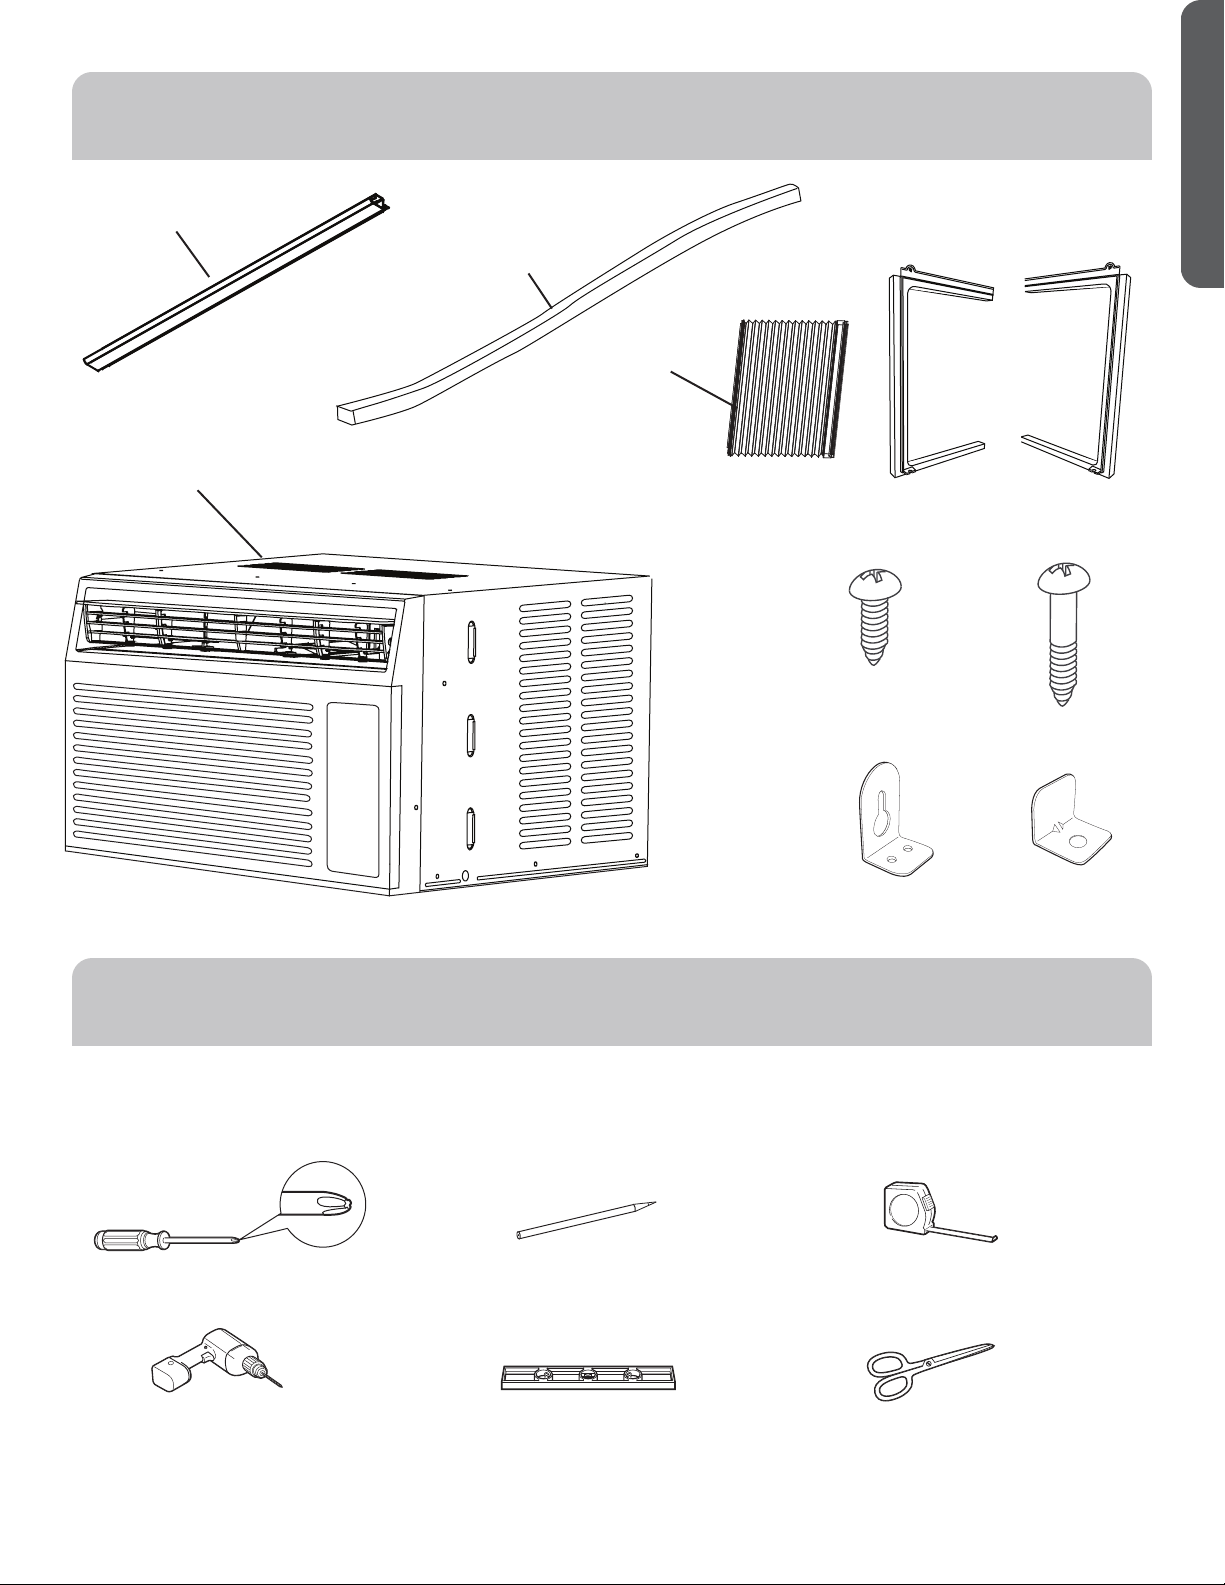
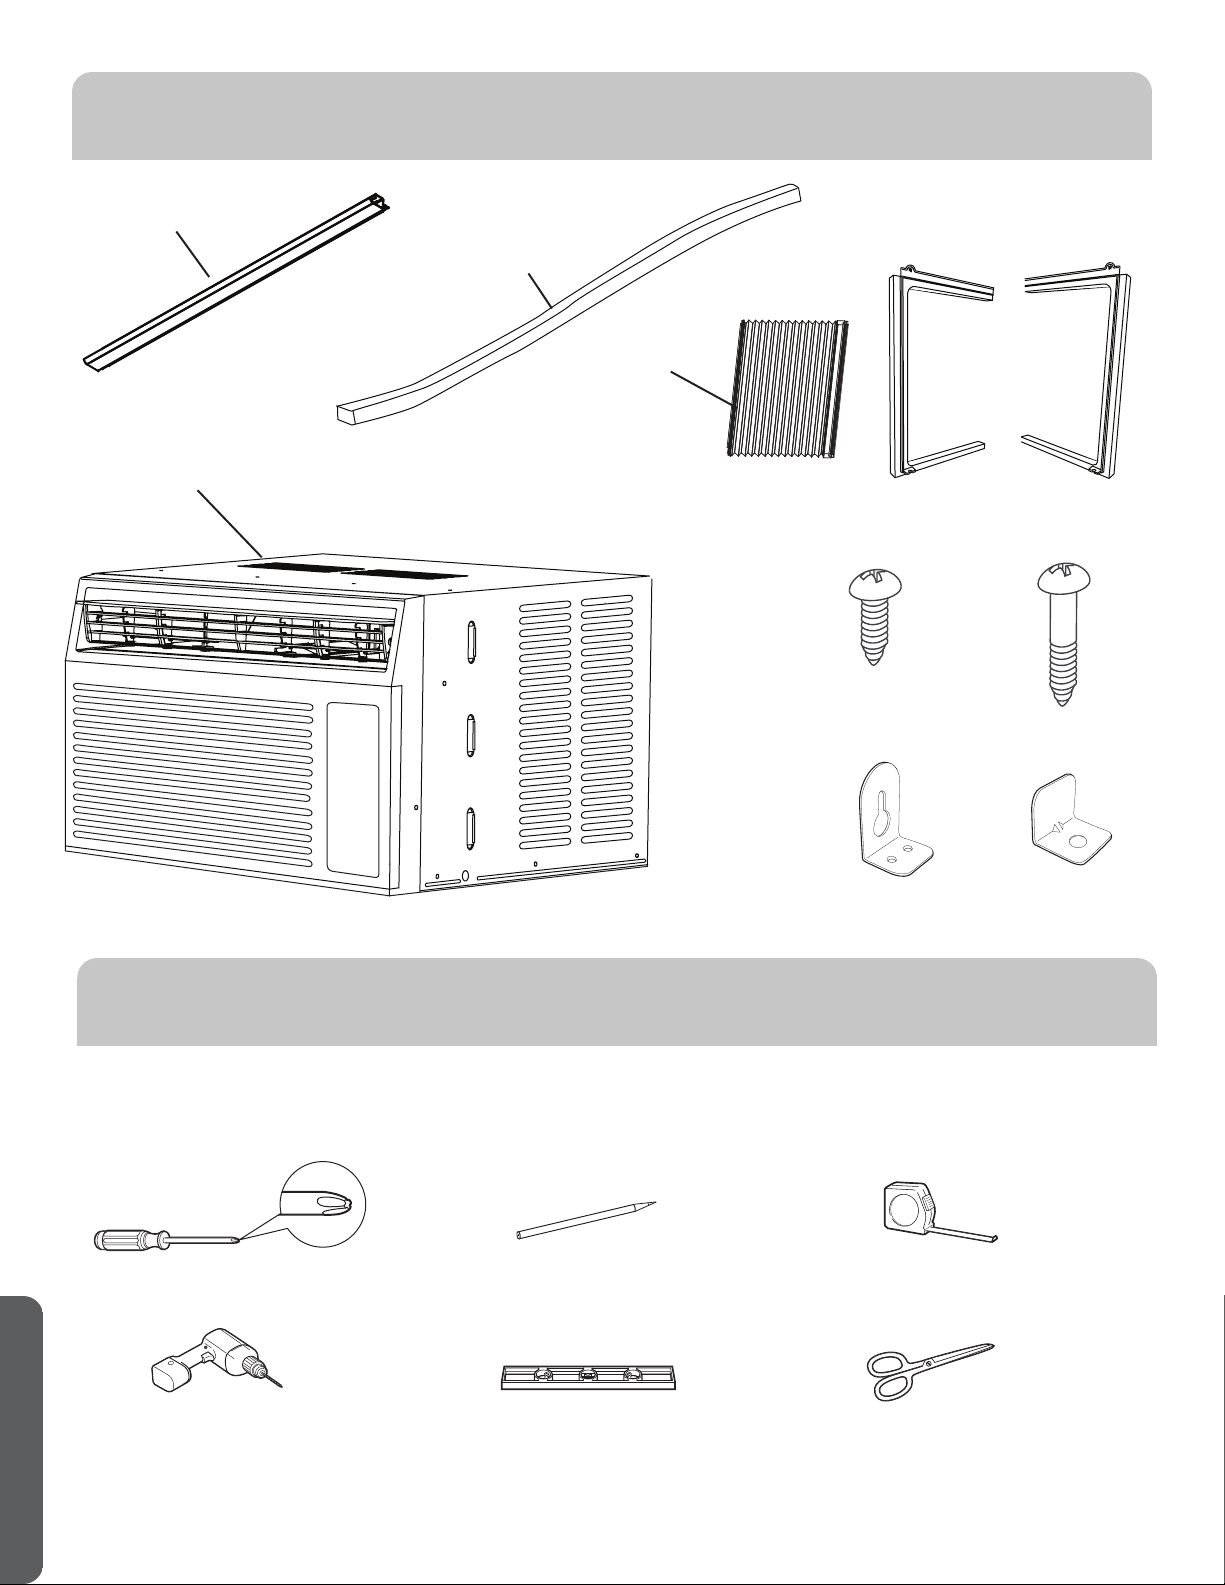
TOOLS YOU WILL NEED
Phillips head screwdriver
Ruler or tape measure
Pencil
Level
Scissors or knife
Drill and 1/8” drill bit
PARTS AND FEATURES
ENGLISH
3
Side Curtain
Frame
Side Curtain
(2)
Top mounting rail
Air
conditioner
Left
Right
Foam top window
gasket
Type B (9)
Window locking
bracket (1)
Side Brackets (2)
Type A (3)
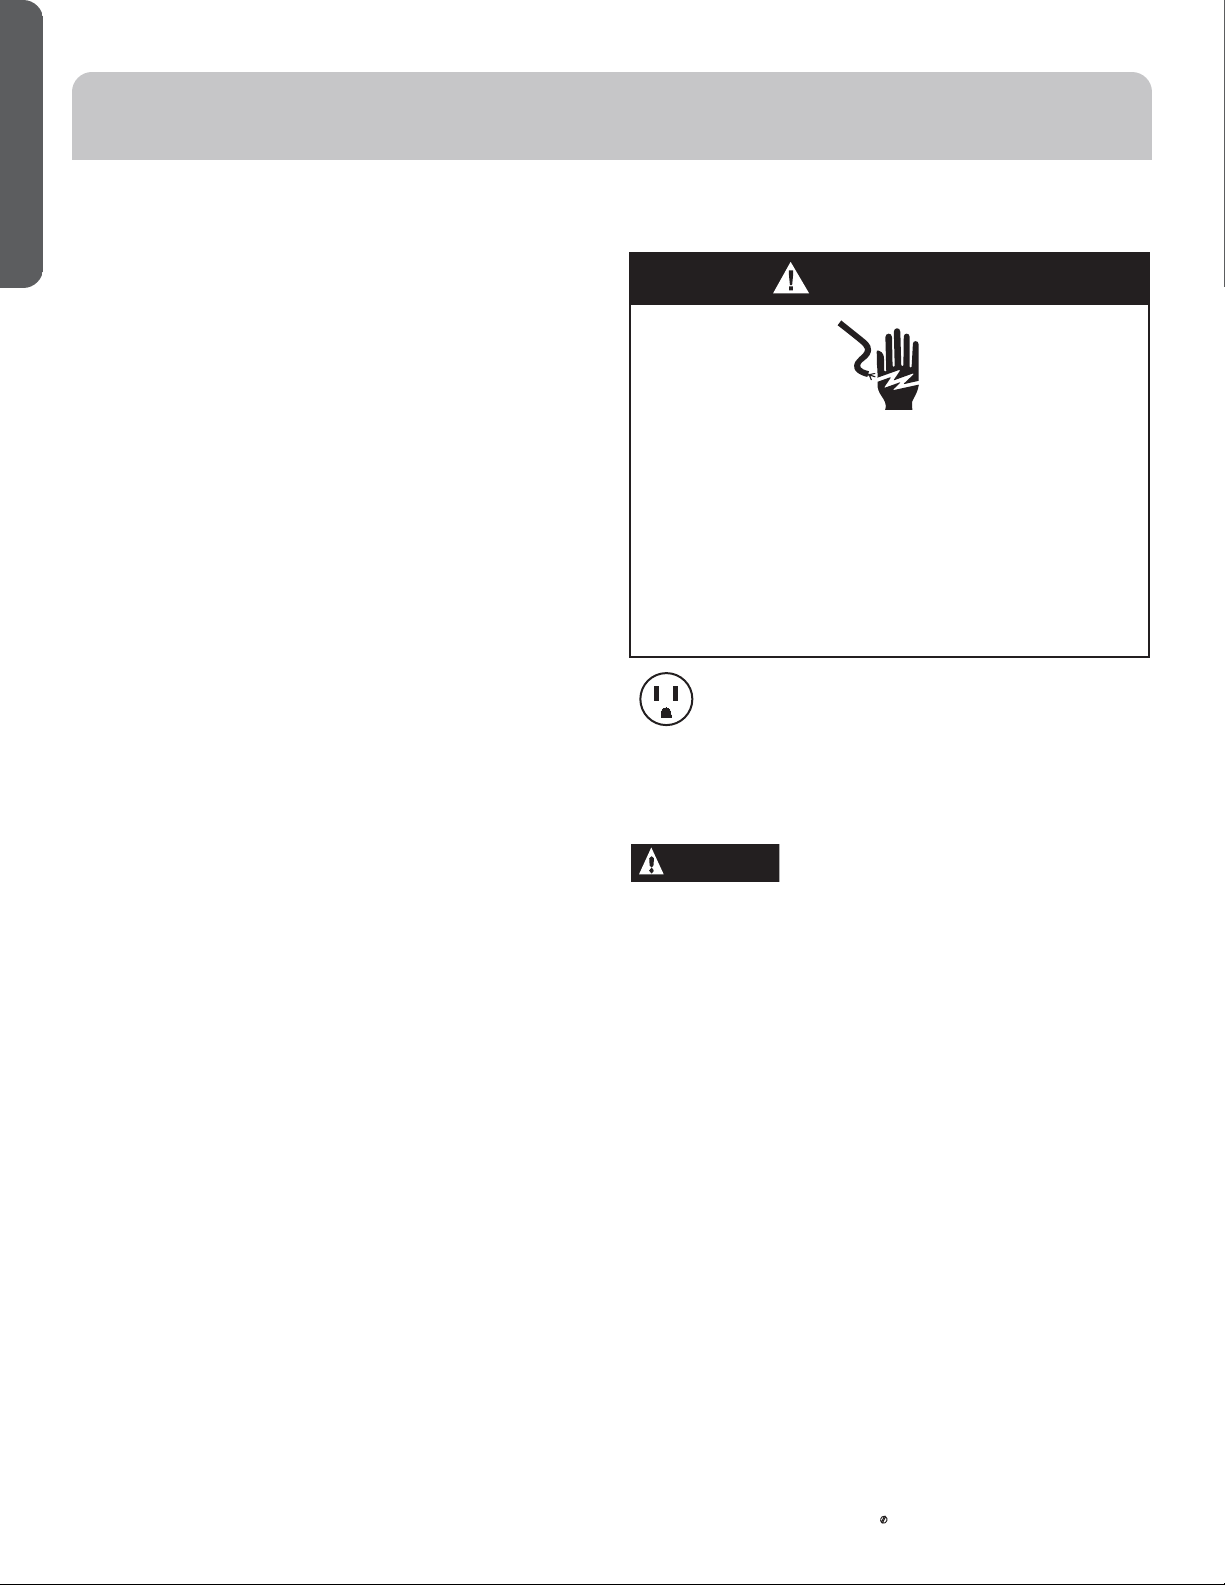
WARNING
Electrical Shock Hazard
Plug into a grounded 3 prong outlet.
Do not remove the ground prong from the power cord
plug.
Do not use an adapter.
Do not use an extension cord.
Ïäìïøõè÷òçòöòæäñõèöøï÷ìñçèä÷ëĤõèòõèïèæ÷õìæäï
shock.
ELECTRICAL REQUIREMENTS
INSTALLATION REQUIREMENTS
BEFORE YOU BEGIN
4
Read these instructions completely and carefully.
•
IMPORTANT – Save these instructions
for local inspector’s use.
•
IMPORTANT – Observe all governing
codes and ordinances.
• Note to Installer – Be sure to leave these
instructions with the Consumer.
• Note to Consumer – Keep these instructions for
future reference.
• Skill level – Installation of this appliance requires
basic mechanical skills.
• Completion time – Approximately 1 hour
• We recommend that two people install
this product.
• Proper installation is the responsibility
of the installer.
• Product failure due to improper installation is not
covered under the Warranty.
• You MUST use all supplied parts and use proper
installation procedures as described in these
instructions when installing this air conditioner.
These models require a 115/120-volt AC, 60-Hz
grounded outlet protected with a 15-amp
time-delay fuse or circuit breaker.
The 3-prong grounding plug minimizes the possibility of
electric shock hazard. If the wall outlet you plan to use is
only a 2-prong outlet, it is your responsibility to have it
replaced with a properly grounded 3-prong wall outlet.
CAUTION
Do not, under any circumstances, cut or remove the third
(ground) prong from the power cord.
Do not change the plug on the power cord of this air
conditioner.
Aluminum house wiring may present special problems—
consult a qualified electrician.
Power cord includes a current interrupter device. A test
and reset button is provided on the plug case. The device
should be tested on a periodic basis by first pressing the
ÝÎÜÝbutton and then the ÛÎÜÎÝbutton while plugged
into the outlet. If the ÝÎÜÝbutton does not trip or if the
RESETåø÷÷òñúìïïñò÷ö÷äüèñêäêèççìöæòñ÷ìñøèøöèòé÷ëè
air conditioner and contact a qualified service technician.
If this power supply cord is damaged, it cannot be
repaired. It must be replaced with a cord from the product
manufacturer. If the power supply cord is damaged call Haier
Customer Service: 1-877-337-3639.
INSTALLATION INSTRUCTIONS
• These instructions are for a standard double-hung window.
You will need to modify them for other types of windows.
• The air conditioner can be installed without the side
curtain panels if needed to fit in a narrow window. See
the window opening dimensions.
• All supporting parts must be secured to firm wood,
masonry or metal.
• The electrical outlet must be within reach of the power
cord.
• Follow the dimensions in the table and illustration for
your model.
ENGLISH
5
WARNING
Excessive Weight Hazard
Use two or more people to move and install air
conditioner.
Failure to do so can result in back or other injury.
STEP 1 - UNPACK AIR
CONDITIONER
• Remove packaging materials. Save the carton and the foam
packaging for storing the air conditioner when not in use.
NOTE: There are NO packing materials inside the
air conditioner to remove—Do Not open the cabinet.
• Properly dispose of/recycle all packing material.
• Handle the air conditioner gently.
• Keep the air conditioner upright and level. Do not set the air
conditioner on its side, front, back or upside down.
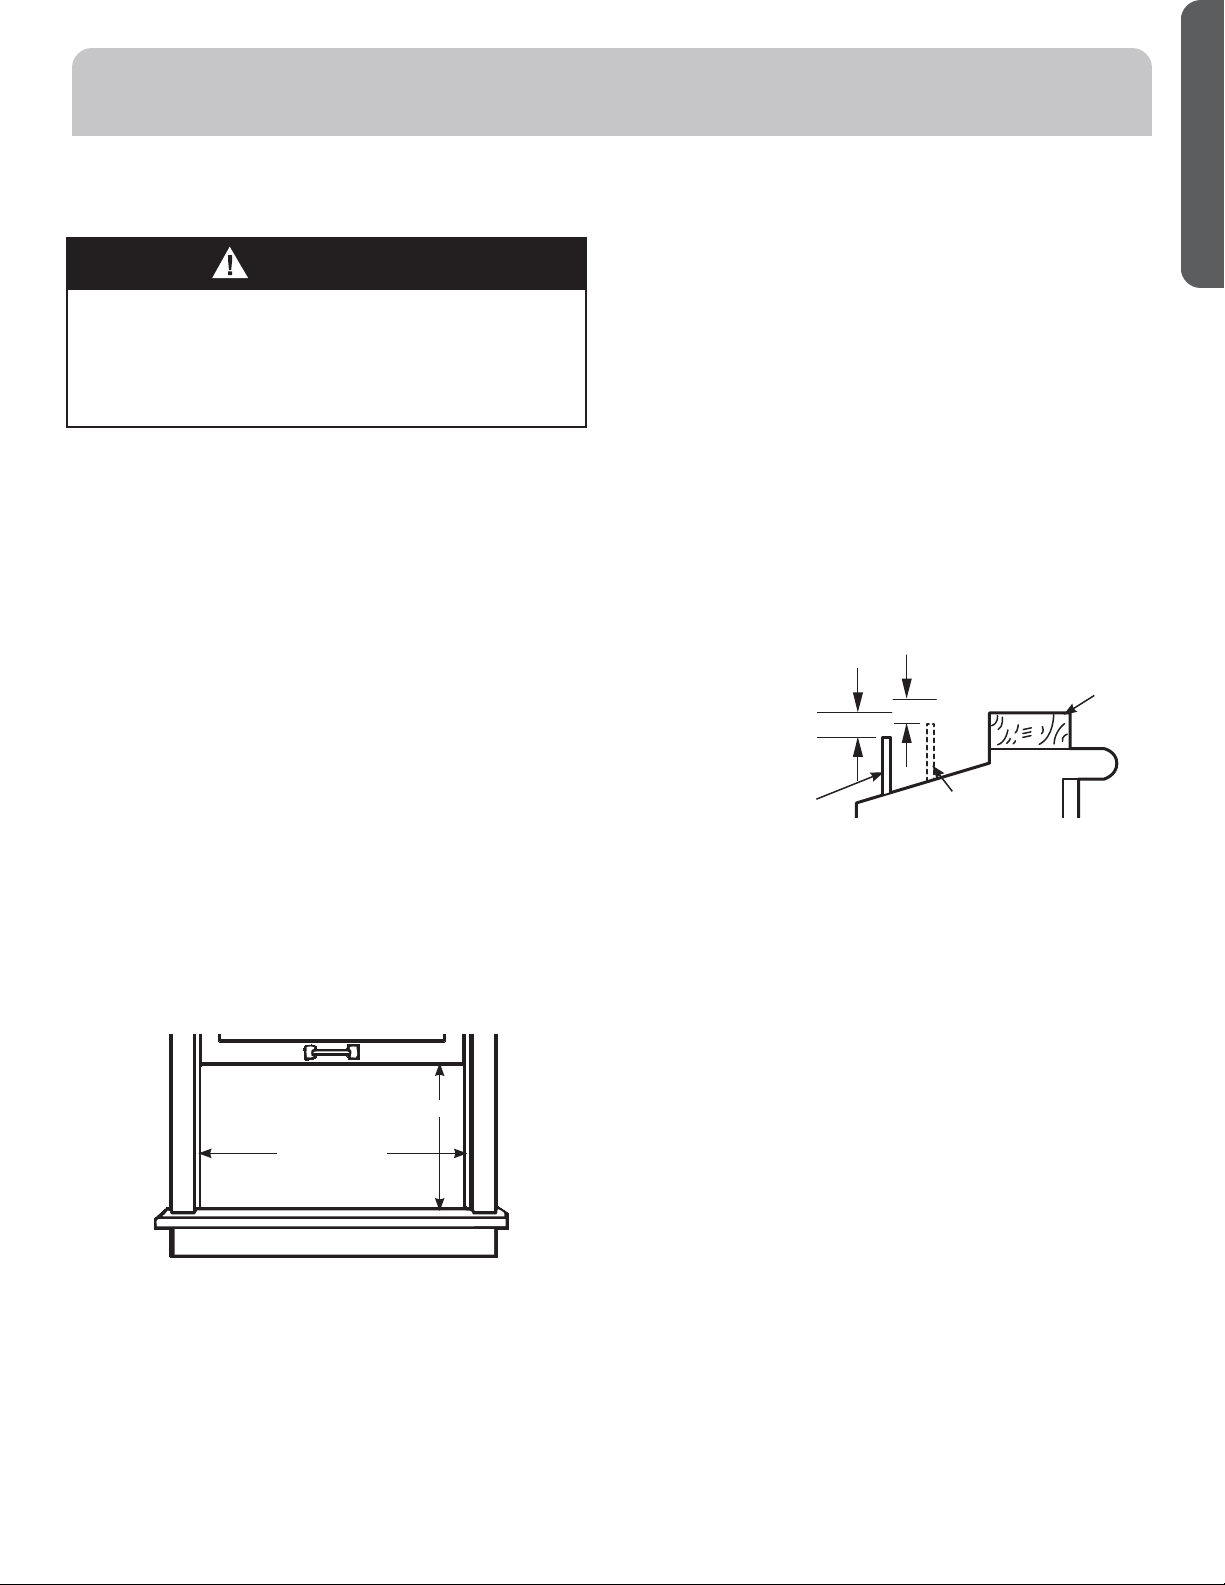
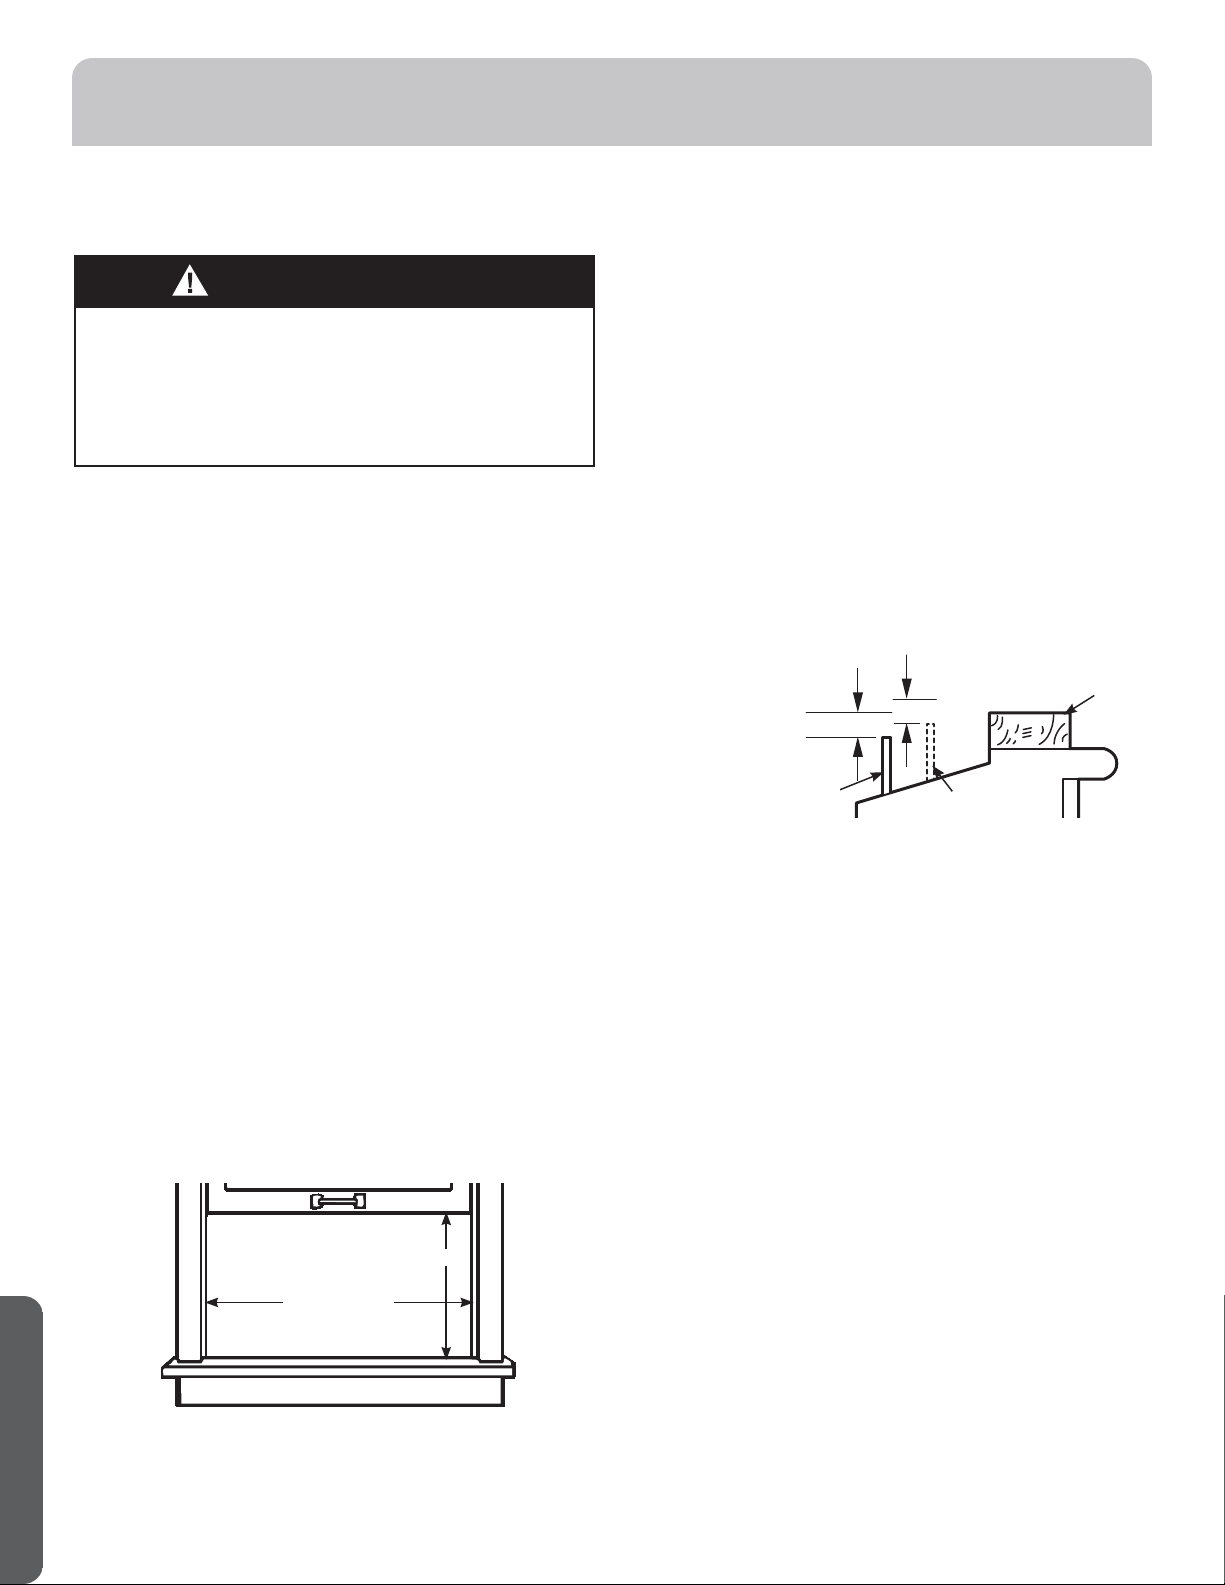
A storm window frame will not allow the air conditioner
to tilt toward the outside, and will keep it from draining
properly. To adjust for this, attach a piece of wood to the
sill.
àØØÍÙÒÎÌÎÜ
àÒÍÝÑ"ė
LENGTH: Long enough to fit inside the window frame.
THICKNESS: To determine the thickness, place a piece of
úòòçòñ÷ëèöìïï÷òðäîèì÷!¦"ėëìêëèõ÷ëäñ÷ëè÷òóòé÷ëè
storm window frame or the vinyl frame.
Attach securely with nails or screws provided by the
installer.
21-7/8” - 36”
!¦"ėëìêëèõ
than storm
window
frame
Storm window
frame
Wood
Sill
!¦"ėëìêëèõ
than vinyl frame
(on some windows)
STEP 2 - WINDOW REQUIREMENTS
13-3/8”
(With side curtain panels)
STEP 3 - STORM WINDOW
REQUIREMENTS

INSTALLATION INSTRUCTIONS
ENGLISH
6
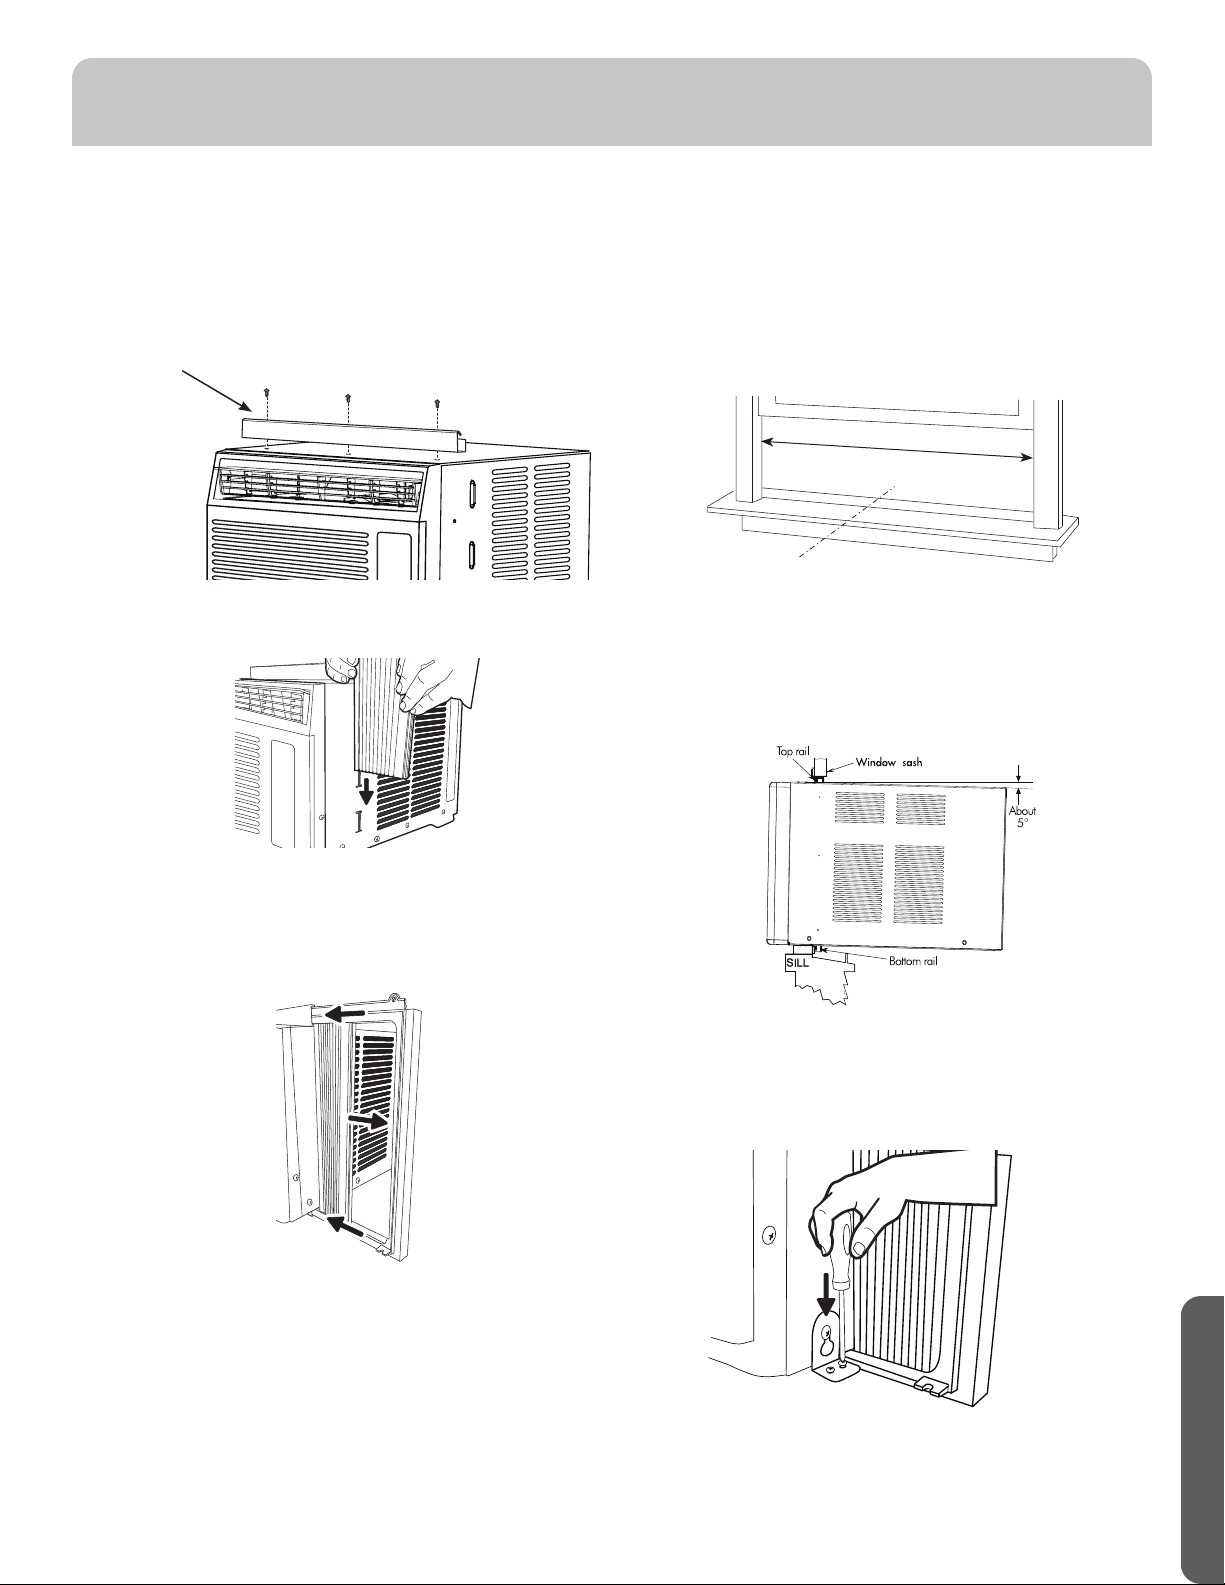
A. Install the top mounting rail with 3 Type A screws.
STEP 4 - PREPARE THE AIR
CONDITIONER
CLICK
7RS
0RXQWLQJUDLO
B. Slide the side curtain panels into the side panel rails.
C. Slide left and right side curtain frames into top and
bottom rails. Make sure that side curtains snap into
side of the frames.
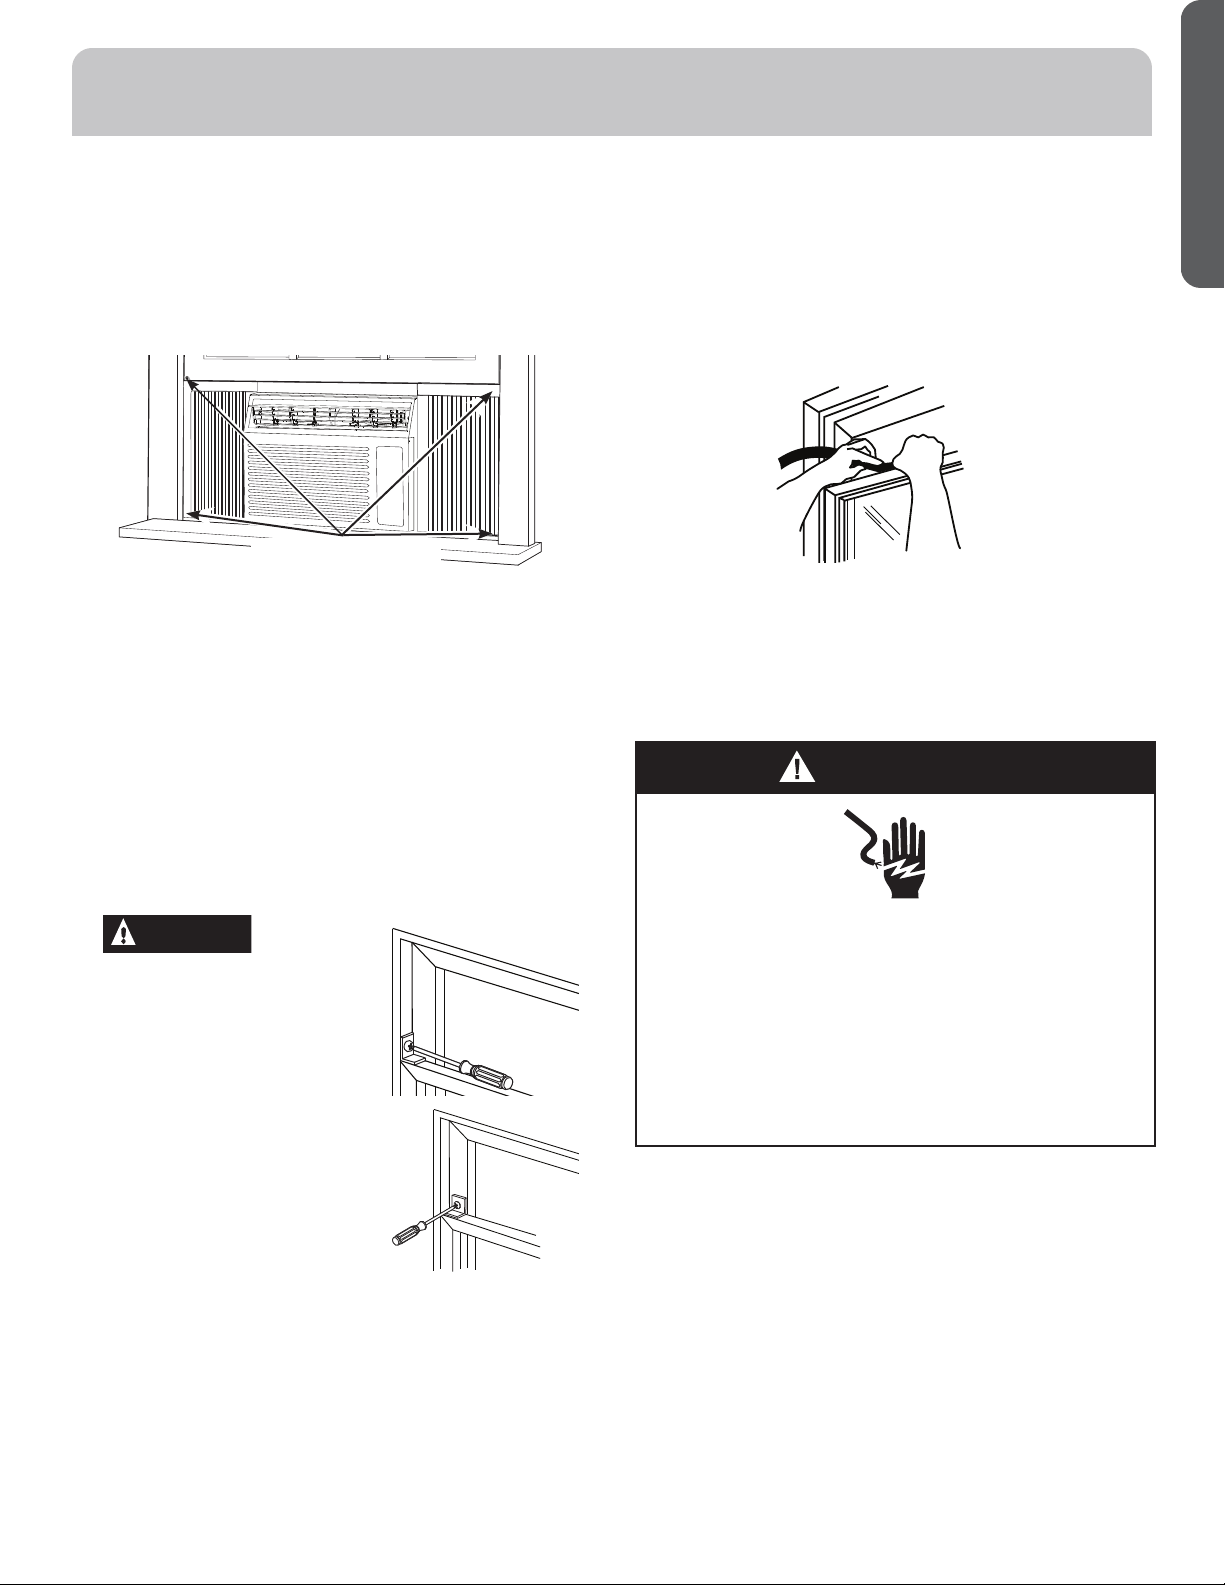
A. Measure the width of the window opening and mark
the center line on the inside window sill. Place the
unit in the window. Lower the window to hold unit in
place.
STEP 5 - INSTALL THE AIR
CONDITIONER IN THE WINDOW
:LGWKRIZLQGRZRSHQLQJ
&HQWHUOLQH
B. Set the air conditioner in the window so that is
centered. Place the air conditioner so that front edge
of the bottom mounting rail is against the back edge
of the sill.
C. Install the side bracket into the unit and into the
window sill using two 1” wood screws provided.
Repeat on other side.
INSTALLATION INSTRUCTIONS
ENGLISH
7
WARNING
Electrical Shock Hazard
Plug into a grounded 3 prong outlet.
Do not remove the ground prong from the power
cord plug.
Do not use an adapter.
Do not use an extension cord.
Ïäìïøõè÷òçòöòæäñõèöøï÷ìñçèä÷ëĤõèòõ
electrical shock.
STEP 7 - COMPLETE INSTALLATION
1. Plug the power cord into a grounded 3 prong outlet.
2. Press the Reset button on the power cord to ensure the
safety plug is providing power to the air conditioner.
D. Bring the window down so that the front edge of the
top mounting is in front of the window. Make sure
that the air conditioner is level or tilting slightly to the
outside.
STEP 5 - INSTALL THE AIR
CONDITIONER IN THE WINDOW
7\SH%VFUHZV
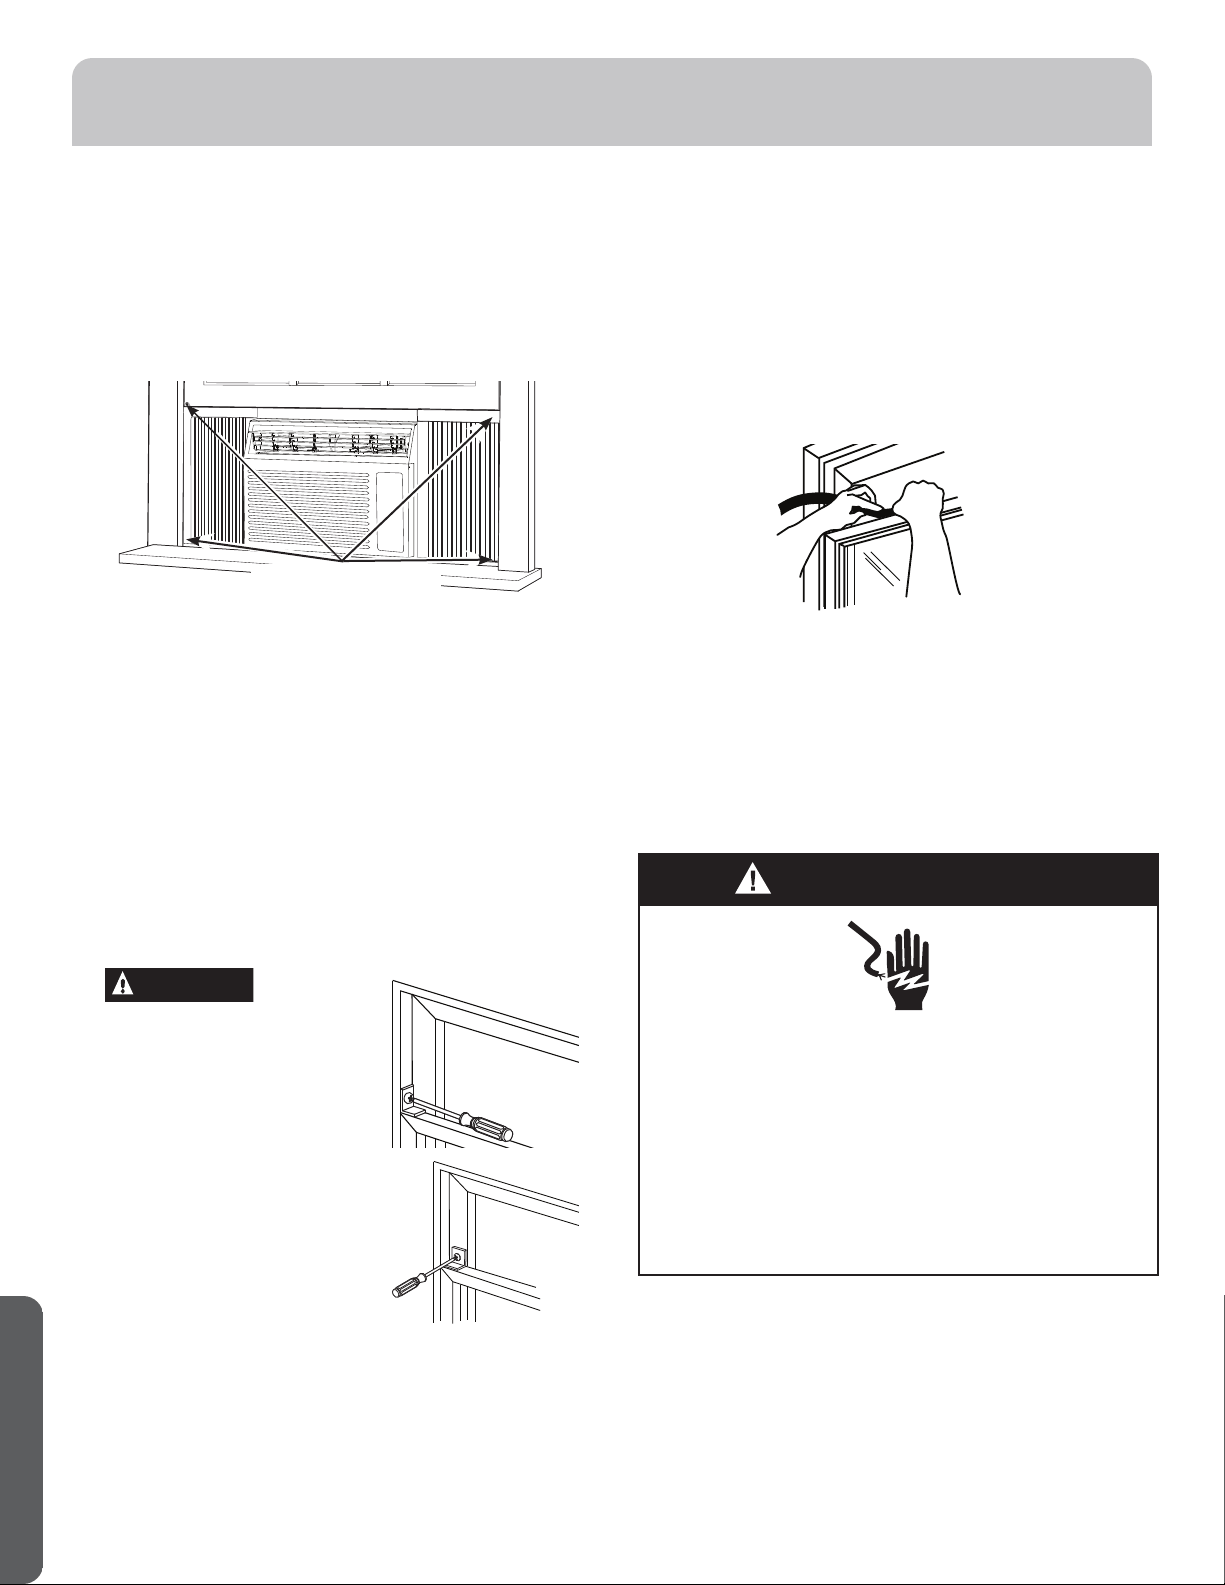
E. Extend the curtain panels until they fill the window.
Mark the location of the holes in each corner. Use the
drill and 1/8” drill bit to drill pilot holes. Use 4 type B
screws to secure the side panels in place.
Use Type B Screw to install the window lock bracket on
top of the bottom window.
A.
To prevent broken glass or
damage to windows, on vinyl
or other similarly constructed
windows, attach the window
locking bracket to the window
side jamb with one Type B
screw.
STEP 6 - INSTALL WINDOW
LOCKING BRACKET AND FOAM TOP
WINDOW GASKET
CAUTION
Wood
Vinyl
B. Cut the foam top window gasket to the window width
C. Stuff the foam between the glass and the window to
prevent air and insects from getting into the room.
NOTE: If the gasket supplied does not fit your
window, obtain appropriate material locally to provide
a proper installation seal.
STEP 6 - INSTALL WINDOW
LOCKING BRACKET AND FOAM TOP
WINDOW GASKET
CONTROL PANEL
ENGLISH
8
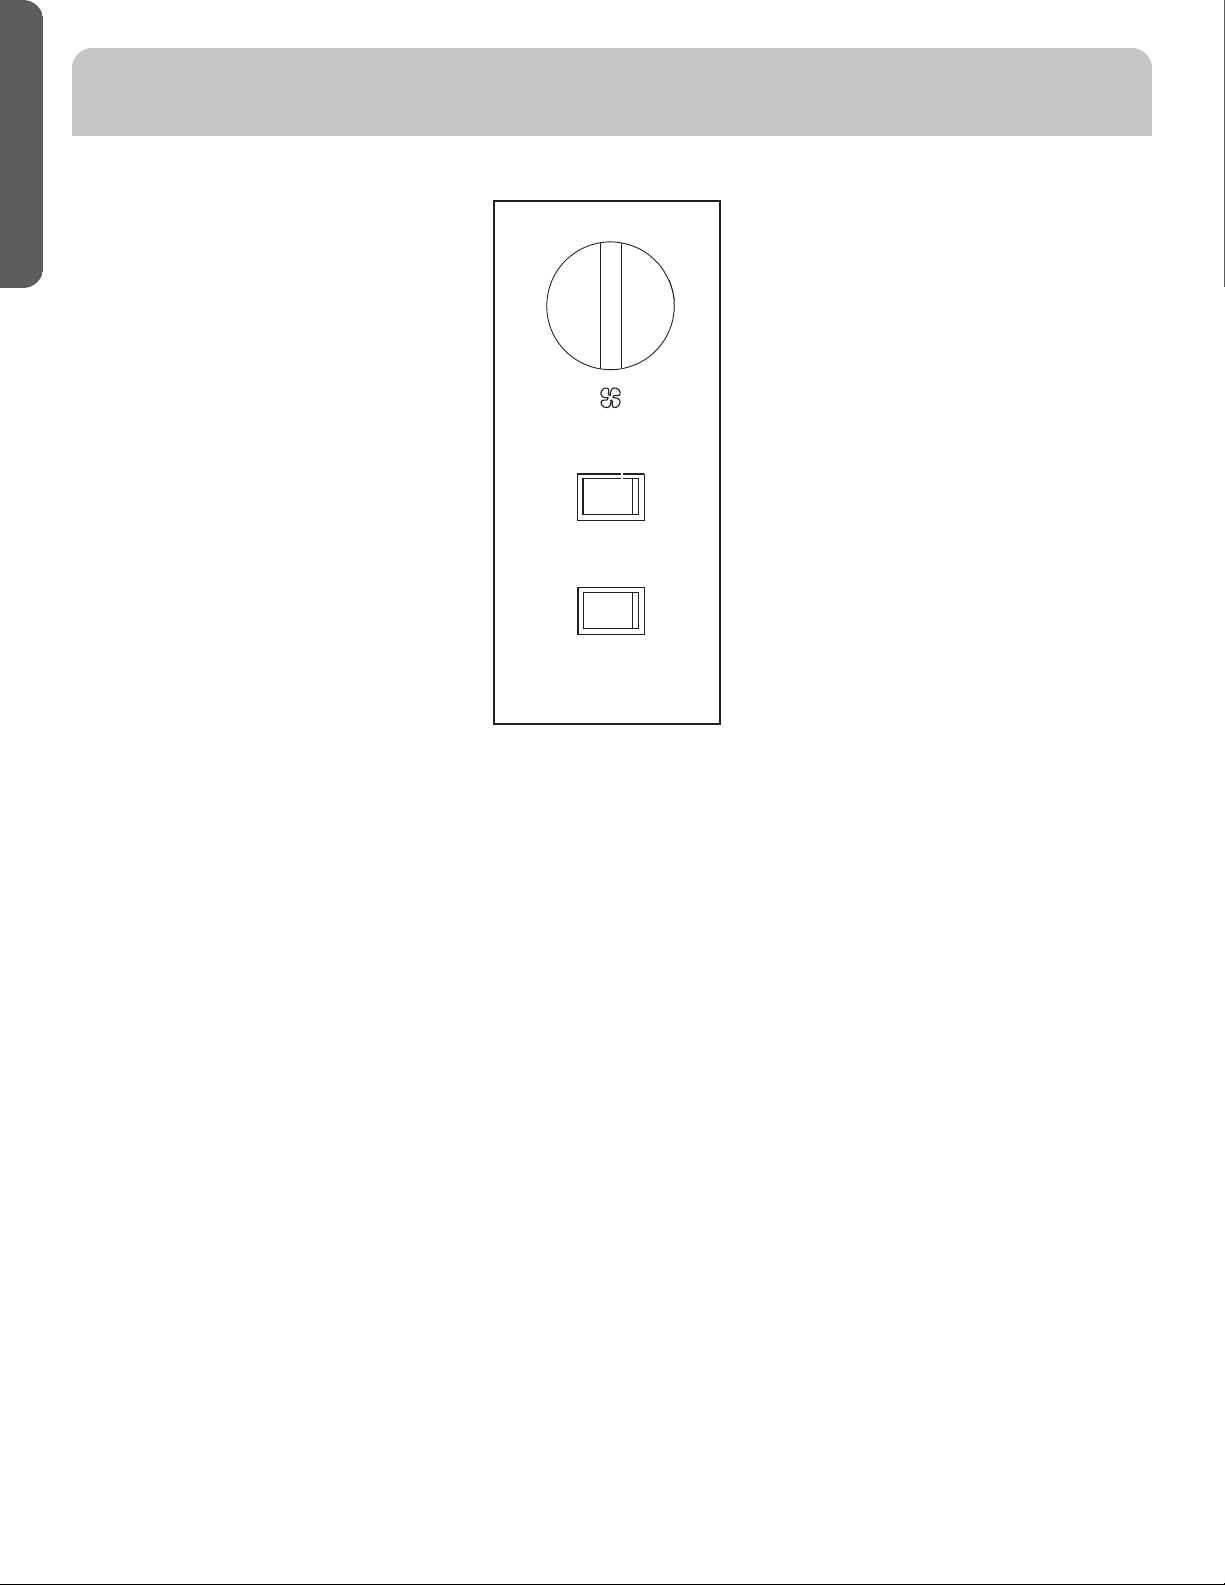
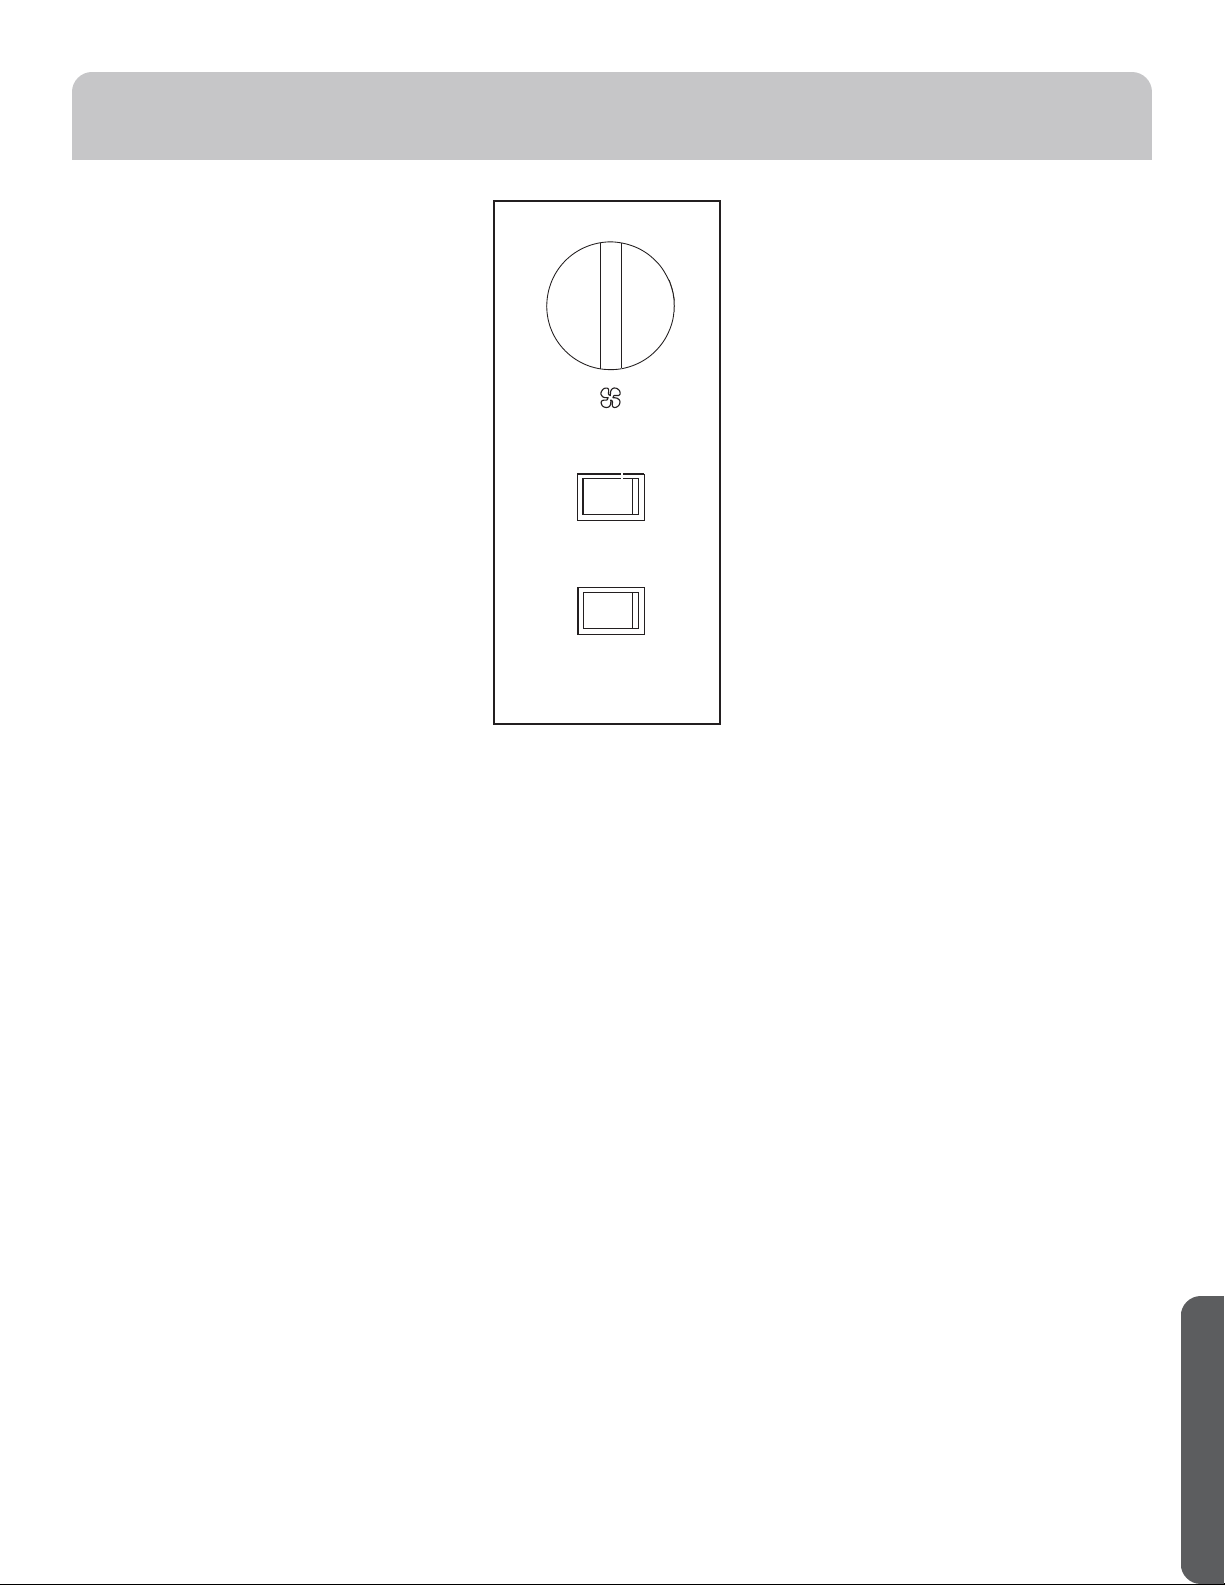
Controls
1. Temperature Control
Setting determines how much cooling is provided.
Max Cool - 10 provides the most cooling and Min Cool -
1 provides the least.
Fan Only turns off the cooling function.
NOTE: If you move the Temperature control from a
cool setting to a fan setting or power off the unit while
cooling, wait at least 3 minutes before switching back to
a cool setting.
Cooling Descriptions
For Normal Cooling—Select 4-7 on the dial with the FAN
SPEED set to HI or LOW.
For Maximum Cooling—Select 8-10 on the dial with the
FAN SPEED set to HI.
For Quieter and Night time Cooling—Select 1-4 on the
dial with the FAN SPEED set to LOW.
2. Fan Speed
The fan speed button can be set on HI or LOW. In both
cooling mode and fan only mode.
3. Power
Turns the unit on or off.
Features and appearance will vary.
FAN ONLY
MIN
COOL
MAX
COOL
Wait 3 Minutes
Before Restarting
SPEED
HI
LOW
POWER
ON
OFF
1
2
3
4
5
6
7
8
9
10
ENGLISH
9
WARNING
Electrical Shock Hazard
Disconnect power before cleaning.
Failure to do so can result in death or electrical shock.
CLEANING
1. Unplug or disconnect power.
2. Use only a soft cloth dampened with water to clean the
cabinet.
NOTE:
•Do not use a liquid or spray cleaner to clean the air
conditioner.
•DO NOT use chemicals, abrasives, ammonia, chlorine
bleach, concentrated detergents, solvents or scouring
pads. Some of these chemicals/items may damage and/
or discolor your air conditioner.
3. Dry thoroughly with a soft cloth.
4. Plug in or reconnect power.
AIR CONDITIONER CARE
DO NOT OPERATE IN FREEZING
OUTDOOR CONDITIONS
This cool-only air conditioner was not designed for freezing
outdoor conditions. It must not be used when the outdoor
temperature is below freezing (32°F).
GRILLE AND CASE
Ýøõñ÷ëèäìõæòñçì÷ìòñèõòģäñçõèðòùè÷ëèóïøêéõòð÷ëè
wall outlet before cleaning.
To clean, use water and a mild detergent. Do not use bleach
or abrasives.
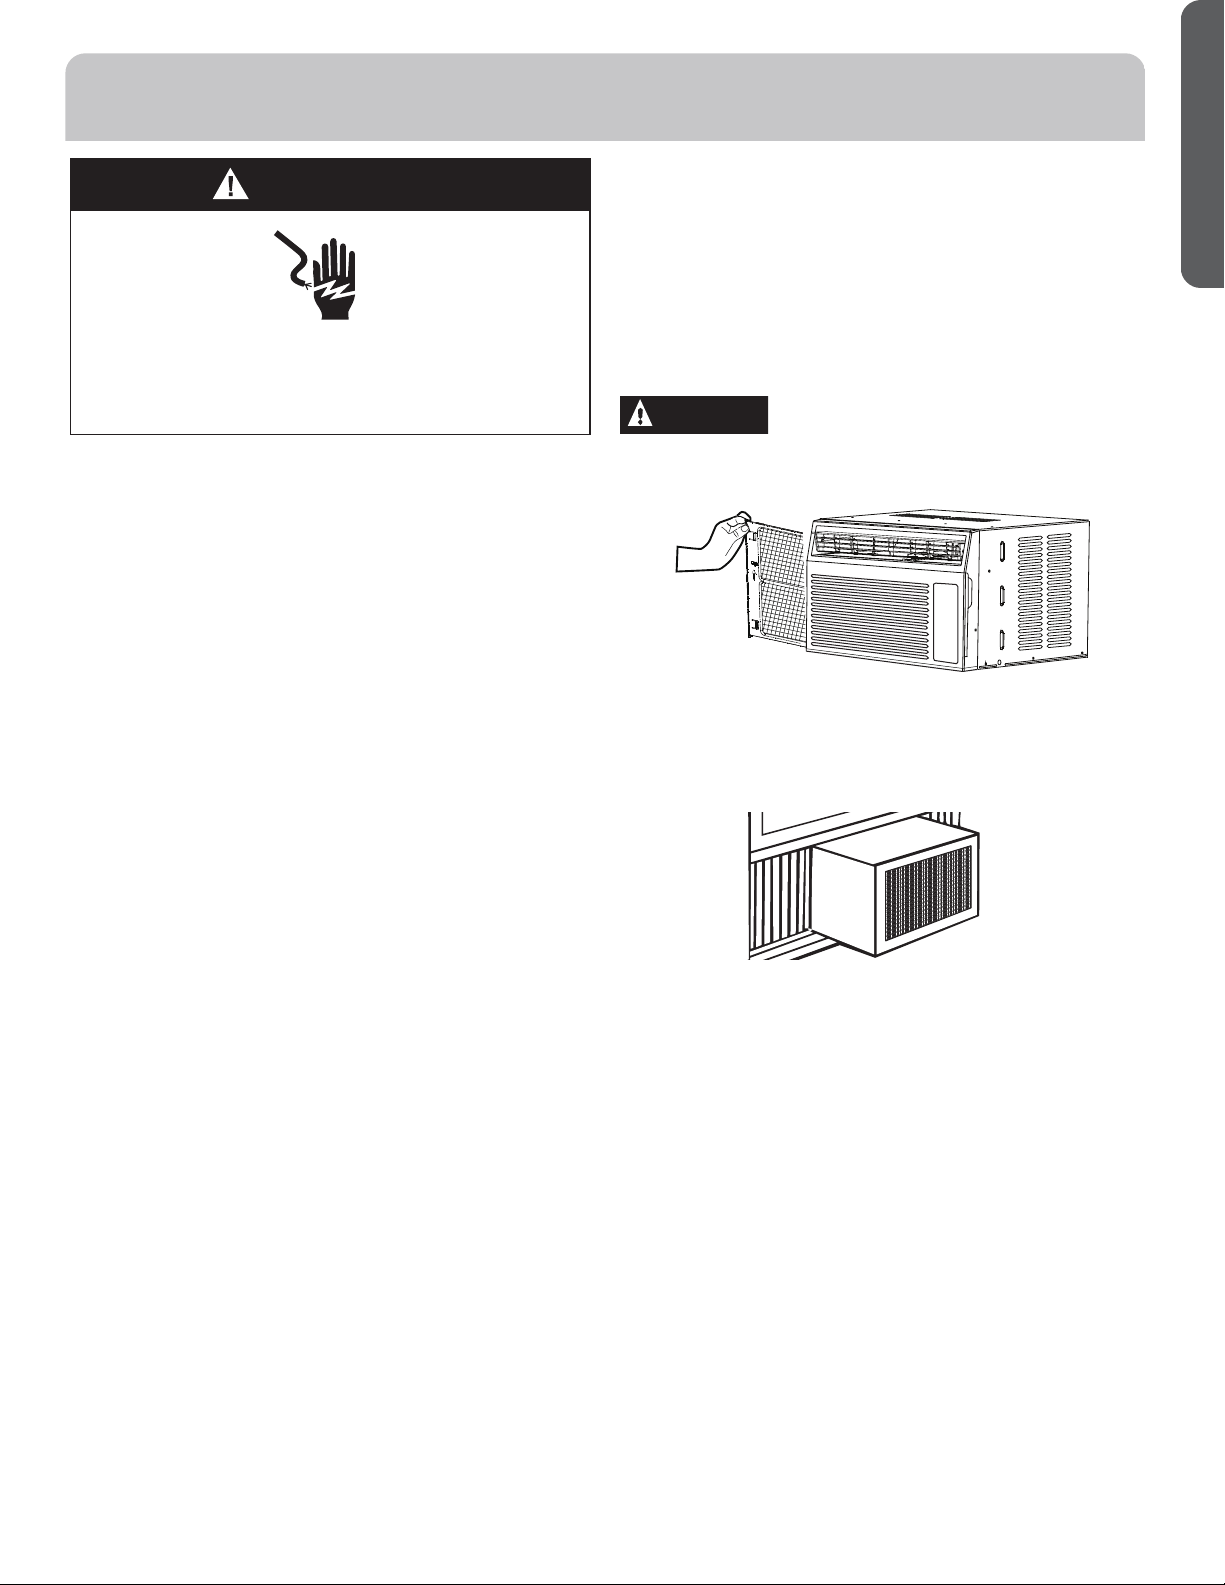
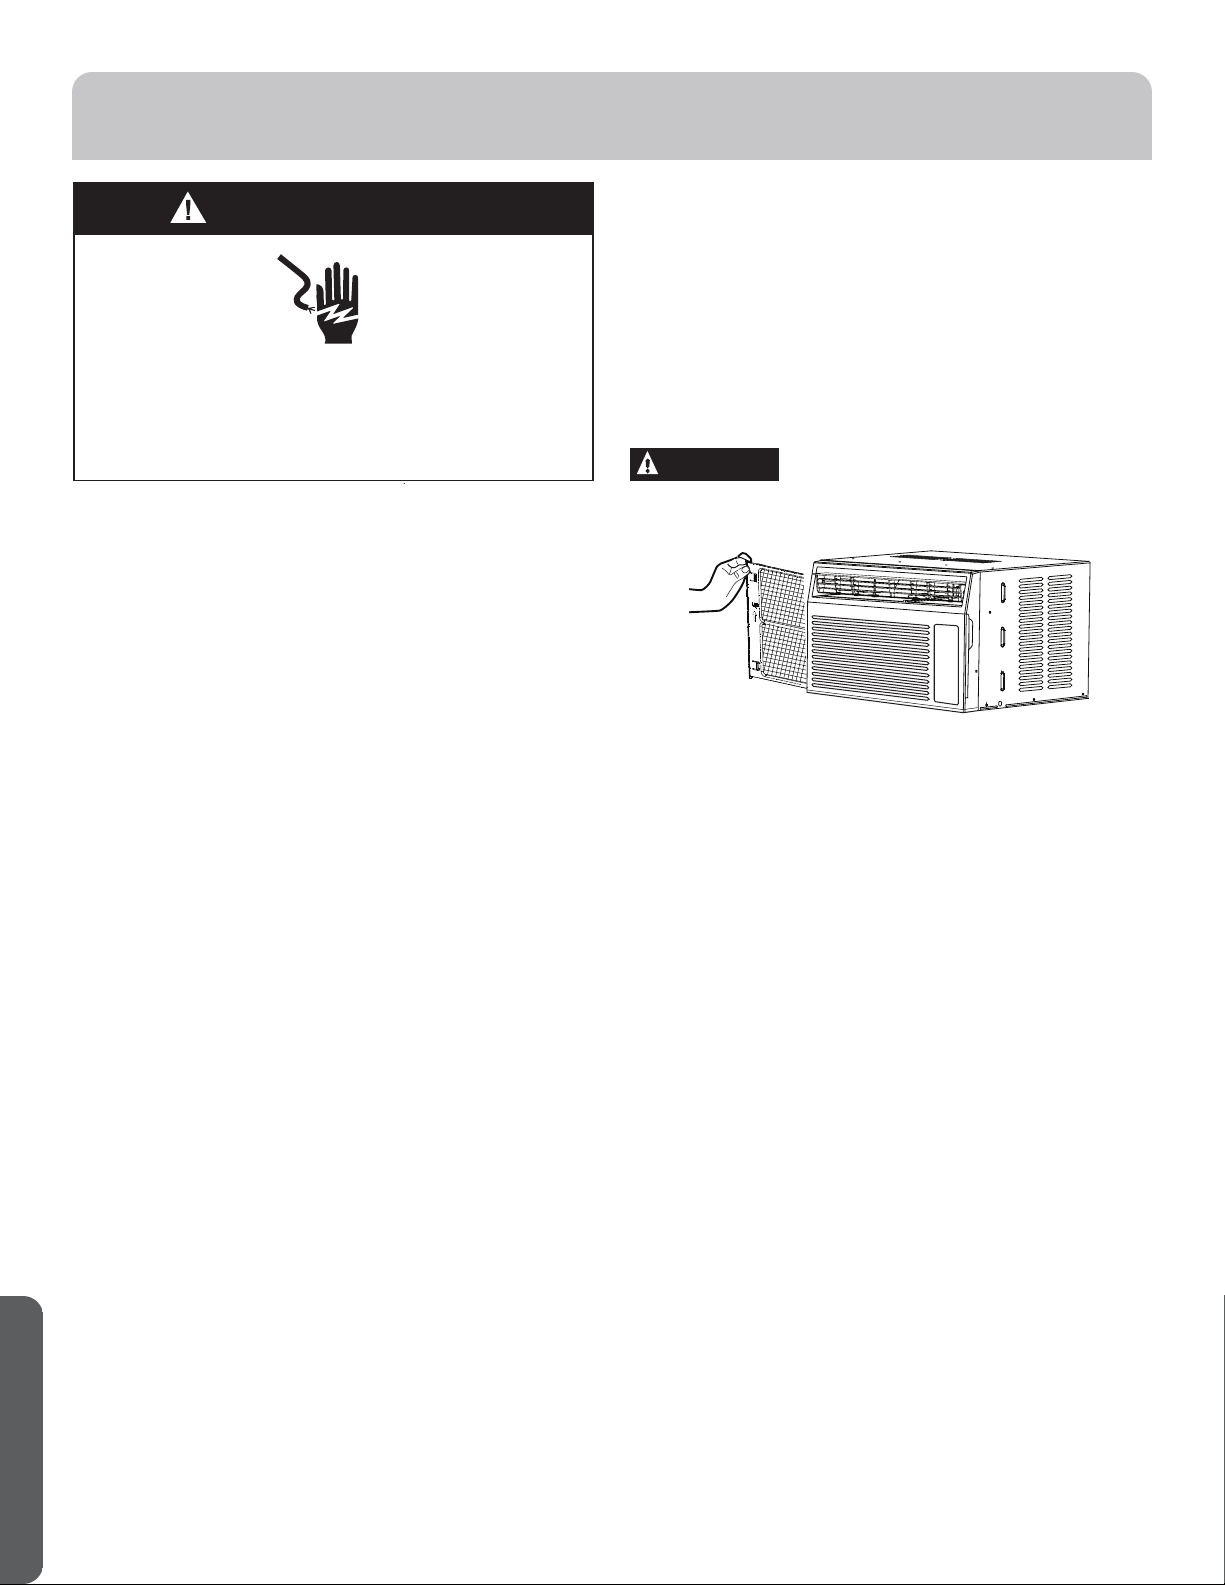
AIR FILTER
ÝëèäìõĤï÷èõåèëìñç÷ëèéõòñ÷êõìïïèöëòøïçåèæëèæîèçäñç
cleaned at least every 30 days or more often if necessary.
To remove:
Üïìçè÷ëèĤï÷èõéõòð÷ëèïèé÷öìçèòé÷ëèøñì÷Ûèðòùè÷ëè
Ĥï÷èõ
Ìïèäñ÷ëèĤï÷èõúì÷ëúäõðöòäóüúä÷èõÛìñöèäñçïè÷÷ëè
Ĥï÷èõçõüåèéòõèõèóïäæìñêì÷Íòñò÷æïèäñ÷ëèĤï÷èõìñä
dishwasher.
CAUTION
ÍØ×ØÝ operate the air conditioner
úì÷ëòø÷äĤï÷èõåèæäøöèçìõ÷äñçïìñ÷úìïïæïòêì÷äñçõèçøæè
performance.
OUTDOOR COILS
The coils on the outdoor side of the air conditioner should be
checked regularly. If they are clogged with dirt or soot, they
may be professionally cleaned.
STORAGE
If the unit is not being used for a long period of time:
1. Unplug or disconnect power.
2. Drain the water from the water tank. See “Air
Conditioner Care.”
3. Use the original packaging to repack the unit to avoid a
buildup of dust or dirt.
4. Store the air conditioner in a cool, dry location.
ENGLISH
10
FOR MORE HELP, VISIT HAIERAPPLIANCES.COM OR CALL THE CONSUMER HELP LINE AT 1-877-337-3639.
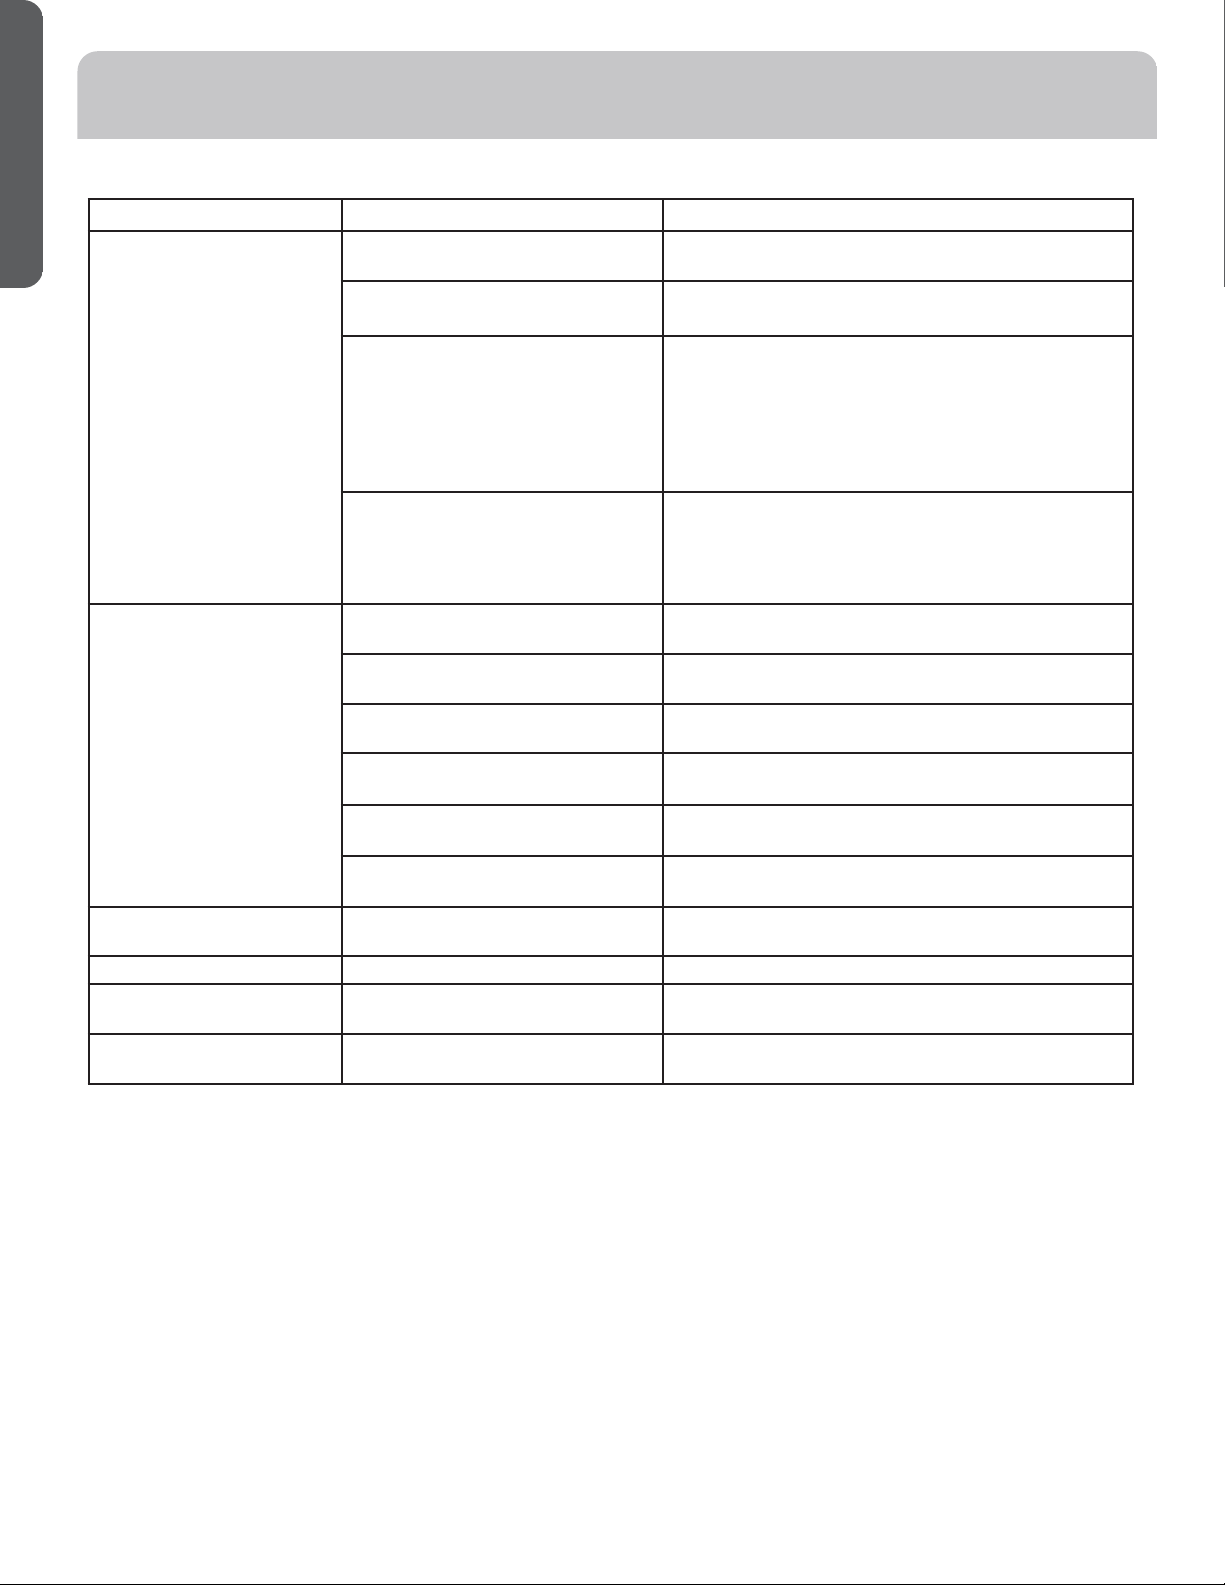
TROUBLESHOOTING
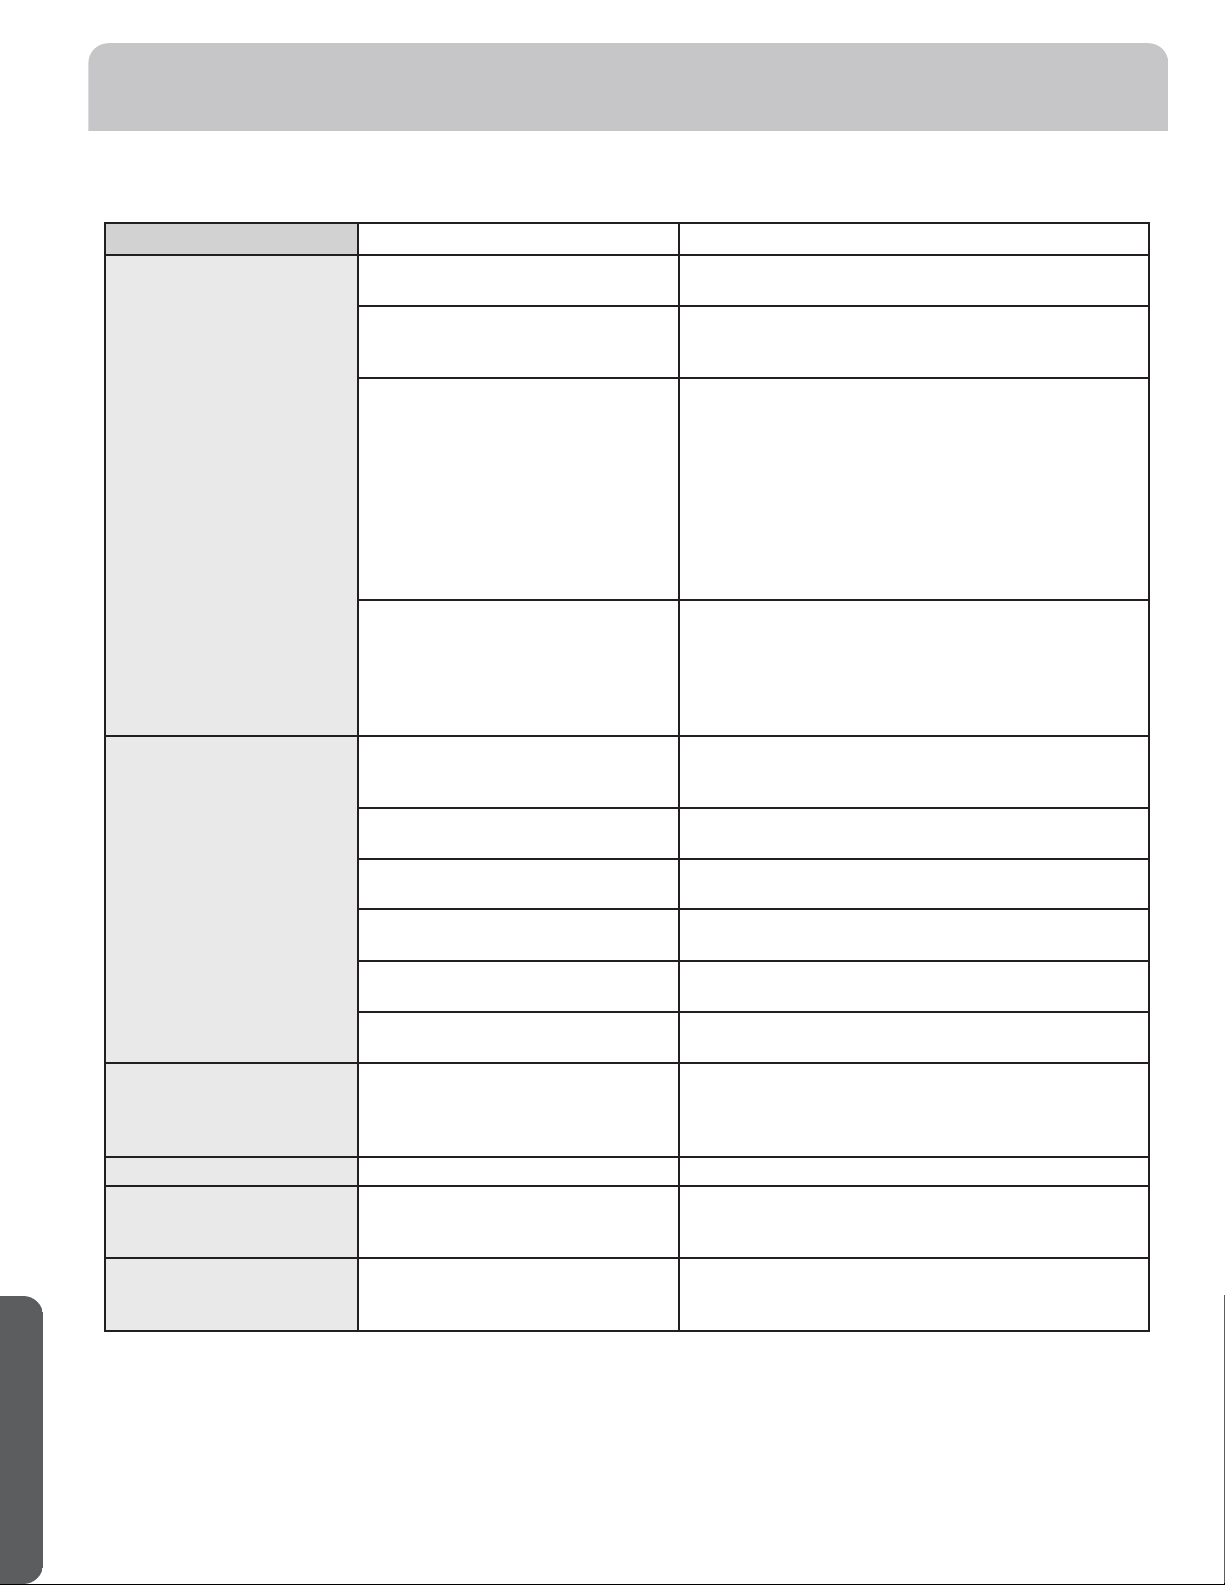
First try the solutions suggested here to possibly avoid the cost of a service call.
Problem Possible Cause Solution
Air conditioner does not
start.
The unit is unplugged. Make sure the air conditioner plug is pushed completely
into the outlet.
The fuse is blown/circuit breaker is
tripped.
Check the house fuse/circuit breaker box and replace the
fuse or reset the breaker.
Power Failure. The unit will automatically restart in the setting last used
after the power is restored.
There is a protective time delay (approximately 3
minutes) to prevent tripping of the compressor overload.
For this reason, the unit may not start normal cooling for
3 minutes after it is turned back on.
The current interrupter device is
tripped.
Press RESET button located on the power cord plug.
If the RESET button will not stay engaged, discontinue
use of the air conditioner and contact a qualified service
technician.
Air conditioner does not cool
as it should.
Indoor airflow is restricted. Make sure there are not curtains, blinds or furniture
blocking the front of the air conditioner.
The temp control may not be set
properly.
Turn the temperature control to a higher number.
The air filter is dirty. Clean the filter at least every 30 days. See Care and
Cleaning section.
The room may have been hot. When the air conditioner is first turned on, you need to
allow time for the room to cool down.
Cold air is escaping. Check for open furnace registers and cold air returns.
Cooling coils have iced up. See “Air conditioner freezing up” below.
Air conditioner freezing up Ice blocks the air flow and stops the
air conditioner from cooling the room.
On models with control knobs, set the mode control at
High Fan or High Cool with the Temp at 1 or 2.
Water drips outside Hot, humid weather. This is normal.
Water drips inside The air conditioner is not tilted to the
outside.
For proper disposal, make sure the air conditioner slants
slightly from the case front to the rear.
Water collects in base pan Moisture removed from air and drain
into base pan.
This is normal for a short period in areas with little
humidity; normal for a longer period in very humid areas.
ENGLISH
11
LIMITED WARRANTY
6WDSOH\RXUUHFHLSWKHUH
3URRIRIWKHRULJLQDOSXUFKDVHGDWHLVQHHGHGWRPDNHDZDUUDQW\FODLP
EXCLUSION OF IMPLIED WARRANTIES - Your sole and exclusive remedy is product repair as provided in this Limited
àäõõäñ÷üÊñüìðóïìèçúäõõäñ÷ìèöìñæïøçìñê÷ëèìðóïìèçúäõõäñ÷ìèöòéðèõæëäñ÷äåìïì÷üòõĤ÷ñèööéòõäóäõ÷ìæøïäõóøõóòöè
are limited to one year or the shortest period allowed by law.
For US Customers: This warranty is extended to the original purchaser and any succeeding owner for products purchased
for home use within the USA. If the product is located in an area where service by a GE Appliances Authorized Servicer is not
available, you may be responsible for a trip charge or you may be required to bring the product to an Authorized GE Appliances
Service location for service. In Alaska, the warranty excludes the cost of shipping or service calls to your home.
Üòðèö÷ä÷èöçòñò÷äïïòú÷ëèèûæïøöìòñòõïìðì÷ä÷ìòñòéìñæìçèñ÷äïòõæòñöèôøèñ÷ìäïçäðäêèöÝëìöúäõõäñ÷üêìùèöüòøöóèæìĤæ
legal rights, and you may also have other rights which vary from state to state. To know what your legal rights are, consult your
ïòæäïòõö÷ä÷èæòñöøðèõäģäìõöòĦæèòõüòøõö÷ä÷èđöÊ÷÷òõñèüÐèñèõäï
Warrantor US:
GE Appliances, a Haier company
Ŷ Customer instruction. This owner’s manual provides
information regarding operating instructions and user
controls.
Ŷ Improper installation. If you have an installation problem,
or if the air conditioner is of improper capacity, contact
your dealer or installer. You are responsible for providing
adequate electrical connecting facilities.
Ŷ Failure of the product resulting from modifications to the
product or due to unreasonable use including failure to
provide reasonable and necessary maintenance.
Ŷ Replacement of house fuses or resetting of circuit breakers.
Ŷ Failure due to corrosion on models not corrosion-protected.
Ŷ Damage to the product caused by improper power supply
voltage, accident, fire, floods or acts of God.
Ŷ Incidental or consequential damage caused by possible
defects with this air conditioner.
Ŷ Damage caused after delivery.
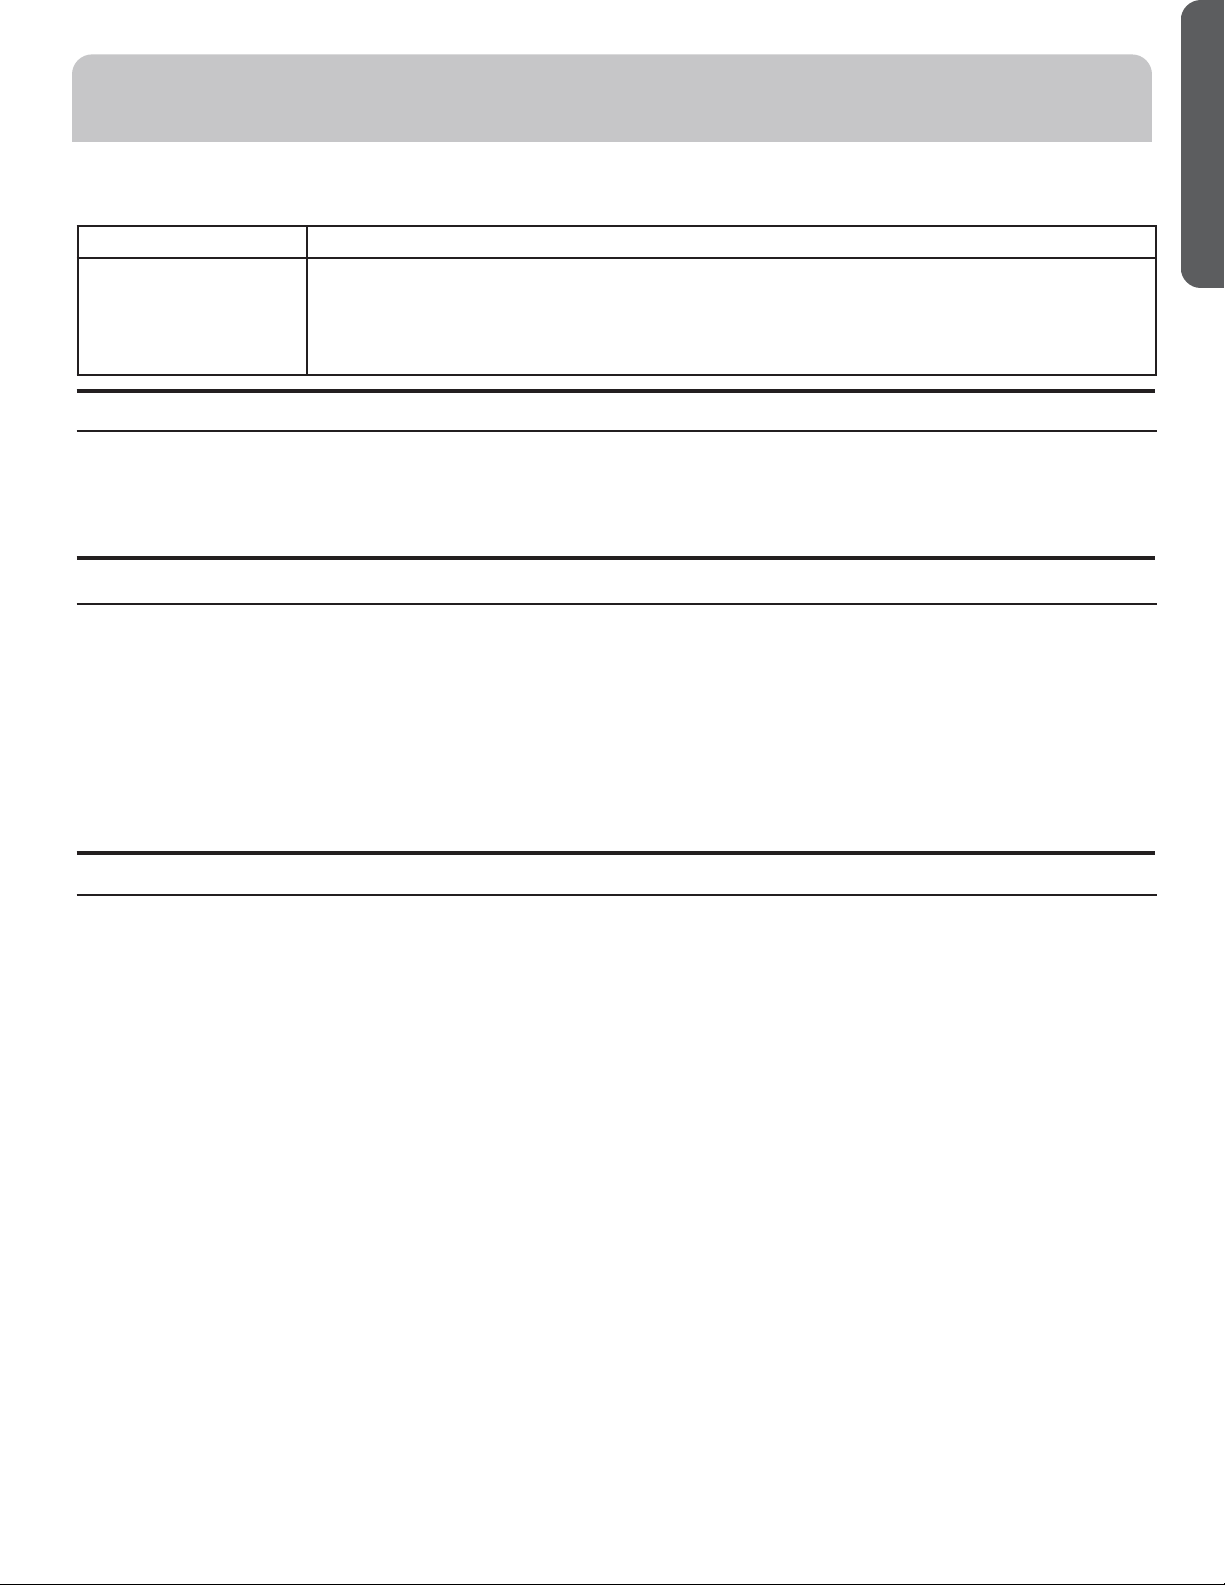
What Will Not Cover:
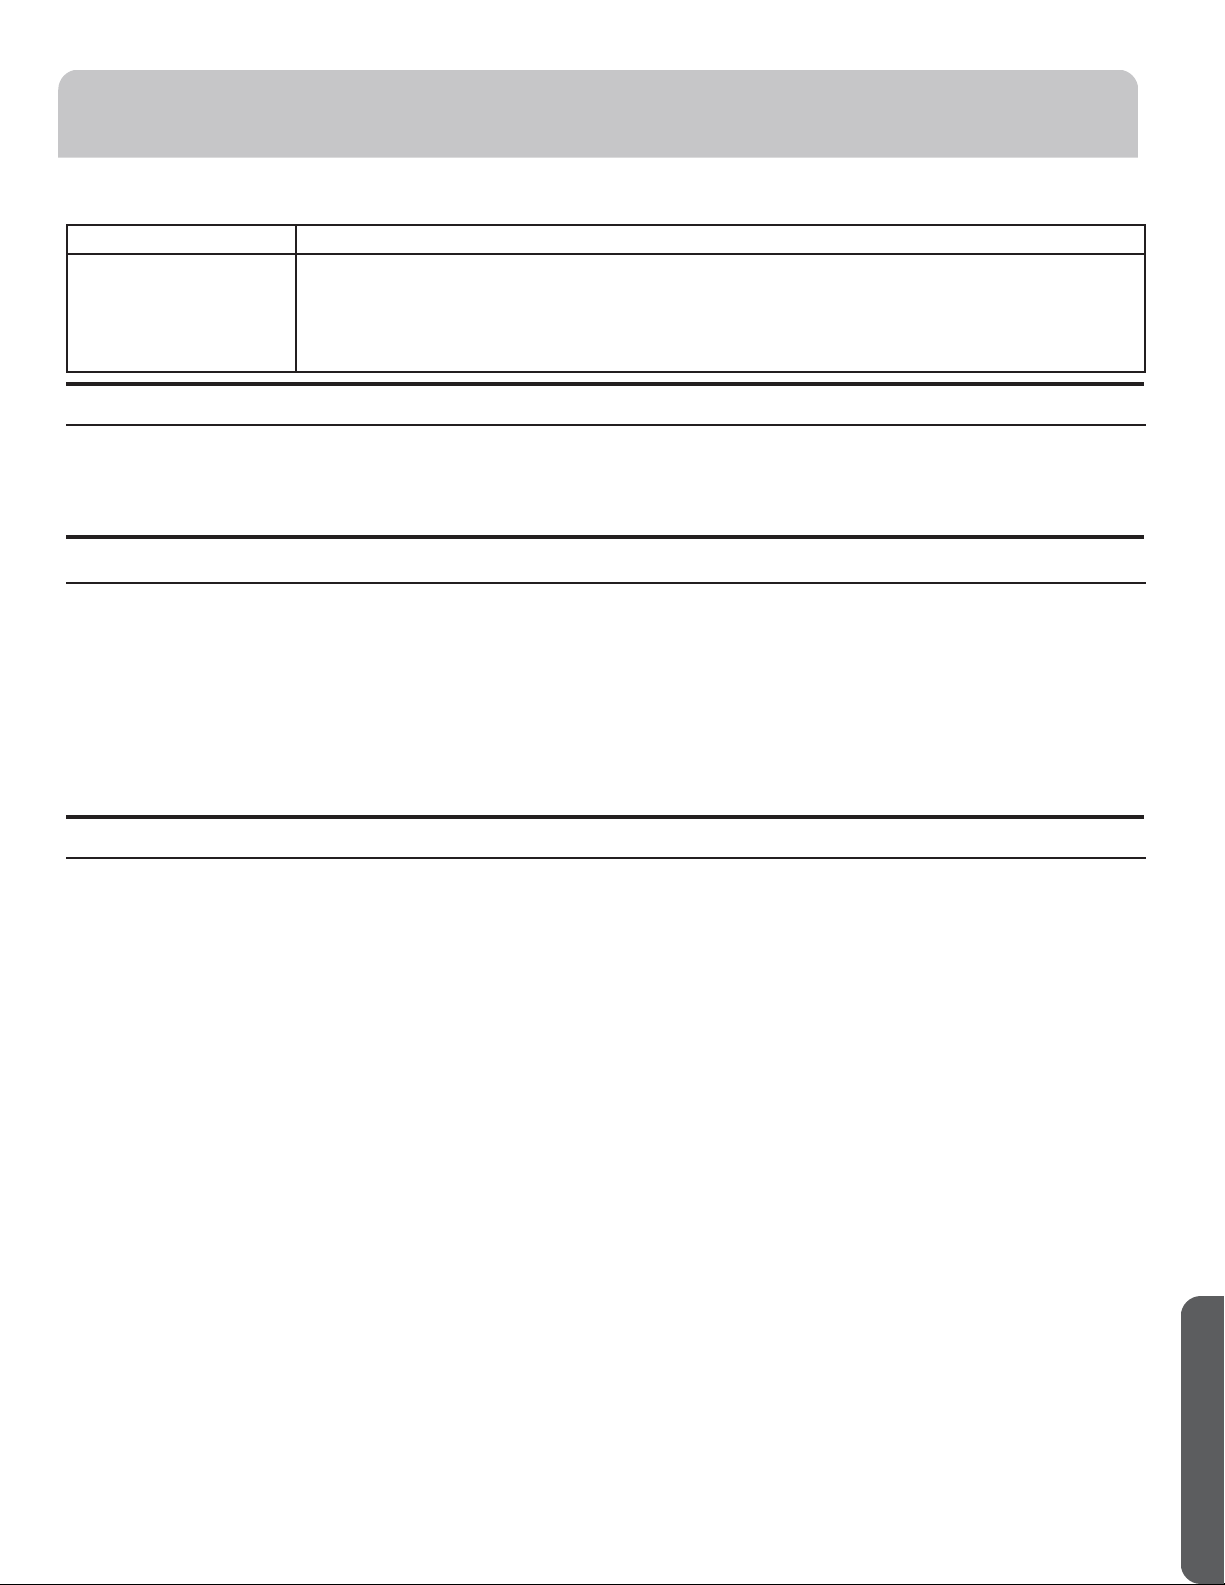
For The Period Of: Will Replace:
One Year
From the date of the
original purchase
Replacement, repair, or refund of the original retail price for any product which fails due to a de-
fect in materials or workmanship. If the unit is exchanged, the replacement unit is warranted for
the remainder of your product’s original one-year warranty period. GE will, at its sole discretion,
replace the product with a product of the same or comparable functionality and quality or refund
the original retail price.
Ŷ Properly pack your unit. We recommend using the original
carton and packing materials.
ŶReturn the product to the retail location where it was
purchased.
Ŷ Include in the package a copy of the sales receipt or other
evidence of date of original purchase. Also print your name
and address and a description of the defect.
In Order to Make a Warranty Claim During Your Retailer’s Allowable Return Period
Ŷ Locate your original sales receipt and make a note of your
model and serial number.
Ŷ Call 800.GE.CARES (800.432.2737) (in the United States) to
initiate the product replacement process.
ŶYou will be asked to provide your name, address, date of
purchase, model and serial number.
ŶGE Appliances will arrange for a carton to be sent to your
home to recover the product.
Ŷ Please return all requested materials (postage pre-paid) in the
carton provided. Please include a description of the defect.
ŶYou should receive your replacement product or refund
within 7 to 10 business days after your package is received.
In Order to Make a Warranty Claim During the Remainder of the One-Year Warranty:

ESPAÑOL
ÍNDICE
SEGURIDAD DEL ACONDICIONADOR DE AIRE ................................................................ 25
PIEZAS Y CARACTERÍSTICAS ................................................................................ 26
REQUISITOS DE INSTALACIÓN ............................................................................... 26
Herramientas y piezas ........................................................................................ 26
Requisitos de ubicación ...................................................................................... 27
Requisitos eléctricos .......................................................................................... 27
INSTRUCCIONES DE INSTALACIÓN ...........................................................................28
Paso 1 - Desempaque su acondicionador de aire ................................................................28
Paso 2 - Instalar una boquilla de escape en el panel de la ventana principal .......................................28
Paso 3 - Instalar el panel principal de la ventana y los paneles de extensión .......................................28
Paso 4 - Sujete la manguera de escape a la boquilla de escape .................................................. 30
Paso 5 - Conecte la manguera de escape para el acondicionador de aire ..........................................30
Paso 6 - Complete la instalación ...............................................................................30
PANEL DE CONTROL .........................................................................................31
Botones .......................................................................................................31
Control remoto ...............................................................................................32
Luces indicadoras .............................................................................................32
USO DEL ACONDICIONADOR DE AIRE ........................................................................ 32
CUIDADO DEL ACONDICIONADOR DE AIRE ....................................................................33
Limpieza ......................................................................................................33
Filtros de aire ................................................................................................ 33
Tanque de agua interno ...................................................................................... 33
Almacenamiento .............................................................................................33
SOLUCIÓN DE PROBLEMAS ..................................................................................33
GARANTÍA LIMITADA .........................................................................................34
INFORMACIÓN A TENER EN CUENTA ..........................................................................24
INFORMACIÓN A TENER EN CUENTA
Le agradecemos la compra de este producto de marca Haier. Este
manual para el usuario le ayudará a obtener el mejor funcionamiento
de su nueva acondicionador de aire.
Para referencia futura, anote el modelo y número de serie en la
etiqueta en el lado de su acondicionador de aire, y la fecha de
compra.
Engrape la prueba de compra a este manual para asistirle cuando
necesite obtener servicio bajo la garantía.
_______________________________________
Número de modelo
_______________________________________
Número de serie
_______________________________________
Fecha de compra
12
SEGURIDAD DEL ACONDICIONADOR DE AIRE
LEA Y GUARDE ESTAS INSTRUCCIONES
Para su seguridad, siga las instrucciones de este manual a fin de minimizar riesgos
de incendio, descargas eléctricas o heridas personales.
Ŷ8VHHVWHHOHFWURGRPpVWLFRVyORSDUDVXSURSyVLWRRULJLQDO
FRPRVHGHVFULEHHQHO0DQXDOGHO3URSLHWDULR
Ŷ(VWHDFRQGLFLRQDGRUGHDLUHVHGHEHLQVWDODUGHIRUPD
DSURSLDGDGHDFXHUGRFRQODV,QVWUXFFLRQHVGH,QVWDODFLyQ
DQWHVGHVHUXVDGR
Ŷ1XQFDGHVHQFKXIHVXDFRQGLFLRQDGRUGHDLUHHPSXMDQGR
HOFDEOHGHFRUULHQWH6LHPSUHWRPHVXHQFKXIHGHPDQHUD
ILUPH\HPSXMHHOPLVPRKDFLDDIXHUDGHOUHFHSWiFXOR
Ŷ5HHPSODFHGHLQPHGLDWRWRGRVORVFDEOHVGHOVHUYLFLR
GHHOHFWULFLGDGSHODGRVRFRQFXDOTXLHUWLSRGHGDxR8Q
FDEOHGHOVHUYLFLRGHFRUULHQWHTXHHVWpGDxDGRGHEHUiVHU
UHHPSOD]DGRSRUXQRQXHYRSURYLVWRSRUHOIDEULFDQWH\
QRGHEHUiVHUUHSDUDGR1RXVHXQFDEOHFRQFRUWDGXUDV
RDEUDVLyQVREUHVXH[WHQVLyQRHQFXDOTXLHUDGHVXV
HQFKXIHVRH[WUHPRV
Ŷ&RORTXHODXQLGDGHQ2))$SDJDGR\GHVHQFKXIHHO
DFRQGLFLRQDGRUGHDLUHDQWHVGHXVDUHOPLVPR
Ŷ*(QRVXPLQLVWUDVHUYLFLRWpFQLFRSDUDHODFRQGLFLRQDGRUGH
DLUH5HFRPHQGDPRVHQIiWLFDPHQWHTXHQRLQWHQWHUHSDUDU
HODFRQGLFLRQDGRUGHDLUHXVWHGPLVPR
Ŷ3DUDVXVHJXULGDGQRDFXPXOHQLXVHPDWHULDOHV
FRPEXVWLEOHVJDVROLQDXRWURVYDSRUHVROtTXLGRV
LQIODPDEOHVFHUFDGHpVWHXRWURHOHFWURGRPpVWLFR
Ŷ7RGRVORVDFRQGLFLRQDGRUHVGHDLUHFRQWLHQHQUHIULJHUDQWHV
ORVFXDOHVGHDFXHUGRFRQODOH\IHGHUDOVHGHEHQTXLWDU
DQWHVGHGHVKDFHUVHGHOSURGXFWR6LVHGHVKDUiGHXQ
SURGXFWRDQWLJXRFRQUHIULJHUDQWHVFRQVXOWHDODFRPSDxtD
DFDUJRVREUHFyPRGHVKDFHUVHGHOPLVPR
Ŷ6LHOUHFHSWiFXORQRFRLQFLGHFRQHOHQFKXIHHOFDPELRGHO
PLVPRGHEHUiVHUUHDOL]DGRSRUXQHOHFWULFLVWDFDOLILFDGR
Ŷ(VWRVVLVWHPDVGHDFRQGLFLRQDGRUHVGHDLUH5$
UHTXLHUHQTXHORVFRQWUDWLVWDV\WpFQLFRVXWLOLFHQ
KHUUDPLHQWDVHTXLSDPLHQWR\HVWiQGDUHVGHVHJXULGDG
DSUREDGRVSDUDVXXVRFRQHVWHUHIULJHUDQWH12XVH
HTXLSDPLHQWRFHUWLILFDGRVyORSDUDUHIULJHUDQWH5
USO DE PROLONGADORES
RIESGO DE INCENDIO. Podría ocasionar lesiones graves
o la muerte.
Ŷ12XVHXQSURORQJDGRUFRQHVWH$FRQGLFLRQDGRUGH$LUHGH
9HQWDQD
Ŷ12XVHSURWHFWRUHVFRQWUDSLFRVGHFRUULHQWHQL
DGDSWDGRUHVSDUDP~OWLSOHVWRPDFRUULHQWHVFRQHVWH
$FRQGLFLRQDGRUGH$LUHGH9HQWDQD
CÓMO CONECTAR LA ELECTRICIDAD
1XQFDEDMRQLQJXQDFLUFXQVWDQFLDFRUWHRHOLPLQHHOWHUFHU
FDEOHWLHUUDGHOFDEOHGHFRUULHQWH3DUDVXVHJXULGDG
SHUVRQDOHVWHHOHFWURGRPpVWLFRGHEHHVWDUDGHFXDGDPHQWH
FRQHFWDGRDWLHUUD
NO use un enchufe adaptador con este electrodoméstico.
(OFDEOHGHFRUULHQWHGHHVWHHOHFWURGRPpVWLFRFRQWLHQHXQ
HQFKXIHGHFDEOHVFRQH[LyQDWLHUUDTXHVHFRQHFWDDXQ
WRPDFRUULHQWHGHSDUHGHVWiQGDUGHFDEOHVFRQH[LyQD
WLHUUDSDUDPLQLPL]DUODSRVLELOLGDGGHULHVJRVGHGHVFDUJDV
HOpFWULFDVSRUSDUWHGHOPLVPR
(OFDEOHGHFRUULHQWHLQFOX\HXQLQWHUUXSWRUGHFRUULHQWH
6HEULQGDXQERWyQGHHYDOXDFLyQ\UHLQLFLRHQODFDMD
GHOHQFKXIH(OGLVSRVLWLYRGHEHUiVHUHYDOXDGRHQIRUPD
SHULyGLFDSUHVLRQDQGRSULPHURHOERWyQTEST(YDOXDU\
OXHJRRESET5HLQLFLRPLHQWUDVVHHQFXHQWUHHQFKXIDGRDO
WRPDFRUULHQWH6LHOERWyQTEST (YDOXDUQRVHDFWLYDRHO
ERWyQRESET5HLQLFLRQRSHUPDQHFHHQVXSRVLFLyQGHMH
GHXVDUHODFRQGLFLRQDGRUGHDLUH\FRPXQtTXHVHFRQXQ
WpFQLFRFDOLILFDGRGHOVHUYLFLR
&RQWUDWHDXQHOHFWULFLVWDFDOLILFDGRSDUDTXHFRQWUROHHO
WRPDFRUULHQWH\HOFLUFXLWRHOpFWULFRSDUDDVHJXUDUTXHHO
HQFKXIHHVWpFRUUHFWDPHQWHFRQHFWDGRDWLHUUD
(QFDVRGHFRQWDUFRQXQWRPDFRUULHQWHGHSDUHGGH
FDEOHVHVVXUHVSRQVDELOLGDG\REOLJDFLyQUHHPSOD]DUOR
SRUXQWRPDFRUULHQWHGHSDUHGGHFDEOHVFRUUHFWDPHQWH
FRQHFWDGRDWLHUUD
(ODFRQGLFLRQDGRUGHDLUHGHEHUtDHVWDUVLHPSUHFRQHFWDGRD
XQHQFKXIHHVSHFtILFRFRQXQtQGLFHGHYROWDMHHTXLYDOHQWHDO
TXHILJXUDHQVXHWLTXHWDGHFDUDFWHUtVWLFDVWpFQLFDV
(VWRJDUDQWL]DHOPHMRUIXQFLRQDPLHQWR\DGHPiVSUHYLHQHOD
VREUHFDUJDGHORVFLUFXLWRVGHOKRJDUORFXDOSRGUtDRFDVLRQDU
ULHVJRVGHLQFHQGLRGHELGRDOUHFDOHQWDPLHQWRGHFDEOHV
3DUDFRQRFHUORVUHTXLVLWRVHVSHFtILFRVGHODFRQH[LyQ
HOpFWULFDFRQVXOWHODV,QVWUXFFLRQHVGH,QVWDODFLyQ5HTXLVLWRV
(OpFWULFRV
ADVERTENCIA
ADVERTENCIA
ESPAÑOL
13
PIEZAS Y CARACTERÍSTICAS
REQUISITOS DE INSTALACIÓN
ESPAÑOL
14
5LHOGHPRQWDMHVXSHULRU
7LSR%
6RSRUWHGH&LHUUH
GHOD9HQWDQD
6RSRUWHV/DWHUDOHV
7LSR$
0DUFRVGHOD
&RUWLQD/DWHUDO
GHMDGR
&RUWLQDV
/DWHUDOHV
$FRQGLFLRQDGRU
GHDLUH
-XQWDGHJRPDHVSXPD
GHODSDUWHVXSHULRUGH
ODYHQWDQD
GHUHFKR
HERRAMIENTAS QUE
NECESITARÁ
8QGHVWRUQLOODGRUGHHVWUHOOD
8QDUHJODRFLQWDPpWULFD
/iSL]
1LYHO
7LMHUDVRFXFKLOOD
7DODGUR\EURFDGH´
ADVERTENCIA
Peligro de Choque Eléctrico
Conecte a un contacto de pared de conexión a tierra de
3 terminales.
No quite el terminal de conexión a tierra del cable de
alimentación.
No use un adaptador.
No use un cable eléctrico de extensión.
No seguir estas instrucciones puede ocasionar la muerte,
incendio o choque eléctrico.
REQUISITOS DE INSTALACIÓN
REQUISITOS ELÉCTRICOS Ê×ÝÎÜÍÎÒ×ÒÌÒÊÛ
Lea estas instrucciones completa y
cuidadosamente.
•
IMPORTANTE – *XDUGHHVWDV
LQVWUXFFLRQHVSDUDXVRGHOLQVSHFWRUORFDO
•
IMPORTANTE – 2EVHUYHWRGRV
ORVFyGLJRV\yUGHQHVGHOH\
• Nota al instalador ±$VHJ~UHVHGHGHMDUHVWDV
LQVWUXFFLRQHVFRQHOFRQVXPLGRU
• Nota al consumidor ±&RQVHUYHHVWDV
LQVWUXFFLRQHVSDUDUHIHUHQFLDIXWXUD
• Nivel de destreza±/DLQVWDODFLyQGHHVWHDSDUDWR
UHTXLHUHGHGHVWUH]DVPHFiQLFDVEiVLFDV
• Tiempo de ejecución – Aprox. 1 hora
5HFRPHQGDPRVGRVSHUVRQDVSDUD
ODLQVWDODFLyQGHHVWHSURGXFWR
/DLQVWDODFLyQDSURSLDGDHVODUHVSRQVDELOLGDGGHO
LQVWDODGRU
/DIDOODGHOSURGXFWRGHELGRDXQDLQVWDODFLyQ
LQDGHFXDGDQRHVWiFXELHUWD
SRUODJDUDQWtD
&XDQGRLQVWDOHHVWHDFRQGLFLRQDGRU
GHDLUH'(%(XVDUWRGDVODVSLH]DVVXPLQLVWUDGDV
\XVDUSURFHGLPLHQWRVDGHFXDGRVGHLQVWDODFLyQ
Algunos modelos requieren tomacorrientes de
115/120 voltios de corriente alterna y 60 Hz
conectados a tierra, protegidos con un fusible
de dilatación de tiempo de 15 amperios o un
cortacircuitos.
El enchufe de tres púas con conexión a tierra minimiza la
posibilidad de descargas eléctricas. Si el tomacorriente de
la pared que usted planea usar solamente tiene 2 tomas, es
su responsabilidad hacer que un técnico lo reemplace por
uno de tres tomas con conexión a tierra.
PRECAUCIÓN
Bajo ninguna circunstancia corte o remueva la tercera púa
(conexión a tierra) del cable eléctrico.
No cambie el enchufe en el cable eléctrico de este
acondicionador de aire.
Los cables caseros de aluminio podrían presentar
problemas especiales. Consulte a un técnico electricista
calificado.
(OFDEOHGHDOLPHQWDFLyQLQFOX\HXQGLVSRVLWLYRSDUD
LQWHUUXSFLyQGHFRUULHQWH6HLQFOX\HXQERWyQGHSUXHED
\GHUHLQLFLRHQHOGLVSRVLWLYR(OGLVSRVLWLYRGHEH
SRQHUVHDSUXHEDSHULyGLFDPHQWHSULPHURVHSUHVLRQD
HOERWyQGHTEST SUXHED\OXHJRRESET UHLQLFLR
PLHQWUDVVHHQFXHQWUDHQFKXIDGRDOWRPDFRUULHQWH6LHO
ERWyQ TEST QRVHGLVSDUDRVLHOERWyQRESET QRTXHGD
HQJDQFKDGRGHMHGHXWLOL]DUHODFRQGLFLRQDGRUGHDLUH\
FRPXQtTXHVHFRQXQWpFQLFRFDOLILFDGR
Si el cable de suministro de energía está dañado, no
se puede reparar. Debe reemplazarse con un cable del
fabricante del producto. Si el cable de suministro de energía
está dañado, llame al Servicio al cliente de Haier: 1-877-
337-3639.
ESPAÑOL
15
ESPAÑOL
• Estas instrucciones son para una ventana estándar de dos
pliegues. Usted necesitará modificar el proceso para otros
tipos de ventanas.
• El acondicionador de aire puede instalarse sin los paneles de
acordeón para ajustarse a una ventana más estrecha. Ver
las dimensiones de la abertura de la ventana.
• Todas las partes de apoyo deben quedar totalmente
aseguradas a algún metal, mampostería o a la madera.
• El tomacorriente eléctrico debe estar al alcance del cable
eléctrico del acondicionador de aire.
• Siga las dimensiones de la tabla y la ilustración según su
modelo.
Un marco de ventana de tormentas no permitirá que
el acondicionador de aire se incline hacia el exterior y
evitará que drene apropiadamente. Para solucionar este
problema, adhiera un pedazo de madera a el umbral.
ÙÎÍÊãØÜÍÎÖÊÍÎÛÊ
Ê×ÌÑØ"ė
LONGITUD: Lo suficientemente largo como para ajustar
en el interior del marco de la ventana.
GRUESO: Para determinar el grueso, coloque un pedazo
çèðäçèõäèñèïøðåõäïóäõäëäæèõïä!¦"ėðŹöäï÷äôøèïä
parte superior del marco de la ventana de tormentas o del
marco vinilo.
Péguelo firmemente con clavos o con tornillos
proporcionados por el instalador.
21-7/8” - 36”
PASO 2 - REQUISITOS PARA LA
VENTANA
13-3/8”
FRQSDQHOHVGHDFRUGHyQ
PASO 3 - REQUISITOS DE UNA
ßÎ×ÝÊ×ÊÍÎÝØÛÖÎ×ÝÊÜ
ƎPiVDOWR
TXHHOPDUFR
GHYHQWDQDGH
WRUPHQWDV
0DUFRGH
YHQWDQDGH
WRUPHQWDV
8PEUDO
ƎPDVDOWRTXHHOPDUFR
YLQLORHQDOJXQDVYHQWDQDV
0DUFRYLQLOR
0DGHUD
INSTRUCCIONES DE INSTALACIÓN
ADVERTENCIA
Peligro de Peso Excesivo
Use dos o más personas para mover e instalar el
acondicionador de aire.
No seguir esta instrucción puede ocasionar una lesión
en la espalda u otro tipo de lesiones.
PASO 1 - DESEMPAQUE SU
ACONDICIONADOR DE AIRE
• Quite los materiales de empaque. Guarde la caja y el empa-
que de espuma para almacenar el acondicionador de aire
cuando no esté en uso.
NOTA: NO hay materiales de empaque internos dentro del
acondicionador de aire para quitar. No abra el gabinete.
• Deshágase adecuadamente de todos los materiales de
empaque o recíclelos.
• Manipule el acondicionador de aire con cuidado.
• Mantenga el acondicionador de aire en posición vertical y
nivelado. No coloque el acondicionador de aire de costado,
sobre su parte frontal, su parte posterior o al revés.
16
ESPAÑOL
INSTRUCCIONES DE INSTALACIÓN
17
A. Instale el riel de montaje superior con 4 tornillos tipo A
desde la parte exterior de la caja.
PASO 4 -
PREPARE EL
ACONDICIONADOR DE AIRE
CLICK
5LHOGH
PRQWDMH
VXSHULRUO
B. 'HVOLFHORVSDQHOHVGHODFRUWLQDODWHUDOHQORVULHOHVGHO
SDQHOODWHUDO
C. 'HVOLFHORVPDUFRVGHODVFRUWLQDVODWHUDOHVL]TXLHUGD
\GHUHFKDHQHOULHOGHPRQWDMHVXSHULRUHLQIHULRU
$VHJ~UHVHGHTXHODVFRUWLQDVODWHUDOHVFRLQFLGDQVREUH
ORVFRVWDGRVGHORVPDUFRV
A. 0LGDHODQFKRGHODDEHUWXUDGHODYHQWDQD\PDUTXHOD
OtQHDFHQWUDOGHODOIpL]DULQWHULRUGHODYHQWDQD&RORTXH
ODXQLGDGHQODYHQWDQD%DMHODYHQWDQDSDUDPDQWHQHU
VRVWHQLGDODXQLGDG
B. &RORTXHHODFRQGLFLRQDGRUGHDLUHHQODYHQWDQDGHPRGR
TXHVHHQFXHQWUHFHQWUDGR&RORTXHHODFRQGLFLRQDGRUGH
DLUHGHPRGRTXHHOH[WUHPRIURQWDOGHOULHOGHPRQWDMH
LQIHULRUVHHQFXHQWUHFRQWUDHOH[WUHPRWUDVHURGHO
DOIpL]DU
C. ,QVWDOHHOVRSRUWHODWHUDOHQODXQLGDG\HQHODOIpL]DUGH
ODYHQWDQDXVDQGRORVGRVWRUQLOORVGHPDGHUDGH´
SURYLVWRV5HSLWDHVWHSDVRGHORWURODGR
PASO 5 - INSTALE EL
ACONDICIONADOR DE AIRE EN LA
VENTANA
ESPAÑOL
INSTRUCCIONES DE INSTALACIÓN
18
D. %DMHODYHQWDQDGHPRGRTXHHOH[WUHPRIURQWDOGHO
PRQWDMHVXSHULRUVHHQFXHQWUHGHODQWHGHODYHQWDQD
$VHJ~UHVHGHTXHHODFRQGLFLRQDGRUGHDLUHHVWp
QLYHODGRRDSHQDVLQFOLQDGRKDFLDHOH[WHULRU
PASO 5 - INSTALE EL
ACONDICIONADOR DE AIRE EN LA
VENTANA
7RUQLOOR7LSR%
E. ([WLHQGDORVSDQHOHVGHODFRUWLQDKDVWDTXHOOHQHQOD
YHQWDQD0DUTXHODXELFDFLyQGHORVDJXMHURVHQFDGD
HVTXLQD8VHHOWDODGUR\XQDEURFDGH´SDUDWDODGUDU
DJXMHURVSLORWR8VHWRUQLOORVWLSR%SDUDDVHJXUDUORV
SDQHOHVODWHUDOHVHQVXVOXJDUHVFRUUHVSRQGLHQWHV
8VHXQWRUQLOORWLSR%SDUDLQVWDODUHOVRSRUWHGHEORTXHR
DUULEDGHODSDUWHLQIHULRUGHODYHQWDQD
A.
PRECAUCIÓN
3DUDHYLWDUODURWXUDGHYLGULRVR
GDxRVVREUHODVYHQWDQDVVREUH
YLQLORRYHQWDQDVFRQVWUXLGDVGH
PDQHUDVLPLODUDGMXQWHHOVRSRUWH
GHEORTXHRGHODYHQWDQDDOD
MDPEDODWHUDOGHODYHQWDQDFRQXQ
WRUQLOOR7LSR%
PASO 6 - INSTALE EL SOPORTE DE
LA TRABA DE LA VENTANA Y LA
JUNTA SUPERIOR DE GOMAESPUMA
DE LA VENTANA
Madera
Vinilo
B. &RUWHODMXQWDGHJRPDHVSXPDVXSHULRUGHODYHQWDQDGHO
PLVPRDQFKRTXHODYHQWDQD
C. &RORTXHODJRPDHVSXPDHQWUHHOYLGULR\ODYHQWDQDSDUD
HYLWDUHOLQJUHVRGHDLUHHLQVHFWRVDODKDELWDFLyQ
NOTA: Si la junta provista no se ajusta a su ventana,
obtenga el material apropiado en forma local para
contar con un sellado correcto en la instalación.
PASO 6 - INSTALE EL SOPORTE DE
LA TRABA DE LA VENTANA Y LA
JUNTA SUPERIOR DE GOMAESPUMA
DE LA VENTANA
ADVERTENCIA
Peligro de Choque Eléctrico
Conecte a un contacto de pared de conexión a tierra de
3 terminales.
No quite el terminal de conexión a tierra del cable de
alimentación.
No use un adaptador.
No use un cable eléctrico de extensión.
No seguir estas instrucciones puede ocasionar la
muerte, incendio o choque eléctrico.
1. Conecte el cable eléctrico a un toma corriente de
3 terminales con conexión a tierra.
2. Presione el botón Reset (Restablecer) en el cable
eléctrico para asegurar que el tapón de seguridad está
proporcionando energía al acondicionador de aire.
PASO 7 - COMPLETE LA
INSTALACIÓN
PANEL DE CONTROL
19
ESPAÑOL
FAN ONLY
MIN
COOL
MAX
COOL
Wait 3 Minutes
Before Restarting
SPEED
HI
LOW
POWER
ON
OFF
1
2
3
4
5
6
7
8
9
10
Controles
1. Control de Temperatura
/DFRQILJXUDFLyQGHO&RQWUROGH7HPSHUDWXUDGHWHUPLQD
HOQLYHOGHIUtRSURYLVWRFrío Máx. – 10 EULQGDHOPD\RU
QLYHOGHUHIULJHUDFLyQ\Frío Mín. - 1 EULQGDODPHQRU
Fan Only (Sólo Ventilador) DSDJDODIXQFLyQGHIUtR
NOTA: 6LPXHYHHOFRQWUROGHWHPSHUDWXUDGHXQD
FRQILJXUDFLyQGHIUtRDXQDFRQILJXUDFLyQGHYHQWLODFLyQ
RDSDJDODXQLGDGPLHQWUDVVHHVWiUHIULJHUDQGR
HVSHUHSRUORPHQRVPLQXWRVDQWHVGHYROYHUDXQD
FRQILJXUDFLyQGHIUtR
Descripciones de Refrigeración
Para una Refrigeración Normal –6HOHFFLRQHGH 4 a
7 HQHOGLDOFRQ)$163(('9HORFLGDGGHO9HQWLODGRU
FRQILJXUDGDHQ+,$OWRR/2:%DMR
Para una Refrigeración Máxima –6HOHFFLRQHGH8 a
10 HQHOGLDOFRQ)$163(('9HORFLGDGGHO9HQWLODGRU
FRQILJXUDGDHQ+,$OWR
Para una Refrigeración Más Suave y Nocturna—
Seleccione de 1 a 4 HQHOGLDOFRQODFRQILJXUDFLyQGH
)$163(('9HORFLGDGGHO9HQWLODGRUHQ/2:%DMR
2. Velocidad del Ventilador
(OERWyQGHYHORFLGDGGHOYHQWLODGRUVHSXHGHFRQILJXUDU
HQ+,$OWRR/2:%DMR6HSXHGHFRQILJXUDUHQHO
PRGRGHUHIULJHUDFLyQRVyORYHQWLODGRU
3. Encendido
(QFLHQGHRDSDJDODXQLGDG
/DVIXQFLRQHV\ODDSDULHQFLDSRGUiQYDULDU
20
ESPAÑOL
CUIDADO DEL ACONDICIONADOR DE AIRE
ADVERTENCIA
Peligro de choque eléctrico
Desconecte el suministro de energía antes de limpiarlo.
No seguir esta instrucción puede ocasionar la muerte o
choque eléctrico.
LIMPIEZA
1. Desenchufe o desconecte el suministro de energía.
2. Utilice solamente un paño suave humedecido con agua
para limpiar el gabinete.
NOTA:
•No utilice un limpiador líquido o con rociador para lim-
piar el acondicionador de aire.
•NO utilice productos químicos, abrasivos, amoníaco,
blanqueador con cloro, detergentes concentrados, sol-
ventes o estropajos de metal. Algunos de estos artícu-
los/productos químicos pueden dañar y/o decolorar su
acondicionador de aire.
3. Seque bien con un paño suave.
4. Enchufe o vuelva a conectar el suministro de energía.
NO UTILIZAR CON CONDICIO´
NES CLIMÁTICAS EXTERIORES DE
CONGELACIÓN
(VWHDFRQGLFLRQDGRUGHDLUHVyORGHIUtRQRIXHGLVHxDGRSDUDXVR
FRQFRQGLFLRQHVFOLPiWLFDVH[WHULRUHVGHFRQJHODFLyQ1RGHEH
VHUXVDGRFXDQGRODWHPSHUDWXUDH[WHUQDHVWpSRUGHEDMRGHOD
WHPSHUDWXUDGHFRQJHODFLyQ)
PARRILLA Y CAJA
$SDJXHHODFRQGLFLRQDGRUGHDLUH\UHWLUHHOHQFKXIHGHOWRPDFRUUL-
HQWHDQWHVGHOLPSLDU
3DUDOLPSLDUXVHDJXD\XQGHWHUJHQWHVXDYH1RXVHEODQTXHD-
GRUHVQLDEUDVLYRV
FILTROS DE AIRE
ÎïĤï÷õòçèäìõèôøèöèèñæøèñ÷õäçè÷õŹöçèïäõèíìïïäéõòñ÷äïöè
debe revisar y limpiar por lo menos cada 30 días o con una
frecuencia mayor, si fuera necesario.
Para retirar:
ÍèöïìæèèïĤï÷õòçèöçèèïïäçòìýôøìèõçòçèïäøñìçäçÛè÷ìõèèï
Ĥï÷õò
ÕìðóìèèïĤï÷õòæòñäêøäæäïìèñ÷èüíäåſñÎñíøäêøèüçèíè
öèæäõèïĤï÷õòäñ÷èöçèöøõèèðóïäýò×òïìðóìèèïĤï÷õòèñøñ
lavavajillas.
PRECAUCIÓN
12XWLOLFHHODFRQGLFLRQDGRUGHDLUHVLQXQ
ILOWUR\DTXHODVXFLHGDG\ODVSHOXVDVSURGXFLUiQDWDVFDPLHQWRV
\UHGXFLUiQVXIXQFLRQDPLHQWR
BOBINAS EXTERIORES
Las bobinas del lado exterior del acondicionador de aire
se deberán controlar de forma regular. Si se encuentran
atascadas con tierra u hollín, deberán ser limpiadas por un
profesional.
ALMACENAMIENTO
Si la unidad no se utiliza durante un período prolongado de
tiempo:
1. Desenchufe o desconecte el suministro de energía.
2. Desagüe el agua del tanque de agua. Vea “Cuidado del
acondicionador de aire”.
3. Utilice el empaque original para volver a empacar la unidad
y evitar acumulación de polvo o suciedad.
4. Guarde el acondicionador de aire en un lugar fresco y
seco.

21
ESPAÑOL
SI NECESITA MÁS AYUDA, VISITE HAIERAMERICA.COM O COMUNÍQUESE CON LA LÍNEA DE AYUDA AL CONSUMIDOR
LLAMANDO AL 1-877-337-3639.
22
ESPAÑOL
SOLUCIÓN DE PROBLEMAS
Pruebe las soluciones sugeridas aquí y posiblemente se evite el gasto de una visita de servicio técnico.
Problema Causas posibles Qué hacer
El acondicionador de aire
no enciende
El acondicionador de aire está
desconectado.
&HUFLyUHVHGHTXHHODFRQGLFLRQDGRUGHDLUHHVWi
HQFKXIDGRWRWDOPHQWHHQHOWRPDFRUULHQWH
El fusible se disparó/ el
cortacircuitos se disparó.
,QVSHFFLRQHORVIXVLEOHVFDMDGHLQWHUUXSWRUHVGH
ODFDVD\UHHPSODFHFXDOTXLHUIXVLEOHRUHDMXVWHHO
LQWHUUXSWRU
Interrupción en el suministro
eléctrico.
/DXQLGDGVHUHLQLFLDUiDXWRPiWLFDPHQWHFRQOD
FRQILJXUDFLyQXWLOL]DGDSRU~OWLPDYH]OXHJRGH
UHHVWDEOHFHUODHOHFWULFLGDG
([LVWHXQUHWUDVRGHWLHPSRSRUSURWHFFLyQGH
DSUR[LPDGDPHQWHPLQXWRVSDUDHYLWDUOD
GHVFRQH[LyQSRUVREUHFDUJDGHOFRPSUHVRU3RUHVWD
UD]yQHVSRVLEOHTXHODXQLGDGQRFRPLHQFHDHQIULDU
GHIRUPDQRUPDOKDVWDWUDQVFXUULGRVPLQXWRVGHVGH
TXHYROYLyDHQFHQGHUVH
El dispositivo de interrupción de
corriente se ha activado.
3UHVLRQHHOERWyQ5(6(7XELFDGRHQHOFDEOHGH
DOLPHQWDFLyQ
6LHOERWyQ5(6(7QRVHPDQWLHQHHQVXOXJDUQR
XWLOLFHPiVHODFRQGLFLRQDGRUGHDLUH\FRPXQtTXHVH
FRQXQWpFQLFRFDOLILFDGR
El acondicionador de aire
no enfría como debería
El flujo de aire está restringido. &HUFLyUHVHGHTXHQRH[LVWHQLQJXQDFRUWLQDSHUVLDQD
RPXHEOHEORTXHDQGRHOIUHQWHGHODFRQGLFLRQDGRUGH
DLUH
El control de temperatura no está
ajustado apropiadamente.
(QORVPRGHORVFRQERWRQHVJLUHODWHPSHUDWXUDDXQ
Q~PHURPD\RU
El filtro de aire está sucio. /LPSLHHOILOWURFDGDGtDVSRUORPHQRV9HUOD
VHFFLyQGH&XLGDGR\OLPSLH]D
La habitación podría haber estado
caliente.
&XDQGRHODFRQGLFLRQDGRUGHDLUHVHHQFLHQGHXVWHG
QHFHVLWDGDUOHWLHPSRSDUDTXHHQIULpODKDELWDFLyQ
El aire frío se está escapando. &HUFLyUHVHGHTXHORVUHJLVWURVGHODFDOHIDFFLyQQR
HVWiQDELHUWRV\VHHQFXHQWUDQUHWRUQDQGRHODLUHIUtR
Las bobinas de enfriamiento se
congelaron.
9HU³$FRQGLFLRQDGRUGHDLUHFRQJHOiQGRVH´PiV
DGHODQWH
El acondicionador de aire
se está congelando
El hielo bloquea el flujo de aire
hacia el acondicionador de
aire evitando que se enfríe la
habitación.
(QPRGHORVFRQORVERWRQHVGHFRQWUROFRORTXHHO
FRQWUROGHPRGRHQ+LJK)DQ9HQWLODGRU$OWRy+LJK
&RRO)UtR$OWRFRQODWHPSHUDWXUDHQy
Hay agua goteando afuera Tiempo húmedo y caliente. (VWRHVQRUPDO
Hay agua goteando en el
interior de la habitación
El acondicionador de aire no está
inclinado hacia afuera.
3DUDGUHQDUHODJXDDSURSLDGDPHQWHFHUFtRUHVH
GHTXHHODFRQGLFLRQDGRUGHDLUHHVWiLQFOLQDGR
OLJHUDPHQWHGHVGHHOIUHQWHKDFLDDWUiV
Se acumula agua en la
bandeja
La humedad removida del aire y
se drena hasta la bandeja.
(VWRHVQRUPDOSRUXQFRUWRSHUtRGRHQiUHDVFRQ
SRFDKXPHGDGQRUPDOSRUXQSHUtRGRGHWLHPSRPiV
SRVWHUJDGRHQiUHDVPiVK~PHGDV
23
ESPAÑOL
GARANTÍA LIMITADA
*UDSHDTXtVXUHFLER
6HUHTXLHUHIDFLOLWDUSUXHEDGHODIHFKDGHFRPSUDRULJLQDOSDUDKDFHUXQUHFODPRGHJDUDQWtD
EXCLUSIÓN DE GARANTÍAS IMPLÍCITAS—Su única y exclusiva alternativa es la reparación del producto, como se indica
en la Garantía Limitada. Las garantías implícitas, incluyendo garantías implícitas de comerciabilidad o conveniencia sobre
un propósito particular, se limitan a un año o al período más corto permitido por la ley.
Para Clientes de EE.UU: Esta garantía se extiende al comprador original y a cualquier dueño subsiguiente de productos
comprados para uso hogareño dentro de EE.UU. Si el producto está en un área donde no se encuentra disponible un Proveedor
Autorizado del Servicio Técnico de GE Appliances, usted será responsable por el costo de un viaje o se podrá requerir que
traiga el producto a una ubicación del Servicio Técnico de GE Appliances Autorizado para recibir el servicio. En Alaska, la
garantía excluye el costo de envío o llamadas del servicio técnico a su hogar.
Algunos estados no permiten la exclusión o limitación de daños fortuitos o consecuentes. Esta garantía le da derechos legales
èöóèæżĤæòöüèöóòöìåïèôøè÷èñêäò÷õòöçèõèæëòöïèêäïèöôøèùäõżäñèñ÷õèøñèö÷äçòüò÷õòÙäõäæòñòæèõæøŹïèööòñöøö
çèõèæëòöïèêäïèöæòñöøï÷èäïäòĤæìñäçèäöøñ÷òöçèïæòñöøðìçòõïòæäïòèö÷ä÷äïòäïÏìöæäïçèöøèö÷äçò
Garante en EE.UU:
GE Appliances, a Haier company
Ŷ Instrucción al cliente. Este manual del propietario
brinda información relacionada con instrucciones de
funcionamiento y controles del usuario.
Ŷ Instalación inadecuada. Si tiene un problema de instalación
o el acondicionador de aire no posee la capacidad adecuada,
contacte a su vendedor minorista o instalador. Usted es
responsable de brindar instalaciones de conexión eléctrica
adecuadas.
Ŷ Falla del producto como resultado de modificaciones sobre
el mismo o debido a un uso irrazonable, incluyendo la falta
de mantenimiento razonable o necesario.
Ŷ Reemplazo de fusibles del hogar o reinicio de disyuntores.
Ŷ Fallas como consecuencia de corrosión en modelos sin
protección contra ésta.
Ŷ Daños ocasionados sobre el producto por nivel de
suministro de voltaje inadecuado, accidente, incendio,
inundaciones o catástrofes naturales.
Ŷ Daños consecuentes o incidentales causados por posibles
defectos del acondicionador de aire.
Ŷ Daño causado después de la entrega.
Qué No Será Cubierto:
Por el Período de: Reemplazaremos:
Un Año
Desde la fecha de la
compra original
Reemplazo, reparación o reembolso del costo minorista original de cualquier producto que falle
debido a un defecto en los materiales o la fabricación. Si la unidad es cambiada, la unidad de reem-
plazo posee garantía por el resto del período de la garantía original de un año sobre su producto.
GE Appliances reemplazará, a su exclusivo criterio, el producto por otro de la misma o de una
funcionalidad y calidad comparable o hará un reembolso por el precio minorista original.
Ŷ Embale la unidad correctamente. Le recomendamos usar la
caja de cartón y los materiales de embalaje originales.
ŶEntregue el producto en la ubicación del vendedor minorista
donde fue adquirido.
Ŷ Incluya en el paquete una copia del receptor de la venta u
otro comprobante de la fecha de compra original. También
escriba su nombre y domicilio y una descripción del defecto.
A Fin de Realizar un Reclamo de la Garantía Durante el Período de Devolución Permitido por el Vendedor Minorista:
Ŷ Ubique su recibo de venta original y haga una nota de su
modelo y número de serie.
Ŷ Llame al 800.GE.CARES (800.432.2737) (en Estados Unidos)
para iniciar el proceso de reemplazo del producto.
ŶSe solicitará su nombre, domicilio, fecha de compra, y
números de modelo y serie.
ŶGE Appliances hará arreglos para que se envíe una caja de
cartón a su hogar para recuperar el producto.
Ŷ Por favor entregue todos los materiales solicitados (envío
postal prepago) en la caja de cartón provista. Por favor incluya
una descripción del defecto.
ŶDebería recibir el producto de reemplazo o un reembolso
entre los 7 y 10 días hábiles una vez que hayamos recibido su
paquete.
A Fin de Realizar un Reclamo sobre la Garantía Durante el Resto de la Garantía de un Año:

Printed in China
IMPORTANTE
No regrese este producto a la tienda
Si tiene un problema con este producto, por favor comuníquese al 1-877-337-
3639 para solicitar el nombre y número telefónico del centro de servicio al cliente
autorizado más cercano.
NECESITA UNA PRUEBA DE COMPRA FECHADA, NÚMERO DE MODELO
Y DE SERIE PARA EL SERVICIO DE LA GARANTÍA
IMPORTANT
Do Not Return This Product To The Store
If you have a problem with this product, please call 1-877-337-3639 for the name
and telephone number of the nearest authorized service center.
DATED PROOF OF PURCHASE REQUIRED FOR WARRANTY SERVICE