ninjakitchen.com
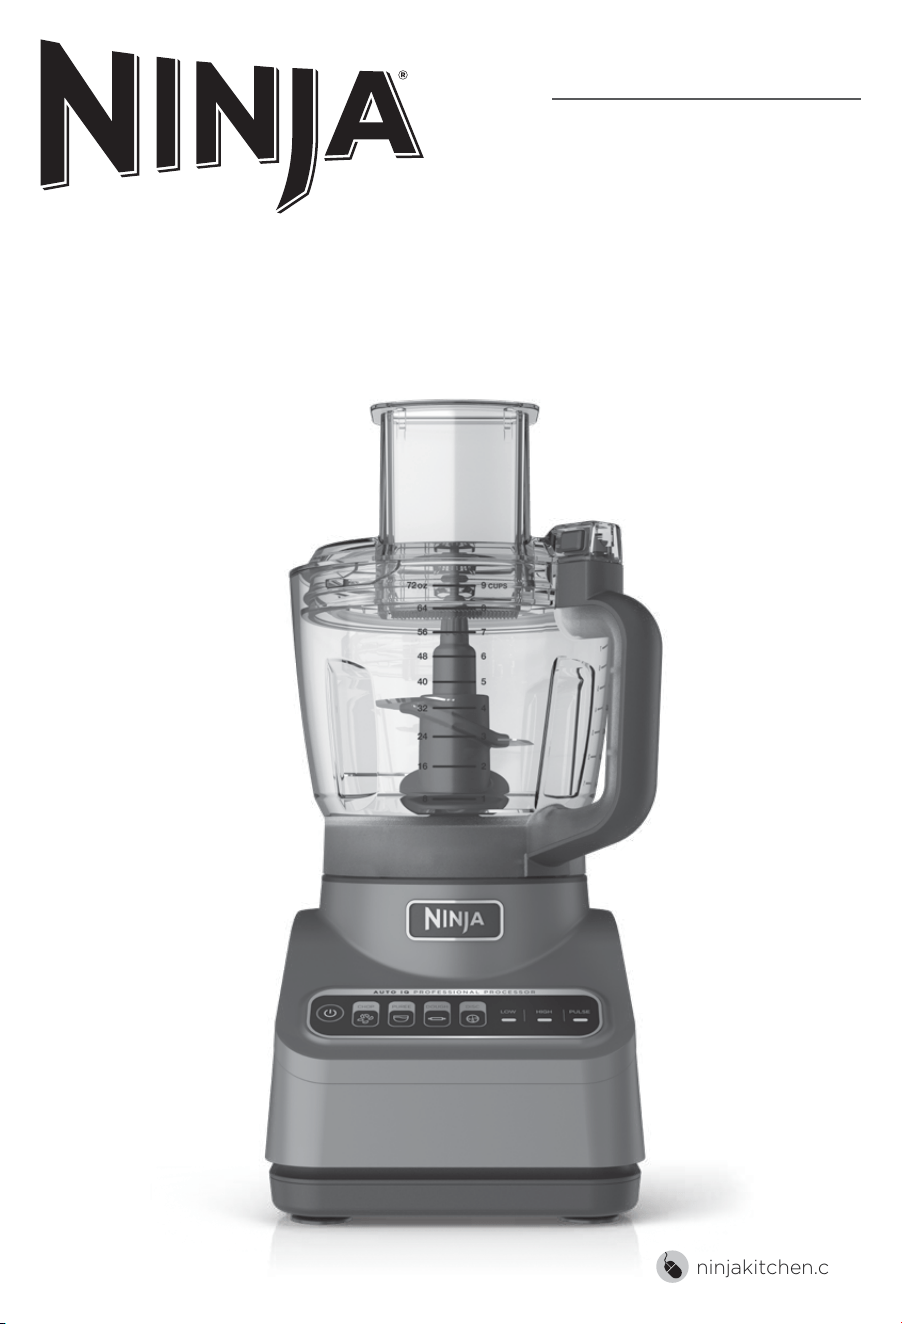
PROFESSIONAL FOOD
PROCESSOR
WITH AUTO-IQ®
OWNER’S GUIDE
BN600 Series

3ninjakitchen.com
2 ninjakitchen.com
CONTENTS
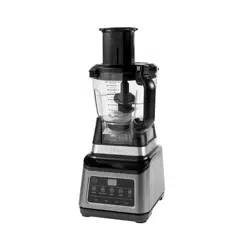
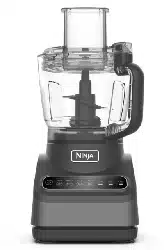
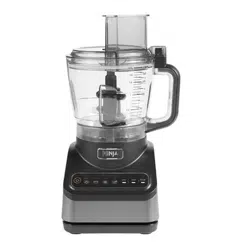
THANK YOU
for purchasing the Ninja® Professional Food Processor with Auto-iQ®
Important Safety Instructions � � � � � � � � � � � � � � � � � � � � � � � � � � � � � � � � � � 4
Parts � � � � � � � � � � � � � � � � � � � � � � � � � � � � � � � � � � � � � � � � � � � � � � � � � � � � � � � � 7
Before First Use � � � � � � � � � � � � � � � � � � � � � � � � � � � � � � � � � � � � � � � � � � � � � 7
Features � � � � � � � � � � � � � � � � � � � � � � � � � � � � � � � � � � � � � � � � � � � � � � � � � � � � � 8
Auto-iQ® Programs for the Precision Processor® Bowl ............... 8
Manual Programs ................................................8
Using the Blade Assemblies ���������������������������������� �9
Using the Reversible Slicing/Shredding Disc �������������������� �11
Care & Maintenance � � � � � � � � � � � � � � � � � � � � � � � � � � � � � � � � � � � � � � � � � � 13
Cleaning . . . . . . . . . . . . . . . . . . . . . . . . . . . . . . . . . . . . . . . . . . . . . . . . . . . . . . . 13
Storing . . . . . . . . . . . . . . . . . . . . . . . . . . . . . . . . . . . . . . . . . . . . . . . . . . . . . . . . . 13
Resetting the Motor Thermostat . . . . . . . . . . . . . . . . . . . . . . . . . . . . . . . . . . 13
Ordering Replacement Parts . . . . . . . . . . . . . . . . . . . . . . . . . . . . . . . . . . . . . 13
Troubleshooting Guide � � � � � � � � � � � � � � � � � � � � � � � � � � � � � � � � � � � � � � � 14
Warranty � � � � � � � � � � � � � � � � � � � � � � � � � � � � � � � � � � � � � � � � � � � � � � � � � � � 15
PLEASE READ CAREFULLY AND
KEEP FOR FUTURE REFERENCE�
TECHNICAL SPECIFICATIONS
Voltage: 120V~, 60Hz
Power: 850 Watts
TIP: You can find the model and serial
numbers on the QR code label on the
back of the unit by the power cord.
RECORD THIS INFORMATION
Model Number: ��������������������
Serial Number: ���������������������
Date of Purchase: �������������������
(Keep receipt)
Store of Purchase: ������������������
REGISTER YOUR PURCHASE
registeryourninja.com
Scan QR code using mobile device

3ninjakitchen.com
2 ninjakitchen.com
CONTENTS
THANK YOU
for purchasing the Ninja® Professional Food Processor with Auto-iQ®
Important Safety Instructions � � � � � � � � � � � � � � � � � � � � � � � � � � � � � � � � � � 4
Parts � � � � � � � � � � � � � � � � � � � � � � � � � � � � � � � � � � � � � � � � � � � � � � � � � � � � � � � � 7
Before First Use � � � � � � � � � � � � � � � � � � � � � � � � � � � � � � � � � � � � � � � � � � � � � 7
Features � � � � � � � � � � � � � � � � � � � � � � � � � � � � � � � � � � � � � � � � � � � � � � � � � � � � � 8
Auto-iQ® Programs for the Precision Processor® Bowl ............... 8
Manual Programs ................................................8
Using the Blade Assemblies ���������������������������������� �9
Using the Reversible Slicing/Shredding Disc �������������������� �11
Care & Maintenance � � � � � � � � � � � � � � � � � � � � � � � � � � � � � � � � � � � � � � � � � � 13
Cleaning . . . . . . . . . . . . . . . . . . . . . . . . . . . . . . . . . . . . . . . . . . . . . . . . . . . . . . . 13
Storing . . . . . . . . . . . . . . . . . . . . . . . . . . . . . . . . . . . . . . . . . . . . . . . . . . . . . . . . . 13
Resetting the Motor Thermostat . . . . . . . . . . . . . . . . . . . . . . . . . . . . . . . . . . 13
Ordering Replacement Parts . . . . . . . . . . . . . . . . . . . . . . . . . . . . . . . . . . . . . 13
Troubleshooting Guide � � � � � � � � � � � � � � � � � � � � � � � � � � � � � � � � � � � � � � � 14
Warranty � � � � � � � � � � � � � � � � � � � � � � � � � � � � � � � � � � � � � � � � � � � � � � � � � � � 15
PLEASE READ CAREFULLY AND
KEEP FOR FUTURE REFERENCE�
TECHNICAL SPECIFICATIONS
Voltage: 120V~, 60Hz
Power: 850 Watts
TIP: You can find the model and serial
numbers on the QR code label on the
back of the unit by the power cord.
RECORD THIS INFORMATION
Model Number: ��������������������
Serial Number: ���������������������
Date of Purchase: �������������������
(Keep receipt)
Store of Purchase: ������������������
REGISTER YOUR PURCHASE
registeryourninja.com
Scan QR code using mobile device

5ninjakitchen.com
4 ninjakitchen.com
SAVE THESE INSTRUCTIONS
IMPORTANT SAFETY INSTRUCTIONS
PLEASE READ CAREFULLY BEFORE USE • FOR HOUSEHOLD USE ONLY
1 Read all instructions prior to using the
appliance and its accessories.
2 Carefully observe and follow all
warnings and instructions. This unit
contains electrical connections and
moving parts that potentially present
risk to the user.
3 Take your time and exercise care
during unpacking and appliance
setup. This appliance contains sharp,
loose blades that can cause injury
if mishandled.
4 Take inventory of all contents to
ensure you have all parts needed
to properly and safely operate
your appliance.
5 Blades are sharp. Handle carefully.
6 This product is provided with a
Chopping Blade Assembly. ALWAYS
exercise care when handling blade
assembly. The blade assembly is
sharp and is NOT locked in place in
the container. The blade assembly
is designed to be removable to
facilitate cleaning and replacement
if needed. ON LY grasp the blade
assembly by the top of the shaft.
Failure to use care when handling the
blade assembly will result in a risk of
laceration.
7 Turn the appliance OFF, then unplug
the appliance from the outlet when
not in use, before assembling or
disassembling parts, and before
cleaning. To unplug, grasp the plug
by the body and pull from the outlet.
NEVER unplug by grasping and
pulling the flexible cord.
8 Before use, wash all parts that may
contact food. Follow washing instructions
covered in this instruction manual.
9 Before each use, inspect blade
assemblies for damage. If a blade is
bent or damage is suspected, contact
SharkNinja to arrange for replacement.
10 DO NOT use this appliance outdoors.
It is designed for indoor household
use only.
11 This appliance has a polarized plug
(one prong is wider than the other).
To reduce the risk of electric shock,
this plug will fit in a polarized outlet
only one way. If the plug does not fit
fully in the outlet, reverse the plug. If
it still does not fit, contact a qualified
electrician. DO NOT modify the plug in
any way.
12
DO NOT operate any appliance with
a damaged cord or plug, or after the
appliance malfunctions or is dropped
or damaged in any manner. This
appliance has no user-serviceable
parts. If damaged, contact SharkNinja
for servicing.
13 This appliance has important markings
on the plug blade. The entire supply
cord is not suitable for replacement. If
damaged, please contact SharkNinja
for service.
14 Extension cords should NOT be used
with this appliance.
15 To protect against the risk of electric
shock, DO NOT submerge the
appliance or allow the power cord to
contact any form of liquid.
16 DO NOT allow the cord to hang over
the edges of tables or counters. The
cord may become snagged and pull
the appliance o the work surface.
17 DO NOT allow the unit or the cord to
contact hot surfaces, including stoves
and other heating appliances.
18 ALWAYS use the appliance on a dry
and level surface.
19 DO NOT allow children to operate
this appliance or use as a toy. Close
supervision is necessary when any
appliance is used near children.
20 This appliance is NOT intended to be
used by people with reduced physical,
sensory, or mental capabilities, or lack
of experience and knowledge, unless
they have been given supervision
or instruction concerning use of the
appliance by a person responsible
for their safety.
21 ON LY use attachments and
accessories that are provided with
the product or are recommended by
SharkNinja. The use of attachments,
including canning jars, not recommended
or sold by SharkNinja may cause fire,
electric shock, or injury.
22 NEVER place a blade assembly
on the motor base without it first
being attached to its corresponding
container (bowl) and lid.
23 Keep hands, hair, and clothing out
of the container when loading
and operating.
24 During operation and handling of
the appliance, avoid contact with
moving parts.
25 DO NOT fill container past the 9-Cup
line.
26 DO NOT operate the appliance with an
empty container.
27 DO NOT microwave any containers
or accessories provided with the
appliance.
28 NEVER leave the appliance
unattended while in use.
29 DO NOT blend hot liquids. Doing so
may result in pressure buildup and
steam exposure that can pose a risk
of the user being burned.
30 DO NOT process dry ingredients
with the Chopping Blade Assembly.
31 To reduce the risk of injury, never
place cutting blade or discs on base
without first putting bowl properly
in place.
32 DO NOT perform grinding operations
with the Chopping Blade Assembly.
33 NEVER operate the appliance
without lids and caps in place. DO
NOT attempt to defeat the interlock
mechanism. Ensure the container
and lid are properly installed before
operation.
WARNING
To reduce the risk of injury, fire, electrical shock or property damage,
basic safety precautions must always be followed, including the following
numbered warnings and subsequent instructions� Do not use appliance for
other than intended use�

7ninjakitchen.com
6 ninjakitchen.com
SAVE THESE INSTRUCTIONS
IMPORTANT SAFETY INSTRUCTIONS
PLEASE READ CAREFULLY BEFORE USE • FOR HOUSEHOLD USE ONLY
WARNING
To reduce the risk of injury, fire, electrical shock or property damage,
basic safety precautions must always be followed, including the following
numbered warnings and subsequent instructions� Do not use appliance for
other than intended use�
34 Before operation, ensure all utensils
are removed from containers.
Failure to remove utensils can cause
containers to shatter and potentially
result in personal injury and property
damage.
35 Keep hands and utensils out of
containers while chopping to reduce
the risk of severe personal injury or
damage to the blender/food chopper.
A scraper may be used ON LY when
the processor is not running. When
using the processor, always use food
pusher to add food. NEVER add food
by hand.
36 DO NOT attempt to remove the
container or lid from the motor base
while the blade assembly is still
spinning. Allow the appliance to come
to a complete stop before removing
lids and containers.
37 If the appliance overheats, a thermal
switch will activate and temporarily
disable the motor. To reset, unplug
the appliance and allow it to cool for
approximately 15 minutes before
using again.
38 DO NOT expose the containers and
accessories to extreme temperature
changes. They may experience damage.
39 Upon completion of processing,
ensure that the blade assembly
is removed BEFORE emptying
container’s contents. Remove the
blade assembly by carefully grasping
the top of the shaft and lifting it from
the container. Failure to remove the
blade assembly before emptying the
container results in a risk of laceration.
40 The maximum wattage rating for
this appliance is based on the
configuration of the Food Processor
Bowl.
41 DO NOT submerge the motor base or
control panel in water or other liquids.
DO NOT spray motor base or control
panel with any liquid.
42 DO NOT attempt to sharpen blades.
43 Turn o the appliance and unplug the
motor base before cleaning.
44 NEVER feed food by hand. Always use
food pusher.
45 To reduce the risk of injury from
damage to the food processing bowl
or separation of the lid, DO NOT load
the bowl with ice cubes for crushing.
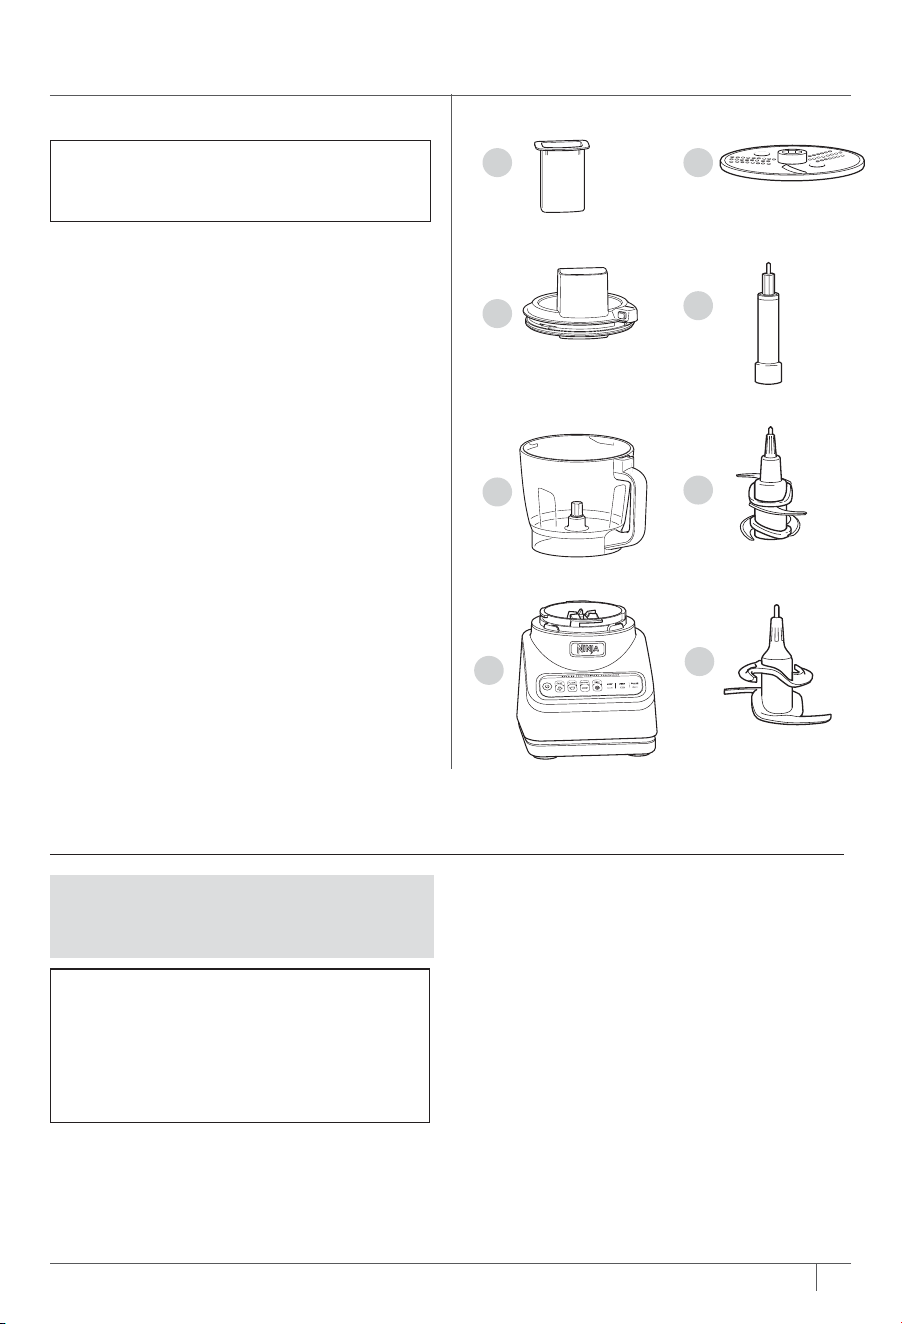
PARTS
A
C
E
F
G
B
D
H
A Pusher for Feed Chute Lid
B Feed Chute Lid
C 9-Cup Precision Processor® Bowl
D Motor Base
(attached power cord not shown)
E Reversible Slicing/Shredding Disc
F Disc Spindle
G Chopping Blade Assembly
H Dough Blade Assembly
NOTE: The top flap of your box shows
the select accessories that are included
with your model.
There are a variety of accessories that are
compatible with this food processor series.
To purchase more accessories and find
great recipes, visit ninjakitchen.com.
1 Remove all packaging materials from
the appliance. Exercise care when
unpacking blade assemblies. All blade
assemblies are sharp.
2 The Chopping Blade Assembly is NOT
locked in place in the bowl. Handle the
Chopping Blade Assembly by grasping
the top of the shaft.
3 Wash bowl, lid, disc, and blade
assemblies in warm, soapy, water using
a dishwashing utensil with a handle to
avoid direct contact with the blades.
Exercise care when handling blade
assemblies, as the blades are sharp.
4 Thoroughly rinse and air-dry all parts.
BEFORE FIRST USE
IMPORTANT: Review all warnings on
pages 4–6 before proceeding.
NOTE: All attachments are BPA free and
dishwasher safe. It is recommended that
the bowl, lid, disc, and blade assemblies
be placed on the top rack of the
dishwasher. Exercise care when handling
blade assemblies.
7ninjakitchen.com
6 ninjakitchen.com
SAVE THESE INSTRUCTIONS
IMPORTANT SAFETY INSTRUCTIONS
PLEASE READ CAREFULLY BEFORE USE • FOR HOUSEHOLD USE ONLY
WARNING
To reduce the risk of injury, fire, electrical shock or property damage,
basic safety precautions must always be followed, including the following
numbered warnings and subsequent instructions� Do not use appliance for
other than intended use�
34 Before operation, ensure all utensils
are removed from containers.
Failure to remove utensils can cause
containers to shatter and potentially
result in personal injury and property
damage.
35 Keep hands and utensils out of
containers while chopping to reduce
the risk of severe personal injury or
damage to the blender/food chopper.
A scraper may be used ON LY when
the processor is not running. When
using the processor, always use food
pusher to add food. NEVER add food
by hand.
36 DO NOT attempt to remove the
container or lid from the motor base
while the blade assembly is still
spinning. Allow the appliance to come
to a complete stop before removing
lids and containers.
37 If the appliance overheats, a thermal
switch will activate and temporarily
disable the motor. To reset, unplug
the appliance and allow it to cool for
approximately 15 minutes before
using again.
38 DO NOT expose the containers and
accessories to extreme temperature
changes. They may experience damage.
39 Upon completion of processing,
ensure that the blade assembly
is removed BEFORE emptying
container’s contents. Remove the
blade assembly by carefully grasping
the top of the shaft and lifting it from
the container. Failure to remove the
blade assembly before emptying the
container results in a risk of laceration.
40 The maximum wattage rating for
this appliance is based on the
configuration of the Food Processor
Bowl.
41 DO NOT submerge the motor base or
control panel in water or other liquids.
DO NOT spray motor base or control
panel with any liquid.
42 DO NOT attempt to sharpen blades.
43 Turn o the appliance and unplug the
motor base before cleaning.
44 NEVER feed food by hand. Always use
food pusher.
45 To reduce the risk of injury from
damage to the food processing bowl
or separation of the lid, DO NOT load
the bowl with ice cubes for crushing.
PARTS
A
C
E
F
G
B
D
H
A Pusher for Feed Chute Lid
B Feed Chute Lid
C 9-Cup Precision Processor® Bowl
D Motor Base
(attached power cord not shown)
E Reversible Slicing/Shredding Disc
F Disc Spindle
G Chopping Blade Assembly
H Dough Blade Assembly
NOTE: The top flap of your box shows
the select accessories that are included
with your model.
There are a variety of accessories that are
compatible with this food processor series.
To purchase more accessories and find
great recipes, visit ninjakitchen.com.
1 Remove all packaging materials from
the appliance. Exercise care when
unpacking blade assemblies. All blade
assemblies are sharp.
2 The Chopping Blade Assembly is NOT
locked in place in the bowl. Handle the
Chopping Blade Assembly by grasping
the top of the shaft.
3 Wash bowl, lid, disc, and blade
assemblies in warm, soapy, water using
a dishwashing utensil with a handle to
avoid direct contact with the blades.
Exercise care when handling blade
assemblies, as the blades are sharp.
4 Thoroughly rinse and air-dry all parts.
BEFORE FIRST USE
IMPORTANT: Review all warnings on
pages 4–6 before proceeding.
NOTE: All attachments are BPA free and
dishwasher safe. It is recommended that
the bowl, lid, disc, and blade assemblies
be placed on the top rack of the
dishwasher. Exercise care when handling
blade assemblies.
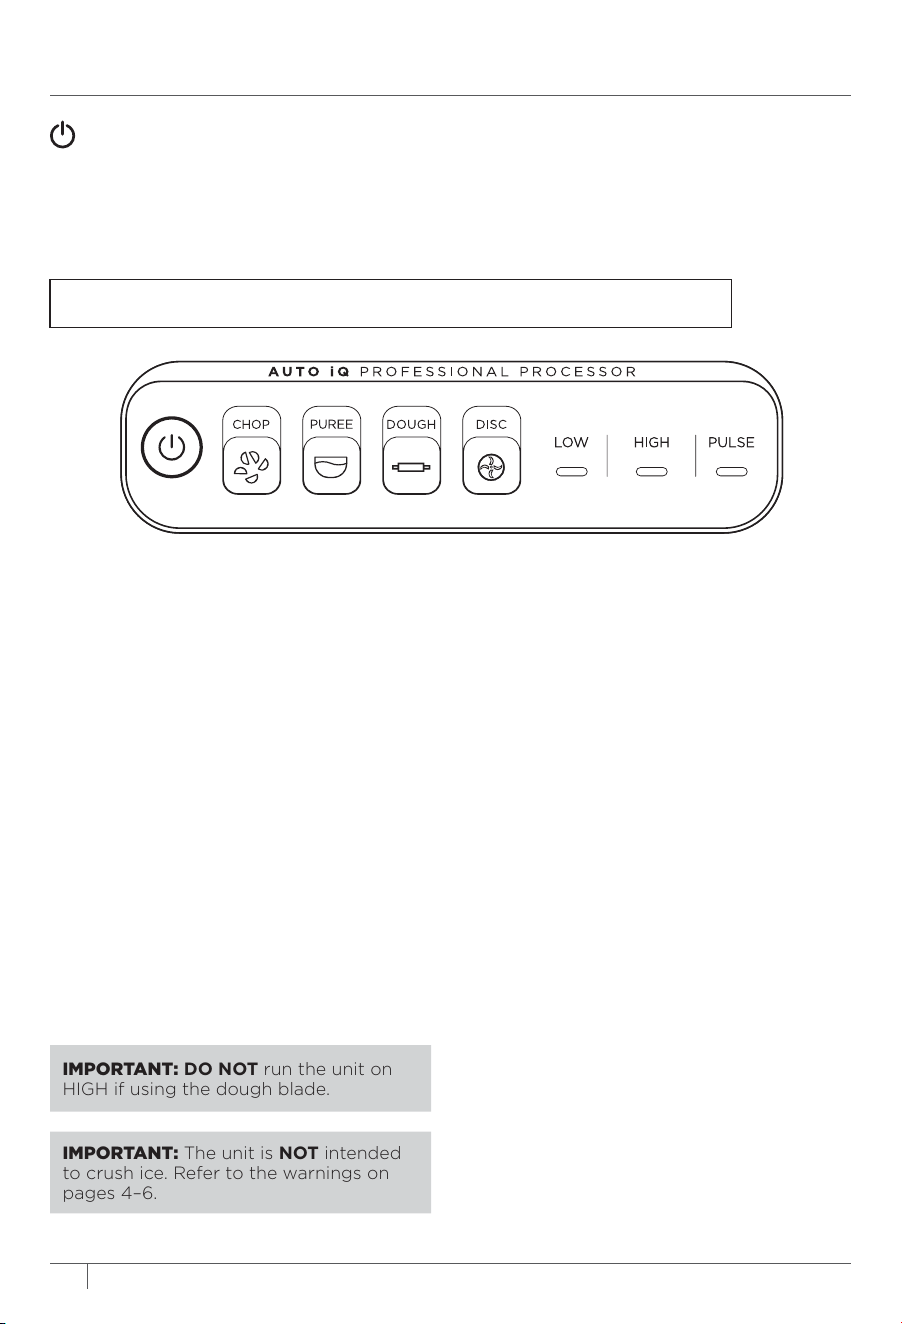
CHOP
Timed pulses and pauses give you
consistent chopping results. Run
program once for a large chop, twice
for a small chop and three times if you
prefer to mince.
DOUGH
Ideal for creating delicious dough,
from pie to pizza to cookie doughs.
NOTE: Use PULSE to add mix-ins, such
as chocolate chips or raisins, after
dough program has completed.
PUREE
(Not available on all models)
Create anything from silky-smooth
sauces to the perfect hummus.
DISC
Slice or shred a variety of ingredients,
from fresh vegetables to cheeses.
LOW and HIGH
When selected, each of these speeds
runs continuously for 60 seconds. They
do not work in conjunction with any
preset Auto-iQ programs.
PULSE
Oers greater control of pulsing and
processing. Operates only when PULSE is
pressed. Use short presses for short pulses
and long presses for long pulses.
9ninjakitchen.com
8 ninjakitchen.com
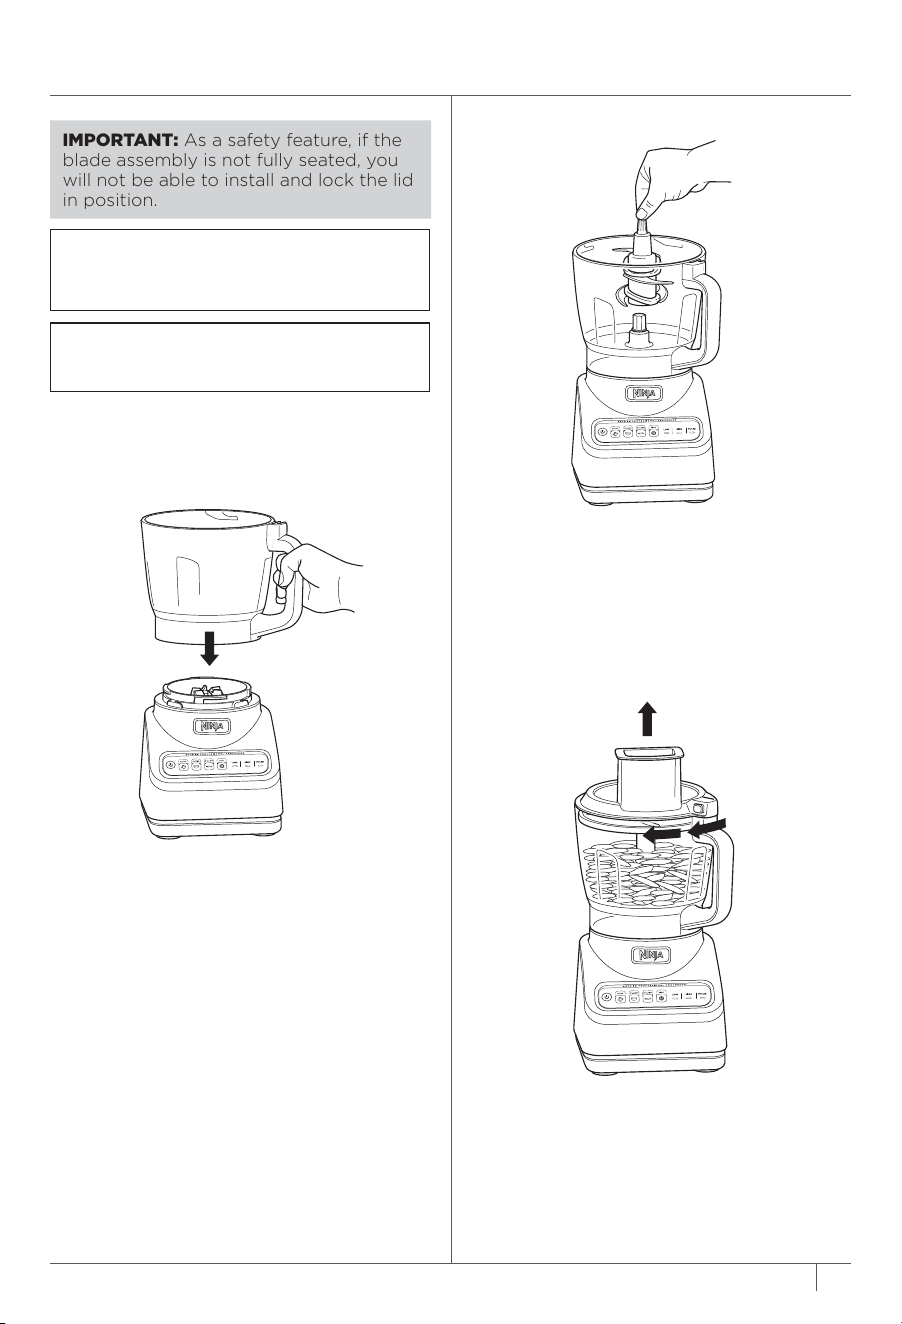
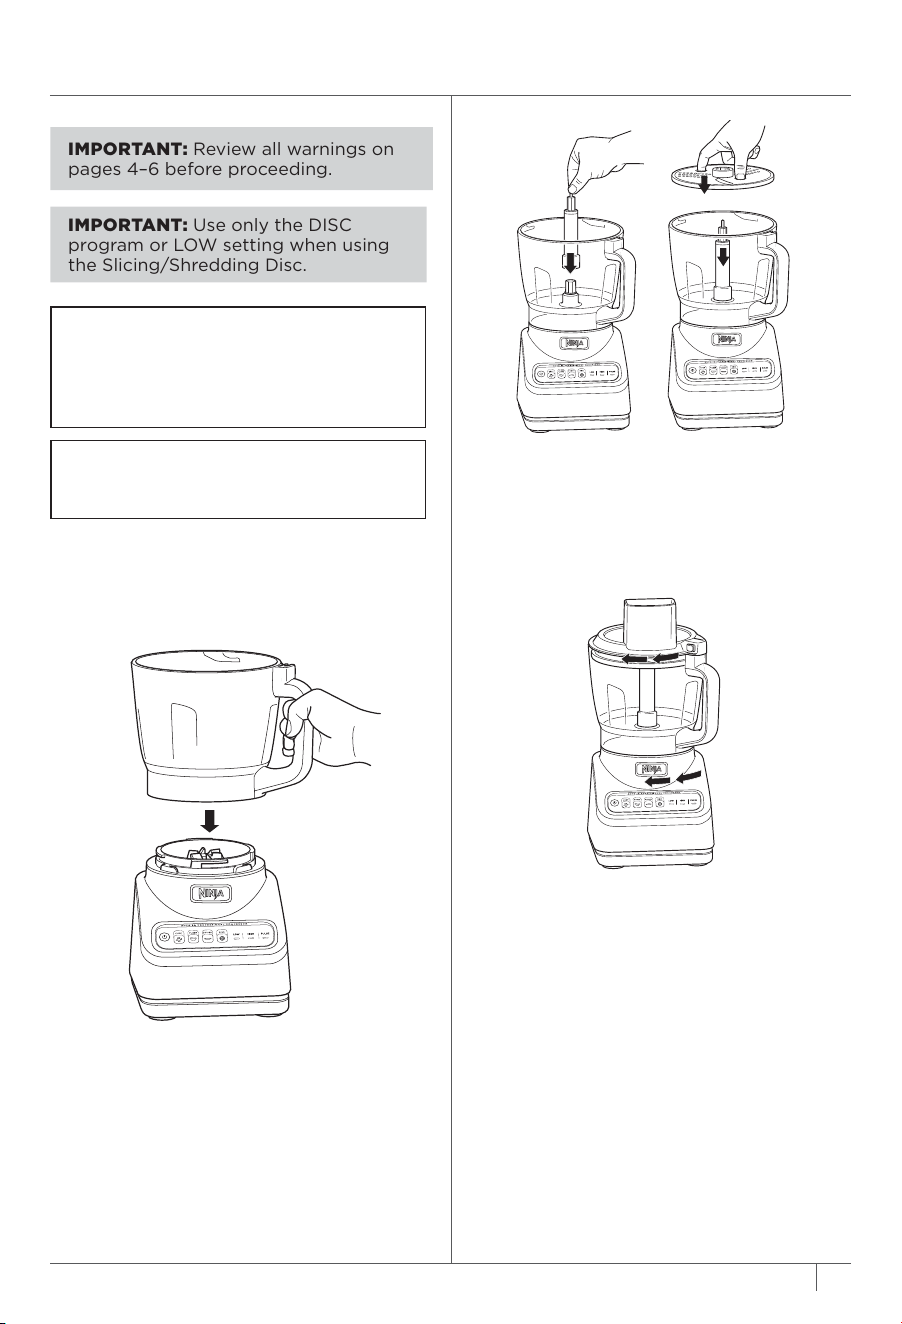
3 Exercising care, grasp the Chopping
Blade Assembly by the top of the shaft
and place it onto the drive gear inside
the bowl. Note that the Chopping
Blade Assembly will fit loosely on the
drive gear.
4 Add ingredients to the bowl, making
sure not to exceed the 9-Cup line.
5 Place the feed chute lid on the bowl and
turn clockwise until you hear a click,
indicating the lid is locked in place.
1 Place motor base on a clean, dry, level
surface such as a countertop or table,
then plug in the unit.
2 Lower the Precision Processor® Bowl
onto the motor base and rotate
clockwise until it clicks into place.
FEATURES
AUTO-IQ PROGRAMS
Use the Power button to turn the unit on and o.
AUTO-IQ®
Intelligent preset programs combine unique processing and pausing patterns that do
the work for you. Once an Auto-iQ program is selected, it will start immediately and
automatically stop when processing is complete. To stop processing before the end of
a program, press the currently active button again
MANUAL PROGRAMS
IMPORTANT: As a safety feature, if the
blade assembly is not fully seated, you
will not be able to install and lock the lid
in position.
IMPORTANT: DO NOT run the unit on
HIGH if using the dough blade.
IMPORTANT: The unit is NOT intended
to crush ice. Refer to the warnings on
pages 4–6.
NOTE: DO NOT add ingredients before
completing installation of the blade
assembly.
NOTE: Please follow the same instructions
to install the Dough Blade Assembly.
NOTE: Program run times vary from a few seconds up to a minute.
USING THE BLADE ASSEMBLIES
CHOP
Timed pulses and pauses give you
consistent chopping results. Run
program once for a large chop, twice
for a small chop and three times if you
prefer to mince.
DOUGH
Ideal for creating delicious dough,
from pie to pizza to cookie doughs.
NOTE: Use PULSE to add mix-ins, such
as chocolate chips or raisins, after
dough program has completed.
PUREE
(Not available on all models)
Create anything from silky-smooth
sauces to the perfect hummus.
DISC
Slice or shred a variety of ingredients,
from fresh vegetables to cheeses.
LOW and HIGH
When selected, each of these speeds
runs continuously for 60 seconds. They
do not work in conjunction with any
preset Auto-iQ programs.
PULSE
Oers greater control of pulsing and
processing. Operates only when PULSE is
pressed. Use short presses for short pulses
and long presses for long pulses.
9ninjakitchen.com
8 ninjakitchen.com
3 Exercising care, grasp the Chopping
Blade Assembly by the top of the shaft
and place it onto the drive gear inside
the bowl. Note that the Chopping
Blade Assembly will fit loosely on the
drive gear.
4 Add ingredients to the bowl, making
sure not to exceed the 9-Cup line.
5 Place the feed chute lid on the bowl and
turn clockwise until you hear a click,
indicating the lid is locked in place.
1 Place motor base on a clean, dry, level
surface such as a countertop or table,
then plug in the unit.
2 Lower the Precision Processor® Bowl
onto the motor base and rotate
clockwise until it clicks into place.
FEATURES
AUTO-IQ PROGRAMS
Use the Power button to turn the unit on and o.
AUTO-IQ®
Intelligent preset programs combine unique processing and pausing patterns that do
the work for you. Once an Auto-iQ program is selected, it will start immediately and
automatically stop when processing is complete. To stop processing before the end of
a program, press the currently active button again
MANUAL PROGRAMS
IMPORTANT: As a safety feature, if the
blade assembly is not fully seated, you
will not be able to install and lock the lid
in position.
IMPORTANT: DO NOT run the unit on
HIGH if using the dough blade.
IMPORTANT: The unit is NOT intended
to crush ice. Refer to the warnings on
pages 4–6.
NOTE: DO NOT add ingredients before
completing installation of the blade
assembly.
NOTE: Please follow the same instructions
to install the Dough Blade Assembly.
NOTE: Program run times vary from a few seconds up to a minute.
USING THE BLADE ASSEMBLIES
11ninjakitchen.com
10 ninjakitchen.com
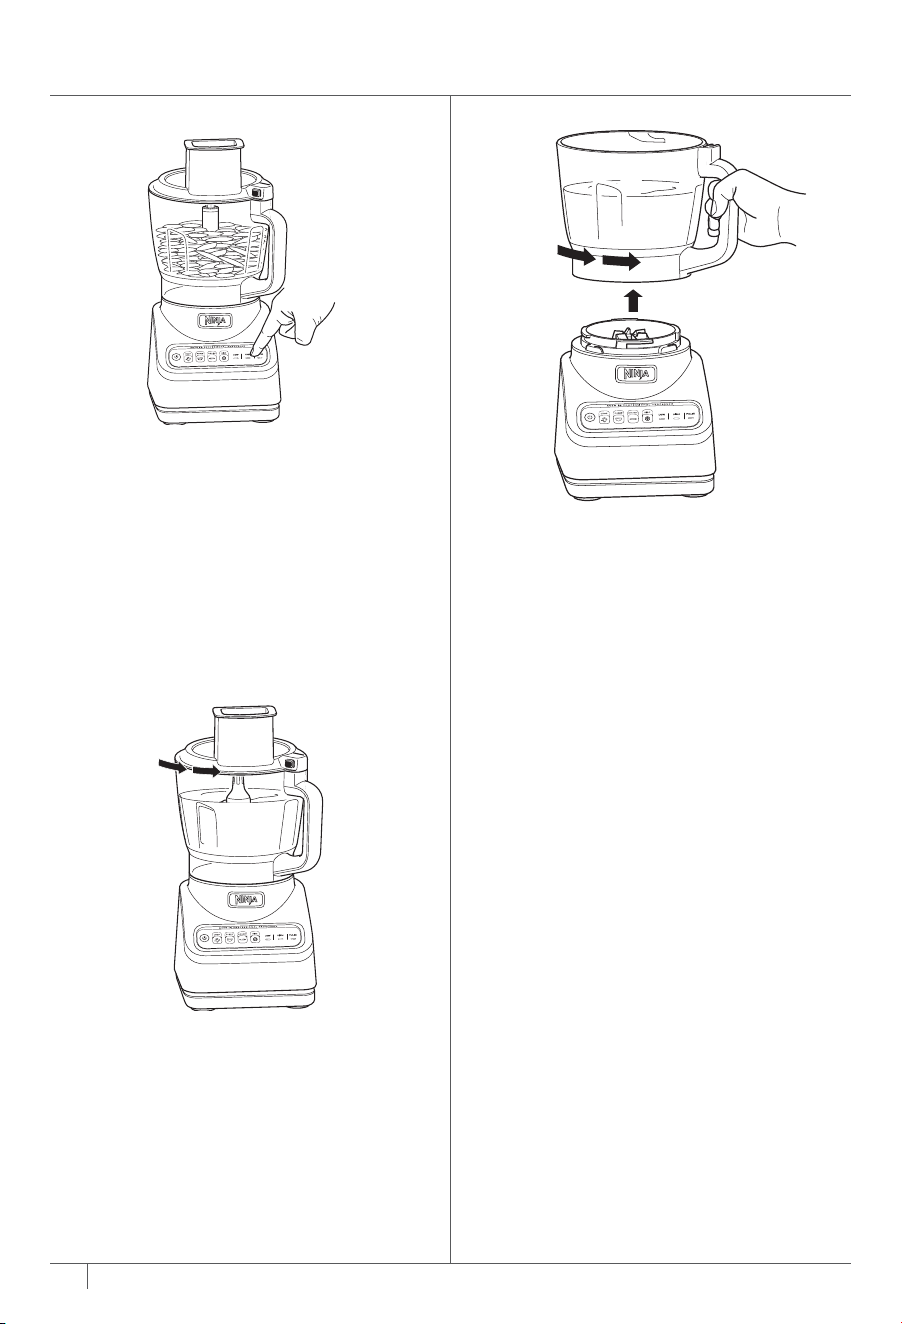
6a Press the Power button to turn it on. If
using an Auto-IQ® program, select the
program that best suits your recipe.
The preset program will automatically
stop the unit at the end of the program.
To stop the unit at any time, press the
currently active program again.
6b If using a manual program, once the
ingredients have reached your desired
consistency, press the active button
again, and wait for the unit to come to
a complete stop.
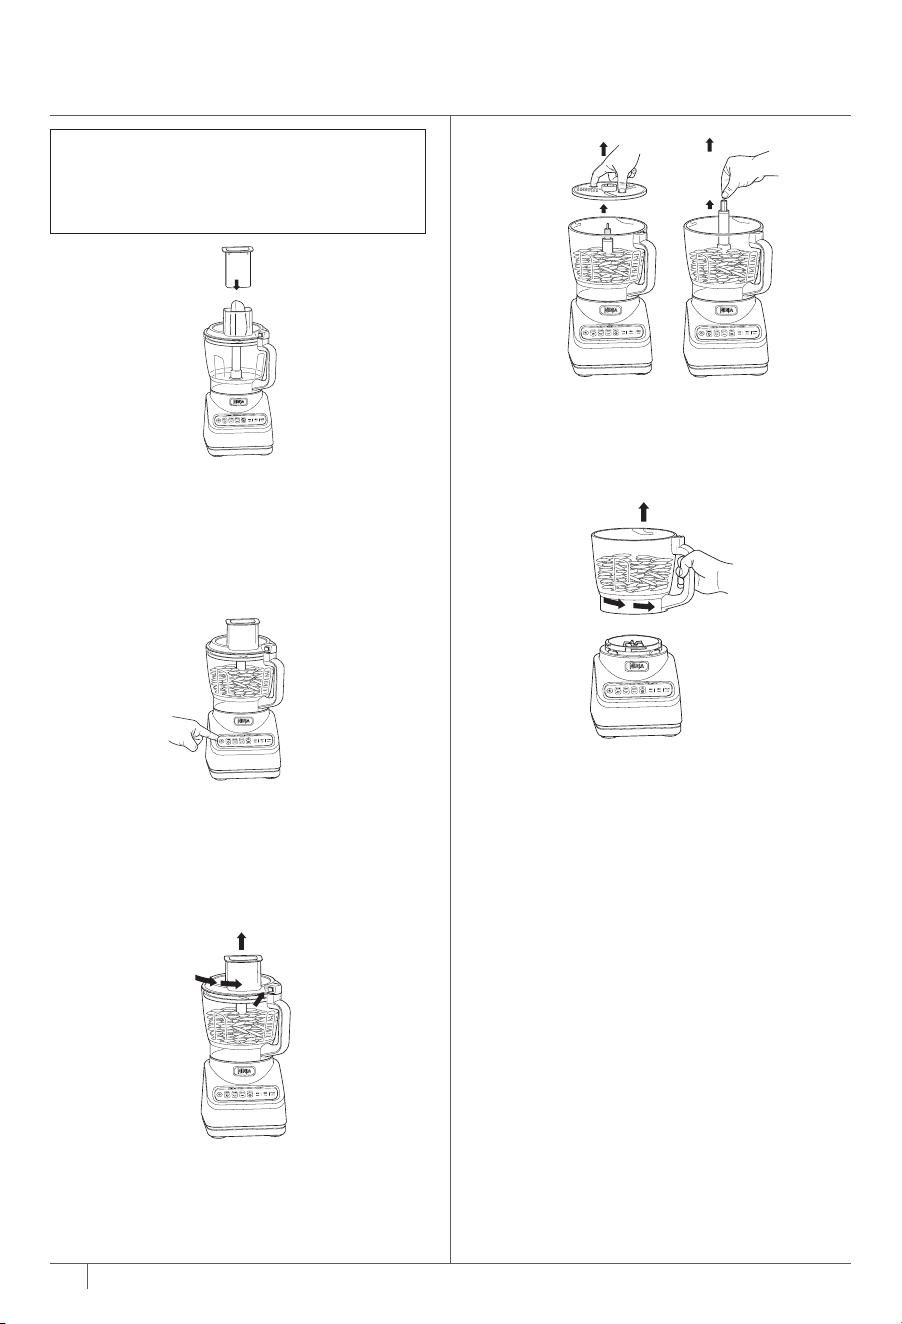
7
When finished, press the button on
the lid near the handle to unlock, then
turn counterclockwise and lift up from
the bowl. Always remove the Chopping
Blade Assembly before emptying
ingredients from the bowl by carefully
grasping it by the top of the shaft and
lifting it out of the bowl.
8 To remove the bowl from the motor
base, turn the bowl counterclockwise
and then lift it up.
9 Press the Power button to turn the unit
o, then unplug the unit. Refer to the
Care & Maintenance section for cleaning
and storage instructions.
USING THE REVERSIBLE SLICING/SHREDDING DISC
IMPORTANT: Use only the DISC
program or LOW setting when using
the Slicing/Shredding Disc.
3 Place the disc spindle onto the drive
gear inside the bowl. Then, use the
finger holes to grasp the reversible
slicing/shredding disc and place it over
the spindle, with the side you would like
to use facing up.
4 Place the feed chute lid on the bowl and
turn clockwise until you hear a click,
indicating the lid is locked in place.
NOTE: The feed chute lid features
a pusher to guide food through the
chute.
1 Place motor base on a clean, dry, level
surface such as a countertop or table,
then plug in the unit.
2 Lower the Precision Processor® Bowl
onto the motor base and rotate
clockwise until it clicks into place.
IMPORTANT: Review all warnings on
pages 4–6 before proceeding.
USING THE BLADE ASSEMBLIES - CON’T
NOTE: The Slicing/Shredding Disc
is reversible. Use the side labeled
“Slicer” for slicing. Carefully flip
the disc over to the side labeled
“Shredder” for shredding.
11ninjakitchen.com
10 ninjakitchen.com
6a Press the Power button to turn it on. If
using an Auto-IQ® program, select the
program that best suits your recipe.
The preset program will automatically
stop the unit at the end of the program.
To stop the unit at any time, press the
currently active program again.
6b If using a manual program, once the
ingredients have reached your desired
consistency, press the active button
again, and wait for the unit to come to
a complete stop.
7
When finished, press the button on
the lid near the handle to unlock, then
turn counterclockwise and lift up from
the bowl. Always remove the Chopping
Blade Assembly before emptying
ingredients from the bowl by carefully
grasping it by the top of the shaft and
lifting it out of the bowl.
8 To remove the bowl from the motor
base, turn the bowl counterclockwise
and then lift it up.
9 Press the Power button to turn the unit
o, then unplug the unit. Refer to the
Care & Maintenance section for cleaning
and storage instructions.
USING THE REVERSIBLE SLICING/SHREDDING DISC
IMPORTANT: Use only the DISC
program or LOW setting when using
the Slicing/Shredding Disc.
3 Place the disc spindle onto the drive
gear inside the bowl. Then, use the
finger holes to grasp the reversible
slicing/shredding disc and place it over
the spindle, with the side you would like
to use facing up.
4 Place the feed chute lid on the bowl and
turn clockwise until you hear a click,
indicating the lid is locked in place.
NOTE: The feed chute lid features
a pusher to guide food through the
chute.
1 Place motor base on a clean, dry, level
surface such as a countertop or table,
then plug in the unit.
2 Lower the Precision Processor® Bowl
onto the motor base and rotate
clockwise until it clicks into place.
IMPORTANT: Review all warnings on
pages 4–6 before proceeding.
USING THE BLADE ASSEMBLIES - CON’T
NOTE: The Slicing/Shredding Disc
is reversible. Use the side labeled
“Slicer” for slicing. Carefully flip
the disc over to the side labeled
“Shredder” for shredding.
13ninjakitchen.com
12 ninjakitchen.com
CARE & MAINTENANCE
USING THE REVERSIBLE
SLICING/SHREDDING DISC - CONT�
CLEANING
Separate all parts. Wash bowl in warm,
soapy water with a soft cloth.
• Hand-Washing
Wash bowl, lid, disc, and blade assemblies
in warm, soapy water. When washing
the blade assemblies, use a dishwashing
utensil with a handle to avoid direct hand
contact with blades.
Handle blade assemblies with care to
avoid contact with sharp edges. Rinse
and air-dry thoroughly.
• Dishwasher
All attachments are dishwasher safe. It
is recommended that the bowl, lid, disc,
and blade assemblies be placed on the
top rack of the dishwasher ON LY. Ensure
the blade assembly is removed from the
bowl before placing in the dishwasher.
Exercise care when handling blade
assemblies.
• Motor Base
Turn o the unit and unplug the motor
base before cleaning. Wipe motor base
with a clean, damp cloth.
DO NOT use abrasive cloths, pads, or
brushes to clean the base.
STORING
Wrap the power cord around the cord
wrap on the back of the motor base.
Store the unit upright and store all blade
assemblies inside or attached to the bowl
with the lid locked in place.
DO NOT stack items on top of the
containers. Store any remaining
attachments alongside the unit or in a
cabinet where they will not be damaged
or create a hazard.
RESETTING THE MOTOR THERMOSTAT
This unit features a unique safety system
that prevents damage to the motor and
drive system should you inadvertently
overload the unit. If the unit is overloaded,
the motor will be temporarily disabled.
Should this occur, follow the reset
procedure below.
1 Unplug the unit from the
electricaloutlet.
2 Allow the unit to cool for approximately
15 minutes.
3 Remove the bowl’s lid and blade
assembly. Empty the bowl and ensure
no ingredients are jamming the blade
assembly.
IMPORTANT: Ensure that maximum
capacity is not exceeded. This is the most
typical cause of appliance overload.
If your unit needs servicing, call Customer
Service at 1-877-646-5288. So we may
better assist you, please register your
product online at registeryourninja.com
and have the product on hand when
you call.
ORDERING REPLACEMENT PARTS
To order additional parts and attachments,
visit ninjaaccessories.com.
5 Press the Power button to turn it on,
then select DISC or LOW. Add the
prepped ingredients you want to slice or
shred through the feed chute on the lid.
Use the food pusher to help guide the
ingredients through the feed chute.
6 If using the Auto-IQ® program, DISC,
the disc will automatically stop
spinning at the end of the program. If
using the manual program LOW, press
the button again, and wait for the unit
to come to a complete stop.
7 To remove the lid, press the button on the
feed chute lid near the handle to unlock,
then turn the lid counterclockwise. Lift the
lid from the bowl.
8 Using the finger holes, carefully lift the
disc out of the bowl. Then, grasp the
spindle by the top of the shaft and lift it
out of the bowl.
10 Press the Power button to turn the unit
o, then unplug the unit. Refer to the
Care & Maintenance section for cleaning
and storage instructions.
9 To remove the bowl from the motor
base, turn the bowl counterclockwise
and then lift it up.
NOTE: Before slicing or shredding,
prep your ingredients. Refer to the
Food Prep section in the Quick Start
Guide for more information.

15ninjakitchen.com
14 ninjakitchen.com
TROUBLESHOOTING GUIDE
WARNING: To reduce the risk of shock and unintended operation,
turn power o and unplug unit before troubleshooting�
Motor base won’t stick to counter or tabletop�
• Make sure surface and suction feet are wiped clean. Suction feet will only stick to
smooth surfaces.
• Suction feet will not stick to some surfaces such as wood, tile, and non-polished finishes.
• DO NOT attempt to use unit when the motor base is stuck to a surface that is not secure
(cutting board, platter, plates, etc.).
Unit is dicult to remove from counter for storage�
• Place your hands underneath both sides of the motor base and gently pull the unit up
and toward you.
Food is not evenly chopped�
• For best results when chopping, cut pieces of ingredients in a uniform size and don’t
overfill the bowl.
Ingredients are unevenly sliced�
• For best results when using the Reversible Slicing/Shredding Disc, trim ingredients to
a uniform size so they fit better through the feed chute. Do not cut ingredients smaller
than the feed chute height.
The One (1) Year Limited Warranty applies to purchases made from authorized retailers of
SharkNinja Operating LLC. Warranty coverage applies to the original owner and to the
original product only and is not transferable.
SharkNinja warrants that the unit shall be free from defects in material and workmanship
for a period of one (1) year from the date of purchase when it is used under normal
household conditions and maintained according to the requirements outlined in the
Owner’s Guide, subject to the following conditions and exclusions:
What is covered by this warranty?
1. The original unit and/or non-wearable parts deemed defective, in SharkNinja’s sole
discretion, will be repaired or replaced up to one (1) year from the original purchase date.
2. In the event a replacement unit is issued, the warranty coverage ends six (6) months
following the receipt date of the replacement unit or the remainder of the existing
warranty, whichever is later. SharkNinja reserves the right to replace the unit with one
of equal or greater value.
What is not covered by this warranty?
1. Normal wear and tear of wearable parts (such as blending vessels, lids, blades,
blender bases, etc.), which require regular maintenance and/or replacement to ensure
the proper functioning of your unit, are not covered by this warranty. Replacement
parts are available for purchase at ninjaaccessories.com.
2. Any unit that has been tampered with or used for commercial purposes
3. Damage caused by misuse, abuse, negligent handling, failure to perform required
maintenance (e.g., failure to keep the well of the motor base clear of food spills and
other debris), or damage due to mishandling in transit.
4. Consequential and incidental damages.
5. Defects caused by repair persons not authorized by SharkNinja. These defects
include damages caused in the process of shipping, altering, or repairing the
SharkNinja product (or any of its parts) when the repair is performed by a repair
person not authorized by SharkNinja.
6. Products purchased, used, or operated outside North America.
How to get service
If your appliance fails to operate properly while in use under normal household conditions
within the warranty period, visit ninjakitchen.com/support for product care and maintenance
self-help. Our Customer Service Specialists are also available at 1-877-646-5288 to assist
with product support and warranty service options, including the possibility of upgrading
to our VIP warranty service options for select product categories. So we may better assist
you, please register your product online at registeryourninja.com and have the product on
hand when you call.
SharkNinja will cover the cost for the customer to send in the unit to us for repair or
replacement. A fee of $19.95 (subject to change) will be charged when SharkNinja ships the
repaired or replacement unit.
How to initiate a warranty claim
You must call 1-877-646-5288 to initiate a warranty claim. You will need the receipt as proof
of purchase. We also ask that you register your product online at registeryourninja.com and
have the product on hand when you call, so we may better assist you. A Customer Service
Specialist will provide you with return and packing instruction information.
How state law applies
This warranty gives you specific legal rights, and you also may have other rights that vary
from state to state. Some states do not permit the exclusion or limitation of incidental or
consequential damages, so the above may not apply to you.
ONE (1) YEAR LIMITED WARRANTY

SharkNinja Operating LLC
US: Needham, MA 02494
CAN: Ville St-Laurent, QC H4S 1A7
1-877-646-5288
ninjakitchen�com
Illustrations may dier from actual product. We are constantly striving to improve our products,
therefore the specifications contained herein are subject to change withoutnotice.
AUTO-IQ, NINJA, and PRECISION PROCESSOR are registered trademarks of
SharkNinja Operating LLC.
For SharkNinja U.S. patent information, visit sharkninja.com/uspatents/
© 2020 SharkNinja Operating LLC
PRINTED IN CHINA
BN600�Series�IB�MP�Mv6
@ninjakitchen