
Read these instructions carefully before using your
microwave oven.
If you follow the instructions, your oven will provide you with
many years of good service.
SAVE THESE INSTRUCTIONS
MODEL:
F3015MVC5SS
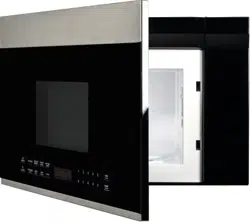
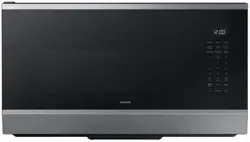
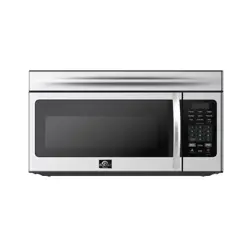
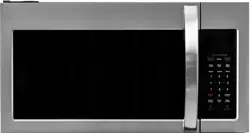
30" OVER THE RANGE
CONVECTION MICROWAVE

PRECAUTIONS TO AVOID POSSIBLE
EXPOSURE TO EXCESSIVE MICROWAVE
ENERGY
(a) Do not attempt to operate this oven with the door open since
operation can result in harmful exposure to microwave energy.
It is important not to defeat or tamper with the safety interlocks.
(b) Do not place any object between the oven front face and the door or allows soil or
cleaner residue to accumulate on sealing surfaces.
(c) Do not operate the oven if it is damaged. It is particular important that
the oven door close properly and that there is no damage to the:
(1) DOOR (bent)
(2) HINGES AND LATCHES (broken or loosened)
(3) DOOR SEALS AND SEALING SURFACE
(d) The oven should
not be adjusted or repaired by anyone except properly
qualified service personnel.
o
pen door
S
ly
Specifications
120V~
60Hz
1500 W
W
Approx.
Model:
Rated Voltage:
Rated Input Power(Microwave):
Rated Output Power(Microwave):
Oven Capacity:
Turntable Diameter:
External Dimensions:
Net Weight:
13.58 in.
F3015MVC5SS
1.5 cu.ft.
900
29.88X15.2X16.42 in.
70.1 lbs.
2

WARNING -
1. Read all instructions before using the
appliance.
2. Read and follow the specific:
EXCESSIVE MICROWAVE ENERGY"
found on page 2.
combustible materials are placed
inside the oven to facilitate cooking.
only to properly grounded outlet. See
found on page
accordance with the provided installation
instructions.
To reduce the risk of burns, electric shock, fire, injury to persons or exposure
to excessive microwave energy:
3. This appliance must be grounded. Connect
"PRECAUTIONS TO AVOID POSSIBLE EXPOSURE TO
"GROUNDING INSTRUCTIONS"
4. Install or locate this appliance only in
5. Some products such as whole eggs and sealed containers - for example, closed glass
jars - are able to explode and should not be heated in this oven.
6. Use this appliance only for its intended use as described in the manual. Do not use
corrosive chemicals or vapors in this appliance. This type of oven is specifically
designed to heat, cook or dry food. It is not designed for industrial or laboratory use.
supervision is necessary when used
by children.
7. As with any appliance, close
damaged cord or plug, if it is not
working
properly, or if it has been
damaged or dropped.
8. Do not operate this appliance if it has a
by qualified service personnel.
Contact nearest
authorized service
facility for examination, repair, or
adjustment.
9. This appliance should be serviced only
10. Do not cover or block any openings on the appliance.
11. Do not store this appliance outdoors.
Do not use this product near water - for
example,
near a kitchen sink, in a wet
basement, near a swimming pool, or
similar location.
1 . Do not immerse cord or plug in water.2
1 . Keep cord away from heated surface.
14. Do not let cord hang over edge of
table or counter.
3
15. When cleaning surfaces of door and oven that comes together on closing the door,
16. To reduce the risk of fire in the oven cavity:
1). Do not overcook food. Carefully attend appliance when paper, plastic, or other
2). Remove wire twist-ties from paper or plastic bag before placing bag in oven.
3). If material inside of the oven ignite, keep oven door closed, turn oven off, and
disconnect the power cord, shut off power at the fuse or circuit breaker panel.
4). Do not use the cavity for storage purposes. Do not leave paper products, cooking
utensils, or food in the cavity when not in use.
point without appearing to be boiling. Visible bubbling or boiling when the container is
removed from the microwave oven is not always present.
17. Liquids, such as water, coffee, or tea are able to be overheated beyon
d the boiling
IMPORTANT SAFETY INSTRUCTIONS
precautions should be followed, including
When using electrical appliances basic safety
following:the
use only mild, nonabrasive soaps, or detergent applied with a sponge or soft cloth.
or
4.
3

stand in the microwave oven for a short time
before removing the container.
spoon or other utensil into the container.
This appliance must be grounded. In the event of an electrical short circuit, grounding
of electric shock by providing an escape wire for the
appliance is equipped with a cord having a
plugged into an outlet that is properly installed and grounded.
GROUNDING INSTRUCTIONS
THIS COULD RESULT IN VERY HOT LIQUID SUDDENLY BOILING OVER WHEN
THE CONTAINER IS DISTURBED OR A UTENSIL IS INSERTED INTO THE LIQUID.
To reduce the risk of injury to persons:
1) Do not overheat the liquid.
2) Stir the liquid both before and halfway through heating it.
3) Do not use straight-sided containers with narrow necks.
4) After heating, allow the container to
5) Use extreme care when inserting a
grounding wire with a grounding plug.
reduces the risk electric current. This
The plug
SA E THESE INSTRUCTIONS
must be
V
ease should not be allowed to accumulate on
hood or filter.
Corrosive cleaning agents, such aslye-based
oven cleaners, may damage the filter
r use above both gas and electric cooking equipment.
o
n
to
p
o
f
t
h
e
a
p
p
lia
n
c
e
s
u
r
f
a
c
e
w
h
e
n
th
e
a
p
plian
ce
i
s
in
20. Do not mount over sink.
21
.
Do
not
s
to
re
a
n
y
t
hin
g
d
irec
t
l
y
o
per
a
t
ion.
22. Clean Ventilation Hoods Frequently - Gr
23. When flaming foods under the hood, turn the fan on.
24. Use care when cleaning the vent-hood filter.
25. Suitable fo
operate any heating or cooking appliance beneath the appliance.
18. Do not
19. Do not mount unit over or near any portion of heating or cooking appliance.
(Exception: A microwave oven investigated for use above another heating appliance.)
(Exception: A microwave oven investigated for use above another heating appliance.)
.
4

1. Operation of the microwave oven may cause interference to your radio, TV
or similar
2. When there is interference, it may be reduced or eliminated by taking the
following
1) Clean door and sealing surface of the oven
2) Reorient the receiving antenna of radio or television.
3) Relocate the microwave oven with respect to the receiver.
4) Move the microwave oven away from the receiver.
5) Plug the microwave oven into a different outlet so that microwave oven
are on different branch circuits.
RADIO INTERFERENCE
equipment.
measures:
and receiver
1. A short power supply cord is provided to reduce the risks resulting from becoming
entangled in or tripping over a longer cord.
2. Longer cord sets or extension cords are available and may be used if care is exercised
in their use.
3. If a long cord or extension cord is used:
1) The marked electrical rating of the cord set or extension cord should be at least as
great as the electrical rating of the appliance.
2) The extension cord must be a grounding-type 3-wire cord.
3) The longer cord should be arranged so that it will not drape over the counter top or
tabletop where it can be pulled on by children or tripped over unintentionally.
-
WARNING -
Improper use of the grounding can result in a risk of electric shock.
Consult a qualified electrician or serviceman if the
grounding instructions are not
completely
or if doubt exists as to whether the appliance is
properly grounded.
extension cord, use only a 3-wire extension cord that
has a
The marked rating of the extension cord shall be
equal to or greater than the electrical
appliance.
understood,
If it is necessary to use an
3-blade grounded plug, and 3-slot
receptacle that will accept the plug on the appliance.
rating of the
Electric Shock Hazard
Touching some of the internal
components can cause serious
personal injury or death.
disassemble this appliance.
DANGER -
Do not
Electric Shock Hazard
Improper use of the grounding
can result in electric shock. Do
not plug into an outlet until
appliance is properly installed
and grounded.
WARNING -
5

Personal Injury Hazard
Tightly-closed utensils
could explode. Closed
containers should be opened
and plastic
pierced before cooking.
Utensil Test:
1. Fill a microwave-safe container with 1 cup of cold
water (250ml) along with the
2. Cook on maximum power for 1 minute.
3. Carefully feel the utensil. If the empty utensil is
warm, do not use it for microwave
4. Do not exceed 1 minute cooking time.
UTENSILS
See the instructions on "Materials you can use in
microwave oven or to be avoided in
There may be certain non-metallic utensils that are not
safe to use for microwaving. If
utensil in question following the procedure below.
CAUTION -
pouches should be
microwave oven."
in doubt, you can test the
utensil in question.
cooking.
Materials you can use in microwave oven
Utensils Remarks
Follow manufacturer* instructions. The bottom of browning dish must be
at least 3/16 inch (5mm) above the turntable. Incorrect usage may cause
the turntable to break.
Microwave-safe only. Follow manufacturer's instructions. Do not use
cracked or chipped dishes.
Always remove lid. Use only to heat food until just warm. Most glass jars
are not heat resistant and may break.
Heat-resistant oven glassware only. Make sure there is no metallic trim.
Do not use cracked or chipped dishes.
Follow manufacturer* instructions. Do not close with metal tie. Make
slits to allow steam to escape.
Use for short*erm cooking/warming only. Do not leave oven unattended
while cooking.
Use to cover food for reheating and absorbing fat. Use with supervision
for a short-term cooking only.
Use as a cover to prevent splattering or a wrap for steaming.
Browning dish
Glass jars
Glassware
Oven cooking
bags
Paper plates
and cups
Paper towels
Parchment
paper
Dinnerware
6

Materials you can use in microwave oven
Utensils Remarks
Microwave-safe only. Follow the manufacturer* instructions. Should be
labeled "Microwave Safe". Some plastic containers soften, as the food
inside gets hot. "Boiling bags" and tightly closed plastic bags should be
slit, pierced or vented as directed by package.
Microwave-safe only. Use to cover food during cooking to retain
moisture. Do not allow plastic wrap to touch food.
Thermometers Microwave-safe only (meat and candy thermometers).
Wax paper Use as a cover to prevent splattering and retain moisture.
Plastic
Plastic wrap
Materials to be avoided in microwave oven
Utensils Remarks
Aluminum tray
Food carton with
metal handle
Metal or metal-
trimmed utensils
Metal twist ties
Paper bags
Plastic foam
Wood
Metal shields the food from microwave energy. Metal trim may
cause arcing.
May cause a fire in the oven.
Plastic foam may melt or contaminate the liquid inside when exposed
to high temperature.
Wood will dry out when used in the microwave oven and may split
or crack.
May cause arcing. Transfer food into microwave-safe dish.
May cause arcing. Transfer food into microwave-safe dish.
May cause arcing and could cause a fire in the oven.
7

PART NAMES
8
1 Microwave oven door with see-through window
2 Door hinges
3 Waveguide cover:
DO NOT REMOVE.
4 Turntable motor shaft
5 Microwave oven light
It will light when microwave oven is operating or
door is open.
6 Rack holders
7 Safety door latches
The microwave oven will not operate unless the
door is securely closed.
8 Handle
9 Light hi/lo/off pad
Press the light hi/lo/off pad once for high, twice
for low and three times to turn off the light.
10 Vent hi/lo/off pad
Press the vent hi/lo/off pad once for high
speed, twice for low speed and three times to
turn off the fan.
11 Auto-Touch control panel
12 Time display: Digital display, 99 minutes, 99
seconds
13 Ventilation openings
15 Removable turntable
The turntable will rotate clockwise or counter-
clockwise. Only remove for cleaning.
16 Removable turntable support
First, carefully place the turntable support on the
motor shaft in the center of the microwave oven
floor. Then, place the turntable on the turntable
support securely.
17 Rack for 2-level cooking/ reheating
14 Menu label
BOTTOM VIEW
floor. Place the support ring on the microwave oven
Front
Back
Filter Access Door
(Do not leave rack in microwave
unless cooking on rack.)
V
18 Light cover
19 Grease filters
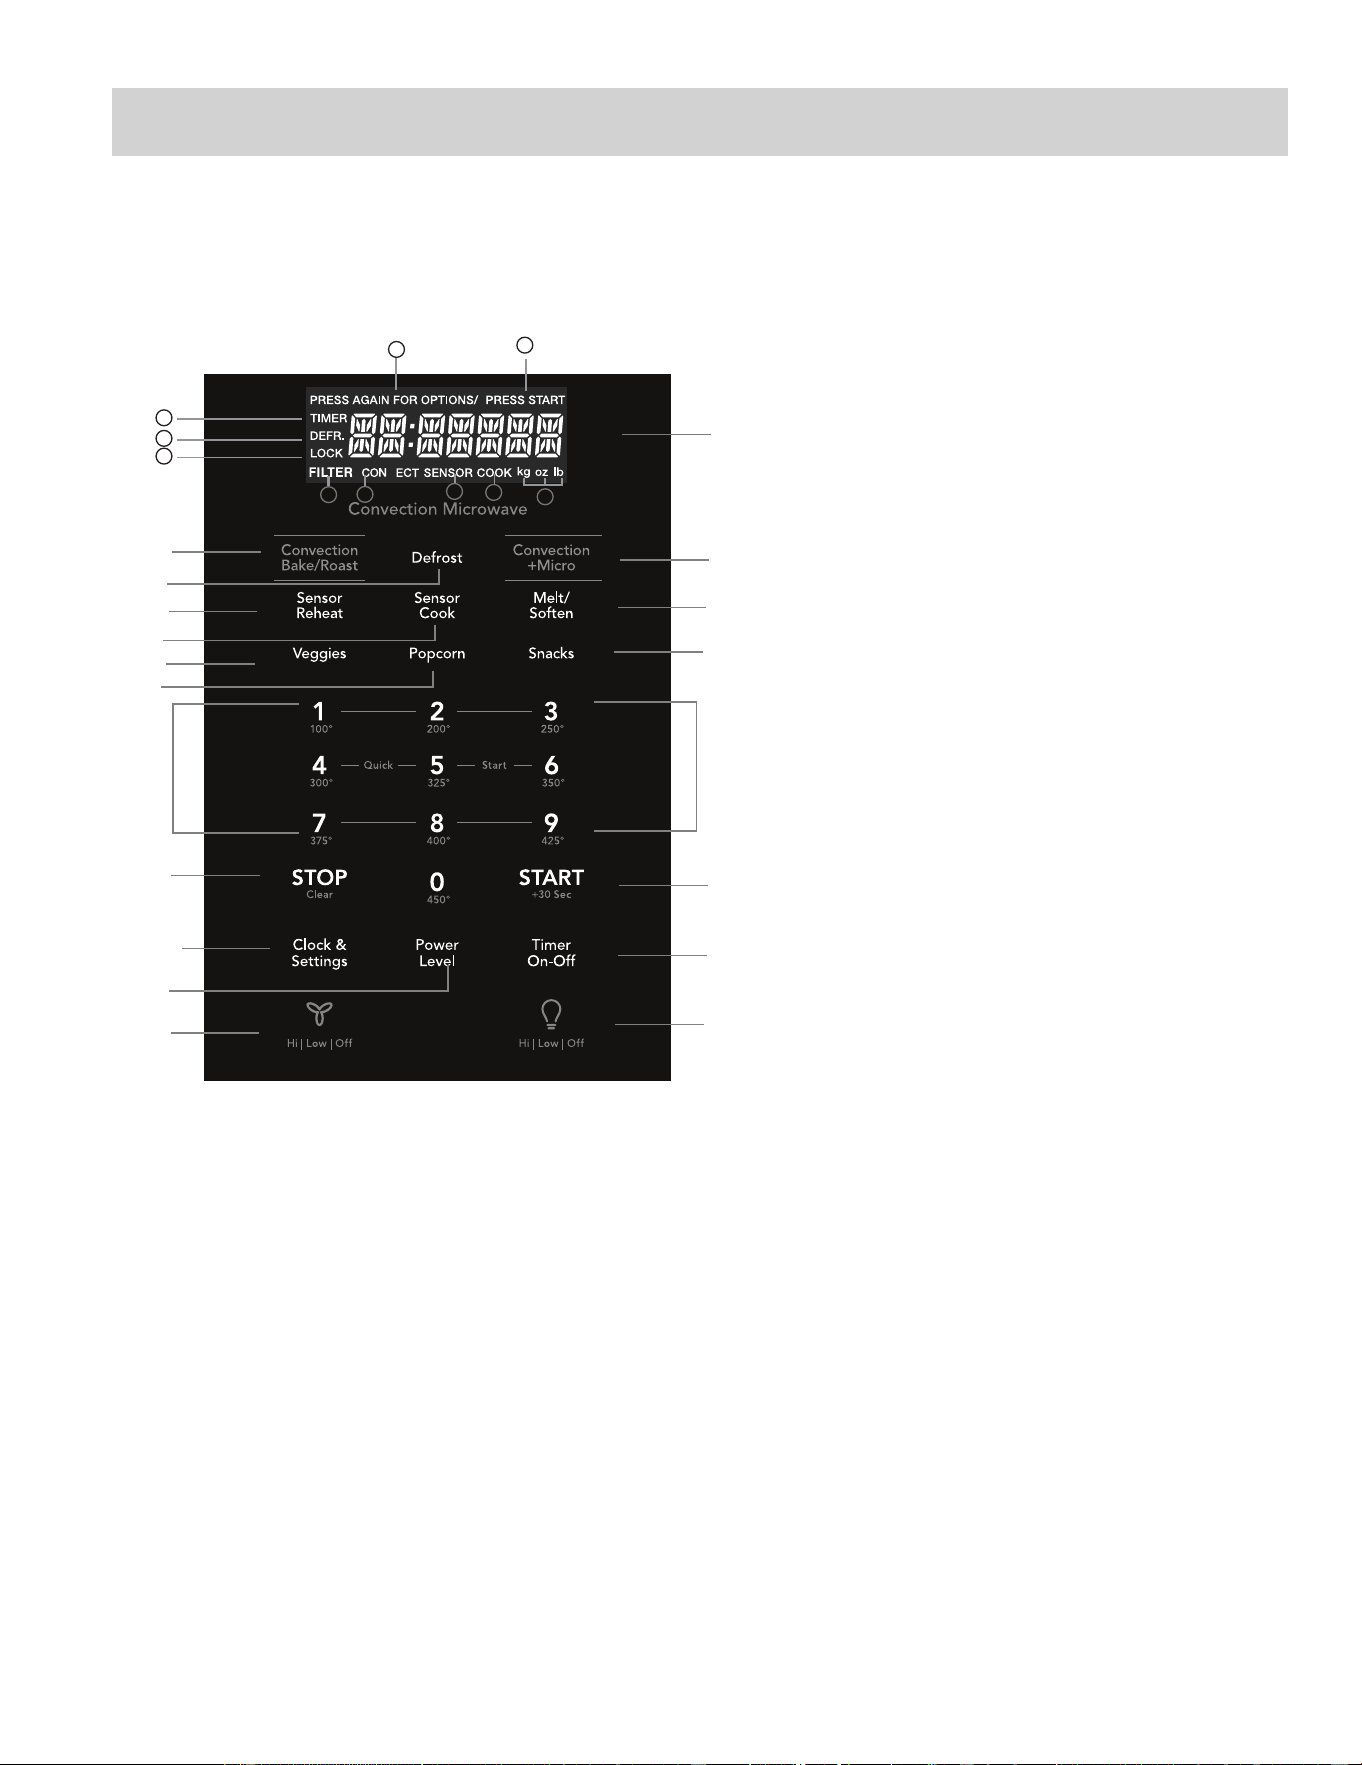
CONTROL PANEL
The 7-digit Interactive Display spells out operating steps
and shows cooking hints.
Note:For detailed information,please go to relative page listed above.
1 h . k g ''''`
Number next to the control panel key
illustration
indicates pages on which
there are featu
re
descriptions and usage
information.
The display includes a clock and indicators
time settings,
cook
powers, sensor, quantities, weights and cooking
functions selected.
1b. TIMER:
Icon displayed when timer is being set or running.
1c. COOK:
Icon displayed when starting microwave cooking.
1d. DEFR:
Icon displayed when defrosting food.
1e. LOCK:
Icon displayed control lock.
1g. PRESS START:
Icon displayed when a valid
function can be started.
1a. SENSOR:
Icon displayed when using sensor cook.
1f. PRESS AGAIN FOR OPTIONS:
in
when additional options are available.
Icon displayed
Icon displayed when choosing the weight.
1h. kg, oz, lb:
that
show the time of day, cooking
(15)
(9)
(2)
(7)
(3)
(5)
(11)
(14)
(10)
(18)
(13)
(12)
(17)
(19)
(6 )
(4)
(8)
(16)
(
1
) Display:
1i. CONVECT:
Icon displayed when choosing convect.
V
1b
1d
1e
1a
1c
1h
1i
1
1f
1g
2
3
4
5
6
7
11
12
14
15
17
8
9
10
13
16
18
Convection Bake/Roast
Defrost
Convection+Micro
(5 different settings) Sensor Reheat
Sensor Cook
Melt Soften
V ggiese
Popcorn
Snacks
Numeric pads (0 thru 9)
Stop/Clear
START
+30 sec
Clock & Settings
Power Level (11power levels
available)
Timer (On-Off)
Exhaust (High/Low/Off) ~ Use
adjust fan speed.
to turn the
exhaust fan off, or to
Surface Light (High/Low/Off)
Press this pad
to adjust the
brightness of
surface lights.
19
(9 instant key settings)
Quick Start
1j. FILTER:
Icon displayed replace
Filter.
1j
9
BEFORE OPERATING
OR7NEWModelEN-4.indd10OR7NEWModelEN-4.indd10 09.4.2811:46:21AM09.4.2811:46:21AM
• Before operating your new oven make sure you read
and understand this Use and Care Guide completely.
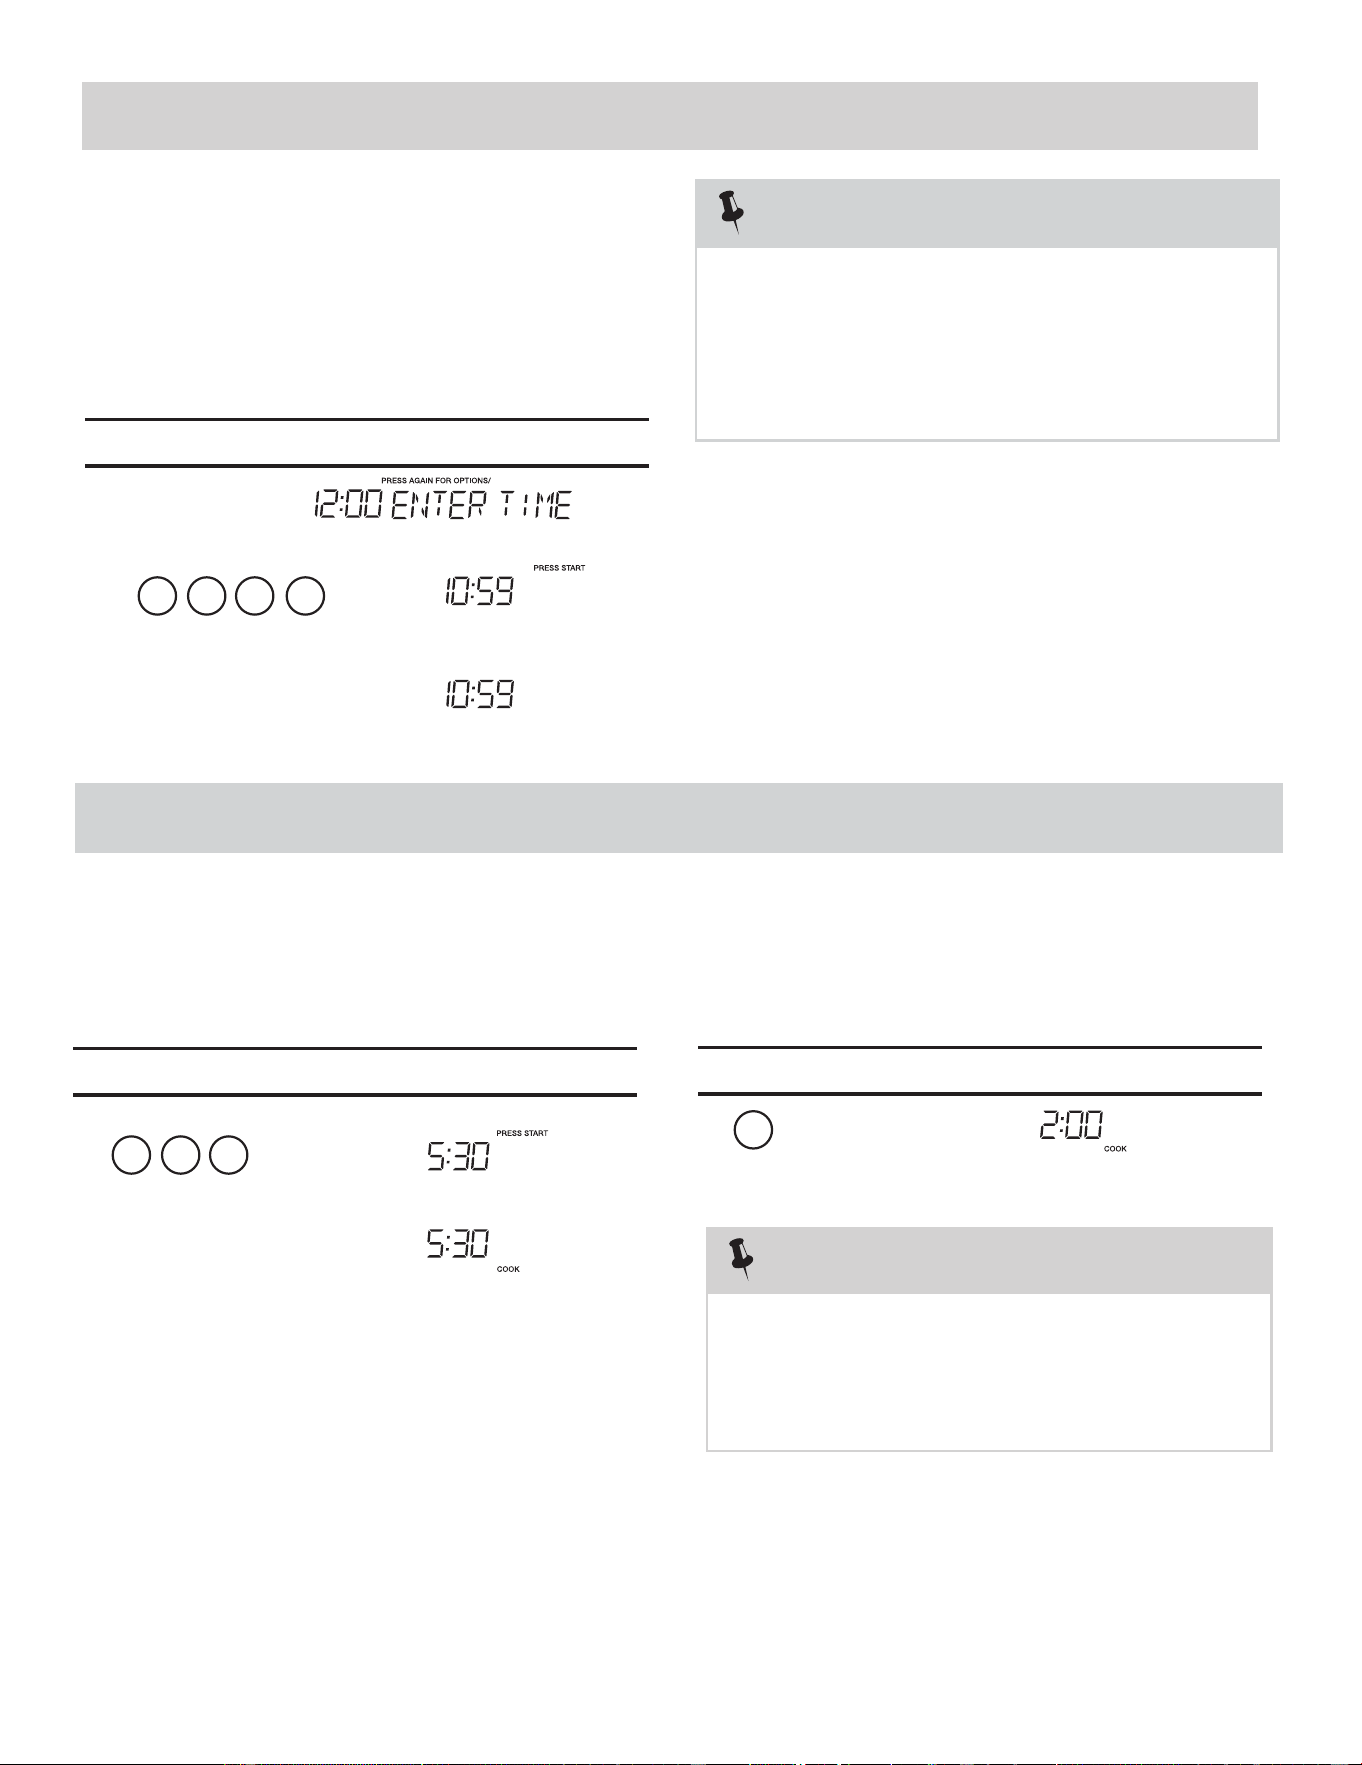
• The clock can be disabled when the microwave is first
To Set the Clock
• Suppose you want to enter the correct time of day 10:59
NOTE
STOP clear
Press the to:
1. Erase if you make a mistake during programming.
Time Cooking
Your Over the Range Microwave Oven can be programmed
after the minutes, even if they are both zeros.
• Suppose you want to cook for 5 minutes, 30
MANUAL COOKING
for 99 minutes 99 seconds (99 :99). Always enter the seconds
4. Return the time of day to the display.
3. Stop the oven temporarily during cooking.
5. Cancel a program during cooking, press twice.
2. Cancel timer setting and the signal after cooking.
1 0
1.
2.
3.
5 9
k, the
display will show the last time of day set or a
correct time.
blank display if no time of day has been set.
the 8 is an invalid digit and cannot be entered.
Enter the
2. If you touch while setting the cloc
1. If you begin to enter in an incorrect time (e.g. 2:89)
Touch: Display Shows:
Time counting down
05 3
Time
counting down
This is a time saving pad that will automatically
2
start cooking 2 seconds after selected. Numeric key
1, 2, 3......or 9 can be touched for a 1 minute, 2 minutes
You can stop the oven during a cycle by opening
the door. The oven stops heating and the fan turns
o
To restart cooking, close the door and Touch.
If you do not want to continue cooking, open the
door and touch
ff, but the light stays on.
or 9 minutes automatic start cooking feature.
1.
seconds at 100% power,
Interrupting Cooking
Using One Touch Start
Touch: Display Shows:
Touch: Display Shows:
plugged in and the STOP key is selected.
To re-enable the clock foll w clock instructions.
1.
2.
o
Clock &
Settings
START
+30 Sec
START
+30 Sec
START
+30 Sec
STOP
Clear
STOP
Clear
STOP
Clear
NOTE
“Food” will be displayed if a quick start cooking cycle or
+30 sec key is not selected within 5 minutes of placing
food in the microwave. You must open then close the
door again to clear ''Food" from the display.
10
OR7NEWModelEN-4.indd20OR7NEWModelEN-4.indd20 09.4.2811:46:25AM09.4.2811:46:25AM
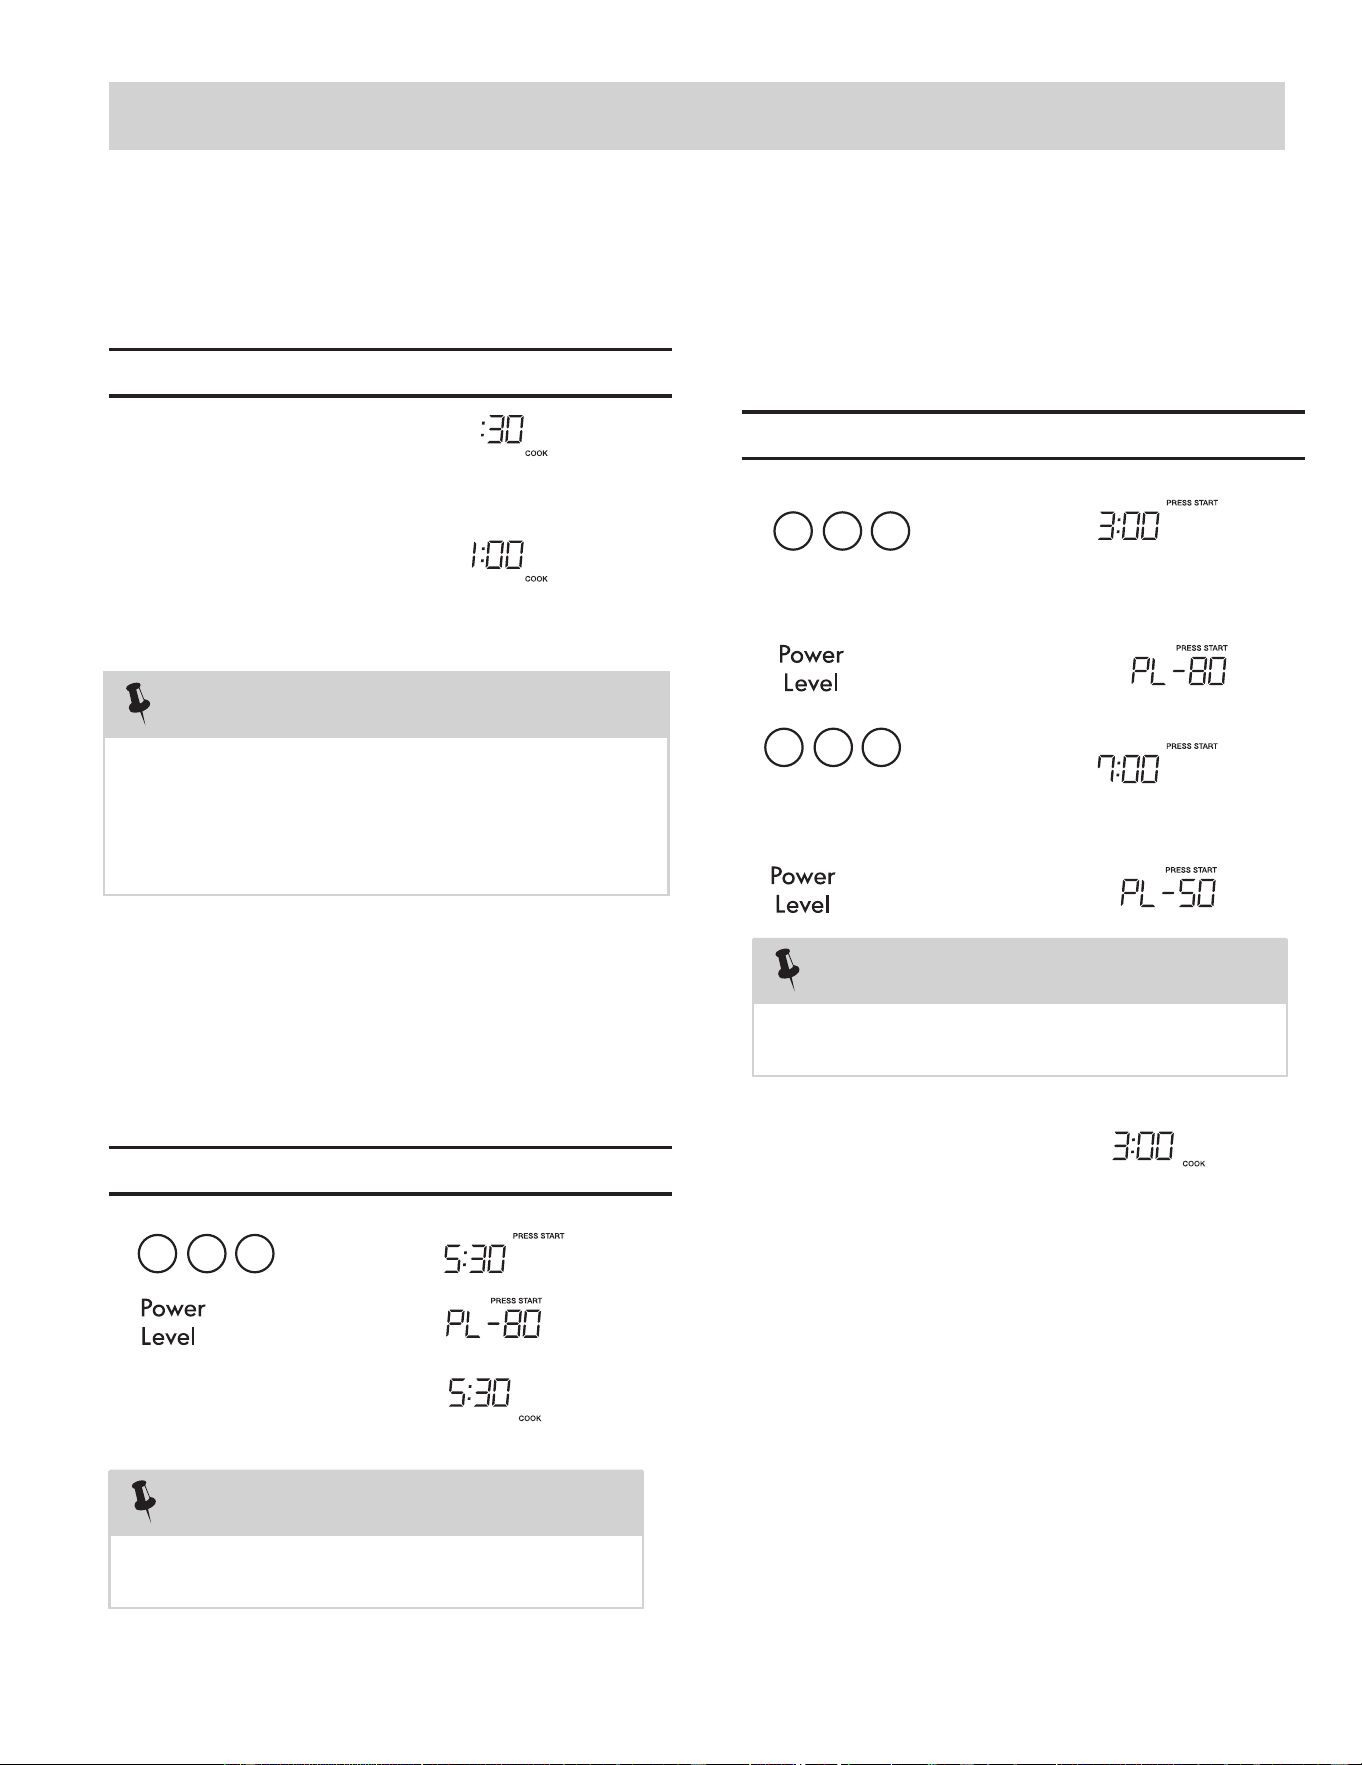
This feature lets you program a specific cook time
and power. For best results, there are 1 power
level settings in addition to HIGH (100%) power.
05 3
This is a time-saving pad. It is a simplified feature
that lets you quickly set and start microwave
cooking at 100% power.
Time counting down
1.
2.
Time counting down
For best results, some recipes call for different
power levels during a cook cycle. You can
program your oven for two power level stages
during the cooking cycle.
set a 2-stage cook cycle.
To set a 7 minute cook
You can program a "0" power second stage for
standing time inside
the oven.
To set a 3 minute cook
time for first stage.
03 0
07 0
Time counting down
power for the second stage.
MANUAL COOKING
• Suppose you want to cook for one minute.
• Suppose you want to cook for minutes,
30 seconds at 80% power.
• Suppose you want to
power then a 7 minute cook time at 50% cook power.
The first stage is a 3 minute cook time at 80% cook
will
cook
at
HIGH
(100%)
power. automatically
If you do not select a power level, the oven
NOTE
Using Add 30 Sec.
Setting Timed Cooking With Power Level
Setting Two-Stage Cooking
Touch: Display Shows:
Touch: Display Shows:
Touch: Display Shows:
x 3
x 3
1.
2.
3.
x 6
NOTE
1.
2.
3.
4.
5.
START
+30 Sec
START
+30 Sec
START
+30 Sec
START
+30 Sec
5
NOTE
“Food” will be displayed if a quick start cooking cycle or
+30 sec key is not selected within 5 minutes of placing
food in the microwave. You must open then close the
door again to clear ''Food" from the display.
1
11

OR7NEWModel2ndEN.indd21OR7NEWModel2ndEN.indd21 10.8.29:59:04AM10.8.29:59:04AM
To Set Power Level
Using lower power levels increases the cooking time which
is recommended for foods such as cheese, milk and long
slow cooking of meats. Consult cookbook or recipes for
specific recommendations.
There are eleven preset power levels.
PRESS POWER LEVEL
PAD NUMBER OF TIMES
FOR DESIRED POWER
POWER LEVEL x 1 100% High
POWER LEVEL x 2 90%
POWER LEVEL x 3 80%
POWER LEVEL x 4 70% Medium High
POWER LEVEL x 5 60%
POWER LEVEL x 6 50% Medium
POWER LEVEL x 7 40%
POWER LEVEL x 8 30% Med Low/Defrost
POWER LEVEL x 9 20%
POWER LEVEL x 10 10% Low
APPROXIMATE
PERCENTAGE
OF POWER
COMMON
WORDS FOR
POWER LEVELS
MANUAL COOKING
Using the Rack
The rack allows several foods to be cooked or reheated at
one time. However, for the best cooking and reheating, use
Turntable ON function and cook with SENSOR COOKING or
AUTO COOKING without the rack. When the rack is used, set
time and power level manually. Allow plenty of space around
and between the dishes. Pay close attention to the cooking
and reheating progress. Reposition the foods and reverse
them from the rack to turntable and/or stir them at least
once during any cooking or reheating time. After cooking
or reheating, stir if possible. Using a lower power level will
assist in better cooking and reheating uniformity.
Avoid:
• Storing the rack in the microwave oven when not in
use.
• Popping popcorn with the rack in the microwave oven.
• Using any browning dish on the rack.
• Using SENSOR COOKING and AUTO COOKING with the
rack.
• Cooking directly on the rack—use microwave-safe
cookware.
NOTE
Turntable on/off function can be used in Manual Operation.
See page 28.
If the food that you wish to defrost is not listed on the
Defrost chart or is above or below the limits in the Amount
column on the Defrost chart (see page 22-23), you need
You can defrost any frozen food, either raw or previously
cooked, by using power level for 30%.
For either raw or previously cooked frozen food the rule of
thumb is approximately 4 minutes per pound. For example,
defrost 4 minutes for 1 pound of frozen spaghetti sauce.
Always stop the oven periodically to remove or separate
the portions that are defrosted. If food is not defrosted at
the end of the estimated defrosting time, program the oven
in 1 minute increments on power level 30% until totally
defrosted.
When using plastic containers from the freezer, defrost only
long enough to remove from the plastic in order to place in
a microwave-safe dish.
Manual Defrost
POWER LEVEL x 11 0%
to defrost manually.
DO NOT STORE THE RACK IN THE
MICROWAVE
NOTE
WHEN NOT IN USE.
12

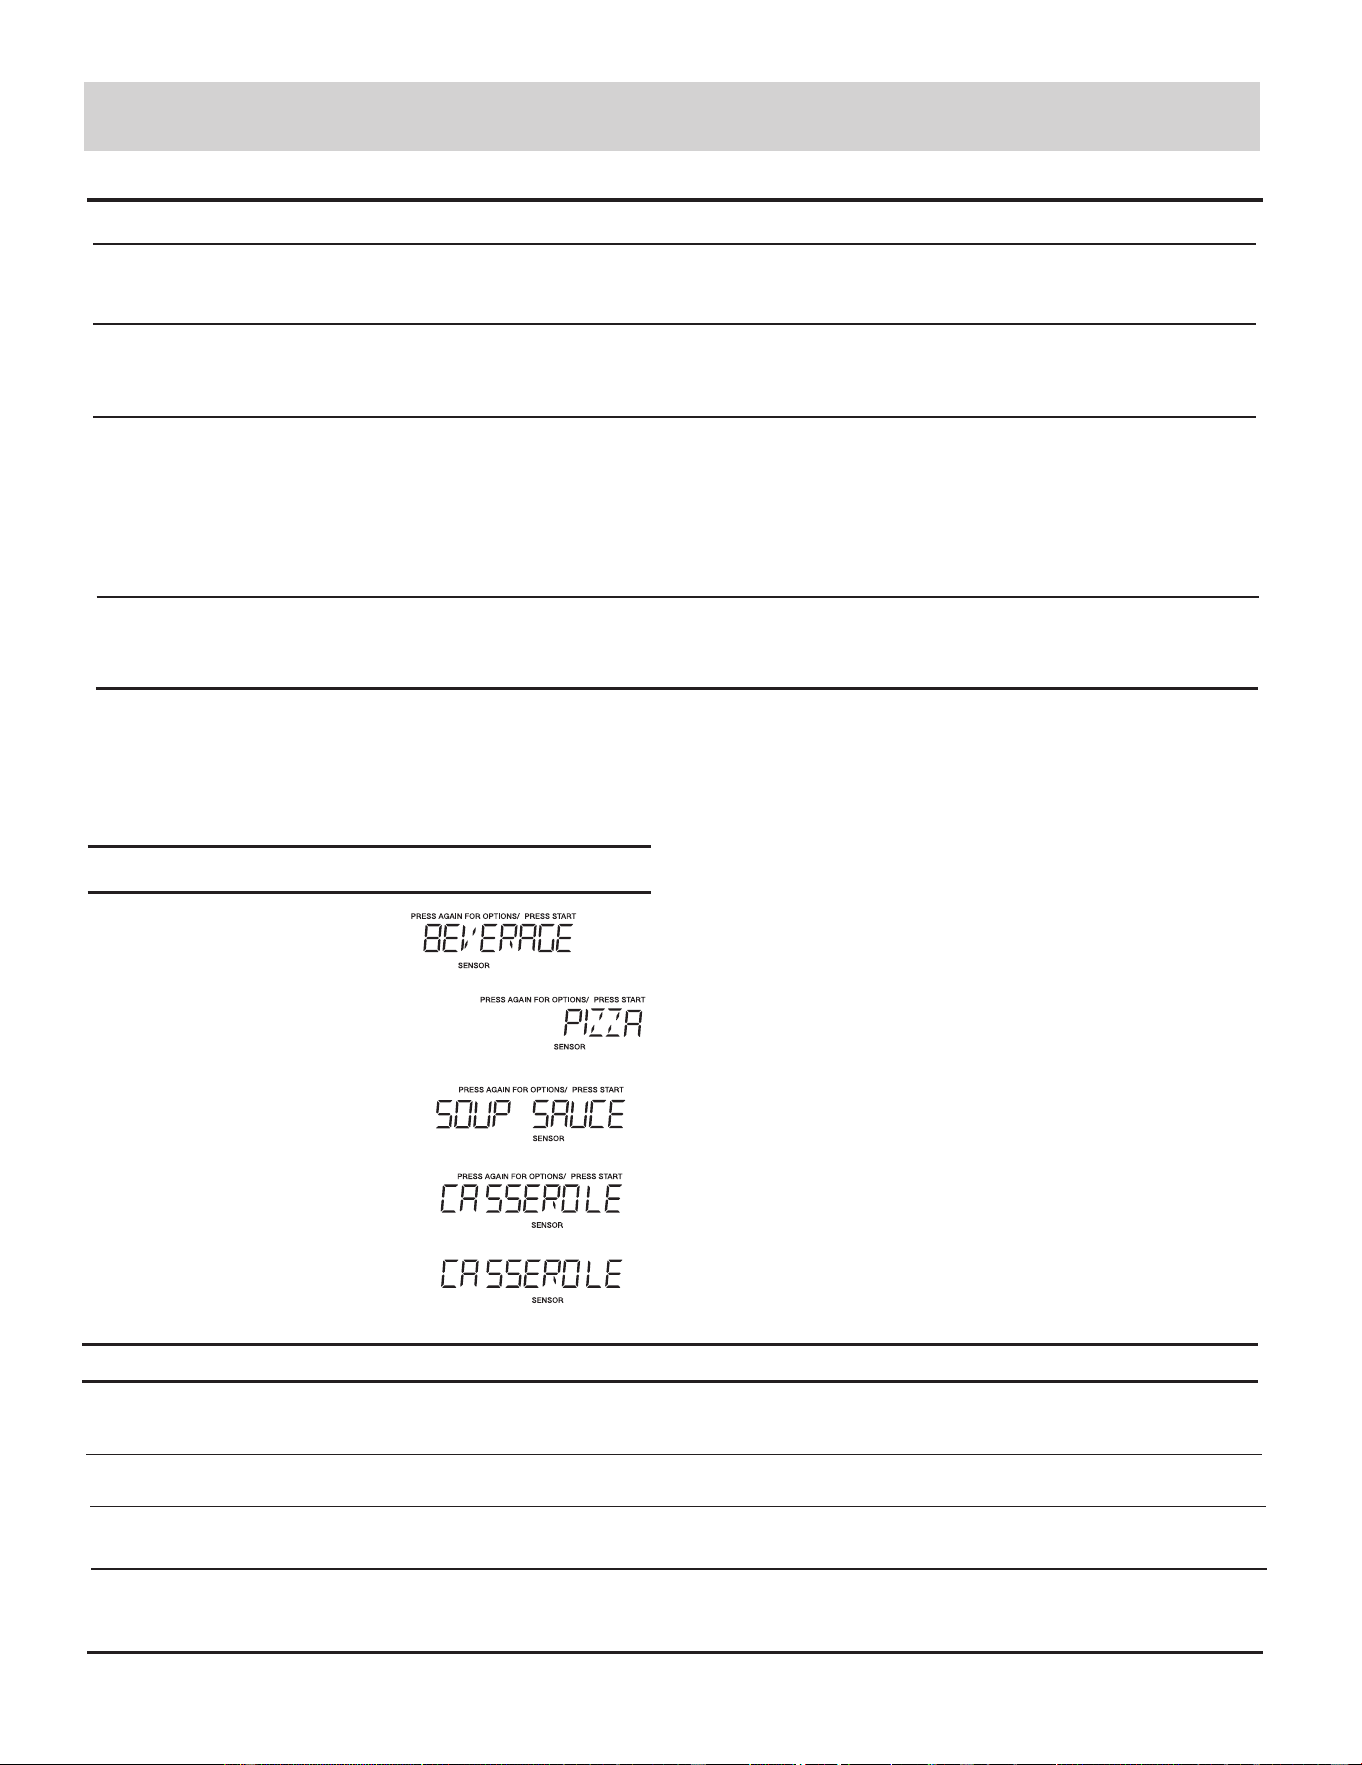
SENSOR COOKING
Sensor cooking has an electronic controlled sensor that
detects the vapor (moisture and humidity) emitted from the
food as it heats. The sensor adjusts the cooking times and
power level for various foods and quantities automatically.
Using Sensor Settings:
interior of the oven are dry. Wipe off any moisture with
a dry cloth or paper towel.
perature. For example, popcorn would be at room
temperature.
should be cooked following the guidelines in any micro-
wave cookbook.
During the first part of SENSOR COOKING, food name will
appear in the display. Do not open the oven door or press
the STOP clear pad during this part of the cycle. The
measurement of vapor will be interrupted.
When the sensor detects the vapor emitted from the
food, remainder of cooking time will appear. Door may
be opened when remaining cooking time appears in the
display. At this time, you may stir or season food, as
desired.
ping popcorn, the oven will turn off, and the correct time
of day will be displayed. If the sensor does not detect
vapor properly when cooking other foods,
time is needed, continue to cook manually.
Covering Foods:
Some foods cook better when covered.
1. Casserole lid.
2. Plastic wrap: Use plastic wrap recommended for microwave
cooking. Cover dish loosely; allow approximately
1
/2 inch
to remain uncovered to allow steam to escape. Plastic
wrap should not touch food.
3. Wax paper: Cover dish completely; fold excess wrap
under dish to secure. If dish is wider than paper, overlap
two pieces at least one inch to cover.
Be careful when removing any covering to allow steam to
escape away from you.
Sensor Cook
You can cook foods by pressing the sensor cook pad
time or power level.
NOTES for SENSOR COOKING
The fi nal cooking result will vary according to the
food condition (e.g. initial temperature, shape,
quality). Check food for temperature after cooking. If
additional time is needed, continue to cook manually.
cooking progress frequently so that there is no
chance of overcooking food.
On is automatically set for optimum cooking.
OR7NEWModelEN-4.indd12OR7NEWModelEN-4.indd12 09.4.2811:46:22AM09.4.2811:46:22AM
1.
1.
2.
3.
4.
multiple times. You don’t need to calculate cooking
• Suppose you want to cook frozen breakfast .
Touch: Display Shows:
1. Be sure the exterior of the cooking container and the
2. The oven works with foods at normal storage tem-
3. More or less food than the quantity listed in the chart
4.
5. If the sensor does not detect vapor properly when pop-
6. Check food for temperature after cooking. If additional
AN ERROR
CODE will be displayed, and the oven will turn off.
2. Stay near the oven while it’s in use and check
3. When SENSOR COOKING is selected Turntable
START
+30 Sec
Sensor
Cook
Sensor
Cook
Sensor
Cook
Sensor
Cook
5.
Sensor
Cook
6.
13
SENSOR COOKING
Sensor Cook chart
OR7NEWModelEN-4.indd13OR7NEWModelEN-4.indd13 09.4.2811:46:22AM09.4.2811:46:22AM
Place rice and twice as much liquid (water, chicken
or vegetable stock) in a 2 quart mic
rowave dish.
Cover with plastic wrap and vent. After cooking,
1-2 cups
Use medium or long
grain rice. Cook
instant rice according
to directions on the
package.
Breakfast
1-3 slices
10 oz./ 20 oz.
8-12
oz.
Place bacon strips on a microwave bacon rack for best
results. (Use dinner plate lined with paper towels if rack
is not available).
Place in an appropriately sized microwave container.
Cover with plastic wrap . After cooking, stir and allow
to stand for 3 minutes.
allow to stand for 10 minutes. Stir for fluffier rice.
Place in an appropriately sized microwave container.
Cover with plastic wrap . After cooking, stir and allow
to stand for 3 minutes.
FOOD
AMOUNT
PROCEDURE
1.Bacon
2. Frozen Dinner
3. Rice
4. Frozen
Sensor Reheat
1.
2.
3.
4.
5.
• Suppose you want to reheat rolls with sensor reheat.
Touch: Display Shows:
Sensor Reheat chart
FOOD
AMOUNT
PROCEDURE
Casserole/
Lasagna
Soup/Sauce
1 Cup
Place in a microwavable bowl or casserole. Cover with
vented plastic wrap. After cooking, stir and let stand
3 minutes.
Place in shallow microwavable casserole. Cover with vented
plastic wrap.
After cooking, stir and let stand 3 minutes.
START
+30 Sec
Sensor
Reheat
Sensor
Reheat
Sensor
Reheat
Sensor
Reheat
12
oz.
5. Frozen
Pizza
Place in an appropriately sized microwave container.
Cover with plastic wrap . After cooking, stir and allow
to stand for 3 minutes.
1 - 3 cups
Beverage
Stir liquid briskly before and after heating to avoid
''eruption .
To reheat beverages.
Use for
pizza. Remove from package and unwrap.
Follow
package
directions
for use of package and/or silver crisping disk.
Pizza
1-4 Pieces
10.5 Oz
14
Popcorn
Veggies
OR7NEWModelEN-4.indd14OR7NEWModelEN-4.indd14 09.4.2811:46:22AM09.4.2811:46:22AM
Vegetables chart
FOOD
AMOUNT
PROCEDURE
Wash and place in casserole. Add no water if vegetables have
just been washed. Cover with lid for tender vegetables. Use
plastic wrap for tender-crisp vegetables. Press the veggies
pad
2 to 5 minutes.
Place in casserole. Add 1-4 tbsp. water. Cover with lid for
tender vegetables. Use plastic wrap cover for tender-crisp
Fresh Vegetables
Broccoli
Brussels sprouts
Cabbage
Caulifl ower (fl owerets)
Caulifl ower (whole)
Spinach
Zucchini
Carrots, sliced
Corn on cob
Green beans
Winter squash
- diced
- halves
Let stand, covered, for
After cooking
vegetables. Press the veggies pad
UHVK
f
stir
, if possible. Let stand,
covered,
for 2 to 5 minutes.
. After cooking, stir, if
possible.
twice for
Frozen Vegetables
)
There are 3 options (Potato,
,
Fresh Vegetables
under the Veggies.
)
o
c
(5
(Initial temperature)
Time counting down
2.
1.
NOTES
oven when cooking popcorn. Do not use regular
paper bags. Do not re-pop unpopped kernals.
Do not pop popcorn in glass cookware.
1.Remove the metal shelf from microwave
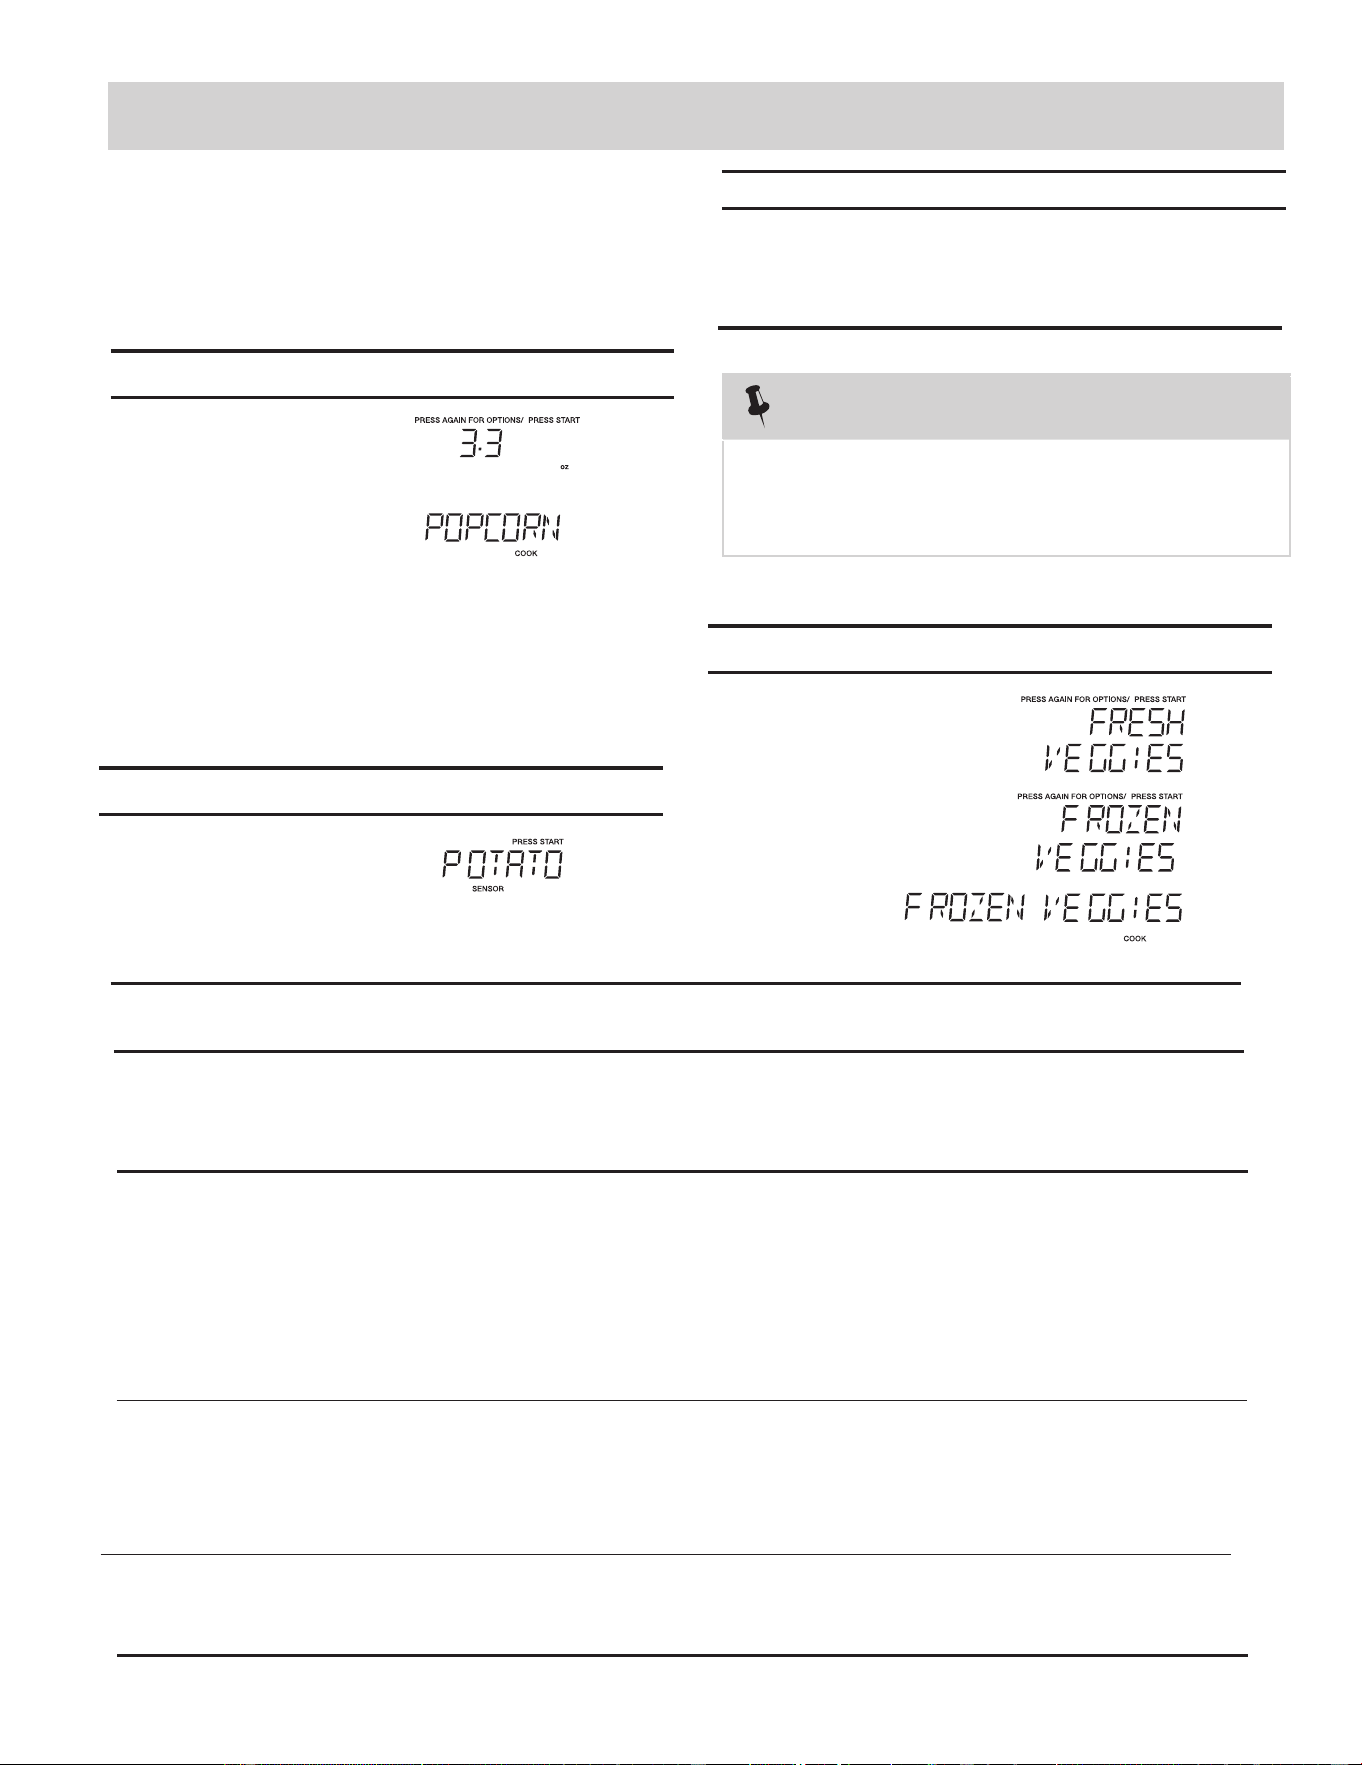
ONE TOUCH COOK
The Popcorn quick touch pad lets you pop 3.3,
3.0, 1.75 ounce bags of commercially packaged
microwave popcorn. Pop only one package at
a time. If you are using a microwave popcorn
popper, follow manufacturer's instructions.
Amount
3.00 oz.
3.
oz.
Press popcorn pad
once
2 times
3 times
1.75
oz.
• Suppose you want to cook two cups of
frozen veggies.
• Suppose you want to pop a 3.3 oz. popcorn.
Touch: Display Shows:
Touch: Display Shows:
30
Time counting down
START
+30 Sec
START
+30 Sec
Popcorn
Veggies
Veggies
vegetables.
2.
3.
4.
Pierce with fork in several places. Place on paper towel on
turntable.
After
cooking, remove from oven and let stand for 5 minutes.
Potato
1
-
pieces4
Frozen Vegetables
9HJHWDEOHV
After cooking, stir
Add no water. Cover with lid or plastic wrap. Press the veggies pad
.
and let stand,
covered, for 3 minutes.
(-18 )
o
c
three times for Frozen
Touch: Display Shows:
1.
Veggies
Press the veggies
pad
one time for potato.
twice for fresh Vegetables
Cooking times are based on an average 8
ounce potato.
2 cups
2 cups
15
OR7NEWModelEN-4.indd20OR7NEWModelEN-4.indd20 09.4.2811:46:25AM09.4.2811:46:25AM
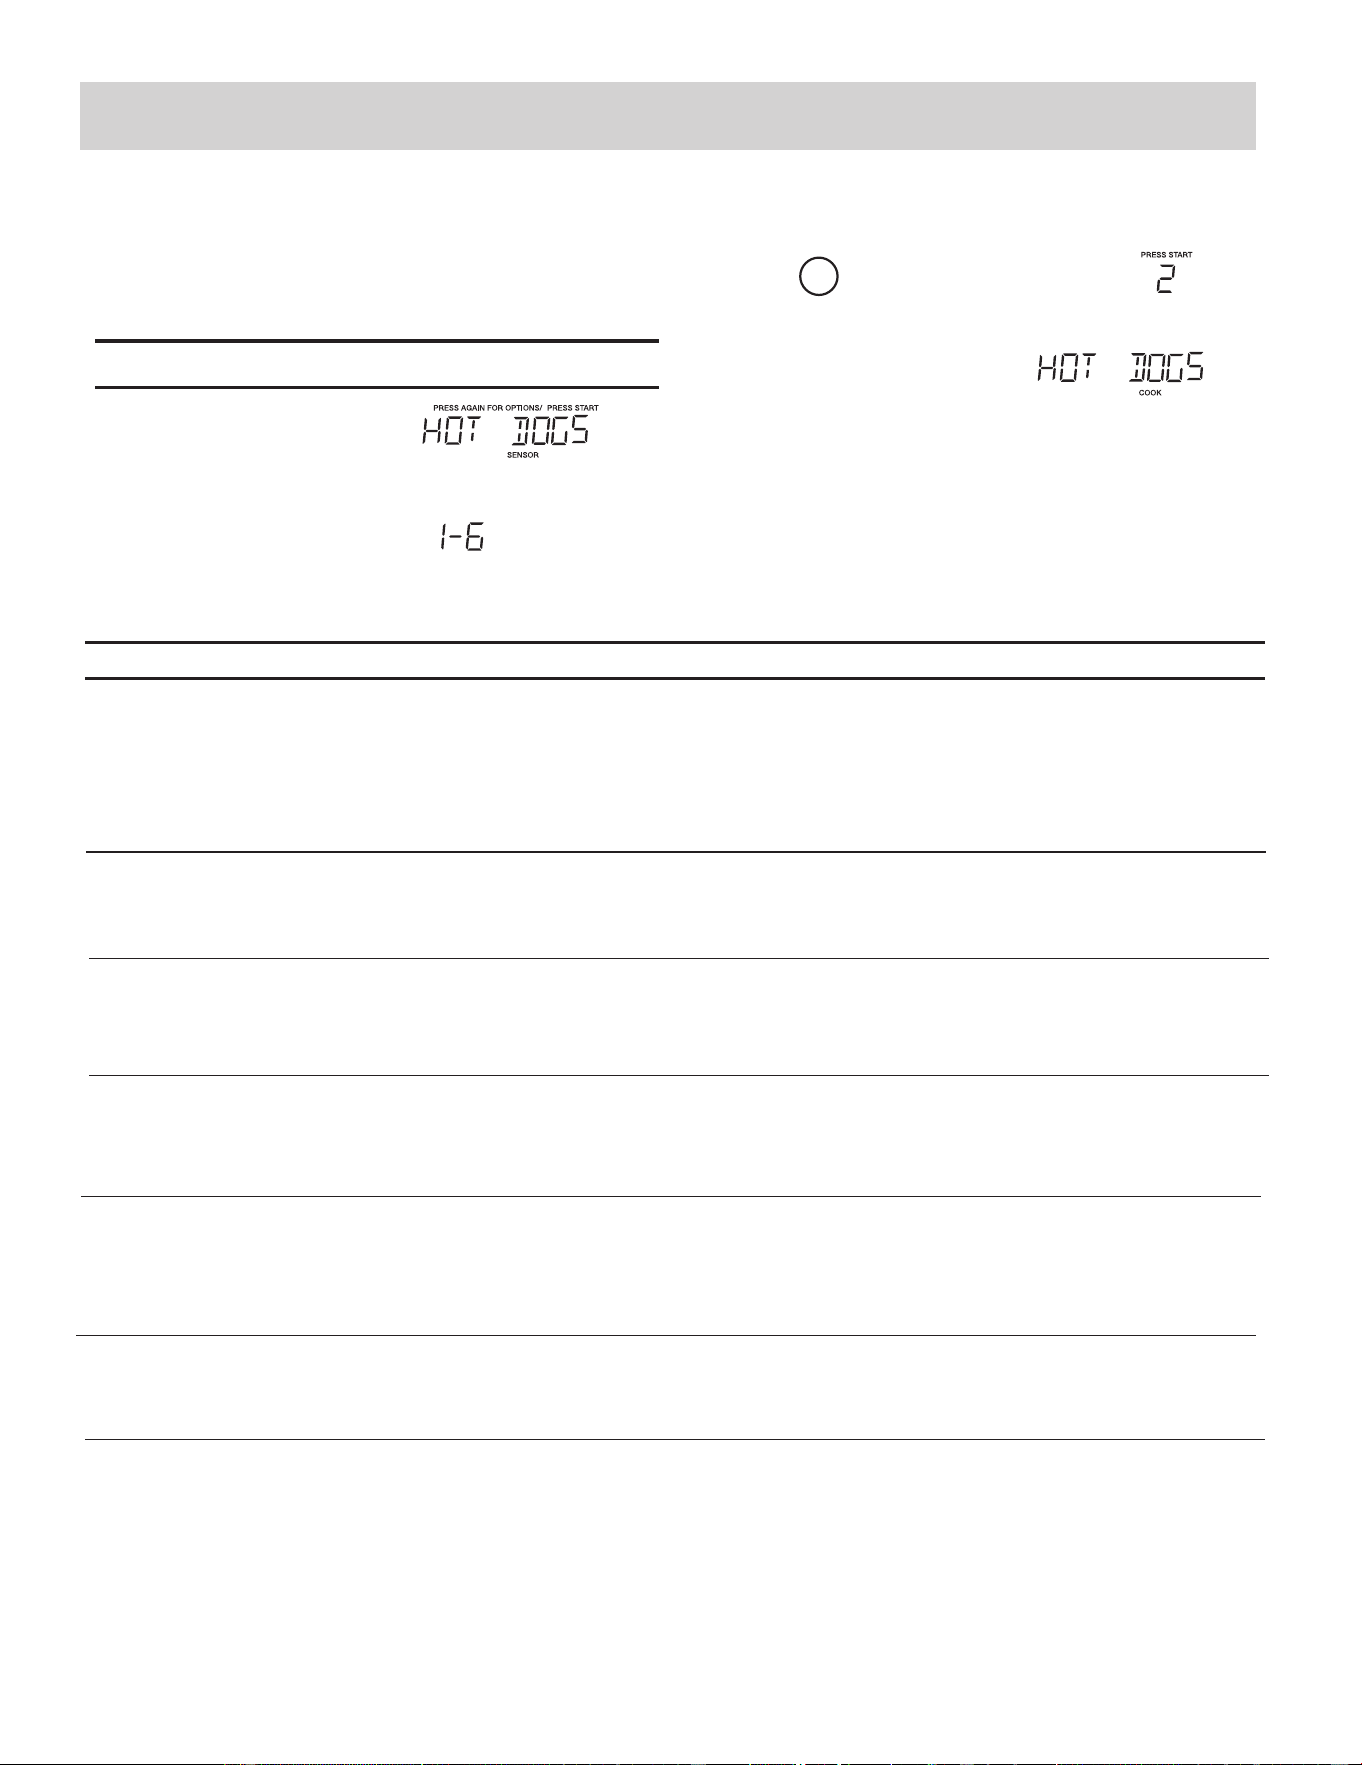
•
Suppose you want to reheat hot dogs.
1.
2.
Snack Menu
Snack Menu is for cooking/heating foods that take a short
amount of time!
Snack Menu chart
FOOD
AMOUNT
PROCEDURE
Place hot dog in bun. Wrap each with paper towel or napkin.
Use for frozen microwave pizza. Remove from package and unwrap. Follow
package directions for use of package and/or silver crisping disk.
1 - 6 pieces
6 - 8 oz
(170 - 225 g)
3. Hot Dogs
2. Frozen MW Pizza
1 - 2 cups
Use this pad for frozen, convenience foods. It will give satisfactory results for most brands. You
may wish to try several and choose your favorite. Remove package from outer wrapping and
follow package directions for covering. After cooking, let stand, covered for 1 to 3 minutes.
Meal
8.8 oz
ONE TOUCH COOK
Stir liquid briskly before and after heating to avoid ''eruption .''
Touch: Display Shows:
To reheat Soup.
3.
2
4.
Time counting down
This setting is ideal for individual portions of canned food packed in a small
microwaveable container, usually 6 to 8 ounces. Remove inner metal lid and replace
outer microwaveable lid. After cooking, stir food and allow to stand 1 or 2 minutes.
2.39 oz
START
+30 Sec
START
+30 Sec
Snacks
12 cookies
1. Chocolate
Chip Cookies
To reheat chocolate chip cookies.
Follow
package directions for use
of package and/or silver crisping disk.
Press the
pad
2 to 5 minutes.
Let stand, covered, for
After cooking, stir, if
possible.
Snack
once for chocolate
chip cookies.
Then press START to preheat the
food to 350 F. At this time, put the
food into the oven, then press START to start cooking.
Press the
pad
Snack
frozen Microwave Pizza.twice for
Press the
pad
Snack
three times for hot dogs.Press SATRT to confirm the menu.
Press numerical pads to choose the portions. Press START to start cooking.
Press the
pad
Snack
4. Frozen Kid's
four times for frozen kids meal.
Press the
pad
Snack
five times for meal in a cup.
5. Meal in a Cup
6. Soup
Press the
pad
Snack
six times for soup.
three times.
16
OR7NEWModel2ndEN.indd21OR7NEWModel2ndEN.indd21 10.8.29:59:04AM10.8.29:59:04AM
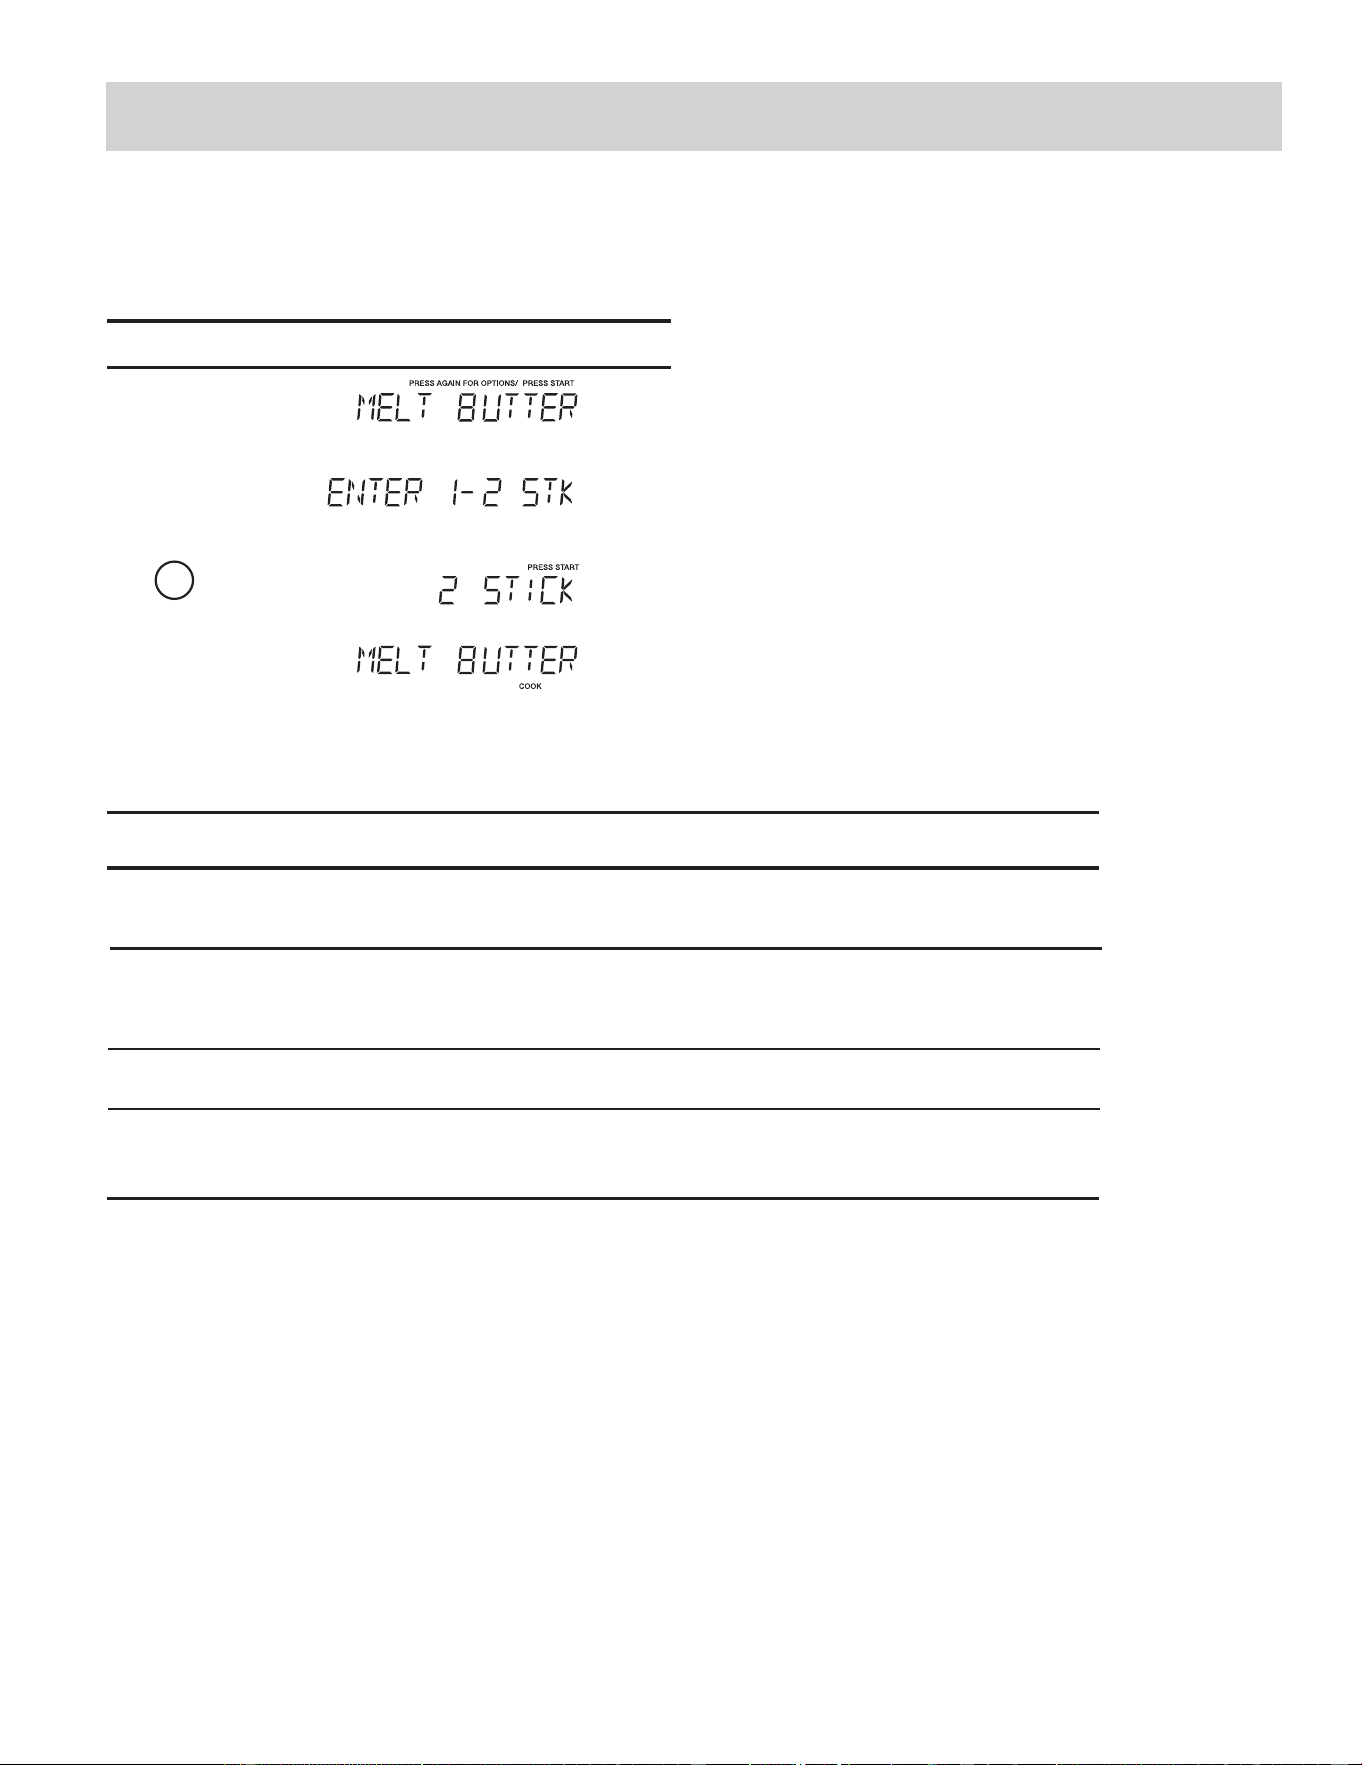
The oven uses low power to melt and soften items.
1.
See the following table.
2.
3.
4.
2
Setting Melt/Soften
Time counting down
DIRECTION
CATEGORY
BUTTER
MELT TABLE
CHOCOLATE
Unwrap and place
in microwavable
container.
cooking to
complete melting.
AMOUNT
Chocolate chips or
squares of baking chocolate
may be used.
Unwrap squares and place in
microwavable
container. Stir at the
end of cycle
ICE CREAM
Place container in oven.
lce cream will be soft
enough to make
scooping easier.
Pint, 1.5 Quart.
1 or 2 sticks
2, 4 or 8 oz.
Unwrap and place
in microwavable
container.
CREAM
CHEESE
room temperature
and ready for use
in recipe.
3 or 8 oz.
No need to cover butter. Stir at the end of
to complete melting.
Cream cheese will be at
ONE TOUCH COOK
• Suppose you want to melt 2 sticks of Butter.
Touch: Display Shows:
START
+30 Sec
START
+30 Sec
Melt/
Soften
17
OR7NEWModelEN-4.indd16OR7NEWModelEN-4.indd16 09.4.2811:46:23AM09.4.2811:46:23AM
3
200
450
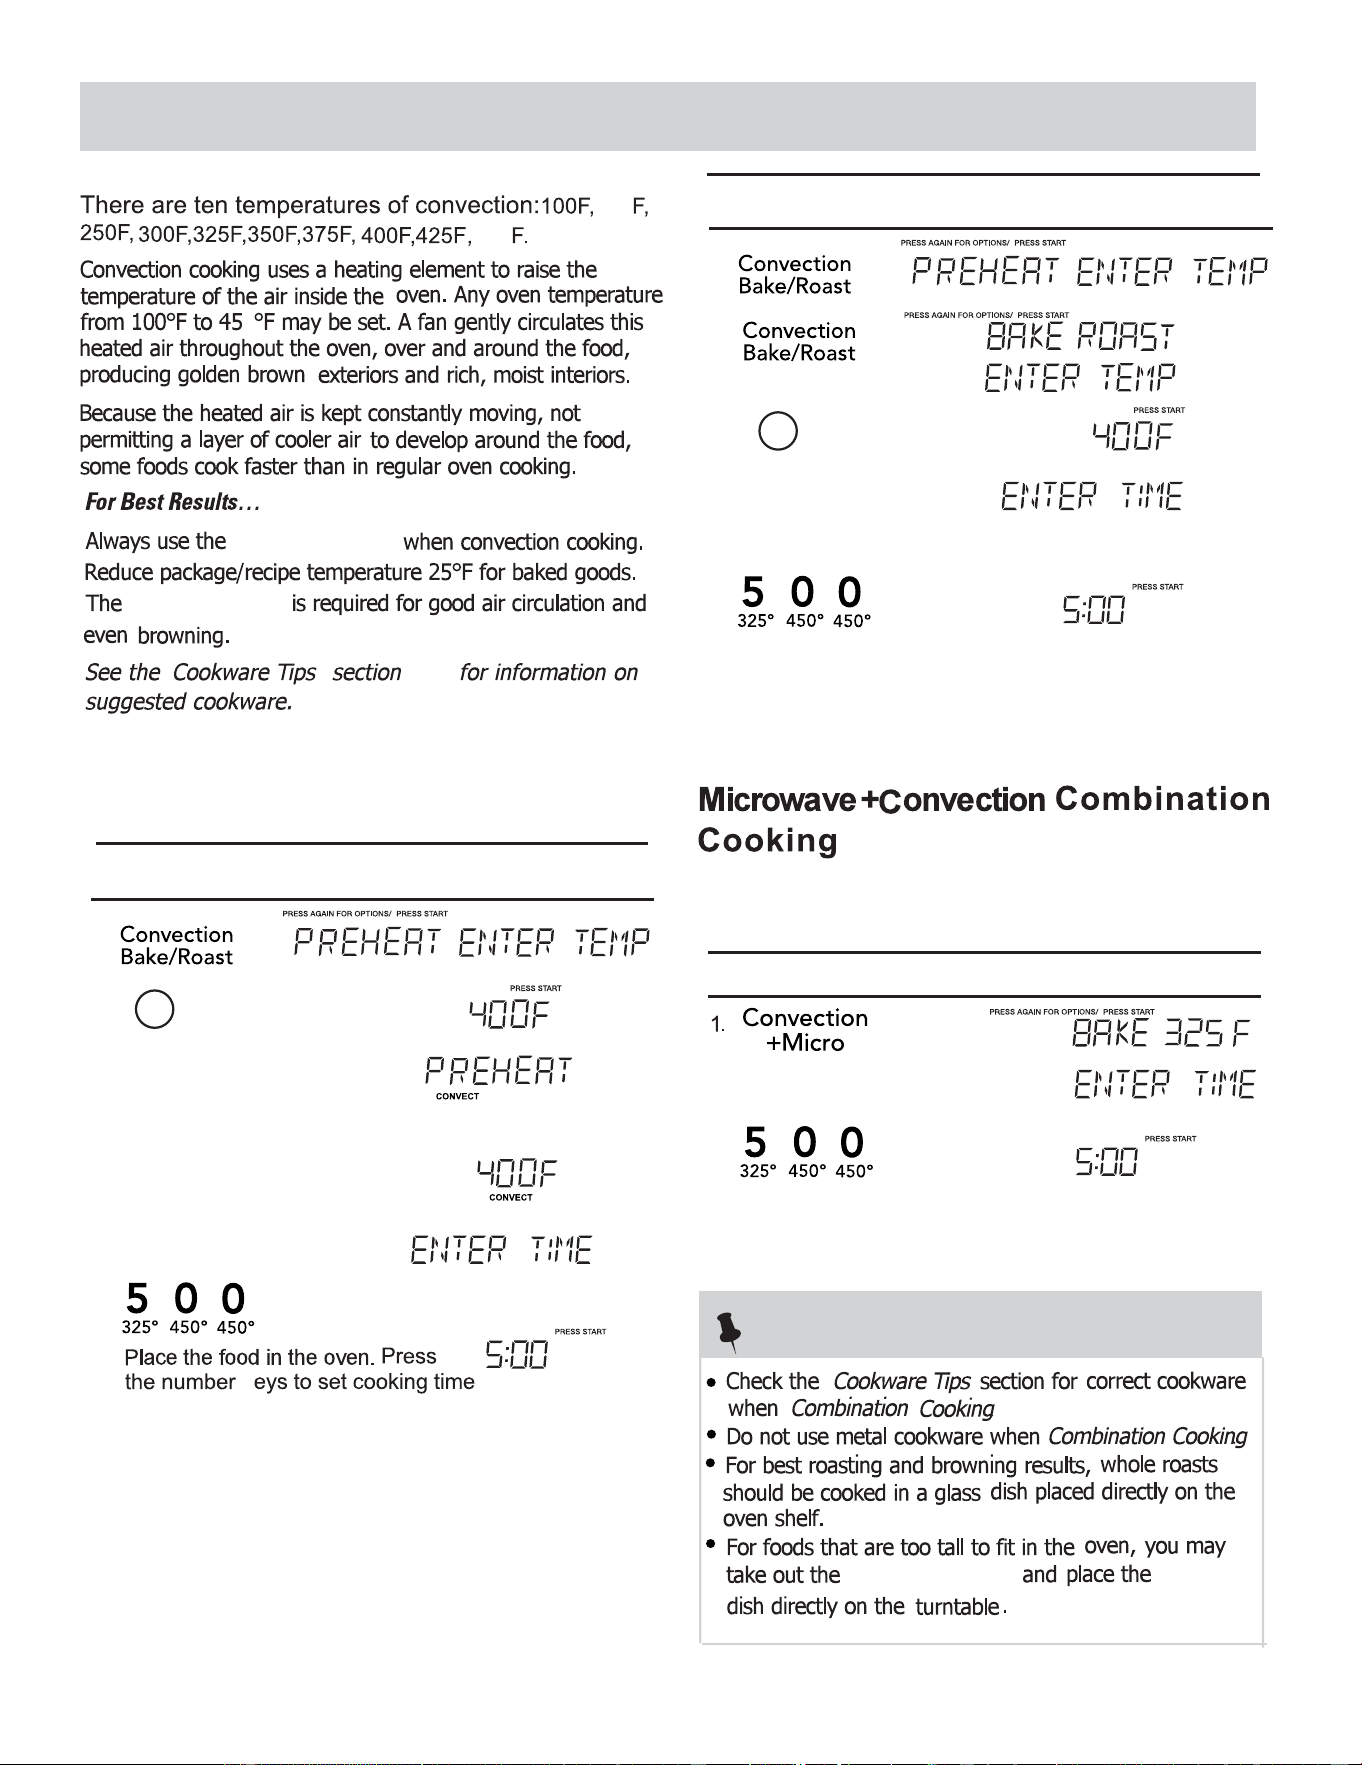
Convection Cooking
0
1
using with preheating
convection
Suppose you want to cook food for 5 minutes
at 400ºF
•
Using convection with preheating
Using convection without preheating
using
convection
Suppose you want to cook food for 5 minutes
at 400ºF
•
without preheating
round wire rack
round wire rack
CONVECTION COOKING
1.
Time counting down
Touch: Display Shows:
START
+30 Sec
START
+30 Sec
2.
3.
8
(The oven is preheated, it will signal ).
When preheated temp. reached.
4.
If no action taken in 12 seconds,
preheated temp. display.
Open the door in 30 minutes.
5.
6.
k
7.
1.
Time counting down
Touch: Display Shows:
START
+30 Sec
START
+30 Sec
8
2.
3.
4.
5.
6.
combination cooking.
Suppose you want to cook food for 5
minutes
using
•
NOTES
round wire rack
Touch: Display Shows:
START
+30 Sec
.2
3.
START
+30 Sec
4.
Time counting down
18

OR7NEWModelEN-4.indd17OR7NEWModelEN-4.indd17 09.4.2811:46:24AM09.4.2811:46:24AM
CONVECTION COOKING
$OZD\VSUHKHDWWKHRYHQEHIRUHFRQYHFWLRQEDNLQJ
$YRLGRSHQLQJWKHRYHQGRRUGXULQJFRRNLQJ±HDFKWLPHWKHGRRULVRSHQHG
WKHRYHQORVHVKHDWDQGWKLVFDQFDXVHXQHYHQEDNLQJ
Biscuits and bread
Cakes
%LVFXLWV PLQXWHV &DQQHGUHIULJHUDWHGELVFXLWVWDNHWRPLQXWHVOHVVWLPH
0XIILQV PLQXWHV 5HPRYHIURPWLQVWUDLJKWDZD\DQGSODFHRQFRROLQJUDFN
1XWEUHDGRUIUXLWEUHDG PLQXWHV
%UHDG PLQXWHV
3ODLQRUVZHHWUROOV PLQXWHV /LJKWO\JUHDVHEDNLQJVKHHW
&KHHVHFDNH PLQXWHV $IWHU EDNLQJ RSHQ RYHQ GRRU VOLJKWO\ DQG OHDYH FKHHVHFDNH
WR
VWDQGLQ RYHQ IRU PLQXWHV
&RIIHHFDNH PLQXWHV
&XSFDNHV PLQXWHV
)UXLWFDNH PLQXWHV
*LQJHUEUHDG PLQXWHV
)
)
)
)
)
)
)
)
)
)
TYPE
TEMPERATURE
TIME
NOTES
TYPE
TEMPERATURE
TIME
NOTES
8VHWKH
round
ZLUHUDFN GXULQJFRQYHFWLRQEDNLQJ
Convection Cooking
19

OR7NEWModelEN-4.indd18OR7NEWModelEN-4.indd18 09.4.2811:46:24AM09.4.2811:46:24AM
Combination Cooking
&RPELQDWLRQFRRNLQJKHOSVWREURZQDQGFULVSIRRGV
%HHIEXUJHUV R] PLQXWHVIRUWZR 3ODFHRQPLFURZDYHSURRISODWHGUDLQIDWDQGWXUQKDOIZD\
WKURXJKFRRNLQJ
%HHIUXPSURDVW NJ5DUHPLQXWHV 3ODFHIDWVLGHGRZQRQORZUDFNVHDVRQVKLHOGLIQHFHVVDU\
0HGLXPPLQXWHV $IWHUFRRNLQJOHDYHWRVWDQGIRUPLQXWHV
:HOOGRQHPLQXWHV
/DPE NJ 5DUH PLQXWHV 3ODFHIDWVLGHGRZQRQORZUDFNEUXVKZLWKPDULQDGHDQG
URDVWUROOHGERQHOHVV 0HGLXPPLQXWHV VHDVRQVKLHOGLIQHFHVVDU\$IWHUFRRNLQJOHDYHWRVWDQGIRU
:HOOGRQH PLQXWHV PLQXWHV
3RUN FKRSV 5DUHPLQXWHV 3ODFHRQKLJKUDFNEUXVKZLWKPDULQDGHDQGVHDVRQ&RRN
0HGLXPPLQXWHV XQWLOQRORQJHUSLQNRULQWHUQDOWHPSHUDWXUHUHDFKHV)
:HOOGRQHPLQXWHV 7XUQKDOIZD\WKURXJKFRRNLQJ$IWHUFRRNLQJFRYHUZLWKIRLO
DQGOHDYHWRVWDQGIRUPLQXWHV
3RUN FKRSV 5DUHPLQXWHV 3ODFHRQKLJKUDFNEUXVKZLWKPDULQDGHDQGVHDVRQ&RRN
0HGLXPPLQXWHV XQWLOQRORQJHUSLQNRULQWHUQDOWHPSHUDWXUHUHDFKHV)
:HOOGRQHPLQXWHV 7XUQKDOIZD\WKURXJKFRRNLQJ$IWHUFRRNLQJFRYHUZLWKIRLO
DQGOHDYHWRVWDQGIRUPLQXWHV
3RUN NJ 5DUH PLQXWHV 3ODFHIDWVLGHGRZQRQORZUDFNVHDVRQVKLHOGLIQHFHVVDU\
ORLQURDVWUROOHG 0HGLXPPLQXWHV $IWHUFRRNLQJFRYHUZLWKIRLODQGOHDYHWRVWDQGIRU
ERQHOHVV :HOOGRQHPLQXWHV PLQXWHV
&KLFNHQEUHDVWV OE PLQXWHV :DVKDQGGU\PHDWUHPRYHVNLQSODFHWKLFNHVWSRUWLRQWR
RXWVLGHRQKLJKUDFN
&KLFNHQ OE PLQXWHV 3ODFHRQKLJKUDFNEUXVKZLWKEXWWHUDQGVHDVRQDV
ERQHOHVVSRUWLRQV UHTXLUHG7XUQKDOIZD\WKURXJKFRRNLQJ&RRNXQWLOQRORQJHU
SLQNDQGMXLFHVUXQFOHDU$IWHUFRRNLQJFRYHUZLWKIRLODQG
OHDYHWRVWDQGIRUPLQXWHV
&KLFNHQZKROH NJ PLQXWHV :DVKDQGGU\ELUGSODFHEUHDVWGRZQRQORZUDFNEUXVKZLWK
EXWWHUDQGVHDVRQDVUHTXLUHG7XUQDQGGUDLQKDOIZD\WKURXJK
FRRNLQJ&RRNXQWLOQRORQJHUSLQNDQGMXLFHVUXQFOHDU $IWHU
FRRNLQJFRYHUZLWKIRLODQGOHDYHWRVWDQGIRUPLQXWHV
7HPSHUDWXUHLQWKLJKVKRXOGEHDSSUR[)
TYPE
TIME
NOTES
QUANTITY
CONVECTION COOKING
20

OR7NEWModelEN-4.indd17OR7NEWModelEN-4.indd17 09.4.2811:46:24AM09.4.2811:46:24AM
CONVECTION COOKING
Cookware Tips
Convection Cooking Combination Cooking
Metal Pans DUHUHFRPPHQGHGIRUDOOW\SHVRIEDNHG
EURZQLQJRUFUXVWLQJ
'DUNRUGXOOILQLVKPHWDOSDQVDUHEHVWIRUEUHDGVDQGSLHV
DQGSURGXFHFULVSHUFUXVW
6KLQ\DOXPLQXPSDQVDUHEHWWHUIRUFDNHVFRRNLHVRU
PXIILQVEHFDXVH WKHVHSDQV
UHIOHFWKHDWDQGKHOS
Glass or Glass-Ceramic FDVVHUROHRUEDNLQJGLVKHV
UHFLSHVGXHWRWKH
SURGXFWVEXWHVSHFLDOO\ZKHUH
EHFDXVHWKH\DEVRUEKHDW
LVLPSRUWDQW
SURGXFHDOLJKWWHQGHUFUXVW
FOHDQDELOLW\RIJODVV
DUHEHVWVXLWHGIRUHJJDQGFKHHVH
Glass or Glass-Ceramic EDNLQJFRQWDLQHUVDUH
Heat-Resistant PlasticPLFURZDYHFRRNZDUHVDIH
LWHPVZLWKPHWDOWULP
EHXVHGEXWLWLVQRW
UHFRPPHQGHG
UHFRPPHQGHG%HVXUHQRWWRXVH
VKHOIGDPDJLQJWKHFRRNZDUHWKHVKHOIRUWKHRYHQ
DVLWPD\FDXVHDUFLQJVSDUNLQJZLWKRYHQZDOORURYHQ
WR)PD\
EHFDXVHWKHSODVWLFLVDSRRUFRQGXFWRURIKHDW
IRUIRRGVUHTXLULQJFUXVWLQJRUDOODURXQGEURZQLQJ
COOKWARE MICROWAVE
Heat-Resistant Glass, Glass-Ceramic
<HV <HV <HV
(Pyrex
®
, Fire King
®
, Corning Ware
®
, etc.)
Metal
1R <HV 1R
Non Heat-Resistant Glass
1R 1R 1R
Microwave-Safe Plastics
<HV 1R <HV
Plastic Films and Wraps
<HV 1R 1R
Paper Products
<HV 1R 1R
Straw, Wicker and Wood
<HV 1R 1R
❊
8VHRQO\PLFURZDYHFRRNZDUHWKDWLVVDIHWR °)
CONVECTION
COMBINATION
21
OR7NEWModelEN-4.indd19OR7NEWModelEN-4.indd19 09.4.2811:46:24AM09.4.2811:46:24AM
The auto defrost feature provides you with the best
defrosting method for frozen foods. The cooking guide
will show you which defrost sequence is recommended
for the food you are defrosting.
For added convenience, the Auto Defrost includes a
built-in beep mechanism that reminds you to check,
turn over, separate, or rearrange the food in order to
get the best defrost results. Three different defrosting
levels are provided:
Available weight is 0.1-6.0 lbs
vFor best results, remove fish, shell fish, meat and
poultry from its original closed paper or plastic
package (wrapper). Otherwise, the wrap will hold
steam and juice close to the foods, which can
cause the outer surface of the foods to cook.
vFor best results, roll your ground meat into a ball
before freezing. During the DEFROST cycle, the
microwave will signal when it is time to turn the
meat over. Scrape off any excess frost from
the meat and continue defrosting.
microwave roasting rack to catch drippings.
This table shows food type selections and the
weights you can set for each type. For best results,
loosen or remove covering on food.
WEIGHTS YOU
CAN SET
(tenths of a pound)
0.1 to 6.0
0.1 to 6.0
Weight conversion table
You are probably used to measuring food in pounds
and ounces that are fractions of a pound (for
example, 4 ounces equals 1/4 pound). However,
in order to enter food weight in Auto Defrost, you
must specify pounds and tenths of a pound.
If the weight on the food package is in fractions of a
pound, you can use the following table to convert
Equivalent Weight
OUNCES DECIMAL WEIGHT
1.6 .10
3.2 .20
4.0 .25 One-Quarter Pound
4.8 .30
6.4 .40
8.0 .50 One-Half Pound
9.6 .60
11.2 .70
12.0 .75 Three-Quarters Pound
12.8 .80
14.4 .90
16.0 1.0 One Pound
weight for the best defrosting results.
the weight to decimals.
If between two decimal weights, choose the lower
KEY
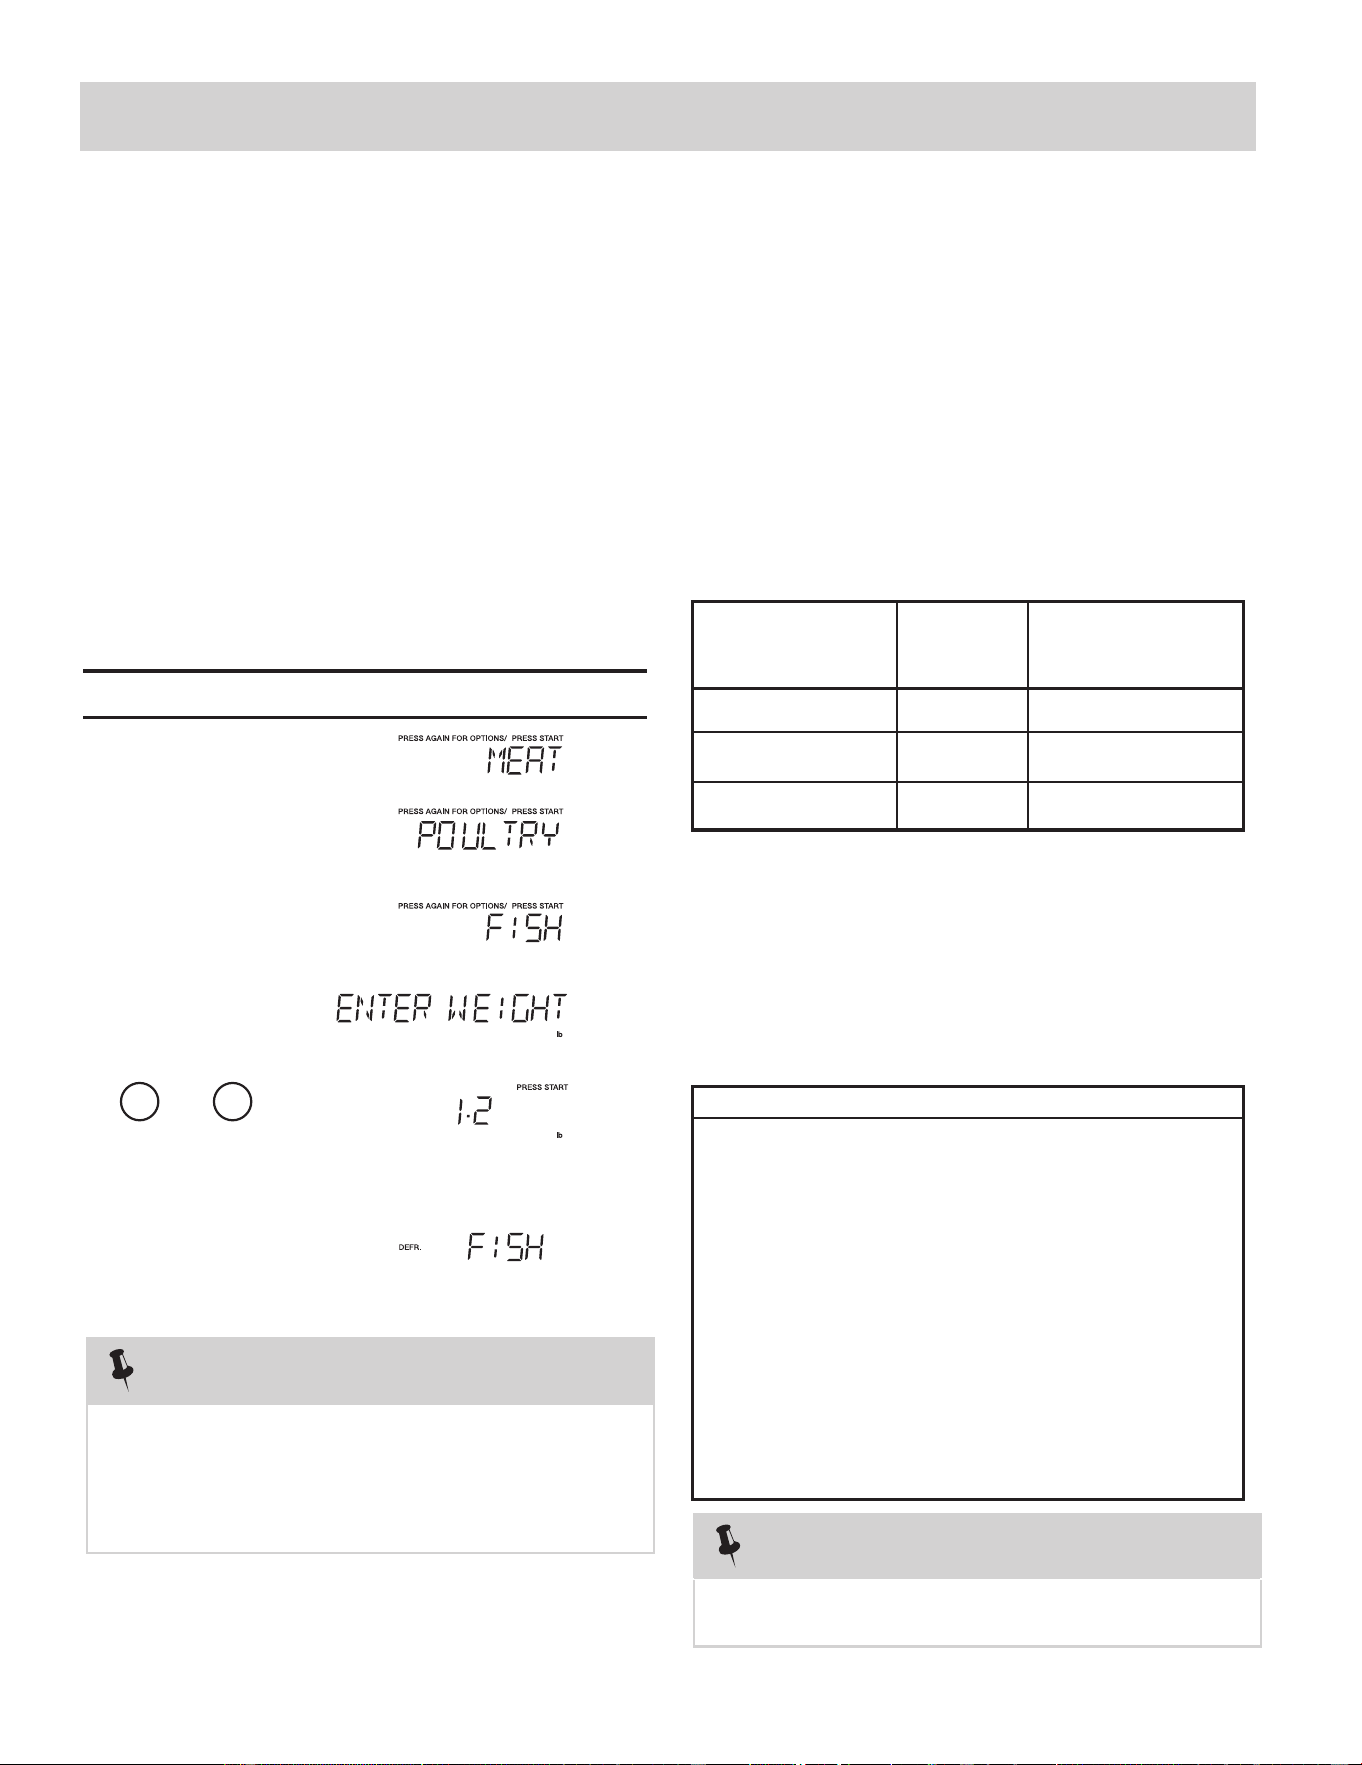
Mea t 0.1 to 6.0
PRESS
Category
Poultry
Fish
1.
.
1 2
To enter weight
and
2.
3.
4.
5.
6
Time counting down
Remove any portions that have thawed. Return frozen
portions to the oven and touch to resume the
defrost cycle.
open the door and turn, separate, or rearrange the food.
NOTES
The oven will beep during the DEFROST cycle. At this time,
1. MEAT
2. POULTRY
3. FISH
NOTES
• Suppose you want to defrost 1.2 lbs of fish.
Using Auto Defrost
Operating Tips
vPlace foods in a shallow container or on a
Touch: Display Shows:
AUTO DEFROST
START
+30 Sec
START
+30 Sec
Defrost
Defrost
Defrost
START
+30 Sec
Defrost x 1
Defrost x 2
Defrost x 3
22

OR7NEWModelEN-4.indd19OR7NEWModelEN-4.indd19 09.4.2811:46:24AM09.4.2811:46:24AM
Auto Defrost Table
NOTE: Meat of irregular shape and large, fatty cuts of meat should have the narrow or fatty areas shielded with
foil at the beginning of the defrost sequence.
M
AT BEEP SPECIAL INSTRUCTIONS
BEEF
Ground Beef,
Bulk
Ground Beef,
Patties
Round Steak
Tenderloin
Steak
Stew Beef
Pot Roast,
Chuck Roast
Rib Roast
Rolled Rump
Roast
LAMB
Cubes for
Stew
Chops
(1 inch thick)
PORK
Chops
(1/2 inch thick)
Hot Dogs
Spareribs
Country-style
Ribs
Sausage,
Links
Sausage,
Bulk
Loin Roast,
Boneless
MEAT
MEAT
MEAT
MEAT
MEAT
MEAT
MEAT
MEAT
MEAT
MEAT
MEAT
MEAT
MEAT
MEAT
MEAT
MEAT
Remove thawed portions with fork.
Turn over. Return remainder to oven.
Separate and rearrange.
Turn over. Cover warm areas with
aluminum foil.
Turn over. Cover warm areas with
aluminum foil.
Remove thawed portions with fork.
Separate remainder.
Return remainder to oven.
Turn over. Cover warm areas with
aluminum foil.
Turn over. Cover warm areas with
aluminum foil.
Turn over. Cover warm areas with
aluminum foil.
Remove thawed portions with fork.
Return remainder to oven.
Separate and rearrange.
Separate and rearrange.
Turn over. Cover warm areas with
aluminum foil.
Separate and rearrange.
Remove thawed portions with fork.
Turn over. Return remainder to oven.
Turn over. Cover warm areas with
aluminum foil.
Do not defrost less than 1/4 lb.
Freeze in ball shape.
Do not defrost less than 2 oz. patties.
Depress center when freezing.
Place in a microwave safe dish.
Place in a microwave safe dish.
Place in a microwave safe dish.
Place in a microwave safe dish.
Place in a microwave safe dish.
Place in a microwave safe dish.
Place in a microwave safe dish.
Place in a microwave safe dish.
Place in a microwave safe dish.
Place in a microwave safe dish.
Place in a microwave safe dish.
Place in a microwave safe dish.
Place in a microwave safe dish.
Place in a microwave safe dish.
FOOD SETTING
eat Settings
AUTO DEFROST
23

OR7NEWModelEN-4.indd20OR7NEWModelEN-4.indd20 09.4.2811:46:25AM09.4.2811:46:25AM
Auto Defrost Table (Continued)
P
CHICKEN
Whole
(up to 6 lbs)
Cut-up
CORNISH
HENS
Whole
TURKEY
Breast
(up to 6 lbs)
POULTRY Turn over breast side down.
POULTRY
POULTRY
areas with
aluminum foil.
Separate pieces and rearrange.
Turn over. Cover warm areas with
aluminum foil.
Turn over. Cover warm areas with
aluminum foil.
Turn over. Cover warm areas with
aluminum foil.
Place chicken breast-side up in a
microwave safe dish. Finish defrosting
by immersing in cold water. Remove
giblets when chicken is partially
defrosted.
Place in a microwave safe dish.
Finish defrosting by immersing in cold
water.
Place in a microwave safe dish.
Finish defrosting by immersing in cold
water.
Place in a microwave safe dish.
Finish defrosting by immersing in cold
water.
Fish Settings
FOOD SETTING AT BEEP SPECIAL INSTRUCTIONS
FISH
Fillets
Steaks
Whole
SHELLFISH
Crab meat
Lobster tails
Shrimp
Scallops
FISH
FISH
FISH
FISH
FISH
FISH
FISH
Turn over. Separate fillets when
partially thawed, if possible.
Separate and rearrange.
Turn over
.
Break apart. Turn over.
Turn over and rearrange.
Separate and rearrange.
Separate and rearrange.
Place in a microwave safe dish.
water.
Place in a microwave safe dish.
defrosting.
Place in a microwave safe dish.
Cover head and tail with foil; do not
let foil touch sides of microwave.
Finish defrosting by immersing in cold
water.
Place in a microwave safe dish.
Place in a microwave safe dish.
Place in a microwave safe dish.
Place in a microwave safe dish.
FOOD SETTING AT BEEP SPECIAL INSTRUCTIONS
Cover warm
oultry Settings
Carefully separate fillets under cold
Run cold water over to finish
AUTO DEFROST
24

OR7NEWModelEN-4.indd19OR7NEWModelEN-4.indd19 09.4.2811:46:24AM09.4.2811:46:24AM
Defrosting Tips
v
net weight in pounds and tenths of pounds (the weight of
the food minus the container).
v
twist-ties that often come with frozen food bags, and
replace them with strings or elastic bands.
v
oven.
v
suitable container.
v
v
v
solidly the food is frozen.
defrost. Shallow packages will defrost more quickly than
such as chicken wings, leg tips, fish tails, or areas that start
to get warm. Make sure the foil does not touch the sides,
top, or bottom of the oven. The foil can damage the oven
lining.
vFor better results, let food stand after defrosting.
v Turn over food during defrosting or standing time.
Break apart and remove food as required.
Separated pieces defrost more easily.
a deep block.
is still icy in the center, return it to the microwave oven
for more defrosting.
When using Auto Defrost, the weight to be entered is the
Before tarting, make sure to remove any and all metal
Open containers, such as cartons, before placing in the
Always slit or pierce plastic pouches or packaging.
Slit the skin of skinned food, such as sausage.
Bend plastic pouches of food to ensure even defrosting.
Always underestimate defrosting time. If defrosted food
vThe length of defrosting time varies according to how
vThe shape of the package affects how quickly food will
v As food begins to defrost, separate the pieces.
v Use small pieces of aluminum foil to shield parts of food
AUTO DEFROST
If food is foil wrapped, remove foil and place food in a
v
s
25
OR7NEWModelEN-4.indd20OR7NEWModelEN-4.indd20 09.4.2811:46:25AM09.4.2811:46:25AM
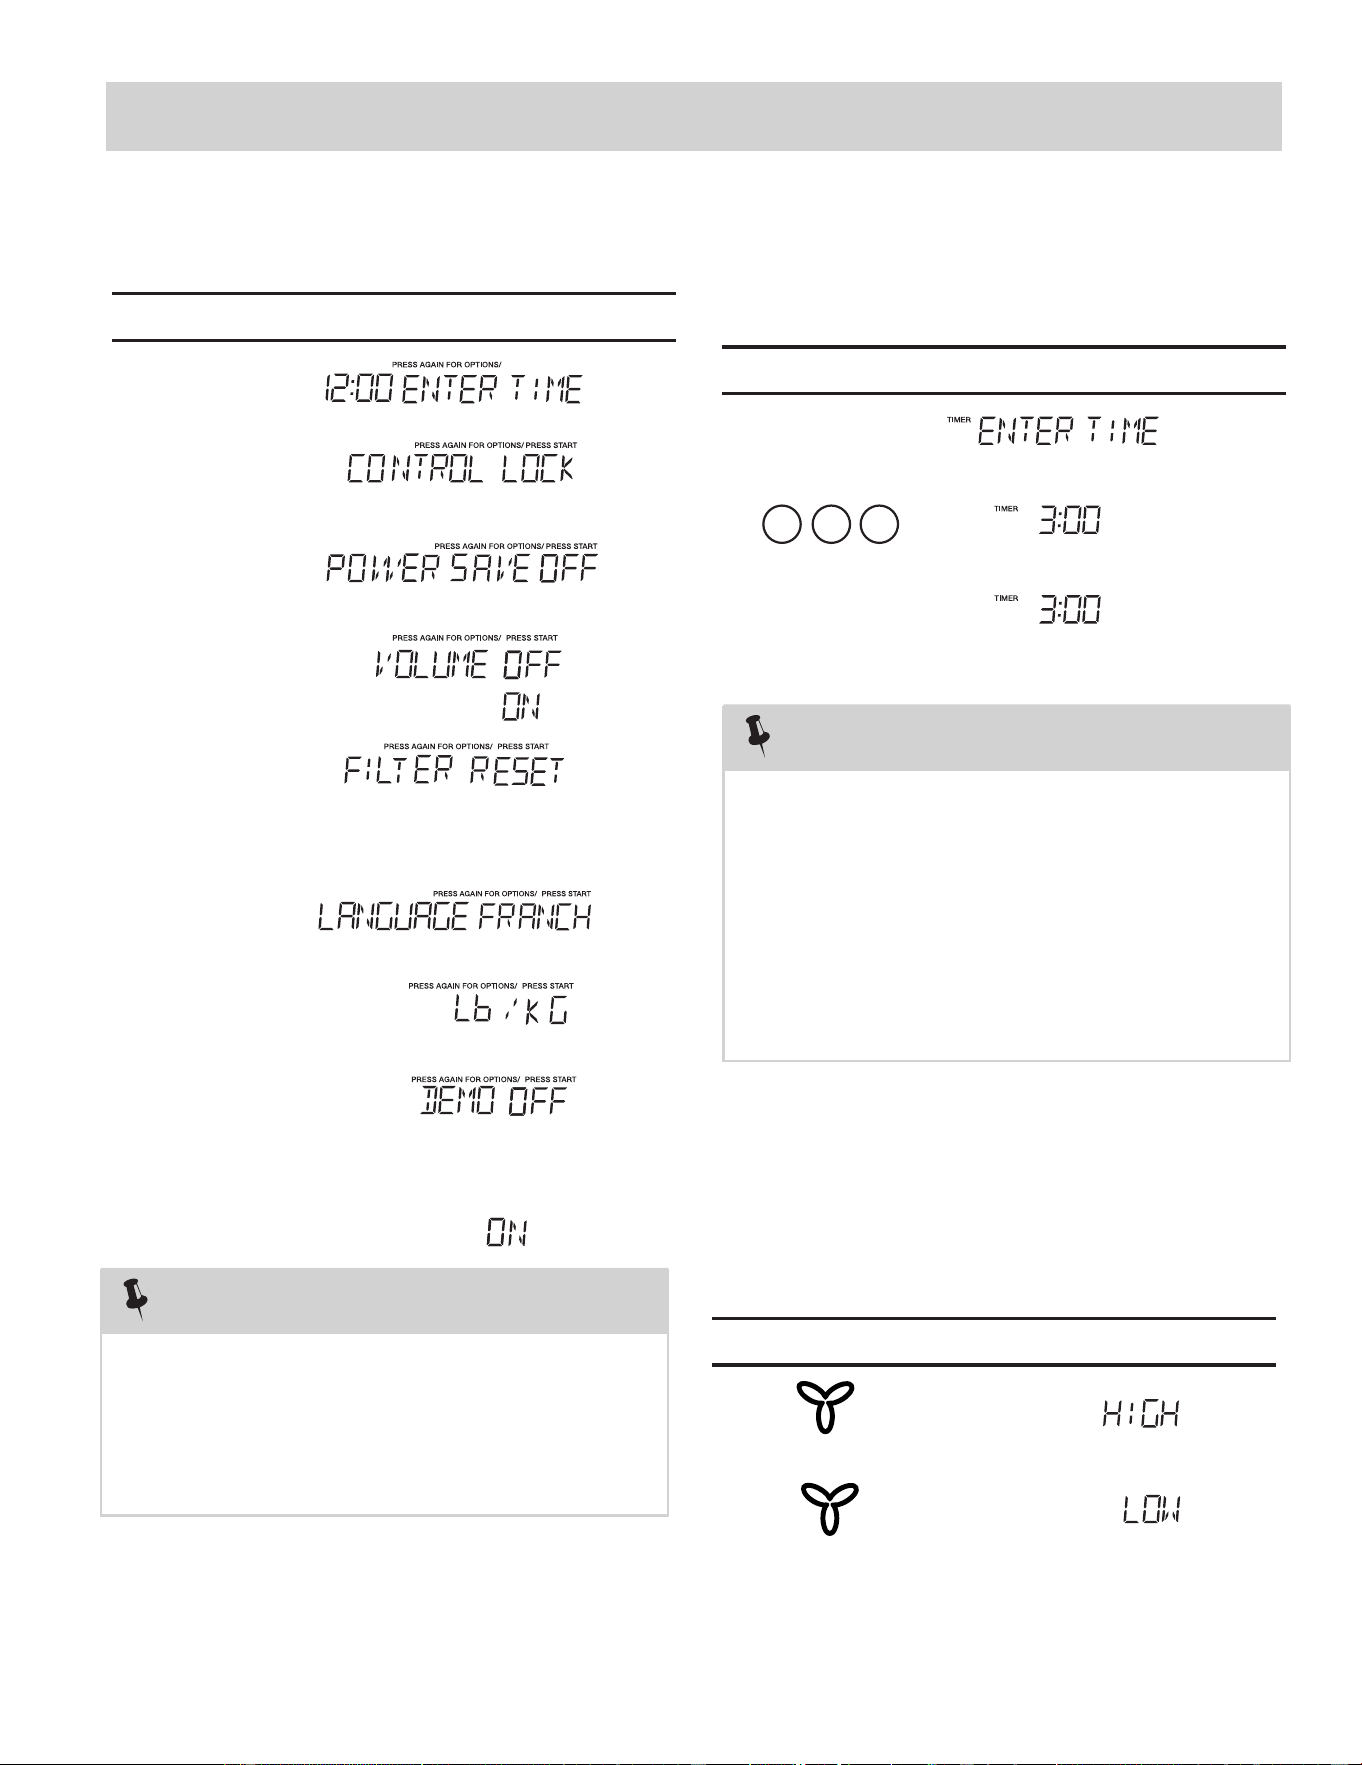
CONVENIENT FEATURES
¬
¬
¬
¬
¬
Option
Key press
The
microwave oven has settings that allow you to
customize the operation for your convenience. Below
setting function.
To re-enable the clock follow clock instructions.
The clock can be microwave is
first plugged in and the key is selected.
k, the
display will show the last time of day set or a
1 0
1.
2.
3.
correct time.
blank display if no time of day has been set.
the 8 is an invalid digit and cannot be entered.
Enter the
5 9
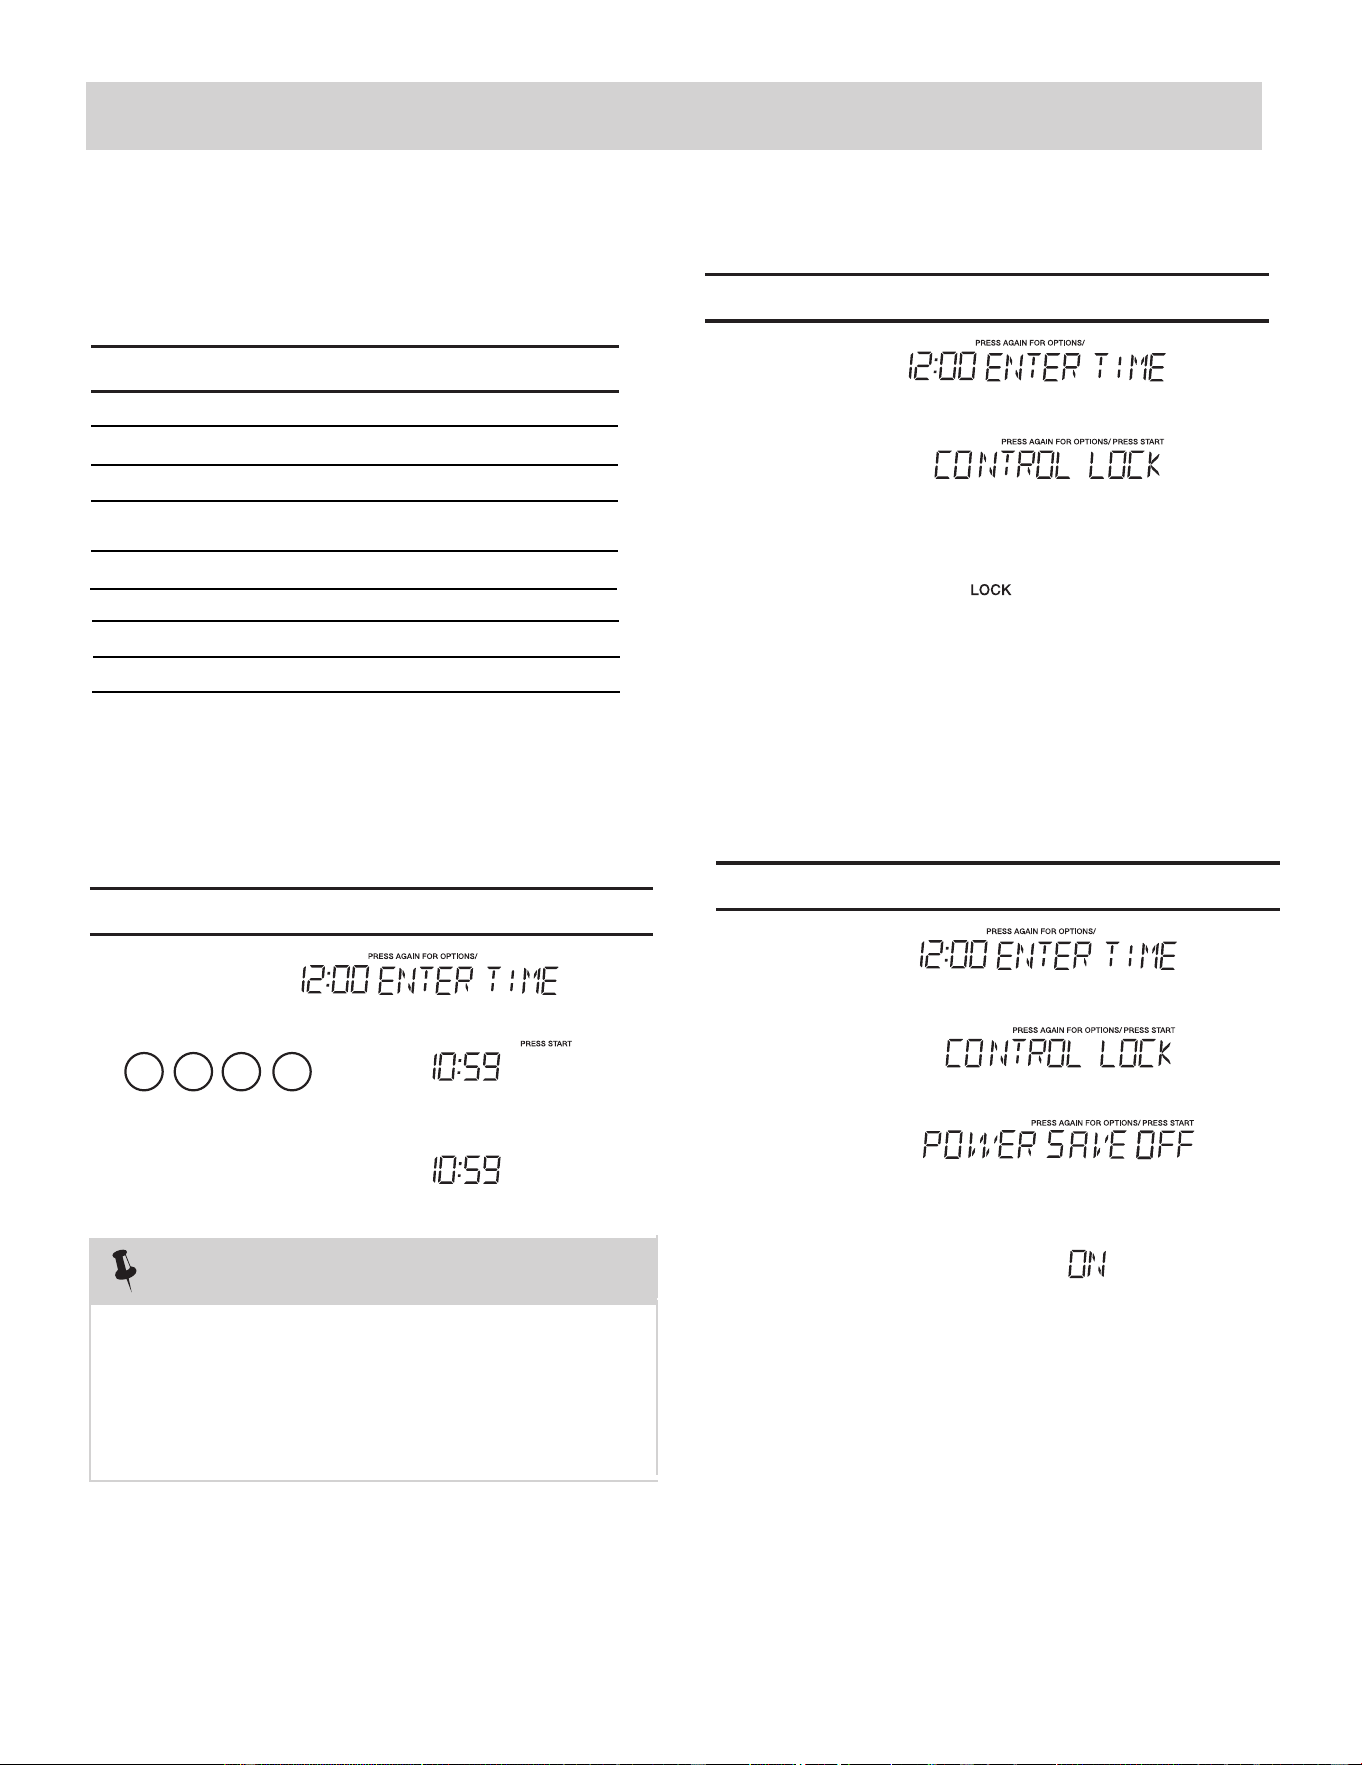
To turn OFF the Control Lock, touch
1.
.
3
Time of day
then touch
if time of day was set
2.
To turn ON Control Lock .
(1). Setting Clock
(2).Setting Control Lock On/Off
NOTE
2. If you touch while setting the cloc
1. If you begin to enter in an incorrect time (e.g. 2:89)
• Suppose you want to set the clock for 10:59.
Touch: Display Shows:
Touch: Display Shows:
key multiple times to scroll to
the desired
is the table showing the various settings. Touch the
x1 Clock
x2 Control Lock
Volume
x3
x4
disabled when the
START
+30 Sec
Power Save
Clock &
Settings
Clock &
Settings
Clock &
Settings
Clock &
Settings
Clock &
Settings
Clock&
Settings
Clock &
Settings
Clock &
Settings
Clock &
Settings
START
+30 Sec
START
+30 Sec
Clock &
Settings
STOP
Clear
STOP
Clear
(3).Setting Power Save On/Off
To turn ON Power Save. Turning ON power save turns
To turn OFF the Power Save, touch
1.
.
2.
Touch: Display Shows:
Clock &
Settings
Clock &
Settings
START
+30 Sec
START
+30 Sec
Clock &
Settings
Clock &
Settings
.
3
4
.
off the time of day clock display.
and choose POWER SAVE, select OFF then touch
Low/Med/High/Off
x6
x
x
Demo
Language
Weight lb/kg
Clock &
Settings
Clock &
Settings
Clock &
Settings
x5
Clock &
Settings
7
8
Pure Air Filter Reset/Off
26
CONVENIENT FEATURES
OR7NEWModelEN-4.indd20OR7NEWModelEN-4.indd20 09.4.2811:46:25AM09.4.2811:46:25AM
1.
Audible signals are available to guide you when
setting and using your oven.
• A programming tone
touch a pad.
• signal the end of a Kitchen Timer
count down.
• signal the end of a cooking cycle.
Three tones
Three tones
will sound each time you
2.
When the cooking cycle is completed END will be
displayed and the audible signal will sound if the
sound is turned on.
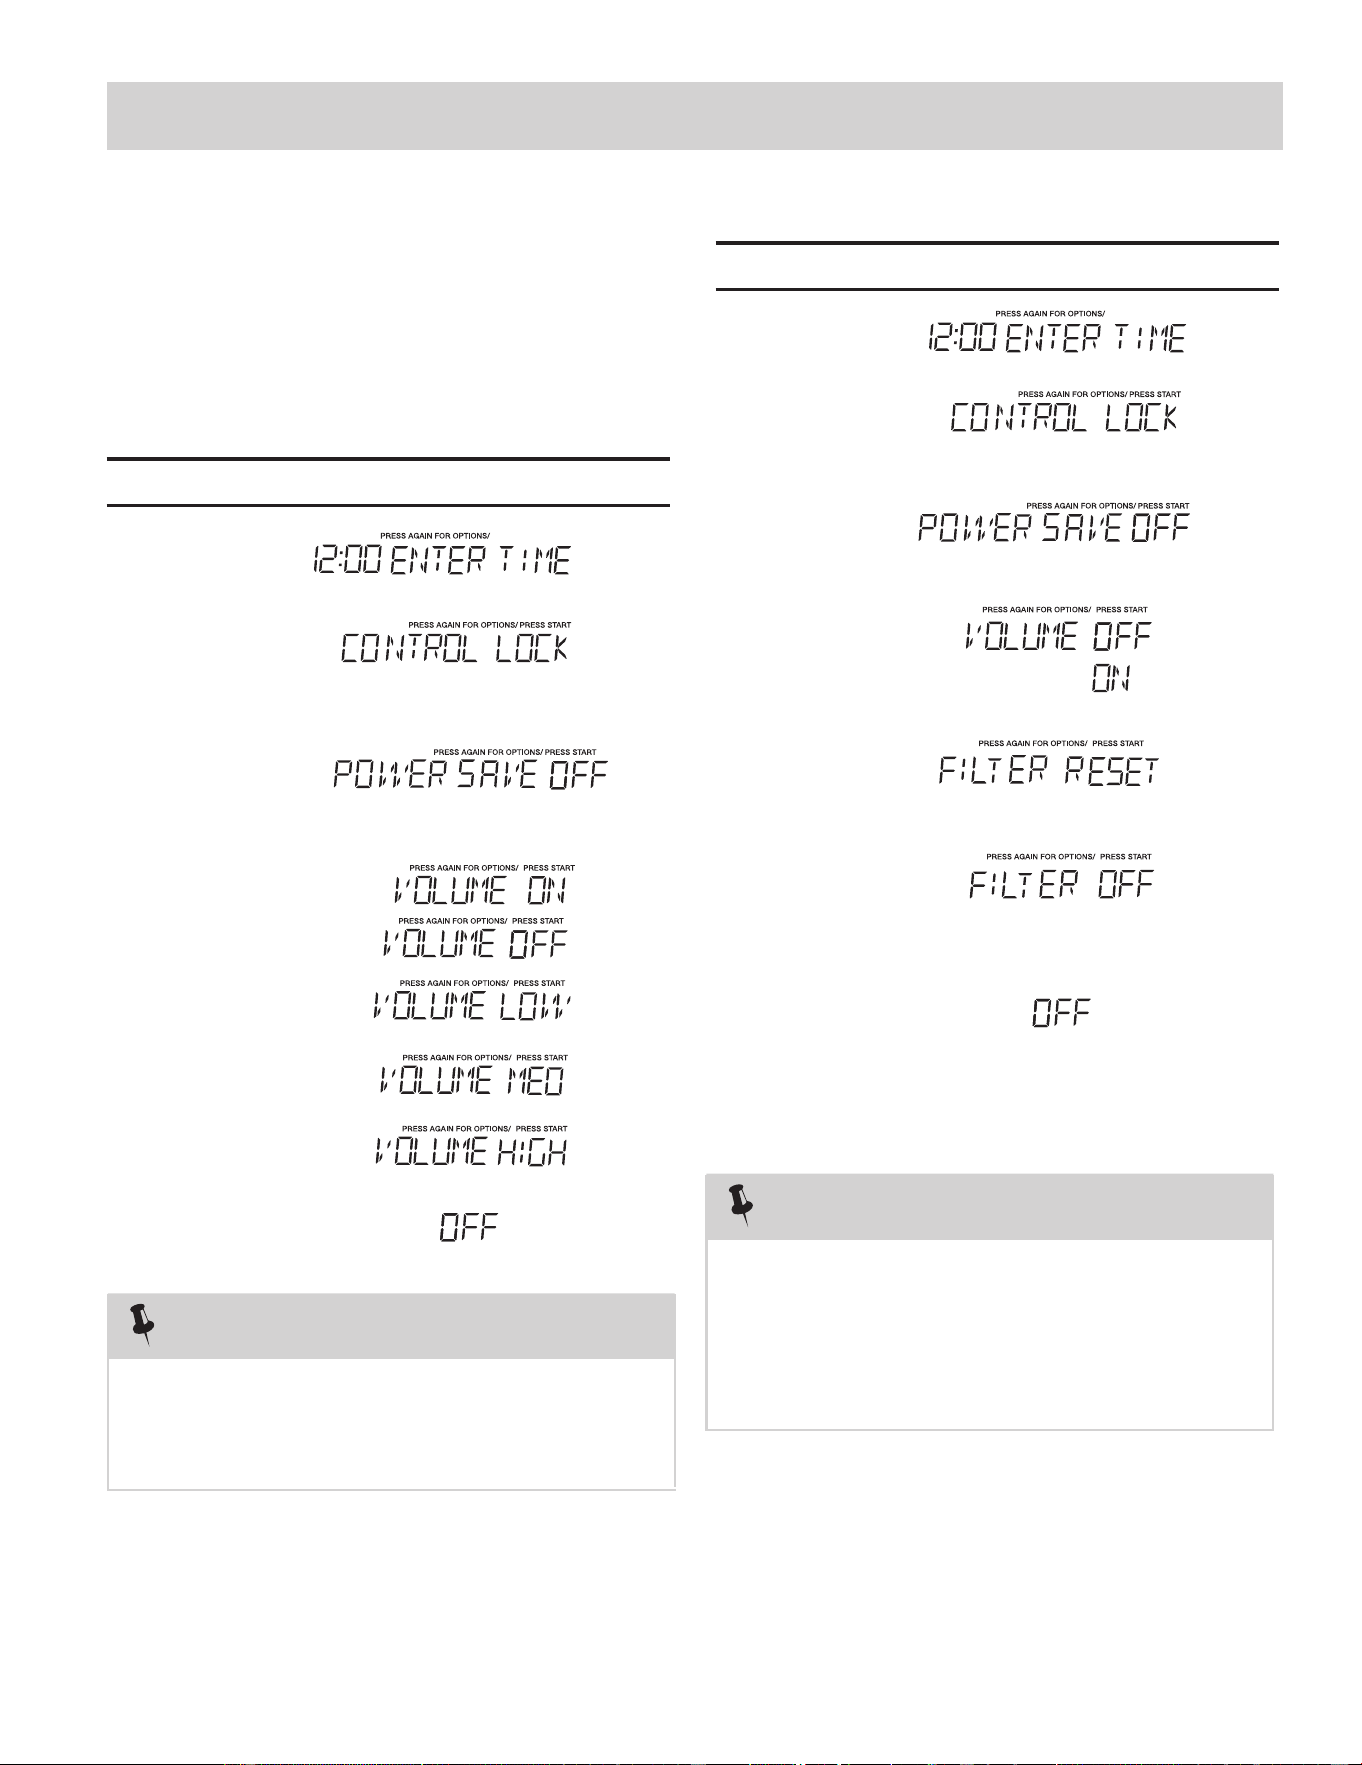
(4).Turning Sound Low/Med/High/Off
NOTE
• Suppose you want to turn audible signal off.
Touch: Display Shows:
3.
4.
5.
Clock &
Settings
Clock &
Settings
Clock &
Settings
Clock &
Settings
START
+30 Sec
1.
2.
Touch: Display Shows:
3.
4.
Clock &
Settings
Clock &
Settings
Clock &
Settings
Clock &
Settings
START
+30 Sec
Clock &
Settings
5.
• Suppose you want to set the filter reset to off.
(5)SETTING FILTER RESET OR FILTER OFF
6.
NOTE
Select FILTER RESET to turn off “FILTER” icon and reset to
remind in 6 months; if you want to turn off “FILTER” icon
notification and not remind at all, select FILTER
OFF and press
START
+30 Sec
.
27
CONVENIENT FEATURES
OR7NEWModelEN-4.indd20OR7NEWModelEN-4.indd20 09.4.2811:46:25AM09.4.2811:46:25AM
1.
2.
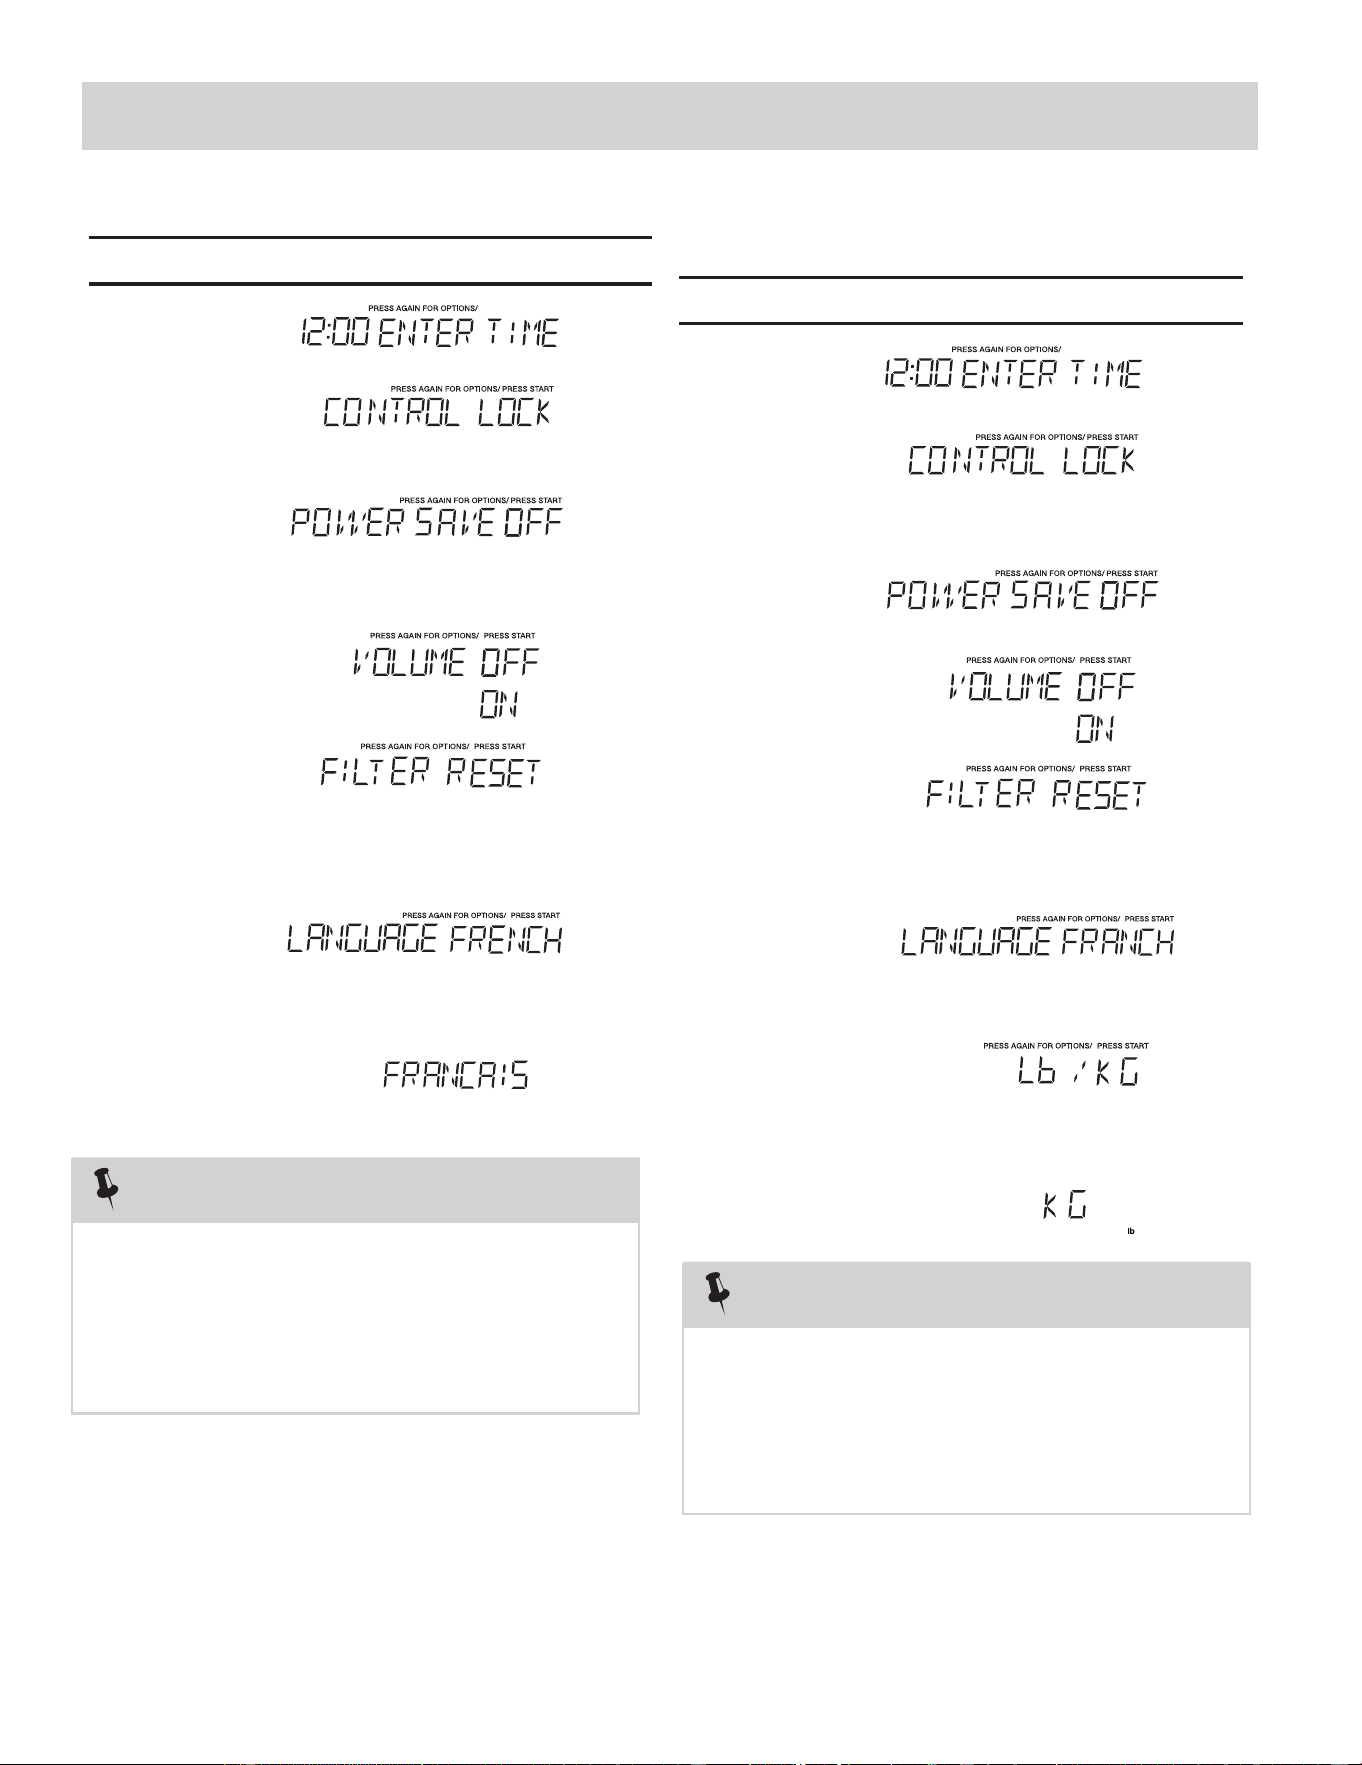
• Suppose you want to set the language.
Touch: Display Shows:
3.
4.
NOTE
When is pressed and the previous setting was
English it will be set to French. If you want switch back
to English you will have to again press five
times and then press
(6)SETTING LANGUAGE ENGLISH/FRANCAIS
Clock &
Settings
Clock &
Settings
Clock &
Settings
Clock &
Settings
Clock &
Settings
START
+30 Sec
START
+30 Sec
START
+30 Sec
.
Clock &
Settings
Clock &
Settings
5.
6.
7.
1.
2.
If the display shows kg, pressing the
button will reset the oven controls to lbs. To return
to kg, you will have to again press six
times and then
(7).S
NOTE
• Suppose you want to toggle weight between
pounds & kilograms.
etting Weight Lb/Kg
J
Touch: Display Shows:
3.
Clock &
Settings
4.
Clock &
Settings
Clock &
Settings
Clock &
Settings
Clock &
Settings
Clock &
Settings
START
+30 Sec
START
+30 Sec
START
+30 Sec
press
.
Clock &
Settings
Clock &
Settings
5.
6.
7.
8.
28
OR7NEWModelEN-4.indd19OR7NEWModelEN-4.indd19 09.4.2811:46:24AM09.4.2811:46:24AM
CONVENIENT FEATURES
1.
2.
When is pressed and the previous setting was
OFF then it will be set to ON. If you want to turn the
demo mode back OFF you will have to again press
(8).Setting Demo Mode On/Of
NOTE
• Suppose you want to enter Demo mode. When Demo
Touch: Display Shows:
seven times and then
4.
3.
Clock &
Settings
Clock &
Settings
START
+30 Sec
Clock &
Settings
Clock &
Settings
Clock &
Settings
Clock &
Settings
Clock &
Settings
START
+30 Sec
START
+30 Sec
press
.
Clock &
Settings
mode is ON programming functions will work in a rapid
countdown mode with no cooking power.
Clock &
Settings
5.
6.
7.
8.
9.
Your microwave oven can be used as a kitchen
timer. You can set up to 99 minutes, 99 seconds.
Timer count down does not stop even if the
door is open. When timer and cooking both are work-
Timer starts
counting down
1.
2.
3.
03 0
The kitchen timer can be used while the microwave
oven is running.
1.
2.
3.U
The pad controls the 2-speed vent fan. If the vent fan
is OFF the first touch of the Vent pad will turn the fan
on HIGH, second touch LOW and third touch OFF.
2. Setting Kitchen Timer
NOTE
• Suppose you want to set for three minutes.
• Suppose you want to set the vent fan speed to
LOW from the OFF position.
sing Vent Fan
Touch: Display Shows:
Touch: Display Shows:
Timer
On-Off
Hi | Low | Off
Hi | Low | Off
remaining timer; to cancel the timer, press '' ''
Timer
On-Off
Timer
On-Off
once to cancel the timer.
Timer
On-Off
once again. When only timer working, press '' ''
Timer
On-Off
ing, press '' '' once, the display would show the
29

OR7NEWModelEN-4.indd20OR7NEWModelEN-4.indd20 09.4.2811:46:25AM09.4.2811:46:25AM
CONVENIENT FEATURES
The pad controls the cooktop light. If the light is OFF
1.
the first touch of the light pad will turn the light ON
()high , second touch Nite ( )low and third touch OFF.
4.U
• Suppose you want to set the light for HIGH from
the OFF position.
sing Cooktop Light
Touch: Display Shows:
If the temperature from the range or
cooktop below the oven gets too hot, the vent
fan will automatically turn on to protect the oven.
It may stay on up to an hour to cool the oven.
When this occurs, the Vent pad will not turn the
NOTE
fan off.
Hi | Low | Off
30

Troubleshooting
Check your problem by using the chart below and try the solutions for each problem. If the
microwave oven still does not work properly, contact the nearest authorized service center.
TROUBLE
Oven will not start
POSSIBLE CAUSE
POSSIBLE REMEDY
a. Electrical cord for oven is
not plugged in.
b. Door is open.
c. Wrong operation is set.
a. Plug into the outlet.
b. Close the door and try
again.
c. Check instructions.
Arcing or sparking
a. Materials to be avoided in
microwave oven were
used.
b. The oven is operated when
empty.
c. Spilled food remains in the
cavity.
a. Use microwave-safe
cookware only.
b. Do not operate with oven
empty.
c. Clean cavity with wet towel.
Unevenly cooked
foods
a. Materials to be avoided in
microwave oven were
used.
b. Food is not defrosted
completely.
c. Cooking time, power level
is not suit ble.
d. Food is not turned or stirred.
a. Use microwave-safe
cookware only.
b. Completely defrost food.
c. Use correct cooking time,
power level.
d. Turn or stir food.
Overcooked foods
Cooking time, power level is
not suitable.
Use correct cooking time,
power level.
Undercooked foods
a. Materials to be avoided in
microwave oven were used.
b. Food is not defrosted
completely.
c. Oven ventilation ports are
restricted.
d. Cooking time, power level is
not suitable.
a. Use microwave-safe
cookware only.
b. Completely defrost food.
c. Check to see that oven venti-
lation ports are not restricted.
d. Use correct cooking time,
power level.
Improper defrosting
a. Materials to be avoided in
microwave oven were used.
b. Cooking time, power level is
not suitable.
c. Food is not turned or stirred.
a. Use microwave-safe
cookware only.
b. Use correct cooking time,
power level.
c. Turn or stir food.
MAINTENANCE
a
31

BEFORE YOU CALL FOR SERVICE
Refer to the following checklist before you call for service.
If oven does not work:
1. Check that power cord is securely plugged in.
2. Check that door is firmly closed.
3. Check that the cooking time is set.
4. Check for tripped circuit breaker.
If there is sparking in the cavity:
Check the containers, dishes or utensils in the oven and make sure they are not metal or
metal trim.

1870 Bath Avenue, Suite 3 | Brooklyn, NY 11214 | Tel: 718.249.1217 | support@forteappliances.com |
www.forteappliances.com
Microwave Warranty
WARRANTY COVERAGE
FORTE microwave parts will be warrantied for two years from the original purchase date for the original purchaser of the
product.
TERMS
This warranty applies only to the original purchaser of the product installed for normal residential use. This is defined as a single-
family, residential dwelling in a non-commercial setting. Commercial settings include but are not limited to: schools, churches,
hotels, restaurants, vacation rentals such as Airbnb, day care centers, private clubs, fire stations, common areas in multi-family
dwellings, nursing homes, food service locations, and institutional food service locations such as hospitals or correction facilities.
This warranty is non-transferable and will not be extended based on the date of installation. The warranty applies only to
products installed in the continental United States and the District of Columbia. Warranty shall not apply and FORTE is not
responsible for damage resulting from negligence, improper maintenance, misuse, abuse, alteration of or tampering with the
appliance, accident, natural disaster, improper electric supply, unauthorized service or repair, improper installation, or
installation not in accordance with the instructions contained in the manual or the local codes.
WHAT IS NOT COVERED
1. Installation or start-up damages or problems caused by improper installation or use.
2. Damage related to unauthorized service or unauthorized parts.
3. Installation in any commercial or non-residential application.
4. Aesthetic damage, scratches, or natural wear caused by normal use.
5. Second-hand, open box products, or products purchased from an unauthorized retailer