Loading ...
Loading ...
Loading ...
ENGLISH
3
batteries may exhibit unpredictable behavior resulting
in fire, explosion or risk ofinjury.
d ) Do not expose a battery pack or appliance
to fire or excessive temperature. Exposure to
fire or temperature above 266°F (130°C) may
causeexplosion.
e ) Have servicing performed by a qualified repair
person using only identical replacement parts.
This will ensure that the safety of the product
ismaintained.
f ) Only for use with SSC-080015US chargers.
SAVE THESE
INSTRUCTIONS
SYMBOLS
The label on your tool may include the following symbols. The
symbols and their definitions are as follows:
V ..............................volts
A .................................. amperes
Hz ................................hertz
W .................................watts
min .............................minutes
or AC ................ alternating current
or DC .......... direct current
n
o ............................... no load speed
..............................Class I Construction
(grounded)
...............................earthing terminal
.............................safety alert symbol
.............................. Class II Construction
(double insulated)
.../min or rpm. revolutions or reciprocation
per minute
Wh ..............................Watt Hours
ASSEMBLY
WARNING: Do not attempt to modify or
repair theappliance.
Intended use
Your BLACK+DECKER lithium ion cordless vacuum cleaner
has been designed for light, dry vacuum cleaning purposes.
This appliance is intended for household useonly.
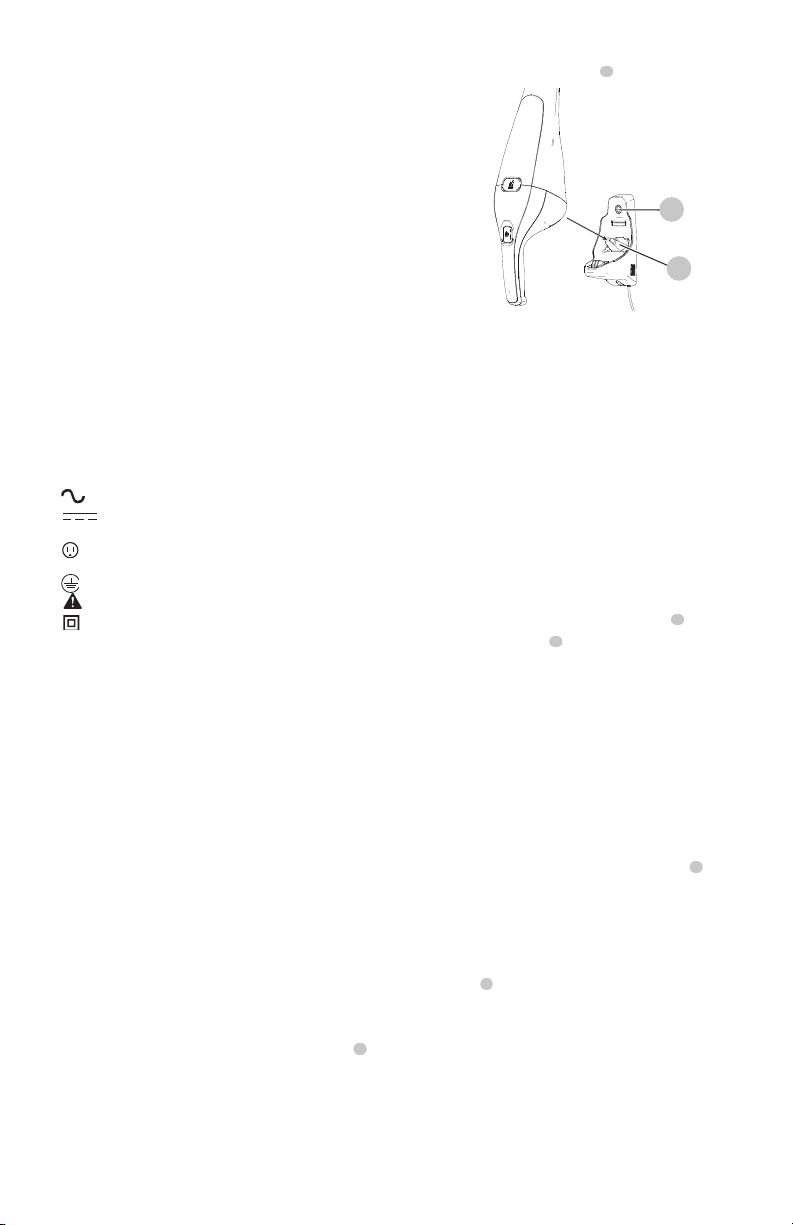
Wall Mounting (Fig. B)
The product can be attached to a wall to provide a
convenient storage and charging point for the appliance.
When mounting to a wall, make sure the mounting method
is suitable for the wall type and is appropriate to the weight
of the appliance.
1. Mark the location of the base charger screw holes
8
on
the wall (within reach of an electrical outlet for charging
the vacuum while it is on the wall bracket).
2. Fix the base charger to the wall using appropriate
screws and plugs for the type of wall, and weight of the
appliance.
3. Hang the appliance by placing the opening of the
vacuum base over the hook
9
on the base charger.
Fig. B
9
8
Charging the battery
WARNING: For use only with the supplied
charger.
WARNING: Before charging, be sure to
empty all contents and dry thoroughly if needed to
avoid damage to your appliance.
1. Before first use, the battery must be charged for at least
10 hours.
2. Place the appliance on the charging bracket whenever
it is not in use.
3. Make sure the appliance is switched off.
4. Place the appliance on the base charger
6
.
5. Plug in the charger
5
.
6. Leave the appliance to charge for at least 9 hours.
NOTE: While charging, the charger may become warm. This
is normal and does not indicate a problem. The appliance
can be left connected to the charger indefinitely.
WARNING: Do not charge the battery
at ambient temperatures below 39°F (4°C) or above
104 °F (40°C).
Charging Indicator LED
1. While charging, the red LED on the charger
5
will
illuminate.
2. When charging is completed, the red LED will turn off.
Switching On (Fig. C)
1. To switch the appliance ON, press and hold the On/Off
button
1
.
2. Once the button is released the vacuum will turn Off.
Loading ...
Loading ...
Loading ...