User Guide Brushless Cordless Snow Blower
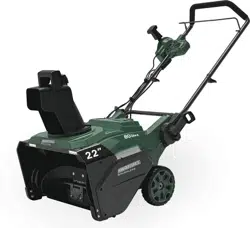
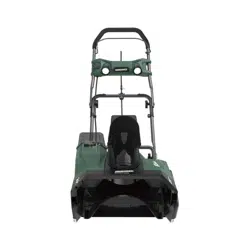
OPERATOR’S MANUAL 80V BRUSHLESS SNOW THROWER
OPERATION
WARNING: Wear eye protection during operation.
COLD WEATHER OPERATIO: The safe battery operation temperature rang-es from 1°F(-17°C) to 113°F (45°C).
WARNING: Do not store or charge battery outside.
Battery must be charged and stored indoors prior to use of the machine.
If the machine does not start :
- remove the battery pack from the machine
- charge the battery pack for 15 minutes in warm area, or until the charging light turns green.
- Install the battery pack back in the unit.
START THE MACHINE
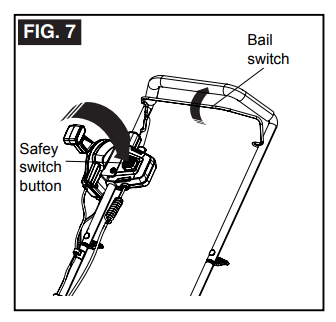
1. While holding the safety switch button. pull the bail lever (2) to start the machine.
NOTE: Lower the scraper to the ground to remove the snow.
WARNING: Keep bystanders a safe distance from the machine.
WARNING: Examine the work area. Remove all stones, sticks, wire, bones, and other debris that can ricochet because of the rotating impeller.
STOP THE MACHINE
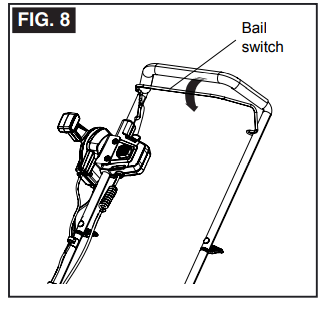
1. Release the bail switch to stop the ma-chine.
WARNING: Wait until the impeller fully stops before you start the machine again. Do not quickly turn the machine off and on.
WARNING: Remove the safety key and battery pack after you complete the work.
ADJUST THE DISCHARGE CHUTE
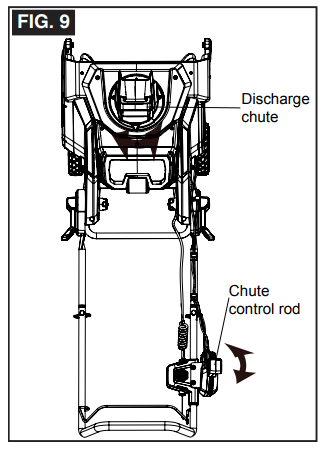
You can adjust the discharge chute 180° to change the snow direction.
- Turn the grip handle forward to move the discharge chute to the left.
- Turn the grip handle rearward to move the discharge chute to the right.
ADJUST THE CHUTE DEFLECTOR

You can adjust the chute deflector up and down to change the throwing distance of the snow.
WARNING: Release the bail switch before you adjust the chute deflector.
WARNING: Do not push the trigger so far forward that a gap shows between the deflector and the chute.
- Push and hold the trigger on the chute de-flector.
- Move the chute deflector up to increase the snow distance.
- Move the chute deflector down to decrease the snow distance.
HEADLIGHTS
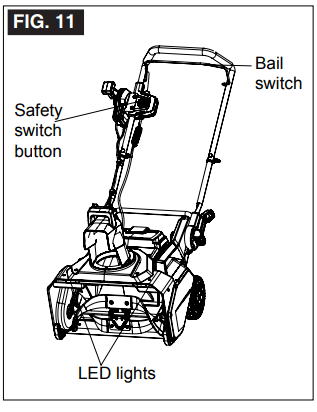
Turning the headlights on :
- Push and hold the safety switch button.
- Pull the bail lever in the direction of the handle bar to turn the headlights on.
Turning the headlights off :
OPERATION TIPS
If it is possible, clear the snow with the direction of the wind.
- In strong winds, lower the chute deflector to direct the snow to the ground.
- When you complete the work, let the machine operate for a while to prevent ice formation in the discharge chute.
- If the snow is deeper than 8", decrease the speed and let the machine work at its own rhythm.
- Do not use the machine to remove compact snow and ice.
MAINTENANCE
WARNING: Remove the safety key and battery pack from the machine before maintenance.
WARNING: Wear correct clothing, gloves and safety glasses before maintenance.
CAUTION: Use only approved replacement parts.
CAUTION: Do not let brake fluids, gasoline, petroleum-based materials touch the plastic parts. Chemicals can cause damage to the plastic, and make the plastic unserviceable.
CAUTION: Do not use strong solvents or detergents on the plastic housing or components.
GENERAL MAINTENANCE
- Before each use, examine the machine for damaged, missing, or loose parts such as screws, nuts, bolts and caps.
- Tighten correctly all the fasteners and caps.
- Clean the remaining snow on the machine with a brush.
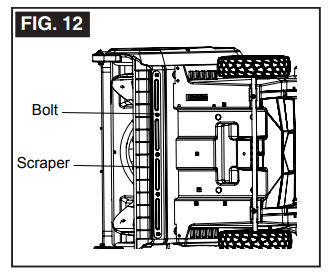
WARNING: Use only approved replacement scrapers.
WARNING: Wear heavy gloves or wind cloth around the impeller when you touch the impeller.
WARNING: The scraper is located at the bottom of the impeller housing. Ensure that the battery is not installed in the tool.
- Turn the machine to its side.
- Remove the 5 bolts below the deck that attach the scraper to the machine.
- Remove the worn scraper from the machine.
- Install the new scraper.
- Install and tighten the bolts that you removed.
REPLACE THE BELT
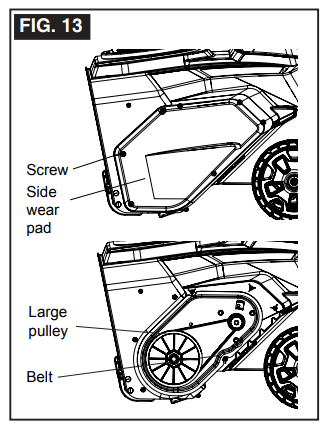
WARNING: Make sure to turn off the bail lever and remove the battery pack(s) before performing any maintenance task on your snow thrower.
- Remove screws on the side wear pad.
- Turn the large pulley counterclockwise while you remove the remaining belt.
- Turn the new belt onto the pulleys.
- Install and tighten the screws that you removed.
REPLACE THE IMPELLER
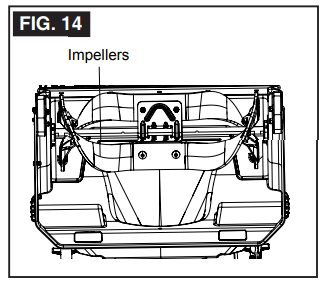
WARNING: Make sure to turn off the bail lever and remove the battery pack(s) before performing any maintenance task on your snow thrower.
- Remove the 4 sets of nuts and bolts on the middle steel plate.
- Remove the 4 sets of nuts and bolts on each side.
- Remove the impellers.
- Install the new impellers.
- Tigthen the 8 sets of nuts and bolts that you removed.
REPLACE THE SKID PLATES
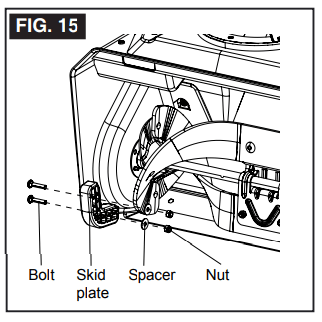
NOTE: The range of adjustable height for skid plates is 1.5mm, when putting the bolts through the U-hole on the skid plates.
- Loosen the 2 sets of bolts , spacers and nuts that attach the skid plates to the snow thrower housing.
- Remove the skid plates.
- Install the new skid plates.
- Do the same operation on the other side.
STORE THE MACHINE
- Clean the machine before storage.
- Make sure the motor is not hot when you store the machine.
- Make sure that the machine does not have loose or damaged parts. If it is necessary, do these steps/instructions:
- Replace the damaged parts. Replacement parts can be purchased on menards. com or by calling 844-678-7423.
- Tighten the bolts if they loosen.
- Speak to a person of an approved service center or call 844-678-7423.
- Store the machine in a dry area.
- Make sure that children cannot come near the machine.
TROUBLESHOOTING
| PROBLEM |
POSSIBLE CAUSE |
SOLUTION |
| The handle is not in position. |
The bolts are not engaged correctly. |
Adjust the height of the handle and make sure that the knobs and bolts are aligned correctly. |
| The machine does not start. |
-The battery is not charged.
-The switch is defective.
-Battery is too cold.
-Battery may require service or replacement.
|
-Charge the battery by following the procedures in the battery and charger manual.
-Have the switch replaced by an authorized service center or call 844-678-7423 for more direction.
-Remove battery from snow thrower. Place battery on charger and allow to charge for 10 minutes or until the changing light turns green. Remove from charger and install in snow thrower for use.
-Call toll free helpline to determine battery issue and to see if a replacement battery is needed.
|
| The engine is on, but the impeller does not turn. |
The belt is damaged. |
Replace the belt |
| A thin layer of snow stays behind. |
The scraper is damaged. |
Replace the scraper. |
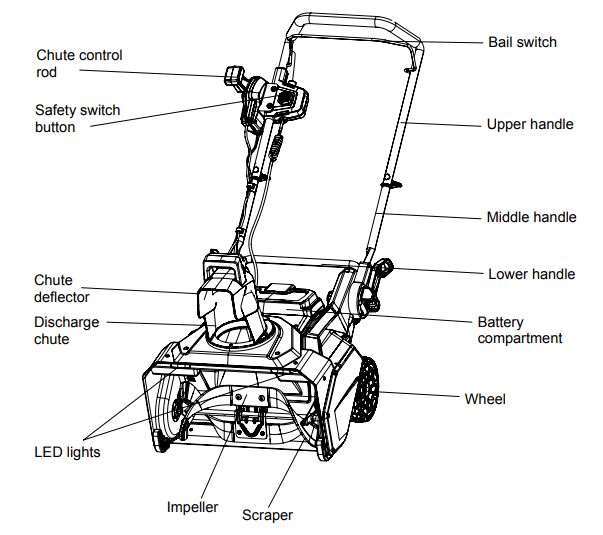
OVERVIEW
SPECIFICATIONS
| Type |
Cordless, battery operated |
| Motor |
80V Brushless |
| No-load Speed |
1800 RPM |
| Clearing Width |
22 in. (55.9 cm) |
| Clearing Depth |
12 in. (30.5 cm) |
| Impeller Size |
18 in. (45.7 cm) |
| Weight (Without Battery) |
56.9 lbs (25.8 kg) |
| Double-insulated construction |
 |