User Manual for Galaxy Book
Getting started
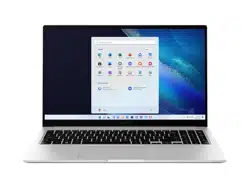
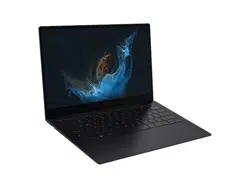
Front view

|
Number/Name
|
Description
|
|
1 Microphone
|
• You can use the built-in microphone.
|
|
2 Camera indicator light
|
• This indicates the camera operating status.
|
|
3 Camera
|
• Using this camera, you can take still pictures and record video.
|
|
4 Display
|
• The screen’s images are displayed here.
|
|
5 Power button/ Fingerprint recognition sensor (optional)
|
• Turns the computer on and off.
• The fingerprint recognition sensor recognizes fingerprints. Scans a fingerprint to sign in to Windows, apps, and services.
|
|
6 Numeric keypad
|
• Enter numbers.
|
|
7 Keyboard
|
• Enter text or control computer functions.
|
|
8 Touchpad
|
• Moves the cursor and selects options.
• Functions as a mouse.
|
Right view
► Type A models

|
Number/Name
|
Description
|
|
1 SIM card/Memory card tray
|
• Insert the SIM or USIM card.
• Insert a memory card into the slot.
|
|
2 Earpiece/Headset jack
|
• Connect an earpiece or a headset to the computer to listen to audio.
|
|
3 USB 3.2 port
|
• Connect various peripheral devices, such as a mouse, camera, or keyboard.
|
|
4 Security slot
|
• Secure the computer by connecting an optional lock and cable to it.
|
► Type B models

| Number/Name |
|
Description |
| 1 Memory card slot |
|
• Insert a memory card into the slot. |
| 2 Earpiece/Headset jack |
|
• Connect an earpiece or a headset to the computer to listen to audio. |
| 3 USB 3.2 port |
|
• Connect various peripheral devices, such as a mouse, camera, or keyboard. |
| 4 Security slot |
|
• Secure the computer by connecting an optional lock and cable to it. |
Left view

|
Number/Name
|
Description
|
|
1 Operating status LED
|
• Shows the operating status of the computer.
– Red: Charging
– Green: Fully charged
– Blue: Turned on
|
|
2 USB Type-C port
|
• Connect the adapter to charge the computer. You can also use or charge USB Type-C devices. Also, you can connect external display devices.
|
|
3 HDMI port
|
• Used to connect an HDMI cable to an external device.
|
|
4 USB 3.2 port
|
• Connect various peripheral devices, such as a mouse, camera, or keyboard.
|
The charging feature of the USB Type-C port
Charging the computer
Connect an external power supply (sold separately) to the USB Type-C port to use it as the auxiliary power or charge the computer.
Use an external power supply (sold separately) with a rating level higher than 10 W (5 V, 2 A) that supports USB Type-C or USB BC 1.2.
Charging a USB Type-C device
Connect and charge your USB Type-C device by connecting it to the computer.
 • It may take longer to charge the battery when charging a connected device.
• The battery power level may be reduced when charging a connected device while the computer is powered by the battery.
• The charging status of the connected device is not displayed on the computer.
• This charging feature may not be available on some devices.
• To charge another device when the computer is in hibernation mode or is turned off, connect to the USB Type-C port.
Bottom view

|
Number/Name
|
Description
|
|
1 Fan vents
|
• Sucks in outside air and discharges heat generated inside the computer through these holes.
• If the vents are blocked the computer may overheat. Avoid blocking the vents as this may be dangerous.
|
|
2 Internal battery
|
• Provides power to the computer when not connected to an adapter.
• To remove or replace the internal battery, take it to a Samsung Service Center. You will be charged for this service.
|
|
3 Speaker
|
• Sound is emitted from the speakers.
|
If the case on the bottom of the device is replaced, the laser-carved model name, serial number, and various logos will not be displayed anymore. For more information, contact a Samsung Service Center.
Turning the computer on and off
 Fully charge the battery using the adapter before using the computer for the first time.
Turning the computer on
1. Before turning on the computer, check that the battery is charged and charge it if necessary.
2. Open the display panel.

3. The computer turns on automatically when the display panel is opened.
If the computer does not turn on automatically, press the Power button.

Set the device to not turn on the computer automatically when the display panel is opened.
1. Select the Start button → Samsung Settings.
2. Select System → Auto booting → Off.
About Windows Activation
When you turn the computer on for the first time, the Windows activation screen appears.
Follow the activation procedures according to the instructions on the screen to use the computer.
The computer’s date and time may be incorrect when you turn it on for the first time. They may also be incorrect if the battery has been fully discharged or removed. To set the date and time, go to the desktop taskbar and right-click the date and clock area. Then, select Adjust date/time and set the current date and time.
Turning the computer off
1. Select the Start button .
2. Select  → Shut down.

Save all data before turning off the computer.
Unlocking the screen
To unlock the lock screen, do one of the following:
• Mouse: Click the lock screen.
• Keyboard: Press any key.
• Touchpad: Tap the touchpad.
If the account has a password, enter the password to log in after unlocking the screen.
Windows
Microsoft Windows is an operating system that is used to control a computer.
• Images and available features may differ depending on the model and operating system.
• This manual is designed for Windows 10 and content may differ depending on the OS version.
• The image displayed on the desktop screen may differ between models and OS versions.
Configuring the Windows Settings
You can configure the basic system settings, such as installing or uninstalling apps and managing accounts, on the Windows Settings screen.
Select the Start button 
Then, select an option you want to change after the Windows Settings screen appears.
You can also configure the settings from the Control Panel like previous OS versions. Select the Start button→ Windows System → Control Panel.
Action Center
The Windows 10 action center allows you to receive system notifications, such as updates, and push notifications, such as emails and SNS updates. You can also adjust settings conveniently. For example, you can select wireless network options or adjust the volume and screen brightness via quick actions in the action center.
Checking notifications
1. Select on the taskbar.
2. When the action center panel appears, select a message to check it.

• You can enable or disable push notifications for applications. You can also set personalized quick actions to appear in the action center by selecting the Start button → System → Notifications & actions.
• Select Expand or Collapse to expand or minimize the action center menu and select the feature you want to use.
Basics
Keyboard
Enter text or access computer functions with the keyboard.

• Images and available features may differ depending on the model and operating system.
• The keyboard layout may differ depending on the country. The hot keys will be mainly explained in this manual.
Using hot keys
To use keyboard hot keys, do one of the following:
• Press and hold the Fn key and press a hot key.

• Press and hold the Fn key and press the F12 key. When the Fn Lock feature turns on, press a hot key.

When the Fn Lock feature is on, hot keys are activated without pressing the Fn key.
Hot key functions


If the hot keys do not work properly, install the Samsung Settings application.
Touchpad
Use the touchpad to move the cursor or select an item. The left and right buttons of the touchpad act the same as the left and right buttons of a mouse.
• Use the touchpad only with fingers. The touchpad will not recognize actions of other objects.
• Images and the touchpad layout may differ depending on the model.
Basic touchpad functions
Moving
To move the cursor, move a finger on the touchpad.

Clicking
Tap the touchpad or press the left touchpad button.

Double-clicking
Double-tap the touchpad or press the left touchpad button twice.

Right-clicking
This function enables right-clicking.
To right-click an item, press the right touchpad button.

Dragging
To move an icon or an app tile to a desired location, press and hold it and then drag it to the target position with the left touchpad button pressed.

Gesture functions
Swiping
To scroll up, down, left or right to a desired location, swipe with two fingers on the touchpad.

Pinching
To zoom in, spread two fingers apart while viewing a website, map, or image. Pinch to zoom out.

Configuring touchpad gestures
Configure touchpad gestures to use the touchpad more efficiently.
Select the Start button → Devices → Touchpad → desired options.
Some options in the touchpad settings may not be available depending on the model.
Touchpad lock
Press and hold the Fn key and press the F5 key to lock the touchpad.

SIM or USIM card (nano-SIM card) tray (LTE models only)
Insert the SIM or USIM card.
• Use only a nano-SIM card (sold separately).
• Use caution not to lose or let others use the SIM or USIM card. Samsung is not responsible for any damages or inconveniences caused by lost or stolen cards.
• It is only for data network. The calling feature is not supported.
• Some services that require a network connection may not be available depending on the service provider.
Installing the SIM or USIM card
1. Insert the ejection pin into the hole on the tray to loosen the tray.
Ensure that the ejection pin is perpendicular to the hole. Otherwise, the device may be damaged.
2. Pull out the tray gently from the tray slot.
Be careful to not hurt your fingertip while pulling out the tray.
3. Place the SIM or USIM card on the tray with the gold-coloured contacts facing downwards.
4. Gently press the SIM or USIM card into the tray to secure it and insert the tray back into the tray slot.

Cellular data (LTE models only)
You can insert the SIM or USIM card so you can access the Internet using your cellular data connection.
You may incur additional charges when using a mobile network.
Turning the cellular data on
On the taskbar, select → Cellular. Cellular data will be connected.

Turning the cellular data off
To save battery power, turn off the cellular data when not in use.
1.On the taskbar, select .
.
2. Select Cellular. Cellular data will be disconnected.

Fingerprint recognition (optional)
You can sign in to Windows, apps, and services by teaching Windows to recognize your fingerprint.
Registering your fingerprint
Create a password and PIN first to use the fingerprint scan feature.
1. Select the Start button → Accounts → Sign-in options.

2. Select Password → Add to create a password.
3. Select Windows Hello PIN → Add to create a PIN number.
4. Select Windows Hello Fingerprint → Set up to start the fingerprint registration.
5. Select Get started on the Windows Hello setup window.
6. Enter your PIN in the Making sure it’s you window.
7. Repeatedly lift and rest your finger on the fingerprint recognition sensor until setup is complete.

The fingerprint recognition sensor’s location may vary depending on the model.
8. Fingerprint registration is complete. If you want to add another fingerprint, select Add another.
Removing a fingerprint
1. Select the Start button → Accounts → Sign-in options.
2. Select Windows Hello Fingerprint → Remove. The fingerprint will be removed.
Unlocking the screen with a fingerprint
You can unlock the screen by resting your fingerprint on the fingerprint recognition sensor.
Place a registered finger on the fingerprint recognition sensor.
The screen will be unlocked if the fingerprint is scanned correctly.
For better fingerprint recognition
• Prevent the fingerprint recognition sensor from being scratched or damaged by metal objects, such as coins, keys, and necklaces.
• Ensure that the fingerprint recognition sensor and your fingers are clean and dry.
• The fingerprint recognition sensor may not recognize fingerprints that are affected by wrinkles or scars.
• The fingerprint recognition sensor may not recognize fingerprints from small or thin fingers.
• If you bend your finger or use your fingertips, the fingerprint recognition sensor may not recognize your fingerprints. Make sure to cover the entire fingerprint recognition sensor with your finger.
• To improve recognition performance, register the fingerprints of the hand you use most often to perform tasks.
• In dry environments, static electricity can build up in the computer. Avoid using this feature in dry environments or before using the feature, discharge static electricity by touching a metal object.
Memory card
Use a memory card to transfer data to other devices. You can use data stored on your device, such as digital cameras, smartphones, or tablets, on your computer, or you can take your saved data to another device.
Memory cards are sold separately.
This computer supports the following types of memory cards.
|
Abbreviation
|
Description
|
|
micro SD
|
• micro Secure Digital
|
|
micro SDHC
|
• micro Secure Digital High Capacity
|
|
micro SDXC
|
• micro Secure Digital eXtended Capacity
|
• Some memory cards may not be fully compatible with the computer. Using an incompatible card may damage the computer or the memory card, or corrupt the data stored in it.
• Use caution to insert the memory card in the indicated direction.
• Store the card separately to prevent losing the card when moving the computer.
• Memory card speeds vary.
Inserting a memory card
► Type A models:
1. Insert the ejection pin into the hole on the tray to loosen the tray and pull out the tray gently from the tray slot.
• Ensure that the ejection pin is perpendicular to the hole. Otherwise, the device may be damaged.
• Be careful to not hurt your fingertip while pulling out the tray.
2. Place a memory card on the memory card tray with the goldcolored contacts facing downward. Gently press the SIM or USIM card into the tray to secure it and insert the tray back into the tray slot.

► Type B models:
1. If a dummy card or a memory card adapter is inserted in the memory card slot, remove it.
2. Insert a memory card into the memory card slot in the indicated direction until it clicks into place.

Removing a memory card
► Type A models: Insert the ejection pin into the hole on the tray to loosen the tray and pull out the tray gently from the tray slot. Remove the memory card and reinsert the memory card tray.
► Type B models: When you push the card, it clicks and disengages from the memory card slot. Grasp the end of the card and pull it out of the slot.
Formatting a memory card
Format the memory card to remove all data or before using it for the first time.
Formatting a memory card deletes all data saved on the card. If necessary, back up important data before formatting the card.
1. On the taskbar, select File Explorer  .
.
2. Right-click the memory card drive, and then select Format.
3. Select Start.
• To use a memory card to exchange data with a digital device, such as a digital camera, formatting the data with the digital device is recommended.
• When trying to use a formatted memory card in another digital device, format the memory card again in the device.
• Data protected by copyright laws cannot be reviewed or modified.
• Inserting and removing a memory card repeatedly may damage the memory card.
• Secure Digital Input Output (SDIO) is not supported.
• If the write-protect tab is in the locked position, you cannot format, write, or delete data on the card.
External display
Connecting the computer to an external display device can be useful for presentations or when watching a movie. The cables required to connect an external display are sold separately. The computer supports HDMI cables and USB Type-C display cables.

Check the available ports on the display device to ensure that it is compatible with the computer.
Connecting to a display
The method for connecting to an external display may differ depending on cable or adapter types.
1. Connect the cable to the corresponding port of the computer.
2. Connect the other end of the cable to the HDMI port of the external display.
<When using an HDMI cable>

<When using a USB Type-C display cable>

3. Connect the power cord to the external display.
4. Turn on the display and change its display mode to one that supports an external input.
5. Press and hold the Fn key and press the F4 key.
6. Select a mode.
 |
PC screen only
Show the screen on the computer monitor only.
|
 |
Duplicate
Show the screen on both the computer and the external display.
|
 |
Extend
Extend the screen to the external display.
|
 |
Second screen only
Show the screen on the external display only.
|
You can also select the display mode in Windows settings.
Select the Start button → System → Display, and then select Detect on the Multiple displays option
Wireless LAN
Connect the computer to a wireless network to use the Internet.
The descriptions below are for computer models with a Wireless LAN card or device. A Wireless LAN device is optional. The pictures in this manual may differ from the actual product depending on the wireless LAN device model.
About Access Point (AP)
An Access Point (AP) is a network device that bridges wired and wireless LANs and corresponds to a wireless hub in a wired network. Multiple devices can be connected to an AP.
Connecting to a Wi-Fi network
1. On the taskbar, select → Network.

2. Select a network from the list of detected wireless networks and select Connect automatically → Connect.

3. Enter a password, if necessary, and select Next.
Once the computer has been connected to a wireless network, it will attempt to connect to it automatically when it is available. If you require a network password, contact the system administrator.
Deactivating the Wi-Fi feature
When you are not using the Wi-Fi feature, turn it off to save battery power.
1. Select on the taskbar.
2. Select Wi-Fi. The Wi-Fi feature is deactivated.

Airplane mode
This disables all wireless functions on your computer. You can use only non-network services.
To activate Airplane mode, on the taskbar, select → Airplane mode.
Bluetooth
Use Bluetooth to listen to music or exchange data or media files with other Bluetooth-enabled devices.
• Samsung is not responsible for the loss, interception, or misuse of data sent or received via Bluetooth.
• Always ensure that you share and receive data with devices that are trusted and properly secured. If there are obstacles between the devices, the operating distance may be reduced.
• Some devices, especially those that are not tested or approved by the Bluetooth SIG, may be incompatible with your device.
• Do not use the Bluetooth feature for illegal purposes (for example, pirating copies of files or illegally tapping communications for commercial purposes). Samsung is not responsible for the repercussion of illegal use of the Bluetooth feature.
Pairing with other Bluetooth devices
1. Select on the taskbar.
2. Check if the Bluetooth feature is on.

Select Expand to expand the action center menu when the Bluetooth menu does not appear.
3. Select the Start button → Devices → Bluetooth & other devices → Add Bluetooth or other device.
4. Select Bluetooth to select a device you want to add and finish pairing.

Unpairing Bluetooth devices
1. Select the Start button → Devices. Your computer will display the paired devices.
2. Select the device to unpair from your computer and select Remove device → Yes. The connection to the Bluetooth device will be disconnected.
Using the security slot
You can secure the computer by connecting a lock and cable to the security slot.
Tie the lock and cable to a fixed object and install the other end of the cable to the security slot.

To use this feature, you must purchase a lock and cable (sold separately). Your product may differ from the one shown above. For more information, refer to your lock’s manual.
Settings & Upgrade
Display brightness
Adjust the display brightness to reduce eye strain and save power.
Controlling brightness using the keyboard
• To dim the display screen, press and hold the Fn key and press the F2 key.

• To brighten the display screen, press and hold the Fn key and press the F3 key.

Controlling brightness using the taskbar
1. On the taskbar, select .
2. Drag the adjustment bar to the desired brightness.

The display screen is automatically set to the brightest level when the adapter is connected. The display screen automatically becomes dimmer when the adapter is disconnected.
Changing display mode
Select the optimal screen settings based on your activity.
Some options may not be available depending on the model.
1. Select the Start button → Samsung Settings.
2. Select Display → Auto mode, and then select an option.
• Auto mode: Optimizes the screen automatically for the currently running program.
• Dynamic: Makes scenes more vivid and clear.
• Standard: Appropriate for normal environments and convenient for most situations.
• Photo editing: Appropriate for viewing photos.
• Reading: Appropriate for reading documents.
Optimizing the full screen color balance
Optimize the screen color by adjusting the color tones to your preference.
1. Select the Start button → Samsung Settings.
2. Select Display → Advanced color settings.
3. Drag the color adjustment bar to the desired color tone.

Volume
Adjust the system volume or sound volume when playing music or video.
Controlling volume using the keyboard
• To turn down the volume, press and hold the Fn key and press the F7 key.

• To turn up the volume, press and hold the Fn key and press the F8 key.

• To mute or unmute the volume, press and hold the Fn key and press the F6 key.

Controlling volume using the taskbar
1. Select on the taskbar.
2. Drag the adjustment bar to the desired volume.

Battery
Fully charge the battery using the adapter before using the computer for the first time.
 • Use only Samsung-approved adapters, batteries, and cables. Unapproved adapters or cables can cause the battery to explode or damage the computer.
• Incorrectly connecting the charger may cause serious damage to the computer.
• This computer is equipped with an internal battery. The battery is not user-serviceable or user-replaceable.
• To safely remove or replace the battery, take the device to a Samsung Service Center. You will be charged for this service.
• You can use the computer while it is charging, but the battery charging time may increase. If the battery temperature rises too much, the charging may stop as a safety measure.
To restore the battery power after cutting it, connect the adapter.
Charging the battery
1. Connect the adapter to the USB Type-C port of the computer.

2. Plug the adapter into an electric socket.
3. When the battery is fully charged, the operating status LED turns green. Disconnect the adapter from the computer.


4. Unplug the adapter from the electric socket.
Do not allow the adapter to make contact with your skin for a long time. A low-temperature burn may result.
Battery status
When the adapter is removed, move the cursor over the battery icon on the taskbar to view the current battery charge.

Viewing the current battery charge when the computer is turned off
Connect or disconnect the adapter from the computer to view the current battery charge when the computer is turned off.

Saving battery power
On the taskbar, select → Battery saver.
Battery saver mode is activated.
Battery saver mode is disabled when the adapter is connected.
Battery usage time
Batteries are replaceable items and over time the battery’s capacity to hold a charge and its power level is reduced. If a battery can only hold its charge for half of the time that it could when new, it is recommended to purchase a new, replacement battery.
Checking battery life instruction messages
When the battery has expired, an instruction message may appear on the screen. To prevent the computer from losing data and to use the computer safely, follow the on-screen instructions.
When battery expiration is imminent
Batteries are consumable parts and the remaining battery life is currently low. Continued use may result in charge or discharge failures. Whether or not batteries can be used is determined based on safety evaluations. Please replace it with a new battery (genuine) to prevent data loss and ensure safe usage.
When the battery has expired
Batteries are consumable parts and the current battery cannot be used as the battery life has expired. Please replace it with a new battery (genuine) to prevent data loss and ensure safe usage. Whether or not batteries can be used is determined based on safety evaluations. To prevent data loss while replacing batteries, please be sure to save your work first.
Instruction messages related to battery life are displayed properly when the Samsung Settings application is installed on your computer. The messages may vary depending on the model and software version.
Troubleshooting
Samsung Recovery
When a problem occurs with the computer, it is easy to restore the computer back to the factory default settings by using the Samsung Recovery application (Recovery/Backup). It is also possible to restore the computer to a previously backed up point. Back up important data regularly before a problem occurs with the computer.
• The Samsung Recovery application may not be provided in models with less than 64 GB of storage. If you cannot access the Samsung Recovery application, refer to Windows recovery function.
• Some functions may differ or may be unavailable depending on the version. Refer to the application’s help information.
• The Samsung Recovery application (Recovery/Backup) is not available when using CD/DVD drives.
• Recovering the computer erases the data or applications saved after a backup point. Therefore, back up important data regularly before a problem occurs with the computer.
• When you launch the application for the first time, read and accept the Terms and Conditions when they display on the screen.
Recovering to factory default
You can restore the computer to its factory default settings. If necessary, back up important data to an external storage device before restoring the system. See Backing up data.
1. When the computer starts Windows:
Select the Start button → Samsung Recovery.
When the computer does not start Windows:
Turn on the computer and press the F4 key several times before the Samsung logo appears.
2. Select PC factory reset → Start factory reset.
Follow the on-screen instructions to complete the recovery to its initial status.

Backing up data
Back up important data to an alternate internal drive or an external storage device regularly to prevent data loss.
Backing up the current system
You can back up the factory default system or current system to an alternate internal drive or an external storage device.
1. Select the Start button → Samsung Recovery → Back up computer.

2. Select a drive to save the backed up data → Start backup.
• When backing up to an external storage device, connect the device to the computer and then select the external drive.
3. Follow the on-screen instructions to complete the backup.
Backing up user data
You can back up data files and folders.
1. Turn on the computer and press the F4 key several times.
2. Select Back up user data.
3. Select the files or folders to back up and choose a storage device to save the data to and then select Start backup.
• The backed up folders or files can be saved only on an external storage device. Connect an external storage device to your computer first and then select the external drive.
4. Follow the on-screen instructions to complete the backup.
Recovering after a backup
Select a backup point saved on an alternate internal drive or an external storage device to recover the computer to that point.
1. When backing up to an external storage device, connect the device to the computer.
2. Select the Start button → Samsung Recovery.
3. Select Backup and restore management.
4. Select Restore of the data you want to recover → Start restore.

5. Follow the on-screen instructions to complete data recovery.
Copying the drive (making a disk image)
To replace the drive, move the data to the new drive by making a disk image. The new drive must be large enough to hold the data from the current drive. Purchase an external hard drive connector separately to connect the new drive to the computer.
When Windows is installed on a non-user replaceable disk, such as an eMMC, you cannot copy the drive.
1. Connect the new drive to the computer with an external hard drive connector.
2. Select the Start button → Samsung Recovery.
3. Select Create factory state disk or Create a disk copy.
4. Select a disk to be copied → Start copy. The data on the disk is copied to the new disk.

Windows recovery function
If the Samsung Recovery application is not supported by the computer, reinstall Windows using the recovery function of Windows.
Reinstalling Windows will erase all data saved on the computer. Back up applications and personal data to an external storage device before reinstalling Windows.
1. Select the Start button → Update & Security → Recovery.
2. Select Reset this PC → Get started.
3. Select Keep my files or Remove everything.
Q&A
When experiencing problems with the computer, try these solutions.
Windows
How can I uninstall an application?
1. Select the Start button → Apps → Apps & features.
2. On the list, select an app to delete, and then select Uninstall.
Samsung Recovery
What is a Recovery Area?
The computer has an additional partition for restoring data or saving backup files (only for models with the Samsung Recovery application). This partition is called a Recovery Area and it includes a recovery image comprised of the operating system and applications.
Why is the capacity representation of the hard disk drive (HDD) in Windows different from the product specifications?
The capacity of the storage device (HDD or SSD) of the manufacturer is calculated assuming that 1 KB = 1,000 Bytes. However, the operating system (Windows) calculates the storage device capacity assuming that 1 KB = 1,024 Bytes, and therefore the capacity representation of the HDD in Windows is smaller than the actual capacity. The capacity representation in Windows may be smaller than the actual capacity because some applications occupy a certain area of the HDD outside of Windows.
For models with the Samsung Recovery application, the HDD capacity representation in Windows may be smaller than the actual capacity because the Samsung Recovery application uses a hidden area of 5–20 GB of the HDD to save the recovery image, and that hidden area is not counted towards the total size available to Windows. The size of the Samsung Recovery application varies by model.
What is a recovery image?
This refers to the operating system, drivers, and software that are converted to a data image. It is required to recover the computer and is embedded in the computer’s HDD. However, this is not provided for storage devices where the capacity is less than 64 GB.
How can I restore a computer that does not have the Samsung Recovery application?
Restore the computer with the recovery function provided by Windows. Refer to the Recover Functionality item in the help for more details.
Miscellaneous
The camera and the microphone are not working. How do I turn them on again?
When recording protect mode is activated, the camera and microphone will not work.
Select the Start button → Samsung Security → Block Recording and tap the switch to turn the features off.
The computer does not turn on automatically when the display panel is opened.
To turn on the computer, the display panel should be opened greater than a certain angle.
The angle may differ depending on the model.
If the computer LED does not turn on automatically, press the Power button.