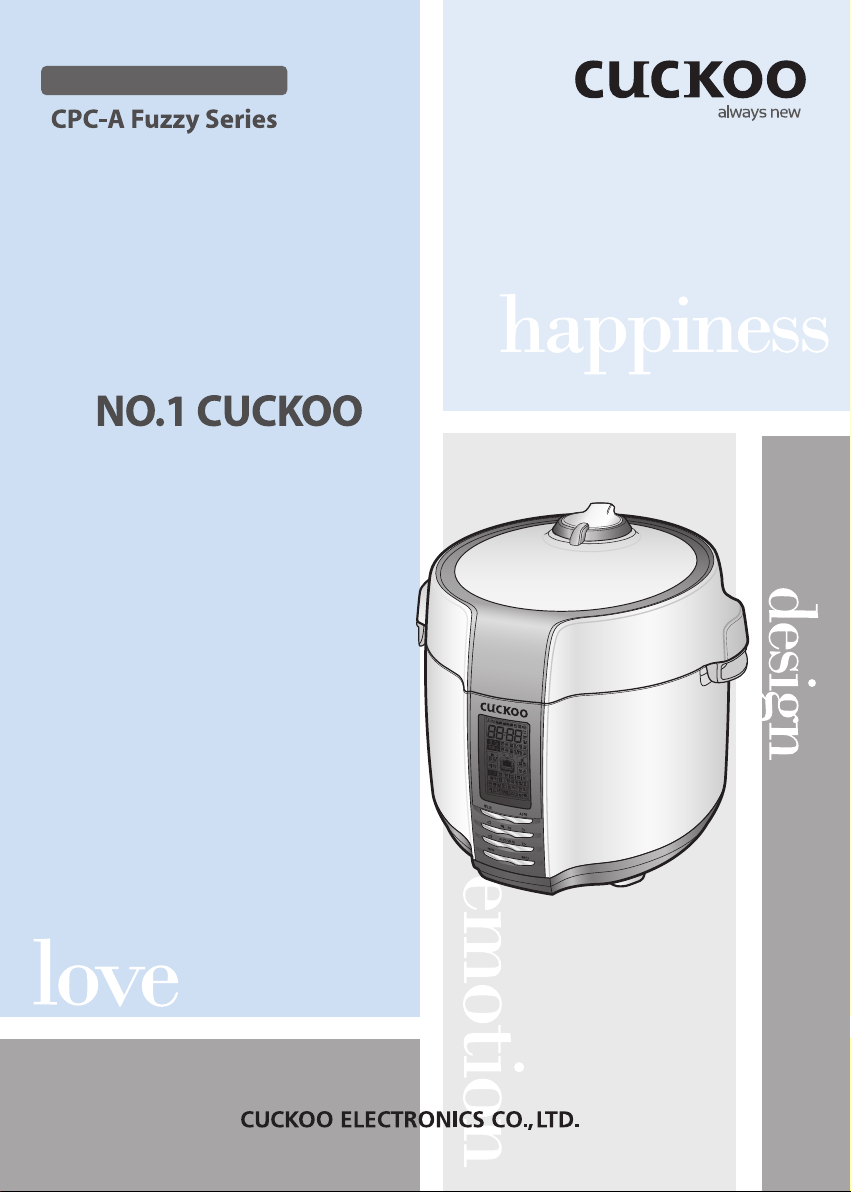
CUCKOO STEAM PRESSURE COOKERCUCKOO STEAM PRESSURE COOKER
User manual
사용설명서

Read the following instruction manual before use.
Save this instruction manual for future reference.
This manual will be useful if you have any question
or have problems operating the cooker.
Thank you very much for puchasing “CUCKOO”
Steam Pressure Cooker.
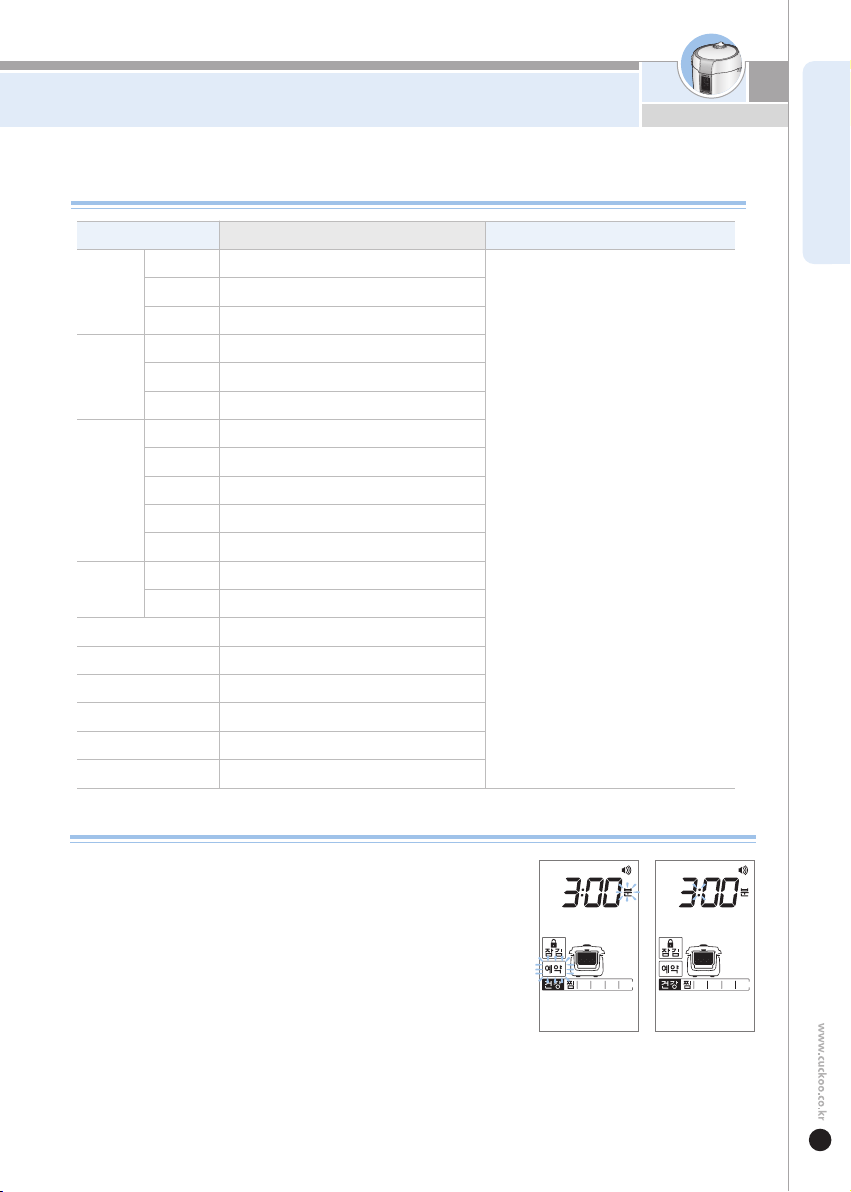
Voice volume setting function
How to set cooking time in the menu
Keep Warm time in the menu
How to set Keep Warm temperature
How to preset timer in the menu
How to age ginseng and decoct red ginseng
How to make red ginseng and black galic
preserved in honey
How to age galic and decoct black galic
How to cook cheonggukjang
How to extract undiluted solution
How to cook rice
Check before asking for service
CONTENTS
CONTENTS
Important safeguards
Specilfications
Safety precautions
Name of each part
How to clean
Function operating part
Error code and possible cause
BEFORE USING
WHEN USING
BEFORE ASKING FOR SERVICE
목 차
Important safeguards
사용하기전에
사용할 때
고장 신고 전에
제품규격
안전상의 경고
각 부분의 이름
제품 손질 방법
기능 조작부의 이름과 역할
기능 표시부의 이상 점검 기능
음성 볼륨 설정기능
메뉴별 조리시간 및 설정방법
메뉴별 보온시간
보온메뉴 사용방법
메뉴별 예약시간 및 설정방법
홍삼 증숙/달임
홍삼/흑마늘 정과
흑마늘 증숙/달임
청국장(콩익힘/청국장 발효)
원액추출
스테인리스 내솥 밥 짓는 방법
고장 신고 전에 확인 하십시오
저희 쿠쿠 압력중탕기를 애용해 주셔서 대단히
감사 드립니다.
이 사용설명서는 잘 보관하여 주십시오.
사
용 중에 모르는 사항이 있을 때나 기능이 제대로
발휘되지 않을 때 많은 도움이 될 것입니다.
3
4
5~8
9
10~12
13
13
14
15~16
17
18
19
20~21
22
23~24`
25
26
27
28~29
3
4
30~33
34
35~37
38
38
39
40~41
42
43
44
45~46
47
48~49`
50
51
52
53~54

1
. Read all instructions before using this appliance.
2. Do not touch hot surfaces. Use handles or knobs.
3. To protect against fire, electric shock and / or injury to persons do not immerse cord, plugs, or
Pressure Multi Cooker Body in water or any other liquid.
4. Close supervision is necessary when this appliance is used by or near children.
This appliance is not intended for use by young children without supervision.
5. Unplug from outlet when not in use and before cleaning.
6. Do not operate any appliance with a damaged cord or plug, after the appliance malfunctions, or has been
damaged in any manner. Return the appliance to the nearest authorized service facility for examination,
repair or adjustment.
7. The use of accessory attachments not recommended by the appliance manufacturer may result in fire,
electric shock, and / or injury to persons.
8. If the supply cord is damaged, it must be replaced by the manufacturer, its service agent or similarly
qualified persons in order to avoid a hazard.
9. Do not use outdoors.
10. Do not let the cord hang over the edge of a table or counter, or touch hot surfaces.
11. Do not place on or near a hot gas, electric burner, or in a heated oven.
12. Always attach the plug to the appliance first, then plug the cord into the wall outlet. To disconnect,
or set all control to “off”, then remove the plug from the wall outlet.
13. Do not use this appliance for other than its intended use.
14. Extreme caution must be used when moving an appliance containing hot oil or any hot liquids.
15. Oversized foods, metal foil packages, or utensils must not be inserted into the appliance as they are a risk
of fire or electric shock.
16. A fire may occur if the appliance is covered or touching flammable material, including curtains,
draperies, walls etc while in operation.
17. To reduce the risk of electric shock, cook any in the provide removable container.
18. This appliance cooks under pressure. Improper use may result in scalding injury.
Before operating the unit, properly secure and close the unit. See “Operating Instructions”.
19. Do not cook foods such as applesauce, cranberries, cereals, macaroni, spaghetti, or other foods.
These foods tend to foam, froth, and sputter, and may block the pressure releasing device.
20. Before use always check the pressure releasing device for clogging.
21. Do not open the pressure cooker until the unit has cooled and internal pressure has been reduced.
See “Operating Instructions”.
22. Do not use this pressure cooker to fry in oil.
23. Be sure that handles are assembled and fastened properly before each use.
Cracked, broken or charred handles should be replaced.
WARNING :
This appliance generates heat and releases steam during use. Use proper precaution to
prevent risk of burns, fires, other injuries, or damage to property.
1. Keep hands and face away from the Pressure Release Valve when releasing pressure.
2. Take extreme caution when opening the Lid after cooking. Severe burns can result from steam inside.
3. Never open the Lid while the unit is in operation.
4. Do not use without the inner Pot in place.
5. Do not cover the Pressure Valve with anything as an explosion may occur.
6. Do not touch the inner pot nor any heating parts, immediately after use.
Allow the unit to cool down completely first.
This appliance is intended to be used in household and similar applications such as :
- staff kitchen areas in shops, offices and other working environments;
- farm houses;
- by clients in hotels, motels and other residential type environments;
- bed and breakfast type environments.
IMPORTANT SAFEGUARDS
ADDITIONAL IMPORTANT SAFEGUARDS
SAVE THESE INSTRUCTIONS
THIS APPLIANCE IS FOR HOUSEHOLD USE ONLY
3

Note:
A. A short power-supply cord(or cord set)is provided to reduce the hazards from entanglement by a longer cord.
B. Extension cord should be used properly.
C. Extension cord usage for the rice cooker:
(1) The correct rated voltage should be used for the rice cooker.
(2) If the appliance is set on the ground, the extension cord should also be set on the ground.
(3) The cord wires and extension cord should always be arranged to prevent hazards to children.
This appliance has a polarized plug : (one blade is wider than the other).
As a safety feature, this plug will fit in a polarized outlet only one way.
If the plug does not properly fit in the outlet, turn the plug over.
If it still does not fit, contact a qualified electrician.
Please, keep this safety feature.
HOW TO USE EXTENSION CORD
CPC-A 2510 Fuzzy Series
AC120V, 60Hz
1185W
2.5L
5L
1.0m
78.4kPa (0.8kgf/cm
2
)
11.7kg
32.7cm
36.5cm
31.2
cm
SPECIFICATIONS /
제품규격
HOW SERVICE IS HANDLED
The East and the Central Districts
Tel. No. 718 888 9144
The West and the Central Districts
Tel. No. +1 323 780 8808
TORONTO
Tel. No. 905 707 8224
VANCOUVER
Tel. No. 604 540 1004
adanaCASU
Model Name
(모델명)
Power Supply
(전원)
Power Consumption
(소비전력)
Power Cord Length
(전원코드길이)
Pressure
(사용압력)
Weight
(중량)
Dimension
(치수)
Wigth
(폭)
Length
(길이)
Height
(높이)
Cooking Capacity
(요리용량)
Germanium Inner Pot
(게르마늄 내솥)
Stainless
Inner Pot
(스테인리스 내솥)
4
•
Do not alter, reassemble,
disassemble or repair.
It can cause fire, electric
shock or injury.
For repair, contact dealer
or the service center.
Do not use the cooker near
hot things such as stove,
gas stove or direct ray
of light.
It can cause an electric shock,
fire, deformation, malfunction, or discoloration.
Use a single socket with
the rated current
above 15A.
Using several lines in one socket
can cause overheating or fire.
Please check the power cord and plug frequently.
Use an extension cord with the rated current
above 15A.
Please check the power cord and plug frequectly.
Do not use damaged
power cord, plug, or loose
socket.
Please check the power cord frequently for damage.
Serious damage can cause electric shock or fire.
If the plug is damaged, contact the dealer or a service
center.
Do not clean the product with water or pour
water in the product.
It can cause an electric shock or fire.
If it contacts water, please separate power cord and
contact dealer and service center.
•
•
•
•
•
•
•
•
•
Do not use a pressure cooker at a place where
dust is trapped or chemical material is located.
Do not use any combustible gas or flammable
materials nearby a product.
It can cause explosion or fire.
Do not cover the automatic
steam outlet or pressure
weight with your hand or face.
It can cause burns.
Especially be careful to keep
it out of children’s reach.
•
•
•
•
Please pay careful attention
against water and chemicals.
It can cause an electric
shock or fire.
•
situation.
This means that the action it describes may result
in death or severe injury.
This means that the action it describes may result
in injury or property damage.
●
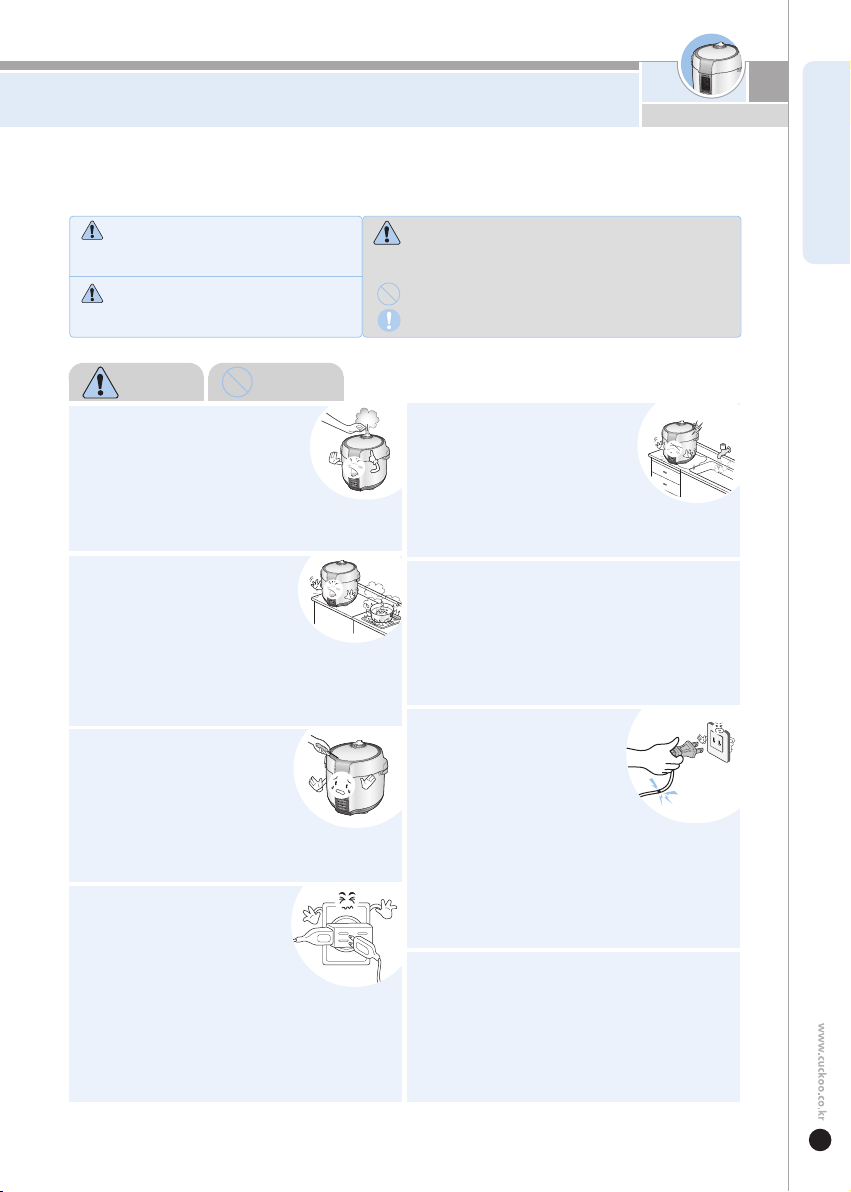
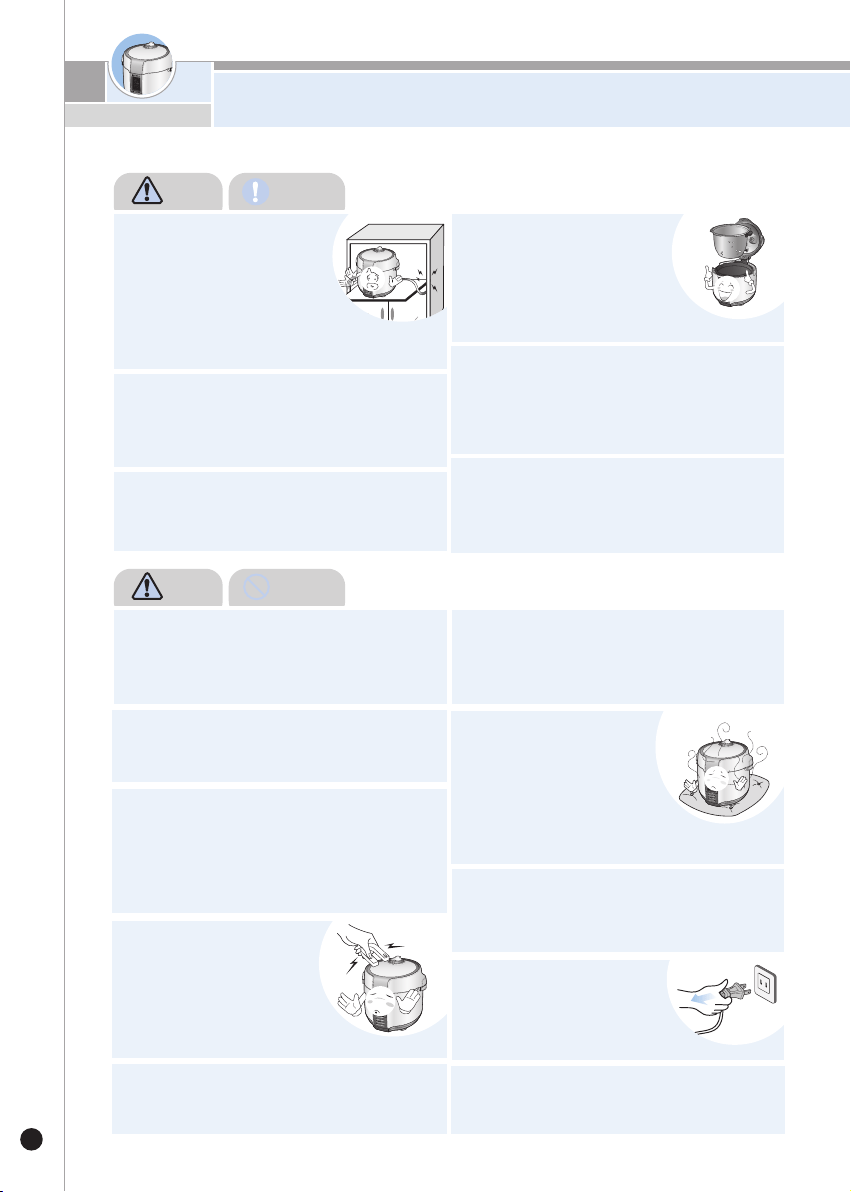
Read the following product safety guide carefully to prevent any accidents and / or serious danger.
●
‘Warning’ and ‘Caution’ are different as follows.
Warning
Caution
Warning
•
This sign is intended to remind and alert that something
may cause problems under the certain situation.
Please read and follow the instruction to avoid any harmful
Indicates a prohibition
Indicates an instruction
•
•
•
Do not
5
SAFETY PRECAUTIONS
ENGLISHENGLISH
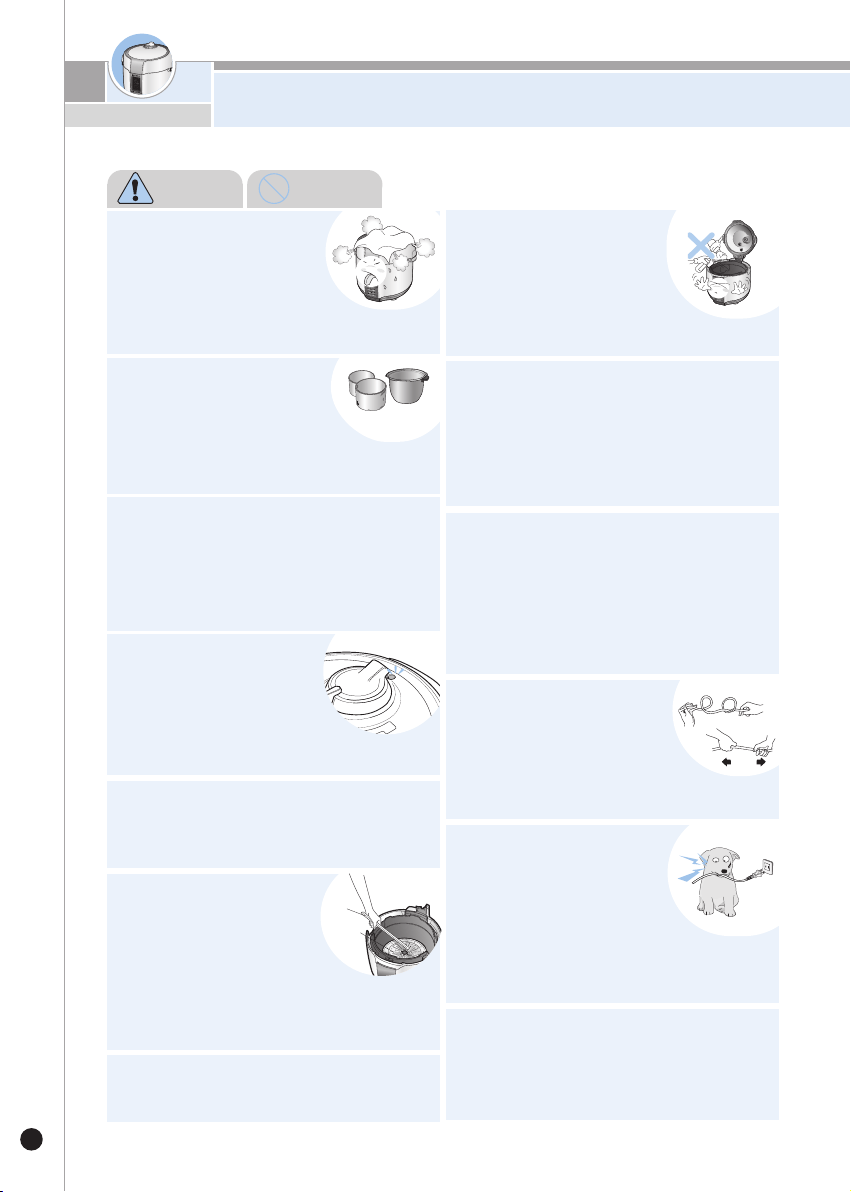
SAFETY PRECAUTIONS
6
<Inner pot>
Metal
objects
Steam
plate
Do not use pots that are not
designed for the cooker.
Do not use abnormal pot and
do not use without Stainless Inner pot.
It can cause an electric shock or fire.
•
Do not cover the automatic
steam outlet or pressure
weight with a duster,
a towel, or apron, etc.
It can cause deformation or a breakdown.
It can cause an explosion by pressure.
•
•
Warning Do not
Do not insert metal objects
such as pins and wires or any
other external substances in
the automatic steam exhaust
outlet or any other slot.
It can cause an electric shock or fire.
Especially be careful to keep it out of the reach of children.
Do not open the lid by
force with the pressure
indicator lifted.
This may cause a breakdown
or an accident.
Keep the cooker out of the reach of children.
It can cause burns, electric shock or injury.
Do not over unplug and plug the power
cord over and over.
It can cause an electric shock or fire.
It can cause electric shock or malfunction.
Do not pour rice or water without Stainless Inner pot.
.
If rice or water gets in then do not turn the product
over or shake it, please contact the dealer or service
center.
Do not use it without Stainless Inner pot.
•
•
•
•
•
•
•
•
Don’t spray or put any
insecticides or chemicals.
It can cause an electric shock or fire.
I
f cockroaches or any insects
get inside the cooker, please call a dealer
or a service center.
It can cause an electric shock or short
circuit resulting in fire. Please check the power
cord and plug frequently.
Do not bend, tie, or pull the
power cord by force.
Do not open the lid while in heating and
cooking.
It can cause burns.
If you need to open the lid while cooking, keep
pressing the cancel button for 2 seconds and confirm
internal steam released completely turning the
pressure controller over.
Be careful that both the plug
and power cord are not to be
shocked by animal bite or
sharp metal materials.
Remove a foreign substance on the cord and
plug with a clean cloth.
It can cause fire. Please check the power cord and plug
frequently.
•
Please check the power cord and plug frequently.
Damages by impact can cause an
electric shock or fire.
•
•
•
•
•
•
•
Do not put any needle cleaning pin etc in
the ventilator or any gap of the cooker.
Do not put a cleaning pin in a gap or a hole of the
product except when dearing a steam outlet.
It can cause an electric shock or fire.
•
•
사
용
설
명
서
7
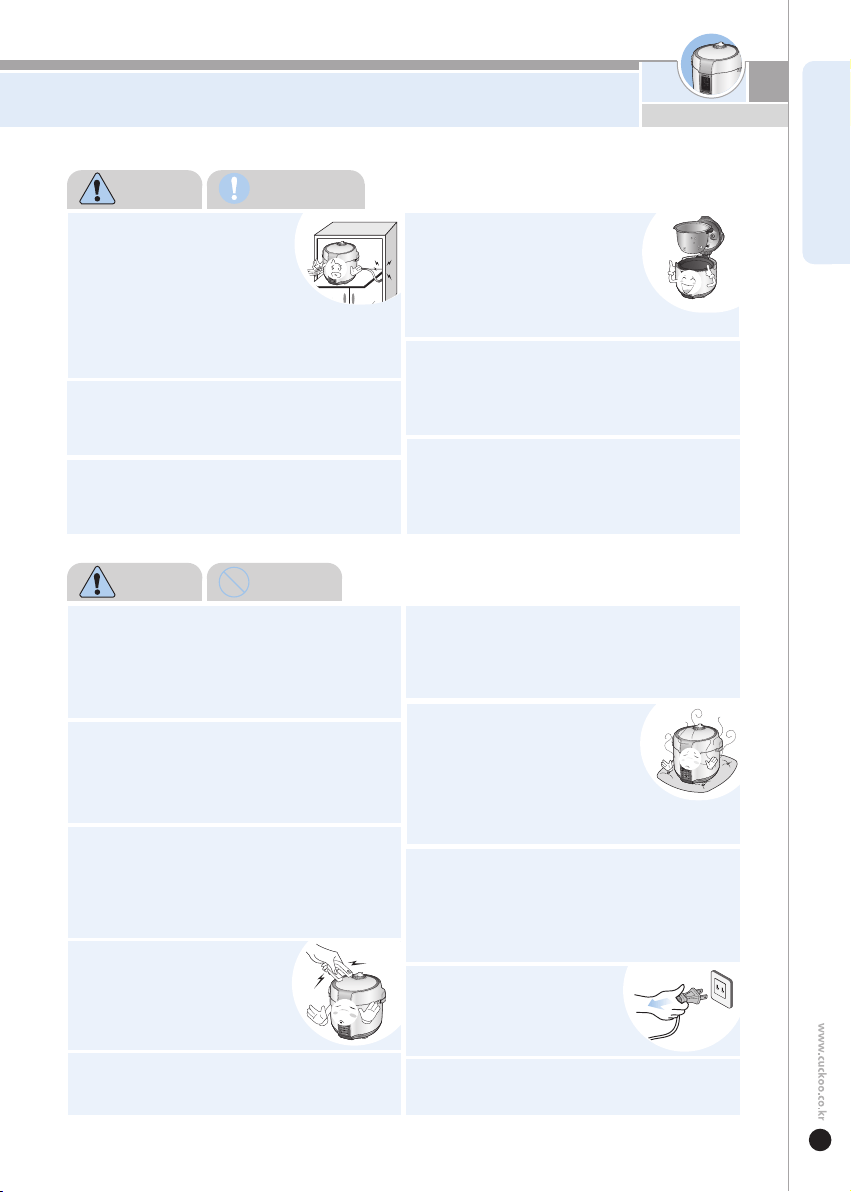
SAFETY PRECAUTIONS
ENGLISH
Do not use it on a rice chest
or a shelf.
Do not press heavy things on the power cord.
Do not place the power cord
between furnitures. It can cause
a
n electric shock resulting in fire.
Please check the power cord and plug frequently.
When using on furniture be cautious of steam release As
it can cause damage, fire and / or electric shock.
It can cause an electric shock or fire.
Please check the power cord and plug frequently.
Do not change, extend or connect the power
cord without the advice of a technical expert.
It can cause an electric shock or fire.
Warning Remember
•
•
•
•
•
First pull out the power cord.
And contact retailer or the service center.
Please contact a retailer or service center
when there is a unexpected smell or smoke.
•
Caution Do not
It can cause burns or breakdown.
It can cause fire, electric shock or injury.
It can cause burns.
Steam pressure cooker is not permitted
for outside use.
Do not touch the metallic surface of the inner
pot and pressure regulator after cooking or
warming.
•
•
•
•
Do not drop or impact the cooker.
It can cause a safety problem.
Don’t use the cooker near a
magnetic field.
Clean any dust or external
substances off the temperature
sensor and Stainless Inner pot.
I
t can cause a system malfunction or fire.
•
Do not plug or pull out the power cord with
wet hands.
It can cause an electric shock.
•
Do not move the product by pulling or using
the power cord.
Electric shock might cause fire.
•
Please surely pull out the plug when not
in use.
It can cause electric shock or fire.
Use AC 120V only.
•
•
Use product on a flat surface.
Do not use on a cushion.
Please avoid using it on an
unstable location prone to
falling down.
It can cause malfunction or a fire. Please check the
power cord and plug frequently.
•
Don’t use for various purpose for inner pot.
And do not heat up the inner pot on the gas
stove.
It can cause deformation of the inner pot.
It can cause to spill the inner coating.
•
•
Please pull out
the plug when not in use.
It can cause electric shock or fire.
•
Please use the cooker for it’s intended purpose.
It can cause malfunction or smell.
•
Tough crubber
Abrasive
Material Brush
Metallic crubber
After you finish cooking, do
not try to open the lid
by force until the steam is
completely exhausted.
The hot steam or any hot content within
the cooker can cause burns.
Cautiously open the lid after cooking is
done to avoid dangerous steam and burns.
•
•
Caution Do not
Do not place on rough top
or tilted top.
It can cause burns or breakdowns.
Be careful to install the power cord
to pass without disruption.
•
•
•
•
•
•
Please call customer
service if the inner pot
coating peels off.
Oven coating may wear away
after long use.
When cleaning the inner pot,
do not use tough scrubber, metallic
scrubber, brush, abrasive metallic etc.
Do not lift the body of the steam pressure
cooker by holding handles on the lid.
The body of steam pressure cooker may drop off
the lid and cause damages.
Please lift the steam pressure cooker by holding grips
on each sides.
Wipe off any excessive water on the cooker
Do not cool down the germanium inner pot and
the germanium ceramic pot suddenly.
after cooking.
It can cause odor and discoloration.
•
Sudden cooling may cause cracking.
Before opening the lid, check first whether the
pressure indicator is down after cooking is
finished. Turn the pressure regulator to
depressurize completely. Then, open the lid.
•
Make sure you wear oven gloves when holding the lid
handle to prevent burns.
Just after cooking, the germanium pots and
the stainless inner pot are very hot.
•
Do not touch the germanium pots and the stainless
inner pot with your bare hands or you will get burnt.
Hold the handles on the stainless inner pot and move it
with all the inner pots assembled.
•
When you use the germanium inner pot and the germanium
ceramic pot, wait until they cool down and handle them
with care to avoid dropping them while moving.
Wipe off water that is left behind from dew.
•
If possible, only use warming function when cooking
white rice. Other foods are easily discolored.
Clean the pressure regulator every time you
finish cooking. If not, the pressure regulator
may cause coloring or unpleasant smells.
While cooking, water may spatter from
the pressure indicator until the pressure inside
the cooker reaches at a certain level.
Cleaning must be done
after each cooking.
When cleaning the lid or oven packing,
please use metallic sponge or dish towel
must be used to avoid scratches or any
damages on surface.
Please refer to pages 10-11 for cleaning the lid of oven packing.
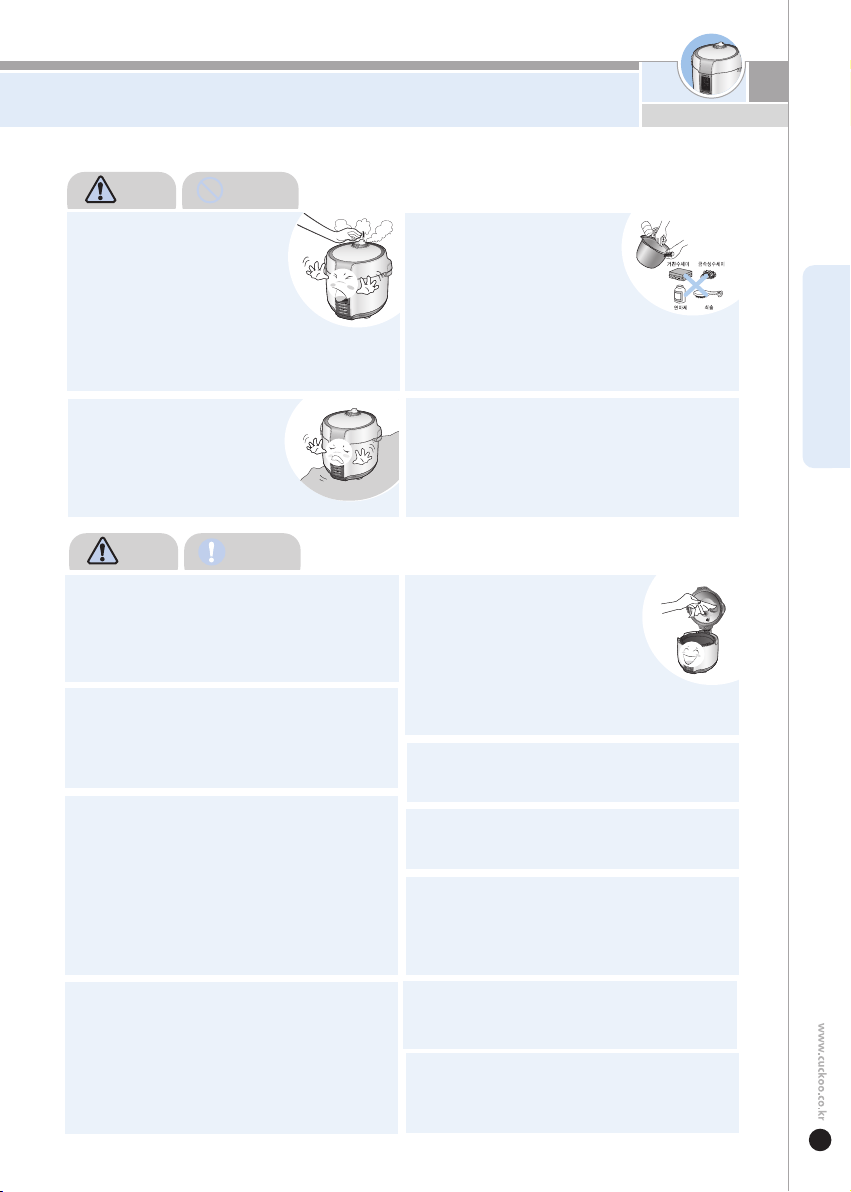
When you pull out the power plug, don’t pull the
power cord. Please, safely pull out the power plug.
If you inflict impact on power cord, it can cause an electric
shock or fire.
Be cautious when steam is being released.
When the steam is released don’t be surprised.
Please keep the cooker out of reach of children.
•
•
•
•
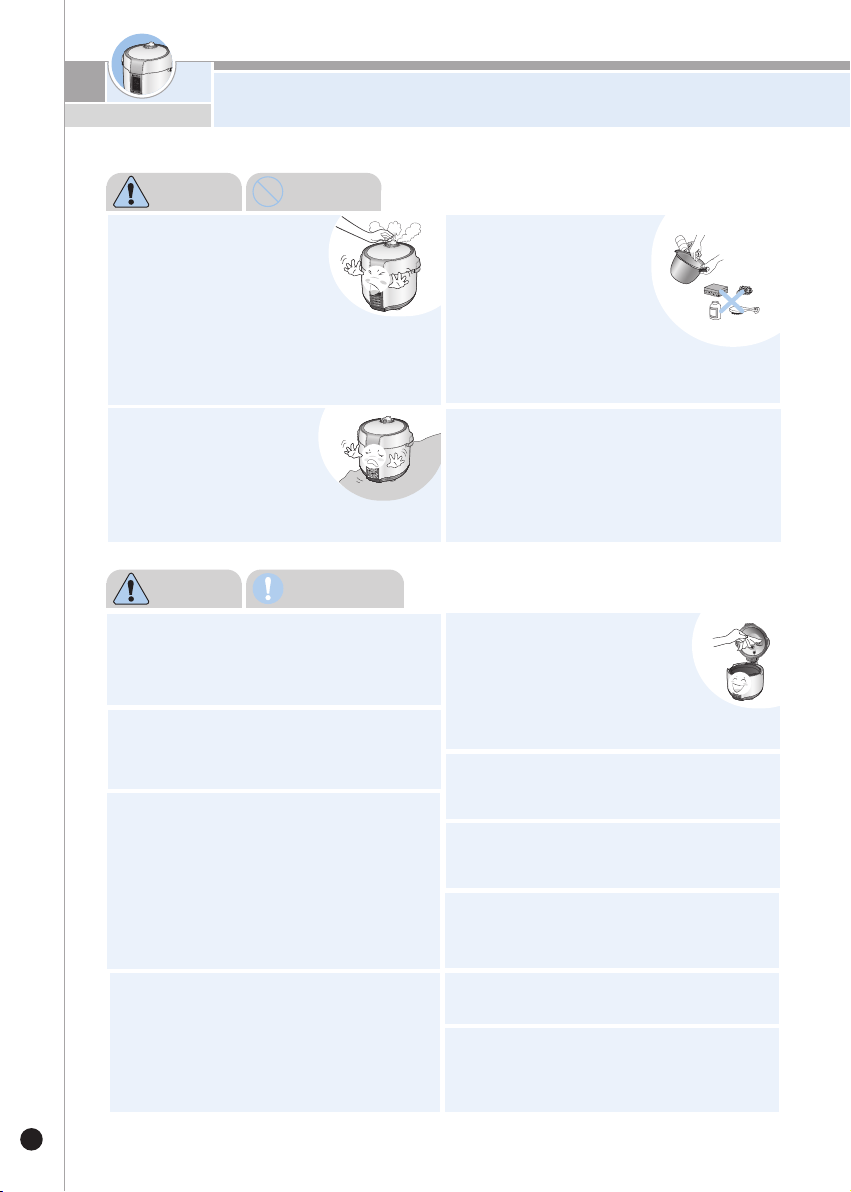
Caution Remember
SAFETY PRECAUTIONS
8
9
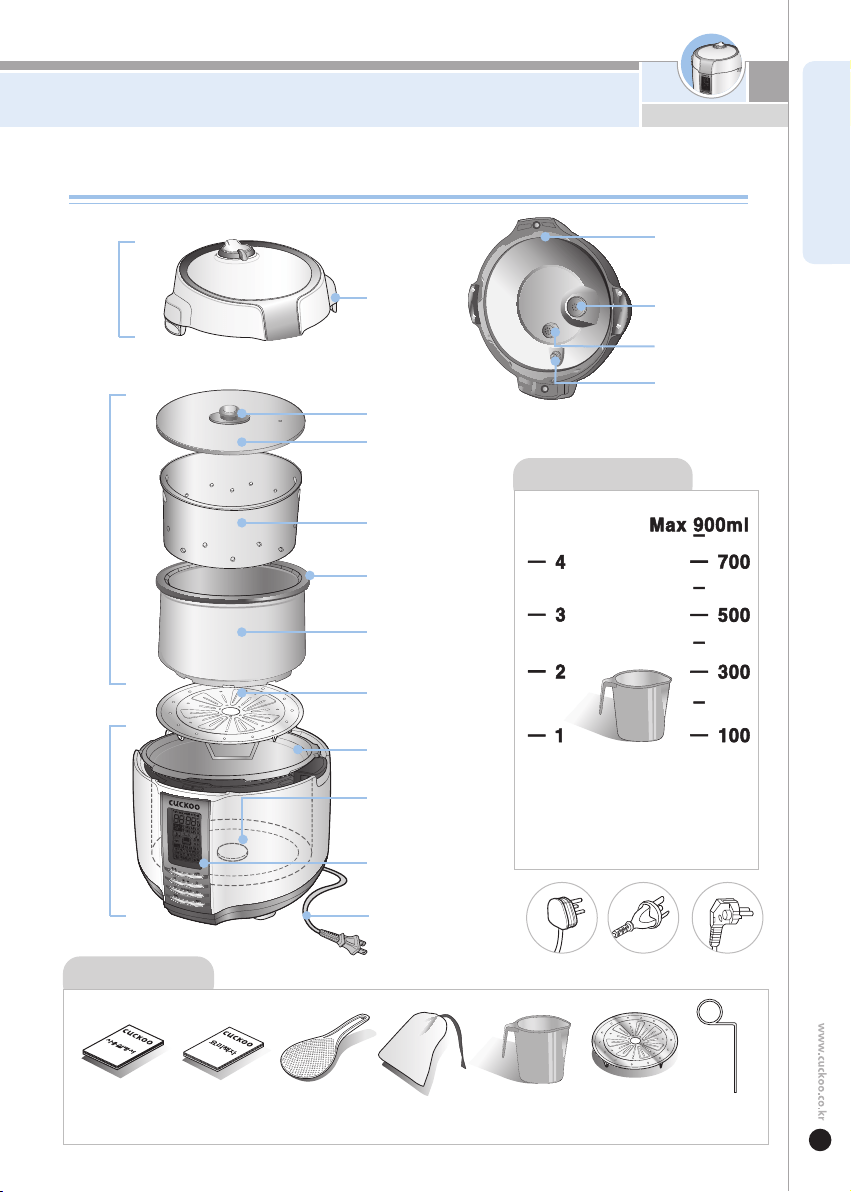
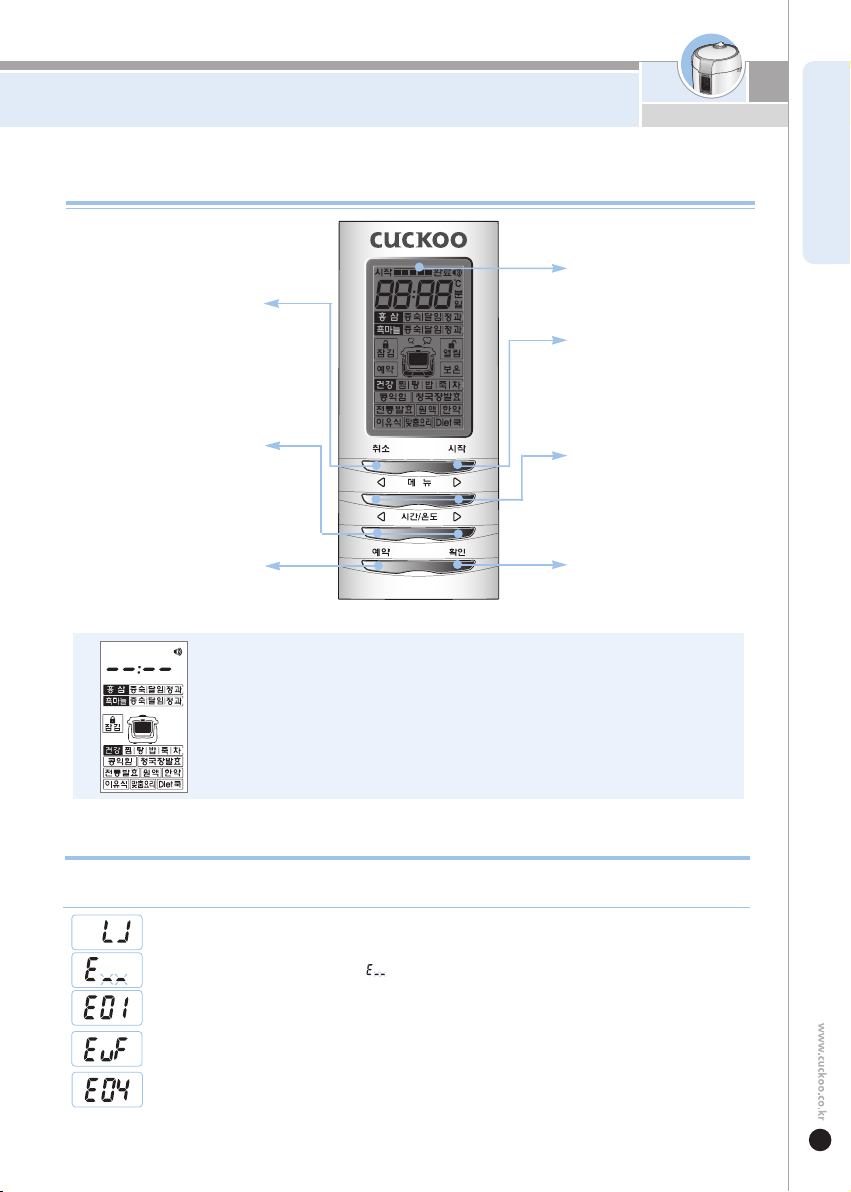
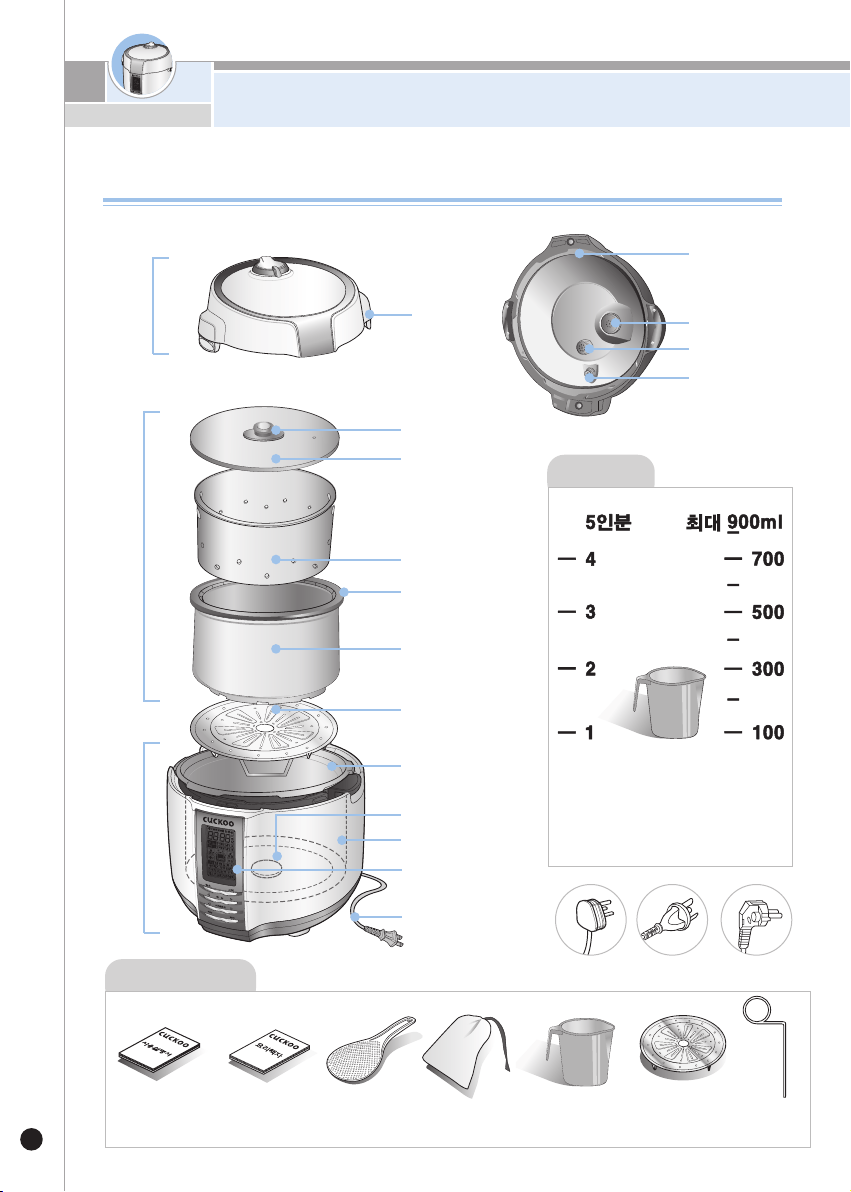
NAME OF EACH PART
ENGLISH
5 Servings5 Servings
(1 Cup)
NAME OF EACH PART
Lid
Lid Handle
Germanium Lid Packing
Germanium Lid
Germanium
ceramic pot
Germanium Inner
Pot Packing
Germanium
Inner Pot
Stainless
Steam Tray
Stainless
Inner Pot
Temperature
Sensor
Control Panel
China
Pot
Body
The plug type may differ
from the actual.
(This is only to explain about how it works.)
Power Plug
Inner
Pot Packing
Lid Safety
Locking Kit
Pressure
regulator
Pressure
Indicator
Rice Measuring Cup
The measuring cup has practical
markings for both amounts of
water (ml) and servings.
Please refer to the measurement
while cooking.
User Manual
Accessories
Cooking Guide Spatula Fabric Bag
Rice
Measuring Cup
Stainless
steam tray
(Refer to Manual &
Cooking Guide)
Cleaning Pin
(Attached on the
bottom of the unit)
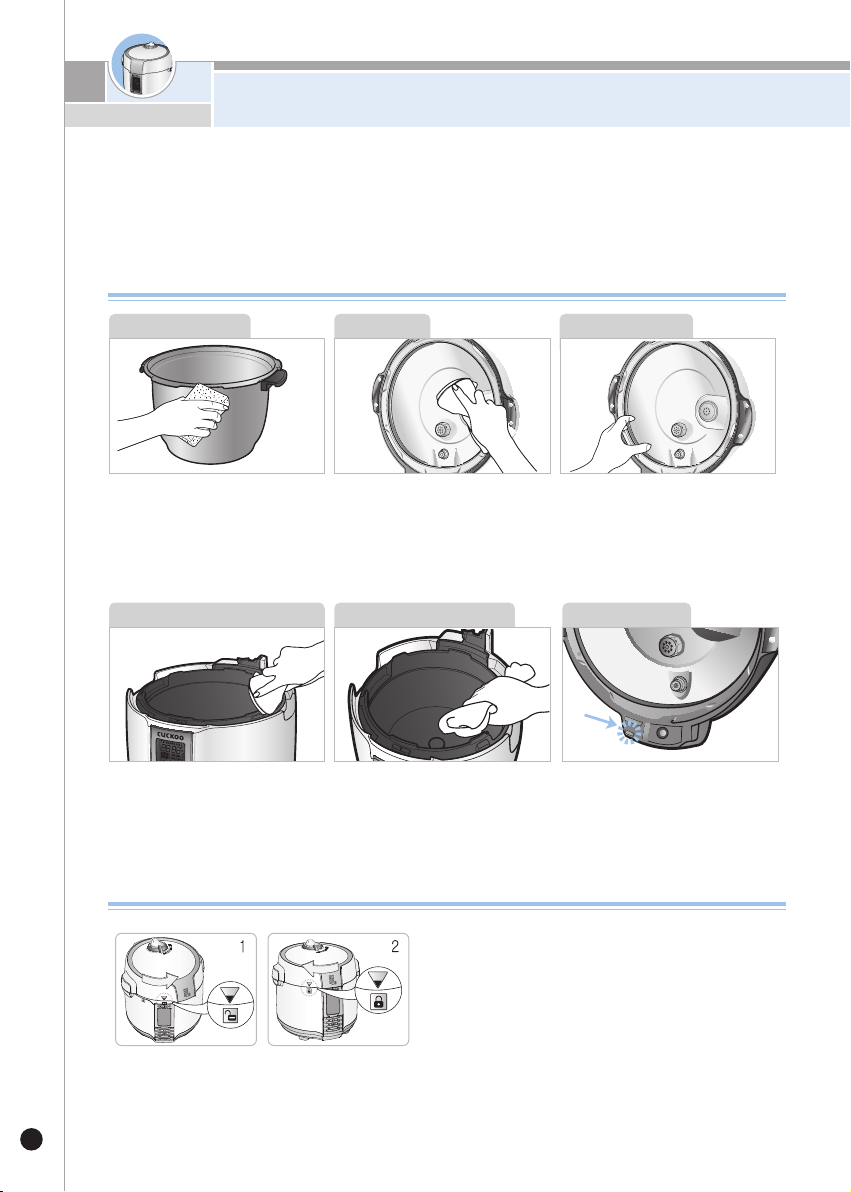
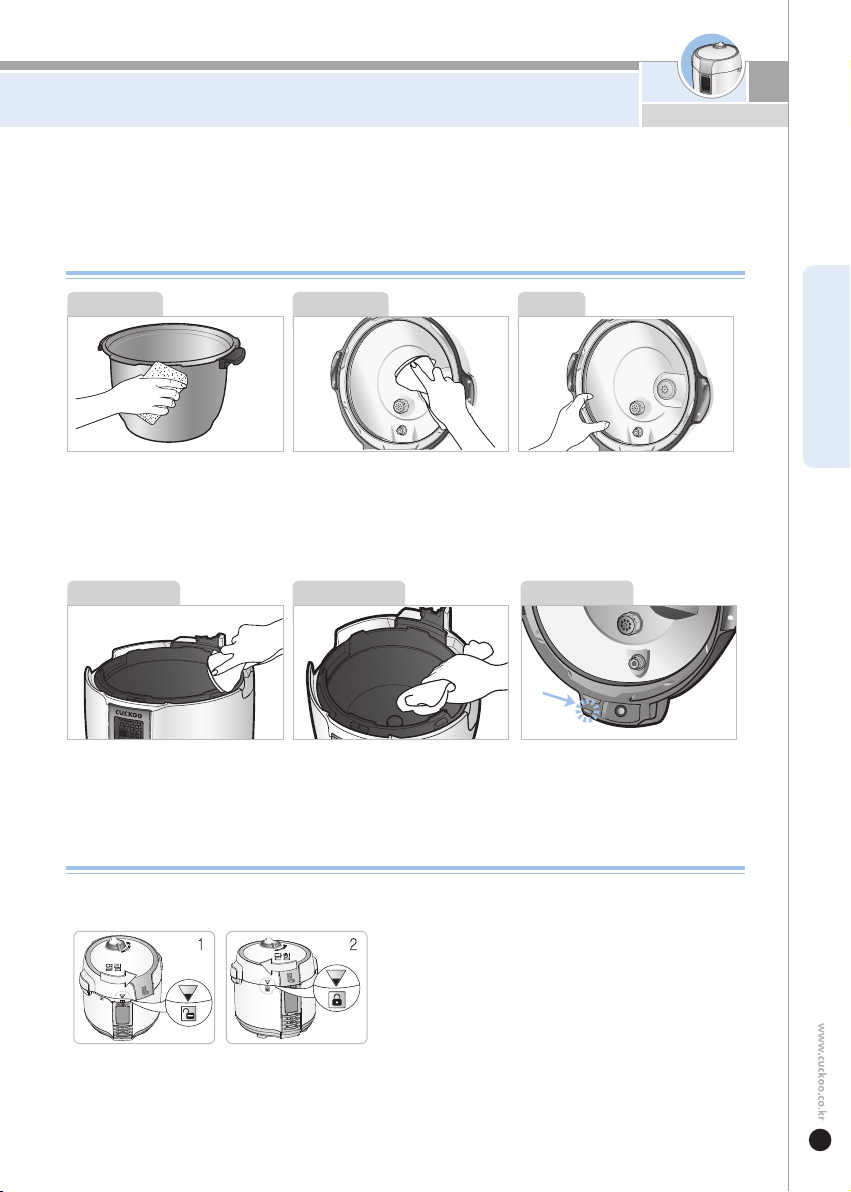
HOW TO CLEAN
10
-
To prevent foul odor clean the lid after the rice cooker has cooled and the rice cooker is unplugged.
- Clean the body and lid with a dry dish toqel. Do not use bentol while using the rice cooker.
Starch may be remain, however there is no health risks.
HOW TO CLEAN
Wipe the water on the outside and
bottom of the Inner Pot.
A rough sponge, a brush or an abrasive
can cause scratches on the surface.
Use a dishwashing liquid and a soft
cloth or a sponge.
Wipe any water on the Inner Pot lid
with a well wrung dish cloth.
Clean the Inner Pot with care as
it has a metalic edge.
Pull the pressure packing to separate
it from the stainless pot.
Clean the packing after cooking is
finished.
This part is designed to gather the
moisture. When the cooking is done,
wipe it clean with a well wrung dish cloth.
Remove gently and substance that might
contaminate the temperature sensor.
Drain the moisture inside the lid
through
the drainage hole as shown
in the picture.
Stainless Inner Pot
Moisture Dish of the Main Body
Inside of the Main Body
Inside of the Lid
Pressure PackingInner Pot lid
How to lock and unlock the Lid
Open
Close
To lock the lid, align each locking mark on the lid
and main body first as shown in Picture 1. Then,
turn the lid clockwise as shown in the Picture 2.
To unlock the lid, turn it counterclockwise.
ENGLISH
HOW TO CLEAN
11
Tough crubber
Inside of the lid
▶ hand wash with a neutral cleaning fluid and a sponge.
Abrasive
Material Brush
Metallic crubber
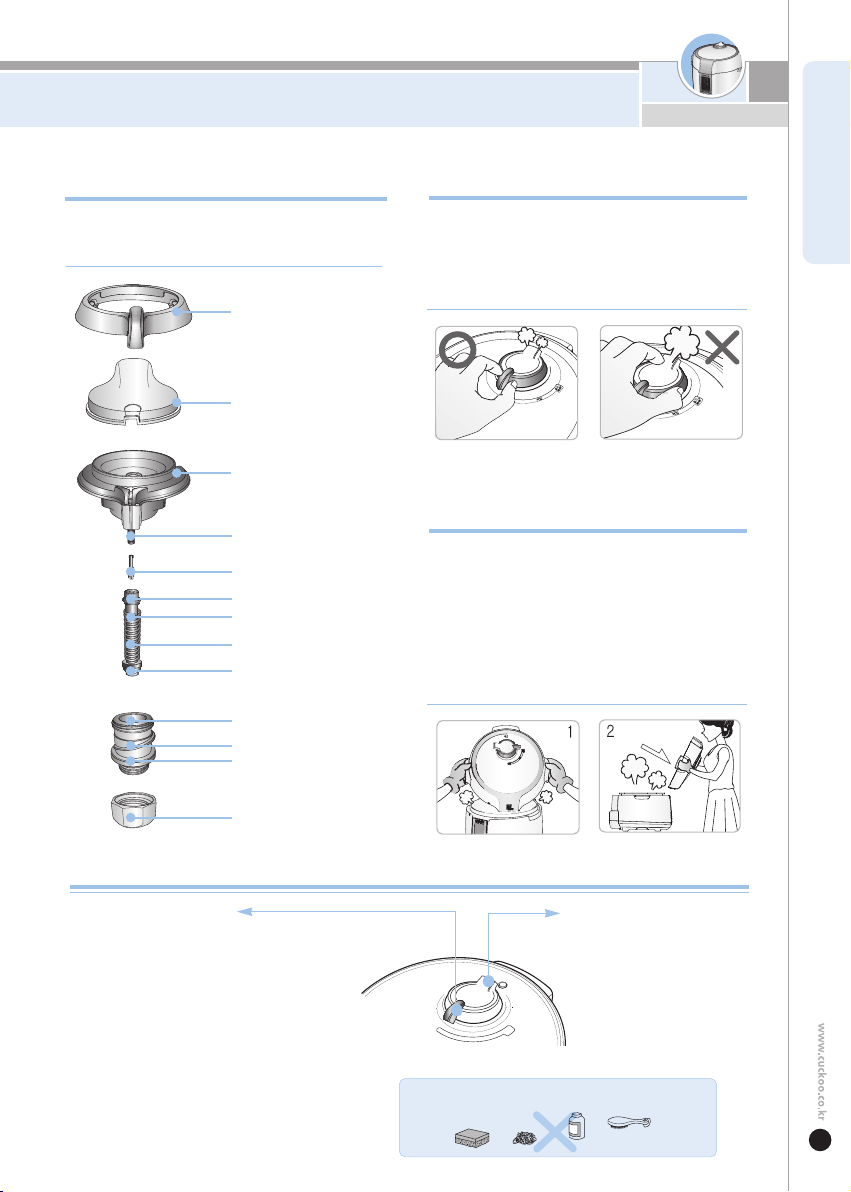
Function Operating Part
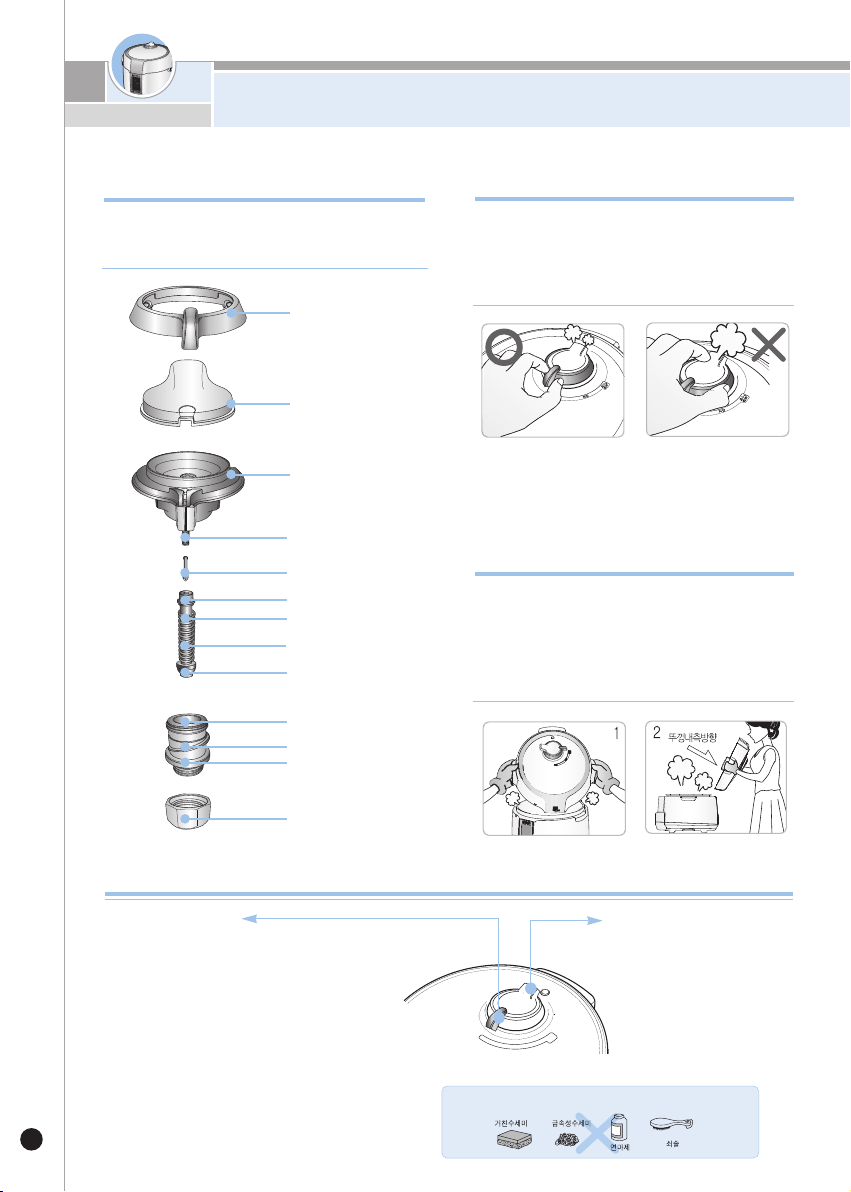
Maintenance tips for pressure regulator
T
he pressure regulator consists of fifteen parts, including
several packings as shown below. Take care not to lose
any of them while handling and cleaning.
Pressure regulator Body
Pressure steam
cap cover
Pressure steam cap
+ packing
Steam vent pipe
Steam vent pipe Packing
Hitch pin
Hitch pin spring
Bolt packing
Bolt
Bolt O-ring
Nut
Steam vent spring
Steam vent cap + Packing
Precautions to be taken with the pressure regulator
Precautions to be taken for opening and
closing the lid
When cooking is finished and you operate the pressure
regulator to let the inside steam out, hold the knob
grasping the pressure steam cap as shown in the picture.
Do not cover the pressure steam cap with your hand.
Hot steam coming from the vent can cause burns.
When cooking is finished and you open
the lid,
make sure that the inside of the lid is turned as shown
in the Picture 1 and pull it toward you as in Picture 2 to
prevent hot water on the inside of the lid from dripping
on you. Hot steam and water coming from the tilted the
lid will burn. Therefore, hold the lid handles in your
hands in a horizontal position.
Wear oven gloves while opening and closing the over.
When the cooking is finished, disassemble
the pressure regulator according to page 12 of
this manual and hand wash frequently with a
neutral cleaning fluid and a sponge.
Before and after use, wipe the steam vent
with a soft cloth and the clean pin in order
to prevent clogging.
-
Do not touch the pressure steam cap just after the cooking is finished. It will burn.
Pressure regulator
Pressure steam cap
Wait until it cools down and remove
the cap from the cover. Hand wash
with a neutral cleaning fluid and
a
ponge. Wipe waterfrom the
hole with a well-wrung dish
cloth.
Stainless Inner pot and Accessories
ENGLISH
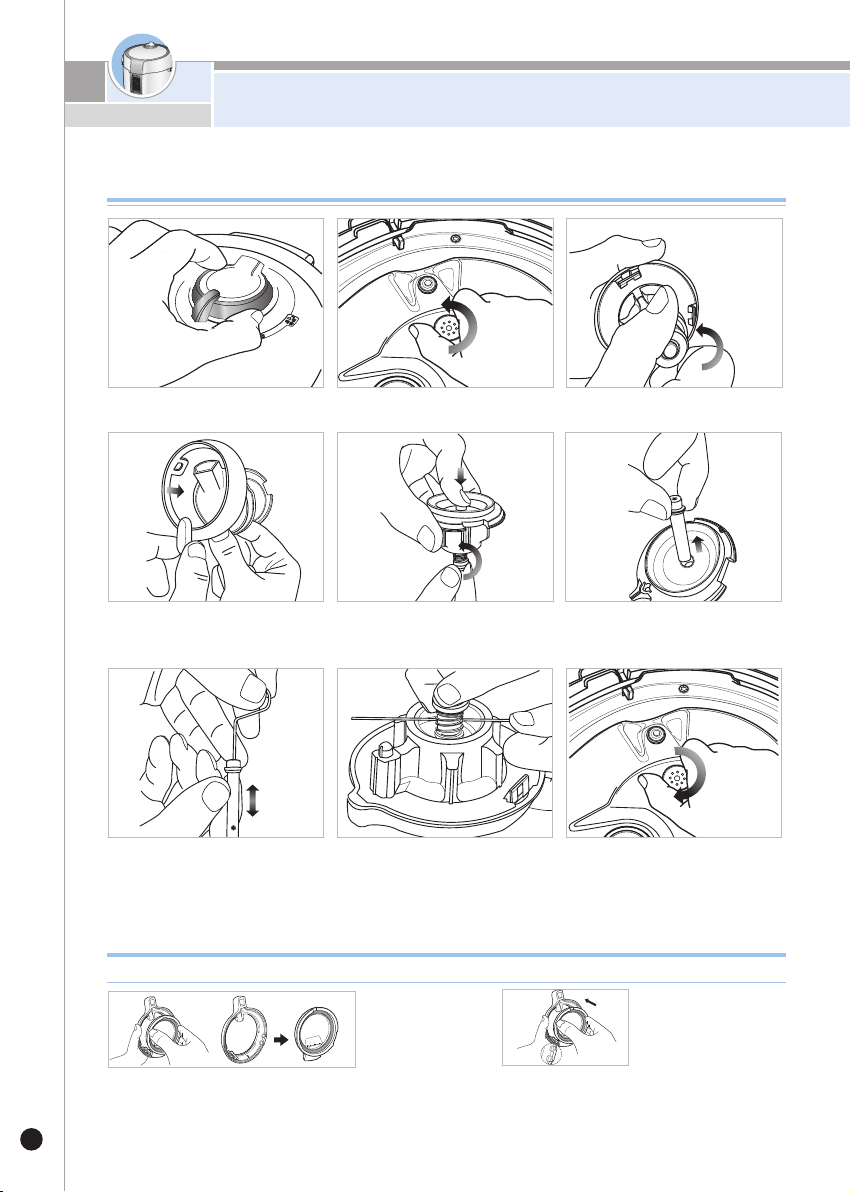
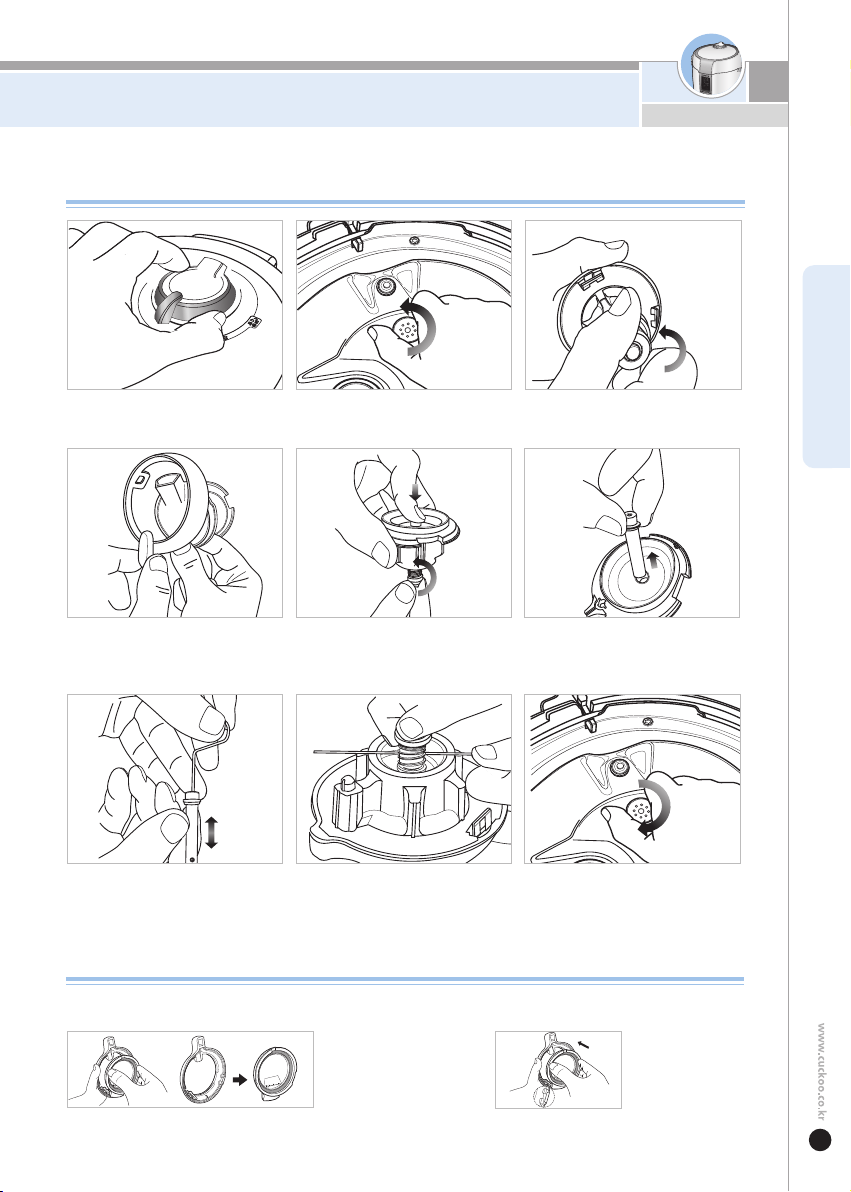
❶
❷
To disassemble the pressure steam cap, press the hooks on both sides of
the pressure steam cap cover. After hand-washing with a neutral cleaning
fluid and a sponge, reassemble them in order. Make sure that the packing
is in the right position and the right direction. Then, insert the packing into the groove.
To reassemble the pressure steam cap, put its lower
part in the right position along the groove first.
Then, push the lower part completely into the groove
in the direction of the arrow as shown in the picture.
❼
❽ ❾
If the pressure regulator is loosely
assembled with the lid, the product will
not cook properly. Please double check
whether the nut is tightly fastened.
Detach the cleaning pin attached to
the bottom of the product and clean
the
drain of the steam vent pipe. After
cleaning, assemble them in reverse order.
After insert the cleaning pin into the hole
in the steam vent pipe, fasten the steam
vent cap tightly. If int is not tightened enough,
proper steam ventilation will not occur.
❹
❺❻
Pull the hook part as shown in the
picture to separate the pressure
steam cap.
While pressing the steam vent pipe
as shown in the picture, loosen the
steam vent cap counterclockwise.
Separate the steam vent pipe.
How to assemble and disassemble the pressure regulator
Maintenance tips for pressure regulator
❸
❶
Grip the pressure regulator.
❷
Hold the pressure regulator tightly
and loosen the nut counterclockwise.
Loosen the bolt at the bottom of the
pressure regulator to disassemble.
Do not touch pressure steam cap just after the coking is finished. It will burn.
HOW TO CLEAN
12
13
FUNCTION OPERATING PART / ERROR CODE AND POSSIBLECAUSE
ENGLISH
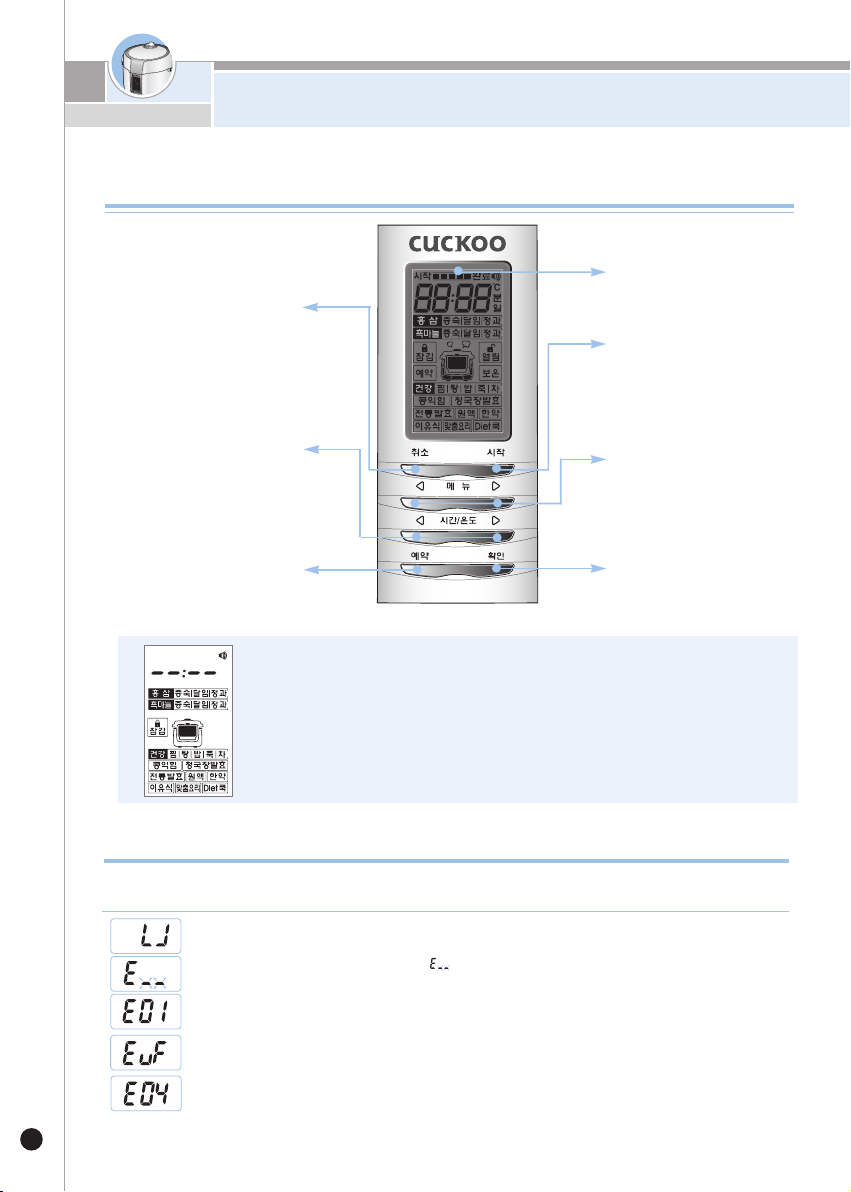
<대기상태화면>
Cancel Button
This function is used
to cancel a selection.
Preset Button
▶
See page 18.
Time/Temp. Button
To set the cooking time and
temperature of the selected menu.
▶
See page 15.
Function Operating Part
Display
Start Button
▶
See page 15.
▶
See page 13.
To start cooking for the selected
menu or to set the Pre-set menu.
▶
See page 15.
Menu Button
Set Button
To set the selected function or to
adjust the voice message volume.
※
※
<Display in the Stand-by Mode>
When the power switched on, the display will appear as shown in the picture.
When all munus are displayed, you can press the Menu, or Pre-set, or Cook button.
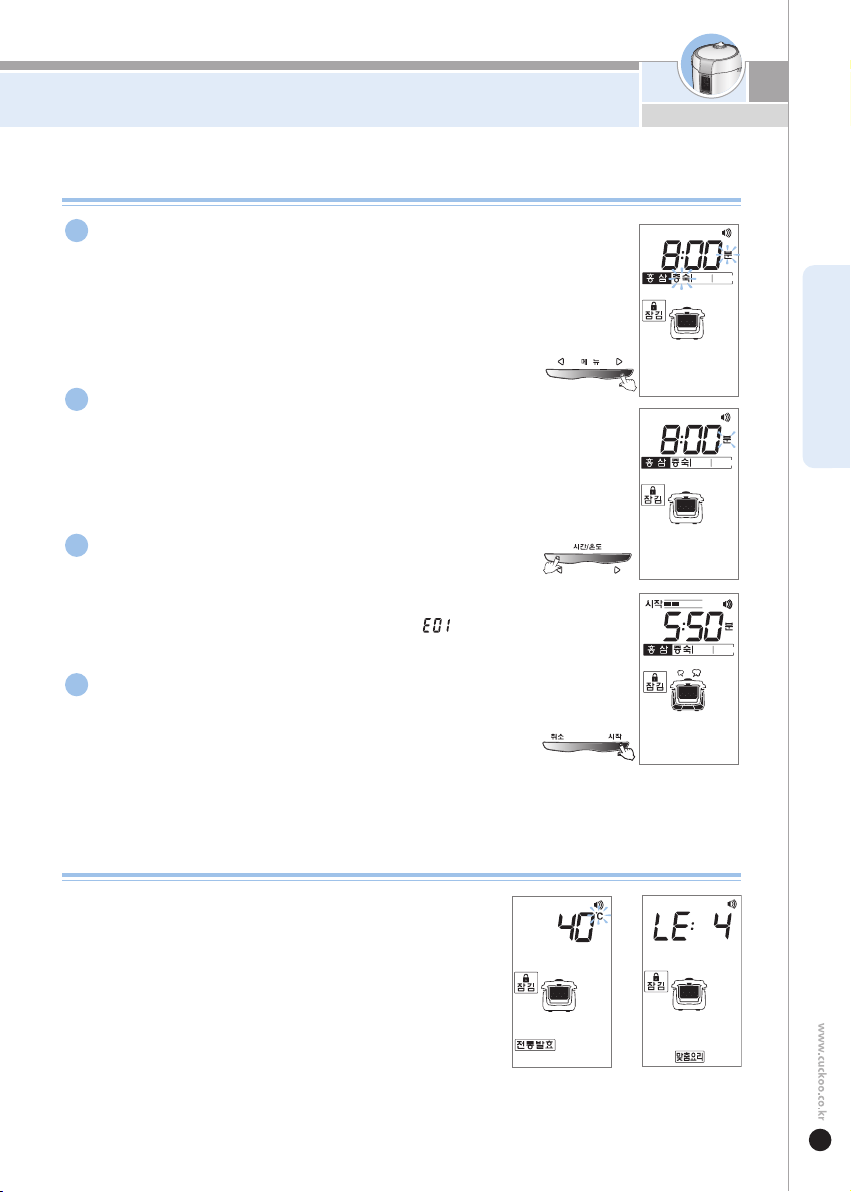
Error Code and Possible Cause
If the product has any problems or is used inapporopriately, you can follow the marks below. If error persistently
shows up,in normal using conditions or after taking recommended measures, inqure with customer service.
When Stainless Steel Inner Pot is not placed into the unit.
Problem on micom memory.
This indicates that there is no water in the stainless inner pot at
the beginning or in the middle of cooking.
Problem on temperature sensor. ( “ ” mark blinks.)
This appears when you press the Start or Pre-set button if the lid is not closed properly.
Close the lid properly.
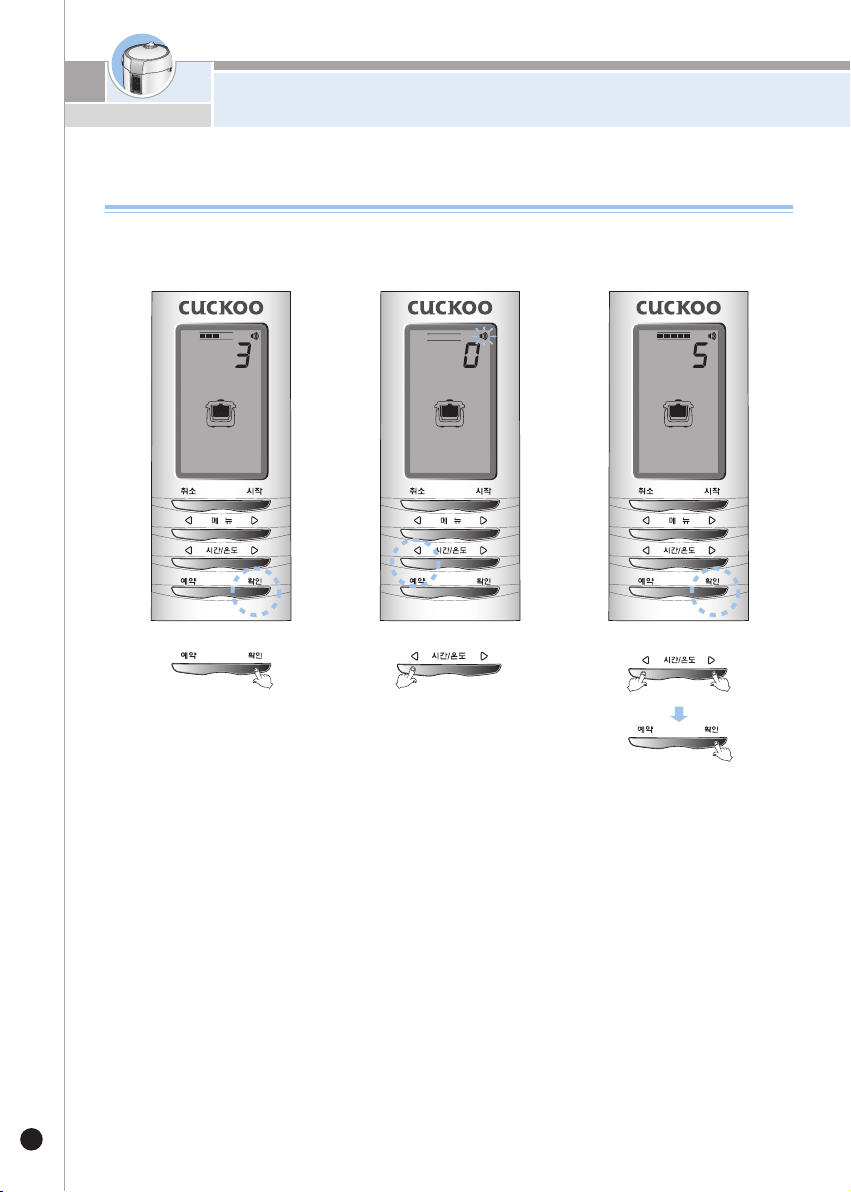
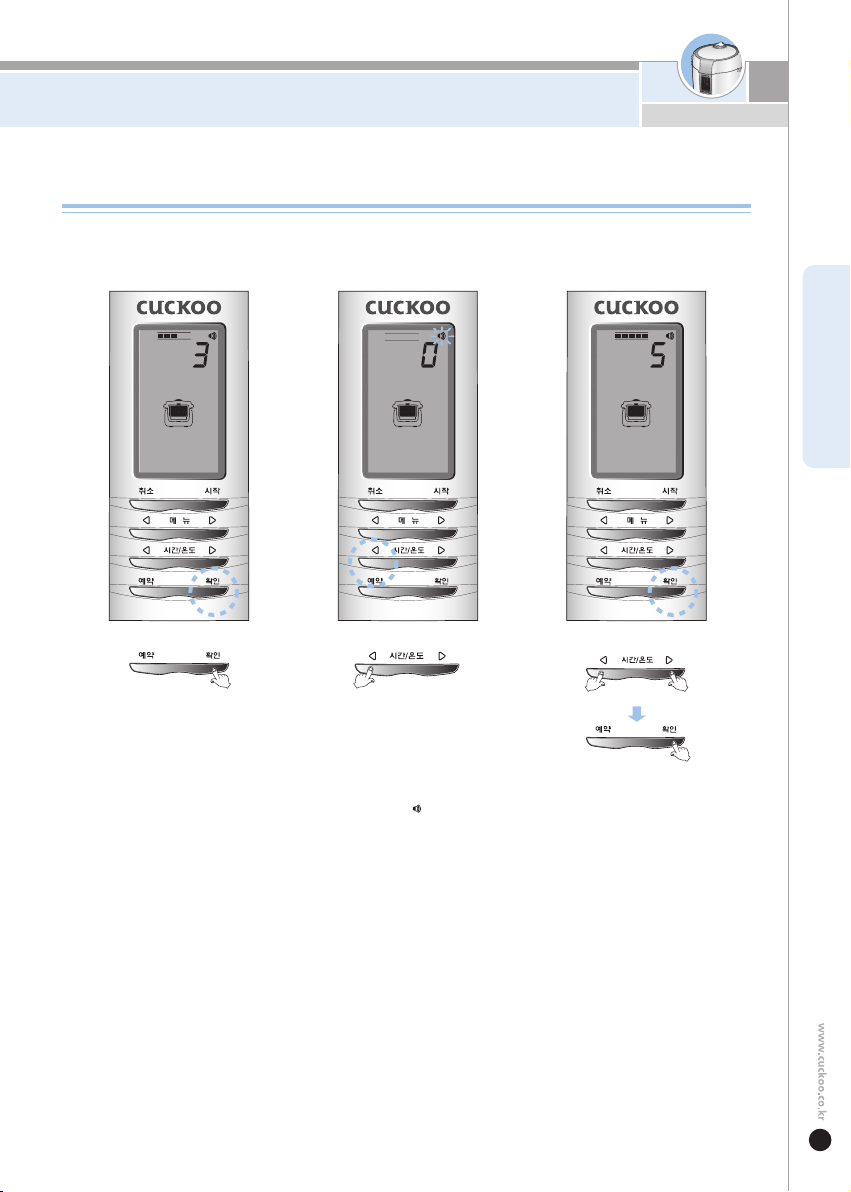
Press set button for 2 seconds in standby status, and you will enter Voice Volume Setting Mode
‘3’ sign is displayed when
entered volume control mode
by pressing Setting
button for 2 seconds.
If set value became ‘0’
by pressing the button,
voice guide function is off.
Press button to set ‘5’,
that is the maximum
volume sound
▶
Set to desired voice volume,
and press Set button.
Voice Volume Setting Fuction( This function is to unset or adjust the voice messaging service.)
VOICE VOLUME SETTING FUCTION
14
ENGLISH
15
HOW TO SET COOKING TIME IN THE MENU
※ You can reset the initial default time and temperature or levels for each menu as you like.
※ For the Baby Food and the Customized Dish, the maximum temperature and cooking levels will vary
depending on the new time setting.
※ After cooking is finished, the newly set cooking time will be stored as the default cooking time.
※ For the menu using the germanium inner pot, add 600ml of water into The stainless inner pot.
※ For the menu using the stainless steam plate, add 400ml of water into the stainless inner pot.
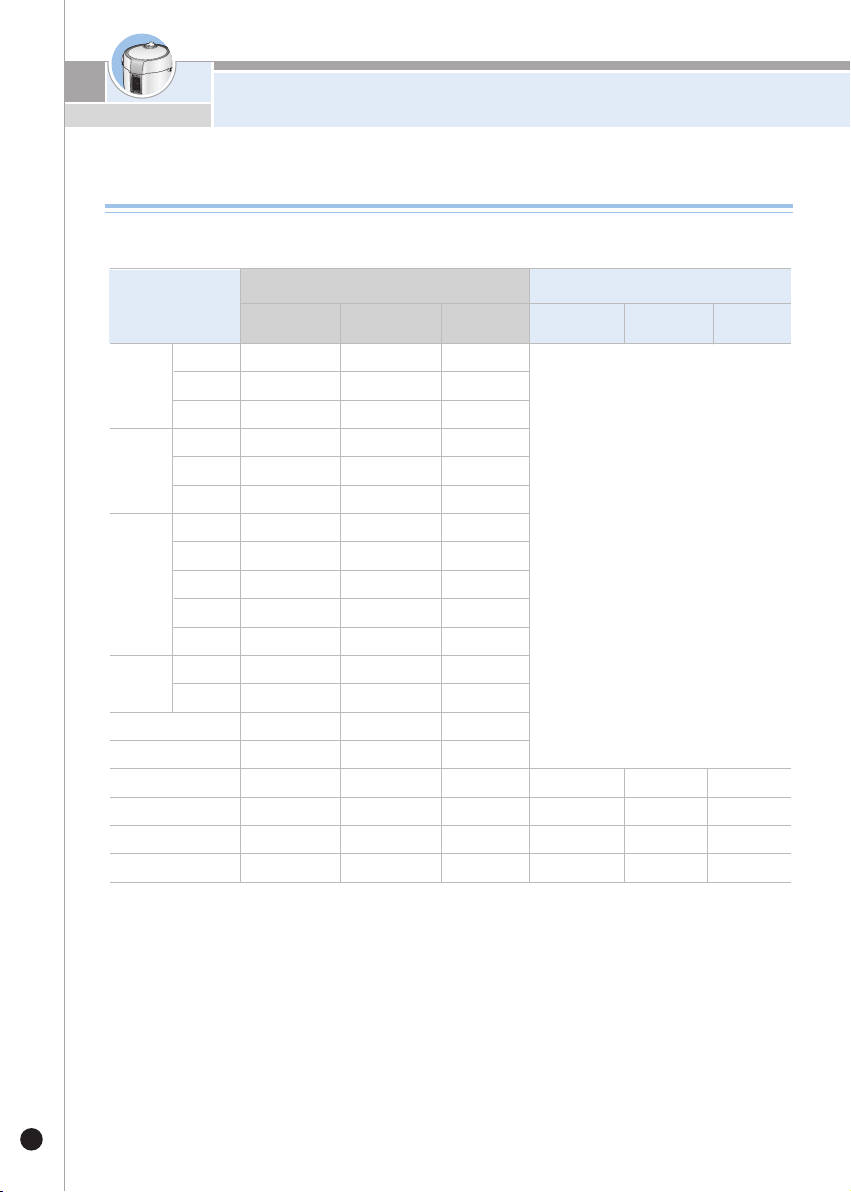
Menu
Default
Cooking Time
Available Cooking
Time Option
Default setting
Temperature / phase
Available setting
Temperature / phase
Cooking Time Setting
Time Setting
Option
Time Setting
Option
Cooking Temperature Setting
Red
Ginseng
Black
Garlic
Nutritious
Fast-
Fermented
Bean Paste
Baby Food
Customized Dish
Diet Cook
Concentrate
Oriental Medicine
Traditional Fermentation
Steaming
Decocting
Decocting
Soup
Rice
Tea
Boiled
Bean
Porridge
Preserves
Preserves
Steamed
Dish
Steaming
Fermentation
6 hour 30 minutes
6 hour 30 minutes
7 hour
7 hour
2 hour
2 hour
2 hour
2 hour
3 hour
36 hour
36 hour
6 hour
6 hour
1 hour 30 minutes
1 hour 30 minutes
1 hour 30 minutes
1 hour 30 minutes
2 hour 20 minutes
4 hour 30 minutes
2 hour ~ 10 hour
2 hour ~ 10 hour
2 hour ~ 10 hour
2 hour ~ 10 hour
2 hour ~ 10 hour
2 hour ~ 10 hour
1 hour
~
4 hour
1 hour
~
4 hour
1 hour
~
3 hour
1 hour
~
6 hour
2 hour
~
6 hour
3 hour
~
6 hour
2 hour
~
6 hour
1 hour
~
30 days
10 hour ~ 48 hour
30 minutes ~ 3 hour
10 minutes ~ 3 hour
10 minutes ~ 3 hour
10 minutes ~ 10 hour
10 minutes /
1 hour / 1days
30 minutes
30 minutes
30 minutes
30 minutes
30 minutes
30 minutes
10 minutes
10 minutes
10 minutes
10 minutes
10 minutes
10 minutes
10 minutes
10 minutes
10 minutes
10 minutes
1 hour
5 minutes /
10 minutes
40
℃
Step 4
Step 4
Step 4
Invariant
35
℃
~
70
℃
Step 3/4/5
Step 1/2/3/4/5
Step 3/4/5
5
℃
Step
Step
Step
Cooking Time by Menu
ENGLISH
HOW TO SET COOKING TIME IN THE MENU
16
❶
For menus that provide customized temperature and temperature level
setting options, select the cooking time and press the OK button, and the
Temperature Setting Mode and the Temperature Level Setting Mode will start.
※ Menus that provide customized temperature setting options : (Fermentation)
※ The menu that provides customized temperature level setting options :
(Baby Food, Customized Dish Diet, Diet Cook)
❷
Press the Time/Temperature button to set the cooking temperature and
temperature levels.
•
As you press the button continuously, the temperature and level
options will increase to their maximum. Then, the minimum options
will appear and increase again, in turn.
•
Hold the button down, and the time and level settings will continue
changing automatically. The time setting will determine the available
temperature level setting option.
❸
Press the Start button to start the cooking.
•If you choose the menu again later, the latest cooking time and temperature level setting will be displayed.
※ The desired temperature set for the menu and the actual temperature of the food can be different depending on other conditions and food materials.
Press the Menu button to select the menu.
Press the Time/Temperature button to set the cooking time.
Start cooking by pressing start button.
Finished cooking
•
After closing the lid, check that the cooking pressure setting is correct for the menu.
•
Press the Menu button repeatedly, and Red Ginseng(Steaming)->Red Ginseng(Decocting)->Red Ginseng (Preserves)->
B
lack Garlic(Steaming)->Black Garlic(Decocting)->Black Garlic(Preserves)->(Nutritious)Steamed Dish->(Nutritious)Soup->
(Nutritious)Rice->(Nutritious)Porridge->Nutritious)Tea->Boiled Bean->Fermentation->Traditional Fermentation->Concentrate->
Oriental Medicine->Baby Food->Customized Dish->Diet Cook-> Keeping warm Will be displayed in turn.
•
Hold on to the Menu button, and all the menus will be displayed in turn continuously.
•
Press the button repeatedly, and the cooking time will change by five munutes,
ten minutes, thirty minutes, one hour and one day.
•
As you press the button continuously, the cooking time options increase to their maximum.
Then, the minimum cooking time will appear and increase again, in turn.
•
To set the temperature, refer to “How to Set the Temperature and Temperature Levels” below.
•
When cooking is finished: When cooking is finished, the voice message will say, “CUCKOO
finished steaming. Enjoy the delicious Red Ginseng.” and Keep-warm mode will start automatically.
•
Before opening the lid when cooking is finished, depressurize completely
using the pressure regulator. Do not press the Cancel button while cooking.
If the Cancel button is pressed, cooking will be canceled.
※ Menus which are not followed by Keep-warm mode will start the Stand-by mode. (Boiled Bean),
(Fermentation) and (Traditional Fermentation) menu will start Keep-warm mode automatically when cooking is finished.
•
Before starting cooking, please make sure that the lid is firmly closed.
First, select the correct cooking pressure for the menu first. Then, press the
Start button and the CUCKOO Pressure Multi Cooker will start cooking and
the voice message will say “CUCKOO starts steaming for Red Ginseng.”
•
If you press the Start button with the lid open or unlocked, the “ ” sign will be
displayed on the panel, alarm will sound and the voice message will say “Please close and
lock the lid.” Then, cooking will be canceled.
How to set the Temperature and Temperature Levels
How to select menu and time
1
2
3
4
eg) For Red ginseng
cooking mode
[Display of
temperature setting]
*Traditional Fermentation
[Display of
temperature Level setting]
*Baby food,
Customized food,
Diet cook

ENGLISH
17
KEEP WARM TIME IN THE MENU
※
※
Keep-warm time (If Keep-warm mode is turned on automatically after cooking is finished.)
Menu
Keep-warm time
Other
Red
Ginseng
Steaming
10 days
10 days
10 days
10 days
10 days
10 days
24 hours
24 hours
24 hours
No keep-warm mode
No keep-warm mode
No keep-warm mode
Under the long Keep-warm
mode or with a little amount of
water, the water in the stainless
inner pot will dry up. Add more
water if necessary.
※
24 hours
24 hours
6 hours
6 hours
6 hours
6 hours
6 hours
Decocting
Preserves
Steaming
Decocting
Preserves
Soup
Rice
Porridge
Tea
Steamed Dish
Boiled Bean
Fermentation
Black
Garlic
Traditional Fermentation
Concentrate
Oriental Medicine
Baby Food
Diet Cook
Customized Dish
Nutritious
Fast-
Fermented
Bean Paste
Please notice that the
Keep-warm time setting will
differ depending on the menu.
If you want to extend
the Keep-warm time,
refer to How to Set the
Keep-warm Mode.
ENGLISH
H
O
W
T
O
S
E
T
K
E
E
P
W
A
R
M
T
E
M
P
E
R
A
T
U
R
E
18
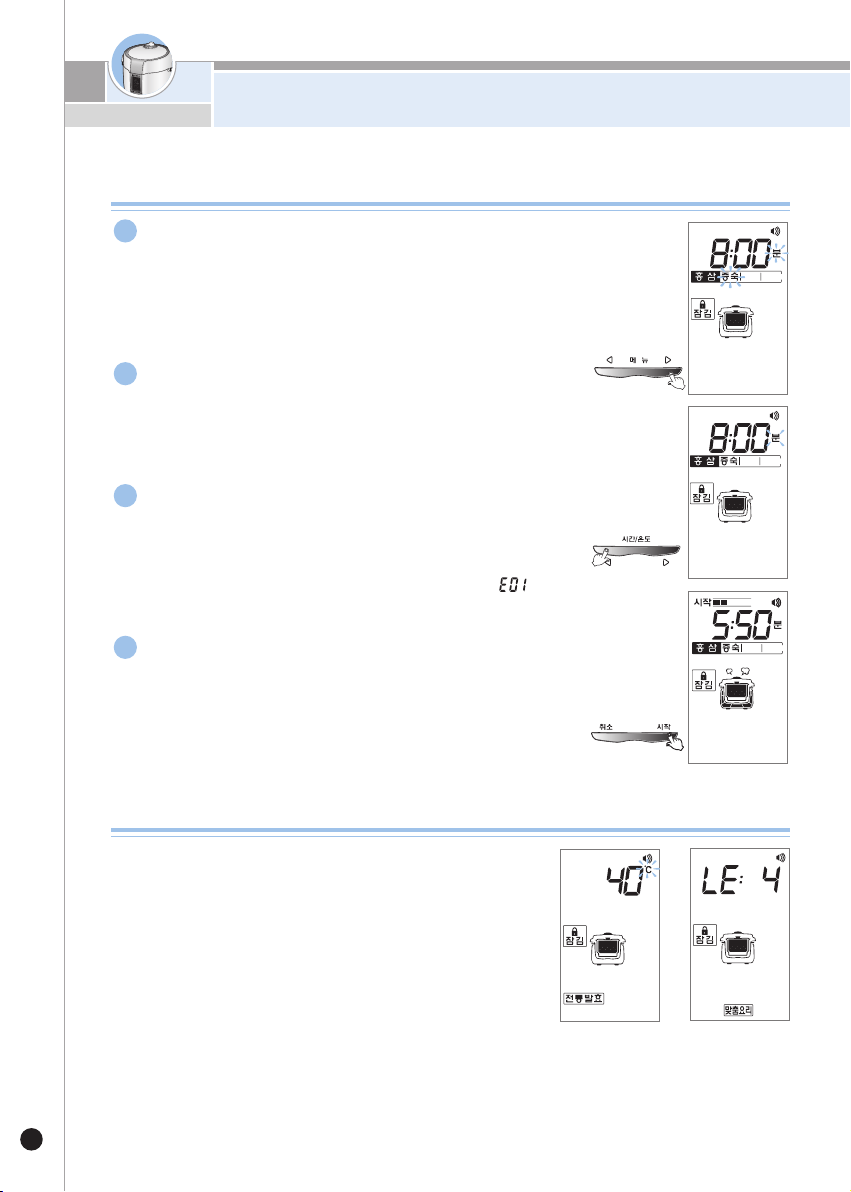
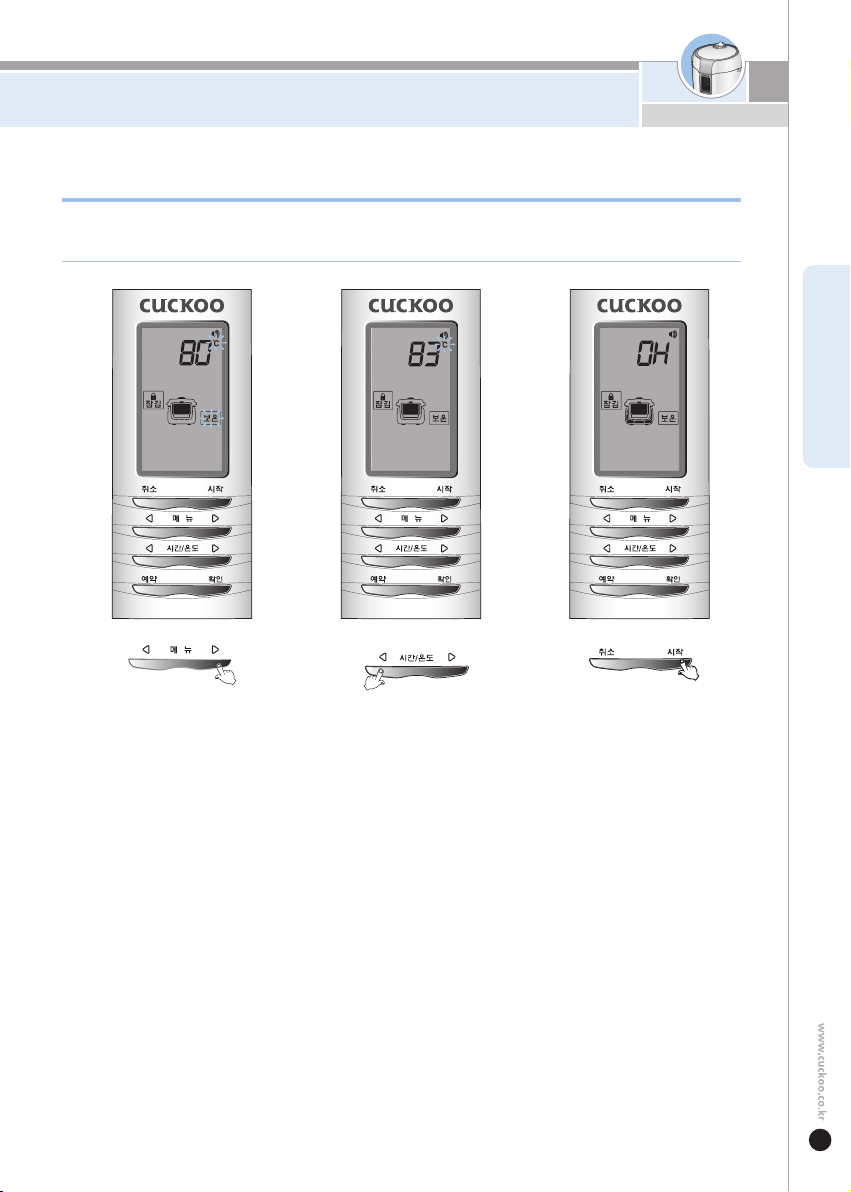
You can enter into Keep-warm Mode manually.
You can set the Keep-warm temperature. (Available temperature range: 70~85
℃
)
Press the Menu button
to select the Keep-warm menu,
and the Keep-warm temperature
will be displayed.
(default Keep-warm
temperature : 80
℃
)
Press the Time/Temperature
button to set the
Keep-warm temperature.
Press the Start button
to start the Keep-warm menu.
How to Set the Keep-warm Mode and the Keep-warm Temperature
※The desired temperature set for the menu and the actual temperature of the food can be different
depending on other conditions and food materials.
※The Keep-warm temperature settings above are only for the manual Keep-warm mode . They will not
affect the default Keep-warm temperature and time set for the menus which are to be automatically
followed by the Keep-warm mode when cooking is finished.
ENGLISH
Menu
No Pre-set Mode
No Pre-set Mode
No Pre-set Mode
No Pre-set Mode
No Pre-set Mode
No Pre-set Mode
No Pre-set Mode
No Pre-set Mode
No Pre-set Mode
The Minimum Pre-set time ~ 12 hour
The Minimum Pre-set time ~ 12 hour
The Minimum Pre-set time ~ 12 hour
The Minimum Pre-set time ~ 12 hour
The Minimum Pre-set time ~ 12 hour
The Minimum Pre-set time ~ 12 hour
The Minimum Pre-set time ~ 12 hour
The Minimum Pre-set time ~ 12 hour
The Minimum Pre-set time ~ 12 hour
No Pre-set Mode
※
Keep-warm time
Other
Red
Ginseng
You can set the Pre-set time
only by one-hour units, up to
twelve hours in addition to the
cooking time.
For example, if the cooking
time is two hours and ten minutes,
you can set the Pre-set time
from three hours to the maximum
twelve hours.
Steaming
Decocting
Preserves
Steaming
Decocting
Preserves
Soup
Rice
Porridge
Tea
Steamed Dish
Boiled Bean
Fermentation
Black
Garlic
Traditional Fermentation
Concentrate
Oriental Medicine
Baby Food
Diet Cook
Customized Dish
Nutritious
Fast-
Fermented
Bean Paste
❶
※
The Pre-set mode is available only for the Nutritious Steamed Dish, Nutritious Soup,
Nutritious Rice, Nutritious Porridge, Nutritious Tea, Concentrate, Oriental Medicine,
Baby Food and Diet Cook menu.
※
In Stand-by mode, press the Pre-set button then the available Pre-set menu
will be displayed. Since the Pre-set mode stores the menu’s previous cooking
records--time and temperature level, if you select the Pre-set mode, the cooking
time and temperature setting will be the same as that of the previous cooking.
Close the lid and check that the correct pressure is set. Press the Menu
button, and the menu with the Pre-set function will be displayed.
Set the time and the temperature by pressing the Time/Temperature button.
Then, press the Pre-set button
.
❷
-
The Pre-set time could be added and adjusted in unit of hour up to 12 hours
on top of cooking time.
Press the Time/Temperature button to reset the time.
❸
-
If you set the time as 6 hours, cooking will be finished 6 hours.
-
If you don’t press any button for 7 seconds then the Pre-set mode will start automatically.
Press the Start or the Pre-set button to start cooking.
How to preset timer for cooking
Pre-set time
Pre-set setting display
eg) Nutritious
Steamed Dish
Pre-set progress
display
eg) Nutritious
Steamed Dish
19
HOW TO PRESET TIMER IN THE MENU
ENGLISH
20
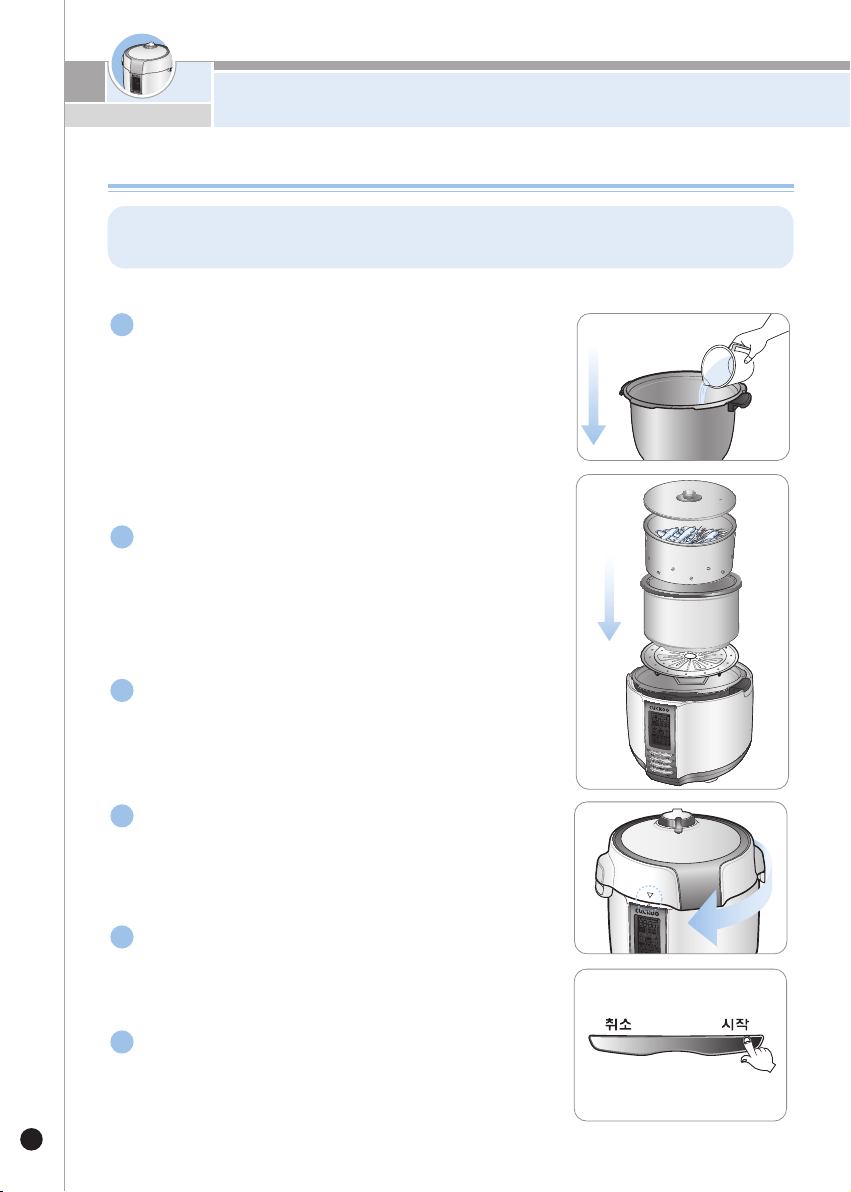
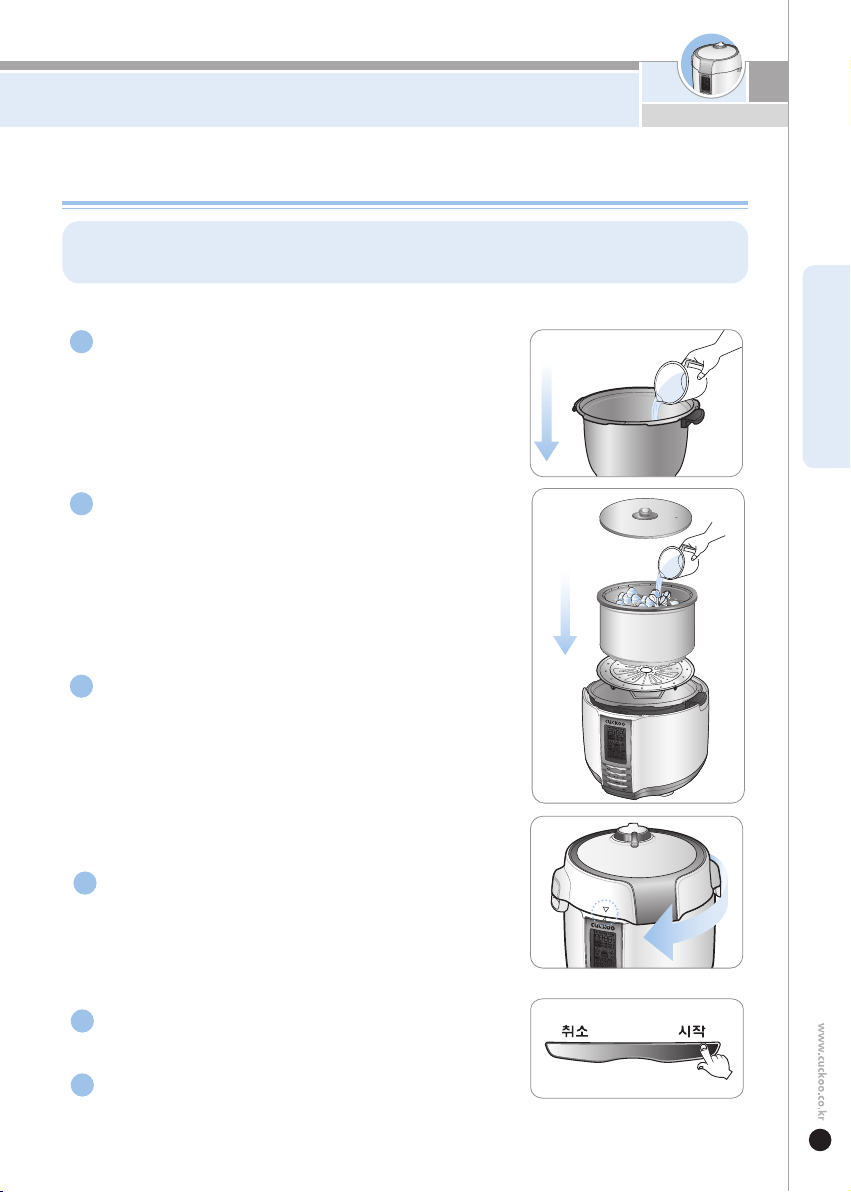
The CUCKOO pressure Multi Cooker can make red ginseng by steam ing fresh ginseng and
white dried ginseng.
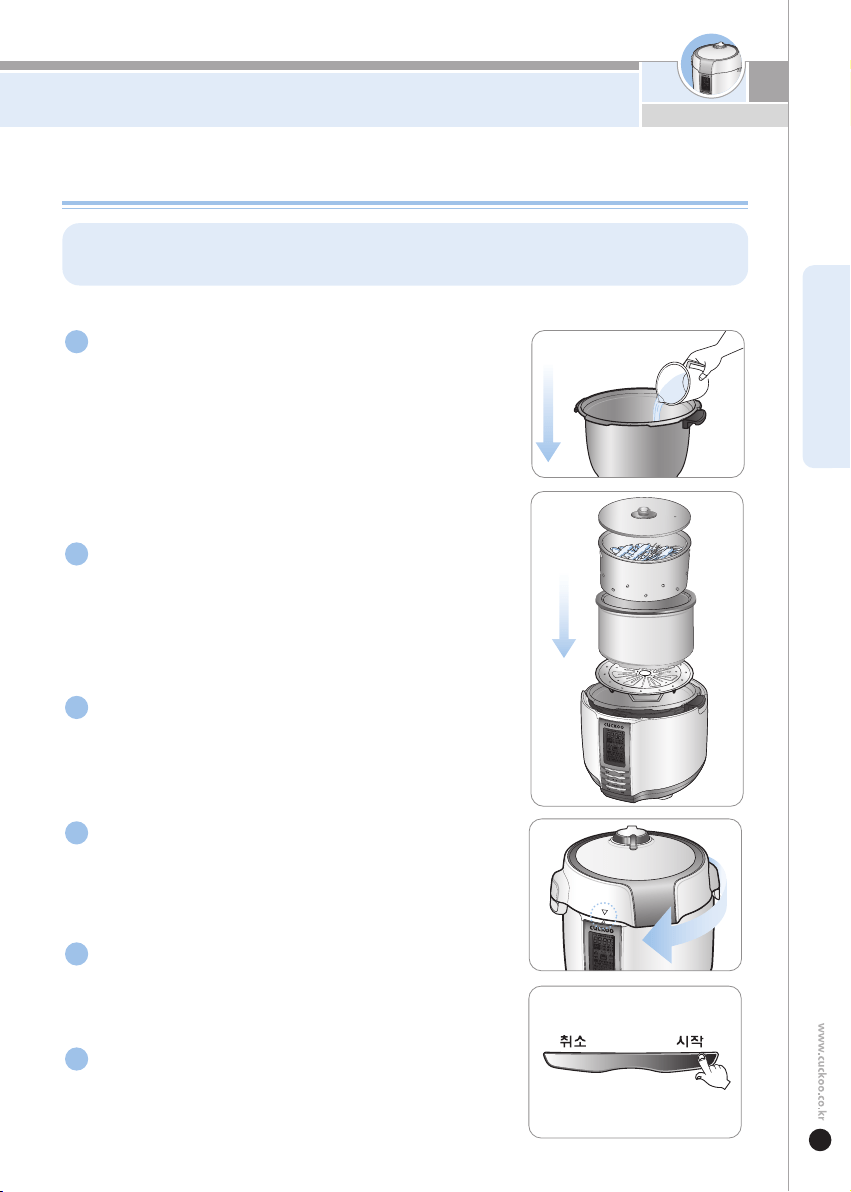
Pour 600ml of water into the stainless inner pot then put
the stainless steam plate into the pot.
※To steam a large quantity of fresh ginseng,
add of water into the stainless inner pot and place the stainless
steam plate in the pot. Put 600g of ginseng on the plate
and steam and cook it.
First, insert the germanium ceramic pot
into the germanium inner pot. Next,
put the germanium pot into the stainless inner pot.
Put 300g of ginseng into the pottery then close
the germanium lid.
Close the lid and double check that packing is
correctly fitted and the pressure regulator closed.
Turn the pressure regulator to the high
pressure position.
Select the Steaming Red Ginseng mode
and press Start button.
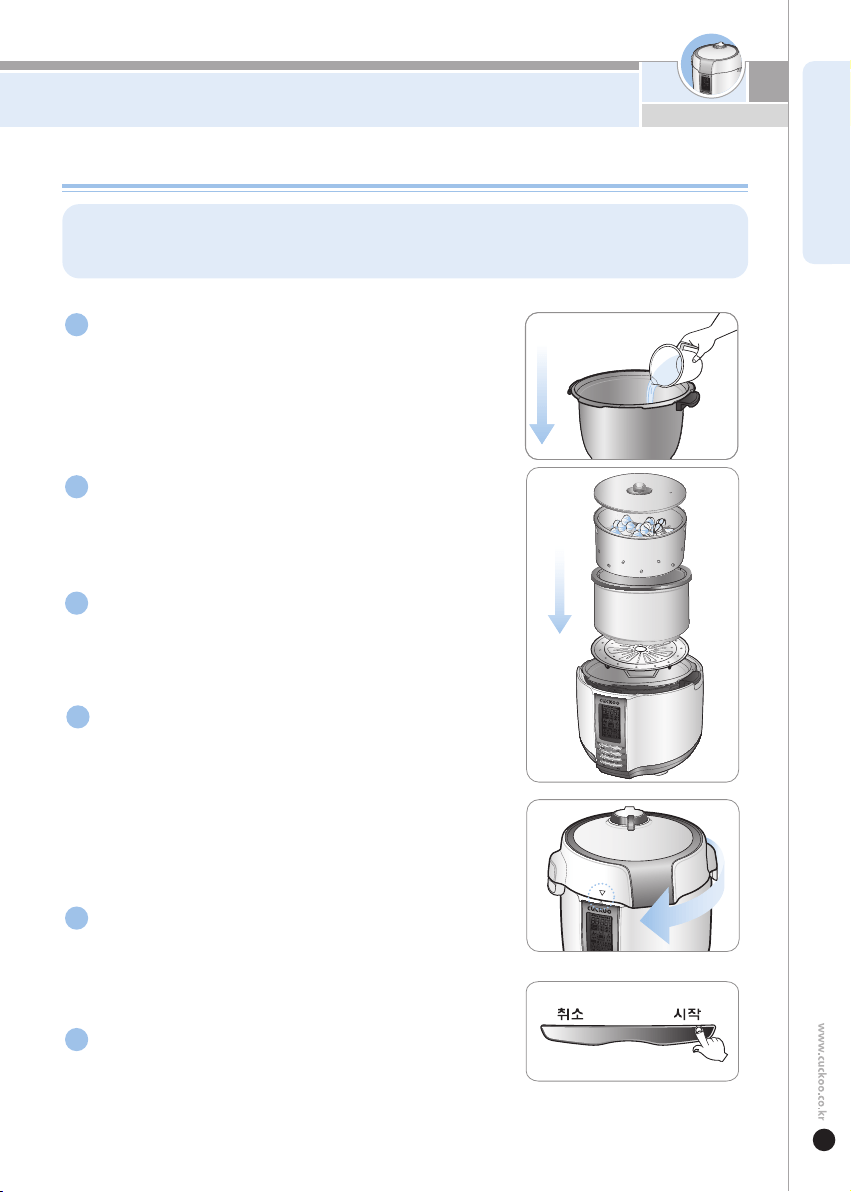
How to age Ginseng
1
2
3
4
5
6
HOW TO AGE GINSENG AND DECOCT RED GINSENG
ENGLISH
21
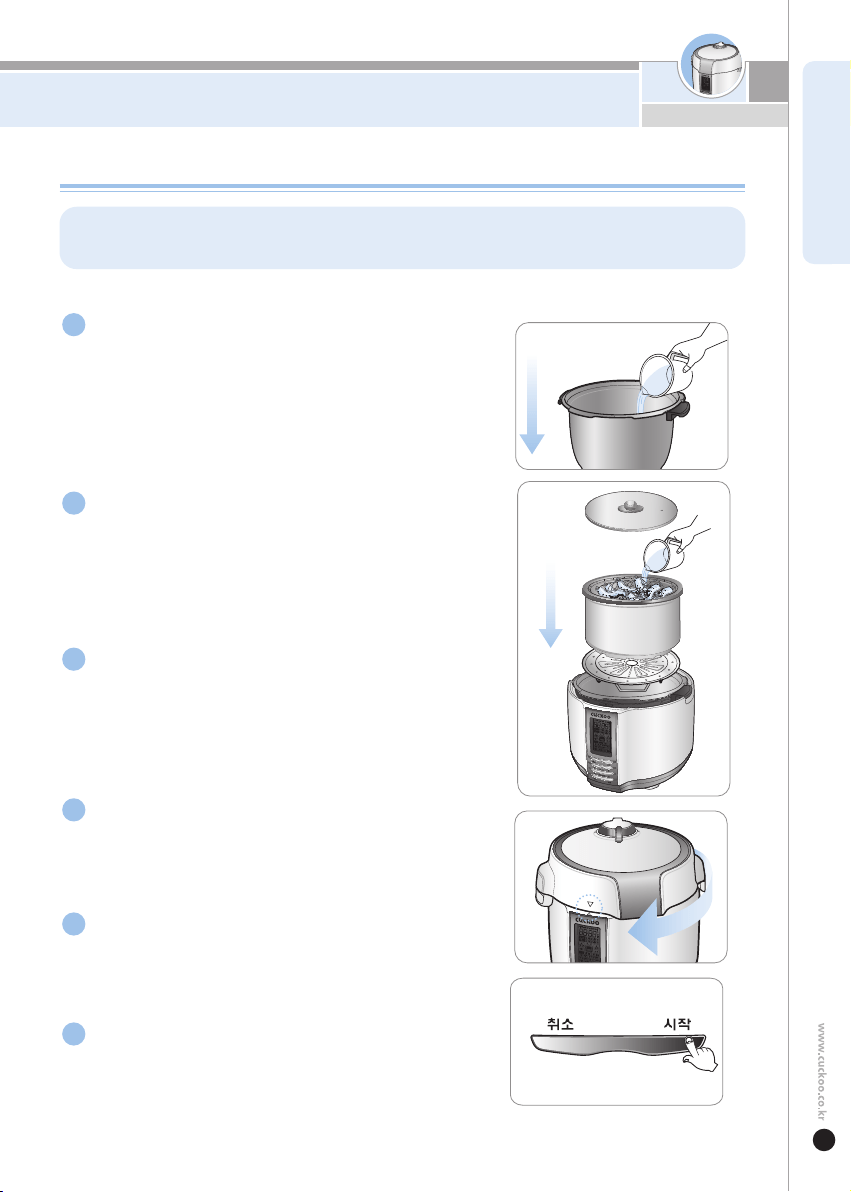
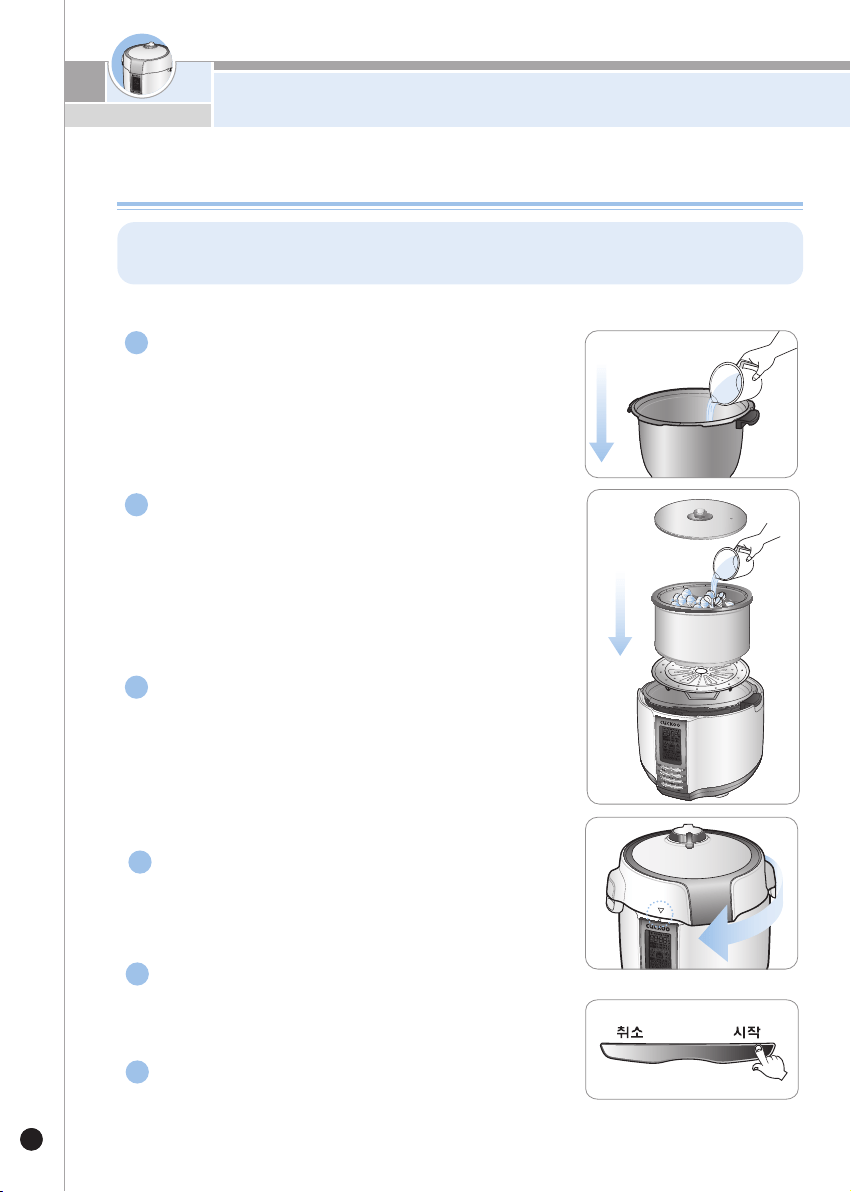
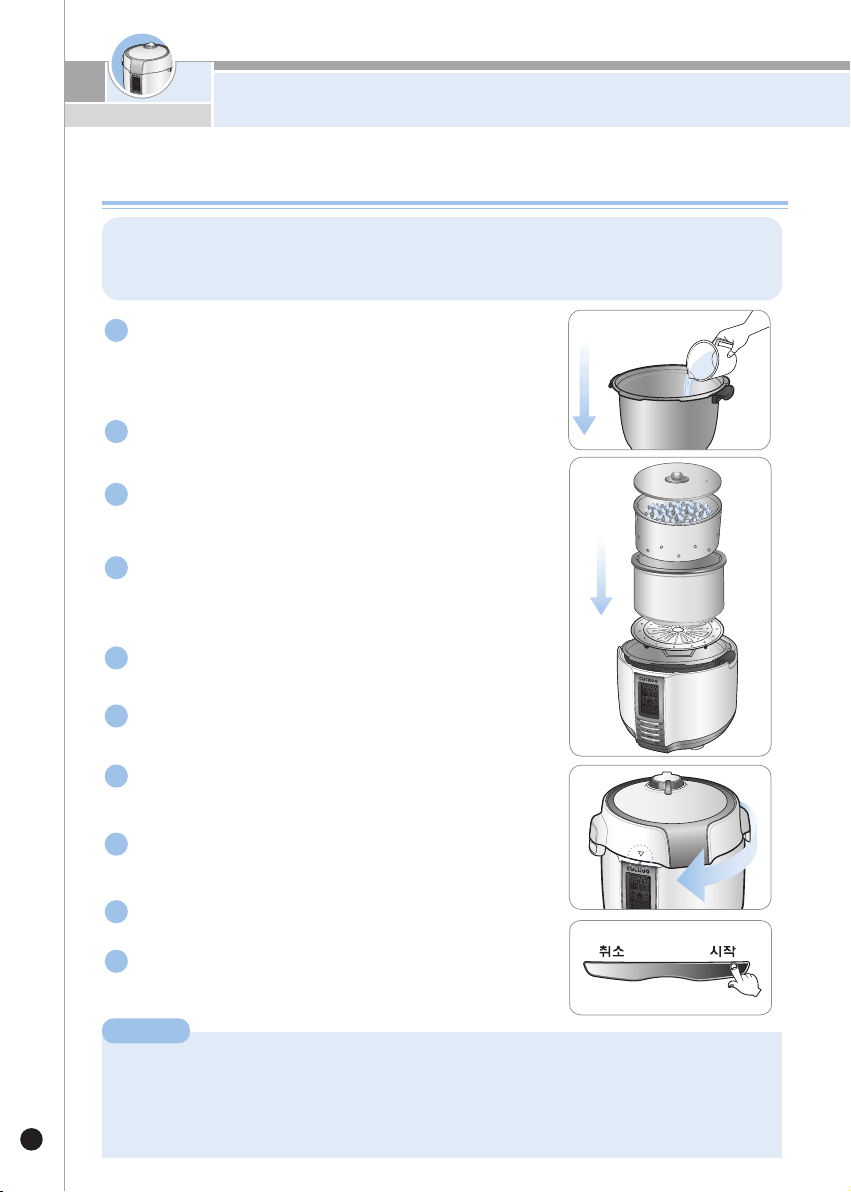
The CUCKOO Pressure Multi Cooker can make a healthy red ginseng decoction by boiling
and decocting the steamed red ginseng.
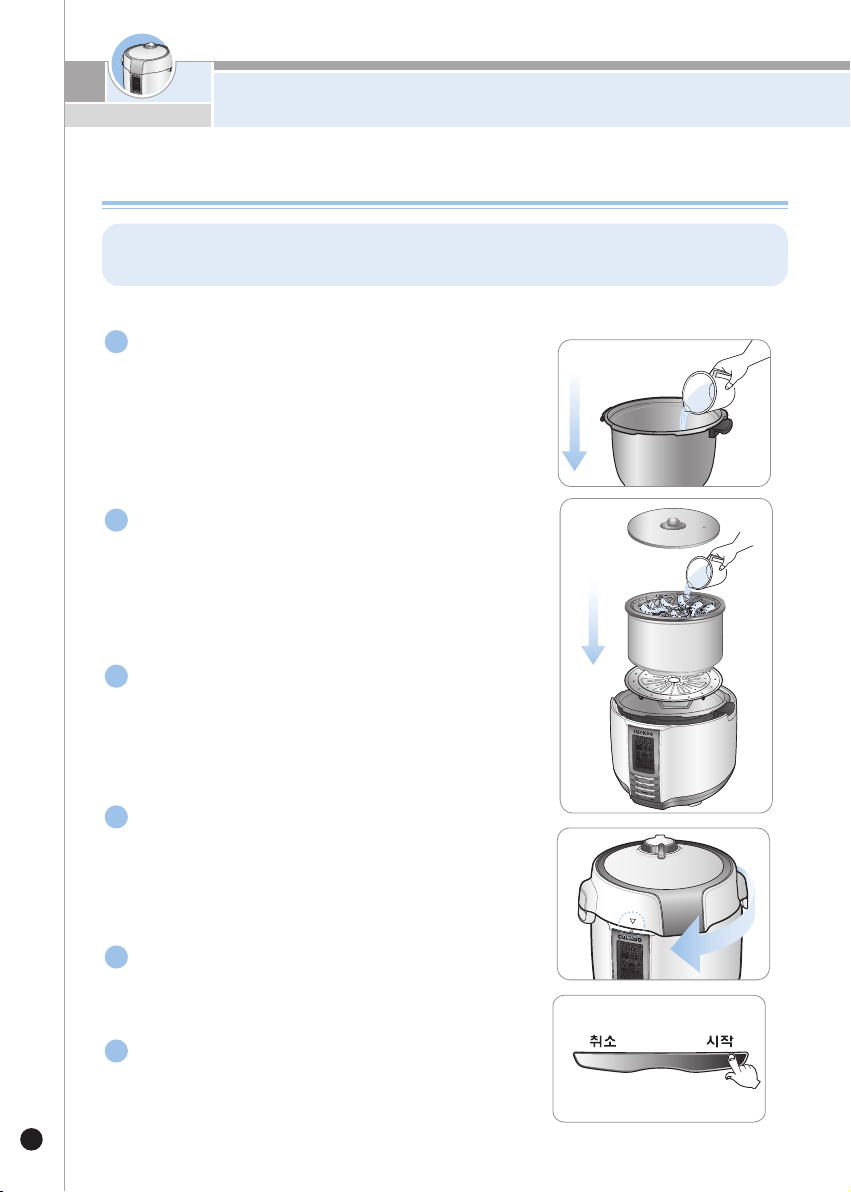
Pour 600ml of water into the stainless inner pot then
put the stainless steam plate into the pot.
※
First, insert the germanium ceramic pot
into the germanium inner pot. Next,
put the germanium pot into the stainless inner pot.
Put the steamed red ginseng or dried ginseng
in the germanium ceramic pot and pour
1800ml of water. Then Close the germanium lid.
Turn the pressure regulator to the high
pressure position.
Select the Decocting Red Ginseng mode and
press Start button.
How to decoct Red Ginseng
Close the lid and double check that packing is
correctly fitted and the pressure regulator closed.
1
2
3
4
5
6
To steam a large quantity of Red Ginseng, add 2700ml of
water into the stainless inner pot and place the stainless
steam plate into the pot. Put 600ml of red ginseng on the
plate and decoct it.
HOW TO AGE GINSENG AND DECOCT RED GINSENG
ENGLISH
22
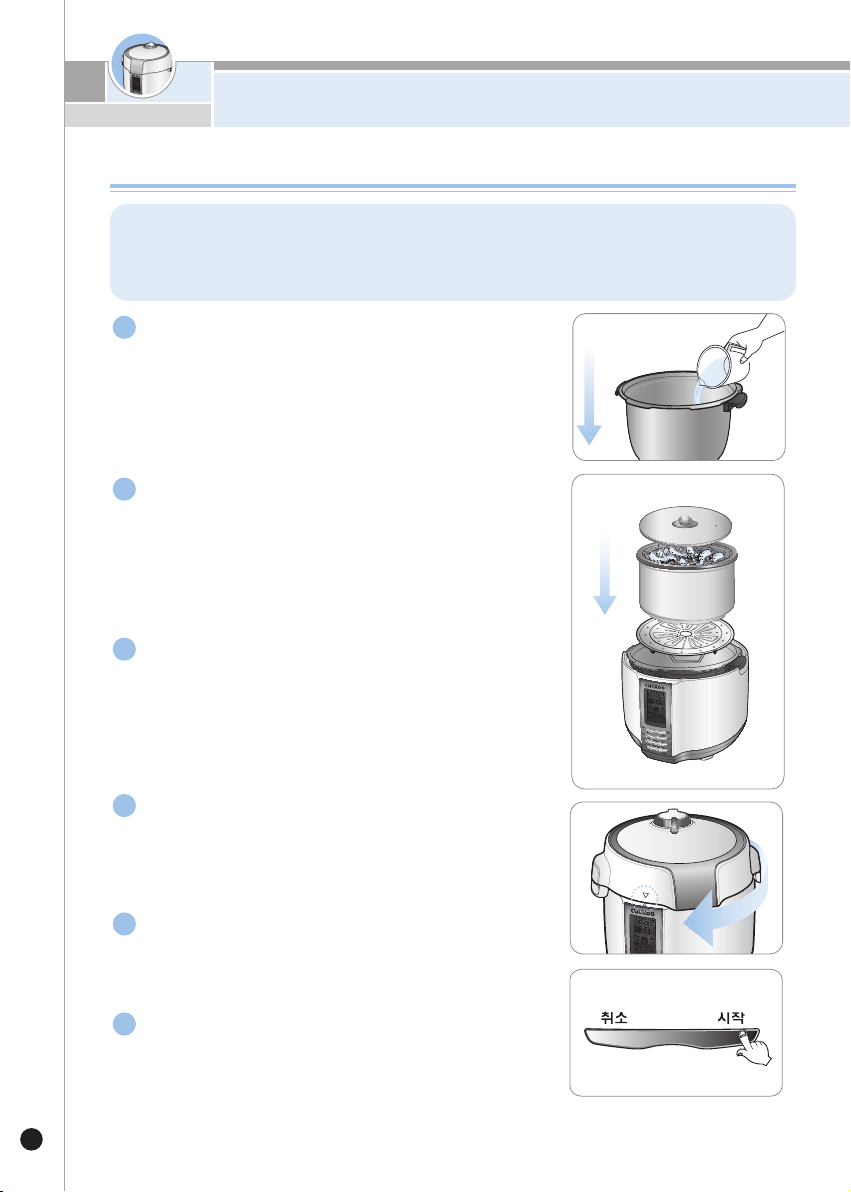
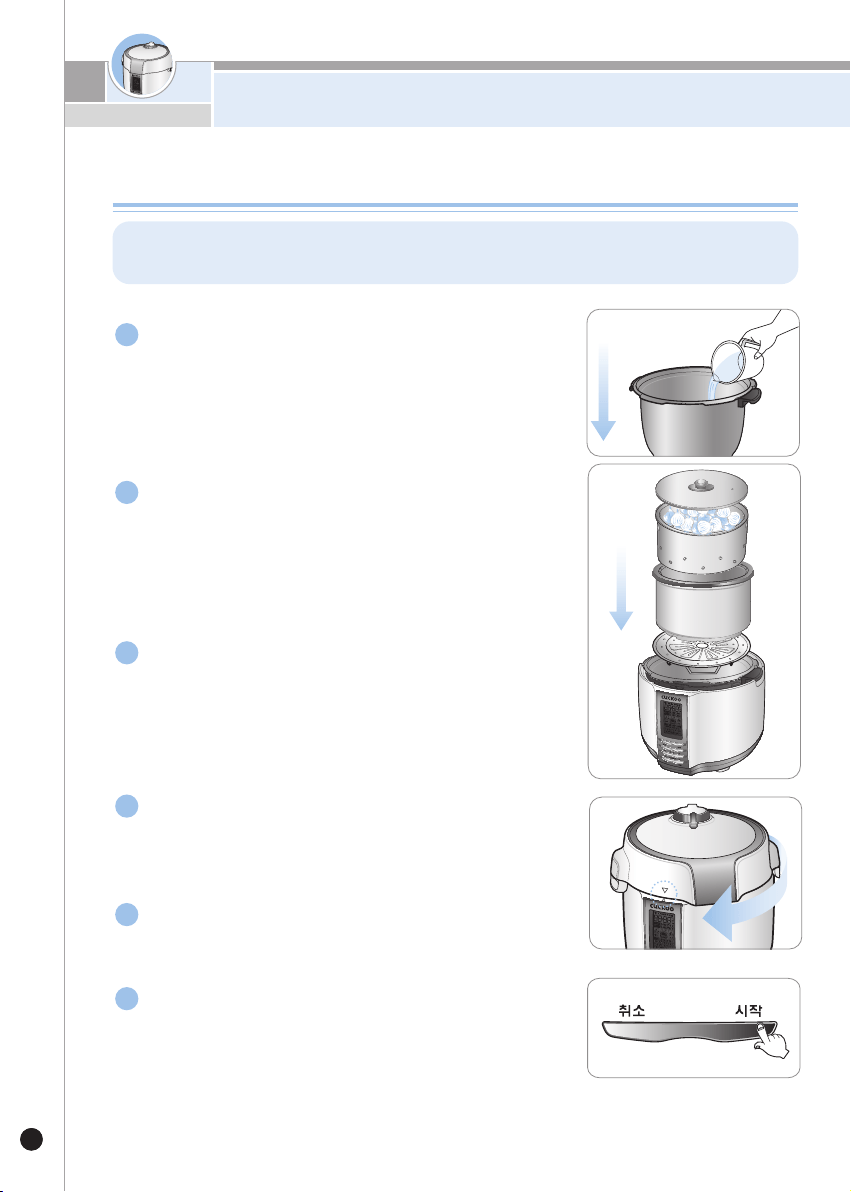
Korean preserves are traditional sweet snacks that are made by cooking fruit or roots with
a large amount of sugar or honey so that they can be stored for a long time.
If you cook red ginseng and black garlic in the Preserves mode, you can enjoy delicious
red ginseng preserves and black garlic preserves.
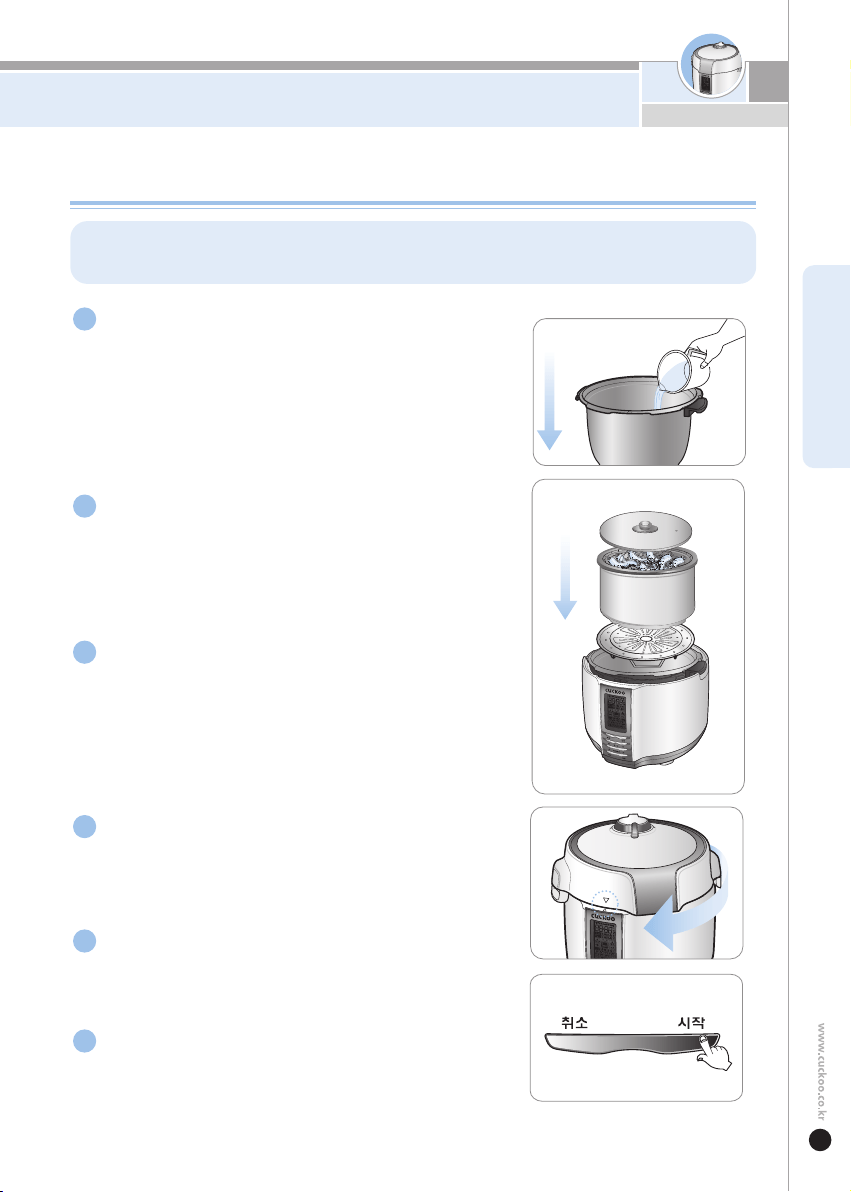
Pour 600ml of water into the stainless inner pot then
put the stainless steam plate in the stainless inner.
First, insert the germanium ceramic pot
into the germanium inner pot. Next,
put the germanium pot into the stainless inner pot.
Put the fresh ginseng or garlic in the germanium
ceramic pot and pour in 1800ml of honey.
Close the germanium lid.
Turn the pressure regulator to the
high pressure position.
Select the Preversing Red Ginseng or Black Garlic
mode and press Start button.
How to make Red Ginseng and Black Galic preserved in honey
Close the lid and double check that
packing is correctly fitted and the pressure
regulator closed.
1
2
3
4
5
6
HOw TO mAkE RED GINSENG AND BLACk GALIC PRESERvED IN HONEy
ENGLISH
23
In the Black Garlic Steaming mode, the CUCKOO Pressure Multi Cooker can cook general garlic
into black garlic, which is well known for many major health benefits such as preventing infections
and cancers. Please use this mode if you want fast steaming.
Pour 600ml of water into the stainless inner pot then
put the stainless steam plate in the stainless inner.
※To steam a large amount of peeled garlic, add 400ml of water
into the stainless inner pot and place the stainless steam plate
into the pot. Put 600g of peeled garlic on the plate and steam it.
First, insert the germanium ceramic pot
into the germanium inner pot. Next,
put the germanium pot into the stainless inner pot.
Turn the pressure regulator to the
high pressure position.
Select the Steaming Red Ginseng mode
and press Start button.
How to age Garlic
Put 300g of Black Garlic in the germanium ceramic
close the germanium lid.
Close the lid and double check
that packing is correctly fitted and the pressure
regulator closed.
1
2
3
4
5
6
HOW TO AGE GARLIC AND DECOCT BLACK GARLIC
ENGLISH
Pour 600ml of water into the stainless inner pot then
put the stainless steam plate in the stainless inner pot.
How to decoct Black Garlic
First, insert the germanium ceramic pot
into the germanium inner pot. Next,
put the germanium pot into the stainless inner pot.
Put the steamed Black Garlic in the germanium
ceramic pot and pour in 1800ml of water.
Close the germanium lid.
Turn the pressure regulator to the
high pressure position.
Select the Decocting Black Garlic mode
and press Start button.
Close the lid and double check that packing is
correctly fitted and the pressure regulator closed.
1
2
3
4
5
6
The CUCKOO Pressure Multi Cooker can make a healthy black garlic decoction by boiling
and decocting the steamed black garlic.
※To decoct large quantity of black garlic, add 2700ml of water
into the stainless inner pot. Put 600ml of black garlic on the
plate and decoct it.
2424
HOW TO AGE GARLIC AND DECOCT BLACK GARLIC

ENGLISH
Fast-Fermented Bean Paste(Boiled Bean / Fermentation)
Pour 600ml of water into the stainless inner pot.
Put the stainless steam plate in the stainless inner.
First, insert the germanium ceramic pot
into the germanium inner pot. Next,
put the germanium pot into the stainless inner pot.
Put two servings of soy beans (300g) in the
germanium inner pot and add 400ml of water.
Close the germanium cover.
Close the lid and double check that packing is
correctly fitted and the pressure regulator closed.
Turn the pressure regulator to the high pressure position.
Select the Preversing Boiled Bean mode and press
Start button.
After boiling the soy beans, move the boiled soy
beans into the germanium ceramic pot and pour
the water inside of the germanium inner pot.
Place germanium ceramic pot into germanium inner
pot then close by placing germanium lid on top.
Select the Preversing Fermentation mode and press
Start button.
Close the lid.
1
2
3
4
5
6
7
8
9
1
0
The CUCKOO Pressure Multi Cooker can make the Chonggukjang, fast-fermented bean paste
easily without the macerating process of soy beans. Just put soy beans into the CUCKOO
Pressure Multi Cooker and boil and ferment them. Imported soy beans may not ferment
due to preservatives. Please use Korean good-quality fresh soy beans.
How to Store Cheonggukjang
※To increase the fermentation effect, set the cooking time longer.
After the fermentation, stir the bean paste well with the rice paddle. Put the bean paste in the
mortar and mix and pound it with various seasonings like salt, powdered red pepper, crushed
garlic and ginger. Divide the seasoned bean paste into small portions and put them in an airtight
container or pack them with plastic wrap. Keep them refrigerated for a relatively short period
(about seven days) or keep them in a freezer for a longer term.
Do not store them at room temperature to prevent them from going bad.
25
HOW TO COOK CHEONGGUKJANG
ENGLISH
2626
Pour 600ml of water into the stainless inner pot
put the stainless steam plate in the stainless inner.
First, insert the germanium ceramic pot
into the germanium inner pot. Next,
put the germanium pot into the stainless inner pot.
Put the fresh fruits and vegetables in the germanium
ceramic pot and do not add water.
Turn the pressure regulator to the
high pressure position.
Select the Steaming Concentrate mode
and press Start button.
※
Close the lid and double check
that packing is correctly fitted and the pressure
regulator closed.
1
2
3
4
5
6
How to Extract Undiluted Solution
The CUCKOO Pressure Multi Cooker can make fresh fruit juice concentrate or vegetable
concentrate by cooking onion, Japanese apricot, blueberry, grape, pear and squash.
To increase the concentration, set the cooking time longer.
HOW TO EXTRACT UNDILUTED SOLUTION
27
ENGLISH
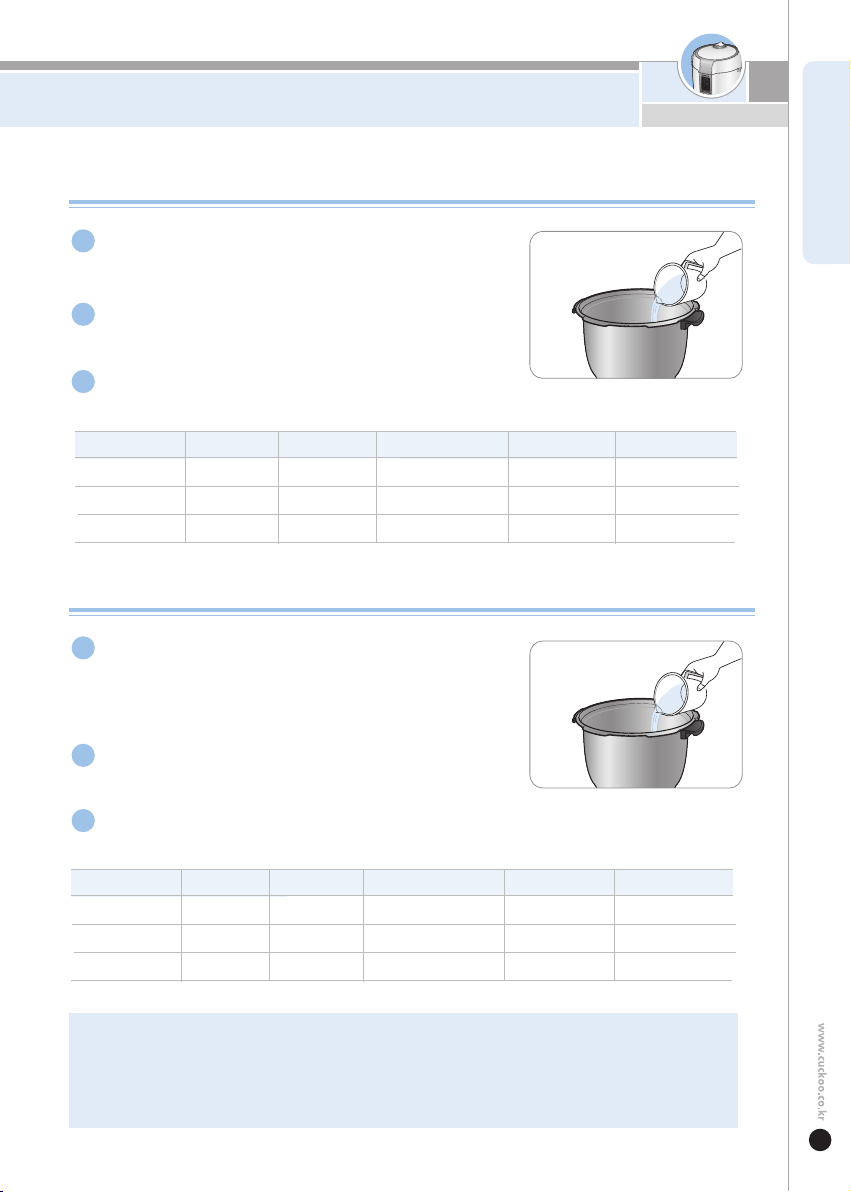
Wash rice clean and drain the water by using
a strainer. Put the rice into the stainless inner pot.
Add water into the stainless inner pot according to
the servings.
Close the lid and turn the pressure regulator to the
High Pressure position. Select the Customized Dish mode and press the Start button.
Glutinous Rice
300g
600g
900g
Rice
400ml
800ml
11 0 0 m l
Water Cooking Level
Step 3
Step 3
Step 3
Cooking Time
40 minutes
30 minutes
40 minutes
Customized Dish
Menu
Customized Dish
Customized Dish
Serving
2 servings
4 servings
6 servings
For five-grain rice, rinse the five grains and drain
the water. Put them into the stainless inner pot.
(
Capacity of 4 servings : Rice 320g, Glutinous rice 100g
,
Sorghum 60g, millet 60g, Steamed Adzuki bean 60g)
Mixed Rice
Add water into the stainless inner pot
according to the measurement and servings.
Close the lid and turn the pressure regulator to the
High Pressure position. Select Customized Dish mode and press the Start button.
※It is natural to see melanoizing effect in the stainless inner pot.
Before cleaning the pot, please soak it in water for over one hour beforehand.
※
Please follow the exact measurement of water and rice.
※
Rice texture may vary according to the cooking environment and other conditions.
※
If you eat the rice straight after cooking, you can enjoy tastier and full flavored rice.
300g
600g
900g
Rice
400ml
800ml
11 0 0 m l
Water Cooking Level
Step 3
Step 3
Step 3
Cooking Time
40 minutes
30 minutes
40 minutes
Menu
Customized Dish
Customized Dish
Customized Dish
Serving
2 servings
4 servings
6 servings
1
2
3
1
2
3
HOw TO COOk RICE
28
28
CHECK BEFORE ASKING
FOR SERVICE
Case
Check points
Do the following
If there is a problem with your cooker, check the following details before requesting service to your dealer. Sometimes
the cooker may not operate as desired if used incorrectly.
▶
The water spills outside
around the cooker.
•
•
•
Did you use the measuring cup for the rice?
Did you put proper amount of water?
Is the menu selected correctly?
•
•
•
When you smell odors
while warming.
•
•
Did you close the lid?
Please check it the power cord is plugged.
•
Is the Keep-warm time too long?
Please set the Keep-warm time as short
as possible.
Close the lid perfectly.
Always keep the power on while warming.
•
Refer to page 9, 15-16.
•
Is the stainless inner pot inserted?
•
Please insert stainless inner pot into cooker.
When the button cannot
operate with “ ”
•
When the Pressure
“Cook/Turbo” Timer
button does not operate
with “ ”
Did you turn the Lock/Unlock Handle
to “Lock”?
Is the lid not properly closed?
Please turn the “Lock/Unlock” handle to “Lock”.
There is too much
melanoizing effect.
Is there any rice or any other alien
substance on the temperature sensor or
the bottom surface of the stainless
inner pot?
Clean all the alien substance on the temperature
sensor or the bottom surface of the stainless
inner pot. (
Refer to page 10)
•
Is the exact amount of water added into
the stainless inner pot?
•
This indicates lack of water.
Please add more water to the pot.
If “ ” sign appears.
29
CHECK BEFORE ASKING
FOR SERVICE
Do the following
Refer to page 10 of this manual and clean
the packing on the lid accordingly.
•
Please cut the power and contact customer
service.
•
The lid will not open during cooking.
Do not open it by force.
If necessary, press the Cancel button for two
seconds. Turn the pressure regulator to the
steam vent position to depressurize completely.
Then, open the lid.
•
The lid does not open even when the pressure
regulator is turned to the steam vent position
•
It is due to the pressure.
•
Pull the pressure handle to aside once and
exhaust the steam perfectly.
•
•
•
•
Clean the packing throughly.
Keep the packing clean.
If the steam leaks from the lid seal area,
press the Cancel button for two seconds to
cancel cooking. Turn the pressure regualtor to
t
he steam vent position to depressurize completely.
Then, open the lid and follow the steps below.
- Check that the packing is correclty fitted.
-
Check that the pressure indicator is correctly fitted.
- Check that the nut of the pressure regulator is
tight enough.
Packing life cycle is 12 months, please replace
the packing per 1 year.
Check points
Did you clean thoroughly after cooking?
•
When micom power is broken.
•
Did you turn the lid with steam
left inside?
•
Did you turn the lid during cooking?
•
•
Is there an external substance on the
packing?
Is packing too old?
Case
Right after cooking or during
Keep-warm mode,
the food smells bad.
When the steam exhausted
between the lid.
When “ ” is showed
on the LCD.
When the lid cannot open
although the Lock/Unlock
handle is turned to “Unlock”.
When cannot turn to
“Unlock”.
If there is a problem with your cooker, check the following details before requesting service to your dealer. Sometimes
the cooker may not operate as desired if used incorrectly.
▶
반드시 정격 15A이상의 교류
220V전용 콘센트에서만 사용해
주시고 한 콘센트에 여러 제품의
전원플러그를 동시에 꽂아
사용하지 마십시오
•여러제품과함께사용하거나,다른기구에사용하면발열
및발화,감전의원인이됩니다.
•수시로콘센트상태를꼭확인하십시오.
•전원플러그에이물질이나물기가묻어있는경우에는잘닦
은다음사용하십시오.
•연장코드도15A이상의것을사용하여주십시오.
안전상의 경고
30
제품을 분해하거나 개조하지
마십시오.
•화재및감전의원인이됩니다.
•서비스기사이외의사람이분해
하거나수리하지마십시오.
수리및고장상담은서비스센터로문의하여주십시오.
제품을 직사광선이 쬐는 곳,
가스레인지, 전열기구 등의
가까이에서 사용하지 마십시오.
•전기누전및감전,변형및변색의
원인이됩니다.
•전원코드를열기구가까이두지마십시오.
코드피복이녹아화재,감전의원인이됩니다.
•수시로전원코드의상태를꼭확인하십시오.
•
오디오,TV등과같은전자제품과2m이상거리를유지하십시오.
경고(금지)
●
‘안전상의 경고’는 제품을 안전하고 올바르게 사용하여 사고나 위험을 미리 막기 위한 것이므로 반드시 지켜 주십시오.
●
‘안전상의 경고’는 ‘경고’와 ‘주의’의 두가지로 구분되어 있으며 ‘경고’와 ‘주의’의 의미는 다음과 같습니다.
•
이기호는특정조건하에서위험을끼칠우려가있는사항에
대하여주의를환기시키는표시입니다.
•
위험발생을피하기위해주의깊게읽고지시에따라사용하십시오.
•이기호는어떤행위를‘금지’하는표시입니다.
•이기호는어떤행위를‘지시’하는표시입니다.
피하지 않을 경우 사망이나 중상을
초래할 수 있는 잠재적인 위험상황
피하지 않을 경우 경상을 초래할 수
있는 잠재적인 위험상황
전원코드나 전원플러그가
파손되었거나 콘센트가
흔들릴 때는 사용을 중지하고,
고객상담실로 문의바랍니다.
•제품사용중사용상의부주의로전원
코드의피복이벗겨지거나찍힐경우화재및
감전의원인이될수있으니,수시로전원코드와전원플러그,
콘센트의상태를꼭확인하십시오.
•전원코드나전원플러그가파손된경우에는위험이생기지
않도록하기위하여제조자나그판매점또는자격이있는
기술자(서비스기사)에의해코드교환을하십시오.
•반드시지정된서비스센터에서수리하시기바랍니다.
사용중 압력조절장치에는 손과
얼굴을 가까이 하지 마십시오.
•화상의우려가있습니다.
취사또는요리중나오는증기는매우
뜨거우므로손이나얼굴을가까이
하지마십시오.
•특히어린이의접근을막아주십시오.
싱크대, 목욕탕 등 제품에
물이 들어 갈 수 있는 곳이나,
화학성 물질이 있는
곳에서는 사용하지 마십시오.
•전기누전및감전의위험이있습니다.
•먼지가많은곳이나화학성물질이있는곳에서는
사용하지마십시오.
•제품에물이들어갔을경우에는서비스센터로꼭문의
하십시오.
제품을 씽크대에 넣고 닦거나 제품 내부에 물을 넣지
마십시오.
•전기누전및감전,화재의원인이됩니다.
•제품에물이들어간경우에는사용을중지하고전원플러그를
뽑은다음서비스센터로문의하여주십시오.
먼지가 많은 곳이나, 화학성 물질이 있는 곳에서는
사용하지 마십시오.
•제품근처에서가연성가스니인화성물질등을
사용하지마십시오.
•폭발및화재의원인이됩니다.
스테인리스 내솥 없이 찜판,
금속성 물질 등을 넣거나,
넣어서 사용하지 마십시오.
(특히 어린이 주의)
•감전및화재의원인이됩니다.
압력 표시장치가 올라온 상태에서
본체뚜껑을 강제로 열지 마십시오.
•압력표시장치가올라온상태에서는
본체뚜껑을강제로열지마십시오.
•강제로본체뚜껑을열면제품고장및
사고의원인이됩니다.
31
안전상의 경고
변형된 내솥이나 전용 내솥이
아닌것은 사용하지 마십시오.
•내솥이가열되어이상작동및
화재의원인이됩니다.
•내솥을떨어뜨렸거나변형된경우에는
서비스센터로문의해주십시오.
경고(금지)
압
력
조
절
장
치
를
막
거
나
증
기
구
에
행
주
나
장
식
용
덮
개
,
기
타
물
건
을
올
린
채
사
용
하
지
마
십
시
오
.
•
압력에의한폭발의위험이있습니다.
•
본체의변형,변색및고장의원인이됩니다.
스테인리스 내솥 없이 사용을 하지 마십시오.
•감전및고장의원인이됩니다.
•스테인리스내솥이없는상태에서조리물을넣지마십시오.
•
조리물이들어갔을경우에는제품을뒤집거나흔들지마시고
서비스센터로
꼭문의하십시오.
전원플러그에 묻은 이물질은 물기가 없는 천으로
깨끗이 제거하여 주십시오.
•화재의원인이됩니다.
수시로전원플러그상태를꼭확인하십시오.
전원플러그에 묻은 이물질은 물기가 없는 천으로
깨끗이 제거하여 주십시오.
•화재의원인이됩니다.
•수시로전원플러그상태를꼭확인하십시오.
흡·배기구 또는 틈 사이에 바늘, 청소용 핀, 금속물 등 이
물질이 들어가거나 막히지 않도록 하십시오.
•감전및화재의원인이됩니다
•청소용핀을증기배출구청소외에제품의틈새나구멍에
넣지마십시오.
제품내에 살충제나 화학물질 등을
뿌리거나 투입하지 마십시오.
•화재발생의우려가있습니다.
•제품내바퀴벌레나벌레등이들어갔을경우는
서비스센터로문의해주십시오.
<전용내솥>
어린이 혼자 사용하거나 어린이가 만질 수 있는 장소에
제품을 두지 마십시오.
•고열에화상을입거나감전이될수있습니다.
KOREAN
플러그 및 전원 코드부를 동물이
물어 뜯거나 못과 같이 날카로운
금속물체로부터 충격을받지
않도록 주의하여 주십시오.
•충격으로인한파손은합선,감전,화재등의
원인이됩니다.
수시로전원코드와전원플러그상태를꼭확인하십시오.
전원코드를 무리하게 구부리거나,
묶거나, 잡아당기지 마십시오.
•감전이나쇼트로인해화재의원인이
될수있습니다.수시로전원코드상태를
꼭확인하십시오.
취사나 요리가 진행중일 때 절대로 본체뚜껑을 열지 마십시오.
•취사나요리가진행중일때는압력에의해본체뚜껑이
열리지않습니다.
•강제로열면화상및폭발의위험이있습니다.
•
취사또는요리가진행중일때부득이하게본체뚜껑을열어야할경우
취소버튼을약2초간누른후압력조절장치를돌려내부압력을제거
하고,압력표시장치가내려간후에본체뚜껑을열어주십시오.
안전상의 경고
32
본체뚜껑 주위에 자성을 지닌 물체를
올려 놓거나 자성이 강한 물체
근처에서 사용하지 마십시오.
•제품고장및기능이정상적으로
작동되지않을수있습니다.
사용하지 않을 때는 전원플러그를
콘센트에서 뽑아 주십시오.
•절연성능저하로인해감전,누전,
화재의원인이될수있습니다.
경고
(지시)
쌀통 및 다용도 선반 등에
제품을 놓고 사용하지 마십시오.
•전원코드가틈새에눌러져
화재및감전의원인이됩니다.
•수시로전원코드상태를꼭확인하십시오.
•취사또는요리중증기가배출될때쌀통
및다용도선반에의해제품의손상,화재,감전의원인이됩니다.
전원코드를 임의로 연장하거나 연결하는 등
가공하여 사용하지 마십시오.
•신체상해의위험및제품사용저하의원인이됩니다.
온도감지기, 내부 또는
스테인리스 내솥 주위의 이물질은
반드시 제거한 후에 사용하십시오.
•온도감지를정확히못하게되므로내솥이
가열되어이상작동및화재의원인이됩니다.
지정된 메뉴 이외의 물끓임, 기름으로 튀기는 요리 등 다른
용도로 사용하지 마십시오.
•고장및냄새의원인이됩니다.
주의(금지)
사용 중에 이상한 소리나 냄새 또는 연기가 나면
즉시 전원플러그를 뽑고 내부 압력을 완전히 제거후
서비스 센터로 문의해 주십시오.
실외에서는 사용하지 마십시오.
•감전및화재의원인이됩니다.
사용 중이거나 사용 직후에는 내솥 내부 및 압력조절
장치 등은 뜨거우므로 만지지 마십시오.
•고열에의해화상을입을수있습니다.
•압력조절장치가돌려져증기에의해화상을입을수있습니다.
제품에 심한 충격을 주거나 떨어뜨리지 마십시오.
•제품고장및안전상의문제가발생할수있습니다.
내솥을 다른 용도로 사용하거나 불위에 올리지 마십시오.
•내솥의변색및손잡이의변형으로제품에이상이발생할수있습니다.
제품을 전자레인지 및 싱크대
스테인레스 위에 올려놓거나 제품
밑에 깔판, 방석, 전기장판, 철판,
은박지 등을 놓고 사용하지 마십시오.
•화재및변형의원인이됩니다.
•수시로제품상태를꼭확인하십시오.
교류 220V이외에는 사용하지 마십시오.
•감전,화재의원인이될수있습니다.
•제품이정상적으로작동을하지않습니다.
전원플러그를 콘센트에서 꽂거나 뺄때는 손의 물기를
반드시 제거한 후 전원플러그를 잡고 꽂거나 빼어 주십시오.
•젖은손으로전원플러그를뽑으면감전의원인이될수있습니다.
•무리하게당겨뽑으면전원코드에이상이발생되어
누전및감전이될수있습니다.
제품 이동시 전원코드를 이용하여 들어올리거나
잡아당겨서 이동하지 마십시오.
•온도감지기가손상되었을경우,그대로사용하게되면과열,
이상동작,감전의원인이됩니다.
전원코드 위에 무거운 물건을 올려 놓거나, 코드가 제품
바닥에 놀러지지 않도록 주의해 주십시오.
•화재및감전의원인이됩니다.
수시로전원코드상태를꼭확인하십시오.
33
안전상의 경고
주의(지시)
전원 플러그를 뽑을때는 전원코드를 잡지 마시고
꼭 전원 플러그를 잡고 뽑아주십시오.
•
전원코드에충격이가면감전및화재의원인이될수있습니다.
게르마늄 내솥 및 내 도자기에 급격한 온도 변화를
주지 마십시오.
•내솥류가아주뜨거운상태에서차가운물이부어질경우
균열의원인이됩니다.
흰밥 이외의 식품에는 변질하기 쉬운 것이 있으므로 가능하면
보온하지 마십시오.
조리 중 제품내부에 압력이 차기 전에는, 압력표시장치에서
물이 튀는 현상이 발생할 수 있으니 주의하십시오.
조리가 완료된 게르마늄 내도자기 및 내솥과 스테인리스
내솥의 표면은 맨손으로 만지지 마십시오.
•조리가완료된게르마늄내도자기와내솥은무겁고뜨거우며
화상의위험이있으니취급시반드시스테인리스내솥의
손잡이를이용하여통째로이동하여주십시오.
•게르마늄내도자기와내솥을취급할때는완전히식은것을
확인한다음떨어뜨리지않도록주의하여들으신후이동하여
주십
시오.
조리 완료 후 압력표시장치가 내려간 것을 확인 한 후,
압력조절장치를 스팀배출로 돌려 완전히 증기를 배출하고
본체뚜껑을 열어주십시오.
•본체뚜껑손잡이가뜨거울수있으므로안전장갑을반드시
착용하시고취급하여주십시오.
조리 후에는 압력조절장치를 반드시 세척한 후에 보관하여
주십시오. 변색 또는 냄새의 원인이 됩니다.
주의
(금지)
경사진 곳이나 울퉁불퉁한 곳에
서는 사용하지 마십시오.
•
화상및제품고장의원인이됩니다.
•
전원코드에손이나발,기타물체가
걸려제품이떨어지지않도록주의하십시오.
조리 완료 후 또는 보온 시
본체뚜껑이 잘 열리지 않을 때
강제로 돌리지 마십시오.
•화상및제품손상의원인이됩니다.
•압력조절장치를젖혀증기가완전히
배출되었는지확인후본체뚜껑을열어주십시오.
•조리완료후본체뚜껑을열때증기에의한화상의우려가
있으므로주의하십시오.
조리 진행 중 증기에 주의하십시오.
•증기가고속으로배출되면서‘취익’하는소리가
나므로놀라지않도록주의하십시오.
•특히어린이의접근을막아주십시오.화상의원인이됩니다.
조리 후에는 반드시 청소해 주십시오.
•
본체뚜껑세척시거친수세미나금속성
수세미를사용할경우표면이손상될
수있으니반드시스폰지또는물기를제거한
행주로닦아주십시오.
•
35~36쪽을참조하여본체뚜껑,패킹등을
깨끗이닦아낸후사용하십시오.
스테인리스 내솥이 손상될 수
있습니다.
•
제품을장기간사용할경우내솥이
변색될수있습니다.
•스테인리스
내솥특성상거친수세미나
금속성수세미로내솥을씻을경우긁힐수있으니
주의하여씻어주십시오.
취사나 요리가 끝난 뒤에는 반드시 본체에 고인 물을
닦아 주십시오.
•이상한냄새및변색의원인이됩니다.
•본체의물받이에고인물을닦아주십시오.
KOREAN
본체뚜껑 손잡이를 잡고 제품을 이동시키지 마십시오.
•
본체뚜껑손잡이를잡고제품을이동시킬경우,
본체와분리되어떨어질경우상해를입을수있습니다.
•
제품바닥좌,우측에있는이동용손잡이홈을양손으로
들어올려안전하게사용하십시오.
각 부분의 이름
34
내부/외부 명칭
부속품 안내
주걱
베주머니
계량컵
스테인리스찜판
(찜판은'요리책자'를
참조하여사용하십시오.)
청소용핀
(실물은본체바닥면에
부착되어있습니다.)
사용설명서요리책자
용기
본체
게르마늄 뚜껑 패킹
게르마늄 뚜껑
게르마늄 내도자기
게르마늄 내솥 패킹
게르마늄 내솥
스테인리스 찜판
스테인리스 내솥
본체
기능 조작부 및 표시부
온도감지기
본체
뚜껑
뚜껑열림안전장치
압력패킹
압력조절장치
압력표시장치
손잡이
계량컵
계량컵에는물눈금(ml),쌀눈금(인분)이
표기되어있습니다.각종요리시,눈금을
참조하여주십시오.
(물눈금최대900ml,쌀눈금5인분)
(한컵)
전원 코드
35
제품 손질 방법
조리 전/후 제품 손질 방법
- 청소를 잘하지 않으면 조리나 보온 중 냄새가 나는 원인이 됩니다. 특히 뚜껑부는 자주 청소해 주십시오.
(
전원플러그를 빼고 본체의 열이 식고 난 후 손질하십시오.)
- 본체·뚜껑은 물기를 제거한 행주로 닦아 주십시오. 벤젠, 신나 등은 사용하지 마십시오.
본체뚜껑 결합방법
스테인리스 내솥
최초사용시스테인리스내솥의내/외측을
주방용중성세제와스폰지로깨끗이세척하여
주십시오.거친수세미,솔연마제등은내솥을
긁을수있습니다.스테인리스내솥특성상
수세미를이용한세척시긁힘이발생할수
있으므로물에충분히불린다음닦아주십시오.
본체뚜껑(표면)
최초사용시본체뚜껑표면을주방용중성
세제와스폰지로깨끗이세척하여주십시오.
본체의뚜껑에음식물이묻어있는경우물기를
제거한행주로닦아주십시오.
뚜껑의가장자리부분은금속으로되어있으
므로청소할때주의하십시오.
압력패킹
압력패킹을손으로잡고당기면분리할수
있습니다.조리후에패킹을분리하여청소하여
주십시오.
본체 물고임부
본체물고임부에고여있는물기는조리전이나
조리완료후에물기를제거한행주로깨끗이닦아
주십시오.
본체내부
온도감지기에이물질이눌러붙어있는경우
금속판이손상되지않게제거하십시오.
본체뚜껑(내부)
본체뚜껑속에물이차있는경우에는화살표
표시된부분의배수구를이용하여뚜껑내부에
있는물기를제거하여주십시오.
본체에뚜껑을체결시그림1.과같이뚜껑의
표시부와 본체의 표시를 일치시켜체결후
시계방향으로회전시켜그림2.와같이닫으십시오.
열때는시계반대방향으로회전시켜열어주십시오.
KOREAN
제품 손질 방법
36
압력조절장치 구성
압력조절장치는그림과같이패킹류를포함하여총15개의
부품으로이루어져있습니다.분리를하여청소를할시에,
부품을분실하지않도록유의하여주시기바랍니다.
압력 스팀 캡 덮개
압력 스팀 캡+패킹
압력조절장치 본체
걸림 핀 스프링
걸림 핀
증기배출 봉 패킹
증기배출 봉 스프링
증기배출 봉
증기배출 캡+패킹
볼트 패킹
볼트
볼트 오링
너트
압력조절장치
조리완료후37쪽의분해방법을참조하여압력조절장치를분리하여중성세제
및스폰지로자주세척해주시고압력조절장치본체에고인물은꼭마른행주
로닦아주십시오.
이물질등으로압력조절장치의증기배출구가막혀있으면
제기능을발휘하지못하므로사용전·후에는압력조절장치를
분리하여청소용핀으로구멍을뚫은후사용해주십시오.
압력 스팀캡
조리완료후떼어낸다음주방용
중성세제및스폰지로자주세척해
주시고제품뚜껑에고인물은물을
꼭짠행주로닦아주십시오.
- 조리 완료 직후에는 압력 스팀캡이 뜨거우므로 만지지 마십시오. 화상을 입을 수 있으므로 주의하십시오.
압력조절장치 손질 방법
내솥·부속품 ▶
주방용중성세제와스폰지로씻어주십시오.
압력조절장치 조작 시 주의사항
조리완료후본체뚜껑에있는압력조절장치를조작할때
압력스팀캡덮개에있는손잡이를그림과같이잡고돌려
증기배출하여주십시오.
압력스팀캡 조절시 손으로 감싸면 증기배출로 인한 화상을
입을 수 있습니다.
본체 뚜껑 개폐 시 주의사항
조리완료후본체뚜껑을열때는뚜껑내측이몸밖깥쪽으
로향하도록하며,최대한가슴쪽으로당겨서뚜껑내측이
하늘을향하게하여뜨거운물이아래로흐르지않게하며,
두손이평행하도록유지해주십시오.뚜껑이기울어지면
스팀과뜨거운물에의해화상을입을수있습니다.
뚜껑 개폐 시 항상 안전장갑을 착용하여 주십시오.
37
제품 손질 방법
압력조절장치 분해조립 방법
❶압력조절장치를한손으로잡습니다.
❷압력조절장치를잡은상태에서,너트를반
시계방향으로돌려풀어줍니다.
❸압력조절장치아랫부분의볼트를반시계
방향으로돌려분리시킵니다.
❹그림에표시된후크부분을당겨압력스팀캡을
분리합니다.
❼본체바닥면에붙어있는청소용핀으로증기
배출구의구멍을청소합니다.청소가끝난
뒤는역순으로조립합니다.
❺증기배출봉을그림과같이누른상태에서
아랫부분의증기배출캡을반시계방향으로
돌려분리합니다.
❻증기배출봉을분리합니다.
❽청소용핀을증기배출봉측면의구멍에삽입한
후증기배출캡을단단히조여주십시오.느슨
하게조립시스팀배출이되지않을수있습니다.
❾압력조절장치가헐겁게조립되어있으면
조리가정상적으로되지않을수있으므로
너트가단단히조여졌는지확인합니다.
취사나 조리 완료 직후에는 압력 스팀캡이 뜨거우므로 만지지 마십시오. 화상을 입을 수 있으므로 주의하십시오.
❶
양옆에있는후크를눌러서분해하고
주방용중성세제및스폰지로자주
세척해주십시오.
세척후순서대로조립해주십시오.
※패킹을끼울때는방향에주의해서
패킹홈을잘맞춘후끼워주십시오.
❷
압력스팀캡을조립하여
끼울때에는아래쪽의
홈부분을맞춘후,화살표
방향으로눌러양옆의
후크를확실히끼워
주십시오.
압력 스팀캡 손질 방법
KOREAN
기능 조작부의 이름과 역할 / 기능 표시부의 이상 점검 기능
38
기능 표시부의 이상점검 기능
사용 방법이 올바르지 않거나 제품에 이상이 생겼을 때 아래와 같은 표시가 나타나 경보를 하여 줍니다.
정상적인 사용 조건에서나 혹은 조치 이후에도 지속적으로 표시가 나타날 경우에는 고객상담실(1588-8899)로 문의하십시오.
<대기상태화면>
내솥이없을때나타납니다.
본체뚜껑을확실하게결합하지않은상태에서[시작]또는[예약]버튼을누를때나타납니다.
본체뚜껑을확실하게결합하여주십시오.
마이컴내부메모리에이상이있을때나타납니다.
고객상담실(1588-8899)로문의하십시오.
온도감지기에이상이있을때나타납니다.(""표시가깜박거립니다.)
고객상담실(1588-8899)로문의하십시오.
조리시작및조리중스테인리스내솥에물이없음을감지하였을때나타납니다.
지속적으로표시가나타날경우고객상담실(1588-8899)로문의하십시오.
취소 버튼
선택한요리,메뉴,기능을
취소할경우사용(조리중에취소
시킬경우2초간눌러주십시오.)
시간/온도 버튼
선택한메뉴의조리시간및
온도를설정할경우사용
▶41쪽참조
예약 버튼
예약조리를사용할경우
▶44쪽참조
기능표시부
시작 버튼
선택한메뉴의조리또는
예약을시작할경우사용
▶41쪽참조
메뉴 버튼
메뉴를선택할경우사용
▶41쪽참조
확인 버튼
선택한기능을설정할경우
음성볼륨을조절할경우사용
▶39쪽참조
기능 조작부의 이름과 역할
<대기 상태 화면>
※전원플러그를꽂으면그림과같은화면상태가나타납니다.
※전체메뉴표시중에는[◀메뉴▶],[예약],[취사]버튼입력이가능합니다.
※버튼을부저음이날때까지확실히눌러주시고본명판의디자인은실물과다를수있습니다.
39
음성 설정 기능
음성볼륨 조절기능(음성기능을 해제하거나 음성볼륨을 조절하는 기능임)
대기상태에서[확인]버튼을2초간누르면음성볼륨조절모드로진입합니다.
[확인]버튼을2초간눌러음성볼륨
설정모드진입시표시부에
현재음성볼륨이표시됩니다.
(기본설정값3)
[시간/온도]버튼을눌러0이
설정되면음성()이깜박거리고
음성기능이해제됩니다.
[시간/온도]버튼을눌러1부터
5까지의음성볼륨을설정할수
있습니다.
▶원하시는음성볼륨을설정하신후
확인버튼을눌러주십시오.
KOREAN
메뉴별 조리시간 및 설정 방법
40
메뉴별 조리시간
메뉴
조리시간 설정
조리온도 설정
홍삼
증숙
달임
정과
증숙
달임
정과
흑마늘
찜
탕
밥
죽
차
콩익힘
청국장발효
원액
한약
전통발효
이유식
맞춤요리
Diet쿡
기본 설정 시간 설정 가능 시간 변경 단위
기본 설정
온도/단계
설정 가능
온도/단계
변경 단위
7시간
6시간 30분
6시간
7시간
6시간 30분
6시간
2시간
2시간
1시간 30분
2시간
2시간 20분
3시간
36시간
4시간 30분
2시간
36시간
1시간 30분
1시간 30분
1시간 30분
2시간~10시간
2시간~10시간
2시간~10시간
2시간~10시간
2시간~10시간
2시간~10시간
1시간~4시간
1시간~4시간
30분~3시간
1시간~3시간
1시간~6시간
2시간~6시간
10시간~48시간
3시간~6시간
2시간~6시간
1시간~30일
10분~3시간
10분~10시간
10분~3시간
30분
30분
30분
30분
30분
30분
10분
10분
10분
10분
10분
10분
1시간
10분
10분
10분/1시간/1일
10분
5분/10분
10분
40℃
4단계
4단계
4단계
35℃~70℃
3/4/5단계
1/2/3/4/5단계
3/4/5단계
5℃
단계
단계
단계
※ 메뉴별 초기 표시시간 및 온도/단계는 기본 조리 시간으로 기호에 따라 원하시는 시간 및 온도/단계를 설정하여 사용하여 주십시오.
※ 이유식, Diet쿡, 맞춤요리의 경우 설정 시간에 따라 최대 설정 가능 온도 단계가 달라집니다.
※ 조리 완료 후 기본 설정시간은 설정한 조리 시간으로 변경되어 저장됩니다.
※ 모든 게르마늄 내솥 조리시에는 스테인리스 내솥에 물 600ml를 반드시 넣고 조리하여 주십시오.
모든 스테인리스 내솥 찜판 사용 조리시에는 스테인리스 내솥에 물 400ml를 반드시 넣고 조리하여 주십시오.
변경불가
건강
청국장
41
메뉴별 조리시간 및 설정 방법
메뉴 선택 및 시간 선택 방법
1
2
3
4
온도 및 온도단계 선택 방법
[메뉴] 버튼을 눌러 원하시는 메뉴를 선택합니다.
·본체뚜껑을닫고메뉴에따른적절한압력이설정되어있는지확인하십시오.
·[◀메뉴▶]버튼을누를때마다[홍삼]증숙→[홍삼]달임→[홍삼]정과→[흑마늘]
증숙→[흑마늘]달임→[흑마늘]정과→[건강]찜→[건강]탕→[건강]밥→
[건강]죽→[건강]차→콩익힘→청국장발효→전통발효→원액→한약→
이유식→맞춤요리→Diet쿡→보온순으로반복선택됩니다.
·버튼을계속누르고있으면메뉴순서대로연속으로변합니다.
[시간/온도] 버튼을 눌러 조리시간을 선택합니다.
·[시간/온도]버튼을누를때마다요리종류및시간선택에따라5분/10분/30분/
1시간/1일단위로변합니다.
·버튼을눌러최대설정시간에도달하면최소설정시간으로이동반복합니다.
·버튼을계속누르고있으면조리시간이연속으로변합니다.
※온도설정방법은아래의온도및온도단계선택방법을참고하십시오.
[시작] 버튼을 눌러 조리를 시작 합니다.
·조리를하기전에반드시본체뚜껑을닫고,메뉴에따른압력을조정한후[시작]
버튼을누르면"홍삼증숙쿠쿠가조리를시작합니다."하는음성과함께조리가
시작됩니다.
·본체뚜껑을닫지않고[시작]버튼을누르면경고음과함께""이표시된후
"본체뚜껑을잠김으로돌려주세요."라는음성이출력되고조리가취소됩니다.
조리 완료
·조리가끝날때"쿠쿠가맛있는홍삼증숙을완성하였습니다."하는음성과함께
보온기능을시작합니다.
·조리완료후압력조절장치를스팀배출로돌려압력을완전히빼낸후본체
뚜껑을열어주십시오.
·조리중에는취소버튼을누르지마십시오.조리가취소됩니다.
※보온이되지않는메뉴는대기상태로전환됩니다.
(콩익힘,청국장발효,전통발효메뉴는조리완료후대기상태로전환됩니다.)
[온도설정 표시부]
*전통발효
[온도단계 설정 표시부]
*이유식, 맞춤요리, Diet쿡
❶온도 및 온도 단계가 변경 가능한 메뉴는
시간 선택 후 [확인] 버튼을 누르면
온도선택 또는 온도단계 선택 모드로 진입합니다.
*온도변경가능메뉴:전통발효
*온도단계변경가능메뉴:이유식,맞춤요리,Diet쿡
❷[시간/온도] 버튼을 눌러 조리온도 및 온도단계를 설정합니다.
·버튼을눌러최대설정온도및온도단계에도달하면최소설정온도및
온도단계로이동반복합니다.
·버튼을계속누르고있으면온도및온도단계가연속으로변합니다.
※선택된조리시간에따라선택가능한온도단계는달라집니다.
❸[시작] 버튼을 눌러 조리를 시작합니다.
·조리완료후메뉴를재선택할경우최종으로입력했던조리시간과온도
또는온도단계가표시됩니다.
※주변환경과내용물에따라설정온도와내용물온도는차이가있을수있습니다.
예) 홍삼증숙 메뉴 조리시
KOREAN
메뉴별 보온시간
42
보온 지속 시간(조리후보온으로자동진입한경우)
메뉴
홍삼
흑마늘
건강
청국장
전통발효
원액
한약
이유식
맞춤요리
Diet쿡
증숙10일
※ 조리 완료 후 보온 지속가능 시간은
메뉴별로 다르게 설정되어 있으니
보온시 참고하여 주십시오.
※ 보온 지속 시간을 연장하시려면
보온 메뉴사용 방법을 참고하여
주십시오. (43쪽 참조)
※ 장시간 또는 적은 물량으로 보온시
스테인리스 내솥의 물이 모두
증발 할 수 있습니다.
물이 부족할 경우 물을 보충하여
주십시오.
10일
10일
10일
10일
10일
24시간
24시간
6시간
6시간
24시간
24시간
24시간
6시간
6시간
보온기능 없음
보온기능 없음
보온기능 없음
6시간
달임
정과
증숙
달임
정과
찜
탕
밥
죽
차
콩익힘
청국장발효
보온 지속 시간기타
43
보온 메뉴 사용 방법
보온 메뉴 보온 온도 설정 방법
[시간/온도]버튼을
눌러원하시는
보온온도를선택합니다.
원하시는보온온도
선택후
[시작]버튼을
눌러줍니다.
보온메뉴를이용하여수동으로보온을진입할수있습니다.
보온온도를설정할수있습니다.(설정가능온도70℃~85℃)
※설정된온도와내부온도는주변환경과내용물에따라차이가있을수있습니다.
※위에서설정된보온온도는보온메뉴로보온을진입하는경우에해당되며,
조리후자동으로진입하는보온의온도및지속시간과는관련이없습니다.
[메뉴] 버튼을눌러보온
메뉴를선택합니다.
보온메뉴를선택하면
보온온도가표시됩니다.
(기본설정온도:80℃)
KOREAN
메뉴별 예약시간 및 설정 방법
44
❶
본체뚜껑을 닫고 메뉴에 따른 적절한 압력이 설정되어 있는지 확인 하십시오.
[메뉴]버튼으로 예약가능 메뉴를 선택하고, [시간/온도] 버튼으로 조리
시간과 온도단계를 선택한 후 [예약] 버튼을 누릅니다.
-예약기능은건강찜,건강탕,건강밥,건강죽,건강차,원액,한약,
이유식,Diet쿡메뉴에한하여가능합니다.
※
대기상태에서[예약]버튼을누르면예약가능메뉴가표시됩니다.
이경우조리시간및온도단계는이전조리후저장된값으로예약이됩니다.
❷[시간/온도] 버튼을 눌러 예약 시간을 설정합니다.
-예약설정시간은조리시간이상부터1시간단위로최대12시간까지
설정이가능합니다.
❸[시작] 또는 [예약] 버튼을 눌러 조리를 시작 합니다.
-예약설정시간이6시간일경우에6시간후에조리가완료됩니다.
-버튼입력이없을경우7초후자동으로예약조리가시작됩니다.
예약 조리 방법
예약 설정 중 Display
[예 : 건강찜 예약 3시간]
예약 진행 중 Display
[예 : 건강찜 예약 3시간]
예약 설정시간
메뉴
홍삼
흑마늘
건강
청국장
전통발효
원액
한약
이유식
맞춤요리
Diet쿡
증숙예약기능 없음
※ 조리 설정 시간을 초과하여
1시간 단위로 최대 12시간까지
설정 가능합니다.
예) 2시간 10분 조리 설정 시
3~12시간 까지 예약 가능합니다.
예약기능 없음
예약기능 없음
예약기능 없음
예약기능 없음
예약기능 없음
최소 예약 설정시간 ~ 12시간
최소 예약 설정시간 ~ 12시간
최소 예약 설정시간 ~ 12시간
최소 예약 설정시간 ~ 12시간
최소 예약 설정시간 ~ 12시간
최소 예약 설정시간 ~ 12시간
최소 예약 설정시간 ~ 12시간
최소 예약 설정시간 ~ 12시간
최소 예약 설정시간 ~ 12시간
예약기능 없음
예약기능 없음
예약기능 없음
예약기능 없음
달임
정과
증숙
달임
정과
찜
탕
밥
죽
차
콩익힘
청국장발효
보온 지속 시간기타
45
홍삼 증숙/달임
홍삼 증숙
압력 중탕기로 수삼(인삼) 또는 백삼(건삼)을 증숙하면 적갈색의 홍삼으로 증숙됩니다.
스테인리스 내솥에 물을 600ml넣고, 스테인리스 찜판을
넣어 주십시오.
※ 수삼을 대용량으로 증숙할 경우 스테인리스 내솥에
물 400ml를 넣고 스테인리스 찜판을 넣은 후 그 위에
수삼 600g을 올려 증숙하여 주십시오.
1
게르마늄 내도자기를 넣은 게르마늄 내솥을 스테인리스
내솥에 올려 주십시오.
2
수삼 300g을 게르마늄 내도자기에 넣고
게르마늄 뚜껑을 닫아주십시오.
3
본체뚜껑을 결합해 주십시오.
※ 압력패킹이 바르게 끼워졌는지 압력조절장치가 잘 닫혀있는지
항상 확인하십시오.
4
압력조절장치를 고압으로 돌려주십시오.
5
홍삼증숙 메뉴를 선택하고 [시작] 버튼을 눌러주십시오.
6
KOREAN
홍삼 증숙/달임
46
홍삼 달임
압력 중탕기로 증숙된 홍삼을 달이면 건강에 좋은 홍삼 달임액을 추출할 수 있습니다.
스테인리스 내솥에 물을 600ml넣고, 스테인리스
찜판을 넣어 주십시오.
※ 홍삼을 대용량으로 달이실 경우 스테인리스 내솥에
물 2700ml와 홍삼 600g을 넣고 달여 주십시오.
1
게르마늄 내도자기를 넣은 게르마늄 내솥을
스테인리스 내솥에 올려 주십시오.
2
게르마늄 내도자기 안에 증숙이 완료된 홍삼 또는
건홍삼을 넣고 물 1800ml를 넣은 후 게르마늄 뚜껑을
닫아주십시오.
3
본체뚜껑을 결합해주십시오.
※ 압력패킹이 바르게 끼워졌는지 압력조절장치가 잘 닫혀있는지
항상 확인하십시오.
4
압력조절장치를 고압으로 돌려주십시오.
5
홍삼달임 메뉴를 선택하고 [시작] 버튼을 눌러주십시오.
6
47
홍삼/흑마늘 정과
홍삼/흑마늘 정과
정과는 꿀이나 설탕에 쟁이거나 조려서 만든 한국 고유의 과자류로
홍삼 정과, 흑마늘 정과 메뉴를 사용하시면 홍삼 또는 흑마늘 정과를 만들수 있습니다.
스테인리스 내솥에 물을 600ml넣고, 스테인리스
찜판을 넣어 주십시오.
1
게르마늄 내솥을 스테인리스 내솥에 올려 주십시오.
2
게르마늄 내솥 안에 수삼 300g또는 마늘 300g을
넣고 꿀 600ml를 넣은 후 게르마늄 뚜껑을 닫아주십시오.
3
본체뚜껑을 결합해주십시오.
※ 압력패킹이 바르게 끼워졌는지 압력조절장치가 잘 닫혀있는지
항상 확인하십시오.
4
압력조절장치를 고압으로 돌려주십시오.
5
홍삼 정과 또는 흑마늘 정과 메뉴를 선택하고 [시작] 버튼을
눌러주십시오.
6
KOREAN

흑마늘 증숙/달임
48
흑마늘 증숙
압력 중탕기로 마늘을 증숙하면 항염, 항암 작용이 뛰어난 홍갈색의 흑마늘이 됩니다.
※짧은시간에흑마늘증숙을원하시는경우사용하세요.
스테인리스 내솥에 물을 600ml넣고, 스테인리스 찜판을
넣어 주십시오.
※ 깐마늘을 대용량으로 증숙할 경우 스테인리스 내솥에
물 400ml를 넣고 스테인리스 찜판을 넣은 후 그 위에
깐마늘 600g을 올려 증숙하여 주십시오.
1
게르마늄 내도자기를 넣은 게르마늄 내솥을
스테인리스 내솥에 올려 주십시오.
2
게르마늄 내도자기 안에 깐마늘 300g을 넣고
게르마늄 뚜껑을 닫아주십시오.
3
본체뚜껑을 결합해주십시오.
※ 압력패킹이 바르게 끼워졌는지 압력조절장치가 잘 닫혀있는지
항상 확인하십시오.
4
압력조절장치를 고압으로 돌려주십시오.
5
흑마늘증숙 메뉴를 선택하고 [시작] 버튼을 눌러주십시오.
6
49
흑마늘 증숙/달임
흑마늘 달임
압력 중탕기로 숙성된 흑마늘을 달이면 건강에 좋은 흑마늘액을 추출할 수 있습니다.
스테인리스 내솥에 물을 600ml넣고, 스테인리스 찜판을
넣어 주십시오.
※ 흑마늘을 대용량으로 달이실 경우 스테인리스 내솥에
물 2700ml와 흑마늘 600g을 넣고 달여 주십시오.
게르마늄 내도자기를 넣은 게르마늄 내솥을 스테인리스
내솥에 올려 주십시오.
게르마늄 내도자기 안에 증숙이 완료된 흑마늘을
넣고 물 1800ml를 넣은 후 게르마늄 뚜껑을
닫아주십시오.
본체뚜껑을 결합해주십시오.
※ 압력패킹이 바르게 끼워졌는지 압력조절장치가 잘 닫혀있는지
항상 확인하십시오.
압력조절장치를 고압으로 돌려주십시오.
1
2
3
4
5
흑마늘달임 메뉴를 선택하고 [시작] 버튼을 눌러주십시오.
6
KOREAN
청국장(콩익힘/청국장 발효)
50
청국장(콩익힘/청국장 발효)
스테인리스 내솥에 물을 600ml넣고, 스테인리스
찜판을 넣어 주십시오.
1
게르마늄 내솥을 스테인리스 내솥에 올려 주십시오.
2
게르마늄 내솥 안에 메주콩(대두) 2인분(300g)과
물 400ml를 넣은 후 게르마늄 뚜껑을 닫아주십시오.
3
본체뚜껑을 결합해주십시오.
※ 압력패킹이 바르게 끼워졌는지 압력조절장치가 잘
닫혀있는지 항상 확인하십시오.
4
압력조절장치를 고압으로 돌려주십시오.
5
콩익힘 메뉴를 선택하고 [시작] 버튼을 눌러주십시오.
6
콩익힘이 완료되면 익힌 콩을 게르마늄 내도자기에
옮겨 담고 콩물은 버려주십시오.
7
게르마늄 내도자기를 게르마늄 내솥에 넣고
게르마늄 뚜껑을 닫아 주십시오.
8
본체뚜껑을 결합해주십시오.
9
청국장발효 메뉴를 선택하고 [시작] 버튼을 눌러주십시오.
※ 발효실을 더 많이 생성하려면 시간 설정을 더 길게 하십시오.
10
대두(메주콩)를 물에 불리지 않고 바로 삶아서 발효까지 시켜 청국장을 만들어 줍니다.
수입콩은방부제등의사용으로인해발효가되지않을수있으므로메주콩으로는국내산햇콩을권장합니다.
상태가좋지않은콩은사용하지마십시오.
보관하기
발효가 끝난 청국장은 주걱을 이용하여 고루 섞어준 다음 절구에 양념(소금, 고추가루, 다진마늘, 다진생강)과 함께 잘 찧어
적당한 밀폐용기 또는 적당한 크기로 랩포장하여 단기간 (약 7일)의 냉장 보관이 가능하며, 장기간 보관시에는 냉동실에 보관
하여 하나씩 꺼내 드시면 편리합니다.(상온에서 보관시 부패의 우려가 있으므로 반드시 냉장이나 냉동보관하시기 바랍니다.)
▶ 냉동 보관된 청국장은 상온에서 1~2시간 정도 방치하시면 원래의 청국장과 동일한 맛과 향을 느끼실 수 있습니다.
▶ 양념을 하지 않은 생청국장은 그냥 드셔도 됩니다.
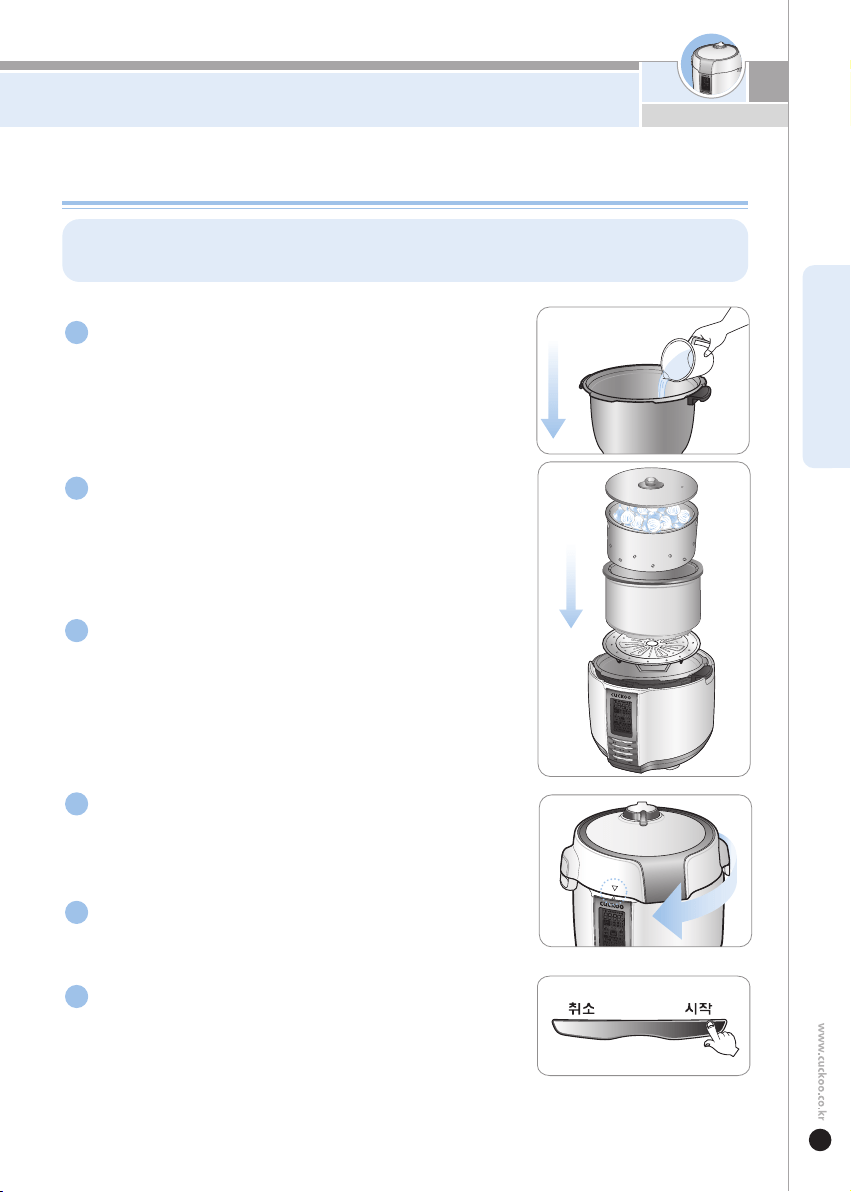
51
원액추출
원액추출
압력 중탕기로 양파, 매실, 블루베리, 포도, 배, 늙은 호박 등 제철 채소 및 과일류의 원액을 진하게 추출할 수
있습니다.
스테인리스 내솥에 물을 600ml넣고, 스테인리스
찜판을 넣어 주십시오.
1
게르마늄 내도자기를 넣은 게르마늄 내솥을 스테인리스
내솥에 올려 주십시오.
2
게르마늄 내도자기 안에 관련 채소 및 과일류를 넣고
물은 넣지 마십시오.
3
본체뚜껑을 결합해주십시오.
※ 압력패킹이 바르게 끼워졌는지 압력조절장치가 잘 닫혀있는지
항상 확인 하십시오.
4
압력조절장치를 고압으로 돌려주십시오.
5
원액추출 메뉴를 선택하고 [시작] 버튼을 눌러주십시오.
※ 원액을 진하게 추출하고자 하실 때는 시간을 늘려 주십시오.
6
KOREAN
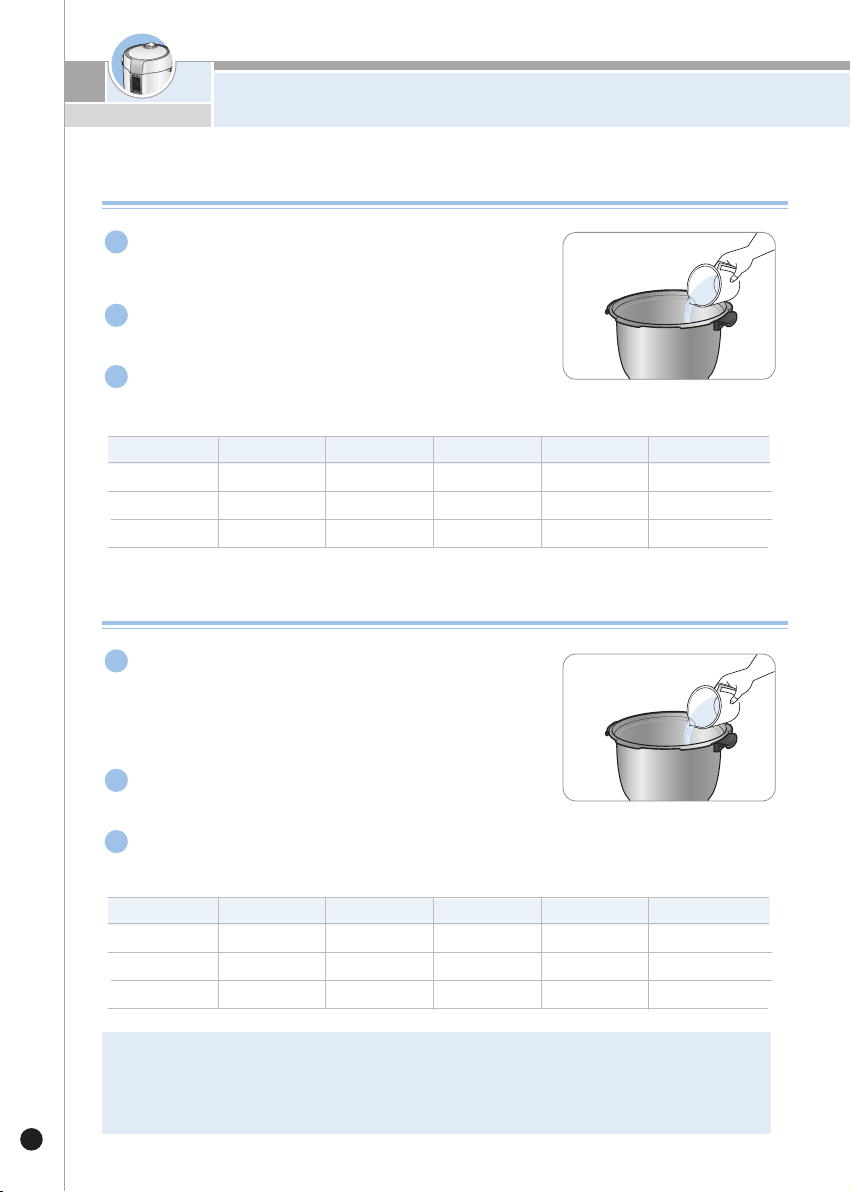
스테인리스 내솥 밥 짓는 방법
52
잡곡밥
오곡은 깨끗이 씻어 체에 받쳐 물기를 뺀 후
스테인리스 내솥에 넣어 주십시오.
(4인분 기준용량 : 백미 320g, 찹쌀 100g, 수수 60g,
조 60g, 삶은팥 60g)
1
오곡량에 맞추어 물을 스테인리스 내솥에 넣어 주십시오.
2
본체뚜껑을 닫은 후 압력조절장치를 고압에 맞춘 후
맞춤요리 메뉴로 취사하여 주십시오.
3
취사 인분수
쌀량 물량
메뉴선택조리시간 설정
조리단계 설정
2인분300g400ml맞춤요리30분3단계
4인분600g800ml
맞춤요리
40분3단계
6인분900g1100ml맞춤요리40분3단계
백미밥
쌀은 깨끗이 씻어 체에 받쳐 물기를 뺀 후
스테인리스 내솥에 넣어 주십시오.
1
쌀량에 맞추어 물을 스테인리스 내솥에 넣어 주십시오.
2
본체뚜껑을 닫은 후 압력조절장치를 고압에
맞춘 후 맞춤요리 메뉴로 취사하여 주십시오.
3
취사 인분수 쌀량 물량
메뉴선택
조리시간 설정
조리단계 설정
2인분300g400ml맞춤요리30분3단계
4인분600g800ml맞춤요리40분3단계
6인분900g
1100ml
맞춤요리40분3단계
※ 스테인리스 내솥의 특성상 눌음이 발생합니다. 취사 후 1시간 이상 충분히 불린 후 세척하십시오.
※ 쌀과 물량을 정량에 맞추어 취사해 주십시오.
※ 취사 환경 및 사용 환경에 따라 밥 상태의 차이가 나타날 수 있습니다.
※ 밥은 취사 후 즉시 드시는 것이 좋습니다.
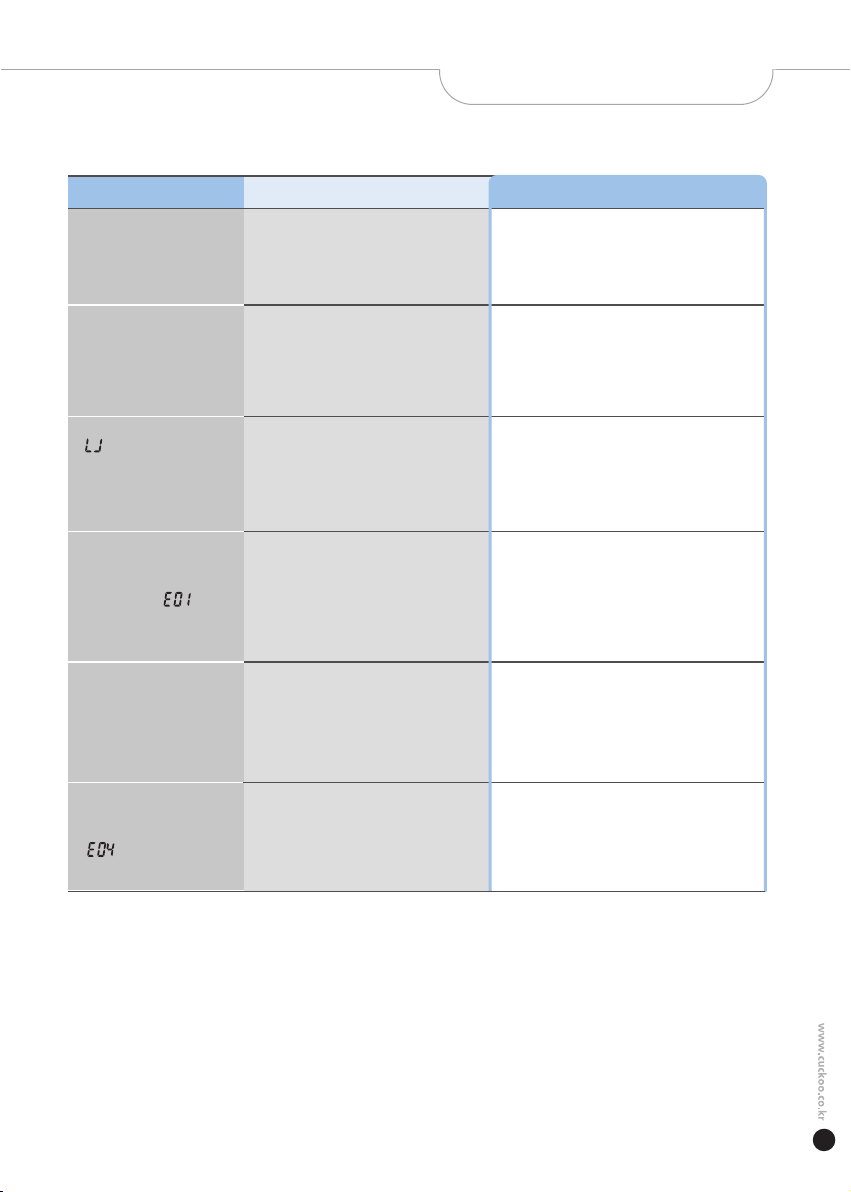
53
▼제품에이상이생겼을경우에는고객상담실로문의하시기전에아래사항을확인해주십시오.
조리 중 내용물이 넘칠 때
증 상확인사항조치사항
•계량컵을사용하셨습니까?
•물조절은정확히하셨습니까?
•
메뉴선택을정확히하셨습니까?
•34쪽,40~41쪽을참조하여올바르게사용하십시오.
보온 중 냄새가 날 때
•본체뚜껑을꼭닫았습니까?
•보온중전원플러그가콘센트에서빠지지않았
습니까?
•장시간보온하지않았습니까?
•본체뚜껑을완전히닫아주십시오.
•보온중전원플러그를항상꽂아주십시오.
•보온시간은가능한단시간만하십시오.
“ ”표시가 나타날 때
•스테인리스내솥이제품에들어있습니까?
•스테인리스내솥이들어있지않은상태에서는버튼
조작이되지않습니다.스테인리스내솥을넣어주십시오.
시작, 예약 등의 버튼이
작동되지 않고 “ ”표시가
나타날 때
•본체뚜껑을체결하셨습니까?
•잠김표시가나타나있습니까?
•본체뚜껑을체결합니다.본체뚜껑이완전히체결되지
않으면시작,예약버튼이작동되지않습니다.
내용물이 심하게 눌을 때
•온도감지기,스테인리스내솥외면에재료가심하
게눌어붙어있거나이물질이있지는않습니까?
•온도감지기,스테인리스내솥외면의이물질을
제거해주십시오.(35쪽참조)
조리 중
“ ”표시가 나타날때
•스테인리스내솥에정량의물을넣었습니까?•조리중물이부족할경우나타나므로
스테인리스내솥에정량의물을넣어주십시오.
고장신고 전에 확인하십시오
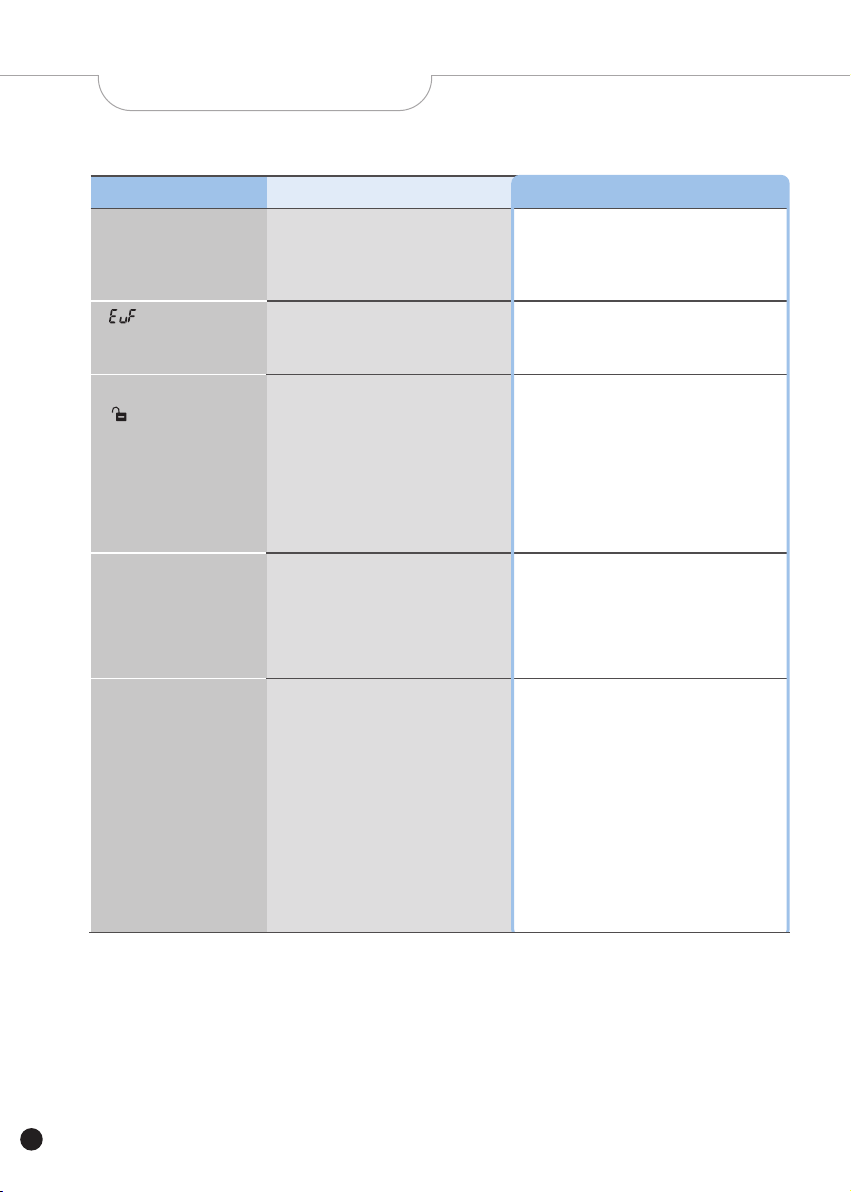
54
고장신고 전에 확인하십시오
▼제품에이상이생겼을경우에는고객상담실로문의하시기전에아래사항을확인해주십시오.
조
리 직후나 보온 중 내용물에
서
이상한 냄새가 날 때
증 상확인사항조치사항
•조리를하신후청소를깨끗이하셨습니까?•35쪽을참조하여본체뚜껑부의패킹을닦아낸후
사
용하여주십시오.
“ ”
표시가 나타날 때
•마이컴내부메모리에이상이있을때
나
타납니다.
•전원을차단후고객상담실로문의하십시오.
본체뚜껑이
“ ”(열림)방향으로
움직이지 않을 때
•조리중에본체뚜껑을돌리지않았습니까?
•증기가완전히배출되지않은상태에서본체
뚜껑을돌리지않았습니까?
•취사또는조리중에는본체뚜껑이열리지않습니다.
본체뚜껑을강제로열지마십시오.부득이한경우는
취소버튼을2초간눌러취소시킨다음압력조절장치를
스팀배출로돌려증기를완전히빼낸후열어주십시오.
•압력조절장치를스팀배출로돌려증기를완전히빼낸
후본체뚜껑을열어주십시오.
압력조절장치가 스팀배출로
완전히 돌아갔는데도
본체뚜껑이
열리지 않을 때
•압력때문입니다.
•증기를완전히빼낸후본체뚜껑을열어주십시오.
뚜껑 사이로 증기가 누설되거나
“삐”하는 휘파람 소리가 날 때
•패킹에이물질(조리물등)이묻어있지
않습니까?
•패킹이낡지않았습니까?
•패킹을행주나부드러운헝겊으로깨끗이닦은후
사용하십시오.
•패킹주변은항상깨끗이유지시켜주십시오.
•증기가누설되면곧바로취소버튼을2초간눌러조리를
취소하시고,압력조절장치를스팀배출로돌려증기를
빼낸후본체뚜껑을열어다음조치를취하여주시기
바랍니다.
-본체뚜껑의패킹을올바르게끼워주십시오.
-압력표시장치가빠지지않았는지확인하여주십시오.
-압력조절장치의너트가헐겁지않은지확인하여주십시오.
•패킹은사용방법및횟수에따라1년~3년정도사용
후교환하여주십시오.낡은패킹을계속하여사용시
증기가누설되어압력조리가되지않을수있습니다.

55
mEmO

100% Recycled paper 00383-0887A0 Rev.0
CUCKOO STEAM PRESSURE COOKER
LIMITED WARRANTY
KEY Company, P&K USA TRADING CORP and Cuckoo Trading Canada will repair at its option replace,
without charge, your product which proves to be defective in material or workmanship under normal use,
during the warranty period listed below from the date of original purchase. This warranty is good only to the
original purchaser of the product during the warranty period. P&K USA TRADING CORP. covers the east and
the central districts, KEY Company covers the west and the central districts, Cuckoo Trading Canada covers
the whole Canada.
WARRANTY PERIOD
MODEL# #LABOR PARTS HOW SERVICE IS HANDLED
CPC-A2510F
Call : 718 888 9144
Address : 129-04 14th Avenue College Point, NY 11356, USA
The West and the Central Districts.
Call : +1 323 780 8808 Toll Free : 877 481 9828
Address : 1137 E. 1st St, Los Angeles CA 90033
Canada (TORONTO)
Call : 905 707 8224
Address :
#D8-7398 Yonge Street
Thornhill Ontario Canada L4J 8J2
Canada (VANCOUVER)
Call : 604 540 1004
Address :
945 Lougheed Hwy Coquitlam BC Canada V3K 3T4
No other express warranty is applicable to this product. THE DURATION OF ANY IMPLIED WARRANTIES,
INCLUDING THE IMPLIED WARRANTY OF MERCHANTABILITY, IS LIMITED TO THE DURATION OF
THE EXPRESS WARRANTY HEREIN. CUCKOO ELECTRONICS CO.,LTD, SHALL NOT BE LIABLE FOR
THE LOSS, THE USE OF THE PRODUCT, INCONVENIENCE, LOSS OR ANY OTHER DAMAGES,
DIRECT OR CONSEQUENTIAL, ARISING OUT OF THE USE OF, OR INABILITY TO USE, THIS PRODUCT
OR FOR ANY BREACH OF ANY EXPRESS OR IMPLIED WARRANTY, INCLUDING THE IMPLIED
WARRANTY OF MERCHANTABILITY APPLICABLE TO THIS PRODUCT
.
Some states do not allow the exclusion or limitation of incidental or consequential damages or limitations on
how long an implied warranty lasts : so these limitations or exclusions may apply to you. This warranty gives
you specific legal rights and you may also have other rights which vary from state to state.
THE ABOVE WARRANTY DOES NOT APPLY IN THESE CASES:
To damages problems which result from delivery or improper installation.
To damages problems which result from misuse, abuse, accident, alteration,
or incorrect electrical current or voltage.
To serve call which do not involve defective workmanship or material and explaining the operation of the unit.
Therefore, these costs are paid by the consumer. Customer assistance numbers :
To Prove warranty Coverage :
Retain your Sales Receipt to prove date of purchase
Copy of your Sales Receipt must submitted at the time
warranty service is provided.
To Obtain Product, Customer, or Service Assistance and Nearest Authorized service center,
Parts Distributor or Sales Dealer:
The West and the Central Districts.
Call : +1 323 780 8808
Toll Free : 877 481 9828
Address : 1137 E. 1st St,
Los Angeles CA 90033
Canada (Toronto)
Call : 905 707 8224
Address : #D8-7398 Yonge Street
Thornhill Ontario Canada
L4J 8J2
Canada (Vancouver)
Call : 604 540 1004
Address : 103-4501 North Road
Burnaby BC Canada
V3R 4R7
The East and the Central Districts
Call : 718 888 9144
Address :129-04 14th Avenue
College Point, NY 11356, USA
1YEAR 1YEAR The East and the Central Districts