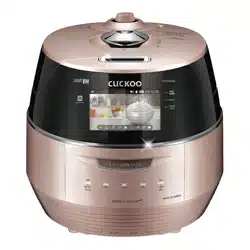
CMC-Q5 Series (cETL approved)
ICOOK Q5 STANDARD
Operating Instruction
KOREA NO.1
CUCKOO
Electric Multi Pressure Cooker
“
”
Read the following instruction manual carefully before use or when facing problems.
在使用产品之前或是使用过程中出现任何问题, 请仔细阅读该产品的说明书.
Lea atentamente a las siguientes instrucciones antes de su uso o en caso de cualquier mal funcion.
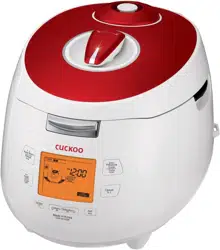
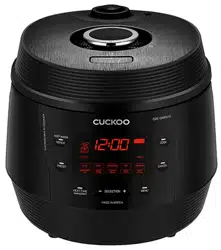
※ Pictures may look different from the actual product.
※ 图片可能与实际产品不同。
※
Los dibujos pueden verse diferentes al producto actual.
※ 사진은 실제 현물과 다를 수 있습니다.

CONTENTS
2
CONTENTS
BEFORE USING
IMPORTANT SAFEGUARDS
…………………………………
3
HOW TO USE EXTENSION CORD
…………………………
5
SPECIFICATIONS
……………………………………………
5
SAFETY PRECAUTIONS
…………………………………
6~7
NAME OF EACH PART
……………………………………
10
HOW TO CLEAN
…………………………………………
11~12
FUNCTION OPERATING PART
……………………………
13
WHEN USING
HOW TO SET FUNCTION
……………………………………
14
HOW TO PRESET COOKING
………………………………
15
COOKER SETTINGS OVERVIEW
…………………………
16
PREPARATION BEFORE COOKING
………………………
17
HOW TO COOK
…………………………………………
18~20
KEEP WARM, REHEAT, VOLTAGE SAG PROTECTION
……
21
PROBLEM CHECKLIST
PLEASE CHECK BEFORE CALLING FOR SUPPORT
……
22~24
TABLA DE CONTENIDOS
ANTES DE USAR
IMPORTANT SAFEGUARDS
…………………………………
3
ESPECIFICACIONES
…………………………………………
5
NOMBRE DE LAS PIEZAS
…………………………………
42
CÓMO LIMPIAR
…………………………………………
43~44
PANEL DE CONTROL Y PANTALLA
………………………
45
CUANDO USAS
CÓMO CONFIGURAR
…………………………………………
46
CÓMO PRECONFIGURAR LA COCCIÓN
…………………
47
TABLA DE RESUMEN
………………………………………
48
PREPARACIÓN ANTES DE COCINAR
……………………
49
CÓMO COCINAR
………………………………………
50~52
MANTENER CALIENTE, RECALENTAR, PROTECCIÓN
DE CAÍDA DE VOLTAJE
………………………………………
53
LISTA DE COMPROBACIÓN DE PROBLEMAS
POR FAVOR VERIFIQUE ANTES DE PEDIR SOPORTE
…
54~56
TABLE DES MATIÈRES
AVANT L'UTILISATION
MESURES DE PROTECTION IMPORTANTES
……………
4
COMMENT UTILISER UNE RALLONGE
……………………
5
SPÉCIFICATIONS
………………………………………………
5
MESURES DE SÉCURITÉ
…………………………………
8~9
……………………………………
3
………………………………………………………………
5
……………………………………………………
26
………………………………………………
27~28
……………………………………………………
29
…………………………………………………………
30
……………………………………………………
31
…………………………………………………
32
…………………………………………………
33
……………………………………………………
34~36
………………………………………
37
………………………………………
38~40
使用时
设定功能
预约煮饭方法
压力锅设置概览
煮饭前准备事项
煮饭方法
保温, 再加热, 防止电压低下
问题检查表
常见故障及处理方法
使用前
IMPORTANT SAFEGUARDS
规格
产品部件名称
清洁保养方法
控制&显示板
目录

3
1. Read all instructions before using this appliance.
2. Do not touch hot surfaces. Use handles or knobs.
3. To protect against fire, electric shock and / or injury to persons do not immerse cord, plugs, or Pressure
Cooker Body in water or any other liquid.
4. Close supervision is necessary when this appliance is used by or near children. This appliance is not
intended for use by young children without supervision.
5. Unplug cord from outlet when not in use and before cleaning. Allow appliance to cool before putting on
or taking off parts, and before cleaning the appliance.
6. Do not operate any appliance with a damaged cord or plug, after the appliance malfunctions, or has
been damaged in any manner. Return the appliance to the nearest authorized service facility for
examination, repair or adjustment.
7. The use of accessory attachments not recommended by the appliance manufacturer may result in fire,
electric shock, and / or injury to persons.
8. If the supply cord is damaged, it must be replaced by a special cord or assembly available from the
manufacturer or your service agent.
9. Do not use outdoors.
10. Do not let the cord hang over the edge of a table or counter, or touch hot surfaces.
11. Do not place on or near a hot gas, electric burner, or in a heated oven.
12. Always attach the plug to the appliance first, then plug the cord into the wall outlet. To disconnect, or
set all control to “off”, then remove the plug from the wall outlet.
13. Do not use this appliance for other than its intended use.
14. Extreme caution must be used when moving an appliance containing hot oil or any hot liquids.
15. Oversized foods, metal foil packages, or utensils must not be inserted into the appliance as they are a
risk of fire or electric shock.
16. Fire may occur if the appliance is covered or touching flammable material, including curtains, draperies,
walls, etc while in operation.
17. To reduce the risk of electric shock, cook only in the provided removable container.
18. This appliance cooks under pressure. Improper use may result in scalding injury. Before operating the
unit, properly secure and close the unit. See “Operating Instructions.”
19. Before use always check the pressure releasing device for clogging.
20. Do not use this pressure cooker to fry in oil.
21. This appliance is not intended for use by persons (including children) with reduced physical, sensory or
mental capabilities, or lack of experience and knowledge, unless they have been given supervision or
instruction concerning use of the appliance by a person responsible for their safety.
22. Never immerse the appliance in water while cleaning.
SAVE THESE INSTRUCTIONS
THIS APPLIANCE IS FOR HOUSEHOLD USE ONLY
WARNING : This appliance generates heat and releases steam during use. Use proper precaution to
prevent risk of burns, fires, other injuries, or damage to property.
1. Keep hands and face away from the Pressure Release Valve when releasing pressure.
2. Take extreme caution when opening the Lid after cooking. Severe burns can result from steam inside.
3. Never open the Lid while the unit is in operation.
4. Do not use without the inner Pot in place.
5. Do not cover the Pressure Valve with anything as an explosion may occur.
6. Do not touch the inner pot nor any heating parts, immediately after use.
Allow the unit to cool down completely first.
This appliance is intended to be used in household and similar applications such as :
- staff kitchen areas in shops, offices and other working environments;
- farm houses;
- by clients in hotels, motels and other residential type environments;
- bed and breakfast type environments.
ADDITIONAL IMPORTANT SAFEGUARDS
IMPORTANT SAFEGUARDS

1. Lisez toutes les instructions avant d'utiliser cet appareil.
2. Ne touchez pas les surfaces chaudes. Utilisez les poignées ou les boutons.
3. Pour prévenir les risques d'incendie, les chocs électriques et/ou les blessures, ne plongez pas le cordon, les prises ou
le corps autocuiseur dans l'eau ou tout autre liquide.
4. Une surveillance étroite est nécessaire quand cet appareil est utilisé par des enfants ou qu'il se situe à leur portée.
Cet appareil n'est pas prévu pour être utilisé par de jeunes enfants sans surveillance.
5. Débranchez le cordon de la prise lorsque vous ne vous servez pas de l'appareil et avant de le nettoyer. Laissez
l'appareil refroidir avant de remettre en place ou de retirer des pièces, et avant de le nettoyer.
6. N'utilisez aucun appareil si le cordon ou la fiche est endommagé, s'il ne fonctionne pas correctement ou s'il est
endommagé de quelque façon que ce soit. Renvoyez l'appareil à un centre technique agréé le plus proche pour le
faire examiner, réparer ou régler.
7. L'utilisation d'accessoires non recommandés par le fabricant peut causer un incendie, un choc électrique et/ou des
blessures.
8. Si le cordon d'alimentation est endommagé, il doit être remplacé par un cordon ou ensemble prévu à cet effet,
disponible auprès du fabricant ou de réparateurs agréés.
9. N'utilisez pas l'appareil à l'extérieur.
10. Ne laissez pas le cordon pendre d'une table ou d'un comptoir. Ne le laissez pas non plus en contact avec une
surface chaude.
11. Ne placez pas l'appareil au-dessus ou près d'un brûleur à gaz, sur une plaque électrique ou dans un four chaud.
12. Branchez toujours la fiche sur l'appareil en premier, puis branchez le cordon dans la prise murale. Pour débrancher,
ou désactiver toutes les commandes, retirez la fiche de la prise murale.
13. N'utilisez pas cet appareil à des fins autres que celles pour lesquelles il a été conçu.
14. Une prudence extrême est requise lorsque vous déplacez l'appareil contenant de l'huile chaude ou tout autre liquide chaud.
15. Des denrées alimentaires de taille excessive, les emballages sous feuille métallique, ou les ustensiles ne doivent pas
être insérés dans l'appareil car ils constituent un risque d'incendie ou de choc électrique.
16. Un incendie peut se déclarer si l'appareil est couvert ou en contact avec des matériaux inflammables, y compris des
rideaux ou des draperies, des murs, etc durant son fonctionnement.
17. Afin de réduire le risque de choc électrique, faites cuire uniquement dans le récipient amovible fourni.
18. Cet appareil cuit sous pression. Un mauvais usage peut entraîner des brûlures. Avant d'utiliser l'appareil, mettez
l'appareil bien en place et fermez-le. Reportez-vous à la section « Instructions d'utilisation ».
19. Avant toute utilisation, vérifiez toujours si le dispositif de relâchement de la pression est obstrué.
20. N'utilisez pas cet autocuiseur pour faire frire dans de l'huile.
21. Cet appareil n'est pas conçu pour être manipulé par des personnes (y compris des enfants) dont les capacités
physiques sensorielles ou mentales sont réduites ou qui manquent d'expérience et de connaissance, à moins
qu'elles n'aient reçu une une formation ou des instructions sur l'utilisation de l'appareil par une personne responsable
de leur sécurité
22. Ne jamais immerger l'appareil dans l'eau pendant le nettoyage.
CONSERVEZ CES INSTRUCTIONS
CET APPAREIL EST DESTINÉ À UN USAGE DOMESTIQUE UNIQUEMENT
AVERTISSEMENT : Cet appareil génère de la chaleur et libère de la vapeur durant son fonctionnement. Utilisez les
protections appropriées pour prévenir le risque de brûlures, d'incendies, de blessures ou de
dégâts matériels.
1. Gardez vos mains et votre visage à l'écart de la soupape de décharge lors du relâchement de la pression.
2. Faites extrêmement attention lors de l'ouverture du couvercle après la cuisson. La vapeur à l'intérieur peut provoquer
des brûlures graves.
3. N'ouvrez jamais le couvercle lorsque l'appareil est en fonctionnement.
4. N'utilisez pas l'appareil sans la cuve de cuisson à sa place.
5. Ne recouvrez pas la soupape de pression par un objet quelconque, une explosion pourrait survenir.
6. Ne touchez pas la cuve de cuisson ni les éléments chauffants immédiatement après utilisation. Laissez tout d'abord
l'appareil refroidir complètement. Cet appareil est prévu pour être utilisé à la maison à des fins telles que :
- la cuisine pour le personnel dans des magasins, des bureaux et d'autres environnements de travail;
- les fermes;
- par des clients dans des hôtels, des motels et autres environnements de type résidentiel;
- des environnements de type chambres d'hôtes.
MESURES DE PROTECTION SUPPLÉMENTAIRES
MESURES DE PROTECTION IMPORTANTES
4
Note:
A. A short power-supply cord (or cord set) is provided to reduce the hazards from entanglement by a longer cord.
B. Extension cord should be used properly.
C. Extension cord usage for the multi cooker:
(1) The correct rated voltage should be used for the multi cooker.
(2) If the appliance is set on the ground, the extension cord should also be set on the ground.
(3) The cord wires and extension cord should always be arranged to prevent hazards to children.
"This appliance has a polarized plug (one blade is wider than the other).
To reduce the risk of electric shock, this plug is intended to fit into a polarized outlet
only one way. If the plug does not fit fully into the outlet, reverse the plug. If it still does not fit,
contact a qualified electrician. do not attempt to modify the plug in any way."
Remarque :
A.
Un cordon d'alimentation court (ou câble) est fourni pour réduire les dangers d'emmêlement causés par un cordon plus long.
B. La rallonge doit être utilisée correctement.
C. L'utilisation de la rallonge pour le cuiseur à riz :
(1) La tension nominale correcte doit être utilisée pour le cuiseur à riz.
(2) Si l'appareil est installé sur le sol, la rallonge doit aussi être installée sur le sol.
(3) Les câbles et la rallonge doivent toujours être disposés dans le but d'éviter les dangers pour les enfants.
"Cet appareil possède une fiche polarisée (une lame plus large que l'autre).
Afin de réduire le risque d'électrocution, cette fiche est conçue pour s'adapter à une prise polarisée dans un seul
sens. Si la fiche ne s'emboîte pas complètement dans la prise, inversez la fiche. S'il ne convient toujours pas,
veuillez communiquer avec un électricien qualifié. N'essayez pas de modifier la fiche de quelque façon que ce
soit."
CMC-Q5 Series
AC120V~, 60Hz
1100W
1.3m
78.4KPa(0.8kgf/cm
2
)
6.7kg
30.4cm
39.5cm
28.2cm
SPECIFICATIONS / 规格 / ESPECIFICACIONES / SPÉCIFICATIONS / 제품규격
Model name/型号名称/Modelo/
모델명
Power supply/电源/Alimentación eléctrica/
전원
Power consumption/功耗/Consumo de energía/
소비전력
Power cord length/电源线长度/Longitud del cable eléctrico/
전원코드길이
Pressure/压力/Presión/
사용압력
Weight/重量/Peso/
중량
Width/宽度/Anchura/
폭
Length/长度/Longitud/
길이
Height/高度/Altura/
높이
Menu/菜单/Menú/
메뉴
Soup
Meat
Vegetables
Rice
Porridge
Steam Cook
Multi Cook
Slow Cook
Browning Fry
Auto Clean
Dimension/尺寸/Dimensiones/
치수
5
HOW TO USE EXTENSION CORD / COMMENT UTILISER UNE RALLONGE
•
This sign is intended to remind and alert that something may cause
problems under the certain situation.
•
Please read and follow the instruction to avoid any harmful situation.
•
Indicates a prohibition
This means that the action it describes
may result in death or severe injury.
This means that the action it describes
may result in injury or property damage.
•
Indicates an instruction
Read the following product safety guide carefully to prevent any accidents and/or serious danger.
‘Warning’ and ‘Caution’ are different as follows.
Use a single socket with the rated current above 15A.
•Using several lines in one socket can cause overheating
or fire. Please check the power cord and plug frequently.
•Use an extension cord with the rated current above 15A.
Do not cover the automatic steam outlet or pressure
weight with your hand or face.
Please pay careful attention against water and
chemicals
•It can cause an electric shock or fire.
Do not use the cooker near hot things such as stove,
gas stove or direct ray of light.
•It can cause an electric shock, fire, deformation, malfunction, or
discoloration. Please check the power cord and plug frequectly.
Do not alter, reassemble, disassemble or repair.
•It can cause fire, electricshock or injury.
•For repair, contact dealeror the service center.
•It can cause burns.
•Especially be careful to keep it out of children’s reach.
Warning Do not
Do not use a multi cooker at a place where dust is
trapped or chemical material is located.
•Do not use any combustible gas or flammable materials nearby a
product.
•It can cause explosion or fire.
Do not use damaged power cord, plug, or loose socket.
•Please check the power cord frequently for damage.
•Serious damage can cause electric shock or fire.
•If the plug is damaged, contact the dealer or a service center.
Do not clean the product with water or pour water in the
product.
Do not over unplug and plug the power cord over and
over.
•It can cause an electric shock or fire.
Do not turn the Lock/Unlock Handle to
“Unlock” while cooking.
•The hot steam or any hot content within the cooker can cause
burns.
•After you finish the cooking do not try to open the cooker by
force until the steam is completely exhausted.
Do not insert metal objects such as pins and wires or
any other external substances in the automatic steam
exhaust outlet or any other slot.
Keep the cooker out of reach of children.
•It can cause burns, electric shock or injury.
Do not use it without the inner pot.
•It can cause electric shock or malfunction.
•Do not pour rice or water without the inner pot.
•If rice or water gets in then do not turn the product over or
shake it, please contact the dealer or service center.
Be careful that both the plug and power cord are not to be
shocked by animal attack or sharp metal materials.
•Damages by impact can cause an electric shock or fire.
Please check the power cord and plug frequently.
Remove a foreign substance on the cord and plug with a
clean cloth.
•It can cause fire. Please check the power cord and plug
frequently.
Don’t spray or put any insecticides or chemicals.
•It can cause an electric shock or fire.
•If cockroaches or any insects get inside the cooker, please call a
dealer or a service center.
Don’t let foreign substances such as needle, cleaning pin, or
metal get in or block the in let/out let pipe or gape.
•It can cause an electric shock or fire.
•Do not put a cleaning pin in a gap or a hole of the product
except when dearing a steam outlet.
Do not open the top cover while in heating and cooking.
•It can cause burns.
•If you need to open the lid while cooking, keep pressing the
cancel button for 2 seconds and confirm internal steam
released completely turning the pressure weight over.
Do not use pots that are not designed for the cooker. Do
not use abnormal pot and do not use without the inner
pot.
•It can cause an electric shock or fire.
Do not bend, tie, or pull the power cord by force.
•It can cause an electric shock or short circuit resulting in fire. Please
check the power cord and plug frequently.
Do not cover the automatic steam outlet or pressure
weight with a duster, a towel, or apron, etc.
•It can cause deformation or a breakdown.
•It can cause an explosion by pressure.
•It can cause an electric shock or fire.
•If it contacts water, please separate power cord and contact dealer
and service center.
•It can cause an electric shock or fire.
•Especially be careful to keep it out of reach of children.
SAFETY PRECAUTIONS
6

Clean any dust or external substances off the
temperature sensor and inner pot.
•It can cause a system malfunction or fire.
Do not use it on a rice chest or a shelf.
Do not plug or pull out the power cord with wet hands.
•It can cause an electric shock.
Do not press heavy things on the power cord.
•It can cause an electric shock or fire.
•Please check the power cord and plug frequently
Do not change, extend or connect the power cord
without the advice of a technical expert.
•It can cause an electric shock or fire.
•Do not place the power cord between furniture. It can cause
an electric shock resulting in fire.
Please check the power cord and plug frequently.
•When using on furniture be cautious of steam release
As it can cause damage, fire and and/or electric shock.
Caution Do not
Do not move the product by pulling or using the power
cord.
•Electric short might cause fire.
Please contact a dealer or service center when there is a
strange smell or smoke.
•First pull out the power cord. And contact dealer or the service
center.
Do not fill the Inner Pot for more than its maximum capacity.
Please call customer service if the inner pot coating peels off.
•
Inner pot coating may wear awayafter long use.
•
When cleaning the inner pot, do not use tough scrubber,
metallic scrubber, brush, abrasive metallic etc.
Do not place on rough top or tilted top.
•It can cause burns or breakdowns.
•Be careful to install the power cord to pass without disruption.
Do not hold the cooker by the inner pot handle.
Always turn the Lock/Unlock Handle to "Lock" when
not in use.
•
It can cause deformation by remaining pressure.
After you finish cooking, do not try to open the cooker by
force until the steam is completely exhausted.
•
The hot steam or any hot content within the cooker can cause
burns.
•
Cautiously open the top cover after cooking is done to avoid
dangerous steam and burns.
Be cautious when steam is being released.
As the food could go bad, please avoid using
the Keep Warm mode for a long time.
When you pull out the power plug, don’t pull the
power cord. Please, safely pull out the power plug.
•When the steam is released don’t be surprised.
•Please keep the cooker out of reach of children.
•If you inflict impact on power cord, it can cause an electric
shock or fire.
Please clean the body and other parts after cooking.
•If you cook rice or use the Keep Warm function after cooking
other food, the rice or the food may smell or stink.
•Clean the oven packing, top heater plate,
and inner pot every time you cook any of those.
•It can cause alteration or smell.
•Use dry kitchen cleaner or sponge to clean the inner pot, since
rough scrub or metallic ones are abrasive to the coating.
•Depending on the using methods or user's circumstances inner
pot coating might rise.
Please call the customer service for those cases.
•Please, do not pull out the clean steam vent by force.
Wipe off any excessive water on the cooker after
cooking.
•
It can cause odor and discoloration.
Wipe off water that is left behind from dew.
Please contact dealer or service center when either a
button of a product or a product itself is not working
properly.
•It c
In case of a blackout during cooking, steam from
a multi cooker will be released automatically.
Thus, the quality of rice is lower than normal.
•
Please start cooking with an indicated amount of rice and water.
•Water can overflow if the amount of water in a pot exceeds the
indicated level of water usage.
•Please start cooking in a status that steam control cap is installed
completely.
Don’t use the cooker near a magnetic field.
•It can cause burns or breakdown.
Do not drop or impact the cooker.
•It can cause a safety problem.
Please surely pull out the plug when not in use.
•It can cause electric shocks or fire.
•Use AC 120V only.
Use product on a flat surface. Do not use on a cushion.
Please avoid using it on an unstable location prone to
falling down.
•It can cause malfunction or a fire. Please check the power
cord and plug frequently.
Don’t use for various purpose for inner pot.
And do not heat up the inner pot on the gas stove.
•It can cause deformation of the inner pot.
•It can cause to spill the inner coating.
Please pull out the plug when not in use.
Please use the cooker for it’s intended purpose.
•It can cause electric shocks or fire.
•It can cause malfunction or smell.
Do not touch the metallic surface of the inner pot and
pressure weight after cooking or warming.
•It can cause burns.
•Remaining hot steam can cause burns when you tilt the
pressure weight while and right after the cooking.
•It may cause a malfunction leading to issues such as
overflow of contents or poor cooking.
•It can cause problems and danger. There are portable handles
on the bottom right and left side of the cooker. Hold the
handles with both hands and move it carefully.
7
SAFETY PRECAUTIONS
SAFETY PRECAUTIONS
Lisez attentivement le guide de sécurité du produit qui suit afin d'éviter les accidents et/ou les dangers graves.
« Avertissement » et « Attention » diffèrent comme suit :
Ne recouvrez pas la sortie de vapeur automatique ou le
poids de pression avec votre main ou votre visage.
N'utilisez pas le cuiseur près de ce qui est chaud comme une
cuisinière, une cuisinière à gaz ou la lumière directe du soleil.
•Cela peut causer un choc électrique, un incendie, une déformation, un
dysfonctionnement ou une décoloration. Veuillez vérifier régulièrement
le cordon d'alimentation et la prise.
Ne modifiez pas, ne remontez pas, ne démontez pas ou ne
réparez pas cet appareil.
•Cela peut entraîner un incendie, un choc électrique ou des
blessures.
•Pour le faire réparer, contactez le revendeur ou le centre
technique.
•Cela peut entraîner des brûlures.
•Faites particulièrement attention à le mettre hors de portée des
enfants.
Utilisez une prise individuelle avec un courant nominal
supérieur à 15A.
Soyez particulièrement attentifs à l'eau ou aux produits
chimiques.
•L'utilisation de plusieurs lignes sur une seule prise peut provoquer
une surchauffe ou un incendie.
•Veuillez vérifier fréquemment le cordon d'alimentation et la prise.
•Utilisez une rallonge avec un courant nominal supérieur à 15A.
N'utilisez pas le cuiseur à riz dans un endroit qui retient la
poussière ou en présence de produits chimiques.
Ne mettez pas la poignée Lock/Unlock (verrouiller/
déverrouiller) sur « Unlock » durant la cuisson.
•La vapeur chaude ou tout autre élément chaud à l'intérieur
de l'autocuiseur peut entraîner des brûlures.
•Après avoir fini la cuisson n'essayez pas d'ouvrir le cuiseur
de force avant que la vapeur se soit complètement évacuée.
N'utilisez pas l'appareil sans la cuve de cuisson.
•Cela peut provoquer un choc électrique ou un
dysfonctionnement.
•Ne mettez pas de riz ni d'eau sans la cuve de cuisson à
l'intérieur.
•Si du riz ou de l'eau s'infiltre, ne retournez pas le produit
et ne le secouez pas, veuillez contacter le revendeur ou le
centre centre technique.
Ne débranchez pas ni ne branchez sans arrêt le cordon
d'alimentation.
•Cela peut entraîner un choc électrique ou un incendie.
N'utilisez pas de cuves de cuisson qui ne sont pas
conçues pour le cuiseur.
N'utilisez pas une cuve de cuisson anormale et
n'utilisez pas l'appareil sans la cuve de cuisson.
•Cela peut entraîner un choc électrique ou un incendie.
Faites attention à ce que la fiche et le cordon d'alimentation
ne soient pas entrechoqués par des attaques d'animaux ou par des
matériaux métalliques tranchants.
•Les dégâts dûs à des impacts peuvent provoquer un choc
électrique ou un incendie. Veuillez vérifier fréquemment le
cordon d'alimentation et la prise.
Ne laissez pas des substances étrangères telles qu'une aiguille,
une épingle de nettoyage, ou du métal entrer et ne bloquez pas
le conduit d'arrivée/d'évacuation ou l'ouverture.
•Cela peut entraîner un choc électrique ou un incendie.
•Ne mettez pas une épingle de nettoyage dans l'ouverture ou le
trou du produit sauf pour nettoyer la sortie de vapeur.
N'ouvrez pas le couvercle supérieur lors de la phase de
chauffage et de la cuisson.
•Cela peut entraîner des brûlures.
•Si vous avez besoin d'ouvrir le couvercle lors de la cuisson,
maintenez appuyé le bouton cancel (annuler) pendant deux
secondes et vérifiez que la vapeur interne s'est complètement
évacuée en retournant le poids de pression.
N'insérez pas d'objets en métal tels que des épingles et des fils ou
toute autre substance extérieure dans la sortie d'évacuation de
vapeur automatique ou toute autre ouverture.
Gardez le cuiseur hors de portée des enfants.
•Cela peut provoquer des brûlures, un choc électrique ou
des blessures.
Ne vaporisez pas et n'utilisez pas d'insecticides ou de
produits chimiques.
•Cela peut entraîner un choc électrique ou un incendie.
•Si des cafards ou d'autres insectes pénètrent dans le cuiseur,
veuillez contacter un revendeur ou un centre technique.
•Cela peut entraîner un choc électrique ou un incendie.
•Faites tout particulièrement attention de garder l'appareil hors
de portée des enfants.
Ne nettoyez pas le produit avec de l'eau ni ne versez de l'eau
dans le produit.
•Cela peut entraîner un choc électrique ou un incendie.
•Si le produit est en contact avec de l'eau, veuillez séparer le
cordon d'alimentation et contactez le revendeur et le centre
technique.
Ne recouvrez pas la sortie de vapeur automatique ou le poids
de pression de pression avec un chiffon, une serviette ou un
tablier etc.
Ne pliez pas, n'attachez pas et ne tirez pas le cordon
d'alimentation de force.
•Cela peut entraîner une déformation ou une panne.
•Cela peut entraîner une explosion due à la pression.
•Cela peut provoquer un choc électrique ou un courtcircuit entraînant
un incendie. Veuillez vérifier fréquemment le cordon d'alimentation et
la prise.
N'utilisez pas un cordon d'alimentation endommagé,
une fiche ou une prise mal fixée.
•Veuillez vérifier régulièrement si le cordon d'alimentation est
endommagé.
•Des dégâts importants peuvent entraîner un choc électrique ou un
incendie.
•Si la fiche est endommagée, contactez le revendeur ou un centre
technique.
•N'utilisez aucun gaz inflammable ou produit inflammable près du
produit.
•Cela peut entraîner une explosion ou un incendie.
•Cela peut causer un choc électrique ou un incendie.
•
Ce symbole vise à rappeler et à alerter que quelque chose peut
entraîner des problèmes dans la situation donnée.
•
Veuillez lire et respecter l'instruction afin d'éviter toute situation
dangereuse.
•
Indique une interdiction.
Cela signifie que l'action qui est décrite peut
entraîner la mort ou une blessure grave.
Cela signifie que l'action décrite peut entraîner
des blessures ou des dégâts matériels.
•
Indique une instruction.
Avertissement Ne pas
MESURES DE SÉCURITÉ
8

Ne placez pas de choses lourdes sur le cordon d'alimentation.
•Cela peut entraîner un choc électrique ou un incendie.
•
Veuillez vérifier fréquemment le cordon d'alimentation et la fiche.
Retirez une substance étrangère sur le cordon et la fiche
à l'aide d'un chiffon propre.
Ne changez pas, ne rallongez pas ni ne branchez le cordon
d'alimentation sans l'avis d'un expert technique.
•Cela peut entraîner un choc électrique ou un incendie.
•Cela peut provoquer un incendie. Veuillez vérifier fréquemment le
cordon d'alimentation et la fiche.
N'utilisez pas l'appareil sur un coffre à riz ou une étagère.
•Ne placez pas le cordon d'alimentation entre des meubles. Cela peut
provoquer un choc électrique entraînant un incendie.
•Veuillez vérifier fréquemment le cordon d'alimentation et la prise.
•En cas d'utilisation sur du mobilier, faites attention à l'évacuation de la
vapeur car cela peut provoquer des dégâts, un incendie et/ou un choc
électrique.
Nettoyez la poussière ou toute substance étrangère sur
le capteur de température et la cuve de cuisson.
•Cela peut provoquer un dysfonctionnement du système ou un incendie.
Ne branchez pas et ne retirez pas le cordon d'alimentation
avec les mains mouillées.
•Cela peut provoquer un choc électrique.
Veuillez contacter un revendeur ou un centre technique en cas
d'odeur ou de fumée inhabituelle.
Ne déplacez pas le produit en tirant ou en utilisant le cordon
d'alimentation.
Veuillez contacter le service client si le revêtement de la cuve de
cuisson s'enlève.
•
Il se peut que le revêtement s'use après une longue utilisation.
•
Lors du nettoyage de la cuve de cuisson, n'utilisez pas de tampon
à récurer dur ou métallique, de brosse, d'abrasifs métalliques etc.
Ne placez pas l'appareil sur une surface irrégulière ou inclinée.
•Cela peut provoquer des brûlures ou des pannes.
•Faites attention à installer le cordon d'alimentation de façon à
ce qu'il passe sans interruption.
Ne tenez pas le cuiseur par la poignée de la cuve de cuisson
•Cela peut entraîner des problèmes ou être dangereux. Des
poignées amovibles sont disposées en bas à droite et sur le
côté gauche du cuiseur. Tenez les poignées à deux mains et
déplacez-le avec précaution.
Après avoir fini la cuisson, n'essayez pas d'ouvrir le cuiseur
de force avant que la vapeur ne soit complètement évacuée.
•La vapeur chaude ou tout autre élément chaud à l'intérieur du
cuiseur peut provoquer des brûlures.
•Ouvrez le couvercle supérieur avec prudence après la cuisson afin
d'éviter la vapeur et des brûlures présentant un danger.
Faites attention lorsque la vapeur est évacuée.
Lorsque vous retirez la fiche d'alimentation, ne tirez pas sur le
cordon d'alimentation. Veuillez retirer en toute sécurité la fiche
d'alimentation.
•Ne soyez pas surpris lorsque la vapeur est évacuée.
•Veuillez conserver le cuiseur hors de portée des enfants.
•Si vous faites prendre un impact au cordon d'alimentation, cela
peut entraîner un choc électrique ou un incendie.
Ne pas réchauffer le contenu pendant trop longtemps sous
peine de détérioration ou alteration.
Veuillez nettoyer le corps ainsi que les autres parties après la
cuisson.
•Une odeur pourrait imprégner le nouveau contenu lorsque vous faites
cuire ou réchauffer après une première utilisation.
•Nettoyez le compartiment du four, la plaque supérieure de chauffage et
la cuve de cuisson à chaque fois que vous faites cuire avec l'un d'entre
eux.
•Cela peut entraîner une altération ou des odeurs.
•Utilisez un essuie-tout sec ou une éponge pour nettoyer la cuve de
cuisson, car les surfaces dures rugueuses ou celles en métal sont
abrasives pour le revêtement.
•En fonction des méthodes d'utilisation ou des circonstances propres à
l'utilisateur, le revêtement de la cuve de cuisson peut se détacher.
•Veuillez contacter le service client dans ces cas de figure. Veuillez ne pas
tirer de force l'évent à vapeur propre.
Mettez toujours la poignée Lock/Unlock (verrouillage/
déverrouillage) sur « Lock » lorsque vous n'utilisez
pasl'appareil n'est pas utilisé.
•Cela peut entraîner une déformation du à la pression restante.
Essuyez toute l'eau en excès sur le cuiseur après la cuisson.
•It c
Veuillez contacter un revendeur ou un centre technique
lorsqu'un bouton du produit ou le produit lui-même ne
fonctionne pas correctement.
En cas de coupure de courant durant la cuisson, la vapeur du
cuiseur à riz est évacuée automatiquement. La qualité du riz est
par conséquent inférieure à la normale.
•
Veuillez démarrer la cuisson avec la quantité d'eau et de riz indiquée.
•
L'eau peut déborder si la quantité d'eau dans la cuve de cuisson dépasse
le niveau d'eau recommandé.
•
Veuillez démarrer la cuisson avec le capot de régulation de la vapeur.
complètement mis en place.
Ne touchez pas la surface métallique de la cuve de cuisson et
le poids de pression après la cuisson et la phase de
chauffage.
•Cela peut entraîner des brûlures.
•La vapeur chaude restante peut provoquer des brûlures
quand vous appuyez sur le poids de pression durant et juste
après la cuisson.
N'utilisez pas le cuiseur près d'un champ magnétique.
•Cela peut provoquer des brûlures ou une panne.
Ne laissez pas tomber le cuiseur et ne le soumettez pas à des
chocs.
•Cela peut entraîner un problème de sécurité.
Veuillez vous assurer de débrancher la prise lorsque l'appareil
n'est pas utilisé.
•Cela peut provoquer des chocs électriques ou un incendie.
•
Utilisez du courant 120V uniquement.
Utilisez le produit sur une surface plane. N'utilisez pas le produit
sur un coussin. Veuillez éviter d'utiliser le produit dans un endroit
qui n'est pas stable où il risquerait de tomber.
Veuillez débrancher la prise lorsque vous n'utilisez pas le
produit.
Veuillez utiliser le cuiseur dans le but dans lequel il a été conçu.
•Cela peut entraîner un dysfonctionnement ou un incendie. Veuillez
vérifier fréquemment le cordon d'alimentation et la prise.
•Cela peut provoquer des chocs électriques ou un incendie.
•Cela peut provoquer un dysfonctionnement ou une odeur.
N'utilisez pas l'appareil au-delà de la capacité maximum.
•Cela pourrait provoquer un dysfonctionnement tel que le
débordement de contenu ou une tout autre panne.
•Débranchez tout d'abord le cordon d'alimentation.
Puis contactez le revendeur ou le centre technique.
Avertissement Se rappeler
•Un court-circuit électrique pourrait provoquer un incendie.
•
Cela peut entraîner des odeurs ou une décoloration. Essuyez
l'eau résultant de la condensation.
9
MESURES DE SÉCURITÉ
MESURES DE SÉCURITÉ
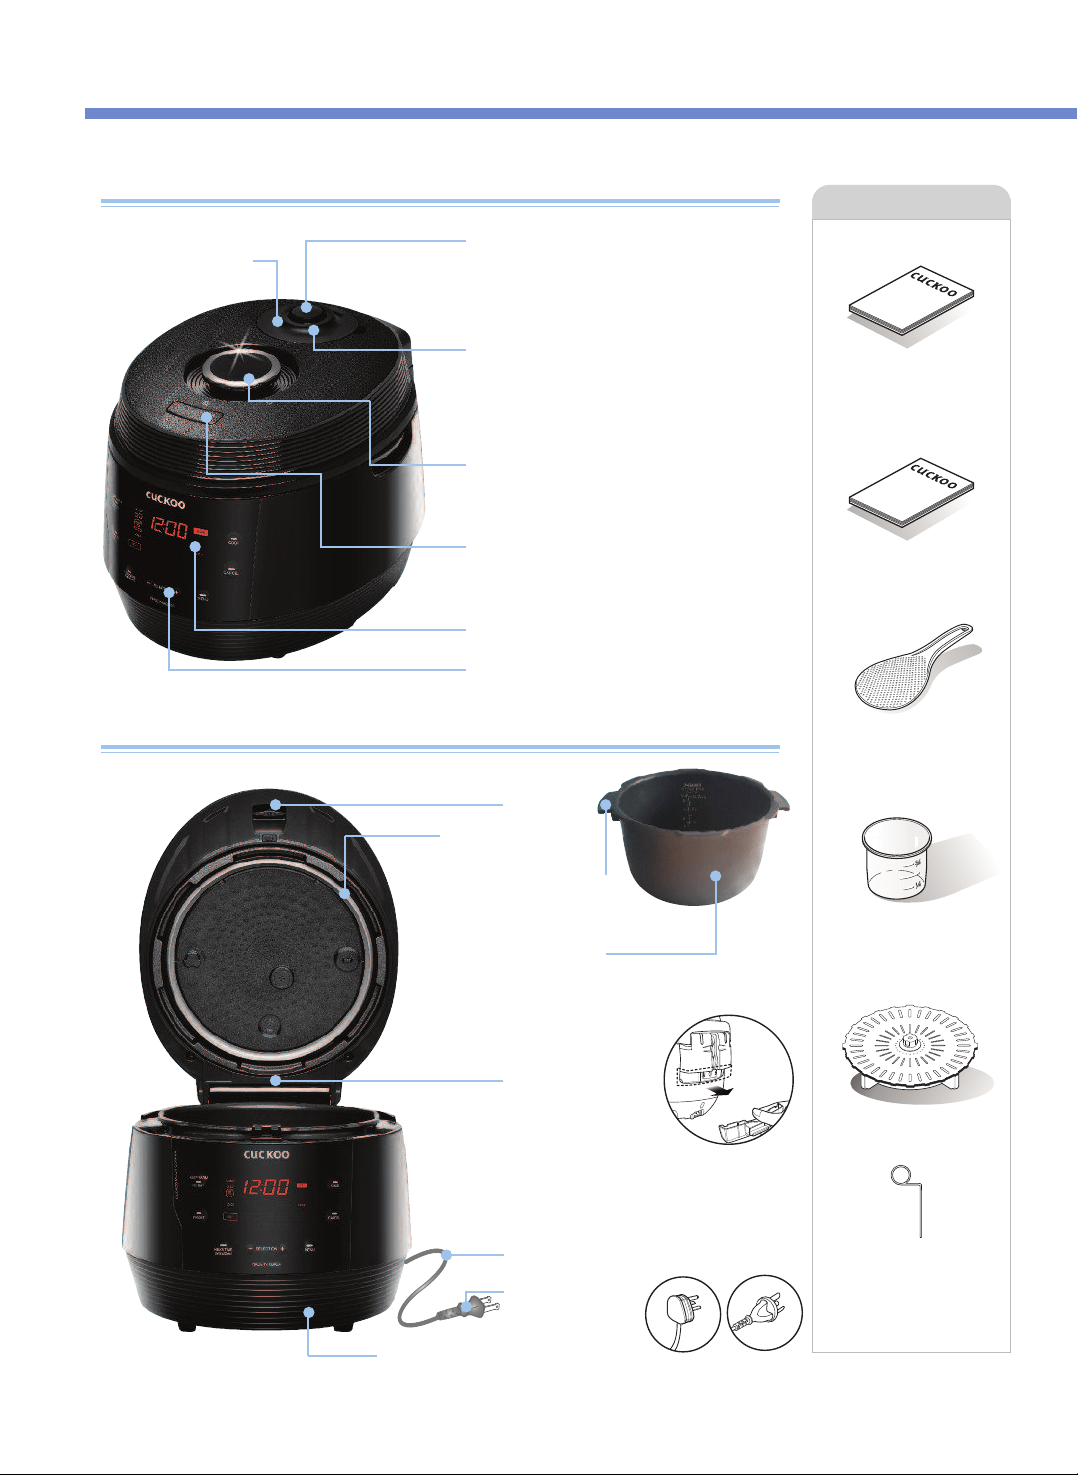
Name of each part
Name of each part
Automatic Steam Exhaust
Outlet
When cooking is finished or in
warming mode, steam releases
automatically.
Digital Programmed Steam Releaser
(Solenoid Valve)
Keep the pressure weight horizontally. It
stabilizes steam inside. When the pressure
weight spins, it releases steam.
Soft Steam Cap
Lock/Unlock Handle
The handle has to be in ‘Lock’ position to
operate.
Clamp Knob
Turn handle to ‘Unlock’, and then press
Clamp knob to open.
LED Display
Control Panel
Drain Dish
Pour out water from
drain dish after cooking
or during ‘Warming’
mode. Otherwise, an
odor(s) may occurs
Power Cord
Power Plug
Temperature
Sensor
Lid Assy
Accessories
Operating Instruction
Cooking Guide
Rice Scoop
Measuring Cup
Steam Plate
Packing
Insert the inner pot into multi cooker.
Inner Pot
Inner Pot Handle
The plug type may
differ from the actual.
(this is only to explain
about how it works.)
Cleaning Pin
(Attached on the
bottom of the unit)
NAME OF EACH PART
10
Manual
Cooking Guid
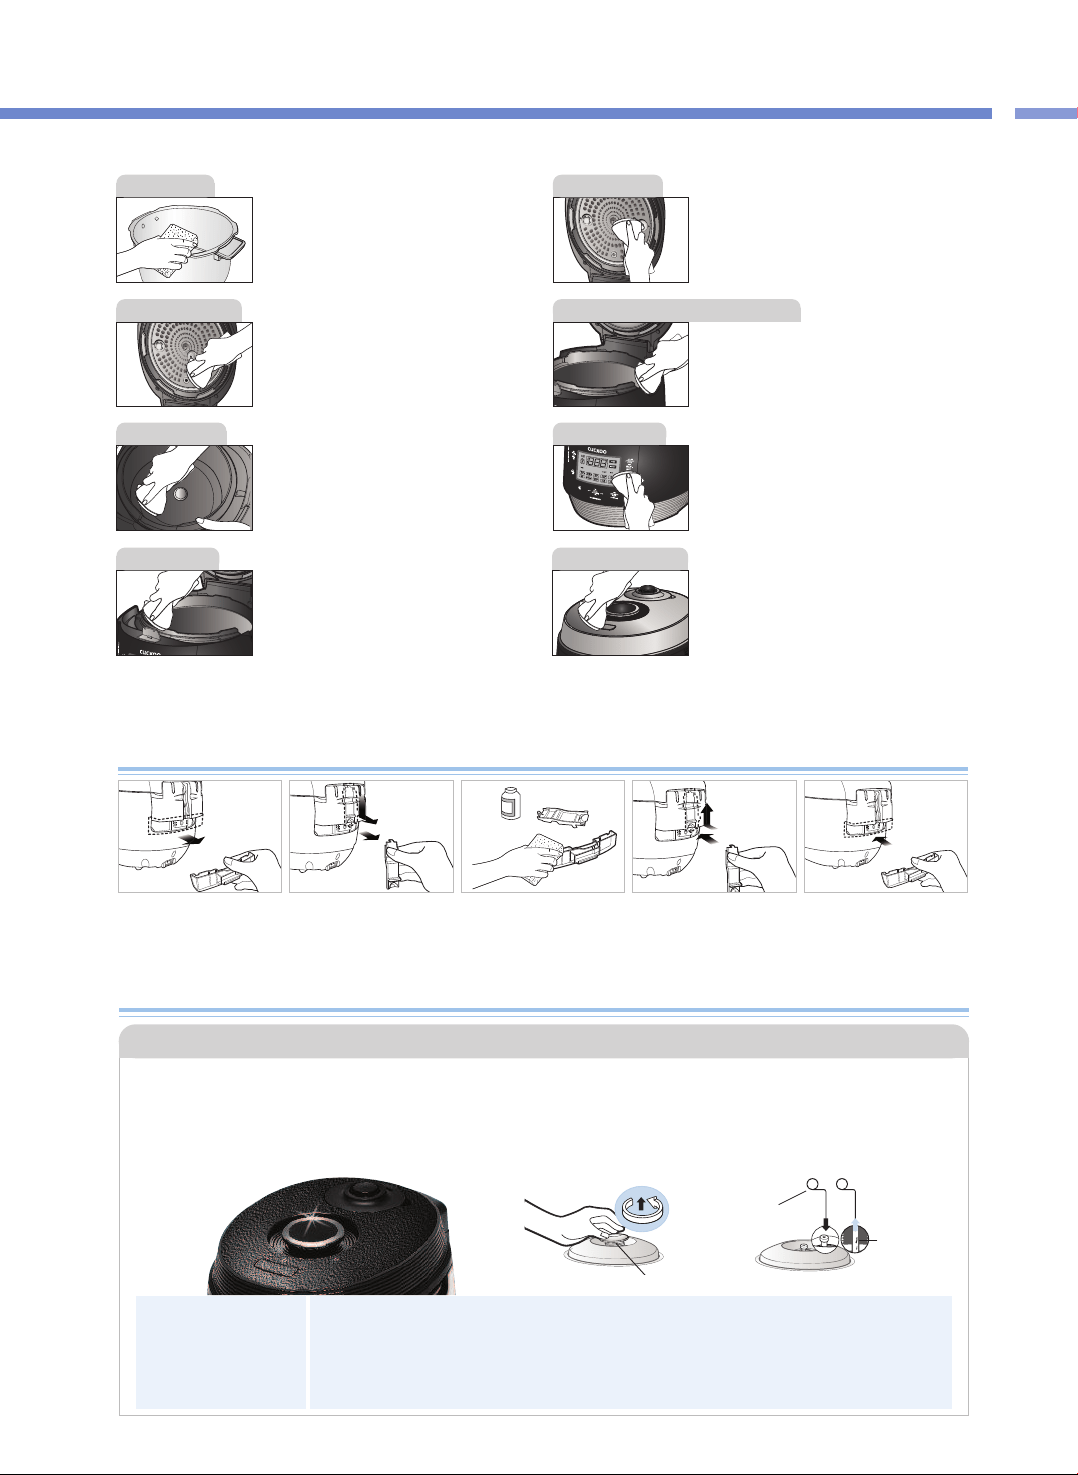
Wipe the inner, upper, and outer parts of the
inner pot of any foreign substance.
If there is rice water left on the lid, please wipe
clean with a wet towel. The center of the lid is
made out of metal so beware when cleaning.
Wipe the top cover with a damp cloth.
Be careful when cleaning the top heater
This part is designed to gather the moisture
coming through the steam vent during
cooking. Once cooking finished, wipe it clean
with a well wrung dish cloth.
In case the cauldron is stained with cooked rice
water or foreign matter, wipe the cauldron with a
damp dishcloth. Using a rough scouring pad,
brush, or etc. may damage the cauldron surface.
If the buttons are not functioning correctly,
please contact our customer care service.
If there are foreign substances stuck on the
temperature sensor, remove them without
damaging the metal plate. Cleanly wipe the
foreign substances or any moisture on the
heat plate.
Wipe the main unit with a damp cloth.
※
Caution
Do not clean the inside of the inner pot with any sharp cutlery (fork, spoon, chopsticks, etc.).
- The coating of the inner pot may peel off.
Before or after use, please wipe around the Lid
Open button and remove rice water or any
other foreign substances using a wet towel.
Before or after use, if the Lid Open button does
not work, please contact customer service.
❶ Separate the drain
dish.
❷
Separate the drain
dish cap by pushing
it down.
❸
Clean the drain dish
cap and drain dish
with a neutral
detergent.
❹
Securely put in the
drain dish cap after
cleaning
❺
Insert the drain dish
firmly by pressing it
indirection of the
arrow(as shown in
thepicture above).
How to Clean Drain Dish
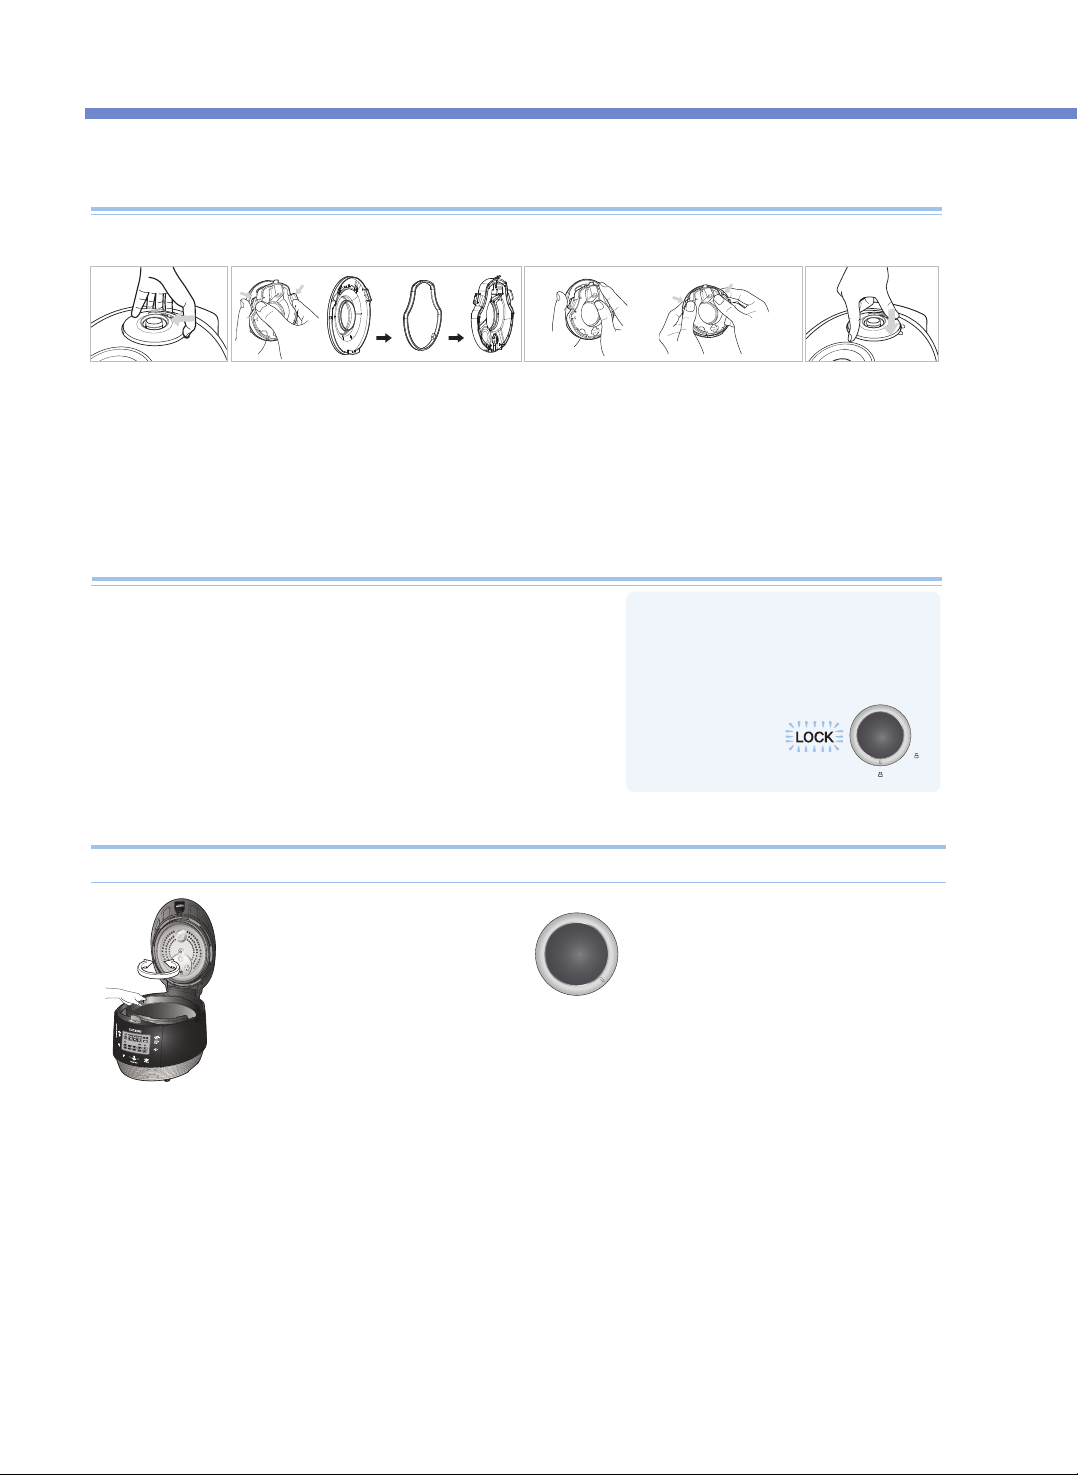
How to Clean The Pressure Weight Nozzle
•The valve hole of the pressure weight allows steam to release. Check regularly to ensure that it is not
blocked. If the valve hole of the pressure weight is blocked, the hot steam and hot content within the
cooker can cause serious injury.
※Do not use the cleaning pin for any other use except to clean the valve hole of the pressure weight.
▶Under the Lock/Unlock handle is the steam cap that guards the pressure weight. To remove the
pressure weight, remove the steam cap, turn the pressure weight counter-clockwise while pulling
it up, and keep turning until it comes out.
▶Puncture the clogged valve hole with the cleaning pin and reassemble it by turning it clockwise.
▶When the pressure weight is properly assembled, it can freely be turned.
Soft steam cap
Cleaning Pin
※Attached on the
bottom of the
unit
Alien
substance
Pressure Weight
a neutral
detergent
11
HOW TO CLEAN
NAME OF EACH PART / HOW TO CLEAN
HOW TO CLEAN
12
How to use the handle
•If the lamp does not turn on, it would
not operate the “Cook” and “Preset”
buttons. Make sure the handle is
located in “Lock”.
2. To close the top cover turn the
handle to unlock shown in the
picture on the right. (Make sure
to turn the handle to "unlock".)
1. Make sure the inner pot is
place correctly inside the main
body.
3. If there is excess steam inside the
inner pot, it may be difficult to lock the
handle. Cautiously pull up the pressure
weight and allow the excess steam to
release. Then try to turn the handle
again.
When top cover does not close perfectly
How to clean the soft steam cap
※ Do not touch the surface of the soft steam cap right after cooking. You can get burned.
(this may cause burns or scalding).
Do not try to close the top cover by force. It may damage your cooker and cause problems.
❶ Peel off the soft
steam cap as
shown in the
image above by
grasping the
dented part with
your fingers and
pulling to the side
while lifting gently.
❷ Disassemble soft steam cap in the rear by
pressing in the direction of the arrow and
wash it frequently with a neutral detergent.
※ Carefully insert the packing.
❸
When you are putting the soft steam
cap together, match the bump on the
bottom, press it towards the arrow and
make sure both the hooks in the front
is locked in.
❹ When installing
the soft steam
cap, insert the
cap firmly by
pressing it in the
direction as
shown above.
1. After cooking, turn the handle from “Lock” to “Unlock” to open
2. If there is unreleased steam in the Inner pot it maybe difficult to
turn the handle. In this case, twist (cautiously pull up) the
pressure weight and let the excess steam out. (See more detail
of the pressure weight on page 11.) Do not open by force.
3. Handle must be turned to “Unlock” to open and close the lid.
※
Pictures may look different from the actual product
13
NAMES AND FUNCTIONS ON CONTROL PANEL / MALFUNCTION INSPECTION OF DISPLAY PANEL
HOW TO CLEAN / CONTROL&DISPLAY PANEL
※
When the product is plugged in and no operation is being conducted. the product is in Standby
Mode. The in screen image showing on the right indicates Standby mode.(The options of the
Standby mode display and presence of the voice are different according to user setting.)
※
When operating functions, press the CANCEL button to enter the Standby mode.
※
Press the button until you hear the buzzer sound. The design of the plate may differ in reality.
KEEP WARM /
REHEAT button
Used to keep warm or heat up food
(Refer to page 21)
COOK button
Used to start cooking
(Refer to page 18)
CANCEL button
Used to cancel a selected
function or to automatically
discharge steam(Press and hold
the button for two seconds to
cancel during cooking.)
Menu button
Used to select among SOUP,
MEAT, VEGETABLES, RICE,
PORRIDGE, BROWNING FRY,
MULTI COOK, STEAM COOK,
SLOW COOK,
and AUTO CLEAN
PRESET button
Used to preset cooking
(Refer to page 15)
HEAT / TIME button
Used to set the heating level or the
cooking time. Language setting
(Reper to page 14), Voice volume setting
(Reper to page 14), Setting of temperature
for keeping warm (Refer to page 14)
SELECTION - , + buttons
Used to set the heating level and the cooking time (Refer to page 19, 20).
Used to change the preset time (Refer to page 15)
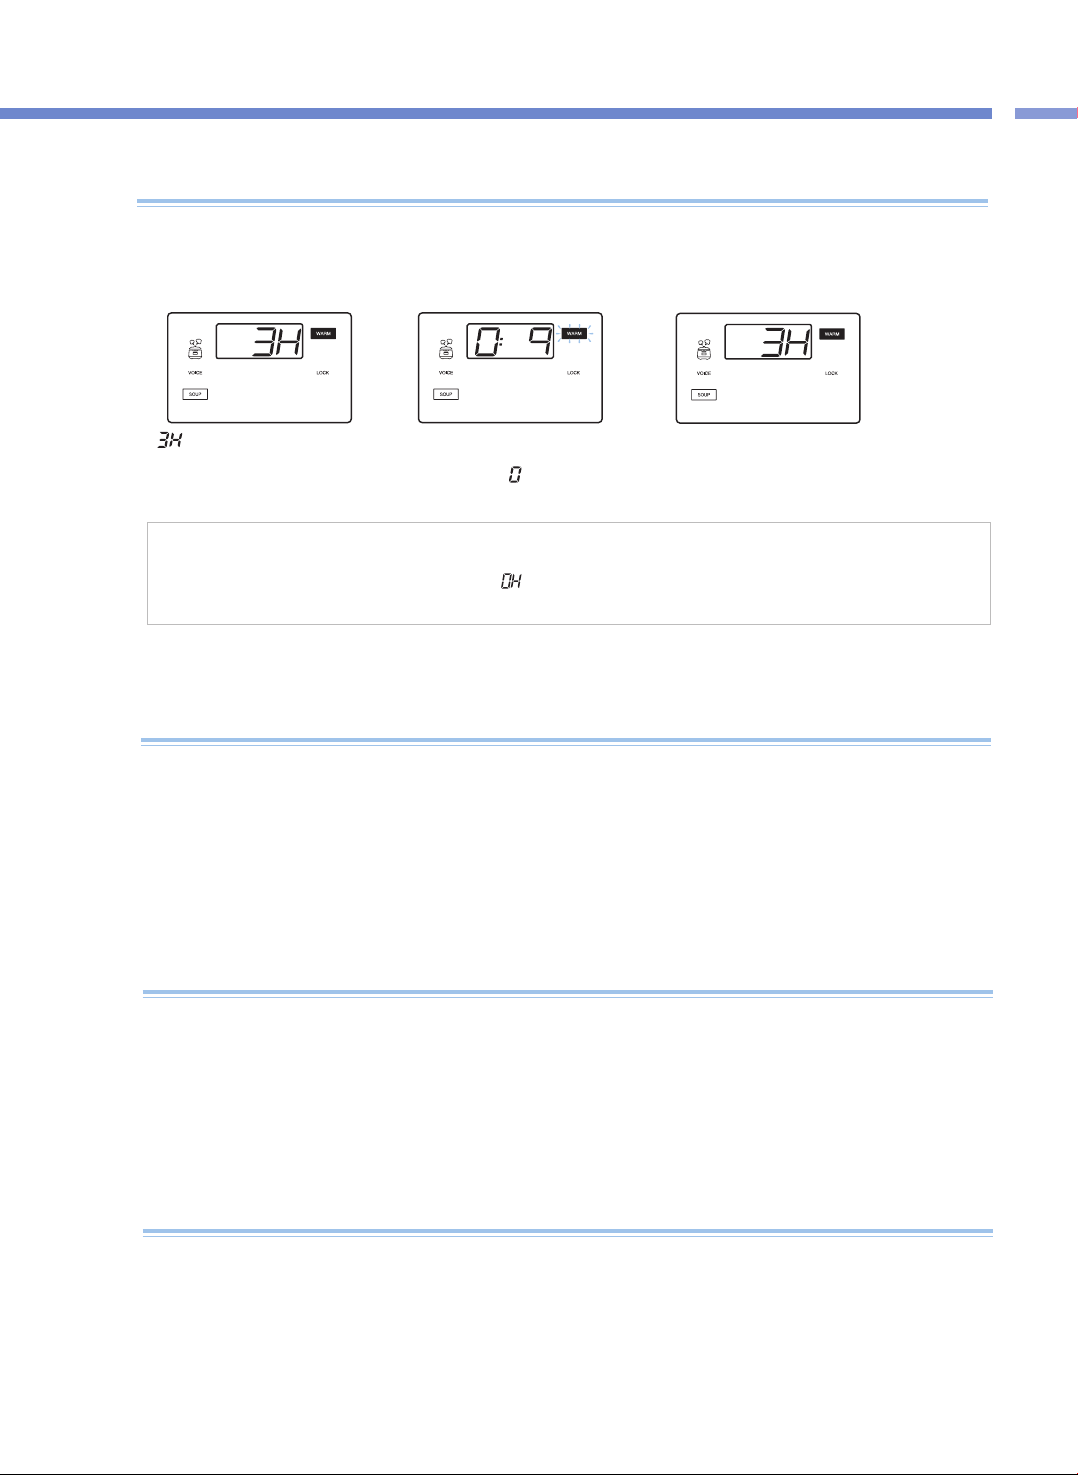
<Standby Mode>
Display Panel
This appears when the Inner Pot is not mounted.
This indicates that the Temperature Sensor is malfunctioning.
Contact our customer service center.
This appears when you press the COOK or PRESET button without completely turning the Cover Handle.
Completely turn the Cover Handle to “ ” (Lock).
For any incorrect use or when the product is not properly working, the Display Panel will display the below
signs to alert you. If a sign keeps showing even in normal conditions or after proper action has been taken,
please contact our customer service center.
Error Inspection Function of Display Panel
This appears when the Cover Handle is not turned to “ ” (Open) in the Keep Warm mode after cooking is done
and you press the COOK or the PRESET button again after entering into Standby mode. This function is to check the
operation of the Cover Fastening Sensor. Turn the Cover Handle to “ ” (Open) and then turn it to “ ” (Lock). If
the problem persists, contact our customer service center.
This indicates that there is an error with the external
memory of MICOM. Contact our customer service center.
This appears when you boil only water continuously or
there is a malfunction with the product.
Contact our customer service center.
This indicates that the Environmental Sensor fails
to work. Contact our customer service center.
This indicates that there is an error with the internal
memory of MICOM. Contact our customer service center.
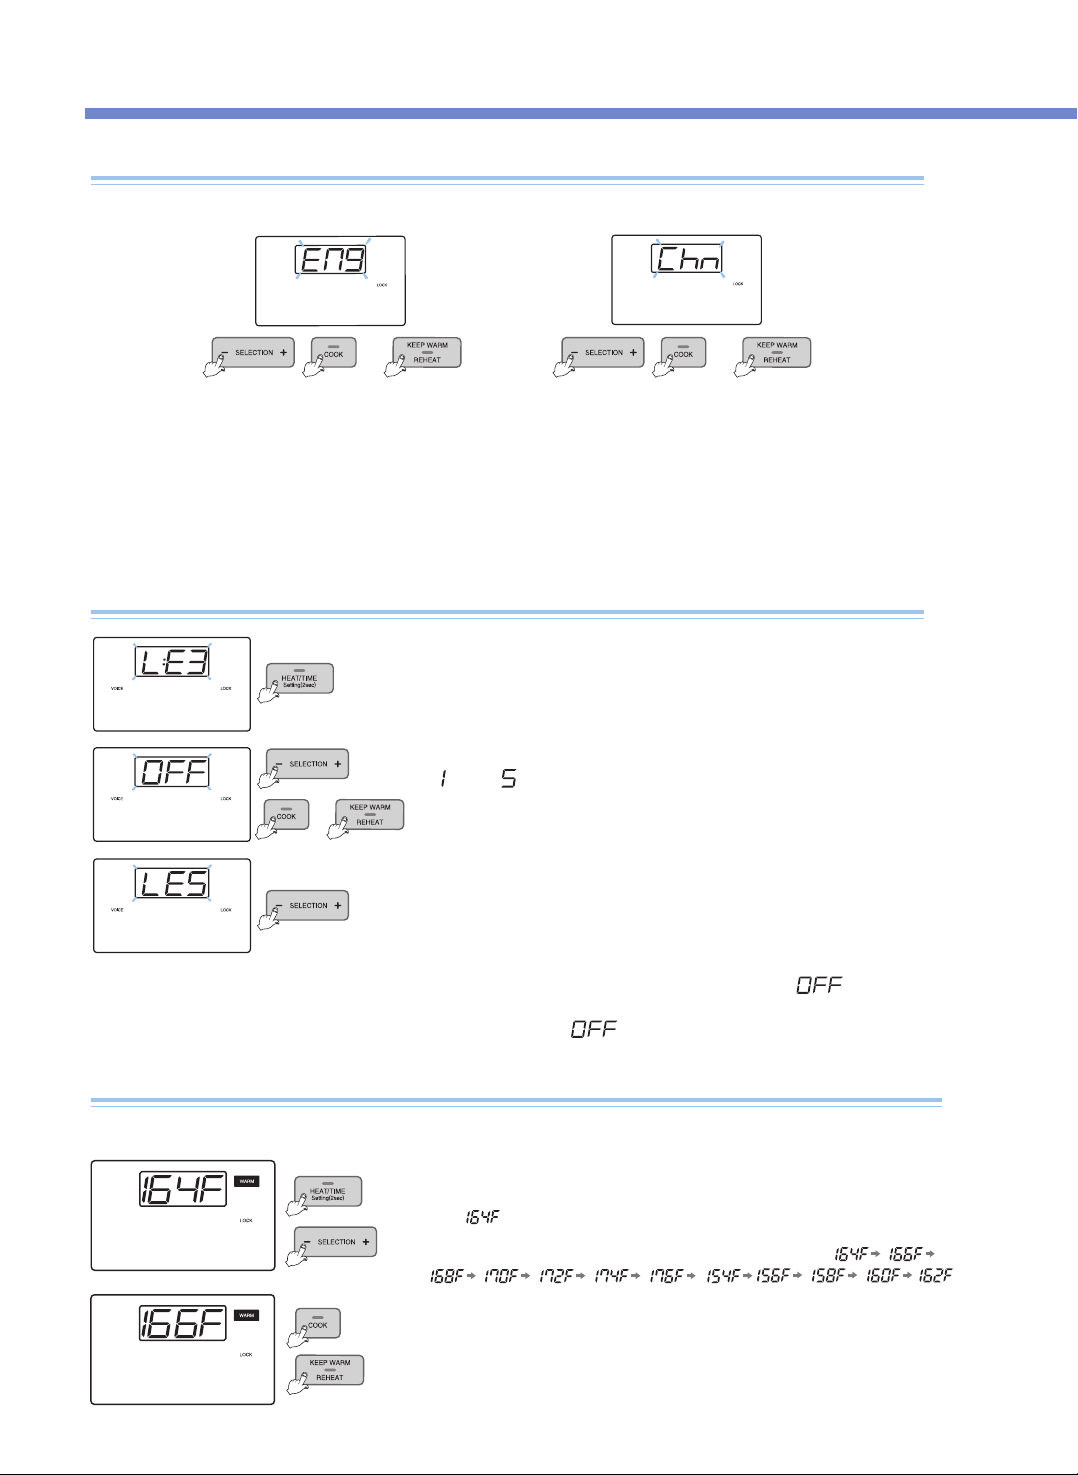
How to Adjust Voice Volume
(To reset the Voice function or adjust the voice volume)
You can select your preferred language(Engilsh and Chinese). The initial default voice setting is in English.
How to Set Language
Enter the Language Setting mode by pressing the SETTING button
for two seconds or longer while in Standby mode, and press the
SETTING button once, then you can enter the Voice Volume Setting
mode.
1. When you press and hold the SETTING button for 2 seconds or longer in Standby Mode, you will enter the
language setting mode as shown in the Display Panel in the image above.
▶ If you press the CANCEL button or 7 seconds have elapsed without any button input, the function will be canceled without being set, and it
will return to Standby Mode.
2. Press the COOK button or the KEEP WARM /REHEAT button after selecting the preferred language, and the
function is set and the product returns to Standby mode.
▶ After setting the desired voice volume, press the COOK button or the KEEP WARM
/ REHEAT button, and the function is set with the voice indicating "Voice volume
has been set" and the product returns to the Standby mode.
▶ If you press the CANCEL button or 7 seconds elapsed without any button input, the
voice indicates "Function setting has been canceled with over time" and no function
is set but the product will returns to Standby mode.
(When you press the SETTING button, you will enter the Keep Warm Temperature
setting mode without saving the changed value.)
Press the SELECTION -, + buttons to set the voice volume from
“ ”
to
“ ”
.
If you press the SELECTION -, + buttons to set
“ ”
, the voice
says function has been canceled” and the voice function is released
with
“VOICE”
and
“ ”
blinking.
❶Press the SETTING button for 2 seconds while in Standby mode to enter the Voice
Volume mode. Then, press the SETTING button twice to enter the Keep Warm
Temperature Setting mode. The Display Panel will show as the image.
Here, means the current Keep Warm temperature.
How to Adjust Keep Warm Temperature
Food may go bad or smell if the Keep Warm temperature is not proper, so adjust the Keep Warm temperature.
❸Set the desired temperature and press the COOK button or the KEEP WARM / REHEAT
button, and the set temperature is automatically entered and the product returns to the
Standby mode.
(If you press the CANCEL button or 7 seconds elapse without any button input, the function
is canceled and the product returns to Standby mode.)
❷Press the SELECTION -, + buttons to change the Display Panel like
e.g.) English voice e.g.) Chinese voice
or
or
or
HOW TO SET FUNCTION(LANGUAGE, VOLUME, KEEP WARM TEMPERATURE)
14
or
15
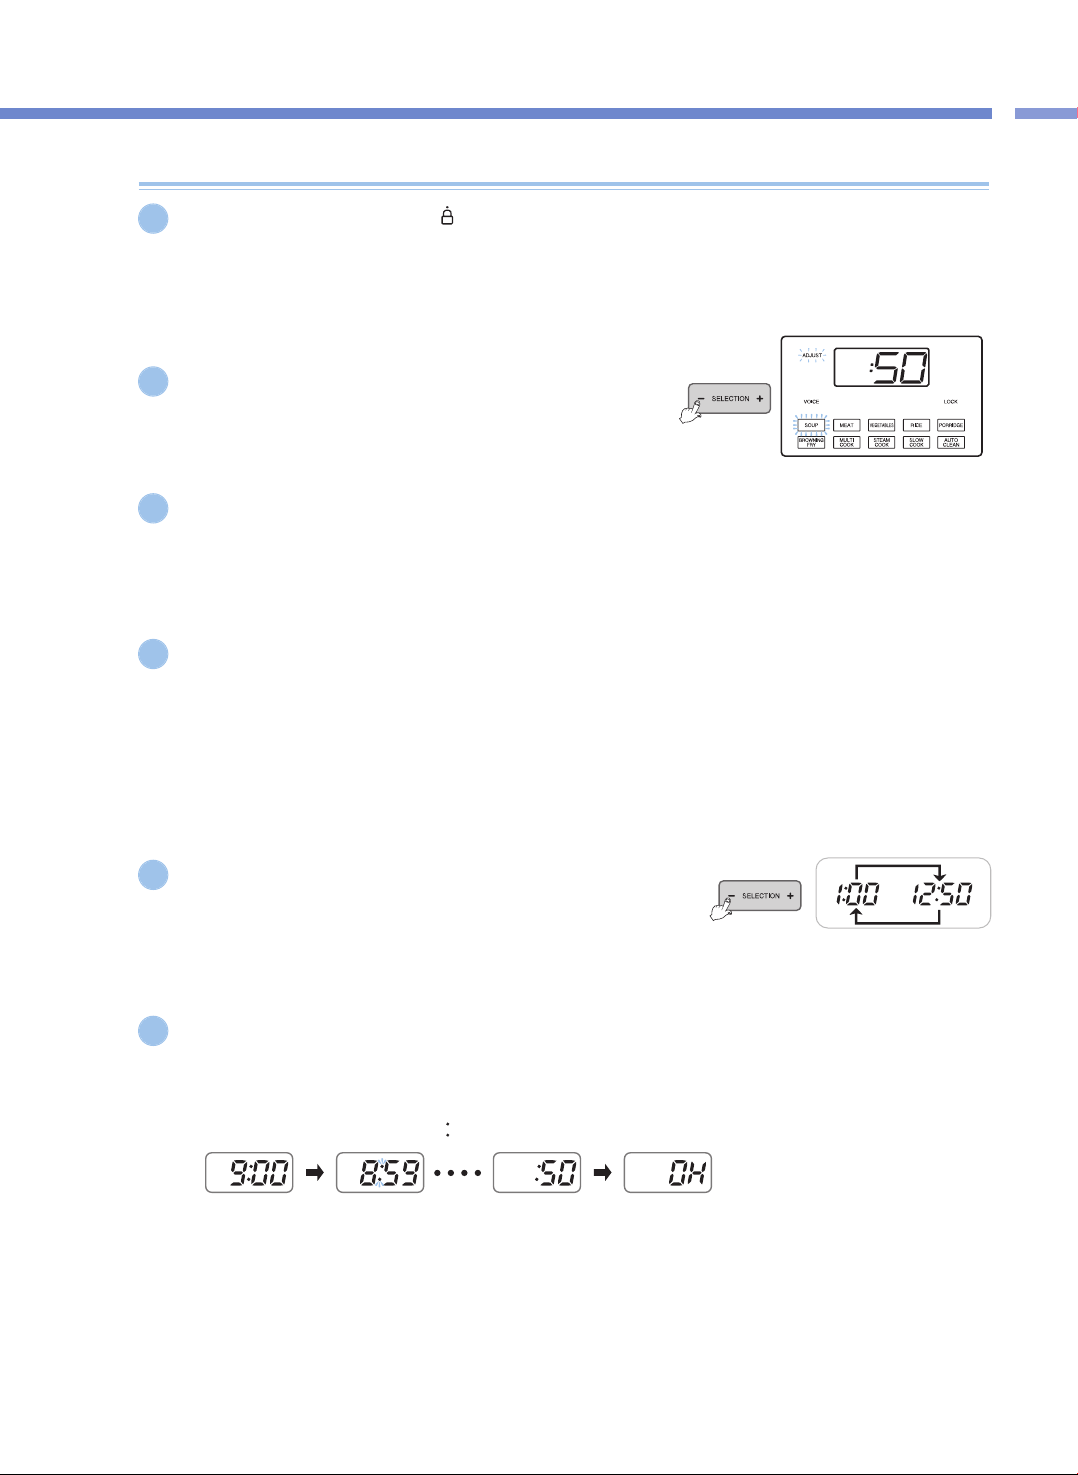
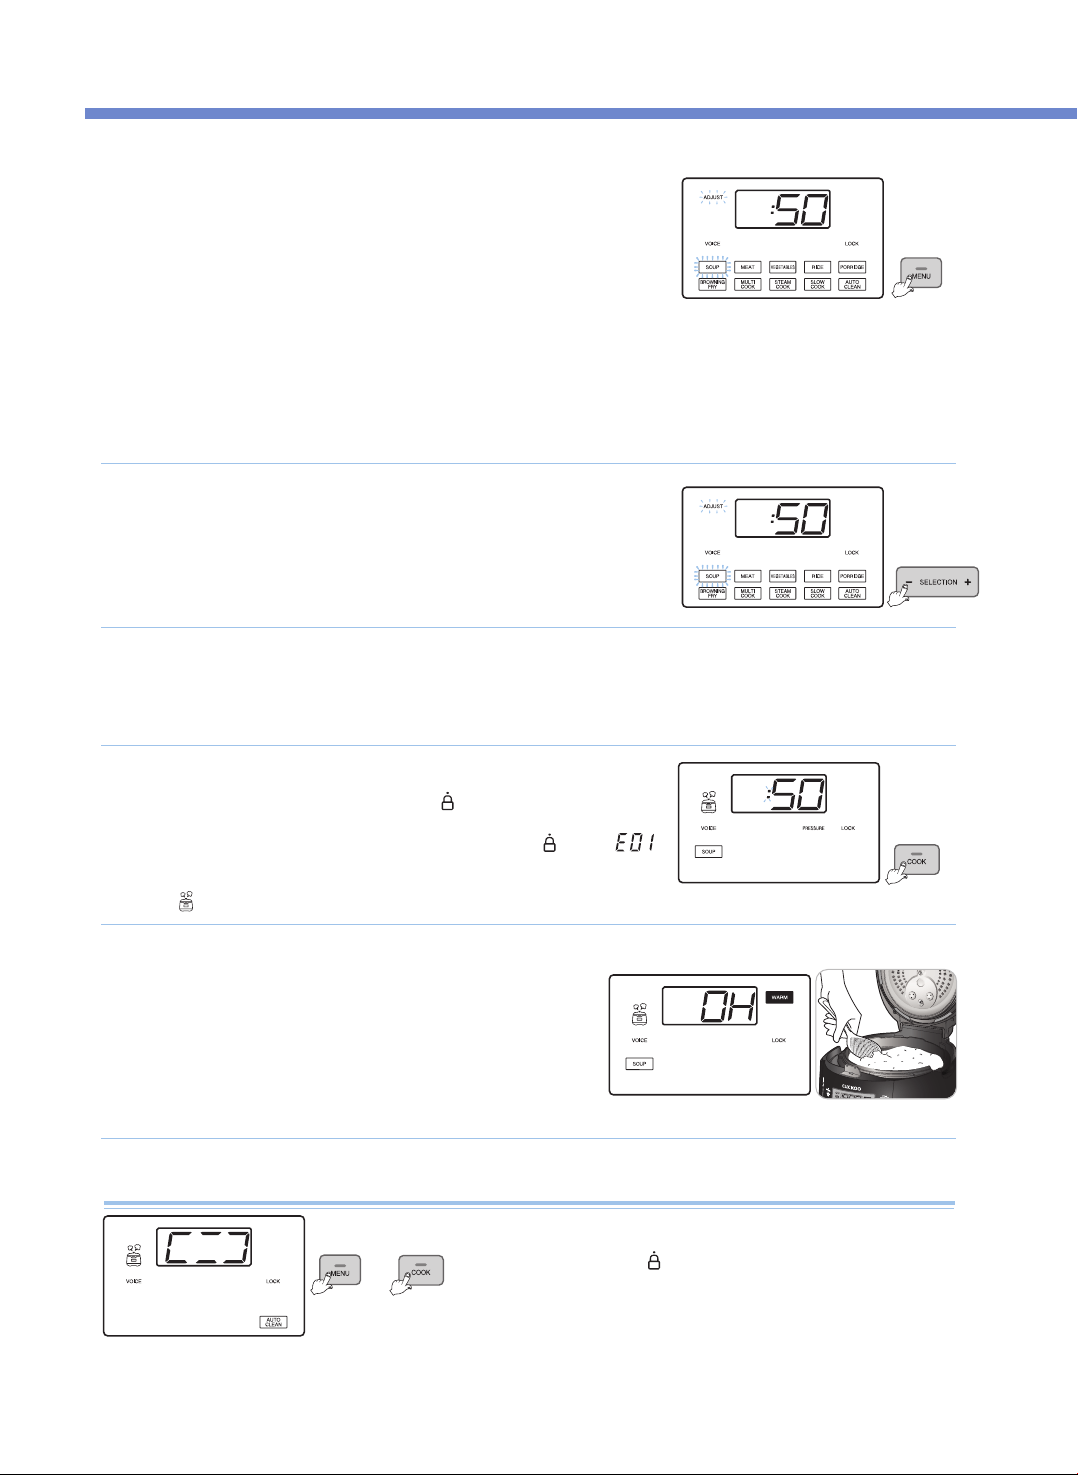
HOW TO PRESET COOKING
HOW TO SET FUNCTION / PRESET COOKING
<Preset Cooking>
<Cooking> <Cooking Complete/Keep Warm>
If you press the Cover Handle to
“ ”
(Lock) and the Lock lamp is turned on, press the MENU button to
select the desired menu.
▶ When the set time is longer than 60 minutes, the preset time is set as 2 hours. (excluding the RICE menu)
▶ If you don't set a specific menu, SOUP will be preset automatically.
Press the SELECTION -, + buttons to set the cooking time.
▶ For the RICE menu, set the steam time instead of the cooking time.
Press the HEAT / TIME button to enter the heating level Setting mode,
and then press the SELECTION -, + buttons to set the heating level.
▶ This only applies to the menus; BROWNING FRY, MULTI COOK, STEAM COOK, and SLOW COOK.
Press the PRESET button.
▶ If you press the PRESET button with the Cover handle unlocked, the cook will not be preset.
▶ Press the PRESET button, and the voice says "Set PRESET TIME with the TIME button then press the COOK button" with the Display
showing the set time and the PRESET sign blinking.
▶ Set the preset time in 7 seconds after pressing the PRESET button.
▶ When you set PRESET during Keep Warm mode, press the CANCEL button to cancel the Keep Warm function, and then set the preset
time.
▶ In the Standby mode, the PRESET button will not work.
Press the SELECTION -, + buttons to set the preset time.
▶ Each time you press the SELECTION -, + buttons, The time increments are 10
minutes.
▶ Preset time ranges from 1 hour to 12 hours and 50 minutes.
Press the PRESET button or the COOK button, and the product presets cooking.
▶ Here, the preset starts with the voice saying “SOUP(the set menu) has been reserved.”.
▶ After pressing the PRESET button, if you don't press any buttons with in 7 seconds, the Preset mode will start automatically.
▶ When the Preset mode begins, the Preset lamp will stop blinking and the preset time will decrease (count down) by minutes until it
starts the preset cooking.
(While the preset cooking continues, the
“ ”
sign between the hour and the minute blinks.)
▶ The preset time is the time remaining until the preset cooking will be completed.
(The time of completion may differ according to the quantity of food and conditions for use.)
▶ If you want to change the preset time, press the CANCEL button to cancel the preset cooking, and then start all over again.
1
5
4
6
2
3
How to Preset Cooking
COOKER SETTINGS OVERVIEW
16
AUTO /
MANUAL
MODE
COOKING
MODE
ADJUSTABLE
Cook/ Steam Time
TEMPERATURE RECIPES
DEFAULT TIME
AUTO
COOK
MODE
SOUP Cooking Time
30 ~ 90 minute
(Def. 50 min)
Up to 225℉
( 107 ℃ )
- Tomato Basil Bisque
- Thai Green Curry
- Beef Vietnamese Pho
- Chicken Tortilla Soup
- French Onion Soup
- New England Clam Chowder
MEAT Cooking Time
25 ~ 90 minute
(Def. 40 min)
Up to 239℉
( 115 ℃ )
- Baby Back Ribs
- Teriyaki Pork Loin
- Veal Shank OssoBucco
- Braised Pork Adobo
- CARNE ASADA TACOS
VEGEATABLES Cooking Time
15 ~ 90 minute
(Def. 20 min)
Up to 239℉
( 115 ℃ )
- Eggs In Purgatory
- Quick Zucchini Ratatouille
- Eggplant and Roasted Red Pepper Dip
- Steamed Artichokes with Dipping Sauce
PORRIDGE Cooking Time
65 ~ 90 minute
(Def. 70 min)
Up to 230℉
( 110 ℃ )
- Pumpkin Rissoto
- Purple Yam Barley Porridge
- Savory Breakfast Porridge
RICE Steam Time
Steam Time
3 ~ 30 minute
(Def. 8 min)
Up to 250℉
( 121 ℃ )
- Rice
- Arroz Con Pollo
- Andouille Jambalaya
- Seafood Paella
Cook Time: 30 minute (Default)
**The cooking time defaults to 30 min, however, it can add more time depending
on the amount of rice cooking to ensure delicious fully cooked rice.
MANUAL
COOK
MODE
MULTI
COOK
Cooking Time
& Heating Level
15 ~ 90 minute
(Def. 20 min)
158℉ ( 70 ℃) ~
248℉ ( 120℃)
- Morrocan Orrzo Salad
- Sausage And Cheese Frittata
- Japanese Beef Sukiyaki
- Crème Brulée
STEAM
COOK
Cooking Time
& Heating Level
15 ~ 90 minute
(Def. 20 min)
212℉ ( 100℃) ~
257℉ ( 125℃)
- Red Curry Steam Cooked Clams
- Prime Rib W/ Red Wine Au Jus
- Korean Steamed Rib
- Japanese Cheesecake
- Pumpkin Pie
SLOW
COOK
Cooking Time
& Heating Level
15 minute ~ 12 hour
(Def. 2 hour)
100℉ ( 38℃) ~
203℉ ( 95℃)
- Honey Glazed Ham
- Zucchini Lasagna
- Yogurt
- Sour Cream
- Pomegranate Sauce
BROWNING
FRY
Cooking Time
& Heating Level
1 ~ 30 minute
(Def. 10 min)
239℉ (115 ℃) ~
275℉ (135 ℃)
- Salted Vanilla Bean Ice Cream
- Beer Braised Brisket W/ Hot Mustard
- Louisiana Hot Shrimp
- Uni Cream Pasta
KEEP
WARM/HEAT
Temperature
1 hour ~ 99 hour
156℉ (69℃) ~
176℉ (80℃ )
* All the cook mode(except BROWNING FRY and KEEP WARM mode) pressure range goes up to 80kPa.
* PRESET (Delay cooking timer offers up to 12:50 hour. You can preset the time when you want the multi cooker to start cooking.)
FIND MORE DEICIOUS RECIPES ON CUCKOOMULTICOOKER.COM
* Control Temperature may have difference from actual food temperature

17
PREPARATION BEFORE COOKING
OVERVIEW TABLE / BEFORE COOKING
1
Wash the inner pot and wipe out excess moisture.
▶
Use a soft dishcloth when washing the inner pot.
▶
If you use a strong scrubber, the inner surface of the inner
pot may peel off.
▶
Do not wash the inner pot with sharp utensils (fork, spoon,
or chopsticks, etc) left inside.
- The coating of the inner pot may be peeled off.
4
Please make sure to plug in the product before
placing the inner pot in the main body.
Put the inner pot completely in the main body.
▶
If there are foreign substances on the bottom of the inner
pot, this may lead to a problem in cooking or a malfunction.
▶ If the inner pot is not precisely put in the main body, the
cover won't be able to be closed. (Put the handle of the
inner pot into the groove of the main body.)
After closing the cover, “ ”(lock) the cover
handle.
▶ If the display panel shows “ ", it means that the cover is
properly locked.
2
Put food in the container by using the
measuring cup.
▶
One cup of food means the measuring cup filled with food
up to its top.
One cup is water : 180ml, rice : 150g.
(There are gradations of ¼, ½, and ¾ on an external
surface of the measuring cup.)
5
▶
The liter gradations on the inner pot show the
gradations for water when water is poured in.
▶ The cup gradations on the inner pot show the
gradations for water when jasmine rice and water are
added together.
❶When you cook old rice or want the rice watery: Add
more water than the standard.
❷In case of four portions of rice (four measuring cups
of rice), pour water up to the 4-cup gradation on the
inner pot. (We recommend cooking four servings or
less of rice at one time)
❸When you have soaked rice enough in water or want
the rice hard-boiled: Put less water than the
standard.
▶ The quality of cooking may vary according to the type
of rice, so adjust the water volume or the steaming
time.
LOCK
3
Adjust the water volume in accordance with
the dish you want to prepare.
▶
Put the inner pot on a flat surface, and adjust the water
volume by using the gradations on the inner pot.
❶
❷
❸
HOW TO COOK
18
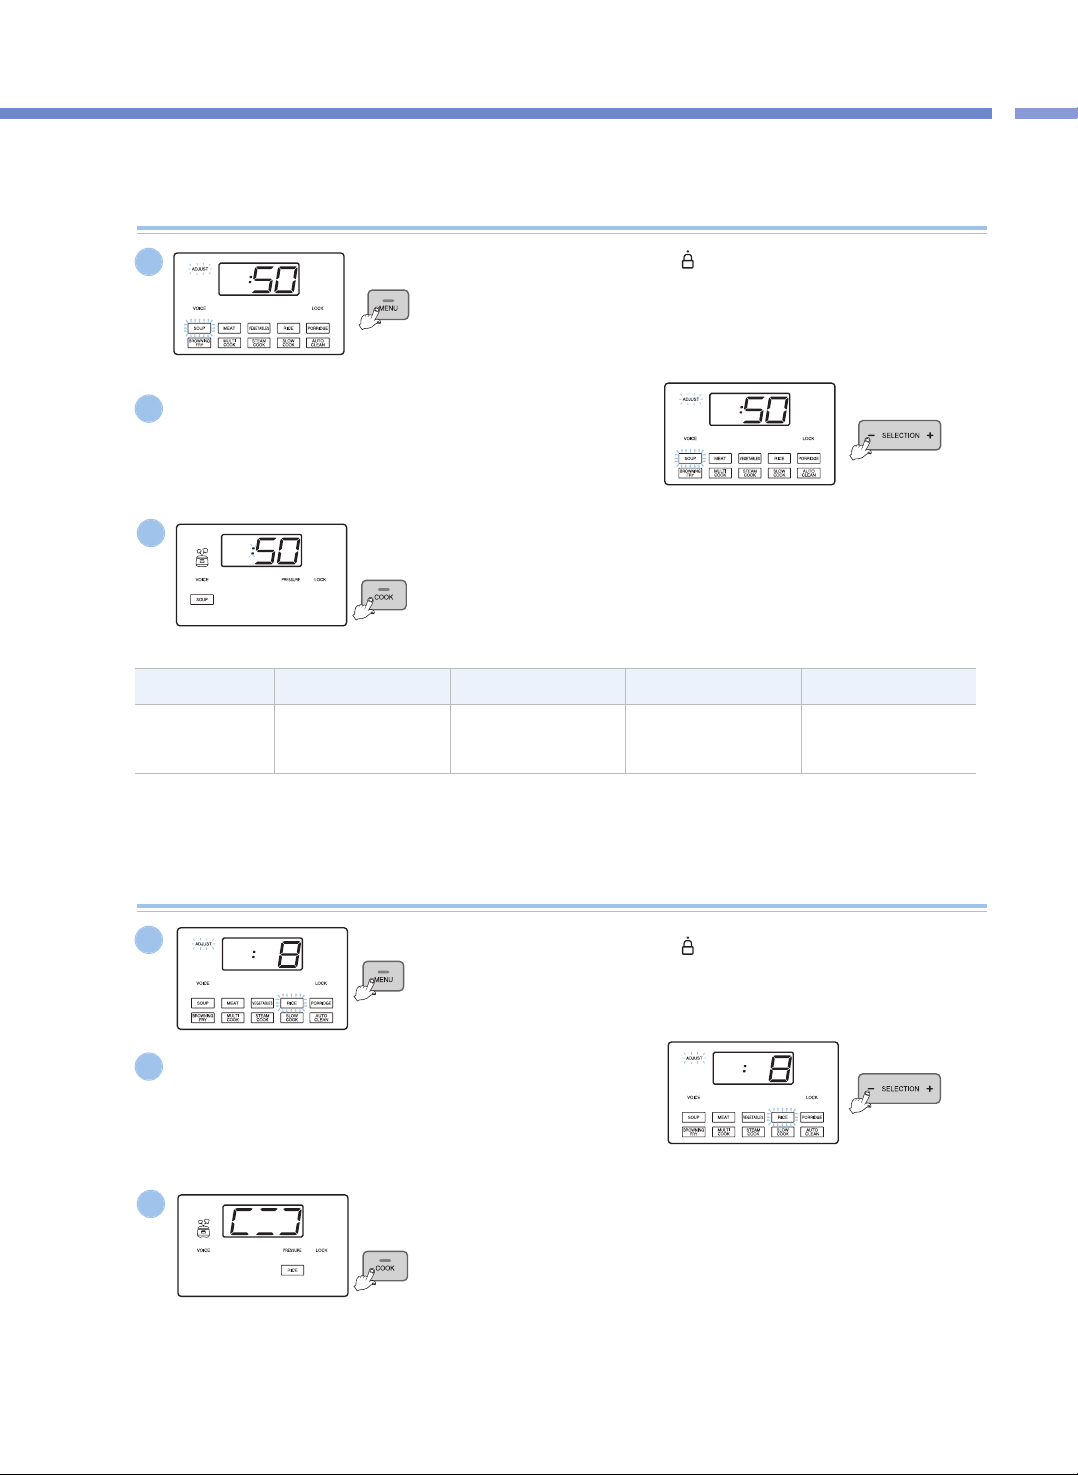
Press the MENU button to select a desired menu.
•
Before cooking, ensure that the Pressure Weight is properly aligned horizontally.
•
Each time you press the button, a function is selected in the order of SOUP → MEAT →
VEGETABLES → RICE → PORRIDGE → BROWNING FRY→ MULTI COOK →
STEAM COOK → SLOW COOK → AUTO CLEAN repeatedly.
•
If you continue pressing the button, it constantly changes in the order of menus.
•
If cooking is completed once, the menu is remembered. So if you use the same menu
repeatedly, you don't need to select the menu.
•
Do not fill 2/3 or more of the Inner Pot with cooked food or liquid food such as meat broth and soup.
•
Do not fill two-thirds or more of the Inner Pot with dry food such as rice and beans
•
Do not fill 2/3 or more of the Inner Pot with food.
※ Do not put excess food in the Inner Pot that goes over its maximum capacity.
How to Use Auto Clean
1
Press the COOK button to start cooking.
•
Before cooking, always turn the Cover Handle to
“ ”
(Lock). Then, Press the COOK
button, and the product begins cooking with the Voice Guide saying "Starting the soup."
•
If you press the COOK button without turning the Cover Handle to
“ ”
(Lock),
“”
appears with a warning sound and the voice saying“Turn the handle to the lock position”,
and cooking will not commence.
•
The “ ” lamp is turned on during cooking.
4
e.g.) When SOUP is selected
▶ The voice says "SOUP".
Cooking Completed
•
When the cooking ends, an ending alarm rings, and the Keep Warm
function begins with the voice saying “SOUP has been completed”.
•
If you don't want the Keep Warm function, press the CANCEL button to cancel
the Keep Warm function.
•
If the Cover Handle won't turn smoothly, cautiously bend the Pressure Weight
to completely discharge the inside steam. Then, turn the Cover Handle again.
•
Do not press the CANCEL button during cooking. Cooking will be canceled.
5
e.g.) When SOUP is selected
Press the SELECTION -, + buttons to set the cooking time.
•
You can set the steam time in case of RICE menu.
(Adjust the steam time according to your taste.)
2
Press the HEAT / TIME button to enter the heating level Setting mode, and press the SELECTION -, +
buttons to set the heating level.
•
It is applied to the menus of BROWNING FRY, MULTI COOK, STEAM COOK, and SLOW COOK.
3
Put 3 cups of water in the Inner Pot, close the Cover, and turn
the Cover Handle to
“ ”
(Lock).
Select the Auto Clean menu with the MENU button, and press the COOK button.
HOW TO COOK
19
HOW TO COOK
TypeSOUPMEATVEGEATABLESPORRIDDGE
Cooking Time
Setting
30~90min
(Def: 50 min)
25~90min
(Def: 40 min)
15~90min
(Def: 20 min)
65~90min
(Def: 70 min)
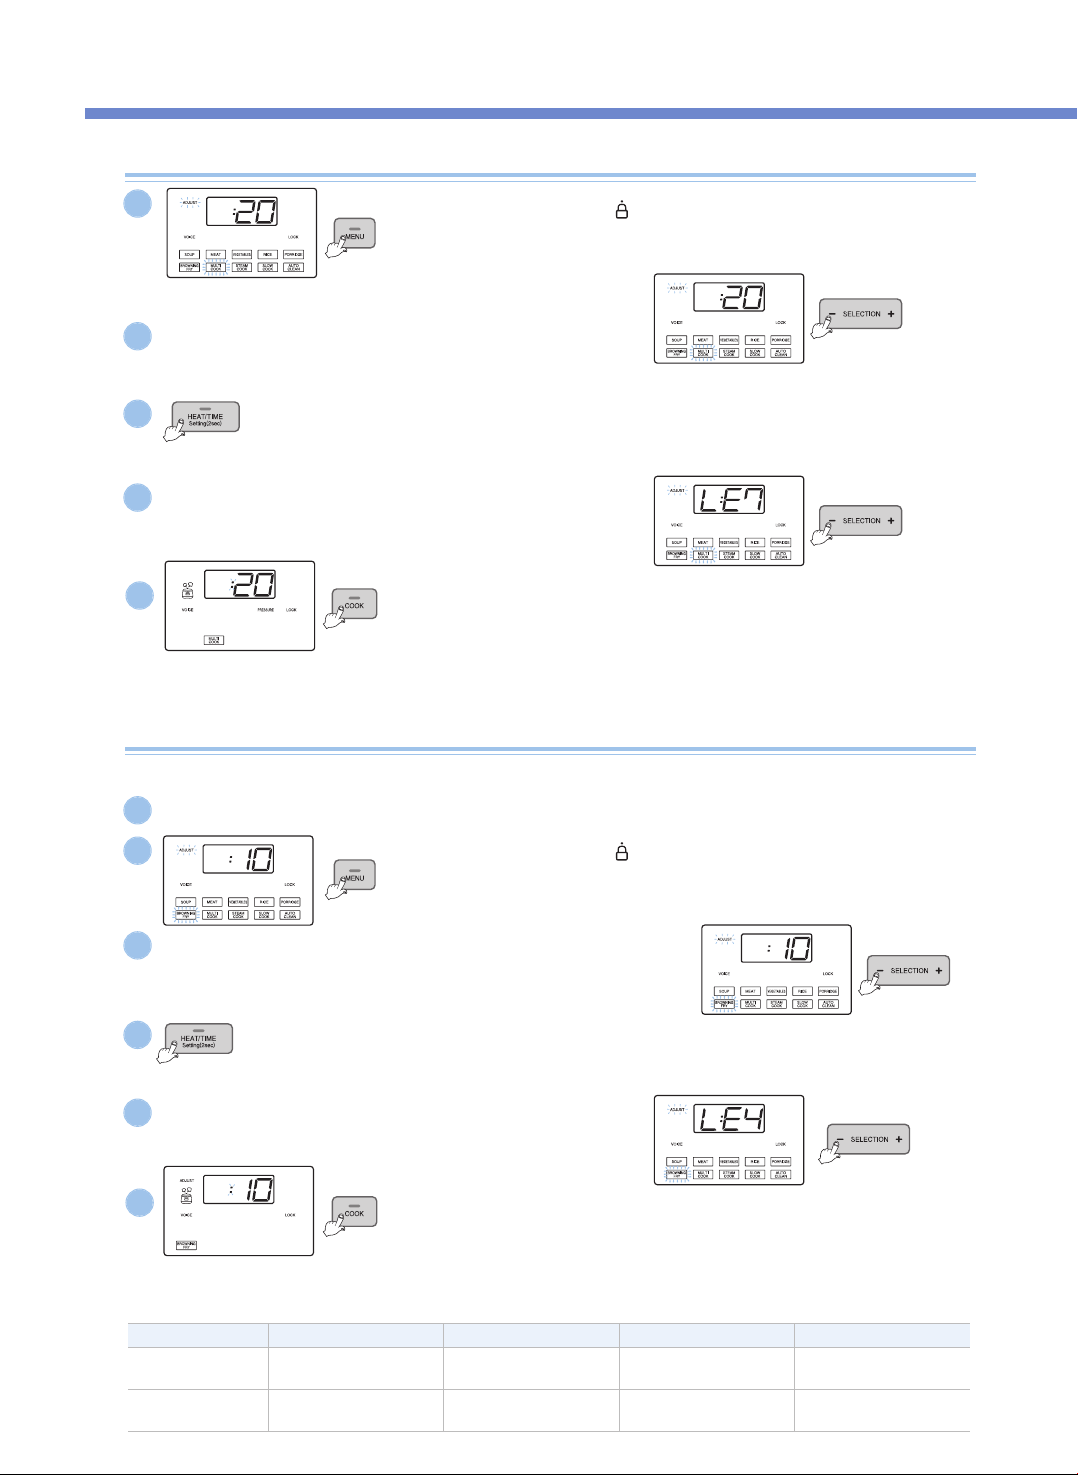
Pressure Cook (SOUP, MEAT, VEGETABLES, PORRIDGE)
Turn the Cover Handle to
“ ”
(Lock), and press the MENU button
to select the desired menu.
▶ The selected Menu's lamp blinks.
1
Press the SELECTION -, + buttons to set the cooking time.
▶ Each time you press the button, the cooking time is adjusted by one minute.
▶ In the Cooking Time Setting mode, the Adjust lamp blinks.
2
Press the COOK button.
▶ Press the COOK button, and the product starts cooking.
When cooking begins, the remaining time will be displayed.
3
e.g.) When SOUP is selected
e.g.) When SOUP is selected
e.g.) When SOUP is selected
Pressure Cook (RICE)
Turn the Cover Handle to
“ ”
(Lock), and press the MENU button
to select RICE.
▶ The RICE menu blinks.
1
Press the SELECTION -, + buttons to set the steam time.
▶ Each time you press the button, the steam time is adjusted by one minute.
▶ You can set the steam time from 3 minutes to 30 minutes. (Def: 8 min)
▶ Adjust the steam time for your taste preference.
▶ In the Steam Time Setting mode, the Adjust lamp blinks.
2
Press the COOK button.
▶ Press the COOK button, and the RICE cooking begins.
3
HOW TO COOK
20
MULTI COOK, STEAM COOK, SLOW COOK
Turn the Cover Handle to
“ ”
(Lock), and press the MENU button
to select the desired menu.
▶ The selected Menu's lamp blinks.
Turn the Cover Handle to
“ ”
(Lock), and press the MENU button
to select BROWNING FRY.
▶ The BROWNING FRY menu lamp blinks.
Press the COOK button.
▶ Press the COOK button, and the product starts cooking. When the product starts cooking,
the remaining time is displayed.
▶ The Adjust lamp is turned off. If you press the HEAT / TIME button during cooking, the
product displays the heating level and the cooking time.
▶ In case of Multi Cook, if you press down the Preset button for two seconds within 10
seconds after cooking begins (while the Pressure lamp blinks), the product can cook with no
pressure.
Press the SELECTION -, + buttons to set the time.
▶ Each time you press the button, the cooking time is adjusted by one minute.
▶ In the Cooking Time Setting mode, the Adjust lamp blinks.
Press the HEAT / TIME button to enter the heating level Setting mode.
▶ Press the HEAT / TIME button again, and the product returns to the Time Setting mode.
▶ In the heating level Setting mode, the Adjust lamp blinks.
Press the SELECTION -, + buttons to set the heating level.
▶ Each time you press the button, the heating level is adjusted by one step.
Press the COOK button.
▶ Press the COOK button, and the BROWNING FRY cooking begins.
When the BROWNING FRY cooking begins, the remaining time is displayed.
▶ For the BROWYING FRY menu, the Adjust lamp is turned on during cooking, and
while the Adjust lamp is turned on, you can adjust the heating level and the cooking
time.
Press the SELECTION -, + buttons to set the time.
▶ Each time you press the button, the BROWNING FRY time is adjusted by one minute.
▶ In the Cooking Time Setting mode, the Adjust lamp blinks.
Press the SELECTION -, + buttons to set the heating level.
▶ Each time you press the button, the heating level is adjusted by one step.
Press the HEAT / TIME button to enter the heating level Setting mode.
▶ Press the HEAT / TIME button again, and the product returns to the Time Setting mode.
▶ In the heating level Setting mode, the Adjust lamp blinks.
1
2
4
3
5
e.g.) When MULTI COOK is selected
e.g.) When MULTI COOK is selected
e.g.) When MULTI COOK is selected
BROWNING FRY
2
3
5
4
6
TypeBROWNING FRYMULTI COOKSTEAM COOKSLOW COOK
Cooking Time
Setting
1~30min
(Def: 10 min)
15~90min
(Def: 20 min)
15~90min
(Def: 20 min)
15 min~12 hr
(Def: 2 hr)
Heating Level
Setting
LE1~LE6
(Def: Level 4)
LE1~LE9
(Def: Level 7)
LE1~LE6
(Def: Level 3)
LE1~LE6
(Def: Level 3)
The BROWNING FRY menu is used for stir-frying or roasting food.
※ Please be careful when using the Browning Fry function with the cover open, the food may splatter.
1
Open the Cover and prevent pressure from being applied into the Inner Pot.
HOW TO COOK / KEEP WARM, REHEAT, VOLTAGE SAG PROTECTION
21
KEEP WARM / REHEAT FUNCTION AND VOLTAGE SAG PROTECTION FUNCTION
Cautions for Keeping Warm
▶ When you open the cover right after cooking or during the Keep Warm function, the cover may not open properly due to pressure. Always use
caution when you bend back the pressure weight to completely remove the pressure before opening the cover.
▶ Always lock the cover handle when keeping warm or reheating food. (If not, there may be damage caused to the Cover Open button and the
Keep Warm function.)
▶ If there is no food in the inner pot during the Keep Warm function or if you are not using the product, press the Cancel button to cancel the
Keep Warm function or remove the power cord from the power outlet.
▶ Do not use the Keep Warm function with a rice spatula left in the inner pot. In particular, a wooden spatula may generate germs and odors.
<Keep Warm>
<Reheat>
When you serve your meal
▶If you want to serve your meal during the Keep Warm mode and want the food hot, press the KEEP WARM /
REHEAT button, and then the Keep Warm / Reheat function begins with the voice saying “REHEATing is
starting”. Reheating will conclude in 9 minutes.
▶ If you use the Reheat function too often, the food may burn or become dry.
▶ If you want to keep leftover food or other food by using the Keep Warm function, put the food in the Pot and press the KEEP WARM /
REHEAT button once. Here, the Display Panel shows “
”
.
▶ If you press the HEAT / TIME button during the Keep Warm mode, the Keep Warm temperature is displayed for 2 seconds.
<Reheat Complete>
“ ”
of the Display Panel means
that the time elapsed for the Keep
Warm function is 3 hours.
The remaining reheat time will show in
minutes while the Keep Warm lamp is
blinking with the “
”
sign on the Display
going round and round.
When the Reheat function ends, the voice says
"REHEAT has been completed" and the product starts
the Keep Warm function again, displaying the time
elapsed.
▶ Clean the product often. In particular, if the Cover is not cleaned completely, germs may grow, which can cause smell during the Keep Warm
mode.
▶ Even if the product looks clean outside, germs may grow anywhere, which can cause smell during the Keep Warm mode. Thus, if the product
smells, clean the product by using the Auto Clean menu.
After the Auto Clean function is completed, the Inner Pot must be washed completely.
▶ If you don't wash the Inner Pot after cooking and then use the Keep Warm function, the food may smell or stink.
When it smells during The Keep Warm mode
▶ This product remembers its status even when a blackout occurs, so if electricity gets back again within around 2 minutes, this product will
normally work again. (There may be differences according to the product.)
▶ If cooking is canceled because of a blackout, you need to press the COOK button again to resume cooking.
▶ If a blackout occurs during cooking, the cooking time is delayed for the duration of the blackout, and the status of cooking may differ to some
extent according to the time of the blackout.
▶ If a blackout occurs The Keep Warm function and when the food becomes cold, the Keep Warm function is canceled.
Voltage Sag Protection Function?

PLEASE CHECK BEFORE CALLING FOR SUPPORT
22
▼ When there is a malfunction with the product, check the following matters before contacting our customer service center.
Problem
When food is not cooked
Checklist
•Did you press the PRESSURE COOK button?
•Did a blackout occur during cooking?
Recommended Actions
•After selecting the desired menu, always press the
PRESSURE COOK button once to check if “
”
appears in the Display Panel.
•Refer to page 21 for the Voltage Sap Protection
function.
When beans (mixed
rice/brown rice) are half-
cooked
•Are the beans (mixed rice/brown rice) too dry?
•Soak the beans (mixed rice/brown rice) in water or boil
them before cooking.
The mixed rice may be half-cooked according to their
type.
When the food is half-cooked
or scorched
•Did you properly select the menu?
•Did you precisely adjust the quantity of
ingredients?
•Did you open the Cover during steaming?
•Properly select the desired menu.
•Adjust the time and the heating level for cooking.
(See pages 19 and 20.)
•After the complete cooking alarm rings and the
pressure is completely removed, open the Cover and
blend the food.
When the food overflows
during cooking
•Did you use a measuring cup?
•Did you precisely adjust the quantity of
ingredients?
•Did you precisely select the menu?
When it smells during the
Keep Warm mode
•Is the Cover closed completely?
•Is the power cord pulled out from the socket
during the Keep Warm mode?
•Did you use the Keep Warm mode for 12 hours
straight or longer?
•Close the Cover completely.
•Always keep the product plugged in during the Keep
Warm mode.
•Use the Keep Warm mode only for 12 hours or less.
When “ ”
appears
•This indicates that the Temperature Sensor fails
to work properly.
•Shut off the power supply, and contact our customer
service center.
When cooking is not
completed even in a long
time and when “ ”
appears
•Did you use the power properly?
•Did you use the proper power voltage?
•This appears when there is a malfunction with the
product (heater disconnection, insufficient quantity of
heat, etc.) and cooking is not completed in a long time.
Shut off the power supply, and contact our customer
service center.
•If you just put in water and heat it for a long time, it is
normal that “
”
appears.
•This product is exclusively for 120V. Use the power
properly.
When “ ”
appears
•Did you press the PRESSURE COOK button
with the Keep Warm mode canceled and the
product in the Standby mode without turning
the Cover Handle to “
”
(Open) after cooking
is completed with the power supplied?
•Turn the Cover Handle to “
”
(Open) and then turn it
to “
”
(Lock).
When the Keep Warm Time
sign blinks during the Keep
Warm mode
•Have 24 hours elapsed since the Keep Warm
mode began?
•After 24 hours have elapsed since the Keep Warm
mode began, the Keep Warm Time sign blinks to let
you know that the Keep Warm mode has been used
for too long.
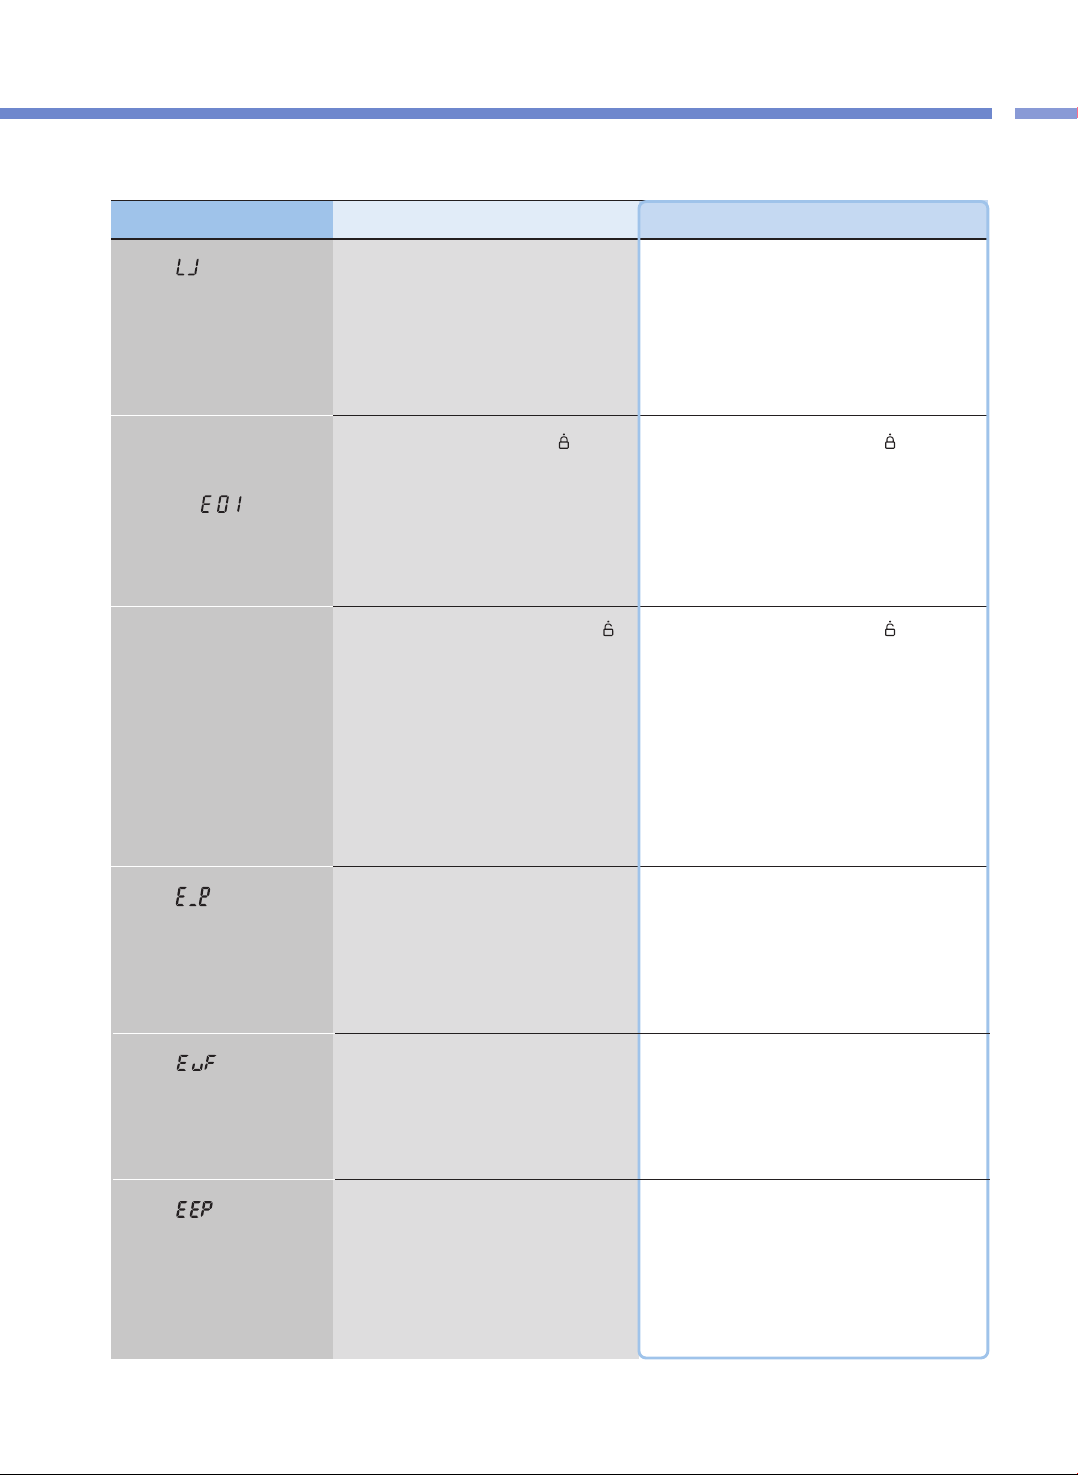
23
PLEASE CHECK BEFORE CALLING FOR SUPPORT
PROBLEM CHECKLIST
▼ When there is a malfunction with the product, check the following matters before contacting our customer service center.
Problem Checklist Recommended Actions
When “ ” appears when
you press a button
•Is the Inner Pot put in the product?
•Did you use the power properly?
•Did you use the proper power supply?
•The buttons will not work without the Inner Pot inside
in the product. Put the Inner Pot inside the product.
•This product is exclusively for 120V.
Use the power property. use the proper power voltage.
When a button such as the
PRESSURE COOK button or
the PRESET button won't
work and “ ” appears
•Did you turn the Cover Handle to “
”
(Lock)?
•Is the Lock lamp turned on?
•Completely turn the Cover Handle to “
”
(Lock).
If the Cover Handle is not completely fastened, the
PRESSURE COOK button and the PRESET button
will not work
When “ ”
appears
•This indicates that the Environmental Sensor
fails to work.
•Shut off the power supply, and contact our customer
service center.
When “ ”
appears
•This indicates that there is an error with the
internal memory of MICOM.
•Shut off the power supply, and contact our customer
service center.
When “ ”
appears
•This indicates that there is an error with the
internal memory of MICOM.
•Shut off the power supply, and contact our customer
service center.
When the Cover won't be
closed
•Is the Cover handle completely turned to “
”
(Open)?
•Is there hot food in the Inner Pot?
•Is the Inner Pot completely in the Main Frame?
•Completely turn the Cover Handle to “
”
(Open) and
then close the Cover again.
•Bend the Pressure Weight, and then close the Cover.
•Turn the Inner Pot Handle attached to the Inner Pot to
both left and right sides, and secure it on the Main
Frame completely.

PLEASE CHECK BEFORE CALLING FOR SUPPORT
24
▼ When there is a malfunction with the product, check the following matters before contacting our customer service center.
Problem Checklist Recommended Actions
When the Cover Handle
won't “ ” (Open)
•Did you turn the Cover Handle during cooking?
•Did you turn the Cover Handle without
completely discharging the steam?
•The Cover will not open during cooking.
Do not forcibly open the Cover.
If you have to open the Cover, press and hold the
CANCEL button for 2 seconds to cancel, cautiously
bend the Pressure Weight to completely discharge the
steam, and then open the Cover.
•Cautiously Bend the Pressure Weight to completely
discharge the steam, and then open the Cover.
When the Cover Handle is
completely turned to “ ”
(Open) but the Cover won't
open
•It is because of the pressure.
•Cautiously Bend the Pressure Weight to completely
discharge the steam, and then open the Cover.
When the steam is leaked
through the Cover and a the
product makes a whistle-like
sound
•Are there any foreign substances (rice, etc.) on
the packing?
•Is the packing worn out?
•Wipe out the packing with a dishcloth or a soft cloth
before use.
•Always keep the parts around the packing clean.
•If steam is leaked, immediately press and hold the
CANCEL button for 2 seconds to discharge the steam,
and pull out the power cord. Then discontinue using the
product, and contact our customer service center.
•Use packing for 1 to 3 years according to the method
or frequency of use and then replace it with a new one.
If you continue to use worn-out packing, steam may be
leaked out during use, and the pressure cooking won't
be operational.
When the CANCEL button
won't work during cooking
•Is the Inner Pot hot inside?
•If you have to cancel during cooking and the
temperature in the Inner Pot is high, you need to
press and hold the CANCEL button for 2 seconds to
cancel cooking for safety purposes.
•If cooking is canceled, the steam is discharged
through the Auto Steam Discharger, and the content
may spill or splatter. Thus, please be cautious since
you might get burned in your face or on your hands.

CMC-Q5 Series (cETL approved)
ICOOK Q5 STANDARD
Operating Instruction
KOREA NO.1
CUCKOO
Electric Multi Pressure Cooker
“
”
Read the following instruction manual carefully before use or when facing problems.
在使用产品之前或是使用过程中出现任何问题, 请仔细阅读该产品的说明书.
Lea atentamente a las siguientes instrucciones antes de su uso o en caso de cualquier mal funcion.
※ Pictures may look different from the actual product.
※ 图片可能与实际产品不同。
※
Los dibujos pueden verse diferentes al producto actual.
※ 사진은 실제 현물과 다를 수 있습니다.
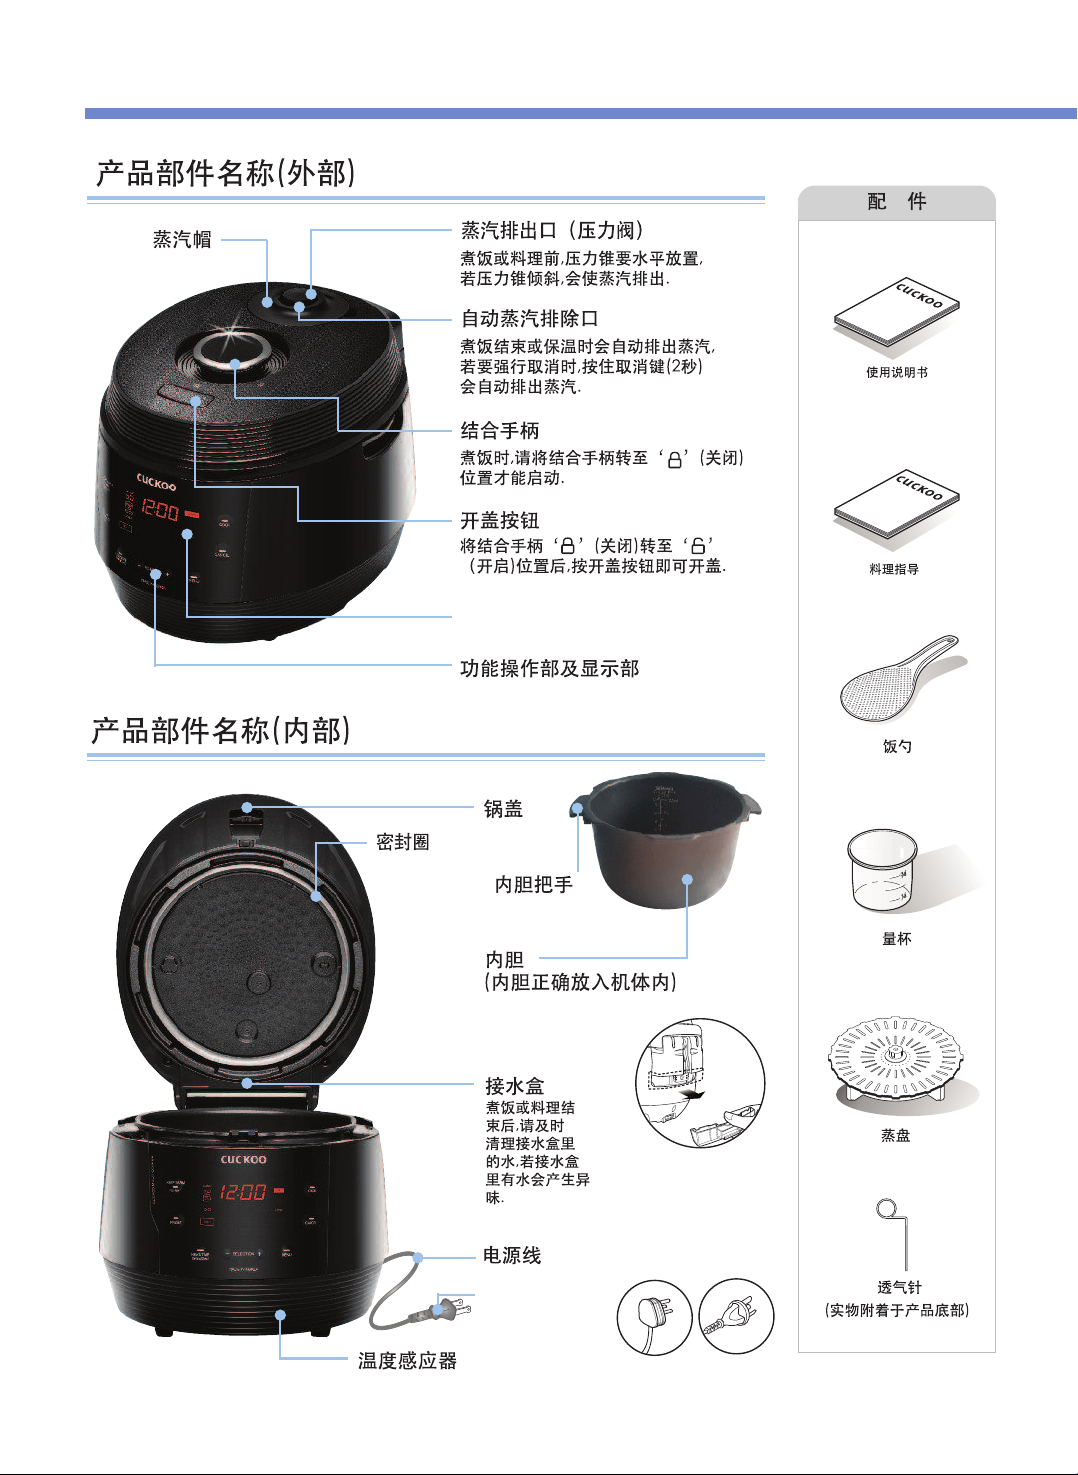
产品部件名称
26
使用说明书
料理指导
電線
各国的电源插头形
状会有所不同。
LED
显示屏
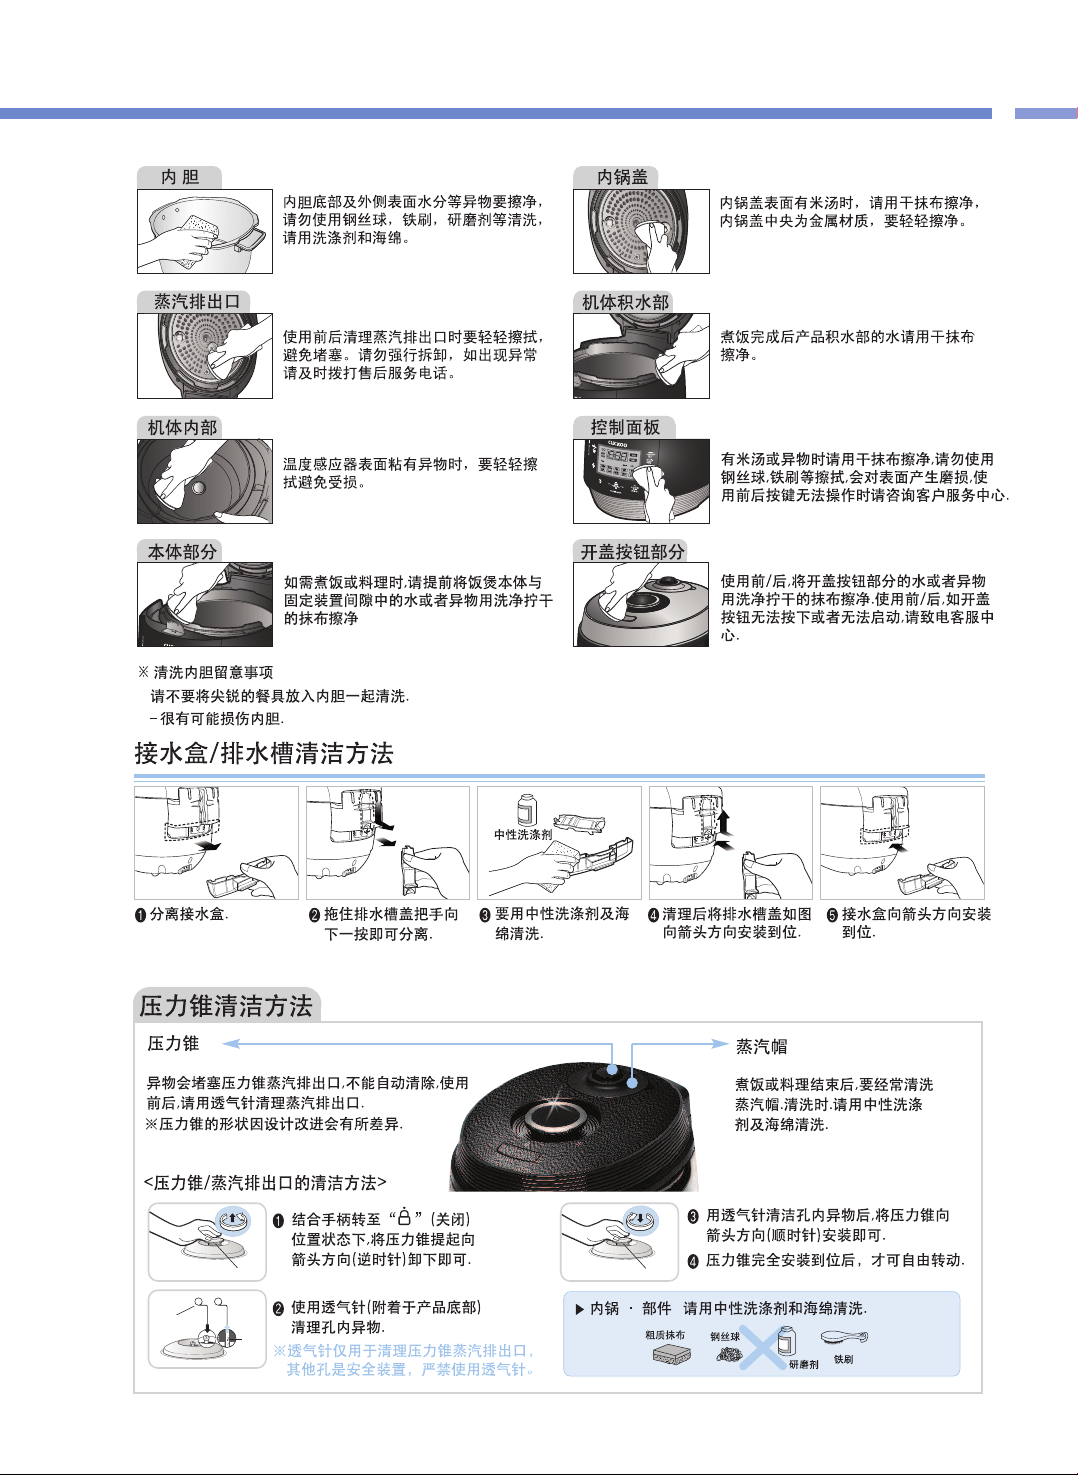
压力锥
压力锥
透气针
异物
产
品
部
件
名
称
/
清
洁
保
养
方
法
27
清洁保养方法

① 用手指扣住蒸汽帽
前端槽后向上提起
卸下蒸汽帽.
② 按住锁扣向箭头方向分离后用中性洗涤
剂和海绵经常清洗.
※ 安装密封圈时注意安装方向
③ 组装蒸汽帽时,先安装下侧的槽部分
后(①),向箭头方向(②)一按即可.
④ 安装蒸汽帽时如图
一样安装后,按下
蒸汽帽直至完全安
装到位.
清洁保养方法
28
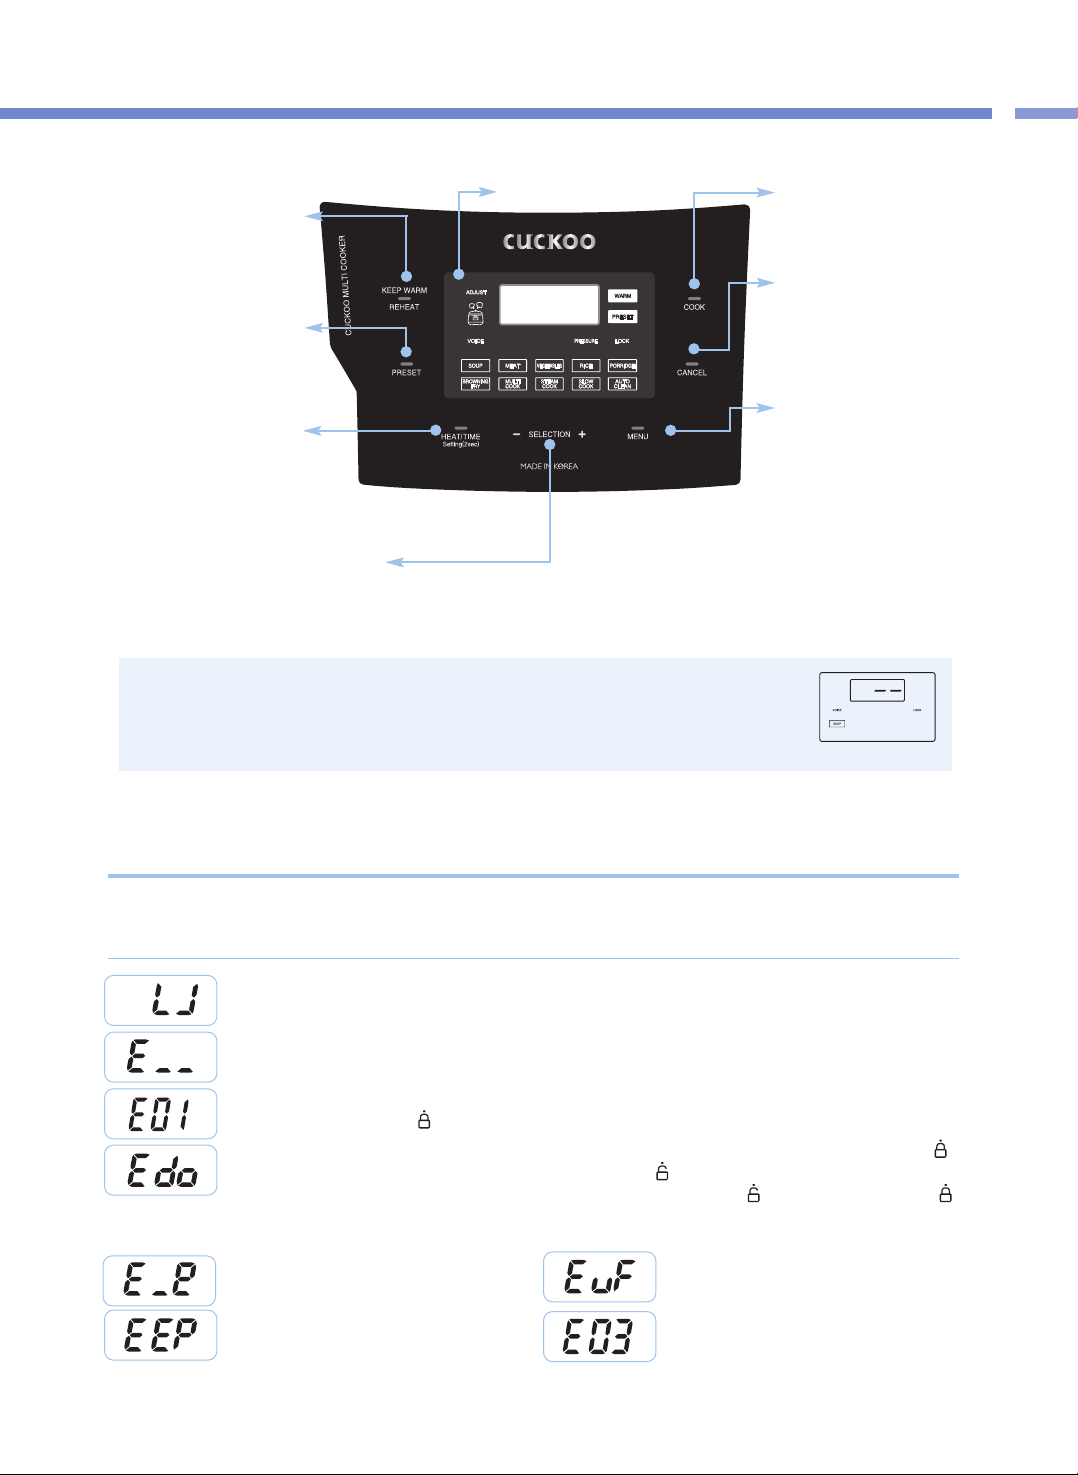
清
洁
保
养
方
法
/
控
制
&
显
示
板
29
控制面板名称及作用 / 功能显示部的异常检测功能
※
※接通电源后无任何操作时,显示屏显示待机状态,如图所示。
(根据设定,待机画面的菜单、有无语音会有所不同。)
※
功能操作时,按CANCEL键返回待机状态。
※
按键力度以听到响声为准,本产品的设计可能与实物略有差异。
KEEP WARM(保温)/
REHEAT(再加热)键
保温或餐前热料理时使用
(参考第37页)
COOK(煮饭)键
开始料理时使用
(参考第34页)
CANCEL(取消)键
取消已选择的功能或自动排出
蒸汽时使用
(料理中,按住取消键2秒)
Menu(菜单)键
选择SOUP、MEAT、VEGETABLE、
RICE、PORRIDGE、BROWNING
FRY、MULTI COOK、STEAM
COOK、SLOW COOK及AUTO
CLEAN(自动杀菌洗涤)时使用
PRESET(预约)键
预约煮饭时使用
(参考第31页)
HEAT(加热)/ TIME(时间)键
设定加热水平及料理时间时使用
语言设定(参考第 30页)、
语音音量设定(参考第 30页)、
保温温度设定(参考第 30页)
SELECTION(选择)-,+键
设定加热水平及料理时间时使用( 参考第 35, 36页)
变更预约时间时使用( 参考第 31页)
<待机画面>
功能显示部
无内锅时显示。
温度感应器异常时显示。
请咨询售后服务中心。
锅盖结合手柄未完全转至关闭位置的状态下,按COOK键,或按PRESET键时显示。
请将锅盖结合手柄完全转至
“ ”
显(关闭)位置。
使用方法不正确或产品出现异常时,显示以下内容并发出警报。
在正常使用条件下或采取措施后仍然显示该内容时,请联系售后服务中心。
功能显示部异常检测功能
锅盖结合手柄未完全转至关闭位置的状态下,按COOK键,或按PRESET键时显示。请将锅盖结合手柄完全转至
“ ”
(关闭)位置。料理完成后,在保温状态下,未将锅盖结合手柄转至
“ ”
(开启)位置而在待机状态下再次按COOK键,
或按PRESET键时显示。此功能是确认结合手柄的感应装置。将锅盖结合手柄转至
“ ”
(开启)位置后,再次转至
“ ”
(关闭)位置即可。如仍无法解决问题请咨询售后服务中心。
内存异常时显示。
请咨询售后服务中心。
持续烧水,或产品异常时显示。
请咨询售后服务中心。
环境传感器异常时显示,请咨询售后服务中心。
内存异常时显示。
请咨询售后服务中心。
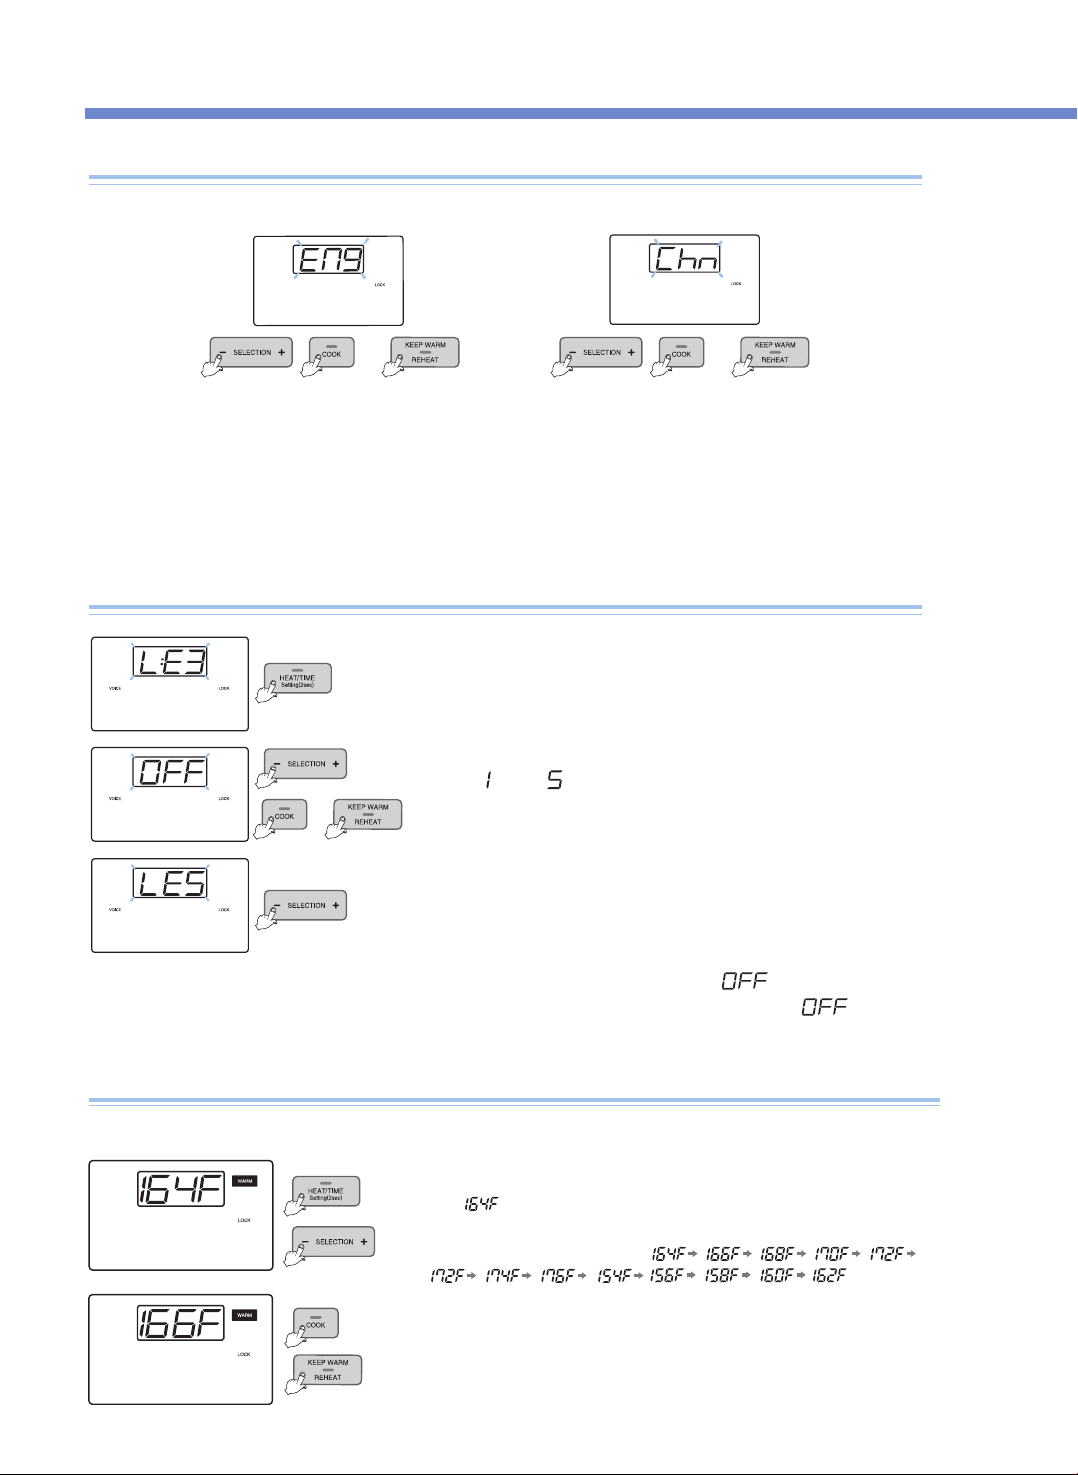
设定功能(语言, 语音音量, 调整保温 )
30
语音音量调节功能(解除语音功能或调节语音音量的功能)
通过英语、中国语及语音选择功能, 设定所需语言。产品的初始状态为英语。
语言设定功能
例)设定为英语语音时 例)设定为中国语语音时
在待机状态下按住SETTING键2秒钟以上,进入语音设定模式
后,再按下SETTING键,进入语音音量设定模式。
1. 在待机状态下按住SETTING键2秒钟以上,如上图的显示部所示,进入语音设定模式。
▶ 按CANCEL键或7秒内无任何操作时,功能无法被设定,并返回待机状态
2. 选择所需语言后,按COOK,或按KEEP WARM / REHEAT键,设定功能后返回待机状态。
or
▶ 选择所需语音音量后,按下COOK或KEEP WARM / REHEAT键,
语音提示“语音音量调整已完成”,同时设定功能后返回待机模式。
▶ 按CANCEL键或7秒内无任何操作时,语音提示“超出设定时间,功能设定已
取消”,同时功能无法被设定,并返回待机状态。
(按下SETTING键, 不保存变更值 并进入保温温度设定模式。)
可按下SELECTION -、+键,
设定
“ ”
至
“ ”
的语音音量。
按下SELECTION -、+键设定为“ ”时,语音提示
“语音功能已解除”,同时“VOICE”和“ ”开始闪
烁,语音功能被解除。
or
or
❶
在待机状态下按住SETTING键2秒钟,进入语音设定模式后,按2次SETTING键,进入
保温温度设定模式。显示部如左图所示。
此时
,
表示当前保温温度。
调整保温温度方法
食物变质或出现异味,是因为保温温度不正确而产生的,请调整保温温度。
❸
设定所需温度后,按COOK键或KEEP WARM / REHEAT键时,所设定温度自动输入并
返回待机状态。
(按CANCEL键或7秒内无任何操作时,功能被取消,并返回待机状态。)
❷
按SELECTION -、+键,使显示部按
顺序变更。
or
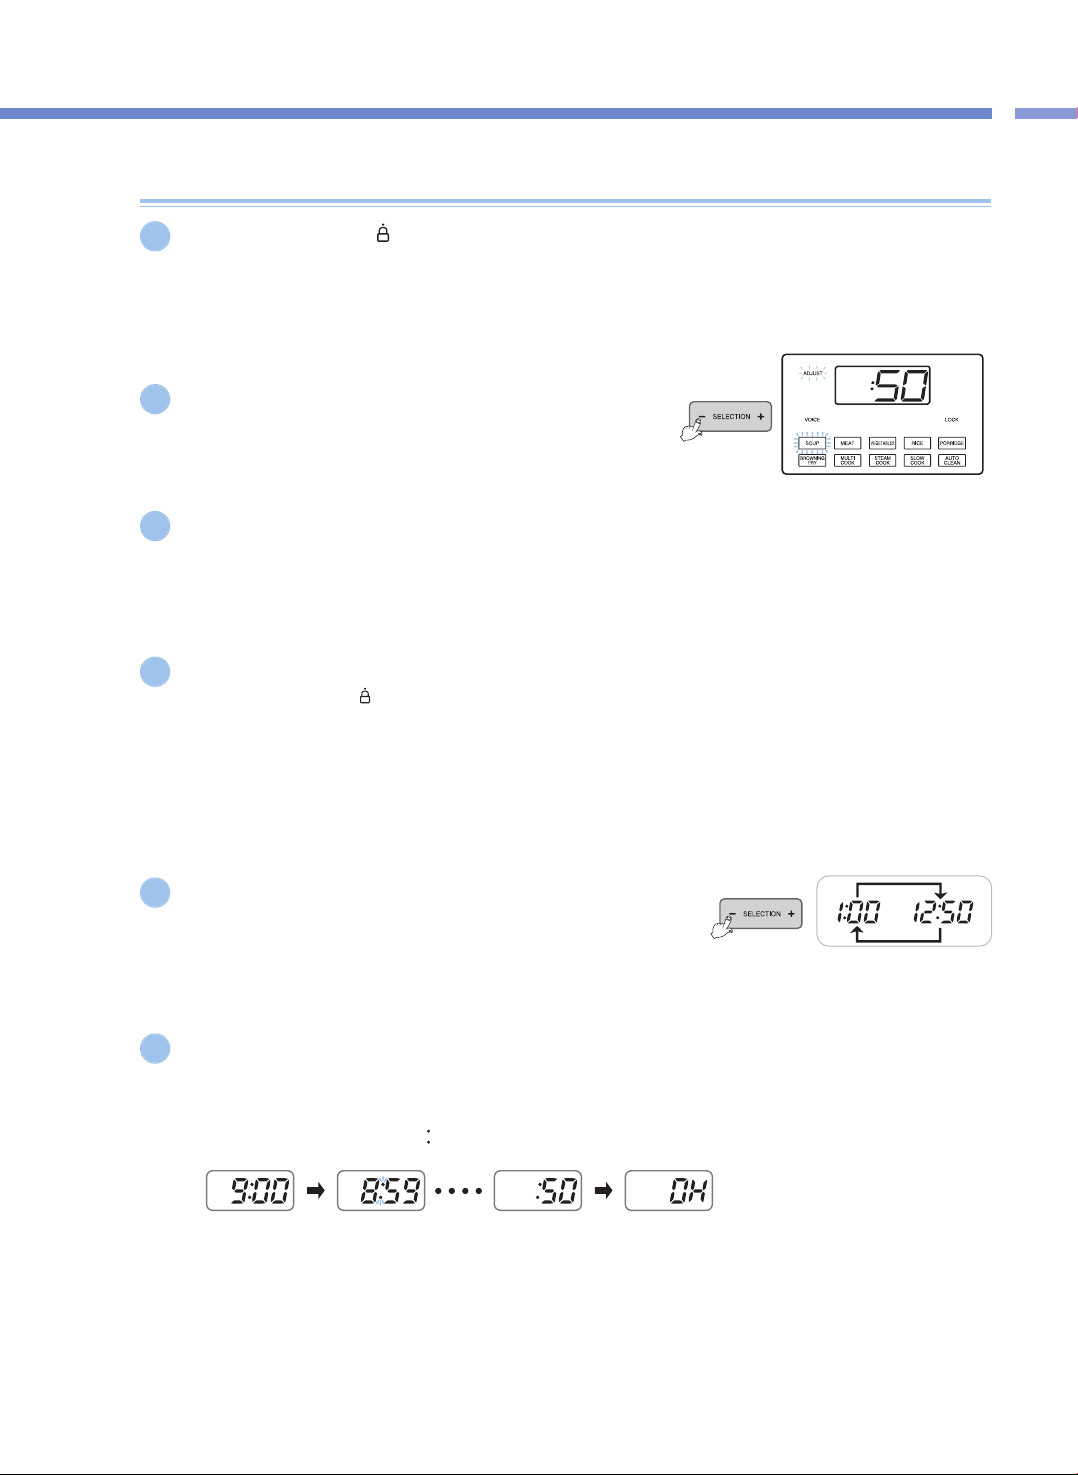
功
能
设
定
方
法
/
预
约
煮
饭
方
法
31
预约煮饭方法
将锅盖结合手柄转至“ ”(关闭)位置后,在关闭指示灯亮起时,按MENU键选择所需菜单。
▶ 设定时间 高于60分钟时,煮饭预约时间设定为2小时(RICE菜单除外)。
▶ 不指定其他菜单时,自动预约SOUP。
按SELECTION -、+键设定料理时间。
▶ 对于RICE菜单,设定焖饭时间而非料理时间。
按HEAT / TIME键,进入加热水平设定模式后,按SELECTION -、+键设定加热水平。
▶ 适用于BROWNING FRY、MULTI COOK、STEAM COOK及SLOW COOK菜单。
按PRESET键。
▶ 未将锅盖结合手柄转至“ ”(关闭)位置而按PRESET键时,无法预约。
▶ 按PRESET键时,语音提示“请按时间键调整预约时间后,按煮饭键完成”,同时显示屏上显示设定时间,预约标识开始闪烁。
▶ 按PRESET键后,7秒内设定预约时间。
▶ 保温中设定预约煮饭时,按CANCEL键取消保温后,设定预约时间。
▶ 在待机状态下,按PRESET键无法预约。
按SELECTION -、+键设定预约时间。
▶ 每按1次SELECTION -、+键预约时间增加10分钟。
▶ 预约时间设定范围为1小时~12小时50分钟。
按PRESET键或COOK键,开始预约煮饭。
▶ 此时,语音提示“汤, 美味料理已预约。”并进行预约煮饭。
▶ 按PRESET键后如7秒内无任何操作,自动进行预约煮饭。
▶ 进入预约煮饭时,预约指示灯停止闪烁,预约时间以1分钟为单位减少并进行预约煮饭。
(进行预约煮饭时,时与分之间的“ ”标识闪烁)
▶ 预约设定时间为预约煮饭剩余时间。
(根据煮饭量与使用条件,煮饭完成时间略有差异。)
▶ 变更预约时间时,按CANCEL键取消预约时间设定后重新设定。
1
5
4
6
2
3
<预约煮饭进行中>
<进行煮饭> <煮饭完成/进行保温>
预约煮饭方法

压力锅设置概览
32
手动/自动
模式
可调节 可调节
料理/焖时间
温度 食谱
默认设定时间
自动料理模式
汤 料理时间
30~90分
(默认值50分)
最高 225℉
( 107 ℃ )
- 番茄罗勒浓汤
- 泰式绿咖喱
- 越南牛肉河粉
- 鸡丝玉米饼浓汤
- 法式洋葱汤
- 新英格兰蛤肉汤
肉类料理 料理时间
25~90分
(默认值40分)
最高 239℉
( 115 ℃ )
- 嫩肋排
- 照烧猪大排骨
- 意大利炖小牛肘
- 红烧猪肉
- 烤肉玉米面豆卷
蔬菜类料理 料理时间
15~90分
(默认值20分)
最高 239℉
( 115 ℃ )
- 意式烩蛋
- 速食小南瓜蔬菜杂烩
- 茄子和烤红椒蘸酱
- 蒸洋蓟蘸酱
粥 料理时间
65~90分
(默认值70分)
最高230℉
( 110 ℃ )
- 意式南瓜烩饭
- 紫山药大麦粥
- 美味早餐粥
米饭 焖时间
焖时间
3~30分
(默认值8分)
最高250℉
( 121 ℃ )
- 米饭
- 古巴鸡肉饭
- 新奥良香肠什锦饭
- 西班牙海鲜饭
烹饪时间 :30分(默认值)
*
烹饪默认时间为30分钟,但根据饭量增加时间可做出美味米饭。
手动料理模式
多样料理
料理时间&
加热阶段
15~90分
(默认值20分)
158℉ ( 70 ℃) ~
248℉ ( 120℃)
- 摩洛哥奥尔佐沙拉
- 香肠干酪馅饼
- 日式牛肉寿喜烧
- 焦糖布丁
蒸汽煮
料理时间&
加热阶段
15~90分
(默认值20分)
212℉ ( 100℃) ~
257℉ ( 125℃)
- 红咖喱蒸蛤蜊
- 红酒原汁烧烤牛排
- 韩式蒸排骨
- 日式乳酪饼
- 南瓜派
慢煮
料理时间&
加热阶段
15分~12小时
(默认值2小时)
100℉ ( 38℃) ~
203℉ ( 95℃)
- 蜜汁火腿
- 小南瓜千层面
- 酸乳酪
- 酸奶油
- 石榴酱汁
油炸
料理时间&
加热阶段
1~30分
(默认值10分)
239℉ (115 ℃) ~
275℉ (135 ℃)
- 盐渍香草豆冰淇淋
- 啤酒芥菜辣汁焖牛腩
- 路易斯安那香辣虾
- 海鲜奶油意大利面
保温 温度 1小时~99小时
156℉ (69℃) ~
176℉ (80℃ )
* 所有烹饪模式(炸/烤及保温/加热模式除外)压力范围为最高80kPa。
* 预约设定(料理延时器最长运行时间为12小时50分钟。料理开始时间可预约。)
菜单的详细内容请查阅 WWW.CUCKOOMULTICOOKER.COM
*控制温度与实际食品温度可能略有差异。

压
力
锅
设
置
概
览
/
煮
饭
前
准
备
事
项
33
煮饭前准备事项
1
洗净内锅,擦干水分。
▶ 请用柔软的抹布清洗内锅。
▶ 使用金属钢丝球,可能破坏锅内的涂层。
▶ 请不要将尖锐的餐具(餐叉、匙子、筷子等)放入内锅
一起清洗。
- 很有可能损坏内锅。
4
插入电源插头后将内锅放入产品内。
请将内锅正确放入产品内。
▶ 内锅外侧底部粘有异物时会影响煮饭或产品
可能会受损。
▶ 内锅未完全放置于机体内时无法盖锅盖。
(内锅把手要放置于机体两侧的槽)
盖上锅盖后将结合手柄转至“ ”(关闭)
位置。
▶ 功能显示屏上显示“LOCK”时,表示锅盖正常关闭。
2
将大米用量杯放入锅内。
▶ 正确使用量杯计量,以铺平量杯顶部为准。
一杯水180ml,大米150g.
(量杯外面标有¼、½、¾刻度。)
5
▶ 内锅上标有的升刻度为将水放入时的刻度。
▶ 内锅上标有的量杯刻度为茉莉香米和水同时放入时的
刻度。
❶用陈米煮饭或煮黏性较大的米饭时:比规定值多加
水量。
❷煮4人份量(4杯米)时,水位调至内锅里的量杯4
刻度。
(建议煮4人分量以下。)
❸煮浸泡的米或较硬的米饭时:比规定值少加水量。
▶ 因料理品质可能根据大米种类有所不同,需根据料理
品质调节水量或焖饭时间
LOCK
3
根据所需料理调整水位。
▶ 把内锅水平放置在固定台面后,按水刻度尺调整
水位。
❶
❷
❸
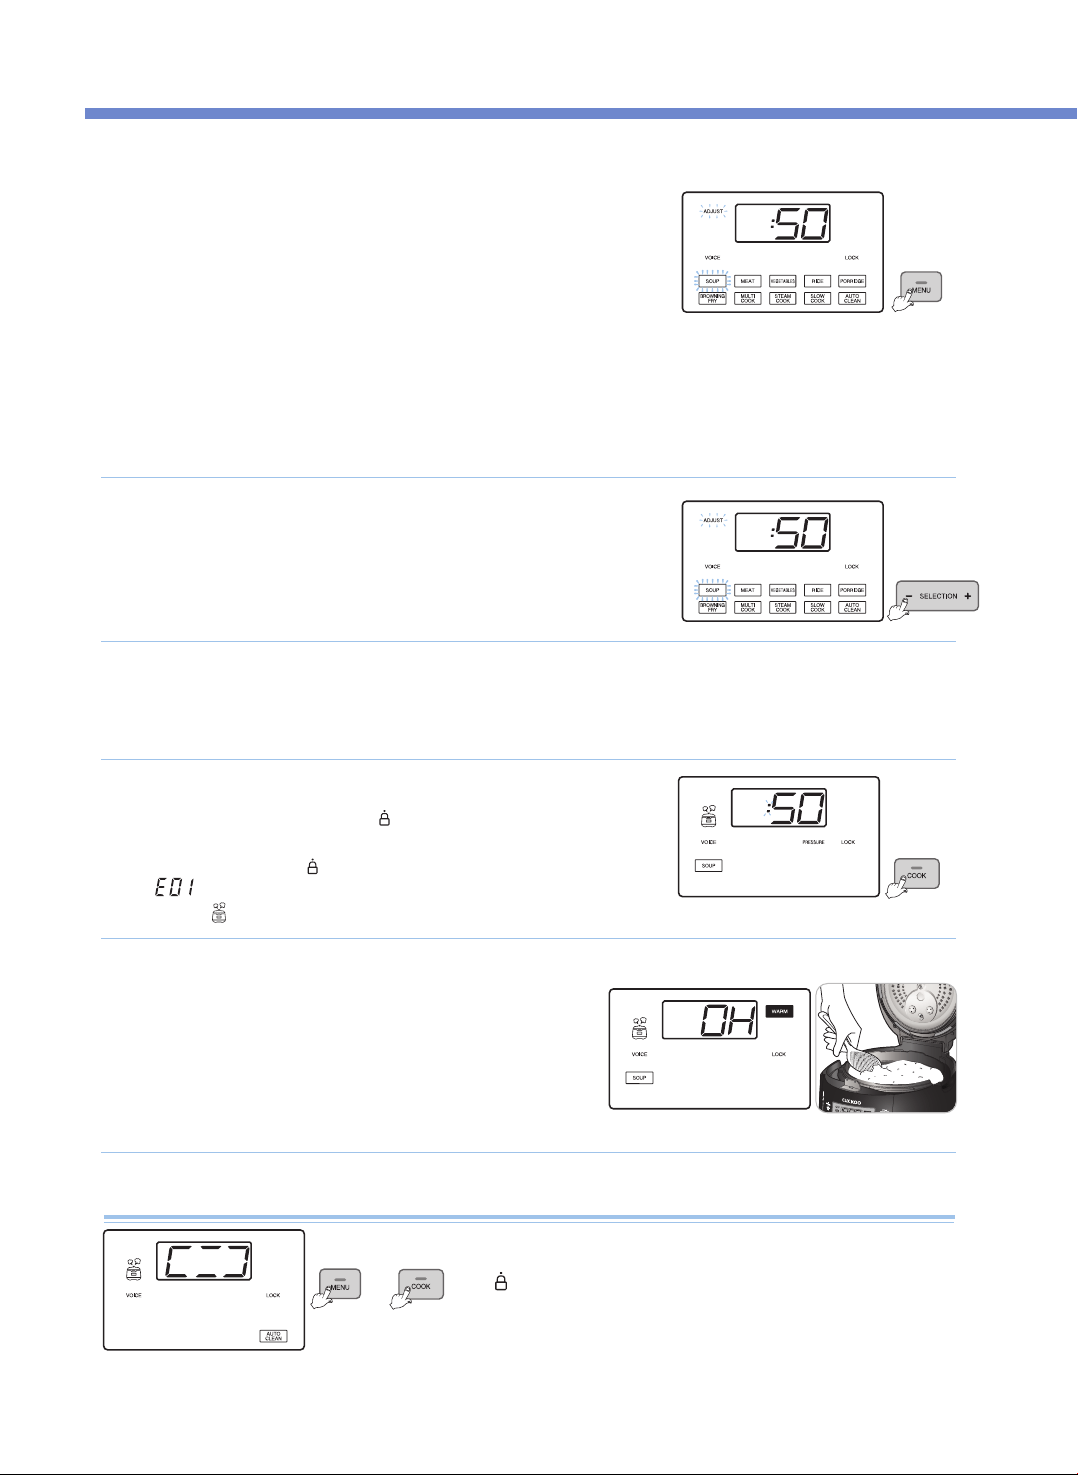
煮饭方法
34
按下MENU键,选择所需菜单。
• 确认是否安装分离式内锅盖。
• 煮饭前请将压力锥水平放置。
• 每按1次MENU键以SOUP → MEAT → VEGETABLE → RICE → PORRIDGE →
BROWNING FRY→ MULTI COOK → STEAM COOK → SLOW COOK →
AUTO CLEAN顺序重复选择。
• 一直按住按键时,按MENU顺序连续变更。
• 所有菜单,1次煮饭结束后,菜单被保存,继续使用时无需再次选择菜单。
• 将预煮的食物或肉汤、SOUP等液体料理放入内锅时,料理量不得超过内锅高度的2/3以上。
• 将大米和豆类等干性食物放入内锅时,不得超过内锅高度的2/3以上。
• 将材料放入内锅时,不得超过内锅高度的2/3以上。
※ 将材料放入内锅时,不得超过最大容量以上。
自动洗涤(自动杀菌洗涤)方法
1
按COOK键,开始煮饭。
• 料理前请务必将锅盖结合手柄转至“ ”(关闭)位置,按COOK键时,语音提示
“Starting the soup”,开始制作美味料理。
• 将锅盖结合手柄未转至“ ”(关闭)
位置按下COOK键时,警示音响起的同时, 显示
“ ”标识后,语音提示
“Turn the handle to the lock position”
,且产品无法运作。
• 料理中, “ ”指示灯亮起
4
例)选择SOUP时
▶语音提示“SOUP”。
煮饭完成
• 料理完成时,完成提示音响起,
语音提示“美味汤已完成”,同时启动保温功能。
• 不需保温时,按CANCEL键即可取消保温。
• 锅盖结合手柄不易转动时,推动压力锥,将蒸汽完全排出后再转动。
• 料理中请勿按CANCEL键,料理会被取消。
5
例)选择SOUP时
按SELECTION -、+键,设定料理时间。
• 煮饭时,可设定焖饭时间。
(根据自己的口味调节焖饭时间。)
2
按HEAT / TIME 键,进入加热水平设定模式后,再按SELECTION -、+键设定加热水平。
• 适用于BROWNING FRY、MULTI COOK、STEAM COOK及SLOW COOK菜单。
3
将3杯水倒入内锅中,关闭锅盖,将锅盖结合手柄转至
“ ”(关闭)位置。
•按MENU键,选择自动洗涤菜单后再按COOK键。
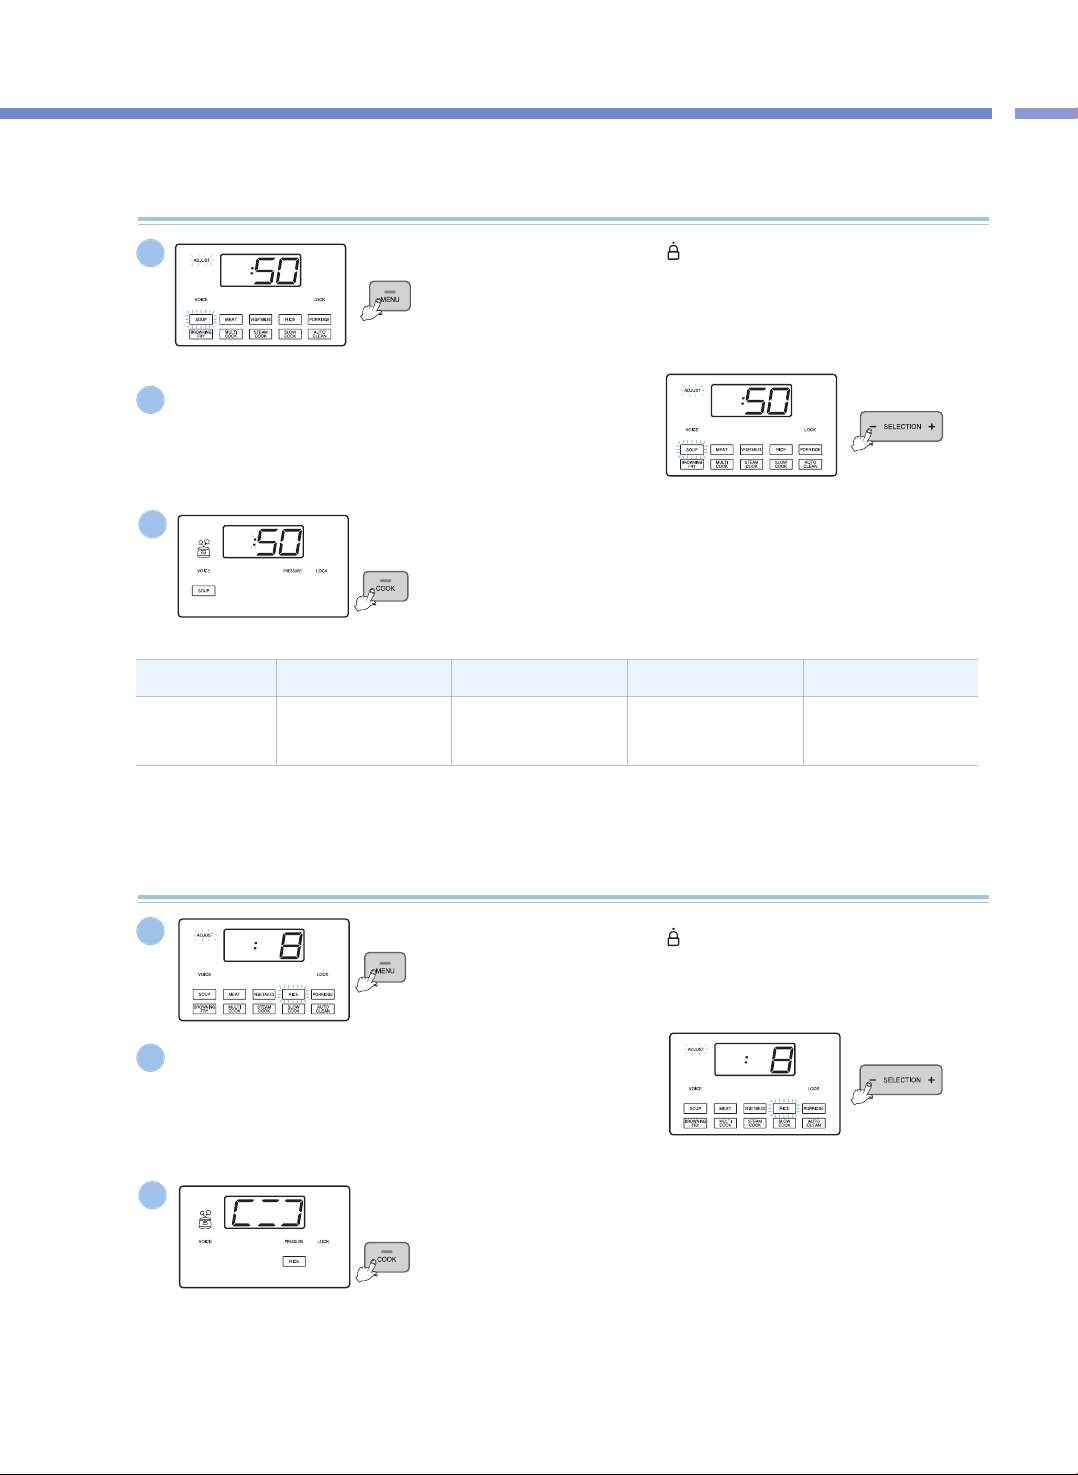
煮
饭
方
法
35
煮饭方法
分类 SOUP MEAT VEGEATABLES PORRIDDGE
料理时间设定
30~90分钟
(Def:50分钟)
25~90分钟
(Def:40分钟)
15~90分钟
(Def:20分钟)
65~90分钟
(Def:70分钟)
压力煮饭(SOUP、MEAT、VEGETABLE、PORRIDGE)
将锅盖结合手柄转至
“ ”
(关闭)位置后,
按MENU键选择所需菜单。
▶ 所选的菜单指示灯开始闪烁。
1
按SELECTION -、+键设定料理时间。
▶ 每按1次按键,料理时间以1分钟为单位进行调节。
▶ 在料理时间设定模式下,Adjust指示灯闪烁。
2
按COOK键。
▶ 按COOK键,开始煮饭。
开始煮饭时,显示屏显示剩余煮饭时间。
3
例)选择SOUP时
例)选择SOUP时
例)选择SOUP时
压力煮饭(RICE)
将锅盖结合手柄转至
“ ”
(关闭)位置后,
按MENU键选择RICE。
▶ RICE菜单闪烁。
1
按SELECTION - 、+键设定焖饭时间。
▶ 每按1次按键,焖饭时间以1分钟为单位进行调节。
▶ 焖饭时间可设为3至30分钟。(Def:8分钟)
▶ 根据自己的口味调节焖饭时间。
▶ 在焖饭时间设定模式下,Adjust指示灯闪烁。
2
按COOK键。
▶ 按COOK键,开始煮大米。
3
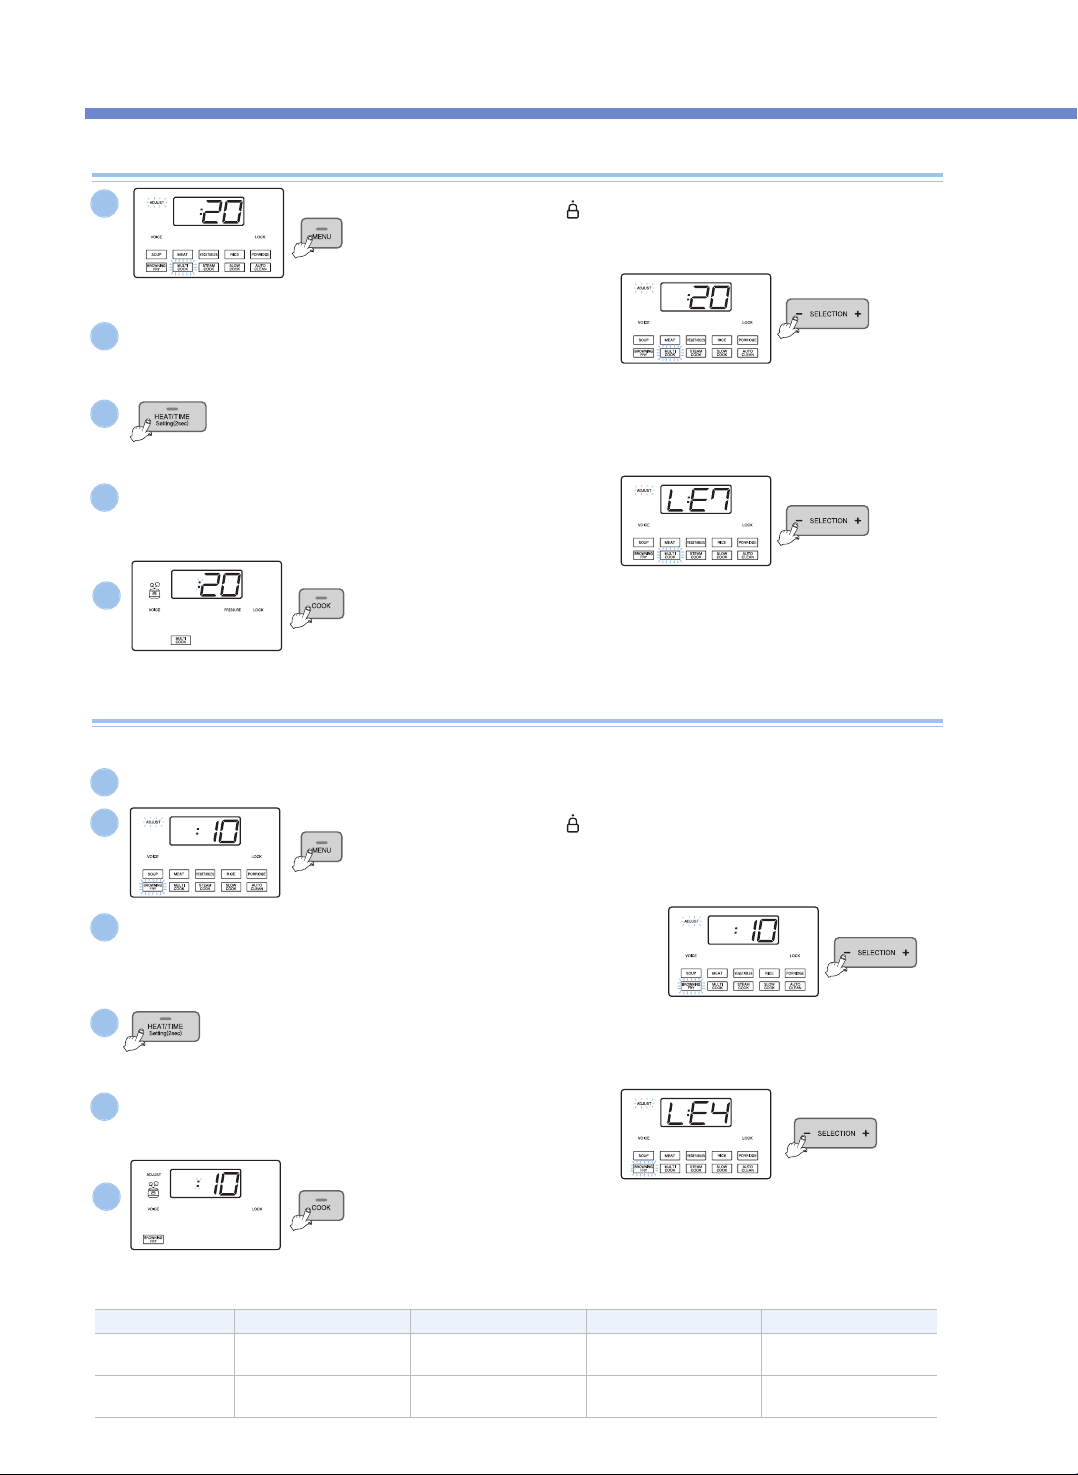
煮饭方法
36
MULTI COOK、STEAM COOK、SLOW COOK
将锅盖结合手柄转至
“ ”
(关闭)位置后,
按MENU键选择所需菜单。
▶ 所选的菜单指示灯闪烁。
将锅盖结合手柄转至
“ ”
(关闭)位置后,按MENU键选择
BROWNING FRY。
▶ BROWNING FRY菜单指示灯闪烁。
按COOK键。
▶ 按COOK键,开始料理。开始料理时,显示屏显示剩余料理时间。
▶ Adjust指示灯灭。料理中,按HEAT / TIME键,显示屏显示加热水平和料理时间。
▶ 使用MULTI COOK功能时,开始料理10秒以内(“PRESSURE”指示灯一直保持闪烁时)
按住【预约】键2秒,可使用非压力形式料理。
按SELECTION -、+键设定时间。
▶ 每按1次按键,料理时间以1分钟为单位调节。
▶ 在料理时间设定模式下,Adjust指示灯闪烁。
按HEAT / TIME键,进入加热水平设定模式。
▶ 再按HEAT / TIME键,返回时间设定模式。
▶ 在加热水平设定模式下,Adjust指示灯闪烁。
按SELECTION -、+键设定加热水平
▶ 每按1次按键,加热水平以一个阶段为单位变更。
按COOK键。
▶ 按COOK键,开始煮饭(BROWNING FRY)。
开始煮饭(BROWNING FRY),显示屏显示剩余煮饭(BROWNING FRY)时间。
▶ 对于BROWNING FRY菜单,料理中,Adjust指示灯亮起,在Adjust指示灯继续开时,
可变更加热时间和料理时间。
按SELECTION -、+键设定时间。
▶ 每按1次按键,BROWNING FRY时间以1分钟为单位进行调节。
▶ 在料理时间设定模式下,Adjust指示灯闪烁。
按SELECTION -、+键设定加热水平
▶ 每按1次按键,加热水平以一个阶段为单位变更。
按HEAT / TIME键,进入加热水平设定模式。
▶ 再按HEAT / TIME键,返回时间设定模式。
▶ 在加热水平设定模式下,Adjust指示灯闪烁。
1
2
4
3
5
例)选择MULTI COOK时
例)选择MULTI COOK时
例)选择MULTI COOK时
BROWNING FRY
2
3
5
4
6
分类 BROWNING FRY MULTI COOK STEAM COOK SLOW COOK
料理时间设定
1~30分钟
(Def:10分钟)
15~90分钟
(Def:20分钟)
15~90分钟
(Def:20分钟)
15分钟~12小时
(Def:2小时)
加热水平设定
LE1~LE6
(Def:4个阶段)
LE1~LE9
(Def:7个阶段)
LE1~LE6
(Def:3个阶段)
LE1~LE6
(Def:3个阶段)
炒菜或烤菜时,选择BROWNING FRY菜单。
※ 打开锅盖进行BROWNING FRY料理时,要注意避免内锅里的材料飞溅。
1
为避免向电饭锅内部施加压力,打开锅盖。
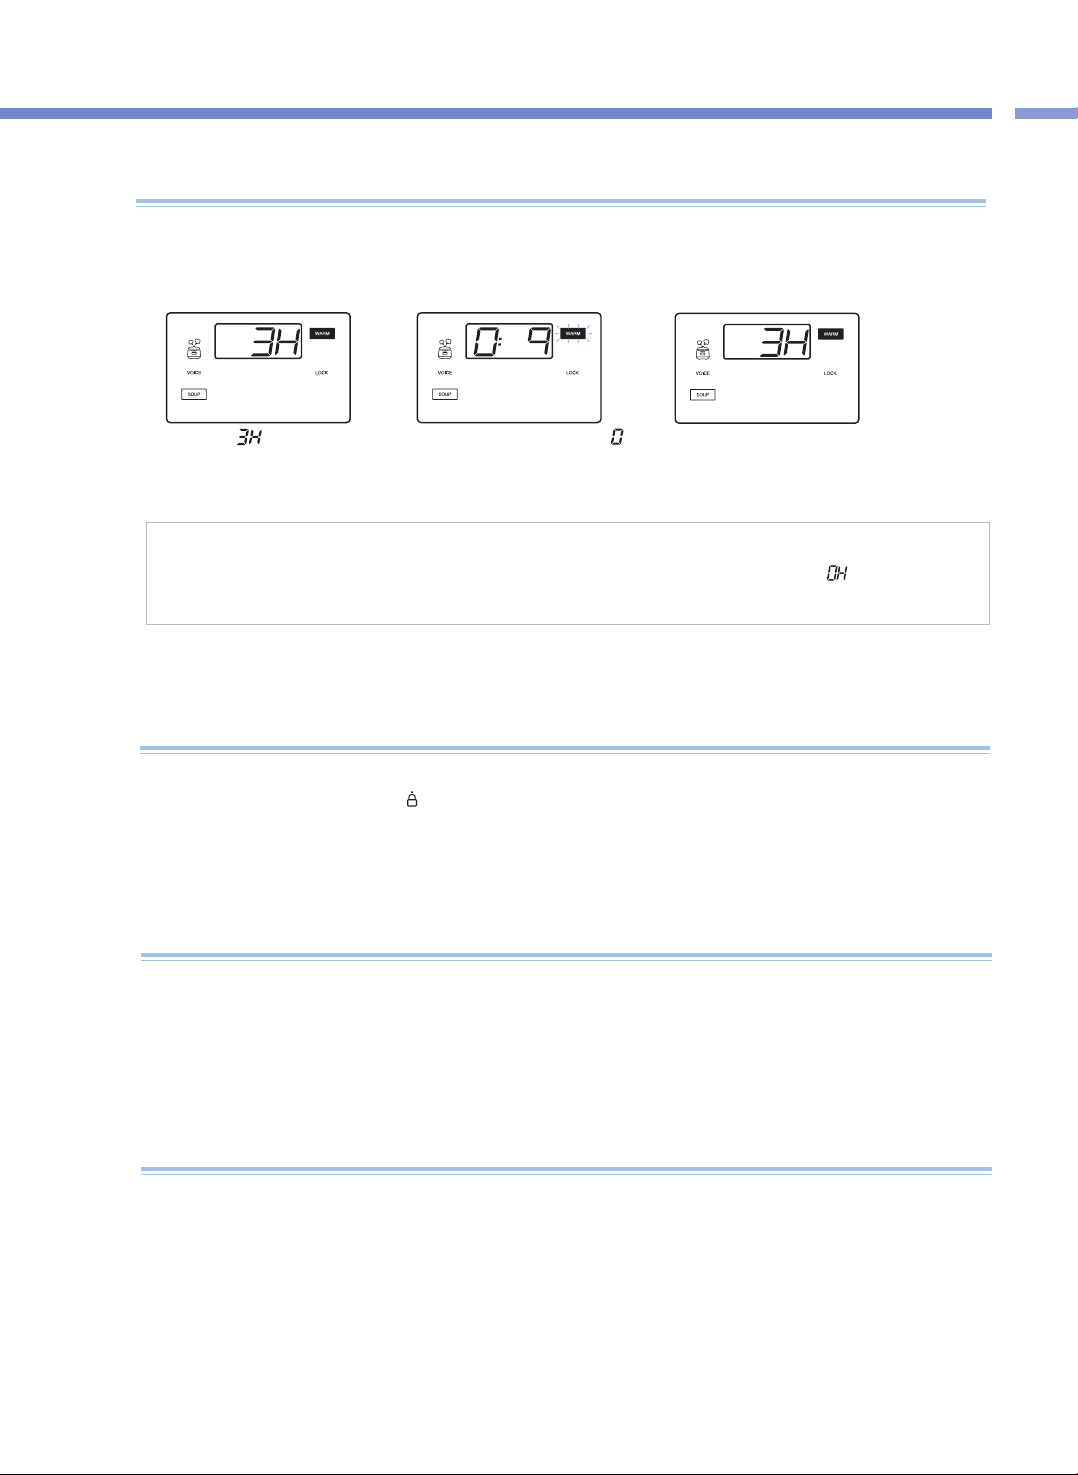
煮
饭
方
法
/
保
温
,
再
加
热
,
防
止
电
压
低
下
37
保温/再加热功能及保温温度设定
保温时注意事项
▶ 料理完成或保温中打开锅盖时,有时会因内部蒸汽压力导致锅盖不易打开。 请推动压力锥,待蒸汽完全排出后再打开。
▶ 保温或再加热,必须将结合手柄转至“ ”(关闭)位置。(若开盖按钮损坏,可能影响保温效果。)
▶ 保温中,内锅里无任何材料或不使用保温功能时,请按取消键取消保温功能或切断电源。
▶请勿将饭勺置于锅内一起保温。特别是放入木勺时,容易滋生细菌、产生异味。
<保温中>
<再加热中>
用餐时
▶ 保温中若要享用热腾腾的料理时,按KEEP WARM / REHEAT键,语音提示“REHEATing is starting”,
同时进入KEEP WARM / REHEAT功能,9分钟后,即可享受热腾腾的料理。
▶ 过度使用再加热功能会使料理烧焦或变干。
▶ 需用保温功能保管剩菜或其他料理时,将料理盛入内锅后,按保温/再加热键1次。此时,显示部显示“ ”时
▶ 保温中,按HEAT / TIME键时,显示保温温度2秒钟。
<完成再加热>
显示部的
,“
”表示已
保温3小时。
保温指示灯闪烁,同时显示部的“ ”
标识来回旋转,以1分钟为单位显示
再加热剩余时间。
再加热结束后,语音提示
“REHEAT has been completed”,
同时进入保温状态并显示已保温时间。
▶ 请及时清理产品。 特别是内锅盖清理不干净时细菌容易滋生,保温时会产生异味。
▶ 即使外观干净,但产品内各个角落里也会有细菌滋生导致异味,异味严重时,使用AUTO CLEAN菜单进行洗涤。
AUTO CLEAN功能结束后,必须将内锅清洗干净。
▶ 料理后,未淸理产品导致保温时饮食会产生异味。
保温中,产生异味时
▶ 本产品设有停电记忆功能,即使停电,也能记住以前状态,停电后约2分钟内再来电时能正常工作。
(该功能可能因产品型号略有差异。)
▶ 煮饭或料理中停电时,再按下COOK键,继续煮饭或料理。
▶ 煮饭或料理开始时,若停电,会相应延长煮饭或料理时间,煮饭或料理状态根据停电时间长短会略有不同。
▶ 保温中停电导致米饭或料理变凉时,会自动取消保溫功能。
何为停电记忆功能?
常见故障及处理方法
38
▼产品出现异常时,请按以下方法确认,仍不能正常使用时请咨询售后服务中心。
现象
不能完成料理时
确认事项
•是否按了压力煮饭键?
•煮饭中是否停电?
处理方法
•选择所需菜单后按1次压力煮饭键,此时确认显示
部是否显示“ ”。
•停电记忆功能,请参考第44页。
豆类(杂粮/糙米)夹生时 •豆类(杂粮/糙米)是否干硬?
•请将豆类(杂粮/糙米)浸泡或煮熟后开始煮饭。
根据杂粮种类不同煮熟程度也会不同。
料理半生不熟或烧焦时
•是否正确选择菜单?
•材料量是否正确?
•焖饭时是否打开了锅盖?
•请正确选择所需菜单。
•通过调节时间和加热水平,调节料理程度。
(参考第42, 43页)
•煮饭完成提示音响起,蒸汽完全排出后打开
锅盖搅拌料理。
煮饭中材料溢出时
•是否正确使用量杯?
•材料量是否正确?
•是否正确选择菜单?
保温中产生异味时 •是否盖好锅盖?
•保温中是否切断电源?
•是否保温12小时以上?
•请盖好锅盖。
•保温中请勿切断电源。
•保温时间要控制在12小时以内。
显示
“ ”
时
•温度感应器出现异常时显示。
•切断电源后与售后服务中心联系。
长时间未能完成煮饭,并显示
“ ”
时
•是否正确接通电源?
•这是因产品出现异常(加热器断线,热量不足等)
导致长时间未完成料理时所显示的标识。
切断电源后与售后服务中心联系。
•只将水倒入内锅后长时间加热时,显示
“
”
是正常的。
•本产品只限使用120V电源。正确接通电源。
显示
“ ”
时
•煮饭完成后,在接通电源状态下,
结合手柄是否一次也未转至
“
”
(开启)
位置并在保温被取消状态(待机状态)
下按了压力煮饭键?
•将结合手柄转至
“
”
(开启)位置后
重新转至
“
”
(关闭)位置。
保温中保温时间闪烁时。 •保温时间是否超过24小时?
•保温时间超过24小时后,显示屏上的保温时间
开始闪烁,提醒保温时间过长。

问
题
检
查
表
39
常见故障及处理方法
▼产品出现异常时,请按以下方法确认,仍不能正常使用时请咨询售后服务中心。
现象 确认事项 处理方法
按下按键,显示
“ ”
时
•是否放入了内锅?
•是否正确接通电源?
•无内锅状态下不能操作。
请先放入内锅后使用
•本产品只限使用120V电源。
正确接通电源。
压力煮饭、预约等键不能操作,
显示
“ ”
时
•结合手柄是否转至
“
”
(关闭)位置?
•关闭标志是否亮起?
•请将结合手柄转
“
”
(关闭)位置。
锅盖结合手柄未转至关闭位置时,压力煮饭、
预约键不能操作。
显示
“ ”
时
•环境感应器异常时显示。
•切断电源后与售后服务中心联系。
显示
“ ”
时
•内存异常时显示。
•切断电源后与售后服务中心联系。
显示
“ ”
时
•内存异常时显示。
•切断电源后与售后服务中心联系。
无法盖锅盖时
•锅盖结合手柄是否完全转至
“
”
(开启)
位置?
•内锅里是否有热食品?
•内锅是否完全放置于机体内?
•将锅盖结合手柄完全转至
“
”
(开启)位置后
关闭。
•请推动压力锥后盖锅盖。
•请抓住内锅把手左右转动,
将内锅完全放置于机体内。

常见故障及处理方法
40
▼产品出现异常时,请按以下方法确认,仍不能正常使用时请咨询售后服务中心。
现象 确认事项 处理方法
锅盖结合手柄未能转
至
“ ”
(开启)位置时
•煮饭或料理中是否转动了锅盖结合手柄?
•蒸汽未完全排出状态下是否转动了锅盖结合
手柄?
•煮饭或料理中因内部压力无法打开锅盖。
请勿强行打开锅盖。
若要在不得已的情况下打开锅盖时,请先按取消
键2秒,推动压力锥,待蒸汽完全排出后再打开。
•推动压力锥等蒸汽完全排出后再打开。
即使锅盖结合手柄完全转
至
“ ”
(开启)位置,
锅盖也无法打开时。
•因内部压力所导致。
•推动压力锥待蒸汽完全排出后再打开。
蒸汽泄漏,
或响起哨音时
•密封圈表面是否粘有异物(饭粒等)?
•密封圈是否老化?
•请用抹布擦净密封圈后使用。
•密封圈周围要保持清洁。
•蒸汽泄漏时按取消键2秒,待蒸汽完全排出后
切断电源并联系售后服务中心。
•根据使用情况及使用次数,密封圈使用寿命
为 1~3年,请及时定期更换。
继续使用已老化的密封圈时,可能导致蒸汽泄漏,
无法进行压力煮饭。
煮饭或料理中
无法按取消键时
•内锅内部是否很烫?
•煮饭或料理中,不得不取消时,因内锅保持高温,
为保障用户安全,请按取消键 2秒,可取消煮饭或
料理。
•取消煮饭或料理时,蒸汽排出装置排出蒸汽的同
时, 内容物也会飞溅,可能导致面部和手部受烫
伤,请不要靠近。

CMC-Q5 Series (cETL approved)
ICOOK Q5 STANDARD
Operating Instruction
KOREA NO.1
CUCKOO
Electric Multi Pressure Cooker
“
”
Read the following instruction manual carefully before use or when facing problems.
在使用产品之前或是使用过程中出现任何问题, 请仔细阅读该产品的说明书.
Lea atentamente a las siguientes instrucciones antes de su uso o en caso de cualquier mal funcion.
※ Pictures may look different from the actual product.
※ 图片可能与实际产品不同。
※
Los dibujos pueden verse diferentes al producto actual.
※ 사진은 실제 현물과 다를 수 있습니다.
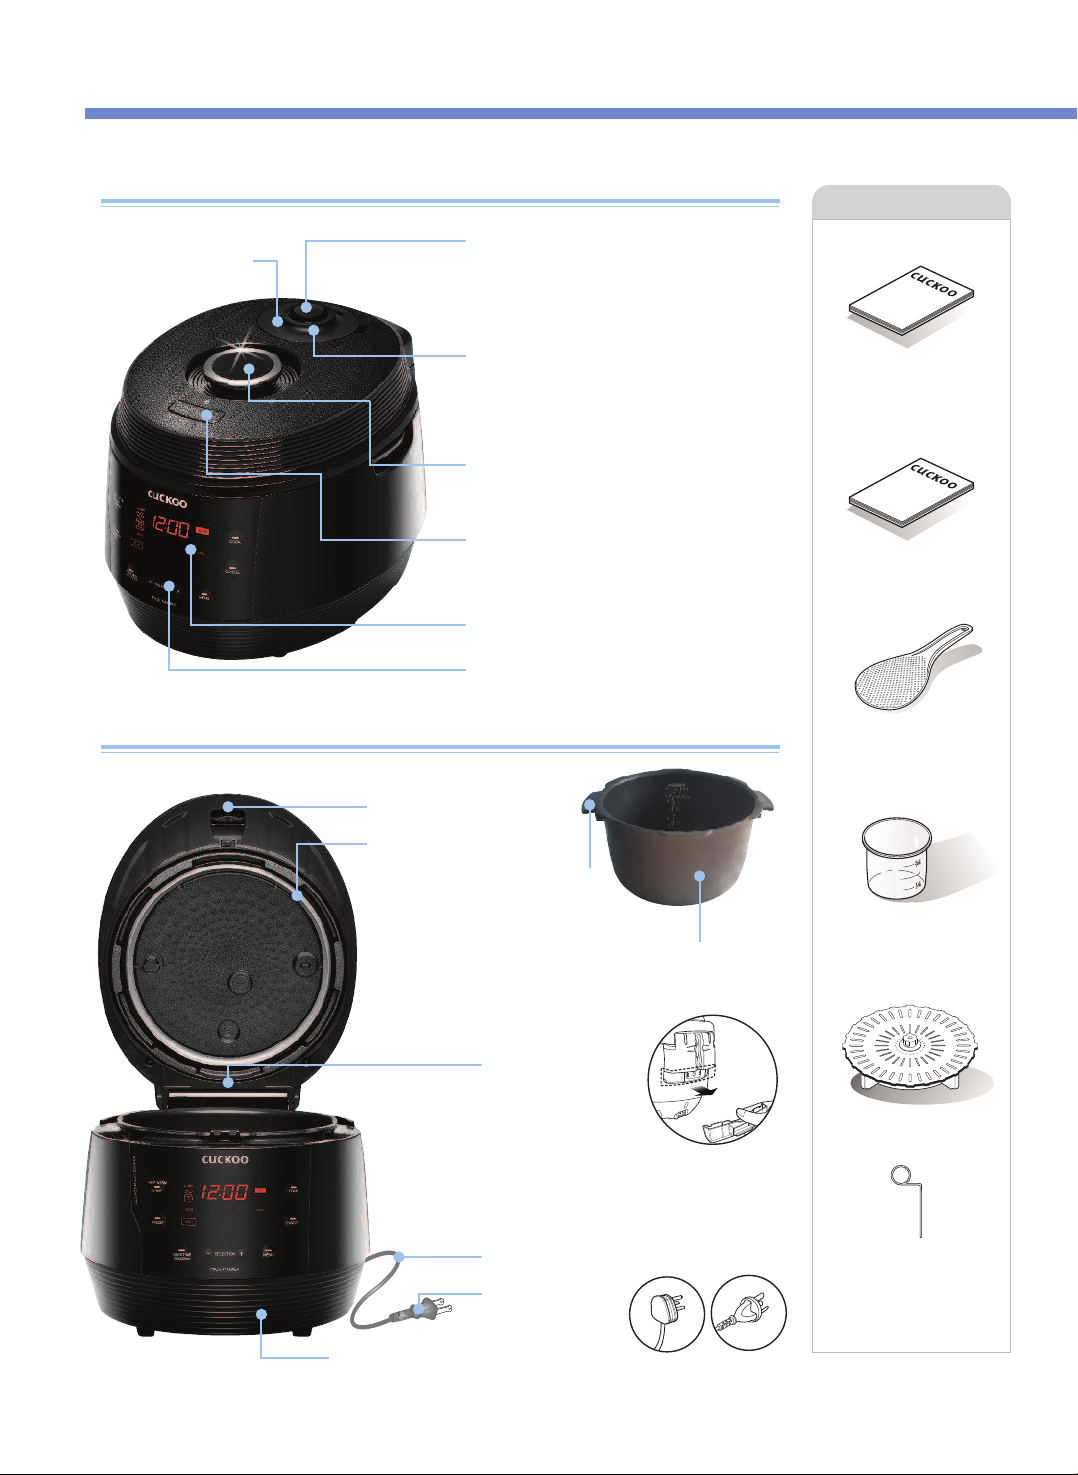
Nombres de las piezas
Nombres de las piezas
Salida para descarga
automática de vapor
Al terminar de cocinar o en el
modo de calentamiento, el vapor
sale automáticamente.
Liberador de vapor programado digitalmente
(Válvula de expulsión de vapor)
Mantenga horizontal el peso de presión.
Estabiliza el vapor dentro. Cuando el peso de
presión gira, suelta el vapor.
Tapa blanda de vapor
Manilla Abrir/Cerrar
La manilla tiene que estar en la posición "Lock"
para operar.
Perilla de sujeción
Gire la manilla a "Unlock" y luego presione
la perilla de sujeción para abrir.
Pantalla LED
Panel de control
Accesorios
Manual
Guía de cocina
Cucharón arrocero
Taza medidora de arroz
Placa de vapor
Gancho de limpieza
(en la parte inferior
de la unidad)
NOMBRE DE LAS PIEZAS
42
Manual
Guía de
cocina
Compartimento
de condensación
Vacíe el agua del
Compartimento de
condensación
después de cocinar o durante
el modo "Calentamiento".
De otro modo pueden
producirse olores.
Cable eléctrico
Enchufe eléctrico
Conjunto de tapa
Embalaje
Inserte el recipiente interno en la olla
arrocera.
Inner Recipiente interno
Asas de la cubeta
El tipo de enchufe
puede diferir del real.
(Aquí solamente se
explica cómo funciona.)
Temperatura
Sensor

Limpie de cualquier substancia extraña las
partes interna, superior y exterior del
recipiente interno.
Si queda agua de arroz en la tapa, límpiela
con una toalla húmeda.
El centro de la tapa está hecho de metal, así
que tenga cuidado al limpiar.
Limpie la cubierta superior con un paño
húmedo.
Tenga cuidado al limpiar el calentador
superior
Esta parte está diseñada para recoger la
humedad que pasa por el respiradero del
vapor al cocinar.
Cuando termine de cocinar, límpiela con un
paño de platos solamente húmedo.
En caso de que la olla se manche con el caldo del arroz
cocinado o con materias extrañas, limpie la olla con un
paño de platos húmedo. El uso de un estropajo o cepillo
ásperos, puede dañar la superficie de la olla. Si los
botones no funcionan correctamente, póngase en
contacto con nuestro servicio de atención al cliente.
Si hay substancias extrañas pegadas en el
sensor de temperatura, quítelas sin dañar la
placa metálica.
Limpie la unidad principal con un paño
húmedo.
※
Precaución
No limpie el recipiente interno con cubiertos afilados (tenedores, cucharas, palillos, etc.).
- El revestimiento del recipiente interno puede pelarse.
Antes o después del uso, limpie alrededor del botón de
apertura de tapa y elimine el agua de arroz o cualquier
otra substancia extraña con una toalla húmeda. Antes o
después del uso, si el botón de apertura de tapa no
funciona, póngase en contacto con el servicio al cliente.
❶ Extraiga el colector
de rocío.
❷
Extraiga la tapa de la
salida de drenaje
empujándola hacia
abajo.
❸
Limpie la tapa de la
salida de drenaje y el
colector de rocío con
un detergente neutro.
❹
Después de limpiarlo,
instale firmemente el
colector de rocío.
❺
Inserte firmemente el
colector de rocío
comprimiéndolo en la
dirección de la flecha.
Cómo limpiar el colector de rocío
Cómo limpiar la boquilla del peso de presión
•El orificio de la válvula del peso de presión permite que salga el vapor. Revise regularmente que no esté
bloqueado. Si el orificio de la válvula del peso de presión está bloqueado, el vapor caliente y el
contenido caliente dentro de la olla pueden causar lesiones grave.
※No use el gancho de limpieza para nada más que limpiar el orificio de la válvula del peso de presión.
▶Bajo la manilla Abrir/Cerrar se encuentra la tapa de vapor donde está el peso de presión. Para extraer el peso de presión,
retire la tapa de vapor, gire el peso de presión en sentido contrario a las agujas del reloj mientras lo tira hacia arriba y siga
girándolo hasta que salga.
▶
Punce el orificio de la válvula obstruido con el gancho de limpieza y vuélvalo a montar girándolo en el sentido de las agujas del reloj.
▶Cuando el peso de presión está correctamente montado, puede girarse libremente.
Tapa blanda de vapor
Gancho de limpieza
※En la parte
inferior de la
unidad
Substancia
extraña
Peso de presión
detergent
e neutro
43
CÓMO LIMPIAR
Cómo limpiar
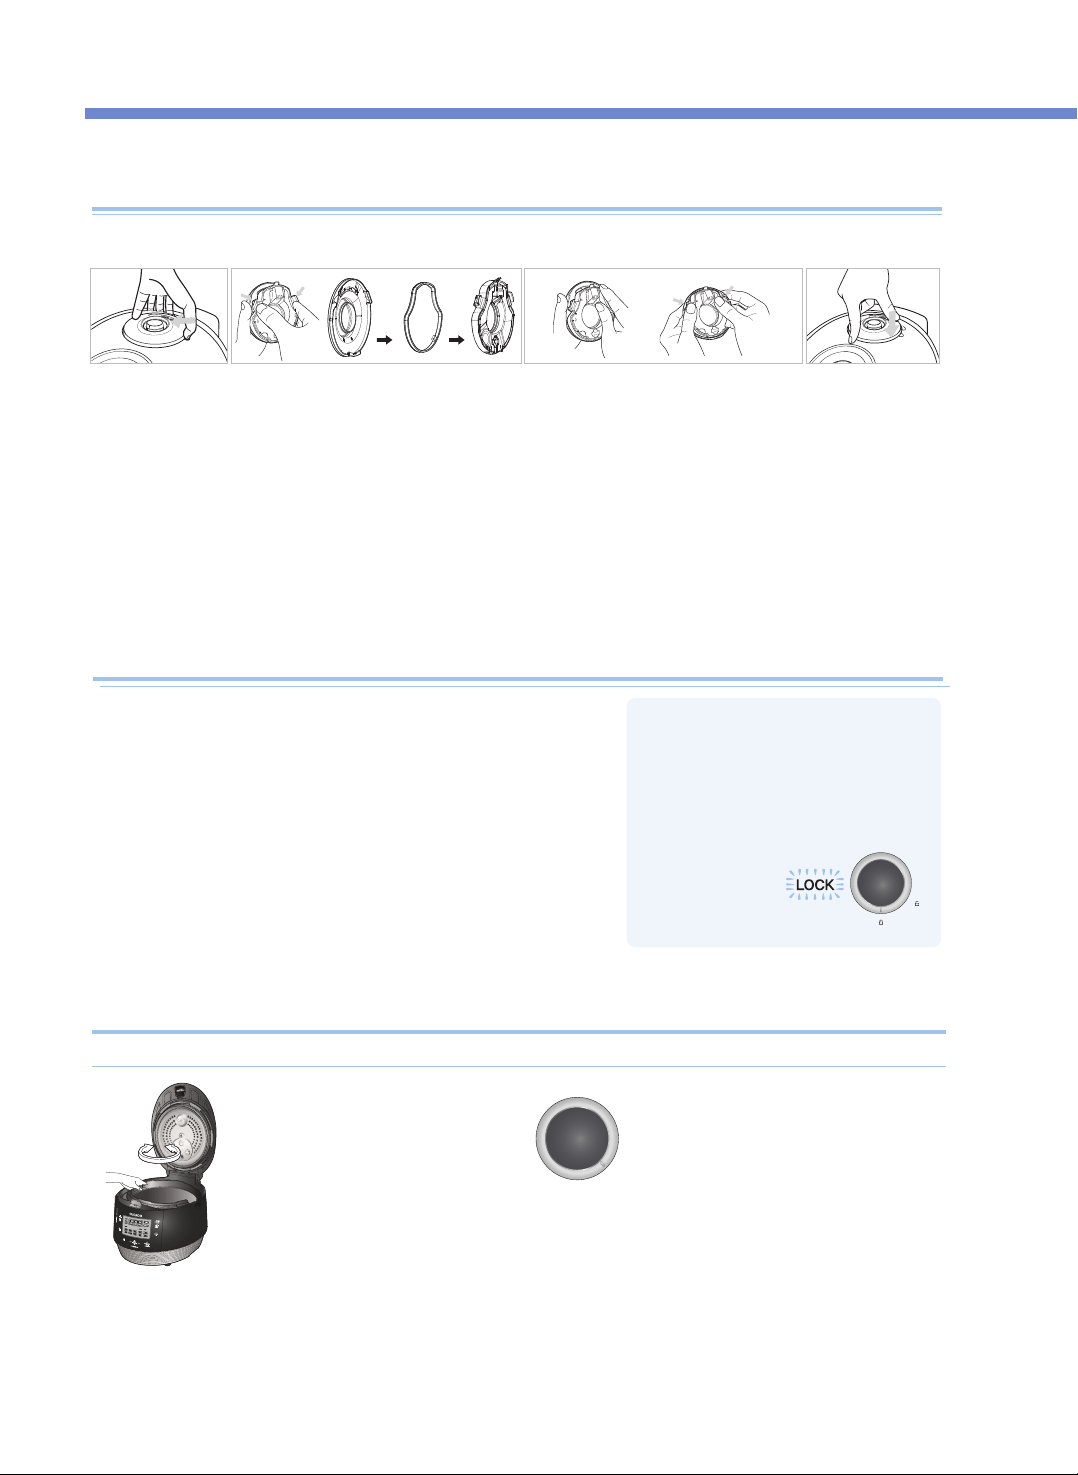
Cómo usar la manilla
•Si la luz no se enciende, no
funcionarán los botones “Cook” y
“Preset”. Asegúrese de que la
manilla se encuentre en “Lock”.
2. Para cerrar la cubierta superior,
gire la manilla para desbloquear
como se muestra en la imagen
de la derecha.
1. Compruebe que el recipiente
interno esté correctamente
instalado dentro del cuerpo
principal.
3. Si hay demasiado vapor dentro del
recipiente interno, podría ser difícil
bloquear la manilla. Gire el peso de
presión y deje que salga el exceso de
vapor. Luego intente de nuevo girar la
manilla.
Cuando la cubierta superior no cierra perfectamente
Cómo limpiar la tapa de vapor blanda
※ No toque la superficie de la tapa de vapor blanda justo después de cocinar. Puede quemarse.
No intente cerrar a la fuerza la cubierta superior. Puede dañar su olla y causar problemas.
❶ Saque la tapa de
vapor blanda
como se muestra
en la imagen
anterior, tomando
con los dedos la
parte con
muescas y tirando
a un lado mientras
la levanta
suavemente.
❷ Desmonte la tapa de vapor blanda en la
parte trasera presionando en la dirección
de la flecha y lávela frecuentemente con
un detergente neutro y una esponja.
※ Inserte cuidadosamente la
empaquetadura de la manera correcta.
❸
Inserte cuidadosamente la
empaquetadura de la manera
correcta.
❹ Al instalar la tapa
de vapor inserte
firmemente la
tapa
presionándolo en
la dirección que
se muestra
arriba.
1.
Después de cocinar, gire la manilla de “Lock” a “Unlock” para abrir.
2. Después de cocinar, gire la manilla de “Lock” a “Unlock” para
abrir.
Si queda vapor en el recipiente interno, podría ser difícil girar la
manilla. En tal caso, gire el peso de presión y deje que salga el
exceso de vapor. No abra a la fuerza.
3. La manilla se debe llevar a “Unlock” al abrir y cerrar.
CÓMO LIMPIAR
44
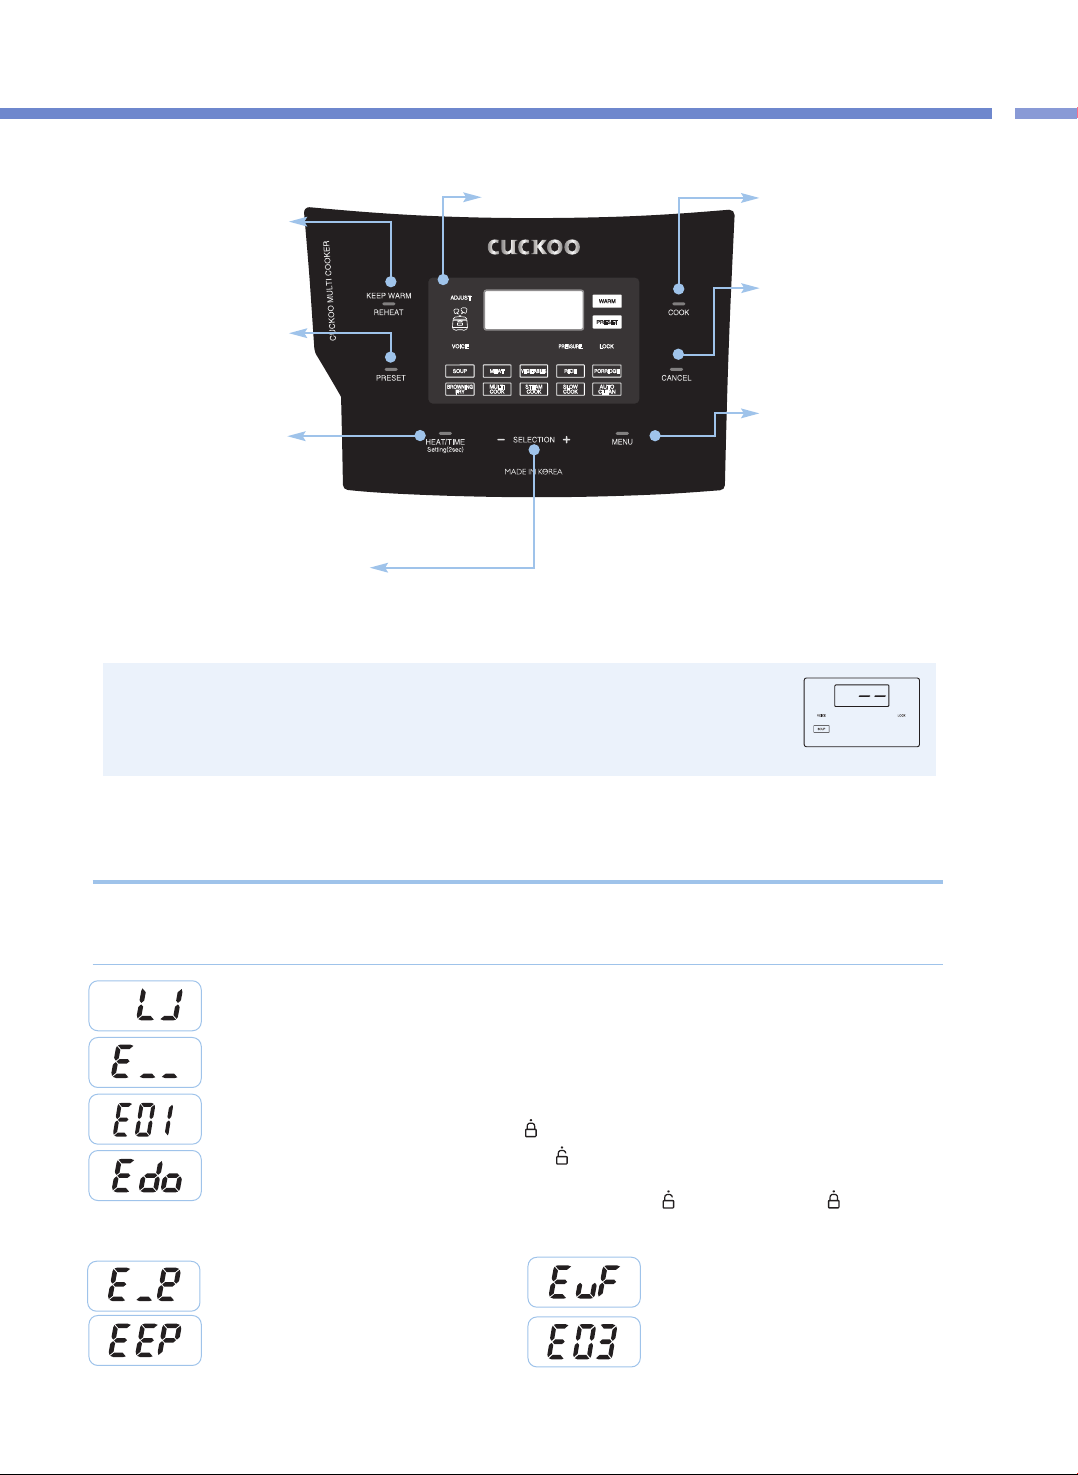
45
Nombres y funciones en el Panel de control/
Inspección de funcionamiento defectuoso del Panel de visualización
Cómo limpiar / Panel de Control y Pantalla
※
Cuando el producto está enchufado y no se realiza ninguna operación con la pantalla, la
imagen mostrada es el modo Standby (En espera).(Las opciones del modo Standby y la
presencia de voz son diferentes según la configuración del usuario).
※
Durante el funcionamiento, presione el botón CANCEL para entrar en modo Standby.
※
Presione el botón hasta que oiga el sonido del timbre. El diseño de la placa puede ser distinto.
Botón KEEP WARM / REHEAT
(Mantener caliente / Recalentar)
Se usa para mantener
tibios/calientes o recalentar los
alimentos justo antes de su comida
(Vea la página 43)
Botón COOK (Cocinar)
Se usa para comenzar a cocinar
(Vea la página 50)
Botón CANCEL (Cancelar)
Se usa para cancelar una función
seleccionada o para expulsar
automáticamente el vapor(Presione
el botón durante dos segundos
para cancelar durante la cocción)
Botón Menu
Se usa para seleccionar entre SOUP
(Sopa), MEAT (Carne), VEGETABLES
(Vegetales), RICE (Arroz), PORRIDGE
(Papilla), BROWNING FRY (Dorar),
MULTI COOK (Cocción múltiple),
STEAM COOK (Cocción al vapor),
SLOW COOK (Cocción lenta) y AUTO
CLEAN (Limpieza automática)
Botón PRESET (Preconfigurar)
Se usa para preconfigurar la cocción
(Vea la página 47)
Botón HEAT / TIME (Calor / Tiempo)
Se usa para configurar el nivel del calefacción o el
tiempo de cocción. Configuración de idioma (Vea
la página 46), configuración del volumen de la voz
(Vea la página 46), configuración de la temperatura
para mantener caliente (Vea la página 46).
Botones de SELECCIÓN - , +
Se usan para configurar el nivel del calentador y el tiempo de cocción (Vea la páginas 51, 52).
Se usa para cambiar el tiempo predeterminado (Vea la página 47).
Panel de visualización
Esto aparece cuando el recipiente interno no está correctamente colocado.
Esto indica que el sensor de temperatura no funciona.
Póngase en contacto con nuestro centro de servicio al cliente.
Esto aparece cuando usted presiona el botón COOK o PRESET sin girar completamente la manilla de la cubierta.
Gire completamente la manilla de la cubierta a “ ” (Lock).
Para cualquier uso incorrecto o cuando no funcione apropiadamente, el Panel de visualización mostrará los
siguientes signos de alerta. Si un signo sigue apareciendo incluso en condiciones normales de uso o después
de tomarse una medida, póngase en contacto con nuestro centro de servicio al cliente.
Función Error Inspection (Inspección de errores) del Panel de visualización
Esto aparece cuando la manilla de la cubierta no se gira a “ ” (Abrir) en el modo Keep Warm después de terminar de cocinar y
cuando usted presiona el botón COOK o PRESET de nuevo después de entrar en modo Standby. Esta función es para verificar la
operación del Sensor de sujeción de cubierta. Gire la manilla de la cubierta a “ ” (Open) y luego gírela a “ ” (Lock). Si el
problema persiste, póngase en contacto con nuestro centro de servicio al cliente.
Esto indica que hay un error con la memoria interna de MICOM.
Póngase en contacto con nuestro centro de servicio al cliente.
Esto aparece cuando usted solamente hierve agua de una forma
continuada o existe un funcionamiento defectuoso del producto.
Póngase en contacto con nuestro centro de servicio al cliente.
Esto indica que el Sensor medioambiental no funciona.
Póngase en contacto con nuestro centro de servicio al cliente.
Esto indica que hay un error con la memoria externa de MICOM.
Póngase en contacto con nuestro centro de servicio al cliente.
<Modo Standby>
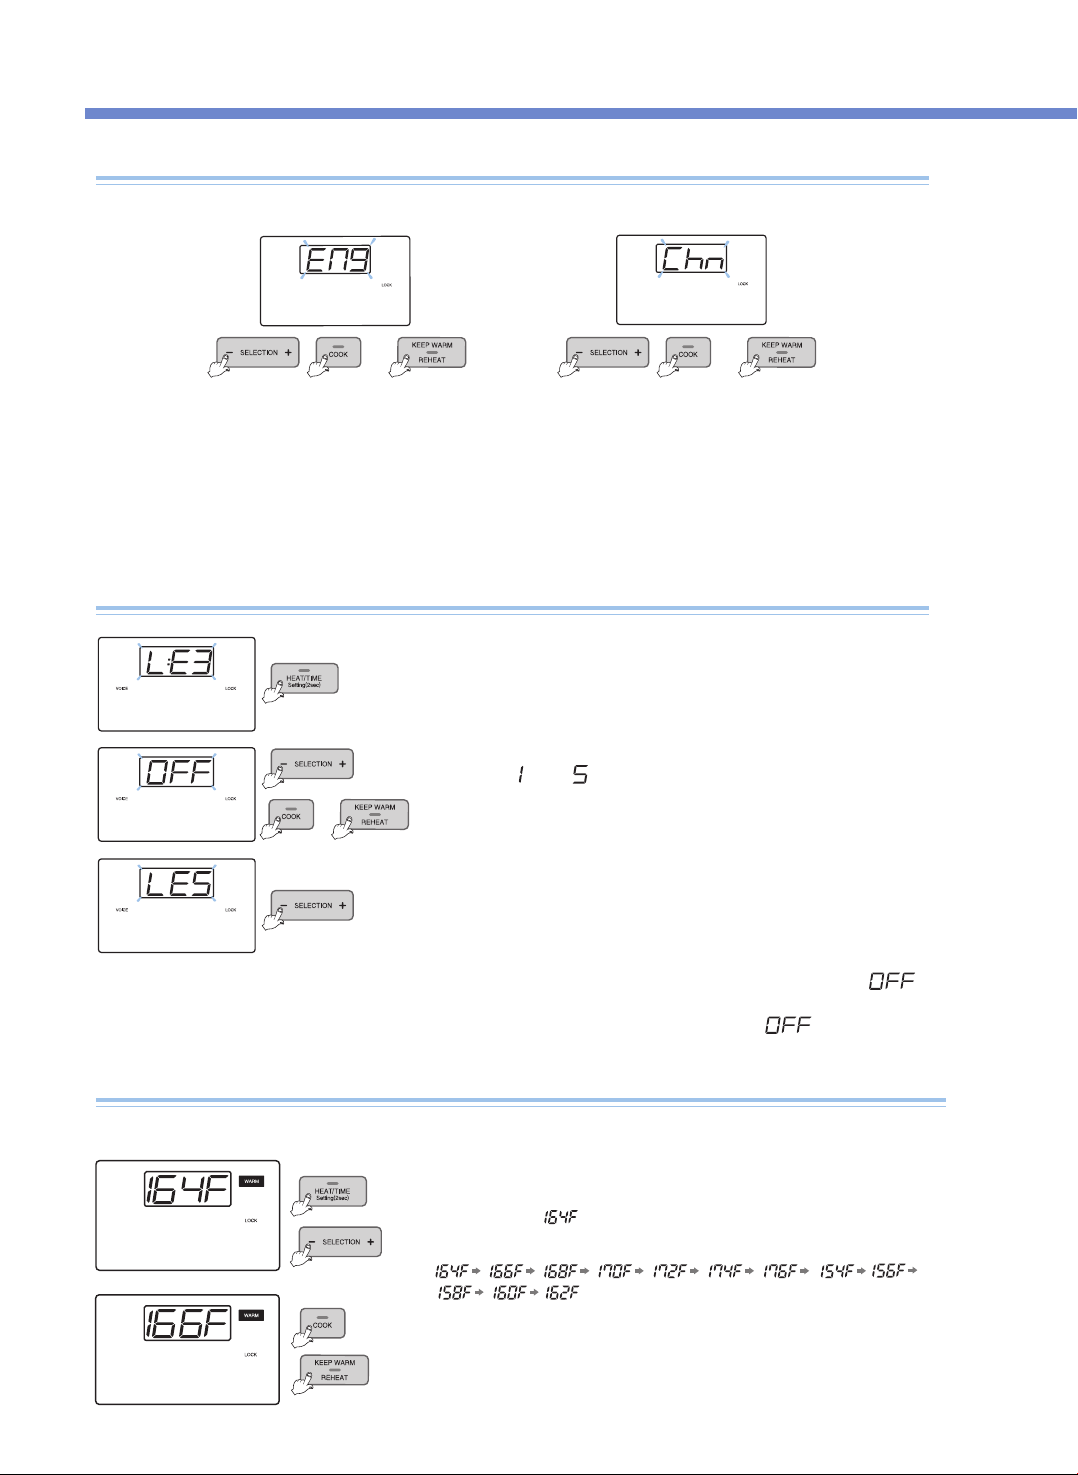
Cómo ajustar el volumen de la voz
(para liberar la función Voice o ajustar el volumen de la voz)
Puede seleccionar su idioma preferido entre inglés, español y chino. El valor predeterminado es inglés.
Cómo configurar el idioma
p. ej.) voz en inglés p. ej.) voz en chino
Entre en modo Language Setting (Configuración de idioma)
presionando el botón SETTING durante dos segundos o más en el
modo Standby. Presione el botón SETTING una vez y podrá entrar
en modo Voice Volume Setting (Configuración de volumen de voz).
1. Cuando presiona el botón SETTING durante 2 segundos o más en el modo Standby, entra en modo de
configuración de idioma como se muestra en el Panel de visualización en la imagen.
▶ Si presiona el botón CANCEL o han transcurrido 7 segundos sin presionar el botón CANCEL ni ningún otro botón, la función se cancela sin
configurarse y vuelve al modo Standby
2. Presione el botón COOK o el botón KEEP WARM /REHEAT después de seleccionar su idioma preferido; la
función se configurará y el producto volverá al modo Standby.
or
▶ Después de configurar el volumen de voz deseado, presione el botón COOK o el botón
KEEP WARM / REHEAT , y la función quedará configurada cuando la voz indique "Voice
volume has been set" (Se configuró el volumen de voz) El producto volverá al modo Standby.
▶ Si presiona el botón CANCEL o transcurren 7 segundos sin presionar ningún botón, la
voz indica "Function setting has been canceled with over time" (Se canceló la
configuración de la función por sobretiempo) No se configura ninguna función y el
producto vuelve al modo Standby. (Cuando presione el botón SETTING, entrará en
modo de configuración Keep Warm Temperature [Mantener temperatura caliente] sin
guardar el valor cambiado).
Presione los botones SELECTION - , + para configurar el volumen de
la voz de
“ ”
a
“ ”
.
Si presiona los botones SELECTION -, + para configurar " ", la
voz dice function has been canceled” (Se ha cancelado la función)
y la función de voz se libera con “
VOICE
” y “ ”
or
or
❶
Presione el botón SETTING durante 2 segundos en el modo para entrar en modo Standby.
Luego, presione dos veces el botón para entrar en modo Keep Warm Temperature Setting
(Configuración de la temperatura de Keep Warm). El Panel de visualización se mostrará como
en la imagen. Aquí, significa la actual temperatura de Keep Warm.
Cómo ajustar la temperatura de Keep Warm
Los alimentos pueden descomponerse u oler mal si la temperatura de Keep Warm no es la correcta, así que
usted debe ajustarla.
❸Configure la temperatura deseada y presione el botón COOK o el botón KEEP WARM /
REHEAT. La temperatura configurada se ingresa automáticamente y el producto vuelve al
modo Standby.
(Si presiona el botón CANCEL o transcurren 7 segundos sin presionar ningún botón, la
función se cancela y el producto vuelve al modo Standby).
❷Presione los botones SELECTION - , + para cambiar el Panel de visualización como
or
Cómo configurar(idioma, volumen de voz, temperatura de Keep Warm)
46
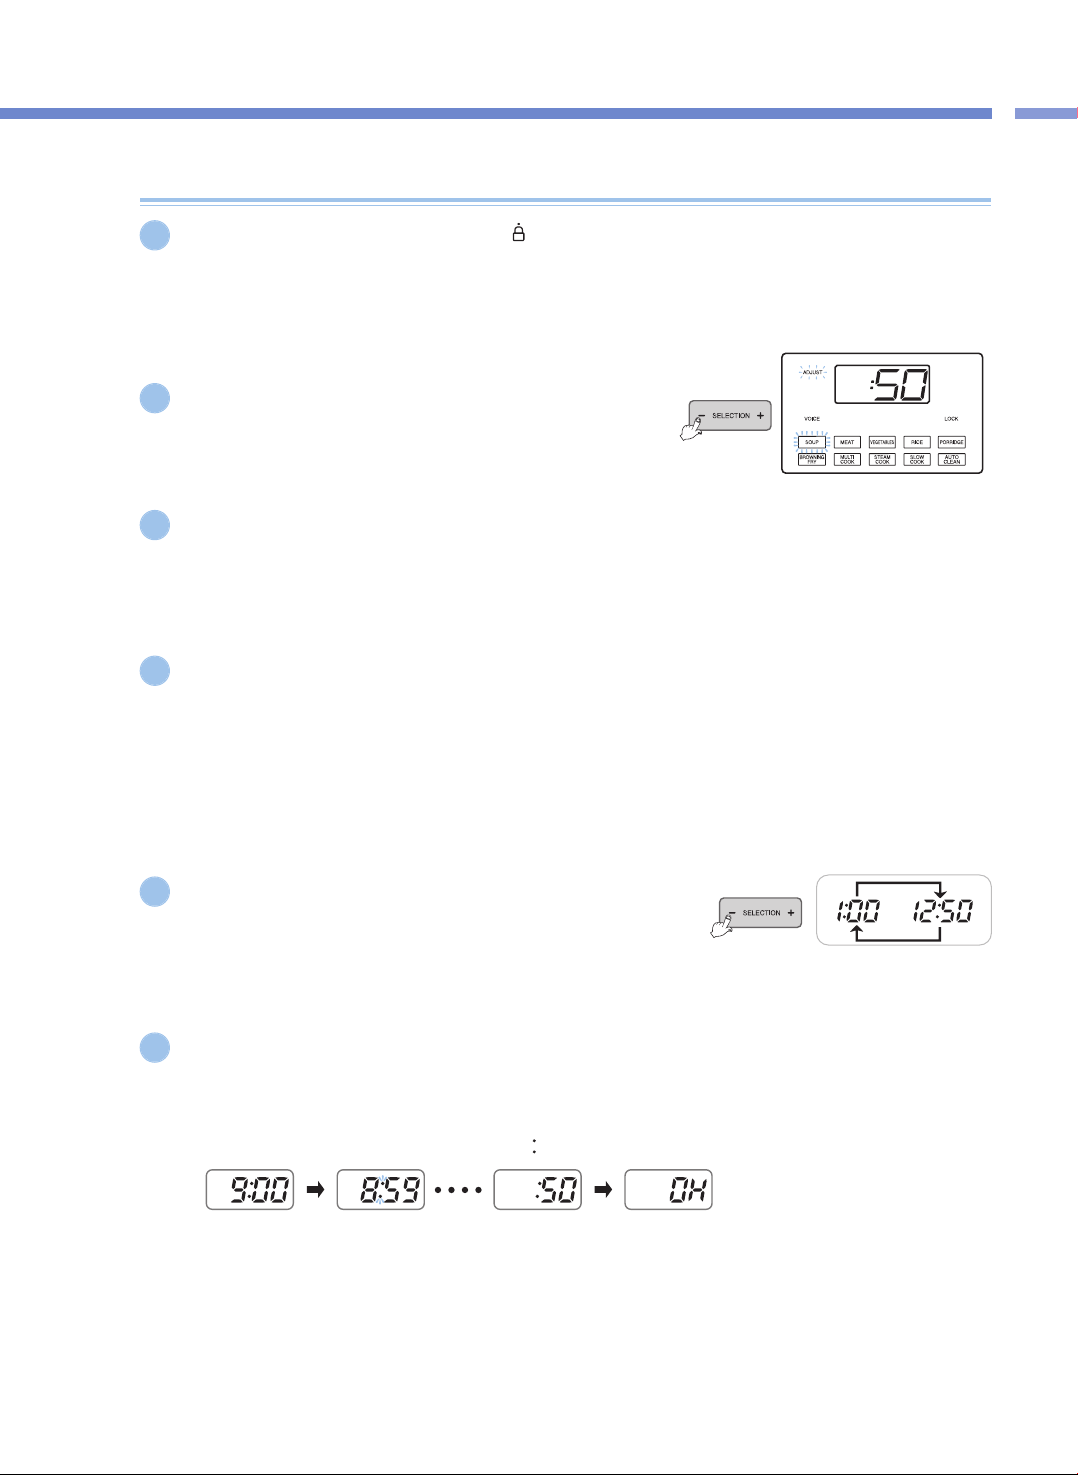
Cómo utilizar la función / Cocinar PRESET
47
Cómo preconfigurar la cocción
Si presiona la manilla de la cubierta hasta
“ ”
(Lock) y se enciende la luz de Lock, presione el botón
MENU para seleccionar el menú deseado.
▶ Cuando el tiempo configurado es superior a 60 minutos, el tiempo predeterminado se configura 2 horas. (excluyendo al menú RICE)
▶ Si no configura un menú específico, se predeterminará automáticamente SOUP.
Presione los botones SELECTION -, + para configurar el tiempo
de cocción.
▶ En el caso del menú RICE, configure el tiempo de vapor en lugar del tiempo de
cocción.
Presione el botón HEAT / TIME para entrar en modo Heater Level Setting y luego presione los botones
SELECTION -, + para configurar el nivel del calentador.
▶ Esto se aplica a los menús BROWNING FRY, MULTI COOK, STEAM COOK y SLOW COOK.
Presione el botón PRESET (Predeterminar).
▶ Si presiona el botón PRESET con la manilla de la cubierta abierta, no se predeterminará la cocción.
▶ Presione el botón PRESET y la voz dirá "Set PRESET TIME with TIME button then press COOK button" (Configure el tiempo
predeterminado con el botón TIME y luego presione el botón), mientras la pantalla muestra el tiempo configurado y el signo PRESET
parpadea.
▶ Configure el tiempo predeterminado dentro de 7 segundos después de presionar el botón PRESET.
▶ Cuando configure PRESET durante el modo Keep Warm, presione el botón CANCEL para cancelar la función Keep Warm y luego
configure el tiempo predeterminado.
▶ En el modo Standby, el botón PRESET no funcionará.
Presione los botones SELECTION - , + para configurar el tiempo
predeterminado.
▶ Cada vez que presiona los botones SELECTION - , +, se agregan 10 minutos al
tiempo predeterminado.
▶ Los límites de tiempo predeterminado son desde 1 hora hasta 12 horas y 50
minutos.
Presione el botón PRESET o el botón COOK y el producto predeterminará la cocción.
▶ Aquí, la predeterminación comienza cuando la voz dice “SOUP (the set menu) has been reserved” (Se reservó SOUP [el menú configurado]).
▶ Después de presionar el botón PRESET, si no presiona ningún botón dentro de 7 segundos, se iniciará automáticamente el modo Preset.
▶ Cuando el modo Preset comienza, la luz de Preset deja de parpadear y el tiempo predeterminado se reduce por minuto hasta que se
inicia la cocción predeterminada.
(Mientras la cocción predeterminada continúa, el signo
“ ”
entre la hora y el minuto parpadea).
▶ El tiempo predeterminado es el tiempo que queda hasta que se completa la cocción predeterminada.
(El tiempo de culminación puede diferir según la cantidad de alimento y las condiciones de uso).
▶ Si desea cambiar el tiempo predeterminado, presione el botón CANCEL para cancelar la cocción predeterminada, y luego
empiece de nuevo.
1
5
4
6
2
3
<Cocción predeterminada>
<Coccióng> <Cocción completa/Mantener caliente>
Cómo predeterminar la cocción

DESCRIPCIÓN GENERAL DE LOS AJUSTES DE LA OLLA
48
AUTO /
MODO
MANUAL
MODO
COCINA
ADJUSTABLE
Tiempo de Cocina / Vapor
TEMPERATURA RECETAS
Tiempo Predeterminado
MODO
AUTO
SOPA
Timepo de
Cocina
30 ~ 90 minuto
(Def. 50 min)
Hasta 225℉
( 107 ℃ )
- Tomate Basil Bisque
- Curry verde tailandés
- Carne vietnamita Pho
- Sopa de pollo y tortilla
- Sopa francesa de cebolla
- Sopa de almejas de nuevaInglaterra
CARNE
Timepo de
Cocina
25 ~ 90 minuto
(Def. 40 min)
Hasta 239℉
( 115 ℃ )
- Costillitas
- Lomo de cerdo Teriyaki
- Veal Shank Osso Bucco
- Adobo de cerdo estofado
- CARNE ASADA TACOS
VEGETALES
Timepo de
Cocina
15 ~ 90 minuto
(Def. 20 min)
Hasta 239℉
( 115 ℃ )
- Huevos en Purgatory
- Ratatouille rápido de calabacín
- Berenjena y salsa de pimiento rojo asado
- Alcachofas al vapor con salsa de Dipping
GACHAS DE
AVENA
Timepo de
Cocina
65 ~ 90 minuto
(Def. 70 min)
Hasta 230℉
( 110 ℃ )
- Risotto de calabaza
- Gachas de PurpleYam Barley
- Gachas de desayuno salados
ARROZ
Timepo de
vapor
Tiempo de Vapor
3 ~ 30 minuto
(Def. 8 min)
Hasta 250℉
( 121 ℃ )
- Arroz
- Arroz Con Pollo
- Andouille Jambalaya
- Paella de mariscos
Tiempo de cocina: 30 minuto (Predeterminado)
**
El tiempo de cocina predeterminado es 30 minutos, sin embargo, puede agregar más
tiempo dependiendo de la cantidad de arroz cocinado para garantizar el sabor del
arroz y cocido completo.
MODO
MANUAL
Multi-Cocina
Tiempo de
Cocina & Nivel
de Calentamiento
15 ~ 90 minuto
(Def. 20 min)
158℉ ( 70 ℃) ~
248℉ ( 120℃)
- Ensalada marroquí de Orzo
- Salchicha y queso Frittata
- Carne de res japonesa Sukiyaki
- Crème Brulée
Cocina de
Vapor
Tiempo de
Cocina & Nivel
de Calentamiento
15 ~ 90 minuto
(Def. 20 min)
212℉ ( 100℃) ~
257℉ ( 125℃)
- Almejas al curry rojo
- Prime Rib con vino tinto Au Jus
- Costilla al vapor coreana
- Pastel de queso japonés
- Pastel de calabaza
Cocina Lenta
Tiempo de
Cocina & Nivel
de Calentamiento
15 minuto ~ 12 hora
(Def. 2 hour)
100℉ ( 38℃) ~
203℉ ( 95℃)
- Jamón Glaseado en Miel
- Lasagna de Zuchini
- Yogurt
- Crema agria
- Salsa de granada
BROWNING
FRY
Tiempo de
Cocina & Nivel
de Calentamiento
1 ~ 30 minuto
(Def. 10 min)
239℉ (115 ℃) ~
275℉ (135 ℃)
- Helado de frijol de vainilla salado
- Cerveza estofado con mostaza caliente
- Louisiana Hot Shrimp
- Pasta UniCream
Mantenimiento Temperatura
1 hora ~ 99 hora
156℉ (69℃) ~
176℉ (80℃ )
* Todos los modos de cocina (excepto el modo BROWNING FRY y MANTENIMIENTO) alcanzan un rango de presión hasta 80kPa.
* PREJUSTE (el temporizador de cocina diferida ofrece hasta 12:50 horas. Puede preajustar la hora en que desea el multi cooker empiece a cocinar.)
ENCUENTRE MÁS RECETAS DELICIOSAS EN CUCKOOMULTICOOKER.COM
* La temperatura de cocción real puede diferir de la temperatura de control.
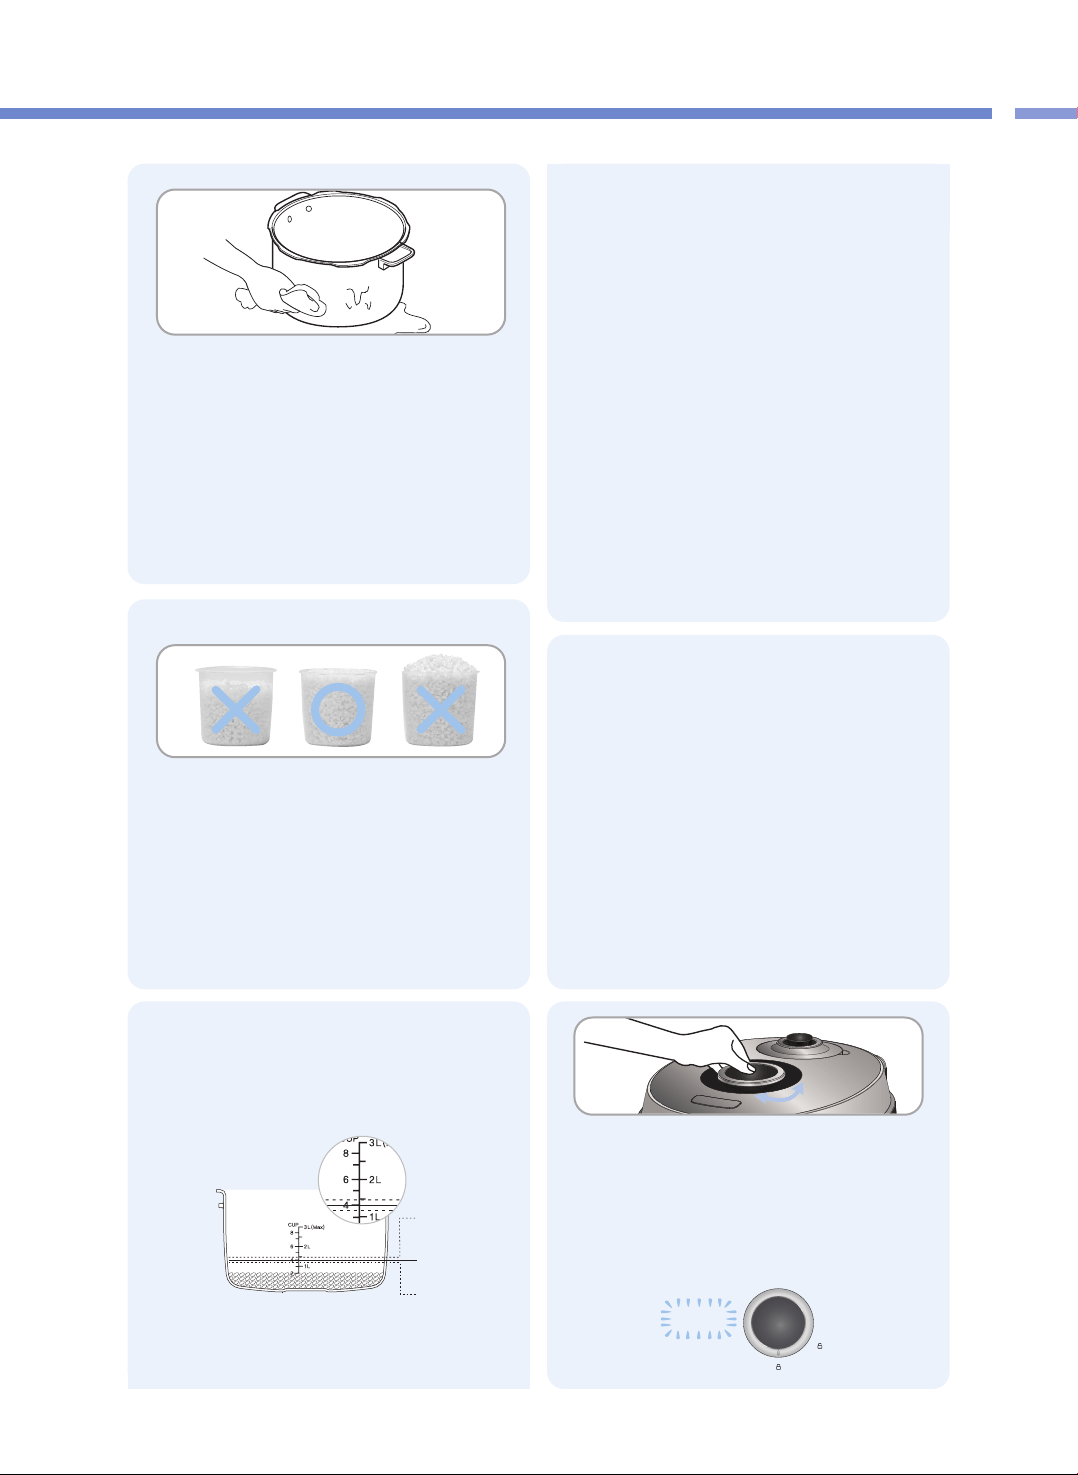
49
PREPARACIÓN ANTES DE COCINAR
Tabla de resumen / Antes de cocinar
1
Lave el recipiente interior y seque la humedad.
▶
Al lavar el recipiente interior, use un paño suave.
▶
Si usa un fibra de fregar, puede rasparse la superficie
interna del recipiente interior.
▶
No lave el recipiente interior si hay utensilios afilados dentro
(como tenedores, cucharas, palillos, etc.).
- El revestimiento del recipiente interior puede rasparse.
4
Asegúrese de conectar el producto antes de
colocar el recipiente interior en el cuerpo
principal.
Coloque el recipiente interior completamente en el cuerpo
principal.
▶
Si hay sustancias extrañas en el fondo del recipiente interior,
pueden ocasionar problemas al cocinar o desperfectos.
▶
Si el recipiente interior no está colocado de manera correcta
en el cuerpo principal, la tapa no se podrá cerrar
correctamente. (Coloque la manija del recipiente interior
entre la muesca del cuerpo principal).
Después de cerrar la tapa, bloquee la manija de
la tapa.
▶ Si la pantalla muestra “LOCK” (bloqueo), significa que la
tapa está bloqueada correctamente.
2
Coloque los alimentos en el recipiente usando
la taza de medir.
▶
Una taza de alimento se refiere a la taza de medir llena con
alimento hasta el tope.
Una taza es agua 180ml, arroz 150g.
(Hay marcas de ¼, ½ y ¾ en la superficie exterior de la taza
de medir).
5
▶ Las marcas de litro del indicador de volumen muestran
las marcas para el agua cuando se ha vertido agua.
▶ Las marcas de taza del indicador de volumen muestran
las marcas para el agua cuando se ha vertido arroz
jazmín y agua juntos.
※ Al usar el indicador de volumen, colóquelo
verticalmente en el centro del recipiente interior para
ajustar el volumen de agua o la cantidad de tazas.
❶Cuando cocine arroz viejo o si desea que el arroz
quede acuoso: Agregue más agua de la normal.
❷En el caso de cuatro porciones de arroz (cuatro
tazas medidoras de arroz), vierta agua hasta la
marca de 4 tazas del recipiente interior.
(Recomendamos cocinar cuatro porciones de arroz
o menos en cada ocasión).
❸Cuando haya remojado el arroz en agua el tiempo
suficiente o cuando desee arroz hervido: Agregue
menos agua de la normal.
▶ La calidad de la cocción puede variar según el tipo de
arroz, por lo que es necesario ajustar el volumen de
agua o el tiempo de cocción al vapor.
LOCK
3
Ajuste el volumen de agua según el platillo que
desee preparar.
▶
Coloque el recipiente interior sobre una superficie nivelada
y ajuste el volumen de agua usando las marcas del
recipiente interior.
❶
❷
❸

CÓMO COCINAR
50
Presione el botón MENU para seleccionar el menú deseado.
•
Antes de cocinar, compruebe que el peso de presión esté apropiadamente alineado en
forma horizontal.
•
Cada vez que presiona el botón, se selecciona una función en el orden SOUP → MEAT →
VEGETABLES → RICE → PORRIDGE → BROWNING FRY→ MULTI COOK →
STEAM COOK → SLOW COOK → AUTO CLEAN, repetidamente.
•
Si sigue presionando el botón, cambia constantemente el orden de los menús.
•
Si se completa una cocción, se memoriza el menú. Así que si usa repetidamente un
mismo menú, no necesitará seleccionar dicho menú.
•
Llene menos de 2/3 del recipiente interno con alimentos cocinados o líquidos como caldo de carne y sopa.
•
Llene menos de 2/ del recipiente interno con alimentos secos como arroz y frijoles.
•
Llene menos de 2/3 del recipiente interno con alimentos.
※ No exceda con alimentos la capacidad máxima del recipiente interno.
Cómo usar Auto Clean
1
Presione el botón COOK para iniciar la cocción.
•
Antes de cocinar, gire siempre la manilla de la cubierta a
“ ”
(Lock). Luego, presione el
botón COOK y el producto comenzará a cocinar mientras la guía de voz dice "Starting the
soup" (Comenzando la sopa).
•
Si presiona el botón COOK sin girar la manilla de la cubierta a “ ” (Lock), aparece “”
con un sonido de advertencia, la voz dice “Turn the handle to the lock position” (Gire la
manilla a la posición Lock), y el producto no funcionará.
•
Se enciende la luz “ ” durante la cocción
4
p. ej.), cuando se selecciona SOUP
▶ La voz dice "SOUP".
Cocción completa
•
Al terminar la cocción se escucha un sonido final, y la función Keep Warm comienza con
la voz diciendo “SOUP has been completed” (Se completó la sopa).
•
Si no desea la función Keep Warm, presione el botón CANCEL para cancelarla.
•
Si la manilla de la cubierta no gira suavemente, doble el peso de presión para descargar
completamente el vapor de adentro. Luego, gire de nuevo la manilla de la cubierta.
•
No presione el botón CANCEL durante la cocción. Si lo hace, se cancelará la cocción.
5
p. ej.) Cuando se cocina SOUP
Para configurar el tiempo de cocción, presione los botones
SELECTION - , +.
•
En el caso del menú RICE, usted puede configurar el tiempo de vapor.
(Ajuste el tiempo de vapor a su gusto.)
2
Presione el botón HEAT / TIME para entrar al modo Heater Level Setting (Configuración de nivel del
calentador), y presione los botones SELECTION -, + para configurar el nivel del calentador.
•
Esto se aplica a los menús BROWNING FRY, MULTI COOK, STEAM COOK y SLOW COOK.
3
Ponga 3 tazas de agua en el recipiente interno, cierre la
cubierta y gire la manilla de la cubierta a
“ ”
(Lock).
Seleccione el menú Auto Clean con el botón MENU y presione el botón COOK.
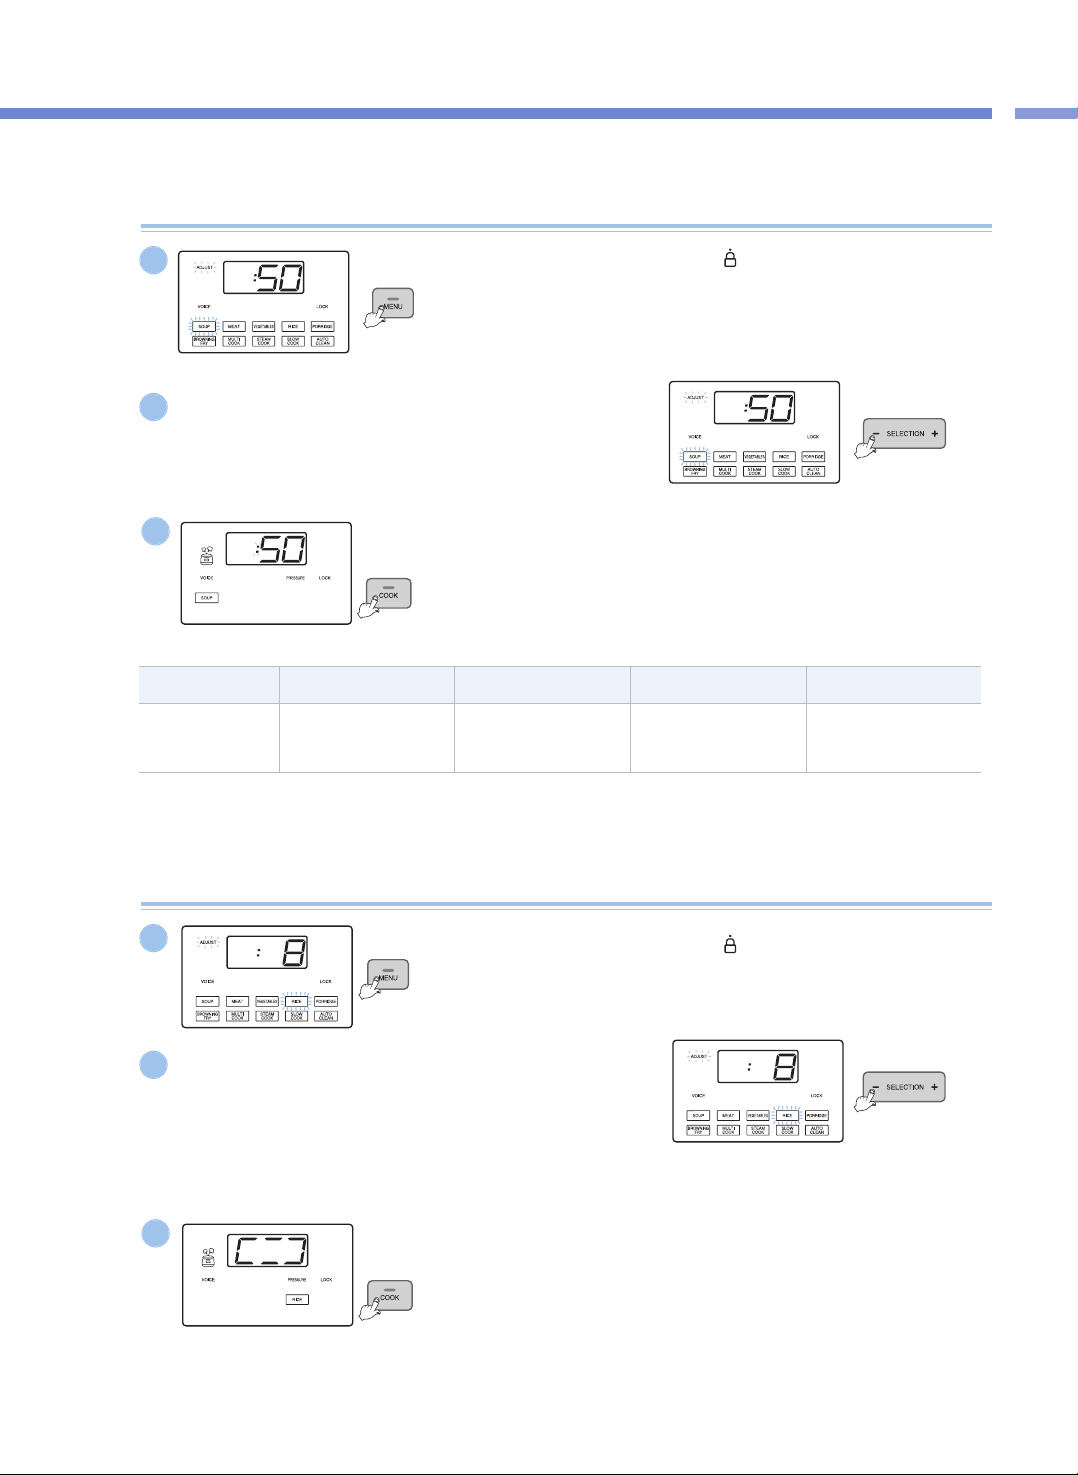
Cómo Cocinar
51
CÓMO COCINAR
TipoSOUPMEATVEGEATABLESPORRIDDGE
Configuración del
tiempo de cocción
30~90min
(Predet: 50 min)
25~90min
(Predet: 40 min)
15~90min
(Predet: 20 min)
65~90min
(Predet: 70 min)
Cocción presión (SOUP, MEAT, VEGETABLES, PORRIDGE)
Gire la manilla de la cubierta a
“ ”
(Lock), y presione el botón
MENU para seleccionar el menú deseado.
▶ La luz del menú seleccionado parpadea.
1
Presione los botones SELECTION -, + para configurar el tiempo
de cocción.
▶ Cada vez que presiona el botón, el tiempo de cocción se ajusta en un minuto.
▶ En el modo Cooking Time Setting , la luz Adjust (Ajustar) parpadea.
2
Presione el botón COOK.
▶ Presione el botón COOK y el producto comenzará a cocinar.
Cuando comience la cocción se mostrará el tiempo restante.
3
p. ej.), cuando se selecciona SOUP
p. ej.), cuando se selecciona SOUP
p. ej.), cuando se selecciona SOUP
Cocción presión (RICE)
Gire la manilla de la cubierta a
“ ”
(Lock), y presione el botón
MENU para seleccionar RICE.
▶ El menú RICE parpadea.
1
Presione los botones SELECTION -, + para configurar el tiempo
de vapor.
▶ Cada vez que presiona el botón, el tiempo de vapor se ajusta en un minuto.
▶ Puede configurar el tiempo de vapor de 3 minutos a 30 minutos.(Predet.: 8 min)
▶ Ajuste el tiempo de vapor a su gusto.
▶ En el modo Steam Time Setting (Configuración del tiempo de vapor), la luz
Adjust parpadea.
2
Presione el botón COOK.
▶ Presione el botón COOK y comenzará la cocción del arroz.
3
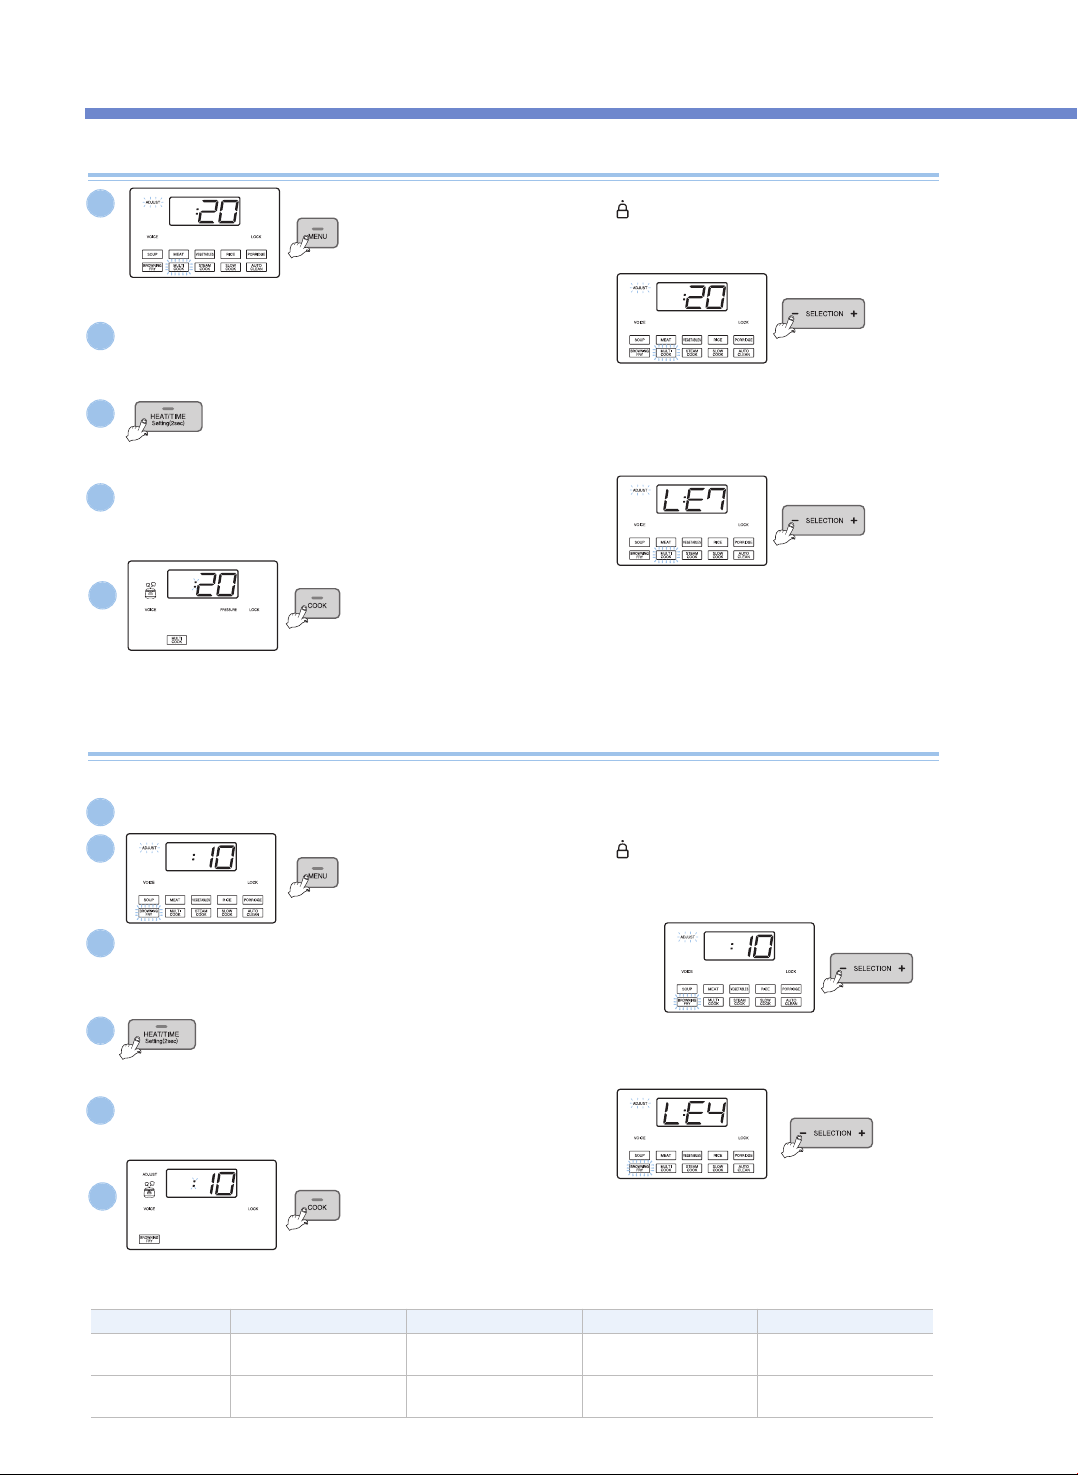
CÓMO COCINAR
52
MULTI COOK, STEAM COOK, SLOW COOK
Gire la manilla de la cubierta a
“ ”
(Lock), y presione el botón
MENU para seleccionar el menú deseado.
▶ La luz del menú seleccionado parpadea.
Gire la manilla de la cubierta a
“ ”
(Lock), y presione el botón
MENU para seleccionar BROWNING FRY.
▶ La luz del menú BROWNING FRY parpadea.
Presione el botón COOK.
▶ Presione el botón COOK y el producto comenzará a cocinar. Cuando el producto comienza a
cocinar, se muestra el tiempo restante.
▶ Se apaga la luz Adjust. Si presiona el botón HEAT / TIME durante la cocción, el producto
muestra el nivel del calentador y el tiempo de cocción.
▶ En el caso de cocción múltiple, si presiona el botón “Preset” (preajuste) durante dos
segundos antes de transcurridos 10 segundos del inicio de la cocción (mientras la luz
indicadora de “Pressure” o presión esté destellando), el producto puede cocinar sin presión.
Presione el botón HEAT / TIME para entrar en modo Heater Level Setting.
▶ Presione de nuevo el botón HEAT / TIME y el producto volverá al modo Time Setting (Configuración de tiempo).
▶ En el modo Heater Level Setting, la luz Adjust parpadea.
Presione los botones SELECTION - , + para configurar el nivel
del calentador.
▶ Cada vez que presiona el botón, el nivel del calentador se ajusta en un paso..
Presione el botón COOK.
▶ Presione el botón COOK y comenzará la función de dorar. Cuando comienza la
cocción de BROWNING FRY, se muestra el tiempo restante.
▶ Para el menú BROWNING FRY se enciende la luz Adjust durante la cocción y,
mientras está encendida, usted puede ajustar el nivel del calentador y el tiempo de
cocción.
※ Extreme las precauciones al usar la función “Browning Fry” (freir y dorar) con la tapa abierta, ya que los alimentos pueden salpicar.
Presione los botones SELECTION - , + para configurar el tiempo.
▶ Cada vez que presiona el botón, el tiempo de BROWNING FRY se ajusta a un minuto.
▶ En el modo Cooking Time Setting , la luz Adjust (Ajustar) parpadea.
Presione los botones SELECTION -, + para configurar el nivel del calentador.
▶ Cada vez que presiona el botón, el nivel del calentador se ajusta a un paso.
Presione el botón HEAT / TIME para entrar al modo Heater Level Setting
▶ Presione de nuevo el botón HEAT / TIME y el producto volverá al modo Time Setting.
▶ En el modo Heater Level Setting, la luz Adjust parpadea.
1
2
4
3
5
p. ej.) Cuando se selecciona MULTI COOK
p. ej.) Cuando se selecciona MULTI COOK
p. ej.) Cuando se selecciona MULTI COOK
BROWNING FRY
2
3
5
4
6
Tipo BROWNING FRY MULTI COOK STEAM COOK SLOW COOK
Configuración del
tiempo de cocción
1~30min
(Predet: 10 min)
15~90min
(Predet: 20 min)
15~90min
(Predet: 20 min)
15 min~12 hr
(Predet: 2 hr)
heating level Setting
LE1~LE6
(Predet: Nivel 4)
LE1~LE9
(Predet: Nivel 7)
LE1~LE6
(Predet: Nivel 3)
LE1~LE6
(Predet: Nivel 3)
El menú BROWNING FRY se usa para dorar o asar alimentos.
1
Abra la cubierta y para evitar que se aplique presión en el recipiente interno.
Presione los botones SELECTION - , + para configurar el tiempo.
▶ Cada vez que presiona el botón, el tiempo de cocción se ajusta a un minuto.
▶
En el modo Cooking Time Setting (Configuración del tiempo de cocción), la luz Adjust parpadea.
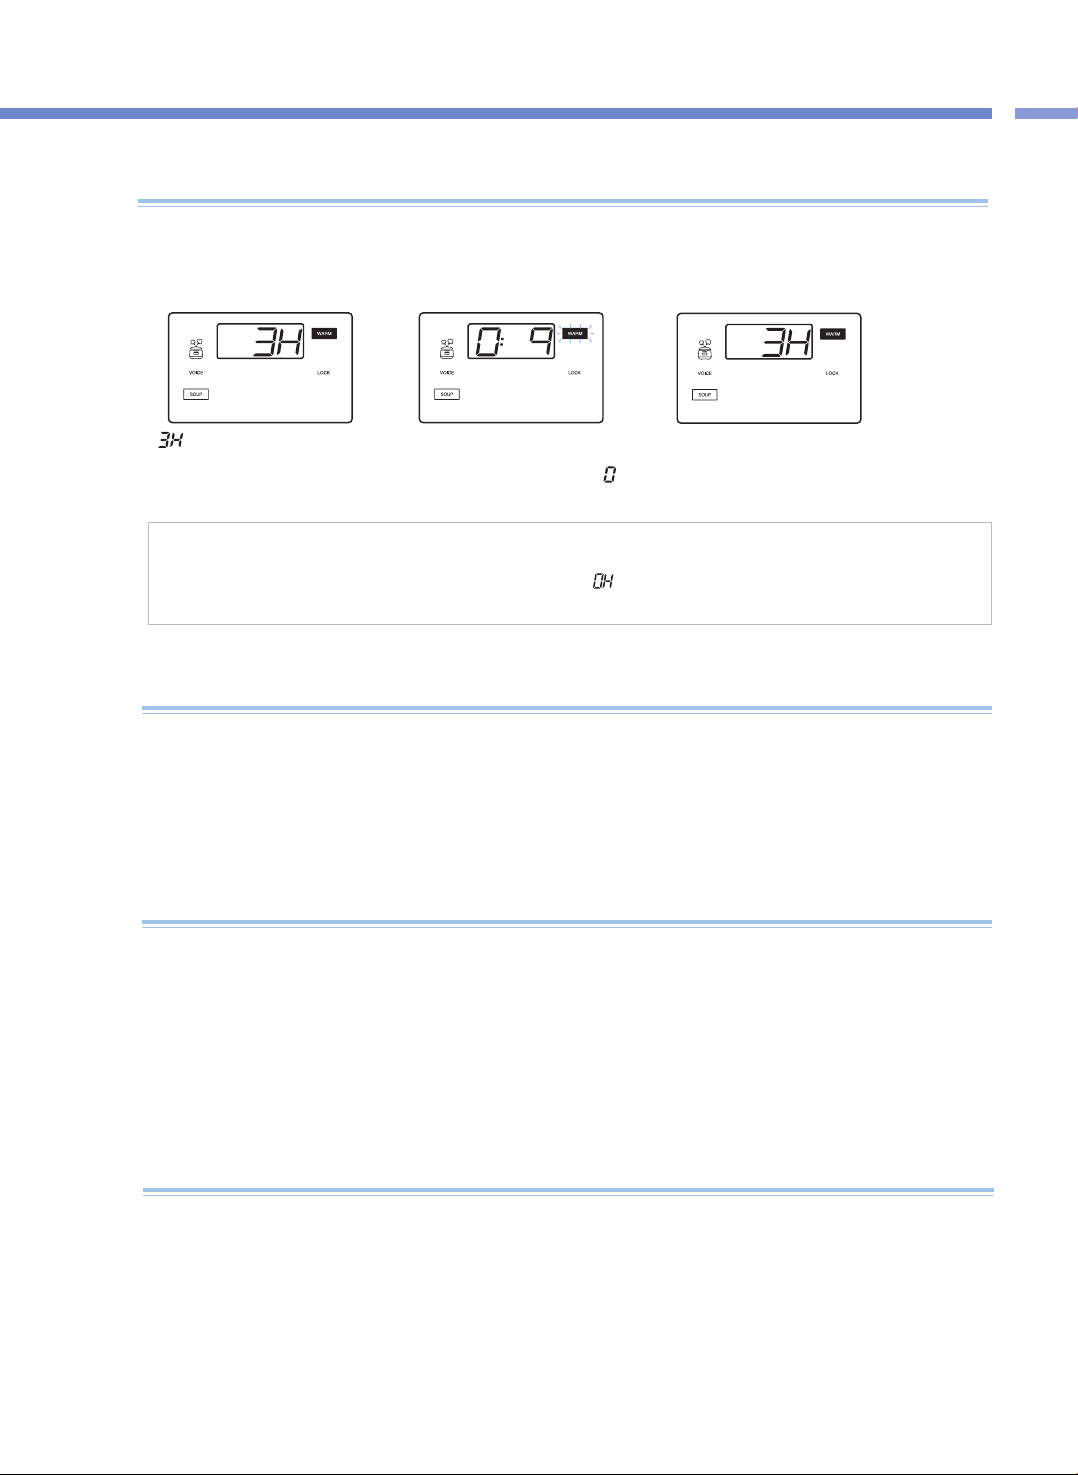
Cómo Cocinar /
Mantener Caliente, Recalentar, Protección de caída de voltaje
53
Función Mantener caliente /
Recalentar y cómo configurar la temperatura para la función Mantener caliente
Cuando hay olores durante el modo Keep Warm
▶ Limpie el producto con frecuencia. En particular, si la cubierta no se limpia por completo, pueden generarse gérmenes que produzcan olores
durante el modo Keep Warm.
▶ Incluso si el producto se ve limpio por fuera, por todas partes pueden generarse gérmenes que produzcan olores durante el modo Keep
Warm. Así, si el producto huele, límpielo con el menú Auto Clean.
Una vez completa la función Auto Clean, debe lavar íntegramente el recipiente interno.
▶ Si no lava el recipiente interno después de cocinar y luego usa la función Keep Warm, el alimento puede oler mal.
Precauciones para modo keep warm
▶ Si abre la tapa inmediatamente después de cocinar o durante la función “Keep Warm” (mantener caliente), es posible que la tapa no se abra
adecuadamente debido a la presión. Antes de abrir la tapa, siempre incline la pesa de presión hacia atrás para eliminar completamente la
presión.
▶ Al mantener calientes o al recalentar alimentos, siempre bloquee la manija de la tapa. (de lo contrario, se pueden ocasionar daños al botón de
apertura de la tapa y a la función “Keep Warm” (mantener caliente).
▶ Si no hay alimentos en el recipiente interior durante la función “Keep Warm” (mantener caliente) o si no está usando el producto, presione el
botón “Cancel” (cancelar) para cancelar la función “Keep Warm” (mantener caliente) o desconecte el cable de la toma de corriente.
▶ No use la función “Keep Warm” (mantener caliente) si hay una espátula en el recipiente interior. En particular, una espátula de madera puede
generar gérmenes y olores.
<Mantener caliente>
<Recalentar>
Cuando la comida ya está cocinada
▶Si ya tiene su comida en el modo Keep Warm y quiere calentarla, presione el botón KEEP WARM / REHEAT
se iniciará la función Keep Warm / Reheat (Mantener caliente / Recalentar) cuando la voz diga “REHEATing
is starting” (Comienza el recalentamiento). Su comida estará caliente y lista para consumirla en 9 minutos.
▶ Si usa la función Reheat con demasiada frecuencia, los alimentos se pueden resecar o quemar.
▶ Si desea guardar alimentos sobrantes u otros alimentos usando la función Keep Warm, póngalos en el recipiente y presione una vez el
botón KEEP WARM / REHEAT. Aquí, el Panel de visualización muestra “
”
.
▶ Si presiona el botón HEAT / TIME durante el modo Keep Warm, se muestra la temperatura de Keep Warm durante 2 segundos.
<Recalentamiento completo>
“ ”
oen el Panel de visualización
significa que el tiempo transcurrido
para la función Keep Warm es de 3
horas.
El tiempo de recalentamiento restante se
muestra en minutos mientras que la luz de
Keep Warm parpadea y el signo “
”
gira
en la pantalla.
Cuando la función Reheat termina, la voz dice
"REHEAT has been completed" (Se completó el
recalentamiento) y el producto inicia de nuevo la
función Keep Warm,
▶ Este producto recuerda el estado antes de un corte de corriente incluso cuando ocurra un corte de corriente, de modo que si la energía eléctrica
vuelve dentro de unos 2 minutos, este producto normalmente funcionará de nuevo.
(Puede haber diferencias según el producto).
▶ Si cancela la cocción debido a un corte de corriente, deberá presionar de nuevo el botón COOK para cocinar.
▶ Si ocurre un corte de corriente durante la cocción, el tiempo de cocción aumentará según la duración del corte de corriente, y el estado de
cocción puede diferir en cierta magnitud según el momento del corte de corriente.
▶ Si ocurre un corte de corriente durante la función Keep Warm y el alimento está refrigerado, se cancela la función Keep Warm.
Función de protección contra la caída de voltaje
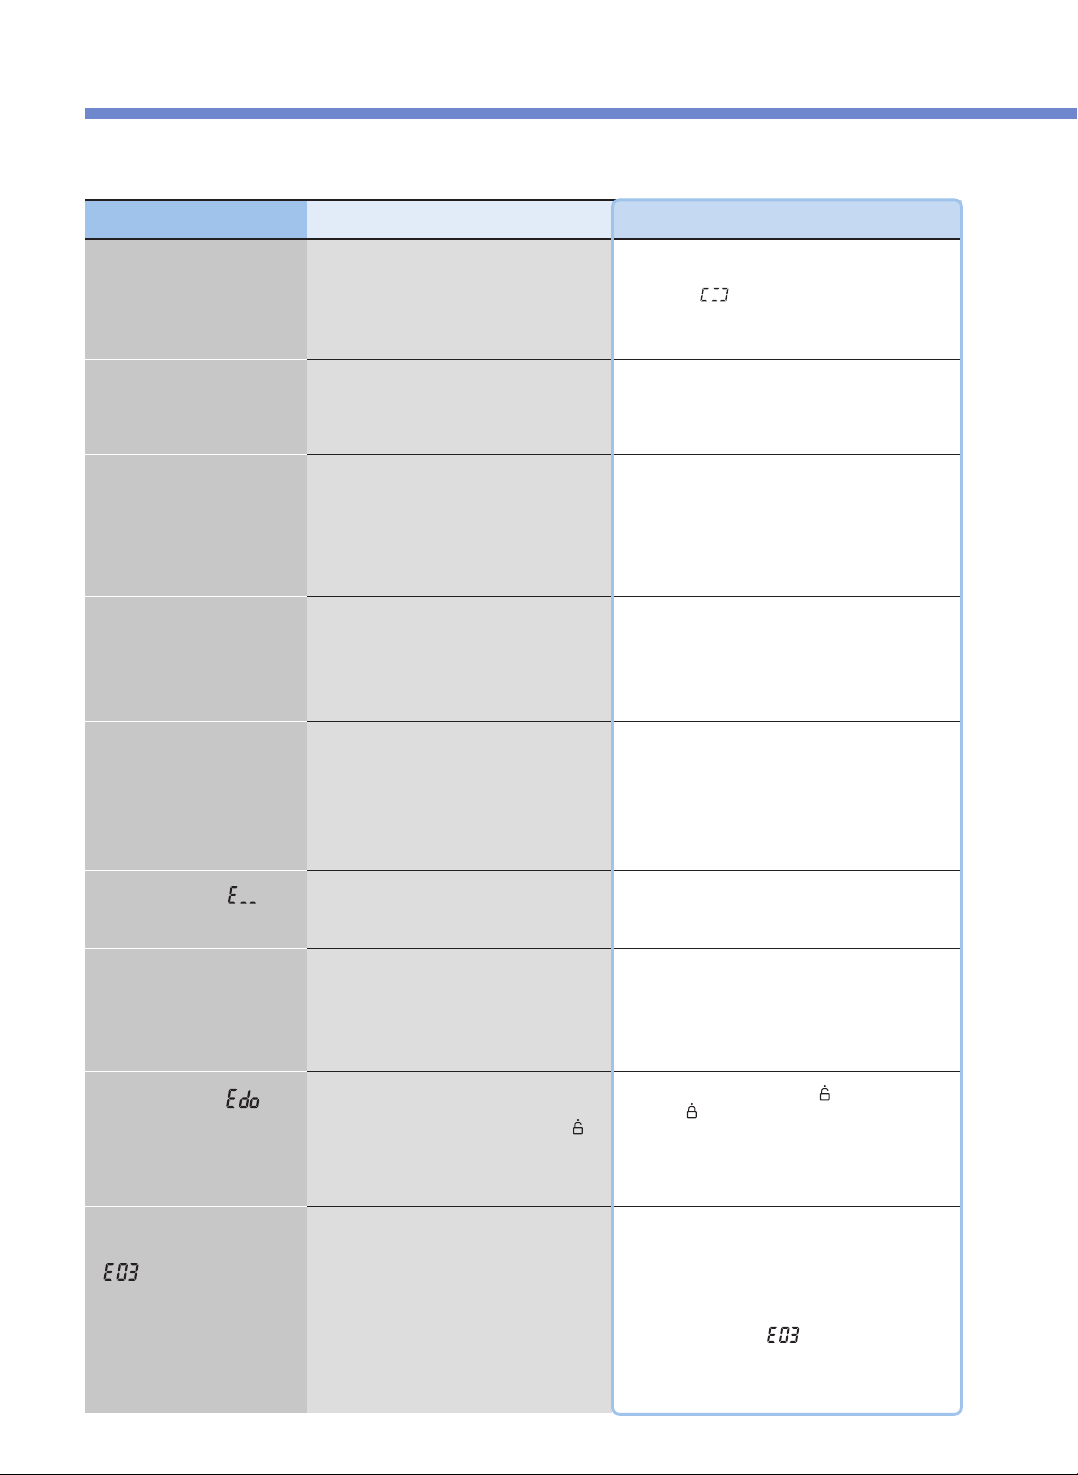
Por favor verifique antes de pedir soporte.
54
▼ Cuando haya un desperfecto en el producto, revise los siguientes temas antes de ponerse en contacto con nuestro centro de servicio al cliente.
Problema
Cuando los alimentos no se
cocinan
Lista de control
•Presionó el botón PRESSURE COOK?
•Ocurrió un corte de corriente durante la
cocción?
Acciones recomendadas
•
Después de seleccionar el menú deseado, presione
siempre el botón PRESSURE COOK una vez para verificar
si aparece “ ” en el Panel de visualización.
•Consulte la función de protección contra la caída de
voltaje en la página 64.
Cuando los frijoles (arroz
mezclado/arroz integral)
quedan a medio cocinar
•Están los frijoles (el arroz mezclado/arroz
integral) demasiado secos?
•Remoje los frijoles (el arroz mezclado/arroz integral) en
agua o hiérvalos antes de cocinarlos.
El arroz mezclado puede quedar a medio cocinar
según el tipo.
Cuando los alimentos quedan
a medio cocinar o se
chamuscan
•Seleccionó correctamente el menú?
•Ajustó precisamente la cantidad de
ingredientes?
•Abrió la cubierta durante la cocción al vapor?
•Seleccione correctamente el menú deseado.
•Ajuste el tiempo y el nivel del calentador para cocinar.
(Vea las páginas 62 y 63).
•Una vez que suene Cooking Complete y que se libere
completamente la presión, abra la cubierta y mezcle
los alimentos.
Cuando los alimentos se
desbordan durante la cocción
•Usó una taza de medición?
•Ajustó precisamente la cantidad de
ingredientes?
•Seleccionó precisamente el menú?
Cuando hay olores durante el
modo Keep Warm
•Está bien cerrada la cubierta?
•
Se desenchufó el cable de alimentación de la toma
de corriente durante el modo Keep Warm?
•Usó el modo Keep Warm durante 12 horas
seguidas o más?
•Cierre bien la cubierta.
•Mantenga siempre el producto enchufado durante el
modo Keep Warm.
•Siempre que sea posible, use el modo Keep Warm
solamente durante un máximo de 12 horas.
Cuando aparece “ ”
•Esto indica que el sensor de temperatura no
funciona.
•Corte la alimentación y contacte a nuestro centro de
servicio al cliente.
Cuando la cocción tarda
excesivamente y aparece
“ ”
•Usó apropiadamente la alimentación de
corriente?
•Esto aparece cuando hay un problema con el
producto (desconexión del calentador, cantidad
insuficiente de calor, etc.) y la cocción no se completa
durante mucho tiempo. Desenchufe el aparato y
contacte a nuestro centro de servicio al cliente.
•Si acaba de poner agua y calor por mucho tiempo, es
normal que aparezca “
”
•Este producto es exclusivamente para 120V. Use
apropiadamente la alimentación de corriente.
Cuando aparece “ ”
•Presionó el botón PRESSURE COOK con el modo
Keep Warm cancelado y el producto en el modo
Standby sin girar la manilla de la cubierta a “ ”
(Open) una vez completa la cocción, con la
alimentación de corriente encendida?
•Gire la manilla de la cubierta a “
”
(Open) y luego
gírela a “
”
(Lock).
Cuando el signo de Keep
Warm Time parpadea
durante el modo Keep Warm
•Han transcurrido 24 horas desde que comenzó
el modo Keep Warm?
•Una vez que transcurren 24 horas desde el comienzo
del modo Keep Warm, el signo de Keep Warm Time
parpadea para advertirle que el modo Keep Warm se
ha usado durante mucho tiempo.
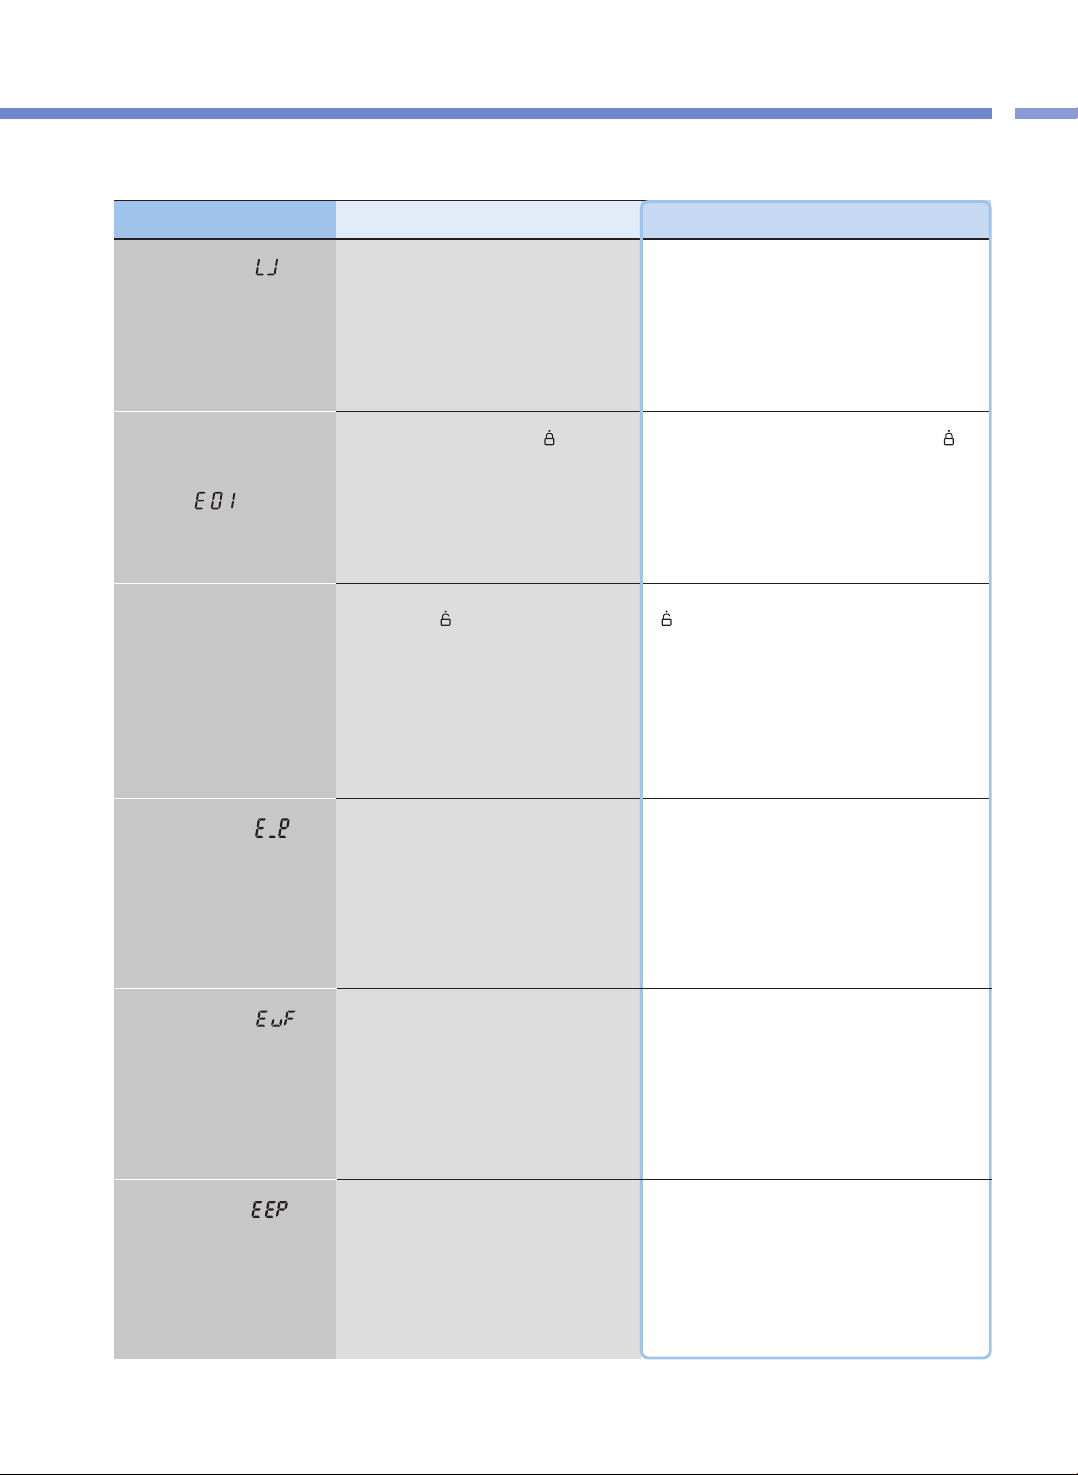
55
Por favor verifique antes de pedir soporte.
Lista de comprobación de problemas
▼ Cuando haya un desperfecto en el producto, revise los siguientes temas antes de ponerse en contacto con nuestro centro de servicio al cliente.
Problema Lista de control Acciones recomendadas
Cuando aparece “ ” al
presionar un botón
•Está el recipiente interno puesto en el producto?
•Usó apropiadamente la alimentación de
corriente?
•Los botones no funcionan si el recipiente interno no
está puesto en el producto. Ponga el recipiente interno
en el producto.
•Este producto es exclusivamente para 120V. Use
apropiadamente la alimentación de corriente.
Cuando un botón como
PRESSURE COOK o
PRESET no funciona y
aparece “ ”
•Giró la manilla de la cubierta a “
”
(Lock)?
•Está encendida la luz de Lock??
•Gire completamente la manilla de la cubierta a “
”
(Lock). Si la manilla de la cubierta no está bien cerrada,
los botones PRESSURE COOK y PRESET no
funcionarán.
Cuando aparece “ ”
•Esto indica que el Sensor medioambiental no
funciona.
•Corte la alimentación y contacte a nuestro centro de
servicio al cliente.
Cuando aparece “ ”
•Esto indica que hay un error con la memoria
interna de MICOM.
•Corte la alimentación y contacte a nuestro centro de
servicio al cliente.
Cuando aparece“ ”
•Esto indica que hay un error con la memoria
externa de MICOM.
•Corte la alimentación y contacte a nuestro centro de
servicio al cliente.
Cuando la cubierta no se
cierra
•Está la manilla de la cubierta completamente
girada hasta “
”
(Open)?
•Hay alimentos calientes en el recipiente interno?
•Está el recipiente interno completamente en el
armazón principal?
•Gire completamente la manilla de la cubierta a hasta “
”
(Open) y luego cierre la cubierta de nuevo.
•Doble el peso de presión y luego cierre la cubierta.
•Gire hacia los lados la manilla del recipiente interno y
fíjela completamente en el armazón principal.

Por favor verifique antes de pedir soporte.
56
▼ Cuando haya un desperfecto en el producto, revise los siguientes temas antes de ponerse en contacto con nuestro centro de servicio al cliente.
Problema Lista de control Acciones recomendadas
Cuando la manilla de la
cubierta no abre hasta
“ ” (Open)
•Giró la manilla de la cubierta durante la
cocción?
•Giró la manilla de la cubierta sin descargar
completamente el vapor?
•La cubierta no se abre durante la cocción.
No abra la cubierta a la fuerza. Si tiene que abrir la
cubierta, presione el botón CANCEL durante 2
segundos para cancelar, doble el peso de presión para
descargar completamente el vapor y luego abra la
cubierta.
•Doble el peso de presión para descargar
completamente el vapor y luego abra la cubierta.
Cuando la manilla de la
cubierta se gira
completamente hasta “ ”
(Open) pero la cubierta no se
abre
•Se debe a la presión.
•Doble el peso de presión para descargar
completamente el vapor y luego abra la cubierta.
Cuando se filtra vapor a
través de la cubierta y se
escucha un silbido
•Hay substancias extrañas (arroz, etc.) en la
empaquetadura?
•Está gastada la empaquetadura?
•Limpie la empaquetadura con un paño para platos o un
paño suave antes de usarla.
•Mantenga siempre limpias las partes alrededor de la
empaquetadura.
•Si se filtra el vapor, presione inmediatamente el botón
CANCEL durante 2 segundos para descargar el vapor,
y desconecte el cable de alimentación. Luego
suspenda el uso del producto y póngase en contacto
con nuestro centro de servicio al cliente.
•Use la empaquetadura durante 1 a 3 años según el
método y frecuencia de uso, y luego reemplácela por
una nueva. Si usa una empaquetadura gastada se
puede filtrar vapor durante el uso, y la cocción a presión
no se realizará.
Cuando el botón CANCEL no
funciona durante la cocción
•Está caliente el recipiente interno?
•Si tiene que cancelar durante la cocción y la
temperatura dentro del recipiente interno es alta, por
seguridad deberá presionar el botón CANCEL durante
2 segundos a fin de cancelar la cocción.
•Si se cancela la cocción, el vapor se descarga a través
del descargador automático de vapor y el contenido
puede derramarse o salpicar. Así, podría quemarse la
cara o las manos. Por consiguiente, tenga cuidado.

57
MEMO

MEMO
58

59
MEMO

00383-0924B0 Rev.0
CUCKOO ELECTRIC MULTI PRESSURE COOKER
LIMITED WARRANTY
KEY Company, P&K USA TRADING CORP and Cuckoo Trading Canada will repair at its option replace,
without charge, your product which proves to be defective in material or workmanship under normal use,
during the warranty period listed below from the date of original purchase. This warranty is good only to the
original purchaser of the product during the warranty period. P&K USA TRADING CORP. covers the east and
the central districts, KEY Company covers the west and the central districts, Cuckoo Trading Canada covers
the whole Canada.
WARRANTY PERIOD
MODEL# #LABOR PARTS HOW SERVICE IS HANDLED
CMC-Q5 1YEAR 1YEAR The East and the Central Districts
Call : 718 888 9144
Address : 5-48 46th Road Long Island City, NY 11101 USA
The West and the Central Districts.
Call : 323 780 8808
Address : 1137 E. 1st Street, L.A, CA 90033, USA
Canada (TORONTO)
Call : 905 707 8224
Address : #D8-7398 Yonge Street Thornhill Ontario Canada L4J 8J2
Canada (VANCOUVER)
Call : 604 540 1004
Address : 945 Lougheed Hwy Coquitlam BC Canada V3K 3T4
No other express warranty is applicable to this product. THE DURATION OF ANY IMPLIED WARRANTIES,
INCLUDING THE IMPLIED WARRANTY OF MERCHANTABILITY, IS LIMITED TO THE DURATION OF
THE EXPRESS WARRANTY HEREIN. CUCKOO ELECTRONICS CO.,LTD, SHALL NOT BE LIABLE FOR
THE LOSS, THE USE OF THE PRODUCT, INCONVENIENCE, LOSS OR ANY OTHER DAMAGES,
DIRECT OR CONSEQUENTIAL, ARISING OUT OF THE USE OF, OR INABILITY TO USE, THIS PRODUCT
OR FOR ANY BREACH OF ANY EXPRESS OR IMPLIED WARRANTY, INCLUDING THE IMPLIED
WARRANTY OF MERCHANTABILITY APPLICABLE TO THIS PRODUCT
.
Some states do not allow the exclusion or limitation of incidental or consequential damages or limitations on
how long an implied warranty lasts : so these limitations or exclusions may apply to you. This warranty gives
you specific legal rights and you may also have other rights which vary from state to state.
THE ABOVE WARRANTY DOES NOT APPLY IN THESE CASES:
✽ To damages problems which result from delivery or improper installation.
✽ To damages problems which result from misuse, abuse, accident, alteration,
or incorrect electrical current or voltage.
✽ To serve call which do not involve defective workmanship or material and explaining the operation of the unit.
Therefore, these costs are paid by the consumer. Customer assistance numbers :
To Prove warranty Coverage :
▶
Retain your Sales Receipt to prove date of purchase
▶
Copy of your Sales Receipt must submitted at the time
warranty service is provided.
To Obtain Product, Customer, or Service Assistance and Nearest Authorized service center.
The West and the Central Districts.
Call : 323 780 8808
Address : 1137 E. 1st Street, L.A,
CA 90033, USA
Canada (Toronto)
Call : 905 707 8224
Address : #D8-7398 Yonge Street
Thornhill Ontario Canada
L4J 8J2
Canada (Vancouver)
Call : 604 540 1004
Address : 103-4501 North Road
Burnaby BC Canada
V3R 4R7
The East and the Central Districts
Call : 718 888 9144
Address : 5-48 46th Road Long Island City,
NY 11101 USA