
1
F
P501020 MUK Rev 1
Please read and keep these instructions for future use
GUARANTEE
2
YEAR
* Register online for your 2 year guarantee. See the back of this instruction book for details (UK and Ireland customers only).
www.facebook.com/morphyrichardsuk
@loveyourmorphy
www.morphyrichards.co.uk/blog
For competitions, product hints and tips
and more join us at
Download the Morphy Richards
Cook & Create app for recipe ideas
Soup Maker
501020 Rev 1.qxp_Layout 1 26/08/2016 09:53 Page 1

2
In addition, we offer the following safety advice.
Location
• Always locate your appliance away from the edge of a
worktop.
• Ensure that the appliance is used on a firm, flat surface.
• Do not use the appliance outdoors, or near water.
Mains Cable
• The mains cable should reach from the socket to the base
unit without straining the connections.
• Do not let the mains cable hang over the edge of a
worktop where a child could reach it.
• Do not let the cable run across an open space e.g.
between a low socket and table.
• Do not let the cable run across a cooker or toaster or other
hot area which might damage the cable.
Personal Safety
• WARNING: To protect against fire, electric shock and
personal injury, do not immerse cord, plug and appliance
in water or any other liquid.
•
WARNING: Misuse of appliance could cause personal injury.
• WARNING: Avoid contact with moving parts.
• Extreme caution must be observed when moving an
appliance with hot contents.
• Do not use product with wet or moist hands.
• Unplug the appliance from the outlet when not in use and
before cleaning.
Treating Scalds
• Run cold water over the affected area immediately. Do not
stop to remove clothing, get medical help quickly.
Other Safety Considerations
• If the mains lead of this appliance is damaged do not use it.
Telephone Morphy Richards helpline for advice.
• The use of accessory attachments not recommended by the
manufacturer may cause damage to the unit.
• Do not place the appliance on or near heat sources such as
gas or electric stove, ovens, or burners.
• Keep the appliance and the cable away from heat, direct
sunlight, moisture, sharp edges and the like.
• When using the unit, ensure the lid is in place before
switching on.
• Do not remove the lid until the Serrator Blade has stopped.
• Do not operate the appliance for making soup
continuously.
• Be careful if hot liquid is poured into the Total Control Soup
Maker as it can be ejected out of the appliance due to sudden
steaming.
Electrical Requirements
Check that the voltage on the rating plate of your
appliance corresponds with your house electricity supply
which must be A.C. (Alternating Current).
WARNING: THIS APPLIANCE MUST BE EARTHED.
Should the fuse in the mains plug require changing a 13 amp
BS1362 fuse must be fitted.
Health And Safety
The use of any electrical appliance requires the following common sense safety rules.
Please read these instructions carefully before using the product.
• This appliance can be used by persons with reduced physical,
sensory or mental capabilities, or lack of experience and
knowledge, if they have been given supervision or instruction
concerning the use of the appliance in a safe way and
understand the hazards involved.
• Children shall not play with the appliance.
• The appliance shall not be used by children.
• Keep the appliance and cord out of the reach of children.
• After one operation cycle, you must allow the appliance to cool
down completely, then clean the appliance.
• This appliance is not intended to be operated by means of an
external timer or separate remote control system.
• If the supply cable is damaged, it must be replaced with a
special cable assembly available from the manufacturer or
its service agent.
• WARNING: The mixing blade is very sharp.
Handle with care when using and cleaning.
• For care and cleaning refer to pages 13 & 32.
501020 Rev 1.qxp_Layout 1 26/08/2016 09:53 Page 2
3
I
ntroducing the Total Control Soup Maker – the
s
imple way to bring confidence to your cooking.
The Total Control Soup Maker is a multi-functional
design to give users the power to create with
confidence.
The Total Control Soup Maker features all the
functions you’d expect from the market leader,
but with extra innovative solutions allowing users
to make perfect soup from just 19 minutes.
W
ith sauté, reheat, keep warm and portion
c
ontrol functions, and 3 soup settings, users can
make soup, smoothies and juice to their taste.
Featuring a unique Removable Vessel, the Total
Control Soup Maker is a breeze to clean, and it
features a Pre-Clean function, so it can be used
again and again with no fuss.
With recipe inspiration from the dedicated Cook
and Create app, the Total Control Soup Maker
gives users the power to create with confidence.
Portion control
Total Control Panel
Pre-Clean
Giving you the power to create with confidence.
501020 Rev 1.qxp_Layout 1 26/08/2016 09:53 Page 3

4
Health And Safety ........................................................ 2
Total Control ................................................................. 3
Introduction .................................................................. 4
Product Overview ........................................................ 5
Before First Use ............................................................ 6
How To Use Your Total Control Soup Maker ............... 6
How to Make Soup ...................................................... 7
How to Use Portion Control ........................................ 8
How to Use Sauté Function ........................................ 9
How to Use Drinks Function ........................................ 10
How to Use Reheat Function ...................................... 11
How to Use Blend Function ........................................ 12
How to Use Pre-Clean Function ................................. 13
A Dream To Clean ........................................................ 14
Using Your Total Control Soup Maker ........................ 15
The Benefits of Homemade Soup .............................. 16
What Makes Your Total Control
Soup Maker So Special ..............................................
16
Recipes ...................................................................... 17
FAQ’S ........................................................................... 31
Contact Us ................................................................... 33
Notes ............................................................................ 34
Guarantee ..................................................................... 36
Contents
Introduction
T
hank you for your recent purchase of the
M
orphy Richards Total Control Soup Maker.
Please read this instruction booklet carefully
b
efore you use your Total Control Soup Maker for
the first time.
W
e’ve designed your Total Control Soup Maker so
that it’s quick and easy to make homemade soup
a
nd smoothies to your own individual taste, with
minimum fuss. All you have to do is place the
ingredients needed for your favourite recipe
i
nside, then it’s as simple as selecting either the
s
mooth, medium or chunky soup setting or drinks
for juice and smoothies, depending on your
p
reference. A short wait while your Total Control
Soup Maker blends and gently cooks the
ingredients for perfectly delicious homemade
s
oup. It really couldn’t get any simpler!
Remember to visit www.morphyrichards.co.uk
to register your product’s two year guarantee.
501020 Rev 1.qxp_Layout 1 26/08/2016 09:53 Page 4
5
P
R
E
C
L
E
A
N
D
R
I
N
K
S
START
STOP
PORTION
S
M
O
O
T
H
M
E
D
I
U
M
C
H
U
N
K
Y
S
A
U
T
E
R
E
H
E
A
T
MODE
P
M
B
L
E
N
D
1
2
9
5
6
8
1
0
1
1
1
2
4
2
3
1
3
1
4
2
4
2
2
1
8
1
9
2
0
1
5
1
6
1
7
3
7
2
1
2
5
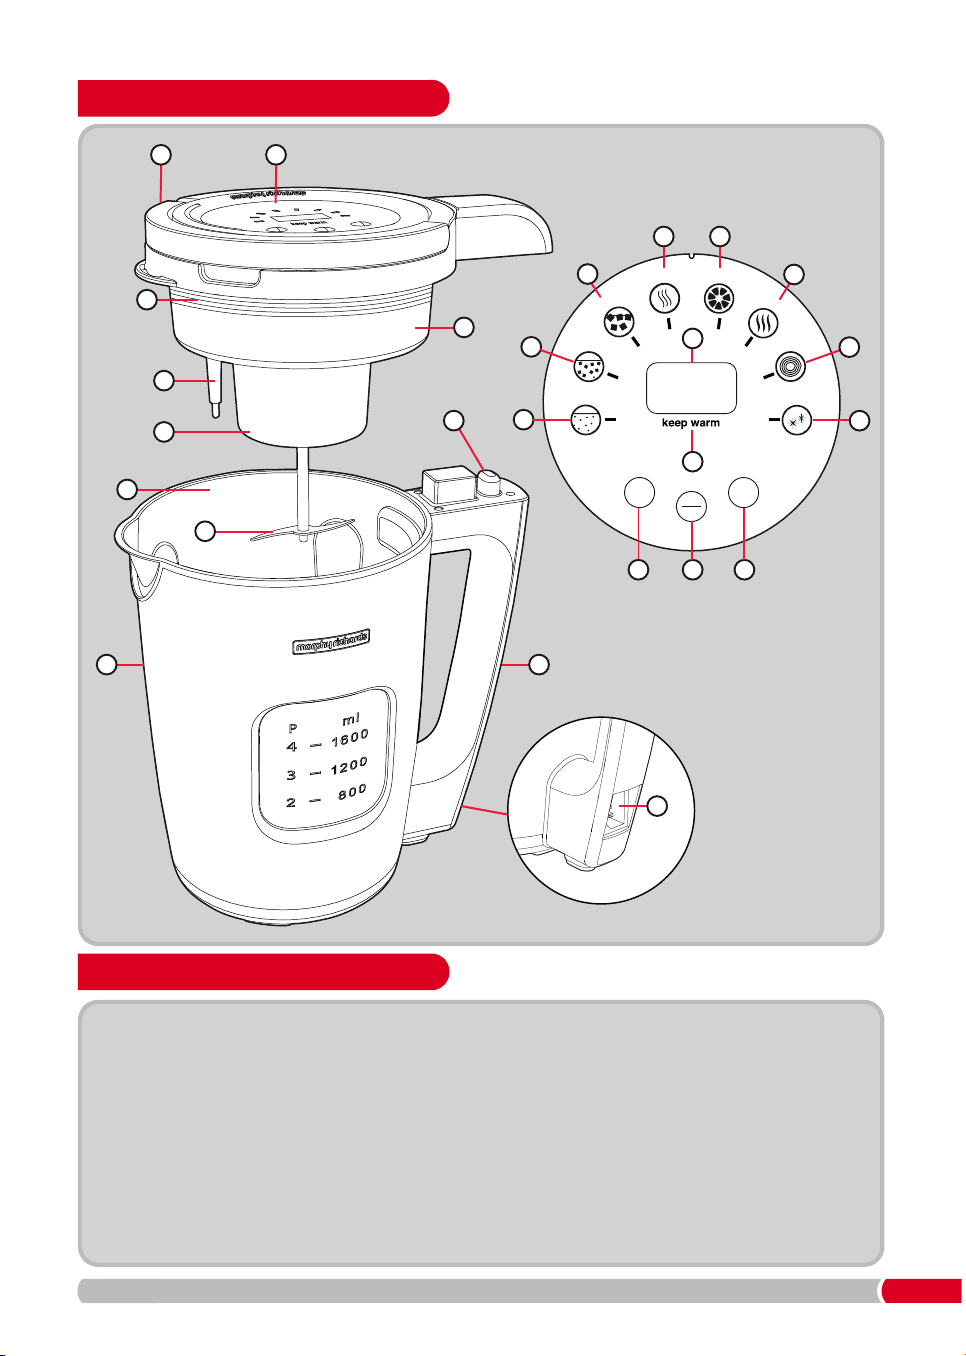
Features
(10) Jug Body
(11) Jug Handle
(12) Power Socket
(13) Smooth Function Indicator
(14) Medium Function Indicator
(15) Chunky Function Indicator
(16) Sauté Function Indicator
(17) Drinks Function Indicator
(18) Reheat Function Indicator
(19) Blend Function Indicator
(20) Pre-Clean Function
Indicator
(21) LED Screen
(22) Mode Button
(23) Start/Stop Button
(24) Portion Button
(25) Keep Warm Indicator
Product Overview
(1) Lid Handle
(2) Control Panel
(3) Seal
(4) Lid
(5) Over Fill Sensor
(6) Motor Housing
(7) Removable Vessel
(8) Serrator Blade
(9) Vessel Release Button
501020 Rev 1.qxp_Layout 1 26/08/2016 09:54 Page 5
6
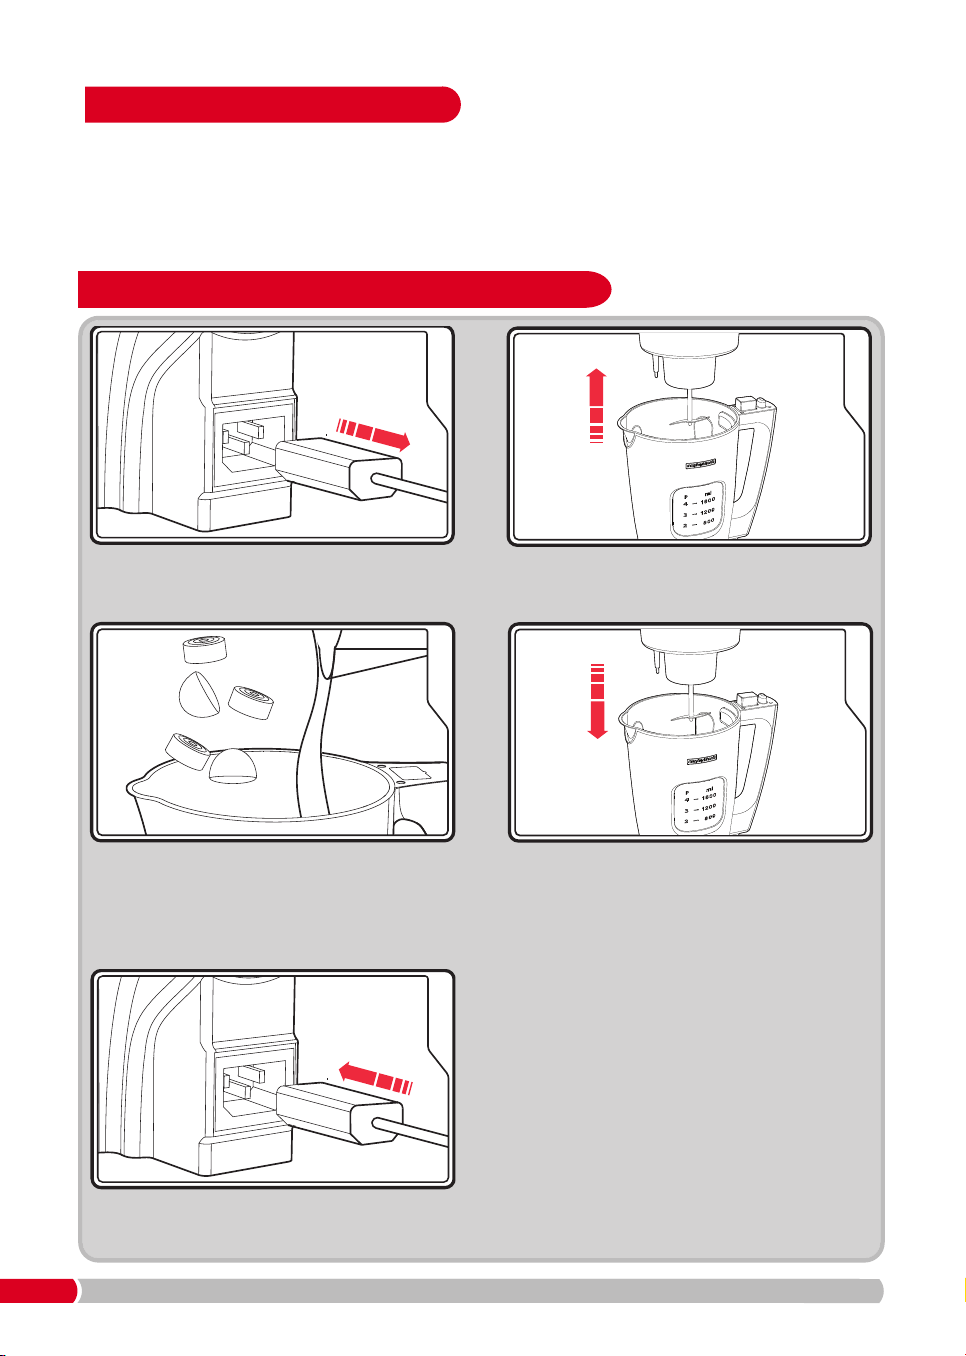
4
Place the Lid (4) back onto the Jug Body (10)
ensuring it is securely in place.
You may need to twist the lid/motor housing
to allow the Blade (8) to pass through the
ingredients to locate the Lid (4) onto the
Jug Body (10) correctly.
3
Place all the ingredients into the Removable
Vessel (7). Add the liquid last, filling up to the
desired portion marked on the Removable
Vessel
(7). See individual recipes for more
information regarding liquid.
2
Remove the Lid (4), be careful not to touch
the Serrator Blade (8).
WARNING: Sharp Blade.
1
Ensure the Total Control Soup Maker is
unplugged from the mains.
5
Plug the lead into the Power Socket (12).
How To Use Your Total Control Soup Maker
It is important to clean your Total Control Soup Maker before first use or if it has not been used for a long
p
eriod of time. See the ‘Dream to clean’ section for more information.
When you first use your Total Control Soup Maker you may notice some smoke/vapour emitting from the
L
id, this is normal and is simply grease that is used on some parts of the appliance applied during the
manufacturing process. After using a few times this will stop.
Before First Use
501020 Rev 1.qxp_Layout 1 26/08/2016 09:54 Page 6
7
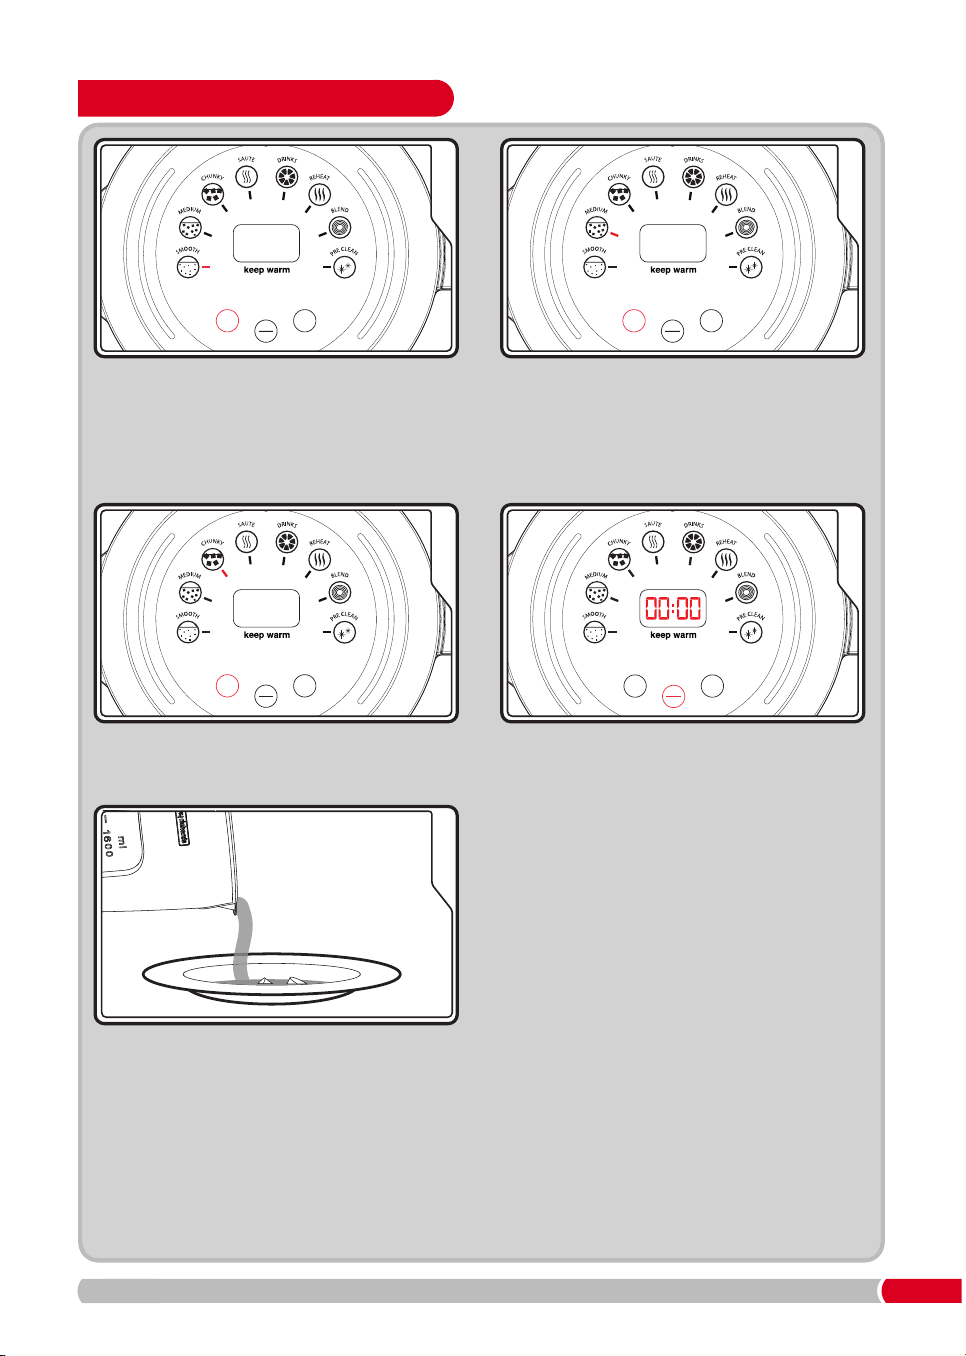
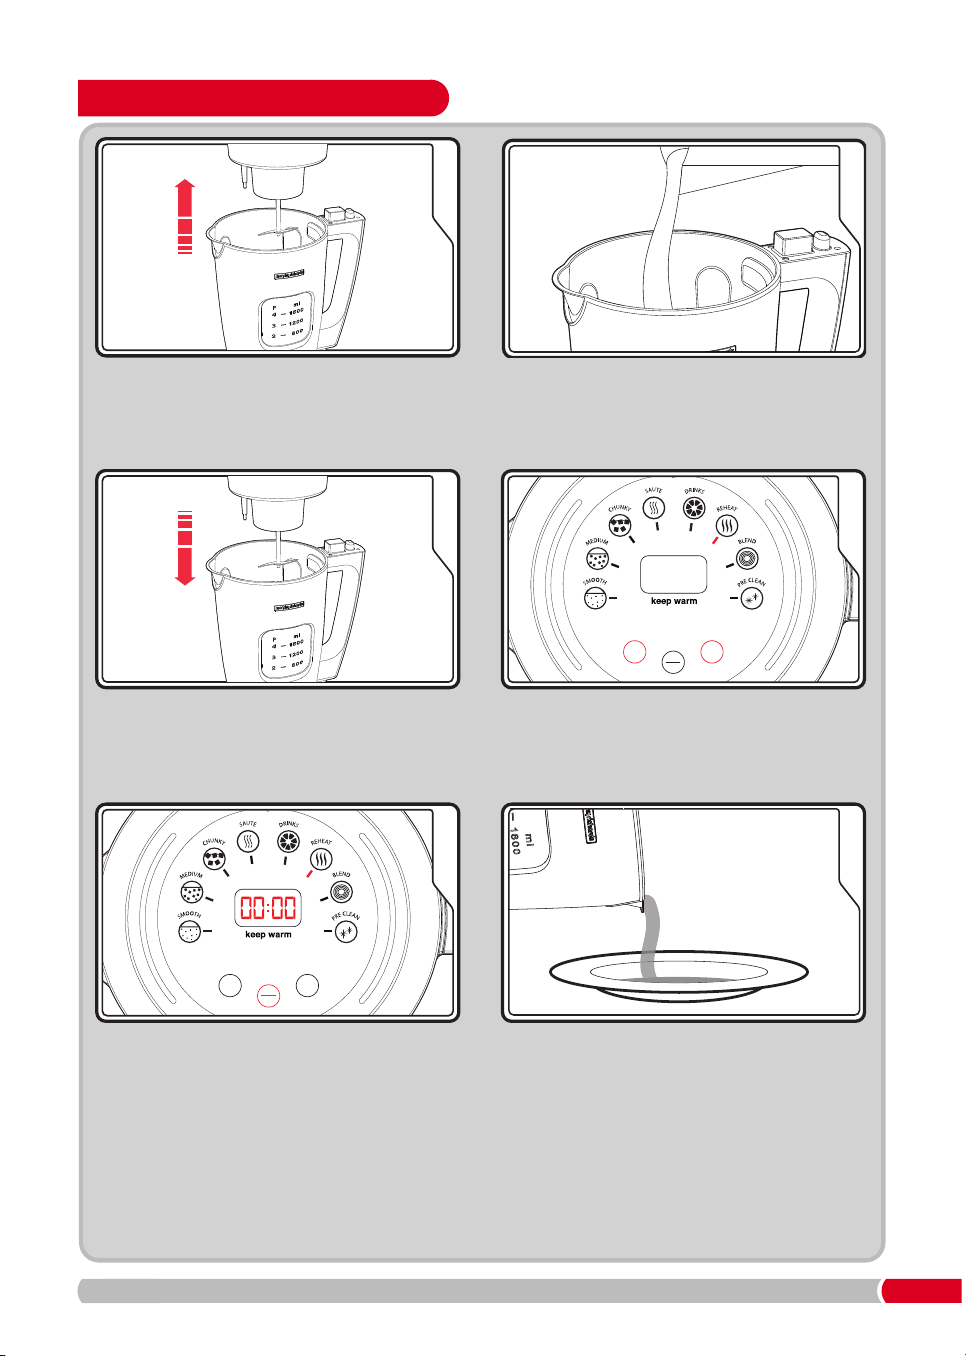
How To Select Soup Function
1
START
STOP
P
ORTIONMODE
PM
Press the Mode Button (22) to select the
program. The Smooth Function Indicator (13)
will illuminate. Continue pressing Mode
Button (22) to go through the settings. Select
Smooth Function Indicator (13) for a smooth
soup.
2
START
STOP
P
ORTIONMODE
PM
Select Medium Function Indicator (14)
for a medium soup.
3
START
S
TOP
PORTIONMODE
PM
Select Chunky Function Indicator (15)
for a chunky soup.
4
START
S
TOP
P
ORTIONMODE
PM
Press the Start/Stop Button (23) and the
processing time will countdown on the
LED screen (21). Portion control is set to 2
portions. If 3 or 4 portions are required it
must be set before the Start/Stop Button (23)
is pressed. See portion control on page 8.
Smooth and drinks function will be set to
3 portions.
When finished, the Total Control Soup Maker
will beep for 10 seconds. Unplug from the
mains, remove the Lid
(4) and serve.
WARNING: Take care removing the Lid
(4)
when making soup to avoid splashing with
hot liquid and steaming.
5
501020 Rev 1.qxp_Layout 1 26/08/2016 09:54 Page 7
8
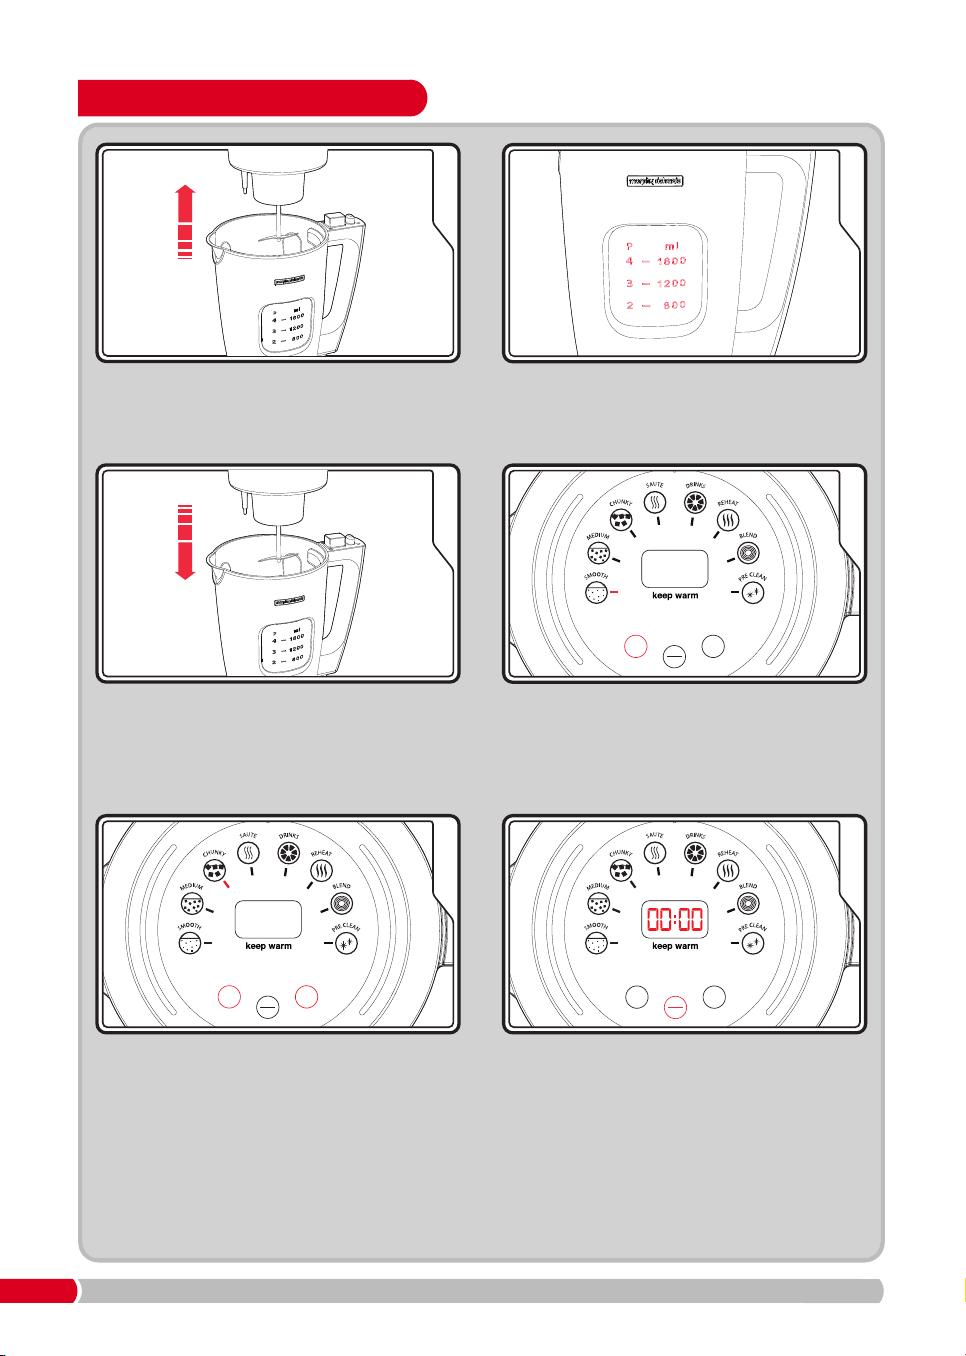
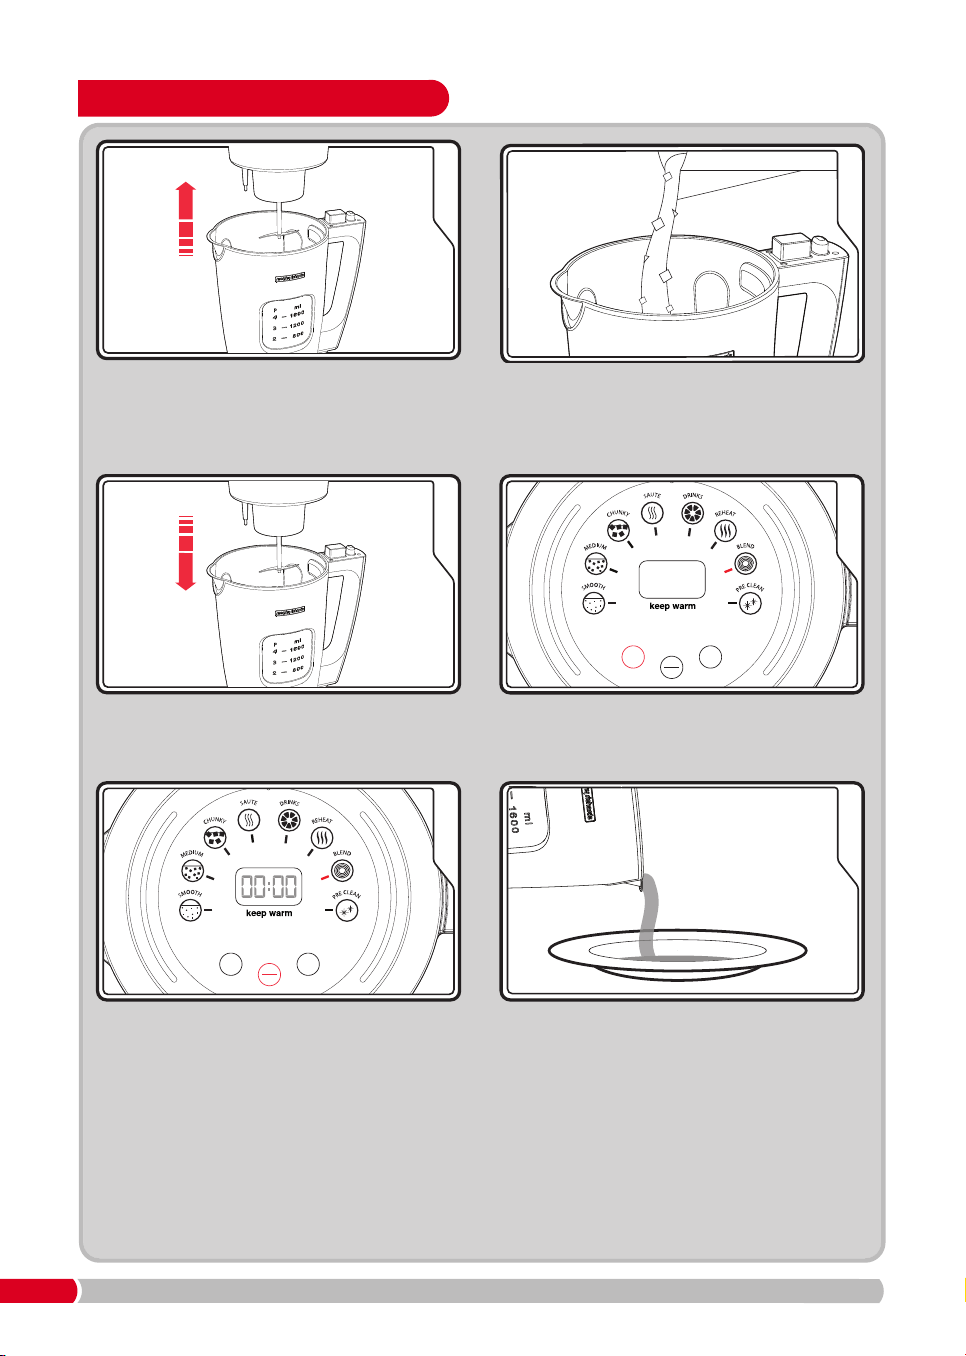
How To Use Portion Control
5
START
STOP
PORTIONMODE
PM
After selecting your soup consistency press
the Portion Button
(24) to select the portion
of soup you would like to make (2, 3 or 4).
NOTE: Portion control available on certain
recipes only. Please see recipes from page
16 for details.
1
Ensure the Total Control Soup Maker is
unplugged from the mains. Remove the Lid
(4), be careful not to touch the Serrator Blade
(8). WARNING: Sharp Blade.
2
Fill up the Total Control Soup Maker to the
level shown on the Removable Vessel (7) for
the desired portion. See individual recipes for
more information.
4
START
STOP
P
ORTIONMODE
PM
Press the Mode Button (22) to select the
program. The Smooth Function Indicator (13)
will illuminate. Continue pressing Mode
Button (22) to go through the settings to
select your soup consistency.
6
START
STOP
PORTIONMODE
PM
Press the Start/Stop Button (23) and the
processing time will countdown on the
LED screen
(21). When finished, the Total
Control Soup Maker will beep for 10 seconds.
Unplug from the mains, remove the Lid (4)
and serve.
3
Place the Lid (4) back onto the Jug Body (10)
ensuring it is securely in place and plug the
Total Control Soup Maker into the mains.
See page 7.
NOTE: Depending on the type of soup you make the ingredients will absorb the added liquid
and can reduce in volume, hence the portions may be less than when started.
501020 Rev 1.qxp_Layout 1 26/08/2016 09:54 Page 8
9
How To Use Sauté Function
1
Ensure the Total Control Soup Maker is
unplugged from the mains. Remove the Lid
(4), be careful not to touch the Serrator Blade
(8). WARNING: Sharp Blade.
2
Add a little oil to the Removable Vessel (7). Plug
the Total Control Soup Maker into the mains.
3
START
S
TOP
PORTIONMODE
PM
Press the Mode Button (22) until the Sauté
Function Indicator (16) is highlighted.
Replace the Lid (4).
After a minute, remove the Lid
(4) and
carefully add the ingredients for sautéing to
the Removable Vessel (7). Replace the Lid (4)
and allow the program to continue.
You may need to remove the Lid and stir the
ingredients part way through, refer to
individual recipes from page 16.
WARNING: Add ingredients carefully to
avoid fat splashing.
4
START
STOP
P
ORTIONMODE
PM
Press the Start/Stop Button (23) and your
Soup Maker will now begin to heat up.
5
When finished press the Start/Stop Button
(23). Add the rest of the ingredients to the
Removable Vessel (7) and begin the soup
making process by selecting the desired
soup program as shown on page 7.
6
When the Lid (4) is removed during sauté function to stir or add ingredients simply replace the Lid
(4) to continue the process. The Lid (4) needs to be in place to continue sautéing. The Soup Maker
memory will retain the setting, there is no need to reset.
501020 Rev 1.qxp_Layout 1 26/08/2016 09:54 Page 9
10
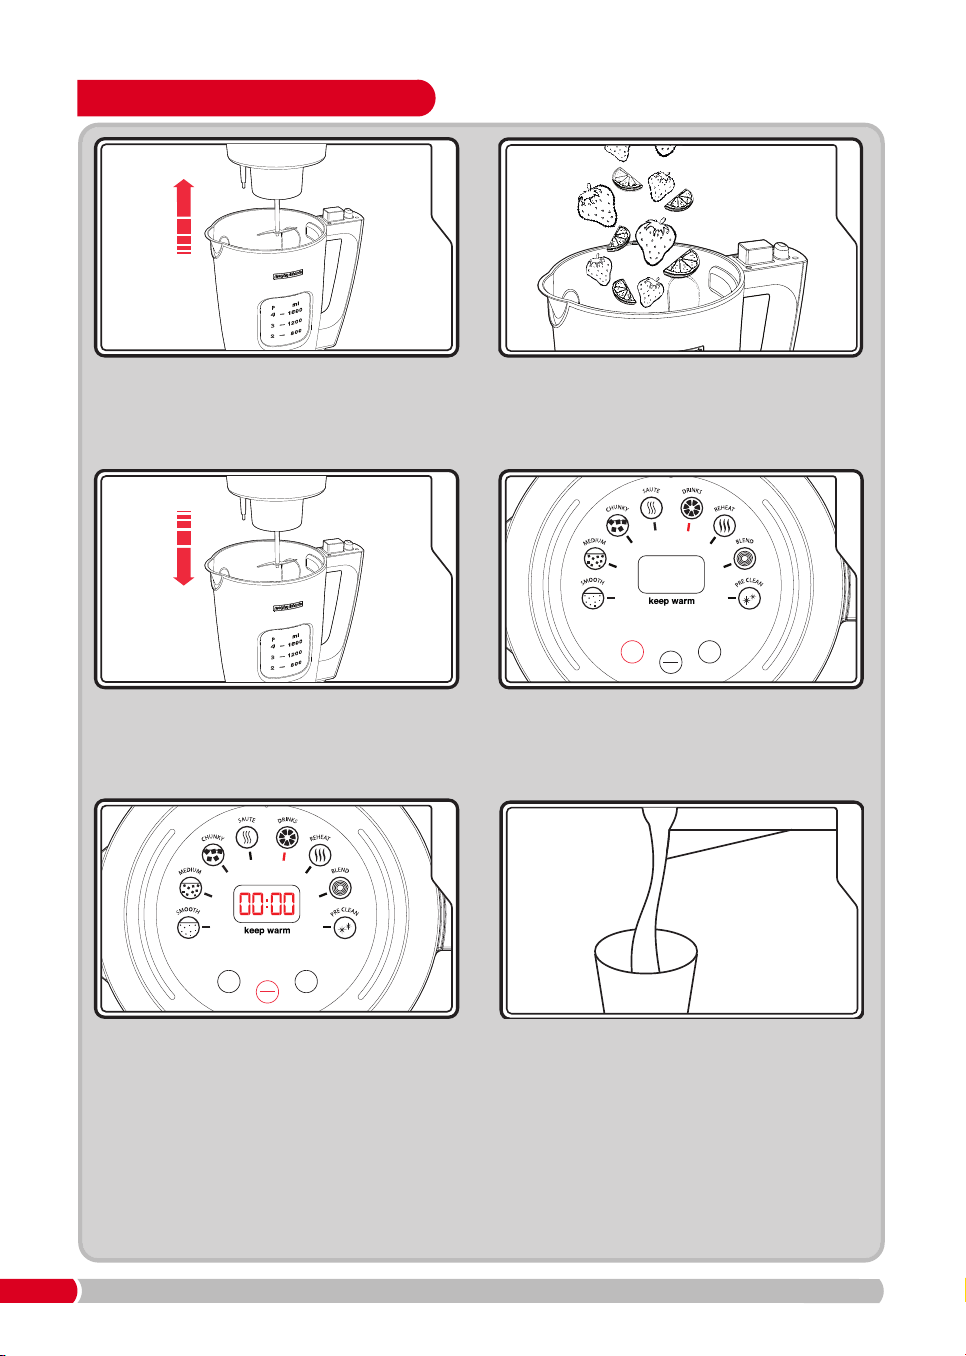
How To Use Drinks Function
1
Ensure the Total Control Soup Maker is
unplugged from the mains. Remove the Lid
(4), be careful not to touch the Serrator Blade
(8). WARNING: Sharp Blade.
2
Place the ingredients for 3 or 4 portions into
the Removable Vessel (7). Add the liquid last.
4
START
STOP
PORTIONMODE
P
M
Press the Mode Button (22) until the Drinks
Function Indicator (17) is highlighted.
6
When finished, the Total Control Soup Maker
will beep for 10 seconds. Unplug from the
mains, remove the Lid (4) and serve.
5
START
STOP
PORTIONMODE
PM
Press the Start/Stop Button (23) and the
processing time will countdown on the
LED screen (21).
NOTE: Drinks function can be used for
3 and 4 portions only. Portion size does
not need to be set.
3
Place the Lid (4) back onto the Jug Body (10)
ensuring it is securely in place and plug the
Total Control Soup Maker into the mains.
501020 Rev 1.qxp_Layout 1 26/08/2016 09:54 Page 10
11
How To Use Reheat Function
1
Ensure the Total Control Soup Maker is
unplugged from the mains. Remove the Lid
(4), be careful not to touch the Serrator Blade
(8). WARNING: Sharp Blade.
4
START
STOP
PORTIONMODE
P
M
Press the Mode Button (22) until the Reheat
Function Indicator (18) is highlighted. Press
the Portion Button (24) to select your portion
size (2, 3 or 4).
When finished, the Total Control Soup Maker
will beep for 10 seconds. Unplug from the
mains, remove the Lid
(4) and serve.
5
START
STOP
PORTIONMODE
PM
Press the Start/Stop Button (23) and the
processing time will countdown on the
LED screen (21) .
3
Place the Lid (4) back onto the Jug Body (10)
ensuring it is securely in place. Plug the Total
Control Soup Maker into the mains.
2
Place the home made soup you would like to
reheat into the Removable Vessel (7). 2
portions minimum, 4 portions maximum.
6
NOTE: The correct portion size must be selected on the control panel to match with the
portions of soup added, failure to do this will not heat the soup to the correct temperature.
Soup consistency may vary after the reheat process.
When reheating chunkier soups the soup will become smoother in consistency.
501020 Rev 1.qxp_Layout 1 26/08/2016 09:54 Page 11
12
How To Use Blend Function
1
Ensure the Total Control Soup Maker is
unplugged from the mains. Remove the Lid
(4), be careful not to touch the Serrator Blade
(8). WARNING: Sharp Blade.
2
Place the chunky soup into the Removable
Vessel (7). NOTE: Only use to blend chunky
or medium soup or other cooked soft
ingredients.
3
Place the Lid (4) back onto the Jug Body (10)
ensuring it is securely in place. Plug the Soup
Maker into the mains.
4
START
STOP
PORTIONMODE
PM
Press the Mode Button (22) until the Blend
Function Indicator (19) is highlighted.
5
START
STOP
PORTIONMODE
PM
Press and hold the Start/Stop Button (23) for
the desired blend time. This is a manual
setting allowing you to blend for up to 20
seconds, and will stop automatically when
you take your finger off the button. If you
need to blend for a few more seconds, repeat
the process.
Unplug from the mains, remove the Lid
(4)
and serve.
6
ALTERNATIVE: If you wish to blend soup you have made already in the Removable Vessel (7),
continue from stage 4.
501020 Rev 1.qxp_Layout 1 26/08/2016 09:54 Page 12
13
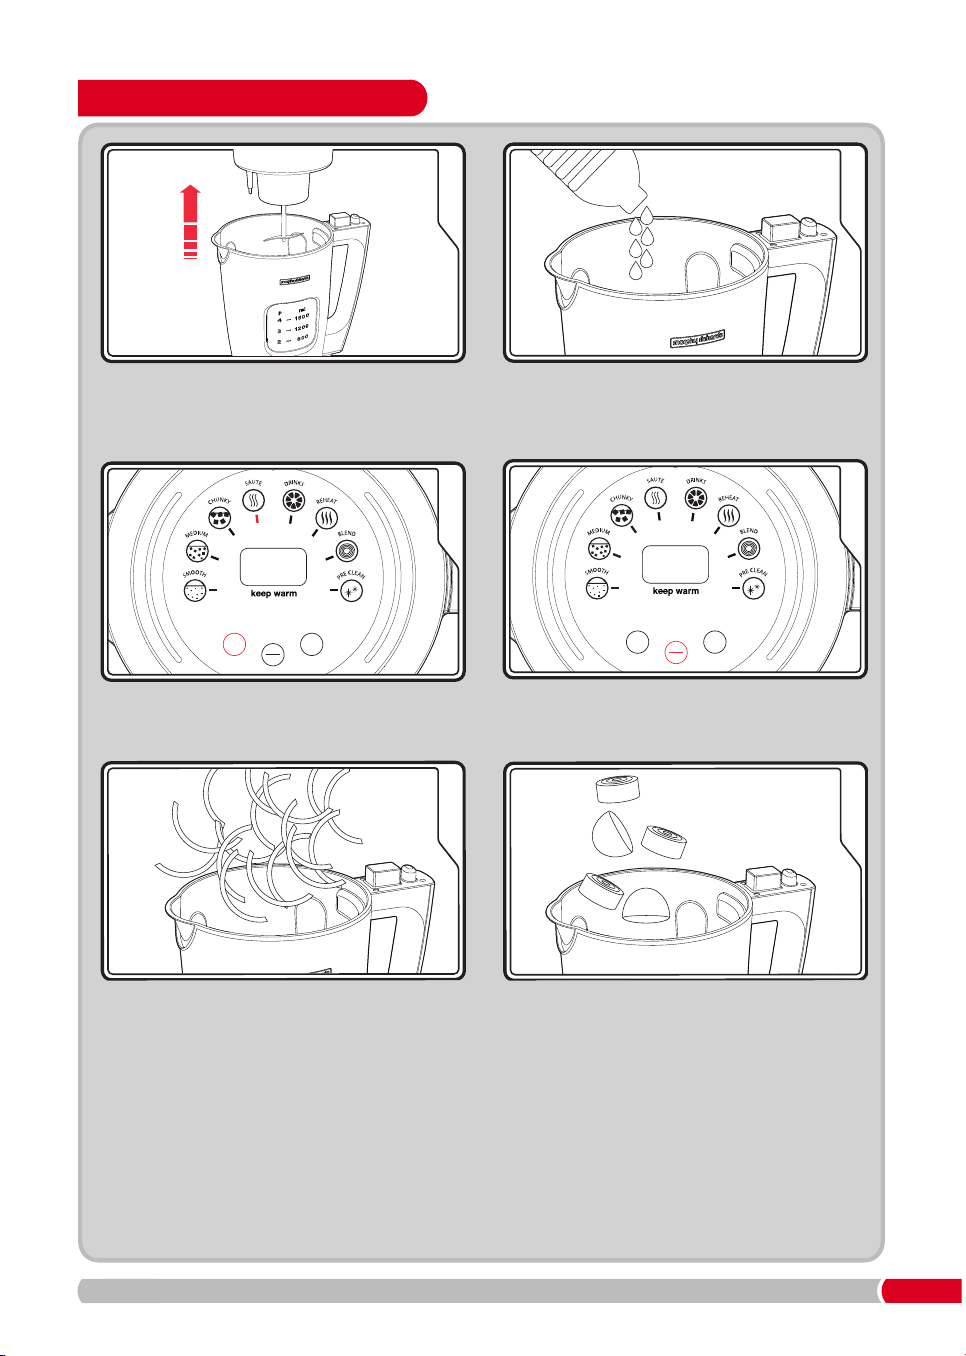
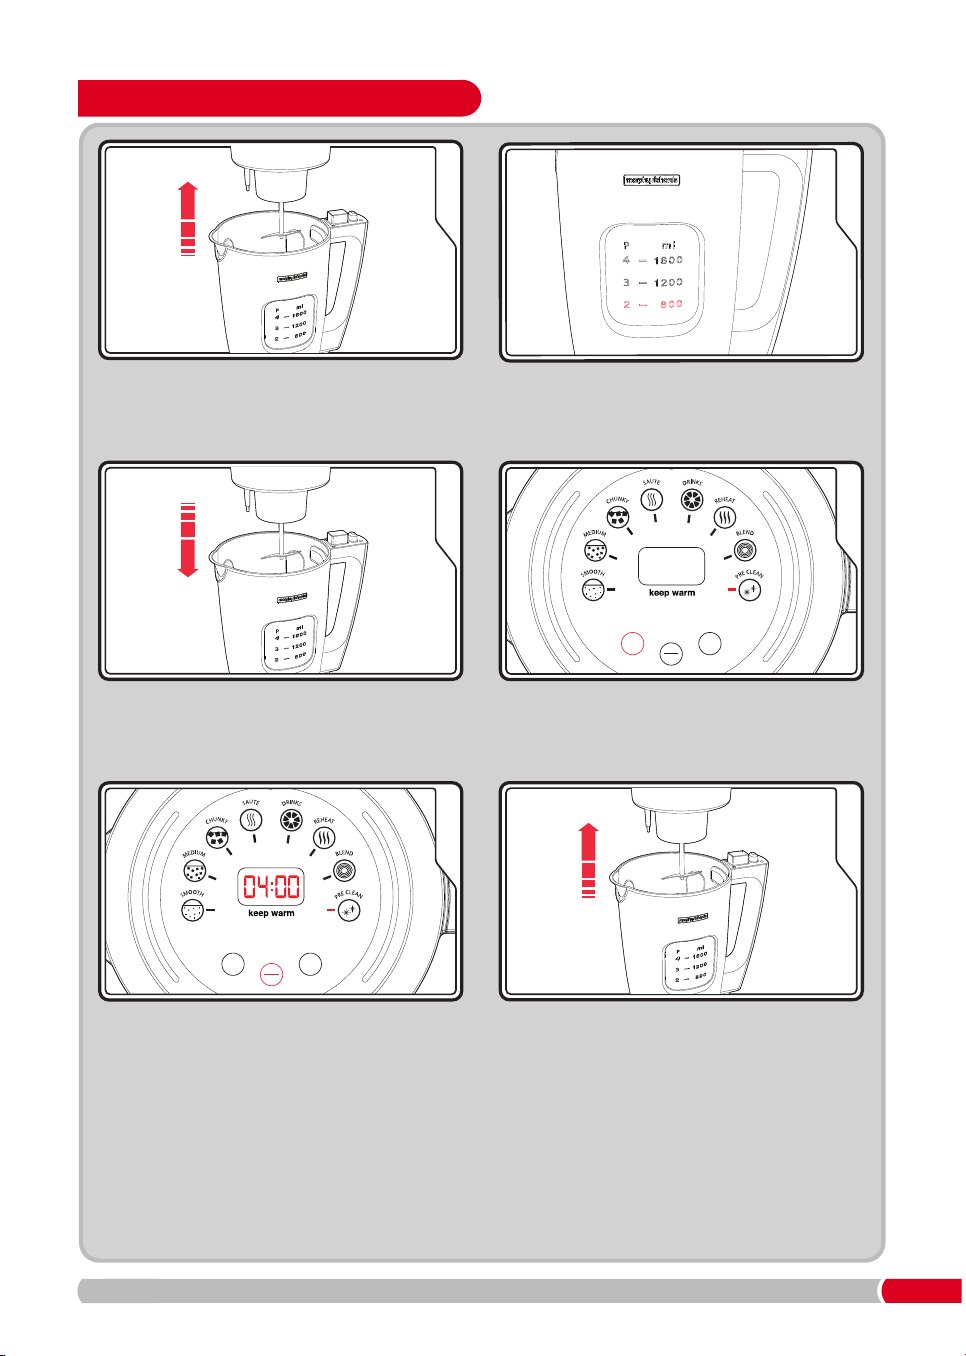
How To Use Pre-Clean Function
1
Ensure the Total Control Soup Maker is
unplugged from the mains. Remove the Lid
(4), be careful not to touch the Serrator Blade
(8). WARNING: Sharp Blade.
2
Pour in 800ml of water into the Removable
Vessel (7) and add a small amount of washing
up liquid.
4
S
TAR T
STOP
PORTIONMODE
PM
Press the Mode Button (22) until the
Pre-Clean Function Indicator (20) is
highlighted.
5
START
STOP
PORTIONMODE
PM
Press the Start/Stop Button (23) and the
processing time will count down on the
LED screen (21). The Pre-Clean program will
run for 4 minutes.
3
Place the Lid (4) back onto the Jug Body (10)
ensuring it is securely in place. Plug the Total
Control Soup Maker into the mains.
6
When the Pre-Clean cycle has finished
ensure the Total Control Soup Maker is
unplugged from the mains. Remove the Lid
(4), be careful not to touch the Serrator Blade
(8). WARNING: Sharp Blade.
NOTE: The Pre-Clean function will clean the base only. Additional cleaning is required for the
Removable Vessel
(7) and Lid (4). See A Dream to Clean on page 32. Rinse out your Soup
Maker with water until the water is clear of soap bubbles.
WARNING: Take care as the Removable Vessel
(7) will be hot after the Pre-Clean cycle.
501020 Rev 1.qxp_Layout 1 26/08/2016 09:54 Page 13

14
T
he Total Control Soup Maker has a Pre-Clean
Function
(20). See page 13. Please note:
Pre-Clean only helps to clean the Removable
V
essel base
(
7)
.
Additional cleaning may be
required.
T
he Total Control Soup Maker is not dishwasher
s
afe, but it is simple and easy to clean.
After use, simply wipe the Motor Housing
(6) and
Serrator Blade (8) with warm soapy water, and
dry.
DO NOT immerse lid or jug body in water.
The Total Control Soup Maker Removable Vessel
(7) may be removed from the Jug Body (10) for
cleaning. Simply press the Vessel Release Button
(9) and remove. Simply hand wash the
Removable Vessel (7) with warm soapy water and
wipe the Jug Body with a soft, damp cloth.
Ensure the Removable Vessel contacts are dried
carefully after washing. To refit the Removable
Vessel into the Jug Body, ensure it is correctly
aligned and then press into place.
Certain food types can burn if in contact
with the base heating element. If this
happens select the Pre-Clean Function.
If staining persists this is discolouration
and will remain. It will not affect the
performance or quality of the food
produced. Do not use abrasive scouring
pads on the Total Control Soup Maker or
damage may occur.
Occasionally it will be necessary to remove the
Lid Seal
(3) for cleaning. Wash with hot soapy
water, rinse and dry carefully before replacing.
WARNING: DO NOT immerse the Lid or Jug
Body in water, as they contain electrical
components that can be damaged by water.
Do not allow water to get onto the electrical
connections.
Dry thoroughly before use.
A Dream To Clean Removing & Replacing the Seal
501020 Rev 1.qxp_Layout 1 26/08/2016 09:54 Page 14

15
Y
our Total Control Soup Maker has 3 Soup
programs and 1 Drinks program.
Select your choice of program:
Smoothly does it... (13)
The Smooth Soup program is perfect for
d
elicious soup recipes requiring a smooth
c
onsistency, such as Quick and Easy Pea, Ham
and Mint Soup (Page 17). The program ensures
the ingredients are blended to the right
consistency and gently cooked at the right
temperature. (The program lasts for 21 minutes
for 4 portions and then your soup is ready to
serve & enjoy!)
Medium Setting (14)
The Medium Soup program is perfect for
delicious soup recipes requiring a medium
consistency, such as Mushroom or Curried
Parsnip Soup. (Pages 19 & 20) The program lasts
for 25 minutes for 4 portions and then your soup
is ready to serve & enjoy!
Chunky Setting (15)
The Chunky Soup program is perfect for rustic
soup recipes requiring a chunkier consistency,
such as French Style Pistou (Page 23). The
program allows the ingredients to be heated for
longer to ensure the chunky ingredients are fully
cooked. The program lasts for 28 minutes for 4
portions. For chunky soup there is no blending
process, just heating. It is therefore
recommended that you cut any vegetables into
small dice sized pieces. If your soup is a little too
chunky after cooking, select the Blend function to
gain your desired consistency. Press and hold the
Start/Stop Button for 5 seconds and check.
Sauté... (16)
T
he Sauté Function heats the Soup Maker up so
food such as onions or bacon lardons can be
s
autéed before the rest of the ingredients are
a
dded to the soup. Add a little oil to the
Removable Vessel (7), select the Sauté Function
a
nd press the Start/Stop Button
(
23)
.
Heat the oil
for a minute before adding the ingredients. The
S
auté function is only available when the Lid
(
4)
is in place on the Jug Body (10). The Sauté
Function will be deactivated when the Lid is
removed. Note: Do not use the Sauté function
for more than 10 minutes.
Drinks (17)
The Drinks setting on the Total Control Soup
Maker is ideal for making smoothies or
milkshakes from fresh ingredients. For drinks
recipes see pages 29-30. The program lasts for
2 minutes before your drink is ready to serve.
The Drinks setting does not heat the ingredients,
so it’s perfect for cold drinks in hot weather.
Note: Do not place ice cubes in your
Total Control Soup Maker.
A perfect Blend! (19)
The Blend setting allows you to further blend the
soup to your desired consistency, if required. This
function works without additional heating.
To access this function after cooking, press the
Start/Stop button to exit the Keep Warm mode.
Remove the lid then refer to page 12 following
stages 4 - 6.
Keep Warm
When the Soup Program has finished, the unit
goes into Keep Warm mode and will indicate
keep warm on the Control Panel (2). If you want to
serve the soup immediately lift the Lid and serve.
Using your Soup Maker
Program Time Portion
Smooth
Medium
Chunky
Sauté
Drinks
Reheat
Blend
Pre-Clean
Keep Warm
19, 21 mins
22, 24, 26 mins
25, 27, 29 mins
Max 10 mins
2 mins
11, 14, 17 mins
As required
4 mins
30 mins
3, 4
2, 3, 4
2, 3, 4
-
3, 4
2, 3, 4
Max 4
-
2, 3, 4
Program Guide
Times may vary depending on the temperature of ingredients.
501020 Rev 1.qxp_Layout 1 26/08/2016 09:54 Page 15

16
Homemade soup tastes great, costs so little and
i
s a healthy, sustaining meal.
Scratch it!
S
cratch cooking is the best way to prepare
wholesome food that the whole family loves. It
gives you complete control over the food you eat,
b
ecause it involves cooking from the most basic
ingredients and helps you to avoid all the
preservatives, flavourings and other additives
found in processed foods.
Batch it!
Batch cooking is great because it allows you to
cook up a batch of wholesome food and pack it
away in meal-sized portions that can be
refrigerated or frozen, locking away all the taste
and nutrients ready to enjoy later in the week.
Don’t waste it!
In the UK we waste up to 8.3 million tonnes of
food every year, most of which could have been
eaten. Whether its forgotten chicken from Sunday
lunch or a tomato tucked away at the back of the
fridge, you can always rustle-up a fantastic
homemade soup recipe using the leftover food
that would normally go to waste.
Nutritious Soups & Smoothies
Homemade soup couldn’t be better for you, and
depending on the recipe can provide a full range
o
f nutrients including vitamins, minerals,
carbohydrate and fibre. Best of all, homemade
s
oup is simply delicious!
H
omemade smoothies are a quick and easy
way of consuming your daily allowance of fruit
and vegetables. Depending on the recipe,
smoothies can provide key vitamins and minerals
your body needs daily. So get creative and
introduce a homemade delicious smoothie
into your diet today.
Works in a flash!
Making fresh homemade soup in the comfort of
your own kitchen couldn’t be quicker when using
your Total Control Soup Maker. All you have to do
is prepare your selected ingredients, transfer
them into your Total Control Soup Maker. and
select your required style of soup – Smooth,
Medium or Chunky. The smooth soup program
blends and gently cooks the soup in 21 minutes.
The chunky soup program takes just 28 minutes
before it’s ready to enjoy! Use Medium setting for
soup inbetween chunky & smooth consistency.
Keeping it simple
At Morphy Richards, we believe life shouldn’t be
complicated. That’s why we’ve worked hard to
make your Total Control Soup Maker as easy to
use as possible. It really couldn’t be simpler. All
you have to do is select your desired program
with one press of a button and then walk away.
In as little as 21 minutes (all times are variable
dependent on program/portion used) you’ve
got perfectly delicious homemade soup, cooked
your way.
Space Saver
We know that space is a valuable commodity in
your kitchen. Your Total Control Soup Maker is a
compact size with a simple design so it fits easily
on any worktop space.
The Benefits Of
Homemade Soup
What Makes Your Total Control
Soup Maker So Special?
501020 Rev 1.qxp_Layout 1 26/08/2016 09:54 Page 16
17
We have developed 16 recipes for you to use in your new Total Control Soup Maker, from rich
hearty soups to refreshing smoothies and milkshakes.
The Chunky Setting
(15) only cooks the ingredients, it will not chop them. If after cooking, the
soup is a little too chunky for your taste, you can use the Blend Setting (19) to help break
down some of the chunks.
The recipes have been developed to fit within the minimum and maximum working levels of
the Total Control Soup Maker (800ml-1600ml).
The recipes have been developed for smooth, medium and chunky consistencies,
providing ingredient quantities for 2, 3 or 4 portions.
NOTE: 2 portions are available for medium & chunky soup recipes only.
Recipes
501020 Rev 1.qxp_Layout 1 26/08/2016 09:54 Page 17

18
Smooth Function (13)
Method:
1 Place all vegetables into the Removable Vessel (7), add stock up to desired level for the recipe and stir
with a wooden spoon.
2 Add a pinch of mixed herbs, select Smooth Function (13), desired portion size and press the
Start/Stop Button (23).
3 When ready check the seasoning and serve.
Basic Vegetable Soup
3 portions 4 portions
Preparation time: 5 minutes 5 minutes
C
ooking time: 19 minutes 21 minutes
Setting: Smooth Smooth
Ingredients:
• 525g 700g vegetables comprising celery, swede, potato, carrot, onion,
parsnip, all chopped
hot vegetable stock
pinch mixed herbs
salt and pepper
Method:
1 Place the peas, mint, ham and potato into the Removable Vessel (7). Add hot stock up to the required
level for the recipe. Stir with a wooden spoon.
2 Select Smooth Function (13), required portion size and press the Start/Stop Button (23).
3 When ready, season with a little salt and milled pepper, add the olive oil and crème fraiche.
Select Blend Function (19) then press and hold the Start/Stop Button (23) for 20 seconds.
R
e
a
l
l
y
Q
ui
c
k
a
nd
Ea
sy
Pea
,
Ha
m
and Mi
nt
S
o
up
3 po
rti
o
n
s 4 po
rti
o
n
s
Pr
ep
arat
i
o
n t
i
me:
5 mi
nut
es 5 mi
nut
es
C
o
o
k
i
ng
t
i
me:
1
9 mi
nut
es
21 mi
nut
es
S
et
t
i
ng
:
S
mo
o
t
h
S
mo
o
t
h
Ingredient
s
:
•
450g
600g
frozen peas
•
15g
20g
fresh mi
nt, leaves only
•
160g
225g
good quali
ty cook
ed ham,
c
hopped/shredded
•
75g
100g
potato ,di
ced
•
Appro
x. 650m
l
Appro
x. 800ml
hot ham stock
Sal
t a
nd bl
ac
k pepper
•
1½ tbs
p
2 tbsp
ol
ive oil
•
2½ rounde
d tbsp
3 rounde
d tbsp
crème fraic
he
501020 Rev 1.qxp_Layout 1 26/08/2016 09:54 Page 18

19
Method:
1 Place the vegetables into the Removable Vessel (7).
2 Add the remaining ingredients, adding stock last to the desired level and stir with a wooden spoon.
3 Fit the Lid (4), select Smooth Function (13), desired number of portions and press Start/Stop Button (23).
4 When ready, add salt and freshly milled black pepper to taste.
Simple Tomato and Basil Soup
3 portions 4 portions
Preparation time: 5 minutes 5 minutes
C
ooking time: 19 minutes 21 minutes
Setting: Smooth Smooth
Ingredients:
• 110g 150g red onion, diced
•
2
20g 300g potato, diced
• 75g 100g carrot, diced
• 300g 400g tinned chopped tomatoes
• ¾ tbsp 1 tbsp tomato puree
• 1 1 garlic clove, crushed
• 5g 7g basil leaves, roughly torn
• Approx. 500ml Approx. 700ml hot chicken stock
501020 Rev 1.qxp_Layout 1 26/08/2016 09:54 Page 19

20
Medium Function (14)
Method:
1 Place the oil in the Removable Vessel (7), fit Lid (4), select Sauté Function (16) and press Start/Stop
Button (23). Heat for 1 minute.
2 Carefully add the onion, celery, garlic, parsley and half the mushrooms, stir with a wooden spoon and
sauté for 4 minutes, stirring occasionally. (As the mushrooms cook their volume will reduce).
3 Add the remaining mushrooms to the Removable Vessel (7), stir, and sauté for a further 5 minutes, stirring
from time to time.
4 Carefully add the hot stock to the desired level for the recipe. Select Medium Function (14), required por-
tion size and press Start/Stop Button (23).
5 At the end of cooking, add the cream, stir with a wooden spoon and season to taste.
Mushroom Soup
2 portions 3 portions 4 portions
P
reparation time: 15 minutes 15 minutes 15 minutes
Sauté: 10 minutes 10 minutes 10 minutes
C
ooking time: 21 minutes 23 minutes 25 minutes
S
etting: Medium Medium Medium
Ingredients:
• 310g 465g 625g mushrooms, finely chopped
• 1 tbsp 1½ tbsp 2 tbsp olive oil
• 75g 115g 150g onion, chopped
• 60g 85g 120g celery, chopped
• 1 1 2 garlic clove, crushed
• 5g 7g 10g fresh parsley, roughly chopped
• Approx. 400ml Approx. 530ml Approx. 700ml hot vegetable stock
• 75ml 115ml 150ml single cream
salt and freshly ground black pepper
501020 Rev 1.qxp_Layout 1 26/08/2016 09:54 Page 20

21
Method:
1 Place oil in the Removable Vessel (7), fit Lid (4), select Sauté Function (16) and press Start/Stop Button
(23). Heat for 1 minute.
2 Carefully add the onion, stir with a wooden spoon and sauté for 2 minutes, stirring once.
3 Add the curry powder to the Removable Vessel (7), stir well, and then stir in the parsnips.
4 Carefully add the hot stock, press and hold Start/Stop Button (23) then select Medium Function (14),
the required number of portions and press Start/Stop Button
(23).
5 At the end of cooking, stir in enough milk to give the desired consistency and season to taste.
6 Serve sprinkled with chopped coriander leaves.
Curried Parsnip Soup
2 portions 3 portions 4 portions
P
reparation time: 15 minutes 15 minutes 15 minutes
S
auté: 3 minutes 3 minutes 3 minutes
Cooking time: 21 minutes 23 minutes 25 minutes
S
etting: Medium Medium Medium
Ingredients:
• ¾ tbsp 1 tbsp 1½ tbsp olive oil
• 50g 75g 100g onion, chopped
• ½ level tsp ¾ level tsp 1 level tsp medium curry powder
• 300g 475g 600g parsnips, chopped
• Approx. 400ml Approx. 650ml Approx. 800ml hot chicken stock
• Approx. 60ml Approx. 100ml Approx. 120ml semi skimmed milk
salt and pepper to taste
Garnish:
Fresh coriander leaves, chopped
501020 Rev 1.qxp_Layout 1 26/08/2016 09:54 Page 21

22
Method:
1 Place the onion, celery, carrot, ground and chopped coriander into the Removable Vessel (7), and mix with
a wooden spoon.
2 Add the stock to the required level, select Medium Function (14), required number of portions and then
press Start/Stop Button (23).
3 At the end of cooking, stir in enough milk with a wooden spoon to give the desired consistency and then
season to taste.
4 Serve sprinkled with chopped coriander leaves if desired.
Carrot and Coriander Soup
2 portions 3 portions 4 portions
P
reparation time: 15 minutes 15 minutes 15 minutes
C
ooking time: 21 minutes 23 minutes 25 minutes
S
etting: Medium Medium Medium
Ingredients:
•
5
0g 75g 100g onion, chopped
• 60g 90g 120g celery, finely chopped
•
2
50g 375g 500g carrot, cut into small dice
• ½ level tsp ¾ level tsp 1 level tsp ground coriander
• 7g 12g 15g fresh coriander, chopped
• Approx. 400ml Approx. 600ml Approx. 800ml hot vegetable stock
• 25 - 50ml 50 - 100ml 50 - 100ml semi skimmed milk
salt and pepper to taste
501020 Rev 1.qxp_Layout 1 26/08/2016 09:54 Page 22

23
Chunky Function (15)
Method:
1 Place the sweetcorn kernels, red onion, garlic, cooked chicken, mushrooms, ginger, spring onions and
soy sauce into the Removable Vessel
(7).
2 Add stock up to the desired level, select Chunky Function (15) and required number of portions and press
the Start/Stop Button (23).
3 Four minutes before the end of the program, add the fine noodles to the Removable Vessel (7) and replace
the Lid (4).
4 Divide the shredded chilli and chopped spring onion garnish between the bowls, spoon the soup over and
serve immediately.
Chinese Chicken & Sweetcorn
2 portions 3 portions 4 portions
Preparation time: 10 minutes 10 minutes 10 minutes
C
ooking time: 24 minutes 26 minutes 28 minutes
S
etting: Chunky Chunky Chunky
Ingredients:
• 50g 75g 100g sweetcorn from the cob,
or tinned (drained)
• 50g 75g 100g red onion, finely chopped
• ½ 1 1 garlic clove, crushed
• 75g 110g 150g cooked shredded chicken
• 50g 75g 100g mushrooms, thinly sliced
• ½ tsp ¾ tsp 1 tsp fresh ginger, grated
• 7g 10g 15g spring onion, finely chopped
• 1 tsp 1½ tsp 2 soy sauce
• Approx. 600ml Approx. 900ml Approx. 1.2L hot chicken stock
• 25-50g 35-75g 50-100g fine egg noodles
Garnish:
• ½ (approx. 5g) ½ (approx. 7g) ½ (approx. 10g) red chilli deseeded
and finely shredded
• 7g 10g 15g spring onions, finely chopped
501020 Rev 1.qxp_Layout 1 26/08/2016 09:54 Page 23

24
Method:
1 Place the vegetables and spaghetti into the Removable Vessel (7), add the vegetable stock/ tomato puree
mixture to the desired level and stir with a wooden spoon.
2 Select Chunky Function (15), required number of portions and press the Start/Stop Button (23).
3 When ready, season to taste and serve with a spoonful of pesto and freshly grated Parmesan cheese.
French Style Pistou
2 portions 3 portions 4 portions
Preparation time: 15 minutes 15 minutes 15 minutes
C
ooking time: 24 minutes 26 minutes 28 minutes
Setting: Chunky Chunky Chunky
Ingredients:
• 75g 110g 150g courgette, cut into small dice
• 35g 50g 70g potato, cut into small dice
• 35g 50g 70g onion, finely chopped
• 25g 35g 50g carrot, cut into small dice
• 200g 300g 400g canned chopped tomatoes
• 25g 35g 50g petit pois
• 25g 35g 50g french beans, cut into 1cm pieces
• 25g 35g 50g spaghetti, broken into small pieces
• Approx. 350ml Approx. 475ml Approx. 650ml hot vegetable stock
• ½ tbsp ¾ tbsp 1 tbsp tomato puree (mix into the stock)
salt and ground black pepper
To serve:
• Pesto
• Parmesan cheese
501020 Rev 1.qxp_Layout 1 26/08/2016 09:54 Page 24

25
Method:
1 Add the oil to the Removable Vessel (7), fit the Lid (4), select Sauté Function (16) and press the Start/Stop
Button (23).
2 After a minute, carefully add the butternut squash, stir with a wooden spoon to coat with oil and sauté for
3-4 minutes, stirring every so often.
3 Add the onion, potato, garlic, ground cumin and red chilli, continue to sauté for a further 5 minutes stirring
occasionally.
4 Stir in the ginger, coconut milk, lime juice and coriander.
5 Add vegetable stock to the required level for the recipe, select Chunky Function (15), number of portions
and press the Start/Stop Button
(23).
6 Once ready season to taste and serve. If you would prefer a smooth soup select the Blend Function (19)
and press and hold the Start/Stop Button (23) until the desired consistency is achieved.
Note: potato thickens the soup. If you prefer to use less than we recommend the blended soup will be of
thinner consistency.
If 2 portions are blended the soup will be of medium consistency.
Butternut Squash, Chilli and Coconut Soup
2 portions 3 portions 4 portions
P
reparation time: 15 minutes 15 minutes 15 minutes
S
auté: 10 minutes 10 minutes 10 minutes
Cooking time: 24 minutes 26 minutes 28 minutes
S
etting: Chunky Chunky Chunky
Ingredients:
• 1 tbsp 1½ tbsp 2 tbsp olive oil
• 250g 375g 500g butternut squash, cut into
small cubes
• 50g 75g 100g onion, chopped
• 100g 100 -150g 150- 200g potato, finely chopped
• 1 2 3 garlic cloves, sliced
• ½ level tsp ¾ level tsp 1 level tsp ground cumin
• ¼ - ½ ½ - ¾ ½ - 1 large red chilli to taste,
finely chopped,
seeds removed
• ½ tsp ¾ tsp 1 tsp fresh ginger, grated
• 100ml 150ml 200ml coconut milk
• ½ ¾ 1 lime, juiced
• 5g 8g 10g fresh coriander, chopped
• Approx. 300ml Approx. 430ml Approx. 600ml hot vegetable stock
salt and pepper
501020 Rev 1.qxp_Layout 1 26/08/2016 09:54 Page 25

26
Method:
1 Place the olive oil in the Removable Vessel (7), fit the Lid (4), select Sauté Function (16) and press the
Start/Stop Button (23). After 1 minute carefully add the lamb mince, refit the Lid (4) and sauté for
2 minutes, stirring occasionally with a wooden spoon until evenly browned.
2 Carefully add the onion, garlic, carrot, potato and swede to the Removable Vessel (7) and sauté for
4 minutes. Stir in the flour then add the rest of the ingredients and hot stock up to the desired level.
3 Stir with a wooden spoon or spatula. Press and hold the Start/Stop Button (23) then select Chunky
Function (15), required portion size and press the Start/Stop Button (23).
4 Season to taste and remove bay leaves (leaf) before serving.
Winter Lamb and Lentil Broth
2 portions 3 portions 4 portions
P
reparation time: 20 minutes 20 minutes 20 minutes
S
auté: 7 minutes 7 minutes 7 minutes
Cooking time: 24 minutes 26 minutes 28 minutes
S
etting: Chunky Chunky Chunky
Ingredients:
• ½ tbsp 1 tbsp 1 tbsp olive oil
• 35g 55g 75g raw minced lamb
• 50g 75g 100g onion, finely chopped
• 1 1½ 2 garlic clove, crushed
• 25g 35g 50g carrot, finely chopped
• 75g 110g 150g potato, finely chopped
• 50g 75g 100g swede, finely chopped
• 1½ tbsp 2½ tbsp 3 tbsp plain flour
• 120g 175g 235g tinned cooked green
lentils, drained
• ¼ tsp ½ tsp ½ tsp chopped fresh rosemary
• ¼tbsp ½tbsp 1tbsp chopped fresh parsley
• 1 1 2 bay leaf
• ½ tsp ½ tsp 1tsp Worcestershire sauce
• Approx. 450ml Approx. 675ml Approx. 900ml hot lamb stock
501020 Rev 1.qxp_Layout 1 26/08/2016 09:54 Page 26

27
Sauté Function (16)
Method:
1 Add the oil to the Removable Vessel (7), fit the Lid (4), select the Sauté Function (16) and press the
Start/Stop Button (23). After 1 minute, carefully add the vegetables, stir with a wooden spoon and sauté
for 5-6 minutes, stirring occasionally.
2 Carefully add the vegetable stock up to the required level for the recipe and stir. Press and hold Start/Stop
Button (23) and then select Smooth Function (13), required portion size and press Start/Stop Button (23).
3 Once the soup is ready, check the seasoning and garnish with freshly chopped parsley.
Celery Soup
3 portions 4 portions
Preparation time: 10 minutes 10 minutes
S
auté: 7 minutes 7 minutes
C
ooking time: 19 minutes 21 minutes
S
etting: Smooth Smooth
Ingredients:
• 1tbsp 1tbsp olive oil
• 350g 450g celery, roughly chopped (including leaves)
• 75g 100g onion, chopped
• 110g 150g potato, chopped
• Approx. 700ml Approx. 800ml hot vegetable stock
salt and ground black pepper
fresh parsley to garnish
501020 Rev 1.qxp_Layout 1 26/08/2016 09:54 Page 27

28
Method:
1 Place the oil in the Removable Vessel (7), select the Sauté Function (16) and press the Start/Stop Button
(23). Heat the oil for one minute.
2 Carefully add the onion, stir with a wooden spoon and sauté for 3 minutes stirring occasionally.
3 Stir in the potato and garlic, and sauté for 2 minutes stirring occasionally.
4 Add the vegetable stock (do not add any more than the specified quantity), press and hold the
Start/Stop Button (23) and then select Smooth Function (13), required portion size and press the
Start/Stop Button (23).
5 When 11 minutes remain on the timer, carefully add the broccoli, and then stir with a wooden spoon.
6 When the programme finishes, add the Stilton, select the Blend Function (19) and press and hold the
Start/Stop Button (23) until of the desired consistency.
7 Adjust the seasoning (the soup may not need any salt) and serve.
Note: Potato thickens the soup. If you prefer to use less than we recommend the soup will be of a thinner
consistency.
Broccoli and Stilton Soup
3 portions 4 portions
P
reparation time: 10 minutes 10 minutes
S
auté: 6 minutes 6 minutes
Cooking time: 19 minutes 21 minutes
S
etting: Smooth Smooth
Ingredients:
• ¾ tbsp 1 tbsp olive oil
• 75g 100g onion, chopped
• 180g 250g potato, diced
• 1 2 cloves garlic, crushed
• 180g 250g broccoli florets and stalks, roughly chopped
• 750ml 1 litre hot vegetable stock
• 115g 150g Blue Stilton, crumbled
freshly ground black pepper
a little salt
501020 Rev 1.qxp_Layout 1 26/08/2016 09:54 Page 28

29
Method:
1 Add the oil to the Removable Vessel (7), fit the Lid (4), select Sauté Function (16) and press Start/Stop
Button (23).
2 After one minute carefully add the chopped bacon and onion and sauté for two minutes, stirring
occasionally with a wooden spoon.
3 Add the leeks and potatoes and continue to sauté for 2-3 minutes stirring occasionally.
4 Carefully add the stock to the desired level.
5 Press and hold the Start/Stop Button (23) and then select the Medium Function (14), desired number of
portions and press the Start/Stop Button (23).
6 Once the soup is ready, check the seasoning and garnish with freshly chopped parsley.
Leek and Bacon Soup
2 portions 3 portions 4 portions
P
reparation time: 15 minutes 15 minutes 15 minutes
S
auté: 6 minutes 6 minutes 6 minutes
Cooking time: 21 minutes 23 minutes 25 minutes
S
etting: Medium Medium Medium
Ingredients:
• ½ tbsp 1 tbsp 1 tbsp sunflower oil
• 40g 60g 85g lean bacon rashers, chopped
• 50g 75g 100g onion, chopped
• 150g 225g 300g leeks, sliced into rings
• 175g 250g 350g potatoes sliced
• Approx. 400ml Approx. 600ml Approx. 800ml hot ham stock
salt and ground black pepper
fresh parsley
501020 Rev 1.qxp_Layout 1 26/08/2016 09:54 Page 29

30
Drinks Function (17)
Method:
1 Place all ingredients into the Removable Vessel (7) and stir with a wooden spoon.
2 Fit the Lid, select Drinks Function (17) and press the Start/Stop Button (23).
3 Serve immediately.
Note: Clear honey may be used in place of maple syrup.
P
e
a
n
u
t
B
u
t
t
e
r
M
i
l
k
s
h
a
k
e
3
p
o
r
t
i
o
n
s
4
p
o
r
t
i
o
n
s
P
r
e
p
a
r
a
t
i
o
n
t
i
m
e
:
5
m
i
n
u
t
e
s
5
m
i
n
u
t
e
s
P
r
o
g
r
a
m
t
i
m
e
:
2
m
i
n
u
t
e
s
2
m
i
n
u
t
e
s
Ing
r
e
di
e
nts
:
•
9
0
0
m
l
1
.
2
L
s
e
m
i
s
k
i
m
m
e
d
m
i
l
k
•
1
2
5
g
1
7
5
g
v
a
n
i
l
l
a
i
c
e
c
r
e
a
m
•
4
½
l
e
v
e
l
t
b
s
p
6
l
e
v
e
l
t
b
s
p
s
m
o
o
t
h
p
e
a
n
u
t
b
u
t
t
e
r
•
4
½
t
b
s
p
6
t
b
s
p
m
a
p
l
e
s
y
r
u
p
Method:
1 Place the coffee into a cup and add the water. Stir until dissolved then leave to cool.
2 Place the milk and ice cream into the Removable Vessel (7), add the coffee mixture and stir with a
wooden spoon.
3 Fit the Lid (4), select Drinks Function (17) and press the Start/Stop Button (23).
4 Serve immediately.
Note: For a change, make a rich chocolate milkshake by substituting drinking chocolate powder for the
coffee. In this case omit the water and add the chocolate powder directly into the Removable Vessel after
the milk and ice cream.
M
o
c
h
a
M
i
l
k
s
h
a
k
e
3
p
o
r
t
i
o
n
s
4
p
o
r
t
i
o
n
s
P
r
e
p
a
r
a
t
i
o
n
t
i
m
e
:
1
0
m
i
n
u
t
e
s
1
0
m
i
n
u
t
e
s
P
r
o
g
r
a
m
t
i
m
e
:
2
m
i
n
u
t
e
s
2
m
i
n
u
t
e
s
Ing
r
e
die
nts
:
•
1
½
l
e
v
e
l
t
b
s
p
2
l
e
v
e
l
t
b
s
p
i
n
s
t
a
n
t
c
o
f
f
e
e
g
r
a
n
u
l
e
s
•
3
t
b
s
p
4
t
b
s
p
b
o
i
l
e
d
w
a
t
e
r
,
a
l
l
o
w
e
d
t
o
c
o
o
l
f
o
r
5
m
i
n
u
t
e
s
•
6
3
0
m
l
8
5
0
m
l
s
e
m
i
s
k
i
m
m
e
d
m
i
l
k
•
1
8
0
g
2
5
0
g
c
h
o
c
o
l
a
t
e
i
c
e
c
r
e
a
m
501020 Rev 1.qxp_Layout 1 26/08/2016 09:54 Page 30

31
Method:
1 Place all ingredients into the Removable Vessel (7) and stir with a wooden spoon.
2 Fit the Lid (4), select Drinks Function (17) and press the Start/Stop Button (23).
Note: If Blueberry and elderberry yogurt is unavailable, a variation on the above may be made using natural
yogurt and fresh blueberries. See recipe below:
B
l
u
e
b
e
r
r
y
a
n
d
O
a
t
B
r
e
a
k
f
a
s
t
S
m
o
o
t
h
i
e
3
p
o
r
t
i
o
n
s
4
p
o
r
t
i
o
n
s
P
r
e
p
a
r
a
t
i
o
n
t
i
m
e
:
5
m
i
n
u
t
e
s
5
m
i
n
u
t
e
s
P
r
o
g
r
a
m
t
i
m
e
:
2
m
i
n
u
t
e
s
2
m
i
n
u
t
e
s
Ing
r
e
d
i
e
nt
s
:
•
6
7
5
g
9
0
0
g
b
l
u
e
b
e
r
r
y
a
n
d
e
l
d
e
r
b
e
r
r
y
y
o
g
u
r
t
•
3
2
5
m
l
5
0
0
m
l
s
e
m
i
s
k
i
m
m
e
d
m
i
l
k
•
4
5
g
6
0
g
r
o
l
l
e
d
o
a
t
s
•
4
5
g
6
0
g
b
l
u
e
b
e
r
r
i
e
s
Method:
1 Place all ingredients into the Removable Vessel (7) and stir with a wooden spoon.
2 Fit the Lid (4) select Drinks Function (17) and press the Start/Stop Button (23).
B
l
u
e
b
e
r
r
y
a
n
d
O
a
t
B
r
e
a
k
f
a
s
t
S
m
o
o
t
h
i
e
(
m
a
d
e
w
i
t
h
N
a
t
u
r
a
l
Y
o
g
u
r
t
)
3
p
o
r
t
i
o
n
s
4
p
o
r
t
i
o
n
s
P
r
e
p
a
r
a
t
i
o
n
t
i
m
e
:
5
m
i
n
u
t
e
s
5
m
i
n
u
t
e
s
P
r
o
g
r
a
m
t
i
m
e
:
2
m
i
n
u
t
e
s
2
m
i
n
u
t
e
s
Ing
r
e
die
nts
:
•
6
7
5
g
8
0
0
g
l
o
w
f
a
t
n
a
t
u
r
a
l
y
o
g
u
r
t
•
3
2
5
m
l
4
0
0
m
l
s
e
m
i
s
k
i
m
m
e
d
m
i
l
k
•
4
5
g
6
0
g
r
o
l
l
e
d
o
a
t
s
•
1
1
5
g
1
5
0
g
b
l
u
e
b
e
r
r
i
e
s
•
2
t
b
s
p
3
t
b
s
p
c
l
e
a
r
h
o
n
e
y
501020 Rev 1.qxp_Layout 1 26/08/2016 09:54 Page 31

32
I
f you have any questions about the use of your
Total Control Soup Maker, check the list below
w
here we have answered some of the more
c
ommon frequently-asked-questions (FAQ’s).
If you require further help, please contact our
H
elpline: 0344 871 0944.
Does the heating function work when I
remove the Lid (4)?
No. Removing the Lid cuts the power to the unit
for maximum safety. The heating function only
activates when you have placed on the Lid (4) and
selected either Smooth (13), Medium (14), Chunky
(15), Sauté (16) or Reheat (18) soup programs.
Can I remove the Lid mid-cycle?
The Total Control Soup Maker will allow you
1 minute in the cycle to add any missed
ingredients and enable you to stir during
Sauté
(16).
Can I use my Soup Maker to make
anything other than soup?
No. The available programs are set to make
perfect soup and drinks from scratch. Follow the
recipes and adapt them to your own taste.
Can I use raw meat in soup recipes made
in my Soup Maker?
Aside from bacon or small amounts of fine
minced meat (100g), no. You should first cook
meat separately before transferring into your
Soup Maker with additional ingredients from your
recipe, as your Total Control Soup Maker is only
designed to gently Sauté
(16) bacon or onions,
then heat the soup. WARNING: You should not
use the sauté function to brown raw meat,
other than bacon or minced meat (100g max).
What is the capacity of my Soup Maker?
The capacity of your Total Control Soup Maker is
1600ml. This is marked on the inside and outside
of the Removable Vessel (7). Ensure you do not fill
your Total Control Soup Maker above this line,
otherwise the overfill detector will cut the power
to the Serrator Blade (8) and the LED screen (21)
will display ‘E1’. If this happens, simply remove
some of your ingredients so the 1600ml fill mark
is not exceeded and wipe clean the Over Fill
Sensor (5) on the Lid (4). Ensure your ingredients
(including liquid) are above the 2 portions line,
failure to do this will impair the blending function.
Can I change the times on the Smooth,
Medium and Chunky soup settings?
No. The times for these settings are preset.
Can I reheat tinned/carton soup?
N
o. The programs are set to make perfect soup
f
rom scratch. Tinned or soup in cartons whilst
convenient could burn to the base of the element
causing damage to the product.
What if my Total Control Soup Maker
stops working?
Your Total Control Soup Maker is fitted with a
safety thermostat, which cuts the power and
stops the product from working to prevent
overheating if it is used continuously on 3 or more
cycles. If this happens, remove any food from the
Removable Vessel and allow the Total Control
Soup Maker to cool for 30 minutes, before
continuing.
If the Blend Function
(19) is used continuously for
more than 20 seconds a safety cut out will cut the
power to prevent overheating. When this happens
wait for 10 seconds before reusing the Blend
Function
(19).
Can I make cold soups like Gazpacho in
my Total Control Soup Maker?
Yes, but you will first need to cook the soup using
either the Smooth (13), Medium (14) or Chunky
(15) soup setting. Then simply allow to cool or
refrigerate before enjoying.
What if food burns on the base of my
Total Control Soup Maker?
Due to the starch and sugars present in some
foods, a slight burning may occur if they are
placed in direct contact with the inside base of
the Removable Vessel. To prevent this, add half a
cup of water or stock to the Total Control Soup
Maker before placing in any solid ingredients.
Then top up with the remaining liquid specified in
your recipe.
Cancelling or changing programs
If you have selected a program incorrectly and
the Start/Stop Button (23) has been pressed,
or you want to cancel the program, simply press
the Start/Stop Button (23) and hold for
2 seconds. Press the Mode Button (22) to select
the correct program and press the Start/Stop
Button
(23) to restart.
FAQ’s?
501020 Rev 1.qxp_Layout 1 26/08/2016 09:54 Page 32

33
Helpline
I
f you are having a problem with your appliance,
please call our Helpline, as we are more likely to be
a
ble to help than the store you purchased the item
from.
P
lease have the product name, model number and
serial number to hand when you call to help us deal
w
ith your enquiry quicker.
U
K Helpline: 0344 871 0944
IRE Helpline: 1800 409 119
S
pares: 0344 873 0710
Talk To Us
If you have any questions or comments, or want
some great tips or recipe ideas to help you get the
most out of your products, join us online:
Blog: www.morphyrichards.co.uk/blog
Facebook: www.facebook.com/morphyrichardsuk
Twitter: @loveyourmorphy
Website: www.morphyrichards.com
Contact Us
Morphy Richards
Cook & Create App
Morphy Richards
501020 Rev 1.qxp_Layout 1 26/08/2016 09:54 Page 33

34
Notes
501020 Rev 1.qxp_Layout 1 26/08/2016 09:54 Page 34

35
Notes
501020 Rev 1.qxp_Layout 1 26/08/2016 09:54 Page 35

36
FP501020 MUK Rev 1 08/16
The After Sales Division
Morphy Richards Ltd
Mexborough, South Yorkshire,
England, S64 8AJ
Helplines (office hours)
UK 0344 871 0944
Spare Parts 0344 873 0710
Republic of Ireland 1800 409 119
www.morphyrichards.com
Your standard one year guarantee is extended for an
additional 12 months when you register the product within
28 days of purchase with Morphy Richards. If you do not
r
egister the product with Morphy Richards within 28 days,
y
our product is guaranteed for 1 year. To validate your 2
year guarantee register with us online at
www.morphyrichards.co.uk
O
r call our customer registration line quoting model and
s
erial number, these numbers can be found on the base of
t
he product.
U
K
0
344 871 0242
IRE 1800 409 119
N.B. Each qualifying product needs to be registered with
Morphy Richards individually.
P
lease note that the 2 year guarantee is only available in
the UK and Ireland. Please refer to the one year guarantee
for more information.
It is important to retain the retailer’s receipt as proof of
purchase. Staple your receipt to this back cover for future
reference.
Please quote the following information if the product
develops a fault. These numbers can be found on the base
of the product.
Model no.
Serial no.
All Morphy Richards products are individually tested before
leaving the factory. In the unlikely event of any appliance
proving to be faulty within 28 days of purchase, it should
be returned to the place of purchase for it to be replaced.
If the fault develops after 28 days and within 12 months of
original purchase, you should contact the Helpline number
quoting Model number and Serial number on the product,
or write to Morphy Richards at the address shown.
You may be asked to return a copy of proof of purchase.
Subject to the exclusions set out below (see Exclusions),
the faulty appliance will then be repaired or replaced as
appropriate and dispatched usually within 7 working days
of receipt.
If, for any reason, this item is replaced or repaired during
the 1 year guarantee period, the guarantee on the new
item will be calculated from original purchase date.
Therefore it is vital to retain your original till receipt or
invoice to indicate the date of initial purchase.
To qualify for the 1 year guarantee, the appliance must
have been used according to the instructions supplied.
For example, crumb trays should have been emptied
regularly.
M
orphy Richards shall not be liable to replace or repair the
g
oods under the terms of the guarantee where:
1 The fault has been caused or is attributable to accidental
u
se, misuse, negligent use or used contrary to the
m
anufacturer’s recommendations or where the fault has
been caused by power surges or damage caused in
transit.
2 T
he appliance has been used on a voltage supply other
than that stamped on the products.
3 Repairs have been attempted by persons other than our
s
ervice staff (or authorised dealer).
4 The appliance has been used for hire purposes or non
d
omestic use.
5 The appliance is second hand.
6 Morphy Richards reserves the right not to carry out any
type of servicing under the guarantee at its discretion
7 B
atteries and damage from leakage are not covered by
the guarantee.
• This guarantee does not confer any rights other than those
expressly set out above and does not cover any claims for
consequential loss or damage. This guarantee is offered
as an additional benefit and does not affect your statutory
rights as a consumer. Morphy Richards products are
intended for household use only. See usage limitations
within the location safety instructions.
Morphy Richards has a policy of continuous improvement
in product quality and design. The company, therefore
reserves the right to change the specification of
its models at any time.
For electrical products sold within the
European Community. At the end of the
electrical products useful life, it should not be
disposed of with household waste.
Please recycle where facilities exist. Check with
your Local Authority or retailer for
recycling advice in your country
Exclusions
Registering Your 2 Year
Guarantee
Your 1 Year Guarantee
Disclaimer
IF YOU ARE HAVING A PROBLEM
WITH ONE OF OUR PRODUCTS, CALL
OUR HELPLINE:
UK: 0344 871 0944
EIRE: 1800 409 119
SPARES: 0344 873 0710
501020 Rev 1.qxp_Layout 1 26/08/2016 09:54 Page 36