IMPORTANT SAFETY INSTRUCTIONS & GROUNDING INSTRUCTIONS
IMPORTANT SAFETY INSTRUCTIONS & GROUNDING INSTRUCTIONS When using an electrical appliance, basic precautions should be always followed, including the following: READ ALL INSTRUCTIONS BEFORE USING THIS APPLIANCE.
ATTENTION! Read all safety rules carefully before attempting to operate. Retain for future reference.
DANGER! Never operate this unit when flammable materials or vapors are present because electrical devices produce arcs or sparks that can cause a fire or explosion.
NEVER LEAVE OPERATING VACUUM UNATTENDED!
WARNING!
To reduce the risk of fire, electric shock, or injury:
Do not leave appliance when plugged in. Unplug from outlet when not in use and before servicing. Connect to a properly grounded outlet only. See Grounding Instructions.
Do not expose to rain. Store indoors.
Always disconnect the plug from the wall outlet before removing the tank cover.
Do not allow to be used as a toy. Close attention is necessary when used by or near children.
Do not use with damaged cord or plug. If appliance is not working as it should, has been dropped, damaged, left outdoors or dropped into water, contact service center for assistance.
Do not: pull or carry by cord, use cord as a handle, close a door on cord or pull cord around sharp edges or corners. Do not run appliance over cord. Keep cord away from heated surfaces.
Do not unplug by pulling on cord. To unplug, grasp the plug, not the cord.
Do not handle plug or appliance with wet hands.
Do not put any object into openings. Do not use with any openings blocked; keep free of dust, lint, hair and anything that may reduce air flow.
Keep hair, loose clothing, fingers and all parts of body away from openings and moving parts.
Do not pick up anything that is burning or smoking, such as cigarettes, matches or hot ashes.
Do not use without dust bag and/or filters in place.
Turn off all controls before unplugging.
Use extra care when cleaning on stairs.
Do not use to pick up flammable or combustible liquids such as gasoline or use in areas where they may be present.
Do not use your cleaner as a sprayer of flammable liquids such as oil-based paint, lacquers, etc.
Do not vacuum toxic, carcinogenic, combustible or other hazardous materials such as asbestos, arsenic, barium, beryllium, lead, pesticides or other health endangering materials.
Do not pick up soot, cement, plaster or drywall dust without filter and dust bag in place. These are very fine particles that may affect the performance of the motor or be exhausted back into the air. Additional dust bags are available.
Do not leave the cord lying on the floor once you have finished the cleaning job. It can become a tripping hazard.
Use special care when emptying heavily loaded tanks.
To avoid spontaneous combustion, empty tank after each use.
The operation of a utility vac can result in foreign objects being blown into eyes, which can result in eye damage. Always wear safety goggles when operating vacuum.
STAY ALERT. Watch what you are doing and use common sense. Do not use vacuum cleaner when you are tired, distracted or under the influence of drugs, alcohol or medication causing diminished control.
NOTE: Use only as described in this manual. Use only manufacturer's recommended attachments.
24. This appliance is provided with double insulation. Use only identical replacement parts. See instructions for servicing double insulated appliances.
25. Unplug before connecting the hose, nozzle and the like.
OPERATING INSTRUCTIONS
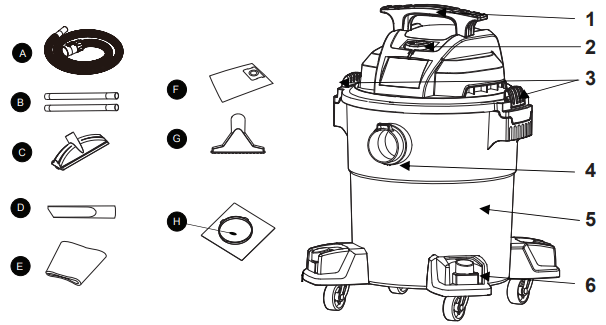
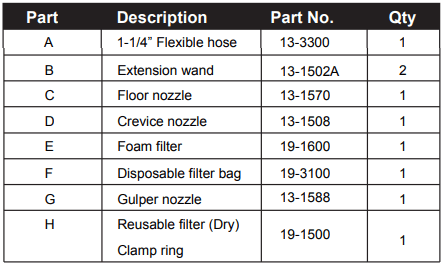
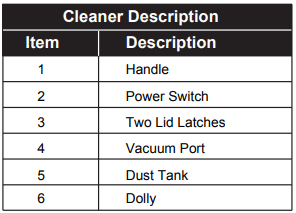
UNPACKING & SET-UP SUMMARY
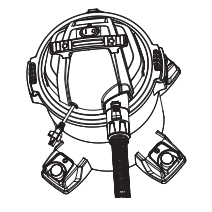
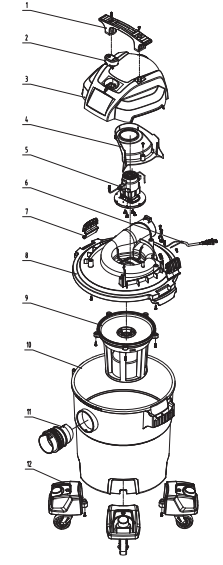
Pull lid latches in an outward motion, remove power head and some accessories that may have been shipped in the tank.
Attach the casters according to the instruction in this manual.
Before replacing power head, refer to this manual to ensure you have the proper filters installed for your cleaning operation.
Replace power head, and apply pressure with thumb to each latch until it snaps tightly in place. Make sure all lid latches are clamped securely.
Insert the flexible hose end into inlet of tank.
Attach the extension wands to the accessor end of the hose. Apply slight pressure until fitting is tight.
Attach one of the cleaning accessories (depending on your cleaning requirements) on the extension wands. Twist slightly to tighten the connection.
Plug the cord into the wall outlet. Your cleaniner is ready for use.
CASTER / ACCESSORY HOLDER ASSEMBLY
Invert dust tank, take the dolly to align the tank bottom sinking place. Secure with screws provided.
Return dust tank assembly upright.
WARNING: To reduce the risk of fire or explosion, do not operate this vac in areas with flammable gases, vapors or explosive dust in the air. Flammable gases or vapors include but are not limited to: lighter fluid, solvent-type cleaners, oil-based paints, gasoline, alcohol or aerosol sprays. Explosive dusts include but are not limited to: coal, magnesium, aluminum, and grain or gun powder. Do not vacuum explosive dust, flammable or combustible liquids or hot ashes. Do not use this vac as a sprayer for any flammable or combustible liquid. To reduce the risk of health hazards from vapors or dusts, do not vacuum toxic materials.
WARNING: The operation of any utility vac can result in foreign objects being blown into the eyes, which can result in severe eye damage. Always wear safety eyewear complying with ANSI Z87.1 or in Canada, CSA Z94.3 before starting operation.
CAUTION:
To reduce risk of hearing damage, wear ear protectors when using the vac for extended hours or when using it in a noisy area.
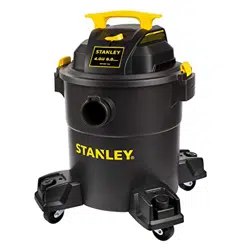
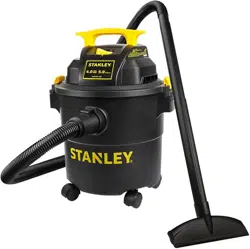
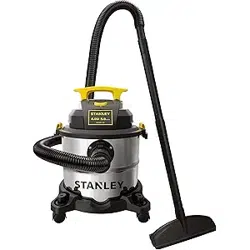
This 6-gallon wet/dry vac is assembled at the factory and ready for use when you remove it from the carton. The unit is ready for dry vacuuming or blowing. After you plug the power cord into the wall receptacle, turn the unit “ON” by pushing the switch from position “O” to position “I”. The “O” is the “OFF” position and the “I” is the “ON” position.
DRY PICK-UP
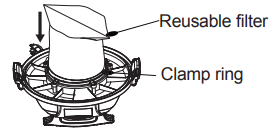
1. The filter must always be in correct position to reduce the risk of leaks and possible damage to vac. Make sure that the filter is completely covering the filter cage and that the clamp ring is as close to the lid as possible. Make sure there are no gaps between the filter and the lid. (See illustration). It is very important to assemble the filter to the cage without allowing any possible leaks or tears. Any leaks will allow the picked up debris to be blown out of the blowing port and back into the surrounding environment.
2. When using your vac to pick up very fine dust, it will be necessary to empty the dust tank and clean or replace the filter at more frequent intervals to maintain peak vac performance.
NOTE: A dry filter is necessary to pick up dry material. If you use your vac to pick up dust when the filter is wet, the filter will clog quickly and be very difficult to clean. If the filter gets wet, replace it before continuing to do dry pickups.
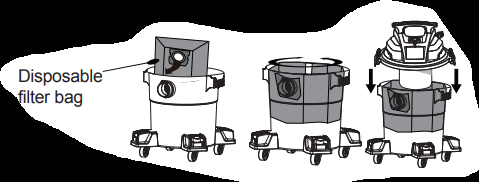
INSTALLING DISPOSABLE FILTER BAG
1. Slide the cardboard collar opening firmly onto the vacuum port deflector until it stops against the deflector wall.
2. Position the bag so that it is distributed around the inside of the tank.
3. Replace and secure the power head onto the tank.
WET PICK-UP
1. Remove reusable filter and replace it with foam filter when you do wet pickups.
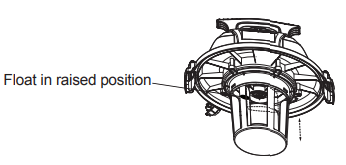
2. This wet/dry vac is equipped with a float mechanism which will rise automatically to cut off the airflow when the liquid in the tank reaches a predetermined level. When this happens, turn off vac, unplug the power cord, and empty the dust tank. You will know that the float has shut the airflow off because the suction ceases and the motor noise becomes higher in pitch due to increased motor speed. The liquid capacity may vary with the rate of pickup.
IMPORTANT: To reduce the risk of damage to the vac, do not run motor with float in raised position.
EMPTY THE TANK
WARNING:
To reduce the risk of injury from accidental starting, unplug power cord before emptying the dust tank.
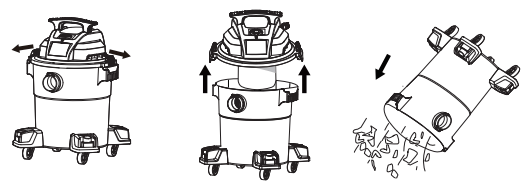
1. Remove the power head assembly of the wet/dry vac by pulling outward on the lid clips located on each side of the vac. Lift off the power head assembly.
2. Dump the tank contents into the proper waste disposal container.
BLOWING OPERATION
WARNING: Always wear safety eyewear complying with ANSI Z87.1 or in Canada CSA Z94.3 when using as a blower.
WARNING: To avoid injury to bystanders, keep them clear of blowing debris.
CAUTION: Wear a dust mask if blowing creates dust which might be inhaled.
CAUTION: To reduce the risk of hearing damage, wear ear protectors when using the vac/blower for extended hours or when using it in a noisy area.
Your vac contains a blowing feature. It has the capability to blow sawdust and other debris. It can be used to blow dust and debris out of garages or off patios and driveways. Follow the steps below to use your vac as a blower.
1. Locate blowing port on your vac.
2. Insert one end of the 1-1/4 in. x 6 ft. hose into the blowing port.
3. Turn vac “ON”.
CARE AND MAINTENANCE
FILTER REPLACEMENT
WARNING: To reduce the risk of injury from accidental starting, unplug power cord before changing or cleaning filter.
Your filter should be cleaned often to maintain peak vac performance.
IMPORTANT: To avoid damage to the blower wheel and motor, always reinstall the reusable filter before using the vac for dry pickups and always reinstall the foam filter before using the vac for wet pickups.
IMPORTANT: After cleaning, check the filter for tears or small holes. Do not use a filter with holes or tears in it. Even a small hole can cause a lot of dust to come out of your vac. Replace it immediately.
NOTE: Before installing the filter on the vac, clean the area of the lid so that the clamp ring will seal the bag against the lid and stop small particles from bypassing the filter bag.
If the filter is clean and not damaged, replace it on the filter cage. If it cannot be reused, place a new filter over the filter cage.
NOTE: Clean the filter in an open area. Cleaning should be done outdoors and not in living quarters.
WARNING: Do not remove filter cage and float. The float prevents water from entering the impeller and damaging the motor. The cage prevents fingers from touching the moving impeller.
CLEANING
To keep your wet/dry vac looking its best, clean the outside with a cloth dampened with warm water and mild soap.
To clean the tank:
1. Dump out debris.
2. Wash tank thoroughly with warm water and mild soap.
3. Wipe out with dry cloth.
STORAGE
Before storing your vac, the dust tank should be emptied and cleaned. The cord should be wrapped and hung on the unit and the accessories should be kept in the accessory holder so they can be readily available. The vac should be stored indoors.
TROUBLESHOOTING
WARNING! TO REDUCE THE RISK OF INJURY FROM MOVING PARTS AND/OR ELECTRICAL SHOCK, TURN POWER SWITCH OFF AND DISCONNECT GROUNDED PLUG FROM ELECTRICAL OUTLET BEFORE PERFORMING TROUBLESHOOTING CHECKS.
Minor problems often can be fixed without calling customer service.
PROBLEM
POSSIBLE CAUSE
CORRECTIVE ACTION
Vacuum will not run
No electricity
Make sure electrical outlet has voltage
(A qualified electrician may need to be contacted)
Loss of suction, wet pick-up
1. Full tank 2. Clogged hose 3. Clogged filter
1. Drain and clean tank 2. Remove hose and clean debris 3. Clean or replace filter
Loss of suction, dry pick-up
1. Full tank 2. Clogged hose 3. Clogged filter
1. Drain and clean tank 2. Remove hose and clean debris 3. Clean or replace filter