Loading ...
Loading ...
Loading ...
- 13 -
MOUNTING SCREWS
(4.8 x 38mm)
MOUNTING SCREWS
(3.9 x 6 mm Flat Head)
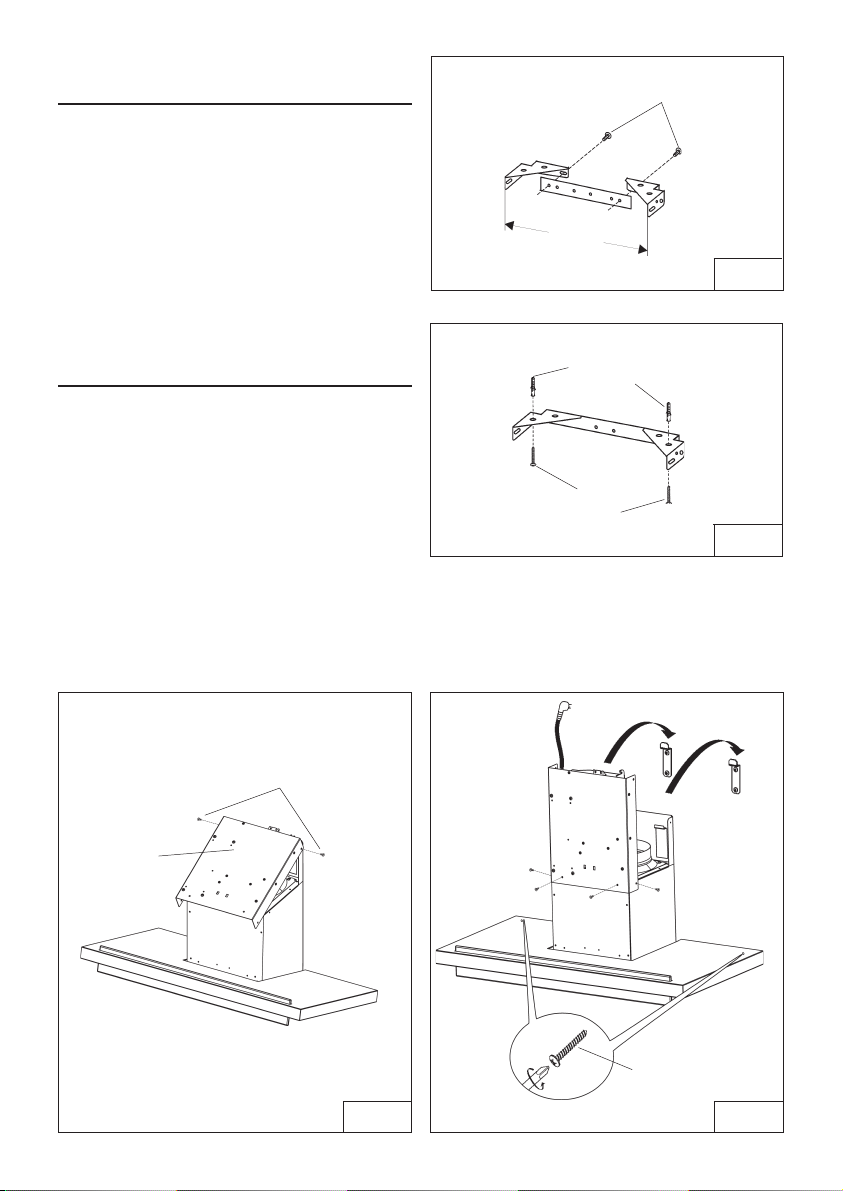
INSTALL FLUE MOUNTING
BRACKET
DUCTED AND NON-DUCTED
1.Assemble the flue mounting bracket,
adjusting outside width as shown. (Fig.10)
2.Carefully center the mounting bracket directly
over the range hood location.
3.Secure the bracket assembly to the ceiling
using (2) 4.8 x 38mm mounting screws and
drywall anchors (Fig.11). Make sure the
bracket is pushed into the corner, tight against
the wall if necessary, and centered over the
hood. Complete the installation.
INSTALL THE HOOD
DUCTED AND NON-DUCTED INSTALLATION
1. Remove the electrical system box from
chimney frame by removing (2) 3.9 x 9.5
mm screws. Fig. 12.
2. Attach electrical system box to frame using
(2) 3.9 x 9.5 mm screws removed in Step
1 and (2) 3.9 x 9.5 mm screws and (2) lock
washers from hardware bag.
3. Install hood onto the wall mounting
brackets. Fig. 13. Adjust leveling screws
on mounting brackets to level hood with
floor.
4. Mark and install (2) additional screws as
shown. Use drywall anchors only if
necessary.
REMOVE (2)
3.9 x 9.5 mm
SCREWS
ELECTRICAL
SYSTEM BOX
DRYWALL
ANCHORS
FIG. 10
FIG. 11
FIG. 12 FIG. 13
11
3/4
”
MOUNTING SCREWS
4.8 x 38 mm
INSTALL (4)
3.9 x 9.5 mm
SCREWS &
LOCK WASHERS
ON (2) SCREWS
Loading ...
Loading ...
Loading ...