NOTE: Your dryer comes with two types of cycles - Sensor drying cycles and Timed drying cycles.
SENSOR DRYING CYCLES:
Use Sensor Cycles for better fabric care and energy savings.The dryer senses moisture in the load or air temperature and shuts off when the load reaches the selected dryness level.
Note that you cannot adjust the time with these cycles.
TIMED DRYING CYCLES:
In these cycles, you can specify the drying time. Time options available are 15, 30, 60 and 90 minutes. For a complete list of all cycles, please refer to the cycle guide document.
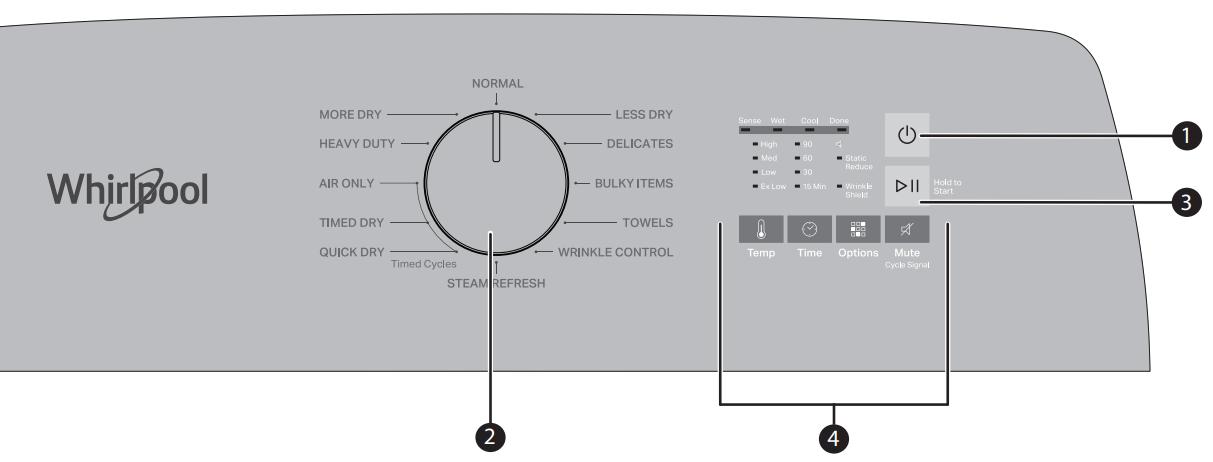
3 START/PAUSE
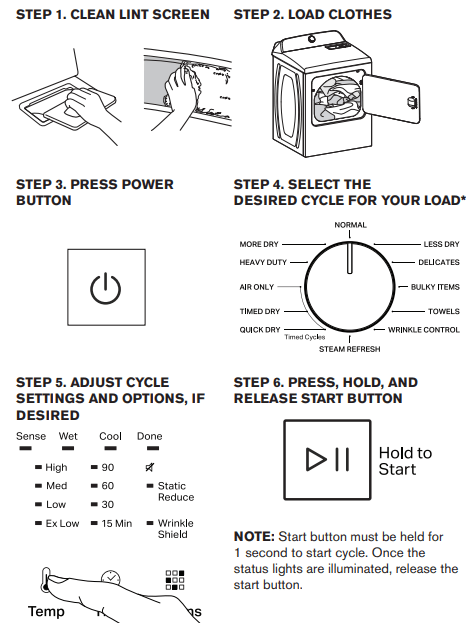
Press and hold the Start/Pause button for 1 second until all status lights are illuminated, then release to start cycle. Press during a cycle to pause cycle.
4 CYCLE MODIFIERS (Not all modifiers are available on all cycles)
TEMP
Press to modify the cycle’s available temperature. (Extra Low, Low, Medium, and High)
TIME (Air Only, Timed Dry, and Quick Dry Only)
Press to modify the time for the timed cycle between 15, 30, 60, and 90 minutes.
OPTIONS
Press to add or remove options for each cycle. Press once to activate Wrinkle Shield, twice to activate Static Reduce and three times for both.
WRINKLE SHIELD
If you will be unable to remove a load immediately, activate this option to add 150 minutes of periodic tumbling to help reduce wrinkles from forming after the cycle completes.
STATIC REDUCE
This option can help reduce the build up of static cling formed during the drying process. When activated, this option will tumble with steam towards the end of the cycle to reduce static.
MUTE CYCLE SIGNAL
Use this option to turn the end of drying cycle signal on or off.
DRYER MAINTENANCE AND CARE
Cleaning the Dryer Location
Keep dryer area clear and free from items that would block the airflow for proper dryer operation. This includes clearing piles of laundry in front of the dryer.
Cleaning the Dryer Interior
To clean dryer drum:
1. Use nonflammable cleaner or a mild hand dish detergent mixed at a low concentration with very warm water, and rubwith a soft cloth.
Rinse well with a wet sponge or towel.
Tumble a load of clean clothes or towels to dry drum.
OR
2. Use a microfiber cloth and very warm water in a spray bottle to clean the drum and a second microfiber towel to dry.
NOTE: Garments that contain unstable dyes, such as denim blue jeans or brightly colored cotton items, may discolor the rear of the dryer interior. These stains are not harmful to your dryer and will not stain future loads of clothes. Dry unstable dye items inside out to avoid transfer of dye.
Removing Accumulated Lint
From inside the dryer cabinet:
Lint should be removed every 2 years, or more often, depending on dryer usage. Cleaning should be done by a qualified appliance service or ventilation system cleaner.
From the exhaust vent:
Lint should be removed every 2 years, or more often, depending on dryer usage.
Cleaning the Lint Screen
Every load cleaning:
The lint screen may be located either in the door opening or the top of the dryer depending on model. A screen blocked by lint can increase drying time.
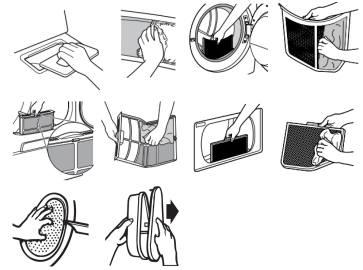
To clean:
1. Remove the lint screen. If necessary, press the tab to release and open the lint screen. Roll lint off the screen with your fingers. Do not rinse or wash screen to remove lint. Wet lint is hard to remove.
2. Push the lint screen firmly back into place.
IMPORTANT:
Do not run the dryer with the lint screen loose, damaged, blocked, or missing. Doing so can cause overheating and damage to both the dryer and fabrics.
If lint falls off the screen into the dryer during removal, check the exhaust hood and remove the lint. See “Venting Requirements” in the Installation Instructions.
Clean space where lint screen is located, as needed. Using a vacuum, gently remove any lint that has accumulated outside of the lint screen.
As-needed cleaning:
Laundry detergent and fabric softener residue can build up on the lint screen. This buildup can cause longer drying times for your clothes, or cause the dryer to stop before your load is completely dry. The screen is probably clogged if lint falls off while the screen is in the dryer. Clean the lint screen with a nylon brush every 6 months, or more frequently, if it becomes clogged due to a residue buildup.
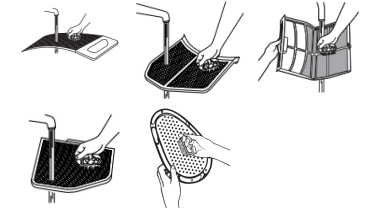
To wash:
1. Roll lint off the screen with your fingers.
2. Wet both sides of lint screen with hot water.
3. Wet a nylon brush with hot water and liquid detergent. Scrub lint screen with the brush to remove residue buildup.
4. Rinse screen with hot water.
5. Thoroughly dry lint screen with a clean towel. Reinstall screen in dryer.
Changing the Drum Light (on some models)
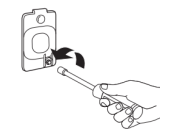
1. Unplug dryer or disconnect power.
2. Open the dryer door. Locate the light bulb cover on the back wall of the dryer. Using a 1/4" (6.5 mm) nut driver or socket wrench, remove the screw located in the lower right-hand corner of the cover. Remove the cover.
3. Turn bulb counterclockwise. Replace the bulb with a 10 W appliance bulb only. Replace the cover and secure with the screw.
4. Plug in dryer or reconnect power.
Check Your Vent System for Good Airflow
Good Airflow
Along with heat, dryers require good airflow to efficiently dry laundry. Proper venting will reduce your drying times and improve your energy savings. See Installation Instructions.
The venting system attached to the dryer plays a big role in good airflow. Blocked or crushed vents as well as improper venting installation will reduce air flow and dryer performance.
Service calls caused by improper venting are not covered by the warranty and will be paid by the customer, regardless of who installed the dryer. To clean or repair venting, contact a venting specialist.
Maintain Good Airflow
Cleaning your lint screen before each load.
Replace plastic or foil vent material with 4" (102 mm) diameter heavy, rigid vent material.
Use the shortest length of vent possible
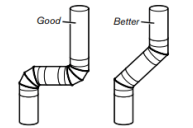
Use no more than four 90° elbows in a vent system; each bend and curve reduces airflow.
Remove lint and debris from the exhaust hood.
Remove lint from the entire length of the vent system at least every 2 years. When cleaning is complete, be sure to follow the Installation Instructions for final product check.
Clear away items from the front of the dryer.
Nonuse, Storage, and Moving Care
Nonuse or Storage Care
If you will be on vacation or not using your dryer for an extended period of time, you should:
1. Unplug dryer or disconnect power.
2. Clean lint screen. See “Cleaning the Lint Screen.”
3. Steam Models Only: Turn off the water supply to the dryer.
This helps to avoid flooding (due to a water pressure surge) while you are away.
Moving Care
For power supply cord-connected dryers:
1. Unplug the power supply cord.
2. Steam models only: Shut off water faucet. Disconnect the water inlet hose from faucet; then drain the hose. Transport hose separately.
3. Make sure leveling legs are secure in dryer base.
4. Use tape to secure dryer door.
5. On models with base trim, remove base trim before moving dryer. See "Install and remove base trim (on some models)" for details.
For direct-wired dryers:
1. Turn off power at fuse or breaker box.
2. Disconnect wiring.
3. Steam models only: Shut off water faucet. Disconnect the water inlet hose from faucet; then drain the hose. Transport hose separately.
4. Make sure leveling legs are secure in dryer base.
5. Use tape to secure dryer door.
6. On models with base trim, remove base trim before moving dryer. See "Install and remove base trim (on some models)" for details.
To winterize the dryer:
1. Unplug dryer or disconnect power.
2. Shut off water faucet.
3. Disconnect water inlet hose from faucet and drain.
To use the dryer again:
1. Flush water pipes. Reconnect water inlet hose to faucet. Turnon water faucet.
2. Plug in dryer or reconnect power as described in theInstallation Instructions.
Reinstalling the Dryer
Follow the Installation Instructions to locate, level, and connect thedryer.
Special Instructions for Steam Models
Install and store your dryer where it will not freeze. Because somewater may stay in the hose, freezing can damage your dryer. Ifstoring or moving your dryer during freezing weather, winterize it.
Water inlet hose
Replace inlet hose and hose screen after 5 years of use to reducethe risk of hose failure. Periodically inspect and replace inlet hoseif bulges, kinks, cuts, wear, or leaks are found.When replacing your inlet hose, record the date of replacement