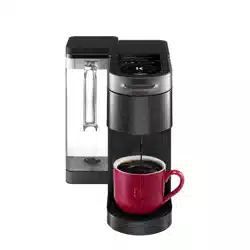
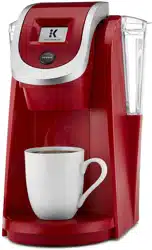
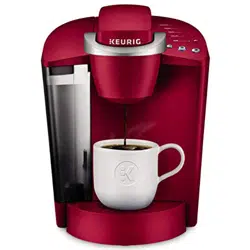
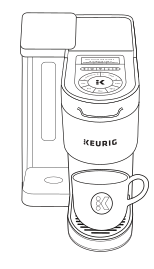
Keurig Use & Care Guide K-Supreme Plus

Get connected with the app.
You will need this to set up and control your brewer.
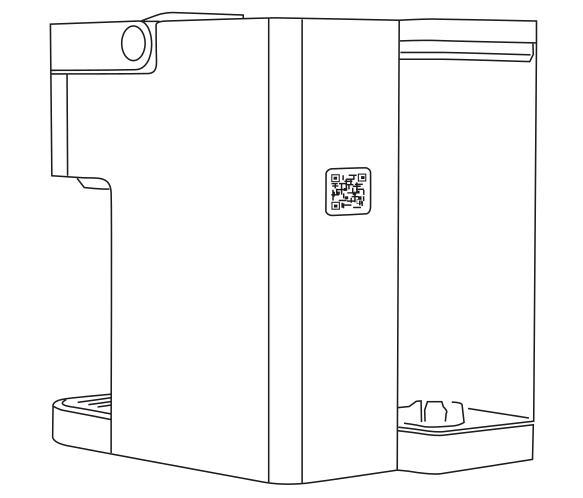
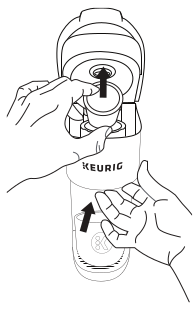
1. SCAN The QR code on the back of the brewer:
Use the camera on your smartphone to scan the QR code to download the app and get started; or download the Keurig app in the App Store.

2. Connect Your Brewer
PLUG IT IN
Remove packing tape from brewer and plug into a grounded outlet. The brewer will automatically power on. you can also press any button on the brewer to power on. Make sure you have your home Wi-Fi password ready.

GET CONNECTED
Open the Keurig app and select Get Connected. then create an account. Once completed. press the right arrow on the brewer to Connect.

SET UP
Follow the instructions in the app to link the brewer to your smart phone. then to connect to your home Wi-Fi. You will see a message that says SUCCESS! Press OK. You will also see a message on the brewer that says Wi-Fi Connected. press FINISH.
Before You Brew
Rinse & Fill
Rinse reservoir with fresh water and fill to the max fill line.
If you have a Keurig Water Filter. install it now.
Cleansing Brew
Press any button to power on
Place a large mug (100z minimum) on the drip tray.
Follow the instruction on the brewer screen to perform a cleansing brew.
The one-time setup process is now complete and you are ready to brew!

Brew Your First Cup
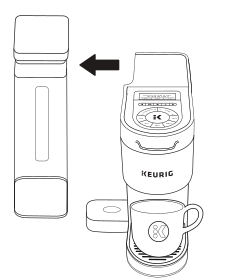
Place Mug & Insert Pod
Lift the handle and place a K-Cup pod in the K-Cup pod holder.
Lower the handle completely to close the lid
Do not remove the foil lid on the K-Cup pod.
NOTE: Remove the drip tray to accommodate a travel mug up to 7” tall
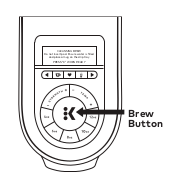
Brew & Enjoy!
Use the Recommended Brew setting or Customize your brew. Choose a size. then press the blinking BREW button. Once the brew is completed dispose of the used K-Cup pod. am
Brewing is complete when the Enjoy screen is displayed.
CAUTION: While brewing. there is extremely hot water in the K-Cup pod holder. To avoid injury. do not lift the handle during the brewing process

Get To Know Your Brewer
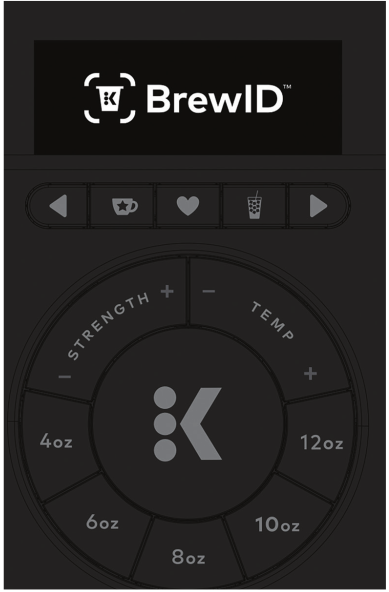
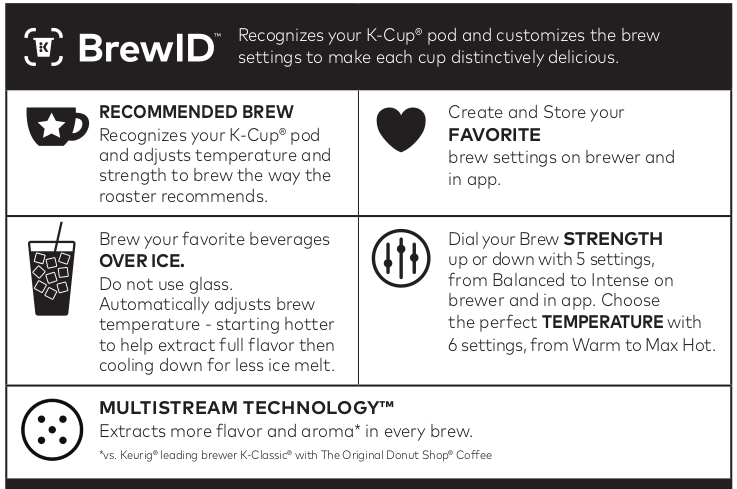
RECOMMENDED BREW: Recognizes your K-Cup pod and adjusts temperature and strength to brew the way the roaster recommends.
Create and Store your FAVORITE brew settings on brewer and in app.
Brew your favorite beverages OVERICE. Do not use glass. Automatically adjusts brew temperature - starting hotter to help extract full flavor then cooling down for less ice melt.
Dial your Brew STRENGTH up or down with 5 settings. from Balanced to Intense on brewer and in app. Choose the perfect TEMPERATURE with 6 settings. from Warm to Max Hot.
MULTISTREAM TECHNOLOGY
Extracts more flavor and aromat in every brew. “vs Keurig leading breverK-Clssi¢ with The Original Donut Shop? Coffee
SMART IN-APP FEATURES:
- Schedule a Brew
- Customize your Brew Settings
- Smart Auto-Delivery, Never Run Out of Coffee
- Voice-Controlled Brew
- Maintenance Alerts
Brewer Features
Create a Favorite: Favorites can be added while customizing your brew. press and hold the heart button above the temperature and strength settings. you can save up to 10 favorites. Favorites can be renamed in the Keurig app by tapping settings. then select a favorite to rename.
The Keurig? app can also be used to reorder favorites. In the app. tap settings. then favorites. then icon. and then drag the favorites into the preferred order. A favorite can be deleted via the brewer or the Keurig? app. To delete via the brewer. select the favorite you wish to delete. then press and hold the heart button. and then confirm deletion
Hot Water Brew: On the home screen with no K-Cup pod inserted in to the brewer. press the K to access hot water. Then choose the size and press the blinking K to brew hot water.
Power on/Auto off: to power your brewer on simply press any button or lift the brew handle. Your brewer will automatically turn off after S minutes. You can also press and hold the K button to turn the brewer off.
Settings When the brewer is plugged in and powered on. press both arrows at the same time to open the Settings menu. Use the right arrow to scroll through the different features within the menu including:
+ Wi-Fi: connect to your Wi-Fi network. modify your password. and change the Wi-Fi settings
+ High Altitude: ensure your brewer works properly at higher altitudes (5. 00 feet)
+ Language: choose your preferred language Water Filter Reminder: set the water filter reminder to ensure you always have quality water for your coffee
+ Brewer Information: provides the latest software version installed on the coffee maker
+ Support: provides contact information to get help when you need it
+ Factory reset: resets to the original manufactured state
Voice Control (Alexa & Google Home): Open the Keurig app. tap Settings. tap My Account. tap Voice Control. Follow the prompts in app.
Remote Brew: First place a pod in the brewer and lower the handle. Then place a sufficiently-sized mug on the drip tray. This may be done at any point before a remote brew. When you are ready to brew remotely. open the Keurig? app. ensure you are on the Brew tab. select your brew settings. and then tap the app's brew button. To override remote brew. you can cancel via the app or power off the brewer.
Remote On & Off: In the Keurig app on the Brew tab. tap to toggle the power on and off.
Schedule a brew allows you to schedule a brew in advance. From the brew tap in the app. tap the calendar icon in the top right corner. Then choose the day and time you would like to schedule a brew. Make sure you have enough water in the reservoir. place a pod in the brewer and lower the handle. and place a sufficently sized mug on the drip tray. You will get a reminder before your next scheduled brew.
Smart Auto-Delivery keeps tracks of how many cups you are using and automatically sends you an order when your remaining inventory is down to 10 days. so you won't run out of pods.
My Brew Style tracks your brewing activity within the app and provides recommendations on favorites we think you will enjoy based on what you've been brewing
ATTENTION!: This brewer is only compatible with the newly designed Keurig? My K-Cup? Universal Reusable Coffee Filter.
Do not attempt to use any other reusable filter or previous versions of Keurig? My K-Cup? Universal Reusable Coffee Filter; may cause damage to brewer.
Caring For Your Brewer
Regular cleaning keeps your brewer running smoothly. Always be sure to turn off and unplug your brewer before cleaning.
Brewer Exterior
Keep your Keurig? brewer looking its best by cleaning the exterior from time to time. Just clean the metal areas with a paper towel and a non-vinegar glass cleaner. and the plastic with a damp. soapy. lint-free. non-abrasive cloth. Never immerse the brewer in water or other liquids.
Drip Tray
The drip tray can hold up to 8 ounces of overflow and should be emptied and cleaned occasionally. To remove. slide it toward you. keeping it level to avoid spilling. Rinse and clean with a damp. soapy. lint-free. non-abrasive cloth.
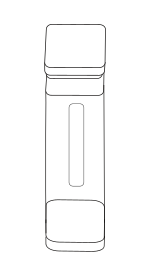
Water Reservoir
The water reservoir should be cleaned periodically by wiping the inside of the reservoir and underside of the lid with a damp. non-abrasive. lint free cloth. Do not dry the inside of the water reservoir with a cloth as lint may remain. Allow the reservoir to dry completely.
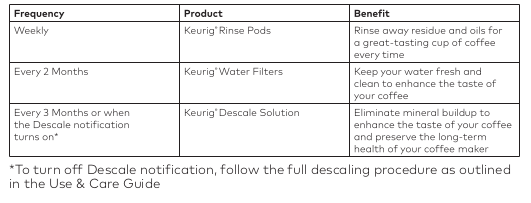
Regular Maintenance
For great-tasting coffee. keep your brewer running at peak performance by following the recommended maintenance schedule:
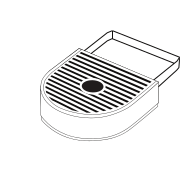
K-Cup Pod Holder
To remove the K-Cup pod holder from the brewer. lift the handle and grasp the top of the K-Cup pod holder with one hand while pushing up on the bottom of the K-Cup pod holder from underneath with the other until it releases. After cleaning. align the K-Cup pod holder with the opening using the two front ribs as a guide and snap into place from the top.
CAUTION: There are sharp needles that puncture the K-Cup” pod above the K-Cup pod holder and in the bottom of the K-Cup? pod holder. To avoid risk of injury. do not put your fingers in the K-Cup” pod holder.
NOTE: Always remove and dispose of the used K-Cup pod after brewing.
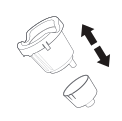
Funnel
Washing the funnel ensures a fresh beverage experience. The funnel should be washed regularly and can be removed from the K-Cup pod holder by pulling on it until it pops off. To replace it. orient the snaps to the indent and just snap it back onto the K-Cup pod holder.
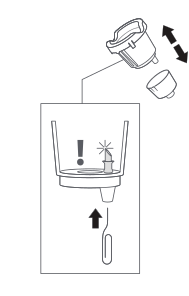
Exit Needle
Remove the pod holder assembly and detach the funnel. Locate the exit needle on the inside bottom of the K-Cup pod holder. Insert a straightened paper clip into the exit needle to loosen any coffee grounds.
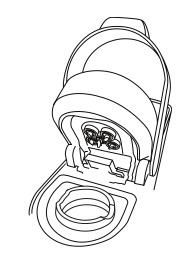
Entrance Needles
Lift the brewer handle and locate the entrance needles on the underside of the lid. To clean the holes in the needles. hold the brewer handle in the upward position and with your other hand. carefully insert a straightened paper clip into all the holes. Gently move it around to loosen any coffee grounds. Lower the handle completely and run a cleansing brew two times. Do not insert a K-Cup pod.
Descaling Your Brewer
You should descale your brewer every 3 months or when the descale notification turns on. Properly follow the descaling procedure in order to turn off the notification.
Depending on the mineral content of your water. calcium deposits or scale may build up in your brewer. Scale is non-toxic but if left unattended can hinder brewer performance. Regularly descaling your brewer every 3 months helps maintain the heating element and other internal parts that come in contact with water. Calcium deposits may build up faster. making it necessary to descale more often.
Descaling Procedure
Before you begin. you will need a large ceramic mug. fresh water. Keurig Descaling Solution, and access to a sink. Do not use a paper cup. Ensure that there is no beverage pod in the K-Cup pod holder. Please allow approximately 15-20 minutes for the descaling procedure.
STEP 1: Prepare the Brewer
When the Descale notification appears on the screen. press the left arrow. then choose CONTINUE. Select your descaling product 20z Pouch or 140z Bottle. Next follow the prompts on the screen to complete the descale process. If you would like to descale your brewer but don't see the descale notification on the display. press both arrows at the same time to open Settings. then select Descale Mode.
Note: Make sure to remove the water filter from the water reservair if applicable.
STEP 2: Descale the Brewer
Empty the water reservoir and add the Keurig? descaling solution to the water reservoir. Pour the entire bottle of Keurig Descale Solution into an empty water reservoir. If using the bottle. fill the empty bottle with water and pour into the water reservoir. If using the Pouch. add 3 cups of water (240z) to the reservoir. Do not insert a K-Cup pod. Place a large mug on the drip tray.
Press the flashing BREW button to dispense 120z of hot water. Discard the hot water and replace mug on the drip tray. Repeat until the water reservoir is empty and the screen says ADD WATER.
STEP 3: Fresh Water Rinse
Rinse the water reservoir and refill it to the max fill ine with fresh water. Make sure the mug is on the drip tray. When the brew button flashes press to begin fresh water rinse. Once the brew is complete. pour the hot liquid into the sink. Repeat this step until the screen says DESCALE COMPLETE. Now the brewer is ready for use.
NOTE: The cleaning action of Keurig? Descaling Solution may result in a "foam dispensed from the brewer. This is natural. as the solution is reacting with the scale inside. For a brewer that is heavily scaled. the brewer may not fill properly after the dascoler is added. IF this accurs. you may seeonlya small or no output dispensed. followed by the sound of air blowing out. If this occurs:
+ Tum off and unplug the brewer.
+ If there is Keurig Descaling Solution in the water reservoir. discard the contents. rinse the water reservoir thoroughly and refill with water.
+ Plug the brewer backin. power on. and repeat the Step 3 Fresh Water Rinse cycle. The brewer should begin to function normally as the solution is rinsed out and the scale is removed. If problem persists. callow brewer to sit unplugged for at least 30 minutes before continuing with the rinse.
Troubleshooting
Grounds in Your Coffee
Grounds may have gathered in the exit or entrance needles and can be cleaned using a straightened paper clip or similar tool.
• Clean the exit needle of the K-Cup Pod Holder. Refer to the Exit Needle care instructions.
• Clean the brewer entrance needles. Refer to the Entrance Needle care instructions.
For optimal enjoyment and to limit grounds in your cup during hot water brews or when transitioning from brewing a coffee pod to a non-coffee pod (i.e. tea or cocoa). clean the exit and entrance needle per the instructions provided and perform 2 cleansing brews.
Excessive Grounds in the K-Cup Pod Assembly Housing
Do not use already-punctured pods. That may result in grounds escaping through holes in the lid.
Brewer Will Not Close or Brew with My K-Cup
Due to the number of entrance needles. older My K-Cup Reusable Coffee Filters may not be compatible with the brewer. The compatible My K-Cup filter will have five holes on its lid.
Recommended Brew Settings Are Not Provided or a Keurig K-Cup Pod is Not Recognized
First. make sure your brewer is connected to Wi-Fi to enable BrewIDTM. Next. ensure the pod that was used was a Genuine Keurig K-Cup pod by finding the Keurig logo on the pod’s lid. If a Keurig pod’s lid is already punctured. it may not be recognized. Try again with an unpunctured pod.
If the brewer continues not to recognize Keurig pods. Contact Customer Service.
How do I connect my brewer if I skipped connecting it out of the box?
Make sure you have your home Wi-Fi password ready.
First. download the Keurig app and select Get Connected to create an account.
If you already have the Keurig app. go to settings in the app. select Connect a Brewer. then Get Started. Scan the QR code on the back of the brewer.
Next. press both arrows at the same time on the brewer to open Settings. Press the right arrow to continue to the Wi-Fi settings.
Press the K button followed by the right arrow to Connect. Tap LINK in the app. Follow the in app instructions.
Brewer Will Not Brew
If you see the add water warning. add water to the water reservoir.
• A minimum of 6oz of water is required to brew. Add an additional 2oz of water to the reservoir to ensure the minimum fill level has been met. then press the BREW button. Repeat until the brewer begins to dispense.
Make sure the water reservoir is seated properly in its base. If the add water warning persists even after refilling. contact Customer Service.
Brewing a Partial Cup
• The exit needle may be clogged. Refer to the Exit Needle care instructions.
• Clean the K-Cup Pod Holder. see K-Cup Pod Holder care instructions.
• The brewer may need to be descaled. If you have repeated the descale procedure on your brewer two times and it is still only brewing a partial cup. contact Customer Service.
Brewer Does Not Have Power or Shuts Off
• Plug brewer into its own grounded outlet. If the electric circuit is overloaded with other appliances. your brewer may not function properly. The brewer should be operated on its own circuit. separate from other appliances.
• For energy savings. the brewer automatically turns off 5 minutes after the last brew.
• If the brewer still doesn’t have power. contact Customer Service.
Helpful Hints
Water quality varies greatly. If you notice an undesirable taste in your beverage (such as chlorine or mineral tastes). we recommend using a Keurig Water Filter. bottled. or filtered water. Do not use distilled water. You can also install a Keurig Water Filter to help remove water impurities and improve beverage taste.
Service
Beyond these recommended cleaning and maintenance procedures. this brewer is not user serviceable. For service. please refer to the Warranty section of this guide.
Storage
Empty the water reservoir before storing or transporting and take care to ensure that you store your brewer in a safe and frost-free environment. When you prepare to use it after storage. we recommend rinsing the water reservoir with fresh water and descaling the brewer as detailed in the Descaling your Brewer section.
If you plan to move your brewer to a different location. turn the brewer off. unplug it. and empty the water reservoir. If your brewer has been in an environment below freezing. please be sure to let it warm to room temperature for at least 2 hours before using.
Have Questions?
We’re here to help. Visit Support.Keurig.com for step-by-step videos on cleaning. descaling. and more.
Still Need Help? Give us a call at 1-866-901-BREW (2739)
LIMITED ONE-YEAR WARRANTY
Keurig Green Mountain. Inc. (Keurig) warrants that your brewer will be free of defects in materials or workmanship under normal home use for one year from the date of purchase. It is recommended that you register your brewer on keurig.com/new so that your purchase information will be stored in our system. Keurig will. at its option. repair or replace a defective brewer without charge upon its receipt of proof of the date of purchase. If a replacement brewer is necessary to service this warranty. the replacement brewer may be new or reconditioned. If a replacement brewer is sent. a new limited one-year warranty will be applied to the replacement brewer.
This warranty only applies to brewers operated in the United States and Canada. This warranty gives you specific legal rights. and you may also have other rights that vary from state to state and. in the case of Canada. from province to province.
Only the use of Keurig K-Cup brand pods and accessories will guarantee the proper functioning and lifetime of your Keurig brewer. Any damage to or malfunction of your brewer resulting from the use of non-Keurig pods and accessories may not be covered by this warranty or may result in a service fee if the damage or malfunction is determined to be caused by such use.
WHAT IS NOT COVERED BY THE LIMITED WARRANTY?
THIS WARRANTY DOES NOT COVER CONSEQUENTIAL OR INCIDENTAL DAMAGES SUCH AS PROPERTY DAMAGE AND DOES NOT COVER INCIDENTAL COSTS AND EXPENSES RESULTING FROM ANY BREACH OF THIS WARRANTY. EVEN IF FORESEEABLE. Some states or provinces do not allow the exclusion or limitations of incidental or consequential damages. so the above limitation or exclusion may not apply to you depending on the state or province of purchase.
Nor does this warranty cover damages caused by use of non-Keurig pods or accessories. services performed by anyone other than Keurig or its authorized service providers. use of parts other than genuine Keurig parts. or external causes such as abuse. misuse. inappropriate power supply. or acts of God.
OTHER LIMITATIONS
THIS WARRANTY IS EXCLUSIVE AND IS IN LIEU OF ANY OTHER EXPRESS WARRANTY. WHETHER WRITTEN OR ORAL.
IN ADDITION. KEURIG HEREBY SPECIFICALLY DISCLAIMS ALL OTHER WARRANTIES WITH RESPECT TO YOUR KEURIG BREWER. INCLUDING ANY IMPLIED WARRANTY OF MERCHANTABILITY OR FITNESS FOR ANY PARTICULAR PURPOSE. Some states or provinces do not allow disclaimers of such implied warranties or limitations on how long an implied warranty lasts. so the above limitation may not apply to you depending on the state or the province of purchase.
HOW DO YOU OBTAIN WARRANTY SERVICE?
Keurig brewers are high-quality appliances and. with proper care. are intended to provide years of satisfying performance. However. should the need arise for warranty servicing. simply call Keurig Customer Service at our toll-free phone number 1.866.901.BREW (2739). Please do not return your brewer for servicing without first speaking to Keurig Customer Service to obtain a Return Materials Authorization (RMA) number. Keurig brewers returned without an RMA number will be returned to the sender without servicing.
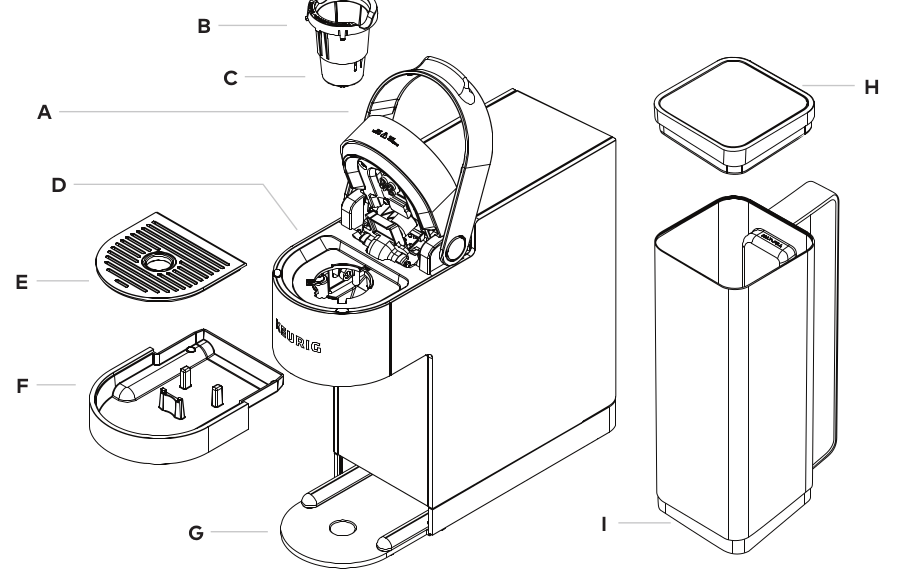
K - Supreme Plus Smart Introduce
A. Handle
B. K-Cup Pod Holder (B and C are the K-Cup Pod Holder Assembly)
C. Funnel
D. K-Cup Pod Assembly Housing
E. Drip Tray Plate
F. Drip Tray
G. Drip Tray Base
H. Water Reservoir Lid
I. Water Reservoir