
Compact audio interface with
advanced guitar tone shaping
USER MANUAL

Contents
2
Table of Contents
Contents 2
English 3
AXE I/O SOLO 3
Register your AXE I/O SOLO 3
Front panel 4
Rear panel 5
1 Installation and setup 6
1.1 Software installation 6
1.2 Setup 6
2 Dedicated guitar features 8
2.1 Direct amplifier output & Re-Amplification 8
2.2 JFET / PURE input (only for Instrument Input 1) 9
2.3 Pick-Up selector (only for Instrument Input 1) 9
2.4 Variable impedance (Z-TONE™) control (only for Instrument Input 1) 10
2.6 External control 11
3 Setup your DAW 12
4 Connecting microphones 12
4.1 Condenser microphones 12
4.2 Dynamic microphones 12
4.3 Ribbon microphones 12
5 Connecting instrument 13
6 Connecting loudspeakers and headphones 14
7 Direct monitoring 15
8 Control software 15
8.1 Interface view 16
8.2 Controller tab 18
9 Specifications 19
Warranty 20
Support and more info 20
Regulatory 21
English
3
AXE I/O SOLO
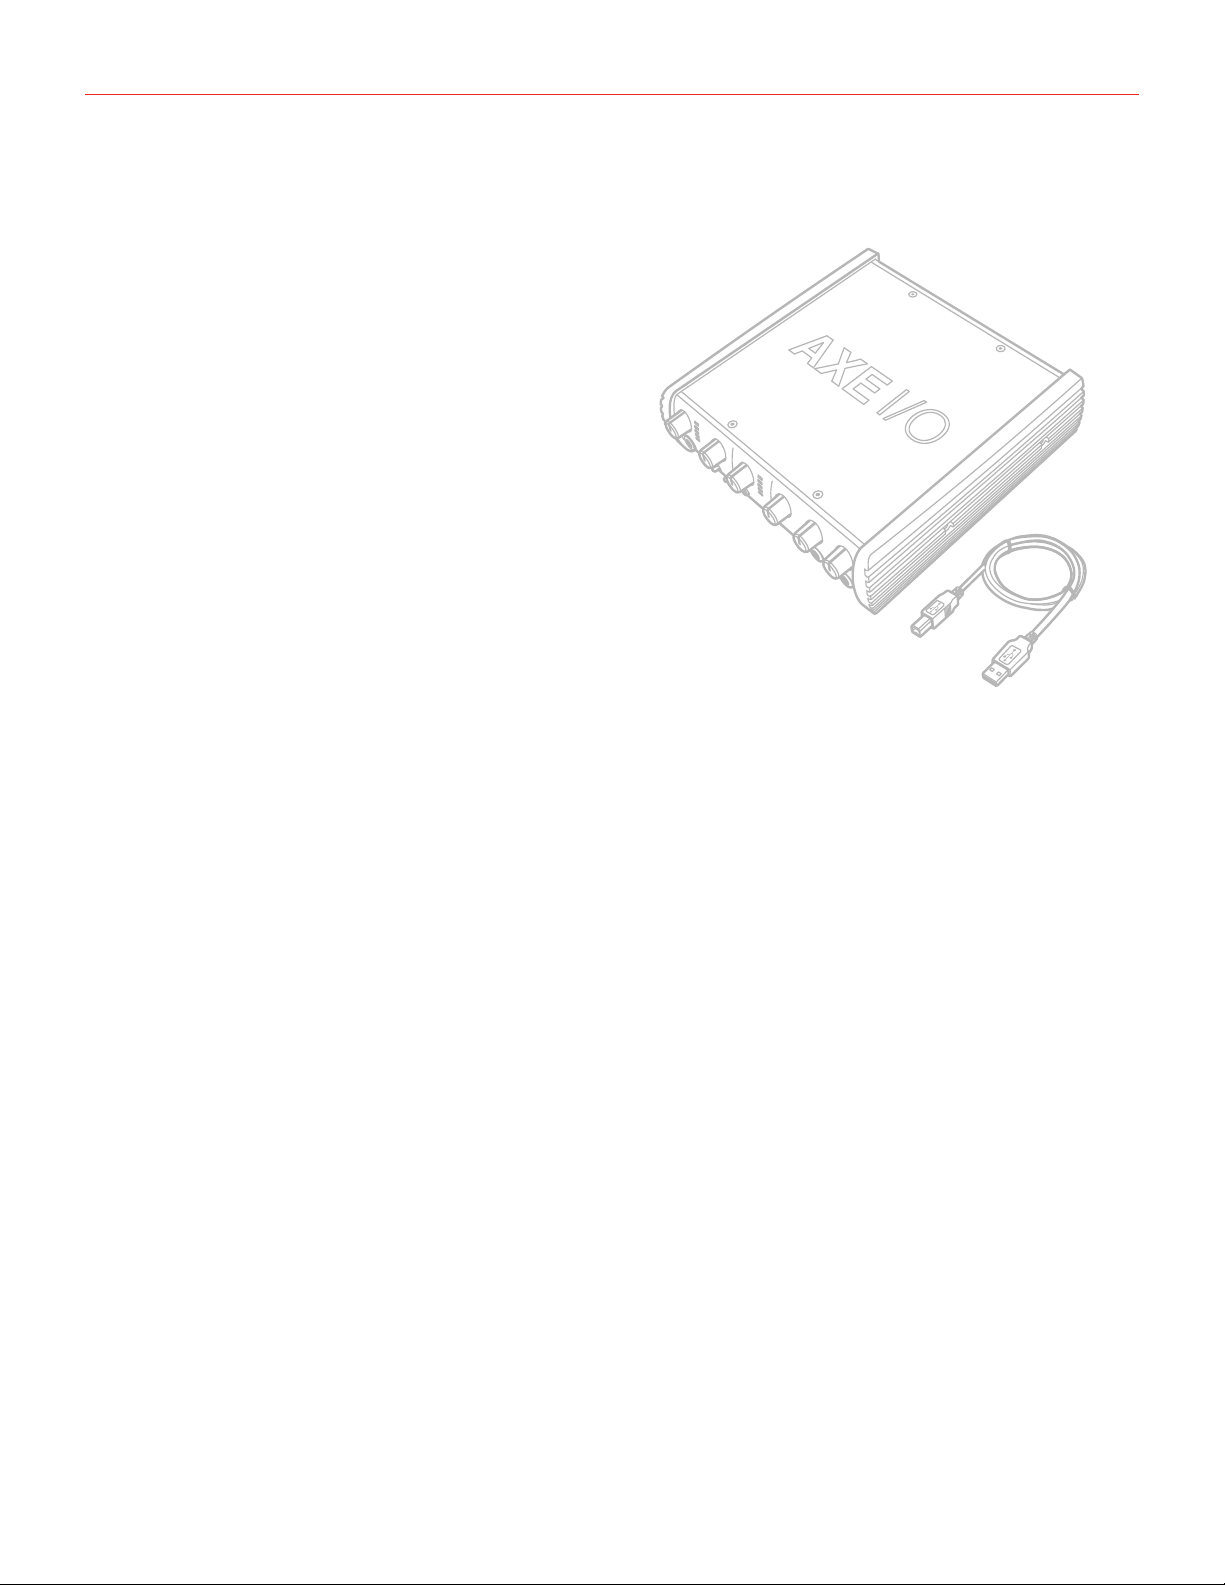
Thank you for purchasing AXE I/O SOLO.
Your package contains:
X1
X1
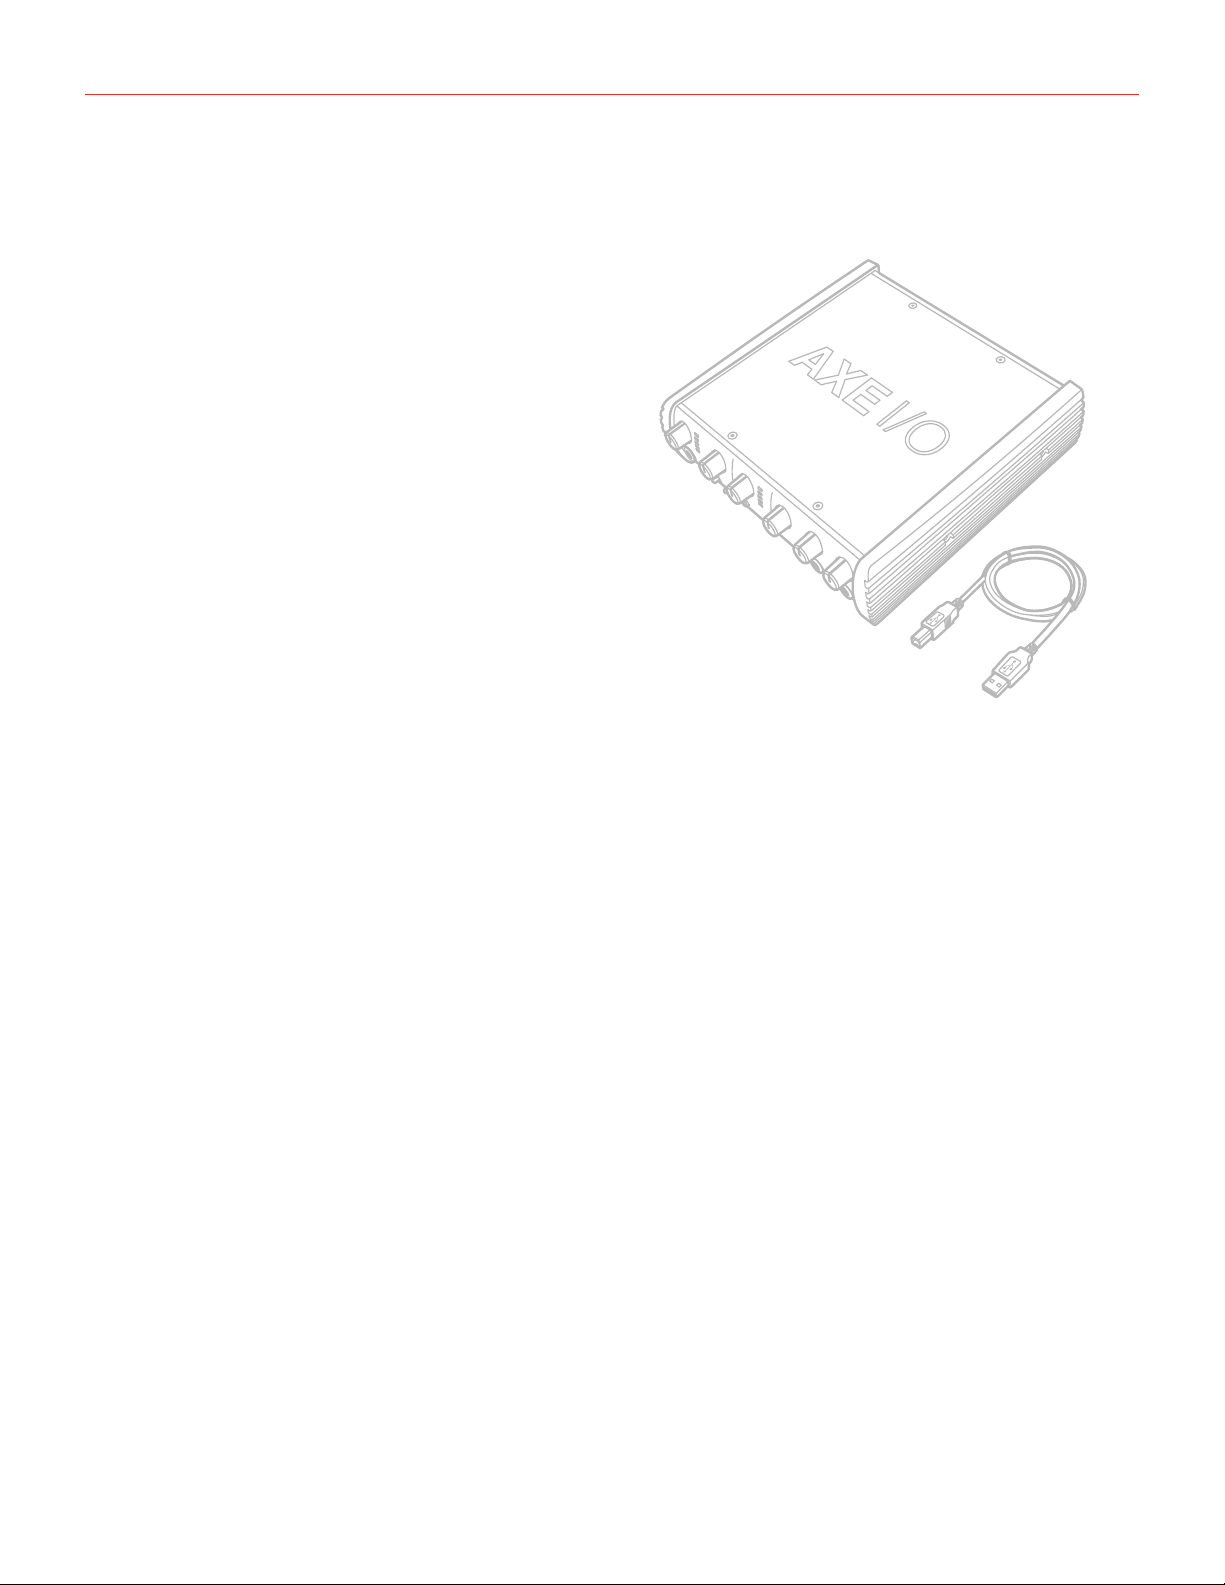
• AXE I/O SOLO
• USB cable
AXE I/O SOLO is the most compact interface in the AXE I/O family, with 2 inputs and 3 outputs.
As with the original AXE I/O, it has been created from the ground-up with the goal of designing the best possible
interface for guitar players, and sports a series of features that can’t be found individually or combined in any
other competitive audio interface today. All of this in a very compact housing.
AXE I/O SOLO is a superior all-round audio interface too, thanks to the 192kHz sampling resolution at 24bit, the
outstanding dynamic range and the asynchronous USB audio, for ultra low conversion jitter for premium audio
performance.
Register your AXE I/O SOLO
By registering, you can access technical support, activate your warranty and receive free JamPoints™ which will
be added to your account. JamPoints™ allow you to obtain discounts on future IK purchases! Registering also
keeps you informed of all the latest software updates and IK products.
Register at: www.ikmultimedia.com/registration
English
4
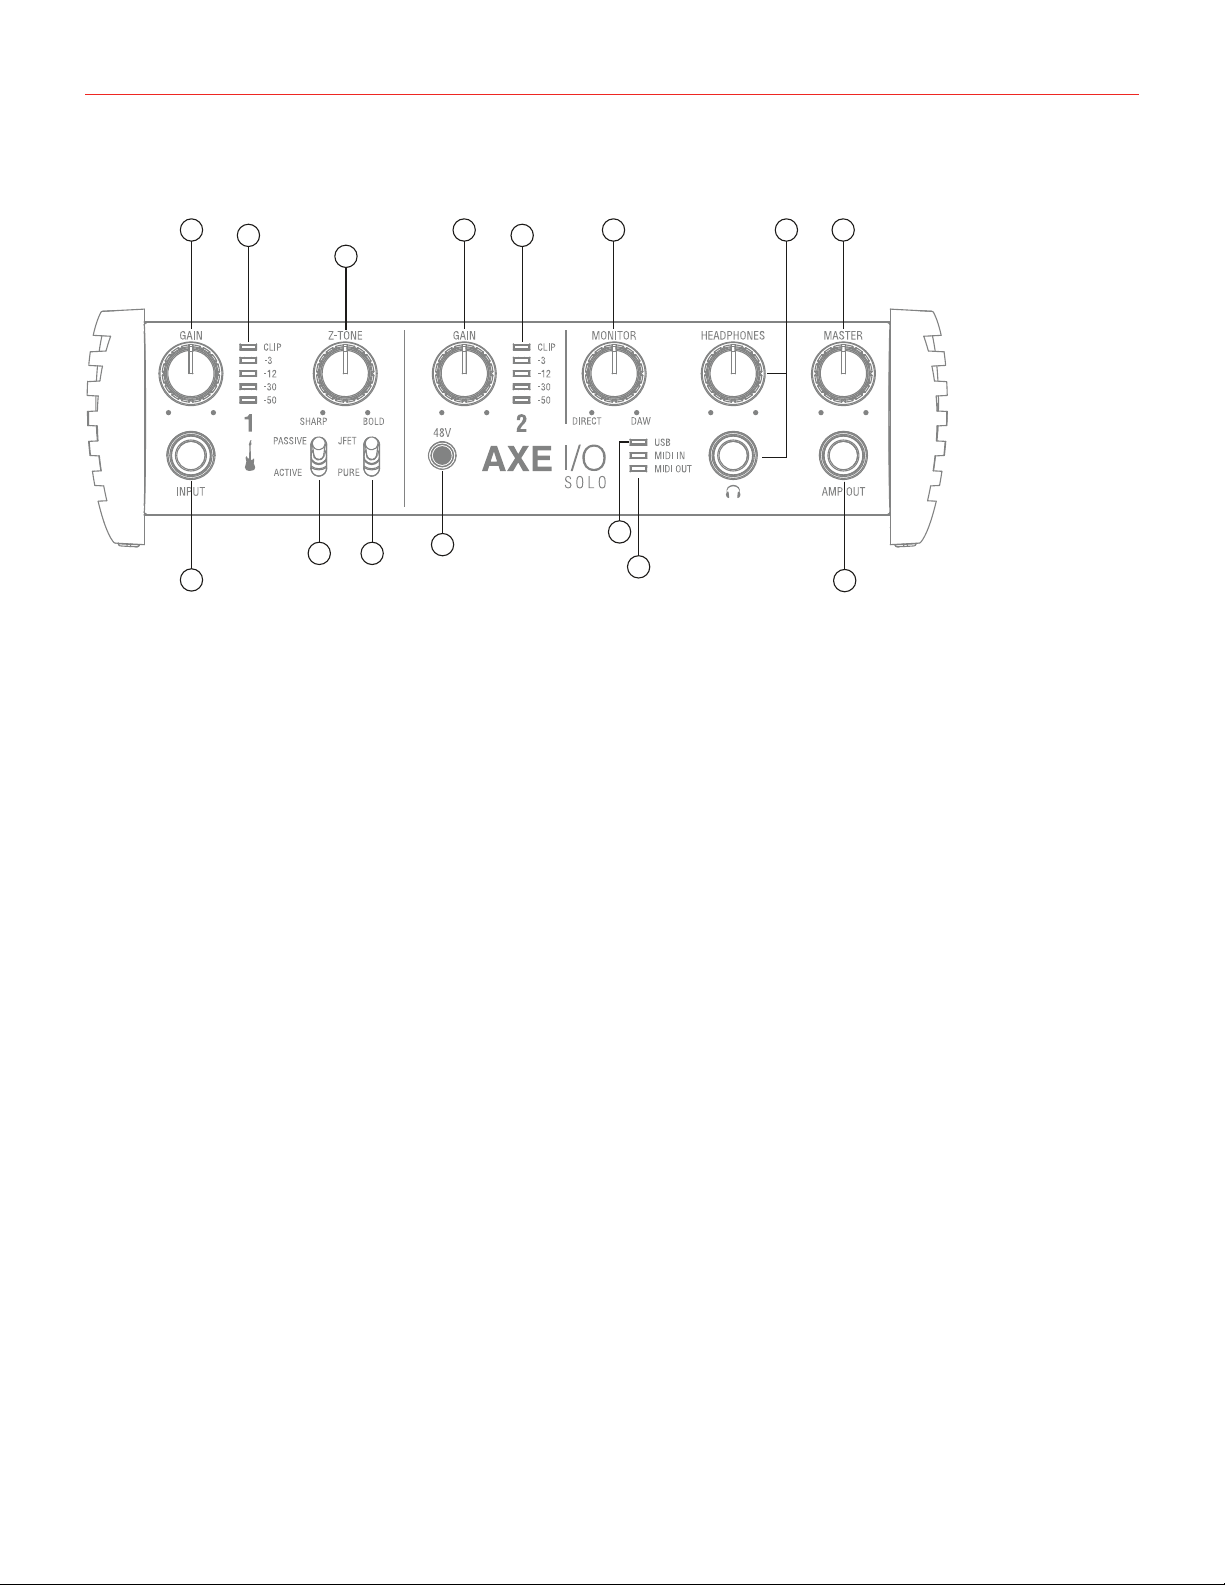
Front panel
1
4
65
7
9
8
2 2 10
12
11
3 3
13
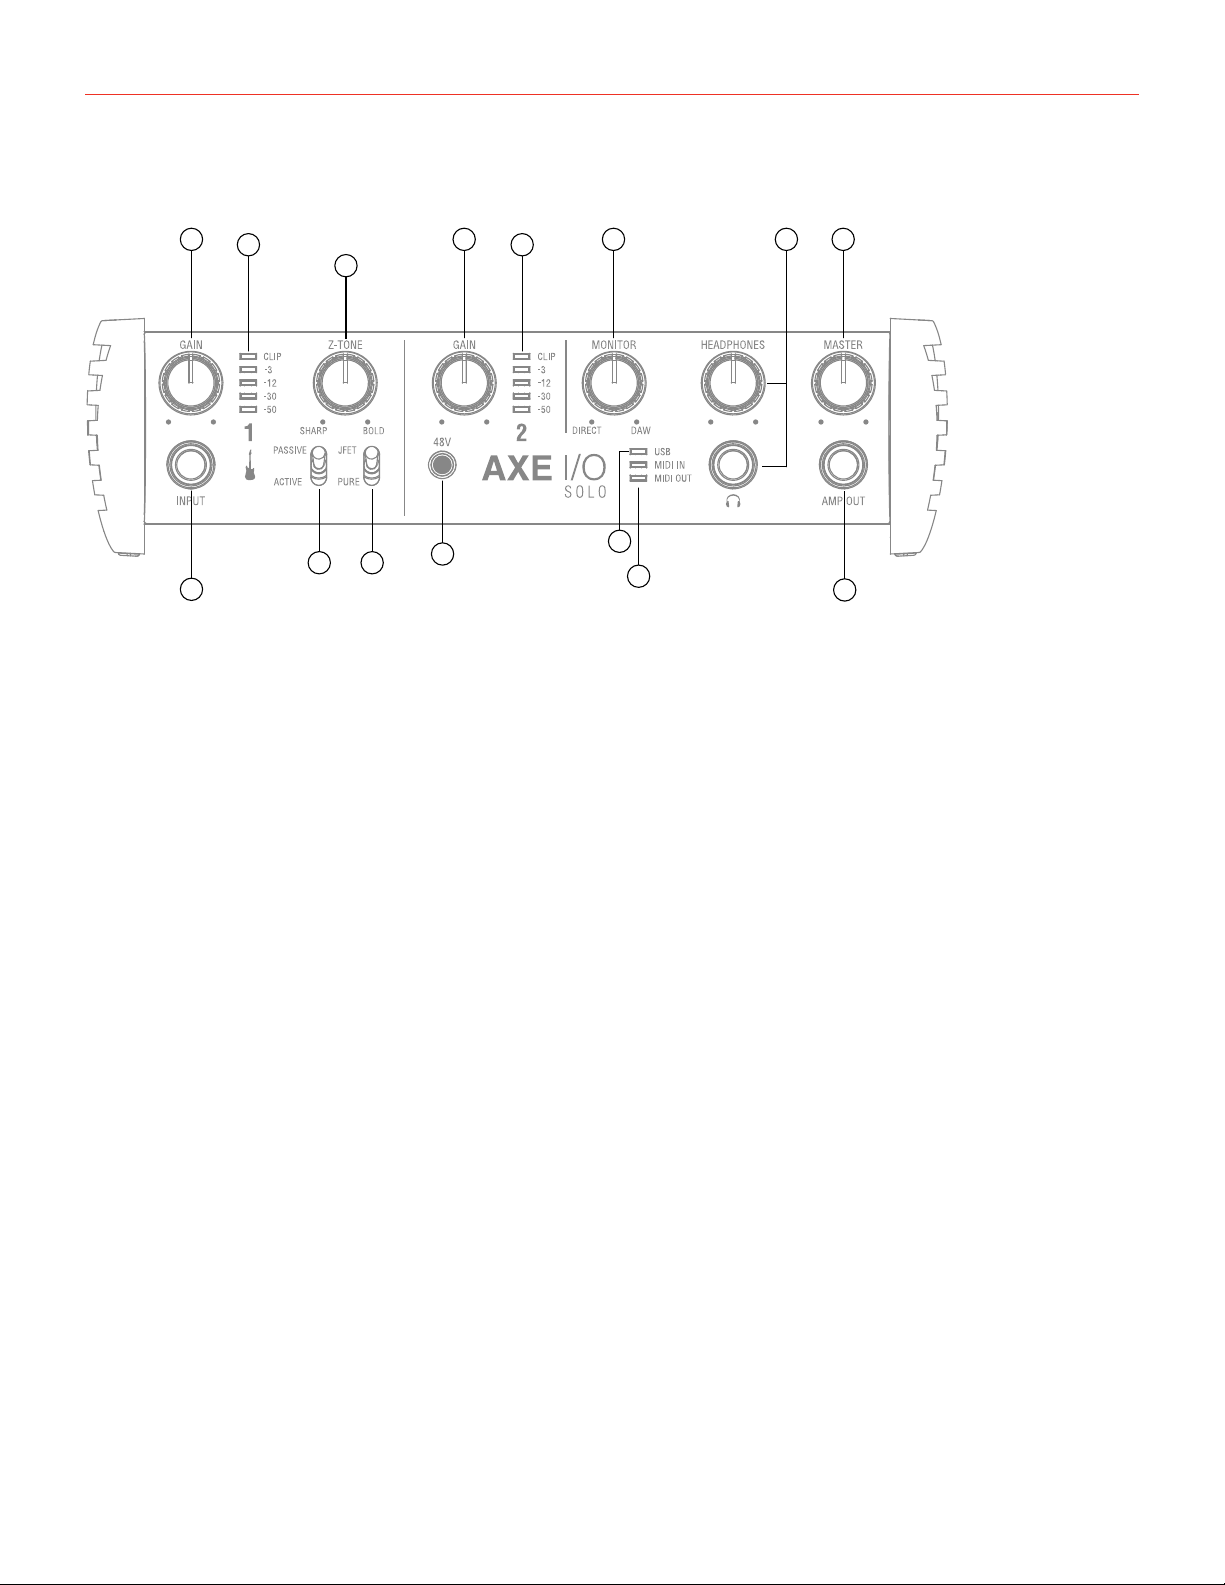
1. Instrument input 1 - 1/4” (6.35mm) jack type - Connect your instrument here (e.g., guitar).
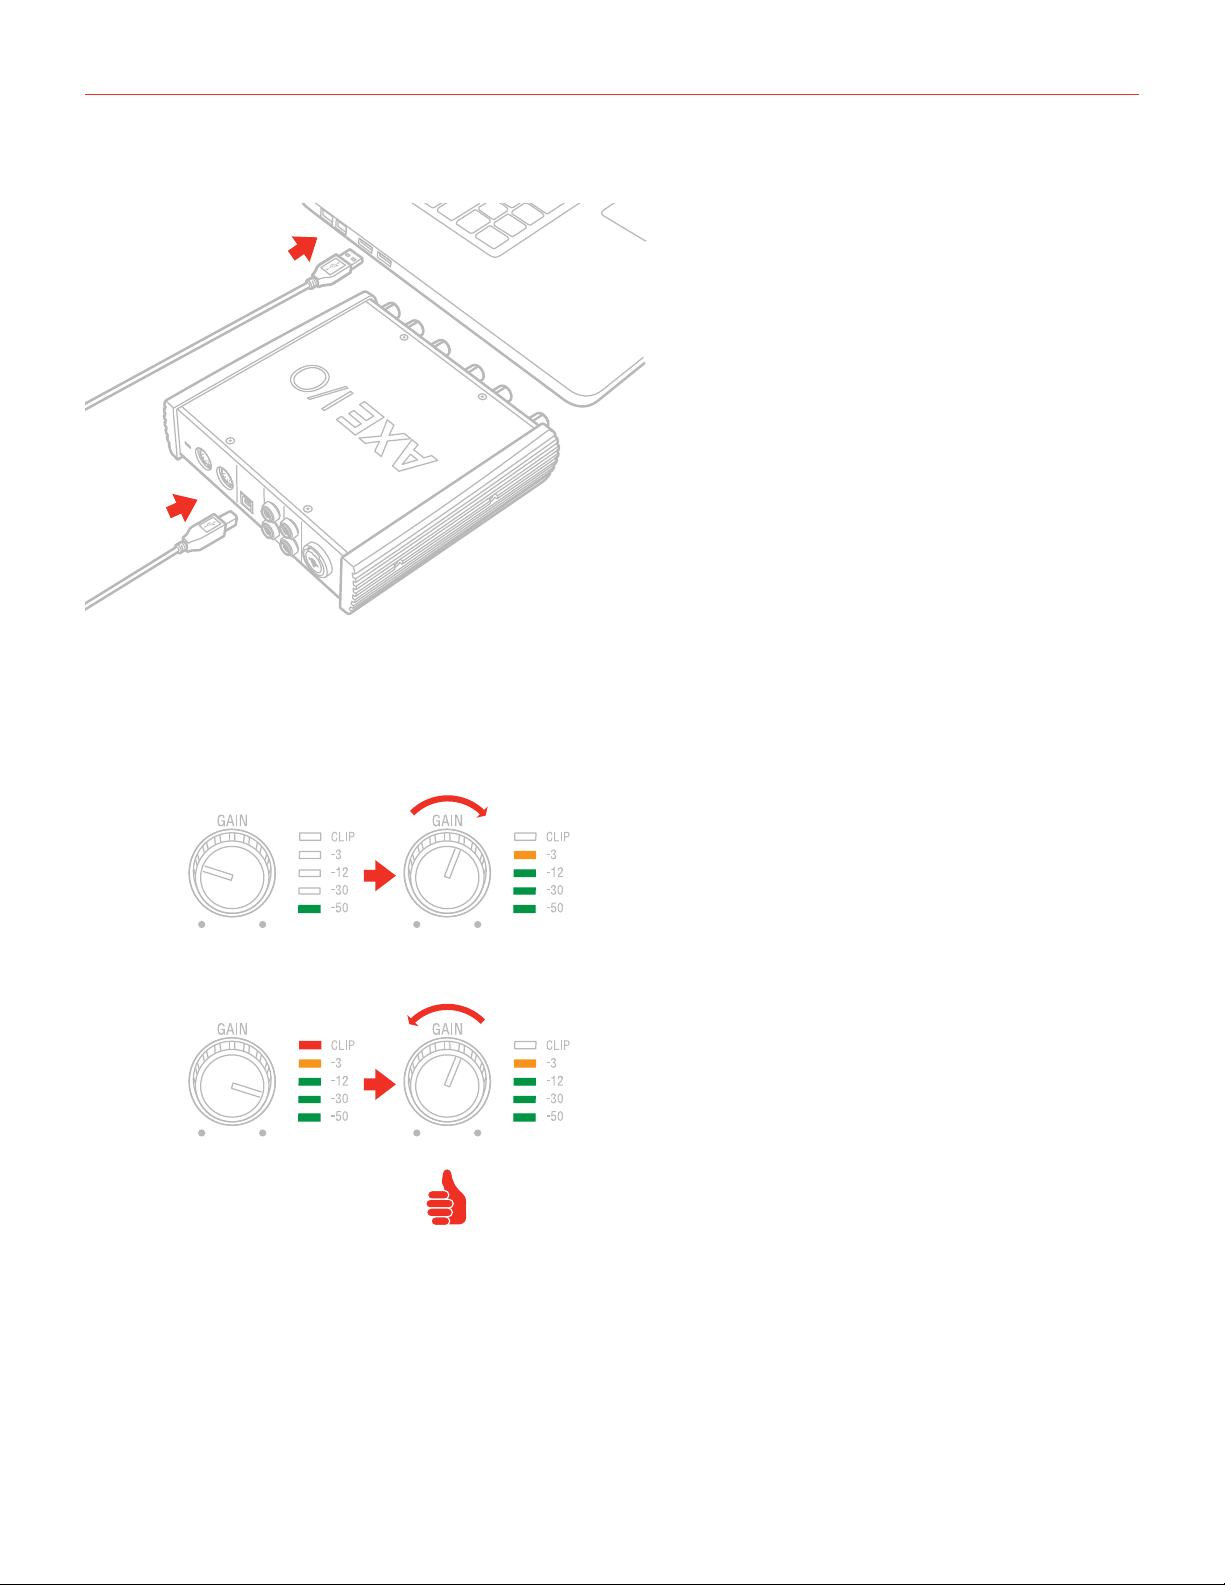
2. GAIN 1 and GAIN 2 - adjust the input gain for the signals at Inputs 1 and 2 respectively.
3. Peak Meters - each input has a dedicated 5-segments peak meter, with 1-second hold on CLIP, that
indicates the level of the input signal.
4. Z-TONE™ - Variable impedance control - the front control named Z-TONE™ allows you to change the input
impedance on the instrument input 1 allowing for a unique possibility for tone shaping on your instruments.
5. PASSIVE/ACTIVE - Pick-Up selector - this selector allows you to match the type of pick-up installed on the
connected instrument. This control will act exclusively on the instrument input 1.
6. JFET/PURE - Preamp topology selector - this selector allows you to select two different preamp topologies
for your connected instrument: JFET preamp type and Pure preamp type. This control will act exclusively on
the instrument input 1.
7. 48V - This switch enables 48V phantom power on both microphone inputs. The switch illuminates when
phantom power is selected.
8. MIDI IN/OUT LEDs - these LEDs illuminate when MIDI data is received from/transmitted to the MIDI port.
9. USB LED - this LED illuminates when the unit is recognised by the computer to which it is connected.
10. MONITOR - the Monitor knob allows you to blend your input signals with the playback streams from your
computer. This allows you to monitor your input signal with zero latency. If the knob is positioned at 12
o’clock, the input signal and the playback stream will be equally balanced. Turning the knob to the left will
increase the level of the direct signal; turning to the right will increase the level of the playback stream from
the DAW. This control works both for Outputs 1-2 and Headphones.
11. HEADPHONES-connectonepairofheadphonestothe1⁄4”(6.35mm)TRSjacksocketsbelowthe
headphone volume controls. The headphone outputs always carry the signals that are currently routed to
outputs 1 & 2.
12. MASTER - main output level control – this control adjusts the level at Outputs 1 and 2 on the rear panel.
13. AMP OUT - this is a third 1/4” physical unbalanced, floating output with selectable ground lift (controlled
with software). It’s independent from main Outputs 1-2. This output is specifically designed to allow the
interface to feed guitar amps or stomps without the typically associated risk or hum or buzz noises caused
by ground loops or mismatched levels and impedances.
English
5
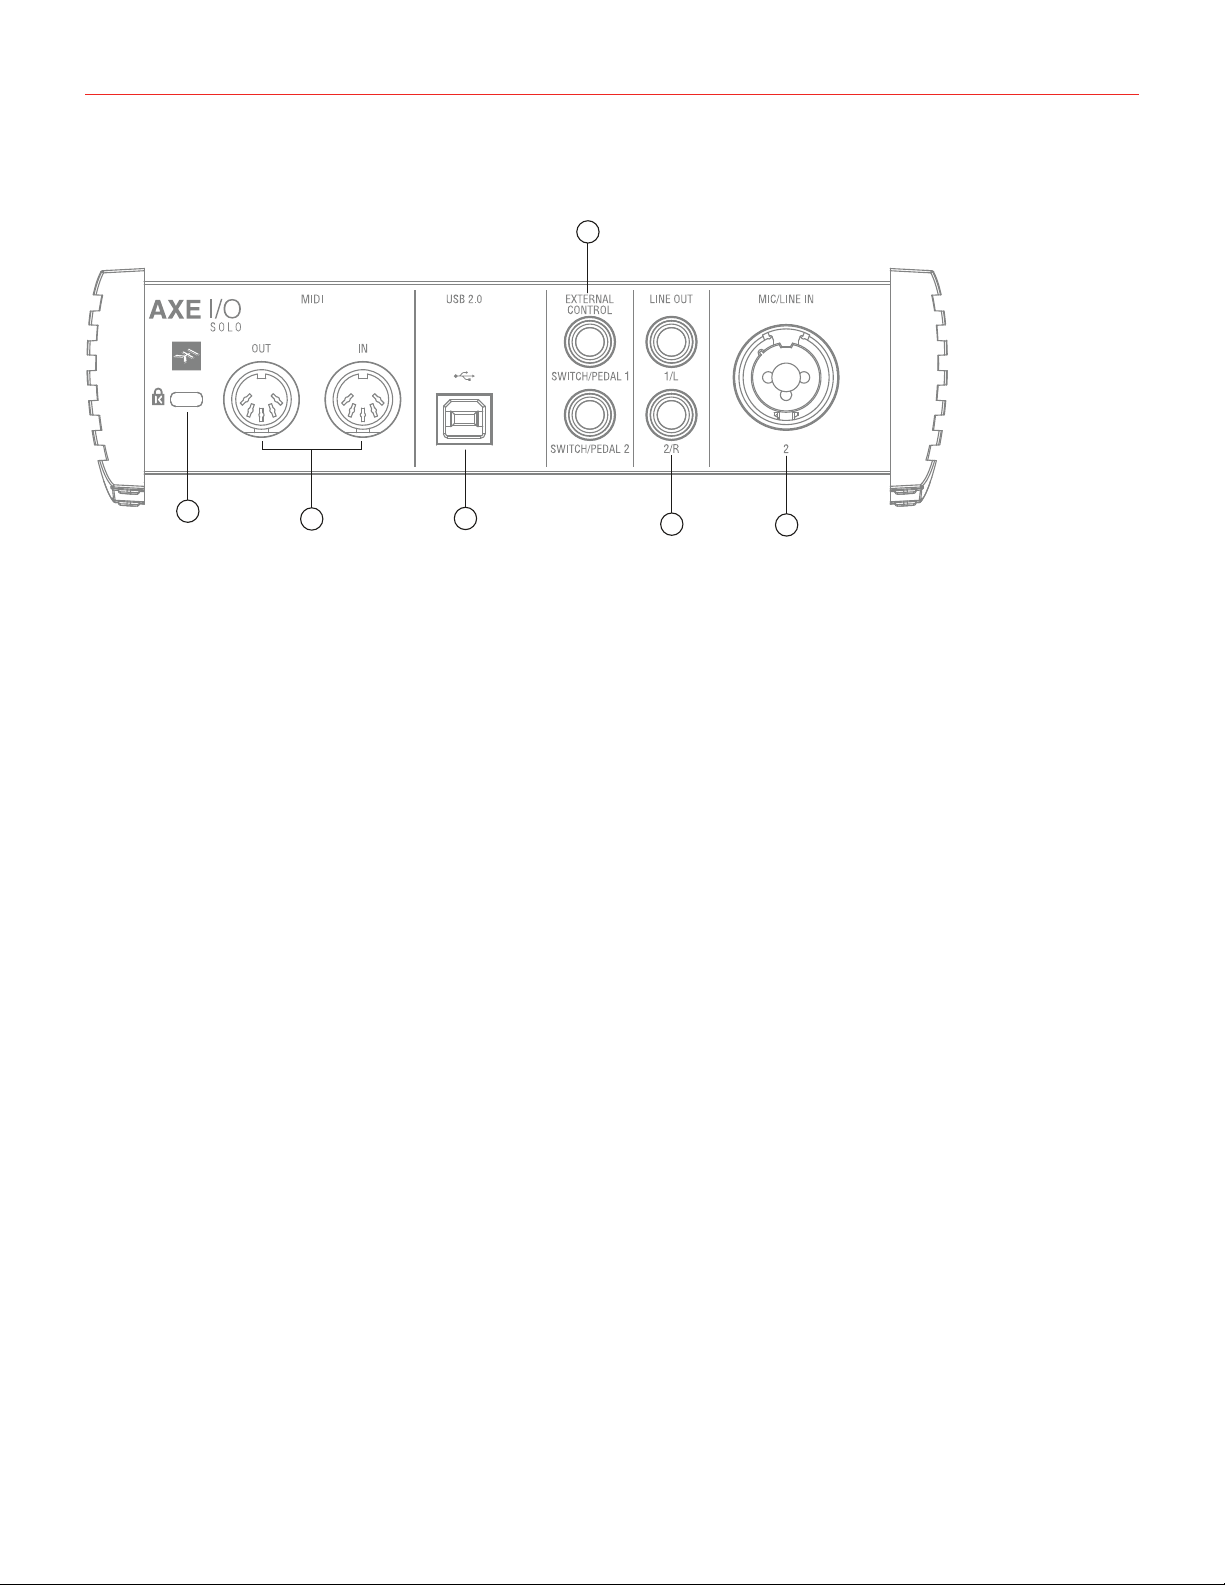
Rear panel
1
2
6
3
5
4
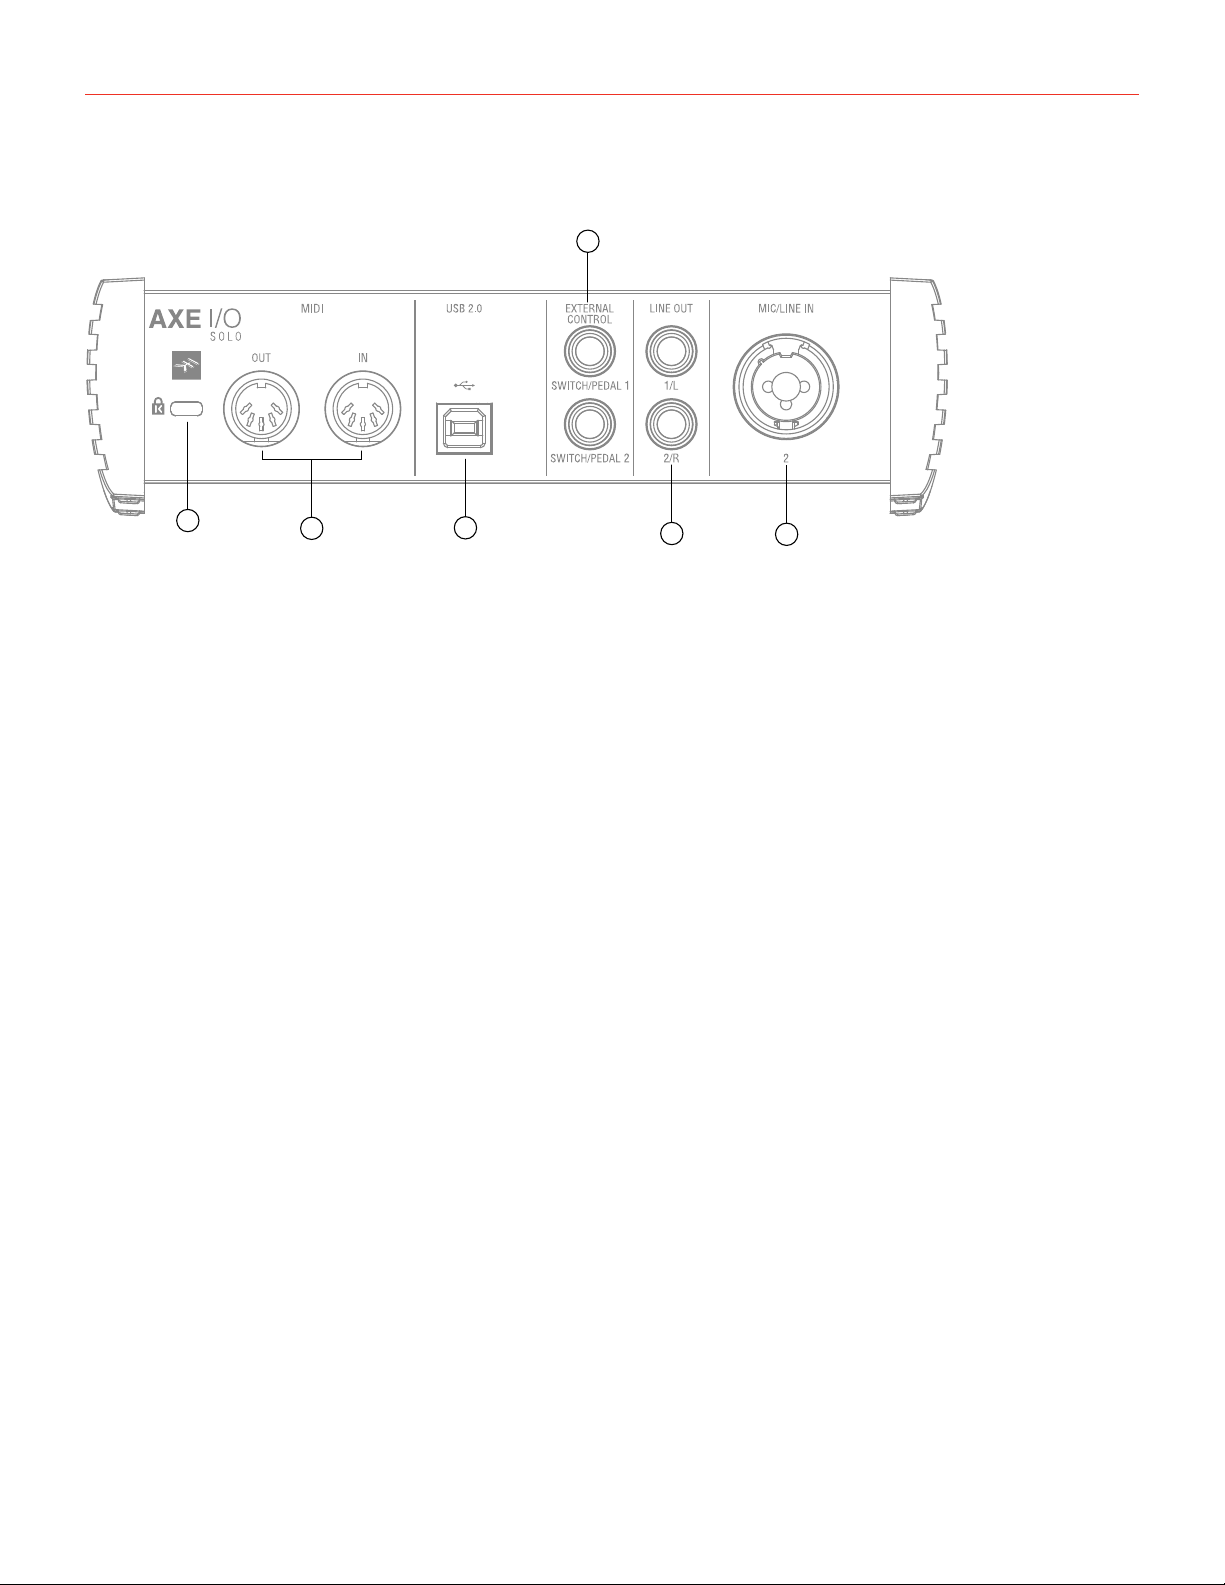
1. Kensington security lock - secure your AXE I/O SOLO to a suitable structure if desired.
2. MIDI IN/OUT - standard 5-pin DIN sockets for connection of external MIDI equipment.
3. USB 2.0 port - Type B connector - connect the AXE I/O SOLO to your computer with the supplied cable.
4. EXTERNAL CONTROL - use these 1/4” (6.35mm) jacks to connect external controller pedals (single or dual
switches, continuous expression pedals). MIDI messages sent are freely assignable from the “Control app”.
5. LINE OUTPUTS1/Land2/R-Outputs1/Land2/Rarebalancedandfloatinganaloguelineoutputson1⁄4”
(6.35 mm) jack sockets; use TRS jacks for a balanced connection. Outputs 1/L and 2/R will normally be
used to drive the primary monitoring system.
6. MIC/LINE IN 2 - XLR Combo type input sockets - connect microphones or line level signals.
English
6
1 Installation and setup
1.1 Software installation
All software required by the AXE I/O SOLO is available for download from the IK Multimedia website (www.
ikmultimedia.com/products/axeiosolo). By downloading the “AXE I/O SOLO Drivers and Control Software” you’ll
find:
MAC users: the installer contains the AXE I/O SOLO Control App.
Windows users: the package includes the AXE I/O SOLO Control App and the necessary drivers for the
interface.
1. Using your web browser, go to www.ikmultimedia.com/products/axeiosolo and go to the Downloads section.
2. You can now download the “AXE I/O SOLO Drivers and Control Software” file (Mac and Windows versions
available).
4. Download and install the “AXE I/O SOLO Drivers and Control Software” version (Mac or Windows)
appropriate for your computer and follow all on-screen instructions.
5. When the installation is complete, restart your computer.
6. After restart, connect the AXE I/O SOLO to your computer with the supplied USB cable.
1.2 Setup
1. Download and install the AXE I/O SOLO Drivers and Control Software as described above.
AmpliTube Deluxe
10 T-RackS plug-ins
Ableton Live Lite
AXE I/O SOLO Control Software
FREE DOWNLOAD
ikdownloads.com/axeiosolo
English
7
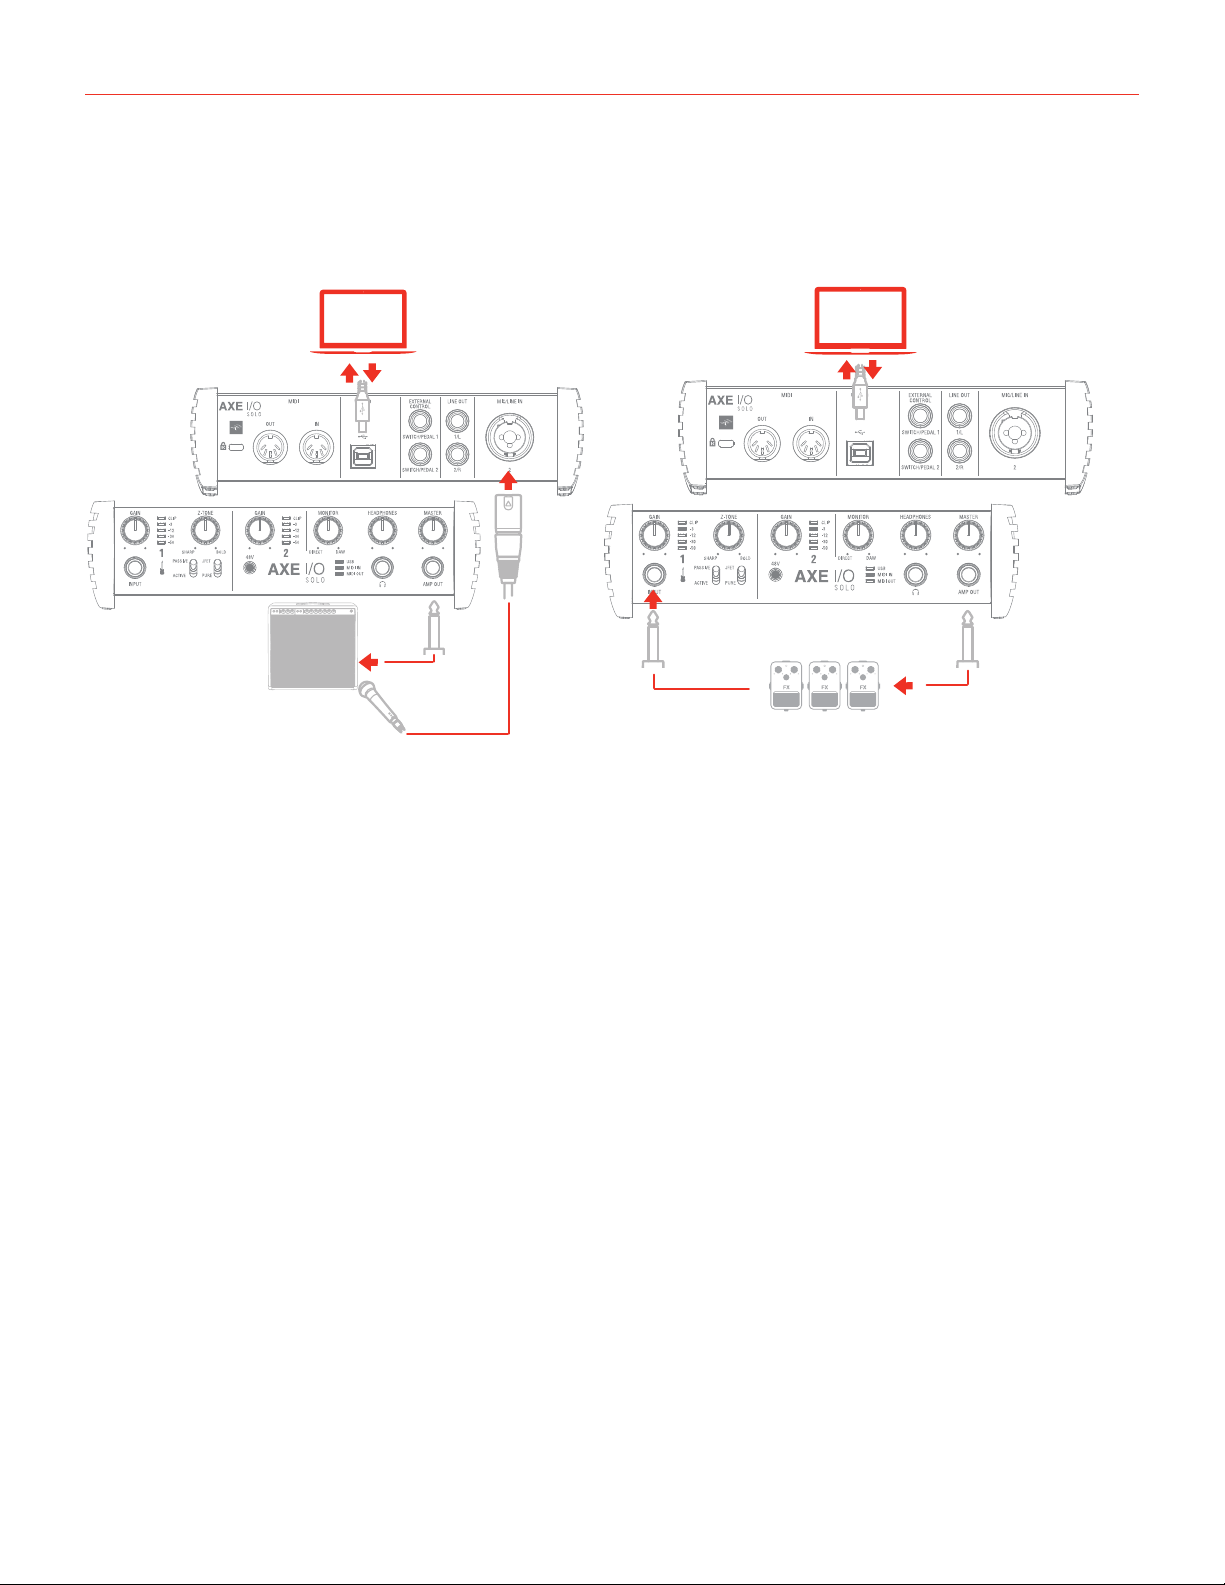
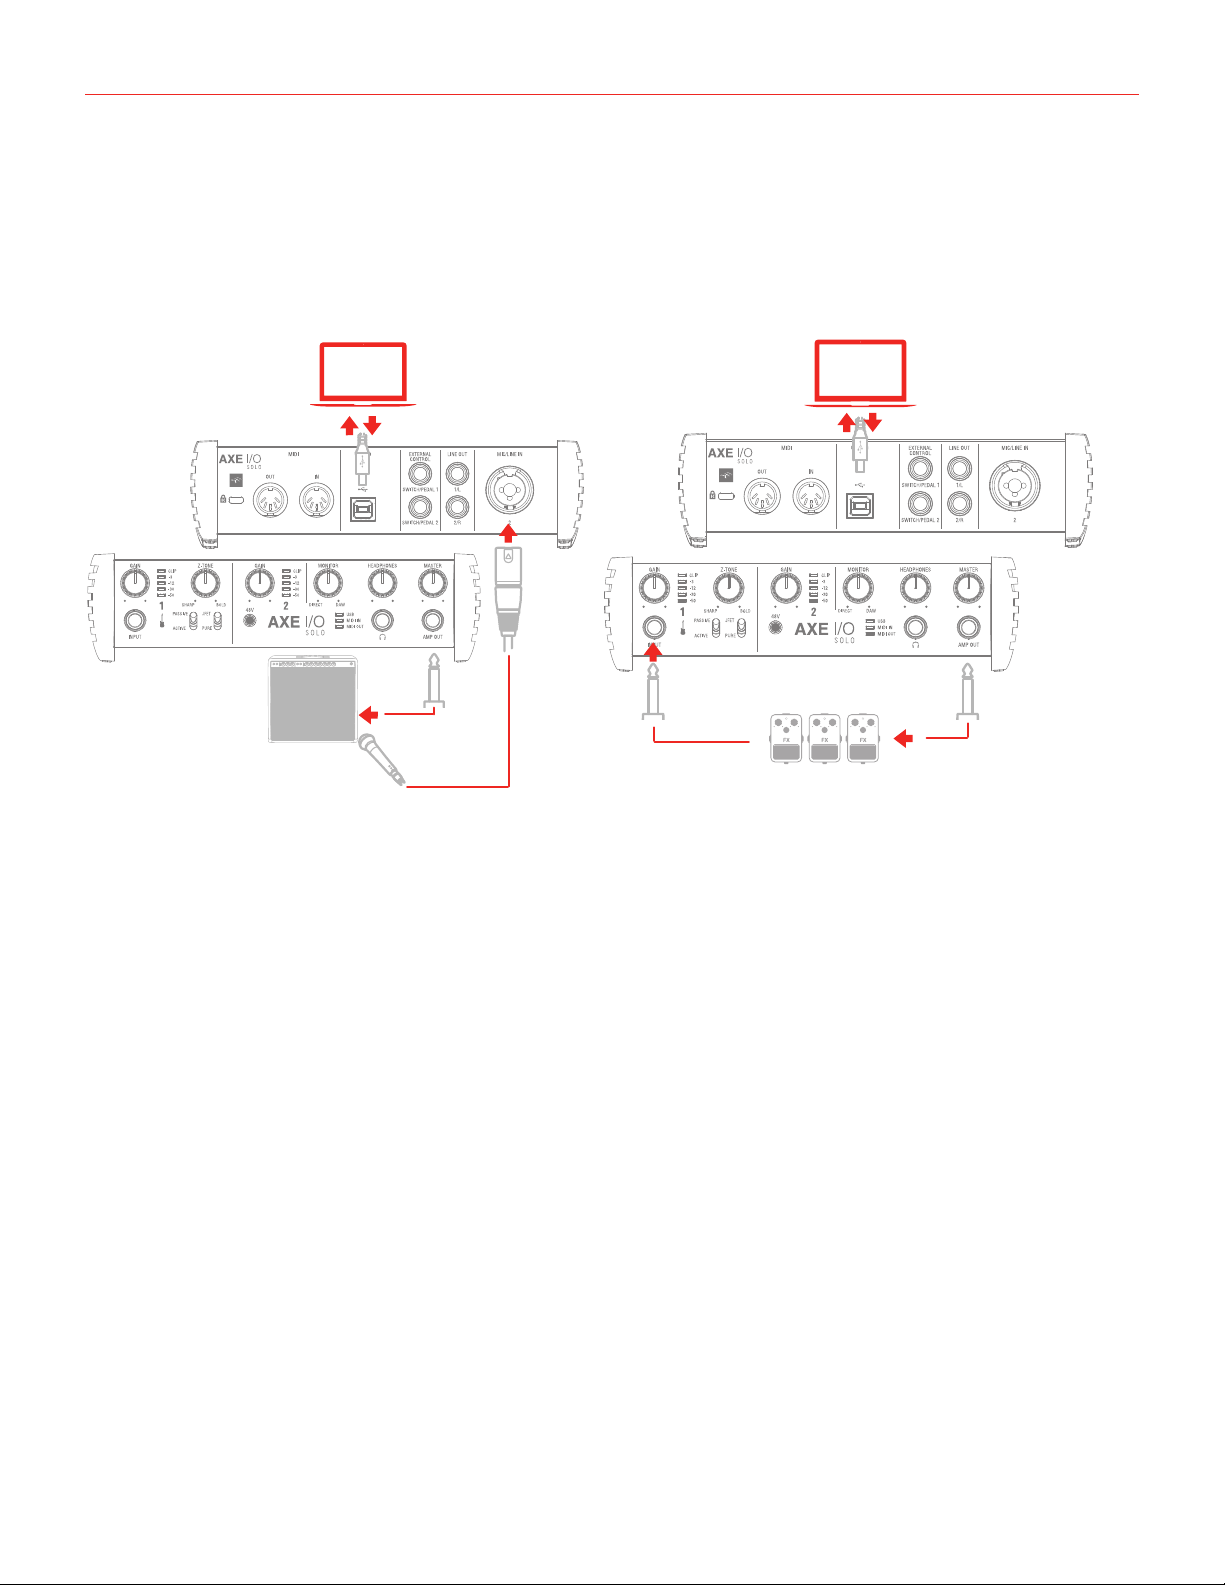
2. Connect the AXE I/O SOLO to your computer with the supplied USB cable.
3. You can connect instrument signal to the front Jack 1/4” Instrument input 1, or microphone and line level
signal to the back combo XLR input 2.
4. Connect speakers, amplifiers or other line devices to the balanced outputs on the rear panel of AXE I/O
SOLO.
5. If needed, you can connect external MIDI devices to the physical MIDI ports (Input/Output).
English
8
2 Dedicated guitar features
2.1 Direct amplifier output & Re-Amplification
RE-AMPLIFICATION
in from MIC
Among the features that make AXE I/O SOLO the definitive guitarist interface is the Re-Amplification feature.
The “AMP OUT” is a third physical output which is independent from main Output 1-2. With this output, you can
feed a DI recorded guitar to external analogue stomps or a real amplifier, still being able to monitor the session
from main Output (1-2). The external stomps (or the miked amplifier) will be connected back to Input to return
into the DAW on a newly recorded track.
The AMP OUT is a floating unbalanced output topology specifically designed to properly interface with guitar
or bass amplifiers of any kind for maximum signal fidelity and integrity. This ensures the immunity from noises
caused by ground loops with the Amps, so actually allowing reamping without the typical associated noise/hum
issues.
English
9
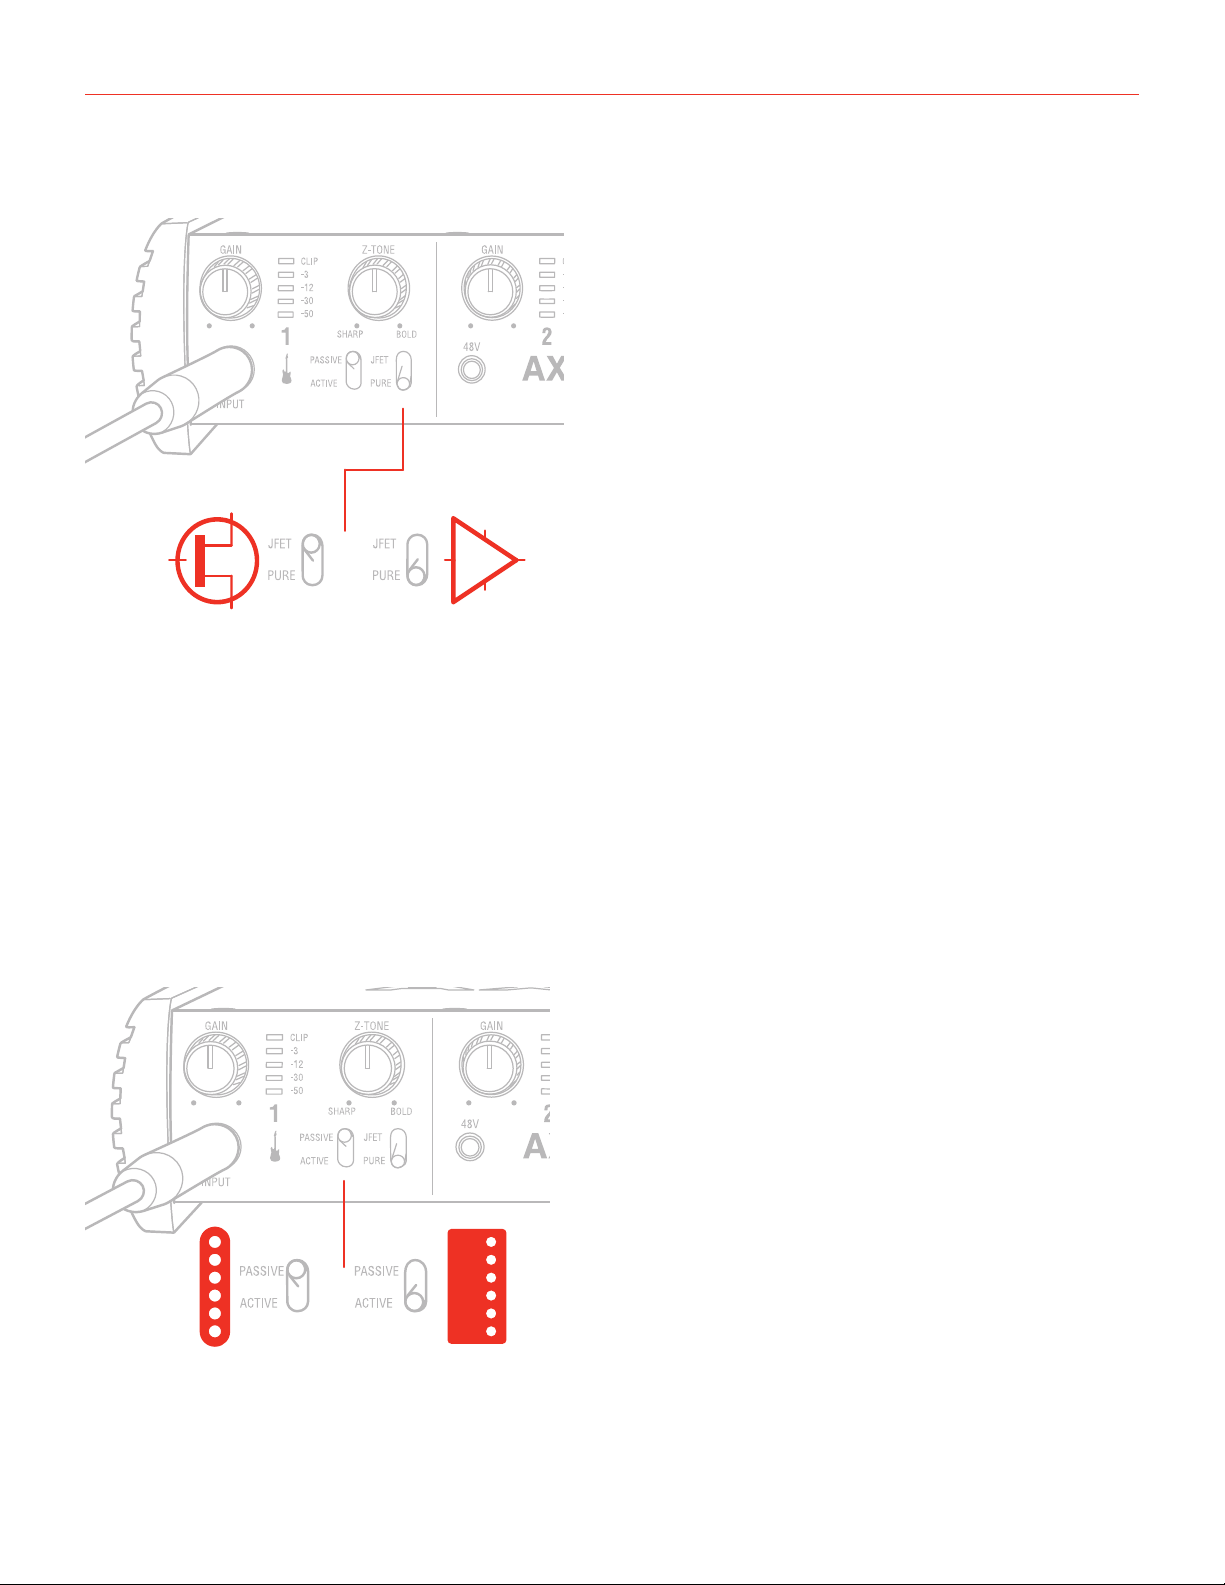
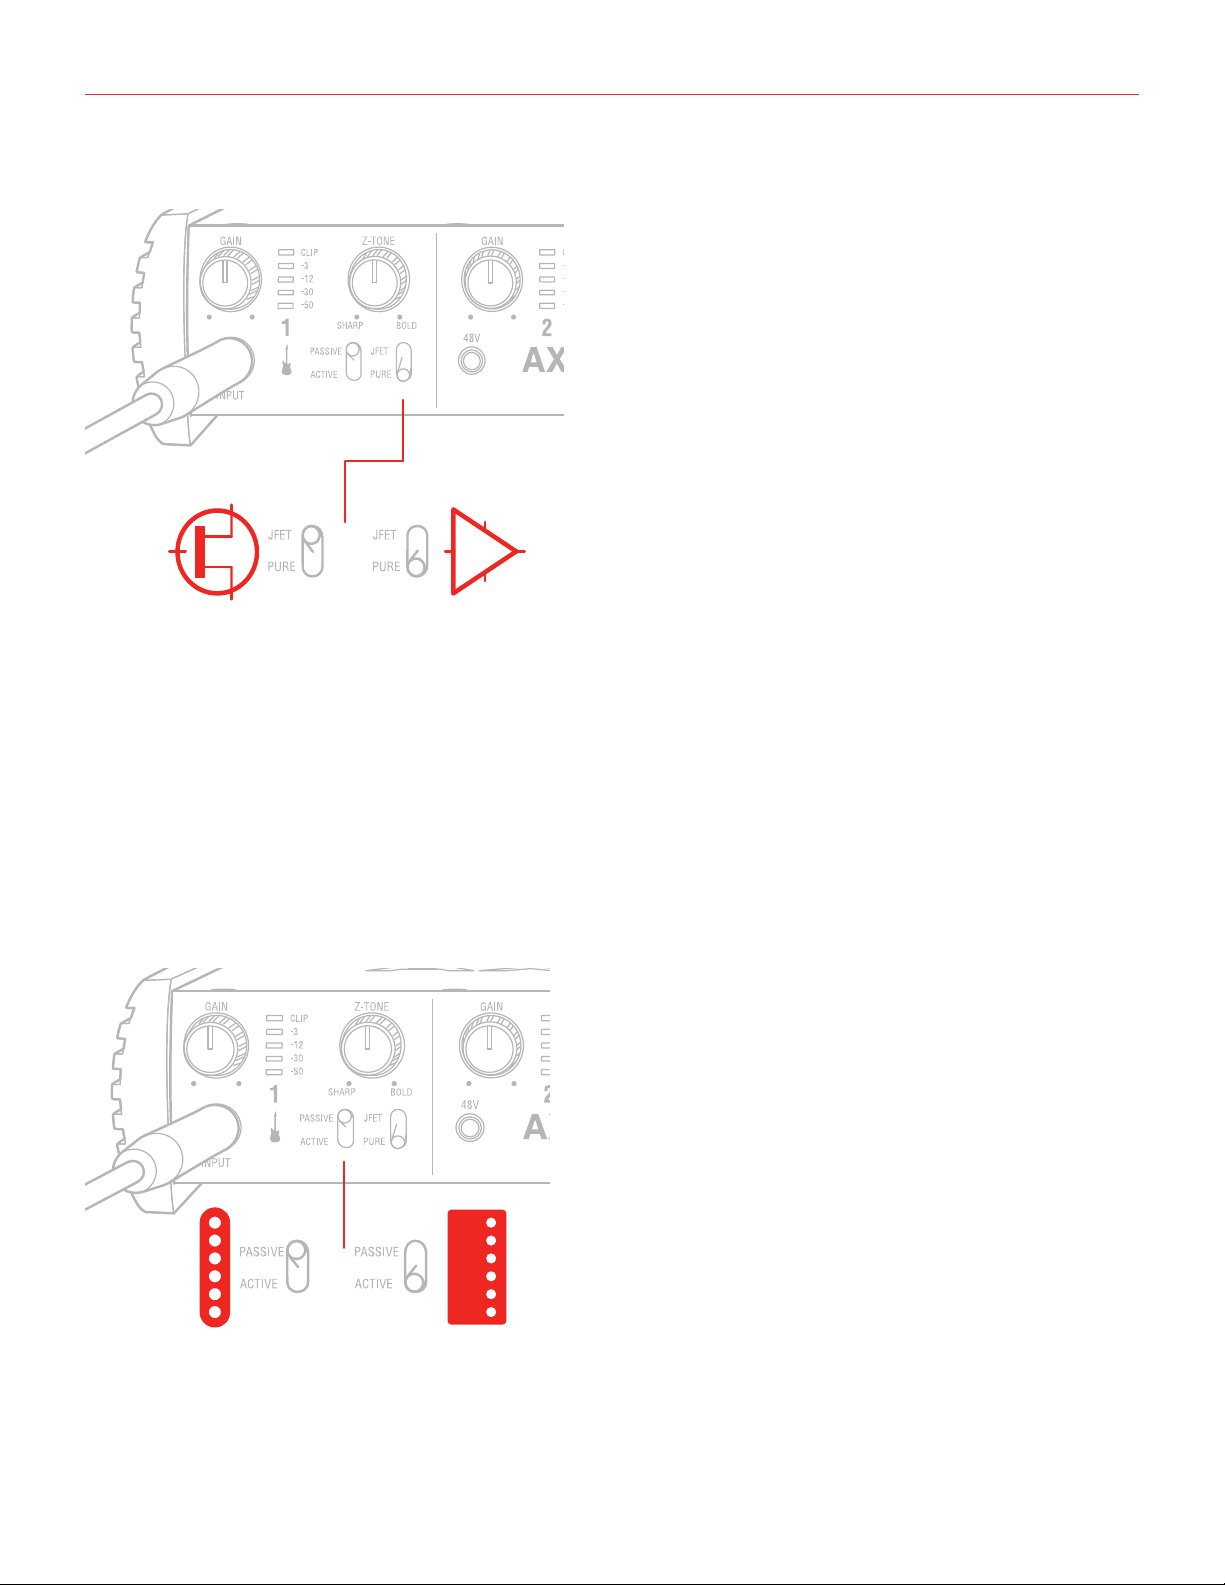
2.2 JFET / PURE input (only for Instrument Input 1)
Thanks to the front panel selector it is possible to select two different preamp topologies for your connected
instrument: JFET preamp type and Pure preamp type.
The discrete JFET (field-effect transistor) circuitry adds a tiny bit of color and harmonics to the signal, giving your
instruments a bit of added warmth.
Pure circuitry results in a more linear response featuring the absolutely cleaner signal path possible, for best
transparency and clarity.
Each amplifier topology offers complimentary sonic performance to the other, and both are widely used in
professional recording and stage work. Note: this control only works when the Pickup selector is on the Passive
position.
2.3 Pick-Up selector (only for Instrument Input 1)
PICK-UP
English
10
AXE I/O SOLO works perfectly with both Passive and Active guitar or bass pickups, having independent circuitry
that suits perfectly both topologies. Passive electric guitar pickups exhibit significantly higher output impedance
than the active counterpart, among other significant tone differences, but neither of the two is “better” or
“worse” than the other: indeed they have different behaviors. To properly couple this diversity of guitar pickups
in the most musically pleasing manner, AXE I/O SOLO offers a pickup selector that allows the artist to select
between Active (when using an active pickup) and Passive (when using a passive pickup).
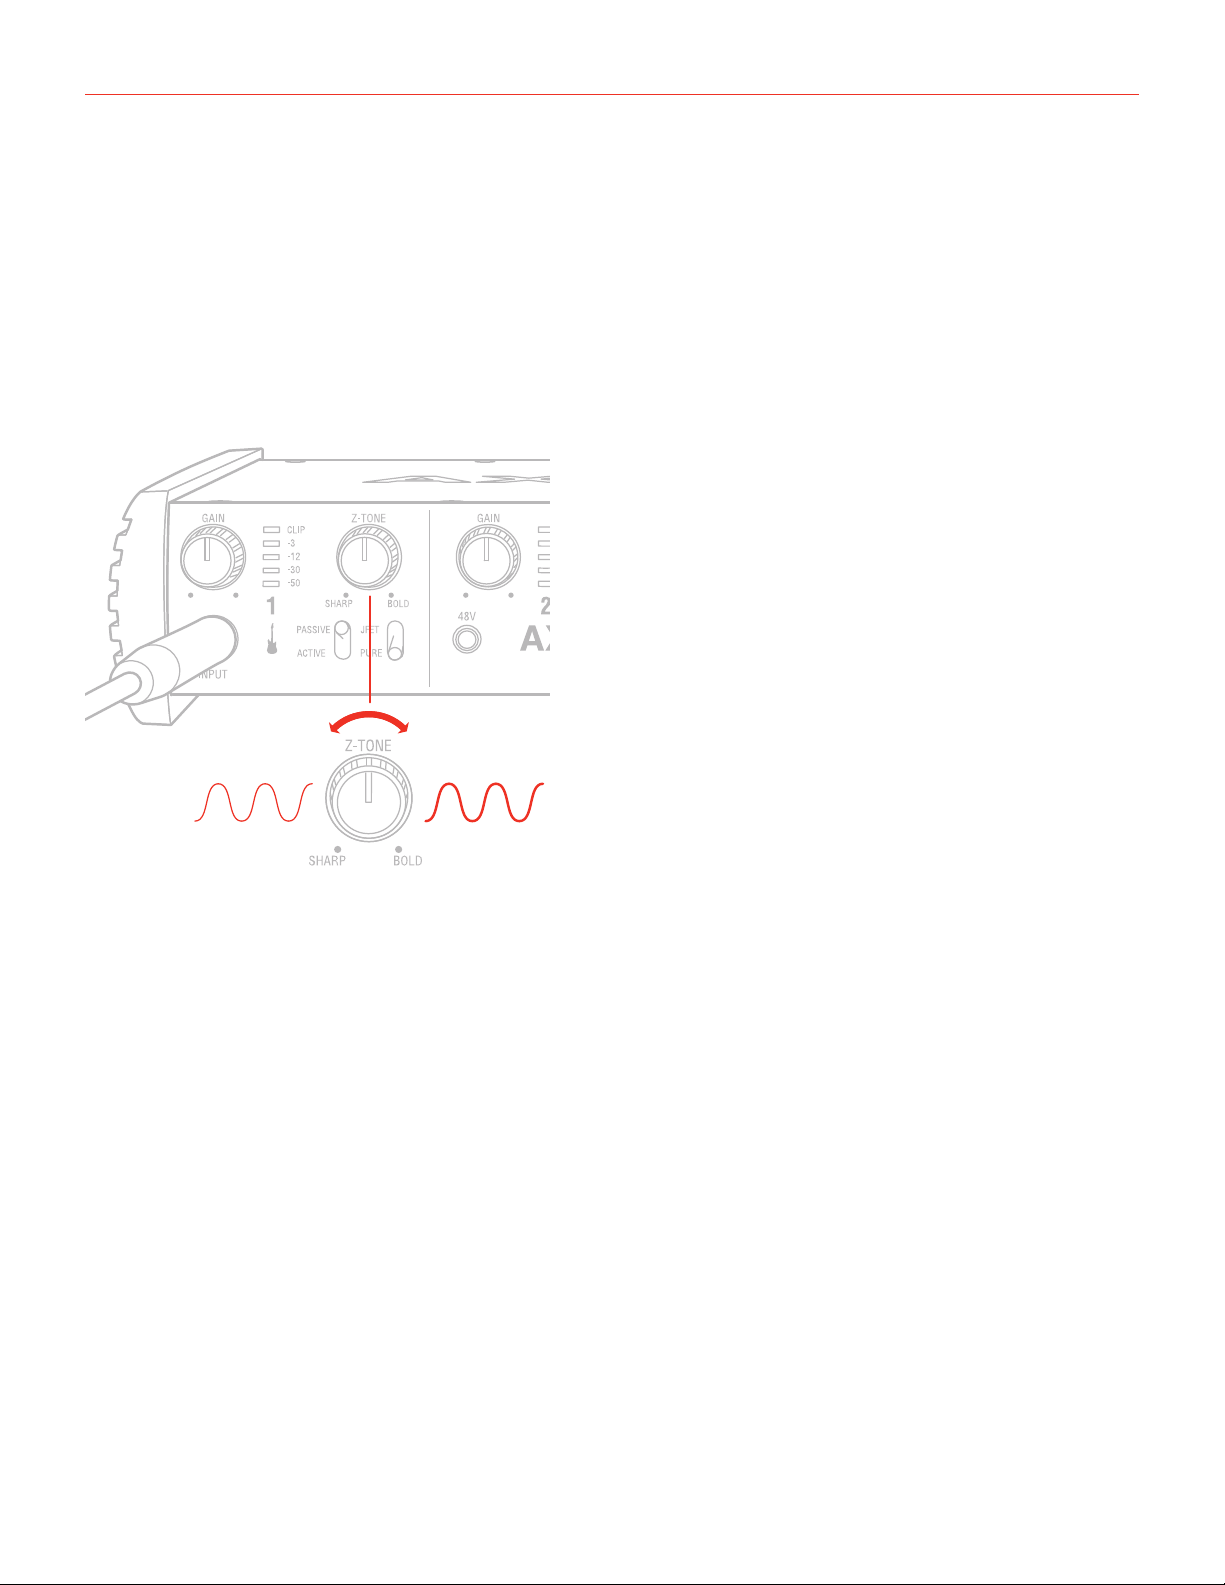
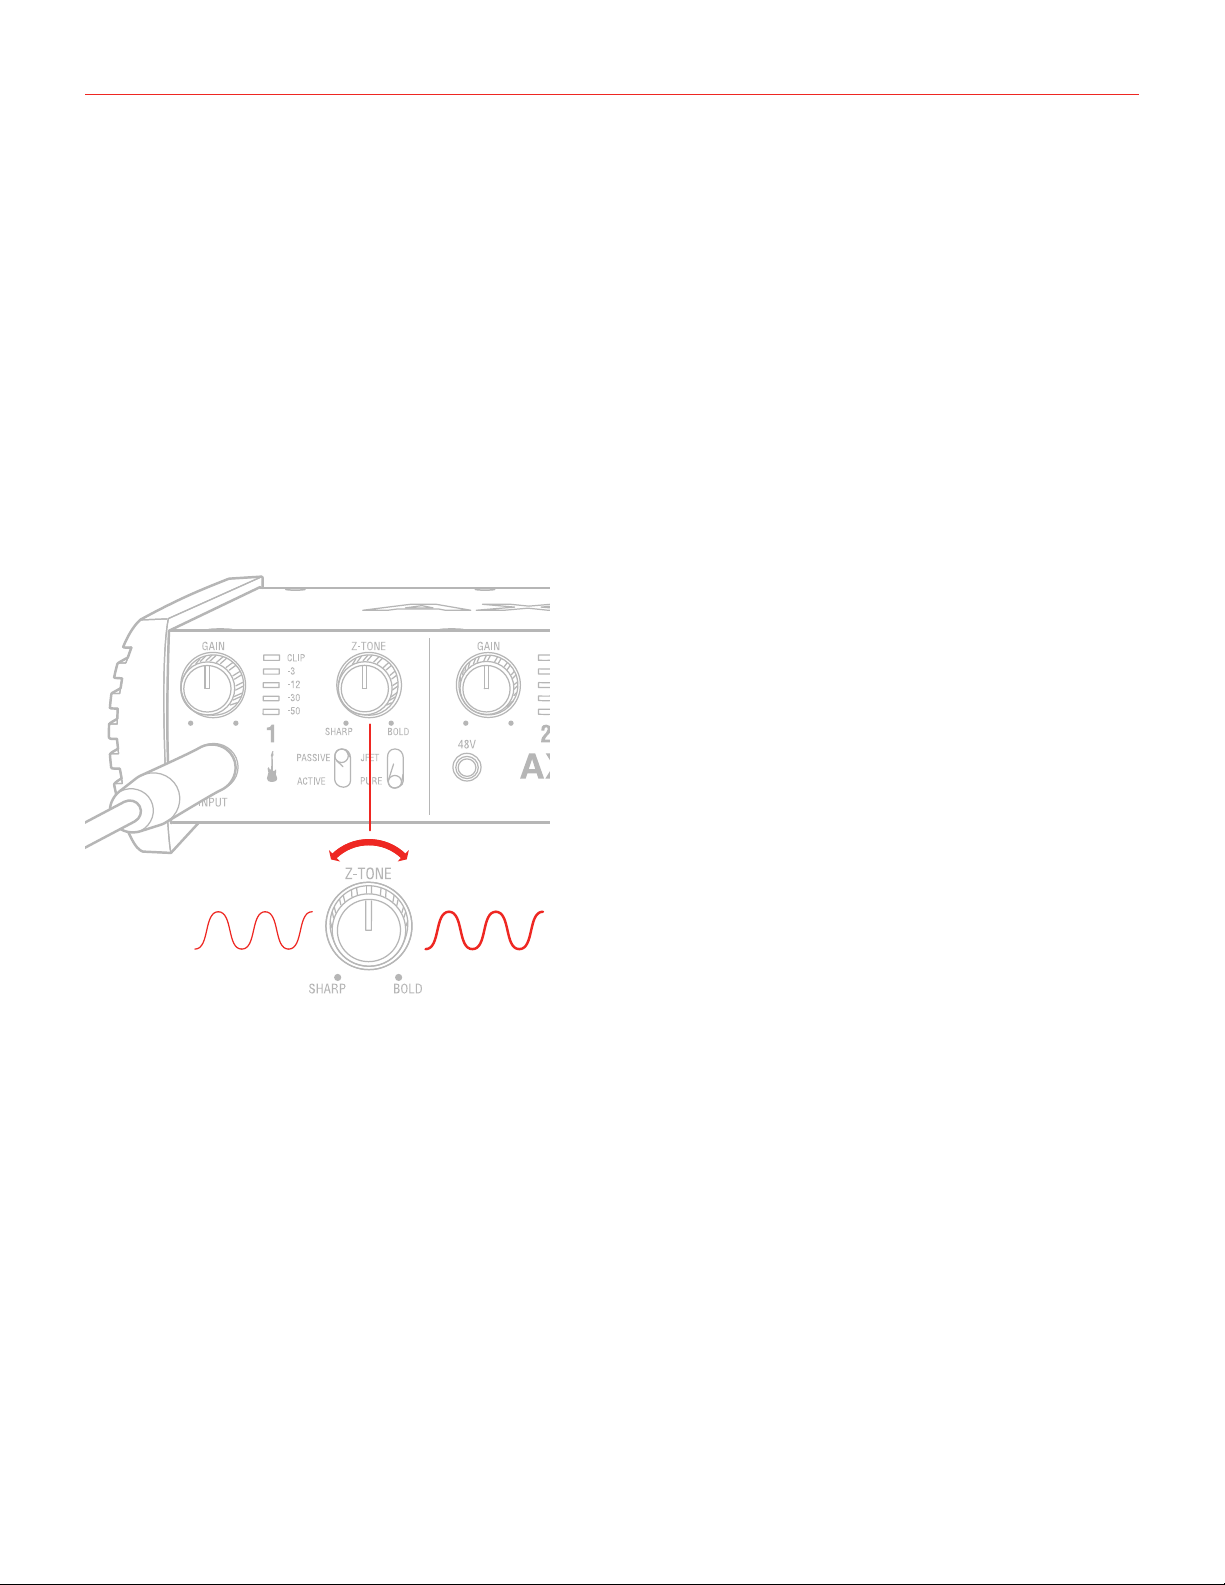
2.4 Variable impedance (Z-TONE™) control (only for Instrument Input 1)
All passive pickups (being them single coil, humbucker, split, etc..) have a certain sound character that is also
determined by the loading impedance. The Z-TONE™ front control allows you to change the input impedance
on the instrument input 1 therefore allowing for a very creative way of shaping the tone of your instruments.
The beauty of this system is that it allows you to discover tonal shades from your instruments that you never
heard before, by shaping the tone right at the source, within the pickups, instead of what is normally done with
post-processing tools of any kind.
Feel free to experiment without rules with this knob! You will find your tone becomes generally more thick and
bold by reducing the impedance (control is moved clockwise) and, on the other hand, more crisp and sharp
when rotated counter-clockwise.
For example if you find your high gain tones to be too harsh, try setting this control at mid position, and you’ll
experience what the Z-TONE can magically do.
If you’re recording a bass (with passive pickups) and find it sounds a bit thin, try the same. The sound will
immediately feel more bold, solid and bigger.
The key here is experimentation! Feel free to check it out on your instruments, on various configurations, the
possibilities are really endless.
Settings start from the highest impedance value (named “Sharp”) to the lowest impedance value (named “Bold”)
The Z-TONE circuit only works with passive pickups of any kind.
Using it on active pickups will not provide any significant useful change to the sonics of the instrument.
English
11
Note: AXE I/O SOLO is very useful for feeding analogue stomp boxes from DAW tracks using the AMP output.
The best way to get the Stomp signal back into the DAW is by using Instrument input 1. This way the Z-TONE
circuit will also be very useful because most vintage stomps can actually change the way they sound depending
on the load impedance, so experimentation in this usage is very welcome as well.
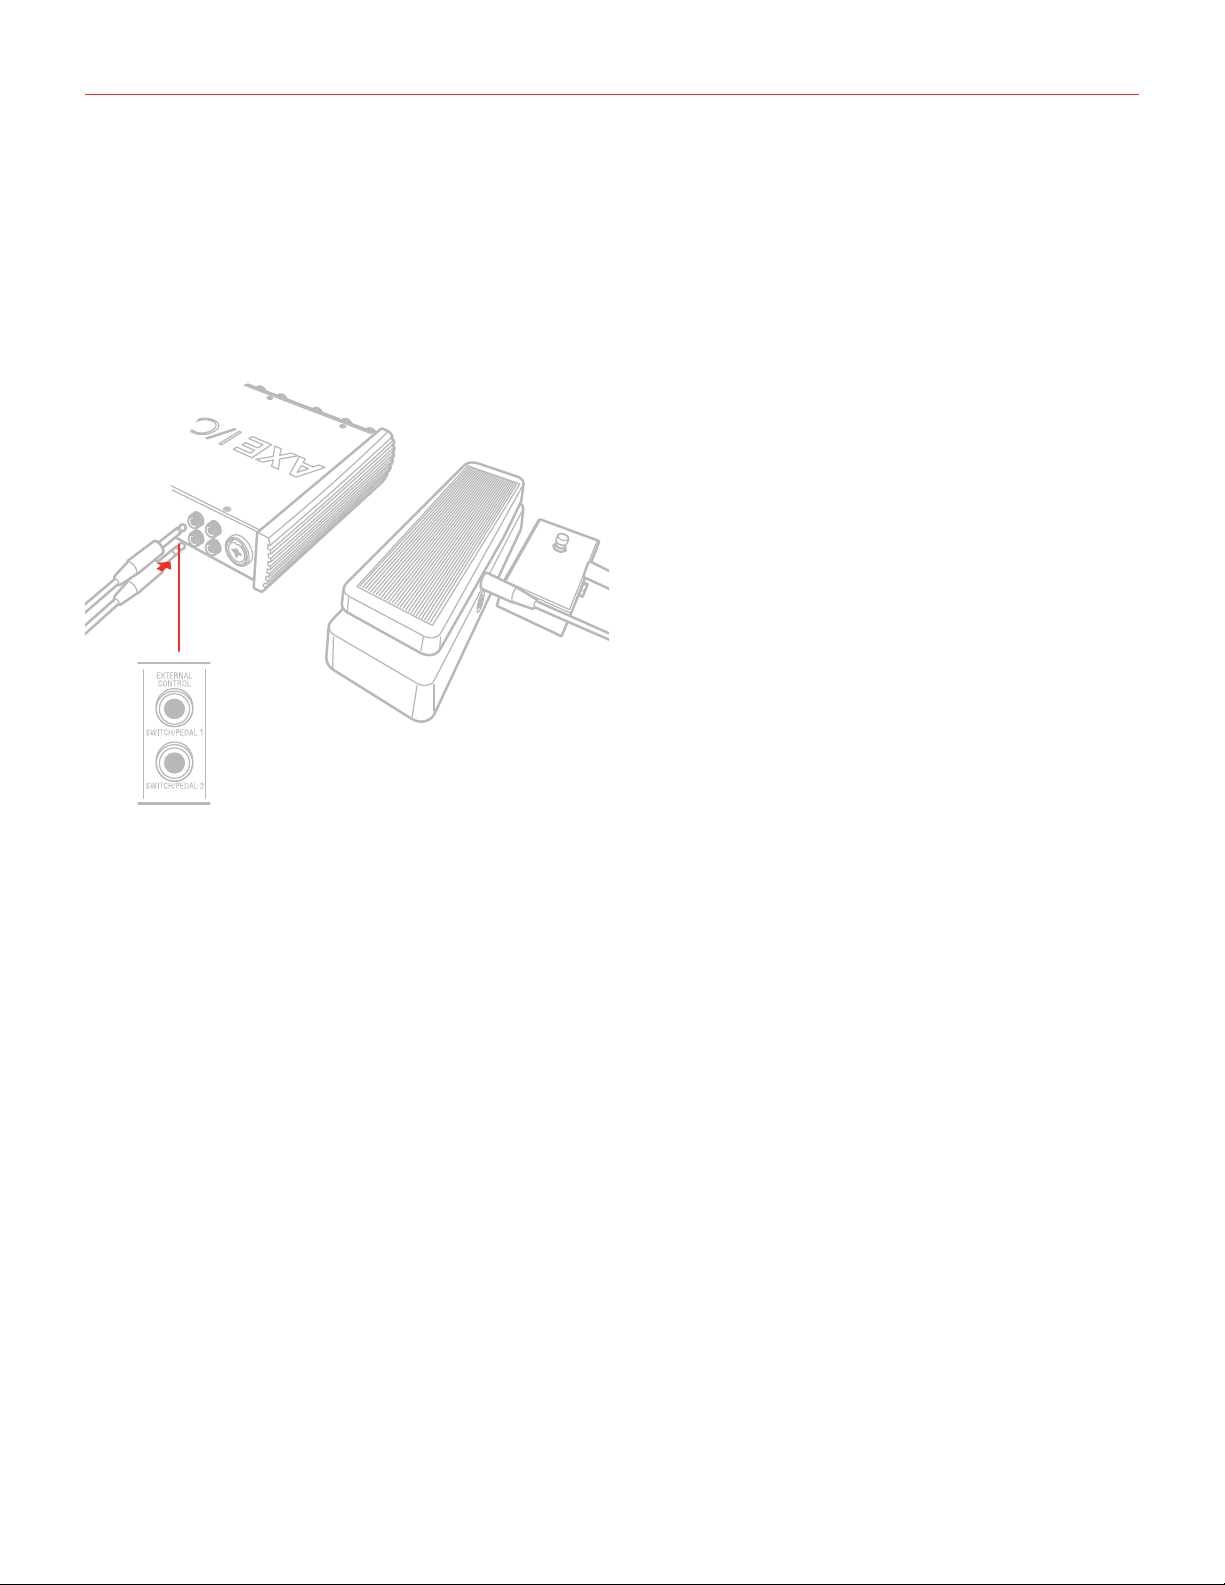
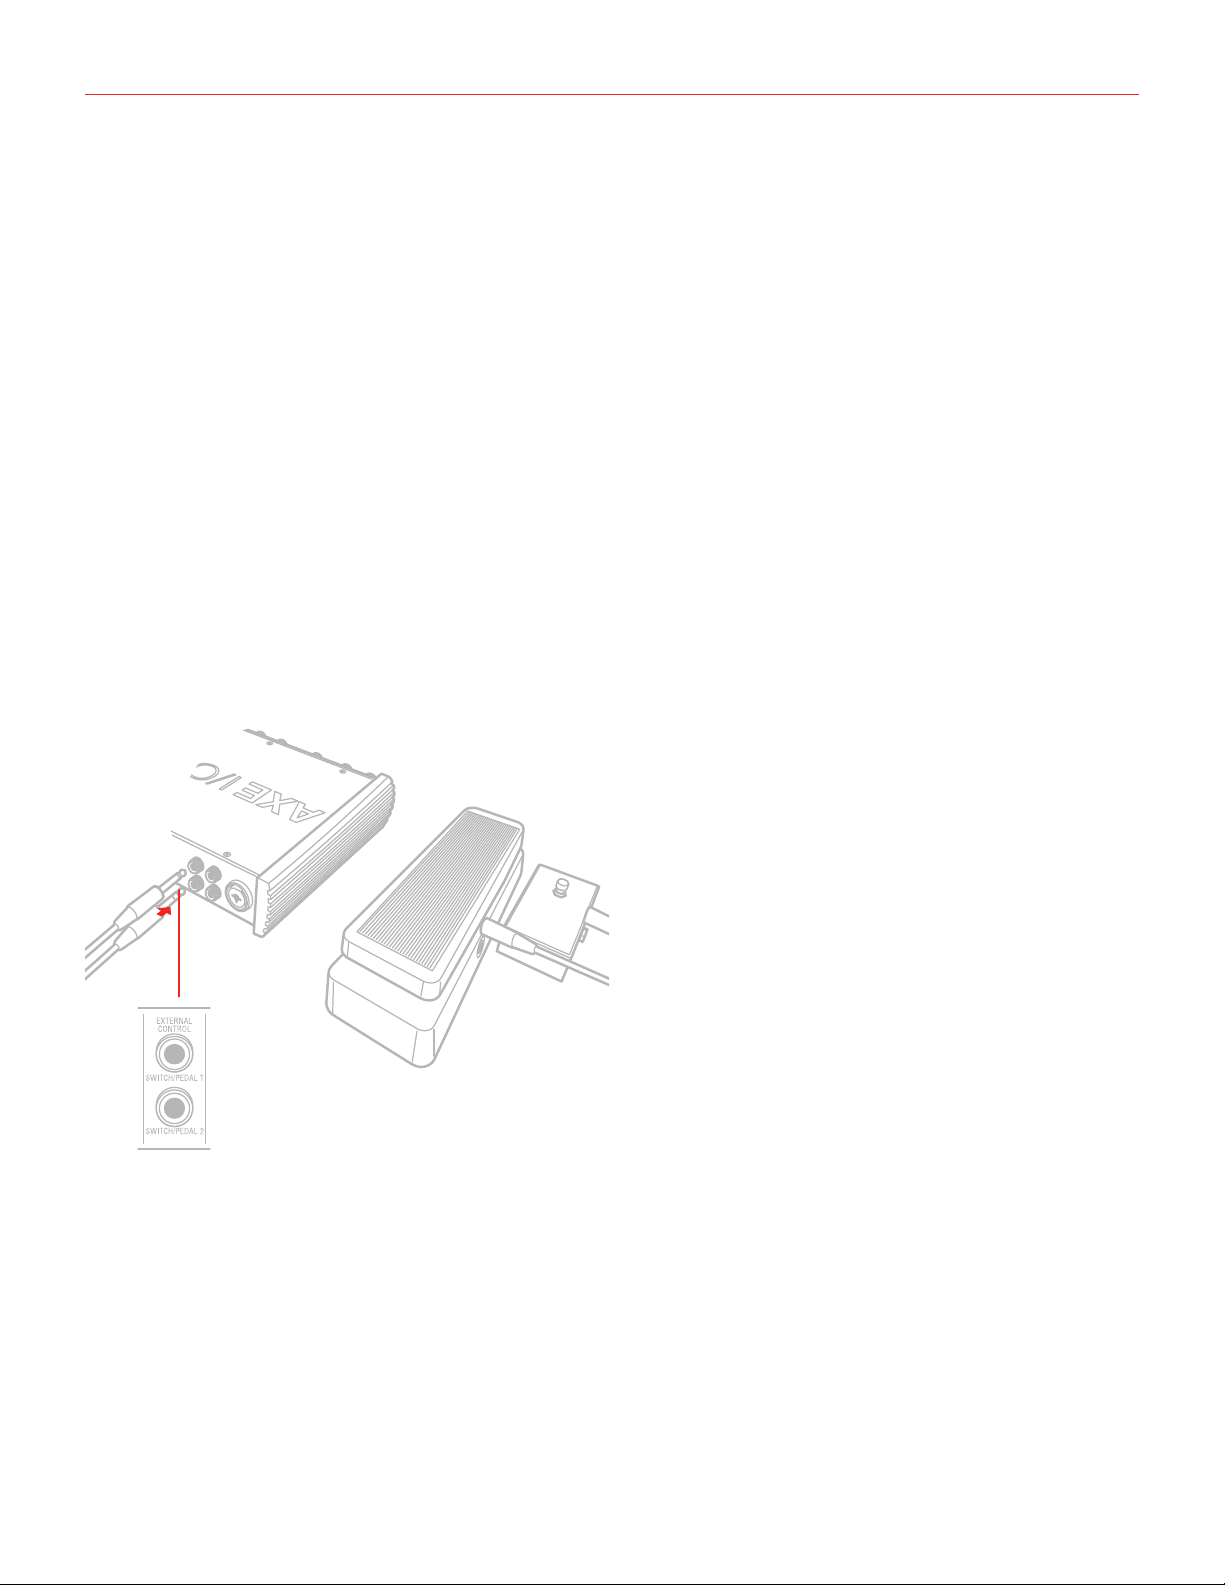
2.6 External control
Connect up to two external controller here to send MIDI control messages. You can use any available
“momentary” or “sustain pedal” type foot switch that includes a 1/4 inch connector. Both normally open
and normally closed switches are supported. AXE I/O SOLO also support continuous expression pedals for
controlling realtime parameters like Wah, Volume, FX depth etc. Any 1/4” TRS connector expression pedal
will work with AXE I/O SOLO. MIDI messages associated with these controllers are freely assignable from the
“Control app”.

English
12
3 Setup your DAW
The AXE I/O SOLO is compatible with any Windows-based DAW that supports ASIO or any Mac-based DAW
that uses Core Audio. After installing AXE I/O SOLO Control Software and connecting the hardware, you can
start using your AXE I/O SOLO with the your DAW.
It is possible that your DAW may not automatically select the AXE I/O SOLO as its default I/O device. In this
case, you must manually select the AXE I/O SOLO as the audio hardware on your DAW’s Audio Setup page.
Please refer to your DAW’s documentation (or Help files) if you are unsure where to select the ASIO/Core Audio
driver.
Once the AXE I/O SOLO is set as the preferred Audio Device in your DAW, all 2 inputs and 3 outputs will appear
in your DAW’s Audio I/O preferences.
4 Connecting microphones
Always connect microphones to AXE I/O SOLO with XLR-to-XLR balanced cables. This will ensure a pristine
and clean performance from your microphone with AXE I/O SOLO.
NOTE: In your audio software, select the Input 2 as the source of the track you will be recording to. Adjust the
channel gain knob until you have a sufficient audio signal without clipping.
4.1 Condenser microphones
Most condenser microphones require external phantom power. If phantom power is ON, switch it OFF, and then
connect your microphone. Turn phantom power ON only after the microphone is connected. Once it’s turned
ON, check that the phantom power LED has become red.
4.2 Dynamic microphones
Before connecting dynamic microphones make sure phantom power is turned OFF. Check that the Phantom
LED is turned off.
4.3 Ribbon microphones
Before connecting a ribbon microphone, turn OFF phantom power and check the microphone’s operating
instruction manual to see if it requires it. Most ribbon microphones don’t require phantom power, and some can
even be damaged by it. If you’re in doubt just leave it OFF. If the microphone won’t work, check its user manual,
it may need phantom power. Please note that when 48V phantom power is turned on, it works on both channels
simultaneously.
English
13
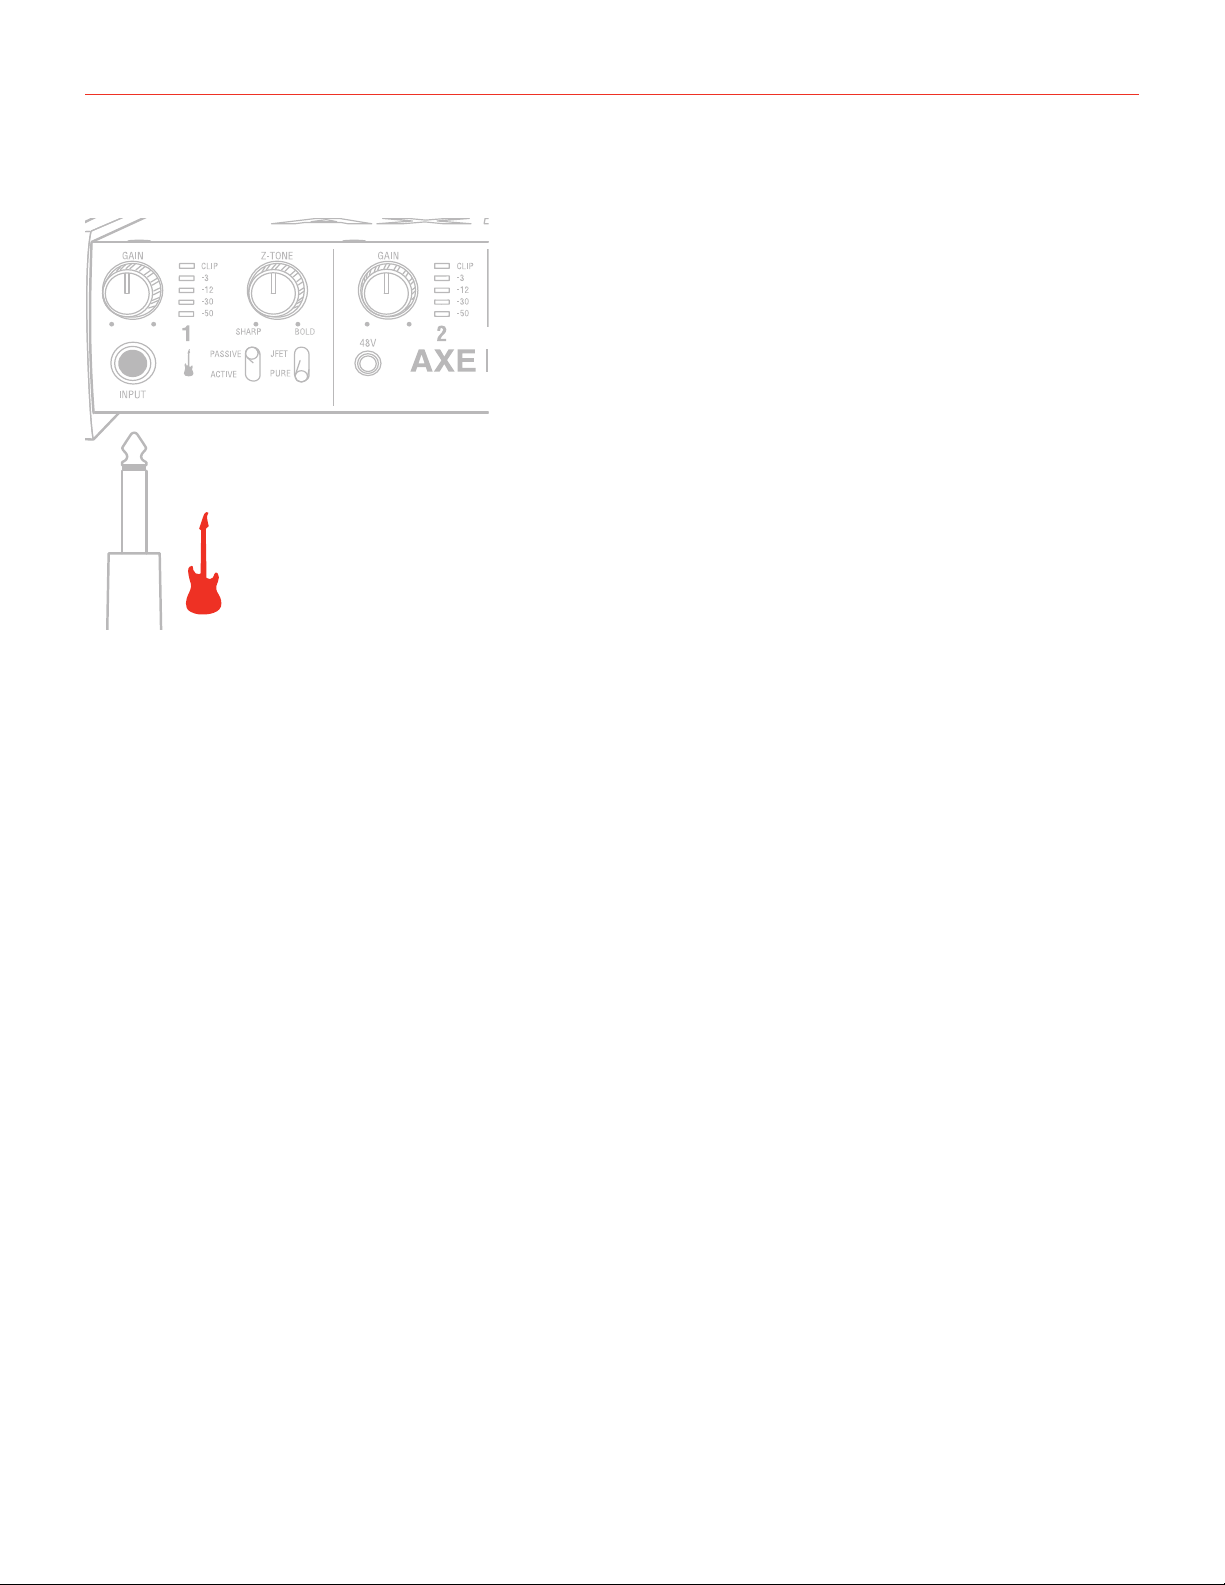
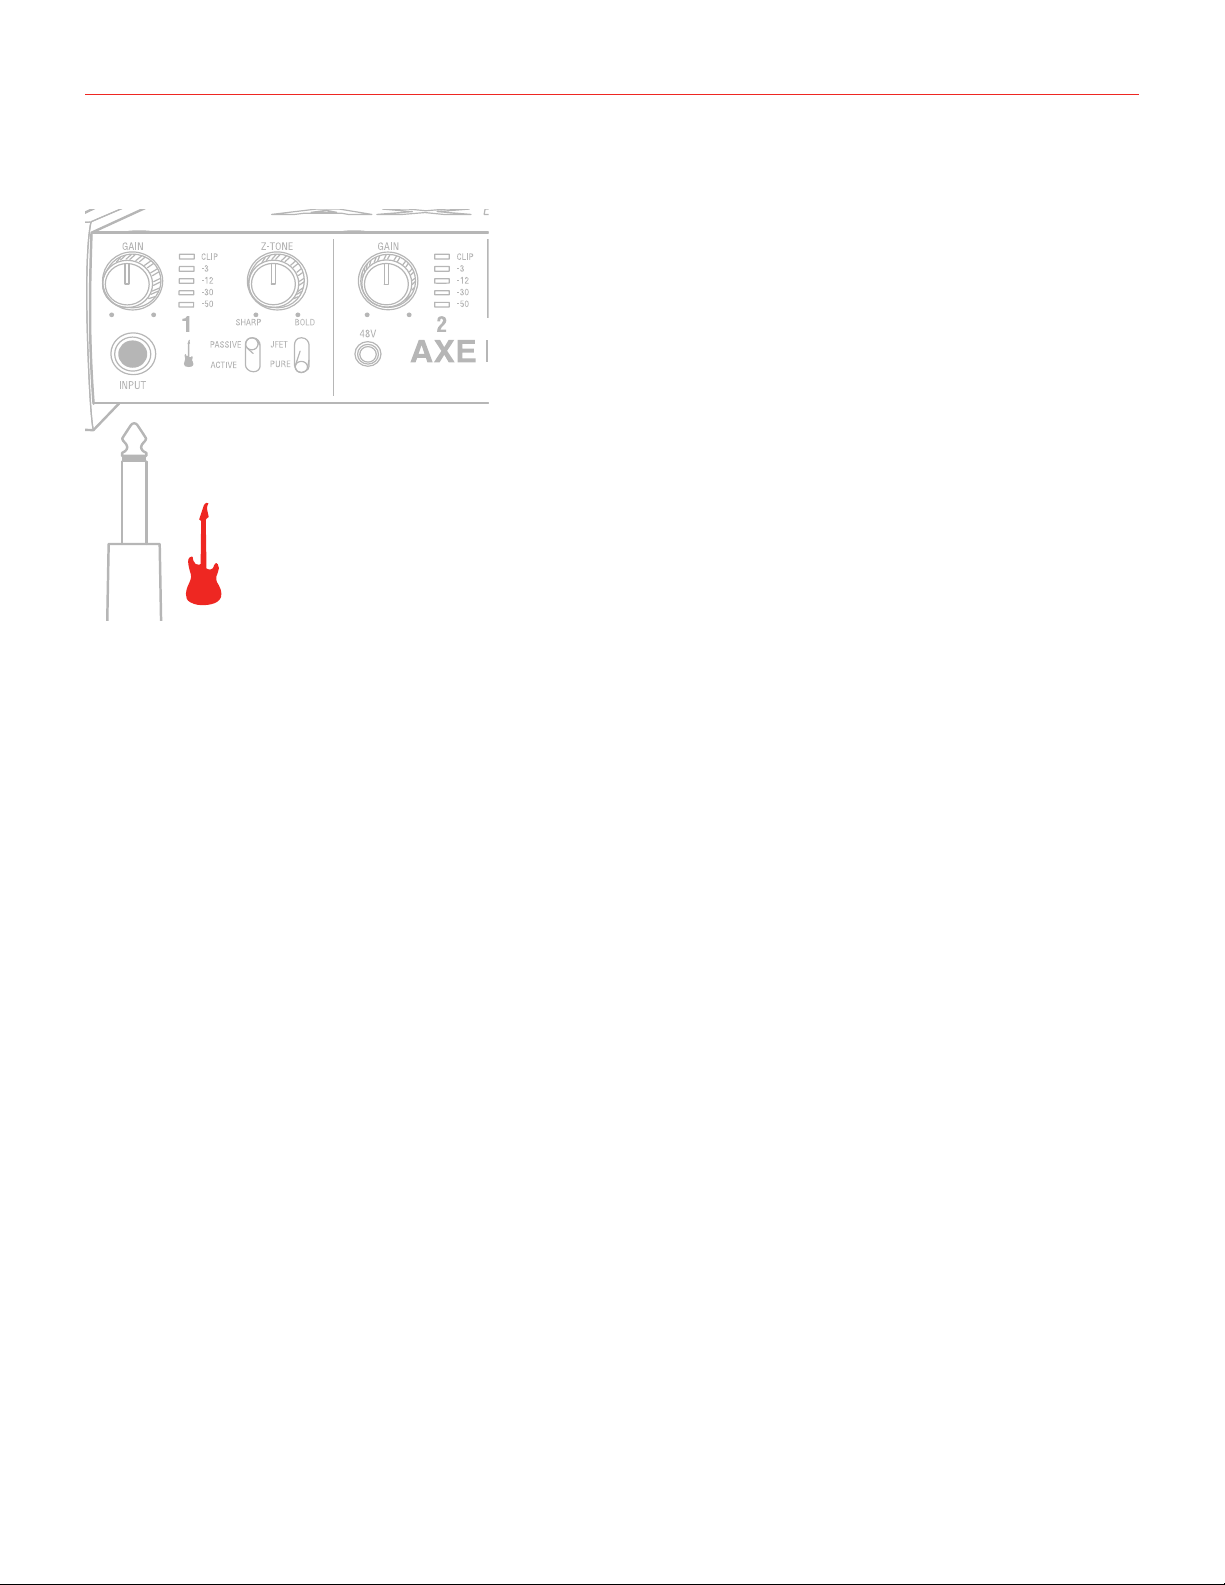
5 Connecting instrument
INSTRUMENT
IN
Connectyourguitar,bassoranyothermonoinstrumentstotheinstrumentinputonAXEI/OSOLOusingan1⁄4”
plug unbalanced (TS or “mono”) guitar cable.
Please refer to Section 2 of this manual for the complete description of features dedicated to the instrument
input.
NOTE: In your audio software, select the Input 1 as the source of the track you will be recording to. Adjust the
channel gain knob until you have a sufficient audio signal without clipping.
English
14
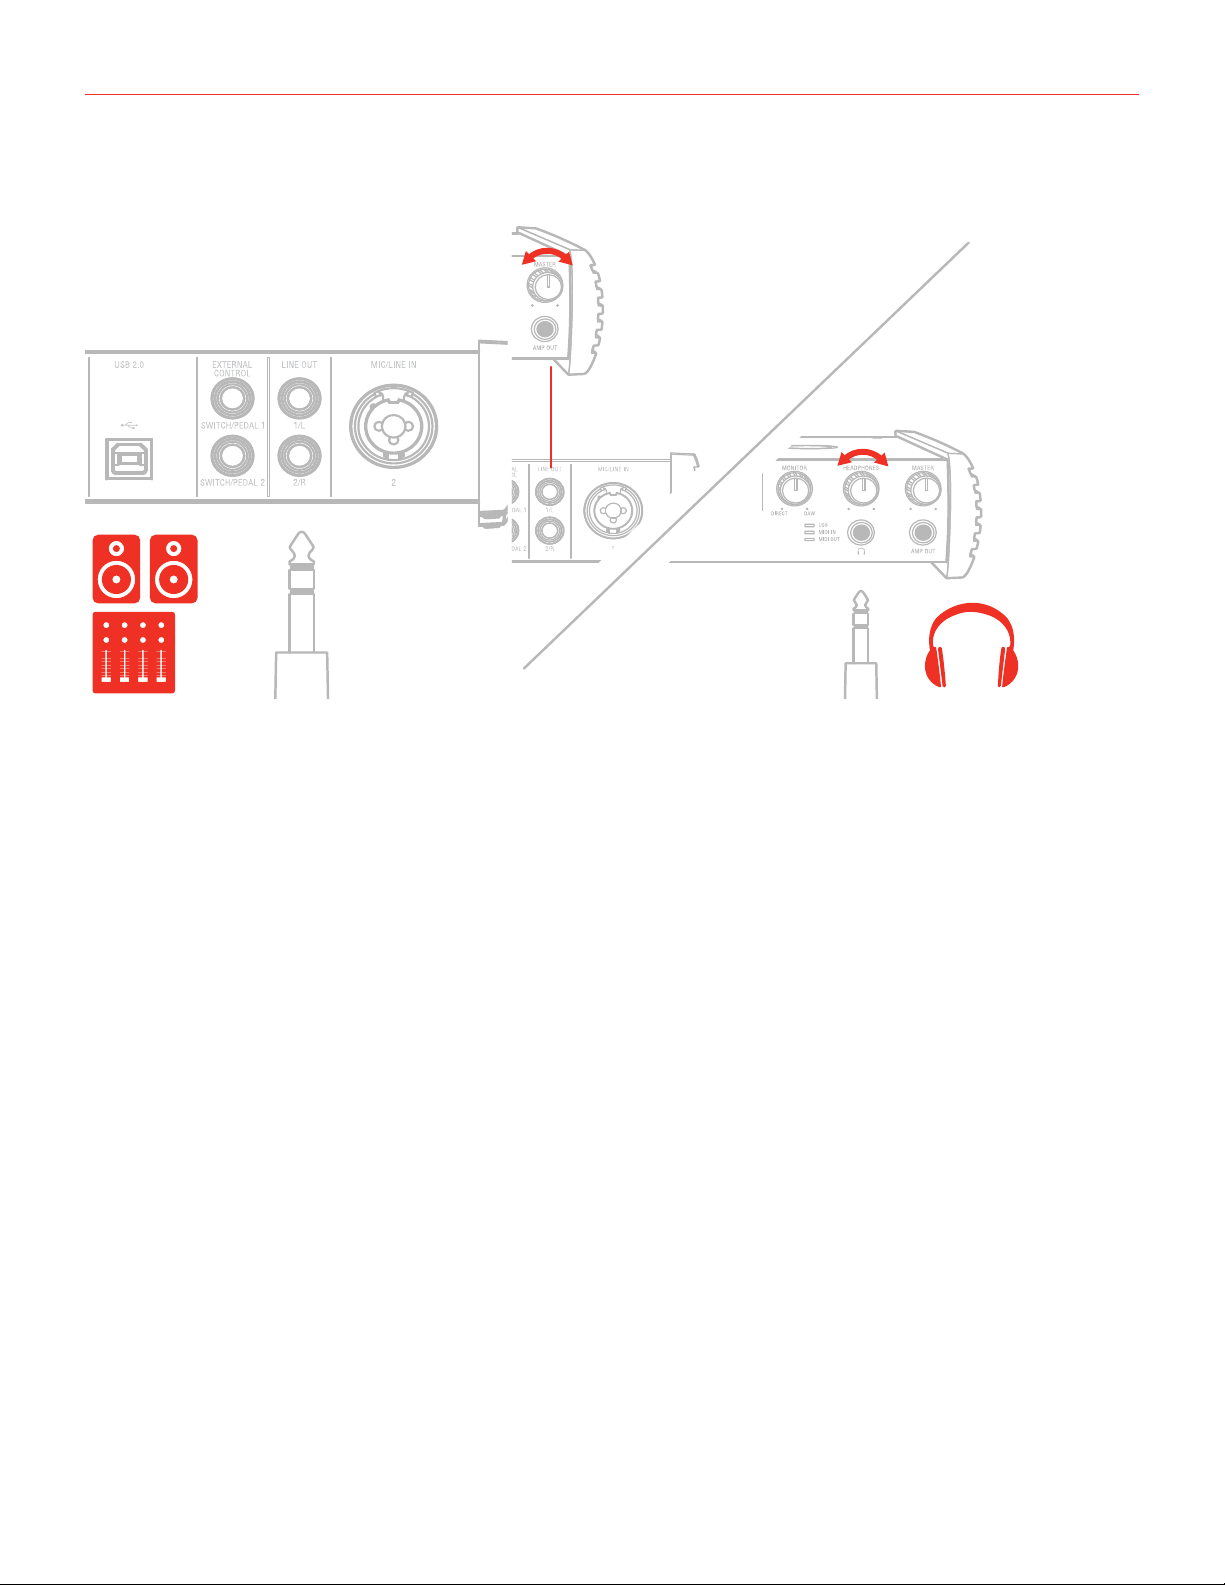
6 Connecting loudspeakers and headphones
The 1/4” jack outputs 1/L and 2/R on the rear panel will normally be used to drive monitoring speakers. Self-
powered (active) monitors incorporate internal amplifiers, and may be connected directly. Passive loudspeakers
will require a separate stereo amplifier; in this case, the rear panel outputs should be connected to the amplifier’s inputs.
Line outputs 1/L and 2R are electronically balanced and floating and will automatically compensates level when
connection is balanced or unbalanced. For this reason these outputs are also ideal for use onstage, when
directly feeding the FOH without any need for isolators or DI boxes. The AXE I/O SOLO has a solid strong signal
free from ground loops that will work perfectly in these situations.
On the front panel of AXE I/O SOLO is present one 1/4” (6.35mm) jack sockets where to connect a pair of
headphones whose level can be controlled with the headphones knob.

English
15
7 Direct monitoring
When recording an audio signal into your audio software, there is often a slight delay before it reaches the
outputs. This delay, called latency, is caused by the computer processing required to process the audio. Since
this delay can be distracting, AXE I/O SOLO provides a direct monitoring path from the inputs to the outputs,
and this is controlled by the Monitor knob. The Monitor knob allows you to blend your input signals with the
playback streams from your computer. This allows you to monitor your input signal with zero latency. If the knob
is positioned at 12 o’clock, the input signal and the playback stream will be equally balanced. Turning the knob
to the left will increase the level of the direct signal; turning to the right will increase the level of the playback
stream from the DAW.
When Monitor is set to DIRECT, make sure any software monitoring option for direct (or “low latency”)
monitoring is disabled. Disabling low latency monitoring prevents “double-monitoring” of input audio signals
when using the Direct Monitoring feature. When “double-monitoring” occurs, there will be an increase in volume
and an undesirable “phasing” sound. For more details about its monitoring function, refer to the documentation
for your audio software.
IMPORTANT: Always makes sure MONITOR knob is set fully clockwise (DAW) when connecting microphones.
This is because even if your DAW is not running or does not have an active recording track, loud feedback could
occur if your monitoring level is high and the MONITOR knob is set on DIRECT.
8 Control software
This is a macOS and Windows applet that controls all the functionalities for the AXE I/O SOLO, also presenting
additional information from the status of AXE I/O SOLO. From this applet you will have extended and
comprehensive metering, have control over output levels, sample rate, MIDI setup, and other important AXE I/O
SOLO options.
To open the Control software:
After installing the Control software on your computer (refer to section 1.1 of this manual for more information)
click the icon on your desktop to launch it.
Assuming that your AXE I/O SOLO interface is connected to your computer with the USB cable, the Control app
GUI (Graphical User Interface) will appear as shown on the sections below. The green State ‘LED’ at the screen
top left should be illuminated; this confirms that the AXE I/O SOLO interface is connected and properly working.
English
16
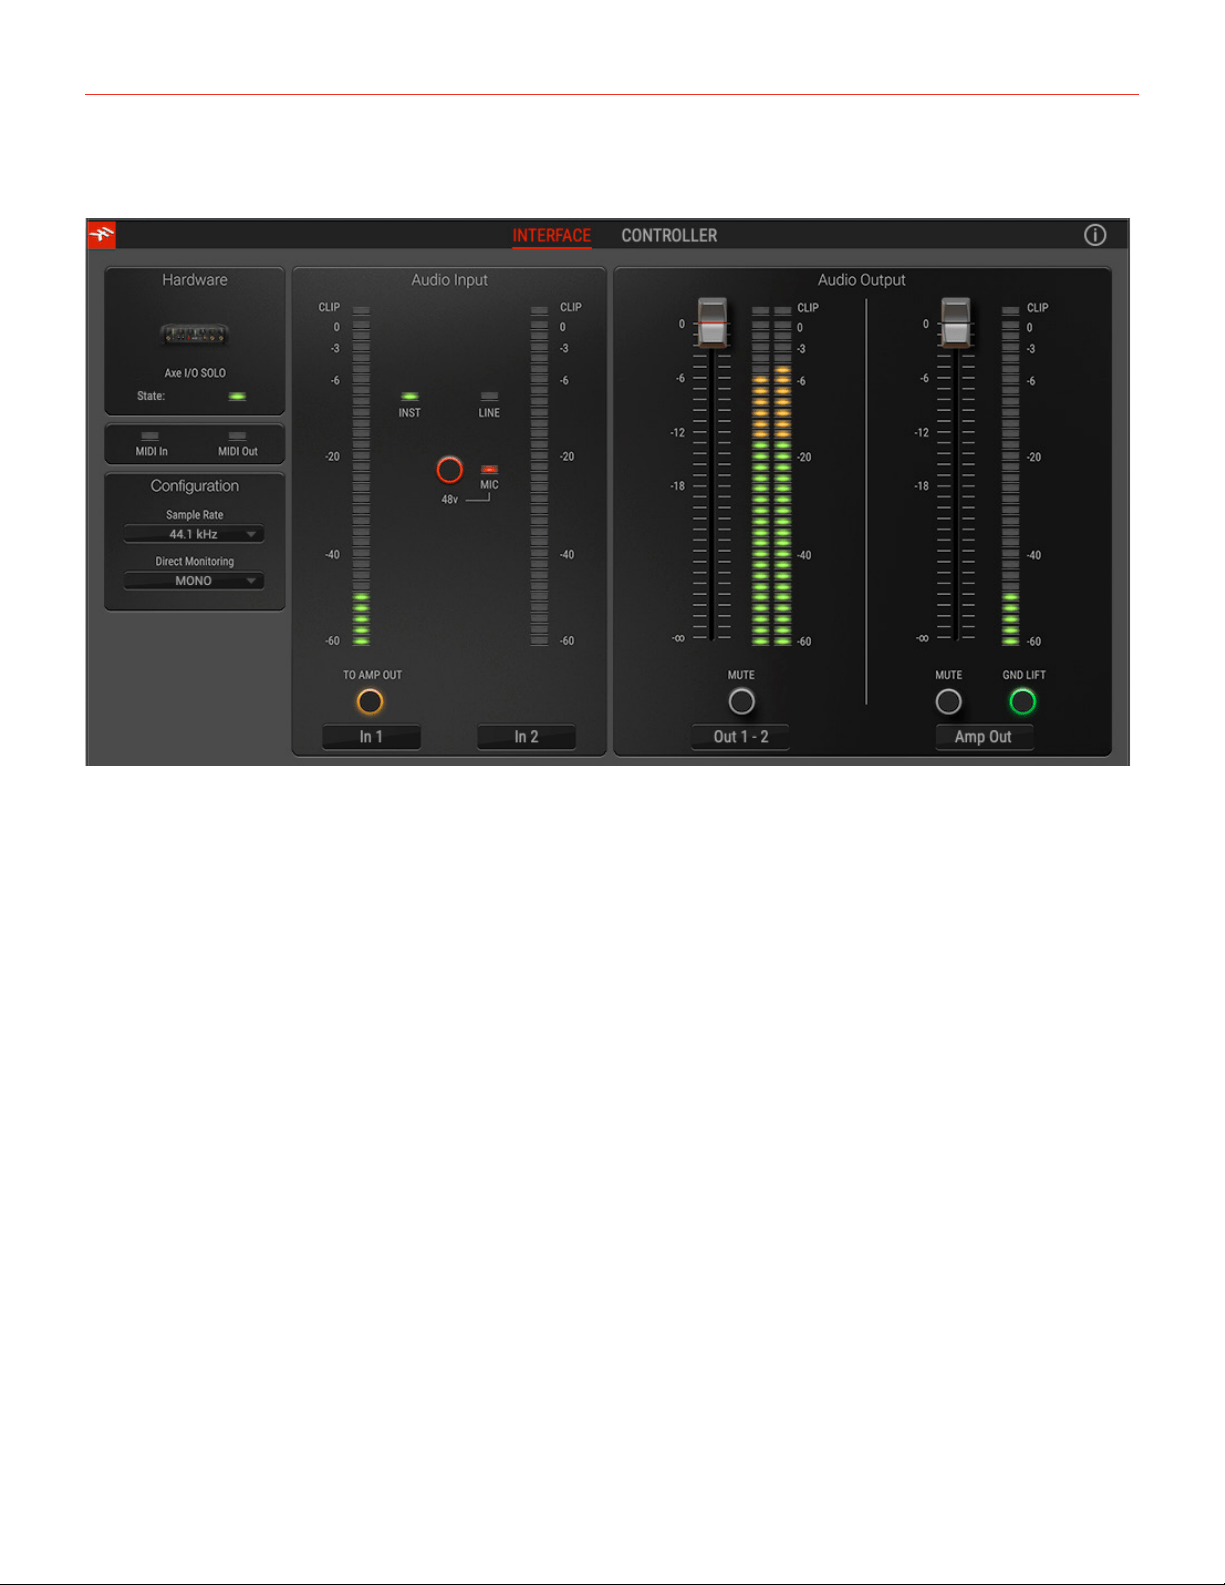
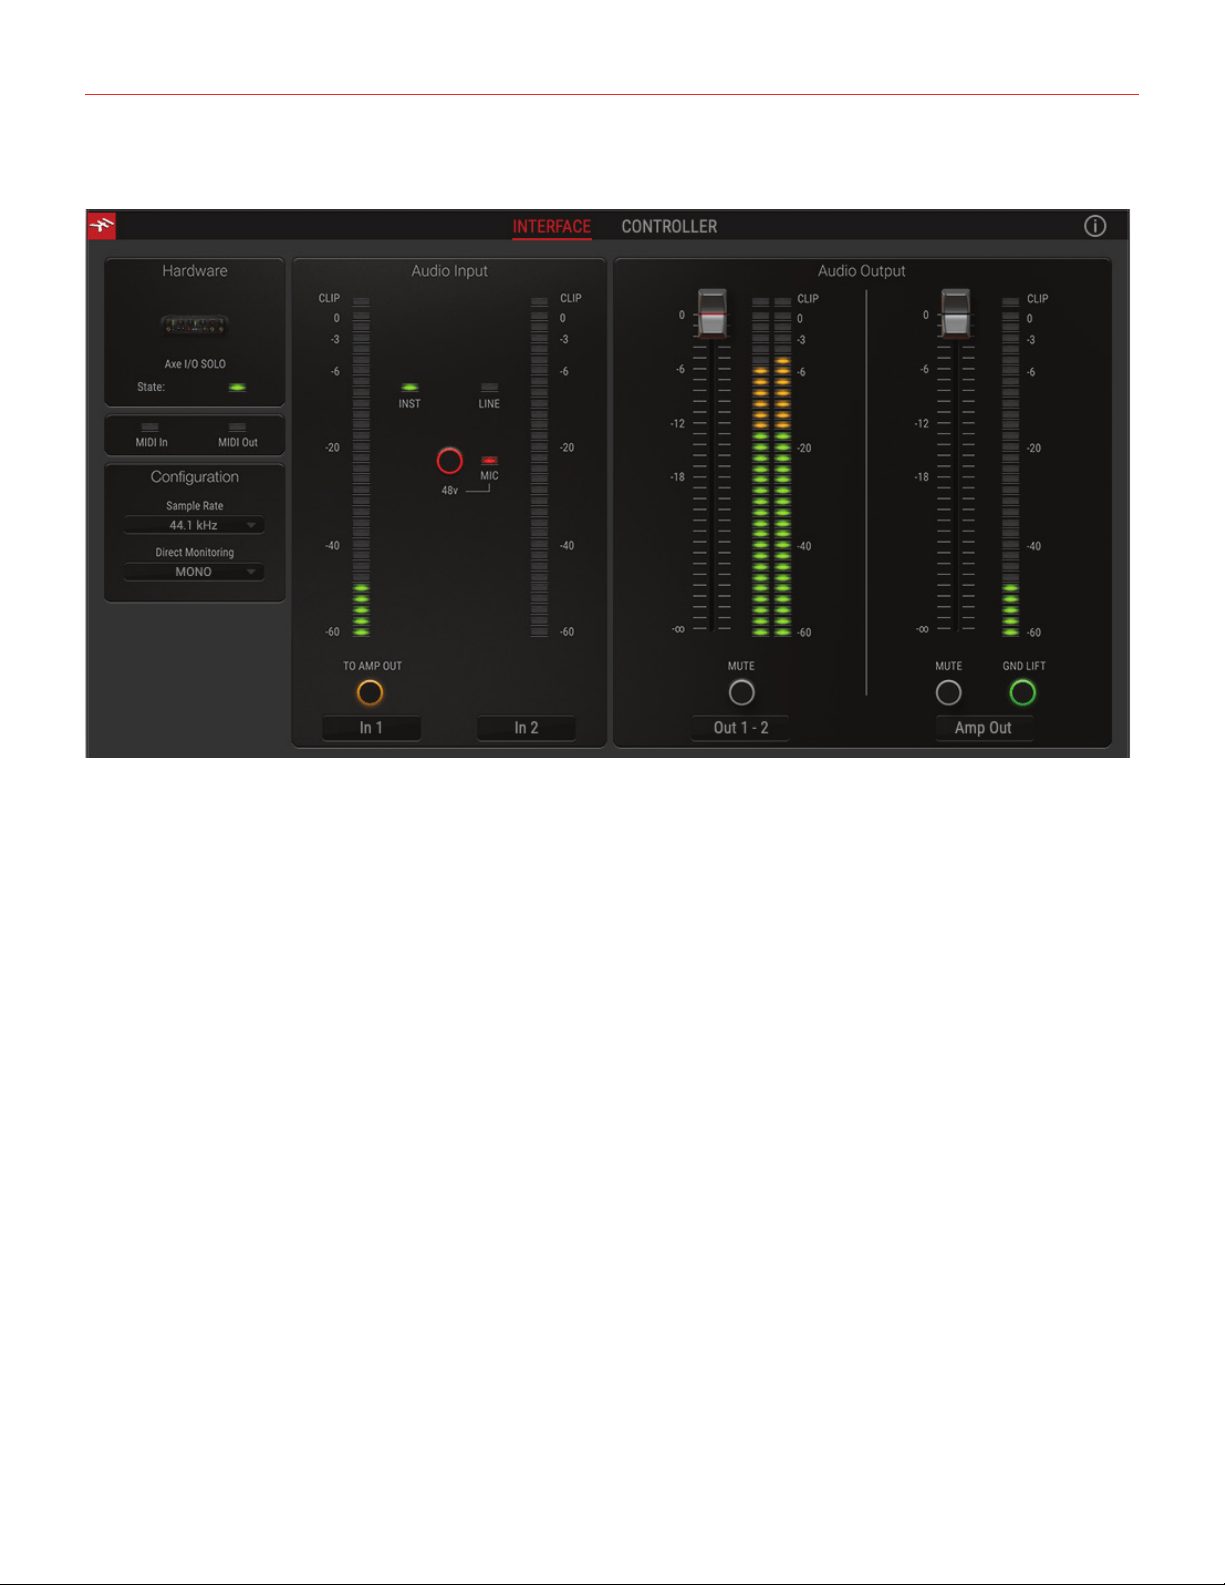
8.1 Interface view
INTERFACE view:
Configuration section:
State:
This LED shows when an AXE I/O SOLO unit is connected and active.
MIDI IN, OUT: these LEDs shows when there is MIDI activity on the AXE I/O SOLO physical MIDI ports.
Sample Rate:
Here you can set the working sample rate for the AXE I/O SOLO unit, from 44.1 to 192 kHz.
Remember than in most cases, DAWS and host applications will likely control this value by their end, not
allowing it to be forced differently. For this reason, you might see this value to go back to its previous state when
you attempt changing it.
Direct Monitoring:
Here you can determine how the two input channels are mixed on the Direct monitoring path.
“Mono” means that both channels are mixed to mono. This is the most useful setting when you want to monitor
one channel per time as this way the input channel will be monitored on both channels of your monitors or
headphones.
“Stereo” mean that channel 1 will be routed to the left side of your monitors or headphones, and channel 2 on
the right side. This is the most useful setting when you need to monitor stereo sources.
“Channel 1” makes only input 1 channel to reach the direct monitoring path on both L and R sides.

English
17
“Channel 2” makes only input 2 channel to reach the direct monitoring path on both L and R sides.
These are useful when only one input is normally used and you don’t want even the slightest amount of noise
coming from the other channel to be mixed into the monitoring path.
TO AMP OUT:
When activated, this button routes the Instrument Input 1 to directly to the Amp Out with zero latency so
guitarists can easily record both a clean DI signal and their amplifier simultaneously, without the need for splitters
or other external gear.
Audio Input section:
Here you can see the input channels active source (Instruments, Mic or Line) and monitor the level on high
precision peak meters.
You can also switch phantom power on and off. Remember that phantom power will only be applied to the XLR
input.
Audio Output section:
Here you can see the output channels levels on precision peak meters, you can adjust the output levels of all
outputs with the large sliders, or you can quickly mute each output individually.
Amp Output GND LIFT:
The Amp Output is a specially designed floating output made to drive amplifiers and sensitive vintage stomps
without the typically associated ground loop noises, hum and buzzes. Depending on what else is connected to
the AXE I/O SOLO and what grounding scheme is implemented in the setup the amp connection can be cleaner
with GND LIFT active or not active.
The default position is GND LIFT, with lift active, in case you hear some buzz or noise when connecting an high
gain guitar amp, try switching off the GND LIFT.
English
18
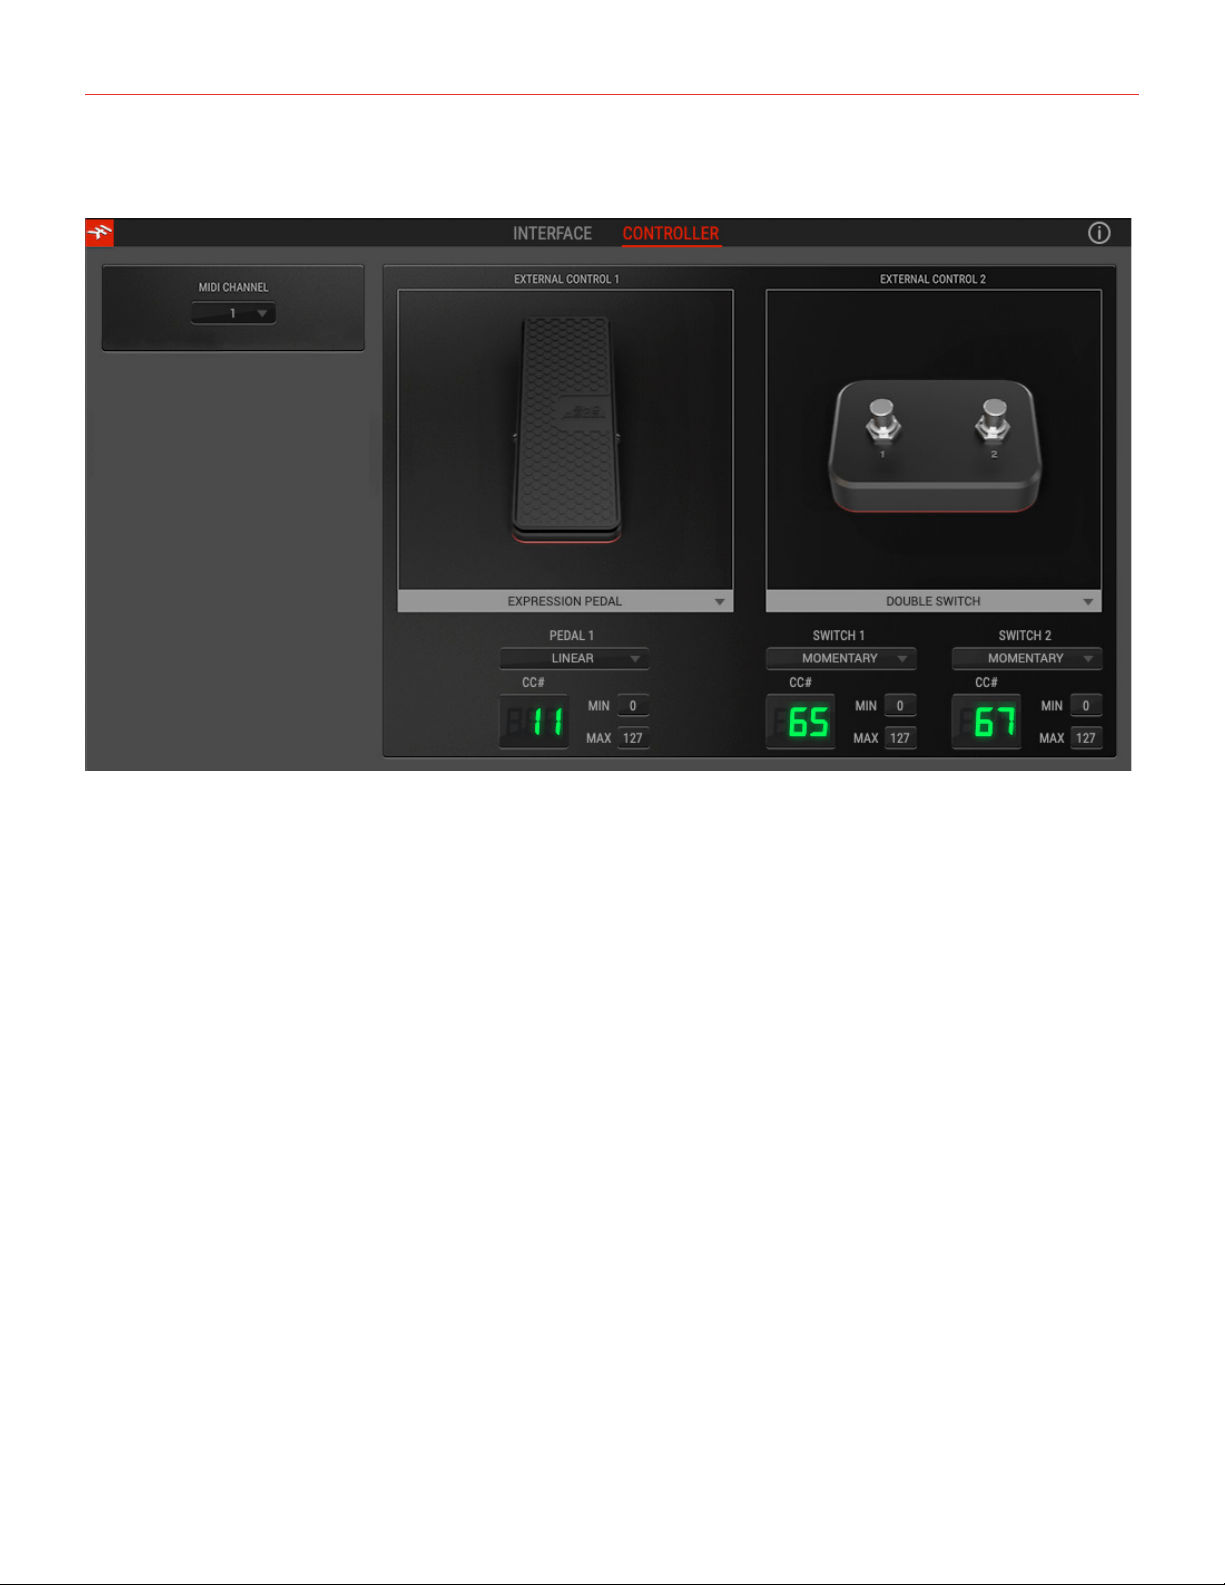
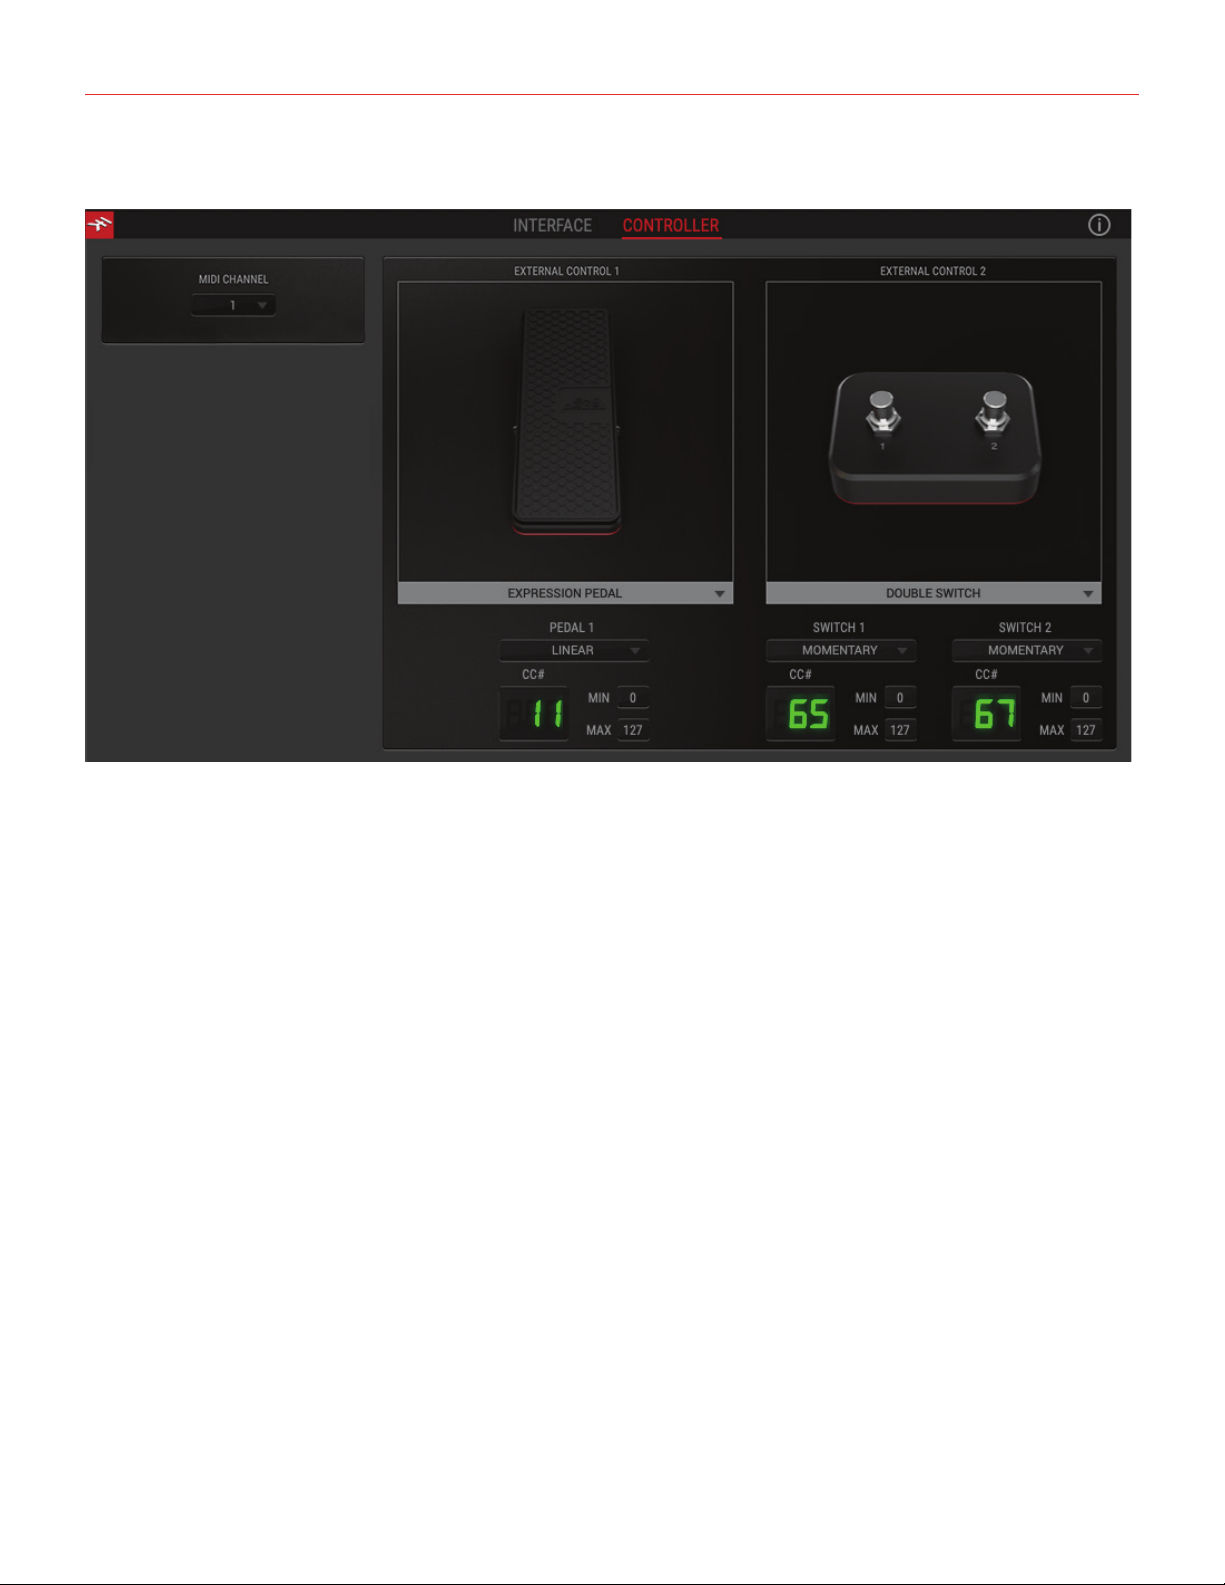
8.2 Controller tab
The CONTROLLER tab gives you control over the 2 controller inputs. Set behavior, MIDI channel, MIDI CC#,
minimum and maximum values, and more, to dial in the best settings for whatever application you want to
control.

English
19
9 Specifications
Common
AD and DA Resolution: 24-bit
Sampling Rate: 44.1 kHz, 48 kHz, 88.2 kHz, 96 kHz, 176.4 kHz and 192 kHz
Host Connection: USB Type-B receptacle. USB 2.0 (High Speed).
Line Outputs 1-2 (Monitor)
Configuration: Electronically balanced and floating, automatically compensates level when connection is
balanced or unbalanced, tip hot.
Output impedance: 150 Ohms balanced, 75 Ohms unbalanced
Output Level: 0 dBFS corresponds to +13.5 dBu
Frequency response: From 1 Hz to 46 kHz within 0.5 dB (96 kHz sample rate)
Dynamic Range: 113 dB(A)
THD @ -1 dBFS: 0.001%
THD+N: -103 dB(A) at -1 dBFS
Channels 1-2 crosstalk: 112 dB(A)
Output 3 (Amp output)
Configuration: Unbalanced, floating, with selectable ground lift
Output impedance: 75 Ohms
Output Level: 0 dBFS corresponds to -3 dBu
Frequency response: From 20 Hz to 42 kHz within 0.5 dB (96 kHz sample rate)
Dynamic Range: 106 dB(A)
THD+N: -93 dB(A)
Headphones Out
Output impedance: Virtually ideal source (zero Ohms) until clipping
Maximum Output level: +9 dBu into 50 Ohms load (approx 95 mW)
Frequency response: From 1 Hz to 42 kHz within 0.5 dB (96 kHz sample rate)
Dynamic Range: 111 dB(A)
THD+N: -102 dB(A)
Instrument Input
Configuration: Multiple topology instrument preamp
Input impedance, PASSIVE mode: Variable from 1 MOhms down to 2.2 kOhms
Input impedance, ACTIVE mode: 10 kOhms
Input level, min gain: 0 dBFS is obtained with a +12.5dBu signal at the TS input
Input level, max gain: 0 dBFS is obtained with a -19 dBu signal at the TS input
Frequency response: From 6 Hz to 42 kHz within 0.5 dB (96 kHz sample rate)
Dynamic Range: 117 dB(A)

English
20
THD, PURE mode: 0.002 % (-1dBFS input)
THD, JFET mode: 0.5 %
Mic Input
Configuration: Class-A discrete differential microphone preamp, pin 2 hot
Input impedance: 4 kOhms differential
Input level, min gain: 0 dBFS is obtained with a +9 dBu signal at the XLR input
Input level, max gain: 0 dBFS is obtained with a -44 dBu signal at the XLR input
Frequency response: From 7 Hz to 32 kHz within 0.5 dB (96 kHz sample rate)
Dynamic Range: 116 dB(A)
THD+N: -104 dB(A) at -10 dBFS
Line Input
Configuration: Class-A discrete differential line receiver, tip hot
Input impedance: 20 kOhms differential
Input level, min gain: 0 dBFS is obtained with a +26 dBu signal at the TRS input
Input level, max gain: 0 dBFS is obtained with a -27 dBu signal at the TRS input
Frequency response: From 7 Hz to 32 kHz within 0.5 dB (96 kHz sample rate)
Dynamic Range: 117 dB(A)
THD+N: -104 dB(A) at -10 dBFS
Warranty
For detail on your product’s warranty, please visit:
www.ikmultimedia.com/warranty
for the complete warranty policy.
Support and more info
www.ikmultimedia.com/support
www.ikmultimedia.com/products/axeiosolo

21
Regulatory
2020/05/05
AXE I/O SOLO, AmpliTube and SampleTank® are trademarks property of IK Multimedia Production Srl. All other product names and images, trademarks and artists names are the property of their
respective owners, which are in no way associated or afliated with IK Multimedia. iPad, iPhone, iPod touch Mac and Mac logo are trademarks of Apple Computer, Inc., registered in the U.S. and other
countries. Lightning is a trademark of Apple Inc. App Store is a service mark of Apple Inc.
USER’S MANUAL REVISION NOTE:
v1.0 (2020/05/05): Initial Release
FCC statement
This device complies with Part 15.107 and 15.109 Class B of the FCC Rules CFR47:
October 2010.
Operation is subject to the following two conditions:
1. This device may not cause harmful interference.
2. This device must accept any interference received, including interference that may
cause undesired operation.
Changesormodicationsnotexpresslyapprovedbythepartyresponsiblefor
compliance could void the user’s authority to operate the equipment.
Compact audio interface with
advanced guitar tone shaping
USER MANUAL
日本語版

目次
2
目次
目次 2
日本語 3
AXE I/O SOLO 3
AXE I/O SOLOの登録 3
フロントパ ネル 4
リアパネル 5
1 インストールと設定 6
1.1ソフトウェアのインストール 6
1.2設定 6
2 ギターに特化した機能 8
2.1アンプへの直接出力とリアンプ 8
2.2JFET/PURE入力(InstrumentInput1のみ)9
2.3ピックアップセレクター(InstrumentInput1のみ)9
2.4入力インピーダンス(Z-TONE)を調整する
10
2.6外部コントロール(Externalcontrol) 11
3 DAW設定 12
4 マイクロフォンの接続 12
4.1コンデンサー型マイクロフォン 12
4.2ダイナミック型マイクロフォン 12
4.3リボン型マイクロフォン 12
5 楽器の接続 13
6 モニタースピーカーとヘッドフォンの接続 14
7 ダイレクト・モニタリング
15
8 AXE I/O SOLO Control Panel 15
8.1インターフェイスビュー(INTERFACE) 16
8.2コントローラータブ(CONTROLLER) 18
9 製品仕様 19
保証 20
サポートおよびその他の情報 20
Regulatory 21
日本語
3
AXE I/O SOLO
この度は、AXEI/OSOLOをお求めいただき、誠にありがとうございます。
以下、パッケージ同梱物になります:
X1
X1
•
AXEI/OSOLO本体
•
USBケーブルx1本
AXEI/OSOLOは2イン/3アウトのオーディオ・インターフェイスで、AXEI/Oシリーズでもっとも小さな製品となっています。
AXEI/Oと同じく、ギタリストの為に一から設計され、他のオーディオ・インターフェイスで見ない快適で素晴らしい機能を搭載され
ています。そのすべてがこの小型ボディでできています。
AXEI/OSOLOは、一般的なオーディオ・インターフェイスとしても優れたものに仕上がっています。192kHzのサンルレートと24bit
の分解能によるダイナミックレンジの確保と非同期転送のUSBオーディオによる超低ジッターのプレミアムオーディオパフォーマ
ンスを実現します。
AXE I/O SOLOの登録
登録をすることで、テクニカルサポートへのアクセス、保証の有効および無料のJamPoints™をお客様のアカウントを通じて受け
取ることが可能になります。JamPoints™は、将来IK製品をお求め頂く際の割引としてご利用頂けます。また、ご登録頂くことで、最
新のソフトウェアアップデートやIK製品に関する情報を随時受け取ることが可能になります。
登録はこちらから:www.ikmultimedia.com/registration
日本語
4
フロントパ ネル
1
4
65
7
9
8
2 2 10
12
11
3 3
13
1.
楽器入力(INPUT 1):楽器(ギターなど)を接続する為の1/4”(6.35mm)標準プラグを装着する為のジャックです。
2.
ゲイン(GAIN 1と2):入力信号レベル(ゲイン)を適切に設定する為のノブです。
3.
ピー クメー ター:適切な入力レベルを設定する為の5セグメントピークメーターです。入力信号過多が発生した場合、一番上
のCLIPインジケーターが、1秒以上点灯しそのことを示します。
4.
Z-TONE™:フロントパネルコントロールのZ-TONE™-バリアブルインピーダンスコントロールは、INPUT1のみに用意された
可変インピーダンスコントロールで、接続したに最適な入力インピーダンス設定を行います。この機能により、楽器本来の音
色、質感を取り戻すことが可能です。また、EQでは得ることの出来ない微細なニュアンスを持った積極的なサウンドメイクに
も役立ちます。
5.
PASSIVE/ACTIVEスイッチ:このスイッチはINPUT1のみに用意されたものです。ギターを接続した際、ギターに搭載された
ピックアップに合わせて設定をします。ギター側のプリアンプの有無に合わせて設定することで、より自然なギタートーンを得
ることが出来ます。
6.
JFET/PURE:INPUT1のみに用意された楽器用プリアンプの:JFETプリアンプとピュア(PURE)プリアンプの切り替え
スイッチです。
7.
48V:マイクロフォン入力を通じた48Vファンタム電源のオン・オフを行うスイッチです。リアパネルに2つの入力に適用します。
8.
MIDI入出力(MIDI IN/OUT LED):MIDI入力と出力それぞれの信号の送受信に合わせて点灯します。
9.
USB LED:コンピューターとのUSB接続が確立した場合、このインジケーターが点灯し、そのことを示します。
10.
モニター(MONITOR):モニターノブはダレクトモニタリングをする際、入力信号とコンピューターからの再生音のバランス調
節に使用します。12時のポジションで、入力信号とコンピューターの再生音が同じバランスになります。左側に回すことで、入
力信号が強くなり、右側でコンピューター(DAW)からの音声が強くなります。このノブの設定は、OUTPUT1/2とヘッドフォン
出力の両方に適用します。
11.
ヘッドフォン(HEADPHONES):ステレオヘッドフォンを接続する為の1/4”(6.35mm)標準ステレオジャックと専用のボリュ
ームコントロールです。ヘッドフォン出力の信号は、OUTPUT1/2から出力されるものと同一になります。
12.
マスター(MASTER):メインの出力、リアパネルのOUTPUT1/2の出力ボリュームの調節に使用します。
13.
アンプ出力(AMP OUT):AXEI/OSOLOの3番目の出力で、ギターアンプの入力に接続する為の1/4"、アンバランスの出力
ジャックです。この出力はギターアンプやギターストンプを接続した際のハムやバズノイズ、あるいはグランドループや音量、
インピーダンスのミスマッチによる諸問題を解決、改善するフローティング出力にすることも可能です。
日本語
5
リアパネル
1
2
6
3
5
4
1.
Kensingtonセキュリティロックポート:AXEI/OSOLOの盗難防止をする為のKensington(ケンジントン)規格のロック
ワイヤーを接続します。
2.
MIDI入出力(MIDI IN/OUT):他のMIDI機器と接続をする為のDIN5ピン仕様の標準MIDI入力と出力ポートです。
3.
USB 2.0ポート:付属のUSBケーブルを使用して、AXEI/OSOLOとコンピューターを接続する為のTypeBコネクターです。
4.
外部コントロール(EXTERNAL CONTROL):コントロールペダル(シングルまたはデュアルスイッチ、エクスプレッション
ペダル)を接続する為の1/4”(6.35mm)ジャックです。ここで扱うMIDIコントロール情報は、専用のソフトウェア:
“Controlapp”で行います。
5.
ライン出力(LINE OUTPUTS 1/Lと2/R):出力1/Lと2/Rは、アナログフローティング仕様のバランス出力です。1/4”
(6.35mm)サイズのプラグを装着して使用します。バランス接続の場合、TRSプラグを使用します。出力1/Lと2/Rは通常、
メインのモニターシステムに接続して使用します。
6.
マイク/ライン入力(MIC/LINE IN 1と2):XLRコンボタイプの入力ジャックです。マイクロフォン(XLR)またはライン
(1/4"プラグ)信号の入力に使用します。入力1はまた、リアンプ入力として使用します。
日本語
6
1 インストールと設定
1.1ソフトウェアのインストール
AXEI/OSOLOの為のソフトウェアは全て、IKMultimediaウェブサイト(www.ikmultimedia.com/products/axeiosolo)を経由し
て供給されますので、ダウンロードをする必要があります。“AXEI/OSOLODriversandControlSoftware”の項目から、以下のソ
フト ウェ ア を 入 手 し ま す:
M A C ユ ー ザ ー: 全てのファイルは、AXEI/OSOLOControlAppのインストーラーに含まれます。
Windowsユーザー: パッケージ内にAXEI/OSOLOControlAppとこのインターフェイスを使用する為のドライバーが含まれてい
ます。
1.
いつもご利用のウェブブラウザーでwww.ikmultimedia.com/products/axeiosoloにアクセスし、ダウンロード(Download)
セクションに 移 動します。
2.
ご利用環境(MacまたはWindows)に応じた“AXEI/OSOLODriversandControlSoftware”ファイルを見つけ、ダウンロード
をします。
3.
コンピューターにダウンロードをしました“AXEI/OSOLODriversandControlSoftware”(MacまたはWindows)を起動し
て、画面の指示に従ってインストールを完了します。
4.
インストールを全て完了しましたら、コンピューターを再起動します。
5.
コンピューターの再起動後、付属のUSBケーブルを使用して、AXEI/OSOLOとコンピューターを接続します。
1.2設定
1.
上記にて解説しました通り、AXEI/OSOLOのドライバー(Driver)とコントロール・ソフトウェア(ControlSoftware)を
ダ ウ ン ロ ー ド し 、イ ン ス ト ー ル を し ま す 。
AmpliTubeDeluxe
10T-RackSplug-ins
AbletonLiveLite
AXE I/O SOLO Control Software
無料ダウンロード
ikdownloads.com/axeiosolo

日本語
7
2.
AXEI/OSOLOとコンピューターを付属のUSBケーブルで接続します。
3.
ギター、ベースなどの楽器をフロントパネルの楽器入力(INSTRUMENTINPUT)を1に接続します。マイクロフォン(XLRケーブ
ル)、ライン出力機器(1/4"プラグのケーブル)リアパネルのXLRコンボ入力(MIC/LINEIN)のに接続します。
4.
パワード・スピーカー、アンプなどの再生機器を、AXEI/OSOLOリアパネルのバランス・アウトに接続します。
5.
必要に応じて、リアパネルのMIDIINとOUTと、MIDI機器を標準のMIDIケーブル(DIN-5)を接続します。
日本語
8
2 ギターに特化した機能
2.1アンプへの直接出力とリアンプ
RE-AMPLIFICATION
infromMIC
AXEI/OSOLOには、ギタリストのスタジオレコーディングで一般的に行われているリアンプ(Re-Amplification)と呼ばれる行為に
特化した機能が備えられています:3番目の出力として用意された“AMPOUT”はその為のもので、メイン出力の1-2とは独立し、
特別な仕様になっています。この出力を用いることで、既にコンピューターソフトウェアでライン収録したトラックを実際のギターア
ンプやギター用のストンプエフェクトを直接繋いて、ギターサウンドを再形成することが可能です。勿論、その間、メイン出力1-2で、
セッションのモニターを行いながら、アンプやストンプを通したサウンドの再収録が可能です。また、AMPOUTを用いることで、新た
にリアンプをする為のデバイスを用意する必要が無くなります。
AXEI/OSOLOのAMPOUTは、フローティング・アンバランス出力仕様で、この技術を用いることで、アンバランス入力であるギター
やベースアンプとのマッチングが図られ、楽器本来のサウンドと品質が保たれるだけでなく、アンプから発生したグランドループに
も強く、リアンプした際のノイズやハムを回避することが可能です。AMPOUTグランド・リフトのOn/Offは、AXEI/OSOLOControl
PanelソフトウェアのAmpOut「GNDLIFT」ボタンにて切り替え可能です。
日本語
9
2.2JFET/PURE入力(InstrumentInput1のみ)
AXEI/OSOLOフロントパネルの楽器入力1には、2つのプリアンプ技術:JFETとPUREが用意され、スイッチ切り替えをすることが
可 能 で す 。
JFET(field-effecttransistor)モードは、ディスクリート回路で構成されたプリアンプで、信号に対してほんの少し倍音と彩りを加
えます。このことにより、楽器の音色に少しだ け温 もりを与えます。
PUREモードは、クリーンなシグナルパスを目指した回路で、リニアなレスポンスと透明感のあるサウンドに適しています。
いずれのプリアンプモードも、現代の業務スタジオでワークやステージパフォーマンスでの使用を想定した品質と特性が高いレベ
ルで確保された仕様に仕上がっています。
注意:JET/PUREスイッチは、ピックアップセレクター(Pickupselector)と連動し、Passiveポジションに設定した際のみ、機能します。
2.3ピックアップセレクター(InstrumentInput1のみ)
PICK-UP
日本語
1 0
AXEI/OSOLOはまた、ギター入力に対しての妥協はありません。エレキギターのパッシブピックアップ(Passive)とプリアンプを装
備したアクティブピックアップ(Active)入力に対する最適な入力回路もそれぞれ独立して用意され、切り替えることが可能です。パ
ッシブピックアップのエレキギターは、アクティブピックアップよりも高出力インピーダンスで、AXEI/OSOLOのPASSIVEモードは
その名の通り、パッシブピックアップ出力に最適化されています。ACTIVEモードは、プリアンプ(電池駆動する)出力を持ったエレキ
ギターに最適化したモードです。
パッシブとアクティブ、どちらが素晴らしいということではなく、それぞれの魅力と特徴があり、AXEI/Oのこの2つのモード切り替え
もそれに習います。従いまして、設定は必ずしも、ピックアップの仕様に合わせるのではなく、実際に耳にして頂き、音楽的に適した
方をお選び下さい。
また、ギターの出力が大き過ぎて、PASSIVEモードでは許容できない場合、エレキベースを繋ぐ場合は、ACTIVEモードの設定をお
試し下さい。
2.4入力インピーダンス(Z-TONE™)を調整する(Input1のみ)
全てのパッシブピックアップ(シングルコイル、ハムバッカー、タップなど...)は、そのロードインピーダンスによって、音色の性質やキ
ャラクターが決定付けられます。つまり、オーディオインターフェイスの入力が単に高出力インピーダンスを受けられる仕様なだけ
では、ギターをアンプに繋いだ際と同様の音色が得られないことがあります。AXEI/Oはこの問題を解消する為、ギターのライン入
力からより音楽的な音色を得る為、入力インピーダンスに可変コントロールを設けました。フロントパネルのZ-TONE™コントロー
ルは、楽器入力1(InstrumentInput1)の入力インピーダンスを接続楽器に合わせて設定することで、その音色をよりクリエイティ
ブに整えることが可 能です。
このシステムの利点は、適切な設定をした際に得られる楽器本来の音色を体験出来ることです。シンプルにツマミを設定するだけ
で、これまでのオーディオインターフェイスの楽器入力では耳にすることの出来なかった響きをそのまま、収録やその後段の信号
処理に使用することが出来る画期的な機能です。
日本語
1 1
このノブの操作にルールや決まりはありません。心赴くまま、耳に心地よい響になるように、ご自由に操作をして下さい!インピー
ダンスを下げて(右方向に回して)膨よかな響にしたり、インピーダンスを上げて(左方向に回して)キレのある鋭い音色にしたり、
最適な設定を見つけましょう。
例えばハイゲインサウンドを入力した際、荒々し過ぎると感じた場合、真ん中付近に設定してみて下さい。Z-TONEは、魔法を掛け
たように程よく落ち着かせます。
エレキベース(パッシブピックアップ)を入力した際、薄いと感じた場合、同様に真ん中に設定しましょう。即座にソリッドな感じを残
しつつ、肉厚で、大きく鳴ることでしょう。このノブの操作の要点は、とにかく試すことです!ご自身の楽器、そして目的のサウンドに
合わせて、自由に操作し、お気に入りの設定を見つけましょう。その可能性と組み合わせはほぼ無限と言えます。
1MΩのハイインピーダンス設定(“Sharp”側)から2.2kΩの最低設定(“Bold”側)まで、Z-TONE回路は、どんなパッシブピックアッ
プにも有効です。アクティブピックアップの場合、このコントロールではハッキリとした有用な効果を得ることは出来ません。また、
その必要もありません。
注意:AXEIOSOLOはDAWのトラックから、AMPOUTを通じて、アナログストンプボックスに信号を送るのに最適なデ
バイスです。その際、ストンプボックスで得たサウンドをDAWに戻す場合、楽器入力1(InstrumentInput1)を使用することをお
勧めします。このことで、ストンプを通した信号に対して、Z-TONE回路を用いることが可能になります。特にロードインピーンダンス
の影響を受ける多くのビンテージストンプボックスには効果てきめんです。ぜひお試し下さい。
2.6外部コントロール(Externalcontrol)
2つの外部コントロール端子は、外部のペダルやスイッチを接続して、MIDIコントロール情報を操作する為に用意されています。こ
の2つの端子、極性を問わず、市販の“momentary”(モメンタリー)、あるいは“サスティンペダル”タイプのフットスイッチと1/4"プ
ラグで、繋ぐことが出来ます。また、市販の1/4"TRSプラグ仕様のエクスプレッションパダルをAXEI/OSOLOに接続して、ボリュー
ムやワウペダルなどのリアルタイム・コントロールにも使用出来ます。ペダルやスイッチで扱う、MIDI情報は専用のコントロールソ
フトウェア:“AXEI/OSOLOControlPanel”で自由に設定出来ます。

日本語
1 2
3 DAW設定
AXEI/OSOLOは、ASIOに対応したWindowsベースのDAW、およびmacOS標準のCoreAudioに対応したMacベースのDAWでご
利用頂けます。AXEI/OSOLOControlSoftwareのインストール後、コンピューターと接続することで、これらのDAWのオーディオ
入出力として、AXEI/OSOLOが使用可能になります。
可能性として、ご利用のDAWが自動で、AXEI/OSOLOを規定のオーディオ入出力デバイスとして設定されない場合があります。そ
の際、手動でDAWのオーディオ設定画面を開いて、設定をする必要があります。設定箇所がご不明な場合、ご利用のDAWのマニュ
アル(あるいはヘルプファイル)のASIO/ASIO/CoreAudioドライバー設定、あるいはオーディオ入出力デバイス設定に関する項目
をご覧下さい。
AXEI/OSOLOが、DAWのオーディオデバイスとして正しく設定されますと、2イン、3アウトのデバイスとして扱うことが可能になり
ます。
4 マイクロフォンの接続
AXEI/OSOLOとマイクロフォンを接続する際、必ず両端ともXLRコネクター(片方がオス/XLR-Mでもう片一方がメス/XLR-F)仕様
のバランスケーブルをご利用下さい。マイクロフォンの信号が正しくAXEI/OSOLOに伝達し、正常機能する為の必須事項です。
ノート:オーディオソフトウェアで録音先のトラックの入力として入力2を選択します。適切なレコーディングレベルの為に、マイクロ
フォンを接続しましたらGAINノブで、CLIPインジケーターが点灯しない程度のレベルに調節をして下さい。
4.1コンデンサー型マイクロフォン
殆どのコンデンサー仕様のマイクロフォンは、マイクケーブルを通じて外部からの電源供給が必要です。マイクロフォンを接続する
前に、必ずAXEI/OSOLOフロントパネルで、このスイッチがオフになっていることをご確認下さい。オフにした状態で、マイクロフォ
ンを接続してからスイッチを押して、オンにします。48Vスイッチが赤色に点灯しましたら、利用可能な状態になります。
4.2ダイナミック型マイクロフォン
ダイナミック型のマイクロフォン(一般的に練習スタジオやライブハウスなどで使用されているハンド型のマイクロフォン)は、ファ
ンタム電源が不要です。不要の電源供給によるマイクロフォンやAXEI/OSOLOへの損傷を防ぐ為、48Vスイッチは常にオフにして
おいて下さい。スイッチをオフの状態であることを確認してから、マイクロフォンを接続して使用します。
4.3リボン型マイクロフォン
リボン型のマイクロフォンも殆どの場合において、ファンタム電源が不要です。不要の電源供給によるマイクロフォンやAXEI/O
SOLOへの損傷を防ぐ為、48Vスイッチは常にオフにしておいて下さい。スイッチをオフの状態であることを確認してから、マイクロ
フォンを接続して使用します。
ファンタム電源必要の有無についてご不明の場合は、ご利用のマイクロフォンのマニュアルなどでその必要をご確認下さい。48V
スイッチでオフにした状態で、マイクロフォンが音声を拾わない場合、まずマイクロフォンのマニュアルや仕様書をご確認下さい。
それに従って、ファンタム電源が必要な場合のみ、48Vスイッチをオンにして下さい。
ファンタム電源が必要な場合であっても、マイクロフォンの接続時は、必ず48Vスイッチをオフにして下さい。接続をしてから48Vの
スイッチをオンにします。
日本語
1 3
5 楽器の接続
INSTRUMENT
IN
ギターやベース、あるいはその他のモノラルの楽器の出力は、フロントパネルのINPUTを使用します。この際、1/4"TS(モノ)プラグ
ののアンバランスケーブルを使用します。一般的なギターケーブルがこれに該当します。
楽器入力に関する詳細は、このマニュアルの第2章に記載しています。
ノート:オーディオソフトウェアで録音先のトラックの入力として入力1を選択します。適切なレコーディングレベルの為に、CLIPイ
ンジケーターが点灯しない程度のレベルに調節をして下さい。

日本語
1 4
6 モニタースピーカーとヘッドフォンの接続
リアパネルのメイン出力1/Lと2/Rは、1/4"TRSプラグのバランスケーブルを使用して、アクティブ仕様(パワーアンプ内蔵型の)モニ
タースピーカーと繋ぐことが可能です。パワーアンプを装備しないパッシブ型のスピーカーをご利用の場合、AXEI/OSOLOの入力
をスピーカーを鳴らす為のステレオアンプの入力と接続をします。
AXEI/OSOLOの出力1/Lと2/Rは、電子バランスのフローティング仕様ですので、アンバランス接続にも対応します。この仕様によ
り、ステージ用途においてFOHに信号を送る際に、DIボックスやアイソレーターを用いることなく、ミキサーに直接繋ぐことが出来
ます。AXEI/OSOLOは、グランドループから切り離された、ノイズに強い安定したデバイスとしてこの用途に適しています。
ヘッドフォンを使用される際、1/4"(6.35mm)の標準ステレオプラグのステレオヘッドフォンをAXEI/OSOLOフロントパネルの
HEADPHONESジャックに接続します。ヘッドフォンボリュームは、専用のHEADPHONESノブで、調節可能です。

日本語
1 5
7 ダイレクト・モニタリング
ダイレクト・モニタリングは、オーディオソフトウェアを用いた録音をする際、よく耳にする用語の1つです。例えば、ギターをDAWの
トラックにレコーディングする際、しばしコンピューターを通じて自身で演奏した音が遅れて聴こえてくる場合があります。この遅
れのことをレイテンシーと言い、コンピューターシステムでオーディオ信号をリアルタイム処理にする際、顕著に発生する現象で
す。この遅れが演奏に支障をきたす場合、入力された信号をコンピューターに送るのと同時に、その信号を分岐して直接モニター
出力することをダイレクト・モニタリングと言います。AXEI/OSOLOには、このダイレクト・モニタリング機能を装備し、入力信号を
そのまま出力に送ることで遅れないピュアな信号で、コンピューターからの再生音とともに遅れることなくモニターすることが可
能です。AXEI/OSOLOフロントパネルのMONITORノブで、ダイレクト・モニター時のバランスを設定することが可能です。ノブを12
時のポジションに設定した場合、入力信号とコンピューターシステムからの再生音は50%ずつのバランスになります。コンピュー
ターの再生音が大きい場合、ノブを左方向(DIRECT側)に回して音量バランスを整えます。入力音が大き過ぎる場合は、逆の右方向
(DAW側)に調節します。
AXEI/OSOLOでダイレクト・モニタリング行う際、ソフトウェア(DAW)側のモニター設定のダイレクト(あるいは低レイテンシー)モ
ニター機能をオフにし、コンピューター側の入力モニターを無効にする必要があります。このことで、ダイレクト・モニター時のダイ
レクトとコンピューターの“二重モニター”現象を防ぎます。二重モニターは、2つのモニター音声に時間差がある為、フランジャー
やフェイザー、あるいはショートディレイ効果が掛かった音になりますので、明瞭に確認出来ます。DAW側のモニター設定について
は、ご利用のDAWのマニュアルのモニター設定などの該当項目をご覧下さい。
重要:マイクロフォンを接続して使用される際は、MONITORノブをDAW側一杯に設定されることをお勧めします。これは、コンピ
ューターの再生に関わらず、モニタースピーカーから発した音声をマイクロフォンで拾い、不要なフィードバックを起こす現象を防
ぐ為の措置です。特にDIRECT一杯にした際、マイクロフォンの音声がそのままモニタースピーカーに流れますので、十分にご注意
下さい。
8 AXE I/O SOLO Control Panel
AXEI/OSOLOControlPanelは、AXEI/OSOLOの全機能をmacOSおよびWindowsコンピューター上で扱う為の専用ソフトウェ
アです。また、このソフトウェアを通じて、AXEI/OSOLOに関する追加情報も確認できます。ここでは、出力レベル、サンプルレート、
MIDI設定、およびその他のAXEI/OSOLOに関する重要な設定が行えます。
AXE I/O SOLO Control Panelの起動
AXEI/OSOLOControlPanelの(このマニュアルの1.1の項目にて解説しました通りに)インストール後、デスクトップにあります
AXEI/OSOLOControlPanelのアイコンをクリックして、起動をします。
AXEI/OSOLO本体が、コンピューターと正しくUSB接続されている状態であれば、ControlPanelの起動後に以下の項目で解説
します画面(GUI=GraphicalUserInterface)が表示されます。そして画面左上の“LED”が緑に点灯し、AXEI/OSOLO本体との接
続が確立していることを示します。
日本語
1 6
8.1インターフェイスビュー(INTERFACE)
INTERFACEビューの各項目は以下の通りです:
HARDWAREセクション:
State:AXEI/OSOLO本体と正しく接続されている場合、ConnectedLEDが緑色に点灯し、そのことを示します。
MIDI InとOut:AXEI/OSOLO本体のMIDIポートのMIDI情報受信(In)と送信(Out)状況に合わせて、LED点灯します。
CONFIGURATIONセクション:
Sample Rate:AXEI/OSOLOのサンプルレート(オーディオ品位)を44.1から192kHzの間で設定をします。
サンプルレート設定は通常、DAWなどのホストアプリケーションで行います。ご利用のオーディオソフトウェアによっては、それらの
ソフトウェアでサンプルレート設定を占有し、ここでは確認のみで、変更することは出来ません。そのような状況では、設定を変更し
ても元に戻る場合がありますこと、ご注意下さい。
Direct Monitoring:AXEI/OSOLOの2つの入力に対するダイレクトモニタリング信号扱い方を設定します。
“MONO”モードでは、2つのチャンネルのダイレクトモニター信号が、モノラルミックスとして扱います。このモードにした場合、左右
のスピーカーやヘッドフォンから同じモニター信号が聴こえます。このモードは、1つのチャンネルのみを入力した際にモニター信
号が片側のスピーカー/ヘッドフォンからのみ聴こえてしまう現象を回避する際に便利です。
“STEREO”モードはでは、チャンネル1は左、チャンネル2は右のステレオモニタリングを行う際に使用します。ステレオマイクロフォ
ン、キーボード、音源モジュールなどのステレオソースのモニター適した設定です。
“Channel1”モードでは、入力1のみをモニター信号として扱い、左右の両チャンネルの両方で同じ信号を聴くことが出来ます。

日本語
1 7
“Channel2”モードでは、入力2のみをモニター信号として扱い、左右の両チャンネルの両方で同じ信号を聴くことが出来ます。
Channelモードは、特定のチャンネル1つのみをモニターする際に使用します。もう片方の使用しないチャンネルの接続をそのまま
にして、不要な音声やノイズなくモニターする際に便利です。
TO AMP OUT:ONにすると、InstrumentInput1の信号をAMPOUTに直接ゼロ・レイテンシーで出力します。AMPOUTに接続し
た外部アンプ、ストンプ・ボックスの出力をInput2に接続すれば、Input1のクリーンなDIトーンと、Input2のアンプ、ストンプ・ボッ
クス経由の信号を同時に録音することができます。
Audio Inputセクション:
入力チャンネルの細かく精度の高い入力レベル、有効なソース(INSTruments、MICまたはLINE)を表示します。
ここでは、ファンタム電源(48V)のオンオフも行えます。ファンタム電源の設定は2つのチャンネル一括で行います。個別設定は出来
ません。
また、ファンタム電源は、XLR入力のみに適用されます。
Audio Outputセクション:
出力チャンネルの細かく精度の高い出力レベルの表示、音量調節、およびチャンネルミュートを行います。
AmpOutputGNDLIFT:アンプ出力(AmpOut)は、ギターアンプやビンテージストンプボックスに信号を直接送る為に特別設計
されたフローティング出力です。この設計によって特別なデバイスを介さずに、グランドループノイズ、ハム、およびバズなどのギタ
ーにまつわるノイズ源を切り離したアンプ/ストンプ接続が直接可能になります。GNDLIFTスイッチは、AXEI/OSOLOと接続したア
ンプ/ストンプのグランド状 況 に従って、オンまたはオフにします。
GNDLIFT,スイッチのデフォルト設定はオンになっています。ハイゲイン・ギター・アンプと接続した際にバズやノイズが聴こえる場
合、GNDLIFTのオン/オフを切り替えて、どちらが良いのかご確認下さい。
日本語
1 8
8.2コントローラータブ(CONTROLLER)
CONTROLLERタブは、フロントパネルのプリセットノブとリアパネルの2つのコントローラー入力で扱うMIDIチャンネル、動作モー
ド、MIDI情報(CC#)、操作時の最大値と最小値などを設定します。コントロール情報の受け手となるソフトウェア側のパラメーター
に 合 わ せ て 、 設 定 を し ま す 。

日本語
1 9
9 製品仕様
定 格:
AD/DA解像度:24-bit
サンプリングレート:44.1kHz,48kHz,88.2kHz、96kHz、176.4kHzおよび192kHz
デバイス接続:USBType-Bコネクター、USB2.0(HighSpeed)準拠
ライン出力 1-2(Monitor)
構成:1/4”TRSバランスコネクター、電子バランスフローティング出力、アンバランスモード時の自動レベル補正機能を装備、Top:
ホット
出力インピーダンス:150Ωバランス、75Ωアンバランス
出力レベル:+13.5dBu@0dBFS
周波数特性:1Hz-46kHz(0.5dB以内)@96kHzサンプルレート
ダイナミックレンジ:113dB(A)
THD@-1dBFS:0.001%
THD+N(高調歪):-103dB(A)@-1dBFS
チャンネル1-2クロストーク:112dB(A)
出力 3(Amp output)
構成:1/4”TSアンバランスコネクター、フローティング、グランドリフトオン・オフ
出力インピーダンス:75Ω
出力レベル:-3dBu@0dBFS
周波数特性:20Hz-42kHz(0.5dB以内)@96kHzサンプルレート
ダイナミックレンジ:106dB(A)
THD+N(高調歪):-93dB(A)
ヘッドフォン出 力
出力インピーダンス:クリップレベルまでソースに最適化(0Ω)
最大出力レベル:+9dBu@50Ω(およそ95mW)
周波数特性:1Hz-42kHz(0.5dB以内)@96kHzサンプルレート
ダイナミックレンジ:111dB(A)
THD+N(高調歪):-102dB(A)

日本語
2 0
楽器入力 1
構 成:ルチトポロ ジーインストゥルメントプリアンプ
入力インピーダンス@PASSIVEモード:1MΩから2.2kΩ可変
入力インピーダンス@ACTIVEモード:10kΩ
入力レベル@最小ゲイン:+12.5dBu@0dBFS、TS入力
入力レベル@最大ゲイン:-19dBudBu@0dBFS、TS入力
周波数特性:6Hz-42kHz(0.5dB以内)@96kHzサンプルレート
ダイナミックレンジ:117dB(A)
THD(高調歪率)@PUREモード:0.002%
THD(高調歪率)@JFETモード:0.5%
マイクロフォン入力
構 成:ピン2:ホット、クラスAディスクリートディファレンシャルマイクロフォンプリアンプ
入力インピーダンス:4kΩ、ディファレンシャル
入力レベル@最小ゲイン:+9dBu@0dBFS、XLR入力
入力レベル@最大ゲイン:-44dBudBu@0dBFS、XLR入力
周波数特性:7Hz-32kHz(0.5dB以内)@96kHzサンプルレート
ダイナミックレンジ:116dB(A)
THD+N(高調歪):-104dB(A)@-10dBFS
ライン入力
構 成: T i p:ホット、クラス A ディス クリ ート ディファレン シャル ラ インレ シ ー バ ー
入力インピーダンス:20kΩ、ディファレンシャル
入力レベル@最小ゲイン:+26dBu@0dBFS、TRS入力
入力レベル@最大ゲイン:-27dBudBu@0dBFS、TRS入力
周波数特性:7Hz-32kHz(0.5dB以内)@96kHzサンプルレート
ダイナミックレンジ:117dB(A)
THD+N(高調歪):-104dB(A)@-10dBFS
保証
保証規約に関しては、下記のリンクに記載しています:
www.ikmultimedia.com/warranty
サポートおよびその他の情報
www.ikmultimedia.com/support
www.axeio.com

2 1
Regulatory
2020/05/05
AXEI/OSOLO,AmpliTubeandSampleTank®aretrademarkspropertyofIKMultimediaProductionSrl.Allotherproductnamesandimages,trademarksandartistsnamesarethepropertyof
theirrespectiveowners,whichareinnowayassociatedoraliatedwithIKMultimedia.iPad,iPhone,iPodtouchMacandMaclogoaretrademarksofAppleComputer,Inc.,registeredinthe
U.S.andothercountries.LightningisatrademarkofAppleInc.AppStoreisaservicemarkofAppleInc.
AXEI/OSOLO,AmpliTubeおよびSampleTank®は、IKMultimediaProductionSrlの登録商標です。その他の製品名、画像、アーティスト名はその権利帰属者の所有物であり、IKMultimediaとは協賛または
契約関係にはありません。iPad,iPhone,iPodtouchMacとMaclogoは米国およびその他の国で登録されたAppleComputer,Inc.,の商標です。LightningはAppleInc.の商標です。AppStoreはAppleInc.サ
ービスマークです。
USER’SMANUALREVISIONNOTE:
v1.0(2020/05/05):InitialRelease
FCCstatement
ThisdevicecomplieswithPart15.107and15.109ClassBoftheFCCRulesCFR47:
October2010.
Operationissubjecttothefollowingtwoconditions:
1.Thisdevicemaynotcauseharmfulinterference.
2.Thisdevicemustacceptanyinterferencereceived,includinginterferencethat
maycauseundesiredoperation.
Changesormodicationsnotexpresslyapprovedbythepartyresponsiblefor
compliancecouldvoidtheuser’sauthoritytooperatetheequipment.