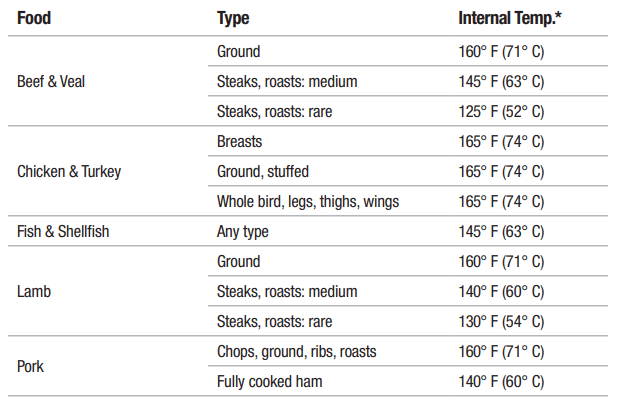
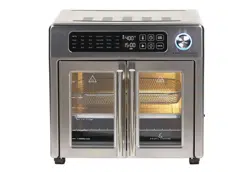
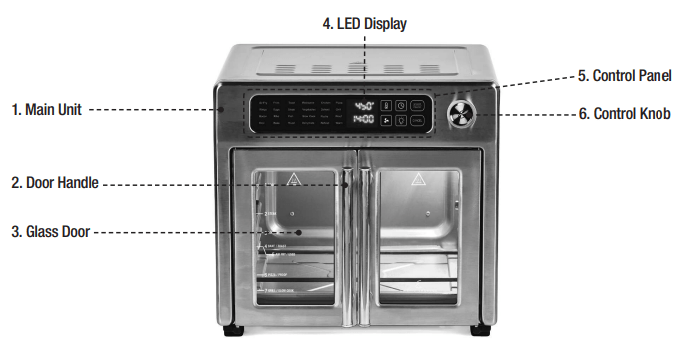
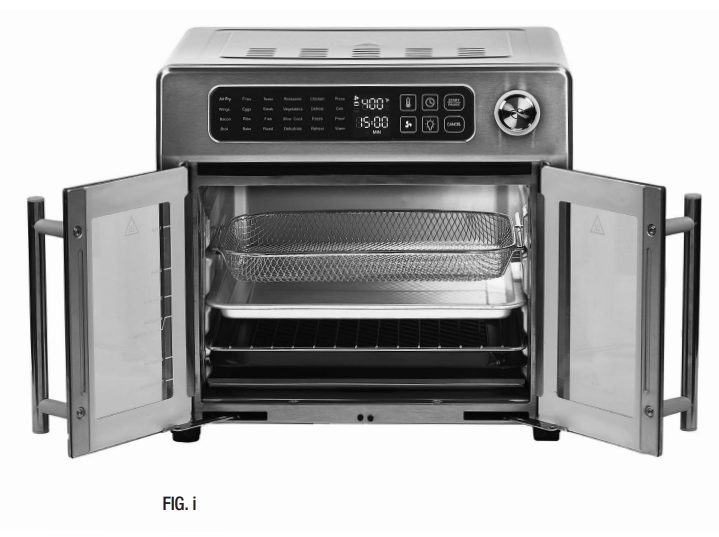
1. MAIN UNIT: Features sturdy stainless steel construction throughout. Cleans easily with a damp sponge or cloth and a mild detergent. Avoid harsh, abrasive cleaners. NEVER submerge this appliance in water or liquids of any kind.
2. DOOR HANDLES: Remains cool during cooking. Always use the handle and avoid touching the door. Opening one door will open both doors. The door may become very hot during the cooking process and can cause injury.
3. GLASS DOORS: Sturdy, durable tempered glass keeps heat in and helps assure even heat distribution to food. NEVER cook with these doors in the open position.
4. LED DISPLAY: Used for selecting, adjusting programming, or monitoring cooking programs.
5. CONTROL PANEL: Contains the Control Buttons and Knobs (see “The Control Panel” section).
6. CONTROL KNOB: Used to select the preset cooking settings (see “The Control Panel” section).
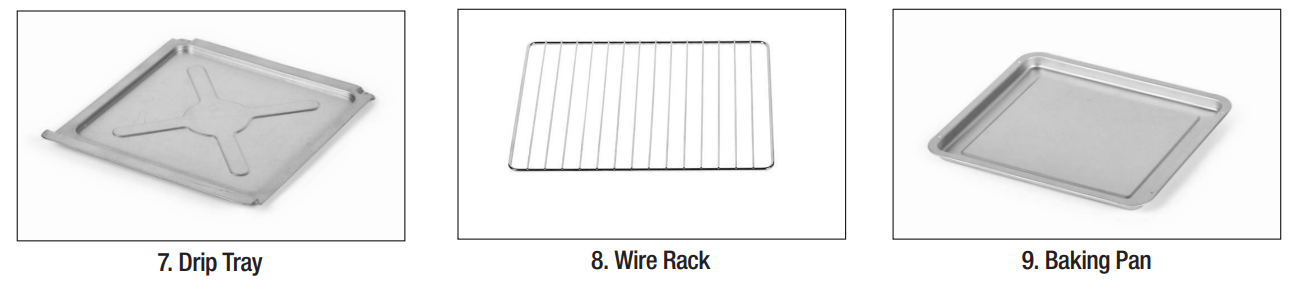
7. DRIP TRAY: Place in the bottom of the appliance just below the heating elements. Never use this appliance without the Drip Tray. The Drip Tray may become full when cooking large or juicy foods. When the Drip Tray becomes more than half full, empty it.
To empty the Drip Tray while cooking:
While wearing oven mitts, open the door and slowly slide the Drip Tray out of the appliance. BE CAREFUL NOT TO TOUCH THE HEATING ELEMENTS. Empty the Drip Tray and return it to the appliance. Close the door to finish the cooking cycle.
8. WIRE RACK: Use for toasting breads, bagels, and pizzas; baking; grilling; and roasting. Quantity may vary.
CAUTION: When baking or cooking with baking pans and dishes, always place them on a rack. Never cook anything directly on the heating elements.
9. BAKING PAN: Use for baking and reheating various foods. Deeper oven-safe pans and dishes may be used in the appliance.
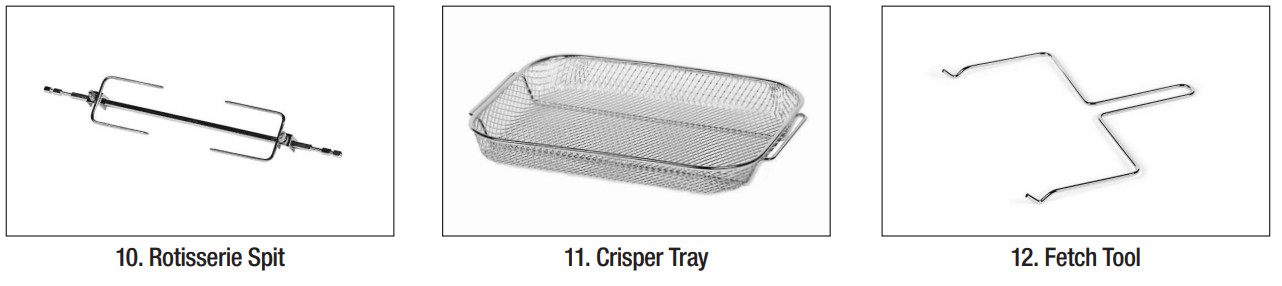
10. ROTISSERIE SPIT: Used for cooking chickens and meat on a spit while rotating.
11. CRISPER TRAY: Use for cooking oil-free fried foods to circulate hot air all the way around the food.
12. ROTISSERIE FETCH TOOL: Use for removing hot food on the Rotisserie Spit from the appliance. Use hand protection to avoid burns from hot food.
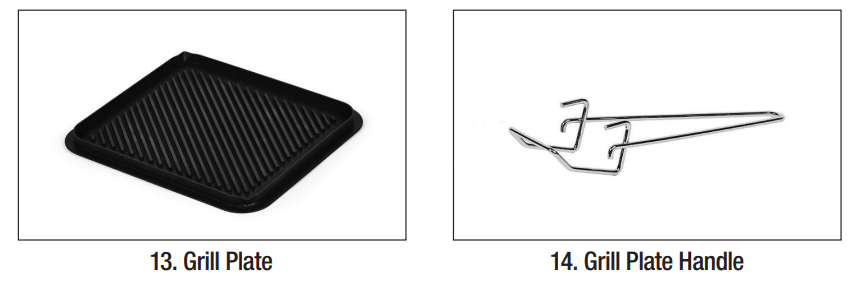
13. GRILL PLATE: Use for grilling steaks, burgers, veggies, and more.
14. GRILL PLATE HANDLE: Attach to the Crisper Tray or the Grill Plate to remove from the appliance.
Using the Accessories
USING THE WIRE RACK
1. Insert the Drip Tray below the bottom heating elements (at the very bottom of the appliance [see Fig. i]).
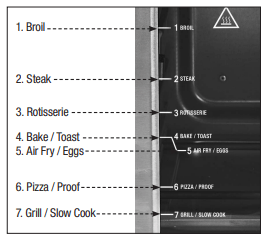
2. Use the markings on the door to choose the shelf position recommended for your recipe. Place food on the Wire Rack and then insert the Wire Rack into the desired slot.
USING THE BAKING PAN
1. Insert the Drip Tray below the bottom heating elements (at the very bottom of the appliance [see Fig. i]).
2. Use the markings on the door to choose the cooking position recommended for your recipe. Place food on the Baking Pan and then insert the Baking Pan into the desired slot.
NOTE: The Baking Pan can be inserted into a shelf below the Crisper Tray or Wire Rack to catch any food drippings (see the “Recommended Accessory Positions” section).
USING THE CRISPER TRAY
1. Insert the Drip Tray below the bottom heating elements (at the very bottom of the appliance [see Fig. i]).
2. Use the markings on the door to choose the shelf position recommend for your recipe. Place food on the Crisper Tray and then insert the Crisper Tray into the desired slot.
NOTE: When using the Crisper Tray or Wire Rack to cook food food that tends to drip, such as bacon or steak, use the Baking Pan below the Tray or Rack to catch any dripping juices and to limit smoke (see the “Recommended Accessory Positions” section).
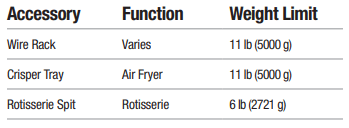
WEIGHT CAPACITY OF ACCESSORIES
USING THE GRILL PLATE
1. Insert the Drip Tray below the bottom heating elements (at the very bottom of the appliance [see Fig. i]).
2. Place food on the Grill Plate and insert the Grill Plate into shelf position 7.
USING THE GRILL PLATE HANDLE
1. Use the larger connected hook on the Grill Plate Handle to hook the top part of the accessory and pull the accessory out of the appliance slightly. You only need to pull the accessory out far enough to fit the larger hook underneath the accessory.
2. Flip the Grill Plate Handle over and use the two smaller hooks to latch the Grill Plate Handle to the accessory. Pull the accessory out of the appliance and transfer it to a heat-resistant surface..
NOTE: The Grill Plate Handle can also be used to remove the Crisper Tray.
CAUTION: Accessories will be hot. Do not touch hot accessories with your bare hands. Place hot accessories on a heat-resistant surface.
WARNING: Do not use the Grill Plate Handle to carry the Crisper Tray or Grill Plate. Only use the Grill Plate Handle to remove these accessories from the appliance.
USING THE ROTISSERIE SPIT
1. Insert the Drip Tray below the bottom heating elements (at the very bottom of the appliance [see Fig. i]).
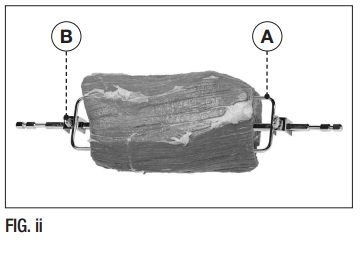
2. With the Forks removed, force the Rotisserie Spit through the center of the food lengthwise.
3. Slide the Forks (A) onto each side of the Spit and secure them in place by tightening the two Set Screws (B).
NOTE: To support the food on the Rotisserie Spit better, insert the Rotisserie Forks into the food at different angles (see Fig. ii).
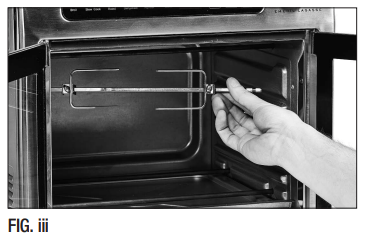
4. Hold the assembled Rotisserie Spit at a slight angle with the left side higher than the right side and insert the right side of the Spit into the Rotisserie connection inside the appliance (see Fig. iii).
5. With the right side securely in place, drop the left side of the Spit into the Rotisserie connection on the left side of the appliance.
REMOVING THE ROTISSERIE SPIT SECTION
1. Using the Fetch Tool, hook the bottom of the left and right sides of the shaft attached to the Rotisserie Spit.
2. Pull the Rotisserie Spit slightly to the left to disconnect the accessory from the Rotisserie Socket.
3. Carefully pull and remove the Rotisserie Spit from the appliance.
4. To remove food from the Rotisserie Spit, twist to unscrew the screws on one Rotisserie Fork. Repeat to remove the second Rotisserie Fork. Slide the food off of the Rotisserie Spit. Using the Accessories
NOTE: Some accessories may not be included with purchase.
The Control Panel
A. COOKING PRESETS: Use the Program Selection Knob to select a cooking preset (see the “Preset Chart” section). Press any button on the Control Panel or turn the Program Selection Knob to illuminate the cooking presets.
B. TIME/TEMPERATURE DISPLAY
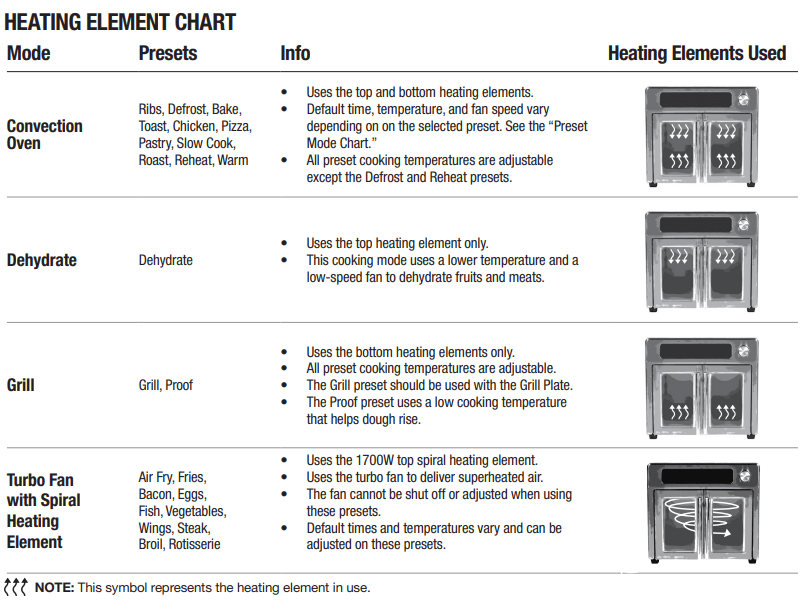
FAN DISPLAY: Illuminates when the appliance’s fan is on.
HEATING ELEMENT DISPLAY: Illuminates when the top and/or bottom heating elements are on.
TEMPERATURE DISPLAY: Displays the current set cooking temperature.
TIME DISPLAY: When the appliance is preheating (only certain cooking presets use the preheating feature; see the “Preset Chart” section for more information), displays “PH.” When the cooking cycle is running, displays the remaining cooking time.
C. TEMPERATURE BUTTON: Allows you to override preset temperatures. Temperature can be adjusted at any time during the cooking cycle by pressing the Temperature Button and then turning the dial to adjust the temperature. Press and hold the Temperature Button to change the displayed temperature from Fahrenheit to Celsius.
D. FAN BUTTON: Press to turn the fan on or off when used with select presets and to change the fan speed from high to low or off (see the “Preset Chart” section). A cooking preset must first be started to adjust the fan speed. After a cooking cycle is complete, you can press and hold the Fan Button for 3 seconds to activate the appliance's manual cool-down function (see the “Manual Cool-Down Function” section).
E. TIME BUTTON: Allows you to override preset times. Time can be adjusted at any time during the cooking cycle by pressing the Time Button and then turning the dial to adjust the time.
F. LIGHT BUTTON: May be selected at any time during the cooking process to light the appliance's interior.
G. START/PAUSE BUTTON: Press to begin or pause the cooking process at any time.
H. CANCEL BUTTON: You may select this button at any time to cancel the cooking process. Hold the Cancel Button for 3 seconds to power off the appliance).
I. CONTROL KNOB: Use to scroll through choices when selecting a preset mode. The ring around the Control Knob lights up blue when the appliance is powered on. The ring changes color to red when a preset has been selected and turns back to blue when the cooking cycle is complete.
Preset Information
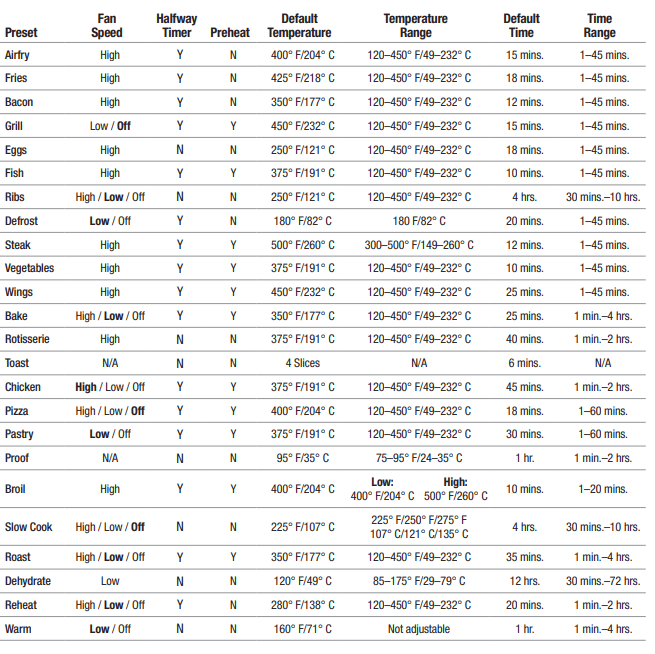
PRESET MODE CHART
The time and temperature on the chart below refer the basic default settings. As you become familiar with the appliance, you will be able to make minor adjustments to suit your taste.
MEMORY: The appliance has a memory feature that will keep your last program setting used. To reset this feature, unplug the appliance, wait 1 minute and power the appliance back on.
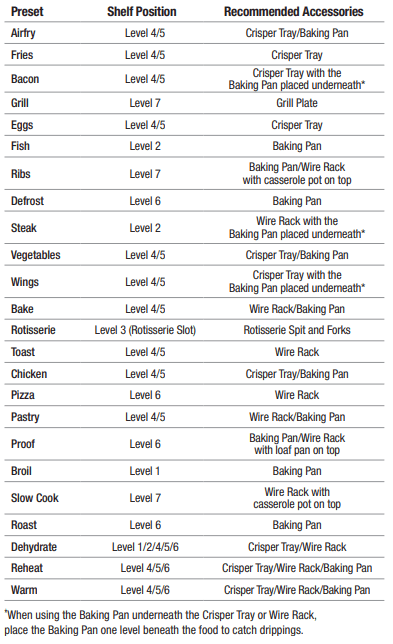
RECOMMENDED ACCESSORY POSITIONS
The Crisper Tray, Wire Rack, and Baking Pan can be inserted into position 1, 2, 4/5, 6, or 7. Position 3 is the Rotisserie slot and can only be used with the Rotisserie Spit. Note that position 4/5 is a single slot in the appliance.
IMPORTANT: The Drip Tray must be kept below the heating elements in the appliance at all times when cooking food.
PREHEATING
Some presets include a preheating function (see the “Preset Chart” section). When you select a preset with this preheating function, the control panel will display “PH” in place of the cooking time until the appliance has reached the set temperature. Then, the cooking timer will begin counting down. For some recipes, food should be added to the appliance after the appliance is finished preheating.
CAUTION: The appliance will be hot. Use oven mitts to add food to the appliance.
HALFWAY TIMER
Some of this appliance’s presets include a halfway timer, which is a timer that will sound when the cooking cycle has reached its halfway point. This halfway timer gives you the opportunity to shake or flip your food or rotate the accessories in the appliance, which helps ensure even cooking. To shake food being cooked in the Crisper Tray, use oven mitts to shake the food.
To flip food, such as burgers, or steak, use tongs to turn the food over. To rotate accessories, move the top accessory to the bottom accessory's position and move the bottom accessory to the top accessory's position. For example, if the Crisper Tray is in shelf position 2 and the Wire Rack is in shelf position 6, you should switch the Crisper Tray to shelf position 6 and the Wire Rack to shelf position 2.
DUAL FAN SPEEDS
When using some of this appliance's presets, you can control the speed of the fan located at the top of the appliance. Using the fan at a high speed helps superheated air circulate around your food as it cooks, which is ideal for cooking many types of food evenly. Using a lower fan speed is ideal when cooking more delicate foods, such as baked goods.
The “Preset Chart” section shows which fan settings are available for each preset. In the chart, the default fan speed for each preset is bolded.
MANUAL COOL-DOWN FUNCTION
After a cooking cycle is complete, you can press and hold the Fan Button for 3 seconds to activate the appliance's manual cool-down function.
When the manual cool-down function is running, the top fan will run for 3 minutes to cool down the appliance, which can be used to cool down the interior of the appliance when cooking food at a lower temperature than the previous cooking cycle. When the manual cool-down function is activated, the light around the Fan Display icon illuminates, the Program Selection Knob turns red, and the Cooking Presets section of the Control Panel darkens.
Pressing the Fan Button while the manual cool-down function is active switches the fan speed from high to low. Pressing the Fan Button a third time cancels the manual cool-down function.
While the manual cool-down function is active, the Program Selection Knob cannot be used to select a cooking preset. You can press the Cancel Button to end the manual cool-down function at any time.
Cooking Chart
Internal Temperature Meat Chart
Use this chart and a food thermometer to ensure that meat, poultry, seafood, and other cooked foods reach a safe minimum internal temperature.
*For maximum food safety, the U.S. Department of Agriculture recommends 165° F/74° C for all poultry; 160° F/71° C for ground beef, lamb, and pork; and 145° F/63° C, with a 3-minute resting period, for all other types of beef, lamb, and pork. Also review the USDA Food Safety Standards.
Instructions for Use
Before First Use
1. Read all material, warning stickers, and labels.
2. Remove all packing materials, labels, and stickers.
3. Wash all parts and accessories used in the cooking process with warm, soapy water. Handwashing is recommended.
4. Never wash or submerge the cooking appliance in water. Wipe the inside and outside of the cooking appliance with a clean, moist cloth. Rinse with a warm, moist cloth.
5. Before cooking food, preheat the appliance for a few minutes to allow the manufacturer's protective coating of oil to burn off. Wipe the appliance with warm, soapy water and a dishcloth after this burn-in cycle.
Instructions
1. Place the appliance on a stable, level, horizontal, and heat-resistant surface. Ensure that the appliance is used in an area with good air circulation and away from hot surfaces, other objects or appliances and any combustible materials.
2. Ensure that the appliance is plugged into a dedicated power outlet.
3. Select the cooking accessory for your recipe.
4. Place food to be cooked in appliance and close the doors.
5. Select a preset mode by using the Control Knob to scroll though the presets and pressing the Start/Pause Button to select the preset. The cooking cycle will begin. Note that some cooking presets include a preheating feature (see the “Preset Chart” section).
6. After the cooking cycle has started, you can adjust the cooking temperature by pressing the Temperature Button and then using the Control Knob to adjust the temperature. You can also adjust the cooking time by pressing the Time Button and using the Control Knob to adjust the cooking time.
NOTE: When toasting bread or a bagel, you control the lightness or darkness by adjusting the same knobs.
NOTE: When the cooking process is complete and the cooking time has elapsed, the appliance will beep several times.
NOTE: Leaving the appliance idle (untouched) for 3 minutes will automatically turn the appliance off.
CAUTION: All surfaces inside and outside of the appliance will be extremely hot. To avoid injury, wear oven mitts. Allow at least 30 minutes for the appliance to cool before attempting cleaning or storing.
Tips
• Foods that are smaller in size usually require a slightly shorter cooking time than larger ones.
• Large sizes or quantities of food may require a longer cooking time than smaller sizes or quantities.
• Misting a bit of vegetable oil on fresh potatoes is suggested for a crispier result. When adding a little oil, do so just before cooking.
• Snacks normally cooked in an oven can also be cooked in the appliance.
• Use premade dough to prepare filled snacks quickly and easily. Premade dough also requires a shorter cooking time than homemade dough.
• A baking pan or oven dish can be placed on the Wire Rack inside the appliance when cooking foods such as cakes or quiches. Using a tin or dish is also recommended when cooking fragile or filled foods.
Cleaning & Storage
Cleaning
Clean the appliance after each use. Remove the power cord from the wall socket and be certain the appliance is thoroughly cooled before cleaning.
1. Wipe the outside of the appliance with a warm, moist cloth and mild detergent.
2. To clean the doors, gently scrub both sides with warm, soapy water and a damp cloth. DO NOT soak or submerge the appliance in water or wash in the dishwasher.
3. Clean the inside of the appliance with hot water, a mild detergent, and a nonabrasive sponge. Do not scrub the heating coils because they are fragile and may break. Then, rinse the appliance thoroughly with a clean, damp cloth. Do not leave standing water inside the appliance.
4. If necessary, remove unwanted food residue with a nonabrasive cleaning brush.
5. Caked-on food on accessories should be soaked in warm, soapy water to remove the food easily. Hand-washing is recommended.
Storage
1. Unplug the appliance and let it cool thoroughly.
2. Make sure all components are clean and dry.
3. Place the appliance in a clean, dry place.
Troubleshooting
Problem
Possible Cause
Solution
The appliance does not work
1. The appliance is not plugged in.
2. You have not turned the appliance on by setting the preparation time and temperature.
3. The appliance is not plugged into a dedicated power outlet.
1. Plug power cord into wall socket.
2. Set the temperature and time.
3. Plug the appliance into a dedicated power outlet.
Food not cooked
1. The appliance is overloaded.
2. The temperature is set too low.
1. Use smaller batches for more even cooking.
2. Raise temperature and continue cooking.
Food is not fried evenly
1. Some foods need to be turned during the cooking process.
2. Foods of different sizes are being cooked together.
3. Accessories need to be rotated, especially if food is being cooked on multiple accessories simultaneously.
1. Check halfway through process and turn food if needed.
2. Cook similar-sized foods together.
3. Rotate the accessories halfway through the cooking time.
White smoke coming from appliance
1. Oil is being used.
2. Accessories have excess grease residue from previous cooking.
1. Wipe down to remove excess oil.
2. Clean the components and appliance interior after each use.
French fries are not fried evenly
1. Wrong type of potato being used.
2. Potatoes not blanched properly during preparation.
3. Too many fries are being cooked at once.
1. Use fresh, firm potatoes.
2. Use cut sticks and pat dry to remove excess starch.
3. Cook less than 2 1/2 cups of fries at a time.
Fries are not crispy
1. Raw fries have too much water.
1. Dry potato sticks properly before misting oil. Cut sticks smaller. Add a bit more oil.
The appliance is smoking.
1. Grease or juice is dripping onto the heating element.
1. The appliance needs to be cleaned. Place the Baking Pan below the Crisper Tray or Wire Rack when cooking food with a high moisture content.
NOTE: Any other servicing should be performed by an authorized service representative. Contact customer service using the information on the back of this manual.
Frequently Asked Questions
1. Does the appliance need time to heat up?
The appliance has a smart feature that will preheat the appliance to the set temperature before the timer begins counting down. This feature takes effect with all preprogrammed settings except Toast, Bagel, and Dehydrate.
2. Is it possible to stop the cooking cycle at any time?
You can use the Cancel Button to stop the cooking cycle.
3. Is it possible to shut off the appliance at any time?
Yes, the appliance can be shut off at any time by holding down the Cancel Button for 3 seconds.
4. Can I check the food during the cooking process?
You can check the cooking process by pressing the Light Button or pressing the Start/Pause Button and then opening the door.
5. What happens if the appliance still does not work after I have tried all the troubleshooting suggestions?
Never attempt home repair. Contact Tristar and follow the procedures set forth by the manual. Failure to do so could render your guarantee null and void.
5.0 out of 5 stars Very Happy! So far, we have used this Air Fryer for air frying, rotisserie, baking, broiling and toasting bread. All the controls seem to work well and we love the rotisserie option! Very happy we bought this product, and we have already recommended it to other family members.
The Power AirFryer 360 includes a Crisper Tray, Pizza Rack, Baking Pan, Oil Drip Tray, and access to online recipe video library plus added BONUS FEATURES: Rotating Rotisserie Spit and Emeril's Power AirFryer 360 Recipe Book.

 FAN DISPLAY: Illuminates when the appliance’s fan is on.
 HEATING ELEMENT DISPLAY: Illuminates when the top and/or bottom heating elements are on.
 TEMPERATURE DISPLAY: Displays the current set cooking temperature.
 TIME DISPLAY: When the appliance is preheating (only certain cooking presets use the preheating feature; see the “Preset Chart” section for more information), displays “PH.” When the cooking cycle is running, displays the remaining cooking time.