User Manual Doorbell Camera
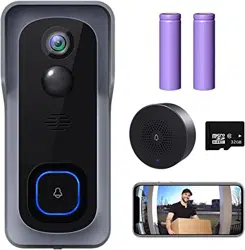
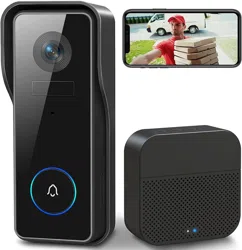
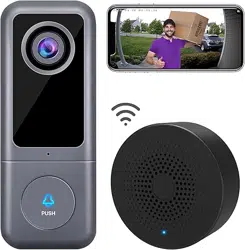
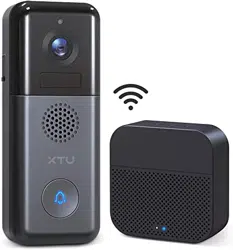
what’s in the box
Please consult below checklist for all the components.

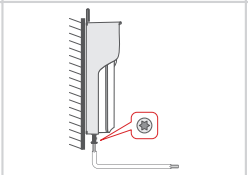
Meet the doorbell
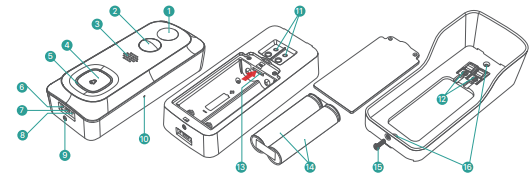
- 2MP camera
- Motion sensor
- Speakers
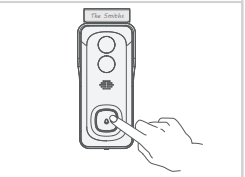
- Doorbell button
- LED indicator
- Charging indicator
- Micro-USB port
- Reset hole
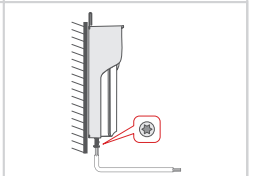
- Security screw hole
- Microphone
- Electric contact
- Hardwire terminals
- Micro-SD card slot
- 18650 Battery × 2
- Security screw
- Mounting screw holes
Meet the chime
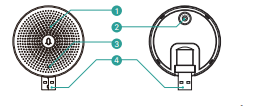
- Speakers
- Reset
- LED Indicator
- USB Port (Type-A/M)
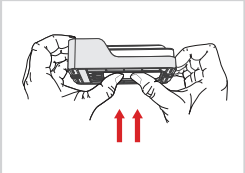
Battery installation
The batteries are pre-installed in the doorbell, with an isolating film inserted in the positive poles. Please remove the film and insert the battery pack back to compartment, with positive poles upward!

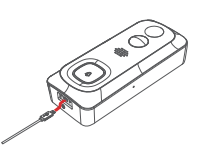
Battery charging
The batteries inside the doorbell are not fully charged in accordance with transportation safety regulations. Please charge the batteries with a USB compatible wall charger (not included) and the provided USB cable for about 8~10 hours prior to installation.
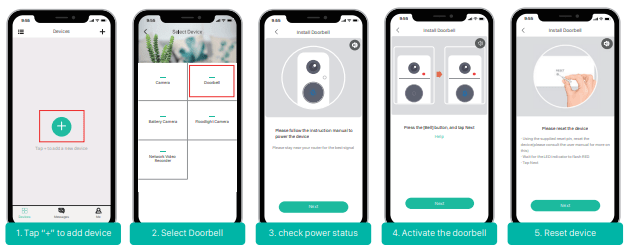
Download the app
Download and install the 'CloudEdge' App from Google PlayTM or the App StoreTM. The App is also available by scanning the QR codes on the right, using your QR code scanner on your smart phone.
Wi-fi set up
Before you start the Wi-Fi configuration, please note below:
1). The doorbell works with 2.4 GHz Wi-Fi, but not with 5 GHz Wi-Fi.
2). Avoid using special characters or symbols like )(@~!#$%^&*..., either in your Wi-Fi name or password.
3). Perform the configuration near your Wi-Fi router.
Launch the ‘CloudEdge’ App and register an account with your mobile phone numer or email ID. Start the Wi-Fi configuration, following the in-App instructions or refering to the following guiding steps.
Guiding steps:

Run a test
After setup, tap on the live view window in the App for a test. Then take your doorbell outside to the installation spot and run a test there. Make sure the installation spot is covered by strong 2.4 GHz Wi-Fi signal.
Live view

- Quit live viewing
- Setting menu
- Battery status
- Volume on/off Speak to the scene
- HD/SD switch Notification history
- Wi-Fi signal status
- Stream bit rate
- Wi-Fi signal status
- Screenshot button
- Speak to the scene
- Record on the phone
- Body detection on/off
- Notification history
- Cloud storage service
Playback
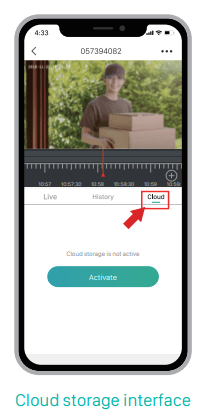
If the Micro-SD card is properly installed, you can playback the video clips taken after detected motions or visitor calls. Video clips can also be recorded to the cloud, if you have activated the cloud storage service (Charge after a 7-Days-Free trial).

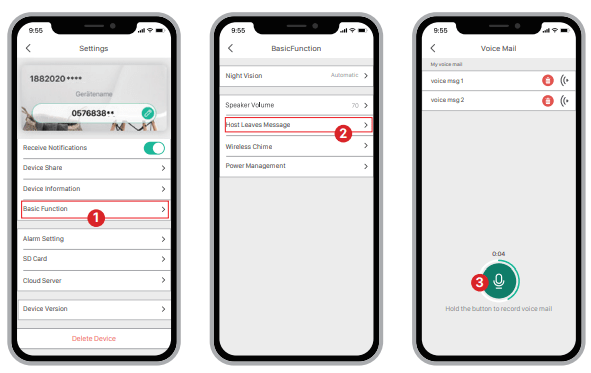
Leave Voice messages
Maximum 3 voice messages (Max. 10 seconds each) can be pre-recorded into the doorbell, which enables you to quickly respond to your visitors when you are not convenient to answer the doorbell call.
Steps: Setting --> Basic function --> Host Leaves Message --> Press and hold this icon  to record voice messages --> Play the selected voice message in reply to the doorbell call

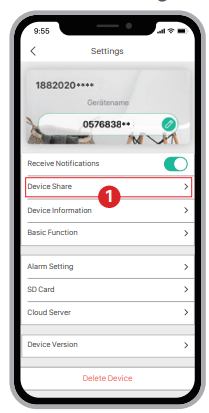
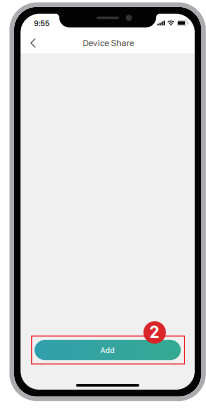
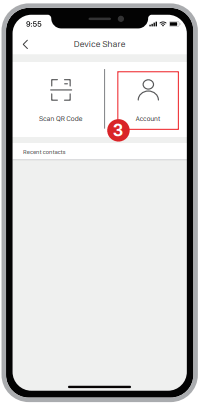
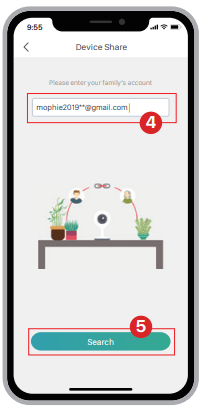
Device share
- Sharing by account searching
Steps: Settings>>Device Share>>Tap on “Add ”>>Tap on “Account”>>Type in account ID>>Confirm Sharing.

- Share by QR code scanning
The new users can show their QR codes to the administrator, and share device by QR Code scanning. Find your QR code: Run CloudEdge App >> Tap on  >> Tap on “
  >'' >> Tap on “ My QR Code” >> Let the administrator scan your QR Code

Connect the chime
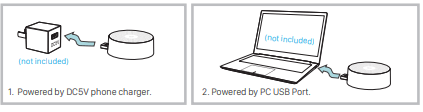
- Supply power to the chime
The chime can be powered by an USB compatible phone charger (DC5V 1A). You can also plug the chime to the USB port on your PC/notebook to supply power.
1). Tap on “···” and enter into Settings-> Basic function, select Wireless Chime page.(refer to Picture.4)
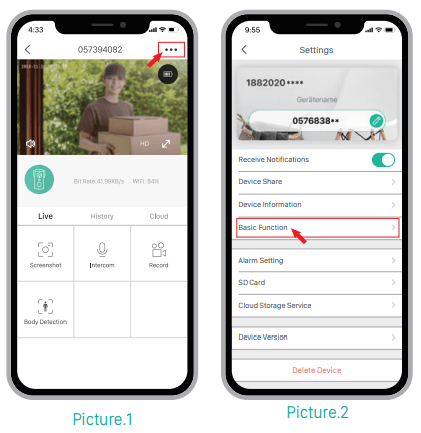
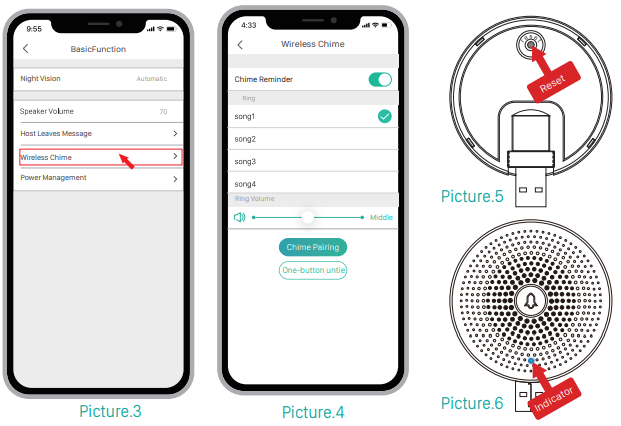
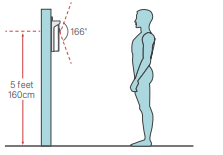
2). A short click on the reset button behind the chime(refer to Picture.5), and the LED indicator will flash blue, indicating the device is in pairing mode
3). Tap “  ” button in the APP (refer to Picture.4), and the doorbell will send a wireless pairing signal to the chime. Pairing succeeds and the indicator on the Chime will be in solid blue. All set! Congratulations! You can push the doorbell button to test the result.
Enter into Settings->Wireless Chime, there are 4 ringtones available (refer to Picture.4).
Drag the Ring Volume bar to control the volume level for the chime (refer to Picture.4).
1. Press and hold reset button on the chime for about 5 seconds till the indicator flashes blue twice, and the chime will be restored to factory default.
2. You can also tap on “ ” (refer to Picture.4) in the App to release the connection between the doorbells and the wireless chimes.
Installation
Your doorbell has 166-degree view angle and 120-degree human detection range. It is suggested to mount your doorbell at least 5 feet (160 cm) above the ground for the best angle of view and motion detection performance.
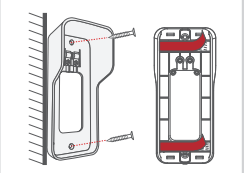
- Hardwire your doorbell (Optional)
If replacing an existing doorbell, please shut off the power breaker in advance, and remove it from the wall and disconnect the wires. Our doorbell works with both 12V - 24V AC and 12V DC power source.
1. Shut off power at the breaker, remove the old doorbell from the wall and disconnect the wires.

2. Connect the wires to the screw terminals on your mounting bracket. Either wire can be connected to either terminal.

3. (Optional) The nameplate holder can be mounted on the top rear/ bottom rear of the bracket, prior to bracket installation.
4. Drive the screws into the anchors, or directly into your wall untill the bracket is tightly fastened on your wall.
5. (Optional) You can also use the provided double-sided tape instead of screws to fix the wall mount on flat surface.

6. Mount the doorbell to the bracket, and secure it with the provided star-shape security screw and screw driver. All set!
1. Dismount the bracket by pushing from the back of your doorbell. Please remove the insulation film in the battery cell.
2. Bracket installation: mount the bracket on the wall with screws & anchors or the double -sided adhesive tape.
3. (Optional) The nameplate holder can be mounted on the top rear/ bottom rear of the bracket, prior to bracket installation.
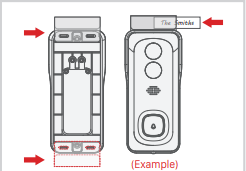
4. Mount your doorbell to the fixed bracket. Make sure it reaches the bottom where you can hear a click.

5. Secure your doorbell with the provided star-shape security screw and screw driver.
6. All set, congratulations! Now you can press the doorbell button to try it out.
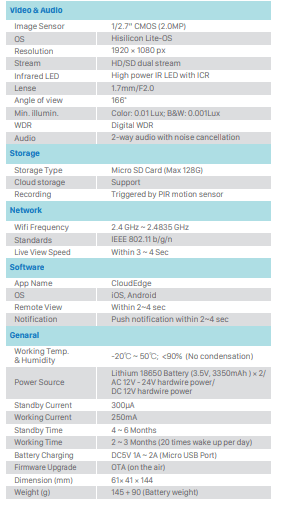
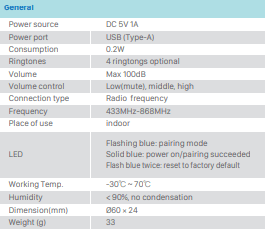
Specification
Trouble shooting
Q1: Why I failed to set up Wi-Fi for the doorbell?
A1: ①.Device works with 2.4GHz Wi-Fi only, but not support 5GHz Wi-Fi. ②.Wi-Fi network is not good, try to keep the camera near the Wi-Fi router when setting up. ③.The Wi-Fi password is wrong. Please check if there are special characters in the password, or the network is specially encrypted.
Q2: How do I know if I have 2.4G or 5G wifi?
A2: Please check the user manual of your Router or call the network operator for help.
Q3: It has to be on same WiFi to see the camera, or is it over internet from anywhere?
A3: You can view the camera from anywhere, if your camera is well connected to the internet.
Q4: Do any of the recordings get saved to the cloud? Or is it mainly saved in the built-in SD card?
A4: It supports SD card recording as well as cloud storage. You can activate the cloud storage service in App.
Q5: What happens when the SD is full?
A5: When the memory card is full, the camera automatically erase the oldest footage.
Q6: Does it work with Google Home or Alexa?
A6: Sorry, this model does not support Google Home or Alexa.
Q7: Why does it lose connection to wifi?
A7: Please check the network connection of your phone and the Wi-Fi router. If the network signal is not strong, you may need to move your router closer to the device, or invest in an extender.
Q8: Can the motion detection be disabled?
A8: Yes, sure. Recording is triggered by detected motions. You can set up the sensitivity or disable motion detection in the setting menu.
Q9: Do we get charger for the batteries?
A9: Battery charger is not included. Please charge the batteries with a USB compatible charger(DC5V 1A~2A) for about 8-10 hours.
Q10: Can we have 2 or more doorbells at the same residence?
A10: Yes, you can add more than one device at the same residence.