Loading ...
Loading ...
Loading ...
1
5
6
2
9
10
7
8
3
4
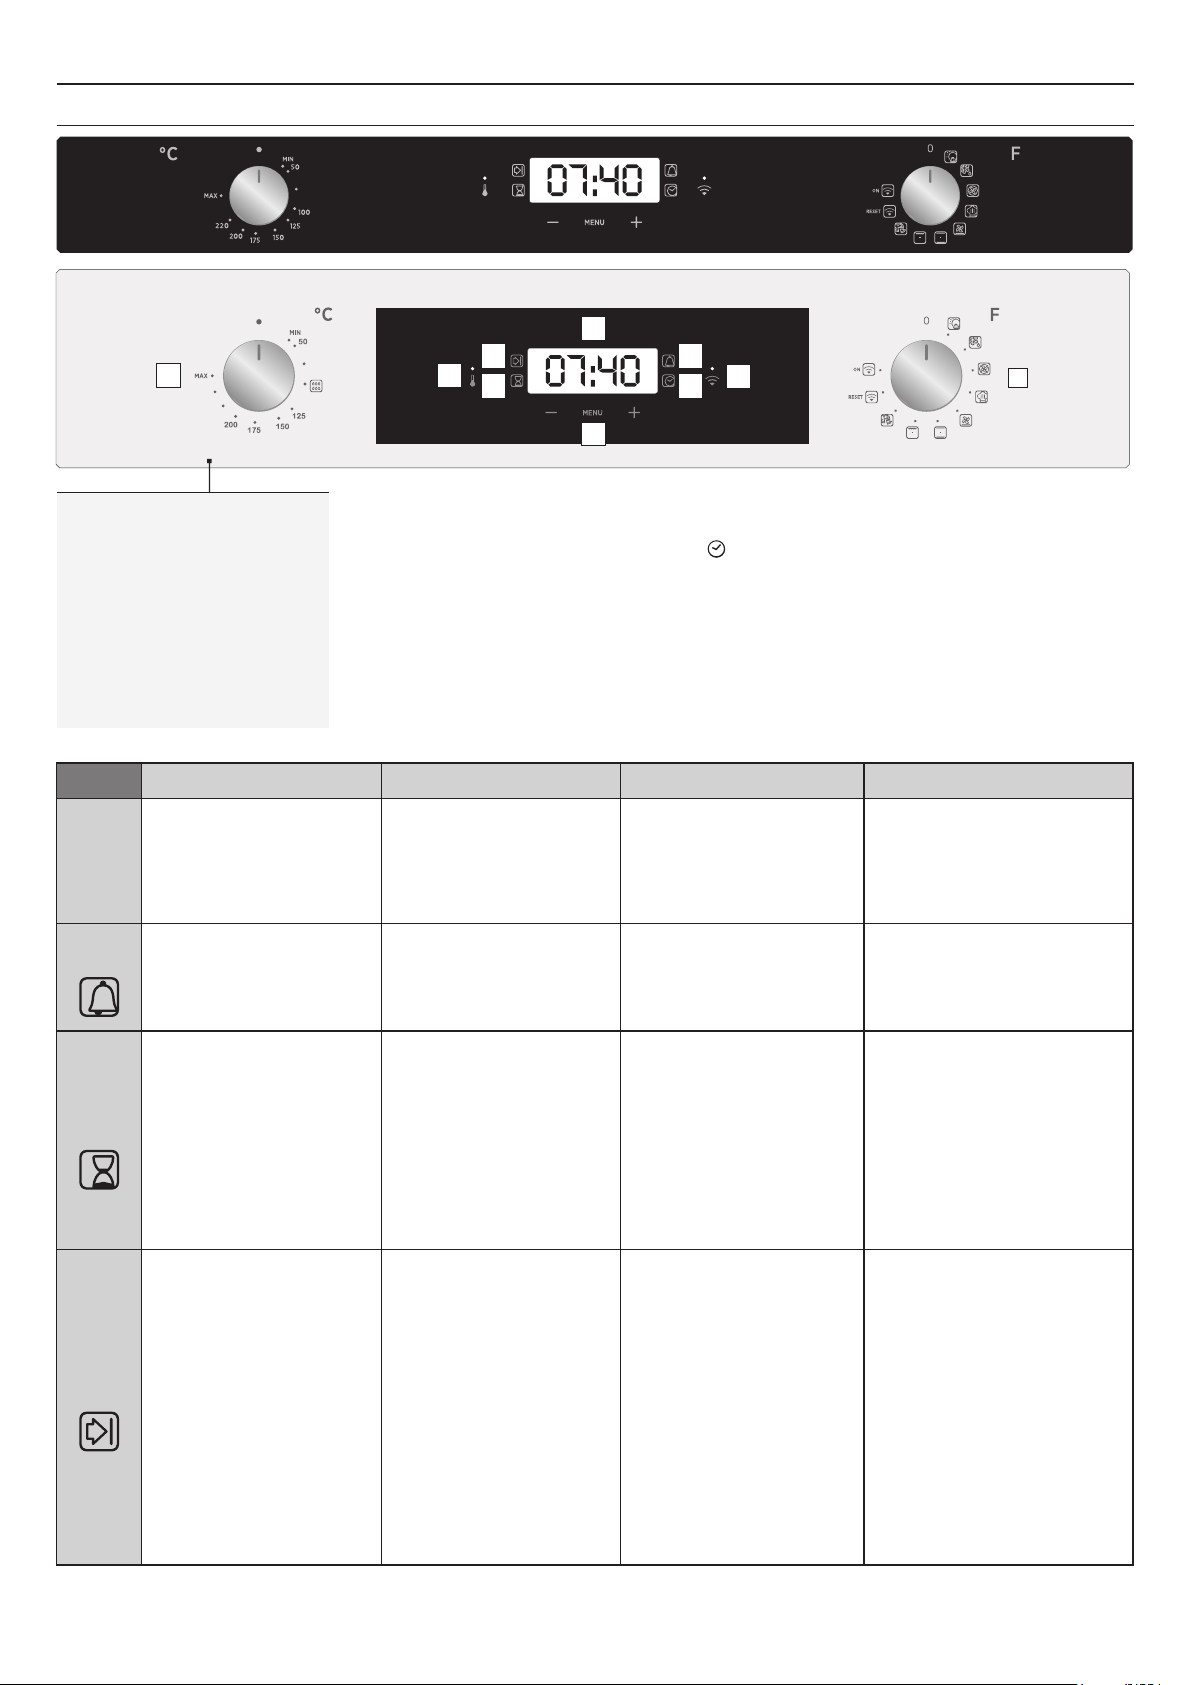
3. Use of the Oven (According to model)
3.1 Display description
WARNING : the first operation to carry out after the oven has been installed or following the interruption
of power supply (this is recognizable the display pulsating and showing ) is setting the correct time. 12:00
The bottom right LED flashes at the same time ( ). This is achieved as follows.
•Set time with buttons."-" "+"
•Push the Menu button or wait 5 seconds than the clock is setted.
ATTENTION: The oven will only operate setting the clock
1. Thermostat selector knob
2. Thermostat signal lamp
3. End of cooking
4. Cooking time
5. Temperature or clock display
6. LCD display adjustment controls
7. Minute minder
8. Clock setting
9. Wifi signal lamp
10. Function selector knob
EN 07
FUNCTION HOW TO DEACTIVATE WHAT IT DOES
NOTE
HOW TO USE
KEY LOCK
•Child Lock function is activated by
touching Set (+) for a minimum of 5
seconds. From this moment on all
other function are locked and the
display will flash 3 sec intervals STOP
and preset time intermittently.
•Child Lock function is deactivated
by touching touchpad Set (+) again
for a minimum of seconds. From 5
this moment on all functions are
selectable again.
•Push the central button 3 times
•Press the buttons "-" "+" to set
the required time
•Release all the buttons
•When the set time has elapsed, an
audible alarm is full stop after
activated this alarm will stop on its
own, however it can be stopped
immediately by pressing any button.
•Sounds an alarm at the end of the
set time.
•During the process, the display
shows the remaining time.
•Allows to use the oven as alarm clock
(could be activated either with operating
the oven or with out operating the oven)
•Select the cooking function with the
oven function knob, the temperature
you want to cook with the
thermostat knob.
• Push the central button 1 times
• Press the buttons "-" or "+"to set
the lenght of cooking required
• Release all buttons
NOTE: If the oven is switched off or
the lamp is functioning, the cooking
time schedule function will not work.
• It allows to preset the cooking time
required for the recipe chosen.
• To check how long is left to run
press the MENU button 1 time.
• To alter/change the preset time
press MENU and "-" "+" buttons.
•Push any button to stop the
signal. Push the central button to
return to the clock function.
•At the end of the program the program
gives 3 warning signals and “End” appears
on the display.
Set the function selector switch to "0" to
return to the clock function.
•At the time set, the oven will
switch off. To switch off manually,
turn the oven function selector to
position O.
•Enables you to set the end of
cooking time
•To check the preset time push the
central button 2 times
•To modify the preset time press
buttons MENU + "-" "+"
•Select the cooking function with
the oven function knob, the
temperature you want to cook with
the thermostat knob.
•Push the central button times 2
•Press the buttons "-" "+" to set the
time at which you wish the oven to
switch off
•Release the buttons
NOTE: If the oven is switched off or
the lamp is functioning, the cooking
time schedule function will not
work.
•This function is typically used with
“cooking time” function.
For example if the dish has to be cooked
for 45 minutes and needs to be ready by
12:30, simply select the required
function, set the cooking time to 45
minutes and the end of cooking time to
12:30.
•At the end of the cooking set time, the
oven will switch off automatically and an
audible alarm will ring.
•Cooking will start automatically at 11:45
(12:30 minus 45 mins) and will continue
until the pre-set end-of-cooking-time,
when the oven will switch itself off
automatically.
END OF
COOKING
COOKING
TIME
MINUTE
MINDER
Loading ...
Loading ...
Loading ...